

Page 1
Coffee Machine
Instruction manual
Koffiezetapparaat
NL
Handleiding
Machine à café
FR
Mode d'emploi
Kaffeemaschine
DE
Bedienungsanleitung
Macchina da caffè
IT
Manuale di istruzioni
Cafetera
ES
Manual de instrucciones
Máquina de café filtro
PT
Manual de instruções
Kaffeapparat
S
Bruksanvisning
Kaffemaskine
DK
Instruktionsvejledning
Kaffetrakter
N
Brukerhåndbok
Kahvinkeitin
FIN
Ohjekirja
Model • Modèle • Modell • Modello • Modelo • Malli:
G108
Page 2

UK
Table of Contents
Safety Tips . . . . . . . . . . . . . . . . . . . . . . . . . . . . . . . . . . . . . . . . . . . . . . 1
Introduction . . . . . . . . . . . . . . . . . . . . . . . . . . . . . . . . . . . . . . . . . . . . . 1
Pack Contents . . . . . . . . . . . . . . . . . . . . . . . . . . . . . . . . . . . . . . . . . . . 1
Operation . . . . . . . . . . . . . . . . . . . . . . . . . . . . . . . . . . . . . . . . . . . . . . . 2
Location of Controls . . . . . . . . . . . . . . . . . . . . . . . . . . . . . . . . . . . . . . . . . . . . 2
Before Using for the First Time . . . . . . . . . . . . . . . . . . . . . . . . . . . . . . . . . . . 2
Making Coffee . . . . . . . . . . . . . . . . . . . . . . . . . . . . . . . . . . . . . . . . . . . . . . . . . 3
Using the Upper Hotplate . . . . . . . . . . . . . . . . . . . . . . . . . . . . . . . . . . . . . . . 3
Cleaning, Care & Maintenance . . . . . . . . . . . . . . . . . . . . . . . . . . . . . . 3
Descaling . . . . . . . . . . . . . . . . . . . . . . . . . . . . . . . . . . . . . . . . . . . . . . . . . . . . . 4
Troubleshooting . . . . . . . . . . . . . . . . . . . . . . . . . . . . . . . . . . . . . . . . . . 5
Technical Specifications . . . . . . . . . . . . . . . . . . . . . . . . . . . . . . . . . . . . 5
Electrical Wiring . . . . . . . . . . . . . . . . . . . . . . . . . . . . . . . . . . . . . . . . . . 5
Compliance . . . . . . . . . . . . . . . . . . . . . . . . . . . . . . . . . . . . . . . . . . . . . 5
NL
Inhoudsopgave
Veiligheidstips . . . . . . . . . . . . . . . . . . . . . . . . . . . . . . . . . . . . . . . . . . . . 6
Inleiding . . . . . . . . . . . . . . . . . . . . . . . . . . . . . . . . . . . . . . . . . . . . . . . . 6
Verpakkingsinhoud . . . . . . . . . . . . . . . . . . . . . . . . . . . . . . . . . . . . . . . . 6
Bediening . . . . . . . . . . . . . . . . . . . . . . . . . . . . . . . . . . . . . . . . . . . . . . . 7
Locatie van alle onderdelen . . . . . . . . . . . . . . . . . . . . . . . . . . . . . . . . . . . . . . 7
Voor het eerste gebruik . . . . . . . . . . . . . . . . . . . . . . . . . . . . . . . . . . . . . . . . . 7
Koffie zetten . . . . . . . . . . . . . . . . . . . . . . . . . . . . . . . . . . . . . . . . . . . . . . . . . . 8
Het bovenste warmhoudplaatje gebruiken . . . . . . . . . . . . . . . . . . . . . . . . . . 8
Reiniging, zorg & onderhoud . . . . . . . . . . . . . . . . . . . . . . . . . . . . . . . . 8
Ontkalken . . . . . . . . . . . . . . . . . . . . . . . . . . . . . . . . . . . . . . . . . . . . . . . . . . . . 9
Oplossen van problemen . . . . . . . . . . . . . . . . . . . . . . . . . . . . . . . . . . . 9
Technische specificaties . . . . . . . . . . . . . . . . . . . . . . . . . . . . . . . . . . . 10
Elektrische bedrading . . . . . . . . . . . . . . . . . . . . . . . . . . . . . . . . . . . . . 10
Productconformiteit . . . . . . . . . . . . . . . . . . . . . . . . . . . . . . . . . . . . . 10
Page 3

FR
Sommaire
Conseils de sécurité . . . . . . . . . . . . . . . . . . . . . . . . . . . . . . . . . . . . . . 11
Introduction . . . . . . . . . . . . . . . . . . . . . . . . . . . . . . . . . . . . . . . . . . . . 11
Contenu de l'emballage . . . . . . . . . . . . . . . . . . . . . . . . . . . . . . . . . . . 11
Utilisation . . . . . . . . . . . . . . . . . . . . . . . . . . . . . . . . . . . . . . . . . . . . . . 12
Emplacement des commandes . . . . . . . . . . . . . . . . . . . . . . . . . . . . . . . . . . . 12
Avant la première mise en service . . . . . . . . . . . . . . . . . . . . . . . . . . . . . . . .12
Pour faire le café . . . . . . . . . . . . . . . . . . . . . . . . . . . . . . . . . . . . . . . . . . . . . . 13
Pour utiliser la plaque chauffante supérieure . . . . . . . . . . . . . . . . . . . . . . . .13
Nettoyage, entretien et maintenance . . . . . . . . . . . . . . . . . . . . . . . . 13
Détartrage . . . . . . . . . . . . . . . . . . . . . . . . . . . . . . . . . . . . . . . . . . . . . . . . . . .14
Dépannage . . . . . . . . . . . . . . . . . . . . . . . . . . . . . . . . . . . . . . . . . . . . . 14
Spécifications techniques . . . . . . . . . . . . . . . . . . . . . . . . . . . . . . . . . . 15
Raccordement électrique . . . . . . . . . . . . . . . . . . . . . . . . . . . . . . . . . . 15
Conformité . . . . . . . . . . . . . . . . . . . . . . . . . . . . . . . . . . . . . . . . . . . . . 15
DE
Inhalt
Sicherheitshinweise . . . . . . . . . . . . . . . . . . . . . . . . . . . . . . . . . . . . . . 16
Einführung . . . . . . . . . . . . . . . . . . . . . . . . . . . . . . . . . . . . . . . . . . . . . . 16
Packungsinhalt . . . . . . . . . . . . . . . . . . . . . . . . . . . . . . . . . . . . . . . . . . 16
Betrieb . . . . . . . . . . . . . . . . . . . . . . . . . . . . . . . . . . . . . . . . . . . . . . . . 17
Teile und Bedienelemente . . . . . . . . . . . . . . . . . . . . . . . . . . . . . . . . . . . . . .17
Vor dem ersten Gebrauch . . . . . . . . . . . . . . . . . . . . . . . . . . . . . . . . . . . . . .17
Kaffeezubereitung . . . . . . . . . . . . . . . . . . . . . . . . . . . . . . . . . . . . . . . . . . . . .18
Die obere Warmhalteplatte . . . . . . . . . . . . . . . . . . . . . . . . . . . . . . . . . . . . .18
Reinigung, Pflege und Wartung . . . . . . . . . . . . . . . . . . . . . . . . . . . . . 18
Entkalken . . . . . . . . . . . . . . . . . . . . . . . . . . . . . . . . . . . . . . . . . . . . . . . . . . . . 19
Fehlersuche . . . . . . . . . . . . . . . . . . . . . . . . . . . . . . . . . . . . . . . . . . . . 19
Technische Spezifikationen . . . . . . . . . . . . . . . . . . . . . . . . . . . . . . . . 20
Elektroanschlüsse . . . . . . . . . . . . . . . . . . . . . . . . . . . . . . . . . . . . . . . . 20
Konformität . . . . . . . . . . . . . . . . . . . . . . . . . . . . . . . . . . . . . . . . . . . . 20
Page 4

IT
Indice
Suggerimenti per la sicurezza . . . . . . . . . . . . . . . . . . . . . . . . . . . . . . . 21
Introduzione . . . . . . . . . . . . . . . . . . . . . . . . . . . . . . . . . . . . . . . . . . . . 21
Contenuto della confezione . . . . . . . . . . . . . . . . . . . . . . . . . . . . . . . 21
Funzionamento . . . . . . . . . . . . . . . . . . . . . . . . . . . . . . . . . . . . . . . . . . 22
Posizione dei comandi . . . . . . . . . . . . . . . . . . . . . . . . . . . . . . . . . . . . . . . . . . 22
Primo utilizzo della macchina da caffè . . . . . . . . . . . . . . . . . . . . . . . . . . . . . 22
Preparazione del caffè . . . . . . . . . . . . . . . . . . . . . . . . . . . . . . . . . . . . . . . . . .23
Utilizzo della piastra riscaldante superiore . . . . . . . . . . . . . . . . . . . . . . . . . .23
Pulizia e manutenzione . . . . . . . . . . . . . . . . . . . . . . . . . . . . . . . . . . . . 23
Rimozione del calcare . . . . . . . . . . . . . . . . . . . . . . . . . . . . . . . . . . . . . . . . . .24
Risoluzione dei problemi . . . . . . . . . . . . . . . . . . . . . . . . . . . . . . . . . . 24
Specifiche tecniche . . . . . . . . . . . . . . . . . . . . . . . . . . . . . . . . . . . . . . . 25
Cablaggi elettrici . . . . . . . . . . . . . . . . . . . . . . . . . . . . . . . . . . . . . . . . . 25
Conformità . . . . . . . . . . . . . . . . . . . . . . . . . . . . . . . . . . . . . . . . . . . . . 25
ES
Índice
Consejos de Seguridad . . . . . . . . . . . . . . . . . . . . . . . . . . . . . . . . . . . . 26
Introducción . . . . . . . . . . . . . . . . . . . . . . . . . . . . . . . . . . . . . . . . . . . . 26
Contenido del Conjunto . . . . . . . . . . . . . . . . . . . . . . . . . . . . . . . . . . 26
Funcionamiento . . . . . . . . . . . . . . . . . . . . . . . . . . . . . . . . . . . . . . . . . 27
Ubicación de los controles . . . . . . . . . . . . . . . . . . . . . . . . . . . . . . . . . . . . . .27
Antes de utilizar el aparato por primera vez . . . . . . . . . . . . . . . . . . . . . . . .27
Preparación de café . . . . . . . . . . . . . . . . . . . . . . . . . . . . . . . . . . . . . . . . . . . .28
Utilización de la placa de calentamiento superior . . . . . . . . . . . . . . . . . . . .28
Limpieza, Cuidado y Mantenimiento . . . . . . . . . . . . . . . . . . . . . . . . . 28
Eliminación de la cal . . . . . . . . . . . . . . . . . . . . . . . . . . . . . . . . . . . . . . . . . . .29
Resolución de problemas . . . . . . . . . . . . . . . . . . . . . . . . . . . . . . . . . . 29
Especificaciones Técnicas . . . . . . . . . . . . . . . . . . . . . . . . . . . . . . . . . . 30
Cableado Eléctrico . . . . . . . . . . . . . . . . . . . . . . . . . . . . . . . . . . . . . . . 30
Cumplimiento . . . . . . . . . . . . . . . . . . . . . . . . . . . . . . . . . . . . . . . . . . . 30
Page 5

PT
Índice
Conselhos de segurança . . . . . . . . . . . . . . . . . . . . . . . . . . . . . . . . . . 31
Introdução . . . . . . . . . . . . . . . . . . . . . . . . . . . . . . . . . . . . . . . . . . . . . 31
Conteúdo da embalagem . . . . . . . . . . . . . . . . . . . . . . . . . . . . . . . . . . 31
Funcionamento . . . . . . . . . . . . . . . . . . . . . . . . . . . . . . . . . . . . . . . . . . 32
O lugar dos comandos . . . . . . . . . . . . . . . . . . . . . . . . . . . . . . . . . . . . . . . . . 32
Antes de utilizar o produto pela primeira vez . . . . . . . . . . . . . . . . . . . . . . . 32
Fazer café . . . . . . . . . . . . . . . . . . . . . . . . . . . . . . . . . . . . . . . . . . . . . . . . . . .33
Utilizar a placa de aquecimento superior . . . . . . . . . . . . . . . . . . . . . . . . . . .33
Limpeza, cuidados & manutenção . . . . . . . . . . . . . . . . . . . . . . . . . . . 33
Descalcificar . . . . . . . . . . . . . . . . . . . . . . . . . . . . . . . . . . . . . . . . . . . . . . . . . 33
Resolução de problemas . . . . . . . . . . . . . . . . . . . . . . . . . . . . . . . . . . 34
Especificações técnicas . . . . . . . . . . . . . . . . . . . . . . . . . . . . . . . . . . . . 34
Cablagem eléctrica . . . . . . . . . . . . . . . . . . . . . . . . . . . . . . . . . . . . . . . 35
Conformidade . . . . . . . . . . . . . . . . . . . . . . . . . . . . . . . . . . . . . . . . . . 35
S
Innehållsförteckning
Säkerhetsråd . . . . . . . . . . . . . . . . . . . . . . . . . . . . . . . . . . . . . . . . . . . . 36
Inledning . . . . . . . . . . . . . . . . . . . . . . . . . . . . . . . . . . . . . . . . . . . . . . . 36
Förpackningsinnehåll . . . . . . . . . . . . . . . . . . . . . . . . . . . . . . . . . . . . . 36
Drift . . . . . . . . . . . . . . . . . . . . . . . . . . . . . . . . . . . . . . . . . . . . . . . . . . 37
Placering av kontrollerna . . . . . . . . . . . . . . . . . . . . . . . . . . . . . . . . . . . . . . .37
Innan du använder apparaten första gången . . . . . . . . . . . . . . . . . . . . . . . . .37
Göra kaffe . . . . . . . . . . . . . . . . . . . . . . . . . . . . . . . . . . . . . . . . . . . . . . . . . . .38
Använda den övre kokplattan . . . . . . . . . . . . . . . . . . . . . . . . . . . . . . . . . . . .38
Rengöring, omvårdnad och underhåll . . . . . . . . . . . . . . . . . . . . . . . . 38
Avkalkning . . . . . . . . . . . . . . . . . . . . . . . . . . . . . . . . . . . . . . . . . . . . . . . . . . .38
Felsökning . . . . . . . . . . . . . . . . . . . . . . . . . . . . . . . . . . . . . . . . . . . . . . 39
Tekniska specifikationer . . . . . . . . . . . . . . . . . . . . . . . . . . . . . . . . . . . 39
Elektriska kablar . . . . . . . . . . . . . . . . . . . . . . . . . . . . . . . . . . . . . . . . . 40
Tillmötesgående . . . . . . . . . . . . . . . . . . . . . . . . . . . . . . . . . . . . . . . . . 40
Page 6

DK
Indholdsfortegnelse
Sikkerhedstips . . . . . . . . . . . . . . . . . . . . . . . . . . . . . . . . . . . . . . . . . . 41
Indledning . . . . . . . . . . . . . . . . . . . . . . . . . . . . . . . . . . . . . . . . . . . . . 41
Pakkens indhold . . . . . . . . . . . . . . . . . . . . . . . . . . . . . . . . . . . . . . . . . 41
Brug . . . . . . . . . . . . . . . . . . . . . . . . . . . . . . . . . . . . . . . . . . . . . . . . . . 42
Oversigt over betjeningsanordninger . . . . . . . . . . . . . . . . . . . . . . . . . . . . . . 42
Før der laves kaffe første gang . . . . . . . . . . . . . . . . . . . . . . . . . . . . . . . . . . . 42
Sådan laves der kaffe . . . . . . . . . . . . . . . . . . . . . . . . . . . . . . . . . . . . . . . . . . .43
Sådan anvendes den øverste varmeplade . . . . . . . . . . . . . . . . . . . . . . . . . . . 43
Rengøring, pleje og vedligeholdelse . . . . . . . . . . . . . . . . . . . . . . . . . . 43
Afkalkning . . . . . . . . . . . . . . . . . . . . . . . . . . . . . . . . . . . . . . . . . . . . . . . . . . .44
Fejlfinding . . . . . . . . . . . . . . . . . . . . . . . . . . . . . . . . . . . . . . . . . . . . . . 44
Tekniske specifikationer . . . . . . . . . . . . . . . . . . . . . . . . . . . . . . . . . . 45
El-kabler . . . . . . . . . . . . . . . . . . . . . . . . . . . . . . . . . . . . . . . . . . . . . . . 45
Overensstemmelseserklæring . . . . . . . . . . . . . . . . . . . . . . . . . . . . . . 45
N
Innhold
Sikkerhetstips . . . . . . . . . . . . . . . . . . . . . . . . . . . . . . . . . . . . . . . . . . . 46
Innledning . . . . . . . . . . . . . . . . . . . . . . . . . . . . . . . . . . . . . . . . . . . . . . 46
Pakkeinnhold . . . . . . . . . . . . . . . . . . . . . . . . . . . . . . . . . . . . . . . . . . . 46
Bruk . . . . . . . . . . . . . . . . . . . . . . . . . . . . . . . . . . . . . . . . . . . . . . . . . . 47
Plassering av kontroller . . . . . . . . . . . . . . . . . . . . . . . . . . . . . . . . . . . . . . . . .47
Før kaffetrakteren brukes første gangen . . . . . . . . . . . . . . . . . . . . . . . . . . .47
Lage kaffe . . . . . . . . . . . . . . . . . . . . . . . . . . . . . . . . . . . . . . . . . . . . . . . . . . . .48
Bruke den øvre varmeplata . . . . . . . . . . . . . . . . . . . . . . . . . . . . . . . . . . . . . 48
Rengjøring, stell og vedlikehold . . . . . . . . . . . . . . . . . . . . . . . . . . . . . 48
Avkalking . . . . . . . . . . . . . . . . . . . . . . . . . . . . . . . . . . . . . . . . . . . . . . . . . . . .48
Feilsøking . . . . . . . . . . . . . . . . . . . . . . . . . . . . . . . . . . . . . . . . . . . . . . 49
Tekniske spesifikasjoner . . . . . . . . . . . . . . . . . . . . . . . . . . . . . . . . . . 49
Elektrisk tilkopling . . . . . . . . . . . . . . . . . . . . . . . . . . . . . . . . . . . . . . . 50
Samsvar . . . . . . . . . . . . . . . . . . . . . . . . . . . . . . . . . . . . . . . . . . . . . . . 50
Page 7

FIN
Sisällysluettelo
Turvallisuusvihjeitä . . . . . . . . . . . . . . . . . . . . . . . . . . . . . . . . . . . . . . . 51
Johdanto . . . . . . . . . . . . . . . . . . . . . . . . . . . . . . . . . . . . . . . . . . . . . . . 51
Pakkauksen sisältö . . . . . . . . . . . . . . . . . . . . . . . . . . . . . . . . . . . . . . . 51
Käyttö . . . . . . . . . . . . . . . . . . . . . . . . . . . . . . . . . . . . . . . . . . . . . . . . . 52
Ohjauslaitteiden sijainti . . . . . . . . . . . . . . . . . . . . . . . . . . . . . . . . . . . . . . . . .52
Ennen kuin laitetta käytetään ensimmäistä kertaa . . . . . . . . . . . . . . . . . . . .52
Kahvin valmistus . . . . . . . . . . . . . . . . . . . . . . . . . . . . . . . . . . . . . . . . . . . . . .53
Ylemmän lämpölevyn käyttö . . . . . . . . . . . . . . . . . . . . . . . . . . . . . . . . . . . . .53
Puhdistus, hoito & huolto . . . . . . . . . . . . . . . . . . . . . . . . . . . . . . . . . 53
Kalkin poisto . . . . . . . . . . . . . . . . . . . . . . . . . . . . . . . . . . . . . . . . . . . . . . . . .53
Vianetsintä . . . . . . . . . . . . . . . . . . . . . . . . . . . . . . . . . . . . . . . . . . . . . 54
Tekniset tiedot . . . . . . . . . . . . . . . . . . . . . . . . . . . . . . . . . . . . . . . . . . 54
Sähköjohdot . . . . . . . . . . . . . . . . . . . . . . . . . . . . . . . . . . . . . . . . . . . . 55
Vaatimustenmukaisuus . . . . . . . . . . . . . . . . . . . . . . . . . . . . . . . . . . . . 55
Page 8

UK
Safety Tips
• Position on a flat, stable surface.
• A service agent/qualified technician should carry out installation and any repairs if required. Do not
remove any components on this product.
• Consult Local and National Standards to comply with the following:
• Health and Safety at Work Legislation
• BS EN Codes of Practice
• Fire Precautions
• IEE Wiring Regulations
• Building Regulations
• DO NOT immerse the appliance in water.
• DO NOT touch hot surfaces.
• DO NOT leave the appliance unattended during operation.
• DO NOT remove the filter basket during the filtration pro ces s.
• Suitable for indoor use only.
• Always switch off and disconnect the power supply to t he appliance when not in use.
• Keep all packaging away from children. Dispose of the packaging in accordance to the regulations of
local authorities.
• If the power cord is damaged, it must be replaced by an BUFFALO agent or a recommended qualified
technician in order to avoid a hazard.
Introduction
Please take a few moments to carefully read through this manual. Correct maintenance and operation of
this machine will provide the best possible performance from your BUFFALO product.
Pack Contents
The following is included:
• BUFFALO Coffee Machine
• Filter basket
•Jug
• Instruction manual
BUFFALO prides itself on quality and service, ensuring that at the time of packaging the contents are
supplied fully functional and free of damage.
Should you find any damage as a result of transit, please contact your BUFFALO dealer immediately.
1
Page 9
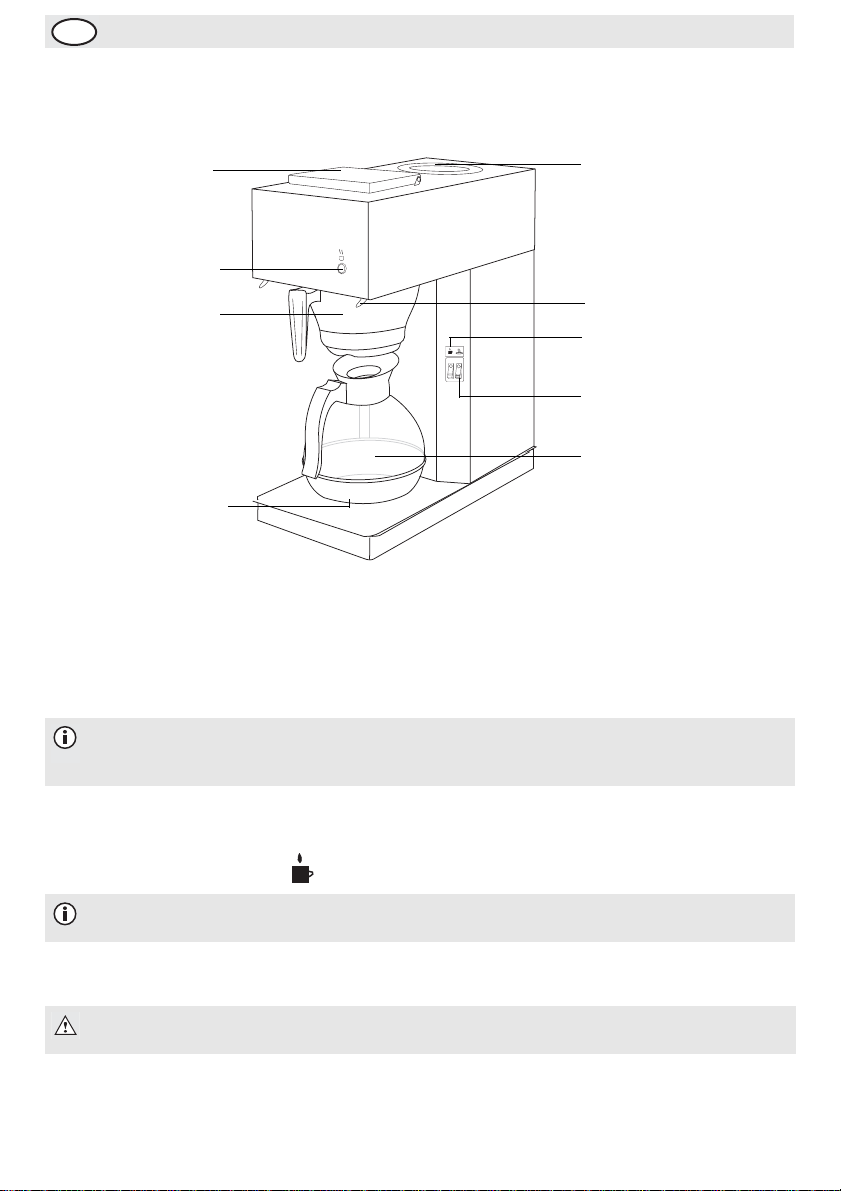
Operation
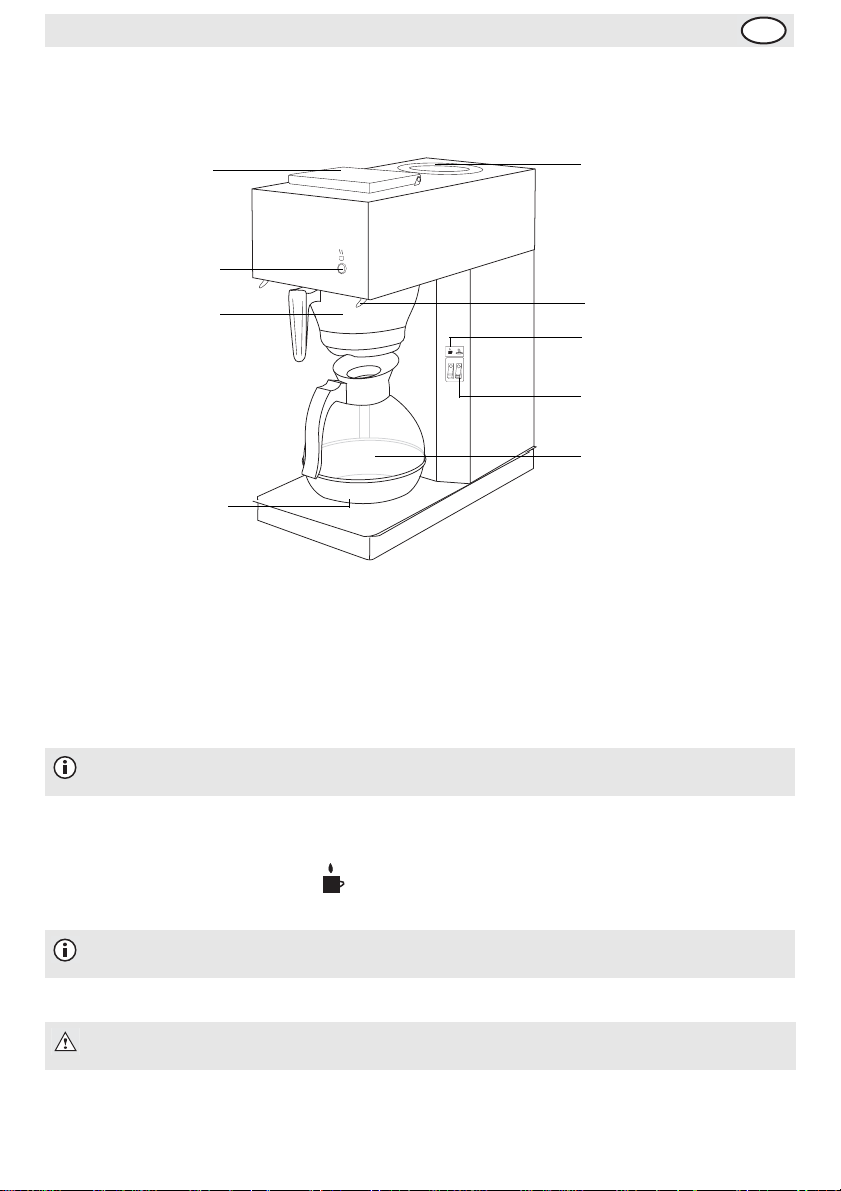
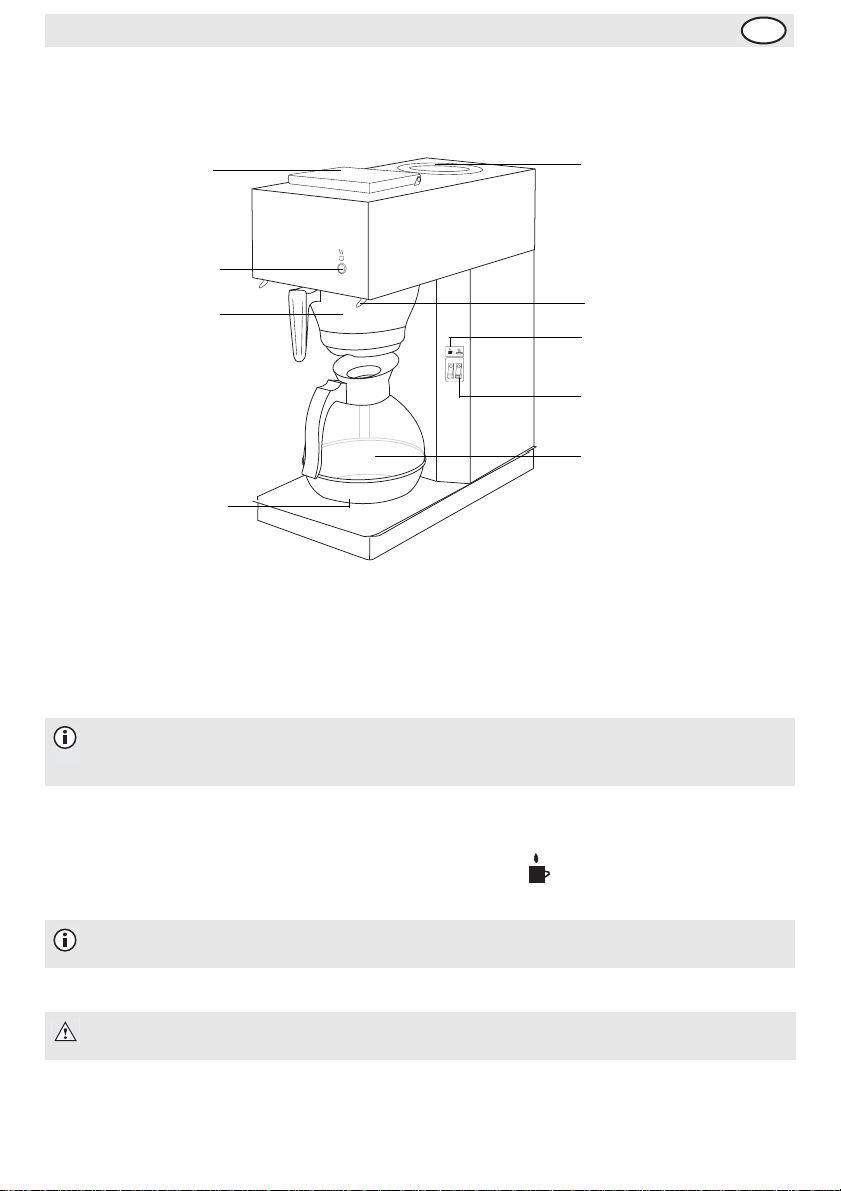
Location of Controls
UK
Water reservoir
Brewing Indicator
Base hotplate
light
Filter basket
Upper hotplate
Basket tabs
Upper hotplate
power switch
Brewing power
switch
Jug
Before Using for the First Time
BUFFALO recommend that the appliance is cleaned out before using for the first time, or if the appliance
has been sat unused for an extended period of time.
1. Fill the water reservoir with cold water.
Note: Use the Jar to fill the reservoir to ensure the maximum capacity of the jar is not
exceeded. The maximum amount of water the reservoir can contain is 2.2 litres.
2. Slide the empty filter basket into position between the two basket tab s.
3. Place the jug on the base hotplate beneath the basket.
4. T urn th e Brew ing power switch O n . The Brewing Indicator lights up and ho t wat er will begin to fill
the jug.
Note: During operation, steam may rise from the appliance and loud bubbling noises
may be heard. This is perfectly normal.
5. Once finished the Brewing Indicator light will switch off. Discard the hot water in the jug.
WARNING: The glass jug becomes hot during operation. Always pick up the jug by the
handle to avoid injury.
6. Repeat steps 1-5. The appliance is now clean.
2
Page 10
UK
Making Coffee
1. Fill the water reservoir with cold water.
Note: Use the Jar to fill the reservoir to ensure it’s maximum capacity is not exceeded.
The maximum amount of water the reservoir can contain is 2.2 litres.
2. Place a filter paper inside the filter basket.
3. Measure the required amount of coffee into the filter paper and slide the filter basket into position.
4. Place the jug on the base hotplate beneath the fil t er ba sket.
5. T urn th e Brew ing power switch O n . The Brewing Indicator lights up and ho t wat er will begin to fill
the jug.
Note: During operation, steam may rise from the appliance and loud bubbling noises
may be heard. This is perfectly normal.
6. Once finished the Brewing indicator will switch off.
WARNING: The glass jug becomes hot during operation. Always pick up the jug by the
handle to avoid injury.
7. Leave the jug on the hotplate to keep warm, if required. Discard the coffee and filter paper from the
filter basket.
8. To turn Off the hotplate, turn off the Brewing power switch .
Using the Upper Hotplate
This appliance is fitted with a second hotplate to keep an additional jug warm. To use:
1. Place the jug on the upper hotplate.
2. Turn th e Up per ho tplate power switch On .
WARNING: The surrounding surface of the hotplate may become hot. DO NOT touch!
Never heat an empty Jug on the hotplate, or allow the Jug to run dry.
Cleaning, Care & Maintenance
• Always turn off and disconnect the appliance from the power supply before cleaning.
• Use soapy water and a damp cloth to clean the exterior of the appliance.
•Dry thoroughly after cleaning.
3
Page 11
UK
Descaling
In hard water areas limescale can build up within the appliance after prolonged use. To descale the
appliance:
1. Pour a solution of descaler and water into the reservoir.
Note: Use a suitable descaler and follow the instructions on the container.
2. Turn the Brewing power switch On .
3. After approximately 4 minutes turn the appliance Off to allow the descaling solution to work through
the system.
4. After approximately 10 minutes turn the Brewing power switch back On . Allow the reservoir to
empty.
5. Discard the solution collected i n the jug.
6. Fill the reservoir with clean water and turn the appliance back On to flush out the system and remove
any descaler residue. Discard the collected water and rinse the jug.
7. The appliance is now ready for use.
Note: BUFFALO recommend that this appliance is descaled every 3 months or more
frequently in hard water areas.
4
Page 12
UK
Tr ou b le s ho o t in g
Fault Probable Cause Action
The unit is not
working
Coffee is not
coming from the
filter basket
Loud noise coming
from appli ance
The unit is not switched on Check the unit is plugged in correctly and
switched on
Plug and lead are damaged Call BUFFALO agent or qualified technician
Fuse in the plug has blown Replace the plug fuse
Power supply Check power supply
Internal wiring fault Call BUFFALO agent or qualified technician
No water in reservoir Turn Off and fill reservoir
Coffee is too compact within the
filter
No water in reservoir Turn Off and fill reservoir
Turn off, loosen coffee within the filter and
resume
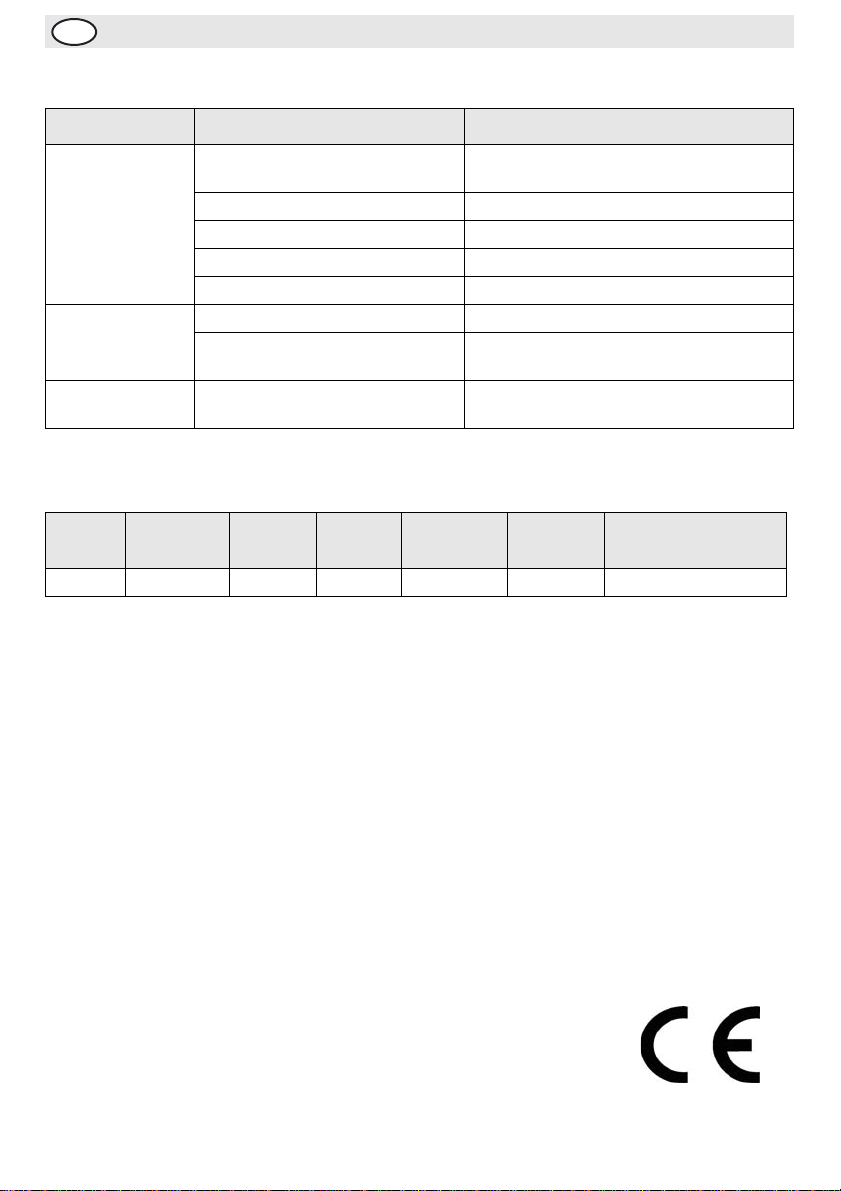
Technical Specifications
Model Voltage Power Current
G108 230V 50Hz 2060W 9A 2.2 litres 5.8kg 455 x 205 x 405
Reservoir
Capacity
Weight
Dimensions
h x w x d mm
Electrical Wiring
This appliance is supplied with a 3 pin, moulded, BS1363 plug and lead, with a 13 amp fuse as standard.
The plug is to be connected to a suitable mains socket.
This appliance is wired as follows:
• Live wire (coloured brown) to terminal marked L
• Neutral wire (coloured blue) to terminal marked N
• Earth wire (coloured green/yellow) to terminal marked E
This appliance must be earthed, using a dedicated earthing circuit.
If in doubt consult a qualified electrician.
Electrical isolation points must be kept clear of any obstructions. In the event of any emergency
disconnection being required they must be readily accessible.
Compliance
BUFFALO parts have undergone strict product testing in order to comply with
regulatory standards and specifications set by international, independent, and
federal authorities.
BUFFALO products have been approved to carry the following s ymb ol:
5
Page 13

NL
Veiligheidstips
• Plaatsen op een vlakke en stabiele ondergrond.
• De installatie en eventuele reparaties zijn door een servicetechnicus/vaktechnicus uit te voeren.
Verwijder geen componenten of servicepanelen van dit product.
• Raadpleeg en volg de plaatselijke en nationale regelgeving op m.b.t. tot het volgende:
• Wetgeving van gezondheid en veiligheid op de werkplaats
• Werkregels
• Brandpreventie
• IEE bekabelingsnormen
• Bouwverordeningen
• Dit apparaat NIET in water dompelen.
• Hete oppervlakken NIET aanraken.
• Laat het apparaat tijdens werking NIET zonder toezicht.
• Filterhouder tijdens het filterproces NIET verwijderen.
• Uitsluitend geschikt voor gebruik binnenshuis.
• Schakel het apparaat altijd uit en haal de steker uit het stopcontact wanneer u het apparaat niet
gebruikt.
• Laat verpakkingsmateriaal niet binnen handbereik van kinderen. Verpakkingsmateriaal in
overeenstemming met de regelgeving van de plaatselijke overheden als afval laten verwerken.
• Indien de stroomkabel bescha digd raakt, dient men deze door een BUFFALO technicus of aanbevolen
vaktechnicus te laten vervangen om gevaarlijke situaties te verhinderen.
Inleiding
Neem de tijd en lees deze handleiding aandachtig door. Een correct gebruik en onderhoud van deze
machine waarborgt de beste prestatie van uw BUFFALO product.
Verpakkingsinhoud
De verpakking bevat het volgende:
• BUFFALO Koffiezetapparaat
• Filterhouder
•Koffiekan
• Handleiding
BUFFALO is trots op de haar productkwaliteit en dienstverlening en controleer de inhoud van de
verpakkingen, tijdens de verpakkingsfase, op functionaliteit en schade.
Mocht u product door transport zijn beschadigd, neem dan onmiddellijk contact op met uw BUFFALO dealer.
6
Page 14
NL
Bediening
Locatie van alle onderdelen
Waterreservoir
Koffiezetlampje
Filterhouder
Warmhoudplaatje
Bovenste
warmhoudplaatje
Houdermarkeringen
Schakelaar bovenste
warmhoudplaatje
Koffiezetschakelaar
Koffiekan
Voor het eerste gebruik
BUFFALO raadt u aan om het apparaat te reinigen alvorens het eerste gebruik of wanneer het apparaat
gedurende een langere periode niet is gebruikt.
1. Vul het waterreservoir met koud water.
Opmerking: Gebruik de koffiekan voor het vullen van het reservoir zodat de maximale
inhoud van de koffiekan niet wordt overschreden. Het water reservoir heeft een
maximale inhoud van 2,2 liter.
2. Schuif de lege filterhouder in de positie tussen de twee houdermarkeringen.
3. Plaats de koffiekan op het warmhoudplaatje onder de filterhouder.
4. Zet de koffieschakelaar op On . koffielampje licht op en kan vult zich met heet water.
Opmerking: tijdens het zetten van koffie kan stoom opstijgen en kunnen bubbelende
geluiden hoorbaar zijn. Dit is normaal.
5. Zit al het hete water in de koffiekan dan gaat het koffielampje uit. Schenk het hete water uit de
koffiekan.
WAARSCHUWING: tijdens werking kan de glazen koffiekan heet worden. Grijp de
koffiekan altijd bij het handvat om eventueel letsel te voork omen.
6. Herhaal de stappen 1-5. Het apparaat is nu schoon.
7
Page 15
NL
Koffie zetten
1. Vul het waterreservoir met koud water.
Opmerking: Gebruik de koffiekan voor het vullen van het reservoir zodat de maximale
inhoud van de koffiekan niet wordt overschreden. Het water reservoir heeft een
maximale inhoud van 2,2 liter.
2. Plaats een koffiefilter in de filterhoud er.
3. Plaats de vereiste hoeveelheid koffie in de koffiefilter en schuif de filter in de filterhouder.
4. Plaats de koffiekan op het warmhoudplaatje onder de filterhouder.
5. Zet de koffieschakelaar op On . koffielampje licht op en kan vult zich met heet water.
Opmerking: tijdens het zetten van koffie kan stoom opstijgen en kunnen bubbelende
geluiden hoorbaar zijn. Dit is normaal.
6. Is de koffie klaar dan gaat het koffielampje uit.
WAARSCHUWING: tijdens werking kan de glazen koffiekan heet worden. Grijp de
koffiekan altijd bij het handvat om eventueel letsel te voork omen.
7. Indien nodig, laat de koffiekan op het warmhoudplaatje staan om de koffie warm te houden. Haal de
koffiefilter met koffie uit de filterhouder.
8. Om het warmhoudplaatje uit te zetten, zet u de koffieschakelaar uit .
Het bovenste warmhoudplaatje gebruiken
9. Dit apparaat is uitgerust met een tweede warmhoudplaatje om een extra koffiekan warm te houden.
Voor gebruik:
10. Plaats de koffiekan op het bovenste warmhoudplaatje.
11. Schakel de schakelaar van het bovenste warmhoudplaatje aan .
WAARSCHUWING: het omringende oppervlak van het warmhoudplaatje kan warm
worden. NIET aanraken!
Nooit een lege koffiekan op het warmhoudplaatje zetten of de kan droog laten worden.
Reiniging, zorg & onderhoud
• Alvorens het apparaat te reinigen dient men altijd de stroomvoorzi ening uit te schakelen.
• Gebruik zeepwater en een vochtige doek om de buitenkant van het apparaat te reinigen.
• Na reiniging goed drogen.
8
Page 16
NL
Ontkalken
Daar waar sprake is van hard water kan er na langdurig gebruik kalkafzetting in het apparaa t voorkomen.
Het apparaat ontkalken:
1. Schenk een oplossing van ontkalkingsmiddel en water in het reservoir.
Opmerking: gebruik een geschikt ontkalkingsmiddel en volg de gebruiksaanwijzingen
op de verpakking.
2. Zet de koffieschakelaar op On (Aan) .
3. Schakel het apparaat na circa 4 minuten uit (Off) zodat het ontkalkingsmiddel de tijd krijgt om op de
kalkafzetting in te werken.
4. Zet de koffieschakelaar na circa 10 minuten opnieuw op On . Wacht tot het reservoir leeg is.
5. Schenk de verzamelde oplossing uit de koffiekan.
6. Vul het waterreservoir met sc hoon w ater en zet het appar aat opnieuw aan om h et systeem te spoelen
en eventuele resten ontkalkingsmiddel te verwijderen. Schenk het verzamelde water uit de koffiekan
en maak de koffiekan schoon.
7. Het apparaat is nu gebruiksklaar.
Opmerking: BUFFALO raadt u aan om dit apparaat om de 3 maanden te ontkalken en
met kortere intervallen wanneer er sprake is van hard water.
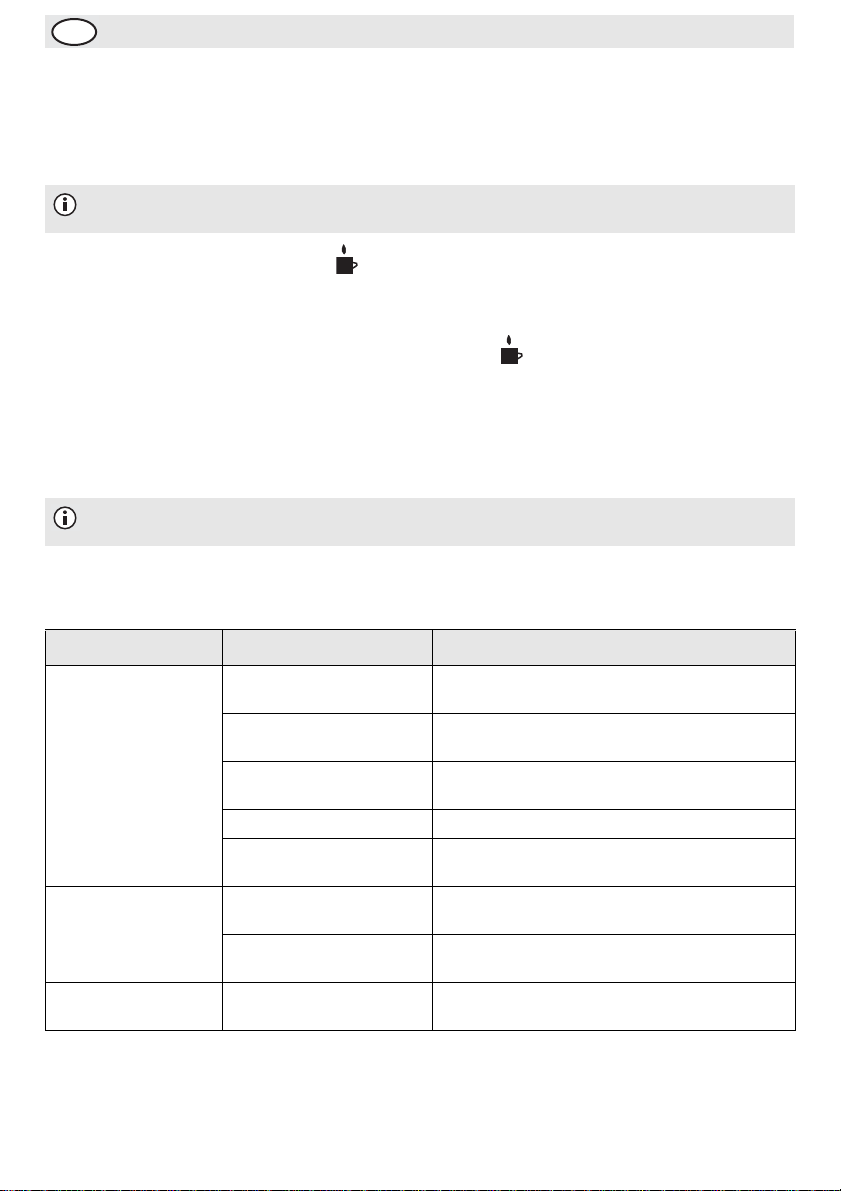
Oplossen van problemen
Probleem Mogelijke oorzaak Handeling
Het apparaat werkt
niet
Er komt géén koffie uit
de filterhouder
Het apparaat maakt
harde geluiden
9
Het apparaat staat uit Controleer of de stroomkabel van het apparaat is
aangesloten en of het apparaat is ingeschakeld
Steker en kabel zijn
beschadigd
De zekering in de steker is
gesprongen
Stroomvoorziening Controleer de stroomvoorziening
Storing interne bedrading Laat een BUFFALO technicus of een vaktechnicus
Er is géén water in het
reservoir
Koffie in de filter te
compact.
Er is géén water in het
reservoir
Laat een BUFFALO technicus of een vaktechnicus
komen
Vervang de zekering in de steker
komen
Zet het apparaat uit en vul het reservoir
Zet het apparaat uit, maak de kof fie in de filter lo s
en ga verder.
Zet het apparaat uit en vul het reservoir
Page 17
Technische specificaties
NL
Model Voltage Vermogen Stroom Reservoirinhoud Gewicht
G108 230V 50Hz 2060W 9A 2,2 liters 5,8kg 455 x 205 x 405
Afmetingen
h x b x d mm
Elektrische bedrading
Men dient de steker op een geschikt stopcontact aan te sluiten.
De bedrading van dit apparaat is als volgt:
• Stroomkabel (bruin) naar de aansluitklem gemarkeerd met L
• Neutraalkabel (blauw) naar de aansluitklem gemarkeerd met N
• Aardekabel (groen/geel) naar de aansluitklem gemarkeerd met E
Dit apparaat moet worden geaard met behulp van een adequaat aardingscircuit.
Bij twijfels raadpleeg een vakkundige elektricien.
De elektrische isolatiepunten mogen niet worden geblokkeerd. In geval van een nooduitschakeling moeten
de isolatiepunten direct toegankelijk zijn.
Productconformiteit
De onderdelen van BUFFALO producten hebben strenge producttesten ondergaan om te voldoen aan
wettelijke regels en specificaties die door internationale, onafhankelijke en landelijke overheden worden
voorgeschreven.
BUFFALO producten zijn goedgekeurd en voorzien van het volgende symbool:
10
Page 18

FR
Conseils de sécurité
• Placez l'appareil sur une surface plane, stable.
• L'installation et les éventuelles réparations doivent être confiées à un dépanneur / technicien qualifié.
Ne retirez aucun composant ou cache de ce produit.
• Consultez les normes locales et nationales pour vous conformer aux :
• lois sur l'hygiène et la sécurité au travail ;
• codes de bonnes pratiques BS EN ;
• précautions contre le risque d'incendie ;
• réglementations sur les branchements électriques IEE ;
• règlements sur la construction.
• NE PAS immerger l'appareil.
• NE PAS toucher ses surfaces chaudes.
• NE PAS laisser l'appareil en service sans surveillance.
• NE PAS retirer le porte-filtre pendant le processus de filtration.
• Cet appareil est réservé exclusivement à une utilisation à l'intérieur.
• N'oubliez jamais d'éteindre et de débrancher l'appareil hors utilisation.
• Gardez les emballages hors de portée des enfants. Débarrassez-vous des emballages conformément
aux règlements des autorités locales.
• Un cordon d'alimentation endommagé doit être remplacé par un agent BUFFALO ou un technicien
qualifié recommandé, pour éviter tout danger.
Introduction
Nous vous invitons à consacrer quelques instants à la lecture attentive de ce manuel. L'entretien et
l'utilisation appropriés de cet appareil vous permettront de tirer le meilleur de votre produit BUFFALO.
Contenu de l'emballage
Eléments fournis de série :
• Machine à café BUFFALO
•Porte-filtre
•Verseuse
• Mode d'emploi
BUFFALO attache une grande importance à la qualité et au service et veille à fournir des produits en parfait
état opérationnel, parfaitement intacts au moment de l'emballage.
Nous vous prions de contacter votre revendeur BUFFALO immédiatement si vous constatez un dommage
quelconque survenu pendant le transport du produit.
11
Page 19
Utilisation
Emplacement des commandes
FR
Réservoir d'eau
Témoin de filtration
Porte-filtre
Plaque chauffante
inférieure
Plaque chauffante
supérieure
Languettes du porte-filtre
Interrupteur marche/arrêt
de plaque chauffante
supérieure
Interrupteur marche/arrêt
de filtration
Verseuse
Avant la première mise en service
BUFFALO vous recommande de nettoyer la machine avant de la mettre en service pour la première fo is ou
après une période d'inutilisation prolongée.
1. Remplissez le réservoir d'eau froide.
Remarque : Servez-vous de la verseuse pour remplir le réservoir, pour éviter de
dépasser sa capacité maximum. Le réservoir peut contenir jusqu'à 2,2 litres d'eau
(contenance maximum).
2. Faites coulissez le porte-filtre vide à sa place, entre les deux languettes du porte-filtre.
3. Placez la verseuse sur la plaque chauffante inférieure, sous le porte-filtre.
4. Mettez l'interrupteur marche/arrêt de filtration sur marche (ON) . TLe témoin de filtration s'allume
et la verseuse se remplit progressivement d'eau chaude.
Remarque : En service, il est possible que de la vapeur monte de la machine et qu'un
bouillonnement bruyant se produise. Ces phénomènes sont tout à fait normaux.
5. À la fin du cycle, le témoin de filtration s'éteint. Jetez l'eau chaude contenue dans la verseuse.
AVERTISSEMENT : La verseuse en verre chauffe en service. Veillez à toujours prendre la
verseuse par l'anse, pour éviter tout risque de blessure.
6. Répétez les étapes 1 à 5. La machine est propre.
12
Page 20
FR
Pour faire le café
1. Remplissez le réservoir d'eau froide.
Remarque : Servez-vous de la verseuse pour remplir le réservoir, pour éviter de
dépasser sa capacité maximum. Le réservoir peut contenir jusqu'à 2,2 litres d'eau
(contenance maximum).
2. Placez un filtre papier dans le porte-filtre.
3. Mesurez la quantité voulue de café dans le filtre papier et positionnez le porte-filtre.
4. Placez la verseuse sur la plaque chauffante inférieure, sous le porte-filtre.
5. Mettez l'interrupteur marche/arrêt de filtration sur marche (ON) . TLe témoin de filtration s'allume
et la verseuse se remplit progressivement d'eau chaude.
Remarque : En service, il est possible que de la vapeur monte de la machine et qu'un
bouillonnement bruyant se produise. Ces phénomènes sont tout à fait normaux.
6. À la fin du cycle, le témoin de filtration s'éteint.
AVERTISSEMENT : La verseuse en verre chauffe en service. Veillez à toujours prendre la
verseuse par l'anse, pour éviter tout risque de blessure.
7. Vous pouvez laisser la verseuse sur la plaque chauffante, pour garder le café au chaud. Retirez le marc
de café et le filtre papier du porte-filtre.
8. Pour éteindre la plaque chauffante, éteignez l'interrupteur de filtration .
Pour utiliser la plaque chauffante supérieure
1. Cette machine est dotée d'une deuxième plaque chauffante pour garder une deuxième verseuse au
chaud. Pour l'utiliser :
2. Placez la verseuse sur la plaque chauffante supérieure.
3. Mettez l'interrupteur marc he / a rrêt de plaque chauffante supérieure sur marche (ON) .
AVERTISSEMENT : Le pourtour de la plaque chauffante risque de chauffer. N'Y TOUCHEZ
PAS !
Ne faites jamais chauffer une verseuse vide sur la plaque chauffante et ne laissez jamais
la verseuse se vider par évaporation.
Nettoyage, entretien et maintenance
• Veillez à toujours éteindre et débrancher l'appareil de la prise secteur avant de le nettoyer.
• Nettoyez l'extérieur de l'appareil à l'aide d'un chiffon hu mide imbibé d'eau savonneuse.
• Veillez à bien l'essuyer après nettoyage.
13
Page 21

FR
Détartrage
Dans les zones où l'eau est très calcaire, le calcaire peut s'accumuler sur les parois de la machi ne à café au
bout d'un certain temps d'utilisation prolo ngée. Pour détartrer l'appareil :
1. Versez la solution de détartrage et l'eau dans le réservoir.
Remarque : Utilisez le produit de détartrage qui convient et suivez les consignes de
l'emballage.
2. Mettez l'interrupteur marche/arrêt de filtration sur marche (ON) .
3. Au bout d'environ quatre minutes, éteignez la machine à café pour donner le temps à la solution de
détartrage de faire effet.
4. Attendez environ 10 minutes, puis mettez l'interrupteur marche/arrêt de filtration sur marche (ON)
. Attendez que le réservoir se vide.
5. Jetez la solution recueillie dans la verseuse.
6. Remplissez le réservoir d'eau propre et rallumez la machine pour rincer le système et le débarrasser
d'éventuels résidus de produit de détartrage. Jetez l'eau recueillie et rincez la verseuse.
7. La machine à café est prête à l'emploi.
Remarque : BUFFALO vous recommande de procéder au détartrage de cette machine à
café tous les trois mois ou plus fréquemment dans les zones où l'eau est très calcaire.
Dépannage
Dysfonctionnement Cause probable Intervention
L'appareil ne
fonctionne pas
Le café ne sort pas du
porte-filtre
La machine émet un
bruit sourd
L'appareil n'est pas allumé Vérifier que l'appareil est bien branché et
La prise et le cordon sont
endommagés
Alimentation Vérifier l'alimentation
Problème de branchement interne Appeler un agent BUFFALO ou un
Le réservoir est vide Eteindre la machine et remplir le
Le café est trop tassé dans le filtre Eteindre la machine, aérer l e café dans le
Le réservoir est vide Eteindre la machine et remplir le
allumé
Appeler un agent BUFFALO ou un
technicien qualifié
technicien qualifié
réservoir
filtre et remettre la machine en marche
réservoir
14
Page 22

FR
Spécifications techniques
Modèle Tension Puissance Courant
G108 230V 50Hz 2060W 9A 2,2 litres 5,8kg 455 x 205 x 405
Capacité du
réservoir
Poids
Dimensions
h x l x p mm
Raccordement électrique
La prise doit être reliée à la prise secteur qui convient.
Cet appareil est câblé comme suit :
• Fil conducteur (brun) à la borne marquée L
• Fil neutre (bleu) à la borne marquée N
• Fil de terre (vert / jaune) à la borne marquée E
Cet appareil doit être raccordé à la terre, par le biais d'un circuit de mise à la terre dédié.
En cas de doute, consultez un électricien qualifié.
Les points d'isolation électrique doivent être libres de toute obstruction. En cas de débranchement requis
en urgence, ils doivent être facilement accessibles.
Conformité
Les pièces BUFFALO ont été soumises à des tests rigoureux pour pouvoir être déclarées conf o r mes aux
normes et spécifications réglementaires définies par les autorités internationales, indépendantes et
fédérales.
Les produits BUFFALO ont été déclarés aptes à porter le symbole suivant :
15
Page 23

Sicherheitshinweise
• Auf eine flache, stabile Fläche stellen.
• Alle erforderlichen Montage- und Reparaturarbeiten sollten von Wartungspersonal oder einem
qualifizierten Techniker durchgeführt werden. Keine Bauteile oder Bedienflächen von diesem Produkt
entfernen.
• Für folgende Normen und Vorschriften sind die lokalen und nationalen Normen heranzuziehen:
• Arbeitsschutzvorschriften
• BS EN Verhaltenspraktiken
• Brandschutzvorschriften
• IEE-Anschlussvorschriften
• Bauvorschriften
• Gerät NICHT in Wasser eintauchen.
• KEINE heißen Flächen berühren.
• Gerät während des Betriebs NICHT unbeaufsichtigt lassen.
• Während der Kaffeezubereitung NICHT den Filterkorb entfernen.
• Nur zum Gebrauch in Gebäuden.
• Nach dem Gebrauch das Gerät stets ausschalten und den Netzstecker ziehen.
• Verpackungsmaterial außerhalb der Reichweite von Kindern aufbewahren und gemäß den lokalen
Vorschriften entsorgen.
• Aus Sicherheitsgründen muss ein beschädigtes Stromkabel von einem BUFFALO-Mitarbeiter oder
empfohlenen qualifizierten Elektriker erneuert werden.
DE
Einführung
Bitte nehmen Sie sich einige Minuten Zeit, um diese Anleitung gründlich zu les en. Durch die korrekte
Wartung und den ordnungsgemäßen Einsatz dieses Geräts erhalten Sie optimale Leistung von Ihrem
BUFFALO-Produkt.
Packungsinhalt
Die Verpackung enthält folgende Teile:
• BUFFALO Kaffeemaschine
• Filterkorb
•Kanne
• Bedienungsanleitung
BUFFALO ist stolz auf die hochwertige Qualität s einer Produkte und seinen erstklassigen Se rvice. Wir stellen
sicher, dass alle gelieferten Produkte zum Zeitpunkt der Verpackung voll funktionsfähig sind und sich in
einwandfreiem Zustand befinden.
Sollten Sie Transportschäden feststellen, wenden Sie sich bitte unverzüglich an Ihren BUFFALO-Händler.
16
Page 24

DE
Betrieb
Teile und Bedienelemente
Wasserbehälter
Betriebsanzeige
Filterkorb
Warmhalteplatte
Untere
Obere
Warmhalteplatte
Korbhalterung
Ein-/Austaste für
obere
Warmhalteplatte
Ein-/Austaste für
Kaffeezubereitung
Kanne
Vor dem ersten Gebrauch
BUFFALO empfiehlt, das Gerät vor dem ersten Gebrauch oder nach längerer Lagerung zu reinigen.
1. Dazu den Wasserbehälter mit kaltem Wasser füllen.
Hinweis: Den Wasserbehälter mithilfe der Kanne füllen. So stellen Sie sicher, dass Sie
nicht mehr Wasser einfüllen, als in die Kanne passt. Der Wasserbehälter fasst maximal
2,2 Liter Wasser.
2. Den leeren Filterkorb zwischen den beiden Korbhalterungen in Position schieben.
3. Die Kanne auf die untere Warmhalteplatte unter den Filterkorb stellen.
4. Die Ein-/Austaste für die Kaffeezubereitung einschalten . Die Betriebsanzeige leuchtet auf, und das
erhitzte Wasser läuft nach und nach in die Kanne.
Hinweis: Während des Betriebs kann Dampf austreten, und es können laute
Gluckergeräusche hörbar sein. Dies ist völlig normal.
5. Sobald das gesamte Wasser dur chgelaufe n ist, schalt et sich die Betriebsanz eige aus. Entleeren Sie die
Kanne.
VORSICHT: Die Glaskanne wird während des Betriebs heiß. Um Verletzungen zu
vermeiden, die Kanne stets am Griff anfassen.
6. Schritte 1-5 wiederholen. Jetzt ist das Gerät sauber.
17
Page 25

DE
Kaffeezubereitung
1. Dazu den Wasserbehälter mit kaltem Wasser füllen.
Hinweis: Den Wasserbehälter mithilfe der Kanne füllen. So stellen Sie sicher, dass Sie
nicht mehr Wasser einfüllen, als in die Kanne passt. Der Wasserbehälter fasst maximal
2,2 Liter Wasser.
2. Eine Filtertüte in den Filterkorb einlegen.
3. Die benötigte Kaffeemenge in die Filtertüte geben und diese mit dem Filterkorb in Position schieben.
4. Die Kanne auf die untere Warmhalteplatte unter den Filterkorb stellen.
5. Die Ein-/Austaste für die Kaffeezubereitung einschalten . Die Betriebsanzeige leuchtet auf, und das
erhitzte Wasser läuft nach und nach in die Kanne.
Hinweis: Während des Betriebs kann Dampf austreten, und es können laute
Gluckergeräusche hörbar sein. Dies ist völlig normal.
6. Sobald das gesamte Wasser durchgelaufen ist, schaltet sich die Betriebsanzeige aus.
VORSICHT: Die Glaskanne wird während des Betriebs heiß. Um Verletzungen zu
vermeiden, die Kanne stets am Griff anfassen.
7. Wenn Sie den Kaffee warmhalten möchten, lassen Sie die Kanne auf der Warmhalteplatte stehen.
Filterpapier mit Kaffeesatz aus dem Filterkorb nehmen.
8. Zum Ausschalten der Warmhalteplatte den Betriebsschalter auf Aus stellen.
Die obere Warmhalteplatte
Auf der zweiten Warmhalteplatte kann eine weitere Kaffeekanne warmgehalten werden. Einsatz:
1. Die Kanne auf die obere Warmhalteplatte stellen.
2. Die Ein-/Austaste für die obere Warmhalteplatte einschalten .
VORSICHT: Die Flächen um die Warmhalteplatte herum können heiß werden. NICHT
berühren!Niemals eine leere Kanne auf die Warmhalteplatte stellen oder die Kanne
solange auf der Platte stehen lassen, bis die gesamte Flüssigkeit verdunstet ist.
Reinigung, Pflege und Wartung
• Vor der Reinigung stets zunächst das Gerät abschalten und den Netzstecker ziehen.
• Die Kaffeemaschine außen mit Seifenlauge und einem feuchten Tuch reinigen.
• Nach dem Reinigen gründlich abtrocknen.
18
Page 26

DE
Entkalken
In Gegenden mit harter Wasserqualität kann sich nach einiger Zeit und häufigem Gebrauch Kalk im Gerät
ablagern. Entkalken des Geräts:
1. Das in Wasser gelöste Entkalkungsmittel in den Wasserbehälter geben.
Hinweis: Verwenden Sie ein geeignetes Entkalkungsmittel und beachten Sie die
Gebrauchsanweisung dieses Mittels.
2. Die Ein-/Austaste für die Kaffeezubereitung auf Ein .
3. Nach ca. 4 Minuten das Gerät ausschalten, damit die Entkalkungslösung einwirken kann.
4. Nach rund 10 Minuten die Ein-/Aus taste für die Kaff eezubereit ung wieder eins chalten . Warten, bis
die gesamte Entkalkungslösung durchgelaufen ist.
5. Die Lösung aus der Kanne ausschütten.
6. Den Wasserbehälter mit sauberem Wasser füllen und das Gerät erneut einschalten, um die Maschine
auszuspülen und Reste des Entkalkungsmittels zu entfernen. Das gesammelte Wasser ausschütten
und die Kanne ausspülen.
7. Jetzt ist die Kaffeemaschine wieder einsatzbereit.
Hinweis: In Gegenden mit harter Wasserqualität empfiehlt BUFFALO, die
Kaffeemaschine mindestens alle 3 Monate zu entkalken.
Fehlersuche
Störung Vermutliche Ursache Lösung
Das Gerät
funktioniert nicht
Es läuft kein Kaffee
aus dem Filterkorb
Laute Geräusche Kein Wasser im Wasserbehälter Ausschalten und Wasserbehälter füllen
19
Das Gerät ist nicht eingeschaltet Prüfen, ob der Netzstecker in die Steckdose
gesteckt wurde und das Gerät eingeschaltet
ist
Stecker und Kabel sind beschädigt BUFFALO-Mitarbeiter oder qualifizierten
Techniker kontaktieren
Sicherung im Stecker ist
durchgebrannt
Stromzufuhr Netzstrom prüfen
Interner Vernetzungsfehler BUFFALO-Mitarbeiter oder qualifizierten
Kein Wasser im Wasserbehälter Ausschalten und Wasserbehälter füllen
Kaffee ist zu kompakt im Filter Ausschal ten , Kaffee im Filter auflockern und
Neue Sicherung in den Stecker einsetzen
Techniker kontaktieren
Gerät wieder einschalten
Page 27

Technische Spezifikationen
DE
Modell Spannung Leistung
G108 230V 50Hz 260W 9A 2,2 litres 5,8kg 455 x 205 x 405
Strom-
stärke
Fassungsvermögen
des Wasserbehälters
Gewicht
Abmessungen
h x b x t mm
Elektroanschlüsse
Der Stecker muss in eine geeignete Steckdose gesteckt werden.
Das Gerät ist wie folgt verdrahtet:
• Stromführender Leiter (braun) an Klemme L
• Neutralleiter (blau) an Klemme N
• Erdleiter (grün/gelb) an Klemme E
Das Gerät muss über eine spezielle Erdleitung geerdet werden.
Bei Fragen wenden Sie sich bitte an einen qualifizierten Elektriker.
Elektroisolierpunkte dürfen nicht blockiert werden. Bei einem Notstopp müssen diese Punkte jederzeit sofort
zugänglich sein.
Konformität
Alle BUFFALO-Produkte werden strengen Tests unterzogen, um die Einhaltung von Normen und
Spezifikationen internationaler und nationaler Behörden un d u nabhängiger Organi sat io nen zu
gewährleisten.
BUFFALO-Produkte dürfen durch folgendes Symbol gekennzeichnet werden:
20
Page 28

IT
Suggerimenti per la sicurezza
• Posizionare il fabbricatore di ghiaccio su una superficie in piano e stabile.
• L'installazione e le eventuali riparazioni devono venire eseguite da un agente/tecnico qualificato. Non
rimuovere i componenti o i pannelli di accesso dell'apparecchio.
• Verificare la conformità alle normative locali e nazionali di quanto segue:
• Normativa antinfortunistica sul lavoro
• Linee guida BS EN
• Precauzioni antincendio
• Normativa IEE sui circuiti elettrici
• Norme di installazione
• NON immergere l'apparecchio in acqua.
• NON toccare le superfici riscaldate.
• Essere SEMPRE presenti quando l'apparecchio è in funzione.
• NON rimuovere il cestello del filtro durante il processo di filtraggio.
• Per esclusivo uso in ambienti chiusi.
• Spegnere e scollegare l'alimentazione quando l'apparecchio non è in funzione.
• Tenere lontano l'imballaggio dalla portata dei bambini. Smaltire l'imballaggio in conformità alle
normative locali.
• Se danneggiato, il cavo di alimentazione deve venire sostituito da un agente BUFFALO o da un tecnico
qualificato al fine di prevenire eventuali rischi.
Introduzione
Leggere con attenzione il presente manuale. La manutenzione e l'utilizzo corretti di questo apparecchio
consentiranno di ottenere le massime prestazioni da questo prodotto BUFFALO.
Contenuto della confezione
La confezione contiene:
• Macchina da caffè BUFFAL O
• Cestello del filtro
• Caraffa
• Manuale di istruzioni
BUFFALO garantisce una qualità e un servizio impeccab ili e assicura che al moment o dell'imballaggi o tutti i
componenti forniti sono integralmente funzionanti e privi di difetti.
Nel caso siano rilevati danni risultanti dal trasporto del prodotto, rivolgersi immediatamente al rivenditore
BUFFALO locale.
21
Page 29

Funzionamento
Posizione dei comandi
IT
Serbatoio dell'acqua
Spia di erogazione
Cestello del filtro
Piastra riscaldante di
base
Piastra riscaldante
superiore
Linguette del
cestello
Interruttore di
alimentazione
piastra superiore
Interruttore di
erogazione
Caraffa
Primo utilizzo della macchina da caffè
BUFFALO raccomanda di pulire l'apparecchio prima di utilizzarlo per la prima volta oppure se l'apparecchio
è rimasto inutilizzato per un periodo prolungato di tempo.
1. Riempire il serbatoio dell'acqua con acqua fredda.
Nota: per riempire il serbatoio, utilizzare la caraffa per assicurarsi di non superare la
capacità massima. Il serbatoio può contenere una quantità massima di 2,2 litri d'acqua.
2. Fare scivolare in posizione il cestello del filtro vuoto tra le due linguette del cestello.
3. Posizionare la caraffa sulla piastra riscaldante di base sotto il cestello.
4. Accendere l'interruttore di erogazione . La spia di erogazione si accende e l'acqua calda inizia a
riempire la caraffa.
Nota: durante il funzionamento, l'apparecchio può emettere vapore e un forte
gorgoglio. Questo comportamento è normale e non rappresenta un'anomalia.
5. Al termine la spia di erogazione si spegne. Eliminare l'acqua bollente presente nella caraf fa..
ATTENZIONE: quando la macchina da caffè è in funzione, la caraffa di vetro si
surriscalda. Per evitare lesioni, maneggiare sempre la caraffa stringendone
l'impugnatura.
6. Ripetere i punti da 1 a 5. L'apparecchio è ora pulito.
22
Page 30

IT
Preparazione del caffè
1. Riempire il serbatoio dell'acqua con acqua fredda..
Nota: per riempire il serbatoio, utilizzare la caraffa per assicurarsi di non superare la
capacità massima. Il serbatoio può contenere una quantità massima di 2,2 litri d'acqua.
2. Inserire un filtro di carta all'interno del cestello del filtro.
3. Collocare la quantità richiesta di caffè nel filtro di carta e far e scivolar e in pos izion e il cestello del filt ro .
4. Posizionare la caraffa sulla piastra riscaldante di base sotto il cestello.
5. Accendere l'interruttore di erogazione . La spia di erogazione si accende e l'acqua calda inizia a
riempire la caraffa.
Nota: durante il funzionamento, l'apparecchio può emettere vapore e un forte
gorgoglio. Questo comportamento è normale e non rappresenta un'anomalia.
6. Al termine la spia di erogazione si spegne.
ATTENZIONE: quando la macchina da caffè è in funzione, la caraffa di vetro si
surriscalda. Per evitare lesioni, maneggiare sempre la caraffa stringendone
l'impugnatura.
7. Se necessario, lasciare la caraffa sulla piastra riscaldante per mantenere in caldo il caffè. Eliminare il
caffè e il filtro di carta dal cestello del filtro.
8. Per spegnere la piastra riscaldante, spegnere l'interruttore di erogazione .
Utilizzo della piastra riscaldante superiore
L'apparecchio è dotato di una seconda piastra riscaldante per mantenere in caldo una seconda caraffa. Per
utilizzarla, procedere nel modo seguente:
1. Posizionare la caraffa sulla piastra riscaldante superiore.
2. Accendere l'interruttore di alimentazione della piastra superiore .
ATTENZIONE: la superficie circostante della piastra riscaldante può raggiungere
temperature elevate. NON toccare.
Non riscaldare una caraffa vuota sulla piastra riscaldante e non lasciare che il contenuto
della caraffa evapori completamente.
Pulizia e manutenzione
• Prima di eseguire la pulizia, spegnere e scollegare l'apparecchio dall'alimentazione.
• Utilizzare acqua saponata e un panno inumidito per pulire la superficie esterna dell'apparecchio.
• Asciugare completamente dopo la pulizia.
23
Page 31

IT
Rimozione del calcare
In presenza di acqua dura e dopo un utilizzo prolungato è possibile l'accumulo d i calc are nell'appar ec chio.
Per rimuovere il calcare dall'apparecchio:
1. Versare una soluzione di acqua e prodotto anticalcare nel serbatoio.
Nota: utilizzare un prodotto anticalcare adeguato e seguire le istruzioni indicate sul
contenitore.
2. Accendere l'interruttore di erogazione .
3. Dopo circa 4 minuti spegnere l'apparecchio per consentire alla soluzione anticalcare di circolare nel
sistema.
4. Dopo circa 10 minuti riaccendere l'interruttore di erogazione . Attendere che il serbatoio si svuoti.
5. Eliminare la soluzione raccolta nella caraffa.
6. Riempire il serbatoio con acqua pulita e accendere l'apparecchio per lavare il sistema e rimuovere
eventuali residui del prodotto anticalcare. Eliminare l'acqua raccolta e sciacquare la cara ffa.
7. L'apparecchio è ora pronto per l'uso.
Nota: BUFFALO consiglia di rimuovere le incrostazioni di calcare ogni 3 mesi o più
frequentemente se l'apparecchio è utilizzato in aree con acqua dura.
Risoluzione dei problemi
Guasto Probabile causa Azione
L'apparecchio non
funziona
Il caffè non scende
dal cestello del
filtro
Dall'apparecchio
proviene un forte
rumore
L'apparecchio non è acceso Controllare che l'apparecchio sia
correttamente collegato e acceso
La presa e il cavo sono danneggiati Rivolgersi a un tecnico qualificato o a un
agente BUFFALO
Il fusibile della presa è guasto Sostituire il fusibile della presa
Alimentazione Controllare l'alimentazione
Guasto dei circuiti interni Rivolgersi a un tecnico qualificato o a un
agente BUFFALO
Non è presente acqua nel serbatoio Spegnere e riempire il serbatoio
Il caffè è troppo compatto nel filtro Spegnere, smuovere il caffè nel filtro e
riprendere l'operazione
Non è presente acqua nel serbatoio Spegnere e riempire il serbatoio
24
Page 32

IT
Specifiche tecniche
Modello Tensione
G108 230V 50Hz 2060W 9A 2,2 litri 5,8kg 455 x 205 x 405
Alimenta
zio
Corrente
Capacità
del
serbatoio
Peso
Dimensioni
h x l x p mm
Cablaggi elettrici
La spina deve venire collegata a una presa di rete appropriata.
L'apparecchio ha i seguenti cablaggi:
• Filo sotto tensione (colore marrone) a terminale L
• Filo del neutro (colore blu) a terminale N
• Filo di terra (colore verde/giallo) a terminale E
L'apparecchio deve avere un circuito dedicato di messa a terra.
In caso di dubbi, consultare un elettricista qualificato.
I punti di isolamento elettrico devono essere liberi da ostruzioni. In caso di emergenza, i punti devono
essere facilmente raggiungibili qualora sia necessario sco llegarli.
Conformità
I componenti BUFFALO sono stati sottoposti a un rigo roso collaudo ai fini della conformità agli standard e
alle specifiche normative previste dalle autorità internazionali, indipendenti e federali.
I prodotti BUFFALO sono autorizzati a esporre il seguente simbolo:
25
Page 33

ES
Consejos de Seguridad
• Colóquela sobre una superficie plana, estable.
• Un agente de servicio / técnico cualificado debería llevar a cabo la instalación y cualquier reparación si
se precisa. No retire ningún componente ni panel de servicio de este producto.
• Consulte las Normas Locales y Nacionales corresp ondientes a lo siguiente:
• Legislación de Seguridad e Higiene en el Trabajo
• Códigos de Práctica BS EN
• Precauciones contra Incendios
• Normativos de Cableado de la IEE
• Normativas de Construcción
• NO sumerja el aparato en agua.
• NO toque las superficies calientes.
• NO deje el aparato desatendido durante el funcionamiento.
• NO saque la cesta del filtro durante el proceso de filtrado.
• Sólo adecuado para uso en interi ores.
• Desconoce y desenchufe siempre el aparato cuando no se esté utilizando.
• Mantenga el embalaje fuera del alcance de los niños. Deseche el embalaje de acuerdo con las
normativas de las autoridades locales.
• Si el cable eléctrico resultada dañado, debe ser reemplazado por un técnico cualificado recomendado o
un agente de POLAR para evitar cualquier riesgo.
Introducción
Tómese unos minutos para leer este manual. El correcto mantenimiento y manejo de esta máquina
proporcionará el mejor funcionamiento posible de su producto POLAR.
Contenido del Conjunto
Se incluye lo siguiente:
• Cafetera BUFFALO
• Cesta del filtro
•Recipiente
• Manual de instrucciones
BUFFALO se enorgullece de su calidad y servicio y asegura que en el mome nt o d el emba l aje, e l co nt eni do
se suministró con plena funcionalidad y sin ningún defecto.
Si encontrara algún daño resultante del transporte, póngase en contacto inmediatamente con su
distribuidor BUFFALO.
26
Page 34

ES
Funcionamiento
Ubicación de los controles
Depósito de agua
Luz indicadora de
preparación
Cesta del filtro
calentamiento de la
Placa de
base
Placa de calentamiento
superior
Lengüetas de la cesta
Interruptor de encendido
de la placa de
calentamiento superior
Interruptor de encendido
de preparación
Recipiente
Antes de utilizar el aparato por primera vez
BUFFALO recomienda limpiar el aparato antes de utilizarlo por primera vez, o si el aparato ha estado fuera
de servicio durante un período de tiempo prolongado.
1. Llene el depósito de agua con agua fría.
Nota: utilice el recipiente para llenar el depósito y asegurarse de que no se sobrepase la
capacidad máxima del recipiente. La cantidad máxima de agua que el depósito puede
contener es 2,2 litros.
2. Deslice la cesta del filtro vacía hasta su posición entre las dos lengüetas de la cesta.
3. Ponga el recipiente en la placa de calentamiento de la base debajo de la cesta.
4. Ponga el interruptor de encendido de preparación en la posición On . El Indicador de preparación
se enciende y el agua caliente empieza a llenar el recipiente.
Nota: Durante el funcionamiento, puede salir vapor del aparato y pueden oírse ruidos
de burbujeo intenso. Esto es totalmente normal.
5. Cuando se haya acabado, la luz indicadora de preparación se apagará. Tire el agua caliente del
recipiente.
ADVERTENCIA: el recipiente para el agua se calienta durante el funcionamiento. Coja
siempre el recipiente por el asa para no dañarse.
6. Repita los pasos 1-5. El aparato ahora está limpio.
27
Page 35

ES
Preparación de café
1. Llene el depósito de agua con agua fría.
Nota: utilice el recipiente para llenar el depósito y asegurarse de que no se sobrepase la
capacidad máxima del recipiente. La cantidad máxima de agua que el depósito puede
contener es 2,2 litros.
2. Ponga un papel de filtro en el interior de la cesta del filtro.
3. Ponga la cantidad de café necesaria en el papel de filtro y coloque la cesta del filtro en su posi ción.
4. Ponga el recipiente en la placa de calentamiento de la base debajo de la cesta.
5. Ponga el interruptor de encendido de preparación en la posición On . El Indicador de preparación
se enciende y el agua caliente empieza a llenar el recipiente.
Nota: Durante el funcionamiento, puede salir vapor del aparato y pueden oírse ruidos
de burbujeo intenso. Esto es totalmente normal.
6. Cuando se haya acabado, la luz indicadora de preparación se apagará.
ADVERTENCIA: el recipiente para el agua se calienta durante el funcionamiento. Coja
siempre el recipiente por el asa para no dañarse.
7. Deje el recipiente en la placa de calentamiento para mantenerla caliente, si es preciso. Saque el café y
el papel de filtro de la cesta del filtro.
8. Para desconectar la placa de calentamiento, ponga el interruptor de encendido de preparación en la
posición Off .
Utilización de la placa de calentamiento superior
Este aparato dispone de una segunda placa de calentamiento para mantener caliente un recipiente
adicional. Para utilizarlo:
1. Ponga el recipiente en la placa de calentamiento superior.
2. Ponga el interruptor de encendido de la placa de calenta m iento superior en la posición On .
ADVERTENCIA: la superficie que rodea la placa de calentamiento puede calentarse. ¡No
la toque!
No caliente nunca un recipiente vacío en la placa de calentamiento, ni deje que el
recipiente se seque.
Limpieza, Cuidado y Mantenimiento
• Desconecte el aparato y desenchúfelo del suministro eléctrico siempre antes de llevar a cabo la
limpieza.
• Utilice agua con jabón y un paño húmedo para limpiar el exterior del aparato.
• Séquelo bien después de limpiarlo.
28
Page 36

ES
Eliminación de la cal
En zonas de aguas duras, puede acumularse cal en el aparato tras un uso prolongado. Para eliminar la cal
del aparato:
1. Vierta una solución de producto para eliminar la cal y agua en el depósito.
Nota: utilice un producto adecuado para eliminar la cal y siga las instrucciones del
recipiente.
2. Ponga el interruptor de encendido de Preparación en la posición On .
3. Después de aproximadamente 4 minutos, desconecte el aparato para permitir que la solución de
eliminación de cal tenga efecto en el sistema.
4. Después de aproximadamente 10 minutos, vuelva a poner el interruptor de encendido de Preparación
en la posición ON . Deje que el depósito se vacíe.
5. Tire la solución recogida del recipiente.
6. Llene el depósito de agua limpia y vuelva a conectar el aparato para purgar el sistema y sacar
cualquier residuo del producto para eliminar la cal. Tire el agua recogida y enjuague el recipiente.
7. Ahora el aparato está a punto para el fun cionamiento.
Nota: BUFFALLO recomienda que se elimine la cal de este aparato cada 3 meses o con
mayor frecuencia en zonas de aguas duras.
Resolución de problemas
Fallo Probable Causa Acción
El aparato no
funciona
No sale café de la
cesta del filtro
El aparato emite un
fuerte ruido
29
El aparato no está conectado Compruebe que el aparato esté enchufado
correctamente y conectado
El enchufe y el cable están dañados Llame a un técnico cualificado o a un agente
de POLAR
El fusible del enchufe se ha fundido Cambie el fusible del enchufe
Suministro eléctrico Compruebe el suministro eléctrico
Fallo del cableado interno Llame a un técnico cualificado o a un agente
de POLAR
No hay agua en el depósito Desconecte el aparato y llene el depósito
El café es demasiado compacto
dentro del filtro
No hay agua en el depósito Desconecte el aparato y llene el depósito
Desconecte el aparato, descompacte el café
dentro del filtro y reanude el func ionamiento
Page 37

Especificaciones Técnicas
ES
Capacidad
Modelo Tensión Potencia Corriente
G108 230V 50Hz 2060W 9A 2,2 litres 5,8kg 455 x 205 x 405
del
depósito
Peso
Dimensiones
a x a x p mm
Cableado Eléctrico
El enchufe tiene que conectarse a una toma eléctrica adecuada.
Este aparato está conectado de la forma siguiente:
• Cable cargado (de color marrón) al terminal marcado como L
• Cable neutro (de color azul) al terminal marcado como N
• Cable de tierra (de color verde / amarillo) al terminal marcado como E
El aparato debe estar conectado a tierra, utilizando un circuito de conexión a tierra especializado.
Si tiene alguna duda, consulte a un electricista cualificado.
Los puntos de aislamiento eléctrico deben mantenerse libres de cualquier ob strucción. En caso de precisarse
una desconexión de emergencia, deben estar disponib les de forma inmediata.
Cumplimiento
Las piezasBUFFALO han pasado estrictas pruebas de productos para cumplir las especificaciones y normas
reguladoras establecidas por las autoridades internacionales, independientes y federales.
Los productos BUFFALO han sido autorizados para ll evar el símb olo siguiente:
30
Page 38

PT
Conselhos de segurança
• Colocar numa superfície plana e estável.
• Um agente de serviço/técnico qualificado deverá efectuar a instalação e quaisquer reparações, caso
necessário. Não retirar qualquer componente ou painéis de serviço deste produto.
• Consultar e cumprir os regulamentos locais e nacionais no que diz respeito à:
• Legislação de saúde e segurança no local de trabalho
• Códigos de trabalho
• Prevenção de incêndios
• Normas para sistemas eléctricos IEE
• Código de construção
• NÃO colocar este aparelho em água.
• NÃO tocar nas superfícies quentes.
• NÃO deixar este aparelho trabalhando sem supervisão.
• NÃO retirar o recipiente do filtro durante o processo de filtragem.
• Apenas adequado para uso doméstico.
• Ao não utilizar o aparelho, deve sempre desligar o mesmo e retirar a ficha da tomada.Mantenha o
material da embalagem fora do alcance de c rianças. O material d a embalagem é par a s er deitado f or a
respeitando as regras das autoridades locais.
• A fim de evitar situações perigosas, a substituição dos cabos de alimentação danific ados deve ser f eita
por um agente BUFFALO ou um técnico qualificado recomendado.
Introdução
Por favor utilize o tempo necessário para ler atentamen te este manual. Uma manutenção e utilização
correcta deste aparelho permitem a melhor capacidade de funcionamento do seu produto BUFFALO.
Conteúdo da embalagem
A embalagem inclui o seguinte:
• BUFFALO Máquina de café filtro
• Recipiente do filtro
•Jarro
• Manual de instruções
A BUFFALO orgulha-se pelo serviço e a qualidade dos seus produtos e portanto verifica, durante a fase de
embalagem, o estado funcional e o bom estado do conteúdo fornecido.
Quando confrontado com quaisquer danos provocados durante o transporte, contacte imediatamente o seu
fornecedor BUFFALO.
31
Page 39

Funcionamento
O lugar dos comandos
PT
Depósito de água
Luz indicadora
Recipiente do filtro
Placa de
aquecimento
Placa de
aquecimento
superior
Encaixes de
retenção
Placa de
aquecimento inferior
Interruptor principal
Jarro
Antes de utilizar o produto pela primeira vez
BUFFALO aconselha limpar a máquina antes da primeira utilização e sempre que a máquina não foi utilizado
durante longos períodos.
1. Enche o depósito de água com água fria.
Nota: Utilize o jarro para encher o depósito e de modo a não exceder a capacidade
máxima do depósito. O depósito de água tem uma capacidade máxima de 2,2 litros.
2. Encaixe o recipiente do filtro nos dois encaixes de retenção.
3. Coloque o jarro em cima da placa de aquecimento e por baixo do recipiente do filtro.
4. Coloque o interruptor principal em On . A luz indicadora acende e água quente começa a encher o
jarro.
Nota: durante este processo de lavagem a máquina pode produzir vapor e
fazer barulhos. Isto é perfeitamente normal.
5. Depois de concluído o processo a luz indicadora desliga. Retire a água quente do jarro.
AVISO: durante o funcionamento da máquina o jarro de vidro pode ficar muito quente.
Pegue sempre o jarro pela asa a fim de evitar ferimentos.
6. Repetir os passos 1-5. Agora a máquina está limpa.
32
Page 40

PT
Fazer café
1. Enche o depósito de água com água fria.
Nota: Utilize o jarro para encher o depósito e de modo a não exceder a capacidade
máxima do depósito. O depósito de água tem uma capacidade máxima de 2,2 litros.
2. Coloque um filtro de café no recipiente do filtro.
3. Coloque a quantidade necessária de café no filtro e ponha o filtro no recipiente.
4. Coloque o jarro em cima da placa de aquecimento e por baixo do recipiente do filtro.
5. Coloque o interruptor principal em On . A luz indicadora acende e água quente começa a encher o
jarro.
Nota: durante este processo de lavagem a máquina pode produzir vapor e
fazer barulhos. Isto é perfeitamente normal.
6. Quando o processo de fazer café está concluído o indicador principal des l iga.
AVISO: durante o funcionamento da máquina o jarro de vidro pode ficar muito quente.
Pegue sempre o jarro pela asa a fim de evitar ferimentos.
7. Caso necessário, deixe o jarro na placa de aquecimento para manter o café quente. Retire o filtro com
o café do recipiente do filtro.
8. Para desligar a placa de aquecimento, desligue o interruptor principal .
Utilizar a placa de aquecimento superior
Esta máquina tem uma segunda placa de aquecimento para aquecer uma jarro adicional. Para utilizar:
1. Coloque um jarro com café na placa de aquecimento superior.
2. Ligue o interruptor da placa de aquecimento superior .
AVISO: a superfície em volta da placa de aquecimento pode ficar quente. NÃO tocar!
Nunca deixar um jarro vazio na placa de aquecimento ou deixar secar totalmente o café
num jarro.
Limpeza, cuidados & manutenção
• Deve-se sempre desligar o aparelho e retirar a ficha da tomada antes de fazer a limpeza.
• Utilize água com sabão e um pano húmido para limpar o interior do aparelho.
• Secar muito bem após limpeza.
Descalcificar
Em lugares de água dura podem-se formar incrustações calcárias após utilização prolongad a da máquina.
Descalcificar a máquina:
Coloque uma solução de produto descalcificante e água no depósito de água.
Nota: utilizar um produto descalcificante adequado e seguir as instruções na
embalagem.
33
Page 41

PT
3. Coloque o interruptor principal em On .
4. Desligue a máquina após 4 minutos (Off) para que a solução descalcificante possa actuar no sistema
da máquina.
5. Após 10 minutos coloque o interruptor principal em On . Aguarde até o depósito estar totalmente
vazio.
6. Retire a água acumulada no jarro.
7. Enche o depósito de água com água limpa e ligue a máquina para retirar quaisquer resíduos da
solução descalcificante da máquina. Retire a água recolhida e lave o jarro.
8. A máquina está pronta para uso.
Nota: a BUFFALO aconselha in tervalos de desca lcificação da má quina de 3 meses e p ara
lugares com água dura intervalos mais curtos.
Resolução de problemas
Problema Causa provável A fazer
O aparelho não
funciona
Não sai café do
recipiente do filtro.
A máquina produz
barulhos fortes
O aparelho não
está ligado
A ficha e o cabo estão
danificados
O fusível da ficha
disparou
Fonte de alimentação Verifique a fonte de alimentação
Erro na cablagem interna Chame o agente da BUFFALO ou um técnico
Não há água no depósito Desligue a máquina e enche o depósito com
O café está demasiado comprimido
no filtro
Não há água no depósito Desligue a máquina e enche o depósito com
Verifique a ligação c orrecta dos cabos e ligue
o aparelho
Chame o agente da BUFFALO ou um técnico
qualificado
Substitua o fusível da ficha
qualificado
água
Desligue a máquina, solte o café e continue
água
Especificações técnicas
Model Voltagem Alimentação Curronte
G108 230V 50Hz 2060W 9A 2,2 litros 5,8kg 455 x 205 x 405
Capacidade do
depósito
Peso
Dimensões
a x l x p mm
34
Page 42

PT
Cablagem eléctrica
Deve-se utilizar tomadas adequadas para ligar a ficha do aparelho.
O esquema de electricidade deste aparelho é o seguinte:
• Cabo eléctrico (castanho) para o terminal marcado L
• Cabo neutro (azul) para o terminal marcado N
• Cabo terra (verde/amarelo) para o terminal marcado com E
Este aparelho tem que estar ligado à terra através de um circuito de terra.
Consulte um electricista qualificado em caso de dúvidas.
Os pontos eléctricos isolados devem ficar limpos de qualquer obstrução. Estes pontos têm que ser
imediatamente acessíveis caso seja necessário deslig ar a elect r icidade.
Conformidade
As componentes BUFFALO foram submetidas a testes rigorosos a fim de cumprirem as normas e
especificações legais determinadas pelas autoridades internacionais, independentes e nacionais.
Os produtos BUFFALO foram aprovados e trazem o seguinte símbolo:
35
Page 43

S
Säkerhetsråd
• Placera på en plan stabil yta.
• Ett serviceombud/kvalificerad tekniker skall utföra installation och reparationer om så krävs. Avlägsna
inte några komponenter eller servicepanler på produkten.
• Konsultera lokala och nationella normer för att efterleva följande:
• Lagstiftning om hälsa och säkerhet i arbetet
• BS EN Tillämpningsregler
• Brandförebyggande åtgärder
• IEE Regler för kabeldragning
• Byggregler
• Doppa INTE ner apparaten i vatten.
• Rör INTE varma ytor.
• Lämna INTE apparaten oövervakad under drift.
• Ta INTE bort filterhållaren under filtreringen.
• Endast lämpad för bruk inomhus.
• Stäng alltid av apparaten och koppla från elförsörjningen när den inte används.
• Håll allt förpackningsmaterial åtskiljt från barn. Släng förpackningsmaterialet i enlighet med loka
myndigheters regleringar.
• Om elsladden är skadad måste den bytas ut av en BUFFALO-representant eller en rekommenderad
kvalificerad tekniker för att undvika risker.
Inledning
Ta några minuter för att noggrant läsa igenom denna manual. Korrekt underhåll och drift av maskinen
kommer att göra att din BUFFALO-produkt ger bästa möjliga prestanda.
Förpackningsinnehåll
Följande medföljer:
• BUFFALO kaffeapparat
• Filterhållare
•Kanna
• Bruksanvisning
Håll allt förpackningsmaterial åtskiljt från barn. Släng förpackningsmaterialet i enlighet med loka
myndigheters regleringar.
Om elsladden är skadad måste den bytas ut av en BUUFALO-representant eller en rekommenderad
kvalificerad tekniker för att undvika risker.
36
Page 44

S
Drift
Placering av kontrollerna
Vattenbehållare
Indikatorljus för
bryggning
Filterhållare
Nedre kokplatta
Övre kokplatta
Korgflikar
Strömbrytare övre
kokplatta
Strömbrytare
bryggning
Kanna
Innan du använder apparaten första gången
BUFFALO rekommenderar att apparaten rengörs innan du använde r den första gången, eller om apparaten
har varit oanvänd under en längre tid.
1. Fyll på vattenbehållaren med kallt vatten.
Obs! Använd kannan för att fylla på behållaren för att försäkra att inte kannans högsta
kapacitet inte överstigs. Högsta mängd vatten som behållaren kan rymma är 2,2 liter.
2. För den tomma filterhållaren på plats mellan de två korgflikarna.
3. Placera kannan på den under kokplattan under korgen.
4. Sätt på bryggarens strömbrytare . Indikatorljuset för bryggning lyser och varmt v atten k ommer att
börja fylla kannan.
Obs! Under drift kan het ånga stiga upp från apparaten och ett högljutt bubblande
höras. Detta är helt normalt.
5. När det är färdigt kommer indikatorljuset för bryggning att stängas av. Töm ut det varma vattnet i
kannan.
VARNING: Glaskannan blir mycket varm under drift. Lyft alltid upp kannan i handtaget
för att undvika skada.
6. Repetera steg 1-5. Apparaten är nu ren.
37
Page 45

S
Göra kaffe
1. Fyll på vattenbehållaren med kallt vatten.
Obs! Använd kannan för att fylla på behållaren för att försäkra att inte kannans högsta
kapacitet inte överstigs. Högsta mängd vatten som behållaren kan rymma är 2,2 liter.
2. Placera ett pappersfilter inuti filterhållaren.
3. Mät upp önskad mängd kaffe i filterpappret och sk jut in filterhållaren på plats.
4. Placera kannan på den under kokplattan under korgen.
5. Sätt på bryggarens strömbrytare . Indikatorljuset för bryggning lyser och varmt v atten k ommer att
börja fylla kannan.
Obs! Under drift kan het ånga stiga upp från apparaten och ett högljutt bubblande
höras. Detta är helt normalt.
6. När kaffet är färdigt kommer indikat orljuset för bryggning att stängas av.
VARNING: Glaskannan blir mycket varm under drift. Lyft alltid upp kannan i handtaget
för att undvika skada.
7. Du kan om du vill låta kannan stå kvar på plattan för att hålla den varm. Töm ut kaffet o ch f iltret från
filterhållaren.
8. Stäng av kokplattan och strömbrytaren för bryggning .
Använda den övre kokplattan
Denna apparat är utrustad med en andra kokplatta för att hålla en extra kanna varm. För att använda:
1. Placera kannan på den övre kokplattan.
2. Sätt på den övre kokplattas strömbrytare .
VARNING: Området runt kokplattan kan bli varmt. Rör INTE!
Värm aldrig upp en tom kanna på kokplattan eller låt kannan kokas torr.
Rengöring, omvårdnad och underhåll
• Stäng alltid av och koppla från eltillförseln till apparaten innan rengöring.
• Använd tvålvatten och en fuktig trasa för att rengöra apparatens yttre.
• Torka noggrant efter rengöring.
Avkalkning
I områden med hårt vatten kan kalkrester byggas upp inuti apparaten efter en längre tids användning. Att
kalka av apparaten:
1. Håll en blandning av avkalkningsmedel och vatten i behållaren.
Obs! Använd ett lämpligt avkalkningsmedel och följ instruktionerna på behållaren.
2. Sätt på bryggarens strömbrytare .
38
Page 46

S
3. Stäng av apparaten efter ungefär 4 minuter för att låta avkalkningslösningen verka i hela systemet.
4. Sätt på bryggarens strömbrytare igen efter ungefär 10 minuter. Låt behållaren tömmas.
5. Töm ut lösningen som samlats i kannan.
6. Fyll behållaren med rent va tten och sät t på apparat en igen för att sp ola igenom syste met och avlägsn a
eventuella rester av avkalkningsmedel. Töm ut det uppsamlade vattnet och skölj kannan.
7. Apparaten är nu redo att användas.
8. Obs! BUFFALO rekommenderar att denna apparat kalkas av var tredje månad eller oftare i områden
med hårt vatten.
Obs! BUFFALO rekommenderar att denna apparat kalkas av var tredje månad eller
oftare i områden med hårt vatten.
Felsökning
Fel Möjlig orsak Åtgärd
Apparaten fungerar
inte
Det kommer inget
kaffe från
filterhållaren
Apparaten låter
mycket
Apparaten är inte påslagen Kontrollera at t appar aten är korrekt ansluten
och påslagen
Kontakt och ledning är skadade Ring BUFFALO-representant eller kvalificerad
tekniker
Säkring i kontakten har gått Byt ut säkringen
Strömtillförsel Kontrollera strömtillförseln
Internt kabeldragningsfel Ring BUFFALO- representant elle r kvalificer ad
tekniker
Inget vatten i behållaren Stäng av och fyll på behållaren
Kaffet är för kompakt i filtret Stäng av, lösgör kaffet i filtret och sätt på
igen
Inget vatten i behållaren Stäng av och fyll på behållaren
Tekniska specifikationer
Modell Spänning Kraft Ström
G108 230V 50Hz 2060W 9A 2,2 liter 5,8kg 455 x 205 x 405
39
Behållarens
kapacitet
Vikt
Mått
h x b x d mm
Page 47

S
Elektriska kablar
Kontakten måste vara ansluten till ett lämpligt eluttag.
Denna apparat har följande kablar:
• Elektrisk kabel (brun) till uttag markerat L
• Neutral kabel (blå) till uttag markerat N
• Jordkabel (grön/gul) till uttag markerat E
Denna apparat måste vara jordad, och bruka en dedikerad jordad krets.
Vid tveksamheter rådfråga en kvalificerad elektriker.
Elektriska isoleringspunkter måste hållas fria från hinder. I händelse av urkoppling vid nödfall krävs, måste
de vara lättåtkomliga.
Du kan också ringa BUFFALO:s hjälplinje för information om nationella företag för avfallshantering i EU.
Tillmötesgående
BUFFALO-delarna har genomgått strikt produkttestning för att tillmötesgå reglerande normer och
specifikationer utsatta av internationella, oberoende och statliga myndigheter.
BUFFALO-produkterna har godkänts för att bära följande symbo l:
40
Page 48

DK
Sikkerhedstips
• Anbring apparatet på en jævn, stabil overflade.
• Installation og reparation skal udføres af en serviceagent/kvalificeret tekniker, hvis det bliver
nødvendigt. Fjern ikke komponenter eller servicepaneler på dette produkt.
• Check de lokale og nationale standarder for at imødekomme det følgende:
• Sikkerhed og sundhed på arbejdspladsen
• BS EN Regler for god praksis
• Brandforholdsregler
• IEE Strømkabelregulativer
• Bygningsvedtægter
• Kom IKKE apparatet i v a nd .
• Rør IKKE ved varme overflader.
• Gå IKKE fra apparatet, mens det er i brug.
• Fjern IKKE filterholderen under filtreringsprocessen.
• Kun egnet til indendørs brug.
• Sluk altid for apparatet og tag stikket ud af stikkontakten, når apparatet ikke er i brug.
• Opbevar al emballage utilgængeligt for børn. Kass er emb a llagen i henhold til de lokale love og
bestemmelser.
• Hvis strømkablet er beskadiget, skal det udskiftes af en BUFFALO agent eller en anbefalet kvalificeret
tekniker for at undgå fare.
Indledning
Brug venligst et par øjeblikke på at gennemlæse denne brugsanvisning grundigt. BUFFALO produktet vil
fungere bedst muligt, hvis maskinen vedligeholdes og anvendes korrekt.
Pakkens indhold
Der skal være følgende:
• BUFFALO kaffemaskine
• Filterholder
•Kande
•Brugsanvisning
BUFFALO er stolte vores kvalitet og service, der sikrer at det leverede indhold er fuldt funktionelt og fri for
skader ved pakning.
Skulle du alligevel opdage skader, som resultat af transporten, bedes du kontakte din BUFFALO forhandler
med det samme.
41
Page 49

Brug
Oversigt over betjeningsanordninger
DK
Vandbeholder
Indikatorlampe for
kaffebrygning
Filterholder
Nederste
varmeplade
Øverste varmeplade
Flige på filterholder
Tænd/sluk-knap for
øverste varmeplade
Kaffebrygningsknap
Kande
Før der laves kaffe første gang
BUFFALO anbefaler, at apparatet rengøres, før der laves kaffe første gang, eller hvis apparatet har stået
ubrugt i længere tid.
1. Fyld vandbeholderen med koldt vand.
Bemærk: Brug kanden til at fylde beholderen for at sikre, at kandens maksimale
kapacitet ikke overskrides. Den maksimale mængde vand, beholderen kan rumme, er
2,2 liter.
2. Sæt den tomme filterholder på plads mellem de to flige.
3. Stil kanden på den nederste varmeplade under filterholderen.
4. Tænd for kaffebrygningsknappen . Kontrollampen for kaffebrygning lyser og der begynder at løbe
varmt vand ned i kanden.
Bemærk: Under brug kan der komme damp fra apparatet og høres høje boblende lyde.
Dette er helt normalt.
5. Når vandet er løbet igennem, går kontrollampen for kaffebrygning ud. Hæld det varme vand i kanden
væk.
ADVARSEL: Glaskanden bliver meget varm under brug. Tag altid kanden af varmepladen
ved at holde i håndtaget for at undgå forbrændinger.
6. Gentag punkt 1-5. Apparatet er nu rent.
42
Page 50

DK
Sådan laves der kaffe
1. Fyld vandbeholderen med koldt vand.
Bemærk: Brug kanden til at fylde beholderen for at sikre, at kandens maksimale
kapacitet ikke overskrides. Den maksimale mængde vand, beholderen kan rumme, er
2,2 liter.
2. Sæt et kaffefilter i filterholderen.
3. Udmål den ønskede mængde kaffe og kom den i kaffefilteret. Sæt så filterholderen på plads.
4. Stil kanden på den nederste varmeplade under filterholderen.
5. Tænd for kaffebrygningsknappen . Kontrollampen for kaffebrygning lyser og der begynder at løbe
varmt vand ned i kanden.
Bemærk: Under brug kan der komme damp fra apparatet og høres høje boblende lyde.
Dette er helt normalt.
6. Når kaffen er færdig, går indikatorlampen for kaffebr ygning ud.
ADVARSEL: Glaskanden bliver meget varm under brug. Tag altid kanden af varmepladen
ved at holde i håndtaget for at undgå forbrændinger.
7. Man kan eventuelt lade kanden blive stående på varmepladen, hvis den skal holdes varm. Kassér
kaffegrumset og kaffefilteret fra filterholderen.
8. Der slukkes for varmepladen ved at sætte kaffebrygningsknappen på .
Sådan anvendes den øverste varmeplade
Dette apparat er udstyret med en ekstra varmeplade, der kan holde endnu en kande varm. Den anvendes
sådan:
1. Stil kanden på den øverste varmeplade.
2. Tænd for den øverste varmeplade ved at sætte dens tænd /sluk-knap på .
ADVARSEL: Overfladen omkring varmepladen kan blive meget varm. Pas på IKKE at
røre ved den! Stil aldrig en tom kande på varmepladen og lad aldrig kaffen i kanden koge
væk.
Rengøring, pleje og vedligeholdelse
• Sluk altid for apparatet og tag stikket ud af stikkontakten inden rengøring.
• Tør apparatets yderside af med sæbevand og en fugtig klud.
• Tør grundigt efter rengøring.
43
Page 51

DK
Afkalkning
I områder med hårdt vand kan apparatet efter længere tids brug trænge til at blive afkalket. Sådan afkalkes
apparatet:
1. Hæld en opløsning af afkalkningsmiddel og van d i beholderen.
Bemærk: Brug et passende afkalkningsmiddel, og følg vejledningen på emballagen.
2. Tænd for kaffebrygningsknappen .
3. Efter ca. 4 minutter slukkes der for apparatet, så afkalkningsopløsningen kan løbe igennem systemet
og opløse kalken.
4. Efter ca. 10 minutter sættes kaffebrygningsknappen på igen. Lad beholderen blive helt tom.
5. Hæld opløsningen i kanden væk.
6. Fyld beholderen med rent vand og tænd for apparatet igen for at skylle systemet igennem og fjerne
alle rester af afkalkningsmidlet. Hæld vandet i kanden væk og skyl den grundigt.
7. Apparatet er nu parat til brug.
Bemærk: BUFFALO anbefaler, at apparatet afkalkes hver 3. måned eller hyppigere i
områder med hårdt vand.
Fejlfinding
Fejl Mulig årsag Løsning
Apparatet virker
ikke
Der kommer ikke
kaffe ud fra
filterholderen
Der kommer høje
lyde fra apparatet
Apparatet er ikke tændt Kontroller, at apparatet er sat rigtigt i
Stik og ledning er beskadiget Kontakt BUFFALO agenten eller en
En sikring i stikket er sprunget Udskift stiksikringen
Strømforsyning Kontroller strømforsyningen
Intern ledningsfejl Kontakt BUFFALO agenten eller en
Der er ikke noget vand i beholderen Sluk for apparatet og fyld beholderen med
Kaffen er presset for hårdt sammen i
filteret
Der er ikke noget vand i beholderen Sluk for apparatet og fyld beholderen med
stikkontakten og er tændt
kvalificeret tekniker
kvalificeret tekniker
vand
Sluk for apparatet, løsn kaffen i filteret og
begynd igen
vand
44
Page 52

DK
Tekniske specifikationer
Model Spænding Strøm Strømstyrke
G108 230V 50Hz 2060W 9A 2,2 liter 5,8kg 455 x 205 x 405
Vandbeholderens
kapacitet
Vægt
Mål h x b x d
mm
El-kabler
Stikket skal tilsluttes til en passende hovedkontakt.
Apparatet er kabelført som følger:
• Strømførende ledning (brun) til terminal L
• Neutral ledning (blå) til terminal N
• Jordledning (grøn/gul) til terminal E
Dette apparat skal være jordforbundet med et fast fejlstrømsrelæ.
Spørg en autoriseret elektriker i tvivlstilfælde.
Elektriske isolationspunkter skal holdes fr i af b lokeringer. I nødstilfælde skal de være tilgængelige for
afbrydelse.
Overensstemmelseserklæring
BUFFALO dele har gennemgået streng produkttestning for at overholde de normer, standarder og
specifikationer, som er fastsat af internationale, uafhængige og amerikanske føderale myndigheder.
BUFFALO produkter er godkendt til at bære følgende symbol:
45
Page 53

N
Sikkerhetstips
• Plasser på en vannrett og stabil flate.
• Installasjon og all reparasjon skal utføres av en serviceagent eller en kyndig tekniker. Komponenter
eller inspeksjonsdeksler må ikke fjernes på dette produktet.
• Rådfør deg med lokale og nasjonale standarder for å oppfylle følgende:
• HMS-lovgivningen (Helse/Miljø/Sikkerhet)
• Bransjestandard BS EN
• Forholdsregler mot brann
• IEE-forskrifter for tilkopling
• Byggeregler
• Kaffetrakteren MÅ IKKE senkes ned i vann.
• IKKE ta på varme overflater.
• IKKE forlat kaffetrakteren uten tilsyn når den er i bruk.
• IKKE fjern filterkurven under filtreringsprosessen.
• Er kun egnet for innendørs bruk.
• Slå alltid av og frakople strømmen til kaffetrakteren når den ikke er i bruk.
• Slå alltid av og frakople strømtilførselen når enheten ikke er i bruk.Hold all emballasj e unna barn.
Emballasjen skal deponeres i henhold til forskrifter bestemt av myndighetene på stedet.
• Hvis strømledningen er skadet skal den skiftes ut av en BUFFALO-agent eller en kyndig tekniker for å
unngå fare.
Innledning
Vennligst ta deg tid til å lese nøye gjennom denne håndboka. Korrekt vedlikehold og bruk av ismaskinen vil
gi best mulig ytelse på ditt BUFFAL O-produktet.
Pakkeinnhold
Følgende er inkludert:
• BUFFALO kaffetrakter
• Filterkurv
•Kanne
• Brukerhåndbok
BUFFALO er stolt av sin kvalitet og service, og garanterer at da innholdet ble pakket var det fullstendig
funksjonelt og uten skade.
Skulle du finne noe som helst skade som et resultat av transitt, vennligst ta o mg å ende kontakt med
BUFFALO-forhandleren på stedet.
46
Page 54

N
Bruk
Plassering av kontroller
Vannbeholder
Indikatorlampe for
kaffetrakting
Filterkurv
Nedre varmeplate
Øvre varmeplate
Kurvtunger
Strømbryter for øvre
varmeplate
Strømbryter for
kaffetrakting
Kanne
Før kaffetrakteren brukes første gangen
BUFFALO anbefaler at kaffetrakteren gjøres ren før den brukes føste gangen, eller hvis den ikke har vært
brukt på en stund.
1. Fyll vannbeholderen med kaldt vann.
Merk: Bruk kannen for å fylle beholderen for å være sikker på at maksimum kapasitet
ikke overskrides. Maksimum vannmengde i beholderen er 2,2 liter.
2. Skyv den tomme filterkurven i stilling mellom de to kurvtungene.
3. Plasser kannen på nedre varmeplate under kurven.
4. Slå på strømbryteren for kaffetrakting . Indikatorlampen for kaffetrakting tenner og varmt vann
fylles i kannen
.
Merk: Damp vil muligens stige opp fra kaffetrakteren og boblelyder kan høres fra
kaffetrakteren under bruk. Dette er helt normalt.
5. Når ferdig vil indikatorlampen for kaffetrakting slå seg av. Tøm ut det varme vannet i kannen.
ADVARSEL: Glasskannen blir varm under bruk og skal alltid løftes etter håndtaket for å
unngå personskade.
6. Gjenta trinn 1-5. Kaffetrakteren vil nå være ren.
47
Page 55

N
Lage kaffe
1. Fyll vannbeholderen med kaldt vann.
Merk: Bruk kannen for å fylle beholderen for å være sikker på at maksimum kapasitet
ikke overskrides. Maksimum vannmengde i beholderen er 2,2 liter.
2. Plasser et papirfilter i filterkurven.
3. Mål nødvendig mengde kaffe i papirfilteret og skyv filterkurven i stilling.
4. Plasser kannen på nedre varmeplate under kurven.
5. Slå på strømbryteren for kaffetrakting . Indikatorlampen for kaffetrakting tenner og varmt vann
fylles i kannen
Merk: Damp vil muligens stige opp fra kaffetrakteren og boblelyder kan høres fra
kaffetrakteren under bruk. Dette er helt normalt.
6. Når ferdig vil indikatoren for kaffetrakting slå seg av.
ADVARSEL: Glasskannen blir varm under bruk og skal alltid løftes etter håndtaket for å
unngå personskade.
7. Hvis nødvendig, la kannen være på varmeplata for å holde den varm. Kast papirfilteret sammen med
den brukte kaffen i filterkurven.
8. For å slå at varmeplata, slå av bryteren for kaffetrakting .
.
Bruke den øvre varmeplata
Kaffetrakteren er utstyrt med to varmeplater for å holde en ekstra kaffekanne varm. For å bruke den andre
varmeplaten:
1. Plasser kannen på øvre varmeplate.
2. Slå på bryteren for den øvre varmeplaten .
ADVARSEL: Overflaten rundt varmeplaten kan bli varm. IKKE ta på overflaten!
En tom kanne må aldri varmes opp på varmeplaten, og den må heller ikke gå tørr.
Rengjøring, stell og vedlikehold
• Kaffetrakteren skal alltid slås av og strømmen frakoples før rengjøring.
• Bruk såpevann og en fuktig klut for å gjøre kaffetrakteren ren utvendig.
• Tørk grundig etter rengjøring.
Avkalking
På steder hvor det finnes hardt vann kan kalkbelegg bygge seg opp i kaffetrakteren etter langvarig bruk.
Slik avkalker du kaffetrakteren:
1. Tøm en oppløsning med avkalkingsmiddel og vann i beholderen.
Merk: Bruk egnet avkalkingsmiddel og følg instruksene på beholderen
48
Page 56

N
2. Slå på bryteren for kaffetrakting .
3. Slå kaffetrakteren av etter cirka 4 minutter og la oppløsningen med avkalkingsmiddel gå gjennom
systemet.
4. Etter cirka 10 minutter, slå strømbryteren for kaffetrakting På igjen . La beholderen bli tom.
5. Tøm ut oppløs ni ngen i kannen.
6. Fyll beholderen med rent vann og slå kaffetrakteren På igjen for å skylle systemet og fjerne eventuelle
rester fra avkalkingsmiddelet.
7. Kaffetrakteren er nå klar til bruk.
Merk: BUFFALO anbefaler at kaffetrakteren avkalkes hver 3. måned, eller oftere hvor
vannet er hardt.
Feilsøking
Feil Sannsynlig årsak Aksjon
Ismaskinen
fungerer ikke
Det kommer ikke
kaffe fra
filterkurven
Kaffetrakteren
lager høye lyder
Ismaskinen er ikke slått på Sjekk at støpslet på ismaskinen er plugget
inn korrekt og at kontakten er slått på
Støpsel og ledning er skadet Ring BUFFALO-agenten eller en kyndig
tekniker
Sikringen i støpslet har gått Skift ut sikringen i støpselet
Strømtilførsel Sje kk strømtilførselen
Intern koplingsfeil Ring BU FFALO-agenten eller en kyndig
tekniker
Det er ikke vann i beholderen Slå av og fyll beholderen
Kaffen er for sammenpakket i filteret Slå Av og gjør kaffen mindre kompakt i
filteret og fortsett
Det er ikke vann i beholderen Slå Av og fyll vann i beholderen
Tekniske spesifikasjoner
Modell Spenning Strøm Strømstyrke
G108 230V 50Hz 2060W 9A 2,2 liter 5,8kg 455 x 205 x 405
49
Kapasitet på
beholderen
Vekt
Mål
h x w x d mm
Page 57

N
Elektrisk tilkopling
Støpselet skal tilkoples en passende strømkontakt.
Enheten er koplet som følger:
• Strømførende ledning (brun) - koplingspunkt merket L
• Nøytral ledning (blå) - koplingspunkt merket N
• Jordledning (grønn) - koplingspunkt merket E
Denne enheten skal ha jording ved å bruke en dedisert jordingskrets.
Hvis i tvil, rådfør deg med en kyndig elektriker.
Elektriske isolasjonspunkter / skillebrytere skal være uhindret. I et nødstilfelle hvor det er nødvendig med
frakopling, skal de alltid være tilgjengelige.
Samsvar
Deler brukt av BUFFALO har gjennomgått streng produkttesting for å være i samsvar med regulative
standarder og spesifikasjoner fastlagt av inte rnasjonal, uavhengig og føderale myndigheter.
BUFFALO-produkter har blitt godkjent for å bære følgende symbol:
50
Page 58

FIN
Turvallisuusvihjeitä
• Aseta laite tasaiselle, vakaalle pinnalle.
• Huoltoedustajan/pätevän huoltomiehen tulisi suorittaa asennus ja tarvittae ssa kaikki korjaustyöt. Älä
irrota mitään tämän laitteen osia tai huoltopaneelia.
• Katso tietoja paikallisista ja kansallisista standardeista varmistaaksesi, että seuraavia määräyksiä
noudatetaan:
• Työterveys- ja turvallisuuslainsäädäntö
• BS EN-mukaiset ohjeet
• Paloturvallisuusmääräykset
• IEE-johdotusmääräykset
• Rakennusmääräykset
• ÄLÄ upota laitetta veteen.
• ÄLÄ kosketa kuumia pintoja.
• ÄLÄ jätä laitetta ilman valvontaa sen toimiessa.
• ÄLÄ poista suodatintelinettä suodat tamisen aikana.
• Sopii ainoastaan käytettäväksi sisätiloissa.
• Kytke laite aina pois päältä ja katkaise virrantulo laitteeseen, kun sitä ei käytetä.
• Pidä kaikki pakkausmateriaali poissa lasten ulottuvilta. Hävitä pakkausmateriaali paikallisten
viranomaisten määräysten mukaisesti.
• Jos virtajohto on vaurioitunut, saa sen vaihtaa uuteen ainoastaan BUFFALO-edustaja tai valtuutettu
pätevä huoltomies vaarojen välttämiseksi.
Johdanto
Käytä muutama minuutti tämän ohjekirjan lukemiseen huolellisesti läpi. Kun tätä BUFFALO-tuotetta
huolletaan ja käytetään oikein, saadaan laitteesta paras mahdollinen hyöty.
Pakkauksen sisältö
Pakkaus sisältää seuraavat:
• BUFFALO kahvinkeitin
•Suodatinteline
•Kannu
•Ohjekirja
BUFFALO on ylpeä laadusta ja palvelusta varmistaen, että laitetta pakattaessa pakkauksen sisältö on täysin
kunnossa ja ilman vikoja.
Mikäli laite on kuljetuksen takia vaurioitunut, ota välittömästi yhteyttä BUFFALO -edustajaan.
51
Page 59

Käyttö
Ohjauslaitteiden sijainti
FIN
Vesisäiliö
Kahvin valmistuksen
merkkivalo
Suodatinteline
Alalämpölevy
Ylempi lämpölevy
Telineen ulokkeet
Ylemmän
lämpölevyn
virtakytkin
Kahvin valmistuksen
virtakytkin
Kannu
Ennen kuin laitetta käytetään ensimmäistä kertaa
BUFFALO suosittelee, että laite puhdistetaan ennen ensimmäistä käyttökertaa, tai kun laitetta ei ole käytetty
pitkään aikaan.
1. Täytä vesisäiliö kylmällä vedellä.
Huom.: Käytä kannua säiliötä täyttäessäsi niin, että kannun suurinta tilavuutta ei
ylitetä. Suurin säiliöön mahtuva vesimäärä on 2,2 litraa.
2. Työnnä tyhjä suodatinteline paikalleen kummankin telineen ulokkeen väliin.
3. Aseta kannu alalämpölevylle telineen alle.
4. Käännä kahvinvalmistuksen virtakytkin . pääl le. Kahvin valmistuksen merkkivalo syttyy ja kannu
alkaa täyttyä kuumalla vedellä.
Huom.: Käytön aikana laitteesta saattaa nousta höyryä, ja siitä voi kuulua
pulputusääniä. Tämä on täysin normaalia.
5. Kun toimenpide on saatu valmiiksi kahvin valmistuksen merkkivalo sammuu. Heitä kannussa oleva
kuuma vesi pois..
VAROITUS: Lasikannu tulee erittäin kuumaksi käytön aikana. Ota kannusta aina kiinni
tarttumalla sen kahvaan, jotta vältettäisiin vahingot.
6. Toista kohdat 1-5. Laite on nyt käyttövalmis.
52
Page 60

FIN
Kahvin valmistus
1. Täytä vesisäiliö kylmällä vedellä.
Huom.: Käytä kannua säiliötä täyttäessäsi niin, että kannun suurinta tilavuutta ei
ylitetä. Suurin säiliöön mahtuva vesimäärä on 2,2 litraa.
2. Aseta suodatinpaperi suodatintelineen sisään.
3. Mittaa tarvittava määrä kahvia suodatinpaperiin ja työnnä suodatinteline paikalleen.
4. Aseta kannu alalämpölevylle telineen alle.
5. Käännä kahvinvalmistuksen virtakytkin . pääl le. Kahvin valmistuksen merkkivalo syttyy ja kannu
alkaa täyttyä kuumalla vedellä.
Huom.: Käytön aikana laitteesta saattaa nousta höyryä, ja siitä voi kuulua
pulputusääniä. Tämä on täysin normaalia.
6. Kun kahvi on valmistettu kahvin valmistuksen merkkivalo sammuu.
VAROITUS: Lasikannu tulee erittäin kuumaksi käytön aikana. Ota kannusta aina kiinni
tarttumalla sen kahvaan, jotta vältettäisiin vahingot.
7. Jätä kannu tarvittaessa lämpölevylle, jott a se py sy is i lämpimänä. Heitä suodatintelineessä oleva kahvi
ja suodatinpaperi pois.
8. Kääntääksesi lämpölevyn pois päältä käännä kahvin valmistuksen virtakytkin pois päältä.
Ylemmän lämpölevyn käyttö
Tässä laitteessa on toinen lämpölevy, jolla voidaan pitää lämpimänä toinen kannu. Käytä sitä seuraavasti:
1. Aseta kannu ylemmälle lämpölevylle.
2. Käännä ylemmän lämpölevyn kytkin päälle.
VAROITUS: Lämpölevyä ympäröivät pinnat saattavat tulla kuumiksi. ÄLÄ kosketa niitä!
Älä koskaan lämmitä tyhjää kannua lämpölevyllä äläkä anna kannussa olevan kahvin
kuivua.
Puhdistus, hoito & huolto
• Kytke laite aina pois päältä ja kytke se irti verkkovirrasta ennen puhdistamista.
• Käytä saippuavettä ja kosteata liinaa laitteen ulkopintojen puhdistamiseen.
• Kuivaa laite perusteellisesti puhdistamisen jälkeen.
Kalkin poisto
Alueilla, joilla vesi on kovaa, voi kalkkia kertyä laitteeseen pitkän käyttöajan jälkeen. Kalkki poistetaan
laitteesta seuraavasti:
1. Kaada kalkinpoistoaineen ja veden liuos säiliöön.
Huom.: Käytä sopivaa kalkinpoistoainetta ja noudata pakkauksessa olevia ohjeita.
53
Page 61

FIN
2. Käännä kahvin valmistuksen virtakytkin n päälle.
3. Kytke laite pois päältä noin 4 minuutin kuluttua, jotta kalkinpoistoliuos saisi mennä järjestelmän läpi.
4. Kytke kahvin valmistuksen virtakytkin takaisin päälle noin 10 minuutin kuluttua. Anna säiliön
tyhjentyä.
5. Heitä kannuun kertynyt liuos pois.
6. Täytä säiliö puhtaalla vedellä ja kytke laite takaisin päälle järjestelmän huuhtelemiseksi ja poistaaksesi
mahdolliset kalkinpoistoaineen jäämät. Heitä kannuun kerääntynyt vesi pois ja huuhtele kannu.
7. Laite on nyt käyttövalmis.
Huom.: BUFFALO suosittelee, että laitteesta poistetaan kalkki joka 3. kuukausi tai
vieläkin useammin alueilla, joilla on kova vesi.
Vianetsintä
Vika Mahdollinen aiheuttaja Toimenpide
Laite ei toimi Laitetta ei ole kytketty päälle Tarkista, että laite on liitetty verkkovirtaan
Pistotulppa ja johto ovat vioittuneet Soita BUFFALO -edustajalle tai pätevälle
Pistotulpassa oleva sulake on
palanut
Virransyöttö Tarkasta virransyöttö
Sisäinen vika johdoissa Soita BUFFALO -edustajalle tai pätevälle
Suodatintelineestä
ei tule kahvia
Laitteesta tulee
kovaa ääntä
Säiliössä ei ole vettä Kytke laite pois päältä ja täytä säiliö
Kahvi on pakkautunut liian tiukasti
suodattimeen
Säiliössä ei ole vettä Kytke laite pois päältä ja täytä säiliö
oikein ja kytketty päälle
huoltomiehelle
Vaihda sulake uuteen
huoltomiehelle
Kytke laite pois päältä, irrottele kahvia
suodattimesta ja aloita kahvin valmistus
uudelleen
Tekniset tiedot
Malli Jännite Teho Virta Säiliön tilavuus Paino
G108 230V 50Hz 2060W 9A 2,2 litraa 5,8kg 455 x 205 x 405
Mitat
k x l x s mm
54
Page 62
FIN
Sähköjohdot
Pistotulppa on liitettävä sopivaan verkkovirtapistokkeeseen.
Laitteen johdot liitetään seuraavasti:
• Jännitteellinen johto (väriltään ruskea) napaan, jossa on merkintä L
• Neutraali johto (väriltä än sininen) napaan, jossa on merkintä N
• Maadoitusjohto (väriltään vihreä/keltainen) napaan, jossa on merkintä E
Tämä laite on maadoitettava käyttämällä tarkoitukseen varattua maadoituspiiriä.
Jos et ole varma asiasta, kysy neuvoa pätevältä sähkömiehelt ä.
Sähkövirran eristyspisteet on pidettävä vapaina kaikista esteistä. Mikäli laite joudutaan hätätapauksessa
kytkemään verkkovirrasta, on niihin päästävä helposti.
Vaatimustenmukaisuus
BUFFALO-osat ovat käyneet läpi tarkan tuotetestauk sen, jotta ne noudattaisivat kansainvälisten, itsenäisten
ja valtiollisten viranomaisten asettamia säädöksiä ja vaatimuksia.
BUFFALO-tuotteet on hyväksytty merkittäviksi seuraavilla merkinnöillä:
55
Page 63
DECLARATION OF CONFORMIT Y
• Conformiteitsverklaring • Déclaration de conformité • Konformitätserklärung • Dichiarazione di conformità •
• Declaración de conformidad • Declaração de conformidade • Överensstämmelseförsäkran •
• Overensstemmelseserklæring • Konformitetserklæring • Selvitys vaatimustenmukaisuudesta •
Equipment Type • Uitrustingstype • Type d'équipement • Gerätety p •
Tipo di apparecchiatura • Tipo de equipo • Tipo de equipamento • Coffee Machine
Enhetstyp • Udstyrstype • Type utstyr • Laitteen tyyppi:
Model • Modèle • Modell • Modello • Modelo: G108
Serial Number • Serienummer • Numéro de série • Seriennummer •
Numero di serie • Número de serie • Número serial • Sarjanumero:
Year of Manufacture • Fabricagejaar • Date de fabrication • Herstellungsjahr •
Anno di produzione • Año de fabricación • Ano de fabricação • Tillverkningsår •
Produktionsår • Produksjonsår • Valmistusvuosi:
Application of Council Directives(s) • Toepassing van Europese Richtlijn (en) •
Application de la / des directive(s) du Conseil: • Anwendbare EU-Richtlinie(n) •
Applicazione delle Direttive: • Aplicación de la(s) directiva(s) del consejo •
Aplicação de directiva(s) do Conselho • Tillämpning av rådets direktiv •
Gennemførelse af Rådets Direktiv(er) af • Applisering av kommuneforskrift(er) •
Neuvoston direktiivi(e)n soveltaminen:
Standards • Standaarden • Normes • Normen • Stand ard • Estándares •
Normas
• Normer • Standarder • Standardit
:
Producer Name
Nome del produttore • Nombre del fabricante • Nome do fabricante •
Tillverkarens namn • Fabrikantens navn • Produsentens navn • Valmistaj an nimi:
Producer Address • Adres fabrikant • Adresse du prodocteur •
Anschrift des Herstellers • Indirizzo del produttore • Dirección del fabricante •
Endereço do fabricante • Tillverkarens adress • Fabrikantens adresse •
Produsentens adresse • Valmistajan osoite:
I, the undersigned, hereby declare that the equipment specified above conforms to the above Directive(s) and Standard(s).
Ik, de ondergetekende, verklaar hierbij dat de hierboven gespecificeerde uitrusting goedgekeurd is volgens de bovenstaande Richtlijn(en) en
Standaard(en).
Je soussigné, confirme la conformité de l'équipement cité dans la présente à la / aux Directive(s) et Norme(s) ci-dessus
Ich, der/die Unterzeichnende, erkläre hiermit, dass da s oben angegebene Gerät der/den oben angeführten Richtlinie(n) und Norm(en)
entspricht.
Il sottoscritto dichiara che l'apparecchiatura di sopra specificata è conforme alle Direttive e agli Standard sopra riportati.
El abajo firmante declara por la presente que el equipo arriba especificado está en conformidad con la(s) directiva(s) y estándar(es) arriba
mencionadas.
Eu, o abaixo-assinado, declaro que o equipamento anteriormente especificado está em conformidade com a(s) anterior(es) Directiva(s) e
Norma(s).
Jag, den undertecknande, betygar härmed att ovan specificerade enhet överrensstämmer med ovan direktiv och norm(er).
Jeg, undertegnede, erklærer hermed at udstyr et, der er specificeret ovenfor opfylder de ovenstående direktive(r) og standard(er).
Jeg, undertegnede, erklærer herved at utstyret som er spesifisert ovenfor er i overensstemmelse med ovennevnte forskrift(er) og standard(er).
Minä allekirjoittanut vakuutan täten, että yllä mainittu laite noudattaa yllä olevaa(olevia) direktiiviä(direktiivejä) ja standardia(standardeja).
Date • Data • Date • Datum • Data • Fecha • Data • Dato • Päivämäärä: 14/12/2006
Signature • Handtekening • Signature • Unterschrift
Firma • Firma • Assinatura • Underskrift • Allekirjoitus:
Full Name • Volledige naam • Nom et prénom • Vollständiger Name •
Nome completo • Nombre completo • Nome por extenso • Richard Cromwell
Fullständigt namn • Fulde navn • Fullstendig navn • Täydellinen nimi:
• Naam fabrikant • Nom du prodocteur • Name des Herstellers •
•
Buffalo
Fourth Way
Avonmouth
Bristol
BS11 8TB
United Kingdom
Position • Functie • Fonction • Position • Qualifica • Posición • Função • Marketing Director
Befattning • Stilling • Asema:
Page 64

BUFFALO Telephone Helpline: +44 (0)845 146 2887
BUFFALO, Fourth Way, Avonmouth, United Kingdom, BS11 8TB
 Loading...