

Page 1
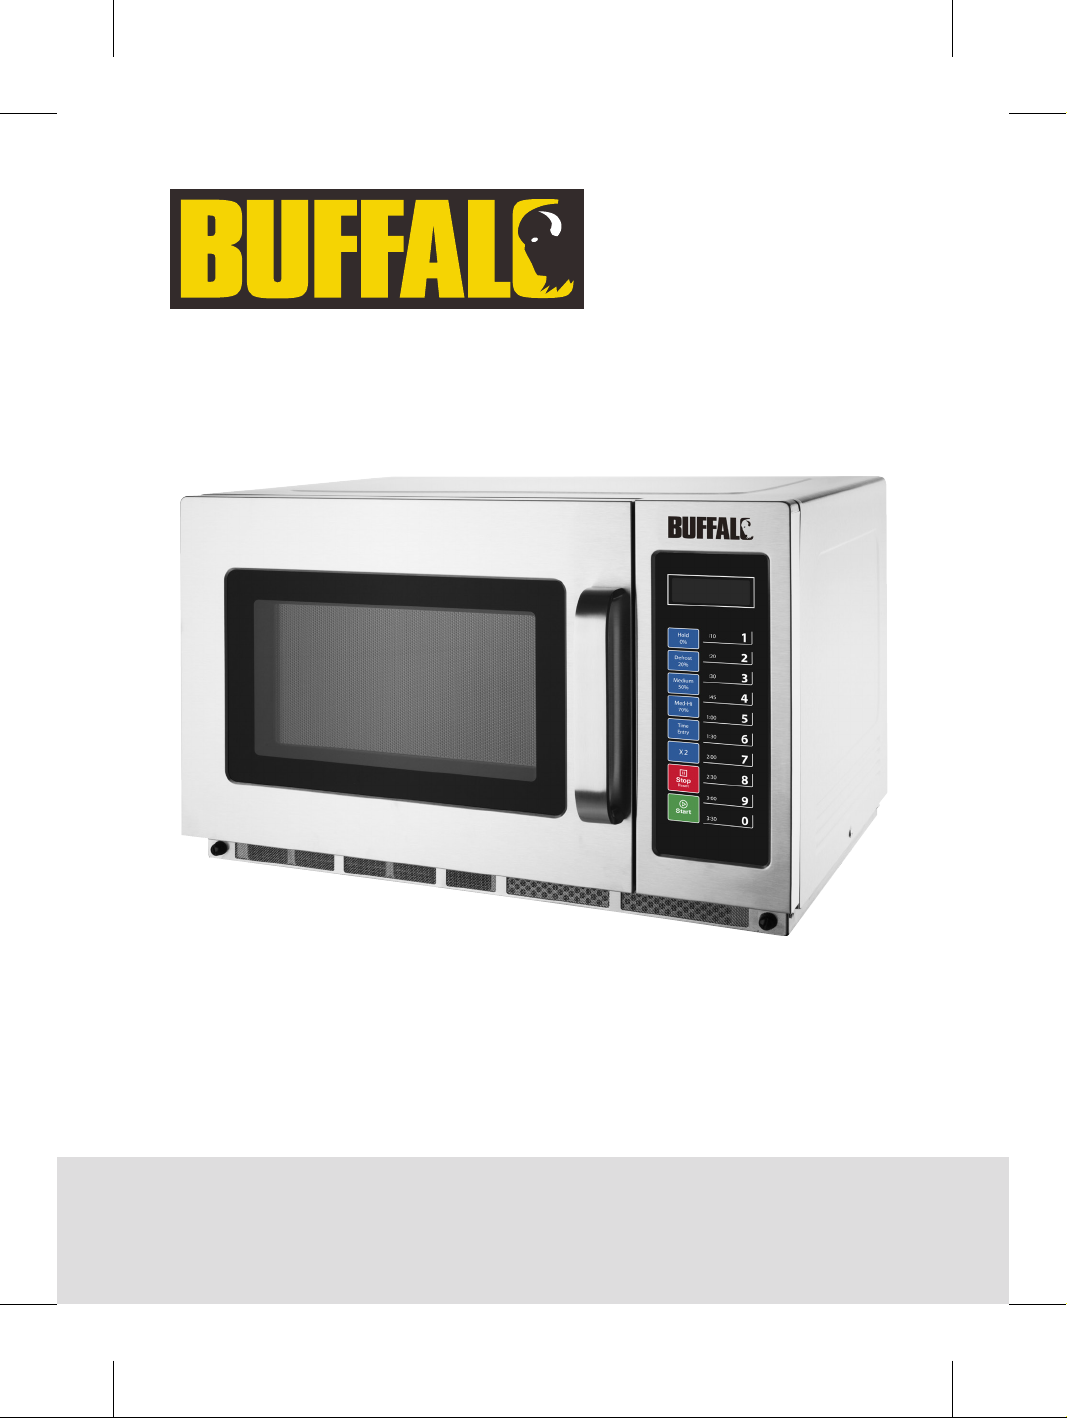
34Ltr 1800W
Programmable
Microwave
Instruction manual
Model • Modèle • Modell • Modello • Modelo • Malli:
FB864 / FE142-E
Page 2
UK
Safety Tips
To reduce the risk of fire, electric shock, injury to persons or
exposure to excessive microwave oven energy when using your
appliance, follow basic precautions, including the following:
PRECAUTIONS TO AVOID POSSIBLE EXPOSURE
TO MICROWAVE ENERGY
Do not attempt to operate this oven with the door open, since
this can result in harmful exposure to microwave energy. It is
important not to break or tamper with the safety interlocks.
Do not place any object between the oven front face and the
door or allow soil or cleaner residue to accumulate on sealing
surfaces.
Warning: If the door or door seals area damaged, the oven
must not be operated until it has been repaired by a competent
person.
• Position on a flat, stable surface.
• A service agent/qualified technician should carry out
installation and any repairs if required. Do not remove any
components on this product.
• Consult Local and National Standards to comply with the
following:
- Health and Safety at Work Legislation
- BS EN Codes of Practice
- Fire Precautions
- IEE Wiring Regulations
- Building Regulations
• Warning: Liquids and other foods must not be heated in
sealed containers since they are liable to explode.
2
Page 3
UK
• Warning: It is hazardous for anyone other than a competent
person to carry out any service or repair operation that
involves the removal of a cover which gives protection against
exposure to microwave energy.
• Only use utensils suitable for use in microwave ovens.
• The oven should be cleaned regularly and any food deposits
should be removed.
• When heating food in plastic or paper containers, keep an eye
on the oven due to the possibility of ignition.
• If smoke is observed, switch off or unplug the appliance and
keep the door closed in order to stifle any flames.
• Do not overcook food.
• Do not use the oven cavity for storage purposes. Do not store
items, such as bread, cookies, etc. inside the oven.
• Remove wire twist-ties and metal handles from paper or
plastic containers/bags before placing them in the oven.
• Install or locate this oven only in accordance with the
installation instructions provided.
• Eggs in the shell and whole hard-boiled eggs should not be
heated in microwave ovens since they may explode, even after
microwave heating has ended.
• Use this appliance only for its intended uses as described in
manual. Do not use corrosive chemicals or vapours in this
appliance. This oven is especially designed to heat. It is not
designed for industrial or laboratory use.
• Do not store or use this appliance outdoors.
• Do not use this oven near water, in a wet basement or near a
swimming pool.
• The temperature of accessible surfaces may be high when
the appliance is operating. The surfaces are liable to get hot
during use. Keep cord away from heated surface, and do not
cover any vents on the oven.
3
Page 4
UK
• Do not let cord hang over edge of table or counter.
• Failure to maintain the oven in a clean condition could lead to
deterioration of the surface that could adversely affect the life
of the appliance and possibly result in a hazardous situation.
• Warning: The contents of feeding bottles baby food jars
shall be stirred or shaken and the temperature checked before
consumption, in order to avoid burns.
• Warning: Microwave heating of beverages result in delayed
eruptive boiling, therefore care must be taken when handling
the container.
• Liquids such as water, coffee and tea can overheat beyond
boiling point without appearing to be boiling.
• Always switch off and disconnect the power supply to the unit
before cleaning or carrying out maintenance.
• Keep all packaging away from children. Dispose of the
packaging in accordance to the regulations of local authorities.
• If the power cord is damaged, it must be replaced by a
BUFFALO agent or a recommended qualified technician in
order to avoid a hazard.
• This appliance is not intended for use by persons (including
children) with reduced physical, sensory or mental capabilities,
or lack of experience or knowledge, unless they have been
given supervision or instruction concerning the use of the
appliance by a person responsible for their safety.
• Children should be supervised to ensure that they do not play
with the appliance.
• Do not operate the oven when empty.
• The microwave oven shall not be placed in a cabinet unless it
has been tested in a cabinet.
• The appliance is not intended to be operated by means of an
external timer or separate remote-control system.
• Do not use jet/pressure washers to clean the appliance.
4
Page 5
UK
• Buffalo recommend that this appliance should be periodically
tested (at least annually) by a Competent Person. Testing
should include, but not be limited to: Visual Inspection,
Polarity Test, Earth Continuity, Insulation Continuity and
Functional Testing.
• Buffalo recommend that this product is connected to a circuit
protected by an appropriate RCD (Residual Current Device).
Introduction
Please take a few moments to carefully read through this manual. Correct maintenance and operation of
this machine will provide the best possible performance from your BUFFALO product.
Pack Contents
The following is included:
• Microwave Oven • Instruction manual
BUFFALO prides itself on quality and service, ensuring that at the time of packaging the contents are
supplied fully functional and free of damage.
Should you find any damage as a result of transit, please contact your BUFFALO dealer immediately.
Installation
1. Remove all packaging materials. Make sure that all protective plastic film and coatings are thoroughly
removed from all surfaces.
Warning: Check for any of the following damage that may have occurred:
• Misaligned or bent door, damaged door seals/sealing surface, broken/loose
door hinges, dents in the oven interior.
• DO NOT operate the oven if any damage is found. Call a BUFFALO agent or
qualified Technician.
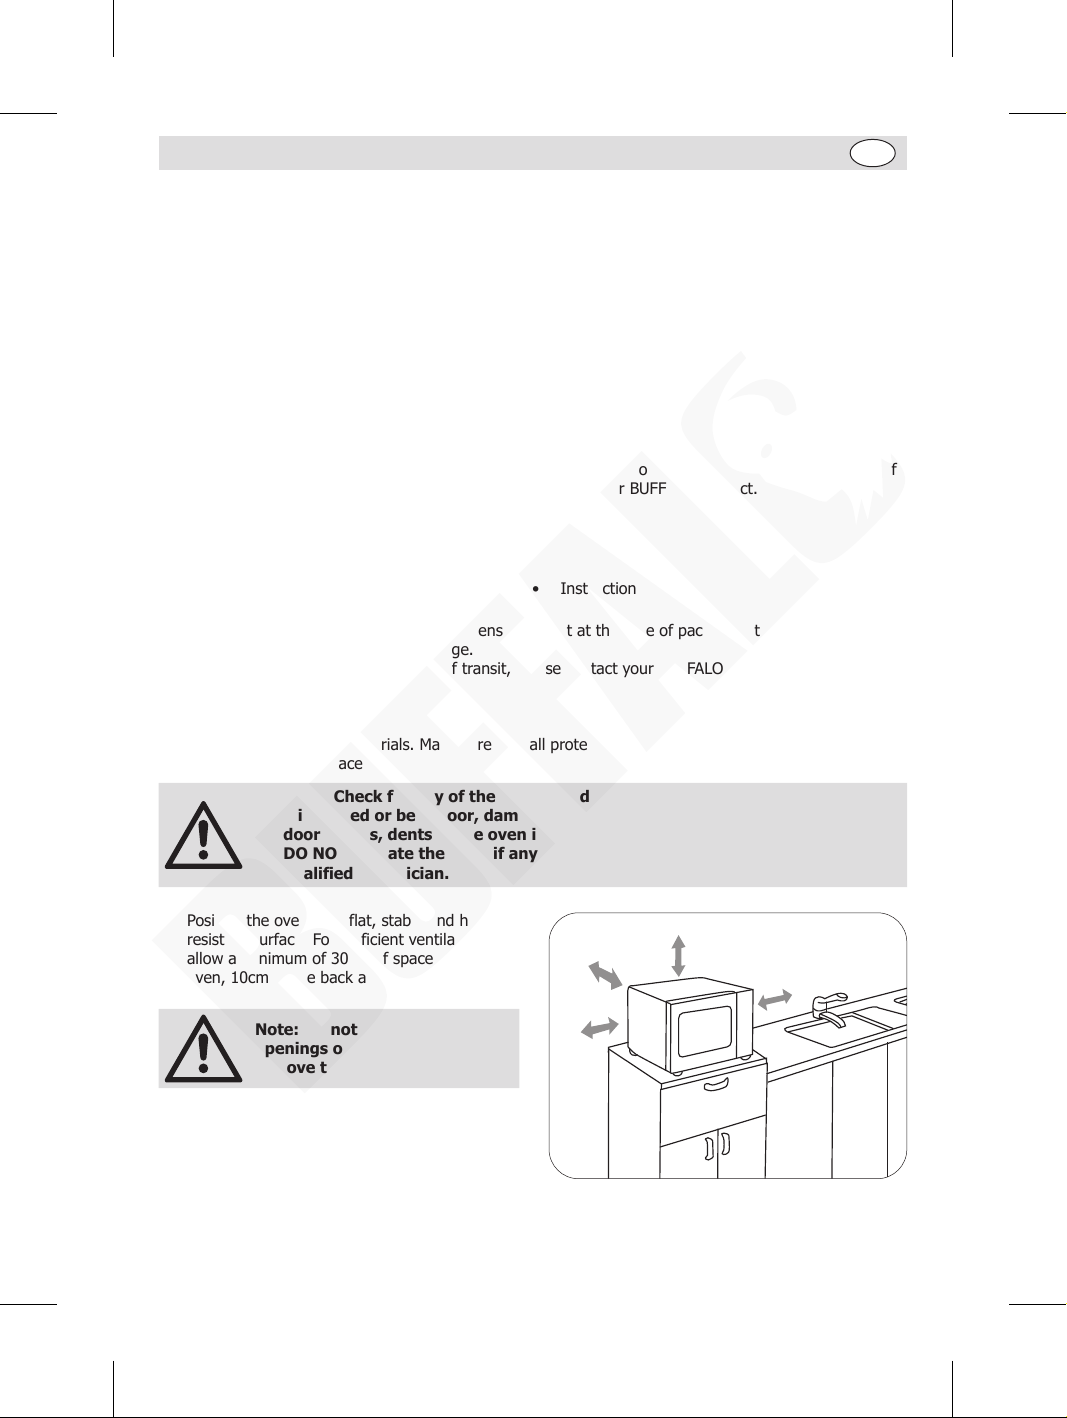
2. Position the oven on a flat, stable and heatresistant surface. For sufficient ventilation,
allow a minimum of 30cm of space above the
oven, 10cm at the back and sides.
Note: Do not cover or block any
openings on the appliance, or
remove the feet.
3. Place the oven as far away from radios and
TV as possible as operation of the appliance
may cause interference to your radio or TV
reception.
10cm
10cm
30cm
5
Page 6
UK
Stacking the appliance
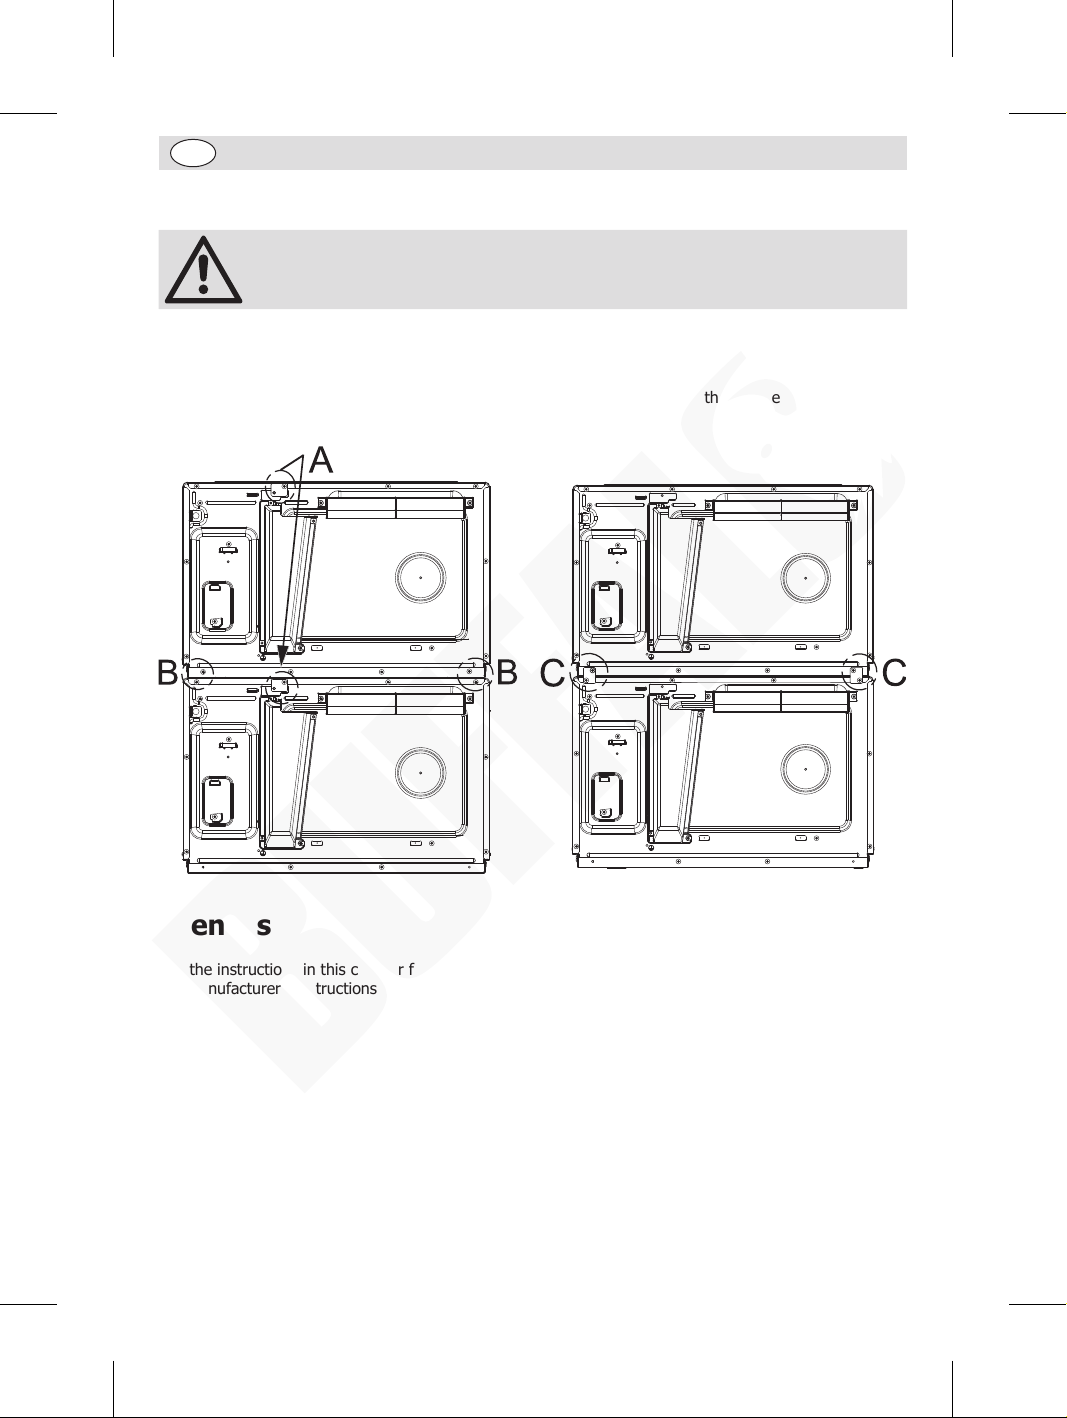
Note: To save space, a maximum of 2 appliances can be stacked together. For
details, please follow below instructions.
1. Loosen the screws that fix the mounting plates. Then remove the mounting plates and re-tighten the
screws in place (Step A).
2. Remove the 4 screws as shown in Step B.
3. Locate the mounting plates to the joined parts of the 2 ovens, then fix with the screws just removed
(Step C).
Utensils
See the instructions in this chapter for utensils to use/avoid with microwaving. If in doubt, please check
the manufacturer’s instructions if your utensil is microwave safe or not.
6
Page 7
UK
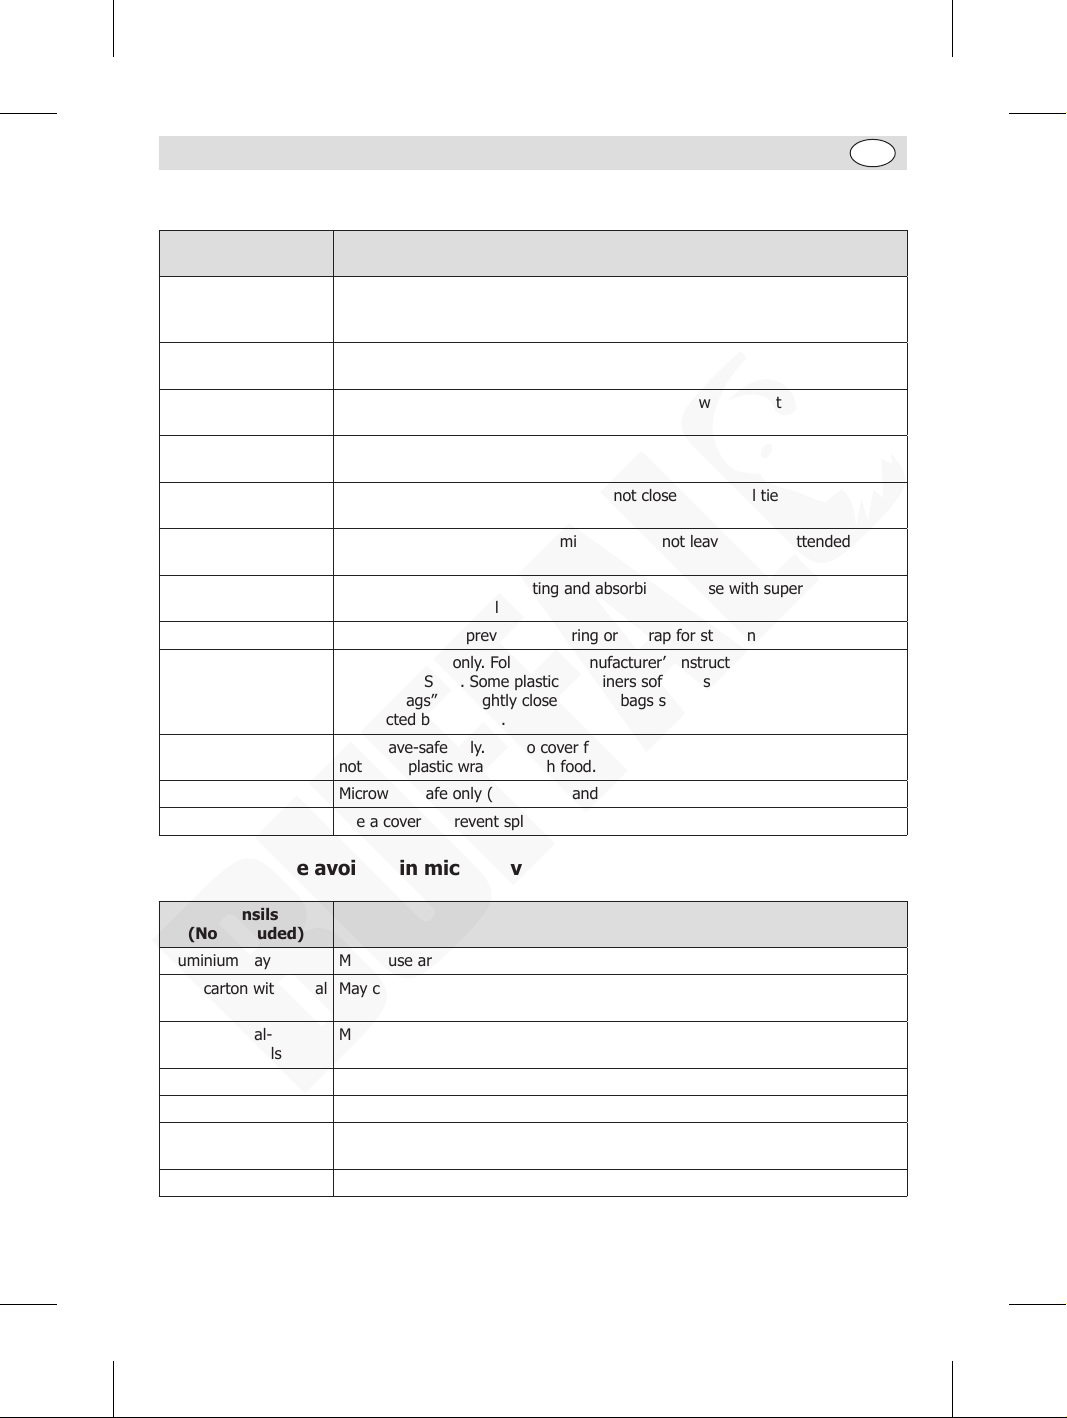
Materials you can use in microwave oven
Utensils
(Not included)
Browning dish Follow manufacturer’s instructions. The bottom of browning dish must be
placed smoothly on the ceramic board. Incorrect usage may the ceramic board
to break.
Dinnerware Microwave-safe only. Follow manufacturer’s instructions. Do not use cracked or
chipped dishes.
Glass jars Always remove lid. Use only to heat food until just warm. Most glass jars are
not heat resistant and may break.
Glassware Heat-resistant oven glassware only. Make sure there is no metallic trim. Do not
use cracked or chipped dishes.
Oven cooking bags Follow manufacturer’s instructions. Do not close with metal tie. Make slits to
allow steam to escape.
Paper plates and cups Use for short-term cooking/warming only. Do not leave oven unattended while
cooking.
Paper towels Use to cover food for reheating and absorbing fat. Use with supervision for a
short-term cooking only.
Parchment paper Use as a cover to prevent splattering or a wrap for steaming.
Plastic Microwave-safe only. Follow the manufacturer’s instructions. Should be labelled
“Microwave Safe”. Some plastic containers soften, as the food inside gets hot.
“Boiling bags” and tightly closed plastic bags should be slit, pierced or vented
as directed by package.
Plastic wrap Microwave-safe only. Use to cover food during cooking to retain moisture. Do
not allow plastic wrap to touch food.
Thermometers Microwave-safe only (meat and candy thermometers)
Wax Paper Use a cover to prevent splattering and to help retain moisture
Remarks
Materials to be avoided in microwave oven
Utensils
(Not included)
Aluminium tray May cause arcing. Transfer food into microwave-safe dish
Food carton with metal
handle
Metal or metal-
trimmed utensils
Metal twist ties May cause arcing and could cause a fire in the oven
Paper bags May cause a fire in the oven
Plastic foam Plastic foam may melt or contaminate the liquid inside when exposed to high
Wood Wood will dry out when used in the microwave oven and may split or crack
May cause arcing. Transfer food into microwave-safe dish
Metal shields the food from microwave energy. Metal trim may cause arcing
temperature
Remarks
7
Page 8
UK
Knowing your appliance
B D
C
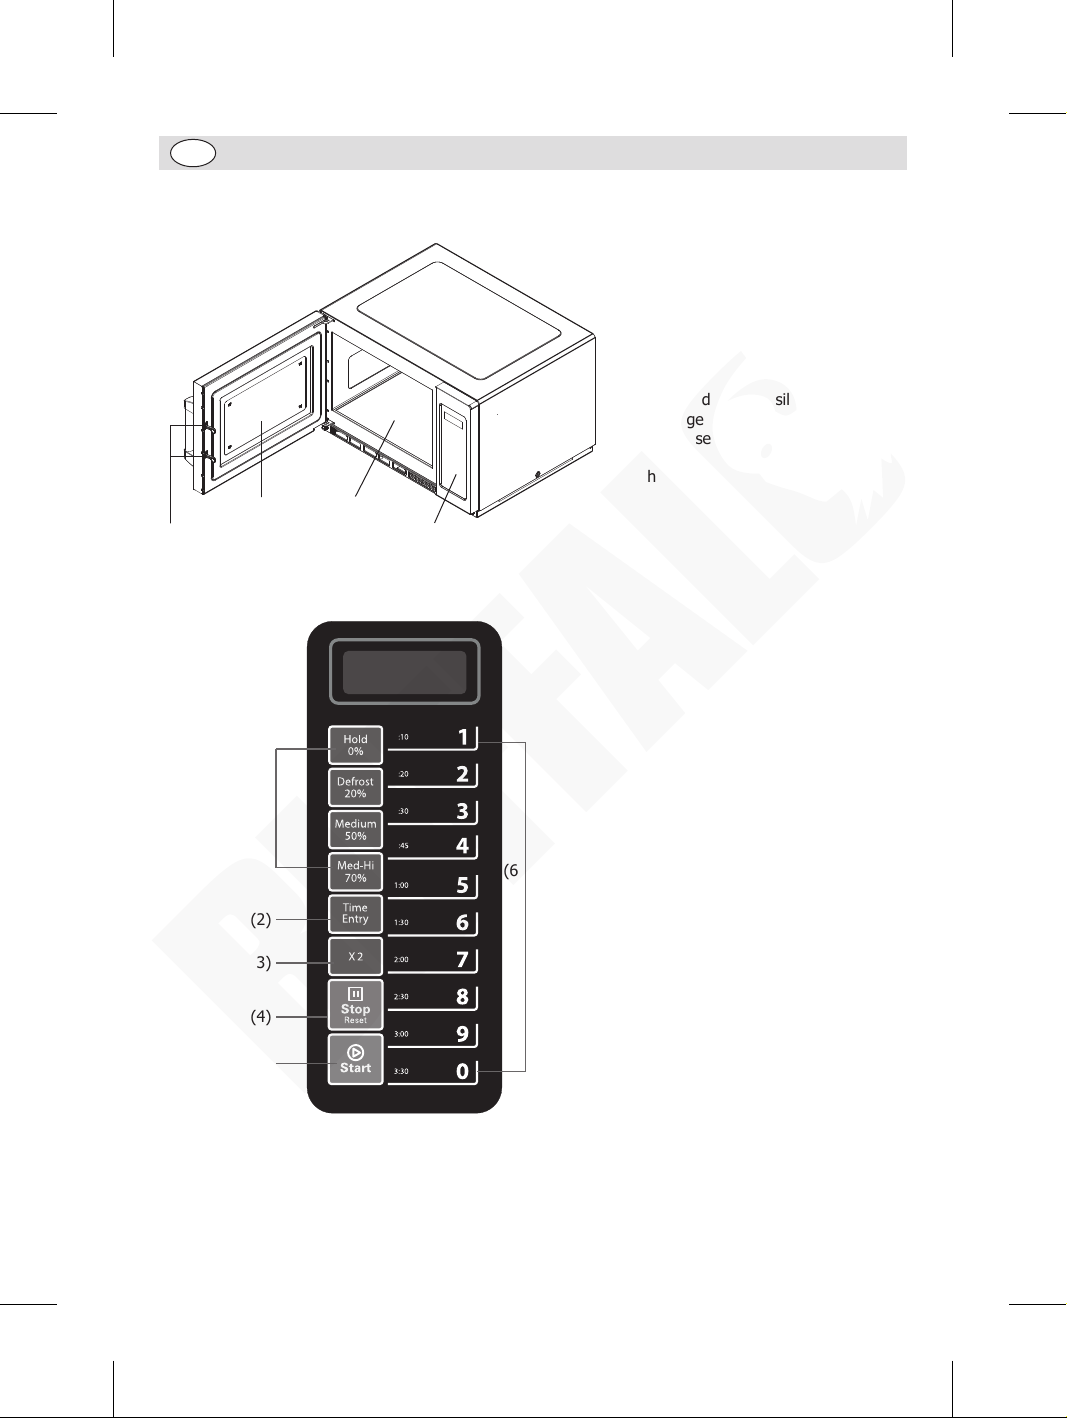
Control panel
A) Control panel
B) Observation window
C) Safety interlock system
D) Ceramic board
Note:
1. DO NOT press the ceramic board
forcibly.
2. Take and put utensils gently to avoid
damage to the ceramic board.
3. After use, DO NOT touch the
ceramic board with hand to avoid
high temperature scalding.
A
(1)
(6)
(2)
(3)
(4)
(5)
8
(1) Power level buttons
(2) Time Entry Button
(3) X2 Button
(4) Stop/Reset Button
(5) Start Button
(6) Number buttons
Page 9
UK
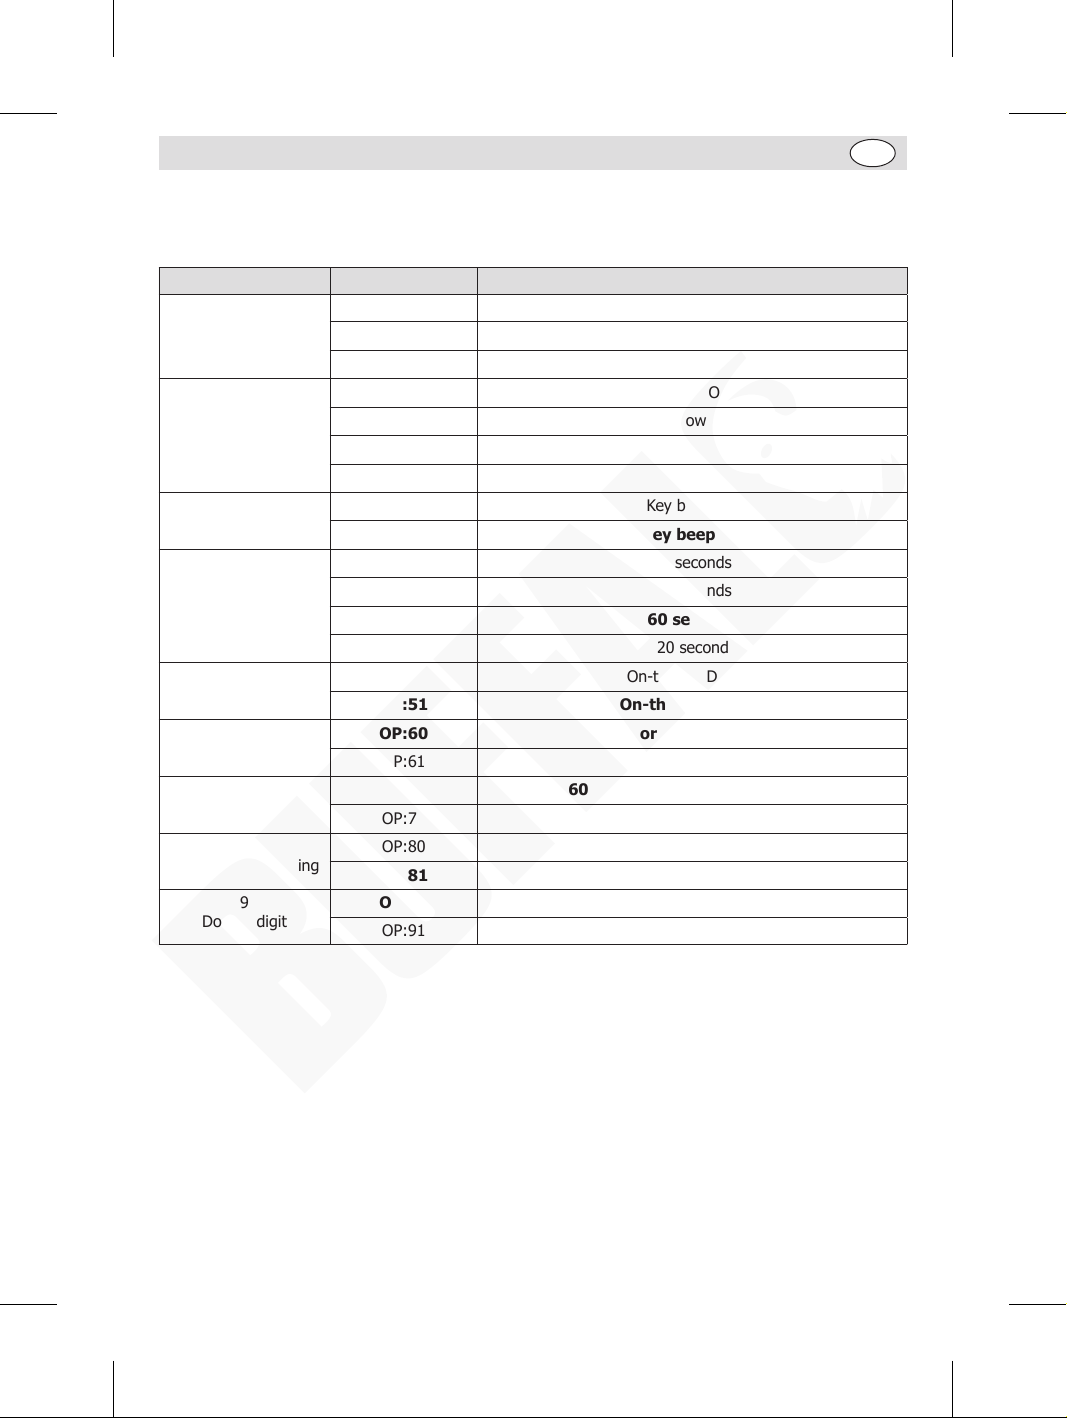
Appendix A: User Options
Values bolded in the table below are the default settings.
Option Setting Description
1
EOC Tone
2
Beeper Volume
3
Beeper On/Off
4
Keyboard Window
5
On the Fly
6
Door Reset
7
Max time
8
Manual Programming
9
Double digit
OP:10 3 seconds beep
OP:11 Continuous beep
OP:12 5 quick beeps, repeating
OP:20 Beeper Off
OP:21 Low
OP:22 Medium
OP:23 High
OP:30 Key beep Off
OP:31 Key beep On
OP:40 15 seconds
OP:41 30 seconds
OP:42 60 seconds
OP:43 120 seconds
OP:50 On-the-Fly Disable
OP:51 On-the-Fly Enable
OP:60 Door reset Disable
OP:61 Door reset Enable
OP:70 60 Minute Maximum cook time
OP:71 10 Minute Maximum cook time
OP:80 Manual Programming Disable
OP:81 Manual Programming Enable
OP:90 Single Digit Mode-10 programs
OP:91 Double Digit Mode-100 programs
9
Page 10
UK
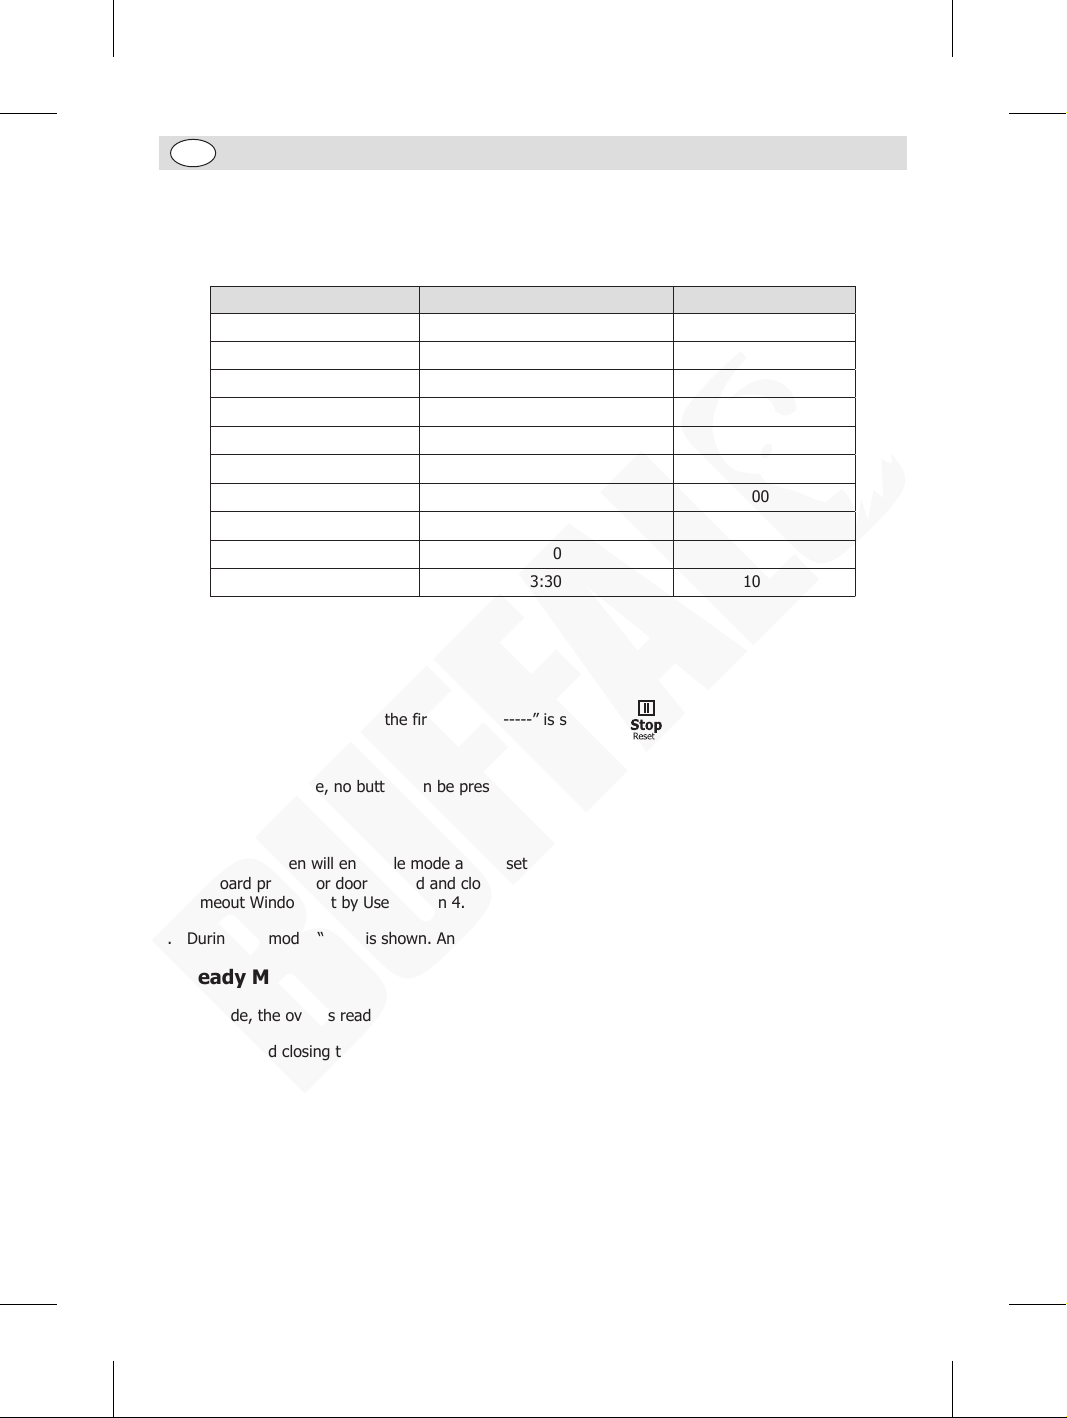
Appendix B: Default Cooking Time
The oven will be shipped with the following Preset Cook Time unless otherwise noted in the product
Specification.
Number Button Display (Time in Minute) Power
1 0:10 100%
2 0:20 100%
3 0:30 100%
4 0:45 100%
5 1:00 100%
6 1:30 100%
7 2:00 100%
8 2:30 100%
9 3:00 100%
0 3:30 100%
Operation
1. Power up
When the oven is electrified for the first time, “-------” is shown. If button pressed, the oven will
change to idle mode.
Note: Under idle mode, no button can be pressed.
2. Idle Mode
1. Entry: The oven will enter idle mode after a set of seconds have expired in Ready Mode without a
keyboard pressed or door opened and closed. The number of seconds is determined by the keyboard
Timeout Window, set by User Option 4.
2. During idle mode, “ECO” is shown. And there will be no oven activity.
3. Ready Mode
In this mode, the oven is ready to begin either a manual or preset cooking cycle.
1. Opening and closing the door while in Idle Mode will put the oven into Ready Mode.
2. During Ready Mode, “READY” is shown.
3. From the Ready Mode, the oven can go to almost all of the other modes.
10
Page 11
UK
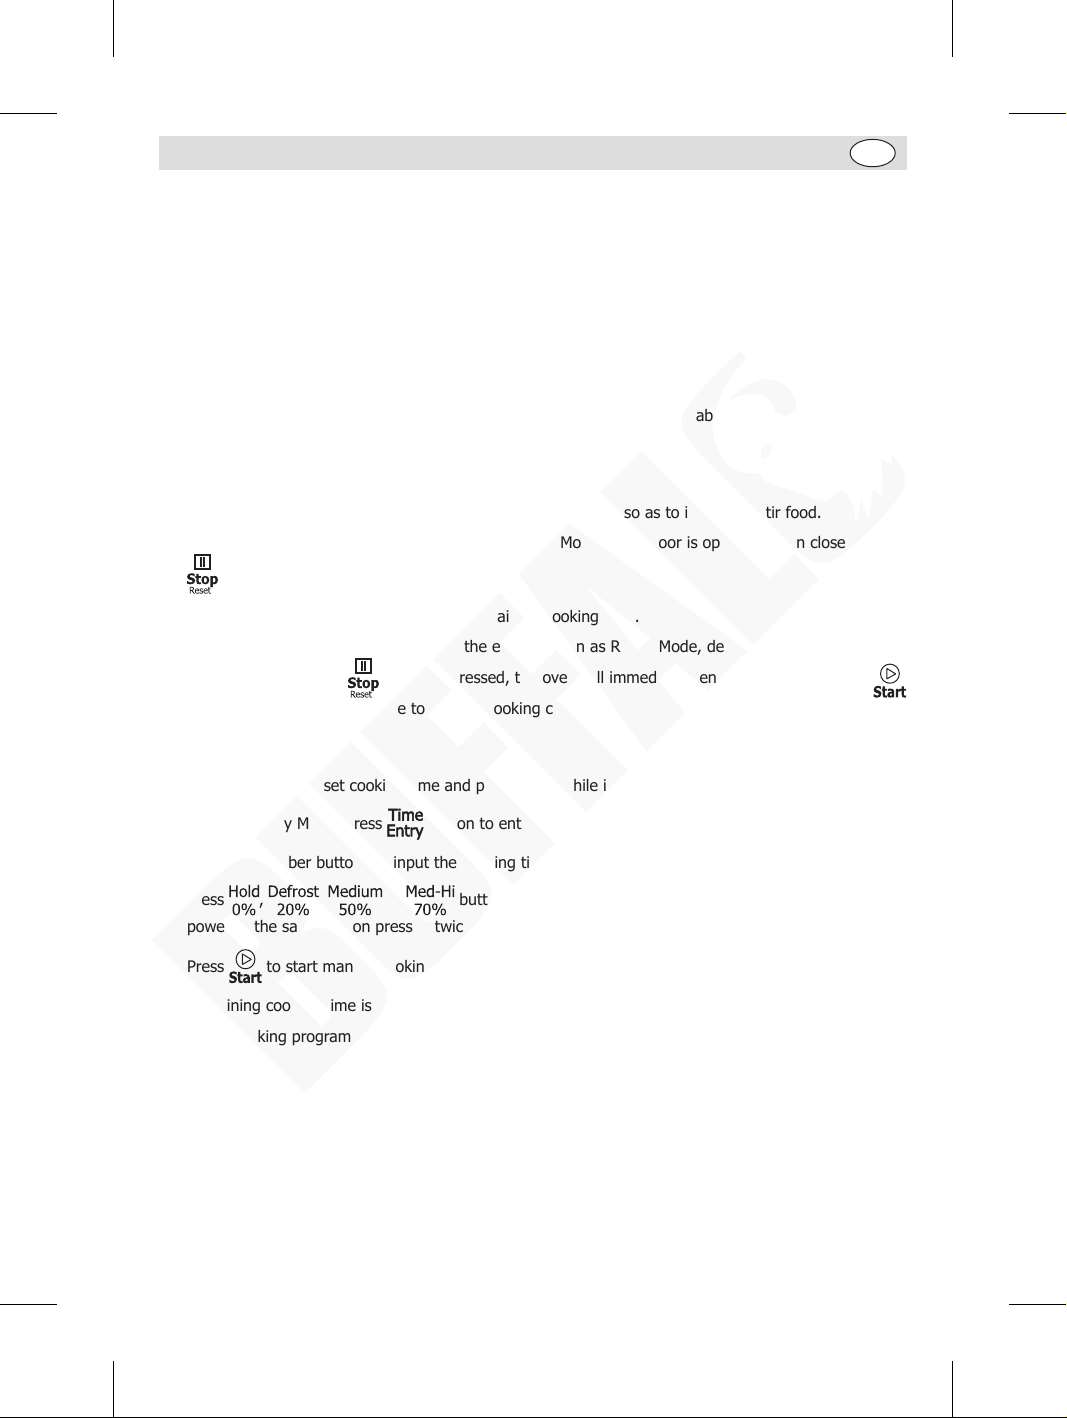
4. Door Open Mode
1. When the door is open, the oven will enter Door Open Mode. This allows for entry into Programming
Mode.
2. During this mode, the display keeps displaying “Door” and “OPEN” alternately. The fan and oven lamp
will work.
3. When the door is closed, if User Option OP:60 is selected and the oven was running a manual or
preset cook cycle, the oven will enter Pause Mode. In all other cases, the oven will return to Door
Open Mode with User Option OP:61 selected.
• Note: Opening and then closing the door will clear out any information about a Manual or Preset
Program which was running.
5. Pause Mode
This mode enables the user to temporarily stop the cooking cycle so as to inspect or stir food.
1. While in Manual Cook Mode or Preset Program Cook Mode, if the door is open and then closed, or if
is pressed, the oven will enter Pause Mode.
2. While paused, the display will show the remaining cooking time.
3. Pause Mode will return to Idle Mode in the exact fashion as Ready Mode, depending on User Option 4
setting. Additionally, if
pressed, the oven will continue to run the cooking cycle.
button is pressed, the oven will immediately enter Ready Mode. Or if
6. Manual Cook Mode
The user can manually set cooking time and power level while in this mode.
1. While in Ready Mode, press button to enter Manual Cook Mode. The display will show“00:00”.
2. Press the number buttons to input the cooking time as needed.
3. Press , , or button to select power level. The display will show the related
power. If the same button pressed twice, the power level will change to full power.
4. Press to start manual cooking.
5. Remaining cooking time is displayed. The fan and oven lamp will work.
6. When cooking program finishes, the oven will enter End of Cook Cycle Mode.
11
Page 12
UK
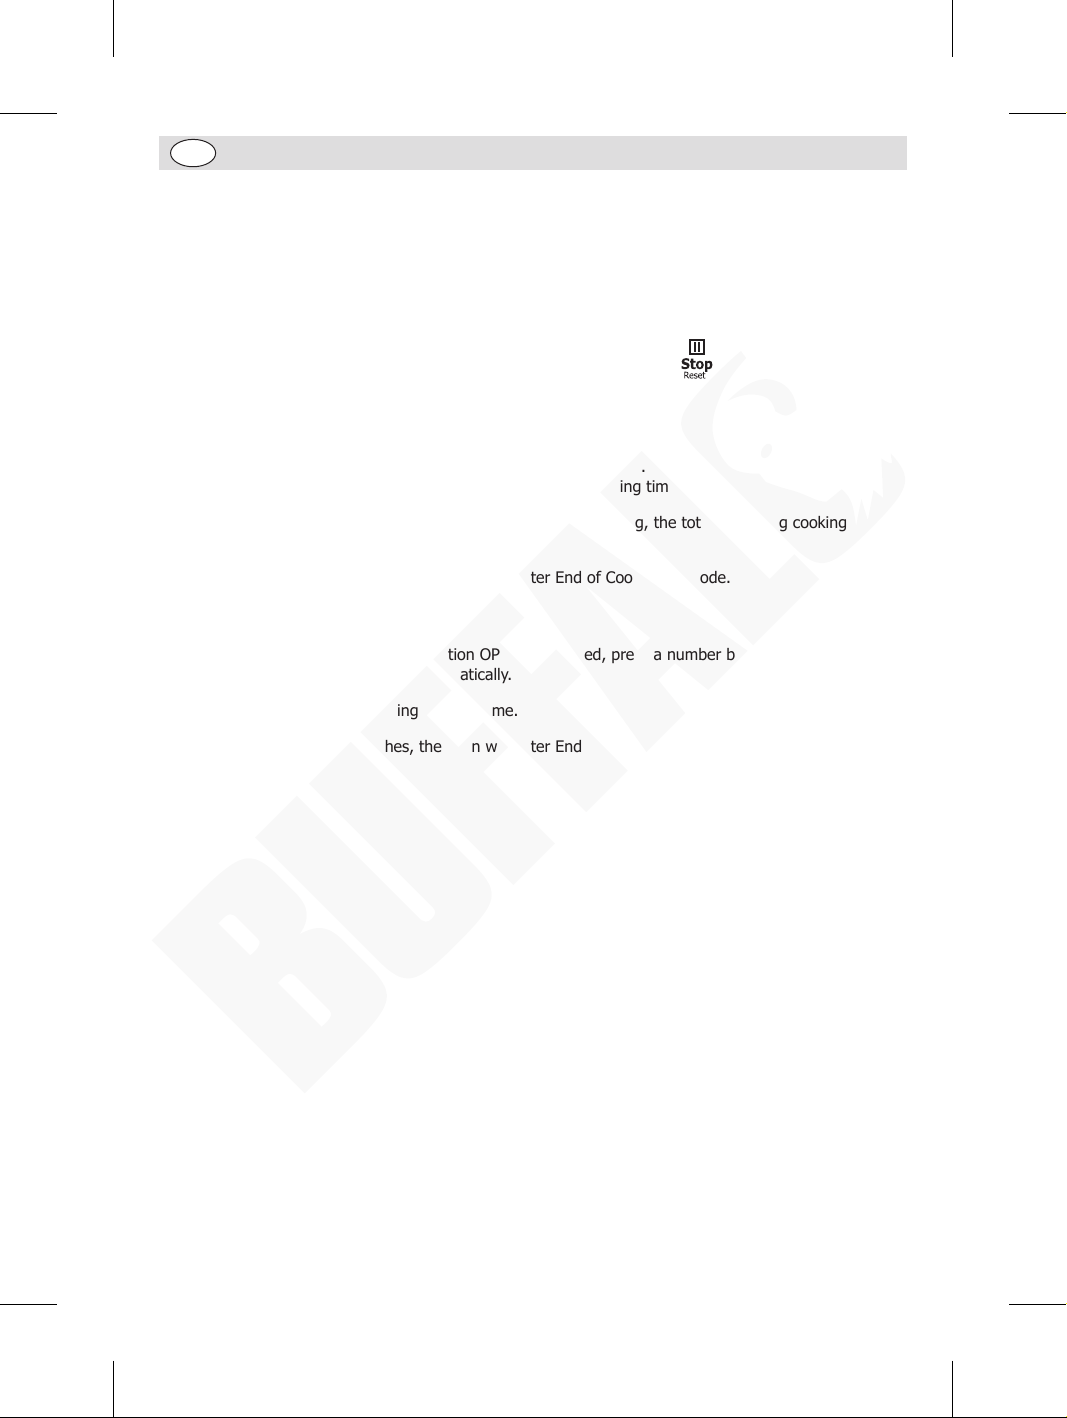
7. End of Cook Cycle Mode
1. After a Manual Cook Mode or a Preset Program Cook Mode expires, the oven will enter End of Cook
Cycle Mode.
2. During this mode, “DONE” is shown.
3. If User Option OP:11 or OP:12 is selected, the oven will continue to sound until the user
acknowledges this by either opening and closing the door or pressing
selected, after 3 seconds beeping, the oven will enter Ready Mode.
. If User Option OP:10 is
8. Preset Program Cook Mode
1. This mode allows cooking through a one-button-touch operation. While in Ready Mode, press one of
the number buttons to run a Preset Program for relative cooking time.
2. The remaining cooking time is shown. If it is multi-stage cooking, the total remaining cooking time is
displayed.
3. When cooking program finishes, the oven will enter End of Cook Cycle Mode.
9. On the Fly Cooking
1. While the oven is cooking, if User Option OP:51 is selected, press a number button will enable a
preset cooking program to start automatically.
2. The display shows the remaining cooking time.
3. When cooking program finishes, the oven will enter End of Cook Cycle Mode.
12
Page 13
UK
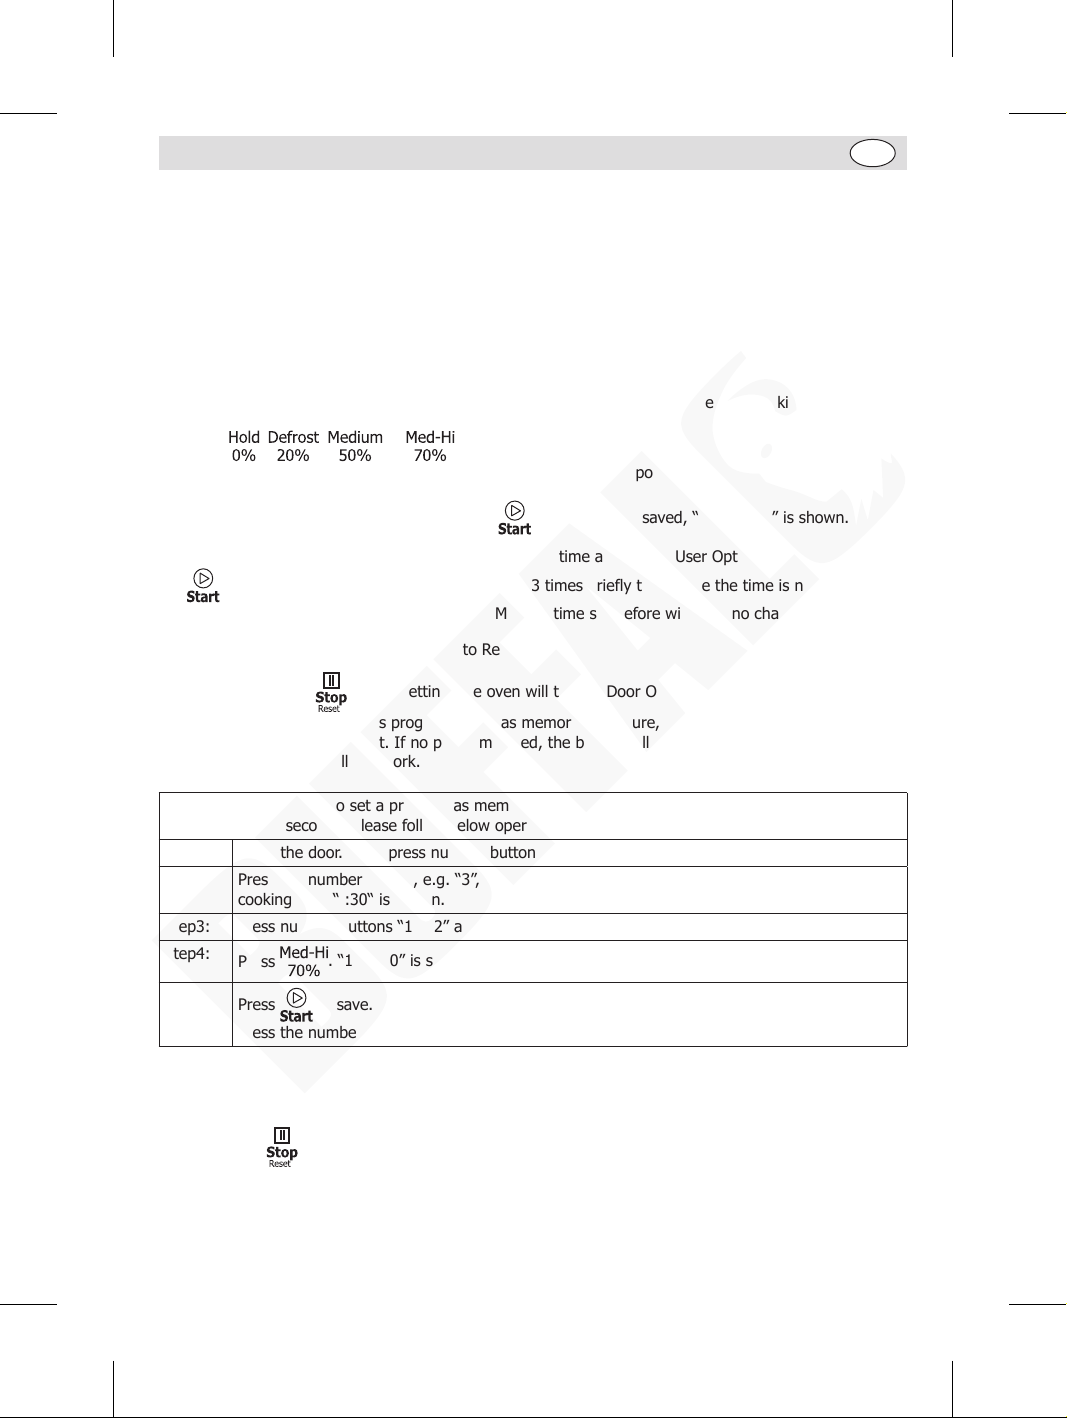
10. Programming Mode
This mode allows the user to set cook time and power level to the preset programs of the number
buttons.
1. Open the door. Then press the number button “1” for 5 seconds. The buzzer will sound once and
enter Programming Mode.
2. “PROGRAM” is shown.
3. Press the number button, e.g. “3”, the display will show “P:03”. After 2 seconds, the default cooking
time “ :30“ is shown. Now you can press the number buttons to set the desired cooking time.
4. Press , , or to set the power level. The display will show the related power.
If the same button pressed twice, the power will change to full power.
5. After setting cooking time and power, press to save. When saved, “PROGRAM” is shown.
• Note: If all the cooking time exceeds the maximum time allowed by User Option 7, when pressing
to save the program, the buzzer will sound 3 times briefly to indicate the time is not valid. Then
the display will turn back to show “PROGRAM”. The time set before will have no change.
6. Close the door, the oven will turn back to Ready Mode.
• Note: If pressing during setting, the oven will turn to Door Open Mode. The program that is not
saved will be lost. If there is program saved as memory procedure, press the related number button,
the saved program will start. If no program saved, the buzzer will alarm when pressing number
buttons and thus it will not work.
For example, if desired to set a program as memory cooking, with power level PL7 and cooking time of
1 minute and 25 seconds, please follow below operations:
Step1: Open the door. Then press number button “1” for 5 seconds, “PROGRAM” is shown.
Step2: Press the number button, e.g. “3”, the display will show “P:03”. After 2 seconds, the default
Step3: Press number buttons “1”, “2” and “5” to set the cooking time. “1:25” is shown.
Step4:
Step5:
Note:
• If power supply is cut off, the saved program will not be lost.
• If the program needs to reset , just repeat the above steps.
• If pressing at the last step, it will return to Door Open Mode. All settings will not be saved.
cooking time “ :30“ is shown.
Press
Press
press the number button “3”, the related program will start automatically.
. “1:25 70” is shown. Setting is now finished.
to save. “PROGRAM” is shown again. When to use the program next time, just
13
Page 14
UK
11. Double cooking time
By using “X2” button, the user can easily set the doubled cooking time for a particular food item.
1. In Ready mode, press “X2” button first, then within 5 seconds press a number button (0-9). The oven
will start cooking with the doubled cooking time. Or, press a number button (0-9) to start cooking
first, then within 5 seconds press “X2” button to start cooking with the doubled cooking time.
2. When pressing “X2”, the display will show “DOUBLE”. When pressing number buttons, the doubled
cooking time will be shown.
• For example, press the number button “5” (whose preset time is 1 minute) first. Then press “X2”, the
total cooking time will change to 1:00*(1+0.8)=1:48 (1 minute and 48 seconds). Please note “0.8”
here means the default proportion setting for double cooking time.
3. When cooking program finishes, the oven will enter End of Cook Cycle Mode.
12. Stage Cooking Program
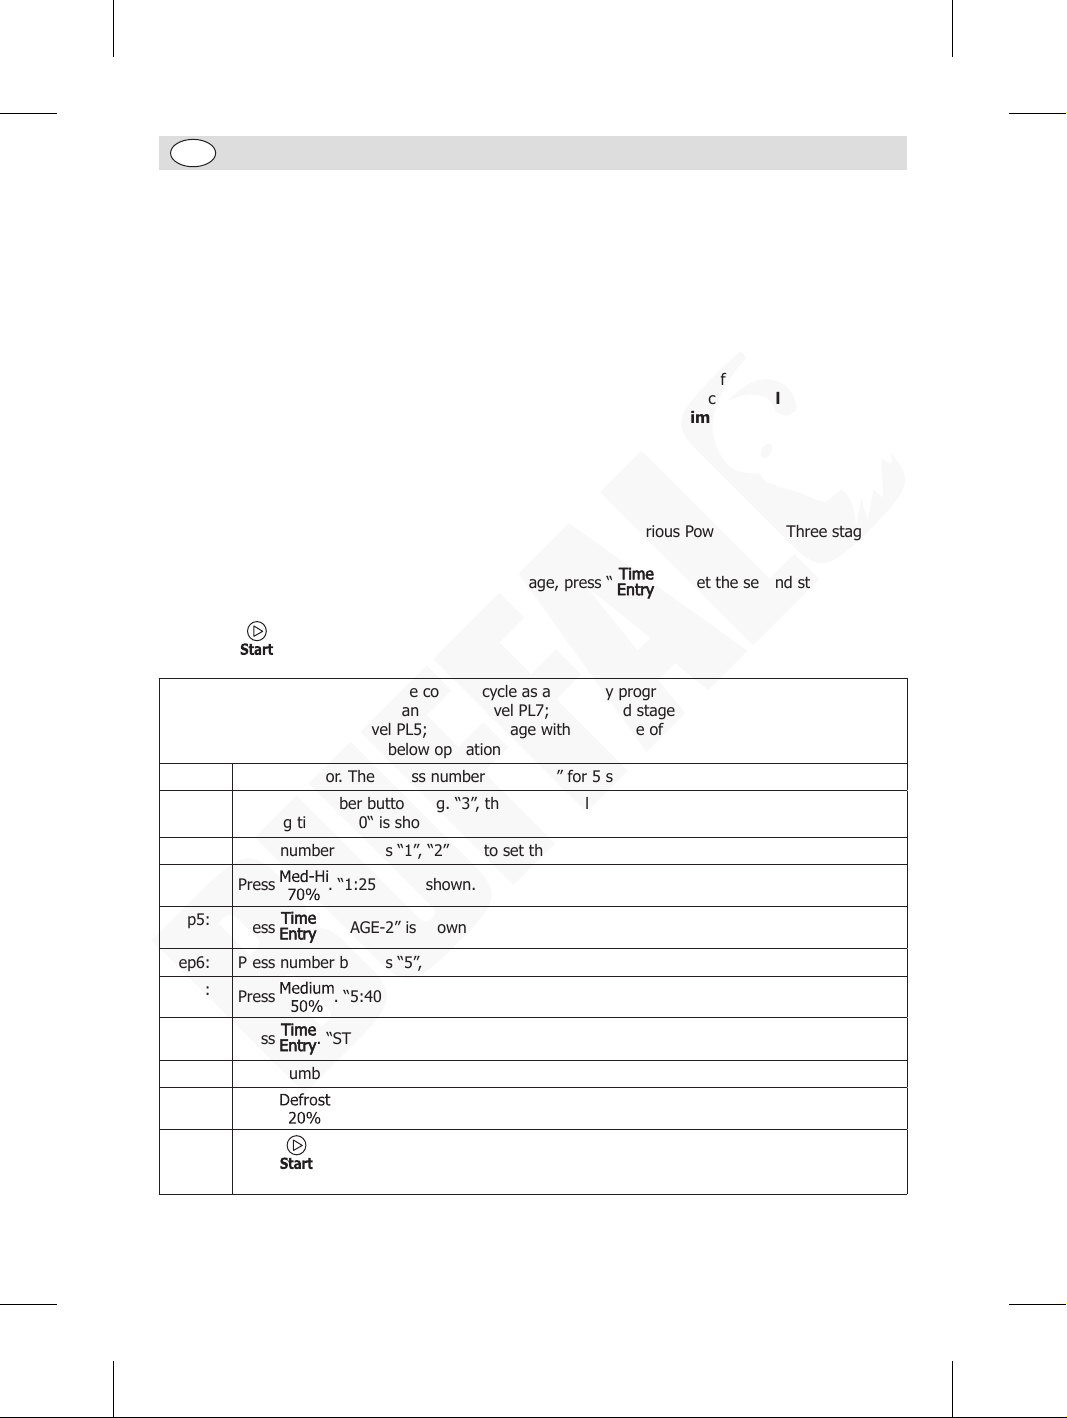
This function allows the user to cook food items at combination of various Power Levels. Three stages can
be set at most.
1. After setting cook time and power for the first stage, press “ ” to set the second stage. Then
the same step to set the third stage.
2. Press “ ” to save.
Example: If desired to set a 3-stage cooking cycle as a memory program (The first stage is with cook
time of 1 minute and 25 seconds and power level PL7; the second stage with cook time of 5 minutes
and 40 seconds and power level PL5; the third stage with cook time of 1 minute and 30 seconds and
power level PL2), please follow below operations:
Step1: Open the door. Then press number button “1” for 5 seconds, “PROGRAM” is shown.
Step2: Press the number button, e.g. “3”, the display will show “P:03”. After 2 seconds, the default
Step3: Press number buttons “1”, “2”, “5” to set the cooking time. “1:25” is shown.
Step4:
cooking time “ :30“ is shown.
Press
. “1:25 70” is shown. Now the first stage is finished.
Step5:
Step6: Press number buttons “5”, “4”, “0” to set the cooking time. “5:40” is shown.
Step7:
Step8:
Step9 Press number buttons “1”, “3”, “0” to set the cooking time. “1:30” is shown.
Step10
Step11:
14
Press
Press
Press
Press
Press
press number button “3”, the program will start automatically.
. “STAGE-2” is shown.
. “5:40 50” is shown. Now the second stage is finished.
. “STAGE-3” is shown.
. “1:30 20” is shown. Now the third stage is finished.
to save. “PROGRAM” is shown again. When to use the program next time, just
Page 15
UK
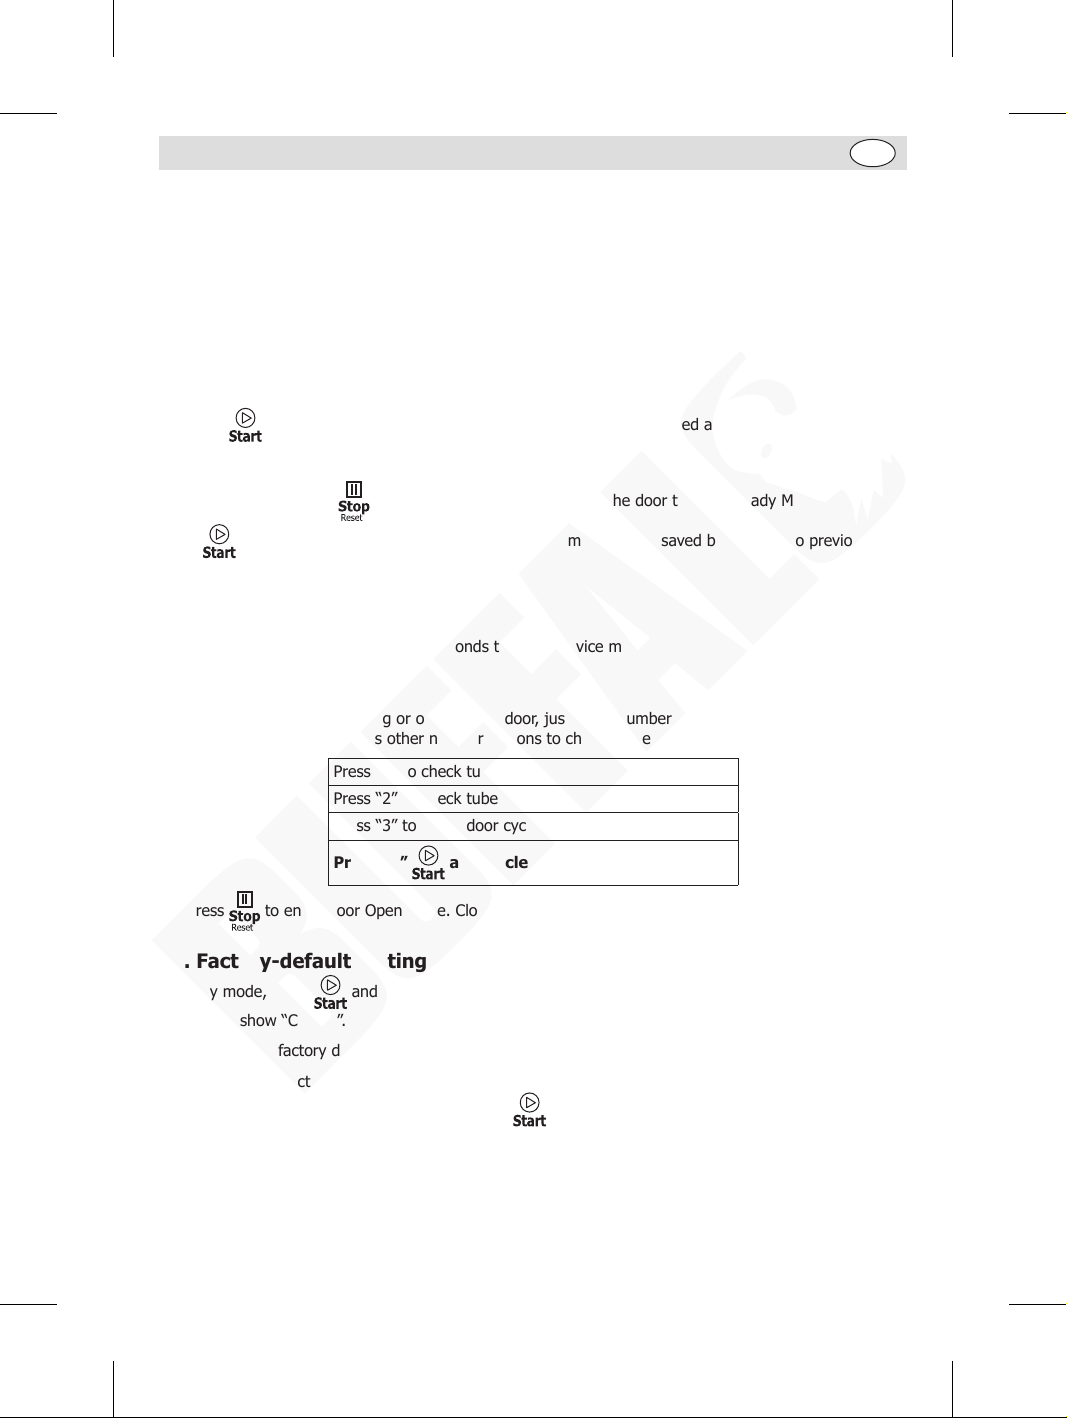
13. User Option Mode
This allows the user to choose between various ways for the oven to operate.
1. Open the door and press “2” for 5 seconds to enter User option mode.
2. The display shows “OP: - -”.
3. Press any number button to enter related mode setting.
• For example: Setting the voice of the buzzer to medium. Press “2”, “OP:22” is displayed. If you want
to change, keep pressing “2”, the display will show “OP:20”, “OP:21”, ”OP:22”, ”OP:23”, “OP:20”.....in
cycle.
4. Press to save the current setting. After saved, “OP: - -” is displayed again.
Notes:
• During setting, press to enter Door Open Mode. Close the door to enter Ready Mode.
• If button not pressed at the last step, the program cannot be saved but returns to previous
state.
14. Service Mode
1. Open the door and press “3” for 5 seconds to enter service mode.
2. The display shows “SERVICE”.
3. To check the times of closing or opening the door, just press number button “3”, the display will show
the times. Or you can press other number buttons to check related information:
Press “1” to check tube hours
Press “2” to check tube cycles
Press “3” to check door cycles
Press “4”
4. Press to enter Door Open Mode. Close the door to enter Ready Mode.
and to clear service information
15. Factory-default setting
In ready mode, press and “0” to check the factory-default setting. The buzzer sounds once and the
display will show “CHECK”.
• If it is in the factory default setting, the display will show “11”.
• If NOT in the factory default setting, the display will show “00”.
• If desired to restore the default setting, press again. The display will show “CLEAR” first, then
“CHECK” and finally “11” . Now the factory-default settings are restored.
Note: Be careful of the operations as it will restore all the factory-default settings.
Note: Should the restoration of default settings fail, please just repeat above operations.
15
Page 16
UK
Cleaning, Care & Maintenance
• Warning: Switch off and disconnect from the power supply before cleaning
and maintenance.
• Always keep the oven clean!
• Clean the door frame, seal and neighbouring parts carefully with a damp
cloth when dirty.
Cleaning the door and oven front face
• For best performance and to maintain the high degree of safety, the inner door panel and oven front
face should be free of food or grease build-up.
• Wipe these parts with a mild detergent, rinse and wipe dry. Never use abrasive powders or pads.
Cleaning the control panel and plastic parts
• Do not apply a detergent or an alkaline liquid spray to the control panel and plastic parts, as this may
cause damage to these parts.
• Use a dry cloth (not a soaked cloth) to clean these parts.
• Do not allow the control panel to become wet.
Cleaning the oven interior
• After use be sure to remove spilled liquids, spattered oil and food debris as quickly as possible.
• If the oven is used when dirty, efficiency drops and the dirt gets stuck on the oven surface. This may
cause bad odours.
• Clean the interior with a cloth soaked in luke-warm water with a mild detergent dissolved in it, then
rinse the soap off with a damp cloth.
Remove any odours in the oven interior by microwaving a cup of water with the
juice of 1 lemon for 5 minutes. Wipe the oven clean with a soft dry cloth.
16
Caution:
Personal Injury Hazard! It is hazardous for anyone other than a competent
person to carry out any service or repair operation that involves the removal of
a cover which gives protection against exposure to microwave energy.
Caution:
Do Not wipe plastic and painted sections of the oven with bleach, thinners or
other cleaning agents, as this may cause these parts to dissolve or distort.
Caution: For the removable oil baffle and filter, always ensure to:
• Clean them in time!
• Install them correctly after cleaning and before use of the oven.
Page 17
UK
Cleaning the oil baffle
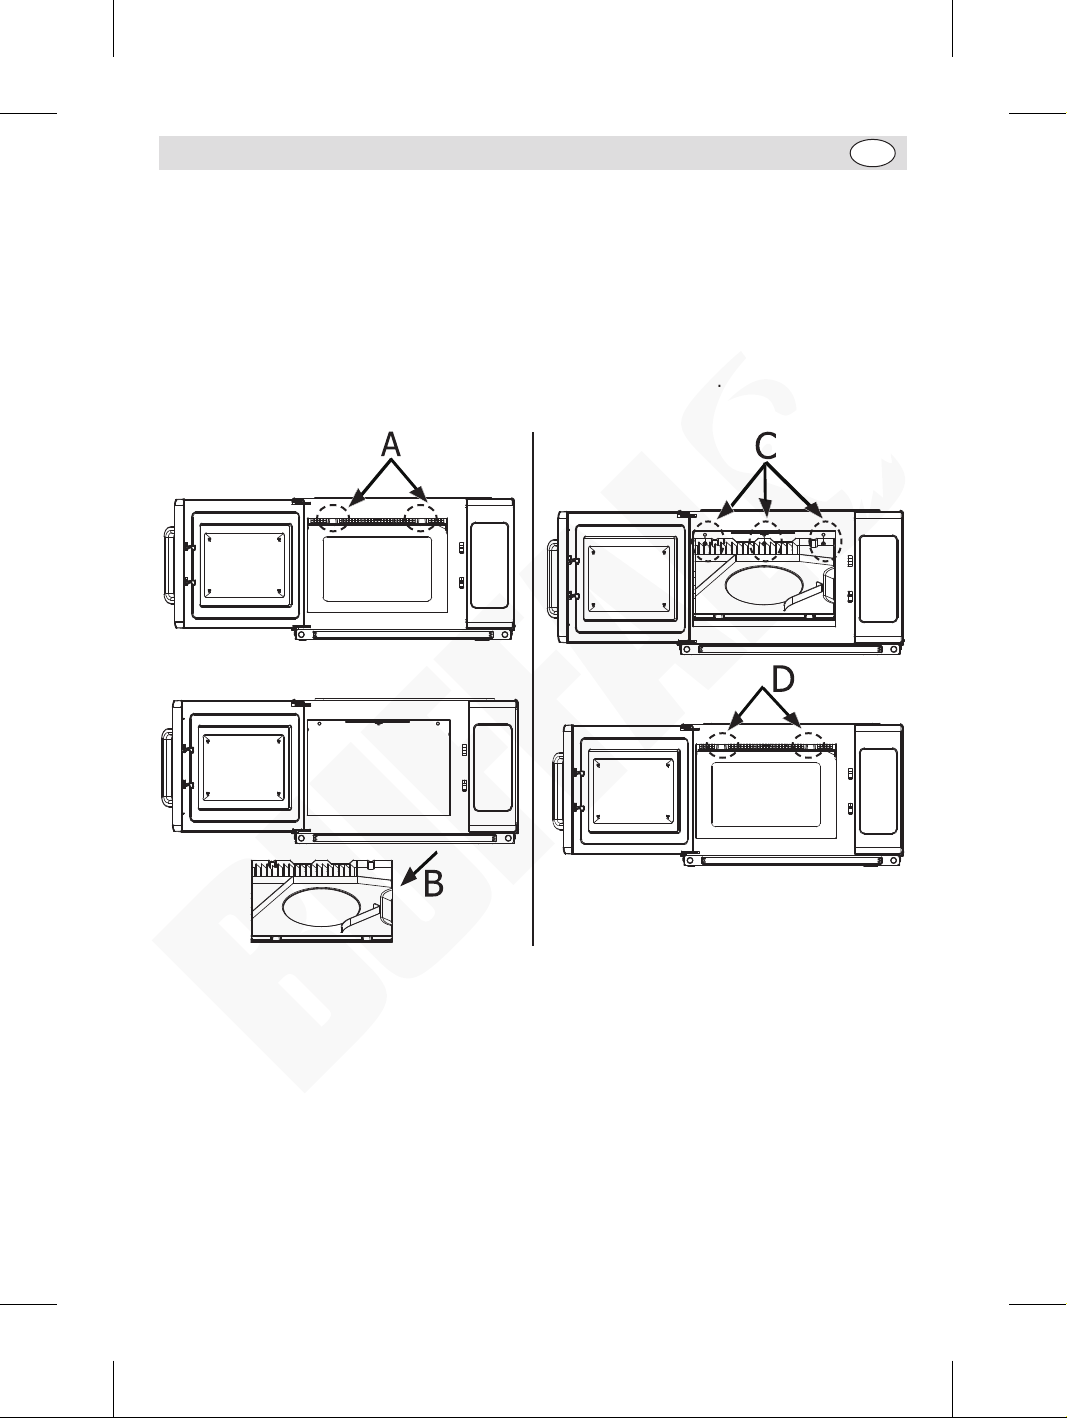
The oven is featured with a removable oil baffle for easy and thorough cleaning. The baffle is located
underneath the interior ceiling of the oven.
• To remove the baffle, press and hold the 2 dents on the baffle front (Step A). Meanwhile push the
whole baffle backward to release. Afterward, remove the baffle from the oven (Step B).
• Clean the baffle with a mild detergent, rinse and wipe dry.
• To install the baffle, hold the baffle and insert the 3 pins on the rear into the holes on the oven back
wall (Step C).
• Press the right dent backward until the right part of the baffle gets buckled. Repeat same operation
to buckle the left part into position (Step D).
17
Page 18
UK
Cleaning the filter
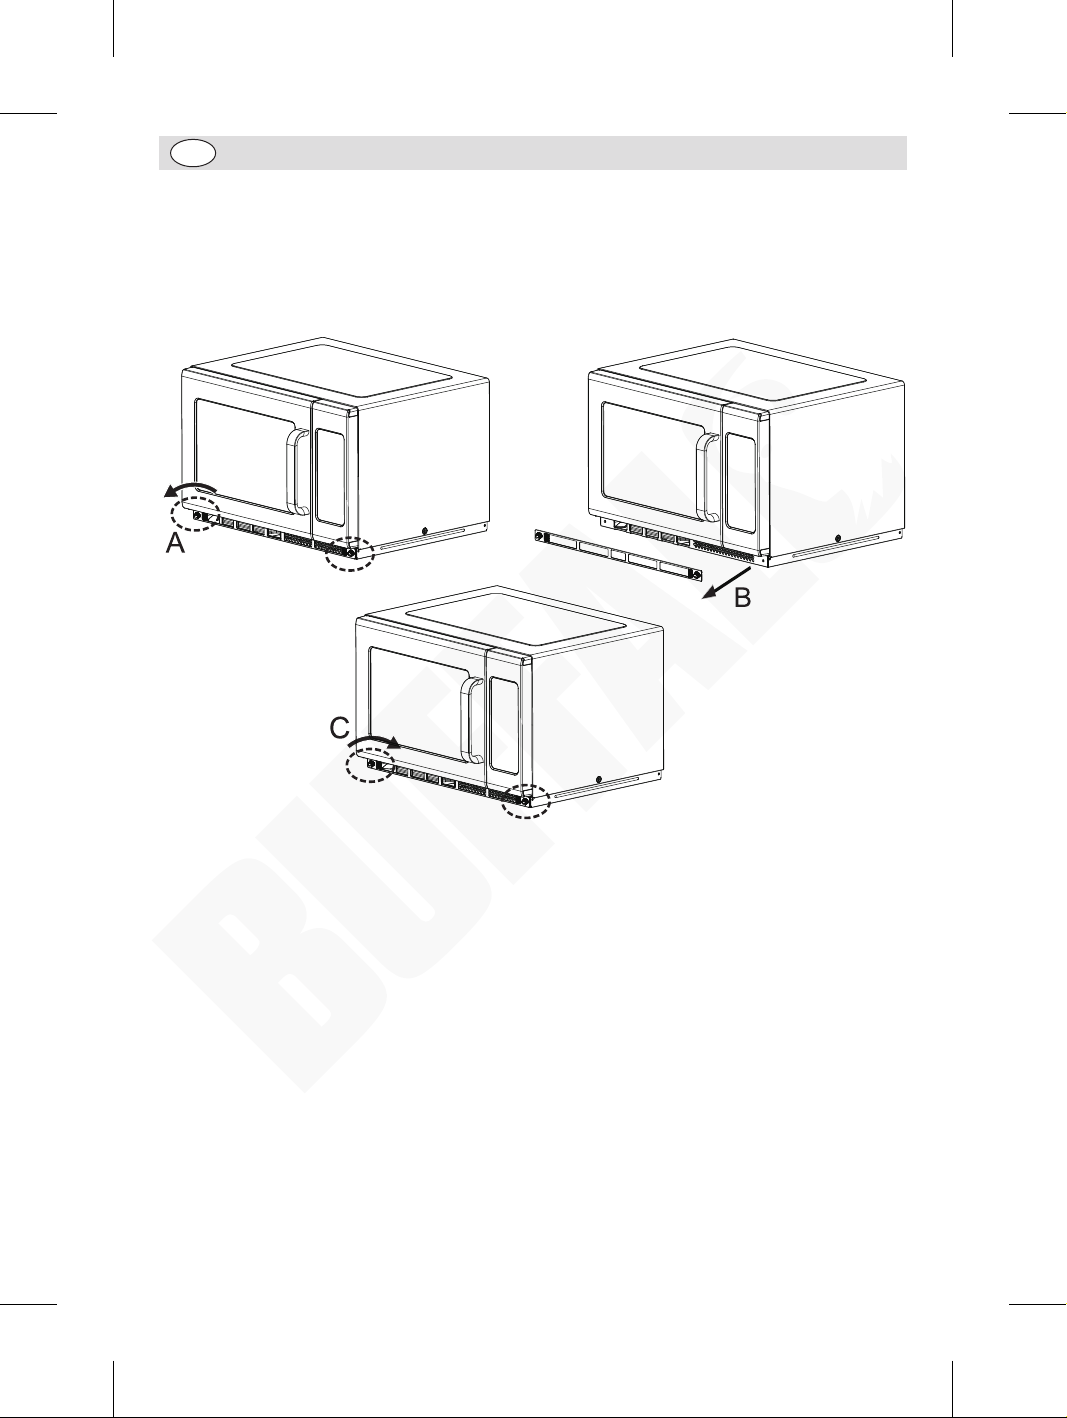
The oven is featured with a removable filter for easy and thorough cleaning.
• Loosen the fixing nails (Step A), then remove the filter (Step B).
• Clean the filter with a soft brush.
• Locate the filter in place and fix with the nails (Step C).
18
Page 19
UK
Troubleshooting
If your BUFFALO appliance develops a fault, please check the following table before making a call to the
Helpline or your BUFFALO dealer.
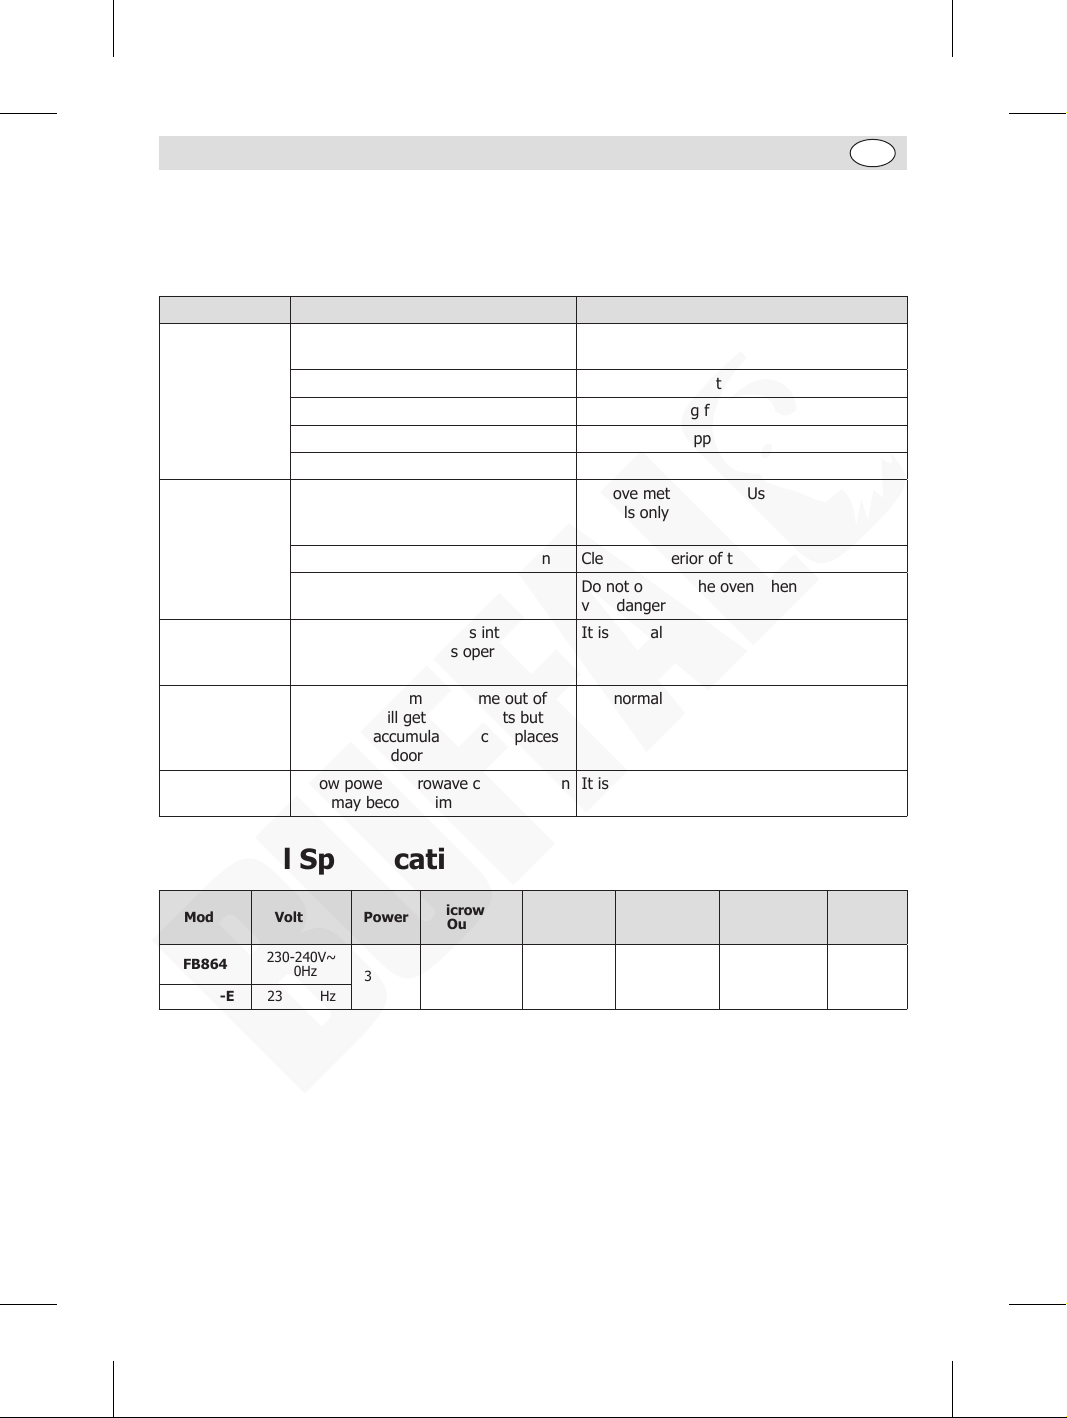
Fault Probable Cause Solution
The unit is not
working
The unit is not switched on Check the unit is plugged in correctly and
switched on
Plug or lead is damaged Call BUFFALO agent or qualified technician
Fuse in the plug has blown Replace the plug fuse
Power supply Check power supply
Door is not closed properly Close door securely
Arcing/Sparking Metallic or other inappropriate
materials are being used in food
Remove metal objects. Use microwave-safe
utensils only
preparation
Spilled food remains inside the oven Clean the interior of the oven
The oven is operated when empty Do not operate the oven when empty. It is
very dangerous
Microwave oven
interfering with
Radio and TV reception is interfered
when then appliance is operating.
It is normal
TV reception
Steam
accumulating on
door and hot air
out of vents
Dim oven light In low power microwave cooking, oven
In cooking, steam may come out of
food. Most will get out of vents but
some may accumulate on cool places
like the oven door
It is normal
It is normal
light may become dim
Technical Specifications
Model Voltage Power
FB864
FE142-E 230~ 50Hz
230-240V~
50Hz
3000W 1800W 34L 2450MHz
Microwave
Output
Oven
Capacity
Operation
Frequency
Dimensions
h x w x d
(mm)
368 x 574 x
528
Weight
(kg)
33.3
19
Page 20
UK
Electrical Wiring
This appliance is supplied with a 3 pin BS1363 plug and lead.
The plug is to be connected to a suitable mains socket.
This appliance is wired as follows:
• Live wire (coloured brown) to terminal marked L
• Neutral wire (coloured blue) to terminal marked N
• Earth wire (coloured green/yellow) to terminal marked E
This appliance must be earthed.
If in doubt consult a qualified electrician.
Electrical isolation points must be kept clear of any obstructions. In the event of any emergency
disconnection being required they must be readily accessible.
Compliance
The WEEE logo on this product or its documentation indicates that the product must
not be disposed of as household waste. To help prevent possible harm to human
health and/or the environment, the product must be disposed of in an approved and
environmentally safe recycling process. For further information on how to dispose of
this product correctly, contact the product supplier, or the local authority responsible for
waste disposal in your area.
BUFFALO parts have undergone strict product testing in order to comply with
regulatory standards and specifications set by international, independent, and
federal authorities.
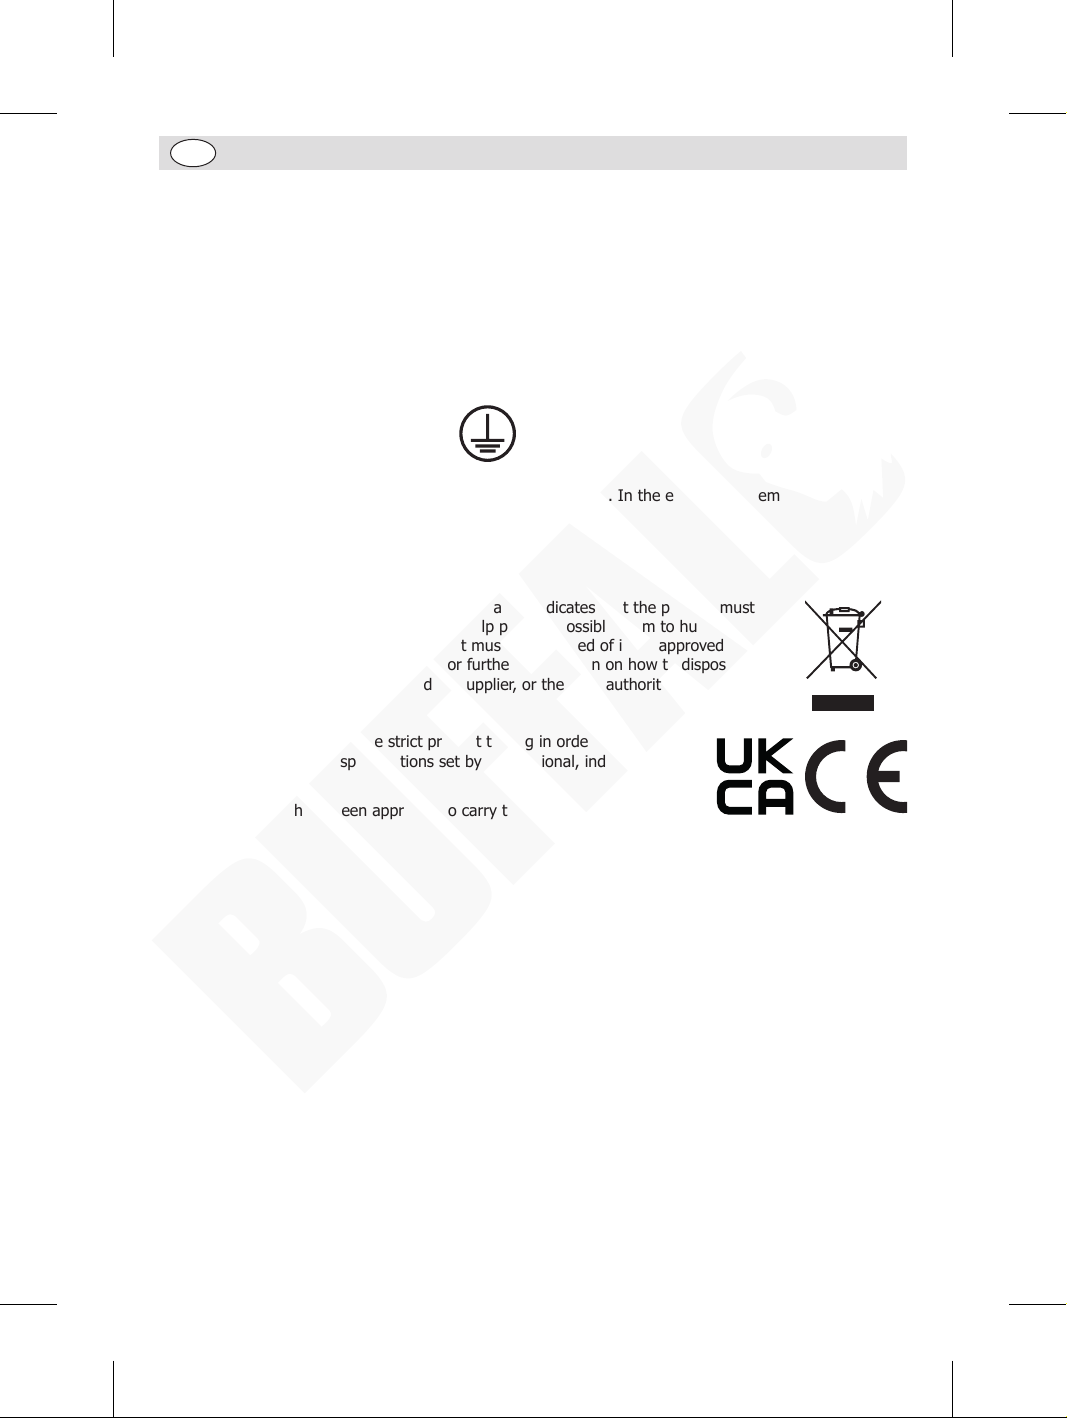
BUFFALO products have been approved to carry the following symbol:
All rights reserved. No part of these instructions may be produced or transmitted in any form or by any means, electronic,
Every effort is made to ensure all details are correct at the time of going to press, however, BUFFALO reserves the right to
mechanical, photocopying, recording or otherwise, without the prior written permission of BUFFALO.
change specifications without notice.
20
Page 21

Page 22
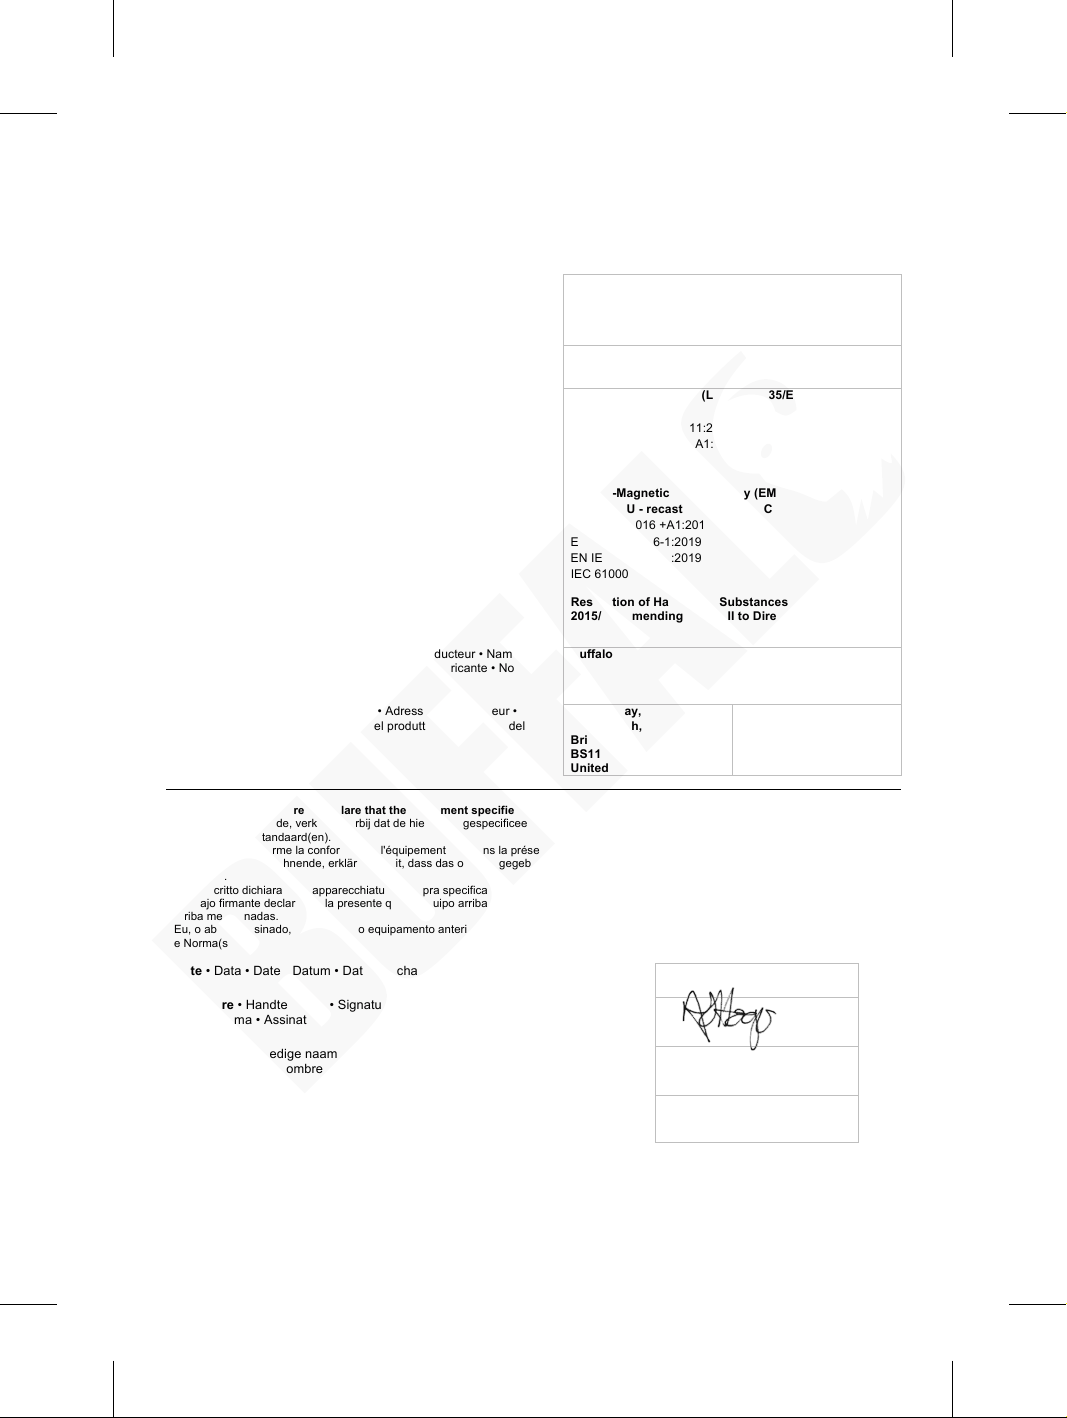
DECLARATION OF CONFORMITY
Equipment Type • Uitrustingstype • Type d'équipement • Gerätetyp •
ProgrammableCommercial Microwave - 34Ltr
Model • Modèle • Modell • Modello • Modelo • Malli
FB864
Application of Council Directives(s)
Low Voltage Directive (LVD) 2014/35/EU - recast of
Producer Name • Naam fabrikant • Nom du producteur • Name des
Buffalo
Producer Address • Adres fabrikant • Adresse du producteur •
Fourth Way,
United Kingdom
42 North Point Business
Ireland
Date • Data • Date • Datum • Data • Fecha • Data
7th January 2020
Signature • Handtekening • Signature • Unterschrift
Full Name • Volledige naam • Nom et prénom • Vollständiger Name •
Position • Functie • Fonction • Position • Qualifica • Posición • Função
Technical & Quality Manager
• Conformiteitsverklaring • Déclaration de conformité • Konformitätserklärung • Dichiarazione di conformità •
Tipo di apparecchiatura • Tipo de equipo • Tipo de equipamento
Toepassing van Europese Richtlijn(en) • Application de la/des
directive(s) du Conseil • Anwendbare EU-Richtlinie(n) • Applicazione
delle Direttive • Aplicación de la(s) directiva(s) del consejo • Aplicação
de directiva(s) do Conselho
Herstellers • Nome del produttore • Nombre del fabricante • Nome do
fabricante
Anschrift des Herstellers • Indirizzo del produttore • Dirección del
fabricante • Morada do fabricante
I, the undersigned, hereby declare that the equipment specified above conforms to the above Directive(s) and Standard(s).
Ik, de ondergetekende, verklaar hierbij dat de hierboven gespecificeerde uitrusting goedgekeurd is volgens de bovenstaande
Richtlijn(en) en Standaard(en).
Je soussigné, confirme la conformité de l'équipement cité dans la présente à la / aux Directive(s) et Norme(s) ci-dessus
Ich, der/die Unterzeichnende, erkläre hiermit, dass das oben angegebene Gerät der/den oben angeführten Richtlinie(n) und Norm(en)
entspricht.
Il sottoscritto dichiara che l'apparecchiatura di sopra specificata è conforme alle Direttive e agli Standard sopra riportati.
El abajo firmante declara por la presente que el equipo arriba especificado está en conformidad con la(s) directiva(s) y estándar(es)
arriba mencionadas.
Eu, o abaixo-assinado, declaro que o equipamento anteriormente especificado está em conformidade com a(s) anterior(es) Directiva(s)
e Norma(s)
• Declaración de conformidad • Declaração de conformidade
1.
1800watt - UK & IE
2. ProgrammableCommercial Microwave - 34Ltr
1800watt - EU (not IE)
1.
2. FE142-E
2006/95/EC
EN 60335-1:2012 + A11:2014 +A13:2017
EN 60335-2-90:2006 +A1:2010
EN 62233:2008
Electro-Magnetic Compatibility (EMC) Directive
2014/30/EU - recast of 2004/108/EC
EN 55011:2016 +A1:2017
EN IEC 61000-6-1:2019
EN IEC 61000-3-2:2019
IEC 61000-3-11:2000
Restriction of Hazardous Substances Directive (RoHS)
2015/863 amending Annex II to Directive 2011/65/EU
Avonmouth,
Bristol,
BS11 8TB
Park
New Mallow Road
Cork
Firma • Firma • Assinatura
Nome completo • Nombre completo • Nome por extenso
Ashley Hooper
Page 23
UK
+44 (0)845 146 2887
Eire
NL 040 – 2628080
FR 01 60 34 28 80
BE-NL 0800-29129
BE-FR 0800-29229
DE 0800 – 1860806
IT N/A
ES 901-100 133
Page 24
http://www.buffalo-appliances.com/
FB864_FE142-E_UK_A5_v2_20210402
 Loading...