

Page 1
15 liter koffieketel
Handleiding
Cafetière électrique15 litres
Mode d'emploi
Kaffeemaschine 15 Liter
Bedienungsanleitung
Scaldacaffè da 15 litri
Manuale di istruzioni
Cafetera de 15 litros
Manual de instrucciones
Cafeteira de café - 15 litros
Manual de instruções
15 liters kaffekokare
Bruksanvisning
15 liter kaffemaskine
Instruktionsvejledning
15 liters urnetrakter
Brukerhåndbok
15 litran kahvinkeitin
Ohjekirja
NL
FR
DE
IT
ES
PT
S
DK
N
FIN
15 litre Coffee
Percolator/Urn
Instruction manual
Model • Modèle • Modell • Modello • Modelo • Malli:
F249
Page 2

Table of Contents
Safety Tips . . . . . . . . . . . . . . . . . . . . . . . . . . . . . . . . . . . . . . . . . . . . . . . . . . . . . . . . . . 1
Introduction . . . . . . . . . . . . . . . . . . . . . . . . . . . . . . . . . . . . . . . . . . . . . . . . . . . . . . . . 1
Pack Contents . . . . . . . . . . . . . . . . . . . . . . . . . . . . . . . . . . . . . . . . . . . . . . . . . . . . . . 1
Operation . . . . . . . . . . . . . . . . . . . . . . . . . . . . . . . . . . . . . . . . . . . . . . . . . . . . . . . . . . 2
Brewing Coffee . . . . . . . . . . . . . . . . . . . . . . . . . . . . . . . . . . . . . . . . . . . . . . . . 2
Serving . . . . . . . . . . . . . . . . . . . . . . . . . . . . . . . . . . . . . . . . . . . . . . . . . . . . . . . 3
Emptying the Appliance . . . . . . . . . . . . . . . . . . . . . . . . . . . . . . . . . . . . . . . . . . 3
Cleaning, Care & Maintenance . . . . . . . . . . . . . . . . . . . . . . . . . . . . . . . . . . . . . . . . . . 3
Descaling . . . . . . . . . . . . . . . . . . . . . . . . . . . . . . . . . . . . . . . . . . . . . . . . . . . . . 3
Troubleshooting . . . . . . . . . . . . . . . . . . . . . . . . . . . . . . . . . . . . . . . . . . . . . . . . . . . . . 3
Technical Specifications . . . . . . . . . . . . . . . . . . . . . . . . . . . . . . . . . . . . . . . . . . . . . . . 4
Electrical Wiring . . . . . . . . . . . . . . . . . . . . . . . . . . . . . . . . . . . . . . . . . . . . . . . . . . . . . 4
Compliance . . . . . . . . . . . . . . . . . . . . . . . . . . . . . . . . . . . . . . . . . . . . . . . . . . . . . . . . . 4
Inhoudsopgave
Veiligheidstips . . . . . . . . . . . . . . . . . . . . . . . . . . . . . . . . . . . . . . . . . . . . . . . . . . . . . . . 5
Inleiding . . . . . . . . . . . . . . . . . . . . . . . . . . . . . . . . . . . . . . . . . . . . . . . . . . . . . . . . . . . . 5
Verpakkingsinhoud . . . . . . . . . . . . . . . . . . . . . . . . . . . . . . . . . . . . . . . . . . . . . . . . . . . 5
Bediening . . . . . . . . . . . . . . . . . . . . . . . . . . . . . . . . . . . . . . . . . . . . . . . . . . . . . . . . . . . 6
Koffie zetten . . . . . . . . . . . . . . . . . . . . . . . . . . . . . . . . . . . . . . . . . . . . . . . . . . 6
Serveren . . . . . . . . . . . . . . . . . . . . . . . . . . . . . . . . . . . . . . . . . . . . . . . . . . . . . 7
Het apparaat leegmaken . . . . . . . . . . . . . . . . . . . . . . . . . . . . . . . . . . . . . . . . . 7
Reiniging, zorg & onderhoud . . . . . . . . . . . . . . . . . . . . . . . . . . . . . . . . . . . . . . . . . . . 7
Ontkalken . . . . . . . . . . . . . . . . . . . . . . . . . . . . . . . . . . . . . . . . . . . . . . . . . . . . 7
Oplossen van problemen . . . . . . . . . . . . . . . . . . . . . . . . . . . . . . . . . . . . . . . . . . . . . . 7
Technische specificaties. . . . . . . . . . . . . . . . . . . . . . . . . . . . . . . . . . . . . . . . . . . . . . . . 8
Elektrische bedrading . . . . . . . . . . . . . . . . . . . . . . . . . . . . . . . . . . . . . . . . . . . . . . . . . 8
Productconformiteit . . . . . . . . . . . . . . . . . . . . . . . . . . . . . . . . . . . . . . . . . . . . . . . . . . 8
Sommaire
Conseils de sécurité . . . . . . . . . . . . . . . . . . . . . . . . . . . . . . . . . . . . . . . . . . . . . . . . . . 9
Introduction . . . . . . . . . . . . . . . . . . . . . . . . . . . . . . . . . . . . . . . . . . . . . . . . . . . . . . . . 9
Contenu de l'emballage . . . . . . . . . . . . . . . . . . . . . . . . . . . . . . . . . . . . . . . . . . . . . . . 9
Utilisation . . . . . . . . . . . . . . . . . . . . . . . . . . . . . . . . . . . . . . . . . . . . . . . . . . . . . . . . . . 10
Pour faire le café . . . . . . . . . . . . . . . . . . . . . . . . . . . . . . . . . . . . . . . . . . . . . . . 10
Servir le café . . . . . . . . . . . . . . . . . . . . . . . . . . . . . . . . . . . . . . . . . . . . . . . . . . 11
Pour vider l'appareil . . . . . . . . . . . . . . . . . . . . . . . . . . . . . . . . . . . . . . . . . . . . 11
Nettoyage, entretien et maintenance . . . . . . . . . . . . . . . . . . . . . . . . . . . . . . . . . . . . 11
Détartrage . . . . . . . . . . . . . . . . . . . . . . . . . . . . . . . . . . . . . . . . . . . . . . . . . . . . 11
Dépannage . . . . . . . . . . . . . . . . . . . . . . . . . . . . . . . . . . . . . . . . . . . . . . . . . . . . . . . . . 11
Spécifications techniques . . . . . . . . . . . . . . . . . . . . . . . . . . . . . . . . . . . . . . . . . . . . . . 12
Raccordement électrique . . . . . . . . . . . . . . . . . . . . . . . . . . . . . . . . . . . . . . . . . . . . . . 12
Conformité . . . . . . . . . . . . . . . . . . . . . . . . . . . . . . . . . . . . . . . . . . . . . . . . . . . . . . . . . 12
UK
NL
FR
Page 3

Inhalt
Sicherheitshinweise . . . . . . . . . . . . . . . . . . . . . . . . . . . . . . . . . . . . . . . . . . . . . . . . . . 13
Einführung . . . . . . . . . . . . . . . . . . . . . . . . . . . . . . . . . . . . . . . . . . . . . . . . . . . . . . . . . . 13
Packungsinhalt . . . . . . . . . . . . . . . . . . . . . . . . . . . . . . . . . . . . . . . . . . . . . . . . . . . . . . . 13
Operation . . . . . . . . . . . . . . . . . . . . . . . . . . . . . . . . . . . . . . . . . . . . . . . . . . . . . . . . . . 14
Kaffeezubereitung . . . . . . . . . . . . . . . . . . . . . . . . . . . . . . . . . . . . . . . . . . . . . . 14
Servieren . . . . . . . . . . . . . . . . . . . . . . . . . . . . . . . . . . . . . . . . . . . . . . . . . . . . . 15
Kaffeemaschine entleeren . . . . . . . . . . . . . . . . . . . . . . . . . . . . . . . . . . . . . . . . 15
Reinigung, Pflege und Wartung . . . . . . . . . . . . . . . . . . . . . . . . . . . . . . . . . . . . . . . . . 15
Entkalken . . . . . . . . . . . . . . . . . . . . . . . . . . . . . . . . . . . . . . . . . . . . . . . . . . . . . 15
Fehlersuche . . . . . . . . . . . . . . . . . . . . . . . . . . . . . . . . . . . . . . . . . . . . . . . . . . . . . . . . . 15
Technische Spezifikationen . . . . . . . . . . . . . . . . . . . . . . . . . . . . . . . . . . . . . . . . . . . . . 16
Elektroanschlüsse . . . . . . . . . . . . . . . . . . . . . . . . . . . . . . . . . . . . . . . . . . . . . . . . . . . . 16
Konformität . . . . . . . . . . . . . . . . . . . . . . . . . . . . . . . . . . . . . . . . . . . . . . . . . . . . . . . . 16
Indice
Suggerimenti per la sicurezza . . . . . . . . . . . . . . . . . . . . . . . . . . . . . . . . . . . . . . . . . . . 17
Introduzione . . . . . . . . . . . . . . . . . . . . . . . . . . . . . . . . . . . . . . . . . . . . . . . . . . . . . . . . 17
Contenuto dell'imballaggio . . . . . . . . . . . . . . . . . . . . . . . . . . . . . . . . . . . . . . . . . . . . . 17
Funzionamento . . . . . . . . . . . . . . . . . . . . . . . . . . . . . . . . . . . . . . . . . . . . . . . . . . . . . . 18
Preparazione del caffè . . . . . . . . . . . . . . . . . . . . . . . . . . . . . . . . . . . . . . . . . . . 18
Servizio . . . . . . . . . . . . . . . . . . . . . . . . . . . . . . . . . . . . . . . . . . . . . . . . . . . . . . 19
Svuotamento dell'apparecchio . . . . . . . . . . . . . . . . . . . . . . . . . . . . . . . . . . . . 19
Pulizia e manutenzione . . . . . . . . . . . . . . . . . . . . . . . . . . . . . . . . . . . . . . . . . . . . . . . . 19
Rimozione del calcare . . . . . . . . . . . . . . . . . . . . . . . . . . . . . . . . . . . . . . . . . . . 19
Risoluzione dei problemi . . . . . . . . . . . . . . . . . . . . . . . . . . . . . . . . . . . . . . . . . . . . . . 19
Specifiche tecniche . . . . . . . . . . . . . . . . . . . . . . . . . . . . . . . . . . . . . . . . . . . . . . . . . . . 20
Cablaggi elettrici . . . . . . . . . . . . . . . . . . . . . . . . . . . . . . . . . . . . . . . . . . . . . . . . . . . . . 20
Conformità . . . . . . . . . . . . . . . . . . . . . . . . . . . . . . . . . . . . . . . . . . . . . . . . . . . . . . . . . 20
Índice
Consejos de Seguridad . . . . . . . . . . . . . . . . . . . . . . . . . . . . . . . . . . . . . . . . . . . . . . . . 21
Introducción . . . . . . . . . . . . . . . . . . . . . . . . . . . . . . . . . . . . . . . . . . . . . . . . . . . . . . . . 21
Contenido del Conjunto . . . . . . . . . . . . . . . . . . . . . . . . . . . . . . . . . . . . . . . . . . . . . . 21
Funcionamiento . . . . . . . . . . . . . . . . . . . . . . . . . . . . . . . . . . . . . . . . . . . . . . . . . . . . . . 22
Preparación del café . . . . . . . . . . . . . . . . . . . . . . . . . . . . . . . . . . . . . . . . . . . . 22
Servicio . . . . . . . . . . . . . . . . . . . . . . . . . . . . . . . . . . . . . . . . . . . . . . . . . . . . . . 23
Vaciado del aparato . . . . . . . . . . . . . . . . . . . . . . . . . . . . . . . . . . . . . . . . . . . . . 23
Limpieza, cuidados y mantenimiento . . . . . . . . . . . . . . . . . . . . . . . . . . . . . . . . . . . . . 23
Eliminación de la cal . . . . . . . . . . . . . . . . . . . . . . . . . . . . . . . . . . . . . . . . . . . . 23
Resolución de problemas . . . . . . . . . . . . . . . . . . . . . . . . . . . . . . . . . . . . . . . . . . . . . . 23
Especificaciones Técnicas . . . . . . . . . . . . . . . . . . . . . . . . . . . . . . . . . . . . . . . . . . . . . . 24
Cableado Eléctrico . . . . . . . . . . . . . . . . . . . . . . . . . . . . . . . . . . . . . . . . . . . . . . . . . . . 24
Cumplimiento . . . . . . . . . . . . . . . . . . . . . . . . . . . . . . . . . . . . . . . . . . . . . . . . . . . . . . . 24
DE
IT
ES
Page 4

Índice
Conselhos de segurança . . . . . . . . . . . . . . . . . . . . . . . . . . . . . . . . . . . . . . . . . . . . . . . 25
Introdução . . . . . . . . . . . . . . . . . . . . . . . . . . . . . . . . . . . . . . . . . . . . . . . . . . . . . . . . . 25
Conteúdo da embalagem . . . . . . . . . . . . . . . . . . . . . . . . . . . . . . . . . . . . . . . . . . . . . . 25
Funcionamento . . . . . . . . . . . . . . . . . . . . . . . . . . . . . . . . . . . . . . . . . . . . . . . . . . . . . . 26
Fazer café . . . . . . . . . . . . . . . . . . . . . . . . . . . . . . . . . . . . . . . . . . . . . . . . . . . . 26
Servir . . . . . . . . . . . . . . . . . . . . . . . . . . . . . . . . . . . . . . . . . . . . . . . . . . . . . . . . 27
Esvaziar o aparelho . . . . . . . . . . . . . . . . . . . . . . . . . . . . . . . . . . . . . . . . . . . . . 27
Limpeza, cuidados & manutenção . . . . . . . . . . . . . . . . . . . . . . . . . . . . . . . . . . . . . . . 27
Descalcificar . . . . . . . . . . . . . . . . . . . . . . . . . . . . . . . . . . . . . . . . . . . . . . . . . . 27
Resolução de problemas . . . . . . . . . . . . . . . . . . . . . . . . . . . . . . . . . . . . . . . . . . . . . . 27
Especificações técnicas . . . . . . . . . . . . . . . . . . . . . . . . . . . . . . . . . . . . . . . . . . . . . . . . 28
Cablagem eléctrica . . . . . . . . . . . . . . . . . . . . . . . . . . . . . . . . . . . . . . . . . . . . . . . . . . . 28
Conformidade . . . . . . . . . . . . . . . . . . . . . . . . . . . . . . . . . . . . . . . . . . . . . . . . . . . . . . . 28
Innehållsförteckning
Säkerhetsråd . . . . . . . . . . . . . . . . . . . . . . . . . . . . . . . . . . . . . . . . . . . . . . . . . . . . . . . . 29
Inledning . . . . . . . . . . . . . . . . . . . . . . . . . . . . . . . . . . . . . . . . . . . . . . . . . . . . . . . . . . . 29
Förpackningsinnehåll . . . . . . . . . . . . . . . . . . . . . . . . . . . . . . . . . . . . . . . . . . . . . . . . . . 29
Drift . . . . . . . . . . . . . . . . . . . . . . . . . . . . . . . . . . . . . . . . . . . . . . . . . . . . . . . . . . . . . . . 30
Brygga kaffe . . . . . . . . . . . . . . . . . . . . . . . . . . . . . . . . . . . . . . . . . . . . . . . . . . . 30
Servera . . . . . . . . . . . . . . . . . . . . . . . . . . . . . . . . . . . . . . . . . . . . . . . . . . . . . . 31
Tömma apparaten . . . . . . . . . . . . . . . . . . . . . . . . . . . . . . . . . . . . . . . . . . . . . . 31
Rengöring, omvårdnad och underhåll . . . . . . . . . . . . . . . . . . . . . . . . . . . . . . . . . . . . 31
Avkalkning . . . . . . . . . . . . . . . . . . . . . . . . . . . . . . . . . . . . . . . . . . . . . . . . . . . . 31
Felsökning . . . . . . . . . . . . . . . . . . . . . . . . . . . . . . . . . . . . . . . . . . . . . . . . . . . . . . . . . . 31
Tekniska specifikationer . . . . . . . . . . . . . . . . . . . . . . . . . . . . . . . . . . . . . . . . . . . . . . . 32
Elektriska kablar . . . . . . . . . . . . . . . . . . . . . . . . . . . . . . . . . . . . . . . . . . . . . . . . . . . . . 32
Tillmötesgående . . . . . . . . . . . . . . . . . . . . . . . . . . . . . . . . . . . . . . . . . . . . . . . . . . . . . 32
Indholdsfortegnelse
Sikkerhedstips . . . . . . . . . . . . . . . . . . . . . . . . . . . . . . . . . . . . . . . . . . . . . . . . . . . . . . . 33
Introduktion . . . . . . . . . . . . . . . . . . . . . . . . . . . . . . . . . . . . . . . . . . . . . . . . . . . . . . . . 33
Emballagens indhold . . . . . . . . . . . . . . . . . . . . . . . . . . . . . . . . . . . . . . . . . . . . . . . . . . 33
Brug . . . . . . . . . . . . . . . . . . . . . . . . . . . . . . . . . . . . . . . . . . . . . . . . . . . . . . . . . . . . . . . 34
Brygning af kaffe . . . . . . . . . . . . . . . . . . . . . . . . . . . . . . . . . . . . . . . . . . . . . . . 34
Servering . . . . . . . . . . . . . . . . . . . . . . . . . . . . . . . . . . . . . . . . . . . . . . . . . . . . . 35
Sådan tømmes apparatet . . . . . . . . . . . . . . . . . . . . . . . . . . . . . . . . . . . . . . . . . 35
Regnøring, pleje og vedligeholdelse . . . . . . . . . . . . . . . . . . . . . . . . . . . . . . . . . . . . . . 35
Afkalkning . . . . . . . . . . . . . . . . . . . . . . . . . . . . . . . . . . . . . . . . . . . . . . . . . . . . 35
Fejlfinding . . . . . . . . . . . . . . . . . . . . . . . . . . . . . . . . . . . . . . . . . . . . . . . . . . . . . . . . . . 35
Tekniske specifikationer . . . . . . . . . . . . . . . . . . . . . . . . . . . . . . . . . . . . . . . . . . . . . . . 36
El-kabler . . . . . . . . . . . . . . . . . . . . . . . . . . . . . . . . . . . . . . . . . . . . . . . . . . . . . . . . . . . 36
Overensstemmelse . . . . . . . . . . . . . . . . . . . . . . . . . . . . . . . . . . . . . . . . . . . . . . . . . . . 36
PT
S
DK
Page 5

Innhold
Sikkerhetstips . . . . . . . . . . . . . . . . . . . . . . . . . . . . . . . . . . . . . . . . . . . . . . . . . . . . . . . 37
Innledning . . . . . . . . . . . . . . . . . . . . . . . . . . . . . . . . . . . . . . . . . . . . . . . . . . . . . . . . . . 37
Pakkeinnhold . . . . . . . . . . . . . . . . . . . . . . . . . . . . . . . . . . . . . . . . . . . . . . . . . . . . . . . . 37
Bruk . . . . . . . . . . . . . . . . . . . . . . . . . . . . . . . . . . . . . . . . . . . . . . . . . . . . . . . . . . . . . . 38
Brygge kaffe . . . . . . . . . . . . . . . . . . . . . . . . . . . . . . . . . . . . . . . . . . . . . . . . . . . 38
Servering . . . . . . . . . . . . . . . . . . . . . . . . . . . . . . . . . . . . . . . . . . . . . . . . . . . . . 39
Tømme apparatet . . . . . . . . . . . . . . . . . . . . . . . . . . . . . . . . . . . . . . . . . . . . . . 39
Rengjøring, stell og vedlikehold . . . . . . . . . . . . . . . . . . . . . . . . . . . . . . . . . . . . . . . . . 39
Fjerning av kjelstein . . . . . . . . . . . . . . . . . . . . . . . . . . . . . . . . . . . . . . . . . . . . . 39
Feilsøking . . . . . . . . . . . . . . . . . . . . . . . . . . . . . . . . . . . . . . . . . . . . . . . . . . . . . . . . . . 39
Tekniske spesifikasjoner . . . . . . . . . . . . . . . . . . . . . . . . . . . . . . . . . . . . . . . . . . . . . . . 40
Elektrisk tilkopling . . . . . . . . . . . . . . . . . . . . . . . . . . . . . . . . . . . . . . . . . . . . . . . . . . . 40
Samsvar . . . . . . . . . . . . . . . . . . . . . . . . . . . . . . . . . . . . . . . . . . . . . . . . . . . . . . . . . . . . 40
Sisällysluettelo
Turvallisuusvihjeitä . . . . . . . . . . . . . . . . . . . . . . . . . . . . . . . . . . . . . . . . . . . . . . . . . . . 41
Johdanto . . . . . . . . . . . . . . . . . . . . . . . . . . . . . . . . . . . . . . . . . . . . . . . . . . . . . . . . . . . 41
Pakkauksen sisältö . . . . . . . . . . . . . . . . . . . . . . . . . . . . . . . . . . . . . . . . . . . . . . . . . . . 41
Käyttö . . . . . . . . . . . . . . . . . . . . . . . . . . . . . . . . . . . . . . . . . . . . . . . . . . . . . . . . . . . . . 42
Kahvin valmistus . . . . . . . . . . . . . . . . . . . . . . . . . . . . . . . . . . . . . . . . . . . . . . . 42
Tarjoilu . . . . . . . . . . . . . . . . . . . . . . . . . . . . . . . . . . . . . . . . . . . . . . . . . . . . . . 43
Laitteen tyhjentäminen . . . . . . . . . . . . . . . . . . . . . . . . . . . . . . . . . . . . . . . . . . 43
Puhdistus, hoito & huolto . . . . . . . . . . . . . . . . . . . . . . . . . . . . . . . . . . . . . . . . . . . . . . 43
Kalkin poisto . . . . . . . . . . . . . . . . . . . . . . . . . . . . . . . . . . . . . . . . . . . . . . . . . . 43
Vianetsintä . . . . . . . . . . . . . . . . . . . . . . . . . . . . . . . . . . . . . . . . . . . . . . . . . . . . . . . . . 43
Tekniset tiedot . . . . . . . . . . . . . . . . . . . . . . . . . . . . . . . . . . . . . . . . . . . . . . . . . . . . . . 44
Sähköjohdot . . . . . . . . . . . . . . . . . . . . . . . . . . . . . . . . . . . . . . . . . . . . . . . . . . . . . . . . 44
Vaatimustenmukaisuus . . . . . . . . . . . . . . . . . . . . . . . . . . . . . . . . . . . . . . . . . . . . . . . . 44
N
FIN
Page 6

1
UK
Safety Tips
• Position on a flat, stable surface.
• A service agent/qualified technician should carry out installation and any repairs if required. Do not
remove any components on this product.
• Consult Local and National Standards to comply with the following:
• Health and Safety at Work Legislation
• BS EN Codes of Practice
• Fire Precautions
• IEE Wiring Regulations
• Building Regulations
• Ensure the location for the appliance can support its weigh t when full.
• DO NOT immerse the appliance in water.
• DO NOT leave the machine unattended during operation.
• DO NOT operate this appli a nc e when les s th an on e thi r d full.
• DO NOT touch the outer surfaces of the appliance. They become hot during use.
• Suitable for indoor use only.
• Always switch off and disconnect the power su pply to the appliance when not in use.
• Keep all packaging away from children. Dispose of the packaging in accordance to the regulations of
local authorities.
• If the power cord is damaged, it must be replaced by an BUFF ALO agent or a recommended qualified
technician in order to avoid a hazard.
Introduction
Please take a few moments to carefully read through this manual. Correct maintenance and operation of
this machine will provide the best possible performance from your BUFFALO product.
Pack Contents
The following is included:
BUFFALO prides itself on quali ty and service, ensuring that at the time of packaging the conte n ts are
supplied fully functional and free of damage.
Should you find any damage as a result of transit, please contact your BUFFALO dealer immediately.
• BUFFALO 15 litre Coffee Urn
•Filter basket
• Basket cover
•Basket tray
•Percolator tube
• Instruction manual
Page 7
2
UK
Telephone Helpline: 0845 146 2887 (United Kingdom)
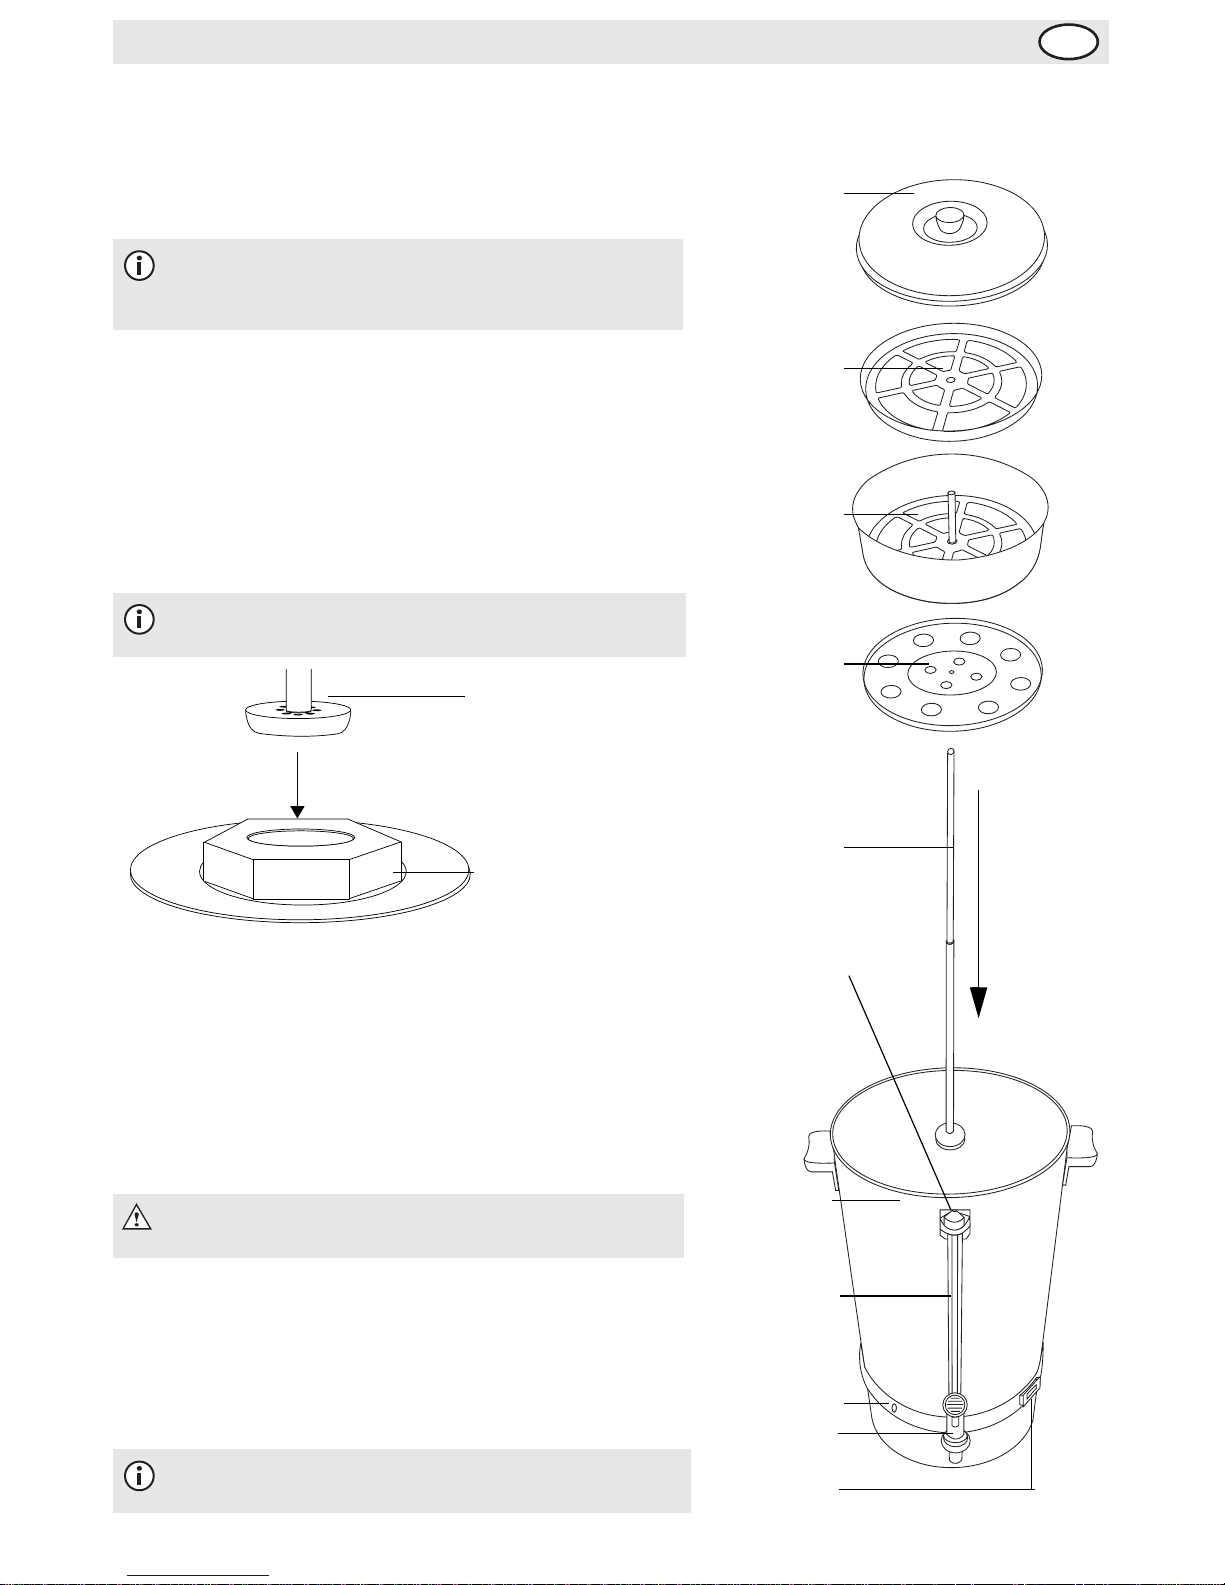
Operation
1. Remove the appliance from the packaging. Make sure
that all protective plastic film and plastic coatings are
thoroughly removed from all surfaces.
Brewing Coffee
1. Pour fresh cold water into the urn; filling it at least half
way. Use the level indicator on the front of the
appliance as a guide.
2. Fill the Filter basket with the desired amount of ground
coffee and cover with the Basket cover.
3. Insert the Percolator tube into the urn.
4. Slot the Basket tray over the Percolator tube. Rest the
tray securely on the lugs protruding from the Per colator
tube.
5. Place the Filter basket and cover over the Percolator
tube and onto the Basket tray.
6. Place the lid on the Coffee Percolator.
7. Connect to the power supply and turn On to begin
brewing the coffee.
8. The ‘Ready’ light is illuminated when the coffee has
been brewed. The coffee is kept at serving temperature
by the percolator.
9.
Turn the power switch OFF when the level indicator is
almost empty, or the equivalent of 3 cups of coffee is left
in the urn, to prevent any damage to the heating element.
Note: Before using for the first time, clean the
interior of the appliance and all parts in warm
soapy water, then rinse thoroughly.
Note: Ensure the base of the Percolator tube is
securely located into the base of the percolator.
WARNING: The outside of the appliance
becomes very hot during use. DO NOT TOUCH!
Note: DO NOT allow the appliance to boil dry.
This invalidates the warranty.
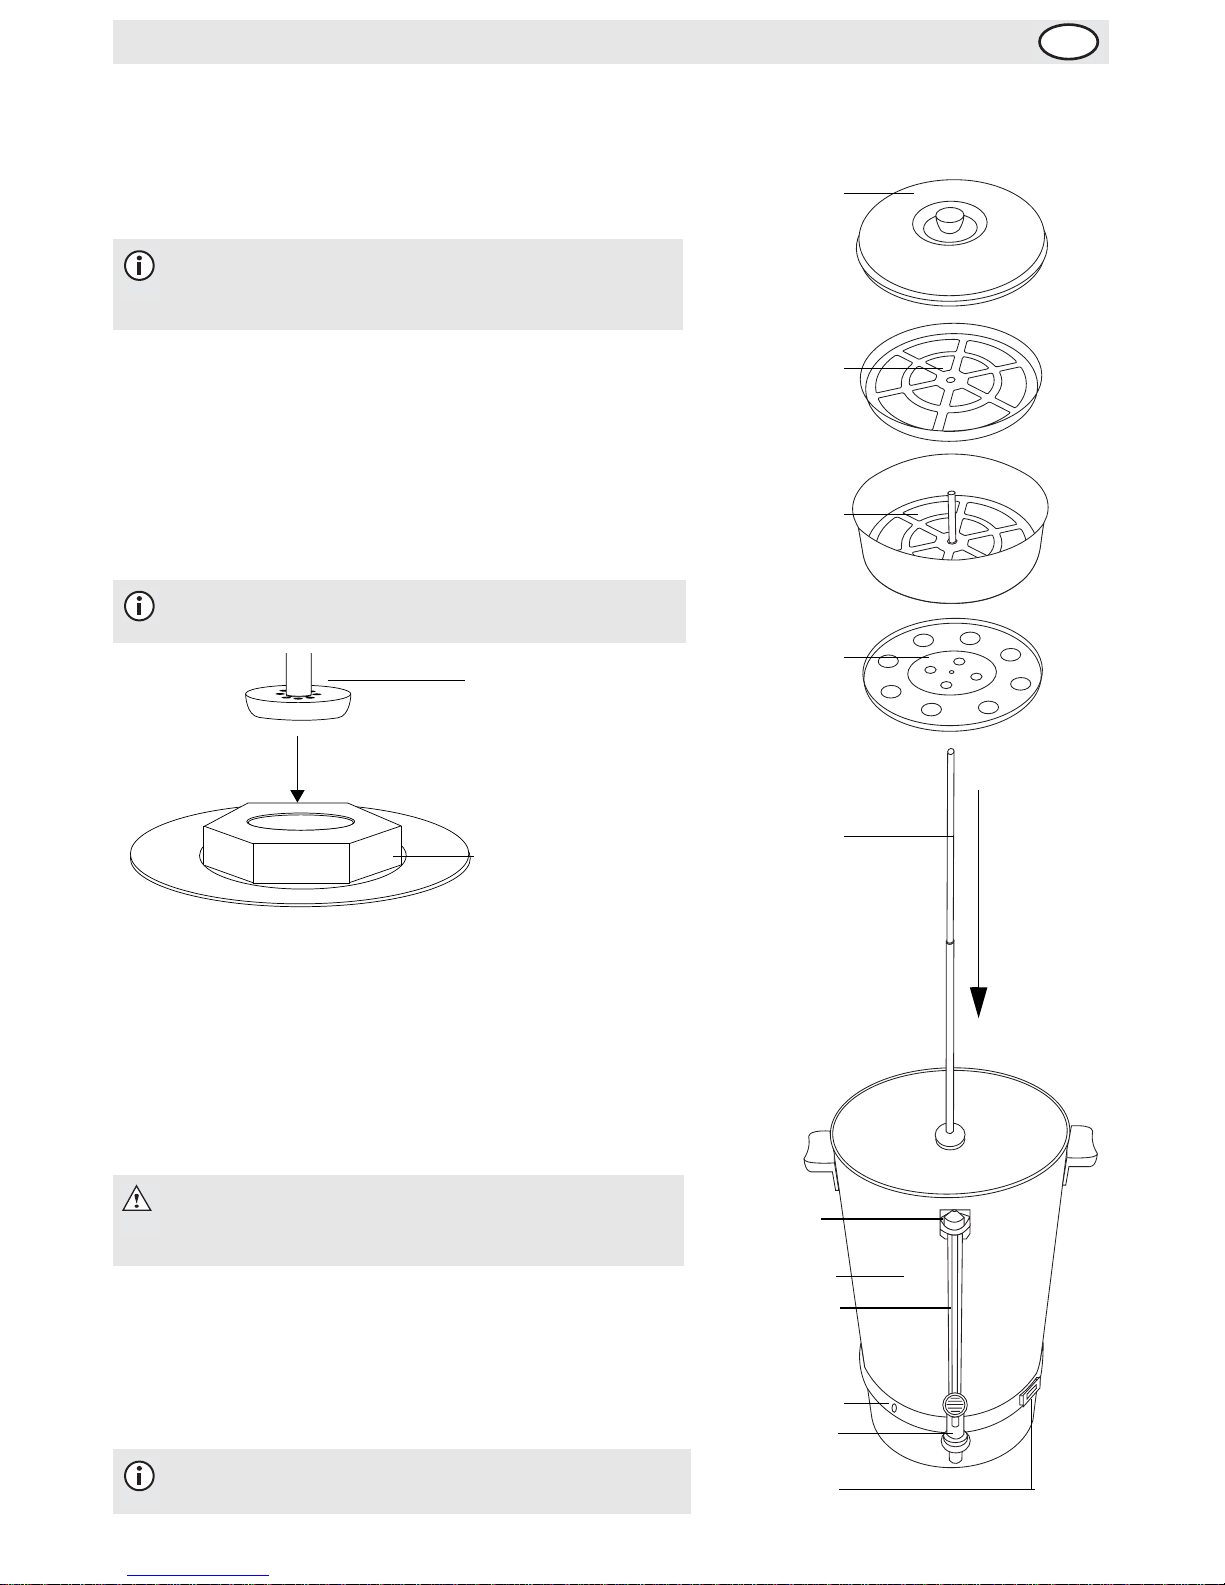
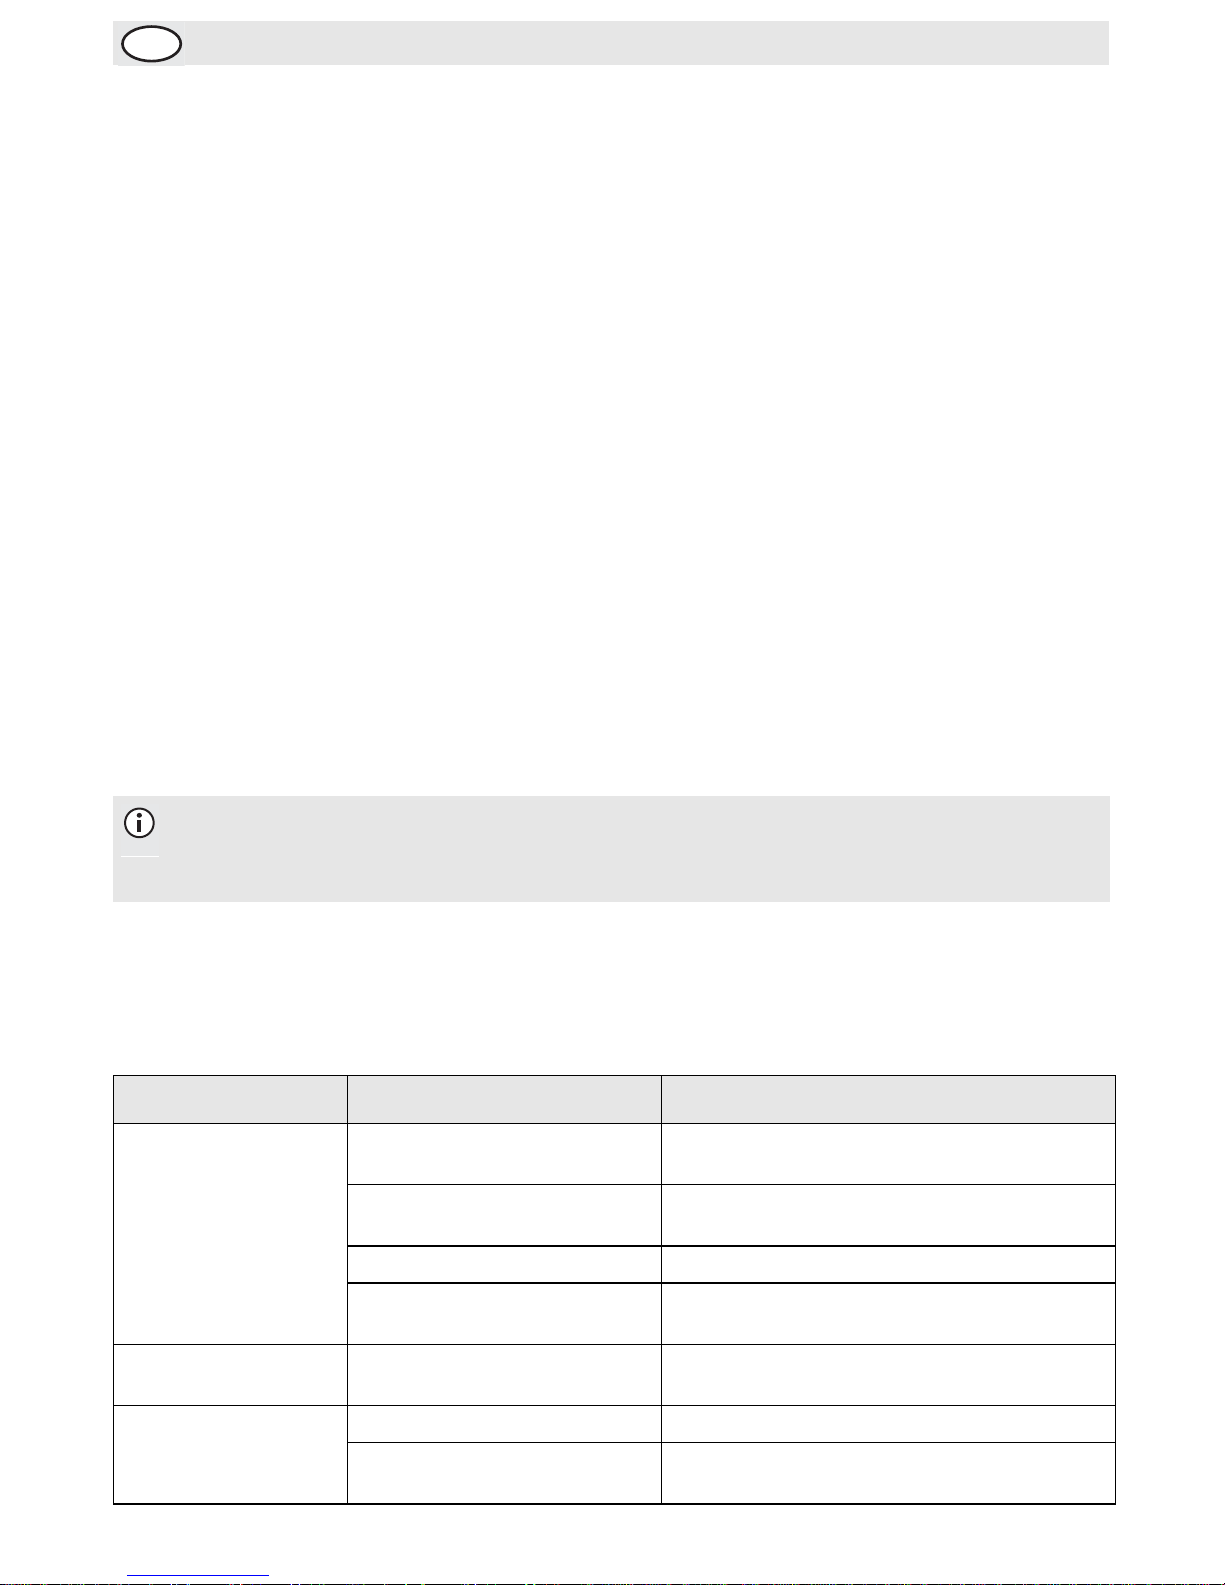
Lid
Basket cover
Filter basket
Basket tray
Percolator
tube
Level
Indicator top
Urn
Level
indicator
Ready light
Tap
On/Off
switch
Percolator tube
Urn base
Page 8
3
UK
Serving
1. Place a suitable vessel beneath the tap.
2. Pull the tap towards you to begin pouring the coffee.
3. Raise the tap handle to close the tap.
Emptying the Appliance
Drain the appliance by using the tap to empty the urn.
Cleaning, Care & Maintenance
• Always turn off and disconnect the appliance from the power supply before cleaning.
• Use soapy water and a damp cloth to clean the exterior of the appliance.
•Dry thoroughly after cleaning.
Descaling
In hard water areas lime scale can build up within the appliance after prolonged use. To descale the
appliance:
1. Pour a solution of descaler and water into the reservoir.
2. Brush the interior gently with a so ft bristled brush.
3. Discard the solution collected in the jug.
4. Fill the reservoir with clean water and turn the appliance back On to flush out the system.
Flush out the system thoroughly to remove any descaler residue.
5. The appliance is now ready for use.
Tro u bl e sh o ot i ng
Note: Use a suitable descaler and always follow the ins tructions on the container.
BUFFALO recommend that this appliance is descaled every 3 months or more frequently
in hard water areas.
Fault Probable Cause Action
The unit is not
working
The unit is not switched on Check the unit is plugged in correctly and
switched on
Plug and lead are damaged Call BUFFALO agent or qualified technician
Fuse in the plug has blown Replace the plug fuse
Power supply Check power supply
Internal wiring fault Call BUFFALO agent or qualified technician
The appliance
turns on but
does not make
coffee
Limescale build up in Percolator tube Descale appliance
The tap is
leaking
The tap has become loose Tighten the tap handle
The level indicator has become loose Tighten the knurled top of the level indicator
Page 9
4
UK
Telephone Helpline: 0845 146 2887 (United Kingdom)
Technical Specifications
Electrical Wiring
This appliance is supplied with a 3 pin, moulded, BS1363 plug and lead, with a 13 amp fuse as standard.
The plug is to be connected to a suitabl e m a ins socket.
This appliance is wired as follows:
• Live wire (coloured brown) to terminal marked L
• Neutral wire (coloured blue) to terminal marked N
• Earth wire (coloured green/yellow) to terminal marked E
This appliance must be earthed, using a dedicated earthing circ uit .
If in doubt consult a qualified electrician.
Electrical isolation points must be kept clear of any obstructions. In the event of any emergency
disconnection being required they must be readily accessible.
Compliance
BUFFALO parts have undergone strict product testing in order to com p ly w ith regulatory standards and
specifications set by international, independent, and federal authorities.
BUFFALO products have been approved to carry the fo llowing symbol:
All rights reserved. No part of these instructions may be produced or transmitted in any form or by any means,
electronic, mechanical, photocopying, recording or otherwise, without the prior written permission of BUFFALO.
Every effort is made to ensure all details are correct at the time of going to press, however, BUFFALO reserve the
right to change specifications without notice.
Model Voltage Power Current Capacity
Weight
(full)
Brewing
Time (full)
Dimensions
w x d x h mm
F249 230V 50Hz 1500W 6.5A 15 litres
(100 cups)
20kg
approx.
60 minutes
approx.
530 x 360 x 280
Page 10

5
NL
Klantenondersteuning: 050 – 609999 (België)
Veiligheidstips
• Plaatsen op een vlakke en stabiele ondergrond.
• De installatie en eventuele reparaties zijn door een servicetechnicus/vaktechnicus uit te voeren.
Verwijder geen componenten of servicepanelen van dit product.
• Raadpleeg en volg de plaatselijke en nationale regelgeving op m.b.t. tot het volgende:
• Wetgeving van gezondheid en veiligheid op de werkplaats
• Werkregels
• Brandpreventie
• IEE bekabelingsnormen
• Bouwverordeningen
• Plaats het apparaat op een locatie die het volledige gewicht, gevuld, kan dragen.
• Dit apparaat NIET in water dompelen.
• Laat het apparaat tijdens de werking NIET zonder toezicht.
• NIET gebruiken wanneer het apparaat voor minder dan eenderde vol is.
• Externe oppervlakken van het apparaat NIET aanraken. Deze worden tijdens het gebruik heet.
• Uitsluitend geschikt voor gebruik binnenshuis.
• Schakel het apparaat altijd uit en haal de steker uit het stopcontact wanneer u het apparaat niet
gebruikt.
• Laat verpakkingsmateriaal niet binnen handbereik van kinderen. Verpakkingsmateriaal in
overeenstemming met de regelgeving van de plaatselijke overheden als afval laten verwerken.
• Indien de stroomkabel beschadigd raakt, dient men deze do or een BUFFALO technicus of aanbevolen
vaktechnicus te laten vervangen om gevaarlijke situaties te verhinderen.
Inleiding
Neem de tijd en lees deze handleiding aandachtig door. Een correct gebruik en onderhoud van deze
machine waarborgt de beste prestatie van uw BUFFALO product.
Verpakkingsinhoud
De verpakking bevat een
BUFFALO is trots op de haar productkwalitei t en dienstverlening en controleer de inhoud van de
verpakkingen, tijdens de verpakkin g sfase, op functionaliteit en schade.
Mocht u product door transport zijn beschadigd, neem dan onmiddellijk contact op met uw BUFFALO dealer.
• BUFFALO 15 liter koff ieketel
•Filterhouder
•Houderdeksel
•Houderlade
•Percolator
• Handleiding
Page 11
6
NL
Klantenondersteuning: 040 – 2628080 (Nederland)
Bediening
Haal het apparaat uit de verpakking. Controleer of al het
beschermingsfolie- en plastic lagen grondig van alle
oppervlakken zijn verwijderd.
Koffie zetten
1. Schenk vers koud water in de koffieketel; minimaal tot
aan de helft. Gebruik de niveau-indicator aan de
voorzijde van het apparaat als richtmiddel.
2. Vul de filterhouder met de gewenste hoeveelheid van
koffie en sluit de houderdeksel.
3. Steek de percolator in de koffieketel.
4. Plaats de houderlade over de percolator. Bevestig de
lade aan de uitstekels van de percolator.
5. Plaats de filterhouder en deksel over de percolator en
op de houderlade.
6. Plaats de deksel op de koffieketel.
7. Steek de steker in het stopcontact en zet de
hoofdschakelaar op On (Aan) om te beginnen met
koffiezetten.
8. Het 'Ready'-lampje licht op wanneer de koffie is gezet.
De koffieketel hou dt de koffie op serveertemp eratuur.
9. Zet de power-schakelaar op OFF (Uit) wanneer er
slechts een hoeveelheid gelijk aan 3 kopjes koffie in de
ketel zit, zodat beschadiging van het
verwarmingselement wordt voorkomen.
Opmerking: alvorens het eerste gebruik, dient
u de binnenzijde van het apparaat en alle
onderdelen met warm zeepwater te reinigen.
Opmerking: zorg dat de basis van de percolator
goed vastzit in de basis van de koffieketel.
WAARSCHUWING: de buitenkant van het
apparaat wordt tijdens gebruik erg heet. NIET
AANRAKEN!
Opmerking: het apparaat mag NIET droo g koken.
Hierdoor vervalt automatisch de garantie.
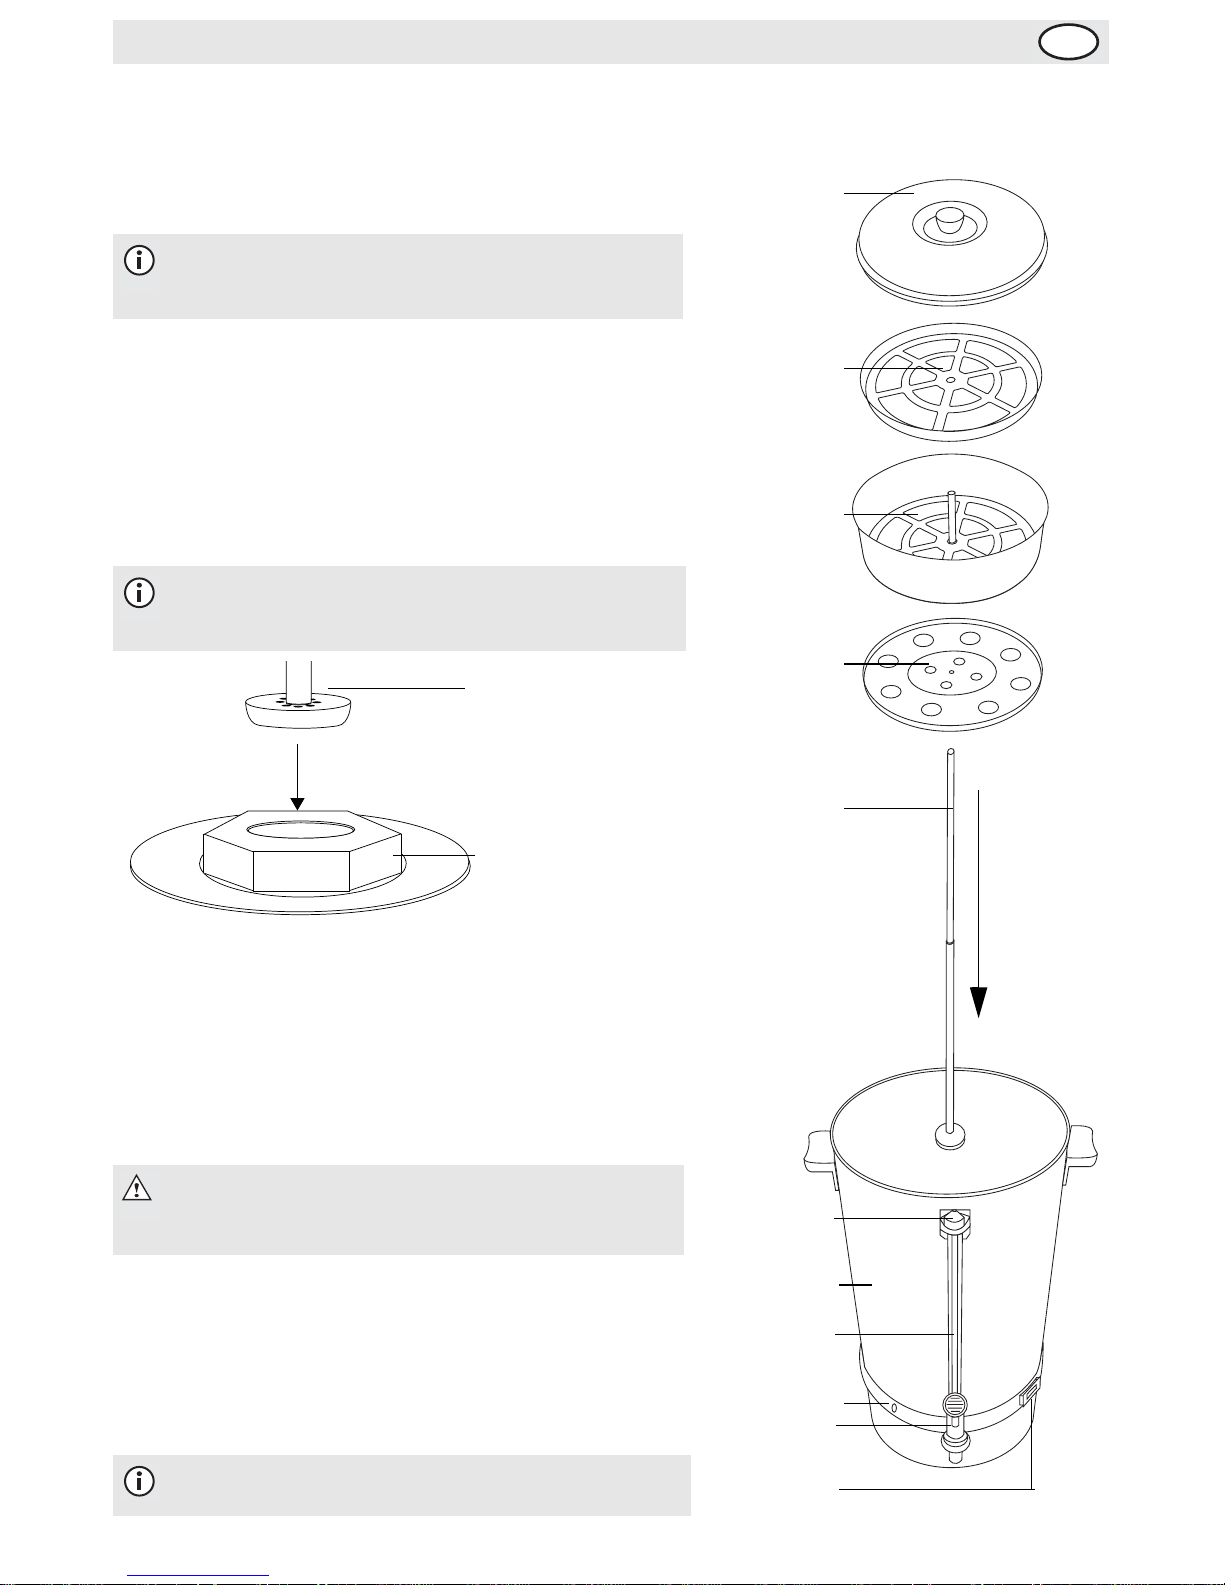
Deksel
Houderdeksel
Filterhouder
Houderlade
Percolator
Niveau-
indicator
bovenzijde
Koffieketel
Niveau-
indicator
Gereed-
lampje
Tap
Aan/uit-
schakelaar
Percolator
Basis koffieketel
Page 12
7
NL
Klantenondersteuning: 050 – 609999 (België)
Serveren
1. Plaats een geschikt opvangbeker onder de tap.
2. Trek de tap naar u toe om koffie te schenken.
3. Breng de taphendel omhoog om de tap te sluiten.
Het apparaat leegmaken
Gebruik de tap om het apparaat te ledigen.
Reiniging, zorg & onderhoud
• Alvorens het apparaat te reinigen dient men altijd de stroomvoorziening uit te schakelen.
• Gebruik zeepwater en een vochtige doek om de buitenkant van het apparaat te reinigen.
• Na reiniging goed drogen.
Ontkalken
Op plaatsen met hard water kan er na langdurig gebruik kalkafzetting in het apparaat voorkomen. Het
apparaat ontkalken:
1. Schenk een oplossing van ontkalkingsmiddel en wat er in het reservoir.
2. Borstel de binnenkant voorzichtig met een zachtharige borstel.
3. Schenk de verzamelde oplossing uit de kan.
4. Vul het waterrese rvoi r met schoon w ater en zet het ap par aat opni euw aan om het systeem t e spoelen
en eventuele resten ontkalkingsmiddel te verwijderen.
5. Het apparaat is nu gebruiksklaar.
Oplossen van problemen
Indien er een storing van uw BUFFALO product optreedt, dient u de onderstaande tabel te raadplegen
alvorens contact op te nemen met uw BUFFA LO dealer of de Hulplijn te bellen.
Probleem Mogelijke oorzaak Handeling
Het apparaat
werkt niet
Het apparaat staat uit Controleer of de stroomkabel van het apparaat is
aangesloten en of het apparaat is ingeschakeld
Steker en kabel zijn beschadigd Laat een BUFFALO technicus of een vaktechnicus
komen
De zekering in de steker is
gesprongen
Vervang de zekering in de steker
Stroomvoorziening Controleer de stroomvoorziening
Storing interne bedrading Laat een BUFFALO technicus of een vaktechnicus
komen
Het apparaat
gaat aan maar
zet geen koffie
Kalkaanslag in de percolator Ontkalk het apparaat
De tap lekt De tap zit los Maak de taphendel vast
De niveau-indicator zit los Draai de bovenzijde van de niveau-indicator vast
Page 13
8
NL
Klantenondersteuning: 040 – 2628080 (Nederland)
Technische specificaties
Elektrische bedrading
Men dient de steker op een geschikt stopcontact aan te sluiten.
De bedrading van dit apparaat is als volgt:
• Stroomkabel (bruin) naar de aansluitklem gema rkeerd met L
• Neutraalkabel (blauw) naar de aansluitklem gemarkeerd met N
• Aardekabel (groen/geel) naar de aansluitklem gemarkeerd met E
Dit apparaat moet worden geaard met behulp van een adequaat aardingscircuit.
Bij twijfels raadpleeg een vakkundige elektricien.
De elektrische isolatiepunten mogen niet worden geblokkeerd. In geval van een nooduitschakeling moeten
de isolatiepunten direct toegankelijk zi jn.
Productconformiteit
De onderdelen van BUFFALO producten hebben strenge producttesten ondergaan om te voldoen aan
wettelijke regels en specificaties die door internationale, onafhankelijke en landelijke overheden worden
voorgeschreven.
BUFFALO producten zijn goedgekeurd en voorzien van het volgende symbool:
le rechten voorbehouden. Het is verboden om deze handleiding, hetzij volledig of gedeeltelijk, elektronisch of
mechanisch te reproduceren, kopiëren, op opslagmedia op te slaan of op enigerlei wijze over te dragen, zonder
voorafgaande goedkeuring van BUFFALO.
Wij hebben er alles aan gedaan om er zeker van te zijn dat op publicatiedatum van de handleiding alle details cor-
rect zijn, desondanks, behoudt BUFFALO het recht voor om specificaties zonder aankondiging te wijzigen.
Model Voltage Vermogen Stroom Inhoud
Gewicht
(vol)
Koffiezettijd
(vol)
Afmetingen
h x b x d mm
F249 230V 50Hz 1500W 6,5A 15 litres
(100 koppen)
circa
20kg
circa 60
minuten
530 x 360 x 280
Page 14

9
FR
Standard d'assistance téléphonique: 050 – 600006 (Belgique)
Conseils de sécurité
• Placez l'appareil sur une surface plane, stable.
• L'installation et les éventuelles réparations doivent être confiées à un dépanneur / technicien qualifié.
Ne retirez aucun composant ou cache de ce produi t.
• Consultez les normes locales et nationales pour vous conformer aux :
• lois sur l'hygiène et la sécurité au travail ;
• codes de bonnes pratiques BS EN ;
• précautions contre le risque d'incendie ;
• réglementations sur les branchements électriques IEE ;
• règlements sur la construction.
• Assurez-vous que l'endroit où vous la posez peut soutenir le poids de la cafetière électrique pleine.
• NE PAS immerger l'appareil.
• NE PAS laisser la machine fonctionner sans surveillance.
• NE PAS utiliser l'appareil à moins que la cafetière ne soit au moins au tiers pleine.
• NE PAS toucher aux surfaces extérieures de l'appareil. Elles chauffent en service.
• Cet appareil est réservé exclusivement à une utilisation à l'intérieur.
• Veillez à toujours éteindre l'appareil et à le débrancher de la prise d'alimentation secteur hors service.
• Eloignez des enfants les matériaux d'emballage. La mise au rebut des emballages do it s'effectuer
conformément aux règlements stipulés pa r les aut orités locales.
• Tout cordon d'alimentation endommagé doit être remplacé par un agent BUFFALO ou par un
technicien qualifié recommandé, pour éviter tout danger.
Introduction
Nous vous invitons à consacrer quelques instants à la lecture attentive de ce manuel. L'entretien et
l'utilisation appropriés de cet apparei l v ous permettront de tirer le meilleur de votre produit BUFFALO.
Contenu de l'emballage
Eléments fournis de série :
BUFFALO attache une grande importance à la qualité et au service et veille à fournir des produits en parfait
état opérationnel, parfaitement intacts au moment de l'emballage.
Nous vous prions de contacter votre revendeur BUFFALO immédiatement si vous constatez un dommage
quelconque survenu pendant le transport du produit.
• Cafetière électrique BUFFALO 15 litres
•Panier filtrant
•Couvercle du panier
• Plateau du panier
• Tube du percolateur
• Mode d'emploi
Page 15
10
FR
Standard d'assistance téléphonique: 01 64 89 73 61 (Français)
Utilisation
1. Sortez l'appareil de l'emballage. Veillez à retirer
intégralement la pellicule de protection et les
revêtements plastique de toutes ses surfaces.
Pour faire le café
1. Remplissez au moins la moitié d e la cafetière électrique
d'eau froide fraîche. Servez-vous de la jauge de niveau
située à l'avant de l'appareil comme d'un guide.
2. Versez la quantité voulue de café moulu dans le panier
filtrant et couvrez-le avec le couvercle du panier.
3.
Insérez le tube du percolateur dans la cafetière électrique.
4. Faites coulisser le plateau du panier sur le tube du
percolateur. Calez fermement le plateau sur les oreilles
qui dépassent du tube du percolateur.
5. Posez le panier filtrant et le couvercle sur le tube du
percolateur, puis sur le plateau du panier.
6. Placez le couvercle sur la cafetière électrique.
7. Branchez l'appareil à l'alimentation secteur et mettez-le
en marche pour passer le café.
8. La diode de fin de filtration " Ready " s'allume quand
toute l'eau est passée. La cafetière garde le café à la
température idéale de service.
9. Mettez l'interrupteur marche/arrêt sur OFF (arrêt)
lorsque la cafetière électrique ne contient plus que
l'équivalent de trois tasses de café, pour éviter
d'endommager l'élément chauffant.
Remarque : avant la première utilisation,
nettoyez l'intérieur et toutes les pièces de
l'appareil à l'eau savonneuse tiède.
Remarque : Vérifiez que la base du tube du
percolateur est bien calée sur la base de la
cafetière électrique.
AVERTISSEMENT : L'extérieur de l'appareil
chauffe énormément en service.
N'Y TOUCHEZ PAS !
Remarque : NE laissez PAS l'appareil bouillir à
sec. Vous n'auriez plus aucun droit à la garantie.
Couvercle
Couvercle du
panier
Panier filtrant
Plateau du
panier
Tube du
percolateur
Haut de la
jauge de
niveau
Cafetière
électrique
Jauge de
niveau
Témoin de
fonctionnement
Robinet
Interrupteur
marche/arrêt
Tube du
percolateur
Base de la
cafetière
électrique
Page 16
11
FR
Standard d'assistance téléphonique: 050 – 600006 (Belgique)
Servir le café
1. Placez le récipient qui convient sous le robinet.
2. Tirez le robinet vers vous pour verser le café.
3. Soulevez la poignée du robinet pour le fermer.
Pour vider l'appareil
Videz l'appareil à l'aide du robinet.
Nettoyage, entretien et maintenance
• Veillez à toujours éteindre et débrancher l'appareil de la prise secteur avant de le nettoyer.
• Nettoyez l'extérieur de l'appareil à l'aide d'un chiffon humide imbibé d'eau savonneuse.
• Séchez minutieusement l'appareil après l'avoir nettoyé.
Détartrage
En cas d'utilisation prolongée dans les régions où l'eau est très calcaire, des dépôts peuvent s'accumuler
dans l'appareil. Pour le détartrer :
1. Versez une solution de produit détartrant et d'eau dans le réservoir.
2. Brossez légèrement l'intérieur à l'aide d'une brosse à poils doux.
3. Jetez la solution récupérée dans le pot.
4. Remplissez le réservoir d'eau propre et rallumez l'appareil pour rincer le système et le débarr asser des
résidus de détartrant.
5. L'appareil est désormais prêt à servir.
Dépannage
En cas de dysfonctionnement de votre appareil BUFFALO, vérifiez les données du tableau ci-dessous avant
d'appeler notre standard d'assi st a nce ou votre revendeur BUFFALO.
Remarque : vous veillerez à utiliser le détartrant qui convient et à toujours suivre les
consignes imprimées sur l'emballage.
BUFFALO vous recommande de détartrer cet appareil tous les trois mois ou plus
fréquemment dans les régions où l'eau est très calcaire.
Dysfonctionnement Cause probable Intervention
L'appareil ne
fonctionne pas
L'appareil n'est pas allumé Vérifier que l'appareil est bien branché et
allumé
La prise et le cordon sont
endommagés
Appeler un agent BUFFALO ou un technicien
qualifié
Alimentation Vérifier l'alimentation
Problème de branchement
interne
Appeler un agent BUFFALO ou un technicien
qualifié
L’a ppareil s’allume mais
le café ne se fait pas
Accumulation de calcaire dans
le tube du percolateur
Détartrer l’appareil
Fuite du robinet Le robinet s’est desserré Resserrer la poignée du robinet
L’indicateur de niveau s’est
desserré
Resserrer le haut de l’indicateur de niveau
Page 17

12
FR
Standard d'assistance téléphonique: 01 64 89 73 61 (Français)
Spécifications techniques
Raccordement électrique
La prise doit être reliée à la prise secteur qui convient.
Cet appareil est câblé comme suit :
• Fil conducteur (brun) à la borne marquée L
• Fil neutre (bleu) à la borne marquée N
• Fil de terre (vert / jaune) à la borne marquée E
Cet appareil doit être raccordé à la terre, par le biais d'un circuit de mise à la terre dédié.
En cas de doute, consultez un élect ricien qualifié.
Les points d'isolation électrique doivent être libres de toute obstruction. En cas de débranchement requis
en urgence, ils doivent être facilement accessibles.
Conformité
Les pièces BUFFALO ont été soumises à des tests rigour eux pour pouv oir être déclarées conformes aux
normes et spécifications réglementaires définies par les autorités internationales, indépendantes et
fédérales.
Les produits BUFFALO ont été déclarés aptes à porter le symbole suivant :
Tous droits réservés. La production ou transmission, partielles ou intégrales, sous quelque forme que ce soit ou par
n'importe quel moyen, tant électronique que mécanique, sous forme de photocopie, d'enregistrement ou autre de
ce mode d'emploi sont interdites sans l'autorisation préalablement accordée par BUFFALO.
Nous nous efforçons, par tous les moyens dont nous disposons, de faire en sorte que les détails contenus dans le
présent mode d'emploi soient corrects en date d'impression. Toutefois, BUFFALO se réserve le droit de changer les
spécifications de ses produits sans préavis.
Modèle Tension Puissance Courant Capacité
Poids
(plein)
Temps de
passage du
café (plein)
Dimensions
h x l x p mm
F249 230V 50Hz 1500W 6,5A 15 litres
(100 tasses)
Env. 20 kg En v. 60
minutes
530 x 360 x 280
Page 18

13
DE
Sicherheitshinweise
• Auf eine flache, stabile Fläche stellen.
• Alle erforderlichen Montage- und Reparaturarbeiten sollten von W artungspersonal oder einem
qualifizierten Techniker durchgeführt werden. Keine Bauteile oder Bedienflächen von diesem Produkt
entfernen.
• Für folgende Normen und Vorschriften sind die lokalen und nationalen Normen heranzuziehen:
• Arbeitsschutzvorschriften
• BS EN Verhaltenspraktiken
• Brandschutzvorschriften
• IEE-Anschlussvorschriften
• Bauvorschriften
• Darauf achten, dass die Stelle, an der die Kaffeemaschine aufgestellt wird, das Gewicht der vollen
Kaffeemaschine tragen kann.
• Gerät NICHT in Wasser eintauchen.
• Gerät während des Betriebs NICHT unbeaufsichtigt lassen.
• Gerät NICHT einschalten, wenn es weniger als ein Drittel gefüllt ist.
• NICHT die Außenflächen des Geräts berühren, da sie sich während des Gebrauchs erhitzen.
• Nur zum Gebrauch in Gebäuden.
• Nach dem Gebrauch das Gerät stets ausschalten und den Netzstecker ziehen.
• Verpackungsmaterial außerhalb der Reichweite von Kindern aufbewahren und gemäß den lokalen
Vorschriften entsorgen.
• Aus Sicherheitsgründen muss ein beschädigtes Stromkabel von einem BUFFALO-Mitarbeiter oder
empfohlenen qualifizierten Elektriker erneuert werden.
Einführung
Bitte nehmen Sie sich einige Minuten Zeit, um diese Anlei tu ng gründlich zu lesen. Durch die korrekte
Wartung und den ordnungsgemäßen Einsatz dieses Geräts erhalten Sie optimale Leistung von Ihrem
BUFFALO-Produkt.
Packungsinhalt
Die Verpackung enthält folgende Teile:
BUFFALO ist stolz auf die hoch wertige Qualität seiner Produkte und seinen erstkl assigen Service. Wir stellen
sicher, dass alle gelieferten Produkte zum Zeitpunkt der Verpackung voll funktionsfähig sind und sich in
einwandfreiem Zustand befinden.
Sollten Sie Transportschäden feststellen, wenden Sie sich bitte unverzüglich an Ihren BUFFALO-Händler.
• BUFFALO-Kaffeemaschine 15 Liter
•Filterkorb
•Filterkorbdeckel
• Filterkorbeinsatz
• Durchlaufrohr
• Bedienungsanleitung
Page 19

14
DE
Telefonische Helpline: 0800 – 1860806
Operation
1.
Gerät aus der Verpackung nehmen. Darauf achten, dass
die gesamte Plastikfolie und alle Kunststoffbeschichtungen
von sämtlichen Flächen entfernt wurden.
Kaffeezubereitung
1. Frisches kaltes Wasser in die Kanne gießen, bis die
Kanne mindestens halbvoll ist. Die Füllstandsanzeige
vorne am Gerät dient dabei als Anhaltspunkt.
2. Die gewünschte Menge gemahlenen Kaffee in den
Filterkorb geben, dann den Korbdeck el auflegen.
3. Das Durchlaufrohr in die Kanne stecken.
4. Den Filterkorbeinsatz über das Durchlaufrohr schieben.
Den Einsatz fest auf den Ösen ruhen lassen, die aus
dem Durchlaufrohr herausragen.
5. Den Filterkorb samt Deckel auf das Durchlaufrohr und
den Korbeinsatz setzen.
6. Den Deckel auf die Kaffeekanne legen.
7. Um frischen Kaffee zuzubereiten, Gerät an die
Stromver so rgung anschließen un d ei nschalten.
8.
Die Betriebsleuchte leuchtet auf, wenn das gesamte
Wasser durchgelaufen und der Kaffee fertig ist. Der Kaffee
wird in der Kanne auf Serviertemperatur gehalten.
9. Damit das Heizelement nicht beschädigt wird, die Ein-/
Austaste AUSschalten, wenn nur noch ca. 3 Tassen
Kaffee i n der Kanne sind.
Hinweis: Vor dem ersten Gebrauch das Gerät
innen sowie alle Teile mit einer warmen
Seifenlösung reinigen.
Hinweis: Darauf achten, dass das untere Ende
des Durchlaufrohrs fest unten in der
Kaffeekanne sitzt.
VORSICHT: Das Gerät wird während des
Gebrauchs außen sehr heiß. NICHT BERÜHREN!
Hinweis: Die Maschine NICHT so lange
eingeschaltet lassen, dass die gesamte Flüssigkeit
verdunstet. Dadurch erlischt die Garantie.
Deckel
Filterkorbdeckel
Filterkorb
Filterkorbeinsatz
Durchlaufrohr
Deckel der
Füllstandsanzeige
Kaffeekanne
Füllstandsanzeige
Betriebsleuchte
Hahn
Ein-/Austaste
Durchlaufrohr
Untersatz
Page 20

15
DE
Servieren
1. Einen geeigneten Behälter unter den Hahn stellen.
2. Zum Eingießen den Hahn zu Ihnen ziehen.
3. Den Hahngriff anheben, um den Hahn wieder zu schließen.
Kaffeemaschine entleeren
Die Kanne mithilfe des Hahns entleeren.
Reinigung, Pflege und Wartung
• Vor der Reinigung stets zunächst das Gerät abschalten und den Netzstecker ziehen.
• Die Maschine außen mit Seifenlauge und einem feuchten Tuch reinigen.
• Nach dem Reinigen gründlich abtrock n en.
Entkalken
In Gegenden mit harter Wasserqualität kann sich nach einiger Zeit und häufigem Gebrauch Kalk im Gerät
ablagern. Entkalken des Geräts:
1. Das in Wasser gelöste Entkalkungsmittel in den Wasserbehälter geben.
2. Den Wasserbehälter innen vorsichtig mit einer weichen Bürste reinigen.
3. Die Lösung aus der Kanne ausschütten.
4. Den Wasserbehälter mit sauberem Wasser füllen und das Gerät erneut einschalten, um die Maschine
auszuspülen und Reste des Entkalkungsmittels zu entfernen.
5. Jetzt ist die Kaffeemaschine wieder einsatzbereit.
Fehlersuche
Bei einem Defekt Ihres BUFFALO-Geräts konsultieren Sie bitte zunächst folgende Tabelle, bevor Sie die
Helpline oder Ihren BUFFALO-Händler anrufen.
Hinweis: Verwenden Sie ein geeignetes Entkalkungsmittel und beachten Sie stets die
Gebrauchsanweisung dieses Mittels.
In Gegenden mit harter Wasserqualität empfiehlt BUFFALO, die Kaffeemaschine
mindestens alle 3 Monate zu entkalken.
Störung Vermutliche Ursache Lösung
Das Gerät funktioniert
nicht
Das Gerät ist nicht eingeschaltet Prüfen, ob der Netzstecker in die
Steckdose gesteckt wurde und das Gerät
eingeschaltet ist
Stecker und Kabel sind beschädigt BUFFALO-Mitarbeiter oder qualifizierten
Techniker kontaktieren
Sicherung im Stecker ist durchgebrannt Neue Sicherung in den Stecker einsetzen
Stromzufuhr Netzstrom prüfen
Das Gerät lässt sich
einschalten, bereitet
aber keinen Kaffee zu
Kalkansammlung im Durchlaufrohr Gerät entkalken
Der Hahn tropft Der Hahn hat sich gelöst Hahngriff anziehen
Die Füllstandsanzeige hat sich gelöst
Den Deckel der Füllstandsanzeige anziehen
Page 21

16
DE
Telefonische Helpline: 0800 – 1860806
Technische Spezifikationen
Elektroanschlüsse
Der Stecker muss in eine geeignete Steckdose gesteckt werden.
Das Gerät ist wie folgt verdrahtet:
• Stromführender Leiter (braun) an Klemme L
• Neutralleiter (blau) an Klemme N
• Erdleiter (grün/gelb) an Klemme E
Das Gerät muss über eine spezielle Erdleitung geerdet werden.
Bei Fragen wenden Sie sich bitte an einen qualifizierten Elektriker.
Elektroisolierpunkte dürfen nicht blockiert werden. Bei einem Notstopp müssen diese Punkte jederzeit sofort
zugänglich sein.
Konformität
Alle BUFFALO-Produkte werden strengen Tests unterzogen, um die Einhaltun g von Normen und
Spezifikationen internationaler und nationaler Behörden und unabhängiger Organisationen zu
gewährleisten.
BUFFALO-Produkte dürfen durch folgendes Symbol gekennzeic hnet werden:
Alle Rechte vorbehalten. Diese Anleitung darf ohne vorherige schriftliche Genehmigung von BUFFALO weder ganz
noch teilweise in irgendeiner Form oder auf irgendeinem Wege - einschließlich elektronischer, mechanischer
Verfahren, durch Fotokopieren, Aufnahme oder andere Verfahren - vervielfältigt oder übertragen werden.
Es werden alle Anstrengungen unternommen um sicherzustellen, dass alle Angaben bei der Drucklegung korrekt
sind. BUFFALO behält sich jedoch das Recht vor, Spezifikationen ohne Vorankündigung zu ändern.
Modell Spannung Leist-ung
Strom-
stärke
Fassungsver-
mögen
Gewicht
(voll)
Zubereitungszeit
(voll)
Abmessungen
h x b x t mm
F249 230V 50Hz 1500W 6,5A 15 liter
(100 tassen)
ca.
20 kg
ca. 60 Minuten 530 x 360 x
280
Page 22

17
IT
Suggerimenti per la sicurezza
• Posizionare il fabbricatore di ghiaccio su una superficie in piano e stabile.
• L'installazione e le eventuali riparazioni devono venire eseguite da un agente/tecnico qualificato. Non
rimuovere i componenti o i pannelli di accesso dell'apparecchio.
• Verificare la conformità alle normative locali e nazionali di quanto segue:
• Normativa antinfortunistica sul lavoro
• Linee guida BS EN
• Precauzioni antincendio
• Normativa IEE sui circuiti elettrici
• Norme di installazione
• Assicurarsi che la base di appoggio sia in grado di sostenere il pes o del l'apparecchio a pieno carico.
• NON immergere l'apparecchio in acqua.
• Sorvegliare SEMPRE l'apparecchio quando è in funzione.
• NON mettere in funzione l'apparecchio quan do è pieno a meno di un terzo della capacità.
• NON toccare le superfici esterne dell'apparecchio. Durante l'utilizzo le superfici esterne si
surriscaldano.
• Per esclusivo uso in ambienti chiusi.
• Spegnere e scollegare l'alimentazione quando l'apparec c hi o non è utilizzato.
• Tenere lontano l'imballaggio dalla portata dei bambini. Smaltire l'imballaggio in conformità alle
normative locali.
• Se danneggiato, il cavo di alimentazione deve venire sostituito da un agente BUFFALO o da un tecnico
qualificato al fine di prevenire eventuali rischi.
Introduzione
Leggere con attenzione il presente manuale. La manutenzione e l'utilizzo c orret ti di questo apparecchio
consentiranno di ottenere le massime prestazioni da questo prodotto BUFFALO.
Contenuto dell'imballaggio
L'imballaggio contiene quanto segue:
BUFFALO garantisce una qualità e un serviz io impeccabil i e assicura che al momento dell 'imballaggio tutt i i
componenti forniti sono integralmente funzionanti e privi di difetti.
Nel caso siano rilevati danni risultanti dal trasporto del prodotto, rivolgersi immediatamente al rivenditore
BUFFALO locale.
• Scaldacaffè BUFFALO da 15 litri
• Cestello del filtro
• Coperchio del cestello
• Vaschetta
• Tubo percolatore
• Manuale di istruzioni
Page 23

18
IT
Funzionamento
1. Rimuovere l'apparecchio dall 'i mballaggio. Assicurarsi
che la pellicola protettiv a e rive stimenti in pl astica siano
interamente rimossi da tutte le superfici.
Preparazione del caffè
1.
Versare acqua fresca fredda nello scaldacaffè, riempiendo
almeno a metà. Utilizzare come guida l'indicatore di livello
sulla parte anteriore dell'apparecchio.
2. Riempire il cestello del filtro con la quantità desiderata
di caffè macinato e coprire con il coperchio del cestello.
3. Inserire il tubo percolatore nello scaldacaffè.
4. Fare scivolare la vaschetta del filtro sul tubo
percolatore. Appoggiare la vaschetta sulle alette del
tubo percolatore.
5. Posizionare il cestello del filtro e il coperchio sul tubo
percolatore e quindi sulla vaschetta.
6. Posizionare il coperchio dello scaldacaffè.
7. Collegare all'alimentazione e accendere per avviare la
preparazione del caffè.
8. La spia di "pronto" si illumina quando il caffè è pronto
per venire erogato. Il caffè viene mantenuto alla
temperatura di servizio dallo scaldacaffè.
9. Posizionare su OFF l'interruttore di alimentazione
quando nello scaldacaffè è presente l'equivalente di 3
tazze di caffè per evitare danni all'elemento riscaldante.
Nota: al primo utilizzo, pulire l'interno e tutte le
parti dell'apparecchio con acqua calda
saponata.
Nota: assicurarsi che la base del tubo
percolatore sia saldamente fissata alla base
dello scaldacaffè.
ATTENZIONE: la superficie esterna
dell'apparecchio diventa bollente durante
l'utilizzo. NON TOCCARE.
Nota: NON lasciare essiccare il liquido
contenuto nell'apparecchio. In questo caso la
garanzia viene invalidata.
Coperchio
Coperchio
del cestello
Cestello del
filtro
Vaschetta
Tubo
percolatore
Indicatore di
livello
Scaldacaffè
Indicatore di
livello
Spia di
pronto
Rubinetto
Interruttore
on/off
Tubo percolatore
Base scaldacaffè
Page 24

19
IT
Servizio
1. Posizionare un contenitore adatto sotto il rubinetto.
2. Tirare il rubinetto per erogare il caffè.
3. Sollevare la maniglia del rubi netto per chiudere il rubinetto.
Svuotamento dell'apparecchio
Scaricare l'apparecchio utilizzando il rubinetto per svuotare lo scaldacaffè.
Pulizia e manutenzione
• Prima di eseguire la pulizia, spegnere e scollegare l'apparecchio dall'alimentazione.
• Utilizzare acqua saponata e un panno inumidit o per pulire la superficie esterna dell'apparecchio.
• Asciugare completament e dopo la pulizia.
Rimozione del calcare
In presenza di acqua dura e dopo un utilizzo prolungato può accumularsi calcare all'i nterno dell'apparecchio.
Per rimuovere il calcare dall'apparecchio:
1. Versare una soluzione di acqua e prodotto anticalcare nel serbatoio.
2. Spazzolare delicatamente l'interno utilizzando una spazzola a setole morbide.
3. Eliminare la soluzione raccolta nella caraffa.
4. Riempire il serbatoio con acqua pulita e accendere l'apparecchio per lavare il sistema e rimuovere
eventuali residui di prodotto anticalcare.
5. L'apparecchio è ora pronto per l'uso.
Risoluzione dei problemi
In caso di guasto dell'erogatore di bevande, controllare quanto segue prima di contattare l'assistenza
telefonica.
Nota: utilizzare un prodotto anticalcare adeguato e seguire sempre le istruzioni indicate
sul contenitore. BUFFALO consiglia di rim uovere le incrostazioni di calcare ogni 3 mesi
o più frequentemente se l'apparecchio è utilizzato in aree con acqua dura.
Guasto Probabile causa Azione
L'apparecchio
non funziona
L'apparecchio non è acceso Controllare che l' apparecchi o sia
correttamente collegato e acceso
La presa e il cavo sono danneggiati Rivolgersi a un tecnico qualificato o a un
agente BUFFALO
Il fusibile della presa è guasto Sostituire il fusibile della presa
Alimentazione Controllare l'alimentazione
Guasto dei circuiti interni Rivolgersi a un tecnico qualificato o a un
agente BUFFALO
Il caffè non
scende dal
cestello del filtro
Non è presente acqua nel serbatoio Spegnere e riempire il serbatoio
Il caffè è troppo compatto nel filtro Spegnere, smuovere il caffè nel filtro e
riprendere l'operazione
Dall'apparecchio
proviene un
forte rumore
Non è presente acqua nel serbatoio Spegnere e riempire il serbatoio
Page 25

20
IT
Specifiche tecniche
Cablaggi elettrici
La spina deve venire collegata a una presa di rete appropriata.
L'apparecchio ha i seguenti cablaggi:
• Filo sotto tensione (colore marrone) a terminale L
• Filo del neutro (colore blu) a terminale N
• Filo di terra (colore verde/giallo) a terminale E
L'apparecchio deve avere un circuito dedicato di messa a terra.
In caso di dubbi, consultare un elettricista qualificato. I punti di isolamento elettrico devono essere li beri da
ostruzioni.
In caso di emergenza, i punti devono essere facilmente raggiungibili qualora sia necessario scollegarli.
Conformità
I componenti BUFFALO sono stati sottop osti a un rigoroso collaudo ai fini della conformità agli standard e
alle specifiche normative previste dalle autorità internazionali, indipendenti e federali.
I prodotti BUFFALO sono stati autorizzati a esporre il seguente simbolo:
Tutti i diritti riservati. È vietata la riproduzione o la trasmissione in alcuna forma, elettronica, meccanica, mediante
fotocopiatura o altro sistema di riproduzione, di qualsiasi parte delle presenti istruzioni senza la previa
autorizzazione scritta di BUFFALO.
Le informazioni contenute sono corrette e accurate al momento della stampa, tuttavia BUFFALO si riserva il diritto
di modificare le specifiche senza preavviso.
Modello Tensione Alimentazio Corrente Capacità
Peso
(a pieno
carico)
Tempo di
preparazione
(a pieno carico)
Dimensioni
h x l x p mm
F249 230V
50Hz
1500W 6,5A 15 litri
(100 tazze)
20 kg circa 60 minuti circa 530 x 360 x
280
Page 26

21
ES
Consejos de Seguridad
• Colóquela sobre una superficie plana, estable.
• Un agente de servicio / técnico cualificado debería llevar a cabo la instalación y cualquier reparación si
se precisa. No retire ningún componente ni panel de servicio de este producto.
• Consulte las Normas Locales y Nacio nales correspondientes a lo siguiente:
• Legislación de Seguridad e Higiene en el Trabajo
• Códigos de Práctica BS EN
• Precauciones contra Incendios
• Normativos de Cableado de la IEE
• Normativas de Construcción
• Asegúrese de que el lugar en el que va a colocarse el aparato podrá soportar su peso cuando esté
lleno.
• NO sumerja el aparato en agua.
• NO deje el aparato desatendido durante el funcionamiento.
• NO utilice el aparato si está lleno en menos de un tercio.
• NO toque las superficies exteriores del aparato. Se calientan durante el funcionamiento.
• Sólo adecuado para uso e n in te r iores.
• Desconoce y desenchufe siempre el aparato cuando no se esté utilizando.
• Mantenga el embalaje lejos del alcance de los niños. Deseche el embalaje de ac uerdo c on las
normativas de las autoridades locales.
• Si el cable eléctrico está dañado, debe ser reemplazado por un agente de BUFFALO o un técnico
cualificado recomendado para evitar cualquier riesgo.
Introducción
Tómese unos minutos para leer este manual. El correcto mantenimiento y manejo de esta máquina
proporcionará el mejor funcionamiento posible de su producto BUFFALO.
Contenido del Conjunto
Se incluye lo siguiente:
BUFFALO se enorgullece de su calidad y servicio y asegura que en el mome nto d el emba la je, e l co nt eni do
se suministró con plena funcionalidad y sin ningún defecto.
Si encontrara algún daño resultante del transporte, póngase en contacto inmediatamente con su
distribuidor BUFFALO.
• Cafetera de 15 litros BUFFALO
• Cesta del filtro
• Tapa de la cesta
• Bandeja de la cesta
•Tubo de la cafetera
•Manual de instrucciones
Page 27

22
ES
Funcionamiento
1. Desembale el aparato. Asegúrese de eliminar bien toda
la película plástica de protección y los revestimientos
plásticos de todas las superficies.
Preparación del café
1. Ponga agua limpia y fría en la cafetera llenándola al
menos hasta la mitad. Utilice el indicador de nivel del
frontal del aparato como indicador.
2. Llene la cesta del filtro con la cantid ad deseada de caf é
molido y cúbrala con la tapa de la cesta.
3. Introduzca el tubo de la cafetera en la cafetera.
4. Introduzca la bandeja de la cesta por encima del tubo
de la cafetera. Fije bien la bandeja sobre las
protuberancias que sobresalen del tubo de la cafetera.
5. Coloque la cesta del filtro y la tapa por encima del tubo
de la cafetera y sobre la bandeja de la cesta.
6. Coloque la tapa sobre la cafetera.
7. Conecte el aparato y gire el interruptor a la posici ón ON
para empezar a preparar el café.
8. La luz "Ready" (Listo) se ilum ina cuan do el c af é ya está
preparado. El café se mantiene a temperatura de
consumo en la cafetera.
9. Gire el interruptor a la posición OFF cuando quede
dentro de la cafetera el equivalente a tres tazas de café
para evitar daños en el elemento de calentamiento.
Nota: antes de utilizarlo por primera vez, limpie
el interior del aparato y todas las piezas con
agua jabonosa.
Nota: asegúrese de que la base del tubo de la
cafetera está bien fijado a la base de la misma.
ADVERTENCIA: el exterior del aparato se
calienta mucho durante su uso. ¡NO LO TOQUE!
Nota: NO deje que el aparato funcione en seco.
Esto invalidaría la garantía.
Tapa
Tapa de la
cesta
Cesta del
filtro
Bandeja de la
cesta
Tubo de la
cafetera
Parte
superior del
indicador de
nivel
Cafetera
Indicador de
nivel
Luz "Ready"
(Listo)
Grifo
Interruptor
On/Off
Tubo de la
cafetera
Base de la
cafetera
Page 28

23
ES
Servicio
1. Coloque un recipiente adecuado debajo del grifo.
2. Tire del grifo hacia usted para empezar a servir el café.
3. Suba el tirador del grifo para cerrarlo.
Vaciado del aparato
Purgue el aparato utilizando el grifo para vaciar la cafetera.
Limpieza, cuidados y mantenimiento
• Desconecte el aparato y desenchúfelo del suministro eléctrico siempre antes de llevar a cabo la
limpieza.
• Utilice agua jabonosa y un paño húmedo para limpiar el exterior del aparato.
• Secar bien después de la limpieza.
Eliminación de la cal
En zonas de aguas duras, puede acumularse cal en el aparato tras un uso prolongado. Para eliminar la cal
del aparato:
1. Vierta una solución de producto para eliminar la cal y agua en el depósito.
2. Limpie el interior con cuidado con un cepil lo de cerdas suaves.
3. Tire la solución recogida del recipiente.
4. Llene el depósito de agua limpia y vuelva a conectar el aparato para purgar el sistema y sacar
cualquier residuo del producto para eliminar la cal.
5. Ahora el aparato está a punto para el funcionamiento.
Resolución de problemas
Si su dispensador de bebidas sufre un f allo, compruebe estos puntos antes de llamar a la línea de asistencia.
Nota: utilice un producto adecuado para eliminar la cal y siga siempre las instrucciones
del recipiente. BUFFALLO recomienda que se elimine la cal de este aparato cada 3 meses
o con mayor frecuencia en zonas de aguas duras.
Fallo Probable Causa Acción
El aparato no
funciona
El aparato no está conectado Compruebe que el aparato esté enchufado
correctamente y conectado
El enchufe y el cable están da ñad os Llame a un técnico cualificado o a un agente de
BUFFALO
El fusible del enchufe se ha fundido Cambie el fusible del enchufe
Suministro eléctrico Compruebe el suministro eléctrico
Fallo del cableado interno
Llame a un técnico cualificado o a un agente de
BUFFALO
El aparato se
enciende pero
no hace café
Se ha acumulado cal en el tubo de
la cafetera
Elimine la cal del aparato
El grifo gotea El grifo se ha aflojado Apriete el tirador del grifo
El indicador de nivel se ha soltado Apriete la parte superior del indicador de nivel
Page 29

24
ES
Especificaciones Técnicas
Cableado Eléctrico
El enchufe tiene que conectarse a una toma eléctrica adecuada.
Este aparato está conectado de la forma siguiente:
• Cable cargado (de color marrón) al terminal marcado como L
• Cable neutro (de color azul) al terminal marcado como N
• Cable de tierra (de color verde / amarillo) al terminal marcado como E
El aparato debe estar conectado a tierra, utilizando un circuito de conexión a tierra especializado. Si tiene
alguna duda, consulte a un electricista cualificado.
Los puntos de aislamiento eléctrico deben mantenerse li bres de cualquier obstrucción. En caso de precisarse
una desconexión de emergencia, deben estar disponibles de forma inmediata.
Cumplimiento
Las piezas BUFFALO han pasado estrictas pruebas de productos para cumplir las especificaciones y normas
reguladoras establecidas por las autoridades internacionales, independientes y federales.
Los productos BUFFALO han sido auto rizados para llevar el símbolo siguiente:
Reservados todos los derechos. Puede estar prohibida la reproducción o transmisión en cualquier forma o por
cualquier medio electrónico, mecánico, de fotocopiado, registro o de otro tipo, de cualquier parte de estas
instrucciones sin la autorización previa y por escrito de BUFFALO.
Se ha hecho todo lo posible para garantizar que todos los datos son correctos en el momento de su publicación; sin
embargo, BUFFALO se reserva el derecho a modificar las especificaciones sin que medie notificación previa.
Modelo Tensión Potencia Corriente Capacidad
Peso
(completo)
Tiempo de
preparación
(completo)
Dimensiones
a x a x p mm
F249 230V
50Hz
1500W 6,5A 15 litros
(100 tazas)
20kg
aprox.
60 minutos
aprox.
530 x 360 x 280
Page 30

25
PT
Conselhos de segurança
• Colocar numa superfície plana e estável.
• Um agente de serviço/técnico qualificado deverá efectuar a instalação e quaisquer reparações, caso
necessário. Não retirar qualquer componente ou painéis de serviço deste produto.
• Consultar e cumprir os regulamentos locais e nacionais no que diz respei to à:
• Legislação de saúde e segurança no local de trabalho
• Códigos de trabalho
• Prevenção de incêndios
• Normas para sistemas eléctricos IEE
• Código de construção
• Coloque o aparelho num lugar que suporta o peso cheio do aparelho.
• NÃO colocar este aparelho em água.
• NÃO deixar este aparelho trabalhando sem supervisão.
• NÃO utilizar este aparelho com menos de um terço da capacidade.
• NÃO tocar nas superfícies exteriores do aparelho. Durante o funcionamento estas superfícies
tornam-se quentes.
• Apenas adequado para uso doméstico.
• Retire a ficha da tomada quando o aparelho não estiver em utilização.
• Mantenha o material da embalagem fora do alcanc e de crianças . O material da embalagem é par a ser
deitado fora respeitando as regras das autoridades locais.
• A fim de evitar situações perigosas, a substituição do s cabos de alim entação danificados dev e ser feit a
por um agente BUFFALO ou um técnico qualificado recomendado.
Introdução
Por favor utilize o tempo necessário para ler atentamente este manual. Uma manutenção e utilização
correcta deste aparelho permitem a melhor capacidade de funcionamento do seu produto BUFFALO.
Conteúdo da embalagem
A embalagem inclui o seguinte:
A BUFFALO orgulha-se pelo serviço e a qualidade dos seus produtos e portanto verifica, durante a fase de
embalagem, o estado funcional e o bom estado do conteúdo fornecido.
Quando confrontado c om quaisquer danos provocados durante o transporte, contacte imediatamente o seu
fornecedor BUFFALO.
• BUFFALO Cafe teira de café - 15 li tros
• Recipiente do filtro
• Tampa do recipiente
• Gaveta do recipiente
•Percolador
•Manual de instruções
Page 31

26
PT
Funcionamento
1. Retire o aparelho da embalagem. Verifique se tirou
todas as tiras de plástico e camadas de protecção das
superfícies.
Fazer café
1. Ponha água fresca na cafeteira, enchendo-o no mínimo
até metade. Utilize com referência o indicador de nível
na parte da frente do aparelho.
2. Coloque a quantidade desejada de café no r ecipiente do
filtro e feche a tampa do recipiente.
3. Introduza o percolador na cafeteira.
4. Coloque a gaveta do recipiente por cima do percolador.
Pouse a gaveta com firmeza nas peças salientes do
percolador.
5. Coloque o recipiente do filtro e a tam pa, por cima do
percolador, na gaveta do filtro.
6. Coloque a tampa na cafeteira de café.
7. Ponha a ficha de electricidade na tomada e o
interruptor na posição On (ligado) para começar a fazer
o café.
8. A luz indicadora 'Ready' acende quando o caf é está
pronto. A cafeteira de café mantém o c afé à
temperatura ideal para servir.
9. Coloque o interruptor principal na posição OFF
(desligado) assim que exista uma quantidade
equivalente a 3 copos de café, a fim de evitar a
danificação do elemento de aquecimento
Nota: antes de utilizar o produto pela primeira
vez deve limpar o aparelho e todos os
componentes com água quente e sabão.
Nota: certifique se a base do percolador está
bem presa na base na cafeteira de café.
AVISO: durante a utilização o exterior do
aparelho fica muito quente. NÃO TOCAR!
Nota: NÃO pode deixar secar totalmente o
aparelho. Isto torna automaticamente a
garantia do aparelho inválido.
Tampa
Tampa do
recipiente
Recipiente
do filtro
Gaveta do
recipiente
Percolador
Capa do
indicador de
nível
Cafeteira
Indicador de
nível
Luz
indicadora
'Ready'
Torneira
Interruptor
On/Off (ligar/
desligar)
Percolador
Base da cafeteira
Page 32

27
PT
Servir
1. Coloque um recipiente adequado por debaixo da torneira do café.
2. Puxe a torneira na sua direcção para encher o recipiente com café.
3. Para fechar a torneira de café, movimente a manivela da torneira para cima.
Esvaziar o aparelho
Utilize a torneira para esvaziar o aparelho.
Limpeza, cuidados & manutenção
• Deve-se sempre desligar o aparelho e retirar a ficha da tomada antes de fazer a limpeza.
• Utilize água com sabão e um pano húmido para limpar o interior do aparelho.
• Secar muito bem após limpeza.
Descalcificar
Em lugares de água dura pode-se formar calcário após utilização prolongada do aparelho. Descalcificar o
aparelho:
1. Coloque uma solução de produto descalcificante e água no depósito de água.
2. Com uma escova suave limpe cuidadosamente o interior do aparelho.
3. Retire a água acumulada no jarro.
4. Encha o depósito com água limpa e ligue o aparelho para retirar quaisquer resíduos da solução
descalcificante do aparelho.
5. O aparelho está pronto para uso.
Resolução de problemas
Se o seu produto BUFFALO apresentar uma falha, consulte a seguinte tabela antes de telefonar à linha de
apoio ou ao seu agente BUFFALO.
Nota: utilize um produto descalcificante adequado e siga sempre as instruções da
embalagem. A BUFFAL O aconselha intervalos de descalcificação do aparelho de 3 meses
e para lugares com água dura intervalos mais curtos.
Problema Causa provável A fazer
O aparelho não
funciona
O aparelho não está ligado Verifique a ligação correcta dos c abos e ligue
o aparelho
A ficha e o cabo estão danificados Chame o agente da BUFFALO ou um técnico
qualificado
O fusível da ficha disparou Substitua o fusível da ficha
Fonte de alimentação Verifique a fonte de alimentação
Erro na cablagem interna Chame o agente da BUFFALO ou um técnico
qualificado
O aparelho liga
mas não faz café
Existe calcário no percolador Deve descalcificar o aparelho
A torneira está a
verter
A torneira está solta Prenda a manivela da torneira
O indicador do nível está solto Aperte a parte superior do indicador do nível
Page 33

28
PT
Especificações técnicas
Cablagem eléctrica
Deve-se utilizar tomadas adequadas para ligar a ficha do aparelho.
O esquema de electricidade deste aparelho é o seguinte:
• Cabo eléctrico (castanho) para o terminal marcado L
• Cabo neutro (azul) para o terminal marcado N
• Cabo terra (verde/amarelo) para o terminal marcado com E
Este aparelho tem que estar ligado à terra através de um circuito de terra.
Consulte um electricista qualificado em caso de dúvidas.
Os pontos eléctricos isolados devem ficar limpos de qualquer obstrução. Estes pontos têm que ser
imediatamente acessíveis caso seja necessári o desligar a electricidade.
Conformidade
As componentes BUFFALO foram submetidas a testes rigorosos a fim de cumprirem as normas e
especificações legais determinadas pelas autoridades internacionais, independentes e nacionais.
Os produtos BUFFALO foram aprovados e trazem o seguinte símbolo:
Todos os direitos reservados. É proibida a reprodução electrónica ou mecânica, ou por qualquer outro meio copiar,
guardar em meios digitais ou transmitir a terceiros estas instruções, seja parcialmente ou na sua totalidade, sem a
autorização prévia de BUFFALO.
Nós nos esforçamos para que no dia de publicação deste manual todos os pormenores sejam correctos, no entanto,
a BUFFALO tem o direito de alterar as especificações sem aviso prévio.
Model Voltagem
Alimenta
ção
Curronte Capacidad
Peso
(cheio)
Tempo de
fazer café
(cheio))
Dimensões
a x l x p mm
F249 230V 50Hz 1500W 6,5A 15 litros
(100 cafés)
aprox.
20kg
aprox. 60
minutos
530 x 360 x 280
Page 34

29
S
Säkerhetsråd
• Placera på en plan stabil yta.
• Ett serviceombud/kvalificerad tekniker skall utföra installation och reparationer om så krävs. Avlägsna
inte några komponenter eller servicepanler på produkten.
• Konsultera lokala och nationella normer för att efterleva följande:
• Lagstiftning om hälsa och säkerhet i arbetet
• BS EN Tillämpningsregler
• Brandförebyggande åtgärder
• IEE Regler för kabeldragning
• Byggregler
• Se till att den plats där apparaten ställs klarar av dess vikt när den är full.
• Doppa INTE ner apparaten i vatten.
• Lämna INTE maskinen oövervakad under drift.
• Använd INTE apparaten fylld me d m indre än en tredjedel.
• Rör INTE apparatens yttre ytor. De blir varma under användning.
• Endast lämpad för bruk inomhus.
• Stäng alltid av apparaten och koppla från elförsörjningen när den inte används.
• Håll allt förpackningsmaterial borta från barn. Kasta allt förpackningsmat e rial i enlighet med de lokala
myndigheternas föreskrifter.
• Om nätsladden skadas, måste den bytas av en BUFFALO-representant eller en kvalificerad tekniker för
att undvika faror.
Inledning
Ta några minuter för att noggrant läsa igenom denna manual. Korrekt underhåll och drift av maskinen
kommer att göra att din BUFFALO-produkt ger bästa möjliga prestanda.
Förpackningsinnehåll
Följande medföljer:
• BUFFALO 15 liters kaffekokare
• Filterhållare
• Hållarlock
• Hållarbricka
• Filtreringsrör
• Bruksanvisning
Håll allt förpackningsmaterial åtskiljt från barn. Släng förpackningsmaterialet i enlighet med loka
myndigheters regleringar.
Om elsladden är skadad måste den bytas ut av en BUUFALO-representant eller en rekommenderad
kvalificerad tekniker för att undvika risker.
Page 35

30
S
Drift
1. Ta ut apparaten från förpackningen. Se till att all
skyddande plastfilm och plastbeläggning har tagits bort
ordentligt från alla ytor.
Brygga kaffe
1. Häll frisk kallt vatten i kokaren; minst till hälften. Se
nivåvisaren på apparatens framsida som en vägledning.
2. Fyll filterhållaren med önskad mängd malt kaffe och
lägg på hållarlocket.
3. Sätt i filtreringsröret i kokaren.
4. Fäst hållarbrickan över filtreringsröret. Vila brickan
säkert på kanterna som skjuter ut från filtreringsröret.
5. Placera filterhållaren och lock et öv er filtreri ngsrör et och
på hållarbrickan.
6. Sätt på locket på kaffekokaren.
7. Anslut till elförsörjningen och sätt på för att börja
brygga kaffet.
8. "Färdig"-ljuset tänds när kaffet har bry ggts. Kaffet hålls
på serveringstemperatur i kokaren.
9. Stäng AV strömbrytare n när mot svarande 3 koppar
kaffe finns i kokaren för att undvika att
uppvärmningselementet skadas.
Obs! Rengör apparaten och alla dess delar med
varmt tvålvatten innan du använder den för
första gången.
Obs! Se till att filtreringsrörets bas är korrekt
placerad i kaffekokarens bas.
VARNING: Apparatens utsida blir väldigt varm
under användning. RÖR EJ!
Obs! Låt INTE apparaten koka torr. Detta
ogiltigförklarar garantin.
Sked
Hållarlock
Filterhållare
Hållarbricka
Filtreringsrör
Nivåvisarens
övre del
Kokare
Nivåvisare
Färdig-ljus
Tappkran
På/Av-
kopplare
Filtreringsrör
Kokarens bas
Page 36

31
S
Servera
1. Placera en lämplig behållare under tappkranen.
2. Dra kranen mot dig för att börja hälla upp kaffet.
3. Lyft upp kr anhandtaget för at t stänga kranen.
Tömma apparaten
Dränera apparaten genom att använda tappkranen för att tömma kokaren.
Rengöring, omvårdnad och underhåll
• Stäng alltid av och koppla från app aratens eltillförsel innan rengörin g.
• Använd tvålvatten och en fuktig trasa för att rengöra apparatens yttre.
• Torka noggrant efter rengöring.
Avkalkning
I områden med hårt vatten kan kalkrester byggas upp inuti apparaten efter en längre tids användning. Att
kalka av apparaten:
1. Håll en blandning av avkalkningsmedel och vatten i behållaren.
2. Borsta insidan försiktigt me d en mjuk borste.
3. Töm ut lösningen som samlats i kannan.
4. Fyll behållaren med rent v atte n och sätt på appar aten igen f ör att spola igen om systemet oc h avlägsna
eventuella rester av avkalkningsmedel.
5. Apparaten är nu redo att användas.
Felsökning
Om din BUFFALO-apparat påvisar något fel, kontrollera fö rst tabellen innan du ringer till hjälplinjen eller din
BUFFALO-återförsäljare.
Obs! Använd ett lämpligt avkalkningsmedel och följ alltid instruktionerna på behållaren.
BUFFALO rekommenderar att denna apparat kalkas av var tredje månad eller oftare i
områden med hårt vatten.
Fel Möjlig orsak Åtgärd
Apparaten fungerar
inte
Apparaten är inte påslagen Kontrollera att apparaten är korrekt
ansluten och påslagen
Kontakt och ledn in g är skadade Ring BUFFALO-representant eller
kvalificerad tekniker
Säkring i kontakten har gått Byt ut säkringen
Strömtillförsel Kontrollera strömtillförseln
Internt kabeldragningsfel Ring BUFFALO-representant eller
kvalificerad tekniker
Apparaten startar men
brygger inte kaffe
Kalkavlagringar i filtr e rin gs r öret Kalka av appara t e n
Kranen läcker Kranen är lös Dra åt kranhandtaget
Nivåvisaren är lös Dra åt nivåvisarens överdel
Page 37

32
S
Tekniska specifikationer
Elektriska kablar
Kontakten måste vara ansluten till ett lämpligt eluttag.
Denna apparat har följande kablar:
• Elektrisk kabel (brun) till uttag markerat L
• Neutral kabel (blå) till uttag markerat N
• Jordkabel (grön/gul) till uttag markerat E
Denna apparat måste vara jordad, och bruka en dedikerad jordad krets.
Vid tveksamheter rådfråga en kvalificerad elektriker.
Elektriska isoleringspunkter måste hållas fria från hinder. I händelse av urkoppling vid nödfall krävs, måste
de vara lättåtkomliga.
Tillmötesgående
BUFFALO-delarna har genomgått strikt produkttestning för att tillmötesgå reglerande normer och
specifikationer utsatta av internationella, oberoende och statliga myndigheter.
BUFFALO-produkterna har godkänts för att bära följande symbol:
Alla rättigheter reserverade. Ingen del av dessa instruktioner får framställas eller överföras i någon form eller på
något sätt, elektroniskt, mekaniskt, fotokopieras, spelas in eller på annat sätt, utan tidigare skriftligt tillstånd från
BUFFALO.
Vi gör allt vi kan för att försäkra att alla detaljer är korrekta då informationen trycks, men, BUFFALO förbehåller
sig rätten att ändra specifikationerna utan tidigare meddelande.
Modell Spänning Kraft Ström Capacitet
Vikt
(full)
Bryggtid (full)
Mått
h x b x d mm
F249 230V 50Hz 1500W 6,5A 15 litres
(100 koppar)
20 kg
ung.
60 minuter
ung.
530 x 360 x 280
Page 38

33
DK
Sikkerhedstips
• Anbring apparatet på en jævn, stabil overflad e.
• Installation og reparation skal udføres af en serviceagent/kvalificeret tekniker, hvis det bliver
nødvendigt. Fjern ikke komponenter eller servicepaneler på dette produkt.
• Check de lokale og nationale standarder for at imødekomme det følgende:
•Sikkerhed og sundhed på arbejdspladsen
•BS EN Regler for god praksis
•Brandforholdsregler
•IEE Strømkabelregulativer
•Bygningsvedtægter
• Sørg for at det sted, hvor apparatet placeres, kan bæ re d e ts vægt, når det er fuldt.
• Kom IKKE apparatet i vand.
• Gå IKKE fra apparatet, mens det er i brug.
• Anvend IKKE apparatet, når det er mindre end 1/3 fuld.
• Rør IKKE ved apparatets yderflader. De bliver meget varme under brug.
• Kun egnet til indendørs brug.
• Sluk altid for apparatet og tag stikket ud af stikkontakten, når apparatet ikke er i brug.
• Opbevar al emballage utilgængeligt for børn. Kasser emballagen i henhold til de lokale love og
bestemmelser.
• Hvis strømkablet er beskadiget, skal det udskiftes af en BUFFALO agent eller en anbefalet kvalificeret
tekniker for at undgå fare.
Introduktion
Brug et par minutter til at læse denne vejledning omhyggeligt igennem. Korrekt vedligeholdelse og drift af
denne maskine vil give dit BUFFALO produkt den bedst mulige ydelse.
Emballagens indhold
Følgende er inkluderet:
BUFFALO er stolte vores kvalitet og service, der sikrer at det leverede indhold er fuldt funktionelt og fri for
skader ved pakning.
Skulle du alligevel opdage skader, som resultat af transporten, bedes du kontakte din BUFF ALO forhandler
med det samme.
• BUFFALO 15 liter kaffemaskine
•Filterholder
•Holderlåg
• Holderbakke
•Perkolatorrør
•Brugsanvisning
Page 39

34
DK
Brug
1. Fjern apparatet fra indpak ningsmaterialet. Sørg for at al
beskyttende plastfolie og plastbelægninger fjernes
omhyggeligt fra alle overflader.
Brygning af kaffe
1. Hæld frisk koldt v and i maskinen; den skal minds t fyldes
halvt op. Brug niveauind ik a toren på forsiden af
apparatet som vejledning.
2. Fyld filterholderen med d en ønskede mængde malede
kaffebønner og sæt låget på holderen.
3. Sæt perkolatorrøret ned i kaffemaskinen.
4. Sæt holderbakken over perkolatorrøret, Lad bakken
hvile godt på fremspringene på perkolatorrøret.
5. Anbring filterholderen og låget over perkolatorrøret og
på holderbakken.
6. Sæt låget på kaffemaskinen.
7. Sæt stikket i stikkontakten og tænd for at begynde at
brygge kaffe.
8. 'Klar'-lampen lyser, når kaffen e r færdig. Maskine n
holder kaffen på den rigtige temperatur.
9. Sluk for tænd/sluk-knappen, når der er det tilsvarende
til 3 kopper kaffe i maskinen for at undgå at beskadige
varmeelementet.
Bemærk: Før apparatet tages i brug første
gang, skal indersiden af apparatet og alle dele
vaskes med varmt sæbevand.
Bemærk: Sørg for at den nederste del af
perkolatorrøret sidder godt fast i bunden af
kaffemaskinen.
ADVARSEL: Ydersiden af apparatet bliver
meget varm under brug. PAS PÅ IKKE AT RØRE
VED DEN!
Bemærk: Lad ALDRIG apparatet koge tør. Sker
dette, bortfalder garantien.
Ske
Holderlåg
Filterholder
Holderbakke
Perkolatorrør
Niveauindikat
ors øverste del
Kaffemaskine
Niveauindikator
Klar-lampe
Hane
Tænd/sluk-
konta
Perkolatorrør
Kaffemaskinesokkel
Page 40

35
DK
Servering
1. Anbring en passende beholder under hanen.
2. Man skal trække hanen mod sig for at begynde at skænke kaffen.
3. Løft hanehåndtaget for at luk k e hanen.
Sådan tømmes apparatet
Apparatet tømmes ved hjælp af hanen.
Regnøring, pleje og vedligeholdelse
• Sluk altid for apparatet og tag stikket ud af stikkontakten inden rengøring.
• Tør apparatets yderside af med sæbevand og en fugtig klud.
• Tør grundigt efter rengøring.
Afkalkning
I områder med hårdt vand kan apparatet efter længere tids brug trænge til at blive afkalket. Sådan afkalkes
apparatet:
1. Hæld en opløsning af afkalkningsmiddel og vand i beholderen.
2. Rengør forsigtigt indersiden med en bl ød børste.
3. Hæld opløsningen i beholderen væk.
4. Fyld beholderen med rent vand og tænd for apparatet igen for at skylle systemet igen n em og f jern e
alle rester af afkalkningsmidlet.
5. Apparatet er nu parat til brug.
Fejlfinding
Hvis der opstår en fejl i dispenseren, skal man kontrollere følgende punkter, før man ringer til
hjælpetelefonen.
Bemærk: Brug et passende afka lkningsmiddel, og følg altid vejledningen på
emballagen. BUFFALO anbe fal e r, at apparatet afkalkes hver 3. må ned e ll e r hy ppige re i
områder med hårdt vand.
Fejl Mulig årsag Løsning
Apparatet virker
ikke
Apparatet er ikke tændt Kontroller, at apparatet er sat rigtigt i
stikkontakten og er tændt
Stik og ledning er beskadiget Kontakt BUFFALO agenten eller en
kvalificeret tekniker
En sikring i stikket er sprunget Udskift stiksikringen
Strømforsyning Kontroller strømforsyningen
Intern ledningsfejl Kontakt BUFFALO agenten eller en
kvalificeret tekniker
Apparatet
tændes, men
laver ikke kaffe
Perkolatorrøret er tilstoppet af kalk Afkalk apparatet
Hanen er utæt Hanen er blevet løs Stram hanehåndtaget
Niveauindikatoren er blevet løs Stram niveauindikatorens øverste del
Page 41

36
DK
Tekniske specifikationer
El-kabler
Stikket skal tilsluttes til en passende hovedkontakt.
Apparatet er kabelført som følger:
• Strømførende ledning (brun) til terminal L
• Neutral ledning (blå) til terminal N
• Jordledning (grøn/gul) til terminal E
Dette apparat skal være jordforbundet med et fast fejlstrømsrelæ.
Spørg en autoriseret elektriker i tvivlstilfælde.
Elektriske isolationspunkter skal holdes fri af blokeringer. I nødstilfælde skal de være tilgængelige for
afbrydelse.
Overensstemmelse
BUFFALO delene har gennemgået strenge produkttests for at opfylde normer, standarder og
specifikationer, der er fastsat af internationale, uafhængige og føderale autoriteter.
BUFFALO produkterne er blevet godkendt til at bære følgende symbol:
Med forbehold for alle rettigheder. Ingen del af disse anvisninger må produceres eller transmitteres i noget format
eller på nogen måde, hvad enten det drejer sig om elektronisk, mekanisk, fotokopiering, lagring på edb eller andet,
før der er blevet forudindhentet skriftlig tilladelse hertil fra BUFFALO.
Der er blevet gjort alle bestræbelser på at sikre, at oplysningerne er korrekte på trykningstidspunktet, men
BUFFALO forbeholder sig ret til at ændre specifikationerne uden varsel.
Model Spænding Strøm Strømstyrke Kapacitet
Vægt
(fuld)
Bryggetid
(fuld)
Mål h x b x d
mm
F249 230V 50Hz 1500W 6,5A 15 liter
(100 kopper)
ca. 20kg ca. 60
minutter
530 x 360 x 280
Page 42

37
N
Sikkerhetstips
• Plasser på en vannrett og stabil flate.
• Installasjon og all reparasjon skal utføres av en serviceagent eller en kyndig tekniker. Komponenter
eller inspeksjonsdeksler må ikke fjernes på dette produktet.
• Rådfør deg med lokale og nasjonale standarder for å oppfylle følgende:
• HMS-lovgivningen (Helse/Miljø/Sikkerhet)
• Bransjestandard BS EN
• Forholdsregler mot brann
• IEE-forskrifter for tilkopling
• Byggeregler
• Forsikre deg om at flaten som apparatet skal hvile på tar vekten av apparatet når det er fullt.
• IKKE senk apparatet ned i vann.
• IKKE bruk apparatet uten tilsyn.
• IKKE bruk når apparatet er mindre enn en tredjedel fullt.
• IKKE ta på apparatet utvendig da overflatene blir varme under bruk.
• Kun egnet til innendørs bruk.
• Slå alltid apparatet av og frakople strømmen når det ikke er i bruk.
• Hold all emballasje unna barn. Emballasjen skal deponeres i henhold til forskrifter bestemt av
myndighetene på stedet.
• Hvis strømledningen er skadet skal den skiftes ut av en BUFFALO-agent eller en kyndig tekniker for å
unngå fare.
Innledning
Vennligst ta deg tid til å lese nøye gjennom denne håndboka. Korrekt vedlikehold og bruk av ismaskinen vil
gi best mulig ytelse på ditt BUFFALO-produktet.
Pakkeinnhold
Følgende er inkludert:
BUFFALO er stolt av sin kvalitet og service, og garanterer at da innholdet ble pakket var det fullstendig
funksjonelt og uten skade.
Skulle du finne noe som helst skade som et resultat av transitt, vennligst ta omgående kontakt med
BUFFALO-forhandleren på stedet.
• BUFFALO 15 liters urnetrakter
•Filterkurv
•Kurvdeksel
•Kurvbrett
• Filtreringsrør
• Brukerhåndbok
Page 43

38
N
Bruk
1. Ta apparatet ut av emballasjen. Sjekk at all plastfilm og
plastbelegg for beskyttelse er ordentlig fjernet fra alle
overflater.
Brygge kaffe
1. Fyll urnen med ferskt kaldt vann til den er halvfull. Bruk
nivåindikatoren foran på apparatet som veiledning.
2. Fyll filterkurven med ønsket mengde malt kaffe og sett
på kurvdekslet.
3. Monter filtreringsrøret i urnen.
4. Monter kurvbrettet over filtreringsrøret. La brettet hvile
presist på ørene som stikker ut av filtreringsrøret.
5. Plasser filterkurven og dekslet o ver filtreringsrøret og på
kurvbrettet.
6. Sett lokket på urnetrakteren.
7. Kople til strømtilførselen og slå apparatet På for å
brygge kaffe.
8. Klar-lampen er tent når kaffen er bry gget. Kaff en holdes
på serveringstemperatur i urnen.
9. Når det er kaffe igjen på urnen som tilsvarer 3 kopper,
skal strømbryteren slås Av for å forebygge skade på
varmeelementet.
Merk: Før apparatet brukes første gangen, gjør
det rent innvendig og alle deler i varmt
såpevann.
Merk: Forsikre deg om at filtreringsrøret er
ordentlig montert i sokkelen på urnetrakteren
ADVARSEL: IKKE TA PÅ APPARATET utvendig
da overflatene blir meget varme under bruk!
Merk: La IKKE apparatet koke tørt. Dette vil
ugyldiggjøre garantien.
Lok
Kurvdeksel
Filterkurv
Kurvbrett
Filtreringsrør
Nivåindikator
-topp
Urne
Nivåindikator
Klar-lampe
Kran
Av/På-bryter
Filtreringsrør
Urnesokkel
Page 44

39
N
Servering
1. Plasser en egnet beholder under kranen.
2. Trekk kranen mot deg for å ha i kaffe.
3. Kranen stenges ved å heve hendelen.
Tømme apparatet
Drener urnetrakteren ved å bruke kranen.
Rengjøring, stell og vedlikehold
• Slå alltid av og frakople strø mt ilførselen til apparatet før rengjøring.
• Bruk såpevann og en fuktig klut for å rengjøre apparatet utvendig.
• Tørk grundig etter rengjøring.
Fjerning av kjelstein
På steder med hardt vann kan det etter lengre bruk bygge seg opp kalk i apparatet. For å fjerne kjelstein i
apparatet:
1. Ha en oppløsning med avskallingsmiddel og vann i beholderen.
2. Børst forsiktig innvendig med en kost som har m y k bus t .
3. Tøm ut oppløsningen som er samlet opp i glasskannen.
4. Fyll beholderen med rent vann og slå apparatet På igjen for å skylle systemet og fjerne rester fra
avskallingsmidlet.
5. Apparatet er nå klart til bruk.
Feilsøking
Hvis kjøledispenseren utvikler feil, sjekk følgende punkter før du ringer hjelpelinjen.
Merk: Bruk egnet avskallingsmiddel og følg alltid instruksene på beholderen.
BUFFALO anbefaler at apparatet fjernes for kjelstein hver 3. måned eller hyppigere på
steder med hardt vann.
Feil Sannsynlig årsak Aksjon
Ismaskinen
fungerer ikke
Ismaskinen er ikke slått på Sjekk at støpslet på ismaskinen er plugget
inn korrekt og at kontakten er slått på
Støpsel og ledning er skadet Ring BUFFALO-agenten eller en kyndig
tekniker
Sikringen i støpslet har gått Skift ut sikringen i støpselet
Strømtilførsel Sjekk strømtilførselen
Intern koplingsfeil Ring BUFFALO-agenten eller en kyndig
tekniker
Apparatet slår
seg På men
brygger ikke
kaffe
Oppbygging av kjelstein i
filtreringsrøret
Fjern apparatet for kjelstein
Kranen lekker Kranen er løs Skru til håndtaket på kranen
Nivåindikatoren er løs Skru til toppen på nivåindikatoren
Page 45

40
N
Tekniske spesifikasjoner
Elektrisk tilkopling
Støpselet skal tilkoples en passende strømkontakt.
Enheten er koplet som følger:
• Strømførende ledning (brun) - koplingspunkt merket L
• Nøytral ledning (blå) - koplingsp unkt merket N
• Jordledning (grønn) - koplingspunkt merket E
Denne enheten skal ha jording ved å bruke en dedisert jordingskrets.
Hvis i tvil, rådfør deg med en kyndig elektriker.
Elektriske isolasjonspunkter / skillebrytere skal være uhindret. I et nødstilfelle hvor det er nødvendig med
frakopling, skal de alltid være tilgjengelige.
Samsvar
Deler brukt av BUFFALO har gjennomgått streng produkttesting for å være i samsvar med regulative
standarder og spesifikasjoner fastlagt av internasjonal, uavhengig og føderale myndigheter.
BUFFALO-produkter har blitt godkjent for å bær:
Vi tar forbehold om alle rettigheter. Ikke noen del av disse instruksjonene må fremstilles eller oversendes i noen
form eller med noen midler, elektronisk, mekanisk, fotokopiert, nedskrevet eller på noen annen måte, uten at
BUFFALO har gitt skriftlig tillatelse på forhånd.
Det er truffet omfattende tiltak for å sikre at alle detaljer er korrekte på tidspunktet for trykking, men BUFFALO
forbeholder seg retten til å endre spesifikasjoner uten forvarsel.
Modell Spenning Strøm Strømstyrke Kapasitet
Vekt
(full)
Bryggetid
(full)
Mål
h x w x d mm
F249 230V 50Hz 1500W 6,5A 15 liter
(100 kopper)
ca. 20 kg ca. 60 min. 530 x 360 x
280
Page 46

41
FIN
Turvallisuusvihjeitä
• Aseta laite tasaiselle, vakaalle pinnalle.
• Huoltoedustajan/pätevän huoltomiehen tulisi suorittaa asen nus ja tarvittaessa kaikki korjaustyöt. Älä
irrota mitään tämän laitteen osia tai huoltopan eelia.
• Katso tietoja paikallisista ja kansallisista standardeista varmistaaksesi, että seuraavia määräyksiä
noudatetaan:
•Työterveys- ja turvallisuuslainsäädäntö
•BS EN-mukaiset ohjeet
•Paloturvallisuusmääräykset
•IEE-johdotusmääräykset
•Rakennusmääräykset
• Varmista, että laite on paikalla, joka kannattaa sen painon, kun se on täynnä.
• ÄLÄ upota laitetta veteen.
• ÄLÄ jätä laitetta ilman valvontaa, kun se toimii.
• ÄLÄ käytä tätä laitetta, kun sen täyttöaste on alle yhden kolmanneksen.
• ÄLÄ kosketa laitteen ulkopintoja. Ne tulevat kuumiksi käytön aikana.
• Sopii ainoastaan käytettäväksi sisätiloi ss a .
• Kytke laite aina pois päältä ja irrota se verkkovi rrasta, kun sitä ei käytetä.
• Pidä kaikki pakkausmateriaali poissa lasten ulottuvilta. Hävitä pakkausmateriaali paikallisten
viranomaisten määräysten mukaisesti.
• Jos virtajohto on vaurioitunut, saa sen vaihtaa uuteen ainoastaan BUFFALO-edustaja tai valtuutettu
pätevä huoltomies vaarojen välttämiseksi.
Johdanto
Käytä muutama minuutti tämän ohjekirjan lukemiseen huolell ise st i läpi . Kun tätä BUFFALO-laitetta
huolletaan ja käytetään oikein, saadaan siitä paras mahdollinen hyöty.
Pakkauksen sisältö
Pakkaus sisältää seuraavat:
BUFFALO on ylpeä laadusta ja palvelusta varmistaen, että laitetta pakattaessa pakkauksen sisältö on täys in
kunnossa ja ilman vikoja.
Mikäli laite on kuljetuksen takia vauri oitunut, ota välittömästi yhteyttä BUFFALO -edustajaan.
• BUFFALO 15 litran kahvinke itin
•Suodatinteline
• Telineen kansi
• Telineen kannatin
• Perkolaattoriputki
•Ohjekirja
Page 47

42
FIN
Käyttö
1. Ota laite pakkauksesta. Varmista, että kaikki suojaavat
muovikalvot on poistettu kaikilta pi nnoilta.
Kahvin valmistus
1. Kaada pannuun raikasta kylmää vettä ja täytä pannu
ainakin puolilleen. Käytä laitteen edessä olevaa pinnan
osoitinta täytettäessä.
2. Täytä suodatinteline halutull a määrällä jauhettua kahvia
ja peitä teline kannella.
3. Aseta perkolaattoriputki pannuun.
4. Pujota telineen kannatin perkolaattoriputken yli. Aseta
kannatin tukevasti perkolaattoriputkesta ulos tulevien
tukien varaan.
5. Aseta suodatinteline ja kansi perkolaattoriputken päälle
ja telineen kannattimeen.
6. Aseta kahvipannun kansi paikalleen.
7. Kytke laite verkkovirtaan ja kytke se päälle kahvin
valmistuksen aloittamiseksi.
8. 'Valmis' -v alo syttyy, kun kahvi on valmista. Pannu pitää
kahvin tarjoilulämpötilassa.
9. Käännä virtakytkin POIS PÄÄLTÄ, kun pannussa on
jäljellä 3 kuppia vastaava määrä, jotta estettäisiin
kuumennuselementille mahdollisesti aihe utuvat vauriot.
Huom.: Puhdista ennen ensimmäistä
käyttökertaa laitteen sisäosa j a kaikki muut
osat lämpimällä saippuavedellä.
Huom.: Varmista, että perkolaattoriputken
alaosa on kiinnitetty hyvin kahvipannun
pohjaan.
VAROITUS: Laitteen ulkopuoli tulee erittäin
kuumaksi käytön aikana. ÄLÄ KOSKE SIIHEN!
Huom.: ÄLÄ anna laitteen kiehua kuiviin. Se
tekee takuun mitättömäksi.
Kansi
Telineen
kansi
Suodatinteline
Telineen
kannatin
Perkolaattori
putki
Pinnan
osoittimen
yläpää
Pannu
Pinnan
osoitin
Valmis-valo
Hana
Päälle/pois
päältä-kytkin
Perkolaattoriputki
Pannun alusta
Page 48

43
FIN
Ta r j o i l u
1. Aseta sopiva astia hanan alle.
2. Vedä hanaa itseesi päin, jolloin kahvia kaadetaan laitteesta.
3. Nosta hanan kahvaa, kun haluat sulkea hanan.
Laitteen tyhjentäminen
Tyhjennä laite käyttämällä hanaa.
Puhdistus, hoito & huolto
• Kytke laite aina pois päältä ja irrota se verkkovirrasta ennen puhdistamista.
• Käytä saippuavettä ja kosteaa pyyhettä laitteen ulkopuolen puhdistamiseen.
• Kuivaa perusteellisesti puhdistamisen jälkeen.
Kalkin poisto
Alueilla, joilla vesi on kovaa, voi kalkk ia kertyä laitteeseen pitkän käyttöajan jälkeen. Kalkki poistetaan
laitteesta seuraavasti:
1. Kaada kalkinpoistoaineen ja veden liuos säiliöön.
2. Harjaa sisäosaa varovasti pehmeällä harjalla.
3. Heitä kannuun kertynyt liuos pois.
4. Täytä säiliö puhtaalla vedellä ja kytke laite takaisin päälle järjestelmän huuhtelemiseksi ja poistaaksesi
mahdolliset kalkinpoistoaineen jäämät.
5. Laite on nyt käyttövalmis.
Vianetsintä
Jos BUFFALO -laitteeseen tulee vika, tarkista seuraavassa taulukossa esitetyt seikat ennen kuin otat
yhteyttä puhelinpalveluun tai BUFFALO -edustajaan.
Huom.: Käytä sopivaa kalkinpoistoainetta ja noudata aina pakkauksessa annettuja
ohjeita. BUFFALO suosittelee, että laitteesta poistetaan kalkki joka 3. kuukausi tai
vieläkin useammin alueilla, joilla on kova vesi.
Vika Mahdollinen aiheuttaja Toimenpide
Laite ei toimi Laitetta ei ole kytketty päälle Tarkista, että laite on liitetty verkkovirtaan
oikein ja kytketty päälle
Pistotulppa ja johto ovat vioittuneet Soita BUFFALO -edustajalle tai pätevälle
huoltomiehelle
Pistotulpassa oleva sulake on palanut Vaihda sulake uuteen
Virransyöttö Tarkasta virransyöttö
Sisäinen vika johdoissa Soita BUFFALO -edustajalle tai pätevälle
huoltomiehelle
Laite kytkeytyy
päälle, mutta kahvia
ei valmistu
Kalkkikive ä on kertynyt
perkolaattoriputkeen
Poista kalkki laitteesta
Hana vuotaa Hana on löystynyt Kiristä hanan kahvaa
Pinnan osoitin on löystynyt Kiristä pinnan osoittimen yläosa
Page 49

44
FIN
Tekniset tiedot
Sähköjohdot
Pistotulppa on liitettävä sopivaan verkkovirtapistokkeeseen.
Laitteen johdot liitetään seuraavasti:
• Jännitteellinen johto (väriltään ruskea) napaan, jossa on merkintä L
• Neutraali johto ( vär iltään sininen) napaan, jossa on merkintä N
• Maadoitusjohto (väriltään vihreä/keltainen) napaan, jossa on merkintä E
Tämä laite on maadoitettava käyttämällä tarkoitukseen varattua maadoituspiiriä.
Jos et ole varma asiasta, kysy neuvoa pätevältä sähkömieheltä.
Sähkövirran eristyspisteet on pidettävä vapaina kaikista esteistä. Mikäli laite joudutaan hätätapauksessa
kytkemään verkkovirrasta, on niihin päästävä help osti.
Vaatimustenmukaisuus
BUFFALO-osat ovat käyneet läpi tark an tuotetestauksen, jotta ne noudattaisivat kansainvälisten, itsenäisten
ja valtiollisten viranomaisten asettamia säädöksiä ja vaatimuksia.
BUFFALO-tuotteet on hyväksytty merkittäviksi seuraavilla merkinnöillä:
Kaikki oikeudet pidätetään. Mitään näiden ohjeiden osaa ei saa jäljentää tai lähettää missään muodossa tai millään
tavalla, elektronisesti, mekaanisesti, valokopioimalla, nauhoittamalla tai jollain muulla tavalla ilman, että BUFFALO
on antanut etukäteisen luvan.
Kaikki mahdollinen on tehty sen hyväksi, että annetut tiedot olisivat aina painatushetkellä oikeita, mutta BUFFALO
varaa itselleen oikeuden muuttaa tietoja siitä erikseen ilmoittamatta.
Malli Jännite Teho Virta Tilavuus
Paino
(täysinäisenä
Kahvin
valmistusaika
(täysinäisenä)
Mitat
k x l x s mm
F249 230V
50Hz
1500W 6,5A 15 litraa
(100 kuppia)
20kg likim. 60 minuuttia
likim.
530 x 360 x 280
Page 50

DECLARATION OF CONFORMITY
• Conformiteitsverklaring • Déclaration de conformité • Konformitätserklärung • Dichiarazione di conformità •
• Declaración de conformidad • Declaração de conformidade • Överensstämmelseförsäkran •
• Overensstemmelseserklæring • Konformitetserklæring • Selvitys vaatimustenmukaisuudesta •
Equipment Type • Uitrustingstype • Type d'équipement • Gerätetyp •
Tipo di apparecchiatura • Tipo de equipo • Tipo de equipamento • 15 litre Coffee Percolator
Enhetstyp • Udstyrstype • Type utstyr • Laitteen tyyppi:
Model • Modèle • Modell • Modello • Modelo: F249
Serial Number • Serienummer • Numéro de série • Seriennummer •
Numero di serie • Número de serie • Número serial • Sarjanumero:
Year of Manufacture • Fabricagejaar • Date de fabrication • Herstellungsjahr •
Anno di produzione • Año de fabricación • Ano de fabricação • Tillverkningsår •
Produktionsår • Produksjonsår • Valmistusvuo si:
Application of Council Directives(s) • Toepassing van Europese Richtlijn(en) • EMC DIRECTIVE 89/336/EEC
Application de la / des directive(s) du Conseil: • Anwendbare EU-Richtlinie(n) • EMC DIRECTIVE 92/31/EEC
Applicazione delle Direttive: • Aplicación de la(s) directiva(s) del consejo • EMC DIRECTIVE 93/68/EEC
Aplicação de directiva(s) do Conselho • Tillämpning av rådets direktiv • LOW VOLTAGE DIRECTIVE 73/23/EEC
Gennemførelse af Rådets Direktiv(er) af • Applisering av kommuneforskrift(er) •
Neuvoston direktiivi(e)n soveltaminen:
Standards • Standaarden • Normes • Normen • Standard • Estándares •
Normas
• Normer • Standarder • Standardit
:
Producers Name
• Naam fabrikant • Nom du prodocteur • Name des Herstellers •
Nome del produttore • Nombre del fabricante • Nome do fabricante •
BUFFALO
Tillverkarens namn • Fabrikantens navn • Produsentens navn • Valmistajan nimi:
Producers Address • Adres fabrikant • Adresse du prodocteur •
Anschrift des Herstellers • Indirizzo del produttore • Dirección del fabricante •
Endereço do fabricante • Tillverkarens adress • Fabrikantens adresse •
Produsentens adresse • Valmistajan osoite:
I, the undersigned, hereby declare that the equipment specified above conforms to the above Directive(s) and Standard(s).
Ik, de ondergetekende, verklaar hierbij dat de hierboven gespecificeerde uitrusting goedgekeurd is volgens de bovenstaande Richtlijn(en) en
Standaard(en).
Je soussigné, confirme la confor mité de l'équipement cité dans la présente à la / aux Directive(s) et Norme(s) ci-dessus
Ich, der/die Unterzeichnende, erkläre hiermit, dass das oben angegebene Gerät der/den oben angeführten Richtlinie(n) und Norm(en)
entspricht.
Il sottoscritto dichiara che l'apparecchiatura di sopra specificata è conforme alle Direttive e agli Standard sopra riportati.
El abajo firmante declara por la presente que el equipo arriba especificado está en conformidad con la(s) directiva(s) y estándar(es) arriba
mencionadas.
Eu, o abaixo-assinado, declaro que o equipamento anteriormente especificado está em conformidade com a(s) anterior(es) Directiva(s) e
Norma(s).
Jag, den undertecknande, betygar härmed att ovan specificerade enhet överrensstämmer med ovan direktiv och norm(er).
Jeg, undertegnede, erklærer herm ed at udstyret, der er specificeret ovenfor opfylder de ovenstående direktive(r) og standard(er).
Jeg, undertegnede, erklærer herved at utstyret som er spesifisert ovenfor er i overensstemmelse med ovennevnte forskrift(er) og standard(er).
Minä allekirjoittanut vakuutan täten, että yllä mainittu laite noudattaa yllä olevaa(olevia) direktiiviä(direktiivejä) ja standardia(standardeja).
Date • Data • Date • Datum • Data • Fecha • Data • Dato • Päivämäärä : 19/01/2007
Signature • Handtekening • Signature • Unterschrift
•
Firma • Firma • Assinatura • Underskrift • Allekirjoitus:
Full Name • Volledige naam • Nom et prénom • Vollständiger Name •
Nome completo • Nombre completo • Nome por extenso • Richard Cromwell
Fullständigt namn • Fulde navn • Fullstendig navn • Täydellinen nimi:
Position • Functie • Fonction • Position • Qualifica • Posición • Função • Marketing Director
Befattning • Stilling • Asema:
Fourth Way
Avonmouth
Bristol
BS11 8TB
United Kingdom
EN55014-1:1997, EN61000-3-2:1995+a1:1998+A2:1998,
EN61000-3-3:1995, EN55014-2:1997,
EN61000-4-2:1995+A1:1998, EN61000-4-4:1995,
EN61000-4-5:1995, EN61000-4-6:1996,
EN61000-4-11:1994, EN60335-1:94+A11:95+A1,
A12:96+A13, A14:98+A2, A15:2000+A16:2001,
EN60335-2-63:1993
Page 51

• Notes • Remarques • Notas • Opmerkingen • Anmerkungen • Notas •
•
Note • Noteringar • Merknader • Bemærkninger • Huomautukset •
Page 52

 Loading...