

Page 1
Model:
DR826
Kamado BBQ
Instruction manual
DR826_UK_A5_v1_20180719.indb 1 2018/7/19 09:49
Page 2

2
UK
Telephone Helpline: 0845 146 2887
Safety tips
• Read all instructions before use and retain for future reference.
• Warning! Keep children and pets away from the BBQ at all
times. Do not allow children to operate it.
• Warning! This barbecue will become very hot. Do
not move during operation or immediately after use
before it completely cools down.
• Do not use indoors!
• Warning! Do not use spirit or petrol for lighting or re-lighting!
Use only fire lighters complying to EN1860-3!
• Never use any volatile to start the charcoal as it is dangerous
and can add unwanted flavour to your food. Electric start-up is
recommended.
• Warning: Use caution when cooking as the appliance
surfaces get hot. To avoid burns, always use protective gloves
to adjust top and bottom vents when in use. Do not wear
loose clothing near the appliance.
• Position on a flat, stable surface.
• Only operate the appliance on a hard, level surface capable of
supporting the its weight when fully loaded.
• Never operate on wooden surface, wood deck or the like
under any conditions.
• Do not use on boats or recreational vehicles.
• Use purpose designed barbecue tools with long, heat resistant
handles.
• Do not cover the appliance before it completely cools down.
• Do not leave the appliance unattended during use.
• Do not modify the appliance in any way.
• Any modification of the appliance, misuse, or failure to follow
the instructions may be dangerous and will invalidate your
warranty.
DR826_UK_A5_v1_20180719.indb 2 2018/7/19 09:49
Page 3

3
UK
Telephone Helpline: 0845 146 2887
• Never use accessories which are not recommended by the
manufacturer. Only use original parts and accessories.
• Do not use this appliance in enclosed areas, or near flammable
materials (Petroleum based products, thinners or any other
solid object that carries a flammable warning label).
• Do not place the appliance under combustible structures, such
as garage, porch, patio or carport. Burning charcoal gives off
monoxide, which has no odour but can cause death.
• Do not store or use gasoline or Methylated Fuels or any other
flammable vapours and liquids in the vicinity of this appliance.
• Do not store any gas cylinder in the vicinity of this appliance.
• The appliance must not have any overhead obstruction, e.g.
trees, shrubs, lean-to roofs. Ensure a clearance of at least 1m
around the appliance for ample ventilation.
• Do not use to heat any sealed glass/container with food.
Pressure may build up and cause the container to burst,
possibly resulting in personal injury or damage to the
appliance.
• Clean the appliance after use.
Introduction
• Please take a few minutes to carefully read through this manual. Correct maintenance and operation
of this appliance will provide the best possible performance from your BUFFALO product.
• BUFFALO prides itself on quality and service, ensuring that at the time of unpacking the contents are
supplied fully functional and free of damage.
• Should you find any damage as a result of transit, please contact your BUFFALO dealer immediately.
Installation
• This appliance is for outdoor use only and should be placed in a well-ventilated area.
• The sides of the barbecue should NEVER be closer than 1 metre from any combustible surface,
including trees and fences and make sure that there are no heat sources nearby (cigarettes, open
flames, spark etc.). Keep away from any flammable materials!
Operation
This Kamado BBQ is the complete outdoor appliance that allows you to sear, grill, bake and smoke all
types of food. For best results, we recommend using natural lump charcoal made from hardwoods.
Compared to briquettes, natural charcoals start faster, burn cleaner and longer, reach higher temperatures
and produce less ash. Left-over natural charcoal also relights for re-use but ensure to knock off excess
ashes from the charcoal first.
DR826_UK_A5_v1_20180719.indb 3 2018/7/19 09:49
Page 4
4
UK
Telephone Helpline: 0845 146 2887
Charcoal and airflow
• Open the lid.
• Fill the inner fire bowl with enough charcoal to cover the air holes in the bowl wall.
Note: For smoking foods at low temperatures for longer period of time (≥ 1.5 hours),
you will need to add a little more charcoal, up to approximately 2” (50mm) above the air
holes.
• Build a charcoal cone with large chunks at the bottom and small ones at the top. Dumping charcoal
directly into the fire bowl will allow small pieces to block the air holes in the charcoal grate, which will
prevent the BBQ from reaching grilling and searing temperatures.
Lighting charcoal
Note: Before re-starting the BBQ, knock off excess ashes from any remaining charcoal.
1. Open the top and bottom vents fully open.
2. Light charcoal with an electric starter or approved BBQ starters.
3. Let the charcoal burn until white and ashy on the surface.
Caution!
• Do not use lighter fluids. Liquid chemicals are a fire hazard and they will
impregnate the ceramic material and impact an undesirable taste to food.
• Do not use briquette charcoal. This type of charcoal cannot reach
temperature above 500°F/260°C and it does not offer true charcoal flavour.
Setting temperature
1. When charcoal is ready, level it out for even heat distribution.
2. Close the lid.
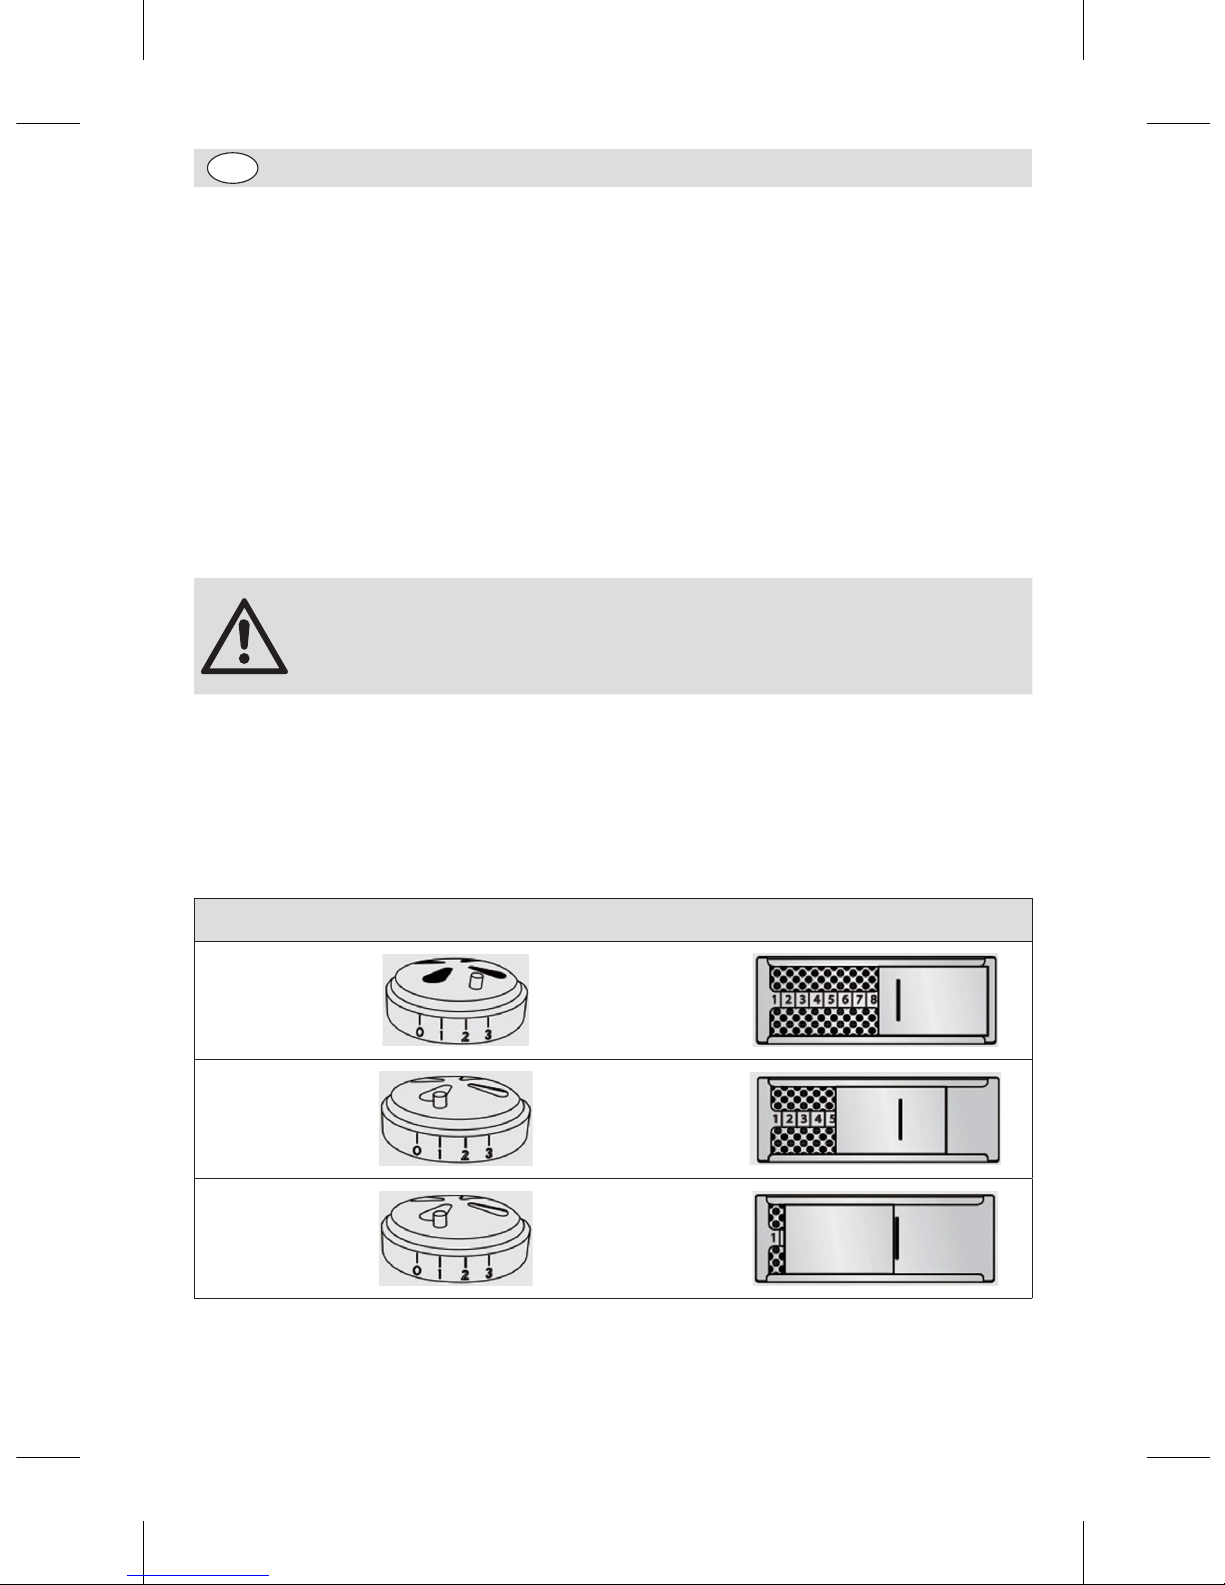
3. Set the top and bottom vents to the desired temperature settings. Increasing air flow through top
and bottom air vents increases cooking temperature, just as deceasing air flow slows the burn and
lowers the cooking temperature. Closing both top and bottom vents starves the charcoal of oxygen
and shuts down the fire.
Top vent Bottom vent
Searing
500°F
260°C
Grilling
300~450°F
149~233°C
Smoking
225~250°F
107~221°C
4. Give your kamado 5-15 minutes to settle into the desired cooking temperature before putting food on
the BBQ.
DR826_UK_A5_v1_20180719.indb 4 2018/7/19 09:50
Page 5

5
UK
Telephone Helpline: 0845 146 2887
CAUTION!
• The cooking temperatures are controlled by
adjusting the top and bottom vents.
• Decide if you are cooking low and slow, then
do not let the BBQ get too hot. Keep the
temperature low, it takes hours to cool down.
• Continuous grilling at extreme high
temperatures will cause the felt gasket to
burn.
Start cooking
• Use a wire grill brush to clean the cooking
grate. Let it dry well and put onto the fire
bowl.
• Lay food on the grate to start cooking.
Note: As needed during cooking
interval, you can add more
charcoal by using the flip grate
feature, but being careful not to
burn yourself with the hot food
or cooking grid.
Cooking temperature guide
Note: All cooking times are approximate and provided for reference only.
SMOKING
Food Size Cooking time Meat temp.
Beef:
Roasts, ribs 3-4 lb. (1.3-1.8kg) 3-4 hours 225°F/107°C
Pork:
Loin
Roasts
Ribs
2-4 lb. (5kg)
4.5 lb. (2kg)
Full grate
2-3 hours
1.5-2.5 hours
3-4 hours
225°F/107°C
225°F/107°C
225°F/107°C
Poultry:
Chicken
Turkey
4 lb. (1.8kg)
10-15 lb. (4.5-6.8kg)
1-2 hours
3-4.5 hours
250°F/121°C
250°F/121°C
GRILLING
Food Size Cooking time Meat temp.
Beef:
Steaks
Kebabs
Hamburger Patty
Sirloin tip
Ribs cut in
Tenderloin
1” (25mm) thick
1” (25mm) cubs
1/2” (12mm) thick
3.5-4 lb. (1.5-1.8kg)
Cut in 1-rib portions
Half 2-3 lb. (0.9-1.3kg)
Whole 4-6 lb. (1.8-2.7kg)
3-4 min./side
4-5 min./side
3-4 min./side
20-25 min./lb.
10 min./side
10-12 min./side
12-15 min./side
160°F / 71°C
145-160°F / 63-71°C
160°F / 71°C
145-160°F / 63-71°C
160°F / 71°C
145°F / 63°C
160°F / 71°C
Chicken:
Breast halves, bone-in
Breast halves, boneless
Legs or thighs
Drumsticks
6-8 oz. (170-226g) each
4 oz. (13g) each
4-8 oz. (113-226g)\
4 oz. (13g)
3 oz. (56-85g)
10-15 min./side
6-8 min./side
10-15 min./side
8-12 min./side
8-12 min./side
170°F/77°C
170°F/77°C
180°F/82°C
180°F/82°C
180°F/82°C
DR826_UK_A5_v1_20180719.indb 5 2018/7/19 09:50
Page 6

6
UK
Telephone Helpline: 0845 146 2887
Preventing Flare-ups
When cooking above 500°F/260°C, with both top and bottom vents closed, rapidly opening the lid will
create a sudden rush of oxygen into the BBQ and thus cause a flare-up of flames.
1. When in this cooking mode, we recommend that, prior to opening the lid, you open both top and
bottom vents to allow oxygen to stabilize inside the BBQ, minimizing the possibility of flare-ups.
2. Lift the lid 1” (25mm) first. Then wait for about 3 seconds before fully opening the BBQ.
Cleaning, care & maintenance
Warning!
• Regularly clean your barbecue between uses, especially after extended
periods of storage.
• Ensure the barbecue and its components are sufficiently cool before
cleaning, care & maintenance, and storage. Never clean the barbecue
surfaces with water while still hot.
• To extend the life and maintain the condition of your barbecue, we strongly recommend that the unit
be covered when left outside for any length of time, especially during the winter months. (There is a
cover available for use with this ceramic BBQ, which is sold separately with the code of DA406)
• Inspect the barbecue on a regular basis as damp or condensation can form which may result in
damage to the appliance. It may be necessary to dry the barbecue internally. It is possible for mould
to grow on any fat-gathering parts. This should be cleaned off with hot soapy water.
Cooking grate and fire bowl
• Regularly remove excess grease or fat using a cloth dampened with hot soapy water. Dry thoroughly.
• Excess fat and food debris can be removed from inside the body using a soft brush.
• Let dry thoroughly.
Removing ashes
• Routinely remove ashes underneath the fire bowl.
• If there is partially used charcoal in the BBQ, stir the charcoal so that any ash in the fire bowl will
drop down.
• Open the bottom draft door and place a small container under the opening to catch the ash. Or
remove the cooking grate and charcoal grate then remove the ash directly.
• Dispose of cooled ashes by placing them in aluminium foil, soaking with water and discarding in a
non-combustible container.
Long-term maintenance
• The wood side shelves should be covered when not in use and may require refinishing from time to
time.
• Routinely check the spring assist band to make sure all the bolts are tight and secure.
• When moving the barbecue, ensure to unlock the castors first. Do not push to move. Pull from the
back hinge instead of the handle in the front.
• Do not remove the fire bowl. The purpose of the fire bowl is to hold the lump charcoal and will
continue to work eve if it is cracked.
DR826_UK_A5_v1_20180719.indb 6 2018/7/19 09:50
Page 7

7
UK
Telephone Helpline: 0845 146 2887
Troubleshooting
Fault Probable Cause Solution
Flare-up Excessive fat in meat Trim fat from meat before grilling
Excessive cooking
temperature
Set the top and bottom vents to lower settings
Lid is lifted so quickly that
oxygen rushes into the BBQ
causing a flare-up.
Lift the lid 1” (25mm) first. Then wait for about 3
seconds before fully opening the BBQ.
Technical specifications
Model
Max. load of each
side shelf
Dimensions
h x w x d mm
Weight
DR826 10kg 1180 x 1330 x 760 83kg
Compliance
BUFFALO parts have undergone strict product testing in order to comply with regulatory standards and
specifications set by international, independent, and federal authorities.
All rights reserved. No part of these instructions may be produced or transmitted in any form or by any
means, electronic, mechanical, photocopying, recording or otherwise, without the prior written permission
of BUFFALO.
Every effort is made to ensure all details are correct at the time of going to press, however, BUFFALO
reserve the right to change specifications without notice.
DR826_UK_A5_v1_20180719.indb 7 2018/7/19 09:50
Page 8

8
UK
Telephone Helpline: 0845 146 2887
Assembly instructions
Tools Required for Assembly (Included)
Wrench x 1
IMPORTANT!
• The assembly of this barbecue requires at least 2 people.
• Whilst every care is taken in the manufacture of this product,
care must be taken during assembly in case sharp edges are
present.
• Please read the Important Information section carefully before
assembly and use of your barbecue.
DR826_UK_A5_v1_20180719.indb 8 2018/7/19 09:50
Page 9

9
UK
Telephone Helpline: 0845 146 2887
Parts list
1. Top vent
2. Ceramic grill lid
3. Top band assembly
4. Fire bowl
5. Bottom band assembly
5.1 Right front side shelf bracket
5.2 Right back side shelf bracket
5.1 Left front side shelf bracket
5.1 Left back side shelf bracket
6. Wood shelf (x2)
7. Charcoal grate
8. Ceramic grill base
9. Leg (x4)
10. Leg connector assembly (x2)
11. Thermometer
12. Handle
13. Cooking grate
14. Castor (x4, with 2 braked)
15. Felt gasket
16. Draft door frame
17. Draft door
Note: Specifications subject to change without prior notice.
DR826_UK_A5_v1_20180719.indb 9 2018/7/19 09:50
Page 10
10
UK
Telephone Helpline: 0845 146 2887
Assembly steps
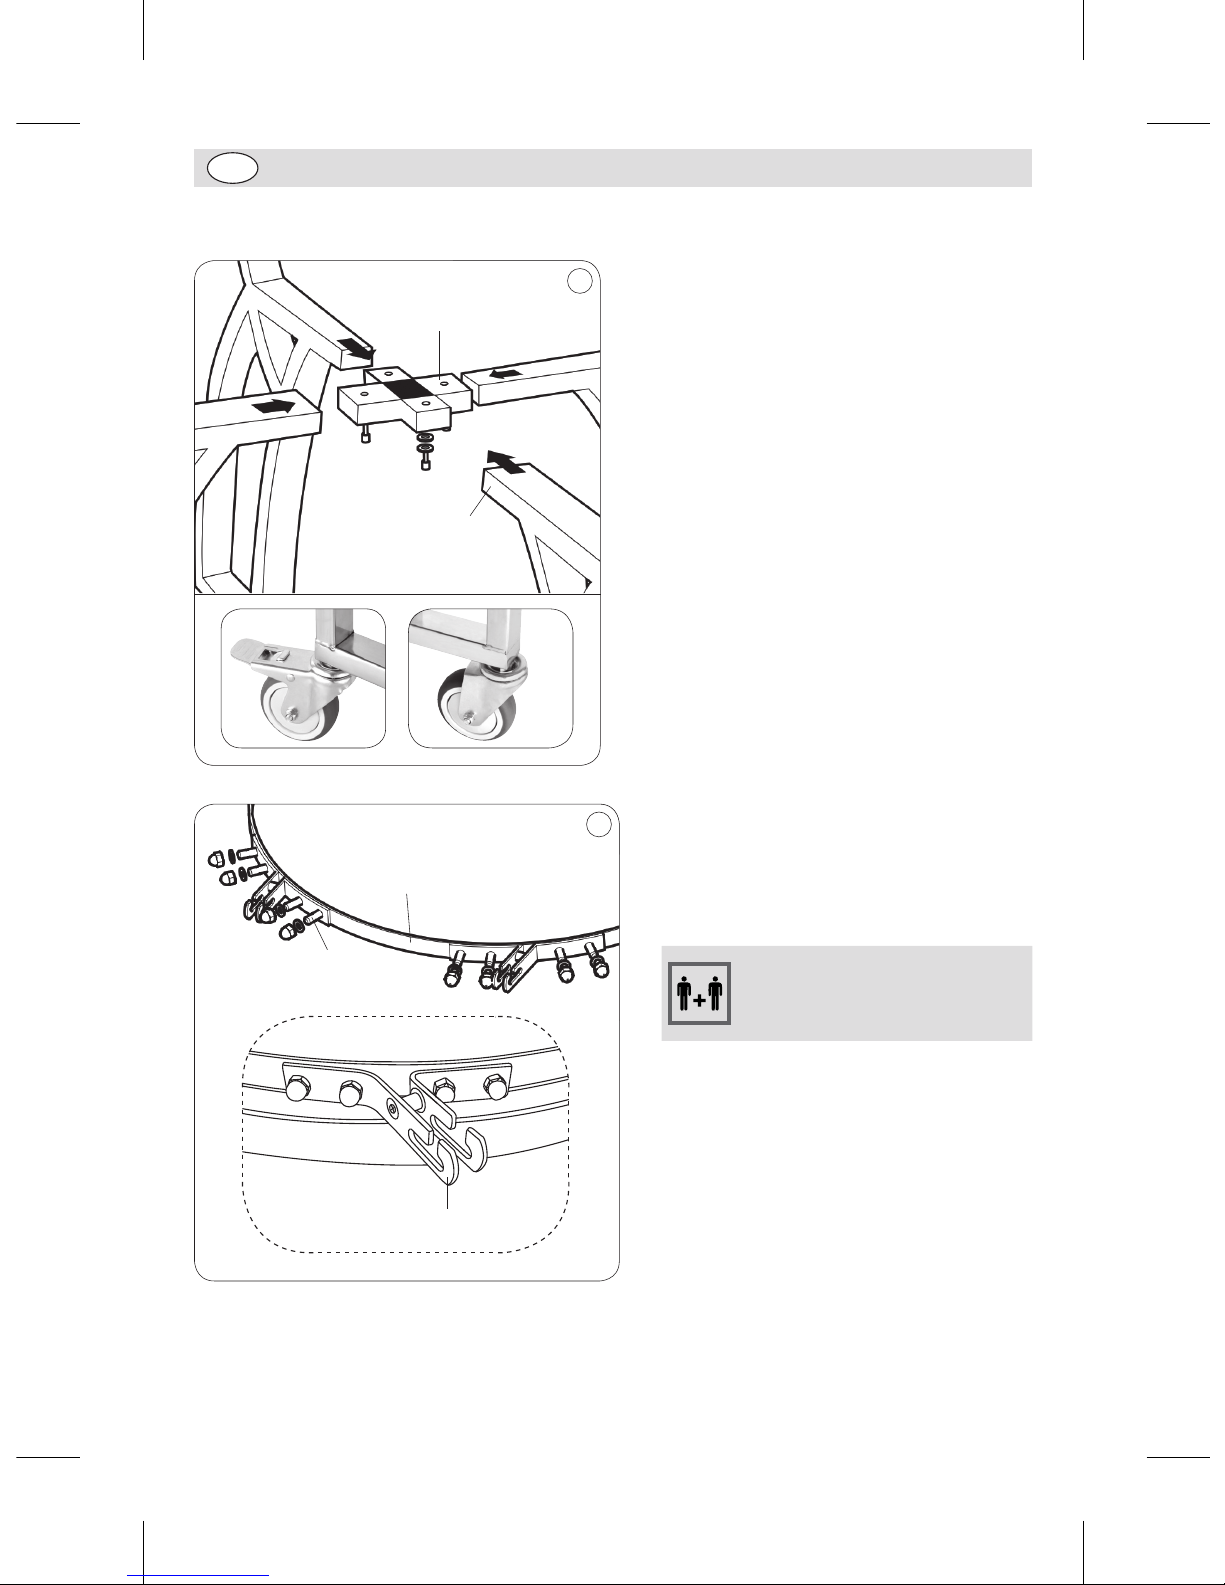
Leg connector
Leg
1
Step 1: Assemble the Cart
• Remove all screws and washers from the
leg connectors.
• Flip the legs upside down for easy
assembly.
• Insert the connectors into the leg ends.
Fix the joint with the lock washers, flat
washers and screws.
• Mount the castor onto the leg bottom and
tighten the nut with the wrench provided.
Repeat with the other castors.
• Check cart balance and tighten all screws
in place.
• Set the brakes on the castors to keep the
cart in position.
• Note: While assembly, ensure
to leave screws loose to allow
adjustment for the cart. Or, it can be
difficult to get all screws in.
Bottom ring
Bolt
Side bracket
2
Step 2: Mount the Shelf brackets
• Take all parts out of BBQ. Then lift and
locate the BBQ body carefully onto the
cart, ensuring the draft door at the bottom
is centred between 2 legs.
The BBQ is heavy and requires
2 people for lifting and maybe
a third person for guiding into
the cart!
• Remove the nuts and washers from the
bolts welded on the metal bottom band on
the ceramic grill body.
• Hang the side brackets on the bolts and
ensure the bracket’s slots are facing up.
• Attach the washers and acorn nuts
consecutively to the brackets. Then tighten
with the wrench provided.
• Note: Side brackets are marked on
the back with letters indicating their
position (e.g., LF=Left front bracket
while RB=Right Back bracket.
DR826_UK_A5_v1_20180719.indb 10 2018/7/19 09:50
Page 11
11
UK
Telephone Helpline: 0845 146 2887
Assembly steps
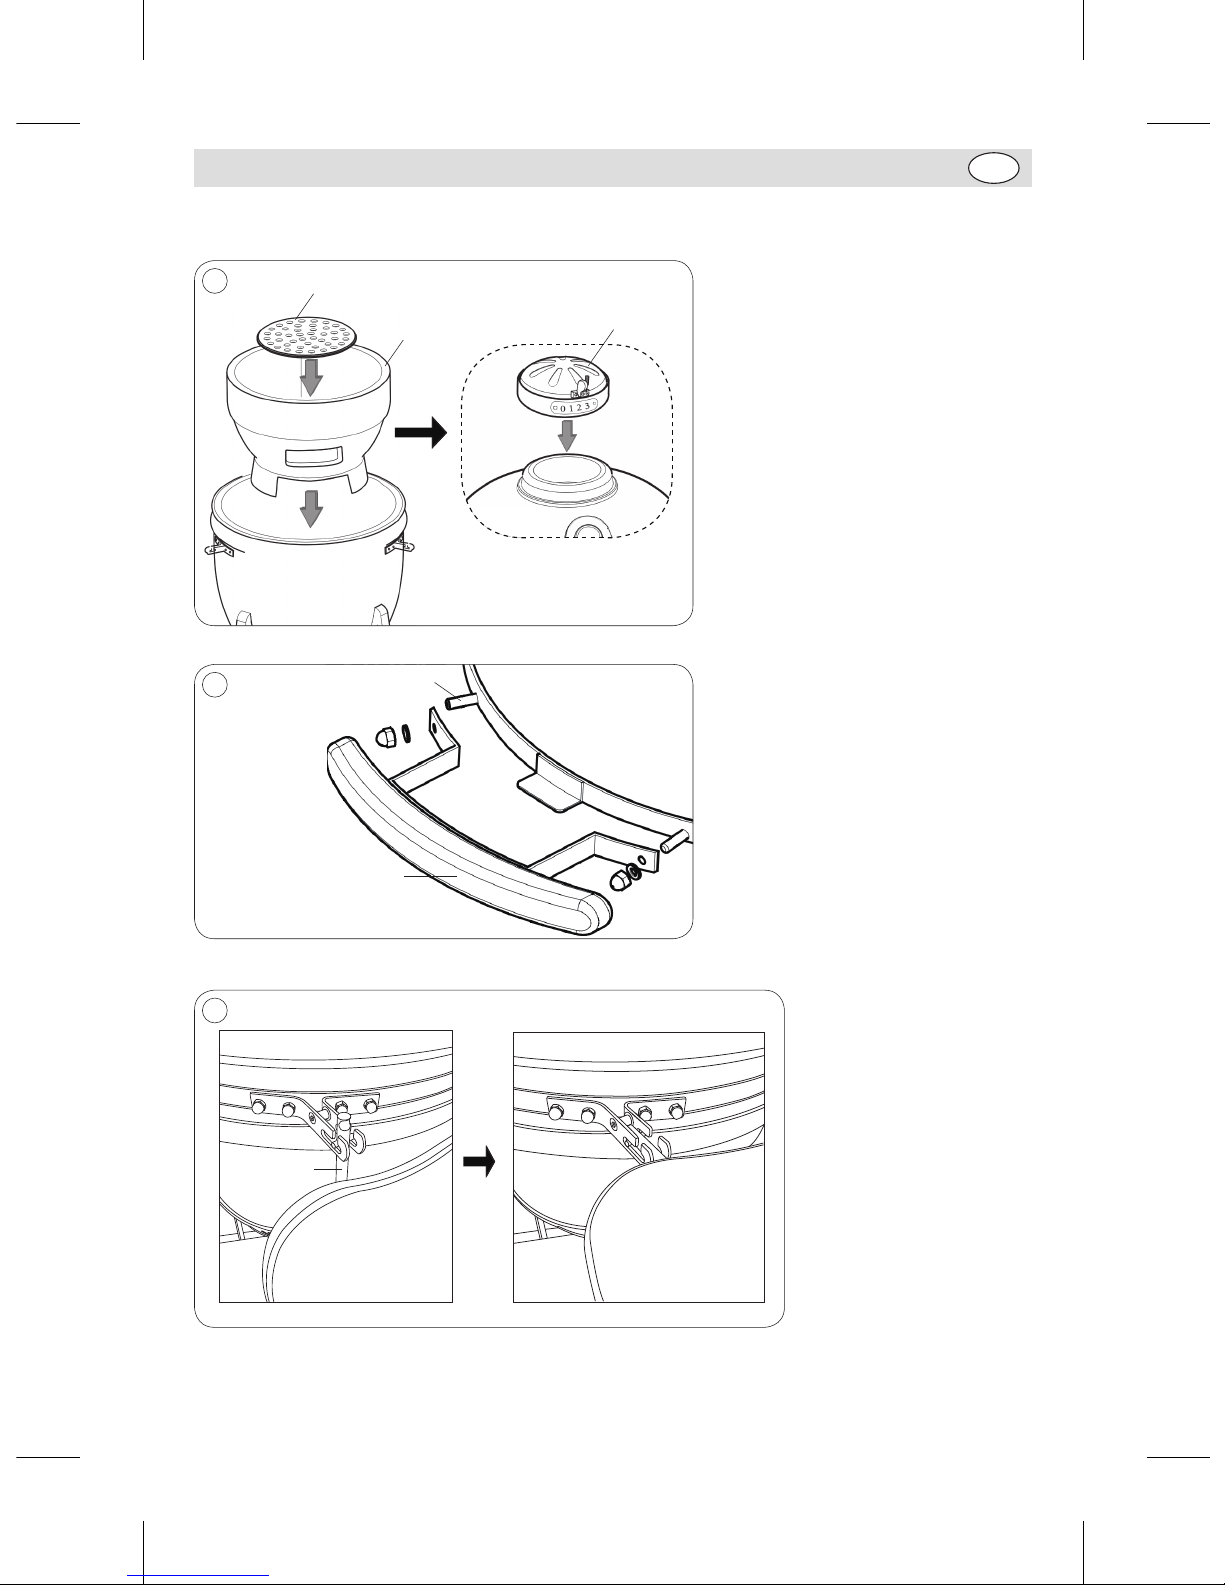
3
Fire bowl
Charcoal grate
Top vent
Step 3: Assemble the BBQ
• Place the fire bowl into the BBQ,
then the charcoal grate into the
fire bowl.
• Place the cooking grid on the fire
bowl with its hinged section facing
front.
• Close the lid so that the spring clips
at the BBQ rear are fully engaged.
• Locate the top vent in place.
4
Bolt
Handle
Step 4: Mount the handle
• Remove the nuts and washers from
the bolts welded on the top ring on
the ceramic grill body.
• Hang the handle’s brackets on the
bolts.
• Attach the washers and acorn nuts
consecutively to the brackets. Then
tighten with the wrench provided.
5
Shelf rod
Side shelf
Step 5: Mount the side
shelves
• Insert the shelf rod into
the bracket slot.
• Tilting the shelf slightly
up and sliding in or out
allows you to deploy or
store the shelf.
DR826_UK_A5_v1_20180719.indb 11 2018/7/19 09:50
Page 12

DR826_UK_A5_v1_20180719
http://www.buffalo-appliances.com/
DR826_UK_A5_v1_20180719.indb 12 2018/7/19 09:50
 Loading...