

Buffalo CC771, CC770 User Manual [de]
Vacuum Pack
Machine
Instruction manual
Vacuümverpakkingsmachine
NL
Handleiding
Machine à emballer sous vide
FR
Mode d'emploi
Vakuumverpackungsmaschine
DE
Bedienungsanleitung
Confezionatrice sottovuoto
IT
Manuale di istruzioni
Envasadora al vacío
ES
Manual de instrucciones
Máquina de embalagem a vácuo
PT
Manual de instruções
Vakuummaskin
S
Bruksanvisning
Vakuumpakkemaskine
DK
Instruktionsvejledning
Vakuum innpakkingsmaskin
N
Brukerhåndbok
Vakuumipakkauskone
FIN
Ohjekirja
Model • Modèle • Modell • Modello • Modelo • Malli:
CC770/CC771

UK
Table of Contents
Safety Tips . . . . . . . . . . . . . . . . . . . . . . . . . . . . . . . . . . . . . . . . . . . . . . . . . . . . . . . . . . . . . . . . . . . . . . . . . . 1
Introduction . . . . . . . . . . . . . . . . . . . . . . . . . . . . . . . . . . . . . . . . . . . . . . . . . . . . . . . . . . . . . . . . . . . . . . . . . 1
Pack Contents . . . . . . . . . . . . . . . . . . . . . . . . . . . . . . . . . . . . . . . . . . . . . . . . . . . . . . . . . . . . . . . . . . . . . . . 1
Location of Controls . . . . . . . . . . . . . . . . . . . . . . . . . . . . . . . . . . . . . . . . . . . . . . . . . . . . . . . . . . . . . . . . . . 2
Operation . . . . . . . . . . . . . . . . . . . . . . . . . . . . . . . . . . . . . . . . . . . . . . . . . . . . . . . . . . . . . . . . . . . . . . . . . . . 2
Setting the Sealing Time . . . . . . . . . . . . . . . . . . . . . . . . . . . . . . . . . . . . . . . . . . . . . . . . . . . . . . . . . 2
Setting the Suction Time . . . . . . . . . . . . . . . . . . . . . . . . . . . . . . . . . . . . . . . . . . . . . . . . . . . . . . . . 3
Vacuum Packing Food . . . . . . . . . . . . . . . . . . . . . . . . . . . . . . . . . . . . . . . . . . . . . . . . . . . . . . . . . . 3
Sealing Without Suction . . . . . . . . . . . . . . . . . . . . . . . . . . . . . . . . . . . . . . . . . . . . . . . . . . . . . . . . 3
Safety Cut-out . . . . . . . . . . . . . . . . . . . . . . . . . . . . . . . . . . . . . . . . . . . . . . . . . . . . . . . . . . . . . . . . 4
Restore Default Settings . . . . . . . . . . . . . . . . . . . . . . . . . . . . . . . . . . . . . . . . . . . . . . . . . . . . . . . . 4
Vacuum Packed Shelf Life . . . . . . . . . . . . . . . . . . . . . . . . . . . . . . . . . . . . . . . . . . . . . . . . . . . . . . . . . . . . . . . 4
Cleaning, Care & Maintenance . . . . . . . . . . . . . . . . . . . . . . . . . . . . . . . . . . . . . . . . . . . . . . . . . . . . . . . . . . . 5
Troubleshooting . . . . . . . . . . . . . . . . . . . . . . . . . . . . . . . . . . . . . . . . . . . . . . . . . . . . . . . . . . . . . . . . . . . . . . 5
Technical Specifications . . . . . . . . . . . . . . . . . . . . . . . . . . . . . . . . . . . . . . . . . . . . . . . . . . . . . . . . . . . . . . . . 6
Electrical Wiring . . . . . . . . . . . . . . . . . . . . . . . . . . . . . . . . . . . . . . . . . . . . . . . . . . . . . . . . . . . . . . . . . . . . . . 6
Compliance . . . . . . . . . . . . . . . . . . . . . . . . . . . . . . . . . . . . . . . . . . . . . . . . . . . . . . . . . . . . . . . . . . . . . . . . . . 6
NL
Inhoudsopgave
Veiligheidstips . . . . . . . . . . . . . . . . . . . . . . . . . . . . . . . . . . . . . . . . . . . . . . . . . . . . . . . . . . . . . . . . . . . . . . . . 7
Inleiding . . . . . . . . . . . . . . . . . . . . . . . . . . . . . . . . . . . . . . . . . . . . . . . . . . . . . . . . . . . . . . . . . . . . . . . . . . . . . 7
Verpakkingsinhoud . . . . . . . . . . . . . . . . . . . . . . . . . . . . . . . . . . . . . . . . . . . . . . . . . . . . . . . . . . . . . . . . . . . . 7
Locatie van alle onderdelen . . . . . . . . . . . . . . . . . . . . . . . . . . . . . . . . . . . . . . . . . . . . . . . . . . . . . . . . . . . . . 8
Bediening . . . . . . . . . . . . . . . . . . . . . . . . . . . . . . . . . . . . . . . . . . . . . . . . . . . . . . . . . . . . . . . . . . . . . . . . . . . 8
Instellen van de sealtijd . . . . . . . . . . . . . . . . . . . . . . . . . . . . . . . . . . . . . . . . . . . . . . . . . . . . . . . . . 8
Instellen van de leegzuigtijd . . . . . . . . . . . . . . . . . . . . . . . . . . . . . . . . . . . . . . . . . . . . . . . . . . . . . . 9
Vacuümverpakken van levensmiddelen . . . . . . . . . . . . . . . . . . . . . . . . . . . . . . . . . . . . . . . . . . . . . 9
Sealen zonder leegzuiging . . . . . . . . . . . . . . . . . . . . . . . . . . . . . . . . . . . . . . . . . . . . . . . . . . . . . . . 9
Veiligheidsuitschakeling . . . . . . . . . . . . . . . . . . . . . . . . . . . . . . . . . . . . . . . . . . . . . . . . . . . . . . . . . 10
Herstellen van de standaardinstellingen . . . . . . . . . . . . . . . . . . . . . . . . . . . . . . . . . . . . . . . . . . . . 10
Houdbaarheid van vaccuümverpakte producten . . . . . . . . . . . . . . . . . . . . . . . . . . . . . . . . . . . . . . . . . . . . . 10
Reiniging, zorg & onderhoud . . . . . . . . . . . . . . . . . . . . . . . . . . . . . . . . . . . . . . . . . . . . . . . . . . . . . . . . . . . . 11
Oplossen van problemen . . . . . . . . . . . . . . . . . . . . . . . . . . . . . . . . . . . . . . . . . . . . . . . . . . . . . . . . . . . . . . . 11
Technische specificaties . . . . . . . . . . . . . . . . . . . . . . . . . . . . . . . . . . . . . . . . . . . . . . . . . . . . . . . . . . . . . . . . 12
Elektrische bedrading . . . . . . . . . . . . . . . . . . . . . . . . . . . . . . . . . . . . . . . . . . . . . . . . . . . . . . . . . . . . . . . . . . 12
Productconformiteit . . . . . . . . . . . . . . . . . . . . . . . . . . . . . . . . . . . . . . . . . . . . . . . . . . . . . . . . . . . . . . . . . . . 12
FR
Sommaire
Conseils de sécurité . . . . . . . . . . . . . . . . . . . . . . . . . . . . . . . . . . . . . . . . . . . . . . . . . . . . . . . . . . . . . . . . . . . 13
Introduction . . . . . . . . . . . . . . . . . . . . . . . . . . . . . . . . . . . . . . . . . . . . . . . . . . . . . . . . . . . . . . . . . . . . . . . . . 13
Contenu de l'emballage . . . . . . . . . . . . . . . . . . . . . . . . . . . . . . . . . . . . . . . . . . . . . . . . . . . . . . . . . . . . . . . . 13
Emplacement des commandes . . . . . . . . . . . . . . . . . . . . . . . . . . . . . . . . . . . . . . . . . . . . . . . . . . . . . . . . . . . 14
Operation . . . . . . . . . . . . . . . . . . . . . . . . . . . . . . . . . . . . . . . . . . . . . . . . . . . . . . . . . . . . . . . . . . . . . . . . . . . 14
Réglage du temps de scellage . . . . . . . . . . . . . . . . . . . . . . . . . . . . . . . . . . . . . . . . . . . . . . . . . . . . . 14
Réglage du temps de succion . . . . . . . . . . . . . . . . . . . . . . . . . . . . . . . . . . . . . . . . . . . . . . . . . . . . . 15
Emballage sous vide des aliments . . . . . . . . . . . . . . . . . . . . . . . . . . . . . . . . . . . . . . . . . . . . . . . . . 15
Scellage sans succion . . . . . . . . . . . . . . . . . . . . . . . . . . . . . . . . . . . . . . . . . . . . . . . . . . . . . . . . . . . 15
Interruption de sécurité . . . . . . . . . . . . . . . . . . . . . . . . . . . . . . . . . . . . . . . . . . . . . . . . . . . . . . . . . 16
Restauration des réglages par défaut . . . . . . . . . . . . . . . . . . . . . . . . . . . . . . . . . . . . . . . . . . . . . . . 16
Durée de conservation des produits emballés sous vide . . . . . . . . . . . . . . . . . . . . . . . . . . . . . . . . . . . . . . 16
Nettoyage, entretien et maintenance . . . . . . . . . . . . . . . . . . . . . . . . . . . . . . . . . . . . . . . . . . . . . . . . . . . . . 17
Dépannage . . . . . . . . . . . . . . . . . . . . . . . . . . . . . . . . . . . . . . . . . . . . . . . . . . . . . . . . . . . . . . . . . . . . . . . . . . 17
Spécifications techniques . . . . . . . . . . . . . . . . . . . . . . . . . . . . . . . . . . . . . . . . . . . . . . . . . . . . . . . . . . . . . . . 18
Raccordement électrique . . . . . . . . . . . . . . . . . . . . . . . . . . . . . . . . . . . . . . . . . . . . . . . . . . . . . . . . . . . . . . . 18
Conformité . . . . . . . . . . . . . . . . . . . . . . . . . . . . . . . . . . . . . . . . . . . . . . . . . . . . . . . . . . . . . . . . . . . . . . . . . . 18

DE
Inhalt
Sicherheitshinweise . . . . . . . . . . . . . . . . . . . . . . . . . . . . . . . . . . . . . . . . . . . . . . . . . . . . . . . . . . . . . . . . . . . 19
Einführung . . . . . . . . . . . . . . . . . . . . . . . . . . . . . . . . . . . . . . . . . . . . . . . . . . . . . . . . . . . . . . . . . . . . . . . . . . . 19
Packungsinhalt . . . . . . . . . . . . . . . . . . . . . . . . . . . . . . . . . . . . . . . . . . . . . . . . . . . . . . . . . . . . . . . . . . . . . . . 19
Teile und Bedienelemente . . . . . . . . . . . . . . . . . . . . . . . . . . . . . . . . . . . . . . . . . . . . . . . . . . . . . . . . . . . . . . 20
Operation . . . . . . . . . . . . . . . . . . . . . . . . . . . . . . . . . . . . . . . . . . . . . . . . . . . . . . . . . . . . . . . . . . . . . . . . . . . 20
Einstellen der Schweißzeit . . . . . . . . . . . . . . . . . . . . . . . . . . . . . . . . . . . . . . . . . . . . . . . . . . . . . . . 20
Einstellen der Absaugzeit . . . . . . . . . . . . . . . . . . . . . . . . . . . . . . . . . . . . . . . . . . . . . . . . . . . . . . . . 21
Vakuumverpacken von Nahrungsmitteln . . . . . . . . . . . . . . . . . . . . . . . . . . . . . . . . . . . . . . . . . . . 21
Verschweißen ohne Luftabsaugung . . . . . . . . . . . . . . . . . . . . . . . . . . . . . . . . . . . . . . . . . . . . . . . . 21
Sicherheitsunterbrechung . . . . . . . . . . . . . . . . . . . . . . . . . . . . . . . . . . . . . . . . . . . . . . . . . . . . . . . 22
Voreinstellungen wiederherstellen . . . . . . . . . . . . . . . . . . . . . . . . . . . . . . . . . . . . . . . . . . . . . . . . 22
Haltbarkeitsdauer vakuumverpackter Nahrungsmittel . . . . . . . . . . . . . . . . . . . . . . . . . . . . . . . . . . . . . . . . 22
Reinigung, Pflege und Wartung . . . . . . . . . . . . . . . . . . . . . . . . . . . . . . . . . . . . . . . . . . . . . . . . . . . . . . . . . . 23
Störungssuche . . . . . . . . . . . . . . . . . . . . . . . . . . . . . . . . . . . . . . . . . . . . . . . . . . . . . . . . . . . . . . . . . . . . . . . 23
Technische Spezifikationen . . . . . . . . . . . . . . . . . . . . . . . . . . . . . . . . . . . . . . . . . . . . . . . . . . . . . . . . . . . . . 24
Elektroanschlüsse . . . . . . . . . . . . . . . . . . . . . . . . . . . . . . . . . . . . . . . . . . . . . . . . . . . . . . . . . . . . . . . . . . . . . 24
Konformität . . . . . . . . . . . . . . . . . . . . . . . . . . . . . . . . . . . . . . . . . . . . . . . . . . . . . . . . . . . . . . . . . . . . . . . . . 24
IT
Indice
Suggerimenti per la sicurezza . . . . . . . . . . . . . . . . . . . . . . . . . . . . . . . . . . . . . . . . . . . . . . . . . . . . . . . . . . . . 25
Introduzione . . . . . . . . . . . . . . . . . . . . . . . . . . . . . . . . . . . . . . . . . . . . . . . . . . . . . . . . . . . . . . . . . . . . . . . . . 25
Contenuto della confezione . . . . . . . . . . . . . . . . . . . . . . . . . . . . . . . . . . . . . . . . . . . . . . . . . . . . . . . . . . . . . 25
Posizione dei comandi . . . . . . . . . . . . . . . . . . . . . . . . . . . . . . . . . . . . . . . . . . . . . . . . . . . . . . . . . . . . . . . . . 26
Funzionamento . . . . . . . . . . . . . . . . . . . . . . . . . . . . . . . . . . . . . . . . . . . . . . . . . . . . . . . . . . . . . . . . . . . . . . . 26
Impostazione del tempo di sigillatura . . . . . . . . . . . . . . . . . . . . . . . . . . . . . . . . . . . . . . . . . . . . . . 26
Impostazione del tempo di aspirazione . . . . . . . . . . . . . . . . . . . . . . . . . . . . . . . . . . . . . . . . . . . . . 27
Confezionamento sottovuoto degli alimenti . . . . . . . . . . . . . . . . . . . . . . . . . . . . . . . . . . . . . . . . . 27
Sigillatura senza aspirazione . . . . . . . . . . . . . . . . . . . . . . . . . . . . . . . . . . . . . . . . . . . . . . . . . . . . . . 27
Blocco di sicurezza . . . . . . . . . . . . . . . . . . . . . . . . . . . . . . . . . . . . . . . . . . . . . . . . . . . . . . . . . . . . . 28
Ripristino delle impostazioni predefinite . . . . . . . . . . . . . . . . . . . . . . . . . . . . . . . . . . . . . . . . . . . . 28
Durata di conservazione dei prodotti confezionati sottovuoto . . . . . . . . . . . . . . . . . . . . . . . . . . . . . . . . . 28
Pulizia e manutenzione . . . . . . . . . . . . . . . . . . . . . . . . . . . . . . . . . . . . . . . . . . . . . . . . . . . . . . . . . . . . . . . . . 29
Risoluzione dei problemi . . . . . . . . . . . . . . . . . . . . . . . . . . . . . . . . . . . . . . . . . . . . . . . . . . . . . . . . . . . . . . . 29
Specifiche tecniche . . . . . . . . . . . . . . . . . . . . . . . . . . . . . . . . . . . . . . . . . . . . . . . . . . . . . . . . . . . . . . . . . . . . 30
Cablaggi elettrici . . . . . . . . . . . . . . . . . . . . . . . . . . . . . . . . . . . . . . . . . . . . . . . . . . . . . . . . . . . . . . . . . . . . . . 30
Conformità . . . . . . . . . . . . . . . . . . . . . . . . . . . . . . . . . . . . . . . . . . . . . . . . . . . . . . . . . . . . . . . . . . . . . . . . . . 30
ES
Índice
Consejos de Seguridad . . . . . . . . . . . . . . . . . . . . . . . . . . . . . . . . . . . . . . . . . . . . . . . . . . . . . . . . . . . . . . . . . 31
Introducción . . . . . . . . . . . . . . . . . . . . . . . . . . . . . . . . . . . . . . . . . . . . . . . . . . . . . . . . . . . . . . . . . . . . . . . . . 31
Contenido del Conjunto . . . . . . . . . . . . . . . . . . . . . . . . . . . . . . . . . . . . . . . . . . . . . . . . . . . . . . . . . . . . . . . 31
Ubicación de los controles . . . . . . . . . . . . . . . . . . . . . . . . . . . . . . . . . . . . . . . . . . . . . . . . . . . . . . . . . . . . . 32
Funcionamiento . . . . . . . . . . . . . . . . . . . . . . . . . . . . . . . . . . . . . . . . . . . . . . . . . . . . . . . . . . . . . . . . . . . . . . 32
Ajuste del tiempo de sellado . . . . . . . . . . . . . . . . . . . . . . . . . . . . . . . . . . . . . . . . . . . . . . . . . . . . . 32
Ajuste del tiempo de succión . . . . . . . . . . . . . . . . . . . . . . . . . . . . . . . . . . . . . . . . . . . . . . . . . . . . 33
Alimentos embalados al vacío . . . . . . . . . . . . . . . . . . . . . . . . . . . . . . . . . . . . . . . . . . . . . . . . . . . . 33
Sellado sin succión . . . . . . . . . . . . . . . . . . . . . . . . . . . . . . . . . . . . . . . . . . . . . . . . . . . . . . . . . . . . . 33
Corte de seguridad . . . . . . . . . . . . . . . . . . . . . . . . . . . . . . . . . . . . . . . . . . . . . . . . . . . . . . . . . . . . 34
Restaurar los ajustes por defecto . . . . . . . . . . . . . . . . . . . . . . . . . . . . . . . . . . . . . . . . . . . . . . . . . 34
Caducidad del empaquetado al vacío . . . . . . . . . . . . . . . . . . . . . . . . . . . . . . . . . . . . . . . . . . . . . . . . . . . . . . 34
Limpieza, Cuidado y Mantenimiento . . . . . . . . . . . . . . . . . . . . . . . . . . . . . . . . . . . . . . . . . . . . . . . . . . . . . . 35
Resolución de problemas . . . . . . . . . . . . . . . . . . . . . . . . . . . . . . . . . . . . . . . . . . . . . . . . . . . . . . . . . . . . . . . 35
Especificaciones Técnicas . . . . . . . . . . . . . . . . . . . . . . . . . . . . . . . . . . . . . . . . . . . . . . . . . . . . . . . . . . . . . . . 36
Cableado Eléctrico . . . . . . . . . . . . . . . . . . . . . . . . . . . . . . . . . . . . . . . . . . . . . . . . . . . . . . . . . . . . . . . . . . . . 36
Cumplimiento . . . . . . . . . . . . . . . . . . . . . . . . . . . . . . . . . . . . . . . . . . . . . . . . . . . . . . . . . . . . . . . . . . . . . . . . 36

PT
Índice
Conselhos de segurança . . . . . . . . . . . . . . . . . . . . . . . . . . . . . . . . . . . . . . . . . . . . . . . . . . . . . . . . . . . . . . . . 37
Introdução . . . . . . . . . . . . . . . . . . . . . . . . . . . . . . . . . . . . . . . . . . . . . . . . . . . . . . . . . . . . . . . . . . . . . . . . . . 37
Conteúdo da embalagem . . . . . . . . . . . . . . . . . . . . . . . . . . . . . . . . . . . . . . . . . . . . . . . . . . . . . . . . . . . . . . . 37
O lugar dos comandos . . . . . . . . . . . . . . . . . . . . . . . . . . . . . . . . . . . . . . . . . . . . . . . . . . . . . . . . . . . . . . . . . 38
Funcionamento . . . . . . . . . . . . . . . . . . . . . . . . . . . . . . . . . . . . . . . . . . . . . . . . . . . . . . . . . . . . . . . . . . . . . . . 38
Configurar o Tempo de Selagem . . . . . . . . . . . . . . . . . . . . . . . . . . . . . . . . . . . . . . . . . . . . . . . . . . 38
Configurar o Tempo de Sucção . . . . . . . . . . . . . . . . . . . . . . . . . . . . . . . . . . . . . . . . . . . . . . . . . . 39
Embalamento de Alimentos a Vácuo . . . . . . . . . . . . . . . . . . . . . . . . . . . . . . . . . . . . . . . . . . . . . . . 39
Selagem Sem Sucção . . . . . . . . . . . . . . . . . . . . . . . . . . . . . . . . . . . . . . . . . . . . . . . . . . . . . . . . . . . 39
Interruptor de segurança . . . . . . . . . . . . . . . . . . . . . . . . . . . . . . . . . . . . . . . . . . . . . . . . . . . . . . . . 40
Restaurar Configurações Predefinidas . . . . . . . . . . . . . . . . . . . . . . . . . . . . . . . . . . . . . . . . . . . . . 40
Tempo de Validade de Produtos de Prateleiras Embalados a Vácuo . . . . . . . . . . . . . . . . . . . . . . . . . . . . . 40
Limpeza, cuidados & manutenção . . . . . . . . . . . . . . . . . . . . . . . . . . . . . . . . . . . . . . . . . . . . . . . . . . . . . . . . 41
Resolução de problemas . . . . . . . . . . . . . . . . . . . . . . . . . . . . . . . . . . . . . . . . . . . . . . . . . . . . . . . . . . . . . . . 41
Especificações técnicas . . . . . . . . . . . . . . . . . . . . . . . . . . . . . . . . . . . . . . . . . . . . . . . . . . . . . . . . . . . . . . . . . 42
Cablagem eléctrica . . . . . . . . . . . . . . . . . . . . . . . . . . . . . . . . . . . . . . . . . . . . . . . . . . . . . . . . . . . . . . . . . . . . 42
Conformidade . . . . . . . . . . . . . . . . . . . . . . . . . . . . . . . . . . . . . . . . . . . . . . . . . . . . . . . . . . . . . . . . . . . . . . . . 42
S
Innehållsförteckning
Säkerhetsråd . . . . . . . . . . . . . . . . . . . . . . . . . . . . . . . . . . . . . . . . . . . . . . . . . . . . . . . . . . . . . . . . . . . . . . . . . 43
Inledning . . . . . . . . . . . . . . . . . . . . . . . . . . . . . . . . . . . . . . . . . . . . . . . . . . . . . . . . . . . . . . . . . . . . . . . . . . . . 43
Förpackningsinnehåll . . . . . . . . . . . . . . . . . . . . . . . . . . . . . . . . . . . . . . . . . . . . . . . . . . . . . . . . . . . . . . . . . . 43
Placering av kontrollerna . . . . . . . . . . . . . . . . . . . . . . . . . . . . . . . . . . . . . . . . . . . . . . . . . . . . . . . . . . . . . . . 44
Drift . . . . . . . . . . . . . . . . . . . . . . . . . . . . . . . . . . . . . . . . . . . . . . . . . . . . . . . . . . . . . . . . . . . . . . . . . . . . . . . 44
Ställa in förseglingstid . . . . . . . . . . . . . . . . . . . . . . . . . . . . . . . . . . . . . . . . . . . . . . . . . . . . . . . . . . . 44
Ställa in sugtid . . . . . . . . . . . . . . . . . . . . . . . . . . . . . . . . . . . . . . . . . . . . . . . . . . . . . . . . . . . . . . . . . 45
Vakuumpacka mat . . . . . . . . . . . . . . . . . . . . . . . . . . . . . . . . . . . . . . . . . . . . . . . . . . . . . . . . . . . . . 45
Försegla utan sugfunktionen . . . . . . . . . . . . . . . . . . . . . . . . . . . . . . . . . . . . . . . . . . . . . . . . . . . . . 45
Säkerhetsbrytare . . . . . . . . . . . . . . . . . . . . . . . . . . . . . . . . . . . . . . . . . . . . . . . . . . . . . . . . . . . . . . 45
Återställa standardinställningarna . . . . . . . . . . . . . . . . . . . . . . . . . . . . . . . . . . . . . . . . . . . . . . . . . 46
Lagringstid för vakuumpackade varor . . . . . . . . . . . . . . . . . . . . . . . . . . . . . . . . . . . . . . . . . . . . . . . . . . . . . 46
Rengöring, omvårdnad och underhåll . . . . . . . . . . . . . . . . . . . . . . . . . . . . . . . . . . . . . . . . . . . . . . . . . . . . . 46
Felsökning . . . . . . . . . . . . . . . . . . . . . . . . . . . . . . . . . . . . . . . . . . . . . . . . . . . . . . . . . . . . . . . . . . . . . . . . . . . 47
Tekniska specifikationer . . . . . . . . . . . . . . . . . . . . . . . . . . . . . . . . . . . . . . . . . . . . . . . . . . . . . . . . . . . . . . . . 47
Elektriska kablar . . . . . . . . . . . . . . . . . . . . . . . . . . . . . . . . . . . . . . . . . . . . . . . . . . . . . . . . . . . . . . . . . . . . . . 48
Tillmötesgående . . . . . . . . . . . . . . . . . . . . . . . . . . . . . . . . . . . . . . . . . . . . . . . . . . . . . . . . . . . . . . . . . . . . . . 48
DK
Indholdsfortegnelse
Sikkerhedstips . . . . . . . . . . . . . . . . . . . . . . . . . . . . . . . . . . . . . . . . . . . . . . . . . . . . . . . . . . . . . . . . . . . . . . . . 49
Indledning . . . . . . . . . . . . . . . . . . . . . . . . . . . . . . . . . . . . . . . . . . . . . . . . . . . . . . . . . . . . . . . . . . . . . . . . . . . 49
Pakkens indhold . . . . . . . . . . . . . . . . . . . . . . . . . . . . . . . . . . . . . . . . . . . . . . . . . . . . . . . . . . . . . . . . . . . . . . 49
Oversigt over betjeningsanordninger . . . . . . . . . . . . . . . . . . . . . . . . . . . . . . . . . . . . . . . . . . . . . . . . . . . . . 50
Brug . . . . . . . . . . . . . . . . . . . . . . . . . . . . . . . . . . . . . . . . . . . . . . . . . . . . . . . . . . . . . . . . . . . . . . . . . . . . . . . 50
Indstilling af forseglingstiden . . . . . . . . . . . . . . . . . . . . . . . . . . . . . . . . . . . . . . . . . . . . . . . . . . . . . 50
Indstilling af sugetiden . . . . . . . . . . . . . . . . . . . . . . . . . . . . . . . . . . . . . . . . . . . . . . . . . . . . . . . . . . 51
Vakuumpakning af mad . . . . . . . . . . . . . . . . . . . . . . . . . . . . . . . . . . . . . . . . . . . . . . . . . . . . . . . . . 51
Forsegling uden sugning . . . . . . . . . . . . . . . . . . . . . . . . . . . . . . . . . . . . . . . . . . . . . . . . . . . . . . . . . 51
Sikkerhedsafbryder . . . . . . . . . . . . . . . . . . . . . . . . . . . . . . . . . . . . . . . . . . . . . . . . . . . . . . . . . . . . 52
Genopretning af defaultindstillingerne . . . . . . . . . . . . . . . . . . . . . . . . . . . . . . . . . . . . . . . . . . . . . . 52
Holdbarhed efter vakuumpakning . . . . . . . . . . . . . . . . . . . . . . . . . . . . . . . . . . . . . . . . . . . . . . . . . . . . . . . . 52
Rengøring, pleje og vedligeholdelse . . . . . . . . . . . . . . . . . . . . . . . . . . . . . . . . . . . . . . . . . . . . . . . . . . . . . . . 53
Fejlfinding . . . . . . . . . . . . . . . . . . . . . . . . . . . . . . . . . . . . . . . . . . . . . . . . . . . . . . . . . . . . . . . . . . . . . . . . . . . 53
Tekniske specifikationer . . . . . . . . . . . . . . . . . . . . . . . . . . . . . . . . . . . . . . . . . . . . . . . . . . . . . . . . . . . . . . . . 54
El-kabler . . . . . . . . . . . . . . . . . . . . . . . . . . . . . . . . . . . . . . . . . . . . . . . . . . . . . . . . . . . . . . . . . . . . . . . . . . . . 54
Overensstemmelseserklæring. . . . . . . . . . . . . . . . . . . . . . . . . . . . . . . . . . . . . . . . . . . . . . . . . . . . . . . . . . . . 54

N
Innhold
Sikkerhetstips . . . . . . . . . . . . . . . . . . . . . . . . . . . . . . . . . . . . . . . . . . . . . . . . . . . . . . . . . . . . . . . . . . . . . . . . 55
Innledning . . . . . . . . . . . . . . . . . . . . . . . . . . . . . . . . . . . . . . . . . . . . . . . . . . . . . . . . . . . . . . . . . . . . . . . . . . . 55
Pakkeinnhold . . . . . . . . . . . . . . . . . . . . . . . . . . . . . . . . . . . . . . . . . . . . . . . . . . . . . . . . . . . . . . . . . . . . . . . . 55
Plassering av kontroller . . . . . . . . . . . . . . . . . . . . . . . . . . . . . . . . . . . . . . . . . . . . . . . . . . . . . . . . . . . . . . . . 56
Bruk . . . . . . . . . . . . . . . . . . . . . . . . . . . . . . . . . . . . . . . . . . . . . . . . . . . . . . . . . . . . . . . . . . . . . . . . . . . . . . . 56
Innstille forseglingstiden . . . . . . . . . . . . . . . . . . . . . . . . . . . . . . . . . . . . . . . . . . . . . . . . . . . . . . . . . 56
Innstille sugetiden . . . . . . . . . . . . . . . . . . . . . . . . . . . . . . . . . . . . . . . . . . . . . . . . . . . . . . . . . . . . . . 57
Vakuumpakking av mat . . . . . . . . . . . . . . . . . . . . . . . . . . . . . . . . . . . . . . . . . . . . . . . . . . . . . . . . . 57
Forsegling uten sug . . . . . . . . . . . . . . . . . . . . . . . . . . . . . . . . . . . . . . . . . . . . . . . . . . . . . . . . . . . . . 57
Sikkerhetsutkopling . . . . . . . . . . . . . . . . . . . . . . . . . . . . . . . . . . . . . . . . . . . . . . . . . . . . . . . . . . . . 58
Gjenopprette standardinnstillinger . . . . . . . . . . . . . . . . . . . . . . . . . . . . . . . . . . . . . . . . . . . . . . . . 58
Vakuumpakket holdbarhet . . . . . . . . . . . . . . . . . . . . . . . . . . . . . . . . . . . . . . . . . . . . . . . . . . . . . . . . . . . . . . 58
Rengjøring, stell og vedlikehold . . . . . . . . . . . . . . . . . . . . . . . . . . . . . . . . . . . . . . . . . . . . . . . . . . . . . . . . . . 59
Feilsøking . . . . . . . . . . . . . . . . . . . . . . . . . . . . . . . . . . . . . . . . . . . . . . . . . . . . . . . . . . . . . . . . . . . . . . . . . . . 59
Tekniske spesifikasjoner . . . . . . . . . . . . . . . . . . . . . . . . . . . . . . . . . . . . . . . . . . . . . . . . . . . . . . . . . . . . . . . . 60
Elektrisk tilkopling . . . . . . . . . . . . . . . . . . . . . . . . . . . . . . . . . . . . . . . . . . . . . . . . . . . . . . . . . . . . . . . . . . . . 60
Samsvar . . . . . . . . . . . . . . . . . . . . . . . . . . . . . . . . . . . . . . . . . . . . . . . . . . . . . . . . . . . . . . . . . . . . . . . . . . . . . 60
FIN
Sisällysluettelo
Turvallisuusvihjeitä . . . . . . . . . . . . . . . . . . . . . . . . . . . . . . . . . . . . . . . . . . . . . . . . . . . . . . . . . . . . . . . . . . . . 61
Johdanto . . . . . . . . . . . . . . . . . . . . . . . . . . . . . . . . . . . . . . . . . . . . . . . . . . . . . . . . . . . . . . . . . . . . . . . . . . . . 61
Pakkauksen sisältö . . . . . . . . . . . . . . . . . . . . . . . . . . . . . . . . . . . . . . . . . . . . . . . . . . . . . . . . . . . . . . . . . . . . 61
Ohjauslaitteiden sijainti . . . . . . . . . . . . . . . . . . . . . . . . . . . . . . . . . . . . . . . . . . . . . . . . . . . . . . . . . . . . . . . . 62
Käyttö . . . . . . . . . . . . . . . . . . . . . . . . . . . . . . . . . . . . . . . . . . . . . . . . . . . . . . . . . . . . . . . . . . . . . . . . . . . . . . 62
Saumausajan asetus . . . . . . . . . . . . . . . . . . . . . . . . . . . . . . . . . . . . . . . . . . . . . . . . . . . . . . . . . . . . 62
Imuajan asetus . . . . . . . . . . . . . . . . . . . . . . . . . . . . . . . . . . . . . . . . . . . . . . . . . . . . . . . . . . . . . . . . 63
Elintarvikkeiden vakuumipakkaus . . . . . . . . . . . . . . . . . . . . . . . . . . . . . . . . . . . . . . . . . . . . . . . . . . 63
Saumaaminen ilman imua . . . . . . . . . . . . . . . . . . . . . . . . . . . . . . . . . . . . . . . . . . . . . . . . . . . . . . . . 63
Ylikuumenemissuoja . . . . . . . . . . . . . . . . . . . . . . . . . . . . . . . . . . . . . . . . . . . . . . . . . . . . . . . . . . . . 64
Oletusasetuksien palauttaminen . . . . . . . . . . . . . . . . . . . . . . . . . . . . . . . . . . . . . . . . . . . . . . . . . . 64
Vakuumipakkauksen kestoikä . . . . . . . . . . . . . . . . . . . . . . . . . . . . . . . . . . . . . . . . . . . . . . . . . . . . . . . . . . . . 64
Puhdistus, hoito & huolto . . . . . . . . . . . . . . . . . . . . . . . . . . . . . . . . . . . . . . . . . . . . . . . . . . . . . . . . . . . . . . 65
Vianetsintä . . . . . . . . . . . . . . . . . . . . . . . . . . . . . . . . . . . . . . . . . . . . . . . . . . . . . . . . . . . . . . . . . . . . . . . . . . 65
Tekniset tiedot . . . . . . . . . . . . . . . . . . . . . . . . . . . . . . . . . . . . . . . . . . . . . . . . . . . . . . . . . . . . . . . . . . . . . . . 66
Sähköjohdot . . . . . . . . . . . . . . . . . . . . . . . . . . . . . . . . . . . . . . . . . . . . . . . . . . . . . . . . . . . . . . . . . . . . . . . . . 66
Vaatimustenmukaisuus . . . . . . . . . . . . . . . . . . . . . . . . . . . . . . . . . . . . . . . . . . . . . . . . . . . . . . . . . . . . . . . . . 66

UK
Safety Tips
• Position on a flat, stable surface.
• A service agent/qualified technician should carry out installation and any repairs if required. Do not
remove any components on this product.
• Consult Local and National Standards to comply with the following:
• Health and Safety at Work Legislation
• BS EN Codes of Practice
• Fire Precautions
• IEE Wiring Regulations
• Building Regulations
• DO NOT immerse the appliance in water.
• The sealing bar becomes hot during use. DO NOT touch the sealing bar during or immediately after
operation.
• Do not turn Off at the plug to halt operation; always use the Stop/Start button or On/Off switch.
• Do not use the appliance for anything other than its intended use.
• Only use bags recommended by the supplier/manufacturer with the appliance.
• Always switch off and disconnect the power supply to the appliance when not in use.
• Not suitable for outdoor use.
• This appliance must only be used in accordance with these instructions and by persons competent to
do so.
• This appliance is not suitable for use by children.
• Keep all packaging away from children. Dispose of the packaging in accordance to the regulations of
local authorities.
• If the power cord is damaged, it must be replaced by a BUFFALO agent or a recommended qualified
technician in order to avoid a hazard.
Introduction
Please take a few moments to carefully read through this manual. Correct maintenance and operation of
this machine will provide the best possible performance from your BUFFALO product.
Pack Contents
The following is included:
• BUFFALO Vacuum Pack Machine
• 10 x sealing food bags (200mm x 300mm)
• Instruction Manual
BUFFALO prides itself on quality and service, ensuring that at the time of packaging the contents are
supplied fully functional and free of damage.
Should you find any damage as a result of transit, please contact your BUFFALO dealer immediately.
1
Telephone Helpline: 0845 146 2887 (United Kingdom)
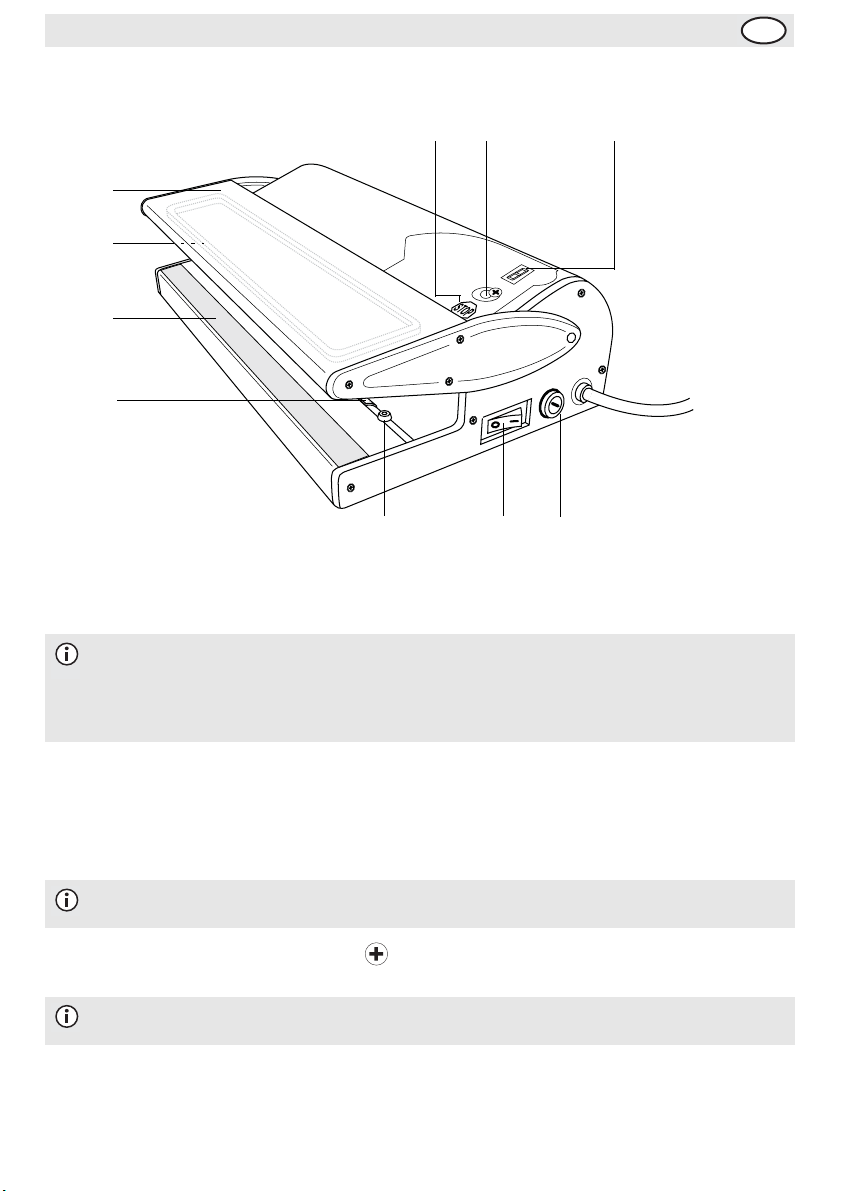
Location of Controls
‘ STOP’ button ‘PLUS’ button Display
Lid
Upper
gasket
Sealing
bar
Lip
Suction nozzle On/Off Switch Fuse
Operation
UK
Note: THIS APPLIANCE IS DESIGNED TO BE USED WITH THE BAGS SUPPLIED. OTHER
BAGS MAY NOT SEAL CORRECTLY.
CONTACT YOUR BUFFALO DISTRIBUTOR FOR SUITABLE REPLACEMENT BAGS.
Setting the Sealing Time
1. Connect the appliance to the mains power supply and turn the power switch On [I].
2. Raise the lid. This activates the appliance ready for use.
3. The value shown in the ‘TIMER’ display window is the default sealing time, shown in seconds.
Note: The default value is suitable for the bags supplied by the appliance.
4. To adjust the sealing time, press and hold the button until the required time is shown on the
display.
Note: A period after the value (e.g. ‘4.’) indicates an increment of half a second for more
accurate timing.
2
UK
Setting the Suction Time
1. Press and hold the STOP button for two seconds. The default suction time flashes on the display.
Note: Each unit is equal to 10 seconds (e.g. 4 equals 40 seconds). A period after the
value (e.g. ‘4.’) indicates an increment of five seconds for more accurate timing.
2. To adjust the sealing time, press and hold the button until the required time is shown on the
display.
3. Press the STOP button to save the suction time and exit. The Sealing time is displayed.
WARNING: Constantly submitting the appliance to excessive periods of suction will
shorten the operational life of the appliance.
Watch the suction process during operation and cancel suction if all air has been
removed before the end of the cycle.
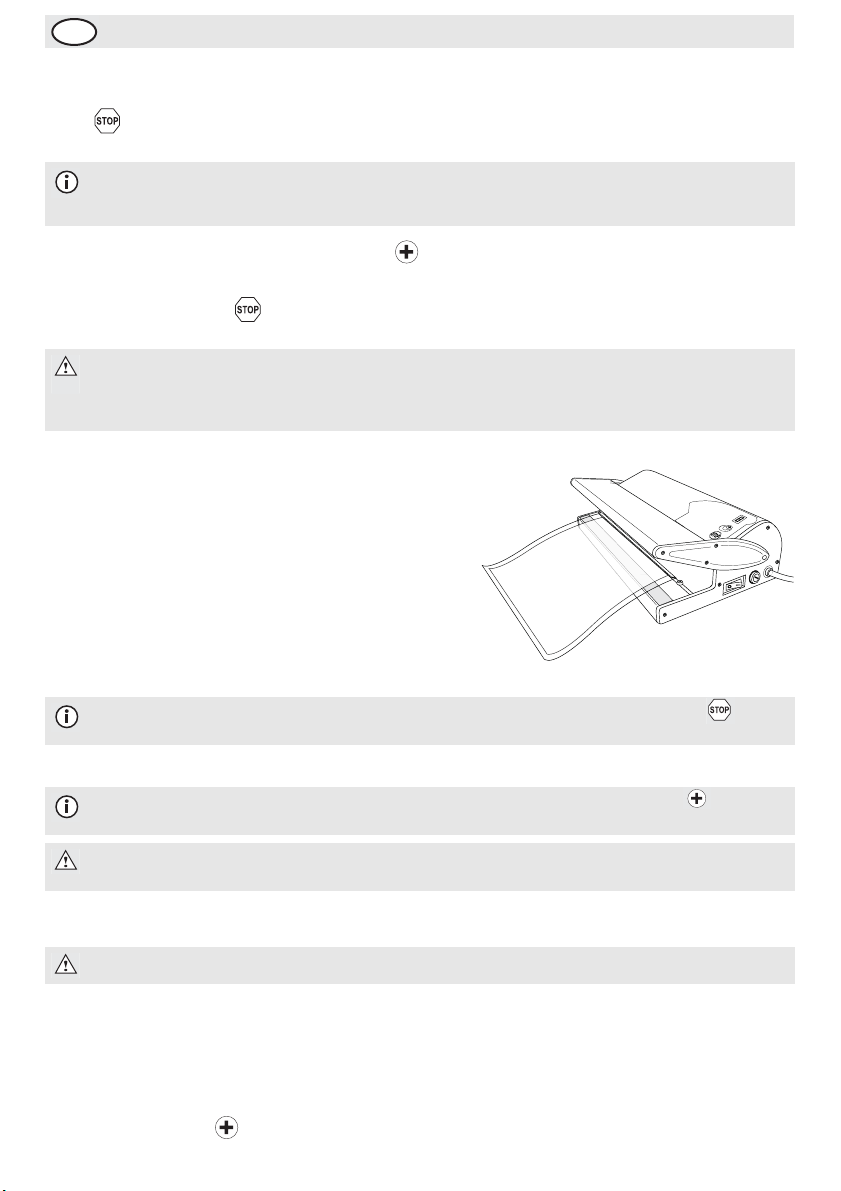
Vacuum Packing Food
1. Place the food inside in the bag and remove any
excess liquid or food residue.
2. Lift the lid of the appliance. The lid will lock in place
once lifted high enough.
3. Place the open end of the bag inside the vacuum
chamber. Place the end of the bag under the lip in the
vacuum chamber.
4. Lower the lid and press down gently to start the
suction process.Maintain a gentle pressure on the lid
for best results.
Note: The suction process can be stopped at any time by pressing the STOP button.
5. Once the programmed suction time is reached the sealing process begins.
Note: The sealing process can be started at any time (overriding the programmed
suction time) by pressing the button.
WARNING: Ensure that enough air has been removed from the bag before overriding
the programmed suction time.
6. ‘E’ flashes on the display when the appliance has finished sealing the bag. Lift the lid by the sides and
remove the bag.
WARNING: Never lift the lid from underneath. The sealing bar remains hot.
Sealing Without Suction
It is possible to seal food within bags without extracting the air first.
1. Programme the appliance with the necessary sealing time, see ‘Setting the Sealing Time’.
2. Lower the lid and begin the suction process, see ‘Vacuum Packing Food’.
3. Press the button immediately to stop the suction process and begin sealing the bag.
3
Telephone Helpline: 0845 146 2887 (United Kingdom)
UK
Safety Cut-out
This appliance is fitted with an automatic safety cut-out system to help prevent any damage from misuse.
When activated ‘E’ flashes on the display, alternating with the time (in minutes) before the appliance can
be used again.
Note: If the appliance is turned off during a cut-out period, the countdown resumes once
power is restored. The appliance will NOT work until the countdown has finished.
Restore Default Settings
1. Switch Off [O] the appliance.
2. Press and hold the button and turn the appliance On [I]. ‘8.’ appears on the display.
3. When the display clears release the button. Default settings are restored.
Vacuum Packed Shelf Life
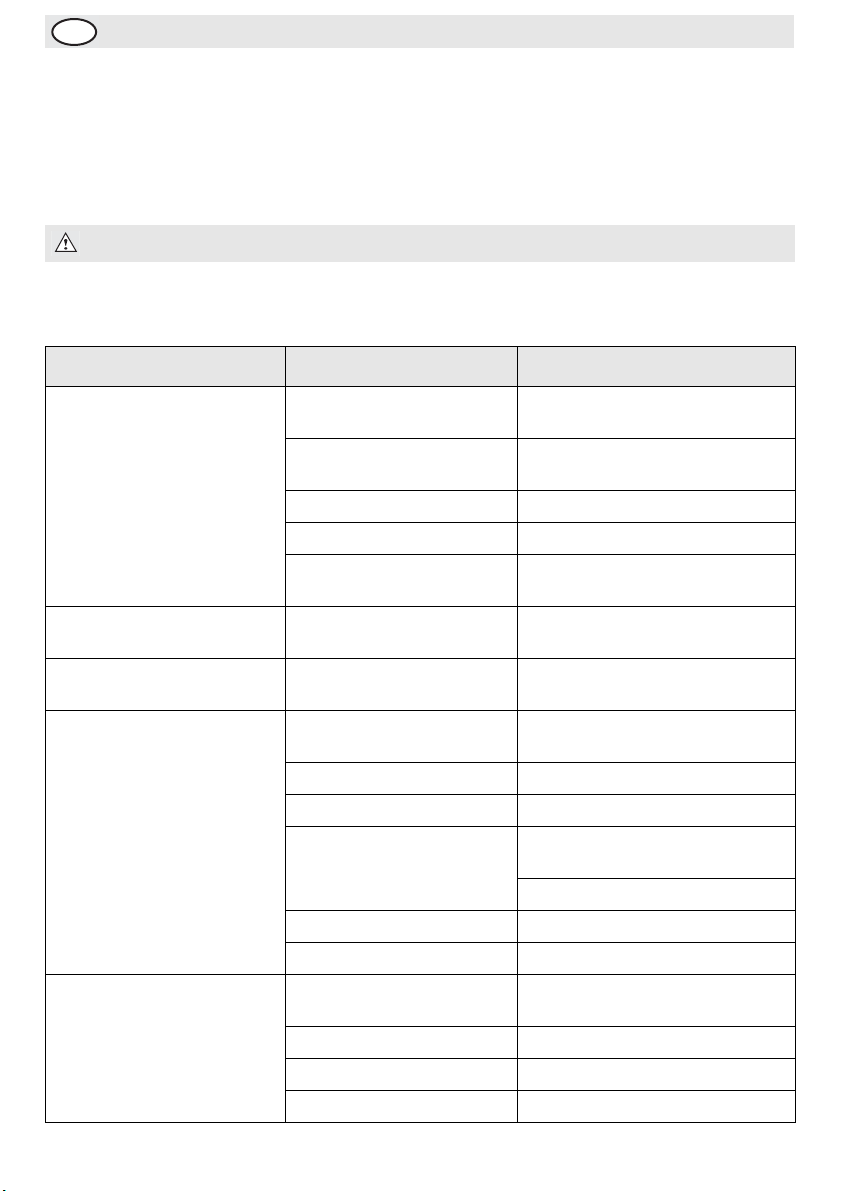
The following table shows the APPROXIMATE shelf life of produce once vacuum packed.
Note: Values are APPROXIMATE. Various factors including produce quality, best before
dates and the quality of vacuum packing all affect shelf life.
Foodstuff Storage temperature Approximate shelf life
Bread
Pasta 12 months
Rice 12 months
Flour 12 months
Ground Coffee/Tea 12 months
Red Meat (raw)
White Meat(raw) 6-9 days
Fish (raw/whole) 4-5 days
Game (raw) 5-7 days
Soft Cheese 14-20 days
Hard Cheese 25-60 days
Vegetables 7-10 days
Fruits 14-20 days
Pasta/Rice (cooked) 6-8 days
Meats (cooked) 10-15 days
Meats
Fish 10-12 months
Vegetables 18-24 months
-2ºC to 25ºC
-2ºC to 5ºC
Frozen (to -18ºC)
6-8 days
8-9 days
15-20 months
4
UK
Cleaning, Care & Maintenance
• Always allow to cool before cleaning.
• Use warm, soapy water and a damp cloth to clean the appliance.
•Dry thoroughly after cleaning.
• A BUFFALO dealer or qualified technician should carry out repairs if required.
WARNING: Do not allow any water to spill into the appliance when cleaning.
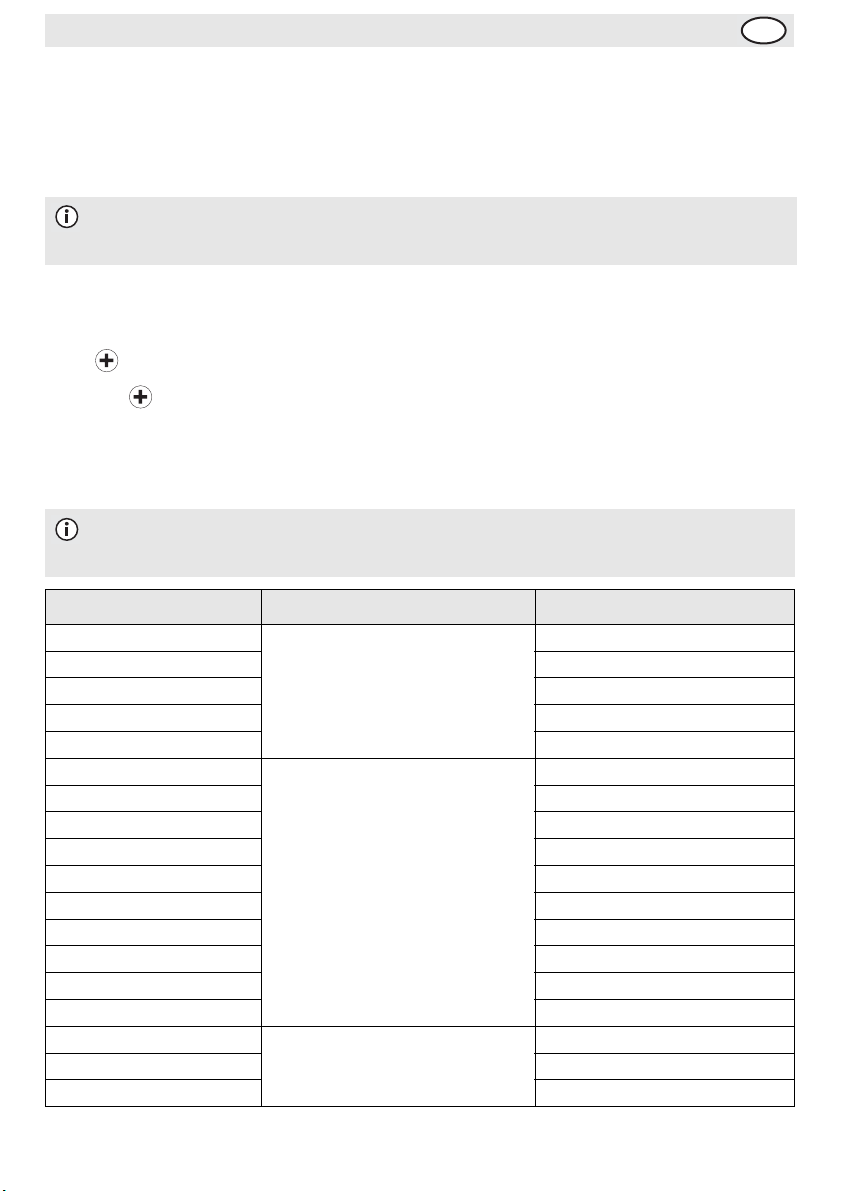
Tr ou b le s h o ot i n g
Fault Probable Cause Action
The unit is not working The unit is not switched on Check the unit is plugged in correctly
and switched on
Plug and lead are damaged Call BUFFALO agent or qualified
technician
Fuse has blown Replace the fuse
Power supply Check power supply
Internal wiring fault Call BUFFALO agent or qualified
technician
The unit is not working - ‘E’
flashes on the display
The unit is not working - ‘0’
flashes on the display
Appliance does not remove all
the air from the bag
Bags are not sealing correctly Sealing bar is overheating Open lid and allow sealing bar to cool
Safety cut-out activated Allow appliance to rest for indicated
time before using again
‘Lid closed’ switch faulty Call BUFFALO agent or qualified
Open end of bag not
completely inserted
Gaskets dirty Clean gaskets
Open end of bag is dirty Clean bag
Bag may be punctured Line bag with paper towels to protect
Incorrect bags used Call Vacuum Pack machine supplier
Suction nozzle blocked Clear suction nozzle
Incorrect Sealing Time set Alter sealing time
Bag too thick Use thinner bag
Incorrect bags used Call Vacuum Pack machine supplier
technician
Open lid and reposition bag
against foodstuffs with sharp edges
Replace bag
down
5

Telephone Helpline: 0845 146 2887 (United Kingdom)
Technical Specifications
UK
Vacuum
Model Voltage Power Current
CC770 230V 50Hz 300W 1.3A 0.8 bar 300 93 x 350 x 191 4.3
CC771 230V 50Hz 400W 1.7A 0.8 bar 380 95 x 425 x 190 5.2
pressure
(approx.)
Max. bag
length (mm)
Dimensions
h x w x d mm
Weight
(kg)
Electrical Wiring
This appliance is supplied with a 3 pin, moulded, BS1363 plug and lead, with a 13 amp fuse as standard.
The plug is to be connected to a suitable mains socket.
This appliance is wired as follows:
• Live wire (coloured brown) to terminal marked L
• Neutral wire (coloured blue) to terminal marked N
• Earth wire (coloured green/yellow) to terminal marked E
This appliance must be earthed, using a dedicated earthing circuit.
If in doubt consult a qualified electrician.
Electrical isolation points must be kept clear of any obstructions. In the event of any emergency
disconnection being required they must be readily accessible.
Compliance
The WEEE logo on this product or its documentation indicates that the product must
not be disposed of as household waste. To help prevent possible harm to human
health and/or the environment, the product must be disposed of in an approved and
environmentally safe recycling process. For further information on how to dispose of
this product correctly, contact the product supplier, or the local authority responsible
for waste disposal in your area.
BUFFALO parts have undergone strict product testing in order to comply with
regulatory standards and specifications set by international, independent, and federal
authorities.
BUFFALO products have been approved to carry the following symbol:
All rights reserved. No part of these instructions may be produced or transmitted in any form or by any means,
electronic, mechanical, photocopying, recording or otherwise, without the prior written permission of BUFFALO.
Every effort is made to ensure all details are correct at the time of going to press, however, BUFFALO reserve the
right to change specifications without notice.
6

NL
Klantenondersteuning: 050 – 609999 (België)
Veiligheidstips
• Plaatsen op een vlakke en stabiele ondergrond.
• De installatie en eventuele reparaties zijn door een servicetechnicus/vaktechnicus uit te voeren.
Verwijder geen componenten of servicepanelen van dit product.
• Raadpleeg en volg de plaatselijke en nationale regelgeving op m.b.t. tot het volgende:
• Wetgeving van gezondheid en veiligheid op de werkplaats
• Werkregels
• Brandpreventie
• IEE bekabelingsnormen
• Bouwverordeningen
• Dit apparaat NIET in water dompelen.
• De sealbalk wordt tijdens gebruik warm. Tijdens of direct na de gebruik sealbalk NIET aanraken.
• Steker niet gebruiken om de machine uit te schakelen; altijd de Stop/Start- of Aan/Uit-schakelaar
gebruiken.
• Gebruik dit apparaat uitsluitend voor het bestemde gebruik.
• Gebruik uitsluitend de zakken die door de leverancier/fabrikant voor het apparaat worden aanbevolen.
• Dit apparaat mag uitsluitend in overeenstemming met deze instructies en door competente personen
worden gebruikt.
• Dit apparaat is ongeschikt om door kinderen gebruikt te worden.
• Laat verpakkingsmateriaal niet binnen handbereik van kinderen. Verpakkingsmateriaal in
overeenstemming met de regelgeving van de plaatselijke overheden als afval laten verwerken.
• Indien de stroomkabel beschadigd raakt, dient men deze door een BUFFALO technicus of aanbevolen
vaktechnicus te laten vervangen om gevaarlijke situaties te verhinderen.
Inleiding
Neem de tijd en lees deze handleiding aandachtig door. Een correct gebruik en onderhoud van deze
machine waarborgt de beste prestatie van uw BUFFALO product.
Verpakkingsinhoud
De verpakking bevat het volgende:
• BUFFALO Vacuümverpakkingsmachine
• 10 x seal voedselzakken (200 mm x 300 mm)
• Handleiding
BUFFALO is trots op de haar productkwaliteit en dienstverlening en controleer de inhoud van de
verpakkingen, tijdens de verpakkingsfase, op functionaliteit en schade.
Mocht u product door transport zijn beschadigd, neem dan onmiddellijk contact op met uw BUFFALO dealer.
7
Klantenondersteuning: 040 – 2628080 (Nederland)
Locatie van alle onderdelen
'STOP'-knop 'PLUS'-knop Display
Deksel
Bovenste
pakking
Sealbalk
Lip
Aanzuigkop Aan/Uit-schakelaar Zekering
Bediening
NL
OPMERKING: DIT APPARAAT IS ONTWORPEN VOOR GEBRUIK MET DE BIJGELEVERDE
ZAKKEN. ZAKKEN VAN ANDERE FABRIKANTEN KUNNEN MOGELIJKERWIJZE NIET
CORRECT WORDEN GEDICHT.
VOOR GESCHIKTE SEALZAKKEN NEEMT U CONTACT OP MET UW LEVERANCIER VAN DE
VACUUMVERPAKKINGSMACHINE.
Instellen van de sealtijd
1. Sluit het apparaat op de stroomvoorziening aan en zet de stroomschakelaar aan [I].
2. Open de deksel. Dit activeert het apparaat klaar voor gebruik.
3. De waarde op het 'TIMER'-displayscherm is de standard sealtijd, aangegeven in seconden.
Opmerking: de standaardwaarde is geschikt voor de met het apparaat meegeleverde
zakken.
4. Om de sealtijd aan te passen, drukt u de knop in en houdt u deze ingedrukt totdat de gewenste
tijd op het display wordt aangegeven.
Opmerking: De punt achter de waarde (bijv. '4.') geeft een verhoging van een halve
seconde aan voor een meer nauwkeurige timing.
8
NL
Klantenondersteuning: 050 – 609999 (België)
Instellen van de leegzuigtijd
1. De STOP knop indrukken en gedurende 2 seconden ingedrukt houden. De standaard leegzuigtijd
knippert op het display.
Opmerking: elke eenheid is gelijk aan 10 seconden (bijv. 4 is gelijk aan 40 seconden).
De punt acht er de waar de (b ijv . '4. ') ge eft een verhoging van vijf seconden aan voor een
meer nauwkeurige timing.
2. Om de leegzuigtijd aan te passen, drukt u de knop in en houdt u deze ingedrukt totdat de
gewenste tijd op het display wordt aangegeven.
3. Druk op de knop STOP om de leegzuigtijd op te slaan en de instelling af te sluiten. De leegzuigtijd
wordt weergegeven.
WAARSCHUWING: Het constant gebruiken van het apparaat met overmatige
aanzuigtijden zal de operationele levensduur van het apparaat verkorten. Houd het
leegzuigproces tijdens werking in de gaten en annuleer de leegzuiging wanneer voor
het einde van de cyclus de lucht volledig uit de zak is.
Vacuümverpakken van levensmiddelen
1. Plaats het voedsel in de zak en verwijder overbodige
vloeistoffen of voedselresten.
2. Open de deksel van het apparaat. Eenmaal hoog
genoeg wordt de deksel vergrendeld.
3. Plaats het open uiteinde van de zak in de
vacuümkamer. Plaats het uiteinde van de zak onder de
rand in de vacuümkamer.
4. Sluit de deksel en druk deze stevig naar beneden om
het zuigproces te starten. Houd een constante druk op
de deksel voor de beste resultaten.
Opmerking: het leegzuigproces kan op elk moment met het indrukken van de STOPknop worden beëindigd.
5. Na het verstrijken van de geprogrammeerde leegzuigtijd begint het sealproces.
Opmerking: het sealproces kan op elk moment door het indrukken van de knop
worden gestart (hierdoor wordt de geprogrammeerde leegzuigtijd onderbroken).
WAARSCHUWING: zorg ervoor dat er voldoende lucht uit de zak is verwijdered voor dat
u de geprogrammeerde leegzuigtijd annuleert.
6. Bij het einde van het sealen van de zak knippert 'E' op het display. Open de deksel aan de zijkanten en
verwijder de zak.
WAARSCHUWING: Deksel nooit van onderen openen. De sealbalk is nog steeds heet.
Sealen zonder leegzuiging
Het is mogelijk om een zak te sealen zonder de lucht eerst weg te zuigen.
1. Programmeer de vereiste sealtijd voor het apparaat, zie 'Instellen van de sealtijd'.
2. Breng de deksel naar beneden om het aanzuigproces te starten, zie 'Vacuümverpakken van voedsel'.
3.
Druk onmiddelijk de knop in om het leegzuigproces te stoppen en het sealen van de zak te starten.
9
Klantenondersteuning: 040 – 2628080 (Nederland)
NL
Veiligheidsuitschakeling
Dit apparaat is voorzien van een automatisch uitschakelingssysteem om uit veiligheidsredenen schade door
verkeerd gebruik te voorkomen.
Wanneer geactiveerd, knippert 'E' op het display en wordt afwisselend de tijd in minuten tot mogelijk
hergebruik weergegeven.
Opmerking: wordt het apparaat door een veiligheidsuitschakeling uitgeschakeld dan
wordt de aftelling na hervatting van de stroomvoorziening voortgezet. Het apparaat zal
NIET werken totdat de aftelling is beëindigd.
Herstellen van de standaardinstellingen
1. Zet het apparaat uit [O].
2.
De knop indrukken en ingedrukt houden, en het apparaat aan [I] zetten. '8.' verschijnt op het display.
3. Laat de knop los wanneer het display niets meer aangeeft. De standaardinstellingen zijn hersteld.
Houdbaarheid van vaccuümverpakte producten
De volgende tabel toont bij BENADERING de houdbaarheid van vacuümverpakte producten in schappen.
Opmerking: dit zijn waarden bij BENADERING. Er zijn meerdere factoren waaronder
productkwaliteit, houdbaarheidsdatums en de kwaliteit van de vacuumverpakking die
van invloed zijn op de houdbaarheid.
Levensmiddel Opslagtemperatuur Houdbaarheid bij benadering
Brood -2ºC tot +25ºC 6-8 dagen
Pasta 12 maanden
Rijst 12 maanden
Bloem 12 maanden
Gemalen koffie/thee 12 maanden
Rood vlees (rauw) -2ºC tot +5ºC 8-9 dagen
Wit vlees (rauw) 6-9 dagen
Vis (rauw/heel) 4-5 dagen
Wild (rauw) 5-7 dagen
Zachte kaas 14-20 dagen
Harde kaas 25-60 dagen
Groente 7-10 dagen
Fruit 14-20 dagen
Pasta/rijst 6-8 dagen
Vlees (gekookt) 10-15 dagen
Vleesbevroren Bevroren (tot -18ºC) 15-20 maanden
Vis 10-12 maanden
Groente 18-24 maanden
10
NL
Klantenondersteuning: 050 – 609999 (België)
Reiniging, zorg & onderhoud
• Laat het apparaat altijd afkoelen voordat u met het schoonmaken begint.
• Gebruik voor de reiniging van het apparaat warm zeepwater en een vochtige doek.
• Eventuele reparaties moeten door een BUFFALO vertegenwoordiger of een vaktechnicus worden
uitgevoerd.
• De verwijderbare vacuümkamer grondig spoelen onder stromend water.
WAARSCHUWING: laat tijdens reiniging niet toe dat er water in het apparaat
binnendringt.
Oplossen van problemen
Probleem Mogelijke oorzaak Handeling
Het apparaat werkt niet Het apparaat staat uit Controleer of de stroomkabel van het
apparaat is aangesloten en of het
apparaat is ingeschakeld
De unit werkt niet - 'E' knippert
op het display
De unit werkt niet - '0' knippert
op het display
De lucht in de zak wordt niet
volledig weggezogen
De lucht in de zak wordt niet
volledig weggezogen
Zakken worden niet correct
gedicht
Steker en kabel zijn
beschadigd
Zekering is gesprongen Vervang de zekering
Stroomvoorziening Controleer de stroomvoorziening
Storing interne bedrading Laat een BUFFALO technicus of een
Veiligheidsuitschakeling is
geactiveerd
Defecte schakelaar 'deksel
gesloten'
Open uiteinde van de zak niet
volledig in de kamer geplaatst
Pakkingen zijn vuil Pakkingen reinigen
Open uiteinde van de zak is
vuil
Het kan zijn dat de zak een
gaatje heeft
Er worden zakken gebruikt die
niet geschikt zijn
Zuigkop geblokkeerd Reinig de zuigkop
Er worden zakken gebruikt die
niet geschikt zijn
De sealbalk is oververhit Open het deksel en laat de sealbalk
Incorrect ingestelde sealtijd Wijzig sealtijd
Zak te dik Gebruik dunnere zakken
Er worden zakken gebruikt die
niet geschikt zijn
Laat een BUFFALO technicus of een
vaktechnicus komen
vaktechnicus komen
Laat het apparaat gedurende de
aangegeven tijd afkoelen.
Laat een BUFFALO technicus of een
vaktechnicus komen
Open het deksel en plaats de zak op
de juiste wijze
Zak reinigen
Voer de zak met papieren doekjes om
deze tegen de scherpe randen van
voedsel te beschermen
Vervang de zak
Neem contact op met uw leverancier
van de vacuümverpakkingsmachine
Neem contact op met uw leverancier
van de vacuümverpakkingsmachine
afkoelen
Neem contact op met uw leverancier
van de vacuümverpakkingsmachine
11
Klantenondersteuning: 040 – 2628080 (Nederland)
Technische specificaties
NL
Model Voltage Vermogen Stroom
CC770 230V 50Hz 300W 1,3A 0,8 bar 300 93 x 350 x 191 4,3
CC771 230V 50Hz 400W 1,7A 0,8 bar 380 95 x 425 x 190 5,2
Vacuümdruk
(ca.)
Max.
zaklengte
(mm)
Afmetingen
h x b x d mm
Gewicht
(kg)
Elektrische bedrading
Men dient de steker op een geschikt stopcontact aan te sluiten.
De bedrading van dit apparaat is als volgt:
• Stroomkabel (bruin) naar de aansluitklem gemarkeerd met L
• Neutraalkabel (blauw) naar de aansluitklem gemarkeerd met N
• Aardekabel (groen/geel) naar de aansluitklem gemarkeerd met E
Dit apparaat moet worden geaard met behulp van een adequaat aardingscircuit.
Bij twijfels raadpleeg een vakkundige elektricien.
De elektrische isolatiepunten mogen niet worden geblokkeerd. In geval van een nooduitschakeling moeten
de isolatiepunten direct toegankelijk zijn.
Productconformiteit
Het WEEE-logo op dit product of bijbehorende documentatie geeft aan dat het product
niet onder huisvuil valt en als zodanig ook niet mag worden verwerkt. Ter preventie
van mogelijke gevaren voor de gezondheid van personen en/of voor het milieu, dient
men dit product in overeenstemming met het voorgeschreven en milieuveilige
recyclingproces als afval te verwerken. Raadpleeg uw productleverancier of uw
plaatselijk afvalverwerkingsbedrijf voor meer informatie over de juiste
afvalverwerking van dit product.
De onderdelen van BUFFALO producten hebben strenge producttesten ondergaan om
te voldoen aan wettelijke regels en specificaties die door internationale,
onafhankelijke en landelijke overheden worden voorgeschreven.
BUFFALO producten zijn goedgekeurd en voorzien van het volgende symbool:
Alle rechten voorbehouden. Het is verboden om deze handleiding, hetzij volledig of gedeeltelijk, elektronisch of
mechanisch te reproduceren, kopiëren, op opslagmedia op te slaan of op enigerlei wijze over te dragen, zonder
Wij hebben er alles aan gedaan om er zeker van te zijn dat op publicatiedatum van de handleiding alle details correct
zijn, desondanks, behoudt BUFFALO het recht voor om specificaties zonder aankondiging te wijzigen.
voorafgaande goedkeuring van BUFFALO.
12

FR
Standard d'assistance téléphonique: 050 – 600006 (Belgique)
Conseils de sécurité
• Placez l'appareil sur une surface plane, stable.
• L'installation et les éventuelles réparations doivent être confiées à un dépanneur / technicien qualifié.
Ne retirez aucun composant ou cache de ce produit.
• Consultez les normes locales et nationales pour vous conformer aux :
• lois sur l'hygiène et la sécurité au travail ;
• codes de bonnes pratiques BS EN ;
• précautions contre le risque d'incendie ;
• réglementations sur les branchements électriques IEE ;
• règlements sur la construction.
• NE PAS immerger l'appareil.
• La barre de scellage devient très chaude durant l'emploi. NE PAS toucher la barre de scellage pendant
ou immédiatement après l'emploi.
• N'éteignez jamais la machine à emballer à la prise ; utilisez toujours le bouton Arrêt / Départ ou
l'interrupteur Marche / Arrêt.
• Utiliser exclusivement des sacs recommandés par le fournisseur/fabricant de l'appareil.
• N'utilisez l'appareil que pour l'application pour laquelle il a été conçu.
• L'utilisation de cet appareil est exclusivement réservée aux personnes formées en la matière et doit se
conformer à ces instructions.
• Cet appareil ne doit pas être utilisé par un enfant.
• Gardez les emballages hors de portée des enfants. Débarrassez-vous des emballages conformément
aux règlements des autorités locales.
• Un cordon d'alimentation endommagé doit être remplacé par un agent BUFFALO ou un technicien
qualifié recommandé, pour éviter tout danger.
Introduction
Nous vous invitons à consacrer quelques instants à la lecture attentive de ce manuel. L'entretien et
l'utilisation appropriés de cet appareil vous permettront de tirer le meilleur de votre produit BUFFALO.
Contenu de l'emballage
Eléments fournis de série :
• Machine à emballer sous vide BUFFALO
• 10 sacs alimentaires pour scellage sous vide (200mm x 300mm)
• Mode d'emploi
BUFFALO attache une grande importance à la qualité et au service et veille à fournir des produits en parfait
état opérationnel, parfaitement intacts au moment de l'emballage.
Nous vous prions de contacter votre revendeur BUFFALO immédiatement si vous constatez un dommage
quelconque survenu pendant le transport du produit.
13
Standard d'assistance téléphonique: 01 64 89 73 61 (Français)
Emplacement des commandes
Bouton d'arrêt 'STOP' Bouton 'PLUS' Fenêtre d'affichage
Couvercle
Joint
d'étanchéité
supérieur
Barre de
scellage
Rebord
Buse d'aspiration Interrupteur Marche/Arrêt Fusible
Operation
FR
Remarque : CET APPAREIL A ETE CONCU POUR ETRE UTILISE AVEC LES SACHETS
FOURNIS. LES AUTRES SACHETS RISQUENT DE NE PAS SE SOUDER CORRECTEMENT.
CONTACTEZ LE FOURNISSEUR DE VOTRE MACHINE A EMBALLER POUR COMMANDER
LES SACHETS D'EMBALLAGE QUI CONVIENNENT.
Réglage du temps de scellage
1. Connectez l'appareil au secteur et placez l'interrupteur en position de marche (On) [I].
2. Soulevez le couvercle. Ceci active l'appareil qui est prêt à fonctionner.
3. La valeur apparaissant dans la fenêtre de temporisation (TIMER) est le réglage par défaut du temps de
scellage, exprimé en secondes.
Remarque : La valeur par défaut est appropriée pour les sacs fournis avec l'appareil.
4. Pour ajuster le temps de scellage, appuyez sur le bouton et maintenez-le enfoncé jusqu'à ce que le
temps requis soit affiché dans la fenêtre.
Remarque : La présence d'un point après la valeur (par exemple, '4.') indique un
incrément d'une demi-seconde pour un réglage plus précis du temps.
14
FR
Standard d'assistance téléphonique: 050 – 600006 (Belgique)
Réglage du temps de succion
1. Appuyez sur le bouton d'arrêt STOP pendant deux secondes. Le temps de succion par défaut
clignote dans la fenêtre.
Remarque : Chaque unité équivaut à 10 secondes (par exemple, 4 équivaut à 40
secondes). Lorsque la valeur est suivie d'un point (par exemple, '4.'), cela signifie un
incrément de cinq secondes pour un réglage plus précis du temps.
2. Pour ajuster le temps de succion, appuyez sur le bouton et maintenez-le enfoncé jusqu'à ce que le
temps requis soit affiché dans la fenêtre.
3. Appuyez sur le bouton d'arrêt STOP pour enregistrer le temps de succion et sortir. Le temps de
succion s'affiche dans la fenêtre.
ATTENTION : Le fait de soumettre constamment l'appareil à des périodes excessives de
succion raccourcira la durée de vie de l'appareil. Surveillez le processus de succion
pendant que l'appareil est en fonctionnement et arrêtez la succion si tout l'air a été
éliminé avant la fin du cycle.
Emballage sous vide des aliments
1. Placez les aliments à l'intérieur du sachet et retirez tout
excès de liquide ou de résidus alimentaires.
2. Soulevez le couvercle de l'appareil. Le couvercle se
bloquera en position une fois suffisamment soulevé.
3. Placez l'extrémité ouverte du sac à l'intérieur de la
chambre à vide. Placez l'extrémité du sac sous le
rebord dans la chambre à vide.
4. Posez le couvercle et appuyez fermement pour amorcer
le processus d'aspiration. Exercez une pression ferme
et continue sur le couvercle pour de meilleurs résultats.
Remarque : Le processus de succion peut être interrompu à tout moment en appuyant
sur le bouton d'arrêt (STOP) .
5. Une fois que le temps de succion programmé est écoulé, le processus de scellage commence.
Remarque : Le processus de scellage peut commencer à tout moment (annulant le
temps de succion programmé) en appuyant sur le bouton .
ATTENTION : Veillez à ce que suffisamment d'air ait été éliminé du sachet avant
d'annuler le temps de succion programmé.
6. Un E' clignote dans la fenêtre lorsque l'appareil a fini de sceller le sac. Soulevez le couvercle par les
côtés et retirez le sac.
ATTENTION : Ne soulevez jamais le couvercle par en dessous. La barre de scellage reste
très chaude.
Scellage sans succion
Il est possible d'emballer hermétiquement des aliments dans des sachets sans extraire préalablement l'air.
1. Programmez l'appareil en réglant le temps de scellage nécessaire, voir 'Régler le temps de scellage'.
2. Abaissez le couvercle et commencez le processus de succion, voir 'Emballage sous vide des aliments'.
3. Appuyez immédiatement sur le bouton pour arrêter le processus de succion et commencer à
sceller le sachet.
15
Standard d'assistance téléphonique: 01 64 89 73 61 (Français)
FR
Interruption de sécurité
Cet appareil est équipé d'un système d'interruption de sécurité automatique pour aider à prévenir tout
endommagement lié à une utilisation incorrecte.
Lorsque ce système est activé, un 'E' clignote dans la fenêtre, en alternance avec le temps en minutes qu'il
reste avant que l'appareil puisse être à nouveau utilisé.
Remarque : Si l'appareil est éteint pendant une période d'interruption, le compte à
rebours continue une fois que l'appareil est remis en marche. L'appareil ne fonctionnera
PAS tant que le compte à rebours n'est pas terminé.
Restauration des réglages par défaut
1. Éteignez [O] l'appareil.
2. Appuyez sur le bouton en le maintenant enfoncé et allumez l'appareil [I]. Un '8.' apparaît dans la
fenêtre.
3. Lorsque la fenêtre est vide, relâchez le bouton . Les réglages par défaut sont restaurés.
Durée de conservation des produits emballés sous vide
Le tableau suivant montre la durée de conservation APPROXIMATIVE des produits emballés sous vide.
Remarque : Ces valeurs sont APPROXIMATIVES. Divers facteurs, notamment la qualité
des produits, les dates de péremption et la qualité de l'emballage sous vide peuvent
affecter la durée de conservation.
Aliment Température de conservation
Pain -2ºC à +25ºC 6-8 jours
Pâtes 12 mois
Riz 12 mois
Farine 12 mois
Café moulu/Thé 12 mois
Viande rouge (crue) -2ºC à +5ºC 8-9 jours
Viande blanche (crue) 6-9 jours
Poisson (cru/entier) 4-5 jours
Gibier (cru) 5-7 jours
Fromage à pâte molle 14-20 jours
Fromage à pâte dure 25-60 jours
Légumes 7-10 jours
Fruits 14-20 jours
Pâtes/Riz 6-8 jours
Viandes (cuites) 10-15 jours
Viandes surgelées Surgelé (jusqu’à -18ºC) 15-20 mois
Poisson 10-12 mois
Légumes 18-24 mois
Durée approximative de
conservation
16
FR
Standard d'assistance téléphonique: 050 – 600006 (Belgique)
Nettoyage, entretien et maintenance
• Laisser toujours l'appareil refroidir avant de le nettoyer.
• Utiliser de l'eau savonneuse chaude et un chiffon humide pour nettoyer l'appareil.
• Séchez minutieusement l'appareil après l'avoir nettoyé.
• Les réparations, le cas échéant, doivent être confiées à un agent BUFFALO ou à un technicien qualifié.
AVERTISSEMENT : Veillez à ce que l'eau ne s'infiltre pas dans l'appareil au nettoyage.
Dépannage
En cas de panne de votre appareil BUFFALO, vérifiez les données du tableau ci-dessous avant d'appeler
notre standard d'assistance ou votre revendeur BUFFALO.
Dysfonctionnement Cause probable Intervention
L'appareil ne fonctionne pas L'appareil n'est pas allumé Vérifier que l'appareil est bien
La prise et le cordon sont
endommagés
Un fusible a sauté Remplacer le fusible
Alimentation Vérifier l'alimentation
Problème de branchement interne Appeler un agent BUFFALO ou un
L'appareil ne fonctionne pas un 'E' clignote dans la fenêtre
d'affichage
L'appareil ne fonctionne pas un '0' clignote dans la fenêtre
d'affichage
L’appareil n’aspire pas tout l’air
du sachet
L'appareil ne fonctionne pas
Les sachets se soudent mal Surchauffe de la barre de soudure Ouvrir le couvercle et attendre
L'interruption de sécurité est
activée
L'interrupteur de 'Couvercle
fermé' est défectueux
Le côté ouvert du sachet n’est que
partiellement inséré
Joints sales Nettoyer les joints
Extrémité ouverte du sachet sale Nettoyer le sachet
Le sachet est peut-être troué Doubler le sachet à l’aide de
Sachets utilisés inadéquats Contacter le fournisseur de la
Buse d'aspiration obturée Dégager l'obstruction de la buse
Temps de scellage incorrect Modifier le temps de scellage
Sac trop épais Utiliser un sac plus fin
Sachets utilisés inadéquats Contacter le fournisseur de la
branché et allumé
Appeler un agent BUFFALO ou un
technicien qualifié
technicien qualifié
Laisser reposer l'appareil pendant
le temps indiqué avant de le
réutiliser
Appeler un agent BUFFALO ou un
technicien qualifié
Ouvrir le couvercle et recentrer le
sachet
serviettes en papier, pour le
protéger contre les aliments
présentant des bords tranchants
Remplacer le sachet
machine à emballer sous vide
d'aspiration
que la barre de soudure
refroidisse
machine à emballer sous vide
17
Standard d'assistance téléphonique: 01 64 89 73 61 (Français)
Spécifications techniques
FR
Pression de
Modèle Tension Puissance Courant
CC770 230V 50Hz 300W 1,3A 0,8 bar 300 93 x 350 x 191 4,3
CC771 230V 50Hz 400W 1,7A 0,8 bar 380 95 x 425 x 190 5,2
mise sous vide
(approx.)
Longueur
maximale
du sac
(mm)
Dimensions
h x l x p mm
Poids
(kg)
Raccordement électrique
La prise doit être reliée à la prise secteur qui convient.
Cet appareil est câblé comme suit :
• Fil conducteur (brun) à la borne marquée L
• Fil neutre (bleu) à la borne marquée N
• Fil de terre (vert / jaune) à la borne marquée E
Cet appareil doit être raccordé à la terre, par le biais d'un circuit de mise à la terre dédié.
En cas de doute, consultez un électricien qualifié.
Les points d'isolation électrique doivent être libres de toute obstruction. En cas de débranchement requis
en urgence, ils doivent être facilement accessibles.
Conformité
Le logo WEEE qui figure sur ce produit ou sa documentation indique qu'il ne doit pas
être mis au rebut avec les ordures ménagères. Pour éviter qu'il ne présente un risque
pour la santé humaine et / ou écologique, confiez la mise au rebut de ce produit à un
site de recyclage agréé respectueux de l'environnement. Pour de plus amples détails
sur la mise au rebut appropriée de ce produit, contactez le fournisseur du produit ou
l'autorité responsable de l'enlèvement des ordures dans votre région.
Les pièces BUFFALO ont été soumises à des tests rigoureux pour pouvoir être
déclarées conformes aux normes et spécifications réglementaires définies par les
autorités internationales, indépendantes et fédérales.
Les produits BUFFALO ont été déclarés aptes à porter le symbole suivant :
Tous droits réservés. La production ou transmission, partielles ou intégrales, sous quelque forme que ce soit ou par
n'importe quel moyen, tant électronique que mécanique, sous forme de photocopie, d'enregistrement ou autre de
Nous nous efforçons, par tous les moyens dont nous disposons, de faire en sorte que les détails contenus dans le
présent mode d'emploi soient corrects en date d'impression. Toutefois, BUFFALO se réserve le droit de changer les
ce mode d'emploi sont interdites sans l'autorisation préalablement accordée par BUFFALO.
spécifications de ses produits sans préavis.
18
 Loading...