

Page 1
4D LABS, Simon Fraser University 8888 University Drive, Burnaby, B.C. V5A 1S6
E [email protected] T 778.782.8158 F 778.782.3765 W www.4dlabs.ca
#
Revised by:
Date
Modification
1
2 3
4
5
Buehler EcoMet 250 Grinder-Polisher
Standard Operating Procedure
Revision: 1.0 — Last Updated: Dec 01 2016, Revised by Matt Bilton
Overview
This document will provide a detailed operation procedure of the Buehler EcoMet 250 Grinder-
Polisher. Formal Training is required for all users prior to using this system.
Revision History
Document No.
1
Page 2

4D LABS, Simon Fraser University 8888 University Drive, Burnaby, B.C. V5A 1S6
E [email protected] T 778.782.8158 F 778.782.3765 W www.4dlabs.ca
Table of Contents
Overview.................................................................................................................................................. 1
Revision History ........................................................................................................................................ 1
Table of Contents ..................................................................................................................................... 2
General Information ................................................................................................................................. 4
Main components: ................................................................................................................................... 4
Safety ...................................................................................................................................................... 5
Operation ................................................................................................................................................ 6
Control Panel: ...................................................................................................................................... 6
Preparing your grinding or polishing platens: ............................................................................................ 8
Using Diamond Polishing Solutions ....................................................................................................... 8
Preparing Samples in the Power Head:...................................................................................................... 9
Specimen Holders................................................................................................................................. 9
Loading a Specimen Holder ................................................................................................................ 10
Removing a Specimen Holder ............................................................................................................. 11
Single Force ....................................................................................................................................... 11
Central Force ..................................................................................................................................... 11
Mounting the Glass Slide Holder......................................................................................................... 12
Begin the Grinding / Polishing Procedure ................................................................................................ 14
Exchanging grinding and polishing discs ................................................................................................. 16
After use ................................................................................................................................................ 16
References and Files ............................................................................................................................... 17
Contact Information ............................................................................................................................... 17
Supplementary Information .................................................................................................................... 18
Silicon Carbide Abrasive Grinding Discs .............................................................................................. 18
Diamond Polishing Solutions .............................................................................................................. 18
2
Page 3

4D LABS, Simon Fraser University 8888 University Drive, Burnaby, B.C. V5A 1S6
E [email protected] T 778.782.8158 F 778.782.3765 W www.4dlabs.ca
3
Page 4
4D LABS, Simon Fraser University 8888 University Drive, Burnaby, B.C. V5A 1S6
E [email protected] T 778.782.8158 F 778.782.3765 W www.4dlabs.ca
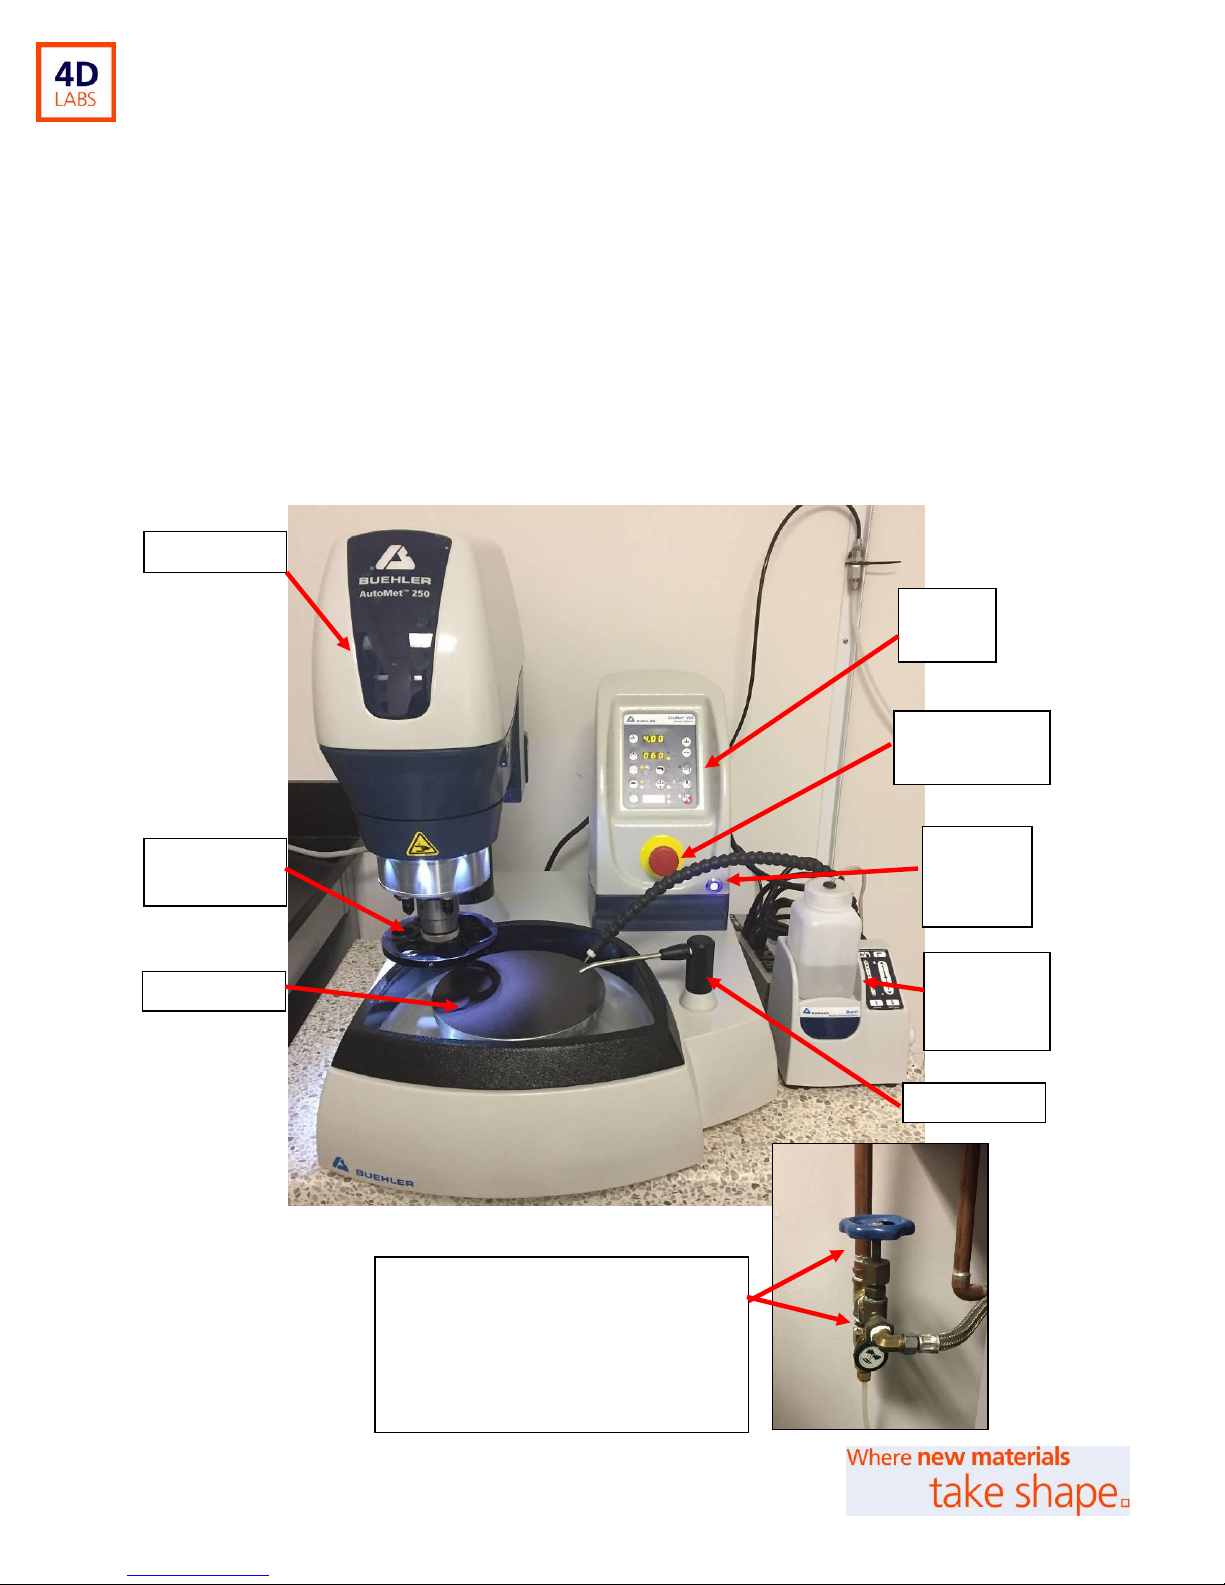
Power Head
Specimen
holder
Platen
Control
Panel
Burst
dispensing
unit
Water Hose
EMERGENCY
STOP
Power
On/Off
button
Water Supply:
Blue Tap = Main water supply
Black Tap = Flow control tap to
polisher
General Information
Buehler’s EcoMet 250 is a variable speed grinder-polisher with an 8-inch (203 mm) platen. The AutoMet
Power Head allows for semiautomatic specimen preparation operation, increasing productivity and
specimen consistency.
Main components:
4
n
Page 5

4D LABS, Simon Fraser University 8888 University Drive, Burnaby, B.C. V5A 1S6
E [email protected] T 778.782.8158 F 778.782.3765 W www.4dlabs.ca
Safety
Only trained users are permitted to operate the Grinder-Polisher.
Wear safety glasses and protective gloves at all times.
To avoid floods, always check that the water flow hose is securely attached to the outlet at the
rear of the machine, and also that the hose is suitably fitted into the waste collection vessel
beneath the table. Monitor the water levels at all times during use of the system. Replace full
vessel if necessary.
Rotation of the platen could be up to 500 rpms. Keep hands away from moving parts. Do not wear
loose clothing or jewellery, and contain long hair. They can be caught in moving parts and may
result in severe personal injury.
Protective equipment should be worn to handle specimens, which may be sharp or hot.
Do not operate machine in the presence of flammable liquids, gases, or dust. Sparks may ignite the
dust or fumes.
If there is a problem with the tool, do not attempt to repair yourself. Always speak with a tool
owner.
Handling and care of polishing media:
All liquid waste must be collected in the waste collection vessel beneath the polisher table. If the
vessel is full, please discuss with a 4D LABS member of staff to have the waste properly disposed
of.
5
Page 6
4D LABS, Simon Fraser University 8888 University Drive, Burnaby, B.C. V5A 1S6
E [email protected] T 778.782.8158 F 778.782.3765 W www.4dlabs.ca
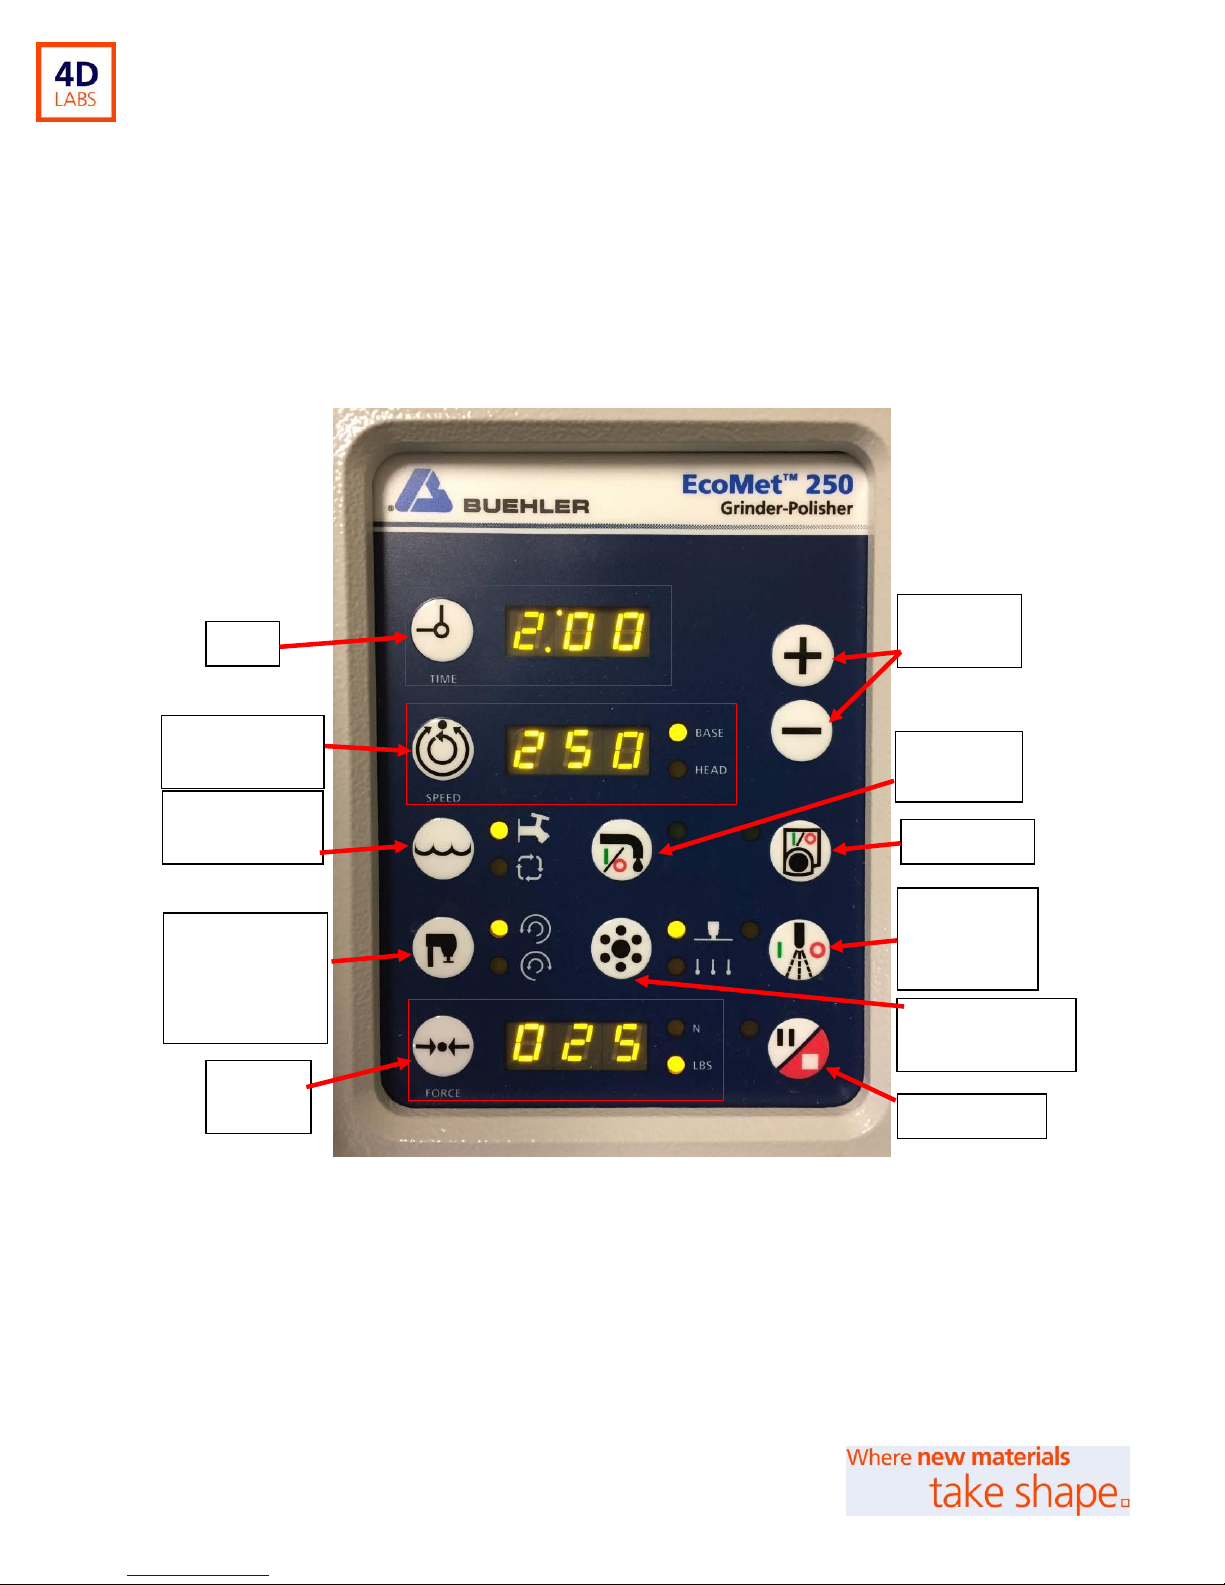
Time
Water flow
(on/off)
Head rotation
direction
(Clockwise /
Anticlockwise)
Force
(N / lbs)
Increase /
decrease
Water source
(tap only)
Burst
dispenser
(on/off)
Pause / Stop
Platen only
Force mode
(single / central)
Speed
(base & head)
Operation
Control Panel:
Figure 1: EcoMet Grinder-Polisher Control Panel Commands
6
Page 7
4D LABS, Simon Fraser University 8888 University Drive, Burnaby, B.C. V5A 1S6
E [email protected] T 778.782.8158 F 778.782.3765 W www.4dlabs.ca
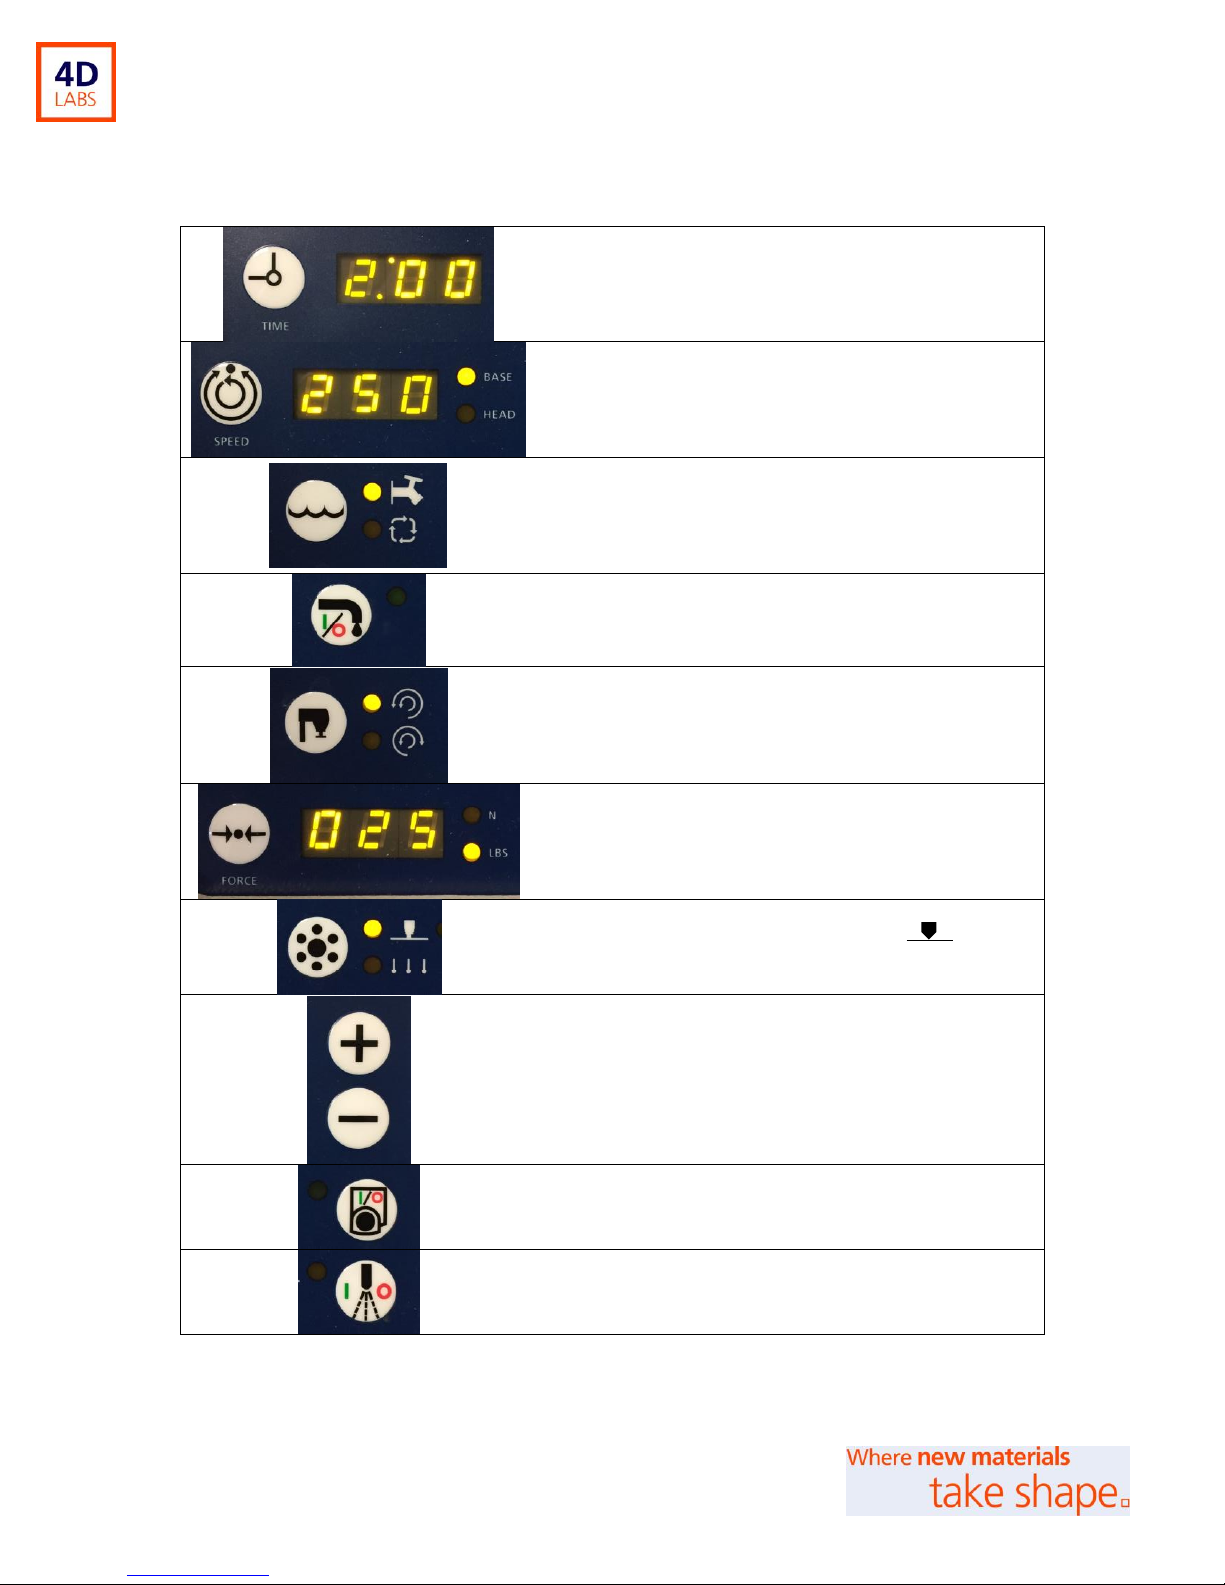
Time display set for a grinding-polishing cycle (m:ss)
Displays the rpm of the platen or Power Head
Base
Base = 1 – 500 rpms
Head = 30 – 60 rpms
Selects the source of water.
Water only comes from the tap and so only this
selection can be made.
No lights indicate that the water is set to OFF
This button will stop and start the water flow
This button selects the rotation directions of the platen
to the head. These can in the same, or opposite
directions (the head always rotates counter-clockwise)
This displays the amount of force (in lbs or N) that is
applied by the Power Head.
Single Force = 1 – 10 lbs (5 – 45 N)
Central Force = 5 – 60 lbs (20 – 260 N)
Selects between the single force (upper; ) and
central force (lower: “↓↓↓”) modes.
Increase or decrease the selected paramter (Time,
Speed, and Force)
This button activates the platen for manual grinding,
removing the use of the Power Head.
This button activates the connected burst dispensor
unit (if required)
7
Page 8

4D LABS, Simon Fraser University 8888 University Drive, Burnaby, B.C. V5A 1S6
E [email protected] T 778.782.8158 F 778.782.3765 W www.4dlabs.ca
Pause or Stop a cycle
Preparing your grinding or polishing platens:
1. Check that the platen is secure and lying flat.
2. Attach the 8” magnetic disc to the platen (it may already be attached), this allows for easy
attachment and exchange of grinding discs and polishing cloths.
3. Prepare the platen with the appropriate abrasive grinding disc (SiC or diamond) or polishing cloth.
For diamond abrasive discs, check that the disc is firstly affixed to an APEX S magnetic
backed plate. This can then be connected to the magnet disc on the platen. Water flow is
recommended during use of SiC discs to prevent heat buildup, and to remove waste
materials.
For Silicon Carbide grinding, affix the selected SiC disc onto the adhesive side of an APEX
S magnetic backed plate. Water flow is recommended during use of SiC discs to prevent
heat buildup, and to remove waste materials.
For Polishing cloths, affix the selected cloth disc onto the adhesive side of an APEX S
magnetic backed plate. Pre-prepared cloths are listed in the grey storage cabinet. Each
cloth corresponds to a specific colored diamond polishing fluid. Do ensure that these are
not mixed up.
Using Diamond Polishing Solutions
1. Ensure that you have selected the appropriate polishing cloth for the diamond polishing media that
you require. These are colour coded and stored in the labelled grey storage drawers.
2. Once the polishing cloth is affixed to the platen, apply a very small amount (10 ml approx..) of
diamond fluid to the centre of the polishing cloth.
3. Using one of your sample pucks, spread the fluid around the entirety of the cloth, for an even
coverage. This will not affect your sample as it will be subsequently polished.
8
Page 9
4D LABS, Simon Fraser University 8888 University Drive, Burnaby, B.C. V5A 1S6
E [email protected] T 778.782.8158 F 778.782.3765 W www.4dlabs.ca
A: Central Force
Holder (1)
B: Single Force
C: Flat-Sample Holder
D: Glass Slide
E: Central Force
4. Proceed to begin the polishing procedure. Do not use a water flow during polishing as this will
remove the diamond fluid from the cloth.
5. At the end of the polishing cycle, use water to rinse both the cloths and your sample.
6. Store the polishing cloth (whilst still damp) into a zip-lock bag and store in the correct grey storage
drawer.
Preparing Samples in the Power Head:
Specimen Holders
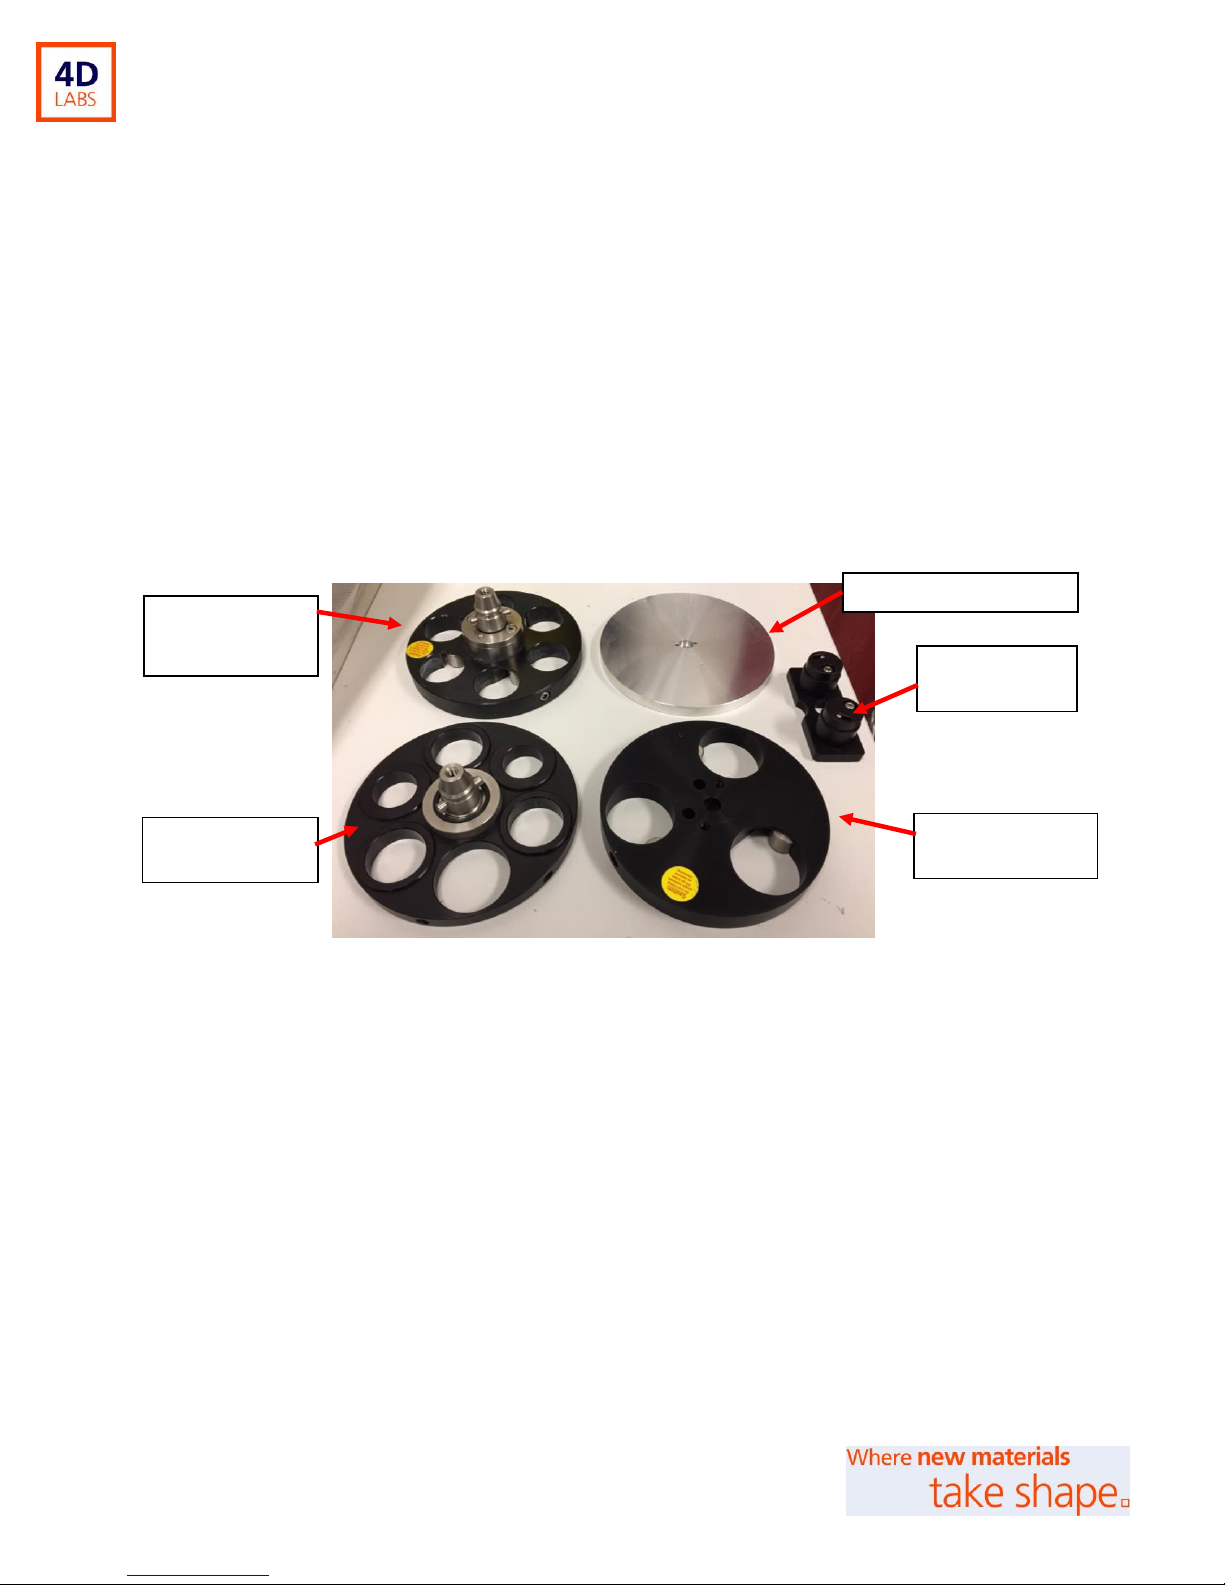
Figure 2: Different sample holders
A. Central Force Holder (1): Supports 1.25” samples
B. Single Force Holder: 40 mm samples with distance rings insets for 1” & 1.25” samples.
C. Flat-Sample Holder: For support of flat/unconventional samples e.g. Si wafers
D. Glass-Slide Holder: Supports 27 x 46 mm glass slides. This holder attaches into the single force
holder using 2 x 1” distance rings; see Section titled “Mounting the Glass Slide Holder”.
E. Central Force Holder (2): Supports 3 x 40 mm samples.
9
Page 10
4D LABS, Simon Fraser University 8888 University Drive, Burnaby, B.C. V5A 1S6
E [email protected] T 778.782.8158 F 778.782.3765 W www.4dlabs.ca
A
B: Lift and hold sleeve
of lock chuck
C: Align pins of specimen
holder to lock chuck
D: Release lock chuck to
secure sample holder
Locking
handle
Loading a Specimen Holder
To load either the Single Force of Central Force Specimen Holder:
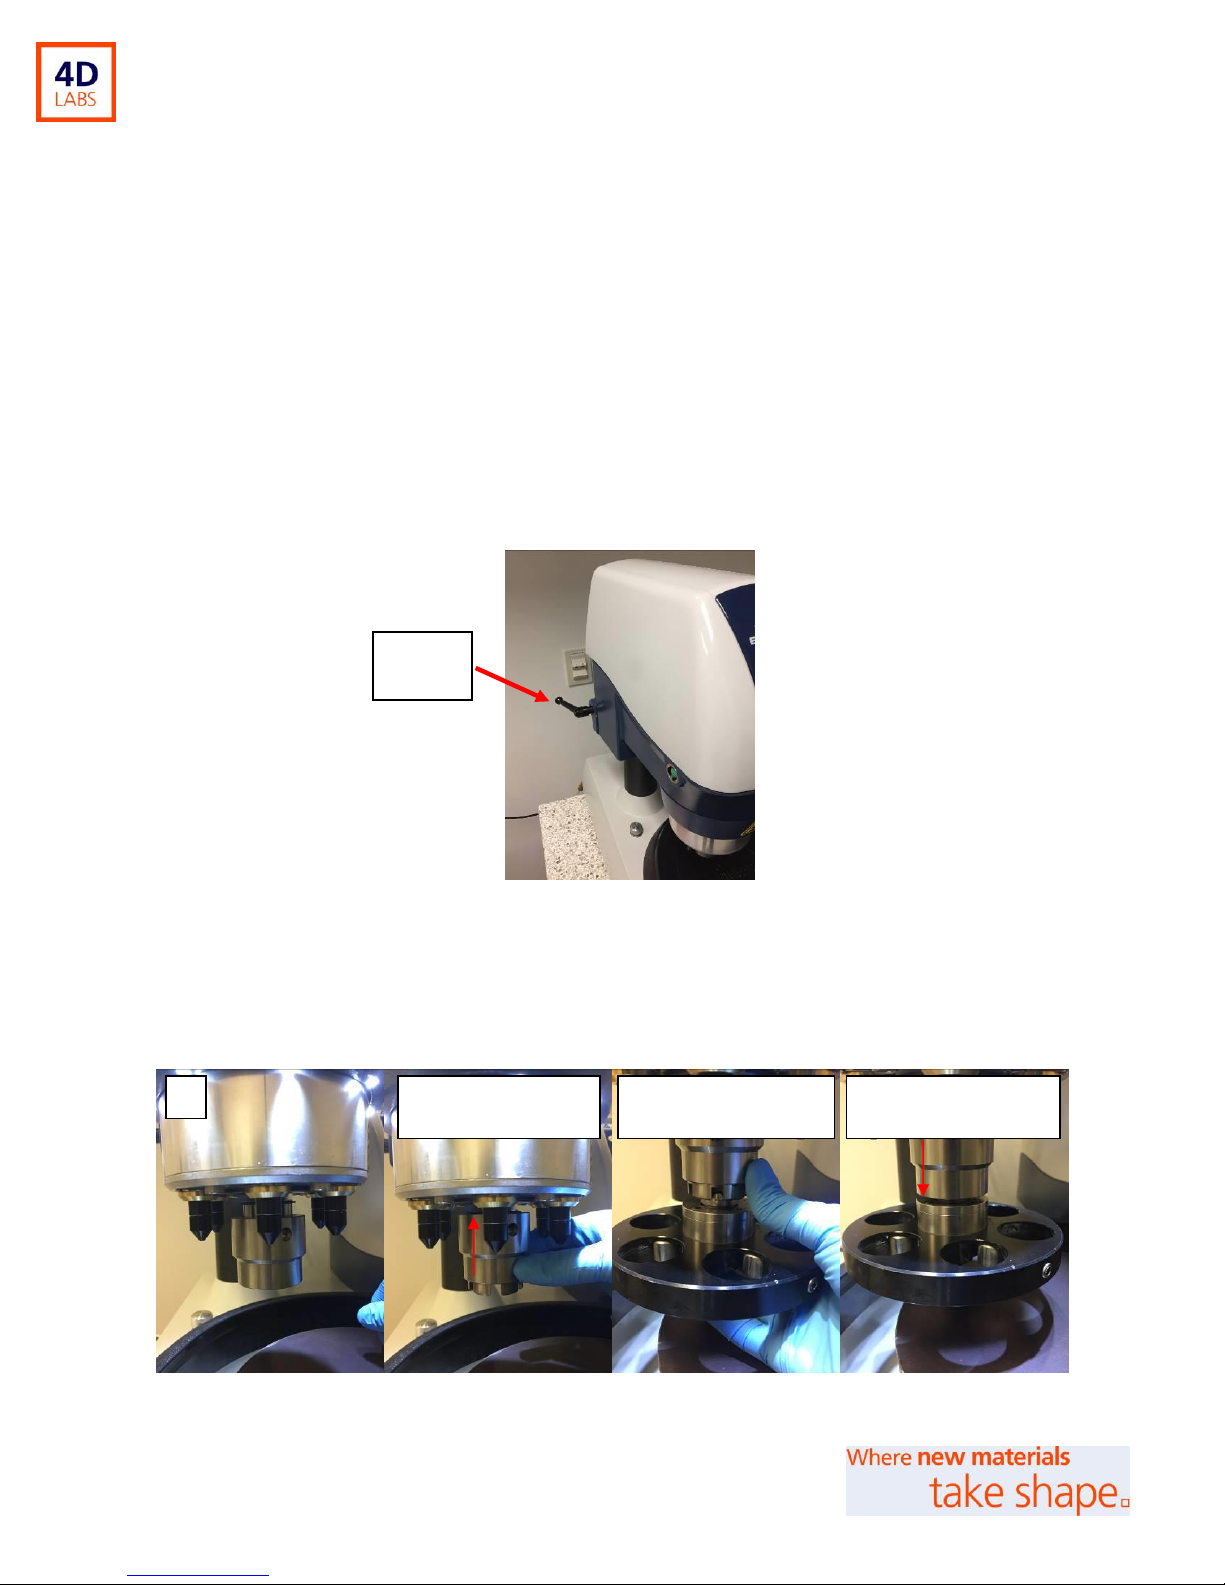
1. Position the Power Head for easy loading of the specimen holder. Untighten the locking handle
(see Figure 3) on the left side of the Power Head to enable rotation of the head. Tighten the
locking handle once the Power Head is in place.
2. Move the Power Head into the desired position. (Buehler recommends the specimen be
approximately 1/3 off the edge of the platen in its outmost position.)
3. Rotate the locking handle clockwise to tighten and secure the Power Head into position.
Figure 3: Locking Handle
4. To attach the Specimen Holder, raise the outer sleeve of the lift-lock chuck of the Power Head
(Figure 4B).
Figure 4: Lift-Lock Chuck on Power Head
10
Page 11
4D LABS, Simon Fraser University 8888 University Drive, Burnaby, B.C. V5A 1S6
E [email protected] T 778.782.8158 F 778.782.3765 W www.4dlabs.ca
B
A
5. Insert the specimen holder (Figure 4C).
6. Release the sleeve to allow the holder to be locked in place (Figure 4D), you may need to gently
rotate the specimen holder until it locks in place. When in place, it may feel slightly loose, but this
is normal.
7. Load your samples. For central force, ensure that the sample holder is balanced (using blank
balance pucks if necessary).
8. Position the polishing head over the platen. Buehler recommends the specimen be approximately
1/3 off the edge of the platen in its outmost position.
Removing a Specimen Holder
• Raise the lift-lock chuck to release the specimen holder.
Single Force
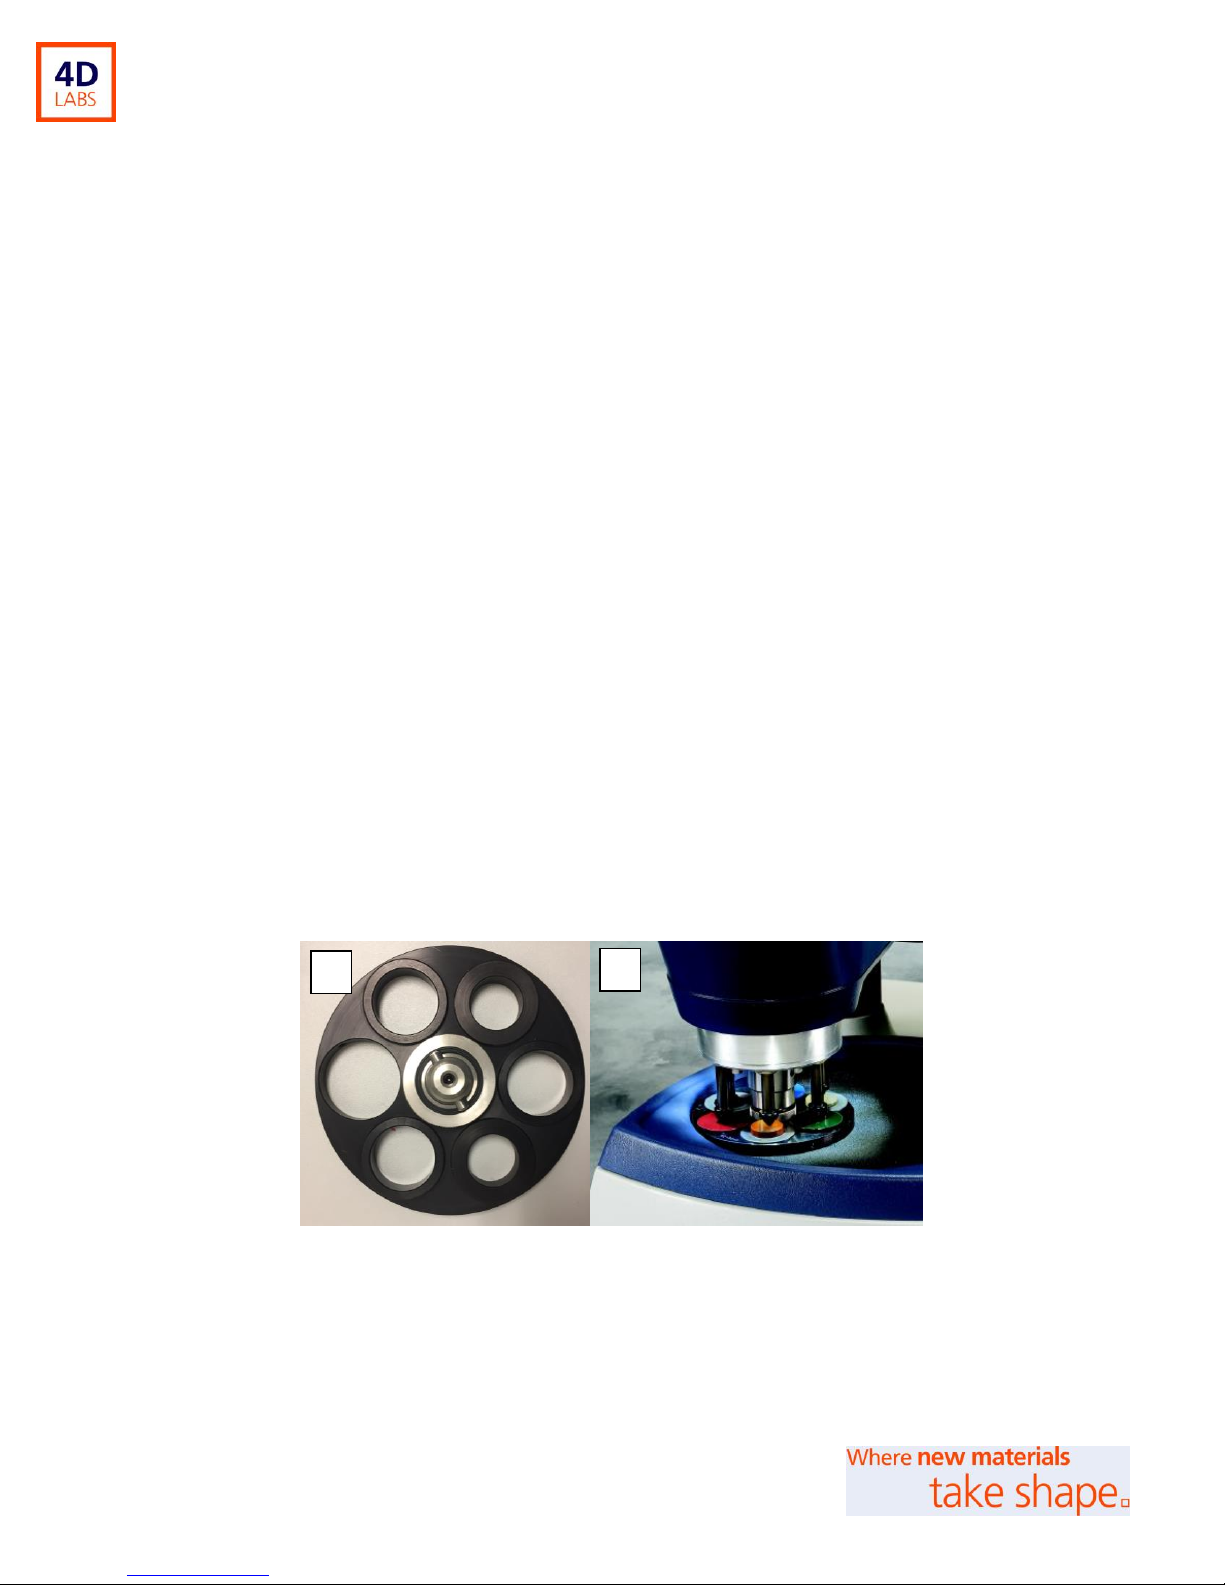
In single force mode, the specimens are placed, but not secured, in the specimen holder (Figure 5). The
amount of force selected on the control panel is applied to each individual specimen through hydraulic
fingers. The single force specimen holder must be locked rigidly in place to ensure optimum polishing
results.
Figure 5: A: Single Force Specimen Holder, and B: lowered force fingers during operation.
Central Force
In central force mode, the specimen holder (Figure 6) secures the specimens in place and the selected
amount of force is applied at the central point of the specimen holder. At least three specimens (balance
11
Page 12
4D LABS, Simon Fraser University 8888 University Drive, Burnaby, B.C. V5A 1S6
E [email protected] T 778.782.8158 F 778.782.3765 W www.4dlabs.ca
pucks are ok) are needed for a grinding and polishing cycle with the central force specimen holder (the do
not have to be in contact with the platen). Ensure that your samples are level for grinding/polishing and
secured in place using an Allen key.
Figure 6: Central Force Specimen Holder
Mounting the Glass Slide Holder
The glass slide holder supports glass slides 27 x 46 mm in size and is used only with the central force
holder. Use the follow steps to mount this holder:
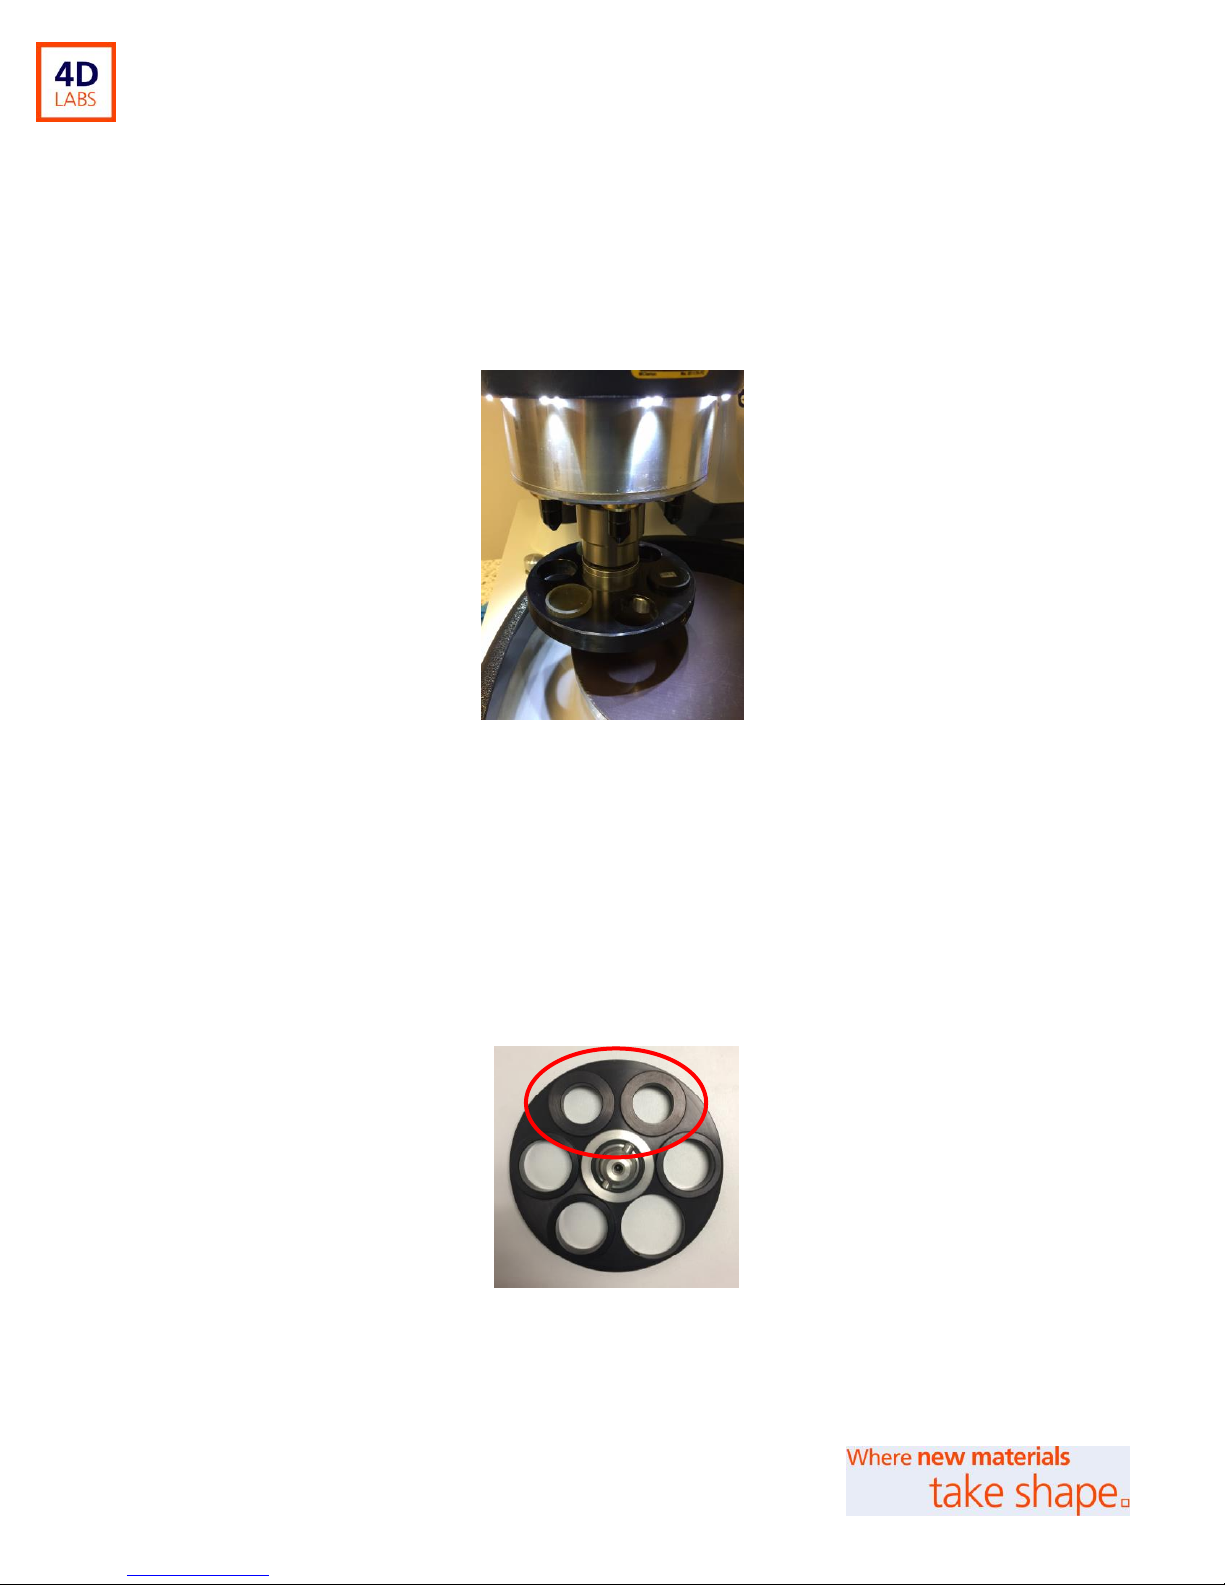
1. Position 2 adjacent 1” distance rings into the central force sample holder. Use the provided Allen
key to unlock and lock these in place as necessary (Figure 7).
Figure 7: Central force holder with 2 x 1” distance rings (circled in red)
12
Page 13
4D LABS, Simon Fraser University 8888 University Drive, Burnaby, B.C. V5A 1S6
E [email protected] T 778.782.8158 F 778.782.3765 W www.4dlabs.ca
B
A
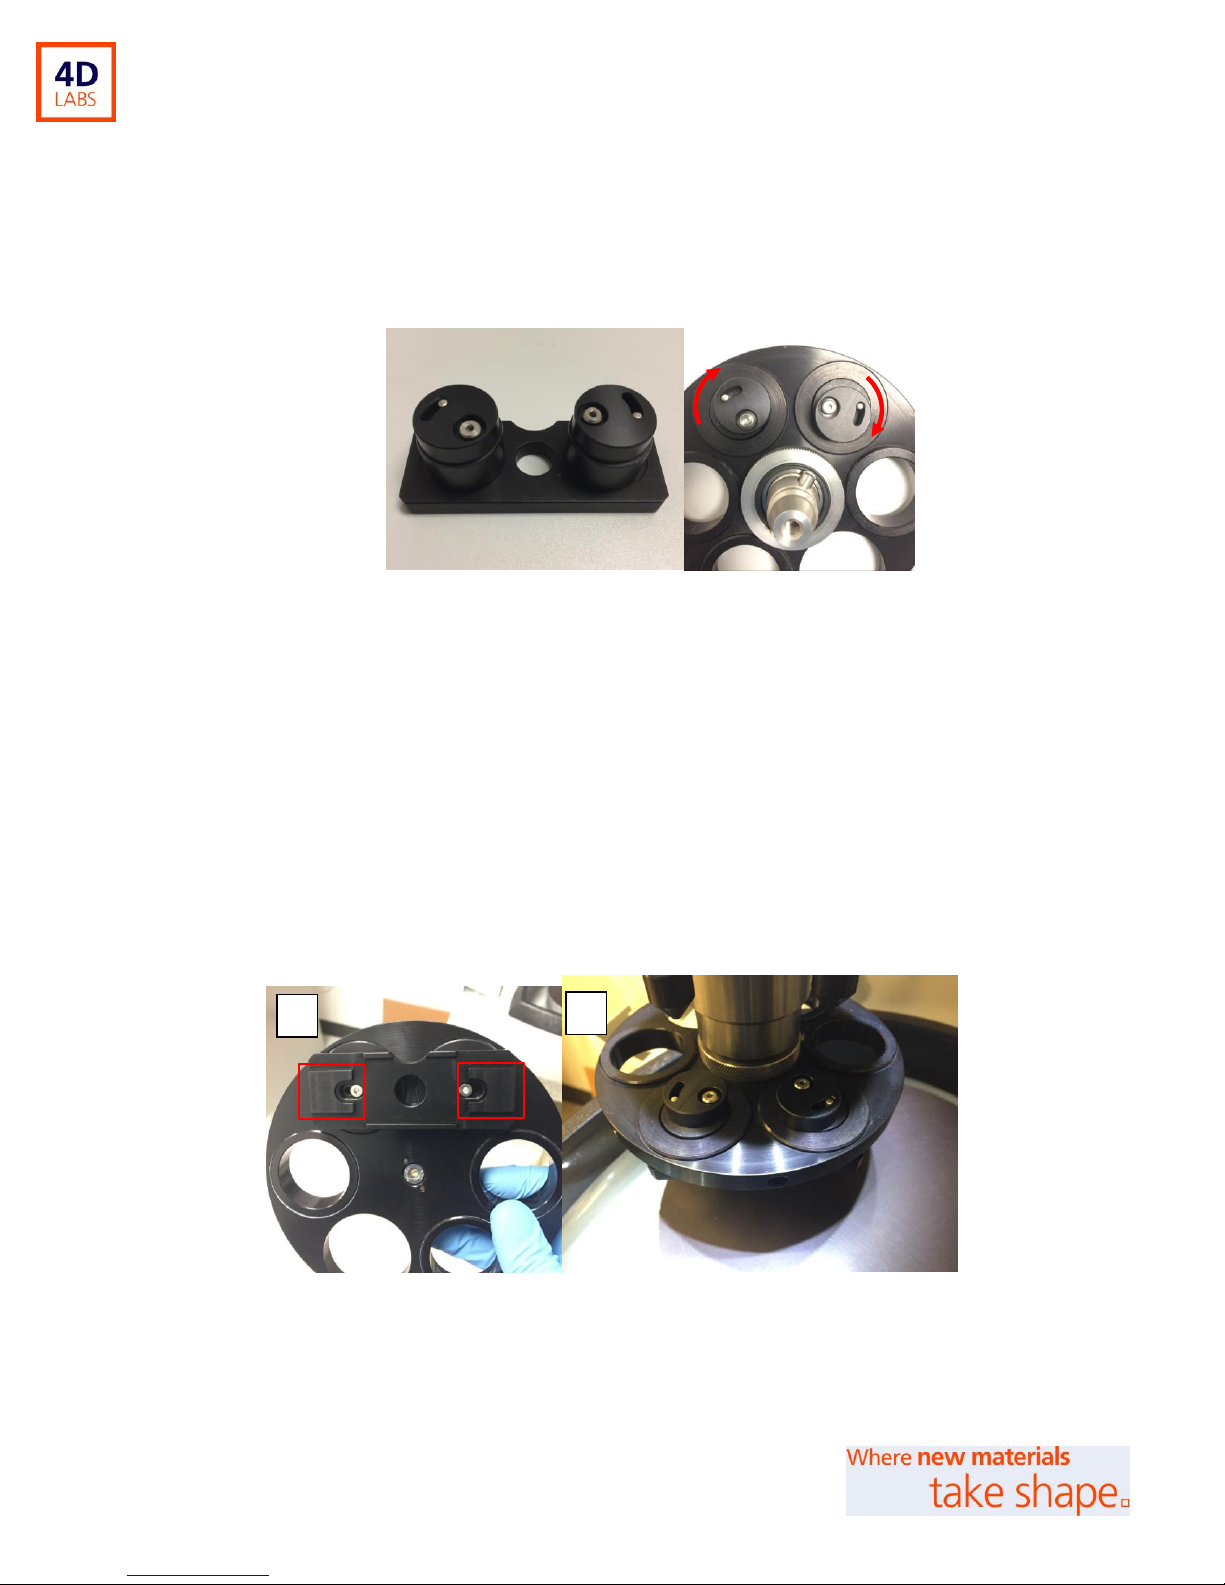
2. Place the glass slide holder into the 1” distance rings (sample side down). Lock the holder in place
by turning the locking caps of the glass-slide holder over the edges of the distance rings (Figure
8).
Figure 8: Positioning the glass-slide holder into the central force holder. Red arrows indicate locking position.
3. Attach your glass slide sample to the under-side of the glass-slide holder (positions for adhesion
are shown in Figure 9A). Use a double-sided adhesive tape, or wax to do this. Do check that your
choice of adhesive is fully removable from the glass-slide holder after polishing. Take care not to
use too much adhesive as your sample may be difficult to detach from the holder after polishing;
Note: the downward force of the Power Head will strengthen the adhesion).
4. Mount the full central-force holder with glass-slide holder onto the Power Head (Figure 9B). You
may need to counter balance the holder using balance pucks.
Figure 9: A: Sample attachment and B: mounting of holder to the Power Head. Attach samples at the red
marked areas of the glass-slide holder.
13
Page 14

4D LABS, Simon Fraser University 8888 University Drive, Burnaby, B.C. V5A 1S6
E [email protected] T 778.782.8158 F 778.782.3765 W www.4dlabs.ca
Begin the Grinding / Polishing Procedure
1. Use the control panel to select your desired force mode, Single or Central (check that this
corresponds to your selected sample holder). Press the MODE button to select between CENTRAL
or SINGLE mode.
An LED will light next to the selected MODE parameter.
2. Enter the TIME for the specimen preparation using the INCREASE or DECREASE buttons.
The time selected will be shown in the TIME display field.
3. Press the SPEED button to enter a platen speed. The SPEED display field will flash when the speed
is changed. Press SPEED again to select the Power Head speed.
Press the INCREASE or DECREASE buttons to adjust the rotational speed of the platen.
The rpms will be displayed in the SPEED display field.
Recommended speeds are as follows:
i. Base = 1 – 500 rpms
ii. Head = 30 – 60 rpms
4. Press the FORCE button seconds to select a force. (N or LBS)
To change the force units between N (Newtons) and LBS (pounds) press the INCREASE
and DECREASE buttons simultaneously.
A LED will light next to the selected FORCE parameter.
Press the INCREASE or DECREASE buttons to select the amount of force. The amount of
force selected will be displayed in the FORCE display field.
Recommended force ranges are as follows:
i. Single Force = 1 – 10 lbs (5 – 45 N)
ii. Central Force = 5 – 60 lbs (20 – 260 N)
5. Press the FLUIDS button to select between having water flowing from the tap, or to have no water.
An LED will light next to the selected FLUIDS parameter.
No LED indicates the FLUID parameter is not selected.
6. Press the HEAD ROTATION button to select between complementary or counter rotation.
An LED will light next to the selected HEAD ROTATION parameter.
14
Page 15
4D LABS, Simon Fraser University 8888 University Drive, Burnaby, B.C. V5A 1S6
E [email protected] T 778.782.8158 F 778.782.3765 W www.4dlabs.ca
7. To use water, position the Water Dispensing Arm over the platen. Press the WATER button.
The WATER LED will light and water will be dispensed from both the Water Dispensing Arm the
Platen Bowl Wash. If there is no running water, open the mains tap behind the sink.
Turn the tap counter-clockwise to increase water flow through, or clockwise to reduce
flow.
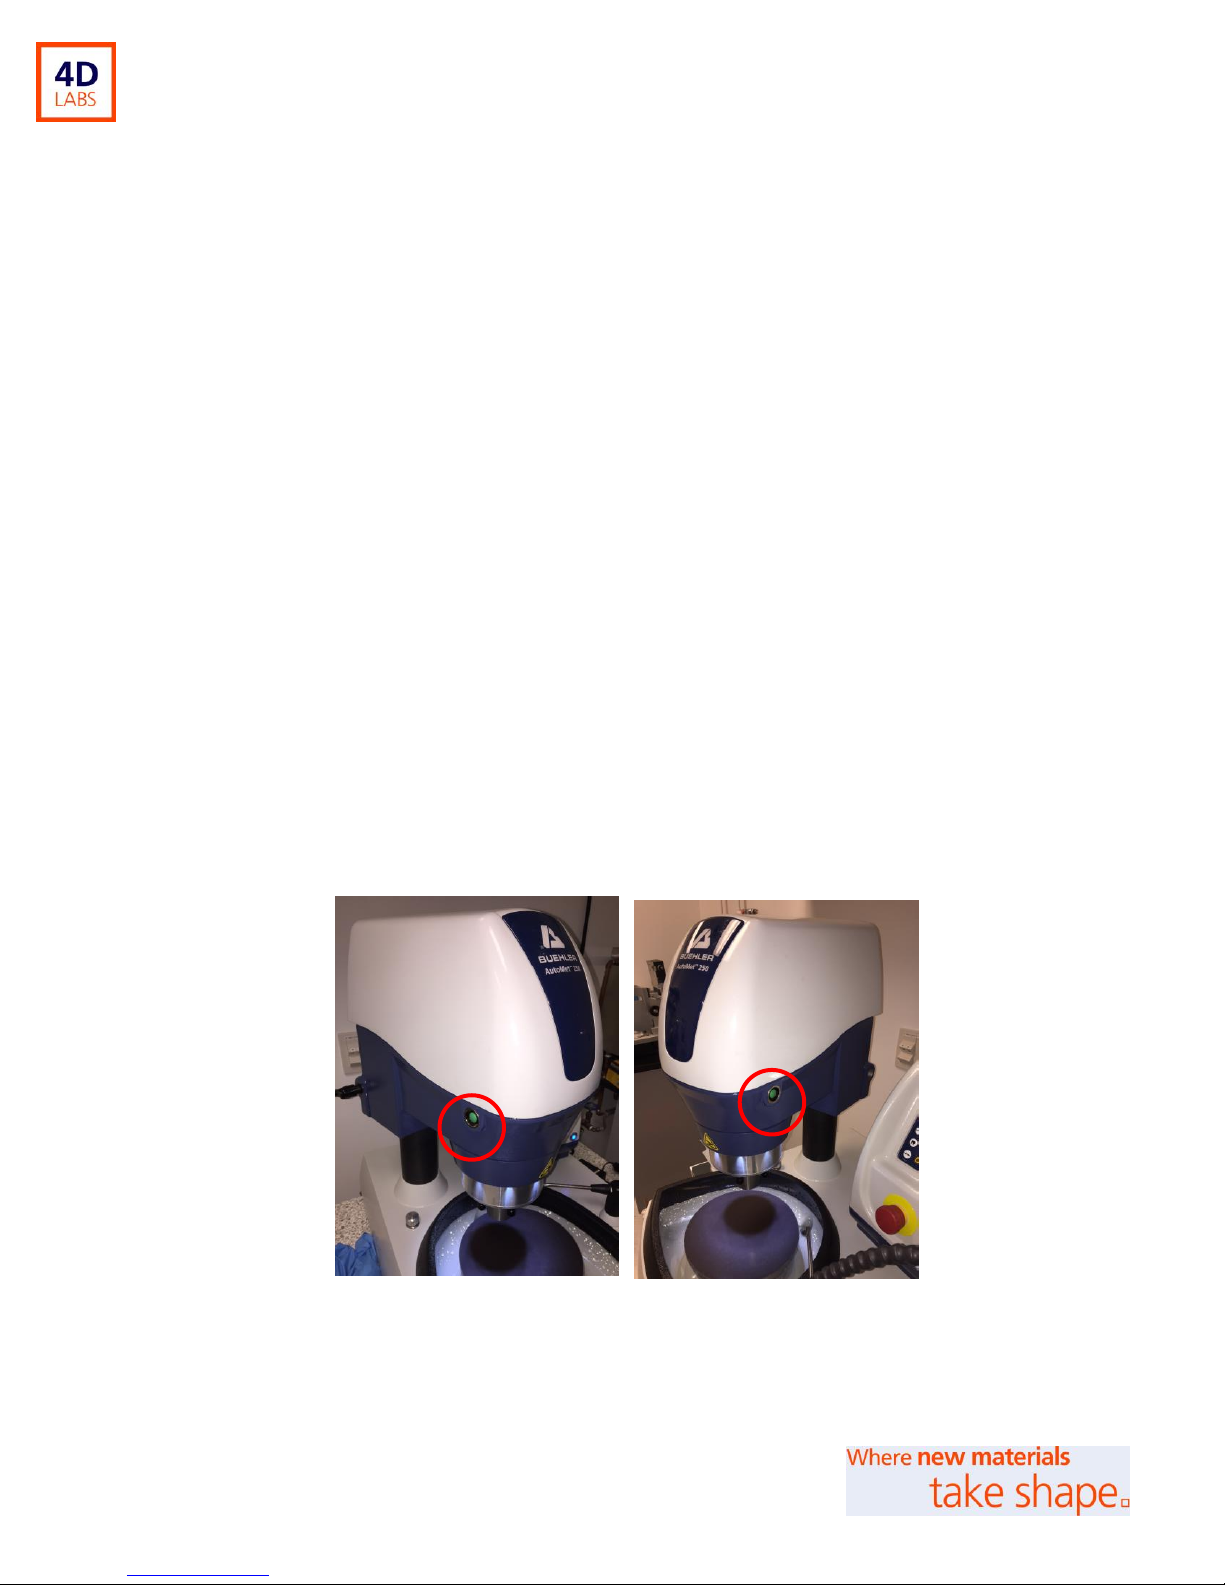
To start the machine, simultaneously press and hold the 2 green buttons on either side of the Power Head.
Keep holding the buttons as the Power head lowers the head to the platen. Let go of the buttons once the
process is underway (see Figure 10). Using both hands here (one for each green button) ensures safety from
trapping hands beneath the Power Head.
In Central Force mode, holding the green buttons will begin the polishing process once the
Power Head reaches the platen.
In Single Force mode, the Power Head will firstly lower onto the platen when the green
buttons are first held; polishing will not begin. Now you can place your samples into the
sample holder. Pressing the 2 green buttons again will lower the force fingers onto the
samples, and polishing process will begin.
Figure 10: Power Head Start Buttons (one located on each side of Power Head)
To pause the process, press the PAUSE / STOP button for approximately 1 second.
15
Page 16

4D LABS, Simon Fraser University 8888 University Drive, Burnaby, B.C. V5A 1S6
E [email protected] T 778.782.8158 F 778.782.3765 W www.4dlabs.ca
To stop the process, press and hold the PAUSE / STOP button for about 3 seconds
When the STOP function has been selected all parameters return to their default settings. To
resume machine operation, press the SPEED button.
To resume machine operation, press the PAUSE / STOP button again for approximately one
second. All parameters will be maintained and the time display field will continue counting.
Exchanging grinding and polishing discs
To exchange grinding and polishing discs, firstly ensure that the Power Head is raised from the platen, and
positioned away from the base using the locking handle.
Carefully lift away the used grinding or polishing disc from the magnetic platen, and replace with your next
appropriate disc.
Used SiC grinding discs can be placed into a zip-lock bag and placed in the nanoparticle waste bin.
Diamond abrasive discs should be cleaned with water and placed back into zip-lock bag. Place this
back into the grey storage drawers.
Reseal polishing cloth discs into a zip-lock bag, to ensure that it keeps wet. Place this back into
the grey storage drawers.
After use
At the end of your session please complete the following checklist:
1. Turn off the machine.
2. Replace all polishing cloths to zip-lock bags so that they do not dry out. Store in the correct filing
drawers.
3. Detach the sample holder from the Power Head, clean thoroughly with water & IPA, and store in
the grey wall cabinet.
4. Clean the single force fingers:
Gently pull down the fingers and wipe using a Kim-wipe and IPA to remove any debris.
16
Page 17

4D LABS, Simon Fraser University 8888 University Drive, Burnaby, B.C. V5A 1S6
E [email protected] T 778.782.8158 F 778.782.3765 W www.4dlabs.ca
5. Store all polishing supplies appropriately to keep the space tidy for other users.
6. Using the water hose, rinse and then wipe the base area to remove any residual solution or
material (always monitor the water level of the collection vessel).
7. Place all particulate-contaminated waste (e.g. used grinding discs, Kim-wipes, gloves etc.) into a
zip-lock bag. Label this as nanoparticle waste and place into a designated nanoparticle waste bin
(currently in room 6170).
8. If the waste container is full, please alert a staff member so that it can be emptied.
9. Do not store your samples in the preparation lab.
10. Fill in the user log book and remember to create your online 4D LABS usage ticket.
References and Files
Buehler Manual for EcoMet™ 250 / 300 Grinder-Polisher & AutoMet™ 250 / 300 Power Head.
Contact Information
Questions or comments in regard to this document or Buehler Grinder-Polisher should be directed towards
Xin Zhang or Matt Bilton ([email protected]; [email protected]; 778-782-8026) in 4D LABS at Simon
Fraser University, Burnaby, BC, Canada.
17
Page 18
4D LABS, Simon Fraser University 8888 University Drive, Burnaby, B.C. V5A 1S6
E [email protected] T 778.782.8158 F 778.782.3765 W www.4dlabs.ca
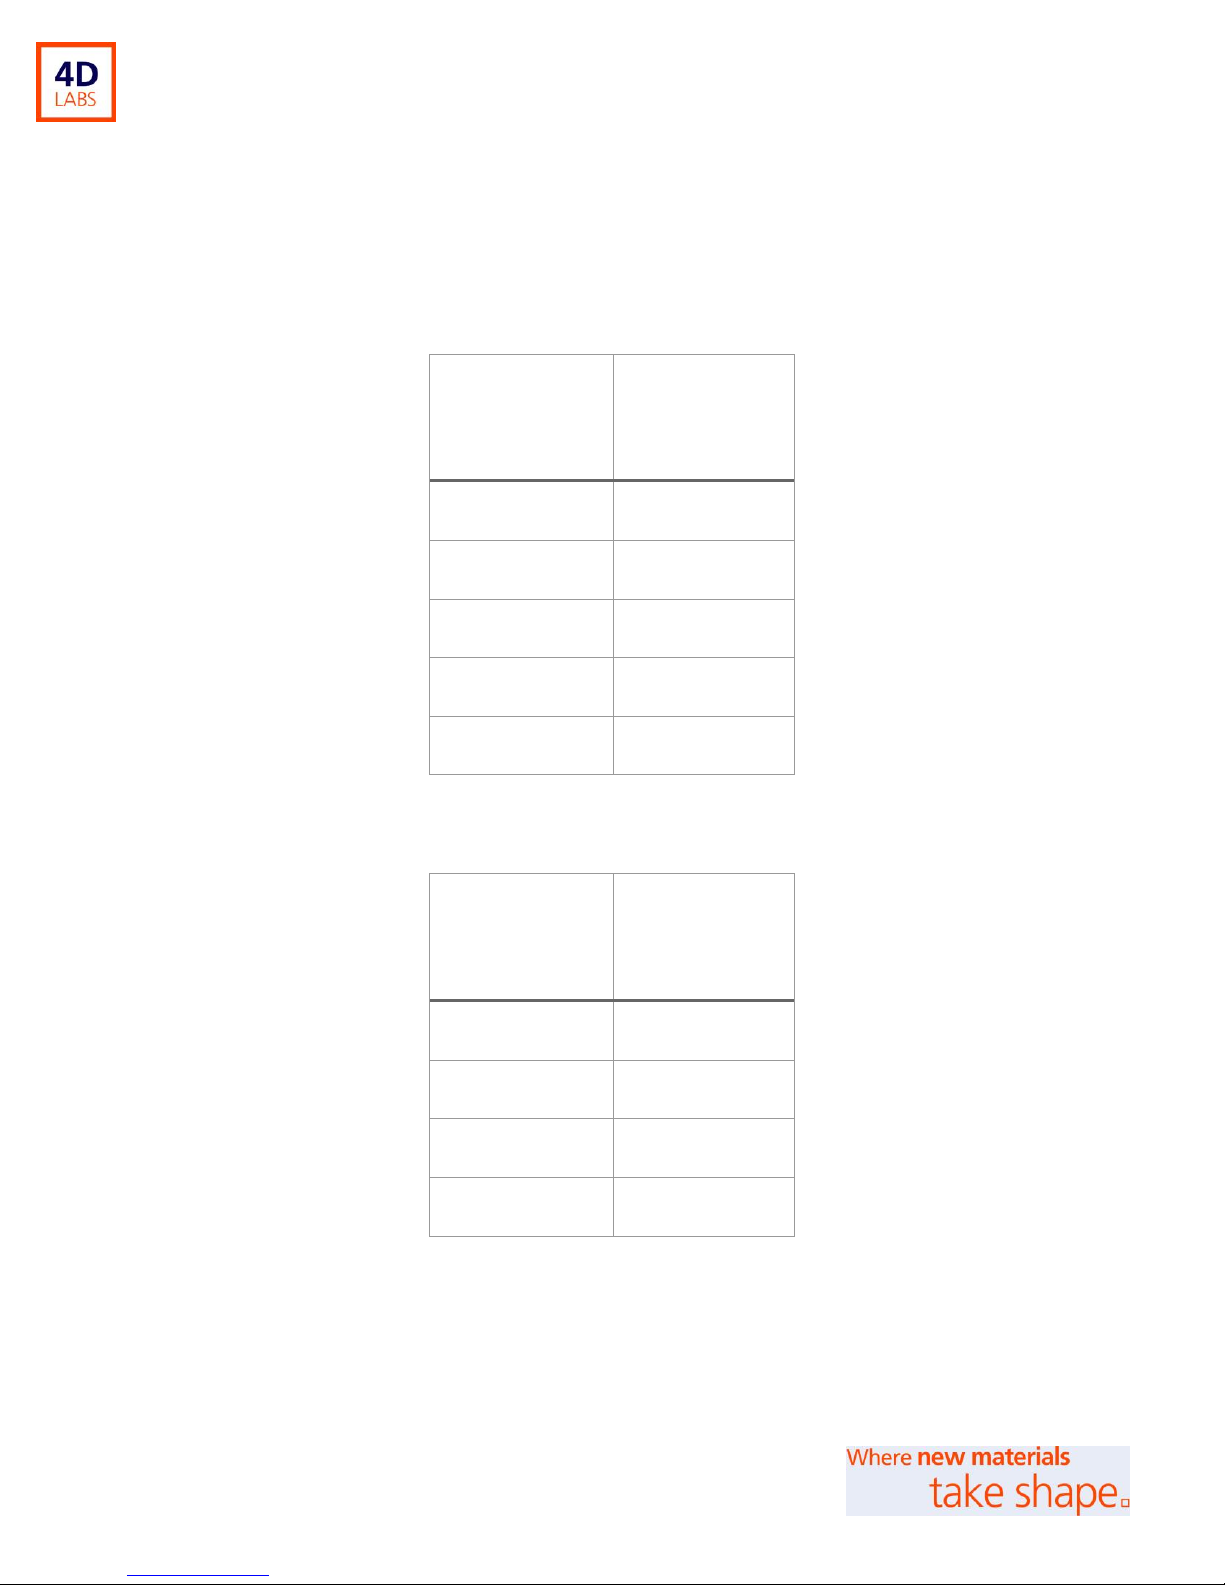
FEPA Grit
Code
Grit Size (µm)
P120
125
P280
52 ± 2
P400
35.0 ± 1.5
P800
21.8 ± 1.0
P1200
15.3 ± 1.0
Solution
Colour
Grit Size (µm)
RED
9
YELLOW
6
GREEN
3
BLUE
1
Supplementary Information
Silicon Carbide Abrasive Grinding Discs
Diamond Polishing Solutions
18
 Loading...