

Page 1
Budmaster II LED Lamp Installation Guide
Product Warnings
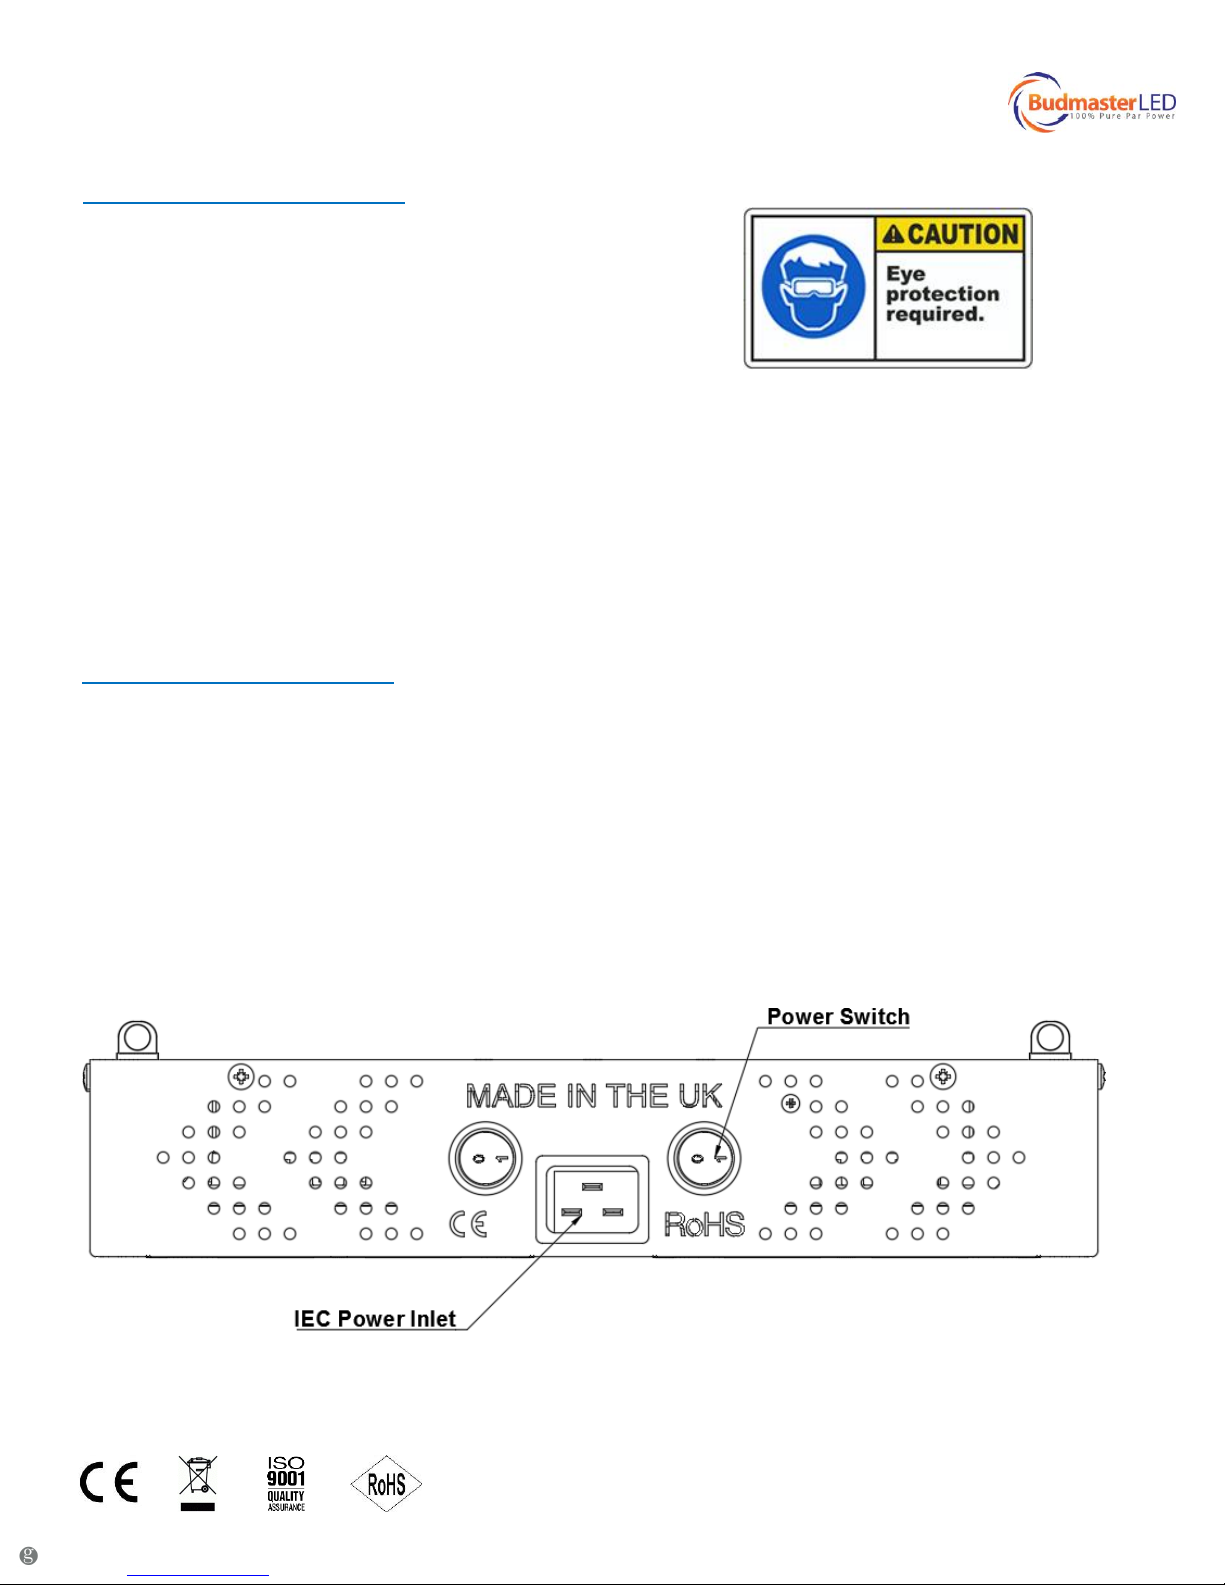
Light Hazard Warning, never look
directly or in-directly into the
lamp without protective eyewear.
1. Do not consume alcohol or drugs of any kind while installing this lamp.
2. Verify input voltage is as indicated on the label at the back of the lamp, before installation.
3. Install hanging kit as described in this document.
4. Remove any plants from the hanging area before installing the lamp.
5. Only secure your lamp via the hanging kit supplied.
6. Ensure your hanging area is moisture free.
7. Ensure your lamp is hanging evenly to avoid eye damage.
Powering Up Your Lamp
Do not attempt to power up your lamp without consultation if:
1. You see significant shipping damage.
2. You see water ingress through the packaging.
All Budmaster lamps use a standard IEC power receptacle and will come with a corresponding 1.8m long
power cord for your region.
The switches on your lamp are to power up the lamp in two separate halfs so you can choose to use less
power for your vegatative stage. Both switches in the 1 position put the lamp to full power.
Page 2
Budmaster II LED Lamp Installation Guide
Attaching Your Hanging Kit
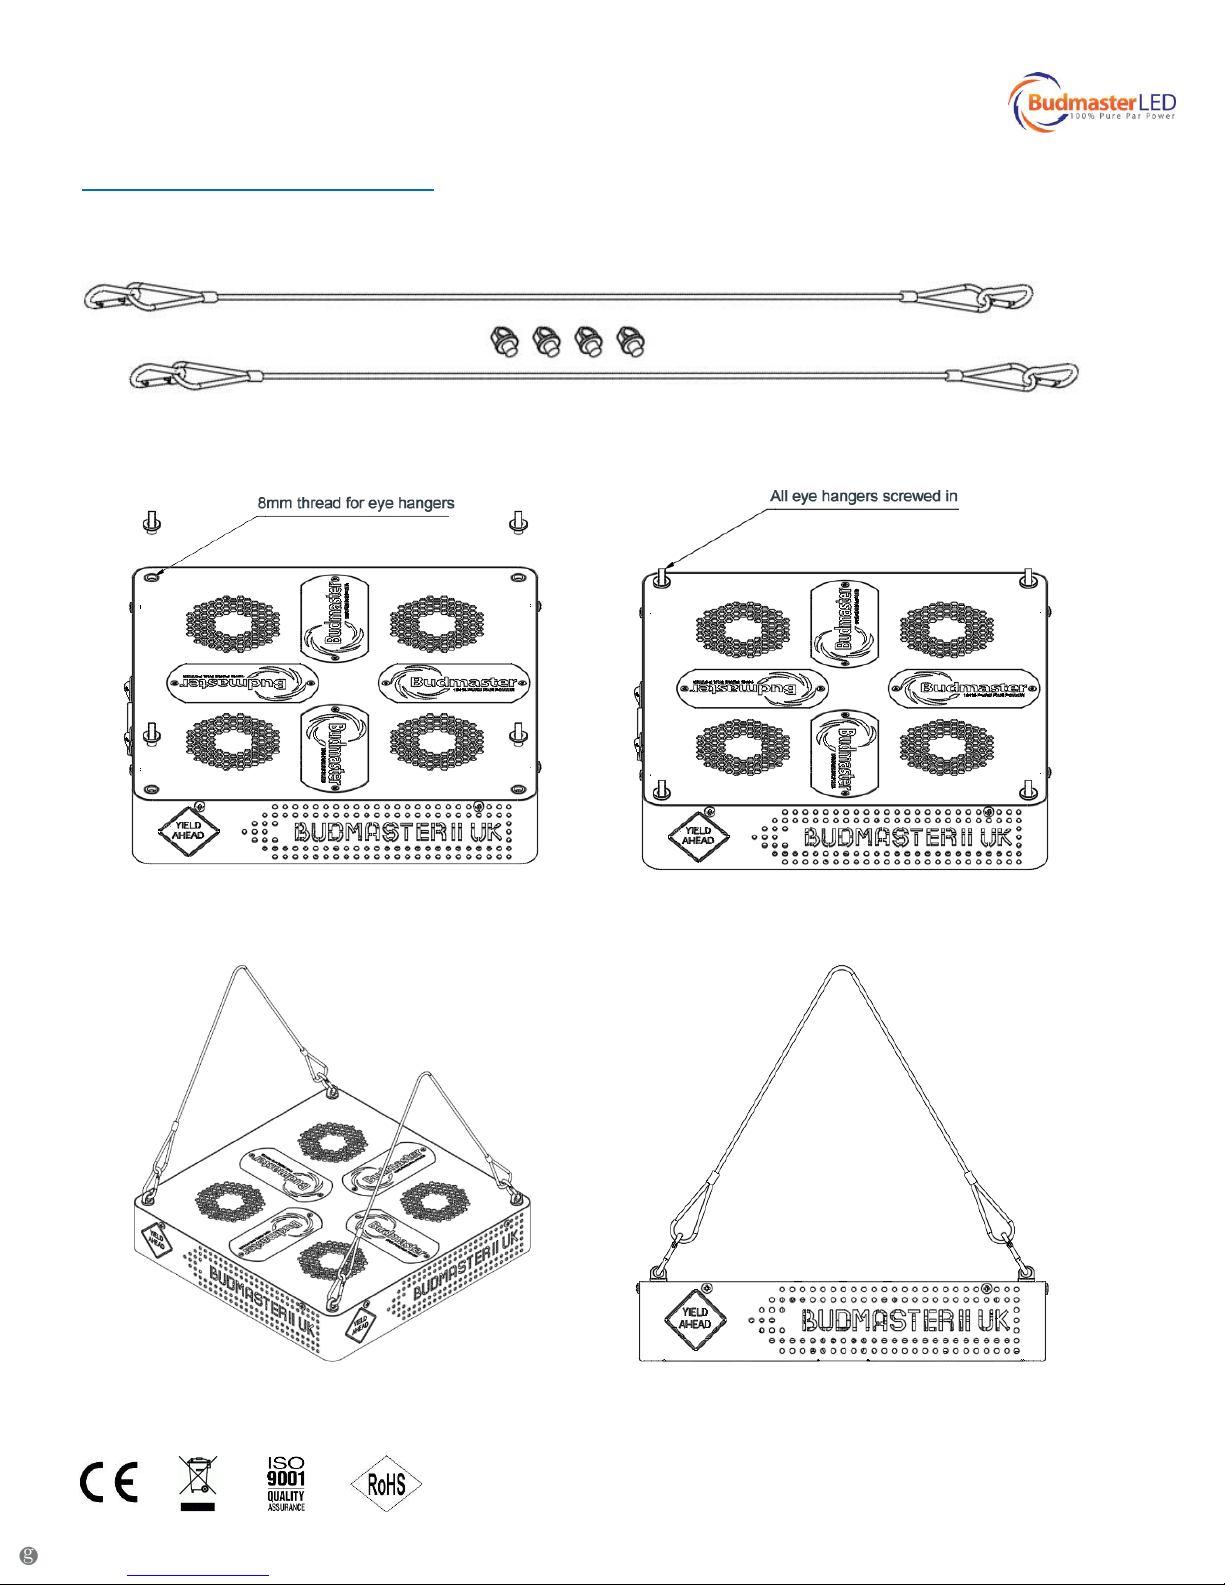
All of our Budmaster lamps are supplied with a hanging kit that can take a 40kg+ load which is
installed by the user, the kit comprises of 4 threaded eye bolts and 2 steel hanging wires:
The eye bolts are screwed into the 8mm threads on the back of the lamp by the user:
The hangers are attached to the eye bolts using the karibeners supplied:
Page 3
Budmaster II LED Lamp Installation Guide
Hanging Your Lamp Safely
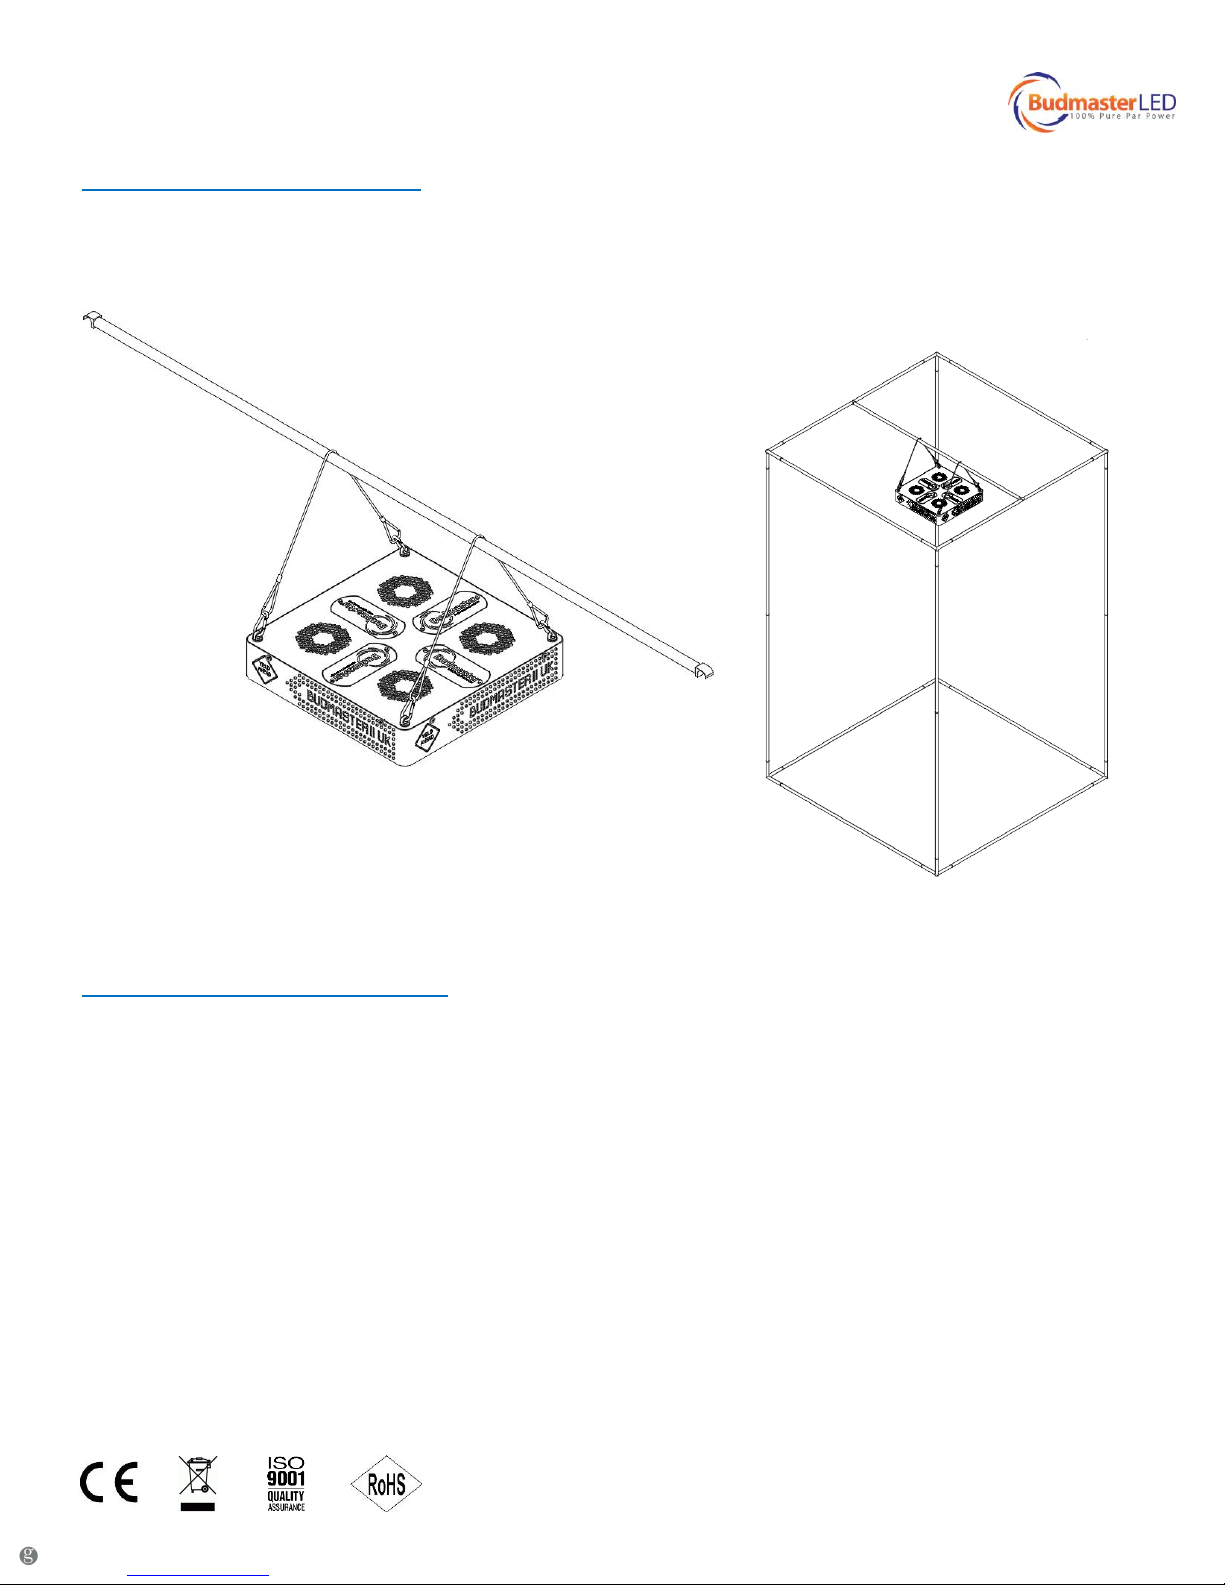
If you are growing plants in a grow tent then we suggest taking down the hanging bar from the tent and
threading it through the hangers and then hanging the light and bar as one, and remove any plants or
equipment from the hanging area:
I you are hanging your lamps in a room then ensure that your hanging gear is rated to take the weight of the
lamps plus an additional 20% to allow for any movement.
Important LED Growing Tips
LED is a superior way to grow but sometimes you may have to make some adjustments to your environment
and feeding regime to get the most out of your lamps:
1. Hang your lamps as stated in the hanging guide for your lamp to get the most effective use of the
lamp and ensure the plants don’t overdose on light. Do not be tempted to hang them too close as
you do when using HID as this is just a waste of energy.
2. Don’t Overwater. If you are not growing hydroponically then be careful not to overwater your plants
as when growing with led there is less radiant heat so less evaporation of nutrients.
3. Turn down the exhaust temperature setting on your fan controller as not as much heat is generated
with led so you need to ensure stale air is dumped.
4. Cold Roots = Small Fruits. Check your pots by placing your hands on them, if they are too cold to the
touch think about adding additional heat to your room. If you are struggling to keep your root zone
warm then switch to felt pots.
5. Additional Cal Mag. Plants grown under our led can take in a lot more nutrients and in some
instances demand much more Calcium and Magnesium so if you are in a rural area especially then it
is a good safeguard to have a bottle of Cal Mag on standby.
Page 4
Budmaster II LED Lamp Installation Guide
Hanging Distance
Our lamps are very powerful and designed to be kept at 1.8m+ distance from the ground. To get the right
amount of light to your plants at the right time consult the chart below.
Seedling Stage average light required = 50µmol/m2/s
Vegetative Stage average light required = 200 – 400µmol/m2/s
Bloom Stage average light required = 800 – 1000µmol/m2/s
Over 1000µmol/m2/s then add carbon dioxide to see a huge increase in yield.
So by consulting the chart below we can see that in bloom for best results the COB-X-9 should be around 18
inches from the plants canopy.
1ft
2ft
3ft
4ft
5ft
COB-X-2
440
140
80
60
40
COB-X-4
1000
321
170
140
121
COB-X-6
1045
465
272
215
178
COB-X-8
1320
550
330
240
200
COB-X-9
1400
625
376
312
270
HPS-2
990
420
230
150
110
HPS-4
1290
680
420
290
210
HPS-6
1320
780
500
340
260
HPS-8
1420
820
550
400
310
HPS-9
1420
1020
720
510
390
OD-2
760
340
195
140
100
OD-4
1490
790
470
330
240
OD-6
1540
910
570
370
280
OD-8
1580
970
690
510
400
OD-9
1850
1120
740
530
410
GOD-2
970
460
260
180
130
GOD-4
1940
1010
610
400
300
GOD-6
2010
1190
720
510
390
GOD-8
2260
1300
850
610
480
GOD-9
2400
1610
1000
710
570
XG-2
800
300
180
130
90
XG-4
1520
650
400
290
210
XG-6
1600
800
500
320
240
XG-8
1770
880
630
450
300
XG-9
2160
1000
650
490
350
Page 5

Deutschland: https://www.growland.net
Europe: https://www.growland.biz
France: https://www.growland.fr
España: https://www.growland.es
Österreich: https://www.growland.at
Nederland: https://www.growland.nl
Italia: https://www.growland.it
United Kingdom: https://www.growland.co.uk
 Loading...