

Page 1
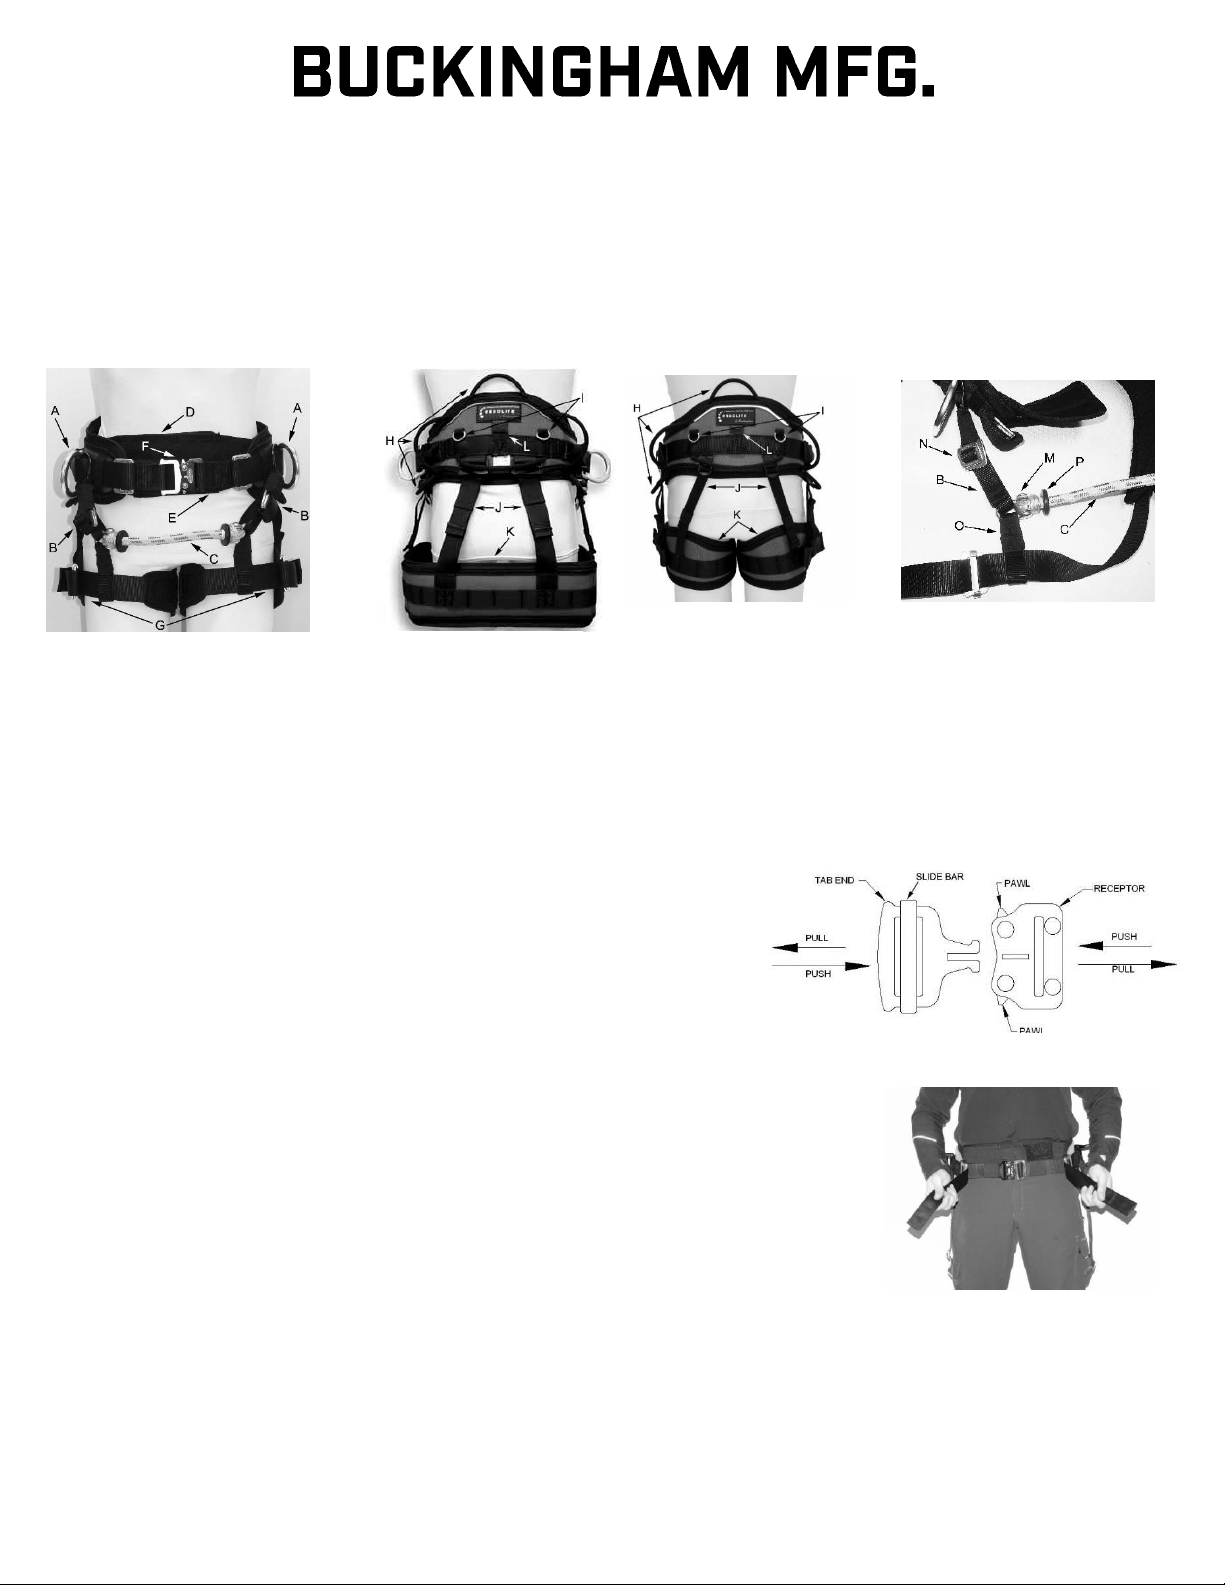
“ErgoLite” P/N 17904, 17906 & J17904, J17906 Series Saddle
A-Work Positioning Dee Ring
B- Suspension Bridge Adjustment Strap
C-Suspension Bridge
D-Abdominal Stabilizer System
E-Waist Belt Strap
F-Waist Belt Quick Connect Buckle
G-Leg Strap with Quick Connect Buckle
H-Accessory Loops (6)
I-Accessory Rings
J-Leg Pad Adjustment Straps
K- Batten Seat (Model 17904)
K - Leg Pads (Model 17906)
L-Suspender Attachment Loop
M -Clevis Shackle
N-Interlocking Buckles
O-Leg Pad Attachment Strap
P- Suspension Bridge Bumpers
ErgoLiteInst.doc
PN 230291 Rev. 6/8/16
PULL
PULL
Figure 2
Figure 1
Model 17904 (rear view)
Model 17906 (rear view)
Instructions/Warnings
The “ErgoLite” arborist saddle is designed for the professional arborist. It is fully adjustable at the waist, legs and suspension
bridge to provide ease of use, comfort, adjustability, versatility and safety. The “ErgoLite” offers advantages over a
conventional saddle including:
multiple adjustments to obtain a custom fit.
the ability to change the length of or replace the suspension bridge.
* Prefix J denotes product is CE certified (EN 358-1999 & EN 813-2008)
WEARING INSTRUCTIONS:
1) Thoroughly inspect saddle and all related equipment before each use.
2) Unbuckle the waist strap and each leg strap.
3) Place the saddle around your waist with the waist strap buckle in the front
and attach the hook and loop fastener of the Abdominal Stabilizer.
Note: Abdominal Stabilization System is for support and comfort only. Do not over
tension to increase snugness of fit!! When attaching the elastic Abdominal Stabilization
System, tighten the abdominal muscles by tightening the abdomen as if you were doing a
crunch and then secure the hook and loop fastener. Don’t hold your breath when you
fasten the hook and loop fastener as this will cause over-tightening. The abdominal
stabilizer can be replaced with a new stabilizer, if over-time it loses its elasticity.
4) Ensure that the work positioning D-rings are slightly forward of the hip bones. Fasten
the Quick Connect Buckle as shown in Figure 1. Visually inspect that the buckle is
secured. Do not rely on hearing the click. Look for both sides to be locked.
5) Pull equally on the free ends of the waist straps until the saddle is snug on your waist as
shown in Figure 2. Be sure not to over tighten as this can cause discomfort on your hips and waist.
6) Wrap the leg straps around the leg so that the padded portions of the leg straps are behind the leg and the
buckles are on the outside of the leg.
7) Connect the leg strap buckles as shown in Figure 1.
8) Adjust the leg straps as necessary so they are snug, but comfortable.
9) Tuck the excess leg strap into the elastic strap keeper attached to each leg pad.
ADJUSTMENT INSTRUCTIONS:
Once the saddle has been properly fitted, you can adjust the Suspension Bridge for optimum comfort.
Page 2
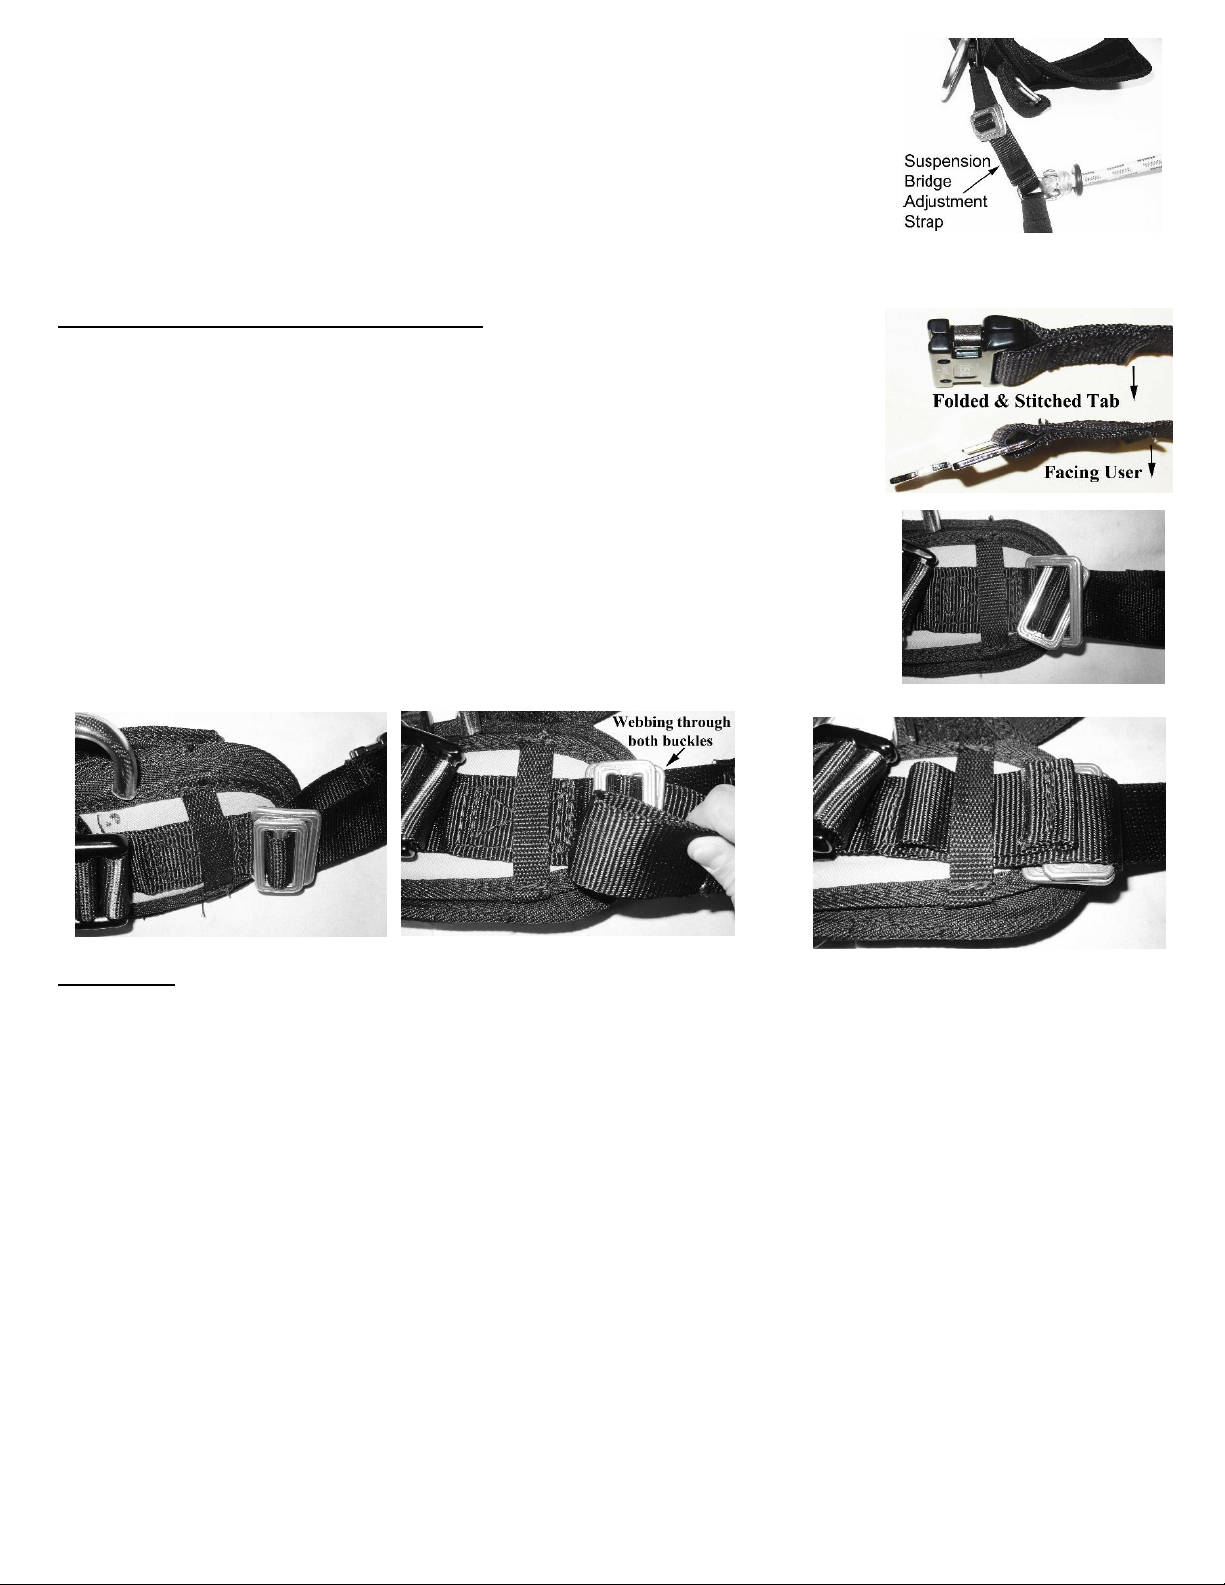
Height adjustment of the Suspension Bridge by use of the Suspension Bridge Adjustment
Figure 3
ErgoLiteInst.doc
PN 230291 Rev. 6/8/16
Figure 4
Figure 5
Figure 6a
Figure 6b
Figure 6c
Straps (Figure 3) will alter your position. Tightening the adjustment straps will move your
position forward and loosening them will move it backwards.
Proper adjustment of the Leg Pad Adjustment Straps ensures that the Leg Pads will be in
the most comfortable position on your legs. Tighten the Leg Pad Adjustment Strap to
raise the Leg Pad and loosen it to lower the Leg Pad.
REPLACING THE SUSPENSION BRIDGE
Replacement Suspension Bridges (W3-size)
are supplied separately and include detailed
replacement instructions to be used when replacing the Suspension Bridge. Use only replacement Suspension Bridges
(manufactured from approved tree climbing rope) supplied by Buckingham Mfg.
Attaching the Waist Straps Instructions: (For use only when waist straps
have been removed)
1) Lay the Back Pad inside down on a flat surface. Orientate each of the Waist
Straps so that the folded & stitched tab of the webbing is facing down (tab towards
the user when wearing. (Figure 4)
2) Angle the smaller of the two Waist Strap Adjustment Buckles and insert it through
the backside of the larger Waist Strap Adjustment Buckle (Figure 5).
3) Pass the smaller buckle completely through the larger buckle so the smaller
is lying flat on top of the larger. Be sure curves of Waist Adjustment Buckles both
slope down when connected. (Figure 6a)
4) Ensure both ends of the webbing passes back through the larger half of
the interlocking buckle as shown in Figure 6b.
5) Tuck the free end of the webbing over the top of the interlocking buckles and then
underneath the web keeper loop attached to the back pad. (Figure 6c) Repeat for
the opposite side of the waist strap.
Inspection: Prior to each use, carefully inspect this equipment for indications of wear or deterioration. The inspection,
should include but not be limited to inspection for:
webbing cuts, kinks, abrasions, burns, excessive swelling, excessive wear, discoloration, cracks, charring, broken
fibers, loose stitching, absence or illegibility of markings, chemical or physical exposures.
buckle holes in strap are not damaged.
loose, bent or pulled rivets, bent grommets, and broken, cut, or burned threads.
tongue of buckle (if equipped) does not bind on buckle frame.
nicks, cracks, distortion or corrosion of hardware (buckle, D-rings, etc.).
An additional inspection shall be performed by a competent person other than the user at an interval of no more than one
year. The frequency of periodic inspection by a competent person shall be established by the users organization based on
careful consideration of relevant factors. Such factors include the nature and severity of workplace conditions affecting the
equipment and the modes of use and exposure time of the equipment.
If any evidence of wear or deterioration as outlined is
observed, immediately cease use, destroy the product and replace it with new equipment. Should any unusual conditions not
outlined above be observed, or you have reasonable doubt about a particular condition, remove the equipment from service
and notify your Supervisor, Safety Director or contact Buckingham Mfg. (1-800-937-2825) for clarification. Failure to carefully
and completely inspect your equipment could result in serious injury or death.
CLEANING, STORAGE and TRANSPORTATION
Principal materials:
Straps: nylon, polyester.
Adjustment buckles: steel.
Work positioning D-rings: aluminum alloy.
Page 3
Proper maintenance, storage and transportation of your equipment will prolong its useful life and contribute toward its performance.
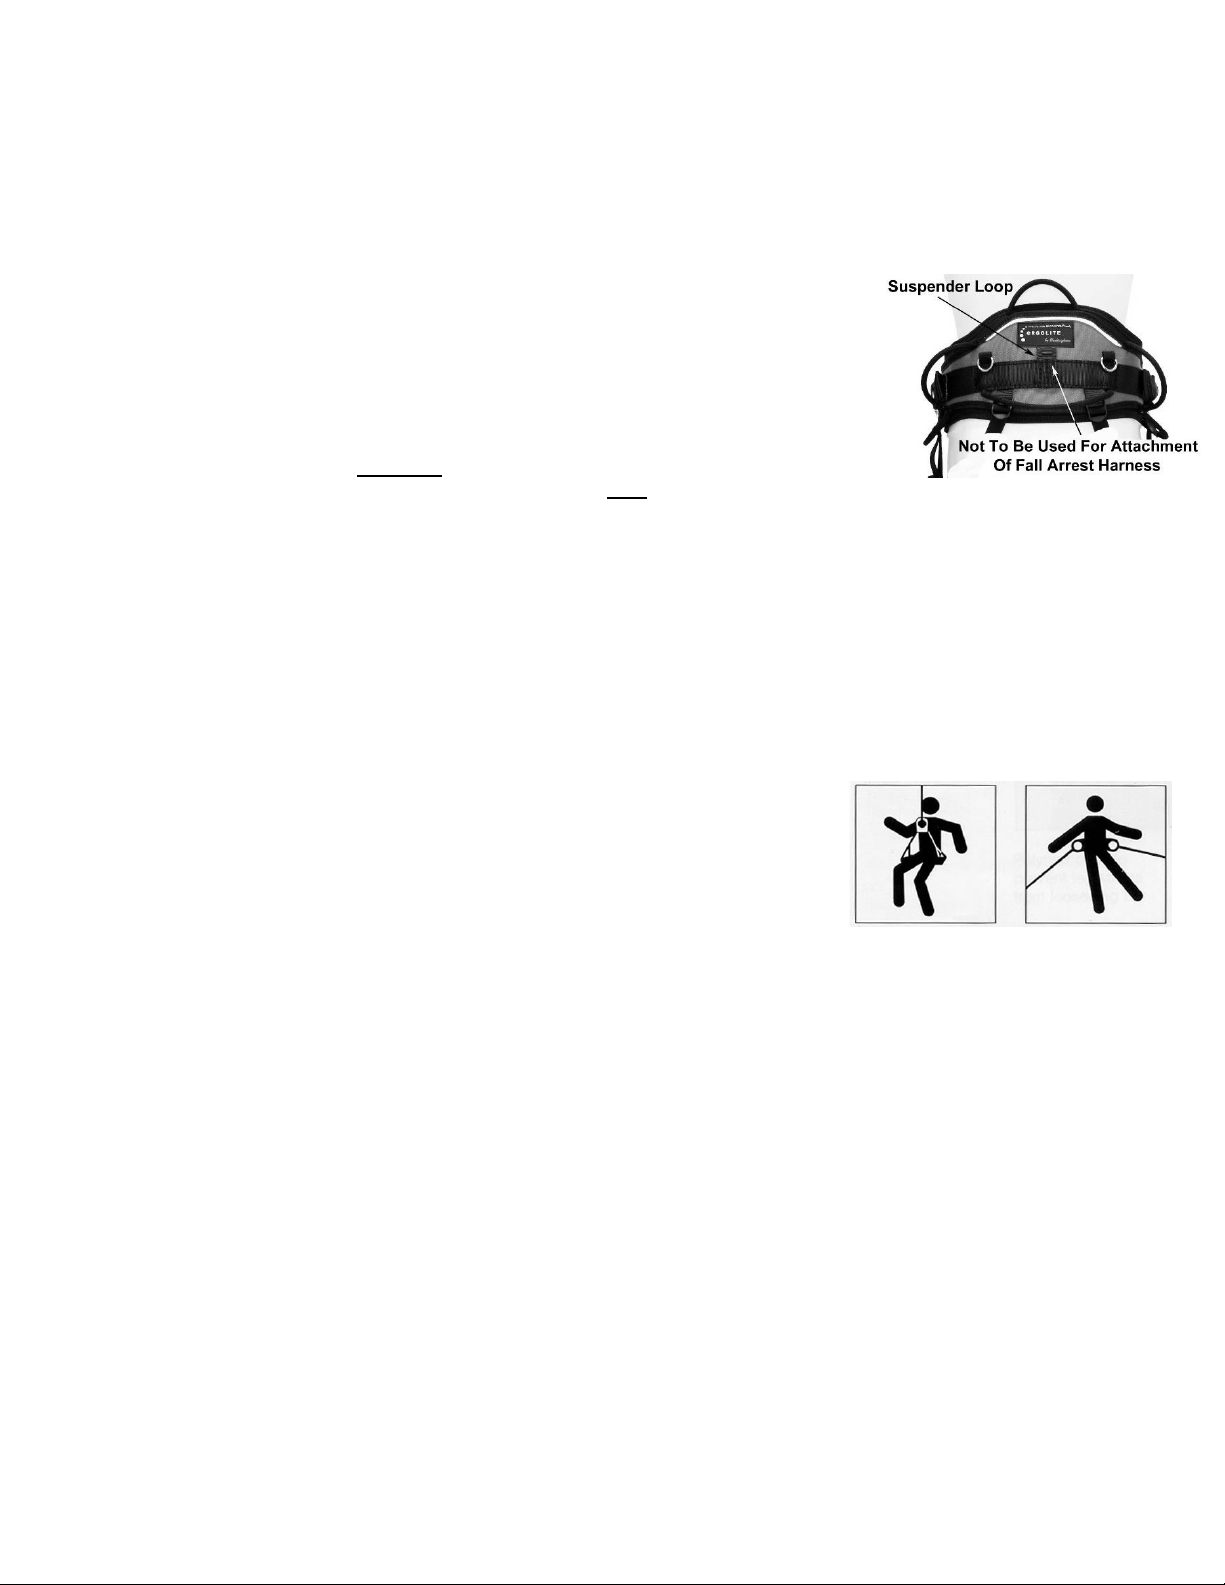
Figure 7
Suspension Positioning
Figure 8
ErgoLiteInst.doc
PN 230291 Rev. 6/8/16
Nylon and polyester should be cleaned and disinfected with water and mild soap and be allowed to air dry thoroughly without using
excessive heat. Do not use any type of corrosive substance or acid, which will gradually deteriorate the fabric. Steel and aluminum
components may be wiped clean with a cloth dampened with a lightweight lubricant such as WD-40®. Your equipment should be
stored and transported so that it does not come into contact with moisture, ultra violet rays, extreme temperatures, or chemical
agents. Warnings pertaining to cleaning, storage and transportation should be strictly adhered to.
WARNINGS
Read, understand, and follow all instructions and warnings
in your serious injury or death.
This equipment is intended for use by properly trained professionals only. Do not use without proper training.
before using this equipment. Failure to do so could result
This product is designed to be used by a person with a maximum weight of 350 lbs.
(158.7 kg.) when fully equipped and medically fit for activities at height.
Anyone with a history of back or neck problems that may be aggravated or complicated
by using this equipment should not do so.
Pregnant women and minors must not use this equipment.
Users of this equipment must be in good health and not under the influence of drugs or alcohol.
This saddle is not designed to be used with a retro fit Fall Arrest Harness. The large loop
centered at the rear of the back pad is intended for connection of saddle suspenders
only (Figure 7). Saddle suspenders ARE NOT safety products. Suspenders are designed
to support only the weight of the saddle, and the tools it contains, NOT the individual.
Buckingham arborist saddles are manufactured in accordance with the ASTM F887,
EN 358 and EN 813 standards and are intended for use as personal protection equipment only, not for towing or hoisting
and when properly used, comply with the requirements of the ANSI Z133-12 standard.
Fall protection equipment, (i.e. fall arrest, work positioning belts, climbers, retrieval, suspension etc.) should not be resold or
provided to others for re-use after use by original user as assurance cannot be granted that a used product meets criteria of
applicable standards and is safe for use to a subsequent user.
Before use the first time, the user should carry out a suspension test in a safe place to ensure that the equipment is the
correct size, has sufficient adjustment and is of an acceptable comfort level for the intended use.
Before use of the equipment, consideration should be given as to how any necessary rescue could be safely achieved.
This product is to be used for positioning and suspension only, NOT FOR FALL ARREST.
supplement arrangements for work positioning / suspension with collective means (i.e. safety nets) or personal means of
protection against falls from a height (i.e. fall arrest system). A fall arrest harness is the only device allowable for supporting
the body in a fall arrest system.
Therefore, it may be necessary to
This equipment must only be used for the specific purpose for which it is designed and
intended (Figure 8).
Destroy any and all equipment subjected to impact loading.
Never work without independent fall arrest protection if there is danger of a fall.
Keep equipment from coming into contact with sharp or abrasive edges, electrical
conductivity, extreme temperatures, excessive ultra violet rays and chemical agents.
Exposure to these elements may have a detrimental effect on the integrity of the equipment.
Always visually check that all buckles are properly closed before use. (If making a connection to a point that cannot be seen by the
wearer, either ensure the connection is made before donning the equipment or the connection is made and checked for security by
a second person).
Attach only connecting devices i.e. snap hook/ carabiner meeting standards/regulations for intended use for positioning and
suspension to belt D-rings and Suspension Bridge (see figure 8).
Only positioning connecting devices should be attached to side D-rings, as side D-rings are not intended for fall arrest.
Only suspension connecting devices should be attached to Suspension Bridge as Suspension Bridge is not intended for fall
arrest or positioning.
Position and / or adjust the work positioning lanyard in such a manner that the anchorage point is maintained at or above waist level.
As outlined by OSHA 1926.502 (e)(2) positioning devices shall be secured to an anchorage capable of supporting at least
twice the potential impact load of an employee's fall or 3,000 lbf. (13.3 kN), whichever is greater versus fall arrest anchor
points which must support a minimum of 5,000 lbf. (22.2 kN) per attached worker and be Independent of worker support.
Always visually check that each connecting device i.e. snap hook / carabiner freely engages D-ring, Suspension Bridge or
anchor point and keeper / gate is completely closed with each use. Never rely solely on the feel or sound of a connecting
device i.e. snap hook/ carabiner engaging. (If making a connection to a point that cannot be seen by the wearer, either ensure
the connection is made before donning the equipment or the connection is made and checked for security by a second person).
Before each use check that: 1) fabric or belt strap is free of burns, cuts, broken stitches or excessive wear, 2) rivets are not
bent, loose or missing, 3) buckles and D-rings are not distorted or cracked, 4) if there is a tongue buckle, that the tongue
does not bind on the buckle and buckle holes are not damaged. Always remove from service, destroy and discard product if
it fails inspection. Your safety is related to the integrity of your equipment.
Ensure that this product is compatible with the other elements of the system.
When in the work position, ensure there is no pressure on the snap hook locking mechanism sufficient to depress it as this will, due
to its length, render it incompatible with currently designed D-rings and make it very susceptible to rollout.
During use all fastening and adjusting elements must be regularly checked to ensure adjustment and closure.
Page 4
Unless using locking snaphooks / carabiners designed for such connections never attach multiple snap hooks to a D-ring.
ErgoLiteInst.doc
PN 230291 Rev. 6/8/16
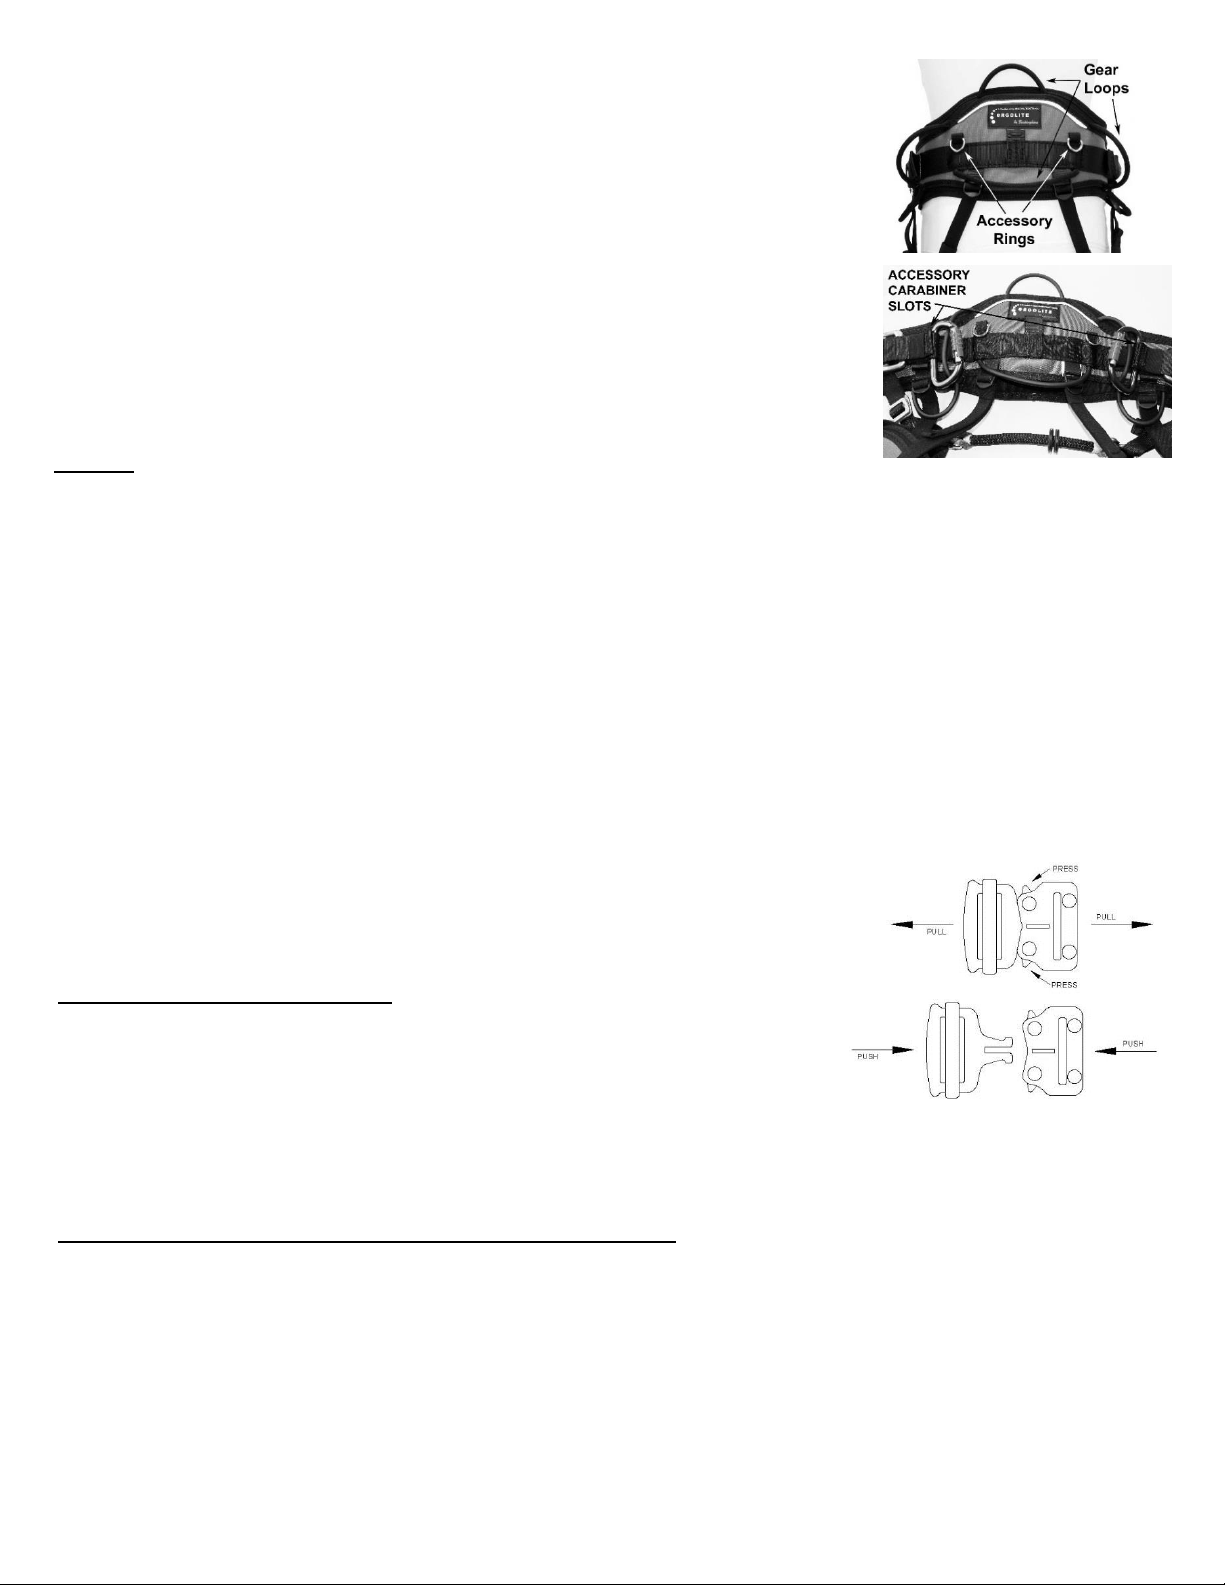
Figure 9a
Figure 9b
Never disable locking keeper on snap hook or carabiner.
Gear loops must only be used to attach and carry lightweight equipment (carabiners, first
aid pouch, etc). Designated slots in the webbing can accommodate accessory carabiners.
Heavy equipment such as chainsaws should be attached to these accessory carabiners
which are supported by load bearing webbing (Figure. 9a & 9b).
Never attach support / suspension connections to gear loops or accessory attachment
points / carabiners (Figure. 9a & 9b) !
Never punch additional holes in or alter any belt or harness in any way.
This equipment should be a personal issue to the employee using it.
Only Buckingham Mfg. Co. or those people authorized in writing by Buckingham Mfg. Co. may
make repairs / modifications to this equipment.
Documentation containing the following information should be issued with and kept for each sit
harness (saddle): identification marks, manufacturer’s or suppliers name and address,
manufacturer’s serial number (if applicable), date of manufacture, suitability for use with other
components within personal fall arresting systems, date of purchase, date first put into service,
dates and details of periodic inspections, next due date of periodic inspection, name of
competent person who carried out periodic inspection, user name and space for
comments.
Employer - instruct your employees as to proper use, warnings and cautions
before use of this equipment.
Product covered under these instructions / warnings should not be resold / redistributed or re-used after use by original user.
It is essential for the safety of the user that, if this product is re-sold outside the original country of destination, the reseller
shall provide instructions for use, for maintenance, for periodic examination and repair in the language of the country in which
the product is to be sold.
When To Retire Your Equipment:
Personal protective equipment is designed to be replaced by the user at regular intervals. This interval should be dictated by the
type and amount of use the product receives rather than a set time frame. Therefore the manufacturer does not place a time limit on
the replacement of this saddle. Extreme circumstances may require that a product must be retired after only one use.
Consideration must be given to the type, intensity and the environment of usage (harsh environments, marine
environment, sharp edges, extreme temperatures, chemical products, improper storage, etc).
As a minimum these saddles must be retired when:
they have been subjected to a major fall (impact loading).
they fail to pass inspection or you have any doubt as to their reliability.
You are unsure of the full usage history of the saddle.
When they become obsolete due to changes in regulations, standards, technique,
or they become incompatible with other equipment.
Destroy all retired equipment to prevent further use.
Additional Instructions / Warnings for Quick Connect Buckle
For your information and attention:
Quick Connect Buckles on those Full Body Harnesses and Arborist’s Saddles that include
this style of buckle may unintentionally disengage under the condition outlined below:
If the pawls of the buckle do not freely rotate, proper engagement of the tab end to the
receptor end of the buckle will be hindered / restricted. If as a result of the users
movements or through contact with an obstruction during the course of his/her work, one of the two pawls of the receptor end of the
buckle is depressed while tension is induced on the strapping attached to the buckle, the potential exists that disengagement of the
tab end of that side from the pawl may occur. If that position is maintained and again through the users movements or contact with
an obstruction the opposite side pawl is depressed, the tab end of the buckle may totally disengage from the receptor end.
To eliminate the potential for this condition, you the user should:
1. Inspect your equipment before each use as you would for all safety equipment. Equipment should be replaced if you have any
question / doubt about it being safe for use.
2. Always position the buckles of your equipment so that contact with obstructions is avoided.
3. Test the pawls on your Quick Connect Buckles to ensure they freely rotate and return back to their original position. If any pawl
does not freely rotate, the buckle should be (a) cleaned as outlined below to ensure there are no obstructions inside the buckle
hindering its intended function and (b) lubricated with a lightweight lubricant such as WD-40® as recommended for locking
snaphooks. If the pawl still does not freely rotate, you should contact Buckingham Mfg. at the telephone number outlined below
and request a Returned Goods Authorization Number for immediate return of your harness or Arborists Saddle for our
inspection and/or buckle replacement.
4. Ensure the receptor end and tab end of the Quick Connect Buckle is fully connected with both locking pawls engaged. When
the two halves are properly attached together, a clicking sound should be heard. Complete by pulling the adjuster strap
through the buckle and tighten until it is snug but comfortable, thus ensuring complete engagement.
Page 5
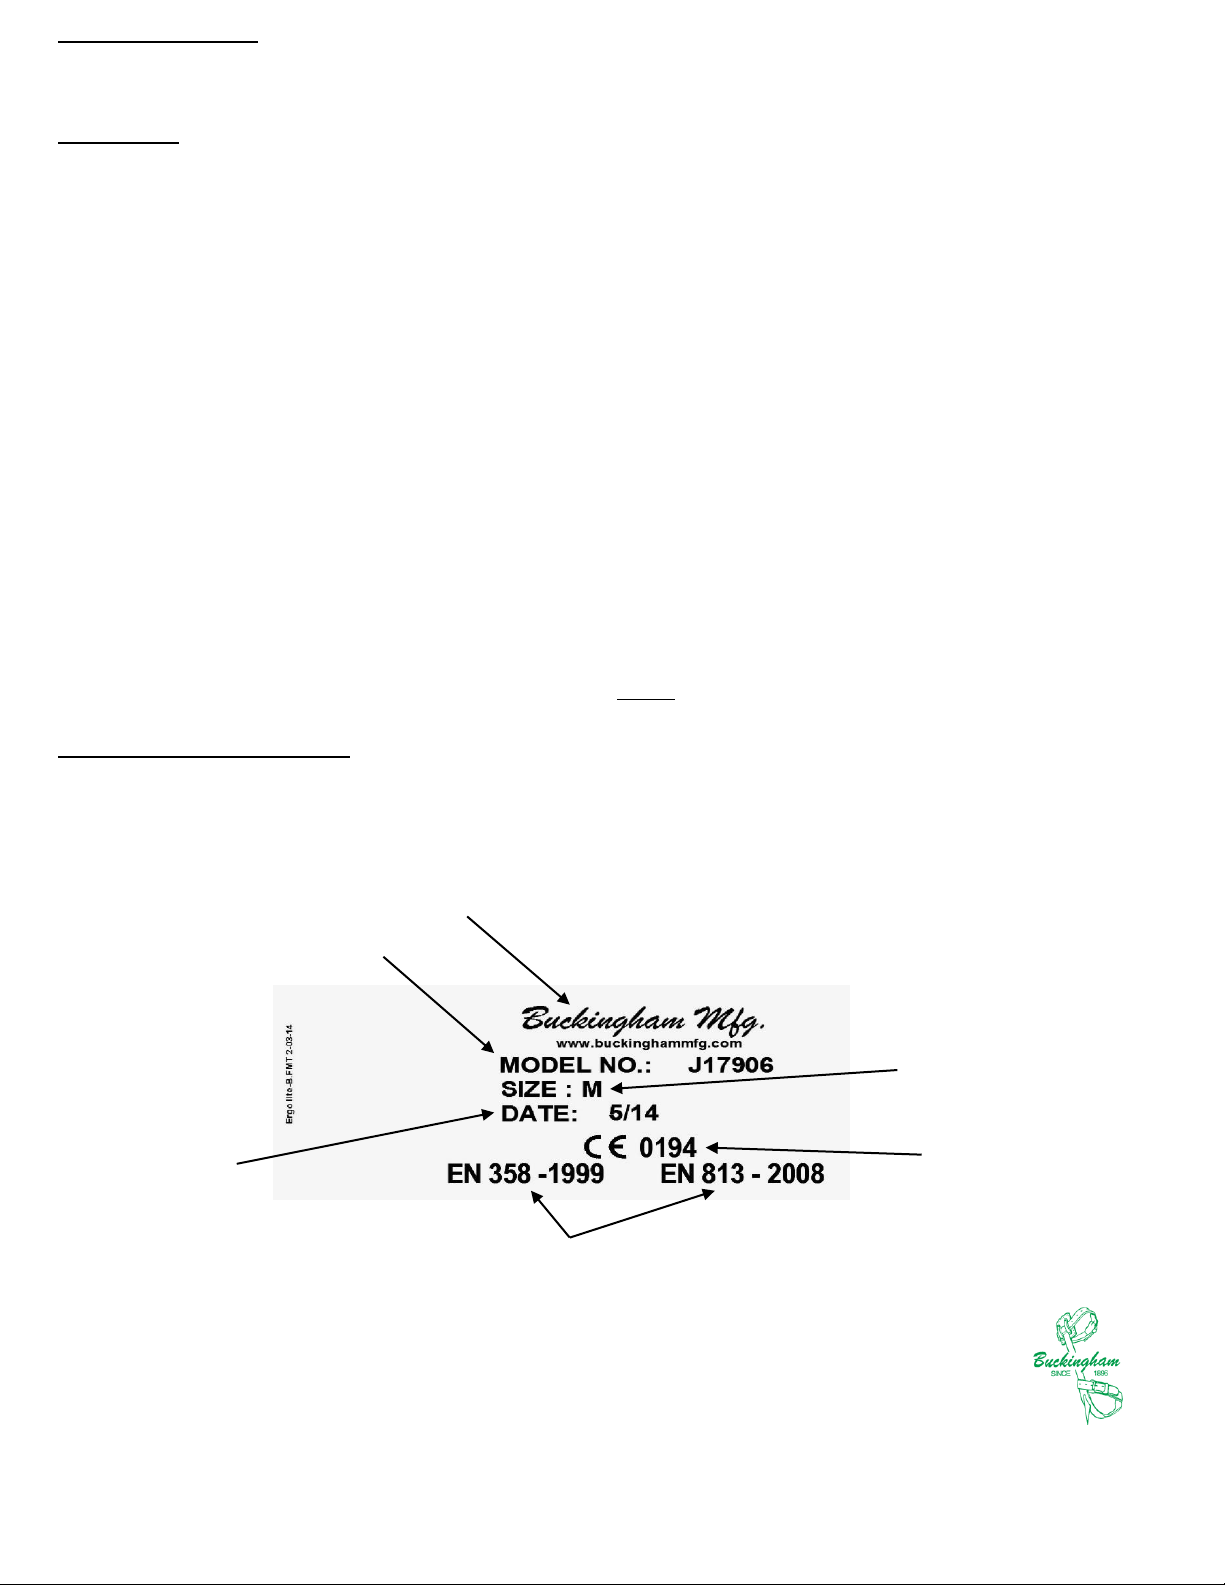
SIZE
XS= Extra Small
S = Small
M = Medium
L = Large
XL = Extra Large
Cleaning Instructions: The Quick Connect Buckle may be cleaned by using a cotton swab, limited air pressure or dipping it into a
BUCKINGHAM MFG. CO., INC
1-11 Travis Ave.
BINGHAMTON, NY
1-800-937-2825
Fax 607-773-2425
e-mail - [email protected]
ErgoLiteInst.doc
PN 230291 Rev. 6/8/16
DATE - Month & Year
Also
BATCH NUMBER
MANUFACTURER’S NAME
MODEL NUMBER
NUMBER OF EUROPEAN STANDARD
container of water to remove fine particles and any foreign matter which may enter the receptor end of the buckle and preventing
proper engagement and function. The exterior of the buckle should be dried with a clean cloth. The inside of the receptor end of
the buckle should be air-dried and re-lubricated.
Maintenance: Lubricate pawls weekly or as often as required to maintain smooth operation (no binding) with a lightweight lubricant
such as WD-40®. Wipe any excess lubricant off with a clean dry cloth. Buckingham's primary concern is to provide a quality product
to its customers to enable them to carry out their profession in a safe manner. However, we always require our customer’s
assistance in proper equipment operation, inspection and maintenance.
Additional Instructions / Warnings for Suspension Bridge:
The Rope Suspension Bridge attached to this saddle is designed to be replaced by the user at regular intervals. This interval
should be dictated by the amount of use the product receives rather than a set time frame. Therefore the manufacturer does not
place a time limit on replacement of the suspension bridge. Due to the rigorous strain the Rope Suspension Bridge endures, it
should be replaced at the earliest signs of wear. Suspension bridge inspection is extremely important and must be performed prior
to each use. This inspection should include but not be limited to:
webbing and rope cuts, nicks, tears, kinks, abrasions, burns, excessive swelling, excessive wear, discoloration, cracks, charring,
broken, fraying or unraveling fibers, loose stitching chemical or physical exposure.
Failure to regularly inspect and replace the Rope Suspension Bridge could result in injury or death due to Suspension Bridge failure.
Note: Only authorized replacement parts from Buckingham Mfg. should be used on this product. The use of unauthorized
replacement parts will void Buckingham Mfg’s Warranty.
SIZING - Fit is important to comfort. Be sure to allow for wear over heavy clothing. In order to obtain an
optimum fit, the work positioning D-rings should be positioned slightly forward of the hip bones. Below are typical fits given
according to waist size.
X-Small (1S) = 24 -28” (610 - 711 mm) waist size Large (L) = 36-40” (914-1016 mm) waist size
Small (S) = 28 - 32” (711-813 mm) waist size X-Large (X) = 40-44” (1016-1118 mm) waist size
Medium (M) = 32-36” (813-914 mm) waist size
NOTE: Ensure proper fit / size of product before use. This product cannot be returned unless it is in new unused
condition.
CE CERTIFICATION ISSUED BY:
INSPEC INTERNATIONAL LIMITED
56 LESLIE HOUGH WAY,
SALFORD, GREATER MANCHESTER
M6 6AJ UNITED KINGDOM
NOTIFIED BODY No. 0194
NUMBER OF CERTIFYING
BODY
Information contained in these written instructions supersedes all other information (written, audio, video etc.) produced by Buckingham Mfg. prior to the revision date of this document
 Loading...