

Page 1
B
B
UUBBBBLLEE
U
SSEERR
U
W
22 W
I
NNSSTTRRUUCCTTIIOONNSS
I
Mk 2 Stove 25-01-03
EETT
I
I
NNSSEETT
S
S
TTOOVVE
I
SSSSUUEE
I
E
33
http://www.oilstoves.co.uk/
Page 2

Index
Index _______________________________________________________________________ 2
1 Introduction _______________________________________________________________ 2
Coal Effect Availability_______________________________________________________ 3
2 How it Works ______________________________________________________________ 3
Controls List _______________________________________________________________ 4
Oil Flow Control Knob _______________________________________________________ 4
Water Temperature Control Knob _______________________________________________ 4
3 Lighting and Adjusting ______________________________________________________ 5
Three Ways to Light the Stove _________________________________________________ 5
Lighting Into The base Of The Pot ______________________________________________ 5
Manual Lighting Through the lighting Port _______________________________________ 6
Electric Ignition _____________________________________________________________ 6
4 Glass and Stove Cleaning_____________________________________________________ 7
5 Extinguishing ______________________________________________________________ 8
6 Fuel Supply Information _____________________________________________________ 8
7 The Coal Kit _______________________________________________________________ 8
8 Routine Maintenance ________________________________________________________ 9
Every 4 Weeks______________________________________________________________ 9
Every 8 Weeks______________________________________________________________ 9
Once per Year ______________________________________________________________ 9
Every 4 Years ______________________________________________________________ 9
As Required ________________________________________________________________ 9
9 Fault Finding_______________________________________________________________ 9
Racing ____________________________________________________________________ 9
Flue Vacuum or Chimney Pull ________________________________________________ 10
Burner Shuts Down and Stove Goes Out ________________________________________ 10
Oil Trip will not Reset _______________________________________________________ 10
Burner Will Not Come to High Fire ____________________________________________ 10
Oil Will Not Flow Into the Pot ________________________________________________ 10
Burner Runs Sooty or with Dirty Flames ________________________________________ 11
Oil Smells ________________________________________________________________ 11
10 Fill in the Warranty Form __________________________________________________ 11
11 Running Costs ____________________________________________________________ 12
I
NNTTRROODDUUCCTTIIOON
11 I
The stove is an inset room heater with an integrated high water content hot water boiler.
The stove can run on a continuous or intermittent basis as required.
N
Page 3

All statements of output are made on the assumption that the stove is run on a CONTINUOUS
BASIS.
The stove burns kerosene in a controlled manner utilising a lined ordinary chimney to discharge
the products of combustion.
The following instructions assume that the stove has been correctly installed and correctly
commissioned, and there are no basic system faults in the existing central heating circuits.
The stove must not be run with:
1. Cracked or damaged door glass.
2. Without the lighting port plug fitted back into it’s tubular socket.
3. With the door permanently open or ajar.
This stove is designed to run with or without a coal effect kit.
It must be clearly understood that coal effect will only be available at the output levels detailed.
Bubble Stoves can be fitted with a variety of oil control valves, each stove has the relevant valve
data sheet packed with it.
Make sure that you read the oil valve data sheet in conjunction with this document to make sure
that you know what controls are available to you.
C
E
OOAALL
C
E
B2I 10/1 inset (Between 3 and 6 on the dial)
For spacing from combustibles and fire guarding this stove must be treated in the same way as a
SOLID FUEL APPLIANCE and as such, whilst it is running, some parts of it will become hot
and must not be touched.
Fireguards must be fitted and only British Standard 6539 or 6778.
H
OOWW IITT
22 H
Your stove generates heat from burning oil mixed with air in a vaporising pot located in the
bottom of the stove.
Once alight, the performance of the appliance is controlled by the oil control valve, which is
situated behind the front fender below the operating knobs on the lower left hand side of the
appliance and operates as follows
It has oil flow control from 2 to 10kW by simply turning the flow control knob to the desired
setting.
In addition it also has an automatic water temperature control thermostat and automatic oil cut
off device (should the appliance water temperature become too high)
The water temperature is controlled automatically by a thermostat which is simply set by turning
clockwise to increase the temperature and anticlockwise to decrease the temperature.
FFFFEECCTT
A
VVAAIILLAABBIILLIITTY
A
W
OORRKKS
W
Y
S
If the stove is operated with the thermostat control set to maximum it will run on full flame until
it achieves the target water temperature and then drop the flame onto mini, from there on it will
automatically modulate the flame from high to low in line with the heating load demand.
(Assuming that the oil flow control knob is set near to maximum)
Page 4

C
OONNTTRROOLLSS
C
L
T
IISST
L
1. 1. Oil flow control knob. (You to set)
2. 2. Water temp. control knob. (You to set)
3. 3. Safety thermostat. (Automatic)
4. 4. Oil trip lever. (You to set and automatic)
The oil trip safety fuel cut off lever is situated on the right hand side of the oil control valve.
o LIFT FOR OIL OFF.
o PRESS DOWN FOR OIL ON
(To gain access to it, remove the centre panel of the fender top, and put your hand in to the left
hand side, you will feel a small bent metal lever projecting out from the topside of the valve.)
The lever is designed to cut off the fuel supply into the oil control valve either manually or
automatically consequently stopping the stove by shutting off the oil supply from the oil control
valve.
It is also designed to warn you of a problem with the oil control valve, if the stove goes out
unexpectedly and you can’t get the trip lever to trip on there are two possible causes.
1. The water temperature has become too hot and caused the safety stat to shut off the oil
supply.
2. Oil has entered the safety float chamber thus automatically shutting off the oil supply into
the stove.
If item 1 has caused a shut down you will have to wait for the water temperature to drop before
you will be able to reset the valve.
If item 2 has caused the problem you will have to seek help from your serviceman.
O
F
O
IILL
LLOOWW
F
C
OONNTTRROOLL
C
K
K
NNOOB
B
Controls the flow of oil into the pot and can be rotated to adjust the flow of oil from minimum to
maximum or any setting in between, determined by where you set it.
o Fully clockwise turns the appliance off.
W
W
AATTEERR
T
EEMMPPEERRAATTUURREE
T
C
OONNTTRROOLL
C
K
K
NNOOB
B
Controls the flow of oil but this control is different in as much as it is related to the water
temperature.
o FULLY CLOCKWISE is for low water temperature
o FULLY ANTICLOCKWISE is for high water temperature.
The water-sensing thermostat will automatically control the boiler water temperature at whatever
setting is required.
If the stove is fired up at full output it will run on full flame until it achieves the target water
temperature as set on the stat knob, and then automatically drop the flame onto mini, from there
on it will automatically modulate the flame from high to low in line with the heating load
demand.
Page 5

This means that when the required water temperature is achieved it will not be possible to
turn the flame up via the oil flow control knob because the water temperature control has
taken priority.
L
IIGGHHTTIINNGG AANNDD
33 L
A
DDJJUUSSTTIINNG
A
G
When attempting to light the stove these are the rules, which must be followed.
1.Always make sure that the pot is not flooded with oil by looking down into the base of the
pot.
2.Never try to light the stove if it is flooded with oil.
3. Always check that oil has not leaked and settled under the pot
4.Do not light the stove and leave it until it is settled down and stabilized into blue flame
combustion on low fire. (This will take 10 to 20 minutes.)
T
T
HHRREEEE
W
AAYYSS TTOO
W
L
IIGGHHTT TTHHEE
L
S
S
TTOOVVE
E
1. Through the lighting port.
2. Through the front door, directly into the base of the pot.
3. Via Electric ignition kit. (Optional extra)
L
IIGGHHTTIINNGG
L
I
I
NNTTOO
T
HHEE BBAASSEE
T
O
T
P
T
O
FF
HHEE
T
OOT
P
On the first light up you may find the first option easier, as you can see the oil trickle in to the
pot more easily.
You must use a heatproof glove when putting the catalysers back into the pot and it is important
to replace them quickly whilst the flame is small.
1. Make sure that the oil is turned off.
2. Open the front door.
3. Carefully remove the coal kit,
4. Remove the upper catalyser and ring,
5. Remove the lower catalyser,
6. Turn the oil on and allow a small pool of oil to flow into the pot about the size of a small
biscuit,
then turn the oil off
7. Light a small piece of firelighter and drop it into the oil, allow a few seconds for it to get
going and then replace the catalysers and coal kit, and close the door.
8. Wait for approx 1 minute until the pool of oil is alight and then turn the oil on to
minimum setting no 1.
9. Watch the appliance for a few minutes and you will see the flame establish and settle
down into blue flame combustion.
10. Allow the burner to run for a further 10 minutes before turning the appliance up to the
higher settings.
11. If at any time during the ignition process large amounts of flame can be seen, turn
the oil off immediately and wait until the flames die down before putting the oil on
again at minimum setting.
Page 6

M
AANNUUAALL
M
L
IIGGHHTTIINNGG
L
T
HHRROOUUGGHH TTHHEE
T
L
IIGGHHTTIINNGG
L
P
P
OORRTT
1. Make sure that the oil safety cut off knob is lifted (tripped off) via an audible click.
2. Check that the isolation valve is turned on.
3. Press the oil safety cut off knob down to trip the oil on via an audible click.
4. Open the front door.
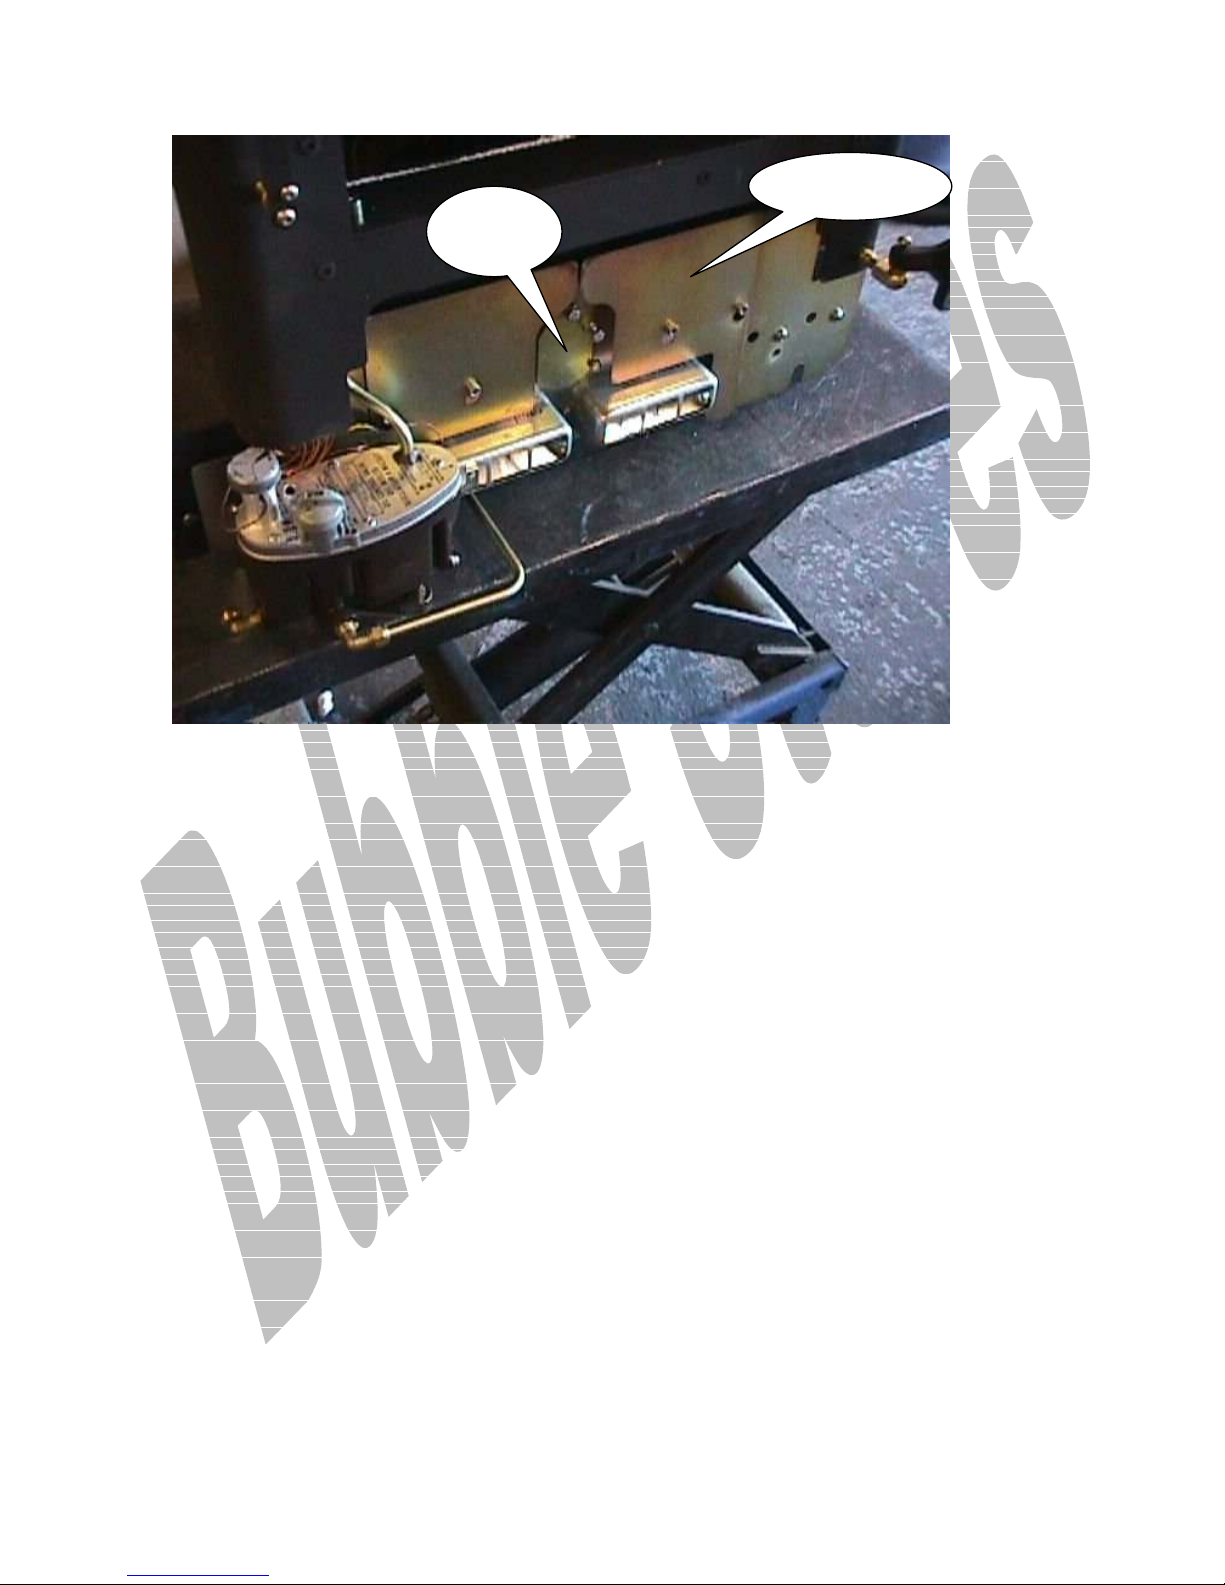
5. Swing the lighting port cover open. (See fig 1)
6. Remove the lighting port plug by pulling it out of its tubular socket.
7. Turn the oil on to the first position via the flow control knob and allow a small pool of oil
to flow into the pot about the size of a small biscuit.
8. Turn the oil off.
9. Cut a small piece of firelighter and stab it onto the spike.
10. Light it and push it into the lighting port tube, let the firelighter drop off the spike into the
bottom of the pot.
11. Replace the lighting port plug back into the tube and close the cover.
12. Close the front door.
13. Turn the fuel flow on again at the lowest setting
14. Watch the appliance for a few minutes until it settles down into blue flame combustion.
15. Allow the burner to run for a further 10 minutes before turning the appliance up to the
higher settings.
16. If at any time during the ignition process large amounts of flame cane be seen, turn the
oil off immediately and wait until they die down before putting the oil on again.
E
LLEECCTTRRIICC
E
I
GGNNIITTIIOON
I
N
If your stove is fitted with an electric ignition kit:
1. Make sure that the oil safety cut off lever is lifted (tripped off) via an audible click.
2. Check that the oil isolation valve is turned on.
3. Press the oil safety cut off lever down to trip the oil on via an audible click.
4. Press the push button ignition and turn the oil on to minimum flow.
5. When flames can be seen, turn the oil off and remove your finger from the push button.
6. Watch the flames and when they start to die down, turn the oil on to a minimum setting.
7. Watch the appliance for a few more minutes until it settles down into blue flame
combustion.
8. Allow the burner to run for a further 10 minutes before turning the appliance up to the
higher settings.
9. If at any time during the ignition process large amounts of flame can be seen, turn the oil
off immediately and wait until they die down before putting the oil on again.
Page 7

If during the lighting stage, excess oil is allowed to build up in the pot, the burner will race and
generate quite loud audible vibrations, if this occurs don’t panic, turn the oil flow control knob to
off and just open the front door and hold it open 15mm or 1/2" to take the pull off the fire, the
more you open the door the more the flame will die down, hold the door slightly open until the
flame starts to reduce in size, at this stage restart the flow of oil at setting No 1 so allowing the
burner to run correctly at its low speed.
When the burner has been running for ten to fifteen minutes move the oil flow control knob
round to position 3 and leave for another ten minutes after which it will be safe to run the burner
up to full output.
When the burner is running correctly on position 1 (LOW FIRE) the lower catalyser will be
glowing dull red. Keep an eye on the low fire and if a dirty yellow flame can be seen, call back
your service man to re adjust the oil flow.
On full output, after approximately ten minutes, the coals should begin to glow red and there
should be whispy blue flames licking through them, to get the maximum effect the stove will
need to be left for half an hour or so, if there are a lot of yellow flames call back your service
man to re adjust the oil flow, a few yellow flames are acceptable.
Excess oil flow, poor flue vacuum, bad coal positioning or bad lighting technique will cause
rapid sooting of the glass and coals.
NEVER TRY TO RELIGHT A HOT BURNER, MAKE SURE THAT THE BURNER IS
COMPLETELY COOLED DOWN BEFORE RE LIGHTING.
G
LLAASSSS AANNDD
44 G
The door glass will require light cleaning occasionally
The frequency of cleaning will depend upon how the stove is used.
Where stoves are ignited each day then the glass may soot up as the lighting process may
generate a little soot until the stove has settled down into blue flame combustion.
Light the stove as per the instructions, let it settle down into blue flame combustion (this may
take 15 minutes or so) Then turn the stove on to low fire and when the flame has reduced to the
bottom of the pot, open the door and gently dust the soot off the glass,
Do this quickly and don’t leave the door open for long say 20 to 30 seconds max.
Close the door and the flame will draw up and then settle down again.
Turn the oil flow up to the required setting.
Where stoves are running continuously then the glass will need cleaning less frequently but
when cleaning is required you will need to let the stove go out and completely cool down
Use a soft cloth and slightly damp it with vinegar or a proprietary stove glass cleaner
Very gently rub the glass in a vertical direction, do not rub the glass with horizontal motion
otherwise you may disturb the glass strips.
S
TTOOVVEE
S
C
LLEEAANNIINNG
C
G
After cleaning wipe dry making sure that you have not dislodged the glass strips.
To clean the stove externally, let it go out and simply brush away any dust with a very soft
brush.
To clean the stove internally, use a soft brush to remove any dust or combustion debris into a
vacuum cleaner hose.
Page 8

Occasionally scrape away any hard carbon deposits from the bottom of the burner pot.
E
55 E
XXTTIINNGGUUIISSHHIINNG
Shutting the burner off is a very simple manoeuvre.
Turn the oil flow control knob FULLY in a clockwise direction until you feel it stop in its off
position.
After a few minutes, the flame will die down and eventually extinguish itself.
DO NOT TOUCH THE STOVE UNTIL IT HAS COMPLETELY COOLED DOWN.
NEVER TRY TO RE LIGHT A HOT BURNER, MAKE SURE THAT THE BURNER IS
COMPLETELY COOLED DOWN BEFORE RE LIGHTING.
F
66 F
UUEELL
Your Fuel is stored in an oil tank, which should incorporate the following features.
1. 1 A fuel gauge, which can be in the form of a numbered circular dial or a site glass into
2. 2 A manually operated isolation valve on the tank, usually a gate valve.
3. 3 A fuel filter to filter out any small particles of dirt or contamination, which may get into
4. 4 An automatically operated safety valve designed to shut off the oil supply should a fire
S
S
UUPPPPLLYY
which oil is fed so as to indicate the amount of oil in the tank.
the oil or tank.
occur near to the stove.
G
I
I
NNFFOORRMMAATTIIOON
N
5. 5 A manually operated isolation valve near to the stove to allow you or the service man
to turn the oil off should the need arise.
If you allow the stove to run the oil tank dry it will obviously go out.
Before filling the fuel tank you must make sure that the oil valve is tripped to it’s off position,
otherwise the pot will flood.
If the pot floods do not attempt to light the stove until the excess oil has been removed from it.
T
77 T
The coals are located on the coal support bars, which are designed to glow red in the flame,
passing on the incandescence into the coals.
Care must be taken when positioning the coals on the spikes.
Do not fit any extra coals, as this will invalidate the product warranty.
The whole system is designed so that it can be removed in its entirety without the need to disturb
the coals making routine cleaning and servicing very easy.
To remove it turn the stove off and when it is cooled down, undo the front door knob, open the
door and carefully lift it out, using the front fret.
The coal support bars and coals may need replacing from time to time and they are available
from your supplier as a service item.
HHEE
C
C
OOAALL
K
K
T
IIT
Take care not to drop any coals into the pot.
Page 9

R
OOUUTTIINNEE
88 R
E
E
1. Operate the descaling lever by turning it completely two or three times.
To gain access to the descaling lever proceed as follows-:
Lift off the removable fender top plates.
Remove the front fender by gently lifting up from its locations.
Remove the right and left hand heat shields, which are located on cap head finger tight stainless
fasteners. (SEE FIG 1)
Behind the heat shields is the access plate which again is fastened on similar stainless fasteners
and held secure by the top fastener which when removed will allow the plate to be lifted up
vertically to expose the pot and descaling device.
Rotate the lever to remove any excess carbon build up.
2. The door glass may require light cleaning occasionally depending upon the continuous
running time of the stove
Lightly clean the inside of the door glass using dry cloth.
Do not attempt to clean the glass whilst it is hot or warm. This will cause the glass to craze or
crack.
VVEERRYY
44 W
W
EEEEKKS
M
AAIINNTTEENNAANNCCE
M
S
E
E
E
Clean the burner completely by removing all the inner components as follows,
O
O
Replace or clean all the filters in the oil supply line.
E
E
Clean the filter in the Oil Control Valve.
A
A
Keep the Coals, Coal kit, and burner inners in good condition, replace as necessary.
99 F
VVEERRYY
NNCCEE PPEERR
VVEERRYY
SS
F
W
88 W
1. Open front door.
2. Remove coal kit.
3. Remove upper catalyser and upper ring.
4. Remove the lower catalyser.
5. Scrape the bottom of the pot clean and remove all carbon build up.
6. Reassemble in the reverse order.
Y
44 Y
R
EEQQUUIIRREED
R
AAUULLTT
EEEEKKS
Y
Y
EEAARRS
EEAAR
D
S
R
S
F
F
IINNDDIINNG
G
R
R
Audible vibrations generated by excessive flames during the lighting process caused by allowing
too much oil to build up in the pot or excessive chimney draught.
AACCIINNG
G
Page 10

Turn off the oil flow and allow the burner to settle down to a steady burn rate, when this has
occurred, turn the fuel on again and close the door, but don’t let the flame go out otherwise the
burner MUST be allowed to cool down fully before a re ignition is attempted.
F
F
LLUUEE
V
AACCUUUUMM OORR
V
C
HHIIMMNNEEYY
C
P
P
UULLL
L
The pot type burner is extremely sensitive to flue vacuum variations.
Good combustion will not be possible unless the chimney is working correctly.
If the burner does not run well check -:
1. 1 The seals in the stove are good and that there is no ingress of air into the appliance flue
ways.
2. 2 The correct fuel oil is being used.
3. 3 The chimney is free FROM blockages and pulling as normal.
4. That the pot doesn’t need cleaning.
A longer burner life will be achieved if the regulator is moved only by one number at a time
leaving approx two minutes between each setting change.
Excessive wear will occur to the catalysers and burner if the appliance is subjected to conditions
of continuous or intermittent high flue vacuum.
B
UURRNNEERR
B
S
HHUUTTSS
S
D
OOWWNN AANNDD
D
S
S
TTOOVVEE
G
G
OOEESS
O
T
UUT
O
o Oil tank empty
o Oil in tank at low level.
o Water temperature safety stat shut down
o Secondary float chamber in oil control valve flooded
o Safety trip button accidentally caught and tripped off.
o Fire valve tripped off.
o Damaged oil feed pipe.
o Height of oil control valve has been disturbed.
O
T
IILL
RRIIPP WWIILLLL NNOOTT
O
T
R
R
EESSEET
T
o Water temperature safety stat shut down.
o Secondary float chamber in oil control valve flooded. (Call serviceman)
B
UURRNNEERR
B
W
W
IILLLL
N
N
OOTT
C
OOMMEE TTOO
C
H
H
IIGGHH
F
E
IIRRE
F
o Water temperature has reached the required setting and is under the control of the
thermostat.
o Oil in storage tank is low or about to run out.
o Height of oil control valve has been disturbed.
O
W
N
F
O
IILL
W
IILLLL
N
OOTT
F
LLOOWW
I
NNTTOO TTHHEE
I
o Oil tank empty
o Water temperature safety stat shut down
P
T
OOT
P
Page 11

o Secondary float chamber in oil control valve flooded.
o Safety trip button accidentally caught and tripped off.
o Fire valve tripped off.
o Damaged oil feed pipe.
o Height of oil control valve has been disturbed.
B
UURRNNEERR
B
This indicates that the fuel air ratio is disturbed and the burner is running fuel rich. There are two
main possibilities when fault finding, either too much fuel or not enough air.
O
O
Generally slight oil leaks in the appliance may only be noticed when the appliance is turned off,
as the oil vapour will normally be drawn into the appliance and vented off through the chimney.
R
S
UUNNSS
R
o Air is leaking into the combustion chamber.
o Check out seal of pot to closure plate.
o Check out door seal.
o Check out chimney vacuum
o Check for downdraft.
o Check out prevailing wind conditions
o Check for correct grade of fuel.
o Check out oil flow rate.
o Check for chimney blockage or partial blockage
o Burner air inlet holes have become blocked due to lack of service.
o Oil control valve is faulty. (Unlikely)
S
IILL
MMEELLLLS
S
OOOOTTYY OORR WWIITTHH
S
S
D
D
IIRRTTYY
F
LLAAMMEES
F
S
Do not attempt to light the appliance if there is any trace of oil smell near or around the
appliance.
If the appliance is running and there is an oil smell, turn the appliance off and investigate or call
a service engineer.
The tee piece has adjustable packing, which may need to be tightened up after first undoing the
lock nut
If this does not work then you will need to replace the gland packing, which is available as a
service item from your supplier or us.
F
1100 F
Make sure that your installer has filled in the warranty form and returned it to us.
The information recorded on the warranty form helps us to deal with any problems you may
encounter.
The warranty covers PARTS ONLY for a period of ONE YEAR and is conditional upon
IILLLL IINN TTHHEE
W
AARRRRAANNTTYY
W
F
F
M
OORRM
Page 12

1. All the requirements of our installation instructions being fully adhered to.
2. All aspects of the installation work being carried out by technically competent persons.
3. All aspects of the relevant building regulations being fully adhered to.
LABOUR, TRAVELLING OR CONSEQUENTIAL LOSS OR DAMAGE IS NOT
COVERED.
Arrange for service visits with a local service engineer.
Only competent personnel, WHO HAVE SUITABLE EXPERIANCE, must carry out
maintenance on this product.
R
1111 R
Running costs are based on oil at 20pence per litre and are shown in pence per hour.
If your oil costs more or less than 20 pence, work out the difference as a percentage and apply it
to the 20 pence for a corrected figure.
WET STOVES large boiler:
Minimum firing Maximum firing
B2I 10/1 5 Pence per hour 24 Pence per hour
© HARWORTH HEATING LTD 4-3-98
This publication must not be copied by any means, without written permission from the authors.
This product is subject to continuous development and improvement and it is consequently
acknowledged that due to this process there may be some omissions and errors.
This publication is intended only to assist the reader in the use of this product and therefore
Harworth Heating Ltd shall not be liable for any loss or damage whatsoever arising from the use
of any information, error or omission found in this guide.
FIG 1
UUNNNNIINNGG
C
C
OOSSTTS
S
Page 13
LIGHTING
HEAT SHIELD
RIGHT SIDE
PORT
COVER
 Loading...