


www.homesystems-legrandgroup.com
User guide
MyHOME_Screen3,5

MyHOME_Screen3,5
User guide

3
MyHOME_Screen3,5
User guide
Introduction 4
The MyHOME_Screen 4
General description 4
The Home page 4
The functions page 5
Navigation arrows 6
Default standby page 7
Use 8
The applications 8
Lighting 9
Automation 12
Scenarios 16
Improved scenarios and schedulers 18
Temperature control + Air conditioning 23
Burglar alarm 43
Sound System 46
Multi-channel sound system 50
Multimedia contents 53
Video door-entry system 59
Energy management 60
Customisation 73
Setup 73
Alarm clock 73
Beep 75
Threshold Beep 75
Clock 76
Display 77
Password 81
Contents

MyHOME_Screen3,5
User guide
4
Introduction
The MyHOME_Screen
General description
The MyHOME_Screen is the room control that can enable you to achieve a centralised
management for all MyHOME functions in a simple and intuitive way.
By touching the icons of the large display, it is in fact possible to control several MyHOME
solutions, like: control the actuators of lights and shutters, recall preset scenarios, adjust the
temperatures of the temperature control zones, arm/disarm the burglar alarm, manage the sound
system, and access new energy management functions.
Using MyHOME_Screen it is also possible to access multimedia contents, like WEB Radio and Media
CLIENT.
The MyHOME_Screen is always switched on and enabled, the backlighting of the display turns on
as soon as you touch it.
All the navigation pages of MyHOME_Screen are created and customised by the installer
depending on the MyHOME solutions installed in the system based on your needs.
The navigation pages in this manual are given for guidance only.
There are icons in the Home page which represent the applications that you can manage as well
as the setup icon (always present). When programming, it is possible to enter more information
such as the date, time and temperature (the possibility to enter information depends on the space
vacated by the icons).
For more information, please call your installer.
The Home page
1. Time.
2. Applications.
3. Setup.
1
2
3

MyHOME_Screen3,5
User guide
5
You can access the functions page by selecting the required application from the Home page.
All you need to do is touch the icon of a command to switch on a light, pull up your rolling shutter
or activate a scenario.
The functions page
Automation page example
Scenario page example
Shutter
Gate
Watering system
Scenario module
DAY
NIGHT

MyHOME_Screen3,5
User guide
6
The arrows at the bottom part of the display have the followings functions:
Navigation arrows
1 2 3
1. Goes to the previous page.
2. Scrolls the contents of the page downwards.
3. Scrolls the contents of the page upwards.
In some pages there is a fourth button that allows you to execute special functions.

MyHOME_Screen3,5
User guide
7
Using the configuration software it is possible to set a page that will be shown on the display after
a period of inactivity of MyHOME_Screen.
The installer can set as default standby page the last page visited, the Home Page, or the favourites
page (page showing the time and some automation and scenario functions).
If the standby page is not set during the configuration, when in standby the display will show the
Home Page.
Default standby page
1. Return to the Home Page.
2. Time.
3. Scrolling through the available pages making up the favourites page.
4. Preferred functions of the automation and scenario systems.
Advanced curtain control
Dimmer
10:22:35
Advanced scenario
1 32
4

MyHOME_Screen3,5
User guide
8
Use
The applications
Automation
This application enables you to manage – through
a user-friendly interface - all the automations in
your home automation system, including rolling
shutters, shutters, motorised blinds, controlled
electrical sockets, irrigation system, etc.
Lighting
This application enables you to turn on, turn off or
adjust an individual light or group of lights, as well
as to manage light timers.
Scenarios
This application enables you to activate or modify
the scenarios available in your MyHOME system.
Multimedia sound system
This application enables you to manage your
MyHOME sound system.
Burglar-alarm
This application enables you to control and
manage the burglar alarm system.
Temperature control
This application enables you to control and
adjust your heating and air-conditioning systems,
allowing you to adjust the temperature on a
zone by zone basis, according to your current
requirements.
Energy management:
This application enables to control the status
of the energy loads, display consumptions/
productions of energy, supervise the electric
system, control the rearming of life saving
(salvavita) devices.
Video door entry system
Depending on the type of video door entry system
installed, you may control - for each entrance
point - the opening of the door lock and/or the
lighting of the staircase light, communicate with
handset units, communicate with an associated
switchboard and use the cameras connected to
your MyHOME system in home CCTV mode.
The MyHOME_Screen enables you to manage the following applications of the system:

MyHOME_Screen3,5
User guide
9
Lighting
The Setup icon, always present in the Home page, can let you access the MyHOME_Screen setup
page (Alarm clock, Beep, Clock, etc.).
For more information see chapter “Customisation”..
Lets you switch on, switch off, adjust a single light or group of lights.
Touch the lighting icon .
The display will show the page where you can find the lights you can control.
Depending on the programming condition, the display can have seven different types of controls:
DISPLAY
VERSION
NETWORK
Staircase light
Garden lights
Kitchen light

MyHOME_Screen3,5
User guide
10
This control lets you switch on/ off a group of lights simultaneously.
This control lets you switch a single light on and off.
This control lets you switch on, switch off and adjust a light with a dimmer.
Use the – and + icons for the adjustment; the brightness of the light is shown graphically.
Depending on the type of dimmer installed (10 or 100 levels), the light intensity is represented by
lit-up marks (10 levels) or increasing light intensity marks (100 levels).
If the light does not work or if it is not connected, a broken light bulb will appear.
DIMMER
SINGLE LIGHT
GROUP OF LIGHTS
Kitchen light
Garden lights
Fault
Staircase light
Minimum level
Dimmer on 100%

MyHOME_Screen3,5
User guide
11
DIMMER ASSEMBLY
This control lets you switch on, switch off and adjust several lights simultaneously with a dimmer.
Use the – and + icons for the adjustment; the brightness of the light is not shown graphically.
The dimmers of the assembly can be adjusted at different illumination intensity levels, hence they
can be adjusted by increasing or decreasing the level of all dimmers, starting from their current
adjustment.
Room lights
This control lets you switch on a light thus setting the activation time with the icon .
TIMED LIGHT WITH PRESET DURATIONS
Timing with preset durations enabled
Timing with preset durations not enabled
1’
1’
The durations that can be set may be:
fixed: 7 different durations that cannot be changed
configurable: 20 durations configurable through software
FIXED TIMED LIGHT
This control lets you switch on a light for only one set durationusing the configuration software.
The icon shows the remaining activation time (in percentage).
The icon shows the timing activation status.
Fixed timing enabled (about half the time remaining to switch off)
Fixed timing disabled
12:10
12:10
STAIRCASE LIGHT
This control lets you activate the Staircase lights function of the video door-entry system.

MyHOME_Screen3,5
User guide
12
Automation
Lets you control shutters, gates, door locks, etc.
Touch the automation control unit icon .
The display will show the page where you can find the automation control units that you can control.
In order for you to have an immediate identification, different icons have been created according
to the actual use of the automation control unit.
Shutter
Curtain
Gate (automation)
Gate (lighting/video door-entry system)
Automation assembly
Up-and-over
Fan
Watering system
Controlled plug
Door lock
Contact
Shutter
Gate
Watering system
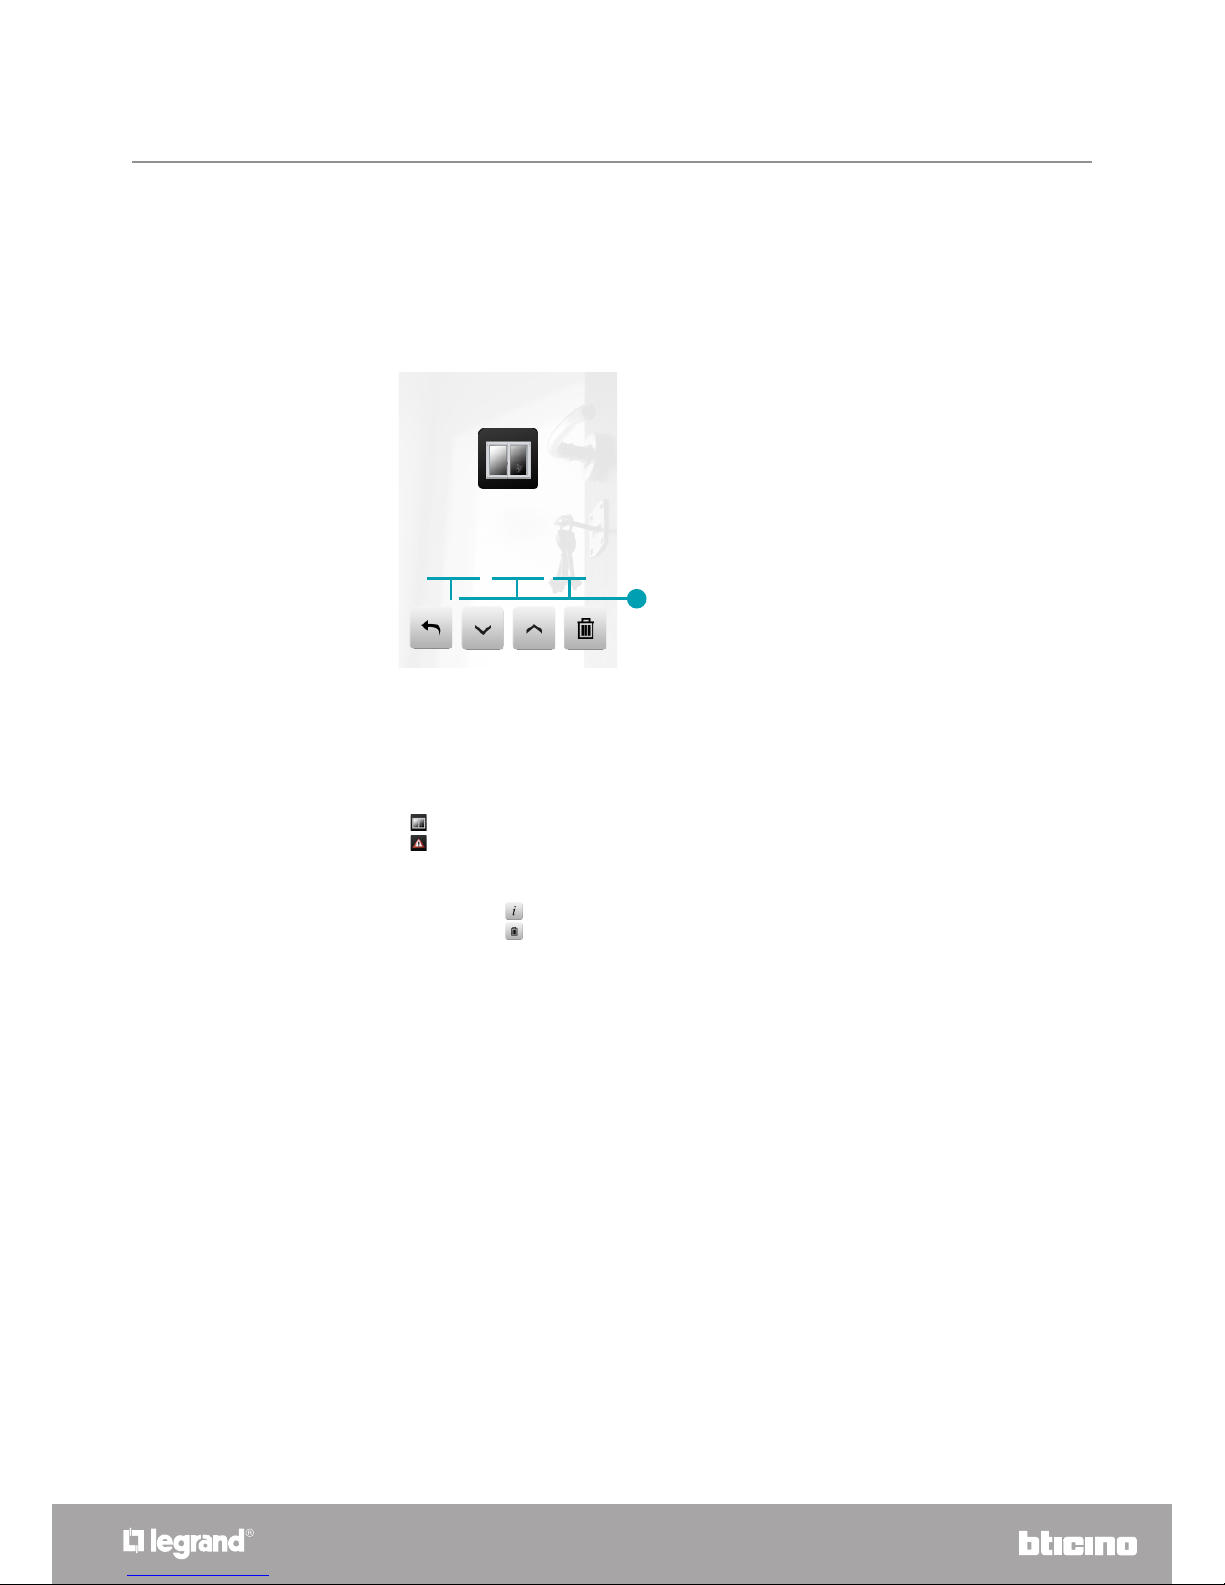
ADVANCED ACTUATOR CONTROLS
All the automation commands have an advanced mode. This means that when an advanced
actuator is installed advanced functions will also be available: for example, when controlling the
opening of a shutter it is possible to display the opening amount as a percentage value.
1
2
4
3
1. Close the shutter.
2. Display the opening percentage.
3. Open the shutter.
4. Increase/decrease the opening amount in 10% steps.

MyHOME_Screen3,5
User guide
13
CURTAIN - SHUTTER - GATE – UP-AND-OVER
These controls allow you to open and close the curtains, shutters, etc. with a simple touch of your
finger.
The operation may occur in two different ways, depending on the programming procedure carried
out by the installer:
Safe mode
The opening or closing movement will occur as long as the corresponding icon is touched; the
icon changes, thus indicating the movement.
When the icon is released, there will be an automatic stop.
Safe mode examples
Normal mode examples
1
Stop
2
Stop
1
2
1. The curtain opens when the icon is kept pressed.
2. When you lift your finger, the curtain stops.
1. The shutter goes down when the icon is kept pressed.
2. When you lift your finger, the shutter stops.
1. Touch the icon to activate the closure of the garage door.
2. Press the icon Stop to stop it.
1. The gate opens when you touch the icon.
2. Press the icon Stop to stop it.
Normal Mode
The opening or closing movement will start by touching the corresponding icon; during the
movement the icon changes showing the Stop icon and the indication of the movement in
progress. Touch the icon to stop the movement.
Stop
1 2
Stop
1 2
GATE (LIGHTING / VIDEO DOOR-ENTRY SYSTEM)
The opening or closing movement will start by touching the icon.
The movement automatically stops when the gate reaches its stop limit.

MyHOME_Screen3,5
User guide
14
1. Touch to switch on.
2. Touch to switch off.
1. Touch to switch on.
2. Touch to switch off.
1. Door lock activated.
AUTOMATION ASSEMBLY
This control can be used to activate several automations at the same time. For example, with a
single touch it would be possible to lower or rise all the rolling shutters of the home.
Movement is activated by touching one of the arrow icons. Touch to stop.
FAN
This control lets you switch a fan on and off.
The icon indicates when the fan is in operation.
ON
2
OFF
1
CONTROLLED PLUG
This control, represented by a plug, lets you switch on and off a generic device (a household
appliance or any other device).
Here again, the icon indicates the status of the device controlled.
ON
2
OFF
1
DOOR LOCK
The door lock is activated when you touch the icon .
This control acts as a button: the door lock is activated when you touch the icon and deactivated
when you release it. If it controls a door lock of the video door-entry system, the activation time
will be set by the door lock configuration.
1

MyHOME_Screen3,5
User guide
15
1. Touch to switch on.
2. Touch to switch off.
1. Contact closed.
2. Contact open.
WATERING SYSTEM
This control lets you switch the watering system on and off.
The icon indicates when the watering system is in operation.
CONTACT
This control provides a synchronised view of the status of a contact connected to the system.
ON
2
OFF
1
1 2

MyHOME_Screen3,5
User guide
16
Scenarios
Lets you activate scenarios that have been previously stored in one or more “scenario units” and
“scenario modules” of your MyHOME system.
Touch the scenario icon .
The display will show the page where you can find the scenarios you can activate.
Touch the icon to activate the scenario.
This command lets you activate a scenario of the Scenario Unit.
You can freely decide to modify the scenario setting on the Unit; the MyHOME_Screen will then
execute the scenario you have set up.
SCENARIO OF THE SCENARIO UNIT
NIGHT
This command lets you activate a scenario of the Scenario Module.
Furthermore, when you touch the icon , new icons will appear which will allow you to cancel or
programme a new scenario according to the functioning mode of the Scenario Module.
Scenario 1
SCENARIO OF THE SCENARIO MODULE
Scenario 2
NIGHT
Scenario 1
If the icon is not displayed, the scenarios module is blocked.

MyHOME_Screen3,5
User guide
17
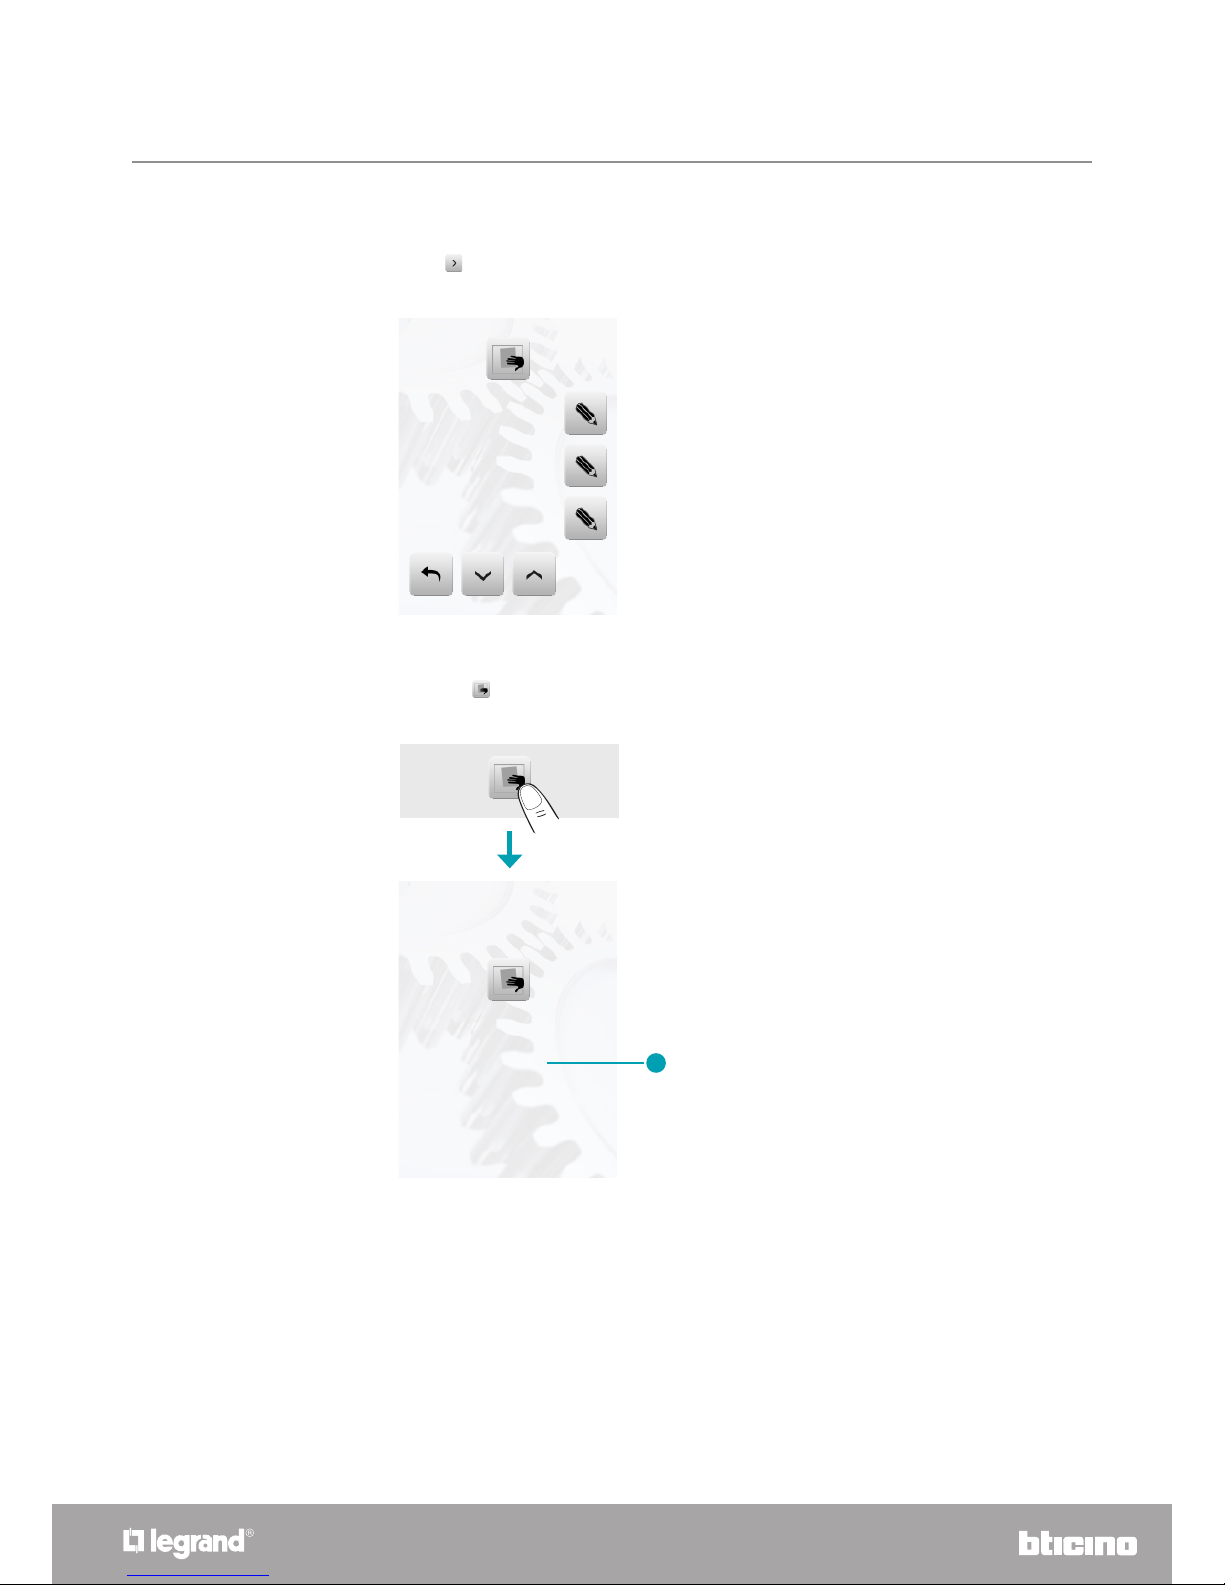
Creating a new scenario
Removing a scenario
1 2 3
1. Touch the icon to start a new scenario programming procedure.
2. Touch the icon to end programming.
3. Touch the icon to return to the menu of the scenarios programmed by you.
1. Touch the icon to remove a scenario programmed by you.
1

MyHOME_Screen3,5
User guide
18
When you select this application – depending on the configuration made by the installer and
customised according to the MyHOME solutions in your system – you can control the improved
scenarios and schedulers (maximum 20).
Touch the improved scenarios and schedulers icon .
This example page displays both functions: Scheduled scenario and Improved scenario.
Improved scenarios and schedulers
1. Enable.
2. Start scenario.
3. Stop scenario.
4. Disable.
5. Modify the scenario.
6. Start scenario.
7. Enable/Disable.
Improved scenario
Scheduled scenario
1 2 3 4
567

MyHOME_Screen3,5
User guide
19
SCHEDULED SCENARIO
This scenario allows you to send a series of commands after one or more actions have occurred or
at a predetermined time.
It is possible to manage up to 20 of the 300 scenarios configured in the Scenario Programmer.
For this scenario, the four possible actions are:
Scheduled scenario
Scheduled scenario
Scheduled scenario
Scheduled scenario
Scheduled scenario
Scheduled scenario
– Enable scenario – Disable scenario
These commands allow you to enable/disable the scenario without operating it.
If the scenario is enabled and if the activation condition occurs, the actions of the scenario will
be executed.
– Start - Stop
These are start / stop commands of the scenario, regardless of the programmed condition.
Configuration examples

MyHOME_Screen3,5
User guide
20
This scenario allows you to send a command at a predetermined time or after an action has
occurred.
It is possible to create up to 20 scenarios.
For this scenario, the two possible actions are:
– Enable/Disable scenario
A command that allows you to enable/disable the scenario without operating it. If the scenario
is enabled and if the activation conditions occur, the actions of the scenario will be executed.
– Start
Forcing command of the scenario.
IMPROVED SCENARIO
The second condition, "condition on device", can be linked to the status of a light, dimmer,
temperature probe or to an amplifier of the sound system.
Improved scenario
1
Improved scenario
2
1. Improved scenario Enabled.
2. Improved scenario Disabled.
Change hour condition
To change the hour condition, touch .
The following page will be displayed:
use the arrows to set the required time, confirm with .
Improved scenario
“Hour condition” scenario
Example of advanced scenario
If at 08:00 p.m. (time condition)
the A1 PF1 amplifier is off (condition on the device)
an ON command is automatically generated to switch it on (action)

MyHOME_Screen3,5
User guide
21
“Hour condition” scenario + “condition on device”
Change the condition on device
If a “condition on device” is configured, there is an arrow in the “hour condition” edit page used for
accessing one of the following pages:
Light status condition
you can change the status of the light. The statuses that can be used as a starting condition of the
scenario are ON and OFF..
OFF
Staircase Lights activ...

MyHOME_Screen3,5
User guide
22
Dimmer value condition
you can change the dimming value of the dimmer.
The permitted values are: OFF, from 20% to 100%, with 20% increases.
Audio value condition
you can change the audio value of the amplifier.
The permitted values are from 0% to 100%, with 20% and 30% increases.
Temperature value condition
you can change the temperature value of the probe.
The allowed values range from –5.0°C to 50.5°C with 0.5°C increments.
20% – 40%
Dimmer activation
0% – 20%
Amplier 18
Temperature
18.0°C 1°C
-
+

MyHOME_Screen3,5
User guide
23
This control enables monitoring the temperature of the whole house, adjusting it according to the
zone, based on actual requirements. In addition, if an air conditioning system has been installed,
you will be able to individually manage all the system splitters, adjusting the temperature, the fancoil speed, etc.
Touch the temperature control icon.
The display shows a page listing the Systems (Central Units), the noncontrolled Zones (if present),
the external Probes (if present), and the air conditioning systems; If only one Central Unit is
present, a new screen will be displayed, with the icon of the selected Central Unit (4 zones/99
zones), and the Zone list.
Temperature control + Air conditioning
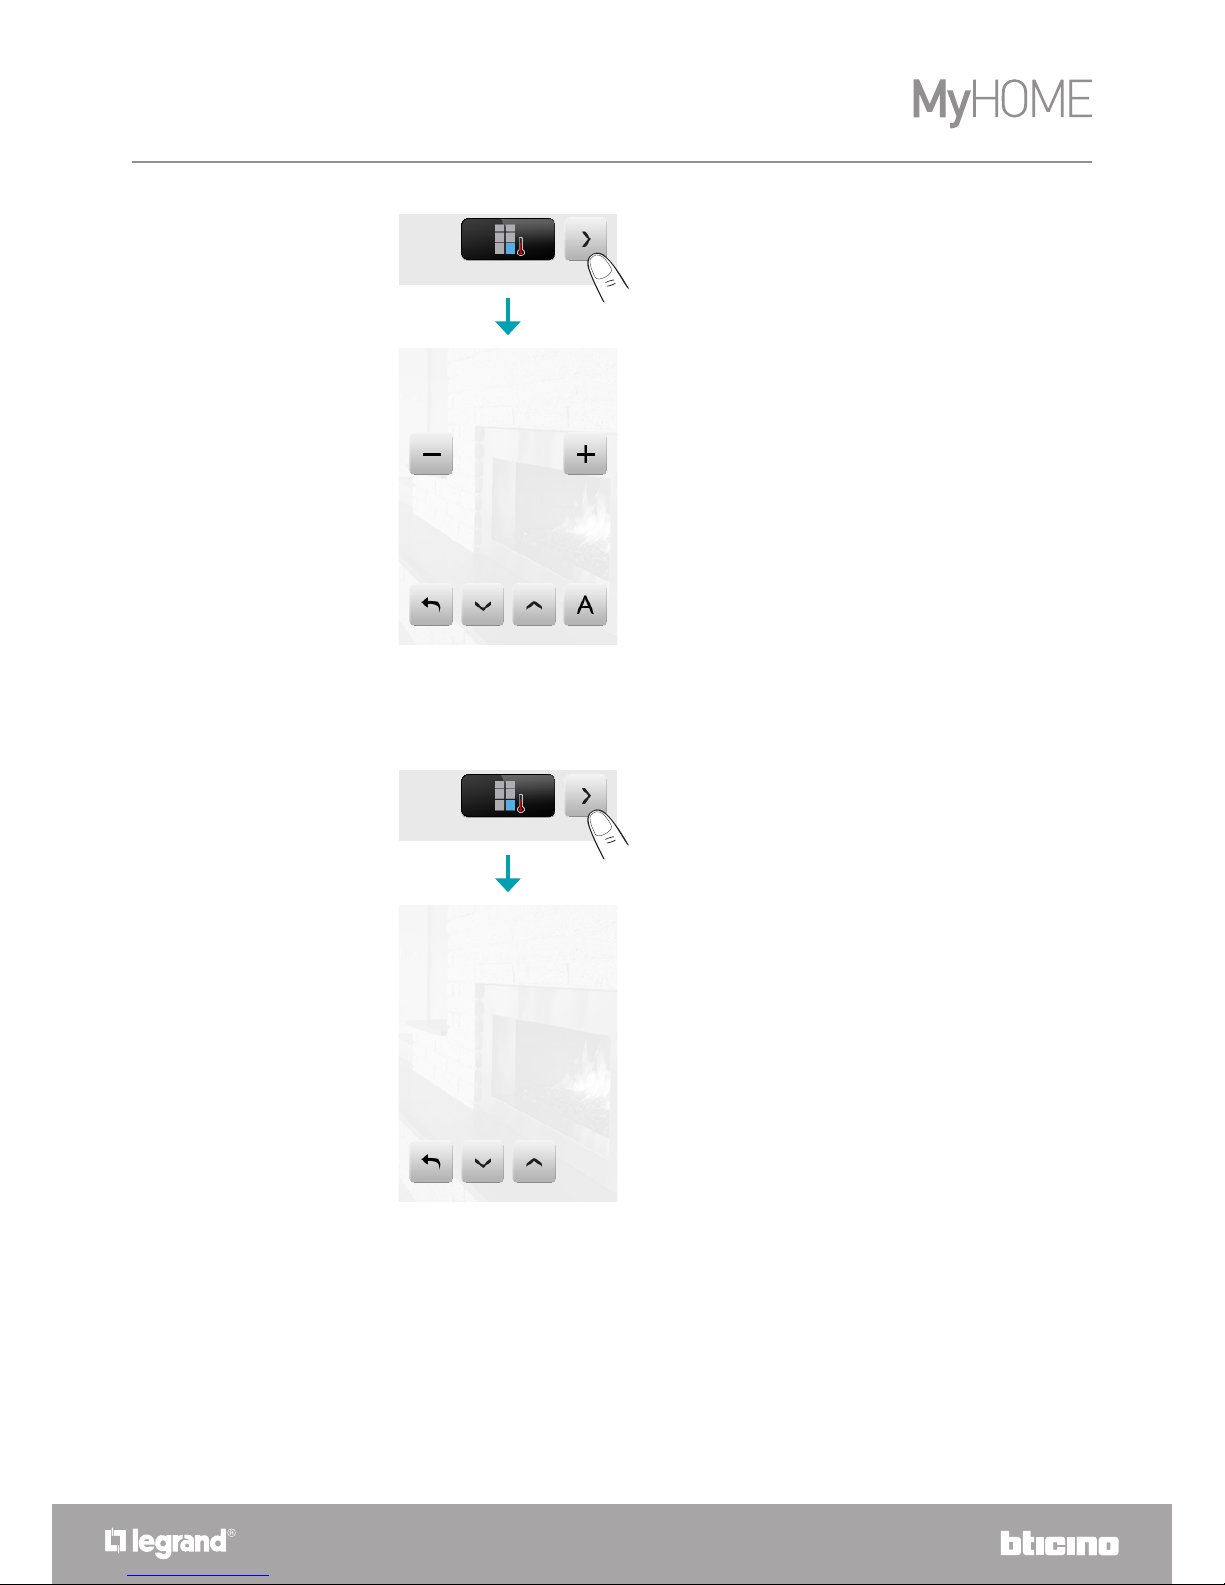
Touch the Control Unit icon to access a page displaying the Control Unit status.
The same page also shows the icon that gives access to the list of the possible modes that can
be set.
4 ZONE CONTROL UNIT
Zone 1
AIR CONDITIONING
4 ZONE CONTROL UNIT
4 ZONE CONTROL UNIT
The management of the temperature control is possible only if the Remote control function
has been activated.

MyHOME_Screen3,5
User guide
24
Weekly Mode
Manual Mode
Timed Mode (only for 4 Zone Control Unit)
Holidays Mode
Holiday/Week-End Mode
Scenario Mode (only for 99 Zone Control Unit)
OFF Mode
Anti-freeze mode
Summer/Winter Mode
Each type of mode will have a dedicated icon:
Touch icons and to scroll through the modes
Touch icon to return to the previous page.
Touch icon to access the individual mode submenu.
Weekly Mode
Manual Mode
Timed Mode

MyHOME_Screen3,5
User guide
25
Weekly Mode
By selecting one of the 3 summer or winter programs (previously set in the control unit), the
system can operate in automatic mode followingthe setup programming procedure.
Touch the icon to confirm the program to set.
Winter programs
Summer programs
Program 3
Program 2
Program 1
Program 3
Program 2
Program 1
MyHOME_Screen3,5
User guide
26
Manual Mode
Touch the and icons to decrease or increase the temperature value by 0.5°C. Touch the
icon to confirm the temperature selected.
This can be used to set a constant temperature in all the zones of the system.
Timed Mode (only for 4 Zone Control Unit)
It can be used to perform manual mode on all zones for a set period.
Manual
23.5°C
Manual
23.5°C
Touch the and icons to decrease or increase the temperature value by 0.5°C.
Touch the and icons to set the hours and minutes during which the Control unit operates in
Manual mode.
Touch the icon to confirm the temperature and the time selected.
MyHOME_Screen3,5
User guide
27
Holidays Mode
Touch the and icons to set the date.
Touch the icon to confirm.
Touch the and icons to set hours and minutes.
Touch the icon to confirm and select the program to set.
With this mode you can keep (for example when you are away for a long time, e.g. on holidays) the
antifreeze system or the thermal protection system on until the date and time set, after which the
selected weekly program will activate.
MyHOME_Screen3,5
User guide
28
Holiday/Week-End Mode
Touch the and icons to set the date.
Touch the icon to confirm.
Touch the and icons to set hours and minutes
Touch the icon to confirm, and select the program to set.
This mode enables you to select a special day profile to be run for a pre-set period of time.
The chosen program operates until the date and hour set, after which the system reverses to the
Manual Mode selected weekly program.
Scenario Mode (only for 99 Zone Control Unit)
If you select one of the 16 summer or the 16 winter scenarios, your system can operate in
automatic mode following the scenario selected.
Touch the icon to confirm the selected scenario.
Summer scenarios
Scenario 3
Scenario 2
Scenario 1

MyHOME_Screen3,5
User guide
29
OFF Mode
Touch this icon to switch all system zones OFF.
Anti-freeze mode
Touch this icon to set the Anti-freeze temperature for all system zones.
Summer/Winter Mode
Touch this icon to set the system mode of operation (Summer/Winter).
Winter scenarios
Scenario 3
Scenario 2
Scenario 1
MyHOME_Screen3,5
User guide
30
ZONES
It is possible to control all the zones of the system.
Touch icons and to scroll through the active zones.
Touch icon to return to the previous page.
Touch to access the individual zone submenus.
4 ZONE CONTROL UNIT
ZONE 1
AIR CONDITIONING
Thermal probe
The local offset of the probe corresponds to the position of the knob placed on the probe
installed in each zone of your temperature control system.
If the probe is set to (antifrost/thermal protection) or OFF position, no adjustment will be
possible from the MyHOME_Screen; to change the setting, it is necessary to act directly on
the knob of the probe.

MyHOME_Screen3,5
User guide
31
ZONES (WITH FAN-COIL FUNCTION)
If the probe for the regulation of the fan-coil speed is installed, in addition to displaying the name
of the zone and the set and measured temperature, this page will also enable selecting one of the
following speeds: Minimum, Medium, Maximum and Automatic.
1. Zone.
2. Measured temperature.
3. Regulation keys and set temperature.
4. Probe status.
5. Fan-coil speed.
6. Control unit mode.
ZONES (99 ZONE CONTROL UNIT)
If you press the Zone icon, the zone name will be displayed, together with the temperature
measured, the temperature setting, if in manual mode, the activation of the manual/automatic
mode, the display of the probe status (-3 -2 -1 0 +1 +2 +3).
ZONE 2
ZONE 2
23.5°C
35.0°C
+2
1
2
3
5
6
4
MyHOME_Screen3,5
User guide
32
ZONES (4 ZONE CONTROL UNIT)
Press the Zone icon to display the zone name, the temperature measured and set, and the probe
status (-3 -2 -1 0 +1 +2 +3).
EXTERNAL PROBES
If the system includes external radio probe, the temperature detected by them may be displayed
through the appropriate zone.
ZONE 1
ZONE 1
23.5°C
35.0°C
+2
ZONE 1
ZONE 1
23.5°C
35.0°C
+2

MyHOME_Screen3,5
User guide
33
NON-CONTROLLED ZONES
If the system includes temperature measurement probes only (noncontrolled zones), the
temperature detected by them can be displayed through the appropriate zone.
EXTERNAL PROBES
28.5°CGARDEN PROBE
NON-CONTROLLED ZONES
28.5°CGARAGE

MyHOME_Screen3,5
User guide
34
AIR CONDITIONING
Touch the “Air Conditioning” icon to access a page where it will be possible to display all the
objects (splitters) previously connected and configured using the software. If the splitter is
associated to a SLAVE probe address, the MyHOME_Screen will be able to display the temperature
detected in the associated room.
1. Switch the splitter off.
2. Switches off all the splitters of the MyHOME Legrand system.
1. Send the Control.
2. Return to the previous page.
3. Switch the splitter off.
LIVING ROOM
Hot
Cold
Dehumidify
23.5°C
1
1
1
2 3
AIR CONDITIONING
SWITCH EVERYTHING OFF
KITCHEN
LIVING ROOM
23.5°C
1
1
2

MyHOME_Screen3,5
User guide
35
With the advanced mode, the splitter can be managed in the same way as with a remote control.
1. Switch the control on.
2. Return to the previous page.
3. Switch the splitter off.
Advanced mode
1. Touch the icon to manually manage the splitter.
Hot
Cold
Dehumidify
LIVING ROOM
23.5°C
1
1
1
2 3
High
Automatic
Swing
25.5°C
1
2 3

MyHOME_Screen3,5
User guide
36
HVAC system
Touch the “HVAC” icon to access a page where it will be possible to display all the air conditioning
units of the BACnet system previously entered and configured using the software.
Below are the different types of air conditioning units that may be controlled using MyHOME_
Screen; for each type the available parameters will be highlighted.
2. Return to the previous page.
3. Confirm any manual changes made to the selected control.
Touch the icon to scroll through the various splitter operating modes (automatic, cooling,
heating, dehumidifier, ventilation).
The and icons are used to decrease or increase the temperature value in steps of 0.5° of 1.0°
(depending on the splitter installed).
Touch the icon to change the fan-coil speed (automatic, high, medium, low, silent).
The icon is used to switch the SWING function off; the icon to switch it on.
HVAC
Floor Heating
ATU
AC Unit and Fancoil
The control functions depend on the type of splitter installed on the system and the
configuration performed using the software.

MyHOME_Screen3,5
User guide
37
Touch the icon to change the operating mode of the unit (automatic, cooling, heating,
dehumidifier, ventilation).
The and icons are used to decrease or increase the temperature value in steps of 0.5° or 1.0°
(depending on the unit installed).
Touch the icon to change the fancoil speed (automatic, high, medium, low, silent).
1. Switch the air conditioning unit off.
2. Switch all the units of the MyHOME system.
1. Touch the icon to manually manage the air conditioning unit.
AC Unit and Fancoil
AC Unit and Fancoil
GENERAL
ROOM
23.5°C
1
2
GENERAL
Auto
Fan speed
Set Point
Working Mode
Winter
23.5°C
25.5°C
1

MyHOME_Screen3,5
User guide
38
ATU
Touch the icon to change the direction of the air flow (automatic, forward, reverse, random,
slow circulation, normal circulation, fast circulation, stop).
1. Switch the unit 23.5°C off.
Air Direction
Auto
ATU
ROOM
23.5°C
1

MyHOME_Screen3,5
User guide
39
Icons and dcan be used to decrease or increase (percentage) the humidity value.
Touch the icon to change the operating mode of the unit (automatic, cooling, heating,
dehumidifier, ventilation).
The and icons are used to decrease or increase the temperature value in steps of 0.5° or 1.0°
(depending on the unit installed).
Touch the icon to change the fancoil speed (automatic, high, medium, low, silent).
1. Touch the icon to manually manage unit.
ROOM
23.5°C
Auto
Fan speed
Set Point
Working Mode
Winter
25.5°C
1
Auto
Air Flow
Humidity
Humidity Set Point
50%
45%
60%

MyHOME_Screen3,5
User guide
40
Icons and can be used to decrease or increase (percentage) the air recirculation.
Icons and can be used to decrease or increase (percentage) the air flow.
Icons and can be used to decrease or increase (percentage) the air flow minimum setting.
Icons and can be used to decrease or increase (percentage) the air flow maximum setting.
Air Flow Max
Air Flow Set Point
Air Flow Min
40%
80%
60%
Recirculation
Air Quality Probe
50%
50%

MyHOME_Screen3,5
User guide
41
1. Switch the unit 23.5°C off.
Touch the icon to change the operating mode of the unit (automatic, cooling, heating,
dehumidifier, ventilation).
The and icons are used to decrease or increase the temperature value in steps of 0.5° or 1.0°
(depending on the unit installed).
1. Touch the icon to manually manage unit.
Floor Heating
ROOM
23.5°C
1
ROOM
Set Point
Working Mode
Winter
23.5°C
25.5°C
1
Floor Heating

MyHOME_Screen3,5
User guide
42
VRV/VAV
Touch the icon to change the operating mode of the unit (automatic, cooling, heating,
dehumidifier, ventilation).
The and icons are used to decrease or increase the temperature value in steps of 0.5° or 1.0°
(depending on the unit installed).
Icons and can be used to decrease or increase (percentage) the air flow.
1. Touch the icon to manually manage unit.
1. Switch the unit 23.5°C off.
VRV/VAV
ROOM
23.5°C
1
ROOM
Working Mode
Winter
23.5°C
25.5°C
Air Flow Set Point
Set Point
50%
1

MyHOME_Screen3,5
User guide
43
This control allows you to control the status of the burglar alarm system (enabled/disabled) and on
single zones.
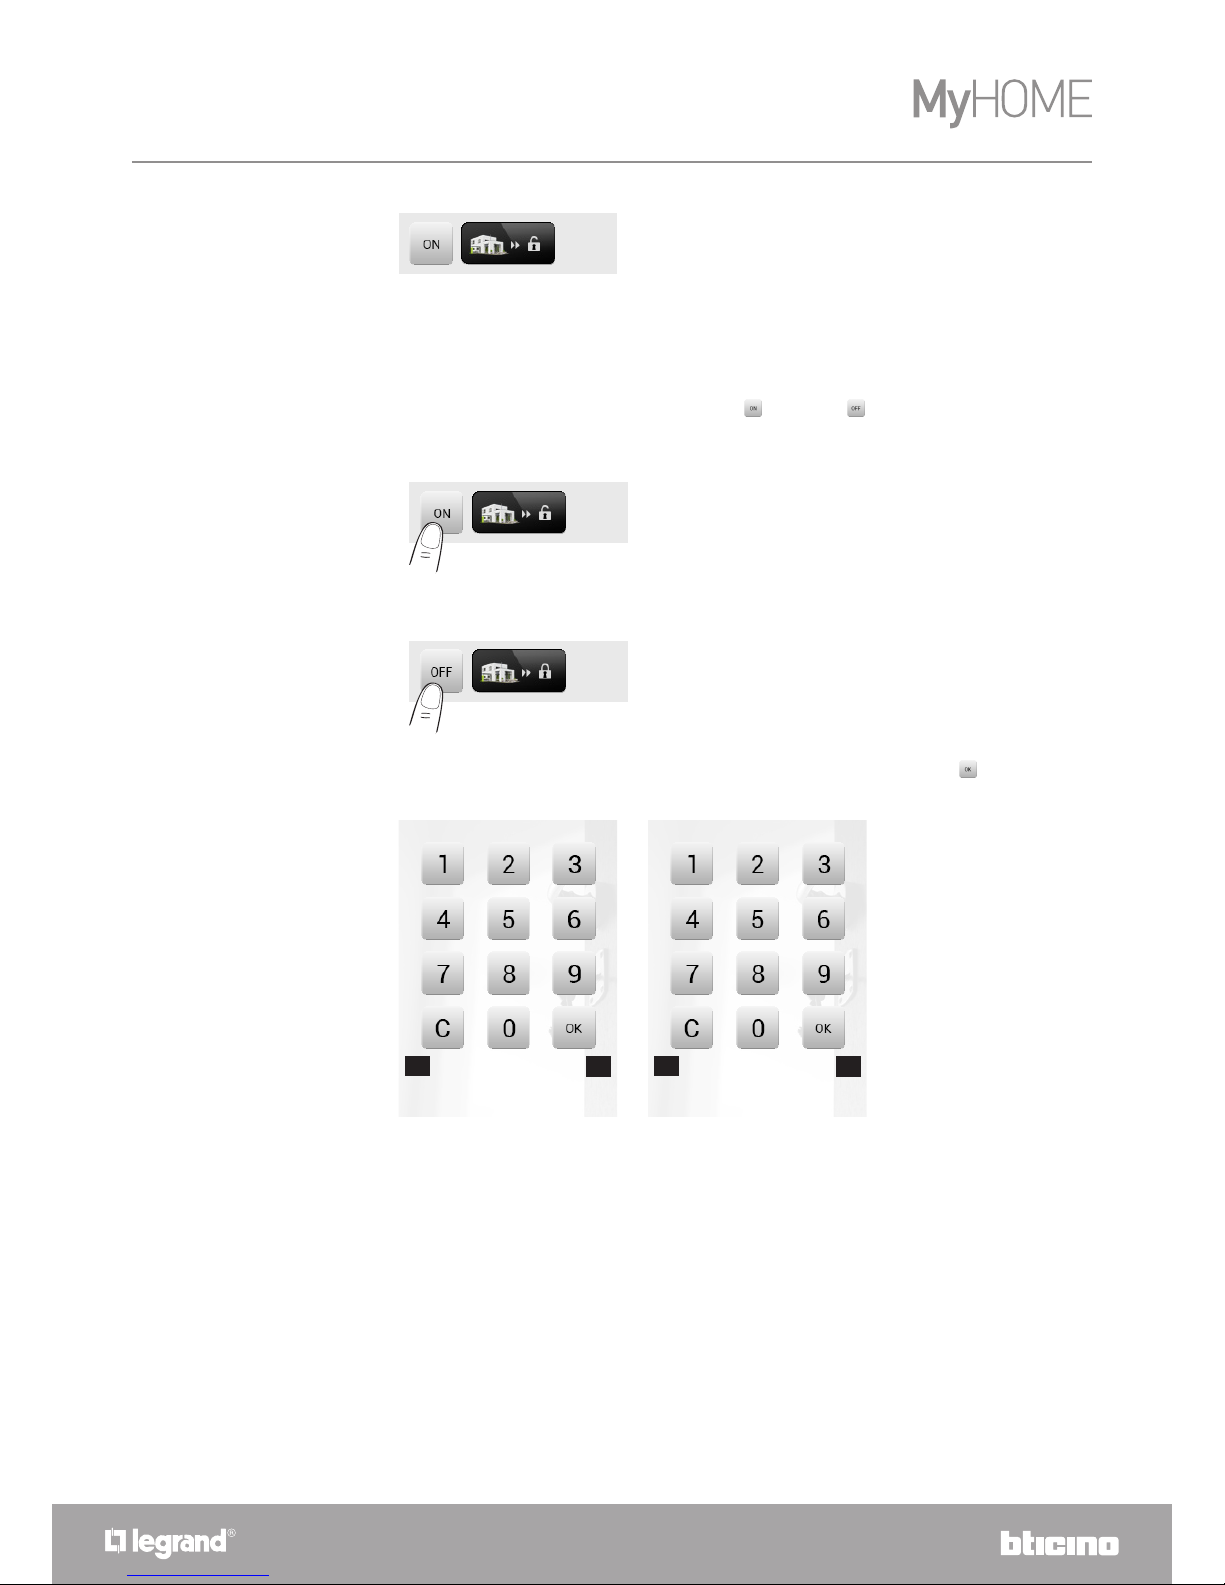
Touch the burglar alarm icon .
The top part of the display will show the system status icon (when the padlock is open it indicates
that the system is disabled, when it is closed it indicates that the system is enabled); in the centre,
you can scroll the zones in which it is subdivided and check which are enabled.
Burglar alarm
1. System disabled.
2. System enabled.
3. Zona 1 activated.
4. Zona 2 deactivated.
Activate/deactivate the zones
When the burglar alarm is disarmed, it is possible to disable (or enable) one or more system zones.
In this way, you can customise the system operation according to your needs. You can for example
exclude the infrared sensor zones, leaving the perimeter zones active (Main door and windows),
and move freely inside the house without compromising on security.
To activate this customisation touch the confirmation icon: a page will appear where you can enter
your user code and confirm the active zones on the system.
Such customisation can only be performed when the system is off using the relevant icons for the
individual zones (not shown on the display when the system is on).
Perimeter
Basement
Perimeter
12
3
4
Basement
MyHOME_Screen3,5
User guide
44
To customise and at the same time arm the system, simply touch the icon, as explained in the next
page.
Enable/disable the burglar alarm
Press the icon to change the status of the system (to enable). (to disable).
Enter your Burglar Alarm Unit user code in the displayed page and confirm with .
If the sound system is enabled, you will hear the voice message: “enabled” or “disabled”.
Enable the burglar alarm
Disable the burglar alarm
PASSWORD:
1 2 3 4 5 6 7 8
PASSWORD: *****
1 2 3 4 5 6 7 8
Icons 1 to 8 shown below (only found in the system arming page), indicate the statuses of the
zones. In the examples, the zone 1 and 8 are active, while the zones from 2 to 7 are shut off.
MyHOME_Screen3,5
User guide
45
What type of alarm occurred?
If alarms have occurred while you were out, as soon as you get home you will find a screen similar
to the one in the example with the following information: the centre icon corresponds to the type
of alarm occurred, indication of the time, date, type of alarm and zone in which it has occurred.
The alarm signal remains stored until the system is enabled again.
Touch the icon in the main page to look at the alarms memory.
Touch the icon to cancel the alarm.
“Intrusion” alarm example
Type of alarm:
– : intrusion;
– : tampering; antipanic; technical.
1. Indication of the:
– time
– date
– zone
intrusion
11:01 17.07 Z 1
1
MyHOME_Screen3,5
User guide
46
You can check your sound system completely.
Touch the sound system icon .
At the bottom part of the display there is an icon referred to the music source; in the middle you
can scroll the amplifiers you want to check.
Sound System
MUSIC SOURCE
You can choose between the Radio tuner and an external source (Aux), for instance a CD unit
controlled with the Stereo Control or connected by means of a RCA input.
Radio
Radio
1
2
3
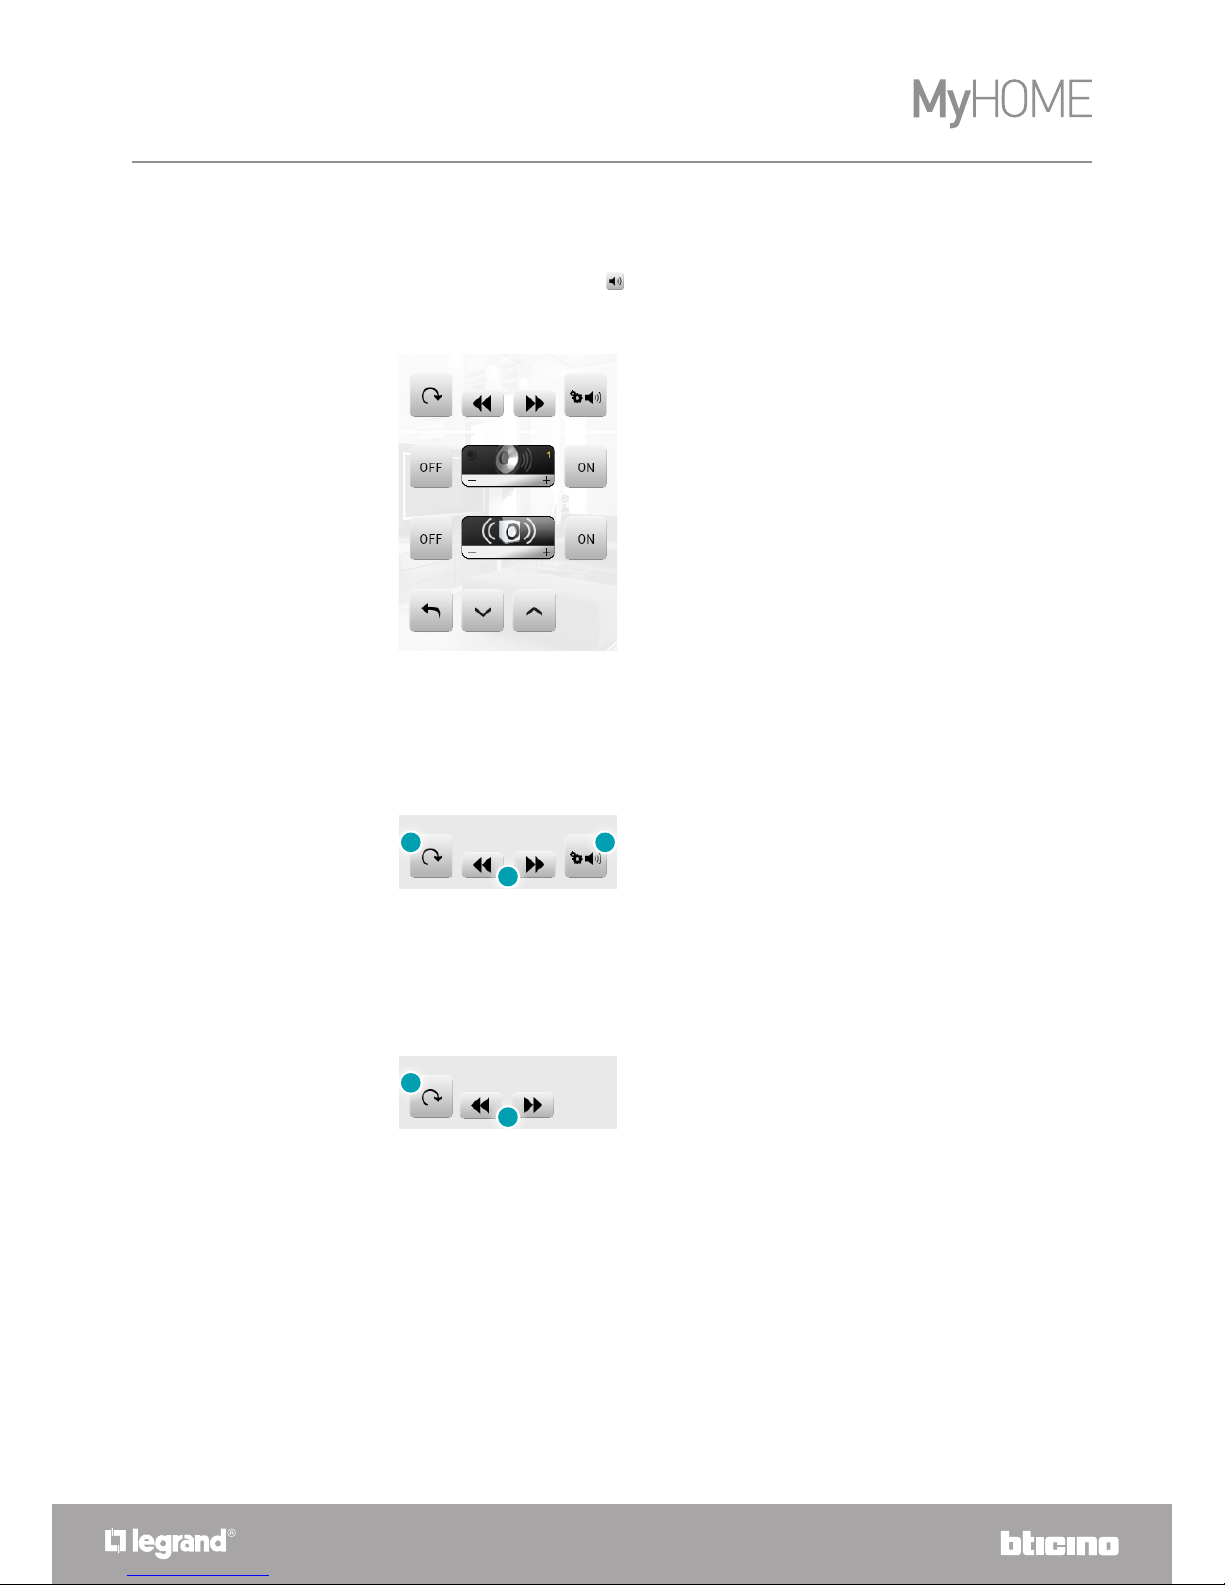
1. Change source.
2. Change channel (only the stored ones).
3. Channel tuning.
1. Change source.
2. Change track (if included in the source).
External source
AUX
1
2
Living room
Basement
Radio

MyHOME_Screen3,5
User guide
47
Tuning in the radio
The MyHOME_Screen lets you tune in your sound system radio and store your favourite channels.
1. Audio source.
2. Change channel.
3. Frequency.
4. RDS Function.
5. Change frequency.
6. Channel search mode (Automatic or manual).
7. Store the selected channel.
1. Off.
2. Low volume
3. High volume.
AMPLIFIER
This control lets you switch on / off an amplifier and adjust its volume using – e +; the volume level
is shown graphically on the display.
AMPLIFIER ASSEMBLY
You can control an amplifier assembly.
The amplifiers of the assembly can be adjusted at different volume levels, hence they can
be adjusted by increasing or decreasing the level of all amplifiers, starting from their current
adjustment.
Radio
Radio 1
2
7
1
3
4
6
5
1
2
3

MyHOME_Screen3,5
User guide
48
POWER AMPLIFIER
This control can be used to switch on/off, and manage, the new power amplifier.
Touch the icon to access the management menu.
1 2
1. ON/OFF icon, to switch the power amplifier on or off.
2. Open the power amplifier management menu.
The following page will appear:
Living room
Power Amplifier
Radio
Treble
+1
+1
Normal
Bass

MyHOME_Screen3,5
User guide
49
Touch the or icons to select the equalization curve::
Equalizer
Dance
Touch the or icons to adjust the treble level between -10 and +10:
Treble adjustment
+3
Treble
Touch the or icons to adjust the bass level between -10 and +10:
Bass adjustment
-1
Bass
Touch the or icons to balance the sound between the right and the left channel.
Balance
Activating LOUD mode enhances low and high frequencies when listening at low volume.
To activate or deactivate LOUD touch the or icons.
Loudness (LOUD)
2
1
1. Right balance

MyHOME_Screen3,5
User guide
50
You can check your multi-channel sound system completely.
Touch the multi-channel sound system icon .
In the example, two configured rooms are displayed (Living room and Bedroom) as well as the
assembly of all the amplifiers (General).
Touch to access the single submenus.
Multi-channel sound system
Example:
“General” sub-menu
In this case, the selected source is the radio.
Example:
submenu of the Room 1
In this case, the selected source is CD (Aux).
Dining-room
General
Living room
General
Radio
Dining-room
CD
Room 1

MyHOME_Screen3,5
User guide
51
Example:
submenu of the “Radio” source.
Radio
Radio
Home ampliers
Radio 1
1:
1
This page includes all the radio tuning controls.
1. Touch on the display to open a new page where you can save up to 15 radio stations.
2. Select the number of stations to save.
3. Touch OK to confirm.
Radio
Home ampliers
Radio 1
1:
2 2
3

MyHOME_Screen3,5
User guide
52
Example:
submenu of the “CD” source.
1. Change track.
2. Go to the previous page.
CD
LIVING ROOM
1
2

MyHOME_Screen3,5
User guide
53
Multimedia contents
In addition to the standard sound system sources, the MyHOME_Screen can also be used to access
network multimedia contents, such as IP Radio and Media Client.
Touch the sound system or multichannel diffusion system icon .
In the example the display shows the configured zone (Living room).
Select to access the individual submenus.
The following functions are included in the top part of the submenu:
Select the multimedia sound source among the available ones:
1 2 3
1. ON source.
2. Change source.
3. Opens the selected source adjustment menu.
Living room
Living room
Multimedia

MyHOME_Screen3,5
User guide
54
Select on the display to load a new page for the display of all radio channels previously saved
using the software.
MULTIMEDIA SOURCES: IP RADIO
This page displays the two options for the management of the multimedia sources using the
Ethernet network.
IP Radio
Servers
Multimedia
Radio 1
Radio 2
Radio 3
Radio 4

MyHOME_Screen3,5
User guide
55
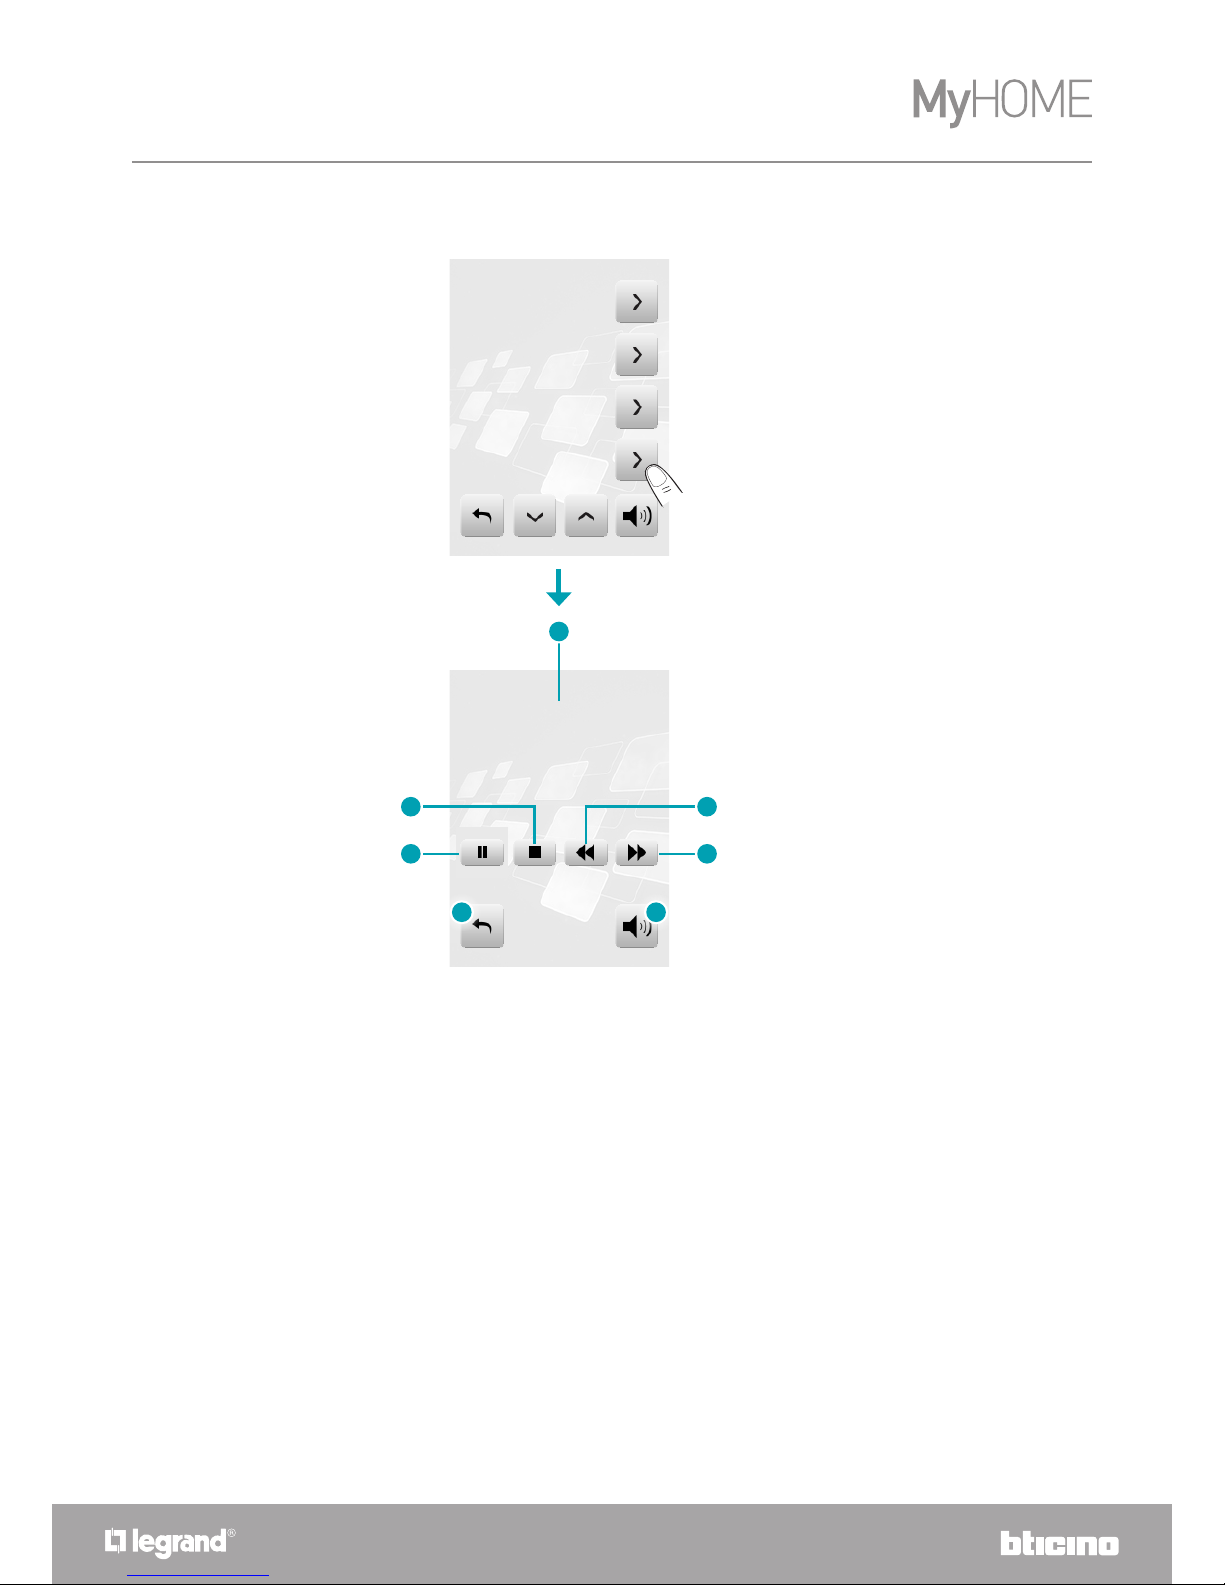
Select on the display to load a new page that can be used to control the IP Radios through the
player.
Radio 3
1
2
4
3
5
6 7
1. Name of the radio.
2. Stop.
3. Go to the previous radio.
4. Pausa.
5. Go to the following radio.
6. Return to the previous page.
7. Return to the main page.

MyHOME_Screen3,5
User guide
56
Select Servers from the display to display a new page showing all PCs connected to the Ethernet
network.
MULTIMEDIA SOURCES: MEDIA CLIENT
Tramite la funzione Media Client è possibile ascoltare musica (.mp3) da un PC collegato alle rete..
When a PC is selected (e.g. Pc3) the display will show a new page with all folders (Images, Music,
Playlist e Video) of the player preset for listening to music.
Select the Music folder and then a subfolder (e.g. All artists) to display all artists included in the
multimedia list of the preset player.
Radio IP
Servers
Pc1
Pc2
Pc3
Pc4
All music les
Genre
All artists
Participating artists
Music

MyHOME_Screen3,5
User guide
57
Select an artist (e.g. U2) to display all the CD of the selected artist.
Select the Album (e.g. The Best Of) to display all the tracks in the CD.
ROLLING STONES
LINKIN PARK
BEATLES
U2
MyHOME_Screen3,5
User guide
58
Select the desired track (e.g. One). The player page appears, showing the details of the track being
played.
1. Current track details.
2. Stop.
3. Go to the previous track.
4. Pause.
5. Go to the following track.
6. Return to the previous page.
7. Return to the main page of the sound system.
Beautiful Day
Numb
Gone
One
Track One
Time 01:16/04:35
Album The Best Of
Artist U2
1
2
4
3
5
6 7

MyHOME_Screen3,5
User guide
59
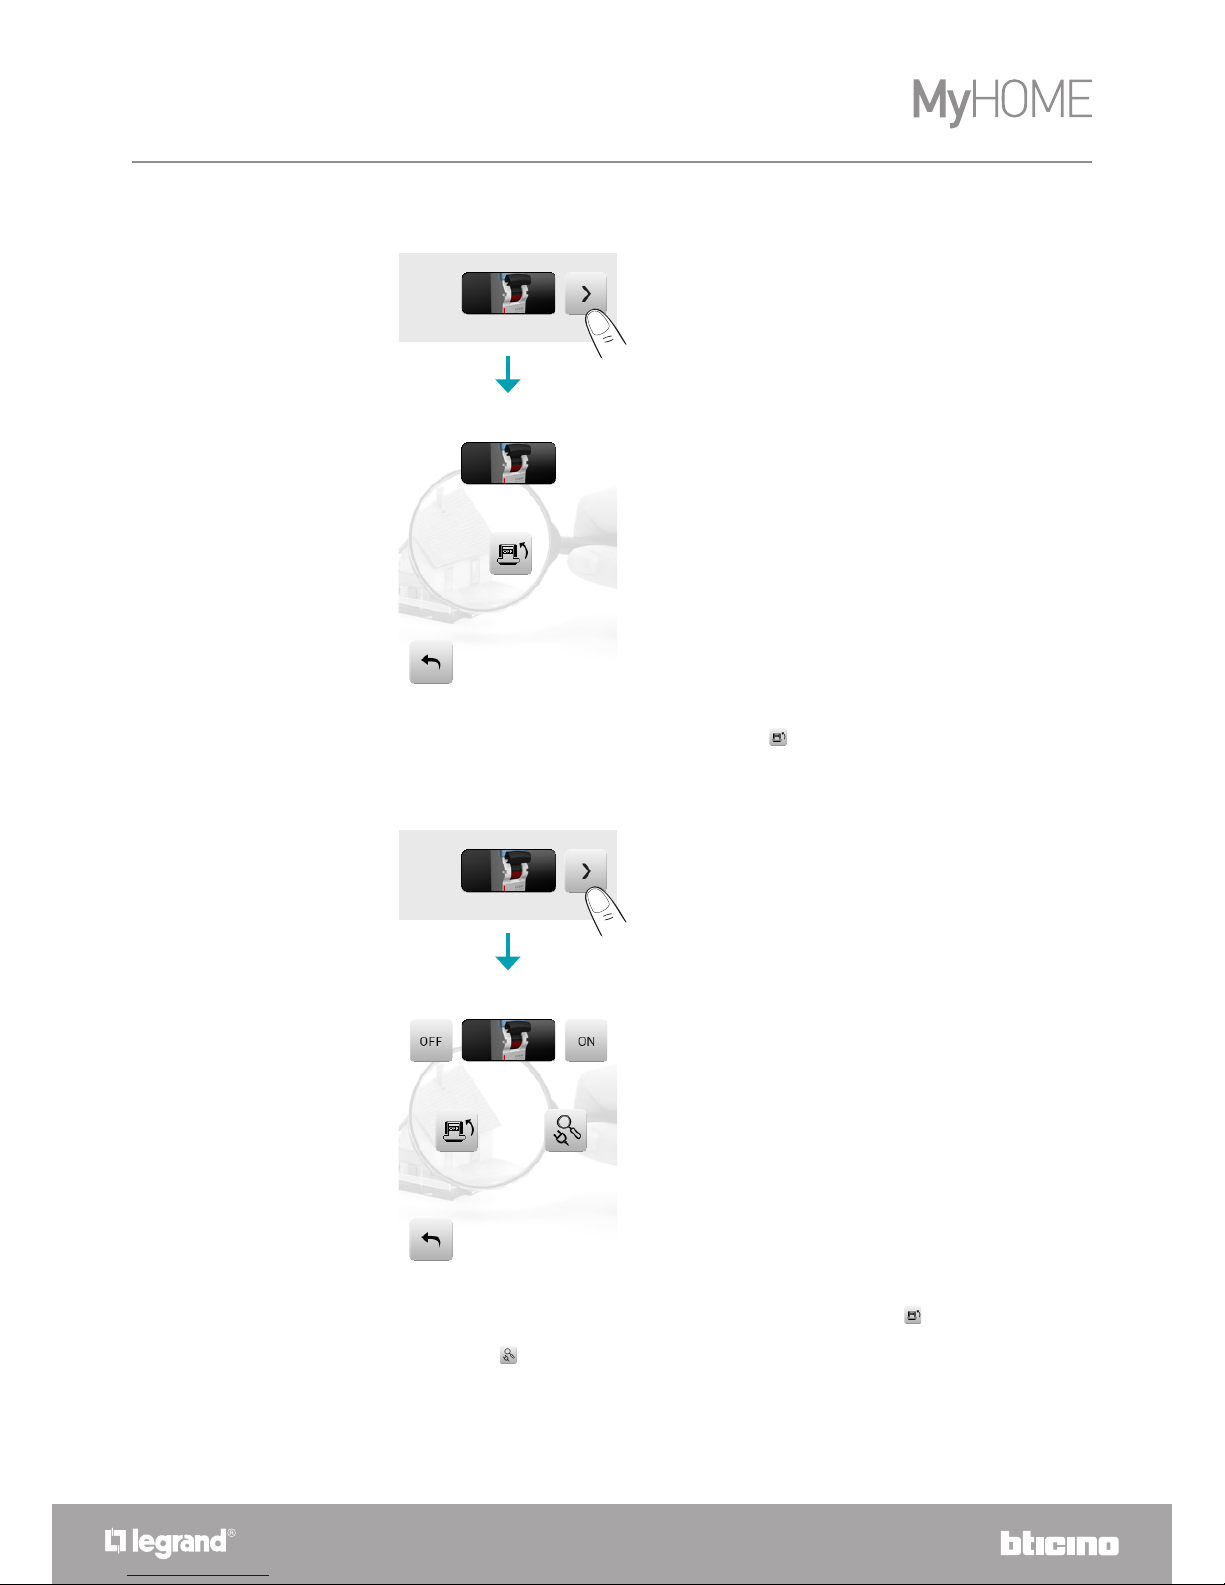
Depending on the type of system and configuration, you can control the door lock opening and/or
the staircase light activation for each entrance panel.
Touch the video door-entry icon .
The main page of the video door-entry will be displayed:
Video door-entry system
1. Activate door lock.
2. Activate staircase light.
When an entrance panel call is received, the display shows the following screen (if MyHOME_
Screen is connected to the video door entry system).
In this case, the entrance panel will have “Staircase light” and “Door lock” controls.
Touch the icons to activate the “staircase light” and/or “door lock release” activation control.
Entrance panel
1 2
Entrance panel
STAIRCASE LIGHT
DOOR LOCK

MyHOME_Screen3,5
User guide
60
This application enables controlling the status of the energy loads, display consumptions/
productions of energy, supervising the electric system, controlling the lifesaving (salvavita)
rearming devices.
Touch the .
Energy management
This can be used to display and control STOP&GO devices (previously
configured) and to check the MyHOME system loads for correct operation.
It enables monitoring energy consumption and production by item: electricity,
gas, water, heating/cooling, sanitary hot water.
Load management (with load management central unit installed)
The load management central unit provides control of the power engaged,
preventing the power meter from cutting the power off, by excluding the loads
based on the priorities set by the installer.
Load management (without load management central unit)
If no load management central unit is installed on the system, and advanced
actuators are used, this application enables checking the current load
consumptions (e.g. oven, washing machine, microwave oven, etc.).
MyHOME_Screen3,5
User guide
61
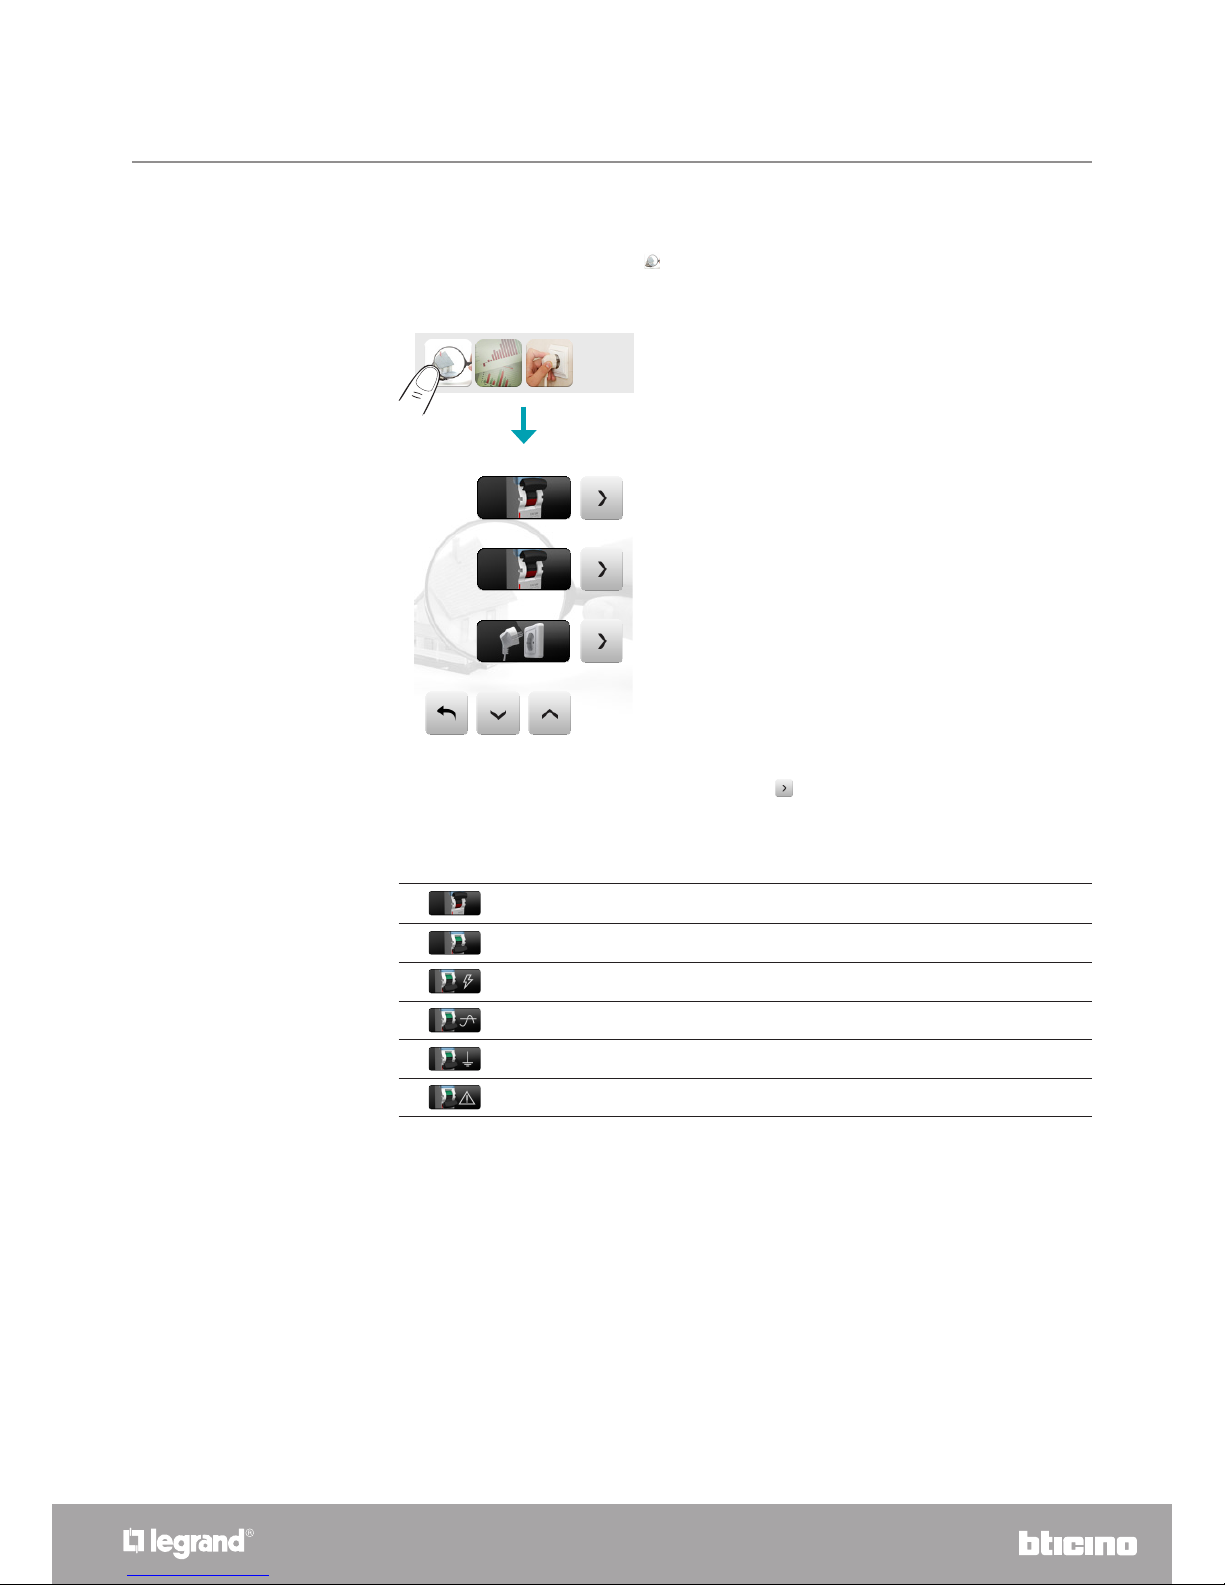
Touch the system supervision icon .
The display shows the page of the STOP&GO devices (visible depending on the type of
installation).
SYSTEMS SUPERVISION
The status of each device will be displayed. Touch the icon to access the details of the individual
STOP&GO devices and the Load diagnostic function.
Each type of status will have its own dedicated icon:
Closed
Open
Open due to short circuit
Open due to overcurrent
Open due to earth fault
Open due to block
Load diagnostic
STOP&GO PLUS
STOP&GO
MyHOME_Screen3,5
User guide
62
Stop&Go
Stop&Go Plus
The detail page of the STOP&GO device contains the icon for automatic rearming enabling or
disabling.
STOP&GO
Reset
STOP&GO
STOP&GO PLUS
Reset Check
STOP&GO PLUS
When entering the STOP&GO PLUS dedicated page the user will see the icon, used to enable
or disable automatic rearming. It is also possible to order the device to perform a system check by
touching icon .
The time delay before rearming is set during the configuration of the STOP&GO device.

MyHOME_Screen3,5
User guide
63
Stop&Go BTest
STOP&GO BTest
STOP&GO BTest
Reset Autotest
When entering the STOP&GO BTest dedicated page the user will see the ## icon, used to enable
or disable automatic rearming. It is also possible to order the device to perform a self-test by
touching icon .
If enabled, it is possible to use icons or to set the self-test frequency interval (number of days
between tests).

MyHOME_Screen3,5
User guide
64
Load Diagnostic
Access the Load diagnostic page to display the load status
The icon indicates that the load is working correctly;
The indicates that the load is working correctly, but the earth leakage current is close to the
limits of the standards;
Icon indicates that the earth leakage current exceeds the limits of the standard, causing the
opening of the earth leakage circuit breaker.
The “Load diagnostic” function can be used to check that the loads are working correctly, through
the measurement of the earth leakage current consumed by the same.
Oven
Microwave oven
Washing machine
Load diagnostic

MyHOME_Screen3,5
User guide
65
Touch the Consumption/Production Display icon .
The display shows the page of the monitored consumptions.
CONSUMPTION/PRODUCTION DISPLAY
Electricity
Display the electric power consumed or produced by the system.
Acqua
By connecting a pulse counter to a water meter with pulse output, it is
possible to display the corresponding system consumption/production.
Gas
By connecting a pulse counter to a gas meter with pulse output, it is
possible to display the corresponding system consumption.
Hot water
By connecting a pulse counter to a hot water meter, or to the
corresponding pulse output of the heat metering central unit, found in
apartment user modules (in case of central heating), the corresponding
system consumption can be displayed.
Heating/Cooling
By connecting a pulse counter to a heat output pulse meter it is possible
to display the calories/frigories detected on the Heating/Cooling system
(in thermal kWh).
Touch the or icons to scroll through the energy management page.
The following control functions are included:
Touch the icon to set the unit of measure values for the corresponding consumption/
production controls (€/kW, ...):
ELECTRICITY’
WATER
GAS
This manual only describes the Electricity, control feature. All energy controls are in fact
managed by the MyHOME_Screen in the same way.

MyHOME_Screen3,5
User guide
66
Electricity
Touch the icon to display the electricity consumption or production information:
1. Cycle between days/months/ last 12 months.
2. Scroll days/ months
3. Total consumptions
4. Graphic display of total consumptions.
5. instantaneous consumption.
6. Set the threshold values, which when exceeded will generate an alarm.
7. Return to the previous page.
8. Change unit of measure.
Days
The daily information display is split into:
Current day
30.09.09
ELECTRICITY’
Cumulative
Actual
0,450 kW/h
0,050 kW/h
30.09.09
2
1
4
6
8
3
5
7
0,450 kW/h
0,050 kW/h
ELECTRICITY’
Cumulative
Actual
MyHOME_Screen3,5
User guide
67
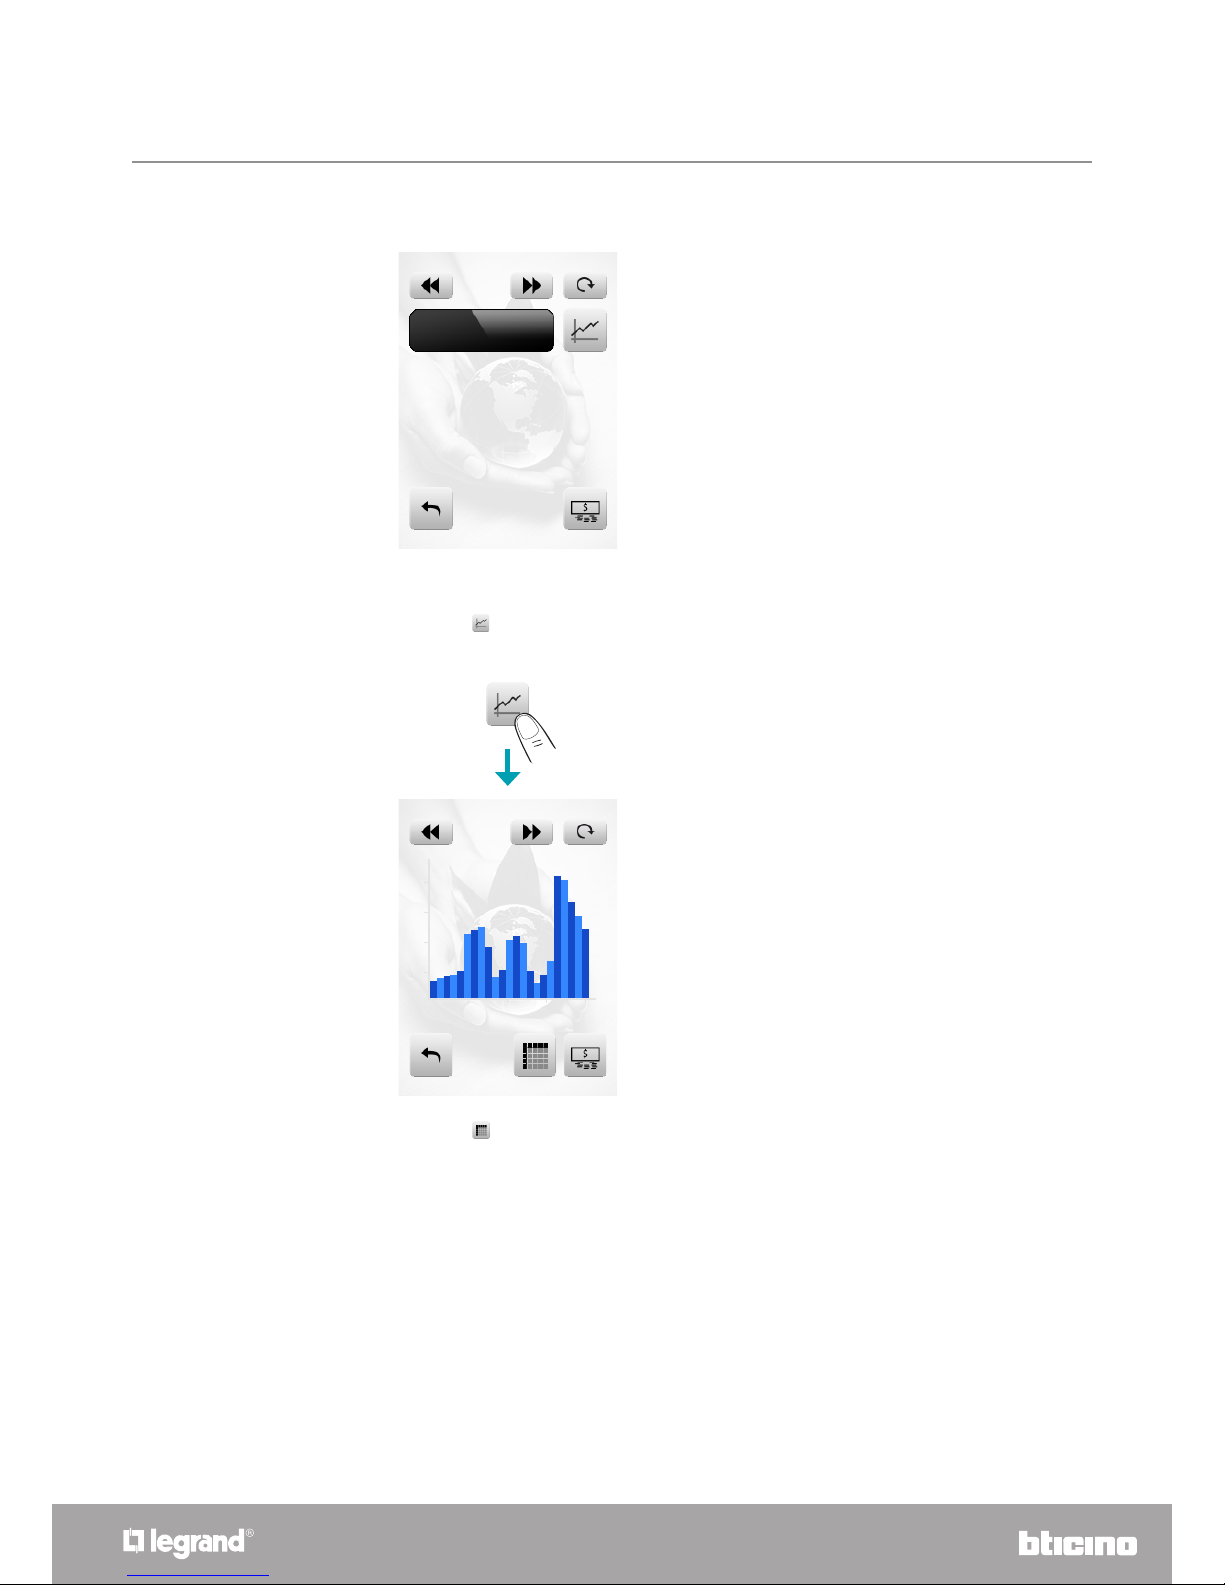
Previous days
Touch the icon to display the consumption information in graphic format.
Graphic information
Touch the icon to display the consumption information in table format.
24121
1,20
2,40
30.09.09
kWh/ora
ELECTRICITY’
29.09.09
0,475 kW/h
ELECTRICITY’
Cumulative

MyHOME_Screen3,5
User guide
68
Months
Touch the icon to switch from “day” view to “month” view:
1. Total monthly consumptions
2. Graphic display of daily consumptions for the month
3. Average daily consumption for the month.
4. Graphic display of average hourly consumption for the month.
30.09.09
Ora kWh
1 0,425
2 0,350
3 0,200
4 0,180
5 0,150
6 0,200
7 0,400
8 0,435
08.09
1 2
3 4
250,540 kW/h
8,255 kW/h
ELECTRICITY’
Cumulative
Daily average

MyHOME_Screen3,5
User guide
69
Last 12 months
Touch the icon to switch from “month” view to “last 12 months” view:”
1. Total consumption for last 12 months.
2. Graphic display of consumptions for last 12 months.
1. Increase or decrease the value.
2. Touch to reset the threshold to zero.
3. Touch to confirm.
Thresholds
It is possible to enable or disable the triggering of an acoustic alarm Customisations > Threshold
Beep
Touch icon to set the thresholds
Threshold 1
4
2
Threshold 2
Thresholds
1
2
3
Last 12 months
1 2
1.952,200 kW/h
ELECTRICITY’
Cumulative

MyHOME_Screen3,5
User guide
70
1. The load is active.
2. It displays current consumptions and power meters*.
3. The load has been disabled.
4. Sets the values of the units of measure of the corresponding consumption/ production
controls (€/kW, ...).
Touch the “Load Control” application . .
LOAD MANAGEMENT (WITH LOAD MANAGEMENT CENTRAL UNIT INSTALLED)
If the central unit detects a system overload, the load with the least priority is disabled (previously
set from the software), and the icon is displayed.
Touch this icon to force the reactivation of the load (the default duration of the activation is 4
hours).
* Only available for advanced actuators.
Oven
Microwave oven
Washing machine
1
3
2
4

MyHOME_Screen3,5
User guide
71
If the central unit detects that the set load limit is being exceeded, the load in question is disabled.
Access the load details page and use the and icons to decrease or increase the forcing time
(default 2 hours and 30 minutes).
Touch the icon to return to the main page, where the icon shows that the load has been
correctly forced.
1. The load is forced and enabled.
1. The load is forced and disabled
Oven
1
Oven
2:30
Oven
Oven
1

MyHOME_Screen3,5
User guide
72
Access the load information page to display the current consumption. Use the icons to reset the
power consumption meters.
Touch icon to switch from W to € display, and vice versa.
Touch the “Load Control” application. .
LOAD MANAGEMENT (WITHOUT LOAD MANAGEMENT CENTRAL UNIT)
Oven
Microwave oven
Washing machine
Oven
01/04/2010 00:01
16/04/2010 16:30
0,050 €
0,800 €
5,085 €
Oven

MyHOME_Screen3,5
User guide
73
Customisation
You can customise some functions of the MyHOME_Screen by accessing.
Touch the icon .
The setup page will be displayed.
Setup
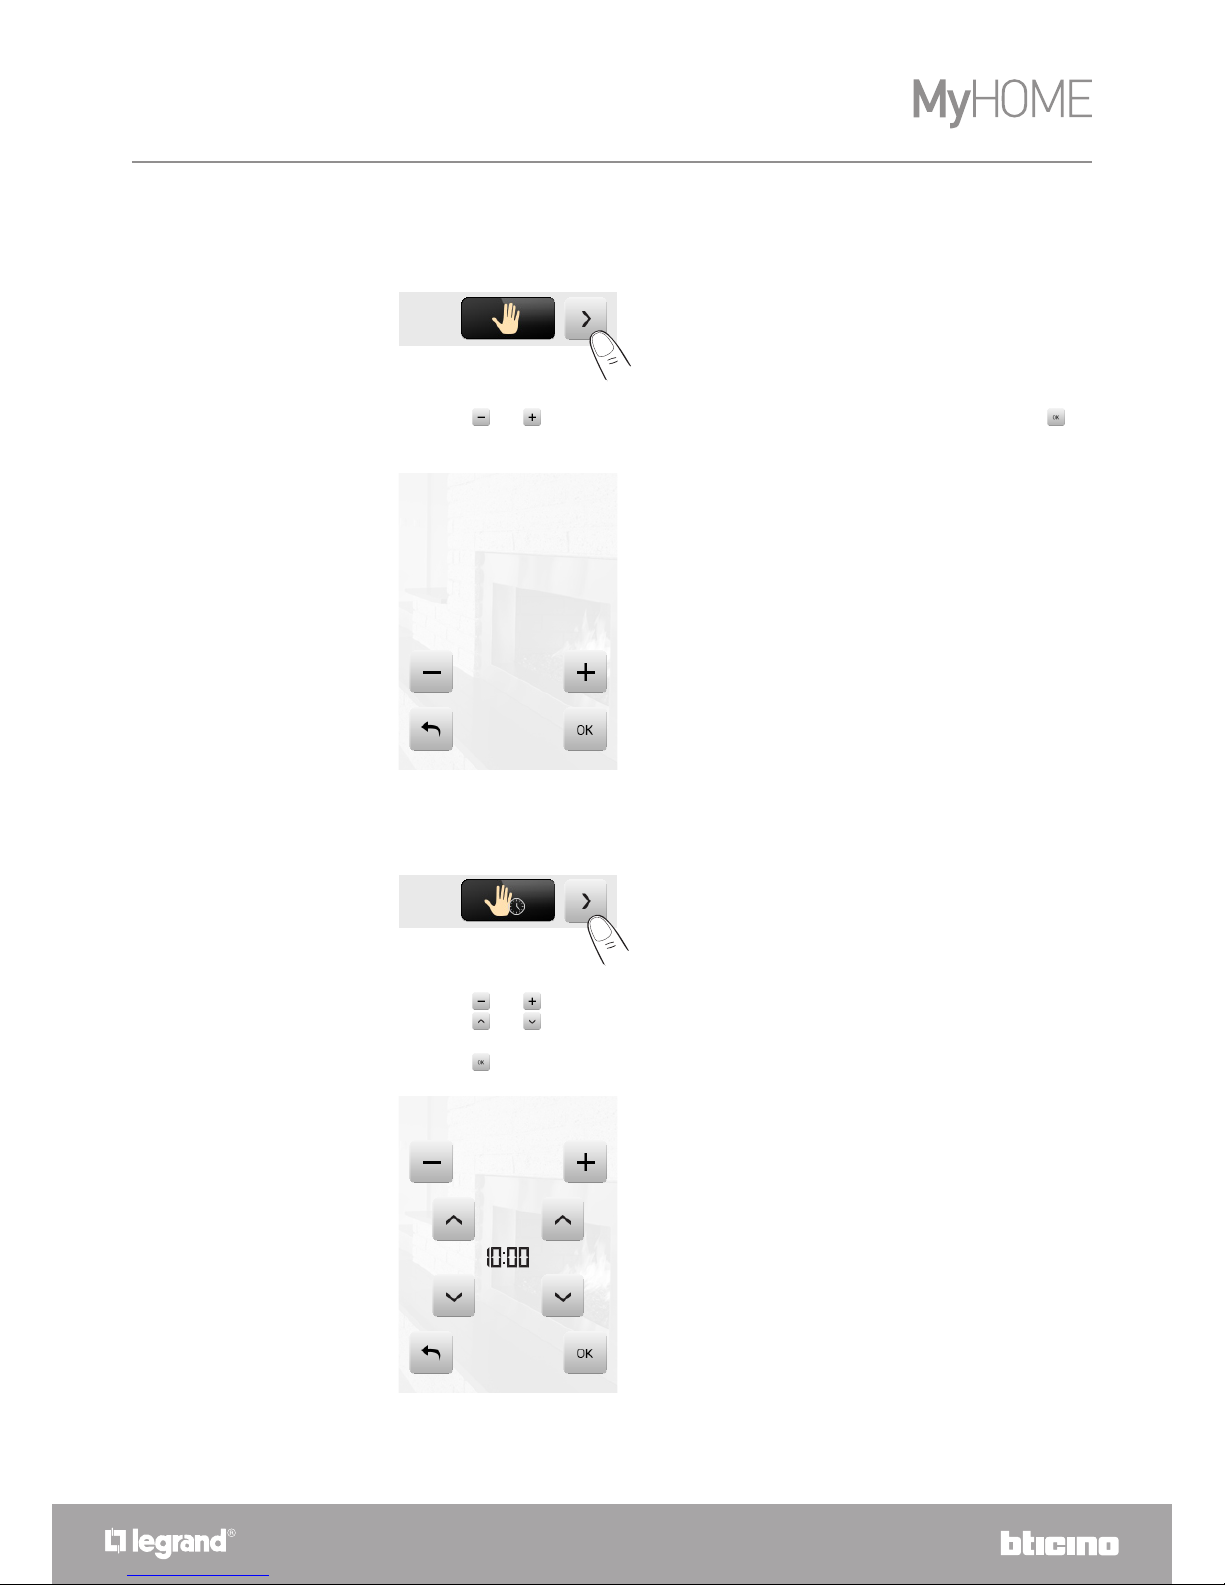
Alarm clock
Touch the icon to enable or disable the alarm clock.
Alarm clock activated
Alarm clock deactivated
ALARM CLOCK
1
ALARM CLOCK
1
1. Touch to disable.
1. Touch to enable.
Touch the icon to set the alarm clock activation time.
The following page will be displayed.
BEEP
THRESHOLD BEEP
ALARM CLOCK

MyHOME_Screen3,5
User guide
74
Use the arrows to set the time; every touch will allow you to increase or decrease by one unit;
when you press your finger, increasing or decreasing will be faster.
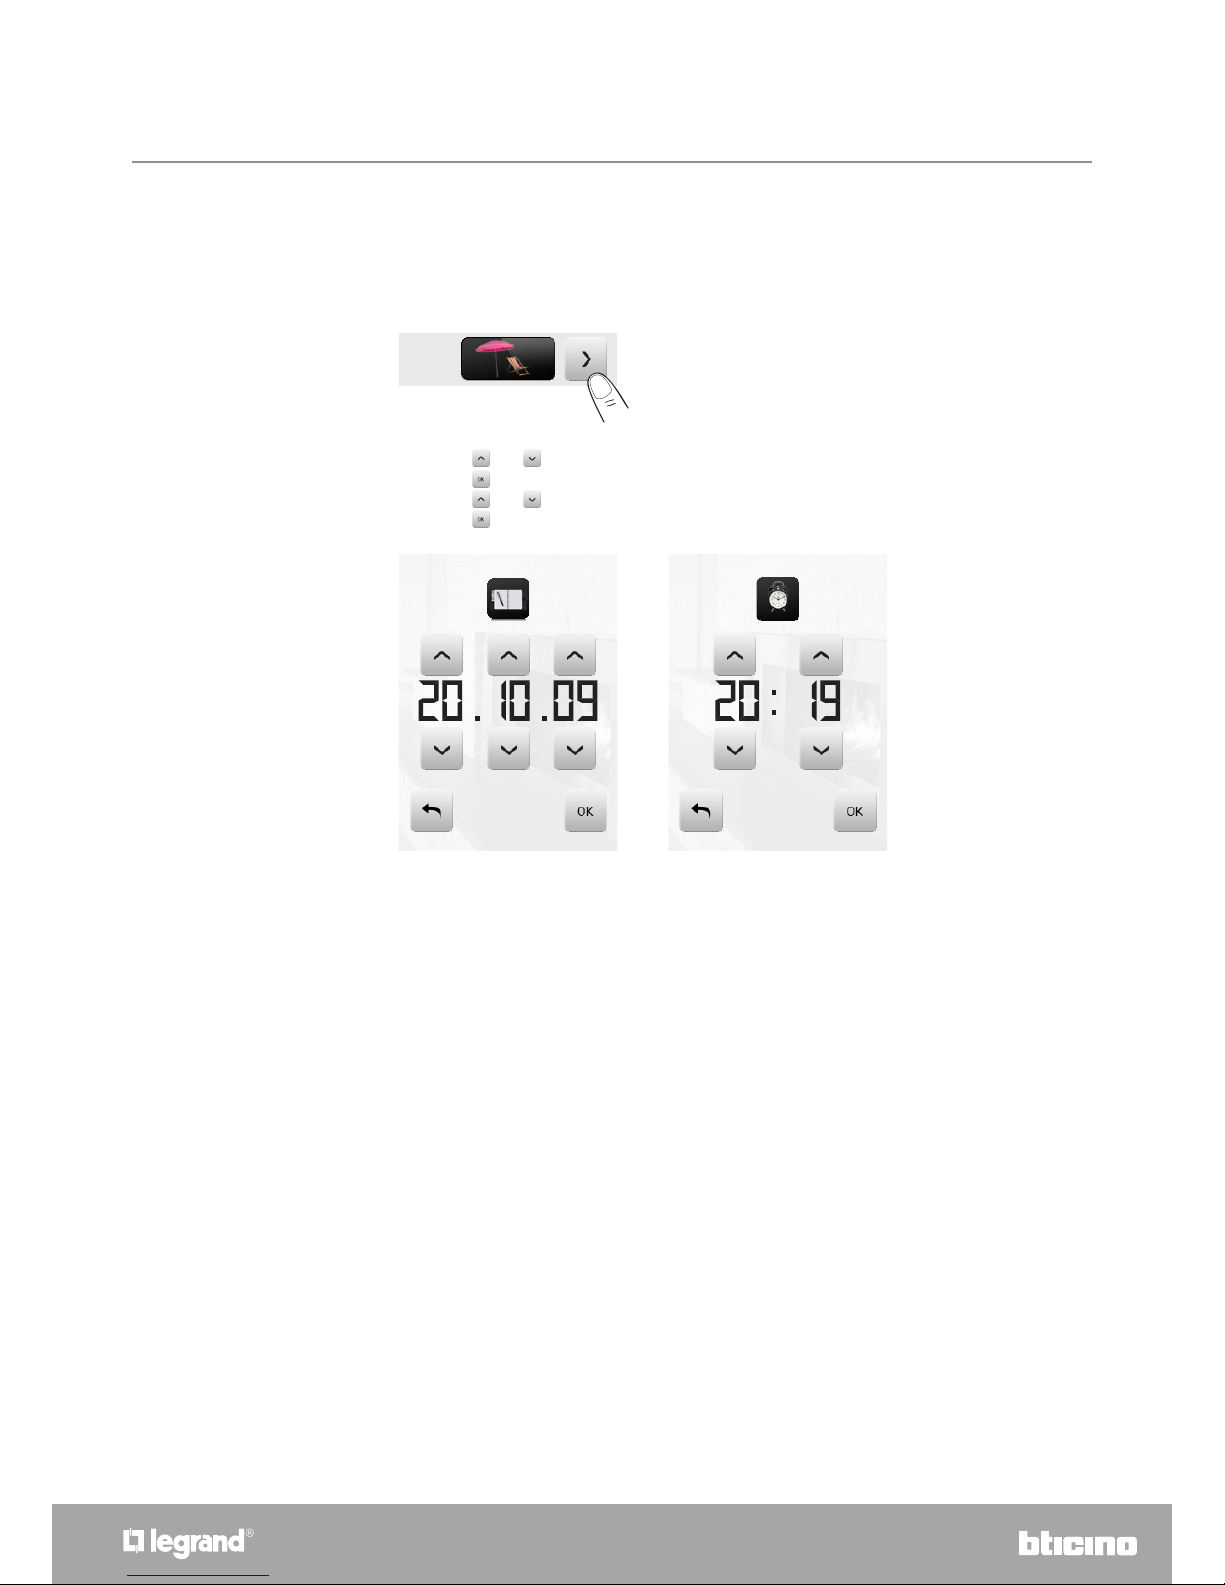
Touch the icon to access the selection page of the alarm clock activation frequency.
Touch the corresponding icon to set the alarm clock to only Once, Monday, Tuesday,
Wednesday, Thursday, Friday, Saturday, Sunday.
If the sound system is configured, the icon at the bottom right corner, will let you access the
configuration page of the sound system for the alarm clock; when the multi-channel sound system
is required, the room must be selected.
once
Monday
Tuesday
Wednesday
You will be able to choose the conditions of the sound system as soon as the alarm clock (source,
amplifiers, volume) is activated.

MyHOME_Screen3,5
User guide
75
Beep
Radio
Bedroom
When the alarm clock is activated, the volume increases until it reaches the volume set previously.
If you touch the display when the alarm clock is activated, the volume of the amplifiers will be set
to the current value (hence interrupting the automatic volume increase).
If there is no pressure on the display, the amplifiers will switch off after two minutes.
You can enable and disable the audible signal when zones are touched.
The use of a multimedia source with the alarm clock is not recommended.
If the Beep is OFF, the device will not emit an audible signal.
Threshold Beep
It is possible to enable or disable the acoustic signal emitted when a threshold set for an electric
line is reached.
BEEP
THRESHOLD BEEP
ALARM CLOCK
BEEP
THRESHOLD BEEP
ALARM CLOCK

MyHOME_Screen3,5
User guide
76
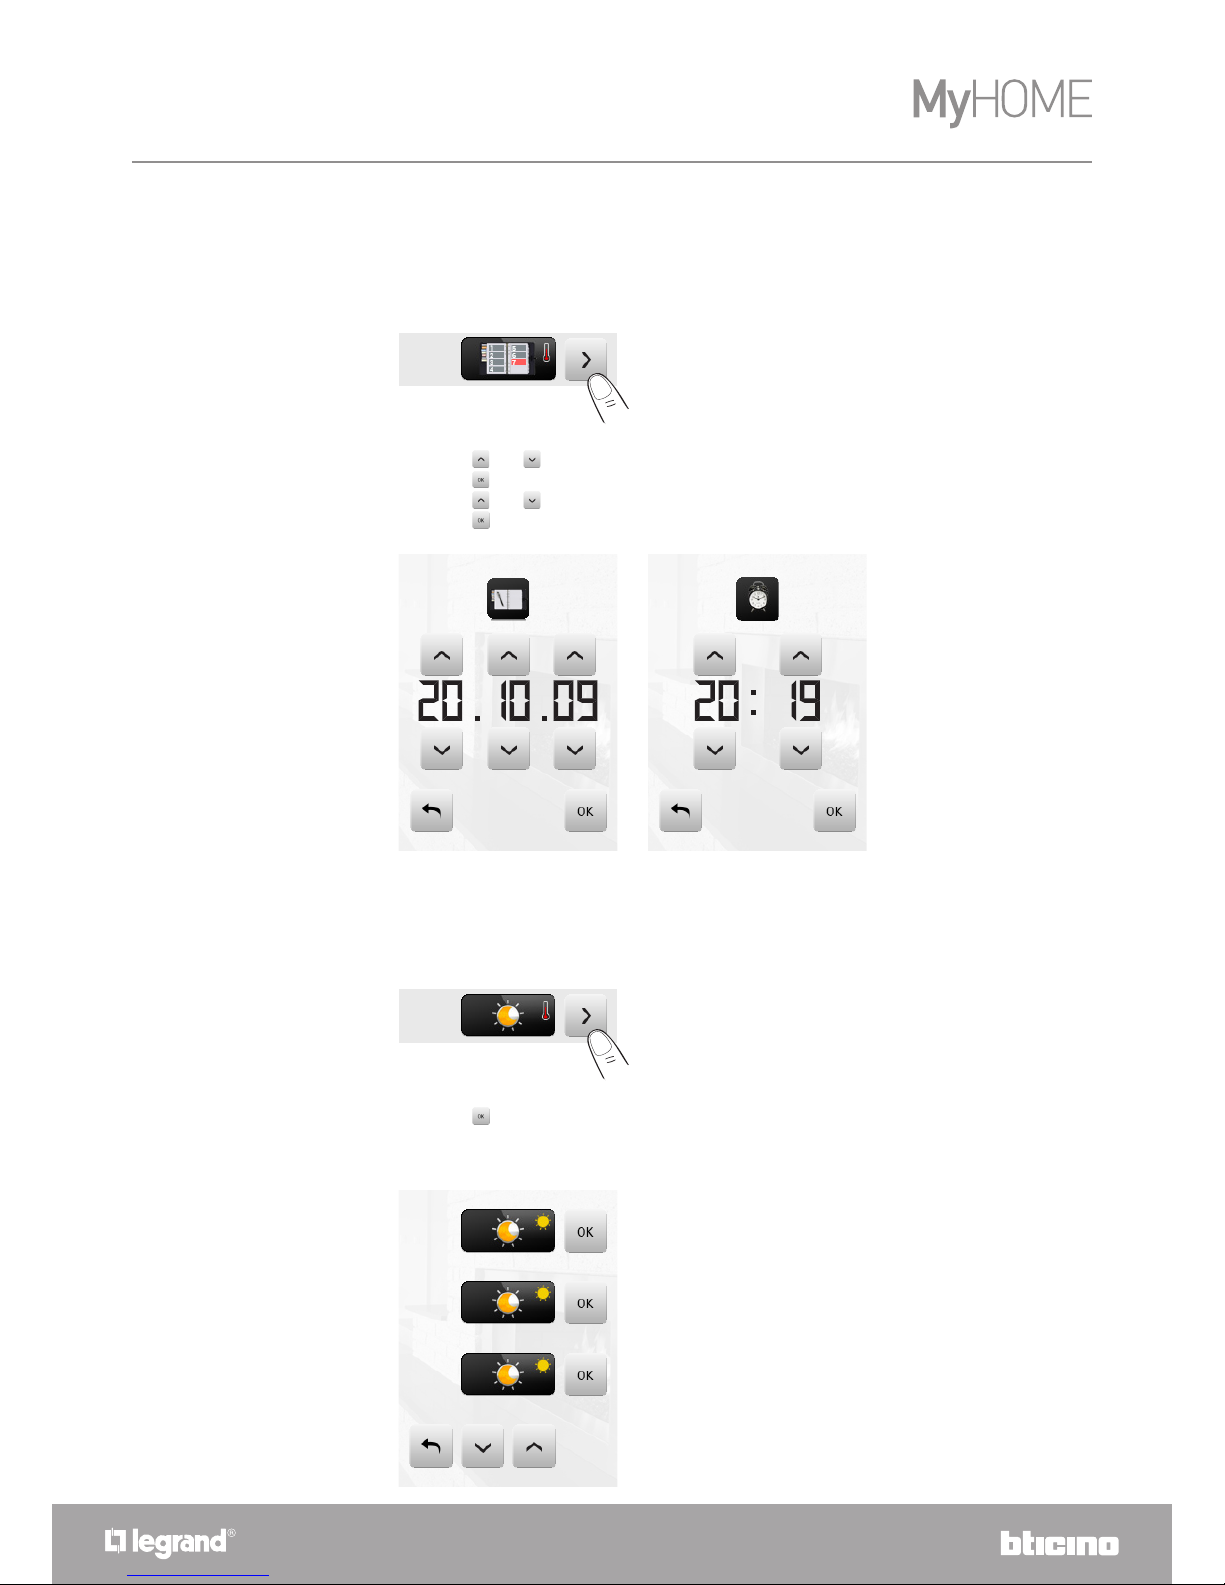
Clock
Touch the icon to access the setup pages of the clock.
The following page will be displayed:
CLOCK
Use the arrows to set the hour, minutes and seconds; every touch will allow you to increase or
decrease by one unit; when you press your finger, increasing or decreasing will be faster.
Touch the icon to access the setup page of the date.
The programmed time will appear in the Home page and/or Default Page, if applied during
programming.
The programmed date will appear in the Home page and/or Default Page, if applied during
programming.
Use the arrows to set the day, month and year; every touch will allow you to increase or decrease
by one unit; when you press your finger, increasing or decreasing will be faster.
Confirm by touching the icon .
MyHOME_Screen3,5
User guide
77
Display
Touch to access the display control page.
The following page will appear:
Touch the icon. LThe screen is deactivated for a certain amount of time that can be set by the
user using the software. The display shows the following page:
SCREEN CLEANING
01 : 15
1
1. Time left for cleaning the screen.
Calibration
Brightness
Screen saver

MyHOME_Screen3,5
User guide
78
Only clean using a soft cloth.
Do not use solvents, abrasive, or corrosive materials.
CALIBRATION
To access the page which allows you to adjust the touch accuracy of the display, touch the icon..
CALIBRATION
The following page will be displayed:
Touch the “cross” symbol on the display, in all positions (5).
The icon will appear twice in the outer areas of the display.
Confirm by touching the icons.
Calibration will start automatically.
+
Press the cross
Do not use solvents or
corrosive products

MyHOME_Screen3,5
User guide
79
BRIGHTNESS
To select the Screensaver mode brightness level touch the icon.
The display shows the brightness level selection screen.
Touch the corresponding to the desired brightness level.
To cancel the selection touch the icon. To confirm the selection touch .
– Off.
– Low.
– Normal.
– High.
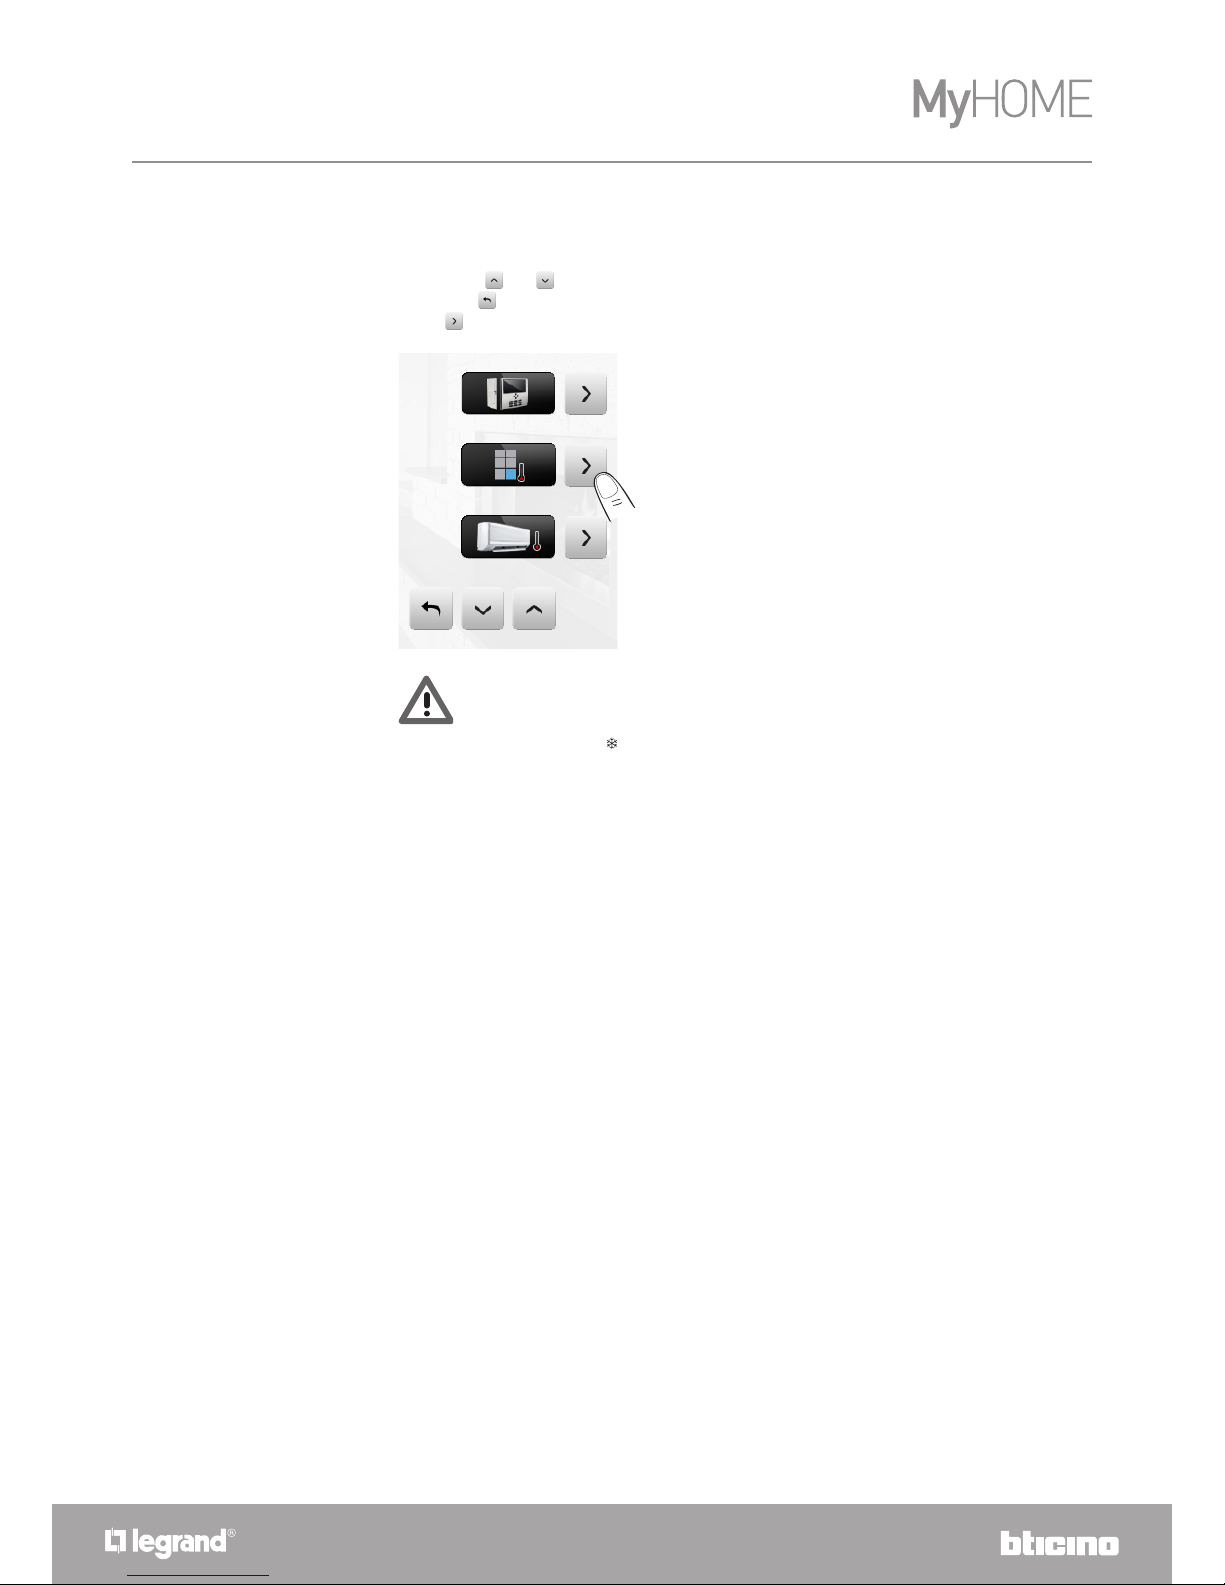
SCREENSAVER
To activate the screensaver function touch the icon in the Setup page:
The following page will appear:
Touch the icon corresponding to the desired screen saver type.
To cancel the selection touch the icon. To confirm the selection touch .
– No screensaver: the display turns dark. The level of darkness depends on the set brightness
level.
– Line: a grey line slides from top to bottom.
– Bubbles: coloured bubbles appear on the screen.
– Time: a grey line with the current time slides from top to bottom.
– Text; A grey line with text (customisable using the software) slides from top to bottom.
BRIGHTNESS
SCREENSAVER
This procedure is very delicate, although it is provided with pressure controls; if it is carried
out incorrectly, the device may no longer perceive the user’s pressure areas, thus forcing it to
stop. In this case, it is necessary to call a technician.

MyHOME_Screen3,5
User guide
80
TRANSITION EFFECTS
The following page will appear:
Touch the corresponding icon to select the desired effect.
To cancel the selection touch the icon. To confirm the selection touch .
– None:direct transition from one page to the other without any effects.
– Blending: the old page blends into the new one followed by the new page being loaded.
– Mosaic: the loaded page is initially displayed as mosaic blocks that gradually fade, showing
the actual page.
– Enlarge: the loaded page appears enlarged.
To select the type of transition from one page to another touch the icon.
NETWORK
Touch the icon to display the MyHOME_Screen network card setup page:
The following page will appear:
NETWORK
Touch the icon to enable or disable the network card.
Touch the icon to return to the previous page.
TRANSITION EFFECTS
Project
Mac
IP
Subnet mask
Gateway
DNS
Connection Status
HW4890
00:03:50:00:18:c7
169.254.253.4
255.255.0.0
192.168.1.1
192.168.1.1
192.168.1.1
Down

MyHOME_Screen3,5
User guide
81
Password
If the MyHOME_Screen is protected with a password, the following page will appear when the
display is touched.
If the password is correct, the Home page will be displayed.
Use the numerical keys to enter the password (default 12345).
Touch to cancel.
Touch to confirm.
Change Password
You can change the existing password at any time.
The new password must have 5 figures.
Touch the icon.
PASSWORD
PASSWORD: *****
The display will show the page for typing in the password (see previous page):
Type in the existing password;
Confirm with .
If the password is correct, you can type in the new password (the password will be shown on the
display).
PASSWORD: 14725
Carefully memorize the new password before pressing OK because, after enabling the
protection, it will be indispensable in order to use the MyHOME_Screen.

MyHOME_Screen3,5
User guide
82
VERSION
Enable protection
You can enable the protection to protect the access to the MyHOME_Screen against unwanted
actions.
By doing so, the access to the functions will be possible only for those who know the password.
PASSWORD
Disable
Enable
PASSWORD
Touch the icon to access the page containing the MyHOME_Screen information.
VERSION
No reaction pressure
In this case you can solve the problem by disconnecting and reconnecting the MyHOME_Screen.
Hold down and repeat the calibration procedure..
Forgot your password?
In this case you can solve the problem by disconnecting and reconnecting the MyHOME_Screen;
after switching on the display, you can use the functions before the stopping process starts. Access
the customisation menu and disable the stopping process or change the password.
After 10 seconds MyHOME_Screen automatically returns to the setup page.
Please note: the use of radio devices will not guarantee the correct indication of the
MyHOME_Screen status.

BTicino SpA
Viale Borri, 231
21100 Varese
www.bticino.com
Legrand SNC
128, av. du Maréchal-de-Lattre-de-Tassigny
87045 Limoges Cedex - France
www.legrand.com
Legrand SNC reserves at any time the right to modify the contents of this booklet and to comunicate in any form and modality,
the charges brought to the same.
83
 Loading...