

Bticino LIVING L4448, LIGHT TECH NT4448, LIGHT N4448 Instruction Sheet [en, fr, de, it, es +1]
Page 1

®
BTicino s.p.a.
Via Messina, 38
20154 Milano - Italia
Call Center “Servizio Clienti” 199.145.145
www.bticino.it
[email protected]
®
L4448 - N4448 - NT4448
®
Istruzioni d’uso
Montageanleitung
Notice de montage
Instruction sheet
Instrucciones de empleo
Gebruiksaanwijzing
®
PART. B2905E
3/02 - DT
Page 2
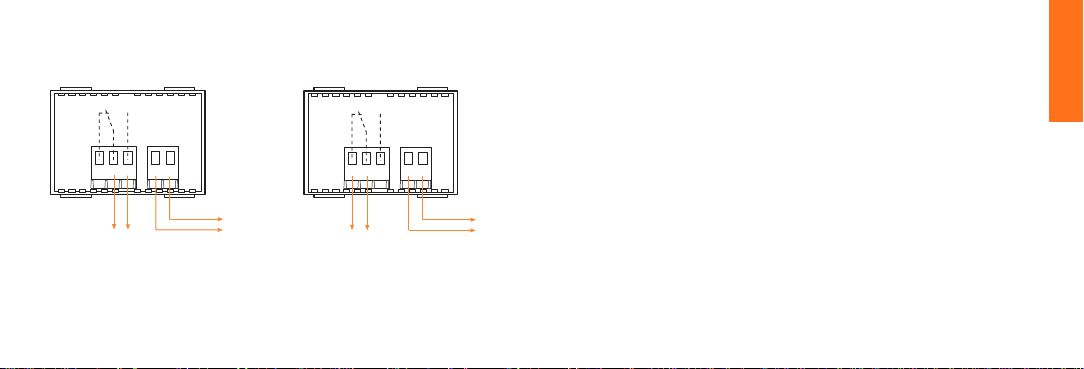
Riscaldamento / Heizung /
Chauffage / Heating /
Calefacción / Verwarming
Italiano
NO L N
C
NC
N
L
sezione max. conduttori: 2 x 2,5 mm
max leiterquerschnitt: 2 x 2,5 mm
section max des conducteurs: 2 x 2,5 mm
max wire cross-sectional area: 2 x 2,5 mm
sección max conductores: 2 x 2,5 mm
max. doorsnede geleiders: 2 x 2,5 mm
2
Condizionamento / Kühlung /
Refraichissement / Cooling /
Refrigeración / Koeling
CNCNO L N
2
2
2
2
2
Indice
Caratteristiche generali 2
Caratteristiche dei programmi 4
Azzeramento (Reset) 8
Programmazione 8
Messa a punto ora e giorno della settimana 10
Programma MAN 12
Programma P1 13
Programma P2 15
Programma P3 16
N
L
Funzione COPY 20
Verifica programmazione inserita 22
Annullamento di un orario nel programma P3 23
Programmazione funzione antigelo ( ❉ )24
Comando manuale 26
Modalità d'installazione 28
Schema di collegamento 31
Italiano
1
Page 3

Cronotermostato elettronico
Caratteristiche generali
● 4 tipi di programmi: MAN, P1, P2, P3
● funzione antigelo (solo in P3)
Italiano
● comando manuale
● possibilità di programmare due differenti temperature di riferimento (Tmin
e Tmax)
●
indicazione dell’ora, del giorno della settimana, della temperatura ambiente,
del tipo di programma selezionato e del funzionamento dell'uscita
● batteria tampone per salvataggio dati in caso di mancanza rete.
Durata: 30 giorni
● tempo min. tra un intervento programmato ed il successivo:1 minuto
● intervallo di temperatura indicato sul display: 5°C ÷ 40°C; aggiornamento
ad intervalli di 1 minuto
● valori di temperatura impostabili: 7°C÷35°C (con intervallo min. di 1°C)
●
tolleranza nei valori di temperatura: ± 0,5°C (raggiunto il regime termico)
● tensione d’impiego 220/230V~±10% - 50 Hz
● contatto in commutazione libero da tensione: 5 A cosϕ 1 - 2A cosϕ 0,5
● sezione max conduttori: 2 x 2,5 mm
2
2
DAY 1
DAY 1
Tmin
Tmax
Tmin
Tmax
20
16
20
16
ON
1
OFF
1
MAN P3 COPY PRG
P+ - MS
ON
1
OFF
1
MAN P3 COPY PRG
P+ -MS
Italiano
3
Page 4

Caratteristiche dei programmi
Programma MAN
L’apparecchio funziona come semplice termostato ambiente; impostando la temperatura di riferimento l’apparecchio inserisce/disinserisce
Italiano
l’utilizzatore, mantenendo la temperatura ambiente nell’intorno di quella
impostata.
Programma P1
Sono già fissati e non modificabili gli orari ed i giorni di inserimento e
disinserimento, vedere tabella. Si devono impostare i valori delle temperature di riferimento (Tmin e Tmax).
Programma P2
Ha le stesse caratteristiche del programma P1, ma con gli orari ed i giorni
fissati in modo diverso, vedere tabella.
Programma P3
E’ possibile personalizzare gli orari, i giorni di inserimento, disinserimento
ed impostare i valori delle temperature di riferimento (Tmin e Tmax).
E’ inoltre possibile impostare la funzione antigelo (indicato con
quale mantiene la temperatura ambiente al di sopra di 7°C.
4
), la
NOTA
Impostare Tmin o Tmax significa che, a partire dall’orario programmato, l’apparecchio provvederà affinché nell’ambiente si venga a
stabilire o una o l’altra temperatura impostata.
P1
day orario 23.00-5.30 5.30-8.30 8.30-11.30 11.30-14.30 14.30-17.00 17.00-23.00
1÷5 temp. T min T max T min T max T min T max
day orario 23.00-7.00 7.00-10.00 10.00-12.00 12.00-16.00 16.00-18.00 18.00-23.00
6-7 temp. T min T max T min T max T min T max
1° 2° 3° 4° 5° 6°
P2
day orario 23.00-7.00 7.00-10.00 10.00-12.00 12.00-16.00 16.00-18.00 18.00-23.00
1÷7 temp. T min T max T min T max T min T max
1° 2° 3° 4° 5° 6°
Italiano
5
Page 5
Italiano
9
Tmin
Tmax
3
20
12 1 2
ON
1
OFF
10
DAY 1
1
MAN P3 COPY PRG
16
P+ - MS
78
56
11
4
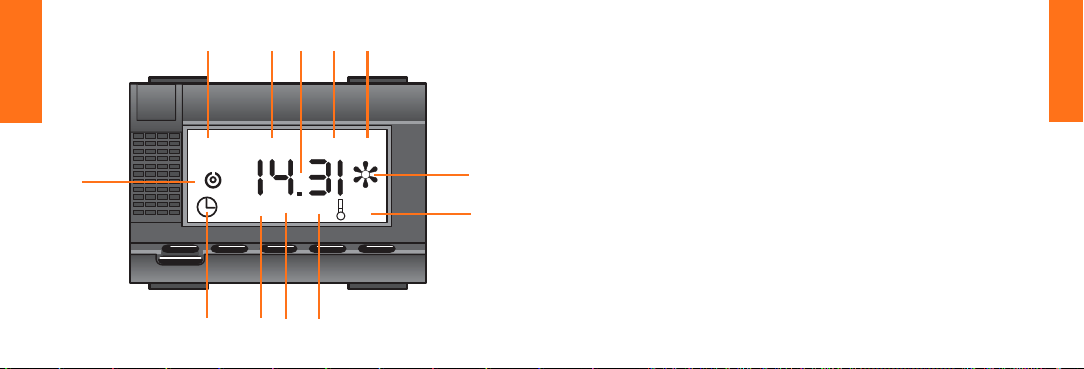
Tasti
+ avanzamento (pressione
continua = avanzamento
veloce)
- arretramento (pressione
continua = arretramento
veloce)
NOTA
Nei programmi P1, P2, P3 premendo il tasto + si inserisce la
Tmax, premendo il tasto - si
inserisce la Tmin.
(Comando manuale)
M = memorizzazione
P =predisposizione alla
programmamazione
S = scelta dei programmi
P+M = azzeramento dell’ap-
parecchio (reset)
Indici
1 giorno della settimana
(DAY1 = lunedì DAY2 = martedì; ecc.)
2 indicatore di temperatura massima
o minima nei programmi P1, P2, P3
3 valore di temperatura impostato
4 valore di temp. ambiente (per valori
> 40°C e < 5°C l’indicatore lampeggia)
5programmazione in corso (non appare
nel programma MAN)
6* copiatura della programmazione
7 tipo di programma (MAN, P1, P2, P3)
8regolazione oraria in corso
(ore, minuti, giorno)
9 stato di funzionamento dell'uscita
10 ora-minuti
11* funzione antigelo inserita
12* fase di programmazione (ON1, OFF1,
ON2, OFF2, ecc.)
*solo per il programma P3
Italiano
76
Page 6
DAY 1
1
Italiano
P1
P +-MS
DAY 1
1
MAN P3 COPY PRG
P+ -MS
Azzeramento (Reset)
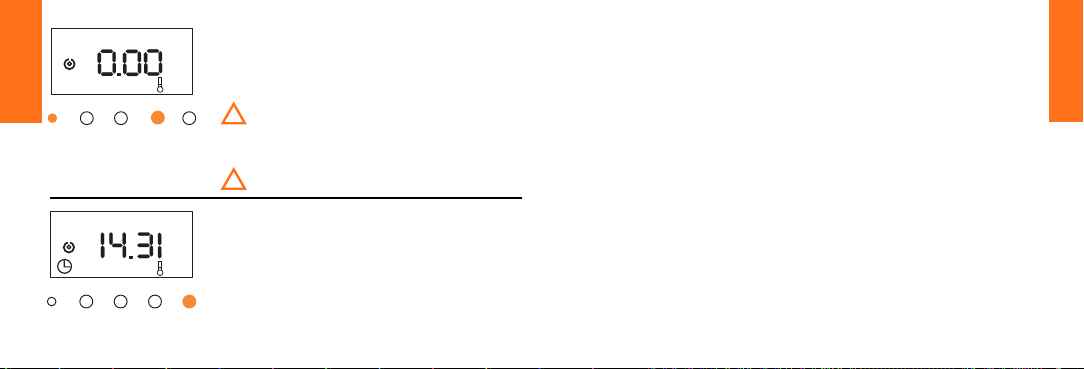
All'installazione, prima di impostare qualsiasi
programmazione, effettuare l'azzeramento
16
premendo contemporaneamente P ed M.
Il reset deve essere ripetuto ogni volta che il
!
cronotermostato, alla riaccensione dopo un lungo periodo in cui rimane non alimentato, non
riprenda a funzionare correttamente.
L'operazione di reset cancella tutti i programmi
!
impostati.
Programmazione
Selezione del tipo di programma
Premendo S, appaiono in sequenza i 4 tipi
16
di programmi da impostare:
MAN, P1, P2, P3.
Funzioni comuni a tutti i programmi
Da qualsiasi situazione, premendo P si accede alla programmazione.
Premendo S scorrono in sequenza le fasi di
programmazione. Inserire o modificare i vari
valori agendo sui tasti - o +.
Premendo M, si memorizza il dato inserito e
la programmazione avanza automaticamente alla fase successiva.
Attenzione: la fase di programmazione si
annulla dopo 30’’ di inattività dei tasti.
Durante la programmazione, premendo P
l’apparecchio ritorna in condizione normale
di funzionamento.
Italiano
8
9
Page 7
DAY 1
Italiano
P1
P+ -MS
DAY 1
P1
P
+-MS
Messa a punto ora e giorno
della settimana
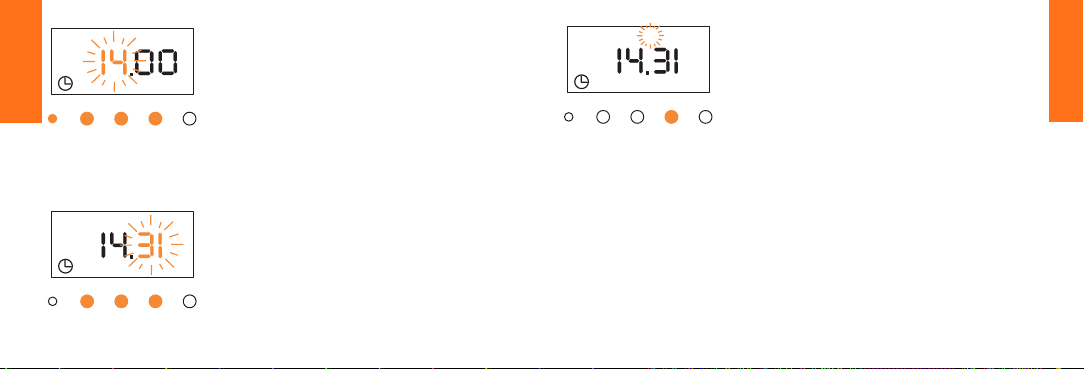
Questa regolazione è valida qualunque sia
il programma selezionato.
Premere P per accedere alla programmazione.
Agire sui tasti + per avanzare, - per arretrare
fino all’ora da inserire (esempio ore 14).
Memorizzare premendo M.
Inserire i minuti agendo sui tasti + e (esempio 31’).
Memorizzare premendo M.
DAY 1
P1
P+ -M S
Inserire con lo stesso procedimento il giorno
della settimana (DAY1 = lunedì, DAY2 = martedì, ecc.).
Memorizzare premendo M.
A questo punto l’apparecchio é programmato
sull’ora, i minuti ed il giorno della settimana al
quale si riferiscono tutte le programmazioni.
Attenzione: le fasi successive di programma-
zione variano a secondo del tipo di programma selezionato (MAN, P1, P2, P3). Se il programma selezionato è MAN, al termine della
messa a punto dell’ora e del giorno, l’apparecchio si pone in stato di funzionamento normale. Se il programma selezionato è P1, P2 o P3,
uscire dalla messa a punto premendo P.
Per le fasi successive di programmazione vedere le specifiche istruzioni indicate nelle pagine successive.
Italiano
10
11
Page 8
DAY 1
1
MAN
Italiano
P +-MS
Programma MAN
1
6
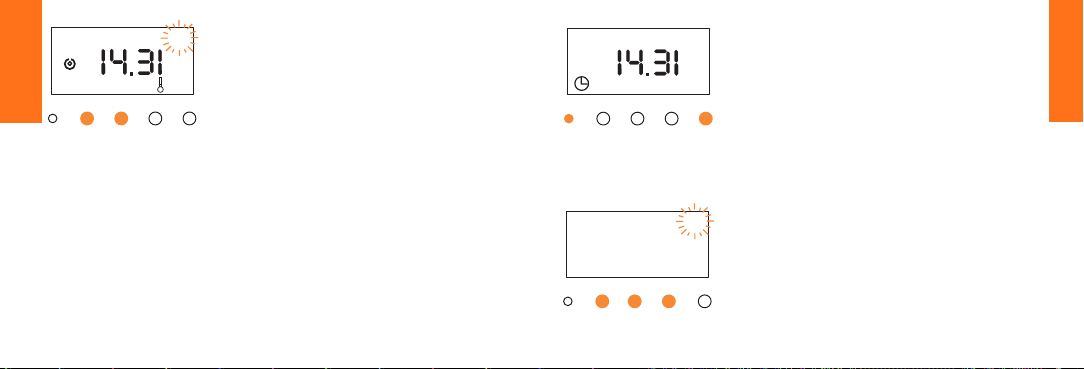
Selezionare il programma MAN premendo
S.
16
Premendo i tasti + o - appare la temperatura sul display. Impostare il valore desiderato (es. 16°C).
L’apparecchio provvederà automaticamente ad aggiornare le condizioni di funzionamento in base ai valori impostati.
DAY 1
P1
P +-MS
Programma P1
Selezionare il programma P1 premendo S.
Programmazione Tmin e Tmax
Premere P per accedere alla programmazione.
Premere S per 3 volte.
Italiano
12
Tmin
1
P1 PRG
P +-MS
All’apparire di Tmin, inserire il valore di tem-
7
peratura minimo desiderato, agendo sui tasti + o - (es. 17°C).
Premere M per memorizzare.
13
Page 9

Italiano
P1 PRG
P +-MS
Tmax
Appare la scritta Tmax.
22
Inserire il valore di temperatura massima
desiderata, agendo sui tasti + o - (es. 22°C).
Premere M per memorizzare.
L’apparecchio si pone in stato di funzionamento normale.
DAY 1
1
P2
P+ -MS
Programma P2
Selezionare il programma P2 premendo S.
16
Per l’impostazione di Tmin e Tmax, vedere
il programma P1.
14 15
Italiano
Page 10
DAY 1
1
P
Italiano
3
P +-MS
Programma P3
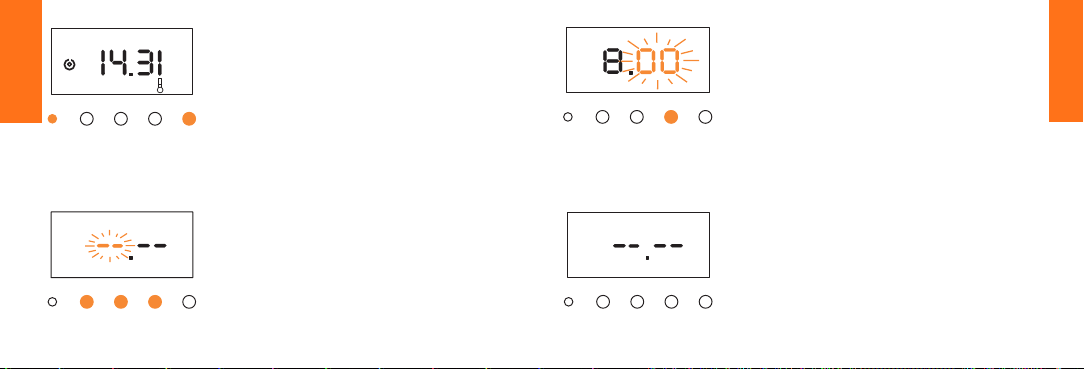
Selezionare il programma P3 premendo S.
16
Programmazione
Premere P per accedere alla programmazione. Premere S per 3 volte.
Impostare i valori di Tmin e Tmax come nei
programmi P1, P2.
ON
1
P+ -M S
DAY 1
P3 PRG
Tmax
20
Inserire con lo stesso procedimento i minuti.
Memorizzare premendo M.
Italiano
ON
1
P +-MS
DAY 1
P3 PRG
Tmax
22
16
Dopo aver inserito Tmin e Tmax premere
S. Osservare che il display indichi esattamente il giorno che si vuole programmare
(DAY1) e la funzione da inserire (ON1 =
Tmax).
Premere + per avanzare - per arretrare fino
all’ora da inserire. (Esempio ore 8). Memorizzare premendo M.
ON
1
P+ -MS
DAY 1
P3 PRG
Tmin
17
La programmazione avanza automaticamente sulla sequenza successiva.
Procedere analogamente per fissare l’ora
ed i minuti della funzione successiva (OFF1
= Tmin).
Procedere in modo analogo per fissare i
restanti orari della giornata.
17
Page 11

Per facilitare la programmazione, compilare la tabella come indicato nell’esempio:
Fasce orarie
Italiano
T max T min T max T min T max T min T max Tmin
ON1 OFF1 ON2 OFF2 ON3 OFF3 ON4 OFF4
day 1 6.00 8.30 11.00 13.00 - - 17.00 23.30
day 2
day 3
day 4
day 5
day 6
day 7
Se le commutazioni ON/OFF sono meno di 4 si possono scavalcare le
sequenze premendo S quando il menu relativo si presenta sul display.
18
NOTA BENE
Tra un ON ed il successivo OFF la temperatura di riferimento è la
Tmax.
Tra un OFF ed il successivo ON la temperatura di riferimento è la
Tmin.
Il cronotermostato provvederà a mantenere la temperatura ambiente
al valore Tmax o Tmin in base all'ora.
Ad esempio: se alla fascia oraria compresa fra le 8.30 e le 11.00
(vedere tabella), è stata abbinata una temperatura minima pari a
17°C e la temperatura ambiente scende al di sotto di tale valore,
l'impianto di riscaldamento viene acceso per ripristinare la temperatura minima impostata.
Se si desidera mantenere l'impianto di riscaldamento completamente spento nelle fasce orarie abbinate alla temperatura minima,
impostare quest'ultima ad un valore inferiore a quello che può essere raggiunto dall'ambiente.
La minima temperatura impostabile è di 7°C.
Italiano
19
Page 12
DAY 2
P3 COPY PRG
Italiano
P+ -M S
Funzione COPY
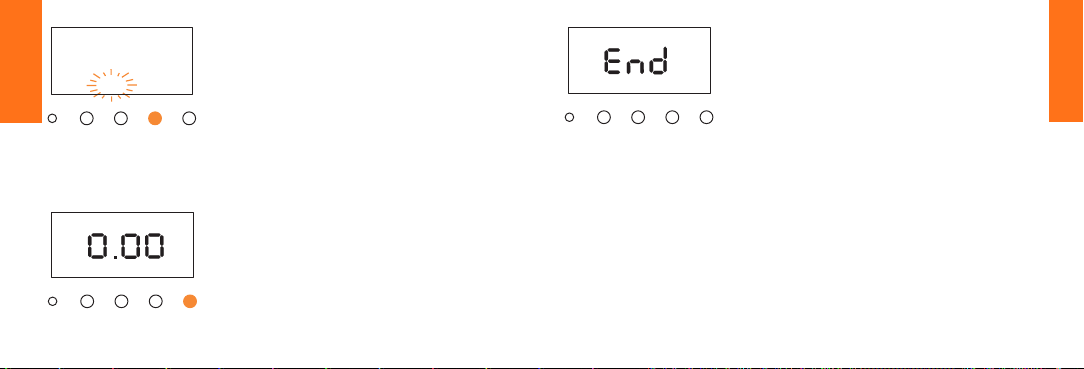
Ultimati gli inserimenti del giorno 1, si può
copiare la stessa programmazione per il
giorno 2.
In tal caso premere M quando sul display
compare “COPY”.
P
3
P+ -MS
Ultimati gli inserimenti della settimana compare la scritta End.
Dopo pochi secondi l’apparecchio si pone
in stato di funzionamento.
Italiano
ON
1
P+ -MS
DAY 2
P3 PRG
Tmax
22
20
Se non si volesse copiare la programmazione premere S.
Procedere alla programmazione come fatto per il giorno 1.
21
Page 13
DAY 1
1
P
Italiano
3
P +-MS
Verifica programmazione
inserita
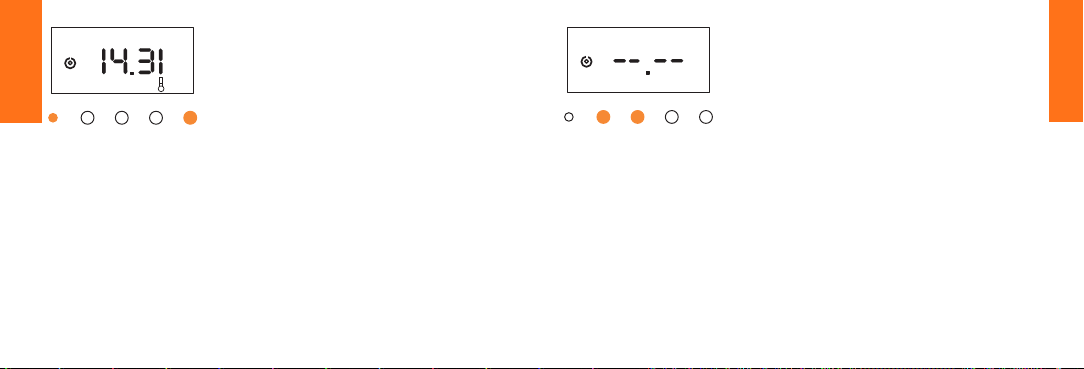
Selezionare il tipo di programma da verifi-
16
care premendo S.
Per il programma MAN: premere i tasti +
o - .
Appare la temperatura impostata sul
display.
Per gli altri programmi: premere P e poi S
ripetutamente; il display ripete in sequenza
la programmazione inserita.
E’ possibile modificare le cifre lampeggianti
con lo stesso procedimento usato per la
programmazione.
ON
1
1
P +-MS
DAY 1
P3 PRG
Tmax
22
Annullamento di un orario nel
programma P3
Selezionare l’orario da annullare premendo
P e poi S ripetutamente.
Premere contemporaneamente i tasti + e -.
Italiano
22
23
Page 14

P3 PRG
Italiano
P +-MS
Programmazione funzione
antigelo ( )
Selezionare il programma P3 premendo S.
Premere P per accedere alla programmazione.
Premere S per 5 volte.
Appare il simbolo
Premere M.
DAY 1
P3 PRG
P +-MS
P
3
P+ -MS
0
7
Premendo il tasto + si inserisce la funzione
antigelo (appare 07°C sul display).
Premendo il tasto - si disinserisce la funzione antigelo.
Premere M per memorizzare la funzione nel
DAY1 e passare automaticamente al DAY2.
Ripetere la stessa operazione per i restanti
giorni.
Al termine della programmazione appare la
scritta End.
Italiano
24
25
Page 15
Tmin
DAY 1
Tmax
1
P3
P +-MS
Italiano
26
Comando manuale
Nei programmi P1-P2-P3 è possibile comandare manualmente l’apparecchio, sen-
16
za alterare la programmazione:
- il tasto + inserisce il riferimento alla
Tmax
- il tasto - inserisce il riferimento alla
Tmin
Il comando manuale rimane inserito fino alla
prima commutazione programmata.
NOTA
Il comando manuale non è attivabile se è
stata impostata la funzione antigelo.
NOTA 2
Per il massimo comfort, il cronotermostato
compensa l'inevitabile lentezza con cui
l'ambiente può essere riscaldato.
Quando viene rilevato che la temperatura
è in diminuzione, l'impianto di riscaldamento viene inserito prima che la temperatura
possa scendere sotto il livello impostato.
Per questo motivo, è possibile che l'impianto di riscaldamento sia inserito, per brevi
periodi, anche se la temperatura misurata
è superiore a quella impostata.
27
Italiano
Page 16
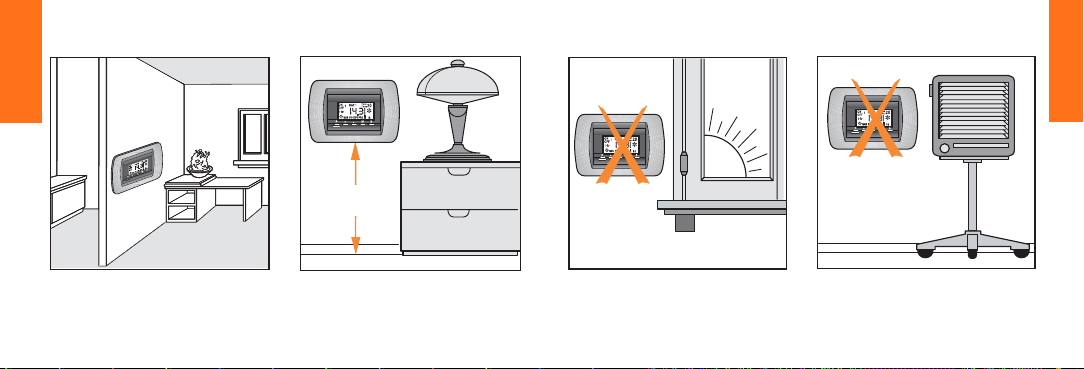
Modalità d'installazione
Italiano
ok!
ok!ok!
h. 1,5m
28 29
Italiano
Page 17
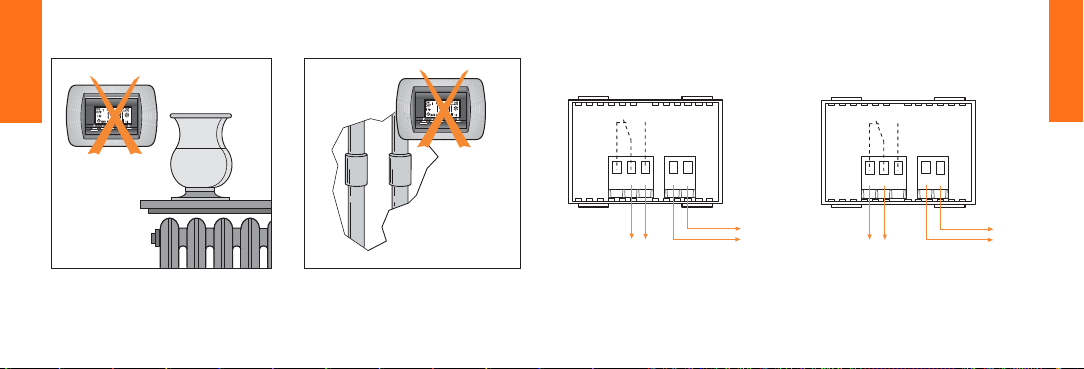
Modalità d'installazione
CNCNO L N
Schema di collegamento
CondizionamentoRiscaldamento
Italiano
30
NO L N
C
NC
N
L
caldaia, pompa di circolazione
condizionatore, ventilatore, etc.
sezione max. conduttori: 2 x 2,5 mm
Italiano
N
L
2
31
Page 18

Deutsch
!
Leggere attentamente il
paragrafo "Azzeramento
(Reset)".
Inhaltsverzeichnis
Allgemeine daten 34
Beschreibung der betriebsarten 36
Löschen (Reset) 40
Programmieren 40
Einstellen der aktuellen uhrzeit und des wochentages 42
Betriebsart MAN 44
Betriebsart P1 45
Betriebsart P2 47
Betriebsart P3 48
Programm KOPIEREN 52
Kontrolle der eingaben 54
Löschen einer schaltzeit von betriebsart P3 55
Programmieren frostchutzfunktion ( ❉ )56
Hand-betrieb (Einmal-Schaltung/Party-Schaltung) 58
Montage 60
Anschluß-Schaltbild 63
Deutsch
32
33
Page 19

Elektronische thermostat - schaltuhr
Allgemeine daten
● 4 Betriebsarten: MAN, P1, P2, P3
● frostschutzfunktion, nur in P3
● handbetrieb
●
programmieren zwei verschiedener Raumtemperaturen (Tmin und Tmax)
● ständig funktionierende Flüssigkristallanzeige von Uhrzeit,
Wochentag,Raumtemperatur,gewähltem Programm und
Schaltzustand des Geräteausganges
●
pufferbatterie, um die Daten bei Stromausfall zu retten. Dauer: 30 Tage.
● schaltabstand: 1 Minute
● temperaturbereich der Flüssigkristallanzeige: 5°C ÷ 40°C; wird
jede Minute auf den neusten Stand gebracht
Deutsch
● einstellbare TeMperaturwerte: 7°C ÷ 35°C (Skala 1 Grad Teilung)
● toleranz der Temperaturwerte: ± 0,5°C (erreicht die thermische
Leistung).
● nennspannung 220/230V~ ±10% - 50 Hz
● ausgang: potential freier Wechsler - 5A cosϕ 1- 2A cosϕ 0,5
● klemmen: 2 x 2,5 mm
34
2
DAY 1
DAY 1
Tmin
Tmax
Tmin
Tmax
20
16
20
16
ON
1
OFF
1
MAN P3 COPY PRG
P+ - MS
ON
1
OFF
1
MAN P3 COPY PRG
P+ -MS
Deutsch
35
Page 20

Beschreibung der betriebsarten
Betriebsart MAN
Das Gerät funktioniert wie ein einfacher Raumthermostat ohne
Nachtabsenkung. Nach Einstellen einer Temperatur schaltet das Gerät
die angeschlossene Heizung ein oder aus und hält so die Raumtemperatur
auf dem eingestellten Wert.
Betriebsart P1
Die Uhrzeiten und Wochentage für das Ein- und Ausschalten sind fest
programmiert und können nicht geändert werden (siehe untenstehende
Tabelle). Es müssen nur noch die gewünschten Raumtemperaturen (Tmin
und Tmax) eingestellt werden.
Betriebsart P2
Deutsch
Das Programm P2 ist Programm P1 ähnlich. Gleiches Programm für alle
Wochentage; es müssen nur die gewünschten Raumtemperaturen
eingestellt werden (Tmin und Tmax).
Betriebsart P3
Bei diesem Programm können Uhrzeiten und Wochentage für das Einund Ausschalten nach Belieben eingestellt werden; die gewünschten
Raumtemperaturen (Tmin und Tmax) müssen auch hier eingestellt werden.
Funktion Frostschutz: Symbol . Die Raumtemperatur wird ständig auf
+7°C gehalten (Temperaturwert fest eingestellt).
HINWEIS
Tmin und Tmax einstellen bedeutet, daß die Thermostat-Schaltuhr die
Raumtemperatur entsprechend der gewählten Betriebsart einstellt.
P1
day uhrzeit 23.00-5.30 5.30-8.30 8.30-11.30 11.30-14.30 14.30-17.00 17.00-23.00
1÷5 temp. T min T max T min T max T min T max
day uhrzeit 23.00-7.00 7.00-10.00 10.00-12.00 12.00-16.00 16.00-18.00 18.00-23.00
6-7 temp. T min T max T min T max T min T max
1° 2° 3° 4° 5° 6°
P2
day uhrzeit 23.00-7.00 7.00-10.00 10.00-12.00 12.00-16.00 16.00-18.00 18.00-23.00
1÷7 temp. T min T max T min T max T min T max
1° 2° 3° 4° 5° 6°
3736
Deutsch
Page 21
9
Deutsch
38
Tmin
Tmax
3
20
12 1 2
ON
1
OFF
10
DAY 1
1
MAN P3 COPY PRG
16
P+ - MS
78
56
11
4
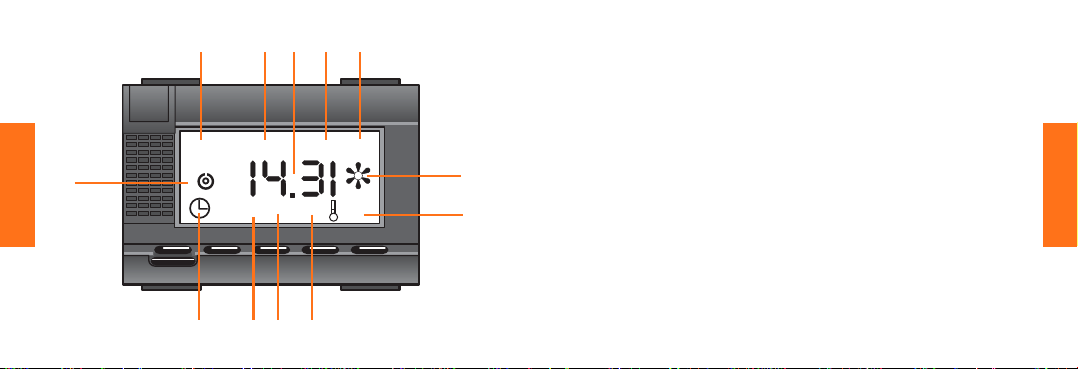
Tasten
+ zorlaufen (dauerndes Drücken
= schnelles Vorlaufen)
- zurücklaufen (dauerndes
Drücken = schnelles
Zurücklaufen)
HINWEIS
In den Betriebsarten P1, P2 und P3
wird durch Drücken der Taste +
(oder Taste - ) die Raumtemperatur
auf Tmax (oder Tmin) eingestellt.
Einmal-Schalktung/PartySchaltung.
M = speichern
P = vorbereiten zum
Programmieren
S = wahl der Betriebsart/
Vorlauf der Funktionen
P+M =löschen aller Eingaben
(Reset)
Anzeigen
1 wochentag (DAY1 = Montag;
DAY2 = Dienstag usw.)
2 einstellen der höchsten (Tmax) oder
der niedrigsten (Tmin) Temperatur für
die Programme P1, P2, P3
3 eingestellte Raumtemperatur (Sollwert)
4 raumtemperatur (Istwert) (bei Werten
über 40°C und unter 5°C blinkt die
Anzeige)
5programmieren (erscheint nicht im
Programm MAN)
6* kopieren einer Programmierung
7programmart (MAN, P1, P2, P3)
8 einstellen der Uhrzeit (stunden,
minuten, wochentag)
9 schaltzustand des Ausgangs
10 stunden - minuten
11* frostschutzfunktion eingeschaltet
12* Programmierschritt (ON1, OFF1,
ON2, OFF2 usw.)
* nur in Betriebsart P3
Deutsch
39
Page 22
DAY 1
1
P1
P +-MS
Deutsch
DAY 1
1
MAN P3 COPY PRG
P+ -MS
40
Löschen (Reset)
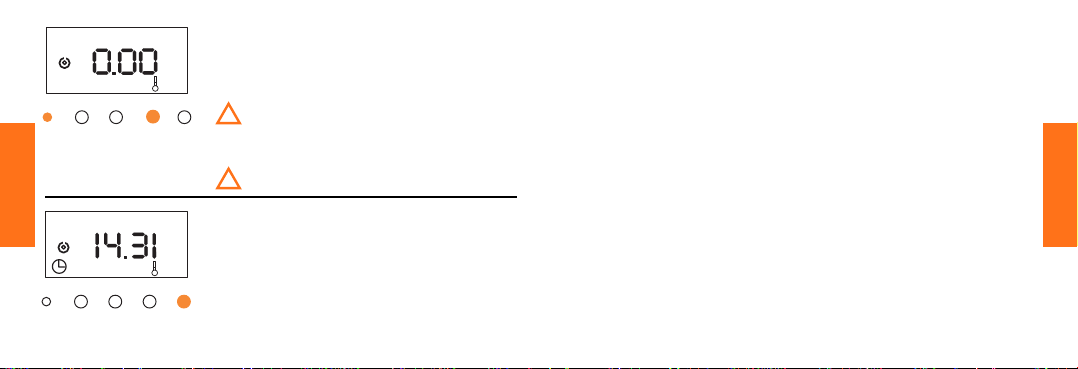
Bei der Installation, bevor eine Programmierung
vorgenommen wird, die Nullstellung durch
16
gleichzeitiges Drücken von P und M vornehmen.
Die Rückstellung muß jedesmal wiederholt
!
werden, wenn der Chronothermostat wieder in
Betrieb gesetzt wird, nachdem er längere Zeit
ohne Stromversorgung war.
Durch die Rückstellung werden alle eingestellten
!
Programme gelöscht.
Programmieren
Wahl der Betriebsart
Durch Drücken der Taste S erscheinen die vier
16
Betriebsarten, die gewählt werden können:
MAN, P1, P2, P3.
Gleiche Funktionen für alle Betriebsarten
Durch Drücken der Taste P kann in jeder
Betriebsart und zu jedem Zeitpunkt programmiert werden.
Durch Drücken der Taste S erscheinen
nacheinander alle Programmierschritte.
Die Werte können durch Drücken der Tasten oder + eingestellt oder geändert werden.
Durch Drücken der Taste M wird der
eingegebene Wert gespeichert und die
Programmierung geht automatisch zum
nächsten Schritt über.
Achtung: falls die Tasten 30 sec. lang nicht
benutzt werden, stellt sich die ThermostatSchaltuhr in die angezeigte Betriebsart zurück.
Falls die Taste P während des Programmierens
gedrückt wird, schaltet das Gerät sofort auf die
angezeigte Betriebsart zurück.
Deutsch
41
Page 23
DAY 1
P1
P+ -MS
Deutsch
DAY 1
P1
P
+-MS
Einstellen der aktuellen uhrzeit
und des wochentages
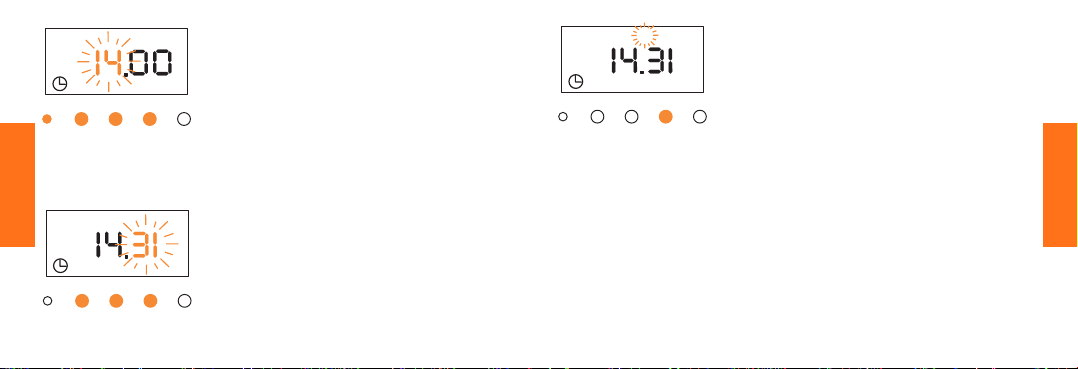
Diese Einstellung gilt als Bezug für alle
gewählten Programme.
Taste P drücken.
Die Taste + für das Vorlaufen oder - für das
Rücklaufen benutzen, bis die ge-wünschte
Stunde erscheint (z.B. 14 Uhr). Mit Taste M
speichern.
Die Minuten mit den Tasten + oder -
einstellen (z.B. 31'). Mit Taste M speichern.
DAY 1
P1
P+ -M S
Den Wochentag mit den Tasten + oder -
einstellen (DAY1 = Montag, DAY2 =
Dienstag usw.).
Mit Taste M speichern.
Jetzt sind die aktuelle Uhrzeit in Stunden
und Minuten und der Wochentag
eingestellt.
Achtung: die nächsten Program-
mierschritte hängen von der gewählten
Betriebsart ab (MAN, P1, P2, P3).
Falls die Betriebsart MAN gewählt wird,
funktioniert das Gerät nach dem Einstellen
der Uhrzeit und des Wochentages sofort in
dieser Betriebsart.
Falls die Betriebsarten P1, P2 oder P3
gewählt werden, P drücken, um die Eingabe
zu beenden.
Deutsch
42
43
Page 24
DAY 1
1
MAN
P +-MS
1
6
16
Betriebsart MAN
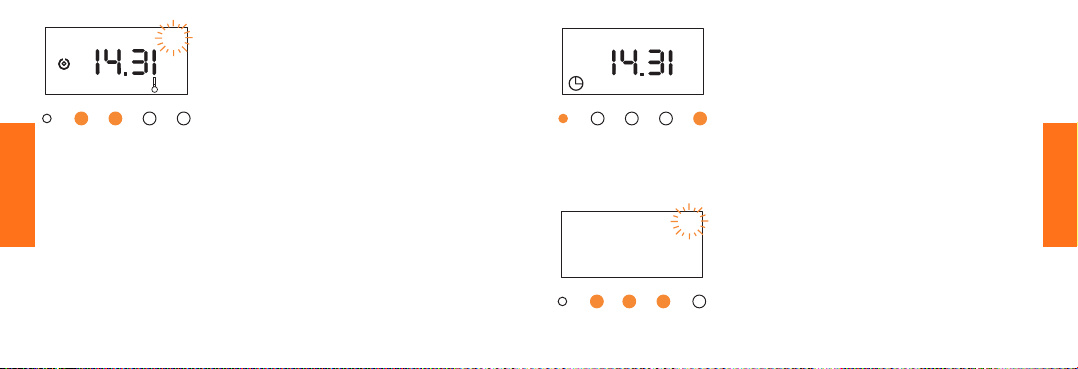
Die Betriebsart MAN wird durch Drücken
der Taste S eingestellt.
Durch Drücken der Taste + oder - wird die
Solltemperatur angezeigt.
Den gewünschten
Werteinstellen (z.B. 16°C).
Die eingestellte Temperatur wird dauernd
eingehalten.
DAY 1
P1
P +-MS
Betriebsart P1
Die Betriebsart P1 wird durch Drücken der
Taste S eingestellt.
Tmin und Tmax Engeben
Taste P für die
Programmierung drücken.
Taste S 3 mal drücken.
Deutsch
44
Tmin
1
7
P1 PRG
P +-MS
Bei Erscheinen des Wertes Tmin wird die
gewünschte Mindesttemperatur durch
Drücken der Tasten + oder - eingestellt (z.B.
17°C).
Mit Taste M speichern.
45
Deutsch
Page 25

Tmax
22
P1 PRG
P +-MS
Jetzt erscheint der Wert Tmax.
Die gewünschte Höchsttemperatur durch
Drücken der Tasten + oder - eingestellen
(z.B. 22°C).
Mit Taste M speichern.
Das Gerät funktioniert entsprechend
Betriebsart P1.
DAY 1
1
P2
P+ -MS
16
Betriebsart P2
Die Betriebsart P2 wird durch Drücken der
Taste S eingestellt.
Einstellen der Werte Tmin und Tmax, wie
für Betriebsart P1.
Deutsch
46
Deutsch
47
Page 26
DAY 1
1
P
3
P +-MS
ON
DAY 1
1
Deutsch
P3 PRG
P +-MS
48
Tmax
Betriebsart P3
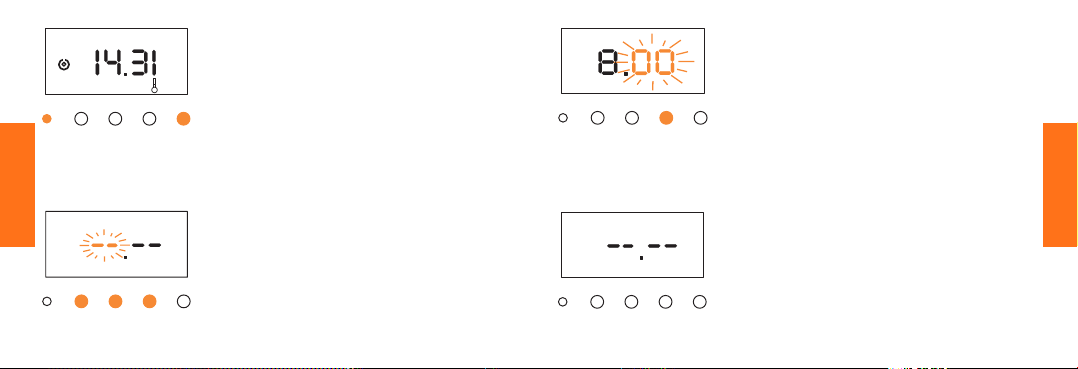
Die Betriebsart P3 wird durch Drücken der
Taste S eingestellt.
16
Programmierung
Der temperaturen und schaltzeiten.
Taste P für die Programmierung drücken.
Taste S 3 mal drücken.
Einstellen der Werte Tmin und Tmax wie für
die Betriebsarten P1 und P2.
Nach Einstellen von Tmin und Tmax Taste
22
S drücken. Kontrollieren, daß in der Anzeige
genau der Tag, der programmiert werden
soll (DAY1) und die zu programmierende
Funktion (ON1=Tmax) erscheinen.
Die Tasten + oder - drücken, bis die zu
programmierende Stunde erscheint (z.B. 8).
Mit Taste M speichern.
ON
1
P+ -M S
ON
1
P+ -MS
DAY 1
P3 PRG
DAY 1
P3 PRG
Tmax
Tmin
20
17
Die Minuten genauso einstellen.
Mit Taste M speichern.
Die Programmierung geht automatisch zum
nächsten Schritt. Die Stunden und Minuten
der nächsten Schaltzeit werden genauso
eingestellt (OFF1=Tmin).
Die weiteren Schaltzeiten des Tages werden
genauso eingestellt.
49
Deutsch
Page 27

Um das Programmieren zu erleichtern, kann die unten stehende Tabelle,
wie im Beispiel angegeben, ausgefüllt werden:
Tageszeiten
T max T min T max T min T max T min T max Tmin
ON1 OFF1 ON2 OFF2 ON3 OFF3 ON4 OFF4
day 1 6.00 8.30 11.00 13.00 - - 17.00 23.30
day 2
day 3
day 4
day 5
Deutsch
day 6
day 7
Werden weniger als 4 ON/OFF-Schaltungen benötigt, können die
unbenutzten Programmierschritte durch Drücken der Taste S
übersprungen werden, wenn das entsprechende Menü auf dem Display
erscheint.
50
ANMERKUNG
Zwischen ON und dem darauffolgenden OFF ist die
Bezugstemperatur Tmax. Zwischen OFF und dem darauffolgenden
ON ist die Bezugstemperatur Tmin.
Der Chronothermostat wird die Umgebungstemperatur je nach
Stunde auf Tmax oder Tmin halten.
Wenn z.B; für die Tageszeit zwischen 8.30 und 11.00 Uhr eine
Mindesttemperatur von 17°C eingestellt worden ist und die
Raumtemperatur unter diesen Wert absinkt, wird die Heizung
eingeschaltet, um den eingestellten Mindestwert wieder
herzustellen.
Falls die Heizung während der mit der Mindesttemperatur
verbundenen Tageszeit ganz ausgeschaltet bleiben soll, muß eine
Temperatur als Mindestwert eingestellt werden, die unter der
möglicherweise erreichten Raumtemperatur liegt. Die geringste
einstellbare Temperatur ist 7°C.
Deutsch
51
Page 28
DAY 2
P3 COPY PRG
P+ -M S
Programm KOPIEREN
Nach Beendigen der Programmierung der
Daten für den Tag DAY1, kann die
Programmierung für den 2.
Tag kopiert werden.
Taste M drücken, wenn “COPY” auf der
Anzeige erscheint.
P
3
P+ -MS
Nachdem die Schaltzeiten für eine Woche
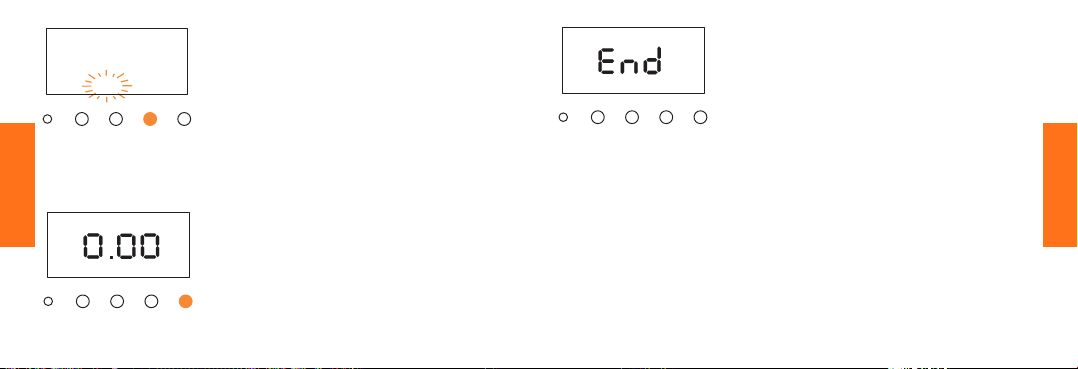
programmiert worden sind, erscheint End
in der Anzeige.
Nach wenigen Sekunden nimmt das Gerät
den Betrieb auf, die aktuelle Uhrzeit wird
angezeigt.
ON
DAY 2
1
Deutsch
P3 PRG
P+ -MS
52
Tmax
Falls die Programmierung nicht kopiert
22
werden soll, S drücken.
Den nächsten Tag programmieren, wie für
Tag 1 beschrieben.
Deutsch
53
Page 29
DAY 1
1
P
3
P +-MS
Deutsch
Kontrolle der eingaben
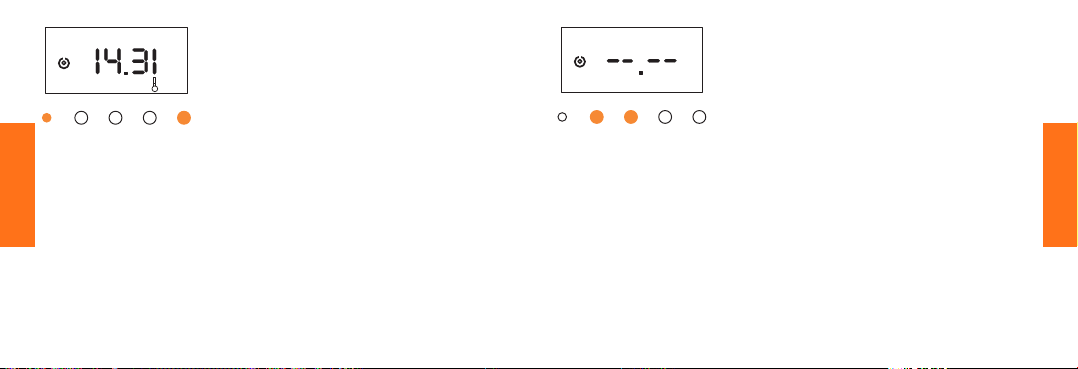
Die gewünschte Betriebsart durch Drücken
der Taste S anwählen.
16
Für die Betriebsart MAN: Taste + oder -
drücken.
In der Anzeige erscheint die eingestellte
Temperatur.
Für alle anderen Betriebsarten: erst P, dann
wiederholt S drücken; in der Anzeige
erscheinen nacheinander die Programmeingaben.
Die blinkenden Zahlen können, genau wie
bei der Programmierung, geändert werden.
ON
1
1
P +-MS
DAY 1
P3 PRG
Tmax
22
Löschen einer schaltzeit von
betriebsart P3
Die Schaltzeit, die annulliert werden soll,
muß in der Anzeige erscheinen; dazu erst
P, dann wiederholt S drücken.
Die Tasten + und - gleichzeitig drücken.
Deutsch
54
55
Page 30

P3 PRG
P +-MS
Programmierender
frostschutzfunktion ( )
Betriebsart P3 durch Drücken der Taste S
wählen.
Taste P für die Programmierung drücken.
Taste S 5 mal drücken.
Das Symbol erscheint auf der Anzeige.
Taste M drücken.
DAY 1
P3 PRG
P +-MS
0
Durch Drücken der Taste + wird die
7
Frostschutzfunktion aufgerufen (auf der
Anzeige erscheint 07°C).
Durch Drücken der Taste - wird die
Frostschutzfunktion wieder ausge-schaltet.
Mit Taste M für DAY1 speichern, die Anzeige
springt automatisch auf DAY2.
Deutsch
56
P
3
P+ -MS
Bei den nächsten Tagen genauso vorgehen.
Nach Beendigung der Programmierung
erscheint End auf der Anzeige.
57
Deutsch
Page 31
Tmin
DAY 1
Tmax
1
P3
P +-MS
Deutsch
58
Hand-betrieb (EinmalSchaltung/Party-Schaltung)
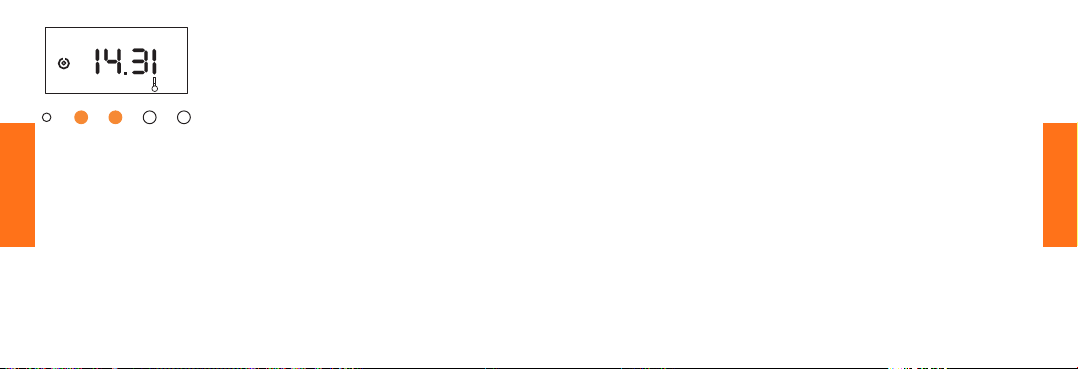
Während der Programme P1, P2 und P3
16
kann das Gerät von Hand geschaltet
werden, ohne daß sich die Programmierung ändert:
- taste + schaltet den Bezugswert
Tmax ein;
- taste - schaltet den Bezugswert
Tmin ein.
Der Hand-Betrieb bleibt bis zum ersten,
programmierten Umschalten eingeschaltet.
HINWEIS
Funktioniert nicht bei Frostschutzfunktion.
ANMERKUNG 2
Für den maximalen Komfort gleicht der
Chronothermostat das unvermeidlich
langsames Heizen eines Raumes aus.
Wenn die Temperatur sinkt, wird die
Heizanlage eingeschaltet bevor die
Temperatur unterhalb des eingestellten
Niveaus sinken kann.
Aus diesem Grund kann es vorkommen,
daß die Heizanlage für kurze Zeit
eingeschaltet wird, auch wenn die
gemessene Temperatur noch oberhalb der
eingestellten Grenze liegt.
59
Deutsch
Page 32
Montage
Deutsch
ok!
ok!ok!
h. 1,5m
Deutsch
60
61
Page 33
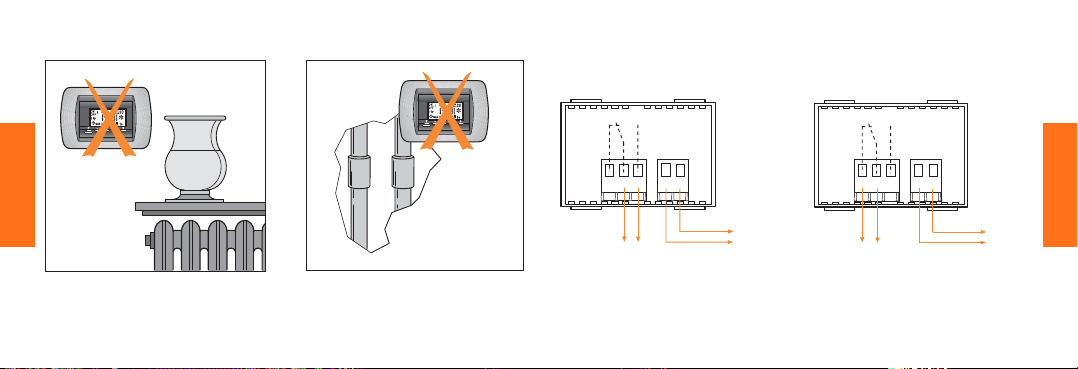
Montage
CNCNO L N
Anschluß-Schaltbild
NO L N
C
NC
KühlungHeizung
Deutsch
62
N
L
heizkessel, umlaufpumpe, usw.
max leiterquerschnitt: 2 x 2,5 mm
klimatisator, ventilator, usw.
2
N
L
Deutsch
63
Page 34

!
Sorgfältig Paragraph
"Rückstellung (Reset)"
lesen.
Table des matières
Caractéristiques generales 66
Caractéristiques des programmes 70
Retour à zero (Reset) 72
Programmation 72
Reglage de l'heure et du jour de la semaine 74
Programme MAN 76
Programme P1 77
Programme P2 79
Programme P3 80
Dupliquer le programme COPY 84
Verification des données programmées 86
Effacement d'un horaire dans le programme P3 87
Programmation fonction antigel ( ❉ )88
Operation manuelle 90
Instructions pour le montage 92
Schéma de connexion 95
64
Français
65
Français
Page 35
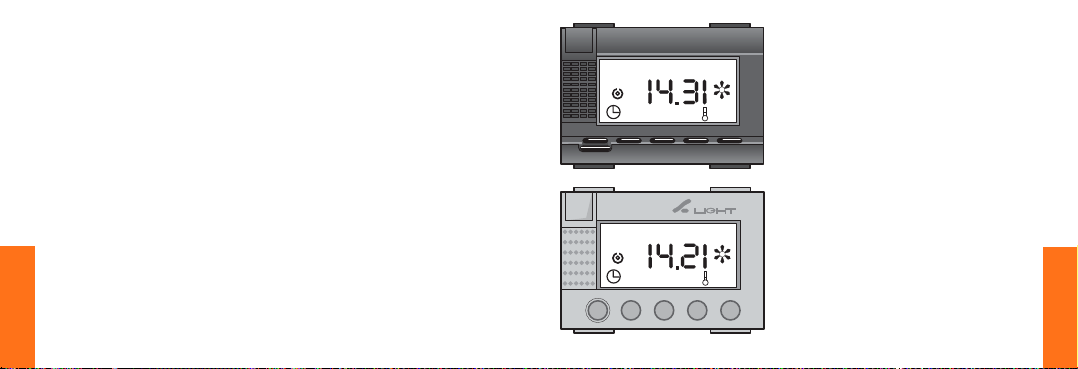
Thermostat temporisateur électronique
Caractéristiques generales
● 4 programmes: MAN, P1, P2, P3
● fonction antigel
● manoeuvre manuel
● on peut programmer deux températures de référence différentes
(Tmin e Tmax)
● indication de l’heure, jour de la semaine température ambiant, du
programme choisi, indication en service ou hors service
● batterie tampon pour sauvegarder les données en cas de coupure de
courant. Durée: 30 jours
● intervalle de temps mini entre deux opérations: 1 Minute
● intervalle de température indiqué sur l’affichage: 5°C ÷ 40°C; mise à jour à
intervalles de 1 minute
● champs de température programmable: 7°C ÷ 35°C (avec un intervalle
mini de 1 dégré )
●
tolérance sur les valeurs de la température: ± 0,5°C (le régime thermique atteint)
● tension d’alimentation 220/230V~ ±10% - 50 Hz
● contact en commutation 5A cosϕ 1 - 2 A cosϕ 0,5
● section maximale des conducteurs: 2 x 2,5 mm
66
Français
2
DAY 1
DAY 1
Tmin
Tmax
Tmin
Tmax
20
16
20
16
ON
1
OFF
1
MAN P3 COPY PRG
P+ - MS
ON
1
OFF
1
MAN P3 COPY PRG
P+ -MS
67
Français
Page 36

Caractéristiques des programmes
Programme MAN
L’appareil fonctionne comme thermostat d’ambiance normal; régulant la
température de référence l’appareil enclenche et déclenche la charge en
gardant la température ambiante près de la valeur programmée.
Programme P1
L’horaire et les jours de enclenchement et déclenchement sont fixés et
ne peuvent pas être modifiés, voir tableau suivant. On doit programmer
seulement les valeurs de la température de référence (Tmin e Tmax).
Programme P2
Mêmes caractéristiques que le programme P1, mais avec horaires et
jours établis différemment, voir tableau suivant.
Programme P3
On peut personaliser les horaires et les jour de enclenchement et
déclenchement; établir les valeurs de la température de référence (Tmin
e Tmax). En plus c’est possible programmer la fonction antigel (indiquée
avec ) qui garde la température ambiante au dessus de 7°C.
NOTE
Programmer Tmin ou Tmax signifie que, à partir du horaire
programmé, l’appareil veille à ce que dans l’ambiance s’établisse
l’une ou l’autre température programmée.
P1
day horaire 23.00-5.30 5.30-8.30 8.30-11.30 11.30-14.30 14.30-17.00 17.00-23.00
1÷5 temp. T min T max T min T max T min T max
day horaire 23.00-7.00 7.00-10.00 10.00-12.00 12.00-16.00 16.00-18.00 18.00-23.00
6-7 temp. T min T max T min T max T min T max
1° 2° 3° 4° 5° 6°
P2
day horaire 23.00-7.00 7.00-10.00 10.00-12.00 12.00-16.00 16.00-18.00 18.00-23.00
1÷7 temp. T min T max T min T max T min T max
1° 2° 3° 4° 5° 6°
68
Français
69
Français
Page 37
9
70
Français
Tmin
Tmax
3
20
12 1 2
ON
1
OFF
10
DAY 1
1
MAN P3 COPY PRG
16
P+ - MS
78
56
11
4
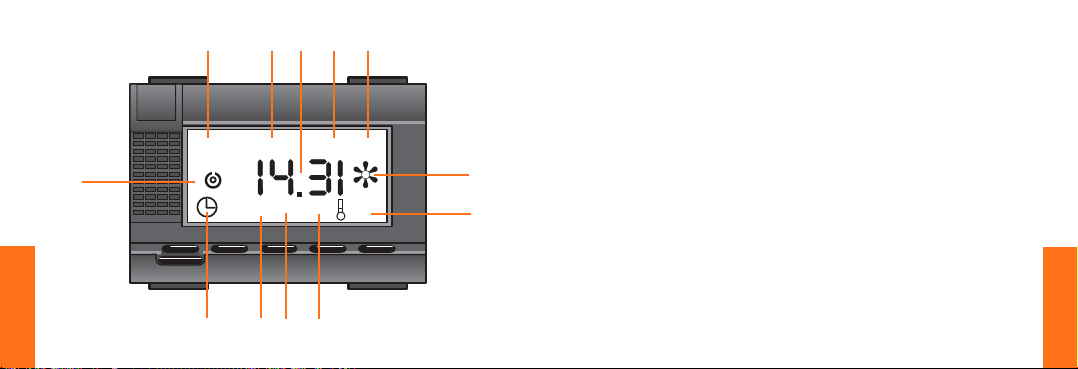
Touches
+ avancement (pression lon-
gue = avancement rapide)
- reculer (pression longue =
recul rapide)
NOTE
Avec les programmes P1, P2,
P3 en appuyant sur + en
enclenche Tmax en appuyant
sur - en enclenche Tmin
(manoeuvre manuelle)
M = mémoriser
P =préparationpour
programmer
S = choix du programme
P+M =effacer la mémoire
(reset)
Affichage
1 jour de la semaine (DAY1 = lundi,
DAY2 = mardi; etc.)
2 indication de la température max ou
dans les programmes P1, P2, P3
3 valeur de la températureprogrammée
4 valeur de la température ambiant (pour va-
leurs > 40°C e < 5°C l’indicateur clignote)
5 programmation en cours (non apparait pas
dans le programme MAN)
6* dupliquer le programme
7 programme (MAN, P1, P2, P3)
8 régulation de l’heure en cours
(heure, minutes, jour)
9 sortie ON/OFF
10 heure, minutes
11* fonction antigel enclenchée
12* tapes de programmation (ON1,OFF1,
ON2, OFF2, etc..)
* seulement pour le programme P3
mini
71
Français
Page 38
DAY 1
1
P1
P +-MS
DAY 1
1
MAN P3 COPY PRG
P+ -MS
72
Français
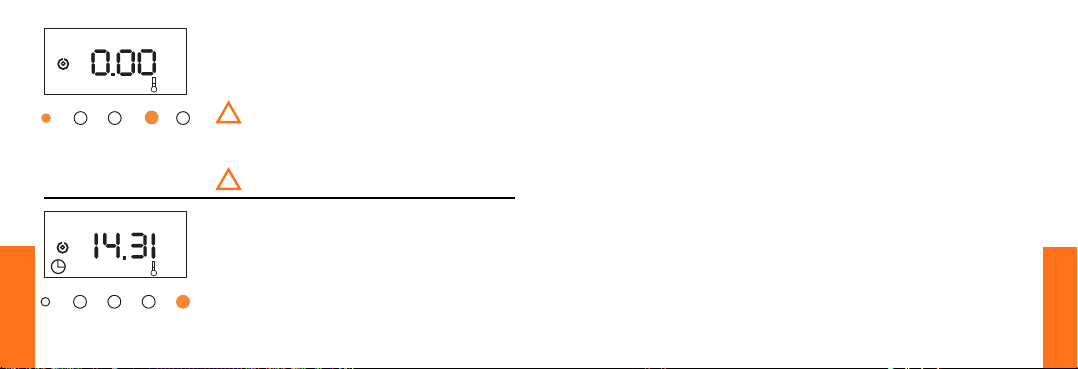
Retour à zero (Reset)
Lors de l'installation, avant de définir une
programmation, effectuer la mise à zéro, en
16
appuyant en même temps sur P et M.
La remise à zéro doit être répétée chaque fois que
!
le chronothermostat, lors d'un réallumage après
une longue période où il est resté non alimenté,
ne se remet pas à fonctionner correctement.
L'opération de reset (remettre à zéro) annule tous
!
les programmes établis.
Programmation
Choisir le programme
En appuyant sur S appairent en séquence
16
les 4
programmes applicables: MAN, P1, P2 P3.
Fonctions communes à tous les
programmes
De quelconque situation, en appuyant sur
la touche P on entre dans la programmation.
En appuyant sur la touche S passent en
séquence les étapes de lprogrammation.
introduire ou modifier les différentes valeurs
en appuyant sur les touches - o +.
Appuyer sur la touche M, la donnée réglée
est mémorisée et le menu du programme
avance automatiquement jusqu’à la
prochaine étape.
Attention: la programmation s’annule
automatiquement, lorsque 30 sec se sont
écoulées sans que les touches aient été
activées (pressées).
En appuyant sur P pendant la programmation l’appareil retourne au mode de
fonctionnement normal.
73
Français
Page 39
DAY 1
P1
P+ -MS
DAY 1
P1
P
+-MS
74
Français
Reglage de l'heure et du jour de la
semaine
Ce réglage est valable pour tous les
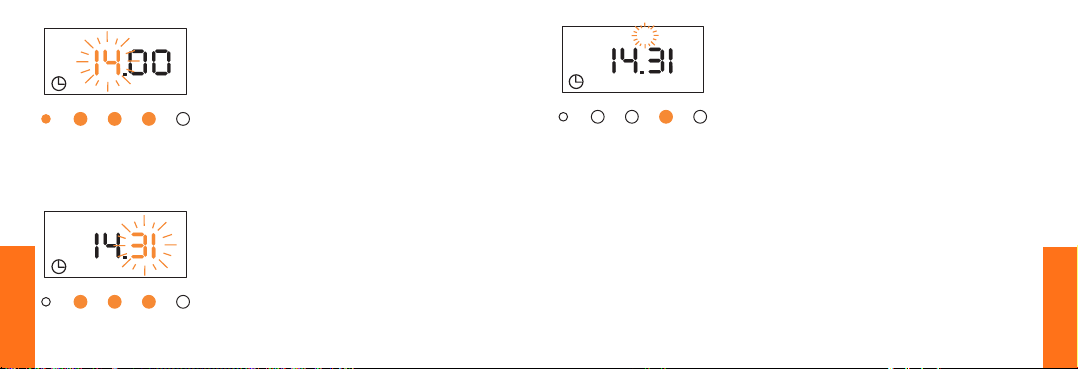
programmes. Appuyer sur la touche P pour
entrer dans la programmation.
Appuyer + pour avancer, ou sur la touche pour retourner, jusqu’à l’appa-rition de
l’heure désirée (par exemple 14). Mémoriser
avec la touche M.
Programmer les minutes avec la touche +
ou - (par exemple 31’). Mémoriser avec la
touche M.
DAY 1
P1
P+ -M S
Suivre la même procédure pour le jour de la
semaine (DAY1= lundi , DAY2= mardi etc).
Mémoriser avec la touche M.
Maintenant le thermostat est réglé sur
l’heure, les minutes et le jour de la semaine
auxquels se référent toutes les programmations.
Attention: les étapes de programmation
suivants diffèrent selon le programme choisi
(MAN, P1, P2, P3). Si le programme choisi
est MAN, à la fin du réglage de l’heure et
du jour de la semaine l’appareil va dans le
mode de fonctionnement normal. Si le
programme choisi est P1, P2 o P3, quitter
le réglage en appuyant P. Pour les étapes
de programmation suivants voir les
instructions spécifiques inhérentes au
programme indiquées dans les pages
suivantes
75
Français
Page 40
DAY 1
1
MAN
P +-MS
1
6
16
Programme MAN
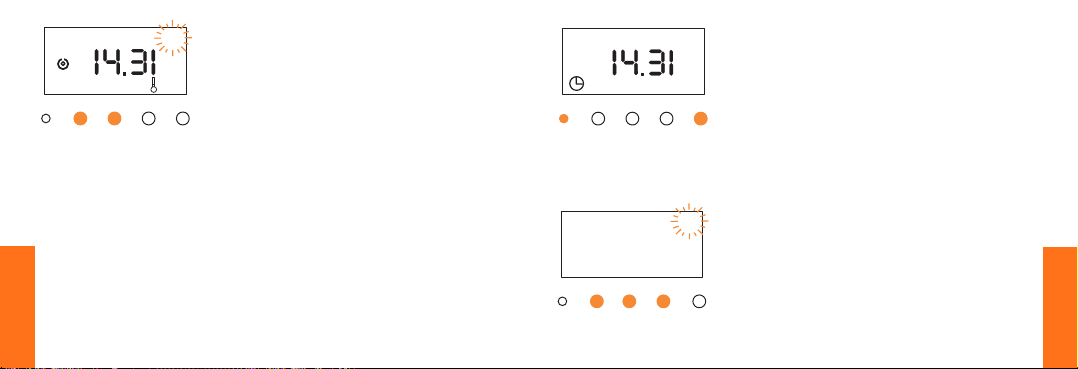
Choisir le programme MAN en appu-yant
sur la touche S.
En appuyant sur les touches + ou - apparaît
la température sur l’affichage.
Entrer la valeur désirée (par exemple. 16°C).
L’appareil effectuera automatiquement le
réglage des conditions de fonctionnement
selon les valeurs programmés.
DAY 1
P1
P +-MS
Programme P1
Choisir le programme P1 en appuyant sur
la touche S.
Programmation de Tmin e Tmax
Appuyer sur la touche P pour entrer dans
la programmation.
Appuyer sur la touche S pour 3 fois.
76
Français
Tmin
1
P1 PRG
P +-MS
Quand apparaît la valeur Tmin introduire la
7
valeur de température minimale désirée en
appuyant sur les touches + ou - (par
exemple. 17°C).
Mémoriser avec la touche M.
77
Français
Page 41

Tmax
22
P1 PRG
P +-MS
Quand apparaît la valeur Tmax introduire la
valeur de température maximale désirée en
appuyant sur les touches + ou - (par
exemple. 22°C).
Mémoriser avec la touche M.
L’appareil va dans le mode de fonctionnement normal.
DAY 1
1
P2
P+ -MS
16
Programme P2
Choisir le programme P2 en appuyant sur
la touche S.
Pour le réglage de Tmin et Tmax, voir
programme P1.
78
Français
79
Français
Page 42
DAY 1
1
P
3
P +-MS
16
Programme P3
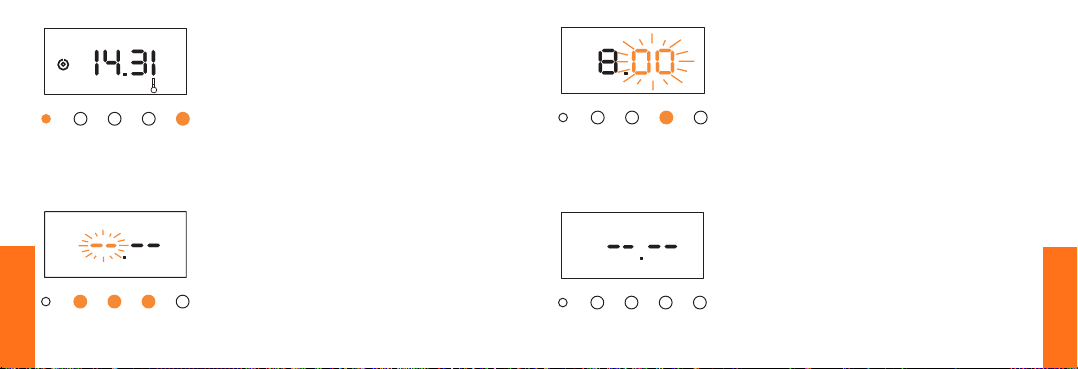
Choisir le programme P3 en appuyant sur
la touche S.
Programmation
Appuyer sur la touche P pour entrer dans la
programmation. Appuyer sur la touche S
pour 3 fois. Pour le réglage de Tmin et Tmax,
voir programme P1 et P2.
ON
1
P+ -M S
DAY 1
P3 PRG
Tmax
20
Suivre la même procédure pour
programmer les minutes.
Mémoriser avec la touche M.
ON
DAY 1
1
P3 PRG
P +-MS
80
Français
Tmax
Après l’introduction de Tmin et Tmax
22
appuyer sur la touche S. Faire attention que
l’affichage montre exactement le jour (DAY1)
qui doit être programmé (DAY1) et la fonction
choisie (ON1 = Tmax). Appuyer sur la touche
+ pour avancer et - pour reculer (Exemple 8
heures). Mémoriser avec la touche M.
ON
1
P+ -MS
DAY 1
P3 PRG
Tmin
17
Le menu passe automatiquement à l’étape
suivante.
Entrer l’heure et les minutes de la fonction
suivante selon le même principe (OFF1 =
Tmin).
Entrer les autres heures du jour selon le
même principe.
81
Français
Page 43

Pour rendre plus simple la programmation remplir le table comme
indiqué dans l’exemple:
Intervalles de temps
T max T min T max T min T max T min T max Tmin
ON1 OFF1 ON2 OFF2 ON3 OFF3 ON4 OFF4
day 1 6.00 8.30 11.00 13.00 - - 17.00 23.30
day 2
day 3
day 4
day 5
day 6
day 7
Si moins de 4 opérations ON/OFF sont requises, il est alors possible
sauter les pas du programme non utilisés en appuyant sur la touche S
quand le programme inhérent apparaît sur l’affichage.
82
Français
NOTE
Entre un ON et le OFF suivant la température de référence est la
Tmax.
Entre un OFF et le ON suivant la température de référence est la
Tmin.
Le chronothermostat pourvoira à maintenir la température ambiante
à la valeur Tmax. ou Tmin. suivant l'heure.
Par exemple: si à l'intervalle de temps compris entre 8.30 et 11.00
a été associée une température minimale de 17°C et que la
température ambiante descende au-dessous de cette valeur,
l'installation de chauffage se remet en marche pour ramener la
température à la température minimale imposée.
Si l'on désire maintenir l'installation de chauffage complètement
éteint dans les intervalles de temps associés à la température
minimale, établir cette dernière à une valeur inférieure à celle que
pourrait atteindre le milieu. La température la plus basse que l'on
peut fixer est égale à 7°C.
83
Français
Page 44
DAY 2
P3 COPY PRG
P+ -M S
Dupliquer le programme COPY
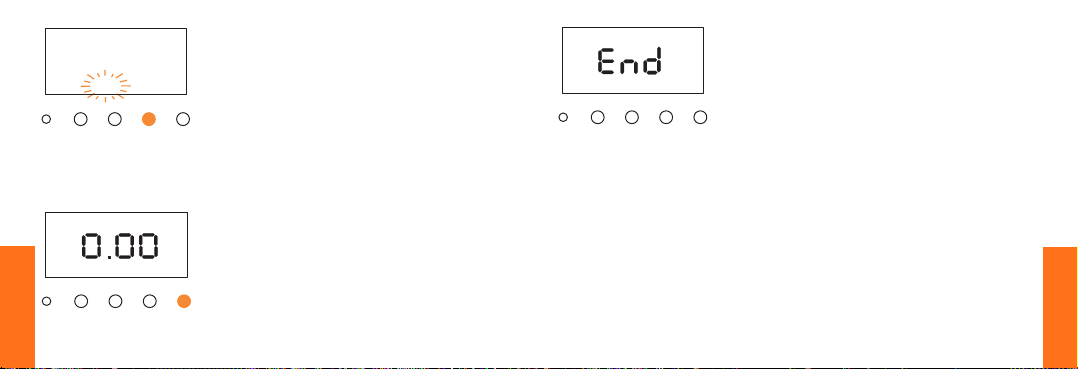
Après avoir entré les données pour le jour
1 il est possible de copier le même
programme pour le jour 2.
Pour cela, quand le signe “COPY” apparaît
sur l’affichage, appuyer sur la touche M.
P
3
P+ -MS
Quand toutes les données de la semaine
ont été mémorisées End apparaît sur
l’affichage.
Après quelques secondes le programmateur est en ordre de marche.
ON
DAY 2
1
P3 PRG
P+ -MS
84
Français
Tmax
Si la programmation ne devait pas être
22
copiée, appuyer sur la touche S.
Programmer comment pour jour 1.
85
Français
Page 45
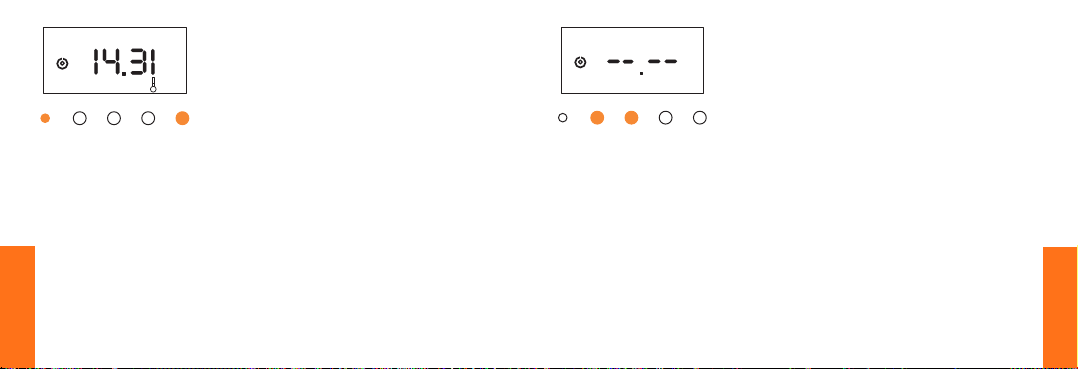
DAY 1
1
P
3
P +-MS
16
Verification des données
programmées
Choisir le programme à vérifier en appuyant
sur S.
Pour le programme MAN appuyer sur la
touche + ou -.
Sur l’affichage apparaît la température
programmée.
Pour les autres programmes appuyer sur
la touche P et puis plusieurs fois S.
L’affichage montre la séquence des
données mémorisées.
On peut modifier les chiffres clignotantes
sur l’affichage selon les étapes de
programmation décrites.
ON
1
1
P +-MS
DAY 1
P3 PRG
Tmax
22
Effacement d'un horaire dans
le programme P3
Choisir l’horaire qui doit être annulé en
appuyant sur P et puis plusieurs fois S.
Appuyer sur les touches + et - en même
temps.
86
Français
87
Français
Page 46

P3 PRG
P +-MS
Programmation fonction
antigel ( )
Choisir le programme P3 en appuyant sur
S.
Appuyer su P pour entrer dans la
programmation.
Appuyer sur la touche S pour 5 fois.
Le symbole apparaît.
Appuyer sur la touche M.
DAY 1
P3 PRG
P +-MS
P
3
P+ -MS
0
7
En appuyant sur la touche + on enclenche
la fonction antigel (sur l’affichage apparaît
07°C).
Appuyer sur la touche M pour mémoriser
cette fonction pour le jour DAY 1 et passer
automatiquement au DAY2.
Répéter la même opération pour les jours
restants.
A la fin de la programmation End apparaît
sur le affichage.
88
Français
89
Français
Page 47
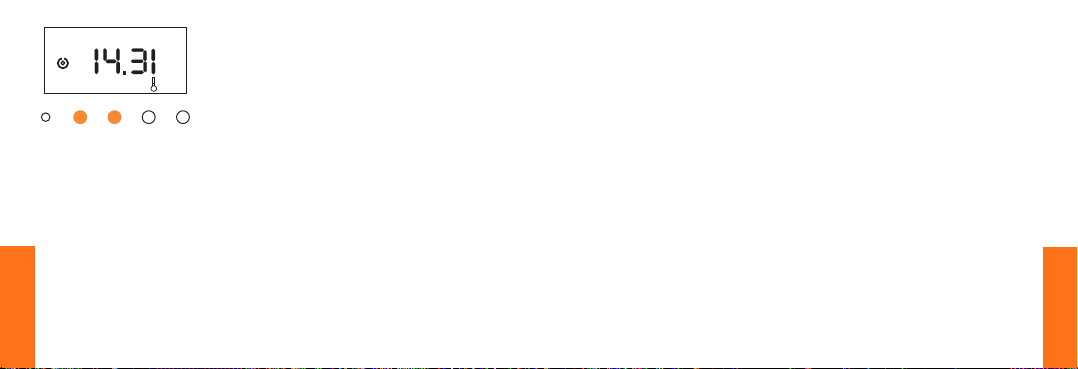
Tmin
DAY 1
Tmax
1
P3
P +-MS
90
Français
Operation manuelle
Dans le programmes P1-P2-P3 il est
possible effectuer une opération manuelle
16
du appareil sans modifier la programmation.
- la touche + enclenche la référence
à Tmax
- la touche - enclenche la référence à
Tmin.
La programmation manuelle reste active
jusqu’àu premier changement programmé.
NOTE
L'opération manuelle ne peut pas être
activé, quand la fonction antigel est en
cours.
NOTE 2
Pour un confort maximal, le
chronothermostat compense la lenteur
inévitable avec laquelle l'air ambiant est
réchauffé.
Lorsqu'il est détecté que la température
diminue, l'installation de chauffage est
insérée avant que la température ne puisse
descendre au-dessous du niveau
programmé.
Pour cette raison, il se peut que l'installation
de chauffage soit insérée, pour de brèves
périodes, même si la température mesurée
est supérieure à celle programmée.
91
Français
Page 48
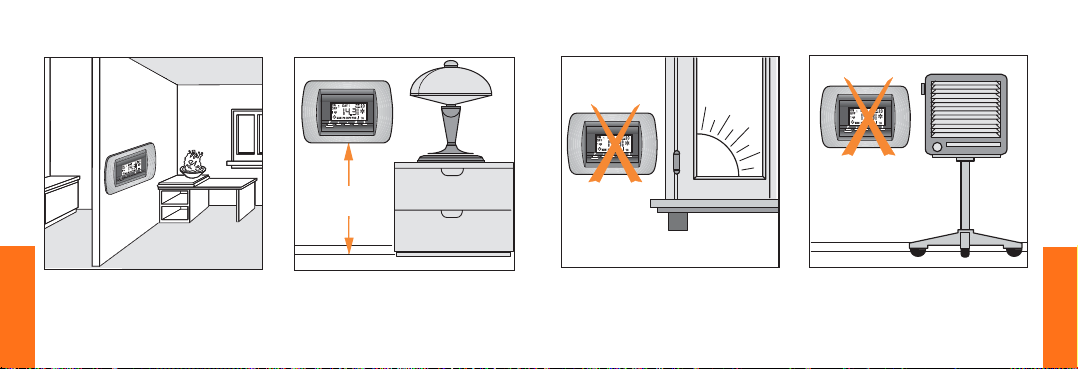
Instructions pour le montage
ok!
ok!ok!
h. 1,5m
92
Français
93
Français
Page 49
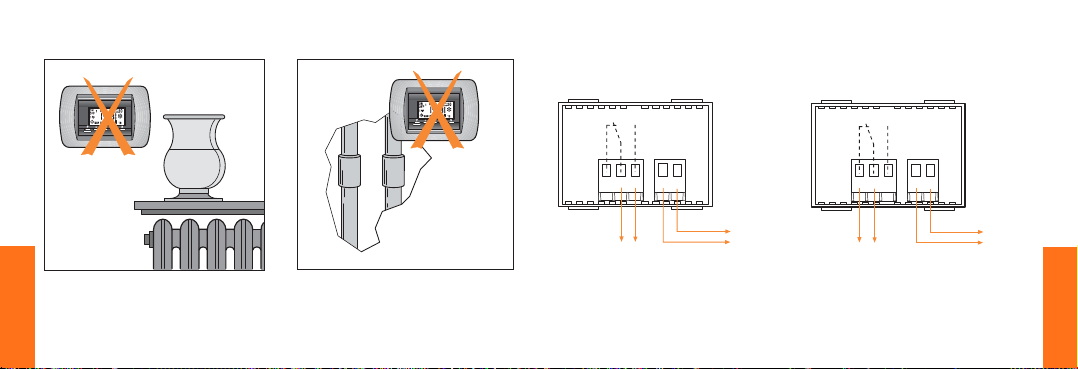
Instructions pour le montage
Schéma de connexion
Chauffage
NO L N
C
NC
Refraichissement
CNCNO L N
94
Français
N
L
chaudière, pompe de circulation etc.
climatiseur, ventilateur etc.
section max des conducteurs: 2 x 2,5 mm
N
L
2
95
Français
Page 50

English
!
Lire attentivement le
paragraphe "Mise à zéro
(Reset)".
Contents
General characteristics 98
Features of the programs 100
Delete (Reset) 104
Programming 104
Setting of the time and the week day 106
Program MAN 108
Program P1 109
Program P2 111
Program P3 112
Copying function 116
Check of the programmed data 118
To delete a time setting in program P3 119
Programming of the frost protection ( ❉ ) 120
Manual operation 122
Mounting instructions 124
Wiring diagram 127
English
96
97
Page 51

Electronic timing thermostat
General characteristics
● 4 programs: MAN, P1, P2, P3
● frost protection ( only with P3 )
English
● manual operation
● it is possible to program two different reference temperature values
(Tmin and Tmax)
● indication of the time , day of the week, the ambient temperature, the
program chosen, and the on or off position of the load
● f
loating battery for saving data in case of power failure. Duration: 30 days.
● min time interval between two operations: 1 Minute
●
temperature field displayed: 5°C ÷ 40°C; updating with 1 minute intervals.
● adjustable temperature values 7°C ÷ 35°C (with a min interval of one
degree)
● tolerance for the temperature values: ± 0,5°C (once thermal state is
reached).
● voltage 220/230V~ ±10% - 50 Hz
● changeover contact 5A cosϕ 1; 2 A cosϕ 0,5, voltage free
● max wire cross-sectional area: 2 x 2,5 mm
2
ON
1
OFF
1
MAN P3 COPY PRG
P+ -MS
ON
1
OFF
1
MAN P3 COPY PRG
P+ -MS
98 99
DAY 1
DAY 1
Tmin
Tmax
Tmin
Tmax
20
16
20
16
English
Page 52

Features of the programs
Program MAN
The device works as a traditional ambient thermostat; setting the reference
temperature the thermostat switches on or off the controlled load keeping
English
the ambient temperature about the chosen value
Program P1
Time and day settings are already programmed, and cannot be modified;
see the following table. It is only necessary to set the reference
temperatures (Tmin and Tmax).
Program P2
This program has the same features as P1, but with different time and
day settings, see following table.
Program P3
It is possible to customize, the time and day settings; programm the
values of the reference temperatures (Tmin and Tmax).
Moreover it is possible to activate the frost protection (indicated with
) which keeps the ambient temperature over 7°C.
NOTE
To program Tmin or Tmax means that starting from the programmed
time the thermostat operates so that the ambient assumes the
programmed reference temperature value.
P1
day time 23.00-5.30 5.30-8.30 8.30-11.30 11.30-14.30 14.30-17.00 17.00-23.00
1÷5 temp. T min T max T min T max T min T max
day time 23.00-7.00 7.00-10.00 10.00-12.00 12.00-16.00 16.00-18.00 18.00-23.00
6-7 temp. T min T max T min T max T min T max
1° 2° 3° 4° 5° 6°
P2
day time 23.00-7.00 7.00-10.00 10.00-12.00 12.00-16.00 16.00-18.00 18.00-23.00
1÷7 temp. T min T max T min T max T min T max
1° 2° 3° 4° 5° 6°
English
100
101
Page 53
English
102
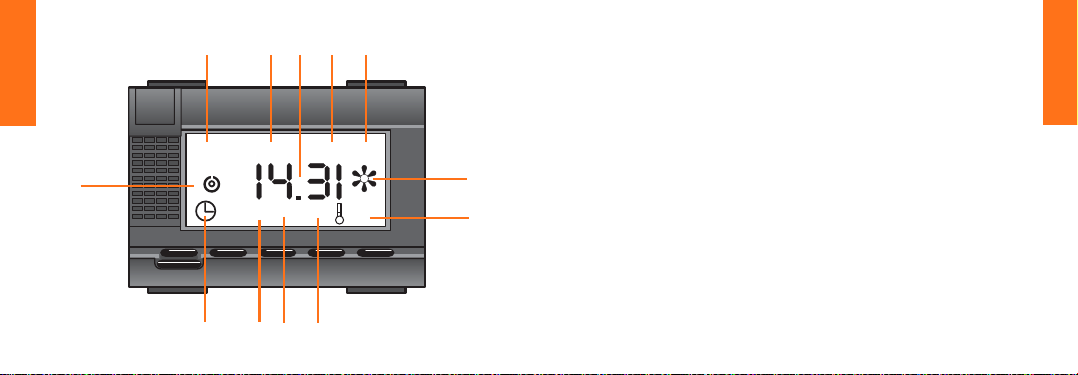
Keys
+ advance (long pressure =
quick advancing)
- downward (long pressure =
quick reverting)
NOTE
With programs P1, P2, P3
pressing the key +, Tmax is
activated, pressing the key Tmin is activated (Manual
operation).
M = store
P =preparation for program-
ming
S = selection of program
P+M = delete memory (reset)
Tmin
Tmax
3
20
16
11
4
12 1 2
ON
1
9
OFF
1
10
DAY 1
MAN P3 COPY PRG
P+ - MS
78
56
Display indications
1 day of the week (DAY 1 = Monday;
DAY 2 = Tuesday etc.
2 indication of the max or min tempe
rature with the programs P1, P2, P3
3 value of the programmed temperature
4 value of the ambient temperature
(for the values > 40°C and < 5°C
flashing indication)
5programming in course (does not
appear with the program MAN)
6* copying program
7program selected (MAN,P1,P2, P3)
8 setting of time in course
9 exit ON/OFF
10 hour- minutes
11* frost protection activated
12* programming step (ON1, OFF1,
ON2, OFF2 etc.)
* only with program P3
103
English
Page 54
DAY 1
1
English
P1
P +-MS
DAY 1
1
MAN P3 COPY PRG
P+ -MS
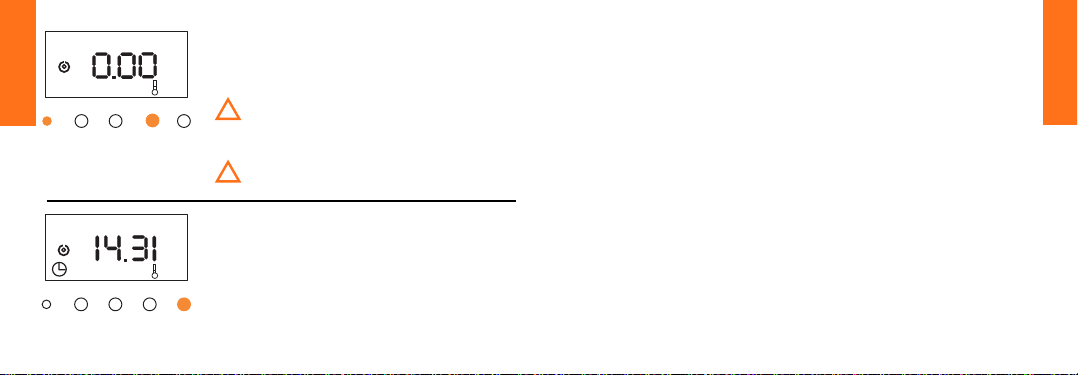
Delete (Reset)
Upon installation, before entering any setting,
reset by pressing P and M at the same time.
16
The chronothermostat must be reset every time
!
it doesn't start to work properly when turned on
after a long period of time during which it in not
energized.
!
Resetting cancels all previous settings.
Programming
Selection of the program
The four programs to be set: MAN, P1, P2
16
P3 appear subsequently pressing the key
S.
Functions applying to all programs
Pressing P gives access to the
programming.
The sequence of the program steps
appears pressing S.
Enter or modify the different values pressing
the keys - or +.
By pressing the key M the set data is
stored, and the program advances
automatically to the next step.
Attention: the programming is automatically
annulled if the keys are not operated within
30".
If P is pressed during the programming, the
thermostat returns to normal operating
conditions.
English
104
105
Page 55
DAY 1
English
P1
P+ -MS
DAY 1
P1
P
+-MS
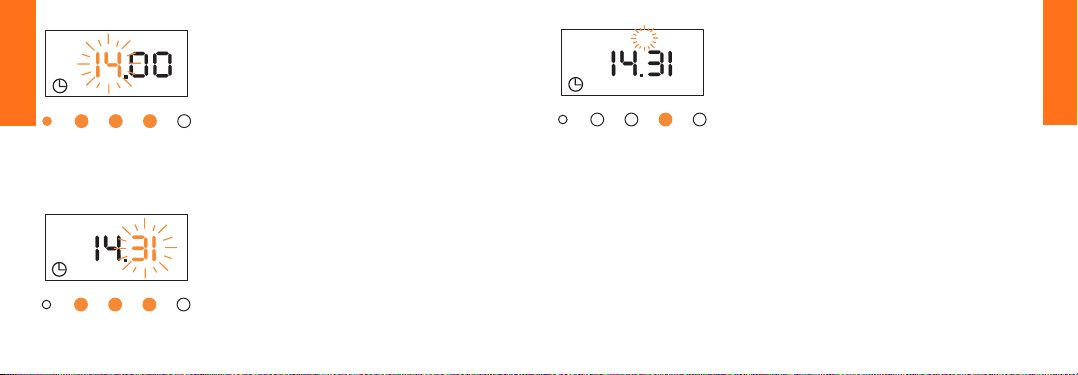
Setting of the time and the week
day
This setting applies for all programs.
Press P to enter the programming.
Press the key + to advance or the key - to
go back, until the requested time appears
(for instance 14 o’clock) store with the key
M.
Follow the same procedure to set the
minutes (for instance 31"). Store with the
key M.
DAY 1
P1
P+ -M S
Follow the same procedure to set the day
of the week (DAY1= Monday, DAY 2 =
Tuesday etc).
Store with the key M.
Now the time is set on the actual hour,
minutes and days of the week referring to
the programming.
Attention: the following programming steps
differ according to the program selected
(MAN, P1, P2, P3).
If the selected program is MAN, at the end
of the time and day setting the thermostat
assumes the normal working conditions.
If the selected program is P1, P2 or P3,
press the key P to quit the setting.
For the subsequent program steps follow
the inherent instructions hereafter specified.
English
106
107
Page 56
DAY 1
1
MAN
English
P +-MS
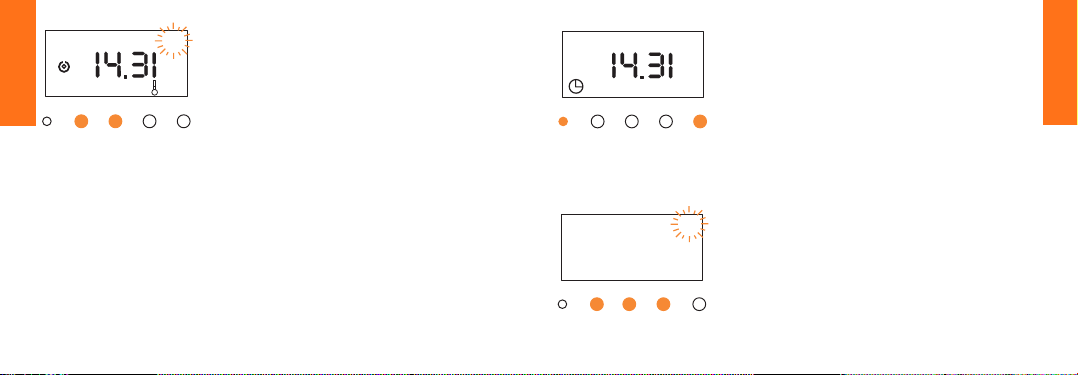
Program MAN
1
6
Select the program MAN pressing S.
The temperature appears on the display
16
pressing the keys + o -. Set the requested
value (e.g. 16°C).
The thermostat will adjust automatically the
operating conditions according to the
programmed values.
DAY 1
P1
P +-MS
Program P1
Select the program P1 pressing S.
Programming of Tmin and Tmax
Press P to enter the programming.
Press S 3 times.
English
108
Tmin
1
P1 PRG
P +-MS
When the display shows Tmin, set the
7
requested minimum temperature value
pressing the keys + or - (e.g. 17°C).
Store with the key M.
109
Page 57

English
P1 PRG
P +-MS
Tmax
When the display shows Tmax, set the
22
requested maximum temperature value
pressing the keys + or - (e.g. 22°C).
Store with the key M.
The thermostat assumes the normal
operating conditions.
DAY 1
1
P2
P+ -MS
16
Program P2
Select the program P2 pressing S.
For the setting of Tmin and Tmax see
program P1.
English
110
111
Page 58
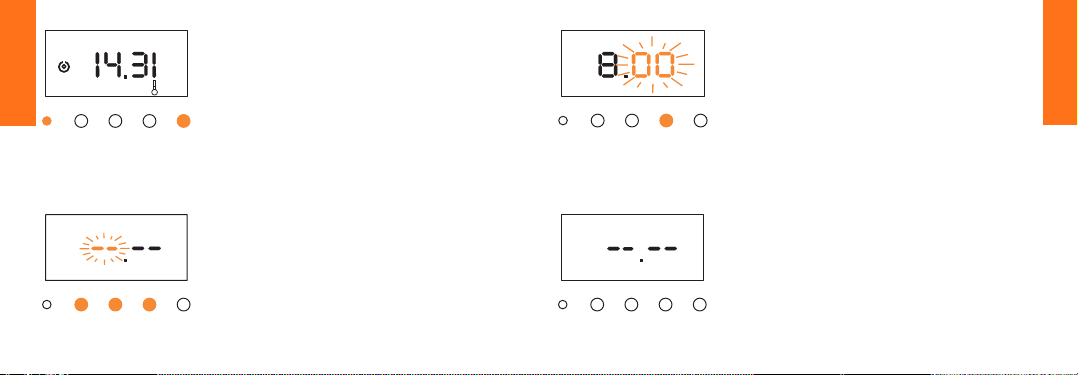
DAY 1
1
P
English
3
P +-MS
Program P3
Select the program P3 pressing S.
16
Programming
Press P to enter the programming.
Press 3 times S .
For the setting of Tmin and Tmax see
program P1 and P2.
ON
1
P+ -M S
DAY 1
P3 PRG
Tmax
20
Use the same procedure to program the
minutes.
Store with key M.
English
ON
1
P +-MS
DAY 1
P3 PRG
Tmax
22
112
After entering Tmin e Tmax press S.
Verify that the display indicates exactly the
day to be programmed (DAY 1) and the
function chosen (ON1 = Tmax).
Press + to advance and - to go back
(example 8 o’clock)
Store with key M.
ON
1
P+ -MS
DAY 1
P3 PRG
Tmin
17
The menu passes automatically to the following step.
Follow the same procedure to set the hour
and the minutes of the following function
(OFF1 = Tmin).
Follow the same procedure for the
remaining time settings.
113
Page 59

In order to facilitate the programming fill the table as indicated in
the example:
Time intervals
English
T max T min T max T min T max T min T max Tmin
ON1 OFF1 ON2 OFF2 ON3 OFF3 ON4 OFF4
day 1 6.00 8.30 11.00 13.00 - - 17.00 23.30
day 2
day 3
day 4
day 5
day 6
day 7
If less then 4 ON/OFF operations per day are required, it is possible
to jump the not used program steps, by pressing the key S several
times until the desired menu appears on the display.
114
NOTE
Between an ON and the subsequent OFF the reference temperature is Tmax.
Between an OFF and the subsequent ON the reference temperature is Tmin.
The chronothermostat will keep room temperature at the value of
Tmax or Tmin depending on the hour.
For example: if the time interval corresponding to 8.30 - 11.00 a.m.
is set on a minimum temperature of 17°C and should the room temperature drop below this value, the heating system is turned on
in order to go back to the minimum set value.
If the heating system has to be kept totally off in the time intervals
set at the minimum temperature, the latter has to be set at a lower
value than the one that may be reached in the room.
The lowest minimum temperature that may be set is 7°C.ture la
plus basse que l'on peut fixer est égale à 7°C.
115
English
Page 60
DAY 2
P3 COPY PRG
English
P+ -M S
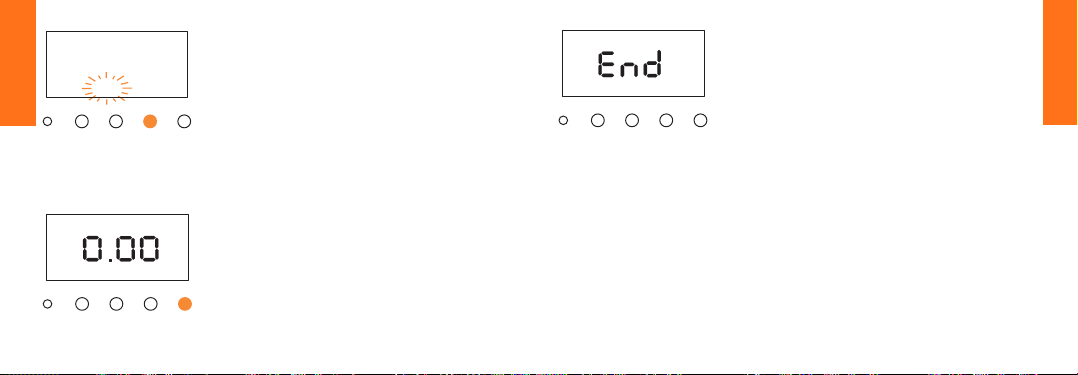
Copying function
After programming the first day, the same
program may be copied for the second day.
In this case press M when “COPY” appears
on the display.
P
3
P+ -MS
When all data for the week have been stored
appears End.
A few seconds later the thermostat retuns
in operating condition.
English
ON
1
P+ -MS
DAY 2
P3 PRG
Tmax
22
116
If the program is not to be copied, press S.
Program the following days as for day 1.
117
Page 61
DAY 1
1
P
English
3
P +-MS
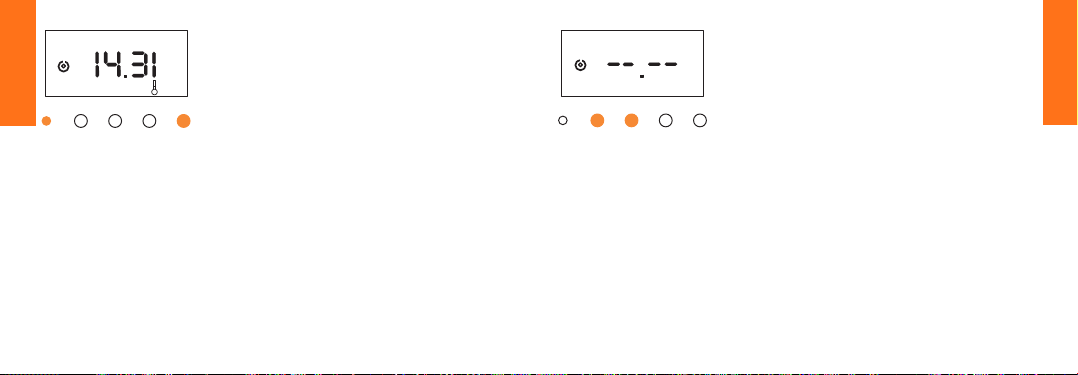
Check of the programmed data
Select the program to be checked pressing
S.
16
For the program MAN: press the keys + or
-.
The display shows the programmed temperature.
For the other programs press P and then
several times S; the display repeats the
sequence of the stored data.
It is possible to change the flashing
numbers appearing on the display
according to the procedure used for
programming.
ON
1
1
P +-MS
DAY 1
P3 PRG
Tmax
22
To delete a time setting in
program P3
Select the time setting to be deleted
pressing P and then several times S.
To delete press keys + and - simultaneously.
English
118
119
Page 62

P3 PRG
English
P +-MS
Programming of the frost
protection ( )
Select the program P3 pressing S.
Press P to enter the programming
Press S 5 times.
The symbol
Press M.
appears on the display.
DAY 1
P3 PRG
P +-MS
P
3
P+ -MS
0
7
Pressing the key + the frost protection is
activated (it appears 07°C on the display).
Pressing the key - the frost protection is
turned off.
Press M to store the function for DAY1 and
pass automatically to DAY2.
Repeat the same procedure for the
remaining days.
At the end of the programming appears the
word End.
English
120
121
Page 63
Tmin
DAY 1
Tmax
1
P3
P +-MS
English
122
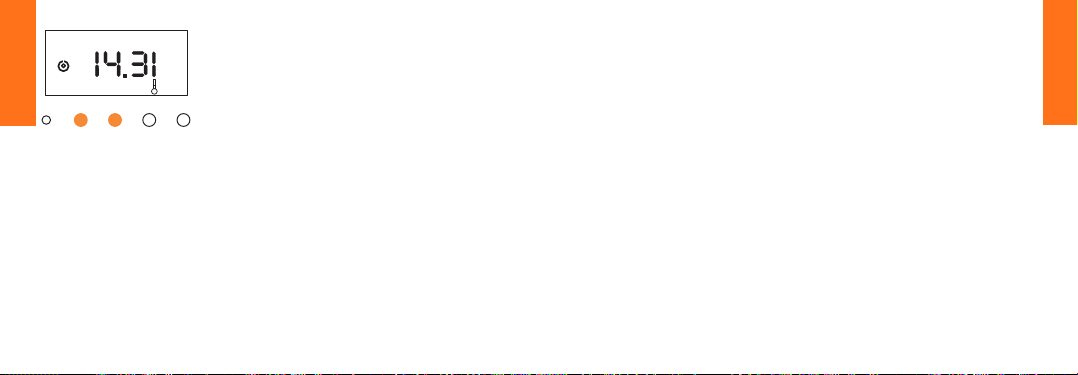
Manual operation
With the programs P1-P2-P3 it is possible
to operate manually the thermostat without
16
changing the programming.
- the key + activates the programmed
reference value Tmax.
- the key - activates the programmed
reference value Tmin.
The manual command lasts till the next
programmed operation occurs.
NOTE
When the frost protection is activated, it is
not possible to use the manual operation.
NOTE 2
For best comfort, the chronothermostat
makes up for the unavoidable slowness in
heating the room.
When a decrease in temperature is
detected, the heating system is turned on
before temperature drops below the set
level.
For this reason, it is possible that the
heating system is turned on, for short
periods of time, even if the measured temperature is higher than the set one.
123
English
Page 64
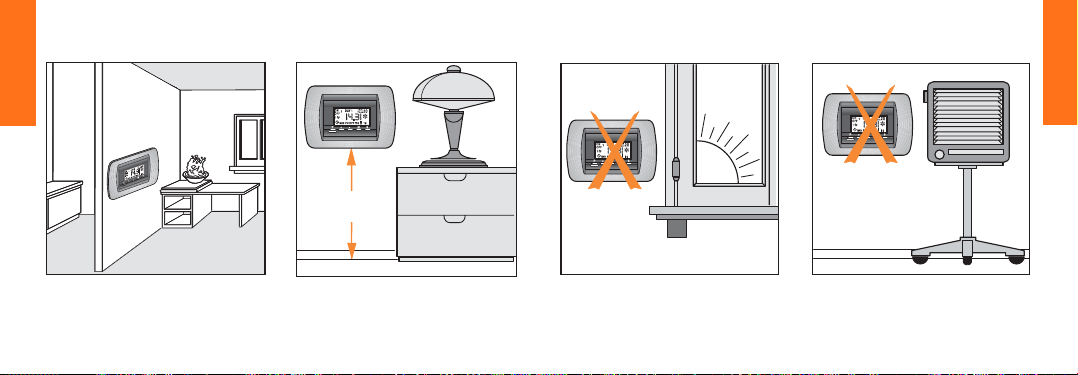
Mounting instructions
English
124
ok!
ok!ok!
English
h. 1,5m
125
Page 65
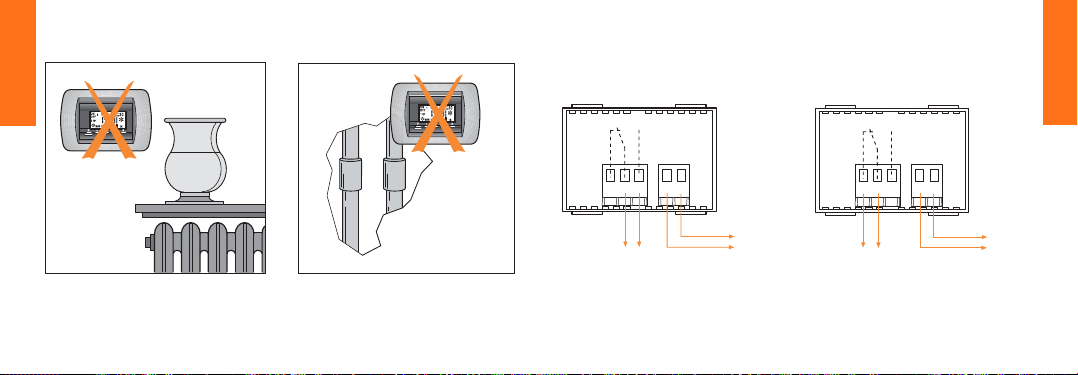
Mounting instructions
CNCNO L N
Wiring diagram
Heating
Cooling
English
126
NO L N
C
NC
N
L
boiler, circulation pump etc.
air-conditioner, fan etc.
max wire cross-sectional area: 2 x 2,5 mm
English
N
L
2
127
Page 66

Español
!
Carefully read paragraph
"Reset".
Indice
Caracteristicas generales 130
Caracteristicas de los programas 132
Puesta a cero (Reset) 136
Programación 136
Puesta a punto de la hora y dia de la semana 138
Programa MAN 140
Programa P1 141
Programa P2 143
Programa 3 144
Función COPY 148
Comprobación programación efectuada 150
Anulación de un horario en el programa P3 151
Programación función anticongelante ( ❉ ) 152
Mando manual 154
Consejos de instalación 156
Esquema de connexión 159
Español
128
129
Page 67

Cronotermostato electronico
Caracteristicas generales
● 4 tipos de programas: MAN, P1, P2 y P3
● función anticongelante
● mando manual
● posibilidad de programar dos temperaturas de referencia diferentes
(Tmin y Tmax)
● indicación de la hora, el día de la semana, de la temperatura ambiente,
del tipo de programa seleccionado y del funcionamiento del aparato
conectado
●
batería-tampón para guardar los datos si falta corriente. Duración: 30 días
● tiempo mín. entre una intervención programada y la sucesiva:1minuto
● banda de temperatura indicada en el display: 5°C ÷ 40°C; actualización
Español
en intervalos de 1 minuto.
● valores de temp. programables: 7°C ÷ 35°C (con un intervalo min 1°C)
● precisión en los valores de la temperatura: ± 0,5°C (se ha alcanzado el
régimen térmico).
● tensión de empleo de 220/230V~ ±10% - 50 Hz
● contacto en conmutación libre de tensión: 5 A cosϕ 1 - 2A cosϕ 0,5
● sección max. conductores: 2 x 2,5 mm
2
ON
1
OFF
1
MAN P3 COPY PRG
P+ - MS
ON
1
OFF
1
MAN P3 COPY PRG
P+ -MS
130 131
DAY 1
DAY 1
Tmin
Tmax
Tmin
Tmax
20
16
20
16
Español
Page 68

Caracteristicas de los programas
Programa MAN
El aparato funciona como un sencillo termostato de ambiente;
programando la temperatura, el aparato enciende o apaga el sistema,
manteniendo la temperatura ambiente seleccionada.
Programa P1
Contiene yá prefijados y sin posibilidad de modificación, los horarios y
los días de encendido o apagado, tal y como aparecen en la tabla adjunta.
Deben programarse los valores de las temperaturas de referencia (Tmin
y Tmax).
Programa P2
Tiene las mismas características del programa P1, pero con los horarios
Español
y los días fijados de forma diferente, ver tabla adjunta.
Programa P3
Permite personalizar los horarios y los días de encendido y apagado;
programar los valores de las temperaturas de referencia (Tmin y Tmax).
Puede programarse también la función anticongelante (indicada con
), que mantiene la temperatura ambiente por encima de 7°C.
132
NOTE
Programar Tmin o Tmax supone que, a partir del horario fijado, el
aparato se pondrá en marcha para establecer en el ambiente la
temperatura programada.
P1
day horario 23.00-5.30 5.30-8.30 8.30-11.30 11.30-14.30 14.30-17.00 17.00-23.00
1÷5 temp. T min T max T min T max T min T max
day horario 23.00-7.00 7.00-10.00 10.00-12.00 12.00-16.00 16.00-18.00 18.00-23.00
6-7 temp. T min T max T min T max T min T max
1° 2° 3° 4° 5° 6°
P2
day horario 23.00-7.00 7.00-10.00 10.00-12.00 12.00-16.00 16.00-18.00 18.00-23.00
1÷7 temp. T min T max T min T max T min T max
1° 2° 3° 4° 5° 6°
133
Español
Page 69
Español
134
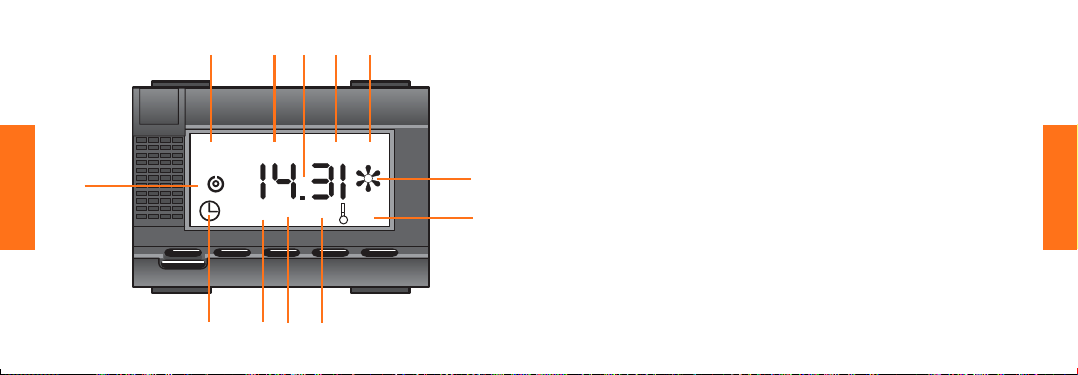
Teclas
+ avance (presión continua =
avance rápido)
- retroceso (presión continua =
retroceso rápido)
NOTA
En los programas P1,P2 y P3,
apretando el pulsador +, se introduce la Tmax, apretando el
pulsador -, se introduce la Tmin
(mando manual).
M = memorización
P =preparado para la progra-
mación
S = selección de programas
P+M =puesta a cero del aparato
(reset)
Indicadores
1 día de la semana (DAY1 =
lunes, DAY2 = martes, etc.)
Tmin
Tmax
3
20
16
11
4
12 1 2
ON
1
9
OFF
1
10
DAY 1
MAN P3 COPY PRG
P+ - MS
78
56
2 indicador de la temperatura máxima o
mínima en los programas P1, P2 y P3
3 valor de la temperatura programado
4 valor de la temperatura ambiente
(para valores > 40°C y < 5° C el indicador
parpadea intermitente)
5programación en curso (no aparece en
el programa MAN)
6* copiado de la programación
7 tipo de programa (MAN, P1, P2 o P3)
8regulación horaria en curso (horas,
minutos, días)
9 situación de funcionamiento en la salida
10 hora-minutos
11* unción anticongelante programada
12*
fase de programación (ON1,
OFF1, ON2, OFF2, etc.)
* únicamente para el programa P3
135
Español
Page 70
DAY 1
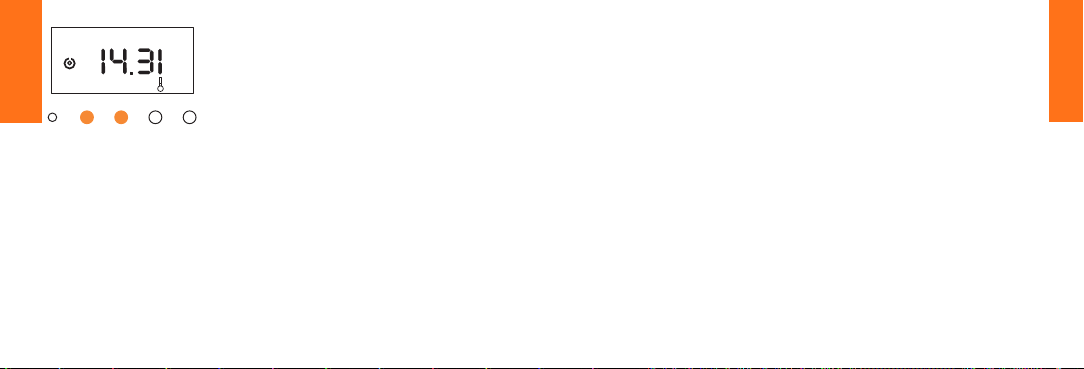
1
P1
P +-MS
Español
DAY 1
1
MAN P3 COPY PRG
P+ -MS
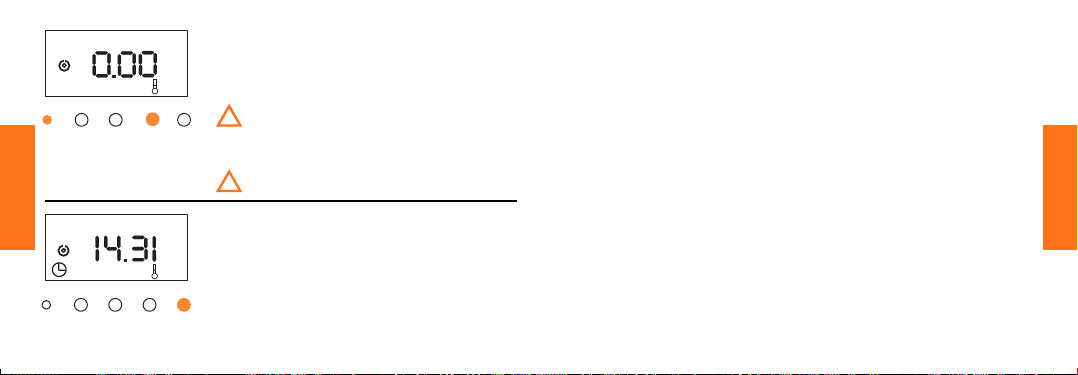
Puesta a cero (Reset)
En la instalación, antes de efectuar cualquier
programación, reponga el aparato pulsando
16
contemporáneamente P y M.
Hay que repetir la reposición siempre que el
!
cronotermóstato no funcione correctamente al
volverlo a encender después de un largo período
que permanece desconectado.
La operación de reposición borra todos los
!
programas establecidos.
Programación
Selección del tipo de programa
Apretando S aparecen en secuencia los
16
cuatro posibles tipos de programas: MAN,
P1, P2 y P3.
Funciones comunes a todos los programas
Desde cualquier situación, apretando P se
accede a la programación.
Apretando S aparecen en secuencia las
diferentes fases de programación.
Insertar o modificar los diferentes valores
apretando los pulsadores - o +.
Apretando M, queda memorizado el dato
insertado y la programación avanza
automáticamente hasta la fase sucesiva.
Atención: la programación queda anulada
tras 30" de inactividad de los pulsadores.
Durante la programación, apretando P el
aparato se sitúa nuevamente en su
condición normal de funcionamiento.
Español
136
137
Page 71
DAY 1
P1
P+ -MS
Español
DAY 1
P1
P
+-MS
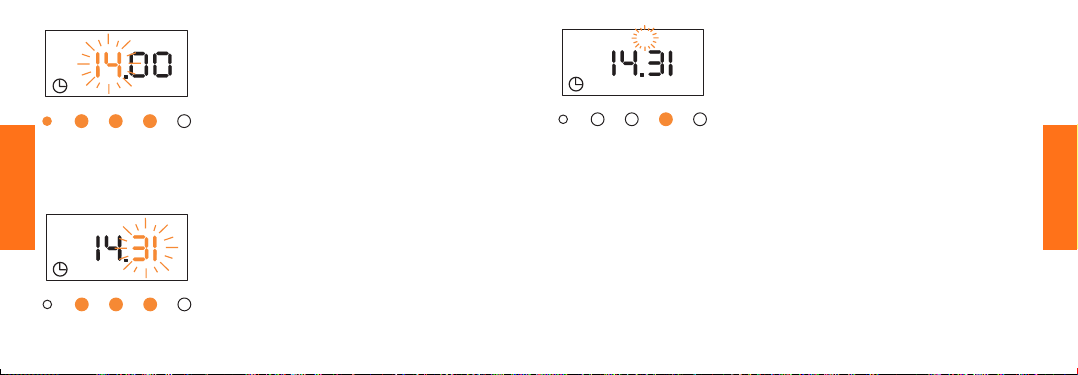
Puesta a punto de la hora y dia de
la semana
Esta regulación es válida para cualquier
programa seleccionado.
Apretar P para acceder a la programación.
Accionar sobre los pul-sadores + para
avanzar, - para retroceder hasta la hora a
programar (ejemplo: hora 14).
Memorizar con M.
Introducir los minutos accionando los
pulsadores + y - (ejemplo 31'). Memorizar
con M.
DAY 1
P1
P+ -M S
Introducir mediante el mismo procedi-miento
el día de la semana (DAY1 = lunes, DAY2 =
martes, etc.).
Memorizar con M. En ese punto el aparato está
ajustado sobre la hora, minutos y día de la
semana, al cual toman como referencia todas
las programaciones.
Atención: las fases sucesivas de
programación varían en función del programa
seleccionado (MAN, P1, P2 o P3). Si el
programa seleccionado es MAN, al finalizar la
puesta a punto del día y la hora, el aparato se
sitúa auto-máticamente en funcionamiento
normal. Si el programa seleccionado es P1, P2,
o P3, salir de la puesta a punto apretando el
pulsador P. Para las fases sucesivas de
programación, ver las instrucciones específicas
que se indican en las páginas siguientes.
Español
138
139
Page 72
DAY 1
1
MAN
P +-MS
Español
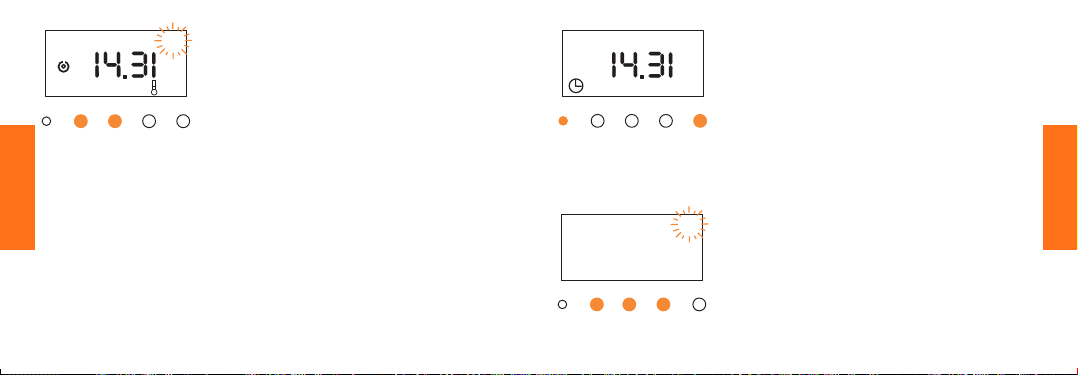
Programa MAN
1
6
Seleccionar el programa MAN apretando
el pulsador S.
16
Apretando los pulsadores + o - aparece la
temperatura en el display. Programar el
valor deseado (ej. 16°C).
El aparato procederá automáticamente a
poner al día las condiciones de funcionamiento en base a los valores
programados.
DAY 1
P1
P +-MS
Tmin
1
P1 PRG
P +-MS
Programa P1
Seleccionar el programa P1 apretando el
pulsador S.
Programación Tmin y Tmax
Apretar P para acceder a la programación.
Apretar S tres veces seguidas.
Al aparecer el valor Tmin, situar el valor de
7
temperatura mínima deseada, apretando
los pulsadores + o - (ej.17°C).
Apretar M para memorizar.
Español
140
141
Page 73

Tmax
22
P1 PRG
P +-MS
Aparece el valor Tmax. Introducir el valor
de temperatura máxima deseada,
apretando los pulsadores + o - (ej. 22°C).
Apretar M para memorizar.
El aparato queda entonces en situación de
funcionamiento normal.
DAY 1
1
P2
P+ -MS
16
Programa P2
Seleccionar el programa P2 apretando S.
Para la programación de Tmin y Tmax consultar el programa P1.
Español
142
Español
143
Page 74
DAY 1
1
P
3
P +-MS
16
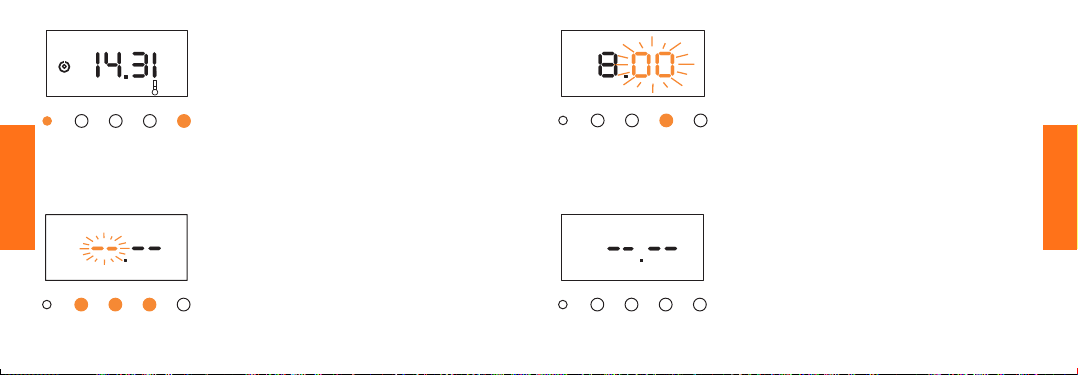
Programa P3
Seleccionar el programa P3 apretando S.
Programación
Apretar el pulsador P para acceder a la
programación. Apretar S tres veces
seguidas. Programar los valores de Tmin y
Tmax como se indica para los programas
P1 y P2.
ON
1
P+ -M S
DAY 1
P3 PRG
Tmax
20
Insertar por el mismo procedimiento los
minutos.
Memorizar con M.
ON
DAY 1
1
Español
P3 PRG
P +-MS
144
Tmax
Tras haber introducido Tmin y Tmax, apretar
22
S. Comprobar que el display indique
exactamente el día que se desea programar
(DAY1) y la función a introducir (ON1 =
Tmax). Apretar + para avanzar y - para retroceder hasta la hora que se desea
programar. (Ej. 8 horas).Memorizar con M.
ON
1
P+ -MS
DAY 1
P3 PRG
Tmin
17
La programación avanza automática-mente en secuencia sucesiva.
Proceder de forma análoga para fijar la hora
y los minutos de la función sucesiva (OFF1
= Tmin).
Proceder de forma análoga para fijar los
restantes horarios de la jornada.
145
Español
Page 75

Para facilitar la programación, ordenar la tabla tal y como se indica
en el ejemplo:
Usos horarios
T max T min T max T min T max T min T max Tmin
ON1 OFF1 ON2 OFF2 ON3 OFF3 ON4 OFF4
day 1 6.00 8.30 11.00 13.00 - - 17.00 23.30
day 2
day 3
day 4
day 5
Español
day 6
day 7
Si las conmutaciones ON/OFF son inferiores a 4, pueden saltarse las
secuencias apretando S, cuando el menú correspondiente aparece en
el display.
146
NOTA
Entre un ON y el sucesivo OFF la temperatura de referencia es la
Tmax.
Entre un OFF y el sucesivo ON la temperatura de referencia es la
Tmin.
El cronotermóstato tiene la función de mantener la temperatura
ambiente al valor Tmax. o Tmin en base a la hora.
Por esempio: si en el período comprendido entre las 8.30 y las 11.00
ha sido combinada una temperatura mínima de 17°C y la temperatura ambiente llega por debajo de dicho valor, la instalación de
calefacción se enciende para restablecer la temperatura mínima
establecida.
Si se desea mantener la instalación de calefacción completamente
apagada en las horas combinadas con la temperatura mínima, hay
que establecer esta en un valor inferior al que puede alcanzar el
ambiente.
La temperatura mínima que se puede establecer es de 7°C.
147
Español
Page 76
DAY 2
P3 COPY PRG
P+ -M S
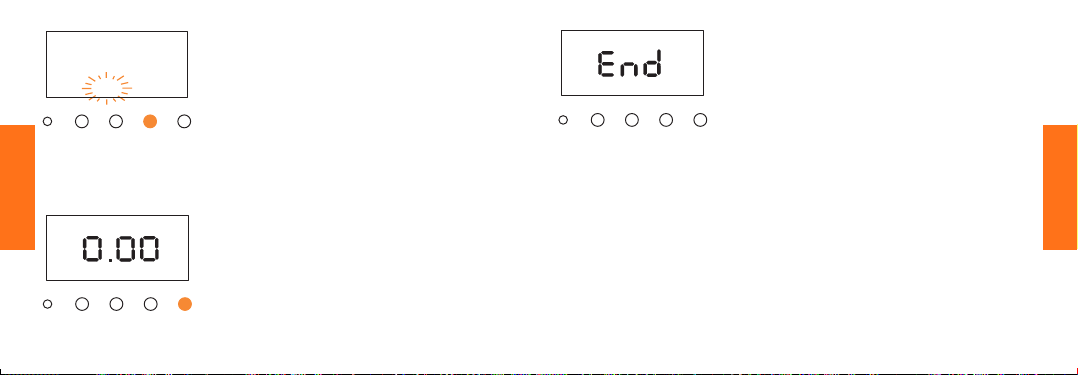
Función COPY
Una vez acabadas las introducciones del
DAY1, puede copiarse la misma programación para el día 2.
En este caso hay que apretar M cuando en
el display aparece “COPY”.
P
3
P+ -MS
Una vez realizadas las introducciones de
la semana, aparece la inscripción End.
Tras unos pocos segundos, el aparato
reanuda su funcionamiento normal.
ON
DAY 2
1
Español
P3 PRG
P+ -MS
148
Tmax
Si no se quisiera copiar la programación,
22
apretar S.
Proceder a efectuar la programación tal y
como se hizo en el día 1.
Español
149
Page 77
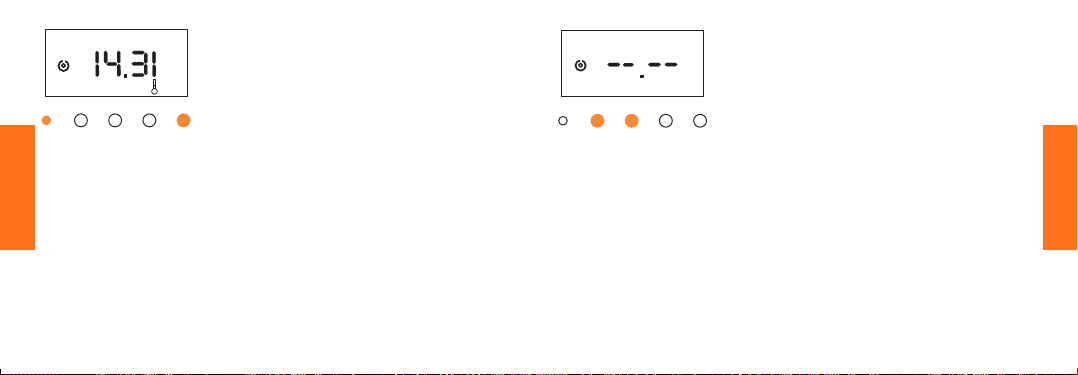
DAY 1
1
P
3
P +-MS
Español
Comprobación programación
efectuada
Seleccionar el programa a comprobar
16
apretando el pulsador S.
Para el programa MAN: apretar los
pulsadores + o -.
Aparece la temperatura programada en el
display.
Para los restantes programas: apretar P y
seguidamente S repetidamente; el display
repite en secuencia la programación
insertada.
Se pueden modificar las cifras que
parpadean intermitentemente mediante el
mismo procedimiento utilizado para
efectuar la programación.
ON
1
1
P +-MS
DAY 1
P3 PRG
Tmax
22
Anulación de un horario en el
programa P3
Seleccionar el horario que se desea anular
apretando P y seguidamente S de forma
repetida.
Apretar simultáneamente los pulsadores +
y -.
Español
150
151
Page 78
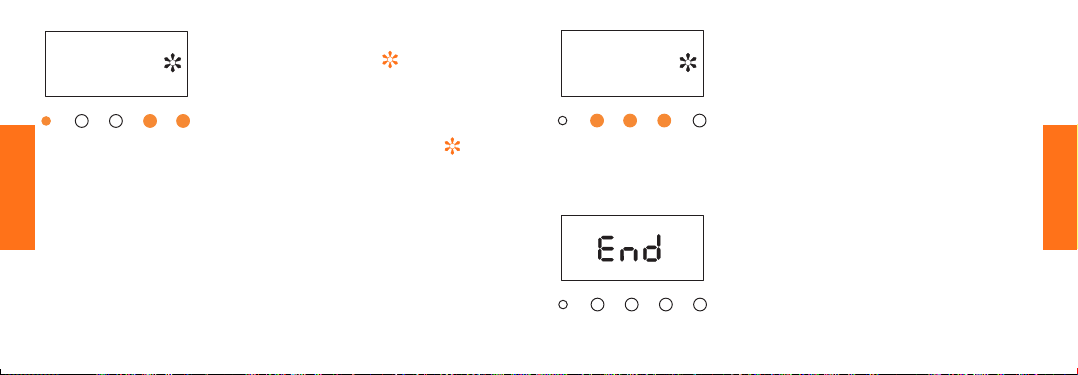
P3 PRG
P +-MS
Programación función
anticongelante ( )
Seleccionar el programa P3 apretando el
pulsador S.
Apretar P para acceder a la programación.
Apretar S 5 veces.
Aparecerá entonces el símbolo .
Apretar el pulsador M.
DAY 1
P3 PRG
P +-MS
0
Apretando el pulsador + se introduce la
7
función anticongelante (aparece en el
display 07°C).
Apretando el pulsador - se desconecta la
función anticongelante.
Apretar M para memorizar la función en el
DAY1 y pasar automáticamente al DAY2.
Español
152
P
3
P+ -MS
Repetir la misma operación para los
restantes días.
Al terminar la programación aparaecerá la
inscripción End.
153
Español
Page 79
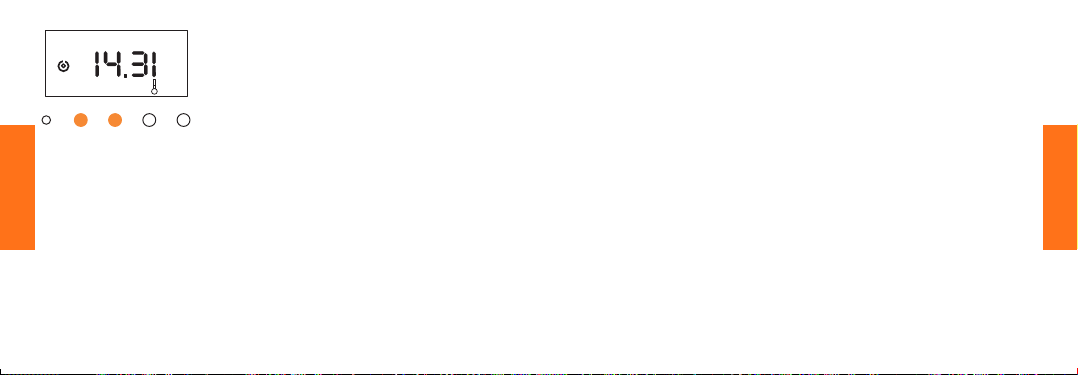
Tmin
DAY 1
Tmax
1
P3
P +-MS
Español
Mando manual
En los programas P1, P2 y P3 es posible
controlar manualmente el aparato, sin al-
16
terar para ello la programación:
- el pulsador + sitúa la referencia a la
Tmax
- el pulsador - sitúa la referencia a la
Tmin
El mando manual se mantiene hasta la
primera conmutación programada.
NOTA
No puede activarse el mando manual si está
programada la función anticongelante.
NOTA 2
Para el máximo confort, el cronotermóstato
compensa la inevitable lentitud con la cual
el ambiente puede ser calentado.
Cuando el aparato registra una disminución
de la temperatura, la instalación de
calefacción se enciende antes de que la
misma descienda por debajo del nivel
fijado.
Por este motivo, es posible que la
instalación de calefacción se encienda, por
breves lapsos, aunque la temperatura
medida es superior a la fijada.
Español
154
155
Page 80
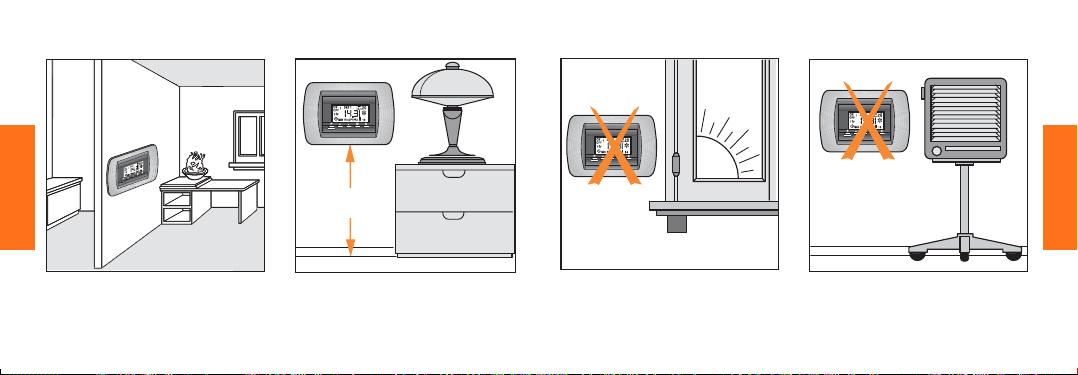
Consejos de instalación
ok!
ok!ok!
Español
h. 1,5m
Español
156
157
Page 81
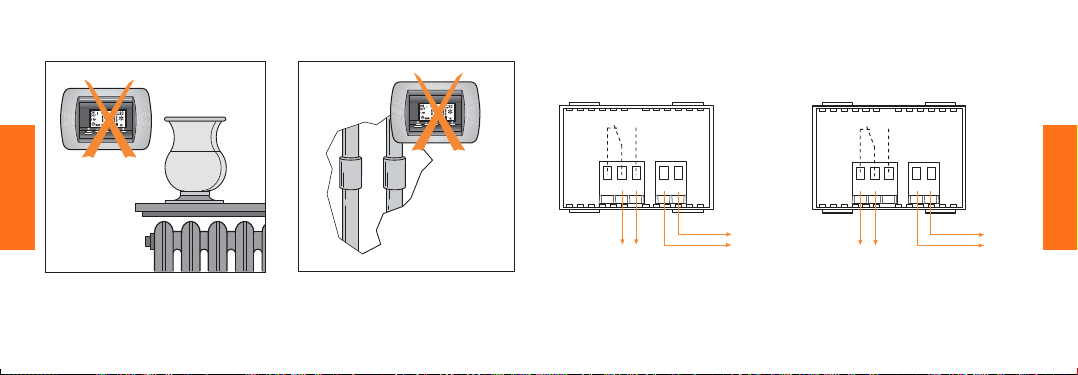
Consejos de instalación
CNCNO L N
Esquema de connexión
Calefacción
NO L N
C
NC
Refrigeración
Español
158
N
L
caldera, bomba de circulation etc.
acondicionnador, ventilador etc.
sección max conductores: 2 x 2,5 mm
N
L
2
Español
159
Page 82

!
Léase atentamente el párrafo
"Reposición (Reset)".
Inhoud
Algemene kenmerken 162
Kenmerken van de programma’s 164
Reset 168
Programmering 168
Instelling van uur en dag van de week 170
Programma MAN 172
Programma P1 173
Programma P2 175
Programma P3 176
Kopiëren van het programma COPY 180
Controle van de geprogrammeerde gegevens 182
Wissen van een uurregeling in programma P3 183
Programmering van de anti-vorstfunctie ( ❉ ) 184
Manuele bediening 186
Montage instructies 188
Aansluitschema 191
160
Nederlandstalige
161
Nederlandstalige
Page 83
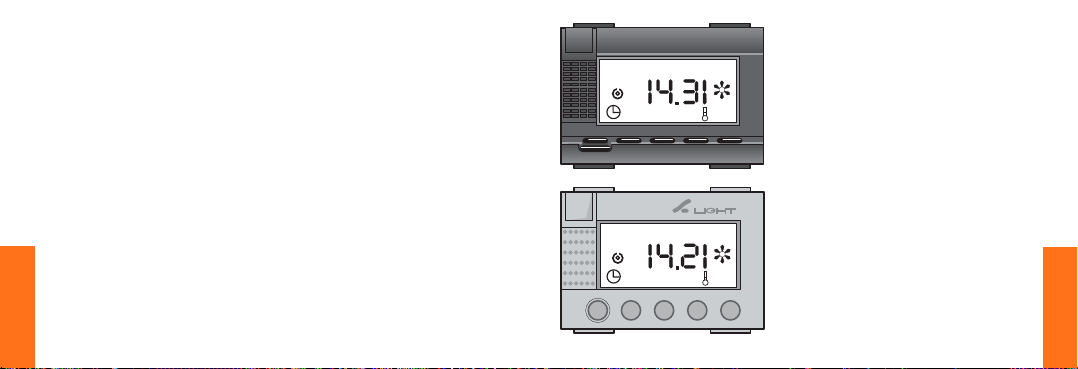
Chronothermostaat
Algemene kenmerken
● 4 programma’s: MAN, P1, P2, P3
● anti-vorstfunctie
● manuele bediening
● er kunnen twee verschillende referentietemperaturen worden
geprogrammeerd (Tmin e Tmax)
● aanduiding van tijdstip, dag van de week, omgevingstemperatuur,
gekozen programma, aanduiding van aan- of uitstand
● back-up batterij voor het behoud van de gegevens bij afwezigheid
van netvoeding. Tijdsduur: 30 dagen
● minimumtijdsinterval tussen twee verrichtingen: 1 minuut
● temperatuurinterval aangegeven in het display: 5°C ÷ 40°C;
updating om de minuut.
● programmeerbaar temperatuurveld: 7°C ÷ 35°C (met een
minimuminterval van 1 graad)
● speling op de temperatuurwaarden: ± 0,5°C (wanneer de ingestelde
temperatuur is bereikt).
● voedingsspanning 220/230V~±10% - 50 Hz
● schakelcontact 5A cosϕ 1 - 2 A cosϕ 0,5
● maximumdoorsnede van de geleiders: 2 x 2,5 mm
162
Nederlandstalige
2
DAY 1
DAY 1
Tmin
Tmax
Tmin
Tmax
20
16
20
16
ON
1
OFF
1
MAN P3 COPY PRG
P+ - MS
ON
1
OFF
1
MAN P3 COPY PRG
P+ -MS
163
Nederlandstalige
Page 84

Kenmerken van de programma’s
MAN-programma
Het toestel werkt als normale omgevingsthermostaat. Het regelt de
referentietemperatuur en schakelt de belasting in en uit, zodat de
omgevingstemperatuur in de buurt van de geprogrammeerde waarde
wordt gehandhaafd.
Programma P1
De uurregeling en de dagen waarop de belasting in- en uitgeschakeld
wordt, staan vast en kunnen niet worden gewijzigd (zie de volgende tabel).
Men moet alleen de waarden van de referentietemperatuur programmeren
(Tmin en Tmax).
Programma P2
Zelfde kenmerken als programma P1, maar met andere uuregelingen en
dagen, zie volgende tabel.
Programma P3
De in- en uitschakeluren en dagen kunnen worden gepersonaliseerd; stel
de waarden van de referentietemperatuur vast (Tmin en Tmax). Bovendien
kan de anti-vorstfunctie worden geprogrammeerd (aangeduid met ):
164
Nederlandstalige
zij handhaaft de omgevingstemperatuur boven 7°C.
Opmerking
Tmin of Tmax betekent dat het toestel, uitgaande van de
geprogrammeerde uuregeling, ervoor zorgt dat een specifieke
geprogrammeerde temperatuur in de omgeving wordt ingesteld.
P1
day uurregeling 23.00-5.30 5.30-8.30 8.30-11.30 11.30-14.30 14.30-17.00 17.00-23.00
1÷5 temp. T min T max T min T max T min T max
day uurregeling 23.00-7.00 7.00-10.00 10.00-12.00 12.00-16.00 16.00-18.00 18.00-23.00
6-7 temp. T min T max T min T max T min T max
1° 2° 3° 4° 5° 6°
P2
day uurregeling 23.00-7.00 7.00-10.00 10.00-12.00 12.00-16.00 16.00-18.00 18.00-23.00
1÷7 temp. T min T max T min T max T min T max
1° 2° 3° 4° 5° 6°
165
Nederlandstalige
Page 85
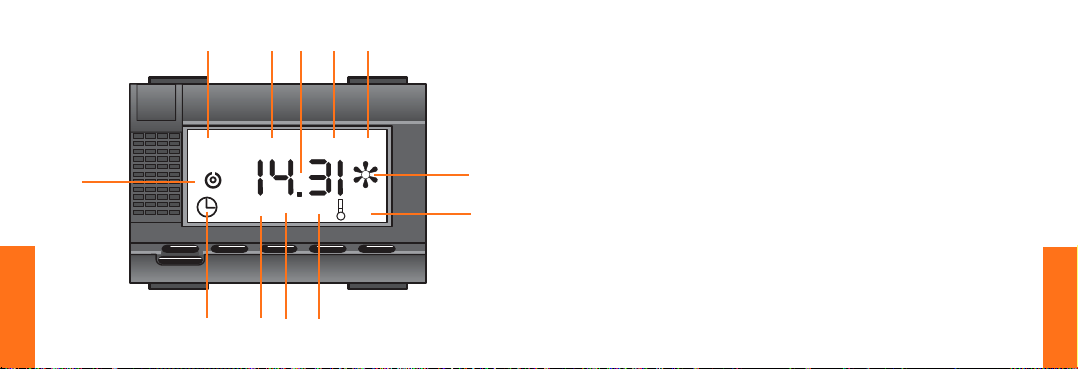
9
166
Nederlandstalige
Tmin
Tmax
3
20
12 1 2
ON
1
OFF
10
DAY 1
1
MAN P3 COPY PRG
16
P+ - MS
78
56
Toetsen
+ vooruit (langdurig drukken
= snel vooruitgaan)
- achteruit (langdurig
drukken =
snel achteruitgaan)
NOTA
Met de programma’s P1, P2,
11
4
P3 schakelt u de Tmax in door
op + te drukken en schakelt u
Tmin in door op - te drukken
(manuele bediening)
M = in het geheugen
opslaan
P = voorbereiding om te
programmeren
S = programmakeuze
P+M = het geheugen wissen
(reset)
Display
1 dag van de week (DAY1 = maandag,
DAY2 = dinsdag, enz.)
2 aanduiding van de max. of min. tempe-
ratuur in de programma’s
3 geprogrammeerde temperatuurwaarde
4 waarde van de omgevingstemperatuur
(voor waarden > 40°C e < 5°C knippert
het controlelichtje)
5 programmering bezig (verschijnt niet in
het MAN-programma)
6* kopiëren van het programma
7 programma (MAN, P1, P2, P3)
8 uurregeling bezig (uur, minuten, dag)
9 ON/OFF uitgang
10 uur, minuten
11* anti-vorstfunctie ingeschakeld
12* programmeringsetappes (ON1,OFF1,
ON2, OFF2, etc..)
* alleen voor programma P3
P1, P2, P3
167
Nederlandstalige
Page 86
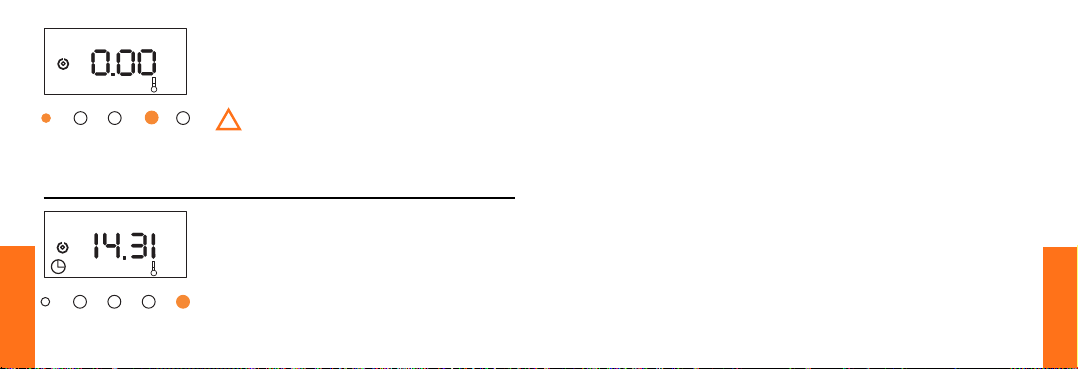
DAY 1
1
P1
P +-MS
DAY 1
1
MAN P3 COPY PRG
P+ -MS
168
Nederlandstalige
Reset
Voordat u het toestel voor het eerst (na het installeren)
programmeert, moet u het ‘resetten’ (d.w.z. alle gegevens
16
wissen) door gelijktijdig te drukken op P en M.
u moet opnieuw alle gegevens wissen als de
!
klokthermostaat niet goed werkt na een lange
periode zonder netvoeding
Programmering
Het programma kiezen
Door op S te drukken verschijnen in
16
volgorde de 4 toepasselijke programma’s:
MAN, P1, P2, P3.
Fonctions communes à tous les
programmes
De quelconque situation, en appuyant sur
la touche P on entre dans la programmation.
En appuyant sur la touche S passent en
séquence les étapes de lprogrammation.
introduire ou modifier les différentes valeurs
en appuyant sur les touches - o +.
Appuyer sur la touche M, la donnée réglée
est mémorisée et le menu du programme
avance automatiquement jusqu’à la
prochaine étape.
Attention: la programmation s’annule
automatiquement, lorsque 30 sec se sont
écoulées sans que les touches aient été
activées (pressées).
En appuyant sur P pendant la programmation l’appareil retourne au mode de
fonctionnement normal.
169
Nederlandstalige
Page 87
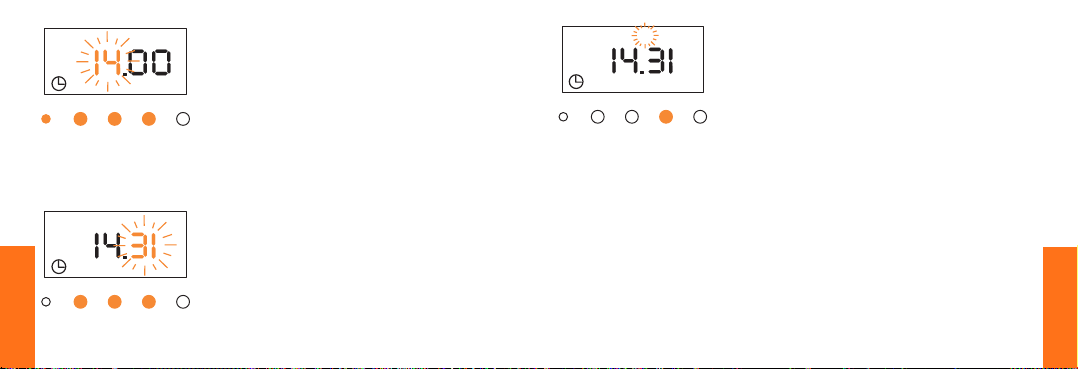
DAY 1
P1
P+ -MS
DAY 1
P1
P
+-MS
Instelling van uur en dag van
de week
Deze afstelling is geldig voor alle
programma’s. Druk op toets P om in de
programmering te gaan.
Druk op + om vooruit te gaan, of op toets om terug te keren, tot het gewenste uur
(bijvoorbeeld 14) in het display verschijnt.
Sla in het geheugen op met toets M.
Programmeer de minuten met toets + of -
(bijvoorbeeld 31'). Sla in het geheugen op
met toets M.
DAY 1
P1
P+ -M S
Ga op dezelfde manier te werk voor de dag
van de week (DAY1 = maandag, DAY2 =
dinsdag, enz.). Sla in het geheugen op met
toets M. Nu is de thermostaat afgesteld op
het uur, de minuten en de dag van de week
waarnaar alle programmeringen verwijzen.
Let op: de volgende programme-
ringsetappes veranderen volgens het
gekozen programma (MAN, P1, P2, P3). Als
het programma MAN wordt gekozen, gaat
het toestel aan het einde van de instelling
van uur en dag van de week over naar de
normale werkwijze.
Voor de volgende programmeringsetappes,
zie de specifieke instructies van het
desbetreffende programma, zoals
aangegeven op de volgende pagina’s.
170
Nederlandstalige
171
Nederlandstalige
Page 88
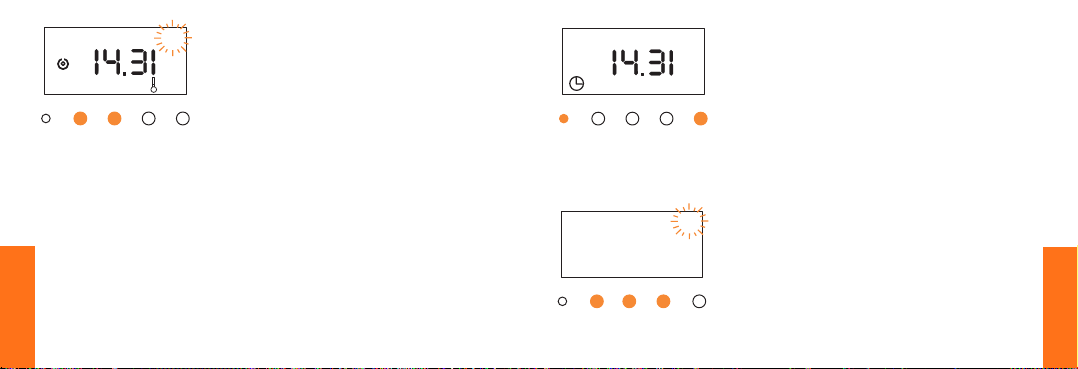
DAY 1
1
MAN
P +-MS
1
6
16
Programma MAN
Kies het programma MAN door op toets S
te drukken.
Door op de toetsen + of - te drukken,
verschijnt de temperatuur in het display.
Voer de gewenste waarde in (bijvoorbeeld
16°C).
Het toestel stelt automatisch de
werkingsvoorwaarden in volgens de
geprogrammeerde waarden.
DAY 1
P1
P +-MS
Tmin
1
P1 PRG
P +-MS
Programma P1
Kies het programma P1 door op toets S te
drukken.
Programmering van Tmin en Tmax
Druk op toets P om in de programmering
te gaan.
Druk 3 maal op toets S.
Als de waarde Tmin verschijnt, voert u de
7
gewenste minimumtemperatuurwaarde in
door op de toetsen + of - te drukken
(bijvoorbeeld 17°C).
In het geheugen opslaan met toets M.
172
Nederlandstalige
173
Nederlandstalige
Page 89

Tmax
22
P1 PRG
P +-MS
Als de waarde Tmax verschijnt, voert u de
gewenste maximumtemperatuurwaarde in
door op de toetsen + of - te drukken
(bijvoorbeeld 22°C). In het geheugen
opslaan met toets M.
Het toestel gaat over naar de normale
werkwijze.
DAY 1
1
P2
P+ -MS
16
Programma P2
Kies het programma P2 door op toets S te
drukken.
Om de Tmin en Tmax in te sellen, zie programma P1.
174
Nederlandstalige
175
Nederlandstalige
Page 90
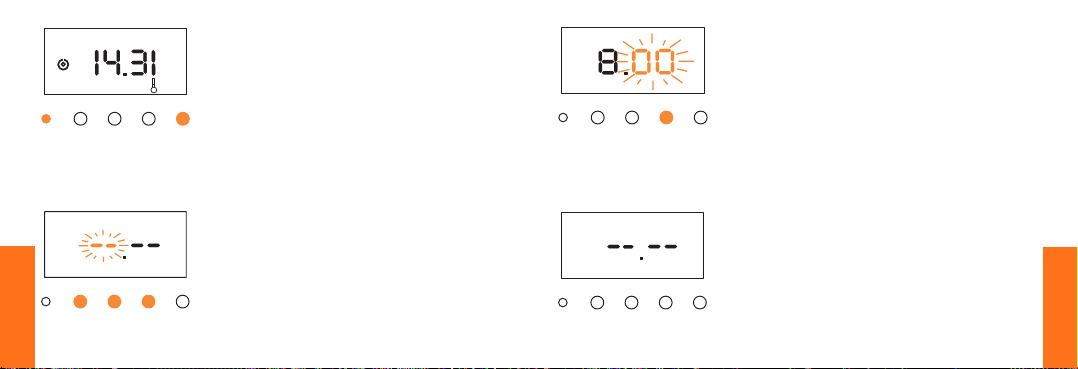
DAY 1
1
P
3
P +-MS
16
Programma P3
Druk toets S in om programma P3 te kiezen.
Programmering
Druk op toets P om in de programmering
te gaan. Druk 3 maal op toets S. Om de
Tmin en Tmax in te stellen, zie programma
P1 en P2.
ON
1
P+ -M S
DAY 1
P3 PRG
Tmax
20
Ga op dezelfde manier te werk om de
minuten te programmeren. Sla in het
geheugen op met toets M.
ON
DAY 1
1
P3 PRG
P +-MS
176
Nederlandstalige
Tmax
Als u de Tmin en Tmax heeft ingevoerd,
22
drukt u op toets S. Let erop dat het display
precies de dag (DAY1) toont die moet
worden geprogrammeerd (DAY1) alsook de
gekozen functie (ON1 = Tmax). Druk op
toets + om vooruit te gaan en op - om
achteruit te gaan (Voorbeeld 8 uur). Sla in
het geheugen op met toets M.
ON
1
P+ -MS
DAY 1
P3 PRG
Tmin
17
Het menu gaat automatisch over naar de
volgende etappe.
Voer het uur en de minuten van de volgende
functie in volgens hetzelfde principe (OFF1
= Tmin).
Voer de andere uren van de dag in volgens
hetzelfde principe.
177
Nederlandstalige
Page 91

Om de programmering te vereenvoudigen, vult u de tabel in zoals
aangeduid in het voorbeeld:
Tijdsintervallen
T max T min T max T min T max T min T max Tmin
ON1 OFF1 ON2 OFF2 ON3 OFF3 ON4 OFF4
day 1 6.00 8.30 11.00 13.00 - - 17.00 23.30
day 2
day 3
day 4
day 5
day 6
day 7
Als er minder dan 4 ON/OFF verrichtingen zijn vereist, kunnen de nietgebruikte programmastappen worden overgeslagen door op toets S te
drukken als het specifieke programma in het display verschijnt.
178
Nederlandstalige
OPMERKING
Tussen een ON en de volgende OFF is Tmax de
referentietemperatuur.
Tussen een OFF en de volgende ON is Tmin de
referentietemperatuur.
De klokthermostaat houdt de kamertemperatuur op Tmax of op
Tmin, afhankelijk van het tijdstip.
Bijvoorbeeld: als aan het tijdsinterval tussen 8u30 en 11u een
minimumtemperatuur van 17°C werd verbonden en de
omgevingstemperatuur onder deze waarde zakt, treedt de
verwarming weer in werking om de temperatuur op de
ingestelde minimumtemperatuur te brengen.
Als u wenst dat de verwarming volledig wordt uitgeschakeld tijdens
de intervallen die gekoppeld worden aan de minimumtemperatuur,
moet deze laatste op een waarde worden ingesteld die lager ligt
dan de waarde die de omgeving kan bereiken. De laagste
temperatuur die kan worden ingesteld is 7°C.
179
Nederlandstalige
Page 92
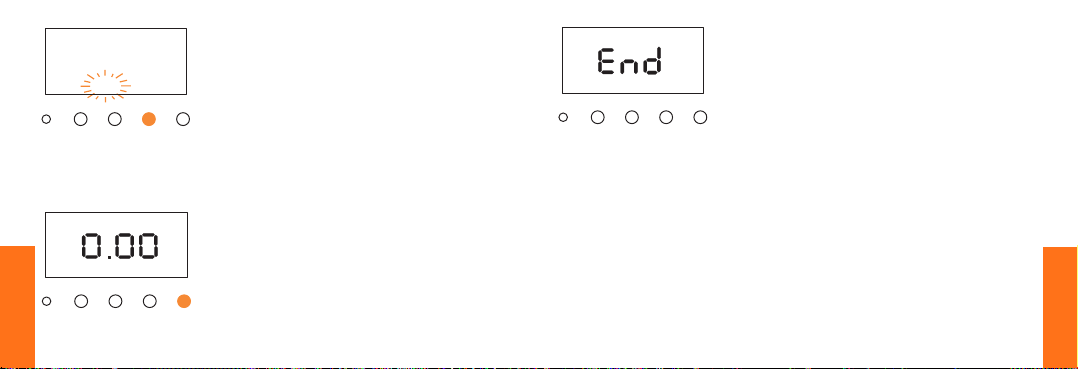
DAY 2
P3 COPY PRG
P+ -M S
Kopiëren van het programma
COPY
Na de gegevens voor dag 1 te hebben
ingevoerd, kan het programma op dezelfde
manier worden gekopieerd voor dag 2.
Hiertoe drukt u op toets M als “COPY” in
het display verschijnt.
P
3
P+ -MS
Als alle gegevens van de week in het
geheugen zijn opgeslagen, verschijnt End
in het display.
Na enkele seconden treedt de programmakiezer in werking.
ON
DAY 2
1
P3 PRG
P+ -MS
180
Nederlandstalige
Tmax
Als de programmering niet moest worden
22
gekopieerd, drukt u op toets S.
Programmeer op dezelfde wijze als voor
dag 1.
181
Nederlandstalige
Page 93
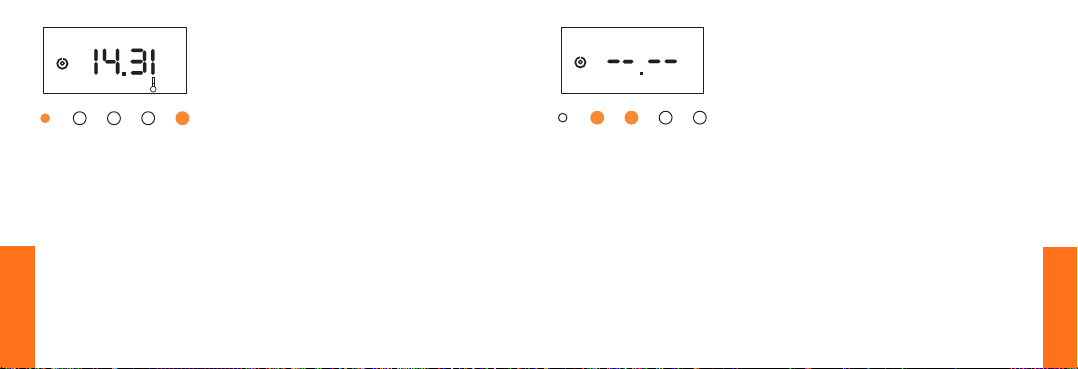
DAY 1
1
P
3
P +-MS
16
Controle van de
geprogrammeerde gegevens
Kies het te controleren programma door op
toets S te drukken.
Voor het programma MAN drukt u op toets
+ of -.
Voor de andere programma’s drukt u op
toets P en daarna verschillende keren op
toets S.
Het display toont de volgorde van de in het
geheugen opgeslagen gegevens.
De cijfers die oplichten in het display
kunnen worden gewijzigd volgens de
beschreven programmeringsetappes.
ON
1
1
P +-MS
DAY 1
P3 PRG
Tmax
22
Wissen van een uurregeling in
programma P3
Kies de te annuleren uurregeling door op P
te drukken en daarna verschillende keren
op S.
Druk tegelijk op de toetsen + en -.
182
Nederlandstalige
183
Nederlandstalige
Page 94

P3 PRG
P +-MS
Programmering van de
anti-vorstfunctie ( )
Kies het programma P3 door op S te
drukken.
Druk op P om in de programmering te gaan.
Druk 5 keer op toets S.
Het symbool verschijnt.
DAY 1
P3 PRG
P +-MS
P
3
P+ -MS
0
7
Door op toets + te drukken, wordt de anti-
vorstfunctie ingeschakeld (in het display
verschijnt 07°C).
Druk op toets M om deze functie voor DAY1
in het geheugen op te slaan en automatisch
over te gaan naar DAY2.
Herhaal dezelfde verrichting voor de overige
dagen.
Aan het einde van de programmering
verschijnt End in het display.
184
Nederlandstalige
185
Nederlandstalige
Page 95
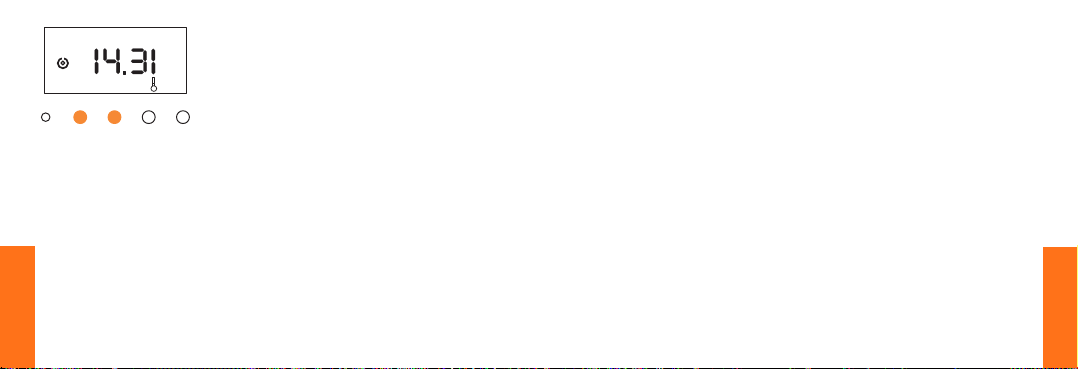
Tmin
DAY 1
Tmax
1
P3
P +-MS
186
Nederlandstalige
Manuele bediening
In de programma’s P1-P2-P3 kan het
toestel manueel worden bediend zonder de
16
programmering te wijzigen.
- toets + schakelt de referentie in op Tmax
- toets - schakelt de referentie in op Tmin.
De manuele programmering blijft actief tot
de eerste geprogrammeerde wijziging.
OPMERKING
De manuele bediening kan niet worden
geactiveerd als de anti-vorstfunctie actief is.
OPMERKING 2
De klokthermostaat compenseert de
onvermijdelijke traagheid waarmee de
woonruimte verwarmd wordt.
Wanneer de klokthermostaat merkt dat de
temperatuur aan het dalen is, dan schakelt
hij de verwarming in voordat de temperatuur
onder de referentietemperatuur zakt.
Daardoor is het mogelijk dat de verwarming
voor korte perioden aan staat, ook al ligt
de gemeten temperatuur boven de
referentietemperatuur.
187
Nederlandstalige
Page 96
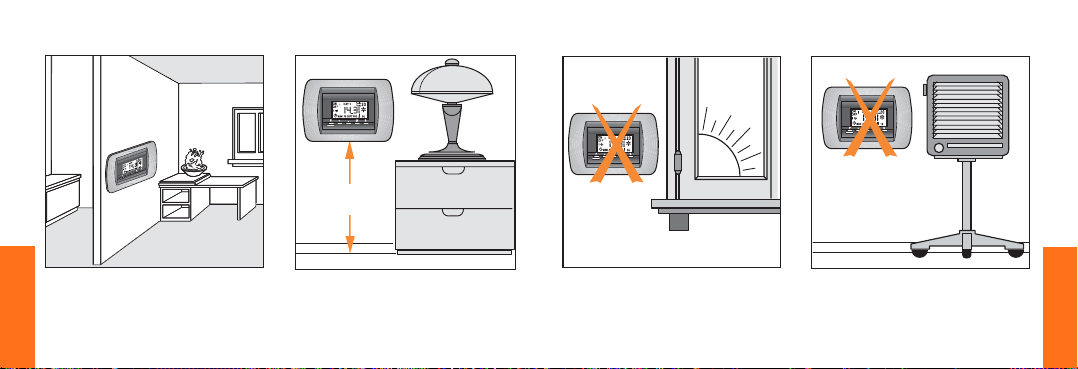
Montage instructies
ok!
ok!ok!
h. 1,5m
188
Nederlandstalige
189
Nederlandstalige
Page 97
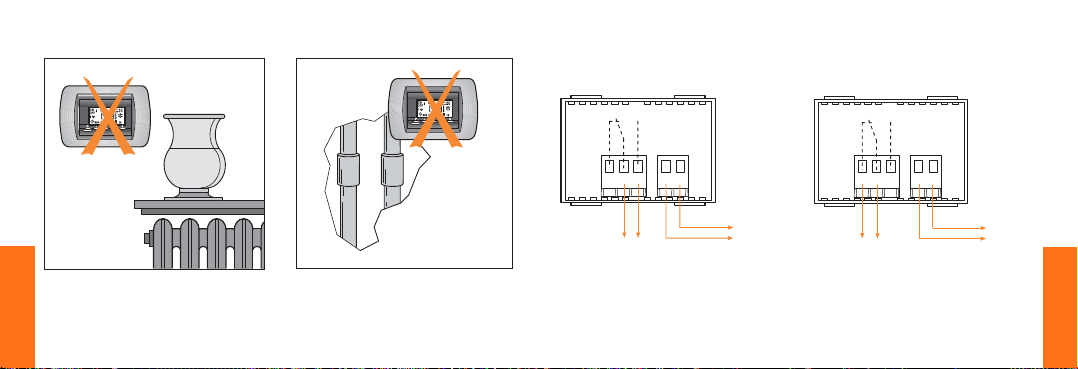
Montage instructies
CNCNO L N
Aansluitschema
Verwarming
NO L N
C
NC
Koeling
190
Nederlandstalige
N
L
ketel, circulatiepomp enz.
koeler, ventilator enz.
max sectie vande geleiders: 2 x 2,5 mm
N
L
2
191
Nederlandstalige
Page 98

Nederlandstalige
!
Lees de paragraaf "De
gegevens wissen (reset)".
!
Leggere attentamente il paragrafo
"Azzeramento (Reset)".
Sorgfältig Paragraph
"Rückstellung (Reset)" lesen.
Lire attentivement le paragraphe
"Mise à zéro (Reset)".
Carefully read paragraph "Reset".
Léase atentamente el párrafo
"Reposición (Reset)".
Lees de paragraaf "De gegevens
wissen (reset)".
Nederlandstalige
 Loading...