

Page 1

Part. U3594B - 11/09-01 PC
Inseritore a tastiera con display
art. HC/HS/HD/L/N/NT4608
Keypad connector with display
item HC/HS/HD/L/N/NT4608
Manuale d’uso
User manual
Page 2

Page 3

IT
Indice
UK
English 25
1 Introduzione 5
L'Inseritore a tastiera con display ■ 6
La tastiera ■ 7
Il display ■ 7
Cosa segnala il display ■ 8
2 Funzionamento 11
Accesso alle funzioni con occultamento abilitato 1 ■ 2
Inserisci – disinserisci l'antifurto 1 ■ 2
Scenari di attivazione 1 ■ 3
Attiva – disattiva le zone 1 ■ 4
Interrompi il suono della sirena 1 ■ 6
Attiva l'allarme antirapina 1 ■ 7
Che tipo di allarme si è vericato? 1 ■ 8
3 Personalizzazioni 19
Il menù dell'Inseritore 2 ■ 0
Accedi al menù Impostazioni 2 ■ 0
Imposta la data e l'ora 2 ■ 1
Regola il contrasto 2 ■ 2
Disabilita il buzzer 2 ■ 3
Attiva l'occultamento ■ 24
Page 4

Page 5

5
1
1 Introduzione
L'Inseritore a tastiera con displa ■ y
La tastier ■ a
I tasti di navigazion ✔ e
Il displa ■ y
Schermata principal ✔ e
In caso di allarm ✔ e
Menù Impostazion ✔ i
Cosa segnala il displa ■ y
Page 6
Introduzione1
6
L'Inseritore a tastiera con display ■
1
2
5 6
3
4
7
0
8 9
C OK
P
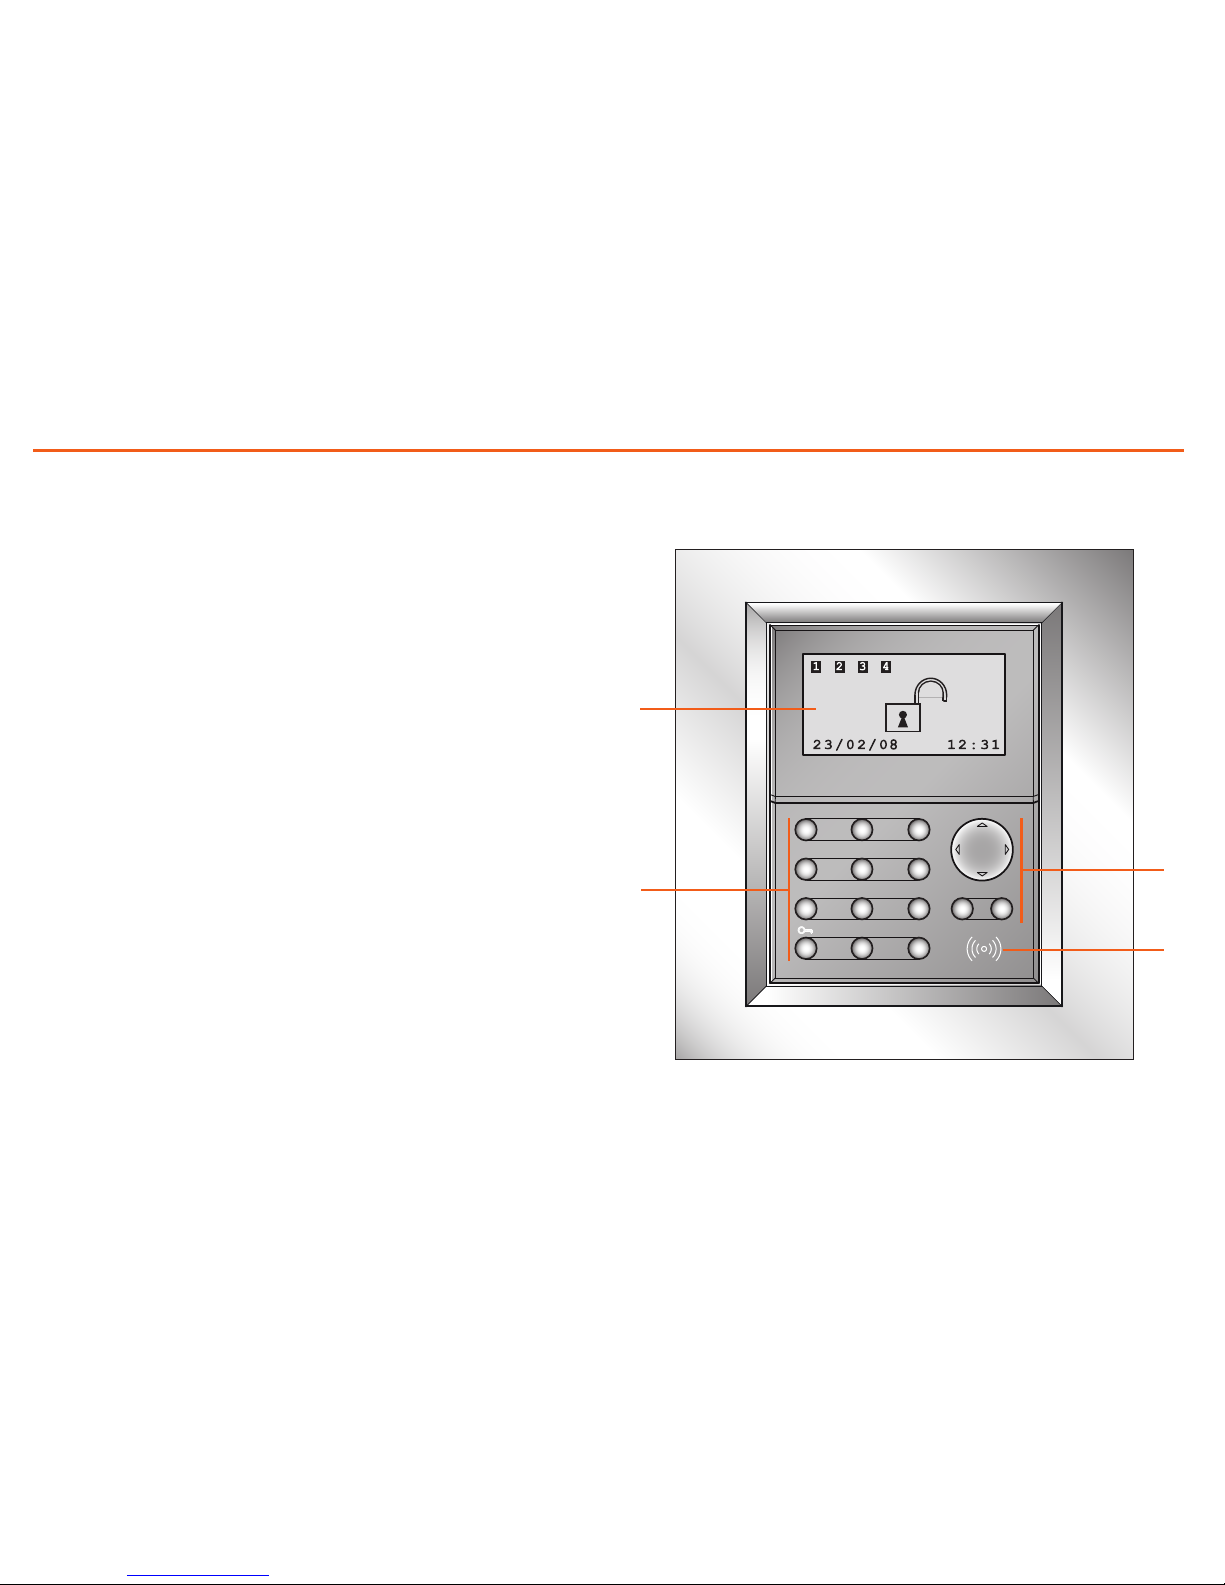
L'Inseritore a tastiera con display ti permette di inserire e disinserire
l'impianto antifurto, attivare le zone in funzione delle esigenze del
momento o utilizzare uno degli scenari di parzializzazione programmati
sulla Centrale antifurto, inoltre puoi ottenere informazioni sullo stato
dell'impianto e visualizzare la memoria degli eventi di allarme memorizzati dalla Centrale.
1 - Display graco
2 - Tastiera numerica
3 - Lettore chiavi transponder
4 - Tasti di navigazione
1
3
2
4
Page 7
Introduzione 1
7
La tastiera ■
I tasti di navigazione ✔
COK
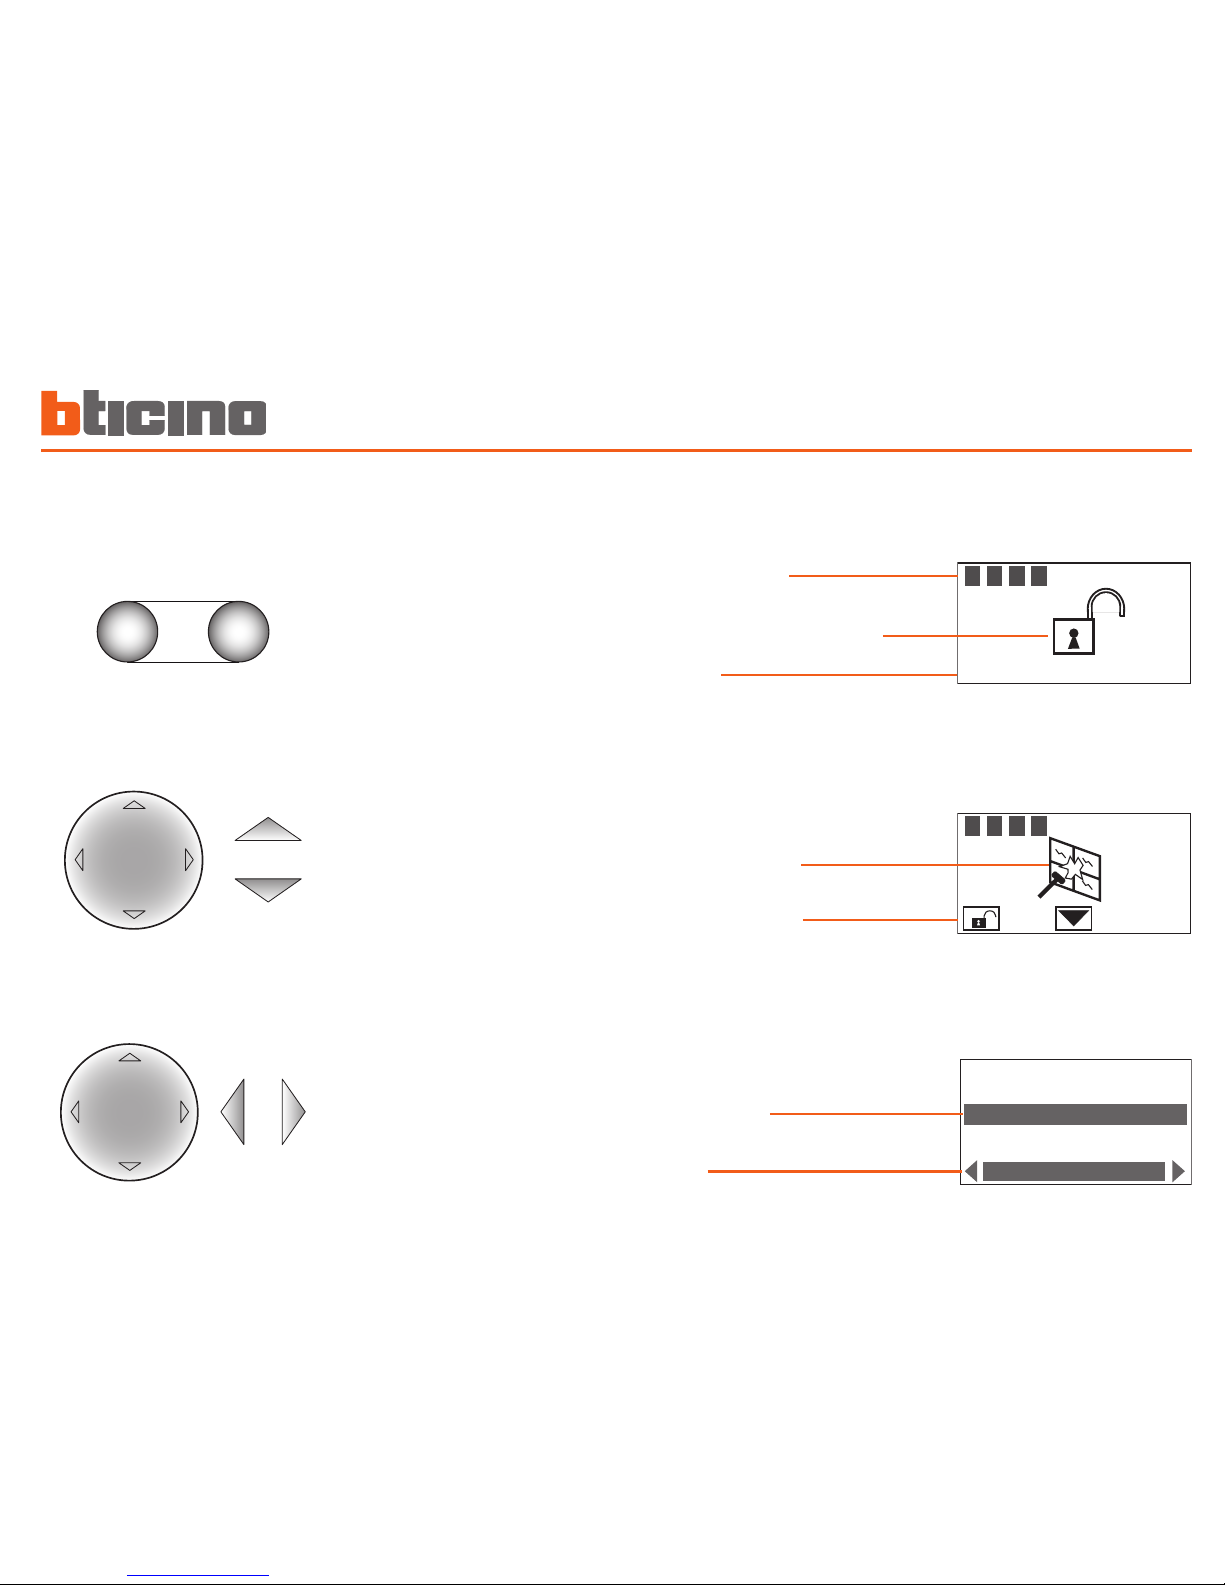
Tasti di scorrimento
permettono di scorrere l’elenco
delle voci nel menù
Tasti di selezione
permettono la selezione delle
fu nzioni che in alcuni men ù
compaiono nell’ultima riga
C
- Tasto di annullamento della
selezione e ritorno alla schermata
precedente; se tenuto premuto
consente l’uscita dal menù
OK
- Tasto di conferma della
selezione o dei dati inseriti
1 2 3 4
15/07/08 14:22
1 2 3 4
IMPOSTAZIONI
Lingua
Indirizzo
Tipo centrale
Italiano
Il display ■
Zone dell’impianto
Indicazioni tecniche
Zona segnalazione
di avvenuto allarme
Funzioni
Voce selezionata
Menù Impostazioni ✔
In caso di allarme ✔
Data e ora
Indicazione inserito/disinserito
Schermata principale ✔
Page 8
Introduzione1
8
Cosa segnala il display ■
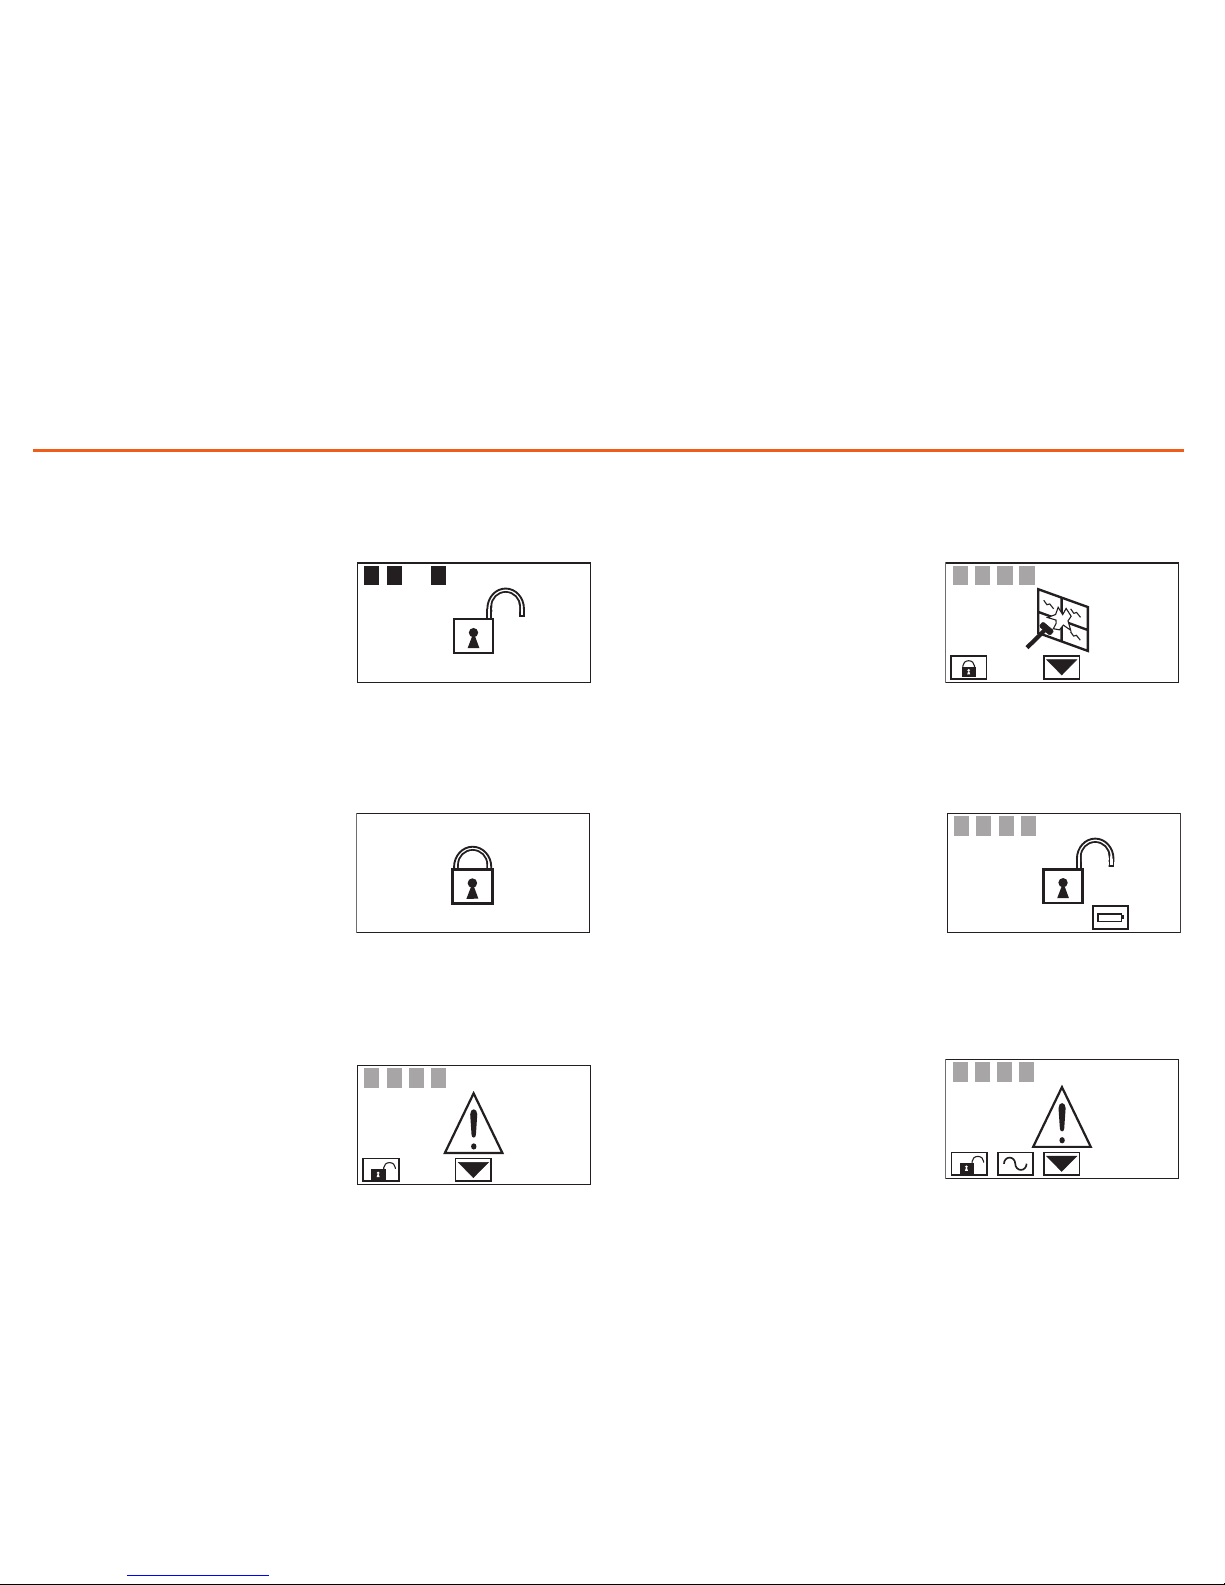
Impianto inserito, es: attivazione
zone come da scenario 2
Impianto disinserito, segnalazione
di allarme generico, tamptest con
impianto disinserito o batteria di
un dispositivo radio scarica
Impianto inserito, segnalazione di
allarme intrusione
Impianto disinserito, batteria
dell'Inseritore scarica o guasta
Impianto disinserito, manca
corrente
Impianto disinserito, es: zone 1, 2
e 4 attive
1 2 3 4
15/07/08 14:22
1 2 3 4
scenario 2
15/07/08 14:22
1 2 3 4
1 2 3 4
1 2 3 4
Page 9
Introduzione 1
9
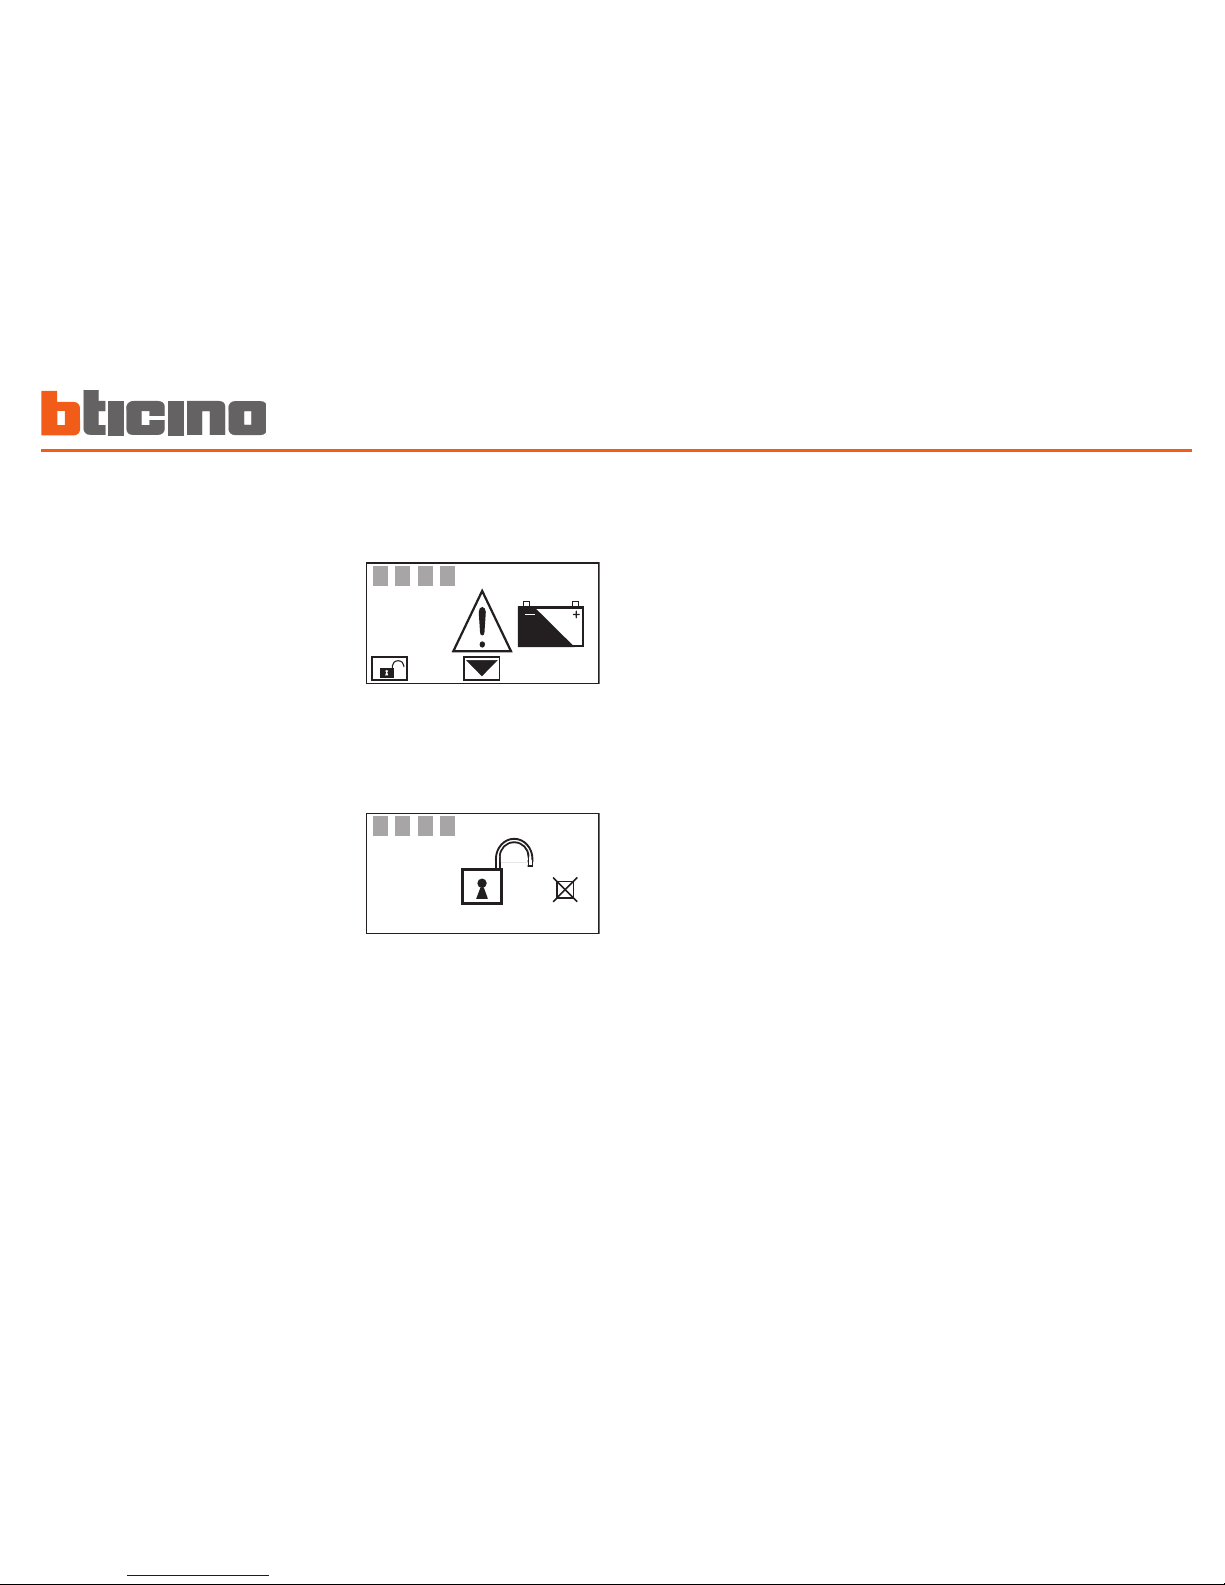
Impianto disinserito, batteria del
sistema antifurto scarica o guasta
e segnalazione di allarme tecnico
Impianto disinserito, uno o più
sensori disabilitati (Vengono
disabilitate importanti funzioni
della Centrale; disabilitare solo in
caso di eettiva esigenza.)
Cosa segnala il display ■
1 2 3 4
15/07/08 14:22
1 2 3 4
Page 10

Introduzione1
10
Page 11

11
2
2 Funzionamento
Accesso alle funzioni con occultamento abilitato ■
Inserisci – disinserisci l'antifurt ■ o
Con il codice utent ✔ e
Con la chiave transponde ✔ r
Scenari di attivazion ■ e
Attiva – disattiva le zon ■ e
Con il codice utent ✔ e
Con la chiave transponde ✔ r
Interrompi il suono della siren ■ a
Con il codice utent ✔ e
Con la chiave transponde ✔ r
Che tipo di allarme si è vericato ■ ?
Page 12
Funzionamento2
12
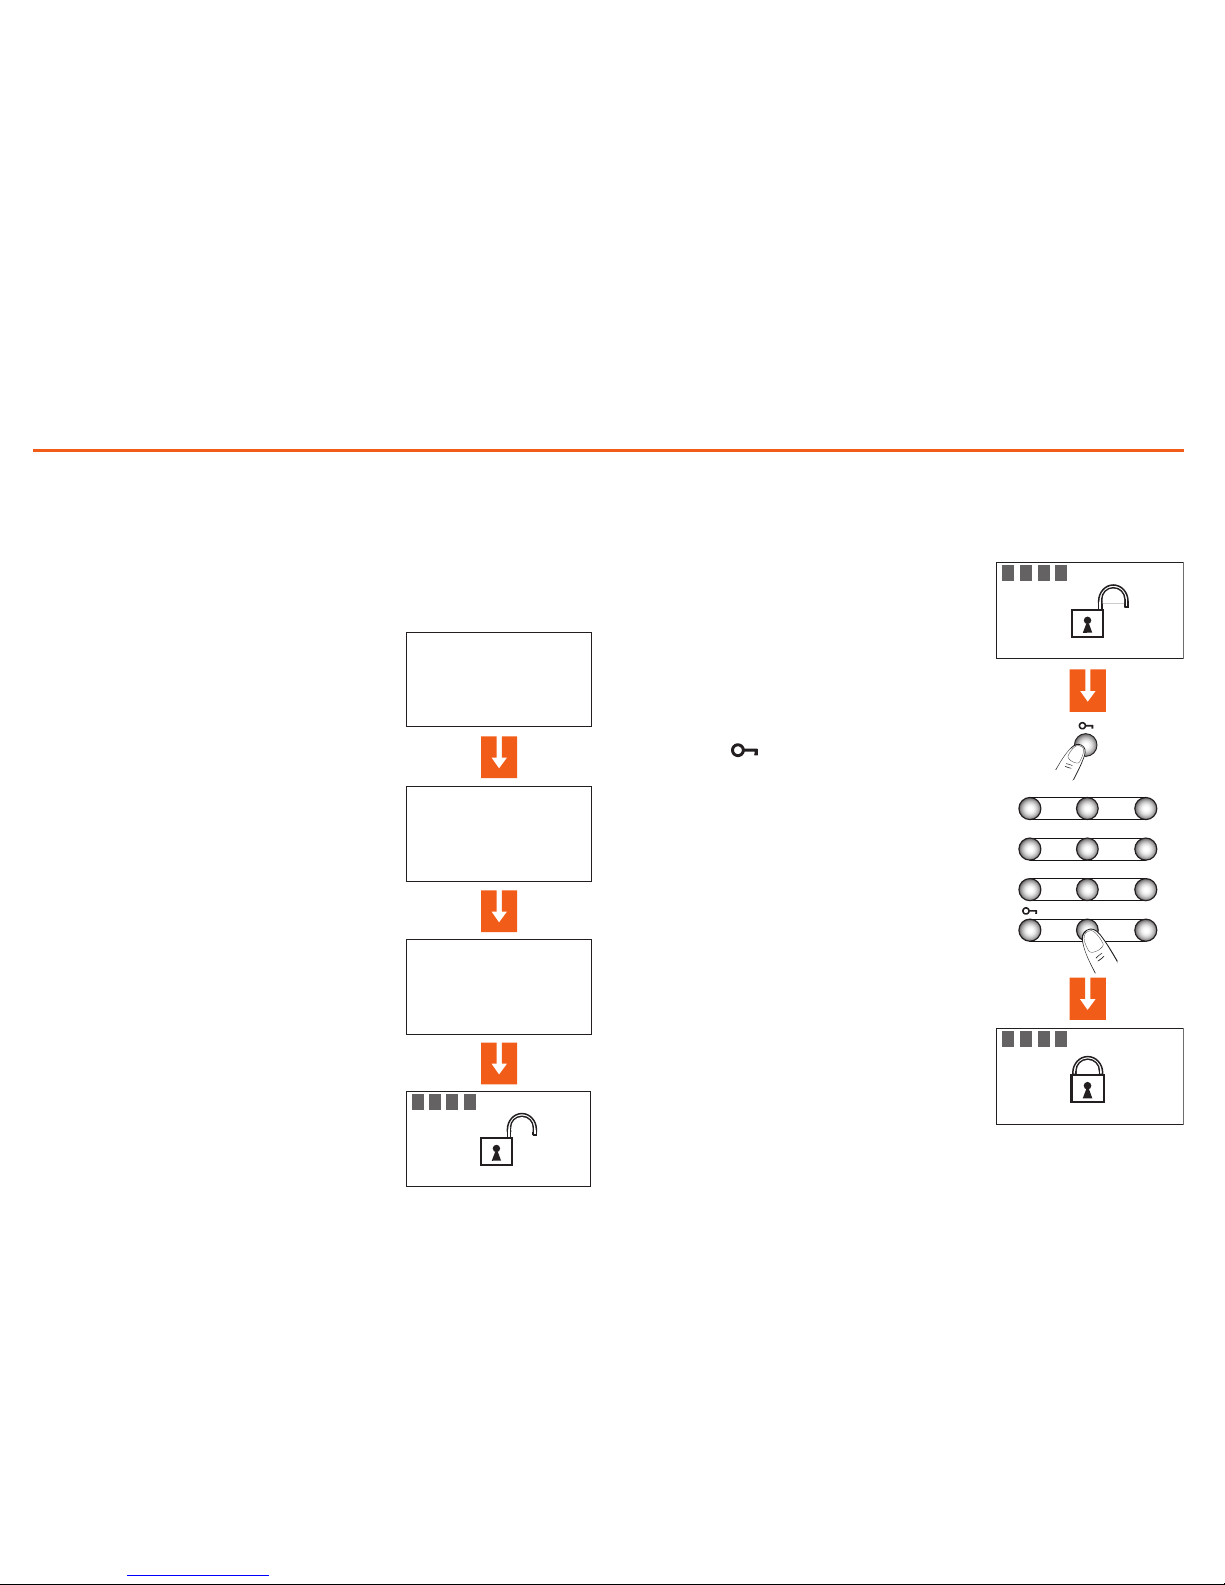
Quando l’antifurto è disinserito,
al centro del display compare un
lucchetto aperto
Sul display comparirà un lucchetto
chiuso, se la diusione sonora è abilitata
sentirai il messaggio vocale “inserito”;
esegui la medesima operazione per
disinserire l’antifurto
Premi il tasto
Digita il codice utente (di base 00000) o
un codice numerico abilitato (se digiti
un codice errato, dopo il terzo tentativo
la tastiera si blocca per circa 1 minuto)
Inserisci – disinserisci l'antifurto ■
Con il codice utente ✔
1 2 3 4
25/02/08 12:23
1 2 3 4
25/02/08 12:23
1
2
56
3
4
7
0
89
P
Accesso alle funzioni con occultamento ■
abilitato
La funzione Occultamento nasconde la visualizzazione dello stato dell'impianto a chi non è in possesso del codice utente o di un transponder
abilitato.
Codice/Chiave
*
Codice/Chiave
*****
1 2 3 4 - - - - - - - -
25/05/06 12:23
MY HOME
Per accedere al menù dell'inseritore
premi il tasto
OK
Digita il codice utente (di base 00000)
o un codice numerico abilitato oppure
avvicina un transpoder abilitato al
lettore entro 4 secondi.
Se il codice è corretto ottieni l'accesso
alla pagina iniziale, se entro 10 secondi
non viene premuto alcun tasto si
riattiverà la schermata di occultamento
Se la funzione Occultamento è attiva sul
display appare il logo My Home
Page 13
Funzionamento 2
13
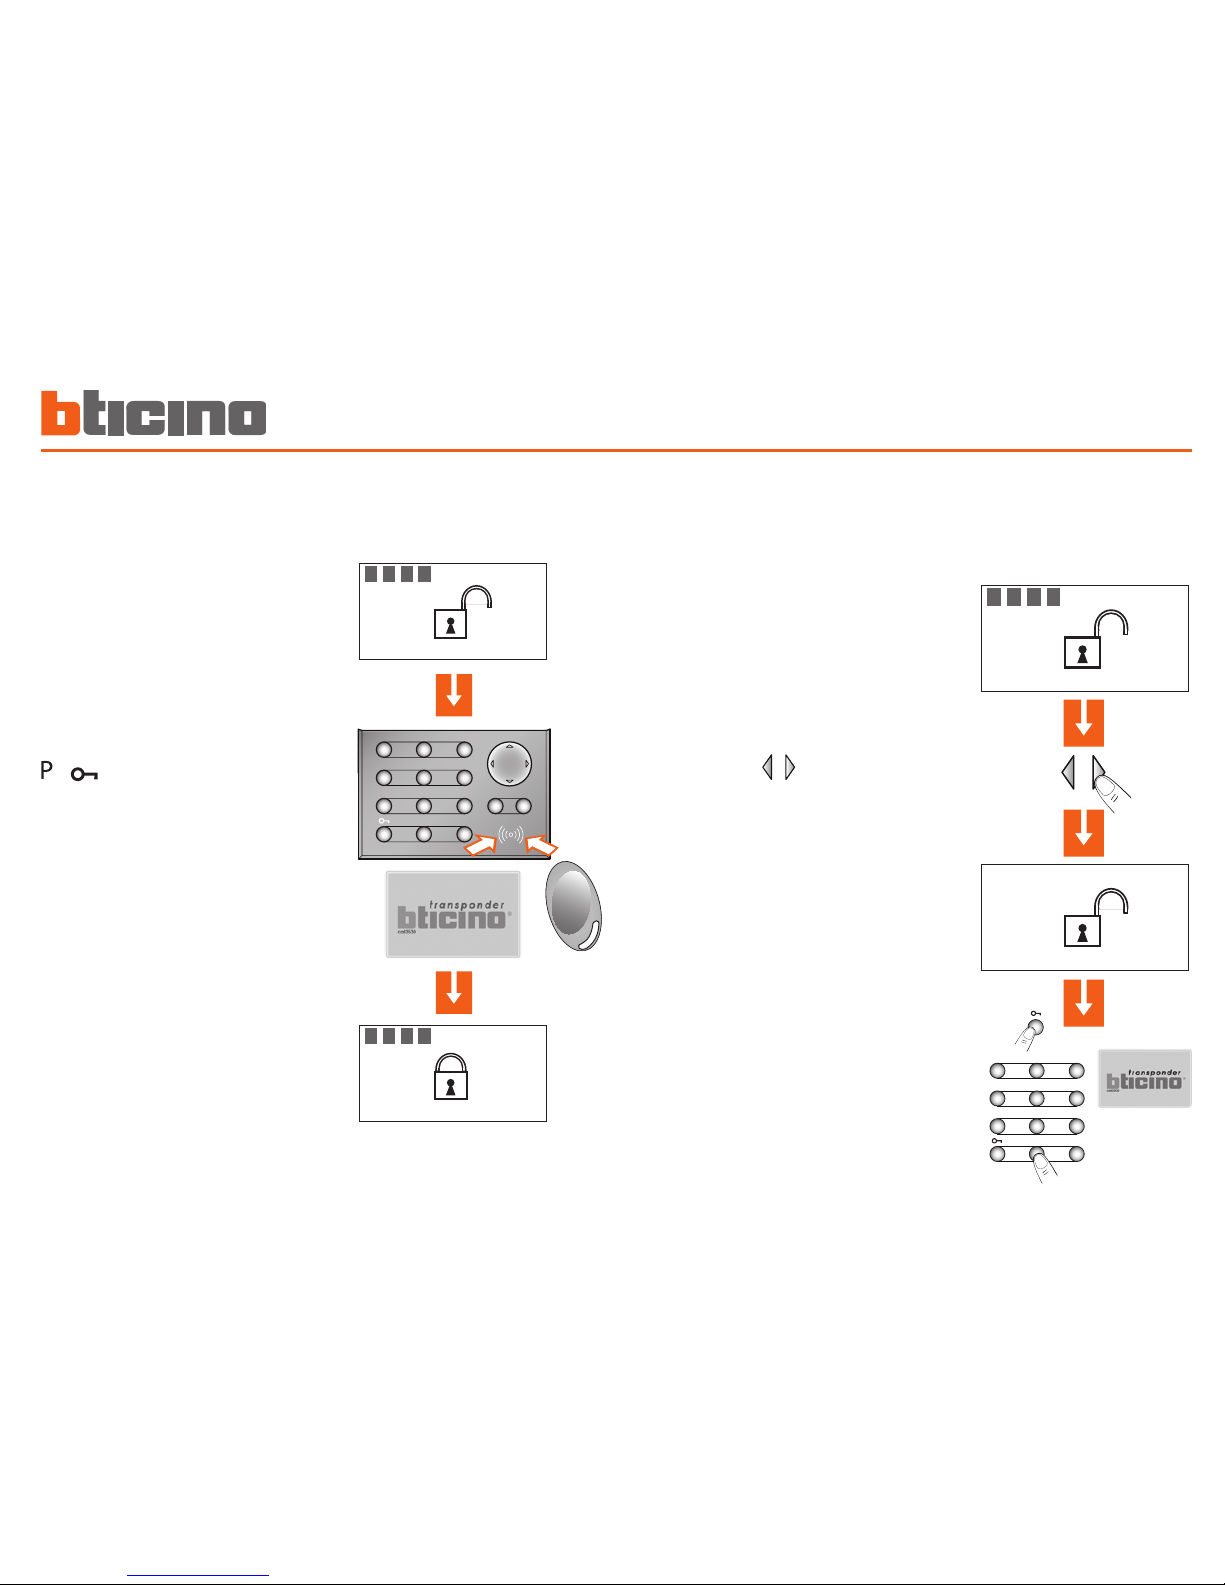
Conferma la scelta utilizzando
il codice utente, una chiave
transpoder o un codice numerico
Quando l’antifurto è disinserito,
al centro del display compare un
lucchetto aperto
Per inserire l’antifurto premi il tasto
o sulla tastiera dell'Inseritore
ed avvicina la chiave a meno di un
centimetro dal lettore per 2 secondi
Sul display comparirà un lucchetto
chiuso, se la diusione sonora è
abilitata sentirai il messaggio vocale
“inserito”; esegui la medesima
operazione per disinserire l’antifurto
Con la chiave transponder ✔
Tramite i tasti seleziona lo
scenario voluto
Dopo la conferma verranno
attivate solamente le zone previste
nello scenario selezionato
Scenari di attivazione ■
Puoi selezionare ed attivare uno degli scenari di parzializzazione delle
zone memorizzati sulla Centrale Antifurto
1 2 3 4
25/02/08 12:23
1 2 3 4
25/02/08 12:23
1
2
56
3
4
7089
COK
P
1 2 3 4
25/02/08 12:23
Scenario notte
25/02/08 12:23
1
2
56
3
4
7089
P
Page 14
Funzionamento2
14
In qualsiasi momento puoi scegliere di disattivare (o riattivare) una o più
zone, questo ti permette di personalizzare il funzionamento dell’impianto
antifurto secondo le tue esigenze.
Se ad esempio desideri la protezione dalle intrusioni anche quando sei
in casa, puoi disattivare le zone relative ai sensori ad infrarossi lasciando
attive le zone perimetrali (porta d’ingresso e nestre), ciò ti permette di
muoverti liberamente all’interno della tua casa senza provocare allarmi
non rinunciando alla sicurezza.
Le zone in cui è suddiviso il tuo impianto antifurto appaiono sulla prima
riga del display.
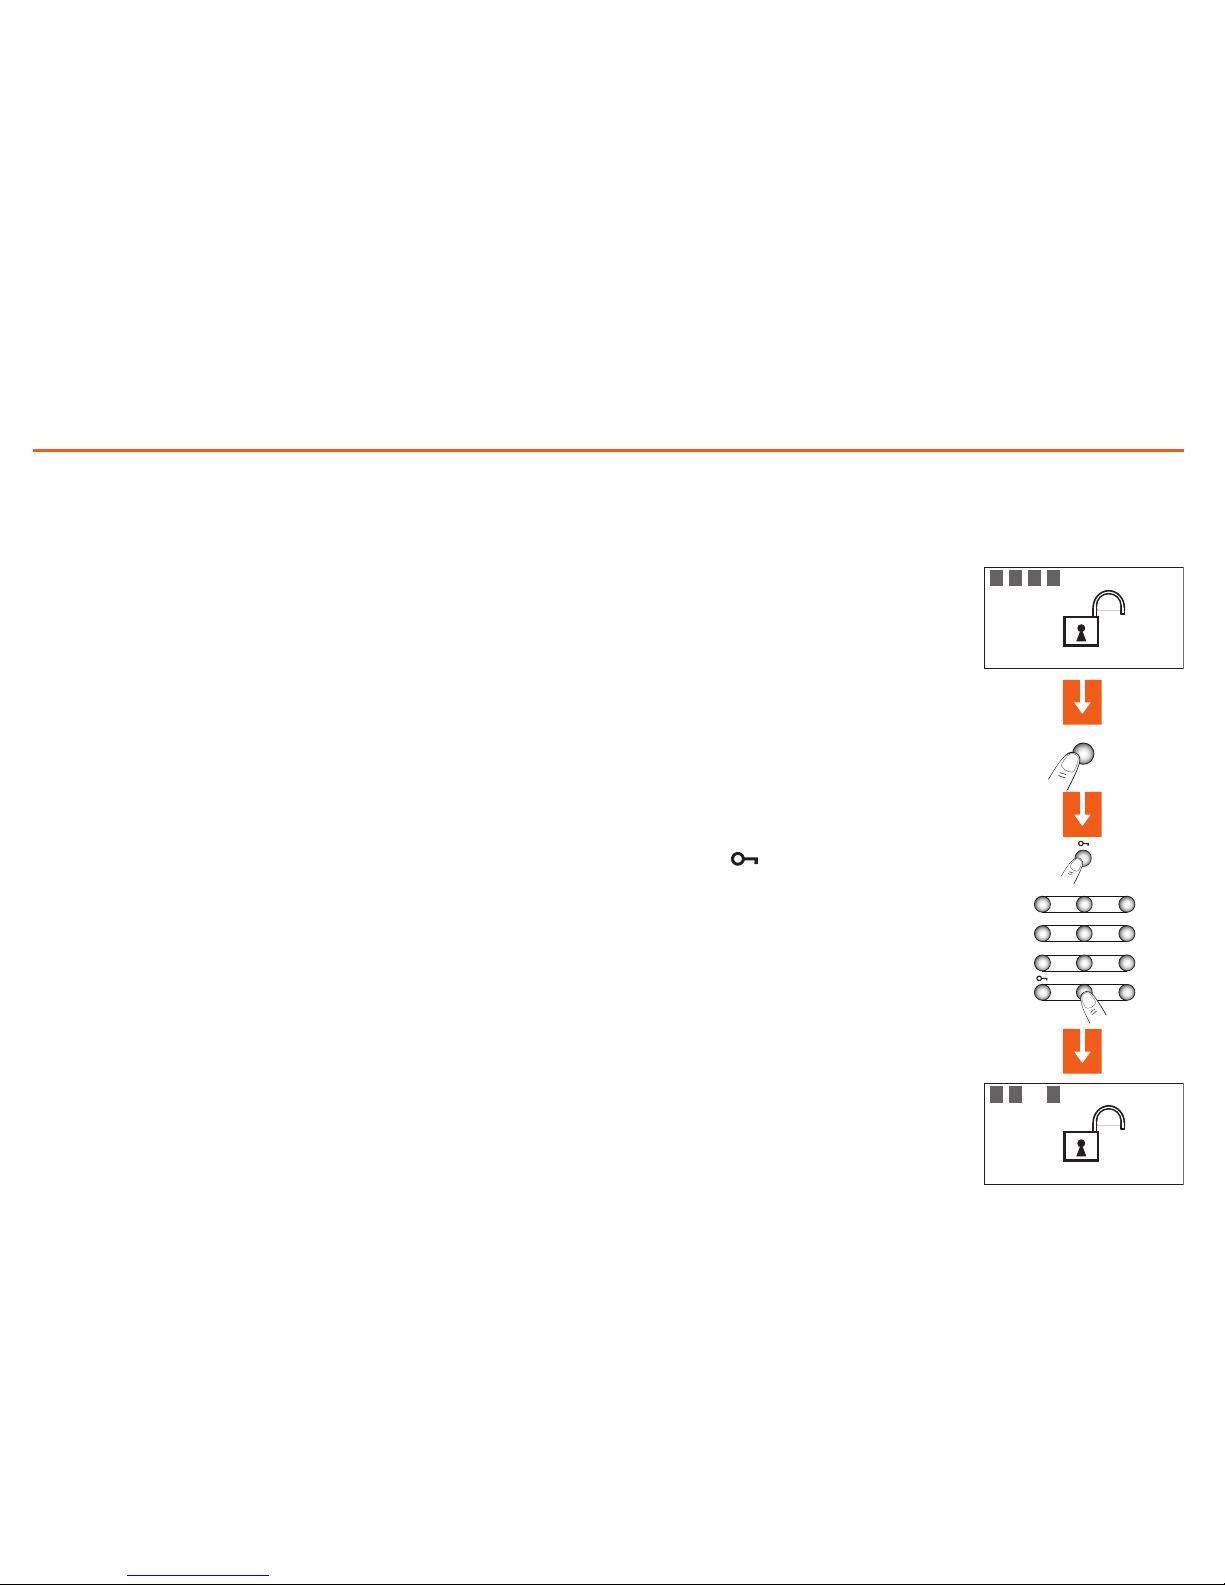
Le zone attive sono evidenziate da un riquadro scuro;
nell’esempio che segue, l’impianto è composto da 4 zone tutte attive;
viene disattivata la zona 3.
Attiva – disattiva le zone ■
Le zone dell’impianto sono tutte
attive (es. 1-2-3-4)
Per disattivare la zona 3, premi il
tasto corrispondente sulla tastiera
della Centrale
Sul display la zona 3 appare senza il
riquadro scuro (disattivata)
Premi il tasto
Digita il codice utente (di base 00000)
o un codice numerico abilitato
Con il codice utente ✔
1 2 3 4
25/02/08 12:23
1 2 3 4
25/02/08 12:23
3
1
2
56
3
4
7089
P
Page 15
Funzionamento 2
15
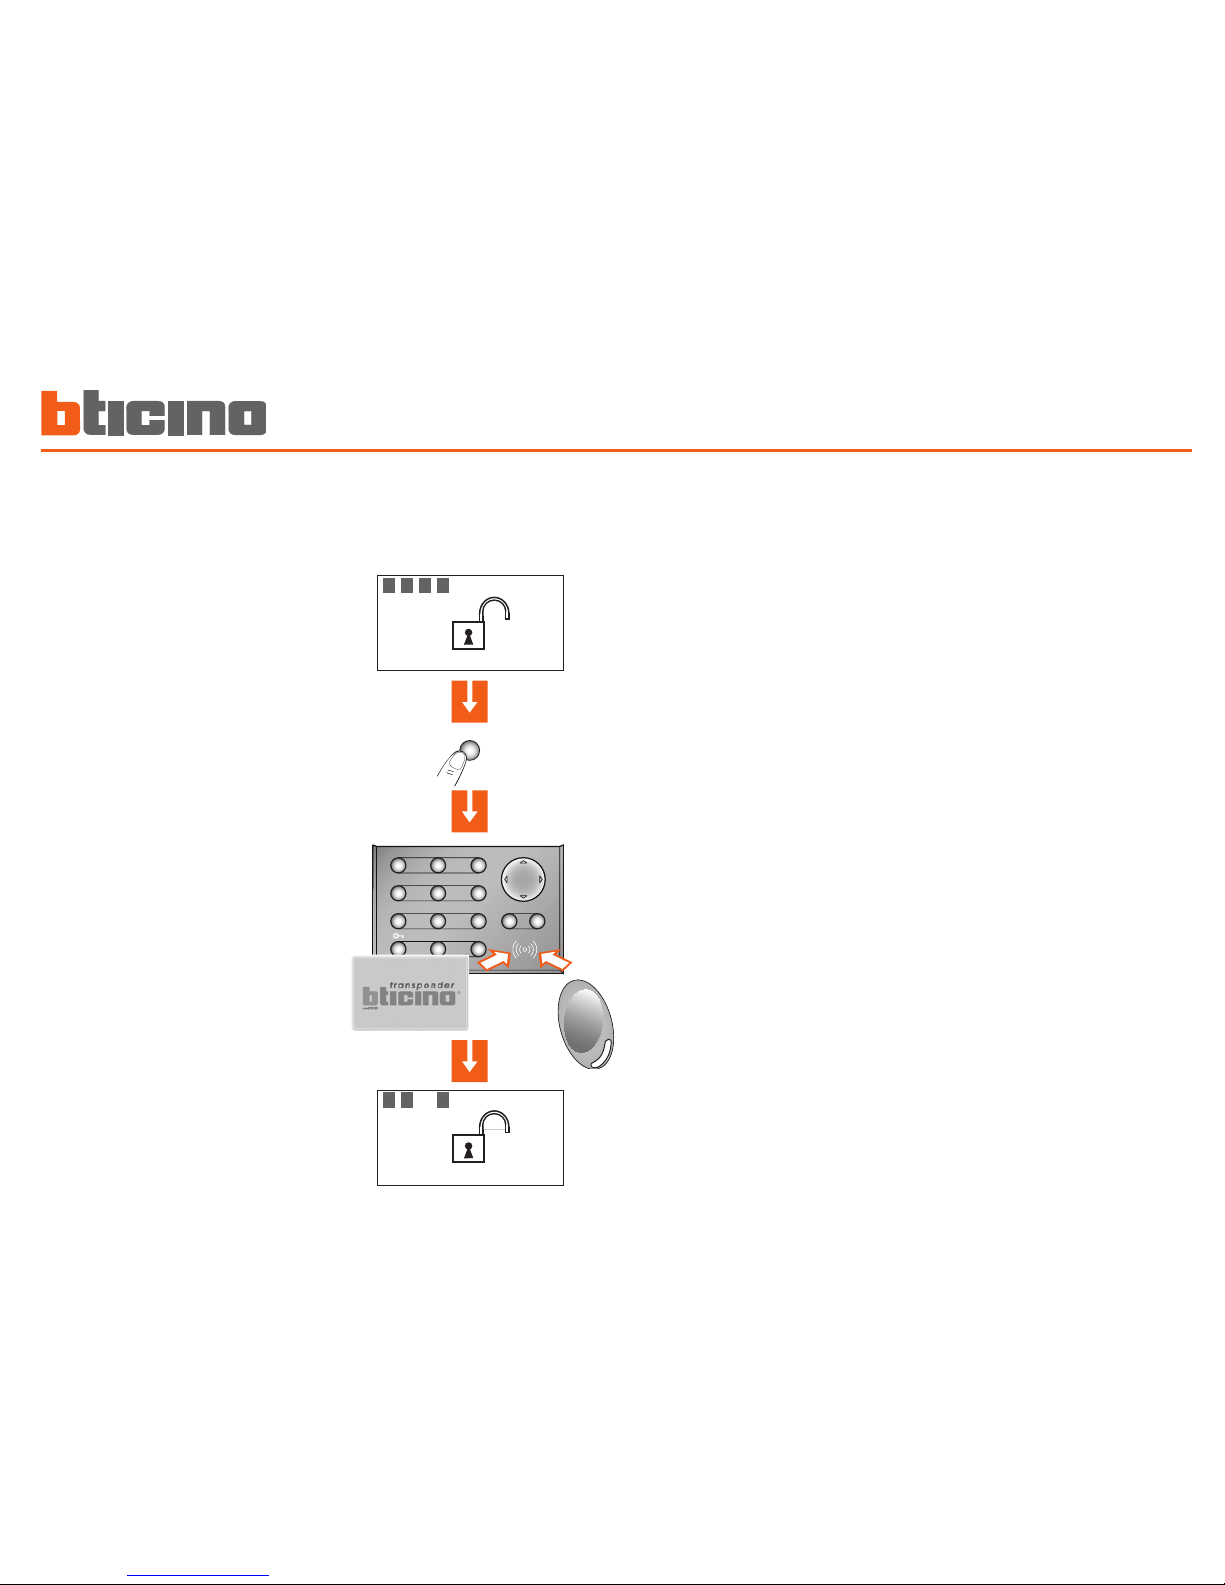
Per disattivare la zona 3, premi il
tasto corrispondente sulla tastiera
della Centrale
Sul display la zona 3 appare senza il
riquadro scuro (disattivata)
Conferma l’operazione avvicinando un
transponder al lettore entro 5 secondi.
Le zone dell’impianto sono tutte
attive (es. 1-2-3-4)
Con la chiave transponder ✔
1 2 3 4
25/02/08 12:23
1 2 3 4
25/02/08 12:23
1
2
56
3
4
7089
COK
P
3
Page 16
Funzionamento2
16
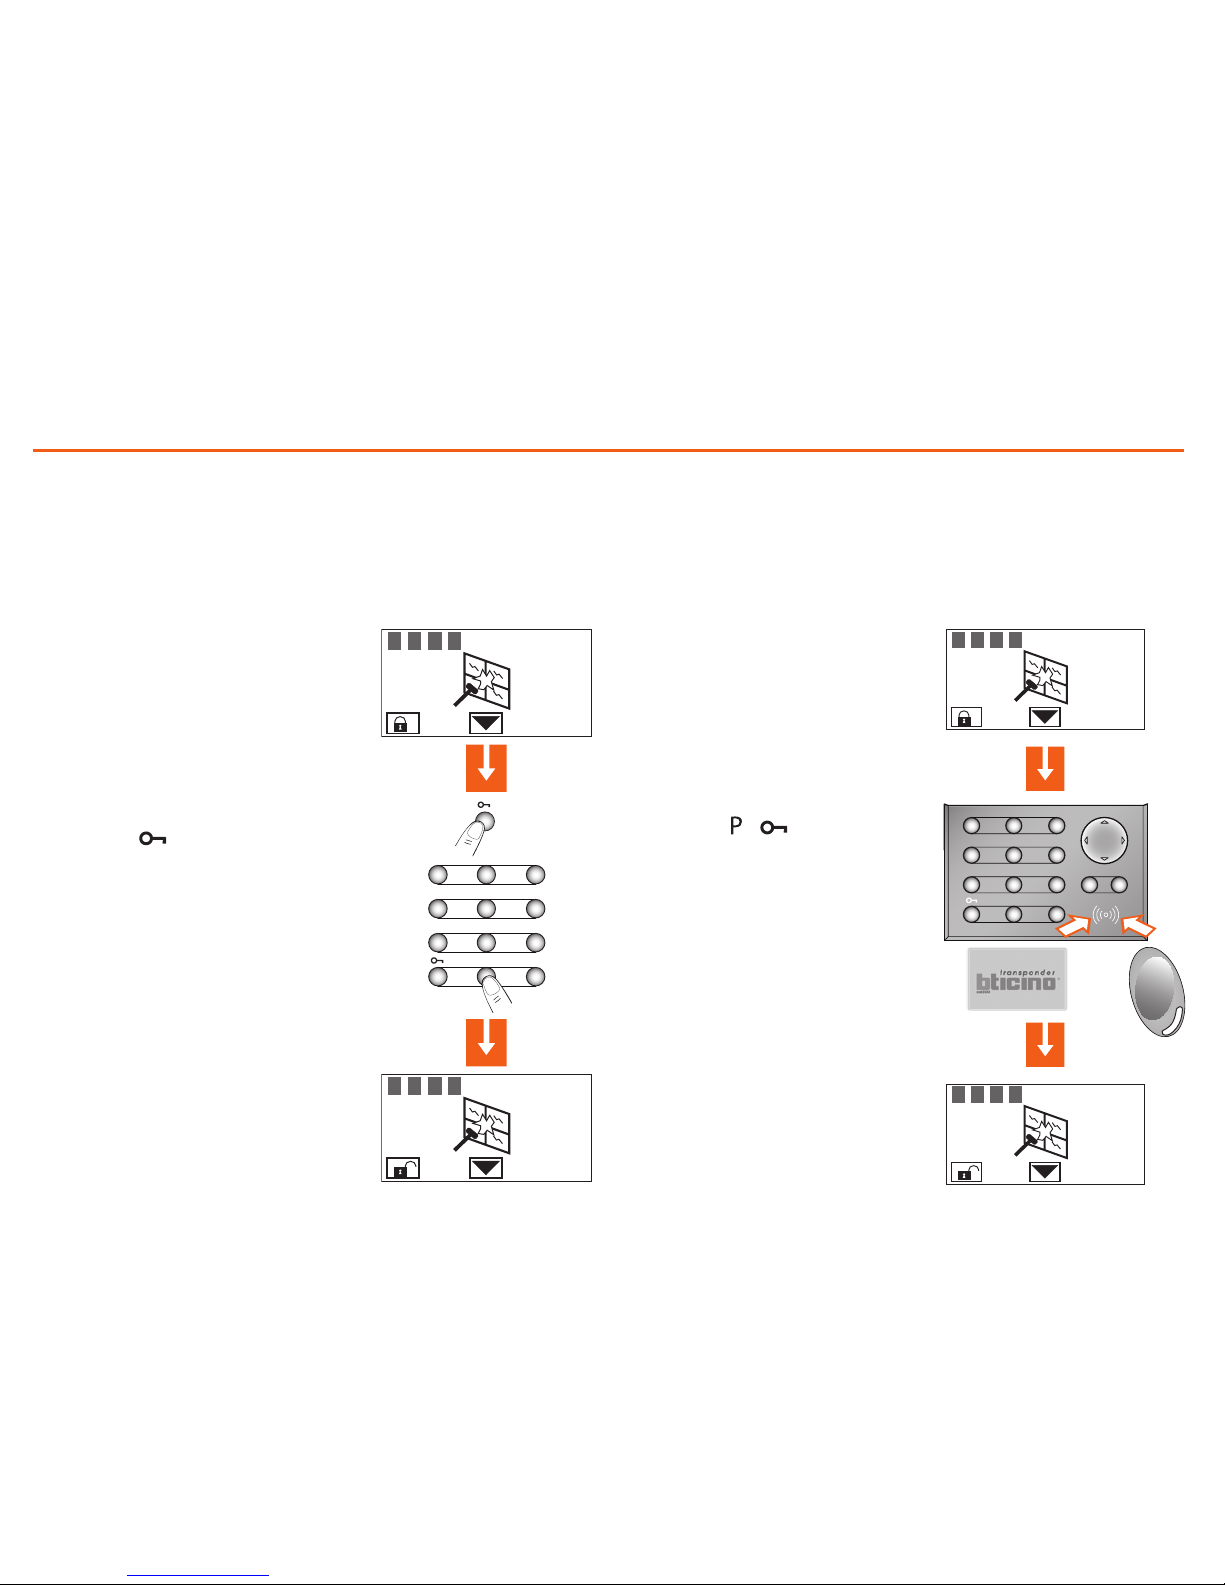
Interrompi il suono della sirena ■
Se durante la tua presenza scatta l’allarme, puoi interrompere il suono
della sirena nei seguenti modi:
Accertati che in casa non ci siano
degli intrusi
La sirena smette di suonare e
l'impianto antifurto viene
disinserito
Premi il tasto
Digita il codice utente (di base 00000)
o un codice numerico abilitato
Con il codice utente ✔ Con la chiave transponder ✔
Premi il tasto o sulla tastiera
della Centrale ed avvicina la chiave
a meno di un centimetro dal lettore,
per 2 secondi
Accertati che in casa non ci siano
degli intrusi
1 2 3 4
1 2 3 4
1
2
56
3
4
7
0
89
P
1 2 3 4
1 2 3 4
1
2
56
3
4
7089
COK
P
La sirena smette di suonare e
l'impianto antifurto viene disinserito
Page 17
Funzionamento 2
17
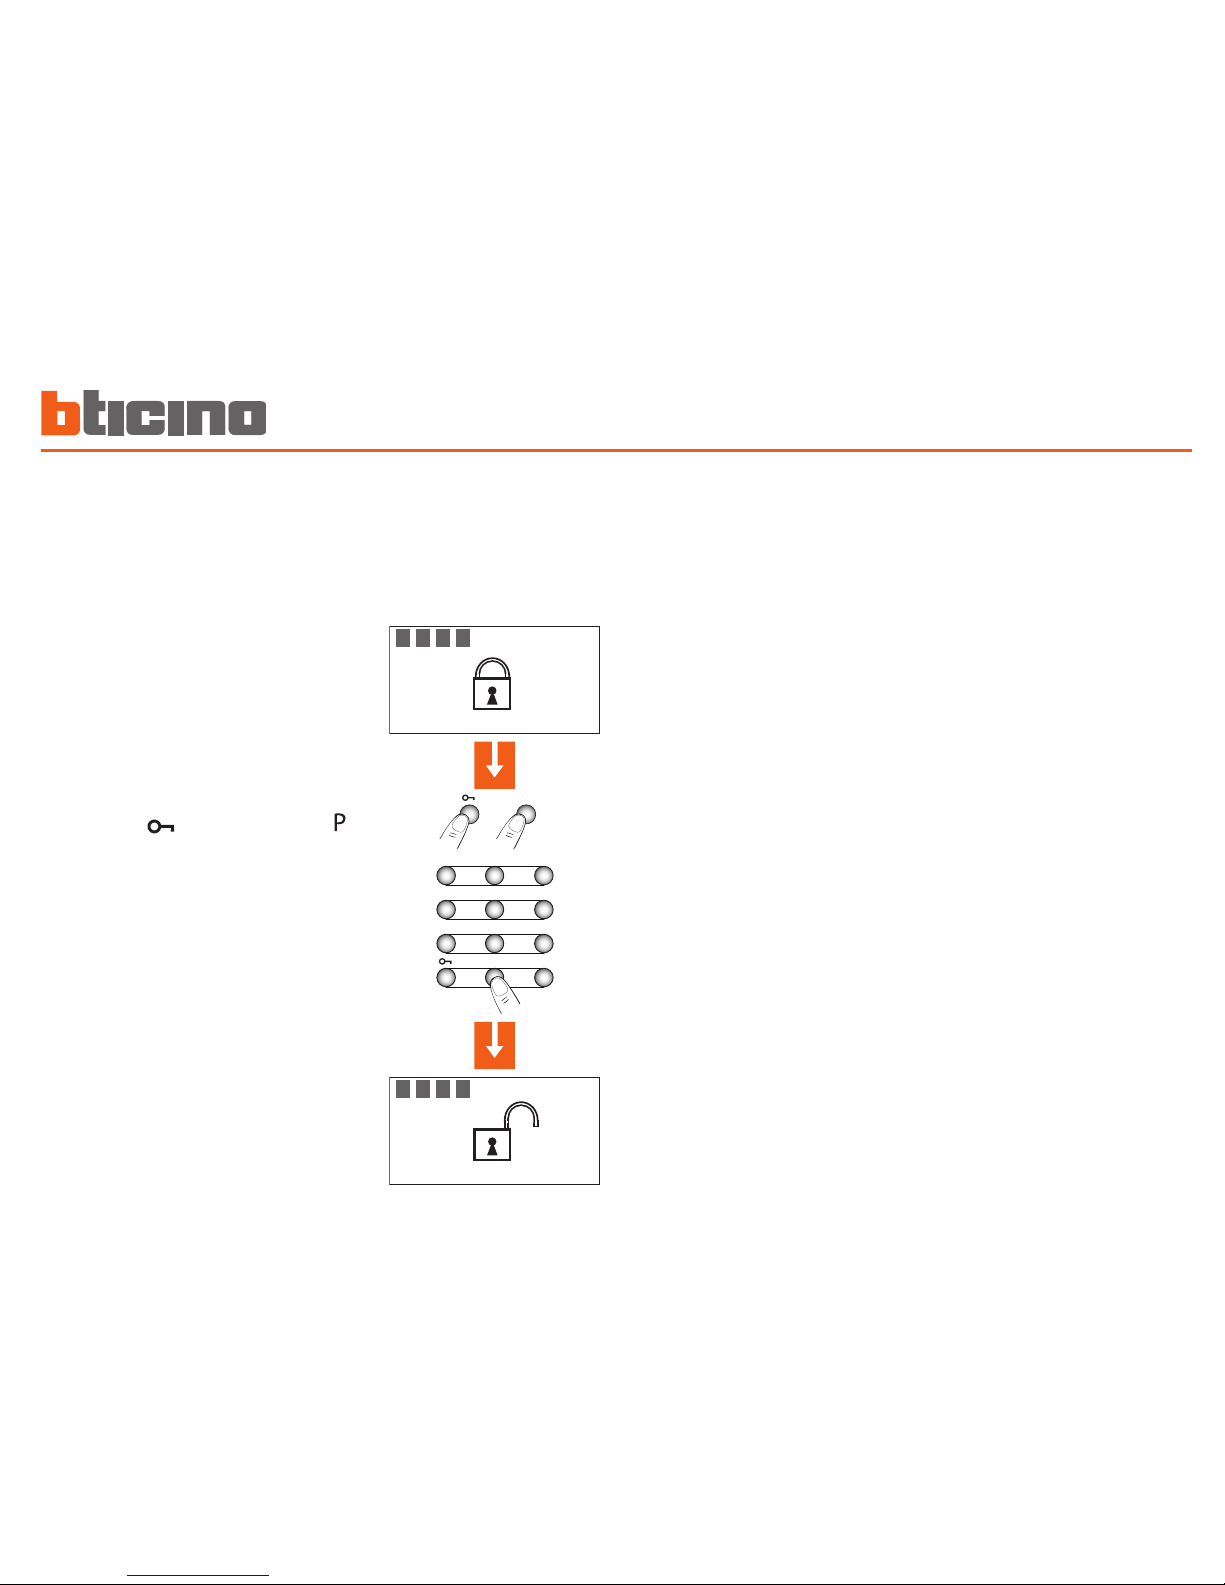
Attiva l'allarme antirapina ■
In caso di rapina puoi contemporaneamente disinserire l'antifurto ed
inviare le chiamate d'emergenza ai numeri memorizzati sulla Centrale
L'antifurto è disinserito, la Centrale inizia
il ciclo delle chiamate d'emergenza in
modo totalmente silenzioso
Premi il tasto e di seguito il tasto
Digita il codice utente (di base 00000)
o un codice numerico abilitato
1
2
56
3
4
7
0
89
P
P
1 2 3 4
25/02/08 12:23
1 2 3 4
25/02/08 12:23
Page 18
Funzionamento2
18
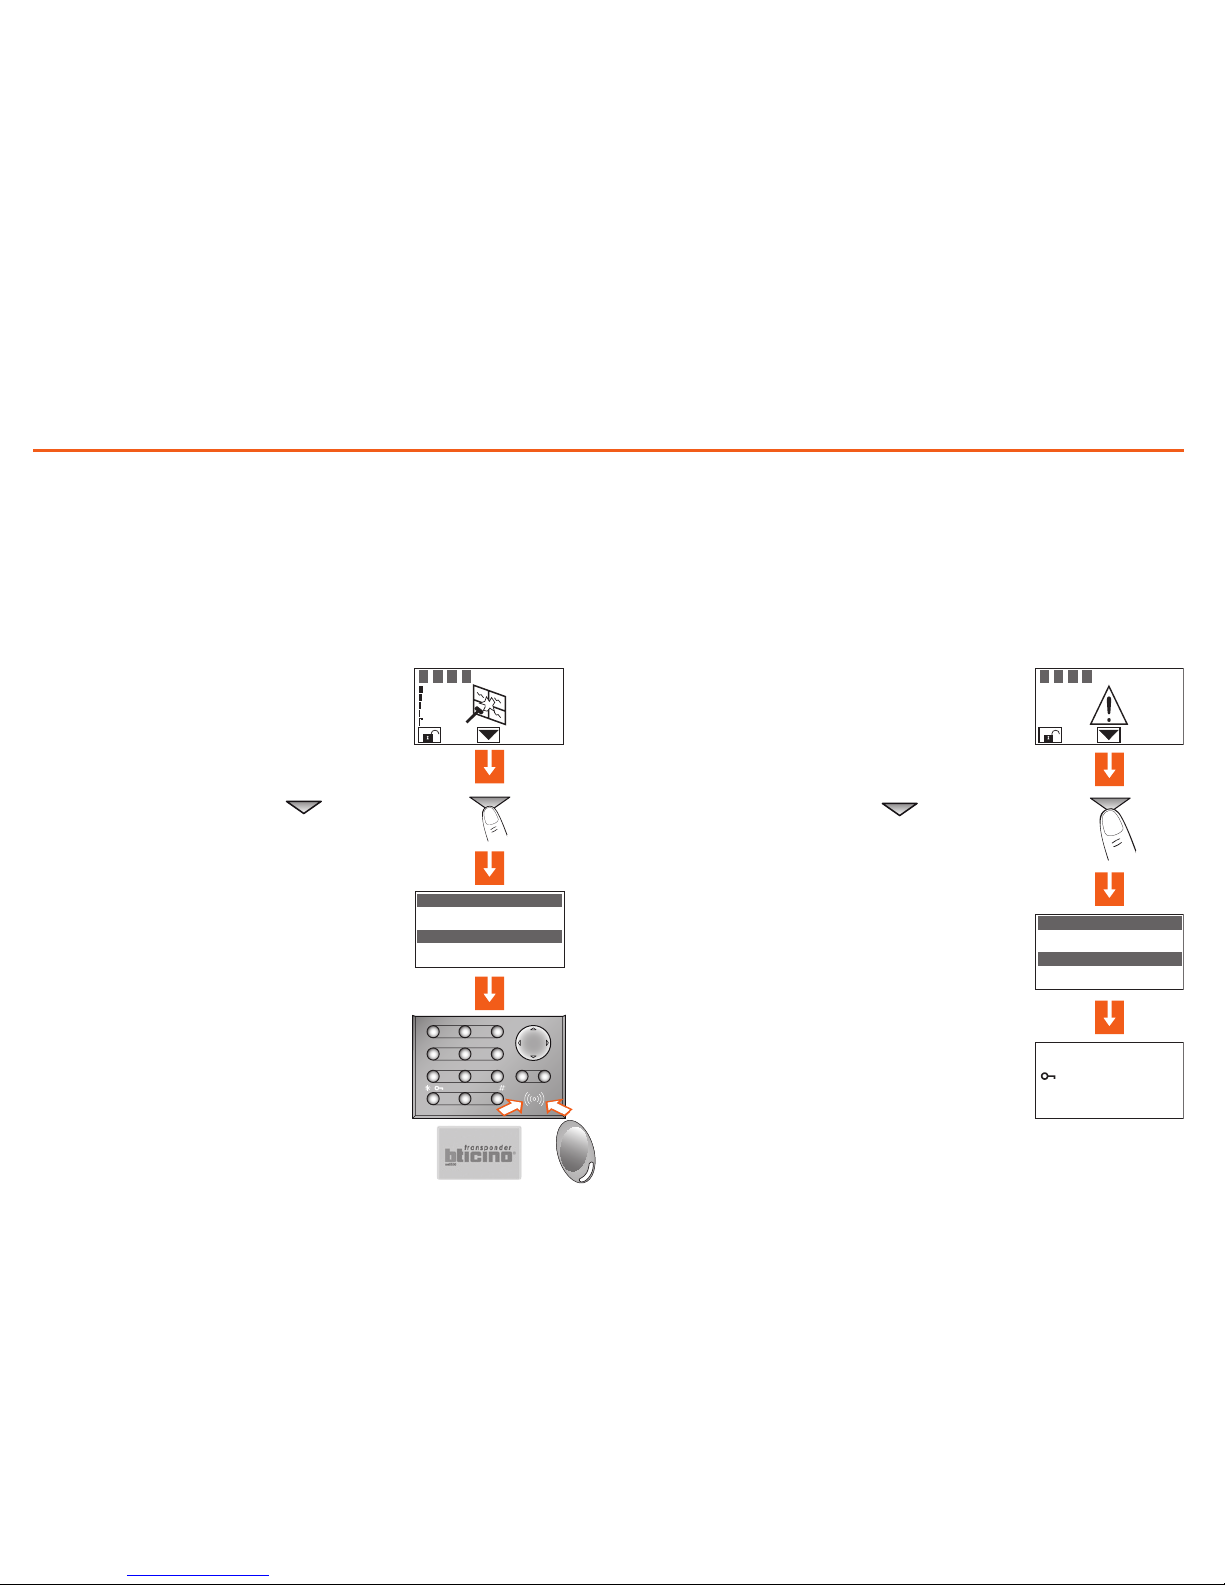
Premendo il tasto OK appare la schermata che ti
consente di resettare il singolo allarme o eseguire
un reset totale
Per saperne di più premi il tasto
Il display ti fornisce le seguenti informazioni:
- sensore e relativo nome (nestra cucina)
- tipo di allarme (intrusione)
- stato dell’antifurto al momento dell’allarme
La segnalazione di allarme viene cancellata
dal display al prossimo inserimento dell’antifurto, ma rimane memorizzata nella “Memoria eventi” della Centrale antifurto.
La Centrale ha rilevato un allarme...
Che tipo di allarme si è vericato? ■
Quando sul display compare una segnalazione di allarme, puoi conoscerne il tipo (intrusione, tecnico, ecc.) e il sensore che lo ha rilevato; ad ogni
sensore l’installatore avrà assegnato un nome (nestra cucina, ingresso,
ecc.) per una più facile identicazione. Per avere queste informazioni
devi premere un solo tasto.
Per saperne di più premi il tasto
Il display ti fornisce le seguenti informazioni:
- dispositivo relativo nome (telesoccorso)
- tipo di allarme (inizio tecnico)
- stato dell’antifurto al momento dell’allarme
La Centrale ha rilevato un allarme tecnico
In caso di allarme tecnico (appare il simbolo relativo), puoi conoscere il
dispositivo che ha generato l’allarme ed anche resettarlo.
MEMO ALLARMI
32: sensore IR
Finestra cucina
All. intrusione
Inserito
1 2 3 4
1
ABC
2
5
JKL6MNO
DEF
3
GHI
4
7
PQRS
0
8
TUVWXYZ
9
COK
P /
/
MEMO ALLARMI
42: ricevitore
telesoccorso
inizio tecnico
Disinserito
1 2 3 4
premere:
OK reset singolo
OK reset totale
Page 19

19
3
3 Personalizzazioni
Il menù dell'Inseritor ■ e
Accedi al menù Impostazion ■ i
Imposta la data e l'or ■ a
Regola il contrast ■ o
Disabilita il buzze ■ r
Attiva l'occultamento ■
Page 20
Personalizzazioni3
20
Il menù dell'Inseritore ■
In questo manuale si è ritenuto di illustrare le personalizzazioni che ti
potranno essere utili per l’uso corrente dell'Inseritore alle quali potrai
tranquillamente accedere senza rischiare di compromettere il corretto
funzionamento della Centrale e quindi la sicurezza di casa tua.
Ti consigliamo di consultare sempre il tuo installatore prima di eettuare
qualsiasi modica alla congurazione della Centrale che non sia tra quelle
descritte in questo manuale.
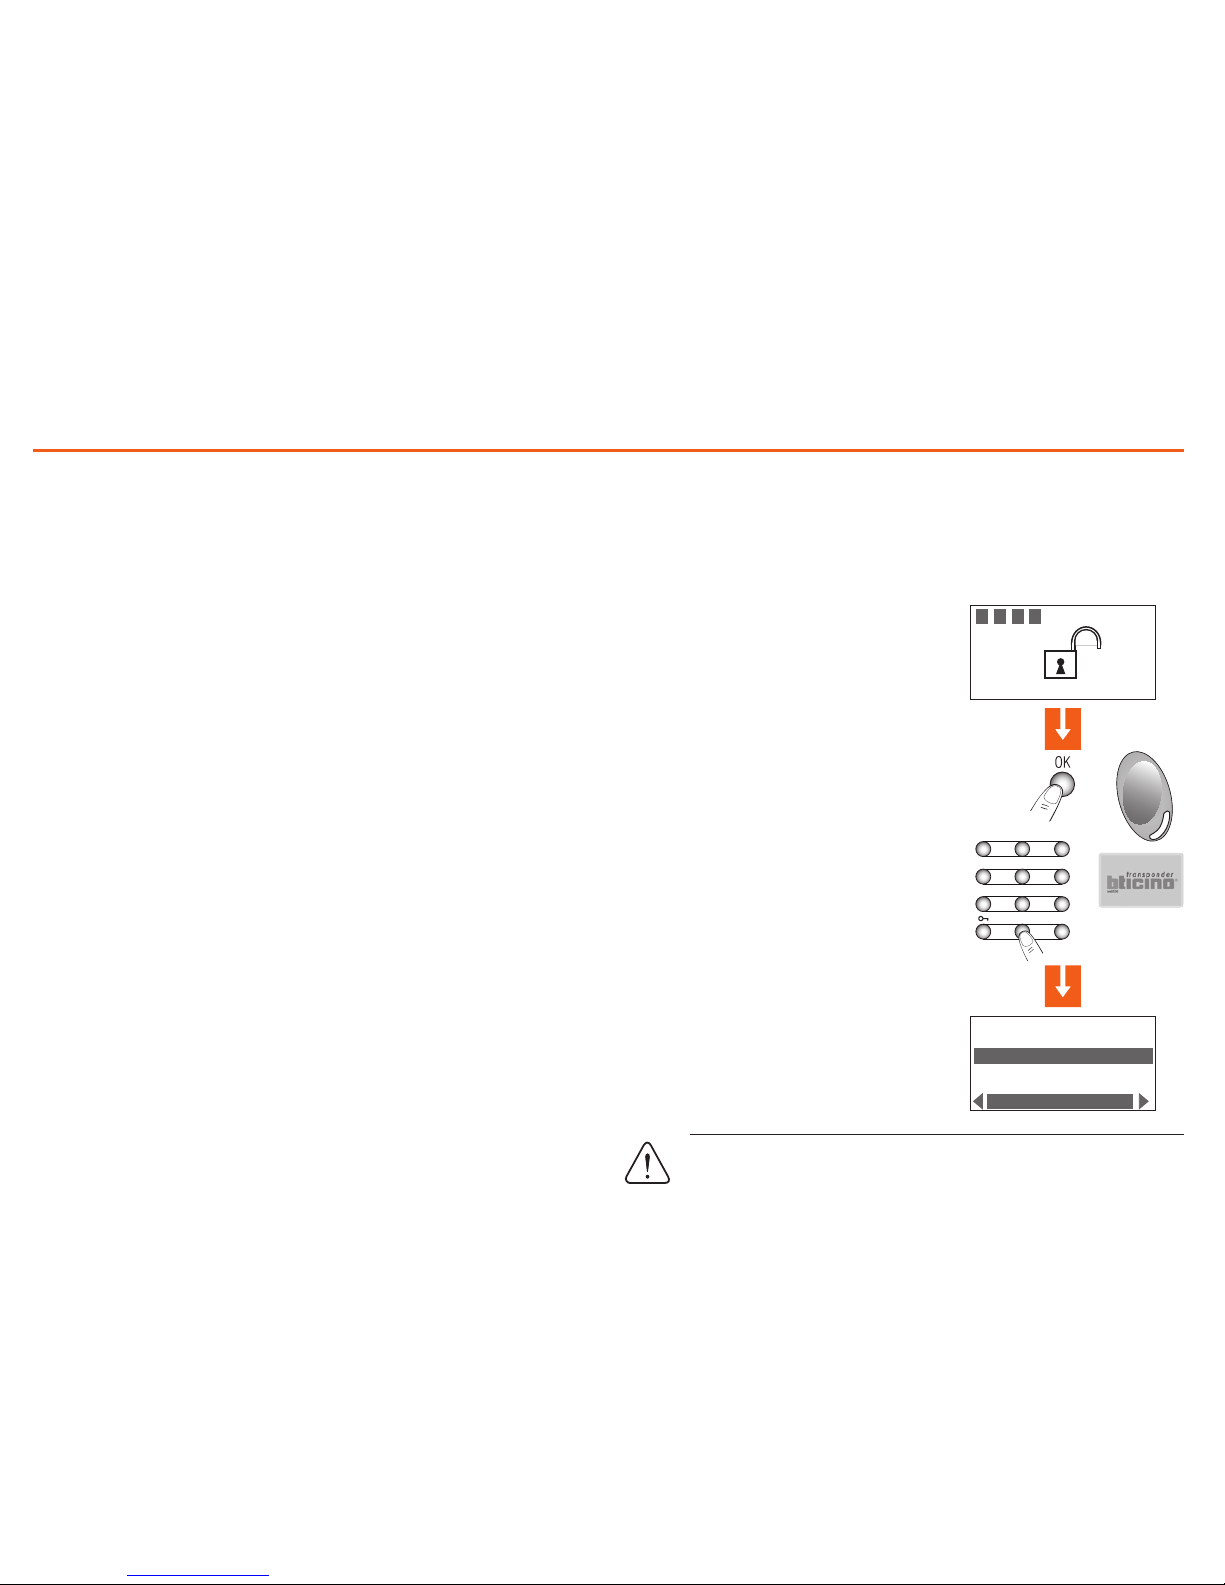
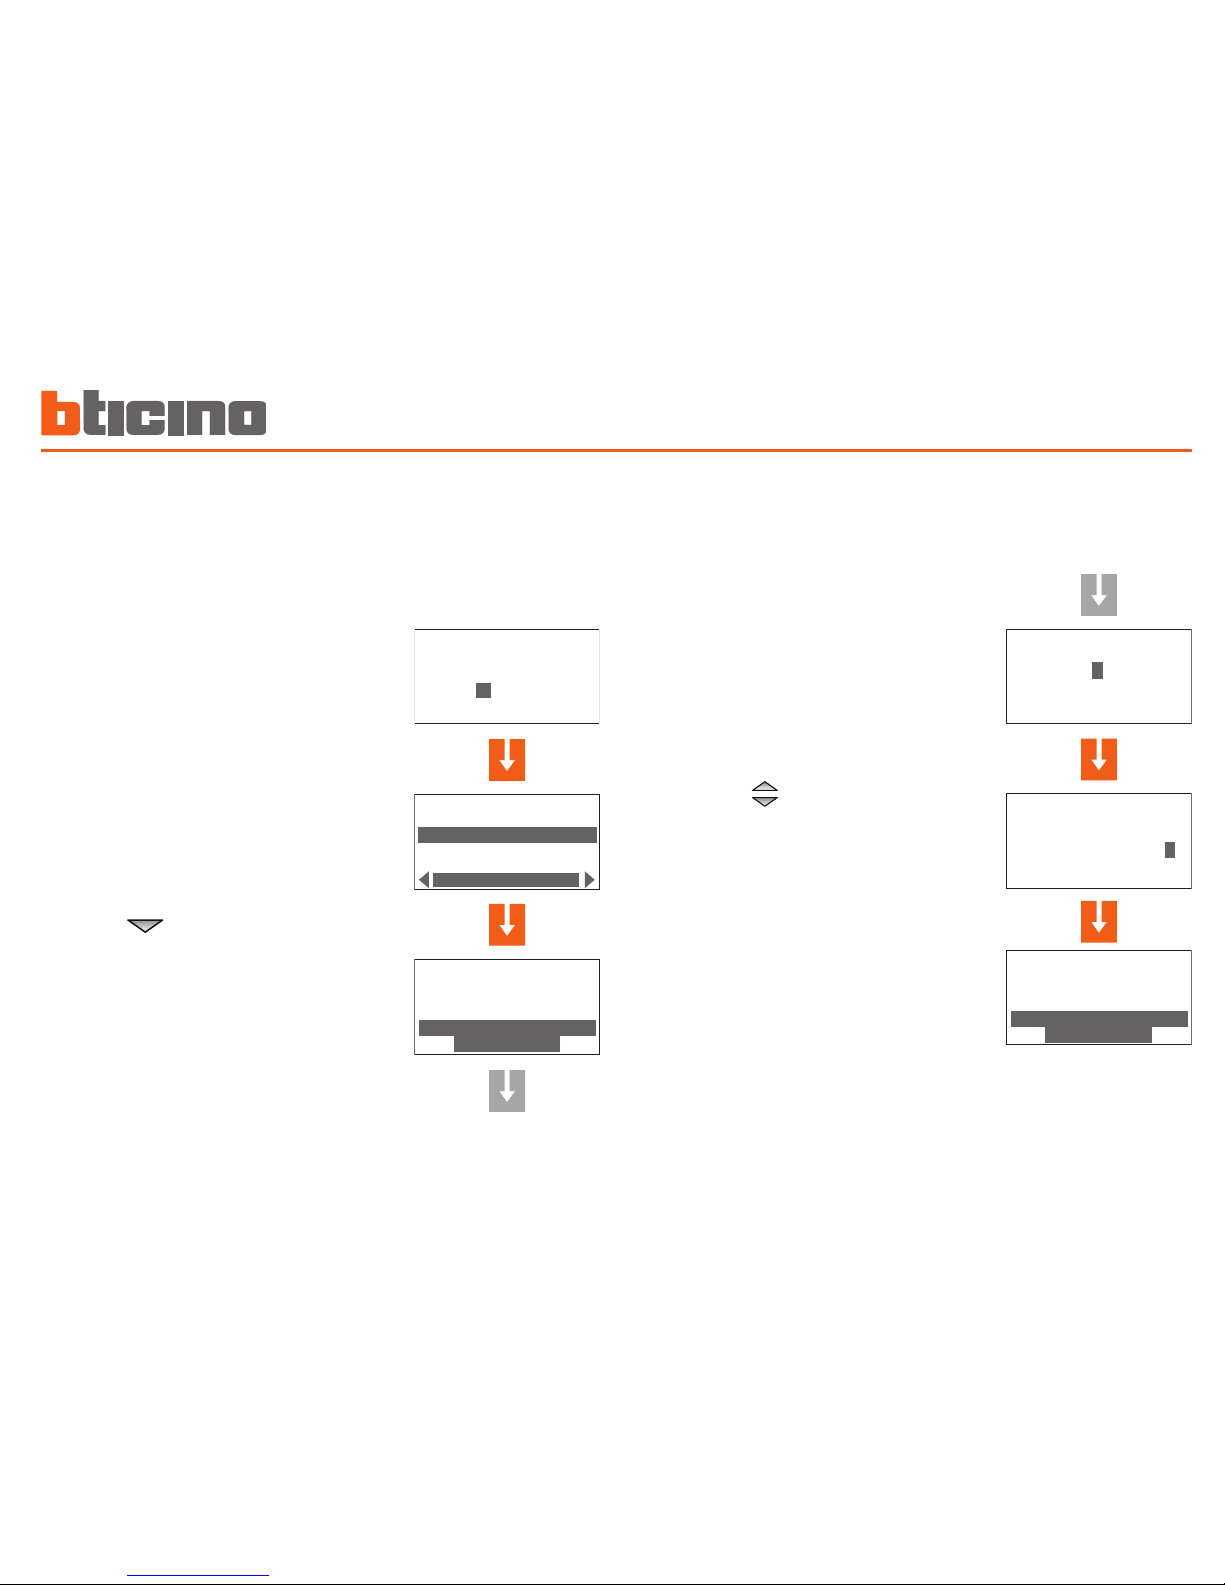
Accedi al menù Impostazioni ■
Per uscire dal menù Impostazioni attendi 30 secondi senza premere alcun tasto oppure premi il tasto C.
Premi il tasto OK
Digita il codice utente oppure utilizza
la chiave transponder come per
l’inserimento dell’antifurto
Accertati che l’impianto sia
disinserito
A questo punto puoi iniziare la
personalizzazione della centrale
Questa procedura è necessaria per accedere al menù Impostazioni:
IMPOSTAZIONI
Lingua
Indirizzo
Tipo centrale
Italiano
1 2 3 4
21/02/08 15:32
1 2 3 4
1
2
56
3
4
7089
P
Page 21
Personalizzazioni 3
21
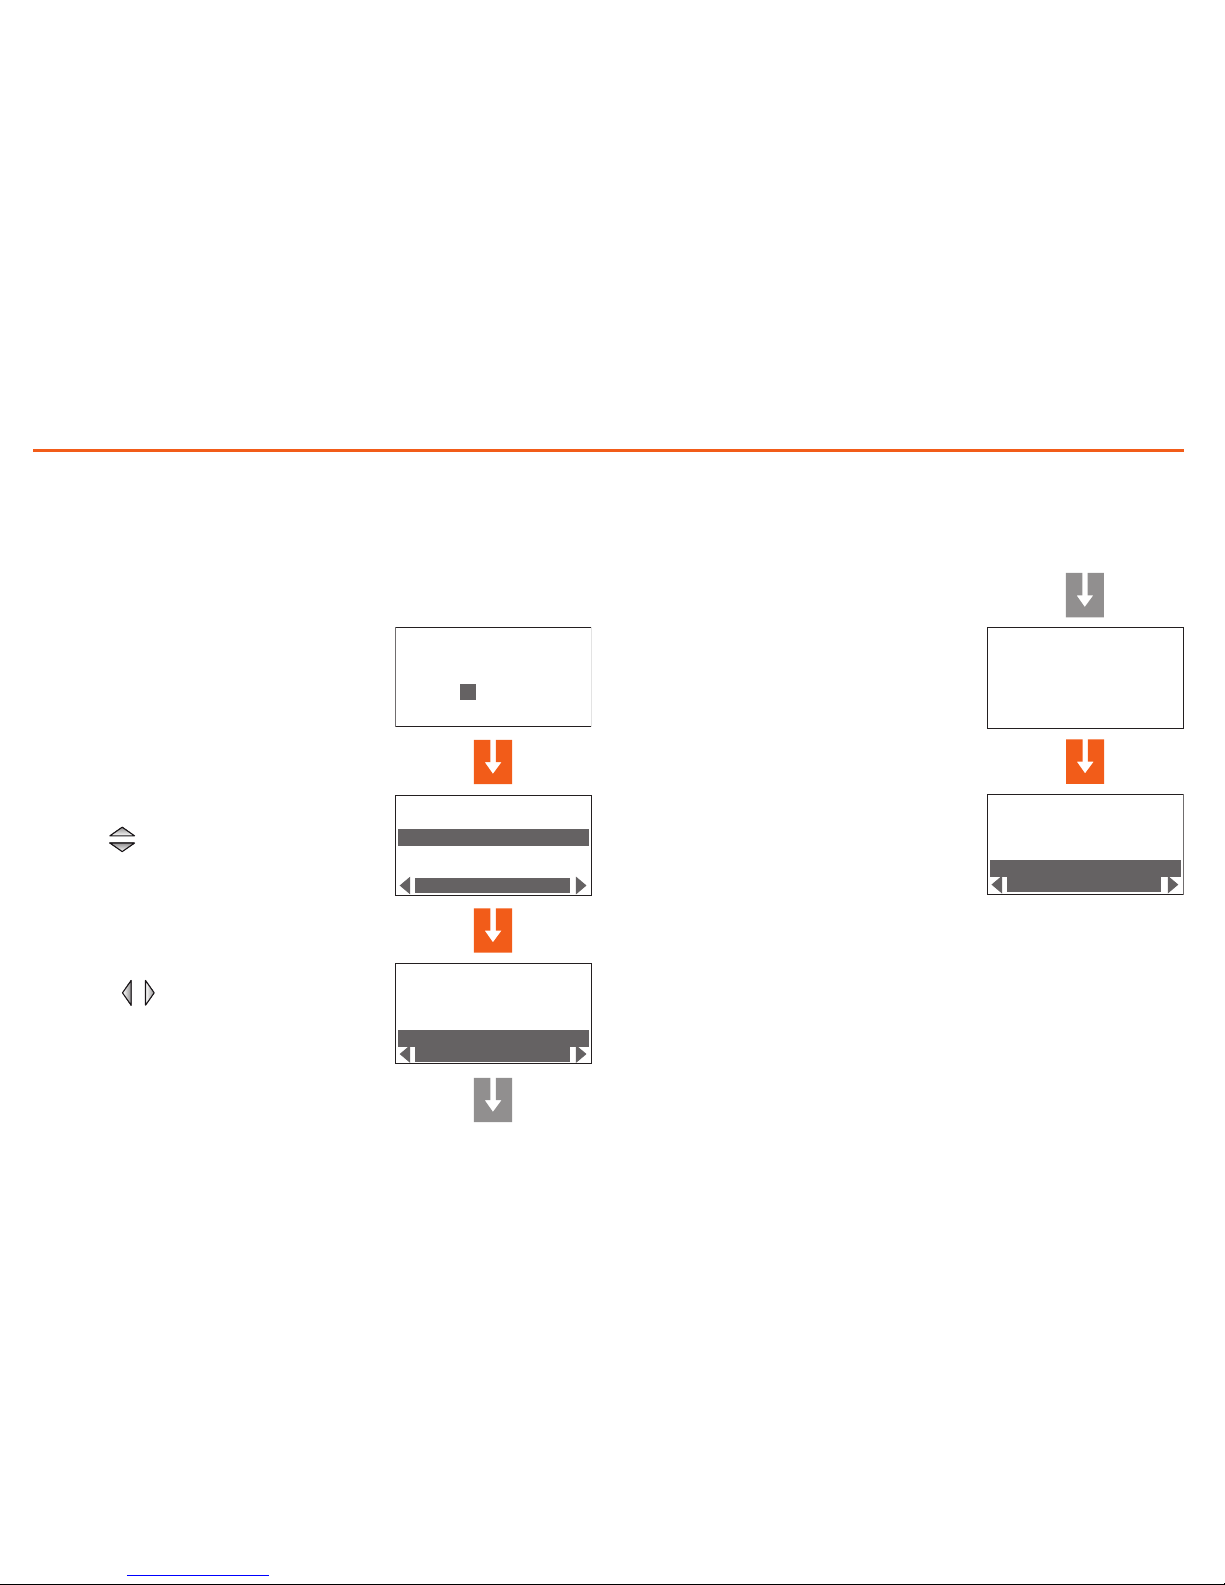
Imposta la data e l'ora ■
Impostare correttamente la data e l’ora è importante anchè si possano
tenere costantemente sotto controllo tutti gli eventi memorizzati dal
sistema.
La nuova impostazione di Data e Ora sarà valida anche per la Centrale.
Accedi al menù Impostazioni
Con il tasto seleziona Data e ora
Premi OK per confermare
Digita sulla tastiera l’ora e la data
attuali; puoi spostare il cursore
dalla riga dell’ora a quella della
data con i tasti .
Terminato l’inserimento, premi OK
per confermare
segue
IMPOSTAZIONI
Lingua
Indirizzo
Tipo centrale
Modifica
IMPOSTAZIONI
Tipo centrale
Occultamento
Data e ora
Modifica
Codice/Chiave
*
DATA E ORA
ora: 0 0:00
data: 01/01/00
sabato
01/01/00 00:00
IMPOSTAZIONI
Lingua
Indirizzo
Tipo centrale
Modifica
IMPOSTAZIONI
Tipo centrale
Occultamento
Data e ora
Modifica
IMPOSTAZIONI
Tipo centrale
Occultamento
Data e ora
Modifica
DATA E ORA
ora: 14:22
data: 25/02/08
sabato
01/01/00 00:00
Codice/Chiave
*
Page 22
Personalizzazioni3
22
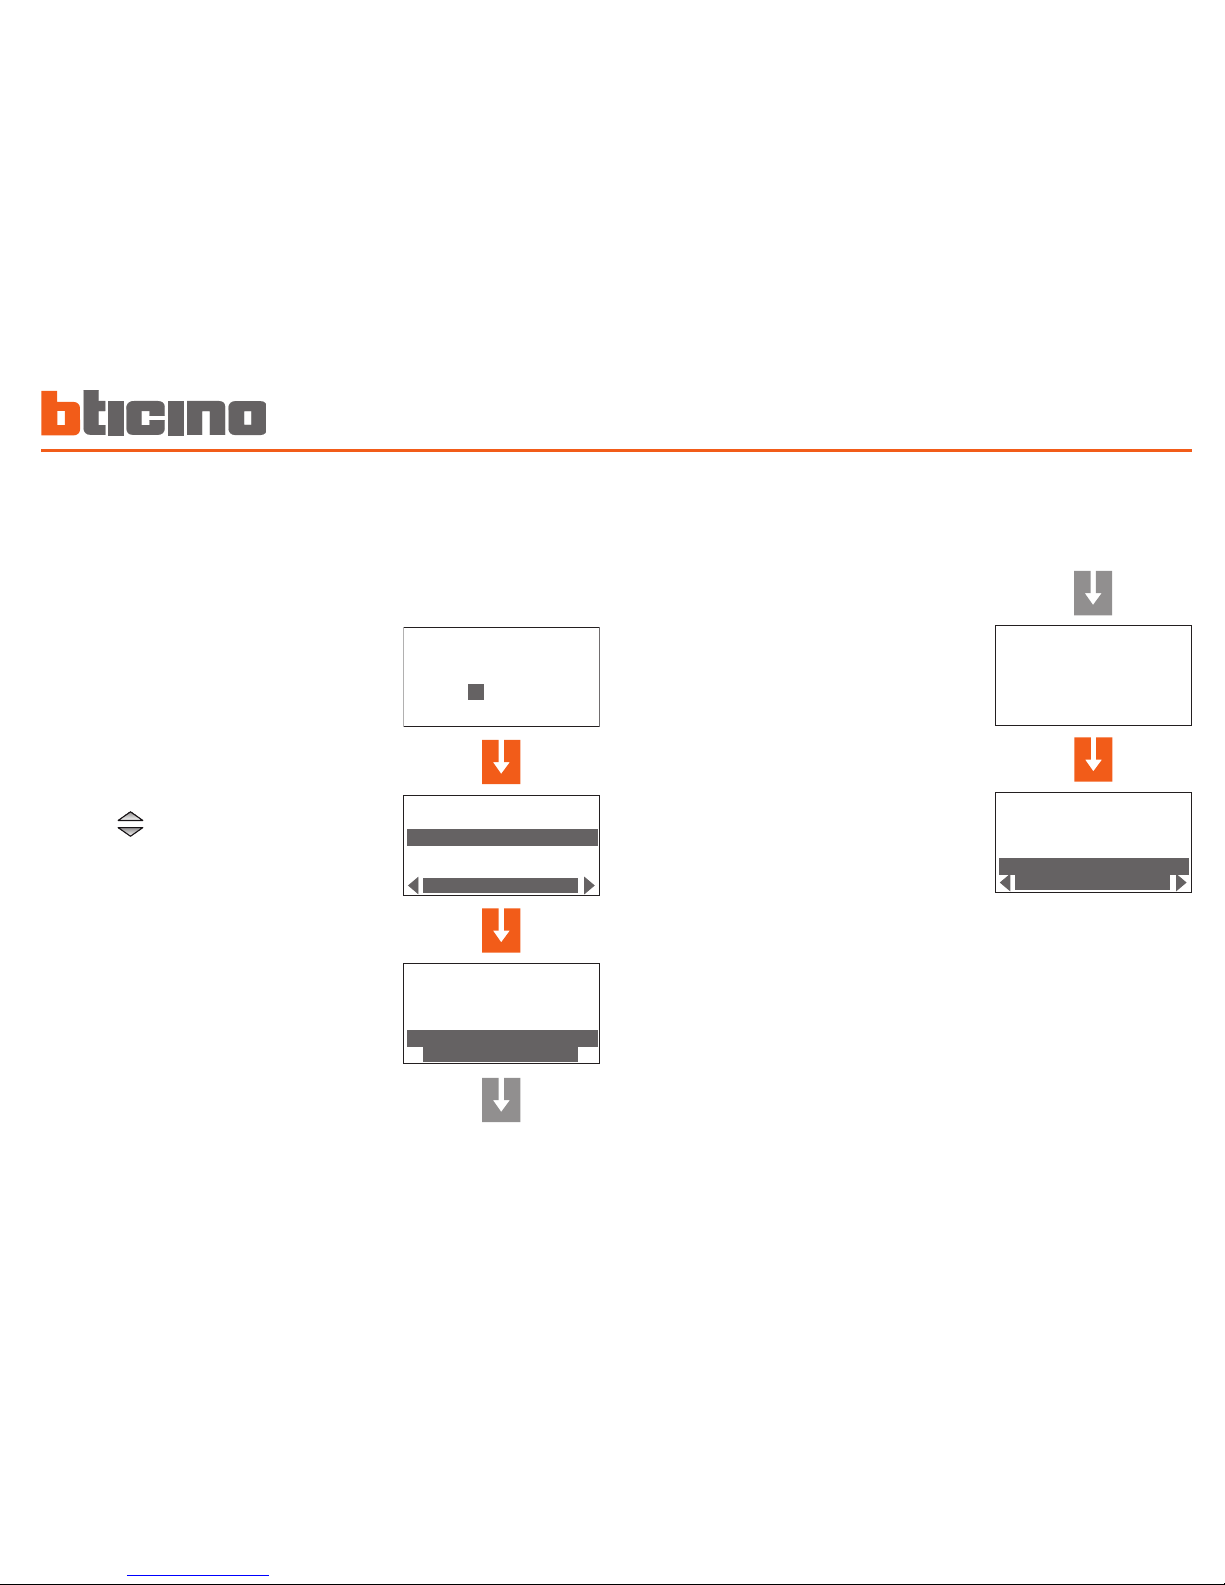
Regola il contrasto ■
Questa impostazione ti permette di regolare il contrasto del display per
una visualizzazione ottimale.
Per alcuni secondi appare la
scritta "in esecuzione", poi viene
visualizzata la pagina precedente
segue
Codice/Chiave
*
IMPOSTAZIONI
Lingua
Indirizzo
Tipo centrale
Italiano
IMPOSTAZIONI
Occultamento
Data e ora
Contrasto
--- LCD +++
in esecuzione...
Codice/Chiave
*
IMPOSTAZIONI
Lingua
Indirizzo
Tipo centrale
Italiano
IMPOSTAZIONI
Occultamento
Data e ora
Contrasto
--- LCD +++
IMPOSTAZIONI
Occultamento
Data e ora
Contrasto
--- LCD +++
Accedi al menù Impostazioni
Con i tasti seleziona
Contrasto
Premi OK per confermare
Con i tasti eettua la
regolazione
La nuova impostazione del
contrasto è stata memorizzata
Page 23
Personalizzazioni 3
23
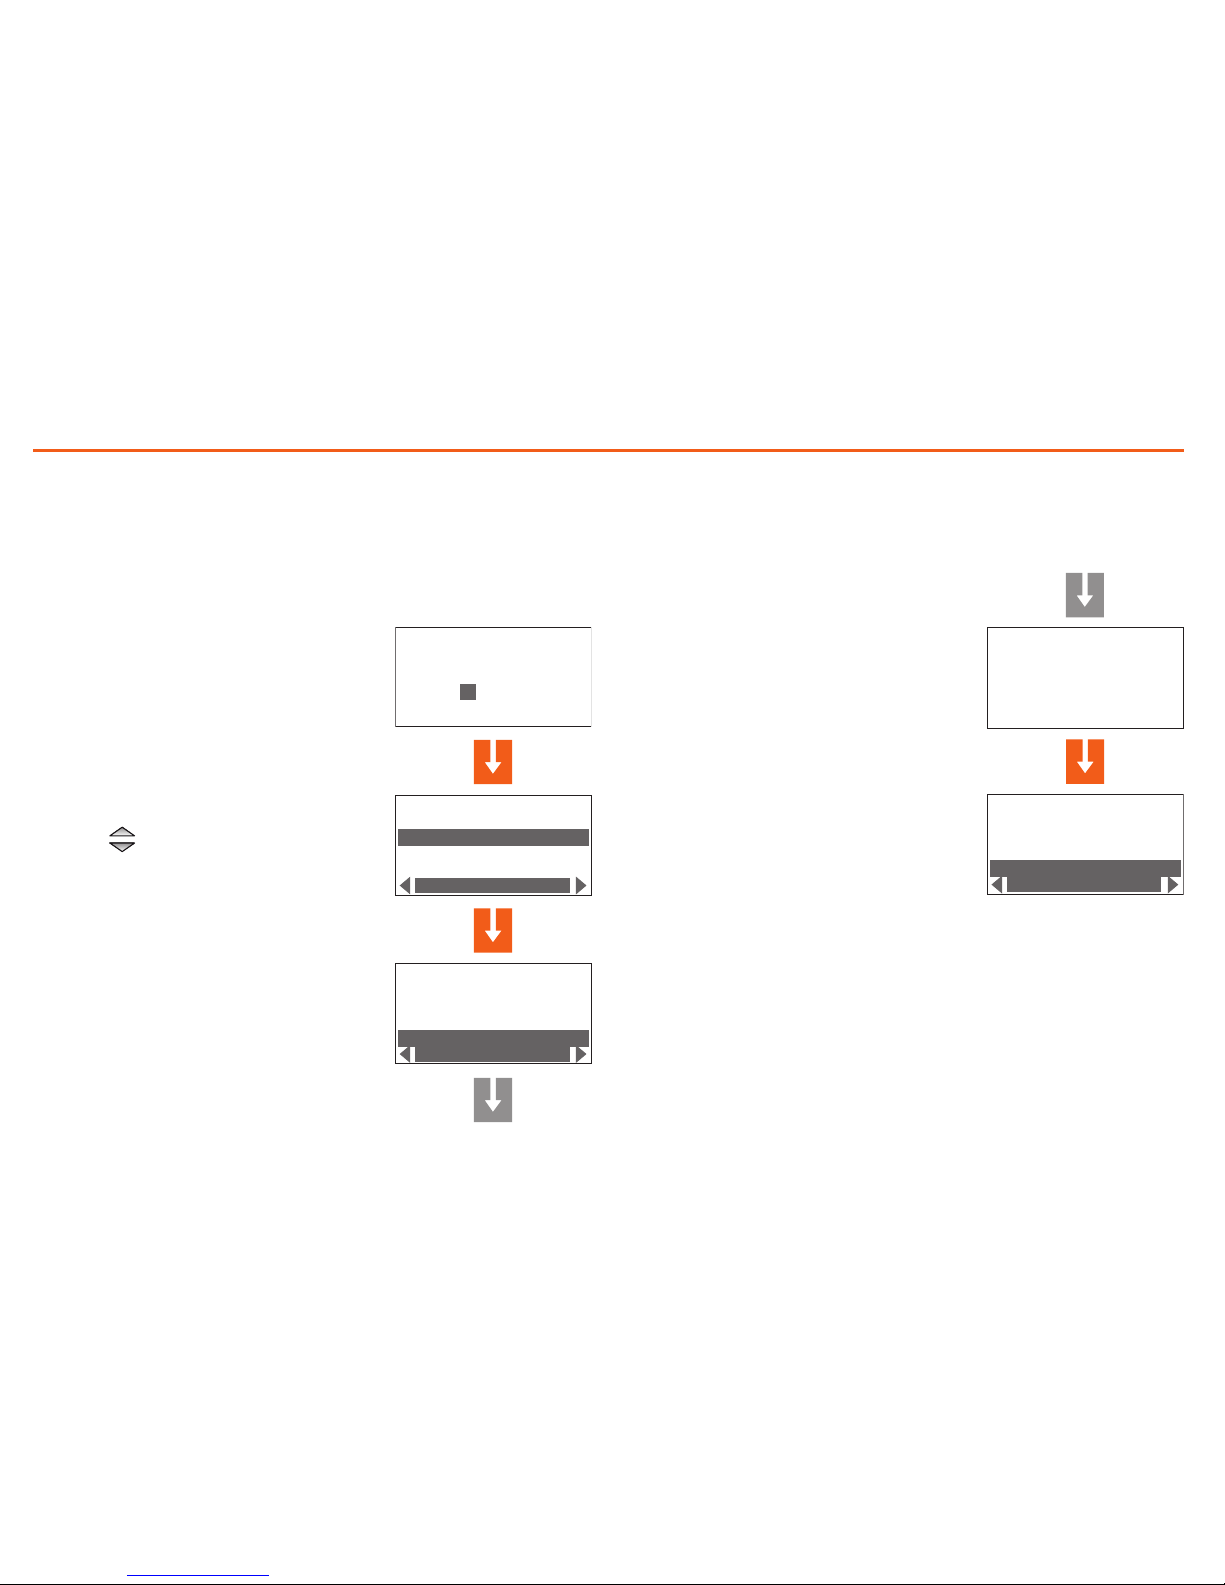
Disabilita il buzzer ■
Le operazioni che esegui con l'Inseritore (pressione dei tasti, inserimento dell'impianto, ecc.) vengono segnalate acusticamente tramite
il buzzer interno.
La seguente procedura ti permette di disabilitare questa funzione
Per alcuni secondi appare la
scritta "in esecuzione", poi viene
visualizzata la pagina precedente
segue
Codice/Chiave
*
IMPOSTAZIONI
Lingua
Indirizzo
Tipo centrale
Italiano
IMPOSTAZIONI
Data e ora
Contrasto
Buzzer
Disabilita
in esecuzione...
Codice/Chiave
*
IMPOSTAZIONI
Lingua
Indirizzo
Tipo centrale
Italiano
IMPOSTAZIONI
Data e ora
Contrasto
Buzzer
Disabilita
IMPOSTAZIONI
Data e ora
Contrasto
Buzzer
Abilita
Accedi al menù Impostazioni
Con i tasti seleziona
Buzzer, se la
funzione è abilitata nell'ultima riga
del display appare la scritta Disabilita
Premi OK per confermare
Il buzzer è disabilitato, nell'ultima
riga appare la scritta Abilita
Page 24
Personalizzazioni3
24
Attiva l'occultamento ■
Questa impostazione permette di nascondere la visualizzazione dello
stato dell'impianto a chi non fosse in possesso di un codice numerico
o di un transponder abilitati.
Per alcuni secondi appare la
scritta "in esecuzione", poi viene
visualizzata la pagina precedente
segue
Codice/Chiave
*
IMPOSTAZIONI
Lingua
Indirizzo
Tipo centrale
Italiano
IMPOSTAZIONI
Indirizzo
Tipo centrale
Occultamento
Abilita
in esecuzione...
Codice/Chiave
*
IMPOSTAZIONI
Lingua
Indirizzo
Tipo centrale
Italiano
IMPOSTAZIONI
Indirizzo
Tipo centrale
Occultamento
Abilita
IMPOSTAZIONI
Indirizzo
Tipo centrale
Occultamento
Disabilita
Accedi al menù Impostazioni
Con i tasti seleziona
Occultamento
Premi OK per confermare
La funzione Occultamento è stata
abilitata
Page 25

Contents
UK
1 Introduction 27
The Keypad connector with display 2 ■ 8
The keypad 2 ■ 9
The display 2 ■ 9
What is the display showing? 3 ■ 0
What is the display showing? 3 ■ 1
2 Operation 33
Accessing the functions with concealment enabled 3 ■ 4
Enabling - disabling the burglar alarm 3 ■ 4
Activation scenarios 3 ■ 5
Activating - deactivating the zones 3 ■ 6
Stopping the siren sound 3 ■ 8
Activating the robbery alarm 3 ■ 9
What type of alarm occurred? 4 ■ 0
3 Editing 41
The connector menu 4 ■ 2
Accessing the settings menu 4 ■ 2
Setting the date and hour 4 ■ 3
Adjusting the contrast 4 ■ 4
Disabling the buzzer 4 ■ 5
Activating concealment mode 4 ■ 6
Page 26

Page 27

27
1
1 Introduction
The keypad connector with display ■
The keypad ■
Navigation keys ✔
The display ■
Main screen ✔
In case of alarm ✔
Settings menu ✔
What is the display showing? ■
Page 28
Introduction1
28
The Keypad connector with display ■
1
2
5 6
3
4
7
0
8 9
C OK
P
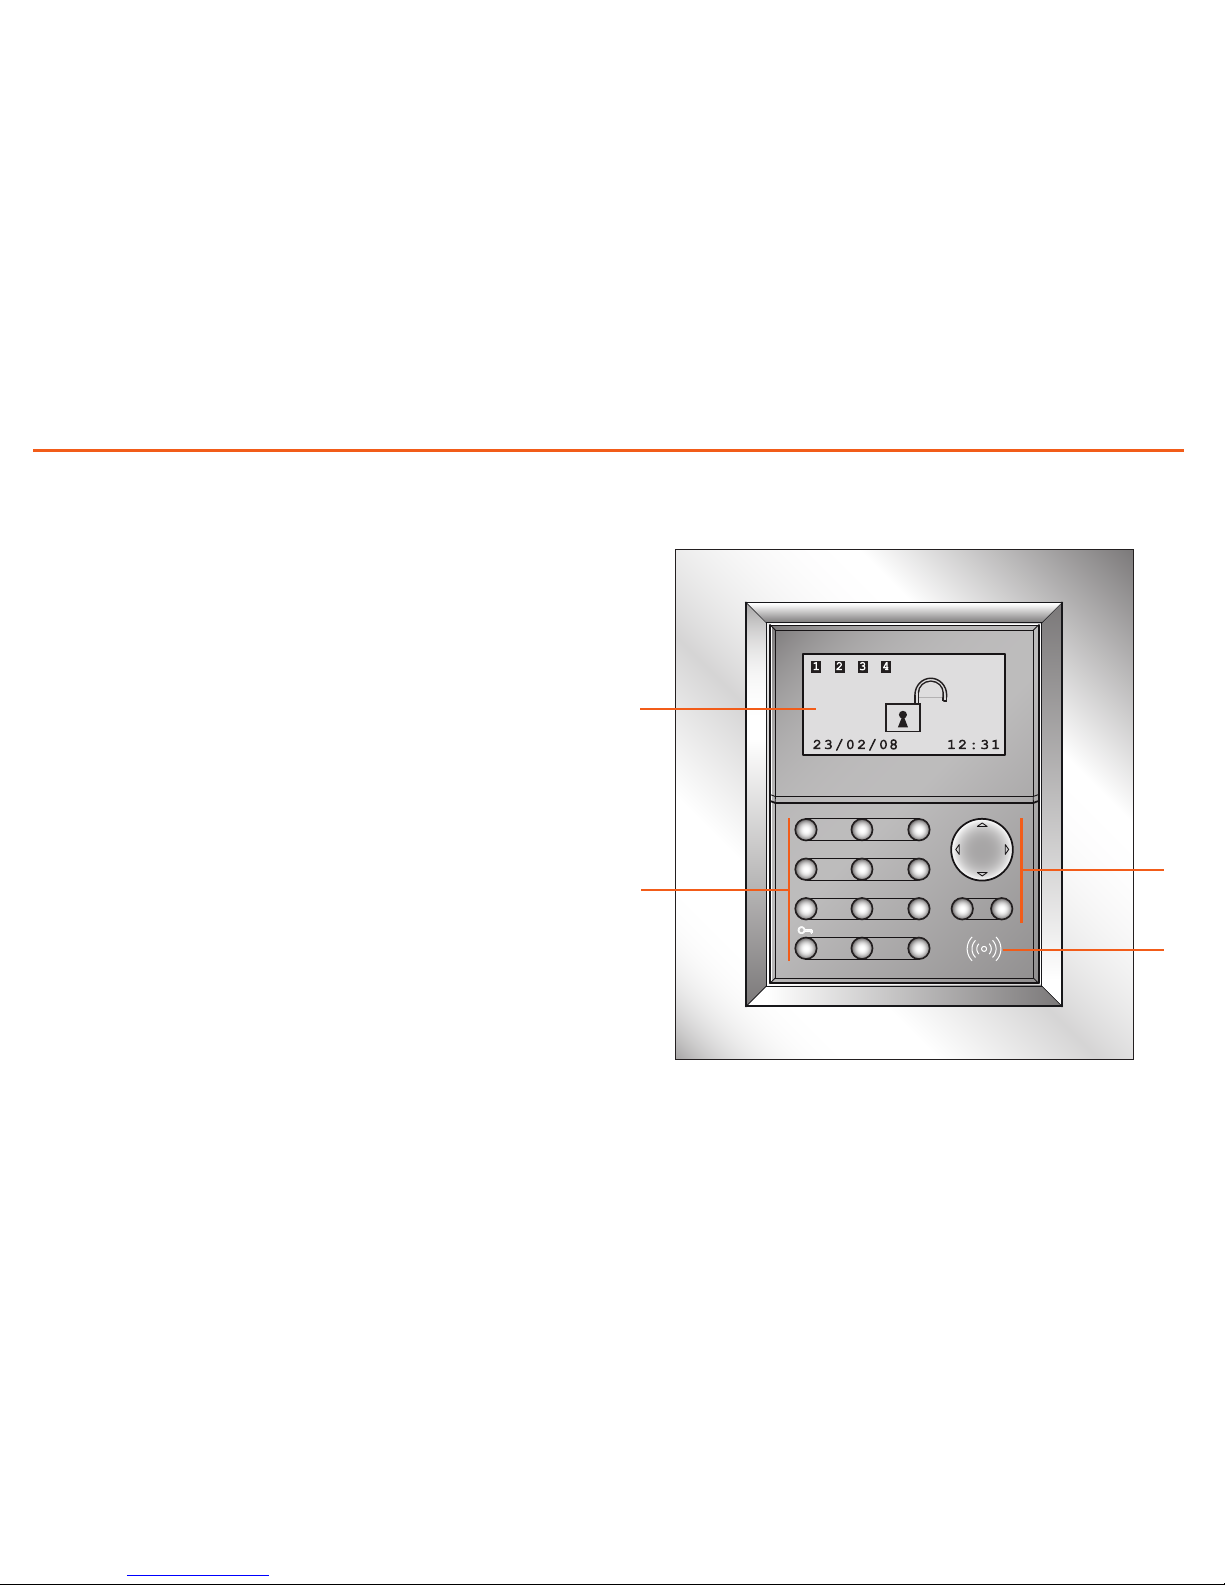
The k ey pad c on ne ct or w it h di sp lay c an be us ed to a rm and d is ar m th e b urgl ar al arm sy st em , to ac ti vate th e var io us zones ba se d on t he curre nt ne ed s,
or to activate one of the division scenarios programmed on the burglar
alarm control unit. It is also possible to obtain information on the status of
the system and to display the alarm events saved by the Control unit.
1 - Graphic display
2 - Numeric keypad
3 - Transponder keys reader
4 - Navigation keys
1
3
2
4
Page 29
Introduction 1
29
The keypad ■
Navigation keys ✔
COK
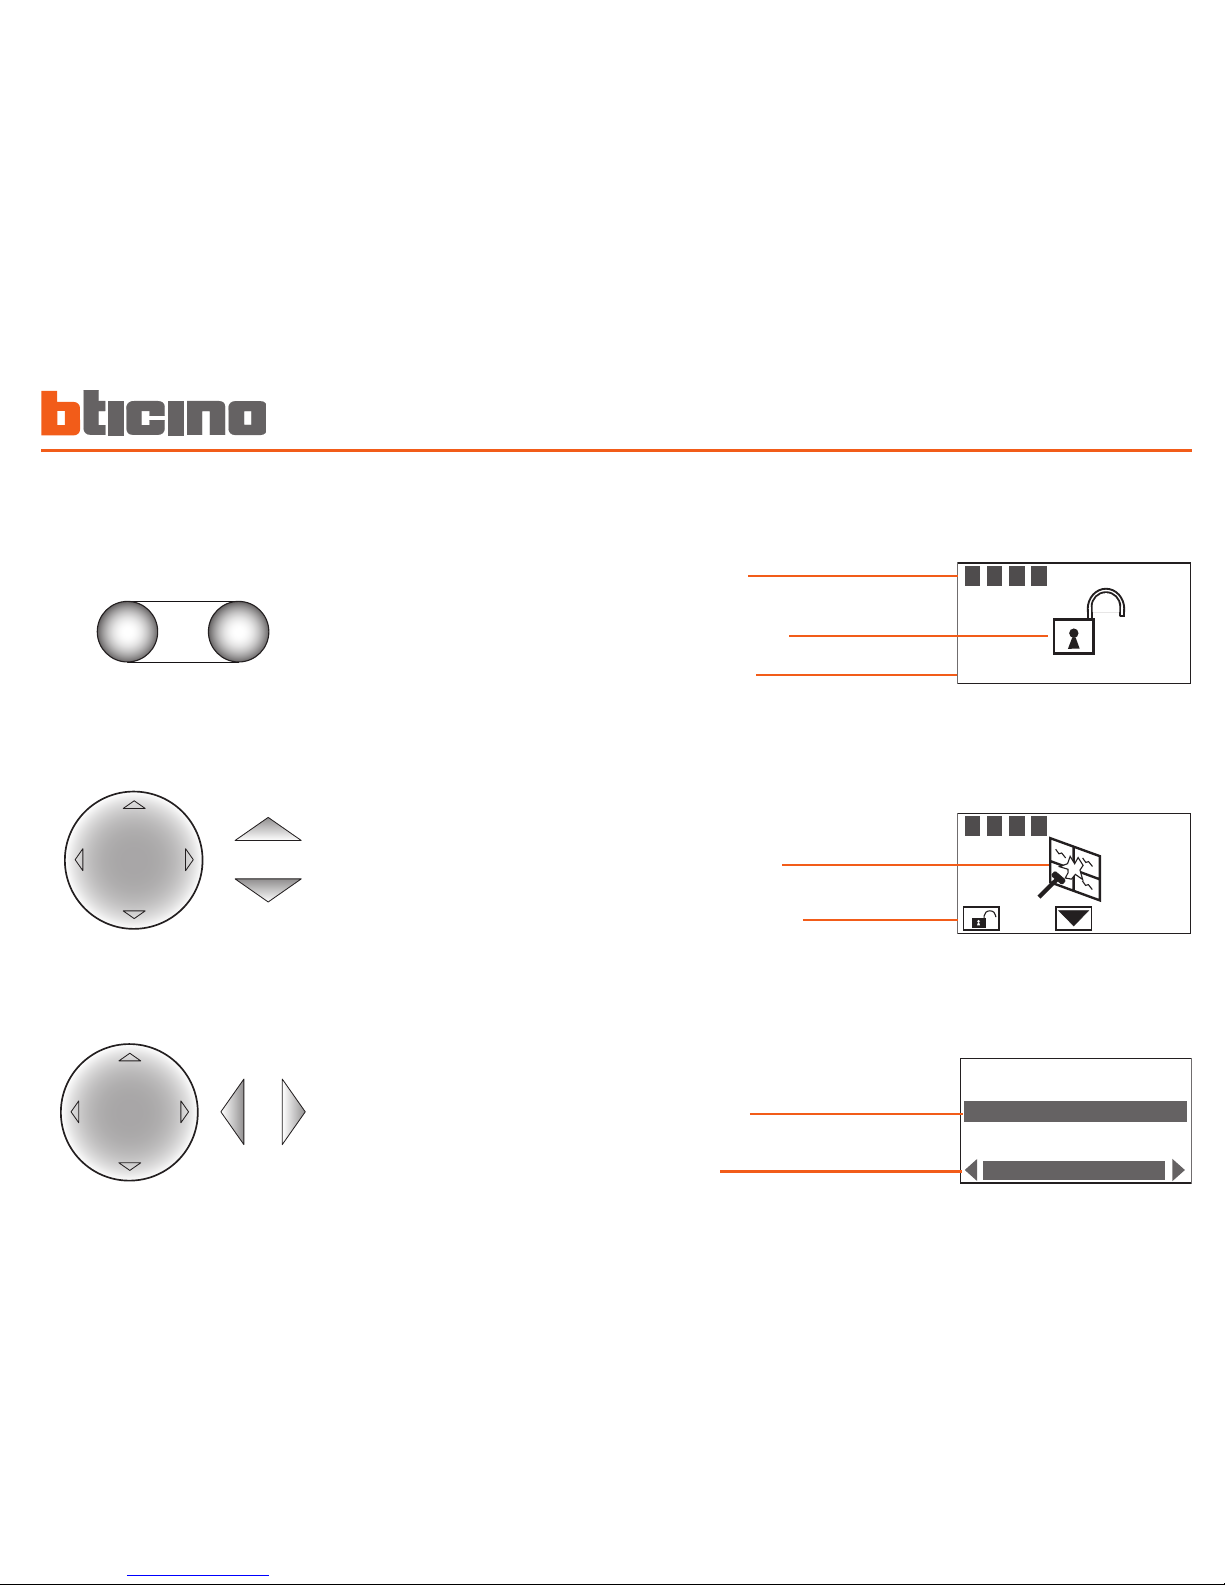
Scroll keys
allow you to scroll the list of items
in the menu
Selection keys
allow you to select the functions,
which in some menus, may appear in the last line
C
- K ey f or cance ll ing t he selec tion
and for returning to the previous
page – if it is held down, you can
escape from the programming
menu
OK
- K ey fo r e nte ri ng the se le ct ion
or data
1 2 3 4
15/07/08 14:22
1 2 3 4
SETTINGS
Language
Address
Central Type
English
The display ■
System zones
Technical indications
Alarm signal zone
Functions
Selected item
Settings menu ✔
In case of an alarm ✔
Date and hour
ON/OFF indication
Main screen ✔
Page 30
Introduction1
30
What is the display showing? ■
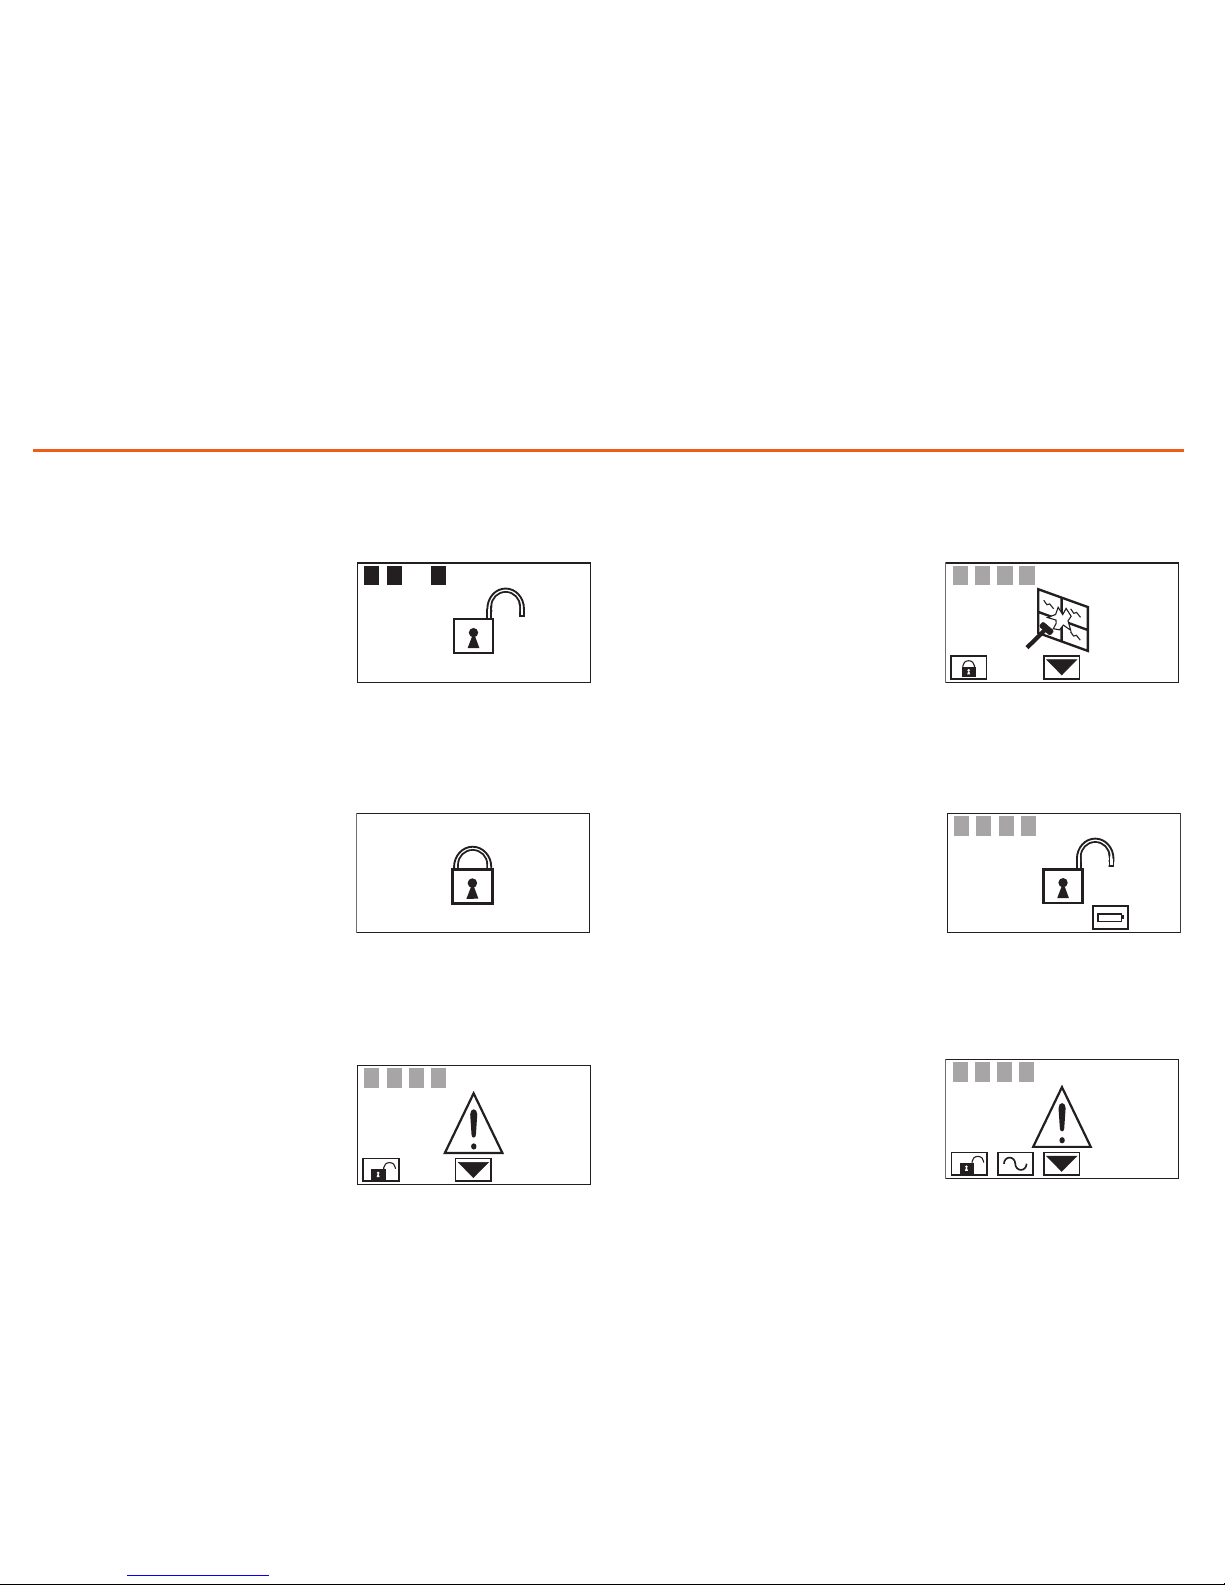
System on,
e.g.: zone activation as in scenario 2
System off, general alarm signal,
tamptest with system switched OFF
or a dead radio device battery
System on, intrusion alarm signal
System o, Unit battery dead
or damaged
System o, no power
System o,
e.g.: zones 1, 2, 4 active
1 2 3 4
15/07/08 14:22
1 2 3 4
scenario 2
15/07/08 14:22
1 2 3 4
1 2 3 4
1 2 3 4
Page 31
Introduction 1
31
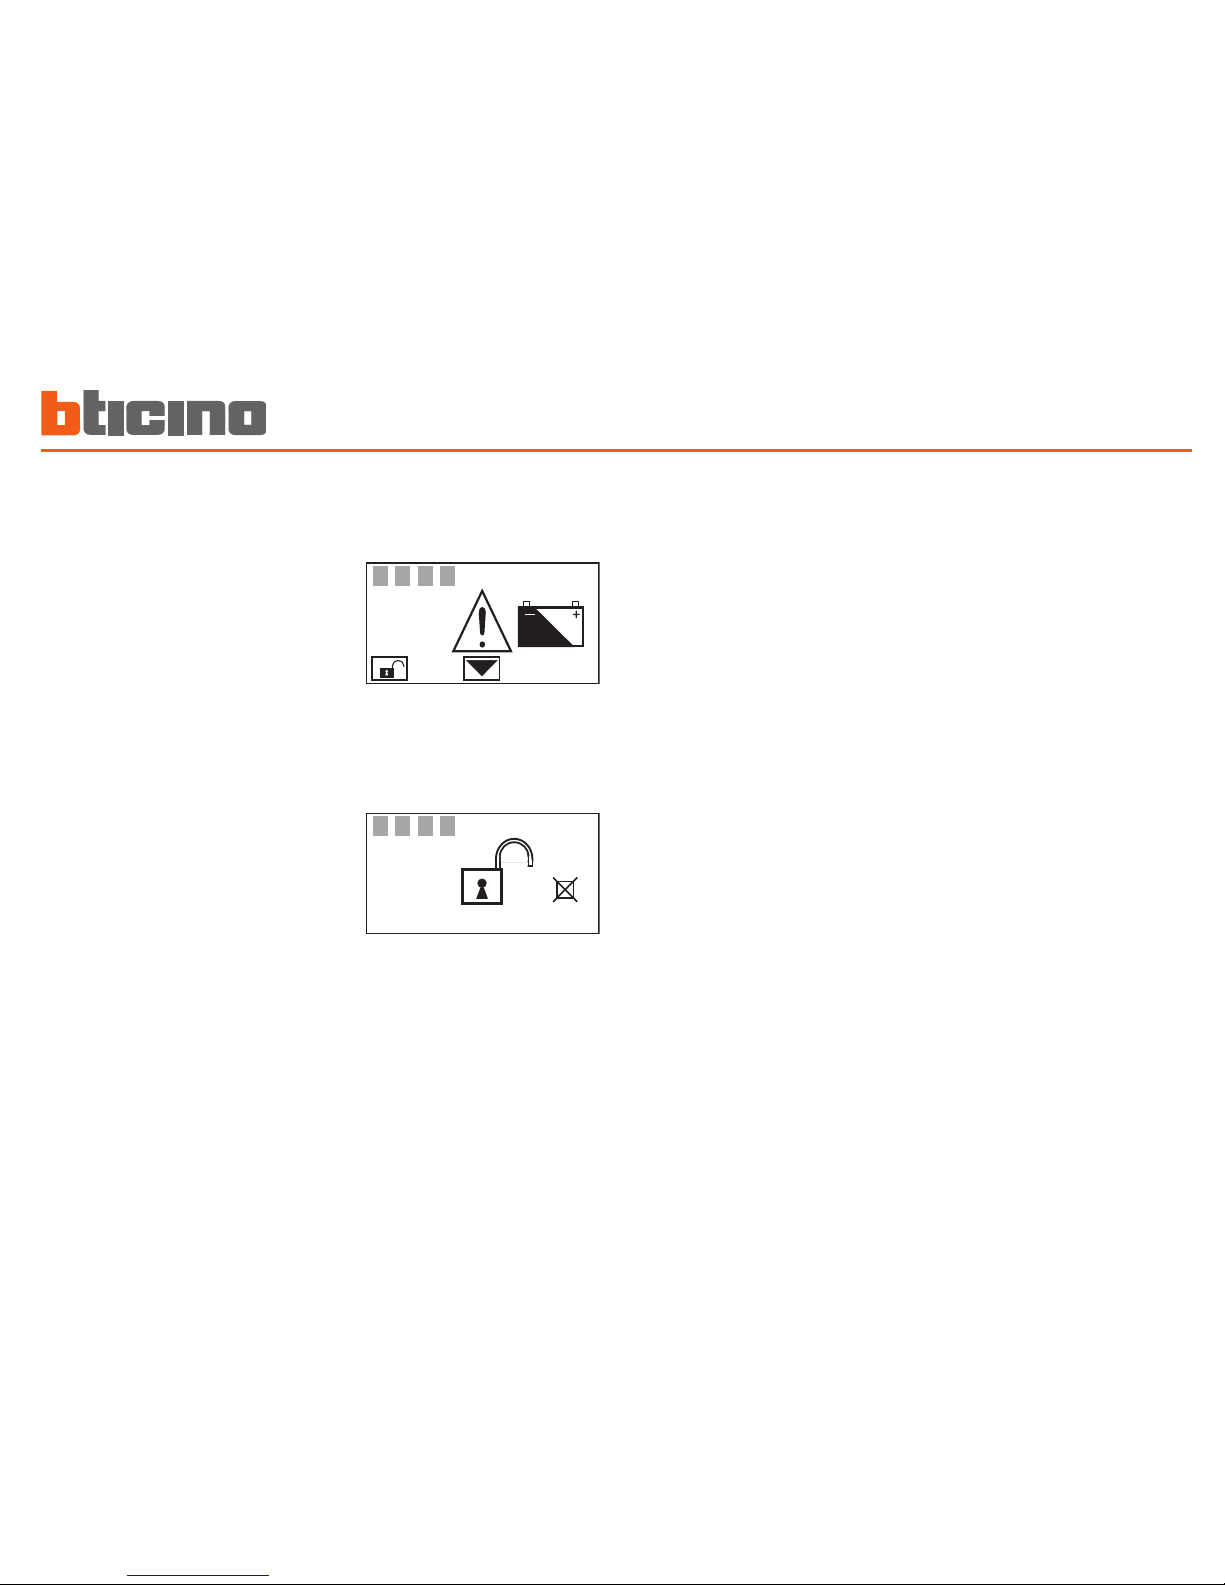
System o, Burglar-alarm (antitheft)
battery dead or damaged and technical
alarm signal
System off, one or more sensors
disabled (Important Unit functions
are d i sab l ed; d isa b le o n ly i f
extremely necessary)
What is the display showing? ■
1 2 3 4
15/07/08 14:22
1 2 3 4
Page 32

Introduction1
32
Page 33

33
2
2 Operation
Accessing the functions with concealment enabled ■
Enabling - disabling the burglar alarm ■
With user code ✔
With transponder key ✔
Activation scenarios ■
Activating - deactivating the zones ■
With user code ✔
With transponder key ✔
Stopping the siren sound ■
With user code ✔
With transponder key ✔
What type of alarm occurred ■ ?
Page 34
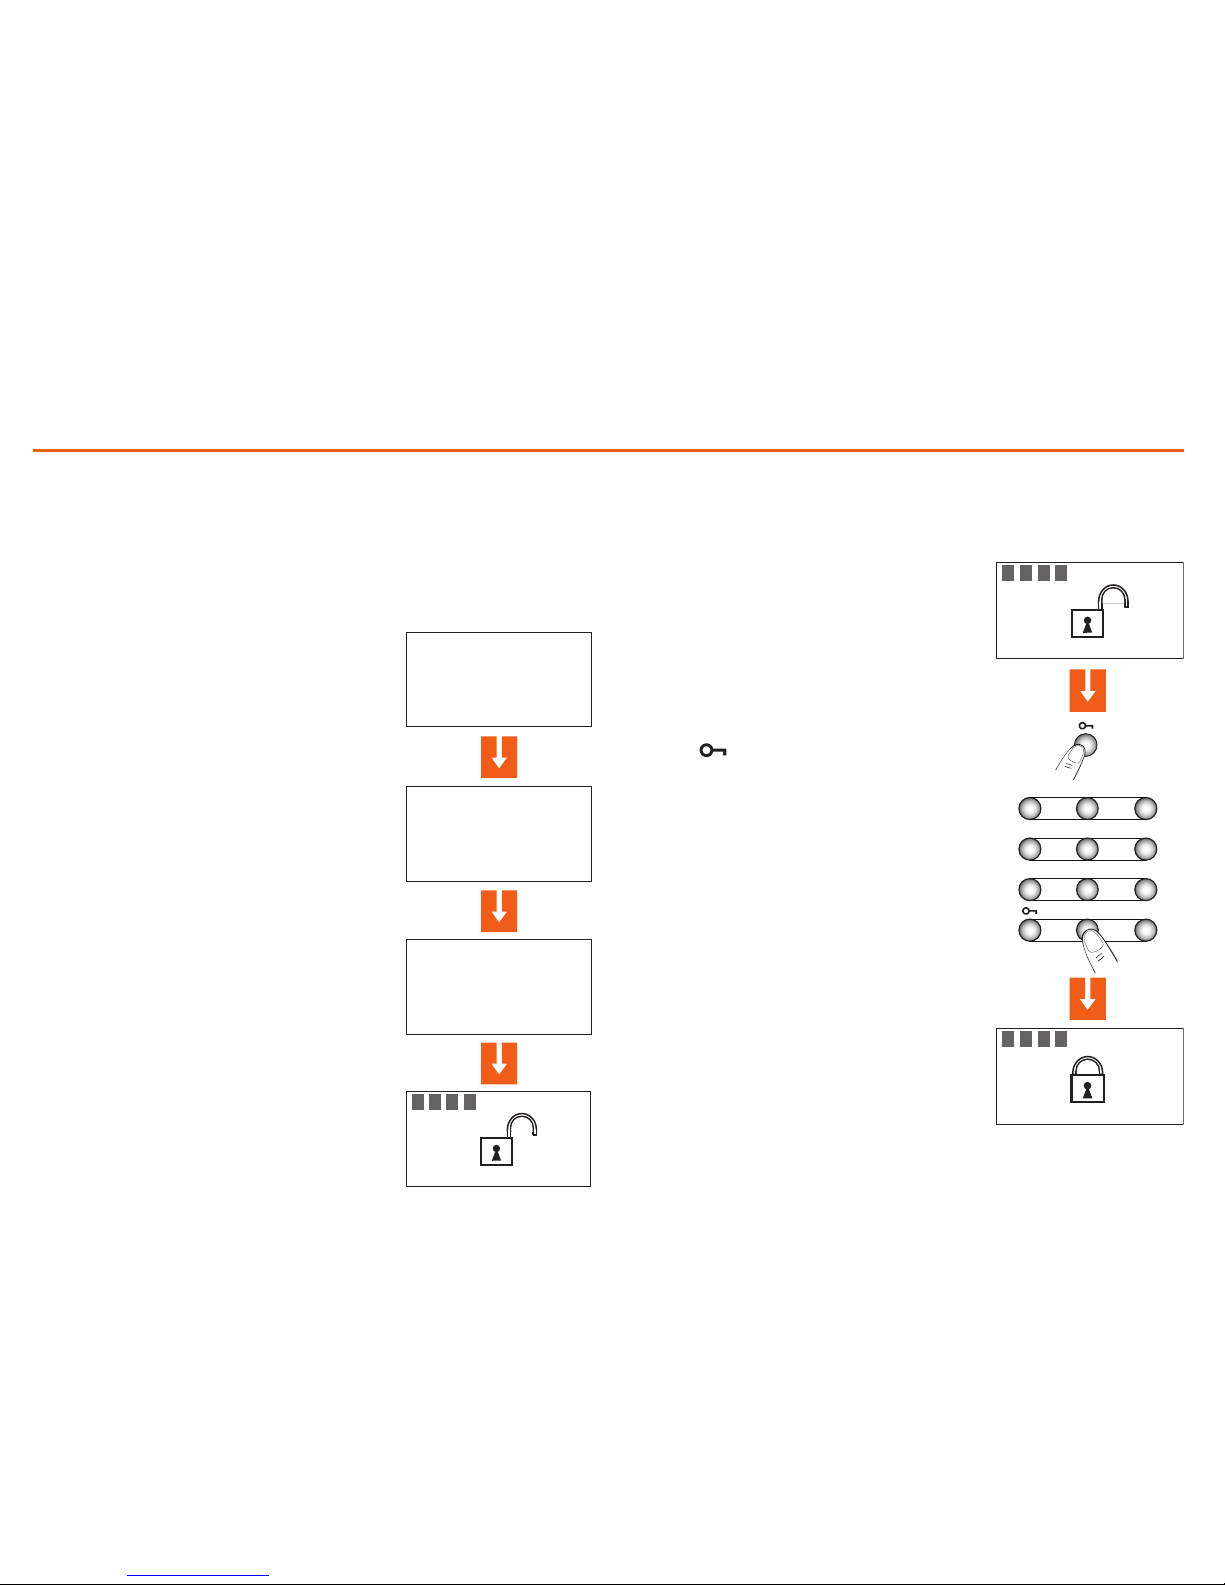
Operation2
34
When the burglar alarm (antitheft)
is disabled, an open lock appears in
the middle of the display
The display will show a closed lock;
if the sound system is enabled, you will
hear an “enabled” vocal message; execute
the same operation to disable the burglar
alarm
Press the key
Type in the user code (basic 00000) or
an enabled numeric code; typing an
incorrect code, after the third attempt the
keypad blocks for about 1 minute
Enabling - disabling the burglar alarm ■
With user code ✔
1 2 3 4
25/02/08 12:23
1 2 3 4
25/02/08 12:23
1
2
56
3
4
7
0
89
P
Accessing the functions with concealment ■
enabled
The Concealment function can be used to prevent displaying of the system status to anyone without a user code or an enabled transponder.
Key/Code
*
Key/Code
*****
1 2 3 4 - - - - - - - -
25/05/06 12:23
MY HOME
To access the connector menu press
OK
Enter the user code (default 00000), or
an enabled numeric code, or place an
enabled transponder near the reader for
four seconds.
If the code is correct, it will be possible
to access the start page. If no keys
are pressed for 10 seconds, the
concealment screen will reappear
When the Concealment function is
active, the display shows the My Home
Logo
Page 35
Operation 2
35
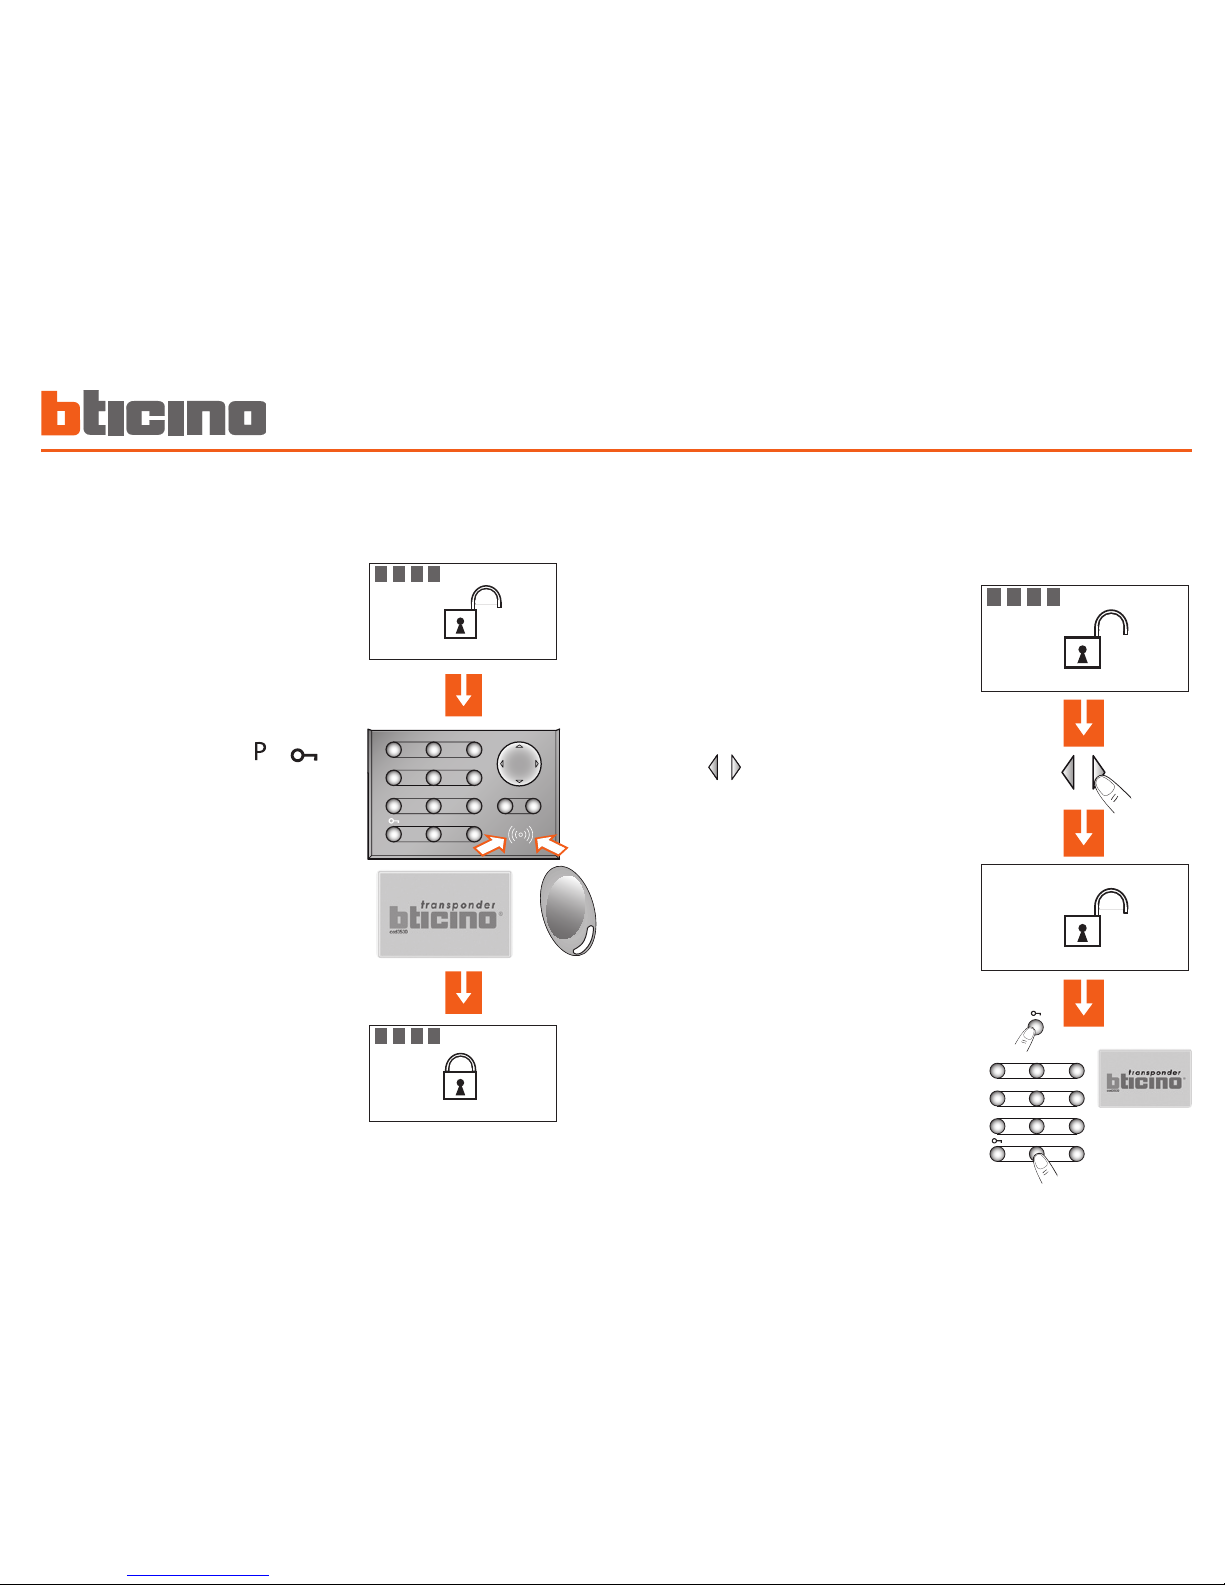
Confirm the selection using the
user code, a transponder key or a
numeric code
When the burglar alarm (antitheft)
is disabled, an open lock appears in
the middle of the display
To activate the alarm press or
on the connector, and place the
key at a distance of less than one
centimetre from the reader for two
seconds
The display will show a closed lock;
if the sound system is enabled, you
will hear an “enabled” vocal message;
execute the same operation to disable
the burglar alarm
With transponder key ✔
Use the keys to select the
scenario you want
After conrmation, only the zones
included in the selected scenario
will be activated
Activation scenarios ■
It is possible to activate one of the zone division scenarios saved on the
Burglar Alarm Control Unit
1 2 3 4
25/02/08 12:23
1 2 3 4
25/02/08 12:23
1
2
56
3
4
7089
COK
P
1 2 3 4
25/02/08 12:23
Night
25/02/08 12:23
1
2
56
3
4
7089
P
Page 36
Operation2
36
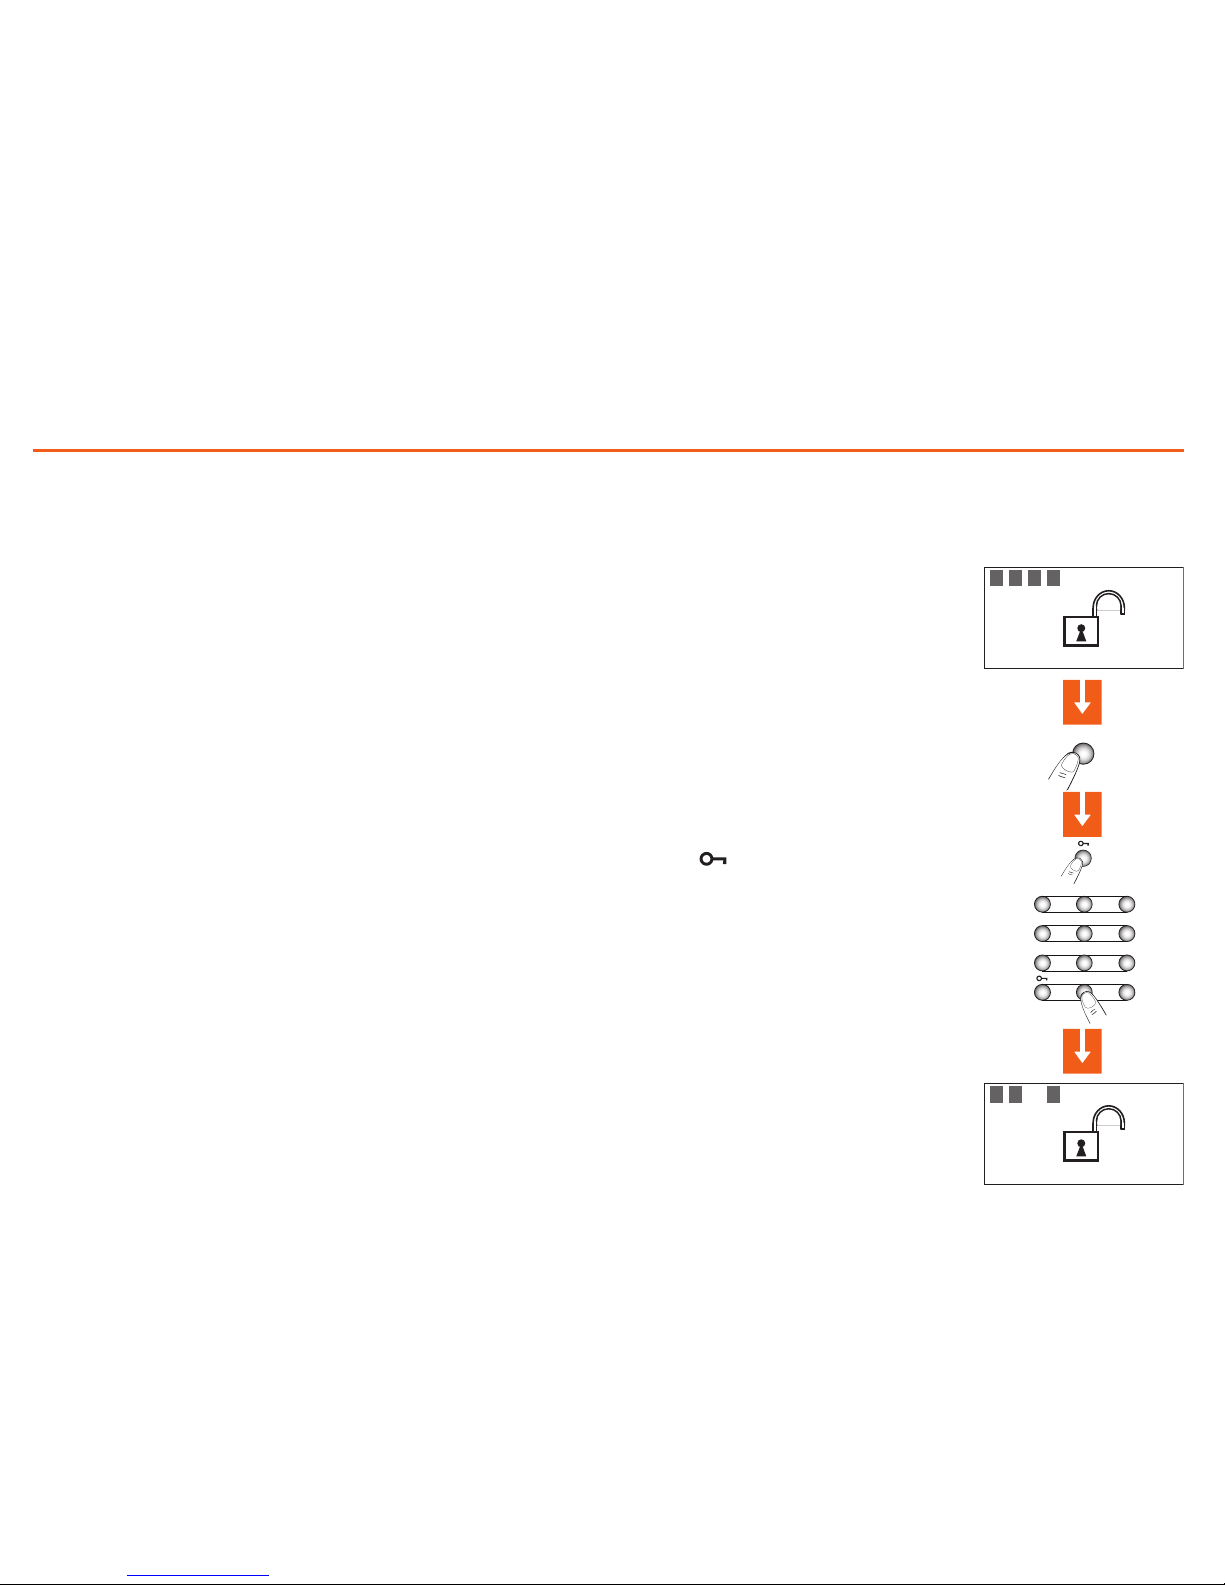
You can deactivate (reactivate) one or more zones at any time. This
will allow you to personalise the burglar-alarm operation according to
your needs.
For instance, if you want to have protection even if you’re not at home,
you can deactivate the infrared detector zones, leaving the outer zones
(entrance door and windows) active. This will allow you to move around
freely inside your house without making any alarms go on and without
giving up safety.
The zones in which your burglar alarm is split into appear in the rst
line of the display.
The active zones are shown in a dark box.
The following example shows the system made up of 4 zones, all active;
zone 3 is deactivated.
Activating - deactivating the zones ■
The zones (max. 4) of the system are
all active (e.g. 1-2-3-4)
Press the corresponding key on the
Unit keypad to deactivate zone 3
The display shows zone 3 without
the dark box (deactivated)
Press the key
Type in the user code (basic 00000)
or an enabled numeric code
With user code ✔
1 2 3 4
25/02/08 12:23
1 2 3 4
25/02/08 12:23
3
1
2
56
3
4
7089
P
Page 37
Operation 2
37
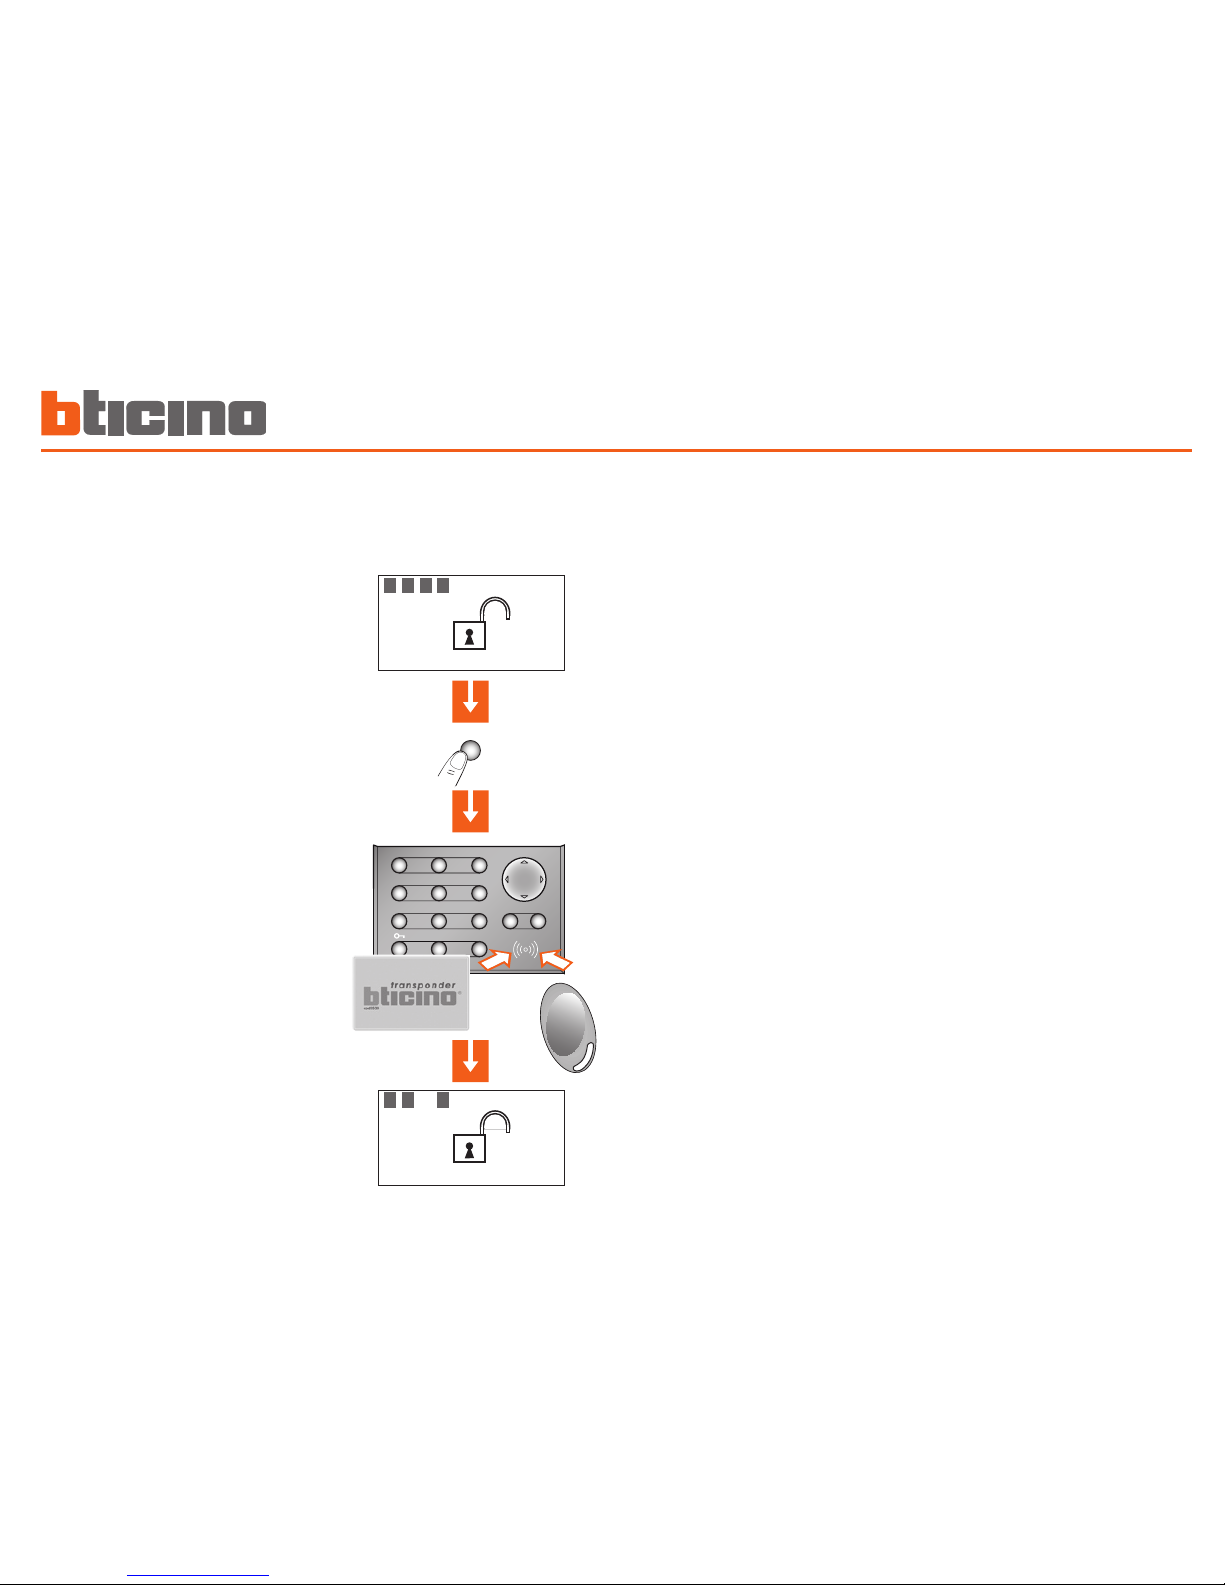
Press the corresponding key on
the Unit keypad to deactivate
zone 3
The display shows zone 3 without
the dark box (deactivated)
Confirm the operation by bringing a
transponder near the reader within 5
seconds
The zones (max 4) of the system are
all active (e.g. 1-2-3-4)
With transponder key ✔
1 2 3 4
25/02/08 12:23
1 2 3 4
25/02/08 12:23
1
2
56
3
4
7089
COK
P
3
Page 38
Operation2
38
Stopping the siren sound ■
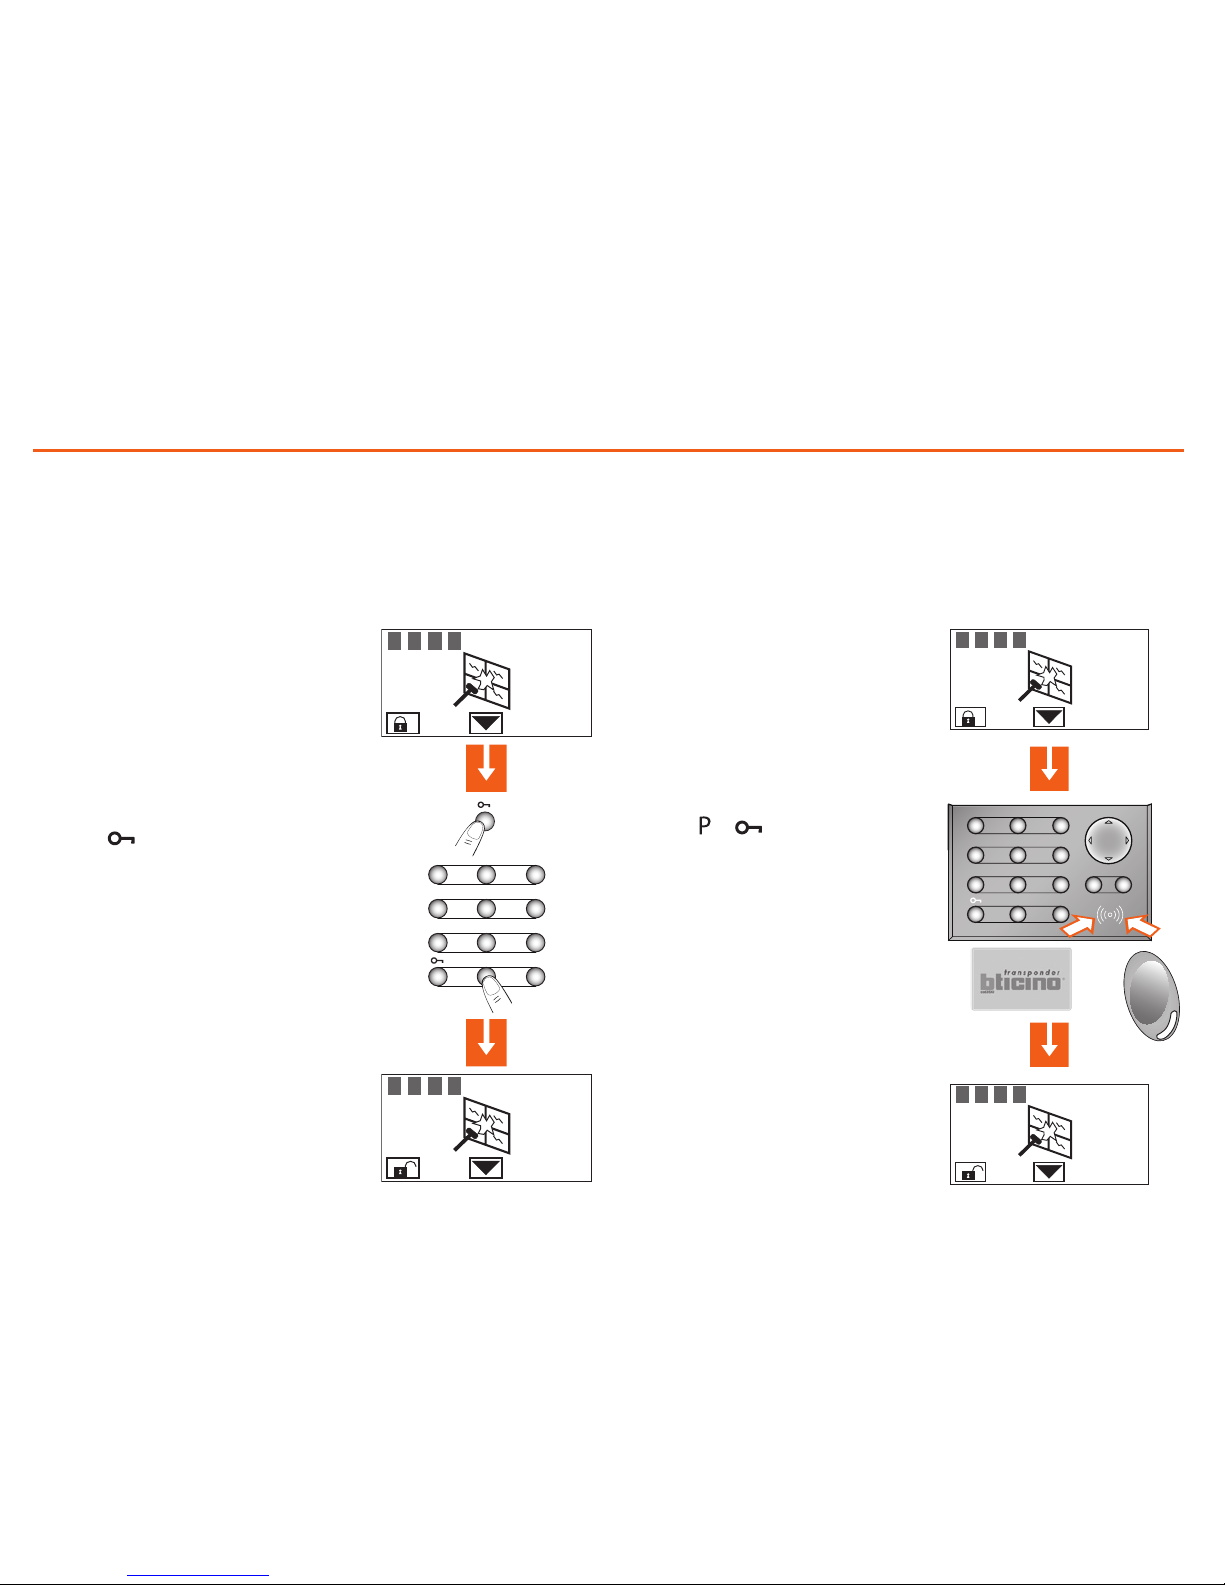
If the alarm goes on while you’re there, you can stop the siren as
follows:
Make sure there are no trespassers
in the house
The siren stops; the Unit answers
with the vocal message “disabled”
Press the key
Type in the user code (basic 00000)
or an enabled numeric code
With user code ✔ With transponder key ✔
Press the or key on the Unit
keypad and then bring the key (less
than one centimeter) near the reader
for 2 seconds
Make sure there are no trespassers
in the house
1 2 3 4
1 2 3 4
1
2
56
3
4
7
0
89
P
1 2 3 4
1 2 3 4
1
2
56
3
4
7089
COK
P
The siren stops and the burglar
alarm system is deactivated
Page 39
Operation 2
39
Activating the robbery alarm ■
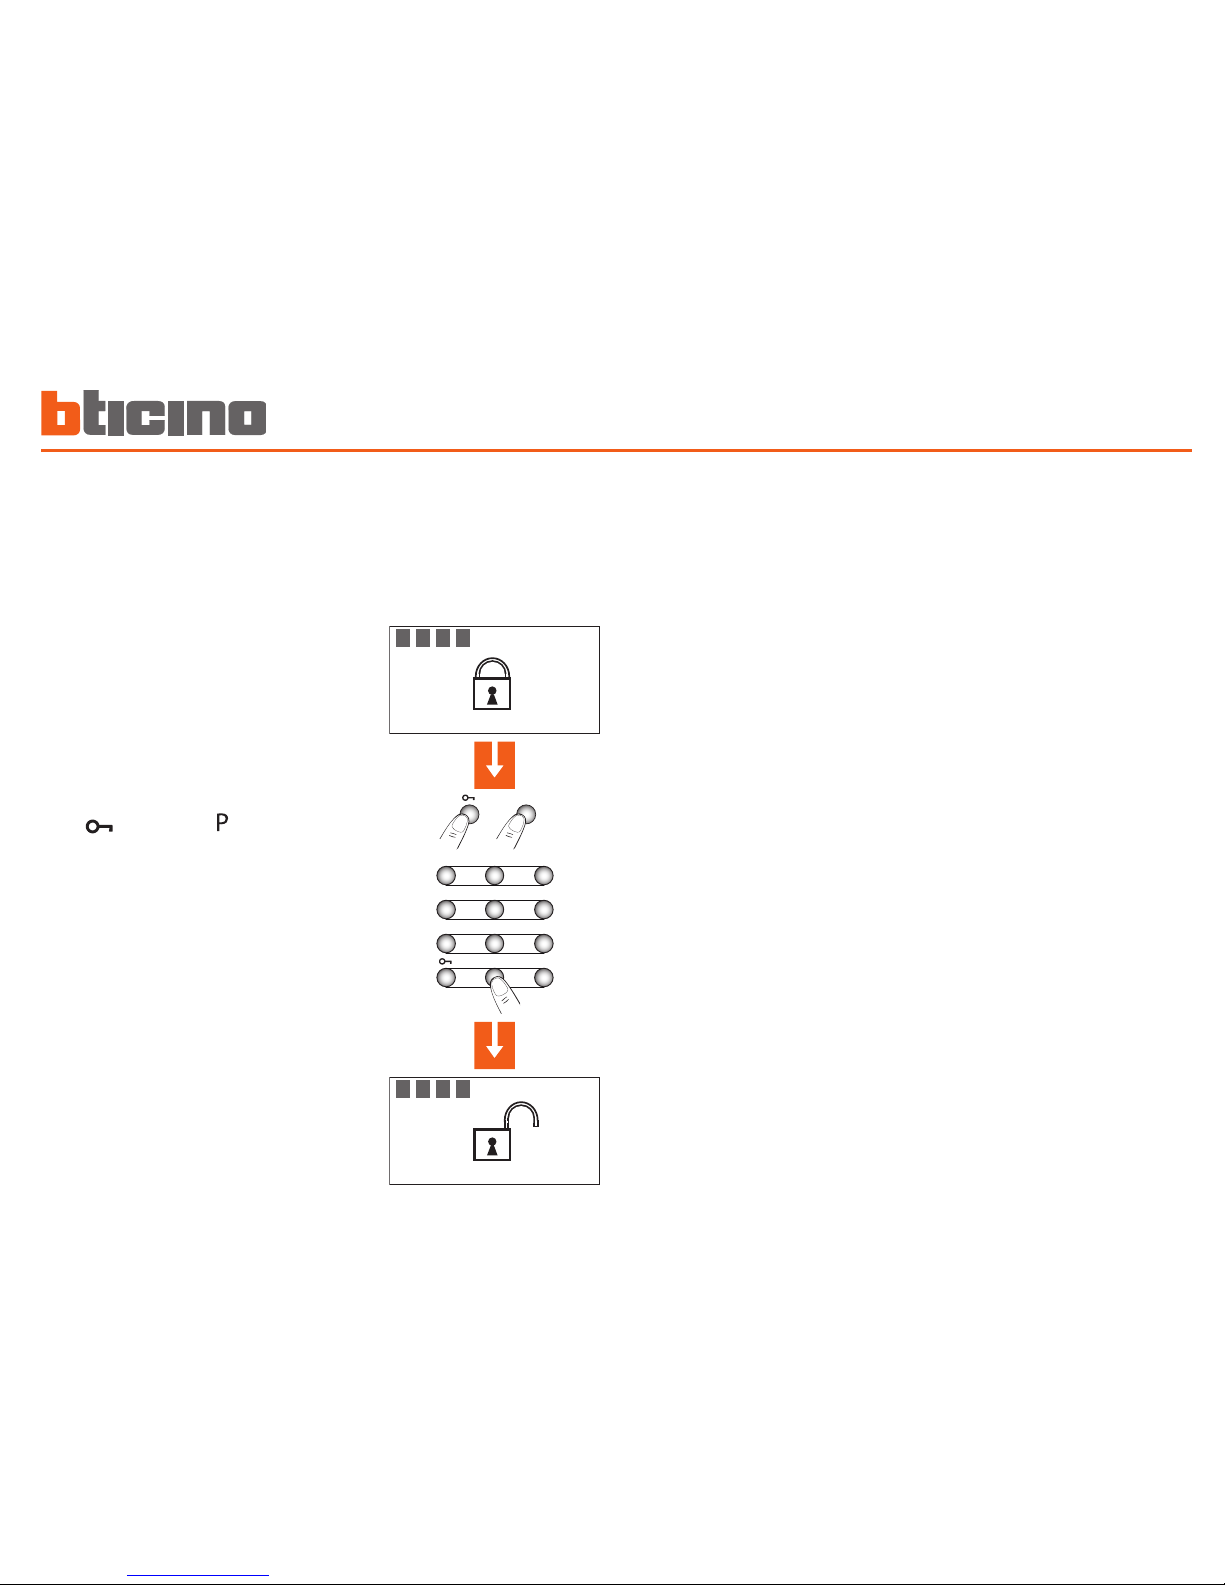
In case of robbery, it is possible to deactivate the burglar alarm system,
while at the same time sending the emergency calls to the numbers
saved in the Control Unit
The burglar alarm is disarmed, the
Control Unit starts making the
emergency calls in a totally silent way
Press followed by
Enter the user code (default 00000)
or another enabled numeric code
1
2
56
3
4
7
0
89
P
P
1 2 3 4
25/02/08 12:23
1 2 3 4
25/02/08 12:23
Page 40
Operation2
40
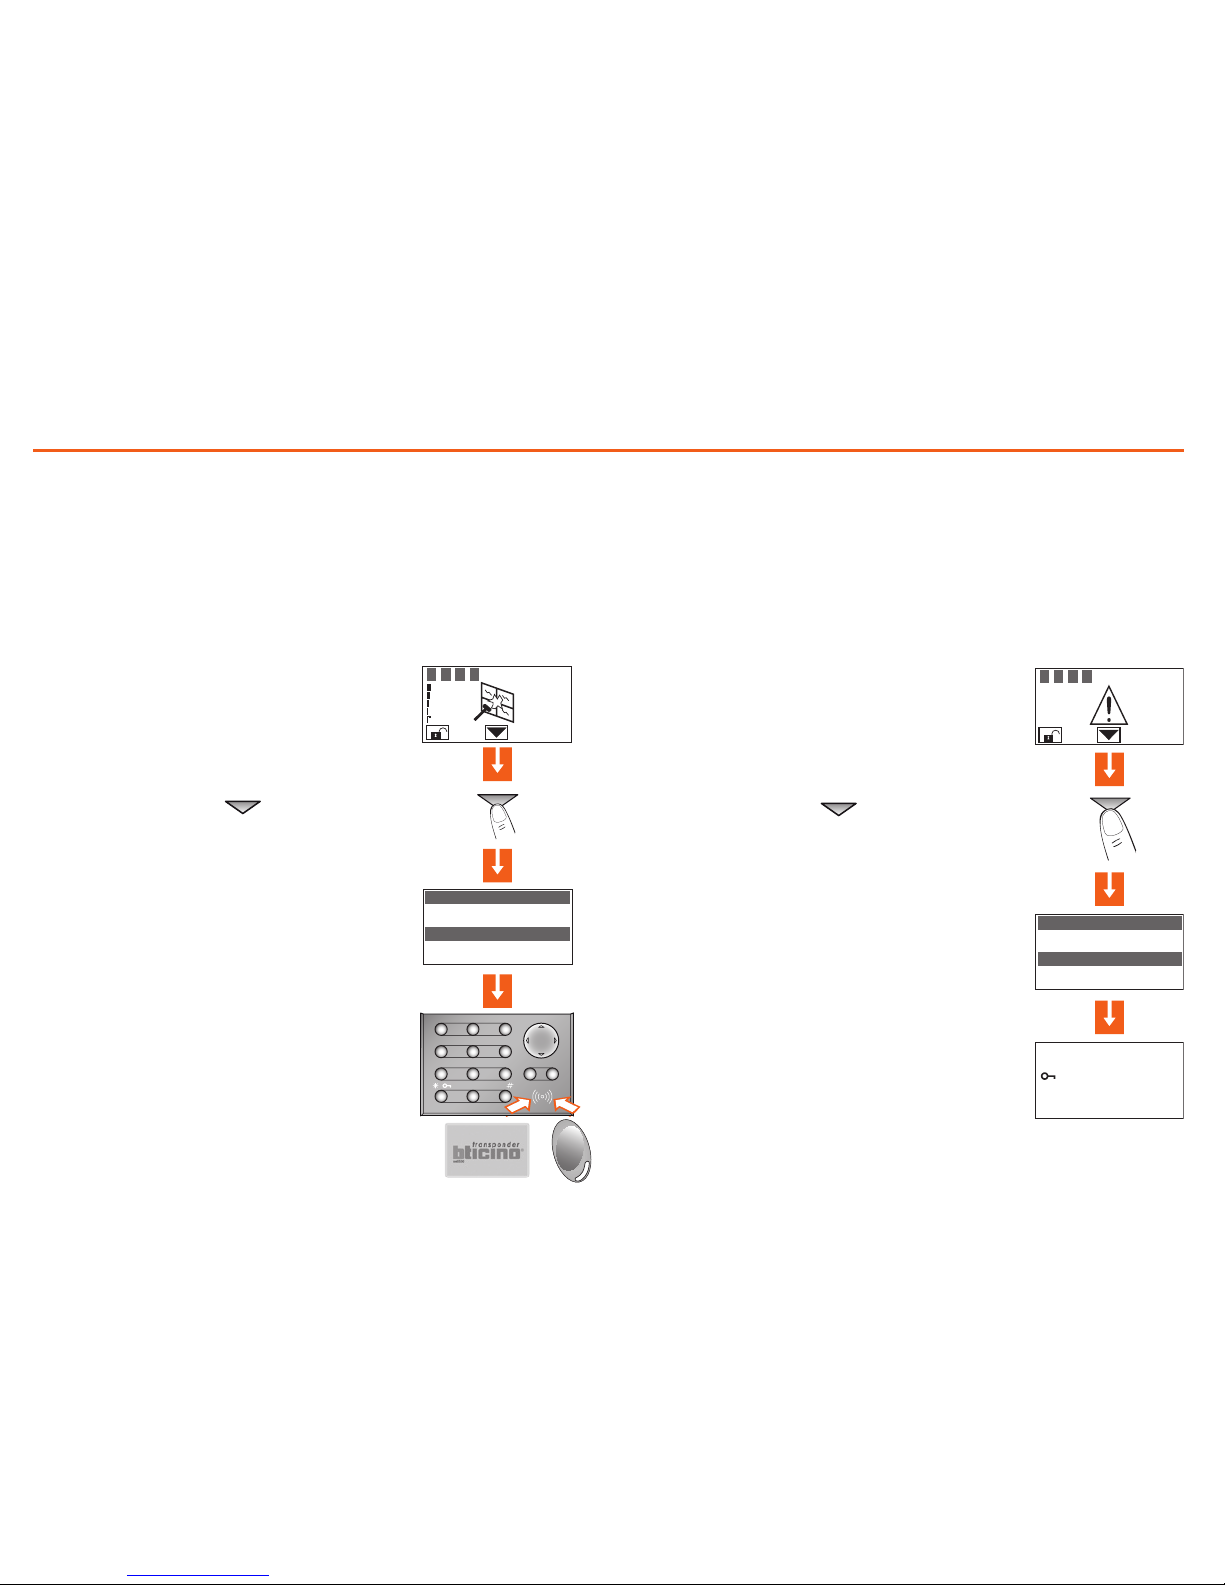
By pressing the
OK key, a page appears, which lets
you reset a single alarm or execute a total reset
To learn more, press the key
The display provides the following information:
- detector and its name (living room window)
- type of alarm (intrusion)
- burglar-alarm (antitheft) status when the
alarm goes on (ON-inserted)
The alarm notication is cancelled from the
display when the burglar alarm system is rearmed. It is however saved in the "Event Memory" of the Burglar Alarm Control Unit
The Unit has detected an alarm
...
What type of alarm occurred? ■
When an alarm signal is displayed, you can nd out what type it is (intrusion, technical, etc.) and which detector has detected it; a name has been
given to each detector (kitchen window, entrance, etc.) by the installer for
easier identication. Press just one key to get this information.
To learn more, press the
The display provides the following information:
- device name (remote assistance)
- type of alarm (technical start)
- burglar-alarm (antitheft) status when the
alarm goes on (OFF-disconnected)
The Unit has detected a technical alarm
In case of a technical alarm (its symbol appears), you can nd out which
device has produced the alarm and reset it as well.
MEMO ALARMS
32: IR sensor
Living room window
Intrusion alarm
Inserted
1 2 3 4
1
ABC
2
5
JKL6MNO
DEF
3
GHI
4
7
PQRS
0
8
TUVWXYZ
9
COK
P /
/
MEMO ALARMS
42: receiver
remote assistance
start technical
Disconnected
1 2 3 4
press:
OK reset single
OK reset total
Page 41

41
3
3 Editing
The connector menu ■
Accessing the settings menu ■
Setting the date and hour ■
Adjusting the contrast ■
Disabling the buzzer ■
Activating concealment mode ■
Page 42
Editing3
42
The connector menu ■
In this manual we felt it would be appropriate to explain all the customisation functions that may be useful when using the connector. These
functions can be easily accessed without any risks of compromising the
correct operation of the Control Unit, and therefore without jeopardising
home security.
We recommend that one always seeks advice from the system installer
before changing in any way the conguration of any of the functions of
the Control Unit not included in this manual.
Accessing the settings menu ■
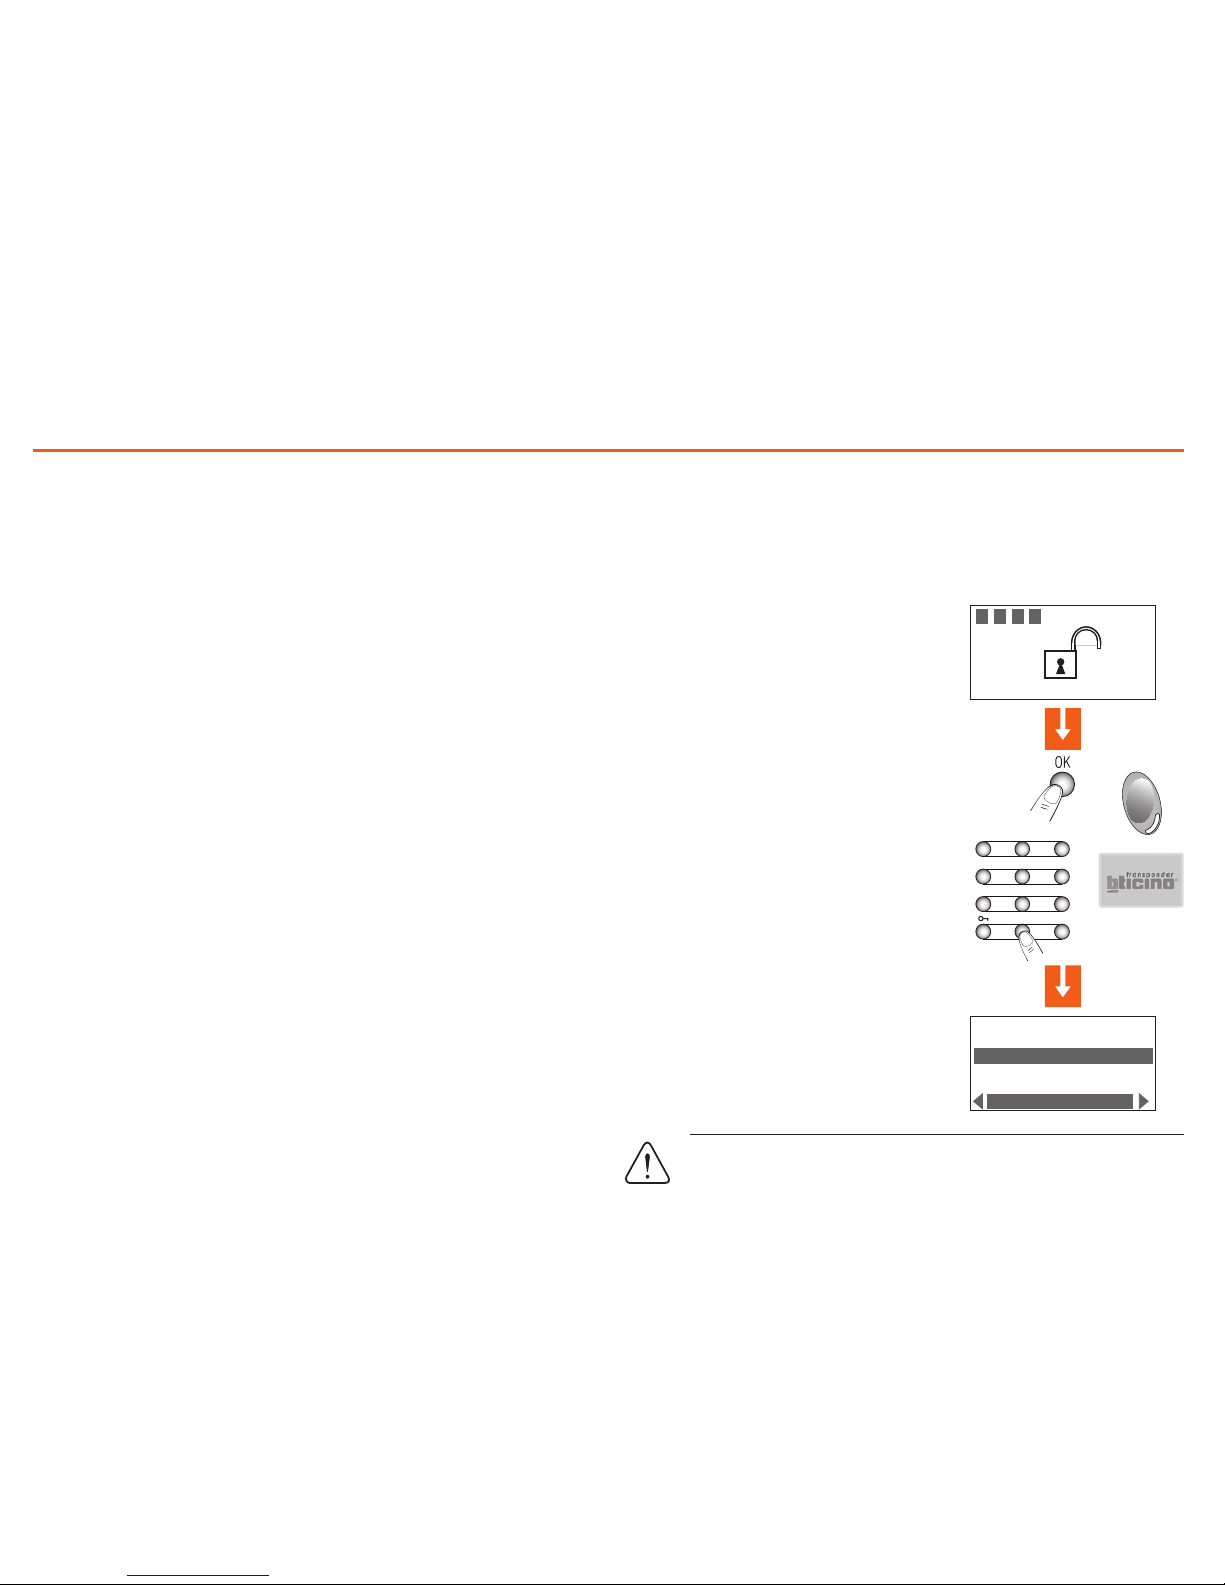
To exit the settings menu wait for 30 seconds without pressing
any keys or press C.
Press OK
Enter the user code, or use the
transponder key in the same way as if
arming the burglar alarm system
Ensure that the system is disarmed
It is now possible to start
customising the connector
This procedure is necessary to access the settings menu:
SETTINGS
Language
Address
Central Type
English
1 2 3 4
21/02/08 15:32
1 2 3 4
1
2
56
3
4
7089
P
Page 43
Editing 3
43
Setting the date and hour ■
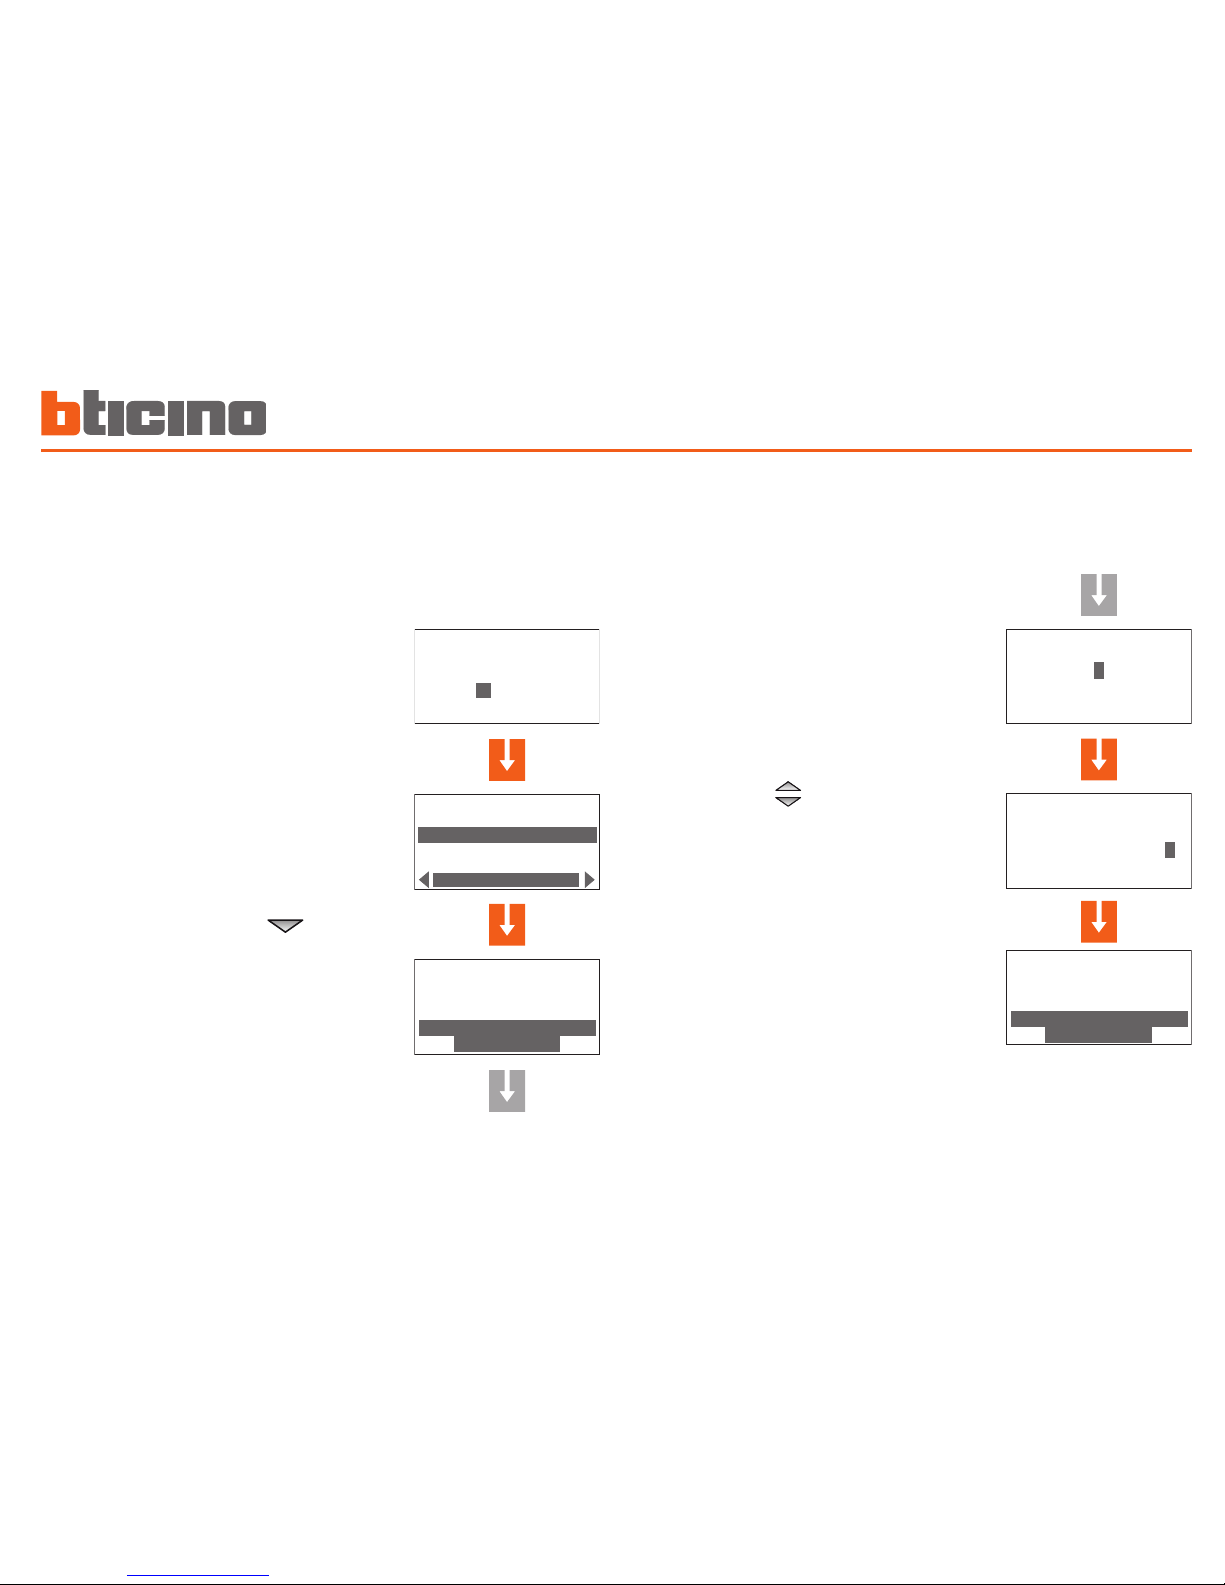
In order for the system to constantly keep all memorised events under
control, it is important to set the correct date and hour.
The new Date and Hour settings will also be sent to the Control Unit
Access the settings menu
Select Date and hour with the key
Press OK to enter
Type in the current hour and date
on the keypad; you can move the
cursor from the hour line to the
date line with the key
When all data has been entered,
press OK to conrm
next
SETTINGS
Language
Address
Central Type
English
SETTINGS
Central Type
Concealment
Date and hour
Modify
Code/Key
*
DATE and HOUR
hour: 0 0:00
date: 01/01/00
tuesday
01/01/00 00:00
SETTINGS
Language
Address
Central Type
English
SETTINGS
Central Type
Concealment
Date and hour
Modify
SETTINGS
Central Type
Concealment
Date and hour
Modify
DATE and HOUR
hour: 14:22
date: 25/02/08
tuesday
01/01/00 00:00
Code/Key
*
Page 44
Editing3
44
Adjusting the contrast ■
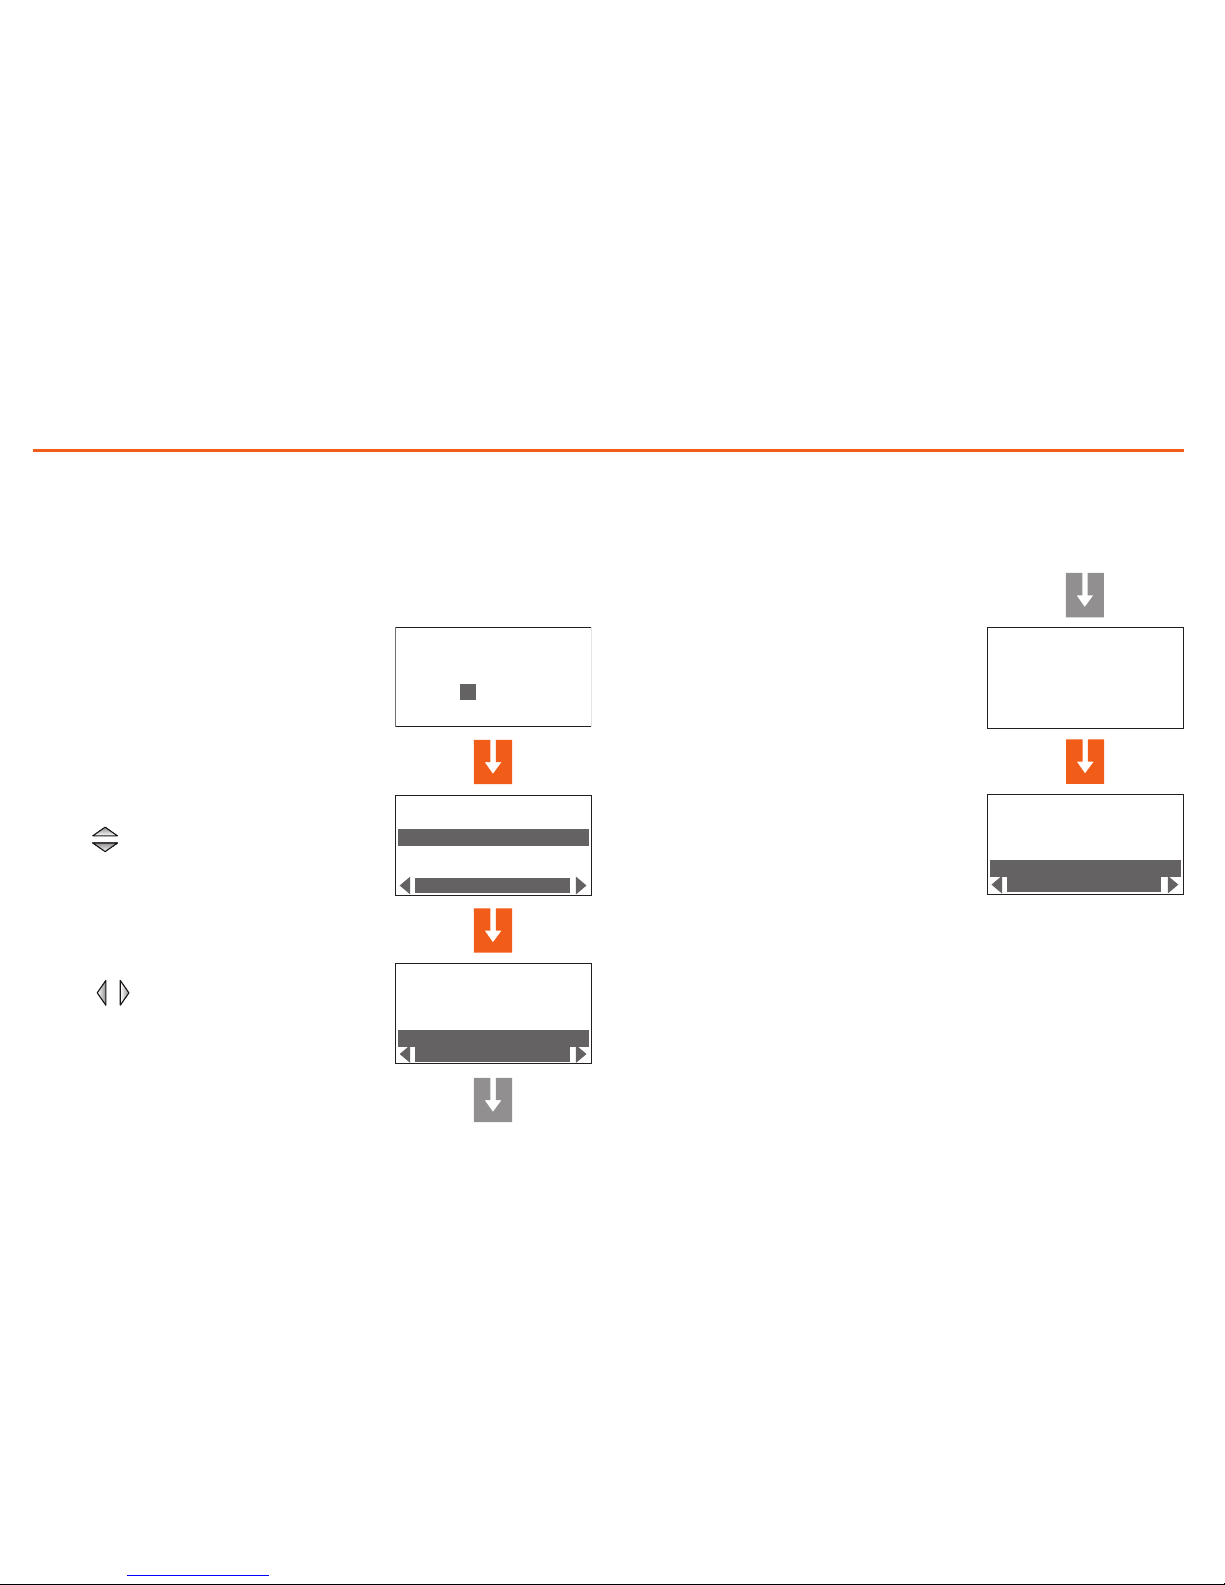
This function can be used to adjust the contrast of the display screen
for optimum view.
The display will show "in execution"
for a few second, after which the
previous page is displayed.
next
Code/Key
*
SETTINGS
Language
Address
Central Type
English
SETTINGS
Concealment
Date and hour
Contrast
--- LCD +++
in progress...
Code/Key
*
SETTINGS
Language
Address
Central Type
English
SETTINGS
Concealment
Date and hour
Contrast
--- LCD +++
SETTINGS
Concealment
Date and hour
Contrast
--- LCD +++
Accessing the settings menu
Use the keys to select Contrast
Press OK to conrm
Use the keys to adjust Contrast
The new contrast settings
have now been saved
Page 45
Editing 3
45
Disabling the buzzer ■
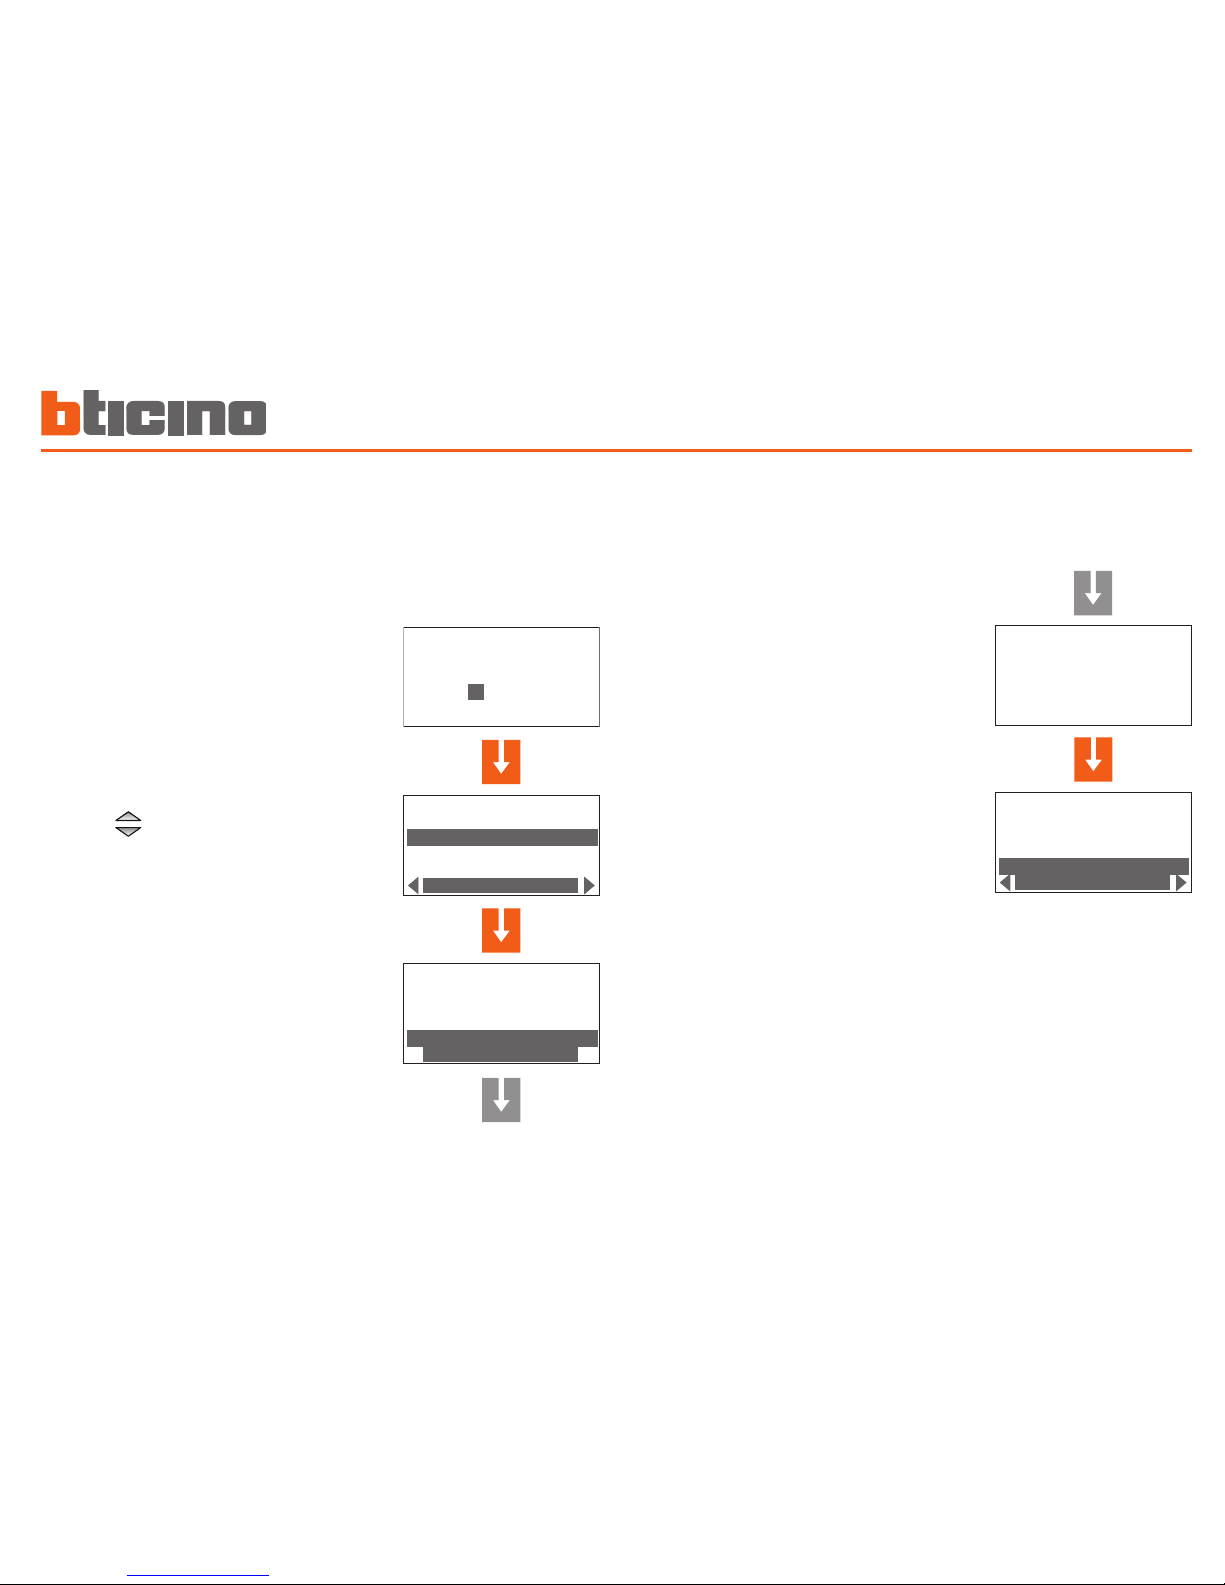
The operations performed using the connector (pressing the keys,
arming the system etc.) are conrmed acoustically by the built in
buzzer.
The following procedure can be used ot disable the buzzer.
The display will show "in execution"
for a few second, after which the
previous page is displayed.
next
Code/Key
*
SETTINGS
Language
Address
Central Type
English
SETTINGS
Date and hour
Contrast
Buzzer
Disabled
in progress...
Code/Key
*
SETTINGS
Language
Address
Central Type
English
SETTINGS
Date and hour
Contrast
Buzzer
Disabled
SETTINGS
Date and hour
Contrast
Buzzer
Enabled
Go to the settings menu
Using the keys to select Buzzer. If
the function is enabled, the last row of
the display shows Disable
Press OK to conrm
The buzzer is disabled.
The last row of the display shows
Enable
Page 46
Editing3
46
Activating concealment mode ■
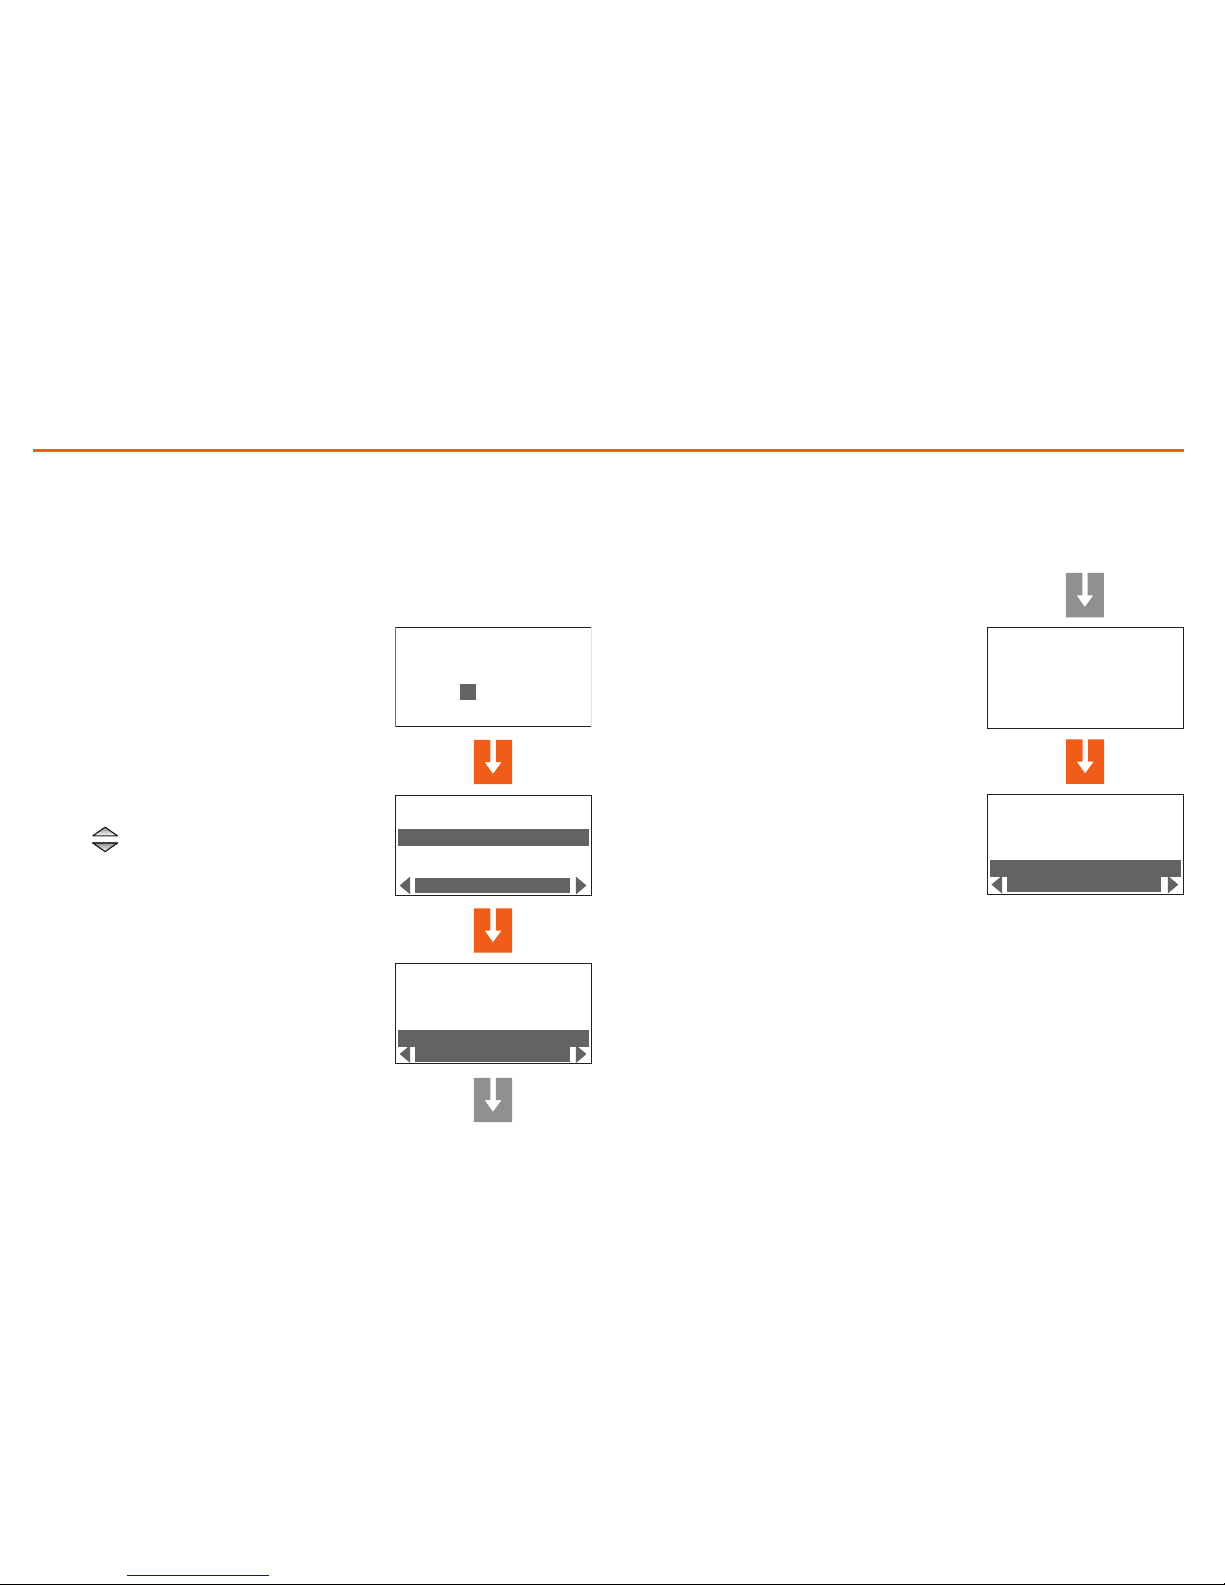
This function can be used to prevent displaying of the system status to
anyone without a user code or an enabled transponder.
The display will show "in execution"
for a few second, after which the
previous page is displayed.
next
Code/Key
*
SETTINGS
Language
Address
Central Type
English
SETTINGS
Address
Central Type
Concealment
Enabled
in progress...
Code/Key
*
SETTINGS
Language
Address
Central Type
English
SETTINGS
Address
Central Type
Concealment
Enabled
SETTINGS
Address
Central Type
Concealment
Enabled
Go to the settings menu
Use the keys to select Concealment
Press OK to conrm
The concealment function is now
enabled
Page 47

Page 48

BTicino SpA
Via Messina, 38
20154 Milano - Italy
www.bticino.it
Servizio Clienti
BTicino SpA si riserva il diritto di variare in qualsiasi momento i contenuti illustrati nel presente stampato e
di comunicare, in qualsiasi forma e modalità, i cambiamenti apportati.
BTicino SpA reserves at any time the right to modify the contents of this booklet and to communicate,
in any form and modality, the changes brought to the same.
Timbro Installatore
Installer stamp
 Loading...