

Page 1

349320 - 349321
AXOLUTE
Nighter & Whice
User manual
09/09-01 PC09/09-01 PC
Page 2

Page 3

User manual
3
Contents
AXOLUTE
Nighter & Whice
1 Introduction and basic functions 6
1.1 General information 6
1.2 Your Video Station: use it now! 6
1.2.1 Video door entry function keys 7
1.2.2 Navigation keys 7
1.3 Menu functions 8
1.3.1 Volume adjustment 10
1.3.2 Monitor adjustment 11
1.3.3 Date/Time adjustment 12
1.3.4 Camera swing 13
1.3.5 Cleaning glass 14
1.3.6 Bells adjustment 15
1.3.7 Paging 16
2 Trouble shooting 18
2.1 Push to Talk mode 19
3 CCTV functions 22
3.1 Activation 22
3.2 Intercommunication 22
3.3 Camera 23
3.4 Cycle cameras 23
4 House automation functions 26
4.1 Scenarios 26
4.2 Alarms 27
4.3 Sound system 28
4.4 Temperature control 29
4.5 Multimedia menu 31
5 Services 34
5.1 The “Settings” menu 34
5.2 Services 35
5.2.1 Professional studio 35
5.2.2 Hands free 35
5.2.3 Door state 36
5.2.4 Alarm messages 36
5.3 Messages 37
Page 4

4
Notes
Page 5

User manual
5
AXOLUTE
Nighter & Whice
Introduction and basic functions
1.1 General information 6
1.2 Your Video Station: use it now! 6
1.2.1 Video door entry function keys 7
1.2.2 Navigation keys 7
1.3 Menu functions 8
1.3.1 Volume adjustment 10
1.3.2 Monitor adjustment 11
1.3.3 Date/Time adjustment 12
1.3.4 Camera swing 13
1.3.5 Cleaning glass 14
1.3.6 Bells adjustment 15
1.3.7 Paging 16
Page 6

6
The Video Station offers the normal video door entry and CCTV functions and
can also interact with your My home system.
Fitting in with My Home
Scenarios:•
Runs the scenarios saved in the Scenario module.
Alarms:•
Signals the last alarm events which have occurred and the division of the system.
Sound system:•
Manages the BTicino digital sound system, acting as an amplifier.
Temperature control:•
Displays and adjusts the temperature in the various zones of the home and
the state of the control unit.
WARNINGS
Incorrect use of the Video Station and of all the devices connected to ●
it excludes any guarantee!
For cleaning only use a damp or antistatic cloth. Avoid the use of ●
alcohol or chemical detergents.
1.1 General information 1.2 Your Video Station: use it now!
1
3
4
LCD 8” colour display1 -
Microphone2 -
Navigation keys3 -
LED and Video door entry function keys 4 -
Loudspeaker5 -
2
5
1 Introduction and basic functions
Page 7

User manual
7
AXOLUTE
Nighter & Whice
1.2.1 Video door entry function keys 1.2.2 Navigation keys
Activation Entrance Panel/Cycling
It activates the switching on of the associated Entrance Panel
and, if present, allows the cycling display of the other Entrance
Panels/cameras.
Connection key
Activates/deactivates the audio connection.
When a call has been received the LED flashes; press once to answer: the LED shines steadily.
At rest activates the paging function (if enabled).
Call exclusion
Enables/disables the call bell. If the bell is excluded the exclusion
LED lights up and the Connection LED (flashing) signals the call.
Door lock key
When there is a call it opens the door lock of the Entrance Panel
from which the call was made, at rest that of the associated Entrance Panel. The LED signals that it is activated.
Staircase Lights
Activates the staircase lights relay.
Mute
Enables/disables the microphone during a sound connection.
Activating the Mute during the conversation the connection key
LED turns red.
key
Allows access to the menu; confirms the selection made.
keys
Inside the menu they change the value set.
In audio/video connection they allow rapid access to the volume and monitor settings.
keys
Inside the menu they select the previous or next item.
keys
Returns to the previous window. If you are already on the first
window it switches the display off.
Page 8

8
Three possible solutions for drawing up the main menu are given below:
menu with • COMMUNICATION functions;
menu with • HOME AUTOMATION functions;
CUSTOMISED • menu.
For more explanations consult the complete User Manual in the CD supplied.
Use the keys to select the functions from those available:
Submenu and commands1 -
Use the settings icon to access a series of adjustments/services described 2 -
below
SETTINGS
1 1 1
1 1 2
COMMUNICATION
Main menu example with programming of just the communication commands.
HOUSE AUTOMATION
Main menu example with communication and house-automation submenu.
1.3 Menu functions
Use the key to access the main menu:
ACTIVATION I
1 2 3
3 4 5
1) Activation
2) Intercommunication
3) Camera
4) Cycle cameras
5) Settings
SCENARIOS
1 2 3
4 5 6
1) Communication
2) Scenarios
3) Alarms
4) Sound system
5) Temperature control
6) Settings
1 Introduction and basic functions
Page 9

User manual
9
AXOLUTE
Nighter & Whice
The installer has given the exact configuration of your Video Station the tables
below; if he has not filled it in ask for it.
COMMUNICATION
FUNCTIONS DESCRIPTION
HOUSE AUTOMATION
SUB-MENU SYSTEM FOUND
SCENARIOS
ALARMS
SOUND SYSTEM
TEMPERATURE CONTROL
MULTIMEDIA INTERFACE
CUSTOMISED MENU
The customised menu allows more intuitive use of the Video Station functions.
In fact the menu only displays the functions in your My Home system and the
text of each command can be customised in the installation phase.
Using the customised menu also lets you:
Have the PROFESSIONAL STUDIO, HANDS FREE, PAGING and MULTIMEDIA •
functions, which otherwise can only be called from the SETTINGS menu, in
the main page or in another page.
SETTINGS
1 2 3
4 5 6
1) Communication
2) Professional studio
3) Hands free
4) Paging
5) Multimedia
6) Settings
Page 10

10
NOTE: During a video door entry call you can access the Adjustments menu
directly by pressing the or key.
IMPOSTAZIONIADJUSTMENTS
VOLUME
BELLS
1.3.1 Volume adjustment
Inside the menu select one
of the items (e.g. Bells)
Adjust the volume to the
level required.
EP SOUND = sound volume when talking to the entrance panel.
INTERCOM = sound volume when holding an intercom conversation.
BELLS = volume level for all the bells.
SOUND SYSTEM = sound system volume.
TONES = high/low balance.
Select Adjustments
Press to access the
menu
Press to confirm
1 Introduction and basic functions
Page 11

User manual
11
AXOLUTE
Nighter & Whice
NOTE: During a video door entry call you can access the Adjustments menu
directly by pressing the or key.
IMPOSTAZIONIADJUSTMENTS
MONITOR
1.3.2 Monitor adjustment
Select Adjustments
Press to access the
menu
Select Monitor
Press to confirm
COLOUR
CONTRAST
Inside the menu select one
of the items (e.g. Contrast)
Make the adjustment
Page 12

12
Sets the current date and time.
IMPOSTAZIONIADJUSTMENTS
DATE/TIME
1.3.3 Date/Time adjustment
Select Adjustments
Press to access the
menu
Select Date/Time
Press to confirm
> TIME 12:05:00
DATE 31:07:08
TIME 12:05:00
> DATE 31:07:08
Press to confirm
Set the hour
Press ; the first two
numbers flash
Set the minutes
Press
Use the same procedure to set the date
1 Introduction and basic functions
Page 13
User manual
13
AXOLUTE
Nighter & Whice
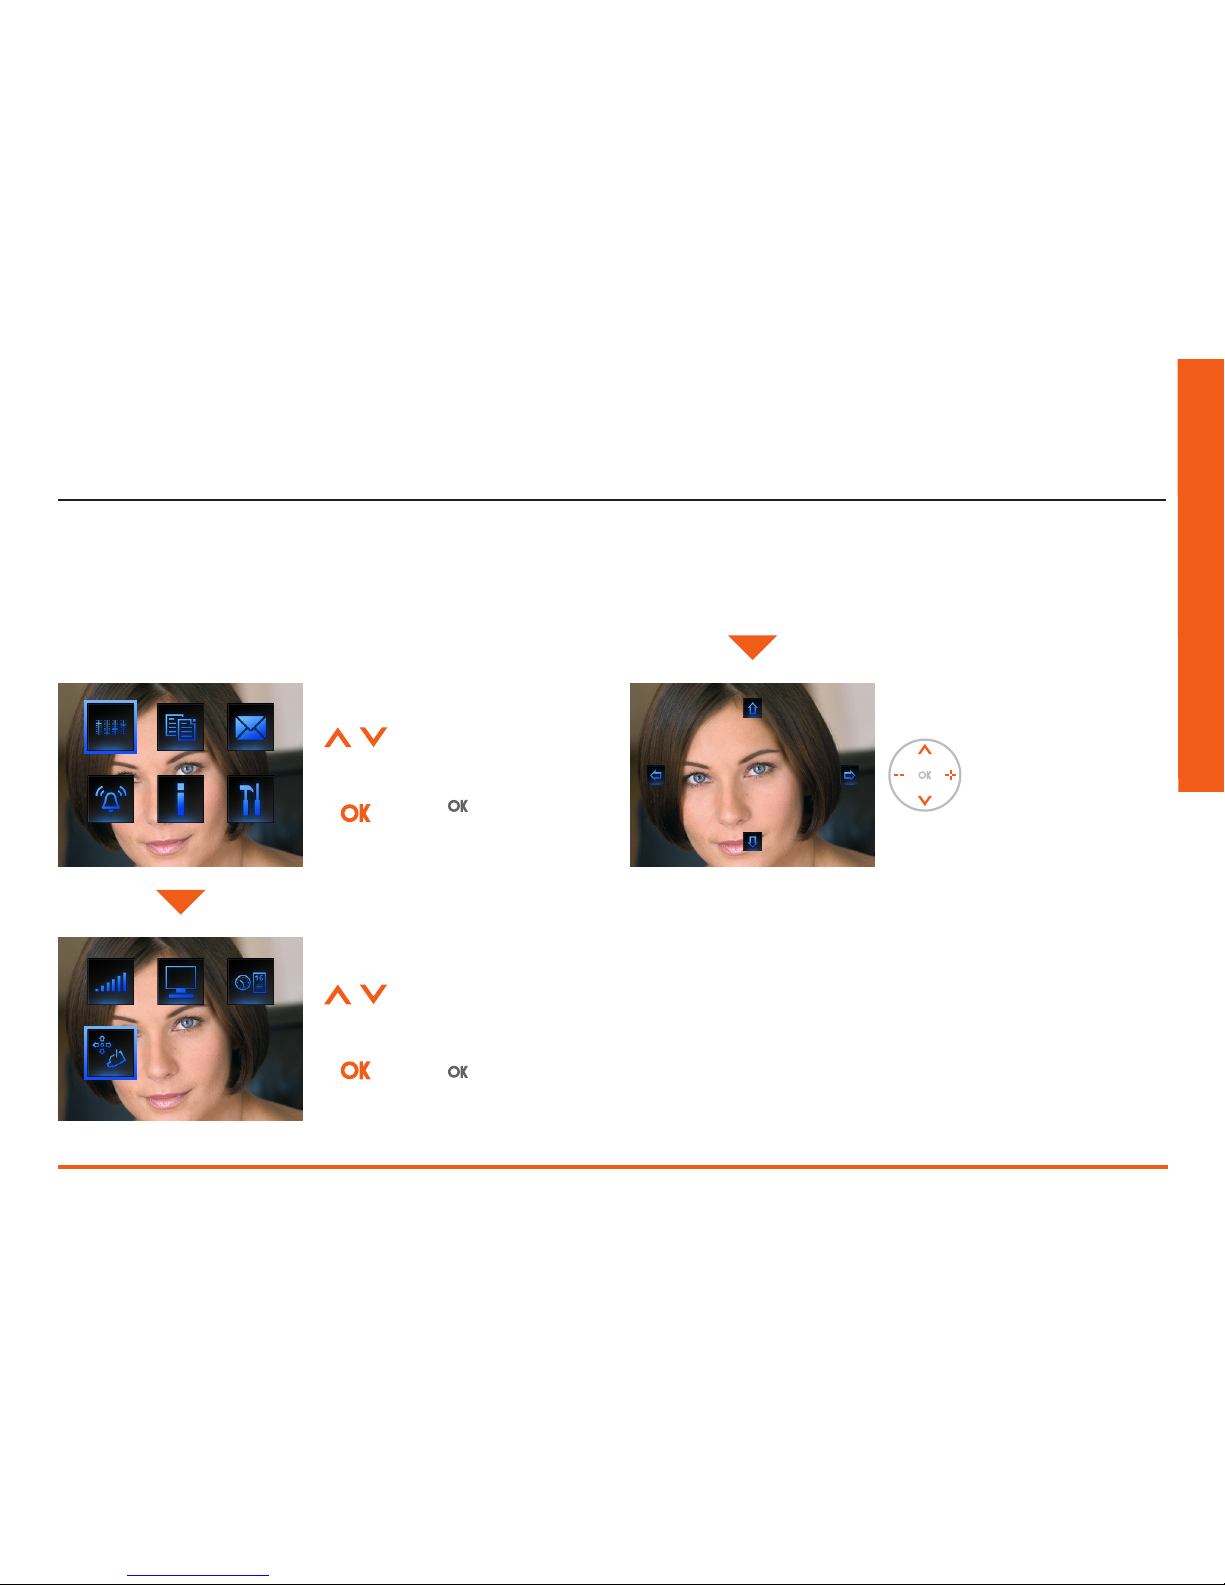
NOTE: This menu can only be accessed during the connection with the entrance panel, if this is set up for the camera swing.
SWING BRACKET
ADJUSTMENTS
1.3.4 Camera swing
Select Adjustments
Press to access the
menu
Select Swing
Press to confirm
Adjust the correct camera
angle
Page 14
14
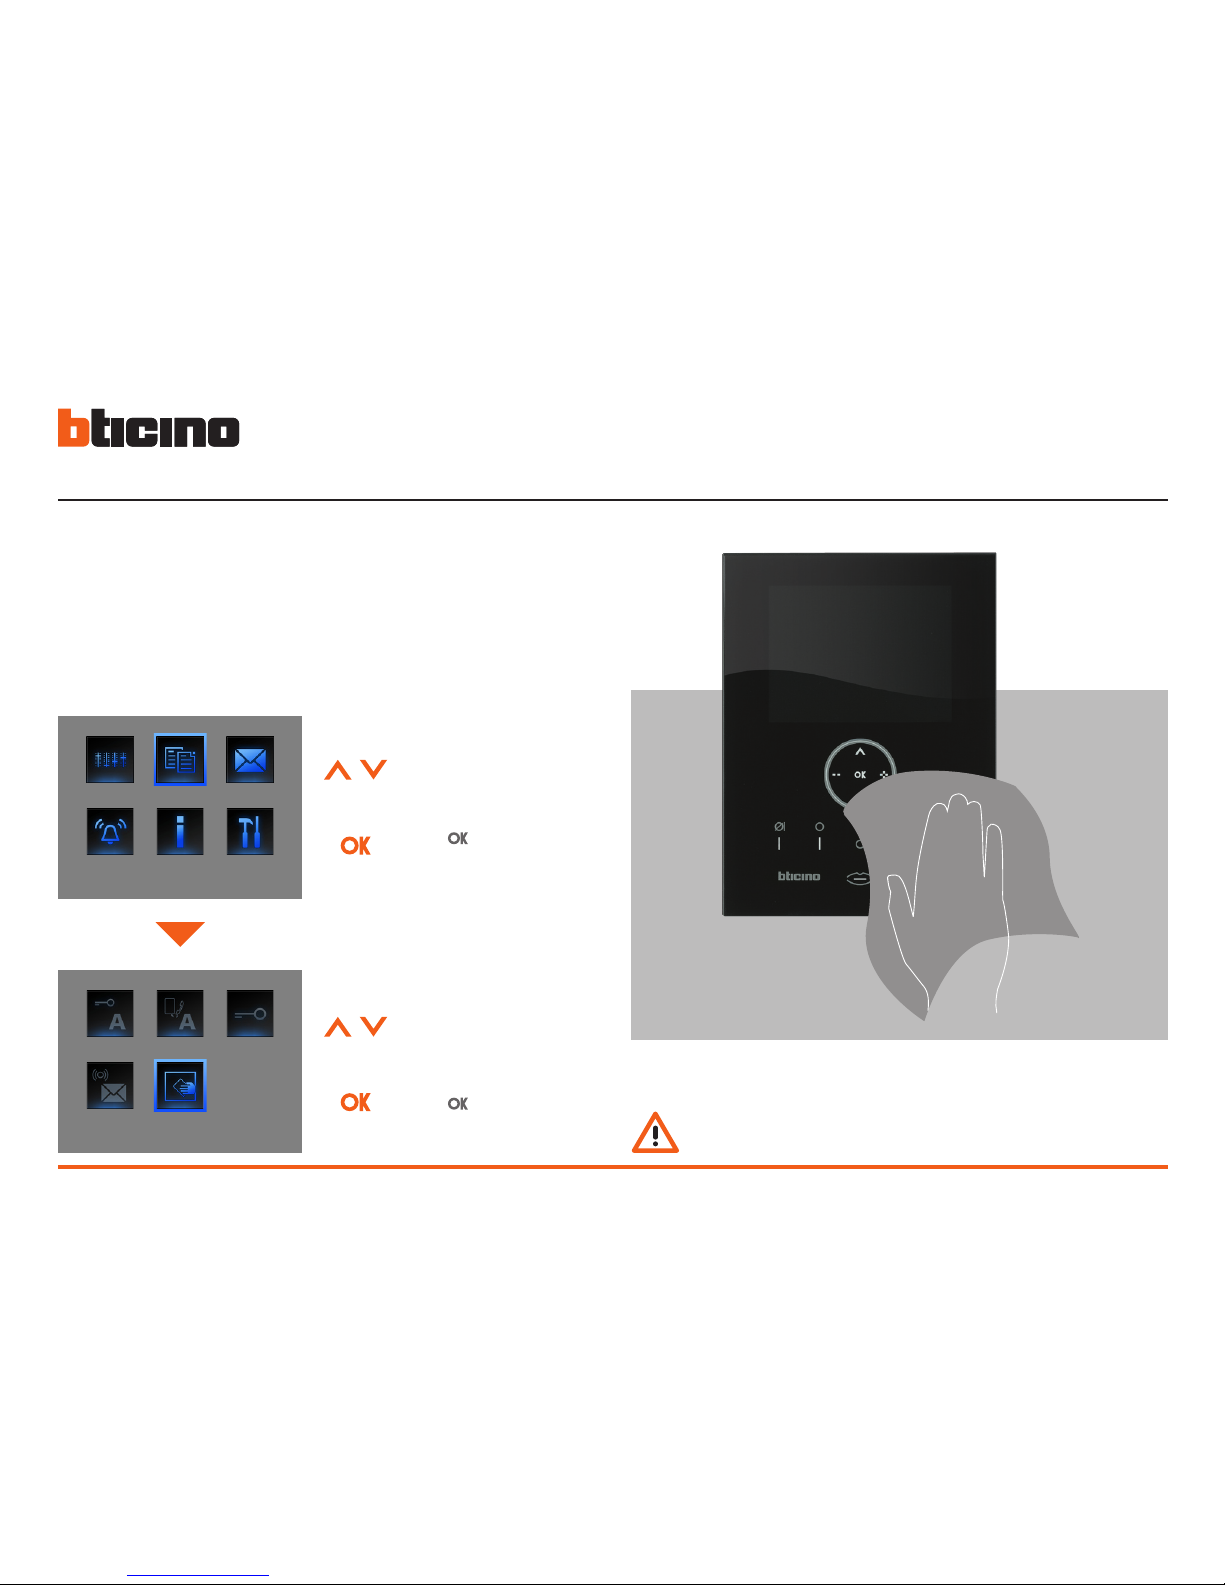
1.3.5 Cleaning glass
IMPOSTAZIONISERVICES
The device can be temporarily deactivated for cleaning (all the LED go out).
At this point the device surface can be wiped with a cloth without sending any
commands to the system.
Normal operation is reset after 20 seconds (all the LED light up again).
Do not clean with solvents, thinners etc. or abrasive products.
Only use the cloth supplied.
CLEANING
Select Services
Press to access the
menu
Select Cleaning glass
Press to confirm
1 Introduction and basic functions
Page 15
User manual
15
AXOLUTE
Nighter & Whice
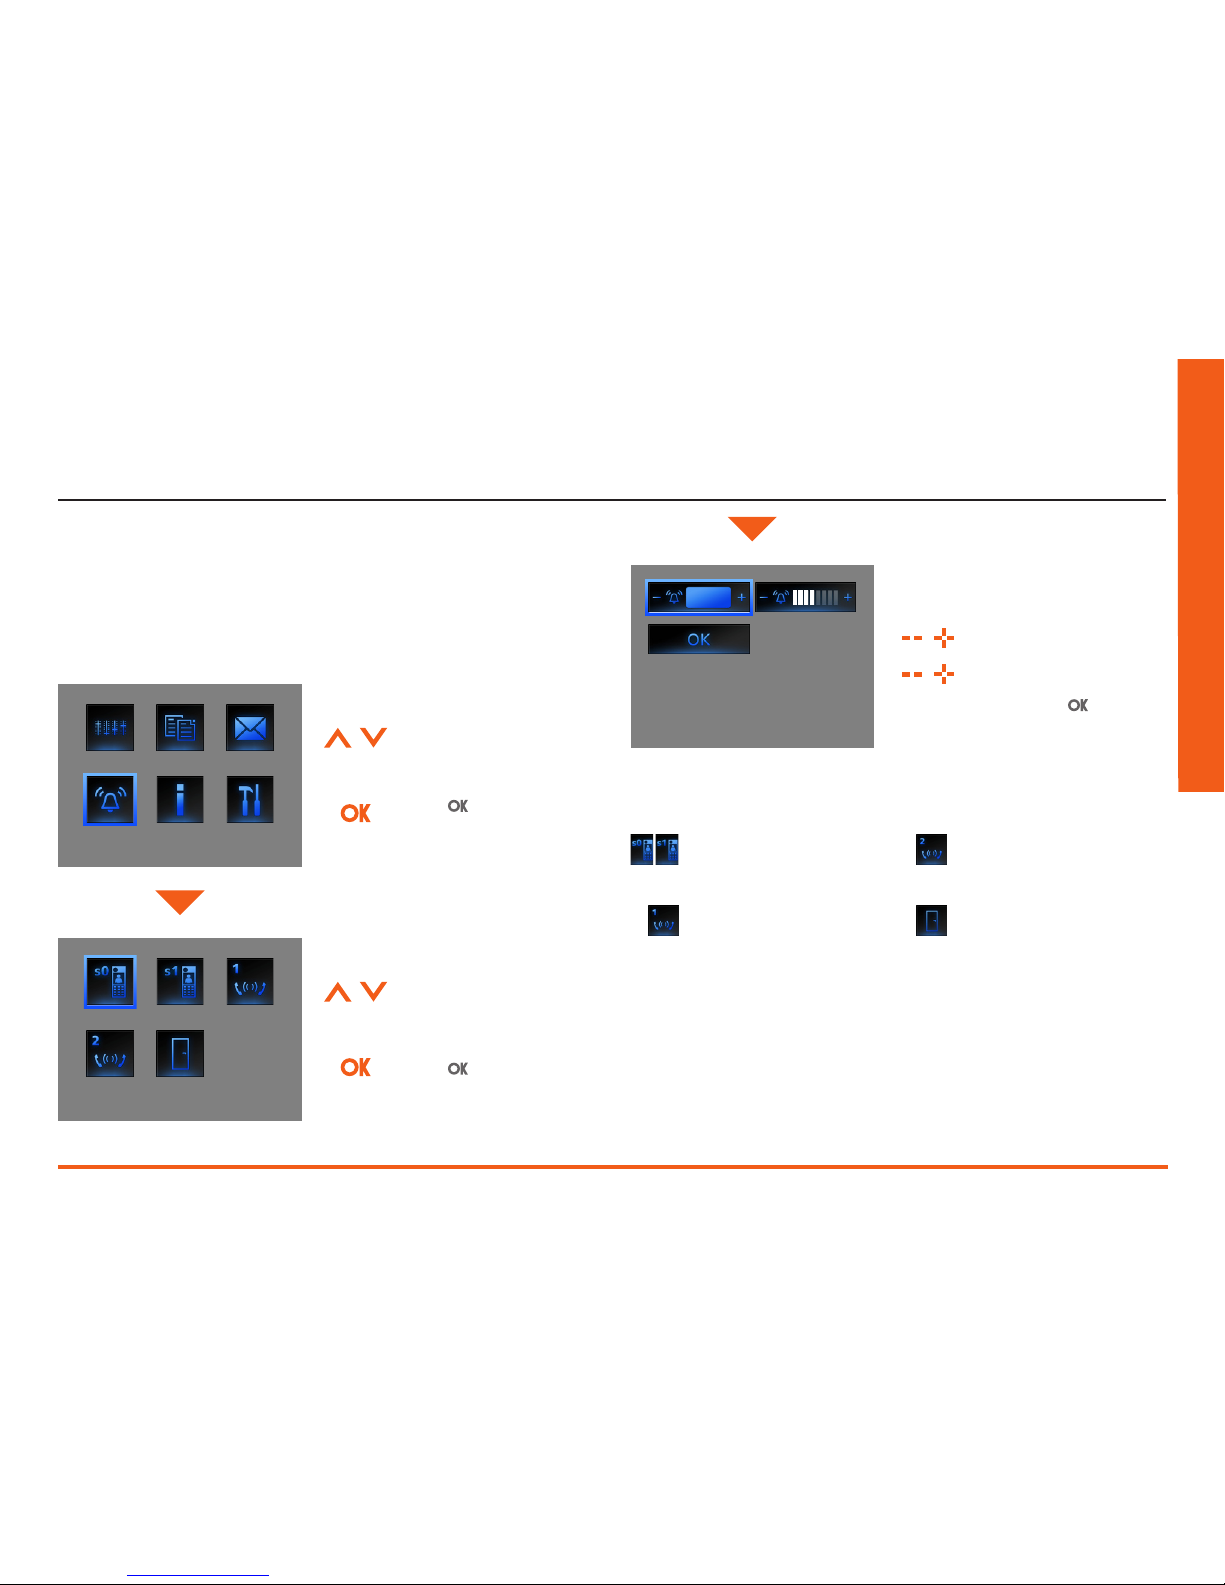
You can associate one of sixteen tunes to each call event.
IMPOSTAZIONIBELLS
1.3.6 Bells adjustment
CALL FROM EP = call from the
entrance panel (S=0 o S=1)
INTERNAL INTERCOM = call
from the intercom in your
apartment
EXTERNAL INTERCOM = call
from an intercom in another
apartment
CALL TO THE FLOOR = call
from the pushbutton near your
entrance door
TUNE
01
Select Confirm and then to save the
selection and return to the previous
page
Adjust the volume
Choose the tune
CALL FROM EP (S=0)
Select Bells
Select the event
Press to access the
menu
Press to confirm
Page 16
16
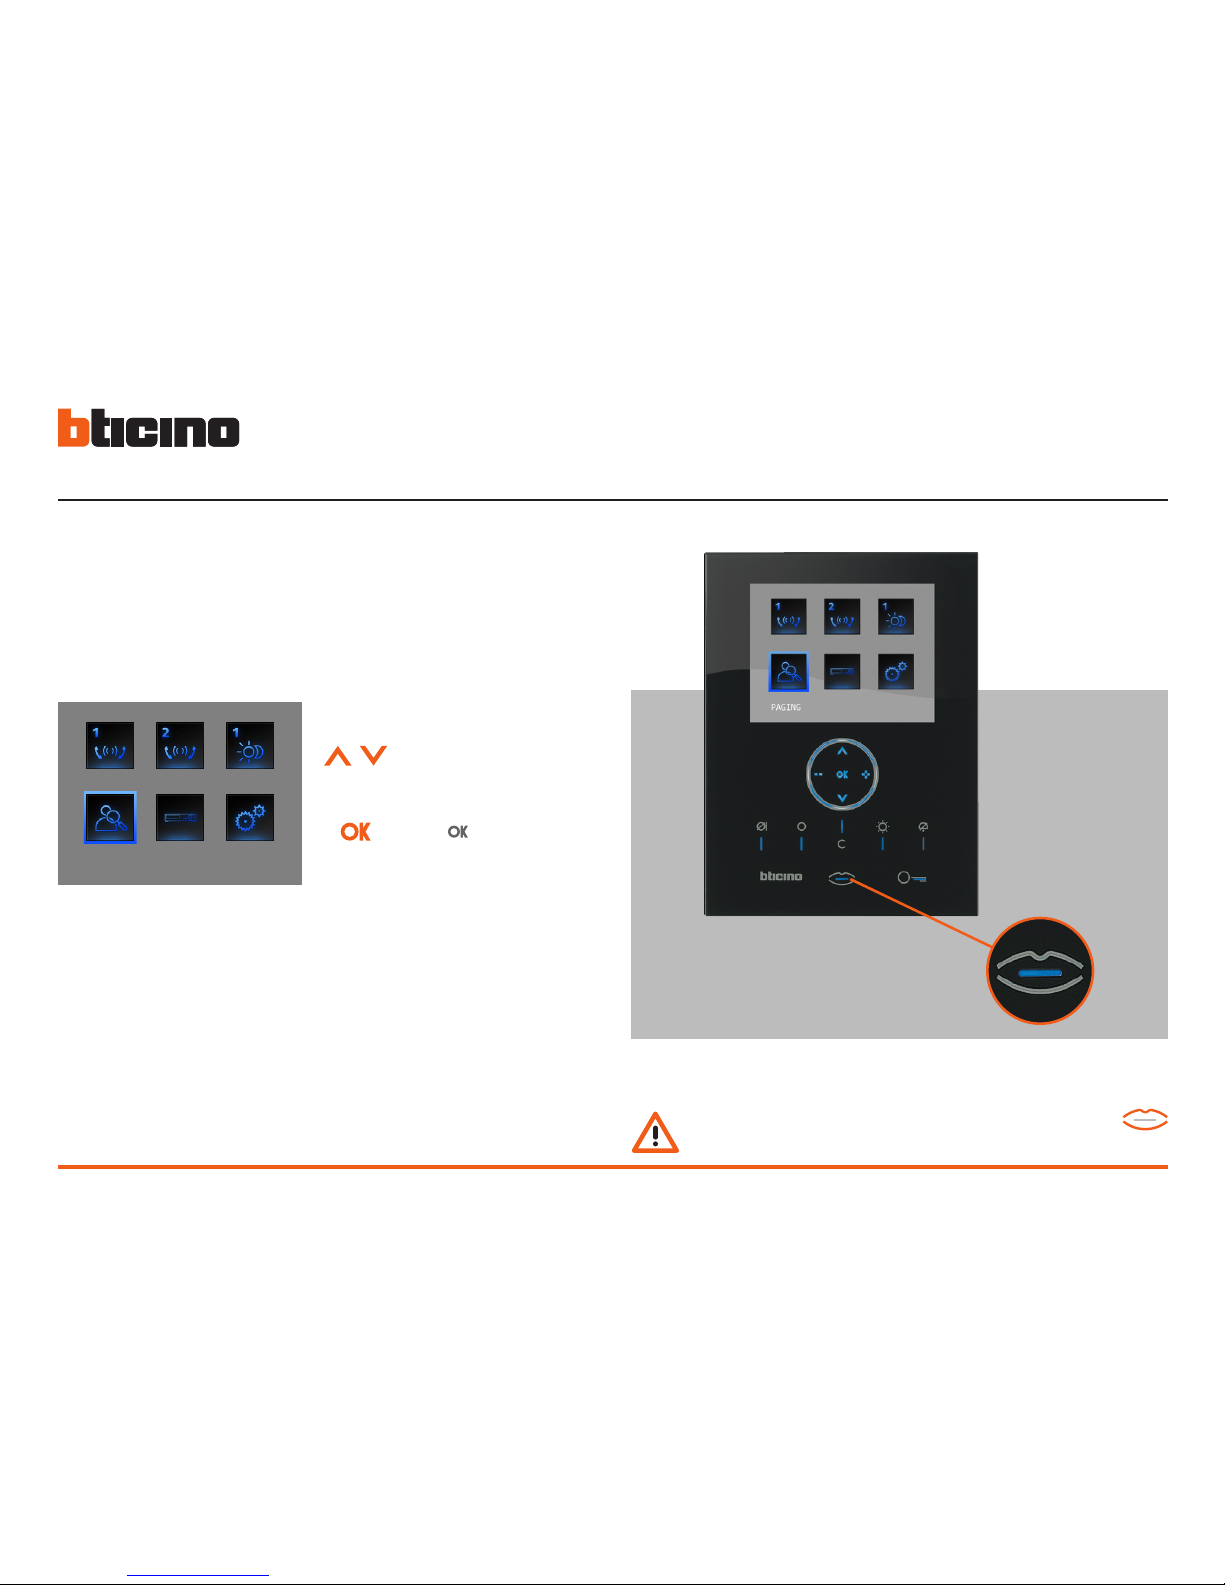
If your system is set up, using the icon in the main menu a “paging” call can be
sent to the system:
Basic• : only sound system
Enhanced• : on the speaker* audio handsets as well
1.3.7 Paging
Once the communication is activated the voice will be played on the whole
system.
PAGING
Select Paging
Press to confirm
The page function can be activated directly by pressing the key
(if the installer has configured it).
* Configurate with Software
1 Introduction and basic functions
Page 17
User manual
17
AXOLUTE
Nighter & Whice
Trouble shooting
2.1 Push to Talk mode 19
Page 18
18
PROBLEM SOLUTION
On pressing the Entrance panel Activation/Cycling key ( ) no picture appears.
- the audio/video channel may be busy, wait for it to become free (from 1 to 3
minutes) and try again.
On pressing the key the menu does not switch on and the handset gives
a busy sound
- the audio/video channel is busy, wait for it to become free (from 1 to 3 minutes) and try again.
When called the handset does not ring
- check that the call has not been excluded
(the call exclusion LED is ON);
- check the configuration of the devices.
At the entrance panel it is difficult to hear the caller
- talk at a maximum distance of 40 centimetres from the Video Station microphone;
- check the entrance panel settings with the installer and if necessary reduce
the microphone volume;
- you can communicate in PUSH TO TALK mode
(see description on next page).
At the handset it is difficult to hear the caller
- check the volume setting on the Video Station;
- make sure that there are no strong noise sources near the Video Station;
- you can communicate in PUSH TO TALK mode
(see description on next page).
2 Trouble shooting
Page 19
User manual
19
AXOLUTE
Nighter & Whice
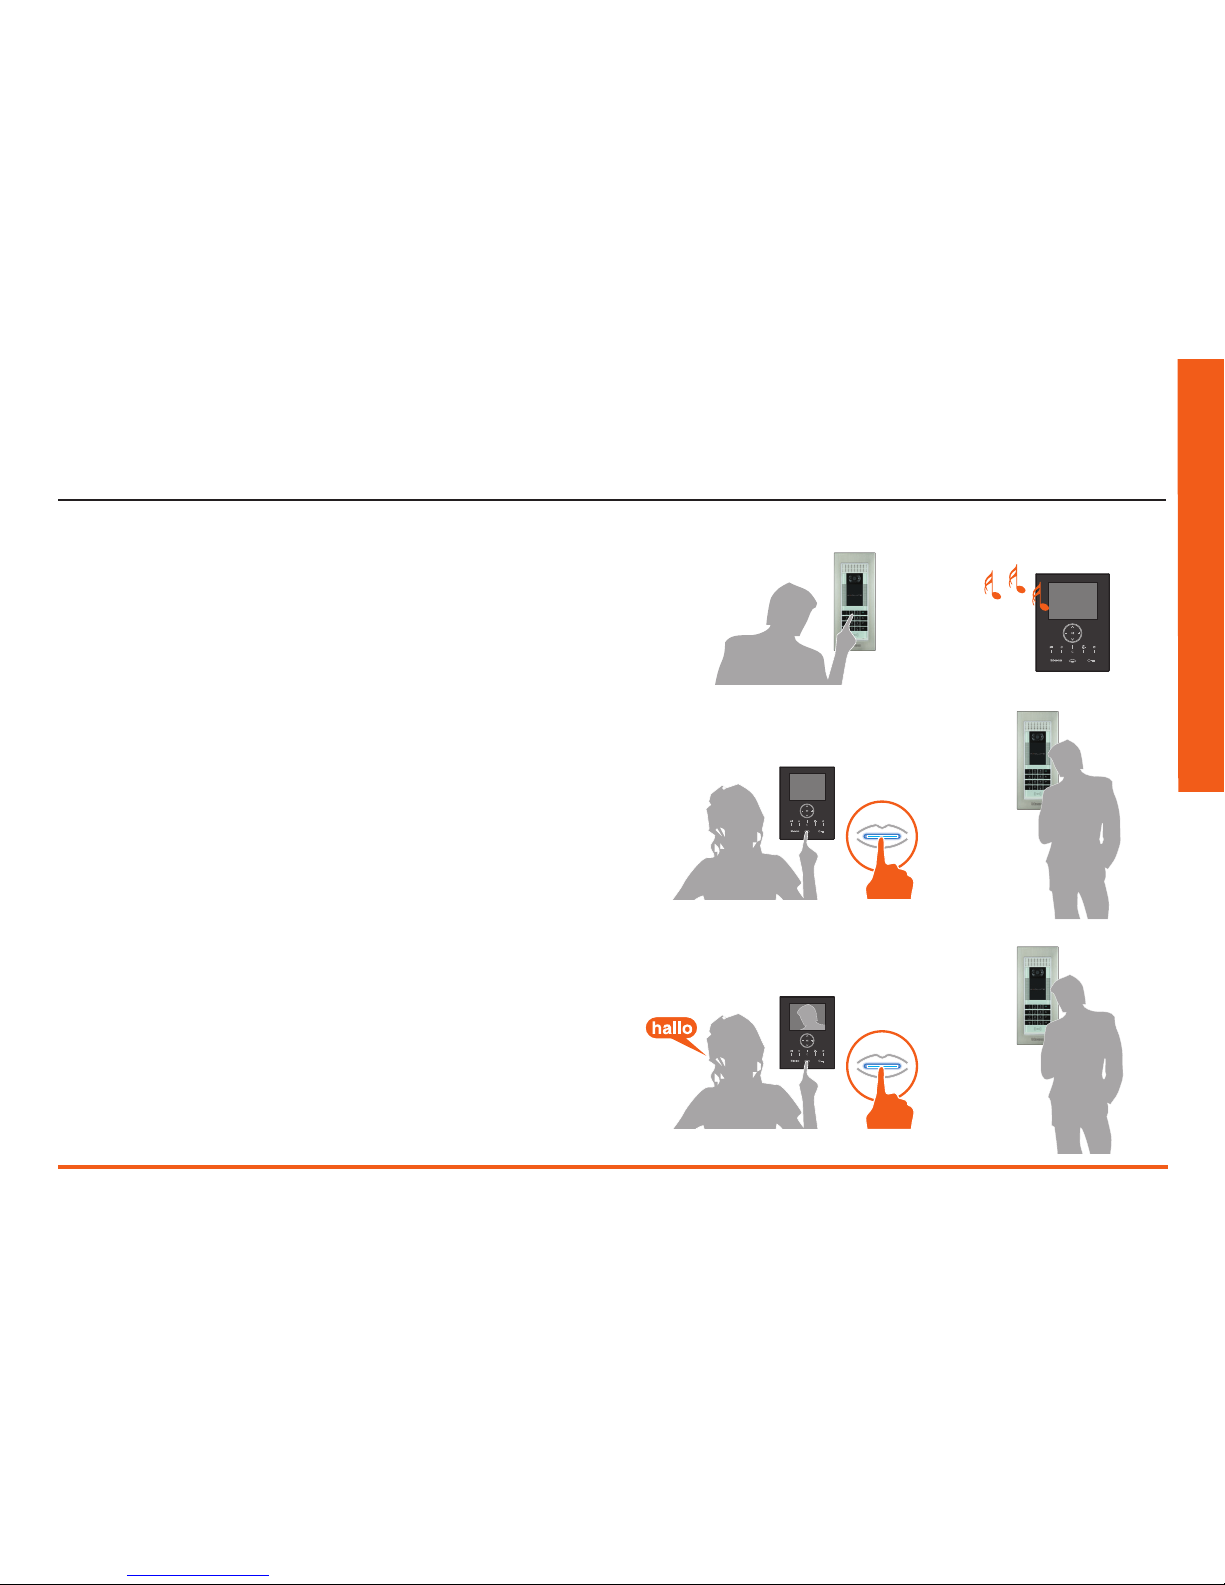
2.1 Push to Talk mode
Receiving a call from the entrance panel.
Press the Connection key to answer the call.
The connection LED lights up.
During the conversation you can activate the PUSH TO TALK function.
Press the Connection key for at least 2 seconds to talk to the entrance panel.
The LED remains ON.
Page 20
20
2 Trouble shooting
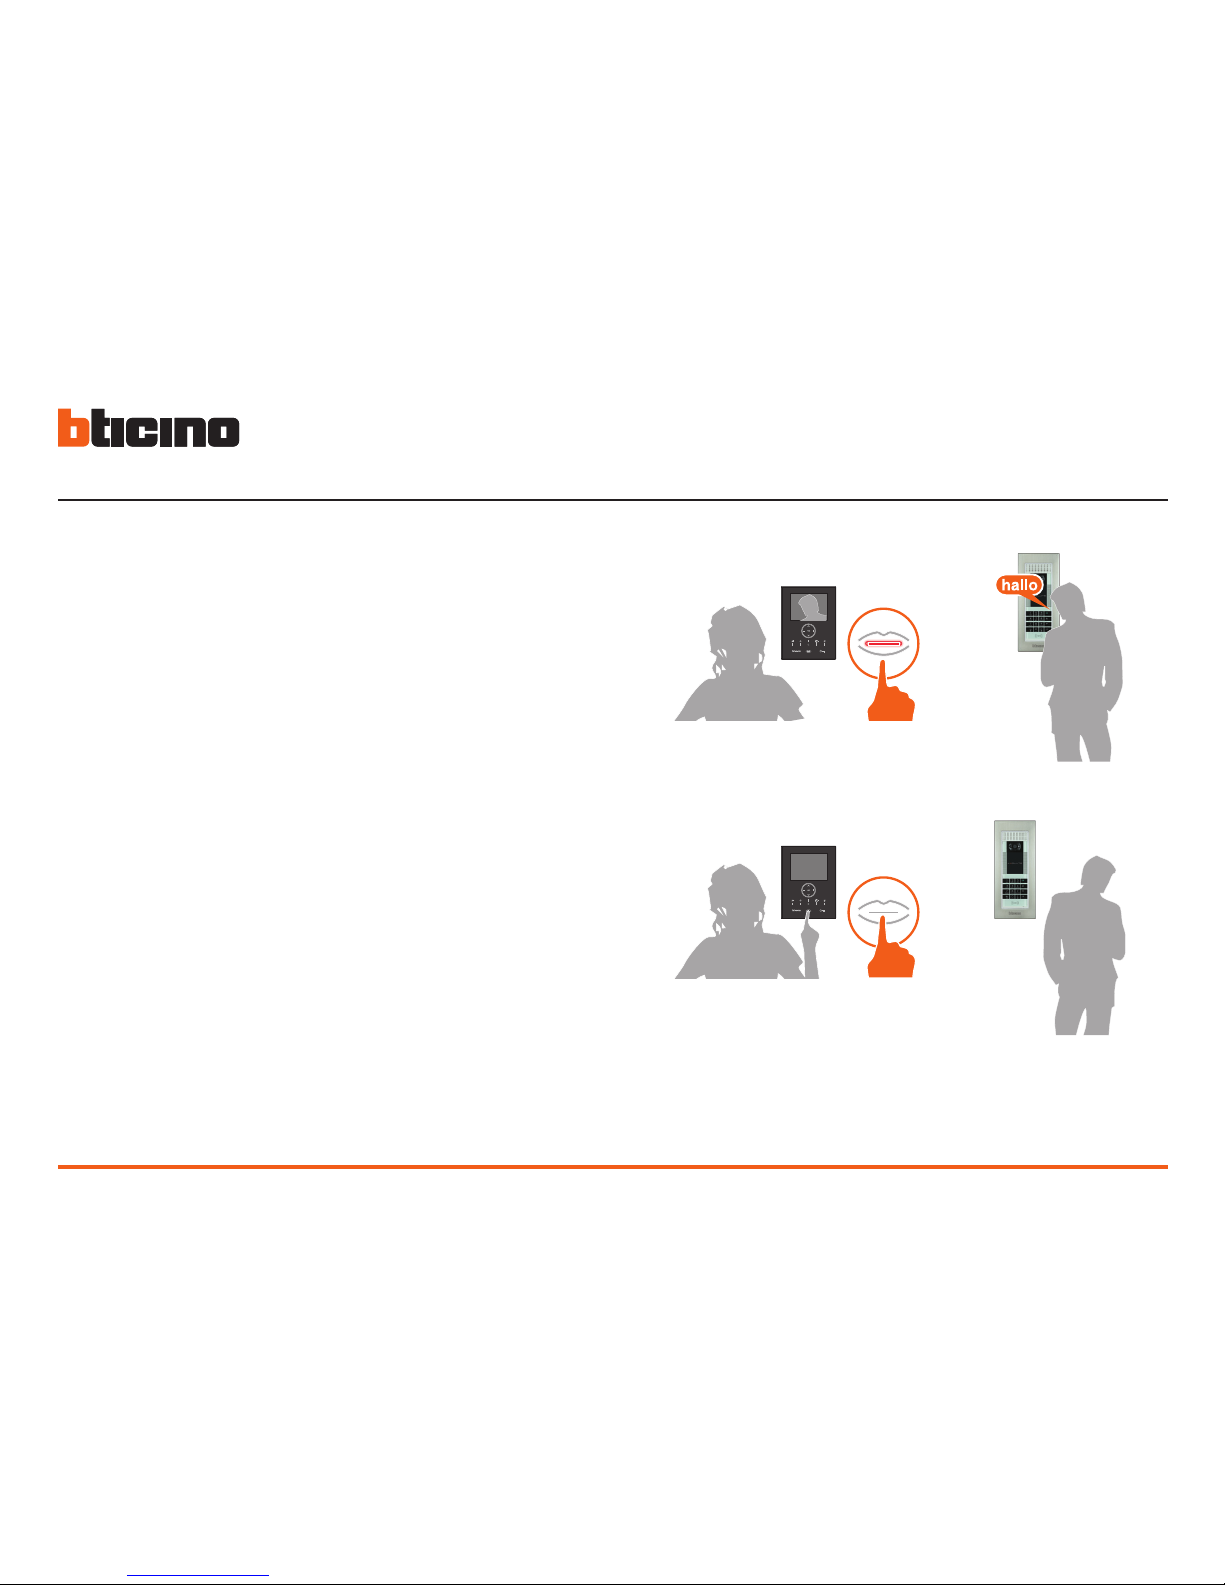
To end the connection press the connection key briefly.
The LED goes out.
Release the key to hear from the entrance panel.
The LED becomes red.
Page 21
User manual
21
AXOLUTE
Nighter & Whice
CCTV functions
3.1 Activation 22
3.2 Intercommunication 22
3.3 Camera 23
3.4 Cycle cameras 23
Page 22
22
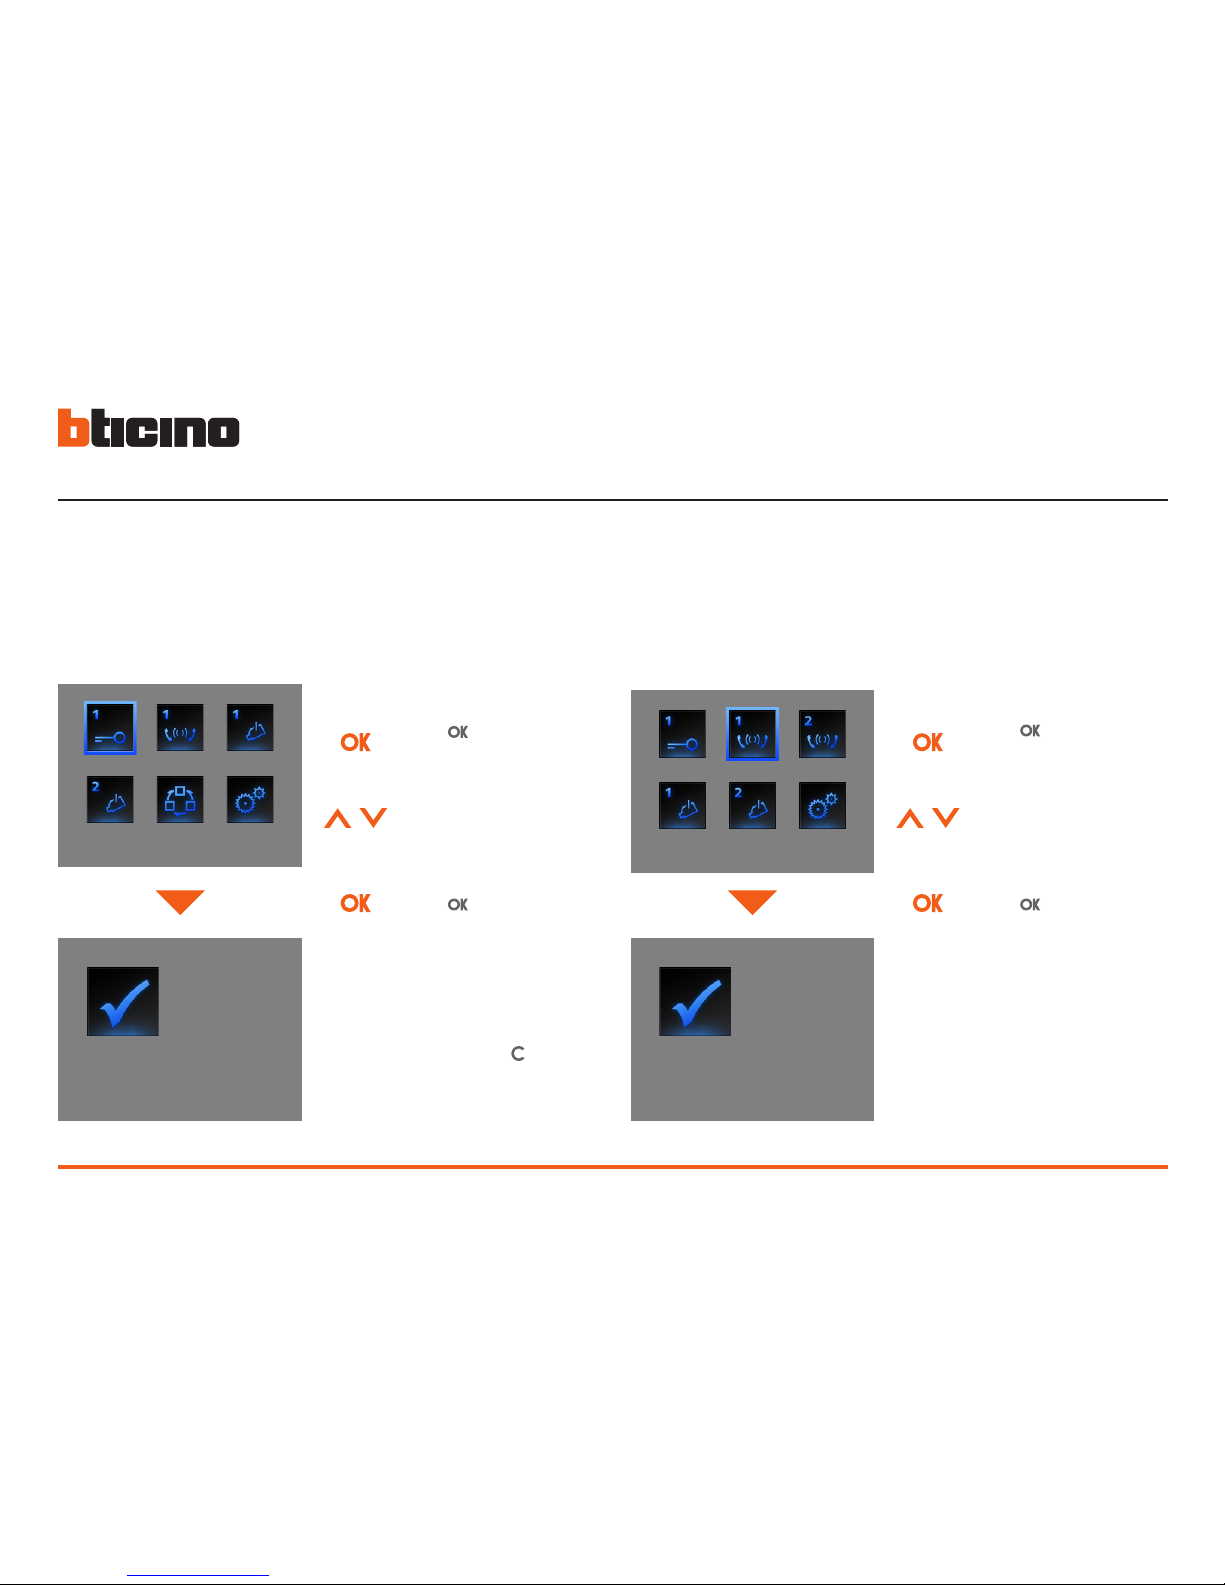
This function activates an actuator or an entrance panel. As an example you can
activate the opening of a secondary gate.
This function allows conversation with other video handsets/ handsets installed
in your home or in other apartments.
Command Performed appears on the
screen briefly
To quit the menu press the key
COMMAND PERFORMED
INTERCOMMUNICATING I
Command Performed appears briefly
and then the screen switches off
If the audio/video channel is occupied
by another user you hear a sound and
the command is not performed.
Wait until the channel is free and try
again.
If there is a call from the entrance panel,
the conversation is interrupted.
COMMAND PERFORMED
3.1 Activation 3.2 Intercommunication
ACTIVATION I
Press to confirm
Select the function
Press to access the
Main menu
Press to confirm
Select the extension to call
Press to access the
Main menu
3 CCTV functions
Page 23
User manual
23
AXOLUTE
Nighter & Whice
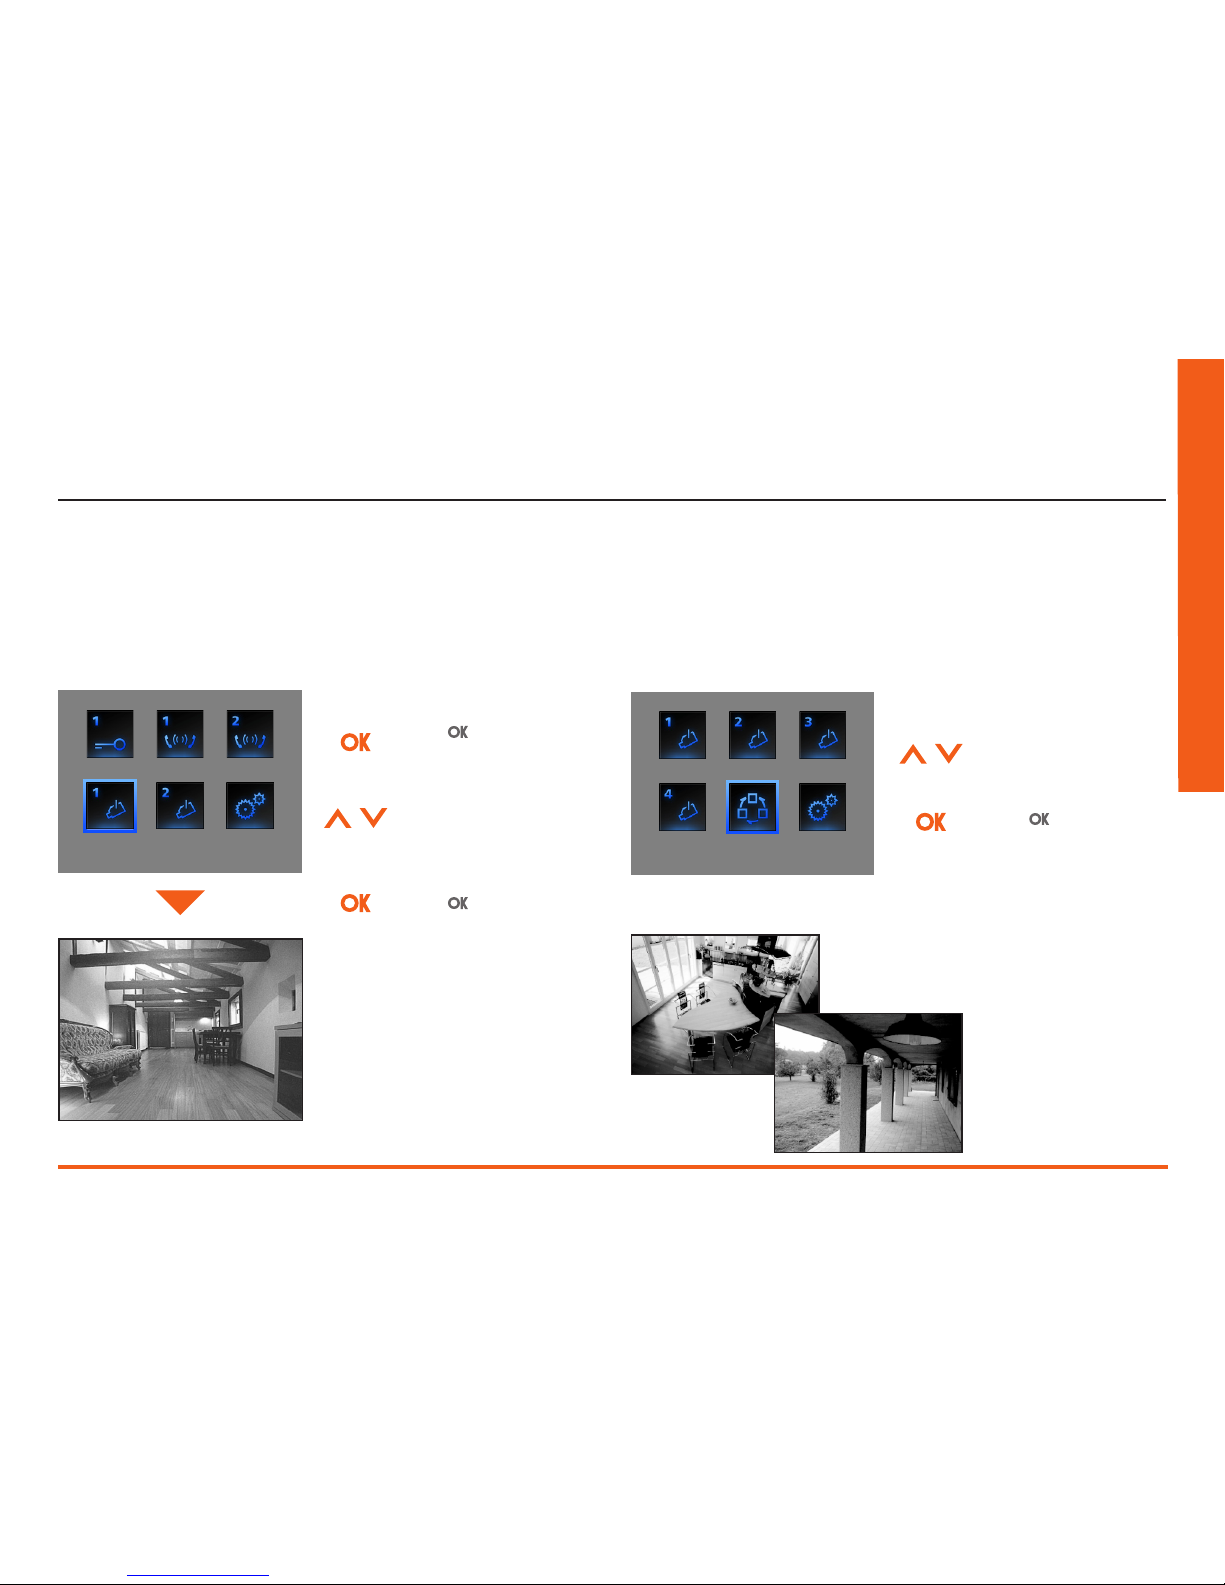
This function lets you monitor your home, activating one of the cameras in the
apartment and in the common areas (e.g. garage or garden).
CAMERA I
The picture taken by the camera selected appears on the screen (if the audio/
video channel is occupied by another
user the command is not performed.
Wait until the channel is free and try
again).
If there is a call from the entrance panel,
the connection will be interrupted.
This lets you display the pictures taken by all the cameras installed one after the
other. Once activated the Video Station displays the first camera for 10 seconds,
then goes to the next. When the cycle is complete, the screen switches off.
You can stop on the display of one camera by pressing the Connection key. The
working camera remains active and if it belongs to an entrance panel the sound
communication is activated as well.
CYCLE CAMERAS
3.3 Camera 3.4 Cycle cameras
Press to confirm
Select the camera to
activate
Press to access the
Main menu
Select Cycle cameras
Press to Confirm (if
the audio/video channel
is occupied by another
user the command is not
performed. Wait until the
channel is free and try
again).
If there is a call from the entrance panel, the connection will be interrupted.
Page 24

24
Notes
Page 25
User manual
25
AXOLUTE
Nighter & Whice
House automation functions
4.1 Scenarios 26
4.2 Alarms 27
4.3 Sound system 28
4.4 Temperature control 29
4.5 Multimedia menu 31
Page 26
26
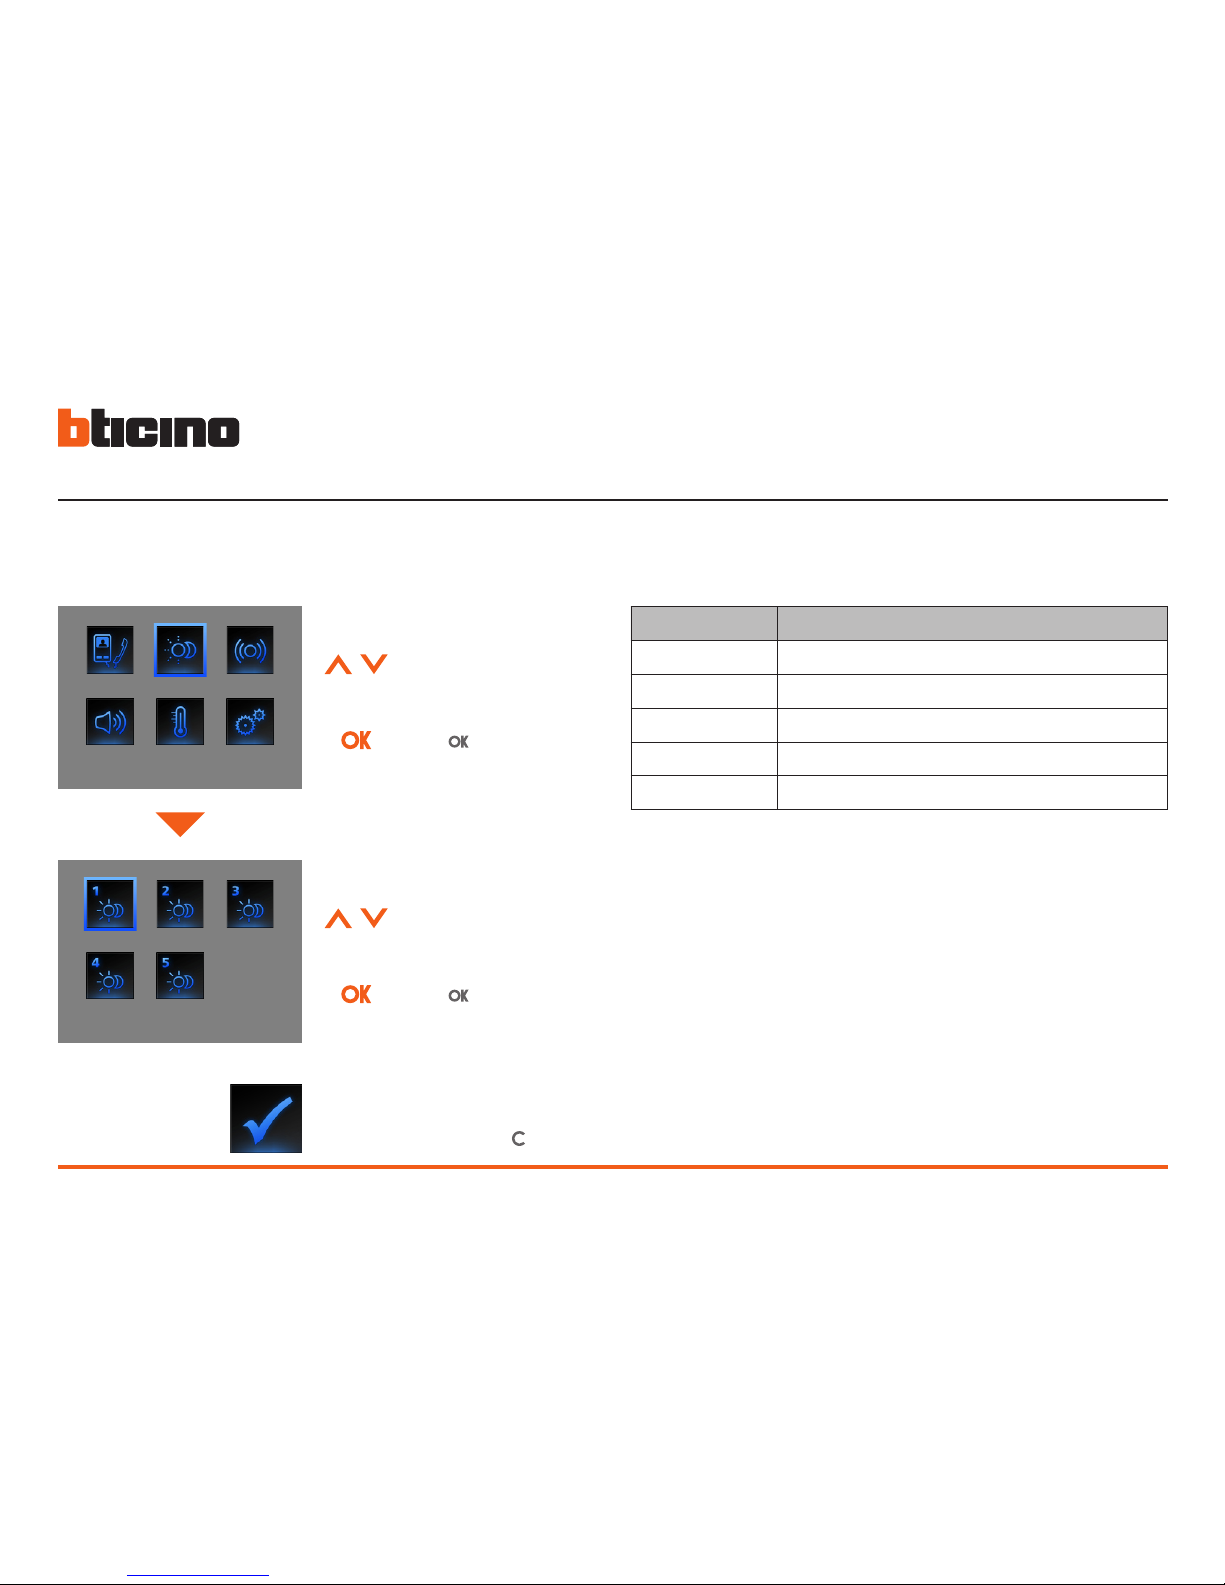
Your Video Station communicates with the BTicino automation system, activating the scenarios.
SCENARIO DESCRIPTION
SCENARIO I
SCENARIO II
SCENARIO III
SCENARIO IV
SCENARIO V
The installer has given a brief description of the scenarios set in the tables below, if he has not filled it in ask for it.
4.1 Scenarios
SCENARIOS
SCENARIO I
Press to confirm
Inside the Main menu
select Scenarios
Press to confirm
Select the scenario you
want to activate
Command Performed appears on the
screen briefly
To quit the menu press the key.
4 House automation functions
Page 27
User manual
27
AXOLUTE
Nighter & Whice
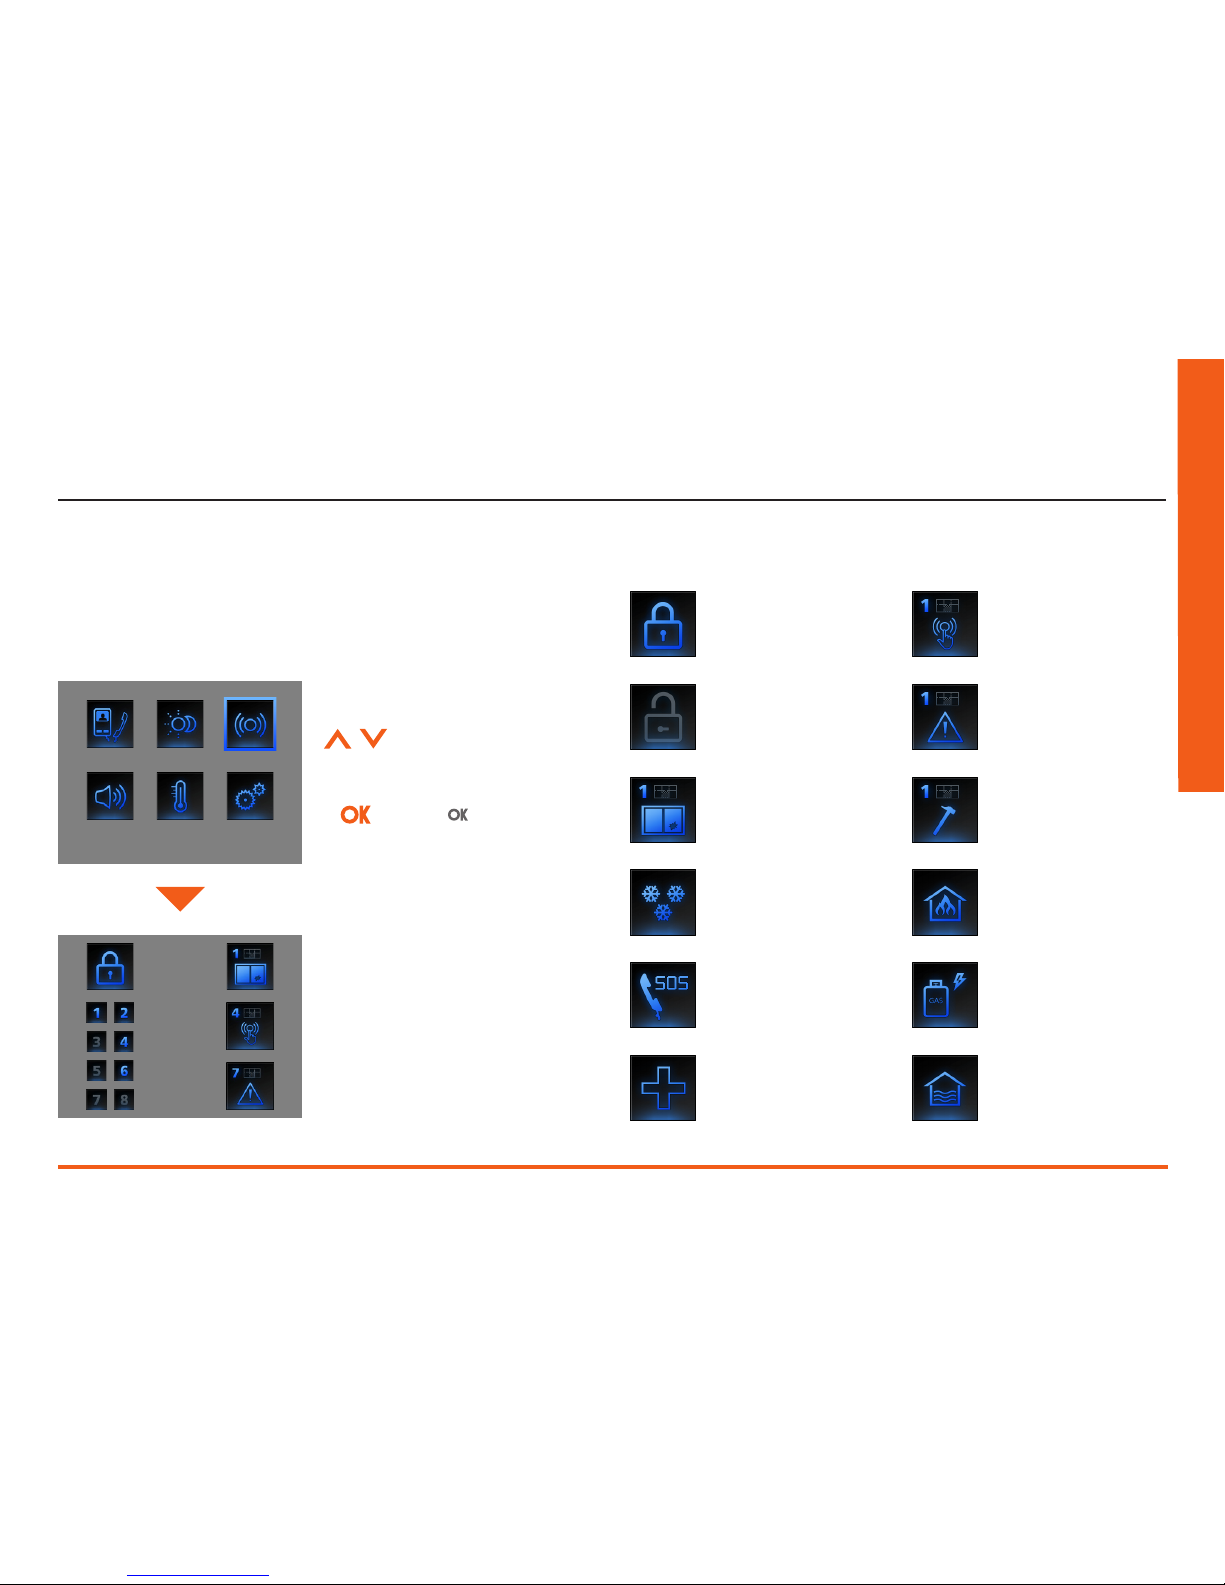
Your Video Station communicates with the BTicino burglar-alarm system, in
particular giving information on the system state, the active zones and the last
3 alarms given.
ALARMS
10/06 10:20
10/06 20:30
10/06 22:55
The information screen appears
Alarms icons key:
INTRUSION TAMPERING
TELERESCUE FLOOD
EMERGENCY CALL
GAS LEAK
FREEZER FIRE
DISARMED TECHNICAL
ARMED ANTIPANIC
4.2 Alarms
Press to confirm
Inside the Main menu
select Alarms
Page 28
28
10/06 10:20
10/06 20:30
10/06 22:55
2
1
3
LOCAL AMPLIFIER
CD
SOUND SYSTEM
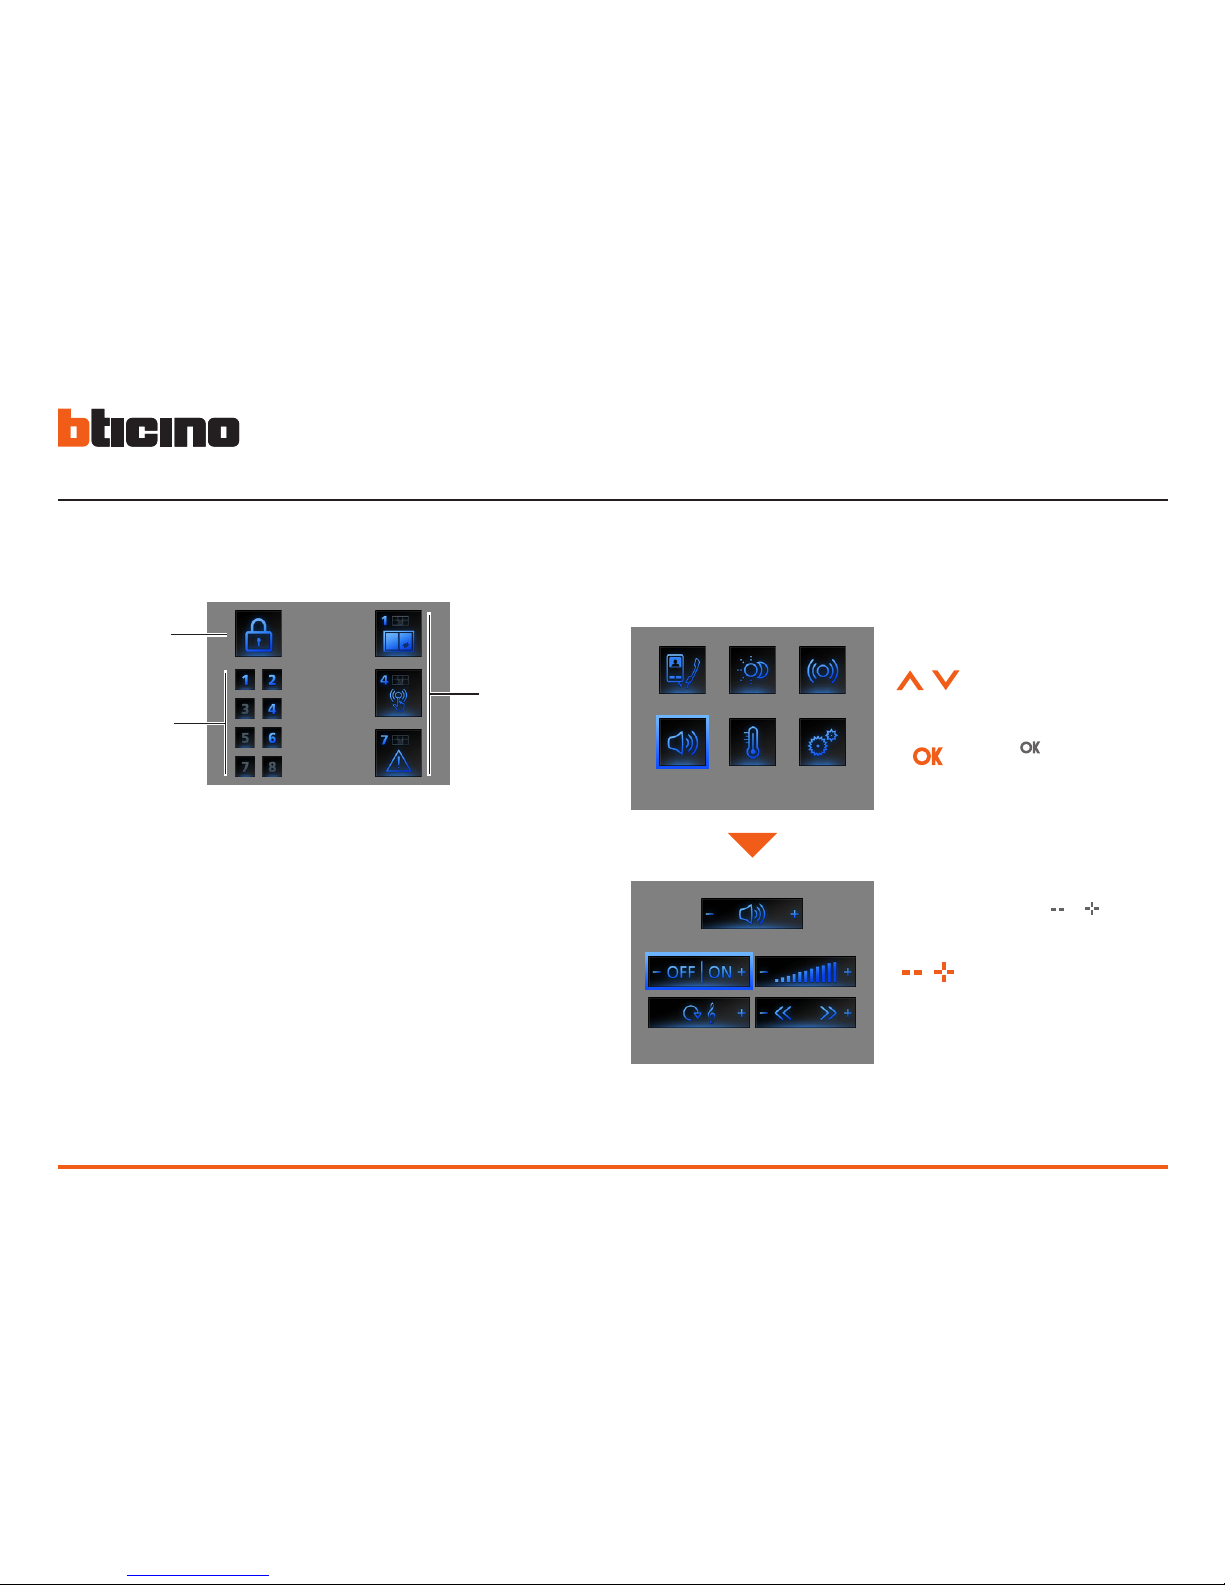
The information in the screen is read as indicated below:
1) State of the 8 zones managed by the burglar-alarm system: the corresponding number (from 1 to 8) is indicated for each active zone
2) System state = ON/OFF
3) Information on the last 3 alarms:
Date, Time, Type of alarm, Zone or Channel of origin
Technical Alarms:
GAS LEAK C=1
FREEZER C=2
FLOOD C=3
EMERGENCY CALL C=4
TECHNICAL GENERIC C=5,6,7
FIRE C=8
TELERESCUE C=9
If your Video Station is connected to the BTicino sound system you can check
it.
NOTE: when the burglar alarm is switched on, the memory of the last 3 alarms
is cancelled; if the siren is active, a further alarm can’t be visualized.
Alarms from the 0 zone are not displayed.
*
– One-channel system: general activation, of the single room and of the single amplifier
if the Video Station is programmed by PC.
– Multi-channel system: activation of the single room and of the single amplifier if the
Video Station is programmed by PC.
4.3 Sound system
Inside the Main menu
select Sound system
Press to access the
menu
Using the or keys you
can switch the amplifier*
ON/OFF, adjust the
volume, choose the CD
track or change the radio
station and select the
music source (radio, CD,
etc.).
4 House automation functions
Page 29
User manual
29
AXOLUTE
Nighter & Whice
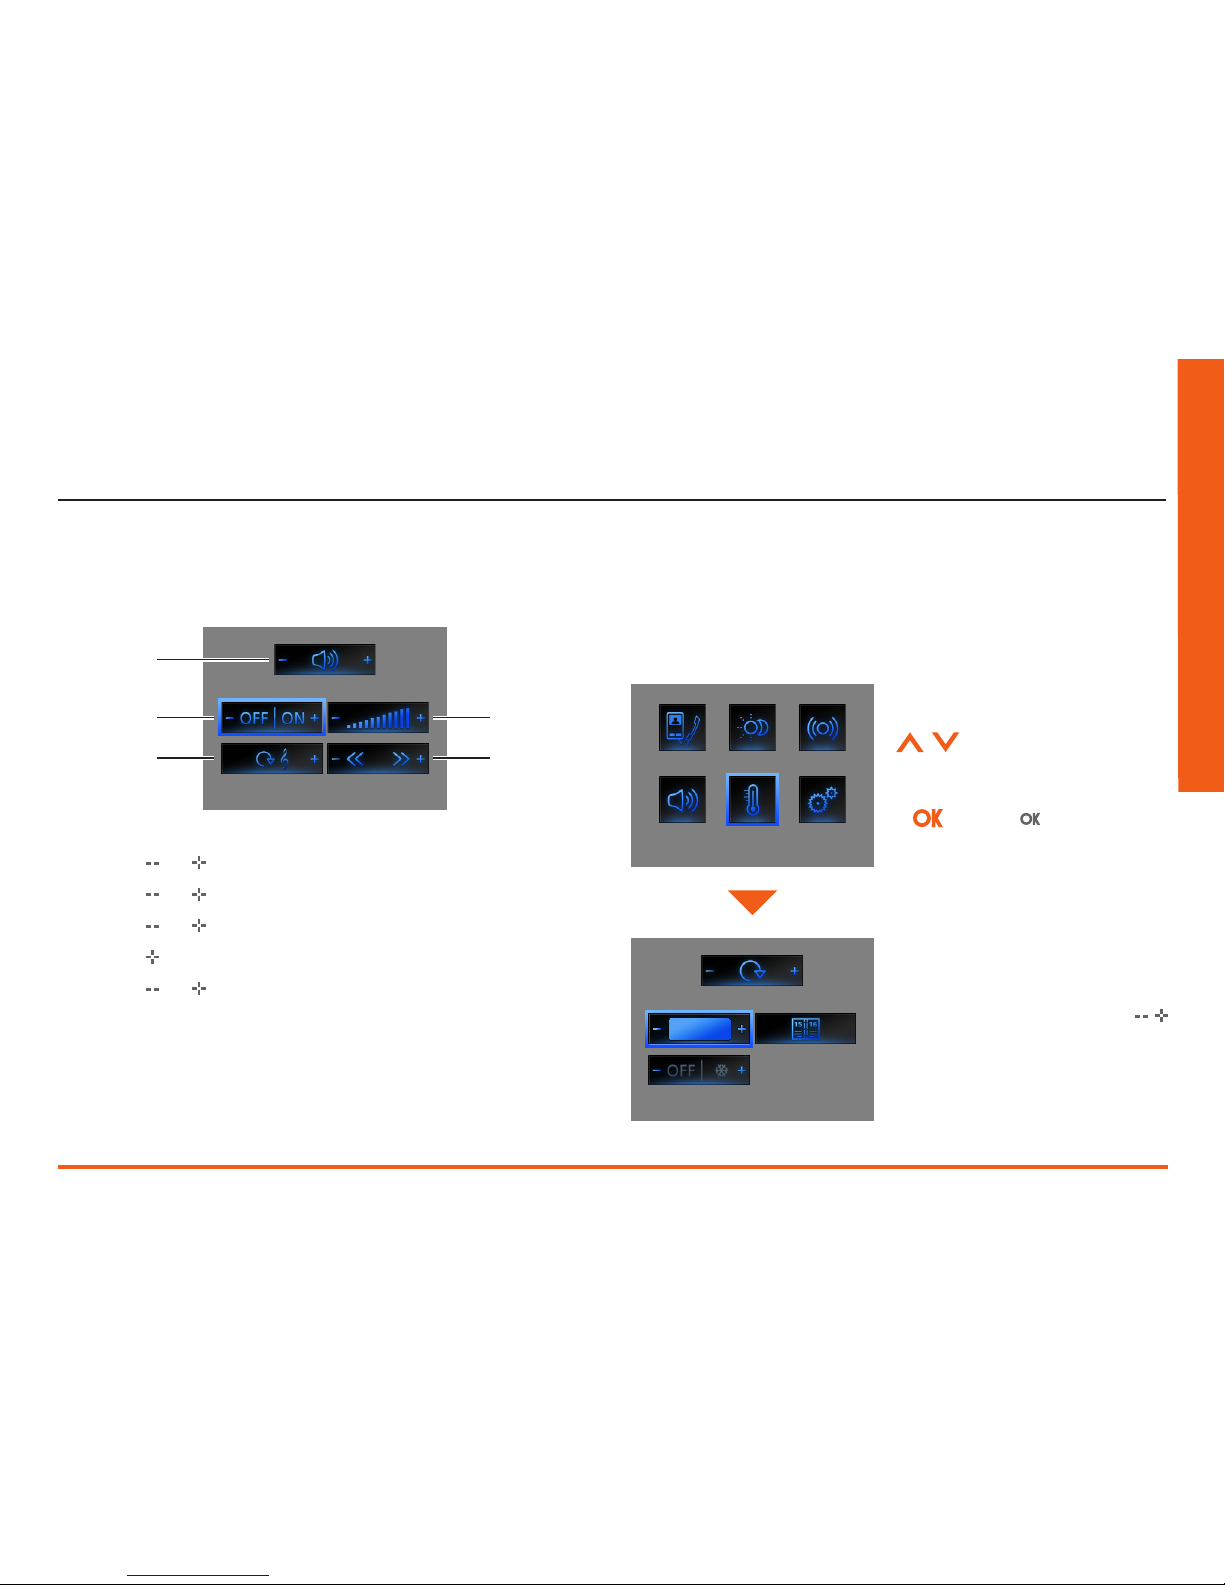
1) Press the and keys to select amplifier
2) Press the and ON/OFF the system
3) Press the and adjust the volume
4) Press the key to select the music source (radio, CD, etc.)
5) Press the and keys to change the radio station or choose the CD track
LOCAL AMPLIFIER
CD
1
2
4
3
5
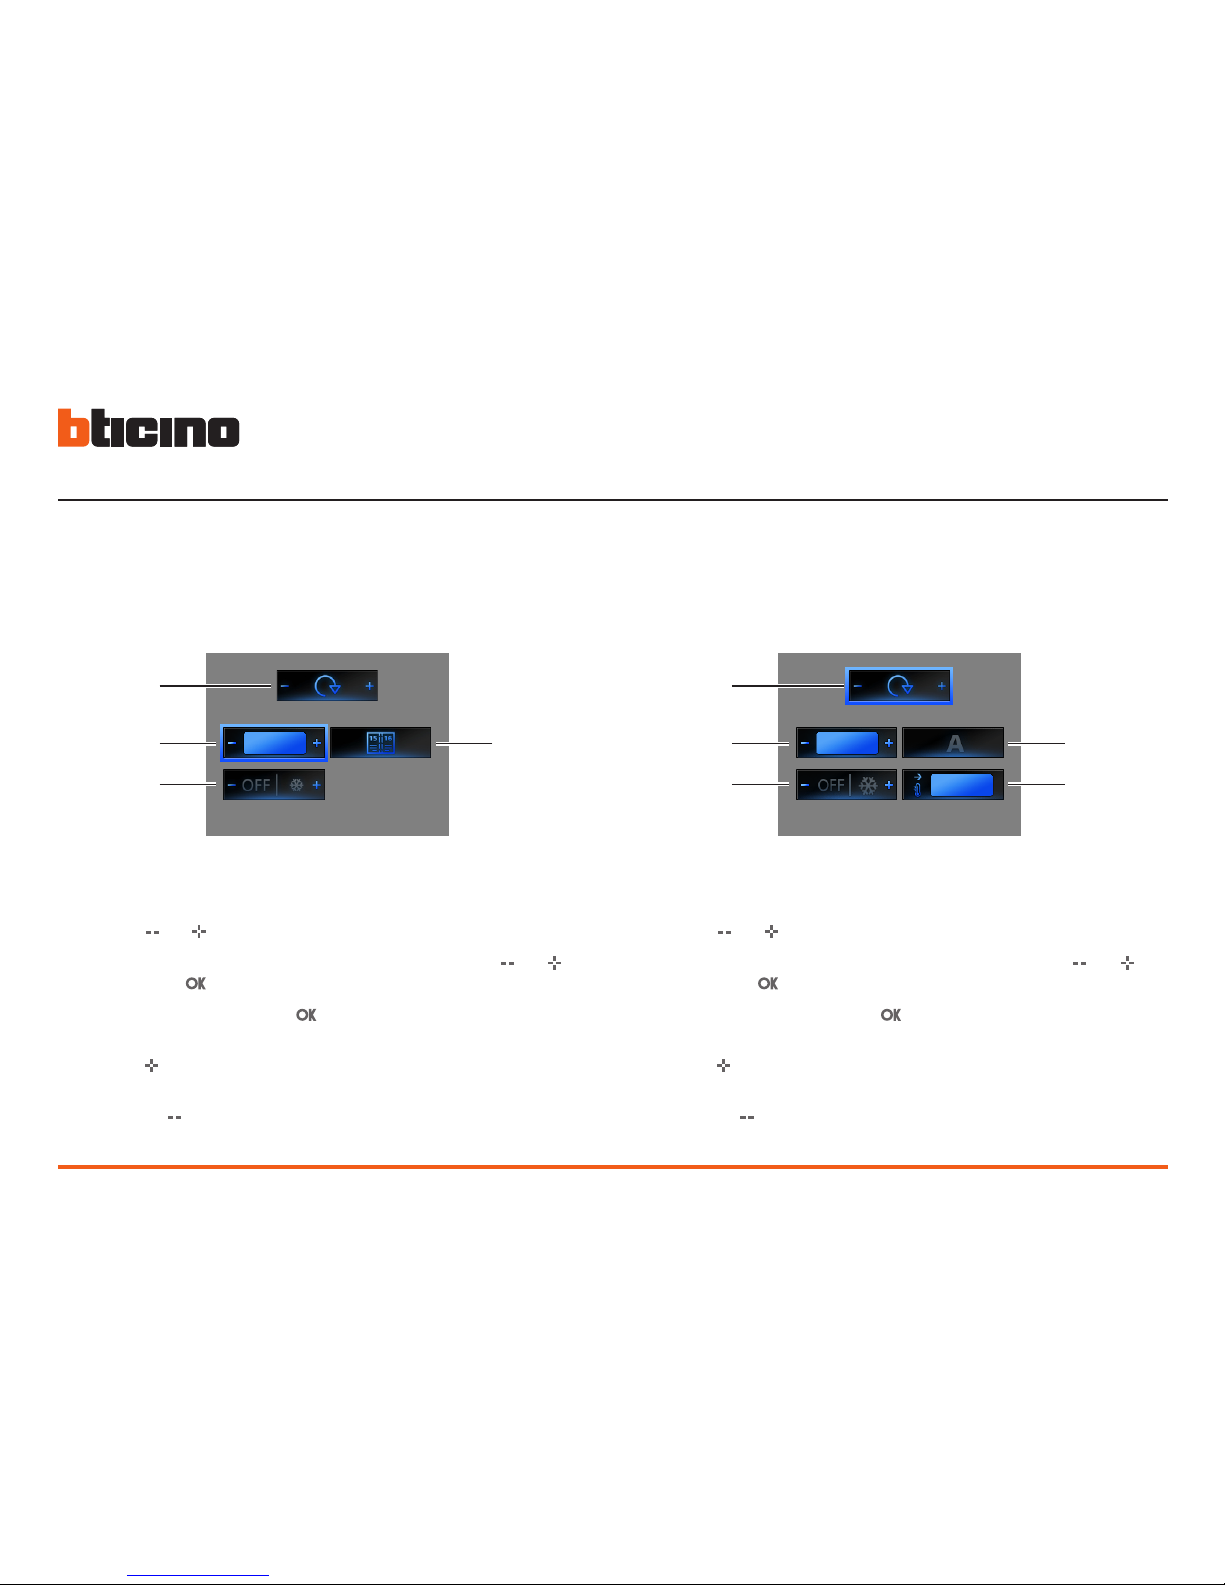
20.5 °C
TEMP. CONTROL UNIT
TEMPERAT. CONTROL
Your Video Station lets you control and adjust the temperature inside the home,
interacting with the BTicino temperature control system.
4.4 Temperature control
You can set the manual mode and
adjust the temperature with the
keys.
Set the heat protection
Press to confirm
Inside the Main menu
select Temperature control
system
Page 30
30
1
2
4
20.5 °C
TEMP. CONTROL UNIT
3
ZONES: 01
22.5 (+2)
18.5 °C
20.5 °C
1
2
4
3
5
1) Press the and keys to select Temperature control unit/Zones
2) To set the manual mode and adjust the temperature use the and keys
and then press to confirm
3) To set the Weekly mode; press to confirm (the last weekly program selected on the Temperature control unit is set)
4) Press the key to set the protection (antifreeze for winter or heat protection
for summer);
Pressing the key switches the system OFF
1) Press the and keys to select Temperature control unit/Zones
2) To set the manual mode and adjust the temperature use the and keys
and then press to confirm
3) To set the Automatic mode; press to confirm (in this case resets the mode
set on the Temperature control unit for this zone)
4) Press the key to set the protection (antifreeze for winter or heat protection
for summer);
Pressing the key switches the zone OFF
5) Display the zone’s current state.
You can set the temperature on different levels in the various system zones.
4 House automation functions
Page 31
User manual
31
AXOLUTE
Nighter & Whice
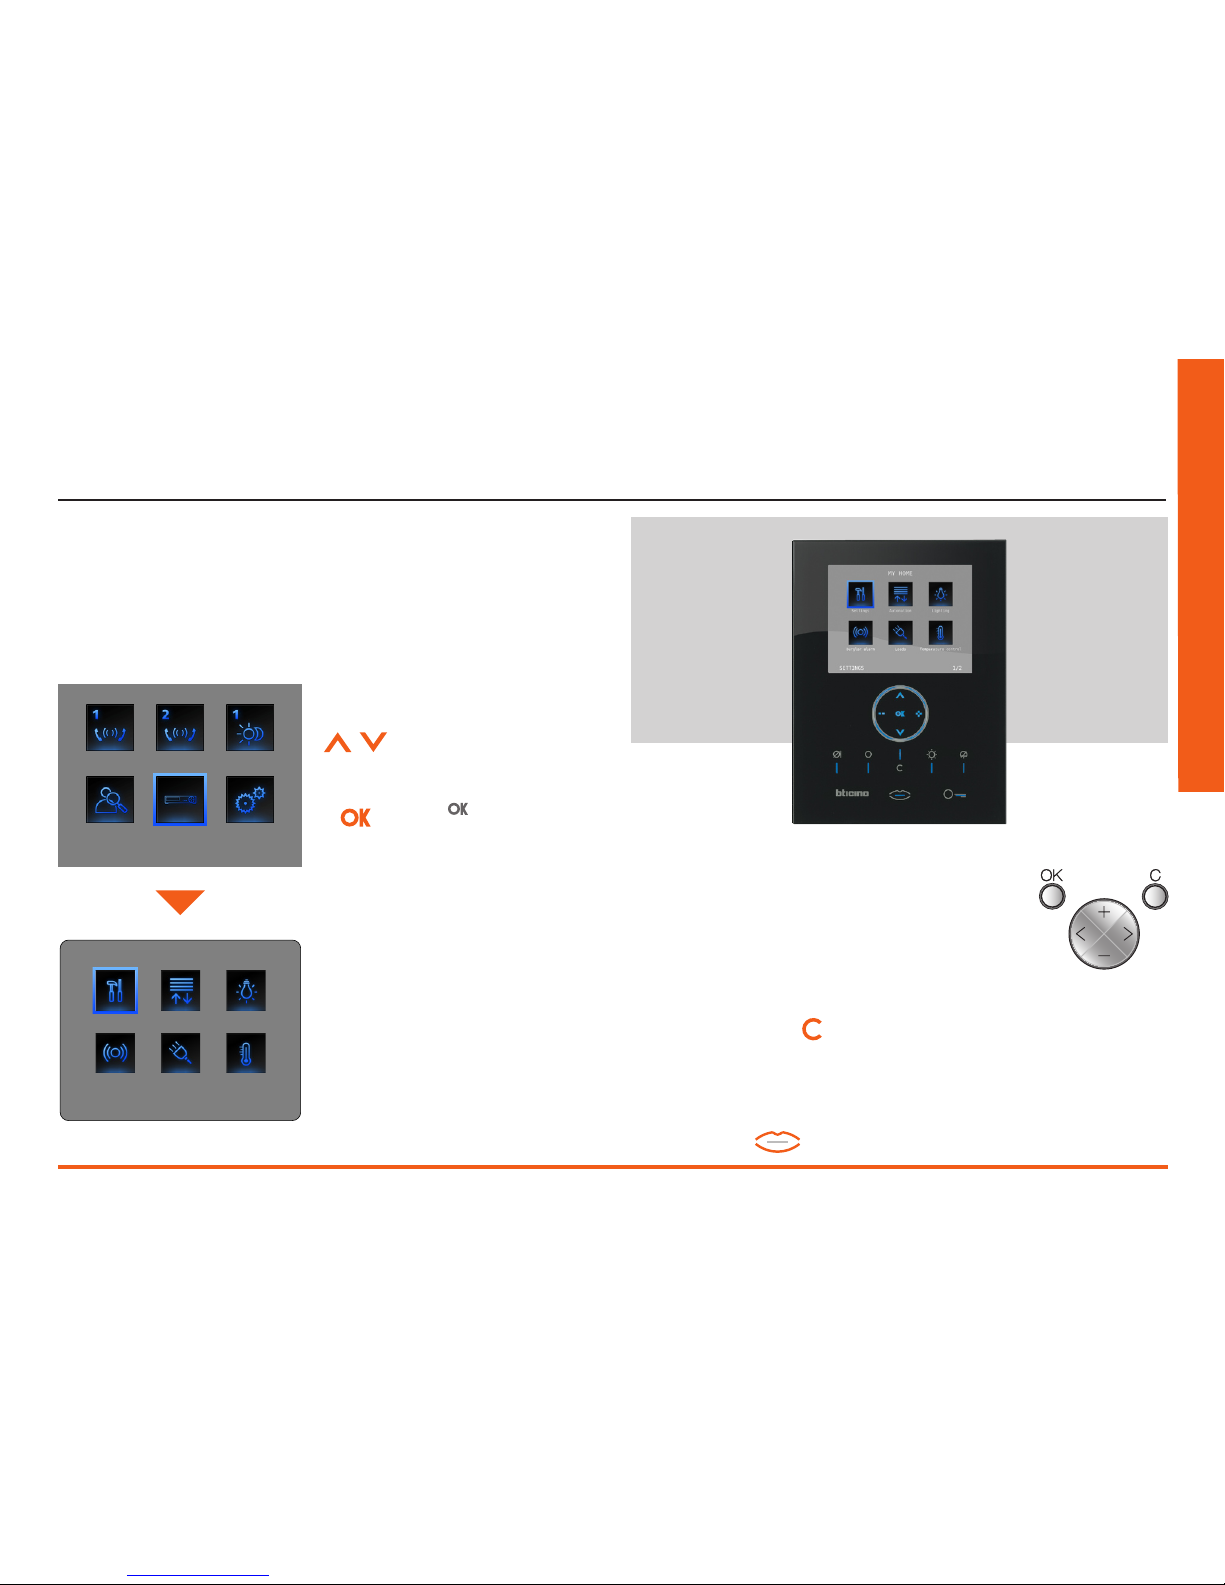
4.5 Multimedia menu
If your system has the Multimedia Interface (item 3465), you can access your
menu via the dedicated icon.
MULTIMEDIA INTERFACE
Press to access the
menu
Inside the Main menu
select Multimedia
MY HOME
AutomationSettings Lighting
LoadsBurglar alarm
Temperature control
SETTINGS 1/2
The display of your Video Station displays the main window of the Multimedia Interface.
To navigate the menu of the multimedia interface
use the same keys as its remote control:
✎
The "MENU" key of the multimedia interface can be activated by pressing
and holding down
on the videostation.
✎
Inside the menu of the multimedia interface the videostation will not
switch off automatically. To exit and switch the monitor off press the
pushbutton
✎
Page 32

32
Notes
Page 33
User manual
33
AXOLUTE
Nighter & Whice
Services
5.1 The “Settings” menu 34
5.2 Services 35
5.2.1 Professional studio 35
5.2.2 Hands free 35
5.2.3 Door state 36
5.2.4 Alarm messages 36
5.3 Messages 37
Page 34
34
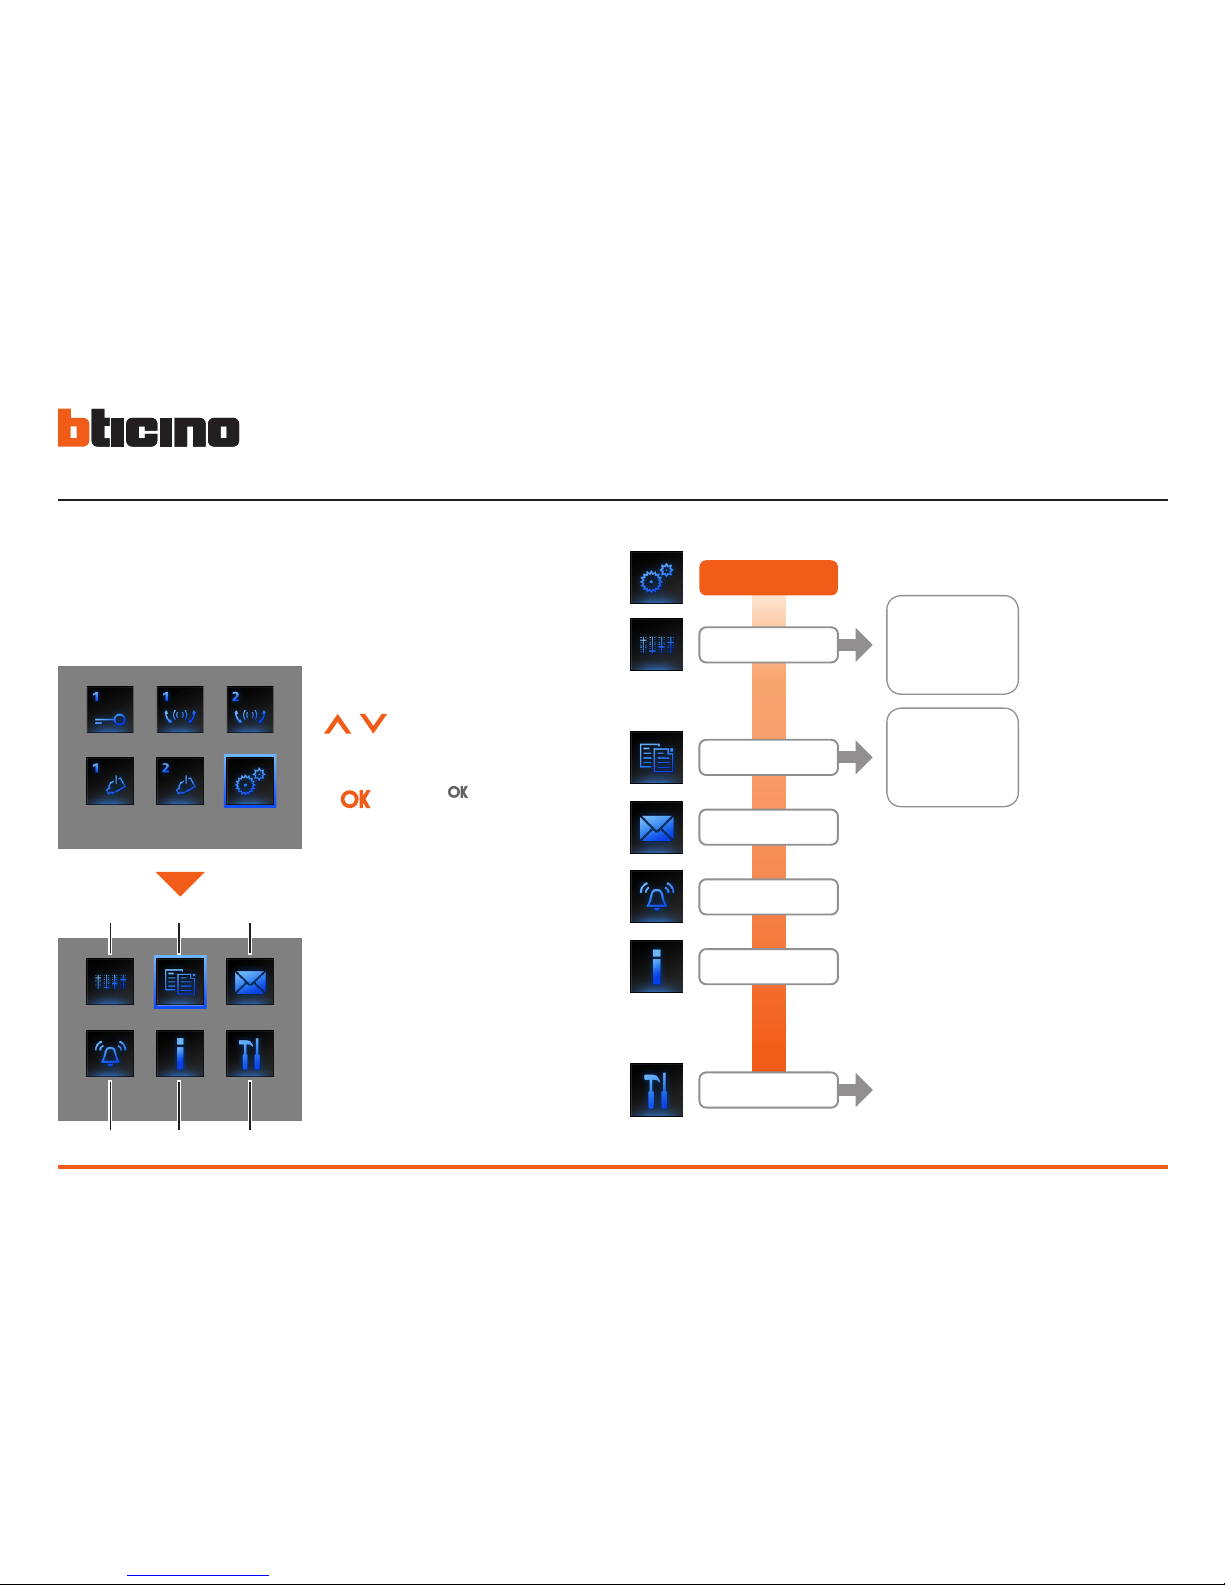
The main menu always has the SETTINGS icon. Selecting it gives access to a
wide range of customisations which let you get the most from your Video Station.
SETTINGS
CAUTION
Only the installer has access to the CONFIGURATION menu; incorrect operations
could affect the operation of the Video
Station.
5.1 The “Settings” menu
Inside the Main menu
select Settings
1) Adjustments (see chapter 1)
2) Services
3) Messages
4) Bells
5) Information
6) Configuration
The following page is displayed with
the icons:
Press to access the
menu
CONFIGURATION
ADJUSTMENT
SETTINGS
SERVICES
MESSAGES
BELLS
INFORMATION
VOLUME
MONITOR
DATE/HOUR
SWING
PROF. STUDIO
HANDS FREE
DOOR STATE
ALARM MSG
CLEANING GLASS
SERVICES
1 2 3
4 5 6
5 Services
Page 35
User manual
35
AXOLUTE
Nighter & Whice
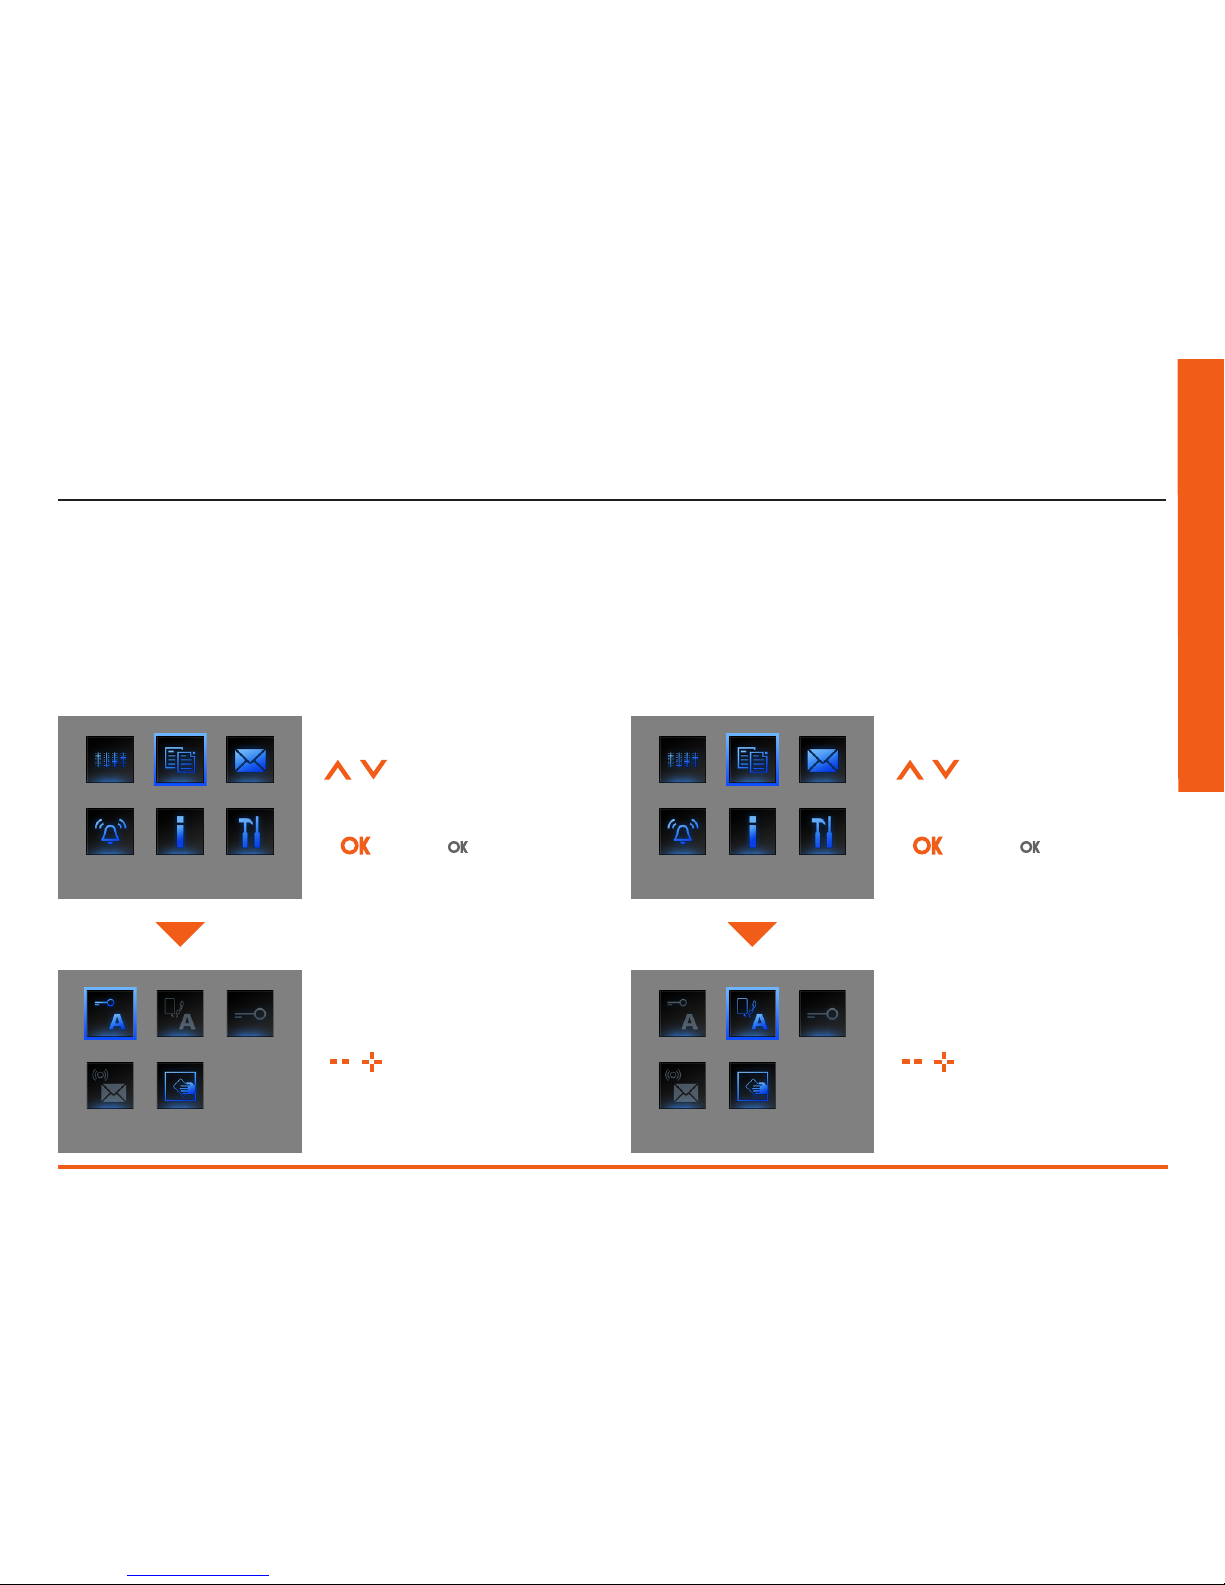
The Professional Studio function lets you set the automatic opening of the door
lock when there is a call from the Entrance Panel. It cannot be activated at the
same time as the Door State function.
The Hands Free function automatically activates the microphone and loudspeaker when there is a call, avoiding having to press the Connection key to
answer (the connection is established immediately the call is made).
IMPOSTAZIONISERVICES
HANDS FREE
IMPOSTAZIONISERVICES
PROF. STUDIO
5.2 Services
5.2.1 Professional studio 5.2.2 Hands free
Select Services
Press to confirm
Enable or disable the
function
If you enable this function your Video
Station door lock LED flashes to remind
you.
Select Settings
Press to confirm
Enable or disable the
function
If you enable this function your Video
Station door lock LED flashes to remind
you.
Page 36
36
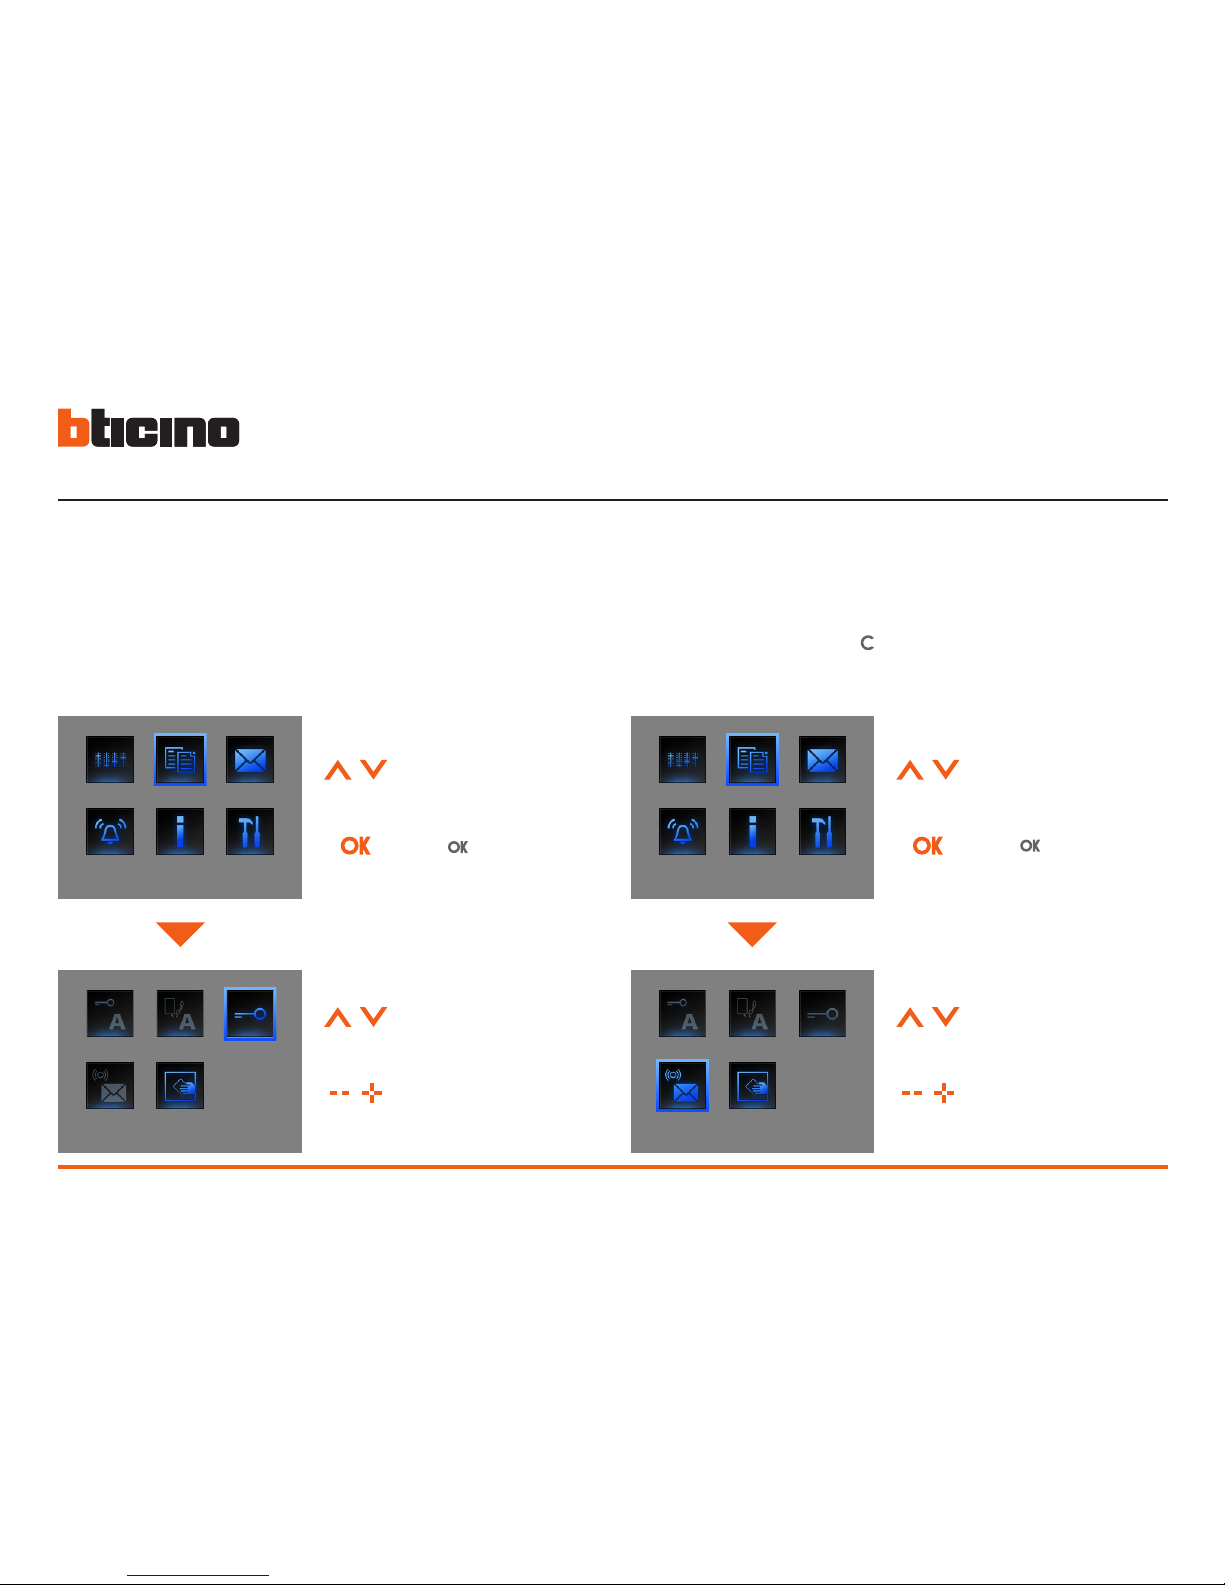
This function tells you about the door lock state. If it is open the “door lock LED”
flashes, if it is closed it remains OFF.
NOTE: it can only be activated if your system allows it (ask your installer for
more information); it can not be activated at the same time as the Professional
Studio function.
If it is activated the Video Station tells you if the antiintrusion system has detected an alarm. The three LED flash alternately until a key is pressed to display
the message (if locally supplied the message will be displayed automatically).
To cancel the message press the key when the message is displayed. If not
the signal will appear the next time a key is pressed.
DOOR STATE
IMPOSTAZIONISERVICES
IMPOSTAZIONISERVICES
ALARM MSG
5.2.3 Door state 5.2.4 Alarm messages
Select Services
Press to confirm
Select Door state
Enable or disable the
function
Select Services
Press to confirm
Select Alarm MSG
Enable or disable the
function
5 Services
Page 37
User manual
37
AXOLUTE
Nighter & Whice
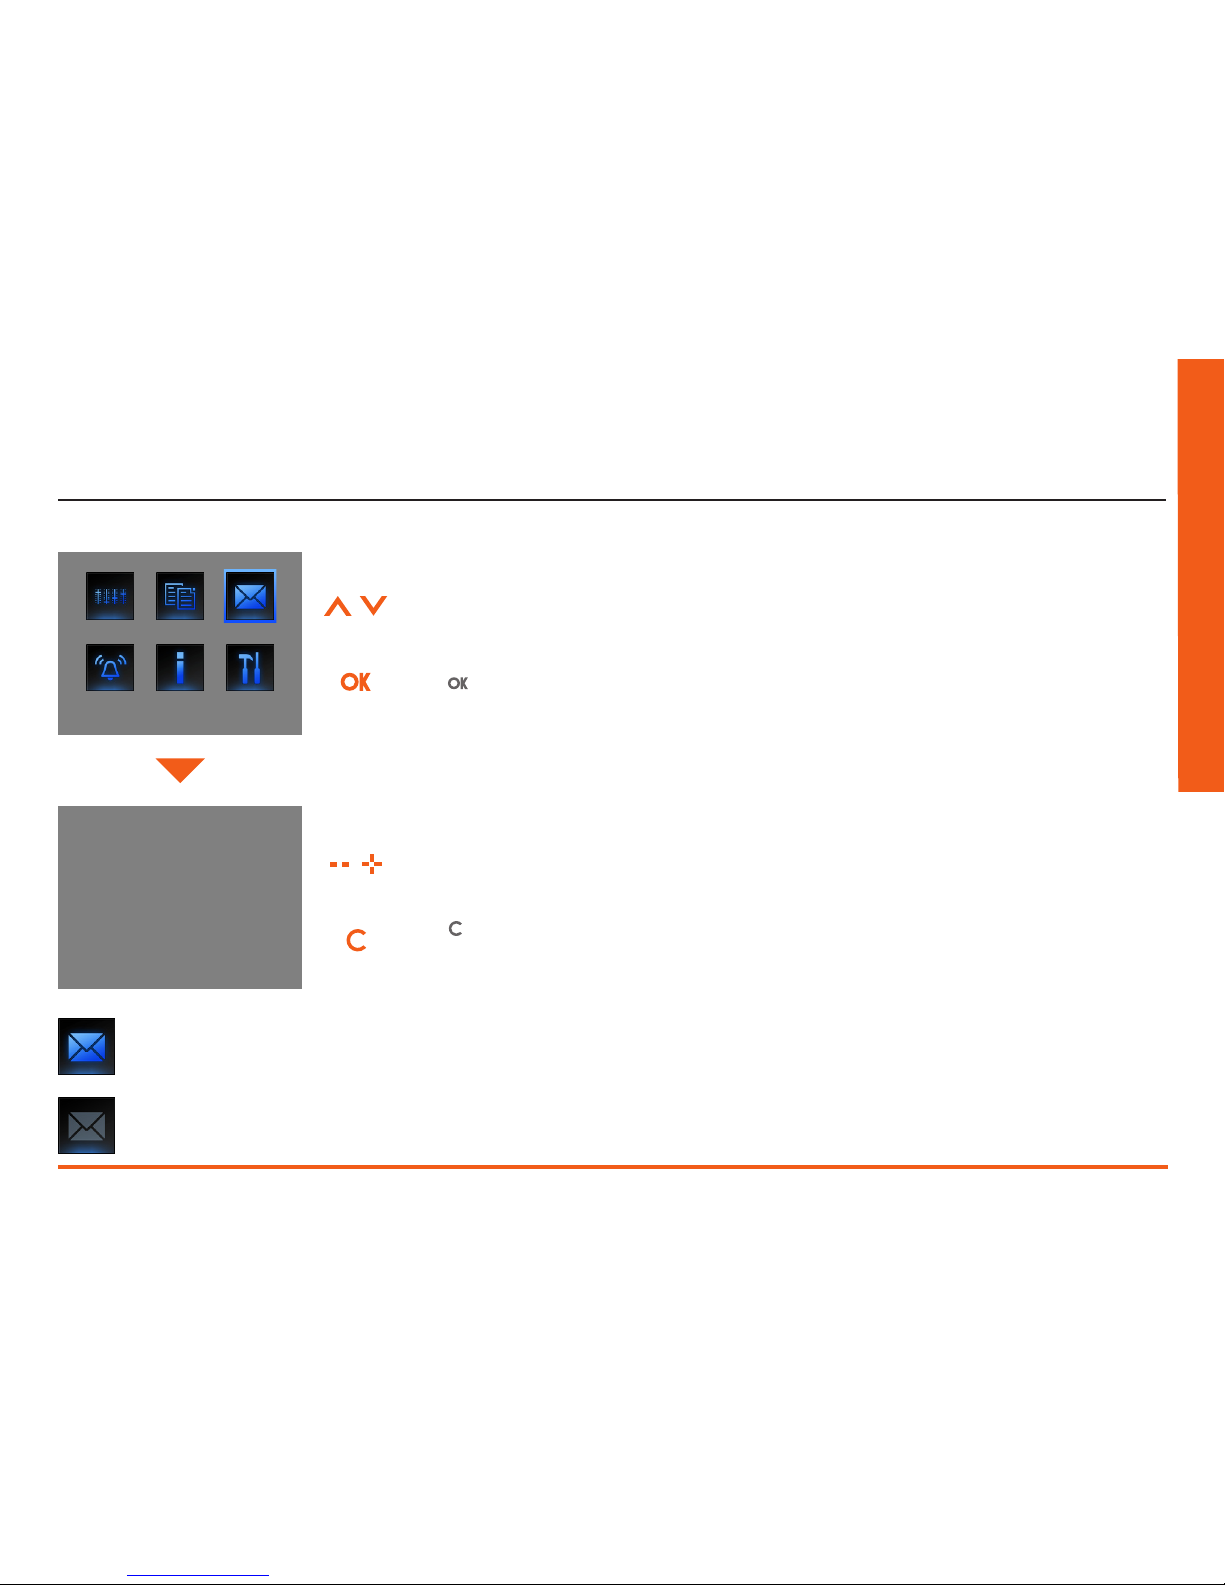
MESSAGES
- 1 +
Message from
switchboard
No messages, the menu cannot be selected.
There are messages, the menu can be selected.
5.3 Messages
Select the message you
want to display
Press to return to the
previous page
Select Messages
Press to confirm
Page 38

BTicino SpA
Via Messina, 38
20154 Milano - Italy
www.bticino.com
BTicino SpA reserves at any time the right to modify the contents of this booklet and to communicate,
in any form and modality, the changes brought to the same.
 Loading...