

Page 1

Camera PCD3100
Quick Guide
Version 1.0
(English)
1
Page 2
封面內頁
This equipment has been tested and found to comply with the limits for a Class B digital device,
FCC GUIDELINES
pursuant to Part 15 of the FCC Rules. These limits are designed to provide reasonable protection
against harmful interference in a residential installation. This equipment generates, uses and can
radiate radio frequency energy and, if not installed and used in accordance with the instructions
may cause harmful interference to radio communications. However, there is no guarantee that
interference will not occur in a particular installation. If this equipment does cause harmful
interference to radio or television reception, w hich can be determined by turning the equipment of f
and on, the user is encouraged to try to correct the interference by one or more of the following
measures:
Reorient or relocate the receiving antenna
Increase the separation between the equipment and receiver
Connect the equipment into an outlet on a circuit different from that to which the receiver is
connected.
Consult the dealer or an experienced radio/TV technician for help.
The Class B digital apparatus meets all requirements of the Canadian Interference-Causing
Equipment Regulation.
Cet appareil numerique de la class B respecte toutes les exigences du Règlement sur le materiel
brouilleur du Canada.
This device complies with Part 15 of the FCC Rules. Operation is subject to the following two
conditions: (1) This device may not cause harmful interference. (2) This device must accept any
interference received, including interference that may cause undesired operation.
Caution:
Any changes or modifications not expressly approved by the party responsible for compliance
could void the user's authority to operate this equipment. Shielded interface cable, if any, must
be used in order to comply with emission limits.
The information in this document is subject to change without notice and does not represent a
commitment on the part of the vendor.
No warranty of representation, either expressed or implied, is made with respect to the quality,
accuracy or fitness for any particular purpose of this document. The manufacturer reserves the
right to make changes to the content of this document and/or the products associated with it at
any time without obligation to notify any person or organisation of such changes.
In no event will the manufacturer be liable for direct, indirect, special, incidental or consequential
damages arising out of the use or inabil ity to u se th is pro duct or d ocumen t ation , ev en if adv ised of
the possibility of such damages.
Copyright © 2003. All rights reserved
IBM, PC/AT and PS/2 are registered trademarks of International Business Machines Corporation.
Microsoft, Windows, and Windows NT are registered trademarks of Microsoft Corporation in the
United States of America and/or other countries.
All other trademarks are trademarks off their respective holders.
2
Page 3
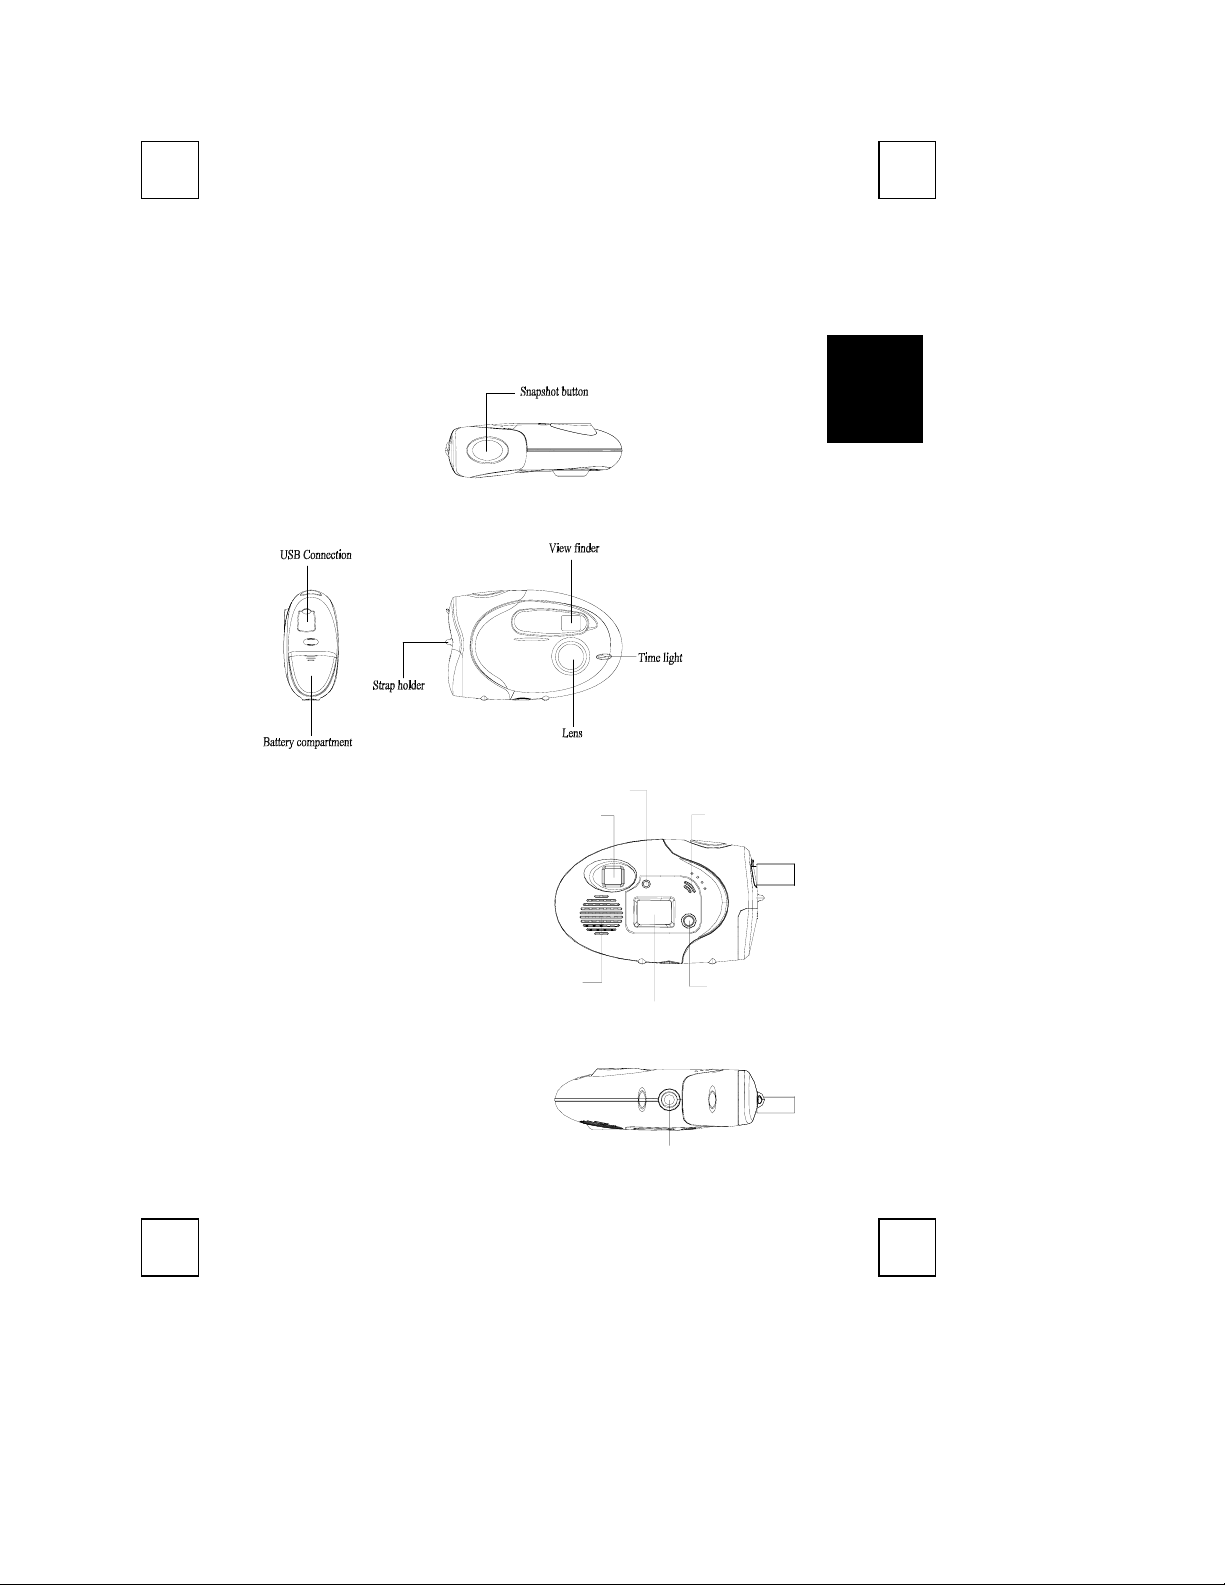
Congratulations on purchasing your new digital & PC camera (Optional).
This camera is an all-in-one pocket size digital and USB PC camera. You
can take digital pictures at once. Alternatively you can also hang up the
camera to a computer and use it as a PC camera for videoconferencing or
capturing video clips.
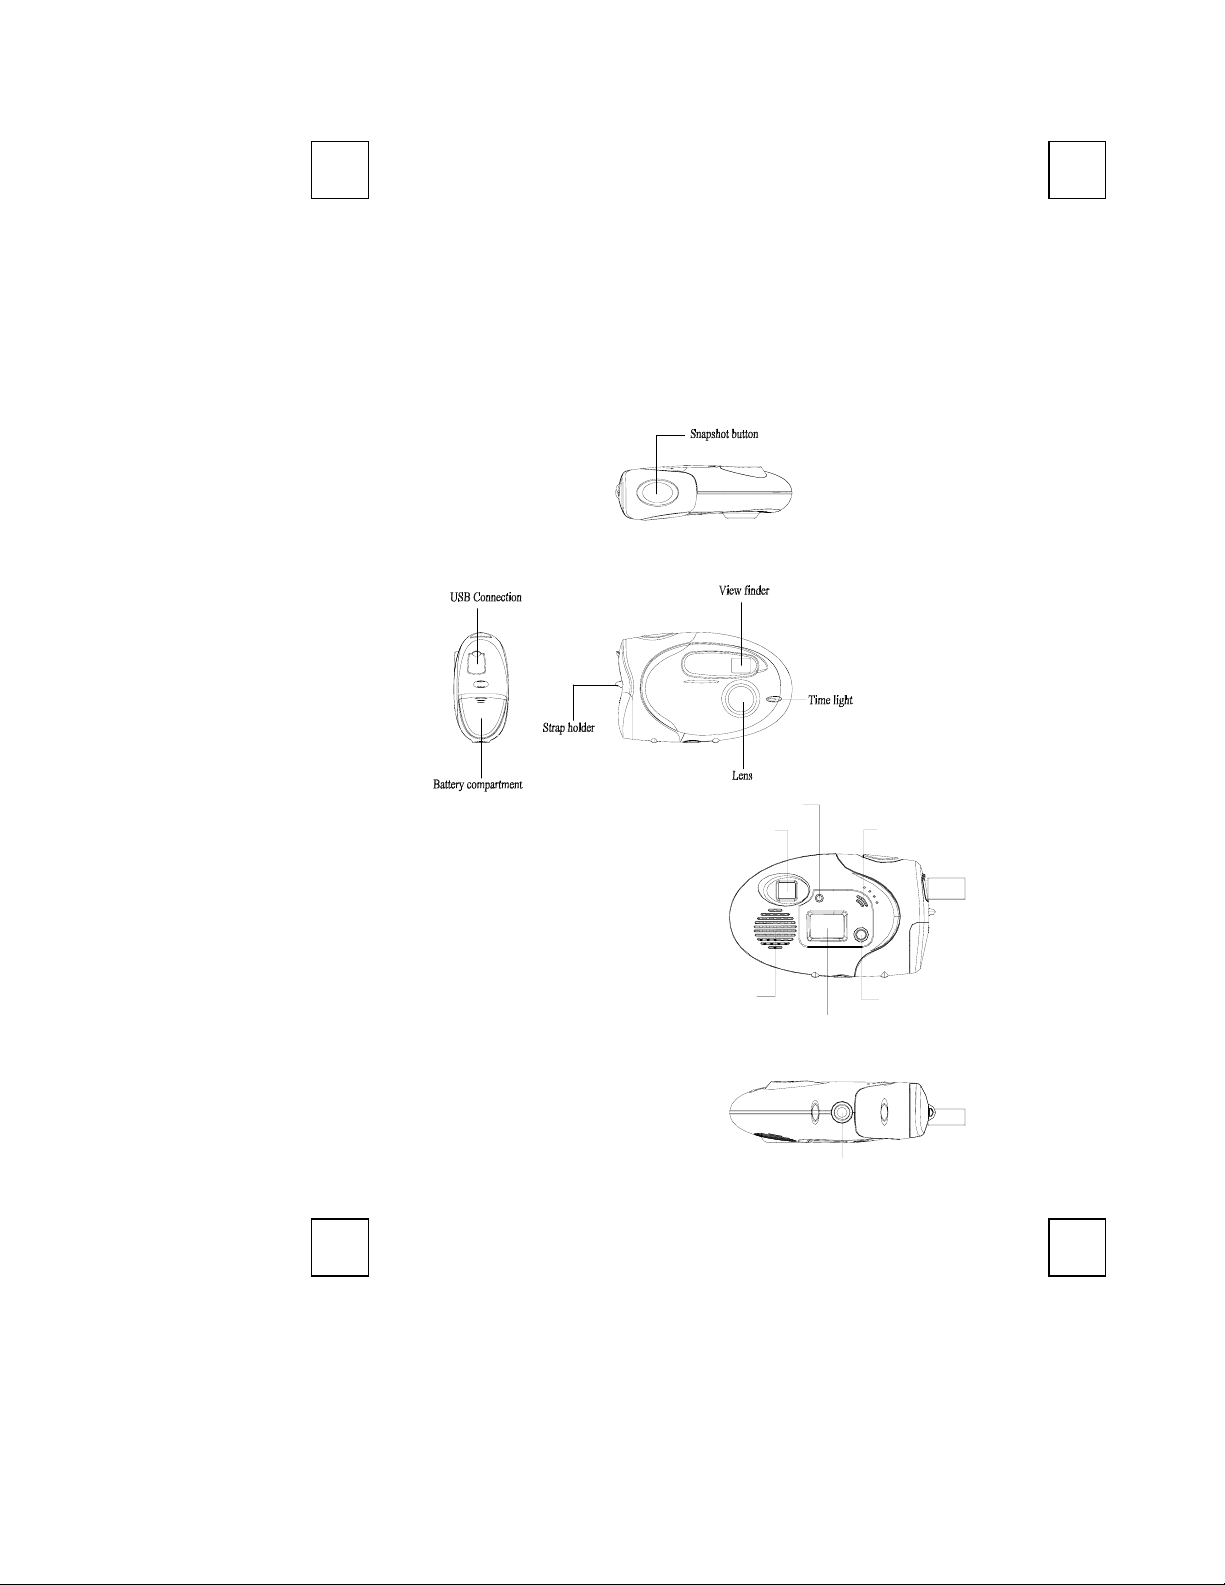
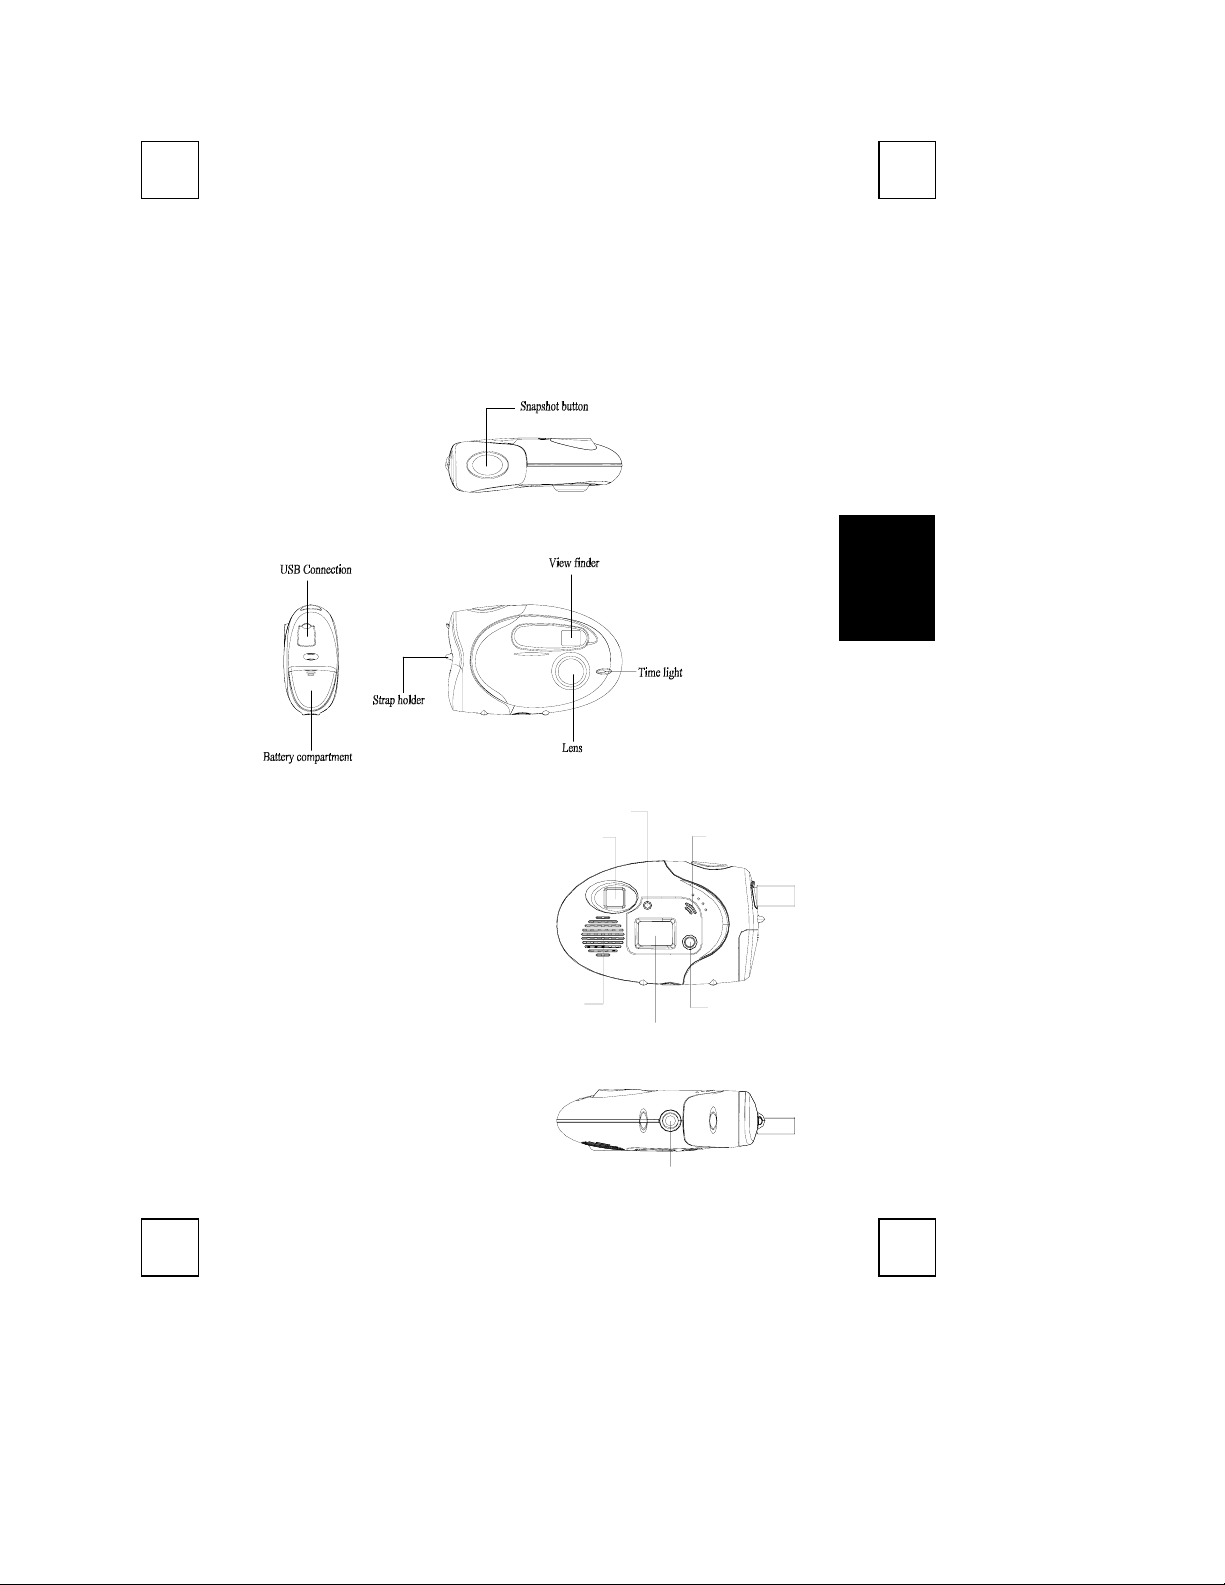
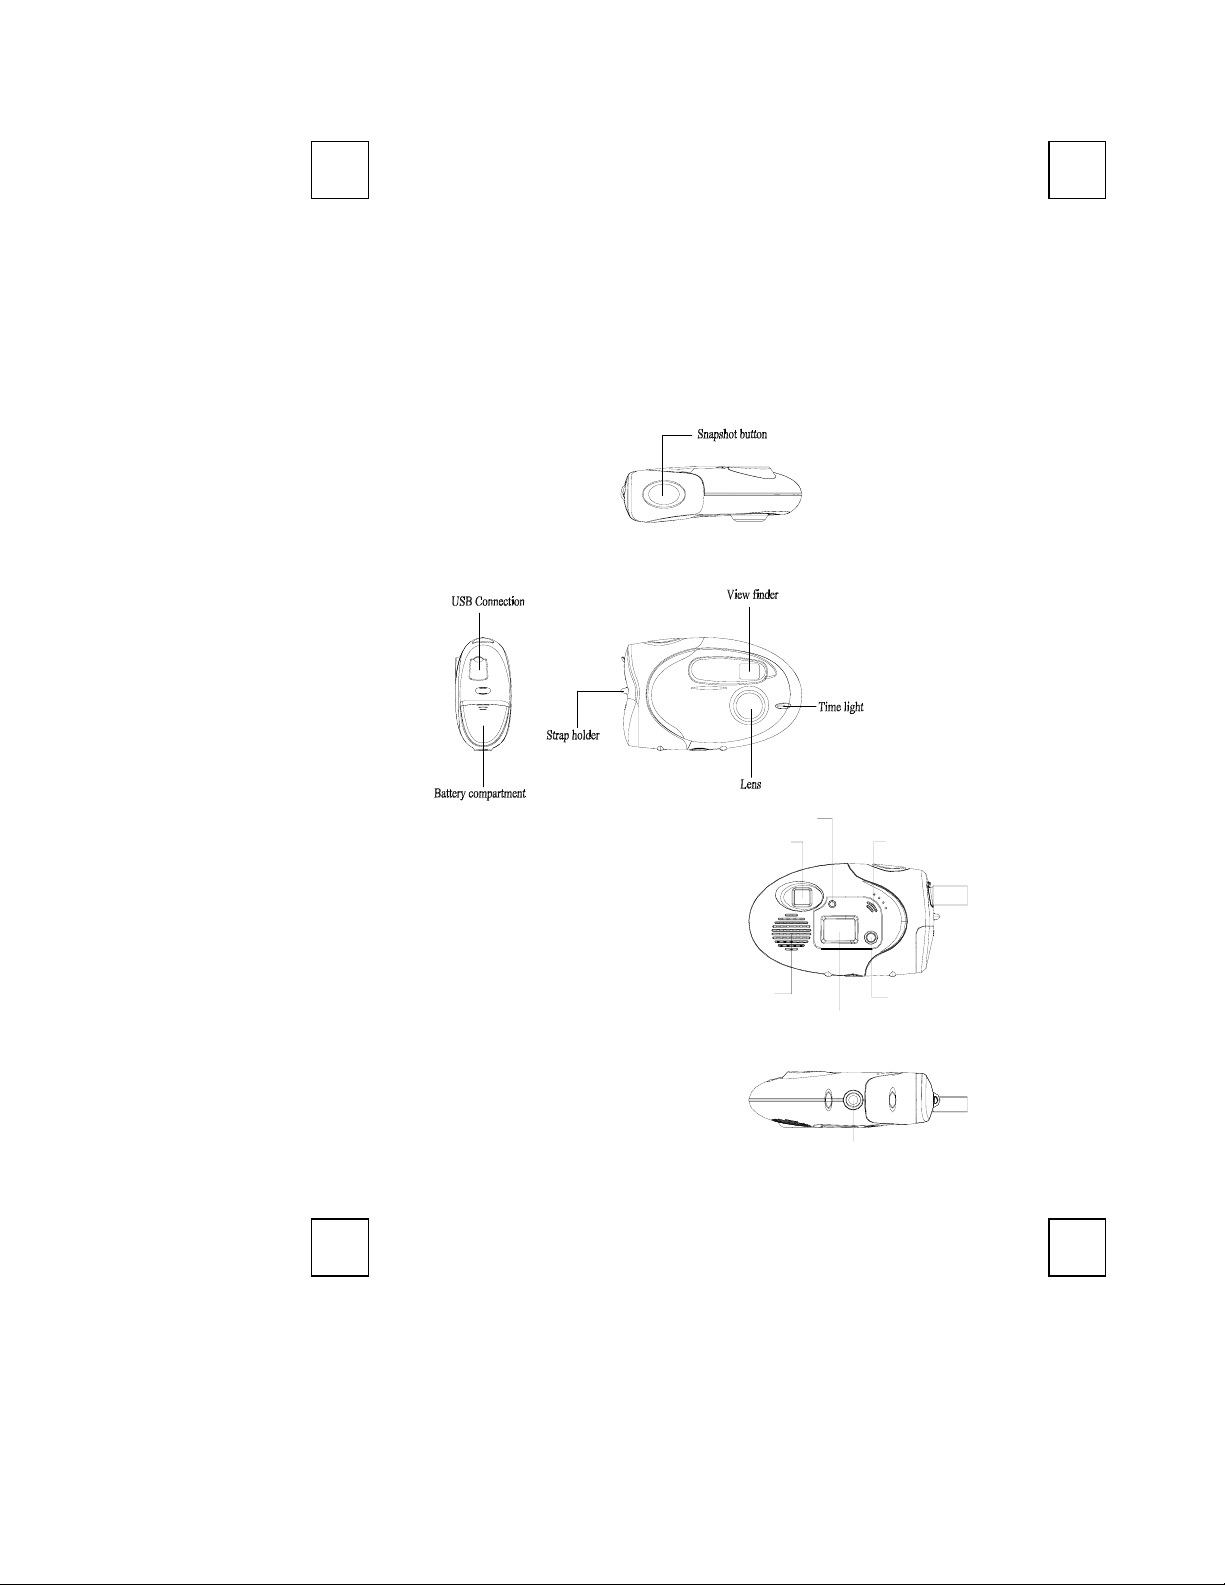
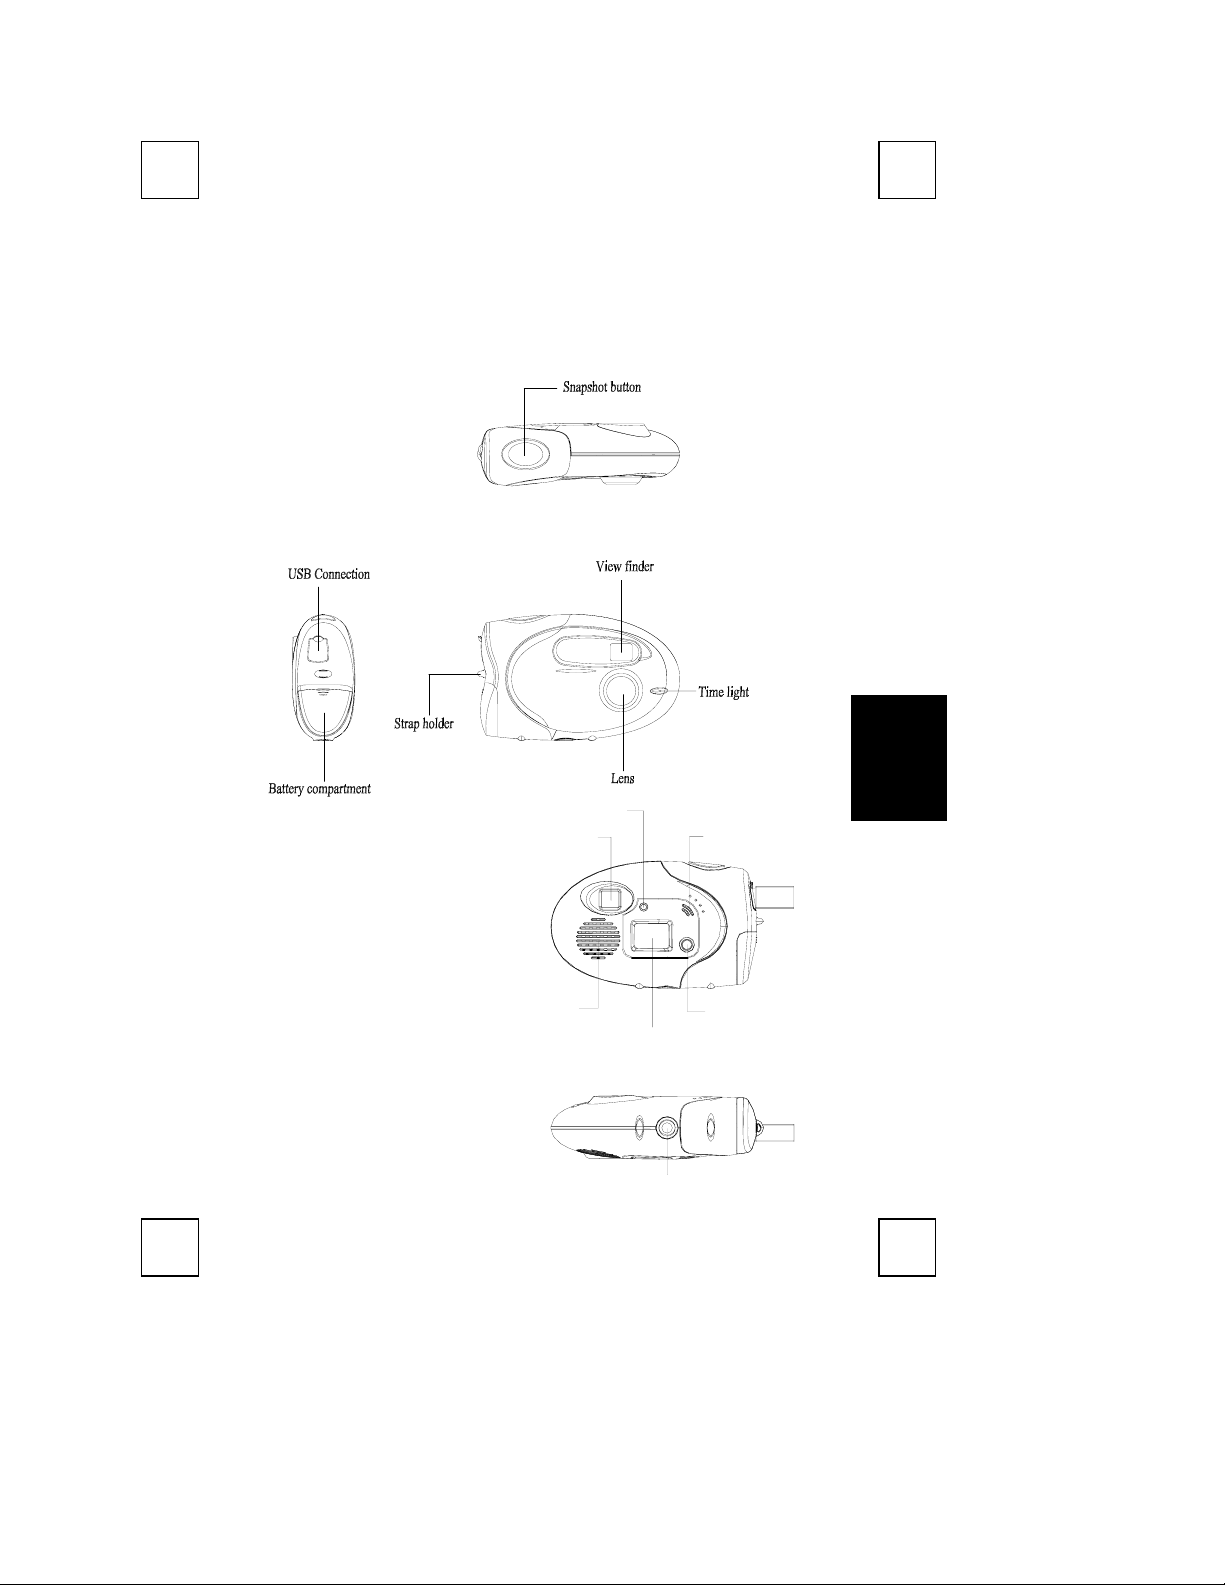
Getting to Know the Camera- PCD3100
English
Flash light indicator
Viewfinder Microphone
Speaker
Display panel
Stand Receptacle
Mode button
3
Page 4
System Requirements
! MicrosoftWindows98, WindowsME, Windows2000 or
WindowsXP operating system
Software Installation
Please note that you have to install the software BEFORE you connect the
camera into the USB port of your computer.
Step 1: Install Ulead Photo Express 4.0 SE
1. Insert the software CD into the CD-ROM drive of your computer.
2. Follow the on screen instruction to install the software. The software
will install automatically.
! Note: If the software does not setup automatically, go to the Taskbar
and click Start, then click on Run and browse the SETUP.EXE in the
software CD and click OK to install.
When all setup procedures are finished, the operating system does not
need to restart. The software is loaded when you see the software icon
shows on the screen.
! Important: For more information on how to use the software,
please refer to the folder named “Manual” in the CD.
Step 2: Install Digital Camera Driver-CamMaestro
1. In order to take great advantage of the camera, please note that you
have to install the driver named “CamMaestro” AFTER
installed the camera application software in step 1.
2. Follow the on screen instruction to install the software. The software
will install automatically.
! Note: If the software does not setup automatically, go to the Taskbar
and click Start, then click on Run and browse the
\Driver directory of the software CD and click OK to install.
When all setup procedures are finished, the operating system needs to
restart.
SETUP.EXE in the
you have
4
Page 5
Uninstallation
To Remove Camera Application Software:
1. Click "Start" menu (on the left-bottom taskbar).
2. Move cursor to "Programs" in "Start" menu and select “Control Panel”.
3. Click on “Add/Remove Programs” in the Control Panel.
4. Select “Ulead Photo Express 4.0 SE” and click on the remove icon.
5. Click "Yes" to confirm you want to uninstall.
To Remove Camera Driver:
1. Click "Start" menu (on the left-bottom taskbar).
2. Move cursor to "Programs" in “Start” menu and select “Control Panel”.
3. Click on “Add/Remove Programs” in the Control Panel.
4. Select “CamMaestro” and click on the remove icon.
5. Click "Yes" to confirm you want to uninstall.
Getting Start
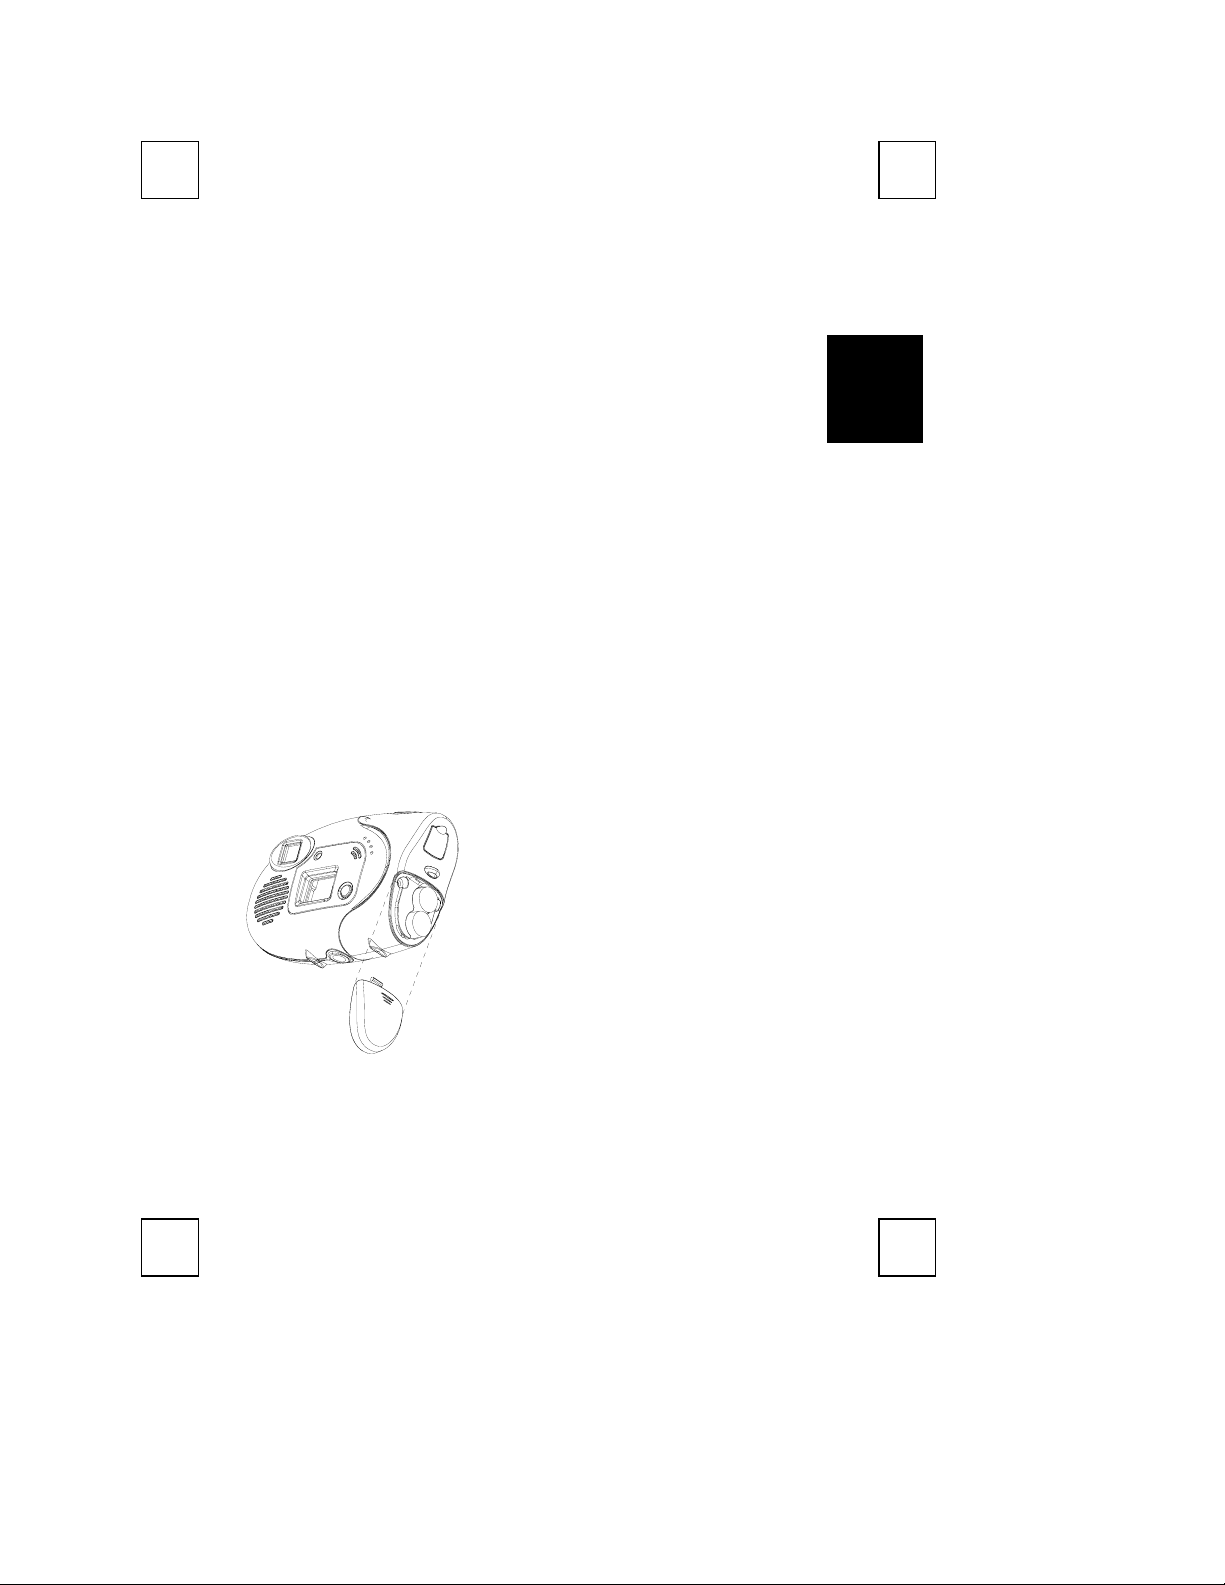
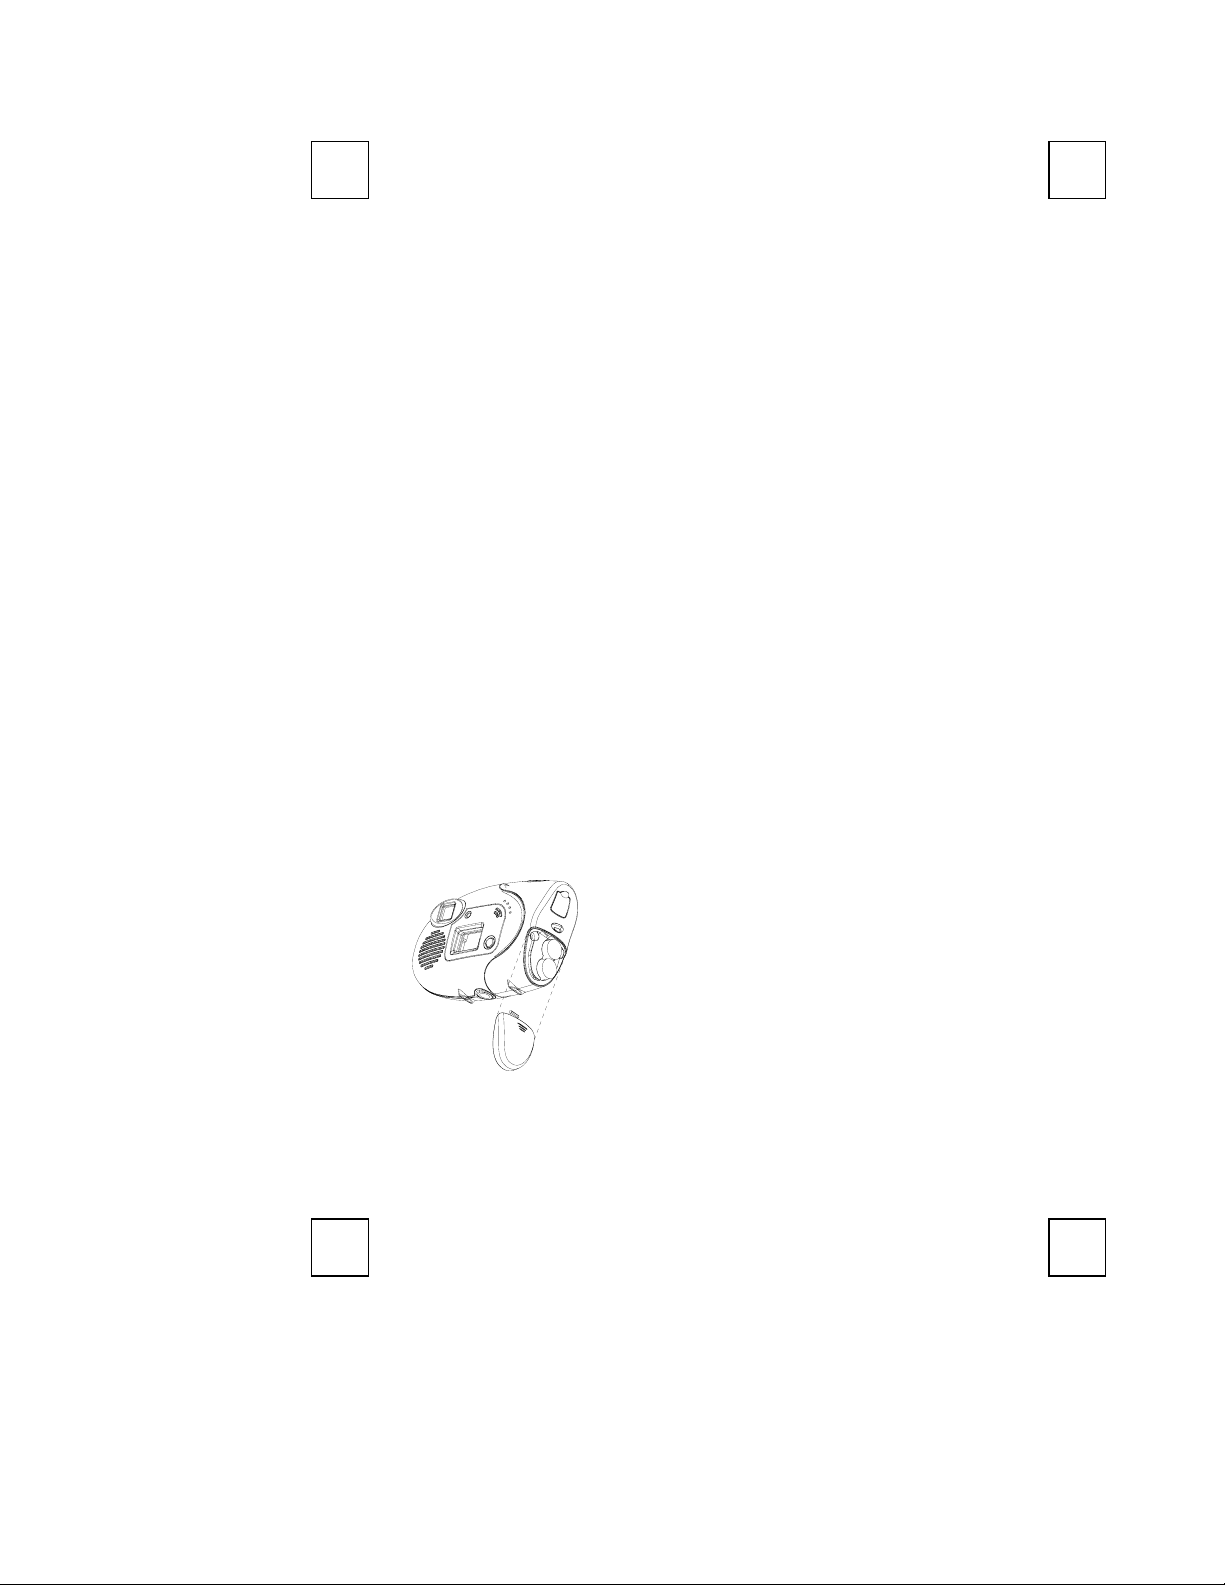
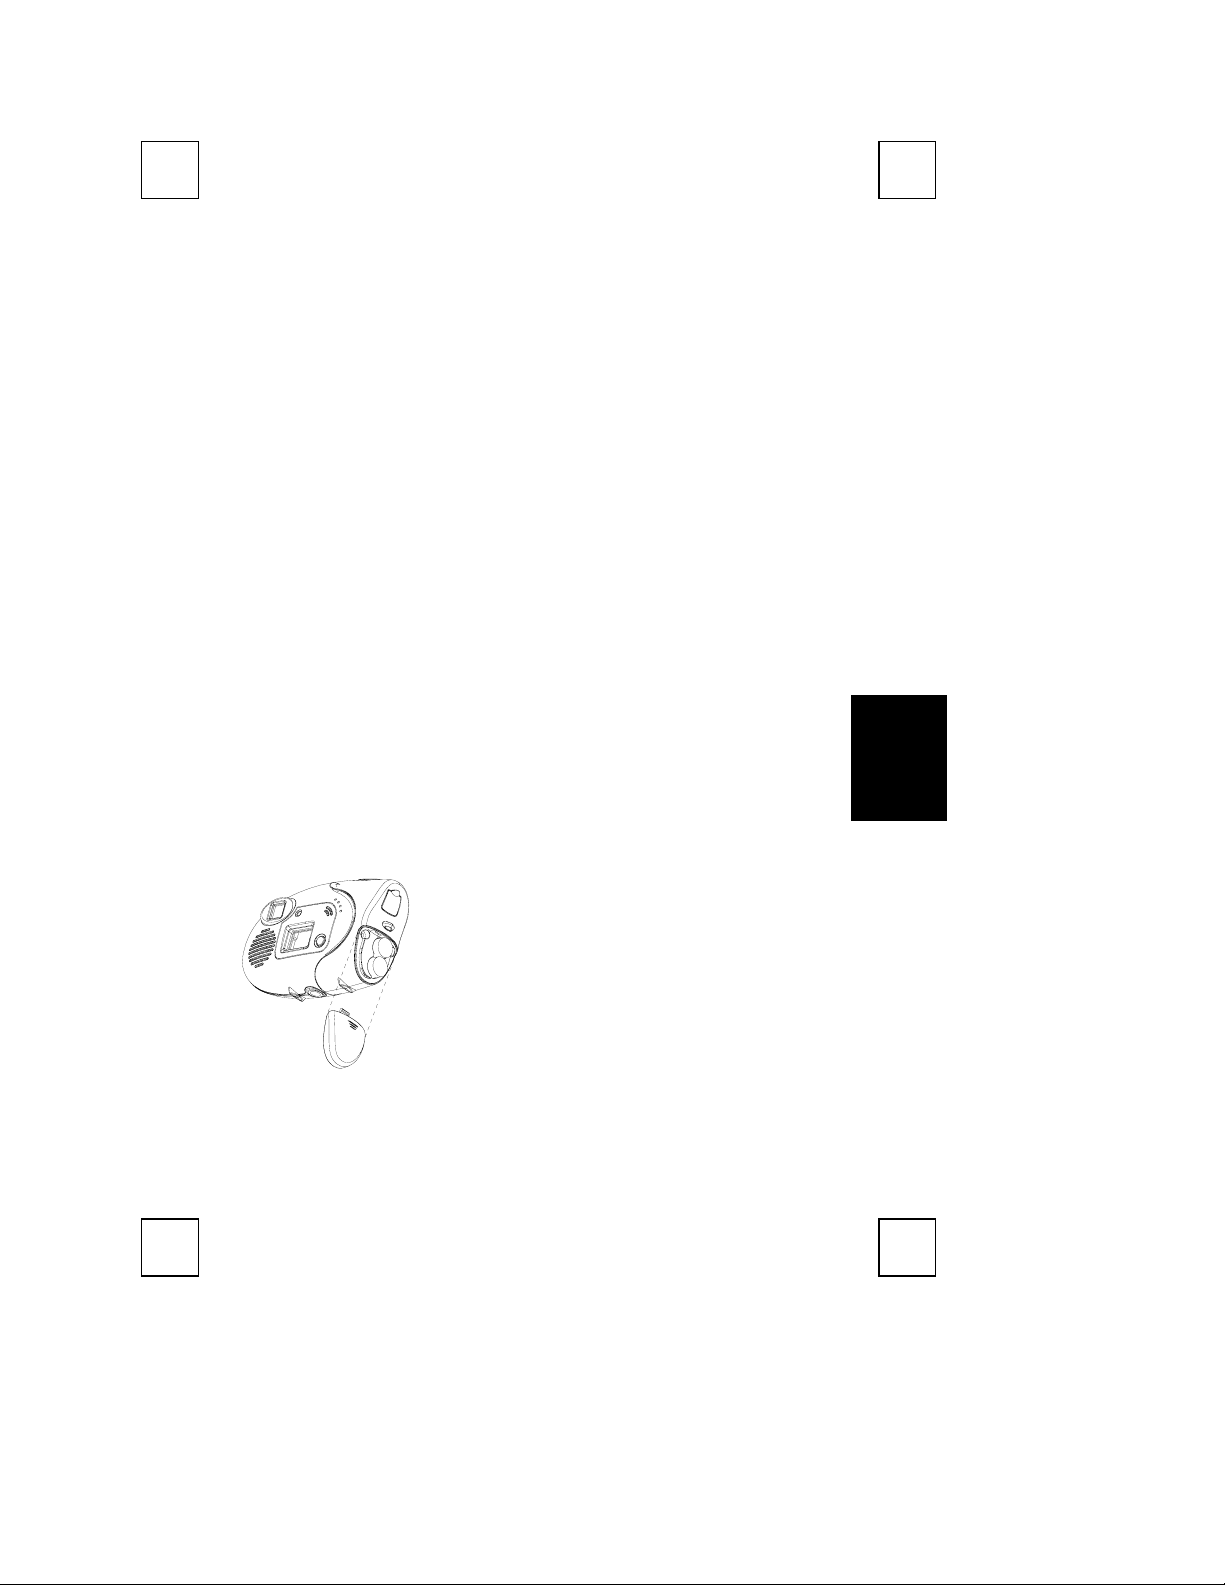
Insert or Change the Battery
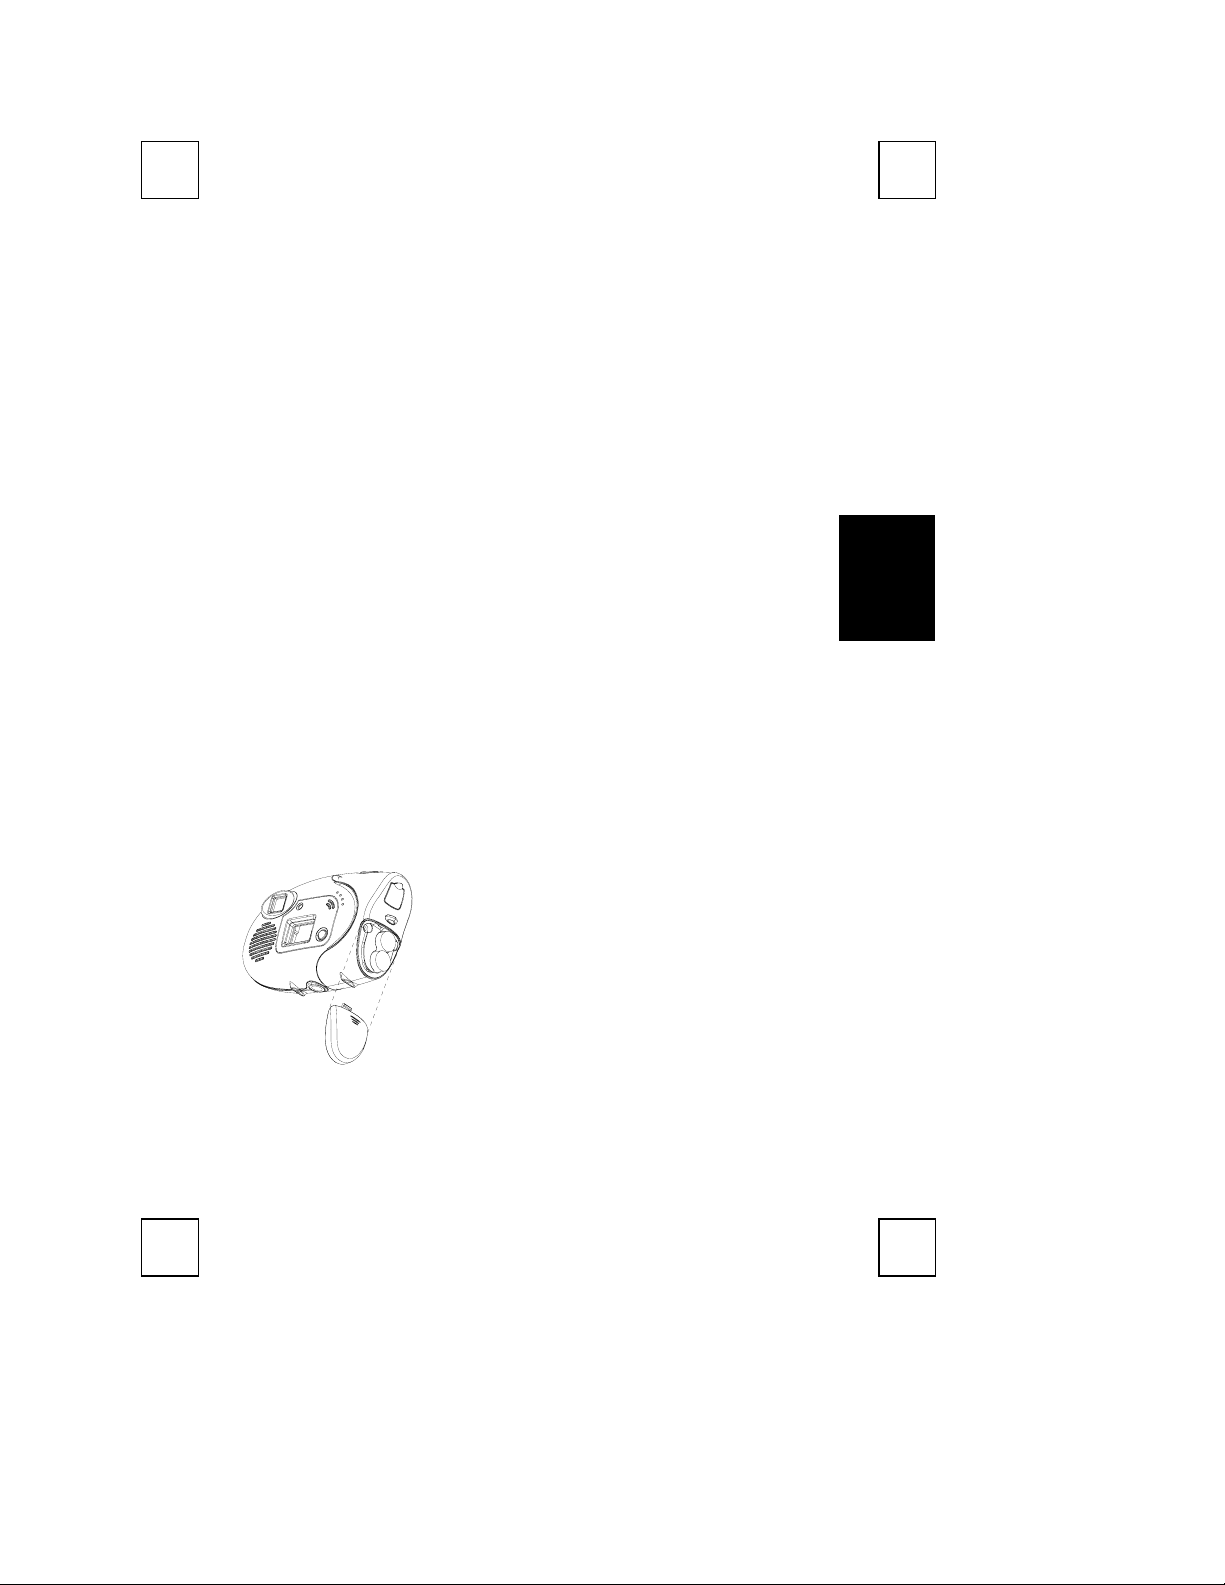
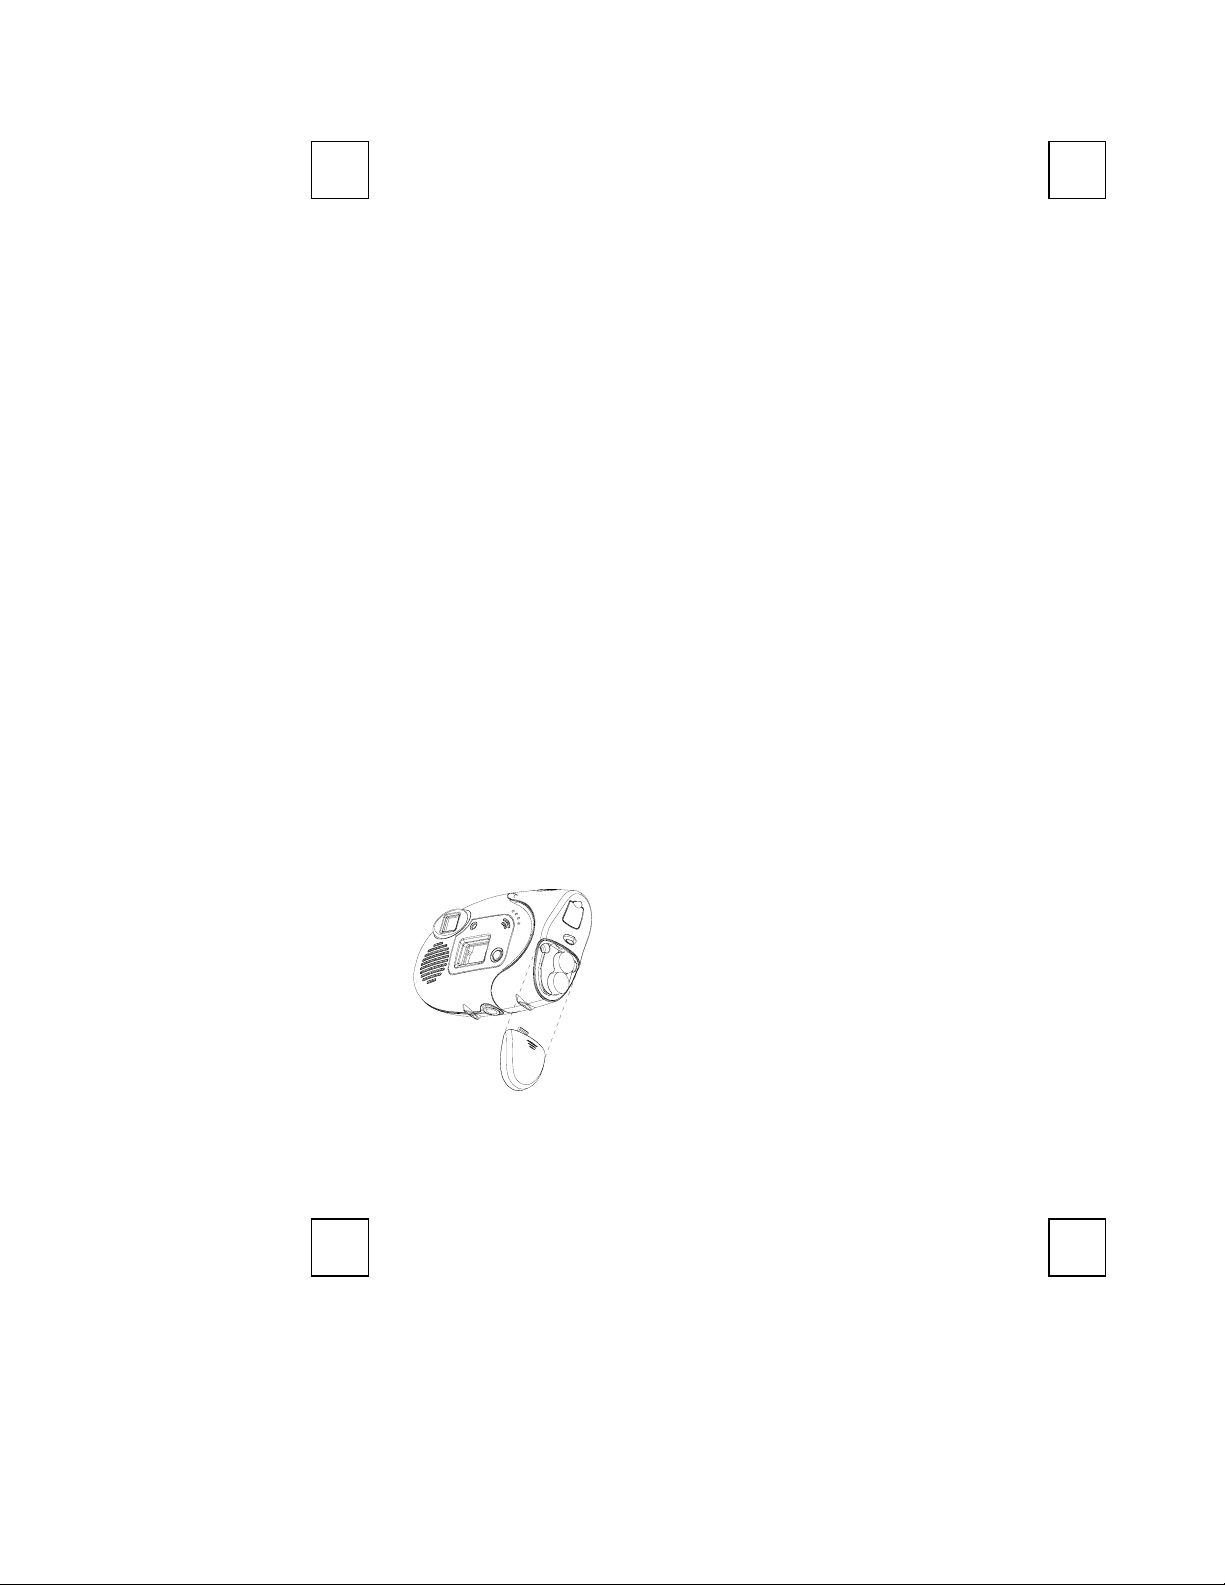
Slide the compartment cover open and change the 2 pcs of AAA alkaline
batteries. After inserting the batteries, you can immediately take the great
advantage of the camera.
English
Make sure to power OFF the camera
before you change the batteries.
Connect to PC
If you want the digital camera works as a PC camera, you just simply have
to use the USB connection cable that enclosed in the package to connect
the camera to you PC.
5
Page 6

Camera Buttons
Mode Button
Snapshot Press Snapshot button once to take one image.
Press on the mode button to switch through High
resolution or Low-resolution mode.
How to Take Pictures
Change modes
Take snapshots
Press on the mode button to cycle through High
resolution or Low-resolution mode.
Press Snapshot button once to take a shot. Press
and hold Snapshot button to take video stream
movie shots.
Camera Display Panel
Here is the list of all the icons that appear on the Camera Display Panel and
functions.
26 Image number for VGA.
OF Power on or power off status.
Ct
AI
St Self-shot.
CL Delete the last image.
CA Delete all pictures in the camera memory.
Lr/Hr
CP/nP Compression mode and non-compression mode.
F5/F6 50Hz and 60Hz
Lo
Continuous shot. You can take a series pictures on VGA
mode by pressing on the snapshot button.
Video recording, AVI file. You can use this function to take a
video by holding the snapshot button.
Low resolution or high resolution, QVGA and VGA.
For Low-resolution mode, you can take pictures for 104
images. (Max.)
For High resolution, you can take 26 images.
Battery Low. Please download your pictures in memory first
and then change the batteries as soon as possible.
6
Page 7
PCD3100
Guide d'Utilisation Rapide
de votre appareil photo numérique
Version 1.0
(Français)
Français
7
Page 8
Félicitations pour votre achat de ce nouvel appareil photo numérique &
caméra PC (Optionnel). Cet appareil photo est un appareil photo numérique
au format de poche et caméra PC USB tout-en-un. Vous pouvez prendre
des images numériques immédiatement. Vous pouvez également
connecter votre appareil photo à un ordinateur et l'utiliser comme une
caméra PC de visioconférence ou capturer des clips vidéo.
FAIRE CONNAISSANCE AVEC VOTRE APPAREIL
PHOTO- PCD3100
Flash light indicator
Viewfinder Microphone
Speaker
Display panel
Stand Receptacle
Mode button
8
Page 9
Configuration Système Requise
! Système d'Exploitation MicrosoftWindows98, WindowsME,
Windows2000 ou WindowsXP
INSTALLATION LOGICIELLE
Veuillez noter que vous devrez installer le logiciel AVANT de connecter
l'appareil photo dans le port USB de votre ordinateur.
Etape 1: Installer Ulead Photo Express 4.0 SE
1. Insérez le CD des logiciels dans le lecteur de CD-ROM de votre
ordinateur.
2. Suivez les instructions à l'écran pour installer le logiciel. Le logiciel
s'installera automatiquement.
! Remarque: Si le logiciel ne se lance pas automatiquement, allez
dans la barre des tâches, cliquez sur Démarrer, puis cliquez sur
Exécuter et localisez SETUP.EXE
sur OK pour installer.
3. Lorsque toutes les procédures d'installation sont terminées, le
système d'exploitation n'aura pas besoin de redémarrer. Le logiciel
est chargé lorsque vous voyez l'icône du logiciel à l'écran.
Important: Pour plus d'informations sur la manière d'obtenir des
informations ou sur la façon d'utiliser le logiciel, veuillez
vous référer au dossier nommé “Manual/Manuel” sur le
CD.
sur le CD des logiciels et cliquez
Etape 2 : Installez le pilote de l'appareil photo
numérique- CamMaestro
Afin de profiter de tous les avantages de l'appareil photo numérique,
veuillez noter que vous devez installer le pilote nommé “CamMaestro”
APRES avoir installé le logiciel de l'appareil photo à l'étape 1.
1. Suivez les instructions à l'écran pour installer le logiciel. Le logiciel
s'installera automatiquement.
! Remarque: Si le logiciel ne se lance pas automatiquement, allez
dans la barre des tâches, cliquez sur Démarrer, puis cliquez sur
Exécuter et localisez SETUP.EXE
des logiciels et cliquez sur OK pour installer.
dans le répertoire \Driver du CD
Français
2. Lorsque toutes les procédures d'installation sont terminées, le
système d'exploitation doit être redémarré.
9
Page 10
A
DESINSTALLATION
Pour retirer le logiciel applicatif de votre appareil photo
numérique :
1. Cliquez sur "Démarrer" (à gauche dans la barre des tâches).
2. Déplacez le curseur sur "Programmes" dans le menu "Démarrer" et
sélectionnez “Panneau de Configuration”.
3. Cliquez sur “Ajout/Suppression de Programmes” dans le panneau de
configuration.
4. Sélectionnez “Ulead Photo Express 4.0 SE” et cliquez sur l'icône
suppression.
5. Cliquez sur "Oui" pour confirmer la désinstallation.
Pour retirer le pilote de l'Appareil Photo:
1. Cliquez sur le menu "Démarrer" (à gauche dans la barre des tâches).
2. Déplacez le curseur sur "Programmes" dans le menu "Démarrer" et
sélectionnez “Panneau de Configuration”.
3. Cliquez sur “Ajout/Suppression de Programmes” dans le panneau de
configuration.
4. Sélectionnez “CamMaestro” et cliquez sur l'icône suppression.
5. Cliquez sur "Oui" pour confirmer la désinstallation.
DEBUTER
Insérez ou changez les piles
Faites glisser le couvercle du compartiment et changez les deux piles
alcalines AAA. Après avoir inséré les piles, vous pouvez
immédiatement profiter de tous les avantages de l'appareil photo.
ssurez-vous de bien mettre
hors tension l'appareil photo
avant de changer les piles.
Connexion au PC
Si vous voulez que votre appareil photo numérique fonctionne comme une
caméra PC, vous avez simplement à utiliser le câble de connexion USB
contenu dans le paquet pour relier le PC et l'appareil photo numérique.
10
Page 11
BOUTONS DE L'APPAREIL PHOTO
Bouton Mode
Bouton Déclencheur
Pressez le bouton mode pour basculer entre les
modes haute et basse résolution.
Pressez le bouton déclencheur une fois pour prendre
une image.
COMMENT PRENDRE DES PHOTOS
Changer de mode
Prendre des
photos
Pressez le bouton mode pour passer du mode haute
résolution au mode basse résolution.
Pressez le bouton déclencheur une fois pour prendre
une photo. Pressez et maintenez le bouton
déclencheur pour prendre des petits morceaux de
vidéo.
ECRAN DE L'APPAREIL PHOTO
Voici la liste de toutes les icônes qui apparaissent sur l'écran de l'appareil
photo et les fonctions associées.
26 Nombre d'images pour le VGA.
OF Etat sous tension ou hors tension.
Ct
AI
St Auto-portrait
CL Supprime la dernière image.
CA
Lr/Hr
CP/nP Mode Compression et mode non-compression.
F5/F6 50Hz et 60Hz
Lo
Prises de vue continues. Vous pouvez prendre une série de
photos en mode VGA en appuyant sur le bouton déclencheur.
Enregistrement Vidéo, fichier AVI. Vous pouvez utiliser cette
fonction pour prendre une vidéo en maintenant le bouton
déclencheur.
Efface toutes les images de la mémoire de l'appareil photo
numérique.
Faible résolution ou Haute résolution, QVGA et VGA.
Pour le mode Faible résolution, vous pouvez prendre jusqu'à
104 (max.) images.
Pour le mode Haute résolution, vous pouvez prendre jusqu’à 26
images.
Piles faibles. Veuillez télécharger vos photos en mémoire puis
remplacer les piles le plus rapidement possible.
Français
11
Page 12

PCD3100
Kamera Kurzanleitung
Version 1.0
(Deutsch)
12
Page 13
Herzliche Glückwünsche zu Ihrem Kauf dieser Digitalkamera bzw.
PC-Kamera (optional). Diese Kamera ist eine alles-in-einem Digital- und
USB-PC-Kamera in einem Taschenformat. Sie können sofort Bilder mit
dieser Kamera aufnehmen. Sie können aber auch diese Kamera an einen
Computer anschließen und sie als PC-Kamera für Videokonferenzen oder
zum Aufnehmen von Videoclips verwenden.
KENNENLERNEN DER KAMERA- PCD3100
Deutsch
Flash light indicator
Viewfinder Microphone
Speaker
Display panel
Stand Receptacle
Mode button
13
Page 14
SYSTEMVORAUSSETZUNGEN
! MicrosoftWindows98, WindowsME, Windows2000 oder
WindowsXP-Betriebssystem
SOFTWAREINSTALLATION
Installieren Sie bitte unbedingt zuerst die Software, BEVOR Sie die Kamera
mit dem USB-Anschluss Ihres Computers verbinden.
Schritt 1: Installieren der Ulead Photo Express 4.0 SE
1. Legen Sie die Software-CD in das CD-ROM-Laufwerk Ihres
Computers ein.
2. Folgen Sie den Anweisungen auf dem Bildschirm, um die Software zu
installieren. Die Software wird automatisch installiert.
! Anmerkung: Falls die Software nicht automatisch eingerichtet wurde,
klicken Sie bitte auf „Start“ auf der Taskleiste und anschließend auf
„Ausführen“, suchen SETUP.EXE in der Software-CD und klicken
zum Schluss auf OK, um die Installation zu starten.
3. Das Betriebssystem muss nicht nach der Installation neu gestartet
werden. Die Software ist geladen, wenn Sie das Softwaresymbol auf
dem Bildschirm sehen.
Wichtig: Öffnen Sie bitte das Handbuch in dem Ordner “Manual” auf
der CD, um die Bedienungsanweisungen der Software zu
lesen.
Schritt 2 : Installieren des Digitalkamera-Treibers –
CamMaestro
Sie müssen den Treiber “CamMaestro” NACH der Installation der
Kameraanwendungssoftware wie im Schritt 1 beschrieben installieren, um
diese Kamera optimal benutzen zu können.
1. Folgen Sie den Anweisungen auf dem Bildschirm, um die Software zu
installieren. Die Software wird automatisch installiert.
! Anmerkung: Falls die Software nicht automatisch
eingerichtet wurde, klicken Sie bitte auf „Start“ auf der
Taskleiste und anschließend auf „Ausführen“, suchen
SETUP.EXE
und klicken zum Schluss auf OK, um die Installation zu
starten.
2. Das Betriebssystem muss nach der Installation neu gestartet werden.
in dem Ordner „Driver“ auf der Software-CD
14
Page 15
DEINSTALLATION
Entfernen der Kameraanwendungssoftware:
1. Klicken Sie auf das “Start”-Menü (auf der unteren Taskleiste links).
2. Gehen Sie zu “Einstellungen” im “Start”-Menü und wählen
“Systemsteuerung”.
3. Klicken Sie auf “Software” in dem Systemsteuerungs-Fenster.
4. Wählen Sie “ Ulead Photo Express 4.0 SE” und klicken dann auf die
“Entfernen”-Schaltfläche.
5. Klicken Sie auf “Ja”, um die Deinstallation zu bestätigen.
Entfernen des Kameratreibers:
1. Klicken Sie auf das „Start“-Menü (auf der unteren Taskleiste links).
2. Gehen Sie zu « Einstellungen » im « Start »-Menü und wählen
“Systemsteuerung”.
3. Klicken Sie auf “Software” in dem Systemsteuerungs-Fenster.
4. Wählen Sie “CamMaestro” und klicken dann auf die
« Entfernen »-Schaltfläche.
5. Klicken Sie auf « Ja », um die Deinstallation zu bestätigen.
VORBEREITUNG
Einlegen oder Auswechseln der Batterien
Schieben Sie den Deckel des Batteriefachs auf und legen 2 Stk. AAA
alkalische Batterien ein. Sie können sofort die Kamera verwenden, nach dem
die Batterien eingelegt wurden.
Schalten Sie bitte unbedingt die
Kamera vor dem
Batteriewechsel aus.
Deutsch
Verbinden mit einem PC
Wollen Sie diese Digitalkamera als PC-Kamera verwenden, müssen Sie nur
die Kamera über das im Paket beigelegte USB-Kabel mit Ihrem PC
verbinden.
15
Page 16

BEDIENELEMENTE DER KAMERA
Mode-Knopf
Auslöser Drücken Sie den Auslöser, um ein Bild aufzunehmen.
Drücken Sie den Mode-Knopf, um eine hohe oder
niedrige Auflösung zu wählen.
AUFNEHMEN DER BILDER
Modus ändern
Bilder Aufnehmen
Drücken Sie den Mode-Knopf, um zwischen der
hohen und niedrigen Auflösung umzuschalten.
Drücken Sie einmal den Auslöser, um ein Bild
aufzunehmen. Halten Sie den Auslöser gedrückt, um
Videoclips aufzunehmen.
KAMERA-ANZEIGEBILDSCHIRM
Die folgende Liste beschreibt die Symbole, die auf dem KameraAnzeigebildschirm angezeigt werden, und die entsprechenden Funktionen.
26 VGA-Bildanzahl.
OF Stromstatus: Ein/Aus.
Ct
AI
St Selbstauslöser
Dp Das letzte Bild löschen.
CL Das letzte aufgenommene Audiostück löschen.
Lr/Hr
CP/nP Kompressionsmodus oder Nicht-Kompressionsmodus.
F5/F6 50Hz und 60Hz
Lo
Bildfolgen-Modus. Sie können eine Reihen von Bildern im
VGA-Modus aufnehmen, indem Sie den Auslöser drücken.
Videoaufnahme--AVI-Datei. Sie können in diesem Modus
einen Videoclip aufnehmen, indem Sie den Auslöser gedrückt
halten.
Niedrige Auflösung (QVGA) oder hohe Auflösung (VGA).
Mit der niedrigen Auflösung können Sie ca. 104 (max.) Bilder
aufnehmen.
Mit der hohen Auflösung können Sie 26 Bilder aufnehmen.
Schwache Batterie. Laden Sie zuerst die Bilder im Speicher
herunter und tauschen Sie die Batterien möglichst bald aus.
16
Page 17
PCD3100
Guida rapida alla macchina fotografica
Versione 1.0
(Italiano)
Italiano
17
Page 18
Congratulazioni per l’acquisto di questa nuova macchina fotografica digitale
& PC camera (Optional). Questa macchina fotografica è insieme una
macchina fotografica digitale ed una PC camera USB tascabile. Si possono
scattare immediatamente fotografie digitali. Alternativamente si può anche
posizionare la macchina fotografica sul computer ed utilizzarla come PC
camere per videoconferenze o riprendere filmati.
IMPARARE A CONOSCERE LA MACCHINA
FOTOGRAFICA- PCD3100
Flash light indicator
Viewfinder Microphone
Speaker
Display panel
Stand Receptacle
Mode button
18
Page 19
REQUISITI DEL SISTEMA
! Sistemi operativi MicrosoftWindows98, WindowsME,
Windows2000 or WindowsXP.
ISTALLAZIONE DEL SOFTWARE
Notare che il software deve essere installato PRIMA di collegare la
macchina fotografica alla porta USB del computer.
1: Installazione di Ulead Photo Express 4.0 SE
1. Inserire il CD software nell’unità CD-ROM del proprio computer.
2. Segu ire le istruzioni su schermo per installare il software. Il software
si installa automaticamente.
! Nota: Se il software non si installa automaticamente, andare sulla
barra delle applicazioni, fare clic su Start, poi su Esegui e sfogliare il
CD software per trovare l’eseguibile SETUP.EXE
installare.
3. Quando tutte le procedure d’installazione sono completate, non è
necessario riavviare il sistema. Il software è caricato quando sulla
barra delle applicazioni appare la corrispondente icona.
Importante: Per maggiori informazioni sull’utilizzo del software, fare
riferimento alla cartella “Manual” del CD.
; fare clic su OK per
Italiano
2° Installazione di Digital Camera Driver-CamMaestro
Per ottenere grandi vantaggi dalla macchina fotografica, si prega di notare
che bisogna installare il driver con nome “CamMaestro” DOPO
istallato le applicazioni di cui al punto 1.
1. Segu ire le istruzioni su schermo per installare il software. Il software
si installa automaticamente.
! Nota: Se il software non si installa automaticamente, andare sulla
barra delle applicazioni, fare clic su Start, poi su Esegui e sfogliare il
CD software per trovare l’eseguibile SETUP.EXE; fare clic su OK per
installare.
avere
2. Quando tutte le procedure d’installazione sono completate, è
necessario riavviare il sistema.
19
Page 20
A
RIMOZIONE
Rimozione applicazioni software della macchina
fotografica:
Step 1: Fare clic sul menu “Start” (in basso a sinistra sulla barra delle
applicazioni).
Step 2: Spostare il cursore su “Programmi” nel menu “Start” e selezionare
“Pannello di controllo”.
Step 3: Fare clic Installazione applicazioni nel Pannello di controllo.
Step 4: Selezionare “Ulead Photo Express 4.0 SE” e fare clic sull’icona
Rimozione.
Step 5: Fare clic su “Sì” per confermare la rimozione.
Rimozione driver macchina fotografica:
Step 1: Fare clic sul menu „Start“ (in basso a sinistra sulla barra delle
applicazioni).
Step 2: Spostare il cursore su „Programmi“ nel menu „Start“ e selezionare
“Pannello di controllo”.
Step 3: Fare clic Installazione applicazioni nel Pannello di controllo.
Step 4: Selezionare “CamMaestro” e fare clic sull’icona Rimozione.
Step 5: Fare clic su “Sì” per confermare la rimozione.
PER INIZIARE
Inserire o cambaire le batterie
Far scorrere per aprire lo scomparto batterie ed inserire 2 batterie alcaline
AAA. Dopo avere inserito le batterie, è possibile sfruttare immediatamente la
macchina fotografica.
ssicurarsi di SPEGNERE la
macchina fotografica prima di
cambiare le batterie.
Collegamento al PC
Se si vuole che la macchina fotografica funzioni come una PC camera,
basta semplicemente utilizzare il cavo di connessione USB, allegato alla
confezione, e collegare la macchina fotografica al proprio PC.
20
Page 21
TASTI DELLA MACCHINA FOTOGRAFICA
Tasto Mde
(modalità)
Otturatore
Premere il tasto Mode (modalità) per passare da
risoluzione alta a bassa.
Premere una volta il tasto otturatore per scattare una
fotografia.
COME FOTOGRAFARE
Cambio di modalità
Fotografare
Premere il tasto Mode (modalità) per passare
ciclicamente da risoluzione alta a bassa.
Premere una volta il tasto otturatore per scattare una
fotografia. Premere, e mantenere premuto, il tasto
otturatore per riprendere una sequenza di
fotogrammi video.
DISPLAY DELLA MACCHINA FOTOGRAFICA
Di seguito sono elencate le icone, che appaiono sul displa y della macchin a
fotografica, e loro funzioni.
26 Numero immagine per VGA.
OF Stato alimentazione (attiva o disattiva).
Ct
AI
St Autoscatto.
CL Elimina l’ultima immagine.
CA
Lr/Hr
CP/nP Modalità compressione e non compressione.
F5/F6 50Hz e 60Hz
Lo
Sequenza scatti. Premendo il tasto otturatore si può
riprendere una serie di immagini in modalità VGA.
Registrazione video, file AVI. Questa funzione è utilizzata per
riprendere filmati tenendo premuto il tasto otturatore.
Elimina tutte le immagini memorizzate nella memoria della
macchina fotografica.
Risoluzione bassa o alta, QVGA e VGA.
In modalità risoluzione bassa, è possibile scattare 104
(massimo) fotografie.
In modalità risoluzione alta, è possibile scattare 26 fotografie.
Batterie scariche. Trasferire le immagini presenti in memoria e
sostituire le batterie quanto prima possibile.
Italiano
21
Page 22

PCD3100
Guía rápida de la cámara
Versión 1.0
(Español)
22
Page 23
Enhorabuena por su compra de la nueva cámara digital y de PC (Opcional).
Esta cámara es una cámara integrada digital y PC USB de tamaño de
bolsillo. Puede tomar fotografías digitales rápidamente. También puede
conectar la cámara a un ordenador y utilizarla como una cámara PC para
videoconferencia o captura de vídeo clips.
CONOCER LA CÁMARA- PCD3100
Flash light indicator
Viewfinder Microphone
Speaker
Display panel
Stand Receptacle
Mode button
Español
23
Page 24
REQUISITOS DE SISTEMA
! Sistema operativo MicrosoftWindows98, WindowsME,
Windows2000 o WindowsXP
INSTALACIÓN DEL SOFTWARE
Tenga en cuenta que debe instalar el software ANTES de conectar la
cámara al puerto USB de su equipo.
Paso 1: Instalación Ulead Photo Express 4.0 SE
1. Inserte el CD de del software dentro de la unidad CD-ROM de su
equipo.
2. Siga las instrucciones que aparecen en pantalla para instalar el
software. El software se instalará automáticamente.
! Nota: Si el software no se configura automáticamente, vaya a la
Barra de tareas, a continuación, haga clic en Ejecutar y vaya a
SETUP.EXE
instalar.
3. Una vez terminado el procedimiento de configuración, no es
necesario reiniciar el sistema. El software se carga cuando aparece
el icono del software en la pantalla.
Importante: Para obtener más información sobre la utilización del
en el CD del software y haga clic en Aceptar para la
software, consulte la carpeta llamada "Manual" del CD.
Paso 2: Instalación del controlador de la cámara
digital-CamMaestro
Con el objeto de sacar un gran partido de la cámara, tenga en cuenta que
tiene que instalar el controlador llamado "CamMaestro" DESPUÉS
haber instalado el software de aplicación de la cámara en el paso 1.
1. Siga las instrucciones que aparecen en pantalla para instalar el
software. El software se instalará automáticamente.
!
Nota: Si el software no se configura automáticamente, vaya a la Barra
de tareas, a continuación, haga clic en Ejecutar y vaya a SETUP.EXE
en el directorio del Controlador del CD del software y haga clic en
Aceptar para la instalar.
2. Una vez terminado el procedimiento de co nfiguración, es necesario
reiniciar el sistema operativo.
de
24
Page 25
A
DESINSTALACIÓN
Para suprimir el software de aplicación de la cámara:
Step 1: Haga clic en el menú "Inicio" (situado en la barra de tareas inferior
izquierda).
Step 2: Mueva el cursor sobre "Programas" en el menú "Inicio" y
seleccione "Panel de control".
Step 3: Haga clic en "Agregar/Quitar programas" en el Panel de control.
Step 4: Seleccione "Ulead Photo Express 4.0 SE" y haga clic en el icono
Suprimir.
Step 5: Haga clic en "Sí" para confirmar si desea la desinstalación.
Para suprimir el controlador de la cámara:
Step 1: Haga clic en el menú "Inicio" (situado en la barra de tareas inferior
izquierda).
Step 2: Mueva el cursor sobre "Programas" en el menú "Inicio" y
seleccione "Panel de control".
Step 3: Haga clic en "Agregar/Quitar programas" en el Panel de control.
Step 4: Seleccione "·CamMaestro" y haga clic en el icono Suprimir.
Step 5: Haga clic en "Sí" para confirmar si desea la desinstalación.
Español
PRIMEROS PASOS
Inserción o cambio de la batería
Deslice la cubierta del compartimento para abrirlo y cambie las dos
baterías alcalinas AAA. Después de insertar las baterías, puede
empezar a utilizar inmediatamente la cámara.
segúrese de APAGAR la
cámara antes de cambiar las
baterías.
Conexión al PC
Si desea que la cámara digital funcione como una cámara PC, sólo tiene
que utilizar el cable de conexión USB que se adjunta en el paquete para
conectar la cámara al PC.
25
Page 26

BOTONES DE LA CÁMARA
Botón de modo
Instantánea
Pulse el botón de modo para cambiar entre los
modos de Alta resolución y Baja resolución.
Pulse el botón Instantánea una vez para tomar una
fotografía.
CÓMO TOMAR FOTOGRAFÍAS
Cambiar modos
Tomar instantáneas
Pulse el botón de modo para cambiar entre los
modos de Alta resolución y Baja resolución.
Pulse el botón Instantánea una vez para tomar una
fotografía. Pulse y mantenga pulsado el botón de
Instantánea para grabar una toma de película de
vídeo.
PANTALLA DE LA CÁMARA
A continuación presentamos una lista de todos los iconos que aparecen en
la Pantalla de la cámara y sus funciones.
26 Número de imagen para VGA.
OF Estado Encendido o Apagado.
Ct
AI Grabación de vídeo, archivo AVI. Botón de Instantánea.
St Disparo automático.
CL Eliminar la última imagen.
CA Elimina todas las imágenes de la memoria de la cámara.
Lr/Hr
CP/nP Modo de compresión y modo sin comprimir.
F5/F6 50Hz y 60Hz
Lo
Disparo continuo. Puede tomar una serie de fotografías en modo
VGA pulsando el botón de Instantánea.
Baja resolución o alta resolución, QVGA y VGA.
Para el modo de Baja resolución, puede tomar fotografías para
104 (máx.) imágenes.
Para Alta resolución, puede tomar 26 imágenes.
Batería Baja. Descargue sus imágenes en memoria antes y
cambie las pilas lo antes posible.
26
Page 27
封底內頁
27
Page 28

3100560180
Version 1.0
July 2003
Printed in China
28
 Loading...