

Page 1

16X DVD-ROM DRIVE
User’s Manual
Page 2

CLASS 1 LASER PRODUCT
APPAREIL A LASER DE CLASSE 1
LASER KLASSE 1
LUOKAN 1 LASERLAITE
PRODUIT LASER
CATEGORIE 1
DANGER INVISIBLE LASER RADIATION WHEN OPEN AVOID DIRECT EXPOSURE TO BEAM
VORSICHT INSICHTBARE LASERSTRAHLUNG WENN ABDECKUNG GEÖFFNET NICHT DEM
ATTENTION RADIATION DU FAISCEAU LASER INVISIBLE EN CAS D’OUVERTURE. EVITER TOUTE
STRAHL AUSSETSEN
EXPOSITION AUX RAYONS.
LASER
for DVD
Type Semiconductor laser GaAs
Wave length 635~665 nm
Output Power Typical
for CD
Type Semiconductor laser GaAlAs
Wave length 760~810 nm
Output Power Typical
Copyright Statement
It is a criminal offence, under applicable copyright laws, to make
unauthorised copies of copyright-protected material, including computer
programs, films, broadcasts and sound recordings. This equipment
should not be used for such purposes.
Page 3

FCC Compliance Statement
This device complies with Part 15 of the FCC Rules. Operation is subject
to the following two conditions:
1. This device may not cause harmful interference, and
2. This device must accept any interference received, including
interference that may cause undesired operation.
FCC Warning Statement
This equipment has been tested and found to comply with the limits for a
Class B digital device, pursuant to Part 15 of the FCC Rules. These limits
are designed to provide reasonable protection against harmful
interference in a residential installation. This equipment generates, uses
and can radiate radio frequency energy and, if not installed and used in
accordance with the instructions, may cause harmful interference to
radio communications. However, there is no guarantee that interference
will not occur in a particular installation. If this equipment does cause
harmful interference to radio or television reception, which can be
determined by turning the equipment off and on, the user is encouraged
to correct the interference by one or more of the following measures:
• Reorient or relocate the receiving antenna
• Increase the separation between the equipment and the receiver
• Connect the equipment into an outlet on a circuit different from that
to which the receiver is connected
• Consult the dealer or an experienced radio/TV technician for help.
CAUTION
Any changes or modifications not expressly approved by the party
responsible for compliance could void the user’s authority to operate the
equipment.
FOR EUROPE
“The drive is in conformity with the EMC directive and lowvoltage directive.”
Page 4

Table of Contents
INTRODUCTION 1
SYSTEM REQUIREMENTS 2
PACKAGE CONTENTS 2
INSTALLATION 3
HOST INTERFACE CONNECTIONS 3
HARDWARE INSTALLATION 4
DRIVER INSTALLATION 5
For Windows Environment 5
SOFTWARE INSTALLATION 5
DVD REGION CODING 6
Region Playback Control Management 6
Region Codes 6
DVD Video Decoder for PC Systems 7
About This DVD-ROM Drive 7
OPERATION & CONNECTION 8
FRONT PANEL 8
REAR VIEW 9
TECHNICAL DATA 11
Page 5

16X DVD-ROM DRIVE
INTRODUCTION
Welcome to a multimedia world of DVD technology. This high-performance
DVD-ROM drive of ATAPI interface plays DVD titles at maximum 16X
DVD-ROM speed and plays CD-ROMs at maximum 48X speed. With the
bundled software, you can enjoy the wide range of educational and
entertaining CD/DVD titles with theater quality.
DVD stands for Digital Versatile Disc or Digital Video Disc which has highdensity capacity of storing 4.7 gigabytes of data on single side and up to
17GB on double side and dual layer. In addition, a DVD is MPEG-2
compressed video compatible and has Dolby Digital Surround Sound audio
(known as AC-3) capabilities. That is, the combination of DVD titles, your
stereo setup and this DVD-ROM drive package will bring you incredible
sound and visual effect.
Here are some important features:
♦
5.25" half-height internal drive
Fast speed and quick access time
♦
High data transfer rate (CAV* technology)
♦
Efficient power saving feature
♦
Superior error recovery
♦
Reading capability of single/dual layer DVD-ROM/Video discs,
♦
CD-DA, CD-ROM, CD-ROM XA, CD-I, Photo CD, Video CD,
CD Extra, CD-Text, CD-R, CD-RW
Horizontal & Vertical operation
♦
Good vibration resistance & low noise
♦
*CAV: Constant Angular Velocity
1
Page 6

16X DVD-ROM Drive
System Requirements
To install and use the DVD-ROM drive, it is recommended that you have
the following for your PC system:
♦ A Pentium
♦ 16 MB RAM (32MB is recommended.)
♦ 2 MB free hard disk space
♦ 16-bit SoundBlaster
♦ Amplified stereo speakers
♦ Microsoft
To run DVD titles with DVD playback software installed, the basic
requirements recommended:
♦ Microsoft
♦ Intel Pentium II 350MHz or above
♦ At least 32 MB RAM
♦ 16-bit SoundBlaster
TM
II 350 MHz or faster CPU
TM
compatible sound card
TM
Windows 95/98/Me/NT/2000/XP
TM
Windows 95/98/98SE/Me/NT4.0 SP5+/2000/XP
TM
compatible sound card
♦ DVD-ROM drive
♦ Display card supporting DirectDraw
For detailed information, please refer to the software package you use.
Package Contents
The package contains the following items:
1. DVD-ROM drive
2. Application CD −including application software
3. Audio cable
2
Page 7
16X DVD-ROM DRIVE
INSTALLATION
Host Interface Connections
Most current mainboard models have two IDE ports (primary and
secondary) which can connect two IDE cables. Two IDE cables
allow you to connect up to four devices, but it is recommended that
you separate IDE ports for your hard drive and your DVD-ROM drive.
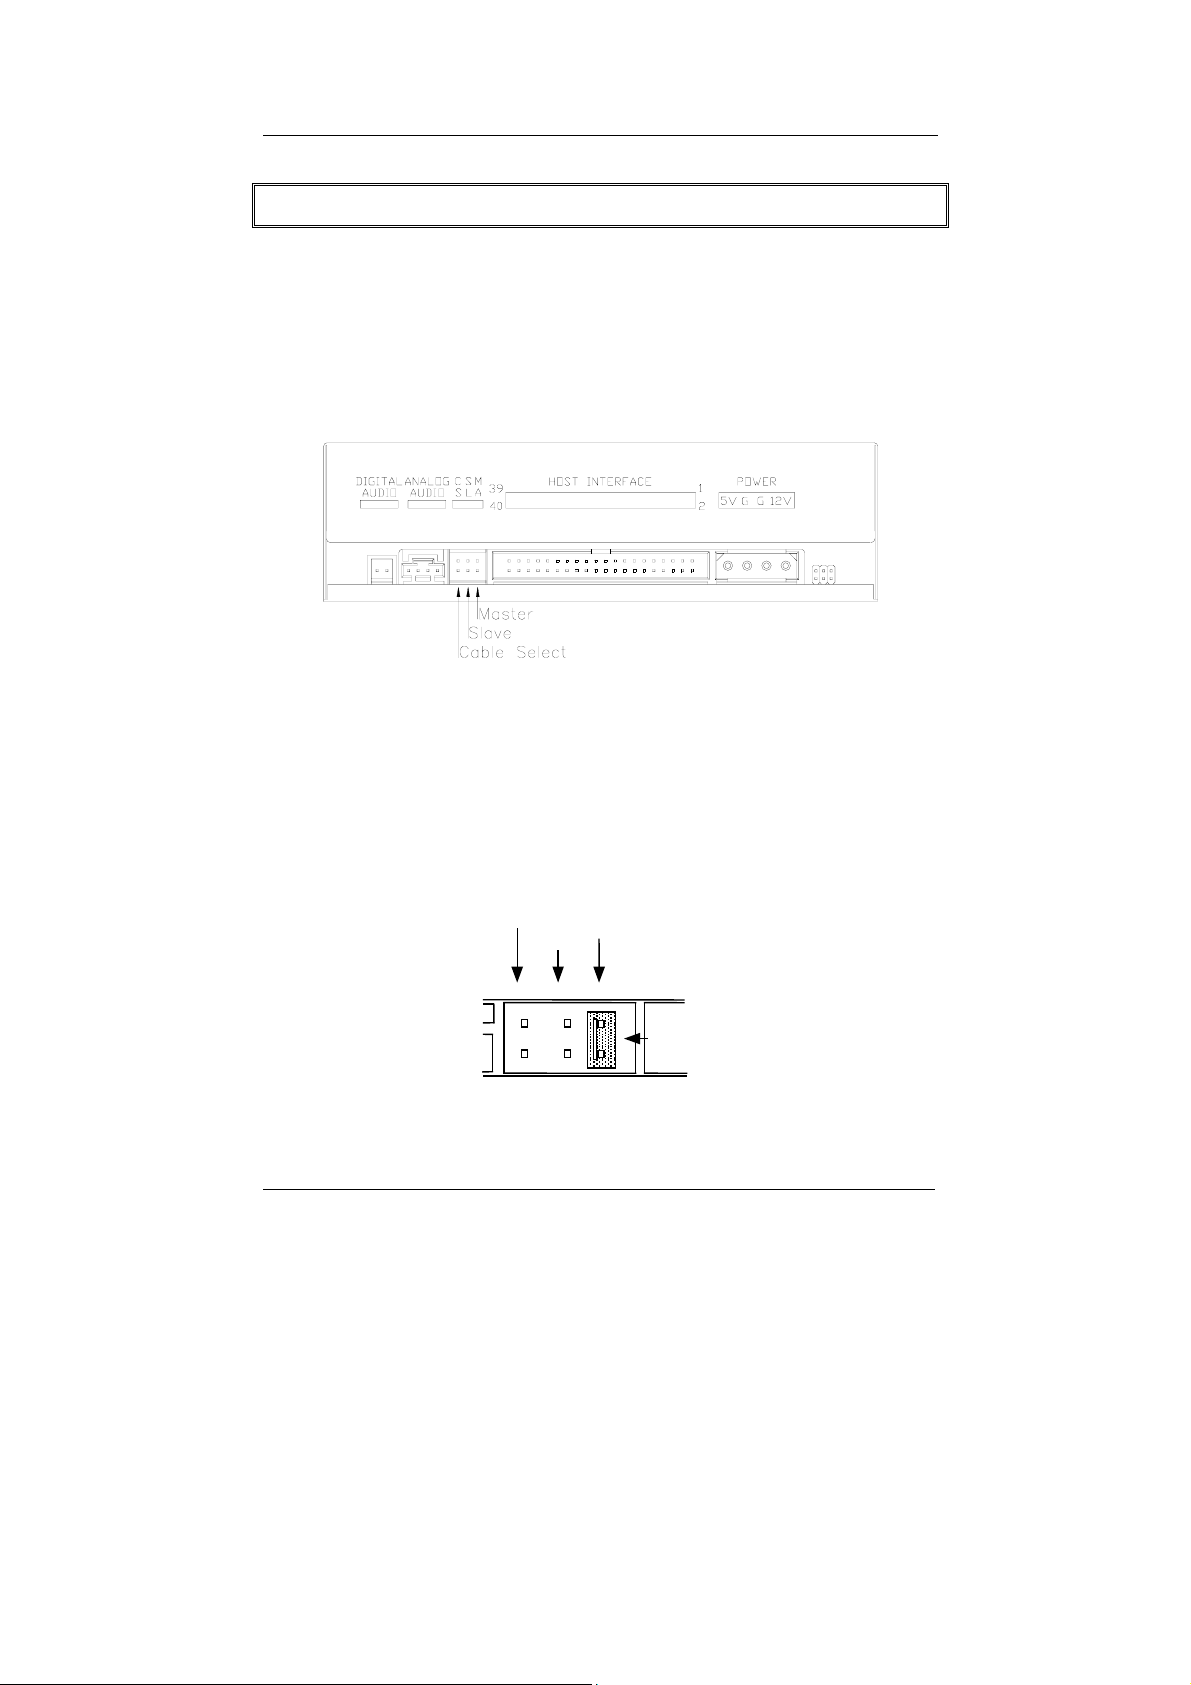
If you connect only one device on the IDE cable, you can set the
jumper as “master” or “slave”.
If you connect two devices (e.g. DVD-ROM & CD-RW) on the same
cable, set different jumpers for each device (DVD-ROM as “master”,
CD-RW as “slave” and vice versa.) The same rule applies to the
connection of having your hard disk and one other device on the
same cable.
CSEL
SLAVE
MASTER
JUMPER
3
Page 8
16X DVD-ROM Drive
Hardware Installation
1. Turn off the power to your computer system and all peripheral
devices.
2. Disconnect all cables and connectors from the back of your
computer, and then remove the cover from the computer.
3. Insert the DVD-ROM drive into one of the vacant 5.25" drive
bays and secure it to your PC with all four mounting screws.
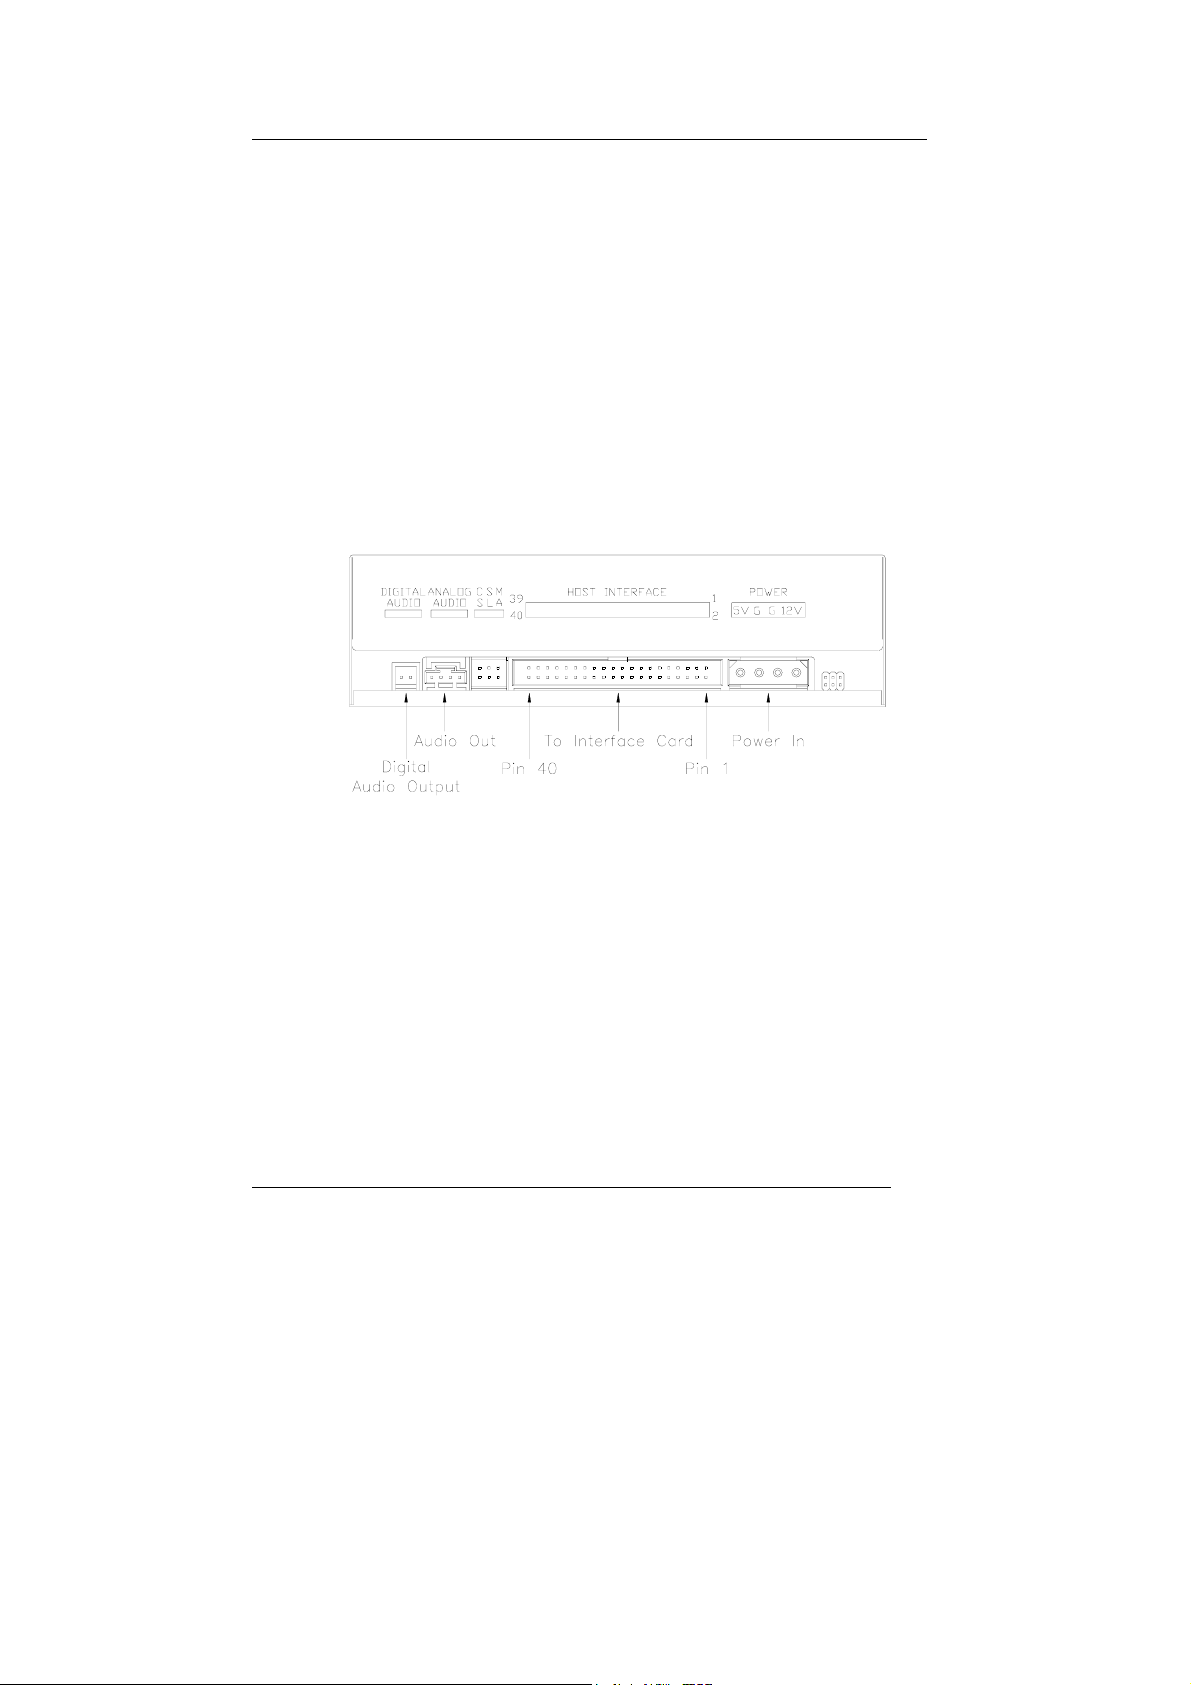
4. Connect one end of the 40-pin IDE cable to the IDE connector of
the DVD-ROM drive and the other end to the IDE port on your
motherboard.
The red-edge of the IDE cable must be connected to Pin 1 on the DVD-
ROM drive.
5. If you have a sound card that can be connected to this DVDROM drive, you can also connect the DVD-ROM drive (as AudioOut) and the sound card (as Audio-in) with a 4-pin audio cable.
If your mainboad is integrated with built-in sound system, plug
the 4-pin audio cable into the CD-IN connector on the
mainboard as Audio-in.
6. Re-attach the cover of your computer, and reconnect all power
cords to the computer.
4
Page 9

16X DVD-ROM DRIVE
Driver Installation
For Windows Environment
This DVD-ROM drive is a Plug & Play device. Windows 95/98//Me,
and Windows NT/2000/XP will automatically detect the drive and
load the appropriate driver.
If Windows cannot detect the drive, you can operate manually:
1. Click the Control Panel Icon in My Computer and then click
Add New Hardware. The Add New Hardware window appears.
2. The program will automatically search for your new drive and
load the appropriate driver.
Software Installation
To install DVD playback software under Windows operating system,
you could either:
1. Insert the application CD and the installation program will run
automatically.
Or
2. Run:\setup.exe on the application CD.
5
Page 10

16X DVD-ROM Drive
DVD Region Coding
Region Playback Control Management
All DVD Video Playback systems have “Region Playback Control”
(RPC) which is required by Hollywood movie industry and defined by
DVD Forum. You can only play DVD-Video discs with the same
region code as your DVD-Video Playback system.
As for DVD-ROM drives, one kind of the DVD-Video Playback
system, there are 2 types:
RPC Phase 1 (as RPC1): RPC1 drives do not have built-in hardware
support for region management. DVD-ROM drives of this kind don’t
play a part in controlling the playback region. It solely depends on
the decoder.
RPC Phase 2 (as RPC2): RPC2 drives maintain the region change
count information in hardware, and in general, the region of such
drives can be changed up to 5 times by the end users under some
software decoder. (e.g. PowerDVD)
Region Codes
Region 1: Canada, U.S.
Region 2: Japan, Europe, South Africa, and Middle East, Egypt
Region 3: Southeast Asia and East Asia
Region 4: Australia, New Zealand, Pacific Islands, Central America,
Mexico, South America, and the Caribbean
Region 5: Eastern Europe, Indian subcontinent, Africa, North Korea,
and Mongolia
Region 6: China
6
Page 11
16X DVD-ROM DRIVE
DVD Video Decoder for PC Systems
There are three types of DVD-Video decoders on the market:
Type 1: The RPC code has been set by the manufacturer and can’t
be changed.
Type 2: The RPC code can be changed up to the maximum of four
times (except the initial setting).
Type 3: With RPC Phase 2 drives, the DVD-Video decoder copies
the same region code as the drive
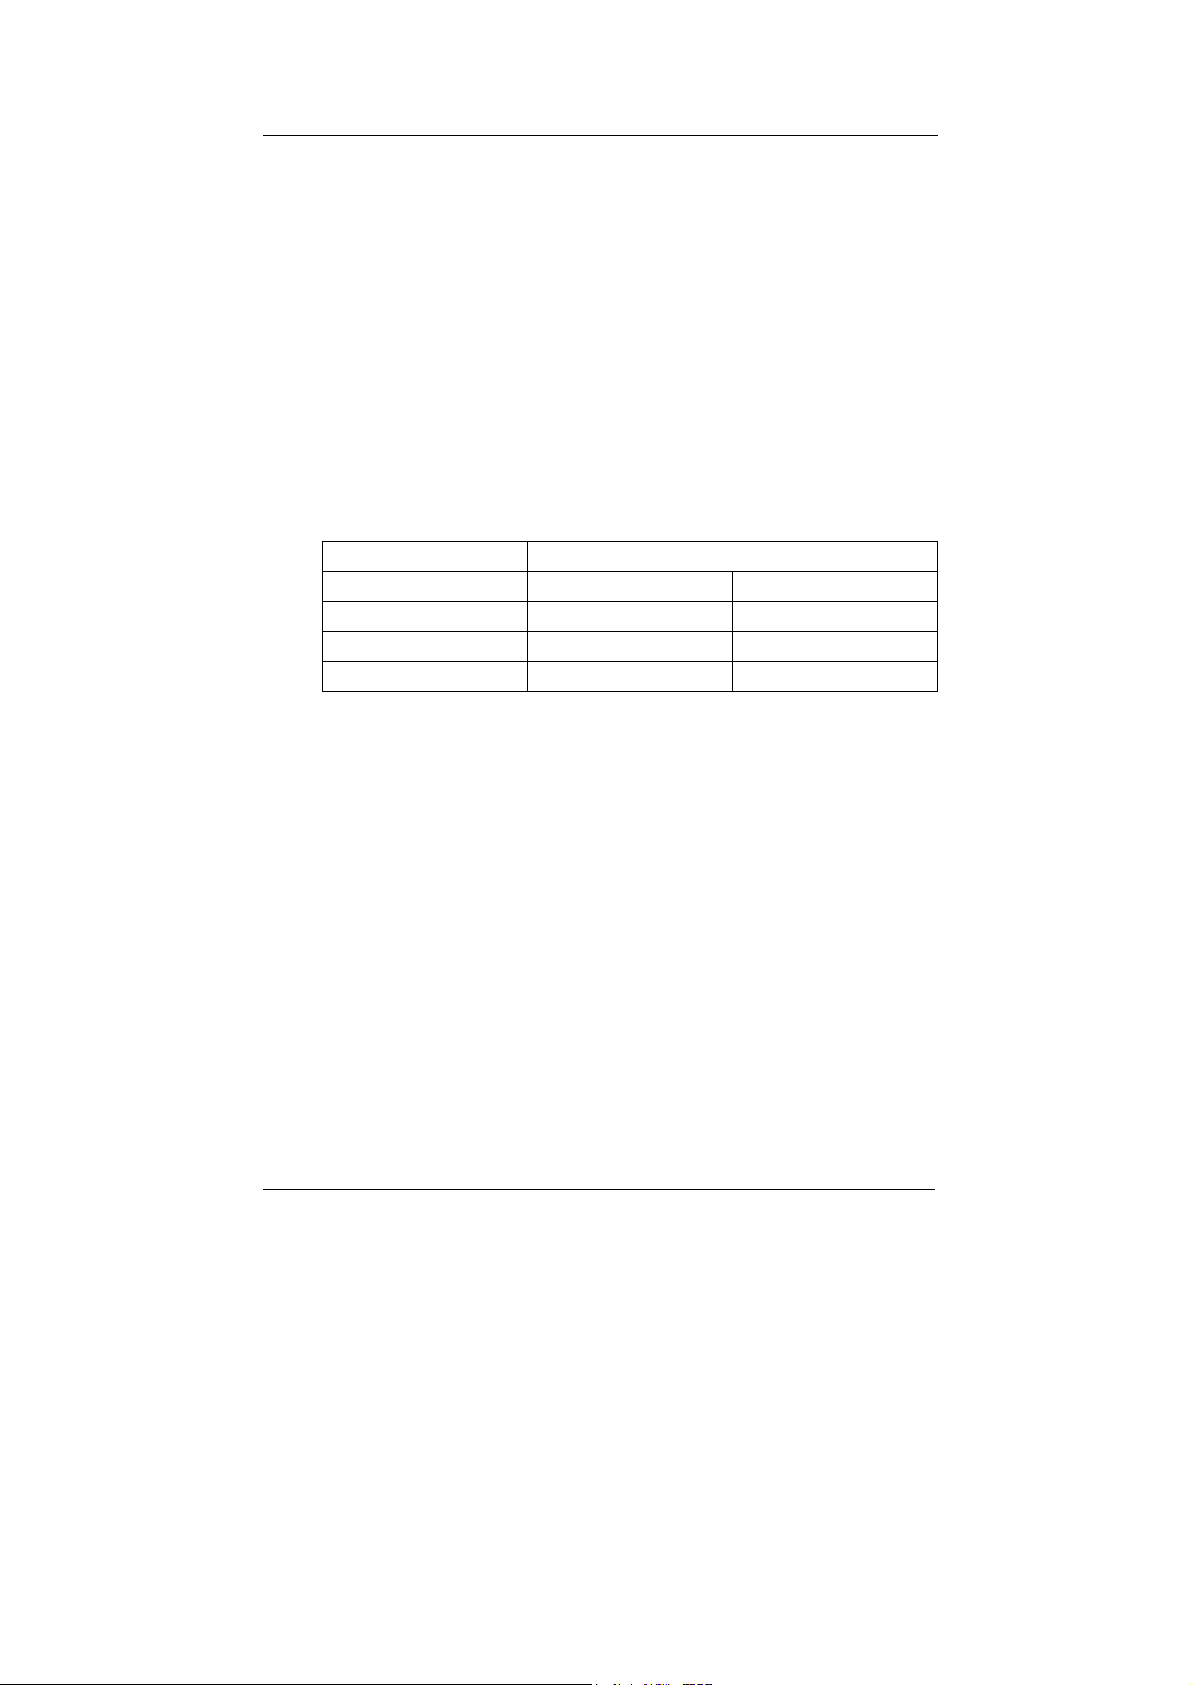
Here is a table to help you understand how DVD-ROM drives and
the decoder (DVD MPEG cards or DVD playback software) work
together for region code setting.
DVD Drive
DVD Decoder RPC Phase 1 RPC Phase 2
Type 1 Decoder Decoder & Drive
Type 2 Decoder Decoder & Drive
Type 3 Decoder Decoder & Drive
About This DVD-ROM Drive
This DVD-ROM drive you have purchased is a PRC2 drive and the
first region code will depend on the DVD title you play. You are
allowed to modify the region code 5 times. After the fifth alteration,
the region code will be locked and only those DVD titles of the same
region code could be played afterwards, so set the code carefully.
7
Page 12

16X DVD-ROM Drive
OPERATION & CONNECTION
Front Panel
1. Headphone Jack
By plugging in the stereo mini jack here, you can listen to audio CD
with headphones.
2. Headphone Volume Control
This rotary knob adjusts the volume level of the headphone output.
Turning the wheel to the right will increase the audio volume.
3. Led Indicator (dual color)
Orange LED for DVD series discs.
Green LED for CD family discs.
The indicator flashes Orange and Green when a disc is being loaded
and identified and it goes off when the disc is ready.
The indicator flashes when the drive is playing an audio disc or
reading a data disc.
4. Disc Tray
This is the tray for the disc. Place the disc in the tray, then press the
Close/Eject button or gently push the tray to close it.
8
Page 13
16X DVD-ROM DRIVE
5. Emergency Eject Hole
When the Eject/Close button doesn’t work properly and the disc tray
can’t be opened, you can insert a paper clip or other small rod into
this hole for manual ejection. Please make sure to power off the
system before you do that.
6. Play/Skip button
Press this button to play tracks or skip to next track during the
playing state.
7. Open/Close/Stop/Eject button
This button opens and closes the disc tray. If the tray is closed,
pressing the button will eject it. If the drive is playing, pressing this
button will stop playing.
Note: The design of front panel is subject to change without notice.
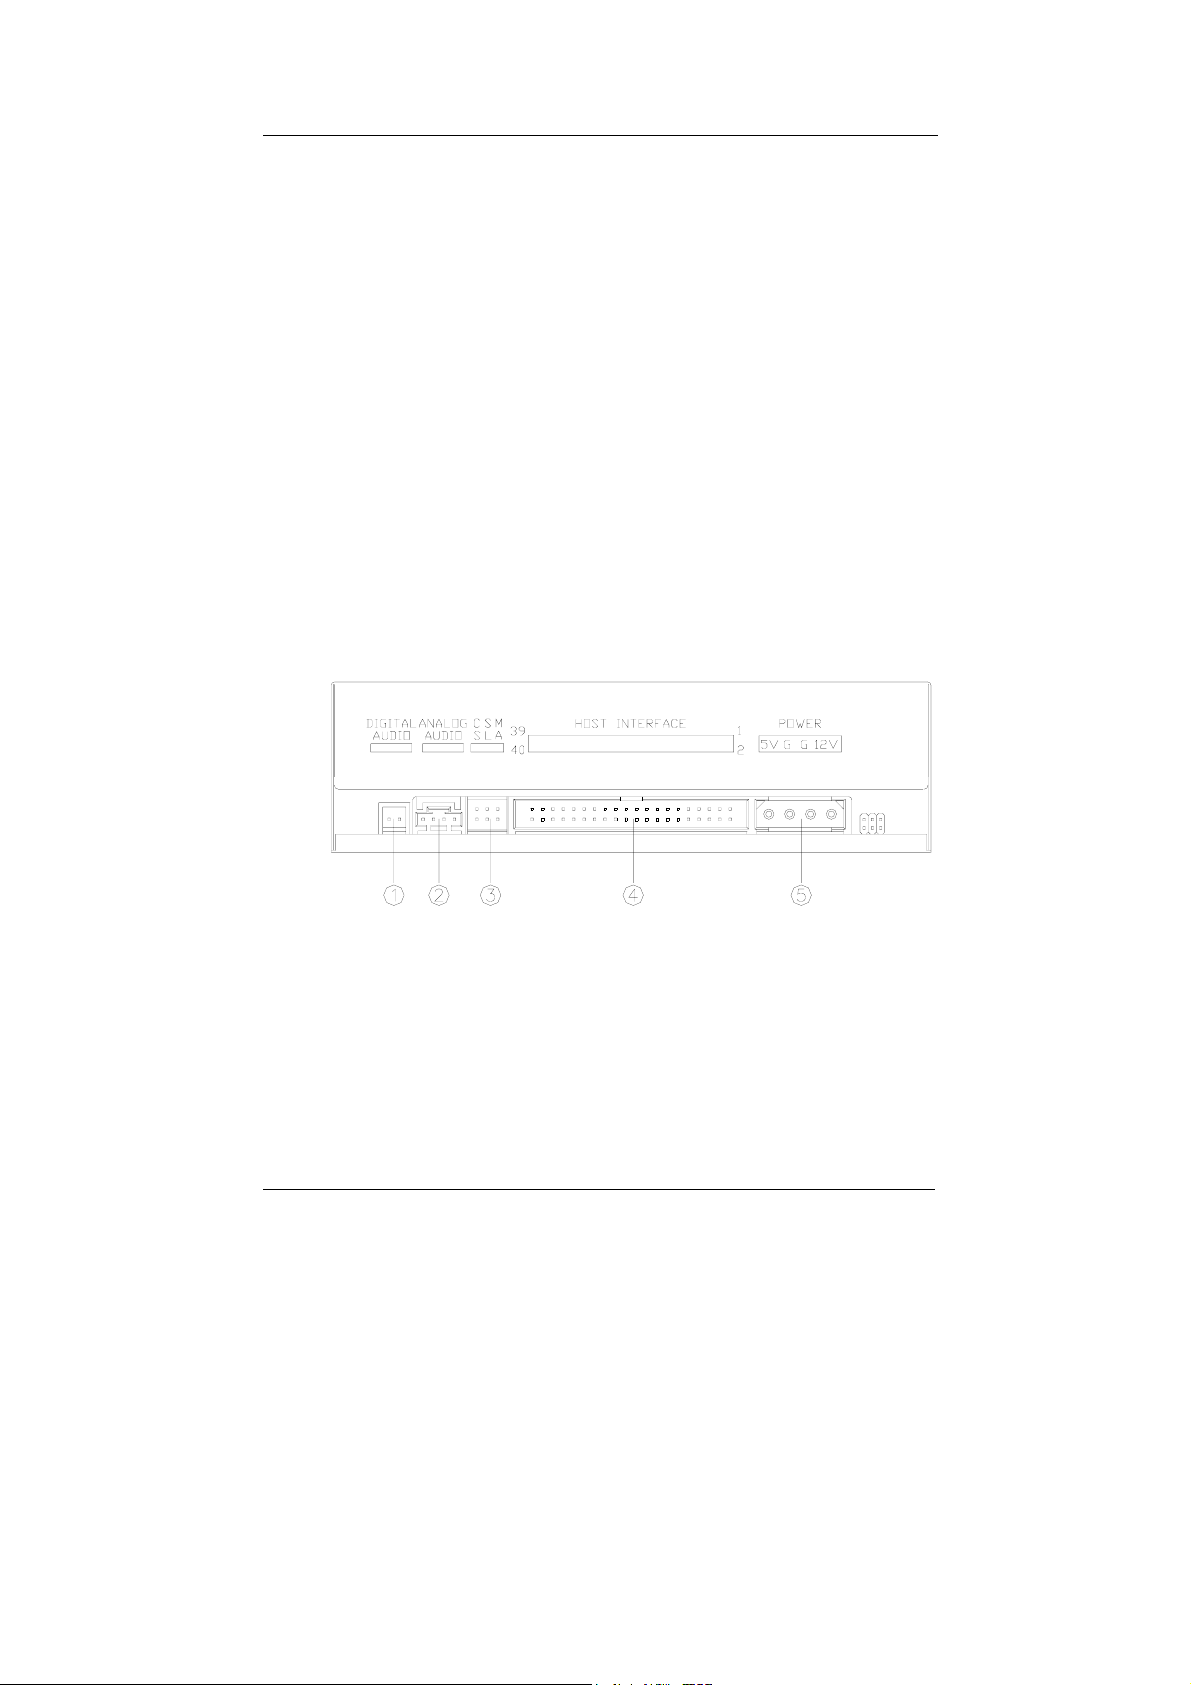
Rear View
1. Digital Audio Output Connector
If your sound card has a digital audio IEC958 format connector, you
can connect it to this digital audio output connector with a 2-pin
audio cable.
2. Analog Audio Output Connector
This connector allows you to connect the drive to your sound card
with a 4-pin audio cable.
9
Page 14

16X DVD-ROM Drive
3. Device Configuration Jumper
Set the jumper to Master, Slave or Cable Select according to your
system configuration.
4. IDE Interface Connector
Plug one end of the 40-pin IDE cable here to join the 40-pin IDE
connector on the motherboard. The red-edge of the IDE cable must
be connected to Pin 1 of each connector.
5. Power Supply Connector
By plugging the computer’s power supply cable here, you can
connect the DVD-ROM drive and your computer system.
10
Page 15

16X DVD-ROM DRIVE
TECHNICAL DATA
Drive Performance
Data Transfer Rate DVD-ROM
Single layer: 21632KB/s(16X Max.)
Dual layer: 13520 KB/s(10X Max.)
CD-ROM: 7200KB/s (48X Max.)
Average Access Time DVD-ROM: 120ms
(⅓ stroke) CD-ROM: 95ms
Interface E-IDE/ATAPI Interface
Data Buffer Memory size 512KB
Burst Rate PIO Mode 4 – 16.7MB/s
Multiword DMA Mode 2–16.7MB/s
Multiword UDMA Mode 2–33.3MB/s
Compact Disc
Disc Size 80mm and 120mm discs
Disc Data Capacity DVD-ROM: Single layer – 4.7GB
Dual layer – 8.5GB
(one side)
CD-ROM Mode 1: 650MB
CD-DA: 747MB
Disc Format Compatibility
CD Family CD-DA, CD-ROM, CD-ROM XA, CD-
I, Photo CD, Video CD, CD Extra,
CD-Text, CD-R, CD-RW,
DVD Family DVD-Video, DVD-ROM, DVD+RW,
DVD-RW
11
Page 16

16X DVD-ROM Drive
Physical Specification
Drive Type 5.25" Half-Height Built-in Drive
Mounting Orientation Horizontal & Vertical
Disc Loading Tray (motorized)
Audio output level Line out = 0.6±10%Vrms
Headphone out = 0.6±10%Vrms
Power Requirements 5V±5%, 12V±10%
Dimension
Height 41.8 ± 0.3 mm
Width 148.6 ± 0.3 mm
Depth 177 ± 0.3 mm
Weight (net) 0.9kg
Environment
Temperature
Operating condition 5°C ~ 45°C
Storage condition -30°C ~ 60°C
Humidity
Operating condition 8% ~ 80% (no condensation)
Storage condition 5% ~ 90% (no condensation)
12
Page 17

Page 18

3100550450
Version 1.1
April 2003
 Loading...