

Page 1
User Guide
Quartet 2015
Cordless Telephone & Digital Answering Machine
This equipment is not designed for making emergency telephone calls when the power
fails. Alternative arrangements should be made for access to emergency services.
Page 2

Please open this page for an ‘at a glance’
guide to your Quartet 2015.
Page 3
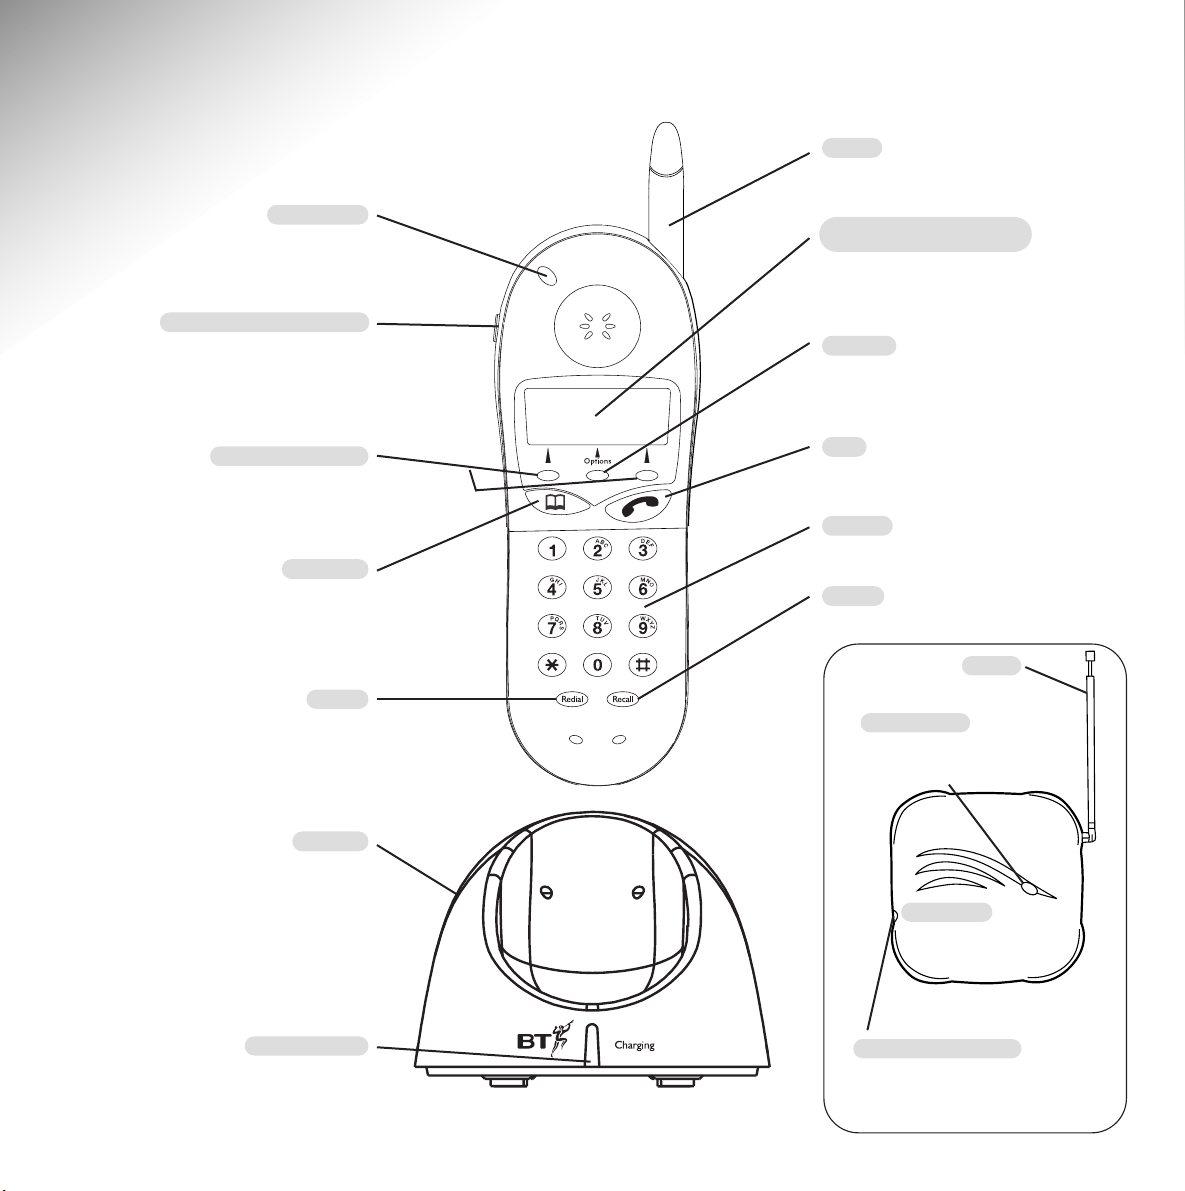
Recall
For use with switchboards.
Charger
Redial
Stores last 3 numbers dialled.
See page 13
Charging light
Illuminates when a handset
is charging.
Registration button
For registering new handsets
to the Quartet 2015 base unit.
Power light
Illuminates when
power is switched on.
Aerial
Extend for use.
Aerial
Extendable.
At a glance
Talk
For making and ending calls.
Options
For navigating through the
menu.
Directory
To call and store up to 20
names and numbers.
See page 16
Command buttons
Used in conjunction with
Display screen options.
Earpiece volume control
Increase or decrease volume
during a call.
See page 15
Display screen/Message
Centre
Shows number of stored
messages and all status displays.
In use light
Lights up when ringing or
a new message is waiting.
Keypad
Keys 0 - 9 plus ✱and #.
Base unit
1
Page 4

2
Page 5

3
In this guide
At a glance 1
Introduction 4
Setting up 6
Using your Quartet 2015 8
Making and receiving calls 12
Using the directory 16
Using the answering machine 19
Optional settings 32
Using Select Services 35
Using additional handsets 44
Wall mounting 46
Help and advice 48
Technical advice 50
Index 52
Wall mounting template 53
Page 6

4
Introduction
Your BT Quartet 2015 combined cordless telephone and digital answering
system is designed for ease of use and is made to BT’s high standards.
The BT Quartet 2015 combines the advantages
of cordless operation with the performance of a
high quality telephone and digital answering
system. It offers unparalleled quality and features.
Cordless telephone functions
Your Quartet 2015 offers you the convenience
and flexibility of a cordless telephone system and
has been specifically designed to be easy to use.
You can use up to 4 handsets with the base unit
and transfer calls between them. The handset
is highly functional and has a clear and simple
display to assist you to use the many helpful
features of your telephone, answering machine
and BT Select Services.
Directory
The Directory, which you access via the
directory button, allows you to store up to 20
names and numbers in alphabetical order. You
can scroll through and edit or delete them. You
can also preview entries and set up calls directly
from them.
Answering machine
The answering machine allows callers to leave a
3-minute message tagged with the day and time.
You can also record memos for family or
colleagues. Different outgoing messages can be
recorded and used on demand.
If you want your caller to leave a message, set to
‘Answer and Record’ if not, set to ‘Answer Only’.
The Quartet 2015 has pre-recorded greetings and
voice prompts and has visual and audible signals
to alert you when new messages have been left.
Select Services
Your Quartet 2015 is designed to make it easy for
you to access and manage BT’s Friends & Family
and certain BT Select Services. For instance,
you may also want to change the time for your
Reminder Call or switch Call Waiting on or off.
These can all be edited, enabled or cancelled via
the handset display.
Handset functions
Apart from some very basic functions on the
base unit and charger, your Quartet 2015 is
managed almost entirely from the handset.
Using the handset’s display screen and buttons,
you can edit and activate the functions of your
Quartet 2015, both on and off-line. The main
method of control, is via a tree of menus, which
you can access and navigate through by using
buttons beneath the Display.
Please see ‘Menu options’, page 8.
Page 7
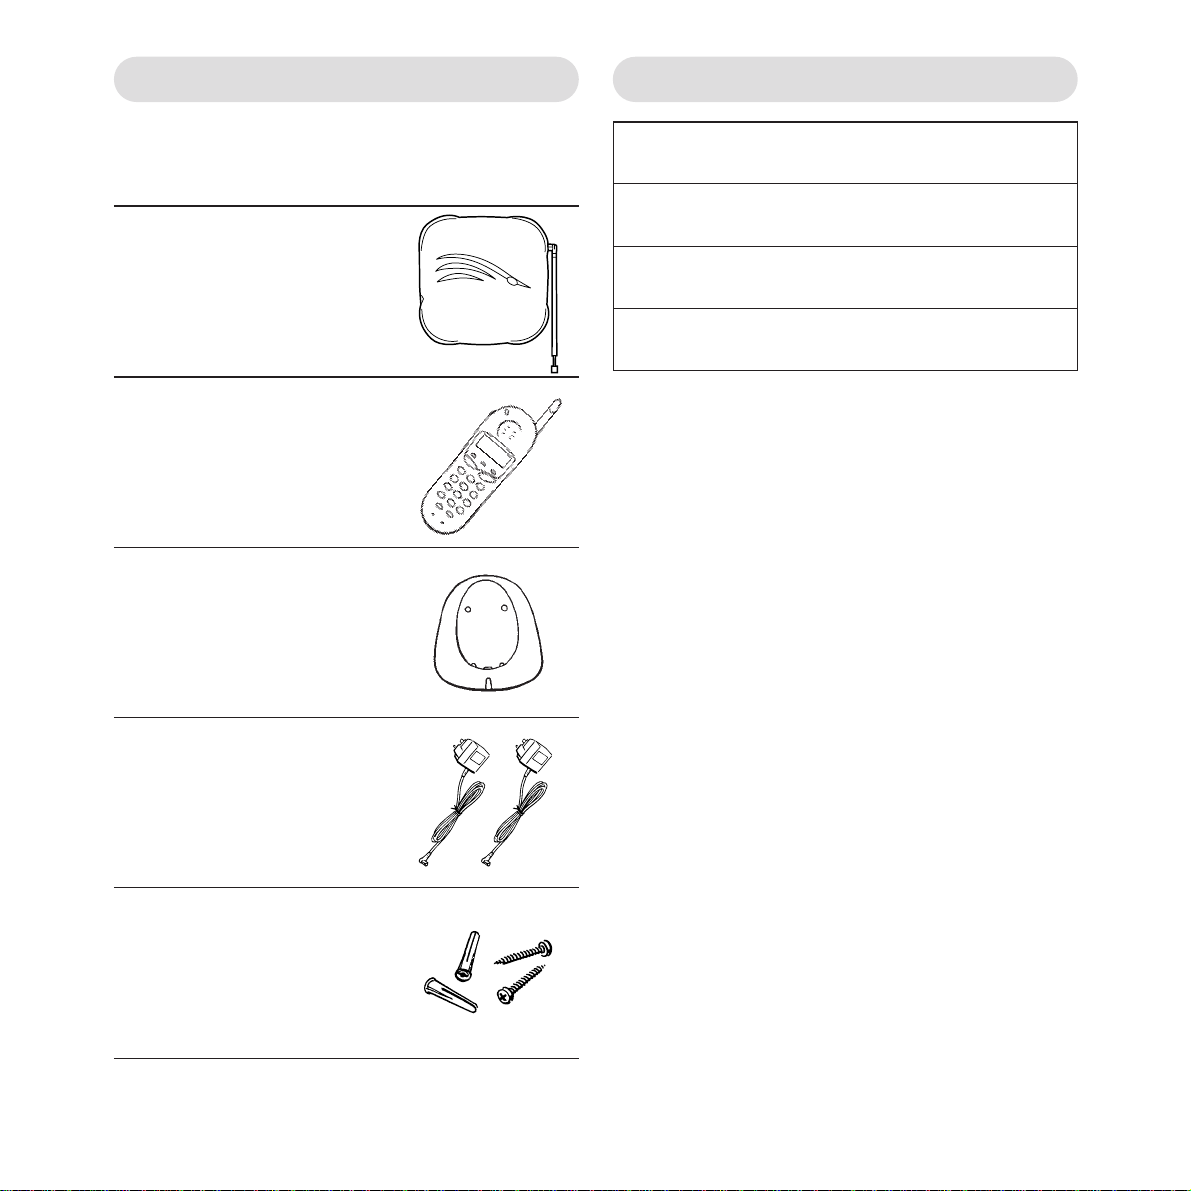
Unpacking your Quartet 2015
Check that your BT Quartet 2015 is complete.
When you unpack it, you should have:
For your records
For warranty purposes, proof of purchase is
required, so please keep your receipt.
●
BT Quartet 2015 base
unit with telephone
line cable attached.
●
Cordless handset
●
Charger
●
2 x 13 amp mains
power adaptor plugs
●
Wall plugs
and screws
Date of purchase:
Place of purchase:
Serial number (on the underside of the telephone base unit):
Purchase price:
5
Page 8
6
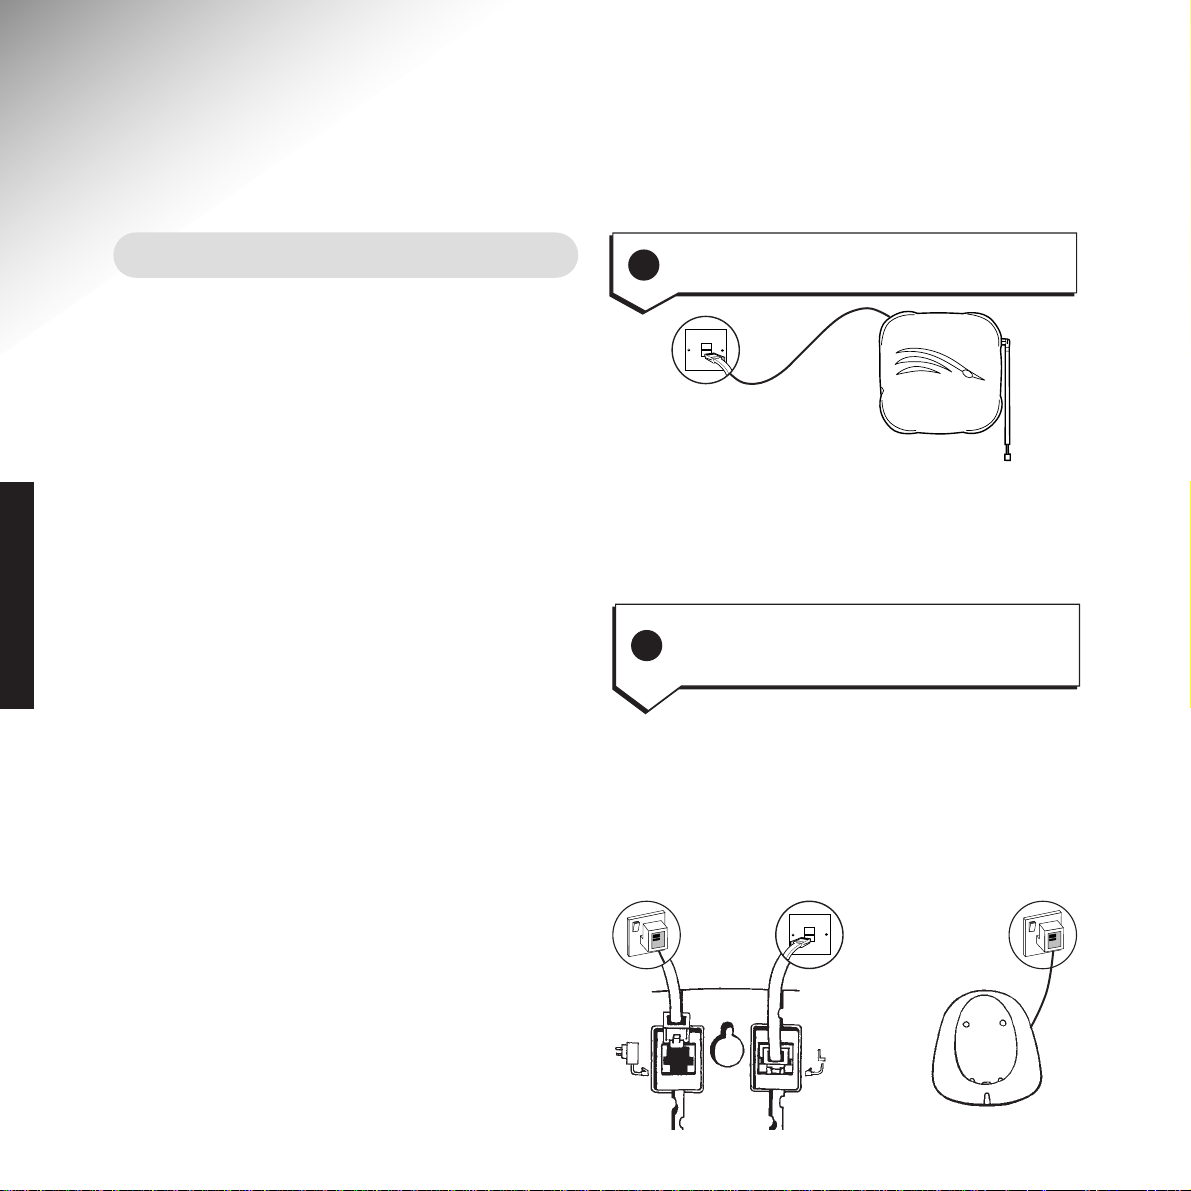
Setting up
Follow these steps to get your Quartet 2015 ready for use.
Situating your Quartet 2015
Position your Quartet 2015 within 2 metres of
a phone socket and 3 metres of a mains power
socket.
Do not stand it on carpets or other similar
surfaces which might generate fibres.
Do not cover or enclose the machine. Allow a
free flow of air to its surfaces.
For the best performance do not position your
Quartet 2015 close to other electrical equipment,
eg. TV’s or large metal objects, metal cabinets etc.
Your Quartet 2015 can be wall-mounted.
For instructions on how to do this, see
‘Wall-mounting’ on page 46.
If you have any problems setting up or using
your Quartet 2015, please call Helpline on
08457 697330.
If you do not have a modern-style socket, call
Freefone 0800 800 150 and ask for a BT
engineer to come and fit the correct type. This
is a chargeable service.
There is one mains power adaptor for the charger
and one for the base unit. Simply plug one end
in the socket provided on the underside of each
box, plug the other end into a mains power supply
socket, and switch on.
1
Plug your Quartet 2015 base unit
into the telephone wall socket
2
Plug your Quartet 2015 base unit
and charger into the mains power
socket
SETTING UP
Base unit Charger
Page 9
Before you use your Quartet 2015 for the first
time, it is important to have the handset batteries
fully charged. We recommend that you leave the
Quartet 2015 handset on the cradle charger for
at least 24 hours.
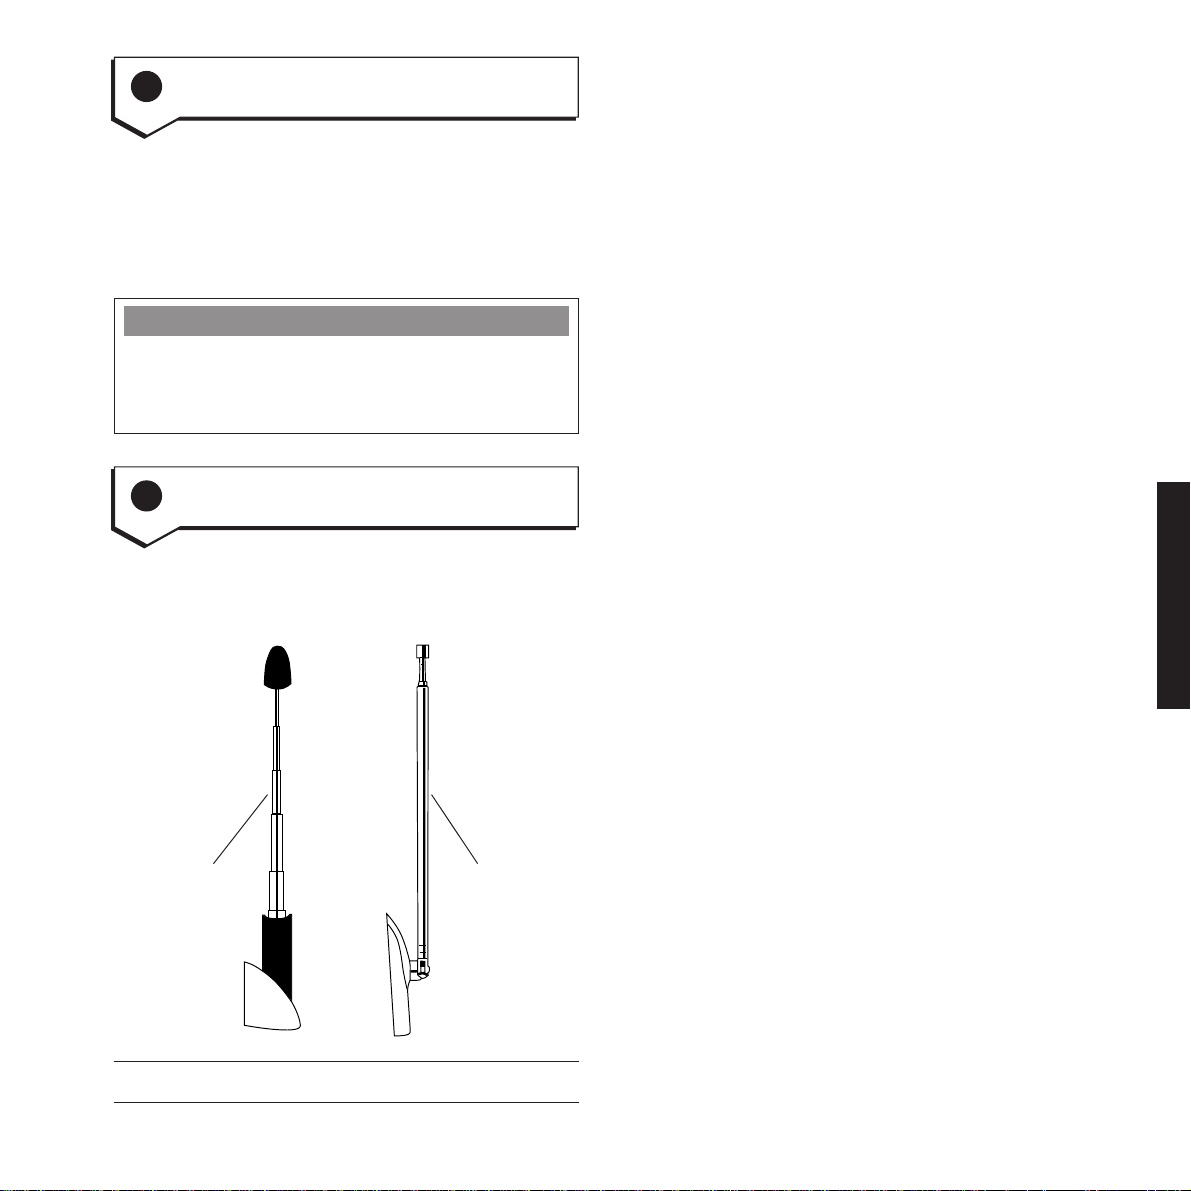
It is advisable to extend the aerials on both
the handset and base unit for optimum
performance.
Your Quartet 2015 is now ready for use.
3
Charge the handset batteries for
at least 24 hours
4
Aerial
7
Battery Low Indication
When the batteries need re-charging, the display
will show a ‘battery low’ symbol. Replace the
handset on the charger to re-charge.
Extendible
handset
aerial
Extendible
base unit
aerial
SETTING UP
Page 10

8
Using your Quartet 2015
Menu options
Your Quartet 2015 uses a display on the handset
which allows you to select from the various
product features detailed throughout this guide.
Using the keypad, you are guided through the
menu options by the prompts on the display.
At standby (that is the basic screen when not in
use) the handset display shows:
Press the
Options button. This opens the top
level menu, showing the first of 3 main options.
The first is:
Press
Options again. Display shows:
Press
Options again. Display shows:
Each menu option offers you with a choice of
prompts that appear on screen (ie. BACK, OK)
which are selected using the 2 buttons located
just below the display.
The Options button is in the middle of these.
For example, if you press
OK when in ANS
MACHINE, you will be presented with a further
menu of 3 screens, which you move between by
pressing the
OPTIONS button again.
Press
Options button. Display shows:
Press
Options button again. Display shows:
If you wish to select an option, press
OK, or BACK
to move back to the previous menu.
When you wish to exit the menus completely,
press and hold
BACK.
Options
HANDSET 1
Options
ANSWER
OFF ON
Options
RECORD MEMO
BACK OK
Options
ANS SET UP
BACK OK
Options
ANS MACHINE
BACK OK
Options
SELECT SERVS
BACK
OK
Options
TELEPHONE
BACK OK
USING
Page 11
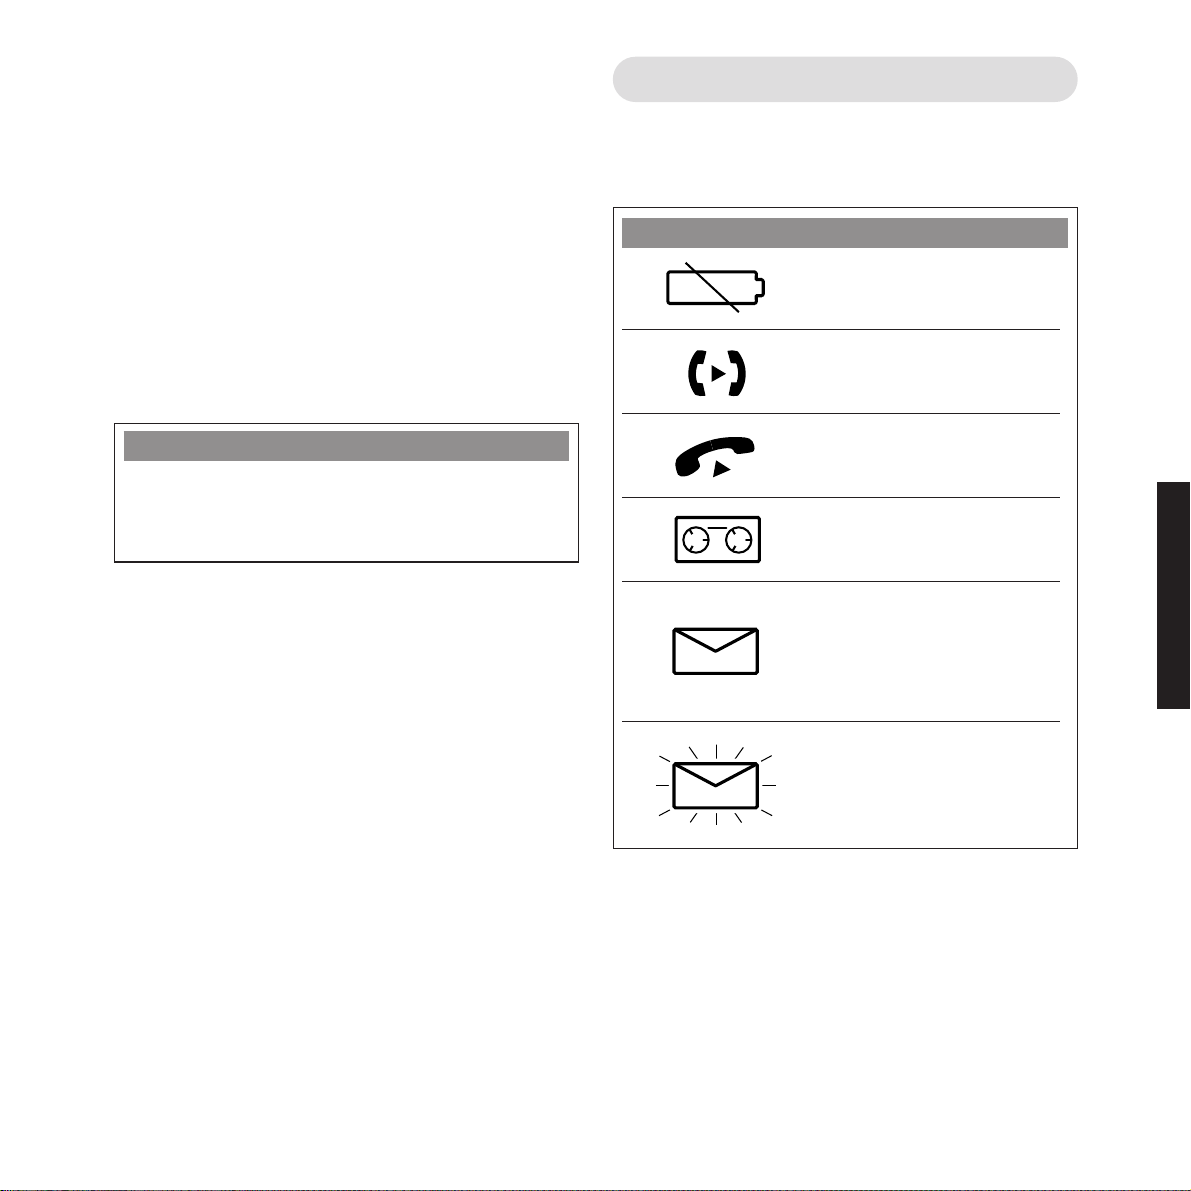
Display symbols
The following symbols may appear on your
handset display.
9
Replacing the handset in the charger at any time
will return the system to standby.
When you have reached the feature you wish
to select or change, just follow the on-screen or
voice prompts to complete.
Using the menus you can edit and set up the
Select Services you subscribe to, switch the
answering machine on and off, record outgoing
messages, set answer modes or change the
number of rings before your outgoing messages
cut in.
PLEASE NOTE
For more details of the menus and how they
work, please refer to the relevant sections in the
guide itself.
Symbol Meaning
Battery Low
Call Transfer
In Use
Answering machine ON
You have messages
stored on your answering
machine
Flashing indicates you
have new messages
stored
USING
Page 12
Page 37
Page 38
Page 39
Page 40
Page 41
Page 43
Page 36
Page 22
Page 22
Page 23
Page 24
Page 25
Page 26
Page 27
Page 27
Page 28
Page 28
Page 32
Page 32
Page 33
Page 33
Page 34
Page 44
10
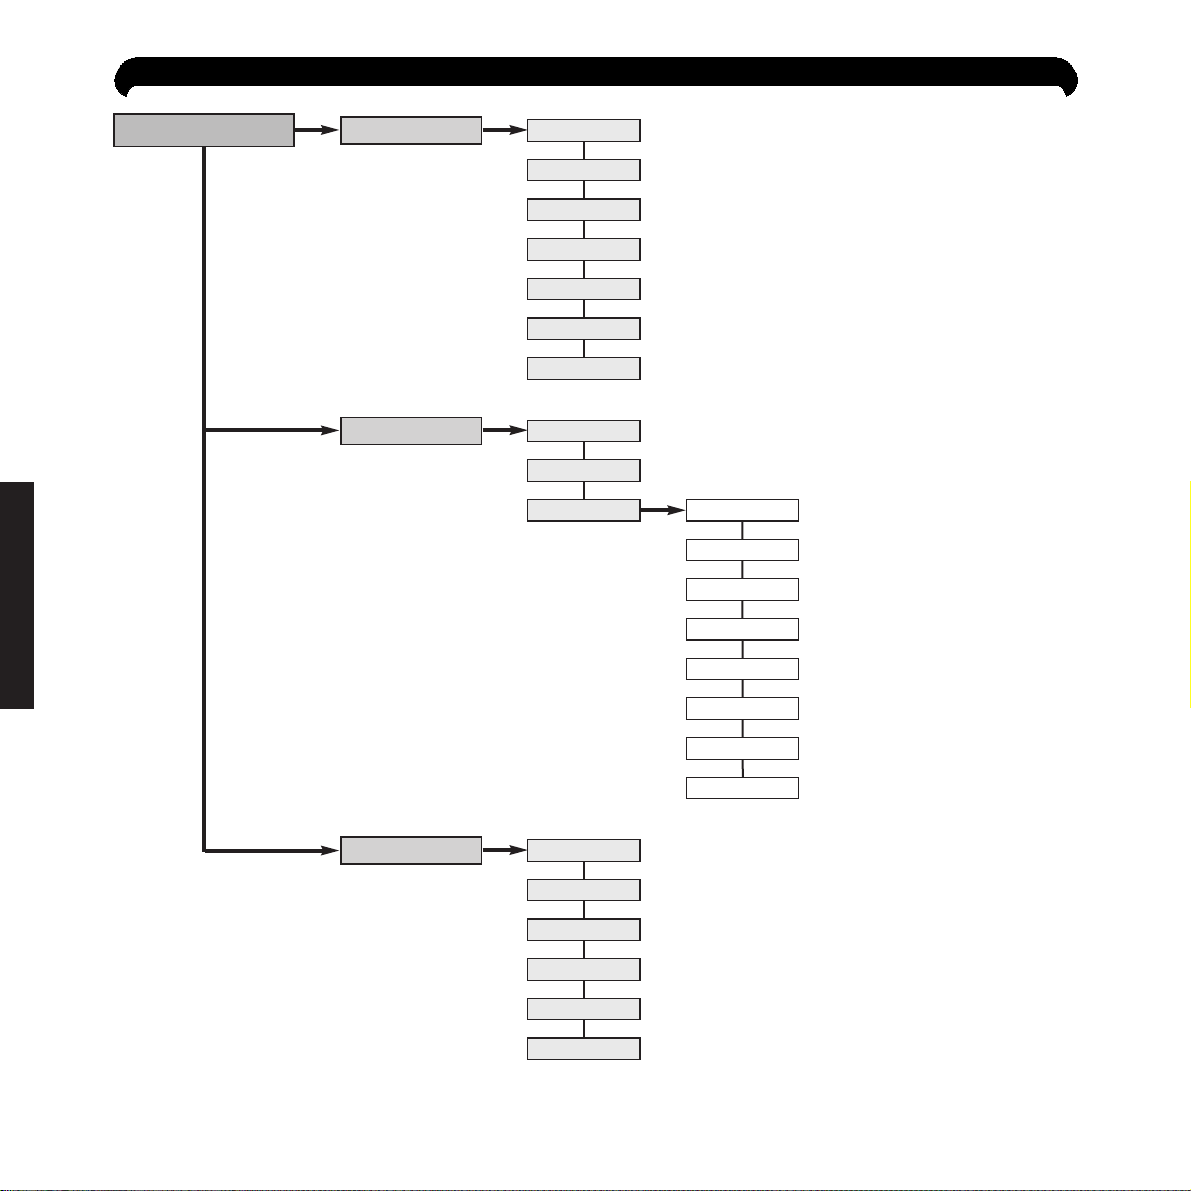
HANDSET
MENU STRUCTURE (WHEN IN STANDBY)
RECORD MEMO
ANSWER
ANS SET UP
BASE SPEAKER
REMOTE ACCESS
SECURITY CODE
MESSAGE ALERT
ANSWER DELAY
DAY AND TIME
OUTGOING MSG
ANS MODE
SELECT SERVICES
ANSWER MACHINE
TELEPHONE
CALL WAITING
REMINDER CALL
CALL DIVERT
CALL MY BILL
CALL RETURN
FRIENDS/FAM
REGISTER
RECALL MODE
DIAL MODE
BASE RING
HANDSET VOLUME
HANDSET RING
EDIT SERVICES
USING
Page 13

See page 30
See page 15
See page 14
See page 14
See page 14
See page 15
See page 44
11
MENU STRUCTURE (DURING A CALL)
CALL WAITING
RING BACK
CHANNEL SEEK
3 WAY CALL
CALL SCREEN*
SECRECY
OPTIONS
TRANSFER
HANDSET OFF HOOK
*This menu is only available when the answering machine has answered an incoming call.
USING
Page 14
12
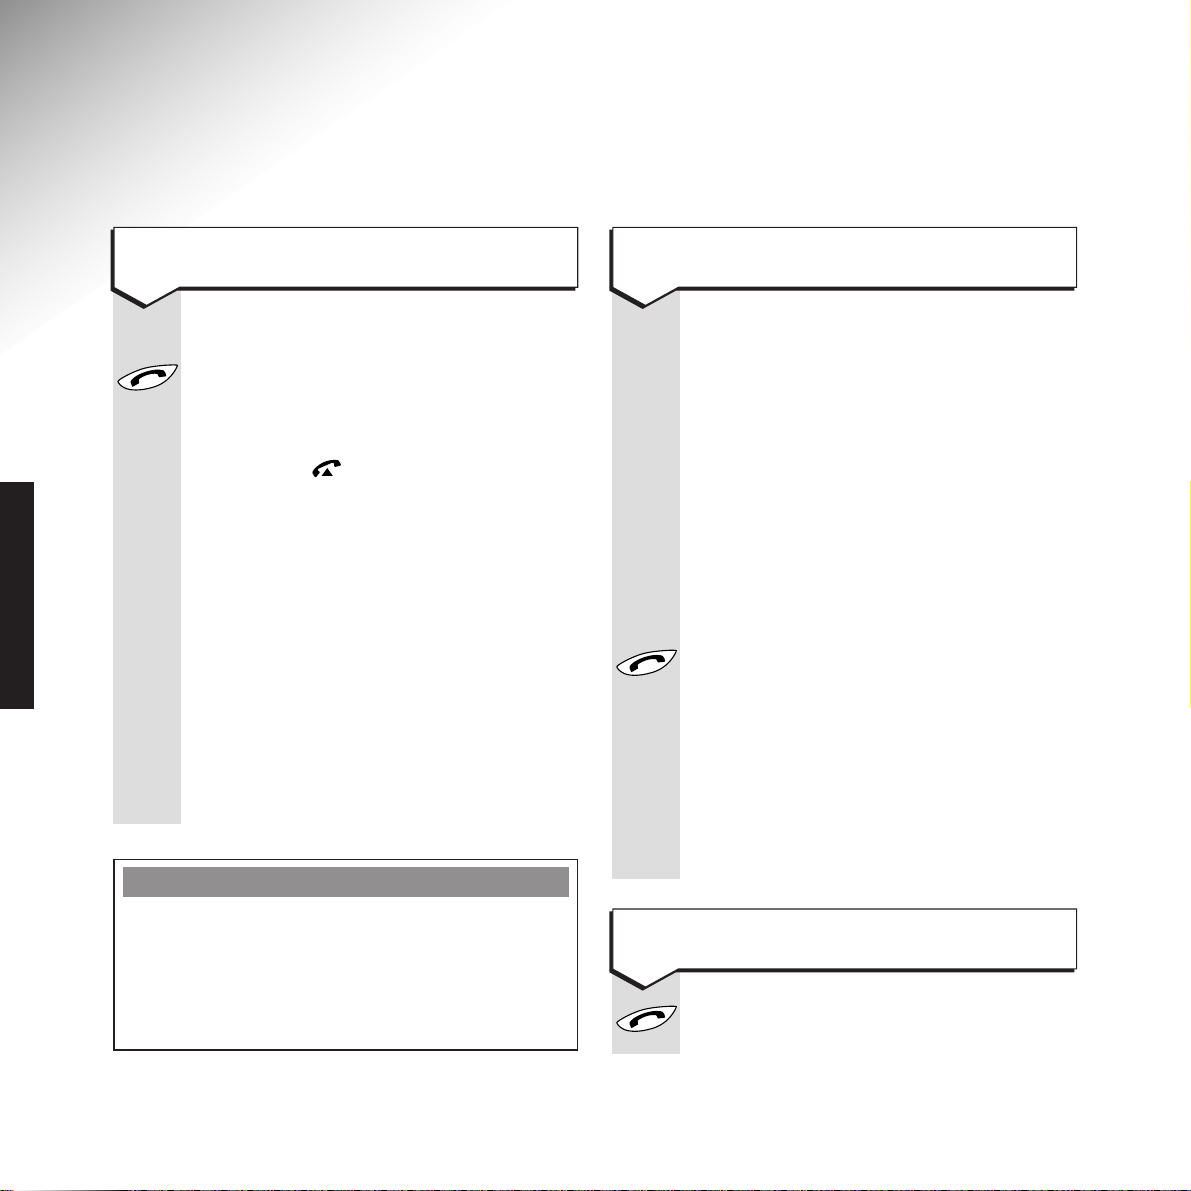
To end a call
USING
To make a call, you can choose to enter
the number first, before you dial it.
Enter the number you wish to dial.
DIAL The number will appear in the handset
display together with
<
for back and
>
for forward. The black cursor will flash.
To delete a digit press and release the
<
button under the <symbol. Press the
>
button under the >symbol to insert a
space.
When you have entered the full number,
press the
TALK button. Your number
will be dialled. (If you do not press the
TALK button, you will be returned to
standby after 20 seconds.)
The display shows the number of the
person being called. Within 10 seconds
of the number being dialled the call
timer starts from zero,
00:00:00
.
Press the
TALK button or replace the
handset in its charger.
Press buttons in order shown
Press the
TALK button to obtain dial
tone.
The handset display shows MAKING
LINK then , to indicate you are now
connected to a line.
DIAL Key in the phone number. The number
is displayed and dialled.
If the number keyed in has more than
12 digits, the number scrolls along to
the left so that the last 12 digits are
always displayed.
Within 10 seconds of the number
being entered the call timer starts
from zero,
00:00:00
.
To view the number before diallingTo make a call
PLEASE NOTE
After using one of the 3 option buttons or
the
TALK button, the words
MAKING LINK
may
momentarily appear in the display.
This confirms that a command has been accepted
and is being acted upon.
Making and receiving calls
Page 15
If the handset is not in its charger:
Press the
TALK button.
If another registered user picks up the
call, an error tone sounds.
To end the call, press the
TALK button
or replace the handset in its charger.
You may like to lock your keypad when
you are carrying it around. This stops
you from accidentally dialling any
numbers.
Press the left button (under the display)
followed by the
✱
button. Display shows
KEYGUARD ON
.
If you now try to dial, display will show
KEYGUARD CANCEL
. When you wish to
cancel the keyguard, press the left
button (under the display) followed by
the
✱
button.
✱
✱
13
Using the redial button that is located
on the bottom left side of your handset:
Press the
REDIAL button. The last
number called appears in the display.
This allows you to check it before
dialling.
Press
TALK to dial the call.
An alternative way of doing this is:
Press
TALK, then the REDIAL button.
The number is immediately dialled.
REDIAL
will store the last 3 numbers
called.
Press the
REDIAL button until the
number you wish to redial is displayed.
Press
TALK to dial.
When the phone rings:
The light on the handset flashes.
Display shows
CALL
. This occurs both
on and off the charger.
If the handset is in its charger:
Lift the handset and you are
immediately in contact with the caller.
To end the call, press the TALK button
or replace the handset in its charger.
Redial
Redial
Redial
To receive a call
To switch on the keyguard
To redial the last number
USING
Page 16
USING
Options during a call
You can use a number of additional functions
during a call.
Press buttons in order shown
Press the
OPTIONS button until the
display shows
CHANNEL SEEK
.
OK
Press OK.
The handset automatically finds the
best channel.
CHANNEL SEEK
will
disappear from the display.
Your call will continue during Channel
Seek.
For an explanation of Call Waiting
service, please see page 36.
When you hear the Call Waiting beeps
during a call:
Press the
OPTIONS button until the
display shows
CALL WAITING
.
SWITCH
Press SWITCH to speak to the other
caller. Your first call will be put ‘on hold’.
SWITCH
Press SWITCH to toggle between the
2 callers.
Options
Options
To seek a stronger channel
14
When you wish to end one of the calls,
press the
TALK button. Your current call
will end.
Your handset will ring, display showing
CALL
. Press the TALK button and you
will be re-connected to the remaining
caller. Press the
TALK button again when
you wish to end the call.
NOTE: Ring back service must be
available – check with network provider.
If the number you are calling is
engaged, press the
OPTIONS button
until the display shows
RING BACK
.
OK
Press OK. Voice says ‘Your Ring Back
request has been accepted’.
To end the call, press the
TALK button
or replace the handset in its charger.
When the engaged number becomes
free, your phone will ring and you will
be connected to the person you were
trying to contact. (They will answer
the call as if you had just called them.)
Options
To answer a Call Waiting call
To use Ring Back for an engaged
number
Page 17
While on a call, if you wish to talk to
someone close by without the person at
the other end hearing the conversation,
you can use the secrecy function.
During a call:
SEC
Select the SEC option.
The display shows
SECRECY ON
.
This confirms that you have activated
the secrecy function and you can now
talk without the other person at the end
of the line hearing you. You will also hear
a beep every 5 seconds or so.
SEC
To allow the caller to hear you again,
select
SEC. You can now resume your
conversation.
To end the call and return to standby,
press
TALK.
15
While on a call or listening to messages:
To adjust the volume of speech of the
person you are talking to, press the
VOLUME button situated at the top
left-hand corner of the handset.
The volume will get louder or softer,
depending on the start point, and will
beep twice when it has reached either
the highest or lowest volume setting.
It will then go back the other way.
Press and release the volume button to
increase/decrease for the required level.
During a call.
Press the
OPTION button until display
shows
3 WAY CALLING
OK
Press OK.
Key in the phone number you require.
JOIN
Press JOIN.
You can now speak to both parties.
To end the call, press the TALK button
or replace the handset on the charger.
Options
VOL
VOL
To use the secrecy function
To use 3 Way Calling
USING
To adjust the handset earpiece
volume (speech)
Page 18
DIRECTORY
Your Quartet 2015 can hold up to 20 names and
numbers in its directory which will be stored in
alphabetical order.
You can add names to the directory and edit or
delete them as required.
You can also set up calls from entries in the
directory.
Press buttons in order shown
Press the
DIRECTORY button.
The display shows
EMPTY
or your first
directory name.
NEW
Select NEW. Display shows
ENTER NAME
.
KEYPAD
Key the first letter of the name you wish
to enter. (For instance, to display the
letter
C
, press the 2 button until
C
appears on the display.)
You will now see the letter just entered,
and the cursor will start flashing under
the next letter space after a few seconds.
Finish entering the letters of the name,
>
using the >symbol to insert a space
between the first and last name.
<
To delete a letter, use the <symbol.
SAVE
Press SAVE. The display shows
ENTER
NUMBER
.
Enter the number in the same way as
you entered the letters. If there are more
than 12, they will be scrolled along,
allowing the last 12 digits to be shown.
Insert a space if you wish (this is
ignored during dialling).
To insert a pause in the string of digits
(for instance for switchboard access),
press the
REDIAL button. The pause
is shown as
P
.
SAVE
Press SAVE. Display shows
UPDATING
DIRECTORY
followed by
SAVED
.
Display confirms name and number
together for up to 15 seconds, then
returns to standby.
BACK
Press and hold BACK to return to standby.
Redial
16
Using the Directory
To store an entry in the Directory
DIRECTORY FULL
If you try to store a new entry and you see the
message
DIRECTORY FULL
,you will need to
delete an entry before you can store any others.
See‘to delete an entry in the directory’ page 18.
NOTE
If you want to enter ‘C’ followed by another ‘C’
wait for a few seconds for the cursor to
automatically move onto the next space before
entering the second ‘
C
’.
Page 19

Press the DIRECTORY button.
Use the DIRECTORY button to scroll
through the names until the name you
wish to edit appears.
Press the
OPTIONS button. The display
shows the name.
EDIT
Press EDIT. You will now see the name,
such as
LOUISE DAVIES
. Use the
backspace, the forward space and the
keypad to edit the name. Then press
SAVE
SAVE until a beep sounds.
If it is only the number you wish to edit,
SAVE
press SAVE to confirm the name.
Edit the number as before. Press SAVE.
SAVE
The revised name and number are
displayed.
BACK
Press BACK to return to standby.
17
To edit an entry in the directory
Press the DIRECTORY button.
Press the OPTIONS button.
NEW
Select NEW.
Follow the process on the previous
page.
To add extra entries to the directory
DIRECTORY
AVAILABLE CHARACTERS
1=
&’() 1
6=
MNO6
2=
ABC2
7=
PQRS7
3=
DEF3
8=
TUV8
4=
GHI4
9=
WXYZ9
5=
JKL5
Options
Options
Page 20

Press buttons in order shown
Press the
DIRECTORY button.
The first stored name is displayed with
the telephone number.
Press and release the
DIRECTORY
button to move to the next entry.
Or
Press and hold the
DIRECTORY button
to scroll through all entries. These are
in alphabetical order. After reaching
Z
the scrolling takes you back to letter A.
If the number has more than 12 digits
the display scrolls to the left.
Or
To go to a specific entry, use the
DIRECTORY button then the handset
keypad to enter the first letter of the
name. For example, for “C Davis” press
button
2 three times, for
C
, wait for the
display to show the first directory entry
under ‘C’, then press the directory button
to access any further names under ‘C’.
If there are no entries under a section
beginning with the chosen letter, the
display will move to the next section
and letter.
To dial the number on the screen:
Press the
TALK button. The name of
the person will appear on the display
for a few seconds before the call timing
begins.
2
A
B
C
To view and then dial a call
from the directory
Press the DIRECTORY button.
The first entry appears on the display.
Use the
DIRECTORY button to scroll
through the names until the name you
wish to delete appears.
Press the
OPTIONS button. The display
shows the name.
DEL
Press DEL. The display shows
DELETE?
YES
Press YES. After a few seconds you will
hear a double beep and the display then
shows
UPDATING DIRECTORY
then
ENTRY
DELETED
.
After confirmation of the deletion has
been displayed for one second, the next
entry in the directory is displayed.
Options
18
To delete an entry in the directory
DIRECTORY
Page 21

The answering machine can be operated from
your Quartet 2015 cordless phone or any external
phone provided it is a Touchtone™.
Voice prompts
The Quartet 2015 makes using your answering
machine easy by using voice prompts as well as
the instructions on the handset display.
These announcements can be heard at the base
unit, or through your Quartet 2015 handset.
We recommend that initially, when setting up
your answering machine, you also listen to the
announcements from the base unit.
Messages are tagged with the day and time
which is announced to you at the end of each
individual message during playback. To ensure
that this information is accurate you must set
the date and time. See page 25.
You can adjust the base speaker volume or
switch it off (see page 28). The base speaker
enables you to clearly hear when messages and
voice announcements are being played.
Using the answering machine
19
When you are unable to answer the phone,
your Quartet 2015’s digital answering machine
will take messages. You can also leave your own
recorded messages (see Memos, page 22).
Your Quartet 2015 can record up to 15 minutes
of messages in total, including the outgoing
messages.
You can skip backwards and forwards through
your messages and memos and delete or save
any or all of them.
Your Quartet 2015 handset display shows the
following symbols relating to the answering
machine functions.
ANSWERING MACHINE
Symbol Meaning
Answering machine ON
You have messages
stored on your answering
machine
Flashing indicates you
have new messages
stored
Page 22

ANSWERING MACHINE
20
Recording time limit
The system also has its own pre-recorded
concluding announcement.
This cuts in automatically to warn callers that
they are about to, or have, run out of time for
recording their message.
Incoming messages are restricted to a maximum
of 3 minutes, with 15 minutes of recording time
in total.
Memos
You can leave messages for members of your
household or office colleagues. Memos can be
recorded and saved as if they were normal
answering machine messages. There is no time
limit on the length of a memo.
PLEASE NOTE
If a period of silence in excess of 8 seconds
occurs during the recording of the outgoing
messages, memos or incoming messages the
answering machine will stop the recording
and return to standby.
Outgoing messages
The Quartet 2015 contains two different
outgoing messages which you can replace with
a recording in your own style and voice.
Of these 2, one announcement invites callers to
leave a message. This is Answer and Record
mode. The second enables you to leave an
announcement, but does not allow callers to leave
a message. This is Answer Only mode.
Your Quartet 2015 will automatically switch to
Answer Only mode when your message memory
is full.
Answer Delay
It is possible to change how many times your
phone will ring before the answering machine
takes a call. The length of the delay is set using
ANSWER DELAY
in the
ANSWER SET UP
menu
options.
Your Quartet 2015 has the following settings:
2, 3, 4, 5, 6, 7, 8, 9
and
TIMESAVER
(Time Saver).
PLEASE NOTE
If the answering machine is set to
TIMESAVER
it
will automatically answer after 2 rings if you
have any new messages, or after 6 rings if you
have no new messages.
This facility is useful if you wish to interrogate
your system remotely, since if your answering
machine does not answer after 2 rings, you will
know that there are no new messages and you
can choose to hang up.
Page 23

21
Message alerts
Your Quartet 2015 features an audible Message
Alert function for new incoming messages.
When the message alert function is switched on,
the handset will beep every 10 seconds to let
you know you have new messages.
Even if the message alert function is switched
off, you can still see if you have new messages
as a visual alert symbol will flash in the
display. If this symbol does not flash you have
messages stored, but no new messages.
A red light on the top left side of the handset will
also flash if new messages have been received.
The display shows the total number of messages
stored, under the symbol.
Remote access
You can operate your answering machine from
any other external phone, providing it is
a Touchtone™ phone. To do this you need a
security code to prevent unauthorised access.
The default setting is
000
.
Your code authorises you to access your
messages from any Touchtone™ phone.
This feature can be turned on or off.
Call screening
Call Screening enables you to listen to incoming
calls while they are being recorded, without the
caller knowing. You can then choose to take the
call or allow the caller to finish the message.
Page 24

22
Press buttons in order shown
Press the
OPTIONS button until the
display shows
ANS MACHINE
.
OK
Select OK.
The display reads
MAKING LINK
then
shows
ANSWER
.
ON
Select ON. Voice says ‘Answer on’ and
the symbol will appear on your
handset’s display.
OFF
Select OFF. Voice says ‘Answer off ’, and
the symbol will disappear from
the display.
Press the
OPTIONS button until the
display shows
ANS MACHINE
.
OK
Select OK. The display briefly reads
MAKING LINK
then shows
ANSWER
.
Press OPTIONS until the display shows
RECORD MEMO
.
OK
Press OK. The display shows
SPEAK
AFTER TONE
. Voice says: ‘Please speak
SAVE
after the tone, then press SAVE to confirm.’
Options
Options
Options
To record a memo
ANSWERING MACHINE
To switch the answering machine
on and off
SAVE
Speak your memo. The display shows
RECORDING SAVE
. When finished, press
SAVE. Voice says ‘Your memo is ....’
Your memo is played and then the day
and time is announced.
Display reads
MEMO PLAY
.
If, during memo playback, you press
DEL
DEL, then your memo will not be
recorded, the display will show
DELETED
and voice will announce ‘Message deleted’.
BACK
Press BACK to return to standby.
If, during memo recording you press,
STOP
STOP or replace the handset in the
charger, then you will be returned to
standby immediately. In this case the
portion of the message left before you
stopped recording is recorded.
STOP
If you press STOP or replace the
handset in the charger during playback
the whole memo is retained and tagged
with day and time.
The message symbol appears once all or
part of your memo has been recorded.
The red light on the handset will flash
to indicate a new message has been
received.
Page 25

Memos are stored as normal answering
machine messages. They are not then
identified separately as memos. See
page 29 for instructions on how to
play back messages.
23
The Quartet 2015 contains 2 different
outgoing messages which you can
substitute with a recording in your own
style and voice.
One announcement invites callers to
leave a message. This is Answer and
Record. The other enables you to leave
a greeting, but does not allow callers to
leave a message. This is Answer Only.
When the message memory is full
your Quartet 2015 answering machine
will automatically switch to Answer Only
mode.
If you choose not to record your own
outgoing message, the pre-recorded
ones will automatically be selected.
To choose the type of outgoing message
you wish to use:
Press the
OPTIONS until the display
shows
ANS MACHINE
.
OK
Select OK. The display briefly shows
MAKING LINK
then shows
ANSWER
.
Options
To select Answer Mode (answer and
record or answer only)
Press OPTIONS again until the display
shows
ANS SET UP
.
OK
Press OK. The display shows
ANSWER
MODE
and either
ANS AND REC
or
ANS ONLY
.
CHANGE
Press CHANGE. The display shows
either
ANS AND RECorANS ONLY
.
If the option you want is displayed
SAVE
press SAVE. The display returns to
ANSWER MODE
.
If not, press
OPTIONS to switch to the
other.
As each option appears the voice
confirms either ‘Answer only’ or ‘Answer
and Record’.
SAVE
Press SAVE to make your choice.
The display returns to
ANSWER MODE
.
Without leaving
ANSWER MODE
you may
now record your own outgoing message.
BACK
Press and hold BACK to return to standby.
Options
Options
ANSWERING MACHINE
To play back a memo
Page 26

24
DEL
To delete during playback, press DEL.
Voice says ‘Message deleted. Your
outgoing message is ...’ and the system’s
pre-recorded message is played instead.
At the end the display returns to
standby
.
To stop playback (ie you are happy
STOP
with it so far), press STOP. Your new
message is retained. The display returns
to standby
.
Press buttons in order shown
Press the
OPTIONS button until the
display shows
ANS MACHINE
.
Then
OK
Press OK. The display briefly shows
MAKING LINK
.
Press
OPTIONS until the display shows
ANS SET UP
.
OK
Press OK. The display shows
ANSWER
MODE
.
Press the
OPTIONS button again, until
display shows
OUTGOING MSG
.
OK
Select OK. Display shows
OUTGOING
MSG
.
REC
Select REC. The display shows
SPEAK
AFTER TONE
. Voice says ‘Please speak
after the tone then press save to confirm’.
Record your message. The display
BACK
shows
RECORDING
. Press BACK during
the recording to delete what you have
recorded so far. Voice says ‘Message
deleted’ and the display reverts to
standby
.
SAVE
If you complete the recording and are
happy with it, press
SAVE.
Voice says ‘Your outgoing message is....’
Your message is played through.
The display shows
OGM PLAY.
Options
Options
Options
PLEASE NOTE
Deleting your recorded outgoing messages
will automatically reinstate the original
pre-recorded message.
It is not possible to delete any of the
pre-recorded messages.
To record a new outgoing message
ANSWERING MACHINE
Page 27

25
The system’s pre-recorded outgoing
message is then substituted and
played. It will remain until you decide
to record your own. Display returns to
standby.
Press the
OPTIONS button until the
display shows
ANS MACHINE
.
OK
Select OK. The display shows
MAKING
LINK
then shows
ANSWER
.
Press the
OPTIONS button until the
display shows
ANS SET UP
.
OK
Press OK. The display shows
ANSWER
MODE
.
Press the
OPTIONS button again until
the display shows
DAY AND TIME
alternating with the current setting,
e.g.
SAT 12.01PM
.
CHANGE
Select CHANGE. The display shows
SAT
12.01PM
. The day flashes, indicating
that it is ready to be changed. Voice says
‘Please enter the day using the buttons
1
to 7, where 1 is Monday and 7 is Sunday,
then press
SAVE to confirm’.
SAVE
Use the handset’s keypad to enter the
correct day (eg.1) and press
SAVE.
Display shows
MON 12.01 PM
. Voice says
“Please enter the time in the 12 hour
clock using four digits, then press
SAVE
to confirm.”
Options
Options
Options
You can check your outgoing message
at any time.
Press the
OPTIONS button until the
display shows
ANS MACHINE
.
Select
OK. The display briefly shows
OK MAKING LINK
.
Press
OPTIONS until the display shows
ANS SET UP
.
OK
Press OK. The display shows
ANSWER
MODE
.
Press the
OPTIONS button again.
The display reads
OUTGOING MSG
.
OK
Select OK. The display reads
OUTGOING
MSG
.
PLAY
Press PLAY. Voice says ‘Your outgoing
message is ...’ and the current message
(ie Answer only or Answer and Record)
is played. The display shows
OGM PLAY
.
STOP
If you are happy with the message while
it is still playing, press
STOP.
Alternatively, wait until the end. In both
instances the display returns to standby.
DEL
However, if you wish to delete the
message, you must press
DEL before the
message ends. The display then shows
DELETED
briefly and voice says ‘Message
deleted. Your outgoing message is’.
Options
Options
Options
To listen to or check your outgoing
messages
Setting day and time
ANSWERING MACHINE
Page 28

26
SAVE
Use the handset’s keypad to enter the
correct time and press
SAVE. Display
shows (eg. 01.45)
MON 01.45PM
and the
options:
AMorPM
. Voice says “Press the
AM or PM button, then press SAVE to
confirm”.
SAVE
Select AMor PMand press SAVE.
Voice confirms day and time set and the
display returns to
ANSWER MODE
.
MAINS POWER FAILURE
If the mains power fails, your Outgoing
Messages and any Incoming Messages or
Memos that have been recorded will be saved.
However, if the mains power fails for more
than about 1 second, you will need to reset the
time and day announcement.
Press buttons in order shown
At standby press
OPTIONS until the
display shows
ANS MACHINE
.
OK
Select OK. The display briefly shows
MAKING LINK
then shows
ANSWER
.
Press
OPTIONS until display shows
ANS SET UP
.
OK
Press OK. Display shows
ANSWER MODE
.
Press
OPTIONS until the display shows
ANSWER DELAY
and
X RINGS
.
The number of rings shown is the
current setting.
CHANGE
Select CHANGE. Display shows the
current setting again:
X RINGS
.
SAVE
Select SAVE to confirm setting shown or
keep pressing the
OPTIONS button to
scroll through the different settings.
As each new number of rings appears
voice says ‘Answer delay X rings’ or
‘Answer delay Timesaver’. Make your
OK
selection by pressing OK. Display
immediately returns to
ANSWER DELAY
,
showing the new setting.
BACK
Wait 20 seconds or press or hold BACK
to return to standby.
Options
Options
Options
Options
To set the number of rings before
your Quartet 2015 answers the call
ANSWERING MACHINE
Page 29

27
At standby, press OPTIONS until the
display shows
ANS MACHINE
.
OK
Select OK. The display briefly shows
MAKING LINK
then shows
ANSWER
.
Press
OPTIONS until the display shows
ANS SET UP
.
OK
Press OK. The display shows
ANSWER
MODE
.
Press the
OPTIONS button until the
display reads
MESSGE ALERT
flashing
alternately with either
ON
or
OFF
,
depending on the current setting.
CHANGE
Press CHANGE. Display shows
OFF
or
ON
. The setting shown is the current
setting. If this is what you want, select
SAVE
SAVE.
If you wish to change the setting, press
the
OPTIONS button and the setting
will change. Voice says ‘Message alert
on/off’. The display then returns to
MESSGE ALERT
, alternating with the
new setting.
BACK
Press and hold BACK to return to
standby.
Options
Options
Options
Options
To turn the message alert beeps
on and off
At standby press OPTIONS until the
display shows
ANS MACHINE
.
OK
Select OK. The display briefly shows
MAKING LINK
then shows
ANSWER
.
Press
OPTIONS until display shows
ANS SET UP
.
OK
Press OK. Display shows
ANSWER MODE
.
Press
OPTIONS until the display shows
SECURITY CODE
and the current three
digit code. (Default code is
000
.)
CHANGE
Press CHANGE. Display repeats the
three digit code with the first digit
flashing. If you wish to retain the
SAVE
existing code, select SAVE.
If not, enter a new number, then press
SAVE
SAVE.Voice says‘Security code setting
XXX’
and the display returns to
SECURITY
CODE
showing the new setting.
BACK
Wait 20 seconds or press and hold BACK
to return to standby.
Options
Options
Options
To set your remote access security
code from your handset
ANSWERING MACHINE
Page 30

28
Press buttons in order shown
At standby press
OPTIONS until the
display shows
ANS MACHINE
.
OK
Select OK. The display briefly shows
MAKING LINK
then shows
ANSWER
.
Press
OPTIONS until display shows
ANS SET UP
.
OK
Press OK. Display shows
ANSWER MODE
.
Press
OPTIONS until the display reads
REMOTE
alternating with
ACCESS ON
.
CHANGE
Press CHANGE. Display shows
ACCESS ON
.
Press the
OPTIONS button to switch
between on and off. At each option
voice says ‘Remote access on’ or ‘off ’.
SAVE
Select the option you want using SAVE.
Display returns to
REMOTE ACCESS ON
or
OFF
, confirming the setting that has
been selected.
BACK
Press and hold BACK to return to
standby.
Options
Options
Options
Options
To turn remote access on and off
There are 3 speaker volume settings:
High, Low or Off.
Press the
OPTIONS button until the
display shows
ANS MACHINE
.
OK
Select OK. Display briefly shows
MAKING LINK
.
Press the
OPTIONS button until the
display shows
ANS SET UP
.
OK
Press OK. Display shows
ANSWER MODE
.
Press the
OPTIONS button until the
display shows
BASE SPEAKER
alternating
with
VOLUME HIGH, LOW
or
OFF
.
CHANGE
Select CHANGE. Display shows
VOLUME
HI LOW
or
OFF
.
Press the
OPTIONS button to switch
between the settings. When
HIGH
is
shown there is a loud beep, a softer one
for
LOW
and silence for
OFF
.
SAVE
Press SAVE to select the one you want.
The display returns to
BASE SPEAKER
and shows the new setting.
BACK
Press and hold BACK to return to
standby.
Options
Options
Options
Options
Setting the base unit speaker volume
ANSWERING MACHINE
Page 31

29
When new messages have been left for
you the message symbol flashes in
the top right-hand corner of the handset
display, the red light also flashes and
the handset beeps every 10 seconds
(if message alert has been switched on,
see page 27). The handset also shows
the number of messages stored and the
word
PLAY
.
PLAY
Select PLAY. The display briefly shows
MAKING LINK
then
MESSAGE 01
. Voice says
‘You have X messages. Message 1’. The
message is played, then voice announces
the day and time the message was left,
then ‘Message 2’ etc.
After all messages have been played
voice says ‘End of messages’. The display
shows
END OF MESS.
To pause a message, press 2. The display
shows
PAUSED
. Press 2 again to resume
playing.
To stop message playing and revert to
standby, press
#
.
STOP
The display returns to standby after a
few seconds or immediately if you
press
STOP.
To listen to your messages
During message playback, as just
described, use
<
and >to skip
<>
backwards and forwards through your
messages.
During message playback the display
shows
MESSAGE 01
together with 3
command options
DEL
<>
.
To delete messages while you are
playing through them, wait for the
message to begin.
DEL
Press DEL at any point after this,
including during the day and time
announcement.
YES
Display shows
DELETE?
Select YES.
Voice says ‘Message deleted’ and
‘Message X’, if there is a next message
to be played.
If you change your mind and select
NO,
the message continues. The display
reverts to
MESSAGE X
.
To delete a message during playback
To move through your messages
ANSWERING MACHINE
Page 32

30
Press buttons in order shown
Wait until all messages have been
played. Voice says ‘End of messages.’
The display shows
END OF MESS
and 3
options
DEL
<<
STOP
.
DEL
Press DEL. The display shows
DELETE ALL
.
YES
Select YES.
Voice says ‘All messages deleted’ and the
display shows
DELETED
before returning
to standby.
The message waiting symbol
disappears.
If you do not want to delete your
messages:
Either
STOP
Press STOP during the
END OF MESS
screen.
Or
NO
Press NO during the
DELETE ALL
screen.
In both cases the display will return to
standby.
To delete all messages at once
PLEASE NOTE
Any message not deleted will automatically
be saved and stored.
The answering machine must be
switched on and be set to
ANSWER AND
RECORD
(see page 23).
Incoming calls will cause the handset
display to show
CALL
.
OK
After the answering machine has
answered the call, the display shows
CALL SCREEN
. Pressing OK allows the
listener to hear the call but the
microphone is muted.
BACK
If you wish to stop listening, press BACK.
The handset returns to standby and the
message is recorded in the usual way.
If you wish to take the call, press the
TALK button. The display shows
SEC
TRANS
. You can now talk to the caller.
The portion of the message left before
you pressed the
TALK button is
recorded and tagged with day and time.
The message symbol appears.
To Call Screen while the handset is on
the charger, handset display shows
CALL
.
OK
Press the OK button before picking up
the handset.
ANSWERING MACHINE
To listen to a caller leaving a
message (Call Screening)
Page 33

31
KEYPAD
Dial your phone number.
When you hear your outgoing
message, press the ✱ button. You will
hear the announcement ‘Please enter
your security code’.
CODE
Enter your security code (default 000).
If you have entered the correct code
you will hear, ‘You have x messages’, and
the messages are played back, with the
day and time they were recorded. If
there are no new messages you will
hear ‘You have no messages’, then ‘To hear
main menu, press 1’.
At the end of the last message, you will
hear ‘End of messages’, then ‘To hear
main menu press 1.
If you enter the wrong security code
the machine announces ‘Incorrect
security code. Please enter your security
code’. You have another chance to
enter the security code. If its wrong
the second time, the Quartet 2015 will
end the call.
✱
Contacting your Quartet 2015
answering machine from another
phone (remote access)
When you have accessed your answering
machine, you can turn it off, play and
delete messages, move backwards and
forwards through your messages and
re-record your outgoing message using
the keypad of the phone you are using.
Your Quartet 2015 will announce the
command options and the corresponding
number to press as follows:
‘To play all messages, press 2’
‘To play new messages, press 3’.
‘To skip forward during messages,
press 6’
‘To delete during messages, press 5’
‘To delete all messages, press 5’
‘To skip back during messages, press 4’.
‘To play outgoing messages, press 8’
‘To record a new outgoing message,
press 9’
‘To set answer on or off, press 0’
‘To change your answer mode, press 7’
‘To hear main menu, press 1’.
ANSWER NG MACH NE
Page 34

The following settings can be altered on your
Quartet 2015.
Press buttons in order shown
Press the
OPTIONS button until the
display shows the
TELEPHONE
.
OK
Press OK. Display briefly shows
MAKING
LINK
then
HANDSET RING
.
CHANGE
Press CHANGE. Display shows
MELODY
.
Scroll through the options using the
OPTIONS button. A different melody
plays each time.
SAVE
Select one and press SAVE. Display
returns to
HANDSET RING
.
BACK
Press and hold BACK to return to
standby.
Options
Options
32
Optional settings
To change the handset ringer melody
Press the OPTIONS button until the
display shows
TELEPHONE
.
OK
Press OK. The display briefly shows
MAKING LINK
then
HANDSET RING
.
Press the
OPTIONS button until the
display shows
HANDSET VOL
alternating
with
VOLUME HIGH ( LOWorOFF)
.
CHANGE
Press CHANGE. The display shows
VOLUME HIGH (LOWorOFF)
.
Scroll through the options using the
OPTIONS button. You will hear the
various volume options as well as see
them on the display.
SAVE
Select one and press SAVE. The display
returns to
HANDSET VOL
alternating with
your selected volume level.
BACK
Press and hold BACK to return to
standby.
Options
Options
Options
To change the handset ringer volume
OPTIONAL SETTINGS
Page 35

OPTIONAL SETTINGS
Press the OPTIONS button until the
display shows
TELEPHONE
.
OK
Press OK. The display briefly shows
MAKING LINK
then
HANDSET RING
.
Press the
OPTIONS button until the
display shows
BASE RING
alternating
with
VOLUME HIGH (LOWorOFF)
.
CHANGE
Press CHANGE. The display shows
VOLUME HIGH (LOWorOFF)
.
Scroll through the options using the
OPTIONS button.
SAVE
Select one and press SAVE. A beep
sounds. The display returns to
BASE
RING
alternating with your selected
volume levels.
BACK
Press and hold BACK to return to
standby.
Options
Options
Options
Press the OPTIONS button until the
display shows
TELEPHONE
.
OK
Press OK. The display briefly shows
MAKING LINK
then
HANDSET RING
.
Press the
OPTIONS button until the
display shows
DIAL MODE
alternating
with
TONE
.
CHANGE
Press CHANGE. The display shows
TONE
(or
PULSE
).
Use the
OPTIONS button to switch
between the 2 settings.
SAVE
Select one and press SAVE.
A beep sounds and the display returns
to
DIAL MODE
alternating with your
selected dial mode.
BACK
Press and hold BACK to return to
standby.
Options
Options
Options
33
To change the base unit
ringer volume
To change the dial mode
Page 36

34
Press buttons in order shown
Press the
OPTIONS button until the
display shows
TELEPHONE
.
OK
Press OK. The display briefly shows
MAKING LINK
then
HANDSET RING
.
Press the
OPTIONS button until the
display shows
RECALL MODE
, alternating
with
TIMED BREAK
(or
EARTH
).
CHANGE
Press CHANGE. The display shows
TIMED BREAK
(or
EARTH
).
Use the
OPTIONS button to switch
between the 2 settings.
SAVE
Select one and press SAVE. A beep
sounds. The display returns to
RECALL
MODE
alternating with your selected
recall mode.
BACK
Press and hold BACK to return to
standby.
Options
Options
Options
To change recall mode
NOTE
Timed Break is required for use with
Select Services.
NOTE
It is recommended that on all BT lines, Dial
Mode should be set to Tone and Recall Mode
be set to Timed Break.
OPTIONAL SETTINGS
Page 37

SELECT SERVICES
35
Call Return
Using Call Return you can find out the number
of the last person who called you and the date
and time of the call by dialling
1471. While on
line you can return the call by dialling
3.
Friends & Family
This is where the telephone number of the
Friends & Family service is pre-programmed
into your Quartet 2015, enabling you to dial the
Friends & Family service and follow the
instructions from the network to add or change
numbers.
Using Select Services
Your Quartet 2015 is designed to make it easy
for you to access certain BT Select Services,
Friends & Family and Call My Bill.
The available Select Services are Call Return,
Call Diversion, Reminder Call, Call Waiting,
3 Way Calling and Ring Back.
If you have any or all of these services (some do
not require you to subscribe), your Quartet 2015
will help you to manage them from your handset
using the Select Services menu.
When you start to use the Select Services menu,
the handset will automatically take you to the
last Select Service you accessed.
For information on BT Select Services, please
call BT free on 0800 800 150 (residential) or
0800 800 152 (business)
PLEASE NOTE
If your Quartet 2015 is connected via a
switchboard, the pre-programmed access to
some Select Services will not be available but
you can connect to the service by dialling your
switchboard access code.
Please contact your switchboard provider if
you are unsure.
PLEASE NOTE
Before phoning the Friends & Family service,
you need your BT customer number. This is in
the top right-hand corner of your phone bill.
Page 38

36
Call My Bill
This feature gives you the cost of calls recorded
on your telephone number since your last bill.
You can get an instant bill total including all
charges up to the last working day.
Call Diversion
You can use your Quartet 2015 to request the
network to divert all incoming calls to another
number.
Using the Quartet 2015 you can only divert all
calls.
Reminder Call
It is possible to select a Select Services option
to ring you at a pre-set time, for instance, to
remind you of an appointment.
Call Waiting
The Call Waiting service lets you know when
you have another caller trying to contact you
while you are already on the phone. You are
alerted that a call is waiting by a series of
on-the- line beeps.
Editing your Select Services
You may need to change some of your Select
Services settings from time to time.
For example, Call Diversion has 3 optional
access codes,
#21#, #61#
or
#67#
, each of
which might be needed at different times. You
may also want to change the divert number.
3 Way Calling
You can hold a conversation with two other
external callers. You can speak to both people at
the same time or choose to switch between both
callers.
VOICE PROMPTS
When using Select Services, your Quartet 2015
display may show ‘Please listen’ – listen to
Select Service prompts which will
guide you. Please refer to your Select Service
instruction book for further details.
PLEASE NOTE
Before phoning the Call My Bill service,
you need your BT customer number. This is in
the top right-hand corner of your phone bill.
SELECT SERVICES
PLEASE NOTE
To make this type of change, you need to enter the
Edit Services menu. Do not enter the Edit Select
Services menu unless you are sure you wish to
change your defaults.
Page 39

SELECT SERVICES
37
(Not to be edited unless requested
by your Network Provider.)
Press the
OPTIONS button, the display
shows
SELECT SERVS
.
OK
Press OK. The display shows the last
Select Service accessed.
Press the
OPTIONS button until the
display shows
EDIT SERVS
.
OK
Press OK.
Press
OPTIONS until the display shows
CALL RETURN
.
CHANGE
Select CHANGE. The display shows the
current number the handset uses to
access Call Return (1471).
<>
Using
<>
as required, edit the
number displayed until it is the one you
want, e.g.
1471
.
SAVE
Press SAVE. The handset beeps and the
display returns to
CALL RETURN
.
BACK
Press and hold BACK to return to
standby.
Options
Options
Options
To edit Call Return
To make a Call Return call
Press buttons in order shown
Press the
OPTIONS button until the
display shows
SELECT SERVS
.
OK
Press OK. The display shows the last
Select Service accessed.
Press the
OPTIONS button until the
display shows
CALL RETURN
.
Either
Press the
TALK button. The display
briefly shows
MAKING LINK
then
PLEASE
LISTEN
. Follow the voice prompts.
Or
DIAL
Press DIAL and follow the voice prompts.
The
CALL TIMER
then replaces the
number some seconds after the number
has been dialled.
To end the call press
TALK.
Options
Options
PLEASE NOTE
If you dial the number of the person who last
called, you will be charged for this call
Page 40

38
(Not to be edited unless requested
by your Network Provider.)
Press the
OPTIONS button, the display
shows
SELECT SERVS
.
OK
Press OK. The display shows the last
Select Service accessed.
Press the
OPTIONS button until the
display shows
EDIT SERVS
.
OK
Press OK.
Press
OPTIONS until the display shows
FRIENDS/FAM
.
CHANGE
Press CHANGE. The display shows the
Friends & Family
0800 number. Edit
<>
the number if required, using the arrows
to move the cursor over the digits.
SAVE
Press SAVE. The display returns to
FRIENDS/FAM
.
BACK
Press and hold BACK to return to
standby.
Options
Options
Options
To set or edit Friends & Family
Press buttons in order shown
Press the
OPTIONS button. The display
shows
SELECT SERVS
.
OK
Press OK. The display shows the last
Select Service accessed.
Press the
OPTIONS button until the
display shows
FRIENDS/FAM.
Press the TALK button or DIAL button.
The display briefly shows
MAKING LINK
then
PLEASE LISTEN
, the Friends &
Family
0800 number is then shown.
The call timer then replaces the number
after a few seconds.
Follow the Friends & Family voice
prompts.
To end the call, press the
TALK button.
Options
Options
To call Friends & Family
SELECT SERVICES
Page 41

SELECT SERVICES
39
(Not to be edited unless requested
by your Network Provider.)
Press the
OPTIONS button. The display
shows
SELECT SERVS
.
OK
Press OK. The display shows the last
Select Service accessed.
Press the
OPTIONS button until the
display shows
EDIT SERVS
.
OK
Press OK.
Press the
OPTIONS several times until
the display shows
CALL MY BILL.
CHANGE
Select CHANGE. The display shows the
current
0800 number for accessing
Call My Bill. Edit the number if
<>
required, using the arrows to move the
cursor over the digits.
SAVE
When ready press SAVE. The display
returns to
CALL MY BILL.
BACK
Press and hold BACK to return to
standby.
Options
Options
Options
To call your bill To set or edit Call My Bill
At standby, press the OPTIONS button.
The display shows
SELECT SERVS.
OK
Press OK. The display shows the last
Select Service accessed.
Press
OPTIONS until the display shows
CALL MY BILL.
Press the TALK button or DIAL button.
OR
The display shows the
CALL MY BILL
DIAL
number being dialled and then
PLEASE
LISTEN
. You are then connected to
Call My Bill. Listen to the voice prompts.
The call timer then replaces the number
after the number has been dialled.
Press
TALK to end the call.
Options
Options
Page 42

40
Press the OPTIONS button, the display
shows
SELECT SERVS
.
OK
Press OK. Display shows the last Select
Service accessed.
Press the
OPTIONS button until the
display shows
EDIT SERVS
.
OK
Press OK.
Press the
OPTIONS button until the
display shows
CALL DIVERT
alternating
with
SET.
CHANGE
Press CHANGE.
Display shows the programmed code
✱21✱ for set.
Using the arrows as required enter or
change the four-digit access number.
SAVE
Press SAVE. The display returns to
CALL
DIVERT
alternating with
SET
.
BACK
Press and hold BACK to return to
standby.
Options
Options
Options
To edit the Call Diversion set code
Press buttons in order shown
Press the
OPTIONS button until the
display shows
SELECT SERVS
.
OK
Press OK, then press the OPTIONS
button until the display shows
CALL
DIVERT
.
SET
Press SET. The display briefly shows
MAKING LINK
then
PLEASE LISTEN
.
Follow the voice prompts.
To end the call press
TALK.
Press the
OPTIONS button until the
display shows
SELECT SERVS
.
OK
Press OK, then press the OPTIONS
button until the display shows
CALL
DIVERT
.
CANCEL
Press CANCEL. The display briefly
shows
MAKING LINK
then
PLEASE LISTEN
.
Follow the voice prompts.
To end the call press
TALK.
Options
Options
To set your Call Diversion setting
To cancel your Call Diversion setting
SELECT SERVICES
Page 43

Press the OPTIONS button, the display
shows
SELECT SERVS
.
OK
Press OK. Display shows the last Select
Service accessed.
Press the
OPTIONS button until the
display shows
EDIT SERVS
.
OK
Press OK.
Press the
OPTIONS button until the
display shows
CALL DIVERT
alternating
with
CANCEL.
CHANGE
Press CHANGE.
Display shows the programmed code
#21#
for cancel.
Using the arrows as required enter or
change the four-digit access number.
SAVE
Press SAVE. The display returns to
CALL
DIVERT
alternating with
CANCEL
.
BACK
Press and hold BACK to return to
standby.
Options
Options
Options
To edit the Call Diversion cancel code
SELECT SERVICES
41
Press the OPTIONS button, the display
shows
SELECT SERVS
.
OK
Press OK. The display shows the last
Select Service accessed.
Press the
OPTIONS button until the
display shows
EDIT SERVS
.
OK
Press OK.
Press the
OPTIONS button until the
display shows
REMINDER CALL
alternating with
SET
or
CANCEL
.
CHANGE
Press CHANGE. The display shows
#55#
, the default setting.
KEYPAD
Using the numeric buttons as required
enter the new code.
SAVE
Press SAVE. The display returns to
REMINDER CALL
. Your reminder call has
been set.
BACK
Press and hold BACK to return to
standby.
Options
Options
Options
To set or edit the Reminder Call
cancel code
Page 44

42
SELECT SERVICES
Press OPTIONS until the display shows
SELECT SERVS
.
OK
Press OK, then press OPTIONS until
REMINDER CALL
appears.
SET
Press SET. The display shows
MAKING
LINK
and the
REMINDER CALL
.
or
CANCEL
Press CANCEL. The display shows
MAKING LINK
and the
REMINDER CALL
.
The number is dialled.
The display shows
PLEASE LISTEN
.
Follow the voice prompts.
The network voice confirms the setting
or cancellation.
To end the call, press
TALK.
Options
To turn your Reminder Call ON/OFF
Press buttons in order shown
Press the
OPTIONS button, the display
shows
SELECT SERVS
.
OK
Press OK. Display shows the last Select
Service accessed.
Press the
OPTIONS button until the
display shows
EDIT SERVS
.
OK
Press OK.
Press the
OPTIONS button until the
display shows
REMINDER CALL
alternating with
SET
or
CANCEL
.
CHANGE
Press CHANGE. The display shows
✱55✱, as set previously.
KEYPAD
Using the numeric buttons as required
enter the new code.
SAVE
Press SAVE. The display returns to
REMINDER CALL
. Your reminder call has
been set.
BACK
Press and hold BACK to return to
standby.
Options
Options
Options
To edit or cancel the Reminder Call
set up code
Page 45

43
Press OPTIONS button until the display
shows
SELECT SERVS.
OK
Press OK. Press the OPTIONS button
until the display shows
CALL WAITING
.
ON
Press ON or OFF. The display shows
MAKING LINK
followed by
PLEASE LISTEN
and your setting is confirmed by the
voice.
To end the call press
TALK or return
the handset to the base unit.
Options
To turn Call Waiting ON/OFF
(Not to be edited unless requested
by your Network Provider.)
Press the
OPTIONS button. The display
shows
SELECT SERVS
.
OK
Press OK. The display shows the last
Select Service accessed.
Press the
OPTIONS button until the
display shows
EDIT SERVS
.
OK
Press OK.
Press the
OPTIONS button until the
display shows
CALL WAITING
alternating
with
ON
.
Press the
OPTIONS button until the
display shows
CALL WAITING
alternating
with
OFF
.
CHANGE
Select CHANGE. The display shows the
current setting, either
✱
43
#
for
ON
or
#43#
for
OFF.
<
Using the <as required to enter or
edit the code as required.
SAVE
When ready press SAVE. The display
returns to
CALL WAITING
alternating
with your chosen setting.
BACK
Press and hold BACK to return to
standby.
Options
Options
Options
Options
To edit the Call Waiting code
Page 46

A double beep sounds and the display
returns to standby. Your handset is now
registered to the Quartet 2015 base unit.
You are Handset 1 and have taken an
incoming call and wish to transfer it to
another Quartet 2015 handset that is
registered to your base unit.
During the call
TRANS
Press TRANS. The display shows
and
TRANSFER X
, where Xis the number
of one of the registered handsets.
KEYPAD
Enter the number of the handset you
wish to transfer the call to (
2, 3, 4).
OK
Press OK. The display shows
HANDSET 1
and .
Press
TALK or return the handset to the
base unit. Your call has been transferred.
The display returns to standby.
You can register more than one handset on your
Quartet 2015 base unit; the maximum is 4.
Press buttons in order shown
Charge the handset for 24 hours.
The handset display will show
YES
Press YES. The display shows
HANDSET X
,
with
X
flashing.
KEYPAD
Enter the number of the handset to be
registered. If yours is the second of two,
enter
2, if the first, enter 1 etc.
OK
Press OK. The display reads
PRESS BASE
BUTTON.
Press the BLACK button on the base unit.
BLACK
BUTTON
44
Using additional handsets
To register an additional handset
To transfer a call to another handset
Options
REGISTER
YES
ADDITIONAL HANDSETS
Page 47

ADDITIONAL HANDSETS
45
If you want to re-register the handset
on another Quartet 2015 unit – then the
handset needs to be completely reset.
This is done by pressing the
VOLUME
button and the REDIAL button together
until the display shows
RESET
. This may
take up to 3 seconds.
OK
Press OK to confirm.
You may then follow these instructions
for registering an additional handset.
The handset display will show
YES
Press YES. The display shows
HANDSET X
,
with
X
flashing.
KEYPAD
Enter the number of the handset to be
registered. If yours is the second of two,
enter
2, if the first, enter 1 etc.
OK
Press OK. The display reads
PRESS BASE
BUTTON.
Press the BLACK button on the base unit.
BLACK
BUTTON
Redial
VOL
A double beep sounds and the display
returns to standby. Your handset is now
registered to the Quartet base unit.
To register your handset to another
Quartet 2015 base
NOTE
If the handset is reset the Directory memories
will be erased and the handset options will
return to their default settings.
Options
REGISTER
YES
Page 48

46
Your BT Quartet 2015 can be wall-mounted using
the screws and wall plugs provided. Use the
wall-mounting template opposite as a guide for
the drill holes.
Before you wall-mount your Quartet 2015 or
handset charger (or both), check that:
• The wall can support the weight of the
apparatus.
• The position you choose leaves enough space
for the unit to clear any obstruction on the wall
with the aerial extended, such as a shelf.
• The positioning gives you sufficient radio
coverage. Avoid mounting the units near large
metal objects and minimising the amount of
walls between the base unit and the handsets.
1 Using a pencil, mark the place on the wall
where you wish to place the screws using the
wall-mounting template on page 53.
2 Drill two holes suitable for the screws and
wall plugs supplied (if required).
3 Drive the screws into the wall, leaving about
5 mm free on which to hang the Quartet 2015.
4 Position the power and telephone cords down
through the grooves before you hook the unit
on the screws.
Wall mounting
To wall-mount the Quartet 2015
base unit
WALL MOUNTING
Page 49

WALL MOUNTING
47
1 Using a pencil, mark two holes on the wall
48mm apart in the position you want to
mount your charger.
2 Drill two holes with a drill bit suitable for the
screws and wall-plugs supplied (if required).
3 Drive the screws into the wall, leaving about
9mm free on which to hang the charger.
4 Remove the back panel of your handset
charger as shown.
5 If you wish, you can rotate the back panel
round and attach it to the bottom of the
charger.
6 Press the power cord into its guide groove
before you hook the unit on the screws.
7 Hook the holes on the back of the charger
over the screws heads in the wall.
To wall-mount the handset charger
Power cable
Page 50

If you have any difficulty using your Quartet 2015,
look in this section first for solutions to the most
common problems
No dialling tone
Make sure the telephone lead is plugged into the
telephone socket at the back of the Quartet 2015
and that the telephone lead is connected to
your wall socket. Check that no other extension
is in use.
Make sure that you are within range of the
Quartet 2015 base unit. Move closer and try
again.
Phone does not ring
Check that the handset ringer volume is not
switched off.
Check that no other connected phones are off
hook.
Check whether you have too many phone
extensions in your home or office. For help
with this, please refer to the section ‘How many
phones can you have?’ in Technical advice on
page 50.
BT can supply a REN booster to support up to 8
separate pieces of equipment connected to your
line.
Cannot get through, even though dialling
tone can be heard
You may be set to the wrong Dial Mode (Tone or
Pulse). Check to see that it is correct for your use.
Batteries may be low, ensure that they are charged
Handset beeps
You have new messages recorded on your
answering machine. Play them, and the beeping
will stop. If you do not wish to hear beeps when
you have new messages, you can turn off the
message alert beeps.
Your handset may be out of range and you will
need to move closer the the base unit.
Batteries may be low, ensure that they are charged
I have no answer machine messages
Check that your answering machine is switched
on. There should be on your display.
Check that your answering machine is set to
Answer and Record mode.
Reception is poor during a call
You may need to change the channel. You can
do this during the call.
Your handset may be out of range and you will
need to move closer the the base unit.
Pre-programmed Select Services do not work
48
Help and advice
BT Services Information
Freefone 0800 800 150 (residential customers).
Freefone 0800 800 152 (business customers).
HELP & ADVICE
Page 51

HELP & ADVICE
Emergency services
The emergency services can be contacted in the
UK by dialling 999. You may also dial 112, which
is valid in any country that is a member of the
European Community.
In certain situations you may not be able to
make an emergency call:
• If the telephone line is disconnected.
• If there is a line fault, whether on your phone
or in the network.
• If there is a power failure.
If your BT Quartet 2015 is connected to a PBX
(switchboard), you may have to dial an access
number before entering 999 to contact the
emergency services.
It is recommended that alternative arrangements
are provided to enable you to make emergency
calls during a mains power failure.
Safety instructions
Use only the power adaptor supplied
and the handset battery pack supplied.
Spare batteries – Item Code: 870461–
are available from BT Shops.
There is a slight chance that your phone
could be damaged by an electrical
storm. We recommend that you unplug
your Quartet 2015 from the mains power and
telephone line socket during storms.
The Quartet 2015 base unit, handset and
charging units produce a small amount
of heat during use. Therefore, we advise
against placing these products on antique, veneered
or wooden surfaces as damage may occur.
Do not use your Quartet 2015 in damp,
humid conditions such as bathrooms.
49
BT Helpline 08457 697330
Please call the BT Helpline (local call rates)
if you need further assistance with your
BT Quartet 2015. Please have your Quartet
2015 Serial Number ready when calling the
Helpline. For your convenience please enter the
Serial Number, place and date of purchase on
Page 5 of this user guide.
Page 52

Environment
Your BT Quartet 2015 should be kept free of
dust, moisture, high temperature and vibration,
and it should not be exposed to direct sunlight.
It should not be used in bathrooms or near water.
Your Quartet 2015 is designed to be operated in
a normal office or domestic environment only,
where the relative humidity is no more than 60%.
Maintaining your Quartet 2015
Clean with a soft, dry cloth, do not use a damp
cloth.
Do not use abrasive materials, solvents or
aerosol cleaners as these may damage the unit.
Do not place on untreated antique furniture.
How many phones can you have?
Although you may have any number of sockets,
it is important to limit the number of phones and
other pieces of apparatus connected in order to
ensure that each phone will ring.
All telephone equipment has a Ringer
Equivalence Number (REN), which is used to
calculate how many pieces of apparatus may be
connected to any one telephone line.
Telephones provided by BT have a REN of 1,
unless otherwise stated on the underside of the
phone. Even where the number of telephones
has been limited, there is no guarantee that
different types of phone on the same line will
ring, even when the REN is less than 4.
You must not connect more than 4 products to a
single line.
Network connection information
Your Quartet 2015 is designed to work with both
BT and other UK networks, including cable.
Although this equipment can use either Loop
Disconnect (Pulse) or DTMF (Tone) signalling,
the performance of the DTMF (Tone) signalling
is subject to regulatory requirements for correct
operation. It is therefore strongly recommended
that your equipment is set to use DTMF (Tone)
signalling for access to public or private
emergency services.
DTMF signalling also provides faster call set-up.
Advice on connection to BT systems can be
obtained by dialling BT Freefone 0800 800 152.
Technical advice
50
TECHNICAL ADVICE
Page 53

TECHNICAL ADVICE
51
Guarantee
If you own your BT Quartet 2015 and it is
under BT’s guarantee, BT guarantees the
product for one year, provided that:
The goods have only been used for their
intended purpose, and have not been subjected
to misuse or been wilfully or accidentally
damaged.
The goods have not been tampered with or
repaired by anyone other than BT, its staff or its
agents.
If a fault does occur, and you bought the unit
yourself, it will be repaired or replaced free of
charge, provided you return it to where you
purchased it and produce your receipt.
The terms and conditions of this guarantee do
not affect your statutory rights.
If you own your BT Quartet 2015, but the
guarantee period has expired:
If your BT Quartet 2015 needs repair after the
guarantee period has ended, it must be repaired
so as to remain compliant with the approval
requirements for connection to the telephone
network.
For details of BT’s recommended repair agents,
please call BT free of charge on Freefone 0800
800 150, or visit your nearest BT shop.
Page 54

52
Index
Additional handsets 44
Aerial 7
Answer mode 23
Answering Machine 19
BT Services Information 48
Call Diversion 40, 41
Call My Bill 39
Call Return 37
Call Screening 30
Call Waiting 14, 43
Channel seeker 14
Charging handset batteries 7
Day and time 25
Delete an entry 18
Dial mode 33
Directory 16
Edit an entry 17
Emergency Services 49
Ending calls 12
Environment 50
Friends & Family 38
Guarantee 51
Help and Advice 48
Helpline 49
Keypad guard 13
Mains power socket 6
Maintenance 50
Making calls 12
Memos 22
Menu options 8
Menu structure 10, 11
Message alert on/off 27
Messages
Delete all
30
Delete individual 29
Listen 29
Move through 29
On and off 22
Optional Settings 32
Outgoing message 25
Recall mode 34
Receiving calls 13
Recording a new
outgoing message
24
Redialling the last number 13
Registering 44
base unit 45
Reminder Call 41, 42
Remote access 28
Remote access security
code
27
Ring back 14
Ring delay 26
Ringer Equivalence Number
(REN)
50
Ringer melody 32
Safety Instructions 49
Secrecy 15
Select Services 35
Setting up 6
Store an entry 16
Symbols 9
Technical Advice 50
Telephone wall socket 6
Three way calling 15
To view a number
before dialling
12
Transfer calls 44
Viewing an entry 18
Volume, base station 28
Volume, handset 15
Wall Mounting 46
Template 53
INDEX
Page 55

53
Wall mounting Template
101 mm
72 mm
Page 56

54
Page 57

APPROVED for connection to
telecommunication systems specified
in the instructions for use subject to
the conditions set out in them
504624
CE compliant to 89/336/EEC
(EMC Directive) & 73/23/EEC
(Low Voltage Directive)
Offices in Europe, North America,
Japan and Asia Pacific.
The telecommunications services described in this publication
are subject to availability and may be modified from time to time.
Services and equipment are provided subject to British
Telecommunications plc’s respective standard conditions of contract.
Nothing in this publication forms any part of any contract.
Touchtone™ is a registered trade mark of
British Telecommunications plc in the UK.
© British Telecommunications plc 1998.
Registered Office: 81 Newgate Street, London EC1A 7AJ.
Registered in England No. 1800000.
Printed in Thailand. Quartet 2015 Issue 1 (11/98) 7
Designed by The Art & Design Partnership Limited.
 Loading...