

Page 1
This product is intended
for connection to analogue
public switched telephone
networks and private
switchboards in the United
Kingdom.
Paragon 200 Plus
Digital Telephone Answering Machine
User
Guide
Page 2

Please open this page for an ‘at a glance’
guide to your Paragon 200 Plus.
Page 3

Please open this page for a further
‘at a glance’ guide to your Paragon 200 Plus.
Page 4
M
i
c
Paragon 200 Plus
Sel
OK
Vol
Del
memo
Answer
on off
Play
1
23
4
5
6
7
8
9
0
A
B
C
J
K
L
M
N
O
G
H
I
P
Q
R
S
T
U
V
W
X
Y
Z
D
E
F
M2
M1
M3
S
R
Q
S
e
c
r
e
c
y
R
e
c
a
l
l
Q
u
i
c
k
d
i
a
l
Redial
05
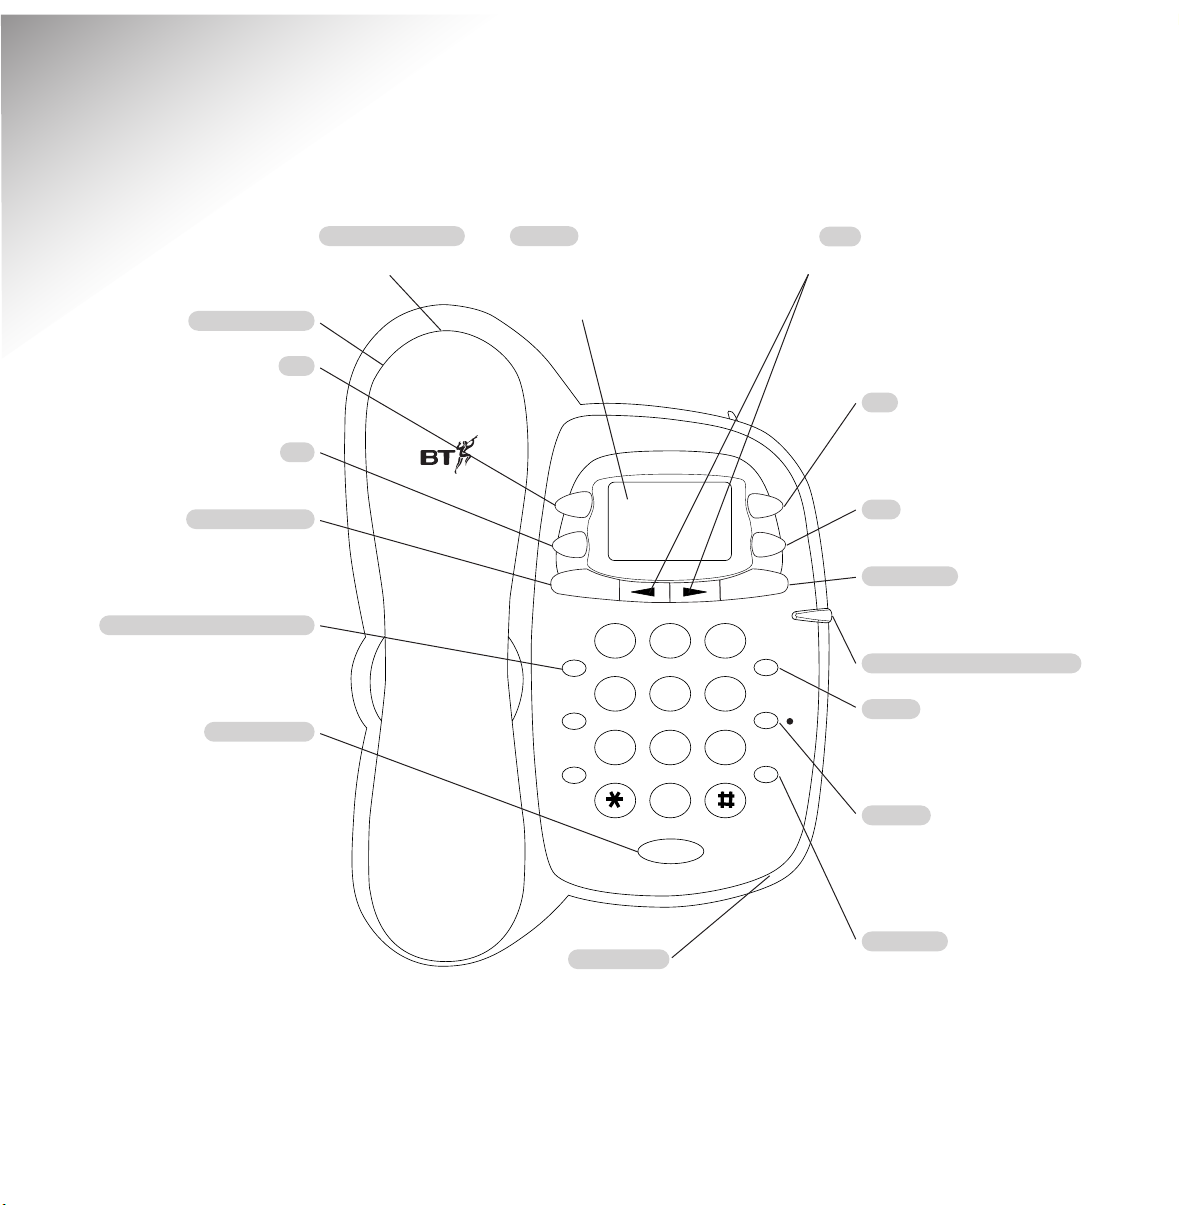
At a glance
Display
Shows the number of
messages and status information,
e.g. battery low indication.
Vol
Adjusts the volume of the
loudspeaker when playing back
messages and memos.
Del
Deletes messages.
Message and Ring indicator
Answer On/Off
Switches the answering machine
on and off. Also lets you set it to
answer only.
Play/Memo
Plays back messages. Also used to
record memo messages.
Lets you skip forwards or backwards
through your messages during playback.
Used to select setup options.
Allows you to change the display contrast.
Inductive coupler
In the handset.
Sel
Lets you select the function you
want from the range of options.
Directory label
Secrecy
Allows you to talk to someone close
by without the person on the other
end of the line hearing your
conversation.
M1-M3 One-touch buttons
Store/dial any one of your 3 most
used numbers at the touch of a
single button.
Quickdial
Lets you store and dial up to
10 numbers by pressing just
two buttons.
Redial/Pause
Redial the last number called.
Also lets you enter a pause when
storing numbers in the memory.
Recall
For use when connected to a
switchboard, or for BT Select
Services.
Microphone
For recording memos and
your outgoing message.
OK
Confirms the setting you want.
1
Page 5
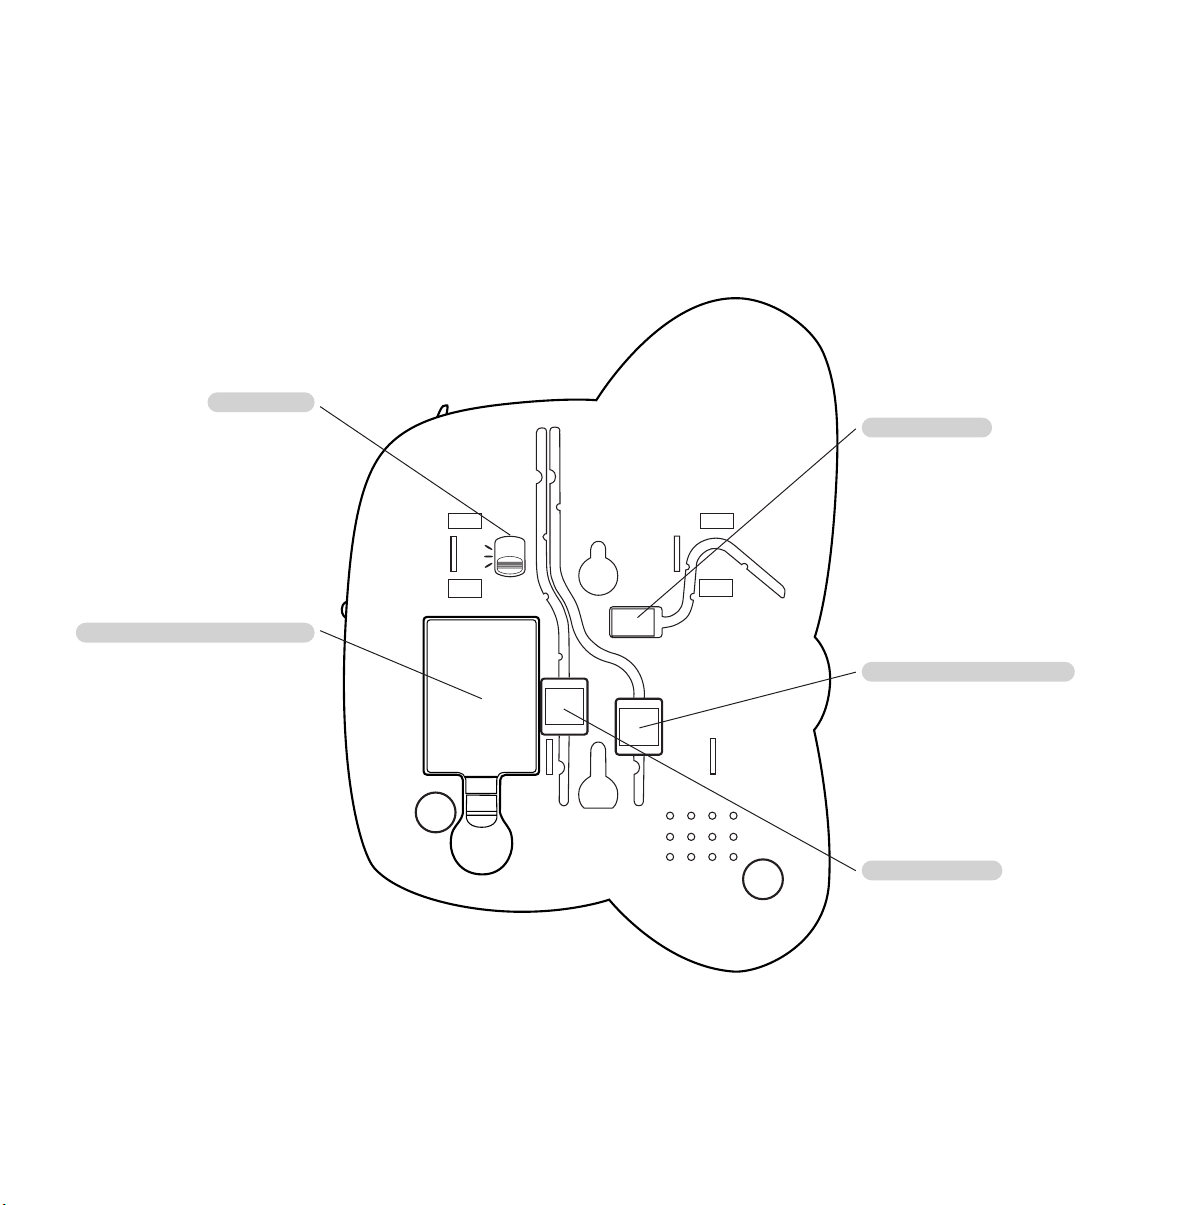
CAUTION
DISCONNECT
FROM PHONE
LINE BEFORE
REPLACING
BATTERY
P
T
TB
9V DC
LINE
HANDSET
MODE
Back up battery compartment
Takes one LR61 battery
(not supplied).
9V power socket
Mode switch
Default TB
Telephone line cord socket
Handset socket
2
Page 6
3
In this guide
At a glance 1
Introduction 4
For your records 4
Unpacking your Paragon 200 Plus 4
Safety information 5
Setting up 6
Plan the location of your
Paragon 200 Plus 6
Using the telephone 10
Using the Inductive Coupler 10
Making and ending calls 10
Using the one-touch buttons 11
Using the quickdial memory 12
Using the answering machine 13
Selecting the answering machine mode 13
To use the pre-recorded
outgoing message 13
Message and Ring indicator 15
To use Caller Return (Auto 1471) 16
Using Remote Access 16
Optional settings 18
Help 20
General information 21
Guarantee 21
Technical information 22
Wall-mounting template 23
Index 25
Note
There is a detailed Index at the back of this guide, see page 25.
Note
In this user guide, we have included helpful
tips and useful notes. They are shown in a
white box like this.
Page 7
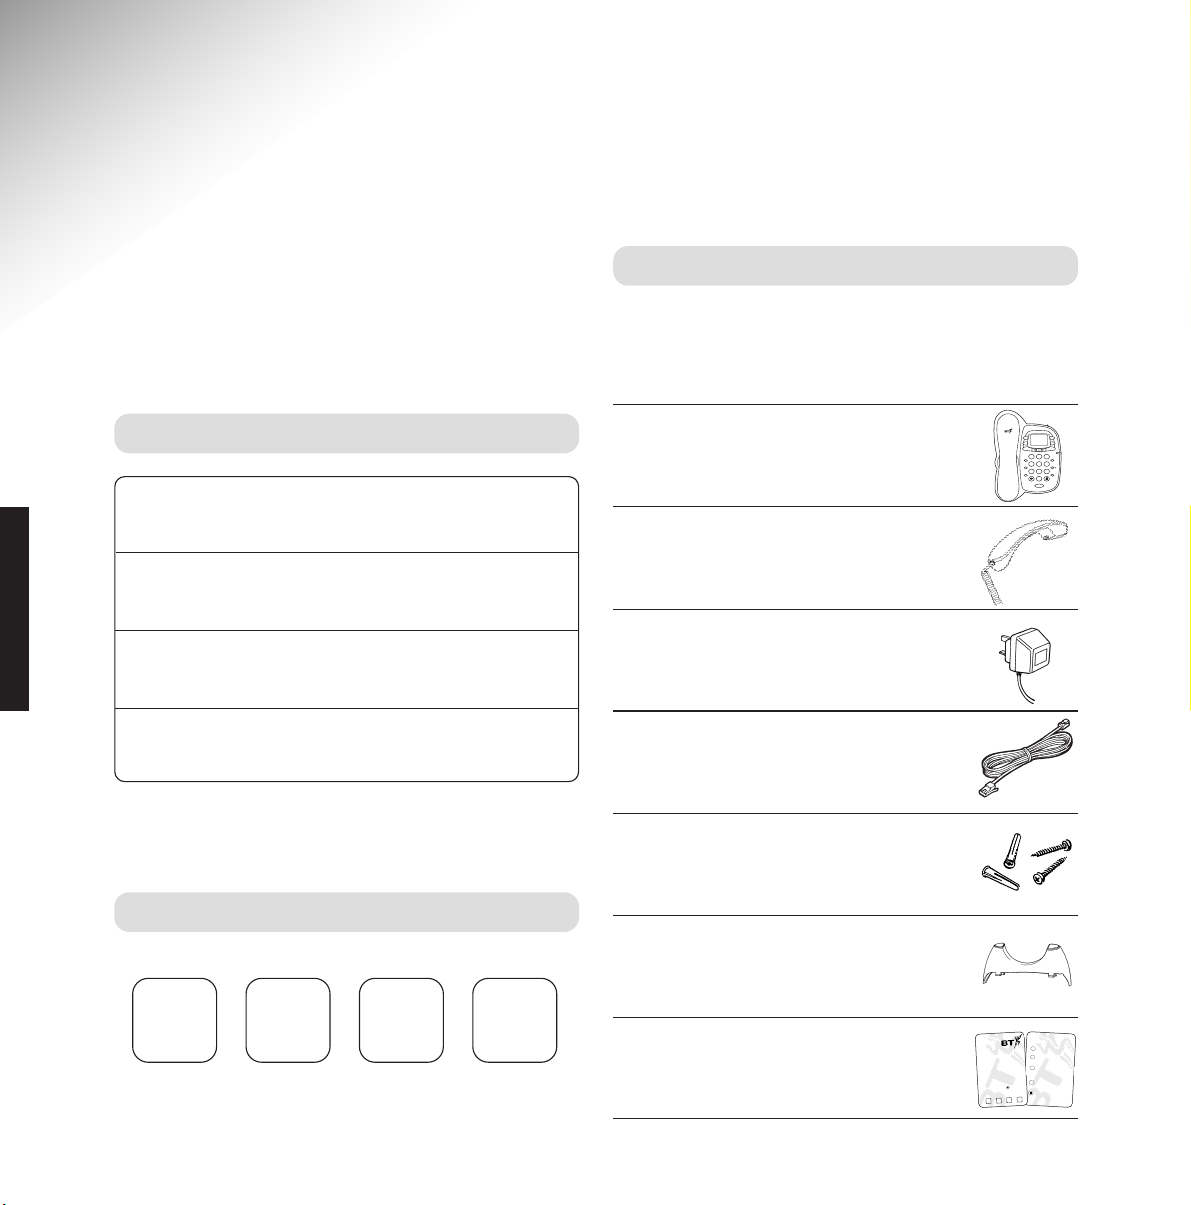
Unpacking your Paragon 200 Plus
If anything is missing, please contact your place
of purchase immediately.
●
Paragon 200 Plus telephone
answering machine.
●
Handset and cord.
●
Plug mounted, 13 amp mains
adaptor.
●
Line cord.
●
Wall mounting plugs and screws.
●
Plinth for desk mounting
●
Remote access card.
Spare memory label.
You can expect your Paragon 200 Plus to give
you many years of trouble-free service.
Please read the instructions carefully before use
and keep this User Guide for future reference.
4
For your records
For guarantee purposes, proof of purchase is
required, so please keep your receipt.
Enter your PIN here
See page 17 for more information about your PIN.
Date of purchase:
Place of purchase:
Serial number (on the underside of the telephone base):
Purchase price:
Introduction
Your Paragon 200 Plus has been designed for ease of use and
made to the high standards set by BT.
INTRODUCTION
Remote access menu
P
r
e
s
s
t
o
:
P
lay m
e
ssa
g
e
s.
S
kip
b
a
ck
to
p
reviou
s
m
essag
e.
D
ele
te th
e
m
e
ssa
g
e
b
e
in
g
p
layed
(o
r d
ele
te
all m
e
ssa
g
es
a
t the
en
d
o
f pla
y b
a
ck).
S
kip
fo
rw
ard
to
th
e
n
ex
t
m
e
ssa
g
e
.
S
kip
o
u
tg
o
ing
m
essa
g
e
(O
G
M
).
2
A
B
C
4
G
H
I
5
J
K
L
6
M
N
O
Operating your Paragon 200
Plus from another telephone
T
o
s
w
i
t
c
h
t
h
e
a
n
s
w
e
r
i
n
g
m
a
c
h
i
n
e
O
N
:
•
Dial your phone number.
•
Let the phone ring for 20 rings.
Your outgoing message begins to play.
Your Paragon 200 Plus is now on and
you may hang up.
T
o
a
c
c
e
s
s
t
h
e
a
n
s
w
e
r
i
n
g
m
a
c
h
i
n
e
m
e
n
u
:
•
Press and release the button during
the outgoing message.
•
Enter your security code.
Paragon 200 Plus
Sel
Vol
05
Del
OK
Answer
Play
on off
memo
D
A
B
E
C
F
23
1
a
c
e
R
R
M1
G
J
K
M
H
N
L
I
O
6
4
5
r
e
c
e
S
S
M2
W
P
T
Q
U
X
R
V
Y
S
Z
8
9
7
k
d
c
i
u
Q
Q
M3
0
Redial
c
i
M
l
l
c
y
i
a
l
Page 8
5
Safety information
General
Only use the power supply included with
the product. Using an unauthorised power
supply will invalidate your guarantee and
may damage the telephone.
The item number for the power supply is
872067.
Do not open the Paragon 200 Plus. This
could expose you to high voltages or other
risks. Contact the Helpline for all repairs.
Cleaning
Simply clean your Paragon 200 Plus with a
damp (not wet) cloth, or an anti-static wipe.
Never use household polish as this may
damage the product.
Never use a dry cloth as this may cause
static shock.
Environmental
Do not expose to direct sunlight.
We recommend that you do not place the
product on antique/veneered wood to avoid
damage.
Do not stand your product on carpets or
other surfaces which generate fibres, or place
it in locations preventing free flow of air over
its surfaces.
Do not submerge any part of your product
in water and do not use it in damp or humid
conditions, such as in bathrooms.
Do not expose your product to fire, explosive
or other hazardous conditions.
There is a slight chance that your phone
could be damaged by an electrical storm.
We recommend that you unplug the power
and telephone line cord for the duration of
the storm.
SAFETY INFORMATION
Page 9
Plan the location of your
Paragon 200 Plus
Situate your Paragon 200 Plus close enough to
both the phone and mains power sockets so that
the cables will reach.
6
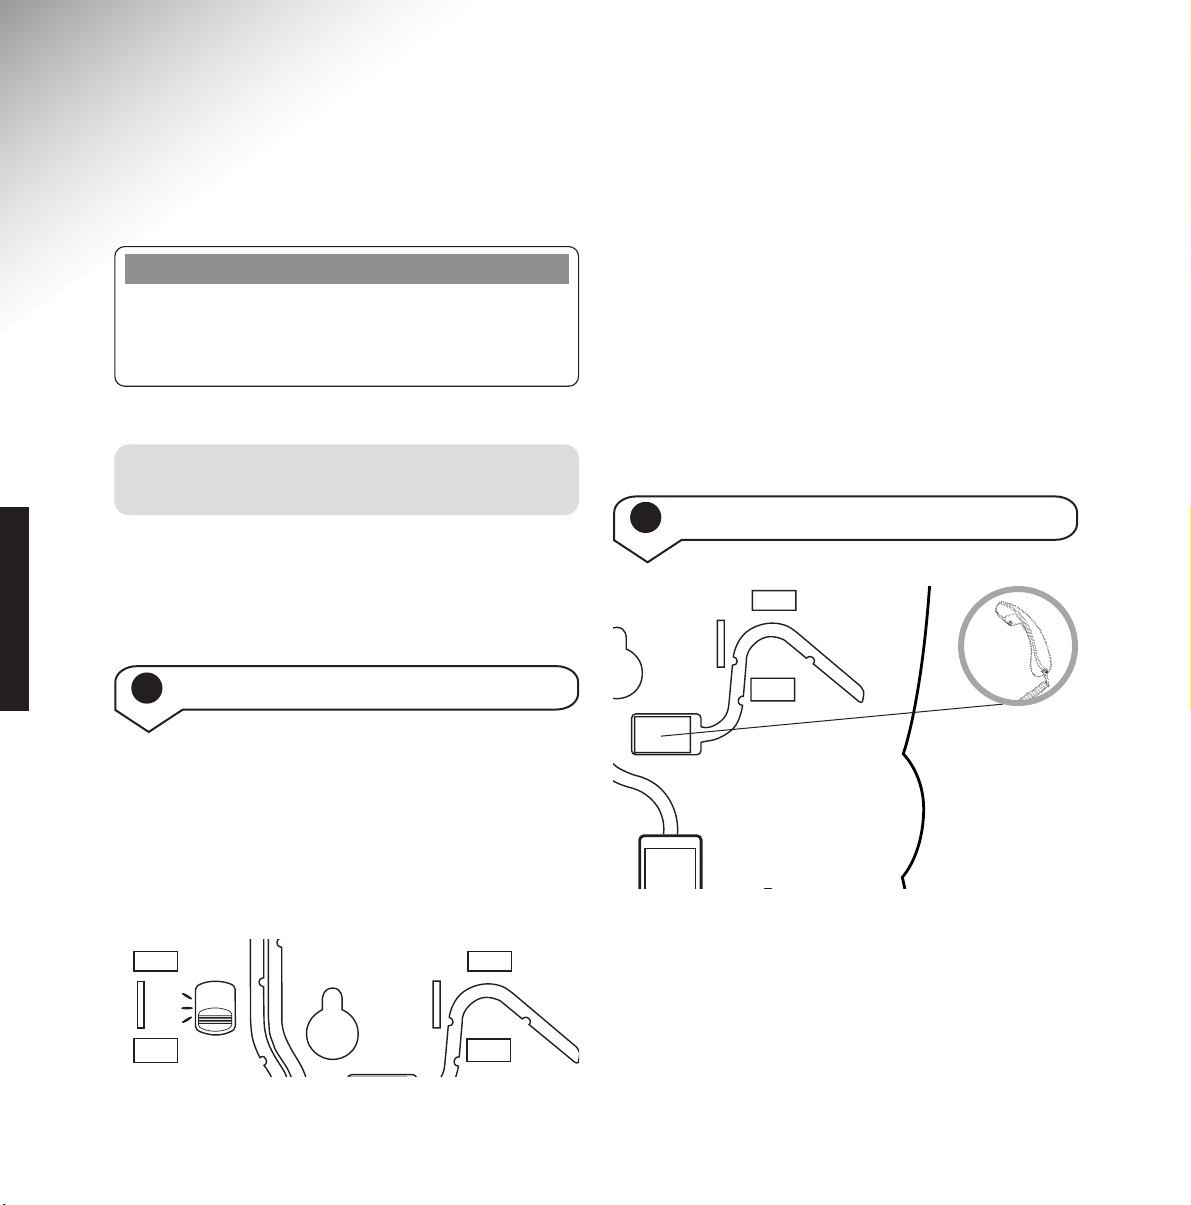
Setting up
Follow these steps to set up your Paragon 200 Plus
ready for use.
SETTING UP
9V
DC
2 Connect handset cord to base
Note
If you require accessories or DIY telephone
extension kits, please phone our Accessories line
on
0870 240 5522. This is a chargeable service.
1 Check Dial Mode setting (default TB)
Use the dialling mode switch on the underside
of your Paragon 200 Plus.
Your Paragon 200 Plus should be pre-set to TB
which gives you Tone dialling. This ensures the
phone will work with all modern digital
exchanges.
P
T
TB
HANDSET
MODE
If you do not get a dialling tone, try setting the
dialling mode to P.
If you are connecting to a switchboard, check
with your switchboard operator or
communications manager which dialling mode
you need. Your Paragon 200 Plus is approved for
all compatible switchboards.
HANDSET
LINE
Page 10

7
SETTING UP
3
Plug the mains adaptor cord into the
back of the telephone
CAUTION
9V DC
LINE
The Paragon 200 Plus automatically goes
through a start-up process during which the
display shows init, and both the secrecy LED
and message indicator flash once.
On completion the unit will beep and the display
will show the number of messages.
Your Paragon 200 Plus is now ready to record
messages.
4
Plug the mains adaptor into the wall
socket and switch on
Note
Your machine automatically adds the time and
day to each incoming message recorded.
5 Insert back-up battery
1
2
Although optional we recommend fitting an
alkaline battery which will provide up to 25 hours
back-up and ensure your messages are saved
in the event of a mains power failure.
Ensure the Paragon 200 Plus is disconnected
from the telephone line.
To fit the battery.
1 Lift the cover.
2 Insert one new LR61 9V battery (not
supplied) on top of the red ribbon.
Battery low warning
The display indicates when the battery power is low.
If no battery is inser ted, it remains on the display.
Page 11

8
7
Fit plinth for desk mounting and
track cables
SETTING UP
If you use your Paragon 200 Plus as a desk
phone you will need to fit the plinth on to
the base.
Ensure all the cables on the underside of
the base are in their respective channels.
Proceed by holding the plinth as shown in the
illustration, ensuring the two arrows are facing
each other.
Now lower the plinth so that the two lugs
nearest to you, fit into the corresponding holes
on the base, as shown.
Push and squeeze until the plinth clicks into
place from front and back as shown in the inset
on the diagram below.
ARROWS
6 Connect the telephone line cord
If you do not have a modern phone socket, call
Freephone 0800 800 150 and ask for a BT
engineer to come and fit the correct socket.
This is a chargeable service.
9V DC
LINE
Page 12

9
9 To set the day and time
Press buttons in the order shown
Press and release until TIME is shown
on the display.
The prompt says “Please enter the day”.
Display the current day:
MON = Monday
TUE = Tuesday
WED = Wednesday
THU = Thursday
FRI = Friday
SAT = Saturday
SUN = Sunday
To confirm the day setting. The prompt
says “Please enter the time using the
24 hour clock”.
Enter the current time using the
numeric buttons. Use the 24 hour clock,
e.g. 0930 = 9.30am; 1500 = 3.00pm.
To confirm the time setting.
The prompt now announces the day
and time settings. The display will
go back to showing the number
of messages.
Sel
OKOKOK
SETTING UP
8 Wall-mounting your Paragon 200 Plus
1 Turn around the handset clip on the base to
prevent the handset from falling when the
product is wall-mounted.
2 Use the template on page 24 to drill holes
in the wall. Leave an 8mm gap between the
screw heads and the wall.
3 Place your Paragon 200 Plus over the screw
heads and slide down.
WALL
WALL PLUG
SCREW
WALL DESK
Note
The Paragon 200 Plus does not display a clock,
but uses this information to advise customers
when messages were left.
Important
Wall mounting precautions:
Please make sure that you do not drill into any
hidden wiring or pipes and check that the cables
will reach the base.
Page 13

10
Using the telephone
To make a call
HANDSET
Lift the handset.
Dial the number you want.
HANDSET
Replace the handset
To use the secrecy function
This allows you to talk to someone
close by without the person on the other
end of the telephone line hearing the
conversation.
During your call:
Press and release. You cannot be heard.
The LED next to
SECRECY button is lit
up to confirm.
Press and release. To resume your
telephone conversation. The LED
goes out.
Your Paragon 200 Plus has an inductive coupler
in its handset, to improve sound quality for
people using hearing aids.
Switch your hearing aid to
T and adjust the
position of the phone until you obtain the best
sound.
To redial the last number
HANDSET
Lift handset
The number is dialled. The display
shows the number as it is dialled.
Using the Inductive Coupler
Making and ending calls
S
S
e
c
r
e
c
y
S
S
e
c
r
e
c
y
Redial
USING THE TELEPHONE
To end a call
Note
Please note that when you want to change
options in the menu you must pr
ess and release
the SEL button in order to scroll through the
menu options. You cannot simply hold the SEL
button down.
Page 14

11
Note
If you make a mistake when entering a number,
press the
DEL button to delete the last digit.
To stop the process at any time, press the
ANSWER ON/OFF button.
To store a one-touch number
You can store 3 one touch numbers of
up to 32 digits long.
Press and release, the display shows
MEMORY.
The prompt says “Please select the
location”.
Press the button under which you want
to store the number.
The prompt says “Please enter the
number ”.
To make a one-touch call
HANDSET
Lift handset
Press the one-touch button you want.
The number is dialled.
Using the one-touch buttons
To delete/change a one-touch number
To change:
Simply follow the steps to store a
one-touch number. The new number
replaces the existing number.
To delete:
Press and release until the display shows
MEMORY.
The prompt says “Please select the
location”.
The prompt says “Deleted”.
Sel
OK
M1-3
M1-3
Sel
OK
Del
To increase the volume in the earpiece.
Display indicates the level.
To decrease the volume in the
earpiece.
After you replace the handset, the
volume automatically returns to the
middle level.
Vol
M1-3
USING THE TELEPHONE
To adjust the earpiece volume during a call
Enter the phone number you want
to store.
The prompt announces the phone
number and the memory button where
it is stored.
OK
Note
If your Paragon 200 Plus is connected to a
switchboard you will need to add the prefix
digit first when storing a number to ensure
you get an outside line.
Page 15

12
To delete/change a quickdial number
To change:
Simply follow the steps to store a
quickdial number. The new number
replaces the existing number.
To delete:
Press and release until the display shows
MEMORY.
The prompt says “Please select the
location”.
The prompt says “Please enter the
number ”.
The prompt says “Deleted”.
Note
You may find it helpful to keep a note of the
location number
(0-9) you set for quickdial
numbers. Use the directory label under
the earpiece of the handset.
To make a quickdial call
HANDSET
Lift handset
Press
QUICKDIAL.
Press the
0-9 button under which the
number you want is stored. The number
is dialled.
Using the quickdial memory
To store a quickdial number
Press buttons in the order shown
You can store numbers of up to 32
digits long.
Press and release until the display shows
MEMORY.
The prompt says “Please select the
location”.
Select the
0-9 location under which you
want to store the number.
The prompt says “Please enter the
number ”.
Enter the phone number you want to
store.
The prompt announces the phone
number and the quickdial location
where it is stored.
Note
If you make a mistake when entering a number,
press the
DEL button to delete the last digit.
To stop the process at any time, press the
ANSWER ON/OFF button.
Sel
OK
OK
0-9
0-9
Q
Q
u
i
c
k
d
i
a
l
0-9
Sel
Del
OK
USING THE TELEPHONE
Page 16

Selecting the answering
machine mode
To use the pre-recorded
outgoing message
When your answering machine is switched on,
the pre-recorded message will automatically
greet callers with:
“Hello, your call cannot be taken at the moment,
so please leave your message after the tone.”
Callers can skip this message by pressing the
#
button and record their message after the tone.
The pre-recorded message remains in the memor y
and you can always choose to use it again.
Default for Answer Only Outgoing Message.
”Hello, your call cannot be taken and you cannot
leave a message. So please call later.“
13
Using the answering machine
To switch the answering machine on,
off and to Answer Only
To set to any of the above settings press and
release the Answer On/Off button until the
prompt announces your required setting.
NB: You will not lose messages when switching
between these settings.
Press and release until the display
shows OGM.
Default is played.
Press either button during playback to
switch between a male or female voice
for your OGM.
Sel
memo
Play
Setting Description Display
On Receives incoming Number of
calls and records messages eg.
messages. 00 or 01 etc.
Off Does not record Off
messages.
Answer Only Will play your AO
outgoing message
but will not record
messages.
ANSWER MACHINE
To listen to and switch between the male
and female pre-recorded Out Going
Message (OGM)
Page 17

14
To delete your personal OGM
Press and release until the display
shows OGM.
Your current OGM is played.
To record a memo
You can use your Paragon 200 Plus to
record a memo which can be played
back by another user.
Hold the button down the prompt says
“Please speak after the tone”.
Speak your memo.
Release the
PLAY/MEMO button to end
recording. Whilst recording the display
counts up the time in seconds.
The memo will automatically be played
back to you. You can press
ANSWER
ON/OFF to cancel playback.
Press
DEL during memo playback to
delete the memo.
Note
If you delete your own recorded outgoing
message, it will automatically be replaced by the
pre-recorded message.
Sel
memo
Play
To delete the message.
The pre-recorded OGM is played.
“Hello, your call cannot be taken at the
moment, so please leave your message
after the tone.”
Del
memo
Play
memo
Play
To record your own outgoing message
Press buttons in the order shown
Press and release until the display
shows OGM.
The prompt says “Please record your
message after the tone. To end recording
press
OK.” Speak your message clearly.
(You can also lift your handset at this
point and record your message). The
display counts up your recording time
in seconds.
To stop recording. Your new OGM is
played back.
Note
Your Paragon 200 Plus has a total recording
capacity of 39 minutes. Your outgoing message
is limited to a maximum of 2 minutes.
Note
If there is no mains power and your battery
low warning indicator is on the display, your
personal recorded outgoing message will revert
back to the pre-recorded message.
Sel
OK
OK
ANSWER MACHINE
Answer
on off
Del
Page 18

15
To delete all messages
All messages are automatically saved
after playback.
When the last message has finished
playing.
Display counts down from 8-0 at the
end of which the messages are deleted.
To privately playback your messages
through the handset
Press the
PLAY/MEMO button.
Lift the handset to listen to your
messages through the handset.
Replace the handset to listen through
the loudspeaker again.
To playback your messages
Your messages are played back in
chronological order. The display will
show the day and time the message
was left. When all the messages have
been played back, the prompt says
“End of messages.”
During playback you also have the
following options:
Skip to the next message.
Once to replay the current message or
twice to replay the previous message.
Deletes the current message. The
prompt says, “Message deleted” and the
next message is played.
Pauses playback. The display flashes.
Press again to resume. If you pause
playback for more than 60 seconds,
your Paragon 200 Plus will
automatically return to normal mode.
Message and Ring Indicator
The indicator blinks when you have new
messages or memos. When you have played
them back, the indicator goes off.
It will also flash when the telephone rings.
memo
Play
memo
Play
Del
Del
memo
Play
Note
If you have deleted a message in error you
can press
ANSWER ON/OFF during the
countdown and it will cancel the deletion.
The display will show the number of messages.
ANSWER MACHINE
Page 19

16
To use Call Screening
You can let your Paragon 200 Plus
answer a call and have the loudspeaker
switched on so you can hear the caller.
This gives you the option of picking up
the handset and speaking to them or
letting them leave a message.
Please note that the caller’s voice will
not be heard on the lowest level.
While the Paragon 200 Plus is
answering a call or while idle.
Adjust the loudspeaker volume.
The level is shown at the bottom of
the display.
Vol
To use Caller Return (Auto 1471)
Caller Return automatically dials 1471 after a
caller has left a message on your answering
machine and records the announcement giving
the telephone number (if available) and the time
of the call. So even if a caller chooses not to
leave a message, you may still have their
telephone number recorded.
Press and release until the display
shows 1471.
Switches between ON and OFF.
Prompt will confirm the setting
displayed.
While the Caller Return setting is
switched ON, the display shows 1471.
Sel
OK
OK
Press buttons in the order shown
During playback:
Adjust the loudspeaker volume.
The level is shown at the bottom of
the display.
Vol
Using Remote Access
You can switch on your answering machine from
another phone and, providing you are using a
TouchTone
TM
phone, play back your messages
and memos.
ANSWER MACHINE
The pre-set code is 0000.
To switch on Caller Return
Note
Please not that the answering machine takes a
recording from 1471, it is not possible to have
the correct date on each message.
To adjust the answering machine
playback volume
Page 20

17
To play back messages
Ring your answering machine as
normal.
Press and release during the outgoing
message. The prompt says “Please enter
your 4 digit security code”.
PIN
Use the appropriate buttons to enter
your security PIN. Wait to hear the
confirmation beep after each digit.
After the last digit, the prompt says
“You have X messages” and begins to
play them.
You can now control your answering
machine by pressing the appropriate
buttons:
Play messages.
Skip back to previous message.
Delete the message being played
(or delete all messages at the end of
play back).
Skip forward to the next message.
To switch on your answering machine
If you have forgotten to switch on your
answering machine
Ring your answering machine from
another phone
After 20 rings, your Paragon 200 Plus
will automatically answer the call.
HANG UP
Your answering machine is now
switched on.
4
G
H
I
2
A
B
C
5
J
K
L
6
M
N
O
Note
When calling your Paragon 200 Plus from
another phone, it allows two attempts to enter
the correct PIN. If this is not done, you hear the
message “Thank you for calling” and the
machine hangs up.
Note
When deleting messages you will hear a
countdown from 8 to 0 followed by, “Thank you
for calling” and then the line is released.
If you decide not to delete a message you
can hang up the phone before the countdown
finishes.
To set your PIN
Press and release until the display
shows SECURITY CODE.
The prompt says “Please enter your
4 digit security code” and displays the
current PIN.
Enter the 4-digit PIN you want.
To confirm the PIN displayed.
Sel
OK
OK
ANSWER MACHINE
Page 21

18
Optional settings
To adjust the number of rings before
your answering machine takes a call
Press buttons in the order shown
This is called the Answer Delay. You
can choose from 2-9 rings or Time
Saver.
Time Saver is useful if you are ringing
up from another phone to see if you
have any messages. With Time Saver
set, your Paragon 200 Plus will answer
your call after 6 rings if there are no
messages, or after 2 rings if you have
messages recorded. So if you hear a
3rd ring, you can hang up and save the
time and cost of connecting to your
phone.
Press and release until the display
shows ANSWER DELAY.
Select the number of rings you want.
Or
Time saver.
To confirm the setting.
To adjust the ring tone
You can choose between three different
ring tones
Press and release until the display
shows RINGER.
The prompt says “Please select the
ringer ”.
Switch between the options. Display
shows t1, t2 or t3.
You hear a sample of the tone.
To confirm the option displayed.
Sel
OK
OK
Sel
OK
OK
OPTIONAL
Note
Please note that when you want to change
options in the menu you must pr
ess and release
the SEL button in order to scroll through the
menu options. You cannot simply hold the SEL
button down.
Page 22

19
Note
If you switch the ringer volume off,
RINGER OFF remains in the display.
To adjust the display contrast
While your phone is idle:
Press to decrease or increase the
contrast.
To adjust the ringer volume
You can select between three different
volume levels, off, medium and loud.
Press and release until the display
shows RINGER.
The prompt says “Please select the
ringer.”
To adjust the ringer volume. You will be
able to hear the change in the volume
setting. The level is shown at the bottom
of the display.
To confirm the level displayed.
To switch the ringer off
Press and release until the display shows
RINGER.
The prompt says “Please select the
ringer.”
Press once.
To adjust the ringer volume until
NO RINGER appears on the display.
Sel
OK
Vol
OK
Sel
OK
Vol
To switch the ringer on
Press and release until the display shows
RINGER.
The prompt says “Please select the
ringer.”
Press once.
To adjust the ringer volume until
NO RINGER disappears from the display.
Sel
OK
Vol
OPTIONAL
Page 23

20
Help
Customer Helpline
If you still have problems with your
Paragon 200 Plus, call the Paragon Helpline on
0870 240 1051.
Outgoing message does not record
Speak clearly – within 20cm of the microphone –
when recording your message.
Incoming message does not record
Check that your machine is set to ANSWER ON
and that the recording capacity is not full.
The caller may be speaking too quietly or has a
bad connection.
Cannot access your machine from
another phone
Make sure the phone you are calling from is a
compatible TouchTone
TM
keypad.
When entering your security PIN, allow enough
time - at least 2 seconds between each digit for
your Paragon 200 Plus to recognise each one.
To reset
If your Paragon 200 Plus will not respond to any
button presses, remove the back-up battery and
turn off the power for 10 seconds. Turning the
power back on will reset your machine to
ANSWER ON mode. However, please note that
during resetting, all messages will be lost.
Help and advice
Emergency calls
The emergency services can be contacted in the
UK by dialling
999 or 11 2 which is valid in any
country that is a member of the European
community.
No dialling tone
Check that your machine is connected to the
phone socket.
Display does not come on
Check that your machine is correctly connected to
the mains power and that the power is switched
on.
Is the answering machine switched to ANSWER
OFF? Press Answer On/Off.
Check that the mains power cable is plugged in
to the back of the machine.
HELP
Page 24

21
General information
Guarantee
Your Paragon 200 Plus is guaranteed for a
period of 12 months from the date of purchase.
Subject to the terms listed below the guarantee
will provide for the repair of, or at BT’s or its
agent’s discretion the option to replace the
Paragon 200 Plus, or any component thereof,
(other than batteries), which is identified as
faulty or below standard, or as a result of
inferior workmanship or materials. Products
over 28 days old from the date of purchase may
be replaced with a refurbished product.
The conditions of this guarantee are:
• The guarantee shall only apply to defects that
occur within the 12 month guarantee period.
• Proof of purchase is provided.
• The equipment is returned to BT or its agent
as instructed.
• This guarantee does not cover any faults or
defects caused by accidents, misuse, fair wear
and tear, neglect, tampering with the
equipment, or any attempt at adjustment or
repair other than through approved agents.
• This guarantee does not af fect your statutory
rights.
Within the 12 month guarantee period:
If you experience difficulty using the product,
prior to returning your product, please read the
‘Help’ section beginning on page 20, or contact
the Paragon Helpline for assistance on
0870 240 1051.
In the unlikely event of a defect occurring,
please follow the Helpline’s instructions for
replacement or repair.
Outside of the 12 month guarantee period:
If your product needs repair after the
guarantee period has ended, the repair must
meet the approval requirements for connection
to the telephone network. We recommend that
you call BT’s recommended repair agent on
01672 564 444.
Instruction for returning the product
If the Helpline is unable to remedy your
problem they will ask you to return the product.
Where possible, pack the product in its original
packaging. Please remember to include all parts,
including line cords. (Please note that we cannot
take responsibility for goods damaged in
transit.) Please obtain and keep proof of posting
from the Post Office.
GENERAL INFORMATION
Page 25

How many phones can you have?
All items of telephone equipment have a Ringer
Equivalence Number (REN), which is used to
calculate the number of items which may be
connected to any one telephone line. The Paragon
200 Plus has a REN of 1. Any other instrument
provided by BT may be assumed to have a
REN of 1 unless otherwise stated. A total
REN of 4 is allowed.
Switchboard compatibility
This product is intended for use within the UK
for connection to the public telephone network
and compatible switchboards, which support
tone dialling and timed break recall. If in doubt,
please call your switchboard provider.
If your phone does not ring try changing the
mode setting to T, see page 6. This also applies
to transferring calls.
If the power fails
You will still be able to make and receive telephone
calls on your Paragon 200 Plus even if the mains
power fails and there is no back-up batter y
installed. However, the answering machine will
not work until the mains power is restored and
the display will be blank.
RTTE
This product is intended to be connected to
analogue networks in the United Kingdom.
This equipment complies with the essential
requirements for the Radio Equipment and
Telecommunications Terminal Equipment
Directive 1999/5/EC.
A copy of the certificate is available on the
web site:
http://www.pdtuk.com/archive/certificates/paragon
BT Accessories and
Replacement Items
For a full range of accessories and replacement
items for BT products please call 0870 240 5522,
or visit:
22
Technical information
GENERAL INFORMATION
Page 26

23
Wall-mounting template
If wall-mounting your Paragon 200 Plus,
drill two holes for the screws using this
template and insert the wall plugs provided
(if required).
WALL-MOUNTING
73mm
Page 27

24
WALL-MOUNTING
Page 28

25
Index
Adaptor cord 7
Answer delay 18
Answering machine
answer mode 13
answer only default outgoing message 13
delete all messages 15
delete personal OGM 14
male/female OGM 13
message indicator 15
on/off 13
playback messages 15
playback volume 16
pre-recorded OGM (default) 13
privately playback messages 15
record memo 14
record own OGM 14
At a glance 1
B
atteries
back-up battery 7
battery low warning 7
C
alls
end 10
make a call 10
make a one-touch call 11
make a quickdial call 12
redial 10
secrecy 10
Call screening 16
Caller return (Auto 1471) 16
Cleaning 5
Day 9
Delete
all messages 15
one-touch number 11
personal OGM 13
quickdial number 12
D
esk mountings 8
Dialling mode 6
Display contrast 19
Earpiece volume 11
End a call 10
Guarantee 21
Handset cord 6
Help 20
Inductive coupler 10
M
ains adaptor 7
Making a call 10
Memo 14
Message indicator 15
INDEX
Page 29

26
Number of rings 18
One-touch button
delete/change number 11
make a call 11
store a number
11
P
IN 17
Playback messages 15
Plinth 8
Pre-recorded OGM
listen to 13
switch between male and female 13
Privately playback messages 15
Quickdial memory 12
delete/change number 12
make a call 12
store a number 12
Record
memo 14
own OGM 14
Redial last number 10
Remote access 16
playback messages 17
set your PIN 17
switch on answering machine 17
REN (Ringer Equivalent Number) 22
Returning your Paragon 200 Plus 21
Ring tone 18
Ringer volume 19
RTTE 22
S
afety
5
Secrecy 10
Set
day 9
time 9
Setting up 6
Store
one-touch number 11
quickdial number 12
Switchboard connection
22
T
echnical information 22
Telephone line cord
8
Time 9
Unpacking 4
Volume
earpiece 11
playback 16
ringer 19
Wall mounting
9, 23
INDEX
Page 30

Offices worldwide
The telecommunications services described in this publication
are subject to availability and may be modified from time to time.
Services and equipment are provided subject to British
Telecommunications plc’s respective standard conditions of contract.
Nothing in this publication forms any part of any contract.
Touchtone™ is a registered trade mark of
British Telecommunications plc in the UK.
© British Telecommunications plc 2003.
Registered Office: 81 Newgate Street, London EC1A 7AJ.
Registered in England No. 1800000.
Designed by The Art & Design Par tnership Limited.
Printed in China.
Paragon 200 Plus. Issue 1 (02/03) 4
 Loading...