

Page 1
BT PaperJet 55E/65E
Printing Guide
PC
Includes:
•
Connecting the printer to your PC
•
Installing and uninstalling the software
•
Viewing and printing the on disk PaperJet Printer User Guide
Page 2

Introduction 2
System requirements 2
Print cartridges 2
Starting up 4
Plug & Play start up 4
Standard start up 6
Uninstalling the PC software 7
View and print the Printer User Guide 8
Installing Acrobat Reader 4.0 8
Opening, viewing and printing the user guide 8
Printing documents 8
Printing faxes 9
Help 10
1
In this guide
Page 3
Lift the top cover.
Pull green tab towards front of machine to
release cartridge.
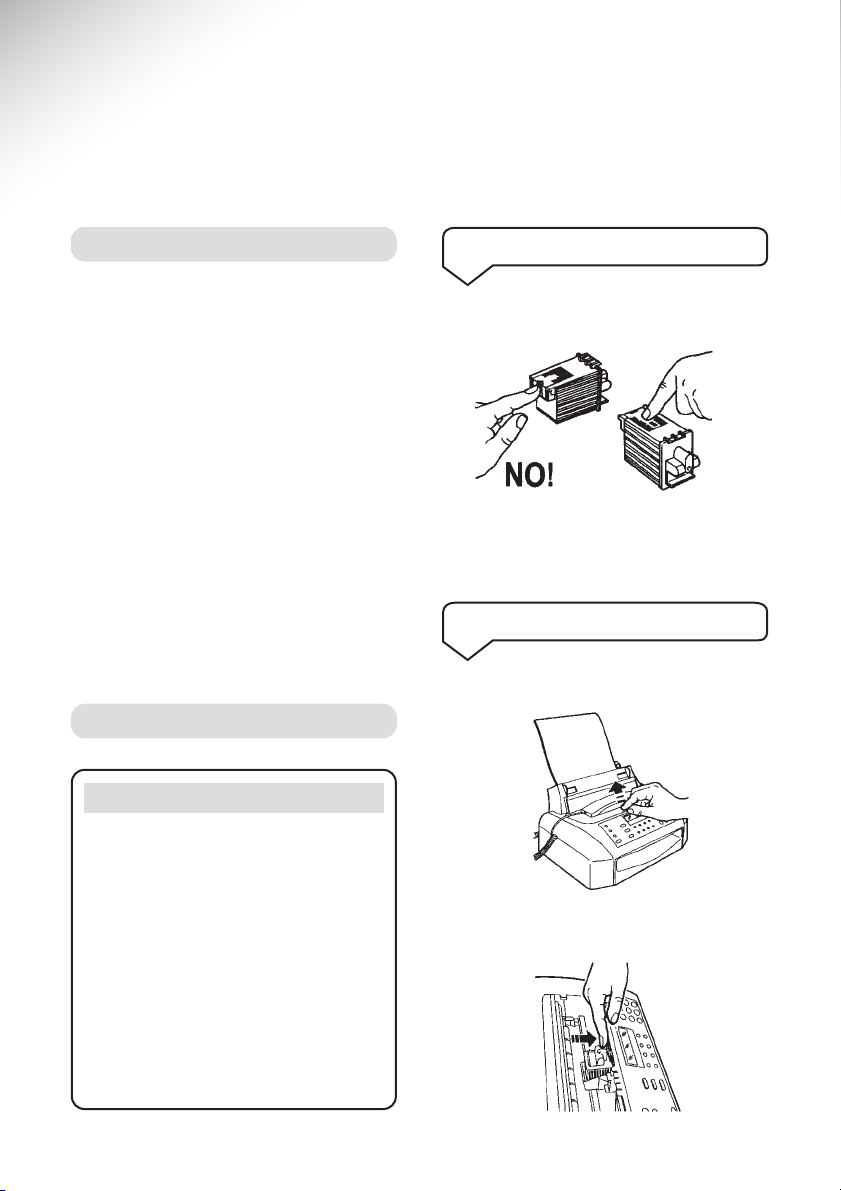
Avoid touching the nozzles and metal
electrical contacts.
Never try to refill the print cartridge, as this
could damage the print head and your
PaperJet 55E/65E.
System requirements
Print cartridges
Please note
Your PaperJet 55E/65E uses a black or
colour ink cartridge. Only one cartridge can
be installed at a time.
Faxes you receive will only be printed when
the black ink cartridge is installed.
Faxes will be stored in the memory if the
colour cartridge is installed.
If the memory becomes full, your machine
will not receive any more until you have
printed some of the faxes, so it is good
practice to keep the black ink cartridge
in the machine for all normal use.
Handling the ink cartridges
To swap over the ink cartridges
2
Introduction
Your PaperJet 55E/65E printer is compatible with
PCs using Windows 95, 98, Me, 2000 and NT.
Recommended configuration
• For Windows 95, Windows 98 first edition
and Windows ME:
Pentium 166 MHz, 32 MB of RAM
• For Windows 98, second edition, Windows
NT and Windows 2000:
Pentium 166 MHz, 64 MB of RAM
• For Windows XP:
Pentium 300 MHz, 128 MB of RAM
All configuration must have at least a CD
reader, a VGA monitor (24-bit board for colour
video) and IEEE 1284 Nibble Mode parallel
interface connection.
Page 4

Remove the current cartridge.
Insert the next cartridge.
Close the top cover.
Always store the ink cartridge you are not
using in the special container provided to
maintain its efficiency and print quality.
Pull cartridge towards front of machine to
lock in place.
Important
Your PaperJet 55E/65E automatically
recognises whether you have the black or
colour cartridge in the printer and checks
the level of ink. When the cartridge is empty,
the display on the PaperJet 55E/65E shows
OUT OF INK.
To ensure the level of ink is accurate, never
swap cartridges between dif ferent printers or
fax machines.
3
Page 5

Important
First set up your PaperJet 55E/65E as
shown in the main user guide.
There are two ways to install your PaperJet as
your PC printer.
Plug and play start up – your PC
automatically detects your PaperJet and
starts software installation. It requires you
to switch off your PC before connection.
Or
Standard start up – you tell your PC to
begin software installation manually.
1
2
1 Set up
2 Switch off your PC
3 Connect the cable
Follow the PaperJet 55E/65E ‘Setting up’
instruction in the main guide.
Connect your PaperJet 55E/65E to your PC’s
parallel port using the printer cable (not
supplied).
4 Switch on your PC
5 Insert the CD6 Insert the CD
5 Connect the fax machine
to the power supply
Insert the PaperJet 55E/65E Software CD in
the CD-ROM drive and close the door.
The “LinkFax” installation procedure starts
automatically.
4
Starting up
Page 6

Important
If the operating system on your PC is
Windows 95 version 4.00.950B (OSR2),
then the Plug & Play installation is slightly
different. If this is the case, carefully follow
the instructions that appear on your PC
screen and do not worry if an error message
appears. Continue and, at the end, in the
“Copy file from:” box, type the name of the
drive your PaperJet 55E/65E Software CD
is in (e.g. D:).
7 Installation
Select the language you want, if it is
not already selected.
Click OK
Follow the on-screen prompts,
by clicking Next in each box that
appears. Or click Exit Installation
to cancel.
‘Select the port’: The recommended
port LPT1 is shown
‘Select Destination folder’: The
recommended folder is shown.
When you have finished selecting
options, click on Start Install installation begins.
A dialogue box is displayed showing
how installation is progressing. To
stop installation click Cancel.
8 Restart your PC
When installation is complete, you are
asked to restart your system.
Click OK. Screen shows the message
Restarting Windows.
Your PaperJet 55E/65E is now installed
and selected as your PCs default printer
Turn to page 8 to print or view the user guide
or remove the PaperJet 55E/65E Software CD
when your PC has restarted Windows.
5
Page 7

6
If you no longer want to use
PaperJet 55E/65E as a printer and
want to remove the software
from your PC
The uninstall procedures indicated
below will enable you to completely
and correctly remove all the files
loaded from the CD and/or created
on the PC during the software
installation procedure, and then
reinstall them.
In Windows 95/98/ME
Select the Uninstall item from the
LinkFax group on the Programs
item of the Start menu.
In Windows 95/98/ME/NT/2000/XP
Select the following items; Start,
Settings, Control Panel, Add
Programs then select the LinkFax
item and confirm by clicking on the
Add/remove button.
Uninstalling the PC software
Page 8

Your PaperJet 55E/65E Software CD contains
a copy of the printer user guide which you can
print or view .
Important
To print or view the user guide on-screen
you need Acrobat Reader 4.0. If this is not
already installed on your PC, the PaperJet
55E/65E Software CD contains a copy
which needs to be installed first.
Insert the CD in the CD-ROM drive.
Click Start.
Click on Run.
Type x:\acrobat \ ar405eng (where x is
the drive letter of the CD-ROM drive).
Click OK and follow the on-screen
instructions.
Installing Acrobat Reader 4.0
Opening, viewing and printing
the user guide
In Windows 95/98/ME
To access the on-line documentation,
click on one of the three icons in the
LinkFax group under the Programs
item on the Start menu.
In Windows NT/2000/XP
In this case, the on-line
documentation may be accessed from
the printer’s “Status monitor” or by
selecting the Properties item of the
“LinkFax printer” on the Printers
menu.
To print the user guide
When the user guide or document
you want to print is displayed on
screen,
Click File to open the drop down
menu.
Click Print. The LinkFax Printer
dialogue box is displayed. This lets
you select how your machine will
print, including the number of copies.
The Properties button lets you
change the printer set-up, select a
different paper size and orientation.
Click OK to begin printing.
Follow the on-screen instructions.
7
View and print the Printer
User Guide
Page 9

The print software can detect if a document
contains colour and, if you have the wrong
cartridge installed, the PC asks you to change it.
Whenever a colour cartridge is installed, your
PaperJet 55E/65E display shows COLOUR
CARTRIDGE.
To print, select Print from the File menu and
click OK. Follow the on screen instructions.
To give the most economical use, your
PaperJet 55E/65E will only print received
faxes when the black cartridge is installed.
If the colour cartridge is installed faxes will be
stored in the memory.
If the memory becomes full, your machine will
not receive any more until you have printed
some of the faxes, so it is good practice to
keep the black ink cartridge in the machine
for all normal use.
To print faxes from the memory, see page 19
of the main PaperJet 55E/65E User Guide.
Printing faxes
8
Printing documents
Page 10

BT PaperJet 55E/65E Helpline
If you cannot resolve a problem by using
the Help section, contact the Helpline
0870 240 8026.
9
Help
Page 11

Offices worldwide
The telecommunications services described in this publication
are subject to availability and may be modified from time to time.
Services and equipment are provided subject to British Telecommunications
plc’s respective standard conditions of contract. Nothing in this publication
forms any part of any contract.
Touchtone™ is a registered trade mark of
British Telecommunications plc in the UK.
© British Telecommunications plc 2001.
Registered Office: 81 Newgate Street, London EC1A 7AJ.
Registered in England No. 1800000.
Designed by: The Art & Design Partnership Limited.
Printed in Europe. PaperJet55E/65E PC printing guide. Issue 1 (7/01) 1
 Loading...