

Page 1
BT PaperJet 55/65
Printing Guide
PC
Includes:
•
Connecting the printer to your PC
•
Installing and uninstalling the software
•
Viewing and printing the on disk PaperJet Printer User Guide
Page 2

Introduction 2
System requirements 2
Print cartridges 2
Starting up 4
Plug & Play start up 4
Standard start up 6
Uninstalling the PC software 7
View and print the Printer User Guide 8
Installing Acrobat Reader 4.0 8
Opening, viewing and printing the user guide 8
Printing documents 8
Printing faxes 9
Help 10
1
In this guide
Page 3
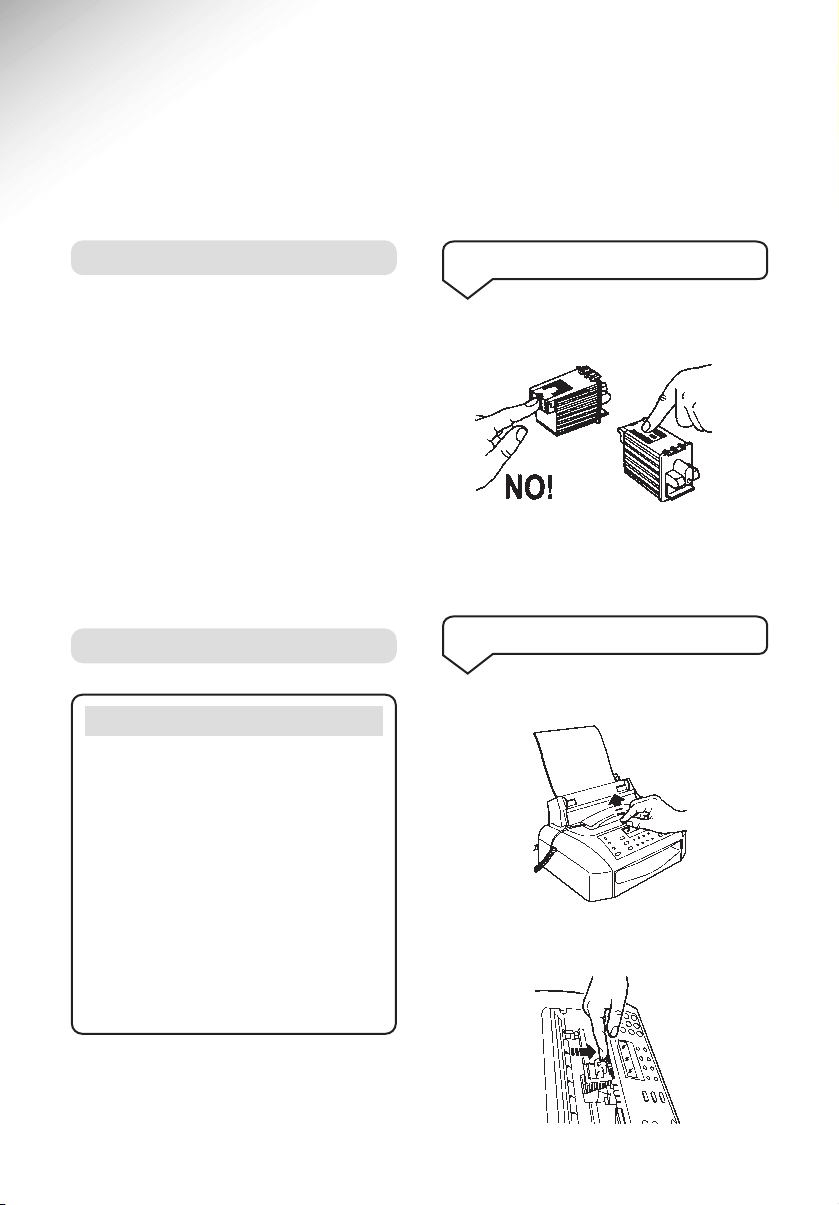
Lift the top cover.
Pull green tab towards front of machine to
release cartridge.
Your PaperJet 55/65 printer is compatible with
PCs using Windows 95, 98, Me, 2000 and NT.
Recommended configuration
• Windows 95 Processor - 486 – 66MHz
or higher (Minimum – 33MHz)
• Windows 98 Processor – Pentium 586
– 133MHz or higher.
• RAM – 16 Mb or higher. (Minimum – 8Mb)
• Monitor – VGA or higher
• CD ROM drive.
Avoid touching the nozzles and metal
electrical contacts.
Never try to refill the print cartridge, as this
could damage the print head and your
PaperJet 55/65.
System requirements
Print cartridges
Please note
Your PaperJet 55/65 uses a black or colour
ink cartridge. Only one cartridge can be
installed at a time.
Faxes you receive will only be printed when
the black ink cartridge is installed.
Faxes will be stored in the memory if the
colour cartridge is installed.
If the memory becomes full, your machine
will not receive any more until you have
printed some of the faxes, so it is good
practice to keep the black ink cartridge
in the machine for all normal use.
Handling the ink cartridges
To swap over the ink cartridges
2
Introduction
Page 4
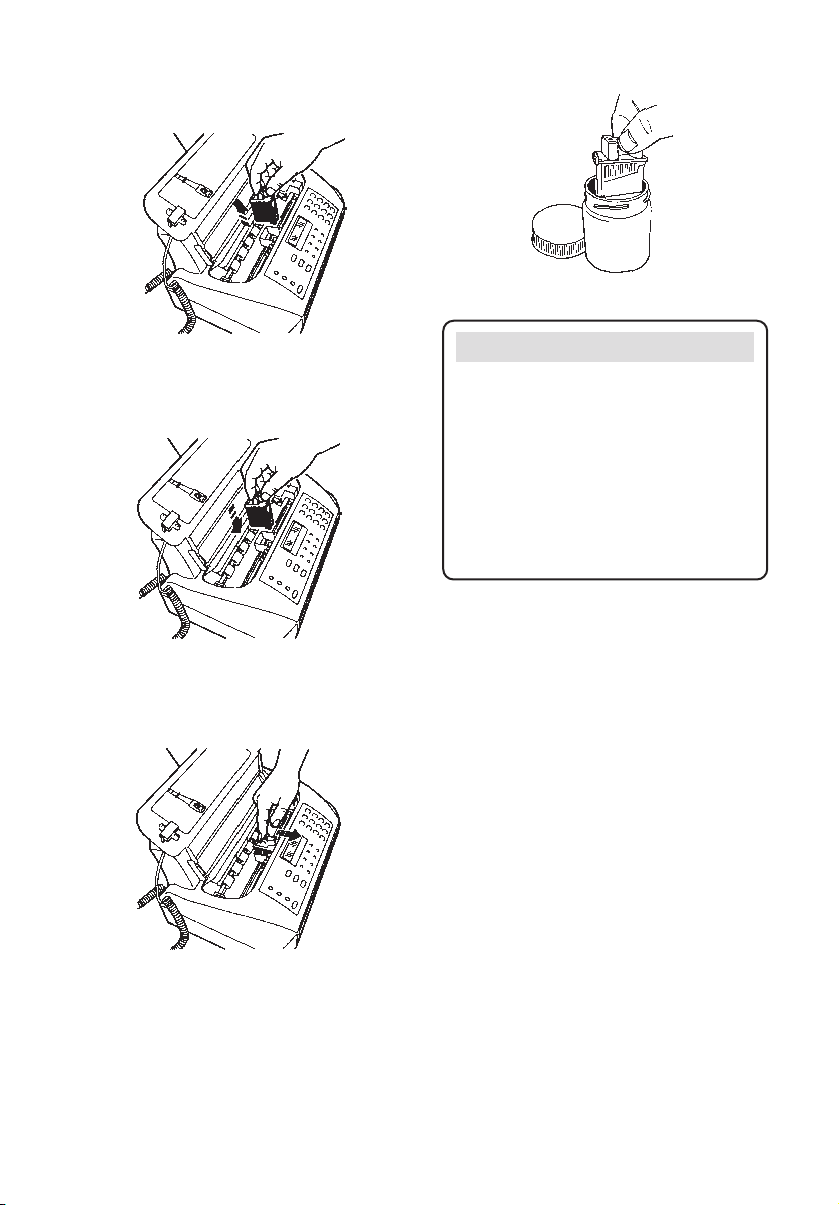
Remove the current cartridge.
Insert the next cartridge.
Close the top cover.
Always store the ink cartridge you are not
using in the special container provided to
maintain its efficiency and print quality.
Pull cartridge towards front of machine to
lock in place.
Important
Your PaperJet 55/65 automatically
recognises whether you have the black or
colour cartridge in the printer and checks
the level of ink. When the cartridge is empty,
the display on the PaperJet 55/65 shows
OUT OF INK.
To ensure the level of ink is accurate, never
swap cartridges between dif ferent printers or
fax machines.
3
Page 5

Important
First set up your PaperJet 55/65 as shown
in the main user guide.
There are two ways to install your PaperJet as
your PC printer.
Plug and play start up – your PC
automatically detects your PaperJet and
starts software installation. It requires you
to switch off your PC before connection.
Or
Standard start up – you tell your PC to
begin software installation manually.
1
2
Plug and play start up
1 Set up
2 Switch off your PC
3 Connect the cable
Follow the PaperJet 55/65 ‘Setting up’
instruction in the main guide.
Connect your PaperJet 55/65 to your PC’s
parallel port using the printer cable (not
supplied).
4 Switch on your PC
When Windows has finished loading, your PC
screen shows a dialogue box indicating that
new hardware has been found and asking
you to select the driver to be installed.
5 Insert the CD
Insert the PaperJet 55/65 Software CD in the
CD-ROM drive and close the door.
4
Starting up
Page 6

Important
If the operating system on your PC is
Windows 95 version 4.00.950B (OSR2),
then the Plug & Play installation is slightly
different. If this is the case, carefully follow
the instructions that appear on your PC
screen and do not worry if an error message
appears. Continue and, at the end, in the
“Copy file from:” box, type the name of the
drive your PaperJet 55/65 Software CD is
in (e.g. D:).
7 Installation
Select the language you want, if it is
not already selected.
Click OK
Follow the on-screen prompts,
by clicking Next in each box that
appears. Or click Exit Installation
to cancel.
‘Select the port’: The recommended
port LPT1 is shown
‘Select Destination folder’: The
recommended folder is shown.
When you have finished selecting
options, click on Start Install installation begins.
A dialogue box is displayed showing
how installation is progressing. To
stop installation click Cancel.
8 Restart your PC
When installation is complete, you are
asked to restart your system.
Click OK. Screen shows the message
Restarting Windows.
Your PaperJet 55/65 is now installed and
selected as your PCs default printer
Turn to page 8 to print or view the user guide
or remove the PaperJet 55/65 Software CD
when your PC has restarted Windows.
5
Your PC will search for a printer
driver for your PaperJet 55/65. If you
are asked to select a drive where the
driver is located, select the CD drive.
6 Click Next on the new
hardware found box
Page 7

5 Installation
Select the language you want, if it is
not already selected.
Click OK
Follow the on-screen prompts, by
clicking Next in each box that
appears. Or click Exit Installation to
cancel.
‘Select the port’: The recommended
port LPT1 is shown.
‘Select Destination folder’: The
recommended folder is shown.
When you have finished selecting
options, click on Start Install installation begins.
A dialogue box is displayed showing
how installation is progressing. To
stop installation click Cancel.
Your PaperJet 55/65 is now installed and
selected as your PCs default printer
Turn to page 8 to print or view the user guide,
or remove the PaperJet 55/65 Software CD
when your PC has restarted Windows.
6
Standard start-up
1 Set up
Follow the PaperJet 55/65 ‘Setting up’
instruction in the main guide.
2 Make sure your PC
is switched on
3 Connect the cable
4 Insert the CD
Insert the PaperJet 55/65 Software
CD in the CD-ROM drive and close
the door.
If the CD does not start running
automatically:
Double click My Computer.
Double click the CD Drive icon.
Double click setup.exe to initiate
installation.
Connect your PaperJet 55/65 to your PC’s
parallel port using the printer cable (not
supplied).
Page 8

7
If you no longer want to use
PaperJet 55/65 as a printer and
want to remove the software
from your PC
Click on Start.
Select Programs.
Select Linkfax 10 Lite.
Click on Uninstaller – uninstalling
will begin.
Follow the on-screen instructions.
When finished you will need to restart
your PC.
Uninstalling the PC software
Page 9

Your PaperJet 55/65 Software CD contains a
copy of the printer user guide which you can
print or view .
Important
To print or view the user guide on-screen
you need Acrobat Reader 4.0. If this is not
already installed on your PC, the PaperJet
55/65 Software CD contains a copy which
needs to be installed first.
Insert the CD in the CD-ROM drive.
Click Start.
Click on Run.
Type x:\ acrobat \ar405eng (where x is
the drive letter of the CD-ROM drive).
Click OK and follow the on-screen
instructions.
Installing Acrobat Reader 4.0
Opening, viewing and printing
the user guide
To open and view the guide.
Click Start.
Select Programs.
Select LinkFax 10 Lite.
Click on User Guide. Your screen
shows the User Guide Help page.
Double click on Printing the user
guide and then on User guide index.
When the Index opens, click the
option you want to open the section.
You can then scroll through the
section as normal.
To print the user guide
When the user guide or document
you want to print is displayed on
screen,
Click File to open the drop down
menu.
Click Print. The LinkFax Printer
dialogue box is displayed. This lets
you select how your machine will
print, including the number of copies.
The Properties button lets you
change the printer set-up, select a
different paper size and orientation.
Click OK to begin printing.
Follow the on-screen instructions.
8
View and print the Printer
User Guide
Page 10

The print software can detect if a document
contains colour and, if you have the wrong
cartridge installed, the PC will ask you if you
want to change it or to print using the current
cartridge.
If the document you are printing has some
black pages and some colour pages the PC will
ask if you want to use Autopilot. If you choose
Autopilot and the mono cartridge is installed,
all the black pages will be printed first. When
the black pages have printed you will be asked
to change the cartridge and the colour pages
will then be printed.
If the colour cartridge is installed when the
print request is made, the colour pages will be
printed first.
Whenever a colour cartridge is installed, your
PaperJet 55/65 display shows COLOUR
CARTRIDGE.
To print, select Print from the File menu and
click OK. Follow the on screen instructions.
To give the most economical use, your
PaperJet 55/65 will only print received faxes
when the black cartridge is installed.
If the colour cartridge is installed faxes will be
stored in the memory.
If the memory becomes full, your machine will
not receive any more until you have printed
some of the faxes, so it is good practice to
keep the black ink cartridge in the machine
for all normal use.
To print faxes from the memory, see page 19
of the main PaperJet 55/65 User Guide.
Printing faxes
9
Printing documents
Page 11

Autopilot does not work
Autopilot tells you when to change between
black and colour cartridges when printing
a document.
Check that your document has colour and
mono sections.
The printer driver uses a pre-set format to
store documents to be printed. Make sure
you have not set the Windows 95/98/Me EMF
format as the spool data format in the print
driver Properties box because this will prevent
the Autopilot from working properly.
Printer will not collate my document
Some applications allow you to collate printed
documents. If you have selected Collate as
well as Autopilot, the Autopilot takes priority
over the collating function.
My laptop PC will not switch on when
connected to the PaperJet 55/65
Disconnect the printer cable from the PaperJet
55/65. Turn on your laptop and PaperJet
55/65. Re-connect the printer cable.
User guide will not print
Have you installed Acrobat Reader 4.0? You
cannot print unless you have version 4.0 or
higher. You can install version 4.0 from
your PaperJet 55/65 Software CD. See page
8 of this guide.
When printing in mono, the image comes
out in a different proportion to the image
shown on screen
Try printing again, with the Print mode setting
on Presentation or Letter.
Printer functions don’t seem to work
properly
Have you re-configured your PCs parallel port?
Ensure it is set to ‘bidirectional’ mode in the
firmware set-up. (BIOS)
The printed page is different to the set-up
shown on my applications print dialogue
box
Give the print driver the same settings as the
print dialogue box.
An error message is displayed after the
print job has started
Have Adobe Type Manager fonts been
installed? If so, uninstall them or use their
version 3.0.
BT PaperJet 55/65 Helpline
If you cannot resolve a problem by using
the Help section, contact the Helpline
0845 052 0052.
10
Help
Page 12

Offices worldwide
The telecommunications services described in this publication
are subject to availability and may be modified from time to time.
Services and equipment are provided subject to British Telecommunications
plc’s respective standard conditions of contract. Nothing in this publication
forms any part of any contract.
Touchtone™ is a registered trade mark of
British Telecommunications plc in the UK.
© British Telecommunications plc 2001.
Registered Office: 81 Newgate Street, London EC1A 7AJ.
Registered in England No. 1800000.
Designed by: The Art & Design Partnership Limited.
Printed in Europe. PaperJet55/65 PC printing guide. Issue 1 (7/01) 1
 Loading...