

Page 1
This equipment is not designed for making emergency telephone calls when the power fails.
Alternative arrangements should be made for access to emergency services.
This product is intended for connection to analogue public switched telephone networks
and private switchboards in the United Kingdom.
Freestyle 60 User Guide ~ 5th Edition ~ 3rd September ’01 ~ 3946
Freestyle 60
Cordless Telephone
User
Guide
Page 2

Freestyle 60 User Guide ~ 5th Edition ~ 3rd September ’01 ~ 3946
Please open this page for an
‘at a glance’ guide to your
Freestyle 60
Page 3

Freestyle 60 User Guide ~ 5th Edition ~ 3rd September ’01 ~ 3946
Please open this page for a
further ‘at a glance’ guide to your
Freestyle 60
Page 4
Freestyle 60 User Guide ~ 5th Edition ~ 3rd September ’01 ~ 3946
1
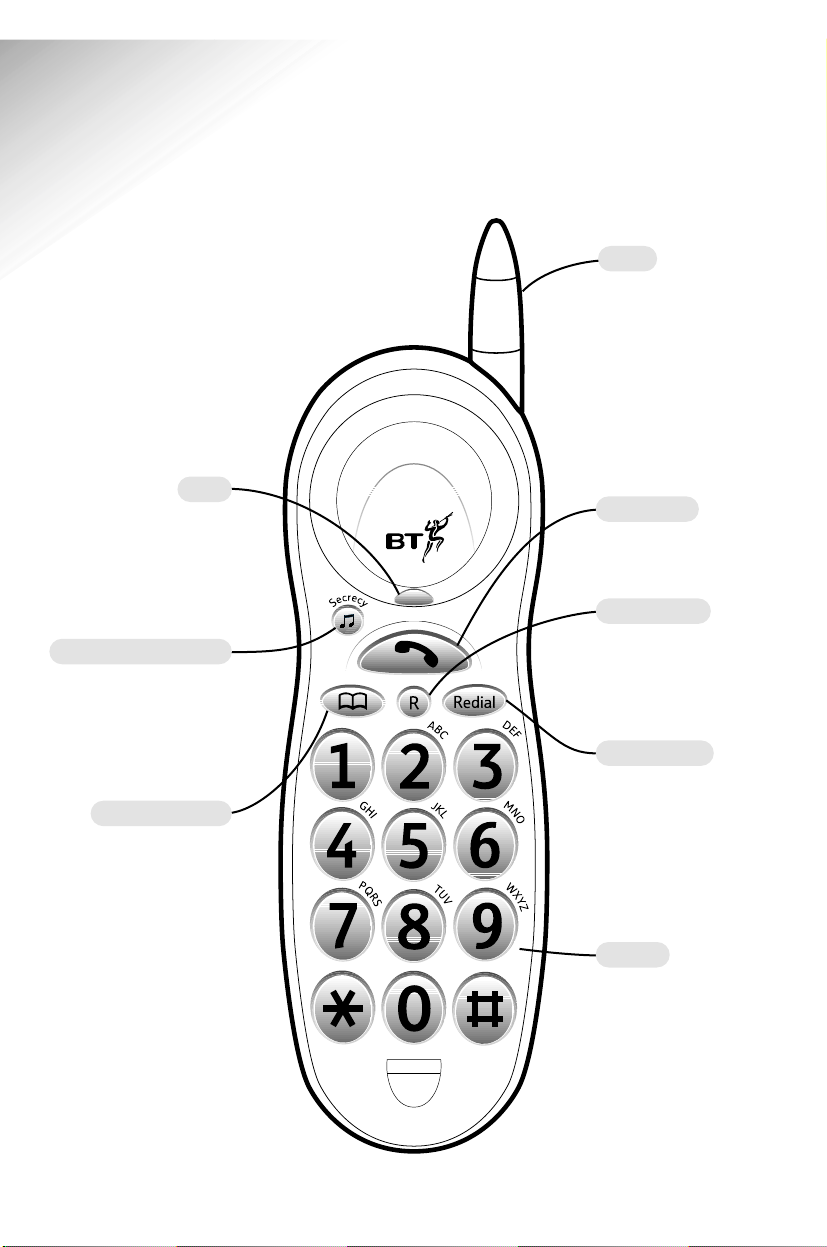
At a glance
Aerial
Can be extended to
obtain the best signal
and reception available,
see page 7.
Keypad
Recall button
For use with a
switchboard/PBX and
BT Select Services, see
pages 14 and 20.
Redial button
Redials the last number
called, or press to enter
a pause in a stored
number, see page 11.
Talk button
Press to make or receive
a call, see page 10.
Light
Indicates when the
handset rings, is in use
or, if the handset battery
needs recharging,
see page 8.
Secrecy/Music on hold
Press to mute the call
so your caller cannot
hear you. You and your
caller will hear music
while on hold, see page 11.
Directory button
Allows you to store and dial
up to 10 numbers in the
memory, see page 12.
Page 5
Freestyle 60 User Guide ~ 5th Edition ~ 3rd September ’01 ~ 3946
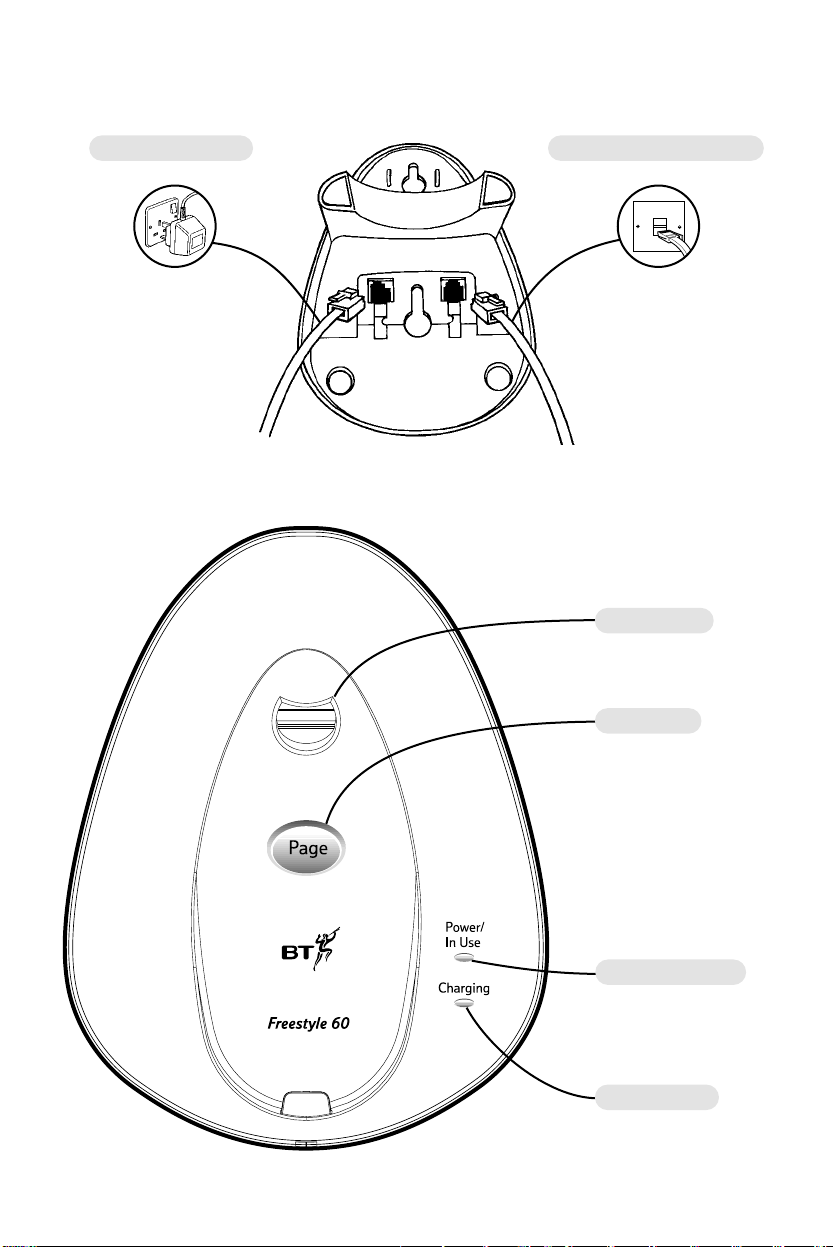
2
Power/In use light
Comes on when connected
to the power supply and
flashes when in use.
Charging light
Comes on to indicate
charging when the
handset is on the base.
Handset hook
Rotate for wall mounting,
see page 24.
Telephone line cord socketMains power socket
Page button
Press to page the handset,
see page 13.
Page 6
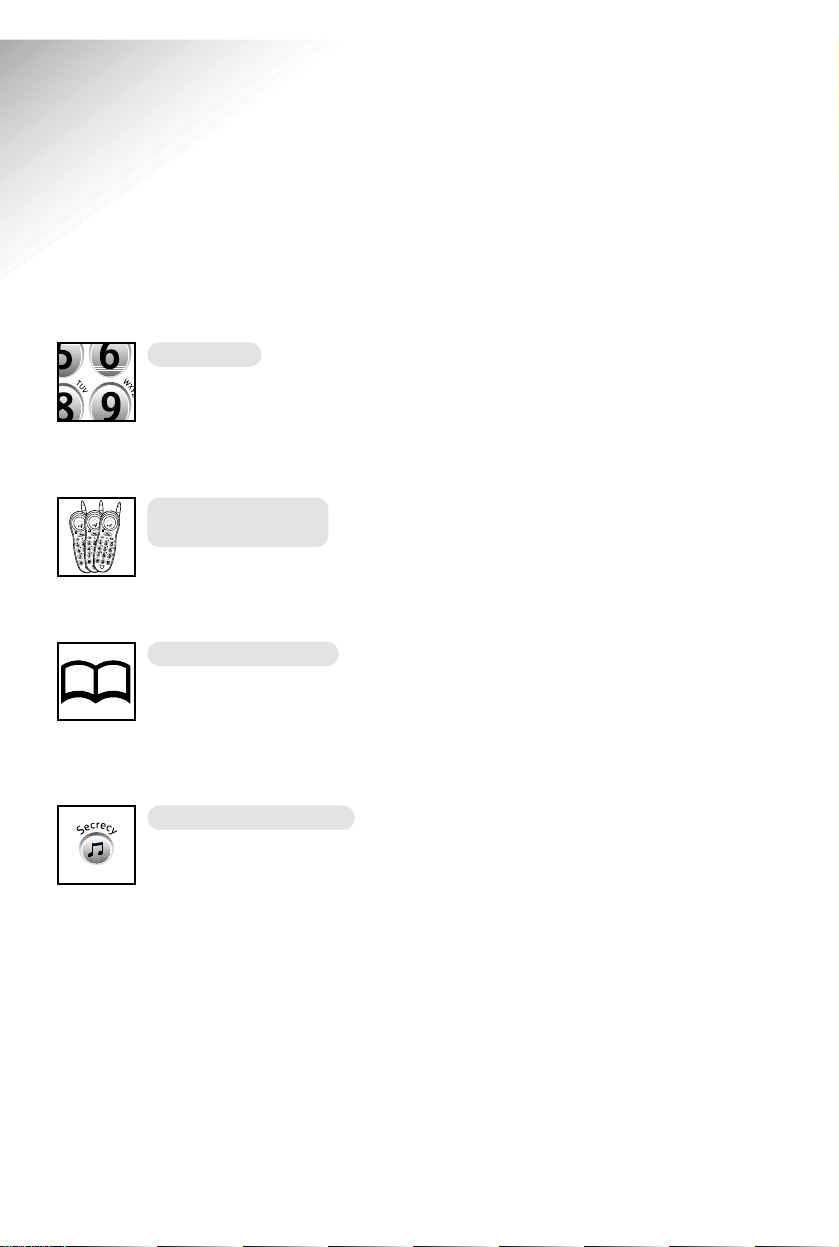
Big buttons
Larger buttons designed for
ease of use, especially for
those with poor eyesight, a disability or
the elderly.
Add up to 3
additional handsets
Use up to 3 additional
handsets with each base.
10 number directory
Allows you to store up to 10
of your most frequently used
numbers in the memory so they can be
easily dialled.
Secrecy/Music on hold
You can mute a call and
speak to someone else in the
room without your caller hearing. You
and your caller will hear music whilst
on hold.
3
Freestyle 60 User Guide ~ 5th Edition ~ 3rd September ’01 ~ 3946
Key features
Page 7

4
Freestyle 60 User Guide ~ 5th Edition ~ 3rd September ’01 ~ 3946
In this guide
At a glance 1
Key features 3
Introduction 5
Safety information 6
Setting up 7
Using your Freestyle 60 10
Making and receiving calls 10
Last number redial 11
Secrecy/Music on hold 11
Directory 12
Base ringer volume 13
Paging 13
Call Waiting 14
Using Freestyle 6
Additional Handsets 15
Registering your handset 15
Transferring calls 16
General information 17
Guarantee 17
If you have to return your product 17
Technical information 18
Batteries 18
Call security 19
Switchboard compatibility 19
Switchboard access codes 19
Help and advice 21
Wall mounting 23
Handset hook 24
Index 25
Wall mounting template 27
Page 8
5
Freestyle 60 User Guide ~ 5th Edition ~ 3rd September ’01 ~ 3946
For your records
For guarantee purposes proof of
purchase is required, so please keep
your receipt.
Introduction
Date of purchase:
Place of purchase:
Serial number:
(on the underside of the base unit)
HELPLINE
If you have problems with your phone,
call the Freestyle 60 Helpline on
0845 7697146.
Your Freestyle 60 is designed for ease
of use and made to the high standards
set by BT.
You can expect your Freestyle 60 to
provide many years of quality service.
Please read the instructions carefully
before use and keep this user guide for
future reference.
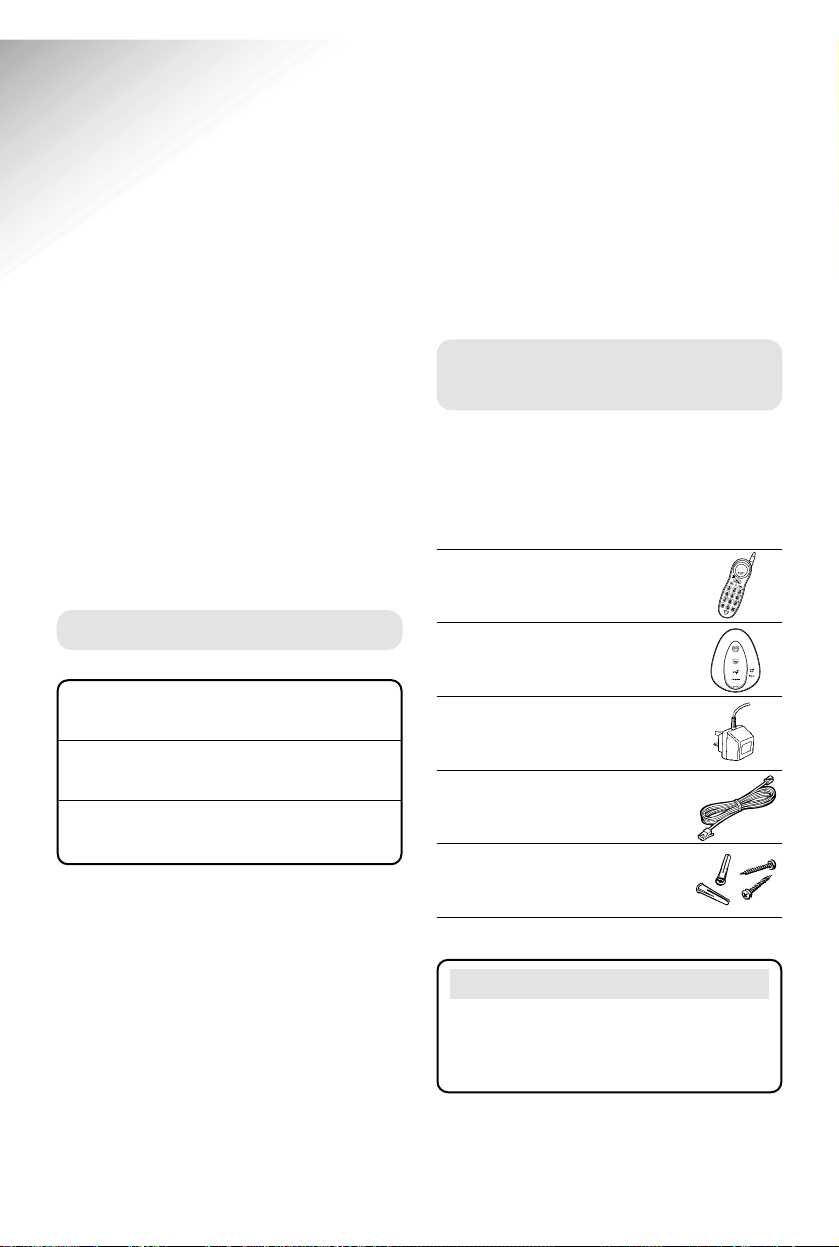
Unpacking your
Freestyle 60
Check that your Freestyle 60 is
complete. If anything is missing, please
contact your place of purchase
immediately.
Freestyle 60 handset.
Freestyle 60 base unit.
Power supply unit.
Telephone line cord.
Wall plugs and
mounting screws.
Page 9

6
Freestyle 60 User Guide ~ 5th Edition ~ 3rd September ’01 ~ 3946
Safety information
General
Only use the power supply unit
included with the product. Using an
unauthorised power supply will
invalidate your guarantee and may
damage the telephone. The item
number for the power supply unit
is 872264.
For the handset use only approved
rechargeable battery pack. Under
no circumstances should nonrechargeable batteries be used.
Using unapproved batteries will
invalidate your guarantee and may
damage the telephone.
Radio signals transmitted between
the handset and base may cause
interference to some hearing aids.
Do not dismantle the handset or
base station. This could expose you
to high voltages or other risks.
Contact the helpline for repairs.
Never dispose of batteries in a fire.
There is a serious risk of explosion
and/or the release of highly toxic
chemicals.
Cleaning
Simply clean the handset and base
station with a damp (not wet) cloth,
or an antistatic wipe. Never use
household polish as this will damage
the product. Never use a dry cloth
as this may cause a static shock.
Environmental
Do not expose to direct sunlight.
The product may heat up when
the batteries are being recharged.
This is normal. However, to avoid
damage we recommend that you
do not place the product on
antique/veneered wood.
Do not expose your product to
fire, explosive or other hazardous
conditions.
There is a slight chance that your
phone could be damaged by an
electrical storm. We recommend
that you unplug the power and
telephone line cord for the
duration of the storm.
Page 10
7
Freestyle 60 User Guide ~ 5th Edition ~ 3rd September ’01 ~ 3946
Setting up
Follow these steps to set up your Freestyle 60 ready for use.
Plan the location
Situate your Freestyle 60 close enough
to the mains power socket and telephone
socket so that the cables will reach.
Make sure it is at least 1 metre away
from other electrical products to avoid
interference.
Do not situate the product in the
bathroom or other humid areas.
Your Freestyle 60 works by sending and
receiving radio signals between the base
unit and the handset.
The strength of the signal depends on
where you site the base unit and how
the aerial is deployed.
The higher the base unit is located,
the better. An upstairs room is ideal.
Your product can be wall mounted, for
more information see page 23.
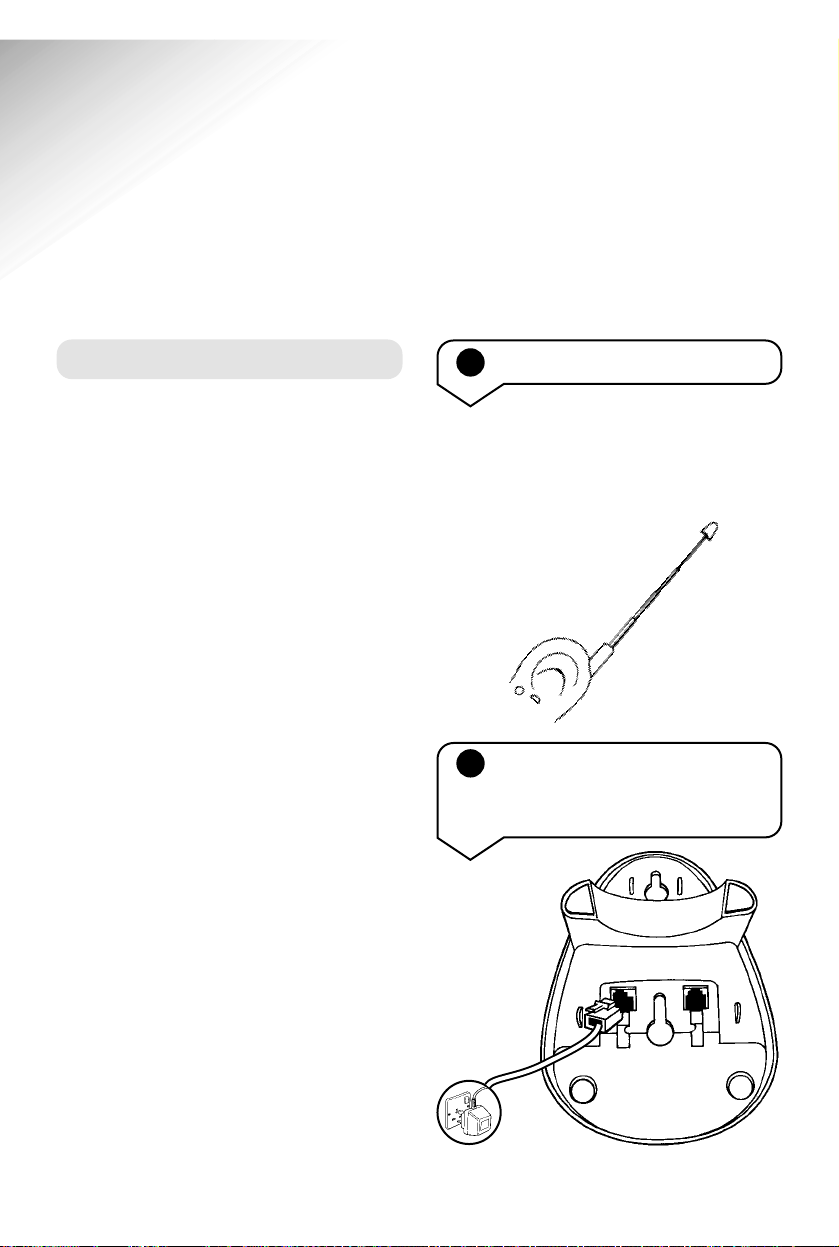
2 Plug the power supply
cord into the back of the
base unit
1 Handset aerial
Your Freestyle 60 handset uses a
compact aerial which we recommend
you pull out to obtain the best signal
and reception available.
Page 11

8
Freestyle 60 User Guide ~ 5th Edition ~ 3rd September ’01 ~ 3946
Note
Do not connect the telephone line cord
to the phone socket until the handset
is fully charged. This will prevent the
risk of the phone being answered
before the batteries are charged, which
may prevent them from reaching
maximum capacity.
Note
When fully charged and in good
condition, the handset will provide up
to 7 hours talktime or 72 hours
standby.
If the handset battery is running low,
the light on the handset will flash
every 10-15 seconds.
If you are making a call and the
handset battery is running low you
will hear a warning tone every
10-15 seconds.
Place the handset on the base unit to
recharge.
However, the charge capacity of
rechargeable batteries will reduce with
time as they wear out, so reducing the
talk/standby time of the handset.
Eventually they will need to be replaced.
New batteries can be obtained from
the BT shop or from the Helpline.
Please see page 18 for instructions
on how to install a new battery pack.
To get the longest possible life from
your battery, take the handset off the
base unit for a few hours each day.
4 Charge the handset
When you first use your Freestyle 60,
the rechargeable battery in the handset
needs charging for 24 hours.
Place the handset on the base unit,
ensuring the contacts are touching.
The red CHARGING light will come on.
The charging light will remain
constantly lit while the handset is
placed on the base unit, even when the
handset batteries are fully charged.
3 Connect the base unit
power supply to a power
socket
The power supply unit must remain
plugged in all the time.
Page 12

9
Freestyle 60 User Guide ~ 5th Edition ~ 3rd September ’01 ~ 3946
5 Plug the telephone line
cord into the bottom of
the base unit and plug the
other end of the line cord
into the telephone wall
socket
Your Freestyle 60 is now ready for use.
Helpline
If you have any difficulties setting up
your Freestyle 60 please call the
Helpline on 0845 7697146.
Page 13

10
Freestyle 60 User Guide ~ 5th Edition ~ 3rd September ’01 ~ 3946
Using your Freestyle 60
Making and receiving calls
To make an external call
Press the buttons in the order
shown:
Lift the handset off the base
unit.
Press the TALK button.
The POWER/IN USE light on
the base unit begins to flash
and the light on the handset
comes on.
Listen for the dialling tone.
Dial the number you want.
To end a call
Press the TALK button.
Or
Replace the handset on the
base unit.
To receive a call
When the phone rings:
If your handset is on the base
unit, simply pick it up to
answer the call.
Or
If your handset is off the base
unit then the handset light will
flash, press the TALK button
to answer the call.
Note
The handset range is up to 250 metres
from the base unit in ideal conditions.
If you start to go out of range while
using the phone, you will hear
warning beeps. Move closer to the base
unit. If you do not move back into
range your call may be disconnected.
Your Freestyle 60 automatically scans
the available radio channels and
selects the best quality reception
to use.
Page 14

11
Freestyle 60 User Guide ~ 5th Edition ~ 3rd September ’01 ~ 3946
Note
An Inductive Coupler has been built
into the handset to improve sound
quality for people using hearing aids.
Switch your hearing aid to T and
adjust the position of the handset until
you get the best reception.
To redial the last number
called
Press the TALK button and
wait for the dialling tone.
Press the REDIAL button. The
number is dialled automatically.
Last number redial
Your Freestyle 60 stores the last number
called which enables quick and easy
redialling. A redial number can be no
longer than 32 digits.
Note
Your Freestyle 60 handset uses a
compact aerial which can be pulled
out to obtain the best signal and
reception available.
To switch Secrecy on and off
During a call press and
release the SECRECY button.
Your caller will be put on
hold and both you and the
caller will hear music until
the SECRECY button is
pressed again.
The handset light will flash.
You can now talk to someone
in the room without your
caller hearing you.
Press and release the
SECRECY button again to
return to your caller.
Secrecy/Music on hold
When on a call you can talk to
someone in the same room, without
your caller hearing.
Page 15

12
Freestyle 60 User Guide ~ 5th Edition ~ 3rd September ’01 ~ 3946
Note
There is a directory label included on
the reverse side of your handset. You
can use this to keep a record of which
location number you have used for
each telephone number.
Remove the battery cover by pressing
down on top of the lid and slide the
cover off.
To remove the directory label from the
battery cover lid, push up the director y
label with your
thumb as
shown.
Note
Storing a number in the directory
automatically overwrites any previous
number stored under the same
location code.
Stored numbers can include
switchboard and network services that
use the
✱
and #buttons as well as
PAUSE and RECALL functions.
To enter a pause in a directory number
press the REDIAL button.
Directory
You can store ten of your most
frequently used telephone numbers in
the directory. Please note that the
numbers can be no longer than 20
digits long.
Note
You can mix manual and memory
dialling as required, for example, you can
dial the area code 020 8304 from the
directory and then complete the
number manually.
To store a number in the
directory
Press the DIRECTORY button.
Enter the location number
between 0 and 9, under which
you want to store the number.
Enter the telephone number
you want to store.
Press the DIRECTORY button
to confirm.
You will hear a confirmation
tone.
0-9
Page 16

13
Freestyle 60 User Guide ~ 5th Edition ~ 3rd September ’01 ~ 3946
To dial a number in the
directory
Press the TALK button.
Press the DIRECTORY button.
Enter the location number
between 0 and 9, under which
the number is stored.
The number is dialled
automatically.
To delete stored numbers
Any existing number stored
in the directory can be
overwritten by entering a
new number under the same
location. Simply follow the
steps under the storing numbers
sections previously shown.
To page the handset
Press the PAGE button on the
base unit.
The handset will ring.
Paging
Base ringer volume
You can page the handset from the
base unit to alert a handset user that
they are wanted or to locate a missing
handset. However, paging calls cannot
be answered by a handset.
To adjust the base ringer
volume
There are 3 levels to choose
from, HIGH, LOW and OFF.
1 = HIGH; 2 = LOW and 3 = OFF.
The default setting is HIGH.
Press the DIRECTORY button.
Press the
#
button.
Enter the setting you want,
1-3.
Press the DIRECTORY button
to confirm the setting.
You will hear a confirmation
tone.
You will also hear a sample
ring of the base ringer at levels
1 and 2.
1-2-3
0-9
Page 17

To use Call Waiting
You can answer the second call,
without disconnecting your
first caller, by pressing the R
button. The first caller will be
put on hold.
When you have spoken to the
second caller you can return
to the first caller by pressing
the R button again. You can
switch back and forth between
the 2 calls without disconnecting
either if you wish.
If you wish to disconnect the
first call, press the TALK
button after speaking to the
first caller.
The handset will then ring.
Press the TALK button again
and continue with the second
caller.
The second caller will only be
charged for their call from the
moment you answer and not
while they are waiting for your
14
Freestyle 60 User Guide ~ 5th Edition ~ 3rd September ’01 ~ 3946
You can stop paging at any time
by pressing the PAGE button
on the base unit or any buttons
on the handset.
Pressing the TAL K button will
not only stop the paging but
also seize the line. Press the
TALK button a second time to
clear the line.
Paging will continue to ring
for approximately one minute.
If the paging is not answered
after this time your handset
will return to standby.
Note
You cannot page the handset while it
is being used on a call. An incoming
call will override a page call and the
handset will ring as normal.
If additional handsets are registered
to the Freestyle 60 base unit then all
handsets will ring when paged.
(this beep is not audible to the person
you are speaking to).
Instead of the engaged tone, the second
caller will hear an announcement to
hold as you are aware that there is a
second call.
If an incoming call arrives while you are
already engaged on a telephone call, you
will hear a soft beep every 5 seconds
Note
To use Call Waiting you will need to
subscribe to the Service from your
network provider. A quarterly fee is
payable.
Call Waiting
Page 18

15
Freestyle 60 User Guide ~ 5th Edition ~ 3rd September ’01 ~ 3946
Using Freestyle 6
Additional Handsets
You can buy and use up to three
Freestyle 6 additional handsets
(or Quartet 1000 additional handsets)
with your Freestyle 60 to extend your
phone system, without needing to install
extension sockets for each new phone.
Please note that Quartet 1000 handsets
are compatible with your Freestyle 60
but the Quartet 1000 has more advanced
features. For more information on
Quartet 1000 additional handsets please
refer to the Quartet 1000 user guide.
Each additional handset is supplied with
its own charger and user instructions,
but the following information will tell
you how to register and use an additional
handset with your Freestyle 60.
Registering your handset
You must register your Freestyle 6
additional handset before it can be used
with your Freestyle 60 base unit.
Note
You must charge your additional
handset for 24 hours before
registering it.
Note
Once your Freestyle 6 handset has been
registered to your base unit it cannot
be re-registered to another base unit.
To register an additional
handset
Please ensure you have only
the handset you wish to
register ready when following
the instructions below.
Press and hold the base unit
PAGE button for 5 seconds until
both the POWER/IN USE
light on the base unit and the
light on the handset begin to
flash.
Release the PAGE button and
press the TALK button on the
additional handset that you
wish to register.
Page 19

16
Freestyle 60 User Guide ~ 5th Edition ~ 3rd September ’01 ~ 3946
Note
Check that your additional handset
is registered correctly by pressing the
TALK button. The talk light should
remain constantly lit and you will
hear a dial tone. If you do not hear
a dial tone your additional handset
is either out of range of the base unit
or it has not been registered properly,
or the base unit line cord is not
plugged in.
Note
Make a note of the handset number by
writing it on the directory label on the
back of the additional handset.
Your additional handset is
registered automatically and you
will hear a long confirmation
beep and the light will stop
flashing.
Each additional handset must
be assigned an identity
number (2, 3 or 4) to be used
when transferring calls. Your
Freestyle 60 handset is already
registered as HANDSET 1. A
Freestyle 6 additional handset
is pre-set as HANDSET 2.
However, further additional
handsets can be numbered as
they are added.
Press the DIRECTORY button.
Press the SECRECY button.
Enter the handset number
between (2 and 4).
To set the handset number
To transfer a call
Press the DIRECTORY
button. You will hear a beep
confirming that the new
number has been stored.
2-4
Transferring calls
You can transfer calls between handsets
that are registered to the base unit.
During your call press the
SECRECY button and then the
handset number that you want
to transfer the call to.
The called handset will ring.
Press the TALK button on the
ringing handset to speak to
the caller.
If the call is not answered
within 30 seconds the original
calling handset will ring.
If after a further 30 seconds
the call is not taken the caller
will be disconnected.
Page 20

17
Freestyle 60 User Guide ~ 5th Edition ~ 3rd September ’01 ~ 3946
General information
Guarantee
Your Freestyle 60 is guaranteed for a
period of 12 months from the date of
purchase. Subject to the terms listed
below the guarantee will provide for the
repair of, or at BT’s or its agent’s
discretion, the option to replace the
Freestyle 60 or any component thereof,
(other than batteries), which is
identified as faulty or below standard,
or as a result of inferior workmanship
or materials. Products over 28 days old
from the date of purchase may be
replaced with a refurbished product.
The conditions of this guarantee are:
• The guarantee shall only apply to
defects that occur within the 12 month
guarantee period.
• Proof of purchase is provided.
• The equipment is returned to BT or
its agent as instructed.
• This guarantee does not cover any
faults or defects caused by accidents,
misuse, fair wear and tear, neglect,
tampering with the equipment, or any
attempt at adjustment or repair other
than through approved agents.
• This guarantee does not affect your
statutory rights.
Within the 12 month guarantee period:
Prior to returning your product, please
read the Help section beginning on
page 21 or contact the Helpline on 0845
769 7146 for assistance. In the unlikely
event of a defect occurring, please
follow the Helpline’s instructions for
replacement or repair.
Outside of the 12 month guarantee period:
If your product needs repair after the
guarantee period has ended, the repair
must meet the approval requirements
for connection to the telephone
network. We recommend that you
contact BT’s approved repair agent
TecLogic on 01672 564444 or a local
qualified repairer.
If you have to return
your product
Prior to returning your product, please
read the Help section on page 21, or
contact the Helpline on 0845 769 7146
for assistance. If you still feel you have
to return your product, pack the base
station and handset securely, preferably
in the original packaging. All parts must
be returned, including line cords, power
supplies and original batteries. (Please
note that we can not take responsibility
for goods damaged in transit).
Page 21

18
Freestyle 60 User Guide ~ 5th Edition ~ 3rd September ’01 ~ 3946
Technical information
How many telephones can you have?
All items of telephone equipment have
a Ringer Equivalence Number (REN),
which is used to calculate the number
of items which may be connected to any
one telephone line. Your Freestyle 60
has a REN of 1. A total REN of 4 is
allowed. If the total REN of 4 is
exceeded, the telephones may not ring.
With different telephone types there is
no guarantee of ringing, even when the
REN is less than 4.
Only use approved power supply, item
code: 872264.
Only use approved batteries, item code
872276.
These products are available from the
Freestyle 60 Helpline 0845 769 7146.
Remove the battery cover by
pressing down on top of the lid
and slide the cover off.
Unplug the connector and
remove the old battery pack.
Plug the new battery pack
connector in and lower the
battery pack into recess then
replace lid.
To replace the battery pack
Batteries
Although the battery pack is
rechargeable it will eventually need
to be replaced, see below for details on
how to replace the battery pack.
Page 22

19
Freestyle 60 User Guide ~ 5th Edition ~ 3rd September ’01 ~ 3946
Note
When fully charged and in good
condition, the handset will provide up
to 7 hours talktime or 72 hours
standby.
If the handset battery is running low,
the light on the handset will flash
every 10-15 seconds.
If you are making a call and the
handset battery is running low you
will hear a warning tone every
10-15 seconds.
Place the handset on the base unit to
recharge.
However, the charge capacity of
rechargeable batteries will reduce with
time as they wear out, so reducing the
talk/standby time of the handset.
Eventually they will need to be replaced.
New batteries can be obtained from
the BT shop or from the Helpline.
To get the longest possible life from
your battery, take the handset off the
base unit for a few hours each day.
Call security
Your Freestyle 60 has its own digital
security code that prevents other
cordless phone owners from using your
phone line. This ensures that you are
charged only for calls using your phone.
However, all approved cordless phones
use radio signals to communicate
between the base unit and cordless
handset units. It is therefore possible that
your conversations could be overheard
by other people, on their cordless
phones, or on ordinary radios that use
the same radio frequencies.
As this problem applies equally to all
similar cordless phones currently
available in the UK, call privacy cannot
be guaranteed. However, the security
coding prevents unauthorised use of
your line.
Switchboard compatibility
This product is intended for use within
the UK for connection to the public
telephone network and compatible
switchboards, which support tone and
pulse dialling and timed break recall.
If in doubt please consult your service
provider.
Switchboard access codes
To set the dialling mode
Press the DIRECTORY button.
Press the
✱
button. You will
hear a tone.
Press 1 for Tone dialling.
Or
Press 2 for Pulse dialling.
Press the DIRECTORY button.
You will hear a confirmation
tone.
Page 23

20
Freestyle 60 User Guide ~ 5th Edition ~ 3rd September ’01 ~ 3946
To insert a pause in the
memory
With some switchboards, after
dialling the access code you
may have to wait for a moment
while the switchboard picks up
an outside line.
If so, press the REDIAL button
to insert a pause before
entering the telephone number.
To use the recall facility
You may need to use the recall
function if you are connected
to a switchboard/PBX (Private
Branch Exchange), contact
your PBX supplier for further
information. The recall
function is set to timed break
recall and is also used for
BT Select Services.
Page 24

21
Freestyle 60 User Guide ~ 5th Edition ~ 3rd September ’01 ~ 3946
Help and advice
If you have any problems using your Freestyle 60, this section will
give you the most common, easy to follow solutions.
Telephone problems Possible cause Solution
• No dialling tone.
• Telephone will not dial out or
cannot receive calls.
• Handset does not ring and no
light on handset.
Telephone not connected to
telephone line.
Mains disconnected.
Power cut.
Handset battery pack is discharged.
Handset not registered.
Plug the telephone into the
telephone line.
Ensure the power supply is correctly
connected and switched on.
Wait until the power is restored.
Replace handset on base unit for 10
seconds and try again. If this does
not work, disconnect the handset
battery from the handset for 10
minutes. Also disconnect the mains
power.
Then reconnect the base unit to the
mains, then replace the handset on
the base unit for 10 seconds and try
again.
Place the handset on the base
unit and recharge it for 24 hours
ensuring the CHARGING light
is on.
Register the handset, see page 15.
• You have dialling tone but the
telephone will not dial out.
You may be trying to use tone dialling
on a pulse dialling exchange.
You are connected to a PBX and are
not dialling the access code.
See page 19 to change to pulse
dialling.
Use the PBX access code.
See page 19 for more information
on switchboard use.
Page 25

22
Freestyle 60 User Guide ~ 5th Edition ~ 3rd September ’01 ~ 3946
• Base unit does not ring but
lights show on base unit.
Telephone is not connected to the
telephone line.
The base ringer is set to off.
Line fault or faulty socket.
Plug the telephone into the telephone
socket.
Set the base ringer setting to a
higher volume, see page 13.
Try the telephone on another socket
or another line. If the telephone
works, contact BT on 151, or your
telephone network operator for
repairs to the line or socket.
• Callers are faint.
• Interference.
• Buzzing.
• Tinniness.
You are moving out of range.
The base unit or the handset are
too close to electrical equipment or
metal obstructions.
Move closer to the base unit.
Relocate the base unit or move
around with the handset until
reception improves.
• Call appears to have been cut
off after pressing the SECRECY
button.
You may have pressed a number key
on the handset after pressing the
SECRECY button. The current
handset will try to transfer the call to
another handset.
Wait 30 seconds; the call will return
to the current handset.
Or press the TALK button and the
call will return immediately.
• No Directory number
stored.
You may have pressed the TALK
button first before storing the number.
Don’t press the TALK button when
storing numbers, see page 12.
• Light on the handset
is flashing.
The handset needs recharging or
there is an incoming call.
Replace the handset on the base unit,
ensuring that the base unit is
plugged in and that the CHARGING
light is on.
• No CHARGING light on the
base unit.
Dirty contacts on base unit or
handset.
Clean the contacts with a dry cloth.
Heavy soiling can be removed with
a pencil eraser.
If you are still experiencing difficulties please call the Helpline on 0845 769 7146.
Telephone problems Possible cause Solution
Page 26

23
Freestyle 60 User Guide ~ 5th Edition ~ 3rd September ’01 ~ 3946
Wall mounting
For the best operating conditions,
try to place the base unit away from
large metal objects and other
electrical appliances.
Drill 2 holes for the screws and insert
the wall-plugs provided (if required).
Drive the screws into the wall, leaving
about 4mm free on which to mount
the bracket and base unit.
Make sure that the power supply and
the telephone cables are connected
to the base unit, then fit the cables
into the channels on the bottom of the
base unit.
Attach the base unit by hooking it over
the screws protruding from the wall.
Your Freestyle 60 can be wall-mounted
by removing the desk bracket.
To remove, just squeeze the bracket in
with thumbs and lift off as shown.
Please refer to page 27, wall-mounting
template.
WALL
WALL PLUG
70 mm
1
2
3
4
Note
Before you wall-mount your
Freestyle 60, check that:
• the wall can support the weight of
the base unit and handset;
• you are not drilling into any hidden
wiring;
• the power supply cable will reach
from the mains power socket to your
wall mounting position;
• the position you choose leaves enough
space so that the base unit is clear
of any obstruction on the wall, such
as a shelf or cupboard. Room should
be left so that the handset can be
placed on charge without touching
any obstructions.
Page 27

24
Freestyle 60 User Guide ~ 5th Edition ~ 3rd September ’01 ~ 3946
Handset hook
Keeps the handset in place when the
Freestyle 60 is wall mounted.
Revolve the handset catch on the top of
the base unit.
Ensure the handset is firmly attached
to the base unit.
The handset will now be able to rest on
the hook when wall-mounted.
1 2
Page 28

25
Freestyle 60 User Guide ~ 5th Edition ~ 3rd September ’01 ~ 3946
Additional handsets 15
Aerial 7
At a glance 1
Base ringer volume 13
Batteries
charging 8
low warning 8
replacing 18
Call security 19
Calls
end 10
external 10
make 10
receive 10
redial 11
transfer 16
Call Waiting 14
Charge handset 8
Directory 12
deleting 13
dial 13
label 12
store 12
Dialling mode 19
Guarantee information 17
Handset
additional 15
aerial 7
charging 8
hook 24
register 15
set number 16
Help 21
Helpline 9
Inductive Coupler 11
Location of product 7
Make a call 10
Memories 12
Paging 13
Pause 20
Phone socket 2, 9
Power supply unit 2, 8
Recall 14, 20
Receive a call 10
Redial 11
Registering a handset 15
Index
Page 29

26
Freestyle 60 User Guide ~ 5th Edition ~ 3rd September ’01 ~ 3946
Returning product 17
Ringer – base 13
Safety information 6
Secrecy 11
Security coding 19
Setting up 7
Switchboard use 19
Technical information 18
Telephone line cord 2, 9
Transfer a call 16
Unpacking 5
Volume – base ringer 13
Wall mounting 23
Wall mounting template 27
Page 30

27
Freestyle 60 User Guide ~ 5th Edition ~ 3rd September ’01 ~ 3946
70mm
Wall mounting template
Page 31

Freestyle 60 User Guide ~ 5th Edition ~ 3rd September ’01 ~ 3946
R&TTE
This product is intended for use within
the UK for connection to the public
telephone network and compatible
switchboards.
This equipment complies with the
essential requirements for the Radio
Equipment and Telecommunications
Terminal Equipment Directive
1999/5/EC.
Declaration of Conformance
Hereby, Suncorp Technologies,
declares that this Freestyle 60 is in
compliance with the essential
requirements and other relevant
provisions of Directive 1999/5/EC.
The Declaration of Conformance for
the Freestyle 60 is published on the
website http://www.suncorptech.com/bt
Page 32

Freestyle 60 User Guide ~ 5th Edition ~ 3rd September ’01 ~ 3946
Offices worldwide
The telecommunications services described in this publication
are subject to availability and may be modified from time to time.
Services and equipment are provided subject to British
Telecommunications plc’s respective standard conditions of contract.
Nothing in this publication forms any part of any contract.
© British Telecommunications plc 2001.
Registered Office: 81 Newgate Street, London EC1A 7AJ.
Registered in England No. 1800000.
Freestyle 60 Issue 1 (9/01) 5
Designed by The Art & Design Par tnership Limited.
Printed in China by SunCorp Technologies.
0168
!
 Loading...