

Page 1
User Guide
BT PAPERJET 45
Page 2
Send, receive and forward SMS text messages. The Qwerty keyboard
makes them easy to write.
A multifunctional machine that combines phone, fax and copying
functions.
Send and receive faxes. Easy controls let you adjust the resolution and
contrast for fine details, drawing and photographs.
Cordless handset with up to 300m range outdoors and 50m indoors.
Add up to 4 additional cordless handsets.
Enlarge, reduce and make multiple copies of original documents.
Quickdial directory lets you dial your 10 most important or frequently
used numbers by pressing just two buttons.
Up to 99 name and number directory makes it simple to store and dial
numbers for faxing and phoning.
Redial any of the last 5 numbers, stored in the redial list.
Welcome…
to your BT PaperJet 45 multifunctional
fax machine.
Page 3

This User Guide provides you with all the
information you need to get the most from
your fax machine.
You must first set up your machine before you
can use it. This doesn’t take long as it is easy
to do. Just follow the simple instructions on
the next few pages or see the Quick Start
guide enclosed.
Need help?
If you have any problems setting up or using
your BT PaperJet 45 please contact the Helpline
on 0870 241 6538.
Alternatively, you may find the answer on the web at
www.bt.com/fax or in ‘Help’ at the back of this guide.
Got everything?
BT PaperJet 45 machine
DECT Cordless handset
3 x AAA NiMH rechargeable
batteries
Mains power cable
Telephone line cord
Quick Start Guide
User Guide
Starter ink film
Page 4

Getting started
Location . . . . . . . . . . . . . . . . . . . . . . . . . . . . . . 6
Setting up . . . . . . . . . . . . . . . . . . . . . . . . . . . . . 6
Connect any additional devices . . . . . . . . . . . . . . 9
Getting to know your fax
Fax machine. . . . . . . . . . . . . . . . . . . . . . . . . . . . 10
DECT cordless handset . . . . . . . . . . . . . . . . . . . . 11
Control panel . . . . . . . . . . . . . . . . . . . . . . . . . . . 12
Fax machine display screen . . . . . . . . . . . . . . . . . 13
Using the phone
Making calls . . . . . . . . . . . . . . . . . . . . . . . . . . . . 14
Call forward . . . . . . . . . . . . . . . . . . . . . . . . . . . . 14
Redial . . . . . . . . . . . . . . . . . . . . . . . . . . . . . . . . 14
Delete a number in the redial list . . . . . . . . . . . . . 15
Handset phonebook . . . . . . . . . . . . . . . . . . . . . . 15
Store a phonebook entry . . . . . . . . . . . . . . . . . . . 15
Call a phonebook entry . . . . . . . . . . . . . . . . . . . . 15
Edit a phonebook entry . . . . . . . . . . . . . . . . . . . . 15
Delete a phonebook entry . . . . . . . . . . . . . . . . . . 16
Main directory . . . . . . . . . . . . . . . . . . . . . . . . . . 16
Store a Directory entry . . . . . . . . . . . . . . . . . . . . 16
Call a Directory entry . . . . . . . . . . . . . . . . . . . . . 16
Edit Directory entry . . . . . . . . . . . . . . . . . . . . . . 17
Delete a Directory entry . . . . . . . . . . . . . . . . . . . 17
Print Directories . . . . . . . . . . . . . . . . . . . . . . . . . 17
Faxing
Inserting documents . . . . . . . . . . . . . . . . . . . . . . 18
Resolution . . . . . . . . . . . . . . . . . . . . . . . . . . . . . 19
Contrast . . . . . . . . . . . . . . . . . . . . . . . . . . . . . . 19
Sending faxes. . . . . . . . . . . . . . . . . . . . . . . . . . . 19
Receiving faxes. . . . . . . . . . . . . . . . . . . . . . . . . . 19
Receiving a fax via an external phone . . . . . . . . . . 20
Receiving faxes into the memory . . . . . . . . . . . . . 20
Memory indicator . . . . . . . . . . . . . . . . . . . . . . . . 20
Fax mode. . . . . . . . . . . . . . . . . . . . . . . . . . . . . . 20
Manual reception . . . . . . . . . . . . . . . . . . . . . . . . 20
To set manual reception . . . . . . . . . . . . . . . . . . . 21
Automatic reception . . . . . . . . . . . . . . . . . . . . . . 21
To set the number of rings. . . . . . . . . . . . . . . . . . 21
Groups . . . . . . . . . . . . . . . . . . . . . . . . . . . . . . . 22
Create a group . . . . . . . . . . . . . . . . . . . . . . . . . . 22
View entries in a group . . . . . . . . . . . . . . . . . . . . 22
Delete an entry or the whole group . . . . . . . . . . . 23
Broadcast faxing. . . . . . . . . . . . . . . . . . . . . . . . . 23
Broadcast to individual numbers . . . . . . . . . . . . . 23
Broadcast to a group . . . . . . . . . . . . . . . . . . . . . 24
Delayed sending. . . . . . . . . . . . . . . . . . . . . . . . . 24
Polling . . . . . . . . . . . . . . . . . . . . . . . . . . . . . . . . 25
Quick polling . . . . . . . . . . . . . . . . . . . . . . . . . . . 25
Polling with a code . . . . . . . . . . . . . . . . . . . . . . . 25
Set a document for polling . . . . . . . . . . . . . . . . . 25
Timer mode . . . . . . . . . . . . . . . . . . . . . . . . . . . . 26
Switch day/night timer on/off. . . . . . . . . . . . . . . . 26
Change day and night periods . . . . . . . . . . . . . . . 26
Change day/night settings. . . . . . . . . . . . . . . . . . 26
Silent operation . . . . . . . . . . . . . . . . . . . . . . . . . 27
Reports and print-outs . . . . . . . . . . . . . . . . . . . . 28
Transmission report . . . . . . . . . . . . . . . . . . . . . . 28
Fax journal . . . . . . . . . . . . . . . . . . . . . . . . . . . . . 28
Dialling list. . . . . . . . . . . . . . . . . . . . . . . . . . . . . 28
Speed . . . . . . . . . . . . . . . . . . . . . . . . . . . . . . . . 29
Received fax size . . . . . . . . . . . . . . . . . . . . . . . . 29
Copying
Copy a document . . . . . . . . . . . . . . . . . . . . . . . . 30
Make up to 15 copies . . . . . . . . . . . . . . . . . . . . . 30
Zoom . . . . . . . . . . . . . . . . . . . . . . . . . . . . . . . . 30
In this guide4
Page 5

SMS
SMS text messaging service. . . . . . . . . . . . . . . . . 31
Sending texts . . . . . . . . . . . . . . . . . . . . . . . . . . . 32
Sending texts to a phone with a subaddress . . . . . 32
Reading texts . . . . . . . . . . . . . . . . . . . . . . . . . . . 33
Options while reading texts . . . . . . . . . . . . . . . . . 33
Printing . . . . . . . . . . . . . . . . . . . . . . . . . . . . . . . 34
Deleting. . . . . . . . . . . . . . . . . . . . . . . . . . . . . . . 34
SMS settings . . . . . . . . . . . . . . . . . . . . . . . . . . . 35
Change or add an SMS text service provider . . . . . 35
Stop/allow SMS reception . . . . . . . . . . . . . . . . . . 35
Caller Display
Caller Display . . . . . . . . . . . . . . . . . . . . . . . . . . . 36
Caller information not available . . . . . . . . . . . . . . 36
Calls list . . . . . . . . . . . . . . . . . . . . . . . . . . . . . . . 37
View and dial entries in the calls list . . . . . . . . . . . 37
Delete entries from the calls list. . . . . . . . . . . . . . 37
Copy a number from the calls list to the
directory . . . . . . . . . . . . . . . . . . . . . . . . . . . . . . 37
Additional settings
Print list of original settings . . . . . . . . . . . . . . . . . 38
Info button. . . . . . . . . . . . . . . . . . . . . . . . . . . . . 38
Time and date . . . . . . . . . . . . . . . . . . . . . . . . . . 38
Header number . . . . . . . . . . . . . . . . . . . . . . . . . 38
Header name . . . . . . . . . . . . . . . . . . . . . . . . . . . 39
Ringer melody . . . . . . . . . . . . . . . . . . . . . . . . . . 39
Ringer volume . . . . . . . . . . . . . . . . . . . . . . . . . . 39
Loudspeaker volume. . . . . . . . . . . . . . . . . . . . . . 40
Connecting a telephone answering machine . . . . . 40
Using additional cordless handsets
Register a DECT handset . . . . . . . . . . . . . . . . . . 41
De-register a cordless handset. . . . . . . . . . . . . . . 41
Easylink . . . . . . . . . . . . . . . . . . . . . . . . . . . . . . . 42
Installing a new ink film
Ink level indicator . . . . . . . . . . . . . . . . . . . . . . . . 43
Plug ‘n’ Print card indicator. . . . . . . . . . . . . . . . . 43
Install a new ink film . . . . . . . . . . . . . . . . . . . . . . 43
Help . . . . . . . . . . . . . . . . . . . . . . . . . . . . . . . . . 47
General information
Safety . . . . . . . . . . . . . . . . . . . . . . . . . . . . . . . . 55
General . . . . . . . . . . . . . . . . . . . . . . . . . . . . . . . 55
Cleaning . . . . . . . . . . . . . . . . . . . . . . . . . . . . . . 56
Guarantee . . . . . . . . . . . . . . . . . . . . . . . . . . . . . 58
Technical information
How many fax machines/telephones
can you have . . . . . . . . . . . . . . . . . . . . . . . . . . . 60
Switchboard compatibility . . . . . . . . . . . . . . . . . . 60
Switchboard external line access code . . . . . . . . . 60
Set access code . . . . . . . . . . . . . . . . . . . . . . . . . 60
R&TTE . . . . . . . . . . . . . . . . . . . . . . . . . . . . . . . 61
In this guide 5
Page 6
Getting started
WARNING
Do not place your BT PaperJet 45 in the
bathroom or other humid areas.
Handset range
The handset reception range from the BT
PaperJet 45 is up to 300m outdoors and up
to 50m indoors.
Signal strength
The symbol on your handset display
indicates when you are in range. When you
are out of range the icon and the handset
number disappear from the display.
IMPORTANT
DO NOT connect the telephone line until
the handset is fully charged.
Your BT PaperJet 45 must be plugged into
the mains power at all times for the handset
to work.
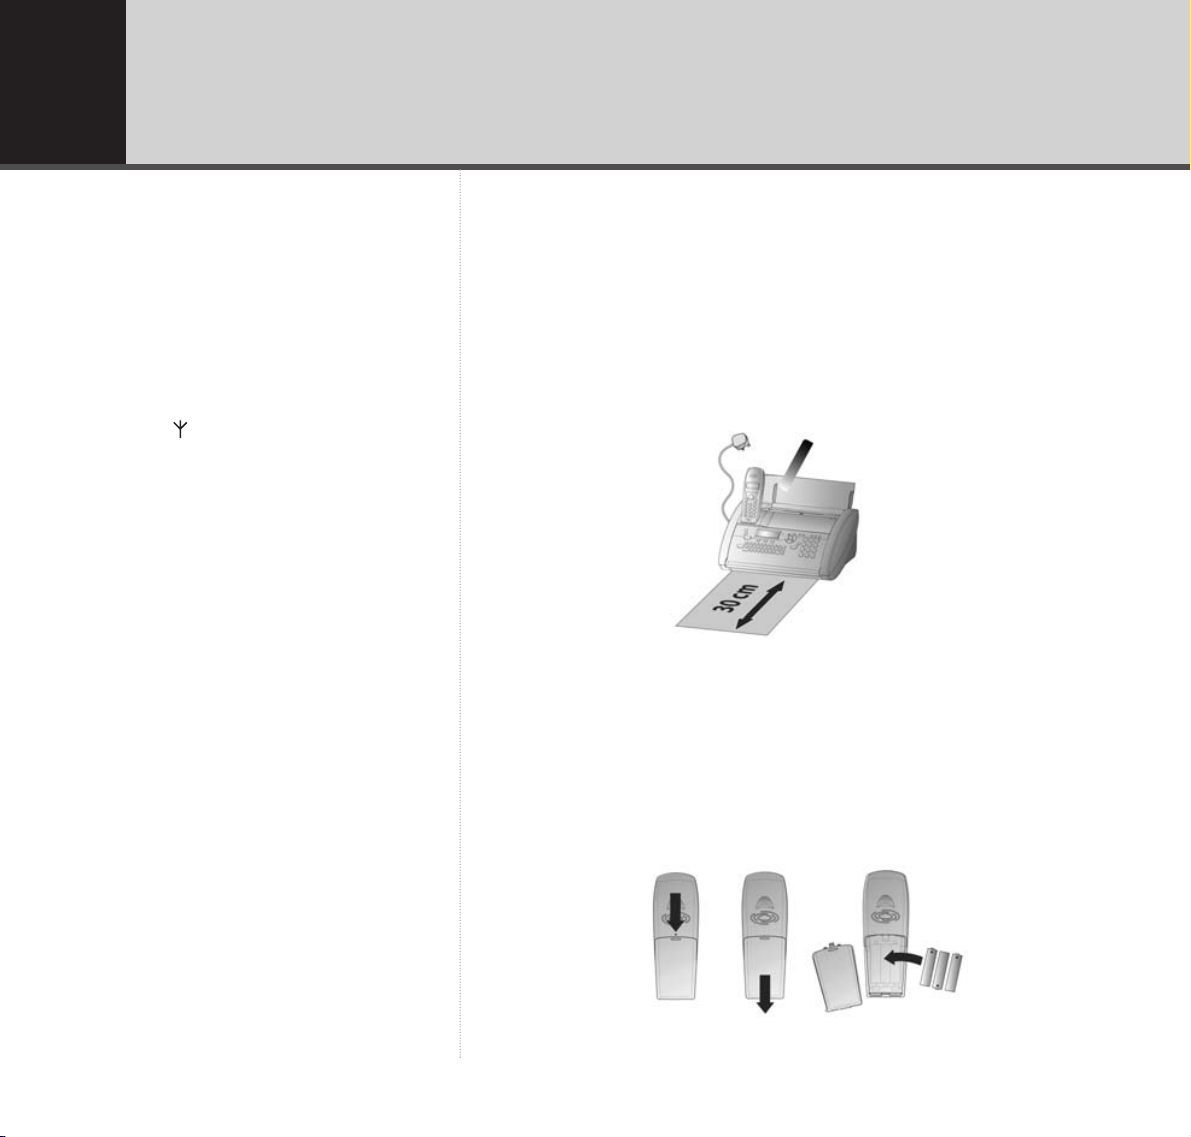
Location
You need to place your BT PaperJet 45 close enough to mains power
and telephone sockets so that the cables will reach. Make sure it is at least
1 metre away from other electrical appliances.
Always choose a smooth, flat, horizontal surface. Avoid soft surfaces
such as carpets.
As documents come out at the front, make sure there are no
obstructions in front of the machine.
Avoid direct sunlight as the ink film is heat sensitive .
Setting up
1. Plug the mains power cable into the machine, and the other end into the
mains power.
2. Remove the battery compartment cover on the handset and insert the
3 x AAA rechargeable batteries.
ILLUSTRATION
Replace the battery compartment cover.
6
Never place the handset on the BT PaperJet
45 cradle without its batteries. This could
permanently damage the handset.
Page 7
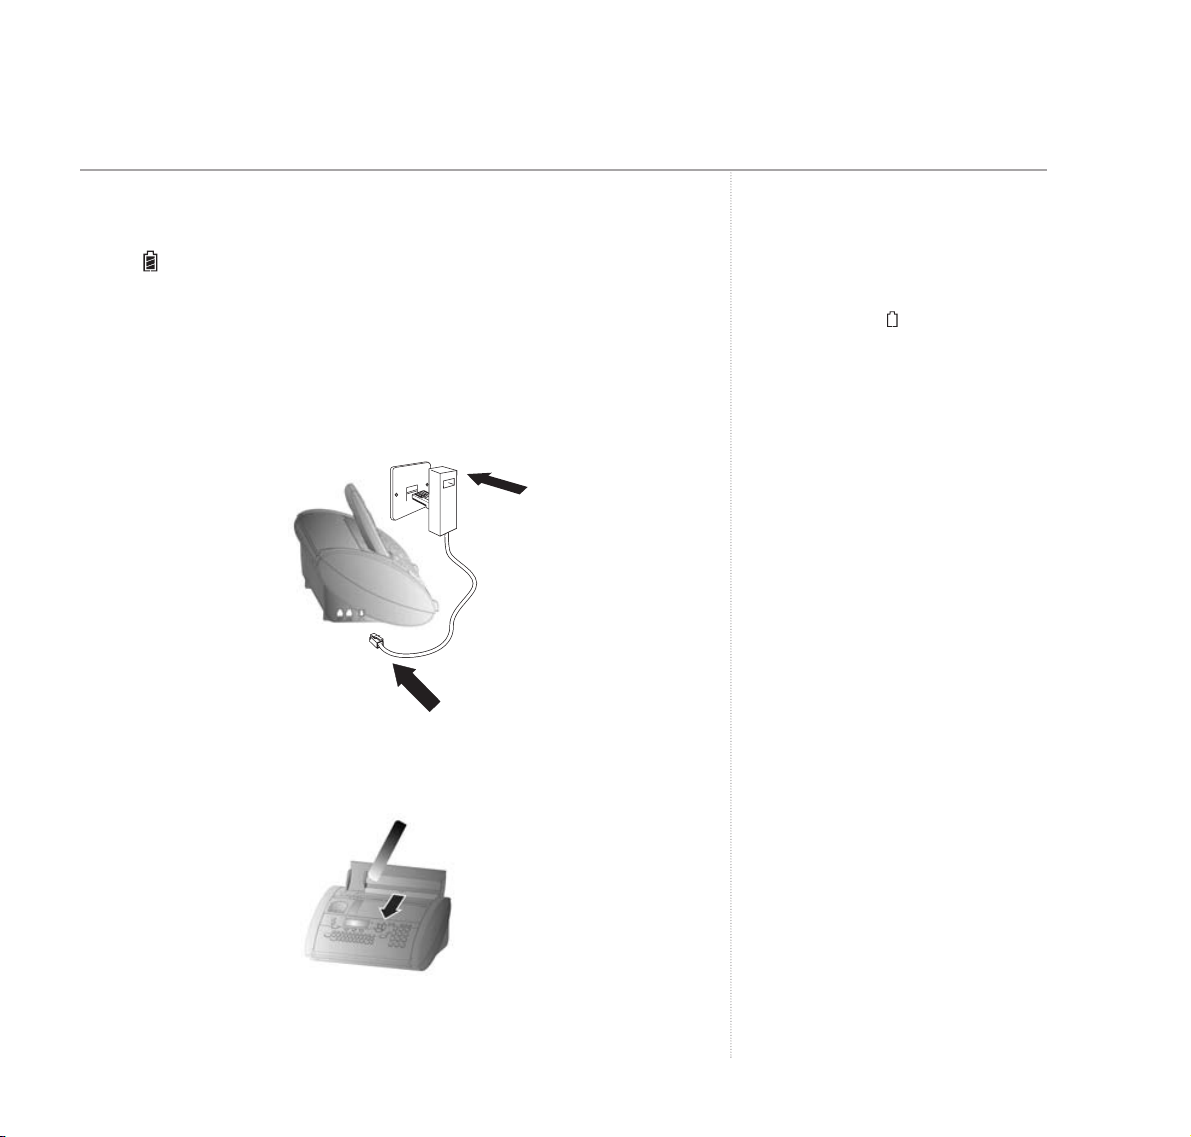
3. Charge the handset for at least 12 hours.
Place the handset in the cradle with the buttons facing outwards.
The icon on the handset display fills up to indicate charging is taking
place.
You can use all the other functions of your BT PaperJet 45 straight away,
but we recommend you leave the handset charging for at least 12 hours
to ensure the batteries are up to full strength.
4. Plug the telephone line cord into the LINE socket on the side of your
BT PaperJet 45 and plug the other end into the telephone wall socket.
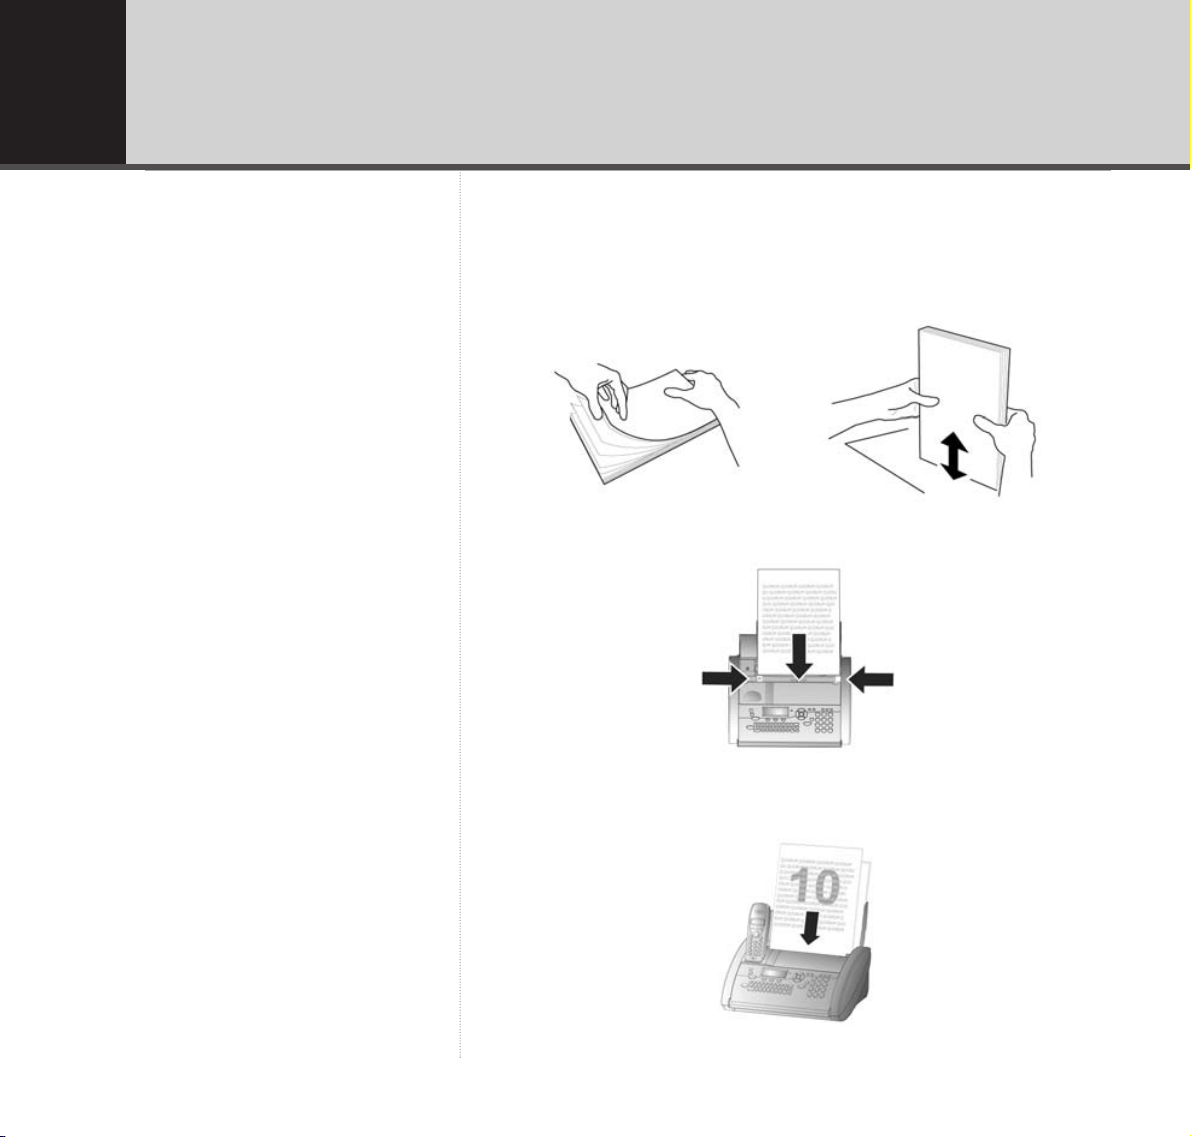
5. Your BT PaperJet 45 can hold up to 15 sheets of 80g/m2 paper.
To prevent several sheets being drawn into the machine together, always
fan out the paper first, then tap it down on a flat surface before inserting
it into the paper tray.
Lift the top flap and rotate the paper support arm upwards.
Pull the paper feed flap forward, load the paper, and close the flap.
Getting started 7
WARNING
Never place the handset on the cradle
without its batteries. This could permanently
damage the handset.
Battery low warning
If the display shows the battery is
almost flat.
Battery performance
To keep your handset batteries in the best
condition, leave the handset off the base for
a few hours at a time (after the initial 12
hour charge).
Running the batteries right down at least
once a week will help them last as long as
possible.
The charge capacity of rechargeable
batteries will reduce with time as they wear
out, giving the handset less talk/standby
time. Eventually they will need to be
replaced.
Batteries and handset may become warm
during charging. This is normal.
Under no circumstances use nonrechargeable batteries. Only use AAA NiMH
rechargeable batteries. Using inappropriate
batteries will invalidate your guarantee and
may damage the telephone.
Page 8
6. Your BT PaperJet 45 display will now alternate between
ENTER TIME
and
the time and date settings.
Using the keypad, enter the time and date, e.g. = 9:15am
and = 15th May 2004, then press .
7. To enter your name and fax number, open the Easy Install option by
pressing for at least two seconds. Your BT PaperJet 45 prints the
one page Easy Install instructions.
Now follow the on-screen prompts together with the printed instructions.
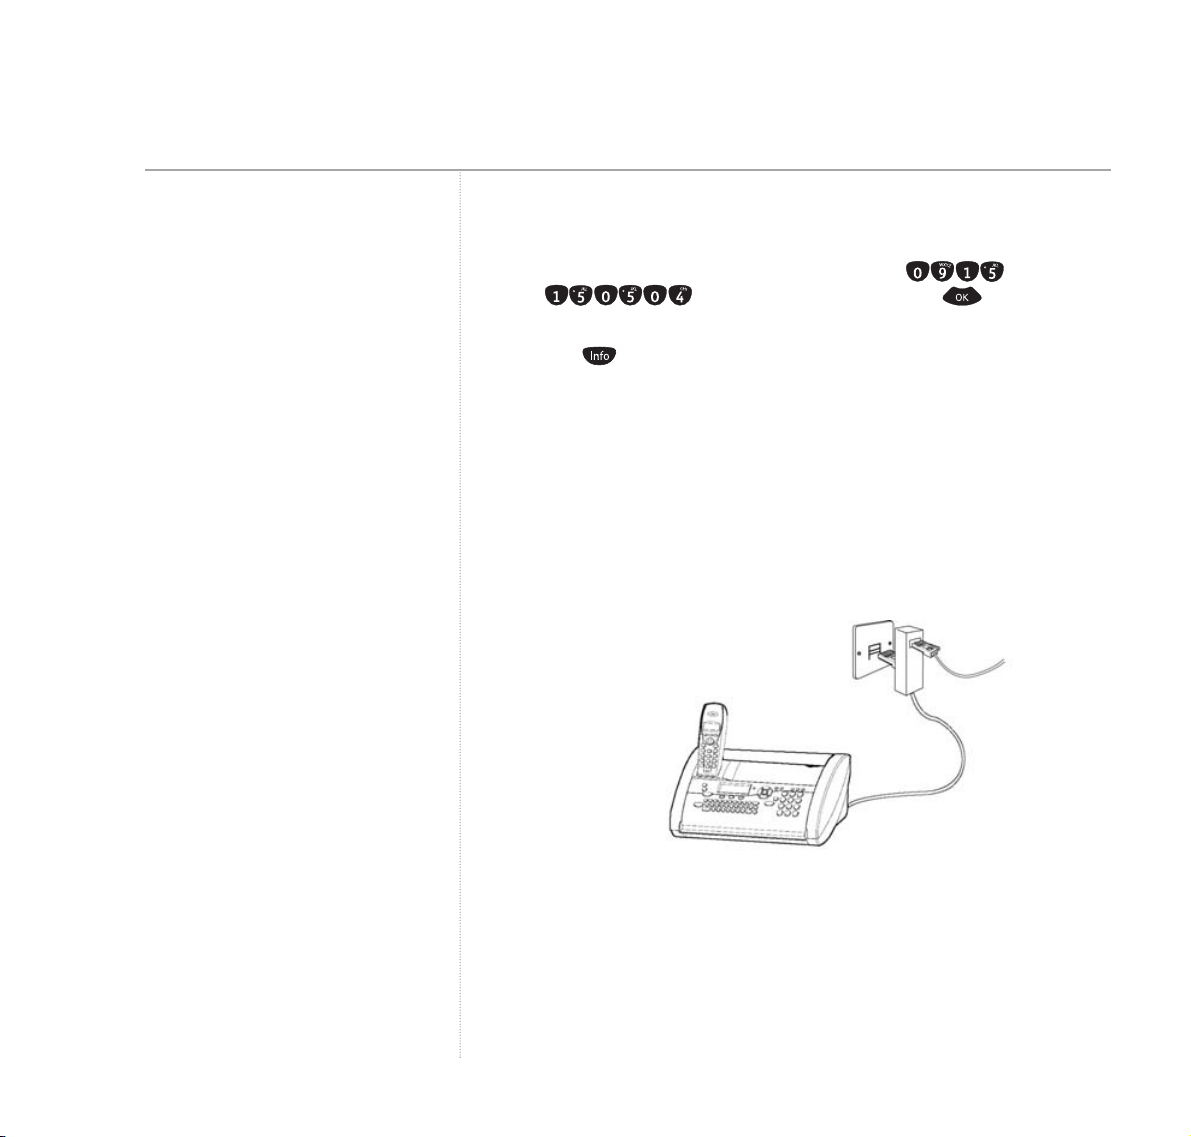
Connect any additional devices
…To the same socket
You can connect an answering machine to the same telephone socket
as your BT PaperJet 45.
Getting started8
Entering names
Use the keyboard to enter text.
Connecting to a switchboard?
To set up switchboard/PBX connection, see
page 60.
If you want to receive faxes via a modem
you must set your BT PaperJet 45 to
MANUAL RECEPTION, see page 21.
If you are attaching a text message (SMS)
compatible cordless phone on the same line,
it is impossible to predict which machine will
actually receive incoming text messages.
We recommend switching off text reception
on your cordless phone. If you cannot do
this, switch it off on your BT PaperJet 45,
see page 35.
Page 9
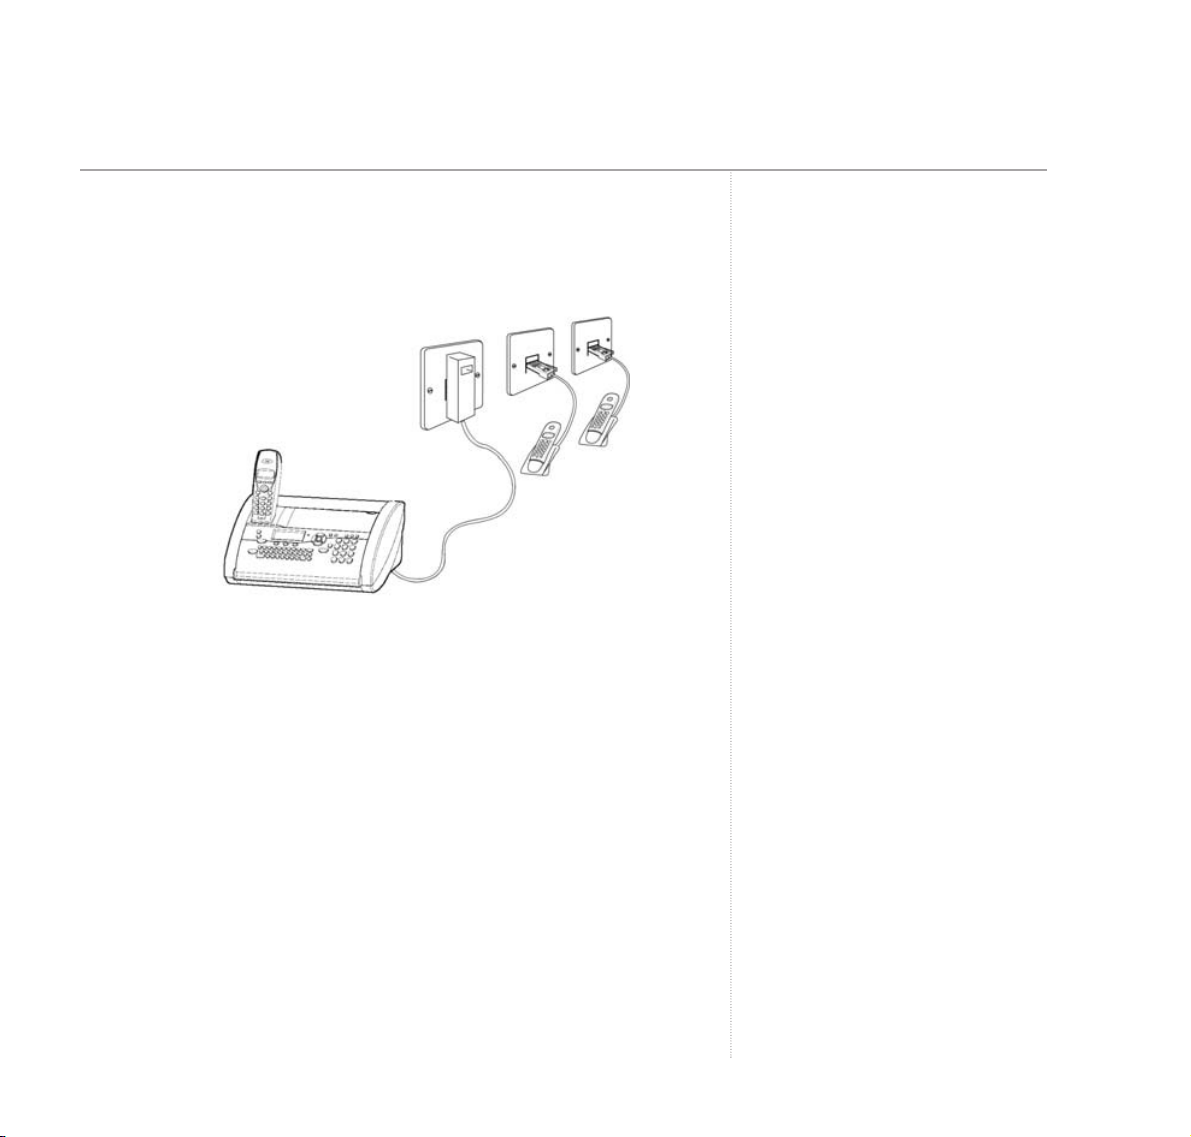
…To separate sockets
You can connect other devices to the same line even if they are in
different rooms.
Getting started 9
Page 10
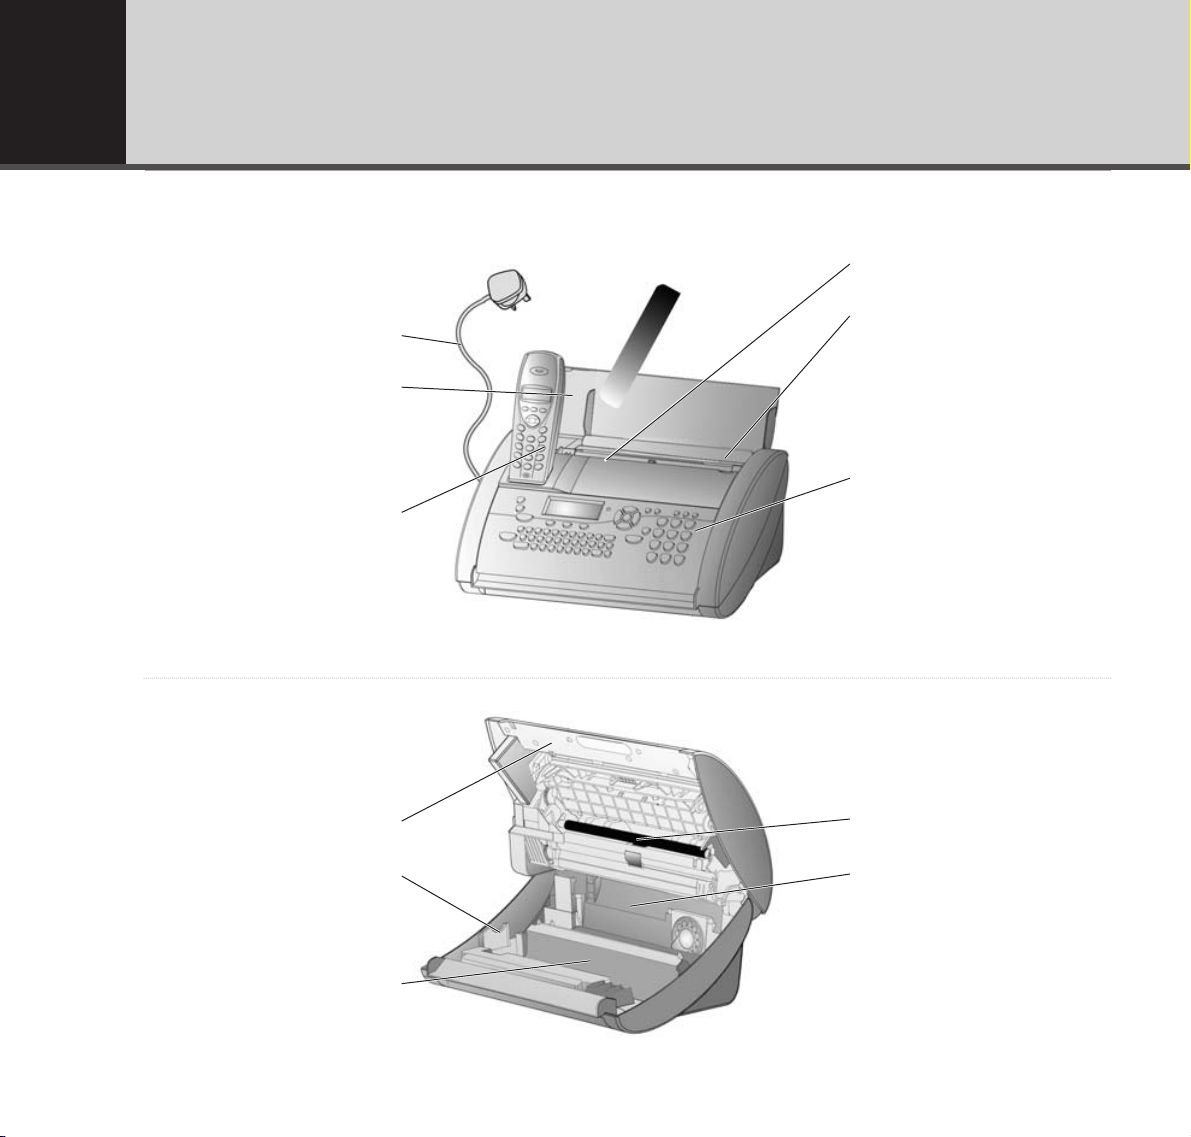
Getting to know your fax
Fax machine
Mains cable
Top flap
Handset
Paper feed flap
Document guide
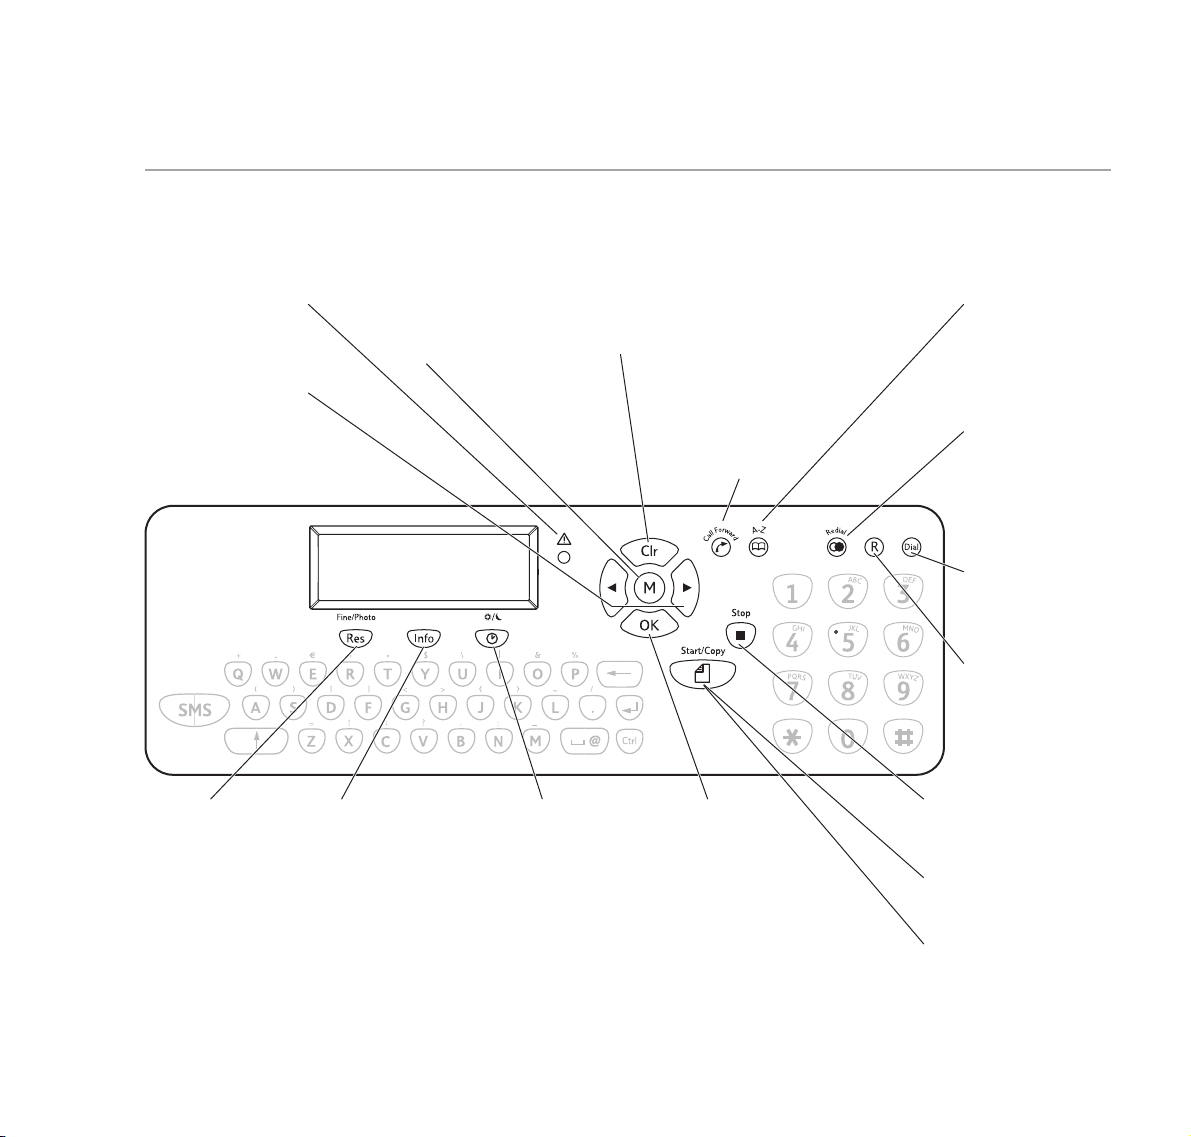
Control panel
Scanner cover
Plug ‘n’ pring card slot
Front ink roll compartment
Printer roller
Rear ink roll compartment
10
Page 11
Getting to know your fax 11
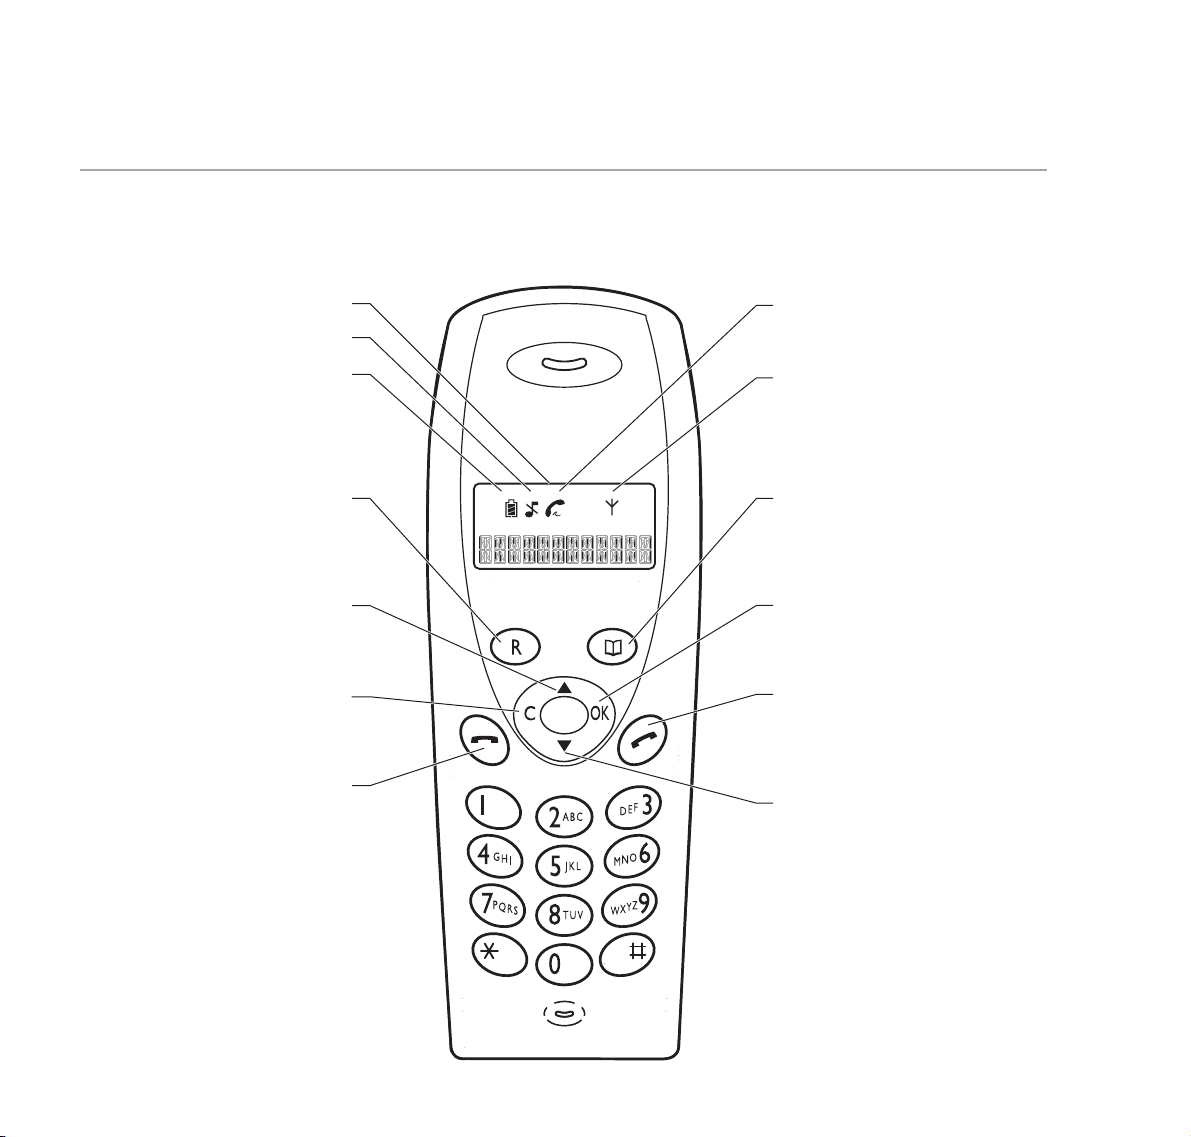
R
Press to display the last number dialled.
Press and hold to open the Calls list.
Press during a call for Recall.
UP
Scroll through lists.
Select menu options.
C
Press to delete characters or
cancel selections.
END
Press to end a call.
Handset Display
Ringer off
Battery charged
On – Call in progress/Line in use.
Flashing – incoming call.
On – In range
Disappears if the handset is out of range
or not registered to your BT PaperJet 45.
DIRECTORY
Lets you store and dial names and
numbers.
OK
Confirms your selections.
TALK
Press to answer or make a call.
Press and hold to open the redial list.
DOWN
Scroll through lists.
Select menu options.
DECT Cordless handset
Page 12
12
Getting to know your fax
DIRECTORY A-Z
Press to open the
directory
Press and hold to
begin storing an
entry.
Redial
Press to select any
of the last 5 numbers
you have dialled
Press and hold to
display a list of your
most recent callers.
Dial
Lets you make calls
using the built in
loudspeaker.
R
Used to access
switchboard functions
and with some
BT Calling Features.
CALL FORWARD
Press twice to forward an
outgoing call from the fax
machine to all cordless
handsets.
Press once and enter
the handset number
to forward a call
to a specific
handset.
Clr
Clr is used to delete
numbers and letters.
Red indicator
When flashing read the
message in the display
screen.
LEFT/RIGHT
Lets you select options,
move the cursor and
adjust the volume.
Res (Fine/Photo)
Use to select the
scan resolution for
faxing and copying.
Info
Press to select help
pages.
Press and hold
to start automatic
installation of your
fax machine and to
print out the Easy
Install instructions.
CLOCK
Press to switch
between modes
(SUN) & (MOON).
Press and hold
to switch mode on
or off.
Copy
Press to copy a document.
Press and hold to select
multiple copies.
Start
Press to send a fax
Press and hold to poll a fax.
Stop
Press to stop current action
and eject the documents.
Control panel
M
M lets you open
the menu and
confirm options.
OK
Press to confirm
options.
Page 13
Getting to know your fax 13
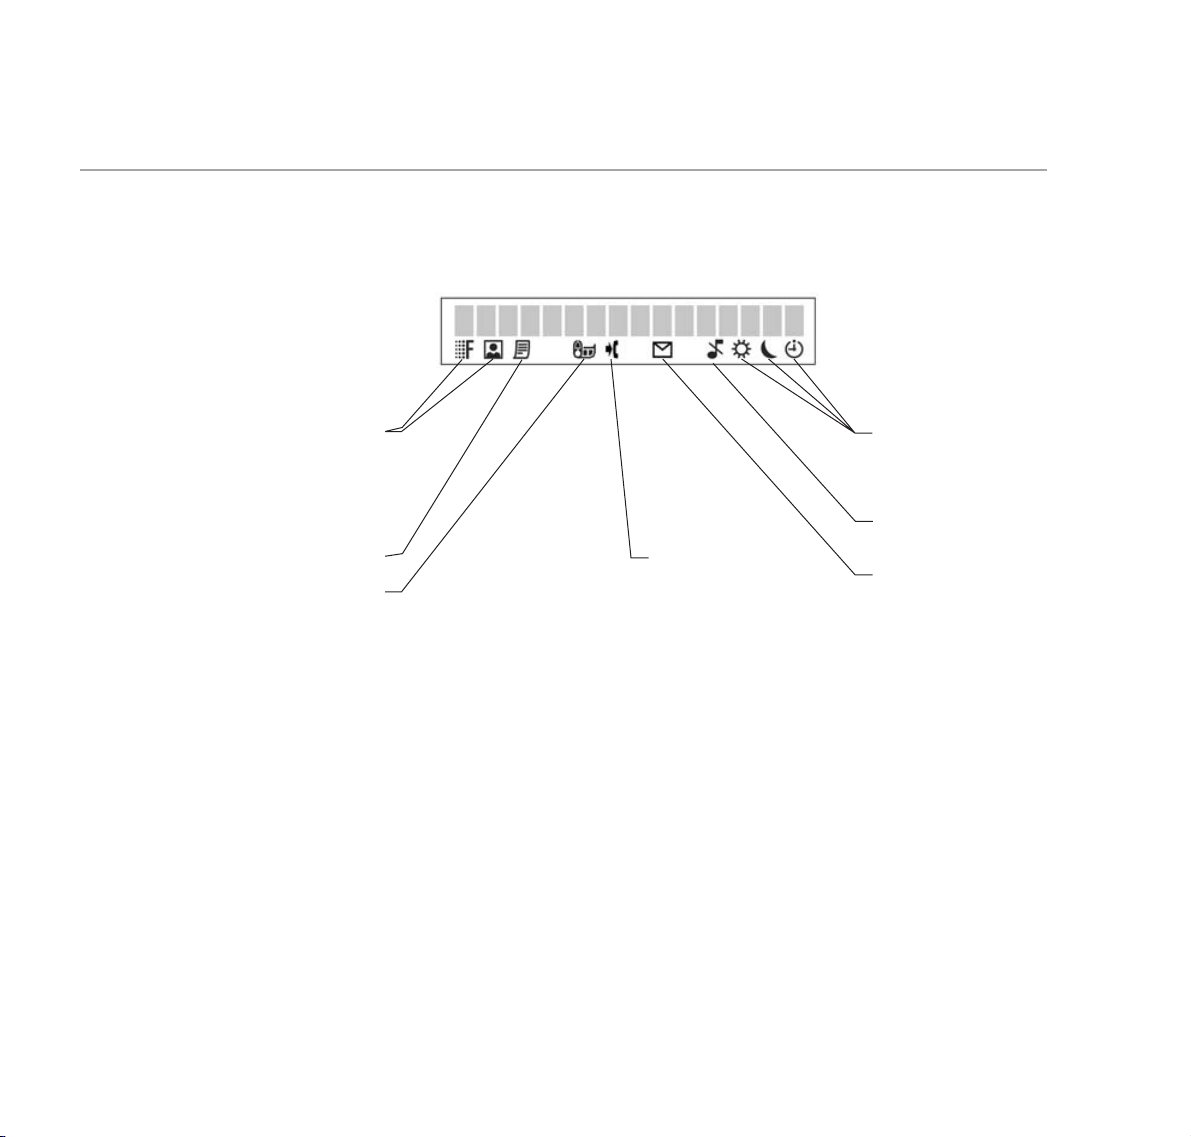
Fax machine display screen
(CLOCK) (SUN) (CRESCENT
MOON) Timer – lets you choose
different settings for day time and
night time.
Ringer is switched off for fax and
phone calls.
Appears when a text (SMS)
message has been received.
Appears when there
are unviewed calls in
the Calls list.
Fine and Photo Resolution options
for faxing and copying. If no symbol
is displayed, the standard resolution
for normal text documents is set.
Faxes are stored in the memory.
Ink roll capacity.
Page 14
Making calls
On the handset:
1. Press and enter the number.
2. To end a call, press .
On the fax:
1. Enter the number on the fax machine keypad.
2. Press , or
3. When the display shows
LIFT HANDSET
, press on the DECT handset.
Call Forward
When you have made an outgoing call from the fax machine you can
transfer the call to a DECT handset.
Pressing twice will allow any DECT handset to take the call if you
have more than one registered. To nominate a particular handset, press
once and then press the number of the required DECT handset.
Redial
You can redial up to the last 5 numbers called.
On the handset:
1. Press then or to scroll through the numbers. When the number
you want is displayed, press to dial.
On the fax machine:
1. Press then or to scroll through the last five numbers called.
2. Press .
3. When the display shows
LIFT HANDSET
, press twice.
4. Press on the handset.
Using the phone
If you make a mistake, press to cancel
the number.
14
Page 15
Delete a number in the redial list
On the fax machine:
1. Press then or to scroll to the number you want.
2. Press to delete the number, then press to confirm.
Handset phonebook
Your handset can store up to 20 names and numbers.
Store a phonebook entry
1. Press or , until the display shows
1 PHONE BK
, then press .
2. Display shows
11 NEW
press and display shows
NAME?
3. Use the Alphanumeric keypad to enter the name you want and press .
Now enter a number to go with the name and press .
Call a phonebook entry
1. Press then or to scroll to the entry you want then press .
Edit a phonebook entry
1. Press or until the display shows
1 PHONE BK
, then press .
2. Press or until the display shows
12 EDIT
, then press . Scroll using
or to display the entry you want.
3. Press then to delete the existing name then re-enter the new
details and press to confirm.
4. The number will be displayed, use to delete and enter the new number.
Press to confirm.
Using the phone 15
Press and hold until the letter you require
is displayed, then release the button.
If you scroll to and select BASE you can
then view and call numbers stored in the
BT PaperJet 45 directory using the handset.
Page 16
Delete a phonebook entry
1. Press or until the display shows
1 PHONE BK
, then press .
2. Press or until the display shows
13 DELETE
, then press .
Scroll using or to display the entry you want.
3. Press to delete.
Main directory on the fax machine
You can store up to 99 names and numbers in the main directory.
Store a Directory entry
1. Press for two seconds.
2. Use the keyboard to type the name, then press .
3. Enter the telephone number you want to store and press .
Call a Directory entry
If sending a fax, load the document.
1. Press . The first stored number is displayed. Press or to scroll to
the entry you want.
2. Press or to dial the number.
Using the phone16
You can store a number during a phone
conversation by following these steps.
If you have a lot of names and numbers
stored, you can jump near to the name
you want using the keyboard for example,
to go quickly to Richard, press then
press on the qwerty keyboard. The first
name starting with R will be displayed.
Press to scroll to Richard.
Page 17
17
Edit a Directory entry
1. Press then or to display the entry you want.
2. Press and hold for two seconds. Press or to move the cursor
and to delete. The character to the left of the cursor will be deleted.
3. Enter any new characters and press to confirm. The number is
displayed.
4. Press or to move the cursor and to delete. The number to the
left of the cursor will be deleted.
5. Enter any new numbers and press to confirm.
Delete a Directory entry
1. Press then or to display the entry you want.
2. Press then press to confirm.
Print Directories
You can print out a list of your quickdial and main directories.
Press , then .
Using the phone
Page 18
Inserting documents
To avoid pages being drawn in together, always fan out the pages to
separate them and tap down before inserting them into the document
feeder for faxing or copying.
Move the document guide to the size of your document.
Insert the document with the text facing towards you into the document
feed tray.
Faxing18
The document feeder holds up to 10 pages
of 65-90g/m2paper.
Page 19
19
If writing a fax note, use dark ink, not
yellow, orange, red or light green.
IMPORTANT
Do not insert into the document feeder:
Pages that are smaller than A5.
Newspaper pages (because of
printer’s ink).
Pages with staples or paperclips,
sticky tape or glue.
Creased or torn pages.
Wet paper or paper with wet
correction fluid.
Glossy or laminated paper.
Paper thicker than 120 g/m
2
or
thinner than 60 g/m
2
.
Resolution
Your BT PaperJet 45 is pre-set to fax documents at standard resolution.
If sending text and drawings with fine detail, press until appears
in the display screen before sending.
If sending photos, press until appears in the display screen
before sending.
About 40 seconds after the document has been faxed or copied, your
machine will reset to standard resolution.
Contrast
You can adjust the brightness for sending or copying light or dark
documents.
LOW
= lighter,
HIGH
= darker
1. Press , then .
2. Press or to select
CONTRAST: LOW, MEDIUM
or
HIGH
, then press .
Sending faxes
1. Insert the document with the text facing towards you in the document
feeder.
2. If required set the contrast and resolution.
3. Dial the number – or select from the Directory entries.
4. Press to begin sending.
To cancel sending, press .
If the number is engaged, your BT PaperJet 45 will dial again.
Receiving faxes
Faxes are received automatically unless you change the reception to
manual, see page 20-21.
Faxing
The contrast is pre-set to MEDIUM. If you
select a new setting it will remain until you
change it again.
Select LOW (lighter for dark original
documents).
Or
Select HIGH (darker for light original
documents.
Fine/Photo
Fine/Photo
Page 20

20
If you answer a call by picking up the handset and hear the fax tones,
press and press on the handset.
Receiving a fax via an external phone
If you have attached an external phone and hear the fax tones when you
answer a call:
Press to start fax reception on your BT PaperJet 45.
Receiving faxes into the memory
If you run out of paper or if the ink film is empty, incoming faxes will
be stored in the memory. Your BT PaperJet 45 has a memory capacity
of approximately 15 standard pages.
Memory indicator
If you have documents stored in the memory, the display shows
and
CHECK PAPER
or
REFILL INK FILM
as appropriate. The red indicator
also flashes. When paper is inserted or a new ink film is installed, the
memory will print out the stored documents automatically.
Once printed, the document is deleted from the memory.
If the memory becomes full, no further pages can be stored. The red
indicator flashes and the display shows
MEMORY FULL
.
Fax mode
Manual reception
Manual reception means you answer all calls yourself by using the
handset and if you hear the fax tones, press to begin reception.
Faxing
Page 21

Between FAX RINGS and TOTAL RINGS you
can only answer the call on the associated
DECT handset.
21
To set manual reception
1. Press , , , then . The display shows
TOTAL RINGS
.
2. Press . The display shows
FAX RINGS
.
3. Press or until the display shows
MANUAL RECEPTION
.
4. Press . The display shows
RINGER VOL
.
5. Press or and
LOW, MED
and
HIGH
will be displayed and a sample heard.
6. Press when the required setting is displayed.
Automatic reception
When set to automatic answer your BT PaperJet 45 checks the
incoming call:
– after the number of
FAX RINGS
it checks to see if the call is a fax or
a voice call
– if it is a fax it is received automatically
– if it is a voice call the BT PaperJet 45 continues to ring until the
TOTAL RINGS
have been reached
– the BT PaperJet 45 then answers the call
– prior to the
TOTAL CALLS
being reached you can take the call on the
DECT handset.
To set the number of rings
1. Press , , , then . The display shows
TOTAL RINGS
.
2. Press or to display the total number of rings you want (between
0
and 7). If you select 0your BT PaperJet 45 will answer without ringing
when you receive a call (unless you have manual reception set).
3. Press . The display shows
FAX RINGS
.
Faxing
Page 22

22
4. Press or to display the number of rings before the fax checks the
status of the incoming call. The number you set should be less than or
equal to the
TOTAL RINGS
.
5. Press . The display shows
RINGER VOL
.
6. Press or and
LOW, MED
and
HIGH
will be displayed and a sample heard.
7. Press when the required setting is displayed.
Groups
You can create up to 5 groups each consisting of up to 25 entries from your
directory so you can Broadcast a fax to the whole group at the same time.
To Broadcast a fax to a group, see page 24.
Create a group
1. Press , then .
2. Press or to select a group number
1-5
and press .
3. Press or to select
ADD MEMBER?
, then press .
4. Press or to scroll to the directory entry you want. Press to
select the entry.
5. Press or then to select other numbers, then press to
complete the group and return to standby.
View entries in a group
You can check all the entries stored in a group.
1. Press , then .
2. Press or to select the group you want,
1-5
then .
3. Press or to display
VIEW MEMBERS?
and press .
4. Press or to scroll through the entries.
5. Press to return to standby.
Faxing
Page 23

If you include a group in the broadcast each
member of the group counts as a recipient.
23
Delete an entry or the whole group.
1. Press , then .
2. Press or to select the group you want,
1-5
then press .
3. Press or to display
DELETE MEMBER?
and press .
4. Press or to scroll to the entry you want to delete and then
press .
5. Press or to select
YES
to delete an entry or
ALL
to delete the
whole group.
6. Press to confirm or press to cancel and return to standby.
Broadcast faxing
You can send the same document to more than one recipient. Broadcast
faxing differs from Group faxing in that you can choose who receives
your fax individually.
Broadcast to individual numbers
1. Insert the document, with the text facing towards you into the document
feeder. If necessary select the Resolution or . Now press ,
then . The document is stored in the memory.
2. Enter the destination numbers. Either use the keypad to enter individual
numbers, or select a name or group pressing for the Main Directory
then or to select the entry you want, then .
Repeat for the next destination number up to a maximum of 25 recipients.
3. Press to begin sending the fax. Each number entered will be dialled
in turn until the fax has been sent to all recipients.
Faxing
Page 24

24
Broadcast to a group
Providing you have stored a group of numbers, see page 22, you can
send a fax to the whole group.
1. Insert the document, with the text facing towards you into the document
feeder. If necessary select the Resolution ( or ). Now press ,
then .
2. Press or to select the group 1-5, then .
3. Press or to display
SEND FAX?
and press . The fax is sent to all
persons listed in the group.
If your BT PaperJet 45 cannot get through first time to everyone in the
group, it will keep trying. After the fax has been sent it will print out a
confirmation report.
Delayed sending
You can set a time for a fax to be sent, to take advantage of cheaper rate
calls or to fit in with another country’s time zone.
1. Press , then . Enter the time you want the document to be
sent, e.g. 1830 for 6.30pm.
2. Press and load the document.
3. Dial the telephone number you want and press . The fax will be sent
at the time set.
To cancel a delayed send, remove the document from the document
feeder.
Faxing
Page 25

25
Faxing
Polling
Polling lets you call another fax machine to retrieve a document
automatically. It also enables another fax machine to call your
BT PaperJet 45 and retrieve a document you have set ready to be polled.
Polling is only available between compatible fax machines. Polling is
sometimes called Faxback.
Quick polling
When you know a document is ready to be polled from another machine:
1. Do not lift the handset. Dial the number of the other machine then press
and hold .
Polling with a code
If a security code is needed in order to poll a document from another
machine.
1. Press , then .
2. Enter the code you have been given then press .
3. Dial the telephone number for the other machine, then press .
Set a document for polling
1. Load the document in the document feed tray.
2. Press , then .
3. If you want to add a code to prevent unauthorised access to the
document enter a security code of up to 20 digits, leave blank for no
code. Press .
4. The document will stay in the document feeder until it is polled.
To cancel the poll remove the document.
Page 26

26
Timer mode
If you want, you can set different modes for day and night , e.g.
change the number of rings before fax calls are answered.
At night pre-set to 10pm-6am, faxes will be received without ringing
and telephone calls will have a quiet ring.
If the day/night timer is switched off, your BT PaperJet 45 will continue
to operate in the mode of operation at the time.
Switch day/night timer on/off
1. Press and hold for two seconds to switch the day/night mode on
and off. When is displayed, the day/night mode is switched on.
Change day and night periods
Night time is pre-set to 10pm-6am, but you can change these times
to suit your preferences.
1. Press , then .
2. Enter the time you want your machine to begin the daytime settings,
e.g. 0800 for 8am. Press to confirm.
3. Enter the time you want your machine to begin the night time
settings, e.g. 2330 for 11.30pm. Press to confirm.
Change day/night settings
You can adjust:
the maximum number of rings you will hear when you receive a call:
0-7
.
the number of rings before the fax answers a call:
0-5
, and
Manual
reception.
If you select
0
you will not hear any rings before your fax answers the
call. If you set manual you will have to answer calls using the handset.
ringer vol: Low, Med, High.
Faxing
Page 27

27
1. Press , for day settings or , for night settings.
2. Press . The display shows
TOTAL RINGS
.
3. Press or to display the total number of rings you want (between 0
and 7). If you select
0
your BT PaperJet 45 will answer without ringing
when you receive a call (unless you have manual reception set).
4. Press . The display shows
FAX RINGS
.
5. Press or to display the number of rings before the fax checks the
status of the incoming call. The number you set should be less than or
equal to the
TOTAL RINGS
.
6. Press . The display shows
RINGER VOL
.
7. Press or and
LOW, MED
and
HIGH
will be displayed and a sample heard.
8. Press when the required setting is displayed.
Silent operation
You can set your BT PaperJet 45 to not ring at all, e.g. at nighttime.
Select
0
for
FAX RINGS
and the BT PaperJet 45 will perform Silent
Reception by receiving faxes without ringing.
Select
0
for
TOTALRINGS
and ensure
FAX RINGS
is not set to manual
reception and you will get total silent reception. The BT PaperJet 45 will
receive faxes but you will not be able to receive incoming telephone calls.
Faxing
IMPORTANT
In silent mode only fax messages will be
received, not phone calls.
Page 28

Reports and print-outs
Transmission report
Your BT PaperJet 45 can print a transmission report every time you have
sent a document. The transmission report for each fax sent can be
switched on or off.
1. Press , then . Press or to select printing ON or OFF,
and confirm with .
If there is an error during sending, a report will always be printed.
Fax journal
You can print out a list with details of the last 10 sent and received faxes.
The details include: remote fax identitiy, number of pages, date and time
of transmission, duration of transmission, resolution and whether the
document was sent or received successfully.
1. Press , then .
2. Press or to select printing or not, then press to confirm.
3. If you select
YES
press or to select
NOW
for an immediate printout
or
EVERY 10
to automatically print a journal after every ten faxes sent or
received.
Dialling list
You can print out a list of your most recent dialled numbers, the most
recent received calls, your directory numbers and group contents.
1. Press , then . The list will be printed.
Faxing28
Page 29

Speed
Your BT PaperJet 45 automatically adjusts its transmission speed to suit
the quality of the line. It always starts at maximum speed – 9600 BPS.
However if the signal is poor, for instance, on an overseas call, your
machine will slow down the speed automatically. If you are having
problems sending a fax it may help to set the speed to 4800 BPS.
1. Press , then . To set 4800 BPS press or to select
YES
, then press .
Received fax size
To make sure that received documents which are slightly longer than
A4 size are printed on one page, the pages are reduced vertically.
The original setting is On. You can switch between On and Off.
1. Press , then .
2. Press or to select
YES
(ON) or NO(OFF) then press to confirm.
Faxing 29
Page 30

Copying30
IMPORTANT
Do not insert into the document feed tray:
Pages that are smaller than A5.
Newspaper pages (because of
printer’s ink).
Pages with staples or paperclips,
sticky tape or glue.
Creased or torn pages.
Wet paper or paper with wet
correction fluid.
Glossy or laminated paper.
Paper thicker than 120 g/m
2
or
thinner than 60 g/m
2.
You can make copies of original documents up to 10 pages long.
Copies are automatically made using resolution. You can also select
PHOTO
for copying photographs or documents with shades of grey.
Copy a document
1. Insert the document with the text facing towards you into the document
feeder. The default resolution is if you require press .
2. Press .
Make up to 15 copies
1. Insert the document with the text facing towards you into the document
feeder. The default resolution is if you require press .
2. Press and hold for 2 seconds. Enter the number of copies you want,
up to a maximum of 15, then press twice. For a quantity higher than
9 press to move the cursor and enter the required number between
10 and 15.
Zoom
You can enlarge or reduce the document you are copying, from 200%
down to 50% of original size.
1. Insert the document with the text facing towards you into the document
feeder. The default resolution is if you require press .
2. If you want more copies, enter the number of copies up to 15 and
press . For a quantity higher than 9 press to move the cursor and
enter the required number between 10 and 15.
3. Press or to select the option you want
ZOOM ENLARGE 200
or
150
,
ZOOM NORMAL 1:1, ZOOM REDUCE 75
or 50. Press to confirm and
start copying.
Your BT PaperJet 45 stores the first page of the document into the
memory and then starts copying.
To cancel copying, press .
30
Fine/Photo
Fine/Photo
Fine/Photo
Page 31

SMS text messaging service
Welcome to the SMS Text Messaging service on your BT PaperJet 45.
The SMS Service is provided by BT.
Your BT PaperJet 45 can send and receive messages to and from any
mobile phone (from participating mobile networks) and compatible
landline telephones in the UK.
You may also send messages to landline phones that are NOT SMS
compatible. Messages to non-compatible lines will be connected to voice
text and delivered in spoken words to the telephone as a call.
The fixed line SMS service is provided under BT’s terms and conditions
for telephone service. These can be found by visiting the BT.com website
at: http://www.bt.com/terms/tor.htm
To subscribe to the SMS text messaging service
When you send your first SMS text message from your BT PaperJet 45
you will automatically be registered for the service.
On receipt of your first SMS through the service, the system will send
you a welcome SMS message back.
You may also register by sending the word Register to 00000 upon which
you will receive a confirmation message.
Cost of the fixed line service
There is no subscription charge (other than the subscription to Caller
Display). Visit the BT.com website (www.bt.com) to find out how much it
costs to send a text message (depends upon your call package).
Your BT PaperJet 45 lets you send and receive SMS text messages of up
to 160 characters. With its QWERTY keyboard compiling a message on
your BT PaperJet 45 is simple and quick.
SMS 31
SMS stands for Short Messaging Service.
IMPORTANT
You must subscribe to your Network
Provider’s Caller Display Service so that you
can use SMS text messaging. A quarterly fee
may be payable, please contact your
network provider for more details. When you
are using SMS text messaging you must not
withhold your telephone number or the
service will not allow you to connect. BT
have prefixed the Service Center number
with ‘1470’, this will release your telephone
number only to the SMS Provider, even if
you normally have your number withheld.
You must have your network’s Caller Display
service activated on your line. To send an
SMS message, you must have the call
number of an SMS message provider
entered in your BT PaperJet 45. Some other
network provider lines may not be
compatible with this SMS service. If your BT
PaperJet 45 is connected to a switchboard,
you may not be able to use text message
services.
You will not be able to receive text messages
until you have first sent a message. The first
sent message registers you with the text
service.
Voice text
Please note that the conversion can
translate common abbreviations and smileys
etc, but to ensure maximum clarity of
message delivery, abbreviations etc should
be used sparingly.
Some other network provider lines may not
be compatible with this SMS service.
Page 32

32
Sending texts
1. Press then or to display
SEND SMS
, then press .
2. Display shows
TEXT
. Use the QWERTY keyboard to write your message
(max 160 characters). Enter any numbers you need with the numerical
keypad.
3. If you want to print the text you are writing, press then .
4. To send the message press then enter the recipient’s number or, to
send to a directory number press or, redial list press , then press .
When sending to a landline number always use the full national code.
5. You can send a text to up to 5 numbers. When you have entered each
number, press .
6. To send the text, press .
Sending texts to a phone with a subaddress
If the person you are sending to asks you to send to a specific subaddress
(it will be a single digit) then you should use the
SEND PLUS
option.
1. Press and hold , the display shows
SMS SEND PLUS
, then press .
2. Display shows
TEXT
. Use the QWERTY keyboard to write your message
(max 160 characters). Enter any numbers you need with the numerical
keypad.
3. If you want to print the text you are writing, press then .
4. To send the message press then enter the recipient’s number or, to
send to a directory number press or, redial list press , then press .
5. The display now shows
SUBADDRESS: 9
. You can change the 9to an
alternative subaddress using the keypad. Press .
6. You can send a text to up to 5 numbers. When you have entered each
number, press .
7. To send the text, press .
SMS
You can also use any of the last five text
messages you have written as a template.
When ready to write a text, press to
scroll through to the text you want.
Press HELP to see how many characters you
can still enter.
Writing text
Press or to move the cursor through
the text message.
Press to delete characters to the left of
the cursor. To delete the whole message,
press and hold .
Page 33

33
Reading texts
When you receive a text message, your BT PaperJet 45 beeps. The text
is automatically printed out and stored in the memory. You can switch
off automatic print out, see page 35.
The button flashes when you have new text messages.
The icon is displayed along with the number of new messages.
To read your messages on the display
1. Press , then or to display
READ SMS
, then press .
2. The number, date and time of the latest message are displayed.
Unread messages are indicated by a
*
.
3. Press or to scroll to the text message you want, then press
to read.
4. Press or to scroll through the message. Hold down to skip to
the beginning of the message or to skip to the end.
5. To print the message press then .
6. Press to return to the list of received texts.
Options while reading texts
When you are reading a text you can scroll through a number of options.
1. Press then or to select between:
PRINT SMS
= print the message.
BACK
= return to the list of text messages.
FORWARD
= send the text on to someone else.
REPLY SMS
= answer the message immediately.
DELETE
= delete the current message.
READ NEXT
= display the next message.
READ PREVIOUS
= display the previous message.
2. Press to confirm.
SMS
Shortcut
You can also read SMS text messages by
pressing then .
Page 34

34
Printing
Print messages
You can print messages stored in the memory at any time.
1. Press , then or to display
PRINT SMS
, then press .
2. Pres or to select between
PRINT: ALL, INBOX
or
NEW
, then press
to begin printing.
Automatically print received text messages
Your BT PaperJet 45 is set to print incoming text messages
automatically. You can switch this feature on and off.
1. Press , then press four times.
2. Press or to select
PRINT SMS: YES
or NO. The press to confirm.
Deleting
You should delete messages regularly so that you always have memory
free to receive new messages. The memory can hold up to 30 text
messages. When the memory is full, no new text messages can be
received.
1. Press , then or to display
READ SMS
, then press .
2.
Stored messages
is displayed. Press or to scroll to the message
you want and press .
3. Press or to select between
DELETE: YES, NO
or
ALL
. Press to
confirm.
SMS
ALL = all text messages stored in
the memory.
INBOX = all received messages.
NEW = new messages only.
YES = delete selected message.
NO = cancel delete.
ALL = delete all stored text messages.
Page 35

SMS settings
Your BT PaperJet 45 is pre-set to send and receive SMS text messages.
Change or add an SMS text service provider
1. Press , , then . Press or to select either
SMS CENTER 1
or 2.
2. Press to confirm. Display shows
NO. FOR TRANSM
. Enter the service
provider’s send centre number.
3. Press . Display shows
NO. FOR RECEPT
. Enter the service provider’s
receive centre number then press .
Switching between service providers
If you have the service providers stored (one in
SMS-CENTER 1
and one in
SMS-CENTER 2
) you can choose which one you use to send your messages.
1. Press , , then .
2. Press or to display the centre you want to use, then press .
3. Continue to press until the display returns to standby. That centre
is now set.
Stop/allow SMS reception
If you are using an SMS compatible cordless handset on the same line,
it is impossible to predict whether your handset or your BT PaperJet 45
will receive an incoming message.
If you want, you can stop your BT PaperJet 45 from receiving texts.
1. Press , then .
2. Enter , , then . Now press or to select
between
SURE: YES
to stop text reception or NOto allow text reception.
3. Press to confirm.
SMS 35
In some cases the numbers for the
provider’s SMS send and receive centre will
be the same.
Your BT PaperJet 45 is pre-programmed to
use SMS Centre 2.
You can still send text messages from your
machine even if you have stopped reception.
Page 36

IMPORTANT
To use Caller Display you must first
subscribe to the service from your network
provider. A quarterly fee is payable.
For more information on BT’s Calling
Features, call BT free on 0800 800 150.
Caller Display
If you subscribe to a Caller Display service you can see who is calling you
on the display screen of both the BT PaperJet 45 and the DECT handset,
as well as the time and date of their call.
If you have stored a name in your directory to go with the number the
name and number will alternate in the display screen.
Whether an incoming call is answered or not the caller’s details including
the date and time of the call, are stored in the Calls list. You can display,
scroll through and dial numbers on the list and copy them into the
directory.
Caller information not available.
With some incoming calls, the telephone number of the caller is not
available and cannot therefore be displayed.
In this case your BT PaperJet 45 provides you with some explanatory
information.
UNAVAILABLE
– The number is unavailable.
WITHHELD
– The caller has withheld their number.
RINGBACK
– Ringback call.
OPERATOR
– The call has been made via the operator.
PAYPHONE
– The caller is ringing from a payphone.
INTERNAT
– International call.
If you have an external phone attached and
have set the number of rings before your fax
takes a call to 0, the telephone number of
incoming callers will not be displayed on the
external phone.
Caller Display36
Page 37

37
Calls list
The Calls list contains the telephone numbers of your last 10 incoming
callers.
New calls in the Calls list are indicated by on the display.
If a call is received when the Calls list is full, the oldest entry will
automatically be replaced with the new call.
View and dial entries in the Calls list
1. Press for two seconds, the number of new Calls is displayed followed
by the Calls list.
2. Press or to scroll through the Calls list.
New entries are displayed with
*
.
3. Press to dial the number.
Delete entries from the Calls list
1. Press and hold for two seconds, the Calls list is displayed.
2. Press or to scroll through the Calls list to the entry you want.
3. Press then or to select
YES
then press .
Copy a number from the Calls list to the directory
1. Press and hold for two seconds, the Calls list is displayed.
2. Press or to scroll through the Calls list to the entry you want.
3. Press and hold for 2 seconds.
4. Enter the name you want associated with the number and press .
5. The Calls list number is displayed, edit if required then press .
Caller Display
Page 38

Additional settings
Print list of original settings
Before you make any changes to the original settings on your
BT PaperJet 45, you can keep a record of the factory settings.
Press then . A list of factory settings is printed.
Info button
If you are not sure how to use your BT PaperJet 45 you can print out a
short guide explaining the main functions. It will also tell you how to get
additional Help pages covering other features on your BT PaperJet 45.
Press then press or to choose between pages
1-7
.
Page
1
provides an overview and index of the Help pages available.
Time and date
You can adjust the time and date.
1. Press , then .
2. Enter the time e.g. 0915 for 9.15am. You are prompted to enter the day.
3. Enter the date using DD MM YY format, e.g. for 15th
May 2004, then press .
Header number
You can change the telephone number entered during setup.
This number appears on the header of all faxes you send.
1. Press , then .
2. Enter your telephone/fax number e.g. #44 6151 for +446151.
+
is often shown in front of the country code when giving the full
international number You can press or to enter
+
at the
beginning of the full international code. To enter a space, press .
You can enter up to 20 digits.
38
Page 39

39
Header name
You can change the name entered during setup. This name appears on
the header of all faxes you send.
1. Press , then .
2. Use the keyboard to enter your name, then press .
To delete, press . You can enter up to 32 characters.
Ringer melody
Select from 6 handset melodies and 10 fax machine melodies.
For the handset:
1. Press or until the display shows
3 RING
, then press .
2. Press or until the display shows
31 MELODY
and press .
3. Press or to select and hear the melody, then press to confirm.
For the fax machine:
1. Press , then .
2. Press - to select and hear the melody, then press to confirm.
3. Press or to set the volume you want, then press to confirm.
Ringer volume
For the handset:
1. Press or until the display shows
3 RING
, then press .
2. Press or until the display shows
32 VOLUME
and press .
3. Press or to set the volume you want, then press to confirm.
Additional settings
You can also set different ringer volumes for
day AM/SUN and night PM/MOON modes.
For example, you can set your fax machine
to ring more quietly at night so that no one
is disturbed. To set separate day and night
modes, see page 26.
Page 40

40
For the fax machine:
1. Press or the current setting is displayed for a few seconds.
2. Press or again to change the volume.
Loudspeaker volume
You can adjust the loudspeaker volume, on your BT PaperJet 45.
1. Press then or to lower or raise the volume.
2. Press to confirm.
DECT handset volume
1. You can adjust the volume heard in the earpiece by pressing the or
on the handset during a call
Connecting a telephone answering machine
If you want to use a telephone answering machine with your
BT PaperJet 45 it is recommended that you connect it to the same
socket (see page 9).
To enable the telephone answering machine to answer incoming calls you
must set the number of rings on your BT PaperJet 45 to two or more
than the number of rings set on the telephone answering machine.
A typical setup would be:
Telephone answering machine – 2 rings.
Fax rings – 4 rings.
Total rings – 4 rings.
(Also see page 21 for information about Fax and Total rings.)
It is recommended that you keep outgoing messages on the telephone
answering machine to less that 10 seconds in duration.
Additional settings
Page 41

You can add up to four more cordless handsets to your BT PaperJet 45.
The cordless handset supplied with your BT PaperJet 45 is pre-registered.
Register a DECT handset
On your fax machine:
1. Press , then .
2. Enter the 4-digit PIN code (original setting = 0000) and press .
The machine will start sending a signal to the handset.
On your BT PaperJet 45 handset:
1. Press or until the display shows
5 BASE
, then press .
2. Display shows
51 REGIST
. Press and the display shows
AUTO
.
3. Press and the handset will search for the base signal.
4. When the signal is detected the display shows
REGIST
followed by the
handset number.
Follow the instructions provided with your handset if you are registering
other GAP compatible handsets.
De-register a cordless handset
On your handset:
1. Set the handset into registration mode following the instructions in the
handset user guide.
On your fax machine:
1. Press , then .
2. Use the numeric keypad to enter the number of the handset you want to
de-register, e.g. . Display shows
HANDSET 2
. Press to confirm.
IMPORTANT
Additional handsets must be GAP
compatible.
Using additional cordless handsets 41
Page 42

Incoming call Cordless handset Fax machine Other phone
Answer call Press . Depends on type
of phone.
Incoming fax – Press . Press . Press and
if you lift the hang up when
handset and you hear the fax
hear a beep or responding.
nothing at all…
Transfer a call… …to the fax Not available.
machine: press
and .
…to an additional
cordless handset
also registered to
the fax machine:
Internal – press
, enter the
handset number
(e.g. 2) then .
External – press
the number of the
handset you want,
e.g.2 then
.
42
Easylink – Using additional phones
You can connect further telephones to the same telephone line (see
Setting up, page 9). Other telephones must be set to Tone dialling.
You can transfer calls or faxes between the DECT handset, fax machine
and other phones using the codes shown below.
Using additional cordless handsets
Unless you are using a very old phone, it will
almost certainly be pre-set to Tone dialling.
Page 43

Your BT PaperJet 45 is supplied with a starter ink film, enough to print
a few pages.
You will then need to insert a new ink film. Each new film comes with a
Plug ‘n’ Print card which holds its consumption and setting details and
which must be inserted into the machine.
Only the starter ink film works without a Plug ‘n’ Print card as the
settings were made at the factory.
Ink level indicator
The display shows you how much is available .
If the ink film is finished or if no ink film is installed, the display shows
and the red warning indicator will flash.
You will also receive a printed warning when the ink film is running low.
Plug ‘n’ Print card indicator
If the Plug ‘n’ Print card is not inserted or replaced when a new ink film is
installed, the display shows
CHANGE CARD
.
When installing a new ink film you must insert the Plug ‘n’ Print card
that comes with it.
Install a new ink film
1. Remove any paper from the paper tray and the handset.
2. Lift the control panel until it clicks open.
IMPORTANT
Use only BT ink films compatible with your
machine.
Ink film rolls are available from most
fax/printer retailers.
Or you can order ink films direct from
0870 240 7285.
Lines open 9.30 am – 5.30 pm, Mon-Fri
(excluding public holidays).
Only your starter ink film does not require a
Plug ‘n. Print card.
Installing a new ink film 43
Page 44

44
Only the initial ink film supplied with your
machine does not have a Plug ‘n’ Print card.
3. Put your index fingers at each end of the rear ink film roll, lift it up and
place it next to the front ink film roll.
4. Remove both rolls. They cannot be re-used.
5. Remove the old Plug ‘n’ Print card from the slot on the left of the ink film
compartment .
Installing a new ink film
Page 45

45
6. Take the new ink film roll, remove the rubber bands around it and slot the
large roll into the compartment at the back of the machine.
7. Place the small roll into the front ink film compartment, keeping the
blue cog on the right. Make sure the pin on the left has slotted into place.
8. Using the blue cog rotate the small roll forward to tighten the film so
that it does not get creased.
Installing a new ink film
Page 46

46
9. Snap out the new Plug ‘n’ Print card and insert it into the slot.
10. Close the cover until it clicks into place. Replace the handset and add
paper to the paper tray.
Installing a new ink film
Page 47

Help
Paper is jammed.
1. Display shows
PAPER JAM
. Open the control panel until it clicks into place.
Remove any free paper in the document and paper feed trays, and the
handset.
2. Remove the jammed paper.
3. Turn the ink film forward so it doesn’t sag or become creased.
47
Page 48

48
4. Close the cover until it clicks back into place and replace the handset.
5. Replace the paper in the paper feed tray.
Document is jammed.
1. Remove the handset.
2. Open the paper feed flap and remove the paper. Close the flap again.
3. Remove any free paper from the document feed tray.
4. Open the operation panel by lifting in the middle. When you hear a first
click, the panel is in place.
5. Open the scanner cover by pressing the two lugs in. The cover will open
downwards.
Help
Page 49

49
6. Carefully remove the document from the front or back.
7. Close the scanner cover on the left and right, making sure it clicks back
into place.
8. Now close the panel so it clicks into place too. Replace the handset.
9. Insert paper.
Help
Page 50

50
BT PaperJet 45 continues ringing.
If you answer a call on another phone, and the fax machine continues to
ring, it means the BT PaperJet 45 has already answered the call. You can
interrupt the ringing of the fax by pressing on the telephone.
Faxes are poor quality.
If you are sending faxes with fine detail or photographs, you may need to
change the resolution – press
FINE
or
PHOTO
. See page 19.
Is the original document poor quality? Try adjusting the contrast for light
or dark originals, see page 19.
Test your machine by making a copy.
Black lines appear on faxes and copies.
If lines appear on faxes you send or on copies, clean the scanner, see
page 56.
If lines appear on faxes you receive, ask the sender to clean their scanner.
Copy is blank.
Check the document is loaded the right way around – printed side facing
the front.
Machine begins to ring, pauses then rings again.
This is normal, the fax machine monitors the incoming call and if it
recognises it as a voice call the machine continues to ring.
Display shows
NO CONNECTION
or
REDIAL FAILED
.
Is the telephone line cord plugged in? Check the connections and try again.
Help
Page 51

51
Help
Display shows
NO PHONE LINE
.
Check your machine is installed correctly.
Display shows
NO DIAL TONE
.
Check your telephone line cable is plugged into the socket marked LINE
on your BT PaperJet 45.
Display continually shows
BUSY
or faxes you send are constantly
interrupted.
Try sending the fax using the button so you can hear the progress of
your call.
Press and dial the number manually. If the recipient is using an
answering machine, wait until you hear the tone after the recorded
message, then press .
When you answer the phone you hear the fax tones or silence.
Your machine is receiving a fax. Press – or if answering on an
attached phone, press – then replace the handset.
Display shows
EXTERNAL PHONE
and the light flashes.
Indicates a separate phone connected to the BT PaperJet 45 line cord
socket is being used.
Cannot fix a recurring problem.
Try unplugging your machine from the mains power, wait at least
10 seconds, then switch the power back on again. If the fault still recurs,
call the Helpline.
Page 52

52
Cordless handset
No dial tone
Place the handset on the cradle and wait at least 12 hours until the
batteries are fully charged.
Still cannot hear a dial tone.
You may be out of range. Try bringing the handset closer to the fax
machine.
Your batteries may be worn out. You will need to install new NiMH AAA
batteries.
Cannot send text
Check send Service Centre number is correct including 1470 prefix, see
page 31.
Check call barring (option 4) is not activated on your line if you have the
call barring service rented from BT.
Cannot receive text
Check receive Service Centre number is correct, see page 31.
Ensure you have subscribed to a Caller Display service and that it is
active. You can check this by noting if your phone displays data
regarding your caller’s number when you receive an incoming call.
You are only receiving incoming messages as voice text
May be due to your telephone line being de-registered. Text the word
Register to 00000. You will receive a confirmation message back. This
assumes that your Caller Display service is active and working on your line.
Help
Page 53

53
Calls from the SMS server cause the ringer to chirp
Cable Networks (typically NTL/Telewest) deliver a single burst of ringing
before the data which identifies the call as a text.
Contact BT if delivery of night calls causes a disturbance. A personal
delivery times profile can be set-up.
Help
Further help and advice for SMS related queries on BT lines:
BT Residential customers – call 151, choose option 2, when prompted
by the Fault Management Service select option 2, input your phone
number on the handset and wait to speak to a customer adviser.
BT Business customers – call 154, choose option 2, when prompted
by the Fault Management Service select option 2, input your phone
number on the handset and wait to speak to a customer adviser.
For other telephone service providers please contact their customer
services.
General sales enquiries:
BT Residential lines – call 150.
BT Business lines – call 152.
For other telephone service providers please contact their customer
services.
Billing enquiries:
Refer to the telephone number shown on your telephone bill.
Page 54

54
Help
BT PaperJet Helpline
0870 241 6538
Call the dedicated BT PaperJet Helpline:
if you are having difficulties using your
BT PaperJet 45.
The Helpline will be open from
8.30am to 5.30pm Monday to Friday,
except for UK public holidays, and
9.00am to 2.00pm on Saturdays.
Other functions and services available from the SMS service
By sending the following commands to the BT text self administration
facility you can control functions and capabilities in your SMS machine
and the way messages are handled.
Press the button then press or to display
SEND SMS
, then
press . Display shows
TEXT
. Type in the following commands
(depending upon what you wish to do) and then press . Press
again and enter 00000. Press to send.
This will enable you to opt out from receiving voice text
messages.
Turns off the opt out option.
Turns on permanent voice text message delivery to your phone.
This means all incoming text is delivered as voice text.
Turns off permanent voice text message delivery.
If you are sending a message from a fixed line phone to another
fixed line phone.
Forces a message sent to be delivered as voice text even
though the recipient may have an SMS enabled phone and
usually receives written text.
This command is inserted at the start of the message and
applies only to that message, e.g. “Hello I will be
home late”.
If you are sending a message from a fixed line phone and require
a status report.
Will allow a status report to be sent back to you when you
have sent a message to confirm delivery. Place
at the start of your text message. Write the message and
send it. You will receive a reply text back to your phone
giving the status report for that message.
Page 55

General information
Safety
General
Your BT PaperJet 45 should be placed on a level and stable surface at
least 10cm away from other electrical equipment.
Do not place it in direct sunlight or near a radiator, heater or air
conditioning unit. Do not allow it to become dusty or come into contact
with water or chemicals.
Make sure air can circulate freely around your BT PaperJet 45. Do not
cover or use in very enclosed spaces. Do not place your machine on soft
surfaces such as beds, duvets, cushions, sofas or carpets as there is a risk
of overheating.
Do not touch telephone wires or mains cables where the insulation is
missing or damaged unless they have been disconnected.
Do not attempt any repairs. This could expose you to high voltages or
other risks. Contact the helpline for all repairs.
Do not expose to rain or any other form of moisture. There is a risk of
electric shock or fire. If any liquid is accidentally spilled into your machine,
immediately remove the mains power plug and have the BT PaperJet 45
inspected professionally.
Do not submerge any part of the product in water and do not use in
damp conditions, such as bathrooms.
There is a slight chance that your BT PaperJet 45 could be damaged
by an electrical storm. We recommend that you unplug the power and
telephone line cord for the duration of the storm.
Do not expose to fire, explosive or other hazardous conditions.
55
Page 56

56
Cleaning
Unplug your BT PaperJet 45 from the mains and telephone line before
cleaning. Do not use liquid or aerosol cleaning agents such as sprays or
polishes as these will damage the product.
Cleaning the exterior.
Simply clean the casing with a damp (not wet) cloth or anti-static wipe.
Never use a dry cloth as this may cause a static shock.
Cleaning the scanner glass.
1. Open the paper feed flap and pull out any paper. Close the flap again.
2. Remove the handset and open the control panel cover until it clicks
into place.
General information
Page 57

57
3. Open the scanner cover by pressing in the two lugs. The cover opens
downwards.
4. Use a soft, lint free cloth to gently wipe the scanner glass on top (A)
and the white strips (B).
5. Close the scanner cover on the left and right making sure it clicks
into place.
General information
Page 58

58
6. Close the control panel so until it clicks into place and replace the handset.
You can now insert paper again.
Guarantee
FOR ASSISTANCE CALL THE HELPLINE ON 0870 241 6538 quoting the
model and serial number
1. In the event that the Helpline is unable to resolve a problem over the
phone, the following will apply:
I. The Helpline will require the customer to provide details of where
the BT PaperJet 45 was purchased, date of purchase and method
of payment.
II. If the fax was purchased within 28 days a brand new replacement
BT PaperJet 45 will be despatched by courier to the customer.
III. If the product was purchased more than 28 days ago and within
the guarantee period, a ‘loan’ BT PaperJet 45 will be despatched
by courier to the customer.
General information
Page 59

59
2. If 1 (III) applies, the original fax will be repaired free of charge subject
to the conditions in clause 5. BT’s normal repair times for most faults is
14 days. If the fax is beyond economical repair we will replace it with a
brand new BT PaperJet 45. On completion of repair the customer will be
contacted and given the option of the return of the original repaired fax
and free collection of the loan fax or at the customer’s choice retention
of the loan fax.
3. A new or loan fax will be delivered by courier. If a Helpline call is received
by 4pm we can arrange an overnight courier, but will agree a delivery
time with the customer. On delivery of the new loan or repaired fax as
appropriate, the customer must promptly replace it in the box with the
faulty fax or loan fax to enable the courier to return the fax to BT.
4. If the customer decides to retain the loan fax the balance of the original
guarantee will transfer to this fax.
5. This guarantee does not cover the fair wear and tear or accidental
damage or damage caused by improper installation. The guarantee will
not apply if upon inspection it is established that unauthorised repairs or
modifications have been made to the fax. In such circumstances the
Customer will be sent a condition report with a choice of either (a) paying
the cost of repair of the faulty fax or (b) the carriage charges incurred in
having the original fax returned unrepaired and the loan fax collected
6. The liability of BT under the terms of the guarantee is limited to the
exchange of the fax or the repair and return of the original fax
7. Excluded from this guarantee are accessories, consumables, e.g. ink film.
8. This guarantee applies to the original customer only and is not
transferable.
9. This guarantee does not affect the customer’s statutory rights.
General information
For your records
Date of purchase:
Place of purchase:
Serial number:
For guarantee purposes proof
of purchase is required so please
keep your receipt.
Page 60

How many fax machines/telephones can you have?
All items of telephone equipment have a Ringer Equivalence Number
(REN), which is used to calculate the number of items which may be
connected to any other telephone line. Your BT PaperJet 45 has a REN
of 1. A total REN of 4 is allowed. If the total REN of 4 is exceeded, the
telephone may not ring.
With different fax/telephone types there is no guarantee of ringing, even
when the REN is less than 4.
Switchboard compatibility
This product is intended for use within the UK for connection to the
public telephone network and compatible switchboards, which support
tone dialling and timed break recall. If in doubt please consult your
service provider.
Switchboard external line access code
You may need to enter an access code (e.g. 9) in order to get an outside
line. So that the switchboard has time to pick up an outside line, you may
also need to add a Pause after the access code.
Set access code
1. Press , then . Press or until the display shows
PABX: YES
. Press to confirm the setting.
2. Enter the access code you need to get an outside line (e.g. 9) and press
. Now press or to display
CHECK: YES
. Press .
Your BT PaperJet 45 automatically checks that the line connection
works. If it is,
CHECK OK
is displayed briefly. If the check is not successful
NO PHONE LINE
is shown and you are prompted to repeat these steps.
You should check the access code and that the BT PaperJet 45 is
connected to the telephone line.
Technical information60
Page 61

61
If you still have problems connecting to a switchboard, contact the
BT PaperJet Helpline on 0870 241 6538.
R&TTE
This product is intended to be connected to analogue networks and
private switching systems in the United Kingdom.
This product complies with the essential requirements of the Radio
Equipment and Telecommunications Terminal Equipment Directive
1999/5/EC.
A copy of the certificate can be obtained from the Helpline
0870 241 6538.
Technical information
Page 62

Offices worldwide
The telecommunications services described in this publication
are subject to availability and may be modified from time to time.
Services and equipment are provided subject to British
Telecommunications plc’s respective standard conditions of
contract. Nothing in this publication forms any part of any contract.
© British Telecommunications plc 2004.
Registered Office: 81 Newgate Street, London EC1A 7AJ.
Registered in England No. 1800000.
BT PaperJet 45 UG (06/04) 5
Designed and produced by The Art & Design Partnership Ltd.
Printed in Austria.
Visit us at www.bt.com
 Loading...