

Page 1
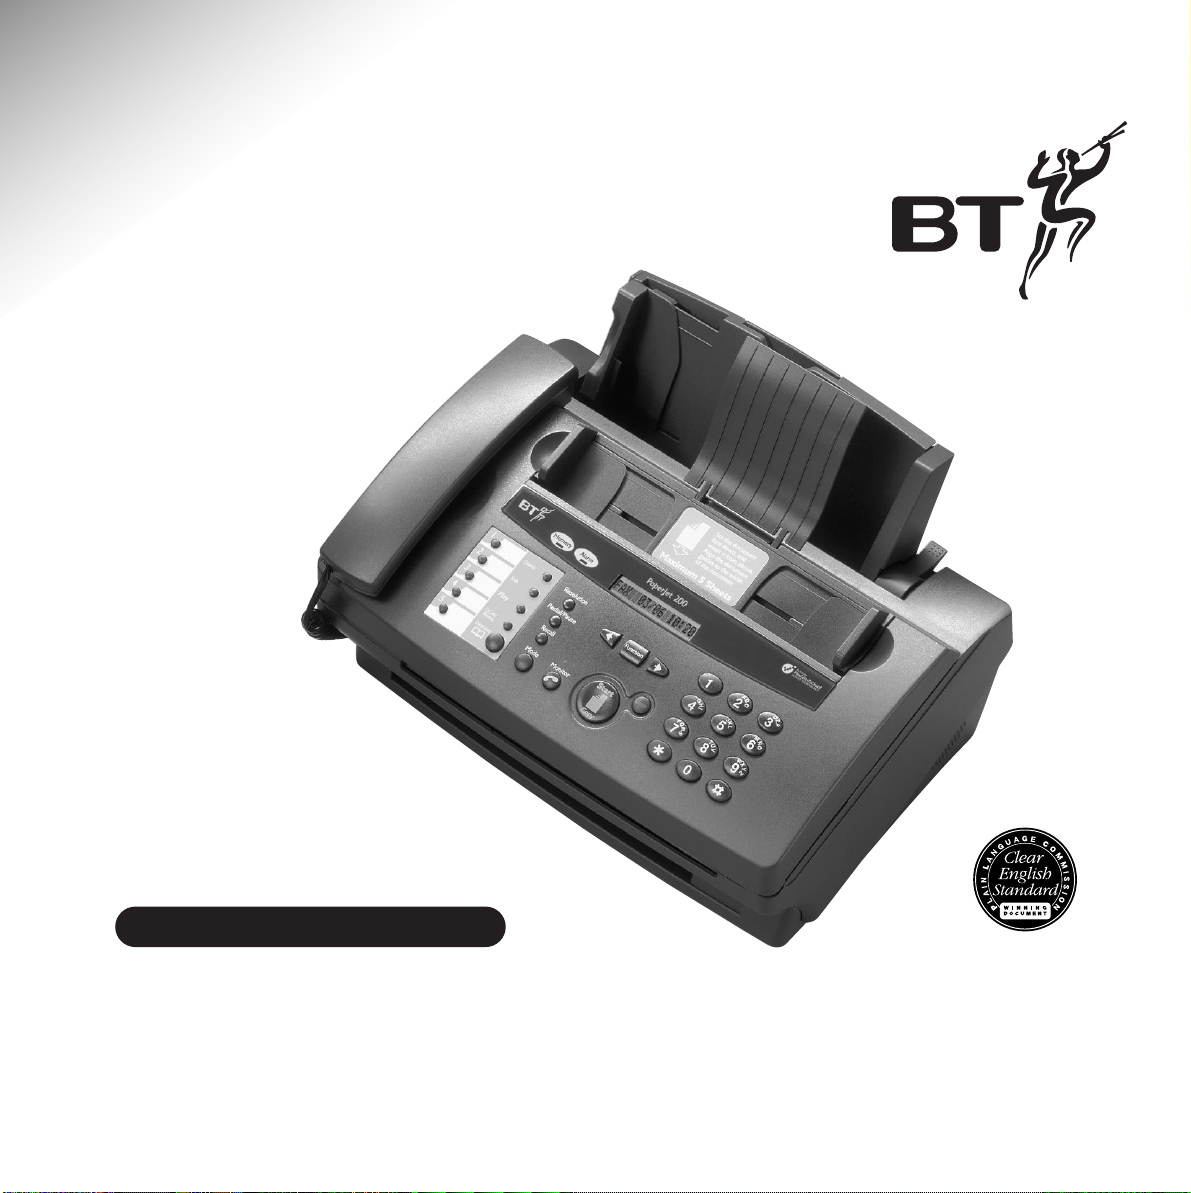
PaperJet 200
Low cost plain paper fax
User Guide
Page 2

Key features
Inkjet printing
With high-capacity, easy-to-replace
ink cartridges.
14.4kbps speed
Faster faxing speed saves time and
can mean cheaper fax calls.
SIM Card
Helping to prevent you ever running
out of ink, your PaperJet 200 tells you
when it’s time to buy another ink cartridge. Each
cartridge comes with its own SIM Card. This is
installed along with the cartridge and when the
level of ink gets low, you get a warning message.
5 one-touch buttons and
20 number directory
You can store a name, phone number
and fax number under each location. If a document
is loaded, the fax number is automatically dialled.
If no document is loaded, the phone number is
dialled.
Polling
You can set your machine to retrieve
a document from another fax or
store a document in your PaperJet 200’s
memory for another machine to retrieve.
Delayed sending
You can set a fax to be sent at a later
time – for example to take advantage
of cheaper call rates or to correspond with
another country’s time zone.
Built-in answering machine
MESSAGES
pick up messages when away from your
machine. Call screening to check who’s
calling before you answer.
Automatic recognition of fax or voice
calls. Remote access allows you to
Please open this page for an ‘at a glance’
guide to your PaperJet 200.
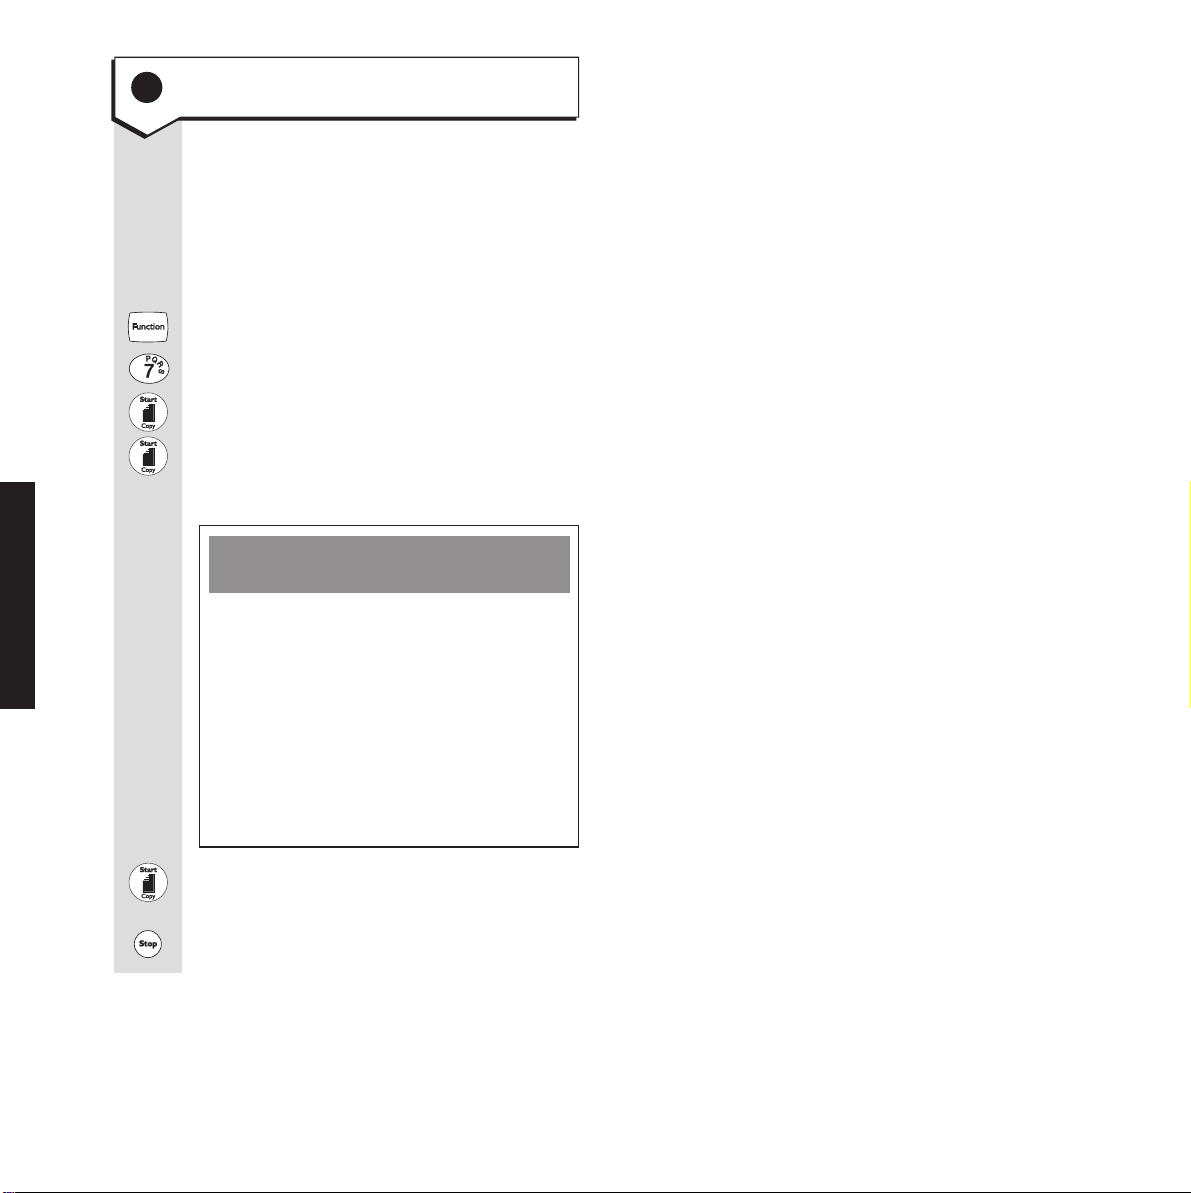
Page 3

PaperJet 200
Maximum 5 sheets
Set the document
face down, and
feed it from above.
Align the document
guides on the width
of the document.
Display
Memory light
Comes on when documents have
been stored in the memory.
Alarm light
Comes on – and alarm tone sounds –
if there is a problem.
Switch off by pressing
the
STOP button.
Resolution
Adjusts the resolution of documents
to be faxed or copied.
See page 28
Redial/Pause
Redials the last number.
Inserts a pause into a number.
See page 15
Recall/Access
Used when connected to a switchboard.
Recall is also used on exchange lines.
See pages 34
Mode
Switches between
answering modes.
See page 11
Monitor
Switches on loudspeaker to enable
handsfree dialling. Light comes on
when in handsfree mode. See page 14
Function
Lets you access the range of
functions when followed by
a number 1-8.
Paper tray
Holds up to 50 sheets of A4 paper.
See page 8
Paper tray lever
Push back to insert more paper,
then pull forward.
See page 8
Stop
Stops the current function or
cancels an error and returns the
machine to standby.
Start/Copy
Press to start faxing or copying.
Also confirms settings you make on
the machine.
LED
Keypad
For dialling and programming.
䊴 䊳 (
Cursor buttons
)
Lets you select options from each
function.
At a glance
1
Automatic document feeder
Place documents to be sent
(up to 5 sheets) with text face down.
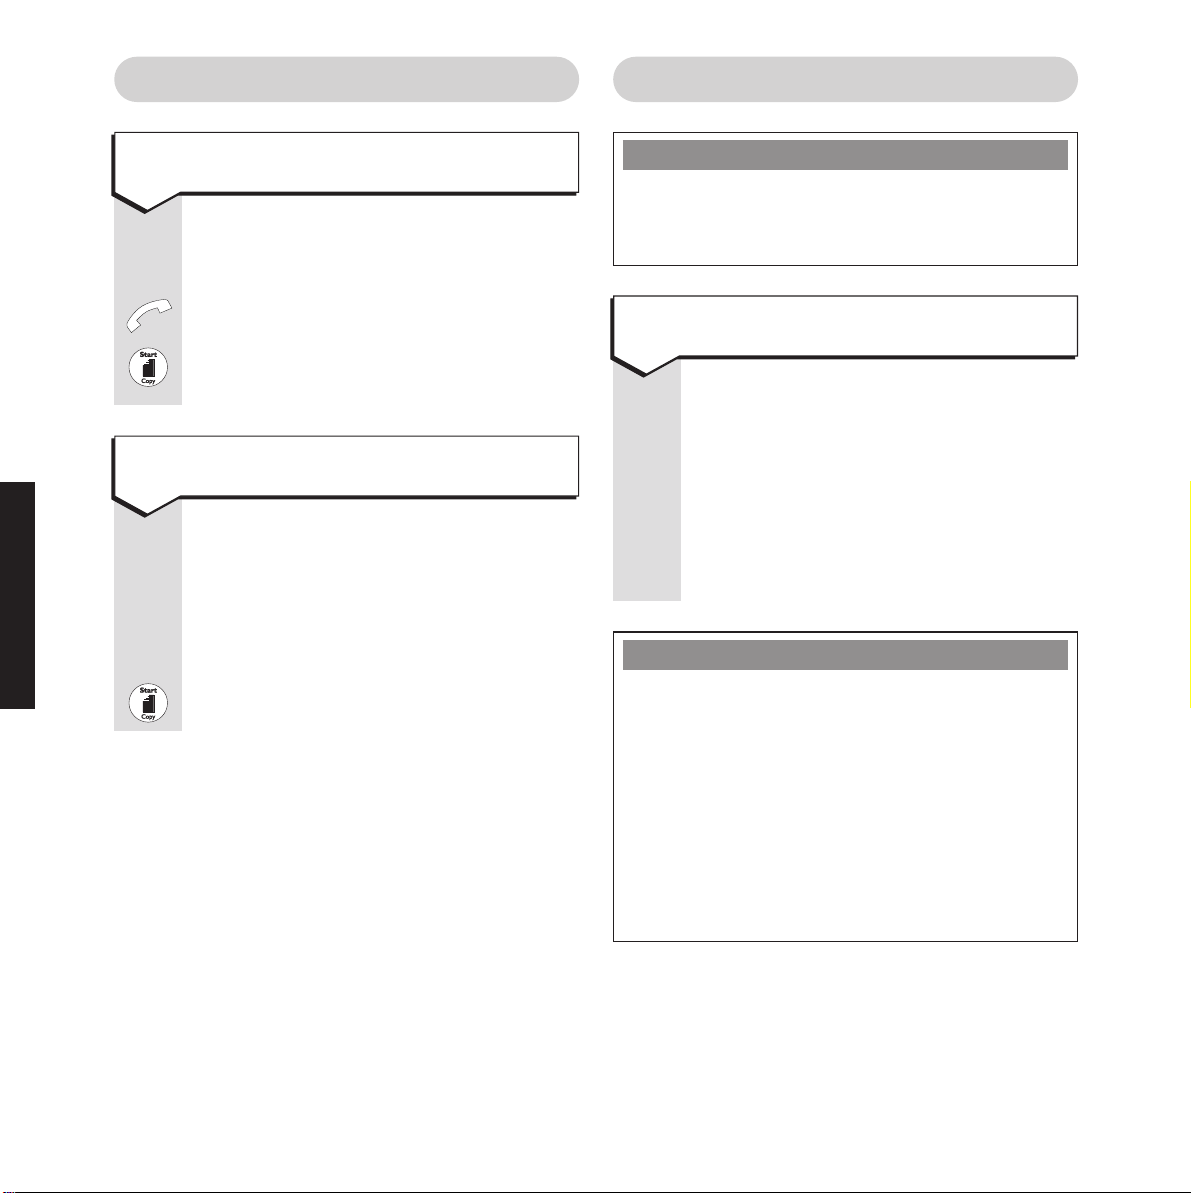
Page 4

Answering machine
One-touch labels
Delete
Delete messages.
See page 23
Use for writing the
names of your contacts
stored under the
one-touch buttons.
One-touch buttons
Store phone and/or fax
numbers for up to five
names and then contact
at the touch of a button.
See pages 12, 13
Directory
Lets you store up to 20 names together
with phone and/or fax numbers in the
directory memory.
See page 14
Skip
Lets you skip
forward through
your messages.
See page 23
Play
Lets you play back
recorded messages
and memos.
See page 23
OGM/Memo
Used to record your personal
outgoing messages.
See page 22
Lets you record a memo.
See page 23
2
Page 5

Page 6

In this guide
At a glance 1
Introduction 4
Unpacking your PaperJet 200 4
For your records 4
Safety instructions 5
Setting up 6
Using your PaperJet 200 11
Set the fax operation mode 11
Storing names and numbers 12
Making calls 14
Receiving calls 16
Sending faxes 16
Delayed faxing 18
Receiving faxes 18
Polling 20
Copying 21
Answering machine 22
Outgoing messages 22
Incoming messages and memos 23
Other features 24
Remote access 26
Optional settings 28
Resolution and contrast 28
Ringer 29
Size 30
Print-outs and reports 31
Connecting to a switchboard 34
Other features 35
Help and advice 37
Jams 37
Replacing the ink cartridge 37
Error messages 39
Technical information 41
Technical specification 43
Index 44
3
Page 7

Introduction
Your PaperJet 200has been designed for ease of use and made to the
high standards set by BT.
INTRODUCTION
Unpacking your PaperJet 200
If anything is missing, please contact your place
of purchase immediately.
• PaperJet 200
• Document support
• Handset
• Handset cord
• Telephone line cord
For your records
Date of purchase:
Place of purchase:
Serial number (on the underside of the fax machine base):
Purchase price:
For warranty purposes, proof of purchase is
required, so please keep your receipt.
Customer Helpline
If you have any problems with your PaperJet 200,
call the BT Helpline on 0845 074 0750.
• Ink cartridge with
SIM Card
• Mains lead
4
Page 8

Safety instructions
• Use only the mains lead supplied.
• There is a slight chance that your machine
could be damaged by an electrical storm.
We recommend that you unplug your
PaperJet 200 from the mains power and
telephone line socket during such storms.
• Do not obstruct any of the ventilation holes
on your machine. Allow a free flow of air to
all surfaces.
• Avoid placing your machine in humid
conditions or in direct sunlight. Don’t install
it close to radiators or air conditioning outlets
or in excessively warm, humid or dusty places.
Cleaning
Use a soft cloth dampened with water or diluted
washing-up liquid to wipe the outside. Never use
a dry cloth as this may cause a static shock.
5
Page 9

Setting up
Follow these steps to set up your PaperJet 200.
SETTING UP
Plan the location of your
PaperJet 200
Situate your PaperJet 200 close enough to the
phone and mains power sockets so that the cables
will reach.
Do not stand it on carpets or other similar
surfaces that generate fibres.
Connect the handset
1
The handset cord has the same plug at each
end. Plug one end of the handset cord into the
handset.
Plug the telephone line cord into
2
the socket marked at the back
of the fax
Connect the other end of the
3
telephone line cord into the
telephone socket
If you do not have a modern phone socket, call
Freephone
engineer to come and fit the correct socket.
This is a chargeable service.
0800 800 150 and ask for a BT
Plug the other end into the socket marked with a
handset
thread the cord through the channel.
Place the handset on the hook.
6
on the underside of machine and
Page 10

Plug the mains lead into the
4
back of the machine
Plug the other end of the mains
Plug the mains power adaptor into
5
4
lead into the wall socket and
the wall socket and switch on
switch on
Attach the document feeder
6
support
Slide the feeder support into the slots on top of
the machine making sure that the wire pins are
facing forward as shown.
SETTING UP
Switch should be
OFF for safety
while you plug in.
The display shows INITIALIZING and then NO
INK. Then the alarm flashes.
Install the ink cartridge and
7
SIM Card
Open the front cover.
7
Page 11

Remove the tape from the cartridge nozzle.
Be careful not to touch the nozzle or the
electrical contacts.
1 Slide the cartridge into place.
2 Push forward until you hear it click.
1
Paper sizes and types
The paper tray holds up to 50 sheets of
60-90gsm plain paper at sizes A4 and Letter.
You can also load thicker paper up to 157gsm
including inkjet OHP transparencies.
Load plain paper
8
Pull up the paper support.
SETTING UP
8
2
Pop the SIM card out of its holder and then
insert the SIM card.
Close the cover. The display shows ADD PAPER.
Push the lever on the right-hand side of the
paper tray towards the back of the machine.
When first using the machine, remove foam
transportation protection pieces situated on
either side of the paper tray. (You may need to
push the back plate of the paper tray towards
the back of the machine at the same time you
pull away the foam protection pieces.)
1 Insert up to 50 sheets of paper, aligning on
the right-hand side and making sure it
touches the bottom of the automatic sheet
feeder. Make sure the paper stays behind the
small guider on the left-hand side.
Page 12

Using the keypad to enter names
You can enter a name of up to 20 characters.
2
1
For example, to enter the name JOHN:
3
2 Adjust the paper guide to fit the width of the
paper.
3 Pull the paper tray lever towards the front of
the machine. The paper is held in place.
9 Enter your name and fax number
Press the buttons in the order shown
Your PaperJet 200 will include your name
and number on the top of each fax you
send. This is your Sender ID HEADER.
Display shows FUNCTION 1-8.
Display shows USER SET UP.
Display shows first option CLOCK
ADJUSTMENT.
To display EDIT HEADER.
•Press the
•Press the
•Press the
•Press the
5
button until the display shows J.
6
button until the display shows O.
4
button until the display shows H.
6
button until the display shows N.
If you make a mistake, use the 䊴button to
move the cursor back a space and enter the
correct letter. To enter a space, press the 䊳
button. This moves the cursor to the right.
To replace a character with a blank space
press
1
.
Display shows ENTER NUMBER.
KEYPAD
Enter your fax number. (You can enter
up to 20 digits. If entering an international
code, press the
✱button to put a + sign
before the first digit.)
To confirm. Display will show the next
option PBX SELECTION.
To return to standby.
SETTING UP
KEYPAD
Display shows ENTER NAME.
To clear the default setting
“PAPERJET 200”.
Enter your name.
Please note
Each fax you send will be printed with your
name, date and time, fax number and page
number at the top of each page. You have the
option of switching it off. See page 31.
9
Page 13
10 Set the date and time
Press the buttons in the order shown
When your fax is not being used, the
display shows the date and time. It will
also print the date and time at the very
top of each fax you send.
Display shows FUNCTION 1-8.
Display shows USER SET UP.
Display shows CLOCK ADJUSTMENT.
Display shows 00/00/1998 00:00.
SETTING UP
KEYPAD
Enter the date and time
Using the keypad to enter the
date and time
Use the keypad to enter the date
e.g., 12th June 1999 = 12/06/1999.
Enter the time using the 24-hour clock
e.g., 9.30am = 0930, 3.30pm = 1530.
If you make a mistake, use the 䊴 䊳
buttons to move the cursor to the
number to be corrected and enter
the correct number.
To confirm the setting displayed. Display
shows next option RING COUNT FAX.
To return to standby.
10
Page 14

Using your PaperJet 200
Set the fax operation mode
You can set your PaperJet 200 to work manually,
automatically or with an answer machine.
To set the mode
Use the MODE button to set your
PaperJet 200 to work the way you want.
Press the
shows the setting you want.
FAX
Your machine automatically answers
incoming calls as faxes. This mode is
used if you want your PaperJet 200 to
receive all calls as fax messages.
AUTO
Use this setting if you want your
machine to answer fax and voice calls
automatically. Your machine answers
all calls after one ring and checks for fax
tones. If none are detected, it is a phone
call. Your caller is put on hold, the
display shows LIFT HANDSET and the
machine rings again (please note that
only the PaperJet 200 machine will
ring, other phones on the same line
will not ring in AUTO mode).
MODE button until the display
If you do not lift the handset before the
ringing stops, your PaperJet 200 will
attempt to answer the call as an
incoming fax.
TAD
Use this setting if you wish to use the
answering machine.
Your answering machine answers all calls.
If the PaperJet 200 detects fax tones, it
will stop the answering machine and
receive the fax call automatically.
TEL
Use this setting if you want your
PaperJet 200 to act as a telephone –
faxes are not
You must answer each call by lifting
the handset.
If you hear fax tones, (a beep every
3 seconds) press the START button and
replace the handset to begin receiving
the fax.
received automatically.
USING
11
Page 15

USING
Storing names and numbers
in the one-touch and directory
memories
Name and number directory
You can store up to 20 names, in alphabetical order,
along with their associated fax and telephone
numbers. The names can be recalled to the display
for dialling. If you’re making a phone call, the
5-number memory (one-touch)
You can store your most frequently dialled
telephone number is dialled: if you have inserted a
document ready to send, the fax number is dialled.
numbers under the 5 ‘one-touch’ memory buttons.
Names can be stored along with their associated
fax and telephone numbers under each button.
If you’re making a phone call, the telephone
number is dialled: if you place a document in
the auto document feeder, the fax number is
automatically dialled.
Characters available on your PaperJet 200
You can enter various letters and symbols using
the keypad. Each consecutive press of the buttons
will display the following characters. (See table
below and ‘Using the keypad to enter names’
on page 13.)
Characters displayed under each button
No. of
presses
1 ADG JMPTW0
2 .BEHKNQUXÇ
3 :CFI LORVY
4 123456S8Z
5 /Ö7ü9
.
..
.
A
6 + Ñ
7 -Æ Ø
8 &
12
Page 16

Using the keypad to enter names
Display shows FUNCTION 1-8.
Display shows ONE-TOUCH.
See table on page 12.
Press the buttons in the order shown
For example to enter the name JOHN:
Press the 5 button until the display
shows J.
Press the
6 button until the display
shows O.
Press the
4 button until the display
shows H.
Press the
6 button until the display
shows N.
To enter a space, press the䊳button.
This moves the cursor to the right.
If you make a mistake, use the 䊴button
to move the cursor back a space and
enter the correct letter.
To store a one-touch memory
eg.
KEYPAD
KEYPAD
KEYPAD
Display shows 1: (or the first one-touch
location available).
If you want to select a different
one-touch location, press the one-touch
button (
1-9) you want.
Display shows ENTER NAME then the
one-touch button you have selected.
Enter the name. (See ‘using the keypad
to enter names’ page 9.)
To confirm. Display shows ENTER
FAX NUMBER.
Enter the fax number.
Display shows ENTER TEL NUMBER.
Enter the phone number.
To confirm. Display shows the next
one-touch button. You can now make
another one-touch entry by pressing the
START button.
To return to standby.
USING
You can store a name, fax number and
phone number under each one-touch
button. Each name can be up to 20
characters and each number up to 40
digits long.
If a document is loaded, your
PaperJet 200 automatically dials the fax
number when you press the one-touch
button. If no document is loaded, the
phone number is dialled.
13
Page 17

USING
To store a number in the directory
Press the buttons in the order shown
Your PaperJet 200 holds up to 20
directory entries in alphabetical order.
You can store a name, fax number and
phone number under each directory
location. Each name can be up to 20
characters and each number up to 40
digits long.
If a document is loaded, your
PaperJet 200 automatically dials the fax
number when you press the
DIRECTORY button. If no document is
loaded, the phone number is dialled.
Display shows FUNCTION 1-8.
Display shows DIRECTORY.
Display shows 01: (or the first directory
location available).
KEYPAD
KEYPAD
KEYPAD
To select a different location, enter the
directory location (
01-20), where you
want to store the entry. (Or use the
䊴 䊳 buttons.)
Display shows ENTER NAME then the
one-touch button you have selected.
Enter the name. (See ‘using the keypad
to enter names’ page 9.)
To confirm. Display shows ENTER
FAX NUMBER.
Enter the fax number.
KEYPAD
Enter the phone number.
To confirm. Display shows the next
directory location (if one is available).
You can now make another entry by
pressing the
START button.
To return to standby.
Please note
When entering a name, if you repeat one
which is already entered, your PaperJet 200 lets
you know by giving you a warning beep
and displaying
NAME REPEAT and then returns
you to the start of the process.
Making calls
To dial a phone number
Lift the handset.
KEYPAD
MONITOR
Dial the number you want.
To dial handsfree
You can dial a number without lifting
the handset.
Display shows TEL NO. You hear the
dial tone. Enter the number you want
(or press the one-touch or directory
buttons). The number is dialled.
14
Display shows ENTER TEL NUMBER.
Pick up the handset when you hear the
line ringing.
Page 18

You can also make a call by pre-dialling.
Dial the number using keypad, one-touch
or directory, then lift the handset or
press
MONITOR or START. After a pause
the number will be dialled.
To adjust the loudspeaker volume
To dial a number stored in the
directory
If a document has been loaded, your
PaperJet 200 will dial the fax number
stored in the Directory. Otherwise the
phone number will be dialled. To store
a directory number, see page 14.
There are 3 levels:
1 = Low, 2 = Medium, 3= High.
Display shows TEL NO.
To decrease the volume.
To increase the volume.
To return to standby.
To dial a one-touch memory
If a document has been loaded, your
PaperJet 200 will automatically dial the
fax number stored under a one-touch
button. Otherwise the phone number
will be dialled. To store a one-touch
number, see page 13.
OR
Lift handset or press MONITOR.
eg.
Display shows and dials the number.
Pick up the handset to speak.
OR
Lift the handset or press MONITOR.
Display shows FAX NO. or TEL. NO.
Display shows the first entry in the list.
To scroll through the alphabetical list
of names (or numbers) until the display
shows the name or number you want
to dial.
For quick access to Directory entries,
enter the first letter of the name you
want and then use the
䊴
and 䊳buttons.
To dial the displayed number.
To redial the last number
OR
Lift handset or press MONITOR.
USING
The last number called is displayed
and redialled.
15
Page 19
Sending faxesReceiving calls
USING
To receive a phone call
Press the buttons in the order shown
When the fax rings.
Lift the handset and speak to your caller.
If you hear the fax tones, press the
START button and replace the handset.
The fax will be received.
To receive a fax after talking to your
caller
You can hold a conversation with your
caller and then receive a fax without
ending the call.
When your caller begins to send their
document, you hear the fax tones.
The document is received.
WARNING
Do not try to send faxes which are still wet
with ink or correcting fluid, stapled or clipped
together, torn or folded.
To load a document
You can load up to 5 pages at a time
for copying or faxing, face down into the
automatic document feeder.
The first page is automatically drawn
into the feeder.
Display shows DOC. READY and the
resolution.
Please note
If a problem occurs while sending a fax, the
display will show COMM ERROR!. This will
clear automatically after 1 minute or you can
clear immediately using the
To identify the nature of the problem, check
the error code on the confirmation report
against the list on page 39. If a confirmation
report has not been printed, you can print out
an activity report to see details of the call.
STOP button.
16
Page 20
To send a fax
DOCUMENT
KEYPAD
Load the document. Display shows
DOC READY and the resolution setting.
You can change the resolution to suit
documents with fine text or photographs.
Change if necessary, see page 28.
Dial the number. (Or use a ONE-TOUCH
button or DIRECTORY.)
Please note
If a fax has been stored in memory for delayed
sending, the new fax will not be scanned into the
memory and the display will show CANCEL
DELAYED TX? If you press START, the delayed
send fax will be deleted and the new fax scanned
into memory before sending. If you press STOP
the delayed send fax will be retained and the
new fax sent directly from the document feeder.
The document is scanned into the
memory and the display shows SCAN
#
*
The number is dialled. Display then
shows CONNECTING, SEND, etc. as in
the example below. When the last page
has been sent, the machine beeps and
returns to standby.
SEND X96 S #01/02
SEND = Sending
If X = E - error correction mode
If X = blank – no error correction
96 = transmission speed
96 = 96000bps,
72 = 7200bps
S = send resolution
standard,
F = fine,
P = photo
#01 = page 1
#01/02 = page 1 of 2
Direct sending
.
If the document you want to send is too
large for the memory, or a delayed send
fax is already programmed, you will have
to send the document directly from the
USING
document feeder.
To send direct from the document feeder,
load the document. Display shows
DOC. READY STD.
Press MONITOR button. Display shows
FAX NO.
Dial number.
Press START. The fax is sent without
first scanning to memory.
To stop a fax in progress
Sending stops.
To eject the paper and return to standby.
Display shows EJECT DOCUMENT.
17
Page 21

To speak to the other party during a
fax transmission
Press the buttons in the order shown
While the fax is being sent:
Display shows INSERT DOCUMENT.
(DOCUMENT)
Load the document. It is automatically
scanned and stored in the memory for
sending. Display shows DELAYED SEND.
USING
Press the
MONITOR button. The display
shows TALK REQUEST.
When sending is complete, if the other
party lifts their handset in response to
your talk request, your PaperJet 200
will ring and display LIFT HANDSET
& PRESS MONITOR.
Lift your handset and then press the
MONITOR button. You will now be able
to hold a conversation.
Delayed faxing
You can store a document in the memory and
set a time for it to be sent later; for example, to
take advantage of lower call rates.
To set up a delayed fax
Display shows FUNCTION 1-8.
Display shows DELAYED SEND.
Display shows TX TIME = (current
time or the time entered at the last
delayed send).
KEYPAD
Enter the time you want the fax to be
sent, e.g. 0845 = 8.45am, 18.30 = 6.30pm.
To cancel a delayed send
When the display shows DELAYED
SEND.
Display shows CANCEL DELAY TX?
To confirm.
Receiving faxes
See also page 11 for further details on which
mode setting to use.
Your PaperJet 200 will automatically answer calls
and receive faxes in
In FAX Mode
Your machine automatically answers incoming
calls as faxes.
In AUTO Mode
Your machine answers all calls after one ring
and checks for fax tones. If none are detected,
it is a phone call. Your caller is put on hold, the
display shows LIFT HANDSET and the machine
rings again.
If you do not lift the handset before the ringing
stops, your PaperJet 200 will attempt to answer
the call as an incoming fax.
FAX, TAD and in AUTO mode.
18
KEYPAD
Display shows FAX NO =.
Enter the fax number you want.
In TAD Mode
Use the
TAD setting if you wish to use the
answering machine.
Page 22

Your answering machine answers all calls.
If the PaperJet 200 detects fax tones, it will stop
the answering machine and receive the fax call
automatically.
In
TEL mode you must answer each call by lifting
the handset.
If you hear fax tones, (a beep every 3 seconds)
press the
START button and replace the handset
to begin receiving the fax.
During reception the display will show
CONNECTING and then RECEIVE. It also
shows the number being called, speed, Error
Correction Mode and page number, as shown
in the example opposite.
DOCUMENT MEMORY
Your PaperJet 200 has a maximum document
memory of about 20 pages. It is used for storing
faxes to be sent or polled and also for receiving
faxes, including when your PaperJet 200 has run
out of paper or there is a paper jam. Faxes will
be received into memory until it is full. When the
memory is full, faxes cannot be received. Faxes
larger than 20 pages will have to be received in
stages. When you add paper, any documents
received to memory will be printed out
automatically. In TAD mode the document
memory is also used to store voice messages.
Answering a fax call from an
extension telephone
RECEIVE X96 S #01
RECEIVE = receiving
If X = E - error correction mode
If X = blank – no error correction
96 = transmission speed
96 = 96000bps,
72 = 7200bps
S = send resolution
standard,
F = fine,
P = photo
#01 = page 1
Please note
If a problem occurs while receiving a fax, the
display will show COMM ERROR! This will clear
automatically after 1 minute or can be
cleared immediately using the STOP button.
To identify the nature of the problem, print
out an activity report and check the error
code against the list on page 39.
If you answer a call on an extension
telephone, on the same line as your
PaperJet 200, and hear the fax tones, you
can switch your PaperJet 200 into fax
receive mode by dialling
is a TouchTone
TM
telephone).
19 (provided it
When you hear your PaperJet 200
responding with fax tones, replace the
extension handset.
USING
19
Page 23

To talk to your caller when receiving
a fax
Press the buttons in the order shown
You can speak with your caller during a
fax call.
Polling
This allows your PaperJet 200 to retrieve a
document from another machine, or for another
fax machine to retrieve a document from your
PaperJet 200.
USING
While the fax is being received:
Press the
MONITOR button. The display
shows TALK REQUEST.
When reception is complete, if the caller
lifts their handset in response to your
talk request, your PaperJet 200 will ring
and display LIFT HANDSET & PRESS
MONITOR.
Lift your handset and then press the
MONITOR button. You will now be able
to hold a conversation.
To empty a full memory
Display shows MEMORY FULL.
Display shows CANCEL TX FILE?
Any existing document stored for
sending or polling is deleted from
the memory.
To set a document which can be
polled by another machine
For security, you can choose to use a
password with polling. The other
machine must send this password in
order to retrieve the document you
have stored in the memory for polling.
However, please note that some fax
machines may not be able to retrieve
documents which are passwordprotected.
Display shows FUNCTION 1-8.
Display shows POLL.
Display shows POLL SEND.
Display shows PASSWORD.
KEYPAD
If desired, enter the password which
can be up to 20 digits long. This stops
unauthorised people from retrieving
the document.
20
If the paper runs out
If the display shows
Faxes received when the paper runs out will be
stored in the memory and automatically printed
out as soon as you add more paper.
ADD PAPER
.
Display shows INSERT DOCUMENT.
Load the document to be polled. It is
scanned automatically. Display flashes
TO BE POLLED.
The document is sent when your
PaperJet 200 is contacted by another
machine set to ‘polling receive’.
Page 24

To cancel a document set
to be polled
To cancel the polling of a document
from another fax
You can cancel before or during polling.
Display shows TO BE POLLED.
Display shows CANCEL POLL TX?
Poll is cancelled and display returns
to standby.
To poll a document from another fax
You can retrieve a document from
another fax machine which has a
document ready to be polled.
Display shows FUNCTION 1-8.
Display shows POLL.
Display shows first option
POLL SEND.
To display POLL RECEIVE.
Display shows PASSWORD =.
KEYPAD
If required, enter the password set at
the other machine.
To stop your PaperJet 200 from
retrieving a document:
The poll is cancelled.
Copying
To copy a document
DOCUMENT
KEYPAD
Load the document. Display shows
DOC. READY and the resolution setting.
To change the resolution between
STANDARD, FINE or PHOTO.
See page 28.
Display shows COPIES = 1 and the
resolution setting.
Enter the number of copies you want,
between 1-50.
The document is copied. Press the
button to halt copying at any time.
USING
STOP
KEYPAD
Display shows DIAL TO POLL.
Enter the fax number you want.
While retrieving the document, the
display shows POLLING then RECEIVE.
If the paper runs out
If the display shows
Faxes received when the paper runs out will be
stored in the memory (as long as it is not full)
and automatically printed out as soon as you
add more paper.
ADD PAPER
.
21
Page 25

Using the answering machine
OGM/Memo
ANSWERING MACHINE
22
You can send and receive faxes when the
answering machine is switched on.
To enable callers to leave messages, your
Paperjet 200 receiving mode must be set to
TAD. (To set the answering mode, see page 11)
When in TAD mode your PaperJet 200 will
automatically take voice messages and fax
messages. The answer machine will take the call
first and if PaperJet 200 detects fax tones whilst
the answering machine is activated it will switch
off the answering machine and receive the fax.
Outgoing messages
Your answering machine allows you to record
up to three different outgoing messages. Each
message is to suit a specific situation. The
maximum length of each outgoing message is
20 seconds.
OGM 1 is the message that is played to callers
when your Paperjet 200 is set to TAD receiving
mode. For example, “Hello, we cannot take your
call at present. You may leave your message after
the tone or send a fax now.”
OGM2 is the message that is played to callers
when your Paperjet 200 is set to TAD but the
recording memory is full. For example, “Hello,
we cannot take your call or record a message at
the moment. You can send a fax now, or please
call again later.”
OGM3 is the message that is played to callers
when your Paperjet 200 is set to AUTO mode.
Callers cannot leave voice messages but they
can still send faxes. The phone will continue to
ring until someone answers the call, a fax is sent
or the caller hangs up. For example, “Thank you
for calling, please hold on while we try to connect
you or send a fax now.”
By recording all three outgoing messages, your
Paperjet 200 is ready for all situations.
To record an outgoing message
Display shows first option MEMO.
Display shows OGM.
Display shows first option PLAY.
Display shows RECORD.
Display shows RECORD OGM1.
1,2 or 3
H/SET
Press the number of the outgoing
message - OGM1, OGM2, and OGM3
you want to record.
Display shows LIFT HANDSET.
Pick up the handset and speak your
outgoing message. Display shows
RECORDING 00:01 and starts
the timer. Replace the handset to
stop recording.
Page 26

To check your outgoing message To play back messages and memos
OGM/Memo
Delete
Skip
Play
Play
Delete
OGM/Memo
Display shows first option MEMO.
Display shows OGM.
Display shows PLAY.
Display shows PLAY OGM1.
1,2 or 3
Press the number of the outgoing
message OGM1, 2 or 3 you want to
play back.
The message displayed is played back
and the unit returns to standby.
Incoming messages and memos
To record a memo
You can record a memo message for
other users which can then be played
back in the same way as an incoming
message. The maximum message time
is the same length set for incoming
callers - the pre-set length is unlimited,
but can be changed - see To set the
maximum length of incoming messages
and memos. See page 25.
Display shows MEMO
Display shows LIFT HANDSET
H/SET
Pick up the handset. Display shows
RECORDING 00:01 and the timer
starts. Use the handset to record
your message. Replace the handset
to stop recording.
If you have a new message the green
memory light will flash.
Display shows the message number
and the date and time it was received.
Display shows N if the message is new
and has not been played back before.
Press again during playback to repeat
the current message.
To skip forward to the next message.
To delete the current message.
ANSWERING MACHINE
To stop playback.
To delete all messages
Recorded messages are saved in the
memory until you delete them in
stand-by mode.
Display shows ERASE ALL MSG?.
either:
To confirm deletion. The display
returns to standby.
or
To cancel deletion. The display returns
to standby.
23
Page 27

Other features
Call screening
So you can hear who’s calling when the
answering machine is switched on,
you can set it to broadcast incoming
messages over the built-in loudspeaker.
If you want to speak to the caller,
simply pick up the handset and talk
and the answering machine
automatically stops recording.
Display shows FUNCTION 1-8.
Display shows TAD.
To change the number of rings
before your answering machine
takes a call
The pre-set number of rings is 3.
You can change this to 1-9 rings.
(RING COUNT)
Display shows FUNCTION 1-8.
Display shows TAD.
Display shows RING COUNT.
The current number of rings
is displayed.
To select the number of rings you
want 1-9.
ANSWERING MACHINE
Display shows first option
RING COUNT.
To display TAD MONITOR.
Display shows the current setting.
ON means the call will be played over
the loudspeaker.
To display ON or OFF.
To confirm the setting displayed.
Display shows next option TAD
ACCESS CODE.
To return to standby.
To confirm the setting displayed.
Display shows next option
TAD SILENCE.
To return to standby.
24
Page 28

If your machine constantly plays
fax tones when callers are trying
to leave messages
When your PaperJet 200 is in TAD mode
it will normally listen for fax tones which
tell it whether the caller is sending a
fax or not. However, some older fax
machines do not send the appropriate
tones, and your PaperJet 200 is pre-set
to switch to fax mode if no tones are
detected. So if your PaperJet 200
sometimes switches to FAX while callers
are trying to leave a message, it may
help to switch the TAD SILENCE
setting to
Display shows FUNCTION 1-8.
Display shows TAD.
Display shows first option
RING COUNT.
To display TAD SILENCE.
OFF.
To set the maximum length of
incoming messages and memos
Your Paperjet 200 has a total recording
time of approximately 15 minutes. The
pre-set maximum length for each
individual message received and memo
is unlimited. You can change this to
1 or 3 minutes.
Display shows FUNCTION 1-8.
Display shows TAD.
Display shows first option
RING COUNT.
To display RECORDING TIME.
Display shows the current maximum
message length.
To display the option you want.
To confirm the setting displayed.
Display shows next option
TAD MONITOR.
ANSWERING MACHINE
To display OFF. (The options are on
or off).
To confirm the setting displayed.
Display shows next option
RECORDING TIME.
To return to standby.
To return to standby.
25
Page 29

Remote access
To access your answering
machine remotely
REMOTE ACCESS
You can access your answering machine from
another phone, provided you are using a
Touchtone™ keypad, to play back your
messages and memos.
Your Paperjet 200 must be set to TAD mode.
Access code
To help keep your messages private, your
Paperjet 200 answering machine requires you to
enter a 3-digit code in order to access messages.
In order to activate Remote access you must
first assign a 3-digit access code to your
Paperjet 200 by following the procedure
‘To change the access code’.
If you wish to disable Remote access change the
access code to 000.
To change the access code
ENTER
Ring your Paperjet 200 telephone
number using a telephone with a
Touchtone™ keypad.
After your outgoing message has
been played:
Press the
phone’s keypad you here two beeps.
Enter your 3-digit access code.
If your code is accepted, you hear a
further beep and you can now operate
your machine.
To play back your messages.
To repeat the current message.
To delete the current message.
To skip forward to the start of the
next message.
button on the
*
26
KEYPAD
Display shows FUNCTION 1-8.
Display shows TAD.
Display shows first option
RING COUNT.
To display TAD ACCESS CODE.
The current code is displayed.
Enter the 3-digit code you want.
To confirm the code displayed. Display
shows next RING COUNT.
To return to standby.
To delete all messages.
To hear all your undeleted
messages again.
Page 30

Time saver
The time saver feature is useful when using
Remote Access to ring in from another phone.
If you have a new message your answering
machine will answer after 2 rings. If you do not
have a new message, your PaperJet 200 will
answer after the number of rings set (RING
COUNT): This means that if you have no new
messages then you can hang up before being
connected and hence not be charged for the call.
In order for this feature to work properly it is
advisable to set the number of rings before your
answering machine answers the call (RING
COUNT) to 5 or more.
REMOTE ACCESS
27
Page 31

Optional settings
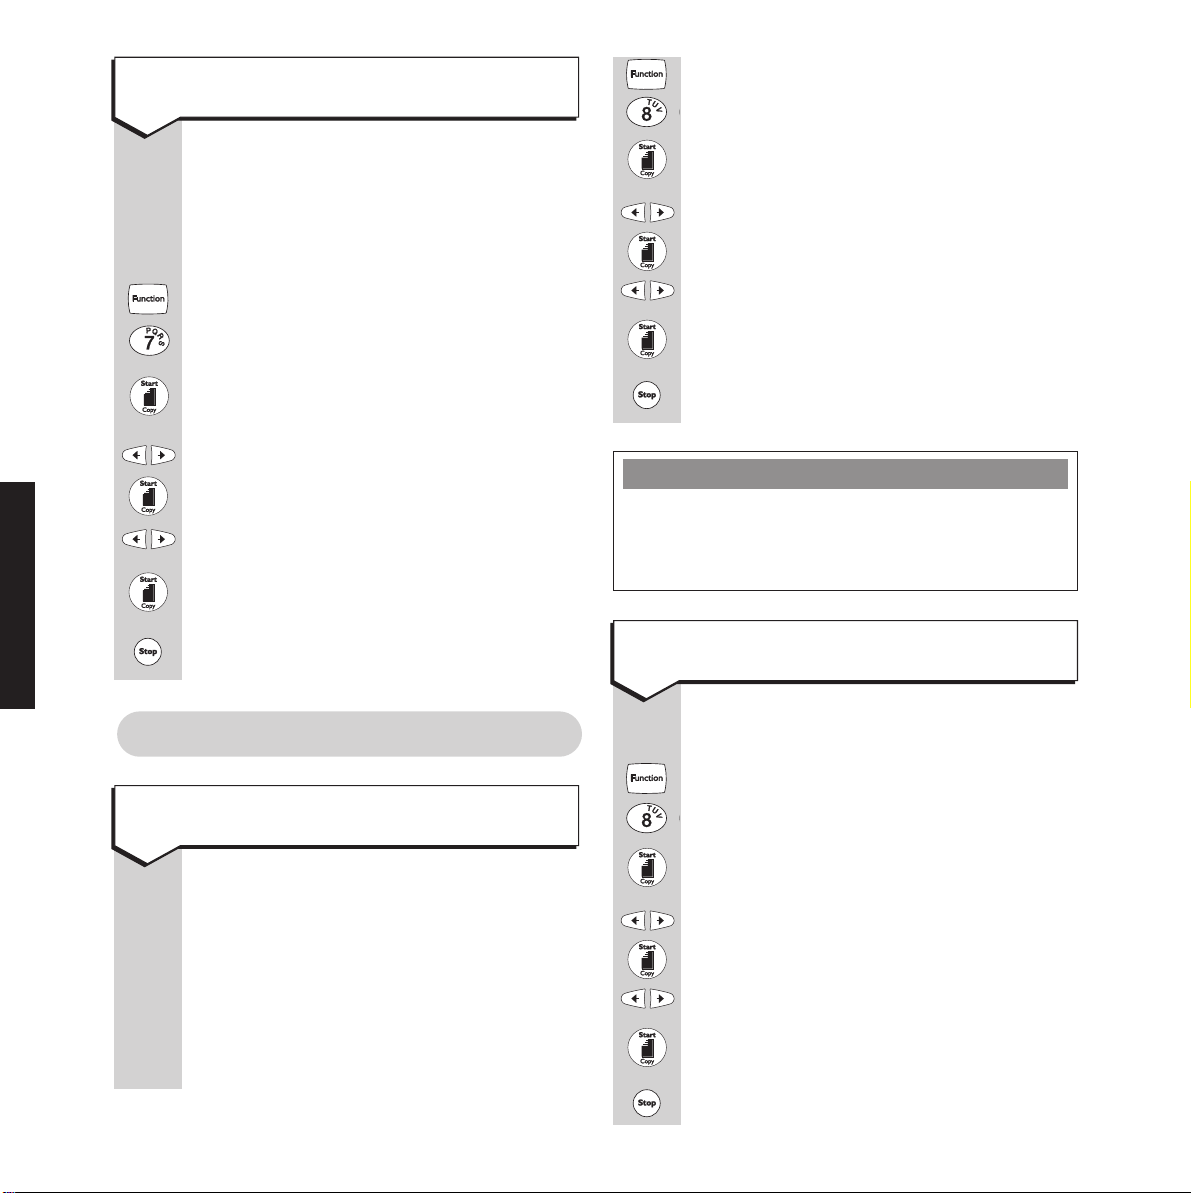
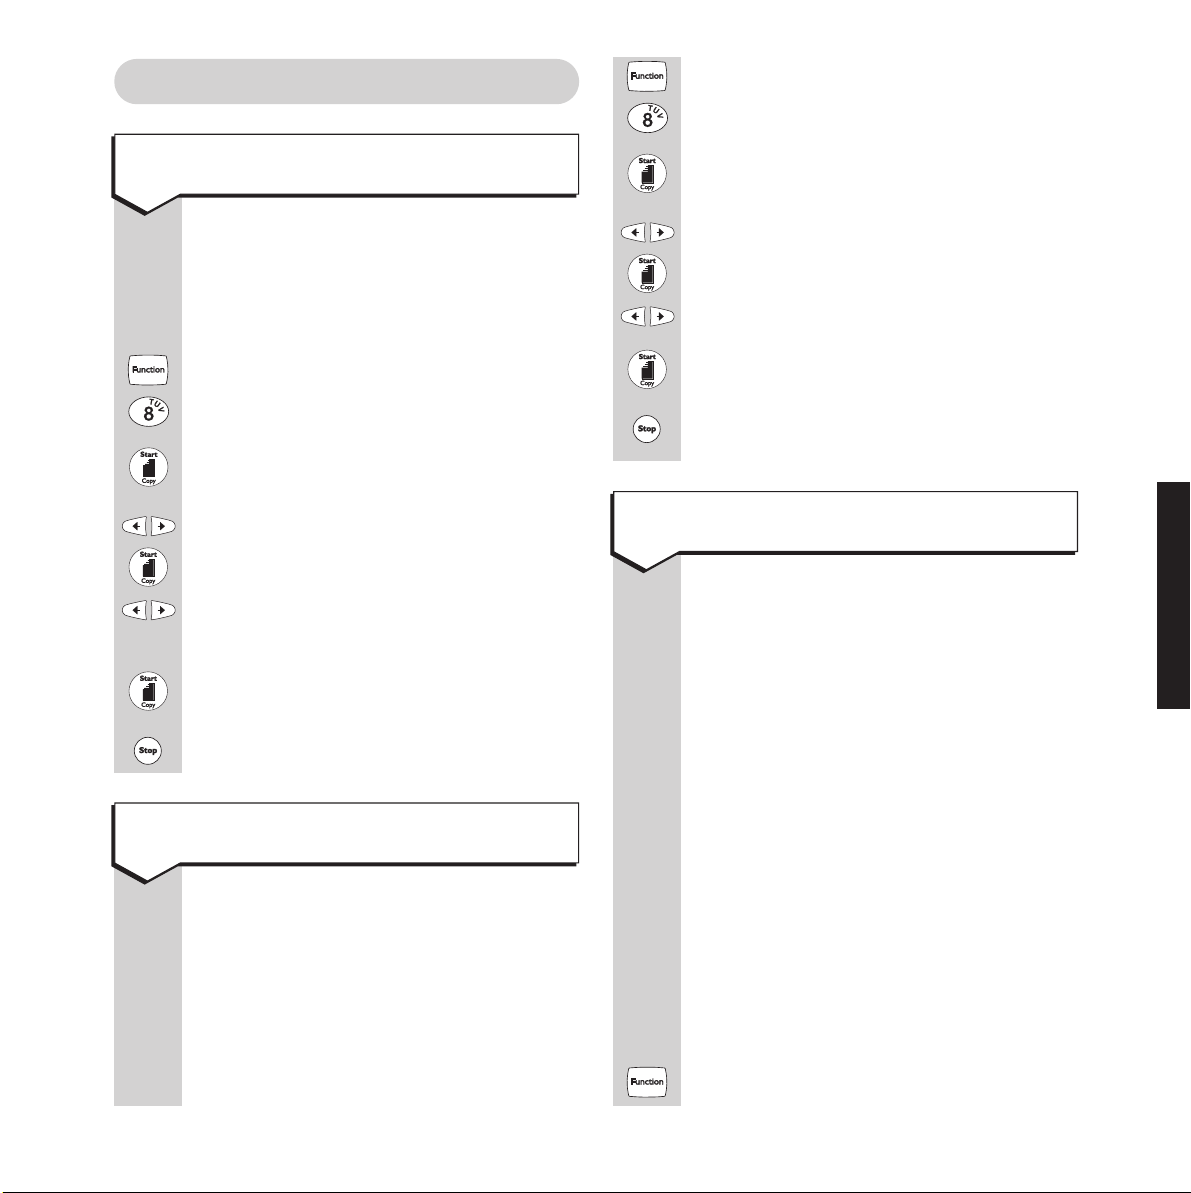
Resolution and contrast
Resolution
You can adjust the resolution to suit each
individual document you are faxing or copying.
• STANDARD – when the original contains
easy-to-read text.
• FINE – when the original contains small or
difficult to read text.
• PHOTO - when the original contains pictures,
photographs or drawings which contain colours
or varying shades of grey.
OPTIONAL SETTINGS
When set to PHOTO, faxes may take longer to send.
To change the resolution
Please note
Press the buttons in the order shown
To change the default resolution
setting
You can set your machine so that the
resolution automatically shows
STD, FINE or PHOTO when you
load a document. You can then change
the setting for individual documents as
normal.
Display shows FUNCTION 1-8.
Display shows USER OPTIONS.
Display shows RESOL. DEFAULT.
Display shows the current default setting,
STANDARD, FINE or PHOTO.
To display the option you want.
To confirm. Display shows next option
CONTRAST. You can change
the contrast – see page 29.
28
Load the document.
The display shows DOC. STD and
the current resolution setting.
To change the setting between
STANDARD (ie. STD), FINE or PHOTO.
After faxing or copying, your
PaperJet 200 automatically returns to
the default resolution setting. This is
usually STANDARD.
To return to standby.
After faxing or copying, the resolution
setting will stay at the setting you have
selected until you change it again.
Please note
You can exit any steps without saving the
setting by pressing the
Your PaperJet 200 will return to standby.
STOP button.
Page 32

Contrast
You can adjust the contrast to help ensure that
documents with coloured backgrounds or any
text that does not stand out clearly are easier to
read when they have been faxed or copied.
•
NORMAL – when the original document is
clearly printed.
•
DARK – when the original document is light
to make your copies darker.
•
LIGHT – when the original document is dark
to make your copies lighter.
To change the contrast
Display shows FUNCTION 1-8.
Ringer
To adjust the number of rings before
your fax machine answers a call
In FAX Mode you can select from 1-9
rings before your fax machine
automatically answers an incoming call.
The default setting is 1 ring.
Display shows FUNCTION 1-8.
Display shows USER SET UP.
Display shows first option CLOCK
ADJUSTMENT.
To display RING COUNT FAX.
OPTIONAL SETTINGS
Display shows USER OPTIONS.
Display shows first option
RESOL. DEFAULT.
To display CONTRAST.
To display the current setting,
NORMAL, DARK or LIGHT.
To display the option you want.
To confirm. Display shows next option
SEND REPORT.
To return to standby.
The contrast setting will not change
until you reset it.
Display shows the current setting such
as 4.
To display the number of rings you want.
To confirm the setting. Display shows
next option RINGER SWITCH.
To return to standby mode.
Please note
When your PaperJet 200 is set up and receiving
in TAD mode, you adjust the number of rings
before answer using TAD RING COUNT
- see page 26.
29
Page 33
To switch the ringer on and off
Display shows FUNCTION 1-8.
Display shows USER OPTIONS.
OPTIONAL SETTINGS
Size
Press the buttons in the order shown
Turning the ringer off means you will
not hear rings for all incoming fax and
phone calls.
Display shows FUNCTION 1-8.
Display shows USER SET UP.
Display shows the first option CLOCK
ADJUSTMENT.
To display RINGER SWITCH.
Display shows ON or OFF.
To switch between the settings.
To confirm the setting. Display shows
the next option EDIT HEADER.
To return to standby.
Display shows first option RESOL.
DEFAULT.
To display RX PRINT MODE.
Display shows 200%, 94%, 86% or 79%.
To display the option you want.
To confirm. The display
shows next option PAPER SIZE.
To return to standby.
Please note
The different settings only affect the vertical
reduction. The width reduction is always about
95% of full size.
To select the paper size
You can set your machine to print on
A4 or Letter size paper.
30
To set the amount of reduction for
each page
Your PaperJet 200 automatically
reduces an incoming fax page or copy
to 94% of original size to enable it to fit
on an A4 page with a header. You can
change this setting to 200%, 94%, 86% or
79%. If you choose 200% and a received
fax extends beyond A4 size, it will print
on 2 pages.
Display shows FUNCTION 1-8.
Display shows USER OPTIONS.
Display shows first option RESOL.
DEFAULT.
To display PAPER SIZE.
Display shows A4 or LETTER.
To display the option you want.
To confirm. The display shows next
option HEADER.
To return to standby.
Page 34
Print-outs and reports
To see a print-out
Your PaperJet 200 can print out information
about its settings and details of faxes you have
sent and received
There are 4 types of print-out.
FUNCTION LIST – gives you details of the
menus and all the settings
you can choose.
PHONE BOOK – lists all the names and
numbers that you have
stored in the directory and
one-touch memory.
CONFIG REPORT – shows you all the current
settings on your machine.
ACTIVITY REPORT – automatic or on-demand
print-out shows the last 40
faxes sent and received and
includes the date, time,
duration, number of pages
and the fax number of the
other machine.
You can also set your
PaperJet200 to print out an
individual activity report
each time your machine
sends or receives a fax.
This is known as a
confirmation report.
The format for activity
reports and for confirmation
reports is the same, as
shown overleaf.
You can tell your PaperJet 200 to print
out a report at any time
Display shows FUNCTION 1-8.
Display shows PRINT OUTS.
Display shows FUNCTION LIST.
To select between
PHONE BOOK, CONFIG REPORT,
ACTIVITY REPORT.
FUNCTION LIST,
Display shows PRINT. The report is
printed. Display shows next print-out.
Press
STOP to return to stand-by.
To switch automatic print-out of
activity reports ON and OFF
Display shows FUNCTION 1-8.
Display shows USER OPTION.
Display shows first option RESOL.
DEFAULT.
Until display shows ACTIVITY REPORT.
Displays current setting ON of OFF.
To display the current setting you want.
To confirm. Display shows next option
RX PRINT MODE.
To return to standby.
OPTIONAL SETTINGS
31
Page 35
Your guide to an activity report
26/04/99
NAME: SMITH
ID: 0154 123 12345
Order of faxes
up to 40
NO DATE TIME TX/RX PAGES
Date Time of
transmission
Transmitted
or
received
01 24/04 06:22 TX 01
Number
of pages
Confirmation reports
Press the buttons in the order shown
You can get a printed confirmation
status of each fax you send which
includes the time, date, number dialled
and whether the send was successful.
Alternatively you can select to print a
report only when a document has not
been sent successfully.
Display shows FUNCTION 1-8.
02 25/04 15.55 RX 09
Duration of call Fax number of
OPTIONAL SETTINGS
DURATION STATION ID RESULT
00’12” 0154 222 2222 OK
02’25” 0167 887 9898 OK
TX/RX key
TX = Fax sent (Transmission).
RX = Fax received (Reception).
POLL RX = Document polled from another
POLL TX = Document polled from this machine.
receiver/sender
machine.
DISTANT
Result of fax
Display shows USER OPTIONS.
Display shows first option CLOCK
ADJUSTMENT.
To display SEND REPORT.
Display shows OFF, ON or ERROR.
Choose:
ON to print a confirmation report of
each fax sent.
ERROR to print only when a fax has not
been sent successfully.
OFF to receive no confirmation report*.
To display the setting you want.
To confirm. Display shows next option
LANGUAGE.
To return to standby.
*Activity reports which detail the last 40 faxes sent and received
can be printed out at any time or set to print out automatically –
see page 31.
32
The format for Confirmation reports is the same
as for Activity reports.
Page 36

Weekly test
Display shows FUNCTION 1-8.
Display shows USER OPTIONS.
You can program your PaperJet 200 to
automatically print a test sheet every
7 days. If you switch this feature on,
a test sheet will be printed immediately
and then automatically at midday every
seventh day. The default setting is off.
Display shows FUNCTION 1-8.
Display shows USER OPTIONS.
Display shows first option RESOL.
DEFAULT.
To display WEEKLY TEST.
Display shows = OFF (or =ON).
Press the 䊴or 䊳button to select ON
(or OFF).
To confirm the setting. Display shows
next option LOW INK WARNING.
To return to standby.
Display shows first option RESOL.
DEFAULT.
To display LOW INK WARNING.
Display shows = OFF (or =ON).
Press the 䊴or 䊳button to select ON
(or OFF).
To confirm the setting. Display shows
next option INK ORDER SHEET.
To return to standby.
OPTIONAL SETTINGS
Ink order sheet
You can program your PaperJet 200 to
automatically print an ink order sheet
when it prints (or displays) a low ink
warning. The default setting is off.
Display shows FUNCTION 1-8.
Low ink warning
You can program your PaperJet 200 to
automatically print a low ink warning
when it has enough ink left to print
approximately 50 pages. The default
setting is off.
Switching the low ink warning print-out
on and off does not affect the low ink
warning given in the display.
Display shows USER OPTIONS.
Display shows first option RESOL.
DEFAULT.
To display INK ORDER SHEET.
Display shows = OFF (or =ON).
Press the 䊴or 䊳button to select ON
(or OFF).
To confirm the setting. Display shows
next option DIAL TONE CHECK.
To return to standby.
33
Page 37
Connecting to a switchboard
or
If you choose RECALL.
To select
RECALL.
Your PaperJet 200 can be connected to a
compatible switchboard. When connected to a
switchboard you normally have to dial an access
code to get an outside line. This can be stored
on the
RECALL/ACCESS button for ease of use.
Ask your switchboard operator or supplier for
your correct access code.
To store the access code
OPTIONAL SETTINGS
Display shows FUNCTION 1-8.
Display shows USER SET UP.
Display shows first option
CLOCK ADJUSTMENT.
To display PBX SELECTION.
Display shows ON or OFF.
To display ON.
Display shows = ACCESS.
Display shows ACCESS.
To return to standby.
Using the RECALL/ACCESS button
If you have programmed the
RECALL/ACCESS button, you can use
it to dial the code when making a call
or to store the code in numbers in the
memory.
If the RECALL/ACCESS button is the
first button pressed in the dialling
sequence, then the access code will be
dialled (or inserted in the stored
number). If it is pressed at any other
time, a RECALL will be dialled. Recall
can utilise switchboard features like
transferring and holding phone calls.
See your switchboard user guide for
details.
34
KEYPAD
Display shows = DIGIT or = RECALL.
To choose between
If you choose
DIGIT and RECALL.
DIGIT.
Display shows ACCESS CODE.
Enter the access code (up to 3 digits).
To confirm the code. Display shows
ACCESS.
To return to standby.
Page 38
Other features
Display shows FUNCTION 1-8.
Display shows USER OPTIONS.
To change the language
Press the buttons in the order shown
You can select the language for the
display, choosing between ENGLISH
or FRENCH.
Display shows FUNCTION 1-8.
Display shows USER OPTIONS.
Display shows first option RESOL.
DEFAULT.
To display LANGUAGE.
Display shows ENGLISH.
To switch between ENGLISH and
FRENCH.
To confirm. Display shows ACTIVITY
REPORT.
To return to standby.
To switch your sender ID on and off
Each fax you send can have your name,
fax number, time and page number at
the top of each page when it is printed
out. The standard setting is ON, so this
will happen automatically. Switching
this option OFF means that your ID
will not be sent.
Display shows first option
RESOL.DEFAULT.
To display HEADER.
Display shows ON or OFF.
To display the option you want.
To confirm. Display shows next option
WEEKLY TEST.
To return to standby.
To switch the Dial Tone check on
and off
When your PaperJet 200 is dialling out it
normally waits a short period before
actually dialling. This is to allow the line
to stabilise when the dial tone is heard.
It is possible to change the set up so that
instead of waiting a fixed period, the
PaperJet 200 won’t dial until it actually
hears the dial tone. There are three
available settings:-
OFF PBX/OFF PST – no dial tone check.
ON PBX/ON PST – dial tone check on if
PBX SELECTION is set on or off.
OFF PBX/ON PST – dial tone check on
only if
The default setting for normal use in the
UK is
Display shows FUNCTION (1-8).
PBX SELECTION is set off.
OFF PBX/OFF PST.
OPTIONAL SETTINGS
35
Page 39

To switch the Busy Tone check on
and off
OPTIONAL SETTINGS
Display shows USER OPTIONS.
Display shows first option RESOL.
DEFAULT.
To display DIAL TONE CHECK.
Display shows = OFF PBX/OFF PST.
Press the 䊴or 䊳button to select the
option you want
= ON PBX/ON PST, = OFF PBX/ON PST.
= OFF PBX/OFF PST,
To confirm the setting. Display shows
next option BUSY TONE CHECK.
To return to standby.
Press the buttons in the order shown
When your PaperJet 200 is sending a fax
it will keep trying, even if the far end is
busy (engaged), for a fixed time (60
seconds). You have the option to change
the set-up so that the PaperJet 200 drops
the line automatically if it detects busy
tone. There are three available settings:-
Display shows first option RESOL.
DEFAULT.
To display BUSY TONE CHECK.
Display shows = OFF PBX/OFF PST
(or current setting).
Press the 䊴or 䊳button to select the
option you want
= ON PBX/ON PST, = OFF PBX/ON PST.
= OFF PBX/OFF PST,
To confirm the setting. Display shows
next option RESOL. DEFAULT.
To return to standby.
36
OFF PBX/OFF PST – no busy tone check.
ON PBX/ON PST – busy tone check on if
PBX SELECTION is set on or off.
OFF PBX/ON PST – busy tone check on
only if
The default setting
PBX SELECTION is set off.
OFF PBX/OFF PST.
Display shows FUNCTION (1-8).
Display shows USER OPTIONS.
Page 40
Help and advice
Jams
Document jam
If you do not put a document in the
automatic feeder correctly, it may jam
during scanning. If this happens, you
will hear a series of beeps.
The display shows DOCUMENT JAM.
Remove any extra pages waiting to be
scanned.
If the page is not automatically ejected,
pull the page out manually (from the
front of the machine if possible).
Paper jam
If the paper from the paper tray gets
stuck:
The display shows PAPER JAM.
Replacing the ink cartridge
When the PaperJet 200 first reports low ink,
there is enough ink left to print about 50
normally typed pages.
If the ink cartridge runs out, the display will
show NO INK.
To obtain a new cartridge please refer to the
phone number on the label on top of the machine.
Please note
You must use a new SIMCARD each time
you fit a new catalogue
To replace the ink cartridge
Display shows FUNCTION 1-8.
Display shows USER SET UP.
Display shows first option CLOCK
ADJUSTMENT.
HELP AND ADVICE
Open the cover if necessary and remove
all paper from the paper tray, then
carefully pull any jammed pages out of
the machine. Close the cover and replace
the paper in the tray. Display shows
RESETTING.
•
To display REPLACE INK.
Display shows INSERT INK/CARD.
Open the cover, pull the top of the
cartridge towards you and then lift it out
– see label inside the fax machine.
37
Page 41

•
Remove the SIM Card.
HELP AND ADVICE
•
•
Insert the new cartridge and SIM Card
– see page 7, 8.
Close the cover.
Display shows INITIALISING and
returns to standby mode.
If the display shows SIMCARD INVALID
Check that the card has been inserted
properly.
If installing a new cartridge, check that
you are inserting the new card.
Cleaning the optical scanner
If copied or sent documents have black
lines down them you may need to clean
the scanner.
Open the front cover.
Clean the revealed glass plate using a
cloth dampened with a specific glass
cleaning product. Dry the glass
carefully. Do not pour or spray cleaning
fluid onto the glass.
Holding it by the two green levers and
with the white cog to the left, lower the
roller back into its retaining slots. Push
it firmly down into the slots and then
rotate the levers towards the back of
the machine until the pips on the levers
locate in the holes in the black
moulding.
Close the cover.
Test the scanner by copying a blank
sheet of white paper. If black lines still
appear then you should calibrate the
scanner, see page 39.
38
Customer Helpline
If you have any problems with your PaperJet 200,
call the BT Helpline on 0845 074 0750.
Remove the white roller by lifting the
two green levers at each end to the
vertical position and lifting the roller out.
Page 42

Calibrating the optical scanner
You should clean the scanner before
calibrating it.
Whilst holding down the
STOP button,
switch the mains power off and back
on again.
When the display shows PUT WHITE
PAPER, release the
STOP button and
load a blank sheet of white A4 paper into
the document feeder. It is automatically
drawn into the machine. Display shows
CIS CALIBRATED.
The paper is ejected and the display
returns to standby.
The scanner is calibrated.
Cleaning the print nozzle
If the print is not clear or has dots
missing, it may be caused by dried ink
on the cartridge nozzles.
Open the front cover, pull the top of the
cartridge towards you and then lift it
out – see label inside the fax machine.
Using a clean cloth dampened only with
clean water, gently clean the nozzle area.
To dissolve any dried ink, hold the damp
cloth against the nozzles for about
3 seconds.
Take care not to touch or smear ink
onto the contact area.
Allow the nozzles to dry and then
replace the cartridge.
Close the cover. The display will show
NO INK and then RESETTING before
returning to standby.
Error messages
Your PaperJet 200 displays different codes to
indicate specific errors or problems when
sending and receiving faxes, as shown on
transmission reports.
Sending faxes
DISPLAY
SHOWS MEANING
01
Failed to connect to the other fax
machine.
02
Document jammed at an angle in the
feeder or document is longer than
600mm.
03
Only the first page has gone through.
04
Poor quality reception at the other
machine.
05
The other machine has ended the call
without receiving the whole document.
STOP
The stop button has been pressed.
HELP AND ADVICE
39
Page 43

Receiving faxes
DISPLAY
SHOWS MEANING
11
Failed to connect to the other machine.
12
Memory is full.
13
Only the first page has gone through.
14
Poor quality reception.
17
The other machine has ended the
call without transmitting the whole
document.
19
Polling failed due to wrong security
code.
HELP AND ADVICE
STOP
The stop button has been pressed.
Lock-ups
If for some reason your PaperJet 200
should lock-up or start behaving
erratically you should, in the first
instance, switch off the power and then
switch on again. This will re-initialise
the machine and should reinstate
normal working.
If this does not cure the problem then
please contact the helpdesk on
0845 074 0750.
40
Page 44

Technical information
Connecting to the UK network
The PaperJet 200 is tested and approved for
connection to the UK network, provided that it is
used in accordance with the guidelines in this booklet.
CE compliant to 89/336/EEC (EMC Directive) and
73/28/EEC (low voltage directive)
The equipment has been approved in accordance
with Council Decision 98/482/EC for pan-European
single terminal connection to the public switched
telephone network (PSTN). However, due to
differences between the individual PSTNs provided
in different countries, the approval does not, of itself,
give an unconditional assurance of successful
operation on every PSTN network termination point.
In the event of problems, you should contact your
equipment supplier in the first instance.
You may connect it –
•To direct exchange lines.
•To extensions with new plug and socket
arrangements provided with these direct
exchange lines.
•To compatible switchboards.
The connection to the telecommunication system
must be unplugged before the earth is disconnected.
The connection to the telecommunication system must
not be hardwired.
This apparatus may be used on telecommunications
systems employing loop disconnect or MF signalling.
How many phones can you have
Your exchange line provides only a small current to
make your PaperJet 200 ring. Although you may
have any number of sockets, it is important to limit
the number of telephones and other items of
apparatus connected to the line by these sockets.
This ensures that each telephone will receive
enough current to ring.
Every telephone or item of apparatus has a Ringer
Equivalence Number (REN), which is used to calculate
the number of items that may be connected to any one
telephone line. The PaperJet 200 has a REN of 1. Any
other instrument provided by BT may be assumed to
have a REN of 1 unless stated otherwise. A total REN
of 4 is allowed.
TECHNICAL INFORMATION
PSTN Equipment is designed to Equipment may have difficulty
work with working with
Germany ✓ ––
Greece ✓ ––
Portugal ✓ ––
Spain ✓ ––
Switzerland ✓ ––
41
Page 45

PSTN Equipment is designed to Equipment may have difficulty
work with working with
Norway ✓ ––
Austria ✓ ––
Belgium ✓ ––
Denmark ✓ ––
Iceland ✓ ––
Ireland ✓ ––
Italy ✓ ––
Luxembourg ✓ ––
Netherlands ✓ ––
United Kingdom ✓ ––
Sweden ✓ ––
TECHNICAL INFORMATION
42
Page 46

Technical specification
Type Desktop Transceiver
Telephone Line PSTN/PBX
Coding Scheme MH/MR
Transmission speed 14.4 Kbps with auto fallback
Scanning Method CIS
Printing Method Ink-jet
Inkjet Cartridge Approx. 1700 pages 40ml Pen Cartridge
Approx. 850 pages 20ml Pen Cartridge
Resolution Horizontal: 8 dots/mm
Vertical: 3.85 line/mm (Standard)
7.70 line/mm (Fine)
7.70 line/mm (Photo)(with 64 levels of grey scale)
Effective Scanning 210mm
Printing Width 203mm
TECHNICAL SPECIFICATION
A.D.F. 5 sheets (A4 size, thickness 0.07-0.11mm)
Document Thickness A4/Letter 0.06-0.15mm (for single page)
Paper Cassette 50 sheets (A4, letter)
Paper weight 60 to 90 gsm.
Answering machine approx. 15mins.
recording time
Power Supply Unit AC 220-240V±10%. 50/60Hz
Dimensions 360(L) x 294(D) x 204(H)mm
Weight Approx. 5kg
Power consumption Standby 9W approx.
Copy 40W (all black)
43
Page 47

Index
INDEX
Access code 34
Advice 37
Answering machine 22
- record outgoing messages 22
- check outgoing messages 23
- record memo 23
- playback messages/memos 23
- delete messages 23
- ring count 24
Busy tone on/off (fax) 36
Calibrating the optical scanner 39
Call screening 24
Cancel a fax 17
Cancel polling 21
Cartridge 7, 8
- replacing 37
Cleaning 5
- optical scanner 38
- print nozzle 39
Confirmation reports 32
Contrast 29
Copying documents 21
Date and time setting 10
Delayed faxing 18
Dialling
- directory numbers 15
- one touch numbers 15
- with/without handset 14
Dial tone on/off (fax) 35
Directory 12
- dialling directory numbers 15
- storing names and numbers 12, 14
Document memory 19
Error messages 39
- receiving 40
- sending 39
Extension telephone 19
Faxes
- answering a fax from an
extension telephone 19
- busy tone on/off 36
- cancel a delayed fax 18
- delayed faxing 18
- dial tone on/off 35
- direct sending 17
- load a document 16
- operation mode 11
- receiving 16, 18
- sending 16, 17
- stop a fax in progress 17
- to speak during fax transmission 18, 20
Fax error messages 39
- receiving 40
- sending 39
Fax mode 11
Fax name and number 9
Feeder support 7
Handset cord 6
44
Page 48

Handset support 7
Help 37
Helpline 4
Ink jet cartridge 7, 8
- replacing 37
Ink order sheet 33
Ink low warning 33
Introduction 4
Language 35
Lock-ups 40
Mains power 7
Making calls 14
Memory 19
Memory full 20
Mode 11
One-touch memory 12
- dialling one-touch numbers 15
- storing names and numbers 13
Operation mode 11
Optical scanner 38
- cleaning 38
- calibrating 39
Paper
- feeder support 7
- jam 37
- loading 8
- size 30
Polling 20
Print cartridge 7
Print nozzle cleaning 39
Print outs 31
- ON/OFF 31
- reports 31
Receive
- fax 16, 18
- phone call 16
Records 4
Redial 15
Remote access 26
Resolution 28
Ringer 29
- ON/OFF 30
Safety instructions 5
Sender ID 9
- ON/OFF 35
Sending faxes 16, 17
Setting up 6
Silence detector 35
SIM card 7, 8, 38
Stop a fax 17
Switchboard connection 34
Technical information 41
Technical specification 43
Telephone line cord 6
Telephone socket 6
Test 33
Time saver 27
Unpacking 4
Volume 15
Warning
- low ink 33
Weekly test 33
INDEX
45
Page 49
Offices worldwide
The telecommunications services described in this publication
are subject to availability and may be modified from time to time.
Services and equipment are provided subject to British
Telecommunications plc’s respective standard conditions of contract.
Nothing in this publication forms any part of any contract.
Touchtone™ is a registered trade mark of
British Telecommunications plc in the UK.
© British Telecommunications plc 1999.
Registered Office: 81 Newgate Street, London EC1A 7AJ.
Registered in England No. 1800000.
Designed by: The Art & Design Partnership Limited.
Printed in Taiwan. PaperJet 200. Issue 1 (10/99)
Printed on paper which meets international environmental standards.
CE compliant to 89/336/EEC
(EMC Directive) & 73/23/EEC
(Low Voltage Directive)
APPROVED for connection to
telecommunication systems specified
in the instructions for use subject to
the conditions set out in them
 Loading...