

Page 1

1
PaperJet 150
3
in 1 Phone, Fax and Copier
User
Guide
This product is intended to be connected to analogue
networks and private switching systems in the
United Kingdom.
This product has not been designed for making emergency
telephone calls when the power fails. Alternative arrangements
should be made for access to emergency services.
YOU MUST
SUBSCRIBE TO
YOUR NETWORK’S
CALLER DISPLAY SERVICE
BEFORE YOUR BT PAPERJET 150
WILL DISPLAY CALL
INFORMATION
Page 2

Please open this page for an ‘at a glance’
guide to your PaperJet 150
Page 3

Please open this page for a ‘further at
a glance’ guide to your PaperJet 150
Page 4
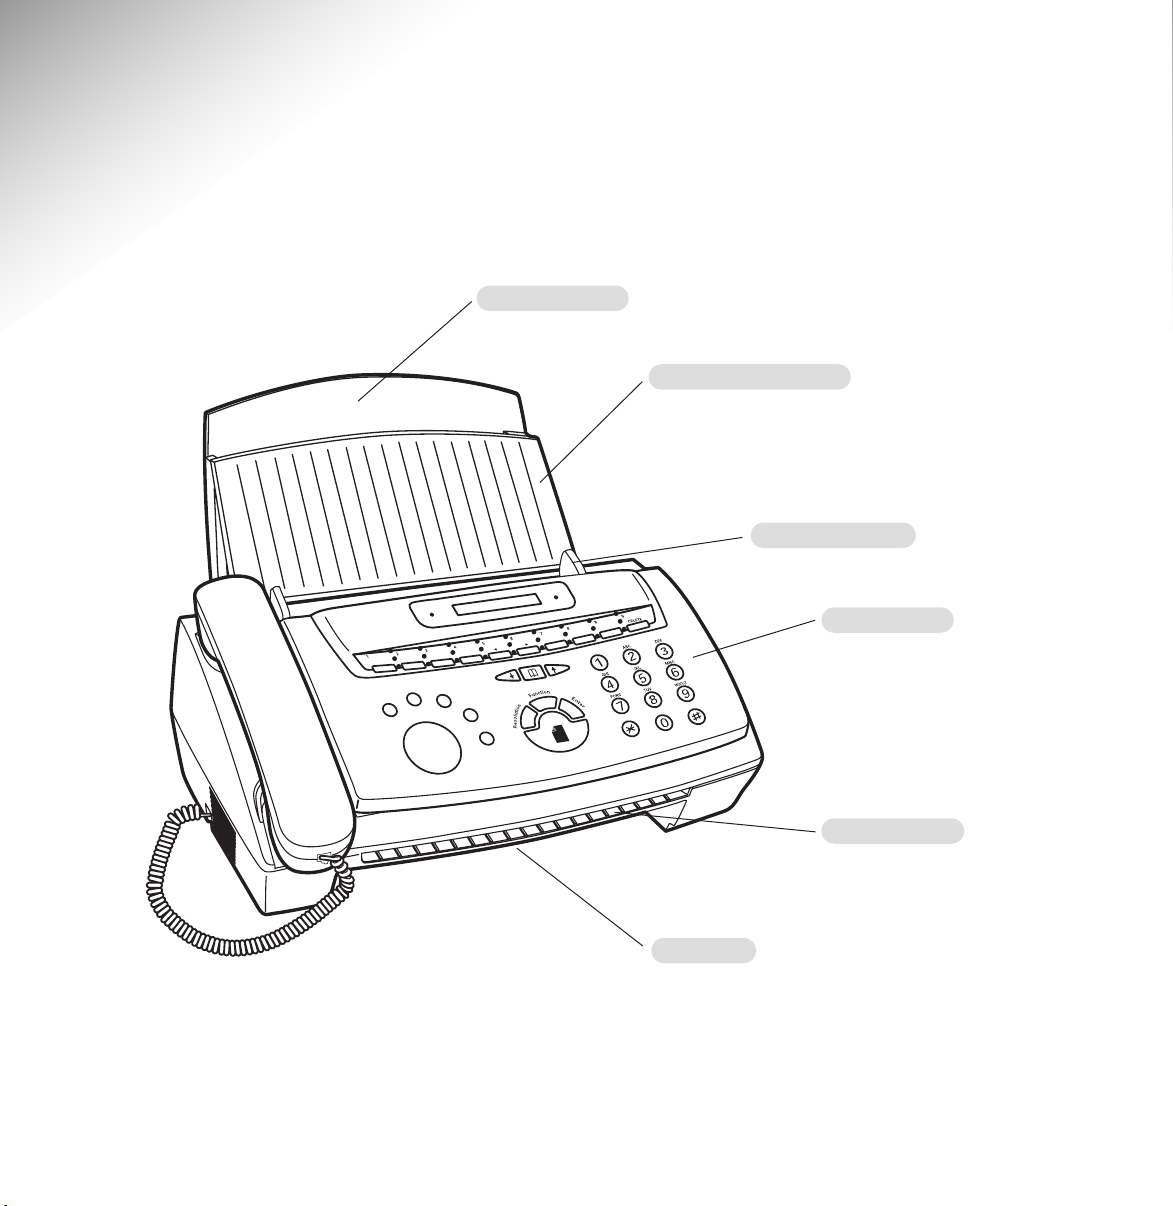
At a glance
2
Paper exit
For received faxes or copies.
Document exit
For your original
documents.
Control panel
Document guides
Plain paper tray
Document feeder tray
Holds documents to be
faxed or copied.
Alarm
e
ss
Mod
R/Acce
set
e
rinter R
P
p
o
St
x in Mem
a
F
ial/P
d
Re
Monito
S
r
ry
o
t
tar
opy
C
Page 5

3
1. Start/Copy
Press to start sending a fax or for manual fax reception.
Press to copy a document.
2. Resolution
Selects scanner resolution.
3. Enter
Press to confirm selections.
4. Function
Used when selecting programming functions.
5. Keypad
6.
Scroll through names and numbers stored in the director y and
Calls list. When entering names, switches between upper and
lower case letters and numbers.
7. Directory
Lets you search for an entry by initial letter or by scrolling.
8. One Touch Memory Buttons
For storing names and numbers to be dialled.
9. Fax in memory
Lights up when a fax is received into the memory.
10. LCD Display
Shows date, time and operation instructions.
11. Alarm
Lights up when an error occurs.
12. Printer Reset
Press to cancel a print error message.
13. Mode
Sets the reception mode.
14. R/Access
For use when connected to a switchboard and for some exchange
line features.
15. Redial/Pause
Press to redial the last number.
Inserts a pause when dialling or storing a number.
16. Stop
Stops sending or receiving a fax and copying.
Used to cancel programming operations.
17. Monitor
Lets you hear the progress of a call without lifting the handset.
18. Delete
Used to delete characters when entering/editing names
and numbers.
19. Memory buttons 5 and 6
Moves the cursor left and right when entering/editing names and
numbers. Also used to display calls data in the directory.
Alarm
11
10
9
Fax in Memory
A4 8
1
2
19
8
12
13
14
15
16
1
Printer Reset
2
3
4
Mode
R/Access
Redial/P
Monitor
Stop
17
2
6
5
t
c
i
o
n
n
u
F
n
o
i
t
u
l
o
s
e
R
Start
Copy
8
7
GHI
E
n
PORS
t
e
r
1
0
9
DELETE
DEF
ABC
MNO
JKI.
TUV
WXYZ
3
4
18
7
6
5
Page 6

4
Mains power cable
Telephone line cord socket
Monitor volume
Adjusts the speaker volume between
Low, Medium and High when
handsfree dialling or monitoring a call.
Ringer volume
Off, Medium, High.
Handset cord socket
Left side view
Back view
Page 7

5
Ink cartridge cover
Document feed roller 2
Document feed roller 1 Green release lever
Spare cartridge holder
Paper sensor
Inner view
Page 8

Plain paper fax, copier and phone
Send faxes to multiple destinations or set documents
to be sent at a later time to take advantage of lower
cost call charges. Quality ink jet printing of received
faxes onto plain paper.
As a plain paper photocopier, the PaperJet 150 lets
you make up to 50 copies of an original document up
to 20 pages long.
One Touch buttons and Directory memory
Store your 10 most frequently used numbers for
dialling at the touch of a single button. The Directory
also holds up to 50 names and numbers making
dialling easier and quicker.
Automatic redial
If a fax fails to get through (e.g. the line is busy)
PaperJet 150 will make up to two automatic redial
attempts every three minutes.
Memory
If the paper or ink cartridge runs out, incoming faxes
can be received into the memory to be printed when
you add paper.
6
Key features
Page 9

7
In this guide
At a glance 2
Key features 6
Introduction 8
Unpacking your PaperJet 150 8
For your records 8
Safety information 9
General 9
Environmental 9
Cleaning 9
Customer Helpline 9
Setting up 10
Using your PaperJet 150 16
Entering names and numbers 16
One Touch memories 17
Directory 18
Sending faxes 21
Receiving faxes 23
Delayed faxing 25
Broadcast faxing 26
Polling reception 27
Voice request 27
Using the phone 28
Connecting an answering machine 29
Making copies 30
Caller Display 31
Additional features 33
Reports and lists 33
Printing activity reports 33
Delayed fax report 34
Broadcast fax report 34
Optional settings 35
Connecting to a switchboard 40
Help 41
Error codes 43
Document jam 44
Paper jam 44
Replacing the ink cartridge 45
Aligning and cleaning the print cartridge 47
Wiping the print nozzles and contacts 48
Cleaning 49
General information 50
Guarantee 50
Helpline 50
Technical information 51
Memory capacity 53
Index 54
Page 10

8
Introduction
Unpacking your PaperJet 150
If anything is missing, please contact your place of
purchase immediately
PaperJet 150 fax
Handset
Plain paper tray
Black ink cartridge
Telephone line cord
with piggy back socket
For your records
Date of purchase:
Place of purchase:
Serial number:
For guarantee purposes proof of purchase is
required so please keep your receipt
NOTE
Please retain the original packaging.
Page 11

9
Safety information
General
Never put foreign bodies into the fax machine.
Their accidental contact with electrical parts may
cause a fire or electric shocks.
If you have a problem with the machine, do not try
to repair it yourself.
Environmental
Install your machine on a stable, smooth and flat
surface
Do not block or cover any of the openings on the
machine.
Avoid placing your PaperJet 150 in direct sunlight,
beside an air conditioner or where it is dusty or
damp.
Do not step on or place anything on the mains
power cable.
Do not stand your fax machine on carpets or other
surfaces which generate fibres, or place it in
locations preventing free flow of air over its surfaces.
Do not submerge any part of your machine in water
and do not use it in damp or humid conditions such
as bathrooms.
Do not expose your fax machine to fire, explosive or
other hazardous conditions.
There is a slight chance that your fax machine could
be damaged by an electrical storm. We recommend
that you unplug the power and telephone line cord
for the duration of the storm.
Cleaning
Clean the cover of control panel with a damp, not
wet cloth. A mild detergent can be used. To clean the
document feed rollers, see page 49.
Customer Helpline
If you have any problems with your PaperJet 150 call
the BT Helpline on 0845 0500 950.
Page 12

10
Setting up
2 Fit the plain paper tray into the two
slots on the PaperJet 150
3 Connect the handset
Plug the handset cord into the socket marked
HANDSET at the side of the machine. Place the handset
in the cradle.
4 Connect the telephone line cord
Plug the telephone line cord into the socket marked
LINE at the back of the machine. Connect the other
end to the telephone wall socket.
1 Plan the location of your
PaperJet 150
Place your PaperJet 150 on a stable, flat surface.
Make sure it is close enough to the telephone and
mains power sockets so that cables will reach.
Remember to leave enough room at the front of the
machine for documents to come out. Allow a free
flow of air around the machine for ventilation.
Handset connection
Page 13

NO CARTRIDGE
11
5 Connect the mains power
Plug into the mains power and switch on.
Your PaperJet 150 displays:
FAX IN MEMORY
ALARM
Pull open the front of paper tray.
8 Load paper
The plain paper sheet feeder can hold up to 50
sheets of 80gsm paper.
NOTE
Your PaperJet 150 is set to print on A4 paper. To
print exactly to fit US Letter (216 x 279mm) and
US Legal (216 x 356mm) you will need to adjust
the paper setting, see ‘Optional Settings’, page 35.
Fan the paper before loading.
Align the paper with the right hand side of the paper
tray and slide in the paper until it stops. Do not force
the paper into the paper tray. Your PaperJet 150
prints on the side of the paper facing you.
Pinch the tabs on the paper guide together and
move to the width of the loaded paper.
Page 14

12
Close the paper tray.
6 Install the ink cartridge
Pull open the control panel.
CAUTION
Do not touch the print head on the ink
cartridge. Do not rest the print head on any
surface. Do not shake the ink cartridge.
Open the cartridge cover.
The ink cartridge carrier should have
automatically moved to the centre position.
If it has not moved, press the Printer Reset
button.
Holding it by the finger grip, peel the
protective film from the print nozzles.
Avoid touching the nozzles and metal
electrical contacts.
Printer Reset
NO!
Page 15

13
7 Align the new cartridge
Press Enter. Display shows
PRINTING
.
The alignment chart is printed.
Enter the 2-digit number beneath the
straightest line, e.g 12. See page 47 for full
details.
Press Enter to confirm. Screen shows the
standby display with the date and time.
A full cartridge will print around 900
standard pages. See page 53.
00-30
Insert the ink cartridge into the car tridge
carrier with the metal contacts facing away
from you.
Push the ink cartridge towards the back of
the machine until it clicks into place.
Close the cartridge cover and control panel
Display shows:
Press Function to display
NEW CARTRIDGE?
Press Enter.
Display shows
ALIGN CARTRIDGE?
OLD CARTRIDGE
FAX IN MEMORY
ALARM
Page 16

14
10
Enter your name and fax number
Your name and number will be added to
every fax page you send. You can set up to
20 characters and up to 20 digits.
Press the Function button until the display
shows
5: FAX SET UP?
Press Enter.
Display shows
1: SET CLOCK?
Press Function.
Display shows
2: SENDER ID?
Press Enter.
Display shows
SENDER NAME?
Use the keypad to enter your name when
the cursor appears.
For example to enter the name JOHN:
Press the 5 button until the display shows
J
Press the 6 button until the display shows
O
Press the 4 button until the display shows
H
Press the 6 button until the display shows
N
Press the or button to switch between
capitals, lower case, letters and numbers.
Press the button twice to enter a space
in a name.
Press 1 to enter
& ’ ( ) , -
.
Press the Stop button to cancel any
instructions.
If you make a mistake entering a number or
name press the and buttons to move
the cursor then press the Delete button.
KEYPAD
JKI.
MNO
MNO
GHI
Stop
5
6
80
DELETE
9 Set the date and time
The current date and time will be included
with every fax page you send.
Press the Function button until the display
shows
5: FAX SET UP?
Press Enter.
Display shows
1: SET CLOCK?
Press Enter.
Display shows the current settings.
Use the keypad to enter the day, month,
year and then the time using the 24 hour
clock. For example, to set 4 August 2001
2.15 pm, enter 04 08 01 14 15.
Press Enter to confirm.
You hear a confirmation beep.
Press Stop to return to standby.
KEYPAD
Stop
NOTE
If you make a mistake, move the cursor to the
position you want by pressing the andbuttons,
then enter the correct number.
6
Page 17

15
NOTE
Using the menu.
There are two methods to access menu options.
1. Press the Function button repeatedly to scroll to
the option you want then press Enter, e.g. to
begin entering the sender ID, press Function 5
times, then Enter, then Function, then Enter.
or
2. Press the Function button then enter the
number corresponding to the menu option you
want e.g. to begin entering the sender ID, press
Function, then 5, then Enter, then 2,
then Enter.
If you are accessing the SETTINGS menu, you
will notice that all options have 2 digit numbers
(see pages 36 to 38). To select, you must
always enter both digits. e.g., for TIMER
REDIAL enter 0 and 5.
KEYPAD
NOTE
Position of your fax header.
When you send a fax, your name, fax number, date
and time will be shown at the top of the page inside
the text area. To change this so that the header is
printed outside the text area or to switch it off, see
‘Optional Settings’, page 35.
Press Enter to confirm.
Display shows
SENDER NUMBER
.
Enter your fax number.
Press Enter to confirm.
Display shows
PBX MODE OFF
.
Either: Press Stop to return to Standby.
Or: If connected to a switchboard set your
switchboard access code now see page 40.
When entering a number:
Press One Touch button 8 to insert a
hyphen.
Press One Touch button 9 to insert a
+
as the first digit.
Stop
Page 18

16
Using your PaperJet 150
Entering names and numbers
You can store names and numbers in the One Touch
buttons and Directory.
How to use the keypad to enter a name
Use the keypad enter a name:
For example to enter the name JOHN:
Press the 5 button until the display shows
J
Press the 6 button until the display shows
O
Press the 4 button until the display shows
H
Press the 6 button until the display shows
N
Press 1 to enter
& ’ ( ) , -
.
To move the cursor to the next space, press
the button
To switch between capital letters, lower
case letters and numbers, press the or
button. The current setting is shown in
the right hand side of the display.
If you make a mistake, press the
buttons to move the cursor to the character
you want to change, then press Delete and
enter the correct letter.
To cancel, press Stop.
How to use the keypad to enter a number
Use the keypad to enter numbers:
To enter a hyphen, press the One Touch 8
button
If you make a mistake, press the
buttons to move the cursor to the digit you
want to change, then press Delete and
enter the correct number.
To cancel, press Stop.
To enter a 3 second pause in a number,
press the Redial/Pause button where
required. A
P
will be shown in the display.
If connected to a switchboard press
R/Access to enter your access code at the
start of the number. This means you won’t
have to press it every time you dial the
number.
If you do not press any button for more
than a minute, the display returns to standby.
JKI.
MNO
MNO
GHI
6
88
5
6
Stop
Stop
Redial/P
R/Access
5
6
80
DELETE80DELETE
NOTE
If you are connected to a switchboard, you will
need to program your access code, if you have
not already done so, before you can proceed, see
‘To set your switchboard access code’, page 40.
Page 19

To edit a One Touch entry
Press Function.
Display shows
1: STORE MEMORY
Press Enter.
Display shows
MEMORY = 1?
Press the One Touch button you want to
change.
Press Enter.
Display shows the name and
:CHANGE
.
Press Enter and edit the name.
Press Enter to confirm and then edit the
displayed number.
Press Enter to confirm.
You hear a confirmation beep.
You can now edit another entry by pressing
another One Touch memory button.
Press Stop to return to standby.
Stop
To dial a One Touch entry
If sending a fax:
Load the document.
Press the One Touch button you want.
Making a phone call:
Lift handset (or press Monitor).
Press the One Touch button you want.
17
To store a One Touch entry
Press Function.
Display shows
1: STORE MEMORY
Press Enter.
Display shows
MEMORY = 1?
Press the One Touch memory you want to
use. Display shows the memory number
Press Enter to confirm.
Enter the name.
For details, see page 16.
Press Enter to confirm.
Enter the number you want.
For details, see page 16.
Press Enter to confirm. You hear a
confirmation beep.
Display shows the next One Touch button.
You can now add another entry.
Press Stop to return to standby.
One Touch memories
KEYPAD
KEYPAD
Stop
Monitor
You can store up to 10 of your most frequently used
numbers and dial them by pressing a single button.
Each one touch memory can store up to 16
characters and 32 digits.
NOTE
If you do not press any button for more than a
minute, the display returns to standby.
Page 20

which has been stored in a One Touch memory, it will
not be added to the Directory. Once the Directory is
full, calls from new numbers will be stored in place
of the oldest received call (unless it has been stored
permanently by adding a name to it).
You can delete entries from the Directory list, transfer
them to One Touch buttons or add/edit names.
You can store up to 50 names and numbers in the
Directory.
If you subscribe to a Caller Display Service, the
Directory will also automatically keep a record of all
calls you receive (except those already stored in
the One Touch memories) by storing the numbers
in vacant spaces in the Directory. If a call is from a
number already in the Directory, it will not be
duplicated but the call counter will be incremented
and the time/date updated (see ‘To view the Directory
by scrolling’ on page 19). If a call is from a number
Directory
NOTE
The Caller Display memory shares the Director y
memory, so if there are no free spaces in the
Directory, numbers will be displayed when calls
arrive but new numbers will be stored. We
recommend that you keep 5-10 entries free in order
to allow an incoming calls list of 5-10 entries.
If you require a longer Calls list, keep more
entries free.
18
To delete a One Touch entry
Press Function.
Display shows
1: STORE MEMORY
Press Enter.
Display shows
MEMORY = 1?
Press the One Touch button you want
to cancel.
Press Enter.
Display shows the name and
:CHANGE
.
Press Function.
Display shows the name and
:DELETE
.
Press Enter to confirm. You hear a
confirmation beep.
You can now delete another entry by
pressing another One Touch memory
button…
Press Stop to return to standby.
Stop
To store a Directory entry
You can store up to 50 names and numbers
in the Directory. These will remain there
until you delete them. Each entry can have
up to 16 characters and 32 digits.
Press Function until the display shows
2:SET DIRECTORY?
Press Enter. Display shows
ENTER NUMBER
Enter the number. For full details see page 16.
Press Enter to confirm.
Enter the name. For full details, see page 16.
KEYPAD
KEYPAD
Page 21

To dial a Directory number
If sending a fax:
Load the document.
Press or to scroll to the entry you
want.
Press Start. The document is scanned and
the number is dialled.
Making a phone call:
Lift handset (or press Monitor).
Press or to scroll to the entry you
want.
Press Start. The number is dialled.
To search for a Directory entry by name
Press Directory.
Use the keypad to enter the first letter of
the name.
Press to display the first name beginning
with that letter and to scroll down the list.
Press or to display the rest of the
entry.
Press Stop to return to standby.
KEYPAD
Start
Copy
19
Press Enter to confirm. You hear a
confirmation beep.
Display shows
ENTER NUMBER
.
You can now add another entry.
Press Stop to return to standby.
Stop
To view the Directory by scrolling
Press to display the most recent entr y
first.
Press to display the oldest entr y first.
If the name is in the display, press to
display the phone/fax number.
Press again to display the number of calls
from that number and the date and time it
last called (or the time it was stored in the
Directory if a call has not been received from
that number). For example,
X5 21 Dec 12:00
means that number has called 5 times and
last called on 21st December at midday.
X0 11 Nov 11:45
means no calls have been
received from that number, it is a name/
number you entered into the directory on
11th November at 11:45.
Press Stop to return to standby.
6
5
6
Stop
Stop
Start
Copy
Page 22

To transfer a Directory entry to a One
Touch button
Press or to scroll to the entry you
want.
Press Function.
Display shows
TRANSFER?
then
MEMORY?
Press the One Touch button you want.
Press Enter to confirm. You hear a
confirmation beep.
You can now transfer another entry by
scrolling to a new phone or fax number.
The transferred entr y is cleared from the
Directory.
Press Stop to return to standby.
Stop
20
Adding a name to a number in the
Directory
Press or to display the number.
Press Enter twice. Display shows
ENTER
NAME
. When cursor appears, enter the name.
Press Enter. The name and number are
stored in the directory.
Press Stop to return to standby.
To edit a Directory entry
Press or to scroll to the entry you
want.
If a name is displayed, press to display
the number.
Press Enter.
The cursor is set to the first digit.
Edit the number if required.
Press Enter to confirm.
Edit the name.
Press Enter to confirm.
Press Stop to return to standby.
KEYPAD
KEYPAD
Stop
Stop
To delete a Directory entry
Press or to scroll to the entry
you want.
Press Delete.
Press Enter to confirm. You hear a
confirmation beep.
You can now delete another entry by
scrolling to a new phone or fax number.
Press Stop to return to standby.
Stop
80
DELETE
Page 23

To set the resolution
You can choose different resolution settings
to ensure the best quality when faxing or
copying a document.
The available settings are:
STANDARD
– for standard text documents.
This is also the fastest setting.
FINE
– for documents with small
type and drawings.
SUPER FINE
– for text with very small
characters and/or graphics.
PHOTO
– for documents with varying
shades of grey, such as
photographs.
Load the document to be faxed or copied.
The first page is pulled slightly into the
machine. Display shows
STANDARD
.
Press the Resolution button to display the
setting you want.
After each document, the setting automatically
returns to
STANDARD
which is the default
setting. You can change the default setting.
See ‘Optional Settings’, page 35.
21
Sending faxes
Paper sizes: Width Length
Maximum: 216mm x 1.5m
Minimum: 184mm x 148mm
Paper weight
70gsm – 90gsm
Do not use
Torn, crumpled and rolled paper.
Paper that is too thin.
Wet or moist paper.
Correction fluid.
Carbon paper.
Make sure that any paperclips or staples have been
removed from documents.
Make sure any correction fluid is dry.
Inserting documents in the feeder
Gently insert documents to be faxed or copied face
down into the document feeder (up to 20 pages).
Adjust the paper feeder width guide to fit.
Page 24

22
To set the contrast
When a document has been loaded, you can
switch between
NORMAL – for normal contrast documents.
LIGHT – for very light documents which
need to be sent or copied darker.
Your PaperJet 150 is pre-set to NORMAL
and you shouldn’t need to change it, but if
the original document is very light or faint
you can change the setting to LIGHT.
Press Function until the display shows
5: FAX SET UP?
Press Enter.
Display shows
1: SET CLOCK?
Press Function until the display shows
3: SETTINGS?
Press Enter.
Display shows
(01) PAUSE TIME
Enter 28. Display shows
CONTRAST
Press Enter. Display shows the current
setting
NORMAL
or
LIGHT
Press the Function button to switch
between
NORMAL
and
LIGHT
.
Press Enter to confirm the setting.
Press Stop to return to standby.
The setting is fixed until you change it.
KEYPAD
Stop
To send a fax
Load the document face down.
Set the resolution and contrast if required.
Dial manually:
Dial the number using the keypad.
Press Start. The document is scanned and
the number is dialled.
One Touch number:
Press the One Touch memory button you
want. The document is scanned and the
number is dialled.
Directory number:
Press or to scroll to the entry you
want.
Press Start. The document is scanned and
the number is dialled.
KEYPAD
To hear the progress of your call.
If you want to hear the dialling tones and fax
tones press the Monitor button before dialling
the number. If you use this method the document
will not be scanned into memory before sending.
To stop a fax being sent
Press Stop. The fax is cancelled.
Stop
Start
Copy
Start
Copy
3
Page 25

23
To redial the last number
If sending a fax:
Load the document.
Press Redial.
The document is scanned and sent.
Making a phone call:
Lift handset (or press Monitor).
Press Redial. The number is dialled
Automatic fax redial
If the number is engaged when sending a fax, your
PaperJet 150 is set to redial two times, waiting
approximately 3 minutes between tries. If you have
set a delayed fax, it will redial three times.
Redial/P
Redial/P
Auto receive
Your PaperJet 150 answers each call after 5 rings
and receives faxes automatically. If the call is a voice
call, the phone will ring again for a further 5 rings
(secondary ringing) and you can answer the call by
picking up the handset. If you do not answer, the
machine will try to receive the call as a fax. During
secondary ringing the caller will hear a beep every
2 seconds to reassure them that the line is active.
You can adjust the number of rings your machine
gives. See ‘Optional Settings’, page 35.
If you are using your PaperJet 150 as a fax machine
only, we recommend that you switch the second set
of rings off. See ‘Optional Settings’, page 35.
If you accidentally answer a fax call.
If you pick up the handset and you hear fax tones,
simply press the Start button, replace the handset and
the fax will be received.
Manual receive
When Manual mode is set, your PaperJet 150 rings
like a normal phone until you answer it yourself.
If a voice caller wants to send a fax.
If the caller wants to send a fax after your
conversation, press START on your PaperJet 150 and
replace the handset.
If you hear fax tones.
Press Start to begin reception and replace the
handset. The display shows
RECEIVING
.
With answer machine
Set this mode when you connect an answering
machine to your PaperJet 150. Your answering
machine will automatically take voice messages and
PaperJet 150 will take faxes.
To set reception mode
Press Mode to display the current setting.
Repeated presses will switch between the
options
MANUAL RECEIVE, AUTO RECEIVE
and
WITH ANS MACHINE
. The mode
displayed is the one that is set.
Reception mode.
Your PaperJet 150 has three reception modes for
receiving faxes and telephone calls.
Receiving faxes
Mode
Page 26

When your PaperJet 150 rings it will wait for the
answering machine to take the call. If there are fax
tones or no incoming voice message it will
automatically try to receive a fax. Remember, it is
advisable to say in your outgoing message that the
caller can send a fax after the tone.
If the answering machine is switched off, your
PaperJet 150 will answer the call after 7 rings. Your
answering machine should be set to answer after
less than 7 rings, see Connecting an answering
machine, page 29.
Receiving faxes into the memory
If you run out of paper or the ink car tridge is empty,
your PaperJet 150 will automatically store incoming
faxes into the memory. The memory can store up to
20 pages of the standard letter, see page 53 .
24
To print a fax stored in the memory
If you have received faxes into the memory
the Fax in memory light flashes and the
display shows the reason for the document
not being printed normally –
PRINTER
ERROR!
,
CHECK PAPER! orINK OUT
Either add new paper, clear the jam or
replace the ink cartridge accordingly.
Press Printer Reset. The fax stored in the
memory will print out.
Clear a paper jam, see page 44.
Replace the ink cartridge, see page 45.
If the memory becomes full while there is
paper in the paper tray:
This happens if the fax is too large for the
PaperJet 150 to handle. Pages received
before the memory became full will be
printed but, you will need to ask the sender
to re-fax the pages you have not received.
Very detailed pages or photos may need to
be sent singly.
Power failure while a fax is stored in the
memory:
If the power fails and a document is stored
in the memory, the stored fax is lost. Your
PaperJet 150 informs you with a power
failure report giving details of any
documents lost from memory. When the
power is restored the display will show
MEMORY DATA LOST
.
Paper jam and out of ink warning:
If the plain paper jams or the ink cartridge
runs out during printing, the display shows
CHECK PAPER orOUT OF INK
.
Clear the paper jam, see page 44.
Replace the ink cartridge, see page 45.
Then press Printer Reset to print out
the document that has been stored in the
memory.
Printer Reset
Printer Reset
Page 27

25
To send a delayed fax
Load the document face down.
Set the resolution and contrast if required.
Press Function until the display shows
3: TIMED SEND?
Press Enter. Display shows
START TIME:
Enter the time you want the fax to be sent
using the 24 hour clock, e.g. to start sending
at 7.30pm, enter 19 30.
Press Enter.
Display shows
ENTER FAX NUMBER?
Enter the fax number. You can also use
One Touch memory buttons and Directory
entries.
Press Enter. The document is scanned.
Display then shows
TIMED SND
and the
time you have set.
To cancel a delayed fax
Press Function until the display shows
3: TIMED SEND?
Press Enter. Display shows
CANCEL?
Press Enter to confirm. You hear a
confirmation beep.
Display shows
CANCELLED!
To change the time and/or number of
a delayed fax
Press Function until the display shows
3: TIMED SEND?
Press Enter. Display shows
CANCEL?
Press Function until the display shows
CHANGE?
Press Enter. Display shows
START TIME
and the time currently set.
Enter the new time.
Press Enter.
Display shows the fax destination.
Press Delete to delete the number.
Enter the correct number. You can also use
One Touch buttons or a Directory entry.
Press Enter to confirm. You hear a
confirmation beep.
Display shows
TIMED SND
and the
time set.
Store a document of up to 20 standard pages in the
memory for sending at a specific time within the
next 24 hours. This lets you take advantage of lower
call rates or coincide with time zone differences if
sending to another country.
Delayed faxing
KEYPAD
KEYPAD
NOTE
If you have set the resolution to Photo and the
scanning memory becomes full, tr y resetting with
the resolution set to Standard, Fine or Superfine.
KEYPAD
KEYPAD
80
DELETE
Page 28

26
To store a broadcast fax
Load the document face down.
Set the resolution and contrast if required.
Press Function until the display shows
4: BROADCAST?
Press Enter.
Display shows
0: NOW 1: LATER
Press 0 if sending now.
Display shows
ENTER FAX NUMBER?
Or
Press 1 if you want to set a time for the fax
to be sent. Display shows
START TIME:
If sending now:
Enter a number you want. You can dial the
number using the keypad or enter a One
Touch or Directory entry.
Press Enter.
Display shows
ENTER FAX NUMBER?
Enter the next number. Then press Enter
and repeat up to a maximum of 20 numbers.
Press Start. Your PaperJet 150 scans the
document and begins sending the fax to all
the numbers you have set.
You can store a document of up to 20 standard
pages in the memory for faxing to up to 20 different
numbers including One Touch and Directory entries.
Broadcast faxing
If sending later:
Enter the time using the 24 hour clock, e.g
to send at 7.30pm, enter 19 30.
Press Enter.
Display shows
ENTER FAX NO?
Enter a number you want. You can dial the
number using the keypad or enter a One
Touch or Directory entry.
Press Enter.
Enter the next number. Then press Enter
and repeat up to a maximum of 20 numbers.
Press Start. Your PaperJet 150 scans the
document you have set. Display shows
B/CAST.
and the time set for broadcasting.
KEYPAD
KEYPAD
KEYPAD
KEYPAD
KEYPAD
NOTE
If you have set the resolution to Photo and the
scanning memory becomes full, tr y resetting with
the resolution set to Standard, Fine or Superfine.
To cancel a broadcast fax
Press Function until the display shows
4: BROADCAST?
Press Enter.
Display shows
CANCEL?
Press Enter. Display shows
CANCELLED!
Start
Copy
Start
Copy
Page 29

27
To poll a document
Press Function until the display shows
7: POLLING RX ?
Press Enter.
If required, enter the other machine’s
password.
Press Enter.
Display shows
ENTER FAX NUMBER?
Enter the number for the other machine.
Press Enter. The number is dialled and the
document is received. Display then returns
to standby.
To cancel polling, press Stop.
To speak after sending or receiving a fax
While the fax is being sent:
Lift the handset. When the fax has finished,
the other machine will beep to let the other
person know you want to talk.
When the person at the other end responds,
you can talk.
You can set your PaperJet 150 to call another fax
machine and receive a document from it. This is
often known as Faxback. You may need to know the
other machine’s password in order to retrieve the
document.
Polling reception
You can start a phone conversation after sending or
receiving a fax.
Voice request
KEYPAD
KEYPAD
NOTE
If you lift the handset and replace it, the voice request
is cancelled.
If the other person does not pick up their handset
while the beeps are sounding – or if the other fax
does not have a voice request function - the line will
be disconnected.
Stop
Page 30

28
To answer a voice request
If the person wants to talk, your PaperJet
150 beeps while the fax is being sent or
received and the display shows
PHONE
CALLING.
Lift the handset and wait for the caller to
respond.
To search and dial a Directory entry
by name
Lift the handset.
Press Directory button.
Use the keypad to enter the first letter of
the name.
Press the button to display the first name
beginning with that letter and to scroll down
the list.
Press Start to dial.
To make a phone call
Lift the handset
Use the keypad to dial the number you want.
Or
Press the One Touch button you want, the
number is dialled.
Or
Press the or button to scroll through
the Directory.
Press Start to dial.
To dial handsfree
Press Monitor. You hear the dialling tone.
Use the keypad to dial the number you
want.
Or
Press the One Touch button you want, the
number is dialled.
Or
Press the or button to scroll through
the Directory.
Press Start to dial.
When the call is answered, lift the handset
and talk.
You can use your PaperJet 150 to make and
receive calls.
Using the phone
KEYPAD
KEYPAD
KEYPAD
Monitor
Start
Copy
Start
Copy
Start
Copy
Page 31

29
To redial a number
Lift the handset.
Press Redial. The last number called is
redialled.
To receive a phone call
When the phone rings.
Lift the handset and speak.
If you hear fax tones, replace the handset
after the display shows
RECEIVING
.
Connecting an answering machine
Redial/P
Your PaperJet 150 can work with an answering
machine so that you can take voice and fax
messages. See also page 23 ‘To set reception mode’.
To ensure the two machines work together, the fax
machine must be in WITH ANS MACHINE mode
and the answering machine line cord must be
connected into the socket on the back of the
PaperJet 150’s line cord doubler plug (as shown
below).
When set up like this, and a call comes in, your
answer machine will always answer the call first.
Your PaperJet 150 will monitor the call and take
control if it detects that it is a fax call. If the
answering machine fails to answer, PaperJet 150
will answer the call after 7 rings and prepare to
receive a fax.
Page 32

30
To make a single copy
Load the document face down.
Set the resolution and contrast, if required.
Press Copy.
Display shows
NUM OF COPIES 01
.
Press Copy. Display shows
SCAN LEFT: 19
.
The original is scanned and the copy printed.
You can make up to 50 copies of an original
document up to 20 pages long.
Making copies
To set the receive mode
Press Mode to display
WITH ANS MACHINE
.
Mode
To set up the answering machine
You can choose the number or rings before
your answering machine takes the call
(refer to your answering machine’s guide
for instructions), it is recommended that
you set the number of rings to between
2 and 4 and it must never be more than
6 rings.
For optimum performance, the outgoing
message on the answering machine should
be as short as possible and should not
exceed the times shown below: -
No. of rings before
answer m/c answers
2
4
Max length of
outgoing message
14 seconds
8 seconds
To make multiple copies
Load the document face down.
Set the resolution and contrast, if required.
Press Copy. Display shows
COPIES #01
Enter the number of copies you want.
Press Copy. The original is scanned and
the copy printed.
KEYPAD
Start
Copy
Start
Copy
Start
Copy
Start
Copy
Page 33

31
To copy a highly detailed original
A highly detailed document may be too much
for the memory. By switching the ADF
COPY setting on, you can set your PaperJet
150 to scan and copy at the same time.
This shows you how to switch ADF on
and off.
Press Function until the display shows
5: FAX SET UP?
Press Enter.
Press Function until the display shows
3: SETTINGS
.
Press Enter. Display shows
(01) PAUSE TIME
Press Function until display shows
COPY
MODE
(or enter 2, 2 to go straight there).
Press Enter. Display shows
MEMORY COPY
.
Press Function to switch between the two
options of
ADF COPY
and
MEMORY COPY
.
Press Enter to confirm.
Press Stop to return to standby.
NOTE
If there is not enough memory to scan all the
original document, copy it in stages.
Copies are reduced to 97% of the original to prevent
an original being copied onto two separate sheets.
Avoid using very smooth or slippery originals such
as fax roll paper or transparencies as these could
slip and the copy may run onto two pages.
On some types of paper the ink may take longer to
dry. Be careful to ensure it does not leave marks on
the original document.
Stop
KEYPAD
Caller Display lets you know who’s calling before you
answer the telephone. Providing you have free space
in the Directory, your PaperJet 150 will also show
you a list of new and old calls you have received.
The number of calls in the list is limited by the
number of free spaces in the 50 number Directory.
With a Caller Display service, your PaperJet 150
receives caller information which is transmitted over
the telephone network.
To use this feature you will first have to subscribe to
your network’s Caller Display ser vice. Ask your
network provider for more information.
With Caller Display, your PaperJet 150 stores the
caller’s number if available, call date and time.
If you have stored the incoming number in the
directory or one touch memory, the display will
show the stored name.
Caller Display
Page 34

32
Caller information not available
If you have subscribed to BT’s Caller Display, you
may see a text message if the number of your caller
is not available.
The text message will be one of the following.
WITHHELD
The caller has stopped their number from being
sent.
INTERNATIONAL
The call received was from outside the UK.
UNAVAILABLE
The caller's exchange/network does not offer a
Caller Display Service.
OPERATOR
The call has come via the operator.
PAYPHONE
The caller is ringing from a payphone.
RINGBACK
The exchange is ringing to let you know that a
previously engaged number is free.
NO CALLER INFO
If your PaperJet 150 does not recognise the
information contained within the caller display
message, it will not show a number.
IMPORTANT
The Caller Display memory shares the Director y
memory. So we recommend that you keep 5-10
entries free in order to allow the Caller Display to
give you an incoming calls list of 5-10 entries.
If you require a longer Calls list, keep more
entries free.
To view and dial from the Calls list
Details of calls received will be stored
providing you have free space in the
Directory memory. When you have new
calls, the display shows
NEW CALL(S)
.
Press or to scroll through the Calls
list. If you have new calls, these are shown
first.
If the name is displayed press button:
• to display the caller’s number
• the number of times the caller has rung
(X2 = 2 calls)
• the date and time of the most recent call.
Press Start to dial the number displayed.
Or
Press Stop to return to standby.
6
Stop
Start
Copy
Page 35

33
Additional features
To print a list of stored names and
numbers
The list contains all One Touch and
Directory entries and received calls if you
subscribe to a Caller Display services.
Press Function until the display shows
6: PRINT OUT?
Press Enter.
Display shows
1: PHONE BOOK?
Press Enter. The list is printed.
Display shows
PHONE BOOK
.
Press Stop to return to standby.
Reports give you details of faxes sent and received.
Lists show you the various settings and stored names
and numbers on your PaperJet 150.
Reports and lists Printing activity reports
Your PaperJet 150 has been set to print a report
automatically after every 20 faxes sent or received.
You can also set it to:
Print immediately.
Once a day.
No print out ,see ‘Optional settings’, page 35.
The activity report may also include error codes to
help you diagnose any problems quickly and accurately.
See ‘Help’, page 41.
Stop
Page 36

34
NOTE
If you have not sent or received any faxes, an
activity report will not be printed, even if you have
set your PaperJet 150 to print one at the same time
every day.
To print an activity report immediately
Press Function until the display shows
6: PRINT OUT?
Press Enter.
Display shows
1: PHONE BOOK?
Press Function until the display shows
3: ACT.REPORT?
Press Enter. The report is printed.
Press Stop to return to standby.
To set to ‘no print out’ or ‘print same
time each day’
Press Function until the display shows
5: FAX SET UP?
Press Enter. Display shows
1: SET CLOCK?
Press Function until the display shows
4: ACT. REPORT?
Press Enter. Display shows
ACT. REPORT ON.
Press Function to switch between
ON
and
OFF
.
Either select
OFF
, press Enter to confirm
and then Stop to return to standby.
Or select ON.
Press Enter. Display shows
PRINT TIME:
Enter the time at which you would like the
activity report printed each day.
Press Enter to confirm. You hear a
confirmation beep. If you press Enter
without entering a time your PaperJet 150
will print an activity report after every 20 fax
transactions.
Press Stop to return to standby.
Your PaperJet 150 can be set to print out a report
after a delayed fax has been sent. This is called a
“Timed Report”. The original setting is ON:ERROR.
To switch it on, See ‘Optional Settings’, page 35.
Delayed fax report
Your PaperJet 150 can be set to print out a report
after a broadcast fax has been sent. The original
setting is off. To switch it on, See ‘Optional Settings’,
page 35.
Broadcast fax report
Stop
Stop
Stop
Page 37

35
Your PaperJet 150 lets you change settings to suit
the way you work.
To change the feature settings
The settings menu lets you adjust a wide
range of settings.
Press Function until the display shows
5: FAX SET UP?
Press Enter.
Press Function until the display shows
3: SETTINGS?
Press Enter.
Enter the feature number you want
,see list on page 36 to 38.
Press Enter.
Enter the code you want for the new setting
,see list page 36 to 38.
Press Enter to confirm. You can now enter
another Feature number in order to change
the next setting.
Press Stop to return to standby.
Optional settings
To print out a list of current feature
settings
The print out lets you see a complete list
of the feature settings currently set on your
PaperJet 150.
Press Function until the display shows
6: PRINT OUT?
Press Enter.
Press Function until the display shows
4: SETTINGS?
Press Enter. The settings list is printed.
Press Stop to return to standby.
To print out the current function list
You can see a list of all the functions you
can set on your PaperJet 150.
Press Function until the display shows
6: PRINT OUT?
Press Enter.
Press Function.
Display shows
2: FUNCTION LIST?
Press Enter. The function list is printed.
Press Stop to return to standby.
Stop
Stop
Stop
Page 38

36
Feature Name Setting Options Explanation Original setting
Number codes
01 PAUSE TIME 02 2 seconds Sets the length of a pause inserted 3 seconds
-- --- seconds into a stored number.
12 12 seconds
05 TIMER REDIAL 00 OFF The number of times the machine 3 times
01 once will redial the number if the fax fails
02 2 times (e.g. other machine is busy). This
03 3 times setting applies to timed jobs only.
06 AUTO REDIAL. 00 OFF The number of times the machine 2 times
01 once will redial the number if the fax fails
02 2 times (e.g. other machine is busy). This
03 3 times
setting applies to non-timed jobs only.
07 No. OF RINGS 01 once Number of rings before your 5 times
02 2 times machine answers a call when set to
03 3 times RECEIVE MODE.
and up to and up to
11 11 times
09 F/T SW. OVER 00 OFF In AUTO mode, you can set the 5 times
01 3 times number of times the unit will ring if
02 5 times the incoming call is a voice call.
03 7 times At the end of these rings the unit
04 9 times prepares to receive a fax.
05 11 times
13 POWER SAVE 00 OFF If power save is set on the unit will On
01 ON revert to an energy saving mode after
5 minutes of no use.
17 KEY TONES 00 OFF Lets you set the pitch of the beeps Low
01 LOW you hear when you press a button.
02 HIGH
20 FAX HEADER 00 OFF This switches the fax header, that is ON (inside)
01 ON (outside) sent with each document, on and off
02 ON (inside) and determines whether it is printed
inside or outside the image area.
21 FAX FOOTER 00 OFF Sets whether the caller’s details OFF
01 ON are printed at the foot of received
documents.
Page 39

37
Feature Name Setting Options Explanation Original setting
Number codes
22 COPY MODE 00 ADF COPY Sets whether or not the document is MEMORY COPY
01 MEMORY COPY scanned into memory before copying.
Use ADF for documents too large for
the memory.
23 PAPER SIZE 00 A4 Allows you to set the size of paper A4
01 LETTER you want to print on.
02 LEGAL
24 ECM 00 OFF Allows you to switch error correction ON
01 ON mode on and off. Error correction
mode automatically rectifies errors
caused by bad lines, etc.
27 RESOLUTION 00 STANDARD Sets the default scanning resolution STANDARD
01 FINE setting.
02 SUPER
03 PHOTO
28 CONTRAST 00 NORMAL Sets the default scanning contrast NORMAL
01 LIGHT setting.
31 SEND REPORT 00 OFF Controls printing of automatic fax ON: ERROR
01 ON: EACH SEND transmission reports. Allows you to
02 ON: ERROR switch send report printing on and
off. Will print for each fax sent or
only when an error occurs.
32 TIMED REPORT 00 OFF Allows you to switch delayed send ON:ERROR
(Delayed send 01 ON:EACH SEND report printing on and off. Will print
report) 02 ON:ERROR for each delayed fax sent or only
when an error occurs.
35 B/CST REPORT 00 OFF When set to On a report is printed OFF
01 ON on completion of each broadcast fax.
36 PHOTO QUAL 00 STANDARD This sets the way the unit prints HIGH
01 HIGH halftones (greys).
47 INK SET 00 SETTING A Controls the amount of ink applied SETTING A
01 SETTING B to the paper when printing faxes and
copies. Setting A applies more ink
than setting B. Reduces print
definition but may be useful to
overcome problems with ink
smudging.
Page 40

38
Feature Name Setting Options Explanation Original setting
Number codes
54 AUTO SEND 00 OFF This feature determines whether the OFF
01 ON fax starts automatically when you
initiate a fax call using the handset.
When set to ON, if the unit hears fax
tones from the far end, it will
automatically start to send. When set
to OFF, you need to press START to
begin sending.
55 PRINT SIZE 00 90% Allows you to set the vertical 90%
01 84% reduction when printing received
02 70% faxes.The horizontal reduction is
constant at approx. 95% This setting
does not affect the printing of copies.
57 REMOTE START 00 OFF Allows you to start up the fax from ON
01 ON another telephone by dialling #, 7.
You can print a list of the current feature settings, see page 35.
Page 41

39
ECM (Error Correction Mode)
ECM automatically reduces the possibility of
damaged data when sending or receiving faxes.
ECM is switched on and we recommend that you
do not change this setting.
Power Save mode
The power save feature reduces power consumption
from 6W to 2W while your PaperJet 150 is lying idle.
Power save is switched on when you receive your
machine.
You can switch power save on and off by changing
the feature setting 13, see list on page 35. Power save
will activate about 5 minutes after the last button has
been pressed or the last call was received. The display
shows
POWER SAVE
.
Power save will automatically deactivate, when a
button is pressed, the handset is lifted or a new call
is received.
Power save will not activate if the display shows
NEW CALLS
.
Press Function until the display shows
3: SETTINGS?
Press Enter.
Press Function until display shows
PRINT
SIZE
(or enter 5, 5 to go straight there).
Press Enter.
Set the ratio you want
00 = 90%
01 = 84%
02 = 70%
Press Enter to confirm.
Press Stop to return to standby.
To reduce the printing area
If someone is trying to send you a fax that
is longer than the paper you are printing on,
your PaperJet 150 will try to receive it over
2 pages. You can reduce the printing area in
order to compress the fax onto a single page.
All faxes are reduced. Your PaperJet 150
has been originally set to 90% of the original
size, but incoming faxes can be switched
between 90%, 84% or 70%. You must re-set
the reduction again to change it back.
Press Function until the display shows
5: FAX SET UP?
Press Enter.
Display shows
1: SET CLOCK?
KEYPAD
KEYPAD
Stop
Page 42

40
To make a call
If sending a fax:
Load the document.
Press the R/Access button.
Enter the number you want.
Press Start. The document is scanned
and sent.
Making a phone call:
Lift handset (or press Monitor).
Press the R/Access button.
Enter the number you want.
Connecting to a switchboard
To set your switchboard access code
Press the Function button until the display
shows
5:FAX SET UP?
Press Enter.
Display shows
1:SET CLOCK?
Press Function.
Display shows
2:SENDER ID?
Press Enter.
Display shows
SENDER NAME
When the name you have entered
previously appears, press Enter.
Display shows
SENDER NUMBER
When the number you have entered
previously appears, press Enter.
Display shows
PBX MODE OFF
Press the Function button to display
No.
or
FLASH
Select
No.
if you use an access code (e.g. 9)
to get an outside line. Select
FLASH
if you
use a recall to get an outside line.
Press Enter to confirm your choice.
If you selected
FLASH
press Stop to return
to standby.
If you selected
No.
enter a code (this is the
prefix you normally use to get an outside
line) of up to 4 digits.
Press Enter to confirm your choice.
Press Stop to return to standby.
R/Access
R/Access
NOTE
When storing numbers in a One Touch button or
the Directory you can use the R/Access button to
enter the access code as the first digit (it will
appear in the display as “R”). This means the
access code will automatically be dialled along
with the number.
Stop
Stop
Start
Copy
Page 43

41
Help
Try these solutions to the most common problems.
Machine does not work
Check that it is plugged in and switched on at the
mains.
Display shows
CHECK PAPER!
Paper tray is empty.
Paper is not properly inserted in the plain paper tray.
If an error code is shown, check the error code list
on page 43. Then press Printer Reset and tr y
printing again.
Display shows
CHANGE CARTRIDGE
The front cover is open. Press top corners firmly
to close.
Original document is not accepted
Paper may be too thick or too thin.
Paper may already be jammed inside. Open the
control panel and remove any jammed paper.
Display shows
OUT OF INK
Install a new ink cartridge, page 45.
You can’t send a fax
Check that the document is inserted properly.
There may be a problem with the receiving machine.
You can’t receive a fax when the machine rings
Is your machine set to Manual receive? If so, lift the
handset and press Start.
Memory may be full and there is no paper in the
plain paper tray. Check that the machine is switched
on at the mains power supply.
Received fax is blank
Check that the sealing tape has been removed from
the ink cartridge print head. See ‘Replacing a print
cartridge’, page 45.
Document may have been placed upside down on the
sending machine.
Can’t print a document stored in the memory
Check that there is ink in the cartridge. Check that
there is paper in the plain paper tray.
Printed document contains illegible or
distorted characters
Phone line quality may have been poor. Ask for the
document to be sent again.
Page 44

42
Printed pages have white lines on them
No dial tone when you lift the handset
Check that the telephone line cord is properly
connected.
Speaker tones are too quiet
Monitor volume may be set to Low. Move the monitor
switch to Medium or High. See ‘At a glance’, page 4.
Cannot make a phone call
Check that your PaperJet 150 is not already sending
or receiving a fax.
Error light comes on
Press Stop to turn of the light. Print an activity
report, page 33 and check the error code shown,
see page 43.
Several sheets of paper are drawn into the printer
at the same time
Pages may be sticking together. Remove and fan out
the paper before inserting again.
Check that there are not too many sheets in the paper
tray. Remove some sheets if necessary.
If the paper tray contains different types of paper, try
loading just one type.
Paper is printed at an angle
Make sure the paper is held straight in the paper tray
by the paper guide.
Printed documents smudge easily
If you find that the ink smudges easily, there may be
a compatibility problem between the ink and the
paper you are using. It is recommended that you try
using a different brand of paper.
If this doesn’t resolve the problem, try changing the
INK SET setting to setting B (47 in the SETTINGS
menu). Note that the ink setting will affect copies
and faxes only.
CUSTOMER HELPLINE
If you cannot solve the problem or need further
advice, call the PaperJet Customer Helpline
0845 0500 950.
Results Probable cause Solution
Smudged Wrong type Try a different
or blurred. of paper. paper
Fading. Print head Clean the print
is clogged or head nozzles,
cartridge is page 47, or
out of ink. replace the print
cartridge page 45.
White streaks, Print head Clean the print
dots missing, is clogged. head nozzles,
irregular dots. page 47.
Straight lines are Print cartridge Align the cartridge,
printed jaggedly. is not aligned. page 47.
Page 45

43
The activity report may show error codes. The chart
shows you what they mean.
Error codes
Code Meaning Action
10 No response from Contact the other party
the other machine. to make sure the machine
can receive.
12 No response.
19 The memory became Check that the ink or
full when receiving a fax. paper hasn’t run out.
Ask the other party to
send a fax in stages.
20 Stop button pressed
while fax was being
sent or received.
21 Original document Remove and try
jammed. sending again.
27 Delayed fax cancelled.
29 Power was turned off
while a fax was being
sent from the memory.
30s Printing quality poor If this code appears
due to bad telephone frequently contact
line. your network operator
help line (151 for BT
residential customers,
154 for BT business
customers)
40’s Problem with other Try resending the
fax machine. fax later. Or ask them
to try sending you the
fax again.
50s Fax stopped by Try resending the fax
other machine. later. Or ask them to try
Line disconnected. sending you the fax again.
71 Other machine is Contact the other party.
not compatible.
Page 46

44
To clear a plain paper jam
The display shows
CHECK PAPER
.
Open the plain paper tray cover and pull out
all the paper.
Replace the paper in the tray. Close
the cover.
Press the Printer Reset button.
Your machine returns to standby.
.
Printer Reset
To clear a document jam
The display shows
DOCUMENT JAM
.
Open the control panel.
Press and hold down the Green Release
Lever while removing the jammed paper.
Close the control panel.
Page 47

45
Avoid touching the nozzles and metal
electrical contacts.
Insert the new cartridge holding it by the
finger grip.
Insert the cartridge with the electrical
contacts facing towards the back of the
machine.
Push the cartridge towards the back of the
machine until it clicks into place.
NO!
To replace an empty ink cartridge
Pull open the control panel.
Open the cartridge cover.
The ink cartridge carrier should have
automatically moved to the centre position.
If it has not moved, press the Printer Reset
button.
Remove the old cartridge.
Remove the new print cartridge from its
packaging. Holding it by the finger grip,
peel the protective film from the print
nozzles.
Printer Reset
Page 48

46
To store a spare ink cartridge
You can store a spare cartridge in the
compartment under the control panel.
Close the cartridge cover and control panel.
Display shows
OLD CARTRIDGE
.
Press Function to display
NEW CARTRIDGE
.
Press Enter.
Display shows
ALIGN CARTRIDGE
.
Press Enter. The alignment page is printed.
Select the vertical line that is closest to
being a straight line.
Enter the number under the straightest
line, e.g. 12.
Press Enter to confirm. You hear a
confirmation beep.
Press Stop to return to standby.
Stop
Page 49

47
To purge the print nozzles
Make sure there is paper in the plain
paper tray.
Press Function until the display shows
8: PRINTER?
Press Enter.
Display shows
1: CLEAN NOZZLES?
Press Enter. Display shows
PRINTING
and
the nozzle test pattern is printed. This shows
a test pattern of nozzles working correctly.
Compare the diagonal line above the bars
to the diagonal line below the bars. If there
is a broken line, the nozzles are clogged.
If the bottom line has fewer breaks, or is of
better print quality than the top line, run
the test again.
Cleaning the print nozzles and contacts
If your documents are not being printed
completely, the ink cartridge nozzles may
be clogged. You can set your PaperJet 150
to clean them.
To align the cartridge
Aligning the cartridge ensures the best
print quality.
Press Function until the display shows
8: PRINTER?
Press Enter.
Display shows
1: CLEAN NOZZLES?
Press Function. Display shows
2: ALIGN?
Press Enter. The alignment page is printed.
Select the vertical line that is closest to
being a straight line.
Enter the number under the straightest
line, e.g.
12
.
Press Enter to confirm. You hear a
confirmation beep.
Press Stop to return to standby.
Aligning and cleaning the print
cartridge
If the print quality should deteriorate at any time you
might want to check the cartridge alignment.
KEYPAD
Stop
Page 50

48
Wiping the contacts
Using a clean damp area of the cloth, gently
wipe the entire gold covered area, on the
back of the cartridge, from one side to the
other, as shown.
Gently wipe dry.
Ensure cartridge is dry before replacing in
the machine.
Wiping the print nozzles
If the print quality does not improve after
purging the nozzles, the contacts may be
dirty or there may be dried ink on the
nozzles.
Remove the print cartridge from the machine,
see “To replace an empty ink cartridge” on
page 45.
Dampen a clean cloth with water.
To dissolve any dried ink, hold the damp
cloth against the nozzles for about 3 seconds
and wipe gently. Wipe from one side to the
other, in one direction as shown.
Allow the nozzles to dry.
If the print quality is not satisfactory after
running the test three times, remove the
cartridge and carefully wipe the nozzle
plate with a damp soft tissue. Reinstall the
cartridge and repeat the clean nozzle routine.
Page 51

49
Cleaning
To clean the casing
Gently wipe the case with a soft, clean cloth
dampened with a mild detergent. Do not use abrasive
cleaning agents.
To clean the document feeder rollers
If a streaky or dirty pattern appears on a copy or fax
you have sent, clean the two document feeder
rollers with a soft, clean cloth dampened with a mild
detergent.
Open the control panel.
Press the document sensor to rotate the feeder rollers.
Clean the document feeder rollers, then use a dry
cloth to dry them thoroughly.
Close the control panel.
Page 52

50
General information
Guarantee information
Your PaperJet 150 is guaranteed for a period of 12
months from the date of purchase.
Subject to the terms listed below the guarantee will
provide for the repair of, or at BT’s or its agent’s
discretion the option to replace the PaperJet 150, or
any component thereof, which is identified as faulty
or below standard, or as a result of inferior
workmanship or materials. Products over 28 days
old from the date of purchase may be replaced with
a refurbished product.
The conditions of the guarantee are:
• The guarantee shall only apply to defects that
occur within the 12 months guarantee period.
• Proof of purchase is provided.
• The equipment is returned to BT or its agent as
instructed.
• This guarantee does not cover any faults or
defects caused by accidents, misuse, fair wear and
tear, neglect, tampering with the equipment, or any
attempt at adjustment or repair other than through
approved agents.
• This guarantee applies to the original customer
only and is not transferable.
• This guarantee does not affect your statutory
rights.
Within the 12 month guarantee period:
If you experience difficulty using the product, prior
to returning it, please read the Help section beginning
on page 41, and contact the PaperJet 150 Helpline
for assistance:
Helpline: 0845 0500 950. Lines open Monday to
Friday from 09:00 to 17:30 excluding bank holidays.
If the problem is not remedied, you will be advised
to contact your original point of purchase.
Outside of the 12 month guarantee period:
If your product needs repair after the guarantee
period has ended, the repair must meet the approval
requirements for connection to the telephone
network. We recommend that you call the Helpline
and ask for details of our recommended repairers.
If you have to return your PaperJet 150:
Pack the unit securely in the original packaging.
The product must be returned with all the accessories
originally supplied. We cannot take responsibility for
goods damaged in transit.
Page 53

51
Technical information
Paper handling: ........................................Automatic feed
Paper tray capacity: ..................................50 sheets max of 75gsm.
Maximum thickness of
stacked paper 10mm
Paper size:................................................A4 – 210 x 297mm
Letter – 8.5 x 11 inches
Legal – 8.5 x 14 inches
Paper weight:............................................64 to 90gsm
Paper type: ..............................................Plain paper. Transparency film.
Ink cartridge: ............................................Black: 900 pages (5% coverage)
Document handling: ..................................20 page, auto document feed.
Document size: ........................................A4, letter, legal.
Document weight: ....................................70 to 90gsm
Page 54

52
Type: ......................................................Desk top type transceiver
Effective scanning width: ............................208mm
Effective recording width:............................203mm
Transmission speed: ..................................14400/12000/9600/7200/4800/2400/bps
Transmission time: ....................................8 sec, standard mode, ITU-T #1, Memory to Memory (MR codes)
Horizontal resolution: ................................8 pels/200 dpi.
Vertical resolution: ....................................Standard mode: 3.85lines/mm
Fine mode: 7.7 lines/mm
Super fine mode: 15.4 lines/mm
Photo: 7.7 lines/mm with 64 grey scales
Compression method: ................................MH/MR
Scanning method:......................................Flat-bed by Contact Image Sensor
Printing method: ......................................Ink jet
Power supply:............................................AC 230V, 50/60Hz
Power consumption: ..................................Stand-by: 6W,
Transmission: 18W
Stand-by (with Power save):2W,
Reception:23W,Copy:35W.
Overall dimensions:....................................366(W) x 279(D) x 179(H)mm (excluding trays)
366(W) x 322(D) x 261(H)mm (with trays)
Weight;....................................................Approx. 3.6kg (no accessories)
Ambient temperature: ................................5°C-35°C(41°F-95°F)
R&TTE
This product is intended to be connected to
analogue networks and private switching systems
in the United Kingdom.
PaperJet 150 Fax Machine
This equipment complies with the essential
requirements of the Radio Equipment and
Telecommunications Terminal Equipment
Directive, 1999/5/EC.
If you require a copy of the original manufacturer’s
Declaration of Conformance, then please contact the
BT PaperJet Helpline on 0845 0500 950.
Page 55

53
Memory capacity
The memory can store up to 20 pages of the
standard letter at A4 size.
Page 56

54
Index
Additional features 33
Activity report 33
Align ink cartridge 47
Answering machine 29
At a glance 2
Broadcast faxing 26
store 26
cancel 26
Caller display 31
caller information not available 32
calls list 32
Cartridge
align 47
clean nozzles 47
replace 45
store spare cartridge 46
Cleaning
machine and paper rollers 49
print nozzles 48
Contrast 22
Copying 30
single copies 30
multiple copies 30
detailed original 31
Date set 14
Delayed faxing
send 25
cancel 25
change time 25
Delete
one touch numbers 18
directory numbers 20
Dialling
one touch numbers 17
directory numbers 19
faxes 22
phone calls 28
Directory 18
add name to number in calls list 20
delete 20
dial 19
edit 20
search 19
store 18
transfer entry to One Touch button 20
view directory 19
Document jam 44
Enter
a fax number 14
a name 14
Error codes 43
Error correction mode (ECM) 39
Page 57

55
Fax
broadcasting 26
delayed send 25
header 14
print from memory 24
receiving 23
redial 23
send 22
send via switchboard 40
stop 22
Features, list of 36
Guarantee 50
Handset-connect 10
Header, name and number 14
Help 41
Helpline 9
Ink cartridge
align 47
clean nozzles 47
replace 45
store 46
Jams 44
Lists
current settings 35
functions 35
stored names and numbers 33
Memory capacity 53
Memory full 24
Monitor volume 4
One Touch memories 17
delete 18
dial 17
edit 17
store 17
Optional settings 35
change features 35
features list 36
Paper
fit paper tray 10
jams 44
load 11
sizes 21
Phone
make call 28
handsfree 28
receive a call 29
redial 29
search and dial 28
Polling reception 27
Power, connect to mains 11
Power save mode 39
Print area-reduce 39
Print from memory 24
Receiving phone calls 29
Receiving faxes 23
Reception mode 23
Redial phone call 23
Redial fax call 29
Replace ink cartridge 45
Page 58

56
Reports and lists
activity 33
broadcast fax 34
delayed fax 34
no print out 34
Resolution 21
Returning the product 50
Ringer volume 4
Safety information 9
Setting up 10
Sending faxes 21
Set
date 14
time 14
Stop
broadcast fax 26
delayed fax 25
fax 22
Speak
after sending a fax 27
before receiving a fax 28
Store
directory entry 18
entering a name & number 14
One Touch entry 17
Switchboard 40
make call 40
send fax 40
set access code 40
Technical information 51
Telephone line connect 10
Time set 14
Unpacking 8
Voice request 27
Volume
loudspeaker 4
ringer 4
Page 59

Offices worldwide
The telecommunications services described in this publication
are subject to availability and may be modified from time to time.
Services and equipment are provided subject to British
Telecommunications plc’s respective standard conditions of contract.
Nothing in this publication forms any part of any contract.
Touchtone
TM
is a registered trade mark of
British Telecommunications plc in the UK.
© British Telecommunications plc 2001.
Registered Office: 81 Newgate Street, London EC1A 7AJ.
Registered in England No. 1800000.
PaperJet 150 user guide Issue 2 (11/01) 1
Designed by The Art & Design Par tnership Limited.
Printed in China.
 Loading...