

Page 1
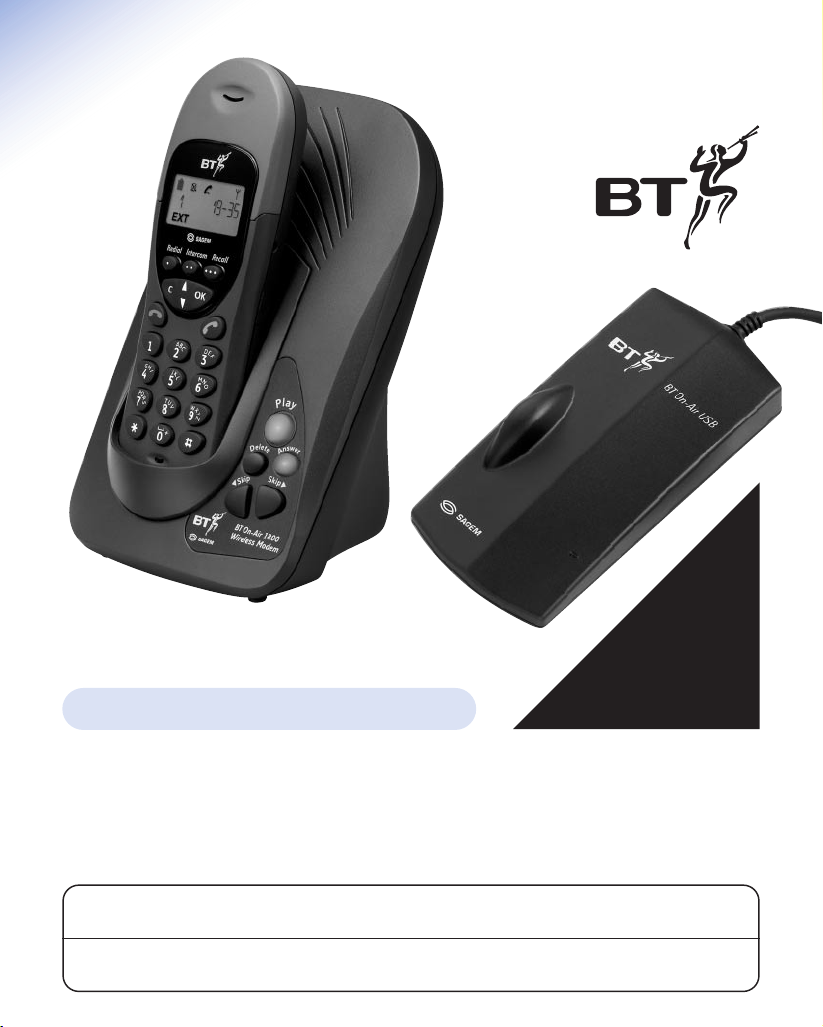
User Guide
BT On-Air 1800
This product is not designed for making emergency telephone calls when the power fails.
Alternative arrangements should be made for access to emergency services.
This product is intended for connection to analogue public switched telephone networks
and private switchboards in the United Kingdom.
Wireless Freedom to Talk & Surf
CALLER DISPLAY. YOU MUST SUBSCRIBE
TO YOUR NETWORK’S CALLER DISPLAY
SERVICE BEFORE YOUR BT ON-AIR
HANDSET WILL SHOW
CALLER DISPLAY
INFORMATION.
Page 2
2
-1-
EXT
INT
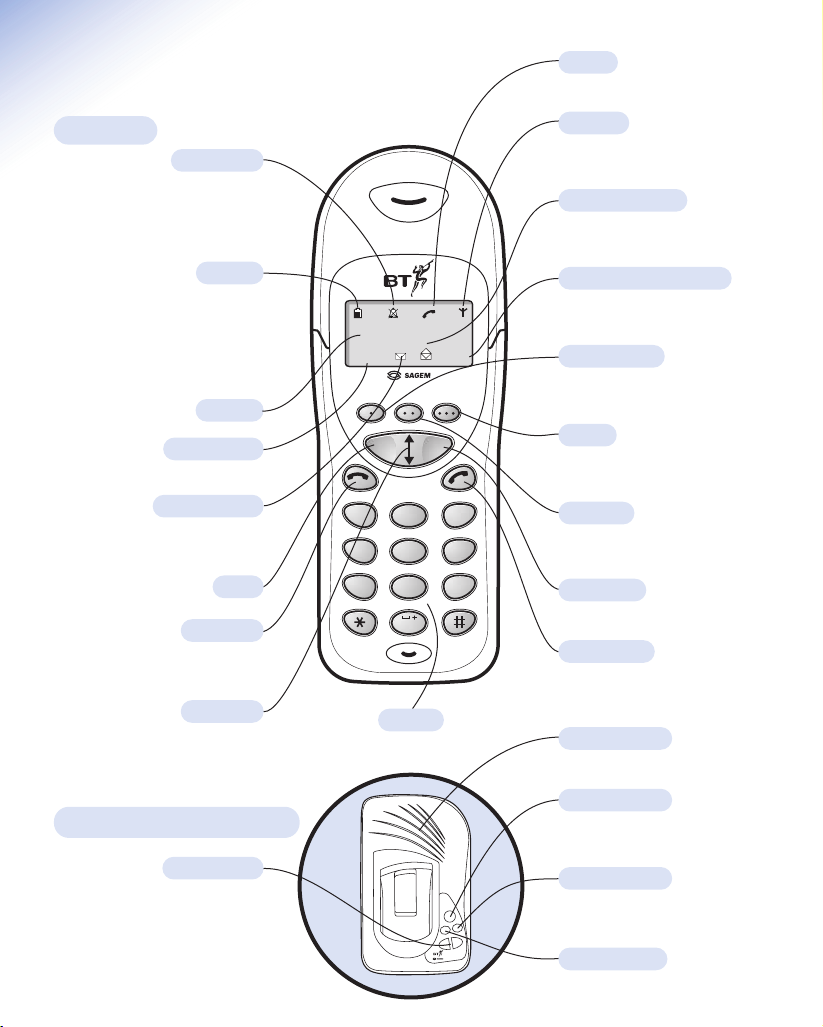
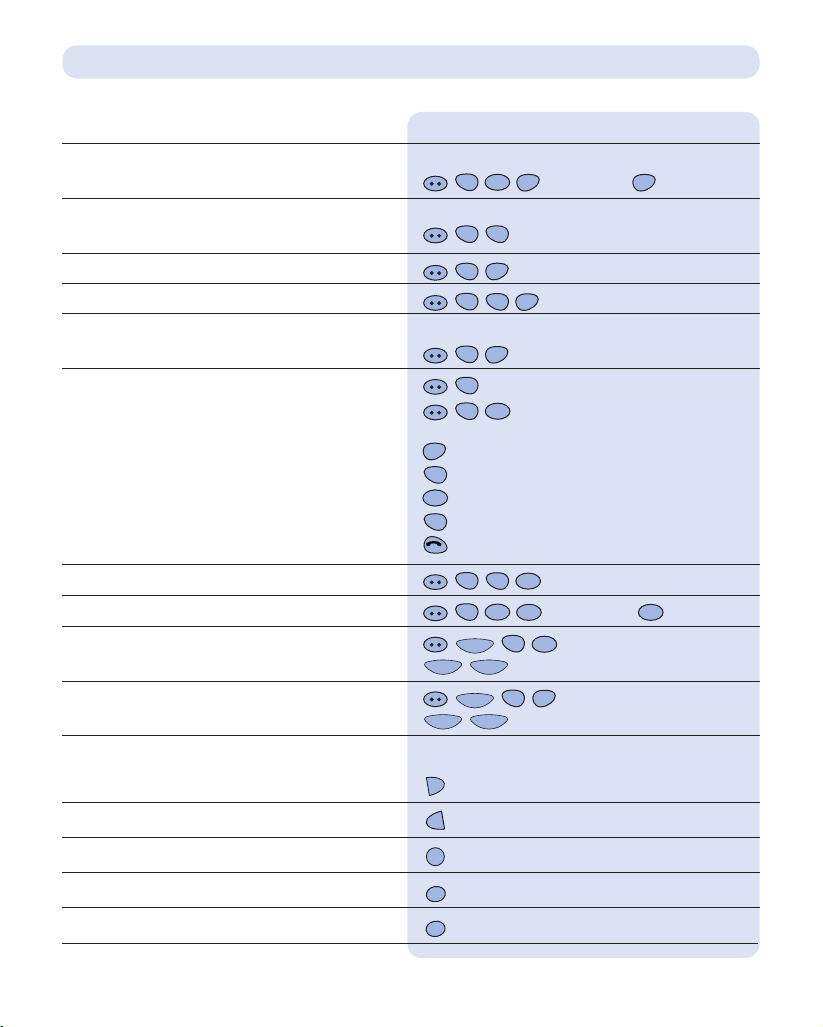
At a glance
Handset
In Use
Shows that the handset is in use.
In range
Indicates that you are in range of
the base station.
Stored messages
Indicates that you have old
messages stored.
Internal (Intercom) Call
Displayed during a call with
another handset (an internal call).
OK button
To confirm settings.
Greenphone
To answer a call and switch the
power on.
Intercom
Enables internal calls and call
transfer between handsets.
Redial button
Lets you redial up to 20 of the last
numbers called.
Recall
For use with Switchboards and
BT Select Services.
Silent mode
Displayed when the handset
ringer has been switched off.
Incoming calls will not cause the
handset to ring.
Battery
Shows the status of the handset
battery. When the battery is fully
charged, the icon is completely
shaded. As the battery is used,
the shaded area is reduced.
Display
Clear
Keypad
External Call
Displayed during an external call.
New messages
Indicates that you have
new messages.
Redphone
To end a call and turn the
power off.
Up/Down
Lets you move through the
options and lists.
Base with 56k modem
P
l
a
y
D
e
l
e
t
e
A
n
s
w
e
r
S
k
i
p
S
k
i
p
BT On-Air 1800
Wireless Modem
Answer button
Switches the answering machine
on and off.
Play button
Red when there are messages to
be played.
Speaker
To hear messages or monitor a call.
Delete button
To delete unwanted messages.
Skip buttons
Allows you to skip backwards and
forwards through your messages.
Press and holdSkip to register.
Press and hold Skipto page
handsets.
Redial
Intercom
COK
A
B
2
1
G
K
J
H
I
4
5
Q
T
U
P
R
S
8
7
0
Recall
D
E
C
F
3
M
N
L
O
6
X
W
Y
V
Z
9
Page 3
3
BT On-Air USB unit
Status (light) Meaning
ON In range of base.
Ready to connect to the Internet.
Flashing Evenly Connected to Internet
Slow Blinking Looking for the base.
Base not in range.
OFF Computer switched off.
Internet connection not possible.
B
T
O
n
-
A
i
r
U
S
B
Status light
About
Provides product version
information.
Base stations
Lists all bases registered
to this USB unit.
Modify base buttons
Adjust settings for the
base in range.
Register button
To register to a new base.
Signal strength bar
To show when you are in
range of a base station.
Close button
Close monitor window.
Page 4
4
Quick guide to main features
During a call:
Function Button combination
Adjust earpiece volume ▲ and
▼
buttons
Secrecy C (press C again to cancel)
Monitor OK (OK again to cancel)
Record conversation ( again to stop recording)
Transfer to another handset internal number then
to transfer or to resume call
Intercom
Intercom
7
P
Q
R
S
Intercom
7
P
Q
R
S
Intercom
0
0
Handset settings:
Function Button combination
Silent ring OK
Ringer volume OK
Ringer melody OK
Keypad beeps and volume OK
5
J
K
L
3
D
E
F
2
A
B
C
1
Page 5
5
Quick Guide to operating the answering machine
From the handset:
Function Button combination
Record your outgoing message (OGM) For Answer and record:
speak OGM
Switch answering machine on For Answer and record mode:
Switch answering machine off
Delete all outgoing messages
Listen to outgoing messages For Answer and record:
Play new messages
Play old messages
During playback:
Skip forwards
Skip backwards
Pause/Resume
Delete current message
Exit playback
Delete all messages
Record memo message speak memo
To set the time enter time
(24hr clock)
To set the date enter date (DD/MM/YY)
At the base:
Skip to next message
Go back to previous message
Play/Pause/Resume playback
Delete current message
Delete all messages Press and hold until a long beep is heard
D
e
l
e
t
e
D
e
l
e
t
e
P
l
a
y
䊴
S
k
i
p
S
k
i
p
䊳
3
D
E
F
1
Intercom
2
A
B
C
1
Intercom
5
J
K
L
5
J
K
L
8
T
U
V
7
P
Q
R
S
Intercom
5
J
K
L
1
7
P
Q
R
S
Intercom
1
5
J
K
L
4
G
H
I
6
M
N
O
5
J
K
L
7
P
Q
R
S
Intercom
7
P
Q
R
S
Intercom
3
D
E
F
7
P
Q
R
S
Intercom
3
D
E
F
1
7
P
Q
R
S
Intercom
9
W
X
Y
Z
7
P
Q
R
S
Intercom
7
P
Q
R
S
7
P
Q
R
S
Intercom
3
D
E
F
3
D
E
F
8
T
U
V
7
P
Q
R
S
Intercom
OK
CC
OK
CC
Page 6

6
In this guide
At a glance 2
BT On-Air USB unit 3
Quick guide to main features 4
Quick guide to operating the
answering machine 5
Introduction 7
Safety information 7
Unpacking your BT On-Air 8
For your records 8
Setting up 9
Base and handset 9
Drivers installation Windows 98/Me 12
Drivers installation Windows 2000 14
Modem Software installation 15
Using the modem 18
Connect to the Internet 18
Modem monitor 18
Rename a base 20
Change the system code 21
Uninstall BT On-Air 21
Using the telephone 23
Making and ending calls 23
Call timer 23
Redial 24
Secrecy 24
Number memory 24
Paging handsets 25
Internal calls 25
Transferring calls 26
Record your phone conversation 26
Caller Display 26
Calls list 27
Handset settings 27
Base settings 29
Using the answering machine 31
Setting up your answering machine 31
Recording your outgoing message 31
Switch on/off at base 32
Switch on/off at handset 33
Playing your messages 34
Answering machine operation
during playback 35
VIP 35
Call Screening 36
Remote access 37
Operating the answering machine
from an external telephone 37
Using additional handsets
and bases 39
Registering additional handsets 40
Using a USB unit with
more than one base 42
Help 45
BT On-Air USB unit installation 45
Connecting to the internet 46
Handset 47
General information 48
Guarantee 48
If you have to return your product 48
Technical information 48
Switchboard compatibility 49
Recall 49
Wall mounting 51
Software Licence Agreement 52
Index 53
Page 7

Safety information
General
Only use the power supply included with the product. Using
an unauthorised power supply will invalidate your guarantee
and may damage the telephone. The item number for the
mains power supply is 001040.
If Keyguard is active, it is still possible to make emergency
calls to 999 and 112.
Do not open the handset or base station. This could expose
you to high voltages or other risks. Contact the helpline for
all repairs.
Radio signals transmitted between the handset and base may
cause interference to hearing aids.
This product should not be used near emergency/intensive
care medical equipment and should not be used by people
with pacemakers.
Never dispose of batteries in a fire. There is a serious risk of
explosion and/or the release of highly toxic chemicals.
Cleaning
Simply clean the handset, USB unit and base station with a
damp (not wet) cloth, or an antistatic wipe. Never use
household
polish as this will damage the product. Never use a dry cloth
as this may cause a static shock.
Environmental
Do not expose to direct sunlight.
The product may heat up when the batteries are being
recharged. This is normal. However, we recommend that
you do not place the product on antique/veneered wood to
avoid damage.
Do not stand your product on carpets or other surfaces
which generate fibres, or place it in locations preventing free
flow of air over it’s surfaces.
Do not submerge any part of your product in water and do
not use it in damp or humid conditions, such as in
bathrooms.
Do not expose your product to fire, explosive or other
hazardous conditions.
There is a slight chance that your phone could be damaged
by an electrical storm. We recommend that you unplug the
power and telephone line cord for the duration of the storm.
7
Introduction
Your BT On-Air 1800 provides an all-in-one
solution combining telephone, answering
machine and wireless modem for Internet
access.
By plugging the BT On-Air USB unit into your
desktop or laptop computer, you can connect
to the Internet from anywhere in or around
your home without wires.
The reliable and proven DECT digital cordless
technology is used for the voice and data
communication between the handset or BT
On-Air USB unit, and the base. The base plugs
into your telephone socket and features a fast
56k Internet Modem.
Minimum PC requirements
• Windows 98/Me or Windows 2000.
• Pentium Processor 200MHz.
• 32MB RAM.
• Free USB port (if an external USB hub is
used, it must be mains powered).
• CD drive for installation of software.
Note
The BT On-Air 1800 Wireless Modem is
approved for connecting to Internet Service
Providers supporting V.90 connections. This is
the case for all major ISPs. It does not support
fax send/receive. It also cannot receive
incoming modem calls and therefore does
not support remote access using callback
mechanism.
Page 8
8
Unpacking your BT On-Air
1800 Wireless USB Modem
If anything is missing, please contact your
place of purchase immediately.
One BT On-Air 1800 Wireless Modem Base.
One BT On-Air USB unit.
One BT On-Air Classic handset with
rechargeable battery.
One power adaptor.
One telephone line cord.
One base plinth.
One handset belt clip.
Three removable handset fascias.
User guide.
Installation software on CD ROM.
Four rubber feet.
One self-adhesive sticky patch to attach the
BT On-Air USB unit to your computer.
For your records
For guarantee purposes proof of purchase is
required so please keep your receipt.
Enter your System Code here.
The pre-set System Code number is
0000
.
See page 21 & 29 for information on your
System Code.
Enter the Remote Access Code for your
answering machine here.
The pre-set Remote Access Code is
0000
.
See page 37 for more information.
Date of purchase:
Place of purchase:
Serial number:
Help web site
For the latest information on BT On-Air
1800 including frequently asked questions
and software downloads, have a look at
the BT On-Air web site: www.bt.com/on-air
Page 9
9
Setting up
Once connected, put the plinth back on the base
to prevent it from rocking on the table.
There are two positions for the plinth when
joining it to the base, both can be used for desk
mounting and one for wall mounting. Position
A is for desk mounting only and position B is
for desk or wall mounting (see wall mounting
on page 51).
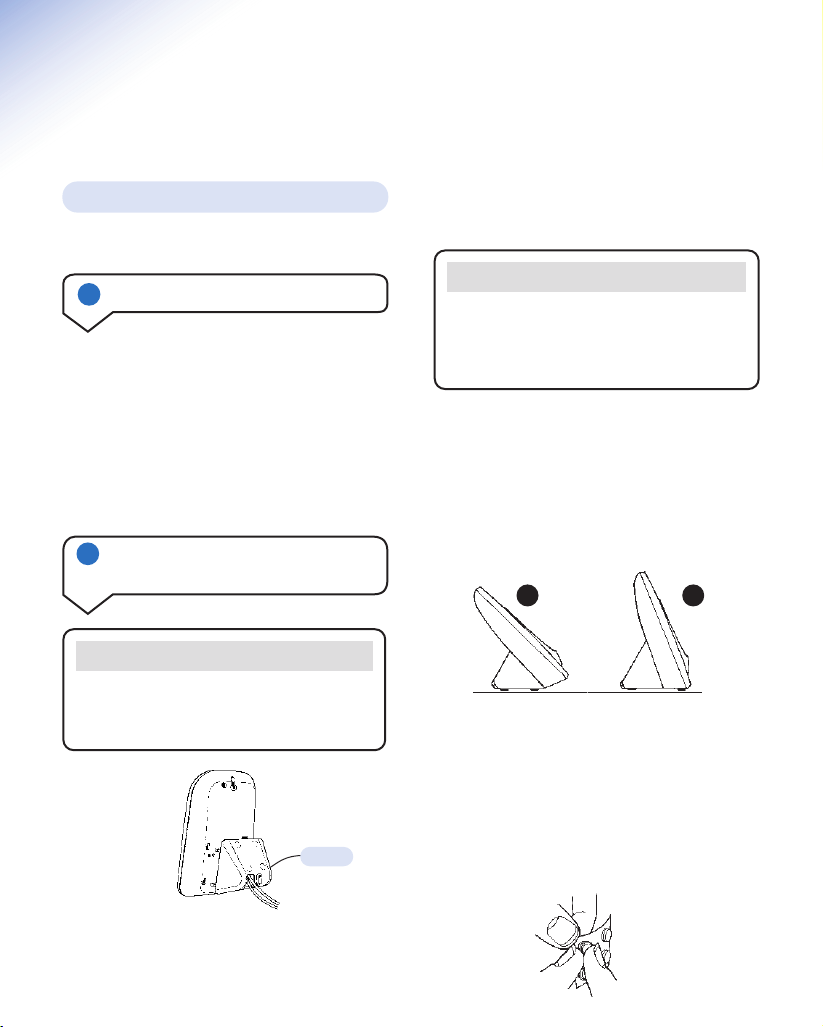
Rubber feet
Hold the black plastic square between thumb
and forefinger and peel off individual feet
from backing sheet as shown. These are to stop
your base from moving and to protect your
work surface.
If you decide on position B, place 2 of the
rubber feet on the plinth and 2 on the base.
Base and handset
2 Connect the power supply and
switch on.
Plug the power supply cable into the socket on
the underside of your base. The power cable
connector and socket are coloured red.
Plug the line cord into the other socket on the
underside of the base marked with a telephone
symbol.
WARNING
Please take care that the power supply and
telephone line cord are connected to the
correct sockets as incorrect placement could
damage your equipment.
BA
Your handset is already registered to the base.
1 Plan the location
Situate your base close enough to the
telephone and mains power sockets so that the
cables will reach.
Make sure it is at least 1 metre away from
other electrical products to avoid interference.
Do not situate the product in the bathroom or
other humid areas.
plinth
Important
You must thread the power supply cable
and line cord through the plinth before you
connect into the sockets on the base.
Page 10
10
3 Charge the battery in the
handset for at least 16 hours
WARNING
Under no circumstances should
non-rechargeable batteries be used. Only use
the approved batteries. Using unapproved
batteries will invalidate your guarantee and
may damage the telephone.
Fully discharging the batteries at least once
a month will help them to last as long as
possible. However, the charge capacity of
rechargeable batteries will reduce with time
as they wear out, so reducing the
talk/standby time of the handset. Eventually
they will need to be replaced. New batteries
can be obtained from any BT Shop or from
the Helpline on 0845 300 0156.
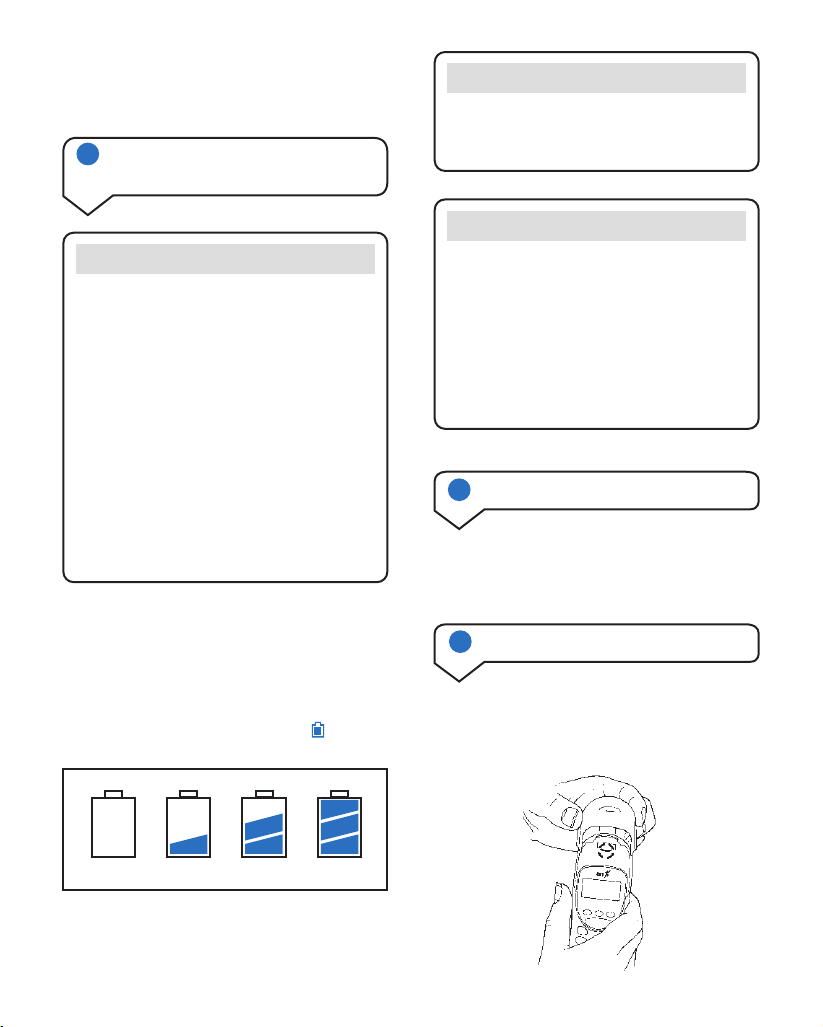
Battery low warning
If the handset battery symbol is empty and you
hear warning beeps, you will need to recharge
your handset before you can use it.
Plug the power adaptor into the wall socket and
switch on. When the power is switched on, the
PLAY button on your base will light up green.
Battery performance
Your handset is supplied with NiMH
batteries. These need to be initially charged
continuously for 16 hours to reach full
charge.
Note that the battery charge icon does not
indicate the correct level when the batteries
are first installed. The batteries must first be
fully charged.
5 Changing your handset fascias
There are 3 removable handset fascias to
choose from. Simply slide the fascias off and
replace with another.
4 Connect the telephone line cord
Plug the line cord into the telephone wall socket.
Place the handset in the cradle on the base
station. The handset display will show the
battery symbol. If it does not appear, see Help,
page 47.
When the battery has been charged for at least
16 hours the display will show the symbol.
Empty
1
/
3
2
/
3
Full
Page 11
11
Helpline
If you are experiencing difficulty, please call
the BT On-Air Helpline on 0845 300 0156.
Follow instructions on page 31 to set-up your
answering machine for the first time.
6 Setting-up your answering
machine
Page 12
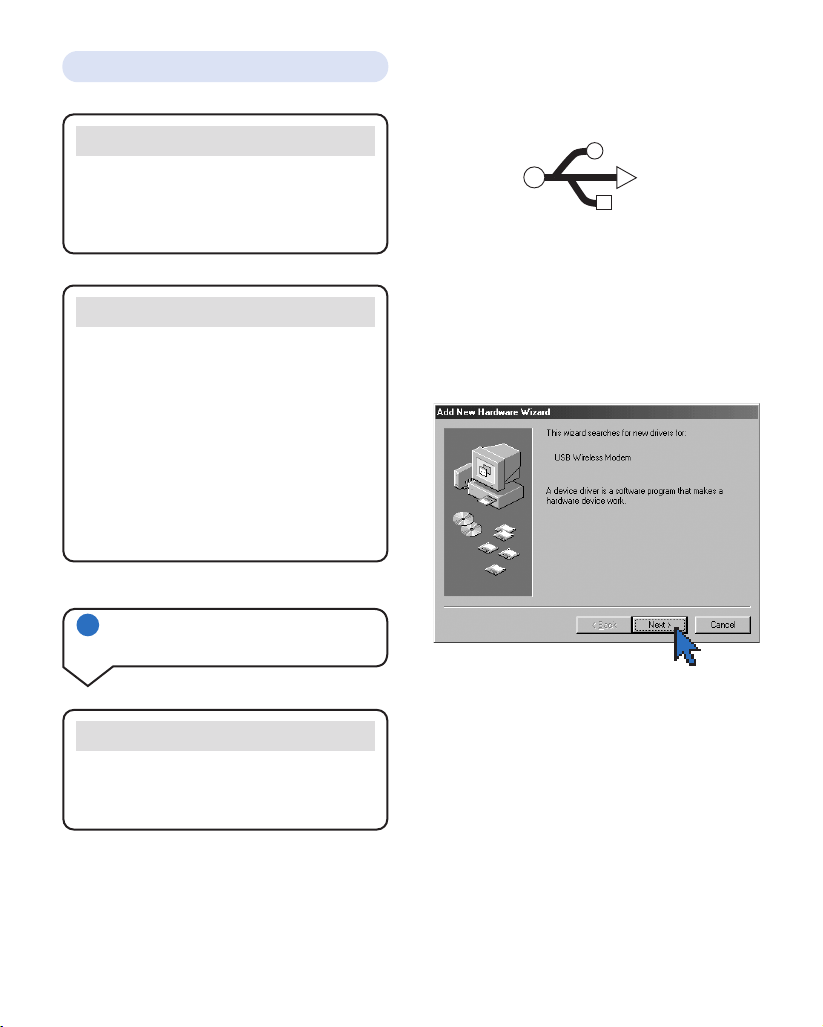
➜
Plug the BT On-Air USB unit into a free
USB port identified by the symbol below
on your computer.
Windows will automatically detect the
BT On-Air USB unit. (If this does not happen
see Help, page 45.)
After a few seconds, the screen will then
display
Add New Hardware Wizard
ready to
search for the USB Wireless Modem driver.
➜
Insert the CD installation software for the
BT On-Air 1800 into your CD ROM drive.
➜
Click Next>
12
BT On-Air USB unit
Note
Wait until you have checked the strength of the
signal between your BT On-Air USB unit and
the base before attaching it to your computer
with the Velcro strip.
Note
The BT On-Air drivers and software must be
installed on your computer before you can use
your BT On-Air 1800 to connect to the Internet.
Installation instructions vary according to your
operating system.
Turn to page 14 if your system uses Windows
2000.
Read on if your system uses Windows 98 or Me
(also known as Millenium Edition).
Important
If an external USB hub is used to plug the
BT On-Air USB unit into your computer, it
must be one that is mains powered.
➜
Switch on your computer and close any
open applications.
1a
Drivers Installation for
Windows 98 and Me
1
Page 13
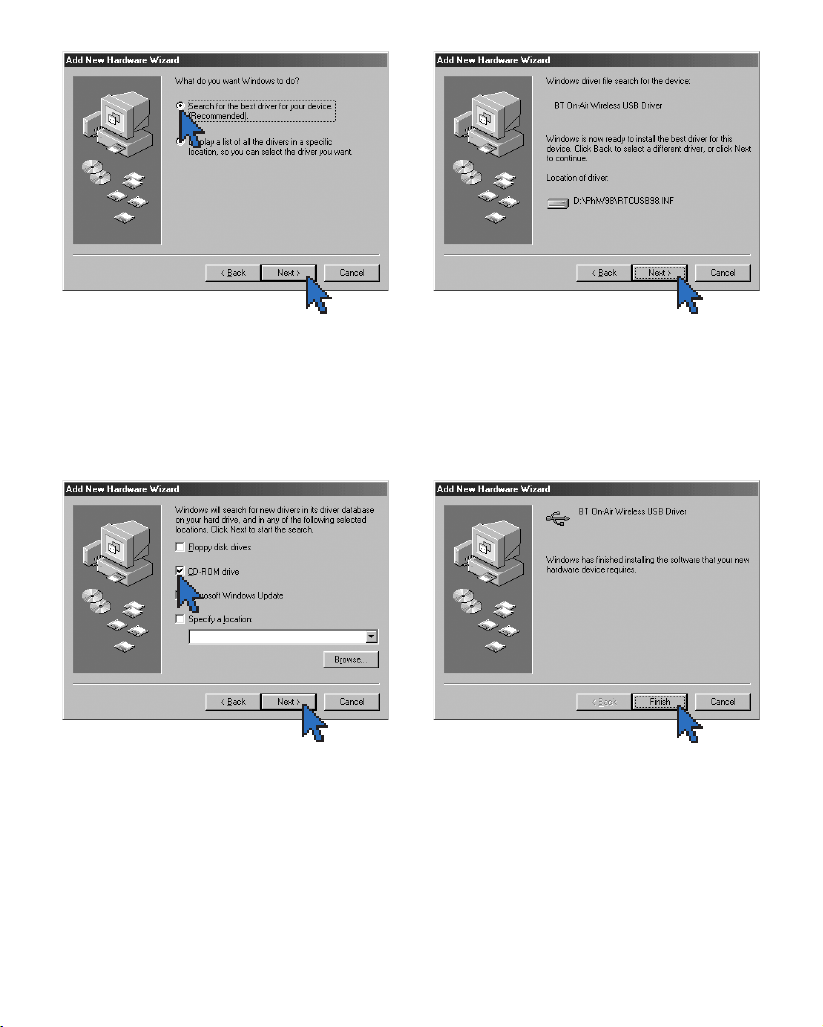
➜
Select the on-screen option
Search for
the best driver for your device
➜
Click Next>.
➜
Select the CD-ROM drive option.
➜
Click Next>.
➜
Click Next>.
Windows copies the files to your system.
13
➜
Click Finish.
The drivers are installed and the Modem
Software Installation can begin, see page 15.
You might be asked at this stage to restart
your computer. Please do so. The Modem
Software Installation procedure will then
automatically resume, see page 15.
2
1
1
1
1
2
Page 14
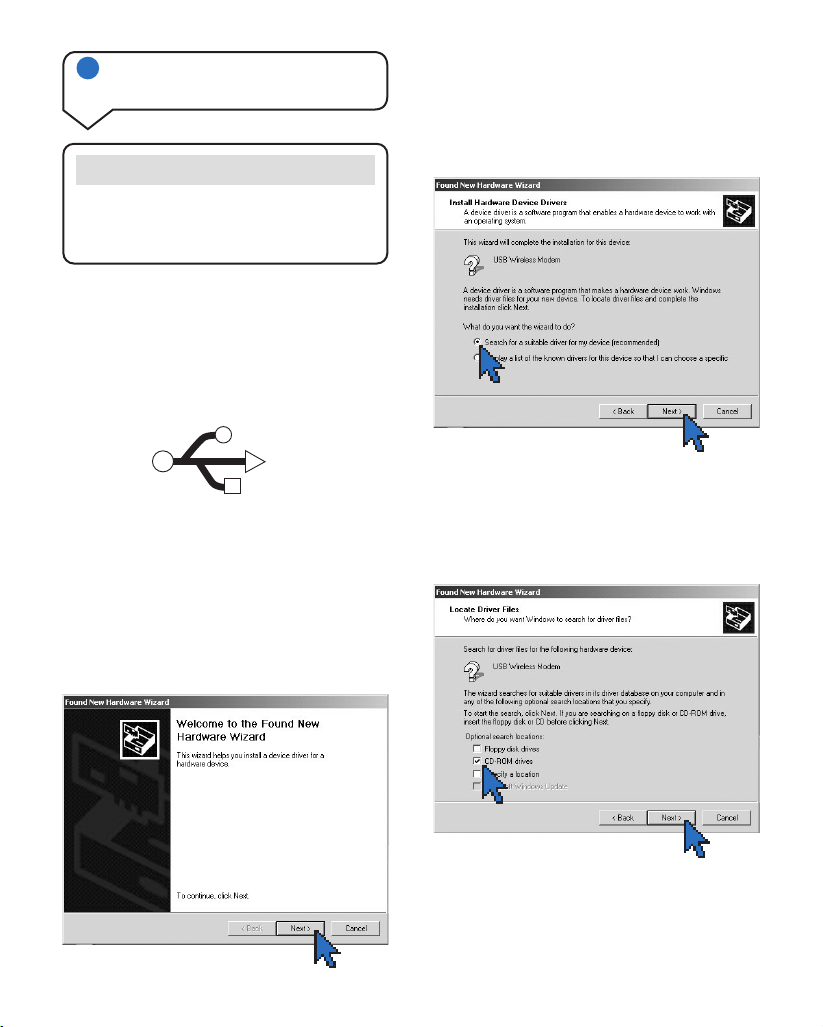
➜
Select the CD-ROM drive option.
➜
Click Next>.
➜
Select the on-screen option
Search for a
suita bl e driver for my device
.
➜
Click Next>.
➜
Insert the CD installation software for the
BT On-Air 1800 into your CD ROM drive.
➜
Click Next>.
14
Important
If an external USB hub is used to plug the
BT On-Air USB unit into your computer, it
must be one that is mains powered.
➜
Switch on your computer and close any
open applications.
➜
Plug the BT On-Air USB unit into a free
USB port identified by the symbol below
on your computer.
Windows will automatically detect the
BT On-Air USB unit and the screen. (If this does
not happen see Help, page 45.)
After a few seconds, the screen will then
display
Found New Hardware Wizard
ready to
search for the USB On-Air Wireless Modem
driver.
1b
Drivers Installation for
Windows 2000
1
1
2
1
2
Page 15
Your modem software installation is
automatically started after the drivers for your
BT On-Air USB unit have been installed.
The BT On-Air screen is shown then replaced
by the Welcome screen.
➜
Click Next>.
➜
Click Next> for automatic installation.
15
➜
Click Yes>.
Windows copies the files to your system.
➜
Click Finish.
The drivers are installed and the Modem
Software Installation can begin.
You might be asked at this stage to restart your
computer. Please do so. The Modem Software
Installation procedure will then automatically
resume.
2 Modem Software installation
for all version of Windows
1
1
1
1
Page 16
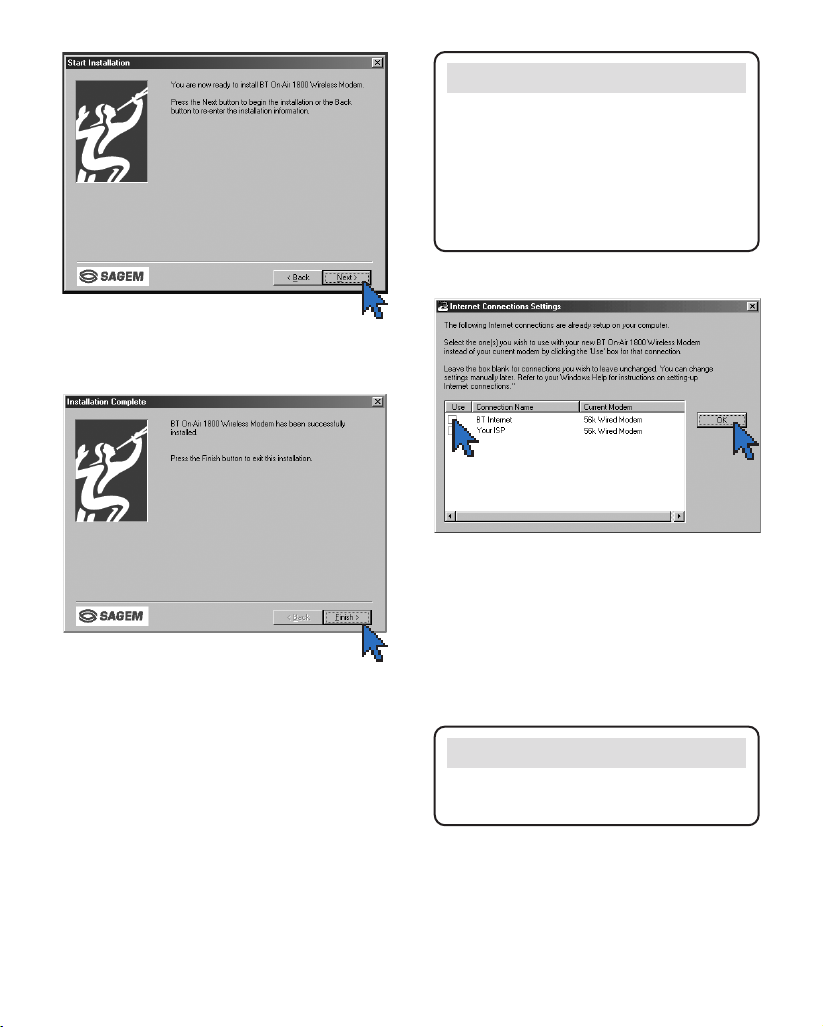
➜
Click Next>.
Windows copies the files to your system.
➜
Click Finish>. The screen shows the
Internet Connections Settings
.
The window displays all Internet Service
Providers (ISPs) already installed on your
computer.
➜
Tick the 'Use' box in front of the Internet
connections you want to use with your
BT On-Air Wireless Modem. You can
select as many as you want.
➜
Click OK.
16
Note
If you do not already have an Internet
Service Provider (ISP) set-up on your
computer, a screen will appear to tell you so.
Skip to Step 3 now to finish the BT On-Air
software installation. Then read Step 4 for
guidelines on how to set-up an Internet
connection.
1
1
1
2
Helpline
If you are experiencing difficulty, please call
the BT On-Air Helpline on 0845 300 0156.
Page 17
computer is out of range of the base or that the
base is not switched on. Check that the base
was properly set-up by following instructions
in this user guide and move closer to the base.
If you still cannot log on to the base, see ‘Help’
page 45.(See page 18 for more information on
using the BT On-Air Monitor.)
After installation, the BT On-Air Monitor
window is displayed.
This window lets you monitor:
• if you are logged on to the base station
(Status column),
• the quality of the radio signal between the
base and the BT On-Air USB unit (Signal
strength).
If the signal strength is poor or you cannot
log on, the most probable causes are that your
17
➜
Click OK.
The installation is now complete and the
BT On-Air Monitor is displayed.
3 Checking the installation
1
If you already had an Internet connection set-up
on your computer before installing BT On-Air:
If you ticked the Internet connection during
the Internet Connection Settings part of the
BT On-Air installation, then you are now ready
to connect to the Internet. You can now turn to
the next section for instructions on how to use
the modem.
If you do not have an Internet connection
installed or want to update an existing one:
Instructions for setting up an Internet
connection depend on your computer and your
chosen Internet Service Provider. Refer to the
Windows online help on how to set-up an
Internet connection or follow the instructions
given by your Internet service provider.
When installing your new Internet
connection or updating an existing one,
select “BT On-Air Wireless Modem”
within the dial-up networking properties
when prompted for a device to use for
the connection.
4 Setting-up your
Internet connection
Note
The BT On-Air 1800 supports speeds of
56 kbit/s for download from an ISP only.
Upload remains at 33.6 kbit/s.
The actual speed achieved depends on the
line condition and will vary across dif ferent
connections.
Page 18

18
Using the modem
Note
Your BT On-Air USB unit is powered via
the connection to your computer so, if you
are using a laptop computer, you may notice
a slight reduction in the battery capacity.
Note
If Call Waiting is enabled on your line, any
incoming call will cause an active Internet
connection to drop. You should disable Call
Waiting before making an Internet
connection. Please refer to your network
operator's instruction.
Note
You cannot use the modem monitor while
connected to the Internet.
To use the modem monitor
The BT On-Air Wireless Modem monitor lets
you rename the base, change the system code
and de-register your BT On-Air USB unit.
It also indicates when your BT On-Air USB
unit is in or out of range of the base.
To connect to the Internet
The BT On-Air software integrates with your
Windows operating system. After software
installation, the Wireless Modem is listed
within the dial-up networking properties on
your computer as 'BT On-Air Wireless
Modem' in the list of devices.
You can now connect to the Internet in the
usual way. If it is the first time you use your
computer for connecting to the Internet, you
should follow instructions from your Internet
Service Provider.
Please refer to Help section on page 46 if you
are experiencing problems.
Click on the BT On-Air icon in the system tray.
This is normally at the bottom right of your
computer screen.
Important
The BT On-Air USB unit must be connected
to your computer and the software installed
before you can connect to the Internet.
Make sure the base has been plugged into the
mains and connected to the telephone line.
1
Page 19

19
The BT On-Air screen is displayed.
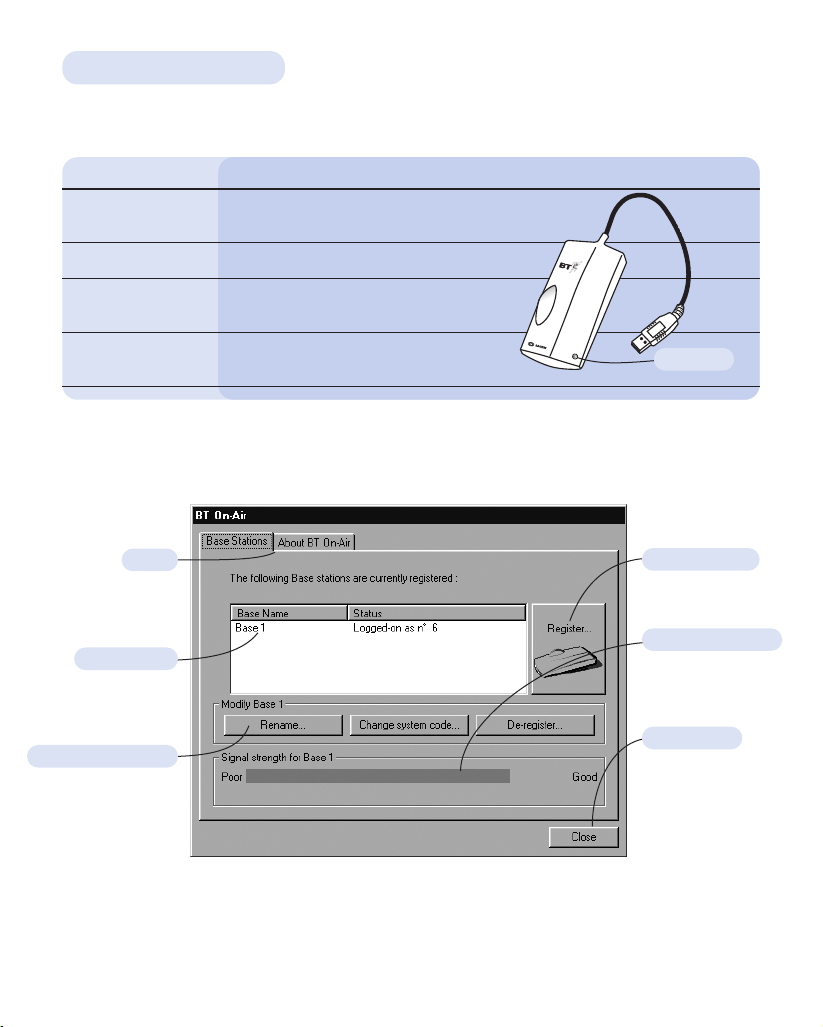
1. Base stations
Base Name displays the bases your BT On-Air
USB unit is registered to. It can be registered
to a maximum of four bases.
Status shows: e.g. with two bases registered.
•
Not logged on
– your computer cannot use
the base (e.g. it is out of range).
•
Logged on
– Your computer is ready to
connect to the Internet. The internal number
allocated by the base to the BT On-Air USB
unit is displayed (e.g. Logged on as n 3).
6 Close
Note
Your BT On-Air USB unit can only log-on to
one base at a time.
2. Adjusting the settings
You must be in range and connected to the base
to adjust the settings of that base. The buttons
are not active when your computer and USB
unit are out of range.
You can rename the current base, change the
system code and de-register the BT On-Air
USB unit from the current base. For
de-registration, see page 43.
5 About
BT On-Air
1 Base
stations
4 Register
to base
2 Adjusting the
settings
3 Signal
Quality
Page 20

You can change the name of a base,
for instance to indicate its location.
The name is stored in your computer,
not in the base itself.
Click the BT On-Air icon in the
system tray to open the Monitor.
Click Rename.
➜
20
4. Register to base
Click on Register if you want to
register your USB unit to a new,
compatible base. See page 42.
5. About BT On-Air
Click on the tab to display
version information for
your product. It also displays the Identity of
the base (RFPI) which is printed on the label
underneath the base.
6. Close
The Monitor must be closed
before making an Internet
connection.
Note
When you are happy with the signal strength,
attach your USB unit to your computer using
the sticky pad provided.
If you experience interference on your
computer screen or other electrical equipment
while using your BT On-Air USB unit, try
moving the unit slightly away from the
equipment which is experiencing interference.
3. Signal quality
The signal indicator shows if your BT On-Air
USB unit is in range of the base. If you get a
very poor signal, it could cause problems when
connecting to the Internet. Try moving closer
to the base or changing the position of the
BT On-Air USB unit.
➜
1
Enter the new name you want.
Click OK to confirm.
Click Close to close the Monitor
screen.
➜
➜
➜
1
2
To rename a base
Page 21

Open the Windows Start menu by
clicking the Start button normally
located at the bottom left of your
screen.
Click Settings.
Click Control Panel. The Control
Panel is displayed.
Enter the current PIN. (Default
setting =
0000
)
Enter the new PIN twice.
Click OK.
A confirmation screen appears after a
few seconds.
Click OK.
If you see a message saying the code
change was unsuccessful, see Help
“General check”, page 46.
Click Close to close the Monitor
screen.
21
➜
➜
➜
➜
➜
➜
➜
Important
Before uninstalling, close any active
Internet connection and unplug the BT
On-Air USB unit from the port on your
computer.
After uninstalling the software, you will
not be able to use your BT On-Air until
you install it again.
You can use the BT On-Air Monitor
to change the base system code. (You
can also use the handset to change
the code, see page 29.)
Click the BT On-Air icon in the
system tray to open the Monitor.
Click Change system code.
➜
➜
1
1
4
2
3
1
1
To change the system code
To uninstall BT On-Air from
your computer
Helpline
If you are experiencing difficulty, please call
the BT On-Air Helpline on 0845 300 0156.
Page 22

22
Click Add/Remove Programs on the
Control Panel.
Select BT On-Air 1800 Wireless
Modem from the list that appears on
the screen. You might have to scroll
down the list.
Click Add/Remove button.
Select Automatic and Click Next>.
Click Finish to uninstall BT On-Air
from your computer.
➜
➜
➜
➜
➜
1
2
1
Page 23

23
Press the GREEN PHONE button.
The display shows the symbol.
Dial the number.
Using the telephone
Your handset will automatically time the
duration of all external calls. The handset
display shows the call duration during your call.
Press and hold the GREEN PHONE
button to switch the handset on.
Press and hold the RED PHONE
button to switch the handset off.
123
Making and ending calls
Call timer
Press the RED PHONE button.
First enter the number to be dialled.
The number is shown in the display.
(If you make a mistake press C to
remove the incorrect digit).
When you have entered the number
correctly, press the GREEN PHONE
button to dial the number.
Press the GREEN PHONE button to
answer the call.
You can adjust the volume during a
call.
Press the UP button to increase the
volume.
Press the DOWN button to decrease
the volume.
The display shows the current
volume level.
▲
▼
Note
The symbol on your handset display
indicates when you are in range of the base
station. If the symbol disappears you are out
of range and will need to move closer to the
base station.
Please note that this product does not have
autotalk standby. To end a call you must
press the RED PHONE button, you cannot
just replace the handset on the base station.
To switch the handset power on
and off
To make an external call
Preparatory dialling
To end a call
To receive a call
To adjust the earpiece volume
Page 24

24
Press OK then 4, this will delete all
numbers in the redial list.
The display will return to the idle state.
4
G
H
I
COK
COK
Press the REDIAL button. This will
take you to the most recent number.
Use the UP or DOWN button to scroll
to the number you require.
Press the GREEN PHONE button to
dial the number.
or
Press the C button to return to idle.
▲
▼
Redial
During a call, press OK then 0. The
display will show the icon to
indicate Monitor is on.
Press OK then 0 again to switch
Monitor off.
During a call, press the C button.
C will now flash to show secrecy is
in operation.
Press the C button again to resume
your call.
When on a call you can talk to someone in the
same room, without your caller hearing.
COK
COK
Secrecy
When on a call you can switch-on the
loudspeaker on the base so that someone in
the same room can hear the conversation.
Call Monitor
Press the UP or DOWN button the
display shows
MEM--.
Use the DOWN button to scroll to
the first available memory location
(marked
---------
).
Or
Enter the number of the memory
location and press OK.
Using the keypad enter the telephone
number you wish to store.
Press the OK button to confirm.
Press the C button to return to idle or
follow these instructions again to
store another number.
You can store up to 20 of your most frequently
used numbers.
123
123
COK
COK
COK
▼
▲
▼
Number memory
COK
0
COK
0
To switch call monitor on/off
Redial list
To switch secrecy on/off
To store a number in the memory
To delete all numbers shown in
the redial list
Page 25

25
Press the UP or DOWN button. The
display will show
MEM--.
Use the DOWN button to scroll to
the required memory number and
press OK.
Or
Enter the number of the memory
location and press OK.
Press the C button to clear and back
space the numbers. Edit entries by
using the numbers on the keypad.
Press OK to confirm.
Press the C button to return to idle.
▲
▼
COK
COK
COK
COK
COK
123
123
Press and hold the Skipbutton on
the base until the handset starts to
ring. All handsets registered with the
base will ring.
To end paging, press and hold the
Skip
button again.
You can alert handset users that they are
wanted, or locate a missing handset. (Paging
calls cannot be answered by a handset.)
S
k
i
p
䊳
S
k
i
p
䊳
Paging handsets
If you have multiple handsets registered to a
base you can make internal calls between
handsets.
You can make an internal call while using the
BT On-Air USB unit to connect to the Internet.
Internal calls
▼
Note
If you dial the number for the BT On-Air
USB unit, you hear an engaged tone.
Press the UP or DOWN button to
display the number you wish to dial.
Press the GREEN PHONE button to
dial the number.
Or
Quickdial:
Enter the number of the memory
location you wish to dial and press
#
(e.g. Press 1 then #from idle to dial
the phone number stored in memory
location 1).
123
▲
▼
To dial a number from the memory
To edit and delete memory numbers
To page a handset from the base
Page 26

If you have subscribed to a Caller Display
service you can see who is calling you on your
handset display, (unless the number has
been withheld).
Important
To use Caller Display you must first subscribe
to your network provider's Caller Display
Service.
Contact your network provider for more
information.
Caller Display
During a call:
Press the INTERCOM button followed
by the 7 button.
The conversation will now be
recorded.
Press the INTERCOM button and then
the 7 button again to end recording.
The conversation has been stored and
can now be played back as a normal
message.
You can record a two-way telephone
conversation. The recorded conversation is
saved as a normal answering machine message
and can be played back.
Record your phone conversation
7
P
Q
R
S
7
P
Q
R
S
Intercom
Intercom
26
You can transfer an external call to another
handset registered to the base.
While on an external call:
Press the INTERCOM button (you will
hear a beep).
Enter the number of the handset to
which you want to transfer the call.
If you wish you can talk to the other
handset user first.
Press the RED PHONE button to
transfer the call.
Or
Press the INTERCOM button to
resume your first call without
transferring.
Intercom
Intercom
123
Transferring calls
Press the INTERCOM button.
Enter the number of the handset you
want to call.
Or
Enter the digit
✱
if you want to call all
the handsets.
To end the call:
Press the RED PHONE button.
123
Intercom
To make an internal call to
another handset
To transfer an external call
between handsets
To record a two-way conversation
Page 27

Keypad beeps and tones
You can set your handset to beep or play a
tone when you press a button on the keypad.
Handset settings
Press the INTERCOM button.
Press the REDIAL button. The most
recently received number will be
displayed.
To scroll backwards through the calls
list towards the older calls in the list
press the DOWN button.
To scroll forwards through the calls
list towards the most recent calls
press the UP button.
If the UP and DOWN buttons are
pressed when at the end of the list,
the handset will go back to idle.
When the number you wish to call is
displayed press the GREEN PHONE
button.
The number will be automatically
dialled.
or
Press the C button to return to idle,
if you do not want to make a call.
Intercom
▼
▲
27
The Calls list contains the telephone numbers
of your last 20 callers. If you receive more than
one call from the same telephone number then
it will only appear once in the list.
If a call is received when the calls list is full,
then the oldest entry will be deleted
automatically.
If no number is received for a call then no
entry will appear in the calls list.
Calls list
Press the OK button.
Press the 5 button.
Use the UP and DOWN buttons for
volume control.
---
indicates the
volume is disabled, 0volume is set to
LOW, 00volume is set to MEDIUM
and
000
volume is set to HIGH.
Press OK to confirm the setting.
▲
▼
COK
COK
5
J
K
L
When you receive a call the caller’s number will
appear on the display. If the caller has withheld
their number then
-------------
will appear on the
display. If for some reason the caller’s number
is not available then will
appear on the display.
888888888888
Important
The Caller Display service will not operate
when your base station is connected to a
switchboard.
Whether you take a call or not, the caller’s
details are stored in the Calls List. The Calls
List holds the telephone numbers of the last
20 people who called you.
You can display, scroll through and dial
numbers on the list and copy them into the
directory.
COK
Keypad beeps and volume
To enter the Calls list
Page 28
Press the OK button.
Press the 2 button.
Use the UP and DOWN buttons to
select the volume you require.
Press OK to confirm.
COK
COK
▲
▼
2
A
B
C
28
Note
The time is also automatically updated from
the information provided by the network
during an incoming call with Caller Display.
Note
Please note that the melody and volume are
emitted from the handset only. They are not
available from the base.
Press the INTERCOM button.
Press the OK button.
Press the 1 button followed by the 2
button.
Use the keypad to input the time
e.g. 17.35 (24 hour clock).
When entering the time press the C
button to move the cursor backwards
and the OK button to move it
forwards.
Press the C button twice to return
to idle.
The time will now appear on the
handset.
123
456
789
COK
COK
COK
Intercom
1
2
A
B
C
Press the INTERCOM button.
Press the OK button.
Press the 1 button followed by the
3 button.
Use the keypad to input the date
DD/MM/YY.
When entering the date press the C
button to move the cursor backwards
and the OK button to move it
forwards.
Press the C button twice to return
to idle.
123
456
789
COK
COK
COK
Intercom
1
3
D
E
F
Press the INTERCOM button.
Press the OK button.
Press the 1 button then the 1 button
again. The date is displayed.
Press the OK button to alternate
between the date and the time.
Press the C button three times to
return to idle.
COK
COK
COK
Intercom
1
1
To set the time
To view the date and time
To set the date
Ringer volume
Page 29

29
Press the INTERCOM button.
Press the OK button.
F1
will appear on
the display.
Press the 3 button followed by the
1 button.
Enter existing code (default setting
0000
). As you enter each digit in turn
the dash will stop flashing. When you
have entered four digits all four
dashes will then start flashing again.
Enter your new System Code. As you
enter each digit in turn the dash will
again stop flashing.
Enter your new System Code again.
Your system code is changed. You will
hear a beep if you have entered the
wrong current system code or if your
new system codes do not match.
Press the C button twice to exit.
COK
COK
Intercom
OLD
CODE
NEW
CODE
CONFIRM
CODE
3
D
E
F
1
System Code
Your base station has a default setting of
0000
but you may want to change this.
If you change your System Code keep a record
of the new number by writing it in the space
provided on page 8.
Base station priority
If you are using more than one base, you can
select which base your handset will use, when
it is in range of more than one base to which it
is registered.
Base settings
Note
The system code can also be changed from
your computer by using the BT On-Air
Wireless Modem Monitor provided your
computer is connected to the base.
Press the OK button.
Press the 3 button.
Use the UP or DOWN button to select
the melody you require.
Press OK to confirm.
COK
COK
▲
▼
3
D
E
F
Press the OK button.
Press the 1 button.
Use the UP or DOWN button to select
1 for ringer active or 2 for silent ring.
The display will show the symbol
to indicate a silent ring.
Press OK to confirm.
▲
▼
1
Silent ring
Ringer melody
To change your System Code
COK
COK
Page 30

30
Press the OK button.
Press the 7 button.
Use the UP and DOWN buttons to
select the base you require.
The flashing digit on the left of the
handset is the base number.
Flashing indicates that no base has
priority and the handset will therefore
randomly register to the first base
it finds.
Press OK to confirm.
COK
COK
▲
▼
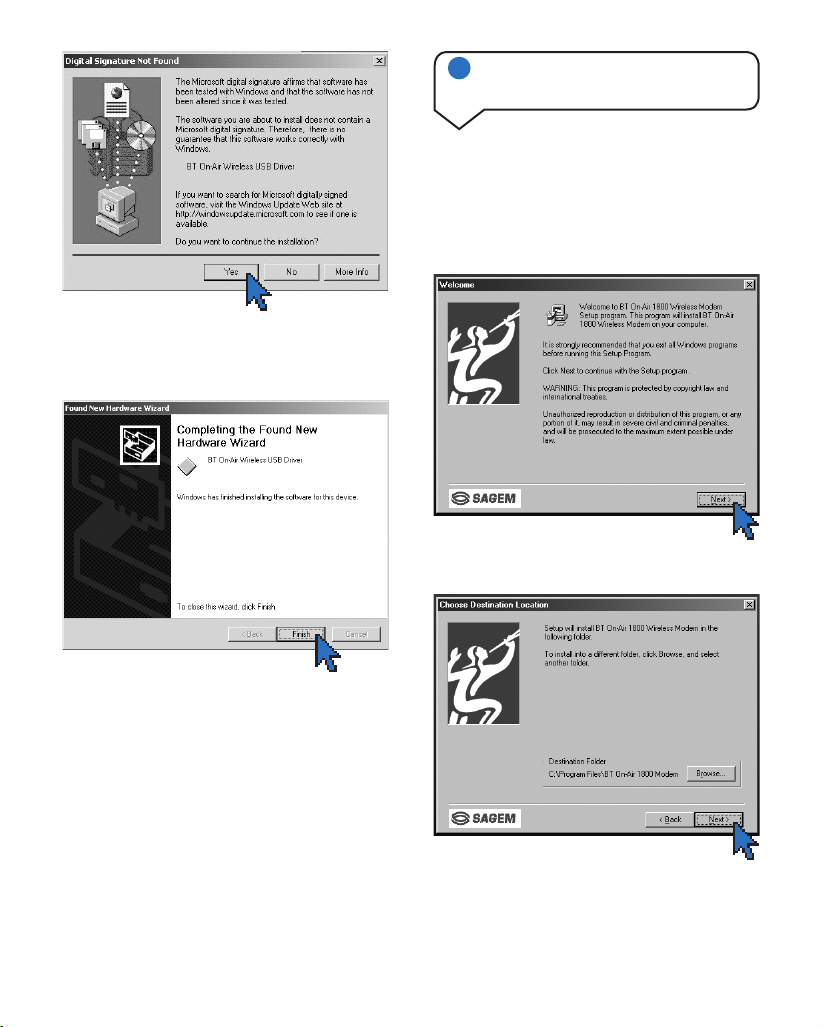
7
P
Q
R
S
To change base station priority
Page 31

31
Using the answering machine
Before using your answering machine for the
first time you need to: set the time and date,
record your outgoing message and switch
the answering machine on.
The base stations answering machine is
shared by all handsets. There are two types of
answering machine mode:
1 Answer and record – Callers can leave you
messages.
2 Answer only – Callers will hear your
outgoing message but cannot leave any
message.
Each answering machine mode has its own
outgoing message.
The answering machine has an incoming
message capacity of approximately 15 minutes.
Important
It is necessary to record your own outgoing
message as the machine has no pre-recorded
message. Also it is not possible to switch on
the answering machine if you have not
recorded an outgoing message for the mode
you have selected.
Please see page 28
‘To set the time and date’.
Setting up your answering
machine
It is necessary to choose which
answering machine mode you will be
using. (Answer only or Answer and
record). It is possible to record a
message for both modes although only
one mode can be selected for use at
any one time.
Press the INTERCOM button.
For Answer and record:
Press the 7 button, then the 8 button,
then the 3 button.
Or
Important
It is not possible to switch on the answering
machine if you have not recorded an
outgoing message for the mode you
have selected.
Intercom
7
P
Q
R
S
3
D
E
F
8
T
U
V
To set the time and date
To record your outgoing message
Page 32

32
Press the INTERCOM button.
Press the 7 button.
For Answer and record:
Press the 3 button.
Or
For Answer only:
Press the 3 button twice quickly.
Your outgoing message will be played.
Press the RED PHONE button to
return to idle.
Intercom
7
P
Q
R
S
3
D
E
F
3
D
E
F
3
D
E
F
To switch on answer and record mode
press the ANSWER button repeatedly
until it is illuminated green. Note that
you must have recorded an answer
and record outgoing message.
To switch on answer only mode press
the ANSWER button repeatedly until
it flashes green. Note that you must
have recorded an answer only
outgoing message.
To switch off the answering machine
press the ANSWER button repeatedly
until it is no longer illuminated green.
A
n
s
w
e
r
A
n
s
w
e
r
A
n
s
w
e
r
Press the INTERCOM button.
Press the 7 button, then the 1 button,
followed by the 3 button.
All outgoing messages will be
deleted and the answering machine
will switch off.
Press the RED PHONE button to
return to idle.
Intercom
7
P
Q
R
S
1
3
D
E
F
For Answer only:
Press the 7 button, then the 8 button,
then the 3 button twice quickly.
You will hear a beep in the earpiece.
Speak your outgoing message.
Press the 3 button to stop recording.
Your outgoing message will be
automatically played back through the
handset earpiece.
You can stop the outgoing message
playback by pressing the RED PHONE
button.
Once an outgoing message has been
recorded the answering machine
automatically switches on.
Press the RED PHONE button to
return to idle.
3
D
E
F
7
P
Q
R
S
3
D
E
F
3
D
E
F
8
T
U
V
To listen to your outgoing message
To delete all outgoing messages
To switch the answering machine
on and off at the base
Page 33

To switch Answer and record mode on:
Press the INTERCOM button.
Press the 7 button twice.
When the answering machine is
switched on the ANSWER button on
the base is illuminated green.
To switch Answer only mode on:
Press the INTERCOM button.
Press the 7 button twice quickly then
the 3 button twice.
When the answering machine is
switched on the ANSWER button on
the base flashes green.
To switch the answering machine off:
Press the INTERCOM button.
Press the 7 button followed by the 9
button.
When the answering machine is
switched off the ANSWER button is
no longer illuminated.
Press the RED PHONE button to
return to idle.
33
Press the INTERCOM button.
Press the OK button.
Press the 4 button twice.
Use the UP or DOWN button to scroll
to the required number of rings,
between 2 and 5. If 1 (Time Saver)
setting is chosen there will be 4 rings
if you have no new messages and 2
rings if there are messages.
Press OK to confirm.
Press the C button twice to return
to idle.
To adjust the number of rings
before the answering machine
switches on
Intercom
4
G
H
I
4
G
H
I
COK
COK
COK
COK
▲
▼
It is possible to adjust the time
available for a caller to leave a message.
The options are 30 seconds, 2 minutes,
4 minutes and unlimited message
length. The answer machine has a
total recording time of up 15 minutes.
Press the INTERCOM button.
Press the OK button.
Press the 4 button followed by the
3 button.
Use the UP or DOWN button to scroll
to the required message length:
1
= 30 seconds, 2= 2 minutes,
3
= 4 minutes, 4= unlimited length.
Intercom
4
G
H
I
3
D
E
F
COK
▲
▼
To adjust the time allowed for
incoming messages
To switch the answering machine
on and off at the handset
Intercom
Q
P
R
S
7
Q
P
R
S
7
Intercom
Q
P
R
S
7
Q
P
R
S
7
D
E
F
3
D
E
F
3
Intercom
Q
P
R
S
7
X
W
Y
Z
9
Page 34

34
At the handset:
Press the INTERCOM button.
Press the 7 button, then the 1 button,
followed by the 5 button.
Press the RED PHONE button to
return to idle.
At the base:
Press and hold the DELETE button
until a long beep is heard.
Intercom
7
P
Q
R
S
1
5
J
K
L
D
e
l
e
t
e
Playing your messages
If you have new messages the button, on
the base, will flash red and an envelope icon
will appear on the display of the handset.
If there is one new message the button will
flash once.
If there are 2 new messages the button will
flash twice rapidly.
If there are 3 new messages the button will
flash three times rapidly.
If there are 4 new messages the button will
flash four times very rapidly.
If there are 5 or more new messages the
button will flash five times rapidly.
If you have old messages the button, on the
base, will be lit solid red and an opened
envelope icon appears on the display of the
handset.
P
l
a
y
P
l
a
y
P
l
a
y
P
l
a
y
P
l
a
y
P
l
a
y
P
l
a
y
Press the INTERCOM button.
Press the 7 button.
Any new messages will be
automatically played through the
handset earpiece.
To skip forward press the 6 button.
To play old messages, press the
5 button.
Intercom
7
P
Q
R
S
If you have new messages, i.e. the
PLAY button is flashing, these will be
played first.
Press the PLAY button.
To play old messages press the PLAY
button again.
P
l
a
y
P
l
a
y
Incoming message indicator:
Press OK to confirm.
Press the C button twice to return
to idle.
COK
COK
COK
6
M
N
O
5
J
K
L
Note
New messages must be played before you
can delete all messages.
To play your messages at the
handset
To play your messages from the
base speaker
To delete all messages
Page 35

When the answering machine is switched on
the VIP feature allows you to only be disturbed
by privileged callers who you have given the
VIP access code to.
When the VIP feature is switched on, your
handset will not ring when a call is received.
In order to call you, your caller must follow
these steps:
1 Dial your telephone number.
2 Listen to your outgoing message.
3 Press the ✱button.
4 Enter the VIP access code.
Your telephone will now ring.
VIP
35
Answering machine operation
during message playback
6
M
N
O
4
G
H
I
5
J
K
L
1
From base From handset
S
k
i
p
䊳
D
e
l
e
t
e
P
l
a
y
䊴
S
k
i
p
Note
When you playback a message, the handset
displays the time and date it was left.
Skip to next
message
Go back to
previous message
Pause/ Resume
playback
Delete current
message
Exit message
playback
It is possible to record a message
directly on to the answering machine
yourself, which can be played back in
the same way as other messages by
other members of the household.
Press the INTERCOM button.
Press the 7 button, then the 8 button.
Press the 5 button, you will hear a
beep in the earpiece. Speak your
memo.
Press the 5 button to stop recording.
Press the RED PHONE button to
return to idle.
Intercom
7
P
Q
R
S
8
T
U
V
5
J
K
L
5
J
K
L
Important
You must change your VIP code from the
original setting of
0000
for your VIP feature
to function.
Press the INTERCOM button.
Press the OK button.
Press the 4 button, followed by the
6 button.
Enter your old four digit access code
(default code:
0000
).
Enter your new four digit access code.
Re-enter your new four digit access
code.
Press the C button twice to return
to idle.
Intercom
4
G
H
I
6
M
N
O
COK
COK
COK
OLD
CODE
NEW
CODE
CONFIRM
CODE
To record a memo
To change your VIP access code
Page 36

Press the INTERCOM button.
Press the OK button.
Press the 4 button, followed by the
7 button.
Use the UP or DOWN button to scroll
to either
0
to switch VIP off or 1to
switch VIP on.
Press OK to confirm.
Press the C button twice to return
to idle.
Intercom
4
G
H
I
7
P
Q
R
S
COK
COK
COK
COK
▲
▼
36
Press the INTERCOM button.
Press the OK button.
Press the 4 button, followed by the 5
button.
Use the UP or DOWN button to scroll
to either
0
to switch call screening off
or 1to switch call screening on.
Press OK to confirm.
Press the C button to return to idle.
You can decide whether to listen to incoming
messages over the loudspeaker and answer
them or let your answering machine take the
message.
Alternatively you can choose not to hear the
callers messages.
You can intercept the call at any time and
speak to the caller by pressing the GREEN
PHONE button.
Call screening is off by default.
Call screening
Intercom
COK
COK
COK
4
G
H
I
▲
▼
5
J
K
L
To switch VIP on and off
To switch call screening
on and off
Page 37

37
Remote access
Operating the answering
machine from an external
telephone
You can operate your answering machine from
any external TouchtoneTMphone by phoning
your BT On-Air 1800 and entering your
Remote access code.
Having a personal remote access code prevents
other people from accessing your answering
machine functions without your permission.
Press the INTERCOM button.
Press the OK button.
Press the 4 button followed by the
1 button.
Enter your old four digit code
(default code =
0000
).
Enter your new four digit code.
Re-enter your new code.
Your code has now been changed.
Press the C button twice to return
to idle.
4
G
H
I
1
COK
COK
COK
Intercom
OLD
CODE
CONFIRM
CODE
Important
You must change the remote access code
from the original setting of
0000
for your
remote access to function.
If you forget to switch your answering
machine on you can do it from another
telephone.
Dial your telephone number and let
the phone ring. After approximately
10 rings your BT On-Air 1800 will
automatically answer, although you
will hear no message.
Press the
#
button.
Enter your remote access code.
Wait for the confirmation tone and
then press the 7 button.
Your answering machine will now be
switched on.
7
P
Q
R
S
To change the remote access code
To switch on your answering machine
from another external telephone
NEW
CODE
CODE
Dial your telephone number.
Start listening to your outgoing
message.
Press the
#
button.
Enter your remote access code.
A confirmation beep is heard.
You now have control of your answering
machine. Any new messages will be
automatically played.
CODE
To access your answering machine
from a remote phone
Page 38

38
To erase current message.
then To erase your outgoing message.
then To erase your messages.
To listen to your outgoing message.
To listen to your previous message.
To replay your messages or pause/resume
playback.
To listen to your next message.
To switch answering machine on.
then To record a new outgoing message,
then press to save.
then To record a message, then press
to save.
To switch the answering machine off.
9
W
X
Y
Z
5
J
K
L
5
J
K
L
8
T
U
V
3
D
E
F
3
D
E
F
8
T
U
V
7
P
Q
R
S
6
M
N
O
5
J
K
L
4
G
H
I
3
D
E
F
5
J
K
L
1
3
D
E
F
1
1
Press:
How to operate the answering
machine’s functions from
another phone
Helpline
If you are experiencing difficulty, please call
the BT On-Air Helpline on 0845 300 0156.
Page 39

39
Using additional handsets
and bases
Using additional handsets
and bases
Up to six handsets can be registered and
operated from any one base. This allows you
to make internal calls between two handsets
while a third is making an external call.
Each handset can also be registered on up to
four bases.
Each additional handset you purchase must be
registered to a base.
Your handset supplied is pre-registered (as
Handset 1) to its base (as Base 1).
Note
Your BT On-Air 1800 base and handset is
compatible with all cordless telephone products
in the BT On-Air range:
BT On-Air 1100 Classic
BT On-Air 1100 Executive
BT On-Air 1250 Classic
BT On-Air 1300 Executive
BT On-Air 1000 Classic handset and charger
BT On-Air 1000 Executive handset and charger
BT On-Air 1000 Executive Plus handset
and charger
BT On-Air DECT f@x plus
IMPORTANT: None of these products are
compatible with the BT On-Air USB unit.
Note
A BT On-Air USB unit counts as one
handset. You can have up to six handsets or
USB units registered to a base.
BT
On-Air USB
Helpline
If you are experiencing difficulty, please call
the BT On-Air Helpline on 0845 300 0156.
COK
D
A
B
E
C
F
2
3
1
M
G
J
K
H
N
L
I
O
6
5
4
Q
T
W
P
X
U
R
Y
V
S
Z
8
9
7
COK
D
A
B
E
C
F
2
3
1
M
G
J
K
H
N
L
I
O
6
5
4
Q
T
W
P
X
U
R
Y
V
S
Z
8
9
7
0
COK
D
A
B
E
C
F
2
3
1
M
G
J
K
H
N
L
I
O
6
5
4
Q
T
W
P
X
U
R
Y
V
S
Z
8
9
7
0
0
BT On-Air 1100
COK
D
A
B
E
C
F
2
3
1
M
G
J
K
H
N
L
I
O
6
5
4
Q
T
W
P
X
U
R
Y
V
S
Z
8
9
7
0
COK
D
A
B
E
C
F
2
3
1
M
G
J
K
H
N
L
I
O
6
5
4
Q
T
W
P
X
U
R
Y
V
S
Z
8
9
7
0
Page 40

If you have changed the base's system
code from the default
0000
or if your
handset is registered to a base and you
also want to register it to another base,
you must use Custom Registration.
At the base:
Press and hold down the
Skip button
until the PLAY button starts to flash.
On the handset:
Press the OK button.
Press the 9 button.
Use the UP or DOWN button to select
the base number (this number is
shown as the RFPI on the underside of
the base).
Press the OK button.
Enter the System Code.
Wait until the available handset
numbers appear. ie.
456
. Then press
the handset number you want.
40
If you purchase new handsets to use with your
current BT On-Air 1800, they will not be
pre-registered to a base station. You will need
to do this before you can use them.
Registering additional
handsets
This automatically registers the new
base as Base 1 and will replace any
existing Base 1 registration.
If you have already changed the base’s
System Code from the default 0000,
you will need to follow the instructions
below for Custom Registration.
At the base:-
Press and hold down the
Skip button
until the PLAY button starts to flash.
On the handset:-
Press the OK button.
Press the 6 button.
The handset will now automatically
register with the handset number.
COK
6
M
N
O
䊴
S
k
i
p
Note
The instructions for registration and
de-registration in the following pages are
for BT On-Air Classic handsets. If you have
purchased another model, refer to your
handset’s user guide.
▲
▼
䊴
S
k
i
p
COK
CODE
Custom registration
Quick registration
COK
X
W
Y
Z
9
Page 41

41
Press the INTERCOM button.
Press the OK button.
F1
will appear on
the display.
Press the 3 button then the 3 button
again
–– –– –– ––
will appear on the display.
Enter the System Code. All registered
handset numbers are displayed.
Enter the number of the handset to be
de-registered.
INIT=F6
will appear on
the de-registered handset.
Press the C button twice to exit.
CODE
COK
3
D
E
F
3
D
E
F
COK
Intercom
Note
When planning to use a handset with more
than one base, we recommend that you:
• Give a number to each base (from 1-4).
• Number each handset (from 1- 6).
• Register your handset(s) at base 2
(and 3 & 4 if used) using the same internal
number as at base 1.
Note
Your BT On-Air USB unit will appear
as a registered handset but should not be
de-registered following the instructions
above. See page 43 for instructions on
de-registering a BT On-Air USB unit.
Helpline
If you are experiencing difficulty, please call
the BT On-Air Helpline on 0845 300 0156.
To de-register a handset from
the base
Page 42

42
Enter a name for the base to be
displayed on your computer.
Enter the system code for the base.
(Default setting =
0000
)
At the base:
Press and hold the Skip button
until the Play button starts to flash.
At your computer:
Click OK to confirm.
Display shows the Searching message
box.
After a short while the display shows
a confirmation message box and the
BT On-Air USB unit is registered.
This can take up to 2 minutes.
Display then shows:
Click OK to return to main Monitor
screen.
If you want to use your BT On-Air
USB unit with another base, you will
first need to register it on that base.
At your computer:
Click the BT On-Air icon in the
system tray to open the Monitor.
Click Register.
Using a BT On-Air USB unit
with more than one base
Your BT On-Air USB unit can be registered on
up to four bases. With a laptop computer this
allows you to connect to the Internet without
wires at up to four geographically separate
locations.
Your BT On-Air USB unit supplied is
pre-registered (as Nb 6) to its base (as Base 1).
➜
➜
➜
➜
➜
➜
䊴
S
k
i
p
Important
The BT On-Air USB unit can only be
registered to a BT On-Air 1800 base. Other
base stations in the BT On-Air range are
not compatible with the USB unit.
1
1
2
3
1
To register a BT On-Air USB unit
to a base
Page 43

Click De-register.
Enter the system code for the base
(default =
0000
).
Click OK.
Once de-registered, the screen
displays the BT On-Air Monitor
window. The base is removed from
the list.
You must now register to a new base
to connect to the Internet via your
BT On-Air.
Click Close to close the Monitor
screen.
If you see a message saying
de-registration was unsuccessful,
see Help “General check”, page 46.
You can deregister your USB unit
from the base.
Click the BT On-Air icon in the
system tray to open the Monitor.
43
Note
Registration information is stored in the
BT On-Air USB unit. If you install it on
another computer, this computer will be able
to access all the BT On-Air 1800 bases to
which your BT On-Air USB unit is registered.
Note
If you have registered your BT On-Air USB
unit with more than one base, and move
from one to another while not connected
to the Internet, the modem will log on the
base automatically.
If you move out of range of a base while still
connected to the Internet, the connection will
be broken.
Note
A warning message will appear if registration
failed. Check that:
– the base is switched on and set-up correctly
– the BT On-Air USB unit is plugged into a
USB port on your computer.
– the correct system code is entered.
– the USB unit is not already registered.
Your computer may be too close to the base.
See Help, page 46.
➜
➜
➜
➜
1
1
2
To deregister a BT On-Air USB unit
Page 44

A BT On-Air USB unit can be
registered on up to 4 bases.
If a BT On-Air USB unit is registered
to more than one base station, you
can select which base your unit will
use if more than one bases are in
range (overlapping coverage).
When more than one bases are
registered, a new Preferred Base
button appears on the BT On-Air
Monitor window:
Click Preferred Base to change the
preferred base station.
Select your preferred base or select
No preferred Base if none of the base
have overlapping coverage or if you
do not want to set a preferred base.
Click OK to confirm and come back to
the On-Air Monitor window.
The status column of the BT On-Air
Monitor now shows if you have
selected a preferred base
44
➜
➜
➜
Note
If you have selected No preferred Base, your
BT On-Air USB unit connects to the first
base it detects. This is the default option.
If you have a Preferred Base selected, your
BT On-Air USB unit will not be able to
log-on to another base. You will have to
select another Preferred Base or select the
No preferred Base option to log-on to
another base.
1
1
2
To change the preferred base
station
Page 45

45
Help
BT On-Air USB unit
installation
The installation does not start
Check the light on the BT On-Air USB unit
If the light is continuously off:
– check that the BT On-Air USB unit is
correctly plugged into the USB port of your
computer or into a mains powered USB Hub
(the BT On-Air USB unit does not operate
on a bus powered hub).
If the light is on or blinking:
– check that the operating system of your
computer is Windows 98, Windows Me or
Windows 2000.
– unplug the BT On-Air USB unit, start
cleanup.exe
on the CD-ROM. A dialog box
will appear with a short message. Click OK.
Then plug the BT On-Air USB unit back into
the USB port and follow the instructions.
– see also help under “USB unit is not
detected by my computer when it is
plugged in”.
USB unit is not detected by my computer
when it is plugged in
Make sure the ‘Universal Serial Bus controller’
is installed in your Windows system. This can
be checked by opening the Control Panel.
To check, open the Control Panel
(Start – Settings – Control Panel).
Double-Click on the System icon.
Click on Hardware tab.
Click on Device Manager button and
scroll down list.
The
Universal Serial Bus controller
should be shown in the device list.
If this is not available refer to your
Windows manual in order to install
new components.
See also help under “The installation
does not start”.
Installation is accidentally interrupted
or fails after several attempts
This might result in your computer not being
able to detect the BT On-Air USB unit or not
being able to install the software.
Start the
cleanup
application found on your BT
On-Air CD-ROM. This will cleanup your
system of all the BT On-Air files that might be
corrupted.
Now proceed with installation as detailed in
the Set-up section of the user guide.
The installation was successful, but the
BT On-Air Monitor application informs
that the base cannot be found?
If the light on the USB unit is blinking:
– is the base connected to the mains?
– is the module close enough to the base?
– is the module registered on the base?
➜
➜
➜
Page 46

46
Connecting to the Internet
What to do first if installation was
successful but you cannot connect to
the Internet
Check that your BT On-Air 1800 base station
is correctly set-up by pressing the Green
Button on the handset to listen to the line. You
should hear a dial tone. If not, check that the
line cord is plugged in your telephone socket
and in the correct socket on the base.
Check the light on your BT On-Air USB unit:
– If it is continuously ON (not blinking); this
means you are in range of the base. Follow
help under “General check”.
– If it is blinking; you are most likely out of
range of the base. Follow help under “How
do I check that the module is close enough
to the base”.
Check that your dial-up networking connection
has been set to use the BT On-Air Wireless
Modem.
General check
If you are experiencing problems using the
modem after it has been successfully installed
open the BT On-Air Monitor by clicking on the
BT On-Air icon in the system tray (usually
situated at the bottom right hand of your
computer). Check that the signal with the base
is of good quality. Now click About BT On-Air.
If the software versions are correctly shown
for components, the problem is likely to be
with Windows dial-up networking rather than
BT On-Air.
How do I check that the module is close
enough to the base
In ideal conditions, your BT On-Air USB
module will have the same range as the BT
On-Air handset (50m indoor, 300m outdoor).
Where you can hear a dial tone on your
handset and speech quality is good, you
should be able to connect to the Internet.
The quality of the radio link between the base
and the USB unit can be checked on the BT
On-Air monitor screen (double click BT On-Air
icon in the Windows system tray). Check that
you can see a green bar in the signal strength
indicator. The green bar should always be
continuously visible and should not
temporarily disappear. You should be able to
use the wireless modem even if the green bar
is small (poor signal). However a poor signal
indicates you are at the limit of the acceptable
range and you might lose connection if you
move your computer.
If you cannot see a green bar or if you are
experiencing connection problems and the
signal is poor, move your computer and the BT
On-Air USB Unit closer to the base station.
The light on the USB unit does not come on
Check you are within range of the base.
Try moving your computer nearer.
Check that the USB unit is correctly plugged
into your computer or into a mains powered
USB hub.
If plugged into a desktop, try moving the USB
unit away from the computer.
Dialling my ISP seems to take longer than
my old corded modem
This is the normal behaviour. Before dialling,
the data module has to establish the radio
communication. This takes a few seconds.
The BT On-Air icon in the Windows system
tray bar has disappeared although the
software was not uninstalled
This can happen if you cancel un-installation
or if you close down the BT On-Air application
other than by clicking the “Close” button.
To restore the icon, go to the Windows Start
Menu, select “Programs”, then “BT On-Air
Modem”, and finally “BT On-Air Modem”
Page 47

47
Handset
Handset does not charge
– Check that the base station is connected to
the mains power.
– Check that the battery in the handset is
correctly installed (see How to install
a new battery).
How to install a new battery
Slide the handset battery cover on the handset
and check the two-wire cable is plugged in its
connector.
Remote access or VIP features do not work
Remote access and VIP features require their
respective access code to be changed from
their default setting. Refer to the main part of
the user guide for instructions.
Help web site
For the latest information on BT On-Air
1800 including frequently asked questions
and software downloads, have a look at
the BT On-Air web site: www.bt.com/on-air
Page 48

48
General information
Guarantee
Your BT On-Air 1800 is guaranteed for a
period of 12 months from the date of purchase.
Subject to the terms listed below the
guarantee will provide for the repair of, or at
BT’s or its agent’s discretion the option to
replace the BT On-Air 1800, or any component
thereof, (other than batteries), which is
identified as faulty or below standard, or as a
result of inferior workmanship or materials.
Products over 28 days old from the date of
purchase may be replaced with a refurbished
product.
The conditions of this guarantee are:
• The guarantee shall only apply to defects
that occur within the 12 month guarantee
period.
• Proof of purchase is provided.
• The equipment is returned to BT or its agent
as instructed.
• This guarantee does not cover any faults
or defects caused by accidents, misuse, fair
wear and tear, neglect, tampering with the
equipment, or any attempt at adjustment or
repair other than through approved agents.
• This guarantee does not affect your
statutory rights.
Within the 12-month guarantee period:
If you experience a problem with your product
you should contact the Helpline on 0845
300 0156. Calls are charged at local call rates.
If the problem is not remedied, you will be
advised to return your product to the Helpline.
Outside the 12-month guarantee period:
If your product needs repair after the
guarantee period has ended, the repair must
meet the approval requirements for connection
to the telephone network. We recommend that
you call the Helpline on 0845 300 0156 and ask
for details of our recommended repair agents.
If you have to return your product
If the Helpline are unable to remedy your
problem they will ask you to return the
product. Pack the base station and handset
securely, preferably in the original packaging.
All parts must be returned, including line
cords, power supplies and original batteries.
(Please note that we can not take responsibility
for goods damaged in transit). Use the self
adhesive Freepost label to post your product.
If you have lost the label please call the
Helpline for instructions.
Technical information
How many handsets can you have?
All items of telephone equipment have a
Ringer Equivalence Number (REN) which is
used to calculate the number of items that may
be connected to any one telephone line.
The BT On-Air 1800 (with up to 6 handsets)
has a total REN of 1. Any other instrument or
USB unit provided by BT may be assumed to
have a REN of 1 unless stated otherwise.
Important
Keep proof of posting.
Make sure the Post Office give you proof
of posting.
Page 49

49
Helpline
If you are experiencing difficulty, please call
the BT On-Air Helpline on 0845 300 0156.
A total REN of 4 is allowed per telephone line.
(For example: if the BT On-Air Classic is used
in conjunction with three extension
telephones, each with a REN of 1, then the
total REN = 4)
Only use approved power supply item code:
872101.
Only use approved batteries supply item code:
872102.
RTTE
This apparatus was designed in compliance
with European Council decision Number
98/482/EC relative to pan-European
connection in view to its connection on the
Public Switched Telephone Network (PSTN).
It is in conformity with Standards TBR21,
TBR38(*)ETSI 201 121.
(*) Terminals integrating an analogue handset function.
If problems arise, your supplier should be
contacted first.
The EC marking attests product conformity
with the essential requirements in compliance
with Directives 73/23/EC for User Safety,
89/336/EC for Electromagnetic perturbations
and 98/13/EC for Telecommunication
network access.
The manufacturer declares that the products
have been manufactured in conformity with
Annex III of RTTE Directive 99/05/EC.
Generally this telephone may be connected
to switchboards which support tone signalling
and timed break recall. In the event of any
difficulties please consult your switchboard
service provider.
When you connect your telephone to a
switchboard, you can set the switchboard’s
external line access code so that when you make
an external call using the handset directory,
redial list or preparatory dialling the code is
automatically dialled before the number.
Switchboard external line
access code
Switchboard compatibility
Recall
This is of use when connecting to
switchboards or using BT Select
Services. It is only available when a
call is in progress.
When you need to use recall during
a call:
Press the Recall button on your
handset
_
_
_
appears on the display.
Note
Please note this product does not support
earth recall.
To activate recall
Recall
Page 50

50
Press the INTERCOM button.
Press the OK button.
F1
will appear on
the screen.
Press 2. Press 4. Press 2.
The number of digits is displayed.
Press the OK button.
Enter or correct the number of digits
you dial to make internal calls to
other extensions on your switchboard.
Press the C button three times to exit.
COK
COK
COK
Intercom
Note
For the external line access code to be dialled
for external calls only, it is important that
all external numbers stored in your handset
memories contain more digits than the
number of digits required to make an internal
call to other extensions on your switchboard.
This is most likely to occur when you have
local external numbers stored in the handset
memories without the area code. To overcome
potential problems ensure that all numbers
are stored complete with area code.
Press the INTERCOM button.
Press the OK button.
F1
will appear on
the display.
Press 2. Press 4. Press 3.
Use the UP or DOWN button to select
0 to de-activate, or 1 to activate.
Press OK to confirm.
Press the C button three times to exit.
COK
COK
COK
Intercom
▲
▼
2
A
B
C
4
G
H
I
2
A
B
C
2
A
B
C
4
G
H
I
3
D
E
F
Press the INTERCOM button.
Press the OK button.
F1
will appear on
the screen.
Press 2. Press 4. Press 1.
The access code is displayed
(
–– –– –– –– ––
if no access code set).
Press the OK button.
Enter or correct the switchboard
external line access code, e.g. 9. You
can enter codes up to 8 digits in length.
Press OK to store.
Press the C button three times to exit.
Now you must set the number of digits required
to make internal calls to other extensions on
your switchboard.
COK
COK
COK
COK
2
A
B
C
4
G
H
I
1
Intercom
Important
The external line access code is not used for
Internet calls. Instead, you should include it
to the telephone number when setting up
your Internet connection on your computer.
To set the external line access code
To set the number of digits
To activate and de-activate the
external line access code
Page 51
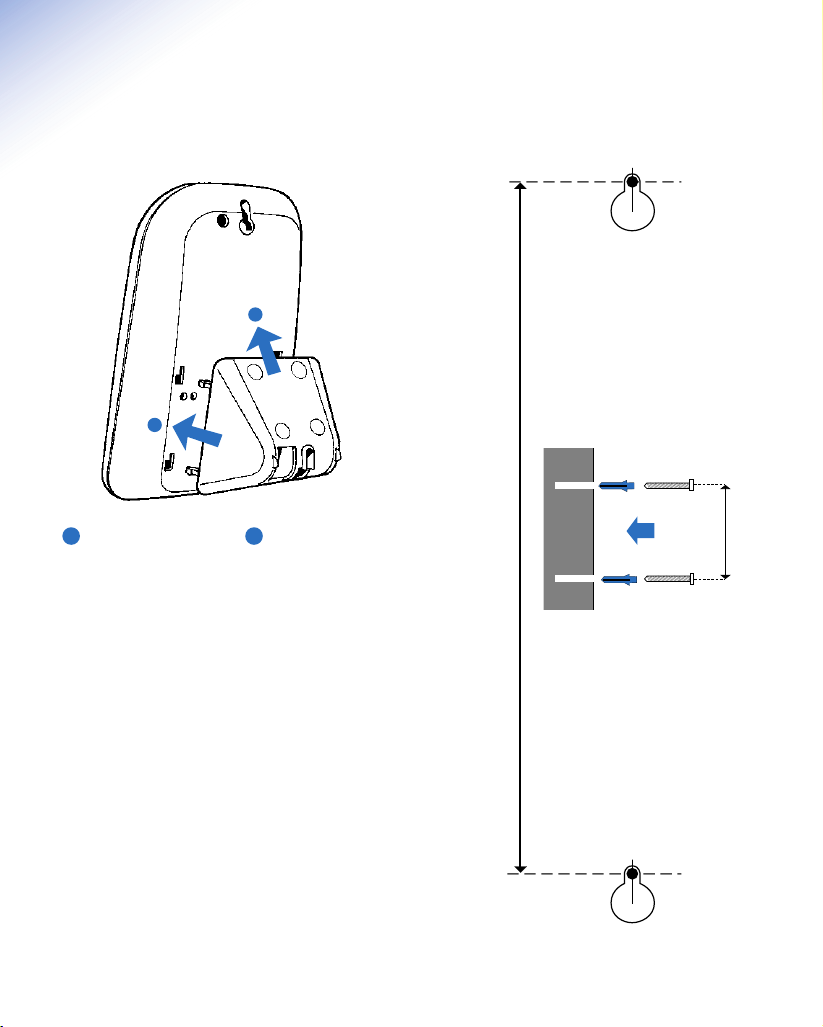
51
Wall mounting
2
Once slotted into the rear
of the base, slide upwards
to lock into position.
1
Push the base-mount
forward onto the rear
of the base.
If wall mounting your BT On-Air 1800 Wireless
Modem, use this guide for position.
• Make sure that you are not drilling into any
hidden wiring and check that the power cable
will reach from the mains socket to the
charger. Switch the power adaptor off at the
mains and remove the adaptor plug from its
socket.
• Drill two holes 25mm deep using a 3mm drill,
122mm apart to take the wall plugs.
• Put wall plugs into the drill holes and then
insert both screws. Leave 2-3mm between
the head of the screw and the wall. You are
now able to mount the base to the wall.
• Fit the base onto the two screws. If necessary,
tighten or loosen the screws for the best fit.
• Put the handset back in the base and switch
the power back on at the wall socket.
2
1
WALL PLUG
SCREW
122 mm
WALL
122mm
Page 52

52
Software Licence Agreement
THIS LEGAL DOCUMENT IS AN AGREEMENT BETWEEN YOU,
THE END-USER, AND BRITISH TELECOMMUNICATIONS PLC
(BT). BEFORE OPENING THE SEALED ENVELOPE, YOU
SHOULD READ THE TERMS PRINTED BELOW. BY OPENING
THIS ENVELOPE YOU ARE BOUND BY THE TERMS OF THIS
AGREEMENT. IF YOU DO NOT AGREE TO THESE TERMS, YOU
SHOULD RETURN THE CD TOGETHER WITH ANY ITEMS THAT
ARE PART OF THE PRODUCT, SUCH AS MANUALS AND
HARDWARE, TO THE PLACE FROM WHICH YOU OBTAINED
THEM, FOR A FULL REFUND.
This End-User Licence Agreement comes with a BT software
product (Program(s)) and related written materials
(Documentation). The term Program(s) also includes any upgrades,
modified versions or updates of the Program(s) licensed to you
by BT.
BT non-exclusively licenses this copy of the Program(s) to you
as the End-User for as long as you comply with the terms of this
licence. You must read this Agreement carefully.
1. The Program(s) and all copyright in them and the copyright in
the Documentation are protected by United Kingdom copyright
law and international copyright treaty provisions. This Licence is
not a sale of the Program(s) recorded on the CD or any copyright
in them.
2. You may:
• use the Program(s) on a single machine (this licence covers all
users on that machine); or
• remove the Program(s) from one machine and load them onto
another; and
• make copies of the Program(s) for the sole purpose of
backing-up.
3. You must not:
• electronically transfer the Program(s) to another machine over
a network;
• rent, lease or sub-license the Program(s);
• translate, modify, adapt or create derivative works from the
Program(s); or
• reverse engineer, decompile, disassemble, or attempt to do
so except as expressly permitted by and subject to all the
conditions laid down by law.
4. You may physically transfer the Program(s) to another person
provided the other person accepts the terms of this Agreement.
If you transfer the Program(s) you must at the same time either:
• transfer all copies of the Program(s) and Documentation to the
same person; or
• destroy any copies not transferred, including any updates and
previous versions.
5. The Program(s), their code, their structure and all ideas and
principles underlying them are, except where they are in the
public domain, the confidential information of BT or its licensors,
and you must not disclose them or use them without permission.
6 DISCLAIMER AND LIMITED WARRANTY EXCEPT AS
EXPRESSLY SET OUT IN THIS AGREEMENT, THE PROGRAM(S)
AND DOCUMENTATION ARE SUPPLIED TO YOU WITHOUT
WARRANTY OF ANY KIND. BT AND ITS SUPPLIERS DO NOT
WARRANT, GUARANTEE OR MAKE ANY REPRESENTATIONS
REGARDING THE USE, OR THE RESULTS OF USE, OF THE
PROGRAM(S) OR DOCUMENTATION. BT AND ITS SUPPLIERS
MAKE NO WARRANTIES, EXPRESS OR IMPLIED, AS TO THE
SUITABILITY OR FITNESS FOR ANY PARTICULAR PURPOSE OF
THE PROGRAM(S). IN NO EVENT WILL BT OR ITS SUPPLIERS
BE LIABLE TO YOU FOR ANY CONSEQUENTIAL OR INCIDENTAL
DAMAGES INCLUDING ANY LOST PROFITS OR LOST SAVINGS,
EVEN IF A BT REPRESENTATIVE HAS BEEN INFORMED OF
THE POSSIBILITY OF SUCH DAMAGES, OR FOR ANY CLAIM BY
ANY THIRD PARTY.
7. BT warrants to its original Licensee that the CD on which the
Program(s) are recorded are free from defects in materials and
workmanship under normal use and service for a period of 90
days from the date of delivery as evidenced by the receipt. BT’s
entire liability and your only remedy under this warranty is, at
BT’s option, either: return of the purchase price; or replacement
of the CD which is returned to BT postage paid with a copy of
the receipt. This limited warranty does not apply to CDs, which
fail as a result of accident, misapplication or abuse not the fault
of BT. If BT replaces CDs, BT will warrant them for the rest of
the original warranty period or 30 days, whichever is the longer.
Your statutory rights remain unaffected by this clause.
8. BT has no obligation to support or maintain the Program(s).
9. BT does not exclude or limit its liability for death or personal
injury caused by its own negligence.
10. This licence shall be construed and governed by English
law. If any part of this Agreement is found void or unenforceable,
the balance of the Agreement remains valid and enforceable
according to its terms.
11. This Agreement automatically terminates if you fail to comply
with its terms. On termination you must destroy or irrevocably
delete all copies of the Program(s) including modified copies.
12. This Agreement may only be modified in writing signed by
a duly authorised representative of BT.
13. BT reserves the right to modify the characteristics of the
Software without prior notice. If the product evolves, your license
does not give you the right to free upgrades.
Page 53

53
Index
Additional handsets units and bases 39
custom registration 40
de-register from base 41
quick registration 40
registering handsets 40
Additional USB units and bases 42
change preferred base 44
de-register 43
register 42
Answering machine 31
delete messages 34
delete outgoing messages 32
number of rings 33
on/off at base 32
on/off at handset 33
play messages 34
record memo 35
record outgoing message 31
remote access 37
set time and date 31
At a glance 2
Base preference 44
Base settings from computer 19
change name 20
change system code 21
uninstall 21
Base settings from handset 29
priority 29
system code 29
Battery 10
charging 10
low warning 10
performance 10
Caller Display 26
Calls
end 23
external 23
internal 25
make 23
monitor 24
number memory 24
preparatory dialling 23
receive 23
record 26
redial 24
secrecy 24
timer 23
transfer 26
Calls list 27
Call screening 36
Call timer 23
Date set 28
De-register handset 41
De-register USB unit 43
External line access code 50
For your records 8
Guarantee 48
Handset fascias 10
Handset power on/off 23
Handset settings 27
Help 45
Helpline 11
Page 54

54
Helpline website 47
Installation
checking 17
modem software 15
USB drivers for Windows 2000 14
USB drivers for Windows 98/Me 12
Internal call 25
Internet connection 17
Introduction 7
Keypad beeps and tones 27
Location of BT On-Air 9
Melody 29
Memo 35
Memory
dial from 25
edit/delete 25
store numbers 24
Minimum PC requirements 7
Monitor on/off 24
Monitor screen 18
On/off
answering machine 31
handset 23
Paging 25
Power supply 9
Preferred base 44
Quick guide to answering machine 5
Quick guide to main features 4
Recall 49
Redial 24
Register
additional handset 40
additional USB unit 42
Remote access 37
calling from another phone 37
change code 37
controls 38
switch on from another phone 37
Returning your product 48
Ringer melody 29
Ringer volume 28
Rings, adjust the number of 33
Rubber feet 9
Safety information 7
Screen icons 2
Secrecy 24
Setting up 9
Signal quality 20
Silent ring 29
Software licence agreement 52
Switchboard
access code 49
compatibility 49
System code 29
Technical information 48
Time set 28
Transfer calls 26
Uninstall from computer 21
Unpacking 8
VIP ringing 35
Volume
earpiece 23
keypad beeps and tones 27
ringer 28
Wall mounting 51
Page 55

Offices worldwide
The telecommunications services described in this publication
are subject to availability and may be modified from time to time.
Services and equipment are provided subject to British Telecommunications
plc’s respective standard conditions of contract. Nothing in this publication
forms any part of any contract.
Touchtone™ is a registered trade mark of
British Telecommunications plc in the UK.
© British Telecommunications plc 2001.
Registered Office: 81 Newgate Street, London EC1A 7AJ.
Registered in England No. 1800000.
Designed by: The Art & Design Partnership Limited.
Printed in Europe. BT On-Air 1800. Issue 1 (6/01) 4
 Loading...