

FI R ST- SP0 8 FI R ST- SP1 0 FI R ST- SP1 2 FI R ST- SP1 5 FI R ST- SP2 1 5 FI R ST- SP1 2S FI R ST- SP1 5S FI R ST- SP1 8S FI R ST- SA1 0 D SP2 FI R ST- SA1 2 D SP2 FI R ST- SA1 5 D SP2 FI R ST- SA2 1 5 D SP2 FI R ST- SA1 2S D SP2 FI R ST- SA1 5S D SP2 FI R ST- SA1 8S D SP2
Table of contents
 Loading...
BST FI R ST- SP0 8 FI R ST- SP1 0 FI R ST- SP1 2 FI R ST- SP1 5 FI R ST- SP2 1 5 FI R ST- SP1 2S FI R ST- SP1 5S FI R ST- SP1 8S FI R ST- SA1 0 D SP2 FI R ST- SA1 2 D SP2 FI R ST- SA1 5 D SP2 FI R ST- SA2 1 5 D SP2 FI R ST- SA1 2S D SP2 FI R ST- SA1 5S D SP2 FI R ST- SA1 8S D SP2 User Manual

FIRST
U s e r ’ s G u i d e
SERIES
F I R S T- S P 0 8
F I R S T- S P 1 0
F I R S T- S P 1 2
F I R S T- S P 1 5
F I R S T- S P 2 1 5
F I R S T- S P 1 2 S
F I R S T- S P 1 5 S
F I R S T- S P 1 8 S
F I R S T- S A 1 0 D S P 2
F I R S T- S A 1 2 D S P 2
F I R S T- S A 1 5 D S P 2
F I R S T- S A 2 1 5 D S P 2
F I R S T- S A 1 2 S D S P 2
F I R S T- S A 1 5 S D S P 2
F I R S T- S A 1 8 S D S P 2

Copyright LOTRONIC 2018
F I R S T- S e r i e s
E N G L I S H
www.bst-dj.com
Thank you for having chosen our speaker system. For your own safety, please read this user manual
carefully before installing the device.
SAFETY INTRODUCTION
•
If the device has been exposed to temperature changes due to environmental changes, do not switch it on
immediately. The arising condensation could damage the device. Leave the device switched off until it has
reached room temperature.
•
It is essential that the device is earthed. A qualified person must carry out the electric connection.
•
Make sure that the available voltage is not higher than stated at the end of this manual.
•
Make sure the power cord is never crimped or damaged. If it is damaged, ask your dealer or authorized agent
to replace the power cord.
•
Always disconnect from the mains, when the device is not in use or before cleaning it. Only handle the power
cord by plug. Never pull out the plug by tugging the power cord.
•
DISCONNECT DEVICE: Where the MAINS plug or an appliance coupler is used as the disconnect
device, the disconnect device shall remain readily operable.
CAUTION:
1.
Please be aware that damages caused by manual modifications to the device are not subject to
warranty. Keep away from children and non-professionals.
2.
The light doesn’t include any spare parts for repair, please check if all the parts are well installed and screws
are fitted tightly before operating. Do not use the light when the cover is open.
GENERAL GUIDELINES
•
This device is only allowed to be operated with an alternating current of max. 220-240VAC/50Hz and was
designed for indoor use only.
•
Operate the device only after having familiarized yourself with its functions. Do not permit operation by person
not qualified for operating the device. Most damages are the result of unprofessional operation.
•
Please use the original packaging if the device is to be transported.
•
For safety reasons, please be aware that all modifications on the device are forbidden. Furthermore, any other
operation may lead to short-circuit, burns, electric shock, crash, etc. If this device will be operated in any way
different to the one described in this manual, the product may suffer damages and the guarantee becomes
void.
©
Page 1
Copyright LOTRONIC 2018
way full range
way full range
way full range
LF 8'' woofer, 2'' VC,
LF 10'' woofer, 2''
LF 12'' woofer, 2.5''
LF 15'' woofer, 3''
LF 15'' woofer, 3''
15mm Plywood
15mm Plywood
15mm Plywood
15mm Plywood
15mm Plywood
9.70kg
13.60kg
18.50kg
23.50kg
37.20kg
100dB
102dB
102dB
400 watts
500 watts
600 watts
8 ohms
8 ohms
8 ohms
15mm Plywood
15mm Plywood
18mm Plywood
Texture Painting
Texture Painting
Texture Painting
420x510x520mm
490x600x610mm
580x700x715mm
Net Weight
21.50kg
31.50kg
44.50kg
F I R S T- S e r i e s
www.bst-dj.com
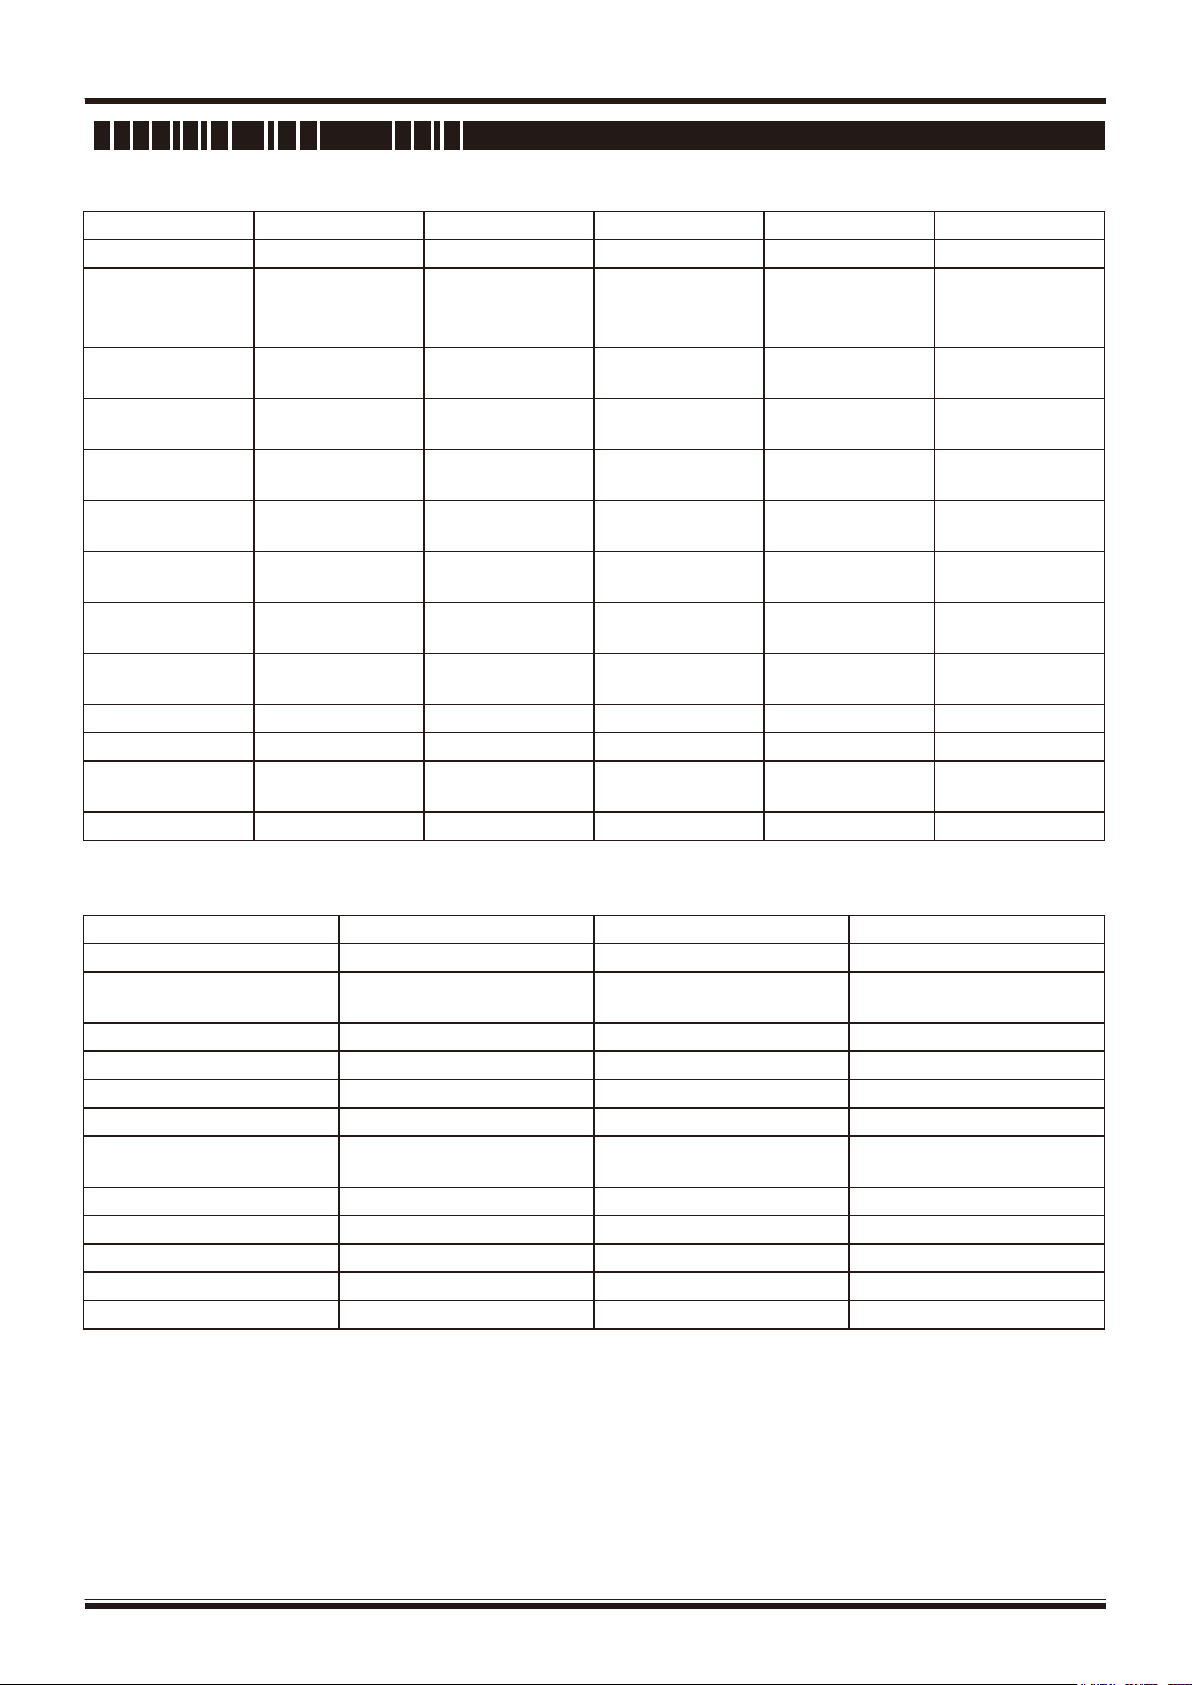
S P E C I F I C AT I O N S - PA S S I V E
ITEM NO FIRST-SP08 FIRST-SP10 FIRST-SP12 FIRST-SP15 FIRST-SP215
TYPE
Freq.Response
(-10dB)
Sensitity
(1W@1M)
Power Handling
(RMS)
Nominal
Impedence
Driver
Grille
Enclosure
Appearance Finish
Dimensions
(W x H x D)
Net Weight
8'' 2-way full range
speaker, passive
65Hz-20KHz 55Hz-20KHz 50Hz-20KHz 45Hz-20KHz 45Hz-20KHz
96dB 97dB 98dB 99dB 101dB
150 watts 200 watts 250 watts 300 watts 600 watts
8 ohms 8 ohms 8 ohms 8 ohms 4 ohms
30 OZ
HF 1'' compression
driver
Steel grille with
acoustic fabric
Texture Painting Texture Painting Texture Painting Texture Painting Texture Painting
300x330x490mm 350x380x585mm 410x430x670mm 475x500x750mm 485x530x1180mm
10'' 2speaker, passive
VC, 30 OZ
HF 1.35''
compression driver
Steel grille with
acoustic fabric
12'' 2speaker, passive
VC, 50 OZ
HF 1.35''
compression driver
Steel grille with
acoustic fabric
15'' 2speaker, passive
VC, 60 OZ
HF 1.75''
compression driver
Steel grille with
acoustic fabric
ITEM NO FIRST-SP12S FIRST-SP15S FIRST-SP18S
Dual 15'' 2-way full
range speaker,
passive
VC, 60 OZ
HF 1.75''
compression driver
Steel grille with
acoustic fabric
TYPE
Freq.Response (-10dB)
Sensitity (1W@1M)
Power Handling (RMS)
Nominal Impedence
Driver
Grille
Enclosure
Appearance Finish
Dimensions (W x H x D)
12'' Bass reflex subwoofer,
passive
40Hz-160Hz 35Hz-160Hz 30Hz-160Hz
LF 12'' subwoofer, 3'' VC, 80
OZ
Steel grille with acoustic fabric Steel grille with acoustic fabric Steel grille with acoustic fabric
15'' Bass reflex subwoofer,
passive
LF 15'' subwoofer, 4'' VC, 125
OZ
18'' Bass reflex subwoofer,
passive
LF 18'' subwoofer, 4'' VC, 125
OZ
©
Page 2
Copyright LOTRONIC 2018
97dB
98dB
99dB
101dB
200 watts
250 watts
300 watts
600 watts
4 ohms
4 ohms
4 ohms
4 ohms
30
60
60
Steel grille with acoustic
Steel grille with acoustic
Steel grille with acoustic
15mm Plywood
15mm Plywood
15mm Plywood
15mm Plywood
Texture Painting
Texture Painting
Texture Painting
Texture Painting
14.50kg
20.00kg
25.00kg
39.00kg
Two-way BI-Amp
Two-way BI-Amp
Two-way BI-Amp
/
Yes
Yes
Yes
Yes
Yes
Combo Line/Mic in, RCA
in, Bluetooth in, XLR Mix
controls, master volume
controls, master volume
On/off front LED switch
On/off front LED switch
On/off front LED switch
BT Status, Limit, Signal,
soft
soft
220-240VAC 50Hz
220-240VAC 50Hz
220-240VAC 50Hz
F I R S T- S e r i e s
www.bst-dj.com
S P E C I F I C AT I O N S - A C T I V E F U L L R A N G E
ITEM NO FIRST-SA10DSP2 FIRST-SA12DSP2 FIRST-SA15DSP2 FIRST-SA215DSP2
TYPE
Freq.Response
(-10dB)
Sensitivity (1W@1M)
Power Handling (RMS)
Nominal Impedance
Driver
Grille
Enclosure
Appearance Finish
Dimensions
(W x H x D)
Net Weight
TYPE
Amp type
Output power
DSP
DSP display screen
Modes
Bluetooth module
10'' 2-way full range
speaker, active
55Hz-20KHz 50Hz-20KHz 45Hz-20KHz 45Hz-20KHz
LF 10'' woofer, 2'' VC,
OZ
HF 1.35'' compression
driver
fabric
350x380x585mm 410x430x670mm 475x500x750mm 485x530x1180mm
Class D LF Class -D, HF Class AB
LF175W+HF75W LF300W+HF60W LF500W+HF80W
24Bit, 96kHz sampling
frequency
PA, Monitor, Sub,
Speech
12'' 2-way full range
speaker, active
LF 12'' woofer, 2.5'' VC,
50 OZ
HF 1.35'' compression
driver
Steel grille with acoustic
fabric
24Bit, 96kHz sampling frequency
Live, Music, Speech, DJ
15'' 2-way full range
speaker, active
LF 15'' woofer, 3'' VC,
OZ
HF 1.75'' compression
driver
fabric
Dual 15'' 2-way full
range speaker, active
LF 15'' woofer, 3'' VC,
OZ
HF 1.75'' compression
driver
fabric
LF Class -D, HF Class
AB
24Bit, 96kHz sampling
frequency
Live, Music, Speech, DJ
Connectors
Controls
Front LED Switch
Indicators
Protection
Cooling
Power Supply
©
2xCombo Line/Mic in,
out
Two input volume
control
Power, DSP 4 Modes
Over temp, over load,
DC protect, over
voltage, low voltage,
start
Convection Convection Convection
2xCombo Line/Mic in, Bluetooth in, XLR Mix out
Two input volume controls, master volume
control/DSP function selector
Limit, Signal, Power Limit, Signal, Power
Over temp, over load, DC protect, over voltage,
low voltage, soft start
Bluetooth in, XLR Mix
out
Two input volume
control/DSP function
selector
Over temp, over load,
DC protect, over
voltage, low voltage,
start
Page 3
Copyright LOTRONIC 2018
400 watts
500 watts
600 watts
4 ohms
4 ohms
4 ohms
Texture Painting
Texture Painting
Texture Painting
420x510x520mm
490x600x610mm
580x700x715mm
23.50kg
33.50kg
46.50kg
Yes
Yes
Yes
XLR Mix out
XLR Mix out
XLR Mix out
On/off front LED switch
On/off front LED switch
On/off front LED switch
Limit, Signal, Power
Limit, Signal, Power
Limit, Signal, Power
Convection
Convection
Convection
220-240VAC 50Hz
220-240VAC 50Hz
220-240VAC 50Hz
F I R S T- S e r i e s
www.bst-dj.com
S P E C I F I C AT I O N S - A C T I V E S U B W O O F E R
ITEM NO FIRST-SA12SDSP2 FIRST-SA15SDSP2 FIRST-SA18SDSP2
TYPE
Freq. Response (-10dB)
Sensitivity (1W@1M)
Power Handling (RMS)
Nominal Impedance
Driver
Grille
Enclosure
Appearance Finish
Dimensions (W x H x D)
Net Weight
TYPE
Amp type
Output power
DSP
DSP display screen
Modes
Bluetooth module
Connectors
12'' Bass reflex subwoofer,
active
40Hz-160Hz 35Hz-160Hz 30Hz-160Hz
100dB 102dB 102dB
LF 12'' subwoofer, 3'' VC, 80
OZ
Steel grille with acoustic fabric Steel grille with acoustic fabric Steel grille with acoustic fabric
15mm Plywood 15mm Plywood 18mm Plywood
Active Sub Amp Active Sub Amp Active Sub Amp
Class D Class D Class D
400W 500W 600W
24Bit, 96kHz sampling
frequency
Yes Yes Yes
Live, Music, DJ1, DJ2 Live, Music, DJ1, DJ2 Live, Music, DJ1, Dj2
2x Combo Line/Mic in,
15'' Bass reflex subwoofer,
active
LF 15'' subwoofer, 4'' VC, 125
OZ
24Bit, 96kHz sampling
frequency
2x Combo Line/Mic in,
18'' Bass reflex subwoofer,
active
LF 18'' subwoofer, 4'' VC, 125
OZ
24Bit, 96kHz sampling
frequency
2x Combo Line/Mic in,
Controls
Front LED Switch
Indicators
Protection
Cooling
Power Supply
Master volume control/DSP
functions selector
Over temp, over load, DC
protect, over voltage, low
voltage, soft start
Master volume control/DSP
functions selector
Over temp, over load, DC
protect, over voltage, low
voltage, soft start
Master volume control/DSP
functions selector
Over temp, over load, DC
protect, over voltage, low
voltage, soft start
©
Page 4
Copyright LOTRONIC 2018
11
F I R S T- S e r i e s
www.bst-dj.com
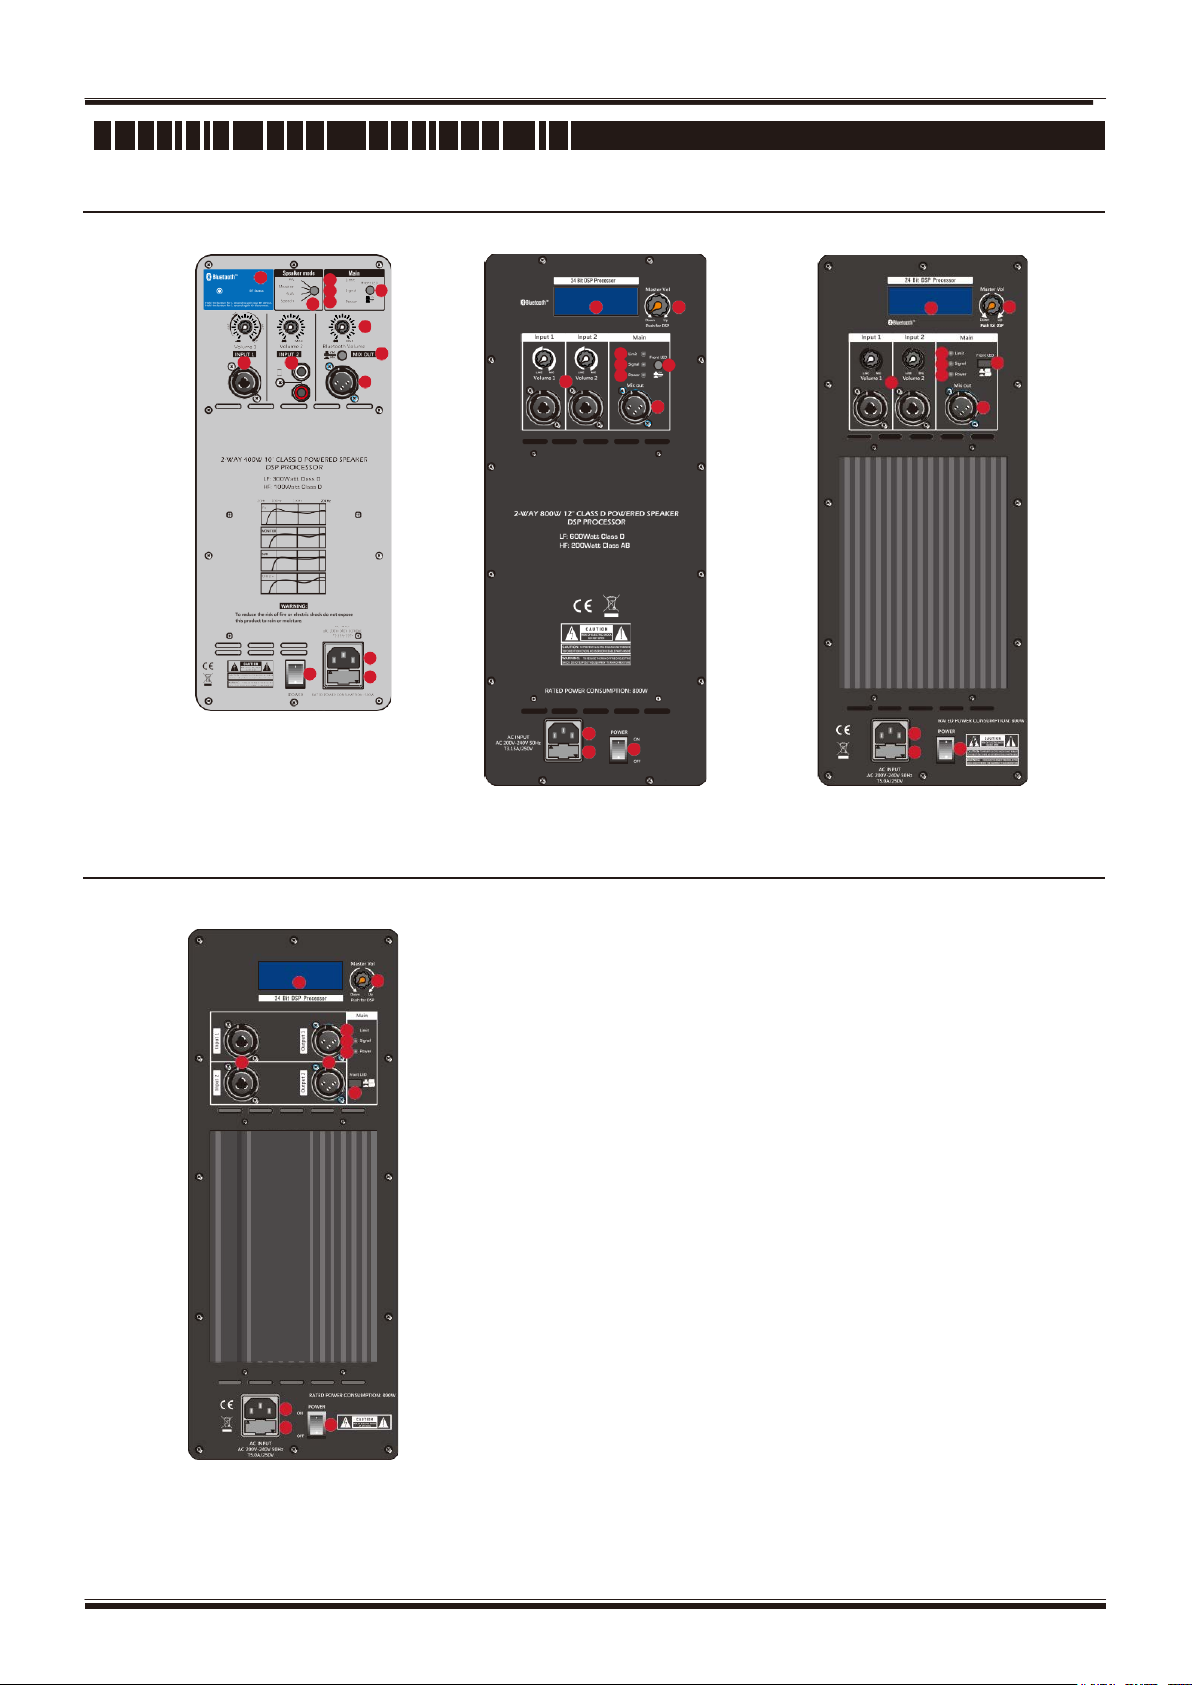
A M P L I F I E R I N P U T C O N F I G U R AT I O N
Full-Range Models
14
1 2
4
5 7
13 6
8
15
16
3
9
10
11 12
1
4
5
6
3
7
11
4
5
6
1
12
7
3
FIRST-SA10DSP2
9
10 8
9
10 8
FIRST-SA12DSP2
FIRST-SA215DSP2
FIRST-SA15DSP2
Subwoofer Models
1.
LINE / MIC IN
12
4
5
1 3
6
7
9
10 8
FIRST-SA12SDSP2
FIRST-SA15SDSP2
FIRST-SA18SDSP2
Balanced input for the connection of signal sources like mixing
consoles, in str umen ts or microphones. Connections can be
established using 1/4 inch TRS or XLR connectors.
Volume control for adjusting the individual inputs’ level. The 12 o'clock
position is unity gain (no gain or attenuation), the range to the left of
zero (0) is for adjusting line level sources, and the range to the right of
Zero (0) is for adjusting microphone levels. LINE and mic input level
controls are available for both INPUT 1 and INPUT 2.
2.
AUX/BT Input
A CD, IPhone or Bluetooth signal for AUX/BT in or Input 2 channel
input.
3.
MIX OUT
XLR output sends the mix of both input signals to another loudspeaker or
subwoofer. INPUT LEVEL controls the signal level to OUTPUT. The
MASTER VOL or DSP control setting does not affect OUTPUT.
4.
LIMIT(Automatic amplitude limiter):
Automatic amplitude “LIMIT” LED; when the audio signal reaches the
dangerous threshold for the transducers, this circuit will automatically
intervene by reducing the amount of signal in order to protect the
speaker, avoid losing roue and despicking distortion as well; the
activation of these protections is recognized via the “CUP” Leds
Lighting up.
5.
SIGNAL
LED signal to indicate the input signal to “IN XLR SOCKET”. Adjusts
the volume of the main mix.
©
Page 5

Copyright LOTRONIC 2018
F I R S T- S e r i e s
www.bst-dj.com
A M P L I F I E R I N P U T C O N F I G U R AT I O N
6.
POWER
LED signal to indicate the switching on of the system.
7.
FRONT LED
Turn on/off front logo LED.
8.
POWER SWITCH
This power switch turns on the system. Remember to adjust the volume level to the lowest setting before turn on the power
switch.
9.
AC INPUT CONNECTOR
Connect the included power cord to the AC input connector before push on the power switch.
10.
Fuse
Only replace the fuse when the device is disconnected from mains. Only use fuses of the same rating and power. The correct
fuse value is specified on the rear panel.
11.
LCD
DSP control and monitoring interface.
12.
MASTER VOLUME
Adjusts the sound level.
DSP: Scroll through the menu and select the available choices. Push the MASTER VOL knob to enter the DSP menu.
13.
SPEAKER MODE:
PA: This is the default setting for the loudspeakers. Use this setting when your loudspeaker is being used either on a speaker
stand and facing towards your audience.
DJ: Use this setting when your loudspeaker is being used for DJ only or play DJ music application and is facing towards
the audience.
Monitor: Use this setting when your loudspeaker is being used as a stage monitor facing towards you.
Speech: Use this setting when your loudspeaker is being used for Speech only or Spoken Word only applications and is facing
towards the audience.
14.
BLUETOOTH:
To pair the speaker with your Blueto ot h dev ice:
A: With the loudspeaker powered on, press the pair button for two seconds, the Bluetooth on. The paired LED will flash.
B: On your Bluetooth device's settings page, enable Bluetooth and select BST-FIRST as the device. When paired
successfully, the paired LED is light steadily.
C: Turn your Bluetooth device's volume to its lowest setting.
D: On your Bluetooth device, play music. Then we recommend setting the Bluetooth device's volume at its maximum.
E: Once your device's is paired with the speaker, the speaker will remember the device. To reconnect it, go to your device's
Bluetooth settings page and select “Connect" to re-establish the connect ion.
F: When the device's connected Bluetooth is playing, press the Pair button for fast play and pause operation, when you
press the pair button for 2 seconds, the device is disconnected, and the Bluetooth power off.
15.
BLUETOOTH VOLUME
Turn this knob to adjust the input volume of you paired Bluetooth device.
16.
MIX OU T SELECTOR
When disengaged (Ch1), the MIX OUT level will be unaffected by the INPUT VOLUME controls.
When engaged (MIX), the MIX OUT level can be adjusted by the INPUT VOLUME controls.
©
Page 6
Copyright LOTRONIC 2018
F I R S T- S e r i e s
www.bst-dj.com
D S P C O N T R O L
An integrated DSP controls menu allows the user to select multiple DSP system settings on the loudspeaker.
To access the DSP control menus, do the following;
1.
Push the Master Vol Knob, the DSP Control menu appears.
2.
Using the Master Vol Knob, scroll through the menu items.
3.
Push the Master Vol Knob to select the menu item you want to modify. The focus moves to the parameters on the
right side of the DSP menu.
4.
Using the Master Vol knob, scroll through the parameters.
5.
Push the Master Vol Knob to confirm the selected parameter.
The setting is saved. The focus returns to the menu items on the left side of the DSP menu.
6.
Repeat steps 2 through 5 to modify additional DSP and system settings.
7.
Select EXIT to return to the home screen.
©
Page 7
Copyright LOTRONIC 2018
MUSIC
SPEECH
DJ
LOACTION
TRIPOD (default)
MONITOR
SUB
OFF(default)
80Hz
100Hz
120Hz
MID
0dB (default)
-12dB–+12dB
BASS
0dB (default)
-12dB–+12dB
LCD DIM
ON (default)
OFF
BRIGHT
5 (default)
1-10 adjust
INFO
Brand Product Name
Firmware Version
EXIT
F I R S T- S e r i e s
www.bst-dj.com
D S P C O N T R O L O F F U L L R A N G E
The full-range loudspeaker DSP control menu selections are available for the 12" and 15'' loudspeakers.
Mode LIVE (default)
WALL
SUPEND
150Hz
TREBLE 0dB (default)
-12dB–+12dB
DELAY 0-116m
BTH VOL OFF (default)
Bluetooth Connected
RESET NO (default)
ARE YOU SURE?
YES OR NO
* Notice ! The display returns to the home screen after twenty second of inactivity.
Mode Menu
The Mode menu is used to configure the type of sound the loudspeaker delivers.
Available options for this selection are: LIVE, MUSIC, SPEECH and DJ.
•
LIVE - is used for live sound applications (Default).
•
MUSIC - is used for recorded music playback.
•
SPEECH - is used for spoken word applications.
•
DJ - is used for recorded electronic music playback.
LOCATION Menu
•
The Location menu is used to optimize the loudspeaker for different boundaries
•
Available options for this selection are: TRIPOD, MONITOR, WALL, and SUSPEND.
•
TRIPOD - is used when the loudspeaker is placed on a tripod stand or placed on a pole.(Default)
•
MONITOR - is used when the loudspeaker is placed on the angled monitor panel in monitor position. This setting
compensates for the amount of low frequency boost created by placing the speaker close to the floor.
©
Page 8

Copyright LOTRONIC 2018
F I R S T- S e r i e s
www.bst-dj.com
D S P C O N T R O L O F F U L L R A N G E
•
WALL - is used when the loudspeaker is mounted to the wall using the mounting bracket. This setting compensates
for the amount of low frequency boost created by placing the loudspeaker close to the wall. If used on a column, it is
recommended to use the SUSPEND mode.
•
SUSPEND - is used when the loudspeaker is suspended in a 3-point suspension by eye bolts.
SUB Menu
The Sub menu is used to select a high pass frequency for use with a subwoofer or a matched subwoofer. Available options for
this selection are: OFF, 80Hz, 100Hz, 120Hz, 150Hz, 15"/18". The high passes are 24dB / octave Linkwitz/Riley crossovers.
The 80 Hz, 100 Hz, 120 Hz, and 150 Hz choices are generic high pass settings for use with other subwoofers. The 15 Sub/18
Sub settings are specifically optimized for subwoofers by including delay for best summation. The default is OFF.
TREBLE Menu
The Treble menu is used to adjust the high frequency performance of the loudspeaker for different applications or personal
preference. The parameter controls a high shelving filter that is centered on 6 kHz. The range is-12 dB to+ 6 dB. The default is
zero (0).
MID Menu
The Mid menu is used to adjust the midrange frequency performance of the loudspeaker for different applications or
personal preference. The parameter controls a parametric EQ that is centered on 1.2 kHz. The range is -12dB to
+6dB. The default is zero (0).
BASS Menu
The Bass menu is used to adjust the low frequency performance of the loudspeaker for different applications or personal
preference. The parameter controls a parametric EQ filter that is centered on 80 Hz. The default is zero (0).
DELAY Menu The DELAY menu is used to adjust the delay time, The range is 0-30ms.
BTH VOL Menu
The Bluetooth menu on the DSP is used to match and connect to the Bluetooth on the mobile devices. Enter the menu and
adjust the Volume to the range of 0-16. At the same time start a Bluetooth search. The Bluetooth symbol is flashing on the
LCD. Then open the Bluetooth on the mobile device to match with the Bluetooth in the loudspeaker. The Bluetooth symbol
stops flashing when the Bluetooth has been paired successfully. At this time you can play music on the speaker via mobile
devices, and the range of 0-16 is to control the loudspeaker Bluetooth volume. The loudspeaker Bluetooth is closed when the
volume is adjusted to 0.
LCD DIM Menu
The LCD Dim menu is used to dim the display when the display is idle for twenty seconds. Available options for this
selection are: ON or OFF. The default is ON.
BRIGHT Menu
The Bright menu is used to determine the brightness of the LCD. The range is 1 to 10. The default is 5.
CONTRAST Menu
The Contrast menu is used to determine the contrast on the LCD. The range is 1 to 10. The default is 5.
RESET Menu
The Reset menu is used to reset the loudspeaker to original factory settings. Available options for this selection are: NO or
YES. The default selection is NO . To reset the system to original factory settings, do the following:
1.
From the DSP menu, select RESET. The
reset Confirm Reset message appears
2.
Select YES.
The loudspeaker restarts and resets the system to the original factor settings.
INFO Menu The Information menu is used to display the Brand, product name and firmware version.
©
Page 9
Copyright LOTRONIC 2018
MUSIC
Dj1 Dj2
Low Pass
OFF(default)
80Hz
150Hz
12" 15"
DELAY
OFF(default)
LCD DIM
ON(default)
OFF
BRIGHT
5(default)
1-10 adjust
INFO
Brand Prouduct Name
Firmware Version
EXIT
F I R S T- S e r i e s
www.bst-dj.com
D S P C O N T R O L O F S U B W O O F E R
The subwoofer DSP control menu selections are availa ble fo r the 12", 15'' and 18'’ subw oofers.
Mode LIVE(default)
100Hz
120Hz
0-30ms
POLARITY POL+(default)
POL
RESET ON(default)
ARE YOU SURE?
YES OR NO
* Notice !
The display returns to the home screen after twenty second of inactivity.
Mode Menu
The Mode menu is used to configure the type of sound the subwoofer delivers.
Available options for this selection are: MUSIC, LIVE, and CLUB.
•
LIVE - is used for recorded music playback and EDM applications. (Default)
•
MUSIC - is used for live sound applications.
•
DJ1- is used for recorded electronic music playback.
•
DJ2 - is used for recorded electronic music playback.
LOW PASS Menu
The LOW PASS menu is used to select low pass frequency for proper summation with a full-range loudspeaker. Available
options for this selection are: 80Hz, 100Hz, 120Hz, 150Hz, 12", 15". The low passes are 24dB / octave Linkwitz / Riley slopes.
The 80Hz, 100Hz, 120Hz, and 150 Hz selections are generic low pass settings for use with other full-range loudspeaker
systems. 12", 15" settings are specifically optimized for full-range loudspeakers for best summation. The default is OFF.
POLARITY Menu
The POLARITY Menu is used to adjust the loudspeaker polarity. The default is Polarity+.
LCD DIM Menu
The LCD Dim menu is used to dim the display when the display is idle for twenty seconds. Available options for this
selection are: ON or OFF. The default is ON.
BRIGHT Menu
The Bright menu is used to determine the brightness of the LCD. The range is 1 to 10. The default is 5.
CONTRAST Menu
The Contrast menu is used to determine the contrast on the LCD. The range is 1 to 10. The default is 5.
©
Page 10

Copyright LOTRONIC 2018
F I R S T- S e r i e s
www.bst-dj.com
D S P C O N T R O L O F S U B W O O F E R
RESET Menu
The Reset menu is used to reset the loudspeaker to original factory settings. Available options for this selection are: NO or
YES. The default selection is NO.
To reset the system to original factory settings, do the following:
1.
From the DSP menu, select RESET. The
reset Confirm Reset message appears
2.
Select YES.
The loudspeaker restarts and resets the system to the original factor settings.
INFO Menu
The Information menu is used to display the Brand, product name and firmware version.
©
Page 11

Copyright LOTRONIC 2018
Mode:
Speech
Location:
Monitor
Sub:
Off
Mode:
Music
Location:
Tripod
Sub:
18'’ SUB
F I R S T- S e r i e s
www.bst-dj.com
A P P L I C AT I O N E X A M P L E
Daisy chaining full-range systems
Location: Tripod
Sub: Off
Using full-range systems as monitors
Mode: Live
15''
Mode: Live
Stacking full-range systems with subwoofers
CD/DVD Stereo configurations
Location: Tripod
Sub: Off
18'' SUB
Mode: Live
Low Pass 15''
©
Page 12

Copyright LOTRONIC 2018
F I R S T- S e r i e s
FRANCAIS
www.bst-dj.com
Nous vous remercions pour l’achat de ce système de sonorisation. Pour votre sécurité, lisez attentivement
ce manuel avant d’installer l’appareil.
CONSIGNES DE SECURITE ET D’UTILISATION :
• Si l’appareil a été exposé à des changements de température, ne le mettez pas immédiatement sous
tension. La condensation qui peut se produire, risque d’endommager les circuits. Attendez que l’appareil
ait atteint la température ambiante avant de le mettre sous tension.
• L’appareil fait partie de la classe de protection I. Il est donc primordial qu’il soit relié à la terre.
• Assurez-vous que la tension secteur ne dépasse pas celle indiquée à la fin de ce mode d’emploi.
• Assurez-vous que le cordon d’alimentation n’est pas écrasé ou endommagé. Dans ce cas, demandez à
votre revendeur ou un technicien de remplacer le cordon.
• Débranchez toujours l‘appareil du secteur lorsqu’il n’est pas utilisé ou avant de le nettoyer. Ne tirez que
sur la fiche, jamais sur le cordon.
• Lorsque le cordon d'alimentation ou un coupleur d'appareil est utilisé comme dispositif de déconnexion,
ce dispositif doit rester facilement accessible
Si un interrupteur omnipolaire est utilisé comme dispositif de déconnexion, l'emplacement sur l'appareil
et la fonction de l'interrupteur doit être décrite, et le commutateur doit rester facilement accessible
ATTENTION :
1. Les dommages résultant du non-respect des instructions ou de la modification de l’appareil ne sont pas
couverts par la garantie. Tenir loin des enfants et des personnes non-qualifiées.
2. L’appareil ne contient aucune pièce remplaçable. Vérifiez si toutes les pièces sont bien installées et que
les vis sont bien serrées avant la mise en service. Ne pas utiliser l’appareil lorsque le boîtier est ouvert.
REGLES GENERALES
• Cet appareil doit être alimenté uniquement en courant alternatif de 230VAC/50Hz et utilisé uniquement à
l’intérieur.
• Utilisez cet appareil uniquement si vous vous êtes familiarisés avec ses fonctions. Ne pas autoriser une
personne inexpérimentée d’utiliser cet appareil. La plupart des dommages résultent d’une mauvaise
utilisation.
• Conservez l’emballage d’origine pour tout transport.
Pour des raisons de sécurité, il est interdit de modifier cet appareil de quelque sorte que ce soit. Toute
manipulation non décrite dans ce manuel peut conduire à des courts-circuits, un choc électrique, une
chute, etc. et invaliderait la garantie
©
Page 13

Copyright LOTRONIC 2018
/38cm
30 OZ
compression
compression
compression
compression
acoustique
acoustique
acoustique
acoustique
acoustique
15mm Multiplex
15mm Multiplex
15mm Multiplex
15mm Multiplex
15mm Multiplex
Peinture à texture
Peinture à texture
Peinture à texture
Peinture à texture
Peinture à texture
9.70kg
13.60kg
18.50kg
23.50kg
37.20kg
40Hz-160Hz
35Hz-160Hz
30Hz-160Hz
8 ohms
8 ohms
8 ohms
Grille acier avec tissu
acoustique
Grille acier avec tissu
acoustique
Grille acier avec tissu
acoustique
15mm Multiplex
15mm Multiplex
18mm Multiplex
Peinture à texture
Peinture à texture
Peinture à texture
21.50kg
31.50kg
44.50kg
F I R S T- S e r i e s
www.bst-dj.com
CARACTERISTIQUES ENCEINT ES PASSIVES
Réf. FIRST-SP08 FIRST-SP10 FIRST-SP12 FIRST-SP15 FIRST-SP215
TYPE
Bande passante
(-10dB)
Sensibilité
(1W@1M)
Puissance
(RMS)
Impédance
nom.
Driver
Grille
Caisson
Finition
Dimensions
(W x H x D)
Poids net
Enceinte passive
large bande à 2
voies 8'' /20cm
65Hz-20KHz 55Hz-20KHz 50Hz-20KHz 45Hz-20KHz 45Hz-20KHz
96dB 97dB 98dB 99dB 101dB
150 watts 200 watts 250 watts 300 watts 600 watts
8 ohms 8 ohms 8 ohms 8 ohms 4 ohms
LF 8'' boomer, 2''
VC,
HF 1'' moteur à
compression
Grille acier
avec tissu
300x330x490mm 350x380x585mm 410x430x670mm 475x500x750mm 485x530x1180mm
Enceinte passive
large bande à 2
voies 10'' /25cm
LF 10'' boomer, 2''
VC, 30 OZ
HF 1.35''
moteur à
Grille acier
avec tissu
Enceinte passive
large bande à 2
voies 12'' /30cm
LF 12'' boomer, 2.5''
VC, 50 OZ
HF 1.35''
moteur à
Grille acier
avec tissu
Enceinte passive
large bande à 2
voies 15'' /38cm
LF 15'' boomer, 3''
VC, 60 OZ
HF 1.75''
moteur à
Grille acier
avec tissu
REF. FIRST-SP12S FIRST-SP15S FIRST-SP18S
Enceinte passive
large bande à 2
voies double 15''
LF 15'' boomer, 3''
VC, 60 OZ
HF 1.75''
moteur à
Grille acier
avec tissu
TYPE
Bande passante (-10dB)
Sensibilité (1W@1M)
Puissance (RMS)
Impédance nom.
Driver
Grille
Caisson
Finition
Dimensions (W x H x D)
Poids net
©
12'' Bass reflex subwoofer,
passif
100dB 102dB 102dB
400 watts 500 watts 600 watts
LF 12'' subwoofer, 3'' VC, 80
OZ
420x510x520mm 490x600x610mm 580x700x715mm
15'' Bass reflex subwoofer,
passif
LF 15'' subwoofer, 4'' VC, 125
OZ
18'' Bass reflex subwoofer,
passif
LF 18'' subwoofer, 4'' VC, 125
OZ
Page 14

Copyright LOTRONIC 2018
active
active
active
active
(-10dB)
4 ohms
4 ohms
4 ohms
4 ohms
LF 12'' boomer, 2.5'' VC,
(L x H x P)
14.50kg
20.00kg
25.00kg
39.00kg
LF175W+HF75W
LF300W+HF60W
LF500W+HF80W
/
Oui
Oui
Combo Line/Mic in, RCA
Bluetooth in, XLR Mix
fonction DSP
BT Status, Limit, Signal,
Convection
Convection
Convection
F I R S T- S e r i e s
www.bst-dj.com
CARACTERISTIQUES – A CT IVES LARGE BANDE
REF FIRST-SA10DSP2 FIRST-SA12DSP2 FIRST-SA15DSP2 FIRST-SA215DSP2
TYPE
Bande passante
Sensibilité (1W@1M)
Puissance (RMS)
Impédance nom.
Driver
Grille
Caisson
Finition
Dimensions
Poids net
TYPE
Amplificateur
Puissance de sortie
DSP
Afficheur DSP
Modes
Module Bluetooth
Connecteurs
10'' Enceinte 2
voies large bande,
55Hz-20KHz 50Hz-20KHz 45Hz-20KHz 45Hz-20KHz
97dB 98dB 99dB 101dB
200 watts 250 watts 300 watts 600 watts
LF 10'' boomer, 2'' VC,
30 OZ
HF 1.35'' moteur à
compression
Grille acier avec tissu
acoustique
15mm Multiplex 15mm Multiplex 15mm Multiplex 15mm Multiplex
Peinture à texture Peinture à texture Peinture à texture Peinture à texture
350x380x585mm 410x430x670mm 475x500x750mm 485x530x1180mm
Bi-amplifié, 2 voies Bi-amplifié, 2 voies Bi-amplifié, 2 voies
Classe D LF Classe-D, HF Classe AB
Fréq. échantillonnage
24Bit, 96kHz
PA, Monitor, Sub,
Speech
Oui Oui Oui
in,
out
12'' Enceinte 2
voies large bande,
50 OZ
HF 1.35'' moteur à
compression
Grille acier avec tissu
acoustique
Fréq. échantillonnage 24Bit, 96kHz
Live, Music, Speech, DJ
2xCombo Line/Mic in, Bluetooth in, XLR Mix out
15'' Enceinte 2
voies large bande,
LF 15'' boomer, 3'' VC,
60 OZ
HF 1.75'' moteur à
compression
Grille acier avec tissu
acoustique
Double15'' Enceinte 2
voies large bande,
LF 15'' boomer, 3'' VC,
60 OZ
HF 1.75'' moteur à
compression
Grille acier avec tissu
acoustique
LF Class e-D, HF
Classe AB
Fréq. échantillonnage
24Bit, 96kHz
Live, Music, Speech, DJ
2xCombo Line/Mic in,
Bluetooth in, XLR Mix
out
Contrôles
Eclairage logo façade
Indicateurs
Protection
Refroidissement
Alimentation
©
2 contrôles de volume
d’entrée, contrôle de
volume général
M/A M/A M/A
Power, DSP 4 Modes
Surchauffe, surcharge,
DC, surtension, basse
tension, soft start
220-240Vac 50Hz 220-240Vac 50Hz 220-240Vac 50Hz
2 contrôles de volume d’entrée, contrôle de
volume général/Sélecteur de fonction
DSP
Limit, Signal, Power Limit, Signal, Power
Surchauffe, surcharge, DC, surtens ion, basse
tension, soft start
2 contrôles de volume
d’entrée, contrôle de
volume
général/Sélecteur de
Surchauffe, surcharge,
DC, surtension, basse
tension, soft start
Page 15

Copyright LOTRONIC 2018
400 watts
500 watts
600 watts
4 ohms
4 ohms
4 ohms
acoustique
acoustique
acoustique
23.50kg
33.50kg
46.50kg
Active Sub Amp
Active Sub Amp
Active Sub Amp
Classe D
Classe D
Classe D
Oui
Oui
Oui
Live, Music, DJ1, DJ2
Live, Music, DJ1, DJ2
Live, Music, DJ1, Dj2
XLR Mix out
XLR Mix out
XLR Mix out
fonction DSP
fonction DSP
fonction DSP
M/A
M/A
M/A
Limit, Signal, Power
Limit, Signal, Power
Limit, Signal, Power
Convection
Convection
Convection
220-240Vac 50Hz
220-240Vac 50Hz
220-240Vac 50Hz
F I R S T- S e r i e s
www.bst-dj.com
CARACTERISTIQUES – SUBWOOFER ACTIF
REF FIRST-SA12SDSP2 FIRST-SA15SDSP2 FIRST-SA18SDSP2
TYPE
Bande passante (-10dB)
Sensibilité (1W@1M)
Puissance (RMS)
Impédance nom.
Driver
Grille
Caisson
Finition
Dimensions (W x H x D)
Poids net
TYPE
Amplificateur
Puissance de sortie
DSP
DSP display
Modes
module Bluetooth
Connecteurs
12'' Bass reflex subwoofer, actif 15'' Bass reflex subwoofer,
actif
40Hz-160Hz 35Hz-160Hz 30Hz-160Hz
100dB 102dB 102dB
LF 12'' subwoofer, 3'' VC, 80 OZ LF 15'' subwoofer, 4'' VC, 125
Grille acier avec tissu
15mm Multiplex 15mm Multiplex 18mm Multiplex
Peinture texturée Peinture texturée Peinture texturée
420x510x520mm 490x600x610mm 580x700x715mm
400W 500W 600W
Fréq. échantillonnage
24Bit, 96kHz
Oui Oui Oui
2x Combo Line/Mic in,
OZ
Grille acier avec tissu
Fréq. échantillonnage
24Bit, 96kHz
2x Combo Line/Mic in,
18'' Bass reflex subwoofer,
actif
LF 18'' subwoofer, 4'' VC, 125
OZ
Grille acier avec tissu
Fréq. échantillonnage
24Bit, 96kHz
2x Combo Line/Mic in,
Contrôles
Eclairage logo façade
Indicateurs
Protection
Refroidissement
Alimentation
Contrôle de volume
général/Sélecteur de
Surchauffe, surcharge,
DC, surtension, basse
tension, soft start
Contrôle de volume
général/Sélecteur de
Surchauffe, surcharge,
DC, surtension, basse
tension, soft start
Contrôle de volume
général/Sélecteur de
Surchauffe, surcharge,
DC, surtension, basse
tension, soft start
©
Page 16

Copyright LOTRONIC 2018
F I R S T- S e r i e s
www.bst-dj.com
ENTREES
Modèles Large bande
14
1 2
4
5 7
13 6
8
15
16
3
9
10
11 12
1
4
5
6
3
7
11
4
5
6
1
12
7
3
FIRST-SP10DSP2
9
10 8
9
10 8
FIRST-SP12DSP2
FIRST-SP215DSP2
FIRST-SP15DSP2
Subwoofers
1.
ENTRÉE LIGNE / MICRO
Entrée symétrique pour le branchement de sources de signaux tels que tables de mixage,
instrument ou microphones. Les branchements se font par des connecteurs Jack stéréo
6,35mm ou XLR.
Contrôle de volume pour ajuster les différents niveaux d’entrée. La position centrale est
neutre (pas d’atténuation, pas d’amplification). La zone à gauche de zéro règle les sources
d’entrée de niveau ligne et la zone à droite les niveaux des microphones. Ces réglages
existent pour l’entrée 1 et l’entrée 2.
2.
Entrée AUX/BT
Branchez un lecteur CD, un IPhone ou un signal Bluetooth sur l’entrée AUX/BT du canal 2.
3.
MIX OUT
Cette sortie XLR envoie le mélange des deux signaux d’entrée vers une autre enceinte ou un
subwoofer. INPUT LEVEL ajuste le niveau du signal d’’entrée qui est envoyé vers la sortie
OUTPUT. Les réglages MASTER VOL ou DSP n’affectent pas la sortie OUTPUT.
4.
LIMIT (Limitateur automatique d’amplitude):
Lorsque le signal audio atteint le seuil dangereux pour les transducteurs, ce circuit interviendra
automatiquement en réduisant le signal pour protéger le haut-parleur et empêcher la distorsion
du son.
L’activation de ces dispositifs de protection est matérialisée par les LED de protection qui s’allument.
5.
SIGNAL
La LED Signal matérialise le signal d’entrée à la fiche d’entrée XLR. Le volume est déterminé par le
contrôle de volume général.
©
Page 17

Copyright LOTRONIC 2018
F I R S T- S e r i e s
www.bst-dj.com
CONFIGURATION DES ENTREES DE L’AMPLIFICATEUR
6.
POWER
Ce voyant indique que le système est sous tension.
7.
FRONT LED
Allume/éteint l’éclairage du logo en façade.
8.
INTERRUPTEUR M/A
N’oubliez pas de mettre le volume au minimum avant de mettre le système sous tension
9.
ENTRÉE D’ALIMENTATION SECTEUR
Branchez le cordon secteur sur cette Fiche avant de mettre le système sous tension.
10.
Fusible
Ne remplacez le fusible que lorsque l’appareil est débranché du secteur. Utilisez uniquement des fusibles ayant la même
puissance et ampérage. La valeur du fusible est indiquée à l’arrière
11.
LCD
Contrôle DSM et écran de contrôle.
12.
VOLUME GENERAL
Règle le volume général
DSP: Naviguez dans le menu et faites une sélection parmi les choix proposés. Appuyez sur le bouton MASTER VOL pour
accéder au menu DPS.
13.
MODES DE FONCTIONNEMENT DU SYSTEME:
PA: C’est le réglage par défaut. Il convient lorsque l’enceinte est posée sur un support et fait face au public.
DJ: Ce réglage convient lorsque l’enceinte est utilisée uniquement pour un DJ ou travaille avec une application de
lecture DJ et est dirigée vers le public.
Monitor: Utilisez ce réglage lorsque l’enceinte est utilisée comme retour de scène et dirigée vers vous.
Speech: Utilisez ce réglage si l’enceinte n’est utilisée que pour des discours et dirigée vers le public.
14.
BLUETOOTH:
Appairage de l’enceinte avec un appareil Bluetooth :
A: Lorsque l’enceinte est sous tension, appuyez pendant 2 secondes sur le bouton PAIR pour activer la fonction
Bluetooth. La ED d’appairage clignote .
B: Activez la recherche Bluetooth sur votre appareil et sélectionnez BST-FIRST. Si les deux appareils sont
synchronisés, la LED d’appairage reste allumée.
C: Réglez le volume de votre appareil Bluetooth au plus bas.
D: Passez un morceau de musique sur votre appareil Bluetooth et réglez le volume de votre appareil Bluetooth au maximum.
E: Lorsque votre appareil est synchronisé avec l’enceinte, l’enceinte reconnaîtra l’appareil. Pour le reconnecter, aller sur la page
Bluetooth de votre appareil et cliquez sur « Connecter » pour rétablir la connexion.
F: Pendant la lecture de l’appareil Bluetooth, appuyez sur la touche PAIR pour basculer entre lecture et pause. Si vous
appuyez sur la touche PAIR pendant 2 secondes, l’appareil se déconnecte et le Bluetooth s’éteint.
15.
VOLUME BLUETOOTH
Tournez ce bouton pour régler le volume d’entrée de votre appareil Bluetooth appairé.
16.
SELECTEUR MI X O UT
En position haute (Ch1), le niveau MIX OUT ne sera pas affecté par les contrôles de volume d’entrée.
En position basse (MIX), le niveau MIX OUT est réglable par les contrôles de volume d’entrée.
©
Page 18

Copyright LOTRONIC 2018
F I R S T- S e r i e s
www.bst-dj.com
CONTROLE DSP
Un menu DSP intégré permet à l’utilisateur de sélectionner de nombreuses fonctions.
Pour accéder au menu de contrôle DSP, procédez de la manière suivante :
1.
Appuyez sur le bouton Master Vol pour afficher le menu DSP.
2.
Naviguez dans les fonctions au moyen du bouton Master Vol.
3.
Appuyez sur le bouton Master Vol pour sélectionner la fonction que vous souhaitez modifier. Le curseur met en
surbrillance les paramètres sur le côté droit du menu DSP.
4.
Naviguez dans les fonctions au moyen du bouton Master Vol.
5.
Appuyez sur le bouton Master Vol pour confirmer les paramètres sélection nés .
Le réglage est sauvegardé. Le curseur revient sur les fonctions sur la gauche du menu DSP.
6.
Répétez les étapes 2 à 5 pour changer d’autres paramètres du DSP et du système.
7.
Sélectionnez EXIT pour revenir à l’écran d’accueil.
©
Page 19

Copyright LOTRONIC 2018
MUSIC
SPEECH
DJ
LOCATION
TRIPOD (default)
MONITOR
SUB
OFF(default)
80Hz
100Hz
120Hz
MID
0dB (default)
-12dB–+12dB
BASS
0dB (default)
-12dB–+12dB
LCD DIM
ON (default)
OFF
BRIGHT
5 (default)
1-10 adjust
INFO
Brand Product Name
Firmware Version
EXIT
F I R S T- S e r i e s
www.bst-dj.com
CONTROLES DSP DES LARGE BANDE
Les contrôles DSP large bande sont disponibles pour les modèle 12 et 15 pouces.
Mode LIVE (default)
WALL
SUPEND
150Hz
TREBLE 0dB (default)
-12dB–+12dB
DELAY 0-116m
BTH VOL OFF (default)
Bluetooth Connected
RESET NO (default)
ARE YOU SURE?
YES OR NO
* Attention ! Après 20 secondes d’inactivité, l’afficheur revient à l’écran d’accueil.
Menu Mode
Le menu Mode permet de configurer le type de son que l’enceinte doit délivrer. Les options disponibles pour cette sélection sont :
LIVE, MUSIC, SPEECH et DJ.
•
LIVE – est utilisé pour des représentations en direct (Default).
•
MUSIC – est utilisé pour la lecture de musiques enregistrées.
•
SPEECH – est utilisé pour des discours.
•
DJ - est utilisé pour la lecture de musiques électroniques enregistrées.
Menu LOCATION
•
Le menu Location permet d’optimiser l’enceinte pour différents emplacements.
•
Les options disponibles sont: TRIPOD, MONITOR, WALL, et SUSPEND.
•
TRIPOD – est sélectionné lorsque l’enceinte est placée sur un support ou posée sur une barre (Default)
•
MONITOR – est sélectionné lorsque l’enceinte est placée sur la surface inclinée en position retour de scène. Ce
réglage compense l’amplification des basses fréquences créées par la proximité de l’enceinte avec le sol.
©
Page 20

Copyright LOTRONIC 2018
F I R S T- S e r i e s
www.bst-dj.com
CONTROLES DSP DES LARGE BANDE
•
WALL – est sélectionné lorsque l’enceinte est fixée au mur au moyen de l’étrier. Ce réglage compense l’amplification
des basses fréquences qui se produit lorsque l’enceinte est placée près d’un mur. Si l’enceinte est utilisée sur une
colonne, il est recommandé d’utiliser le mode SUSPEND.
•
SUSPEND – est utilisé lorsque l’enceinte est suspendue par 3 points de suspensions sur des anneaux à visser.
SUB Menu
Le menu Sub permet de sélectionner une fréquence passe-haut pour travailler avec un subwoofer ou un subwoofer accordé.
Les options possibles pour cette sélection sont : OFF, 80Hz, 100Hz, 120Hz, 150Hz, 15"/18". Les passe-haut sont des filtres
Linkwitz/Riley 24dB / octave. Les 80 Hz, 100 Hz, 120 Hz, et 150 Hz sont des réglages passe-haut génériques pour une
utilisation avec d’autres subwoofers. Les réglages 15 Sub/18 Sub so nt spé cifi que men t opt i misés pour des subw oofer s en
incluant un délai pour la meilleure addition. Le réglage par défaut est OFF.
Menu TREBLE
Le menu Treble est utilisé pour régler la perfor ma nce de s hautes fréquences de l’enceinte pour différente s appli cat ions ou la
préférence personnelle. Les paramètres contrôlent un filtre de dégradé passe-haut qui est centré à 6 kHz. La plage de réglage
est de -12 dB à+ 6 dB. Le réglage par défaut est zéro (0).
Menu MID
Le menu Mid est utilisé pour régler la perfor man ce des fréquences moyennes de l’enceinte pour différentes applications
ou la préférence personnelle. Le paramètre contrôle un EQ paramétr iq ue qui est cen tré à 1.2 kHz. La plage de réglage
est de -12 dB à+ 6 dB. Le réglage par défaut est zéro (0).
Menu BASS
Le menu BASS est utilisé pour régler la performance des basses fréquences de l’enceinte pour différentes applications ou la
préférence personnelle. Le paramètre contrôle un EQ paramétrique qui est centré à 80 Hz. Le réglage par défaut est zéro (0).
Menu DELAY
Le menu DELAY permet de régler le délai de temporisation. La plage de réglage est de 0-30ms.
Menu BTH VOL
Le menu Bluetooth sur le DSP permet de se connecter aux appareils mobiles Bluetooth. Entrez dans le menu et ajustez le
volume de 0-16. Lancez en même temps une recherche Bluetooth. Le symbole Bluetooth clignote sur le LCD. Appairez
l’appareil mobile avec l’enceinte. Le symbole Bluetooth cesse de clignoter lorsque l’appairage a réussi. Vous pouv ez
maintenant écouter la musique de votre appareil mobile. La plage de 0-16 permet de régler le volume Bluetooth de l’enc einte .
La fonction Bluetooth sur l’enceinte s’arrête lorsque le volume est réglé sur 0.
Menu LCD DIM
Le menu LCD Dim menu permet de réduire la luminosité de l’afficheur lorsqu’il est inactive pendant au moins 20
secondes. Les options possibl es sont : ON ou OFF. Le réglage par défaut est ON.
Menu BRIGHT
Le menu Bright permet de définir la luminosité de l’écran. La plage de réglage est de 1 à 10. La valeur par défaut est 5.
Menu CONTRAST
Le menu Contrast permet de définir le contraste de l’écran. La plage de réglage est de 1 à 10. La valeur par défaut est 5.
Menu RESET
Le menu RESET permet de revenir aux réglages d’usine. Les options possibles sont: NO ou YES. La valeur par défaut est
NO. Pour revenir aux réglages d’usine, procédez de la manière suivante :
1.
Dans le menu DSP sélectionnez RESET.
Le message suivant s’af fiche :
2.
Sélectionnez YES.
L’enceinte redémarre et remet le système aux réglages d’usine.
©
Page 21

Copyright LOTRONIC 2018
Mode
LIVE(default)
MUSIC
Dj1 Dj2
100Hz
120Hz
150Hz
12" 15"
POLARITY
POL+(default)
POL
LCD DIM
ON(default)
OFF
RESET
ON(default)
ARE YOU SURE?
YES OR NO
INFO
Marque et modèle
Version Firmware
F I R S T- S e r i e s
Menu INFO
Le menu Information permet d’afficher la marque, le nom du produit et la version Firmware.
www.bst-dj.com
CONTROLE DSP DU SUBWOOFER
Le contrôle DSP du subwoofer est disponible sur les modèles 12", 15'' et 18'’.
Low Pass OFF(default)
80Hz
DELAY OFF(default)
0-30ms
BRIGHT 5(default)
1-10 adjust
EXIT
* Note !
L’afficheur revient à l’écran initial après 20 secondes d’inactivité.
Menu Mode
Le menu Mode permet de configurer le subw oofer se lon son utili sat ion. Les options disponibles sont: MUSIC, LIVE et CLUB.
•
LIVE – est utilisé pour la lecture de musiques enregistrées et des applications EDM (Default)
•
MUSIC – est utilisé pour la musique live.
•
DJ1- est utilisé pour de la lecture de musiques électroniques enregistrées.
•
DJ2 - est utilisé pour de la lecture de musiques électroniques enregistrées.
Menu LOW PASS
Le menu LOW PASS est utilisé pour sélectionner la fréquence passe-bas en accord avec une enceinte large-bande. Les
réglages possibles sont: 80Hz, 100Hz, 120Hz, 150Hz, 12" et 15". Les passe-bas sont des filtres Linkwitz / Riley 24dB / octave.
Les réglages 80Hz, 100Hz, 120Hz et 150 Hz sont des réglages génériques pour une utilisation avec d’autres systèmes de
haut-parleurs large bande. Les réglages 12", 15" ont été optimisés pour la meilleure somme avec des haut-parleurs large
bande. Le réglage par défaut est OFF.
Menu POLARITY
Le menu POLARITY permet de régler la polarité du haut-parleur. Le réglage par défaut est Polarity+.
Menu LCD DIM
Le menu LCD Dim permet de diminuer la luminosité de l’afficheur lorsqu’il est inactif pendant 20 secondes. Les options
de réglage sont ON ou OFF. Le réglage par défaut est ON.
Menu BRIGHT
Ce menu règle la luminosité de l’afficheur. La plage de réglage va de 1 à 10. La valeur par défaut est 5.
Menu CONTRAST
Ce menu règle le contraste de l’afficheur. La plage de réglage va de 1 à 10. La valeur par défaut est 5.
©
Page 22

Copyright LOTRONIC 2018
Mode:
Speech
Location:
Tripod
Mode:
Music
Location:
Tripod
Sub:
Off
Mode:
Live
Location:
Monitor
Sub:
18'’ SUB
18'' SUB
15''
Empiler des systè mes
F I R S T- S e r i e s
www.bst-dj.com
CONTROLE DSP DU SUBWOOFER
Menu RESET
Ce menu remet le subwoofer sur les réglages d’usine. Vous avez le choix entre NO ou YES. Le réglage par défaut est NO.
Pour revenir aux réglages d’usine, procédez de la manière suivante :
1.
A partir du menu DSP, sélectionnez RESET. Le message de
confirmation s’affiche
2.
Sélectionnez YES.
Le subwoofer redémarre et revient aux réglages d’usine.
Menu INFO
Le menu INFO affiche la marque, la reference et la version Firmware.
EXEMPLE D’APPLICATION
Chaînage de systèmes large bande Configurations stéréo CD/DVD
Sub: Off
Utilisation d’un système large bande comme retour de scène
Sub: Off
©
large bande avec des
subwoofers
Mode: Live
Location: Tripod
Mode: Live
Low Pass 15''
Page 23

Copyright LOTRONIC 2018
F I R S T- S e r i e s
DEUTSCH
www.bst-dj.com
Wir danken Ihnen für den Kauf dieser Sound Anlage. Zu Ihrer eigenen Sicherheit lesen Sie bitte diese
Anleitung vor der ersten Inbetriebnahme sorgfältig durch.
SICHERHEITS- UND BEDIENHINW E ISE
• Wenn das Gerät starken Temperaturschwankungen ausgesetzt war, schalten Sie es nicht sofort ein,
dann das Kondenswasser, das sich gebildet haben könnte, würde das Gerät beschädigen. Warten Sie,
bis das Gerät Raumtemperatur erreicht hat.
• Das Gerät nur an eine geerdete Netzsteckdose anschließen. Alle elektrischen Anschlüsse müssen von
einem Fachmann vorgenommen werden.
• Die Netzspannung muss der Versorgungsspannung des Geräts entsprechen.
• Das Netzkabel darf nie gequetscht oder beschädigt werden. Ein defektes Kabel sofort von einem
Fachmann ersetzen lassen.
• Das Gerät vom Netz trennen, wenn es nicht benutzt wird oder bevor Sie es reinigen. Nur am Stecker
anfassen, niemals am Kabel ziehen.
• Wenn das Gerät über den Netzstecker ausgeschaltet wird, muss die Steckdose jederzeit leicht
zugänglich bleiben
Wenn das Gerät über einen Schalter ausgeschaltet wird, muss dieser klar gekennzeichnet und leicht
zugänglich sein
ACHTUNG :
1. Das Gerät darf nicht technisch verändert werden, denn dann erlischt jeglicher Garantieanspruch. Bei
unsachgemäßem Gebrauch verfällt der Garantieanspruch. Von Kindern und Laien fernhalten.
2. Das Gerät enthält keine vom Bediener auswechselbaren Teile. Prüfen, ob alle Teile richtig installiert und
die Schrauben festgezogen sind, bevor Sie das Gerät einschalten. Das Gerät nicht bei offenem Gehäuse
betreiben.
ALLGEMEINE VORSCHRIFTEN
• Das Gerät darf nur mit 220-240VAC/50Hz Wechselstrom und in trockenen Innenräumen betrieben
werden
• Benutzen Sie das Gerät nur dann, wenn Sie mit seinen Funktionen vertraut sind. Alle Personen, die mit
der Bedienung, Installation und Wartung des Geräts zu tun haben, müssen ausgebildet und qualifiziert
sein und diese Bedienungshinweise beachten.
• Das Gerät vorzugsweise in der Originalverpackung transportieren.
Aus Sicherheitsgründen sind Veränderungen jeglicher Art verboten. Zudem kann falsche Bedienung zu
Kurzschluss, Verbrennungen, Stromschlag, usw. führen. Bei unsachgemäßem Gebrauch verfällt der
Garantieanspruch
©
Page 24

Copyright LOTRONIC 2018
passiv
passiv
passiv
passiv
, 2''
30 OZ
VC, 50 OZ
treiber
Druckkammertreiber
Druckkammertreiber
Druckkammertreiber
Druckkammertreiber
Akustikfilz
Strukturlack
Strukturlack
Strukturlack
Strukturlack
Strukturlack
(B x H x T)
40Hz-160Hz
35Hz-160Hz
30Hz-160Hz
100dB
102dB
102dB
400 Watt
500 Watt
600 Watt
8 Ohm
8 Ohm
8 Ohm
Stahlgitter mit Akustikfilz
Stahlgitter mit Akustikfilz
Stahlgitter mit Akustikfilz
15mm Multiplex
15mm Multiplex
18mm Multiplex
Strukturlack
Strukturlack
Strukturlack
21.50kg
31.50kg
44.50kg
F I R S T- S e r i e s
www.bst-dj.com
TECHNISCHE DATEN - PASSIVBOXEN
Best. Nr. FIRST-SP08 FIRST-SP10 FIRST-SP12 FIRST-SP15 FIRST-SP215
TYP
Frequenzbereich
(-10dB)
Empfindlichkeit
(1W@1M)
Leistung (RMS)
Nennimpedanz
Driver
Gitter
Gehäuse
Beschichtung
Abmessungen
8'' 2-Weg
BreitbandLautsprecher,
65Hz-20KHz 55Hz-20KHz 50Hz-20KHz 45Hz-20KHz 45Hz-20KHz
96dB 97dB 98dB 99dB 101dB
150 Watt 200 Watt 250 Watt 300 Watt 600 Watt
8 Ohm 8 Ohm 8 Ohm 8 Ohm 4 Ohm
LF 8'' Tieftöner
VC,
HF 1''
Druckkammer-
Stahlgitter
mit
15mm Multiplex 15mm Multiplex 15mm Multiplex 15mm Multiplex 15mm Multiplex
300x330x490mm 350x380x585mm 410x430x670mm 475x500x750mm 485x530x1180mm
10'' 2-Weg
BreitbandLautsprecher,
LF 10'' Tieftöner, 2''
VC, 30 OZ
HF 1.35''
Stahlgitter mit
Akustikfilz
12'' 2-Weg
BreitbandLautsprecher,
LF 12'' Tieftöner,
2.5''
HF 1.35''
Stahlgitter mit
Akustikfilz
15'' 2-Weg
BreitbandLautsprecher,
LF 15'' Tieftöner, 3''
VC, 60 OZ
HF 1.75''
Stahlgitter mit
Akustikfilz
Dual 15'' 2-Weg
BreitbandLautsprecher,
passiv
LF 15'' Tieftöner, 3''
VC, 60 OZ
HF 1.75''
Stahlgitter mit
Akustikfilz
Nettogewicht
9.70kg 13.60kg 18.50kg 23.50kg 37.20kg
ITEM NO FIRST-SP12S FIRST-SP15S FIRST-SP18S
TYPE
Frequenzbereich (-10dB)
Empfindlichkeit (1W@1M)
Leistung (RMS)
Nennimpedanz
Driver
Gitter
Gehäuse
Beschichtung
Abmessungen (B x H x T)
Nettogewicht
12'' Bassreflex Subwoofer,
passiv
LF 12'' Subwoofer, 3'' VC, 80
OZ
420x510x520mm 490x600x610mm 580x700x715mm
15'' Bassreflex Subwoofer,
passiv
LF 15'' Subwoofer, 4'' VC, 125
OZ
18'' Bassreflex Subwoofer,
passiv
LF 18'' Subwoofer, 4'' VC, 125
OZ
©
Page 25

Copyright LOTRONIC 2018
aktiv
aktiv
aktiv
aktiv
(-10dB)
(1W@1M)
200 Watt
250 Watt
300 Watt
600 Watt
60
15mm Multiplex
15mm Multiplex
15mm Multiplex
15mm Multiplex
Strukturlack
Strukturlack
Strukturlack
Strukturlack
(B x H x T)
14.50kg
20.00kg
25.00kg
39.00kg
Bi-amplified, 2-Weg
Bi-amplified, 2-Weg
Bi-amplified, 2-Weg
LF175W+HF75W
LF300W+HF60W
LF500W+HF80W
Ja
Ja
Ja
Combo Line/Mic in, RCA
in, Bluetooth in, XLR Mix
Funktionswahlschalter
Ein/Aus
Ein/Aus
Ein/Aus
Überhitzung, Überlast, DC
Kühlkörper
Kühlkörper
Kühlkörper
220-240VAC 50Hz
220-240VAC
50Hz
220-240VAC 50Hz
F I R S T- S e r i e s
www.bst-dj.com
TECHNISCHE DATEN – BREITBAND, AKTIV
Best. Nr. FIRST-SA10DSP2 FIRST-SA12DSP2 FIRST-SA15DSP2 FIRST-SA215DSP2
TYP
Frequenzbereich
Empfindlichkeit
Leistung (RMS)
Nennimpedanz
Driver
Gitter
Gehäuse
Beschichtung
Abmessungen
Nettogewicht
TYP
Verstärker
Ausgangsleistung
DSP
DSP Display
Modes
10'' 2-Weg
Breitbandlautsprecher,
55Hz-20KHz 50Hz-20KHz 45Hz-20KHz 45Hz-20KHz
97dB 98dB 99dB 101dB
4 Ohm 4 Ohm 4 Ohm 4 Ohm
LF 10'' Tieftöner, 2'' VC,
30 OZ
HF 1.35''
Druckkammertreiber
Stahlgitter mit Akustikfilz Stahlgitter mit Akustikfilz Stahlgitter mit
350x380x585mm 410x430x670mm 475x500x750mm 485x530x1180mm
Klasse D LF Klasse -D, HF Klasse AB
Samplingfreq. 24Bit,
96kHz
/ Ja Ja
PA, Monitor, Sub, Speech
12'' 2-Weg
Breitbandlautsprecher,
LF 12'' Tieftöner, 2.5''
VC, 50 OZ
HF 1.35''
Druckkammertreiber
Samplingfreq. 24Bit, 96kHz
Live, Music, Speech, DJ Live, Music, Speech, DJ
15'' 2-Weg
Breitbandlautsprecher,
LF 15'' Tieftöner, 3'' VC,
60 OZ
HF 1.75''
Druckkammertreiber
Akustikfilz
Dual 15'' 2-Weg
Breitbandlautsprecher
LF 15'' Tieftöner, 3'' VC,
OZ
HF 1.75''
Druckkammertreiber
Stahlgitter mit Akustikfilz
LF Klasse -D, HF
Klasse AB
Samplingfreq.24Bit,
96kHz
Bluetooth Modul
Verbinder
Regler
Front LED Schalter
Anzeiger
Schutzvorrichtungen
Kühlung
Versorgung
©
2xCombo Line/Mic in,
out
2 Eingangslautstärkeregler ,
Hauptlautstärkeregler
BT Status, Limit, Signal,
Power, DSP 4 Modes
Überhitzung, Überlast,
DC Schutz,
Überspannung,
Unterspannung, Soft start
2xCombo Line/Mic in, Bluetooth in, XLR Mix out
2 Eingangslautstärkeregler ,
Hauptlautstärkeregler,
DSP Funktionswahlschalter
Limit, Signal, Power Limit, Signal, Power
Überhitzung, Überlast, DC Schutz,
Überspannung, Unterspannung, Soft start
Bluetooth in, XLR Mix
out
2 Eingangslautstärkeregler ,
Hauptlautstärkeregler /
DSP
Schutz, Überspannung,
Unterspannung, Soft start
Page 26

Copyright LOTRONIC 2018
aktiv
aktiv
aktiv
400 Watt
500 Watt
600 Watt
4 Ohm
4 Ohm
4 Ohm
OZ
OZ
OZ
Stahlgitter mit Akustikfilz
Stahlgitter mit Akustikfilz
Stahlgitter mit Akustikfilz
15mm Multiplex
15mm Multiplex
18mm Multiplex
Strukturlack
Strukturlack
Strukturlack
420x510x520mm
490x600x610mm
580x700x715mm
400W
500W
600W
24Bit, 96kHz
24Bit, 96kHz
24Bit, 96kHz
Ja
Ja
Ja
Live, Music, DJ1, DJ2
Live, Music, DJ1, DJ2
Live, Music, DJ1, Dj2
Ja
Ja
Ja
Verbinder
in,
Bluetooth in, XLR Mix out
2xCombo Line/Mic in,
2xCombo Line/Mic in,
Bluetooth in, XLR Mix out
2 Eingangslautstärkeregler ,
H
Funktionswahlschalter
Funktionswahlschalter
Anzeiger
Limit, Signal, Power
Limit, Signal, Power
Unterspannung, Softstart
Überhitzung, Überlast, DC
Unterspannung, Softstart
Kühlkörper
Kühlkörper
Kühlkörper
220-240VAC 50Hz
220-240VAC 50Hz
220-240VAC 50Hz
F I R S T- S e r i e s
www.bst-dj.com
TECHNISCHE DATEN – AKTIVE SUBWOOFER
Best. Nr. FIRST-SA12SDSP2 FIRST-SA15SDSP2 FIRST-SA18SDSP2
TYP
Freq. bereich (-10dB)
Empfindlichkeit (1W@1M)
Leistung (RMS)
Nennimpedanz
Driver
Gitter
Gehäuse
Beschichtung
Abmessungen (B x H x T)
Nettogewicht
TYP
Verstärker
Ausgangsleistung
DSP
DSP Display
Modes
Bluetooth module
12'' Bassreflex Subwoofer,
40Hz-160Hz 35Hz-160Hz 30Hz-160Hz
100dB 102dB 102dB
LF 12'' Subwoofer, 3'' VC, 80
23.50kg 33.50kg 46.50kg
Aktiver Sub Amp Aktiver Sub Amp Aktiver Sub Amp
Klasse D Klasse D Klasse D
Samplingfrequenz
15'' Bassreflex Subwoofer,
LF 15'' Subwoofer, 4'' VC, 125
Samplingfrequenz
18'' Bassreflex Subwoofer,
LF 18'' Subwoofer, 4'' VC, 125
Samplingfrequenz
Regler
Front LED Schalter
Schutzvorrichtungen
Kühlung
Versorgung
Combo Line/Mic in, RCA
2 Eingangslautstärkeregler ,
Hauptlautstärkeregler
Ein/Aus Ein/Aus Ein/Aus
Limit, Signal, Power
Überhitzung, Überlast, DC
Schutz, Überspannung,
Bluetooth in, XLR Mix out
auptlautstärkeregler / DSP
Schutz, Überspannung,
Unterspannung, Softstart
2 Eingangslautstärkeregler ,
Hauptlautstärkeregler / DSP
Überhitzung, Überlast, DC
Schutz, Überspannung,
©
Page 27

Copyright LOTRONIC 2018
F I R S T- S e r i e s
www.bst-dj.com
VERSTÄRKER BEDIENFELD
Subwoofer Modelle
1. LINE / MIC IN
Symmetrischer Eingang zum Anschluss von Signalquellen wie Mischpulten, Instrumenten oder
Mikrofonen. Die Anschlüsse können mit 6,35mm Klinken- oder XLR Verbindern vorgenommen
werden. Der Lautstärkeregler bestimmt die einzelnen Eingangspegel. Die 12 Uhr Stellung ist
neutral (weder Verstärkung, noch Dämpfung). Der linke Regelbereich ist für die Einstellung der
Line-Pegelgeräte und die rechte Skala für die Einstellung der Mikrofonpegel. Dieselben Regler gibt
es auch für Eingang 2.
2. AUX/BT Eingang
Zum Anschluss eines CD Spielers, iPhones oder Bluetooth Signals an den AUX/BT Eingang von
Kanal 1 oder 2.
3. MIX OUT
Dieser XLR Ausgang schleift beide Eingangssignale in einen anderen Lautsprecher oder
Subwoofer. INPUT LEVEL stellt den Signalpegel zum OUTPUT ein. Die MASTER VOL oder DSP
Einstellung hat keinen Einfluss auf den OUTPUT.
4. LIMIT LED (Automatische Amplitudenbegrenzung):
Diese LED leuchtet, wenn das Audiosignal einen für die Wandler gefährlichen Pegel erreicht. Die
Schaltung reduziert die Signalamplitude, um die Lautsprecher zu schützen.
5. SIGNAL
Diese LED zeigt das Signal am XLR Eingang und hängt von der Master Lautstärke ab.
6. POWER
Leuchtet, wenn das Gerät eingeschaltet ist.
7. FRONT LED
Schaltet die Logo-Beleuchtung an und aus.
8. EIN/AUS Schalter
Schaltet das Gerät ein. Vor dem Einschalten alle Regler ganz herunterfahren.
©
Page 28

Copyright LOTRONIC 2018
F I R S T- S e r i e s
9. AC EINGANGSBUCHSE
Zum Anschluss des mitgelieferten Netzkabels.
10. Sicherung
Das Gerät erst vom Netz abkoppeln, bevor die Sicherung ausgewechselt wird. Nur durch eine gleichwertige Sicherung ersetzen.
Der Sicherungswert ist auf der Rückplatte vermerkt.
11. LCD
DSP Information
12. MASTER LAUTSTÄRKE
Einstellung des Klangpegels
DSP: Durchlaufen der Menüs und Wahl der verschiedenen Einstellpunkte. Den MASTER VOL Knopf drücken, um ins DSP
Menü zu schalten.
13. LAUTSPRECHER-BETRIEBSART:
PA: Standardeinstellung für die Lautsprecher. Benutzen Sie diese Einstellung, wenn der Lautsprecher auf einem Stativ benutzt
wird und aufs Publikum gerichtet ist.
DJ: Diese Einstellung ist für DJs und DJ Musikapps, und wenn der Lautsprecher aufs Publikum gerichtet ist.
Monitor: Der Lautsprecher wird als Bühnenmonitor eingesetzt und richtet sich auf den Sänger.
Speech: Wenn der Lautsprecher für Vorträge und Reden eingesetzt wird und aufs Publikum gerichtet ist.
14. BLUETOOTH:
Verbinden des Lautsprechers mit Ihrem Bluetooth Gerät:
A: Bei eingeschaltetem Lautsprecher 2 Sekunden lang die PAIR Taste drücken, um die Bluetooth Funktion zu aktivieren. Die
Pair LED blinkt.
B: Bluetooth auf Ihrem Handy aktivieren und BST-FIRST wählen. Wenn die Verbindung erfolgreich hergestellt ist, leuchtet die
Pair LED ständig.
C: Lautstärke des Bluetooth Geräts ganz herunterfahren.
D: Spielen Sie Ihre Musik auf dem Bluetooth Gerät ab und stellen Sie die Lautstärke Ihres Bluetooth-Geräts aufs Maximum.
E: Wenn das Bluetooth-Gerät erst einmal an den Lautsprecher angeschlossen war, erinnert sich der Lautsprecher ans Gerät.
Zur erneuten Verbindung einfach auf die Bluetooth Seite Ihres Gerät gehen und “Connect" wählen, um die Verbindung
herzustellen.
F: Wenn die Musik vom angeschlossenen Bluetooth Gerät abgespielt wird, drücken Sie einmal die Pair Taste für Play und
Pause. Wenn Sie die Taste 2 Sekunden lang gedrückt halten, koppelt sich das Gerät ab.
15. BLUETOOTH VOLUME
Zur Einstellung der Eingangslautstärke des Bluetooth Geräts.
16. MIX OUT WAHLSCHALTER
In der oberen Stellung (Ch1) wird der MIXOUT Pegel nicht von den Eingangspegelreglern beeinflusst.
In der unteren Stellung (MIX), kann der MIX OUT Pegel von den Eingangspegelreglern eingestellt werden.
www.bst-dj.com
©
Page 29

Copyright LOTRONIC 2018
F I R S T- S e r i e s
www.bst-dj.com
DSP REGLER
Das integrierte DSP Menü eröffnet dem Bediener eine Vielzahl von Einstellungsmöglichkeiten.
Zugang zum DSP Menü
1.
Den Master Vol Knopf drücken und das DSP Menü erscheint.
2.
Den Master Vol Knopf drehen, um das Menü zu durchlaufen
3.
Den Master Vol Knopf drücken , um die Funk tion zu wählen, die Sie ändern möc hten. Der Cursor geht zu den
Parametern auf der rechten Seite des DSP Menüs.
4.
Mit dem Master Vol Knopf die Parameter durchlaufen .
5.
Den Master Vol Knopf drücken, um das gewählte Parameter zu bestätigen.
Die Einstellung ist nun gespeichert. Der Cursor geht zurück zur linken Seite des DSP Menüs.
6.
Schritte 2 bis 5 wiederholen, um wei tere DSP Werte zu ändern.
7.
Zum Verlassen des Menüs E XIT wählen.
©
Page 30

Copyright LOTRONIC 2018
MUSIC
SPEECH
DJ
LOACTION
TRIPOD (default)
MONITOR
SUB
OFF(default)
80Hz
100Hz
120Hz
MID
0dB (default)
-12dB–+12dB
BASS
0dB (default)
-12dB–+12dB
LCD DIM
ON (default)
OFF
BRIGHT
5 (default)
1-10 adjust
INFO
Brand Product Name
Firmware Version
EXIT
F I R S T- S e r i e s
www.bst-dj.com
DSP REGLER DER BREITBAND-LAUTSPRECHER
Das DSP Menü ist auf den 12” und 15” Lautsprechern verfügbar.
Mode LIVE (default)
WALL
SUPEND
150Hz
TREBLE 0dB (default)
-12dB–+12dB
DELAY 0-116m
BTH VOL OFF (default)
Bluetooth Connected
RESET NO (default)
ARE YOU SURE?
YES OR NO
* Hinweis ! Wenn 20 Sekunden lang kein Regler berührt wird, schaltet das Display wieder auf die normale Anzeige um.
Mode Menu
In diesem Menü wird der Klangtyp des Lautsprechers bestimmt.
Die Einstellmöglichkeiten sin d folge nde: LIVE, MUSIC, SPEECH und DJ.
•
LIVE - für live Sound Applikationen (Standardeinstellung).
•
MUSIC –zum Abspielen aufgenommener Musik.
•
SPEECH –für Vorträge und Reden.
•
DJ – zum Abspielen aufgenommener elektronischer Musik.
LOCATION Menu
•
Mit diesem Menü wird der Lautsprecher für verschiedene Räumlichkeiten optimiert.
•
Die Einstellmöglichkeiten sind folgende: TRIPOD, MONITOR, WALL und SUSPEND.
•
TRIPOD – wenn der Lautsprecher auf einem Stativ steht (Standardeinstellung)
•
MONITOR – Wenn der Lautsprecher horizontal angewinkelt in Monitorstellung liegt. Diese Einstellung kompensiert die
Verstärkung der Bässe, die durch die Bodenn ähe entsteht.
©
Page 31

Copyright LOTRONIC 2018
F I R S T- S e r i e s
www.bst-dj.com
DSP REGLER DER BREITBAND-LAUTSPRECHER
•
WALL – wenn der Lautsprecher mit dem Halter an einer Wand befestigt ist. Diese Einstellung kompensiert die
Verstärkung der Bässe, die durch die Wandnähe entsteht. Wenn eine Säule benutzt wird, ist es ratsam, die
SUSPEND Einstellung zu wählen.
•
SUSPEND – wenn der Lautsprecher aufgehängt ist.
SUB Menu
Im Sub Menü wird eine Hochpassfrequenz zum Einsatz mit einem Subwoofer oder einem abgestimmten Subwoofer
eingestellt. Die Einstellmöglichkeiten sind folgende: OFF, 80Hz, 100Hz, 120Hz, 150Hz, 15"/18". Die Hochpässe sind 24dB /
Octave Linkwitz/Riley Filter. Die 80 Hz, 100 Hz, 120 Hz und 150 Hz sind allgemeine Hochpasseinstellungen zum Einsatz mit
anderen Subwoofern. Die 15 Sub/18 Sub Einstellungen sind spezifisch optimiert für Subwoofer, unter Berücksichtigung einer
Zeitverzögerung für optimale Summen. Die Standardeinstellung ist OFF.
TREBLE Menü
Das Treble Menü dient zur Einstellung der hohen Frequenzen für verschiedene Einsatzbereiche oder persönlichen Geschmack.
Der Parameter steuert einen Kuhschwanzfilter, der auf 6kHz zentriert ist. Der Regelbereich beläuft sich auf -12 dB bis+ 6 dB. Die
Standardeinstellung ist Null (0).
MID Menü
Das Mid Menü stellt die mittleren Frequenzen des Lautsprechers für verschiedene Einsatzbereiche oder persönlichen
Geschmack ein. Der Parameter steuert einen parametrischen EQ, der auf 1,2KHz zentriert ist. Der Regelbereich beläuft
sich auf -12dB bis +6dB. Die Standardeinstellung ist Null (0).
BASS Menü
Das BASS Menü stellt die tiefen Frequenzen des Lautsprechers für verschiedene Einsatzbereiche oder persönlichen Geschmack
ein. Der Parameter steuert einen parametrischen EQ, der auf 80Hz zentriert ist. Die Standardei nstellung ist Null (0).
DELAY Menü Das DELAY Menü stellt die Zeitverzögerung ein. Der Regelbereich beträgt 0-30ms.
BTH VOL Menü
Das Bluetooth Menü im DSP dient zum Abstimmen und Verbinden der Bluetooth Funktion an mobile Geräte. Gehen Sie ins
Menü und stellen Sie die Lautstärke in einem Bereich von 0-16 ein. Starten Sie gleichzeitig die Bluetooth Suche. Das Bluetooth
Symbol blinkt auf dem Display. Aktivieren Sie die Bluetooth Funktion im mobilen Gerät und verbinden Sie die beiden Geräte.
Das Bluetooth Symbol blinkt nicht mehr, wenn beide Geräte miteinander verbunden sind. Nun können Sie die Musik des
Bluetooth Geräts über den Lautsprecher hören und die Lautstärke einstellen. Die Bluetooth Funktion des Lautsprechers ist
deaktiviert, wenn die Lautstärk e auf 0 eingeste llt ist.
LCD DIM Menü
Das LCD Dim Menü verringert die Helligkeit des Displays nach 20 Minuten Nichtgebrauch. Sie haben die Wahl zwischen
ON und OFF. Die Standardeinstellung ist ON.
BRIGHT Menü
Mit diesem Menü wird die Helligkeit des Displays eingestellt. Der Regelbereich beträgt 1 bis 10. Die Standardeinstellung ist 5.
CONTRAST Menü
Mit diesem Menü wird der Kontrast des Displays eingestellt. Der Regelbereich beträgt 1 bis 10. Die Standardeinstellung ist 5.
RESET Menü
Mit diesem Menü wird der Lautsprecher wieder auf seine Werkseinstellungen zurückgesetzt. Einstellmöglichkeiten sind
NO oder YES. Die Werkseinstellung ist NO. Um das System auf die Werkseinstellungen zurück zu setzen, gehen Sie wie
folgt vor:
3.
Im DSP Menü RESET wählen. Die Frage nach Bestätigung
erscheint auf dem Display:
4.
Wählen Sie YES.
Der Lautsprecher startet erneut und stellt alle Parameter auf die
Werkseinstellungen.
INFO Menü
In diesem Menü können Sie die Marke, den Produktnamen und die Firmware Version sehen.
©
Page 32

Copyright LOTRONIC 2018
MUSIC
Dj1 Dj2
Low Pass
OFF(default)
80Hz
150Hz
12" 15"
DELAY
OFF(default)
LCD DIM
ON(default)
OFF
BRIGHT
5(default)
1-10 adjust
INFO
Brand Prouduct Name
Firmware Version
EXIT
F I R S T- S e r i e s
www.bst-dj.com
DSP REGLER DES SUBWOOFERS
Das Subwoofer DSP Menü ist auf den 12", 15'' und 18'’ Modellen vorhanden.
Mode LIVE(default)
100Hz
120Hz
0-30ms
POLARITY POL+(default)
POL
RESET ON(default)
ARE YOU SURE?
YES OR NO
* Hinweis ! Wenn 20 Sekunden lang kein Regler berührt wird, schaltet das Display wieder auf die normale Anzeige um.
Mode Menu
In diesem Menü wird der Klangtyp des Lautsprechers bestimmt.
Die Einstellmöglichkeiten sin d folge nde: LIVE, MUSIC und DJ.
•
LIVE - zum Abspielen aufgenommener Musik und EDM (Standardeinstellung).
•
MUSIC – für live Sound Applikationen
•
DJ1 – zum Abspielen aufgenommener elektronischer Musik.
•
DJ2 - zum Abspielen aufgenommener elektronischer Musik.
LOW PASS Menü
Das LOW PASS Menü dient zur Wahl der richtigen Tiefpassfrequenz für die Einschleifung in die Summe eines BreitbandLautsprechers. Verfügbare Frequenzen: 80Hz, 100Hz, 120Hz, 150Hz, 12", 15". DieTiefpässe sind 24dB / Octave Linkwitz/Riley
Flanken. Die 80 Hz, 100 Hz, 120 Hz und 150 Hz sind allgemeine Tiefpasseinstellungen zum Einsatz mit anderen
Breitbandlautsprechersystemen. Die 12“ und 15“ Einstellungen sind spezifisch optimiert für Breitbandlautsprecher für optimale
Summen. Die Standardeinstellung ist OFF.
POLARITY Menü
Das POLARITY Menü dient zur Einstellung er Lautsprecherpolarität. Die Werkseinstellung ist Polarity+.
LCD DIM Menü
Das LCD Dim Menü verringert die Helligkeit des Displays nach 20 Minuten Nichtgebrauch. Sie haben die Wahl zwischen
ON und OFF. Die Standardeinstellung ist ON.
BRIGHT Menü
Mit diesem Menü wird die Helligkeit des Displays eingestellt. Der Regelbereich beträgt 1 bis 10. Die Standardeinstellung ist 5.
CONTRAST Menü
Mit diesem Menü wird der Kontrast des Displays eingestellt. Der Regelbereich beträgt 1 bis 10. Die Standardeinstellung ist 5.
©
Page 33

Copyright LOTRONIC 2018
Mode
Speech
Location
Tripod
Sub
OFF
Mode
Music
Location
Tripod
Sub
OFF
Mode
Live
Location
Tripod
Sub
18“ sub
Mode
Live
Low
Pass
15“
Mode
Live
Location
Monitor
Sub
OFF
F I R S T- S e r i e s
www.bst-dj.com
DSP REGLER DES SUBWOOFERS
RESET Menü
Mit diesem Menü wird der Lautsprecher wieder auf seine Werkseinstellungen zurückgesetzt. Einstellmöglichkeiten sind NO oder
YES. Die Werkseinstellung ist NO. Um das System auf die Werkseinstellungen zurück zu setzen, gehen Sie wie folgt vor:
Im DSP Menü RESET wählen. Die Frage nach Bestätigung erscheint auf dem Display:
Wählen Sie YES.
Der Lautsprecher startet erneut und stellt alle Para mete r auf die Werkseinstellungen.
INFO Menü
In diesem Menü können Sie die Marke, den Produktnamen und die Firmware Version sehen.
EINSATZBEISPIELE
Daisy-Chain Verbindung von
Breitbandsystemen
CD/DVD Stereo Konfiguration
Stapeln von Breitbandsystemen mit Subwoofern
15“ 18“ SUB
Einsatz von Breitbandsystemen als Bühnenmonitore
©
Page 34
Loading...