

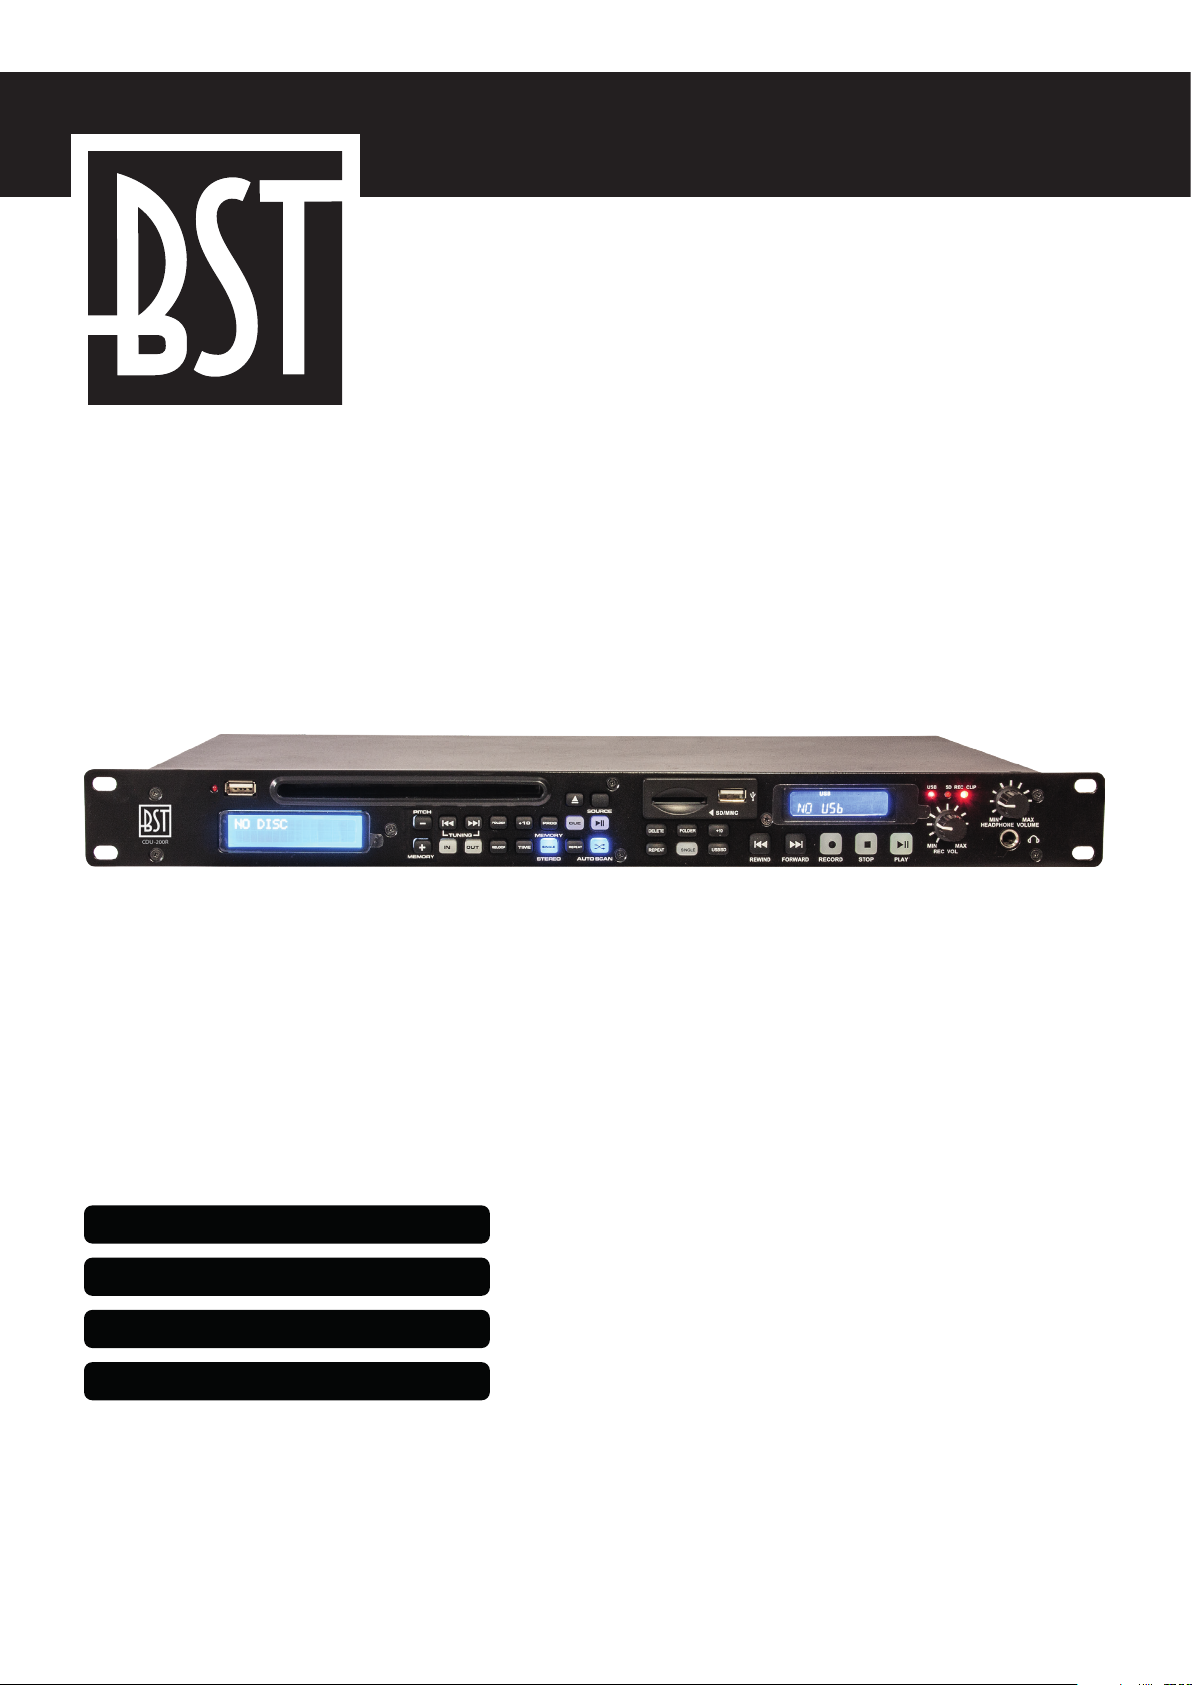
CDU-200R
CODE: 95-1522
PROFESSIONAL DUAL PLAYER WITH CD, USB, SD & FM TUNER
DOUBLE LECTEUR PROFESSIONNEL AVEC CD, USB, SD & TUNER FM
DOPPEL-PLAYER MIT CD, USB, SD & FM TUNER
PROFESSIONELE DUALSPELER MET CD, USB, SD & FM-TUNER
INSTRUCTION MANUAL • EN • p. 3
MANUEL D‘UTILISATION • FR • p. 7
BEDIENUNGSANLEITUNG • DE • S.11
HANDLEIDING • NL • p. 15

2 • CDU-200R

CDU-200R • 3
PROFESSIONAL DUAL PLAYER WITH CD, USB, SD & FM TUNER
Instruction Manual
The triangle containing a lightning symbol is used to indicate whenever your health is at risk (due to electrocution, for example).
An exclamation mark in a triangle indicates particular risks in handling or operating the appliance.
SAFETY INSTRUCTIONS
• Read all safety and operating instructions prior to using the device for the rst time and keep them for future
reference.
• All warnings on the device and in the operating instructions should be adhered to.
• Unplug the device from the wall outlet before cleaning. The device should be cleaned only with a dry cloth.
Avoid solvents or other cleaning detergents.
• Do not use the device near water for example, near a bath tub, wash bowl, kitchen sink, or laundry tub, in a
wet basement, or near a swimming pool and the like.
• Do not place or mount the device on an unsuitable and/or unstable stand, tripod, bracket or table. The device
might fall and injure people and/or get seriously damaged. Install the unit only as recommended in this manual.
• Ventilation slots and openings in the cabinet are provided for ventilation and to ensure reliable operation by
avoiding overheating. These openings must not be blocked nor covered. The device should not be built into
a closed installation such as a bookcase or rack unless proper ventilation is provided. There should be free
space of at least 20cm and an opening behind the appliance.
• The appliance should be operated only from AC 100-240V ~ 50/60 Hz mains power.
• The appliance is a class II apparatus with double isolation and no protective earth terminal.
• Power supply cords should be routed so that they are not likely to be walked on or pinched by items placed
upon or against them. Pay particular attention to cords at plugs, convenience receptacles and the point
where they exit from the appliance.
• For added protection of the device during a thunderstorm, or when it is left unattended and unused for long
periods of time, unplug it from the wall outlet and disconnect the cable system. This will prevent damage to
the appliance due to lightning and power-line surges.
• Do not overload wall outlets, extension cords or integral convenience receptacles as this can result in a risk
of re or electric shock.
• Never push objects of any kind into the appliance through openings as they may touch dangerous voltage
points or short-circuit parts that could result in a re or electric shock. Never spill liquids of any kind on the
appliance.
• Do not attempt to service the appliance yourself as opening or removing covers may expose you to dangerous
voltage or other hazards. Refer all servicing to qualied service personnel.
• When spare parts are required, be sure the service technician has used replacement parts specied by the
manufacturer or that the spare parts have the same specications as the original parts. Unauthorized substitutions may result in re, electric shock or other hazards.
• Keep away from heat sources such as radiators, heat registers, stoves or other appliances (including ampli-
ers) that produce heat.
DISCONNECT DEVICE
Where the MAINS plug or an appliance coupler is used as the disconnect device, the disconnect device shall
remain readily operable.
4 • CDU-200R
IMPORTANT
Use of controls or adjustments or performance of procedures other than those specied herein may result in
hazardous radiation exposure.
CLASS 1 LASER
The built-in CD players contain a class 1 laser. DO NOT STARE INTO THE BEAM!
WARNING
CAUTION
DO NOT OPEN THE HOUSING
SHOCK HAZARD
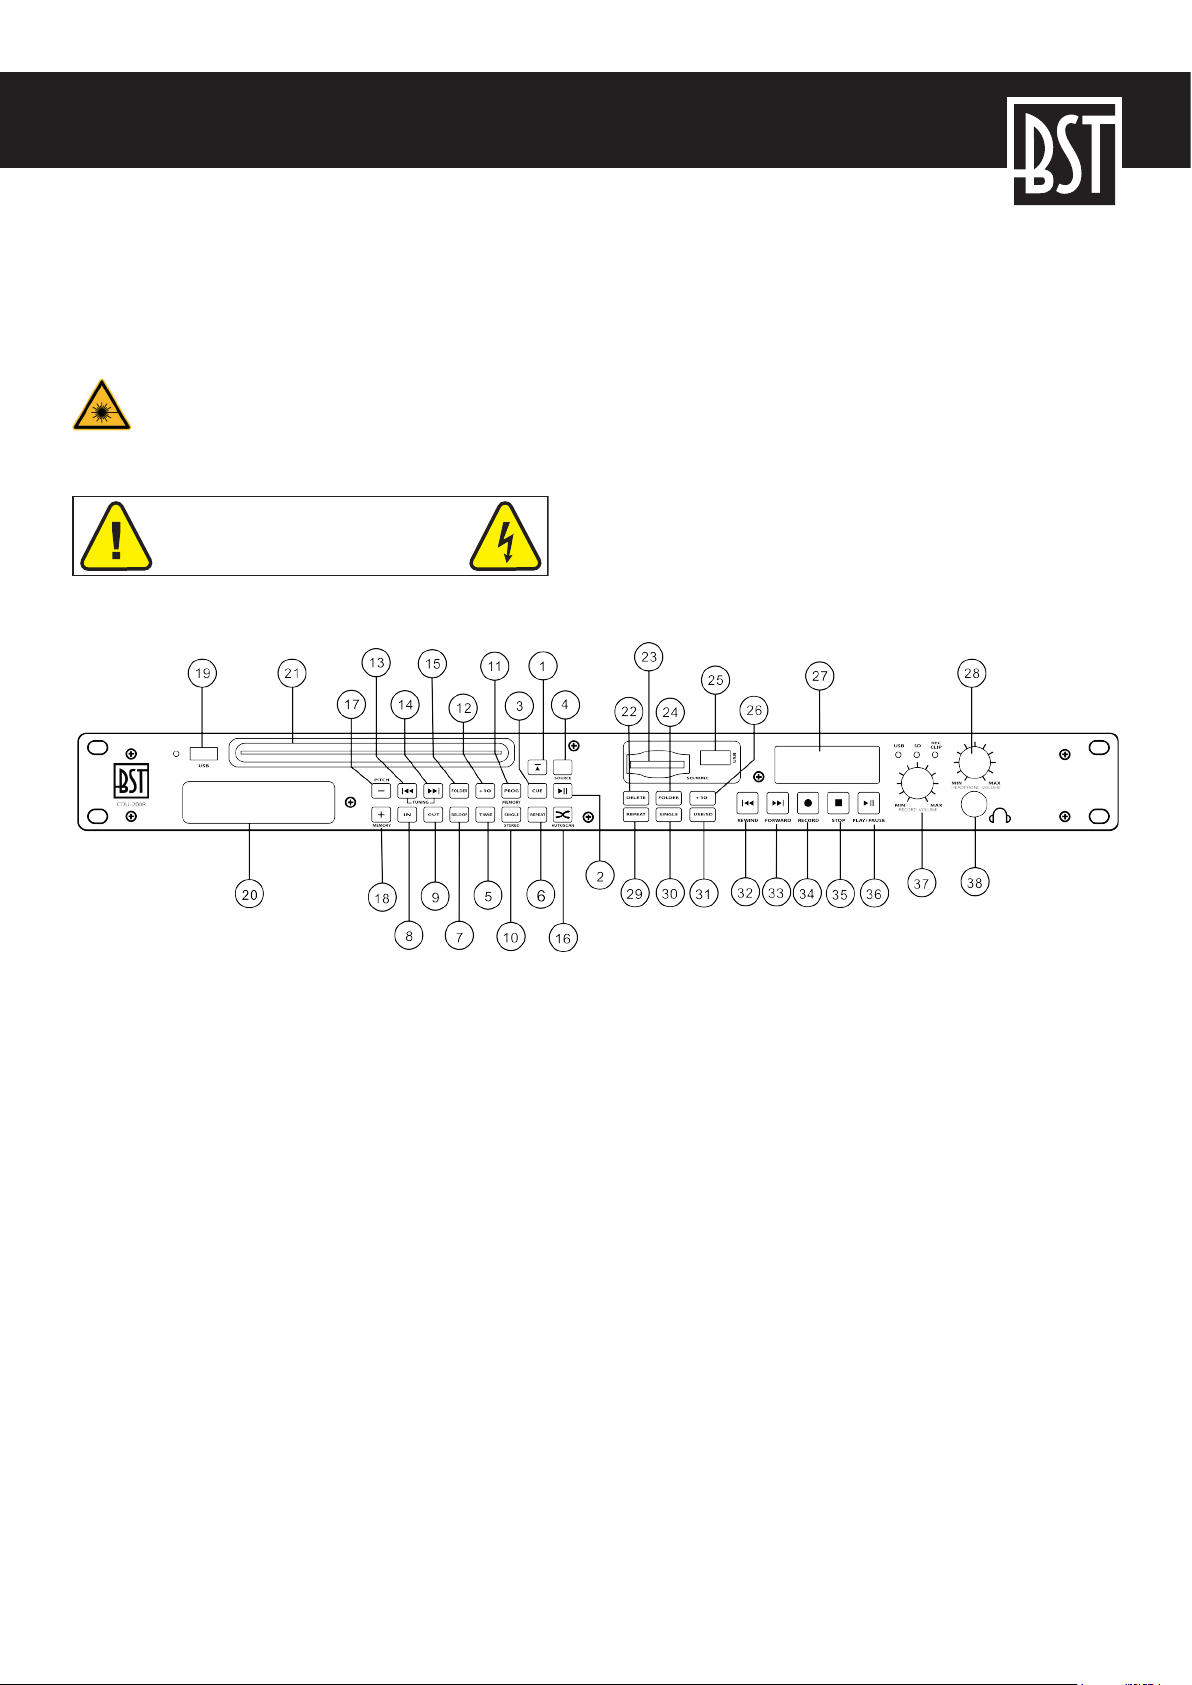
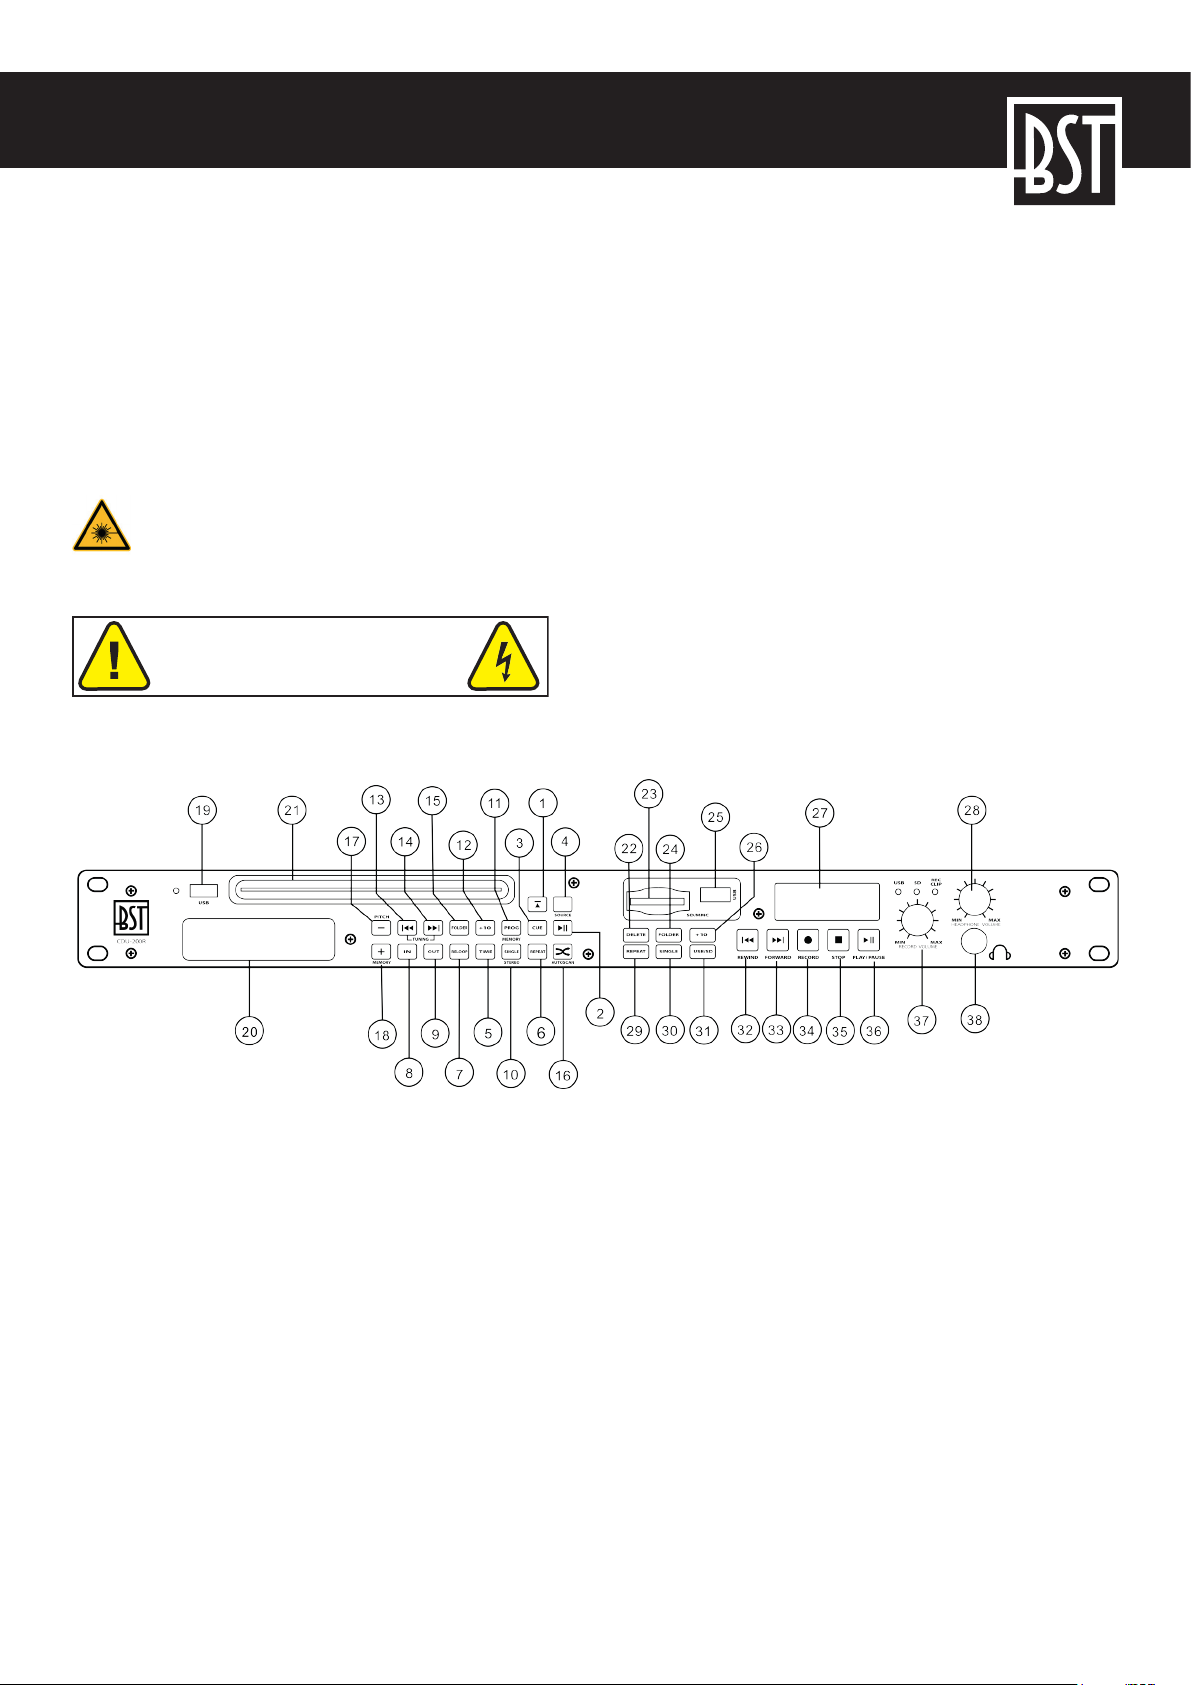
DESCRIPTION OF THE FRONT PANEL CONTROLS
1. EJECT button: Press to open or close the CD tray. If a CD is playing, stop the play first and then press the
button to open the tray.
2. PLAY/PAUSE BUTTON: Each time you press the Play/Pause button, the operation changes from Play
to Pause or from Pause to Play.
3. CUE BUTTON: Press the Cue button during play to return to the position where the play has started.
4. SOURCE button: Press this button to choose among CD, USB or FM radio mode
5. TIME button: The TIME button switches the time display between elapsed time, remaining time or total
remaining time.
6. REPEAT: Press the REPEAT button once to activate the function and repeat the selected track. Press
REPEAT again to activate the REPEAT ALL function and repeat all tracks on the CD. Press the REPEAT
button again to deactivate the repeat function.
7. RELOOP BUTTON: Use this button to start the last saved loop. To finish the loop, press the RELOOP button
again.
8. LOOP IN BUTTON: Sets the starting point of your loop. The loop indicator on te display flashes.
9. LOOP OUT BUTTON: Sets the end point of your seamless loop and starts the playback of the loop. Press
again to exit the loop.
10. CONT./SINGLE: Pressing the SINGLE button activates the SINGLE mode. In this mode, the player will
play one song and then stop. Press the button again to activate the CONTINUOUS mode causing the unit
to play continuously. After the last track, the unit will return to the first track on the disc and continue to play.
STEREO: In FM mode, press this button to change audio between mono and stereo

CDU-200R • 5
11. PROG BUTTON: In Stop mode, you can program several tracks (20 tracks max.):
Press the STOP button to enter into stop mode
Press the PROG button to enter into program mode
Choose a track via the Skip track buttons and press the PROG button to save your choice.
Use once more the Skip Track buttons to choose the next track you want to listen to and press the PROG
button to save your choice.
Repeat the operation to select up to 20 tracks you want to listen to.
Press the PLAY/PAUSE button to start playback
MEMORY: In FM mode, this button gives access to the radio station memories. If you wish to store
a station in the memory, press this button, select a memory place via the buttons 17 & 18 and press this
button again to save the station in the desired memory.
12. +10 Button: Use this button to jump 10 tracks at once.
13. SKIP Button: Use this button to restart the track or select the last track.
In FM mode, press this button to skip backwards to the previous frequency.
14. SKIP Button: Use this button to select the next track.
In FM mode, press this button to skip upwards to the following frequency
15. FOLDER button: This button allows you to browse through folders when you are in USB or in CD mode.
16.
17. PITCH BEND – BUTTON: The pitch will drop while the – button is pressed and return to the
18. PITCH BEND + BUTTON: The pitch will automatically rise when the + button is pressed and
19. USB PORT: Connect your USB drive containing the MP3 files.
20. DISPLAY
21. DISC TRAY
22. DELETE button: Delete songs on the SD or USB track
23. SD CARD SLOT: Insert your SD card with the contacts pointing downwards into the slot. The unit
BUTTON: Random play. When this function is activated, the LCD will light up.
In FM mode, press this button to search automatically for radio stations. All found stations will be stored
automatically in one of the 20 available memories. At each press on the button, the search direction will
change.
original pitch when it is released.
In FM mode, press this button to browse backwards through the memories. To listen to a stored radio
station, select the memory via this button or button 18.
return to the original pitch when it is released.
In FM mode, press this button to browse forwards through the memories. To listen to a stored radio
station, select the memory via this button or button 17.
cannot read cards with a capacity of more than 4Gb. The unit is not compatible with SDHC cards.
24. FOLDER button: This button allows you to browse through folders when you are in USB or in CD mode.
25. USB PORT: Connect your USB drive.
26. +10 Button: Use this button to jump 10 tracks at once.
27. DISPLAY
28. HEADPHONE VOLUME: Adjusts the volume of the headset
29. REPEAT: Press the REPEAT button once to activate the function and repeat the selected track. Press
REPEAT again to activate the REPEAT ALL function and repeat all tracks on the CD. Press the REPEAT
button again to deactivate the repeat function.
30. CONT./SINGLE: Pressing the SINGLE button activates the SINGLE mode. In this mode, the player will
6 • CDU-200R
play one song and then stop. Press the button again to activate the CONTINUOUS mode causing the unit
to play continuously. After the last track, the unit will return to the first track on the disc and continue to
play.
31. USB/SD select button: This button allows you to toggle between the inserted SD card and the mass
storage device connected to the USB port.
32. SKIP Button: Use this button to restart the track or select the last track.
33. SKIP Button: Use this button to select the next track.
34. RECORD BUTTON: Enter into record mode.
35. STOP button: Stops the music from the media player
36. PLAY/PAUSE BUTTON: Each time you press the Play/Pause button, the operation changes from Play
to Pause or from Pause to Play.
37. RECORD VOLUME: Adjusts the volume level of the record
38. HEADPHONE JACK: Connect a stereo headphone to this 3.5mm Jack.
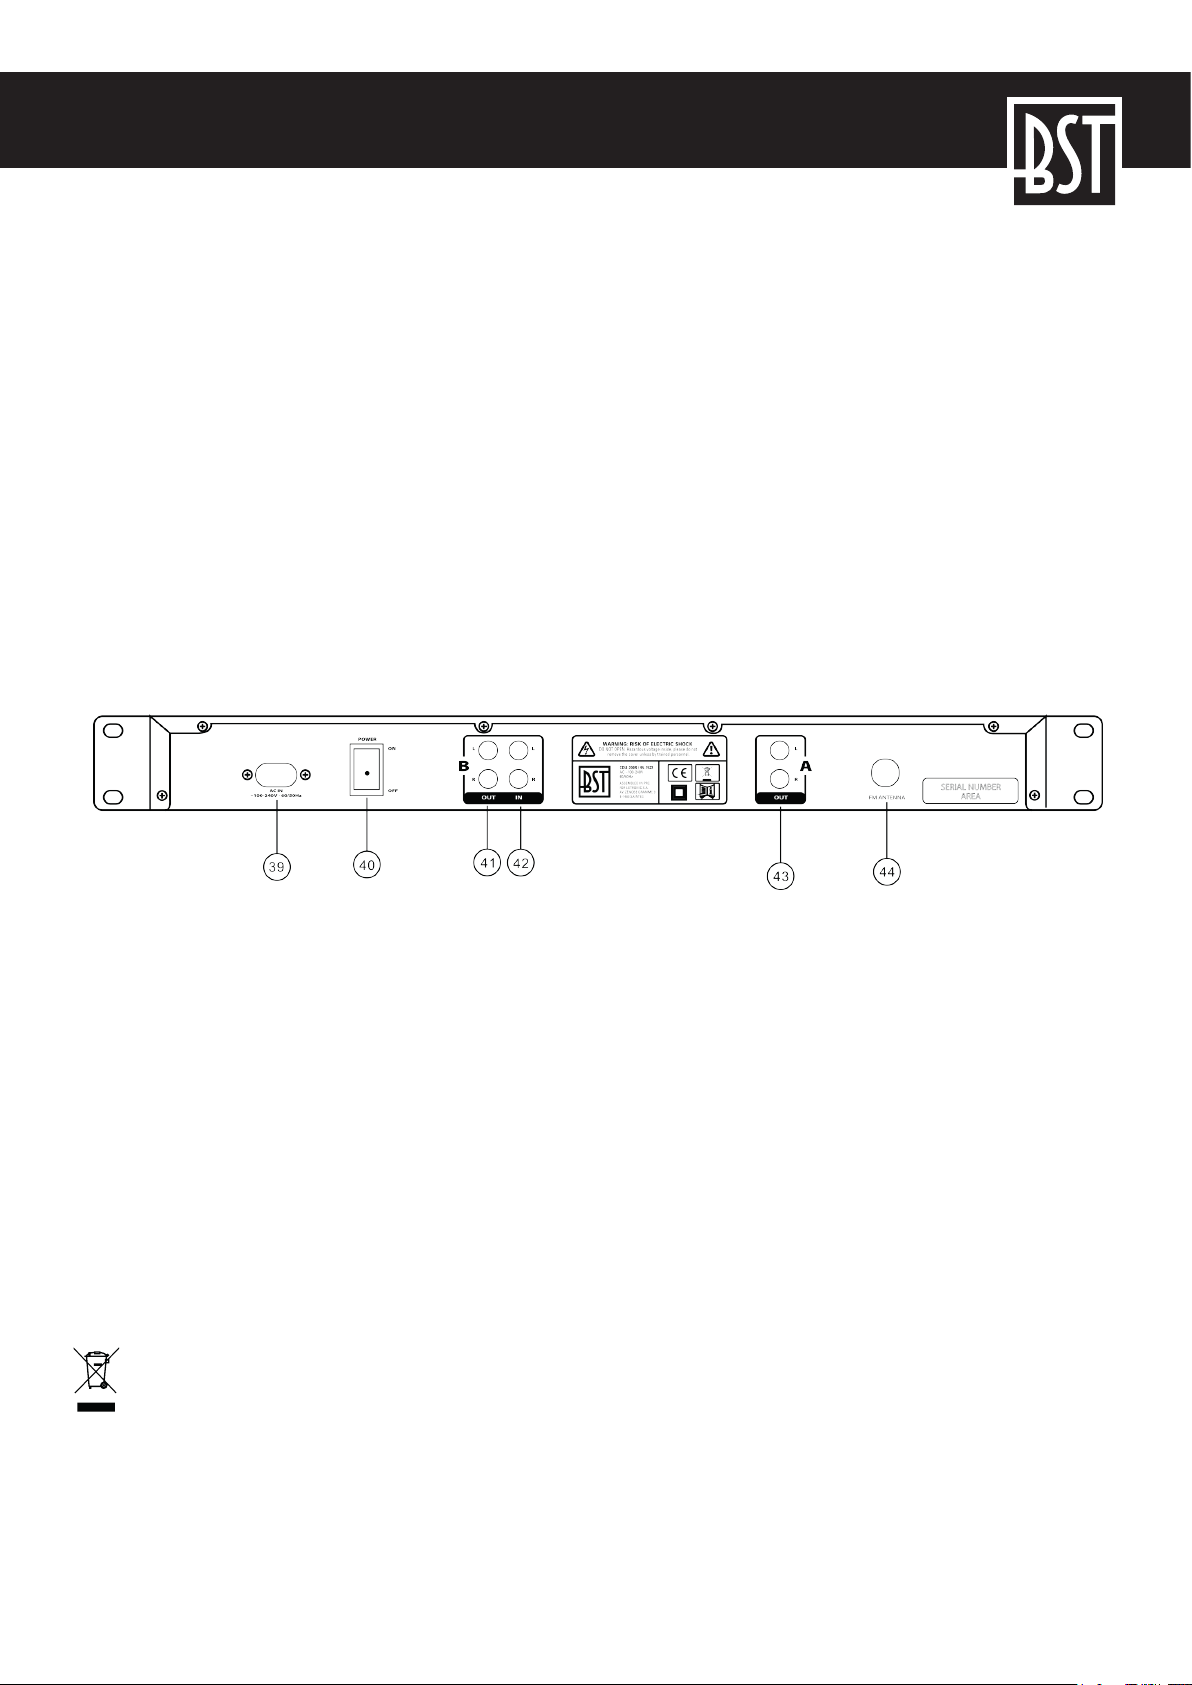
REAR PANEL CONNECTIONS
39. AC IN: Connection cable to the mains outlet.
40. POWER BUTTON: Press to turn the unit on or off.
41. LINE OUT (B): Audio output of the right player (SD & USB)
42. LINE IN: Input jack for each SD/USB player.
43. LINE OUT (A): Audio output of the left player (CD & USB)
44. ANTENNA connector: Plug the supplied antenna into this connector
SPECIFICATIONS
Anti-shock buffer memory .................................................................................................................40 seconds
Power supply ........................................................................................................................ 100-240Vac 50/60Hz
Dimensions ................................................................................................................................482 x 45 x 52.5mm
Weight............................................................................................................................................................ 2.85kg
Correct disposal of the product
This marking indicates that this product should not be disposed with other household wastes throughout the EU. To prevent possible harm to the
environment or human health from uncontrolled waste disposal, recycle it responsibly to promote the sustainable reuse of material resources. To return your used device, please use the return and collection systems or contact the retailer where the product was purchased. They can take this
product for environmental safe recycling.

CDU-200R • 7
DOUBLE LECTEUR PROFESSIONNEL AVEC CD, USB, SD & TUNER FM
Manuel d’Utilisation
SIGNIFICATION DES SYMBOLES
L’éclair dans le triangle attire l’attention de l’utilisateur sur la présence de tensions dangereuses non iso-
lées à l’intérieur du boîtier qui sont d’une magnitude sufsante pour constituer un risque d’électrocution.
Le point d’exclamation dans un triangle attire l’attention de l’utilisateur sur des consignes d’utilisation et
de maintenance importantes contenues dans le manuel livré avec les appareils
CONSIGNES DE SECURITE
• Lire attentivement toutes les consignes de sécurité de d’utilisation avant la première utilisation. Conserver
le manuel pour référence ultérieure. Respectez tous les avertissements sur l’appareil et dans le manuel.
• Débranchez l’appareil de la prise murale avant le nettoyage. Nettoyez l’appareil uniquement avec un chiffon
sec. Ne pas utiliser de dissolvants ou autres détergents
• Ne pas utiliser l’appareil à proximité d’eau, p.ex. à proximité d’une baignoire, d’un lavabo, d’un évier de cuisine, sur un sol humide ou à proximité d’une piscine ou autre.
• Ne pas placer ou monter l’appareil sur un support inapproprié ou instable, un trépied, un étrier ou une table.
S’il tombe, il risque de blesser gravement un enfant ou un adulte et être lourdement endommagé. Pour le
montage de l’appareil, suivez les instructions du fabricant et utilisez des accessoires de montage recommandés par le fabricant.
• Les fentes de ventilation et les ouvertures sur le boîtier servent au refroidissement et assurent un fonction-
nement able en protégeant l’appareil contre la surchauffe. Ne pas obstruer ou couvrir ces ouvertures. Ne
pas installer l’appareil dans un meuble fermé tel qu’une bibliothèque ou un rack à moins qu’une ventilation
sufsante soit prévue. Laissez au moins un espace de 20cm derrière l’appareil.
• L’appareil ne doit être alimenté que par une tension secteur de 100-240Vac 50/60Hz. Si vous ne connaissez
pas avec certitude le type d’alimentation secteur chez vous, consultez votre revendeur ou votre fournisseur
d’électricité.
• L’alimentation de cet appareil fait partie de la classe 2, sans connexion à la terre.
• Passez les cordons secteur de telle façon qu’ils ne peuvent pas être écrasés par des personnes ou des
objets. Soyez particulièrement attentive aux sorties du cordon à la che, aux prises murales et aux points
de sortie de l’appareil.
• An de protéger l’appareil pendant un orage ou lorsqu’il n’est pas utilisé pendant un lapse de temps prolongé,
débranchez-le du secteur. Ainsi vous éviterez des dommages suites à des surtensions.
• Ne pas surcharger les prises murales, rallonges ou multiprises car cela peut provoquer un incendie ou un
choc électrique.
• Ne jamais insérer d’objets d’aucune sorte dans l’appareil. Ils risquent de toucher des endroits sous tension
ou court-circuiter des composants et provoquer un incendie ou un électrochoc. Ne jamais verser de liquides
sur l’appareil.
• Ne pas essayer de réparer l’appareil vous-même puisqu’en ouvrant le boîtier vous vous exposez à des ten-
sions dangereuses ou autres dangers. Toutes les réparations doivent être effectuées par des techniciens
qualiés.
• Lorsque vous avez besoin de pièces détachées, assurez-vous que le technicien utilise les pièces détachées
spéciées par le fabricant qui possèdent les mêmes caractéristiques techniques que les pièces d’origine.
8 • CDU-200R
Des remplacements inappropriés peuvent provoquer des incendies, des chocs électriques et autres dangers.
• Tenir l’appareil à l’abri des sources de chaleur telles que radiateurs, chauffages ou autres appareils (y compris des amplicateurs) qui produisent de la chaleur.
Dispositif de coupure du secteur
Si l’appareil est coupé du secteur par une che secteur, la prise doit être facilement accessible
AVERTISSEMENT
ATTENTION
NE PAS OUVRIR LE BOITIER
RISQUE DE CHOC ELECTRIQUE
ATTENTION LASER
Le lecteur CD de cet appareil contient un laser de classe 1. Ne pas regarder dans le rayon laser!
DESCRIPTION DES COMMANDES EN FACADE
1. Touche EJECT: Appuyer pour charger ou éjecter le disque. A chaque pression, le tiroir s’ouvre ou se
ferme. NOTE : Le tiroir ne s’ouvre que lorsque la touche Pause ou Stop a été appuyée auparavant.
2. PLAY/PAUSE: A chaque pression sur cette touche, le mode bascule entre lecture et pause.
3. CUE: Appuyez sur la touche CUE en cours de lecture pour retourner à l’endroit où la lecture a commencée.
4. Touche SOURCE: Appuyez pour basculer entre la source d’entrée CD, USB et FM.
5. Touche TIME: Cette touche sélectionne l’affichage de la durée : temps restant, temps de lecture écoulé
et temps restant total.
6. REPEAT: Cette touche permet de répéter un titre ou tous les titres du CD.
7. Touche RELOOP: (système de boucle): Cette touche démarre la dernière boucle sauvegardée. Pour
terminer la boucle, appuyez à nouveau
8. LOOP IN: Cette touche marque le début de la boucle et le voyant sur l’afficheur clignote.
9. LOOP OUT: Cette touche marque la fin de la boucle et démarre la boucle. Pour mettre fin à la boucle,
appuyez à nouveau.
10. CONT./SINGLE: Appuyer pour basculer entre le mode de lecture UNIQUE (single) et CONTINU
(continuous). Le mode sélectionné s’affiche. En mode SINGLE, le lecteur s’arrête à la fin de chaque titre.
En mode continu, le lecteur passe tous les titres et s’arrête.
STEREO: En mode FM, appuyez sur cette touche pour basculer entre le son mono et stéréo.

CDU-200R • 9
11. Touche PROG:
In mode d’arrêt, vous pouvez programmer jusqu’à 20 titres.
- Appuyez sur STOP pour aller en mode d’arrêt.
- Appuyez sur PROG pour aller en mode de programmation.
- Choisissez un titre avec les touches de sélection de titre et appuyez sur PRO pour confirmer votre
choix.
- Choisissez le titre suivant avec les touches de sélection et confirmez avec PROG.
- Répétez ce processus jusqu’à ce que vous ayez sélectionné tous les titres que vous souhaitez écouter.
- Appuyez sur Lecture/Pause pour commencer la lecture.
MEMORY: En mode FM, cette touche donne accès à la mémoire des 20 stations. Pour mémoriser
une station, appuyez sur la touche 11, sélectionnez un emplacement au moyen des touches 17 et 18 et
appuyez à nouveau sur la touche 11 pour valider.
12. Touche +10: Avancez de 10 numéros de titres
13. Touche
: Appuyez pour revenir au début du titre ou sélectionnez le dernier titre.
En mode FM: Revient à la station précédente.
14. Touche
: Appuyez pour avancer au début du titre suivant.
En mode FM: Avance jusqu’à la station suivante.
15. Touche FOLDER: Ce bouton vous permet de naviguer à travers les dossiers et les titres en mode USB
ou CD.
16. Touche
: Lecture aléatoire. Lorsque cette fonction est activée, l’écran s’allume.
AUTOSCAN: En mode FM, appuyez sur cette touche pour lancer une recherche automatique des
stations. A chaque pression sur cette touche, le sens de recherche s’inverse. Toutes les stations trouvées sont automatiquement enregistrées dans la mémoire interne de 20 emplacements.
17. Touche PITCH BEND – : Le pitch descend pendant que la touche – est appuyée et revient au niveau
normal lorsqu’elle est relâchée.
En mode FM, cette touche permet de parcourir les emplacements de mémoire vers le bas. Pour écouter
une station mémorisée, sélectionnez-la avec cette touche ou la touche 18.
18. Touche PITCH BEND + : La vitesse de lecture augmente lorsque la touche + est appuyée et revient
au niveau normal lorsqu’elle est relâchée.
En mode FM, cette touche permet de parcourir les emplacements de mémoire vers le haut. Pour écouter
une station mémorisée, sélectionnez-la avec cette touche ou la touche 18.
19. PORT USB: Vous pouvez lire les fichiers à partir d’une clé USB ou bien brancher un ordinateur au moyen
d’un câble USB mais seulement en mode de fonctionnement USB.
20. AFFICHEUR
21. Tiroir CD
22. Touche DELETE: Effacez des titres sur la carte SD ou la clé USB.
23. SD: Insérez votre carte SD avec les contacts vers le bas. Le lecteur ne peut pas lire des cartes supé-
rieures à 4 Go. L’appareil n’est pas compatible avec les cartes SDHC.
24. Touche FOLDER: Ce bouton vous permet de naviguer à travers les dossiers et les titres en mode USB
ou CD.
25. PORT USB: Vous pouvez lire les fichiers à partir d’une clé USB.
26. Touche +10: Avancez de 10 numéros de titres
27. AFFICHEUR
28. VOLUME DU CASQUE

10 • CDU-200R
29. REPEAT: Cette touche permet de répéter un titre ou tous les titres du CD.
30. CONT./SINGLE: Appuyer pour basculer entre le mode de lecture UNIQUE (single) et CONTINU (conti-
nuous). Le mode sélectionné s’affiche. En mode SINGLE, le lecteur s’arrête à la fin de chaque titre. En mode
continu, le lecteur passe tous les titres et s’arrête.
31. Touche SD/USB: Appuyez pour sélectionner le mode SD ou USB pendant qu’une clé USB et une carte
SD sont en place.
32. Touche
33. Touche
: Appuyez pour revenir au début du titre ou sélectionnez le dernier titre.
: Appuyez pour avancer au début du titre suivant.
34. Touche RECORD: Pour aller en mode enregistrement.
35. Touche STOP: Pour arrêter la lecture d’un titre en cours
36. PLAY/PAUSE: A chaque pression sur cette touche, le mode bascule entre lecture et pause.
37. Touche REC VOL: Règle le volume de l’enregistrement.
38. Entrée casque: Branchez un casque stéréo muni d’une fiche Jack 3,5mm
BRANCHEMENTS A L’ARRIERE
39. AC IN: Branchement du cordon secteur.
40. POWER: Appuyez pour mettre l’appareil sous et hors tension.
41. LINE OUT (B): Sortie audio du lecteur CD & USB de gauche
42. LINE IN: Entrée audio pour le lecteur de droite.
43. LINE OUT (A): Sortie audio du lecteur SD & USB de droite
44. ANTENNE: Branchez l’antenne fournie sur ce connecteur
SPECIFICATIONS
Mémoire anti-chocs ......................................................................................................................... 40 secondes
Alimentation .......................................................................................................................... 100-240Vac 50/60Hz
Dimensions ................................................................................................................................482 x 45 x 52.5mm
Poids............................................................................................................................................................... 2,85kg
Élimination correcte du produit
Ce marquage indique que ce produit ne doit pas être éliminé avec les autres déchets ménagers dans l’UE. Pour éviter tout risque pour l’environnement
ou la santé humaine d’une élimination incontrôlée des déchets, recyclez-le de manière responsable afin de promouvoir la réutilisation durable des
ressources matérielles. Pour retourner votre appareil usagé, veuillez utiliser les systèmes de retour et de collecte ou contactez le revendeur chez qui
vous avez acheté le produit. Ils peuvent prendre ce produit pour un recyclage sans danger pour l’environnement.

CDU-200R • 11
DOPPEL-PLAYER MIT CD, USB, SD & FM TUNER
Bedienungsanleitung
ZEICHENERKLÄRUNG
Der Blitz im Dreieck weist auf Gefahren hin, die die Gesundheit gefährden können (wie z.B. Stromschlag).
Ein Ausrufezeichen im Dreieck weist auf Gefahren bei der Handhabung oder dem Betrieb des Geräts hin.
SICHERHEITSHINWEISE
• Alle Sicherheitshinweise und Bedienanweisungen vor der Inbetriebnahme lesen und die Anleitung für spätere Bezugnahme aufbewahren. Alle Warnungen auf dem Gerät und in der Anleitung beachten.
• Das Gerät vor der Reinigung vom Netz trennen. Nur mit einem trockenen Tuch reinigen. Keine Lösungsmittel
oder andere Scheuermittel benutzen.
• Das Gerät nicht in Wassernähe benutzen wie z.B. in der Nähe einer Badewanne, einer Küchenspüle, eines
Waschbeckens, auf einer feuchten Unterlage oder in der Nähe eines Swimmingpools o.ä.
• Das Gerät nicht auf eine unangebrachte oder instabile Fläche stellen, wie einen Dreifuss, einen Halter oder
einen Tisch. Wenn es herunterfällt, können Kinder oder Erwachsene schwer verletzt werden, sowie das
Gerät selbst schweren Schaden nehmen. Zur Montage die Anweisungen des Herstellers beachten und das
empfohlene Montagezubehör benutzen.
• Die Belüftungsschlitze und die Öffnungen dienen zur Kühlung und gewährleisten einen zuverlässigen Betrieb,
indem sie das Gerät gegen Überhitzung schützen. Diese Öffnungen dürfen nicht verstopft werden. Niemals
das Gerät in einem geschlossenen Gehäuse wie einem Bücherschrank oder einem Rack aufstellen, es sei
denn, es wurde für ausreichende Belüftung gesorgt. Lassen Sie einen Mindestabstand von 20cm hinter dem
Gerät.
• Das Gerät darf nur an eine 100-240VAC 50/60Hz Netzspannung angeschlossen werden.
• Das Gerät gehört zur Schutzklasse II und besitzt eine Doppelisolierung ohne Schutzkontakt.
• Verlegen Sie die Netzkabel so, dass sie nicht von Personen oder Gegenständen gequetscht werden können.
Seien Sie mit den Kabelaustritten am Gerät, am Stecker und an der Netzsteckdose besonders vorsichtig.
• Um das Gerät während eines Gewitters oder bei längerem Nichtgebrauch gegen Überspannungen zu
schützen, muss es vom Netz getrennt werden.
• Nicht die Netzsteckdosen, Verlängerungsschnuren und Vielfachsteckdosen überlasten. Das kann zu Feuer
und Stromschlag führen.
• Niemals Gegenstände jeglicher Art ins Gerät stecken. Sie können unter Spannung stehende Teile berühren
oder Komponenten kurzschließen und dadurch Feuer und Stromschlag verursachen. Niemals Flüssigkeiten
auf das Gehäuse gießen.
• Versuchen Sie auf keinen Fall, das Gerät selbst zu reparieren, denn Sie setzen sich gefährlichen Spannungen
und anderen Risiken aus. Alle Reparaturen müssen von einem Fachmann vorgenommen werden.
• Wenn Ersatzteile benötigt werden, vergewissern Sie sich, dass der Techniker die vom Hersteller angegebenen Teile benutzt, die dieselben technischen Eigenschaften wie die Originalteile besitzen müssen.
Ungeeignete Ersatzteile können Feuer, Stromschlag und andere Gefahren verursachen.
• Das Gerät vor Hitzequellen wie Heizkörpern, Heizungen und anderen Wärme abgebenden Geräten (inkl.
Verstärker) schützen.
12 • CDU-200R
VORSICHT
Netztrennungsvorrichtungen
Wenn das Gerät über den Netzstecker ausgeschaltet wird, muss die Steckdose jederzeit leicht zugänglich
bleiben
WICHTIG
Die Benutzung der Bedienelemente, sowie die Durchführung von Handlungen, die nicht ausdrücklich in dieser
Anleitung beschrieben sind, können zu gefährlichen Strahlungen führen.
KLASSE 1 LASER
Der eingebaute CD Spieler enthält einen Laser der Klasse1. NICHT IN DEN STRAHL BLICKEN!
WARNUNG
NICHT DAS GEHÄUSE ÖFFNEN
STROMSCHLAGGEFAHR
BEDIENELEMENTE AUF DER FRONTBLENDE
1. Auswurftaste: Bei jedem Tastendruck öffnet bzw. schließt sich die CD Lade.
HINWEIS: Die Lade öffnet sich nur, wenn vorher die STOPP oder PAUSE Taste gedrückt wurde
2. PLAY/PAUSE: Bei jedem Druck auf die Play/PauseTaste schaltet der Spieler um zwischen Abspielen
und Pause.
3. CUE: Cue Taste während des Abspielens drücken, um zur Position zu gehen, wo das Abspielen angefan-
gen hat.
4. SOURCE: Wählen Sie mit dieser Taste die Eingangsquelle unter CD, USB und FM.
5. TIME: Zur Wahl der Zeitanzeige: Abgelaufene Spielzeit, Restzeit des Titels oder Restzeit der CD..
6. REPEAT: Mit dieser Taste einen oder alle Titel der CD wiederholen.
7. RELOOP (Schleifensystem): Mit dieser Taste wird die zuletzt gespeicherte Schleife gestartet. Zum Been-
den der Schleife erneut die Taste drücken.
8. LOOP IN: Diese Taste setzt den Anfangspunkt der Schleife.
9. LOOP OUT: Diese Taste setzt den Endpunkt der Schleife und startet die Schleife. Zum Beenden der
Schleife erneut auf diese Taste drücken.
10. CONT./SINGLE: Diese Taste schaltet zwischen einmaligem (Single) und Dauerabspielbetrieb (Continuous)
um. Die gewählte Betriebsart erscheint auf dem Display. Im SINGLE Betrieb stoppt der Spieler nach jedem Titel

CDU-200R • 13
und schaltet am Anfang des folgenden Titels in Pausenbetrieb. Im CONT. Betrieb werden alle Titel abgespielt.
STEREO: Im FM Betrieb wird mit dieser Taste zwischen Mono und Stereo umgeschaltet.
11. PROG TASTE: Im Stopp-Betrieb können Sie bis zu 20 Titel programmieren.
- Auf die STOP Taste drücken, um den Spieler in Stoppbetrieb zu schalten.
- Auf die PROG Taste drücken, um Programmierbetrieb zu schalten.
- Mit den Titelsprungtasten den Titel wählen, den Sie programmieren möchten und mit der PROG Taste
die Wahl bestätigen.
- Weitere Titel mit den Titelsprungtasten wählen und mit PROG bestätigen.
- Auf die Play/Pause Taste drücken, um das Programm abzuspielen.
MEMORY: Im FM Betrieb gibt diese Taste Zugang zum Speicher der Radiosender. Um einen Sender
zu speichern, drücken Sie diese Taste und wählen Sie einen Speicherplatz mit den Tasten 17 und 18.
Drücken Sie erneut diese Taste, um den Sender im gewünschten Platz zu speichern.
12. +10 Taste: Mit dieser Taste springt der Spieler um 10 Titelnummern weiter.
13. TITELSPRUNG : Geht zum Anfang des laufenden Titels oder wählt den vorigen Titel.
Im FM Betrieb springt das Gerät zum vorigen Radiosender zurück.
14. TITELSPRUNG : Geht zum Anfang des nächsten Titels.
Im FM Betrieb springt das Gerät zum nächsten Radiosender.
15. FOLDER Taste: Mit dieser Taste können Sie im USB oder CD Betrieb die Ordner durchsuchen.
16.
17. PITCH BEND – TASTE: Die Tonlage (Pitch) verringert sich, wenn die Pitch Bend – Taste gedrückt
18. PITCH BEND + TASTE: Der Pitch erhöht sich, wenn die + Taste gedrückt wird. Sobald die Taste
19. USB PORT: Zum Anschluß eines USB Mediums oder eines Computers über das USB Kabel, jedoch nur
20. DISPLAY
21. CD LADE
Taste: Zufallsgenerator. Wenn diese Funktion aktiviert ist, leuchtet das LCD.
AUTOSCAN: Im FM Betrieb durchläuft das Gerät alle Frequenzen auf der Suche nach empfangenen
Radiosendern. Bei jedem Druck auf die Taste ändert sich die Suchrichtung. Alle empfangenen Sender
werden automatisch in einem der 20 Speicherplätze gespeichert.
wird. Sobald die Taste losgelassen wird, wird die Geschwindigkeit wieder normal.
Im FM Betrieb: Durchläuft die Speicherplätze abwärts. Um einen gespeicherten Radiosender zu hören,
gehen Sie mit dieser bzw. der Taste 18 zum gewünschten Speicherplatz.
losgelassen wird, wird die Geschwindigkeit wieder normal.
Im FM Betrieb: Durchläuft die Speicherplätze aufwärts. Um einen gespeicherten Radiosender zu hören,
gehen Sie mit dieser bzw. der Taste 17 zum gewünschten Speicherplatz.
im USB Betrieb.
22. DELETE Taste: Löscht Songs von der SD Karte oder dem USB Stick
23. SD KARTENSLOT: Die SD Karte mit den Kontakten nach unten einstecken. Das Gerät kann nur Karten
bis zu 4Gb lesen. Es ist nicht mit SDHC Karten kompatibel.
24. FOLDER Taste: Mit dieser Taste können Sie im USB oder CD Betrieb die Ordner durchsuchen.
25. USB PORT: Zum Anschluß eines USB Sticks.
26. +10 Taste: Mit dieser Taste springt der Spieler um 10 Titelnummern weiter.
27. DISPLAY
28. Regler zur Einstellung der Kopfhörer-Lautstärke
29. REPEAT: Mit dieser Taste einen oder alle Titel der CD wiederholen.
30. CONT./SINGLE: Diese Taste schaltet zwischen einmaligem (Single) und Dauerabspielbetrieb (Conti-

14 • CDU-200R
nuous) um. Die gewählte Betriebsart erscheint auf dem Display. Im SINGLE Betrieb stoppt der Spieler nach
jedem Titel und schaltet am Anfang des folgenden Titels in Pausenbetrieb. Im CONT. Betrieb werden alle
Titel abgespielt.
31. SD/USB Taste: Mit dieser Taste wird die SD Karte oder der USB Stick gewählt, wenn beide angeschlossen
sind.
32. TITELSPRUNG TASTE : Geht zum Anfang des laufenden Titels oder wählt den vorigen Titel.
33. TITELSPRUNG TASTE : Geht zum Anfang des nächsten Titels.
34. RECORD Taste: Zur Aufnahme von Titeln
35. STOP Taste: Stoppt den laufenden Titel.
36. PLAY/PAUSE TASTE: Bei jedem Druck auf die Play/PauseTaste schaltet der Spieler um zwischen
Abspielen und Pause.
37. RECORD VOLUME: Stellt die Aufnahmelautstärke ein.
38. Kopfhörereingang: Zum Anschluss eines Stereo-Kopfhöreres mit 3,5mm Klinkenstecker.
ANSCHLÜSSE AUF DER RÜCKSEITE
39. AC IN: Netzanschluss
40. POWER Taste: Schaltet das Gerät ein und aus.
41. LINE OUT (B): Audio Ausgang des rechten SD / USB Spielers
42. LINE IN: Eingangsbuchse für den linken CD / USB player.
43. LINE OUT (A): Audio Ausgang des linken CD / USB Spielers
44. ANTENNE: Schliessen Sie die mitgelieferte Antenne an diesen Verbinder an
TECHNISCHE DATEN
Anti-Schock Speicher ..................................................................................................................... 40 Sekunden
Versorgung............................................................................................................................ 100-240Vac 50/60Hz
Abmessungen ........................................................................................................................... 482 x 45 x 52.5mm
Gewicht.......................................................................................................................................................... 2,85kg
Ordnungsgemäße Entsorgung des Geräts
Dieses Zeichen bedeutet, dass das Gerät innerhalb der europäischen Gemeinschaft nicht in den normalen Hausmüll geworfen werden darf. Um
Umwelt- und Gesundheitsschäden durch unkontrollierte Müllabfuhr zu vermeiden, muss das Gerät verantwortungsbewusst entsorgt und für dauerhafte Wiederverwertung der Rohstoffe recycelt werden. Bitte bringen Sie das alte Gerät zu einer Sammelstelle für elektrische und elektronische
Geräte bzw. zu Ihrem Fachhändler, wo Sie das Gerät gekauft haben, damit eine umweltfreundliche Entsorgung gewährleistet ist.

CDU-200R • 15
DUAL SPELER MET CD, USB, SD & FM-TUNER
Handleiding
VERKLARING VAN DE TEKENS
De bliksem in de driehoek vestigt de aandacht van de gebruiker op een elektrisch schokrisico.
De driehoek met het uitroepteken vestigt de aandacht van de gebruiker op belangrijke gebruik- of onde-
rhoud instructies.
VEILIGHEIDSINSTRUCTIES
• Lees alle veiligheids- en bedieningsinstructies aandachtig alvorens U het toestel in werking stelt en berg ze
voor later op. Volg alle waarschuwingen en instructies.
• Ontkoppel het toestel van het lichtnet alvorens U het reinigt. Alleen met en droge doek reinigen. Geen oplossingsmiddelen of andere reinigingsmiddelen gebruiken.
• Gebruik de set niet in de buurt van water zoals nabij het bad, de lavabo, de afwasbak, de wasmachine, op
een vocht vloer or nabij een swimmingpool.
• De set niet op een instabiele standaard, tafel of niet geschikte vlakte stellen. Het toestel kan vallen en schaden nemen of mensen wonden.
• Voor montage volg de instructies van de fabrikant.
• Ventilatie openingen beschermen tegen verhitting. De openingen moeten altijd vrij zijn. Stel het toesel niet in
een gesloten vak zoals een rack of een kast. Laat tenminste 20cm ruimte achter het toestel.
• Het toestel benodigd een voedingsbron van AC 100V-240 ~ 50/60 Hz.
• De unit behoort tot beschermingsklasse II met dubbele isolatie, zonder beschermende aardingsterminal.
• Plaats het netsnoer zodat niemand erop kan trappen. Plaats geen voorwerpen op de kabels.
• In geval van onweer of indien het toestel voor langere tijd niet wordt gebruik, ontkoppel het van het lichtnet.
• Nooit wandcontactdozen, verlengsnoeren enz. overbelasten om brand en elektrische schok te vermijden.
• Nooit voorwerpen binnen de behuizing stekken. Zij kunnen gevaarlijke punten aanraken of kortsluitingen
veroorzaken. Nooit vloeistoffen op de behuizing gieten.
• Nooit het toestel zelfs repareren. Laat alle reparaties van een erkende technicus uitvoeren.
• Alleen van de fabrikant aanbevolen onderdelen gebruiken. Alle onderdelen moeten dezelfde specicaties
hebben als de originele delen.
• Nooit in de buurt van hittebronnen zoals verwarmingen, enz. opstellen.
ONTKOPPELING VAN HET LICHTNET
Indien het toestel via het stopcontact wordt uitgeschakeld, moet de contactdoos altijd gemakkelijk bereikbaar
zijn.
CLASSE 1 LASER
De ingebouwde CD-spelers bevatten een klasse 1-laser. STAR NIET IN DE STRALEN!

16 • CDU-200R
LET OP
WAARSCHUWING
NIET DE BEHUIZING OPENEN
GEVAAR VOOR ELECTRISCHE SCHOKKEN
BEDIENELEMENTEN OP HET FRONTPANEEL
BELANGRIJK
Het gebruik van bedieningen of instellingen of de uitvoering van procedures anders dan degene die in deze
handleiding worden beschreven kunnen leiden tot blootstelling aan schadelijke straling.
1. EJECT toets: Druk om een schijf te laden of uit te werpen. Bij elke druk wordt de schijflade geopend of
gesloten. OPMERKING: De schijflade zal niet opengaan zonder dat er eerst op de STOP- of PAUZE-knop
werd gedrukt.
2. PLAY/PAUSE toets: Elke keer als u op de SPEEL/PAUZE-knop drukt, verandert de functie van spelen
naar pauze of van pauze naar spelen.
3. CUE toets: Als u tijdens het afspelen op de CUE-knop drukt begint het afspelen opnieuw bij de startpositie.
4. SOURCE toets: Kies een ingangsbron tussen CD, USB en FM
5. TIME toets: Gebruik deze knop om de tijdmodus te kiezen: verstreken tijd, resterende tijd of totale reste-
rende tijd.
6. REPEAT: Gebruik deze knop om een nummer of alle nummers van de cd te herhalen.
7. RELOOP toets: Deze knop wordt gebruikt om de laatst opgeslagen lus te starten. Druk nogmaals op deze
knop om de lus te beëindigen.
8. LOOP IN toets: Met deze knop stelt u het begin van de lus in.
9. LOOP OUT toets: Als u op deze knop drukt stelt u het eindpunt van de oneindige lus in en start u de lus.
Druk nogmaals op deze knop om de lus te beëindigen.
10. CONT./SINGLE: Druk op deze knop om te wisselen tussen de speelmodi ‘SINGLE’ (enkel) en ‘CONTI-
NUOUS’ (continu). De geselecteerde modus wordt op het LCD-scherm weergegeven. In de modus
‘SINGLE’ (enkel) stopt het apparaat na elk nummer met afspelen. In de modus ‘CONTINUOUS’ (continu)
stopt het apparaat nadat alle nummers afgespeeld zijn.
STEREO: In FM modus: Schakel om tussen mono en stereo geluid.
11. PROG toets: In STOP-modus kunt u verschillende nummers programmeren (maximum 20 nummers):
- Druk op de STOP-knop om de STOP-modus op te roepen
- Druk op de PROG-knop om de programmeermodus op te roepen
- Gebruik de SKIP-knoppen om het nummer te kiezen dat u wilt beluisteren en druk dan op de PROGknop om uw keuze in te voeren.

CDU-200R • 17
- Gebruik de SKIP-knoppen een of meerdere keren om het (de) nummer(s) te kiezen dat (die) u wilt
beluisteren en druk dan op de PROG-knop om uw keuze in te voeren.
- Herhaal deze stappen om alle nummers die u wilt beluisteren te selecteren
- Druk op de SPEEL/PAUZE-knop om het afspelen te starten
MEMORY: In FM modus, druk deze toets om in het geheugen voor radiozenders te gaan. Als u een
station in het geheugen wilt opslaan, drukt u op deze knop, selecteert u een geheugenplaats met de knoppen 17 en 18 en drukt u nogmaals op deze knop om het station in het gewenste geheugen op te slaan.
12. +10 toets: Druk op deze toets om 10 nummers verder te gaan.
13. SKIP toets : Gaat naar het begin van de track of naar het begin van de vorige track.
In FM modus gaat het toestel terug naar de vorige station.
14. SKIP toets : Gaat naar het begin van de volgende track.
In FM modus gaat het toestel verder naar de naaste station.
15. FOLDER toets: Hiermee kunt u door mappen of nummers navigeren in de USB- of cd-modus.
16.
17. PITCH BEND – toets: De ‘pitch’ (toonhoogte) zal automatisch dalen als de ‘- knop’ wordt
18. PITCH BEND + toets: De ‘pitch’ (toonhoogte) zal automatisch stijgen als de ‘+ knop’ wordt
19. USB PORT: Hiermee kunt u een USB-geheugenstick of een PC aansluiten indien USB modus gekozen is.
20. DISPLAY
21. SCHIJFLADE
22. DELETE toets:Wist songs van de SD of USB
23. SD KAARTJE SLOT: Stek het kaartje met de kontakten naar beneden in de slot. Het toestel kan geen
24. FOLDER toets: Hiermee kunt u door mappen of nummers navigeren in de USB- of cd-modus.
toets: Toevalsgenerator. Als deze functie geactiveerd is, licht de LCD op.
AUTOSCAN: Druk in de FM-modus op deze knop om automatisch naar radiostations te zoeken. Alle
gevonden zenders worden automatisch opgeslagen in een van de 20 beschikbare geheugens. Bij elke
druk op de knop zal de zoekrichting veranderen.
ingedrukt en naar de originele ‘pitch’ (toonhoogte) terugkeren als de knop wordt losgelaten.
Druk in de FM-modus op deze knop om achteruit door de geheugens te lopen. Om naar een opgeslagen
radiostation te luisteren, selecteert u het geheugen via deze knop of knop 18.
ingedrukt en naar de originele ‘pitch’ (toonhoogte) terugkeren als de knop wordt losgelaten.
Druk in de FM-modus op deze knop om vooruit door de geheugens te lopen. Om naar een opgeslagen
radiostation te luisteren, selecteert u het geheugen via deze knop of knop 17.
kaartjes van meer dan 4 Mb of SDHC kaartjes lezen.
25. USB PORT: Hiermee kunt u een USB-geheugenstick aansluiten
26. +10 toets: Druk op deze toets om 10 nummers verder te gaan.
27. DISPLAY
28. HEADPHONE VOLUME: Instelling van het hoofdtelefoon volume
29. REPEAT: Herhaal één of alle nummers op de CD
30. CONT. / SINGLE: Druk op deze knop om te wisselen tussen de speelmodi ‘SINGLE’ (enkel) en ‘CONTI-
NUOUS’ (continu). De geselecteerde modus wordt op het LCD-scherm weergegeven. In de modus ‘SINGLE’
(enkel) stopt het apparaat na elk nummer met afspelen. In de modus ‘CONTINUOUS’ (continu) stopt het
apparaat nadat alle nummers afgespeeld zijn.
31. SD/USB: Kies SD of USB modus als beide ingangen aangesloten zijn.
32. SKIP : Gaat naar het begin van de track of naar het begin van de vorige track.
33. SKIP toets : Gaat naar het begin van de volgende track

18 • CDU-200R
34. RECORD: Opname toets
35. STOP: Stopt het afspelen
36. PLAY: Elke keer als u op de SPEEL/PAUZE-knop drukt, verandert de functie van spelen naar pauze of
van pauze naar spelen
37. RECORD VOLUME: Stelt het volume van de opname in.
38. HEADPHONE ingang: Sluit een stereo hoofdtelefoon met 3.5 mm jack plug aan.
CONNECTOREN OP HET ACHTERPANEEL
39. AC IN: Aansluiting op het lichtnet.
40. POWER toets: Schakelt het toestel aan en uit.
41. LINE OUT (B): Audio uitgang van de rechter SD / USB player
42. LINE IN: Ingang voor de rechter SD / USB player.
43. LINE OUT (A): Audio uitgang voor de linker CD / USB player
44. ANTENNE: Sluit de meegeleverde antenne op deze connector aan.
SPECIFICATIES
Anti-shock geheugen ......................................................................................................................... 40 seconds
Voeding .................................................................................................................................. 100-240Vac 50/60Hz
Afmetingen ................................................................................................................................ 482 x 45 x 52.5mm
Gewicht.......................................................................................................................................................... 2,85kg
Correcte verwijdering van dit product
Deze markering geeft aan dat dit product niet met ander huishoudelijk afval in de hele EU mag worden weggegooid. Om mogelijke schade aan het
milieu of de menselijke gezondheid door ongecontroleerde afvalverwijdering te voorkomen, moet u deze op verantwoorde wijze recyclen om duurzaam
hergebruik van materiaalbronnen te bevorderen. Als u uw gebruikt apparaat wilt retourneren, gebruikt u de retour- en verzamelsystemen of neemt u contact
op met de winkel waar het product is gekocht. Ze zullen voor milieuveilige recycling zorgen.

CDU-200R • 19

CDU-200R
DOUBLE LECTEUR PROFESSIONNEL AVEC CD, USB, SD & TUNER FM
PROFESSIONAL DUAL PLAYER WITH CD, USB, SD & FM TUNER
DOPPEL-PLAYER MIT CD, USB, SD & FM TUNER
DUAL SPELER MET CD, USB, SD & FM-TUNER
CODE: 95-1522
Electric products must not be put into household waste. Please bring them to a recycling centre.
Ask your local authorities or your dealer about the way to proceed.
Les produits électriques ne doivent pas être mis au rebut avec les ordures ménagères. Veuillez les faire recycler
là où il existe des centres pour cela. Consultez les autorités locales ou votre revendeur sur la façon de les recycler.
Dieses Zeichen bedeutet, dass das Gerät innerhalb der europäischen Gemeinschaft nicht in den normalen Hausmüll geworfen werden darf. Um Umwelt- und Gesundheitsschäden durch unkontrollierte Müllabfuhr zu vermeiden, muss das Gerät verantwortungsbewusst entsorgt und für dauerhafte Wiederverwertung der Rohstoffe
recycelt werden. Bitte bringen Sie das alte Gerät zu einer Sammelstelle für elektrische und elektronische Geräte bzw. zu Ihrem Fachhändler, wo Sie das Gerät gekauft
haben, damit eine umweltfreundliche Entsorgung gewährleistet ist.
Deze markering geeft aan dat dit product niet met ander huishoudelijk afval in de hele EU mag worden weggegooid. Om mogelijke schade aan het milieu of de menselijke
gezondheid door ongecontroleerde afvalverwijdering te voorkomen, moet u deze op verantwoorde wijze recyclen om duurzaam hergebruik van materiaalbronnen te
bevorderen. Als u uw gebruikt apparaat wilt retourneren, gebruikt u de retour- en verzamelsystemen of neemt u contact op met de winkel waar het product is gekocht. Ze
zullen voor milieuveilige recycling zorgen.
© 2018 COPYRIGHT LOTRONIC SA
 Loading...