

Afin de prévenir tous risques de choc électrique vous ne devez pas enlever le capot.
CDD 218
PROFESSIONAL DUAL CD PLAYER WITH JOG WHEELS – USER MANUAL
DOUBLE LECTEUR DE CD AVEC MOLETTES – MODE D’EMPLOI
FRANÇAIS
ATTENTION
Aucune pièce utile à l’utilisateur à l’intérieur.
Confier la réparation à un personnel qualifié.
IMPORTANT
L'emploi de contrôles ou ajustements ou utilisations
autres que celles indiquées peuvent provoquer une
exposition aux radiations.
DESCRIPTION
Double lecteur CD avec molettes multifonctions
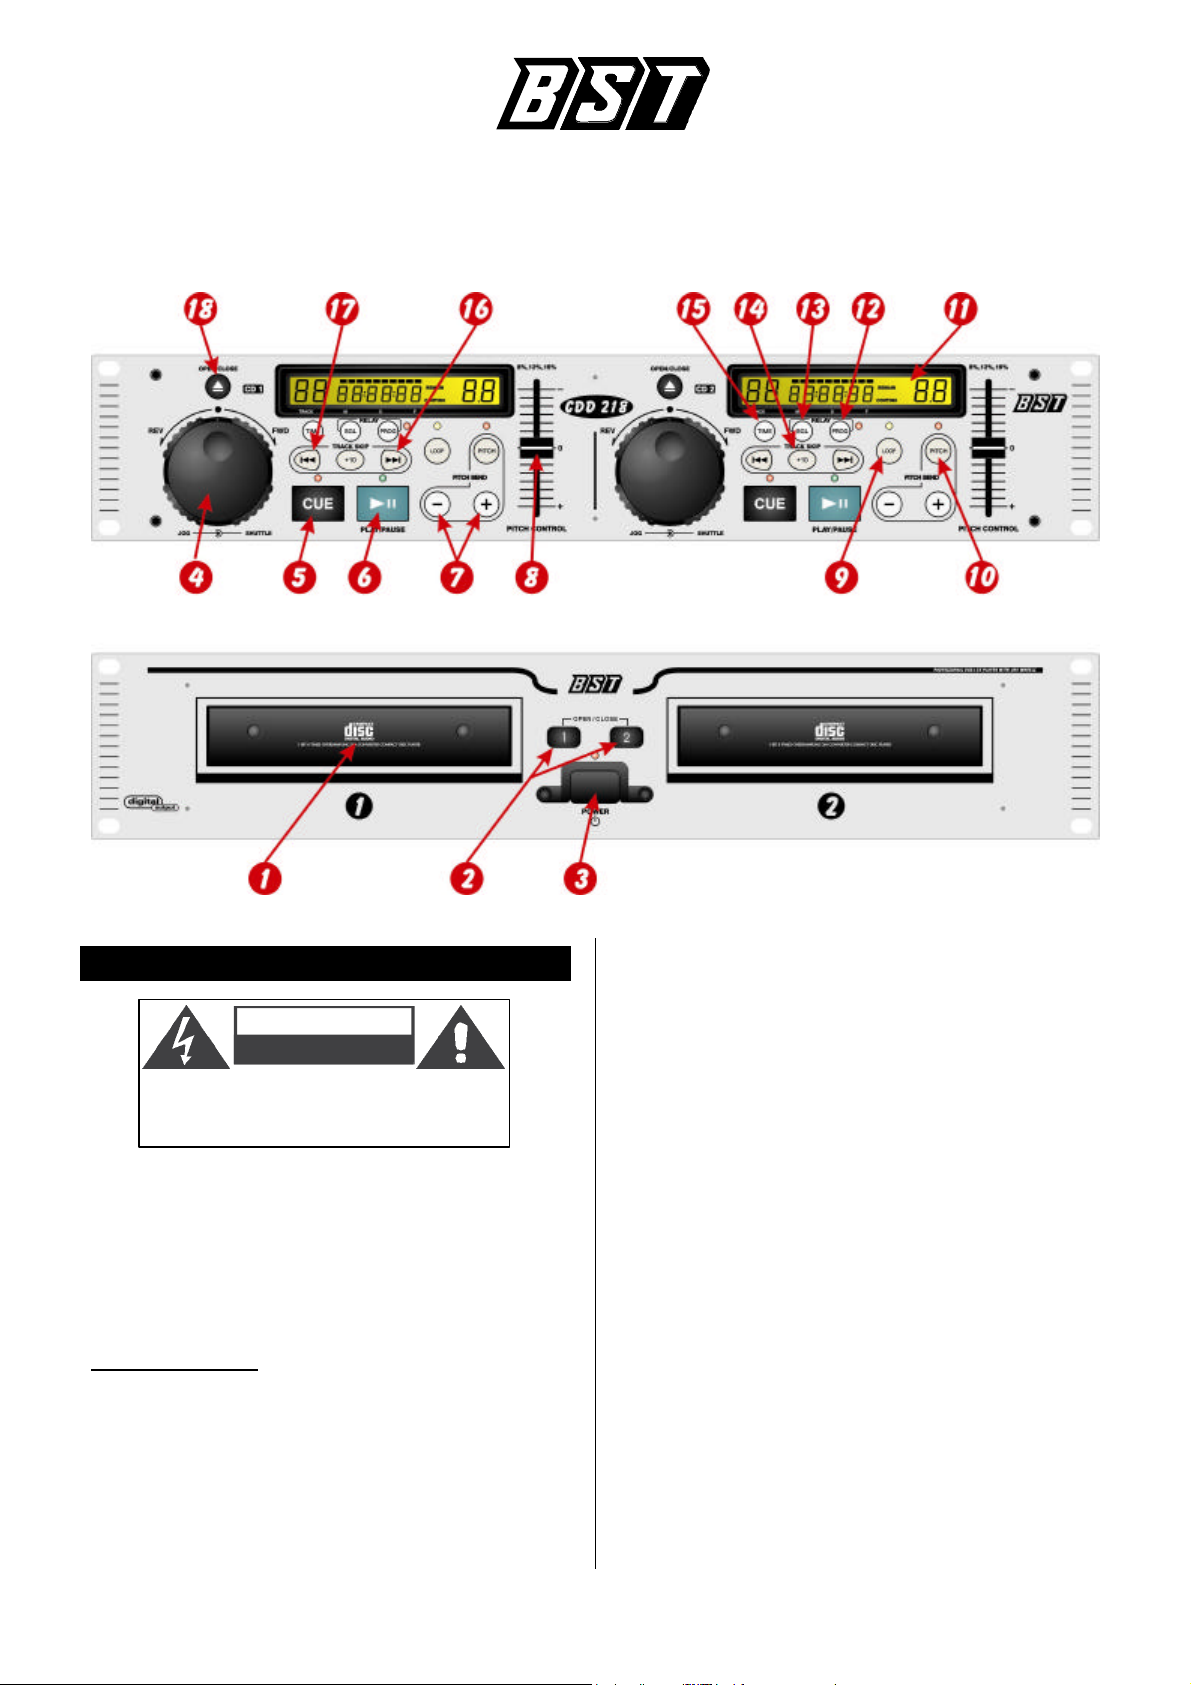
PANNEAU AVANT :
1. TIROIR CD
Placez le disque sur le tiroir.
2. BOUTON OPEN / CLOSE
Appuyez sur la touche OPEN / CLOSE pour ouvrir et fermer
le tiroir. Le tiroir ne peut pas être ouvert pendant la lecture du
disque
3. BOUTON POWER ( ON / OFF )
Lorsque vous appuyez sur ce bouton, vous mettez en marche
l’appareil.
4. MOLETTE JOG & SHUTTLE
Shuttle : En pause, tournez cette molette dans le sens
horaire pour scanner la chanson vers l’avant.
Tournez la molette dans le sens anti-horaire pour
scanner la chanson vers l’arrière. Plus vous tournez
le shuttle ( dans un sens ou dans un autre ), plus la
vitesse de recherche augmente.
Jog : En pause, ce jog vous permet d’effectuer une
recherche trame à trame ( en avant ou en arrière ).
Pendant cette recherche, vous entendez les sons
correspondant aux trames.
En lecture, le jog vous permet d’accélérer ou
diminuer la vitesse de la chanson ( Sens horaire :
augmentation , Sens anti-horaire : diminution ).
5. BOUTON CUE
Appuyez sur ce bouton durant la lecture pour retourner au
point de départ de la lecture .
6. BOUTON PLAY / PAUSE
Utilisez cette touche pour passer en mode lecture. Durant la
lecture, appuyez sur cette touche pour passer en mode
pause.
7. BOUTON PITCH BEND
Si vous appuyez sur la touche -, la vitesse de la chanson
diminuera. Si vous relâchez cette touche la vitesse reviendra
à son tempo original.
Si vous appuyez sur la touche +, la vitesse de la chanson
augmentera. Si vous relâchez cette touche la vitesse
reviendra à son tempo original.
8. POTENTIOMETRE PITCH
Ce potentiomètre est utilisé pour augmenter ou diminuer la
vitesse de la chanson.
1
D
C
E
9. BOUTON LOOP
Quand le point de départ de la boucle ( loop ) est
présélectionné, la LED clignote. Lorsque le lecteur cd est en
mode boucle ( loop ) , la LED s’allume.
10. BOUTON SELECTION PITCH
A l’aide de ce bouton, vous pouvez valider le fonctionnement
du potentiomètre pitch. Laissez appuyé plus 0.6s pour
changer de gamme d’ajustement : Soit +/-8%, soit +/-12% ou
soit +/-16%
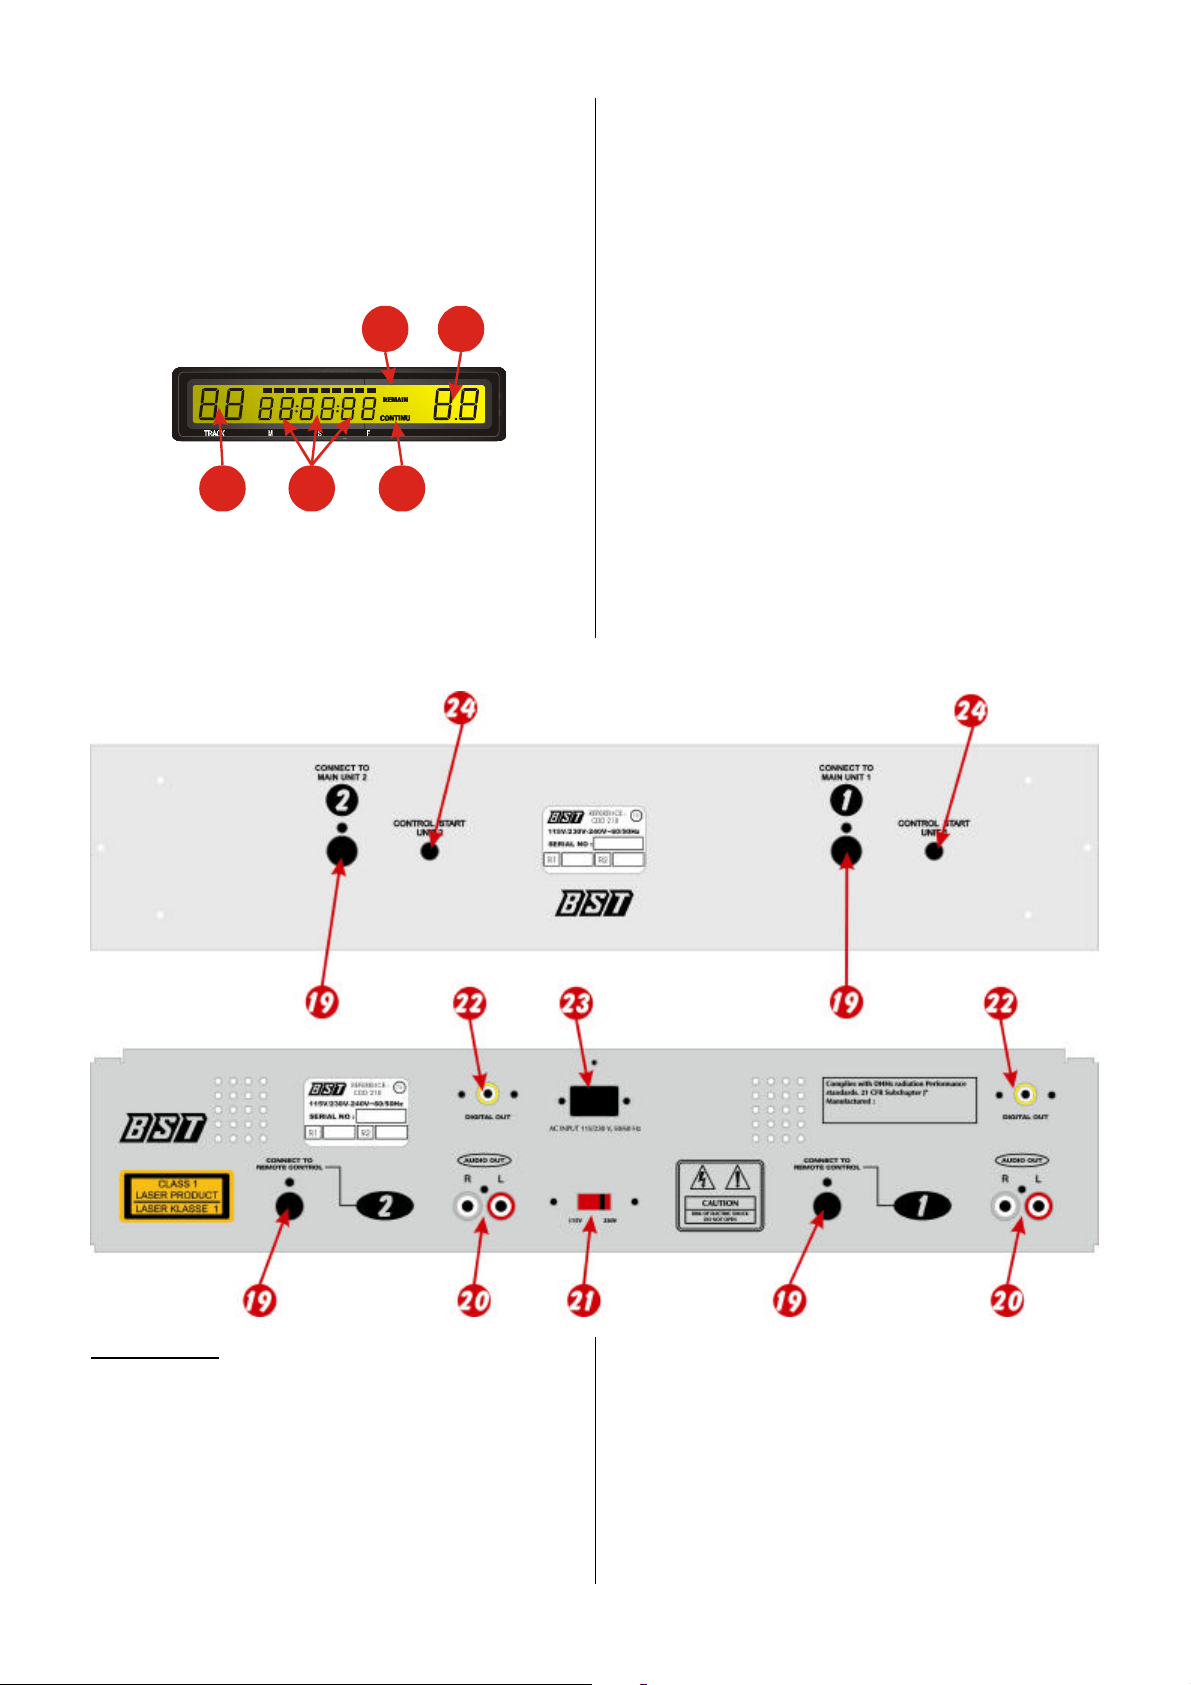
11. AFFICHEUR
A
A : Numéro de piste
B : Temps
C : Mode temps : écoulé ou restant
D : Mode lecture : Single ou continu
E : Valeur pitch
B
12. BOUTON PROG
Si vous appuyez sur ce bouton, le lecteur rentre en mode
PROGRAM et la lecture s’arrête. ( voir programmation plus
bas )
13. SGL ( SINGLE )
Appuyez sur ce bouton pour choisir le mode de lecture : Soit
Single ( Le lecteur lit une piste puis se met en pause ), soit
Continu ( le lecteur lit l’intégralité des pistes sans se mettre en
pause ). Les indicateurs SINGLE et CONTINU vous indiquent
le mode de lecture.
14. BOUTON +10
Utilisez ce bouton pour passer dix pistes d’un coup. ( ex :
vous pouvez passer de la piste 1 à la piste 11 ).
15. BOUTON TIME
Appuyez sur ce bouton pour choisir l’affichage du temps. Soit
le temps écoulé, soit le temps restant. Les indicateurs
ELAPSED et REMAIN vous indiquent le mode TIME
16. BOUTON SKIP AVANT
Utilisez cette touche pour passer à la piste suivante.
17. BOUTON SKIP ARRIERE
Utilisez ce bouton pour retourner au début de la piste ou pour
passer à la piste précédente.
18. BOUTON OPEN / CLOSE
Appuyez sur la touche OPEN / CLOSE pour ouvrir et fermer
le tiroir. Le tiroir ne peut pas être ouvert pendant la lecture du
disque
Connexions :
19. CONNECTEUR MINI-DIN
Permet de connecter la télécommande au lecteur de CD à
l’aide des cordons mini-din fourni avec l’appareil.
20. SORTIE LINE OUT
Ces connecteurs sont les sorties gauche et droite. Reliez ces
connecteurs RCA à votre table de mixage.
21. SELECTEUR TENSION ALIMENTATION
Positionnez correctement ce sélecteur sur la tension
correspondant à votre pays ( Ex : France = 220V )
2
22. SORTIE NUMERIQUE
Reliez cette sortie numérique à un ampli numérique ou à
l’entrée numérique d’un minidisc.
23. CONNECTEUR ALIMENTATION
Branchez votre câble secteur sur cette prise.
24. CONNECTEUR START
Ces connecteurs vous permettent de démarrer la lecture à
partir d’une table de mixage.

FONCTIONS :
Ouverture et fermeture du compartiment à disques.
- Mettez l’appareil en marche. Appuyez sur la
commande OPEN /CLOSE afin d’ouvrir la
trappe.
- Il est impossible d’ouvrir le compartiment
lorsque la lecture est en cours, et ce afin
d’éviter toute interruption de la lecture en cas
d’appui accidentel sur la touche.
Il faut donc arrêter la lecture, puis appuyer
sur OPEN/CLOSE.
Charger les disques.
Tenez le disque par les côtés et placez-le
dans la trappe, puis pressez la touche
open/close afin de la refermer. S’affiche alors
le nombre total de plages du disque, et le
temps total de lecture pendant environ 2
secondes, et les modalites de cue, le point
cue sera automatiquement fixé au point de
départ de la première plage.
PRECAUTIONS :
- Ne placer aucun objet étranger dans le
compartiment à disques, ni plus d’un disque à
la fois.
- Ne pas repousser manuellement la porte du
compartiment à disque, cela pourrait
l’endommager.
Sélection des plages.
- Appuyez sur SKIP une fois pour sauter d’une
plage en avant ou revenir une plage en
arrière.
- Maintenez la touche SKIP enfoncée afin de
passer les plages à une vitesse plus rapide.
- Lorsqu’on sélectionne une nouvelle piste
pendant la lecture, la lecture commence
aussitôt que la recherche SKIP est terminée.
- Si la touche SKIP >>I est actionnée pendant
la dernière plage d’un disque, le lecteur se
positionne à la première plage du CD. De la
même façon, si on appuie sur SKIP <<I
pendant la première plage, on va passer
automatiquement à la dernière plage.
Lecture.
- Appuyez sur PLAY/PAUSE pendant une
pause ou un CUE afin de commencer la
lecture : l’indicateur PLAY s’allume.
- Le point à partir duquel la lecture commence
est automatiquement mémorisé comme point
CUE. Si on appuie sur CUE, le lecteur va se
replacer automatiquement sur ce point.
Soit vous appuyez sur cue pendant la lecture
pour retourner au point cue et entrer la
condition pause.
Modifier la vitesse de la musique.
- Il y a trois outils disponibles pour harmoniser
les BPM de deux CD.
1) utiliser le potentiomètre pitch
pour ajuster les BPM
2) utiliser le pitch bend pour
changer les BPM
temporairement
3) utiliser la molette dans le même
esprit que les touches pitch bend
1) Potentiomètre pitch
Pour ajuster le BPM à l’aide du potentiomètre,
appuyez sur le bouton pitch.
Montez le potentiomètre pour diminuer les BPM et
descendez-le pour les augmenter.
La gamme d’ajustement est de +/-8%, +/-12% ou
+/-16%
2) Pitch bend
- Le BPM augmente ou diminue en fonction de
l’utilisation du pitch bend + ou –
- Plus vous maintenez le bouton enfoncé, plus
les BPM augmentent ou diminuent. Une
pression d’une demi seconde permet une
augmentation de +16 % ou une diminution de
– 16 %. Une petite pression rapide permet de
changer le BPM de façon légère sans
changement audible dans la musique .
- Le CD revient au tempo indiqué par le
potentiomètre quand vous relâchez la touche
- La figure suivante montre un exemple
d’utilisation de cette fonction. Dans cet
exemple, les deux lecteurs sont en
fonctionnement et le BPM a déjà été
harmonisé par les potentiomètres pitch
3) Molette
Tournez cette molette dans le sens horaire
pendant la lecture afin d’augmenter le BPM et
inversement pour le diminuer. Plus vous tournez
rapidement, plus le BPM change. La gamme
d’ajustement est de +/- 16 %
Lorsque vous relâchez la molette jog, le cd
retrouve un tempo normal.
Arrêt de la lecture.
- Il y a 2 façons de l’arrêter :
Soit vous appuyez sur PLAY/PAUSE
pendant la lecture.
3
Fonction Program
- Appuyez sur la touche PROGRAM. Vous
entrez dans le mode program et le CD arrête
de tourner.
- Choisissez la piste souhaitée en appuyant
sur les touches SKIP, puis appuyez une
nouvelle fois sur la touche PROGRAM. La
piste est alors ajoutée à la séquence
programmée.
- Répétez l’opération précédente. ( vous avez
jusqu’à 30 pistes programmables. )
- Appuyez sur la touche PLAY/PAUSE, le
programmation commence à la première
piste programmée.
- Appuyez sur la touche pendant la lecture de
la programmation pour arrêter la lecture.
- Restez appuyé plus de 2 secondes sur la
touche PROGRAM pour annuler la
programmation.

Fonction LOOP
- Appuyez sur le bouton LOOP pour fixer le
point A de départ de la boucle. L’indicateur
LOOP clignote sur l’afficheur.
- Appuyez à nouveau sur le bouton LOOP pour
fixer le point B de fin de la boucle. Une
lecture répétitive se fera alors du point A au
point B
- Appuyez sur la touche loop pour annuler la
fonction loop. L’indicateur loop sur l’afficheur
disparait.
Recherche trame à trame.
- C’est une fonction qui permet de faire une
recherche d’un point sonore particulier.
- Tournez la molette en mode pause ou CUE
afin de commencer la recherche. Le son
correspondant au point recherché est
entendu en continu. Le point de départ de la
lecture est montré sur l’afficheur.
- Lorsque la molette est tournée dans le sens
des aiguilles d’une montre, la recherche se
fait vers l’avant. Et inversement vers l’arrière.
Scan
- Scan est une fonction qui permet de se
déplacer rapidement vers l’avant ou vers
l’arrière par rotation de la molette shuttle.
- Ce lecteur possède 3 vitesses différentes en
fonction de l’angle de rotation du shuttle.
- Tournez le shuttle pour commencer le scan.
Le disque se place rapidement en avant ou
en arrière puis émet le son. Le point de scan
en cours est indiqué sur l’afficheur.
- Tournez la molette dans le sens horaire pour
scanner vers l’avant et inversement vers
l’arrière.
Relay
La fonction relay permet d’enchaîner la
lecture d’un coté puis de l’autre. Pour lancer
la fonction relay, vous devez appuyer sur la
touche PROG ( en laissant appuyé ) puis sur
la touche SGL. Lorsque vous rentrez dans le
mode relay, l’indicateur sur l’afficheur
clignote.
CONDITIONS DE GARANTIE :
Les équipements BST sont couverts par une garantie d’1 an
pièces et main d’œuvre sauf pour les crossfaders (90 jours).
Les principes suivants s’appliquent à partir du moment où
l’appareil quitte nos usines.
La facture de mise à la consommation fera foi de date de départ
de la garantie, dans la mesure ou celle-ci n’excède pas 12 mois
par rapport à la date de fabrication.
Seules les compagnies agréées par BST sont autorisées à
opérer sur ces équipements.
La garantie devient nulle si l’intervenant appartient à un autre
groupe.
Durant la période sous garantie, tout matériel défectueux doit
nous être retourné dans son emballage d’origine sous colis prépayé.
BST vous retournera vos biens par colis pré-payé au cours de
l’année de garantie. Au-delà, les frais d’expédition seront à la
charge du client.
Les potentiomètres ont une durée de vie limitée et ne sont pas
garantis par le fabricant en cas d’utilisation très intensive.
Pour toute demande relative à ces services, adressez-vous à
votre distributeur habituel, qui sera le plus apte à vous renseigner
Caractéristiques techniques :
Gamme d’ajustement : +/- 8, 12, 16%
Pitch bend : +/- 16%
Alimentation : 115V / 230V~240V~ 60/50Hz
Dimensions : Contrôleur : 482x88.8x60mm
Boîtier CD : 482x88.8x251mm
4

To prevent electric shock do not remove cover (or bottom) screws.
ENGLISH
CAUTION
No user serviceable parts inside refer servicing to qualified
servicing personnel.
IMPORTANT
Use of controls or adjustments or performance
of procedures other than those specified herein
may result in hazardous radiation exposure.
DESCRIPTION
Dual CD player with jog wheels
Front Panel :
1. DISC HOLDER
2. OPEN / CLOSE BUTTON
Press to load or eject disk. Each press will open or close the
disk tray.
NOTE: disc holder will not open unless stop or pause button
has been pushed first.
3. POWER SWITCH ( ON / OFF )
Press the power switch to turn the unit on. To switch the
POWER off press the POWER switch again.
4. JOG & SHUTTLE
Shuttle : Use the dial to select the scanning direction and
Jog : In pause mode, if you turn the jog, the point at which the
speed. The disc is scanned in the forward direction
when the shuttle dial is turned clockwise from the
neutral position, in the reverse direction when the
shuttle dial is turned counterclockwise. The
scanning speeds up when the shuttle dial is turned
faster.
sound is being produced moves by a number of frames
corresponding to the number of clicks. Clockwise
moves the point forward, counterclockwise moves the
point backward.
In play mode, the jog increases or decreases the speed
of the song. ( clockwise : increase , counterclockwise :
decrease ).
5. CUE BUTTON
Pressing the CUE button during play provides a return to the
position at which play was started
6. PLAY / PAUSE BUTTON
Each time you press the PLAY/PAUSE button, the operation
changes from play to pause or from pause to play.
7. PITCH BEND
When 2 CD players are playing a CD, the pitch bend function
allows the positioning of the bass beats to be matched after
the pitch has been matched. The pitch will automatically rise
when the + button is pressed and return to the original pitch
when it is released.
The pitch will drop while the - button is pressed. By changing
the pitch in this way, the positioning of the beats can be
matched.
8. PITCH ADJUSTEMENT
use this fader to increase or decrease the speed of the track.
9. LOOP BUTTON
When you have selected the start point, the loop indicator
starts flashing. When the unit is in the loop mode, the loop
indicator lights. ( see operation later )
10. PITCH BUTTON
If you push this button, the adjustement of the pitch
potentiometer is available. Hold the pitch button down more
than 0.6 seconds to switch pitch in +/-8%, +/-12% or +/-16%
5

D
C
E
11. DISPLAY
A
A : Track number
B : Time
C : Time mode : elapsed or remaining
D : Play mode : Single or continu
E : Pitch value
12. PROG BUTTON
If you push this knob, the unit enter in the program mode (
see operation later )
B
13. SGL ( SINGLE )
Press this button to switch between the SINGLE and
CONTINUOUS play mode. The selected mode is indicated on
the LCD. In SINGLE mode, after each track, the unit stop the
reading. In continu mode, the unit read all track and stops.
14. +10 BUTTON
Use this switch to jump 1 track at one press ( ex : with this
knob, you can jump from the track 1 to the track 11 ).
15. TIME BUTTON
Used this knob to choose the time mode : Elapsed time or
remaining time.
16. SKIP FORWARD BUTTON
Used this knob to select the next track.
17. SKIP BACK BUTTON
Use this switch to re-start the track or to select the last track.
18. OPEN / CLOSE BUTTON
Press to load or eject disk. Each press will open or close the
disk tray.
NOTE: disc holder will not open unless stop or pause button
has been pushed first.
Connexions :
19. MINI-DIN SOCKET
These sockets are used to connect the remote control to the
main unit. Use the Mini-din cable to connect it.
20. LINE OUT OUTPUT
The audio for each CD player is an output for these jacks.
Connect to the line input of the mixer.
21. POWER SUPPLY SELECTOR
Used this selector to choose the good Power supply. ( several
countries have another power supply )
22. DIGITAL OUTPUT
These jacks are digital outputs of each CD player. Connect to
the line input of the D/A Amplifier.
23. POWER SUPPLY SOCKET
Used to connect the AC mains power to the unit.
6
24. START REMOTE CONTROL
These sockets are to connect to a mixer using a 3.5mm jack
plug to give start capability. When the switch contacts are
shorted, the respective unit play, and similary when the switch
contact are open, the player will be in pause mode.
FUNCTIONS :
Opening & closing the disc holder.
- Switch the unit on. Push the OPEN / CLOSE
button to open the disc holder.
- You can’t open the disc holder when the unit
is reading ( to avoid the read trouble ).
Push the START / PAUSE before pushing
the OPEN / CLOSE button.
Loading discs
- Take the disc by each sides and put it on the
disc holder, then push the OPEN / CLOSE

Note :
Selecting tracks.
Starting playback.
button to close the dic holder. The number of
tracks of the disc is displayed and the total
time disc during 2 seconds. The CUE point is
automatically fixed at the start point of the
first track.
- Don’t place objet or more than one disc on
disc holder.
- Don’t push the disc holder with your finger. It
would damage it.
- Press SKIP button once to move to one
higher or lower track.
- Hold the SKIP button to change tracks
continuously at a higher speed.
- When a new track is selected during the
playback, playback begins as soon as the
skip search operation is completed.
- If the SKIP >>I button is pressed while the
last track is playing, the first track is selected.
In the same way, if the SKIP I<< button is
pressed while the first track is playing, the
last track is selected.
- Press the PLAY / PAUSE button during the
pause or CUE condition to start playback, the
play indicator lights.
- The point at which playback starts is
automatically stored in the memory as the
CUE point. The pickup then returns to the
CUE point when the CUE button is pressed.
( Back CUE ).
2) Pitch bend
- The BPM increases or decreases
respectively while the pitch bend + or pitch
bend – button is pressed.
- The BPM increase depends on how long
you hold the button. If you hold the button
for about ½ second, The BPM will go either
to +16% for the pitch bend + or –16% for
the pitch bend -. If you tap the button, the
BPM will only change a little so you can
change the beat slightly without audible
changes in the music.
- The CD will return to the tempo indicated by
the pitch potentiometer when you let the
pitch bend + or - go.
- The next drawing shows an example of how
to use the pitch bend function. In this
example, both player are playing, the BPM
has already been matched with the pitch
potentiometers.
3) Jog
- Turn the jog dial clockwise during play to
increase the BPM in the forward direction,
counterclockwise to decrease the BPM in
the reverse direction. The faster you turn
the wheel, the more the BPM changes. The
BPM changes with a range of +/- 16%
- When you relase jog wheel, the CD will
return to the tempo indicated by the pitch
potentiometer.
Stopping playback.
- There are two ways to stop playback :
Press the PLAY / PAUSE button during the
playback to pause at the point.
Press the CUE button during playback to
return to the CUE point and enter pause
condition ( Back CUE ).
Matching the beat per minute ( BPM )
- There are three tools for matching the BPM of
two CDs.
1) Use the pitch potentiometer to
adjust the BPM statically.
2) Use the pitch bend to adjust the
BPM temporarily.
3) Use the jog in the same way of
the pitch bend.
1) Pitch Potentiometer
To adjust the BPM by sliding the pitch
potentiometer up or down, press the pitch button
to turn on the pitch adjustement function before
use.
Slide the pitch potentiometer up to decrease BPM
or down to increase the BPM. The adjustement
range is +/- 8%, +/-12% or +/-16%
7
Program Play
- Press the program button, the player will
enter the program mode and the CD will
stop rotating.
- Select the desired track by pressing the
SKIP button, then press the program button
again. The selected track will be added to
the program sequence.
- Repeat step 2 operation. A maximum of 30
tracks can be programmed at one time.
- Press the PLAY / PAUSE button to start the
program play from the first selection.
- Press the program button again during
program play to stop play.
- Press and hold the program button more
than 2 seconds to cancel the program mode
and erase all the current program contents.
Loop play
- Press the LOOP button to set the loop start
point A, The loop indicator will flash on the
LCD.
- Press the LOOP button again to set the loop
end point B, after the point B is set, the
playback will enter the loop play from A to B
repeatedly.
- Press the LOOP button again, the loop play
function is canceled, the loop indicator goes
out.
Frame search
- Frame search is a function for monitoring the
sound at a certain section of the disc and
manually change the position. Searching is
used to set play start points with precision.
- Turn the JOG dial while in pause or CUE mode
to begin searching. The sound for one
revolution of the disc is output repeatedly. The

point at which the sound starts is indicated on
the LCD.
- When the JOG dial is turned, the point from
which the sound is output moves a number of
frames corresponding to the number of clicks,
and the time display on LCD also changes.
- The search point moves in the forward direction
when the JOG dial is turned clockwise, in the
reverse direction when the JOG dial is turned
counterclockwise.
Scanning ( fast forward / fast backward )
- Scanning is a function for moving quickly
forward or backward when the SHUTTLE is
rotated.
- This unit supports 3 differents speeds according
to the rotating angle of the shuttle
- Turn the SHUTTLE dial to begin scanning. The
disc moves rapidly forward or backward and the
sound is output. The current scan point is
indicated on the LCD.
- Turn the SHUTTLE dial clockwise to scan in the
forward direction, counterclockwise to scan in
the reverse direction.
Relay
The relay function enables to play continuously first and
seconds sides of the disc. To enter in the relay mode,
press and hold the button PROG and press the button
SGL. When you are in the relay mode, the indicator on
the display flashes.
WARRANTY CONDITIONS
BST equipment is covered by a 1-year warranty on parts and
labour except for Crossfaders (90 days).
The following rules apply from the day the equipment leaves the
factory:
The date on the invoice is considered to be the date the warranty
begins.
Only companies approved by BST are allowed to work on the
equipment. Warranty becomes void when other service
technicians open the equipment.
During warranty period, defective equipment must be sent by prepaid mail in the original box.
BST will return the goods by pre-paid mail during the first year of
warranty; thereafter the mailing cost is to be paid by the recipient
Potentiometers have a limited lifetime and are not covered by the
manufacturer for more than normal use.
For all service enquiries, refer to your local distributor, as he is
best able to help you.
Specifications :
Range of pitch : +/- 8, 12, 16%
Pitch bend : +/- 16%
Power supply : 115V / 230V~240V~ 60/50Hz
Dimensions : Contrôler : 482x88.8x60mm
Main unit : 482x88.8x251mm
8
 Loading...