

Page 1

Professional Waistband Amplifier with USB/SD Card Reader
User ManualUser Manual
www.audio.com.sg
Made in Taiwan
BA-9800
Page 2
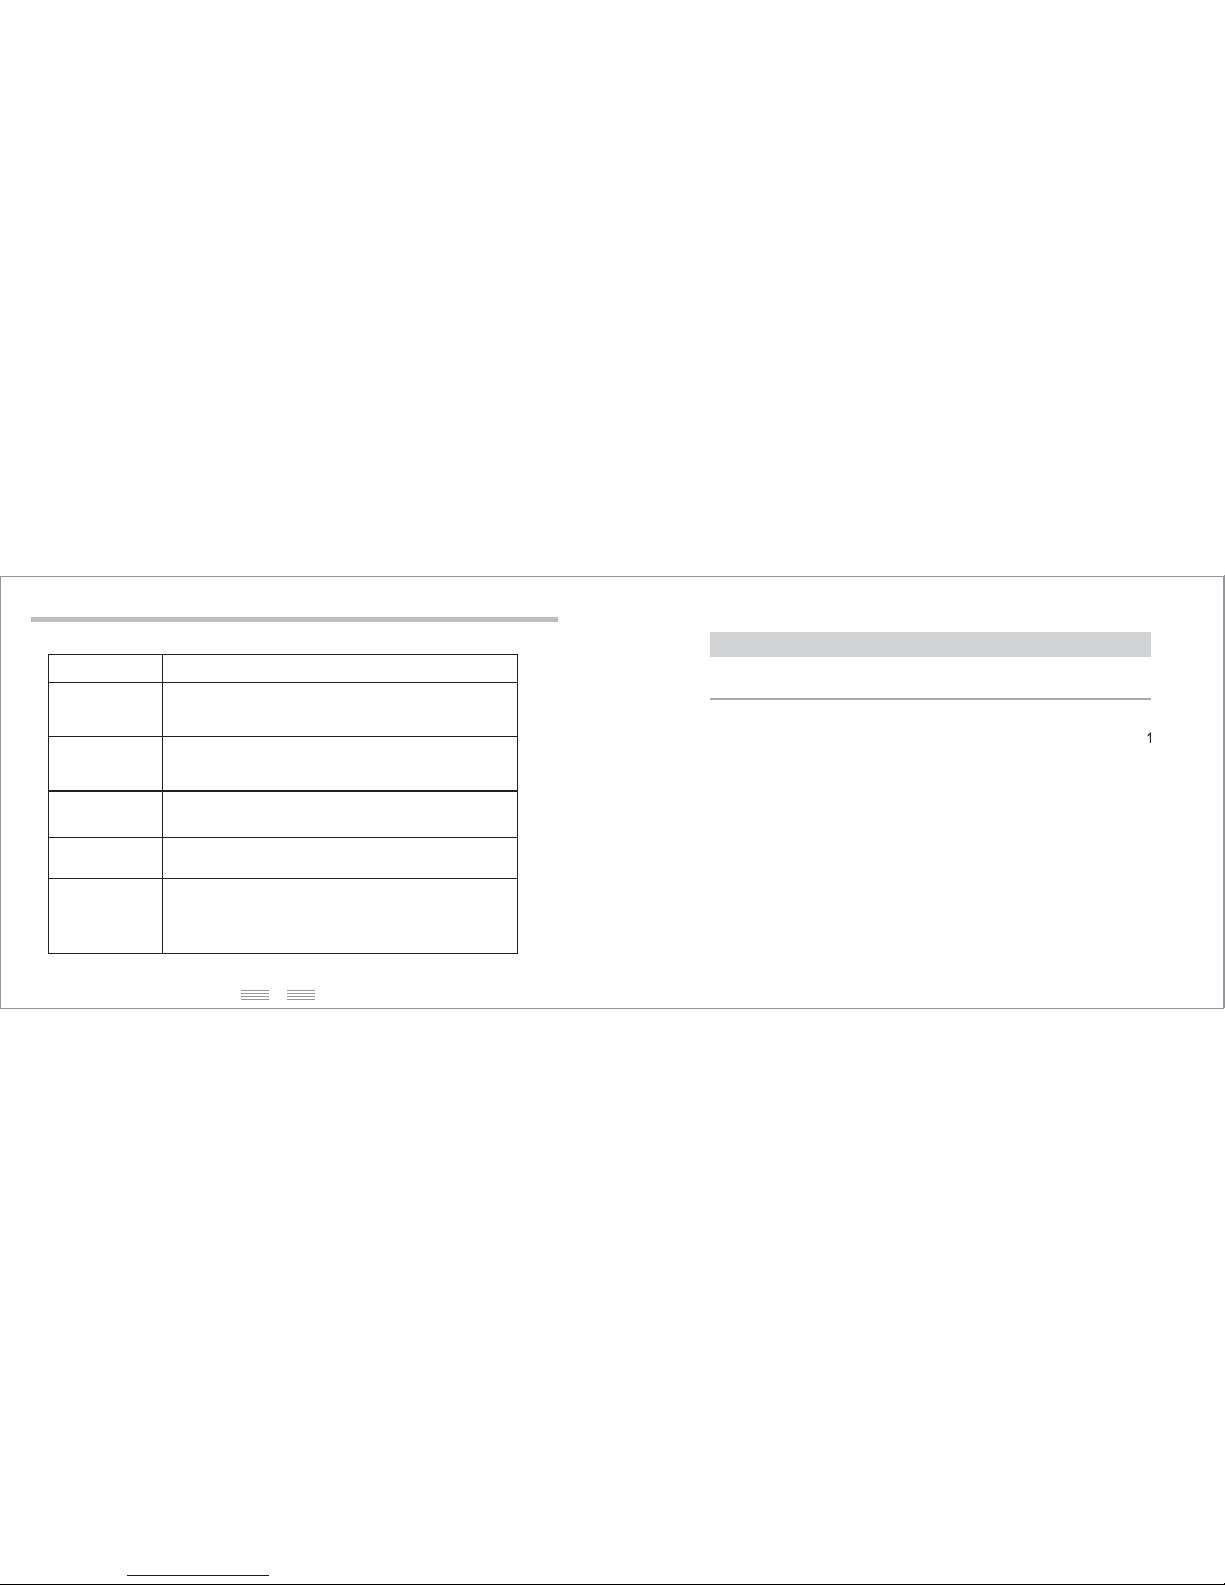
7.Troubleshooting & Solutions7.Troubleshooting & Solutions
Problem
No Outputfrom
Microphone
Troubleshooting
1. Checkbatteries are fullycharged.
2. Checkpower ON/OFF switch.
3. Checkmic input jackis inserted at“▲” mic input.
Feedback
(howling)
1. Checkmic is worncorrectly.
2. Checkvolume is setat appropriate level.
3. Checktone control isset at appropriatelevel.
4. Adjust distance between the main unit & mic.
No signalwhen
Power ON
1. Mainunit comes withlow voltage protectioncircuit. When voltageis
below safelevel, power willbe cut-off toprevent damage tobatteries.
Charge batteriesif LED indicatordoes not illuminate.
Troubleshooting & Solutions
1. Adjust USB / SD Card Output Volume using Power/Vol
Control Switchor Vol+/Vol-buttons.
1. CheckUSB /SD Cardis inserted properly.
2. CheckMP3 “ON” buttonis switched on.
3. Checkthe light indicator“PLAY” is on and blinking, to
indicate USB/SD Card isbeing read. Redlight indicates
USB input,green light indicatesSD Card input.
7
1~4
4
5
5~6
6
7
USB /SDCard
Output Volume
too soft
No outputfrom
USB /SDCard
Contents
Table of Contents
.......................................
.............................................................
..................................................................
...........................................................
...........................................................
.................................................................
........................................................
(1)Foreward & Parts Description
(2)Functions
(3)Features
(4)Specifications
(5)Instructions
(6)Basic Set
(7)Troubleshooting
Specifications subject to change without notification.
Page 3
1
1.Forward
Thank you for selecting BSD Professional WaistbandAmplifier. Before using,
please read this instruction manual in order to achieve the best performance.
1.Forward
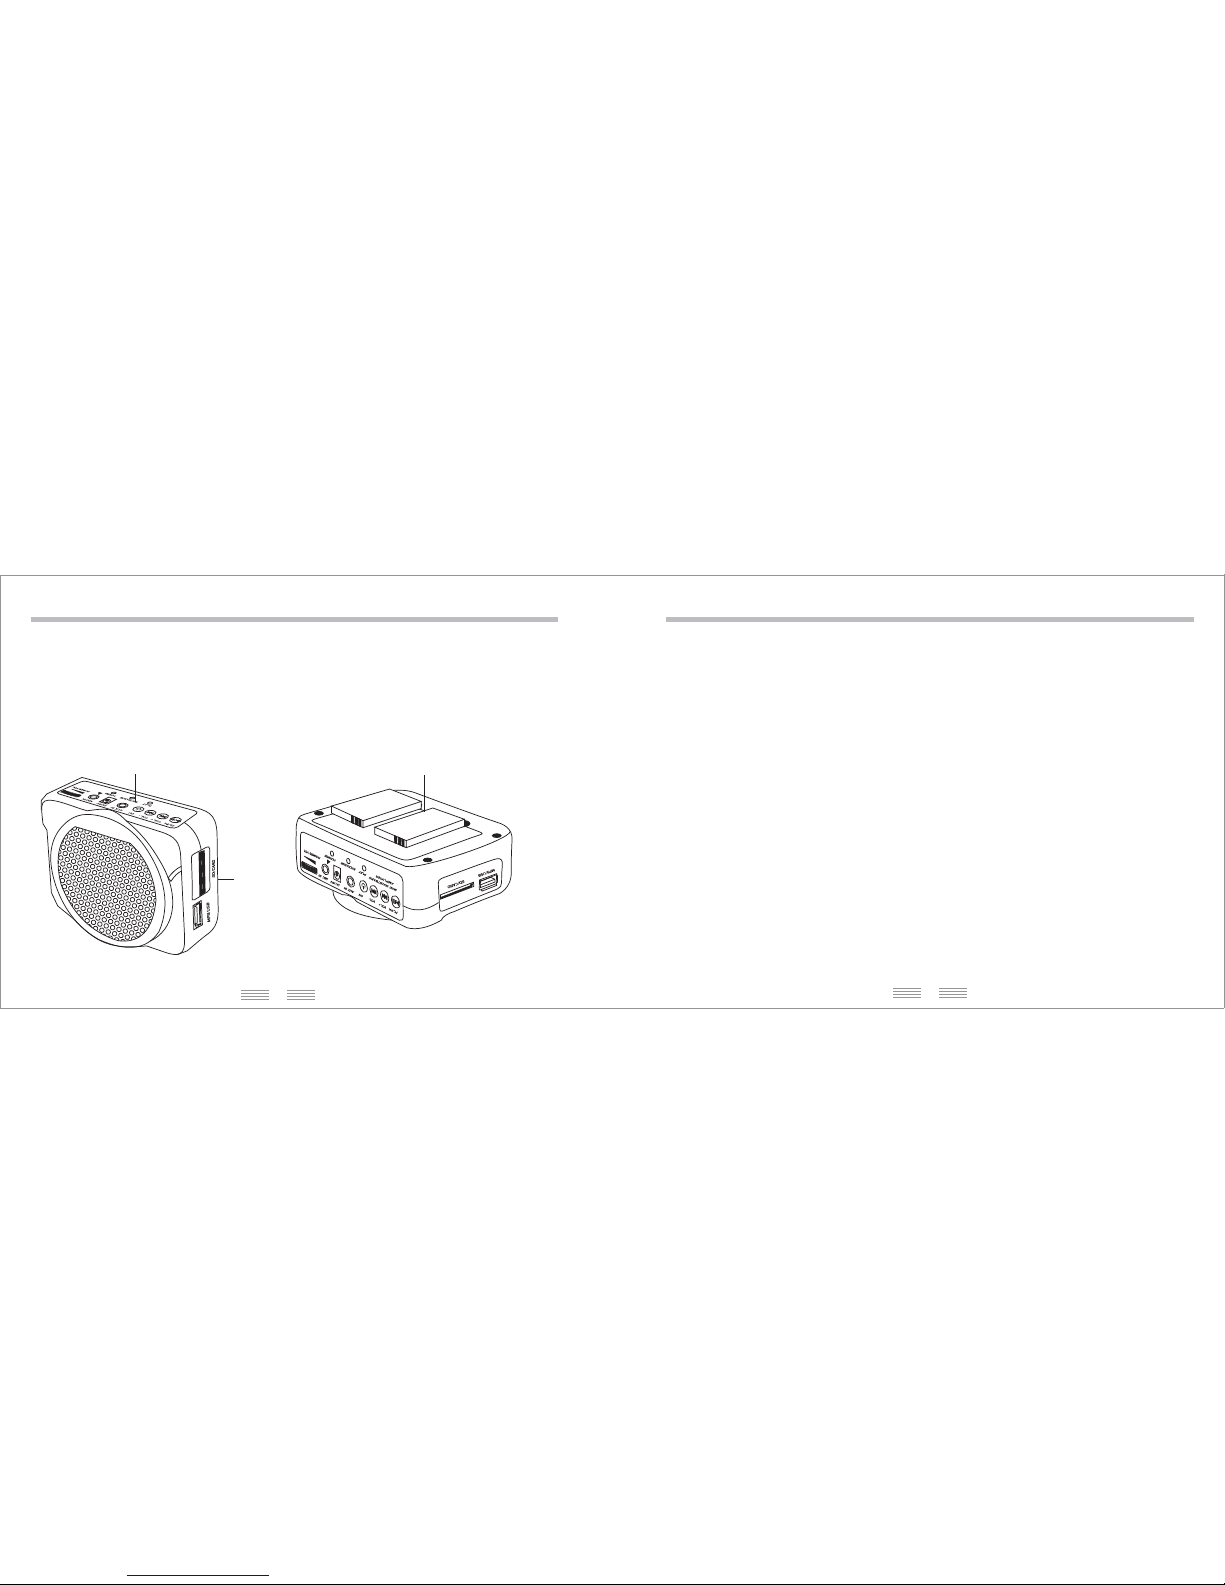
2.Parts Description2.Parts Description
2.1Host structure2.1Host structure
6
Forward & Parts Description Instructions & Basic Set
Front View
Control Panel
SD Card
Input Slot
Rear View
Battery Compartment
5.2 MP3/USB/SD Card Function5.2 MP3/USB/SD Card Function
(1) Insert SD Card into the SD Card Input slot (Fig. 2). When reading/playing the
MP3/ USB/ SD Card, the “PLAY” button (Fig.1-12) will illuminate and continue
blinking. Red light indicates MP3/USB input (Fig. 2-1), green light indicates SD
Card input (Fig. 2-2).
(2) Adjust MP3/ USB / SD Card Output Volume using Power/Vol Control Switch
(Fig. 1-1) or Vol+/Vol- buttons (Fig. 1-6 and Fig. 1-7).
(3) When playing MP3, press “reverse” (Fig. 1-6) or “forward” (Fig. 1-7) buttons to
select the desired track. Press “play” or “pause” button (Fig. 1-8) to play or
pause the desired track.
(4) Press “ON” button (Fig. 1-5) to turn off MP3/USB/SD Card function, and the
light indicator on “PLAY” button (Fig. 1-12) will go off.
6.Basic Set6.Basic Set
(1)Main Unit
(2)Headset Microphone
(3)Belt
(4) 3.5mm ConnectorΦ
1PC
1PC
1PC
1PC
(5)Switching Power Supply (9V 1A)
(6)User Manual
1PC
1PC
Page 4
3
4
Functions Functions & Features
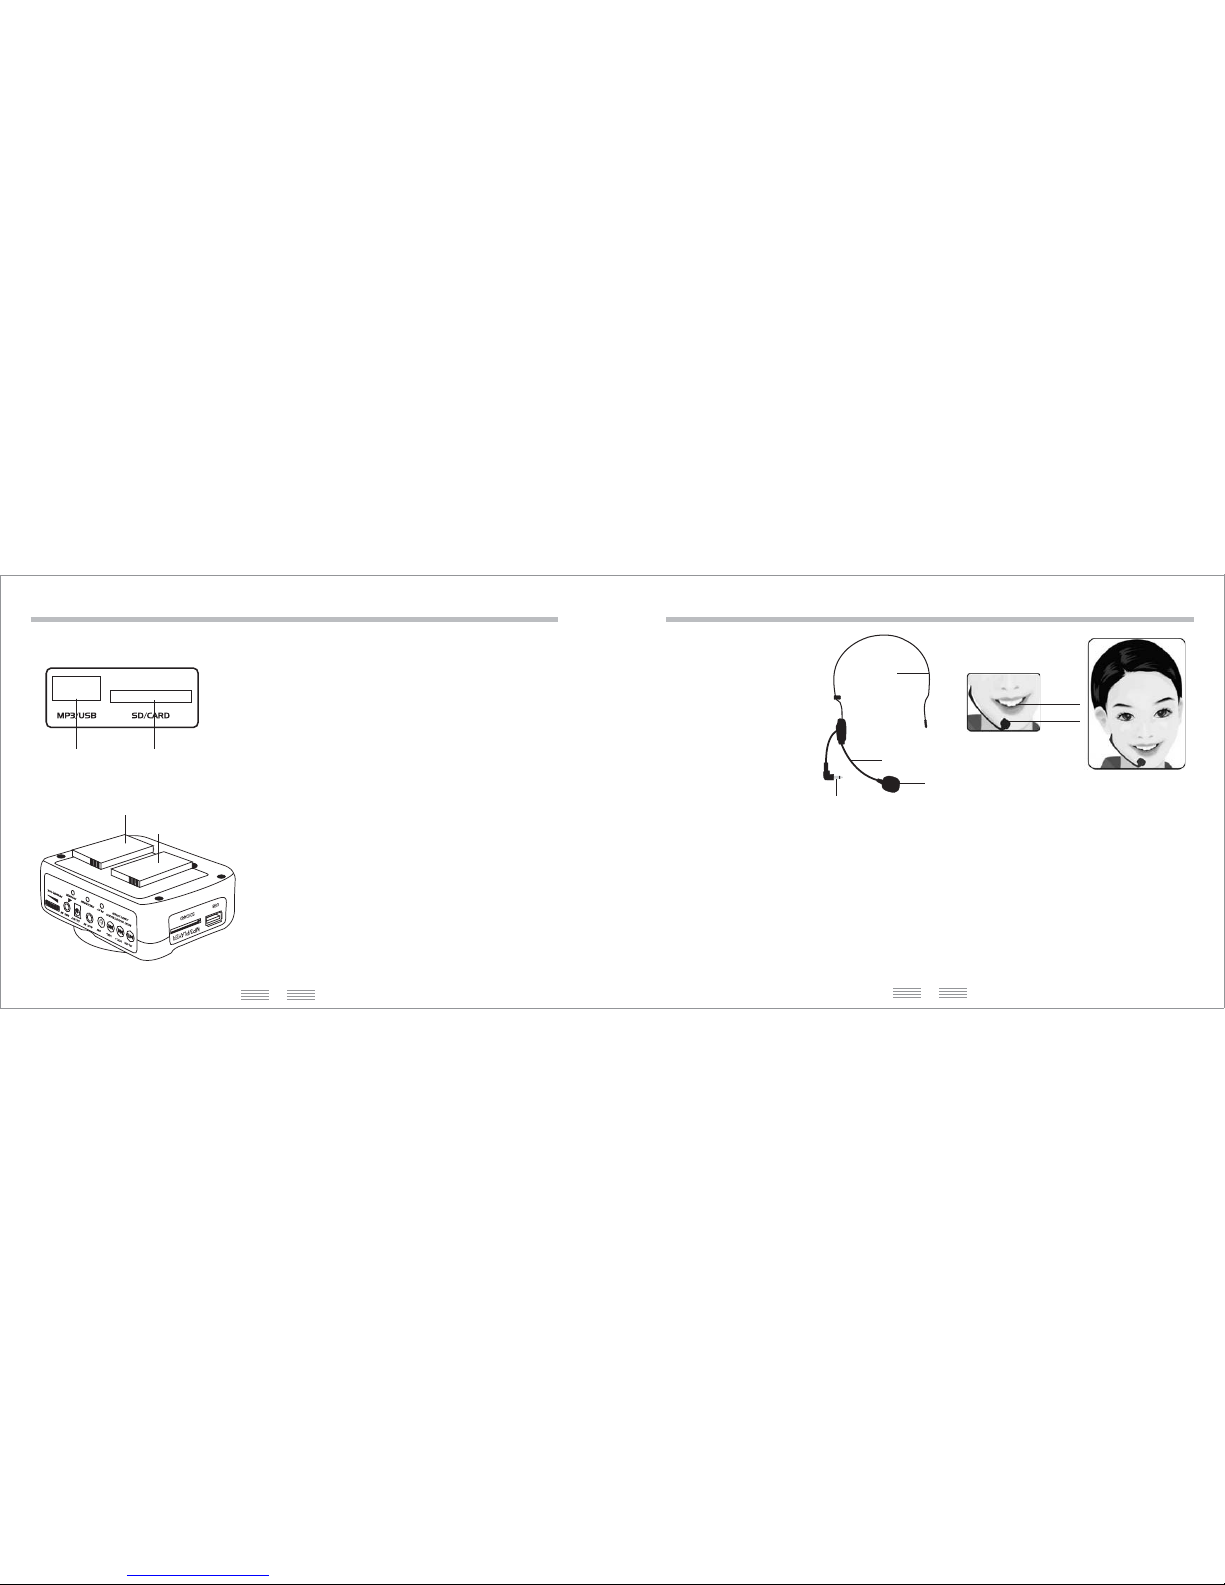
Note:
Pls adjustthe gooseneck untilthe microphone is
approx. 2-3cmaway from thelips. Do notturn on
power /volume before microphoneis securely worn.
2.5 Headset Mic2.5 Headset Mic
(1) Microphone capsule
(2) Bending Gooseneck
(3) Headset
(4) 3.5 JackΦ
3 Features.3 Features.
(1) USB port & SD card reader.
(2) Latest Digital Circuit Design for higher output & lower power consumption.
(3) Rechargeable lithium batteries prolong life span of main unit.
(4) Neodymium magnet provides better sound quality.
(5) Compact, lightweight & portable.
(6) Amplifies inputs from MP3, PC, etc
(7) Power is cut-off automatically when batteries are fully charged.
↓
↑
2~3cm
2.3 MP3/USB / SD Card Function2.3 MP3/USB / SD Card Function
Fig. 2
(1) (2)
(1)
(1)
2.4 Battery Compartment2.4 Battery Compartment
(1) Whenreading/playing the MP3/USB/ SD Card,
the “PLAY” button will illuminate and continue
blinking. Redlight blinking indicatesmain unit
is readingMP3/USB input.
(2) Greenlight blinking indicatesmain unit is
reading SDCard input.
(1) 3.7V/ 1500MA high capacity rechargeable
lithium battery 2 nos.
Toprolong battery life,pls fully chargethe lithium
batteries afterevery use forthe first fewtimes.
Note: IfMP3/USB is inserted,and SD Cardis
inserted later, the main unit will readthe SD
Card, asit is insertedlater.
Supported FileFormat: MP3 format.
Supported USB/SDCard : Max.32G(Version 2.0)
Note: For optimum performance & safetyreasons,
pls useoriginal lithium batteriesprovided by
manufacturer.
(1)
(2)
(3)
(4)
Fig. 3
Fig. 4
Fig.5
Page 5
Specifications & Instructions
(1) Power Output : RMS 10W
(2) AF Response : 100Hz-13KHz
(3)Battery:3.7Vx2nos.
(4) Battery Type: Rechargeable
Lithium Batteries
(5) Speaker : 3-inch speaker x 1
(6) Input Signal : Mic/MP3/USB/SD Card
(7) Charging Time : 7-8 hrs
(8) Usage Time : 12-15 hrs per charge
5
(1) Please use the original headset microphone for best performance. Insert headset
mic input jack (Fig. 4-4) into the mic input on the main unit (Fig. 1-2), adjust the
(2) When main unit is turned on (Fig. 1-1), green “POWER” indicator (Fig. 1-10) light
denotes main unit is powered on. Red “POWER” indicator (Fig. 1-10) light indicates
battery level is low. When charging, “RECHARGE” indicator turns red (Fig. 1-11).
“RECHARGE” indicator (Fig. 1-11) turns green when main unit is fully charged.
(3) Adjust Power/Vol Control Switch (Fig. 1-1) to set desired volume for headset mic
output.
(4) If feedback (howling) occurs, check volume (Fig. 1-1) is set at appropriate level.
gooseneck (Fig.4-2) untilthe microphone is approx. 2-3cm awayfrom the lips (Fig. 5).
Functions
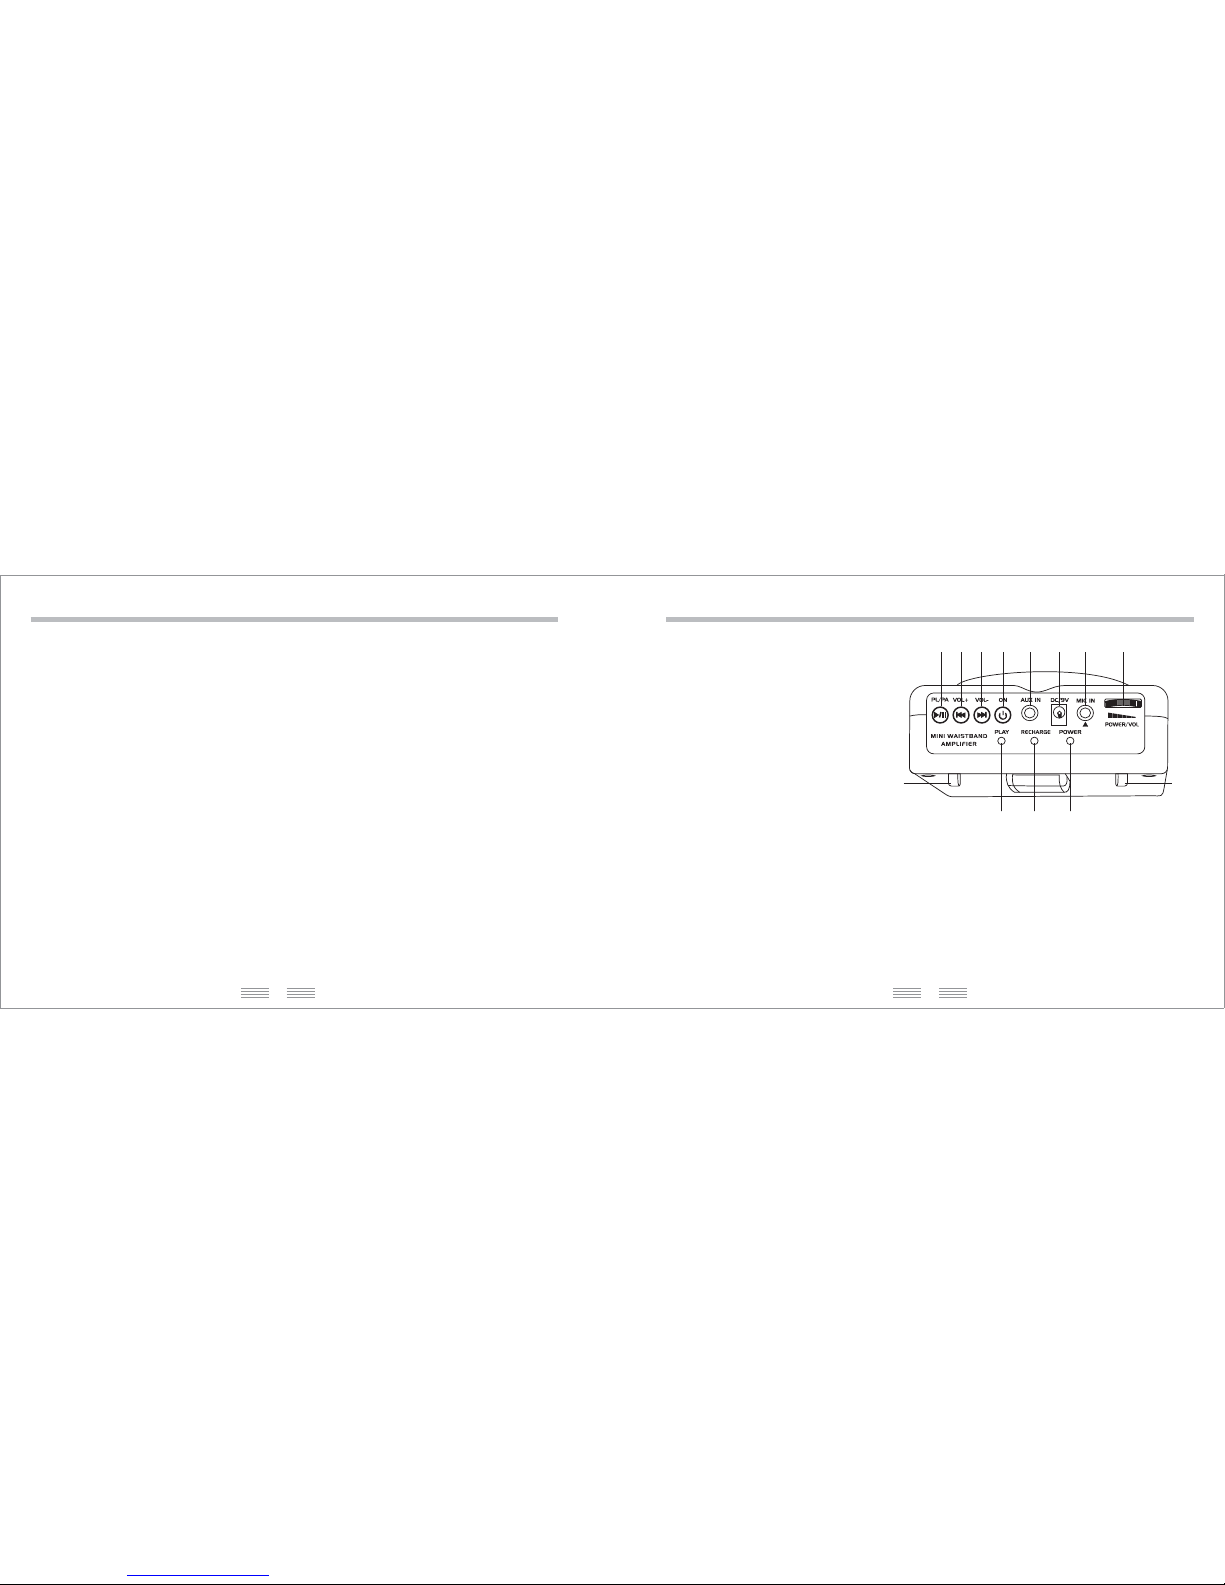
2.2 Control Panel Functions2.2 Control Panel Functions
(1) PowerOn/Off & Volume Control Switch
(2) MicInput
(3) DC9V Power Input
(4) AUX IN Input
(5) MP3ON/OFF Button
(6) MP3Volume Control - Press &
hold tolower MP3 volume,quick
press toselect previous track.
(7) MP3Volume Control Press & hold
to increaseMP3 volume, quick
press toselect next track.
(8) “PLAY” or “PAUSE” button
(9) Eyeletfor Belt
(10) PowerLED Indicator
(11) Power Recharge Indicator
(12) MP3LED Indicator. When reading MP3/ USB/SD Card, the“PLAY” button will illuminate
and continueblinking. Red lightindicates MP3/USB input,green light indicatesSD Card
input.
(1)
(2)(3)(4)(5)(6)(7)(8)
(9)
(10)(11)(12)
(9)
Fig. 1
2
5.1 Headset Mic5.1 Headset Mic
4. Specifications4. Specifications
5 Instructions.5 Instructions.
 Loading...