

Page 1

Operating Instructions
Before commissioning the machine, read operating instructions
and observe warning and safety instructions.
PLEASE ALSO READ ORIGINAL
BCS INSTRUCTION MANUAL
Crusader Power Scythes
Manufactured by BCS S.p.A.
Models 615L
●
615SL ● 630
Page 2
BCS Crusader Power Scythes
Page 2 CPS/MAX/0817
No liability will be accepted for any damage caused to persons or property
through failure to observe the operating and safety instructions.
!
IMPORTANT READ CAREFULLY
Contents
Page 3 Safety
Page 4 Controls - 615L
Page 5 Controls - 615SL
Page 6 Controls - 630
Page 7 Identication & Stickers
Page 9 Setting Up The Scythe Cutter Bar
Page 11 Types of Transmission & Cutter Bars
Page 12 Identifying Controls
Page 13 Instructions for Use
Page 16 Attaching Scythe to Power Unit
Page 17 Operating Hints
Page 18 Starting the Engine
Operation
Page 19 Stopping the Engine
Page 20 Useful Information
Page 21 Maintenance Guide
Page 23 Risk Assessment
Page 24 Troubleshooting
Page 25 Sound & Vibration Levels
Page 26 Spare Parts
Page 27 Manufacturer Information
Page 3

BCS Crusader Power Scythes
CPS/MAX/0817 Page 3
Safety
ALWAYS read the original manufacturer’s manual rst
ALWAYS start the engine in the open air
DO NOT smoke when refuelling
DO NOT mix OIL with the fuel
ALWAYS stop the engine before making any adjustments, refuelling, moving or
cleaning, or when the unit is unattended
USE ONLY fuel from containers designed for this purpose - refuel outdoors only and
replace the tank cap securely
IN CASE of petrol spillage move the machine away from the area of spillage and
allow the petrol vapours to dissipate before starting the engine
DO NOT remove any safety guards that are tted
DO NOT touch any moving parts or attempt any maintenance whilst the machine is
running - KEEP HANDS AND FEET AWAY
BEFORE starting work clear the work area of any objects that could damage the
machine
DO NOT allow children or anyone uninstructed to operate the machine - KEEP
ANIMALS AWAY
DO NOT use on slopes or banks of more than 20
o
ALWAYS wear suitable clothing to give personal protection including footwear that
offers a good grip
AVOID wearing loose garments that may catch in moving parts
KNOW how to stop the machine in an emergency
NEVER interfere with any control settings on the engine
NEVER select reverse gear with your back to a wall or other immovable object
IF A FAULT develops DO NOT attempt any repair - immediately contact the supplier
from whom the machine was obtained
VISUALLY INSPECT the machine before use - ensure all blades, nuts and bolts are
tight and not worn or damaged and replace blades if necessary
KEEP IN MIND the operator is responsible for accidents or hazards occurring to
people or property
Page 4
BCS Crusader Power Scythes
Page 4 CPS/MAX/0817
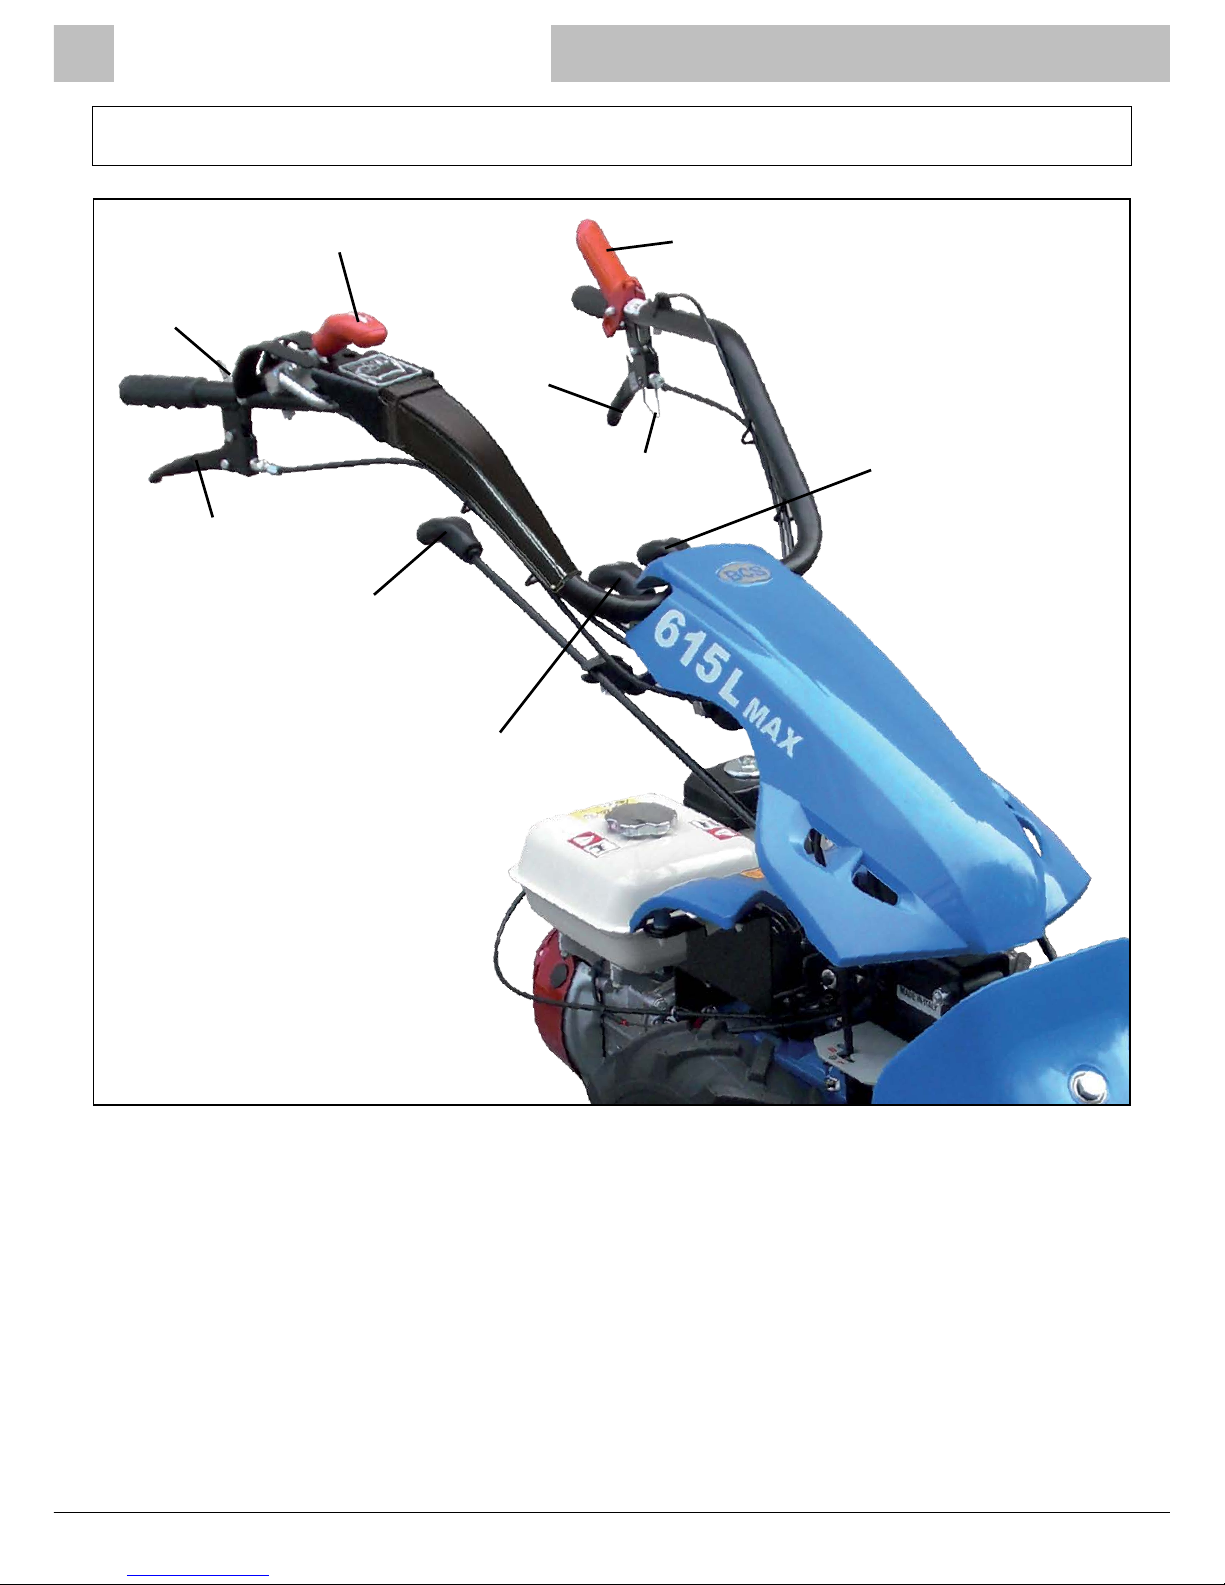
Controls
BCS 615L
Forward / Reverse Lever
Engine Stop (OPC) Lever
Throttle Lever
Handlebar Offset
Lever
Wheel Speed
Lever
Handlebar Height
Adjustment Lever
PTO Lever
Clutch Lever
Locking Clip
Page 5
BCS Crusader Power Scythes
CPS/MAX/0817 Page 5
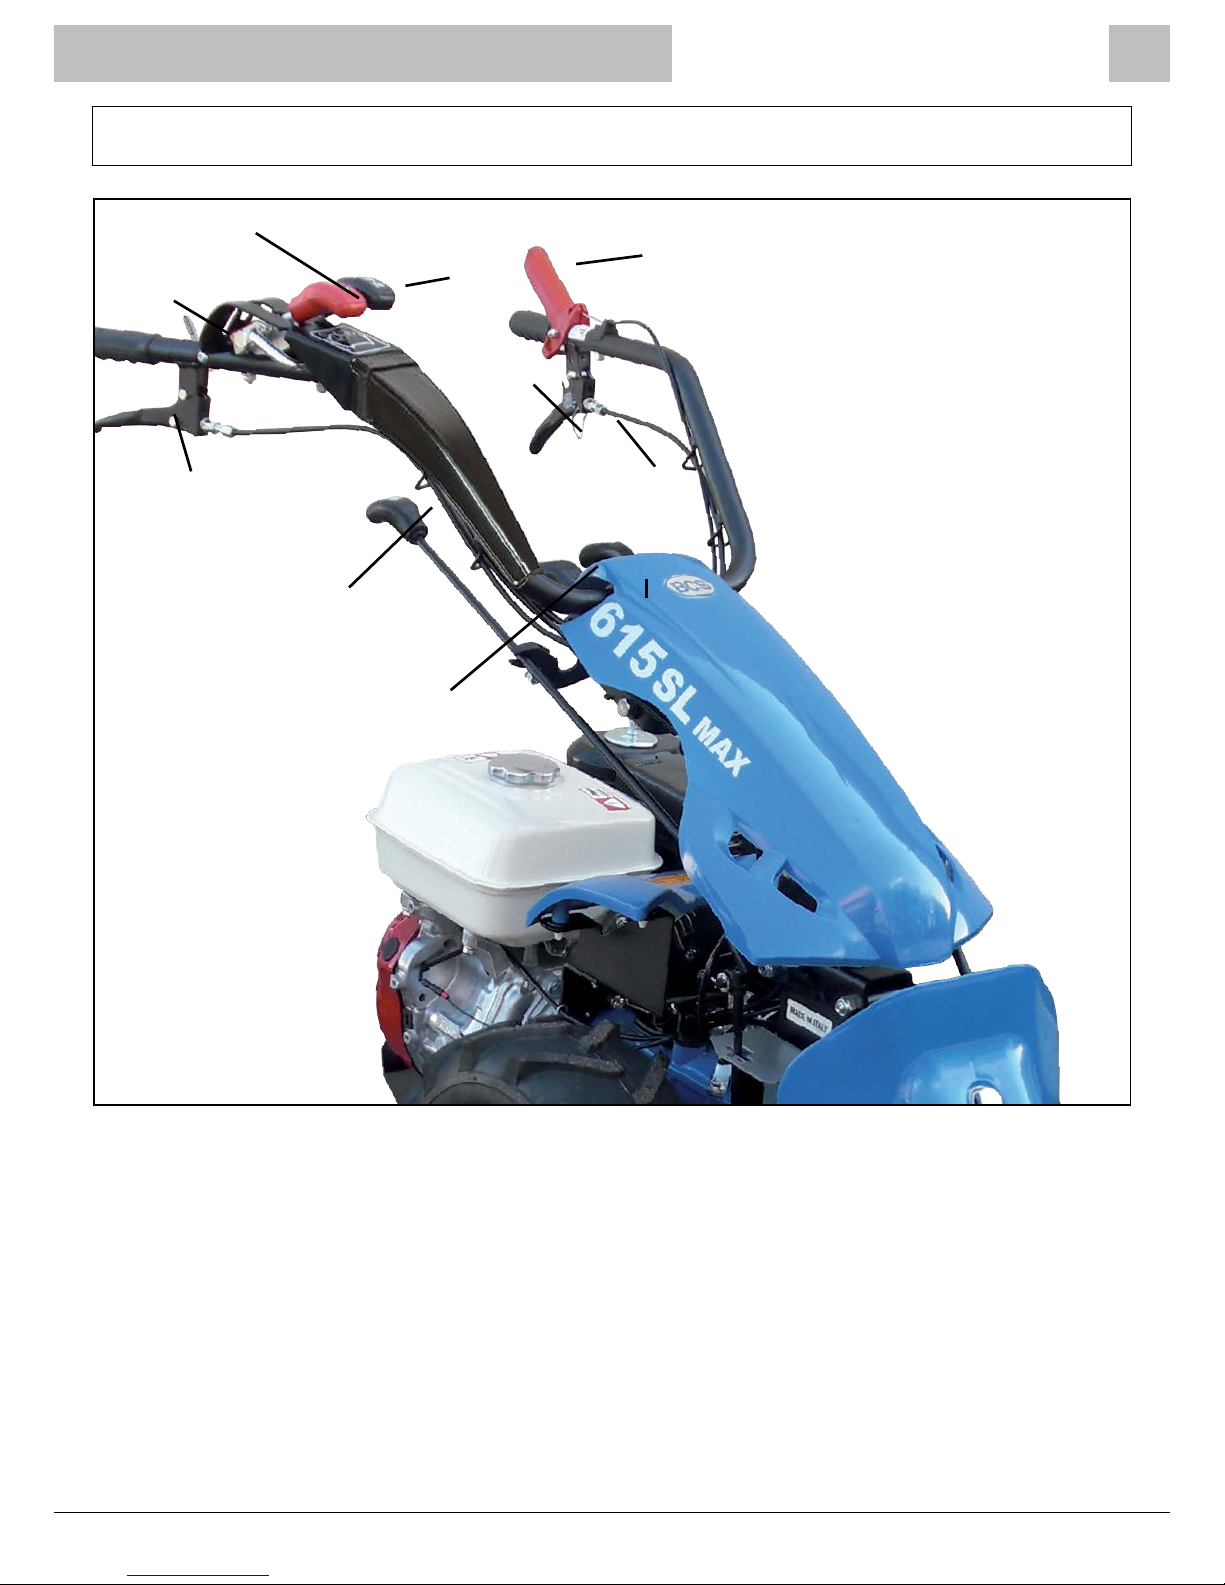
Controls
Forward / Reverse Lever
Throttle Lever
Handlebar Offset
Lever
Wheel Speed
Lever
Handlebar Height
Adjustment Lever
PTO Lever
Clutch Lever
Locking Clip
Differential
Lever
BCS 615SL
Engine Stop (OPC) Lever
Page 6
BCS Crusader Power Scythes
Page 6 CPS/MAX/0817
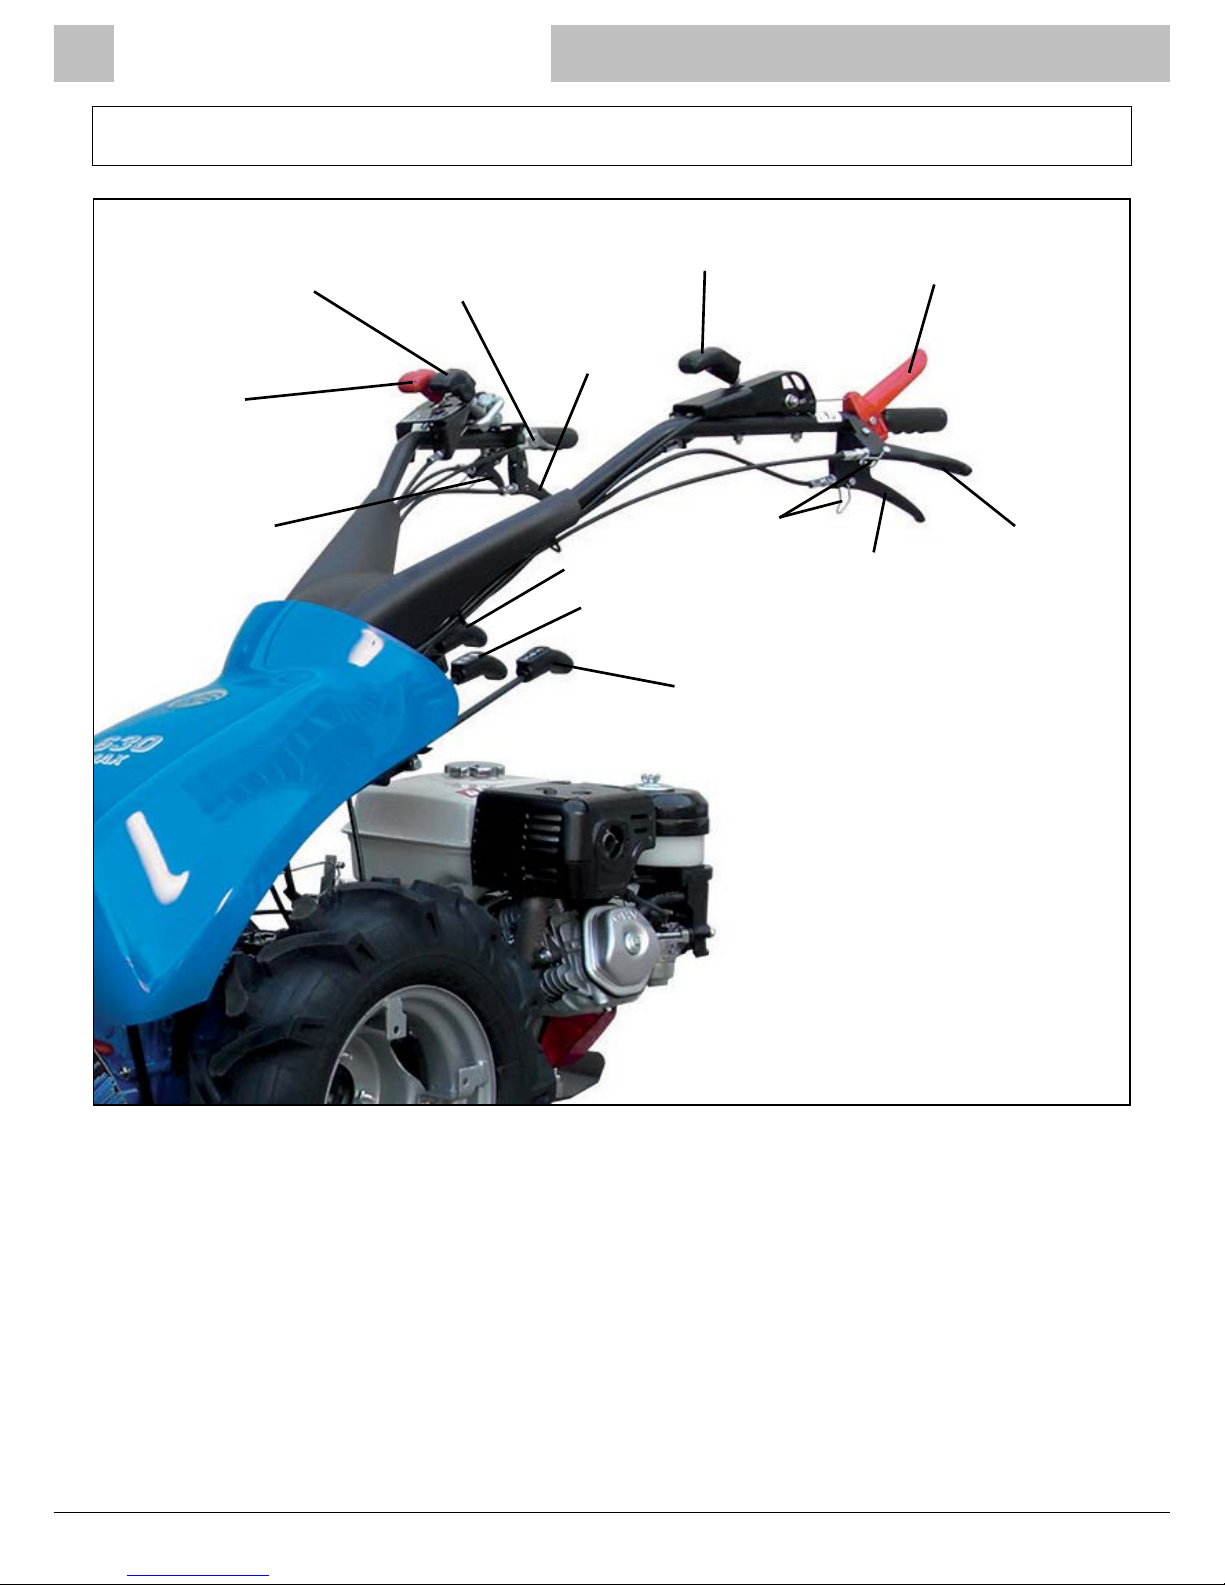
Controls Description
Forward /
Reverse
Lever
Engine Stop (OPC) Lever
Throttle Lever
Handlebar
Offset Lever
Wheel Speed Lever
Handlebar Height
Adjustment Lever
Parking Brake
Lever
Clutch Lever
Locking Clip
BCS 630
Differential Lever
Left Steering
Brake Lever
Right Steering
Brake Lever
PTO Lever
Page 7
BCS Crusader Power Scythes
CPS/MAX/0817 Page 7
Identication and Stickers
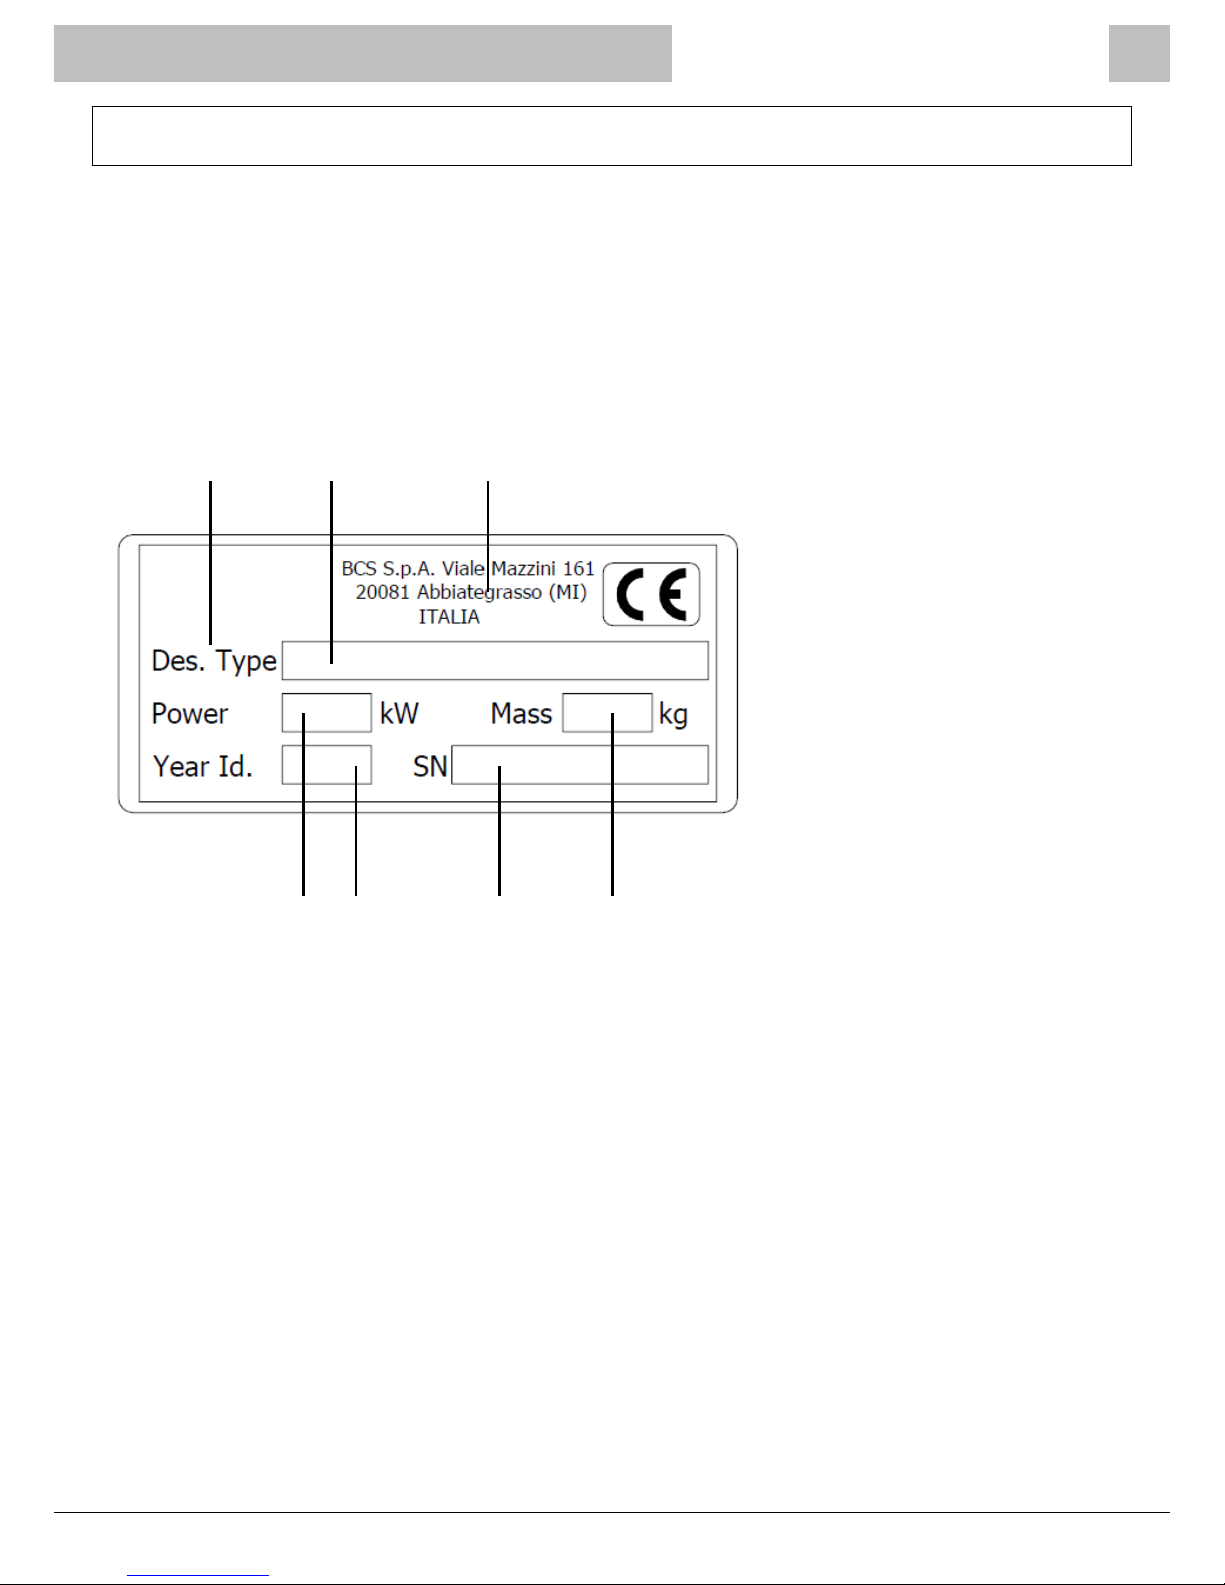
An identication sticker is applied to every machine, as well as product certication in accordance
with the EC Machine Directive (g.2/1).
NOTE: The weight value indicated on the identication plate only refers to the transmission. In
order to obtain the overall weight of the sickle bar, it is necessary to add the weight of the cutter
bar which has been chosen for coupling.
Preservation of the Labels
IMPORTANT! The labels must be kept clean from dust and mud, must always be clearly visible
and legible, and must be replaced if missing or illegible.
If any of the components have to be replaced and they were originally equipped with a safety
label, it is important that the component is returned to its original condition complete with new
labels.
The labels are available as spare parts and can be obtained from your supplier. The part numbers
for each sticker can be found on the parts diagram specic to each machine model, and are
normally also printed on the label.
g.2/1
1 3 2
4 6 7 5
1. Brand
2. Manufacturer
3. Model
4. Minimum Power Required
5. Weight (see note above)
6. Identication Number of
Production Year
7. Serial Number
Page 8
BCS Crusader Power Scythes
Page 8 CPS/MAX/0817
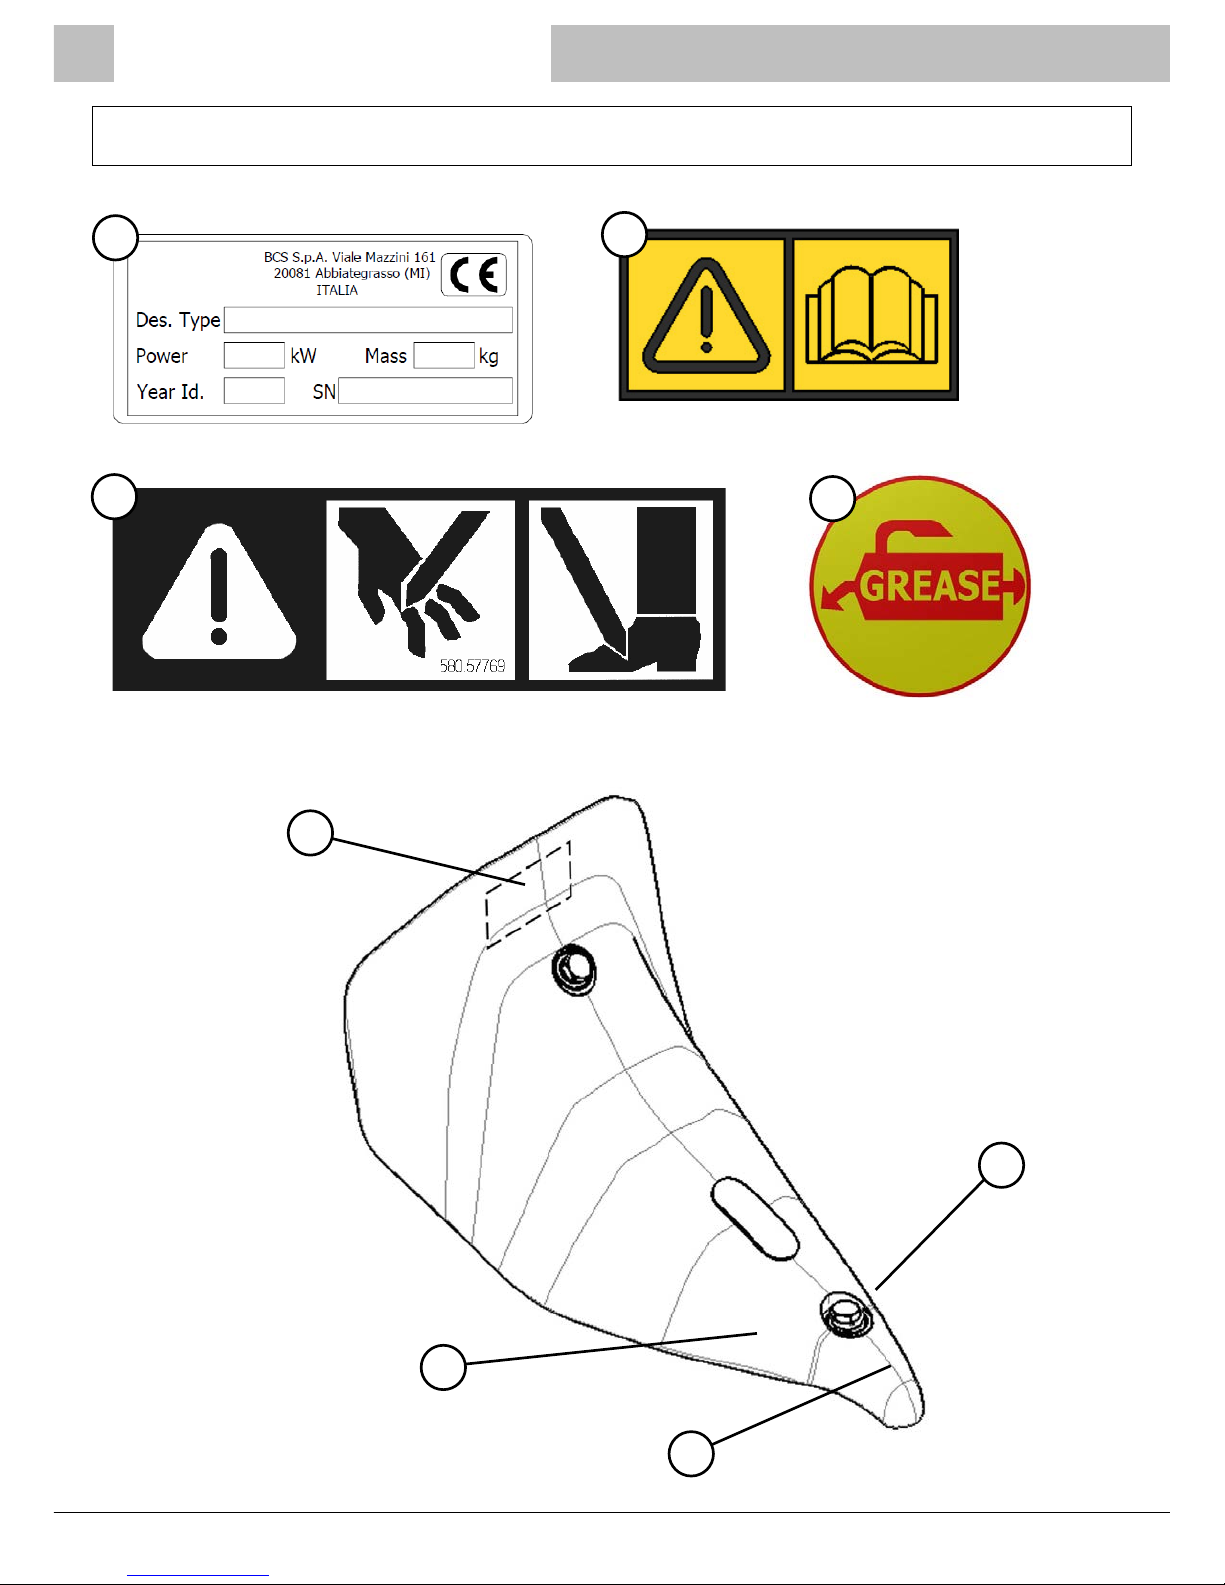
Identication and Stickers
1
1
2
4
3
2
4
3
58057724
58040548
58057769
Page 9
BCS Crusader Power Scythes
CPS/MAX/0817 Page 9
Setting Up The Scythe Cutter Bar
What the Machine is Designed For
The scythe cutter bar is designed for mowing grass and
pastures by cutting stems at the base.
This is achieved by coupling the gearbox or transmission
(power unit) to the cutter bar attachment which consists of
the cutting blades.
Opening the Boxes
The scythe attachment is delivered in two boxes, one
containing the transmission and the other containing the
cutter bar.
These should be moved either with a forklift truck or carried
by at least two people. Open the boxes starting from the lid,
and remove the accessories.
Preliminary Checks
Check that the machine is in good condition and has not
been damaged in transit, then proceed with assembly as
indicated in the following points.
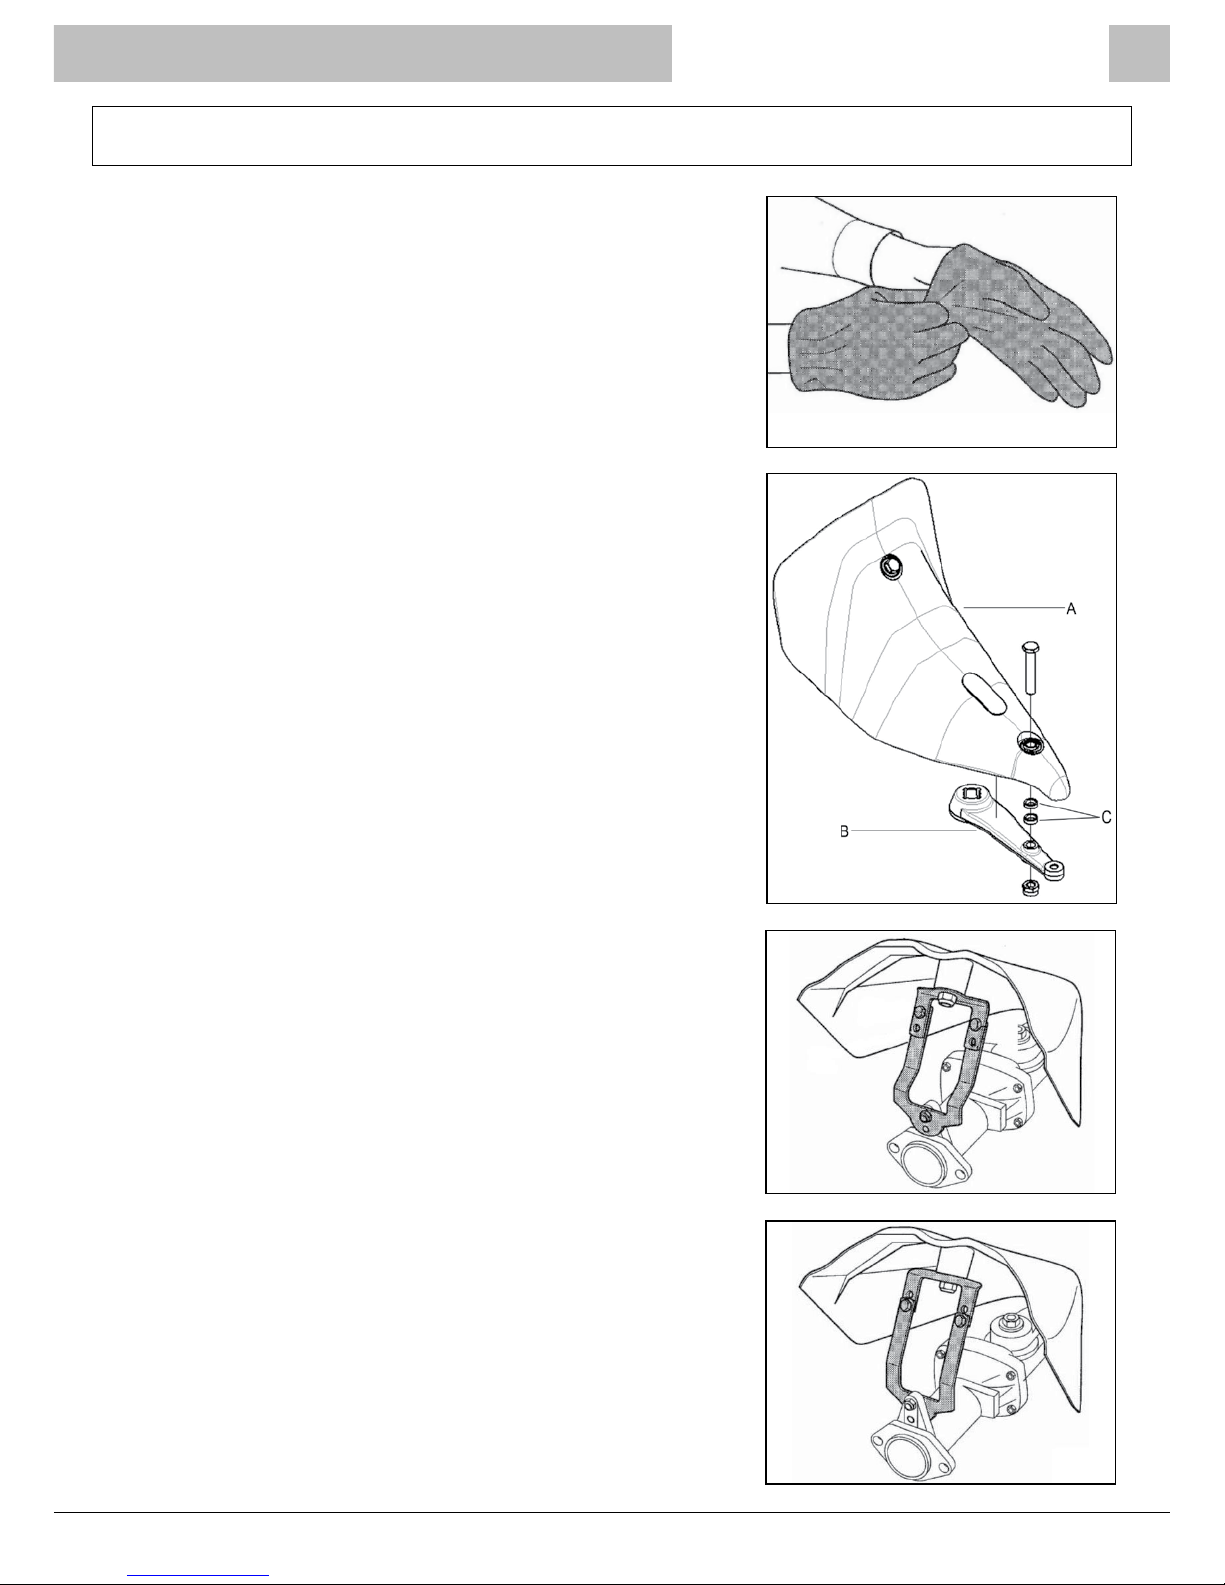
WARNING! Protective gloves must be worn for all assembly
operations, repair and use (g.4/1).
Gearbox Assembly
Fix the protection cover A to crank B as shown in g.4/2.
NB: For dry transmission and short oil bath transmissions two
C spacers must be used, for long oil bath transmissions only
one C spacer is required, and for DUPLEX transmissions no
spacers are required.
Fix the rear side of the protection cover A to the transmission,
as shown in g.4/3 and g.4/4, according to the type of
transmission and gearbox.
g.4/1
g.4/2
g.4/3
g.4/4
Page 10
BCS Crusader Power Scythes
Page 10 CPS/MAX/0817
Setting Up The Scythe Cutter Bar
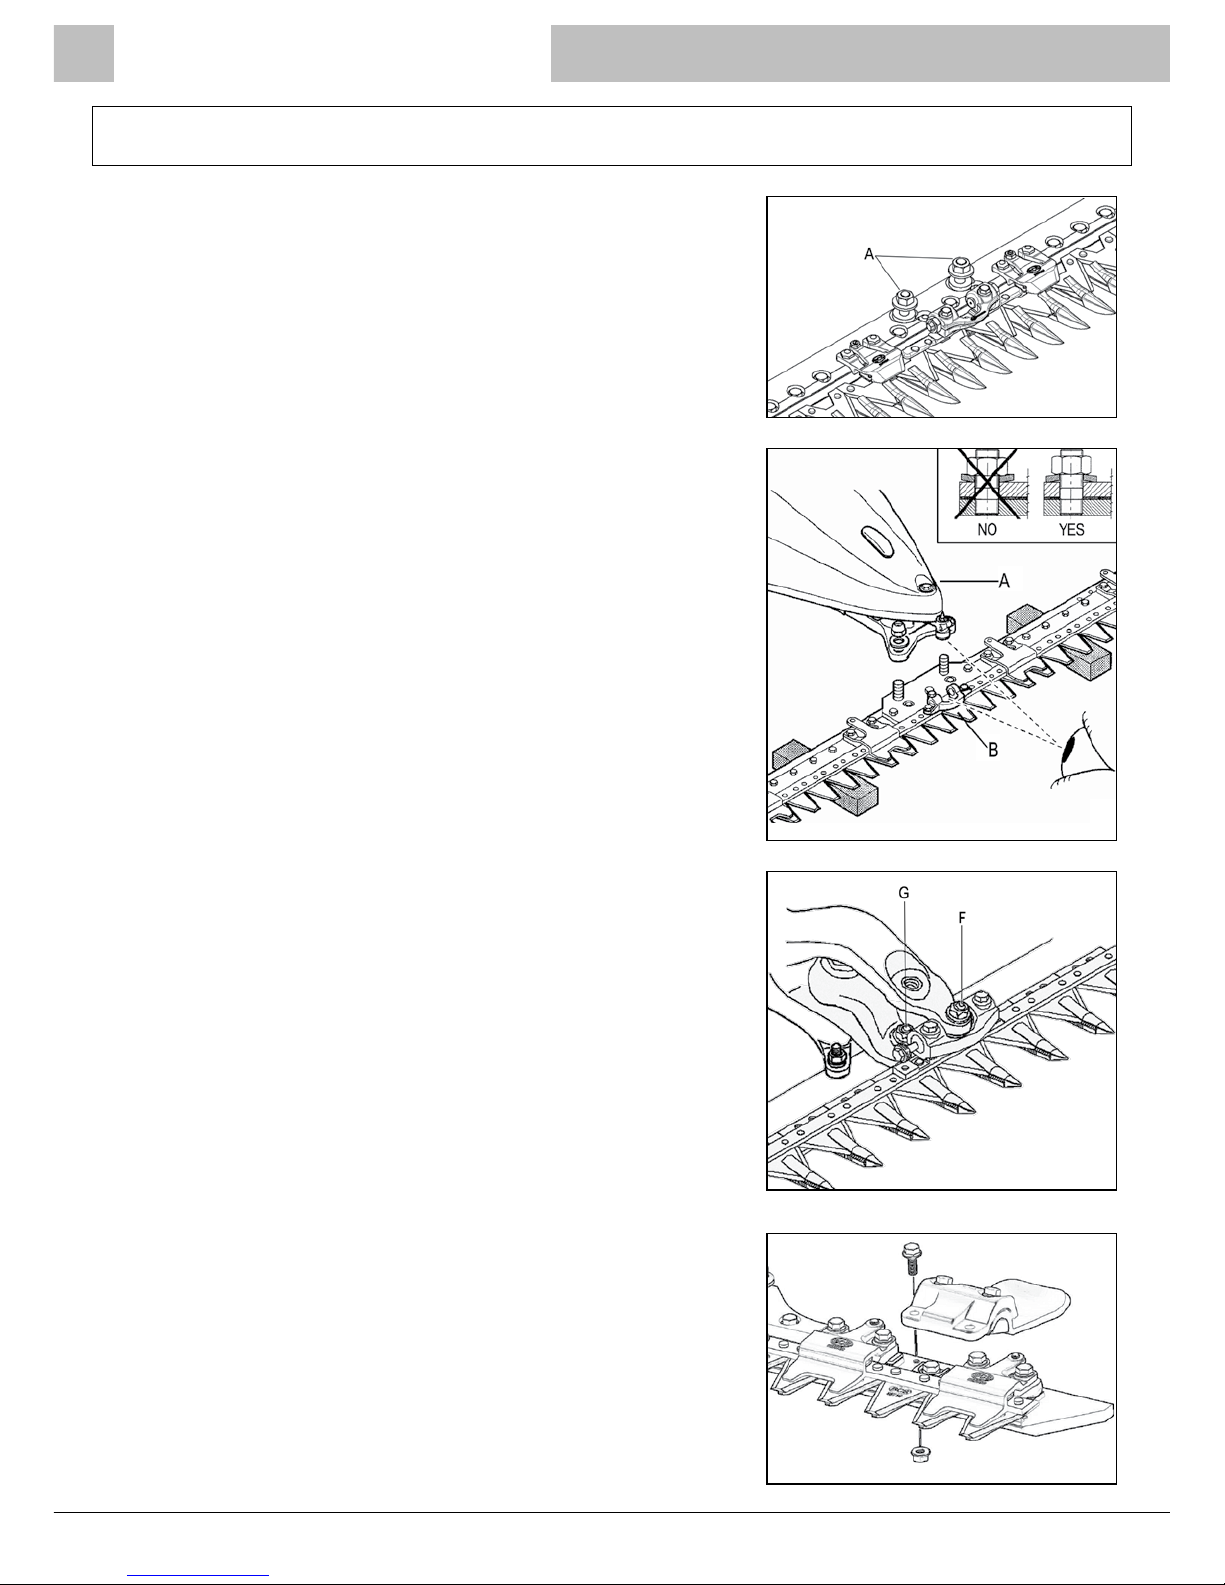
Fixing Cutter Bar to Transmission
Lay the cutter bar at and remove the two nuts A and related
washers (g.4/5).
Move the transmission closer to the cutter bar making sure
that the pivot is correctly lodged, then mount the cutter bar
B to control panel A using the two nuts and washers (g.4/6)
and tighten securely.
NB: For the assembly of the DUPLEX bars (with a double
crank mechanism), ensure both pins F and G t into their
housings (g.4/7), then proceed as described above.
IF A HIGH CUT IS NECESSARY: Install the cutting height
adjustment slides (skids) C on the cutter bar using the bolts
provided (g.4/8).
g.4/5
g.4/6
g.4/7
g.4/8
Page 11

BCS Crusader Power Scythes
CPS/MAX/0817 Page 11
Types of Transmission and Cutter Bars
Types of Transmission
1. Dry transmission, with ordinary maintenance and grease lubrication.
2. Low maintenance oil bath transmission, available in long and short versions.
3. Reciprocating movement and oil bath transmission, for DUPLEX cutter bars.
Types of Cutter Bar
1. Laser cutter bars (widths available 80 - 100 - 115 - 135 - 155 - 175cm).
These anti-clogging bars are recommended for tangled, tough and ne grass typical of
mountainsides. The perfect “scissor cut” is enhanced by the high quality of the materials.
Also available with a spring-steel blade-holder to reduce adjustments, improve cutting and
performance. It should not be used on uncultivated and stony land.
2. Cutter bar with ngers (widths available 115 - 145cm). These have the traditional ngers
which protect the blade and work very well on grass in general and for haymaking.
Due to the characteristics of the ngers, they should not be used when grass is thick, ne
or tangled, due to clogging problems.
3. DUPLEX bars with reciprocating movement and oil bath transmission (widths available 120
- 150 - 180cm).
These have traditional ngers and self-adjusting spring-steel blade-holder which assure
constant pressure. Efcient and effective in every working condition, they never clog and
offer a high quality cut even at high speed.
Page 12
BCS Crusader Power Scythes
Page 12 CPS/MAX/0817
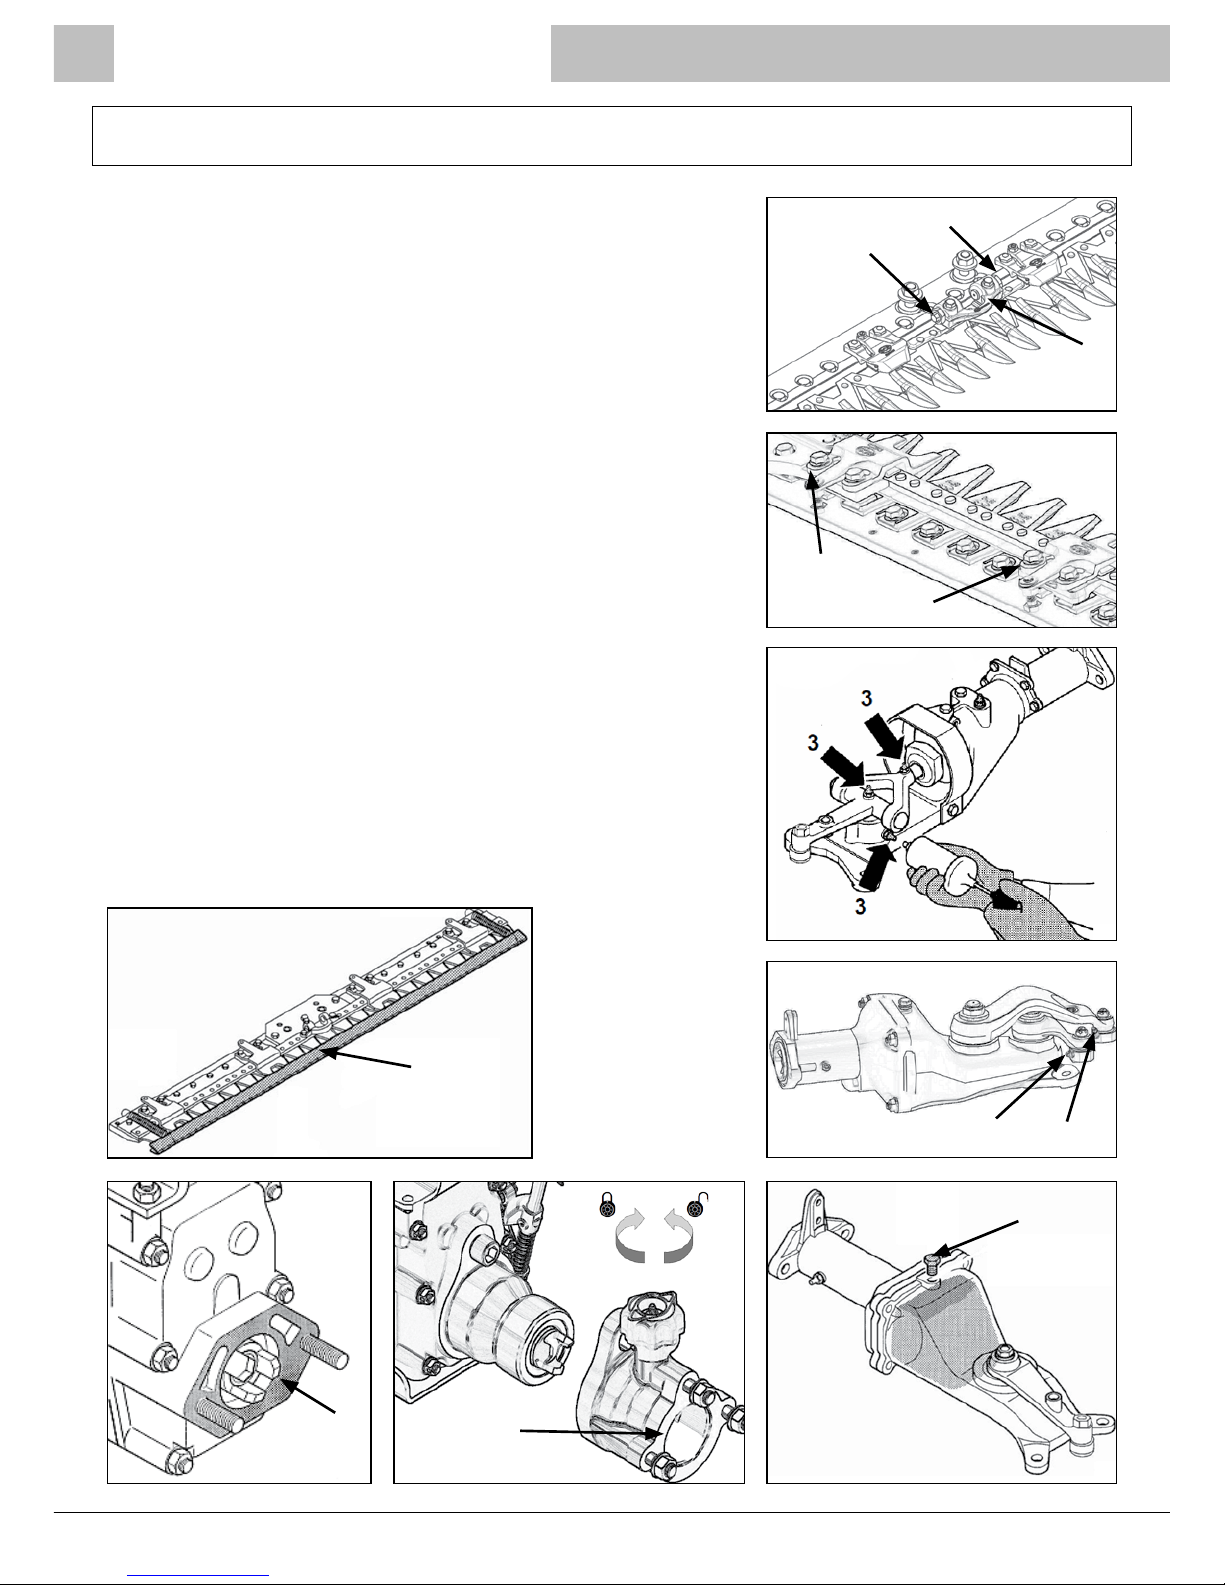
Identifying Controls
1. Regulating screws for coupling blade (g.5/1)
2. Regulating screws for blade holders (LASER bars
and FINGERS bars) (g.5/2)
3. Crank drive group greasers (g.5/3)
4. Blade control pin greasers (DUPLEX) (g.5/4)
5. Oil replacement and discharge plug (oil-bath crank
drive) (g.5/5)
6. Blade protection (g.5/6)
7. Flanging (g.5/7 – 5/8)
8. Coupling blade (g.5/1)
g.5/1
1
1
8
g.5/2
2
2
g.5/3
OIL BATH
g.5/4
4
4
g.5/6
6
g.5/7
7
g.5/8
7
g.5/5
5
Page 13
BCS Crusader Power Scythes
CPS/MAX/0817 Page 13
Instructions for Use
Operator Training
Warning! The machine has been designed for the use
indicated on page 6. It is strictly forbidden to use it for any
other purposes (eg. transporting persons, as a trailer, any
type of racing, run on public roads, etc). It must not be
changed nor tampered with.
Warning! Do not put your hands or feet near the work
zones or moving or rotating parts.
Warning! Before using the machine, you must familiarise
yourself with the controls. Learn how to turn off the engine
safely and quickly, always read the safety instructions.
Warning! Do not allow the use of the machine to minors, to
non-experts, do not carry passengers, do not operate near
channels or docks that can collapse under the weight of the
machine.
Caution! Whilst using the machine it is important that the
operator uses appropriate personal protective equipment
(PPE) safety shoes, ear protections, goggles, gloves, etc.
Do not attempt any cleaning or maintenance operations to
the machine or parts of the implement without observing
the safety instructions contained in this manual, and in the
specic manual to each implement.
Before you switch on the machine, you must know the
devices and safety features and controls.
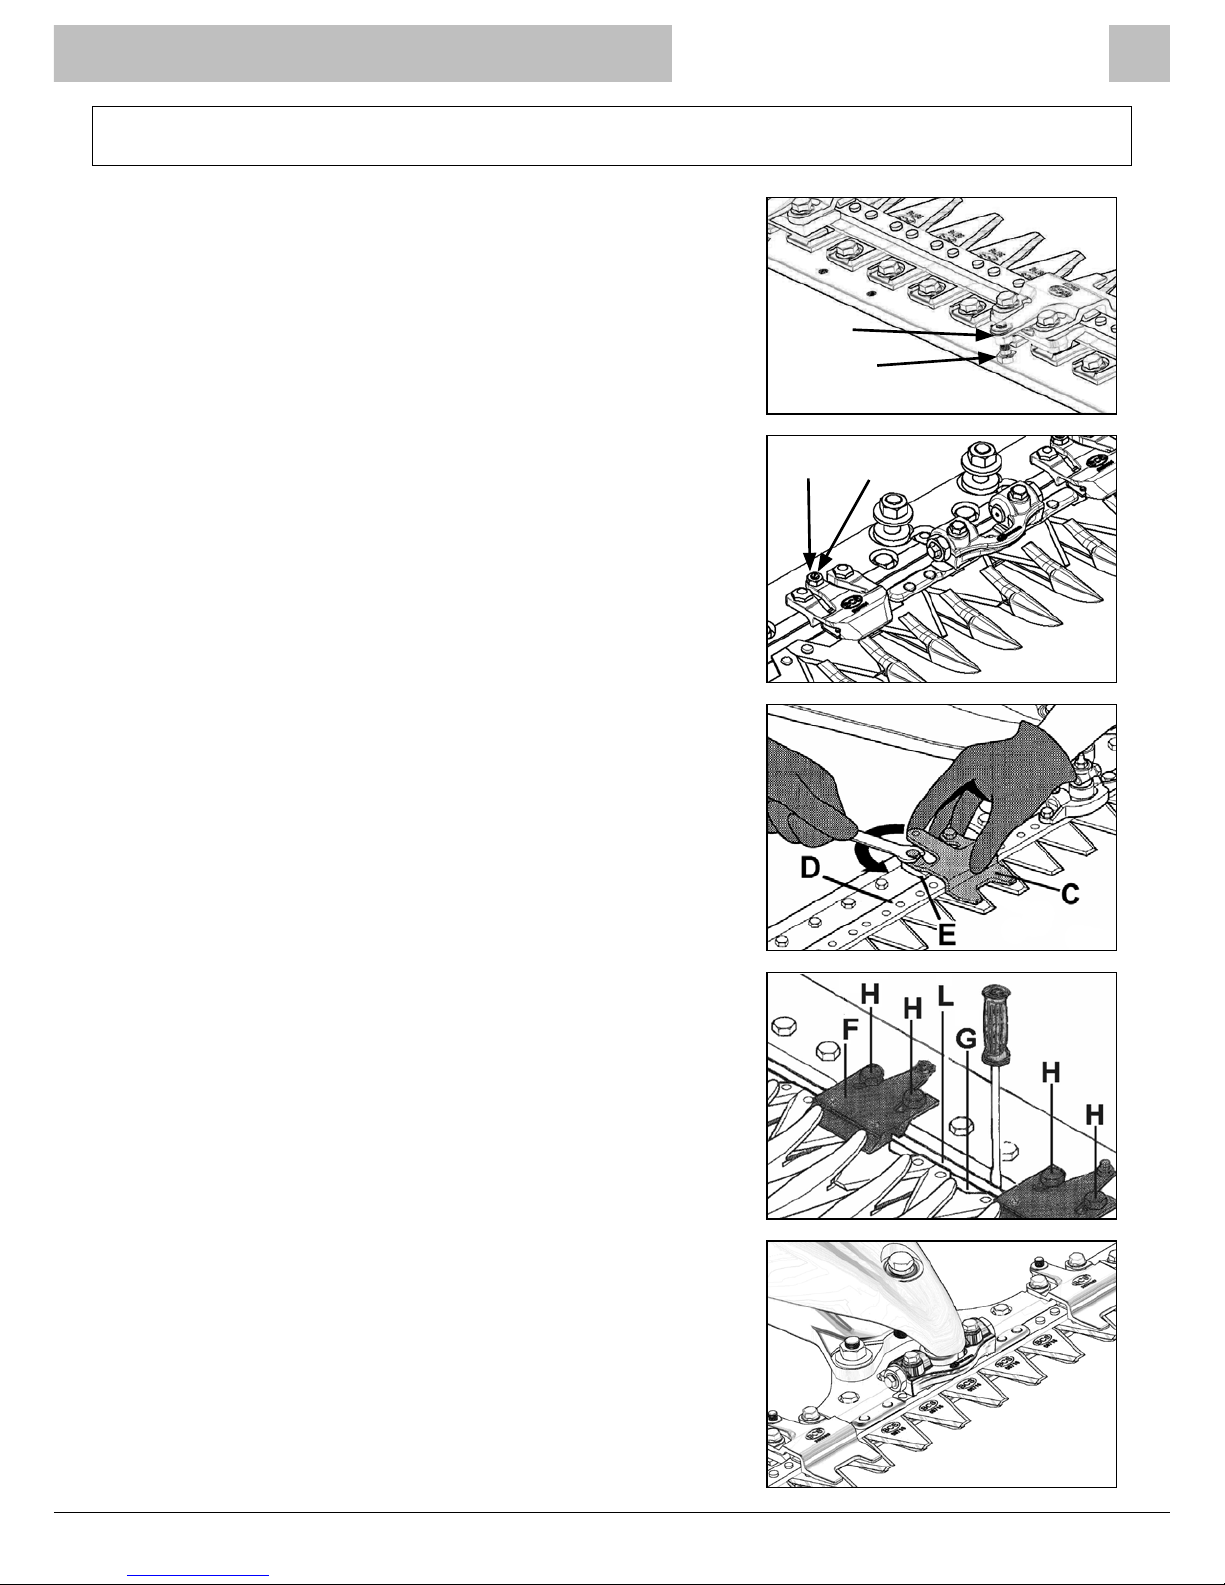
Checks Prior to Starting the Machine
• Check that in oil-bath transmission, the oil is at a certain
level (g.13/2).
• Check that the gearstick of the engine unit is in neutral.
• Check that the PTO of the engine unit is in neutral.
• Check that the implements are clean and free from
impediments.
g.6/0
A
B
g.6/1
A
B
g.6/2
g.6/3
g.6/4
Page 14
BCS Crusader Power Scythes
Page 14 CPS/MAX/0817
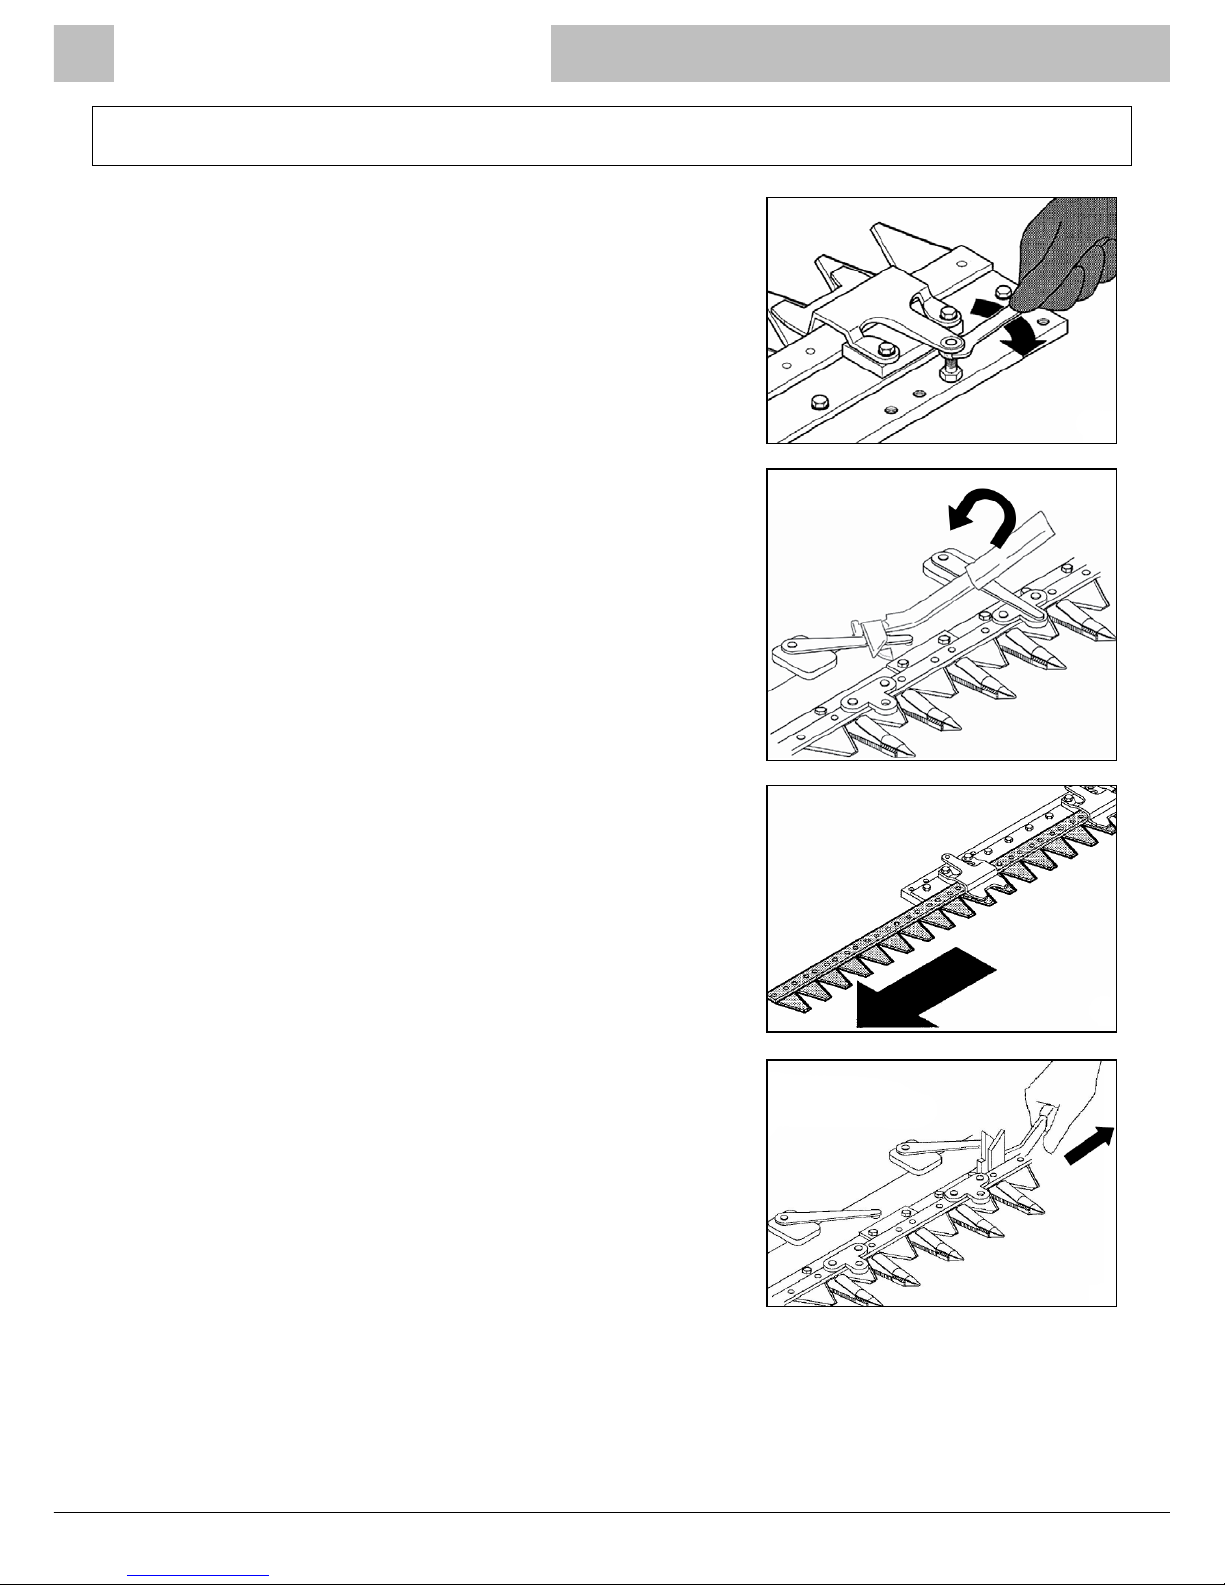
Blade Holder Adjustment
There are three types of blade pressing bars suitable for:
1. LASER bar
2. Cutter bar with FINGERS
3. DUPLEX and LASER ELASTO bars
1. Blade holder adjustment for LASER cutter bar
Loosen the upper lock nut A (g.6/0). Adjust the tension
screw B until the blade slides freely between the tooth
and blade holder without excessive slack.
When the adjustment produces the best motion without
binding, tighten the upper lock nut A.
2. Blade holder adjustment for cutter bars with FINGERS
Loosen the upper lock nut A (g.6/1). Adjust the tension
screw B until the blade slides freely between the tooth
and blade holder without excessive slack. When the
adjustment produces the best motion without binding,
tighten the upper lock nut A.
3. The spring-steel blade-holders of the DUPLEX and LASER
ELASTO bars do not require any adjustment.
Blade Adjustment
To adjust the LASER bar, loosen the blade-holder C (g.6/2),
position the blade on the wear blocks E on the blade holder,
and then tighten the bolts allowing a little slack.
For the bar with FINGERS, loosen the screws H on the bladeclamping devices F (g.6/3), and using a screwdriver draw
the blade guide L closer to the blade bar G, leaving a space
of 0.1/0.5mm between them. Then tighten the screws H on
the blade-clamping devices once again.
The DUPLEX and LASER ELASTO bars do not require blade
adjustments.
Instructions for Use
g.6/5
g.6/7
g.6/8
DUPLEX /
LASER ELASTO
g.6/6
DUPLEX /
LASER ELASTO
Page 15
BCS Crusader Power Scythes
CPS/MAX/0817 Page 15
Instructions for Use
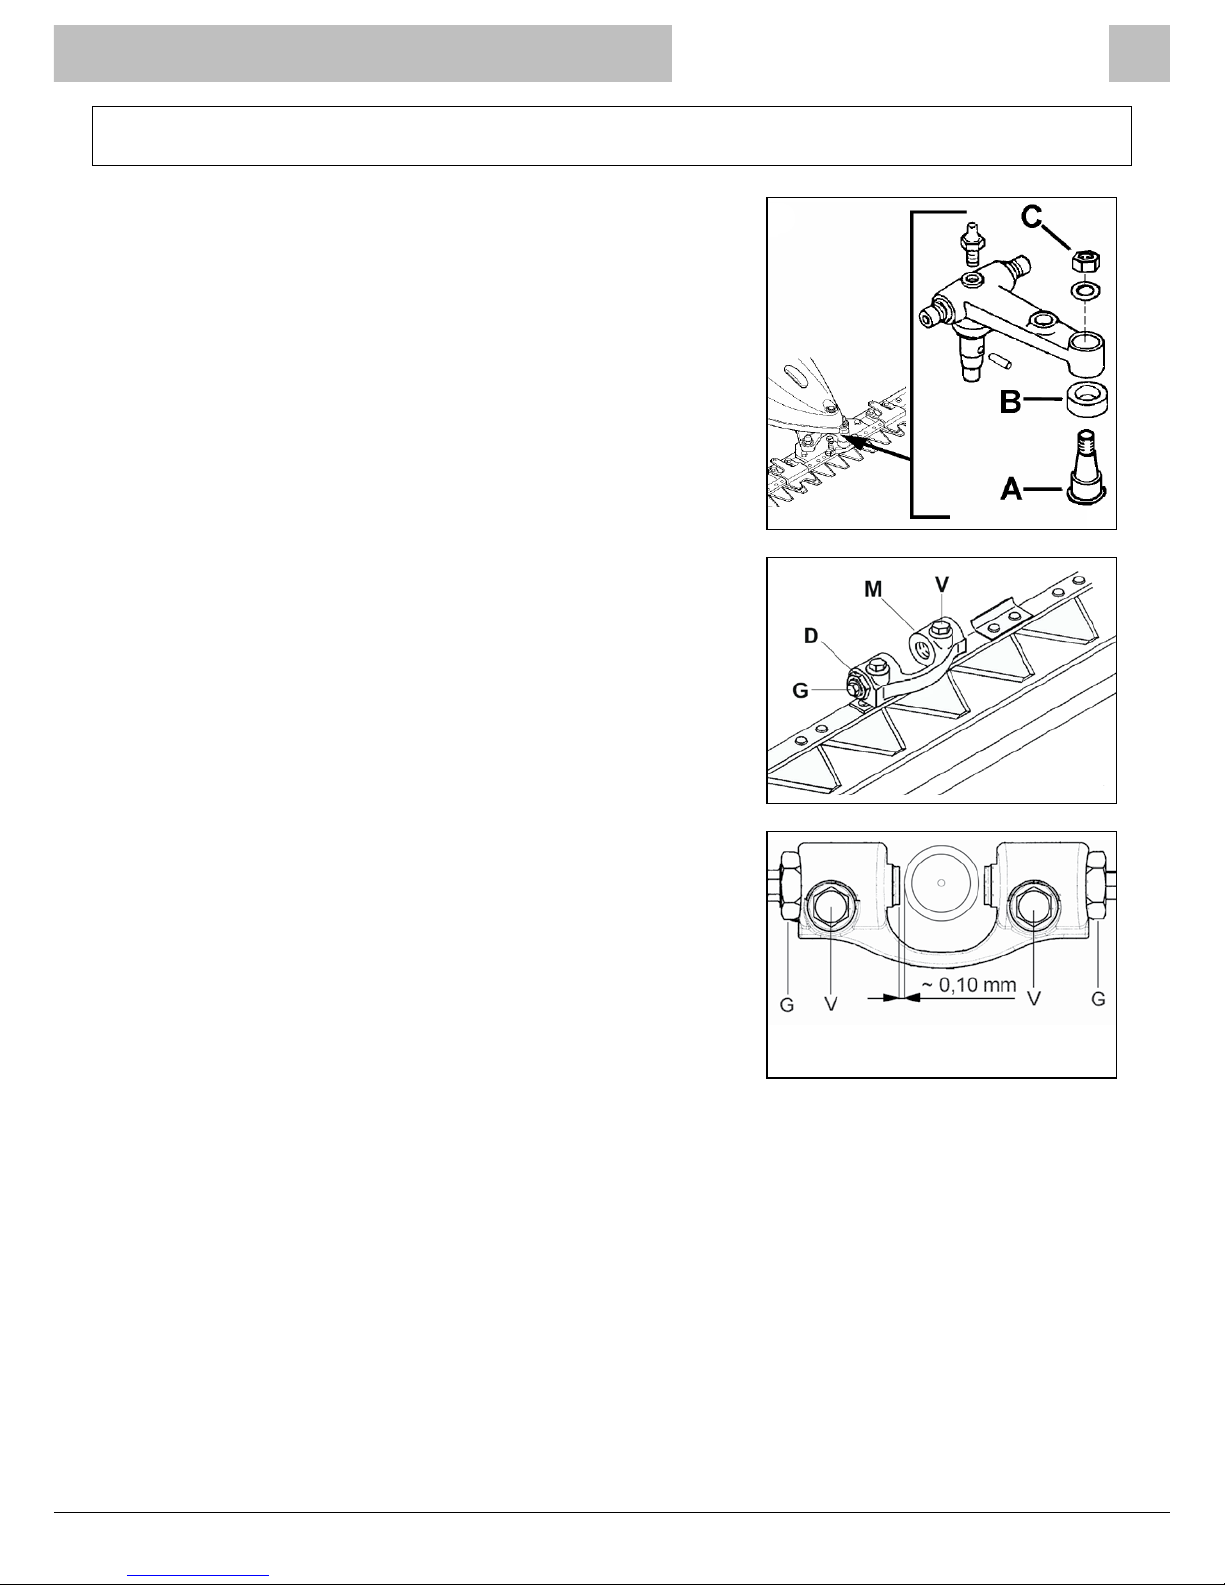
Blade Replacement
All types of blades are replaced by loosening the bolts and
removing the blade holder (g.6/4).
If necessary loosen the blade holder (g.6/5 and 6/6) and
remove the blade (g.6/7 and 6/8).
FOR BLADE ADJUSTMENT SEE PREVIOUS PARAGRAPH.
Replacement of Traction Pin
Every 100 work hours check the condition of the blade
control pin A, and the ferrule B (g.6/9).
If replacement is required, loosen the block nut C then slide
out the pin A and the ferrule B, then replace them with new
parts.
Check the setting screw G (g.6/10) that xes the steel blade
M, and replace if necessary.
Tighten the V screws completely on the steel blade. Tighten
each G setting screw to the same degree until almost all the
play has been eliminated on the blade control pin (g.6/11)
and then block them with conic lock nut D.
NB: The DUPLEX has two pins A, and two bushes B.
g.6/9
g.6/10
g.6/11
Page 16
BCS Crusader Power Scythes
Page 16 CPS/MAX/0817
Attention! For all assembly and repair operations, always wear heavy work gloves to protect
your hands.
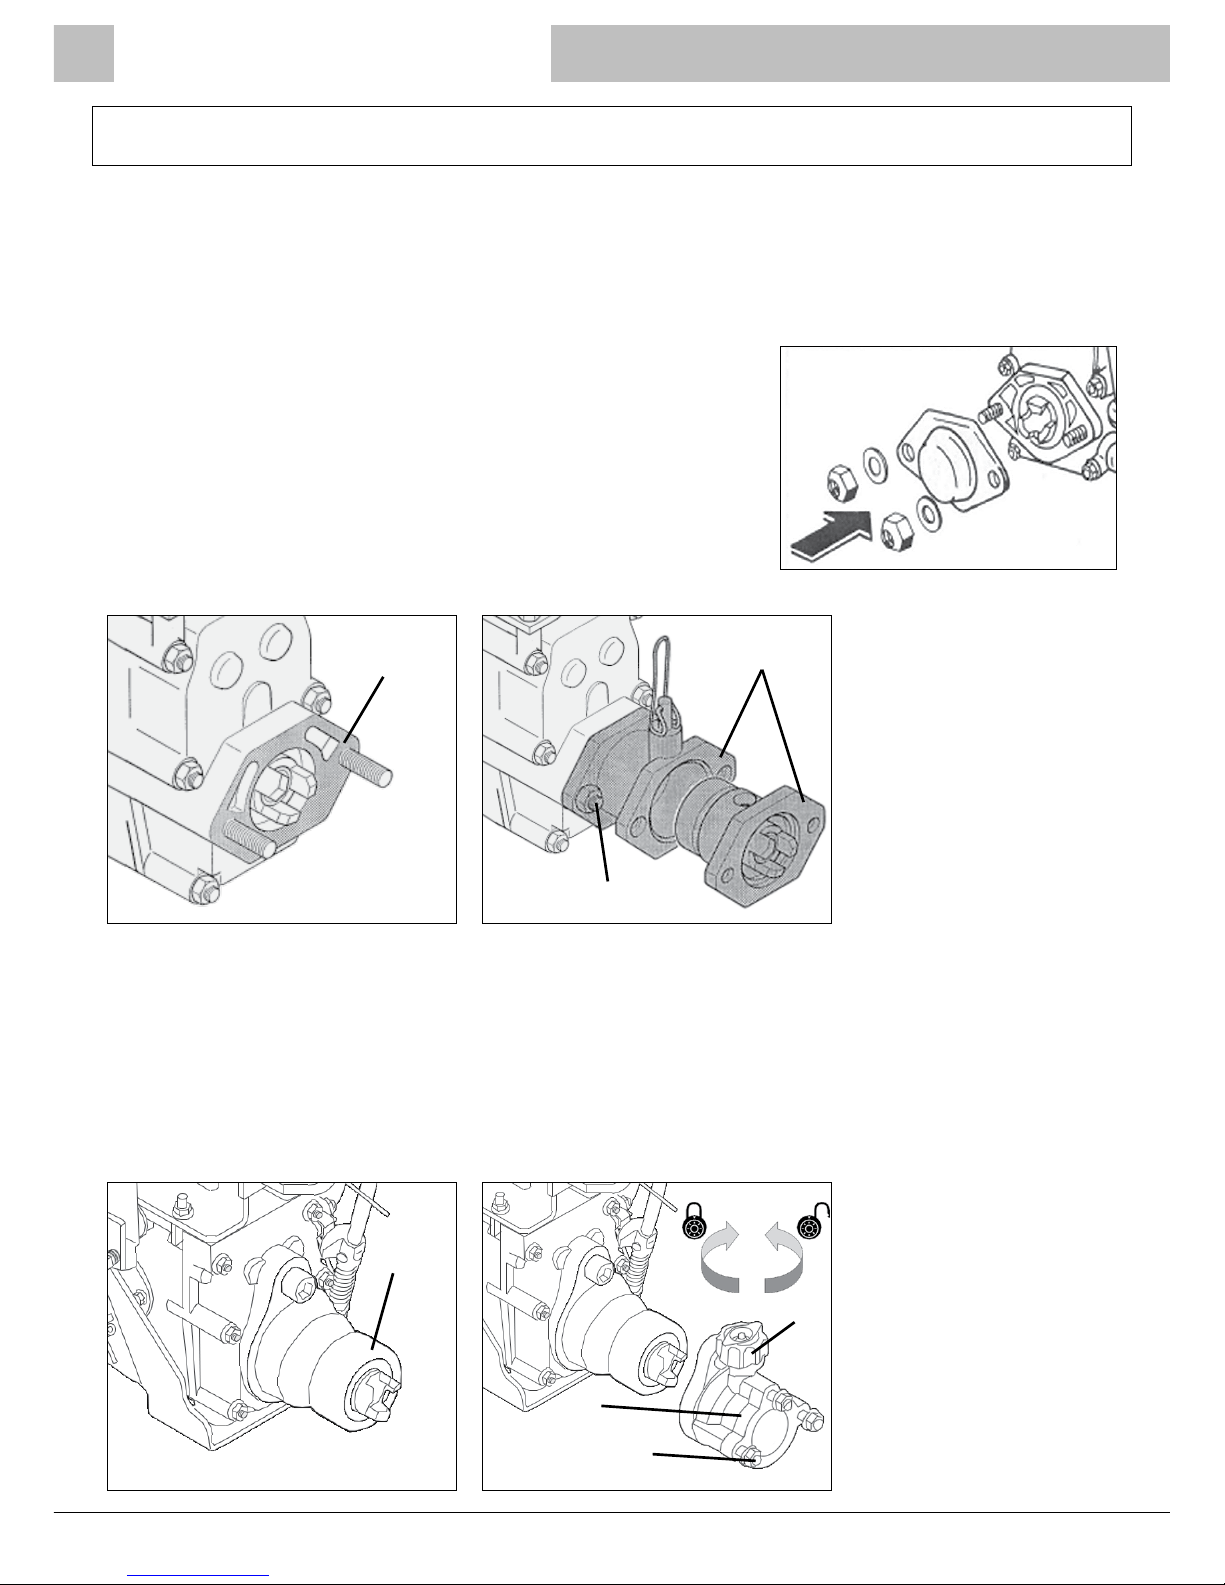
Fitting to models: 615L - 615SL - 630 - 630WS - 710 - 728 - 738 - 740
If tted, remove the PTO cover plate, remove the nuts,
washers and cover plate (g.7/1) and then attach the scythe
cutter bar to the tractor unit (g.7/2 A) using the previously
removed nuts and washers.
If using implement quick release, x the implement coupler
to the scythe cutter bar (g.7/3 C). It is important that nuts
(g.7/3 D) which fasten the implement and the bushing are
well tightened.
Fitting to models: 660 - 750
The scythe cutter bar is mounted directly to the machine coupler (g.7/4 A) by attaching the
coupler (g.7/5 C) that is xed to the scythe.
The tting and removal of attachments is achieved by rotating the knob (g.7/5 R). The device
is locked by turning the knob clockwise and unlocked by the knob anti-clockwise. It is important
that nuts (g.7/5 D) which fasten the implement and the bushing are well tightened.
Attaching to Power Unit
g.7/1
g.7/2
A
g.7/3
D
C
g.7/4
A
g.7/5
D
C
R
Page 17

BCS Crusader Power Scythes
CPS/MAX/0817 Page 17
Operating Hints
During transportation of the machine, or when it is not in use, install the blade guard on the bar.
Always wear heavy gloves to protect your hands whilst working on the equipment.
Read and observe all warning labels on the machine and implements.
Always wear appropriate work clothes whilst operating the machine, always wear safety footwear.
Do not use the machine near children or animals.
The machine operator is responsible for any damage to persons or property.
Always walk with the machine - do not run.
Never work on slopes of more than 20
o
and always work across the face of a slope (side to side),
never up and down. Never use the machine on a bank where there is a possibility of the machine
sliding down the slope.
Always disengage the power take-off (PTO) when changing direction or location of operation.
Do not replace the blades or attempt to undertake any maintenance of the cutter bar while the
engine is running.
Only qualied persons should operate the machine.
IMPORTANT: Read all machine and implement manuals thoroughly before using the cutter bar.
Always familiarise yourself with the machine’s operation before commencing work.
Best results are obtained with the engine at a low throttle setting, which enables the bar to
cut cleanly and gives less wear and tear on the reciprocating parts, which in turn reduces
maintenance.
On rough terrain, the bar should be raised by the height adjuster skids to prevent the blades
from digging into the ground (see g.4/8 on page 7).
Read the owner’s manual before starting using the cutter bar.
After starting the engine, position the accelerator at minimum power, pull the clutch handle and
engage the power take-off. Release the clutch and observe the normal operation of the machine.
Pull the clutch again engage the desired gear, release the clutch and begin normal operation.
Do not engage too high gears as these can be dangerous.
Familiarise with the machine and its commands before starting operation.
WARNING: If any abnormal vibrations or sounds occur, STOP the engine immediately and
check the machine and the cutter bar. If you have any concerns contact your supplier.
Page 18

BCS Crusader Power Scythes
Page 18 CPS/MAX/0817
Starting the Engine
Check the engine oil level. Top up with 10w/40 oil if necessary.
Check fuel level. Only use unleaded petrol from a clean container.
Never re-fuel when the engine is hot or running.
Leave 1” air space in the fuel tank.
Depress the red Engine Stop (OPC) Lever then pull up the Clutch Lever and secure with the
Locking Clip.
Ensure the Wheel Speed Lever is in neutral ‘O’ position.
Set the Throttle Lever to half.
Turn the fuel tap on the engine to ‘ON’ position, if the engine is cold set the choke lever to ‘ON’
position.
Pull the recoil start handle gently until it engages then give it a good strong pull to start the
engine.
When the engine has started, release the choke lever after a few seconds and return the Throttle
Lever to idle position.
!
IMPORTANT
NEVER USE MORE THAN ¼ THROTTLE
WHEN THE CUTTER BAR IS OPERATING
Page 19

BCS Crusader Power Scythes
CPS/MAX/0817 Page 19
Use the Handlebar Height Adjustment Lever to set handlebar height.
Pull up the Clutch Lever. This will automatically release the lever Locking Clip.
Ensure the red Forward/Reverse Lever is in the correct position to move forward: if the handlebars
are positioned over the engine then this lever should be in the fully back position.
Engage drive to the cutter bar by using the PTO Lever: if the handlebars are positioned over the
engine then pull the PTO Lever towards you.
Using the Wheel Speed Lever, select 1st gear.
Raise the throttle slightly, release the Clutch Lever gently and fully, keeping the red Engine Stop
(OPC) Lever depressed as the engine will stop if this is released.
Commence work.
IMPORTANT! NEVER USE MORE THAN ¼ THROTTLE WHEN
THE CUTTER BAR IS OPERATING
!
Operation
Stopping the Engine
Close the Throttle.
Pull up the Clutch Lever.
Locate the Wheel Speed Lever in neutral position.
Disengage drive to the cutter bar by using the PTO Lever (push the PTO Lever away from you).
Release Clutch Lever.
Release red Engine Stop (OPC) Lever completely.
WARNING: THE EXHAUST COVER MAY BE HOT - DO NOT TOUCH
Page 20

BCS Crusader Power Scythes
Page 20 CPS/MAX/0817
Useful Information
General
The scythe cutter bar is the ideal tool for cutting grass in general, both in orchards and vineyards,
and on agricultural land in general.
The transmission of movement from the power take-off to the actual cutting equipment itself
occurs by means of a highly resistant steel shaft and a crankshaft (two in the case of the
DUPLEX) lubricated with an oil bath.
Cutting speed must be evaluated each time, depending on the type of product being used and
on the type and conditions of the terrain being worked on.
IMPORTANT: Check the terrain before proceeding to work, in order to ensure there are no
stones, sticks, irrigation pipes or foreign bodies.
Cleaning
To keep the machine in good working order it is recommended that cleaning is carried out daily
and that dust, mud, leaves, dry or encrusted grass, etc is removed.
Pressure washing machines removes lubricating grease as well as dirt. It is imperative all linkages
are kept well greased otherwise they will become difcult to operate and cause damage.
DO NOT turn the machine on its side for cleaning.
Storage and Prolonged Inactivity
Clean grass and mud off the bar carefully and then lubricate the bar to avoid oxidation. Use an
old paintbrush or similar to smear grease over the cutter blades.
Let the machine run for a few minutes, then return the machine to a dry environment, sheltered
against bad weather and, if possible, cover it with a cloth.
If storing the machine for a prolonged period (over one month), it is recommended that the
petrol be drained from the carburettor and fuel tank, or a fuel stabiliser added to prevent the
petrol becoming stale and ineffective.
Movement and Transport
If the machine must be lifted up, it is recommended that it is placed on pallets, appropriately
secured, and lifted using fork-lift trucks.
Page 21
BCS Crusader Power Scythes
CPS/MAX/0817 Page 21
Maintenance Guide
Engine Maintenance
For detailed engine maintenance please refer to engine
manufacturers manual.
After every hour of operation stop the engine and remove the
spark plug cap.
Check engine oil level (recommended oil SAE 10w/40). Before
checking the oil level ensure the machine is level.
Remove the gearbox unit dipstick and ensure the oil reaches
the top level mark, if necessary top up with the recommended
gear oil for the specic power unit (see Power Unit Owner’s
Manual for more details).
Replace the spark plug cap.
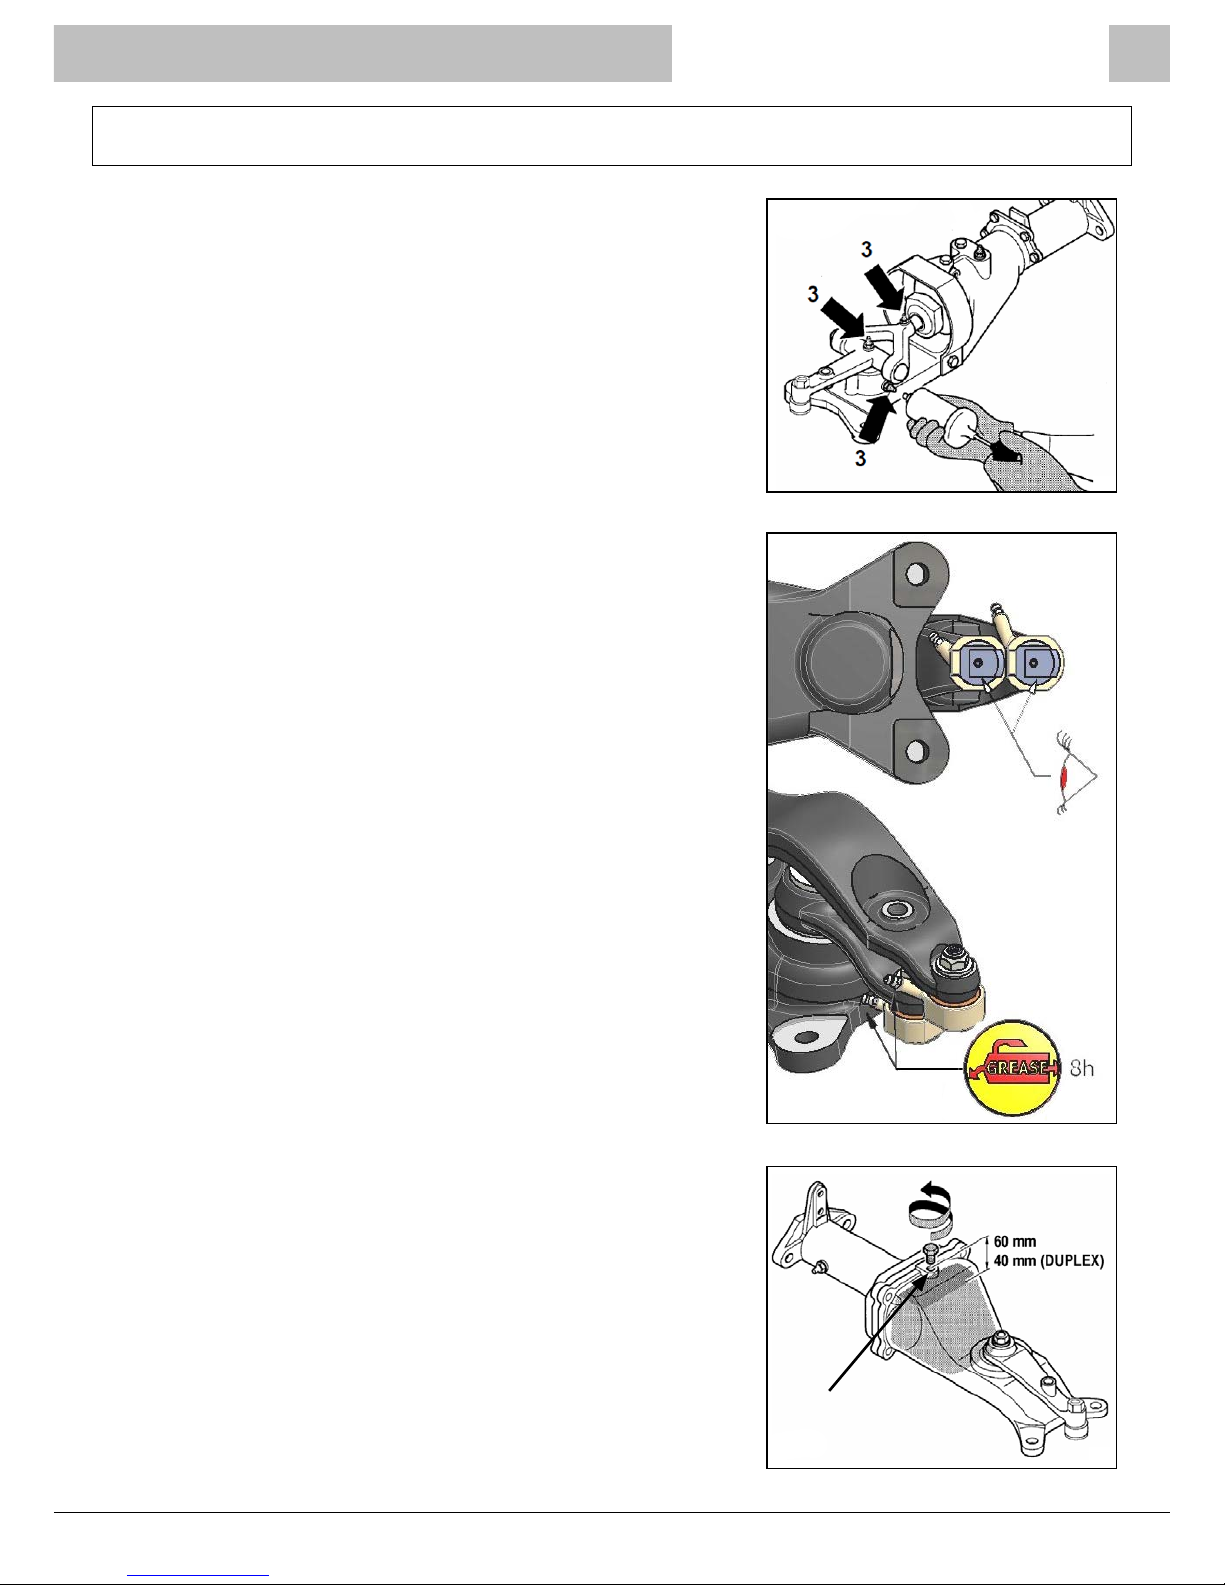
Cutter Bar Maintenance
Every 8 work hours, grease the drive unit at the lubrication
points (g.5/3).
The blade control pivots of the DUPLEX gearbox must be
greased every 8 hours (g.13/1).
The oil bath control units contain 1 litre of oil for the normal
unit and 1.4 litres for the DUPLEX unit. They do not require
greasing just periodic checks to ensure correct oil levels.
To check the oil level remove the oscillating safety device then
remove the oil plug (g.13/2 A).
For LASER units the oil should be 60mm below the hole, and
for DUPLEX units it should be approximately 40mm below the
hole. If the oil level is too low, top up with SAE 80W/90 oil
(g.13/2).
Ensure the cutter bar blades are clean and sharp at all times.
After each use wash the cutter bar to remove any grass or soil
and check the sharpness of the blades.
After washing lubricate the blade to avoid oxidation. Use an old
paintbrush or similar to smear grease over the cutter blades.
Check to ensure all nuts and bolts are well fastened, including
those securing the bar to the drive unit and machine implement.
g.13/2
g.13/1
g.5/3
OIL BATH
A
Page 22

BCS Crusader Power Scythes
Page 22 CPS/MAX/0817
Maintenance Guide
OPERATION
EVERY
DAY
EVERY
WEEK
EVERY
MONTH
EVERY 6
MONTHS
EVERY 12
MONTHS
Engine
Check engine oil level 10w/40
See separate engine manual
X X
Gearbox
&
Controls
Check gearbox oil level EP90
X X
Check nuts & bolts
X X
Ensure clutch cable has free play
X
Check tyre pressure (20psi)
X X
Lubricate control cable/linkages
X
Check control cable operation
X
Check operation of safety devices
X
Change gearbox oil EP90
X
Grease gear speed detent ball
X X
Scythe
Cutter Bar
Lubricate blades
X
Check for loose bolts
X
*
Pressure washing machines removes lubricating grease as well as dirt. It is imperative all
linkages, especially the gear speed lever detent ball, are kept well greased otherwise they will
become difcult to operate and cause damage.
*
DO NOT turn the machine on its side for cleaning.
*
Before storing machine always leave the Clutch Lever pulled in and secured with the Locking
Clip to prevent sticking of the clutch plates.
*
DO NOT allow maximum engine speed to exceed 3600rpm.
Page 23

BCS Crusader Power Scythes
CPS/MAX/0817 Page 23
Risk Assessment
HAZARDS RISK LEVEL ACTION NEEDED
Machine tipping over Low Do not use on slopes over 25°. Work across
slopes, never up and down.
Machine running away Low Operator presence control (see Power Unit
manual) stops the machine driving if the operator
releases the handlebars. Always check operation
before use.
Lacerations High Remove the spark plug cap before carrying out
any maintenance or cleaning. Always wear gloves
when cleaning or lubricating the cutter bar blades.
Machine reversing and trapping
the operator against an
immoveable object
High Never reverse the machine with your back to a
wall or similar object.
Burns High Be very careful of a hot exhaust. Turn off the
machine before re-fuelling. Allow 1” air space in
fuel tank.
Flying objects Low Never exceed ¼ throttle when mowing.
Foot injuries High Never let anyone stand in front of the machine
when it is operating. Keep all pets and animals
away.
Handlebar adjustment Low Always set the height and sideways position
before operating the machine – never while it is
moving.
Page 24

BCS Crusader Power Scythes
Page 24 CPS/MAX/0817
Troubleshooting Guide
PROBLEMS POSSIBLE CAUSES SOLUTIONS
When the PTO
is turned on the
cutter bar does not
work or only works
intermittently.
The clutch cable has not been
adjusted.
Adjust clutch cable play.
Issues preventing the PTO from being
activated.
Activate the PTO properly.
PTO electrical connections are
damaged.
Replace the electrical connections.
Excessive vibration
during operation.
The engine has high revs, above
3400'/min.
Adjust the engine revs.
The accelerator is being used beyond
¾ of its limit.
Lower the accelerator’s rpm.
Unsuitable or old fuel is being used. Use fresh and suitable fuel.
The blade attachment has not been
adjusted.
Adjust play to 0.1mm.
The engine is not revving properly. Clean or replace the air lter.
Clean the carburettor, spark plug or
injector.
Insufcient or lack of greasing. Grease as shown in the manual.
Too much play between pivot and
bush.
Parts are worn, replace them.
Bush / pivot have not been lubricated
as shown.
Lubricate as shown in manual.
Loose nuts on PTO ange. Tighten the PTO nuts well.
Loose screws and nuts in general. Check and tighten well.
Scythe attachment is too light (power
unit is engine-heavy).
Add cutter bar weights or implement
extension.
Unriveted blades. Rivet and replace if necessary.
Broken ngers. Replace the ngers.
Worn transmission bearings. Check and replace if necessary.
Loose crank nut. Tighten the nut well.
Worn crankshaft. Replace the crankshaft.
When going downhill
grass is not emptied.
Excessive downhill slope.
Where required for your own safety,
avoid cutting on excessive downhill /
uphill slopes.
Going uphill the
machine loses grip.
Excessive uphill slope.
Page 25

BCS Crusader Power Scythes
CPS/MAX/0817 Page 25
Troubleshooting Guide
PROBLEMS POSSIBLE CAUSES SOLUTIONS
Bad cut. Blunt blade. Sharpen or replace blade.
Sections of blade broken. Replace broken sections.
Spring-steel blade holder not
adjusted.
Adjust spring-steel blade holder as
shown in the manual.
Cutting progress speed too high. Reduce cutting progress speed.
Excessively attened grass. Change cutting entry direction.
Excessively wet grass. Let it dry out.
Terrain is not at. Change direction of cutting progress.
Power
Unit
Petrol Engine Diesel Engine
LAeq (1) LwA (2) m/sec
2
(3) LAeq (1) LwA (2) m/sec2 (3)
615L MAX 89.8 105.2 32.39 n/a n/a n/a
615SL MAX 89.8 105.2 32.39 n/a n/a n/a
630 MAX 99.6 106.4 33.31 n/a n/a n/a
(1) LAeq - ACOUSTIC PRESSURE: values expressed in equivalent dB(A).
(2) LwA - ACOUSTIC POWER: values expressed in dB(A).
(3) m/sec² - VIBRATION: average square value calculated at handlebars according to UNI EN 12733.
Sound & Vibration Levels
Page 26
BCS Crusader Power Scythes
Page 26 CPS/MAX/0817
Spare Parts
When ordering spare parts please ensure you provide the
complete part number as listed in the spare parts diagrams.
Diagrams can be downloaded from our website at
www.tracmaster.co.uk/pages/parts-diagrams or obtained
by contacting our Spare Parts Department.
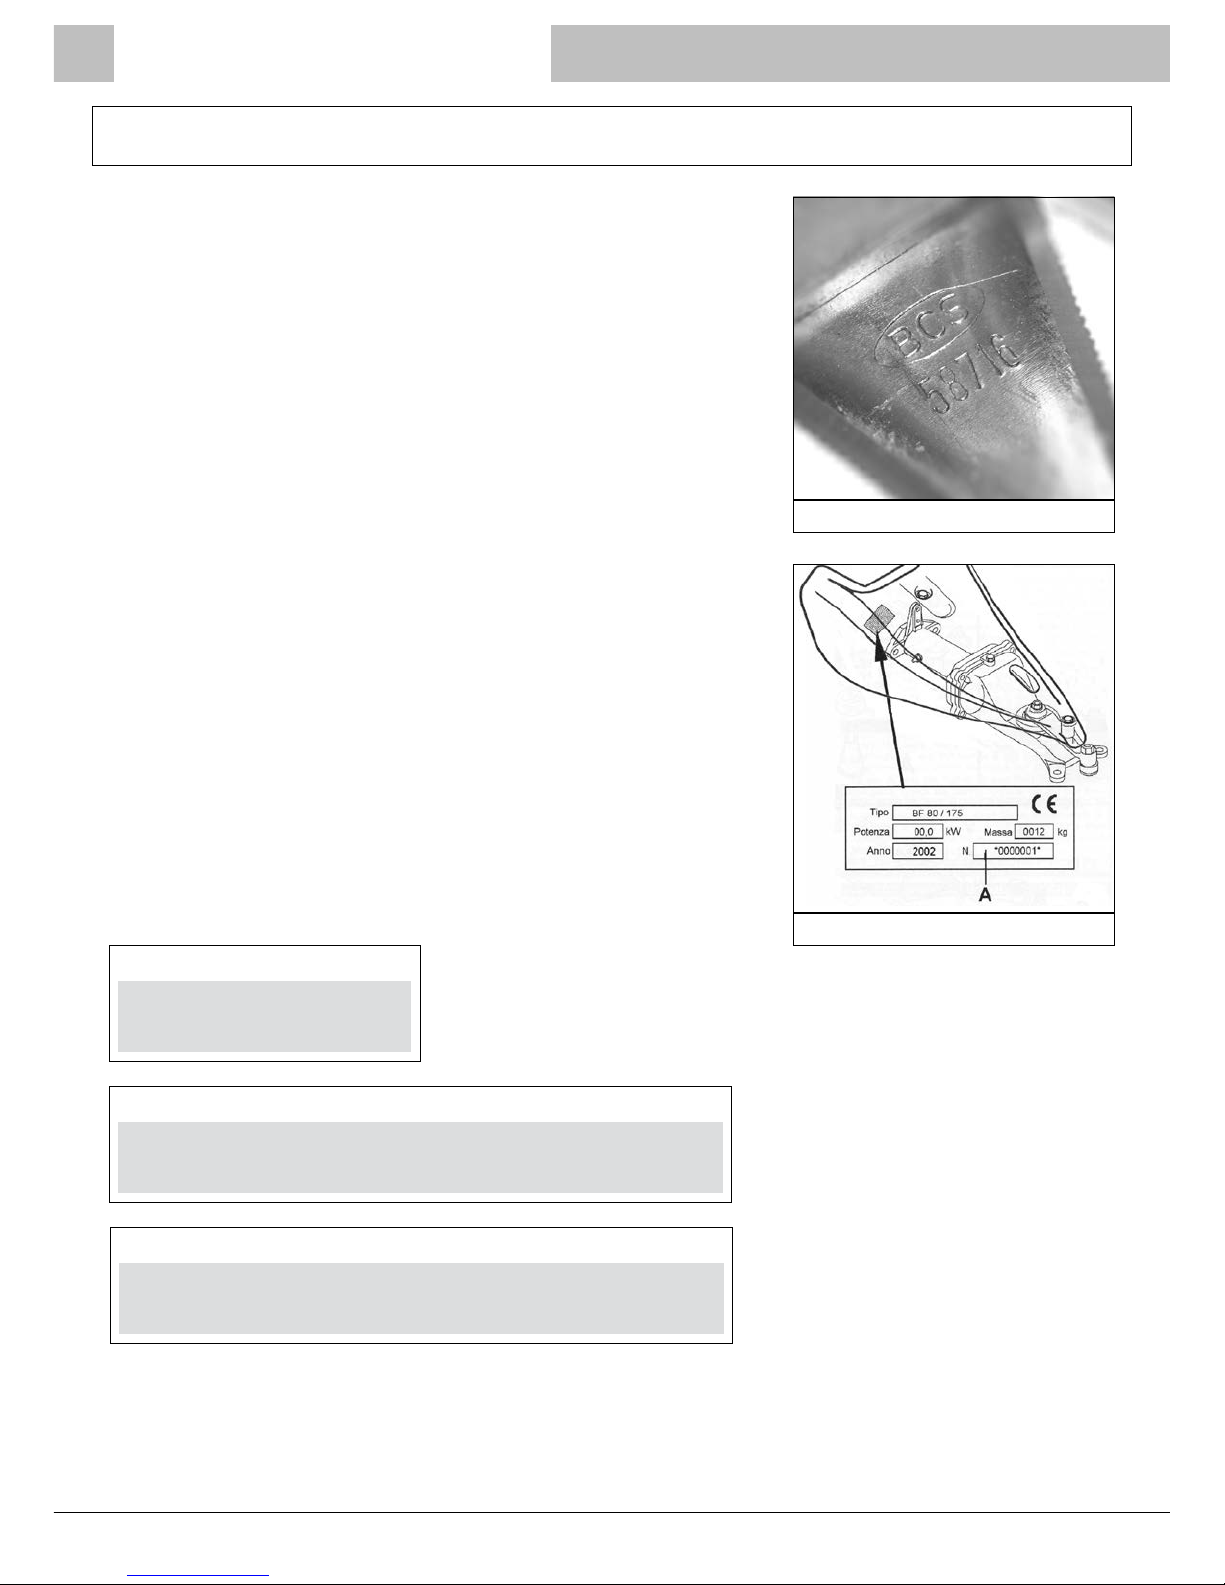
If you need to order replacement blades then it is important
that you quote the following information:
• The number that is engraved on the top of each tooth.
• The number of blades on your complete top bar.
• The serial number of the scythe cutter bar.
The serial number of the implement should also be quoted,
this can be found on a label on the underside of the blue
cowling.
Complete the boxes below to record this information and
have it to hand when ordering parts.
To order parts contact our Spare Parts Department by
phone on 01444 247689 or email [email protected].
Number Imprinted on Blades:
Scythe Cutter Bar Serial Number:
Number of Blades on Top Bar:
Scythe Serial Number
Number Imprinted on Blades
Page 27

BCS Crusader Power Scythes
CPS/MAX/0817 Page 27
Manufacturer Information
This machine is manufactured in Italy by BCS S.p.A.
Tracmaster Ltd is the UK distributor for these models, the BCS Laser Scythe Cutter Bars.
BCS S.p.A. has been at the forefront of developing cutting edge agricultural machinery since its
formation in 1943, when their founder developed a self-propelled motor mower. Tracmaster Ltd
has been the UK distributor for BCS pedestrian equipment since 1984.
Please ensure you read the original manufacturer’s manual before operating this machine.
BCS S.p.A.
V.le Mazzini, 161
20081 Abbiategrasso (MI)
Italy
Tel: +39 02 9482 1
Fax: +39 02 9496 0800
Email: [email protected]
Website: www.bcsagri.it
Page 28

CPS/MAX/0817
© Tracmaster Ltd 2017.
Specications are subject to change without prior notice.
Tracmaster Ltd, Sovereign Centre, Victoria Road, Burgess Hill RH15 9LR
T: +44 (0) 1444 247689 F: +44 (0) 1444 871612
W: www.tracmaster.co.uk E: [email protected]
 Loading...