

Page 1
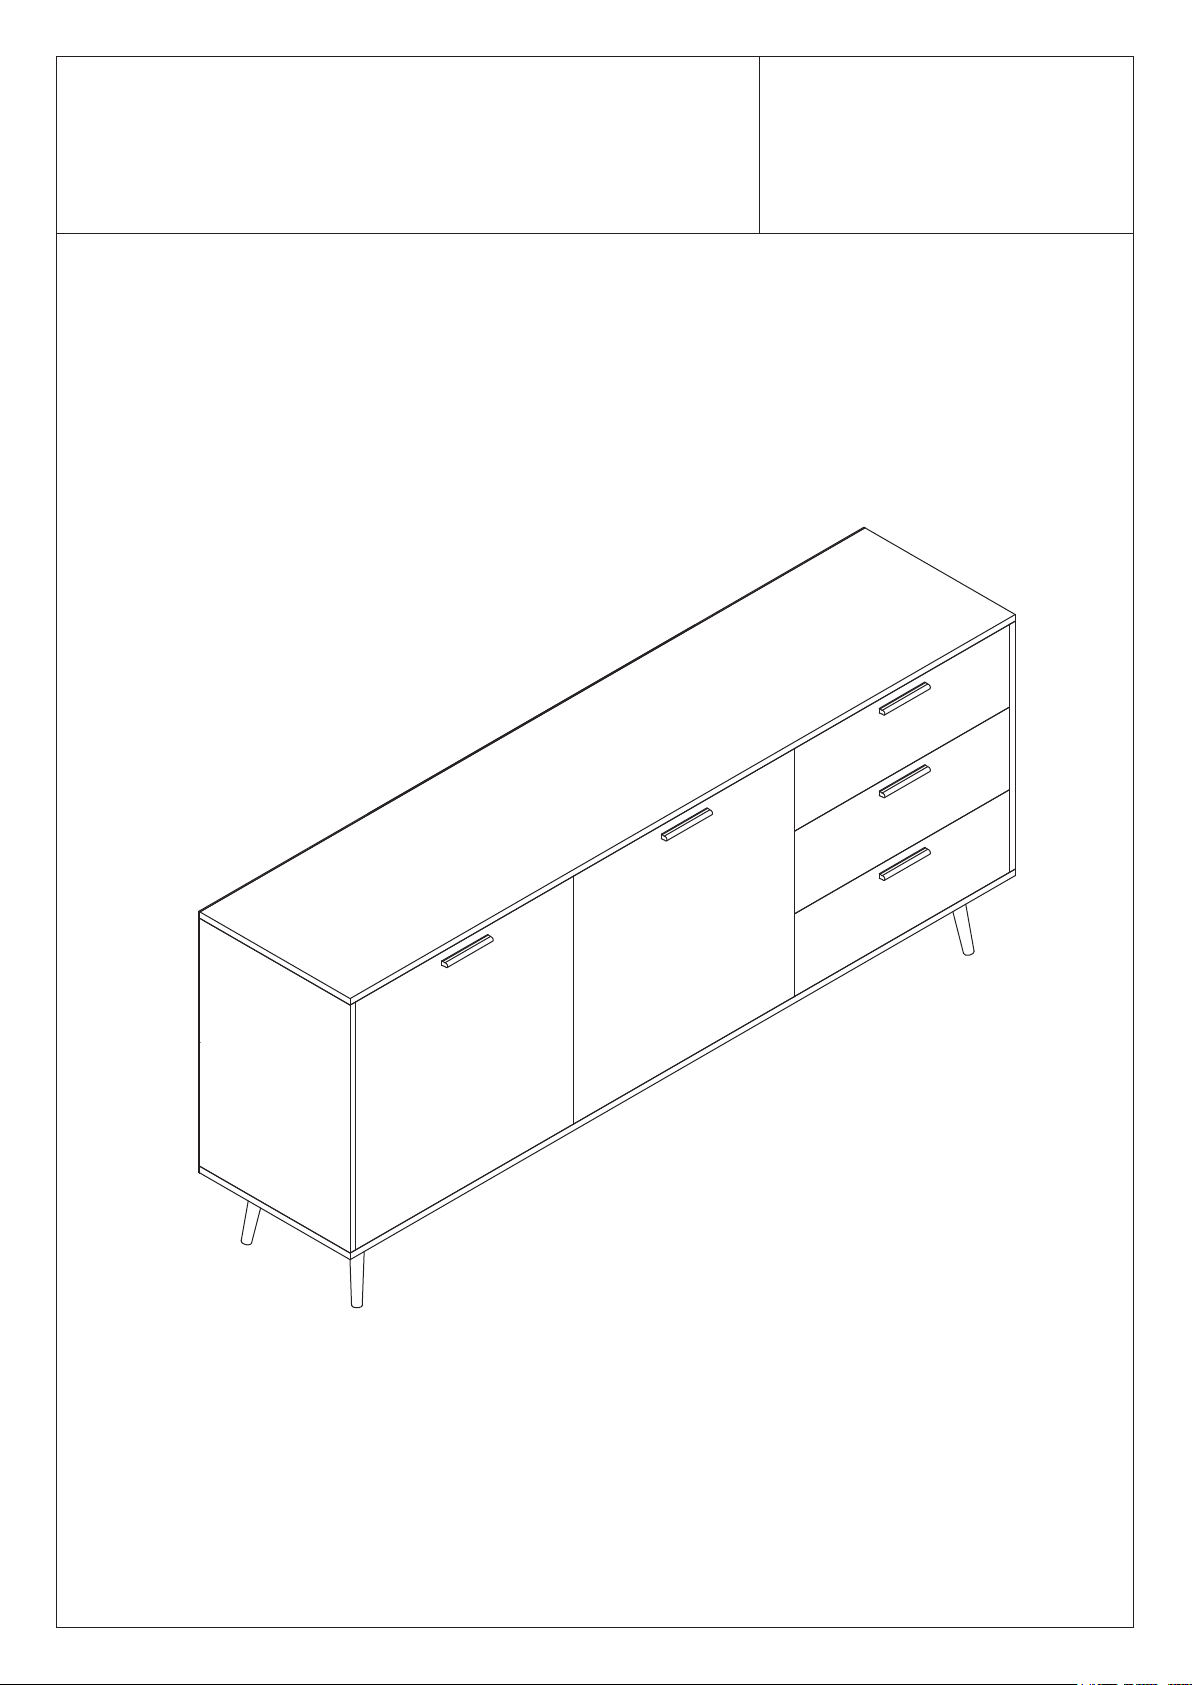
Sideboard
Version:05/09/2022 1/21
Page 2
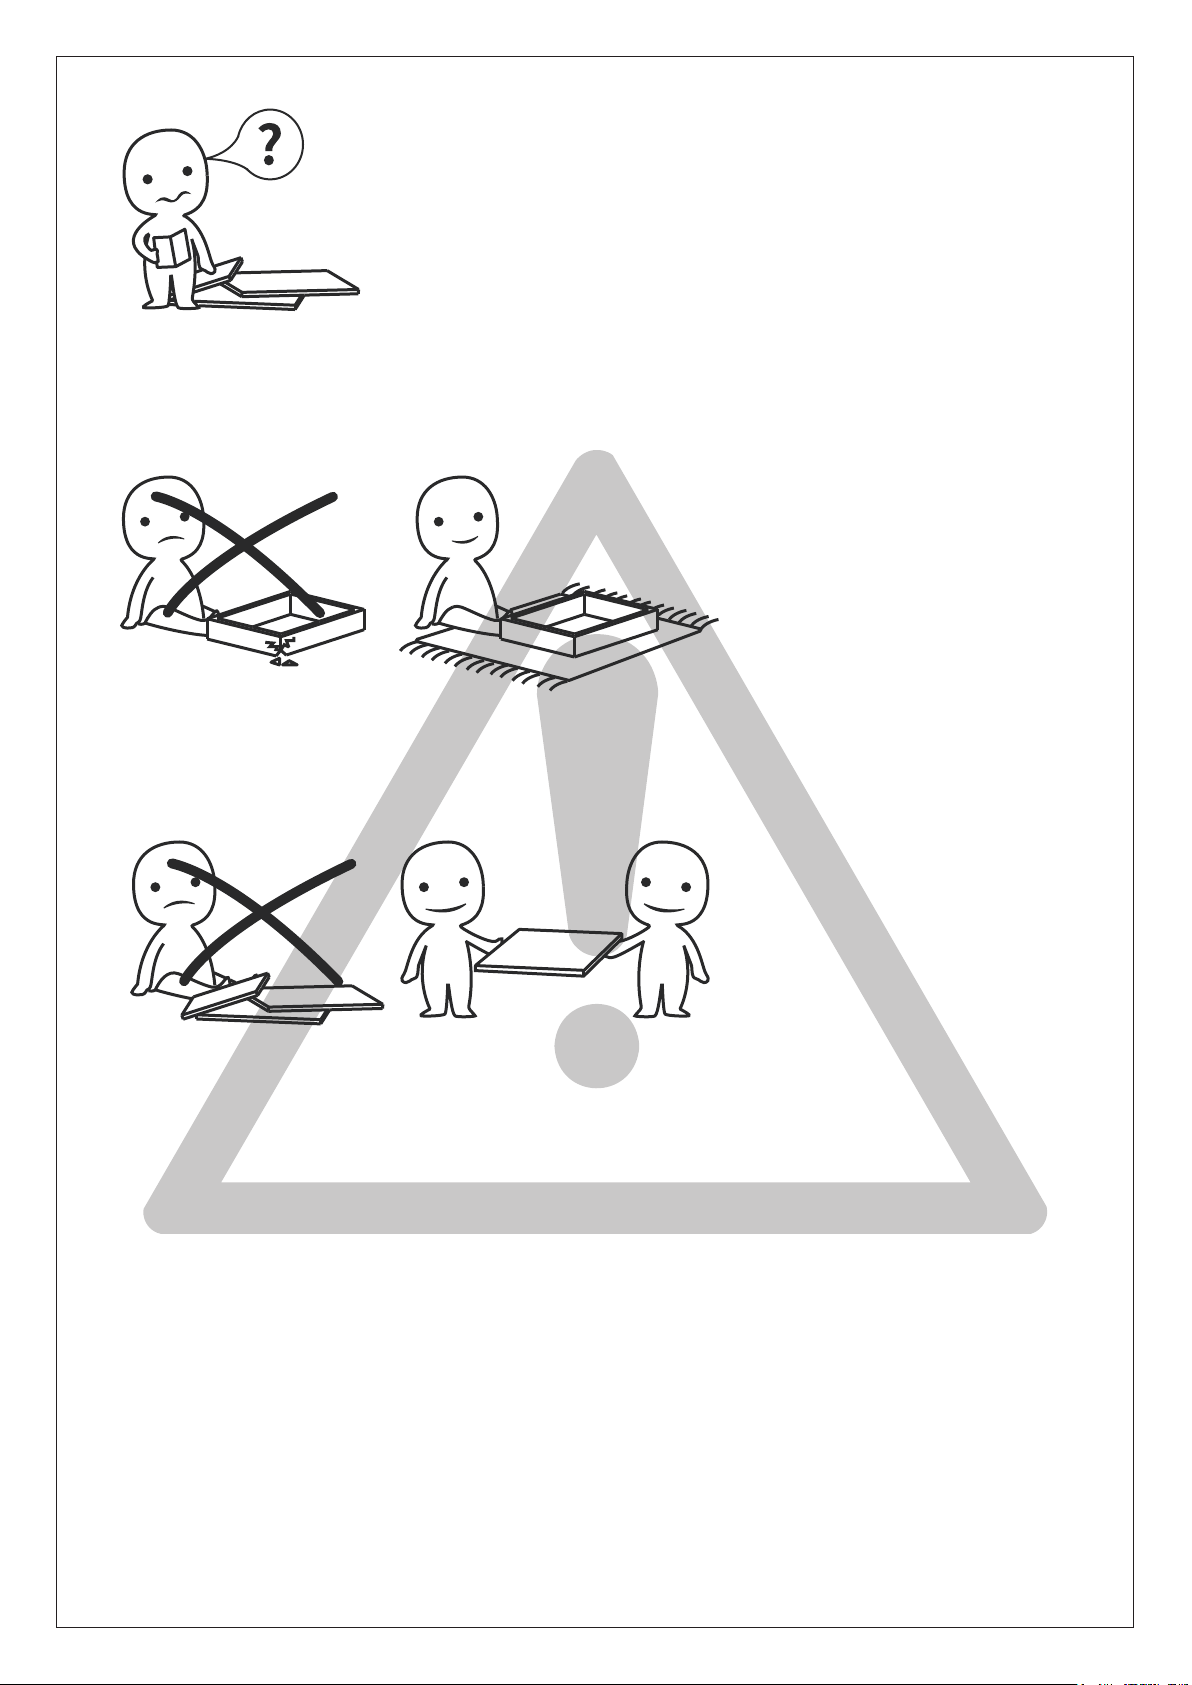
IMPORTANT INFORMATION!
please read the entire manual before starting to assemble
and/or using this product.follow the manual thoroughly and
keep it for further reference.
AVOID SCRATCHES!
In order to avoid scratching this
furnuture should be assembled
on a soft layer-could be a rug.
IMPROVE EFFICIENCY !
Try to find a partner to install
with you, which can speed up
the installation efficiency and
shorten the time.
ANTI-TOPPLE WARNING !
Overturned furniture can cause serious or fatal crush injuries. To prevent tipping over, be sure
to use the wall attachment, if not included with this product. Please purchase the wall
attachment that fit your wall. If unsure, seek professional advice. Please read and follow each
step of the instructions carefully.
IMPORTANT !
It is important that any product which is assembled using any kind of screw is re-tightened
2 weeks after assembly,and once every 3 months - in order to assure stability through-out
the lifespan of the product.
For regular maintenance and cleaning of the product, for the frame, please use a rag dipped
in neutral detergent to fully wipe it, and then dry it with a clean rag.For glass materials, wipe
with a rag dampened with water glass cleaner, and then dry with a dry rag.
2/21
Page 3
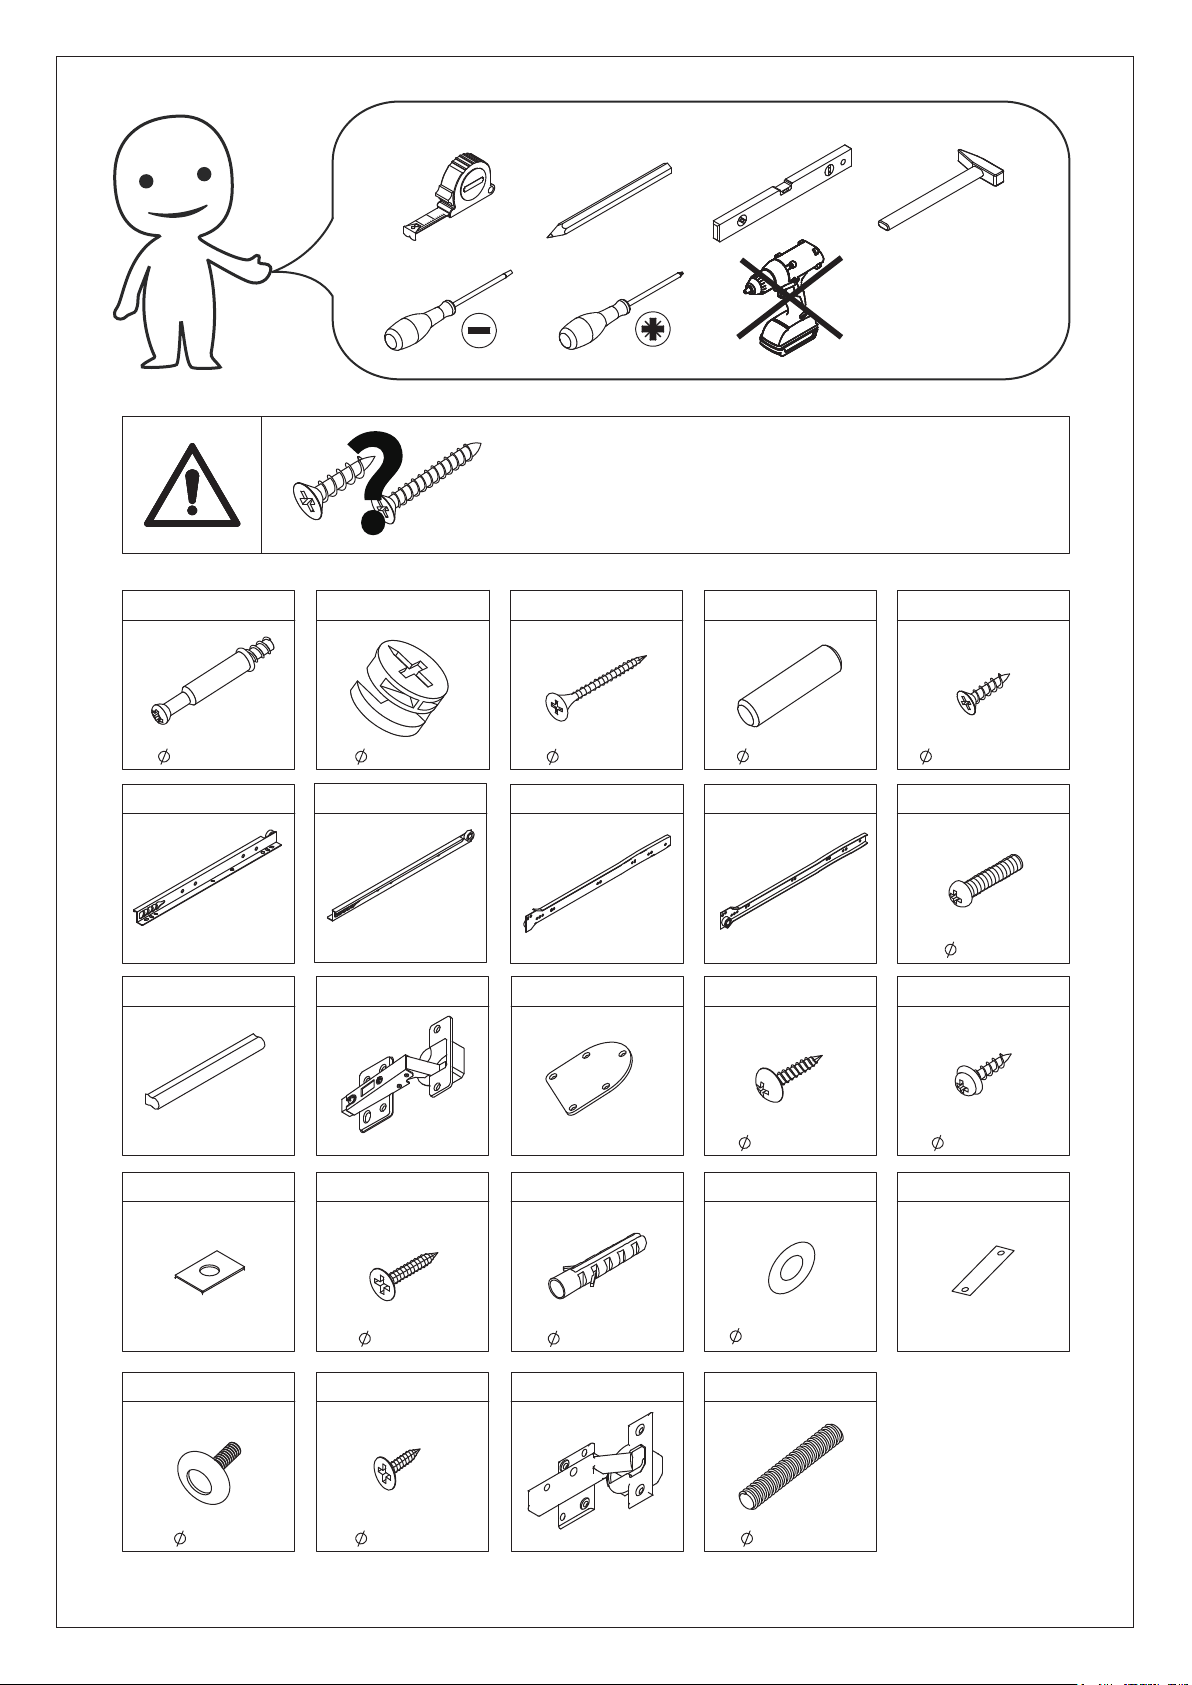
Please prepare the following tools
When installing, please carefully confirm whether
each screw corresponds to the manual, accessories
with similar shapes can be distinguished by size
A x 35 B x 35
7 x 35 mm
DR x 3
K x 5
P x 6
15 x 9 mm
DL x 3
L x 2
Q x 2
C x 25 D x 28
4 x 40 mm
CL x 3
M x 4
R x 2
6 x 30 mm
CR x 3
N x 20
4x14 mm
S x 4
E x 24
3.5 x 12 mm
J x 10
4x16 mm
O x 34
3x12 mm
T x 2
6 mm
3.5 x 14 mm
V x 24U x 2
4 x 14 mm
6 x 30 mm
W x 2
3/21
12 x 4 mm
X x 4
8 x 30 mm
Page 4
10
11
12
20
20
8
19
13
16
14
21
15
9
3
7
6
2
5
3
4
1
4
17
17
18
18
17
17
6
2
5
3
1
4
6
2
5
1
4/21
Page 5
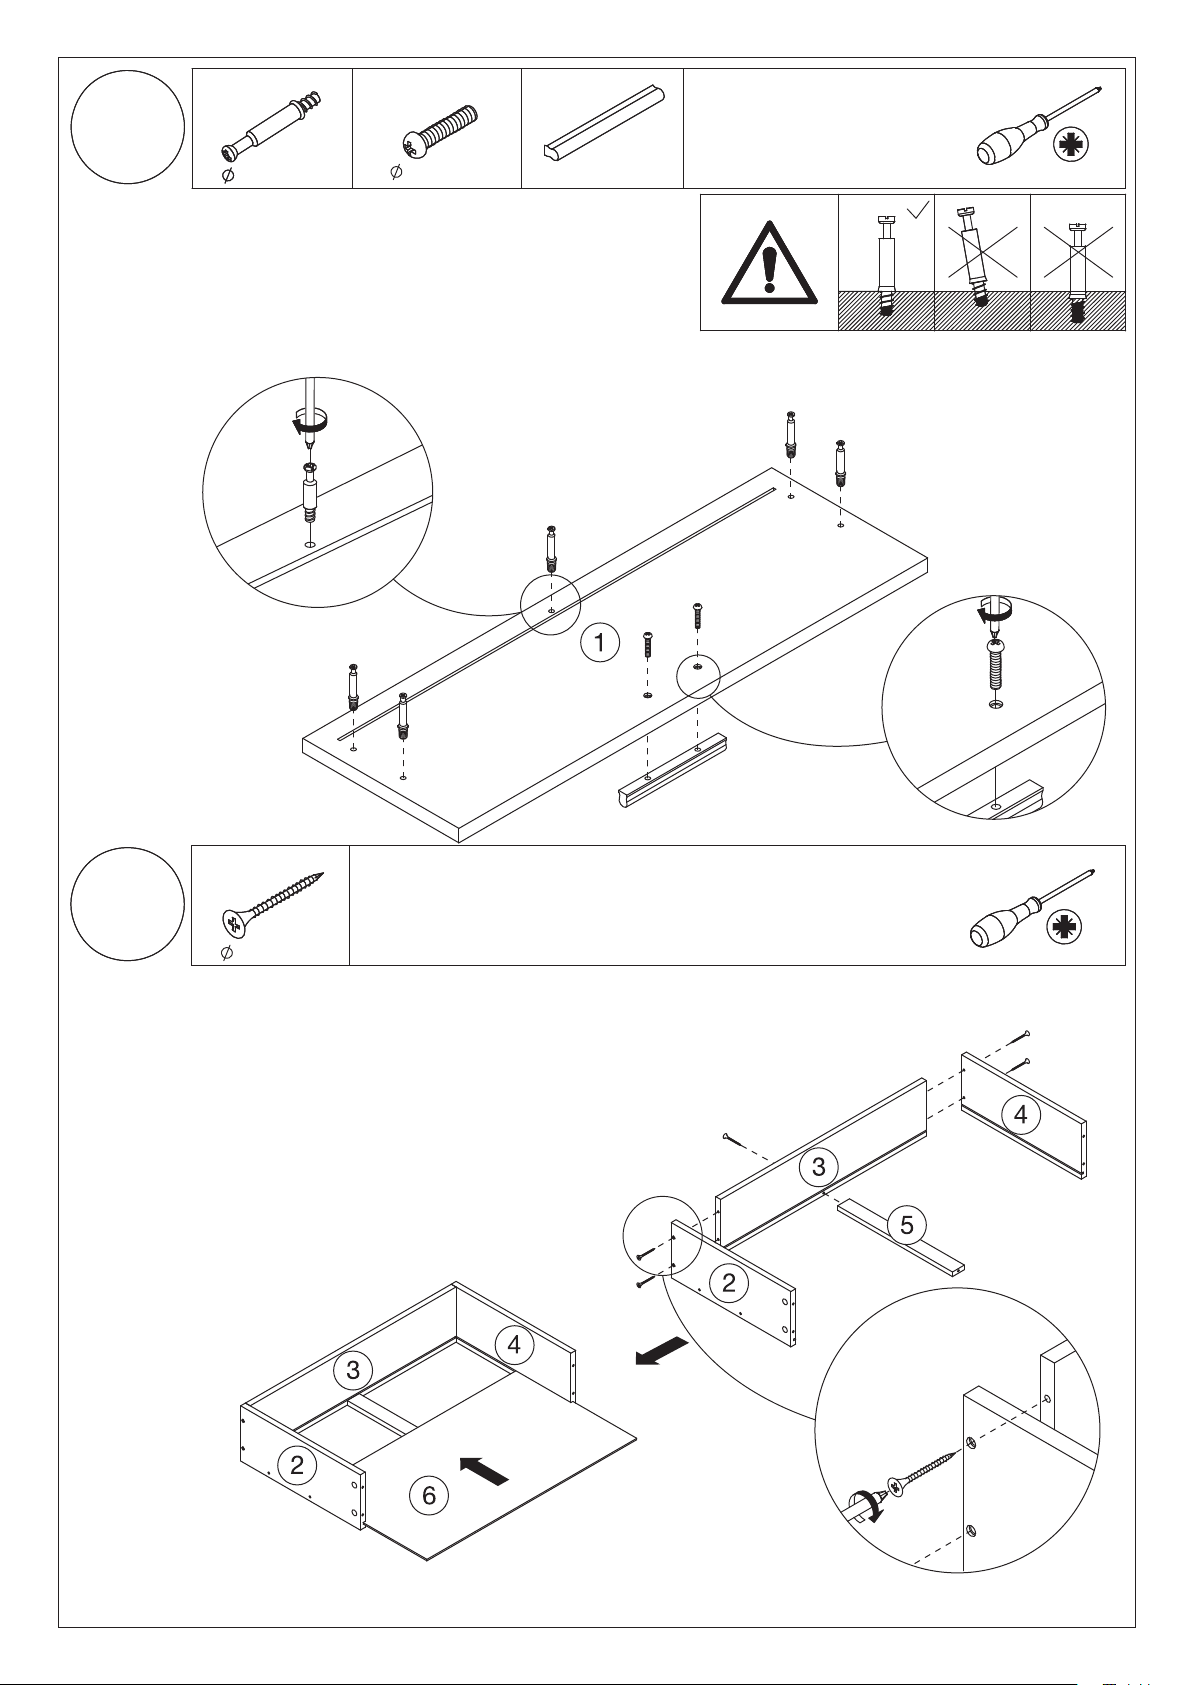
1
1
A x 15
7 x 35 mm
Insert quickfit screws(A)to part 1,
as shown.
Fix handle (K)to part 1 using bolts(J),
as shown.
J x 6
4x16 mm
Do not use an electric screwdriver,
do not use force during the rotation
of the accessories, otherwise it may
cause the board to crack
K x 3
A
A
2
2
A
A
A
C x 15
4 x 40 mm
Attach parts 2,4 and 5 to
part 3 using screws(C),
as shown.
x3
A
J
J
K
C
C
Insert cam lock to part 5.
Slide part 6 into available slot
of parts 2,3 and 4,
as shown.
C
C
C
C
x3
5/21
Page 6
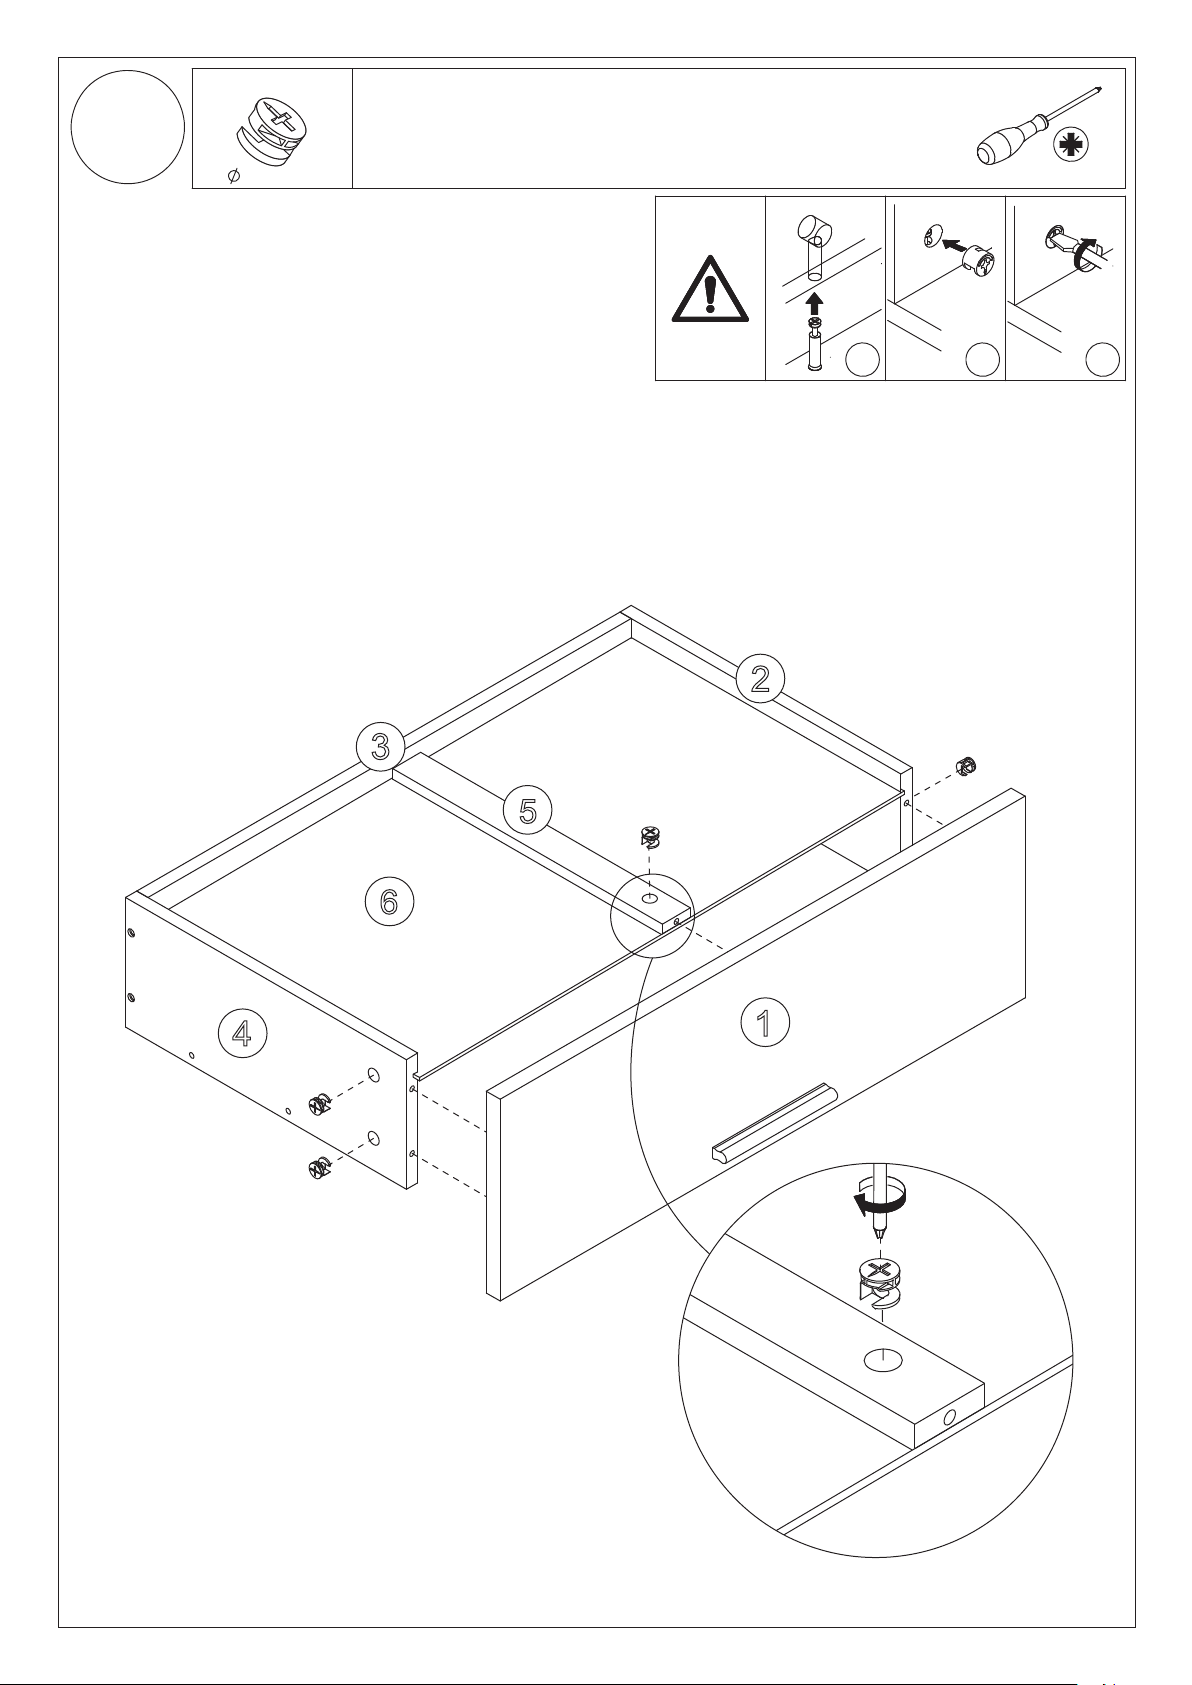
3
B x 15
15 x 9 mm
Insert cam locks(B)to parts 2 and 4
and attach part 1,as shown.
Turn cam locks clockwise to tighten.
IIIIII
x3
4
B
B
3
6
5
2
B
B
1
180°
6/21
B
Page 7
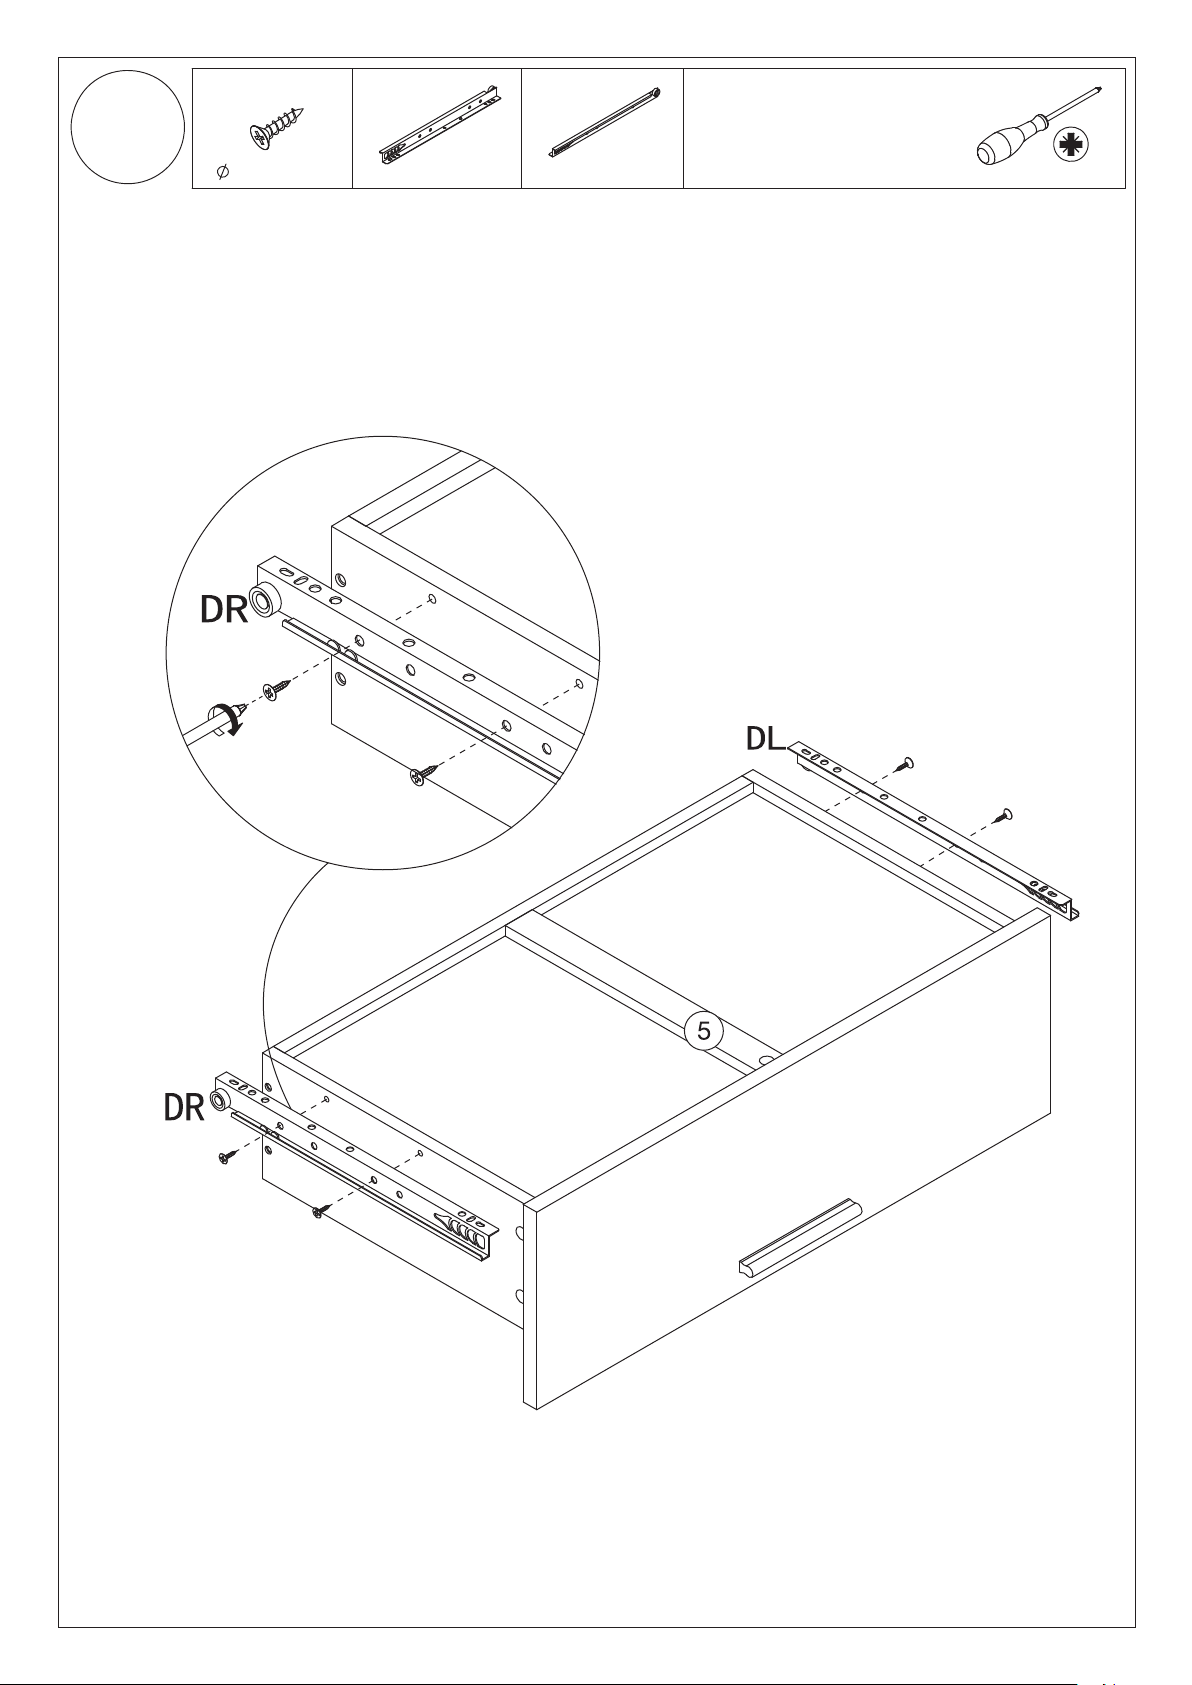
4
E x 12
3.5 x 12 mm
Tighten cam lock in part 5.
Fix right inner drawer runner(DR)
and left inner drawer runner DD
to assembled unit using
screws (E),as shown.
DRx 3
DL x 3
x3
E
E
E
E
E
E
Repeat steps 1-4 for remaining 2 drawers.
7/21
Page 8
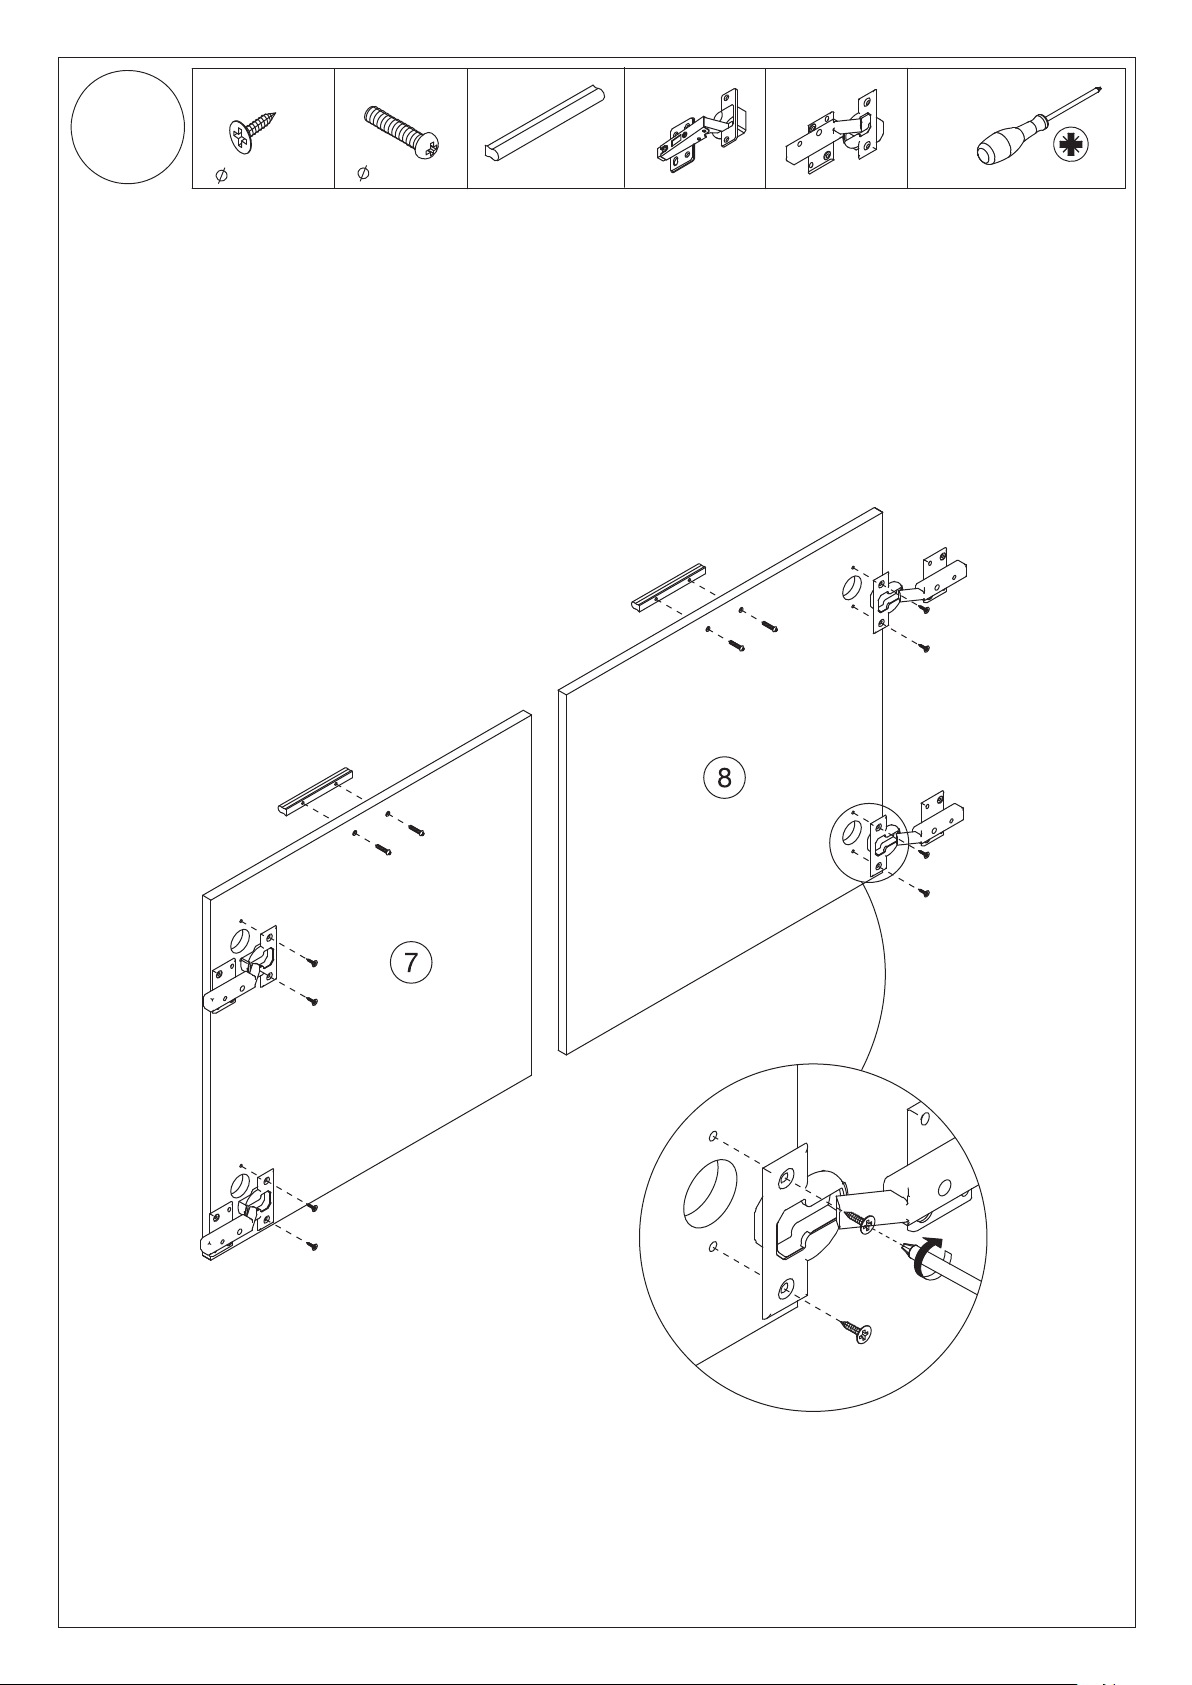
5
V x 8
4 x 14 mm
Fix handles(K)to parts 7 and 8
using bolts(J),as shown.
Fix hinges (W)to parts 7
using screws (V),as shown.
Fix hinges(L)to parts 8
using screws (V),as shown.
J x 4
4x16 mm
K x 2
L x 2
W x 2
W
K
J
J
K
J
J
V
V
L
V
V
L
V
V
W
L
V
V
8/21
V
V
Page 9
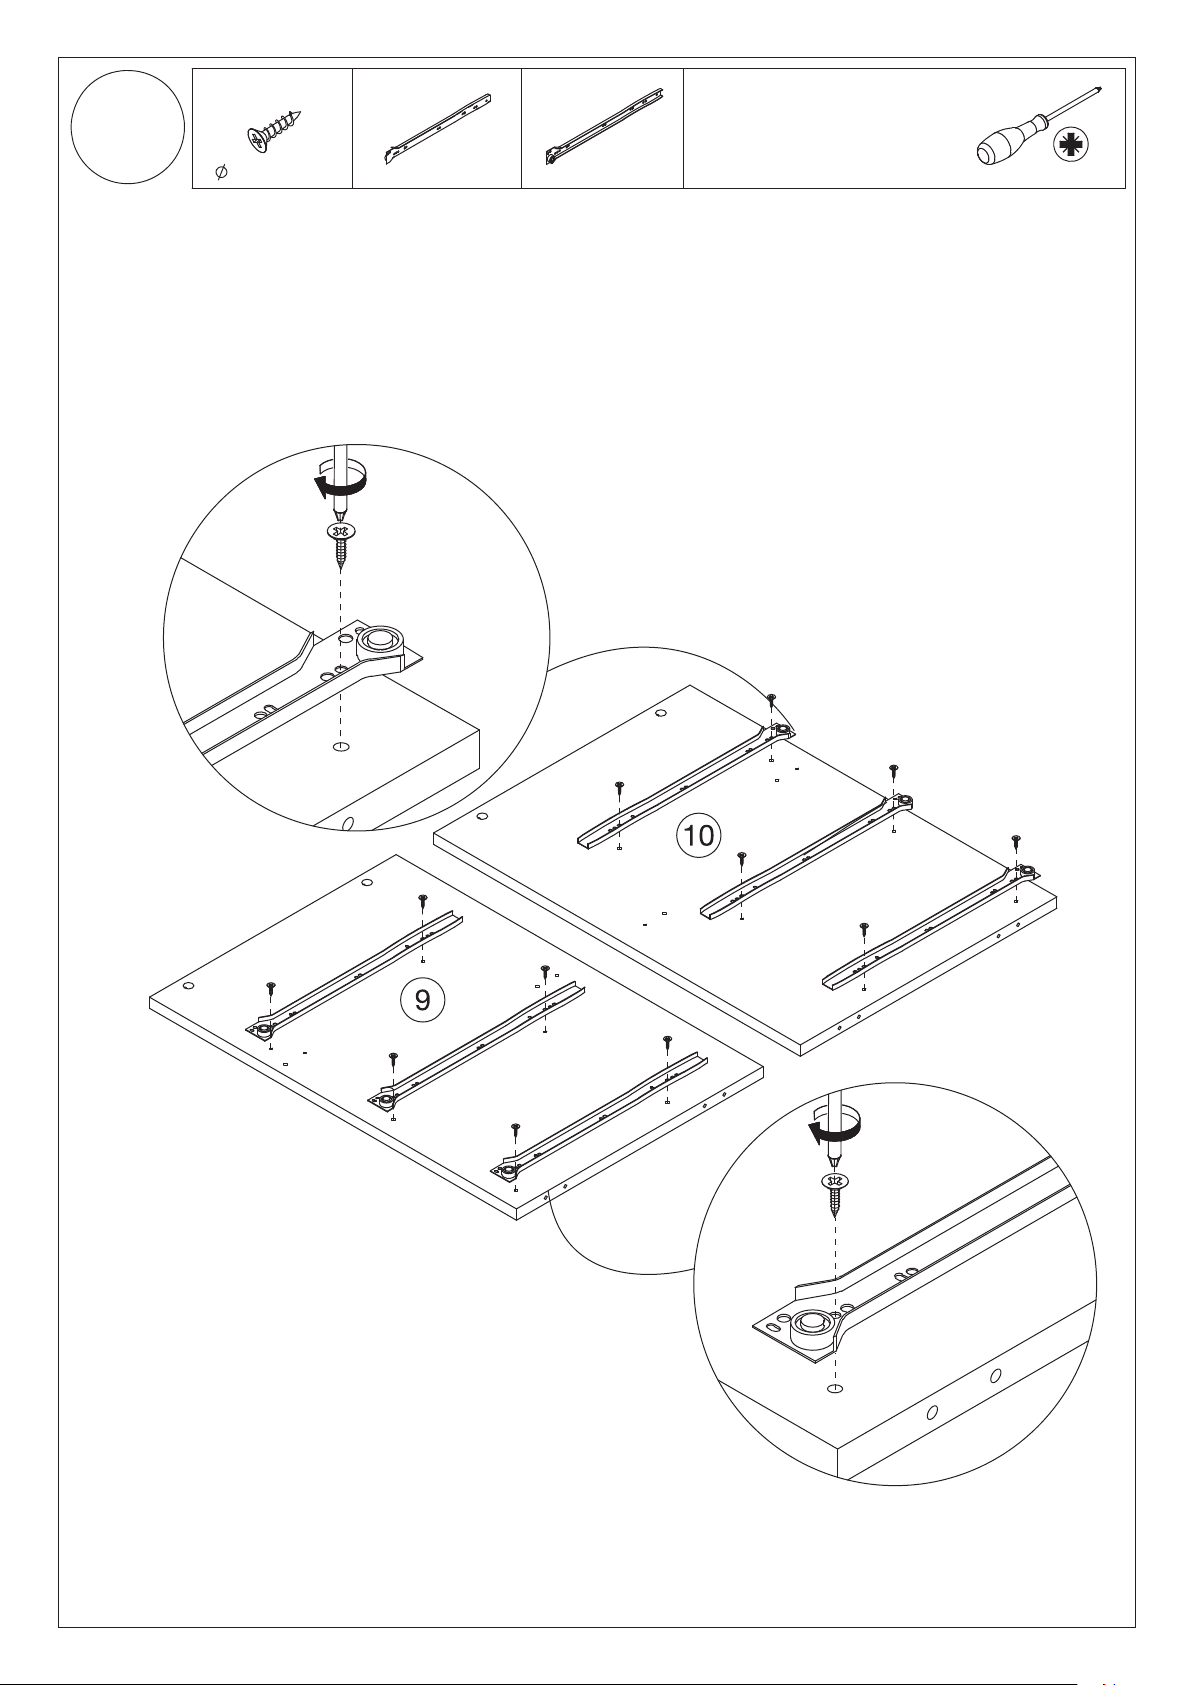
6
E x 12
3.5 x 12 mm
Fix left outer drawer runner(CL)and
right outer drawer runner(CR)to
parts 9 and 10 using screws(E),
as shown.
CL x 3
E
CR x 3
CR
CR
E
E
E
CL
E
CL
E
E
E
CL
E
E
CR
E
CR
E
E
CL
E
9/21
Page 10
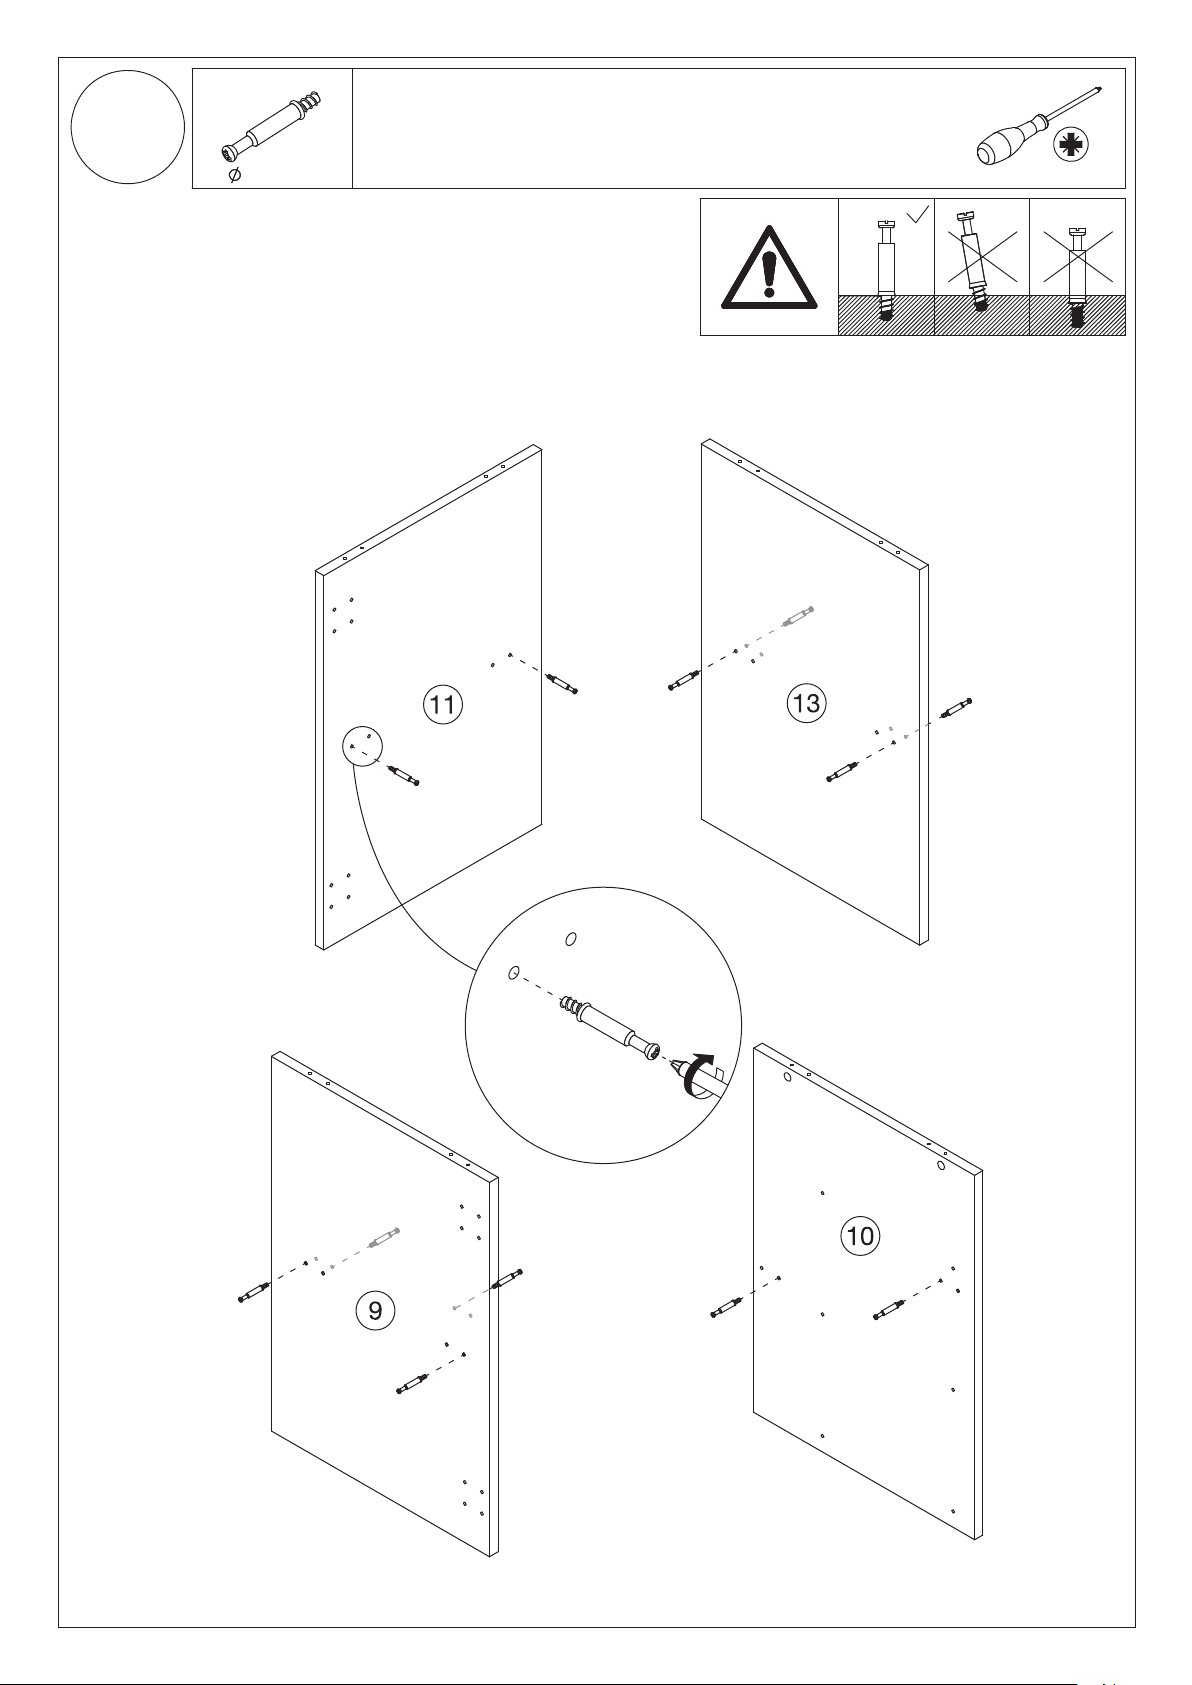
7
A x 12
7 x 35 mm
Insert quickfit screws A into
part9,10,11,13
A
A
A
A
A
A
A
A
A
A
A
10/21
A
A
Page 11
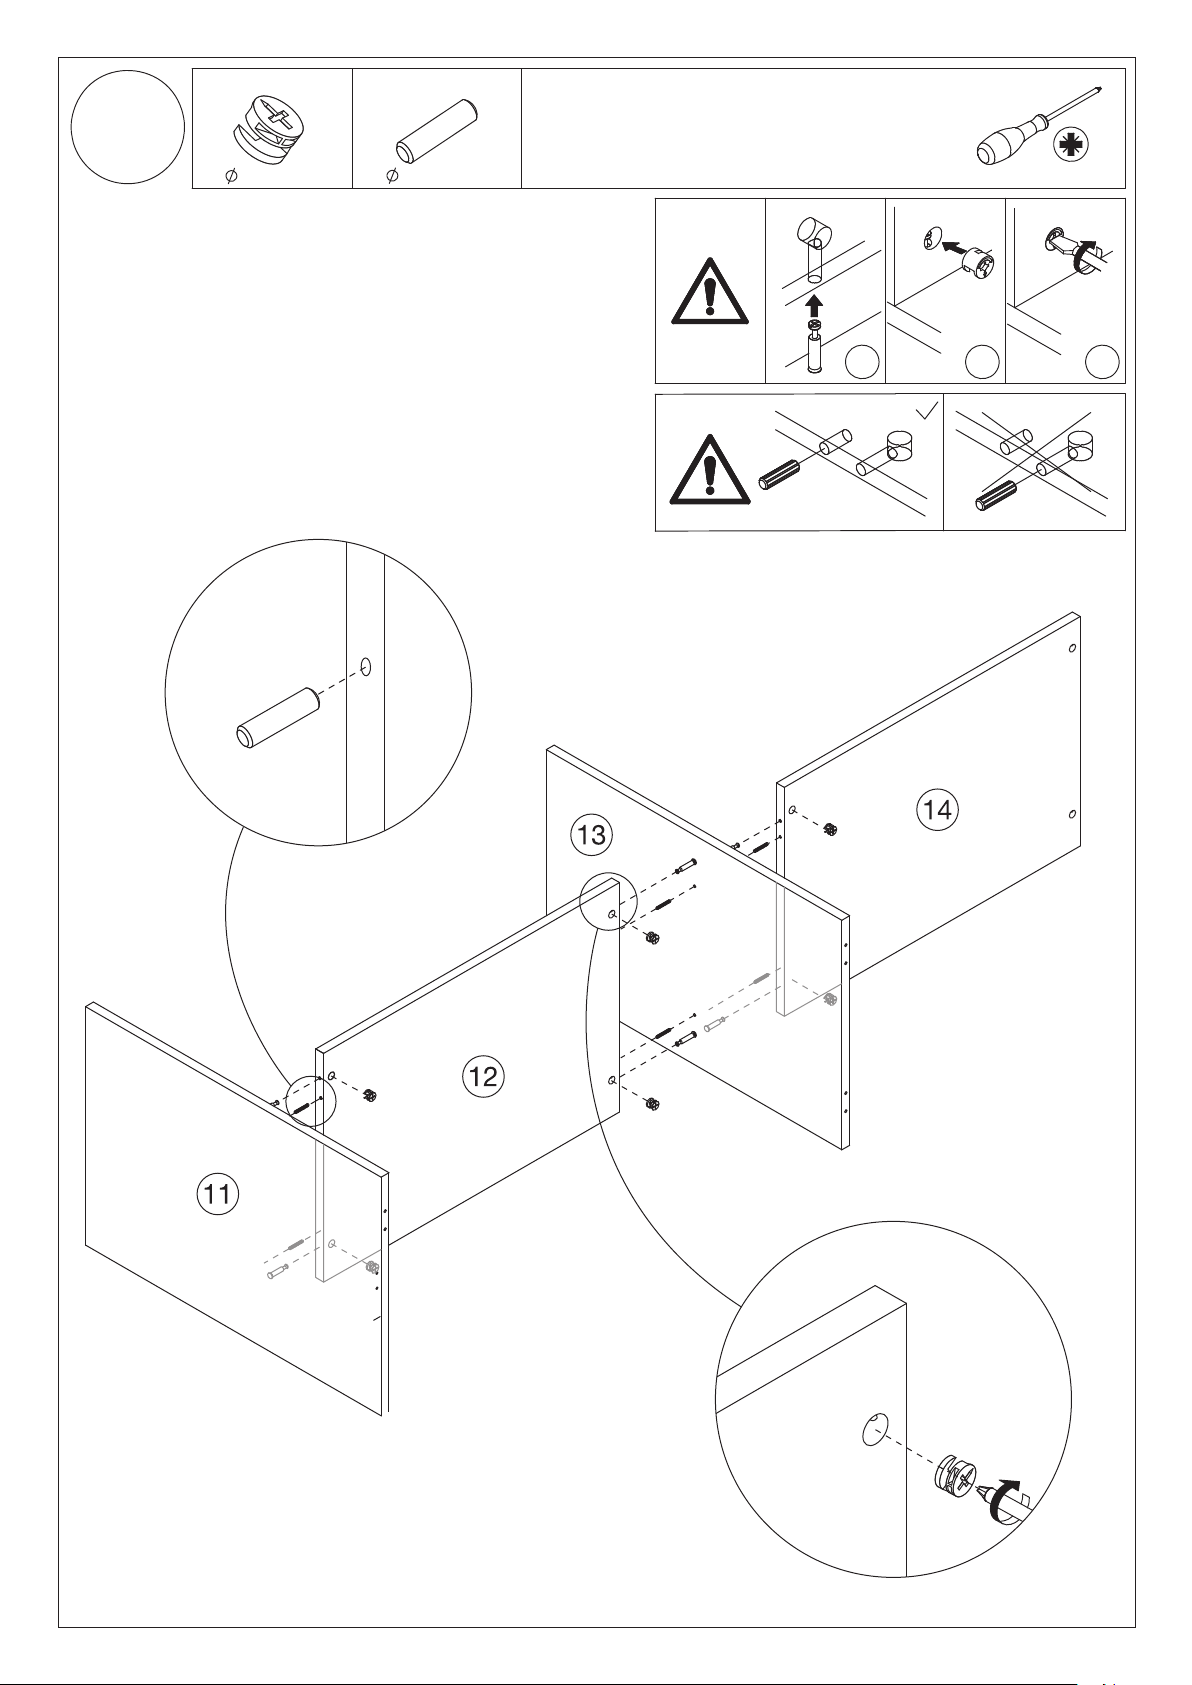
8
B x 6
15 x 9 mm
Insert quickfit screws(A)and wooden
dowels (D)into parts 11 and 13,as
shown.
Insert cam locks(B)into parts 12 and
14,as shown.
Attach parts 11 and 13 to part 12.
Attach part 14 to part 13.
Tum cam locks clockwise to tighten.
D x 6
6 x 30 mm
IIIIII
D
D
D
B
B
B
D
D
B
D
D
B
B
B
180°
11/21
Page 12
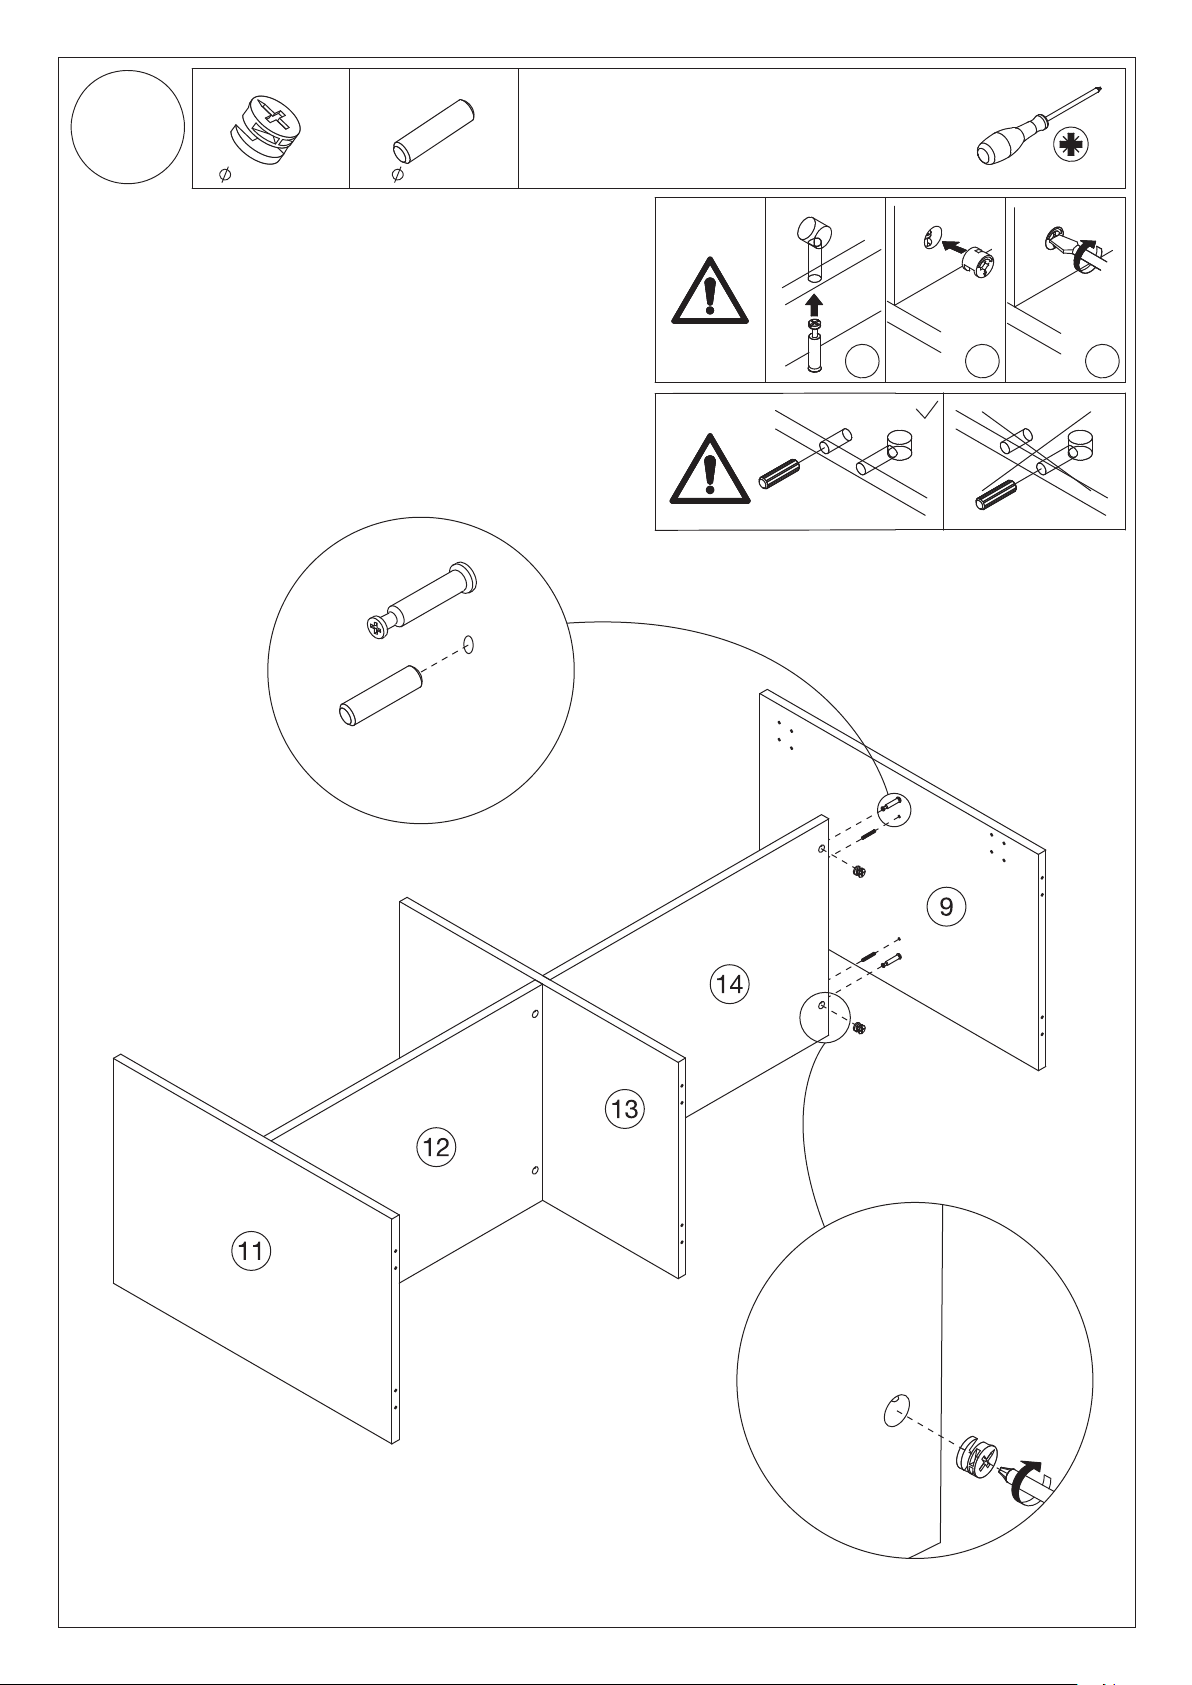
9
B x 2
15 x 9 mm
Insert quickfit screws (A)and wooden
dowels(D)into part 9,as shown.
Insert cam locks(B)into part 14 as
shown and attach part 9 to part 14.
Turn cam locks clockwise to tighten
D x 2
6 x 30 mm
IIIIII
D
D
B
D
B
12/21
B
180°
Page 13
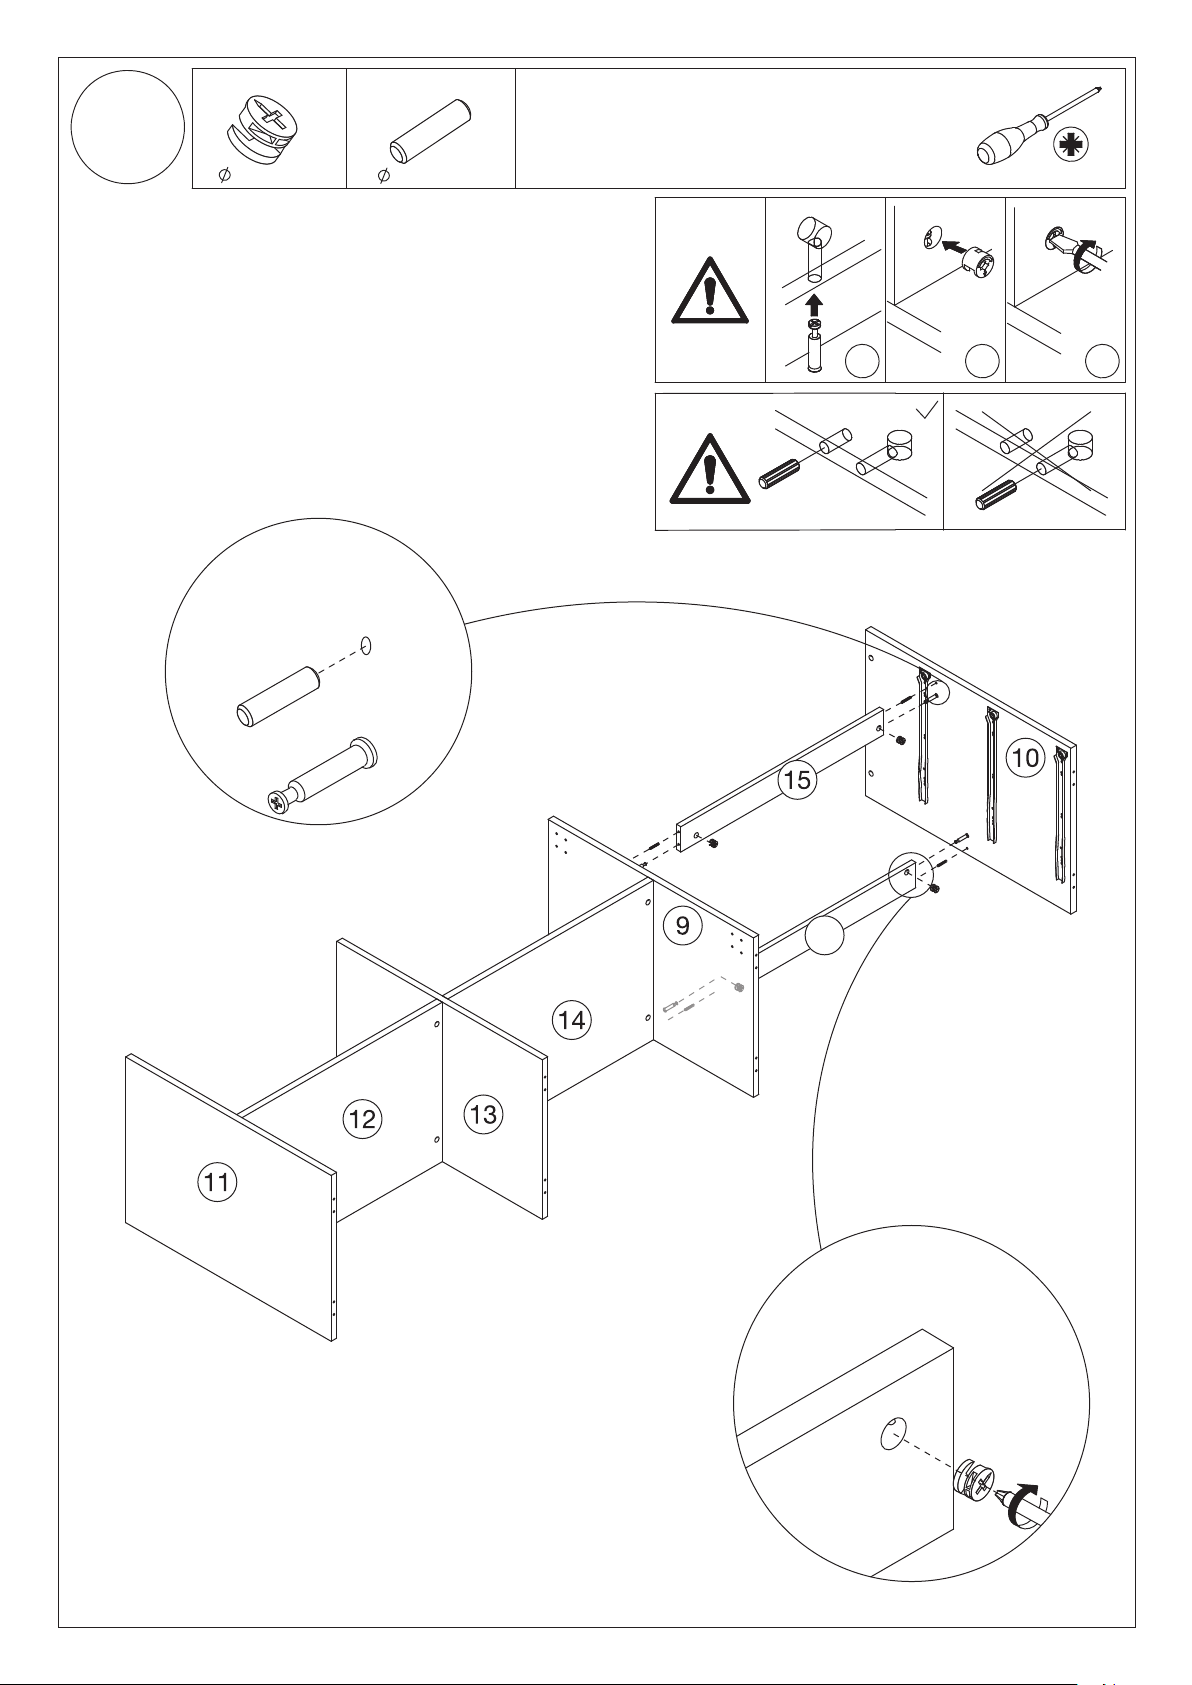
10
B x 4
15 x 9 mm
Insert quickfit screws (A) and wooden
dowels (D) into parts 9 and 10, as
shown.
Insert cam locks (B) into parts 15 & 21,
as shown
Attach parts 9 and 10 to parts 15 & 21.
Tum cam locks clockwise to tighten.
D x 4
6 x 30 mm
D
IIIIII
D
D
B
B
D
B
D
B
21
13/21
B
180°
Page 14
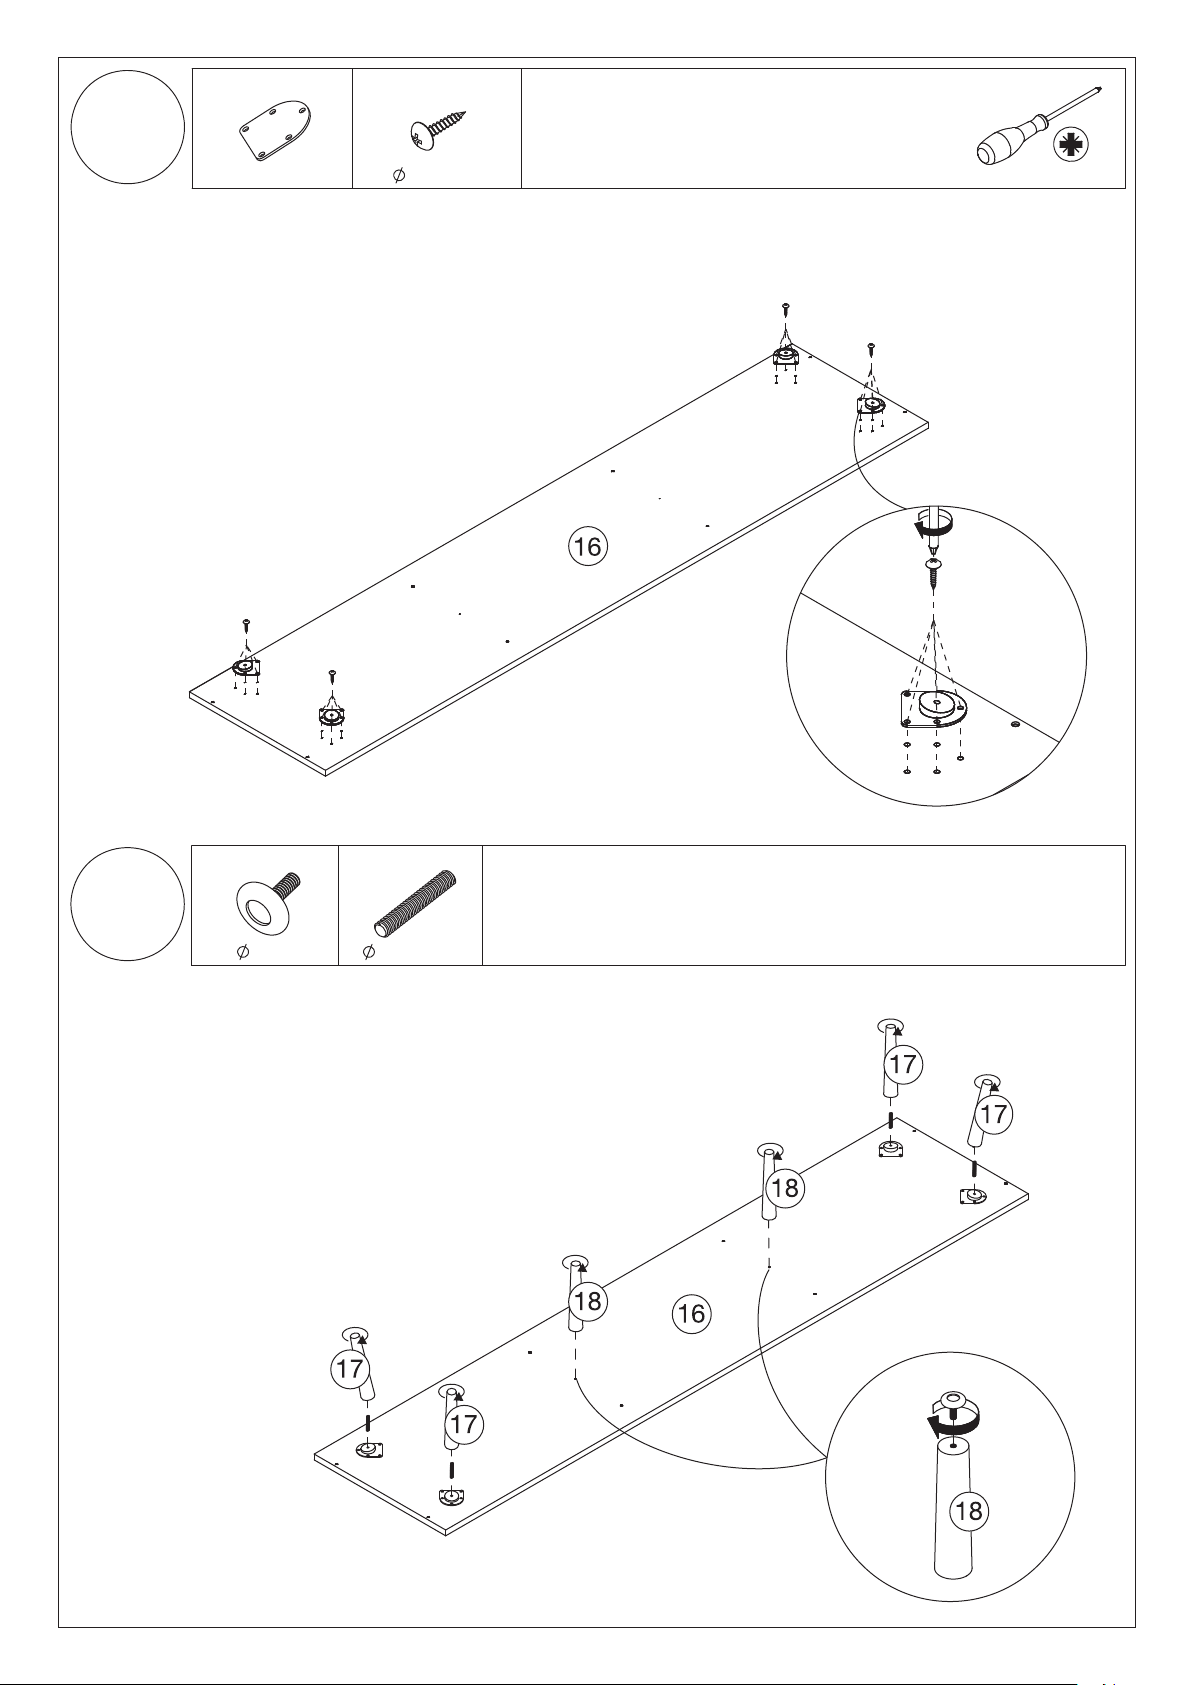
11
M x 4
Fix leg supports (M) to part 16
using screws (N), as shown.
N x 20
4x14 mm
N
12
N
M
U x 2
6 mm
N
M
X x 4
8 x 30 mm
M
N
M
N
M
Fix legs 17 by rotating clockwise to
leg supports attached into part 16,
as shown.
Fix legs 17 to leg supports M by using X
Fix legs 18 by rotating clockwise into
part 16,as shown.
Fix adjustable feet (U) by turning
clockwise into legs 18, as shown.
X
X
X
X
M
14/21
Page 15
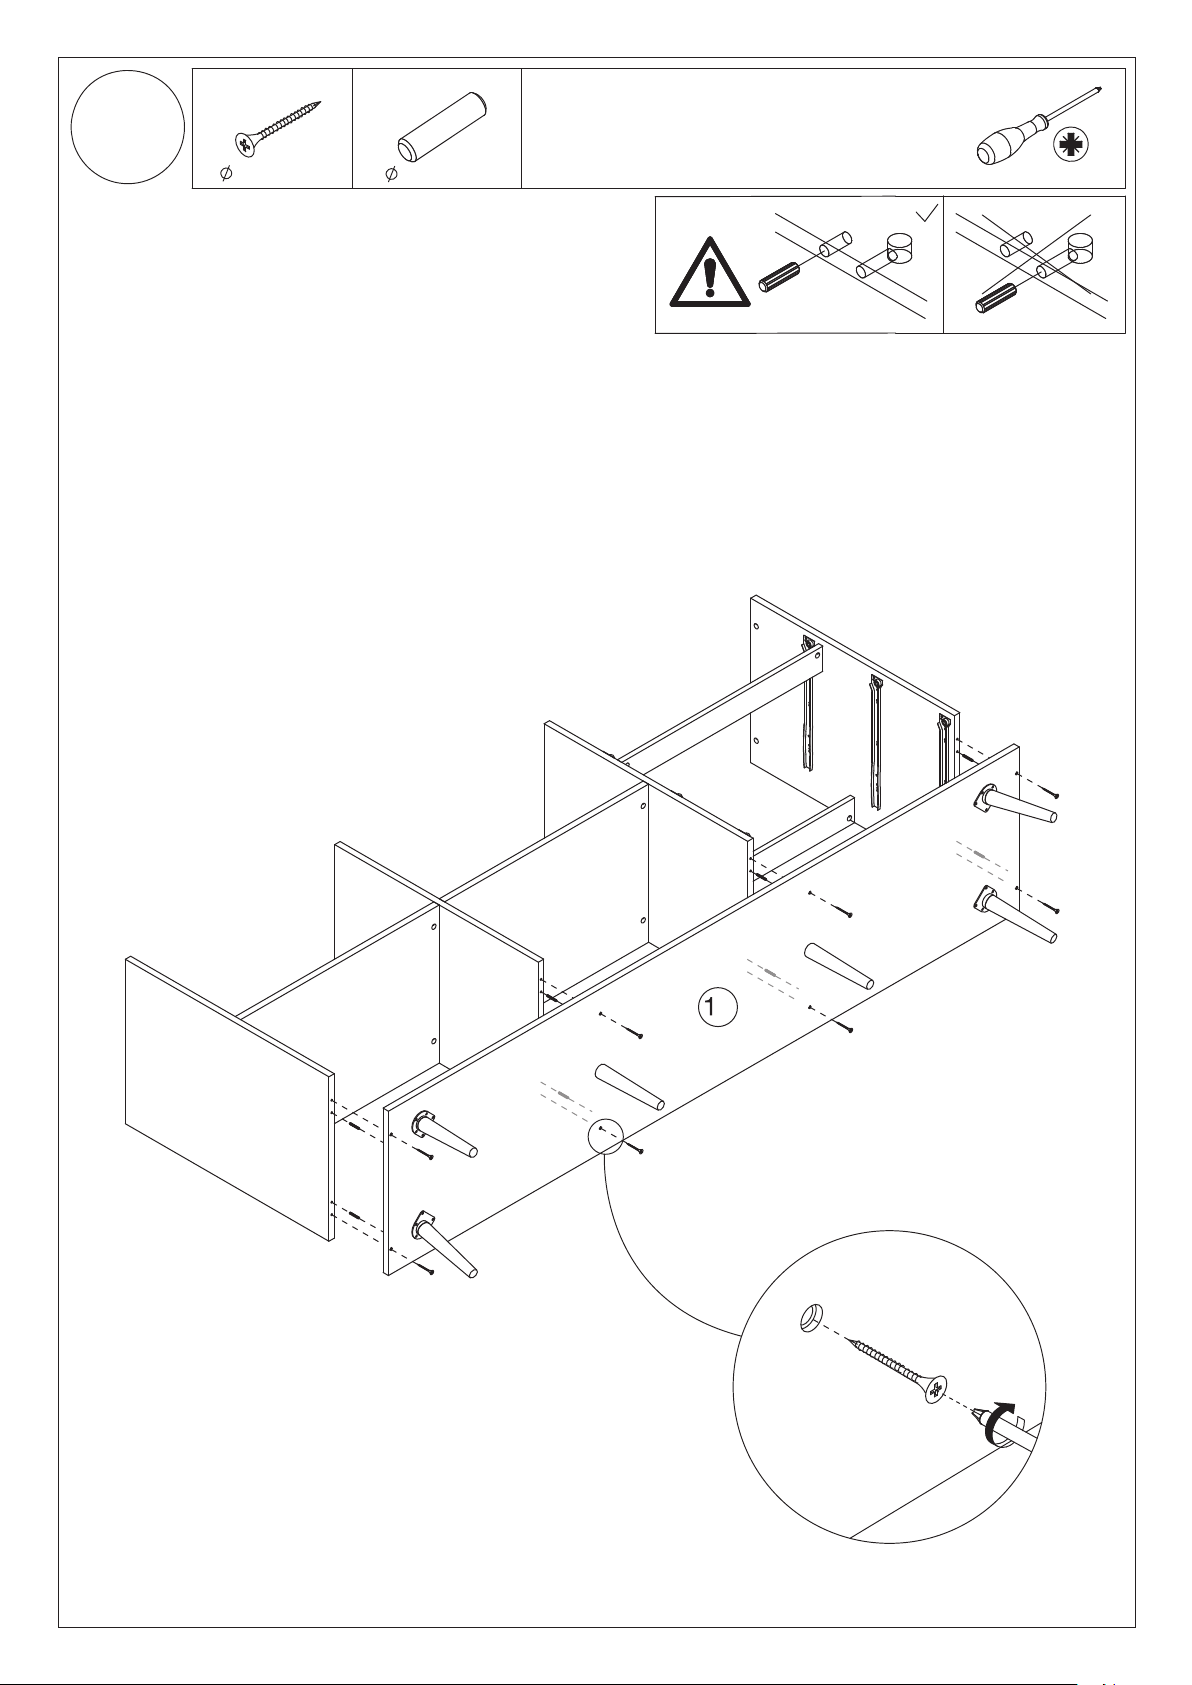
13
C x 8
4 x 40 mm
Insert wooden dowels (D) into
assembled unit, as shown.
Attach part 15 into assembled
unit using screws (C), as shown.
D x 8
6 x 30 mm
D
D
C
C
D
D
C
C
D
C
D
D
D
6
C
C
C
C
15/21
Page 16
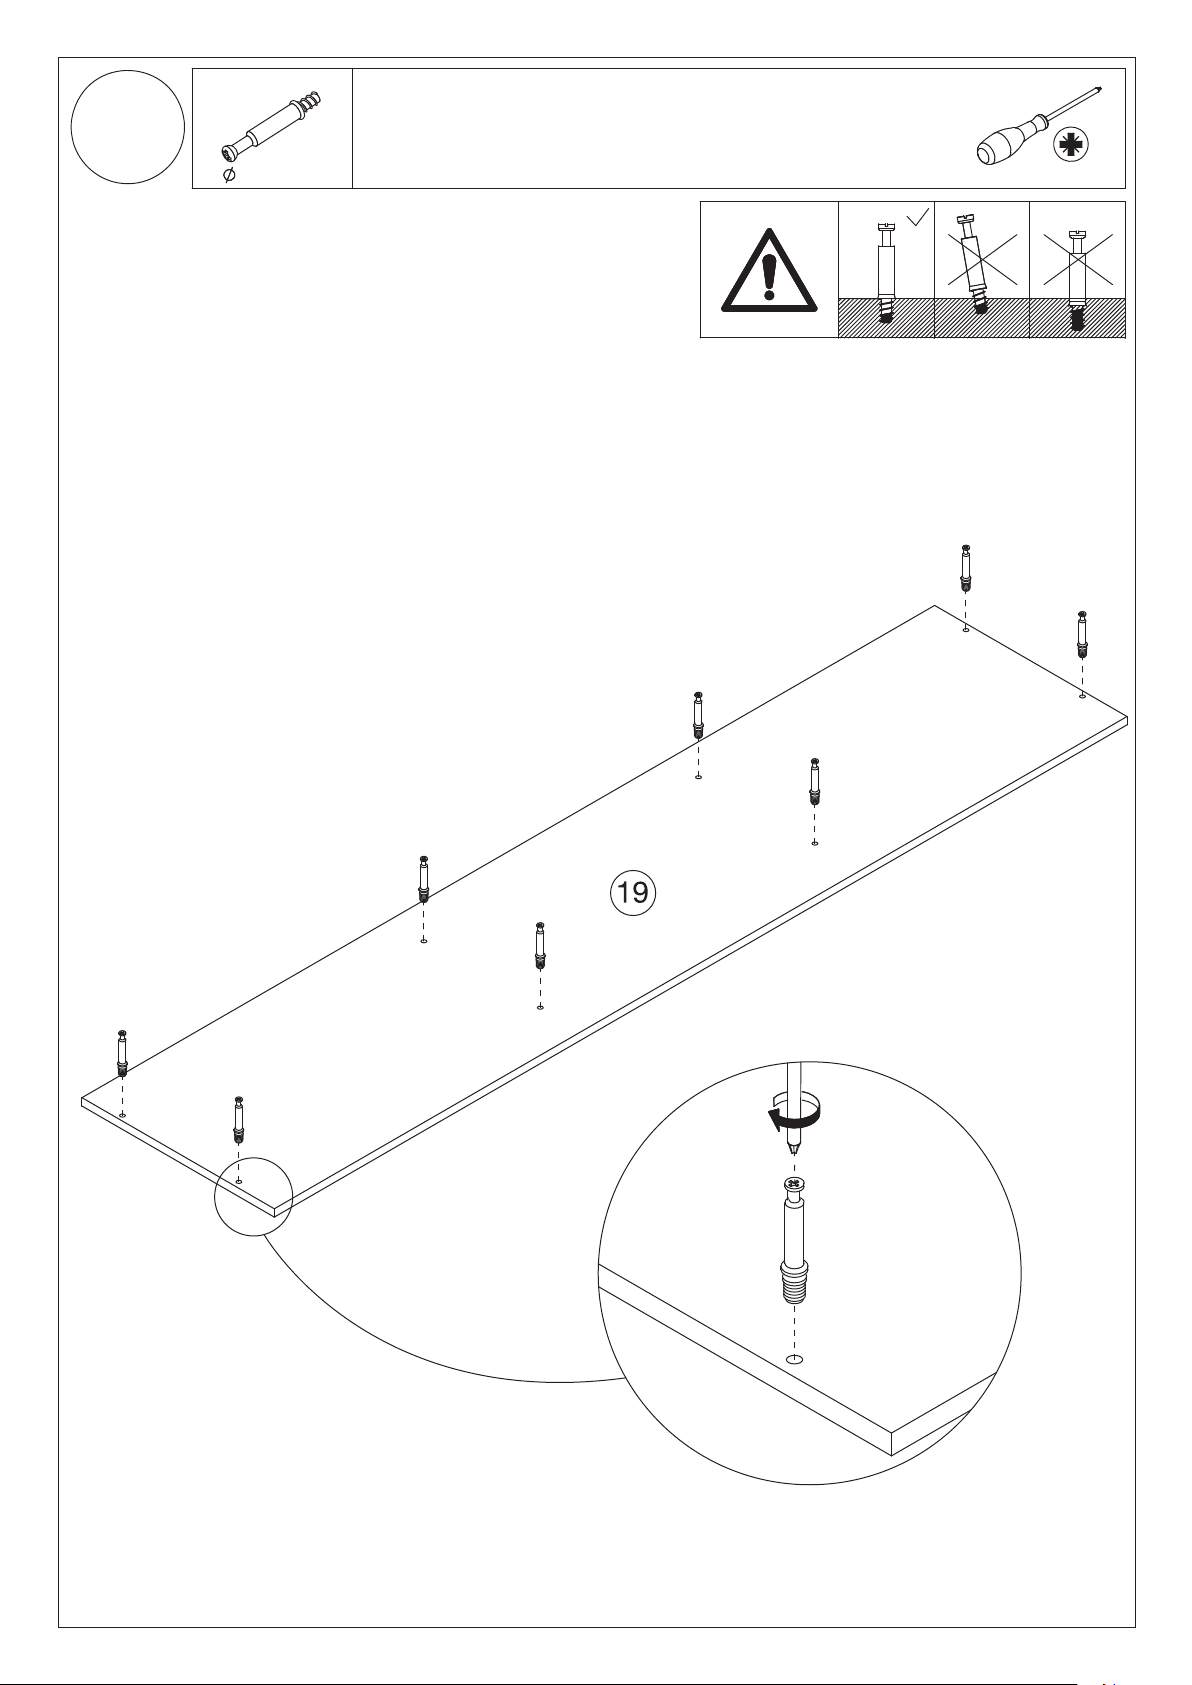
14
A
A x 8
7 x 35 mm
Insert quickfit screws A into part 19
A
A
A
A
A
A
A
A
16/21
Page 17
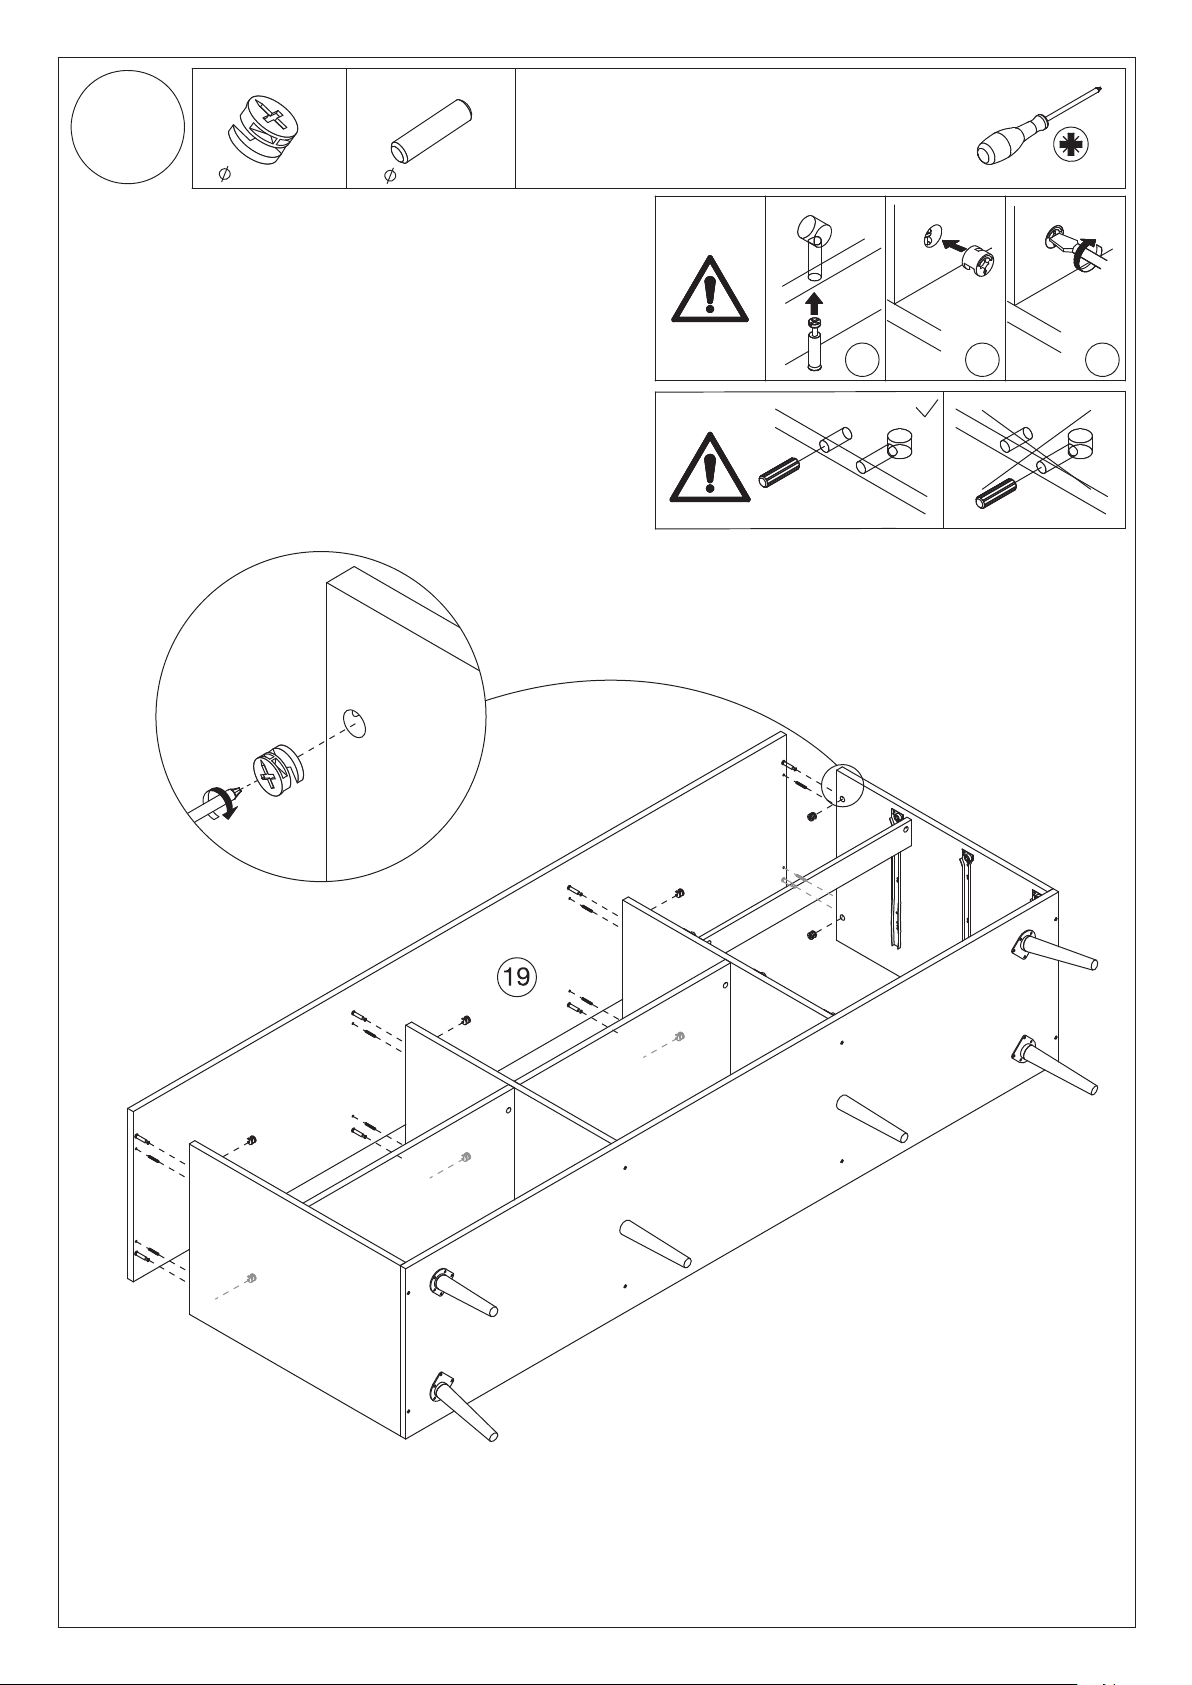
15
B x 8
15 x 9 mm
Insert quickfit screws (A) and wooden
dowels (D) into part 19, as shown.
Insert cam locks (B) into assembled
unit as shown and attach part 19 to
assembled unit.
Turn cam locks clockwise to tighten.
D x 8
6 x 30 mm
IIIIII
D
D
B
180°
D
D
D
D
D
D
17/21
Page 18
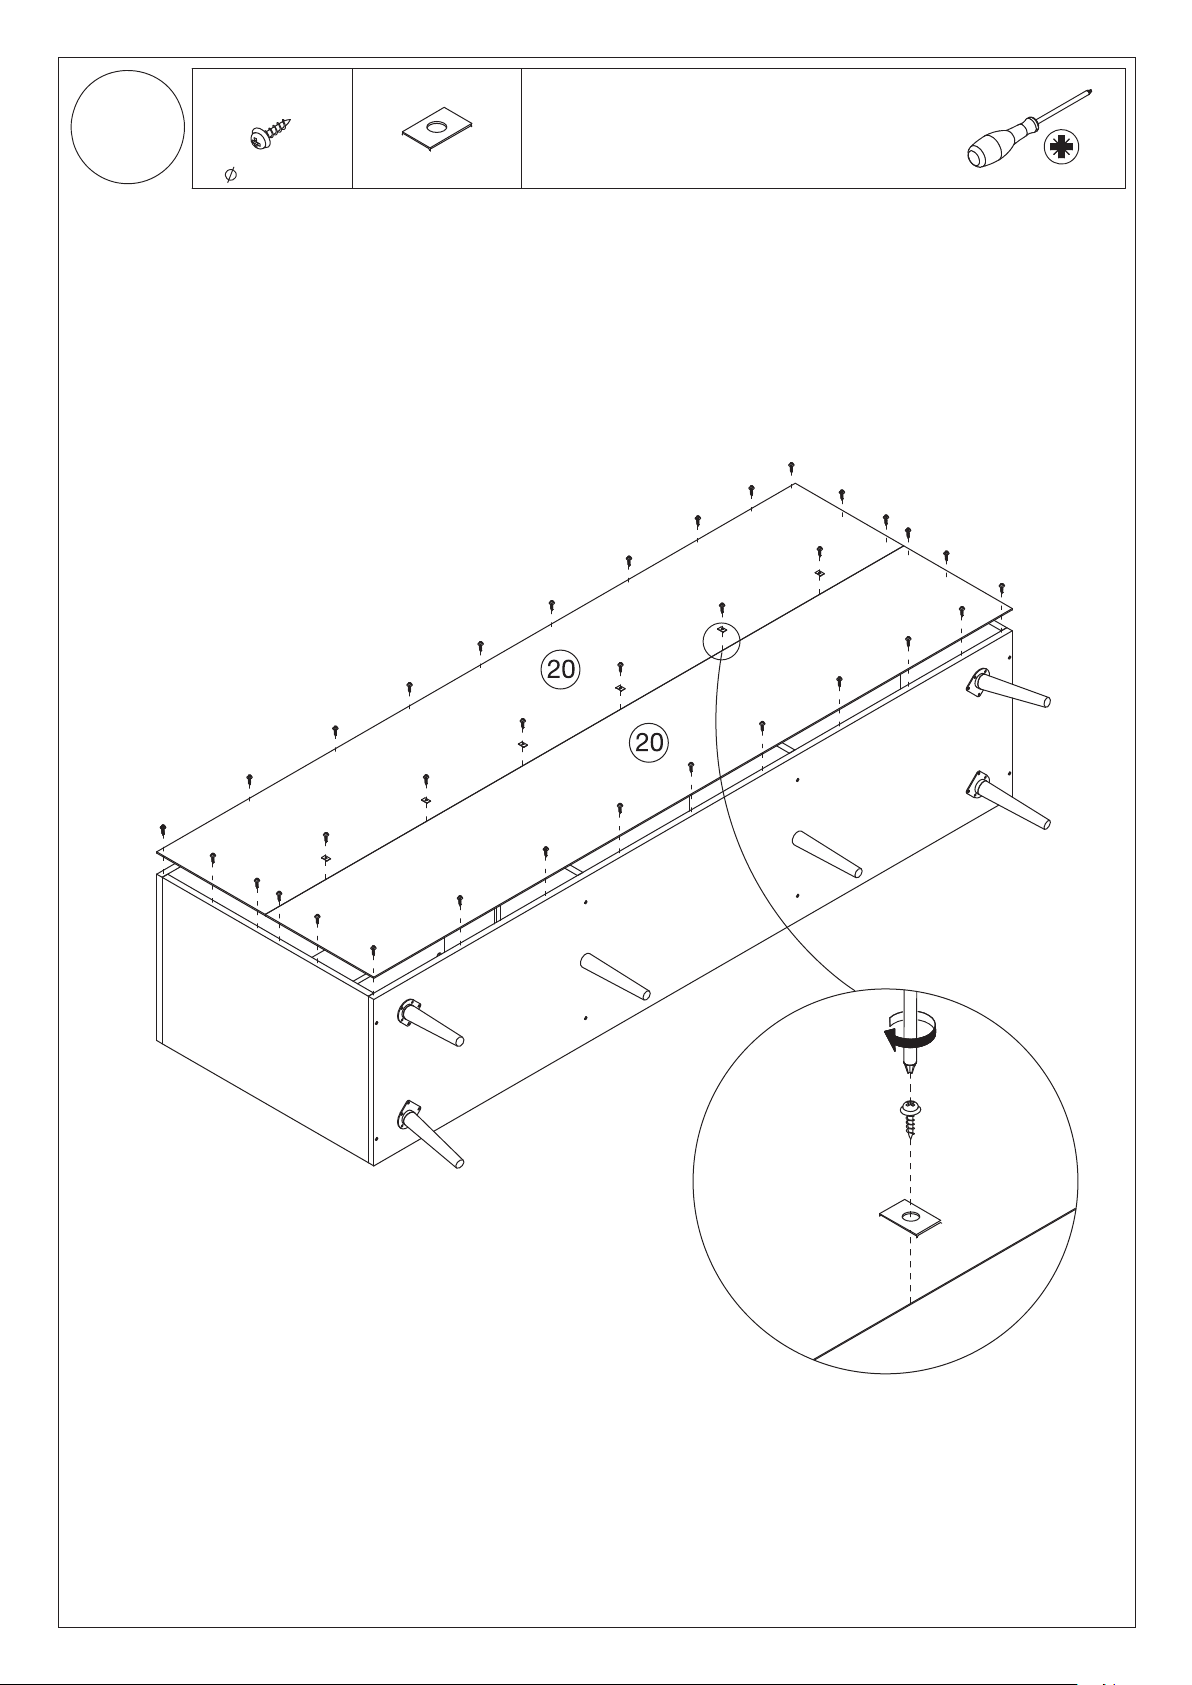
16
O
O x 34
3x12 mm
Fix parts 20 using nails (O)
and square washers (P)
onto assembled unit, as
shown.
P x 6
O
O
O
O
O
O
O
O
P
O
O
P
O
O
O
P
O
O
O
O
O
P
O
O
O
P
O
O
O
O
O
P
O
O
O
O
O
O
O
18/21
O
P
Page 19
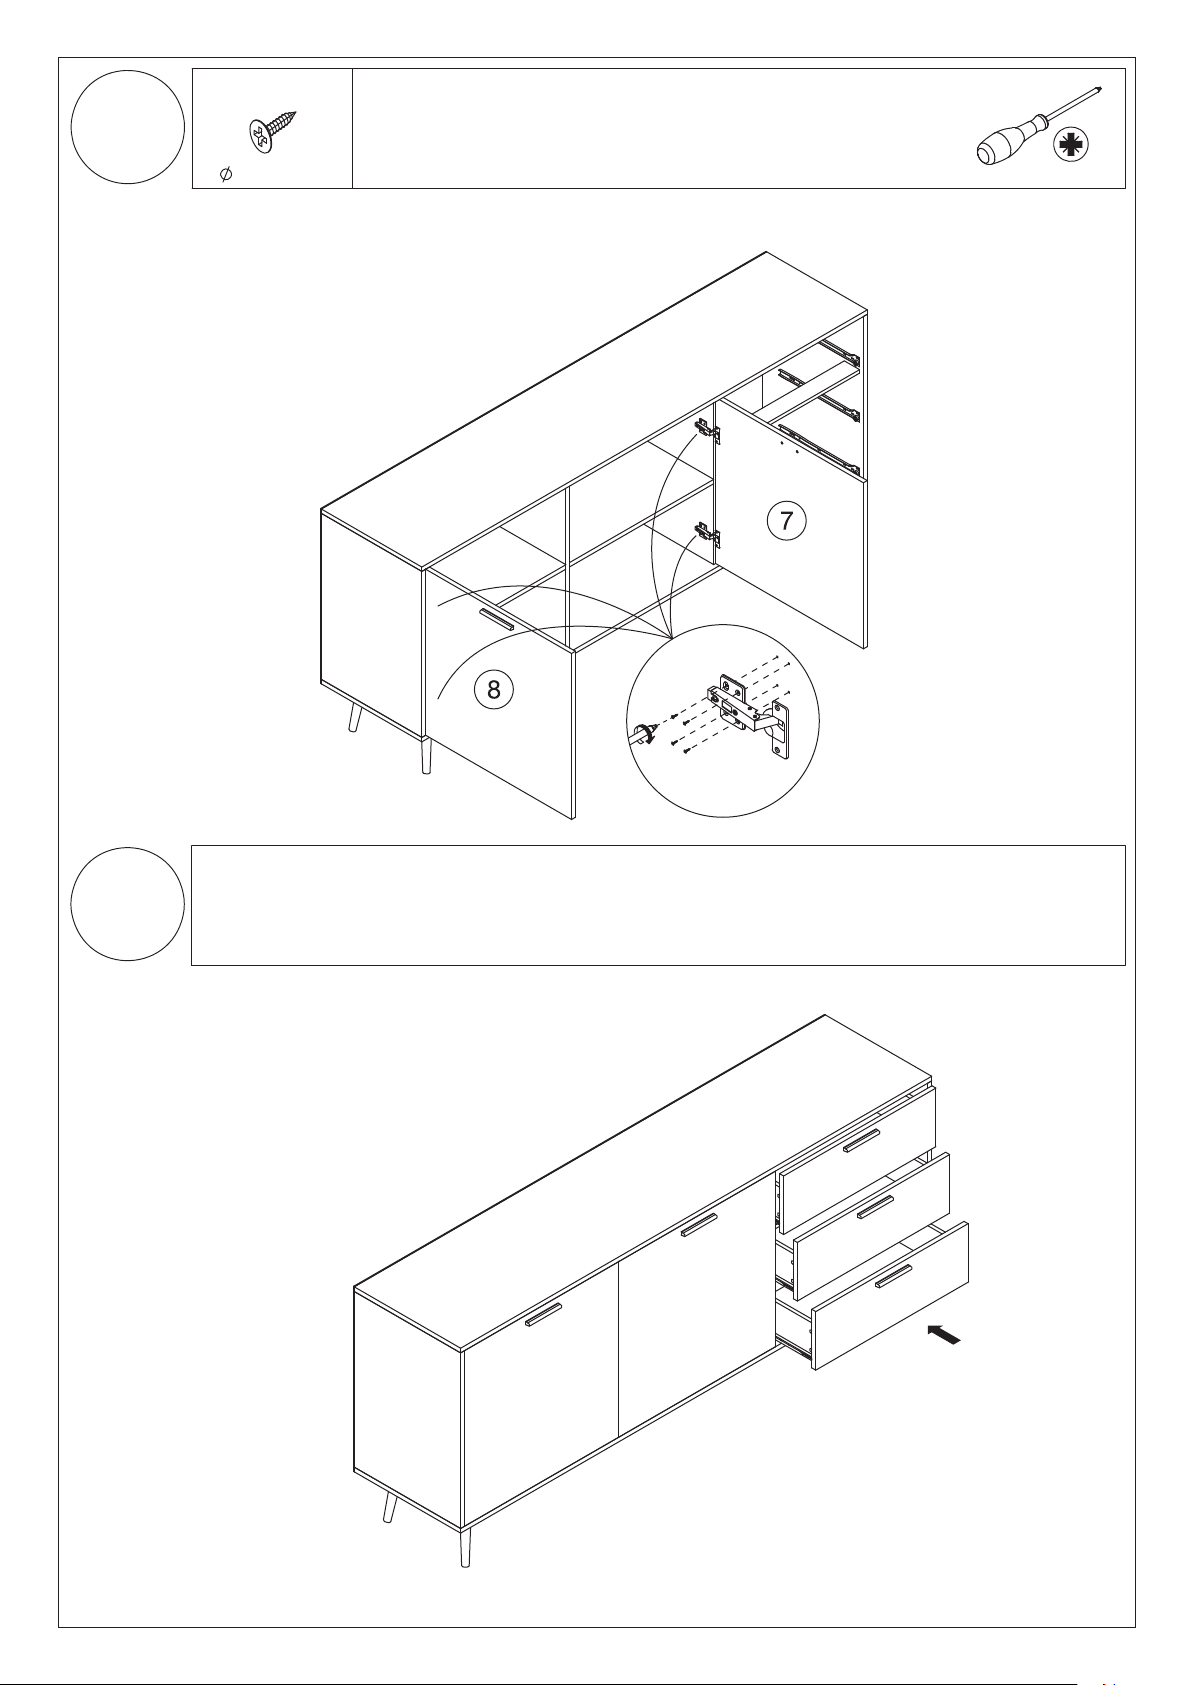
17
V x 16
4 x 14 mm
Fix parts 7 and 8 thru attached
hinges into assembled unit using
screws (V), as shown.
18
Insert drawers to assembled
unit, as shown.
V
V
V
V
19/21
Page 20
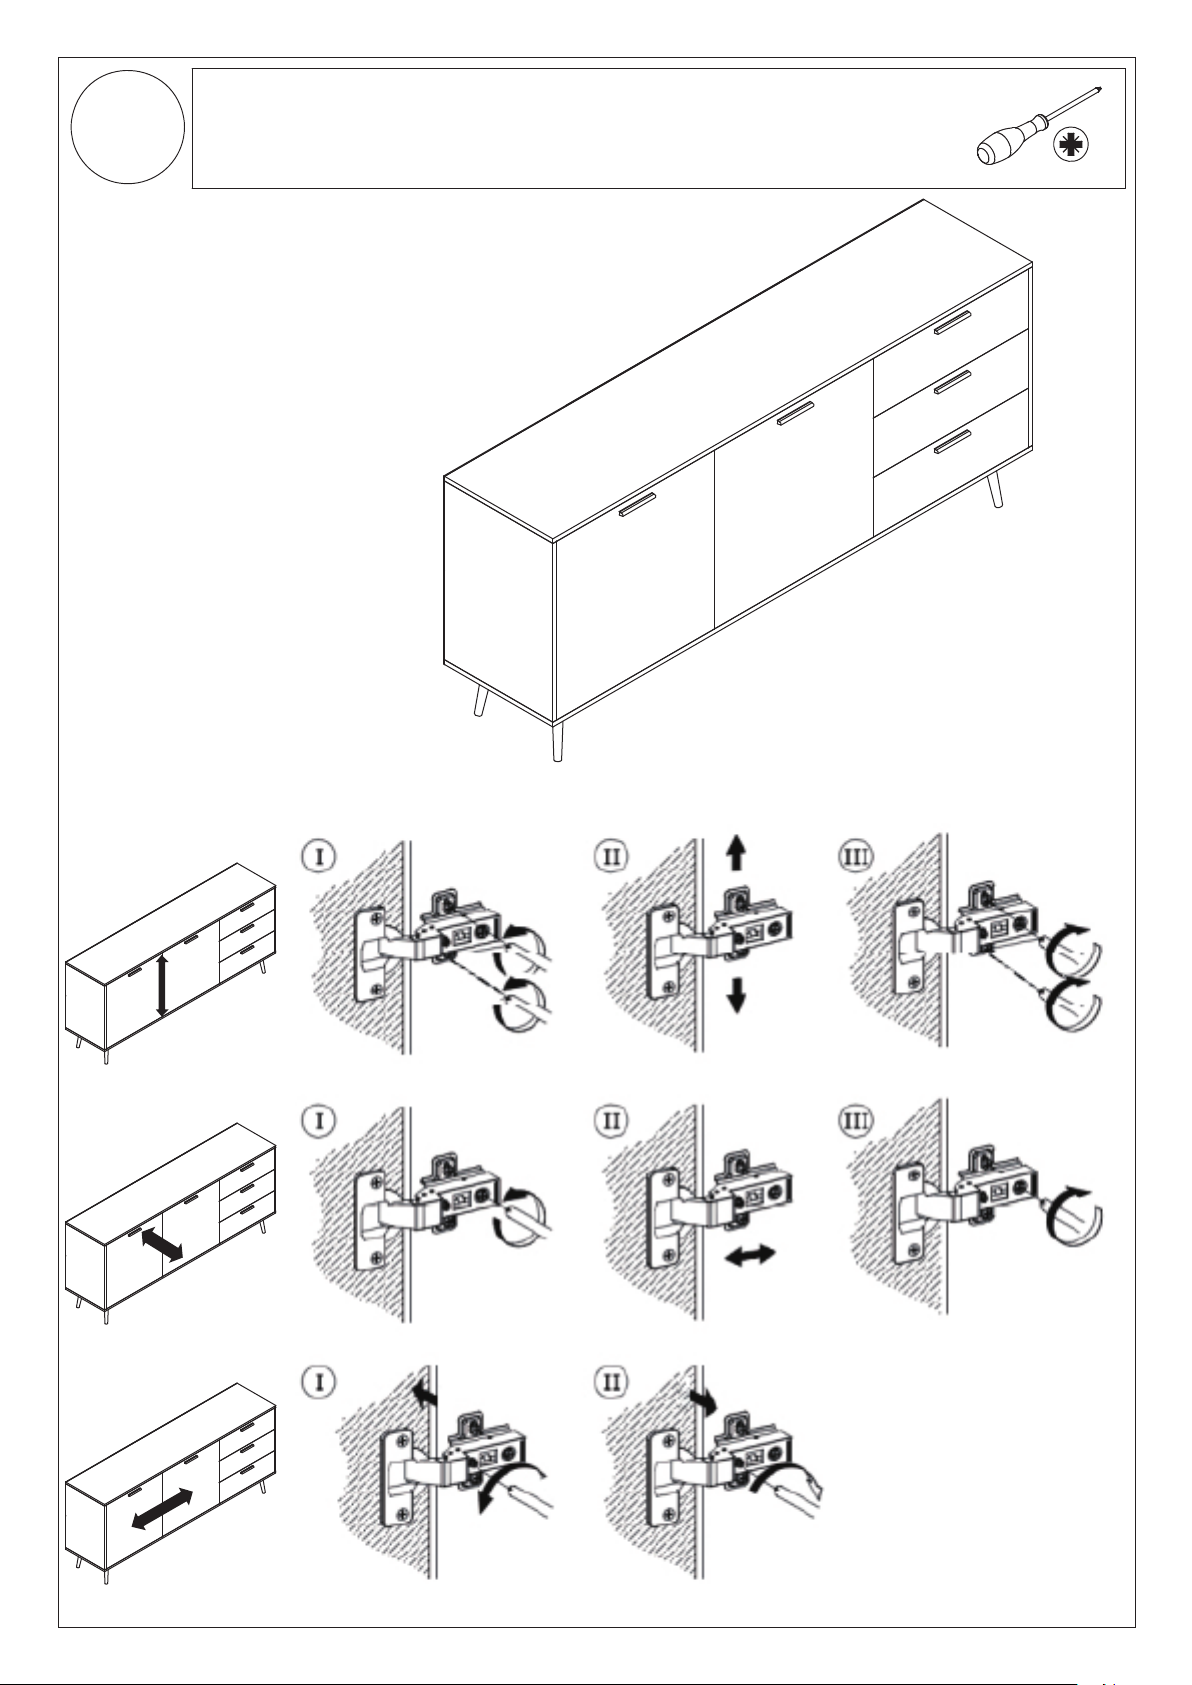
19
Adjust the length of hinges
to avoida gap btween doors
as picture shown
20/21
Page 21
C x 2
Q x 2
R x 2
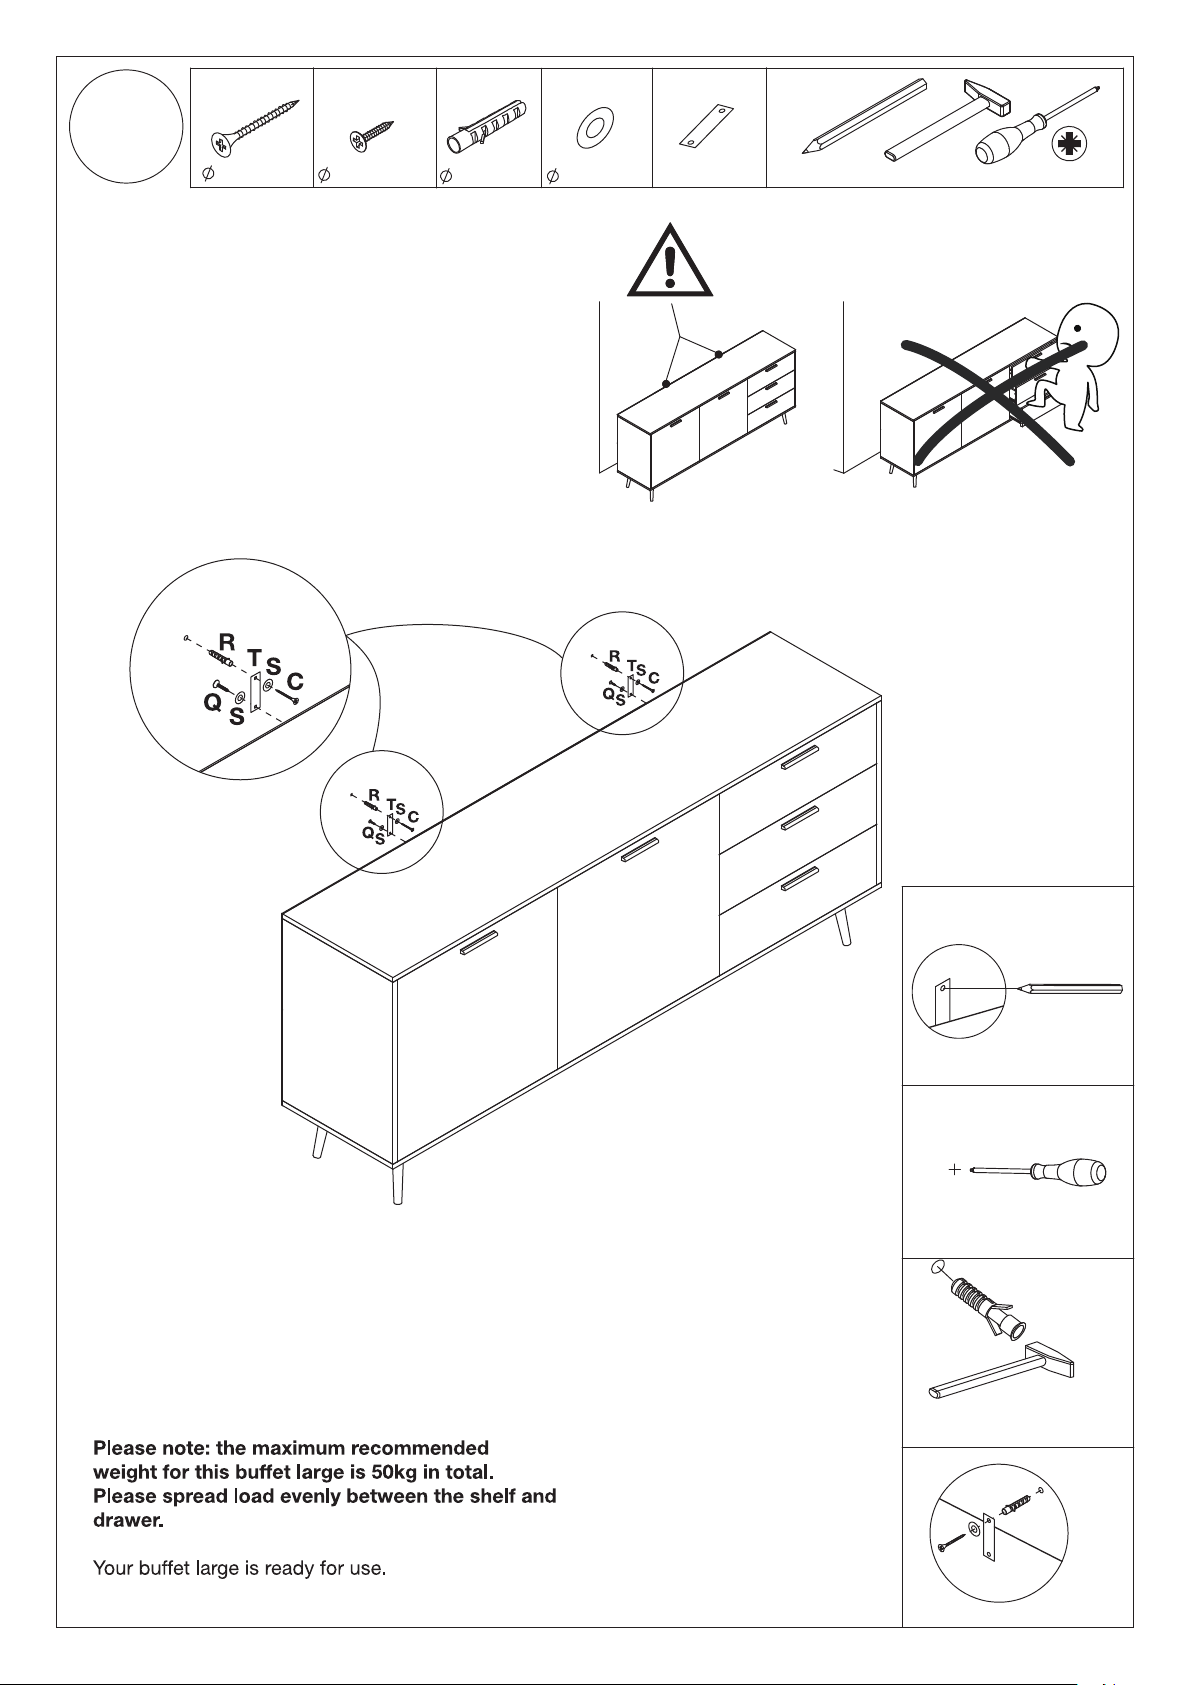
20
4 x 40 mm
For extra stability, it is recommended that
you fix your buffet large to the wall using the
additional hardwares (C, Q, R, S and T), as
shown.
Should you choose not to
affix the product to the wall,
serious injury may be caused
if the product tips over.
3.5 x 14 mm
6 x 30 mm
S x 4
12 x 4 mm
T x 2
21/21
Page 22

WARRANTY
WARRANTY CLAIMS
•There is a 30-day warranty for broken furniture or any other problems that do not
work properly. The warranty will start from the date of purchase which must be
verified by proof of purchase.
•Before making a claim, we may be able to answer your query, simply visit
[email protected] for further information. Our dedicated After-sale Team
will endeavour to answer all messages within 48 hours. Please leave your purchase
order number, along with some details of the problem, if you want a replacement
part. We will arrange within 48 hours. If there is out of stock, we will reply with a
shipping date.
•The product must be used in accordance with the instructions provided. For health
reasons.
•For other reasons, if the furniture needs to be returned, it must be cleaned and dried
and operated within 30 days of receipt.
Type of Warranty Claim
•Failure to follow the furniture instructions will invalidate the warranty. Attention please.
•Does not include damage during installation, but includes damage during transportation.
Scope of responsibility
•Shall not bear any responsibility for misuse or user damage and / or loss of parts during
the installation of furniture.
•After using, the damage and scratches of the furniture are not covered by the warranty.
The Warranty Relates to All Bought in The Us and Covers The
Following Areas
•Sheet parts: 6 months from the date of purchase.
•Electrical parts: 3 months from the date of purchase.
Page 23

RETURNS
CHANGED YOUR MIND AND NEED TO RETURN YOU ITEM?
PLEASE FOLLOW THE BELOW INSTRUCTIONS:
•If you have purchased and have simply changed your mind, follow the retailer’s
instructions for returns.
DEFECTIVE ITEMS
•If your item is defective in any way, i.e. it doesn’t work but you can’t identify why, in
the first instance, please consult our FAQ section at [email protected] as there
may be a simple solution to the issue.
DAMAGED ITEMS
•If you receive an order with obvious shipping damage from the retailer, then we suggest
the delivery is refused. If the delivery has been accepted and then shipping damage is
found, please follow the specific instructions advised by the retailer.
In all circumstances please save all packaging material and paperwork for the order.
Please be aware that if you dispose of packaging material or attempt to return the
merchandise without contacting the fulfiller, you jeopardise your chances of making a
claim, and you may not receive a credit for the return.
 Loading...