

Page 1
CBRD30CP3 & BOWRD30CP
INSTRUCTION
MANUAL
Page 2

PROLOGUE
Your BSA® Illuminated sight is for use on both compound and
standard bows. Each version of the BSA® illuminated sight has a
specic reticle to help maintain precision on target with the actual
application you are using.
When you turn on the Cross Bow sight, (CBRD30C) 3, 3 MOA
dots appear in the center of the site, instead of one individual dot.
With ultra-fast acquisition, pin-point precision and wide eld-of-
view, you’ll always hit your target*. The BOWRD30CP Bow Red
dot is built with the same reticle 3-3 dot with red illumination.
Attaching to the riser of your bow, a sight can deliver reliable
performance and foster accurate arrow placement.
*Keep in mind accuracy is based upon the shooter practicing
proper form; properly tuning their equipment and incorporating
a consistent anchor point. The sight itself can only work as a
shooting aid, not as a guarantee for making perfect shots. If you’re
a shooter that enjoys hunting and competitive shooting, explore
your options and consider purchasing a sight for each particular
use. Don’t limit yourself to just one sight for all situations, it’s
easy to remove one and attach another for effective and accurate
shooting in different applications.
2
Page 3
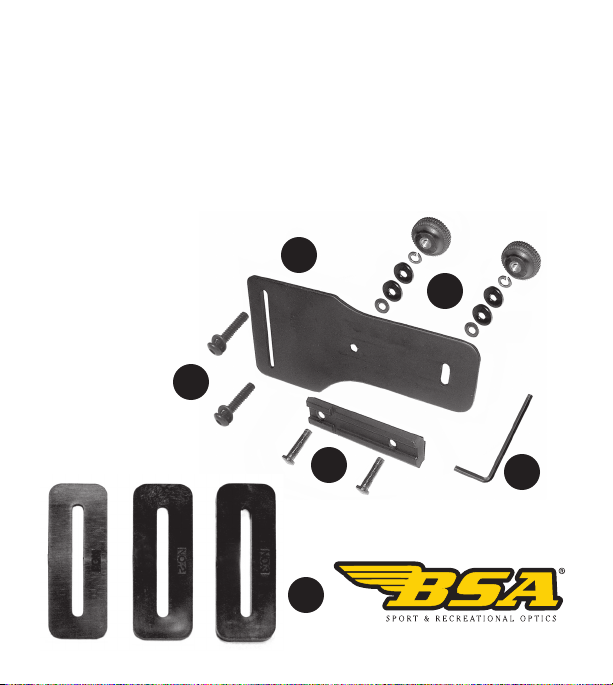
The BSA® BOW Mount is a versatile, universal bow mount, that may be adapted to t nearly
all modern compound bows and used with any type of bow red dot sight.
Please carefully read all instructions before proceeding.
KIT INCLUDES:
1. Mounting plate with attached weaver style rail
2. Riser spacers (gure 2)
3. Hex head mounting bolts and washers
4. Hex head wrench
5. Bow torque washers
BSA® BOW MOUNT
1
5
3
1
324
4
Page 4
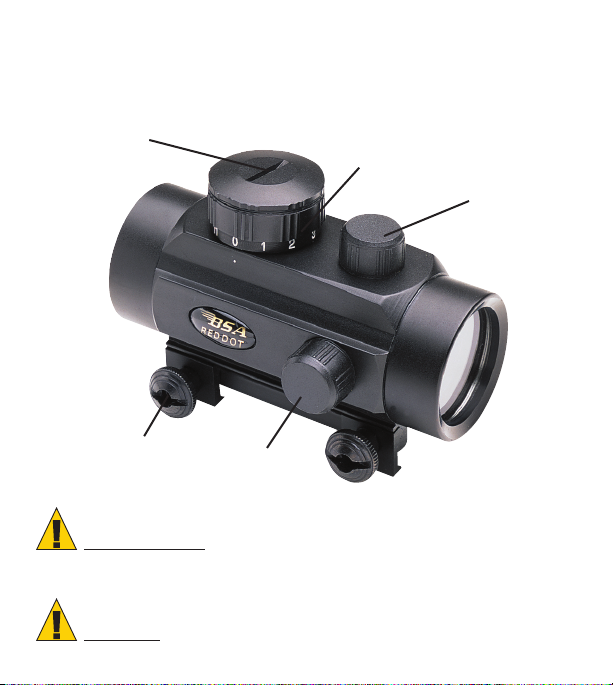
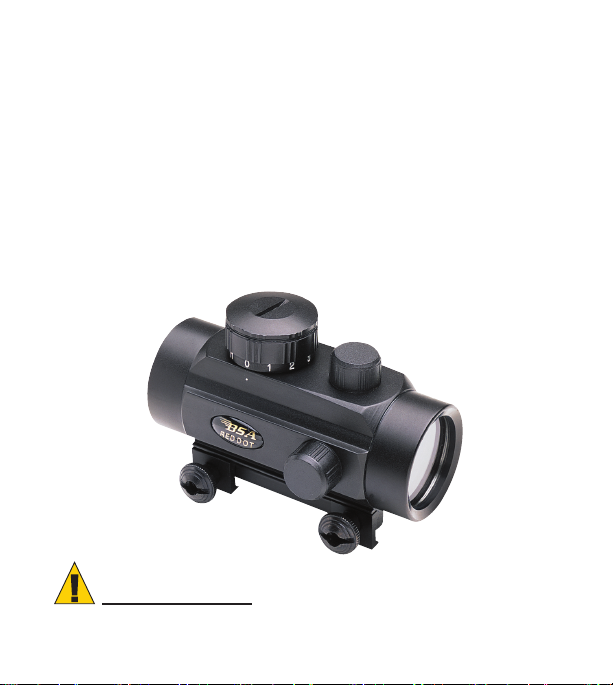
BSA® BOW & CROSS BOW SIGHT
Battery
Cover
Locking Nut
Windage
Adjustment
Knob
Rheostat
Changing Dot
Intensity
Elevation
Adjustment
Knob
CAUTION: DIRECT VIEWING OF THE SUN CAN CAUSE
PERMANENT EYE DAMAGE. DO NOT ATTEMPT TO VIEW THE SUN WITH
EITHER THIS PRODUCT OR THE NAKED EYE.
NOTE: KEEP ALL INSTRUCTIONS FOR FUTURE REFERENCE.
Page 5
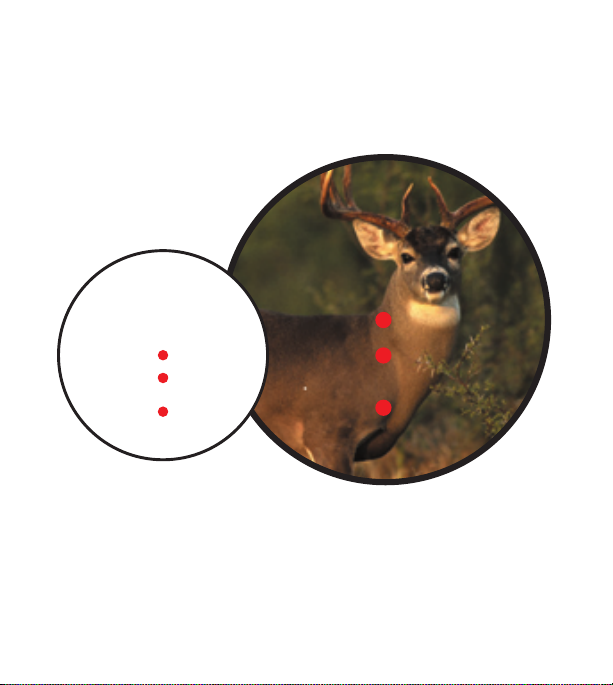
TABLE OF CONTENTS:
1. ASSEMBLY
2. SIGHTING IN
3. FINISHING TOUCHES
The BSA® 3 Red Dot Sight is designed for quick target acquisition
under any light conditions. Engineered with three (3 M.O.A.) illuminated
red dots and specically calibrated at 10-yard intervals it allows for
easy range adjustment. The 11 position brightness adjustment can
accommodate all lighting conditions and targets. BSA® 3 Red Dot Sight
operates on a standard 3 volt lithium battery (included).
Replacement battery #CR2032.
5
Page 6

1. ASSEMBLY
1a) Remove the parts from their packaging and familiarize yourself
with them. (see pg. 2)
1b) The BSA® BOW Mount is meant to be attached to your bow in
place of your existing sights.
NOTE: Before beginning the installation process, your existing
sights must be removed. The sight screw holes in the riser of your
bow will be used to attach your BSA® BOW Mount .
Tech Tip #1: To make sighting in easier, mark on the inside of the
riser window your most commonly used pin location. This will be
useful later in quickly locating the red dot.
Tech Tip #2: The weaver style rail is attached to the mounting plate
so it can be used with a right hand bow. For a left hand bow, the rail
must be removed and placed on the opposite side of the mounting
plate.
1c) Hold the bow so that it is possible for you to sight the drawstring
passing through the center of your bows limbs and the center of
your arrow rest. Keeping this orientation, lay the red dot sight
mounting bracket against the outside of the riser. With the red dot
sight extending inside, approximately over the arrow rest.
6
Page 7

NOTE: Whether the drawstring passes through the center of
the red dot sight. If the string passes to the right of center, one or
more riser spacers must be used. (see pg. 2) Start with the smallest
spacer, No.1, and attach the mounting plate to your bow with the
spacer between it and the riser using the hex head mounting bolts
and washers.
Tech Tip #3: The BSA® BOW Mount is a versatile kit which may
be tted to nearly all modern bows. However, when attaching the
mounting plate to your bow, you may nd where the red dot sight
has interference with either the cables or the riser. In this case, the
rail may be reversed on the mounting plate. This will change the
mounted orientation of the red dot sight forward or backward by
approximately one inch.
1d) Perform the quick test as before, orienting the bow so that the
string runs through the center of the upper limb, through the red dot
sight, through the center of the arrow rest and down through the
lower limb. Does the string pass through the center of the red dot
sight? If it is still to the right of center, try spacer No. 2.
1e) Using trial and error, select the correct spacer or combination
of spacers necessary to allow the draw string to pass more or less
through the center of the red dot sight. When completed, your rough
windage adjustment has been done.
7
Page 8
1f) Loosen the hex head mounting bolts slightly and slide the
mounting plate up or down until the center of the red dot sight is
about where your most often used sight pin was.
1g) When nished with assembly, double check all screws for
tightness.
Tech Tip #4: Every red dot sight has internal windage and elevation
adjustment of about 15 inches at 25 yards. However, it is best to
make all the big adjustments of windage with the spacers (see pg.
2) and elevation [sliding mounting plate up or down] before making
ne adjustments with the internal click adjustments.
2. SIGHTING IN
CAUTION: REFER TO YOUR BOW OWNER’S MANUAL
FOR PROPER USE. ALWAYS USE APPROPRIATE CAUTION
WHEN SHOOTING.
2a) Rough Sighting In. Hold your bow up at arm’s length and
familiarize yourself with the appearance of the reticle against the
target. If necessary, loosen the tow knobs attaching the rail or rings
to the mounting plate and rotate the back of the red dot sight up or
down until a full, round view through the devise is obtained. You
will note that the windage and elevation will be located at nine and
8
Page 9

six o’clock. Although the screw located at nine o’clock is marked
“UP” its function in this orientation is windage. This also applies to
the screw located at six o’clock. It is marked as “R” but its function
in this orientation is elevation. At a safe archery range, start from a
close distance (about 5 yards) and shoot two arrows into the target.
If they hit within six inches of your point of aim, move back to 10
yards and try two more arrows.
Tech Tip #5: With some bows, the rise will torque (twist counter
clockwise for right hand bows, clockwise with left hand bows) when
drawn. This will make it difcult to see the reticle as it will not
be possible to look straight through the sight. To correct for this
condition one or more washers (included) should be added between
the rail and mounting plate on the back bolt.
2b) Hitting lower or higher than point of aim. If the hit on the
target is lower than your point of aim, loosen the hex head mounting
bolts and slide the mounting plate further down the riser. (If hitting
high, do the opposite.) Make small adjustments. Re-tighten the
mounting bolts and try two more shots. If you are now hitting within
six inches of your point of aim at 10 yards, continue back to your
ideal sight in distance and repeat the process until you are within six
inches of your point of aim.
Tech Tip #6: If the structure of your riser is such that interference is
9
Page 10

caused when sliding the mount in the desired direction, the mounting
plate may be ipped over. (Note that the red dot sight must also be
removed and placed on the opposite side of the mounting plate.)
Flipping the mounting plate will provide an additional travel of
approximately one inch.
2c) Hitting left or right of point of aim. If the hit on the target
is left of your point of aim, your reticle must be moved to the left
of its current position. This can be done by using a lower spacer
number or no spacer at all. However, as with elevation, make small
adjustments. Your goal is to hit within six inches at 10 yards. When
achieved, move back to your ideal sight in distance and repeat the
process until you are within six inches of your point of aim.
2d) Fine Sighting in at Ideal Distance. Now that you are sighted
in to within six inches of your point of aim at your ideal distance,
you are ready for ne adjustments. Fine adjustments are made by
removing the windage and elevation caps of the red dot sight and
rotating the windage or elevation screws. Note that the adjustment
located at nine o’clock is windage and the one at six o’clock is
elevation.
2e) Hitting lower or higher than your point of aim. If you are
hitting lower, you must move your reticle down. If hitting higher,
you must move your reticle up. These up and down adjustments are
10
Page 11

done with your elevation adjustment screw, which is located at 6
o’clock when your bow is held in a shooting position. Rotating this
screw clockwise moves the reticle up. Five clicks will move your
point of impact approximately one inch at 25 yards.
2f) Hitting left or right of your point of aim. If you are hitting to
the left, you must move your reticle to the left. If you are hitting
to the right, you must move your dot to the right. These left and
right adjustments are done with your windage adjustment, which is
located at 9 o’clock when your bow is held in a shooting position.
Rotating this screw clockwise moves the dot left. Rotating it counter
clockwise moves the dot right. Five clicks will move your point of
impact approximately one inch at 25 yards.
Tech Tip #7: Should you nd that there is not enough adjustment
range provided, go back and repeat the “Rough Sighting In”
procedure. (2a)
3. FINISHING TOUCHES
Modern high-powered bows create a great deal of vibration when
red. It is advisable to use string wax or a semi-permanent thread-
locking compound on all bolt threads when sighting in has been
completed. This may be done by carefully loosening only one bolt
at a time, applying the wax or thread locker, and re-tightening. Care
11
Page 12
must be taken to not bump the sight or loosen more than one screw
at a time. Otherwise, sight in adjustments may be lost. Keep manual,
warranty and unused spacers in the shipping box for future reference
and use.
We hope that your increased understanding of the design and
capabilities of the BSA® BOW mount will allow you many years of
enjoyment and satisfaction. If you should have any questions, please
feel free to direct them to the address and phone number listed on
your warranty card.
ATTENTION: THE OBJECTIVE LENS (FRONT) OF THE
RED DOT SIGHT IS ANGLED. IT IS ANGLED FOR THE PROPER
OPERATION OF THE RED DOT.
12
Page 13
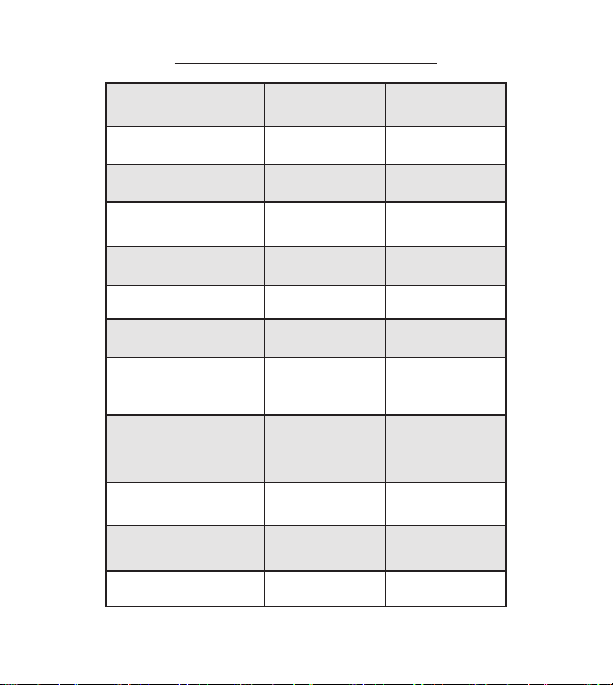
COMPARISON CHART:
MODEL BOWRD30 CBRD30CP
Magnication 1X 1X
Eye Relief (in) Unlimited Unlimited
FOV @ 100 Yards (ft) 68 68
Tube Diameter 30mm 30mm
Parallax Setting 50 Yards 50 Yards
Weight (oz.) 12.24 5.94
Adjustment Graduation
(MOA)
Max. Internal WIE
Adjustment (MOA)
Illuminated 3-3 MOA 3-3 MOA
Reticle Type Red Dot Red Dot
Light/Laser No No
1 click = 1/2” 1 click = 1/2”
45-45 45-45
13
Page 14

NOTES:
______________________________________________________
______________________________________________________
______________________________________________________
______________________________________________________
______________________________________________________
______________________________________________________
______________________________________________________
______________________________________________________
______________________________________________________
______________________________________________________
______________________________________________________
______________________________________________________
______________________________________________________
______________________________________________________
______________________________________________________
______________________________________________________
______________________________________________________
______________________________________________________
______________________________________________________
______________________________________________________
______________________________________________________
______________________________________________________
______________________________________________________
______________________________________________________
______________________________________________________
______________________________________________________
______________________________________________________
______________________________________________________
______________________________________________________
14
Page 15

NOTES:
______________________________________________________
______________________________________________________
______________________________________________________
______________________________________________________
______________________________________________________
______________________________________________________
______________________________________________________
______________________________________________________
______________________________________________________
______________________________________________________
______________________________________________________
______________________________________________________
______________________________________________________
______________________________________________________
______________________________________________________
______________________________________________________
______________________________________________________
______________________________________________________
______________________________________________________
______________________________________________________
______________________________________________________
______________________________________________________
______________________________________________________
______________________________________________________
______________________________________________________
______________________________________________________
______________________________________________________
______________________________________________________
______________________________________________________
15
Page 16
CBRD30CP3 & BOWRD30CP
©2008 BSA Optics, Inc.
Ft. Lauderdale, FL 33314 USA
RD120508 • CBRD-BOWRD30 MANUAL04.indd
Made in China - Printed in China
bsaoptics.com
 Loading...