

Page 1
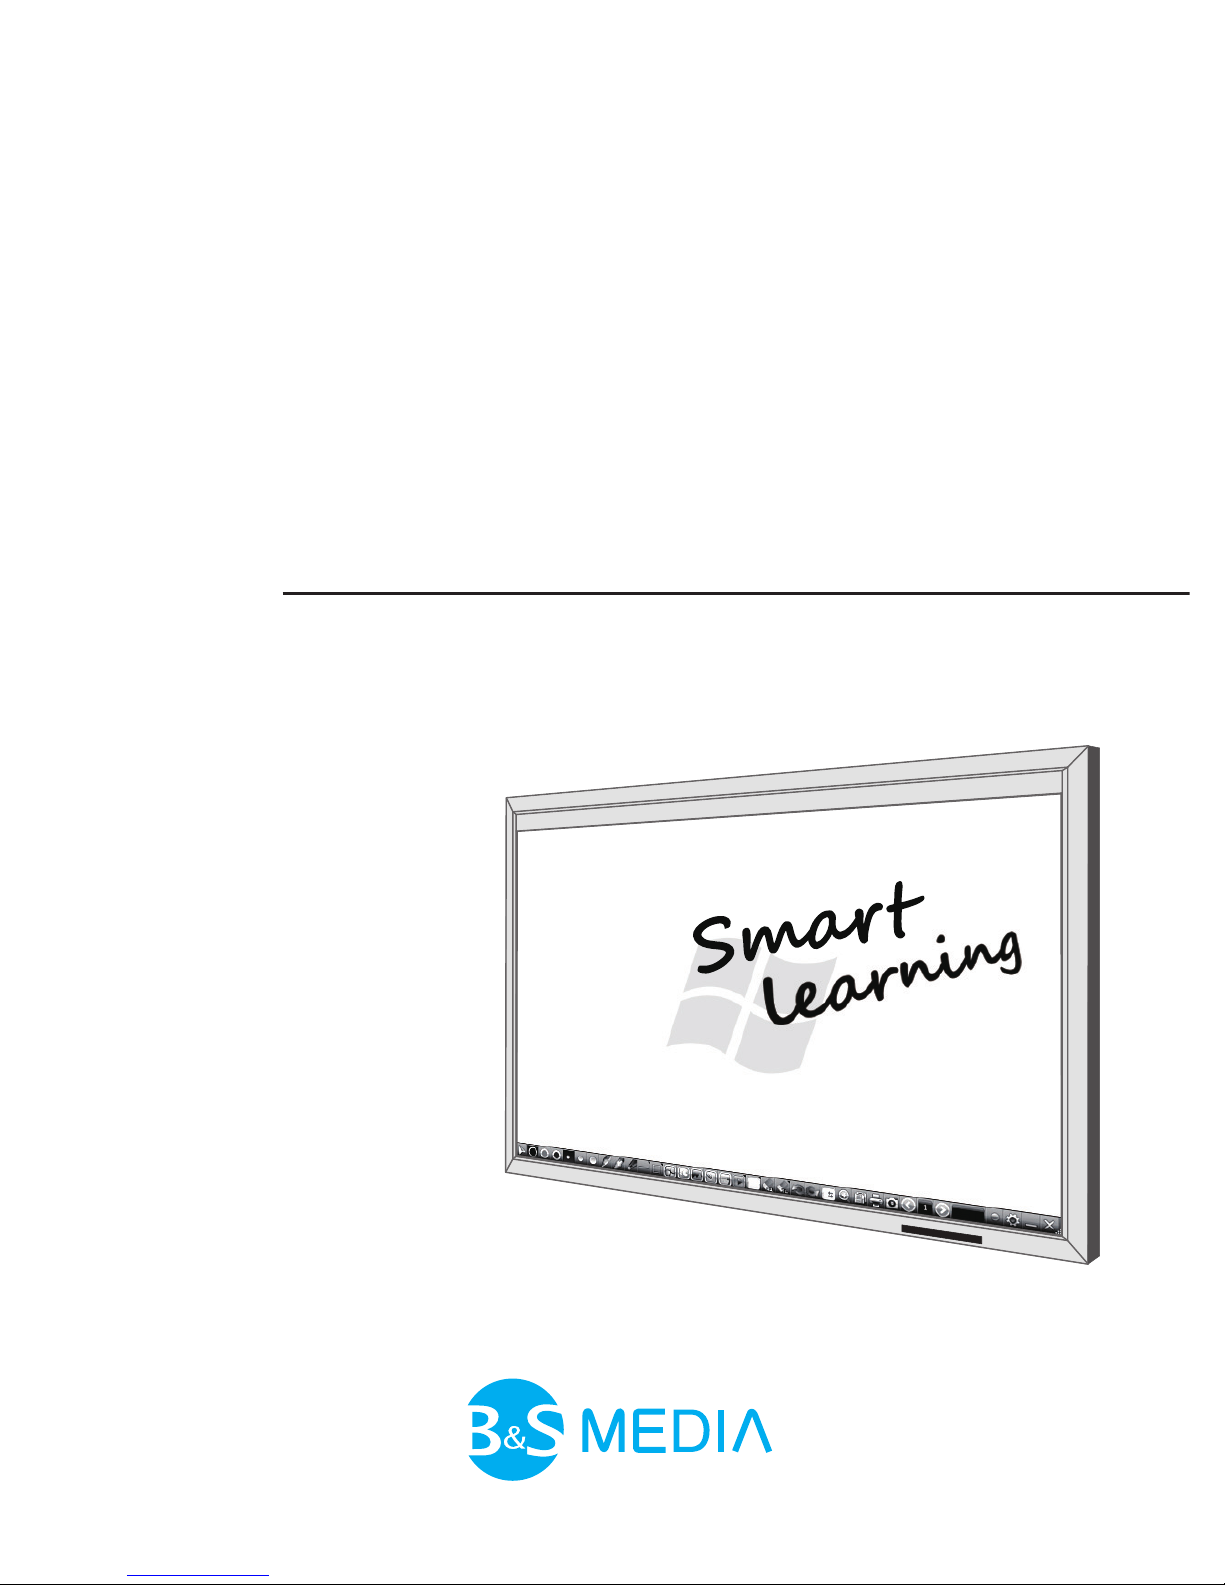
LED Interactive Display
e-VISION 70/80 LED
User’s Manual
Page 2

Copyright ( ) 2012 B&S MEDIA Co.,Ltd. All rights reserved.
#703 JnK Digital Tower, 111, Digitalro-26gil, Guro-gu, Seoul, Korea
B&S MEDIA Co., Ltd.
Technical Support Center : +82-2-588-3323
Fax : +82-2-588-3659
www.bnsmedia.com
●
●
●
LED Interactive Display
e-VISION 70/80 LED
Page 3

www.bnsmedia.com
03
Contents
1. Before Use
1.1 Safety Instructions
1.2 Features
1.3 Package Components
1.4 Shape of Product
1.5 Name of Each Component
1.6 Connection
1.7 Remote Controller
2. How to Use
2.1 How to Use Product
2.2 Picture Adjustment
2.3 Sound Adjustment
2.4 Time / PC Screen / Initialization
3. Additional Instructions
3.1 Fault Diagnosis before A/S
3.2 Customer Support & A/S
04
17
27
Page 4
1. Before Use
www.bnsmedia.com
04
1.1 Safety Instructions
LED Interactive Display
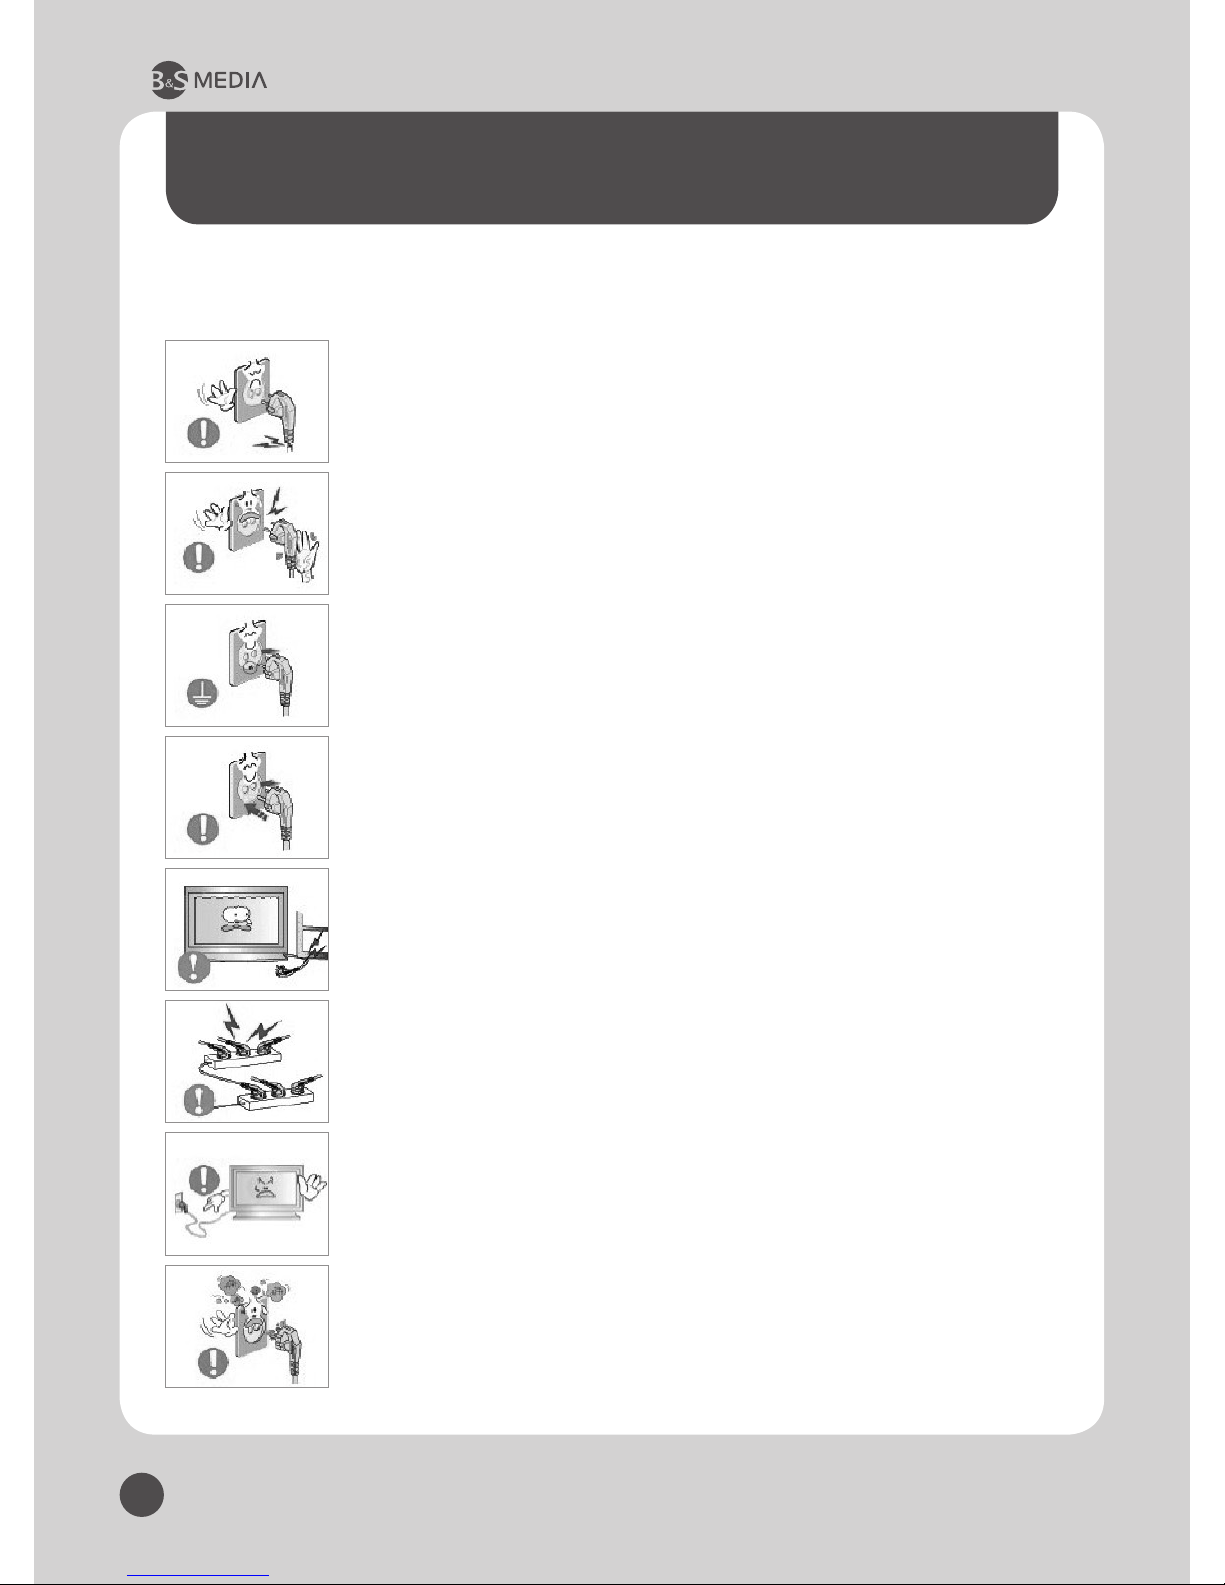
Do not use a damaged or loose plug.
- This may cause electric shock or re.
Do not pull the plug out by the wire nor touch the
plug with wet hands.
- This may cause electric shock or re.
Use only a properly grounded plug and receptacle.
- An improper ground may cause electric shock or
equipment damage.
Insert the power plug rmly so that it does not come loose.
- A bad connection may cause re.
Do not excessively bend the plug and wire nor place heavy
objects upon them, which could cause damage.
- This may cause electric shock or re.
Do not connect too many extension cords or plugs to one outlet.
- This may cause re.
Do not disconnectthe power cord while using this product.
- A surge may be caused by the separation and may damage
this product
Do not use the power cord when the connector or plug is dusty.
- If the connector or plug of the power cord is dusty,
clean it with a dry cloth.
- Using the power cord with a dusty plug or connector may cause
electric shock or re.
Page 5
e-VISION 70/80 LED USER’S MANUAL
www.bnsmedia.com
05
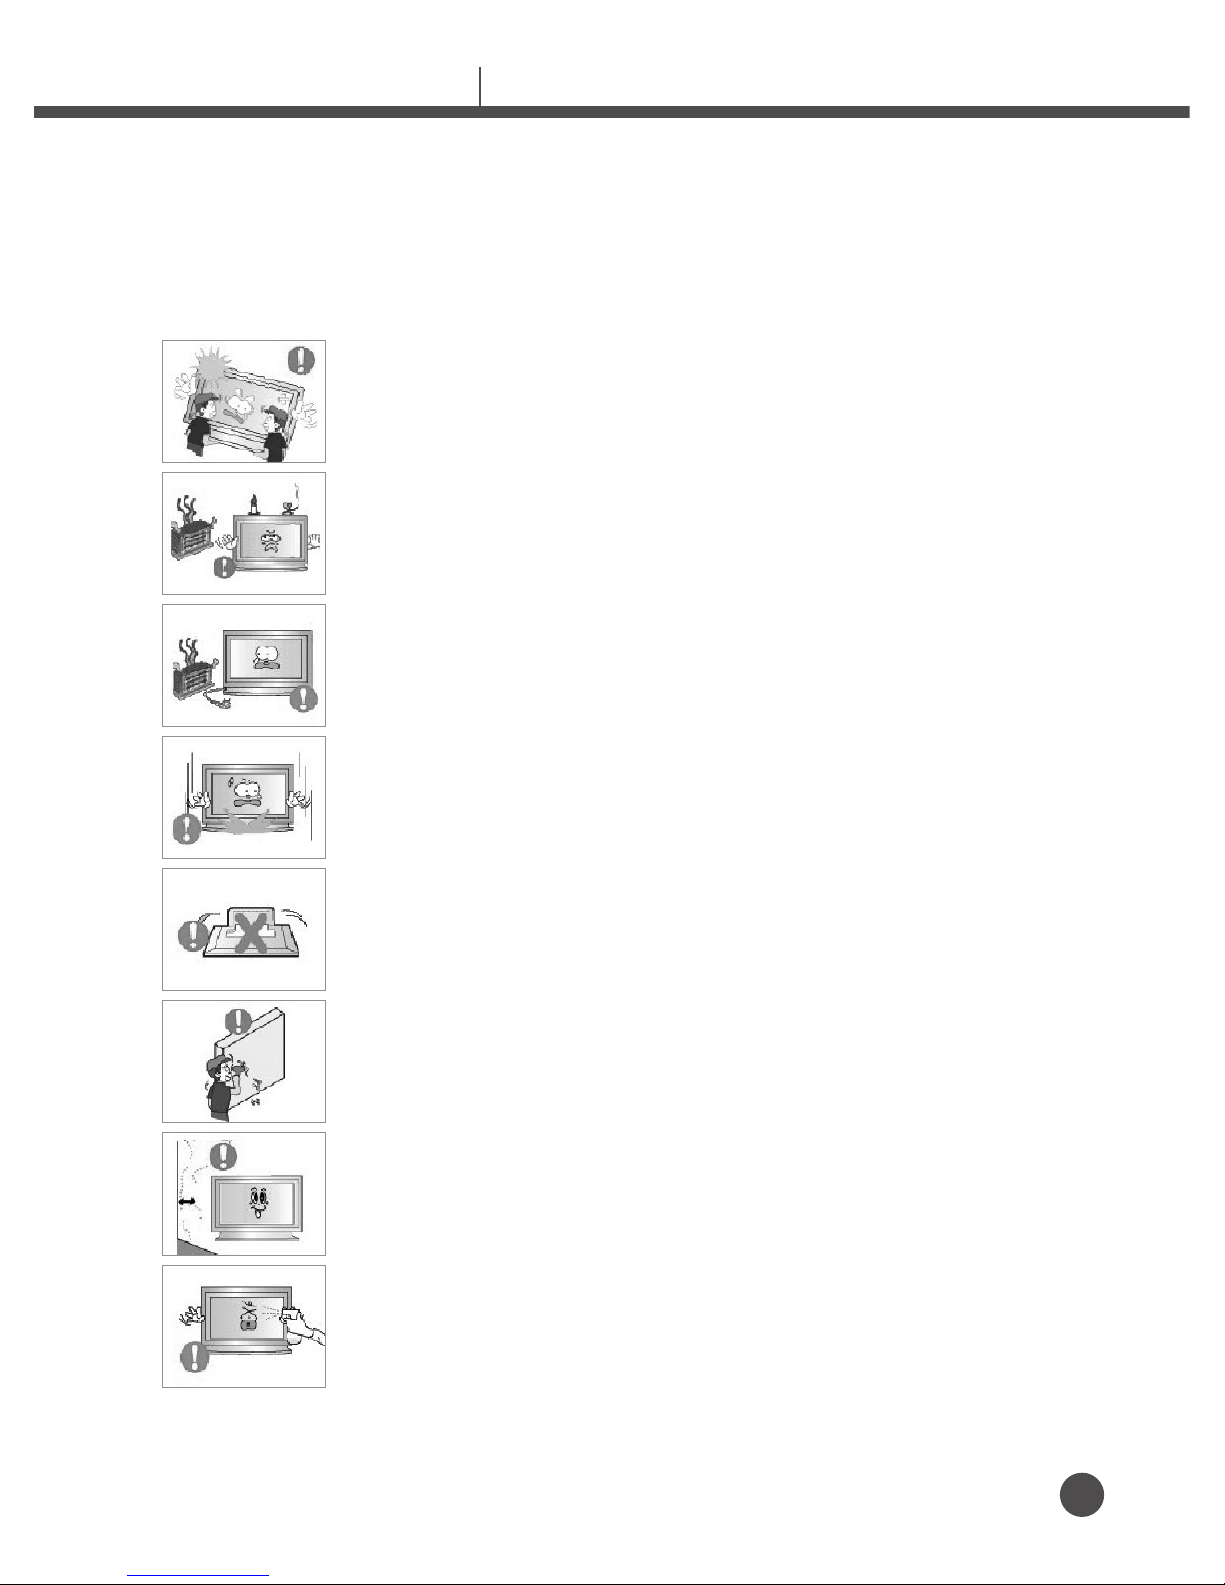
Do not drop this product when moving it.
- This may cause damage to the product or the person carrying it.
Keep any ammable objects such as candles, insecticides or
cigarettes away from the product.
- Otherwise, this may cause re.
Keep any heating devices away from the power cable.
- A melted coating may cause electric shock or re.
Put down this product carefully.
- Failing to do so may damage this product
Do not place this product face down.
- This may damage surface of this product.
The installation of the bracket must be done by a qualied professional.
- Installing the bracket by unqualied personnel may result in injury.
- Always use the mounting device specied in the owner’s manual.
When installing the product, make sure to keep it away from the wall
(more than 10 cm / 4 inches) for ventilation purposes.
- Poor ventilation may cause an increase in the internal temperature of the
product, resulting in a shortened component life and degraded performance.
Do not spray water or detergent directly onto this product.
This may cause damage, electric shock or re.
Page 6
www.bnsmedia.com
06
LED Interactive Display
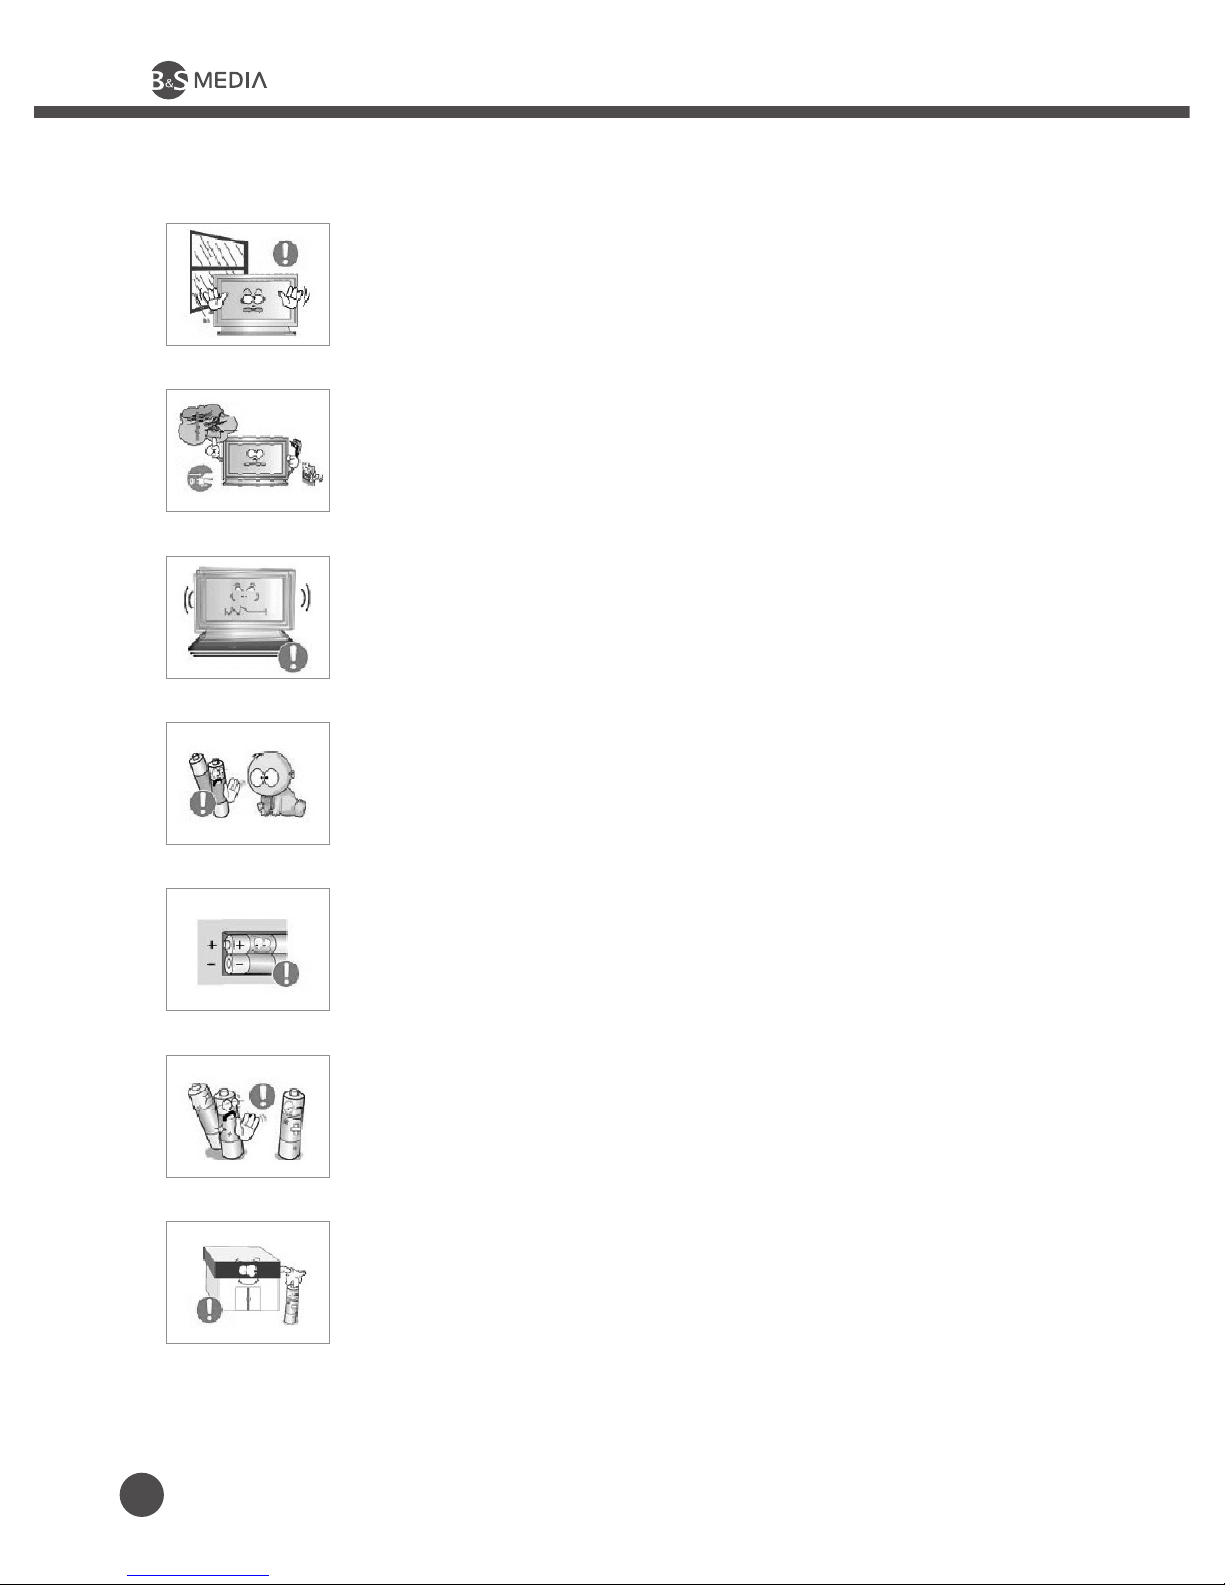
Keep the product away from places exposed to oil, smoke or
Moisture do not install inside a vehicle.
- This may cause a malfunction, electric shock or re.
- In particular, avoid operating this product near water or
outdoors Where this product could be exposed to snow or rain.
Disconnect the plug from the outlet during storms or lightning or
if it is not used for a long period of time.
- Failure to do so may cause electric shock or re.
Do not install the product on an unstable, uneven surtace or a
location prone to vibrations.
-
Dropping the product may cause damage to the product or the person carrying it.
Using the product in a location prone to vibrations mayshorten
the lifetime of the product or may cause the product to catch re.
When removing batteries from the remote control, be careful that
they are not swallowed by children. keep the batteries out of
children’s reach.
- If the batteries are swallowed, see a doctor immediately.
When replacing batteries, place the batteries in the correct +/polarity position as indicated on the battery holder.
- The incorrect polarity may cause a battery to break or leak and
Cause re, injury, or contamination (damage).
Use only specied standard batteries. Do not use new
and used batteries together.
- This may cause a battery to break or leak and may cause
re, injury, or contamination (damage).
The batteries (and rechargeable batteries) is not ordinary refuse
and must be returned for recycling purposes.
The customer is responsible for returning the used or rechargeable
batteries for recycling purposes as the consumer.
- The customer can return used or rechargeable batteries to a nearby
Public recycling center or to a store selling the same type of
the battery or rechargeable battery.
Page 7
www.bnsmedia.com
07
e-VISION 70/80 LED USER’S MANUAL
Important Safety Instructions
1. Read these instructions.
2. Keep these instructions.
3. Heed all warnings.
4. Follow all instructions.
5. Do not use this apparatus near water.
6. Clean only with dry cloth.
7. Do not block any ventilation openings. Install in accordance with the manufacturer’s instructions.
8. Do not install near any heat sources such as radiators, heat registers, stoves, or other
apparatus (including ampliers) that produce heat.
9. Do not defeat the safety purpose of the polarized or grounding-type plug. A polarized plug has
two blades with one wider than the other. A grounding type plug has two blades and a third
grounding prong. The wide blade or the third prong are provided for your safety. If the provided
plug does not t into your outlet, consult an electrician for replacement of the obsolete outlet.
10. Protect the power cord from being walked on or pinched particularly at plugs, convenience
receptacles, and the point where they exit from the apparatus.
11. Only use attachments/accessories specied by the manufacturer.
12. Use only with the cart, stand, tripod, bracket, or table specied by the manufacturer,
or sold with the apparatus. When a cart is used, use caution when moving the cart/
apparatus combination to avoid injury from tip-over.
13. Unplug this apparatus during lightning storms or when unused for long periods of time.
14. Refer all servicing to qualied service personnel. Servicing is required when the apparatus has
been damaged in any way, such as power-supply cord or plug is damaged, liquid has been
spilled or objects have fallen into the apparatus, the apparatus has been exposed to rain or
moisture, does not operate normally, or has been dropped.
15. Do not expose this apparatus to dripping or splashing and ensure that no objects
lled with liquids, such as vases, are placed on the apparatus.
16. To completely disconnect this apparatus from the AC Mains, disconnect the power
supply cord plug from the AC receptacle.
17. The mains plug of the power supply cord shall remain readily operable.
18. An apparatus with CLASS I construction shall be connected to a Mains socket outlet
with a protective earthing connection.
Note: Prolonged use of headphones at a high volume may cause health damage on your ears.
The lightning ash with arrowhead symbol within an equilateral triangle, is intended to
alert the user to the presence of uninsulated “dangerous voltage” within the product’s enclosure that may be of sufcient magnitude to constitute a risk of electric shock to persons.
The exclamation point within an equilateral triangle is intended to alert the user
to the presence of important operating and maintenance (servicing) instructions
in the literature accompanying the product.
Page 8
www.bnsmedia.com
08
1.2 Features
LED Interactive Display
Enjoy like in a Theater with High-denition Video & stereophonic sound!
1. Adopted Cutting edge LED-LCD Display Panel
Enjoy video by easy connection with PC!
2. Recognizes automatically if connecting with PC as supporting
VESA Plug & Play
3. Enjoy audio & video simultaneously by connecting with PC Audio
Signal Cable with is Extra product.
4. Change screen size variously depending on situation.
5. Supports perfect digital audio and video by adopting HDMI.
6. Power Consumption decreased by realizing Sleep Mode for Energy
Conservation
Page 9
www.bnsmedia.com
09
1.3 Package Components
e-VISION 70/80 LED USER’S MANUAL
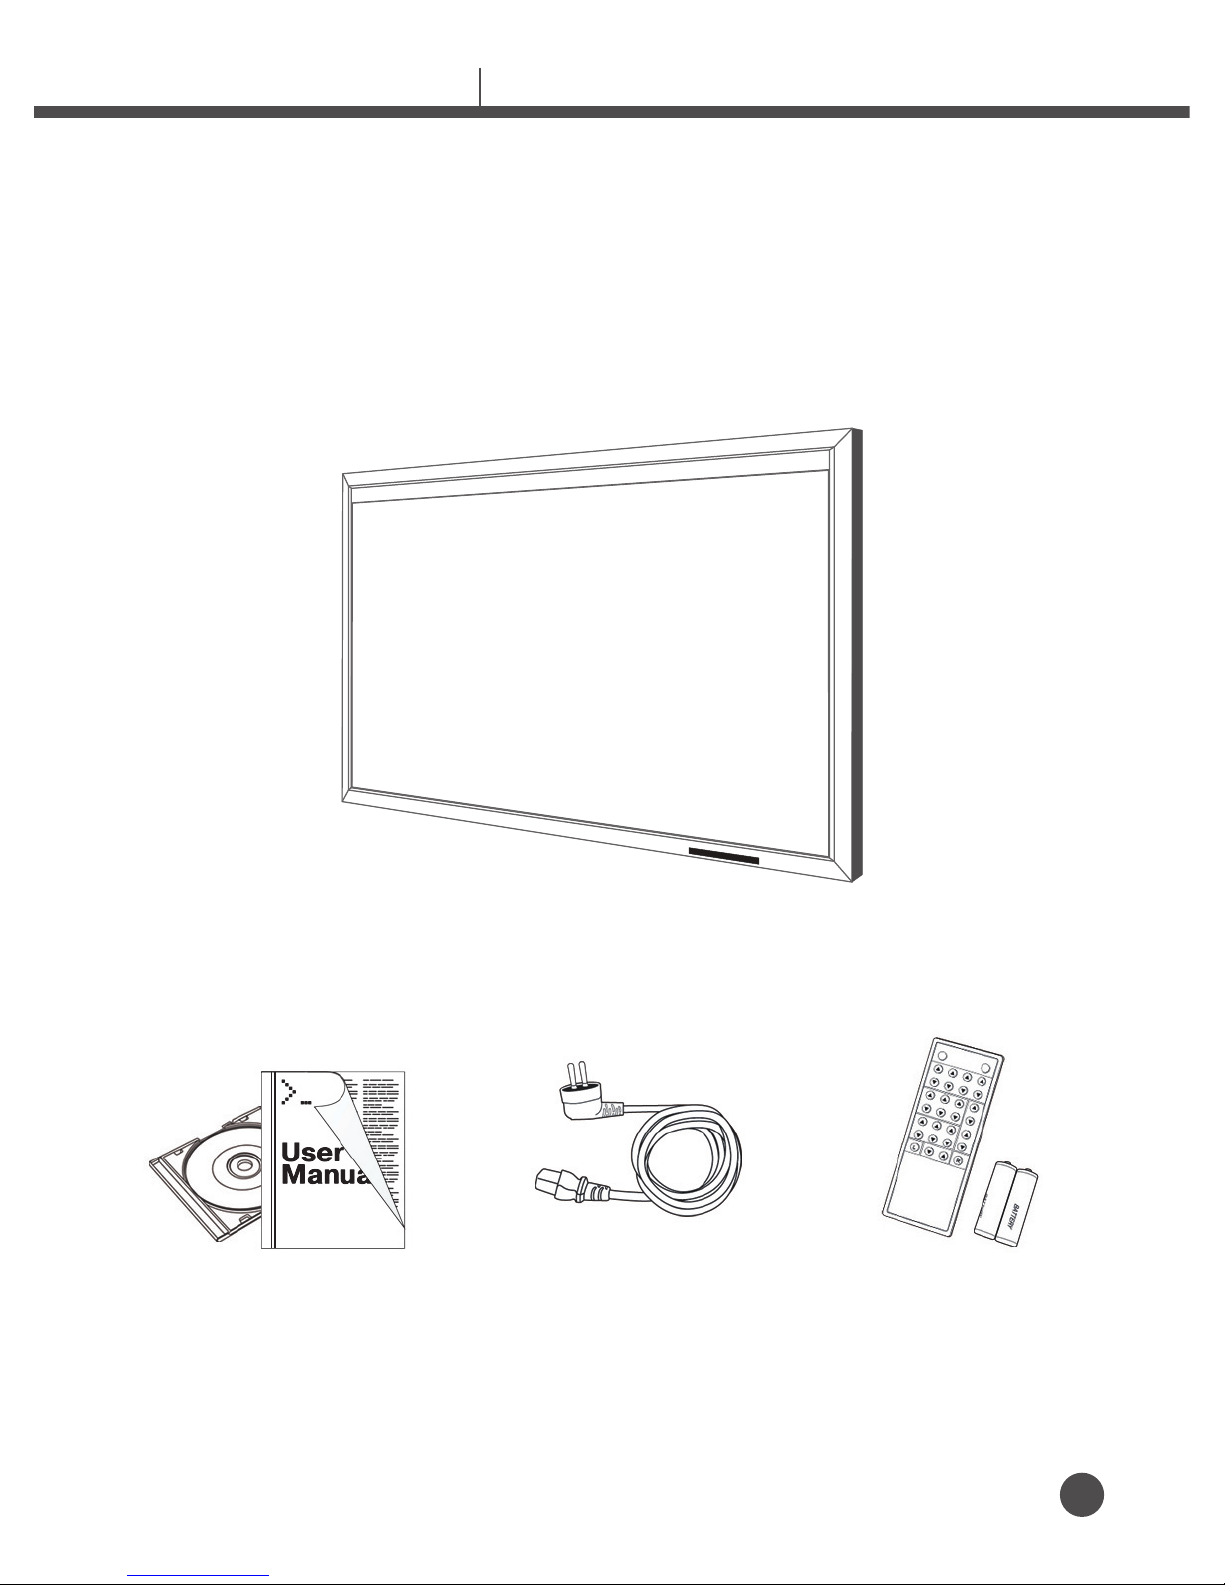
※
The pictures of Package Components are for user’s comprehension and can be
different from real product.
User’s Manual Power Cable Remote Controller,
Battery
Manual
LED Body
Cable Others
Page 10
www.bnsmedia.com
10
LED Interactive Display
1.4 Shape of Product
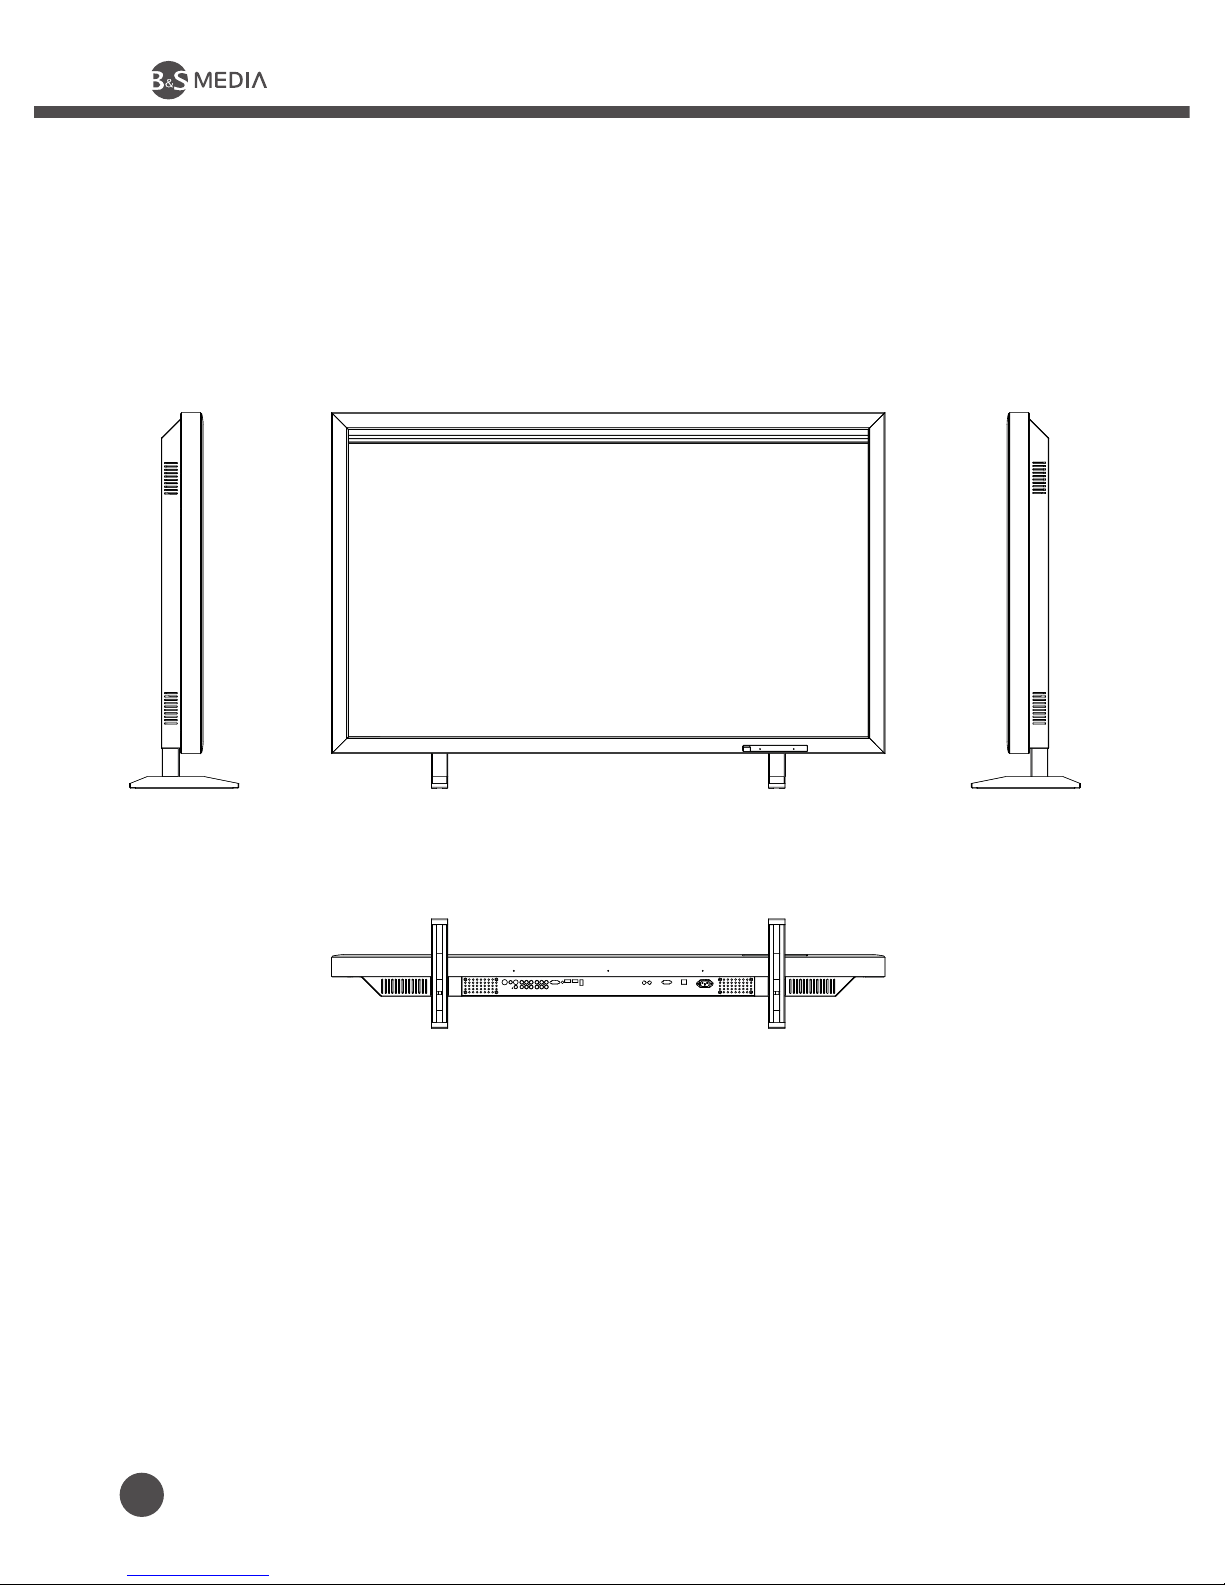
※
Shape of Product can be different from each inch.
Page 11
www.bnsmedia.com
11
e-VISION 70/80 LED USER’S MANUAL
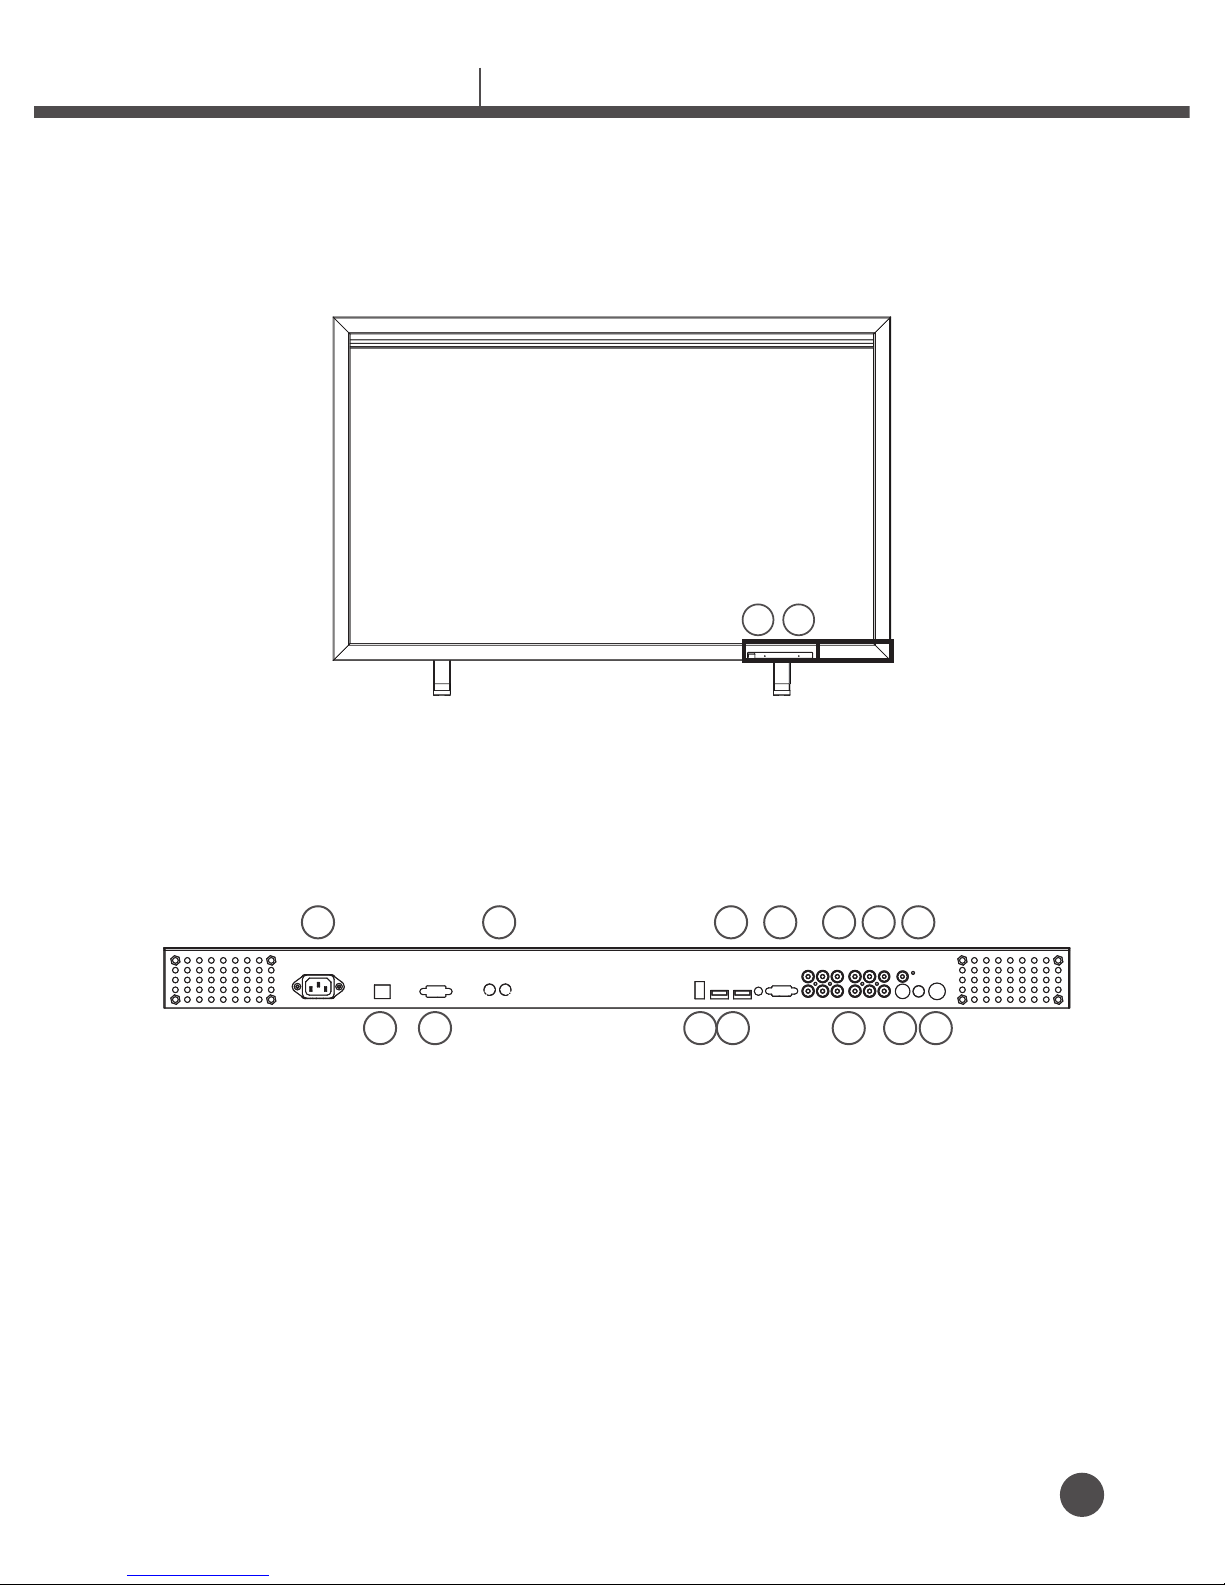
1.5 Name of Each Component
1 4 7 6 89 10
51413 1223 11
A. LED / IR
B. OSD KEY : POWER / MENU / SOURCE / VOL+ / VOL- / CH+ / CH-
BA
1. AC Power Input Port
2. HDMI 2 Input Port
3. HDMI 1 Input Port
4. Audio(Line Audio) Output Port
5. Digital Audio Output (Optical) Port
6. PC Input Port
7. Service Port/pc Audio Input Port
9. Component Input Port
10. Component Audio Input Port
11. AV/ Audio Input Port
12. S-Video Input Port
13. USB JACK(TOUCH)
14. RS232
Page 12
www.bnsmedia.com
12
LED Interactive Display
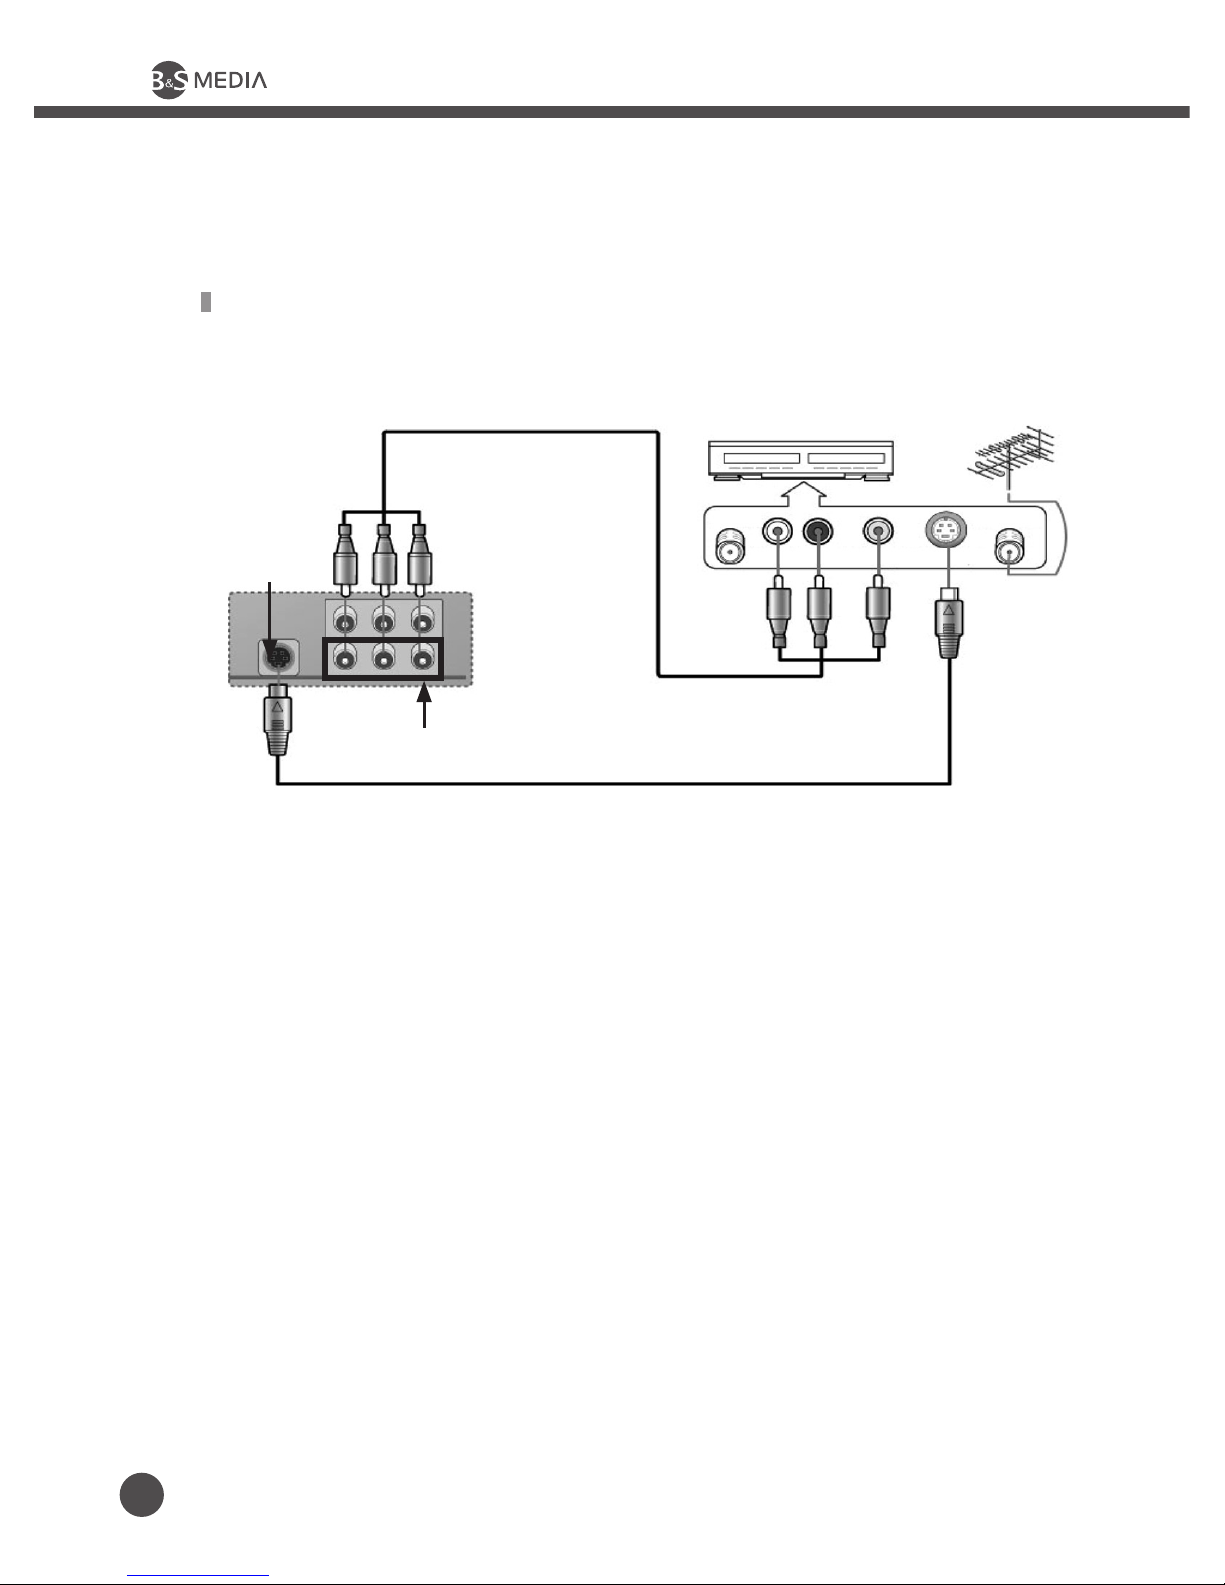
1.6 Connection
Video(Composite) / S-Video Connection
S-Video Input
AV1 (Video/Audio Input)
TV Output
(L)Sound
Output(R)
Video Output S-Video Input
Antenna Input
Video Connection
Connection
1. Connection Guide
1.1 Video (Composite) Cable: In case of Audio/Video (composite) Cable,
be careful of color. (Video – Yellow, Audio – White, Red)
1.2 S-Video Cable: If a VCR you have supports S-Video output, connect
S-Video Input of VCR to S-Video Input of this product. Audio Cable can
be connected in same way. (White, Red)
Watching VCR
1. Turn on this product. Select connected input source by pressing [Source]
button on remote controller
2. Turn on VCR, insert a video tape and press [Play] button.
Page 13
www.bnsmedia.com
13
e-VISION 70/80 LED USER’S MANUAL
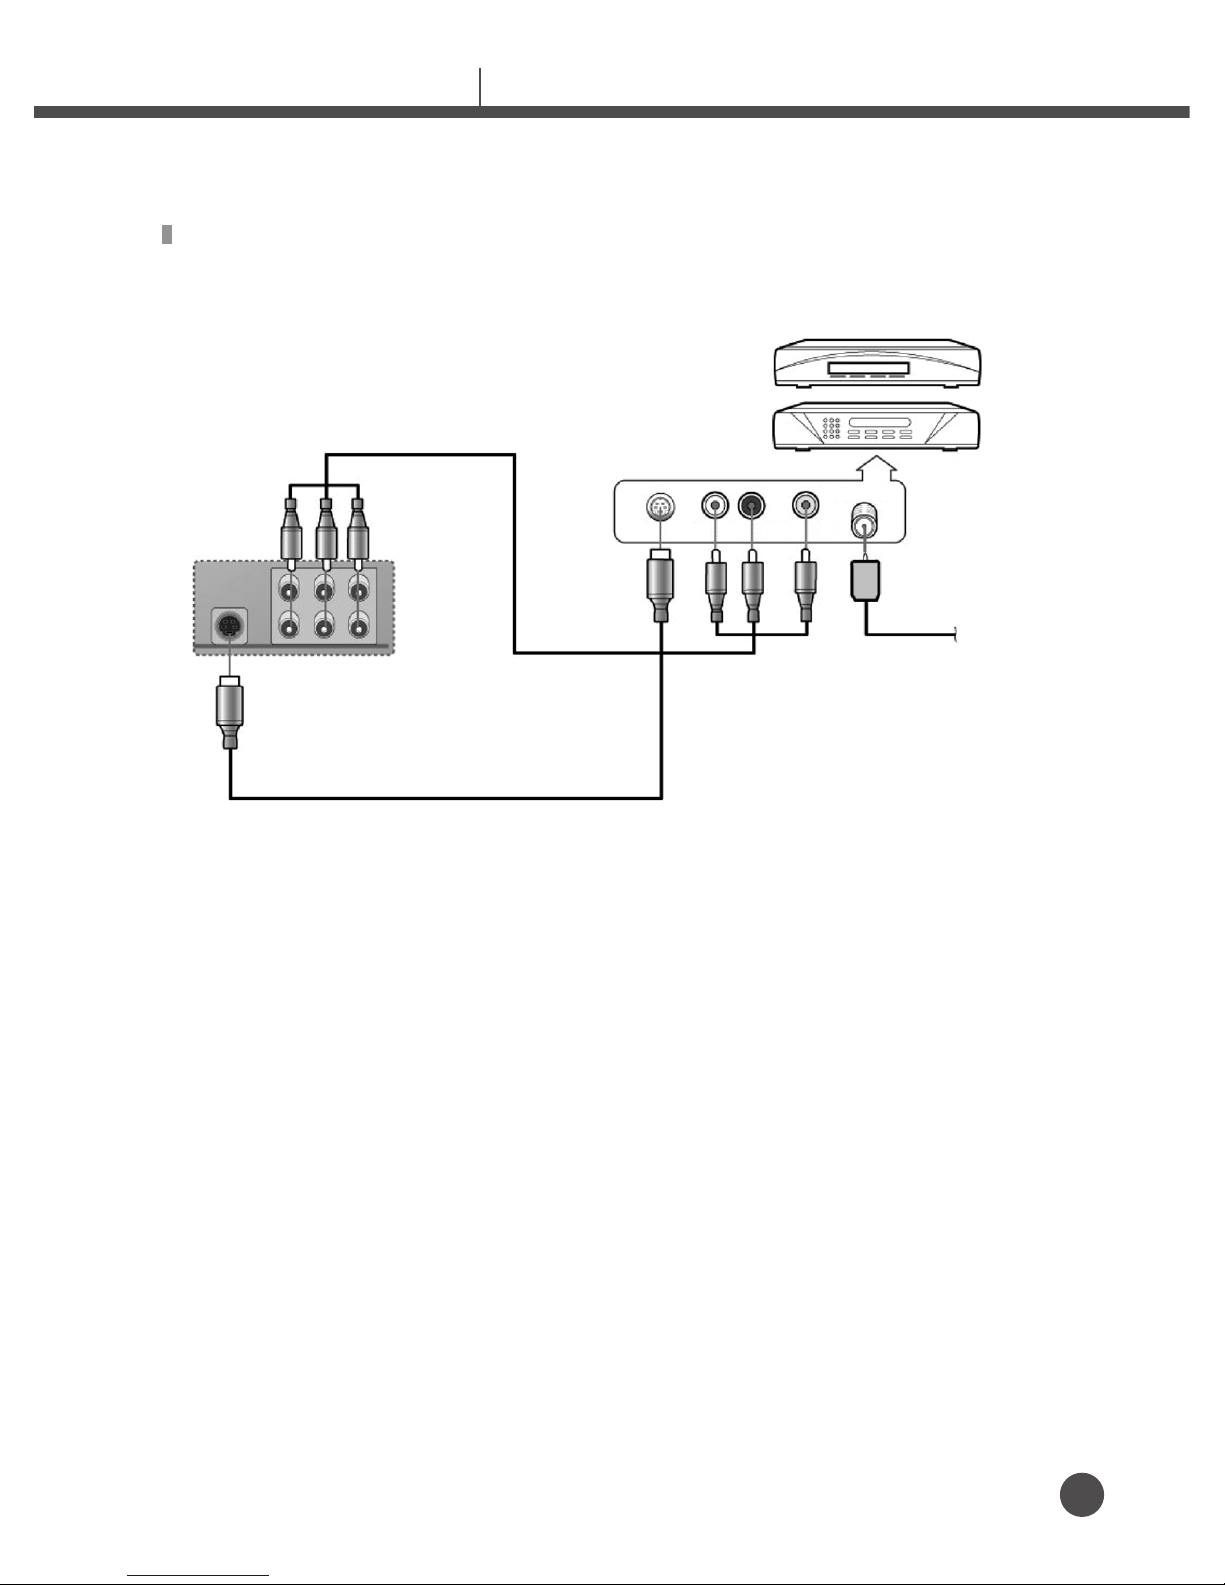
Video(Composite) / S-Video connection
Connecting Cable Receiver or satellite Receiver
Connection
1. Connecting Antenna Cable to Cable Box/Satellite Receiver:
Connect a antenna cable of 75-Ohm to input port of cable box/satellite receiver.
2. Connection Guide
2.1 How to Use Video (A/V) Cable
• Video Connection: Connect Video Input Port of this product to Video Output
Port of Video Cable Box/ Satellite Receiver
Video Cable Output Port is YELLOW..
• Audio Connection: Connect Audio Input Port of this product to Audio Output
Port of Video Cable Box/ Satellite Receiver
Audio Cable Output Ports are WHITE & RED.
2.2 How to Use S-Video Cable (In case that S-Video is supported)
• Video Connection: Connect S-Video Input Port of this product S-Video) to
Video S-Video Output of Cable Box/Satellite Receiver by cable.
• Audio Connection: Connect Audio Input Port of this product to Audio
S-Video Output of Cable Box/Satellite Receiver by cable.
Audio Cable Output Ports are WHITE & RED..
Video (Composite)
S-Video Cable
(L)Sound
Output(R)
Video OutputS-Video
Antenna Input
Page 14
www.bnsmedia.com
14
LED Interactive Display
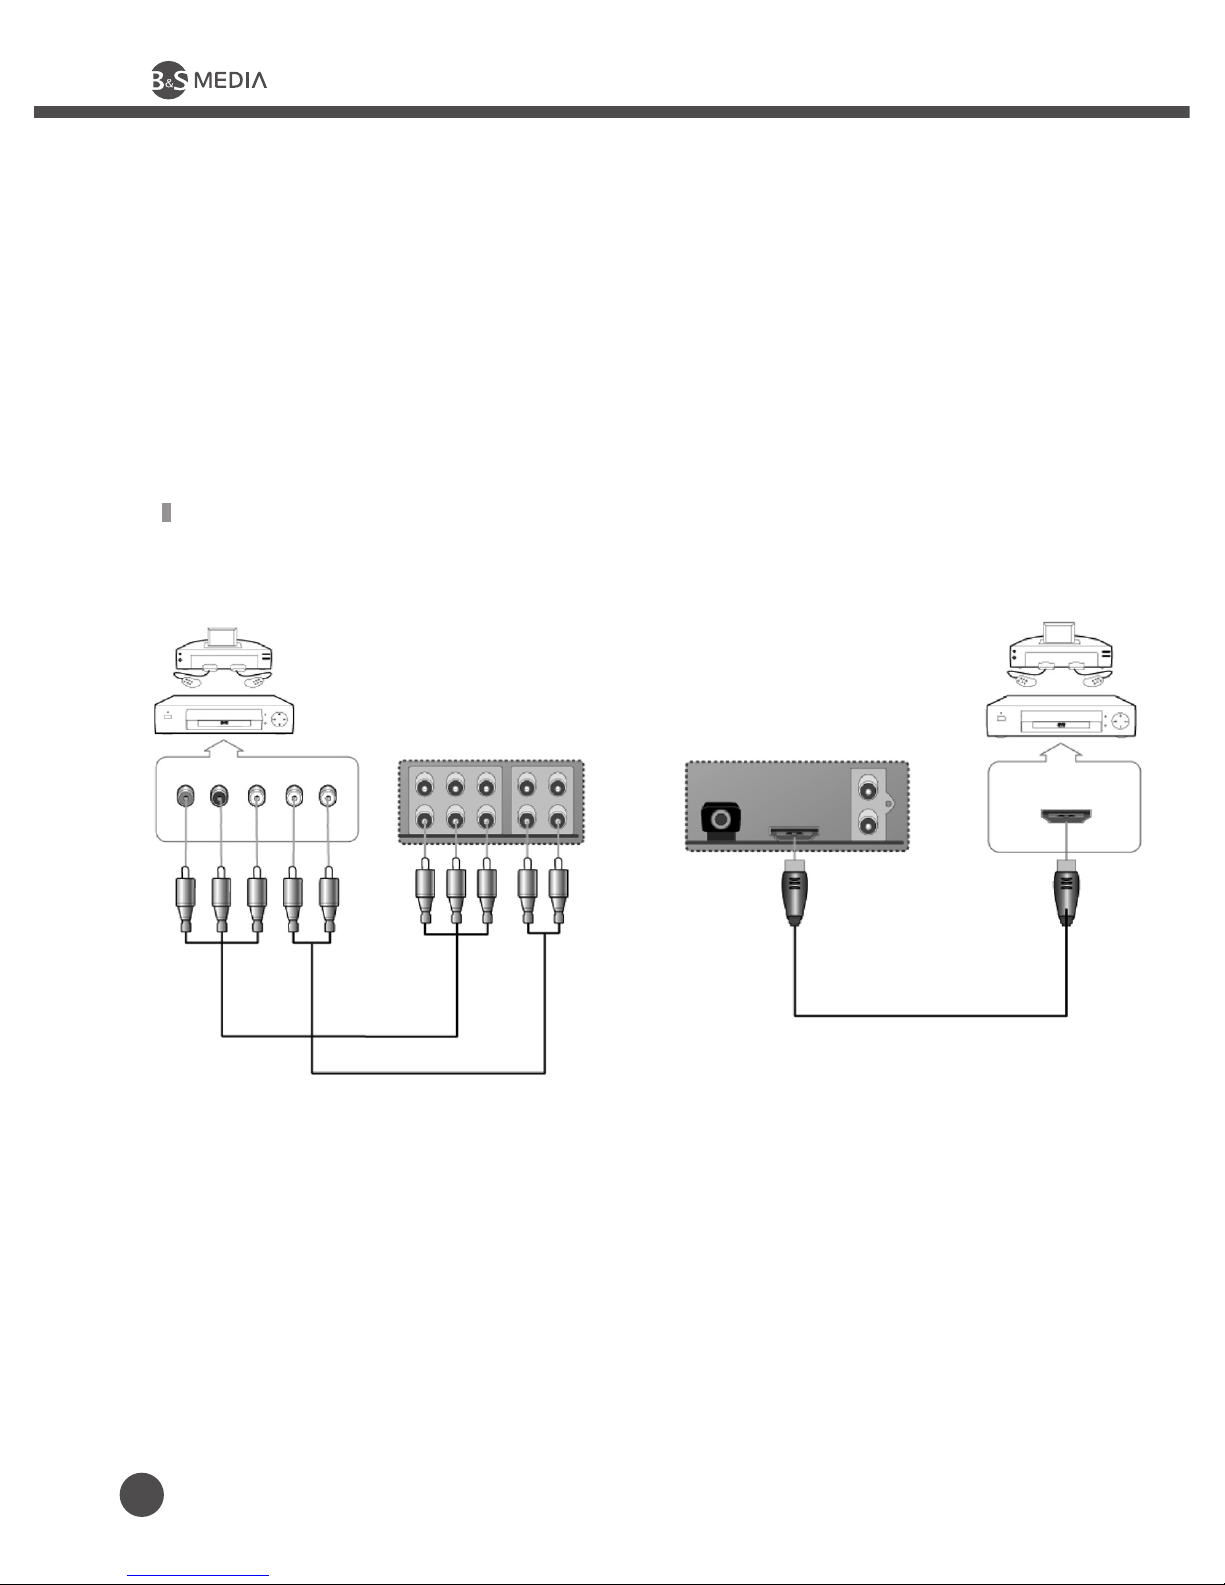
Component HDMI
DVD Connection
Watch Cable /Satellite Broadcasting
1. Turn on this product. Select connected Input Source by pressing Source button
on remote controller.
2. Turn on Cable Box/Satellite Receiver. Select Channel you want to watch.
Component Cable
Sound Cable
Sound Input
YYPbPbPr
Pr L R
Output(R)
Component
Input Port
(L)Sound
HDMI Cable
HDMI Output
Page 15
13
www.bnsmedia.com
15
e-VISION 70/80 LED USER’S MANUAL
Connection
1. Connection Guide
1.1 How to Use Component Cable (Green, Blue and Red)
• Video Connection: Connect Component Input Port of to Component Output
of DVD Player/ Video Machine DVD by this product Component Cable.
Input / Output ports are GREEN, BLUE and RED.
• Audio Connection: Connect audio input port of this product to component
port of DVD player/video game machine by audio cable. Audio cable output
ports are WHITE/RED. Audio ports are usually located on component ports.
* Right connection of audio ports Left/Right is needed for component connection.
If Left/Right are connected wrongly, it might not sound.
1.2 HDMI : There should be HDMI ports on both input & output devices.
HDMI signal consists of audio signal and video signal. There is no need of
additional audio cable connection.
How to Use DVD Player/Video Game Machine
1. Turn on this product. Select Input Source by pressing Source button on remote
controller
2. Turn on DVD Player
Page 16
www.bnsmedia.com
16
LED Interactive Display
1
7
6
15
8
12
2
13
3
4
5
15
9
14
10
11
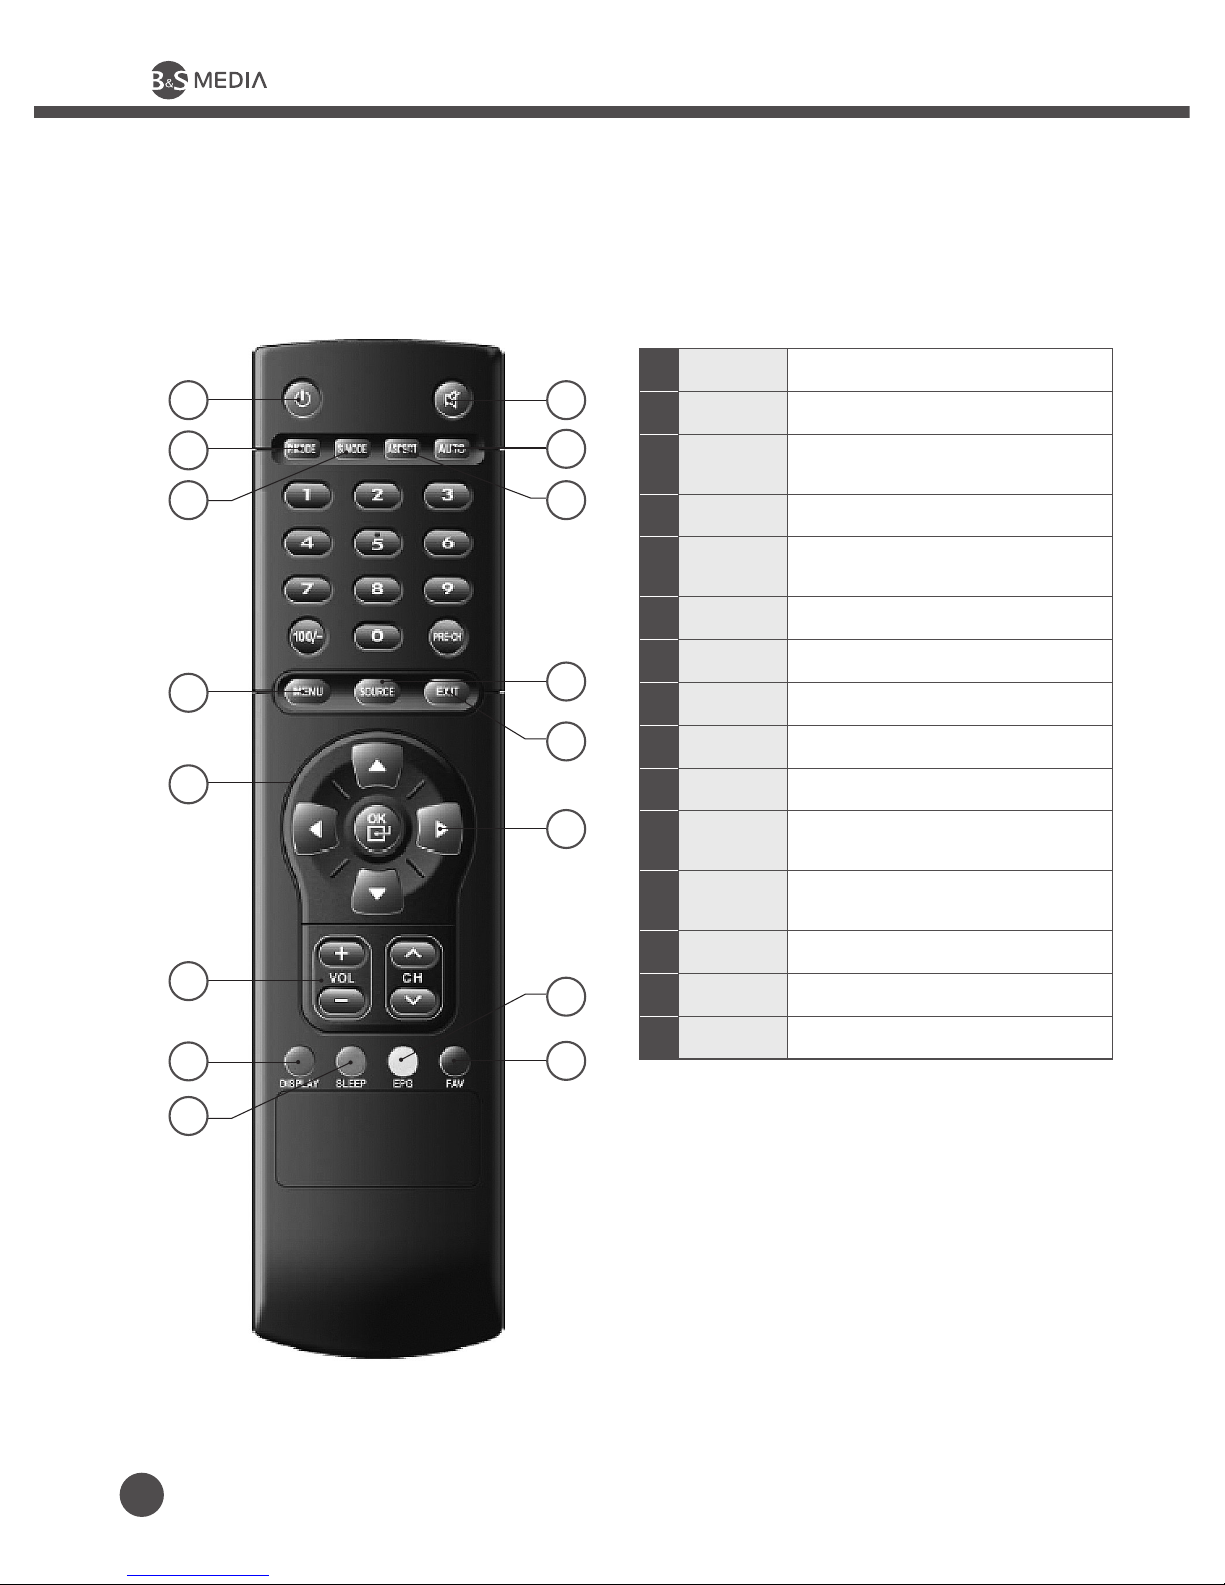
1.7 Remote Controller
1 Power Power On/Off
2 Mute It does not sound temporarily.
3 SOURCE
Select the input source
connected with other products.
4 DISPLAY
5
Direction
Button
Used when move and adjust
on Menu Window.
6 Menu Shows Menu Window.
7 SLEEP Sets up time to be turned off.
8 VOL Adjusts volume of sound.
9 EXIT Removes directly Menu window
10 AUTO Adjusts automatically on PC
11 S.MODE
Please refer to audio
adjustment page
12 P.MODE
Please refer to picture
adjustment page
13 ASPECT Adjusts screen size
14 EPG No support
15 FAV No support
Page 17
2. How to Use
2.1 How to Use Product
www.bnsmedia.com
17
e-VISION 70/80 LED USER’S MANUAL
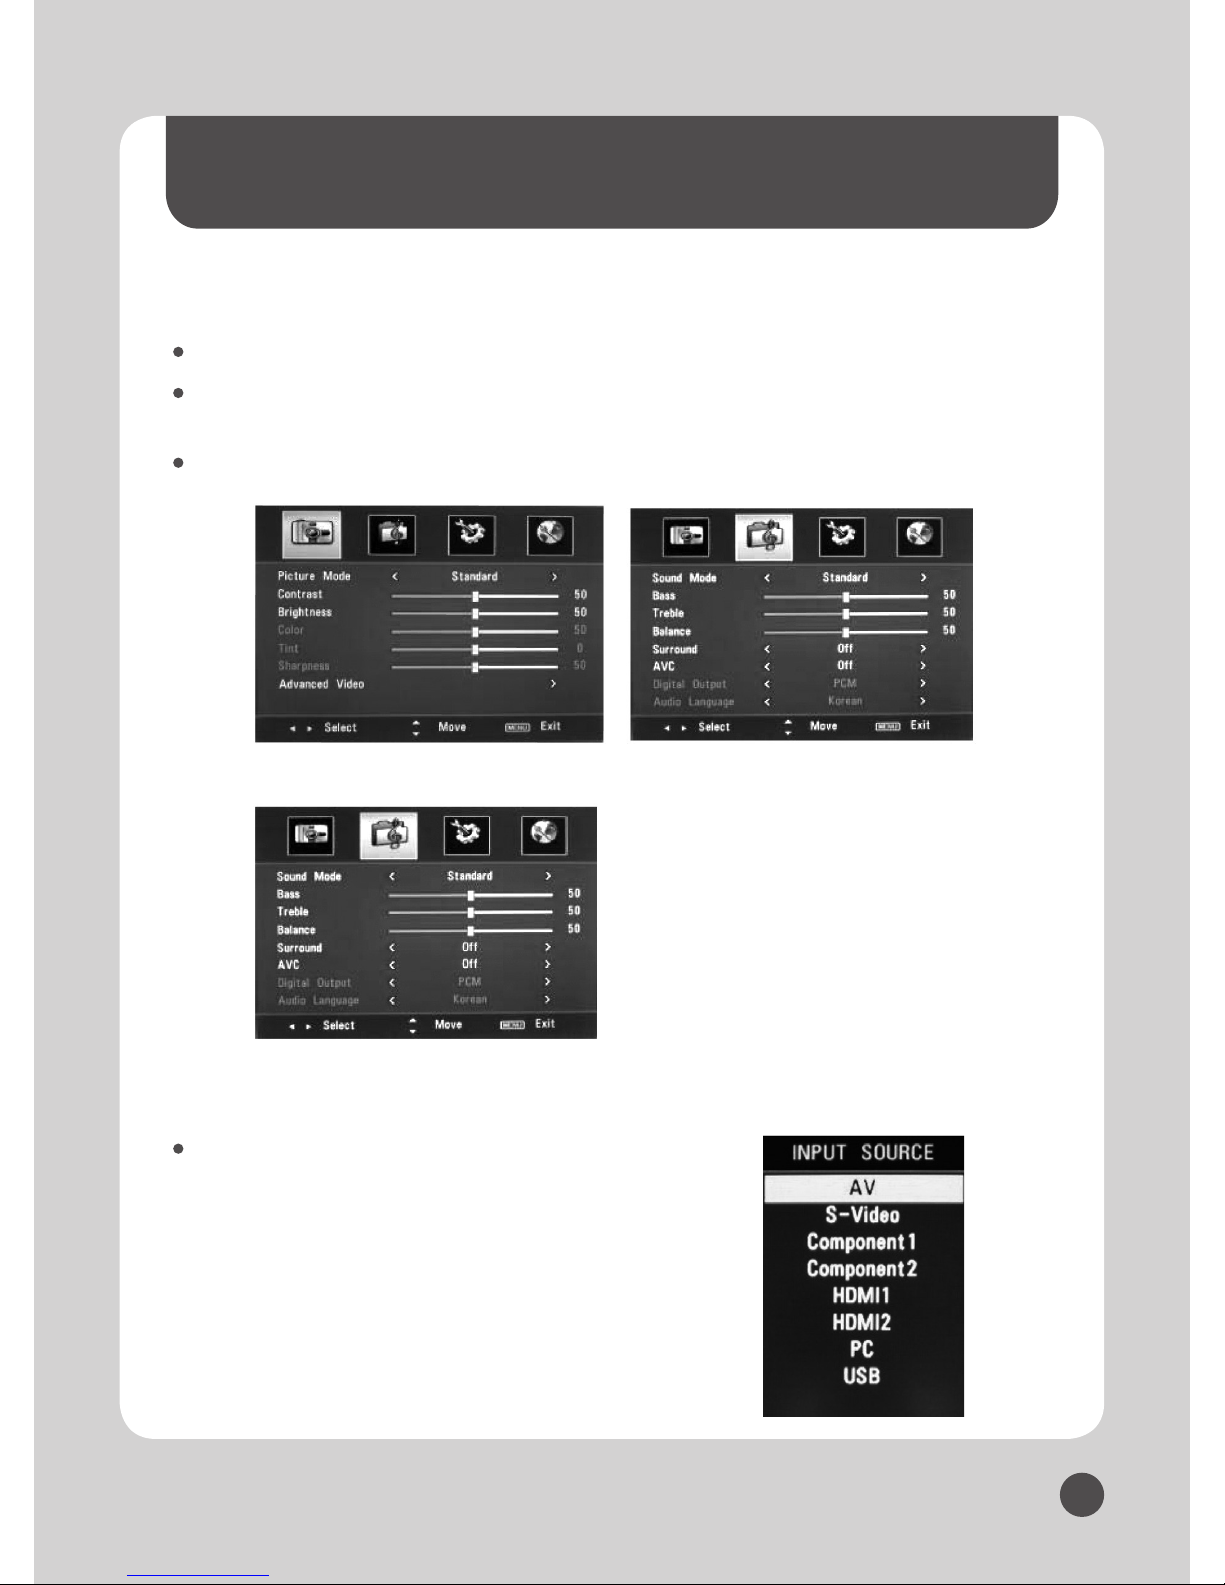
Press Menu Button.
Select screen to control with Direction Button(
◀.▶
) and Select Direction
B utton (
◀.▶
) item to adjust
Exit by pressing Menu Button
If you change Input Source, press Input Source
and select source after moving(
▲.▼
).
Video Settings Menu
Time/Caption/PVR/PC Menu
Audio Settings Menu
Page 18
www.bnsmedia.com
18
2.2 Picture Adjustment
LED Interactive Display
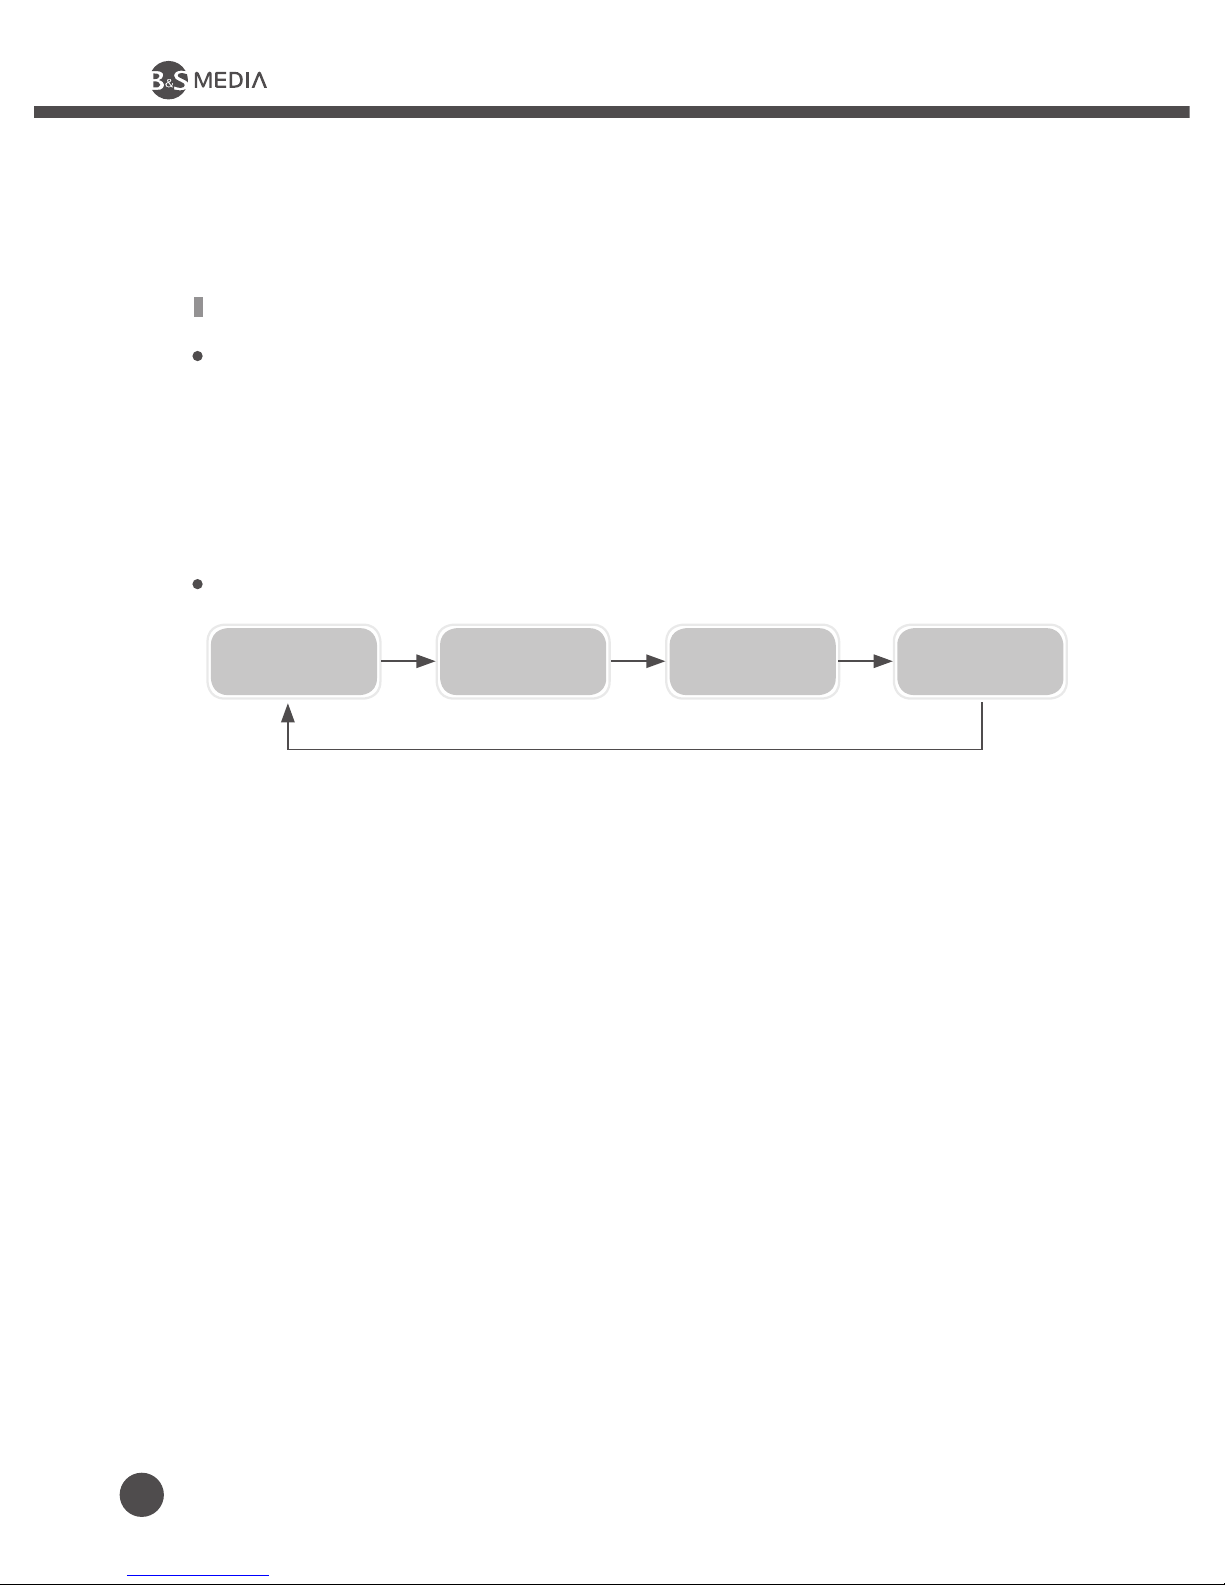
VIVID CUSTOMTHEATERSTANDARD
How to Control Picture Mode
Select picture mode congured automatically or select picture status you
want with picture mode button
1. Press Menu Button
2. Select Picture Control Mode and Item with Direction Button (
◀.▶
)
It changes as below whenever pressing.
3. Exit by pressing Menu Button
Page 19
www.bnsmedia.com
19
e-VISION 70/80 LED USER’S MANUAL
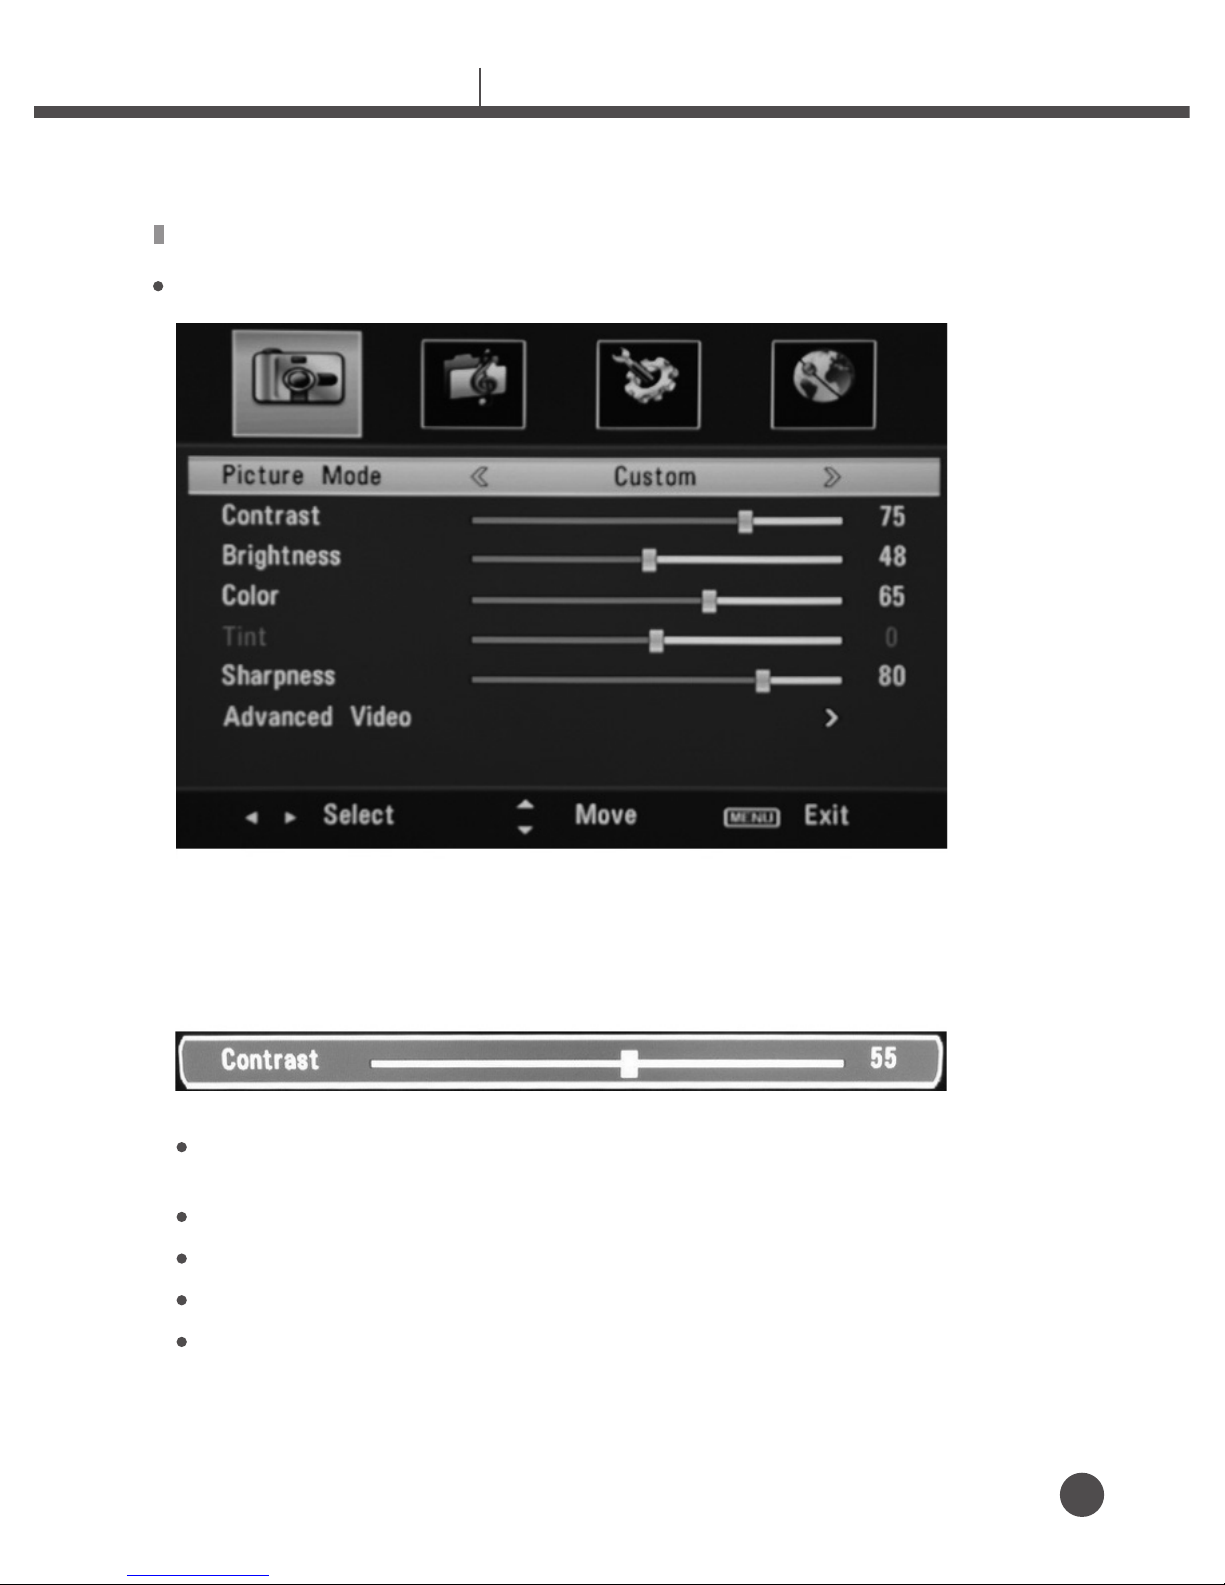
How to Control Picture Directly
This is function for user to control picture directly.
Contrast: Adjusts difference between brightness and darkness of
object and background.
Brightness: Adjusts between brightness and darkness of whole screen.
Color: Adjusts color between vivid or tender.
Tint: Adjusts tint of object.
Sharpness: Adjusts outline of object.
1. Press Direction Button (▶) after selecting 【Brightness】 with Direction Button (▲.▼)
2. Press OK button after adjusting with Direction Button (
◀.▶
)
Page 20
www.bnsmedia.com
20
LED Interactive Display
2.2 Picture Adjustment (Advanced Video)
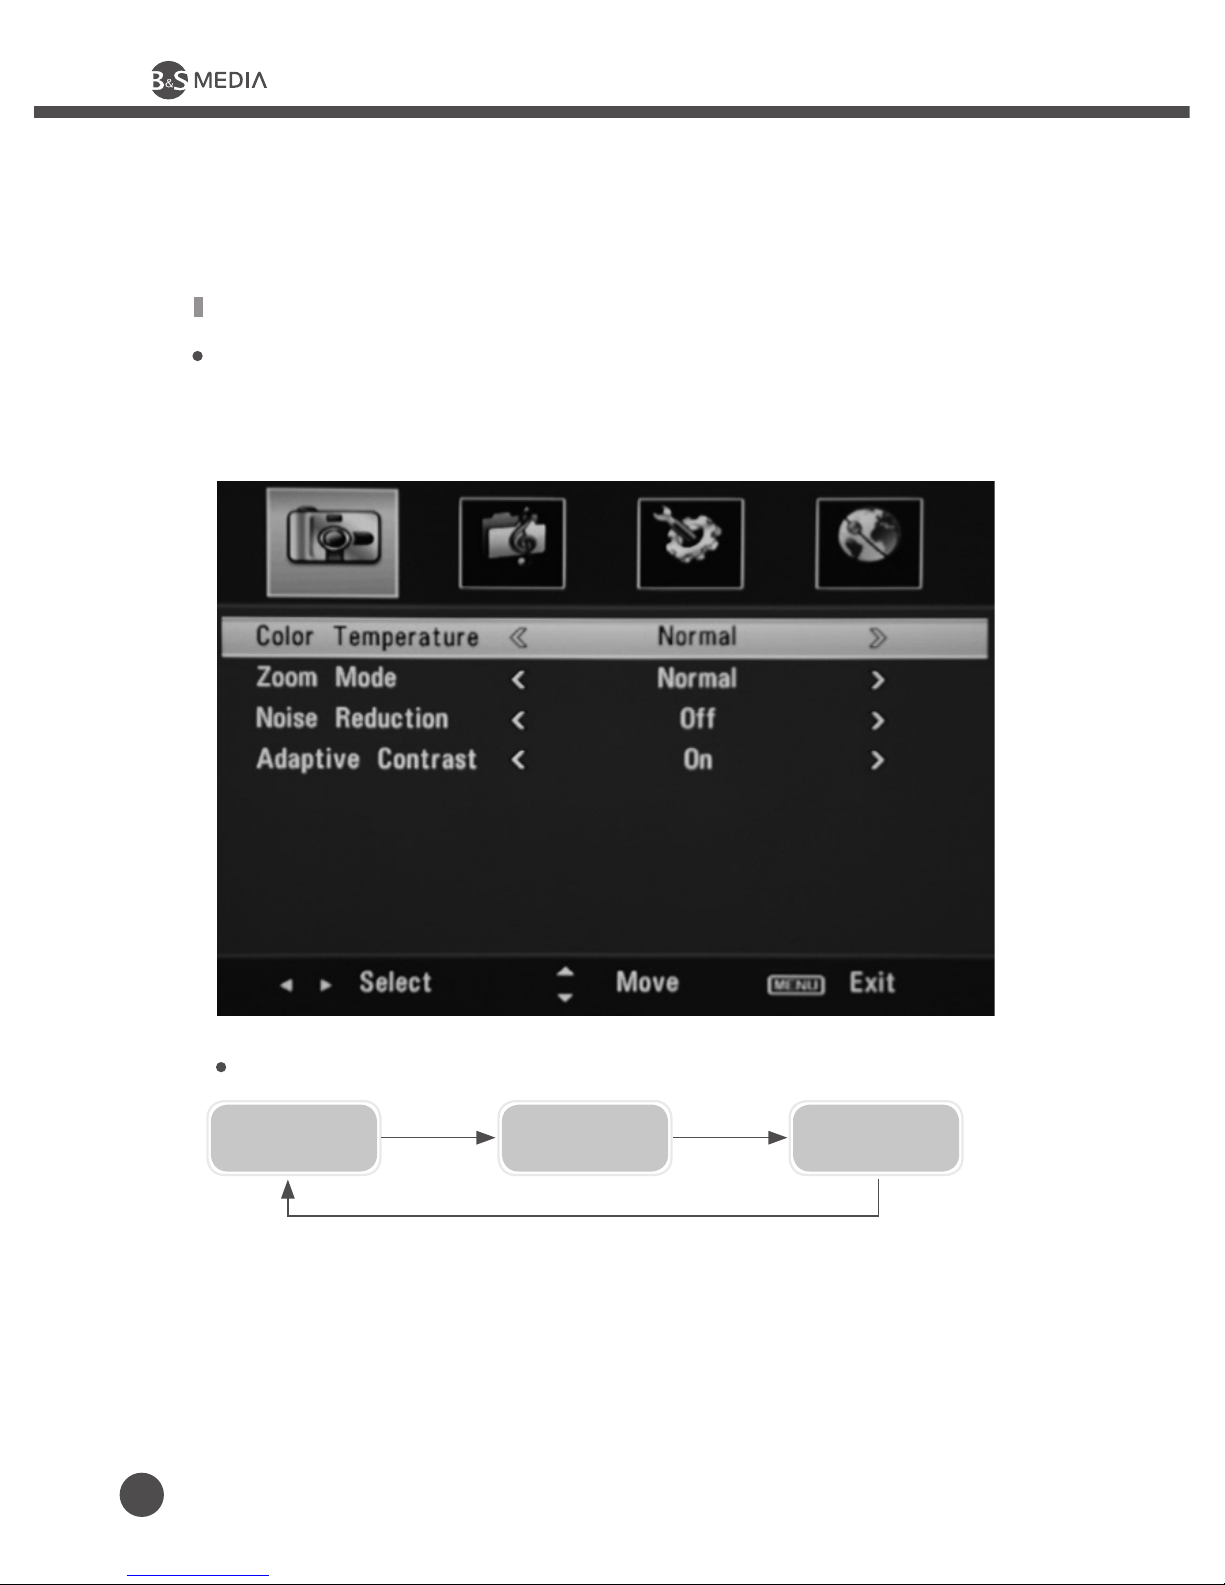
How to adjust Background Tint
It is possible to adjusts color temperature in order of Cool Normal Warm.
1. Press Direction Button (◀.▶) and select Background Tint you want after
Selecting 【Color Temperature】 with Direction Button (▲.▼)
It changes like below.
Cool: This results in a blue tone.
Normal: This is standard color setting.
Warm: This results in a reddish tone.
2. Exit by pressing Menu Button.
WARM NORMALCOOL
Page 21
www.bnsmedia.com
21
e-VISION 70/80 LED USER’S MANUAL
2.2 Picture Adjustment
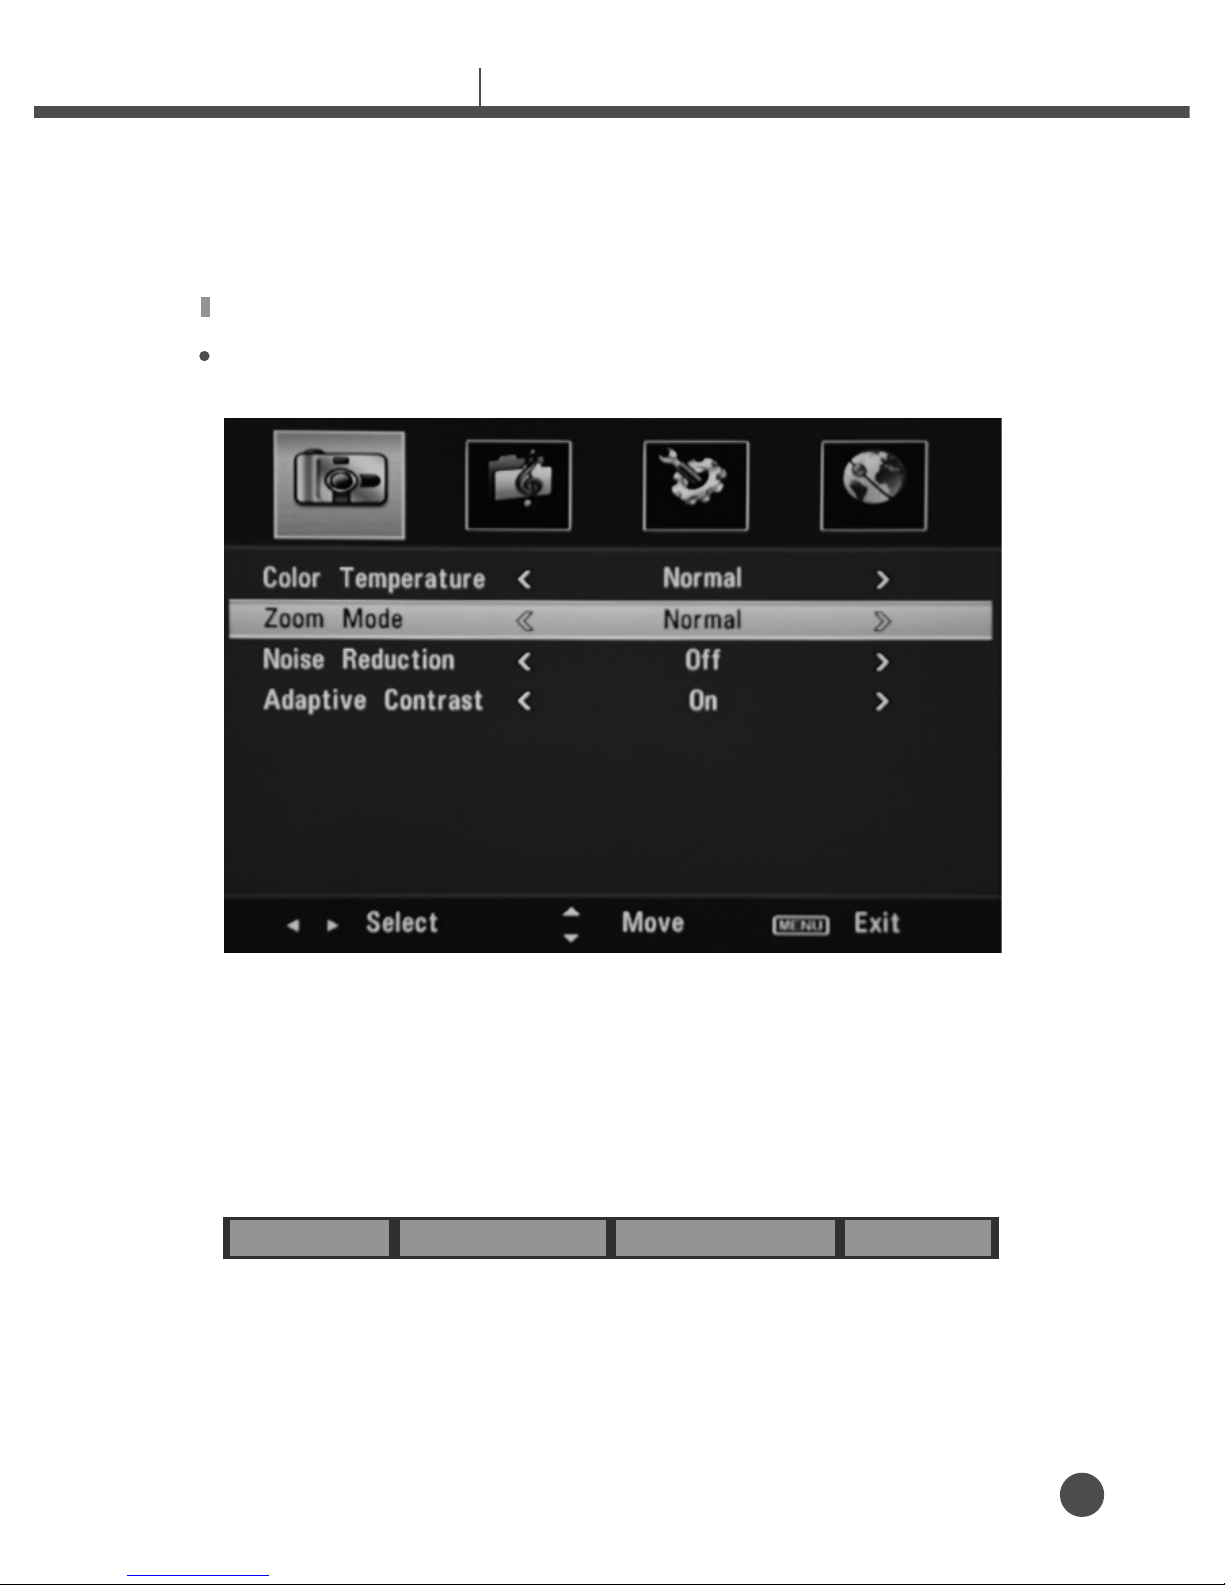
How to Screen Size
You can select screen size congured automatically in order of
【Normal】 【Wide】 【Zoom】 【Cinema】
Zoom Mode: Select On/Off by Direction Button(◀.▶) only on HDMI mode.
Noise Reduction: Select Auto → Off→ Weak → Middle → Strong Select by
Direction button(◀.▶)
Adaptive Contrast: Select On/Off by Direction button(◀.▶).
Back Light: Adjust it from 0 to 100 depending on surroundings brightness
by Direction button(◀.▶)
1. Press the MENU button to display the menu.
2. Press the ENTER button.
3. Press the ▲ or ▼ button to select Size, then press the ENTER button.
4. Select the required option by pressing the ▲ or ▼ button, then press
the ENTER button.
5. Press the EXIT button to exit.
Zoom Mode Noise Reduction Adaptive Contrast Back Light
Page 22
www.bnsmedia.com
22
LED Interactive Display
2.3 Sound Adjustment
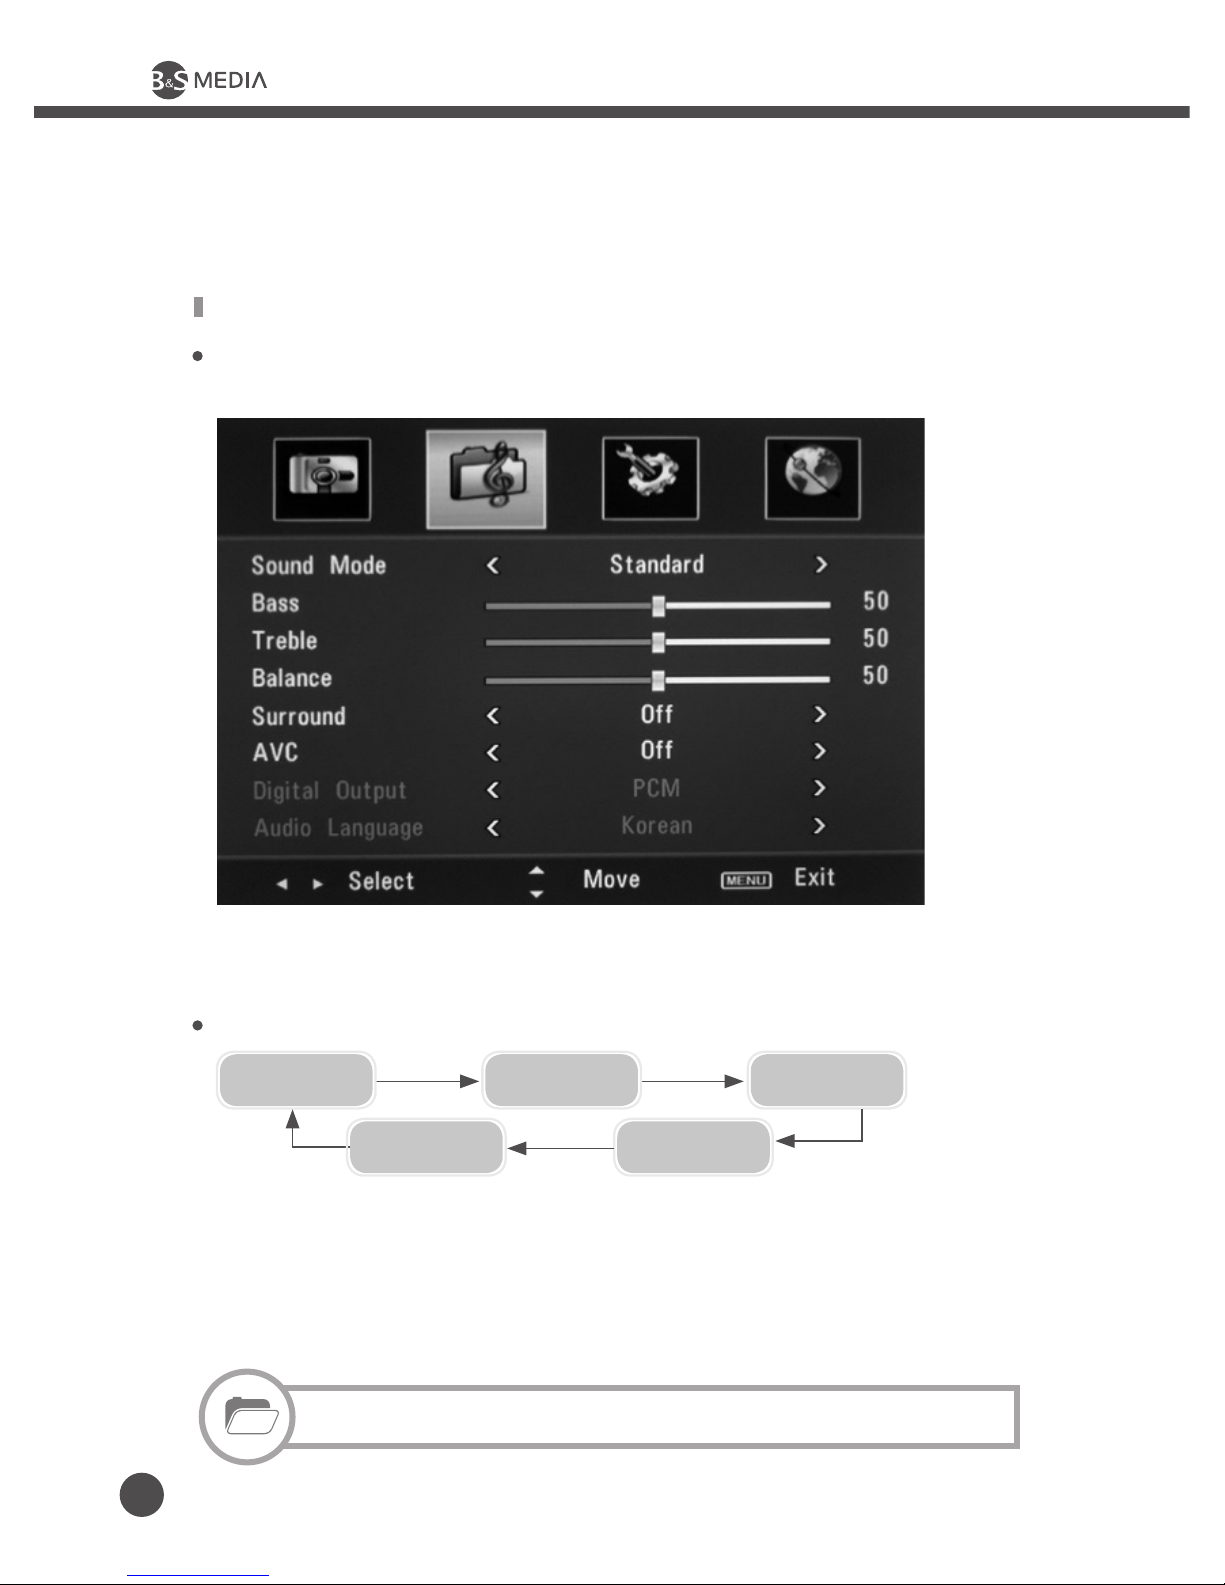
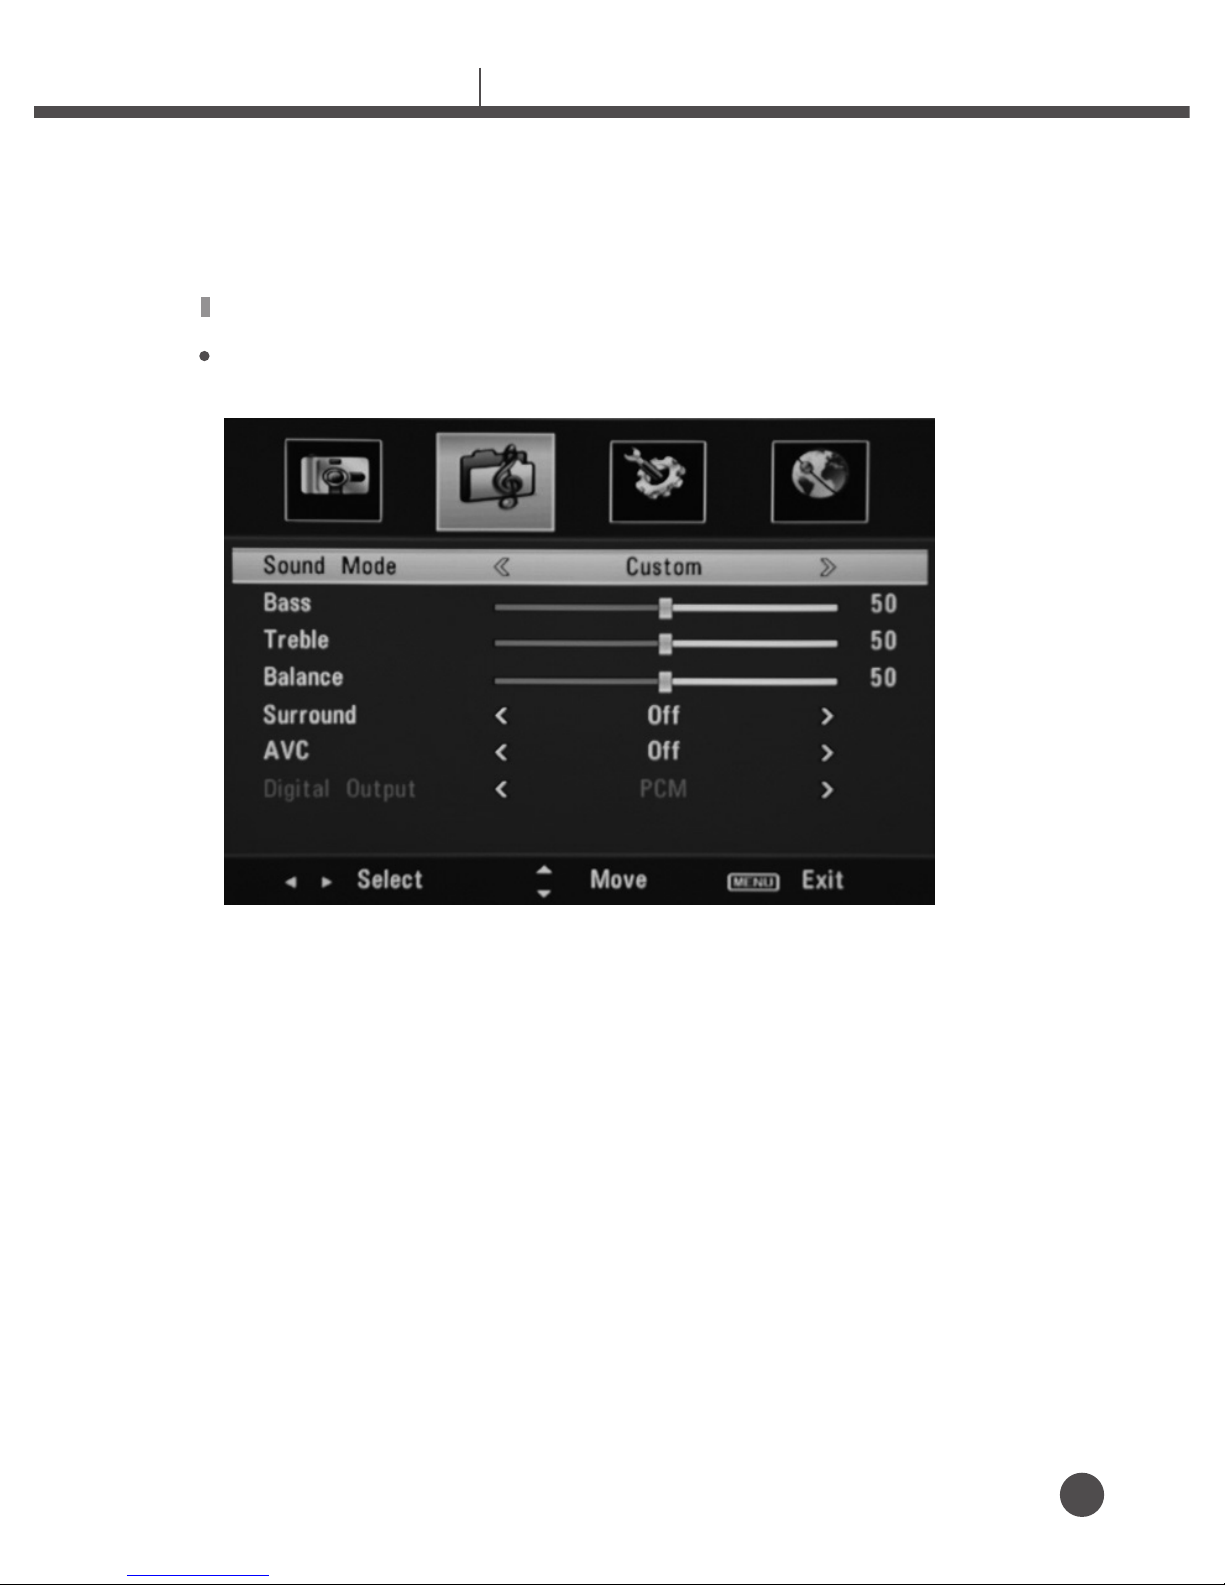
How to control Sound
Sound Mode is automatically adjusted among 【Standard】 【News】 【Music】
【Film】 【Custom】
1. Select 【Sound Mode】 by direction button (▲.▼) and press direction button (◀.▶).
2. Select sound mode by direction button (◀.▶).
It changes as below.
Standard: Plus any genre is typically look good acoustics.
Music: Music when watching music videos or concerts.
News: Voice is heard clearly.
Film: You can enjoy the magnicent sound.
Custom: Adjust the sound settings of your own when you choose.
STANDARD
FILM
NEWS MUSIC
CUSTOM
It is possible to adjust auto sound by s.mode button on the remote controller.
Page 23
www.bnsmedia.com
23
e-VISION 70/80 LED USER’S MANUAL
How to adjust audio mode directly by user
You can select screen size congured automatically in order of
【Normal】 【Wide】 【Zoom】 【Cinema】
1. Select 【Bass】 by direction button (▲.▼)
2. Adjust sound mode by direction button (◀.▶) and press OK button
Adjust 【Treble】 【Balance】 by same way of 【Bass】
3. Surround: Select On/Off by direction button (◀.▶)
4. Auto Volume Control: Select On/Off by direction button (◀.▶).
Page 24
www.bnsmedia.com
24
LED Interactive Display
2.4 Time / PC Screen / Initialization
How to control Sound
How to adjust menu settings
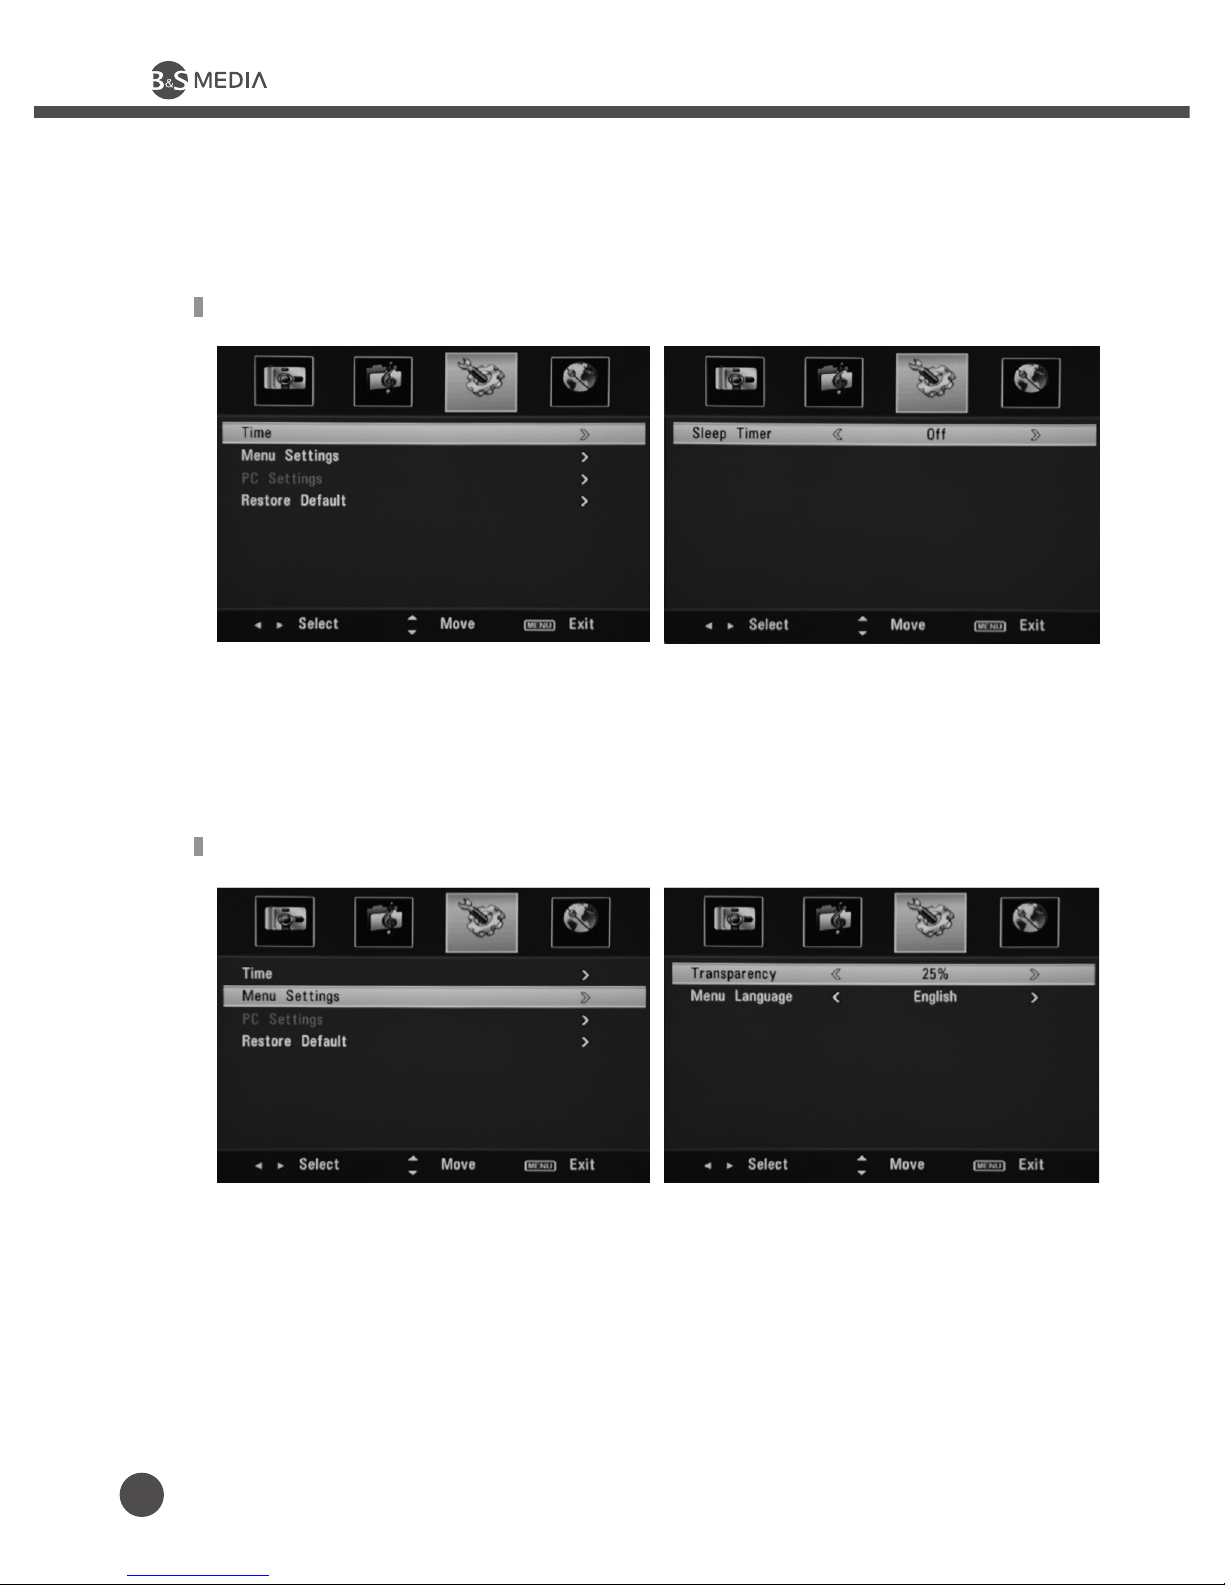
1. Select Time by direction button and press direction button(▶)
2. Sleep Timer: Select Off / 5 Min / 10 Min / 15 Min / 30 Min / 45 Min / 60 Min /
90 Min / 120 Min / 180 Min / 240 Min / Off by direction button (◀.▶)
1. Select Transparency by direction button (◀.▶) (▲.▼) and press direction button (▶)
Adjust transparency of Menu Window among 0% / 25% / 50% / 75% / 100%.
2. Select Menu Language by direction button (▲.▼) and press direction button
Adjust between English -> 한국어
Page 25
www.bnsmedia.com
25
e-VISION 70/80 LED USER’S MANUAL
How to adjust PC Screen Set-up
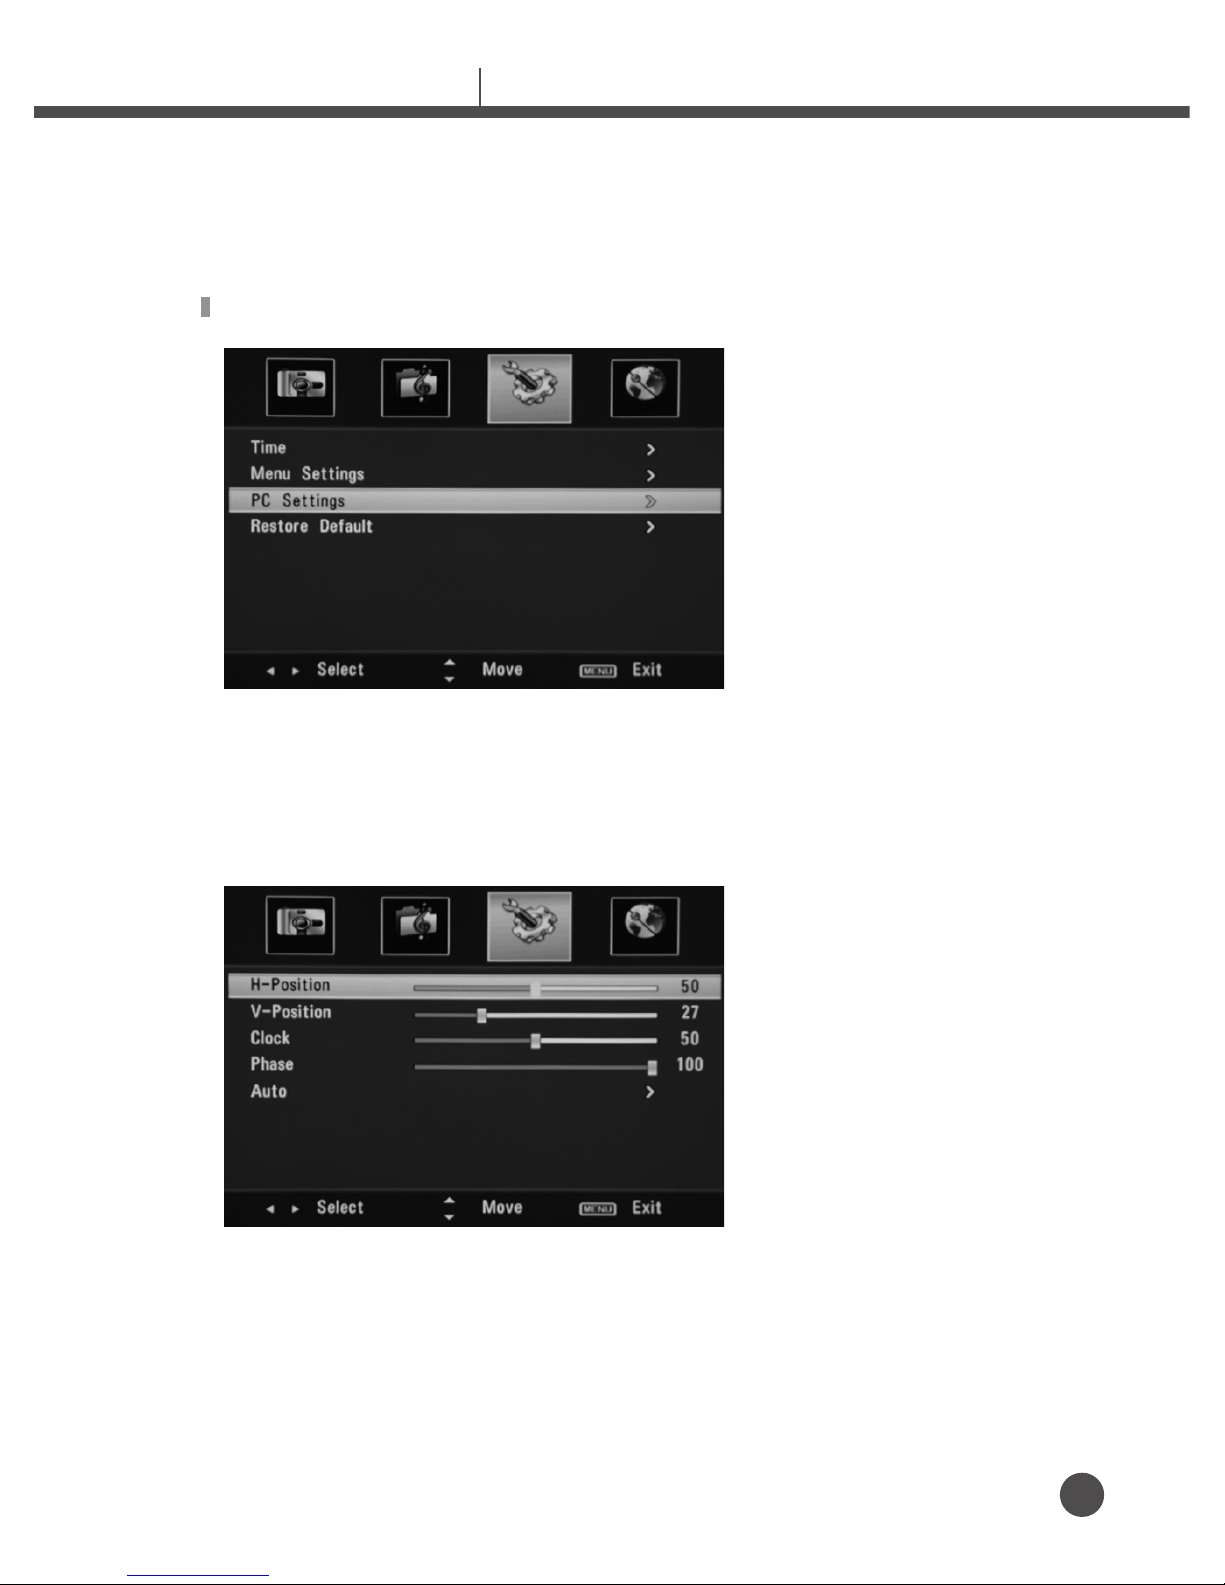
1. Select PC Settings with Direction Button and press Direction Button
2. Select 【H-Position】 by direction button (▲.▼) and adjust horizontal
position by direction button(◀.▶).
Adjust 【V-Position】 【Clock】 【Phase】 by same way of 【H-Position】.
H-Position: Screen moves horizontally.
V-Position: Screen moves vertically
Clock: Adjusts frequency of image signal.
Phase:
If screen is out of focus or noise occurs on the screen, adjust it vivid by this setting
Auto: If screen is out of focus, it adjusts automatically size, horizontality, verticality
as default settings. This function can be used only on Analog RGB mode
Page 26
www.bnsmedia.com
26
LED Interactive Display
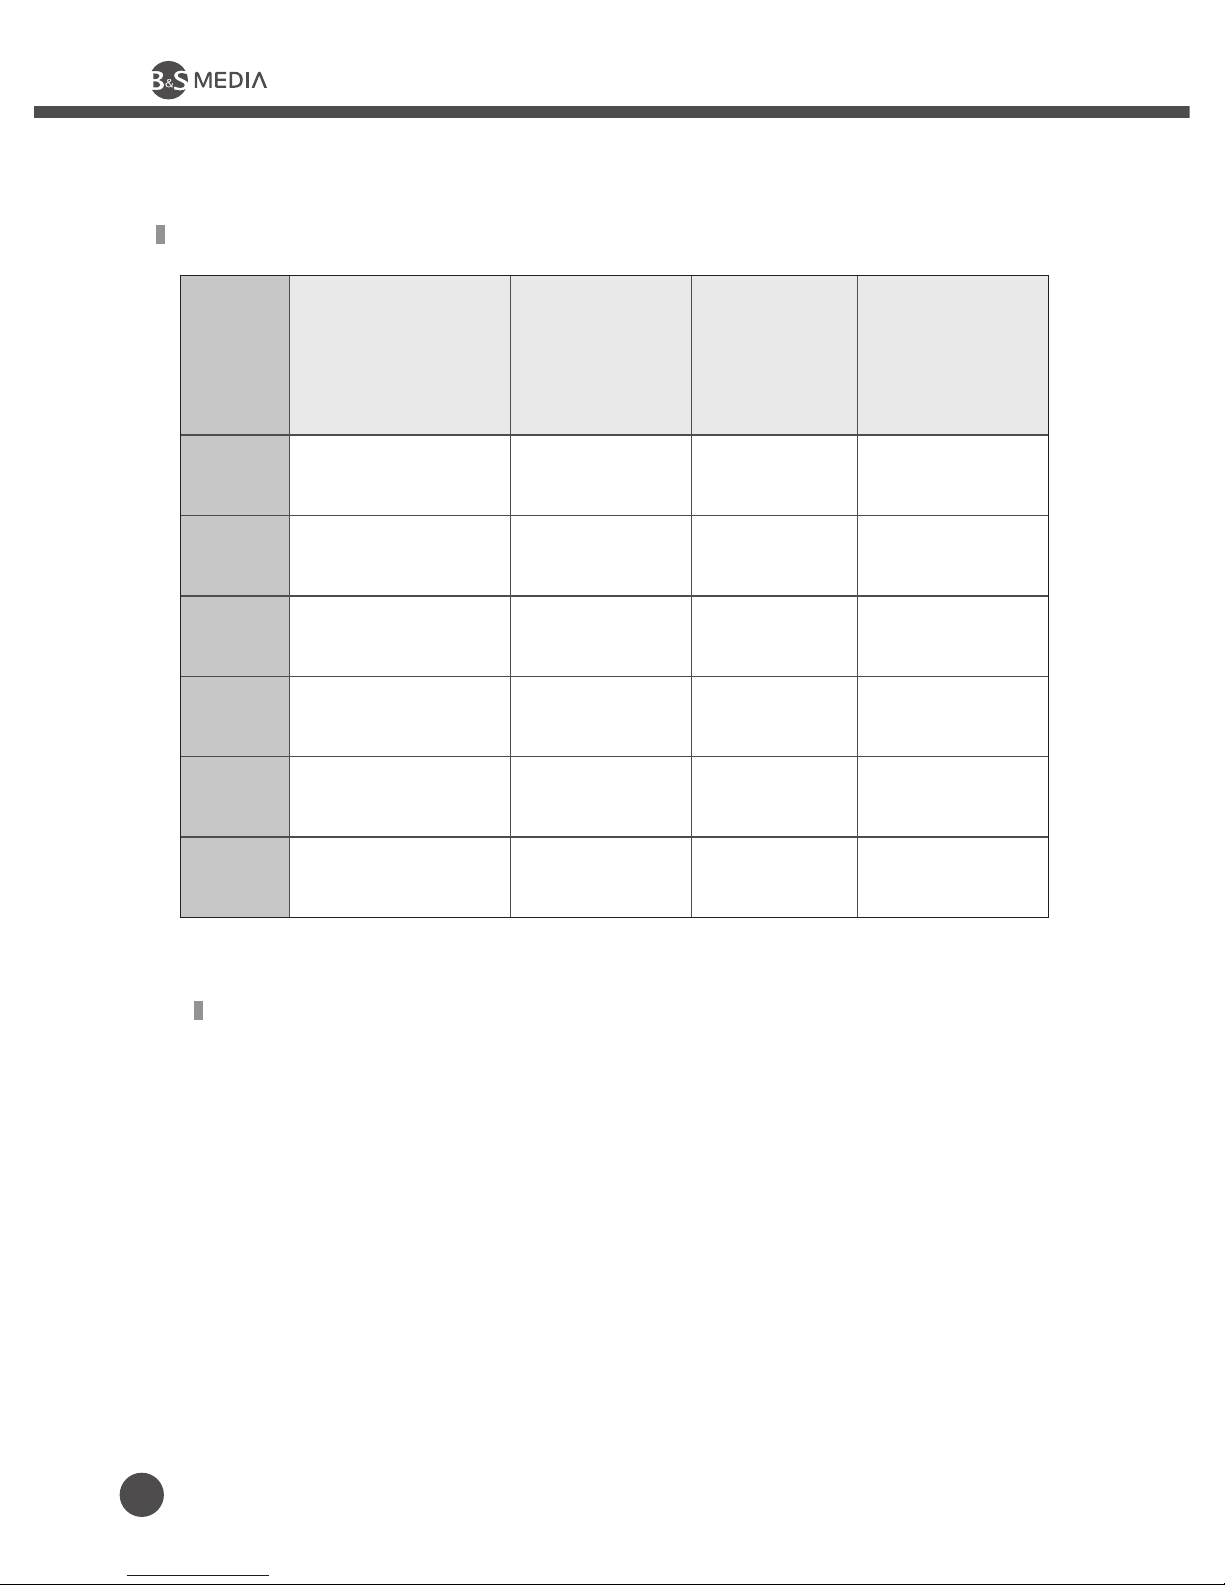
PC support resolution
NO Resolution
H-freq
(KHz)
V-freq.
(Hz)
Pixel Clock
(MHz)
1
800x600 37.354 59.861 38.25
2
1024x768 47.861 59.92 63.5
3
1280x720 44.772 59.855 74.5
4
1360x768 47.720 59.799 84.75
5
1280x1024 63.668 59.895 109.0
6
1920x1080 66.587 59.934 138.5
PC screen Self-adjustment
Adjusts automatically PC signal by Self-adjustment function.
Adjusts automatically Location, Frequency, Phase
Page 27
3. Additional Instructions
www.bnsmedia.com
27
e-VISION 70/80 LED USER’S MANUAL
3.1 Fault Diagnosis before A/S
Symptoms which could happen
Following symptoms could be happen even though there is no problem with this product. Please try ways to solve in the list below before
call Customer Service Center.
Please check the possible problem and follow solution list. If problem
could not be solved, turn off this product, call Customer Service Center.
If this product looks faulty, check out the list below before call
Customer Service Center.
If the problem is not in the list, do not try to solve it by yourself.
Call Customer Service Center.
Symptom Problem How to Solve
Power LED is not
turned on
There is a problem
with Power connection.
Check out power code is
connected with outlet.
If so, try to turn it on
again.
Turning on power
but there is nothing
displayed on the
screen.
Brightness Adjustment is too low or
Fluorescent Tube has
problem.
Adjust Brightness &
Contrast.
There is still
afterimage on the
screen continuously.
This is the unique feature of this product.
Pixel is shown black or bright depending on
Pixel number of valid LCD panel.
This is shown under 0.005% of whole Pixel. This
is not problem.
Page 28
www.bnsmedia.com
28
LED Interactive Display
Symptoms which could happen
Symptom Problem How to Solve
Nothing is displayed
on the screen.
Input Cable is disconnected or wrong
Input Source is
selected.
Adjust Input Source again.
Screen shows pictures but it does not
sound.
Audio Volume is
adjusted at ‘0’.
Mute is selected.
Audio Cable is
disconnected or connected wrongly.
Turn up the Volume.
Press the Mute button again.
Check out the audio connection.
Remote Controller
has broken.
Electrode of Battery
is connected wrongly.
Battery of Remote
Controller was not
removed.
Insert a battery rightly.
Replace the battery.
There is some noise
from the radio
If using Radio near
this product, this
symptom could be
happen.
Use Radio far away from this
product.
Screen shows black
and white.
Color density was set
at 0 or near 0.
Set up Color density at middle.
“No Signal” Message appears on the
screen.
Signal Connection is
not right.
Check out the display cable
connection. Refer to instructions
to know if this product supports
input signal.
Input Signal is not
supported in this
product.
Refer to instructions to know
if this product supports input
signal.
Check out the display cable on
the manual.
Page 29
www.bnsmedia.com
29
e-VISION 70/80 LED USER’S MANUAL
B&S MEDIA CO., Ltd.
● Customer Careline: +82-2-588-3323
● www.bsmedia.com -> Customer Inquiry
3.2 Customer Support & A/S
A. When this product is not working, refer to the diagnosis page
on the manual.
B. If problem could not be solved, contact us by phone or online.
※ This user’s manual could be changed for safety and function.
Before A/S
A. Warranty Period is 1 year.
B. A/S cost is decided depending on A/S Price Standard.
For exact A/S cost, call our Customer Careline.
C. Despite warranty period, in case of user’s fault, cost of delivery
and A/S is charged.
A/S Cost
OperationTemperature : 10°C ~ 40°C (50°F ~ 104°F)
Humidity: 10 % ~ 80 %, Non-liquefaction
Storage Temperature: -20°C ~ 45°C (-4°F ~113°F)
Humidity: 5 % ~ 95 %, Non-liquefaction
Environmental Condition
Page 30

www.bnsmedia.com
HEADQUARTERS
#703 JnK Digital Tower, 111, Digitalro-26gil, Guro-gu, Seoul, Korea
TEL: +82.2.588.3323 / FAX: +82.2.588.3659
FACTORY
351-4 Hodang-li, Yipjang-myun, Seobuk-gu, Cheonan-shi, Chungnam, Korea
TEL: +82.41.584.8378 / FAX: +82.41.584.8379
CHINA BRANCH
4F, Building A, YaoLu Industrial Park, TieGangShuiKu Road, BaoAn District,
ShenZhen, GuangDong, China
TEL: +86.0755.2794.8636 / FAX: +86.0755.2794.8636 (612)
 Loading...