

Page 1
™
Evolution®Control
Homeowner’s Guide
Page 2
Your decision to choose the
Bryant Evolution
®
Control puts
you in a select group of homeowners who understand the
value of precise comfort control
and appreciate the simplicity
of an easy-to-use, intuitive,
user interface.
We sincerely appreciate you
putting your trust in Bryant.
Bryant has been delivering
the finest indoor comfort
equipment since 1904. Your
new Evolution Control offers yet
another example of the high
quality comfort technology for
which we are recognized.
Please take a few moments to
review this manual…set up a
comfort schedule that makes
sense for your lifestyle…then
relax and enjoy the comfort!
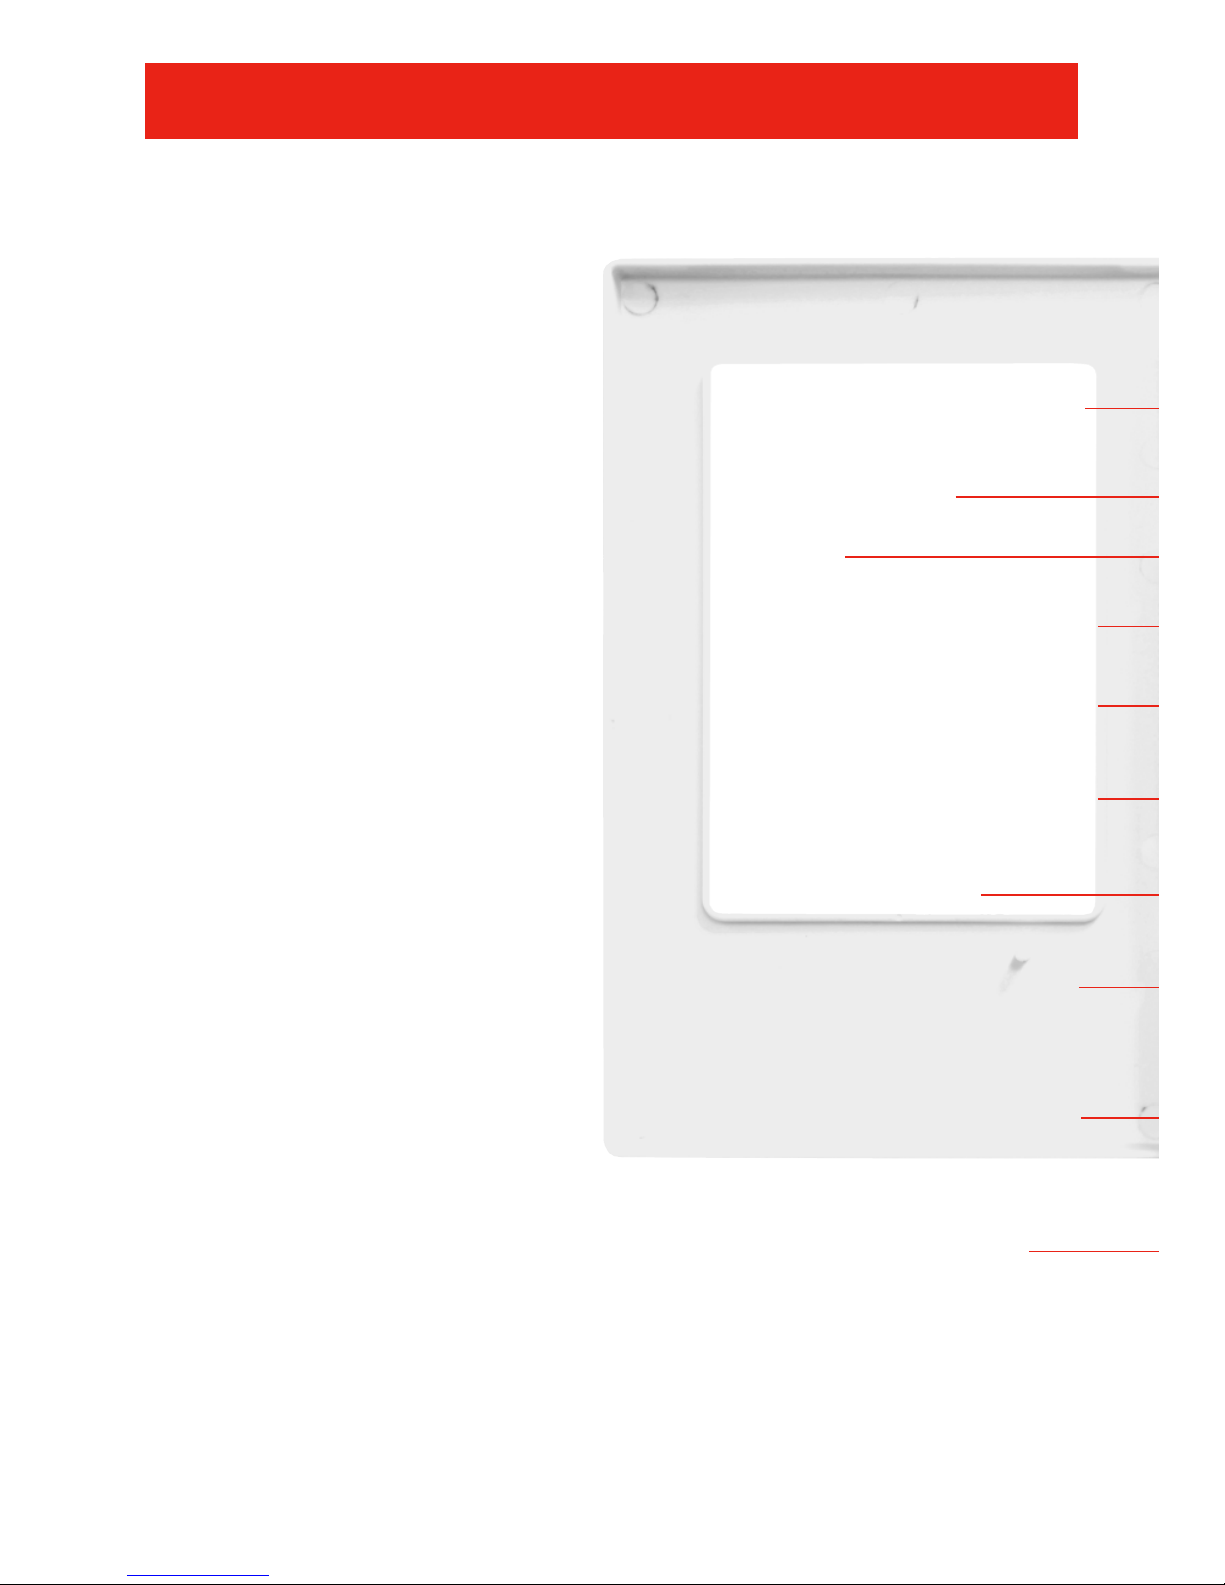
Temperature/Humidity Button
displays current indoor humidity
or outside temperature.
Room Temperature
Day & Time
Time Period
displays the com-
fort schedule’s active period.
Left Button provides accessory
status.
Hold Button maintains desired
temperature indefinitely.
Left Up/Down Button
Schedule Button
used to
access and exit the comfort
schedule.
Vacation Button
activates/deactivates vacation
comfort settings.
Scroll Button used to move
up and down the screen
during scheduling and setup.
CONGRATULATIONS!
Page 3
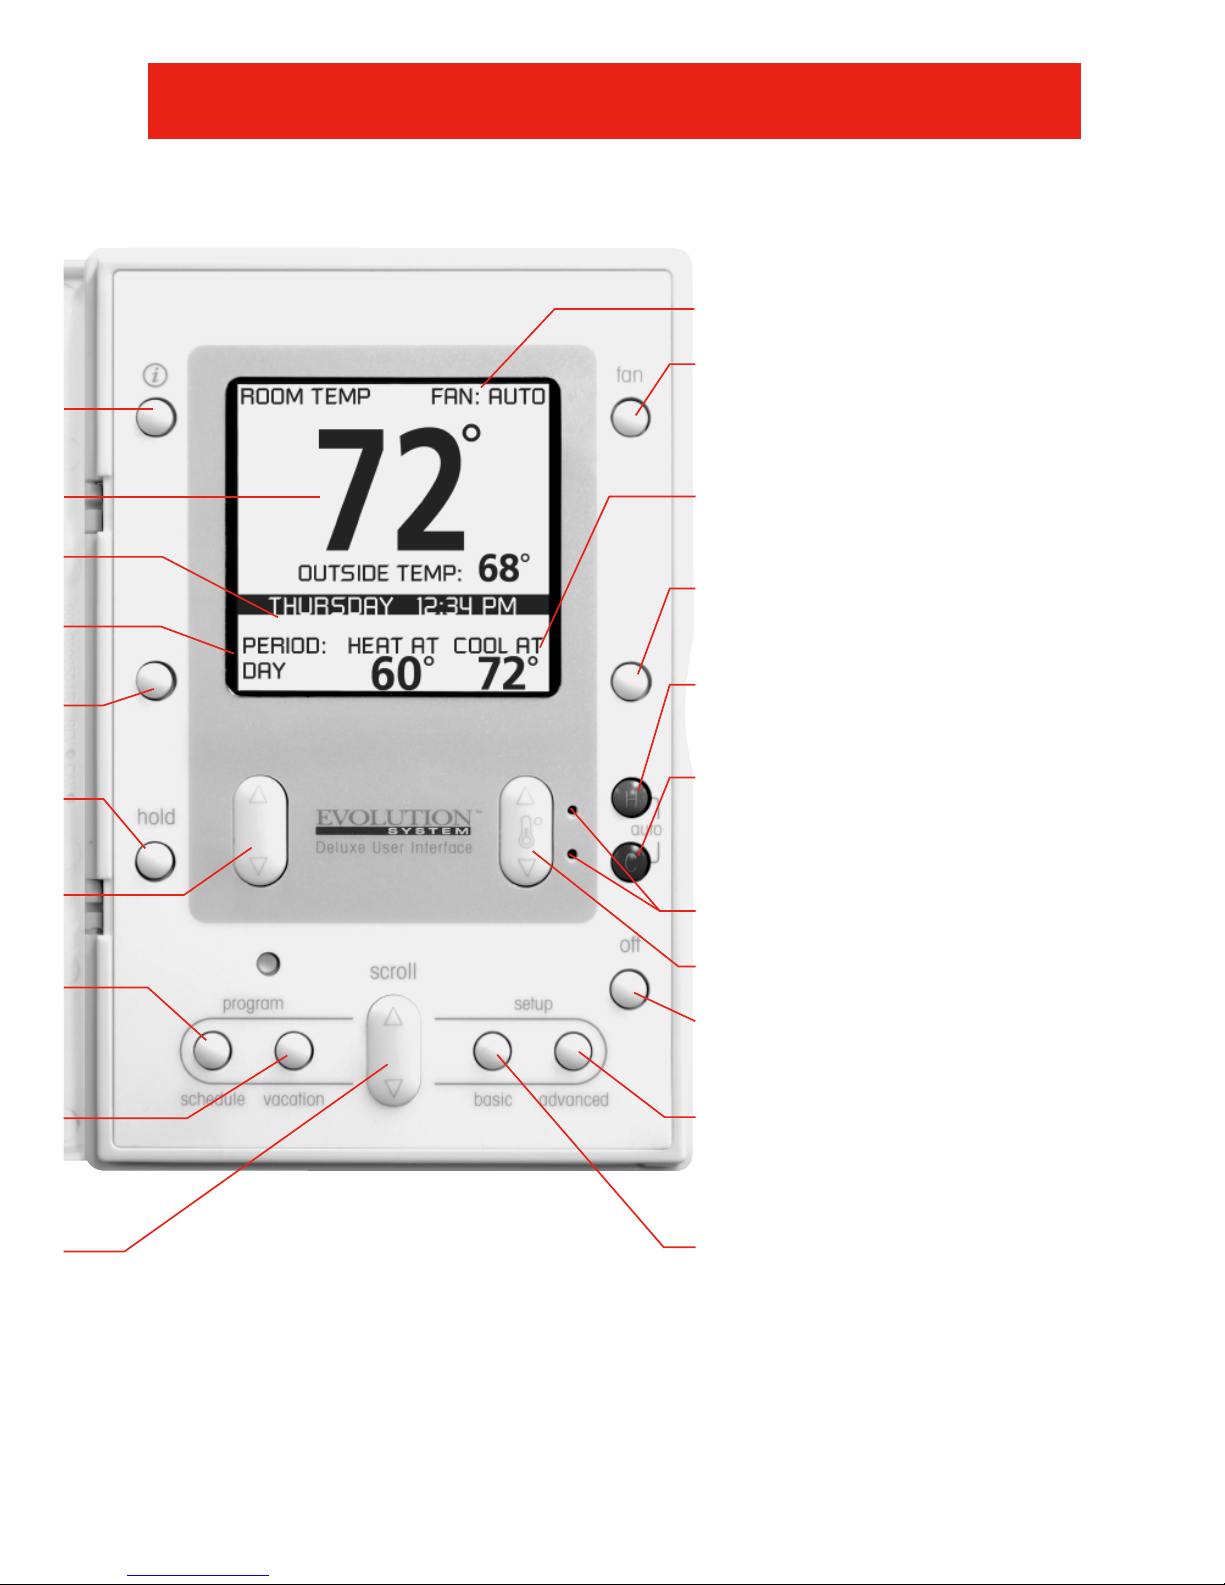
Fan Setting
Fan Button
chooses “high,”
“medium,” “low,” or “auto”
fan mode.
Desired Heating/Cooling
Temperature
Right Button
provides
system status.
Heat Button selects heating
operation.
Cool Button selects cooling
operation.
Heat/Cool LEDs indicate
heating or cooling operation.
Right Up/Down Button
Off Button
turns the system
on and off.
Advanced Setup Button
provides access to
customizable features.
Basic Setup Button provides
access to current day, time
and desired humidity level.
Page 4

TABLE OF CONTENTS 1
QUICK GUIDE INSTRUCTIONS . . .2
BASIC SETUP . . . . . . . . . . . . . . . . . .6
Set Day, Time & Humidity . . . . . .6
NORMAL OPERATION . . . . . . . . . .7
Turn System On/Off . . . . . . . . . . . .7
Heating . . . . . . . . . . . . . . . . . . . . . .7
Auxiliary Heat . . . . . . . . . . . . . . . . .7
Emergency Heat . . . . . . . . . . . . . .7
Cooling . . . . . . . . . . . . . . . . . . . . . .8
Auto . . . . . . . . . . . . . . . . . . . . . . .9
Adjust Current Temperature . . .9
Adjust Heating Temperature .9
Adjust Cooling Temperature 10
Adjust Fan Speed . . . . . . . . . . . .10
Hold Current Temperature . . . .10
Vacation Function & Settings . .11
Check System Status
(Right Button) . . . . . . . . . . . . . . . . . . . .12
Accessory Status (Left Button) 12
Resetting Accessory Usage
Indicator . . . . . . . . . . . . . . . . . . . . .13
Accessory Maintenance Pop-Up
Messages . . . . . . . . . . . . . . . . . . . . . .13
Service Pop-Up Messages
. . . . .14
Keyboard Lock-out . . . . . . . . . . .15
PROGRAMMABLE FEATURES,
SETUP & OPERATION . . . . . . . . . .16
Backlighting . . . . . . . . . . . . . . . . . .16
Determining Your Comfort
Schedule . . . . . . . . . . . . . . . . . . . . . . . .16
Programming Your Comfort
Schedule . . . . . . . . . . . . . . . . . . . . .17
One Schedule for All Days . . . .18
Weekdays Schedule . . . . . . . . . .19
Weekend Schedule . . . . . . . . . .20
Daily Schedule . . . . . . . . . . . . . . .21
Copying a Schedule . . . . . . . . .22
Programming Fan Speed . . . .23
VENTILATION FEATURES,
SETUP & OPERATION . . . . . . . . . .24
Fresh Air Ventilation . . . . . . . . . .24
ADVANCED SETUP . . . . . . . . . . . .25
Accessory Maintenance
Reminders . . . . . . . . . . . . . . . . . . .25
Display Settings . . . . . . . . . . . . . .26
Heating Humidity . . . . . . . . . . . .27
Cooling Humidity . . . . . . . . . . . .28
Vacation . . . . . . . . . . . . . . . . . . . .29
GLOSSARY . . . . . . . . . . . . . . . . . . .31
Page 5
QUICK GUIDE INSTRUCTIONS 2
This guide provides the basic operations for setting up and operating your Evolution
®
Control.
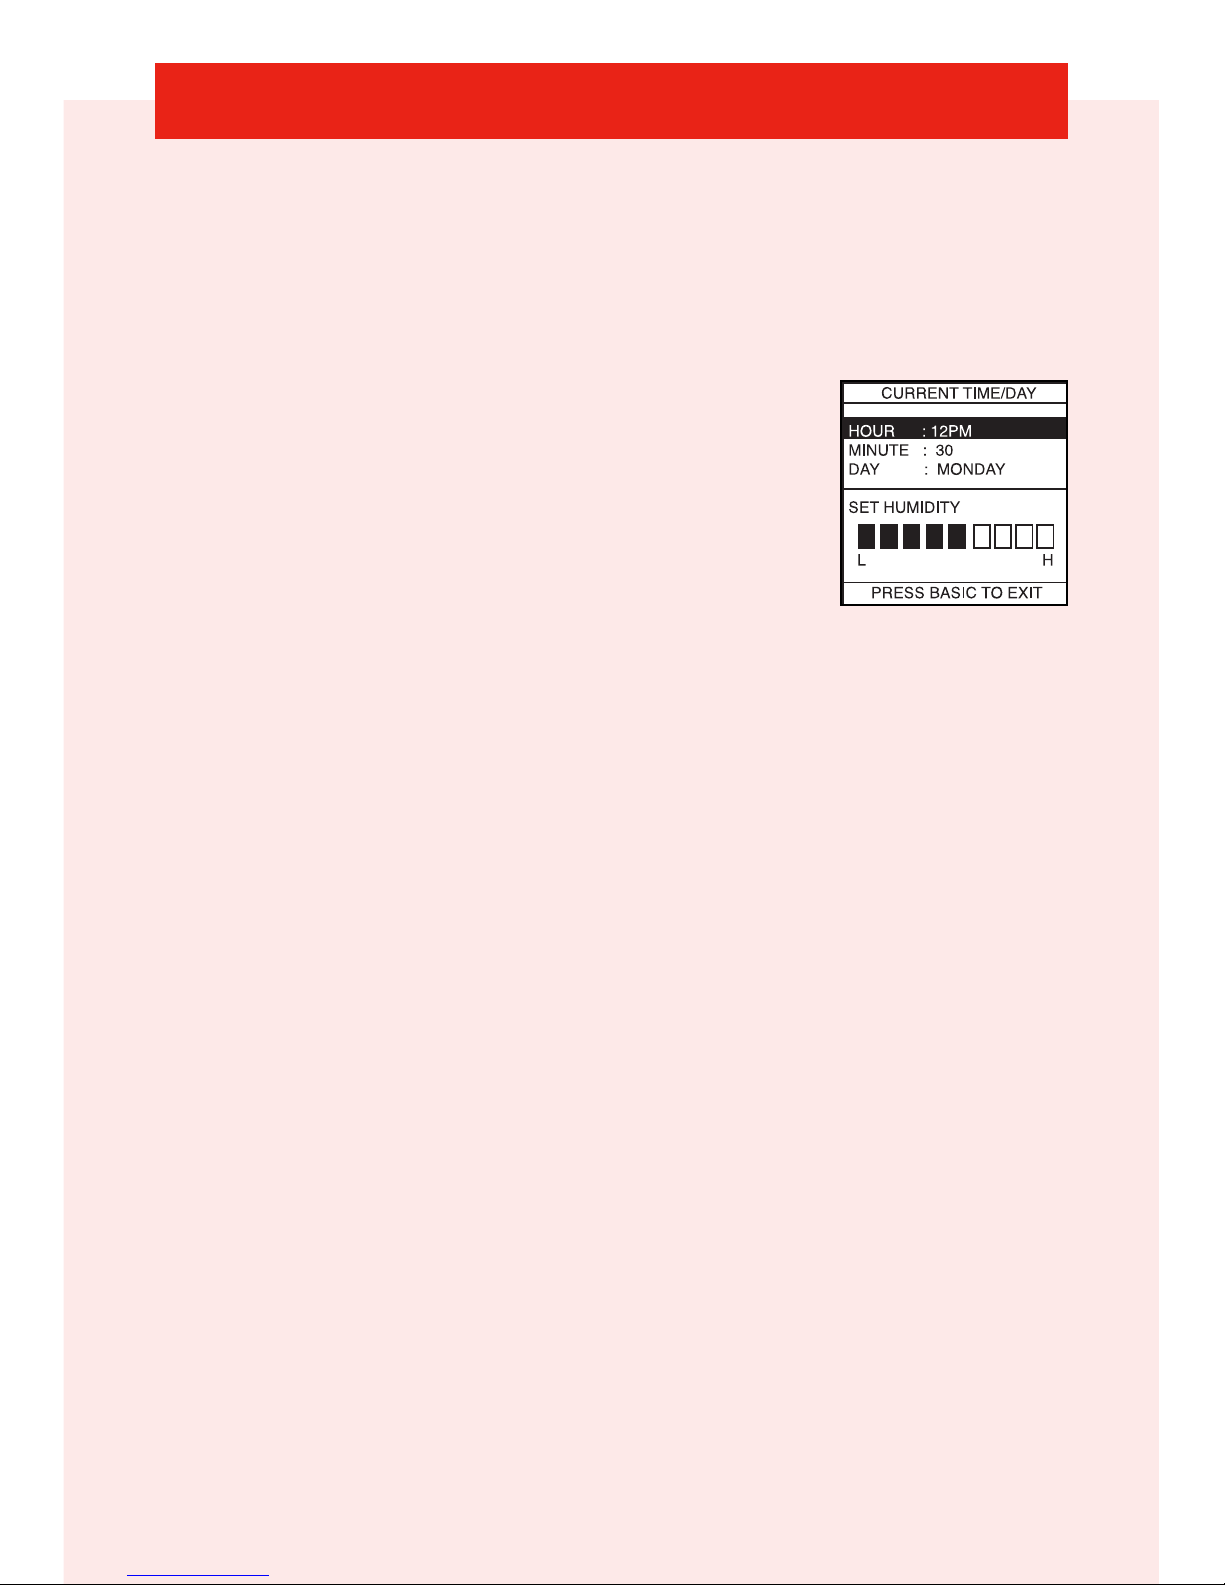
Set Day, Time & Desired Humidity
1
Open the door of the Evolution®Control.
2 Press the BASIC button.
3 Adjust the highlighted HOUR setting using
the Left Up/Down button.
4 Press SCROLL to highlight MINUTE.
5 Adjust the MINUTE setting using the Left Up/Down button.
6 Press SCROLL to highlight DAY.
7 Adjust the current DAY setting, using the Left Up/Down
button, until the correct day is displayed.
8 Press SCROLL to highlight HUMIDITY.
9 Press the red HEAT button to set the heating humidity.
10 Adjust the desired heating humidity using either Up/Down but-
ton.
11 Press the blue COOL button to set the cooling humidity.
12 Adjust the desired cooling humidity using either Up/Down but-
ton.
13 Press BASIC or close the door to exit.
Page 6
QUICK GUIDE INSTRUCTIONS 3
Adjust Heating Temperature
1
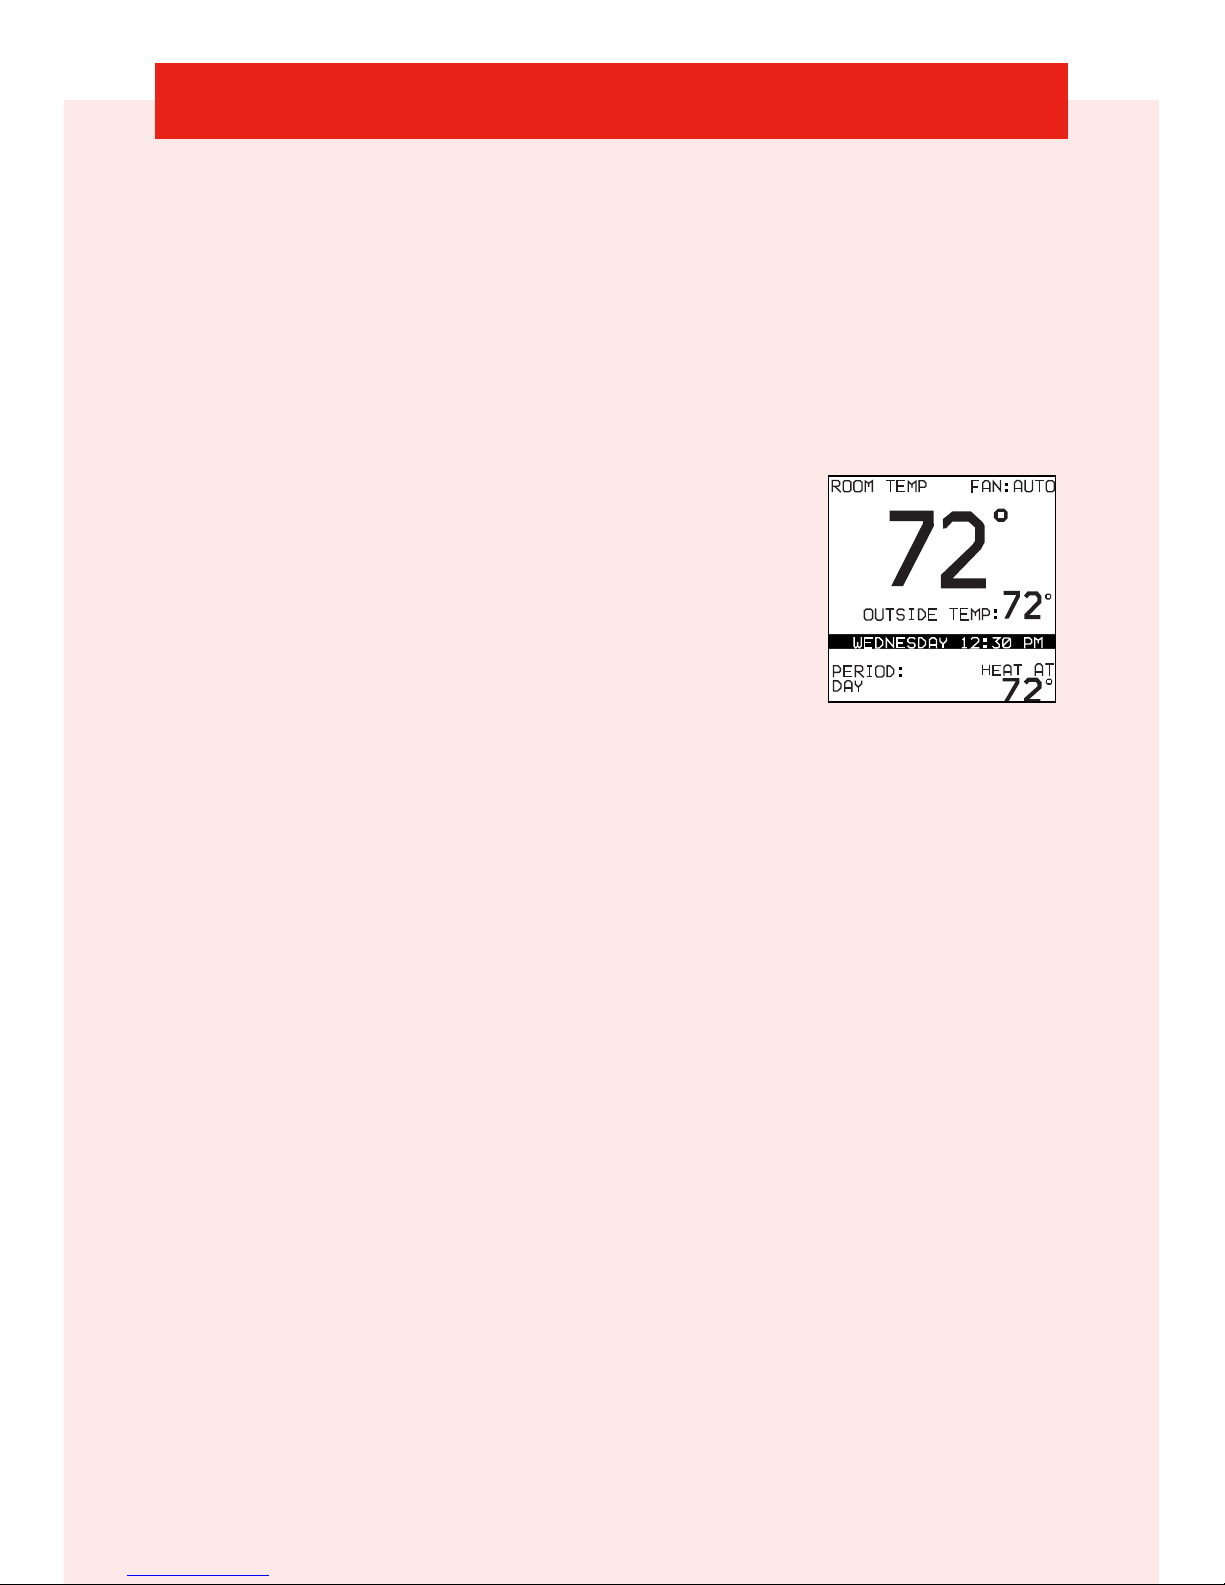
Press the red HEAT button. Heating is confirmed when the red
LED adjacent to the red HEAT button is lit.
2 Use the Right Up/Down button to select your desired
temperature, which will be displayed on the lower right.
An override time will be displayed on the lower left.
Please note an override time will not
appear if programming has been turned off.
3 You can change the override time in
15-minute increments by pressing the Left
Up/Down button until the desired override
time is selected.
- OR -
Press the HOLD button to override the schedule indefinitely.
Adjust Cooling Temperature
1
Press the blue COOL button. Cooling is confirmed when the
blue LED adjacent to the blue button is lit.
2 Use the Right Up/Down button to select your desired
temperature, which will be displayed on the lower right.
An override time will be displayed on the lower left. Please note
an override time will not appear if programming has been
turned off.
3 You can change the override time to 15-minute increments by
pressing the Left Up/Down button until the desired
override time is selected.
- OR -
Press the HOLD button to override the schedule indefinitely.
Page 7
QUICK GUIDE INSTRUCTIONS 4
Quick Programming Instructions
These instructions will guide you through creating one comfort
schedule that will repeat every day. For more details on
programming, or to create customized schedules for the week,
weekend, or each day, refer to PROGRAMMABLE FEATURES, SETUP
& OPERATION on pages 16 - 23 of this manual.
One Schedule for All Days
1
Open the door of the control.
2 Press the SCHEDULE button.
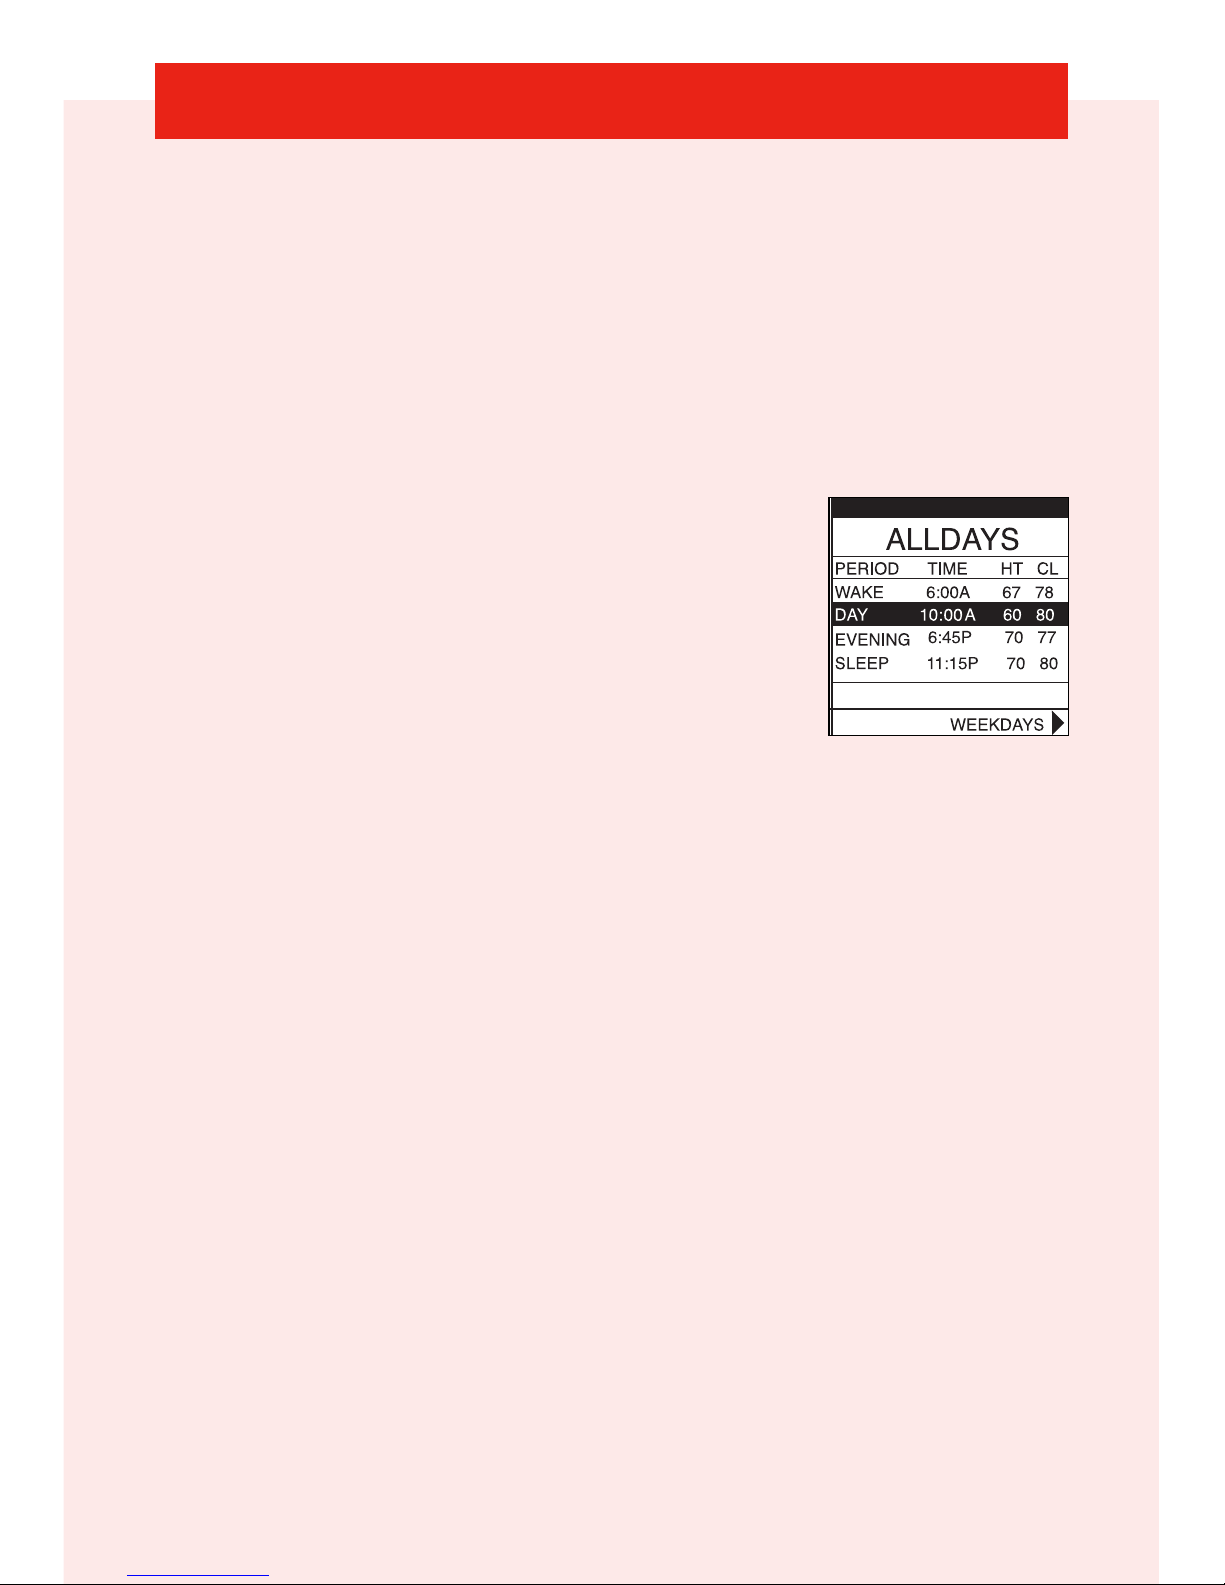
3 Press either the LEFT or RIGHT button
repeatedly until “ALLDAYS” is displayed.
4 The WAKE time period will be highlighted. Set the start time for
this time period using the Left Up/Down button.
5 Press the red HEAT button. Heating temperature will begin
flashing.
6 Set the heating temperature using the Right Up/Down
button.
7 Press the blue COOL button. Cooling temperature will begin
flashing.
8 Set the cooling temperature using the Right Up/Down
button.
9 Set the remaining periods, “DAY,” “EVENING,” AND “SLEEP” by
using the SCROLL button to select a time period, then follow
steps 5 – 9 to select temperature and time settings.
10 Exit the scheduling mode by either closing the door or press-
ing the SCHEDULE button.
Page 8

QUICK GUIDE INSTRUCTIONS 5
Pop-up Messages
Your Evolution®Control provides important and useful maintenance
and service reminders via pop-up messages on the display.
Accessory Maintenance Reminders: An accessory reminder lets
you know when it’s time for maintenance of your air filter, humidifier
pad, UV lamp or ventilator. When an accessory reminder pop-up
message appears, perform the accessory maintenance yourself
OR contact your dealer/contractor.
Service Reminders: When a service reminder pop-up message
appears, contact your dealer/contractor.
See ACCESSORY MAINTENANCE OR SERVICE POP-UP MESSAGES
on page 13 - 14 in this manual for additional information on service
and maintenance reminders.
Page 9
BASIC SETUP 6
Set Day, Time & Desired Humidity
1
Open the door of the Evolution®Control.
2 Press the BASIC button.
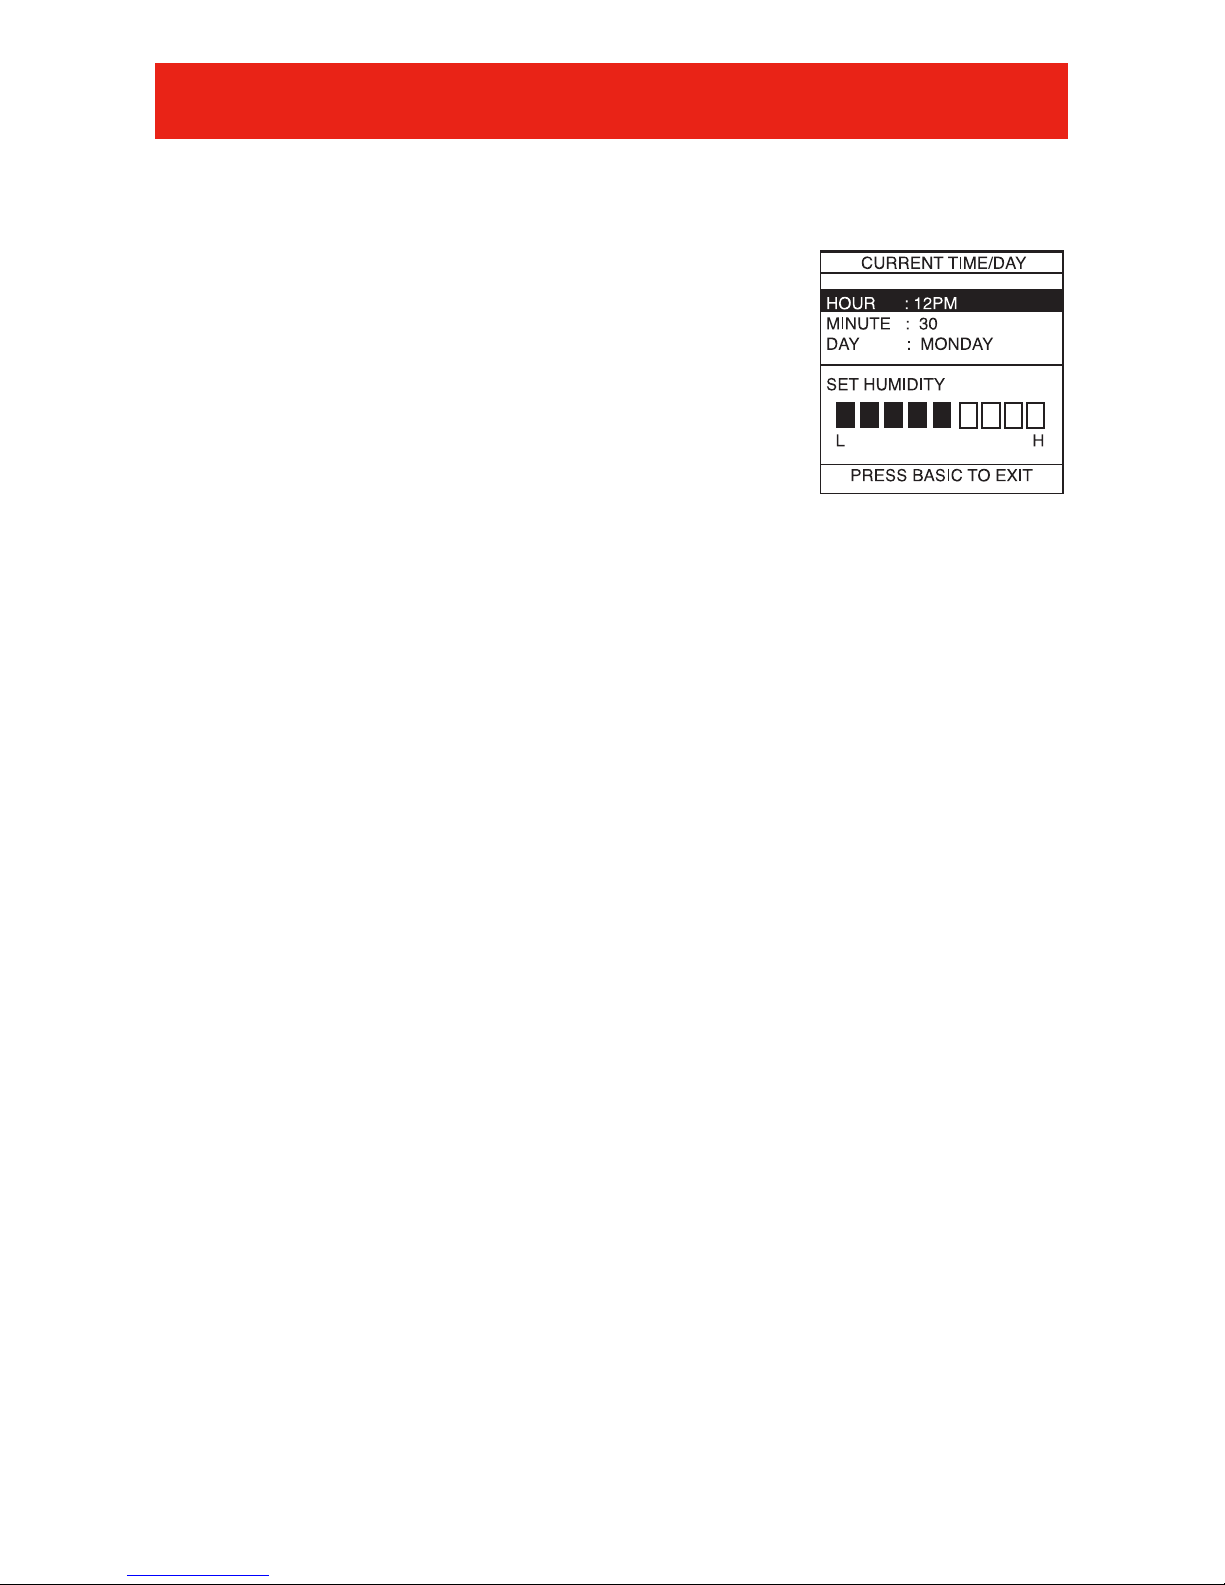
3 Adjust the highlighted HOUR setting using
the Left Up/Down button.
4 Press SCROLL to highlight MINUTE.
5 Adjust the MINUTE setting using the Left
Up/Down button.
6 Press SCROLL to highlight DAY.
7 Adjust the current DAY setting, using the Left Up/Down button,
until the correct day is displayed.
8 Press SCROLL to highlight HUMIDITY.
9 Press the red HEAT button to set the heating humidity.
10 Adjust the desired heating humidity using either Up/Down
button.
11 Press the blue COOL button to set the cooling humidity.
12 Adjust the desired cooling humidity using either Right
Up/Down button.
13 If a ventilator has been installed, press scroll to highlight
FRESH AIR.
14 Adjust your desired FRESH AIR setting using the Right
Up/Down button. For a description of fresh air settings, see
FRESH AIR VENTILATION on page 24 in this manual.
15 Press the BASIC button to exit.
- OR -
If you need to readjust one of your settings, use the SCROLL
button to highlight the desired setting, then make your changes.
Page 10
NORMAL OPERATION 7
16 Close the door.
NOTE: You can exit at any time. When exiting, you will be prompted
to save changes if you have made any. Select “YES” to
save your changes, “NO” to revert back to previous settings.
Turn System On/Off
The OFF button is used to turn the system both on and off.
Heating
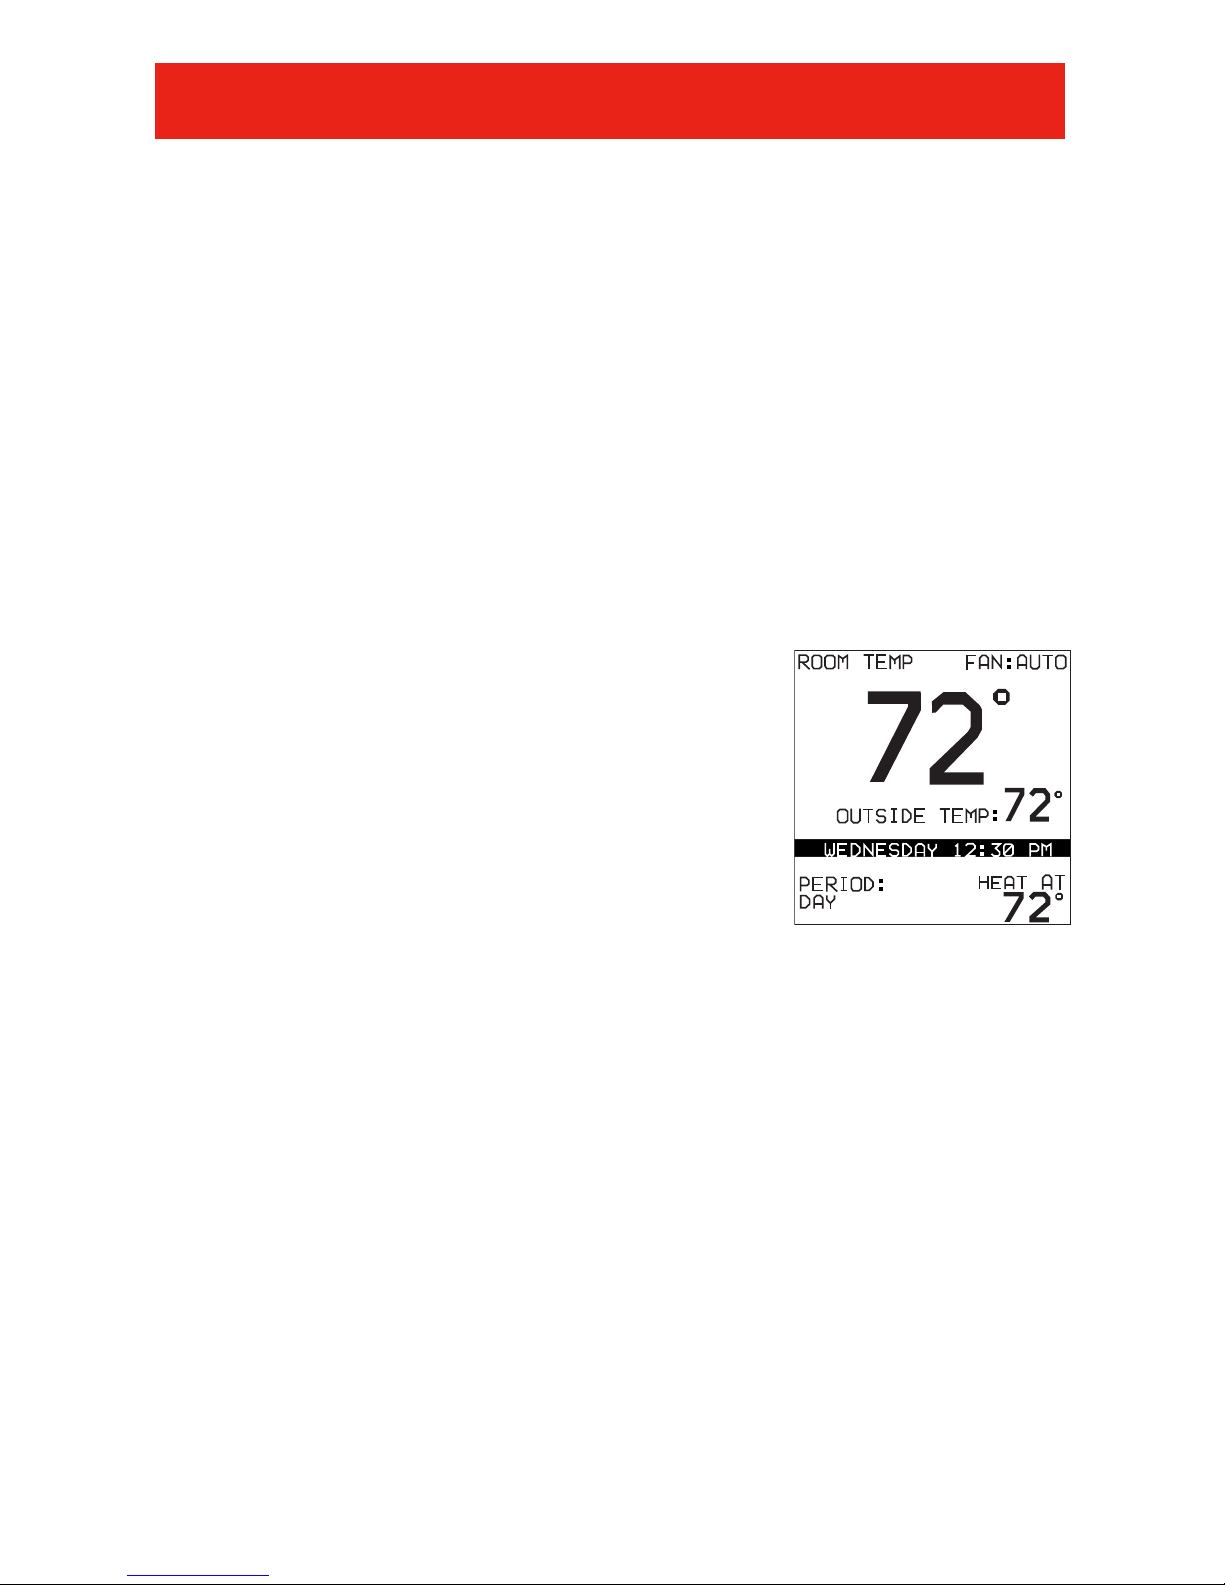
To select heating, press the red HEAT button.
Heating is confirmed when the red LED
adjacent to the red HEAT button is lit.
Heating is operating when the red LED is
gradually pulsing on and off. (The LEDs can
be turned off. For details, see ADVANCED
SETUP – DISPLAY on page 26.) The heating
temperature will appear in the lower right
screen with the text, “HEAT AT.”
Auxiliary Heat
Auxiliary heat is staged electric heating included with many heat
pump systems. Auxiliary heat is automatically activated by the
system when it’s too cold for the heat pump to effectively heat
your home. Auxiliary heat operation is confirmed when the red
LED adjacent to the red HEAT button is lit, gradually pulsing on,
then off. (The LEDs can be turned off. For details, see ADVANCED
SETUP – DISPLAY on page 26.) The text, “AUXILIARY HEAT ACTIVE”
will appear below the room temperature.
Page 11

Emergency Heat
Emergency heat is staged electric heating included with many heat
pump systems. Emergency heat is activated either when the heat
pump has malfunctioned and heating is required, or when the
homeowner manually activates emergency heat. Emergency heat is
manually activated by pressing the red HEAT button for four
seconds. To activate Emergency Heat, press the red HEAT button
for four seconds. If your system is a heat pump with electric heat,
then the display will show the three choices:
SYSTEM IN CONTROL (the system will choose the type and
amount of heat needed for conditions)
HEAT PUMP ONLY (only the heat pump will be used for heating)
ELECTRIC HEAT ONLY (only electric heat will be used for
heating)
If your system is a HYBRID HEAT™ Dual Fuel System (heat
pump with gas or oil furnace), then the display will show the
three choices:
HYBRID HEAT™ (the system will choose the type and amount
of heat needed for conditions)
FURNACE ONLY (only the furnace will be used for heating)
HEAT PUMP ONLY (only the heat pump will be used for heating)
Scroll the highlight to your choice using the scroll button under the
door, then press the left side button to save your selection and exit.
To deactivate Emergency Heat, press the red HEAT button for four
seconds and choose SYSTEM IN CONTROL or HYBRID HEAT,
depending on your type of heating equipment.
NORMAL OPERATION 8
Page 12
NORMAL OPERATION 9
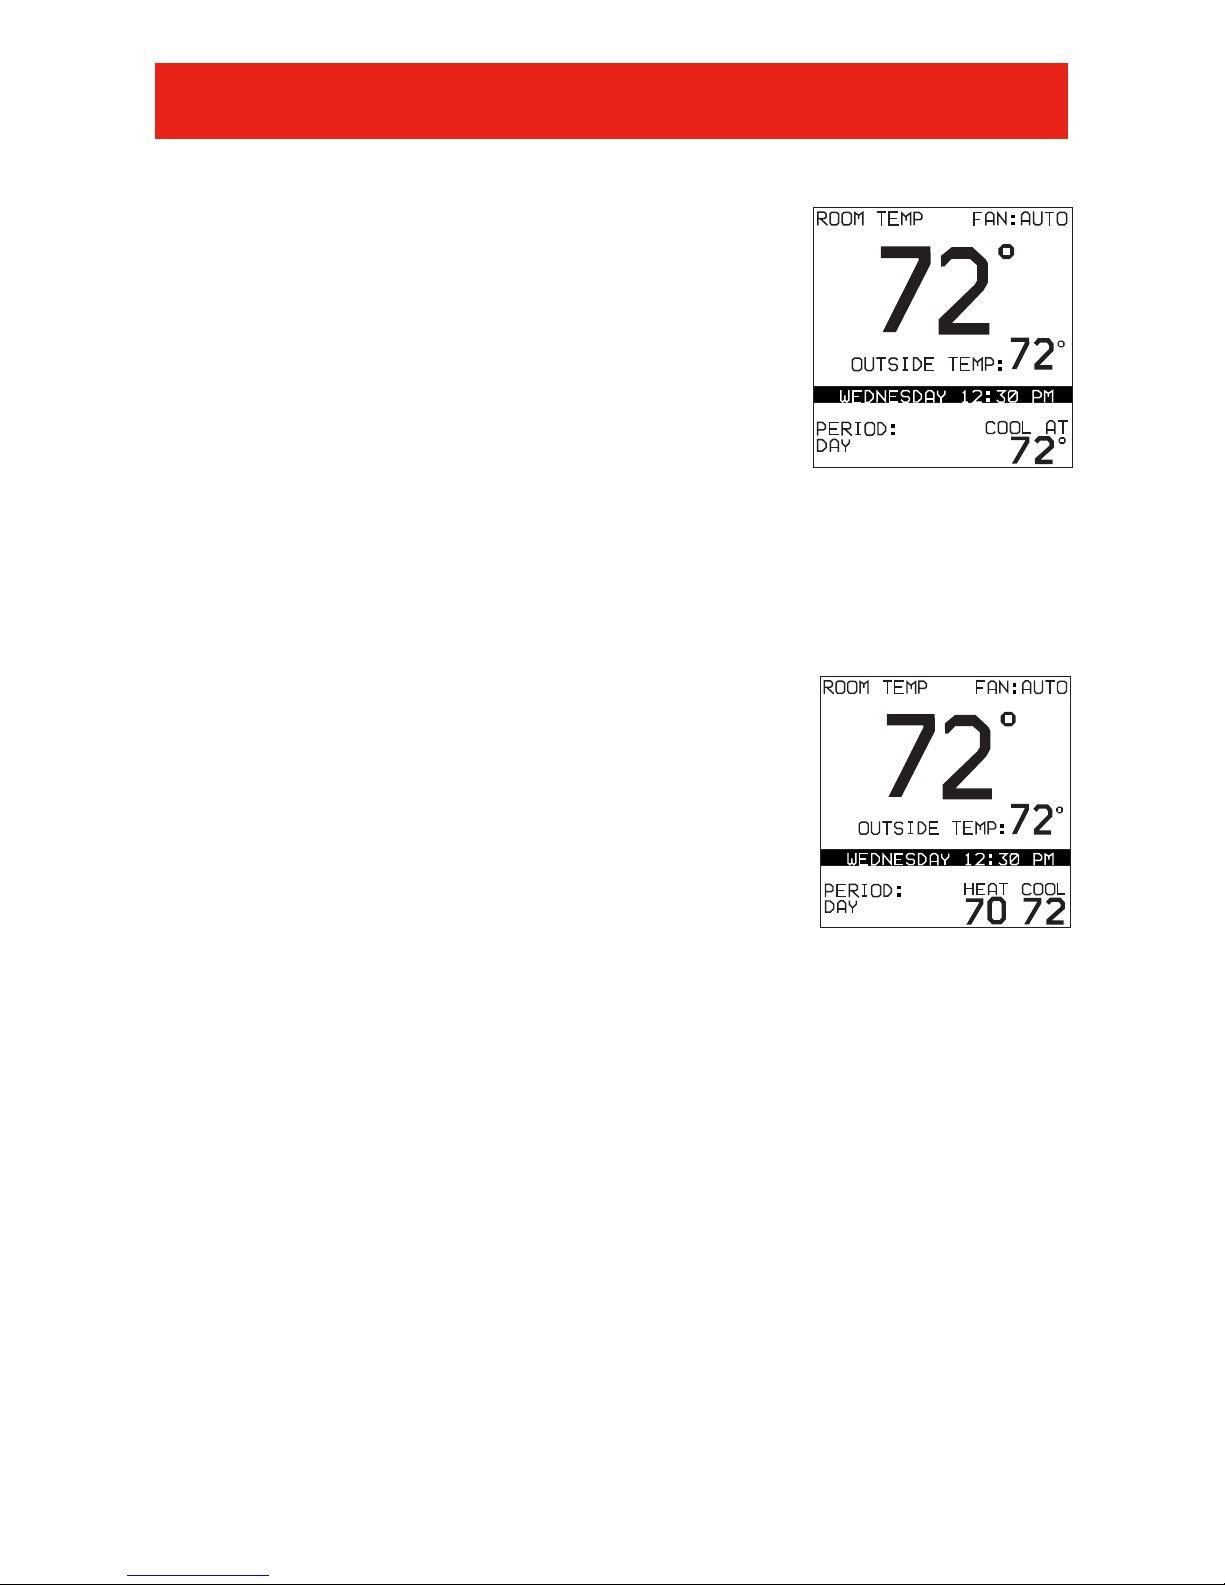
Cooling
To select cooling, press the blue COOL button.
Cooling is confirmed when the blue LED
adjacent to the blue COOL button is lit. Cooling
is operating when the blue LED is gradually
pulsing on and off. (The LEDs can be turned
off. For details, see ADVANCED SETUP –
DISPLAY on page 26.) The programmed cooling temperature will
appear in the lower right screen with the text, “COOL AT.”
Auto
The AUTO function allows your Evolution®Control
to automatically switch between heating and
cooling operation to maintain your comfort
during transitional heating and cooling seasons.
To select AUTO operation, press the red HEAT
and blue COOL buttons simultaneously. The red
and blue LEDs will light up, and both heating and cooling
temperatures will be displayed.
Adjust Heating Temperature
The Evolution®Control allows you to adjust your indoor temperature
at any time, overriding your programmed settings.
1 Press the red HEAT button. Heating is confirmed when the red
LED adjacent to the red HEAT button is lit.
2 Use the LEFT button to select your desired temperature, which
will be displayed on the lower right. An override time will be
displayed on the lower left. Please note an override time will
not appear if programming has been turned off.
Page 13

NORMAL OPERATION 10
3 You can change the override time in 15-minute increments by
pressing the Left Up/Down button until the desired override
time is selected.
- OR -
Press the HOLD button to override the schedule indefinitely.
Adjust Cooling Temperature
1
Press the blue COOL button. Cooling is confirmed when the
blue LED adjacent to the blue COOL button is lit.
2 Use the Right Up/Down button to select your desired tempera-
ture, which will be displayed on the lower right. An override time
will be displayed on the lower left. Please note an override time
will not appear if programming has been turned off.
3 You can change the override time in 15-minute increments
by pressing the Left Up/Down button until the desired override
time is selected.
- OR -
Press the HOLD button to override the schedule indefinitely.
Adjust Fan Speed
The Evolution®Control offers the benefit of customized fan speeds
during continuous fan operation.
1 Press the FAN button to adjust the fan speed between LOW,
MEDIUM, HIGH or AUTO airflow. OFF is also a selection
when the system has been turned off at the
Evolution®Control.
Page 14
NORMAL OPERATION 11
Hold Current Temperature
Press the HOLD button to override the program and maintain the
current indoor temperature set point(s) indefinitely.
To revert back to your programmed comfort schedule, press the HOLD
button again.
NOTE: HOLD is not available if programming has been turned off.
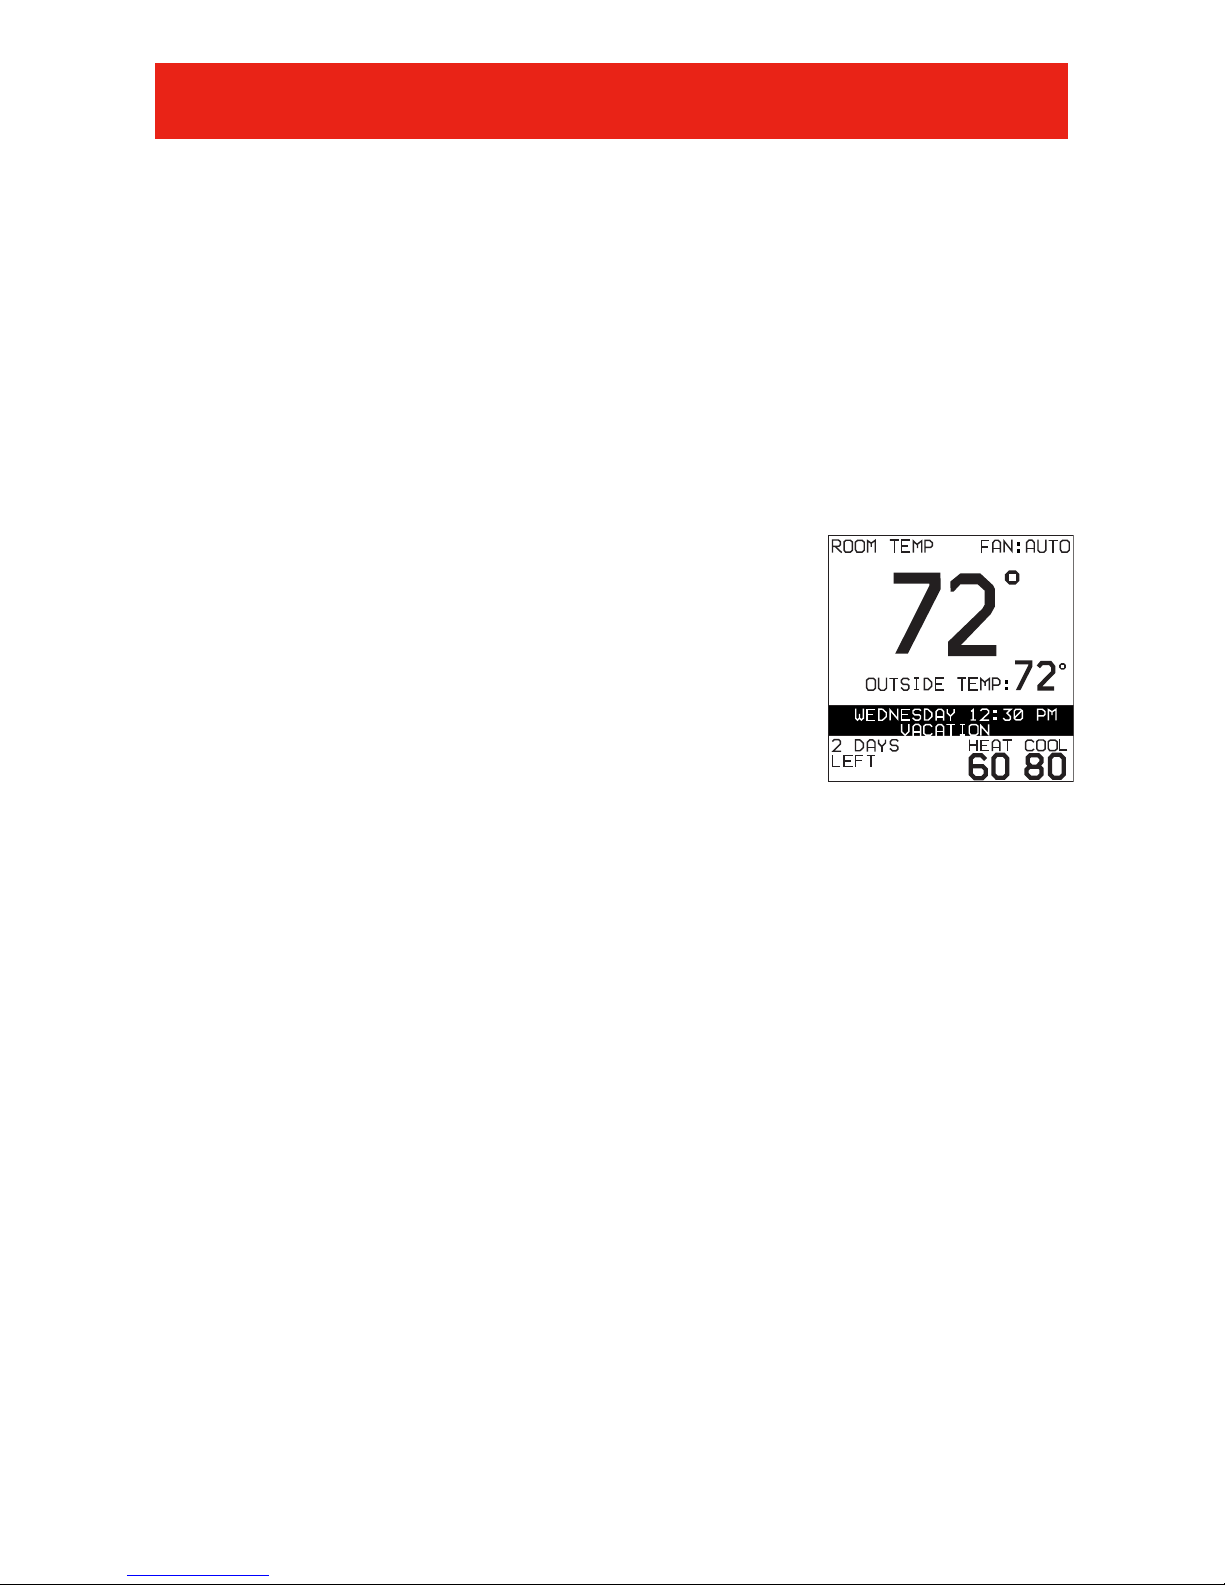
Vacation Function & Settings
VACATION operation conserves energy while
you are away and ensures a comfortable home
upon your return.
1 Openn the door of the Evolution®Control.
2 Press the VACATION button.
3 Use the Right Up/Down button to select the desired
temperature for VACATION operation.
4
Use the Left Up/Down button to select the number of days for
VACATION operation as seen in lower left corner of screen.
5 Press the VACATION button to start VACATION operation.
6 You will be prompted to start VACATION operation. Press the
RIGHT button for YES or press the LEFT button for NO.
Note: You have up to 15 minutes to make changes to the
temperature or duration after VACATION has been activated.
Any changes made after the 15 minute period will be treated
as a temporary override to vacation settings.
7 The system will automatically revert back to its normal opera-
tion after the selected number of VACATION days has expired.
- OR -
Page 15

NORMAL OPERATION 12
To cancel VACATION operation at any time simply press the
VACATION button. You will be prompted to cancel VACATION
operation. Press the RIGHT button for YES or press the LEFT
button for NO.
Details for selecting default temperature, humidity, and fan
settings for VACATION are provided in the ADVANCED SETUP
section of this manual, page 29.
Check System Status
The system status function allows you to view detailed information
about the system’s status.
1 Press the RIGHT button to check:
- Equipment status
- Accessory status
- Current humidity
- Target humidity
2 Press the RIGHT button again (from the STATUS screen) for
zoning status. Blinking Set Temperatures on this screen
indicate that the zone is calling for heating or cooling.
3 Press the RIGHT button again to return to the main screen.
- OR -
The status screen will automatically revert back the main
screen after 60 seconds.
Page 16

NORMAL OPERATION 13
Accessory Status
The accessory status screen allows you to check the approximate
usage of your mechanical or electronic air cleaner, humidifier pad,
and UV lamps before routine maintenance is required. The
accessory status screen also shows your servicing dealer’s name
and phone number. You may also reset the usage indicators for
your accessories from this screen.
1 Press the LEFT button to show the status of:
- Air filter (FILTER)
- Humidifier pad (HUM. PAD)
- UV Lamps
2 Press the LEFT button to exit.
Resetting Accessory Usage Indicator
After an air filter, humidifier pad, or UV Lamp has been replaced or
cleaned, you may need to manually reset the percent used indicator for the respective accessory.
1
Press the LEFT button to access the ACCESSORY STATUS
screen.
2 Use the SCROLL button to highlight the accessory you wish to
reset.
3 Press the RIGHT button to reset the selected accessory.
4 Press the LEFT button to exit.
- OR -
5 Continue to reset accessory usage indicators as desired.
Page 17

NORMAL OPERATION 14
Accessory Maintenance Pop-Up Messages
Accessory Pop-Up messages remind you when it’s time for
accessory maintenance. There can be up to five messages,
depending on the accessories installed with your system:
- Replace UV Lamps
- Change Humidifier Pad
- Clean Air Filter - EAC
- Clean or Replace Air Filter
- Clean Ventilator Filter
REMIND LATER: Pressing the LEFT button to select
REMIND LATER will cause the accessory status message to
reappear in seven days. The message will not reappear at the end
of the seven-day period if the usage indicator has been reset.
DISMISS NOTICE: Press the RIGHT button to DISMISS NOTICE and
reset the accessory maintenance reminder. The reminder will
reappear at the next maintenance cycle.
The maintenance cycle for the humidifier, UV lamp and EAC is
based on time and may be set by your installer. The defaults are
as follows:
EAC: 3 months of operation
Humidifier: 12 months of operation
UV Lamp: 12 months of operation
Ventilator Filter: 3 months of operation
The maintenance cycle for MEDIA or EAC + MEDIA is based on
actual airflow restriction which is automatically detected by the
system.
Page 18

NORMAL OPERATION 15
Service Pop-Up Messages
Service Pop-Up messages remind you when it’s time for routine
equipment maintenance or if the system has malfunctioned.
ROUTINE MAINTENANCE RECOMMENDED: This pop-up appears
when seasonal maintenance should be performed to maintain
optimum performance of your system. Press the RIGHT button to
DISMISS NOTICE and reset the maintenance reminder. The
reminder will not reappear until the routine maintenance timer has
expired (default 12 months). The reminder will not appear if it has
been turned off by the installer.
SYSTEM MALFUNCTION: This pop-up appears when the system
has detected an equipment failure. Press the RIGHT button to
DISMISS NOTICE . The system may continue to operate, however
total system shutdown could occur at any time. It is highly
recommended that you contact your dealer immediately. The
pop-up will reappear in 24 hours if the equipment failure has not
been corrected.
Keyboard Lock-Out
You can lock the Evolution®Control buttons to help avoid
inadvertent changes to your settings.
Keyboard lock-out can ONLY be activated from the main screen.
To do so, simultaneously press the “•” and FAN buttons for two
seconds. Keyboard lock-out will be indicated by a graphic lock
on the screen.
To unlock the control, simultaneously press the “•” and FAN
buttons for two seconds.
Page 19

PROGRAMMABLE FEATURES, 16
SETUP & OPERATION
Backlighting
The Evolution®backlight feature makes the screen easy to read,
even at night or in low light conditions. High-intensity backlighting
is activated when a button is pushed or the door at the base of
the unit is opened. The backlighting will automatically revert to a
lower intensity constant backlighting after 10 seconds of no button
activity or 30 seconds after the door is opened. Back-lighting will
remain on throughout Programming, Basic Setup, and Advanced
Setup. Constant backlighting can be adjusted in ADVANCED
SETUP, page 26 of this manual.
Determining Your Comfort Schedule
Before you program the Evolution®Control, take a moment to plan
your comfort schedule. Each day of the week is divided into four
time periods:
- WAKE
- DAY
- EVENING
- SLEEP
You can select a different heating and cooling temperature for
each time period, based on your daily or weekly schedule. Using
the chart provided, enter a start time, heating temperature and
cooling temperature. Then you can use this chart when you begin
programming.
Page 20

PROGRAMMABLE FEATURES, 17
SETUP & OPERATION
Programming Your Comfort Schedule
The Evolution®Control allows you maximum flexibility in creating a
comfort schedule that best matches your lifestyle. You can choose to
keep it simple with the same schedule every day…you can create one
schedule for the work week and one for the weekend…or, you can
make every day different. Instructions for programming this control are
detailed on the pages that follow.
NOTE: You can quit the programming process at any time by simply
pressing the SCHEDULE BUTTON or closing the door at the bottom of
the control. You will be prompted to either save your changes or to
ignore the changes using the RIGHT or LEFT buttons.
WAKE DAY EVENING SLEEP
Time / HT˚ / CL˚ Time / HT˚ / CL˚ Time / HT˚ / CL˚ Time / HT˚ / CL˚
Monday / / / / / / / /
Tuesday / / / / / / / /
Wednesday / / / / / / / /
Thursday / / / / / / / /
Friday / / / / / / / /
Saturday / / / / / / / /
Sunday / / / / / / / /
Page 21
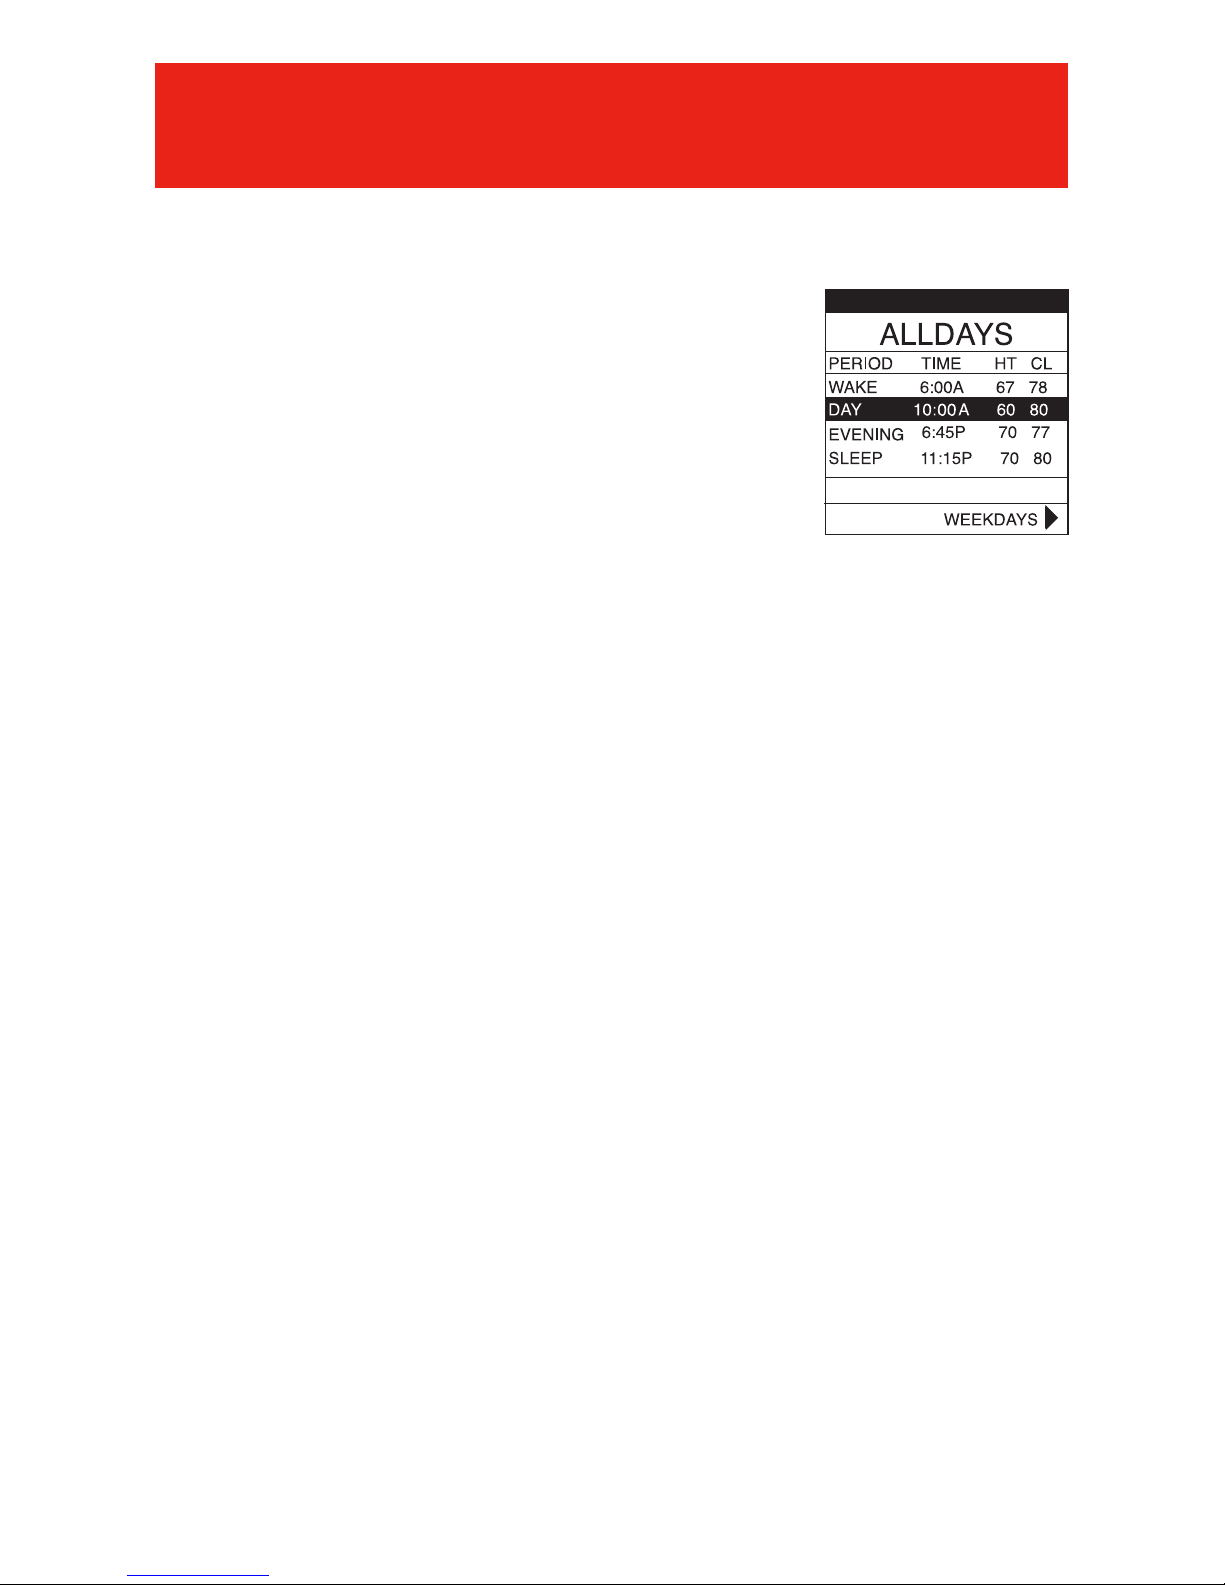
One Schedule for All Days
You can create one schedule for all seven days
of the week using the ALLDAYS screen.
1 Open the door of the control.
2 Press the SCHEDULE button to access the
schedule screen.
3
If the text “ALLDAYS” appears at the top of
the screen, you are ready to start.
- OR -
Press either the LEFT or RIGHT button repeatedly as necessary
until “ALLDAYS” is displayed. The WAKE time period will be
highlighted.
4 Using the Left Up/Down button, set the start time for this time
period.
5 Press the red HEAT button. Heating temperature will begin
flashing.
6 Set the heating temperature using the Left Up/Down button.
7 Press the blue COOL button. Cooling temperature will begin
flashing.
8 Set the cooling temperature using the Left Up/Down button.
9 Use the SCROLL button to highlight the next period, then
repeat steps 5 – 9 to select settings for DAY, EVENING and
SLEEP.
10 Exit the scheduling mode by either closing the door or pressing
the SCHEDULE button.
PROGRAMMABLE FEATURES, 18
SETUP & OPERATION
Page 22

Weekdays Schedule
You can program one schedule for Monday through Friday using the
WEEKDAYS screen.
1 Open the door of the control.
2 Press the SCHEDULE button to access the schedule screen.
3 If the word “WEEKDAYS” appears at the top of the screen, you are
ready to start. If not, press either the LEFT or RIGHT button as
necessary until “WEEKDAYS” is displayed. The WAKE time period
will be highlighted.
4 Using the
Left Up/Down button
, set the start time for this time
period.
5 Press the red HEAT button. Heating temperature will begin
flashing.
6 Set the heating temperature using the
Left Up/Down button
.
7 Press the blue COOL button. Cooling temperature will begin
flashing.
8 Set the cooling temperature using the
Left Up/Down button
.
9 Use the SCROLL button to highlight the next period, then repeat
steps 5 – 9 to select settings for DAY, EVENING and SLEEP.
10 Exit by pressing the SCHEDULE button or closing the door.
- OR -
11 Begin entering your WEEKEND schedule by pressing the RIGHT
button and following the Weekend Schedule instructions (the
next section in this manual).
PROGRAMMABLE FEATURES, 19
SETUP & OPERATION
Page 23

Weekend Schedule
You can program an identical schedule for Saturday and Sunday
using the WEEKEND screen.
1 Open the door of the control.
2 Press the SCHEDULE button to access the schedule screen.
3 If the word “WEEKEND” appears at the top of the screen, you
are ready to start. If not, press either the LEFT or RIGHT button
as necessary until WEEKEND is displayed. The WAKE time
period will be highlighted.
4 Using the Left Up/Down button, set the start time for this period.
5 Press the red HEAT button. Heating temperature will begin
flashing.
6 Set the heating temperature using the Left Up/Down button.
7 Press the blue COOL button. Cooling temperature will begin
flashing.
8 Set the cooling temperature using the Left Up/Down button.
9 Using the SCROLL button to highlight the next period, repeat
steps 5 – 9 to select DAY, EVENING and SLEEP.
10 Exit by pressing the SCHEDULE button or closing the door.
- OR -
11 Begin entering a separate schedule for individual days by
pressing the RIGHT button and following the instructions in
the Daily Schedule (the next section in this manual).
PROGRAMMABLE FEATURES, 20
SETUP & OPERATION
Page 24

Daily Schedule
You can program a different schedule for each day of the week by
using the SUNDAY, MONDAY, TUESDAY, WEDNESDAY, THURSDAY,
FRIDAY and SATURDAY screens.
1 Open the door of the control.
2 Press the SCHEDULE button to access the schedule screen.
3 If the word “SUNDAY,” “MONDAY,” “TUESDAY,” “WEDNESDAY,”
“THURSDAY,” “FRIDAY,” or “SATURDAY” appears at the top of
the screen, you are ready to start..
4 If not, press either the LEFT or RIGHT button repeatedly as
necessary until the day of the week you want to select is
displayed. The WAKE period will be highlighted.
5 Using the Left Up/Down button, set the start time for this time
period.
6 Press the red HEAT button. Heating temperature will begin
flashing.
7 Set the heating temperature using the Left Up/Down button.
8 Press the blue COOL button. Cooling temperature will begin
flashing.
9 Set the cooling temperature using the Left Up/Down button.
10 Using the SCROLL button, highlight the next time period, and
repeat steps 5 – 9 to select settings for DAY, EVENING and
SLEEP.
11 Repeat steps 5 – 11 in this section for each day you would like
to schedule or use the COPY function to copy one day to
another.
12 Exit by pressing the SCHEDULE button or closing the door.
PROGRAMMABLE FEATURES, 21
SETUP & OPERATION
Page 25

Copy
1
To COPY a daily schedule to another day, use the SCROLL
button to highlight the COPY function.
2 You will be prompted to select YES to continue or NO to return
to the schedule screen. Press the RIGHT button to access the
COPY screen.
3 Use the SCROLL button to highlight the first day to which you
wish to copy.
4 Use the Left Up/Down button to select YES to copy, or NO to
not copy.
5 Repeat steps 2 & 3 until YES appears for each day to which
you would like to copy.
6 Press the RIGHT button to copy or the LEFT button to cancel.
7 A confirmation screen will list the days you have selected. If
the list is correct, press the RIGHT button to confirm and return
back to the SCHEDULE function. If you would like to make a
change, press the LEFT button to return to the COPY screen.
NOTE: You can quit the programming process at any time by
simply pressing the SCHEDULE BUTTON or closing the door at
the bottom of the control.
PROGRAMMABLE FEATURES, 22
SETUP & OPERATION
Page 26

Programming Fan Speed
You can select a different fan speed for each time period of your
comfort schedule. Scheduling the fan speed follows the same
basic steps as programming time and temperature settings. You
can create one fan schedule for ALLDAYS, WEEKDAYS, WEEKENDS,
or a different schedule for each day.
Programmable fan is automatically defaulted to off. Your dealer will
need to turn programmable fan on in the dealer thermostat setup
screens.
1 Open the door of the control.
2 Press the SCHEDULE button to access the schedule screen.
3 Press the FAN button to access the Fan Speed programming
screen.
4 Press the LEFT or RIGHT button to select the days you wish to
program – ALLDAYS, WEEKDAYS, WEEKEND, or choose a
specific day (MON, TUES, WED, etc.).
5 Using the Left Up/Down button, select your desired fan
speed – LOW, MED, HIGH or AUTO.
6 Use the SCROLL button to highlight the next period, then
repeat steps 5 and 6 to select settings for DAY, EVENING and
SLEEP.
7 Press the FAN button to return to the standard scheduling
screen.
- OR -
8 Exit the scheduling mode by either closing the door or
pressing the SCHEDULE button.
PROGRAMMABLE FEATURES, 23
SETUP & OPERATION
Page 27

Fresh Air Ventilation
A fresh air ventilator is used to exchange stale indoor air for fresh
outdoor air. Fresh air ventilation can be customized with up to four
settings. The setting you choose for heating operation can be
different from the setting you choose for cooling. The indoor fan
will operate while the ventilator operates.
HIGH: The fresh air ventilator will operate at high. This setting is
recommended to help quickly remove unwanted odors.
LOW: The fresh air ventilator will operate at low continuously. This
setting is recommended for continuous operation in mild climates
with low humidity.
AUTO: The system will automatically vary the fresh air ventilator
speed to accommodate outdoor seasonal conditions and desired
indoor humidity and temperature settings. This setting is recommended for cold, northern climates.
DEHUM: The system will operate the fresh air ventilator only if dehumidification is necessary. This setting is only available in heating.
Refer to the BASIC SETUP section of this manual to select your
fresh air setting. Please note that a fresh air setting will only appear
if a ventilator has been installed.
ZONING FEATURES, SETUP & OPERATION 24
VENTILATION FEATURES, SETUP & OPERATION
24
Page 28

Accessory Maintenance Reminders
The Evolution®Control can remind you when it’s time to change the
filter, humidifier pad, UV lamps, and ventilator pre-filter with a popup message. The REMINDERS screen allows you to individually turn
on or off your accessory maintenance reminders depending on
which accessories are installed.
1 Open the door of the Evolution®Control.
2 Press the ADVANCED setup button.
3 Use the SCROLL button to select the accessory service
reminder you would like to turn ON or OFF.
4 Use the Left Up/Down button to turn the reminder ON or OFF.
A pop-up reminder will only appear when it is time for
maintenance if ON is selected.
5 For a detailed description of accessory maintenance
reminders, please see ACCESSORY POP-UP MESSAGES,
page 13 in this manual.
6 Press the LEFT or RIGHT side buttons to select another
ADVANCED feature.
- OR -
7 To exit, push the ADVANCED button or simply close the door.
You may exit at any stage during this setup.
NOTE: You can exit Advanced Setup at any time. When exiting,
you will be prompted to save changes if you have made any.
Select “YES” to save your changes, “NO” to revert back to
previous settings.
ADVANCED SETUP 25
Page 29

Display Settings
You can adjust the constant backlight level, display contrast, color
theme, display behavior and font.
1 Open the door of the Evolution®Control.
2 Press the ADVANCED setup button.
3 Press the RIGHT button once to select the DISPLAY screen
(2 of 5).
4 Use the SCROLL Up/Down button to select a Display item.
Press either Left or Right Up/Down to adjust the item.
CONTRAST - Adjust the contrast of the display.
BACKLITE - Adjusts the constant backlight level of the display.
HEAT/COOL LITES - Turns on/off the heat/cool LED indicators.
COLOR THEME - Selects the desired foreground/background
colors. After changing, wait two seconds for the change to
take affect.
MAIN SCREEN - Select EZ-VIEW to display the simple main
screen, or CLASSIC to display the information-rich screen.
TEMP FONT - Changes the font of the large actual temperature
digits. Select SIMPLE or STYLISH.
- OR -
5 To exit, push the ADVANCED button or simply close the door.
You may exit at any stage during this setup.
NOTE: You can exit Advance Setup at any time. When exiting,
you will be prompted to save changes if you have made any.
Select “YES” to save your changes, “NO” to revert back to
previous settings.
ADVANCED SETUP 26
Page 30

ADVANCED SETUP 27
Heating Humidity
If you have a whole house humidifier, heat recovery ventilator (HRV)
or energy recovery ventilator (ERV) as a part of your system, you
can select your desired heating humidity setting and change how
your system controls the humidifier or fresh air ventilation.
1 Open the door of the Evolution®Control.
2 Press the ADVANCED setup button.
3 Press the RIGHT button twice to view the HEATING HUMIDITY
screen (3 of 5).
4
Use the
LEFT
button to select your desired humidity setting.
5 To exit, press ADVANCED or simply close the door.
- OR -
6 If you want to change how your system controls the heating
humidity, scroll to HUMIDITY. You will have three options to
choose from:
a. OFF – The system will disable humidification or
ventilator dehumidification.
b. MANUAL – The system will control the relative humidity
in your home based on your desired set point.
c. AUTO – The system will control the relative humidity
in your home based on the setting you have selected
and outside air temperature. The humidity target is
lowered automatically as the outdoor temperature
decreases.
7 Use the Right Up/Down button to make your selection.
8 If you want to change how your system controls fresh air
ventilation scroll to FRESH AIR. For a description of settings
see FRESH AIR VENTILATION, page 24 in this manual.
9
Use the
Right Up/Down
button to select AUTO, HIGH, LOW
OR DEHUM.
10 To exit, press ADVANCED or simply close the door.
NOTE: You can exit Advanced Setup at any time. When exiting, you
will be prompted to save changes if you have made any. Select
“YES” to save your changes, “NO” to revert back to previous settings.
Page 31

ADVANCED SETUP 28
Cooling Humidity
1
Open the door of the Evolution®Control.
2 Press the ADVANCED setup button.
3 Press the LEFT button three times to view the COOLING
HUMIDITY screen (4 of 5).
4 Use the LEFT button to set your desired humidity level.
5 To exit, press ADVANCED or simply close the door.
- OR -
6 If you want to change the way cooling dehumidification is
controlled, scroll to DEHUMIDIFY. You will have two options.
OFF – The system will not activate the cooling equipment to
dehumidify if the cooling temperature has been satisfied.
ON – The system dehumidifies by activating the cooling
equipment – even after the cooling temperature has been
satisfied. The system will not cool to dehumidify below 70° F
n order to protect equipment.
Your air conditioning system will provide excellent
humidification control with DEHUMIDIFY set to either ON or OFF.
However, you will receive better humidification control with
the ON setting.
7 Use the LEFT button to make your selection.
8 To exit, press ADVANCED or simply close the door.
NOTE: You can exit Advanced Setup at any time. When exiting,
you will be prompted to save changes if you have made any.
Select “YES” to save your changes, “NO” to revert back to previous settings.
Page 32

ADVANCED SETUP 29
Vacation Settings
You can pre-select temperature, humidity and fan settings for
your VACATION function. These settings will take effect when
you activate VACATION operation as outlined in the NORMAL
OPERATION section of this manual, pages 7 - 15.
1 Open the door of the Evolution®Control.
2 Press the ADVANCED setup button.
3 Press the RIGHT button four times to select the VACATION
screen (5 of 5)..
4 Use the LEFT button to select the highest temperature the
system will allow during VACATION operation.
5 Press down on the SCROLL button to select MIN TEMPERA-
TURE.
6 Use the LEFT button to select the lowest temperature the
system will allow during VACATION operation.
7 Press down on the SCROLL button to select MAX HUMIDITY.
8 Use the LEFT button to select the highest humidity the system
will allow during VACATION operation.
9 Press down on the SCROLL button to select MIN HUMIDITY.
10 Use the LEFT button to select the lowest humidity the system
will allow during VACATION operation.
11 Press down on the SCROLL button to select FAN.
12 Use the LEFT button to select AUTO, LOW, MED or HIGH fan
operation.
13 To exit, press ADVANCED or simply close the door.
NOTE: You can exit at any time. When exiting, you will be
prompted to save changes if you have made any. Select “YES”
to save your changes, “NO” to revert back to previous settings.
Page 33

ADVANCED SETUP 30
Accessory Status…pg. 12
This function allows you to check the approximate usage of an air
filter, humidifier pad, UV lamp(s) or ventilator pre-filter.
All Days Schedule…pg. 4 & 18
One comfort schedule that stays the same every day of the week.
Auxiliary Heat…pg. 7
A supplemental heating source often found with heat pump systems that is used to maintain comfort when outdoor temperatures
fall significantly.
Comfort Schedule…pg. 17
A personalized list of temperature and fan settings organized
according to time of day. The
Evolution®Control allows up to four
different periods per day with the flexibility to have a different
schedule every day of the week.
Emergency Heat…pg. 7-8
Typically associated with heat pumps, it is a secondary source of
heating used when outdoor temperatures are too cold to allow the
heat pump to operate effectively, or when the heat pump has malfunctioned.
Hold…pg. 10
This function allows you to override the programmed temperature
settings indefinitely.
GLOSSARY 30
Page 34

Weekdays Schedule…pg. 19
One comfort schedule that is repeated every weekday, Monday
through Friday.
Weekend Schedule…pg. 20
One comfort schedule that is repeated on Saturday and Sunday.
A
GLOSSARY 31
Page 35

Before purchasing this appliance, please read the important
energy cost and efficiency information available from your dealer.
Manufacturer reserves the right to discontinue, or change, at any time,
specifications or designs without notice and without incurring obligations.
OMUID-4BR
© Bryant Heating & Cooling Systems 2009
7310 West Morris Street, Indianapolis, IN 46231
Visit our website at www.bryant.com
Printed in China
 Loading...