

Bryant Evolution Connex SYSTXBBECW01-A, Evolution Connex SYSTXBBECN01-A, Evolution Connex SYSTXBBECC01-A Owner's Manual

SYSTXBBECW01--A, SYSTXBBECN01--A
& SYSTXBBECC01--A
Evolutionr Connext Control
Owner’s Manual
A12479
NOTE: Read the entire instruction manual before starting the installation.
US Patents: Carrier U.S. Pat No. 7,243,004, Carrier U.S. Pat No. 7,775,452, pointSETt U.S.
Pat No. 7,415,102


TABLE OF CONTENTS
PAGE
Introduction 1.....................................................
Home Screen 1....................................................
Information Displayed 1...........................................
Wi--Fi Connectivity 2.............................................
Information Buttons 4.............................................
Main Screen 4....................................................
System Mode 4..................................................
Set Day and Time 5..............................................
Adjust Temperature (Temporary Hold) 6..............................
Adjusting Comfort Activities (See Comfort Profiles on Page 9) 6...........
Adjusting Heating 6..............................................
Adjusting Cooling 7..............................................
Adjust Temperature (Permanent Hold) 7..............................
Adjusting Comfort Activities (See Comfort Profiles on Page 9) 7...........
Adjusting Heating 8..............................................
Adjusting Cooling 8..............................................
Features 8........................................................
Adjust Fan Speed 8...............................................
View Current Humidity Level 9.....................................
Menu Screen 9....................................................
Comfort Profiles 9...............................................
Home Humidity Control 11........................................

TABLE OF CONTENTS (cont.)
PAGE
Home Fresh Air Control 12........................................
Away Humidity Control 13.........................................
Away Fresh Air Control 13.........................................
Programming the Evolutionr Connex Control 14.......................
Schedule Yourself 14.............................................
Guide Me through Scheduling 15....................................
Upload My Schedule 17...........................................
Set Time and Date 18.............................................
Operating Status 19..............................................
Accessories Status 20.............................................
Zone Status (If Applicable) 20......................................
Vacation Settings 21..............................................
Wireless Set--up 22..............................................
Wi--Fi Diagnostics 30............................................
Screen Lock 31..................................................
Weather Forecast 33..............................................
Service 34......................................................
Photo Upload 40.................................................
Accessory Reminders 41..........................................
Display 42.....................................................
Heat Source (If Applicable) 43......................................
Zone Names (If Applicable) 43.....................................
Home Automation System Interface (If Applicable) 44...................

1
INTRODUCTION
CONGRATULATIONS! Your decision to choose the EvolutionR Connext
Control puts you in a select group of homeowners who understand the value of
precise comfort control and appreciate the simplicity of an easy--to--use, intuitive,
control.
Your new Evolution Connex Control offers high quality comfort technology. Please
take a few moments to carefully read through this manual. Next set up a comfort
profile and schedule that makes sense for your lifestyle; then relax and enjoy the
new comfort of your home!
HOME SCREEN
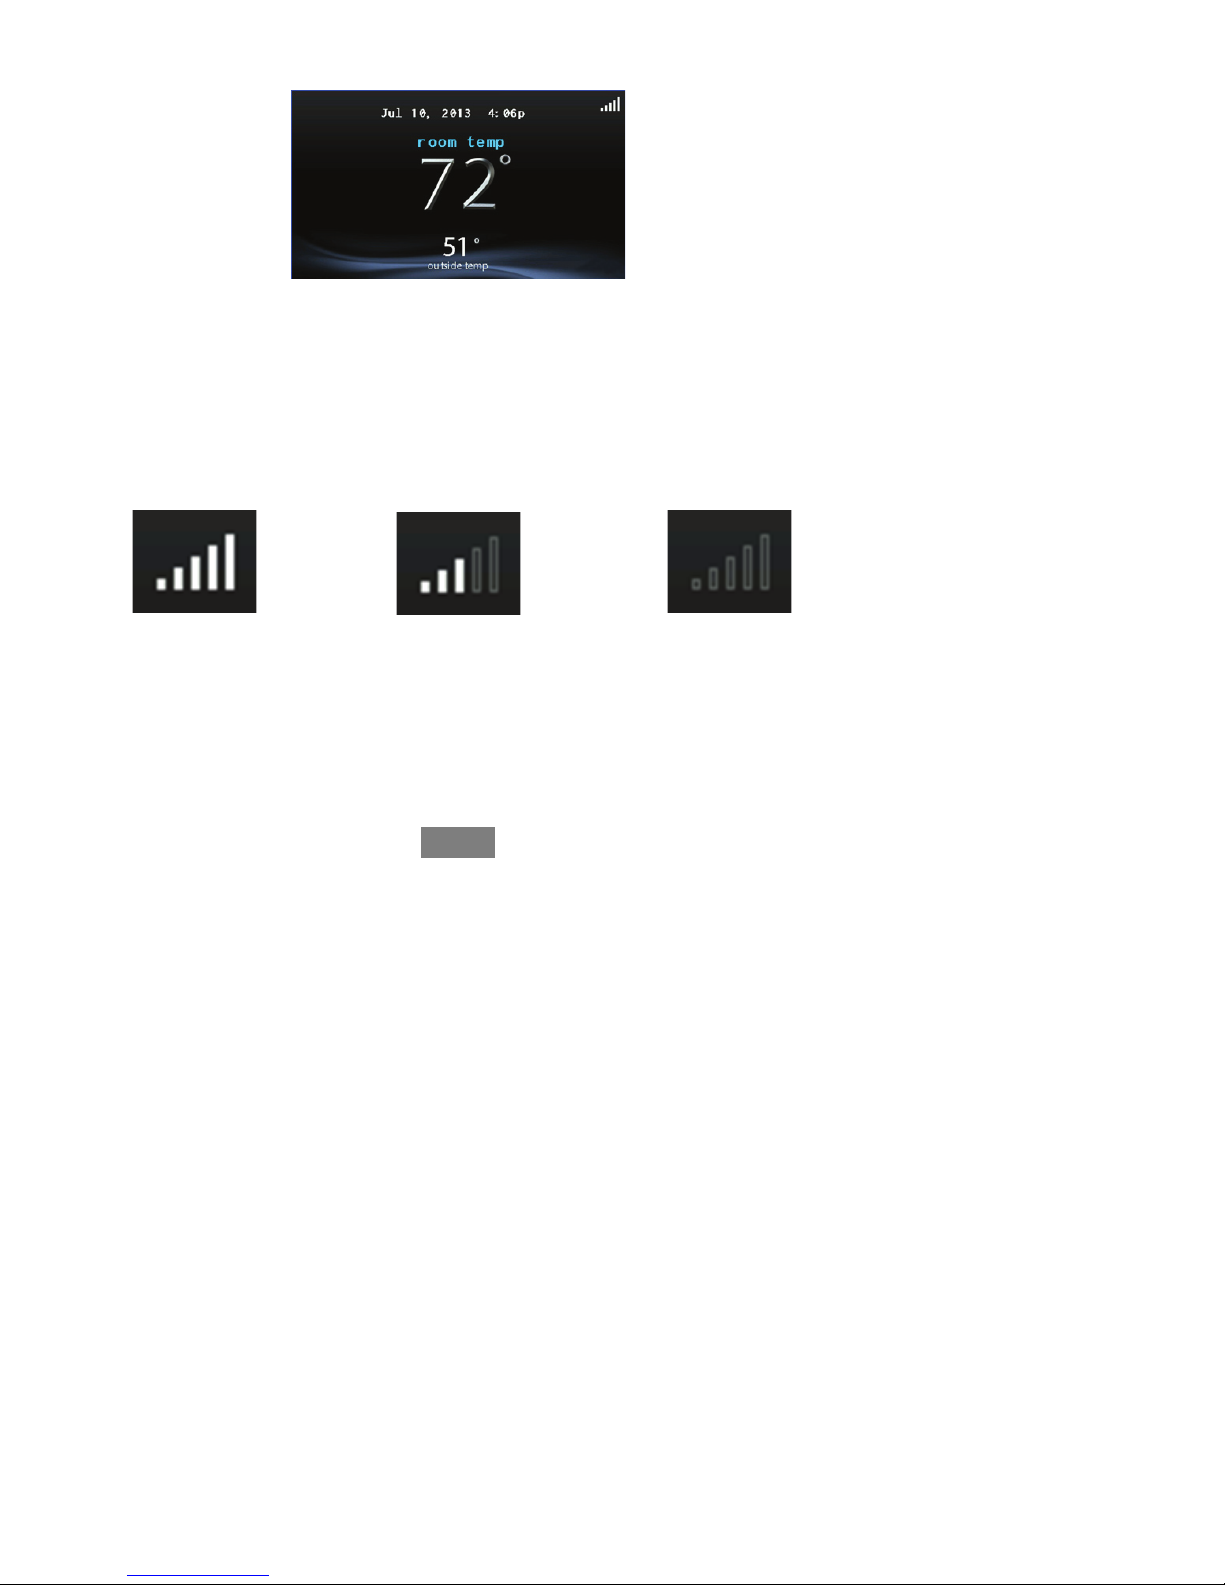
Information Displayed
The information displayed on the home screen will appear when there has been no
interaction with the Evolution Connex Control for at least one minute. The basic
information displayed on the Home Screen consists of the current date and time, the
room temperature (zone temperature if applicable), the outdoor temperature, and
current weather condition. Connectivity status to the home Wi--Fi network and the
MyEvolution Server will also be displayed on the Home Screen for compatible
Wi--Fi units (SYSTXBBECW01--A and SYSTXBBECC01--A). Note: You must
have Wi--Fi enabled for the indicator to appear.
If you have uploaded a photo to the control (see page 40), it will be displayed until
you touch the display. You will then be taken to the Home Screen.
2
Wi--Fi Connectivity Status
A13258
With the SYSTXBBECW01--A and SYSTXBBECC01--A Evolution Connex Wi--Fi
models, connectivity status to the home Wi--Fi network and MyEvolution Server is
displayed in the top right hand corner of the Home Screen.
When the Evolution Connex control is connected to the home Wi--Fi network and
the MyEvolution Server, the signal strength bars will be displayed in white as
depicted in the image above. Connection strength to the home Wi--Fi network will
be indicated by the number of solid white bars displayed.
Strong Connection
Limited Connection No Connection
A13259
S Pressing on the Connectivity Status bars from the Home Screen will
allow you to view the Remote Access Status screen.

3
A13266
S NOTE: If the Evolution Connex control is connected to the home Wi--
Fi network but loses connection to the MyEvolution Server, the signal
strength bar will be displayed in red as depicted in the image below.
Connection strength to the home Wi--Fi network will continue to be
displayed by the number of solid bars. If this problem persists, please
contact Bryant Customer Relations at 1--800--4284326 for assistance.
Strong Connection
Limited Connection No Connection
A13261
S Again, pressing on the Connectivity Status bars from the Home Screen
will allow you to view the Remote Access Status screen.
4
A13267
Information Buttons
On the bottom of some screens will be an information icon. By pressing the
information icon, a text box will display to show what interactions are available on
that particular screen. To close the text box, press the information icon again.
FIGURE PLACE HOLDER
A12103
MAIN SCREEN
The main screen is where most interactions will take place. Touch anywhere on the
screen to arrive at the main screen.
System Mode
S Once in the main screen,

5
S To access your system mode touch the MODE label located in the upper
right of the control.
S The drop--down menu will allow you to choose between AUTO, HEAT,
COOL, FAN ONLY and OFF.
S If OFF is selected that means your heating and cooling systems are not
operational.
S If AUTO is selected, the Evolution Connex Control automatically
switches between heating and cooling to maintain your comfort during
transitional seasons.
S If HEAT is selected then the Evolution Connex Control operates only the
heating system.
S If COOL is selected then the Evolution Connex Control operates only
the cooling system.
S If FAN ONLY is selected, then the Evolution Connex Control operates
the indoor fan.
Set Day and Time
S To set the day and time for your home screen enter the main screen by
touching anywhere on the control.
S Touch the DAY and TIME label located at the top middle of the screen
or access by going through the menu screen (see page 18).
S To set the HOUR, MINUTE, MONTH, DAY,orYEAR touch the fea-
ture you wish to change.
S Use the Up (Y) and Down (B) buttons to make the appropriate
changes.
S When you have completed all of the settings, touch SAVE.
S If you make a mistake you may touch CANCEL and begin again.

6
Adjust Temperature (Temporary Hold)
The Evolution Connex Control allows you to temporarily override your
programmed schedule by adjusting the indoor temperature at any time to meet your
needs.
Adjusting Comfort Profiles (See Comfort Profiles on Page 9)
S To adjust the comfort activity, enter the main screen by touching any-
where on the control.
S Touch the activity under the Touch N Got feature on the left side of the
screen; then select the desired activity of HOME, AWAY, SLEEP,or
WA K E .
S Use the Up (Y) and Down (B) buttons to change the time to temporar-
ily hold the desired temperature in 15 minute increments.
S When the correct time interval is displayed, touch DONE.
S To return to the scheduled program, touch HOLD UNTIL,andthen
select PER SCHEDULE.
Adjusting Heating
S To adjust the heating temperature, enter the main screen by touching
anywhere on the control.
S With the system in either AUTO or HEAT mode, use the Up (Y)and
Down (B) buttons to set the desired temperature.
S On the left hand side of the screen, the comfort profile will switch to
manual, and the system will be placed in a temporary hold.
S Use the Up (Y) and Down (B) buttons to change the time to temporar-
ily hold the desired temperature in 15 minute increments.
S When the correct time interval is displayed, touch DONE.
S To return to the scheduled program, touch HOLD UNTIL,andthen
select PER SCHEDULE.

7
Adjusting Cooling
S To adjust the cooling temperature, enter the main screen by touching
anywhere on the control.
S With the system in either AUTO or COOL mode, use the Up (Y)and
Down (B) buttons to set the desired temperature.
S On the left hand side of the screen, the comfort profile will switch to
manual, and the system will be placed in a temporary hold.
S Use the Up (Y) and Down (B) buttons to change the time to temporar-
ily hold the desired temperature in 15 minute increments.
S When the correct time interval is displayed, touch DONE.
S To return to the scheduled program, touch HOLD UNTIL,andthen
select PER SCHEDULE.
Adjust Temperature (Permanent Hold)
The Evolution Connex Control allows you to permanently override your
programmed schedule by adjusting the indoor temperature at any time to meet your
needs.
Adjusting Comfort Profiles (See Comfort Profiles on Page 9)
S To adjust the comfort activity, enter the main screen by touching any-
where on the control.
S Touch the activity under the Touch N Got feature on the left side of the
screen; then select the desired activity of HOME, AWAY, SLEEP, or
WA K E .
S Touch the HOLD UNTIL button, then touch HOLD.
S To return to the scheduled program touch HOLD, and then touch PER
SCHEDULE.

8
Adjusting Heating
S To adjust the heating temperature, enter the main screen by touching
anywhere on the control.
S With the system in either AUTO or HEAT mode, use the Up (Y)and
Down (B) buttons to set the desired temperature.
S On the left hand side of the screen, the comfort profile will switch to
MANUAL.
S Touch the HOLD UNTIL button, then touch HOLD.
S To return to the scheduled program, touch HOLD, and then touch PER
SCHEDULE.
Adjusting Cooling
S To adjust the cooling temperature, enter the main screen by touching
anywhere on the control.
S With the system in either AUTO or COOL mode, use the Up (Y)and
Down (B) buttons to set the desired temperature.
S On the left hand side of the screen, the comfort profile will switch to
MANUAL.
S Touch the HOLD UNTIL button, then touch HOLD.
S To return to the scheduled program, touch HOLD, and then touch PER
SCHEDULE.
FEATURES
Adjust Fan Speed
The Features function of Evolution Connex Control allows you to adjust the fan
speed during continuous fan operation.
S To adjust the fan speed, enter the main screen by touching anywhere on
the control.

9
S Touch FEATURES on the top left of the screen.
S A drop down menu will appear. Touch FAN selection.
S Use the Up (Y) and Down (B) buttons to set the fan to OFF, LOW,
MEDIUM or HIGH, then touch SAVE.
View Current Humidity Level
The Features function of Evolution Connex Control allows you to view the current
humidity level within the conditioned space.
S Enter the main screen by touching anywhere on the control.
S Touch FEATURES on the top left of the screen.
S In the drop down menu you will see your measured humidity levels
within the conditioned space.
MENU SCREEN
Your menu screen offers more features and control for your Evolution Connex
Control. Touch the menu button at the bottom right of the main screen.
Comfort Profiles
You will need to set the comfort profiles before you attempt to program your new
Evolution Connex Control.
S The COMFORT PROFILES button includes settings for Temperature
and Fan Profiles, as well as Humidity and Fresh Air profiles

10
A12487
S Set your desired heating and cooling temperatures and your fan setting
using the TEMPERATURE AND FAN PROFILES for each activity.
d For example to change your HOME comfort profile, touch the
HOME icon.
d Use the Up (Y) and Down (B) buttons to change the fan settings,
heating and cooling temperatures. When you are done, press the
DONE button on the bottom right.
d Do the same thing to change the WA K E and SLEEP profiles.
d The AWAY profile provides an extra feature called Smart Setback.
It allows the Evolutionr System to dynamically determine the away
temperature automatically to save the most amount of money, yet
reach your comfort settings when you return home.
d Use the Up (Y) and Down (B) buttons to change the fan settings
and temperature settings. The temperature settings are the range in
which you choose to keep your home conditioned while you are
away. The Smart Setback function will maintain your temperature
within this range.
S Set your desired humidity and fresh air (if applicable) using the HU-
MIDITY AND FRESH AIR PROFILES for each activity.

11
Home Comfort Profile Humidity Control
S Touch WHEN AT HOME to set your humidity settings while the home
is occupied to enjoy superior comfort.
S If you have a humidifier installed for your system, touch HEATING
HUMIDITY to set the desired humidity level within the home.
d You will have the option to choose to use USE HUMIDIFIER TO
HUMIDIFY and/or USE VENTILATOR TO DEHUMIDIFY,ifa
ventilator is installed in your system. Select YES or NO to the options that apply to your system.
d If you choose YES for either, next touch the SET HUMIDITY
button.
d You will have the option of choosing between WINDOW PRO-
TECT or MANUAL.
d Choosing MANUAL, allows you to set the humidity level between
5--45%. Use the Up (Y) and Down (B) buttons to set the desired
humidity level.
d Choosing WINDOW PROTECT, the system will pick the right
settings to keep condensate from forming on your windows, based
on the outdoor temperature and the quality of your windows.
d Press SAVE when finished, or CANCEL to discard any changes.
S Next, select your desired humidity level during cooling by touching
COOLING HUMIDITY.
d Use the Up (Y) and Down (B) buttons to set the desired dehumidi-
fication level between 46--58%.
d Touch YES or NO for the system to over--cool the conditioned
space by up to 3º F to remove as much humidity out of the air as
possible.
d Press SAVE when finished, or CANCEL to discard any changes.

12
Home Comfort Profile Fresh Air Control
S If a ventilator is installed in your home, select the amount of fresh air to
circulate during heating mode by touching HEATING FRESH AIR.
d You will have the option of choosing among AUTO, MANUAL,or
OFF.
d The AUTO setting will allow the system to choose the fresh air
setting in a range of Low, Medium or High, as selected by you.
d The MANUAL setting allows you to select the percentage of fresh
air to supply to your home.
d Use the Up (Y) and Down (B) buttons to set the desired ventilator
speed level.
d Press SAVE when finished, or CANCEL to discard any changes.
S If applicable, next select the amount of fresh air to circulate during cool-
ing mode by touching Cooling Fresh Air. Again, you will have the option of choosing among AUTO, MANUAL and OFF.
d Use the Up (Y) and Down (B) buttons to set the desired ventilator
speed level.
d Press SAVE when finished or CANCEL to discard any changes.
Away Comfort Profile Humidity Control
S You may wish to have different humidity settings when you’re away.
Press the Menu area on the Main Screen to access the additional menu
selections. Select COMFORT PROFILES, then select the HUMIDITY
AND FRESH AIR PROFILES option.
d Touch AWAY to set your humidity settings while you are away
from home to save the most amount of energy.
 Loading...