

Bryant 912SB, 925SA, 926TA A SERIES, 925TA, 925TA SERIES B Installation, Start-up, Operating And Service And Maintenance Instructions
Page 1
912SB
SINGLE STAGE 4--WAY MULTIPOISE
CONDENSING GAS FURNACE
SERIES B
Installation, Start--up, Operating and
Service and Maintenance Instructions
NOTE: Read the entire instruction manual before starting the
installation.
SAFETY CONSIDERATIONS 3.........................
INTRODUCTION 4...................................
CODES AND STANDARDS 4...........................
ELECTROSTATIC DISCHARGE (ESD) PRECAUTIONS 4...
ACCESSORIES 5.....................................
LOCATION 8........................................
General 8.........................................
AIR FOR COMBUSTION AND VENTILATION 9..........
Introduction 9.....................................
CONDENSATE TRAP 13...............................
Upflow 13........................................
Downflow 13.....................................
Horizontal 13.....................................
CONDENSATE DRAIN 17.............................
INSTALLATION 20...................................
Upflow 20........................................
Downflow 20.....................................
Horizontal 21......................................
Filter Arrangement 21...............................
AIR DUCTS 29.......................................
General Requirements 29.............................
Ductwork Acoustical Treatment 29.....................
GAS PIPING 31......................................
ELECTRICAL CONNECTIONS 32.......................
115--V Wiring 32...................................
J--Box Installation 33................................
24--V Wiring 33....................................
Accessories 33.....................................
Alternate Power Supplies 33..........................
VENTING 37........................................
Special Venting Requirements for Installations in Canada 37.
General 38........................................
Materials 38.......................................
Venting Systems 38.................................
Locating the Vent Termination 39......................
Combustion Air and Vent Piping Insulation Guidelines 41...
START--UP, ADJUSTMENT, AND SAFETY CHECK 60......
General 60.........................................
Prime Condensate Trap 60.............................
Purge Gas Lines 60...................................
Adjustments 60......................................
SERVICE AND MAINTENANCE PROCEDURES 68........
Cleaning Heat Exchangers 73...........................
SEQUENCE OF OPERATION 76........................
PARTS REPLACEMENT GUIDE 80......................
TABLES
Loose Parts Bag 5.....................................
Minimum Clearances to Combustible Materials 5.............
Minimum Free Area Required 11.........................
Minimum Space Volumes 11.............................
Filter Size Information 23...............................
Opening Dimensions 25................................
Air Delivery CFM 30...................................
Maximum Capacity of Pipe 32...........................
Electrical Data 34......................................
Vent Termination Kit for Direct Vent (2--Pipe) System 39.......
Combustion--Air Vent Pipe, Fitting & Cement Material.. 45.....
Maximum Allowable Exposed Vent Lengths Insulation 46......
Maximum Equivalent Vent Length 47......................
Deductions from Maximum Equivalent Vent Length 47........
Blower Off Delay Setup Switch 62........................
Altitude Derate Multiplier for U.S.A. 63....................
Gas Rate 65..........................................
Orifice Size and Manifold Pressure 67.....................
CERTIFIED
Use of the AHRI Certified
manufacturer’s participation in the program. For
verification of certification for individual products,
go to www.ahridirectory.org.
Portions of the text and tables are reprinted from NFPA 54/ANSI
Z223.1--2012E, with permission of National Fire Protection
Association, Quincy, MA 02269 and American Gas Association,
Washington DC 20001. This reprinted material is not the complete
and official position of the NFPA or ANSI on the referenced
subject, which is represented only by the standard in its entirety.
TM
Mark indicates a
1
Page 2

912SB
Required Notice for Massachusetts Installations
IMPORTANT
The Commonwealth of Massachusetts requires compliance with regulation 248 CMR as follows:
5.08: Modifications to NFPA--54, Chapter 10
2) Revise 10.8.3 by adding the following additional requirements:
a. For all side wall horizontally vented gas fueled equipment installed in every dwelling, building or structure used in
whole or in part for residential purposes, including those owned or operated by the Commonwealth and where the
side wall exhaust vent termination is less than seven (7) feet above finished grade in the area of the venting,
including but not limited to decks and porches, the following requirements shall be satisfied:
1. INSTALLATION OF CARBON MONOXIDE DETECTORS. At the time of installation of the side wall horizontal vented
gas fueled equipment, the installing plumber or gasfitter shall observe that a hard wired carbon monoxide detector with an
alarm and battery back--up is installed on the floor level where the gas equipment is to be installed. In addition, the installing
plumber or gasfitter shall observe that a battery operated or hard wired carbon monoxide detector with an alarm is installed on
each additional level of the dwelling, building or structure served by the side wall horizontal vented gas fueled equipment. It
shall be the responsibility of the property owner to secure the services of qualified licensed professionals for the installation of
hard wired carbon monoxide detectors
a. In the event that the side wall horizontally vented gas fueled equipment is installed in a crawl space or an attic, the hard wired
carbon monoxide detector with alarm and battery back--up may be installed on the next adjacent floor level.
b. In the event that the requirements of this subdivision can not be met at the time of completion of installation, the owner shall
have a period of thirty (30) days to comply with the above requirements; provided, however, that during said thirty (30)day
period, a battery operated carbon monoxide detector with an alarm shall be installed.
2. APPROVED CARBON MONOXIDE DETECTORS. Each carbon monoxide detector as required in accordance with the
above provisions shall comply with NFPA 720 and be ANSI/UL 2034 listed and IAS certified.
3. SIGNAGE. A metal or plastic identification plate shall be permanently mounted to the exterior of the building at a minimum
height of eight (8) feet above grade directly in line with the exhaust vent terminal for the horizontally vented gas fueled
heating appliance or equipment. The sign shall read, in print size no less than one--half (1/2) inch in size, ”GAS VENT
DIRECTLY BELOW. KEEP CLEAR OF ALL OBSTRUCTIONS”.
4. INSPECTION. The state or local gas inspector of the side wall horizontally vented gas fueled equipment shall not approve the
installation unless, upon inspection, the inspector observes carbon monoxide detectors and signage installed in accordance
with the provisions of 248 CMR 5.08(2)(a)1 through 4.
5. EXEMPTIONS: The following equipment is exempt from 248 CMR 5.08(2)(a)1 through 4:
(1.) The equipment listed in Chapter 10 entitled ”Equipment Not Required To Be Vented” in the most current edition of
NFPA 54 as adopted by the Board; and
(2.) Product Approved side wall horizontally vented gas fueled equipment installed in a room or structure separate from
the dwelling, building or structure used in whole or in part for residential purposes.
c. MANUFACTURER REQUIREMENTS -- GAS EQUIPMENT VENTING SYSTEM PROVIDED. When the
manufacturer of Product Approved side wall horizontally vented gas equipment provides a venting system design
or venting system components with the equipment, the instructions provided by the manufacturer for installation of
the equipment and the venting system shall include:
1. Detailed instructions for the installation of the venting system design or the venting system components; and
2. A complete parts list for the venting system design or venting system.
d. MANUFACTURER REQUIREMENTS -- GAS EQUIPMENT VENTING SYSTEM NOT PROVIDED. When
the manufacturer of a Product Approved side wall horizontally vented gas fueled equipment does not provide the
parts for venting the flue gases, but identifies “special venting systems”, the following requirements shall be
satisfied by the manufacturer:
1. The referenced “special venting system” instructions shall be included with the appliance or equipment installation
instructions; and
2. The “special venting systems” shall be Product Approved by the Board, and the instructions for that system shall include a
parts list and detailed installation instructions.
e. A copy of all installation instructions for all Product Approved side wall horizontally vented gas fueled equipment,
all venting instructions, all parts lists for venting instructions, and/or all venting design instructions shall remain
with the appliance or equipment at the completion of the installation.
For questions regarding these requirements, please contact the Commonwealth of Massachusetts Board of State Examiners of Plumbers and
Gas Fitters, 239 Causeway Street, Boston, MA 02114. 617--727--9952.
2
Page 3
SAFETY CONSIDERATIONS
!
WARNING
FIRE, EXPLOSION, ELECTRICAL SHOCK, AND
CARBON MONOXIDE POISONING HAZARD
Failure to follow this warning could result in dangerous
operation, personal injury, death, or property damage.
Improper installation, adjustment, alteration, service,
maintenance, or use can cause carbon monoxide poisoning,
explosion, fire, electrical shock, or other conditions which
may cause personal injury or property damage. Consult a
qualified service agency, local gas supplier, or your
distributor or branch for information or assistance. The
qualified service agency must use only factory--authorized
and listed kits or accessories when modifying this product.
!
WARNING
FIRE HAZARD
Failure to follow this warning could result in personal injury,
death, or property damage.
Solvents, cements and primers are combustible. Keep away
from heat, sparks and open flame. Use only in well--ventilated
areas. Avoid breathing in vapor or allowing contact with skin
or eyes.
!
CAUTION
FURNACE RELIABILITY HAZARD
Failure to follow this caution may result in unit component
damage.
Application of this furnace should be indoors with special
attention given to vent sizing and material, gas input rate,
air temperature rise, unit leveling, and unit sizing.
Improper installation, adjustment, alteration, service, maintenance,
or use can cause explosion, fire, electrical shock, or other
conditions which may cause death, personal injury, or property
damage. Consult a qualified installer, service agency, or your
distributor or branch for information or assistance. The qualified
installer or agency must use factory-authorized kits or accessories
when modifying this product. Refer to the individual instructions
packaged with the kits or accessories when installing.
Installing and servicing heating equipment can be hazardous due to
gas and electrical components. Only trained and qualified
personnel should install, repair, or service heating equipment.
Untrained personnel can perform basic maintenance functions such
as cleaning and replacing air filters. All other operations must be
performed by trained service personnel. When working on heating
equipment, observe precautions in literature, on tags, and on labels
attached to or shipped with furnace and other safety precautions
that may apply.
These instructions cover minimum requirements and conform to
existing national standards and safety codes. In some instances,
these instructions exceed certain local codes and ordinances,
especially those that may not have kept up with changing
residential construction practices. We require these instructions as a
minimum for a safe installation.
Follow all safety codes. Wear safety glasses, protective clothing,
and work gloves. Have a fire extinguisher available. Read these
instructions thoroughly and follow all warnings or cautions
included in literature and attached to the unit.
!
CAUTION
CUT HAZARD
Failure to follow this caution may result in personal injury.
Sheet metal parts may have sharp edges or burrs. Use care
and wear appropriate protective clothing, safety glasses and
gloves when handling parts, and servicing furnaces.
This is the safety--alert symbol . When you see this symbol on
the furnace and in instructions or manuals, be alert to the potential
for personal injury.
Understand the signal words DANGER, WARNING,and
CAUTION. These words are used with the safety--alert symbol.
DANGER identifies the most serious hazards which will result in
severe personal injury or death. WARNING signifies a hazard
which could result in personal injury or death. CAUTION is used
to identify hazards which may result in minor personal injury or
product and property damage. NOTE and NOTICE are used to
highlight suggestions which will result in enhanced installation,
reliability, or operation.
1. Use only with type of gas approved for this furnace. Refer
to the furnace rating plate.
2. Install this furnace only in a location and position as specified in the “Location” section of these instructions.
3. Provide adequate combustion and ventilation air to the furnace space as specified in “Air for Combustion and Ventilation” section.
4. Combustion products must be discharged outdoors. Connect this furnace to an approved vent system only, as specified in the “Venting” section of these instructions.
5. Never test for gas leaks with an open flame. Use a commercially available soap solution made specifically for the detection of leaks to check all connections, as specified in the
“Gas Piping” section.
6. Always install furnace to operate within the furnace’s intended temperature--rise range with a duct system which hasan
external static pressure within the allowable range, as specified in the “Start--Up, Adjustments, and Safety Check”
section. See furnace rating plate.
7. When a furnace is installed so that supply ducts carry air
circulated by the furnace to areas outside the space containing the furnace, the return air shall also be handled by
duct(s) sealed to the furnace casing and terminating outside
the space containing the furnace. See “Air Ducts” section.
8. A gas--fired furnace for installation in a residential garage
must be installed as specified in the warning box in the
“Location” section.
9. The furnace may be used for construction heat provided that
the furnace installation and operation complies with the first
CAUTION in the LOCATION section of these instructions.
10. These Multipoise Gas--Fired Furnaces are CSA design--certified for use with natural and propane gases (see furnace
rating plate) and for installation in alcoves, attics, basements, closets, utility rooms, crawlspaces, and garages. The
furnace is factory--shipped for use with natural gas. A CSA
(A.G.A. and C.G.A.) listed accessory gas conversion kit is
required to convert furnace for use with propane gas.
11. See Table 2 for required clearances to combustible construction.
12. Maintain a 1--in. (25 mm) clearance from combustible materials to supply air ductwork for a distance of 36 in. (914
mm) horizontally from the furnace. See NFPA 90B or local
code for further requirements.
912SB
3
Page 4
13. These furnaces SHALL NOT be installed directly on carpeting, combustible tile, or any other combustible material other than wood flooring. In downflow installations, factory
accessory floor base MUST be used when installed on combustible materials and wood flooring. Special base is not required when this furnace is installed on manufacturer’s Coil
Assembly Part No. CNRV, CNPV, CAP, or CAR or when
Coil Box Part No. KCAKC is used. See Table 2 for clearance to combustible construction information.
INTRODUCTION
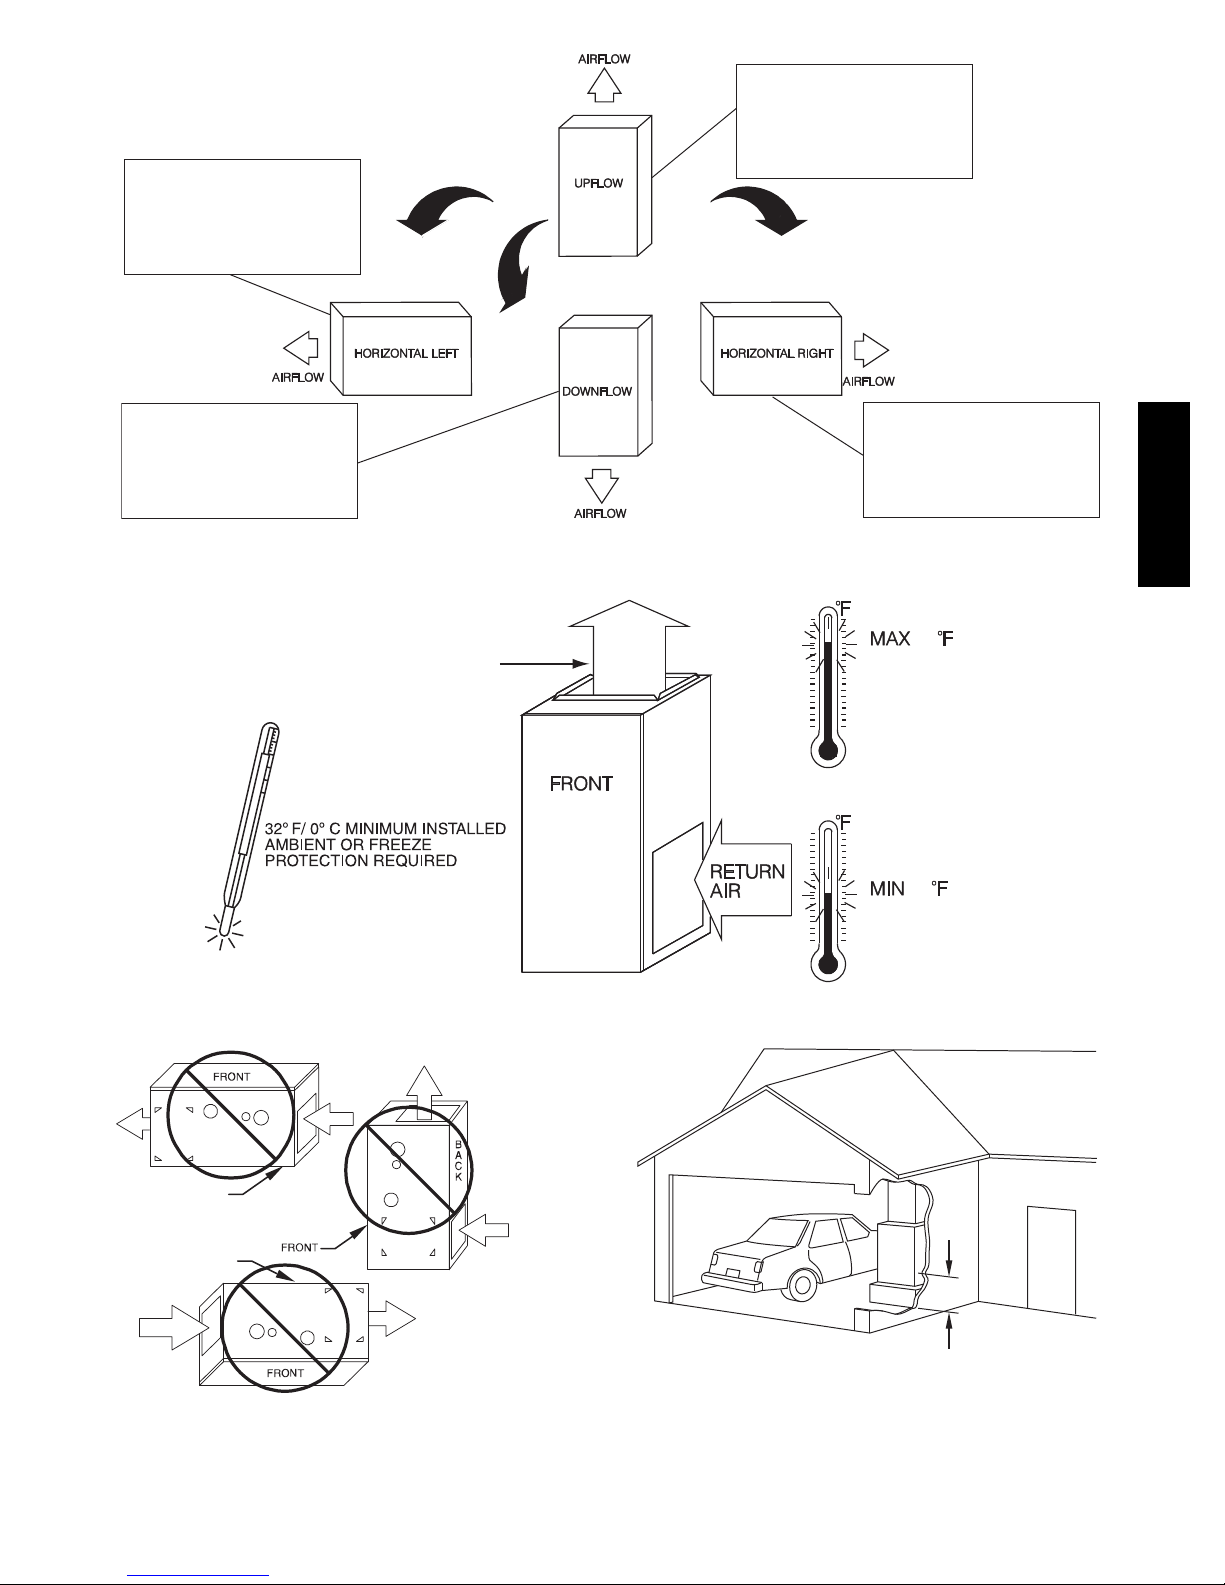
This 4--way multipoise Category IV condensing furnace is CSA
design--certified as a direct--vent (2-pipe) or non-direct vent
(1-pipe) furnace. See Fig. 2. The furnace is factory--shipped for
use with natural gas. The furnace can be converted in the field for
use with propane gas when a factory-supplied conversion kit is
used. Refer to the furnace rating plate for conversion kit
information.
These furnaces are not approved for installation in recreational
vehicles or outdoors. Single--stage furnaces (40,000 through
120,000) are approved for installation in manufactured
housing/mobile homes with manufacturer--approved accessory.
The conversion kit is required for use with both natural and
912SB
propane gas. The furnace must also be installed on a
factory-supplied accessory combustible floor base or evaporator
coil casing.
This furnace is designed for minimum continuous return--air
temperature of 60_F(15_C) db or intermittent operation down to
55_F(13_C) db such as when used with a night setback
thermostat. Return-air temperature must not exceed 80_F(27_C)
db. Failure to follow these return-air temperature limits may affect
reliability of heat exchangers, motors, and controls. See Fig. 3.
The furnace should be sized to provide 100 percent of the design
heating load requirement plus any margin that occurs because of
furnace model size capacity increments. Heating load estimates can
be made using approved methods available from Air Conditioning
Contractors of America (Manual J); American Society of Heating,
Refrigerating, and Air--Conditioning Engineers; or other approved
engineering methods. Excessive oversizing of the furnace could
cause the furnace and/or vent to fail prematurely.
For accessory installation details, refer to the applicable instruction
literature.
NOTE: Remove all shipping materials, loose parts bag, and
literature before operating the furnace. See Table 1.
CODES AND STANDARDS
Follow all national and local codes and standards in addition
to these instructions. The installation must comply with
regulations of the serving gas supplier, local building, heating,
plumbing, and other codes. In absence of local codes, the
installation must comply with the national codes listed below and
all authorities having jurisdiction.
In the United States and Canada, follow all codes and standards for
the following:
Safety
S US: National Fuel Gas Code (NFGC) NFPA 54--2012/ANSI
Z223.1--2012 and the Installation Standards, Warm Air Heating
and Air Conditioning Systems ANSI/NFPA 90B
S A manufactured (Mobile) home installation must conform with
the Manufactured Home Construction and Safety Standard, Title
24 CFR, Part 3280, or when this standard is not applicable, the
Standard for Manufactured Home Installation (Manufactured
Home Sites, Communities, and Set-Ups),ANSI/NCS A225.1,
and/or CAN/CSA-Z240, MH Series Mobile Homes
S CANADA: National Standard of Canada, Natural Gas and
Propane Installation Code (NSCNGPIC) CAN/CSA
B149.1--2010
General Installation
S US: NFGC and the NFPA 90B. For copies, contact the National
Fire Protection Association Inc., Batterymarch Park, Quincy,
MA 02269; or for only the NFGC contact the American Gas
Association, 400 N. Capitol, N.W., Washington DC 20001
S CANADA: NSCNGPIC. For a copy, contact Standard Sales,
CSA International, 178 Rexdale Boulevard, Etobicoke
(Toronto), Ontario, M9W 1R3, Canada
Combustion and Ventilation Air
S US: Section 9.3 of the NFPA54/ANSI Z223.1--2012 Air for
Combustion and Ventilation
S CANADA: Part 8 of the CAN/CSA B149.1--2010, Venting
Systems and Air Supply for Appliances
Duct Systems
S US and CANADA: Air Conditioning Contractors Association
(ACCA) Manual D, Sheet Metal and Air Conditioning Contractors
National Association (SMACNA), or American Society of Heating,
Refrigeration, and Air Conditioning Engineers (ASHRAE) 2005
Fundamentals Handbook Chapter 35
Acoustical Lining and Fibrous Glass Duct
S US and CANADA: current edition of SMACNA, NFPA 90B as
tested by UL Standard 181 for Class I Rigid Air Ducts
Gas Piping and Gas Pipe Pressure Testing
S US: NFPA 54/ANSI Z223.1--2012 NFGC; Chapters 5, 6, 7, and 8
and national plumbing codes.
CANADA: CAN/CSA--B149.1--2010, Parts 4, 5, 6, and 9.
In the state of Massachusetts:
S This product must be installed by a licensed plumber or gas fitter.
S When flexible connectors are used, the maximum length shall
not exceed 36 in. (914 mm).
S When lever type gas shutoffs are used they shall be T--handle type.
S The use of copper tubing for gas piping is not approved by the
state of Massachusetts.
Electrical Connections
S US: National Electrical Code (NEC) ANSI/NFPA 70--2011
S CANADA: Canadian Electrical Code CSA C22.1
ELECTROSTATIC DISCHARGE (ESD)
PRECAUTIONS PROCEDURE
!
CAUTION
FURNACE RELIABILITY HAZARD
Failure to follow this caution may result in unit component
damage.
Electrostatic discharge can affect electronic components.
Take precautions during furnace installation and servicing
to protect the furnace electronic control. Precautions will
prevent electrostatic discharges from personnel and hand
tools which are held during the procedure. These
precautions will help to avoid exposing the control to
electrostatic discharge by putting the furnace, the control,
and the person at the same electrostatic potential.
4
Page 5
1. Disconnect all power to the furnace. Multiple disconnects
may be required. DO NOT TOUCH THE CONTROL
OR ANY WIRE CONNECTED TO THE CONTROL
PRIOR TO DISCHARGING YOUR BODY’S
ELECTROSTATIC CHARGE TO GROUND.
2. Firmly touch the clean, unpainted, metal surface of the furnace chassis which is close to the control. Tools held in a
person’s hand during grounding will be satisfactorily discharged.
3. After touching the chassis, you may proceed to service the
control or connecting wires as long as you do nothing to
recharge your body with static electricity (for example; DO
NOT move or shuffle your feet, do not touch ungrounded
objects, etc.).
4. If you touch ungrounded objects (and recharge your body
with static electricity), firmly touch a clean, unpainted metal
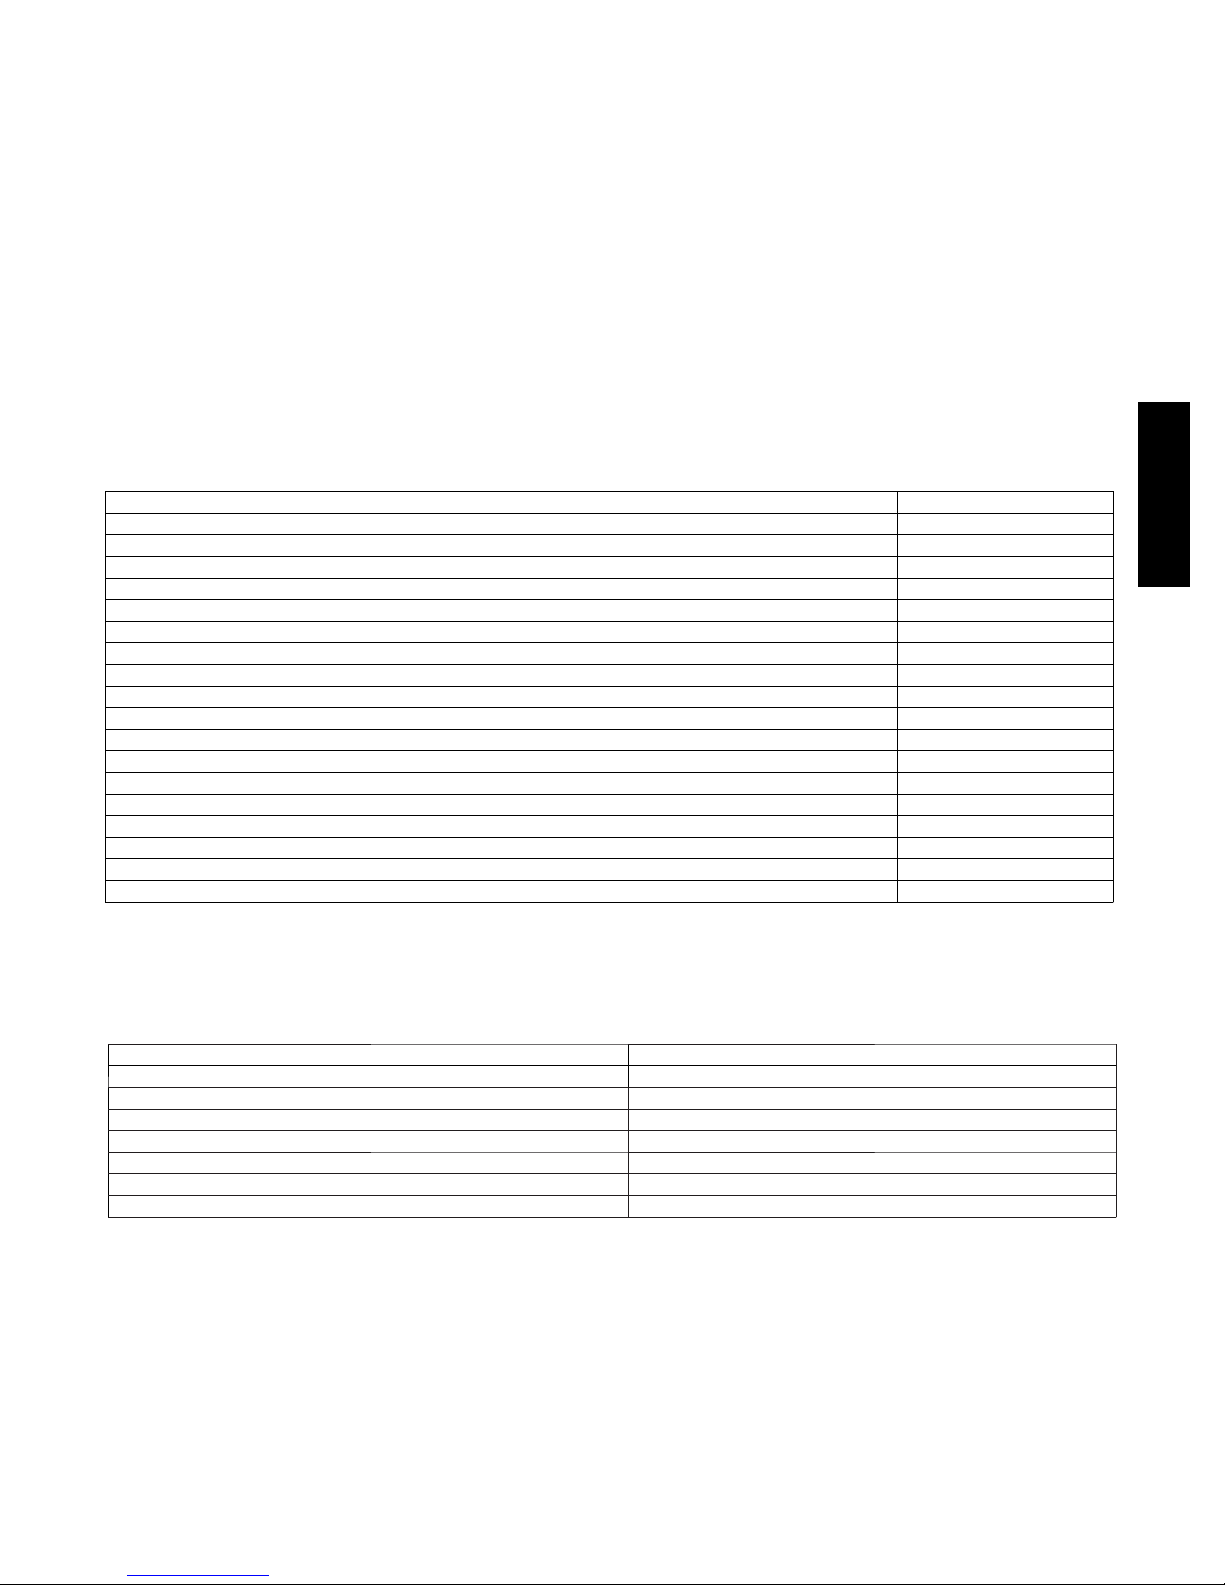
Table 1 – Factory--Supplied Installation Parts
DESCRIPTION QUANTITY
Outlet Choke Plate (provided with 40K BTUH furnaces only; see Note) 1
AirIntakePipeFlange 1
Vent Pipe Flange 1
Pipe Flange Gaskets 2
Sharp Tip Screws (Vent and Inlet Flanges) 10
Vent Pipe Coupling 1
Vent Pipe Coupling Clamps 2
Pressure Switch Tube 1
Rubber Drain Elbow 1
Drain Tube Clamps 4
1 / 2 --- i n . C P V C to 3 / 4 --- i n . P V C P i p e A d a p t e r 1
Gas Line Grommet 1
Junction Box Cover 1
Junction Box Base 1
Green Ground Screw 1
Blunt Tip Screws (Junction Box) 3
Thermostat Wire Grommet 1
Drain Extension Tube (Z ---pipe) (Provided separately in furnace) 1
surface of the furnace again before touching control or
wires.
5. Use this procedure for installed and uninstalled (ungrounded) furnaces.
6. Before removing a new control from its container, discharge
your body’s electrostatic charge to ground to protect the
control from damage. If the control is to be installed in a
furnace, follow items 1 through 4 before bringing the control or yourself in contact with the furnace. Put all used and
new controls into containers before touching ungrounded
objects.
7. An ESD service kit (available from commercial sources)
mayalsobeusedtopreventESDdamage.
ACCESSORIES
See Product Data Sheet for a list of accessories for this product.
912SB
NOTE: Only used for 40K BTUH furnaces from 0--2000 ft. (0 to 610 M) above sea level for total equivalent vent lengths under 10 ft. (3 M)
Table 2 – Minimum Clearances to Combustible Materials for All Units
POSITION CLEARANCE
REAR 0
FRONT (Combustion air openings in furnace and in structure) 1in.(25mm)
Required for service *24 in. (610 mm)
All Sides of Supply Plenum *1 in. (25 mm)
Sides 0
Vent 0
Top of Furnace 1in.(25mm)
*Consult local building codes.
5
Page 6
912SB
29 1/2
[749.3]
28 3/4
[730.5]
[678.1]
26 11/16
26 3/8
[669.9]
[557.4]
21 15/16
21 1/16
[535.8]
20 5/8
[522.7]
AIR FLOW
3
[76.2]
1 3/4
[44.5]
AIR INTAKE
7/8
GAS CONN
[22.2]
E
REV
1
SHT
23 3/8
7/8
[22.2] POWER CONN
[63.5]
SIDE INLET
7/8
[101.6]
[889.0]
28 3/8
[720.4]
[757]
29 13/16
[22.2]
28 5/8
17 7/16
24
[726.9]
7/8
[442.3]
[609.7]
[22.2]
THERMOSTAT ENTRY
[420.9]
16 9/16
[458.6]
18 1/16
20 1/4
[513.9]
4
35
7/8
[22.2]
2 1/2
3
[76.2 ]
21 5/8
[549.5]
BOTTOM INLET
6 1/16
[154.0]
11/16
[17.5]
[592.0]
1 5/16
[668.8]
26 5/16
[33.3]
SD5024-4
PART NUMBER
NEXT SHEET
2
B
A
NOTES:
1. Doors may vary by model.
2. Minimum return-air openings at furnace, based on metal duct. If ex duct is used,
see ex duct manufacturer's recommendations for equivalent diameters.
a. For 800 CFM-16-in. (406 mm) round or 14 1/2 x 12-in. (368 x 305 mm) rectangle.
b. For 1200 CFM-20-in. (508 mm) round or 14 1/2 x 19 1/2-in. (368 x 495 mm) rectangle.
c. For 1600 CFM-22-in. (559 mm) round or 14 1/2 x 22 1/16-in. (368 x 560mm) rectangle.
d. Return air above 1800 CFM at 0.5 in. w.c. ESP on 24.5" casing, requires one of the following
congurations: 2 sides, 1 side and a bottom or bottom only. See Air Delivery table in this
document for specic use to allow for sucient airow to the furnace.
3. Vent and Combustion air pipes through blower compartment must
use accessory “Vent Kit - Through the Cabinet”. See accessory list for
current part number.
D
[58.4]
6 15/16
[176.1]
2 3/10
3
[76.2]
VENT
3
[76.2]
AIR INTAKE
[170.1]
6 11/16
TOP VIEW
[678.1]
26 11/16
26 3/8
[670.0]
25 1/8
[638.7]
23 5/16
[592.9]
20 5/8
[522.7]
19 1/8
OUTLET WIDTH
3
[76.2]
AIR INTAKE
[485.8]
AIR FLOW
5/8
[15.8]
1 3/4
AIR FLOW
[44.5]
GAS CONN
3
[76.2]
VENT
7/8
[22.2]
4
[101.6]
CONDENSATE DRAIN TRAP
LOCATION
2 1/2
7/8
[22.2]
32 5/8
[829.5]
28 5/8
[715.9]
28 3/16
7/8
[22.2] POWER CONN
[63.5]
7/8
[22.2]
[726.4]
25 3/16
[595.6]
23 7/16
20 1/4
[513.9]
16 9/16
7/8
SIDE INLET
[639.1]
[581.9]
22 15/16
[439.2]
17 5/16
[420.9]
[376.3]
14 13/16
[22.2]
THERMOSTAT ENTRY
C
WIDTH
BOTTOM RETURN
NOTE: ALL DIMENSIONS IN INCH [MM]
11/16
[17.5]
SEE NOTE #3
[668.8]
22
26 5/16
21
[534.0]
[558.3] (BOTH SIDES)
[25.4]
1 (BOTH SIDES)
912SB
FURNACE SIZE
30040
36060 125.0 (56.8)
A B C D
CABINET WIDTH OUTLET WIDTH BOTTOM INLET WIDTH AIR INTAKE
14--- 3/16 (361) 12--- 1/2 (319) 12--- 9/16 (322) 7--- 1/8 (181)
36040
48060 142.0 (64.5)
17--- 1/2 (445) 15--- 7/8 (403) 16 (406) 8--- 3/4 (222)
48080 151.0 (68.6)
60080
48100 166.5 (75.7)
21 (533) 19--- 3/8 (492) 19--- 1/2 (495) 10--- 1/2 (267)
66100 166.5 (75.7)
66120 24---1/2 (622) 22 --- 7/ 8 (581) 23 (584) 12--- 1/4 (311) 184.0 (83.6)
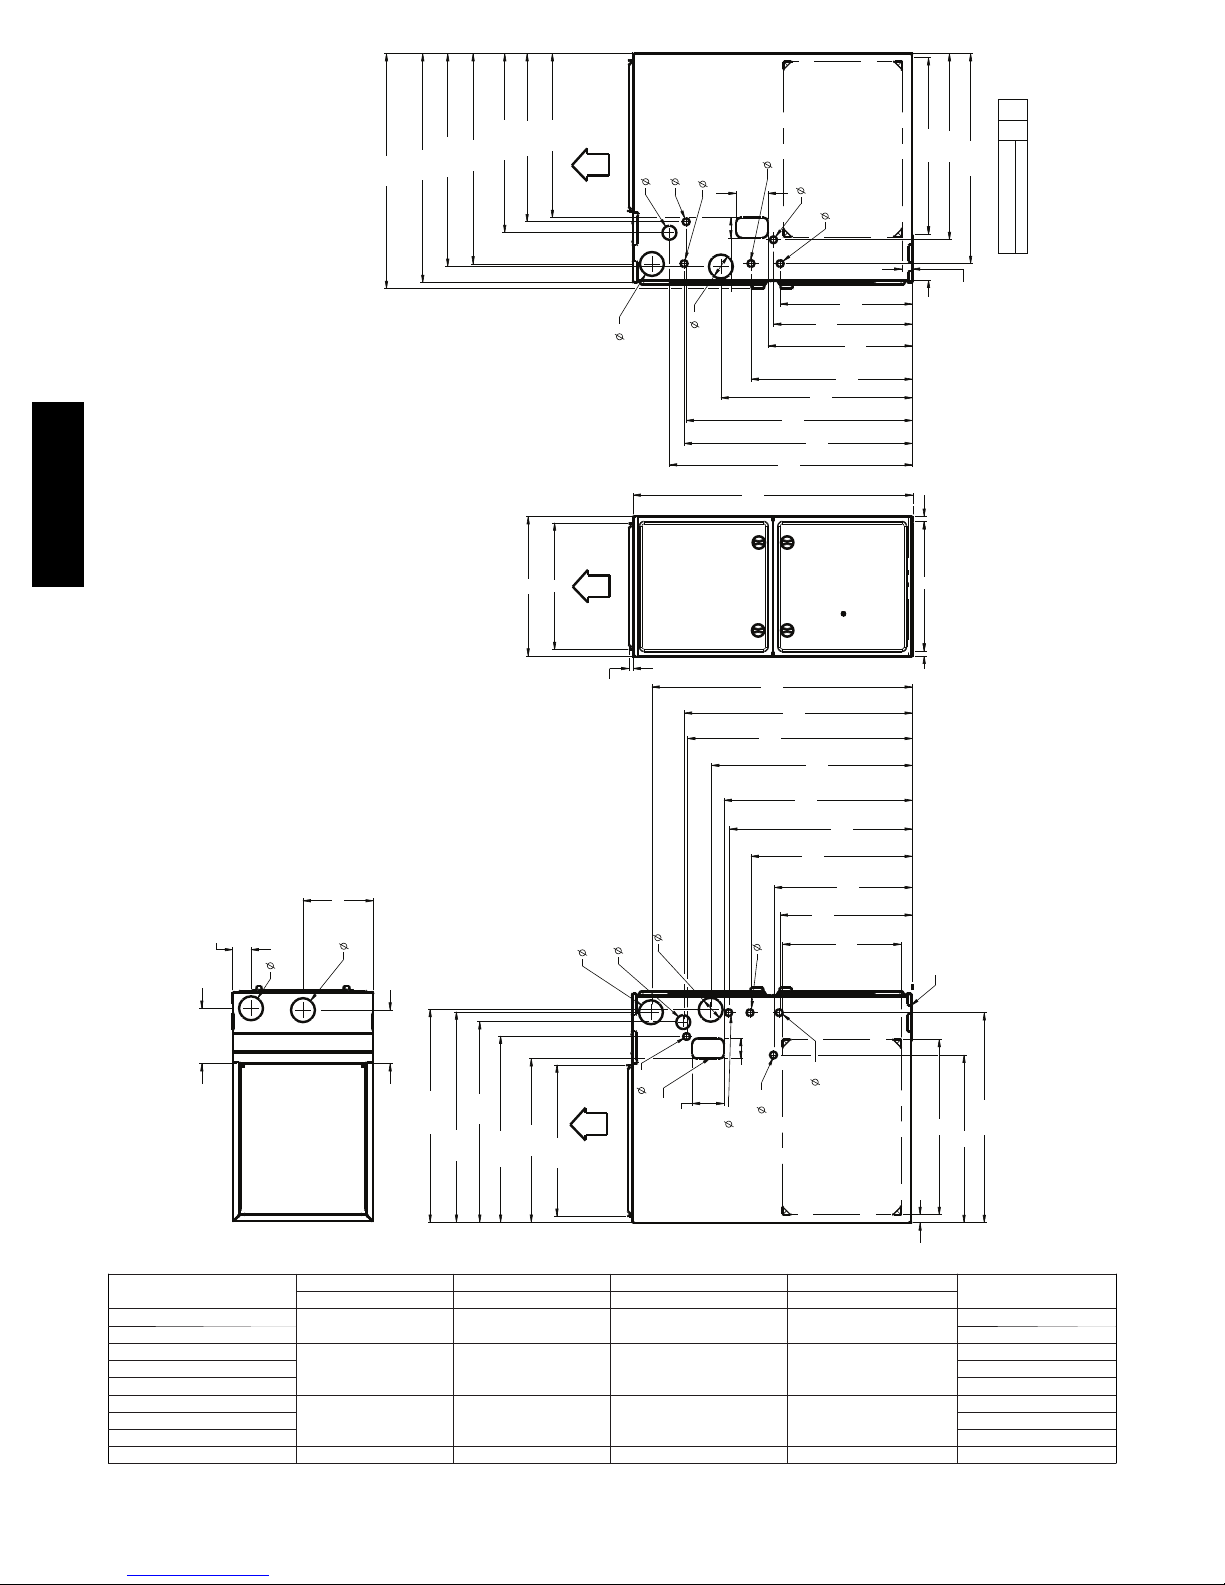
Fig. 1 -- Dimensional Drawing
6
SHIP WT.
LB (KG)
121.0 (55.0)
132.0 (60.0)
158.5 (72.0)
A12267
Page 7
THE BLOWER IS LOCATED
TO THE RIGHT OF THE
BURNER SECTION, AND
CONDITIONED AIR IS
DISCHARGED TO THE LEFT.
THE BLOWER IS
LOCATED BELOW THE
BURNER SECTION, AND
CONDITIONED AIR IS
DISCHARGED UPWARD.
THE BLOWER IS
LOCATED ABOVE THE
BURNER SECTION, AND
CONDITIONED AIR IS
DISCHARGED DOWNWARD
Fig. 2 -- Multipoise Orientations
SUPPLY AIR
Fig. 3 -- Freeze Protection and Return Air Temperature
THE BLOWER IS
LOCATED TO THE LEFT
OF THE BURNER SECTION,
AND CONDITIONED AIR IS
DISCHARGED TO THE RIGHT.
A12181
80 / 27˚C
60
/ 16˚C
A10490
912SB
BACK POSITIONED
DOWNWARD
BACK POSITIONED
UPWARD
Fig. 4 -- Prohibited Installations
AIR RETURN
CUT IN BACK
A12182
18-IN. (457.2 mm)
MINIMUM TO BURNERS
A93044
Fig. 5 -- Installation in a Garage
7
Page 8
LOCATION
!
CAUTION
PERSONAL INJURY AND/OR PROPERTY
DAMAGE HAZARD
Improper use or installation of this furnace may result in
premature furnace component failure. This gas furnace may
be used for heating buildings under construction provided
that:
--The furnace is permanently installed with all electrical
wiring, piping, venting and ducting installed according to
these installation instructions. A return air duct is provided,
sealed to the furnace casing, and terminated outside the
space containing the furnace. This prevents a negative
pressure condition as created by the circulating air blower,
causing a flame rollout and/or drawing combustion
products into the structure.
--The furnace is controlled by a thermostat. It may not be
“hot wired” to provide heat continuously to the structure
without thermostatic control.
912SB
--Clean outside air is provided for combustion. This is to
minimize the corrosive effects of adhesives, sealers and
other construction materials. It also prevents the
entrainment of drywall dust into combustion air, which can
cause fouling and plugging of furnace components.
--The temperature of the return air to the furnace is
maintained between 55_F(13_C) and 80_F(27_C), with
no evening setback or shutdown. The use of the furnace
while the structure is under construction is deemed to be
intermittent operation per our installation instructions.
--The air temperature rise is within the rated rise range on
the furnace rating plate, and the gas input rate has been set
to the nameplate value.
--The filters used to clean the circulating air during the
construction process must be either changed or thoroughly
cleaned prior to occupancy.
--The furnace, ductwork and filters are cleaned as necessary
to remove drywall dust and construction debris from all
HVAC system components after construction is completed.
--Verify proper furnace operating conditions including
ignition, gas input rate, air temperature rise, and venting
according to these installation instructions.
General
These furnaces are shipped with materials to assist in proper
furnace installation. These materials are shipped in the main
blower compartment.
See Table 1 for loose parts bag contents.
This furnace must:
S be installed so the electrical components are protected from
water.
S not be installed directly on any combustible material other than
wood flooring (refer to SAFETY CONSIDERATIONS).
S be located close to the chimney or vent and attached to an air
distribution system. Refer to Air Ducts section.
S be provided ample space for servicing and cleaning. Always
comply with minimum fire protection clearances shown in Table
2 or on the furnace clearance to combustible construction label.
!
WARNING
CARBON MONOXIDE POISONING / COMPONENT
DAMAGE HAZARD
Failure to follow this warning could result in personal injury
or death and unit component damage.
Corrosive or contaminated air may cause failure of parts
containing flue gas, which could leak into the living space.
Air for combustion must not be contaminated by halogen
compounds, which include fluoride, chloride, bromide, and
iodide. These elements can corrode heat exchangers and
shorten furnace life. Air contaminants are found in aerosol
sprays, detergents, bleaches, cleaning solvents, salts, air
fresheners, and other household products. Do not install
furnace in a corrosive or contaminated atmosphere. Make
sure all combustion and circulating air requirements are met,
in addition to all local codes and ordinances.
The following types of furnace installations may require
OUTDOOR AIR for combustion due to chemical exposures:
S Commercial buildings
S Buildings with indoor pools
S Laundry rooms
S Hobby or craft rooms
S Chemical storage areas
If air is exposed to the following substances, it should not be used
for combustion air, and outdoor air may be required for
combustion:
S Permanent wave solutions
S Chlorinated waxes and cleaners
S Chlorine based swimming pool chemicals
S Water softening chemicals
S De--icing salts or chemicals
S Carbon tetrachloride
S Halogen type refrigerants
S Cleaning solvents (such as perchloroethylene)
S Printing inks, paint removers, varnishes, etc.
S Hydrochloric acid
S Cements and glues
S Antistatic fabric softeners for clothes dryers
S Masonry acid washing materials
All fuel--burning equipment must be supplied with air for fuel
combustion. Sufficient air must be provided to avoid negative
pressure in the equipment room or space. A positive seal must be
made between the furnace cabinet and the return--air duct to
prevent pulling air from the burner area.
!
WARNING
FIRE, INJURY OR DEATH HAZARD
Failure to follow this warning could result in personal
injury, death and/or property damage.
When the furnace is installed in a residential garage, the
burners and ignition sources must be located at least 18 in.
(457 mm) above the floor. The furnace must be located or
protected to avoid damage by vehicles. When the furnace is
installed in a public garage, airplane hangar, or other
building having a hazardous atmosphere, the furnace must
be installed in accordance with the NFPA 54/ANSI
Z223.1--2012 or CAN/CSA B149.2--2010. See Fig. 5.
8
Page 9
!
WARNING
!
CAUTION
FIRE HAZARD
Failure to follow this warning could result in personal
injury, death and/or property damage.
Do not install the furnace on its back or hang furnace with
control compartment facing downward. Safety control
operation will be adversely affected. Never connect
return--air ducts to the back of the furnace. See Fig. 4.
Location Relative to Cooling Equipment
The cooling coil must be installed parallel with, or on the
downstream side of the unit to avoid condensation in the heat
exchangers. When installed parallel with the furnace, dampers or
other flow control must prevent chilled air from entering the
furnace. If the dampers are manually operated, they must be
equipped with means to prevent operation of either unit unless the
damper is in the full--heat or full--cool position.
AIR FOR COMBUSTION AND
VENTILATION
Introduction
Direct Vent (2--pipe) Applications
When the furnace is installed as a direct vent (2-pipe) furnace, no
special provisions for air for combustion are required. However,
other gas appliances installed in the space with the furnace may
require outside air for combustion. Follow the guidelines below to
insure that other gas appliances have sufficient air for combustion.
Non--Direct Vent (1--pipe) Applications
When the furnace is installed as a non-direct vent (1-pipe) furnace,
it will be necessary to insure there is adequate air for combustion.
Other gas appliances installed with the furnace may also require air
for combustion and ventilation in addition to the amount of
combustion air and ventilation air required for the furnace. Follow
the guidelines below to insure that the furnace and other gas
appliances have sufficient air for combustion.
Ventilated Combustion Air Applications
When the furnace is installed using the ventilated combustion air
option, the attic or crawlspace must freely communicate with the
outdoor to provide sufficient air for combustion. The combustion
air pipe cannot be terminated in attics or crawlspaces that use
ventilation fans designed to operate during the heating season. If
ventilation fans are present in these areas, the combustion air pipe
must terminate outdoors as a Direct Vent/ 2-Pipe system.
All air for combustion is piped directly to the furnace from a space
that is well ventilated with outdoor air (such as an attic, crawl space
or equipment closet) and the space is well isolated from the living
space or garage. In addition, other gas appliances installed in the
space with the furnace may require outside air for combustion.
Follow the guidelines below to insure that the roof or crawlspace
walls have sufficient free area to provide sufficient air for
combustion and ventilation for the furnaces. The guidelines below
can be used to insure that other gas appliances have sufficient air
for combustion.
Provisions for adequate combustion, ventilation, and dilution air
must be provided in accordance with:
S U.S.A. Installations: Section 9.3 of the NFPA 54/ANSI
Z223.1--2012 , Air for Combustion and Ventilation and
applicable provisionsof the local building codes.
S Canada: Part 8 of the CAN/CSA--B149.1--2010, Venting
Systems and Air Supply for Appliances.
FURNACE CORROSION HAZARD
Failure to follow this caution may result in furnace damage.
Air for combustion must not be contaminated by halogen
compounds, which include fluoride, chloride, bromide, and
iodide. These elements can corrode heat exchangers and
shorten furnace life. Air contaminants are found in aerosol
sprays, detergents, bleaches, cleaning solvents, salts, air
fresheners, and other household products.
!
WARNING
CARBON MONOXIDE POISONING HAZARD
Failure to follow this warning could result in personal
injury or death.
The operation of exhaust fans, kitchen ventilation fans,
clothes dryers, attic exhaust fans or fireplaces could create a
NEGATIVE PRESSURE CONDITION at the furnace.
Make--up air MUST be provided for the ventilation devices,
in addition to that required by the furnace. Refer to the
Carbon Monoxide Poisoning Hazard warning in the venting
section of these instructions to determine if an adequate
amount ofmake--up air is available.
The requirements for combustion and ventilation air depend upon
whether or not the furnace is located in a space having a volume of
at least 50 cubic feet per 1,000 Btuh input rating for all gas
appliances installed in the space.
S Spaces having less than 50 cubic feet per 1,000 Btuh (4.8 cubic
meters per kW) require the Outdoor Combustion Air Method.
S Spaces having at least 50 cubic feet per 1,000 Btuh (4.8 cubic
meters per kW) may use the Indoor Combustion Air,
Standard or Known Air Infiltration Method.
Outdoor Combustion Air Method
1. Provide the space with sufficient air for proper combustion,
ventilation, and dilution of flue gases using permanent horizontal or vertical duct(s) or opening(s) directly communicating with the outdoors or spaces that freely communicate
with the outdoors.
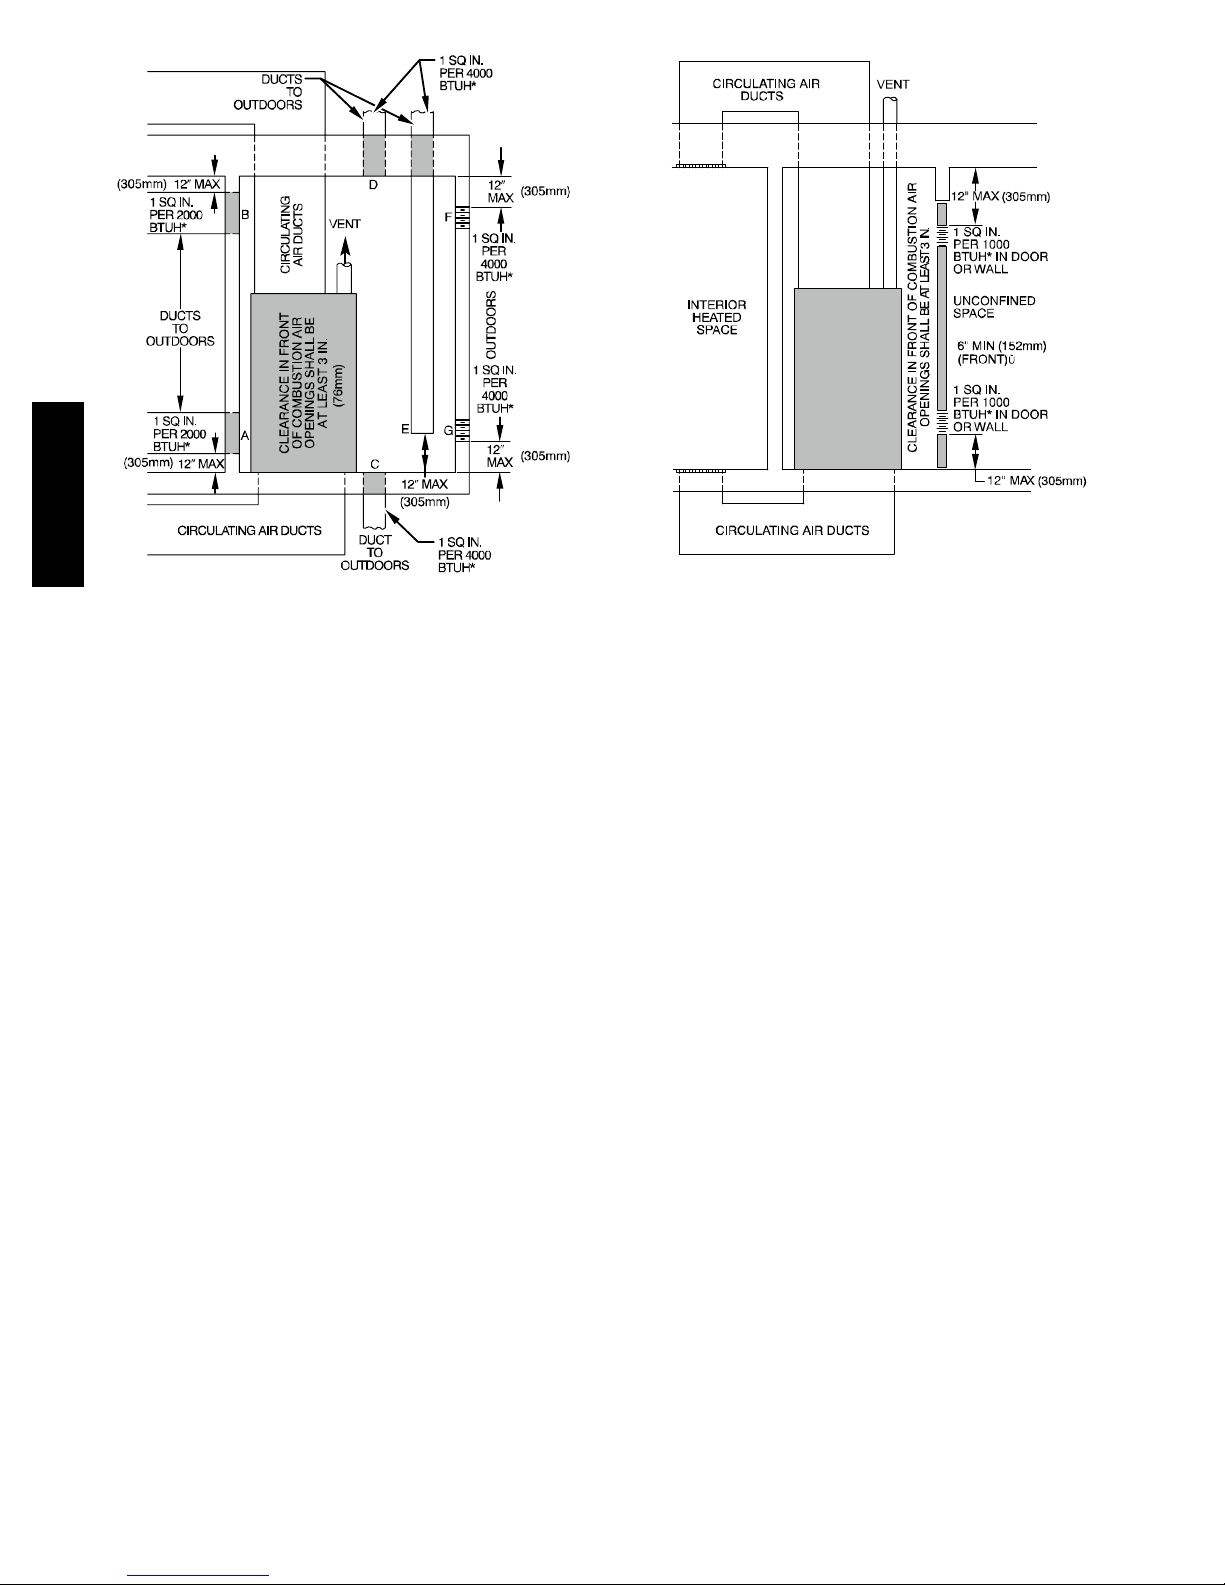
2. Fig. 6 illustrates how to provide TWO OUTDOOR
OPENINGS, one inlet and one outlet combustion and ventilation air opening, to the outdoors.
a. One opening MUST commence within 12 in. (300 mm)
of the ceiling and the second opening MUST commence
within 12 in. (300 mm) of the floor.
b. Size openings and ducts per Fig. 6 and Table 3.
c. TWO HORIZONTAL DUCTSrequire 1 sq. in. (645 sq.
mm) of free areaper 2,000 Btuh (1,100 mm
binedinput for allgasappliances in the space perFig.6 and
Tab le 3 .
d. TWO OPENINGS OR VERTICAL DUCTS require 1
sq. in. (645 sq. mm) of free area per 4,000 Btuh (550
2
/kW) for combined input of all gas appliances in the
mm
space per Fig. 6 and Table 3.
3. ONE OUTDOOR OPENING requires:
a. 1 sq. in. (645 sq. mm) of free area per 3,000 Btuh (734
2
mm
/kW) for combined input of all gas appliances in the
space per Fig. 6 and Table 3.
b. Not less than thesum of the areas ofall vent connectorsin
the space.
2
/kW) of com-
912SB
9
Page 10
The opening shall commence within 12 in. (300 mm) of the
ceiling. Appliances in the space shall have clearances of at least 1
in. (25 mm) from the sides and back and 6 in. (150 mm) from the
front. The opening shall directly communicate with the outdoors or
shall communicate through a vertical or horizontal duct to the
outdoors or spaces (crawl or attic) that freely communicate with the
outdoors.
Indoor Combustion AirE NFPA & AGA
Standard and Known--Air--Infiltration Rate Methods
Indoor air is permitted for combustion, ventilation, and dilution, if
the Standard or Known--Air--Infiltration Method is used.
!
WARNING
CARBON MONOXIDE POISONING HAZARD
Failure to follow this warning could result in personal
injury or death.
Many homes require air to be supplied from outdoors
for furnace combustion, ventilation, and dilution of flue
gases.
912SB
The furnace combustion air supply must be provided in
accordance with this instruction manual.
Standard Method
1. The space has no less volume than 50 cubic feet per 1,000
Btuh of the maximum input ratings for all gas appliances
installed in the space and
2. The air infiltration rate is not known to be less than 0.40 air
changes per hour (ACH).
The Known Air Infiltration Rate Method shall be used, if the
infiltration rate is known to be:
1. Less than 0.40 ACH and
2. Equal to or greater than 0.10 ACH
Infiltration rates greater than 0.60 ACH shall not be used. The
minimum required volume of the space varies with the number of
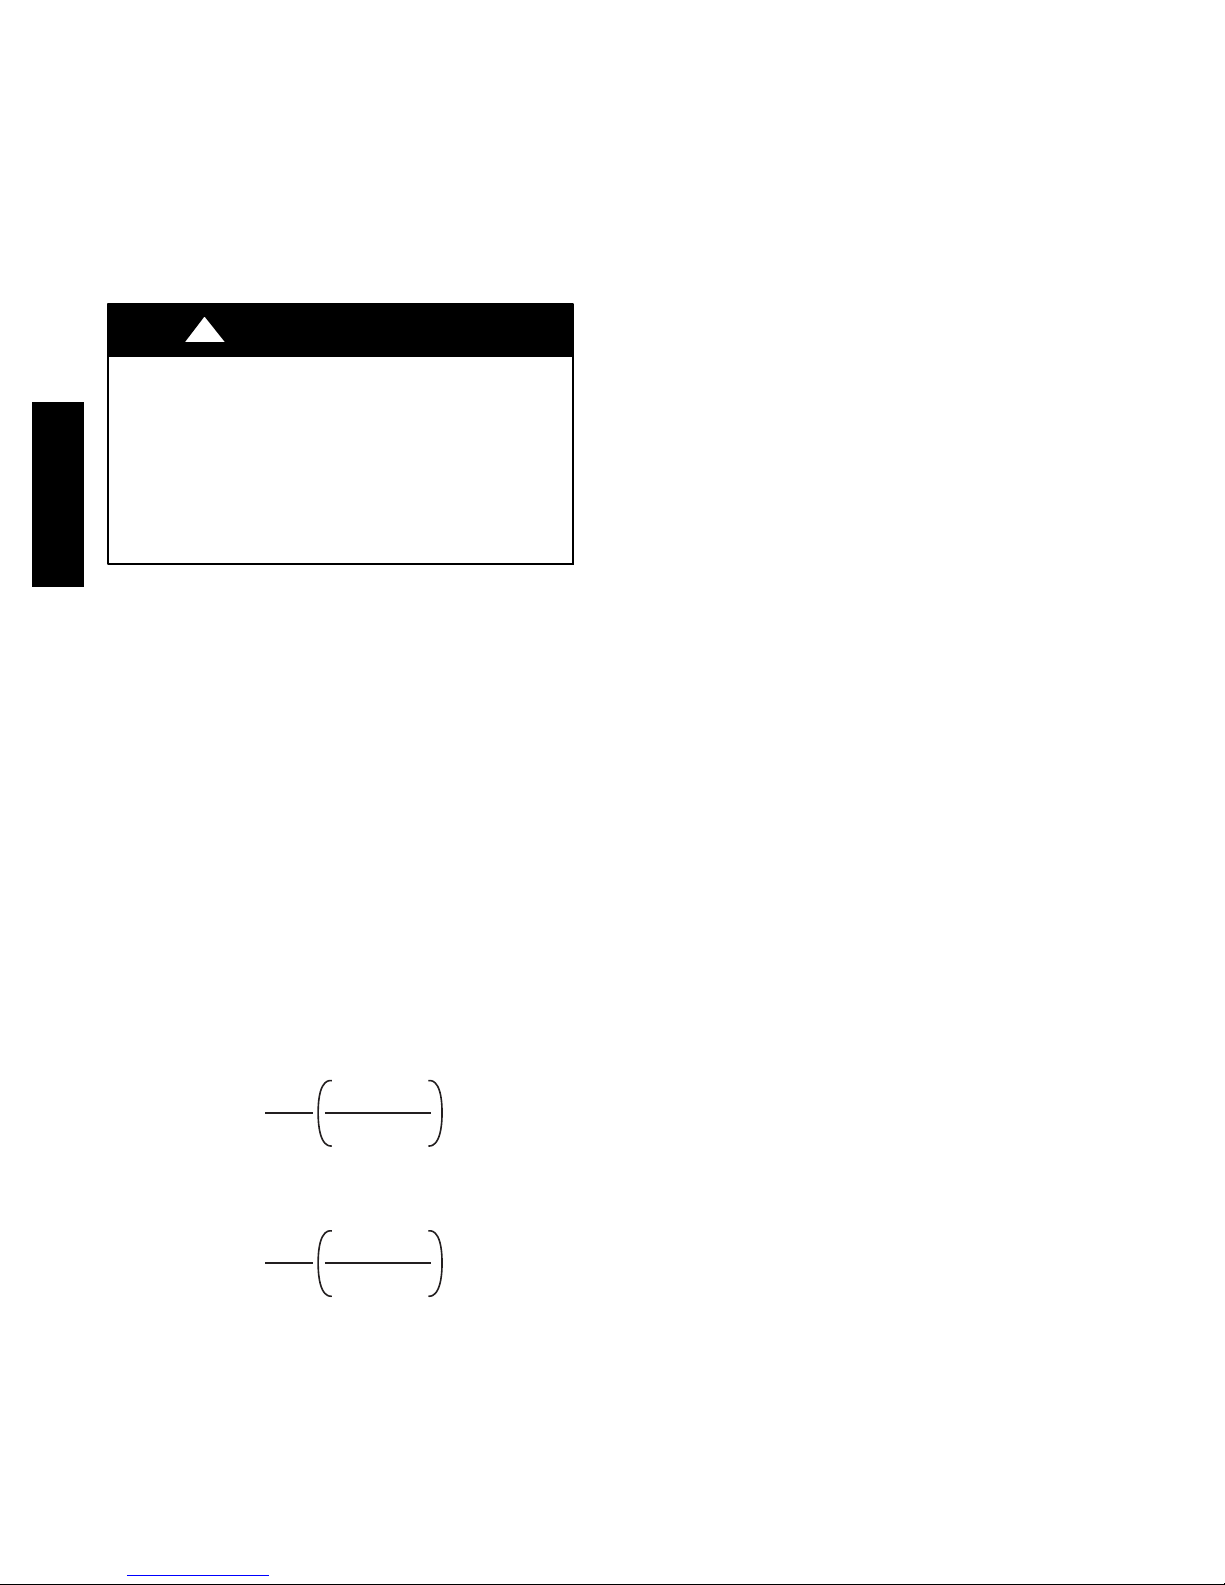
ACH and shall be determined per Table 4 or Equations 1 and 2.
Determine the minimum required volume for each appliance in the
space and add the volumes together to get the total minimum
required volume for the space.
Table 4 -- Minimum Space Volumes were determined by using the
following equations from the current edition of the National Fuel
Gas Code ANSI Z223.1/NFPA 54, 9.3.2.2:
1. For other than fan--assisted appliances, such as a draft
hood--equipped water heater:
3
I
other
1000 Btu/hr
3
I
1000 Btu/hr
fan
Volume
2. For fan--assisted appliances such as this furnace:
Volume
Other
Fan
=
=
21ft
ACH
15ft
ACH
A04002
The following requirements apply to the Standard Method and to
the Known Air Infiltration Rate Method.
1. Adjoining rooms can be considered part of a space if:
a. There are no closeable doors between rooms.
b. Combining spaces on same floor level. Each opening shall
have freearea ofat least1 in.
of the total input rating of all gas appliances in the space,
but not less than 100 in.
commence within 12 in. (300 mm) of the ceiling and the
second opening shall commence within 12 in. (300 mm)
of thefloor.The minimumdimensionof air openingsshall
be at least 3 in. (80 mm). See Fig. 7.
c. Combining spaceon different floor levels. The volumes of
spaces on different floor levels shall be considered as communicating spaces if connected by oneor morepermanent
openings in doors or floors having free area of at least 2
2
/1,000 Btuh (4,400 mm2/kW) of total input rating of
in.
all gas appliances.
2. An attic or crawlspace may be considered a space that freely
communicates with the outdoors provided there are adequate permanent ventilation openings directly to outdoors
having free area of at least 1--in.
rating for all gas appliances in the space.
3. In spaces that use the Indoor Combustion Air Method, in-
filtration should be adequate to provide air for combustion,
permanent ventilation and dilution of flue gases. However,
in buildings with unusually tight construction, additional air
MUST be provided using the methods described in the
Outdoor Combustion Air Method section.
4. Unusually tight construction is defined as Construction
with:
a. Walls and ceilingsexposed to theoutdoorshave acontinu-
ous, sealed vapor barrier. Openings are gasketed or sealed
and
b. Doors and openable windows are weatherstripped and
c. Other openingsare caulkedor sealed.These includejoints
around window and door frames, between sole plates and
floors, between wall--ceiling joints, between wall panels,
at penetrations for plumbing, electrical and gas lines, etc.
2
/1,000Btuh (2,000 mm2/kW)
2
(0.06 m2). One opening shall
2
/4,000 Btuh of total input
Combination of Indoor and Outdoor Air
1. Indoor openings shall comply with the Indoor Combus-
tion Air Method below and,
2. Outdoor openings shall be located as required in the Out-
door Combustion Air Method mentioned previously and,
3. Outdoor openings shall be sized as follows:
a. Calculate the Ratio of all Indoor Spacevolume divided by
required volumefor Indoor Combustion Air Method be-
low.
b. Outdoor opening sizereduction Factor is 1 minus the Ra-
tio in a. above.
c. Minimum size of Outdoor openings shall be the size re-
quiredin Outdoor Combustion AirMethod above multi-
plied by reduction Factor in b. above. The minimum dimension ofairopeningsshallbenot lessthan 3in. (80mm).
If:Iother = combined input of all other than fan--assisted appliances
in Btuh/hr
Ifan = combined input of all fan--assisted appliances in Btuh/hr
ACH = air changes per hour (ACH shall not exceed 0.60.)
A04003
10
Page 11
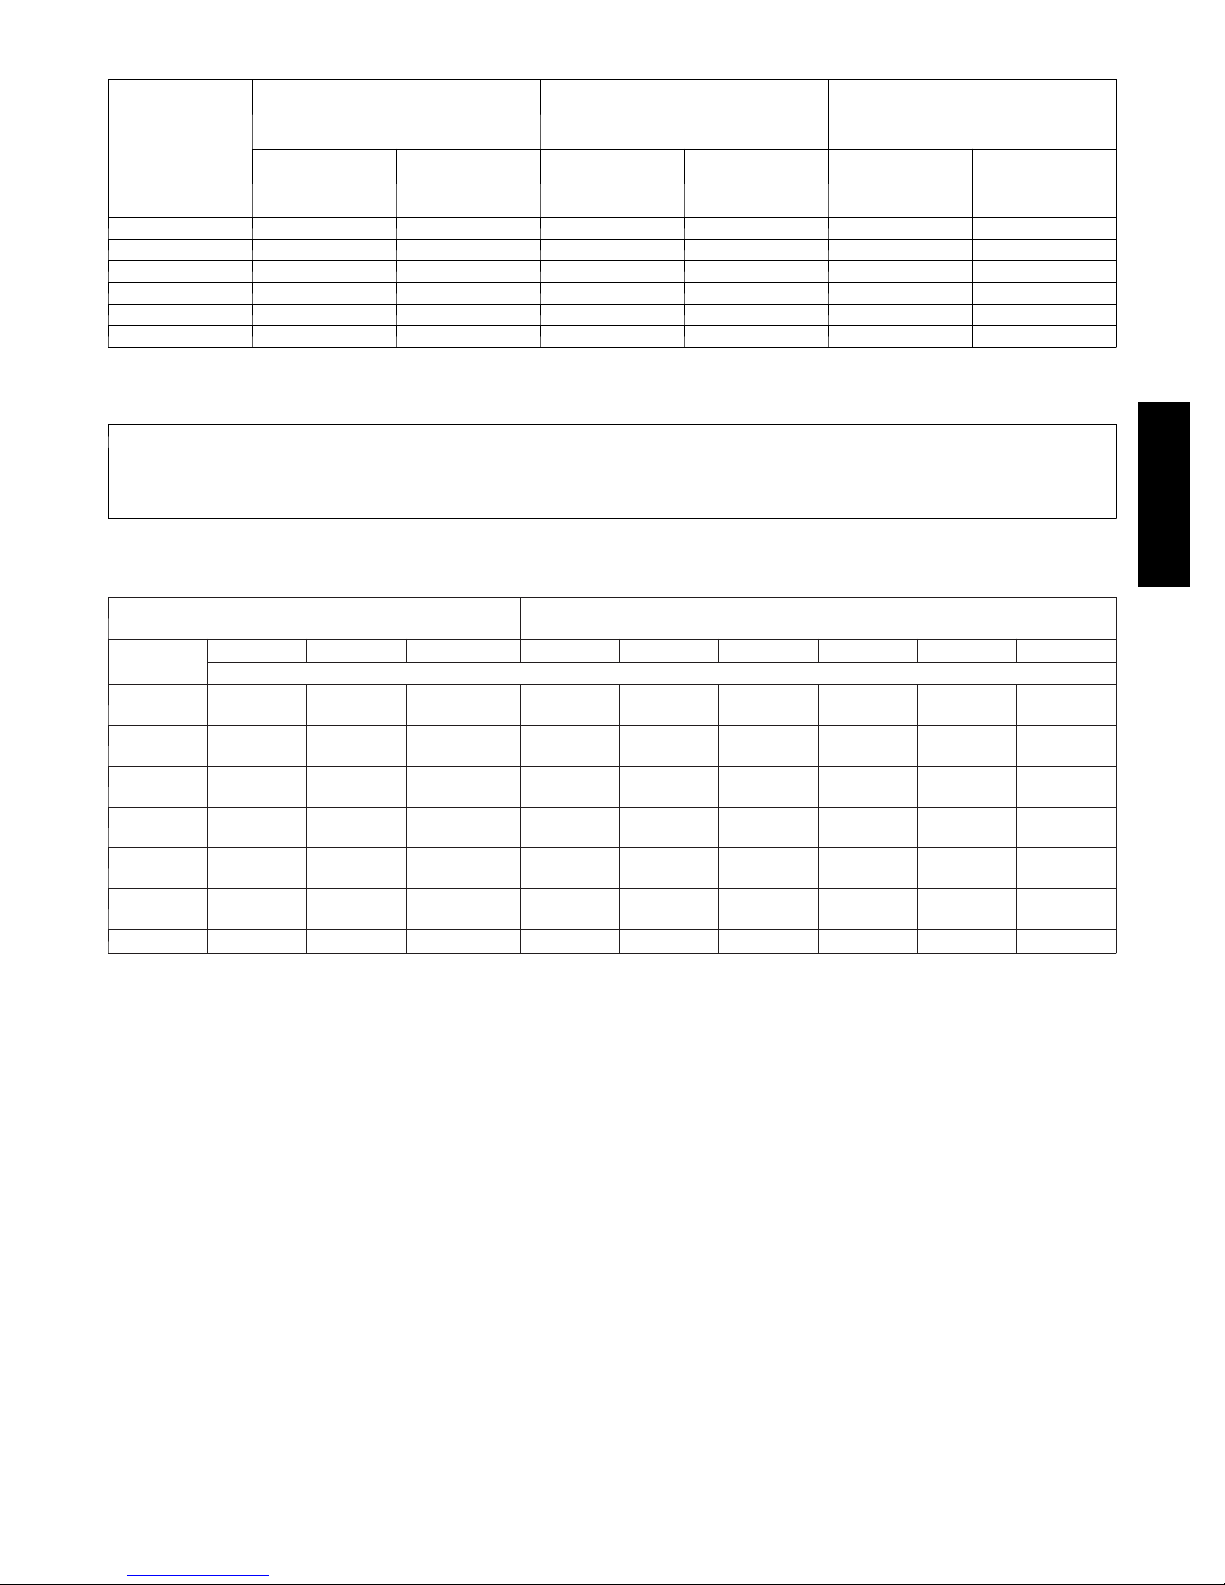
Table 3 – Minimum Free Area Required for Each Combustion Air Opening or Duct to Outdoors
TWO HORIZONTAL DUCTS
(1 SQ. IN./2,000 BTUH)
FURNACE
INPUT
(BTUH)
40,000* 20 (12904) 5 (127) 14 (8696) 5 (127) 10 (6452) 4 (102)
60,000 30 (19355) 6 (152) 20 (13043) 5 (127) 15 (9678) 5 (127)
80,000 40 (25807) 7 (178) 27 (17391) 6 (152) 20 (12904) 5 (127)
100,000 50 (32258) 8 (203) 34 (21739) 7 (178) 25 (16130) 6 (152)
120,000 60 (38709) 9 (229) 40 (26087) 7 (178) 30 (19355) 6 (152)
140,000* 70 (45161) 10 (254) 47 (30435) 8 (203) 35 (22581) 7 (178)
*Not all families have these models.
(1,100 SQ. MM/KW)
Free Area of
Opening and
Duct
Sq. In (Sq. mm)
Round Duct
In. (mm) Dia
SINGLE DUCT OR OPENING
(1 SQ. IN./3,000 BTUH)
(734 SQ. MM/KW)
Free Area of
Opening and
Duct
Sq. In (Sq. mm)
Round Duct
In. (mm) Dia
TWO OPENINGS OR
VERTICAL DUCTS
(1 SQ. IN./4,000 BTUH)
(550 SQ. MM/KW)
Free Area of
Opening and
Duct
Sq. In (mm)
Round Duct
In. (mm) Dia.
EXAMPLES: Determining Free Area
FURNACE WATER HEATER TOTAL INPUT
100,000 + 30,000 = (130,000 divided by 4,000) = 32.5 Sq. In. for each two Vertical Ducts or Openings
60,000 + 40,000 = (100,000 divided by 3,000) = 33.3 Sq. In. for each Single Duct or Opening
80,000 + 30,000 = (110,000 divided by 2,000) = 55.0 Sq. In. for each two Horizontal Ducts
Table 4 – Minimum Space Volumes for 100% Combustion, Ventilation and Dilution Air from Outdoors
OTHER THAN FAN-ASSISTED TOTAL
(1,000’S BTUH GAS INPUT RATE)
ACH
0.60
0.50
0.40
0.30
0.20
0.10
0.00 NP NP NP NP NP NP NP NP NP
NP = Not Permitted
30 40 50 40 60 80 100 120 140
SpaceVolumeFt3(M3)
1,050
(29.7)
1,260
(35.6)
1,575
(44.5)
2,100
(59.4)
3,150
(89.1)
6,300
(178.0)
1,400
(39.6)
1,680
(47.5)
2,100
(59.4)
2,800
(79.2)
4,200
(118.9)
8,400
(237.8)
1,750
(49.5)
2,100
(59.4)
2,625
(74.3)
3,500
(99.1)
5,250
(148.6)
10,500
(297.3)
1,400
(39.6)
1,680
(47.5)
2,100
(59.4)
2,800
(79.2)
4,200
(118.9)
8,400
(237.8)
1,500
(42.5)
1,800
(51.0)
2,250
(63.7)
3,000
(84.9)
4,500
(127.3)
9,000
(254.6)
FAN-ASSISTED TOTAL
(1,000’S BTUH GAS INPUT RATE)
2,000
(56.6)
2,400
(67.9)
3,000
(84.9)
4,000
(113.2)
6,000
(169.8)
12,000
(339.5)
2,500
(70.8)
3,000
(84.9)
3,750
(106.1)
5,000
(141.5)
7,500
(212.2)
15,000
(424.4)
3,000
(84.9)
3,600
(101.9)
4,500
(127.3)
6,000
(169.8)
9,000
(254.6)
18,000
(509.2)
3,500
(99.1)
4,200
(118.9)
5,250
(148.6)
7,000
(198.1)
10,500
(297.1)
21,000
(594.1)
912SB
11
Page 12
912SB
*Minimum dimensions of 3‐in. (76mm)
NOTE: Use any of the following combinations of openings:
A & B, C & D, D & E, F & G
L12F012
Fig. 6 -- Air for Combustion, Ventilation, and Dilution for
Outdoors
* Minimum opening size is 100 sq in. (64516 sq. mm) with
minimum dimensions of 3‐in. (76mm)
{ Minimum of 3‐in. (76mm) when type‐B1 vent is used.
L12F013
Fig. 7 -- Air for Combustion, Ventilation, and Dilution from
Indoors
12
Page 13
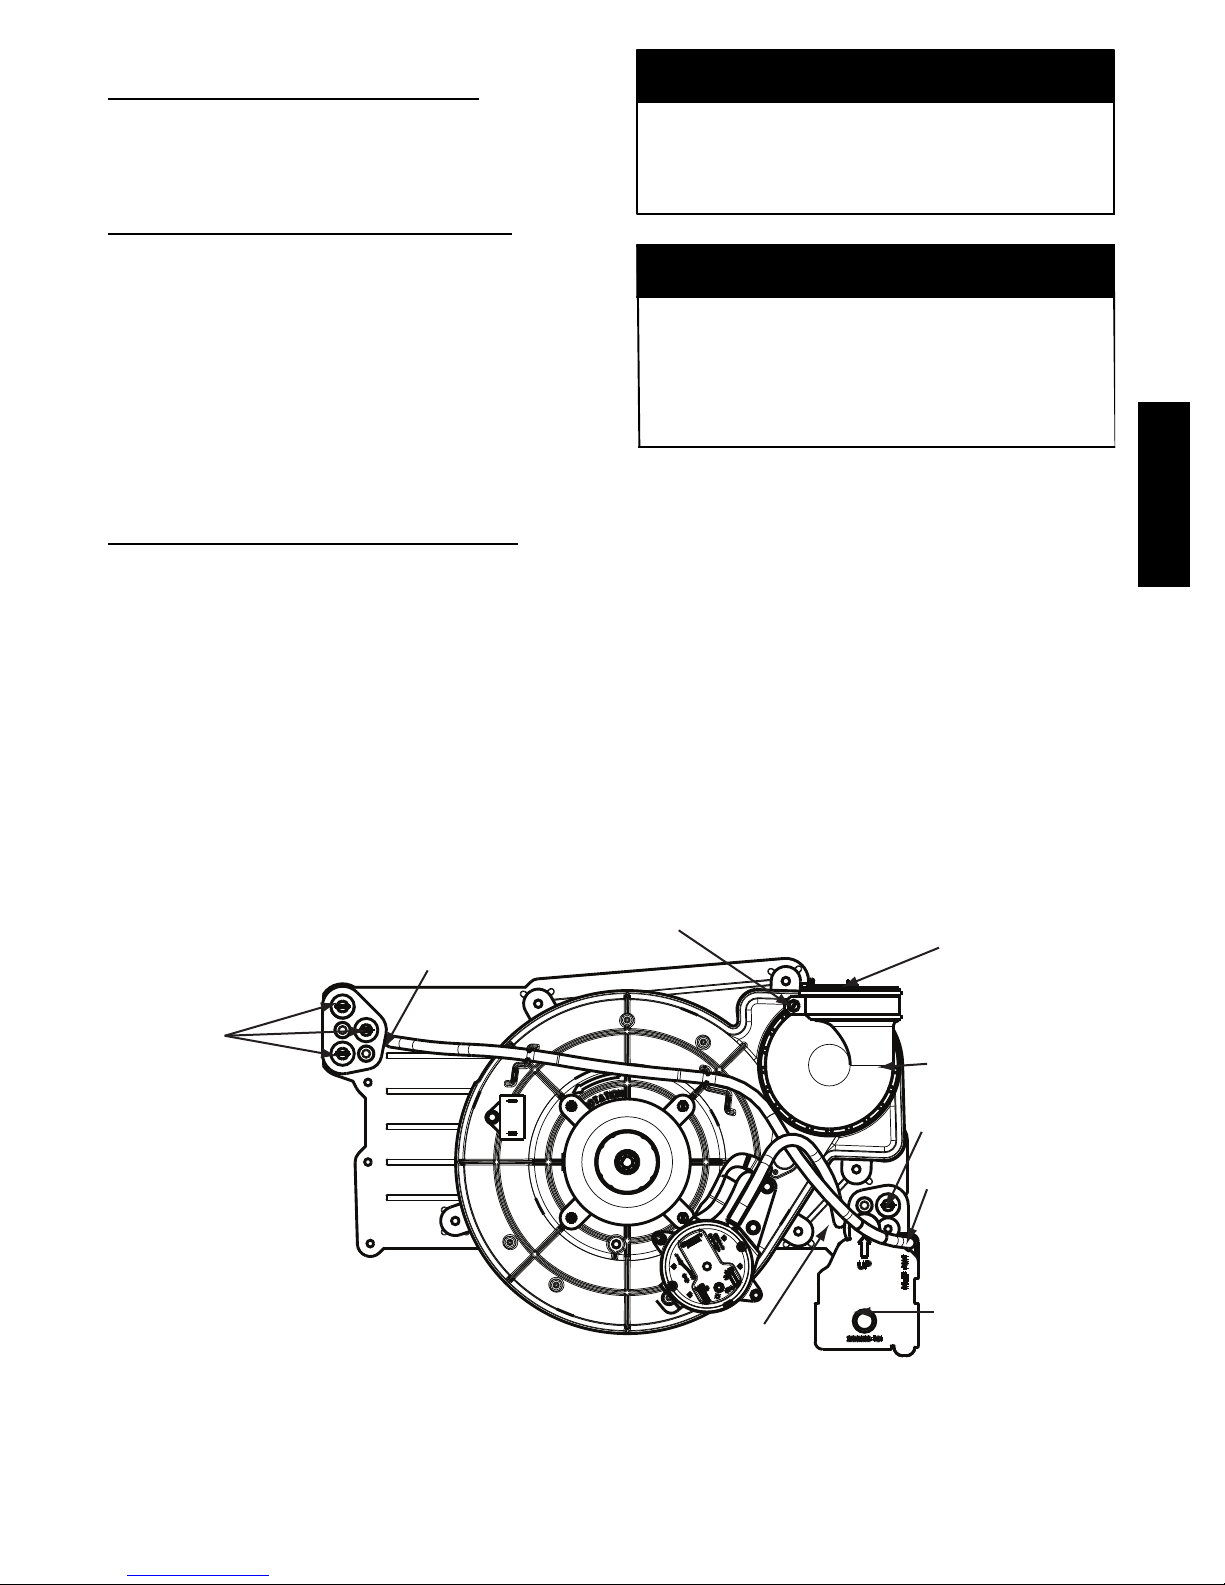
CONDENSATE TRAP
Condensate Trap -- Upflow Orientation
When the furnace is installed in the upflow position, it is not
necessary to relocate the condensate trap or associated tubing.
Refer to Fig. 8 for upflow condensate trap information. Refer to
Condensate Drain section for information how to install the
condensate drain.
Condensate Trap -- Downflow Orientation.
When the furnace is installed in the downflow position, the
condensate trap will be initially located at the upper left corner of
the collector box, as received from the factory. See the top image
in Fig. 9. When the furnace is installed in the downflow
orientation, the condensate trap must be relocated for proper
condensate drainage. See the bottom image in Fig. 9.
To Relocate the Condensate Trap:
S Orient the furnace in the downflow position.
S Fig. 9 shows the condensate trap and tubing before and after
relocation. Refer to Fig. 9 to begin the trap conversion.
S Refer to Condensate Drain section for information how to install the
condensate drain.
Condensate Trap -- Horizontal Orientation.
When the furnace is installed in the horizontal right position, the
condensate trap will be initially located at the bottom of the collector
box, as received from the factory. See the top image in Fig. 10.
When the furnace is installed in the horizontal left position, the
condensate trap will be initially located at the top of the collector box,
as received from the factory. See the top image in Fig. 11. In both
cases the trap must be repositioned on the collector box for proper
condensate drainage. See the bottom images in Fig. 10 and 11.
A field--supplied, accessory Horizontal Installation Kit (trap
grommet) is required for all direct--vent horizontal installations (only).
The kit contains a rubber casing grommet designed to seal between
the furnace casing and the condensate trap. See Fig. 16.
NOTICE
The field--supplied, accessory horizontal drain trap grommet is
ONLY REQUIRED FOR DIRECT VENT APPLICATIONS.
It it NOT required for applications using single--pipe or
ventilated combustion air venting.
NOTICE
The condensate trap extends below the side of the casing in
the horizontal position. A minimum of 2--in. (51 mm) of
clearance is required between the casing side and the furnace
platform for the trap to extend out of the casing in the
horizontal position. Allow at least 1/4--in. per foot (20 mm
per meter) of slope down.
To Relocate the Condensate Trap:
S Remove the knockout in the casing for the condensate trap.
S Install the grommet in the casing when required for direct--vent
horizontal applications.
S Orient the furnace in the desired position.
S Allow for 2 in. (51 mm) of clearance underneath the furnace for the
condensate trap and drain line.
S Fig. 10 shows the condensate trap and tubing before and after
relocation in the horizontal right position.
S Fig. 11 shows the condensate trap and tubing before and after
relocation in the horizontal left position.
S Refer to the appropriate figure to begin the trap conversion.
S Refer to Condensate Drain section for information how to install the
condensate drain.
912SB
Collector Box
Plugs
Condensate Trap
Relief Port
Fig. 8 -- Upflow Trap Configuration
Vent Pipe Clamp
Pressure Switch
Port
UPFLOW TRAP CONFIGURATION
1 & 2 Stage Units
(Appearance may vary)
Vent Elbow Clamp
Vent Elbow
Collector Box
Plug
Condensate Trap
Relief Port
Condensate Trap
Outlet
A11307
13
Page 14
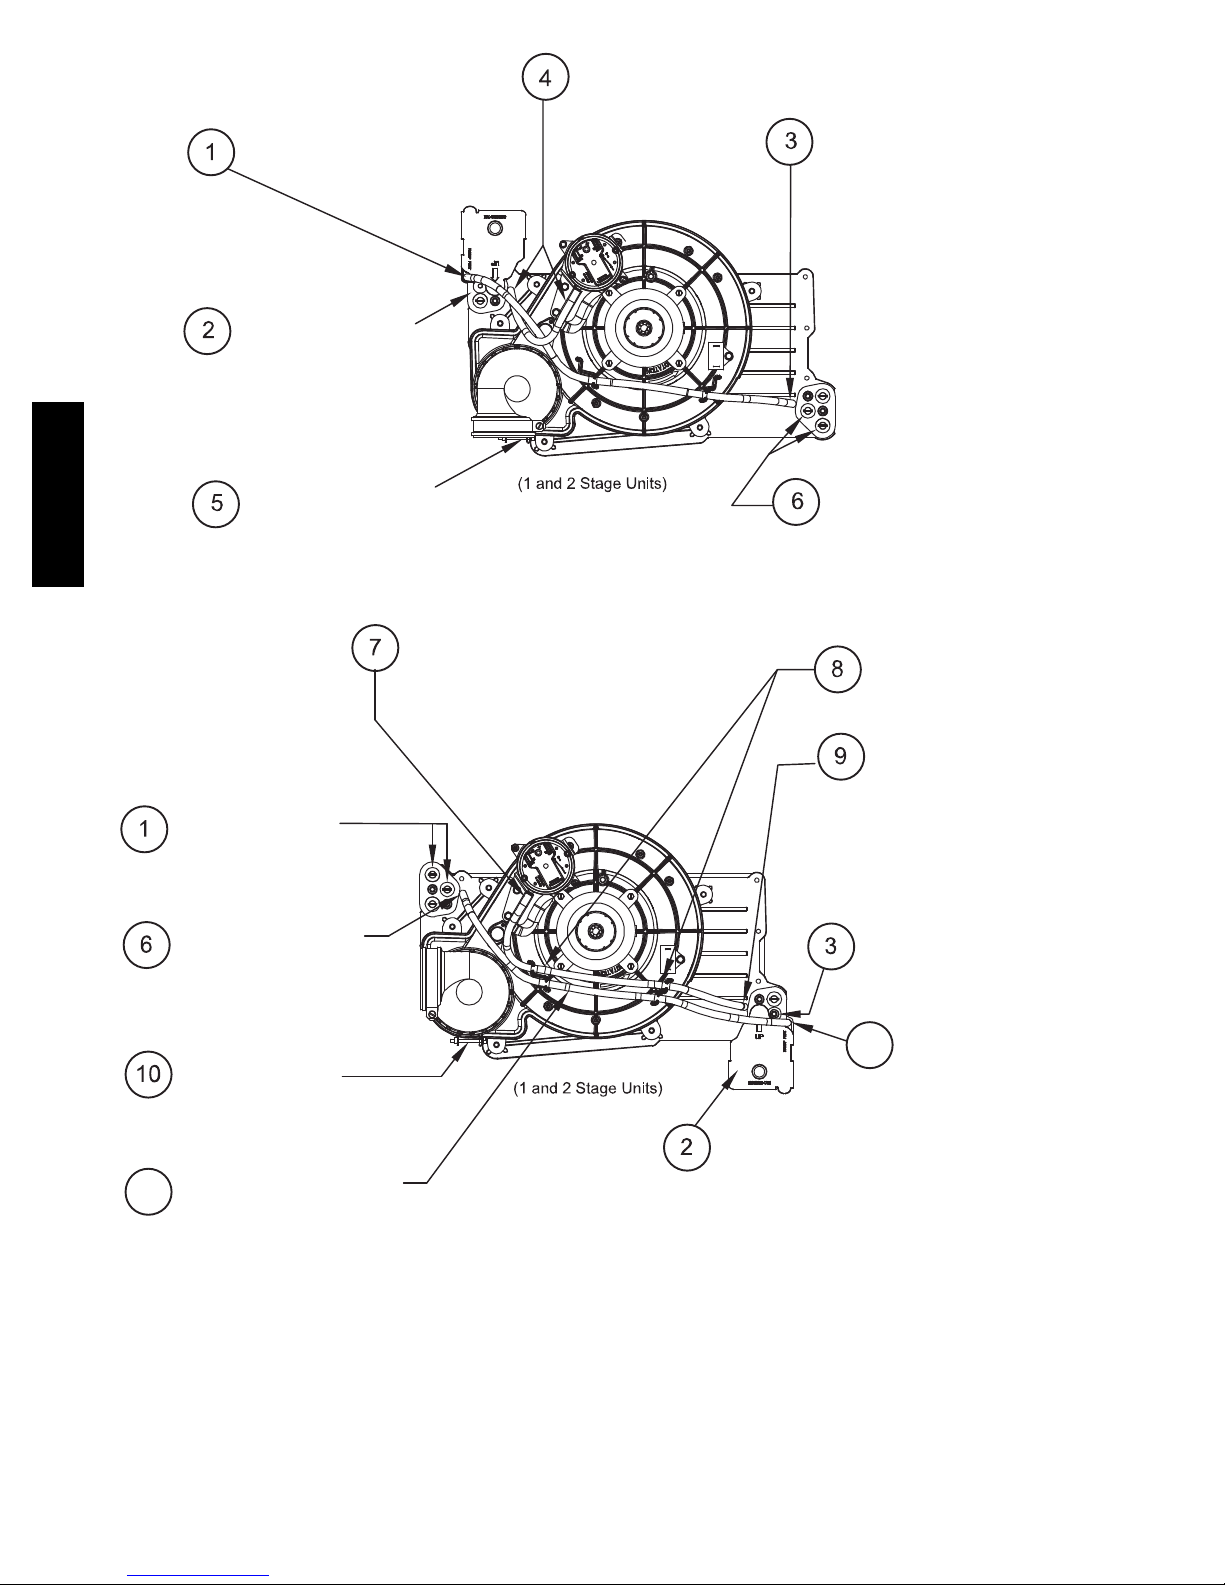
Remove pressure switch tube from
front pressure switch and discard. A
new tube is shipped in the loose parts bag.
912SB
Remove relief tube from relief
port on condensate trap.
Remove the screw
that secures the trap
to the collector box and
remove trap.
Loosen clamp on inlet
to vent elbow.
Unconverted Factory Configuration as
Viewed in the Downflow Orientation
Connect the new pressure switch
tube from Loose Parts bag to
port on front pressure switch.
Remove tube from relief port.
Remove middle and bottom
plugs. DO NOT DISCARD.
Route tube through inducer
standïoffs to adjust position
of the tube.
Install the two plugs
previously removed
on the open ports
of the collector box.
Connect relief tube
to port on collector
box.
Rotate elbow to
desired position and
tighten clamp to
15 lb.ïin.
Slide tube in standïoffs
4
to adjust length.
Align condensate trap
over middle and bottom
ports of collector box.
Downflow Trap Configuration
Fig. 9 -- Downflow Trap Configuration
(Appearance may vary)
Trim excess tube.
Connect pressure switch
tube to port on collector
box.
Attach condensate trap
with screw to collector box.
Connect relief tube to
5
relief port on condensate
trap.
A11587
14
Page 15
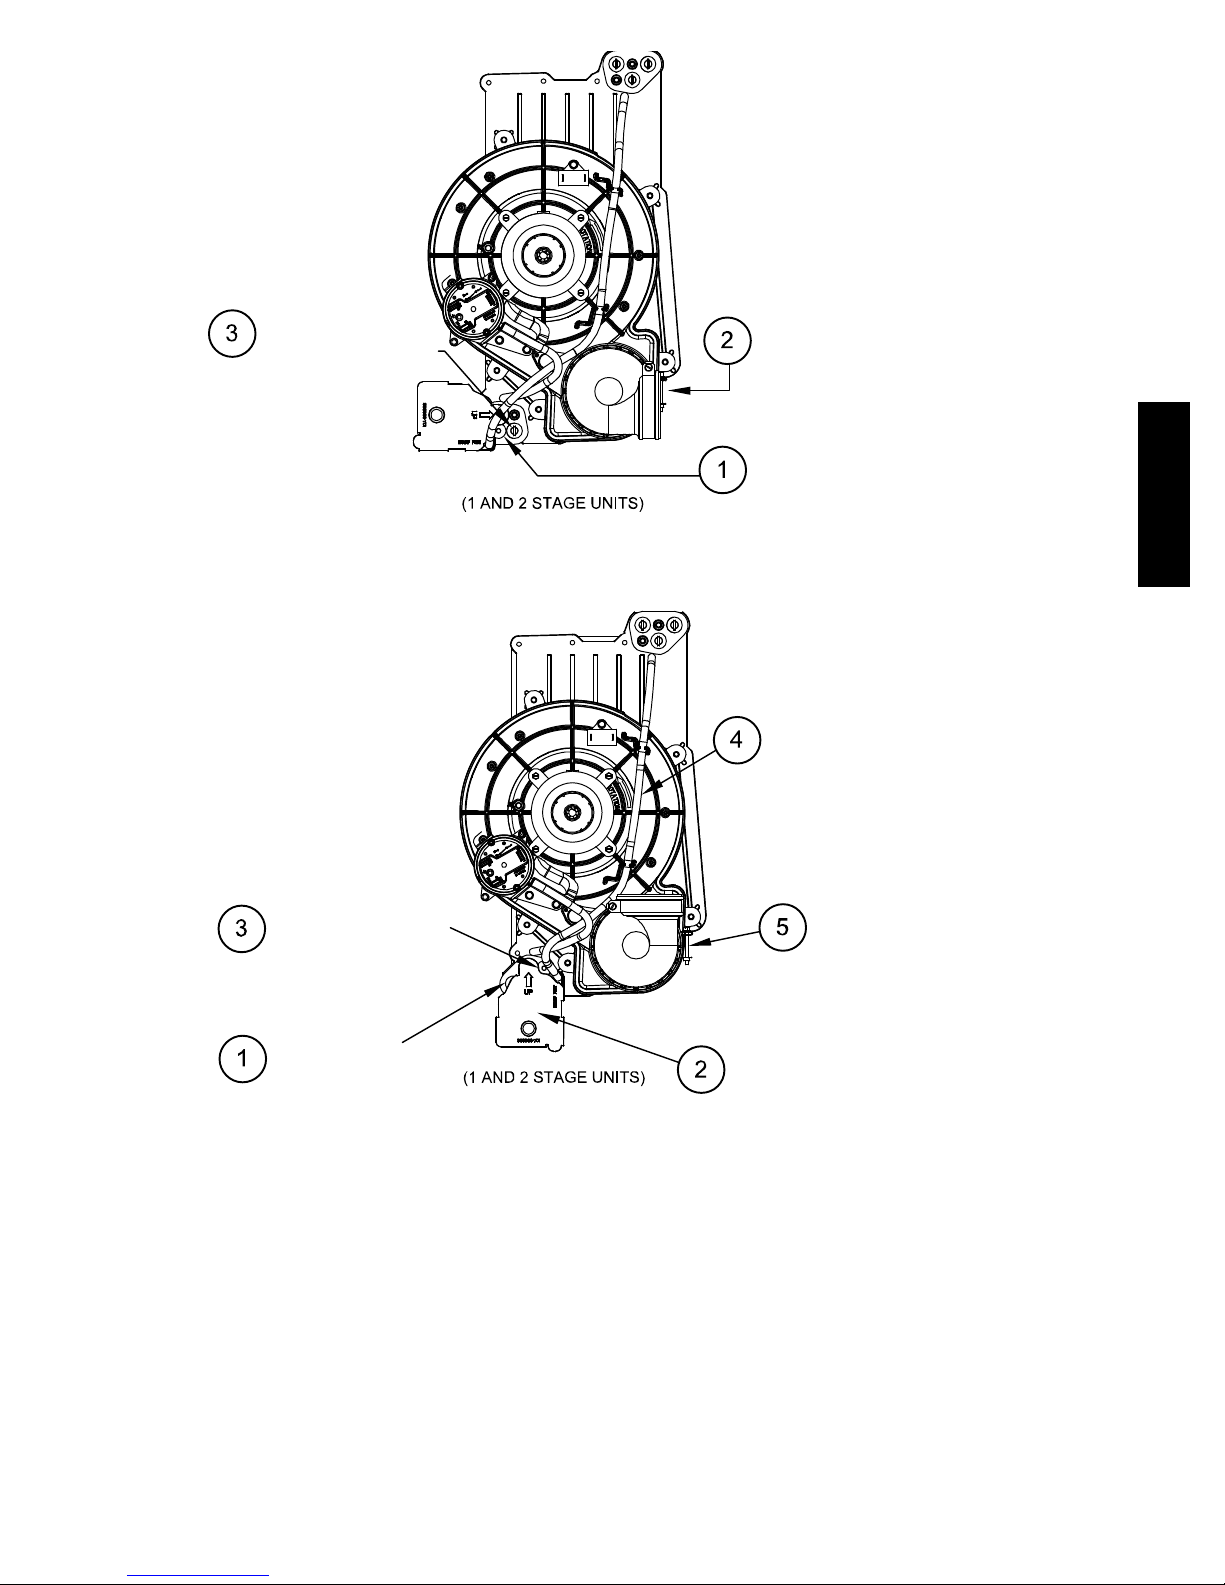
Remove plug from
collector box.
DO NOT DISCARD.
As Viewed in the Horizontal Right Orientation
NOTE: Remove knockout in
casing before reïinstalling the
condensate trap.
If alternate vent position
is required, loosen clamp
on inlet of vent elbow.
Remove the screw that secures
the trap to the collector box and
remove trap.
912SB
Unconverted Factory Configuration
Slide relief tube in standïoffs
to adjust length.
Attach condensate
trap with screw to
collector box.
Install plug on
open port of
collector box
Vent elbow shown in alternate
orientation. Tighten clamp on
inlet to vent elbow 15 lb.ïin.
Align trap over middle and
rightïhand port on collector box.
Horizontal Right Trap Configuration
A11573
Fig. 10 -- Horizontal Right Trap Configuration
(Appearance may vary)
15
Page 16

If alternate vent position
5
is required, loosen clamp
on vent elbow inlet.
Remove the screw that secures the
condensate trap to the collector box
and remove trap.
Remove relief tube from
relief port on condensate
trap.
Remove front pressure
switch tube and discard.
A new tube is shipped in
the Loose Parts bag.
912SB
NOTE: Remove knockout in
casing before re-installing the
condensate trap.
Remove relief tube
from port on collector
box.
Rotate elbow to
9
desired position
and torque clamp
on inlet 15 lb.-in.
Slide relief tube in
stand-offs to adjust
length.
Remove middle and right
6
plug from collector box.
DO NOT DISCARD.
Unconverted Factory Trap Configuration
As Viewed in the Horizontal Left Orientation
Install two plugs previously
removed in open ports on
collector box.
Connect relief tube to port
on collector box.
Connect the new pressure switch
7
tube from Loose Parts bag to port
on front pressure switch.
Attach condensate
trap with screw to
collector box.
Align trap over middle
and right-hand port on
collector box.
Route pressure switch tube
underneath relief tube and
8
connect to port on
collector box.
Connect relief tube to relief
port on condensate trap.
Horizontal Left Trap Configuration
Fig. 11 -- Horizontal Left Configuration
(Appearance may vary)
16
A11574
Page 17
CONDENSATE DRAIN CONNECTION
!
CAUTION
FROZEN AND BURST WATER PIPE HAZARD
Failure to protect against the risk of freezing may result in
property damage.
Special precautions MUST be made if installing furnace in an
area which may drop below freezing. This can cause improper
operation or damage to equipment. If furnace environment
has the potential of freezing, the drain trap and drain line must
be protected. The use of accessory drain trap heaters, electric
heat tape and/or RV antifreeze is recommended for these
installations.
!
CAUTION
PROPERTY DAMAGE HAZARD
Failure to follow this caution may result in burst water pipes
and/or property damage.
If a condensate pump is installed, a plugged condensate drain
or a failed pump may cause the furnace to shut down. Do not
leave the home unattended during freezing weather without
turning off water supply and draining water pipes or otherwise
protecting against the risk of frozen pipes.
DO NOT trap the drain line in any other location than at the
condensate drain trap supplied with the furnace. If possible, DO
NOT route the drain line where it may freeze. The drain line must
terminate at an inside drain to prevent freezing of the condensate
and possible property damage.
Special precautions MUST be made if installing furnace in an area
which may drop below freezing. This can cause improper
operation or damage to the equipment. If the furnace environment
has the potential of freezing, the drain trap and drain line must be
protected. A self--regulating, shielded and waterproof heat tape
rated at 3 to 6 watt per foot (10 to 20 watt per meter) at 115 volt,
40_F(4_C) may be used to help provide freeze protection. Wrap
the drain trap and drain line with the heat tape and secure with
appropriate plastic ties. Follow the heat tape manufacturer’s
recommendations. Prime the trap before furnace operation.
Upflow/Downflow Orientation
In the Upflow or Downflow orientation, the condensate trap is
inside the furnace casing. The condensate drain must be routed
from the trap through the furnace casing. The condensate drain can
be routed through the left or right side of the casing. (The left or
right side is as you are viewing/facing the furnace from the front.)
The furnace condensate drain can be connected to the indoor coil
condensate drain, humidifier or auxiliary drain traps as shown in
Fig. 13.
NOTE: On narrower casings, it may be easier to remove the
condensate trap, connect the drain line components and re-install
the condensate trap. Read the steps thoroughly to familiarize
yourself with the required steps.
For Right Side Condensate Drain:
1. Remove the 7/8--in. knock--out from the right side of the
casing. See Fig. 12 for suggested knockout removal technique.
2. Remove the pre--formed rubber drain elbow and two spring
clamps from the loose parts bag.
3. Slide a spring clamp 1--inch (25 mm) down the plain end
(the end without the formed grommet) of the drain elbow.
4. From inside the casing, insert the formed grommet end of
the elbow through the 7/8--in. knockout in the casing.
5. Pull the grommet through the casing from the outside until
it is seated in the knockout
6. Attach the plain end of the drain elbow to the outlet stub on
the drain trap. Secure the drain elbow to the trap with the
spring clamp.
The remaining drain line can be constructed from field supplied
1/2--in. CPVC or 3/4--in. PVC pipe, in compliance with local
building codes. A factory--supplied 1/2--in. CPVC to 3/4--in. PVC
adapter is supplied in the loose parts bag for use as required.
7. Install the adapter or connect the 1/2--in. CPVC pipe by
sliding a spring clamp over the open end of the grommet on
the outside the furnace casing.
8. Open the spring clamp and insert the long end of the
adapter or the 1/2--in. CPVC pipe into the outlet stub on the
drain tube.
9. Connect additional condensate piping to a code--approved
drain, or to a condensate pump approved for use with acidic
furnace condensate and compatible with mineral and
vegetable oils, such as canola oil.
Allow at least 1/4-in. per foot (20 mm per meter) of slope down
and away from the furnace in horizontal sections of drain line.
TIP FROM CONTRACTORS: Contractors have found that
temporarily removing the inducer assembly in upflow applications
while performing the steps, below, makes upflow left--side drain
connections easier.
For Left Side Condensate Drain Connection:
1. For left side condensate drainage, the drain line is routed
from the condensate trap, behind the inducer (upflow) or
gas valve (downflow) and out through the left side of the
furnace casing. A pre-formed 1/2--in. CPVC “Z-pipe” is
provided with the furnace. The Z-pipe is long enough to
extend across the casing for drain connections.
2. Locate the Z-pipe. Remove the pre-formed drain elbow and
four spring clamps from the loose parts bag.
3. The Z-pipe is connected to the condensate trap and the
outside of the furnace by modifying the formed rubber
drain elbow as shown in Fig. 15.
4. Remove the formed grommet from the rubber drain elbow
by cutting the elbow along the vertical line located about
1--3/8 in. (35 mm) away from the formed grommet. See Fig.
15. DO NOT DISCARD THE FORMED GROMMET
OR THE RUBBER ELBOW. Both of these pieces will be
used.
Assemble and route the drain line to the opposite side of the
furnace as detailed below:
5. Remove the knock-out from the left side of the casing. See
Fig. 12 for suggested knockout removal technique.
6. From the outside of the casing, insert the angled end of the
Z-pipe through drain hole in the left side of the casing and
behind the inducer or gas valve. Allow the Z-pipe to
temporarily rest on the blower shelf (upflow) or burner box
(downflow). (NOTE: When the inducer housing has been
removed to ease installation in upflow applications, this step
is not needed.)
7. After inserting the Z pipe through the casing, slide a spring
clamp over each end of the Z pipe.
8. From inside the casing, insert the short end of the formed
grommet cut from the rubber drain elbow through the
7/8-in. drain knockout in the casing.
9. Pull the grommet through the casing from the outside until
it is seated in the knockout.
10. Align the Z-pipe with the long end of the grommet inside
the furnace and insert slightly. The angled end of the tube at
912SB
17
Page 18
the other side of the casing should be facing the front of the
furnace.
11. Slide a spring clamp over the end of the remaining rubber
drain elbow.
12. Attach the drain elbow to the angled end of Z-pipe and the
drain trap outlet stub. Adjust the length of Z-pipe inserted
into the grommet at the opposite side of the furnace as
necessary for proper fit and positioning. In both upflow and
downflow orientations, the Z-pipe should NOT be resting
on any sheet metal parts.
13. Secure the rubber elbow to the drain trap and the Z-pipe
with spring clamps.
14. Secure the grommet to the Z-pipe with the spring clamp.
The remaining drain line can be constructed from field supplied
1/2--in. CPVC or 3/4--in. PVC pipe, in compliance with local
building codes. A factory-supplied 1/2--in. CPVC to 3/4--in. PVC
adapter is supplied in the loose parts bag for use as required.
15. Install the adapter or connect the 1/2--in. CPVC pipe by
sliding a spring clamp over the open end of the grommet on
the outside the furnace casing.
912SB
16. Open the spring clamp and insert the long end of the
adapter or the 1/2--in. CPVC pipe into the outlet stub on the
drain tube.
17. Connect additional condensate piping to a code-approved
drain, or to a condensate pump approved for use with acidic
furnace condensate and compatible with mineral and
vegetable oils, such as canola oil.
Allow at least 1/4-in. per foot (20 mm per meter) of slope down
and away from the furnace in horizontal sections of drain line.
7. The remaining drain line can be constructed from field-supplied 1/2--in. CPVC or 3/4--in. PVC pipe, in compliance
with local building codes. A factory--supplied 1/2--in.
CPVC to 3/4--in. PVC adapter is supplied in the loose parts
bag for use as required.
8. Install the adapter or connect the 1/2--in. CPVC pipe by
sliding a spring clamp over the open end of the elbow or
grommet on the outside the furnace casing.
9. Open the spring clamp and insert the long end of the
adapter or the 1/2--in. CPVC pipe into the outlet stub on the
drain tube.
10. Connect additional condensate piping to a code--approved
drain, or to a condensate pump approved for use with acidic
furnace condensate and compatible with mineral and
vegetable oils, such as canola oil.
Allow at least 1/4-in. per foot (20 mm per meter) of slope down
and away from the furnace in horizontal sections of drain line.
NOTICE
The field--supplied, accessory horizontal drain trap grommet is
ONLY REQUIRED FOR DIRECT VENT APPLICATIONS.
It is NOT required for applications using single--pipe or
ventilated combustion air venting.
TIP FROM CONTRACTORS: When installing the furnace
horizontally, use the entire drain elbow (that is, do NOT cut as
shown in Fig. 15 to connect the trap to the drain line. This helps to
prevent bumps and shocks to the drain line from damaging the
furnace drain trap. Avoid misalignment of the drain pipe which
may cause kinks in the elbow.
Horizontal Orientation
1. The condensate trap outlet extends 2--in. (51 mm) below the
furnace casing. Leave enough clearance between the furnace
and the furnace platform for the trap.
2. To allow for servicing the trap, the condensate drain elbow
in the loose parts bag can be used to make a coupler to
allow for future service of the condensate trap and drain
line.
3. Remove the knock-out for the condensate trap in the side of
the casing.
4. Install the drain trap grommet in the casing if required for
direct--vent applications. If necessary, remove the trap,
install the grommet and re-install the trap.
5. Remove the pre-formed rubber drain elbow, and two spring
clamps from the loose parts bag.
6. Connect the full or modified elbow and/or grommet to the
outlet of the condensate trap with one spring clamp. Avoid
misalignment of the drain pipe which may cause kinks in
the elbow or grommet.
!
CAUTION
CUT HAZARD
Failure to follow this caution may result in personal injury.
Sheet metal parts may have sharp edges or burrs. Use care
and wear appropriate protective clothing, safety glasses and
gloves when handling parts, and servicing furnaces.
L12F019B
Fig. 12 -- Knockout Removal
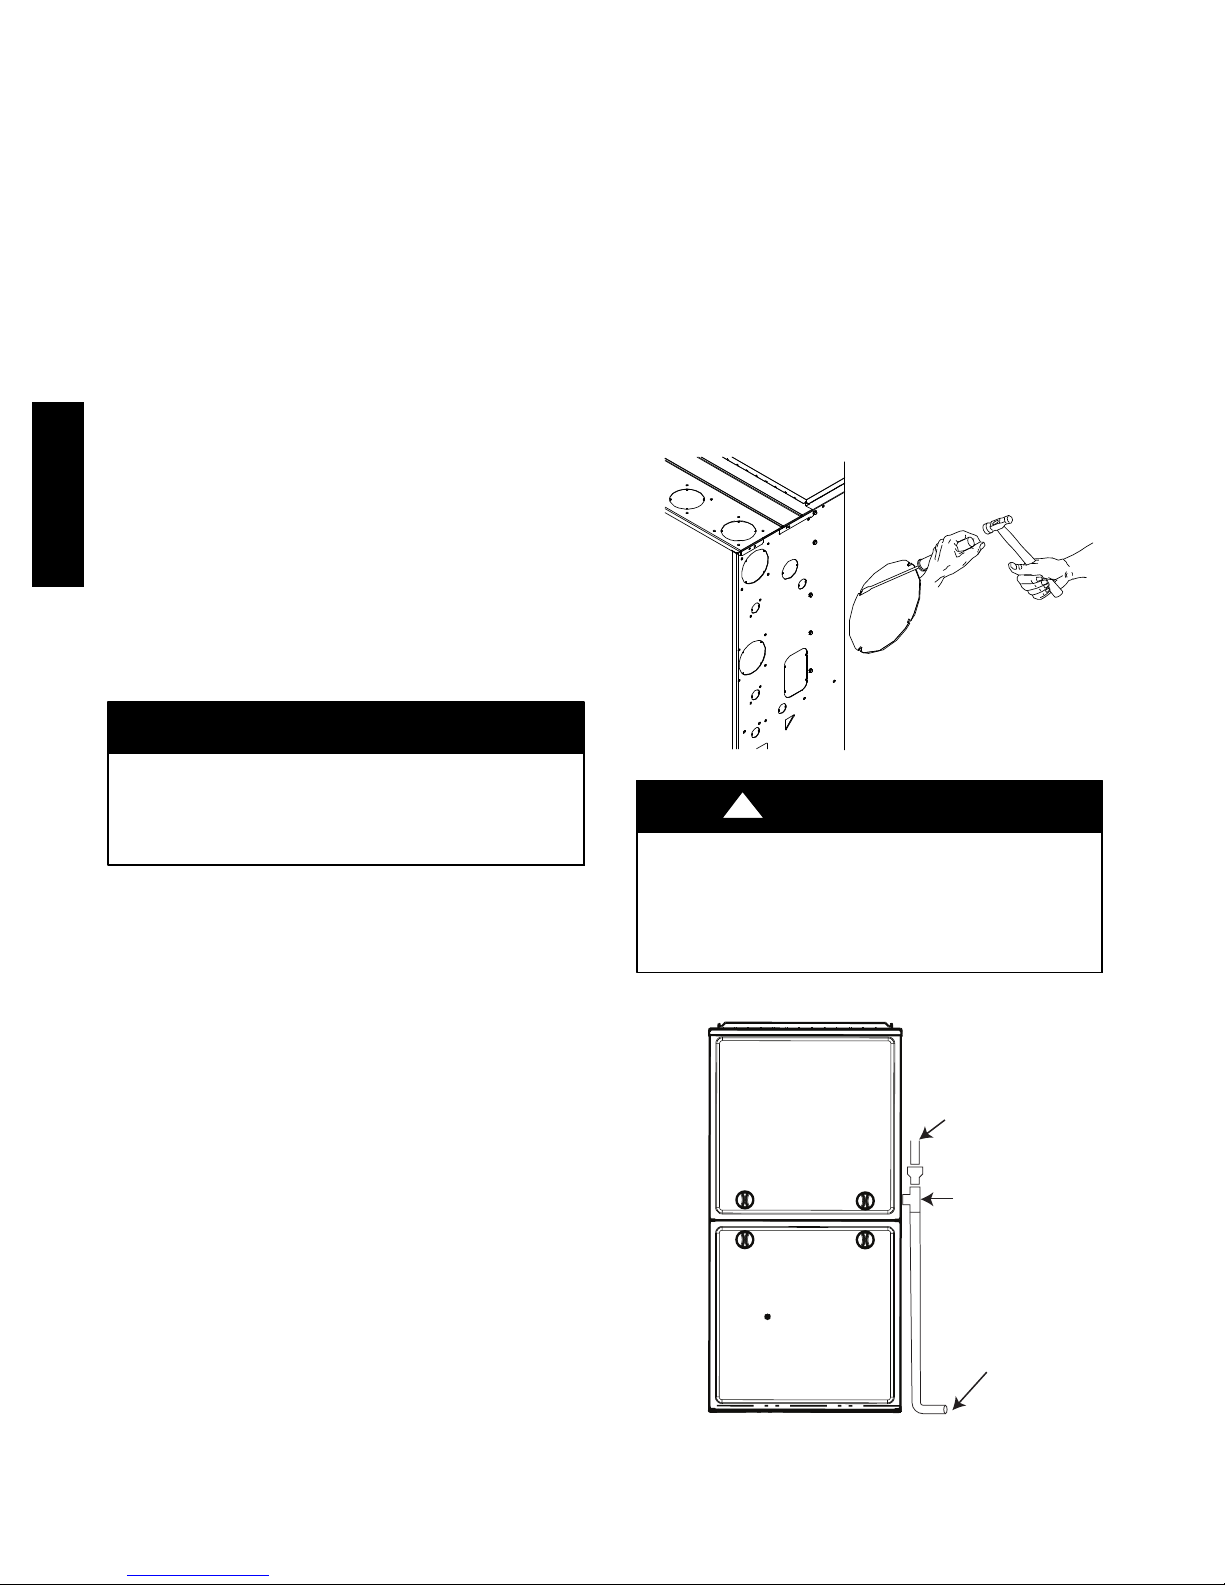
OPEN STAND
PIPE FOR
A/C OR
HUMIDIFIER
DRAIN
TEE
TO OPEN
DRAIN
Fig. 13 -- Example of Field Drain Attachment
A11276
18
Page 19
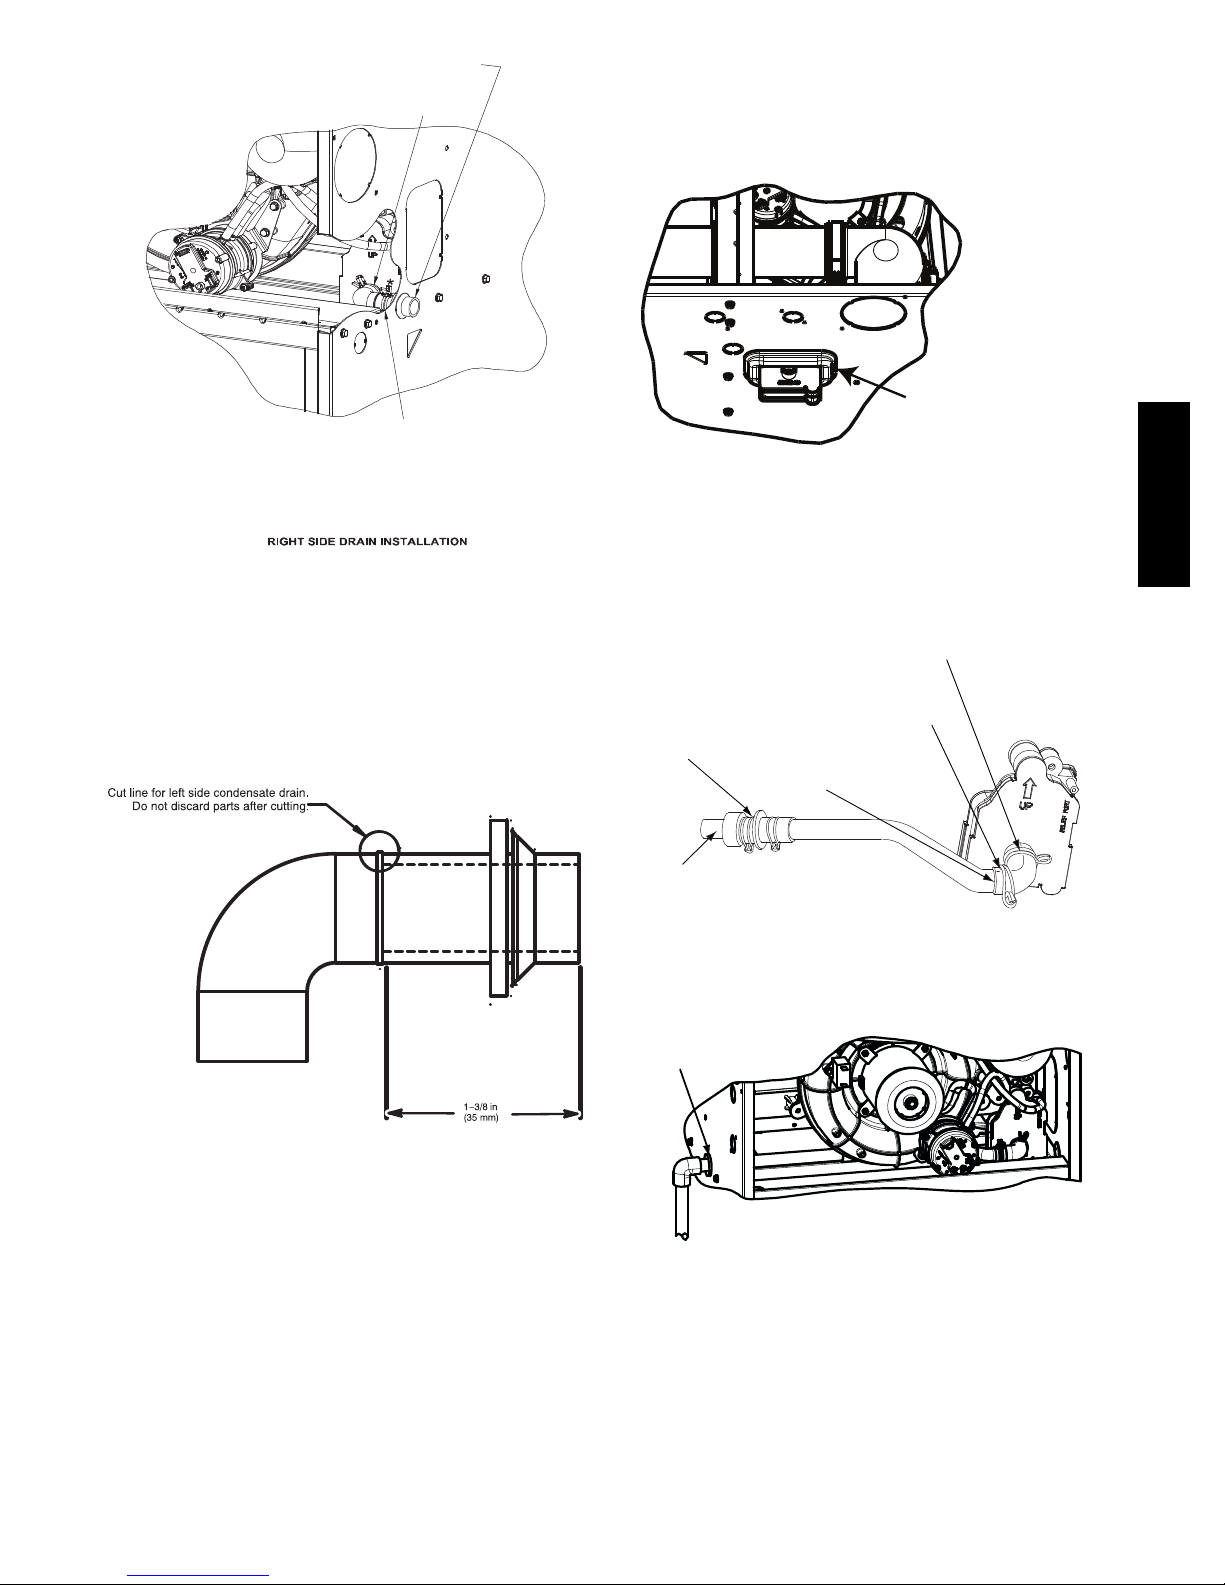
INSTALL CLAMPS ON DRAIN TUBE
ATTACH DRAIN TUBE TO CONDENSATE
DRAIN TRAP
PULL DRAIN STUB
THROUGH CASING
OPEN SPRING CLAMP
INSERT FACTORYïSUPPLIED 1/2ïIN. CPVC
TO 3/4ïIN. PVC ADAPTER OR 1/2ïIN. CPVC PIPE
*CLAMP MAY BE LOCATED ON OUTSIDE OF DRAIN
TUBE
NOTE: Trap grommet is required only for direct-vent
applications.
Remove knockout.
Install grommet before
relocating condensate
trap.
912SB
Fig. 14 -- Formed Rubber Drain Grommet
A11342A
Fig. 16 -- Horizontal Drain Trap Grommet
Attach elbow to condensate trap
Cut formed end off
Formed end of
grommet
Factory supplied 1/2ïin. CPVC to
3/4ïin. PVC adapter
TRAP, DRAIN ELBOW WITH DISCHARGE PIPE
Formed end of grommet
Open spring clamp. Insert
1/2ïin. to 3/4ïin. CPVC to
PVC adapter or 1/2ïin.
CPVC pipe
condensate drain
elbow
Connect short end
of “Z” pipe to modified
drain elbow
A11582
s
Modified drain elbow connect to
condensate trap and “Z” pipe
Fig. 15 -- Modify Rubber Drain Elbow
A11581
NOTE: Remove Inducer Housing for easier access, if desired.
LEFT SIDE DRAIN ROUTED BEHIND INDUCER
L12F015
Fig. 17 -- Drain Trap Connection and Routing
(Appearance may vary)
19
Page 20

INSTALLATION
NOTICE
This furnace is certified to leak 2% or less of nominal air
conditioning CFM delivered when pressurized to 1--in. water
column with all present air inlets, including bottom closure in
upflow and horizontal applications, air outlets, and plumbing
and electrical ports sealed.
Upflow Installation
NOTE: The furnace must be pitched as shown in Fig. 24 for
proper condensate drainage.
Supply Air Connections
For a furnace not equipped with a cooling coil, the outlet duct shall
be provided with a removable access panel. This opening shall be
accessible when the furnace is installed and shall be of such a size
that the heat exchanger can be viewed for possible openings using
light assistance or a probe can be inserted for sampling the air
stream. The cover attachment shall prevent leaks.
912SB
Connect supply--air duct to flanges on furnace supply--air outlet.
Bend flange upward to 90_ with wide duct pliers. See Fig. 21.
The supply--air duct must be connected to ONLY the furnace
supply--outlet--air duct flanges or air conditioning coil casing
(when used). DO NOT cut main furnace casing side to attach
supply air duct, humidifier, or other accessories. All supply side
accessories MUST be connected to duct external to furnace main
casing.
Return Air Connections
!
WARNING
FIRE HAZARD
A failure to follow this warning could cause personal injury,
death and/or property damage.
Never connect return--air ducts to the back of the furnace.
Follow instructions below.
The return--air duct must be connected to bottom, sides (left or
right), or a combination of bottom and side(s) of main furnace
casing. Bypass humidifier may be attached into unused return air
side of the furnace casing. See Fig. 25, 26, and 27.
Bottom Return Air Inlet
These furnaces are shipped with bottom closure panel installed in
bottom return--air opening. Remove and discard this panel when
bottom return air is used. To remove bottom closure panel, perform
the following:
1. Tilt or raise furnace and remove 4 screws holding bottom
plate. See Fig. 23.
2. Remove bottom plate.
3. Remove bottom closure panel.
4. Reinstall bottom plate and screws.
Side Return Air Inlet
These furnaces are shipped with bottom closure panel installed in
bottom return--air opening. This panel MUST be in place when
only side return air is used.
NOTE: Side return--air openings can be used in UPFLOW and
some HORIZONTAL configurations. Do not use side return--air
openings in DOWNFLOW configuration. See Fig. 25, 26, and 27.
Leveling Legs (If Desired)
In upflow position with side return inlet(s), leveling legs may be
used. See Fig. 22. Install field--supplied, 5/16 x 1--1/2 in. (8 x 38
mm) (max) corrosion--resistant machine bolts, washers and nuts.
NOTE: Bottom closure must be used when leveling legs are used.
It may be necessary to remove and reinstall bottom closure panel to
install leveling legs. To remove bottom closure panel, see Item 1 in
Bottom Return Air Inlet section in Step 1 above.
To install leveling legs:
1. Position furnace on its back. Locate and drill a hole in each
bottom corner of furnace.
2. For each leg, install nut on bolt and then install bolt with
nut in hole. (Install flat washer if desired.)
3. Install another nut on other side of furnace base. (Install flat
washer if desired.)
4. Adjust outside nut to provide desired height, and tighten inside nut to secure arrangement.
5. Reinstall bottom closure panel if removed.
Downflow Installation
NOTE: The furnace must be pitched as shown in Fig. 24 for
proper condensate drainage.
Supply Air Connections
NOTE: For downflow applications, this furnace is approved for
use on combustible flooring when any one of the following 3
accessories are used:
S Special Base, KGASB
S Cased Coil Assembly Part No. CNPV, CNRV, CAP, or CAR
S Coil Box Part No. KCAKC
1. Determine application being installed from Table 8.
2. Construct hole in floor per Table 8 and Fig. 20.
3. Construct plenum to dimensions specified in Table 8 and
Fig. 20.
4. Install special base coil assembly or coil box as shown in
Fig. 20.
NOTE: It is recommended that the perforated supply--air duct
flanges be completely removed from furnace when installing the
furnace on a factory--supplied cased coil or coil box. To remove the
supply--air duct flange, use wide duct pliers or hand seamers to
bend flange back and forth until it breaks off. Be careful of sharp
edges. See Fig. 21.
!
CAUTION
CUT HAZARD
Failure to follow this caution may result in personal injury.
Sheet metal parts may have sharp edges or burrs. Use care
and wear appropriate protective clothing, safety glasses and
gloves when handling parts, and servicing furnaces.
Connect supply--air duct to supply--air outlet on furnace. Bend
flange inward past 90_ with wide duct pliers See Fig. 21. The
supply--air duct must be connected to ONLY the furnace supply
outlet or air conditioning coil casing (when used). When installed
on combustible material, supply--air duct must be connected to
ONLY the factory--approved accessory subbase, or a
factory--approved air conditioning coil casing. DO NOT cut main
furnace casing to attach supply side air duct, humidifier, or other
accessories. All supply side accessories MUST be connected to
duct external to furnace casing.
20
Page 21
Return Air Connections
!
WARNING
FIRE HAZARD
A failure to follow this warning could cause personal injury,
death and/or property damage.
Never connect return--air ducts to the back of the furnace.
Follow instructions below.
The return--air duct must be connected to return--air opening
(bottom inlet). DO NOT cut into casing sides (left or right).
Bypass humidifier connections should be made at ductwork or coil
casing sides exterior to furnace. See Fig. 26.
Bottom Return Air Inlet
These furnaces are shipped with bottom closure panel installed in
bottom return--air opening. Remove and discard this panel when
bottom return air is used. To remove bottom closure panel, perform
the following:
1. Tilt or raise furnace and remove 4 screws holding bottom
plate. See Fig. 23.
2. Remove bottom plate.
3. Remove bottom closure panel.
4. Reinstall bottom plate and screws.
Horizontal Installation
NOTE: The furnace must be pitched forward as shown in Fig. 24
for proper condensate drainage.
!
WARNING
FIRE, EXPLOSION, AND CARBON MONOXIDE
POISONING HAZARD
Failure to follow this warning could result in personal
injury, death, or property damage.
Do not install the furnace on its back or hang furnace with
control compartment facing downward. Safety control
operation will be adversely affected. Never connect
return--air ducts to the back of the furnace.
!
CAUTION
MINOR PROPERTY HAZARD
Failure to follow this caution may result in minor property
damage.
Local codes may require a drain pan under entire furnace and
condensate trap when a condensing furnace is used in an attic
application or over a finished ceiling.
The furnace can be installed horizontally in an attic or crawlspace
on either the left--hand (LH) or right--hand (RH) side. The furnace
can be hung from floor joists, rafters or trusses or installed on a
non--combustible platform, blocks, bricks or pad.
Platform Furnace Support
Construct working platform at location where all required furnace
clearances are met. See Table 2 and Fig. 28. For furnaces with
1--in. (25 mm) clearance requirement on side, set furnace on
non--combustible blocks, bricks or angle iron. For crawlspace
installations, if the furnace is not suspended from the floor joists,
the ground underneath furnace must be level and the furnace set on
blocks or bricks.
Suspended Furnace Support
The furnace must be supported under the entire length of the
furnace with threaded rod and angle iron. See Fig. 29. Secure
angle iron to bottom of furnace as shown.
Roll--Out Protection
Provide a minimum 12--in. x 22--in. (305 x 559 mm) piece of sheet
metal for flame roll--out protection in front of burner area for
furnaces closer than 12--in. (305 mm) above the combustible deck
or suspended furnaces closer than 12--in. (305 mm) to joists. The
sheet metal MUST extend underneath the furnace casing by 1--in.
(25 mm) with the door removed.
The bottom closure panel on furnaces of widths 17--1/2--in. (445
mm) and larger may be used for flame roll--out protection when
bottom of furnace is used for return air connection. See Fig. 28 for
proper orientation of roll--out shield.
Supply Air Connections
For a furnace not equipped with a cooling coil, the outlet duct shall
be provided with a removable access panel. This opening shall be
accessible when the furnace is installed and shall be of such a size
that the heat exchanger can be viewed for possible openings using
light assistance or a probe can be inserted for sampling the air
stream. The cover attachment shall prevent leaks.
Connect supply--air duct to flanges on furnace supply--air outlet.
Bend flange upward to 90_ with wide duct pliers. See Fig. 21.
The supply--air duct must be connected to ONLY the furnace
supply--outlet--air duct flanges or air conditioning coil casing
(when used). DO NOT cut main furnace casing side to attach
supply air duct, humidifier, or other accessories. All supply side
accessories MUST be connected to duct external to furnace main
casing.
Return Air Connections
The return--air duct may be connected to bottom of the furnace.
The side of casing that faces downward may also be used for return
air connection. A combination of the bottom and downward
facing side may also be used. The upward facing side of the casing
cannot be used as a return air connection. See Fig. 27.
Bottom Return Air Inlet
These furnaces are shipped with bottom closure panel installed in
bottom return--air opening. Remove and discard this panel when
bottom return air is used. To remove bottom closure panel, perform
the following:
1. Tilt or raise furnace and remove 4 screws holding bottom
plate. See Fig. 23.
2. Remove bottom plate.
3. Remove bottom closure panel.
4. Reinstall bottom plate and screws.
Side Return Air Inlet
These furnaces are shipped with bottom closure panel installed in
bottom return--air opening. This panel MUST be in place when
side return air inlet(s) are used without a bottom return air inlet.
Not all horizontal furnaces are approved for side return air
connections See Fig. 27.
Filter Arrangement
!
WARNING
FIRE, CARBON MONOXIDE AND POISONING
HAZARD
Failure to follow this warning could result in fire, personal
injury or death.
Never operate a furnace without a filter or filtration device
installed. Never operate a furnace with filter or filtration
device access doors removed.
912SB
21
Page 22
There are no provisions for an internal filter rack in these furnaces.
An external filter is required and is purchased separately. A field
supplied accessory air cleaner may also be used in place of the filter
rack.
For upflow applications, the filter can be installed on either side of
the furnace, the bottom of the furnace or any combination of side
and bottom of the furnace. See Fig. 18, 19, and 25.
For downflow applications, the filter rack (or field supplied
accessory air cleaner) must only be connected to the bottom
opening on the furnace. See Fig. 19 and 26.
For horizontal applications, the filter rack (or field supplied
accessory air cleaner) can be connected to the bottom opening on
the furnace. For side return use in the horizontal position, refer to
Fig. 27. If both side and bottom openings are used in Fig. 27, each
opening used will require a filter.
A filter rack or any field supplied accessory air cleaner can also be
installed in the common return duct prior to entering the return air
opening in any orientation.
Refer to the instructions supplied with filter rack or accessory air
filter for additional assembly and installation options.
See Table 7 for filter size details.
912SB
Filter and Return Duct Sizing
Pressure drop must be taken into account when sizing filters, filter
racks, IAQ devices, and associated system ductwork. See Table 5
for a comparison of Pressure Drop (initial/clean resistance to
airflow) versus Airflow for a variety of filter media types and sizes.
These are representative numbers. Consult the filter or IAQ device
manufacturers’ specification sheet for performance data for a
particular filter media or IAQ device.
Design the filter and associated ductwork for the best match of
pressure drop versus filter size. Best practice usually chooses filter
systems with pressure drops under 0.2 in. W.C. (50 Pa), with the
best blower electrical efficiency and system airflow performance
occurring with filter pressure drops under 0.1 in. W.C. (25 Pa).
Due to the relatively high pressure drops of 1--in. (25 mm) thick
after--market filter media, it is recommended that the filtration
system be designed for at least 2--in. (51 mm) thick media.
TIPS FROM CONTRACTORS: Install a media cabinet capable
of incorporating a 4--in. (102 mm) thick media filter. This allows
room for future upgrades to other IAQ devices.
NOTICE
Design the duct system FIRST to determine how much
pressure drop may be allowed in the filter system. See the Air
Ducts section. Excessive filter pressure drop often
compromises system airflow and duct performance, causes
inadequate airflow to the furthest ends of the duct system, as
well as causes excess noise and higher than anticipated
electrical consumption.
Provide duct transitions, as required, to smoothly transition airflow
from the return duct system to the filter (or IAQ device) to the
furnace when the dimensions of the ductwork or furnace return air
opening do not match the required filter or IAQ device dimensions.
See the instructions supplied with factory--accessory duct adapters.
22
Page 23
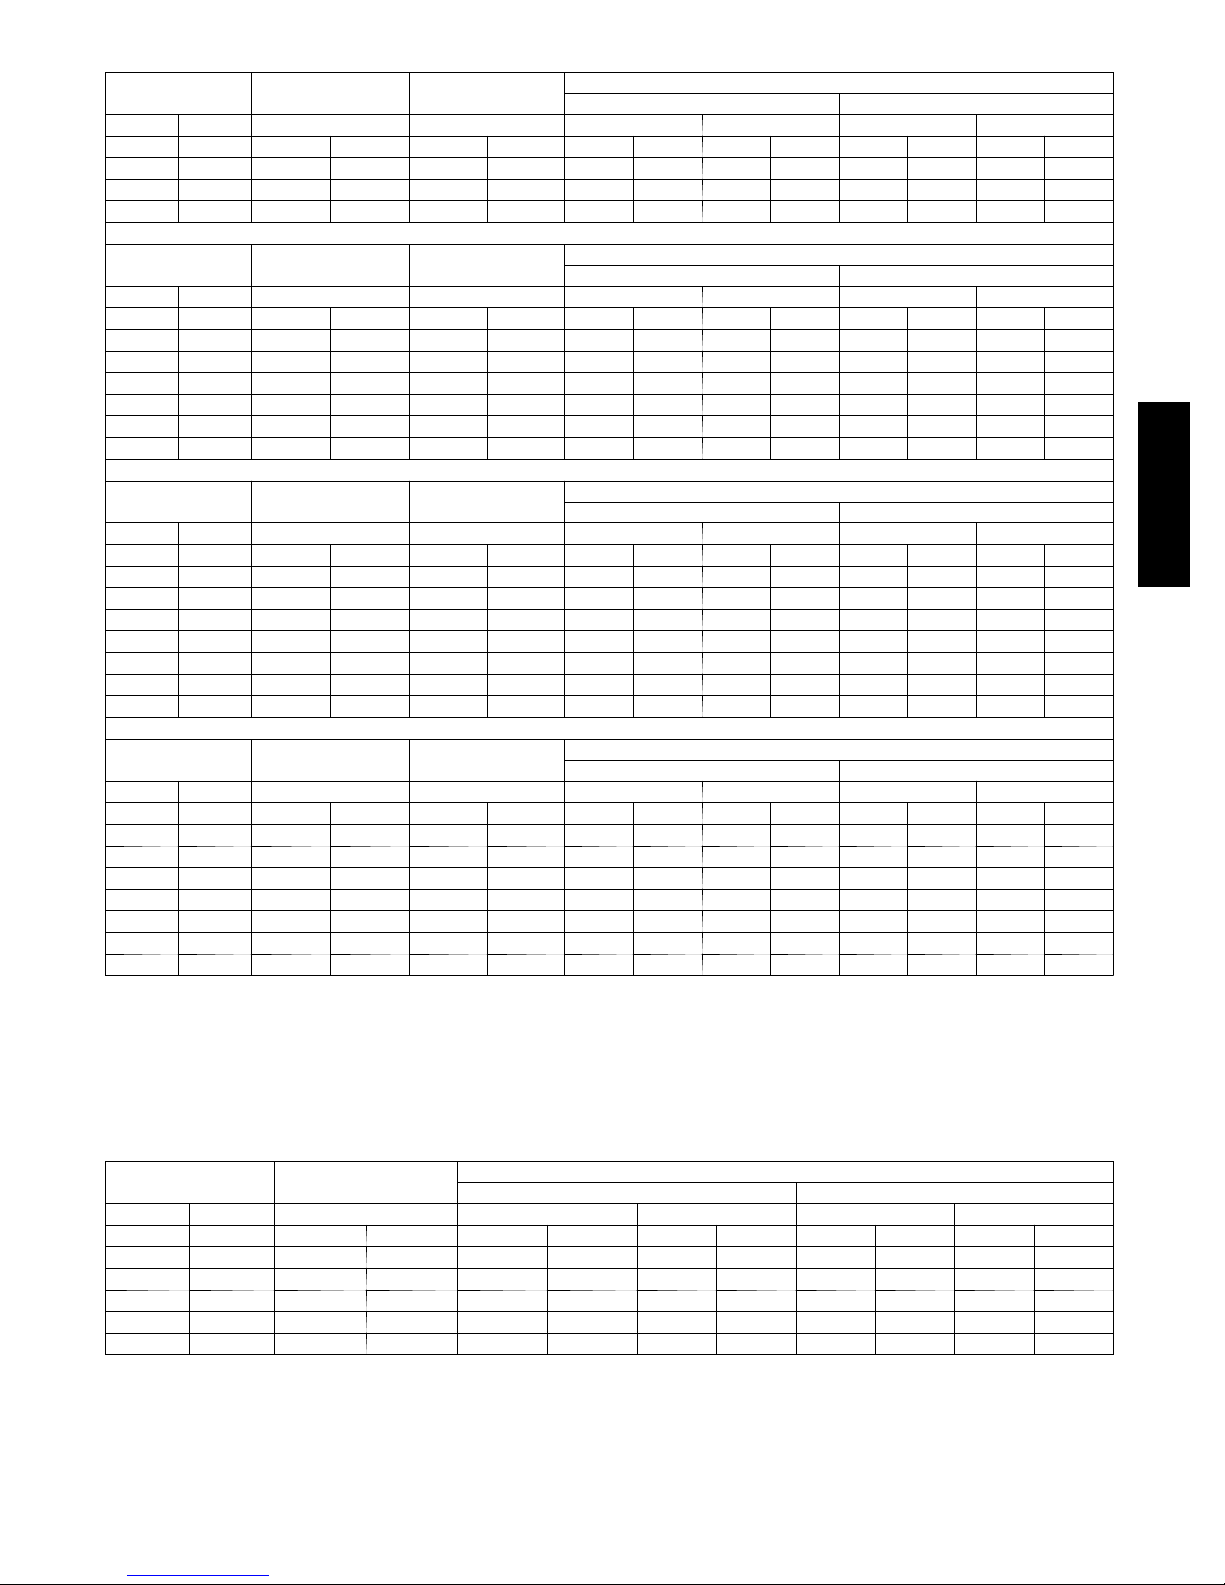
Table 5 – Filter Media Pressure Drop (Clean) Versus Airflow -- In. W.C. (Pa)
14 x 25 Filter
(356 x 635 mm)
CFM L/s (1-in. / 2.5 cm) (4-in. / 10 cm) (1-in. / 2.5 cm) (2-in. / 5 cm) (1-in. / 2.5 cm) (2-in. / 5 cm)
600 (283) 0.04 (12) 0.05 (12) 0.07 (17) 0.10 (26) 0.24 (60) 0.16 (40)
800 (378) 0.06 (15) 0.07 (19) 0.10 (25) 0.15 (39) 0.34 (85) 0.23 (59)
1000 (472) 0.07 (18) 0.10 (27) 0.13 (34) 0.21 (52) - - 0.32 (81)
1200 (566) 0.08 (20) 0.14 (36) 0.17 (43) 0.27 (68) - - - -
Factory-Accessory
Washable
Factory-Accessory
Media*
Representative After-Market Filter Media*
Fiberglass* Pleated*
16 x 25 Filter
(406 x 635 mm)
CFM L/s (1-in. / 2.5 cm) (4-in. / 10 cm) (1-in. / 2.5 cm) (2-in. / 5 cm) (1-in. / 2.5 cm) (2-in. / 5 cm)
600 (283) 0.04 (10) 0.05 (13) 0.06 (15) 0.09 (22) 0.20 (51) 0.13 (34)
800 (378) 0.05 (13) 0.07 (18) 0.08 (21) 0.13 (32) 0.29 (72) 0.20 (49)
1000 (472) 0.06 (16) 0.11 (28) 0.11 (28) 0.17 (43) - - 0.27 (67)
1200 (566) 0.07 (18) 0.15 (37) 0.14 (36) 0.22 (56) - - - 1400 (661) 0.08 (21) 0.19 (48) 0.18 (45) 0.28 (70) - - - 1600 (755) 0.09 (23) 0.24 (60) 0.21 (54) - - - - - 1800 (850) 0.10 (25) - - 0.26 (64) - - - - - -
20 x 25 Filter
(508 x 635 mm)
CFM (L/s) (1 -in. / 2.5 cm) (4 -in. / 10 cm) (1 -in. / 2.5 cm) (2-in. / 5 cm) (1-in. / 2.5 cm) (2-in. / 5 cm)
800 (378) 0.04 (11) 0.05 (12) 0.06 (16) 0.09 (24) 0.22 (55) 0.15 (37)
1000 (472) 0.05 (13) 0.07 (18) 0.08 (21) 0.13 (32) 0.29 (72) 0.20 (49)
1200 (566) 0.06 (15) 0.09 (22) 0.11 (27) 0.16 (41) - - 0.25 (63)
1400 (661) 0.07 (17) 0.12 (31) 0.13 (33) 0.20 (51) - - 0.31 (79)
1600 (755) 0.08 (19) 0.15 (38) 0.16 (40) 0.24 (61) - - - 1800 (850) 0.08 (21) 0.18 (47) 0.18 (47) 0.29 (73) - - - 2000 (944) 0.09 (23) 0.22 (56) 0.21 (54) - - - - - 2200 (1038) 0.09 (24) 0.26 (66) 0.25 (62) - - - - - -
25 x 25 Filter
(635 x 635 mm)
CFM L/s (1-in. / 2.5 cm) (4-in. / 10 cm) (1-in. / 2.5 cm) (2-in. / 5 cm) (1-in. / 2.5 cm) (2-in. / 5 cm)
800 (378) 0.03 (9) 0.03 (8) 0.05 (12) 0.07 (18) 0.17 (43) 0.11 (28)
1000 (472) 0.04 (11) 0.05 (12) 0.06 (16) 0.09 (24) 0.22 (55) 0.15 (37)
1200 (566) 0.05 (13) 0.07 (17) 0.08 (20) 0.12 (31) 0.27 (68) 0.18 (47)
1400 (661) 0.06 (15) 0.09 (23) 0.10 (24) 0.15 (38) - - 0.23 (58)
1600 (755) 0.06 (16) 0.12 (31) 0.11 (29) 0.18 (45) - - 0.28 (69)
1800 (850) 0.07 (18) 0.14 (35) 0.13 (34) 0.21 (53) - - - 2000 (944) 0.08 (19) 0.16 (41) 0.16 (39) 0.24 (61) - - - 2200 (1038) 0.08 (21) 0.19 (49) 0.18 (45) 0.28 (70) - - - -
Factory-Accessory
Washable
Factory-Accessory
Washable
Factory-Accessory
Washable
Factory-Accessory
Media*
Factory-Accessory
Media*
Factory-Accessory
Media*
Representative After-Market Filter Media*
Fiberglass* Pleated*
Representative After-Market Filter Media*
Fiberglass* Pleated*
Representative After-Market Filter Media*
Fiberglass* Pleated*
912SB
If the filter size that you are looking for is not contained in Table 5, refer to Table 6 for a comparison of Pressure Drop (initial/clean resistance
to airflow) versus Face Velocity for a variety of filter media types.
The following equations relate Face Velocity (FPM), Filter Area and Airflow (CFM):
Filter Face Velocity = Airflow / Filter Area
Minimum Filter Area = Rated System Airflow / Maximum Filter Face Velocity
Table 6 – Filter Media Pressure Drop (Clean) Versus Face Velocity-- In. W.C. (Pa)
Face Velocity
FPM (m/s) (1-in. / 2.5 cm) (1-in. / 2.5 cm) (2-in. / 5 cm) (1-in. / 2.5 cm) (2-in. / 5 cm)
200 (1) 0.04 (10) 0.05 (13) 0.08 (20) 0.18 (47) 0.12 (31)
300 (1.5) 0.05 (14) 0.09 (22) 0.13 (34) 0.30 (75) 0.21 (52)
400 (2) 0.07 (17) 0.13 (32) 0.20 (50) - - 0.31 (78)
500 (2.5) 0.08 (21) 0.18 (44) 0.27 (69) - - - 600 (3) 0.09 (23) 0.23 - - - - - - 700 (3.6) 0.10 (26) 0.29 - - - - - - -
Factory-Accessory
Washable
Representative After-Market Filter Media*
Fiberglass* Pleated*
23
Page 24
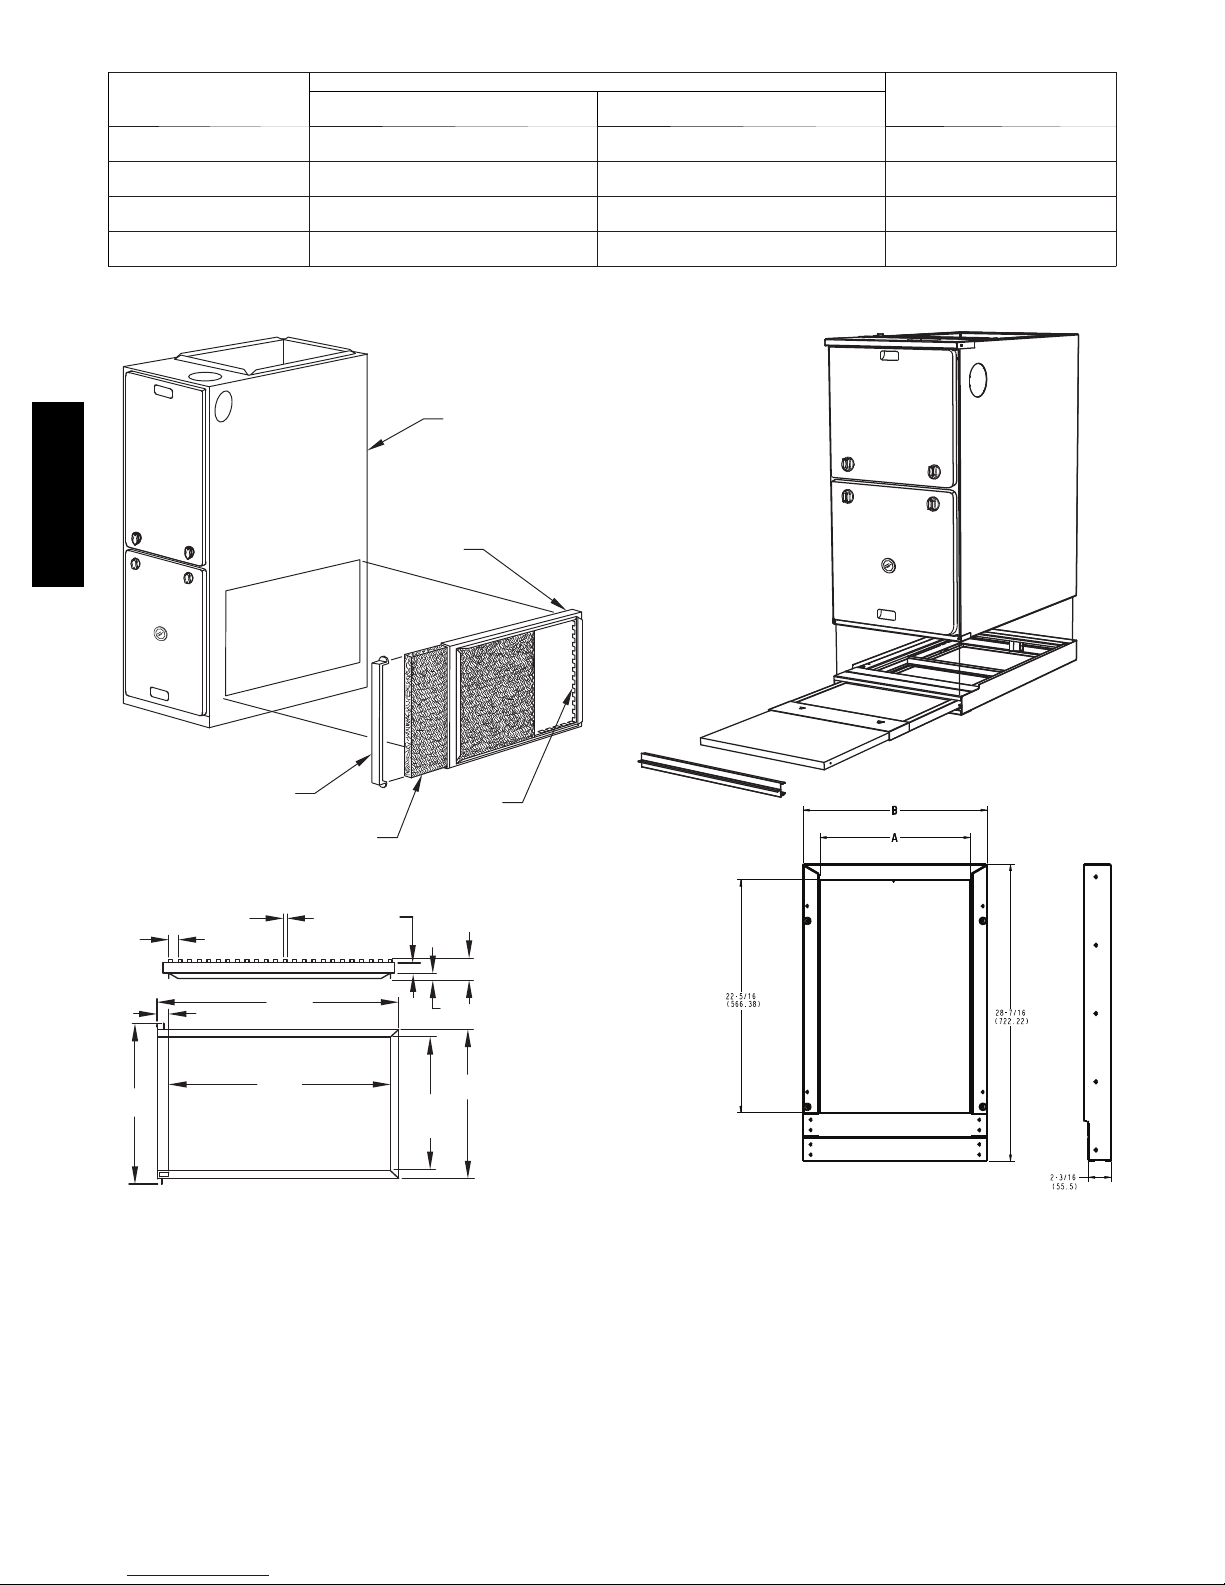
Table 7 – Air Filter Selection and Duct Sizing -- In. (mm)
FURNACE CASING WIDTH
14---3/16{ (360)
17---1/2 (445)
21 (533)
24---1/2 (622)
* Recommended to maintain air filter f ace velocity. See Product Data for part nu mber.
{ Not all families have these models.
SIDE
RETURN
16 x 25 x 3/4
(406 x 635 x 19)
16 x 25 x 3/4
(406 x 635 x 19)
16 x 25 x 3/4
(406 x 635 x 19)
16 x 25 x 3/4
(406 x 635 x 19)
FURNACE
FILTER SIZE
BOTTOM
RETURN
14 x 25 x 3/4
(356 x 635 x 19)
16 x 25 x 3/4
(406 x 635 x 19)
20 x 25 x 3/4
(508 x 635 x 19)
24 x 25 x 3/4
(610 x 635 x 19)
FILTER TYPE
Wash able*
Wash able*
Wash able*
Wash able*
912SB
17
(435 mm)
FILTER
FRAME
DOOR
FILTER
(FIELD SUPPLIED)
(10 mm)
1
25
(638 mm)
(587 mm)
1
/
23
3
TABS
/
8”
8”
(32 mm)
1
/
4”
1
(TYP.)
1
/
4”
1
(32 mm)
1
/
8”
OPENING
1
/
/
8”
2”
(13 mm)
14
(368 mm)
OPENING
TABS
3
(60 mm)
/
2
8”
3
/
(19 mm)
4”
1
/
(410 mm)
16
8”
1
/
2”
Fig. 18 -- Accessory Side Filter Rack
A11091
A11095
Fig. 19 -- Accessory Bottom Filter
24
Page 25
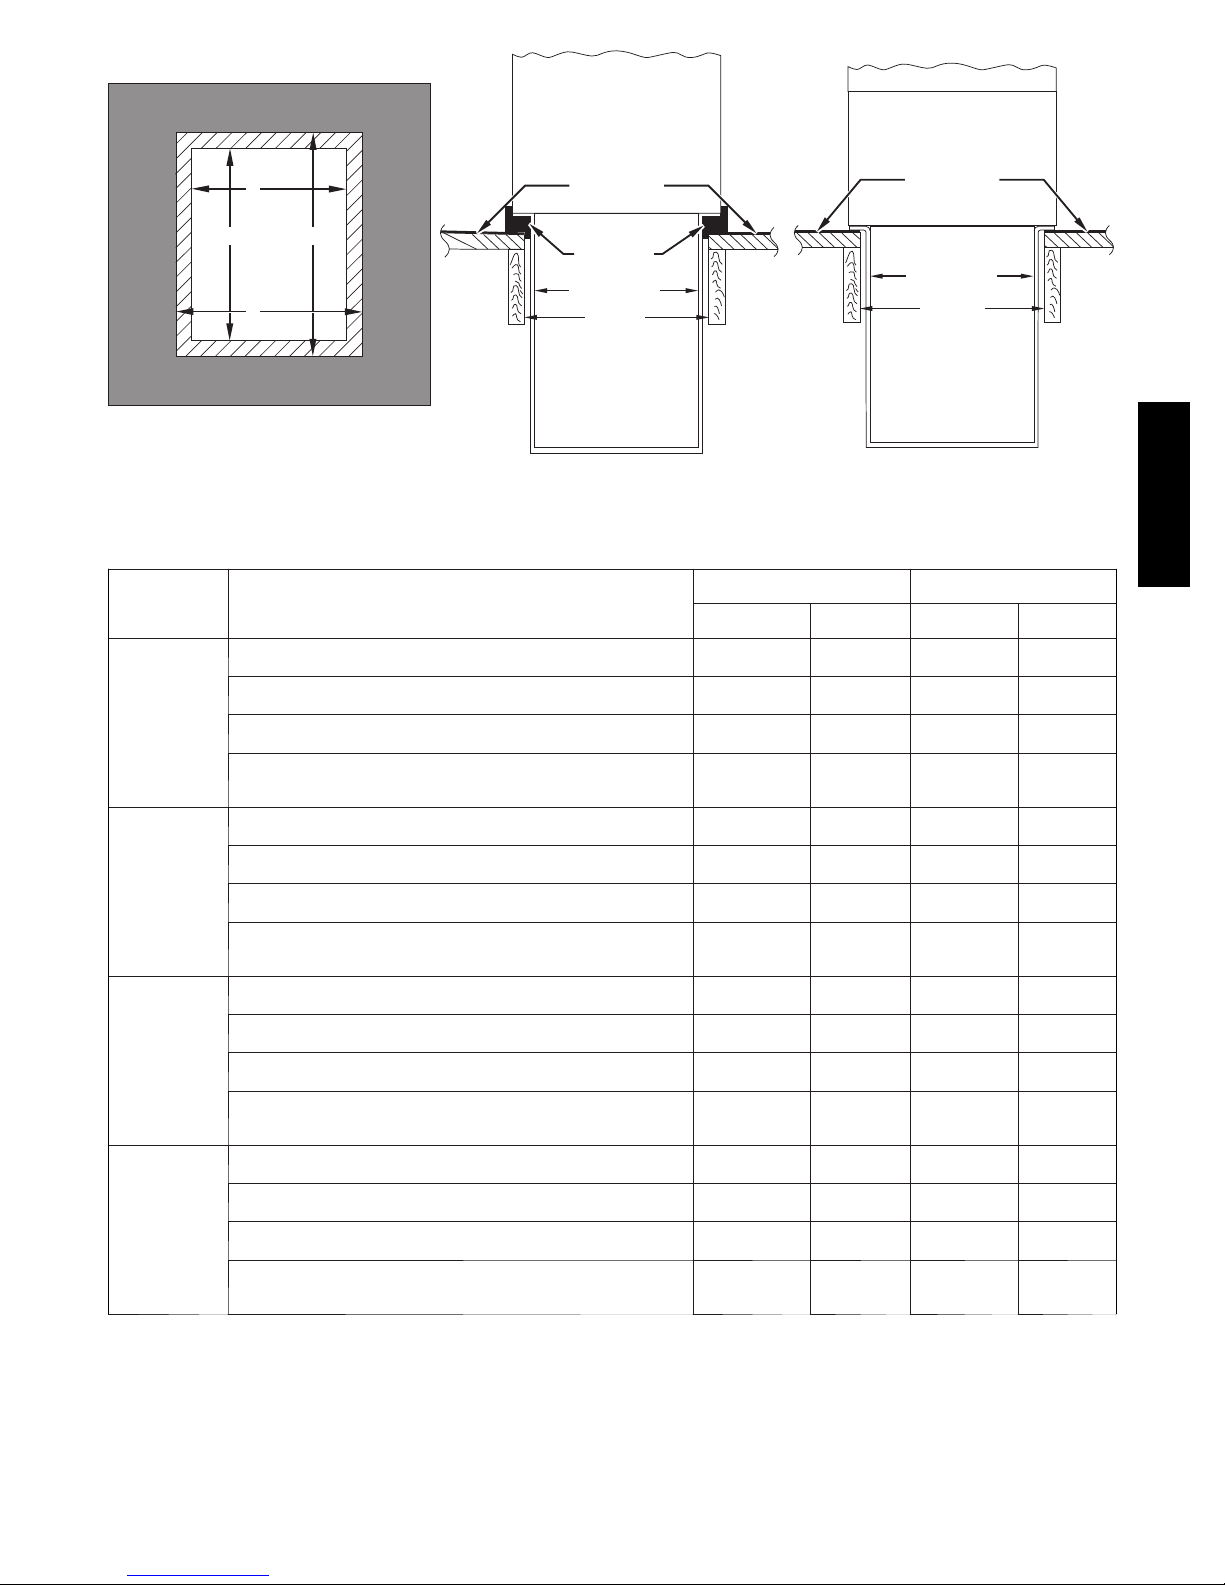
FURNACE
(OR COIL CASING
WHEN USED)
FURNACE
APPROVED
COIL ASSEMBLY
OR
COIL BOX
A
PLENUM
FURNACE
CASING
WIDTH
IN. (mm)
OPENING
B
FLOOR
OPENING
C
D
Upflow Applications on Combustible or Noncombustible Floor-
Downflow Applications on Noncombustible Flooring (KGASB
14–3/16{
(360)
Downflow applications on combustible flooring (KGASB sub-
Downflow Applications on Combustible Flooring with CNPV,
CNRV, CAR or CAP Coil Assembly or KCAKC coil box (KGASB
Upflow Applications on Combustible or Noncombustible Floor-
Downflow Applications on Noncombustible Flooring (KGASB
17–1/2
(445)
Downflow applications on combustible flooring (KGASB sub-
Downflow Applications on Combustible Flooring with CNPV,
CNRV, CAR or CAP Coil Assembly or KCAKC coil box (KGASB
Upflow Applications on Combustible or Noncombustible Floor-
Downflow Applications on Noncombustible Flooring (KGASB
21
(533)
Downflow applications on combustible flooring (KGASB sub-
Downflow Applications on Combustible Flooring with CNPV,
CNRV, CAR or CAP Coil Assembly or KCAKC coil box (KGASB
Upflow Applications on Combustible or Noncombustible Floor-
Downflow Applications on Noncombustible Flooring (KGASB
24--- 1/2
(622)
{ Not all families have these models.
Downflow applications on Combustible flooring (KGASB sub-
Downflow Applications on Combustible Flooring with CNPV,
CNRV, CAR or CAP Coil Assembly or KCAKC coil box (KGASB
Fig. 20 -- Installation on Combustible Flooring
Table 8 – Opening Dimensions -- In. (mm)
APPLICATION
ing (KGASB subbase not required)
subbase not required)
base required)
subbase not required)
ing (KGASB subbase not required)
subbase not required)
base required)
subbase not required)
ing (KGASB subbase not required)
subbase not required)
base required)
subbase not required)
ing (KGASB subbase not required)
subbase not required)
base required)
subbase not required)
COMBUSTIBLE
FLOORING
DOWNFLOW
SUBBASE
SHEET METAL
PLENUM
FLOOR
OPENING
COMBUSTIBLE
FLOORING
SHEET METAL
PLENUM
FLOOR
OPENING
PLENUM OPENING FLOOR OPENING
A B C D
12--- 11/16
(322)
12--- 9/16
(319)
11--- 13/16
(284)
12--- 5/16
(319)
16
(406)
15--- 7/8
(403)
15--- 1/8
(384)
15--- 1/2
(394)
19--- 1/2
(495)
19--- 3/8
(492)
18--- 5/8
(473)
19
(483)
23
(584)
22--- 7/8
(581)
22--- 1/8
(562)
22--- 1/2
(572)
21--- 5/8
(549)
19
(483)
19
(483)
19
(483)
21--- 5/8
(549)
19
(483)
19
(483)
19
(483)
21--- 5/8
(549)
19
(483)
19
(483)
19
(483)
21--- 1/8
(537)
19
(483)
19
(483)
19
(483)
13--- 5/16
(338)
13--- 3/16
(335)
13--- 7/16
(341)
13--- 5/16
(338)
16--- 5/8
(422)
16--- 1/2
(419)
16--- 3/4
(425)
16--- 1/2
(419)
20--- 1/8
(511)
20
(508)
20--- 1/4
(514)
20
(508)
23--- 5/8
(600)
23--- 1/2
(597)
23--- 3/4
(603)
23--- 1/2
(597)
A10491
22--- 1/4
(565)
19--- 5/8
(498)
20--- 5/8
(600)
20
(508)
22--- 1/4
(565)
19--- 5/8
(498)
20--- 5/8
(600)
20
(508)
22--- 1/4
(565)
19--- 5/8
(498)
20--- 5/8
(600)
20
(508)
22--- 1/4
(565)
19--- 5/8
(498)
20--- 5/8
(600)
20
(508)
912SB
25
Page 26
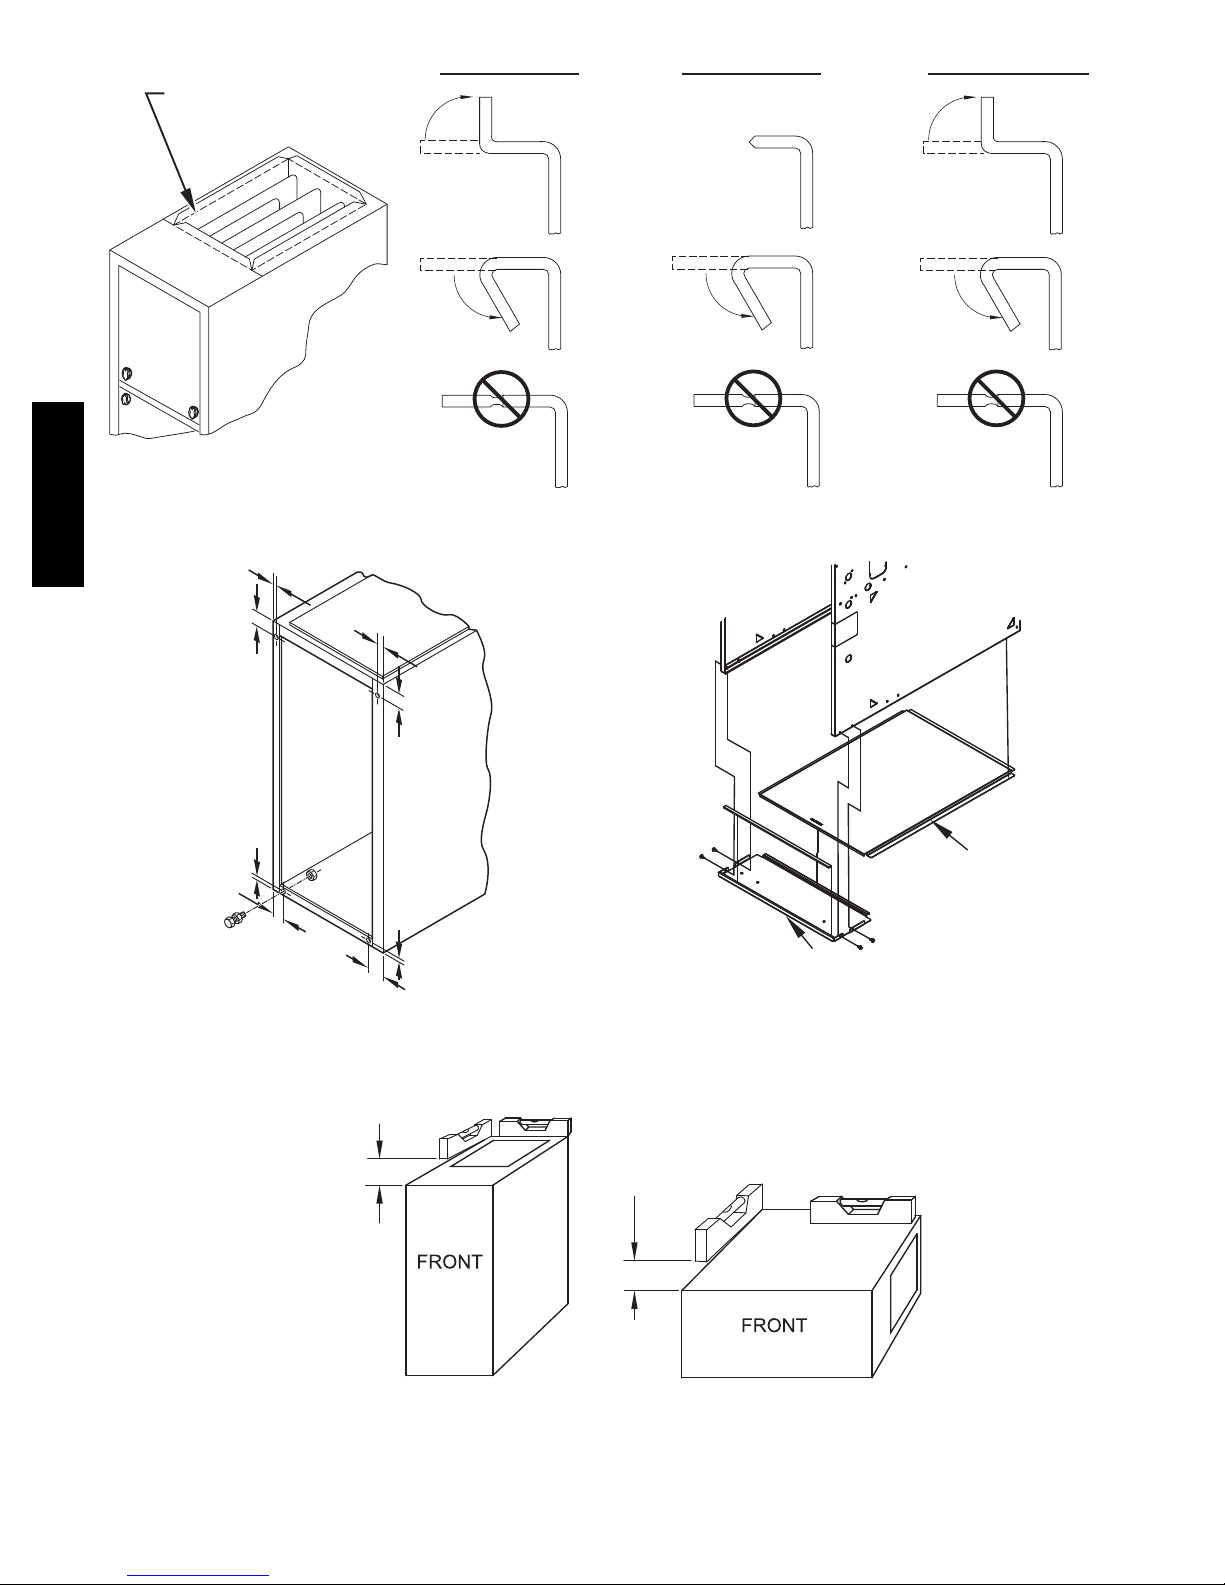
PERFORATED
DISCHARGE DUCT
FLANGE
UPFLOW DOWNFLOW HORIZONTAL
90°
90°
912SB
5/
(8mm)
(44mm)
16
1 3 / 4
(8mm)
5/
16
3
/ 4
1
(44mm)
120°
MIN
YES
YES
NO
Fig. 21 -- Duct Flanges
120°
MIN
YES
YES
NO
120°
MIN
YES
YES
NO
A10493
(8mm)
5
/
16
1
(44mm)
3/
4
3/
1
4
(44mm)
Fig. 22 -- Leveling Legs
LEVEL 0-IN. (0 MM) TO
1/2-IN. (13 MM) MAX
(8mm)
5/
16
A89014
MIN 1/4-IN. (6 MM) TO
1/2-IN. (13 MM) MAX
BOTTOM
CLOSURE
PAN EL
BOTTOM PLA TE
A11092
Fig. 23 -- Removing Bottom Closure Panel
UPFLOW OR
DOWNFLOW
HORIZONTAL
A11237
Fig. 24 -- Furnace Pitch Requirements
26
Page 27
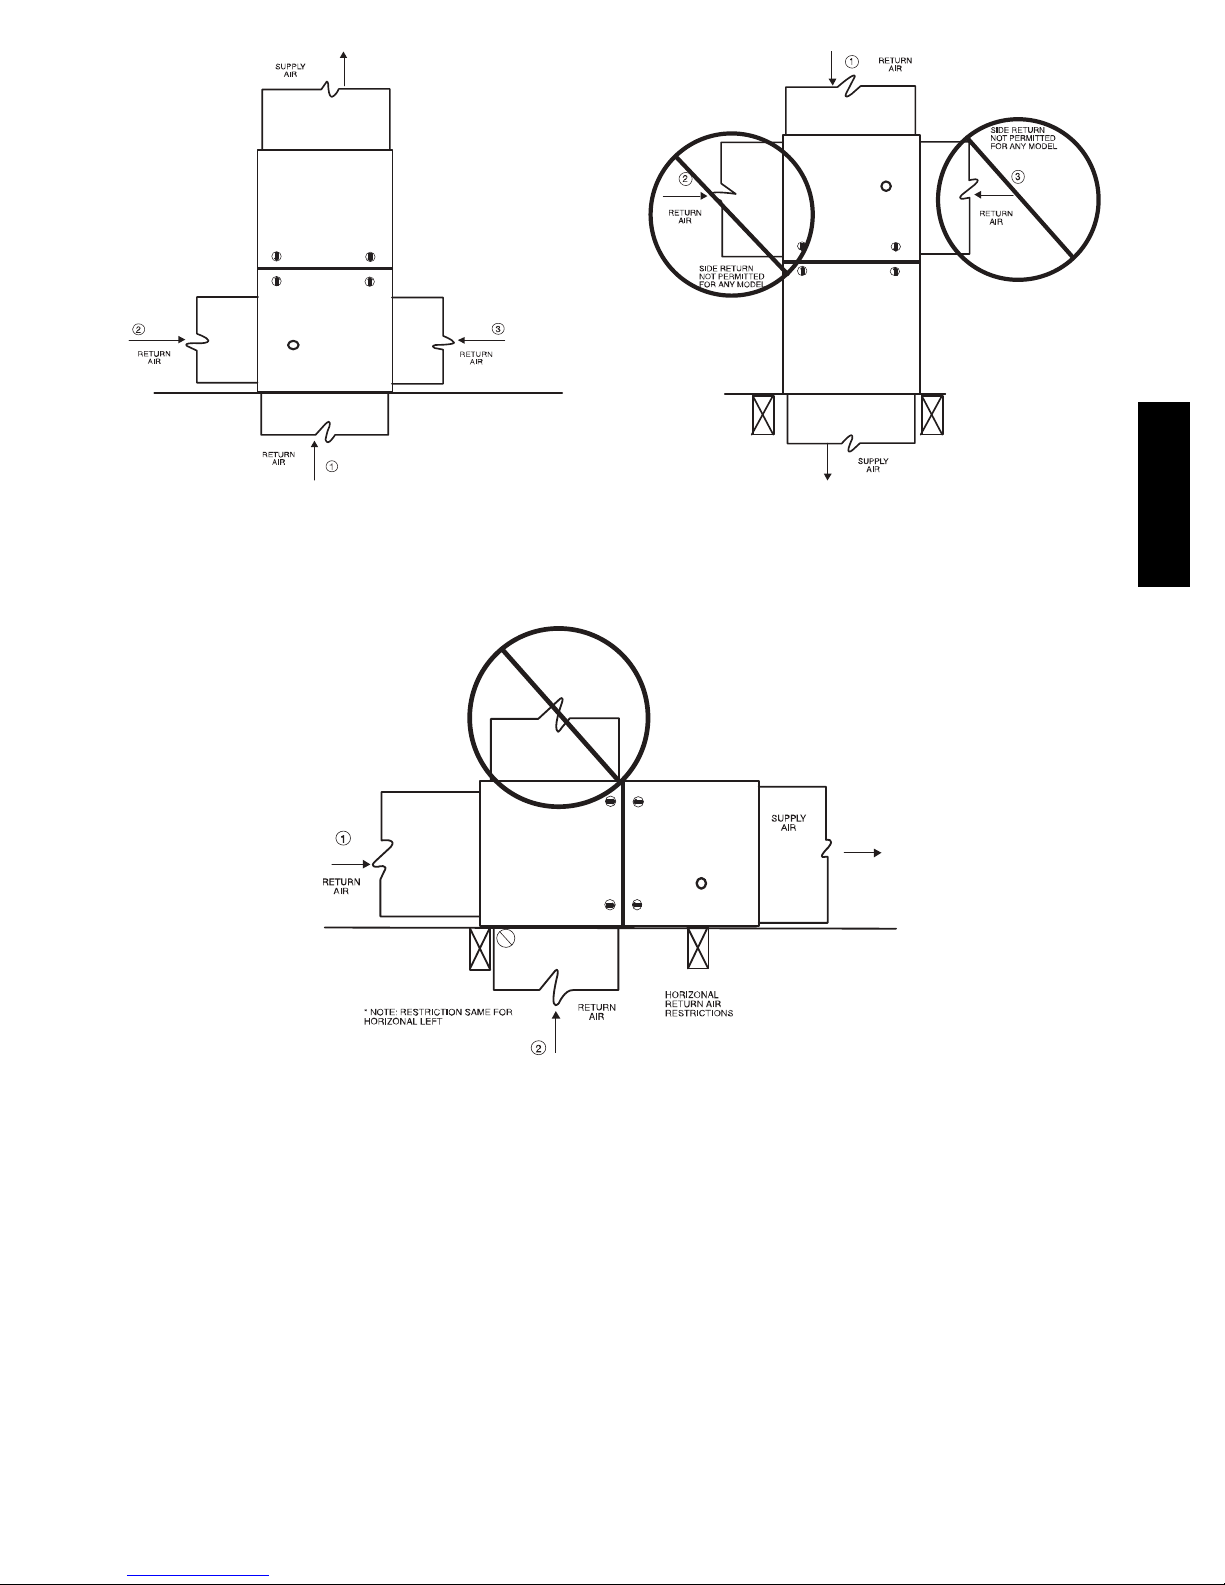
ANY COMBINATION OF 1, 2, OR 3 PERMITTED.
A11036
Fig. 25 -- Upflow Return Air Configurations and Restrictions
HORIZONTAL TOP
RETURN NOT
PERMITTED FOR
ANY MODEL
Fig. 27 -- Horizontal Return Air Configurations and Restrictions
Fig. 26 -- Downflow Return Air Configurations
and Restrictions
A11037
912SB
A11038
27
Page 28
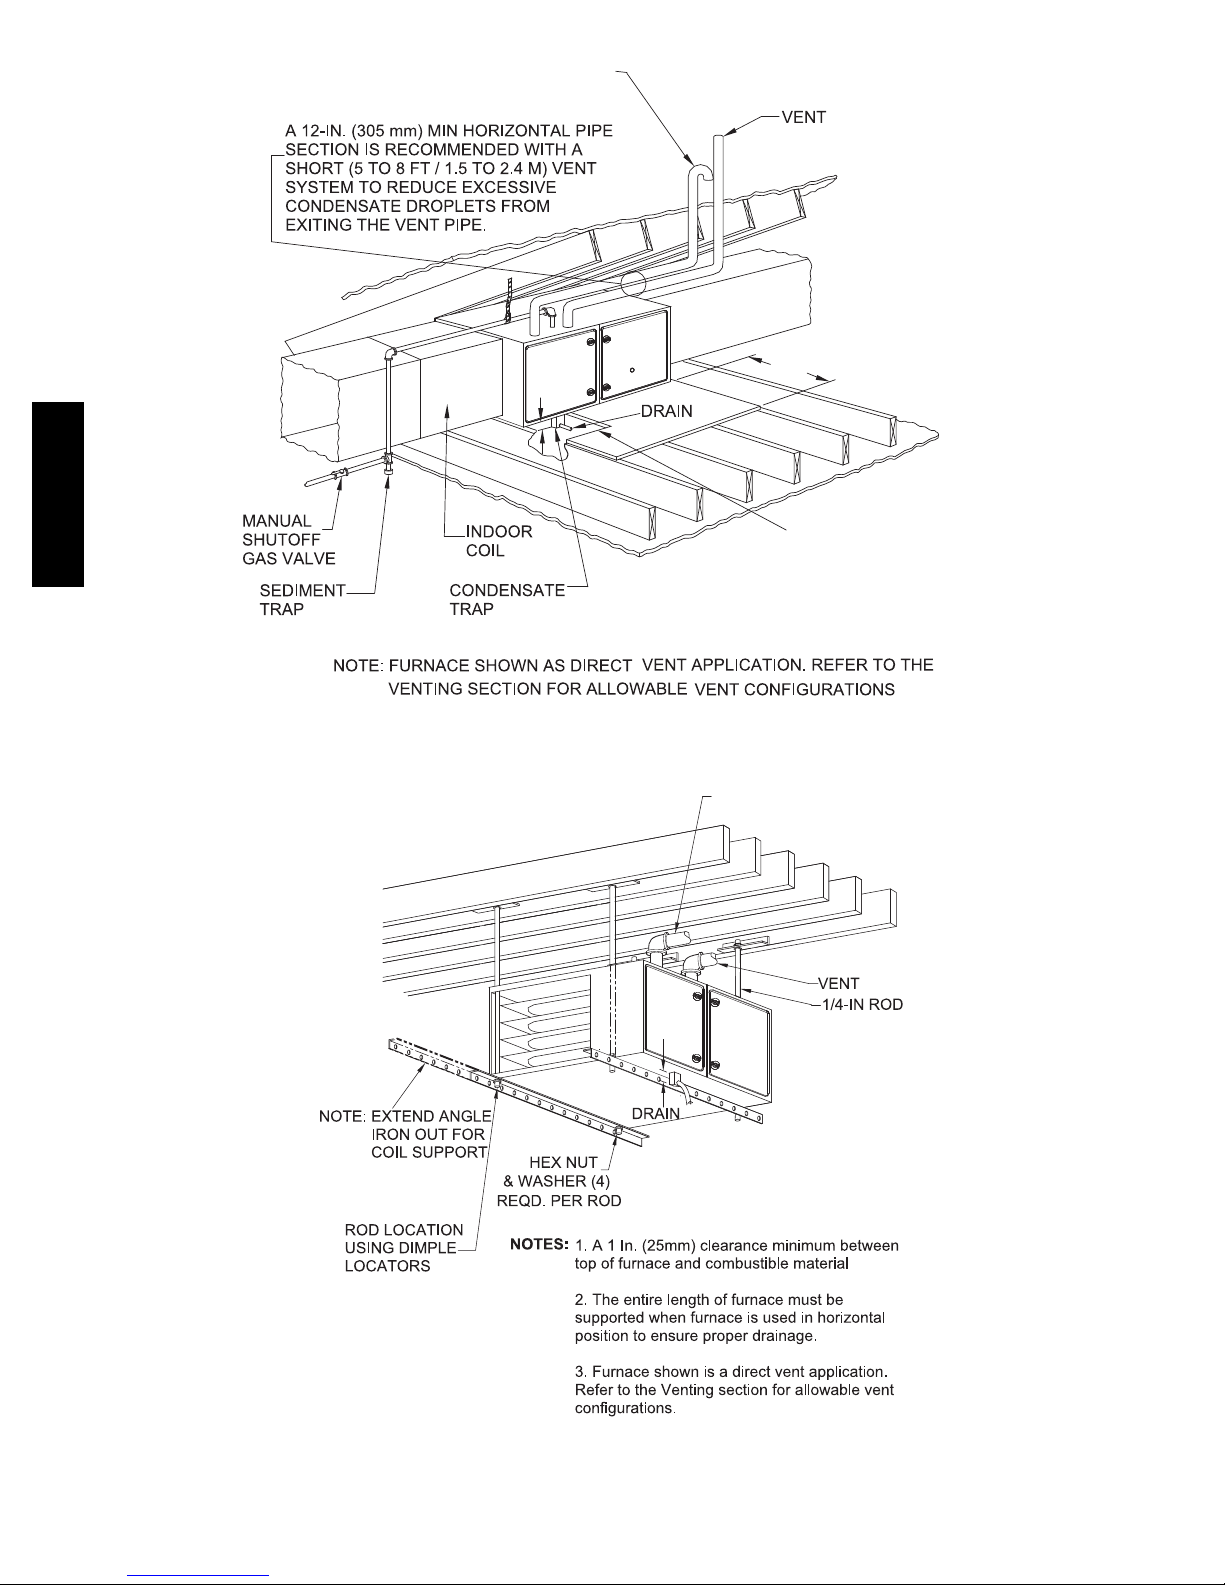
COMBUSTION - AIR PIPE
(SEE VENTING SECTION)
2-IN.
(51 mm)
30 IN. (762 mm)
MIN. WORK AREA
912SB
ROLLOUT PROTECTION REQUIRED
Install 12” x 22” (305 x 559 mm) sheet
metal in front of burner compartment
area.
Fig. 28 -- Working Platform for Attic Installation
NOTE: Local codes may require a drain pan and condensate trap when a condensing furnace is installed over a finished ceiling.
COMBUSTION-AIR PIPE
(SEE VENTING SECTION)
2-IN.
(51 mm)
A11154
NOTE: Local codes may require a drain pan and condensate trap when a condensing furnace is installed over a finished ceiling.
A11155
Fig. 29 -- Suspended Furnace Installation
28
Page 29
AIR DUCTS
NOTICE
Many states, provinces and localities are considering or have
implemented standards and/or restrictions on duct sizing
practices, ductwork leakage, and/or ductwork thermal, airflow
and electrical efficiencies. CONSULT LOCAL CODE
OFFICIALS for ductwork design and performance
requirements in your area.
General Requirements
The duct system should be designed and sized according to
accepted national standards such as those published by: Air
Conditioning Contractors Association (ACCA Manual D), Sheet
Metal and Air Conditioning Contractors National Association
(SMACNA) or American Society of Heating, Refrigerating and
Air Conditioning Engineers (ASHRAE) or consult The Air
Systems Design Guidelines reference tables available from your
local distributor. The duct system should be sized to handle the
required system design CFM at the design external static pressure.
The furnace airflow rates are provided in Table 9--Air
Delivery--CFM (With Filter). When a furnace is installed so that
the supply ducts carry air circulated by the furnace to areas outside
the space containing the furnace, the return air shall also be
handled by duct(s) sealed to the furnace casing and terminating
outside the space containing the furnace.
Secure ductwork with proper fasteners for type of ductwork used.
Seal supply-- and return--duct connections to furnace with code
approved tape or duct sealer.
NOTE: Flexible connections should be used between ductwork
and furnace to prevent transmission of vibration.
Ductwork passing through unconditioned space should be
insulated to enhance system performance. When air conditioning is
used, a vapor barrier is recommended.
Maintain a 1--in. (25 mm) clearance from combustible materials to
supply air ductwork for a distance of 36--in. (914 mm) horizontally
from the furnace. See NFPA 90B or local code for further
requirements.
Return Duct Sizing
Refer to the Filter Selection and Duct Sizing section for
information on the proper selection of filter sizes and the associated
ductwork and duct transitions. Improperly designed filtering
systems and return ductwork are the most common causes of
airflow and/or noise complaints in HVAC systems.
Ductwork Acoustical Treatment
NOTE: Metal duct systems that do not have a 90 degree elbow
and 10 ft. (3 M) of main duct to the first branch take--off may
require internal acoustical lining. As an alternative, fibrous
ductwork may be used if constructed and installed in accordance
with the latest edition of SMACNA construction standard on
fibrous glass ducts. Both acoustical lining and fibrous ductwork
shall comply with NFPA 90B as tested by UL Standard 181 for
Class 1 Rigid air ducts.
NOTE: For horizontal applications, the top most flange may be
bent past 90_ to allow the evaporator coil to hang on the flange
temporarily while the remaining attachment and sealing of the coil
are performed.
912SB
29
Page 30
UNIT
SIZE
030040 SIDE/BOTTOM
036040 SIDE/BOTTOM
036060 SIDE/BOTTOM
048060 SIDE/BOTTOM
912SB
048080 SIDE/BOTTOM
060080
048100 SIDE/BOTTOM
066100
066120
RETURN-AIR
CONNECTION
BOTTOM or
TWO-SIDES
BOTTOM or
TWO-SIDES
BOTTOM or
TWO-SIDES
3,4
3,4
3,4
Table 9 – Air Delivery -- CFM (With Filter)
SPEED
TAPS
2
0.1 0.2 0.3 0.4 0.5 0.6 0.7 0.8 0.9 1.0
EXTERNAL STATIC PRESSURE (IN. W.C.)
Black 1160 1120 1070 1020 965 905 835 765 695 630
Blue 970 940 905 865 825 770 715 655 585 515
Yellow 920 890 855 820 770 720 665 600 545 465
Red 730 705 670 630 580 535 495 445 380 335
Black 1310 1255 1205 1150 1100 1045 985 930 870 805
Yellow 1215 1165 1120 1070 1025 970 915 860 800 740
Orange 1065 1030 1000 960 920 875 830 780 725 670
Blue 1005 980 950 920 880 840 790 745 695 640
Red 750 740 720 700 670 640 615 585 550 500
Black 1295 1265 1230 1195 1155 1110 1055 990 895 795
Blue 1035 1010 980 940 905 865 805 740 655 580
Yellow 965 940 915 885 855 805 750 685 610 530
5
Red
760 735 705 675 630 570 520 470 405 335
Black 1760 1705 1635 1575 1505 1430 1355 1270 1180 1090
Yellow 1415 1400 1365 1335 1290 1240 1180 1115 1040 965
Orange 1065 1060 1050 1035 1010 975 940 890 835 770
Blue 1010 1000 990 975 955 925 885 845 785 720
Red 770 745 730 710 685 660 625 585 545 500
Black 1800 1770 1735 1685 1630 1570 1495 1415 1330 1230
Yellow 1445 1430 1410 1385 1350 1305 1255 1195 1120 1045
Orange 1250 1240 1225 1200 1170 1130 1090 1040 975 910
Blue 1090 1080 1060 1035 1010 970 930 885 835 765
5
Red
880 860 835 810 780 750 710 665 615 560
Black 2310 2235 2140 2050 1960 1860 1755 1650 1535 1430
Yellow 1720 1700 1670 1625 1570 1505 1435 1360 1275 1185
Orange 1515 1500 1480 1445 1405 1350 1290 1225 1155 1075
Blue 1150 1135 1105 1080 1050 1020 980 935 880 815
Red 945 915 885 860 835 805 770 720 670 610
Black 1725 1700 1665 1620 1570 1510 1445 1365 1265 1160
Blue 1500 1475 1450 1410 1370 1330 1260 1180 1095 1010
5
Yellow
Red
1235 1215 1190 1160 1120 1075 1020 950 880 805
5
1035 1005 955 915 875 825 770 715 650 575
Black 2690 2595 2490 2390 2280 2170 2050 1930 1810 1675
Yellow 2180 2145 2095 2045 1980 1905 1820 1725 1615 1490
Orange 1790 1795 1785 1765 1735 1690 1630 1555 1460 1350
Blue 1640 1640 1635 1620 1595 1565 1510 1450 1365 1270
Red 1365 1360 1360 1345 1330 1300 1265 1215 1155 1080
Black 2645 2545 2445 2340 2230 2110 1990 1810 1685 1580
Blue 2430 2355 2275 2185 2090 1980 1850 1700 1600 1500
Yellow 1850 1825 1795 1760 1705 1625 1540 1465 1380 1280
Orange 1610 1595 1575 1550 1500 1455 1405 1345 1270 1185
5
Red
1445 1430 1405 1380 1350 1315 1265 1215 1150 1075
6
NOTE:
1. A filter is required for each return ---air inlet. Airflow performance includes a 3/4 ---in. (19 mm) washable filter media such as contained in a factory---authorized accessory filter rack. See accessory list. To determine airflow performance without this filter, assume an additional 0.1 in. W.C.. available external static
pressure.
2. Blower speed taps are not always in the same order. Factory default blower connections are as follows:
a. Heating airflow --- BLUE (also used for Continuous Fan)
b. Cooling airflow --- BLACK (enabled when the Y terminal is energized)
ADJUST THE BLOWER SPEED TAPS AS NECESSARY FOR THE PROPER AIR TEMPERATURE RISE FOR EACH INSTALLATION.
3. Airflows over 1800 CFM require bottom return, two---side r e tu rn, or bottom an d side return. A minimum f ilter size of 20” x 25” (508 x 635 mm) is required.
4. For upflow applications, air entering from one side into both the side of the furnace and a return air base counts as a side and bottom return.
5. Highlighted areas indicate that this airflow range is beyond the range allowed for heating. THESE AIRFLOW RANGES MAY ONLY BE USED FOR
COOLING.
6. All airflows that are shown in BOLD exceed 0.58 watts per CFM at the given external static pressure.
30
Page 31
GAS PIPING
!
WARNING
FIRE OR EXPLOSION HAZARD
Failure to follow this warning could result in personal
injury, death, and/or property damage.
Never purge a gas line into a combustion chamber. Never
test for gas leaks with an open flame. Use a commercially
available soap solution made specifically for the detection
of leaks to check all connections. A fire or explosion may
result causing property damage, personal injury or loss of
life.
!
WARNING
FIRE OR EXPLOSION HAZARD
Failure to follow this warning could result in personal
injury, death, and/or property damage.
Use proper length of pipe to avoid stress on gas control
manifold and gas valve.
!
WARNING
FIRE OR EXPLOSION HAZARD
Failure to follow this warning could result in personal
injury, death, and/or property damage.
Gas valve inlet and/or inlet pipe must remain capped until
gas supply line is permanently installed to protect the valve
from moisture and debris. Also, install asediment trap in the
gas supply piping at the inlet to the gas valve.
Gas piping must be installed in accordance with national and local
codes. Refer to current edition of NFGC in the U.S.A. Refer to
current edition of NSCNGPIC in Canada.
Installations must be made in accordance with all authorities
having jurisdiction. If possible, the gas supply line should be a
separate line running directly from meter to furnace.
NOTE: Use a back--up wrench on the inlet of the gas valve when
connecting the gas line to the gas valve.
NOTICE
In the state of Massachusetts:
1. Gas supply connections MUST be performed by a licensed
plumber or gas fitter.
2. When flexible connectors are used, the maximum length
shall not exceed 36 in. (915 mm).
3. When lever handle type manual equipment shutoff valves
are used, they shall be T--handle valves.
4. The use of copper tubing for gas piping is NOT approved
by the state of Massachusetts.
Refer to Table 10 for recommended gas pipe sizing. Risers must be
used to connect to furnace and to meter. Support all gas piping
with appropriate straps, hangers, etc. Use a minimum of 1 hanger
every 6 ft. (2 M). Joint compound (pipe dope) should be applied
sparingly and only to male threads of joints. Pipe dope must be
resistant to the action of propane gas.
!
WARNING
FIRE OR EXPLOSION HAZARD
A failure to follow this warning could result in personal
injury, death, and/or property damage.
If local codes allow the use of a flexible gas appliance
connector, always use a new listed connector. Do not use a
connector which has previously served another gas
appliance. Black iron pipe shall be installed at the furnace
gas control valve and extend a minimum of 2--in. (51 mm)
outside the furnace.
!
CAUTION
FURNACE DAMAGE HAZARD
Failure to follow this caution may result in furnace damage.
Connect gas pipe to furnace using a backup wrench to
avoid damaging gas controls and burner misalignment.
An accessible manual equipment shutoff valve MUST be installed
external to furnace casing and within 6 ft. (2 M) of furnace.
Install a sediment trap in riser leading to furnace as shown in Fig.
31. Connect a capped nipple into lower end of tee. Capped nipple
should extend below level of furnace gas controls. Place a ground
joint union between furnace gas control valve and exterior manual
equipment gas shutoff valve.
A 1/8--in. (3 mm) NPT plugged tapping, accessible for test gauge
connection, MUST be installed immediately upstream of gas
supply connection to furnace and downstream of manual
equipment shutoff valve.
Piping should be pressure and leak tested in accordance with the
current addition of the NFGC in the United States, local, and
national plumbing and gas codes before the furnace has been
connected. Refer to current edition of NSCNGPIC in Canada.
After all connections have been made, purge lines and check for
leakage at furnace prior to operating furnace.
NOTE: The furnace gas control valve inlet pressure tap
connection is suitable to use as test gauge connection providing
test pressure DOES NOT exceed maximum 0.5 psig (14--in. W.C.)
stated on gas control valve. See Fig. 53.
If pressure exceeds 0.5 psig (14--in. W.C.), gas supply pipe must be
disconnected from furnace and capped before and during supply
pipe pressure test. If test pressure is equal to or less than 0.5 psig
(14--in. W.C.), turn off electric shutoff switch located on furnace
gas control valve and accessible manual equipment shutoff valve
before and during supply pipe pressure test. After all connections
have been made, purge lines and check for leakage at furnace prior
to operating furnace.
The gas supply pressure shall be within the maximum and
minimum inlet supply pressures marked on the rating plate with
the furnace burners ON and OFF.
Some installations require gas entry on right side of furnace (as
viewed in upflow). See Fig. 30.
Gas Pipe Grommet
For direct vent (2-pipe) applications, the knockout for the gas pipe
must be sealed to prevent air leakage. Remove the knockout, install
the grommet in the knockout, then insert the gas pipe. The
grommet is included in the loose parts bag. See Fig. 30.
912SB
31
Page 32
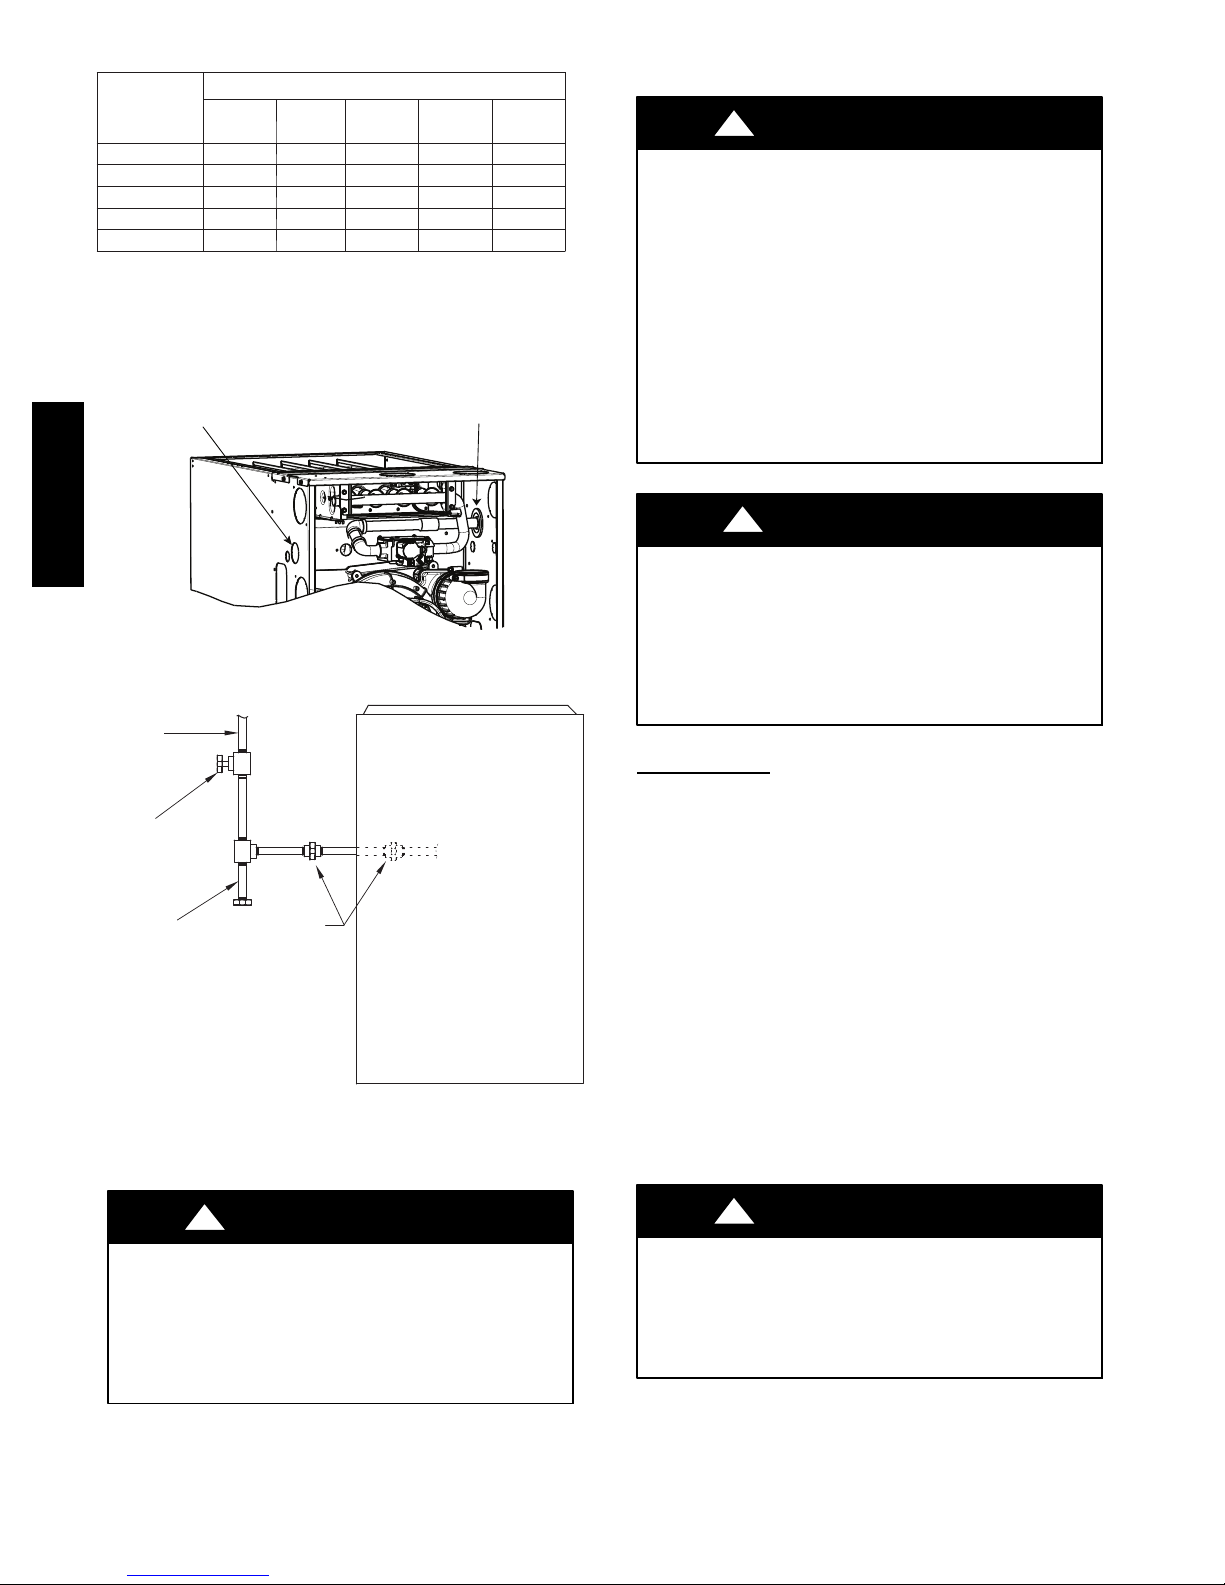
Table 10 – Maximum Capacity of Pipe
NOMINAL
IRON PIPE
SIZE
IN. (MM)
1/2 (13) 175 120 97 82 73
3/4 (19) 360 250 200 170 151
1 ( 25) 680 465 375 320 285
1-1/4 (32) 1400 950 770 660 580
1-1/2 (39) 2100 1460 1180 990 900
* Cubic ft of gas per hr for gas pressures of 0.5 psig (14 - -- in. W.C.) or less
and a pressure drop of 0.5 ---in . W.C. (based on a 0.60 specific gravity gas).
Ref: Table 10 above and 6.2 of NFPA54/ANSI Z223.1---2012.
Left Side Gas Entry. Gas Pipe
Grommet Required For Direct
Vent Applications.
(3.0)20(6.0)30(9.1)40(12.1)50(15.2)
LENGTH OF PIPE --- FT (M)
10
Gas Pipe Grommet Required
For Direct Vent Applications
Field--supplied wiring shall conform with the limitations of 63_F
(33_C) rise.
!
WARNING
ELECTRICAL SHOCK AND FIRE HAZARD
Failure to follow this warning could result in personal
injury, death, or property damage.
The cabinet MUST have an uninterrupted or unbroken
ground according to NEC ANSI/NFPA 70--2011 or local
codes to minimize personal injury if an electrical fault
should occur. In Canada, refer to Canadian Electrical Code
CSA C22.1. This may consist of electrical wire, conduit
approved for electrical ground or a listed, grounded power
cord (where permitted by local code) when installed in
accordance with existing electrical codes. Refer to the
power cord manufacturer’s ratings for proper wire gauge.
Do not use gas piping as an electrical ground.
912SB
MANUAL
SHUT OFF
VALV E
(REQUIRED)
Fig. 30 -- Gas Entry
GAS
SUPPLY
SEDIMENT
TRAP
UNION
Fig. 31 -- Typical Gas Pipe Arrangement
NOTE: Union may be inside the
vestibule where permitted by
local codes.
ELECTRICAL CONNECTIONS
FRONT
A11338
A11035
!
CAUTION
FURNACE MAY NOT OPERATE HAZARD
Failure to follow this caution may result in intermittent
furnace operation.
Furnace control must be grounded for proper operation or
else control will lock out. Control must remain grounded
through green/yellow wire routed to gas valve and manifold
bracket screw.
115-- V Wiring
Furnace must have a 115-v power supply properly connected and
grounded.
NOTE: Proper polarity must be maintained for 115-v wiring. If
polarity is incorrect, control LED status indicator light will flash
rapidly and furnace will NOT operate.
Verify that the voltage, frequency, and phase correspond to that
specified on unit rating plate. Also, check to be sure that service
provided by utility is sufficient to handle load imposed by this
equipment. Refer to rating plate or Table 11 for equipment
electrical specifications.
U.S.A. Installations: Make all electrical connections in accordance
with the current edition of the National Electrical Code (NEC)
ANSI/NFPA 70 and any local codes or ordinances that might
apply.
Canada Installations: Make all electrical connections in
accordance with the current edition of the Canadian Electrical
Code CSA C22.1 and any local codes or ordinances that might
apply.
!
WARNING
ELECTRICAL SHOCK HAZARD
Failure to follow this warning could result in personal
injury or death.
Blower door switch opens 115--v power to control. No
component operation can occur. Do not bypass or close
switch with blower door removed.
See Fig. 35 for field wiring diagram showing typical field 115--v
wiring. Check all factory and field electrical connections for
tightness.
!
WARNING
FIRE HAZARD
Failure to follow this warning could result in personal
injury, death, or property damage.
Do not connect aluminum wire between disconnect
switch and furnace. Use only copper wire. See Fig. 33.
Use a separate, fused branch electrical circuit with a properly sized
fuse or circuit breaker for this furnace. See Table 11 for wire size
and fuse specifications. A readily accessible means of electrical
disconnect must be located within sight of the furnace.
32
Page 33
J--Box Installation
!
WARNING
FIRE OR ELECTRICAL SHOCK HAZARD
Failure to follow this warning could result in personal
injury, death, or property damage.
If field--supplied manual disconnect switch is to be mounted
on furnace casing side, select a location where a drill or
fastener cannot damage electrical or gas components.
The J-Box is used when field line voltage electrical connections are
made to the furnace wiring harness inside the furnace casing. The
J-Box is not required if a field-supplied electrical box is attached to
the outside of the furnace casing and the box is grounded to the
green ground wire of the main wiring harness and the earth ground
of the field electrical supply.
The J--Box cover, mounting bracket and screws are shipped in the
loose parts bag included with the furnace. The J--Box can be
mounted on the left or right side of the casing, as viewed from the
upflow position. See Fig. 32.
Remove the J--Box cover and mounting bracket from the loose
parts bag. Select a 7/8--in. (22 mm) knock-out on the desired side
of the casing. Remove the knock-out from the casing. Drill two (2)
1/8--in. (3 mm) pilot holes in the casing dimples by the desired
7/8--in. (22 mm) knock-out.
Align the J--Box mounting bracket against the inside of the casing
and secure the mounting bracket with the screws. See Fig. 32.
Electrical Box on Furnace Casing Side
NOTE: Check that duct on side of furnace will not interfere with
installed electrical box.
1. Fasten a field-supplied external electrical box to the outside
of the casing by driving two field-supplied screws from inside electrical box into casing. See Fig. 33.
2. Route field power wiring into external electrical box.
3. Pull furnace power wires through 1/2-in. (12 mm) diameter
hole in J-Box. If necessary, loosen power wires from strain-relief wire-tie on furnace wiring harness.
4. Connect any code required external disconnect(s) to field
power wiring.
5. Route external field power wires through holes in electrical
box and casing.
6. Connect field ground wire and factory ground wire to green
ground screw on J--Box mounting bracket as shown in Fig.
32.
7. Connect field power and neutral leads to furnace power
leads as shown in Fig. 35.
8. Attach furnace J-Box cover to mounting bracket with
screws supplied in loose parts bag. Do not pinch wires
between cover and bracket.
9. Complete external disconnect wiring and installation. Connect line voltage leads as shown in Fig. 33. Use best practices (NEC in U.S.A. for wire bushings, strain relief, etc.,
CANADA: Canadian Electrical Code CSA C22.1)
Power Cord Installation in Furnace J--Box
NOTE: Power cords must be able to handle the electrical
requirements listed in Table 11. Refer to power cord
manufacturer’s listings.
1. Install J--Box mounting bracket to inside of furnace casing.
See Fig. 32.
2. Route listed power cord through 7/8--in. (22 mm) diameter
hole in casing and J--Box bracket.
3. Secure power cord to J--Box bracket with a strain relief
bushing or a connector approved for the type of cord used.
4. Pull furnace power wires through 1/2--in. (12 mm) diameter
hole in J--Box. If necessary, loosen power wires from
strain—relief wire--tie on furnace wiring harness.
5. Connect field ground wire and factory ground wire to green
ground screw on J--Box mounting bracket as shown in Fig.
32.
6. Connect power cord power and neutral leads to furnace
power leads as shown in Fig. 35.
7. Attach furnace J--Box cover to mounting bracket with
screws supplied in loose parts bag. Do not pinch wires
between cover and bracket. See Fig. 32.
BX Cable Installation in Furnace J--Box
1. Install J--Box mounting bracket to inside of furnace casing.
See Fig. 32.
2. Route BX connector through 7/8--in. (22 mm) diameter
hole in casing and J--Box bracket.
3. Secure BX cable to J--Box bracket with connectors approved for the type of cable used.
4. Connect field ground wire and factory ground wire to green
ground screw on J--Box mounting bracket as shown in Fig.
32.
5. Connect field power and neutral leads to furnace power
leads. as shown in Fig. 35.
6. Attach furnace J--Box cover to mounting bracket with
screws supplied in loose parts bag. Do not pinch wires
between cover and bracket.
24--V Wiring
Make field 24--v connections at the 24--v terminal strip. See Fig.
36. Connect terminal Y as shown in Fig. 35 for proper cooling
operation. Use only AWG No. 18, color--coded, copper thermostat
wire.
NOTE: Use AWG No. 18 color-coded copper thermostat wire for
lengths up to 100 ft. (30 M). For wire lengths over 100 ft., use
AWG No. 16 wire.
The 24--v circuit contains an automotive--type, 3--amp. fuse located
on the control. Any direct shorts during installation, service, or
maintenance could cause this fuse to blow. If fuse replacement is
required, use ONLY a 3--amp. fuse of identical size. See Fig. 36.
Accessories (See Fig. 34 and 36.)
1. Electronic Air Cleaner (EAC)
Connect an accessory Electronic Air Cleaner (if used) using
1/4--in. female quick connect terminals to the two male
1/4--in. quick--connect terminals on the control board
marked EAC--1 and EAC--2. The terminals are rated for
115VAC, 1.0 amps maximum and are energized during
blower motor operation.
2. Humidifier (HUM)
The HUM terminal is a 24 VAC output, energized when the LPS
closes during a call for heat.
Connect an accessory 24 VAC, 0.5 amp. maximum humidifier (if
used) to the ¼--in. male quick--connect HUM terminal and
COM--24V screw terminal on the control board thermostat strip.
NOTE: If the humidifier has its own 24 VAC power supply, an
isolation relay may be required. Connect the 24 VAC coil of the
isolation relay to the HUM and COM/24V screw terminal on the
control board thermostat strip. See Fig. 34.
Alternate Power Supplies
This furnace is designed to operate on utility generated power
which has a smooth sinusoidal waveform. If the furnace is to be
operated on a generator or other alternate power supply, the
alternate power supply must produce a smooth sinusoidal
waveform for compatibility with the furnace electronics. The
33
912SB
Page 34
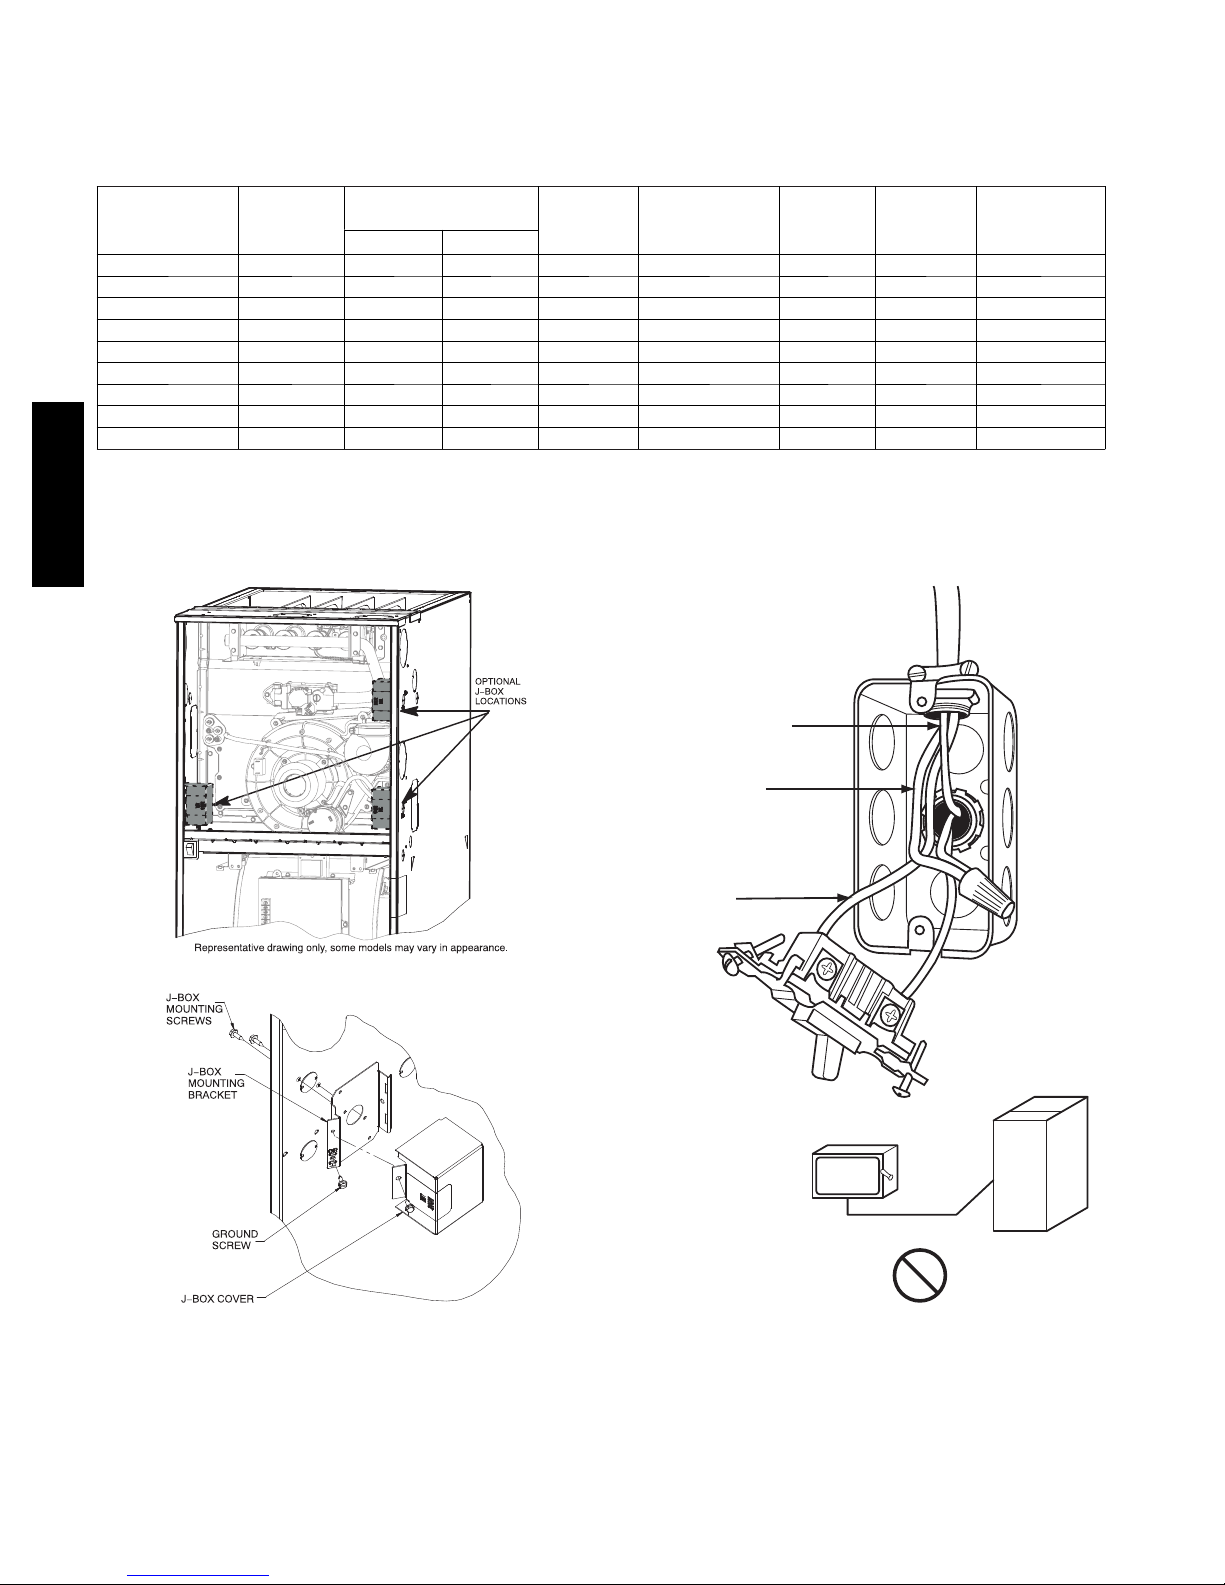
alternate power supply must generate the same voltage, phase, and
frequency (Hz) as shown in Table 11 or the furnace rating plate.
Contact the alternate power supply manufacturer for specifications
and details.
Power from an alternate power supply that is non-sinusoidal may
damage the furnace electronics or cause erratic operation.
Table 11 – Electrical Data
MINIMUM
WIRE
SIZE
AWG
UNIT SIZE
V O LT S ---
H E R T Z ---
PHASE
OPERATING VOLTAGE
RANGE*
Maximum* Minimum*
MAXIMUM
UNIT
AMPS
UNIT
AMPACITY#
30040 1 1 5 --- 6 0 --- 1 127 104 5.2 7.5 14 49 (14.9) 15
36040 1 1 5 --- 6 0 --- 1 127 104 7.4 10.3 14 36 (11.0) 15
36060 1 1 5 --- 6 0 --- 1 127 104 5.3 7.6 14 48 (14.6) 15
48060 1 1 5 --- 6 0 --- 1 127 104 7.5 10.4 14 35 (10.7) 15
48080 1 1 5 --- 6 0 --- 1 127 104 8.1 11.1 14 33 (10.1) 15
60080 1 1 5 --- 6 0 --- 1 127 104 8.9 12.1 14 30 (9.1) 15
48100 1 1 5 --- 6 0 --- 1 127 104 7.3 10.1 14 36 (11.0) 15
66100 1 1 5 --- 6 0 --- 1 127 104 14.6 19.2 12 29 (8.8) 20
66120 1 1 5 --- 6 0 --- 1 127 104 14.9 19.6 12 29 (8.8) 20
* Permissible limits of the voltage range at which the unit operates satisfactor ily.
# Unit ampacity = 125 percent of largest operating component’s full load amps plus 100 percent of all other potential operating components’ (EAC, humidifier,
etc.) full load a mps.
{Time---delay type is recommended.
912SB
}Length shown is as measured one way along wire path between furnace and service panel for maximum 2 percent voltage drop.
MAXIMUM
WIRE
LENGTH
FT (M)}
FUSE OR CKT
MAXIMUM
BKR
AMPS{
Fig. 32 -- Installing J--Box (When Used)
A12226
GROUND
NEUTRAL
LINE VOLTAGE
ELECTRIC
DISCONNECT
SWITCH
COPPER
WIRE ONLY
ALUMINUM
WIRE
A11146
Fig. 33 -- Field--Supplied Electrical Box on Furnace Casing
34
Page 35
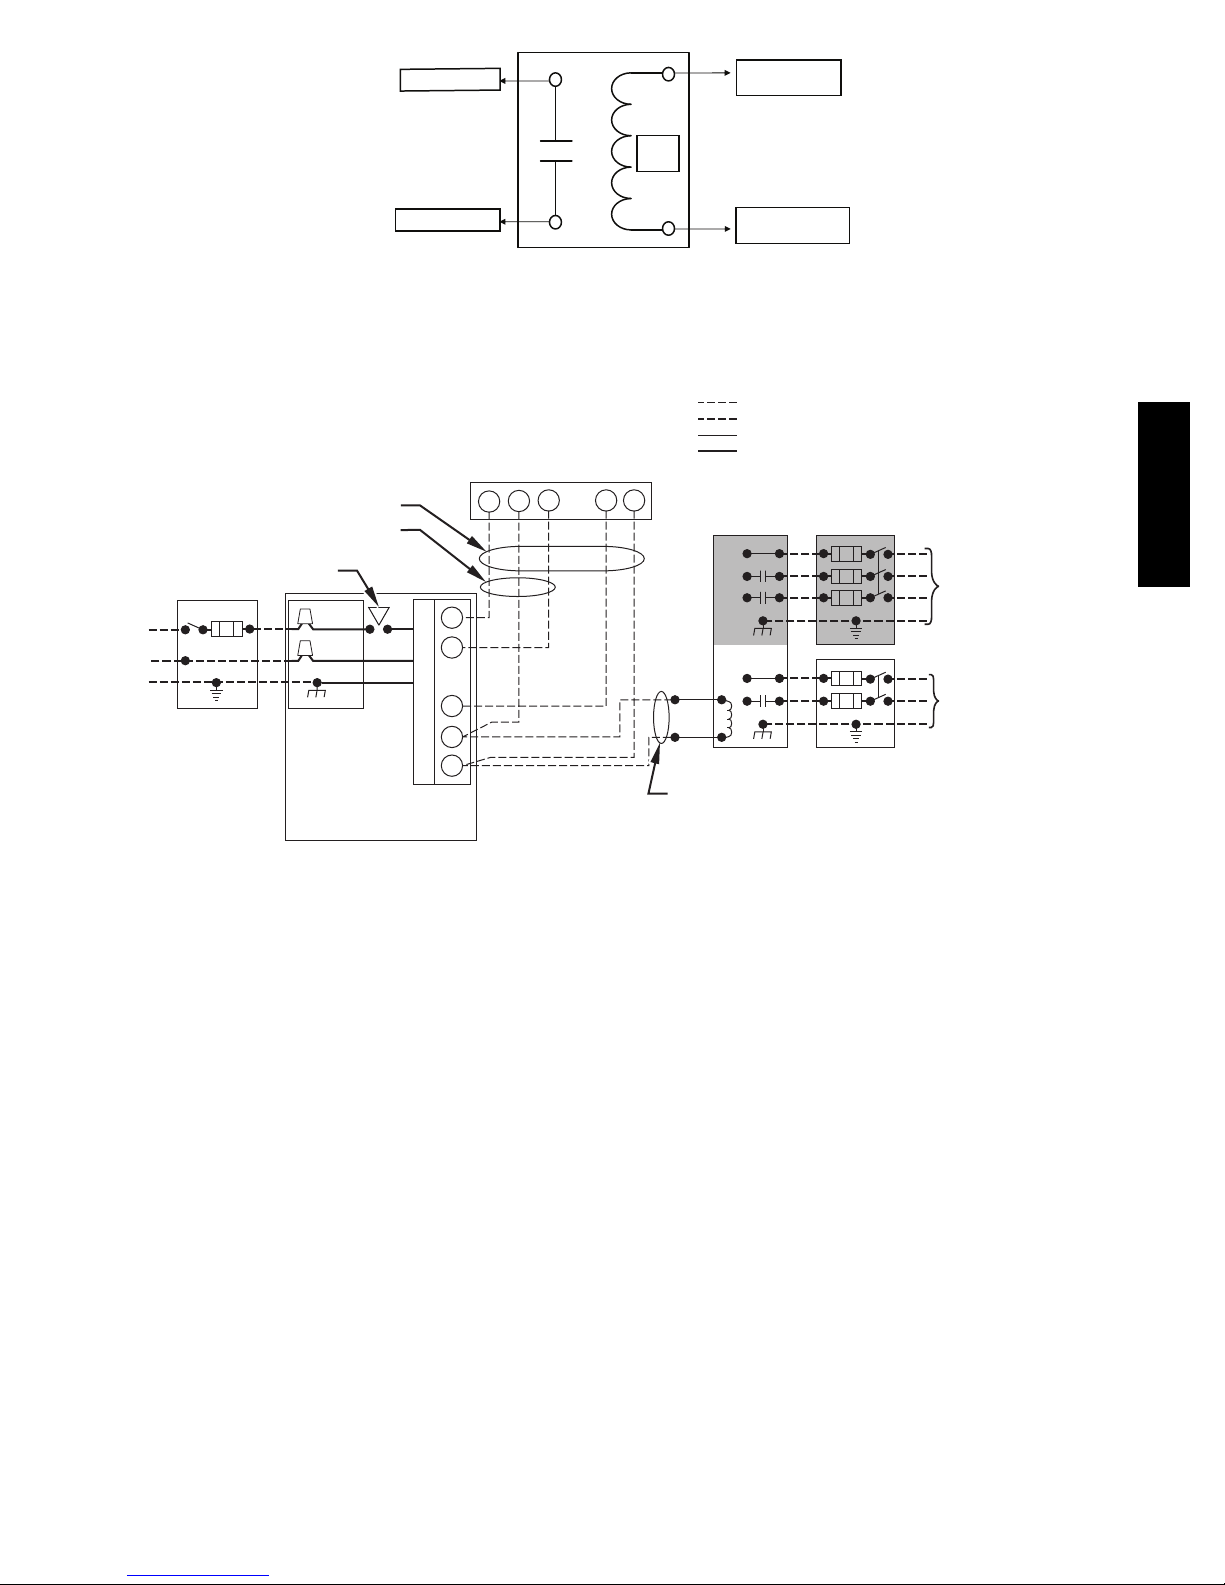
To Humidifier Leads
24 V
Coil
To HUM Terminal On
Furnace Control Board
Fig. 34 -- Field--supplied Isolation Relay for Humidifiers with Internal Power Supply
FIVE WIRE
THREE-WIRE
HEATING-ONLY
BLOWER DOOR SWITCH
BLK
WHT
115-V FIELD-
SUPPLIED
DISCONNECT
BLK
WHT
GND
AUXILIARY
J-BOX
GND
FURNACE
To Humidifier Leads
NOTE 2
W
C
R
O
WCR GY
THERMOSTAT
TERMINALS
N
T
G
R
O
COM
L
Y
24-V
TERMINAL
NOTE 1
CONDENSING
UNIT
TWO
WIRE
BLOCK
NOTES: Connect Y-terminal in furnace as shown for proper blower operation.
1.
Some thermostats require a "C" terminal connection as shown.
2.
If any of the original wire, as supplied, must be replaced, use
3.
same type or equivalent wire.
Fig. 35 -- Typical Single--Stage Wiring Diagram
To Com/24V Screw Terminal
on Thermostat Strip
FIELD 24-V WIRING
FIELD 115-, 208/230-, 460-V WIRING
FACTORY 24-V WIRING
FACTORY 115-V WIRING
FIELD-SUPPLIED
DISCONNECT
208/230- OR
460-V
THREE
PHASE
208/230-V
SINGLE
PHASE
GND
A11157
912SB
A11387
35
Page 36
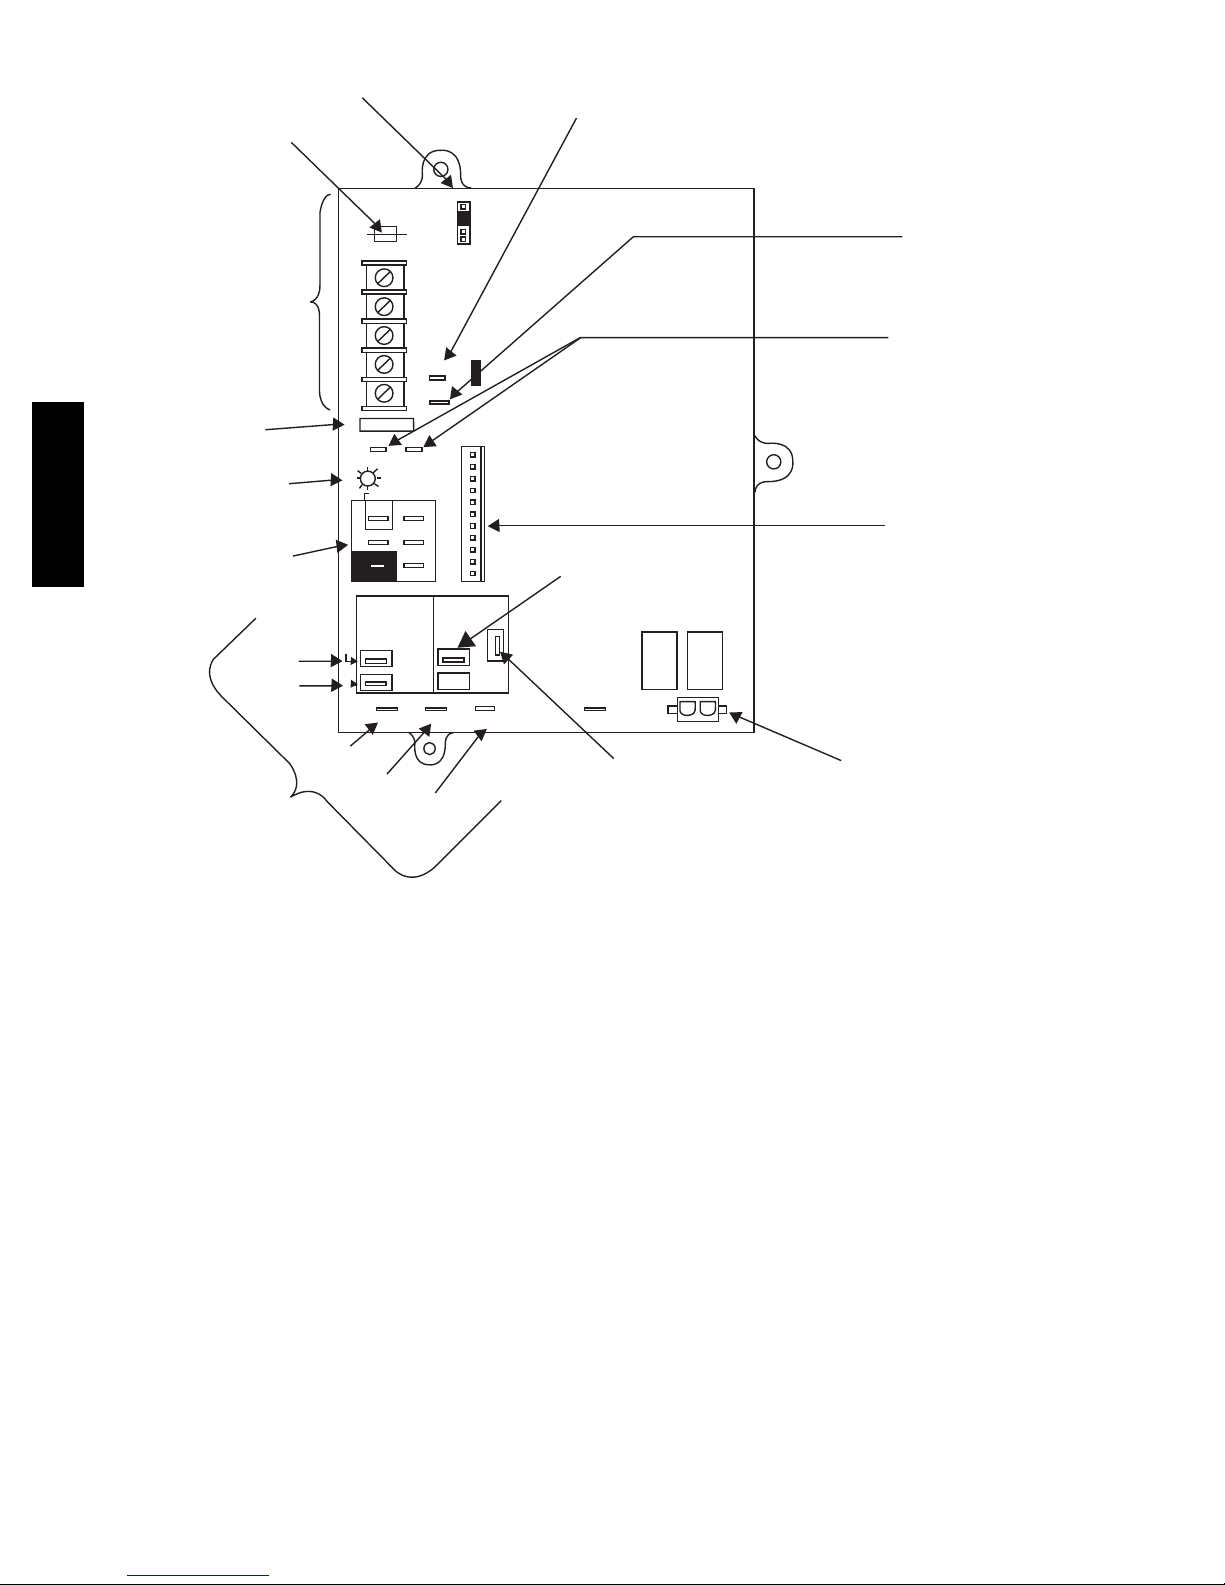
BLOWER OFF-DELAY
J2 JUMPER
24-V THERMOSTAT
TERMINALS
G Com W Y R
24V
BLOWER OFF-DELAY
90 150
J2
120 180
TWINNING AND/OR
COMPONENT TEST
TERMINAL
HUMIDIFIER TERMINAL
(24-VAC 0.5 AMP MAX.)
3-AMP FUSE
LED OPERATION &
DIAGNOSTIC LIGHT
912SB
115-VAC(L2)NEUTRAL
CONNECTIONS
BLOWER SPEED
SELECTION TERMINALS
COOL
HEAT
STATUS CODE LED
NUETRAL
BLW
COOL HEAT
SPARE-1
SPARE-2
HUM
PLT
PL1
1
EAC-1 TERMINAL
TEST/TWIN
0.5 AMP@24VAC
FUSE 3-AMP
SEC-2 SEC-1
EAC-2 L2
(115-VAC 1.0 AMP MAX.)
L1
SPARE-1 SPARE-2
SPARE-3
PR-1
115 VAC (L1) LINE
SP
ARE-3
VOLTAGE CONNECTION
Fig. 36 -- Example of Single Stage Furnace Control
TRANSFORMER 24-VAC
CONNECTIONS
PL1-LOW VOLTAGE MAIN
HARNESS CONNECTOR
PL2 1
PL2-HOT SURFACE
IGNITER & INDUCER
MOTOR CONNECTOR
A11619
36
Page 37

VENTING
NOTE: Planning for the venting system should be done in conjunction with planning for the ductwork, drainage, and furnace accessories,
such as air cleaners and humidifiers. Begin assembling the venting system AFTER the furnace is set in place in the required orientation.
Venting for this furnace shall follow all Local codes for Category IV venting systems. This furnace is CSA approved for venting with
PVC/ABS DWV venting systems. This furnace is also CSA approved for venting with M&G DuraVentR PolyProR polypropylene
venting systems.
NOTE: THESE INSTRUCTIONS DO NOT CONTAIN DETAILED INSTALLATION INSTRUCTIONS FOR POLYPROPYLENE
VENTING SYSTEMS. Refer to the polypropylene venting system manufacturer’s installation instructions for the polypropylene venting
system installation.
NOTE: When using polypropylene venting systems, all venting materials used, including the vent terminations, must be from the same
manufacturer.
Special Venting Requirements for Installations in
Canada
Installation in Canada must conform to the requirements of CSA
B149 code. Vent systems must be composed of pipe, fittings,
cements, and primers listed to ULC S636. The special vent
fittings, accessory concentric vent termination kits and accessory
external drain trap available from the furnace manufacturer have
been certified to ULC S636 for use with those Royal Pipe and
IPEX PVC vent components which have been certified to this
standard. In Canada, the primer and cement must be of the same
manufacturer as the vent system – GVS-65 Primer (Purple) for
Royal Pipe or IPEX System 636, PVC/CPVC Primer, Purple
Violet for Flue Gas Venting and GVS-65 PVC Solvent Cement for
Royal Pipe or IPEX System 636
Venting, rated Class IIA, 65 deg C. must be used with this venting
system - do not mix primers and cements from one manufacturer
with a vent system from a different manufacturer. Follow the
manufacturer’s instructions in the use of primer and cement and
never use primer or cement beyond its expiration date.
The safe operation, as defined by ULC S636, of the vent system is
based on following these installation instructions, the vent system
manufacturer’s installation instructions, and proper use of primer
and cement. All fire stop and roof flashing used with this system
must be UL listed material. Acceptability under Canadian standard
CAN/CSA B149 is dependent upon full compliance with all
installation instructions. Under this standard, it is recommended
that the vent system be checked once a year by qualified service
personnel.
The authority having jurisdiction (gas inspection authority,
municipal building department, fire department, etc.) should be
consulted before installation to determine the need to obtain a
permit.
*IPEX System 636™ is a trademark of IPEX Inc.
t, PVC Cement for Flue Gas
(1)
Consignes spéciales pour l’installation de
ventilation au Canada
L’installation faite au Canada doit se conformer aux exigences du
code CSA B149--2010. Ce systême de ventillation doit se
composer de tuyaux, raccords, ciments et apprêts conformes au
ULC S636. La tuyauterie de ventilation des gaz, ses accessoires, le
terminal concentrique mural ainsi que l’ensemble du drain de
condensation extérieur fourni par le fabricant de cette fournaise ont
été certifiés ULCS 636 pour l’application des composantes Royal
Pipe, IPEX PVC qui sont certifiées à ce standard. Au Canada,
l’apprêt et le ciment doivent être du même fabricant que le système
d’évacuation. L’apprêt GVS-65 (Purple) et le ciment-solvant
GVS-65 doivent être utilisé avec les Royal Pipe. Système IPEX
636, apprêt PVC/CPVC, Purple pour évacuation des gaz de
combustion et système IPEX 636(1)t, ciment PVC pour
évacuation des gaz de combustion, coté classe IIA, 65 deg C.
doivent être utilisés avec le système d’évacuation IPEX 636 – Ne
pas combiner l ’apprêt et le ciment d’un manufacturier avec un
système d’évacuation d’un manufacturier différent.
Bien suivre les indications du manufacturier lors de l’utilisation de
l’apprêt et du ciment et ne pas utiliser ceux-ci si la date d’expiration
est atteinte.
L’opération sécuritaire, tel que définit par ULC S636, du système
de ventilation est basé sur les instructions d’installation suivantes,
ainsi que l’usage approprié de l’apprêt et ciment. Tout arrët feu et
solin de toit utilisés avec ce système doivent être des matériaux
listés UL. L’acceptation du standard Canadien CAN/CSA B149
est directement relié à l’installation conforme aux instructions cihaut mentionnées. Le standard Canadien recommande l’ inspection
par un personel qualifié et ce, une fois par année.
Les autoritées ayant juridiction (inspecteurs de gas, inspecteurs en
bâtiments, département des incendies, etc) devraient être consultées
avant l’installation afin de déterminer si un permis est requis.
912SB
37
Page 38
!
WARNING
CARBON MONOXIDE POISONING HAZARD
Failure to follow the steps outlined below for each appliance
connected to the venting system being placed into operation
could result in carbon monoxide poisoning or death.
The following steps shall be followed for each appliance
connected to the venting system being placed into operation,
while all other appliances connected to the venting system are
not in operation:
1. Seal any unused openings in venting system.
2. Inspect the venting system for proper size and
horizontal pitch, as required in the National Fuel Gas
Code, ANSI Z223.1/NFPA 54 or the CSA B149 Natural Gas and Propane Installation Code and these instructions. Determine that there is no blockage or
restriction, leakage, corrosion and other deficiencies,
which could cause an unsafe condition.
3. As far as practical, close all building doors and
912SB
windows and all doors between the spacein which the
appliance(s) connected to the venting system are
located and other spaces of the building.
4. Close fireplace dampers.
5. Turn on clothes dryers and any appliance not
connected to the venting system. Turn on any exhaust
fans, such as range hoods and bathroom exhausts, so
they are operating at maximum speed. Do not operate
a summer exhaust fan.
6. Follow the lighting instructions. Place the appliance
being inspected into operation. Adjust the thermostat
so appliance is operating continuously.
7. Test for spillage from draft hood equipped appliances
at the draft hood relief opening after 5 minutes of
main burner operation. Use the flame of a match or
candle.
8. If improper venting is observed during any of the
above tests, the venting system must be corrected in
accordance with the National Fuel Gas Code, ANSI
Z223.1/NFPA 54 and/or CSA B149.1 Natural Gas
and Propane Installation Code.
9. After it has been determined that each appliance
connected to the venting system properly vents when
tested as outlined above, return doors, windows,
exhaust fans, fireplace dampers and any other
gas--fired burning appliance to their previous
conditions of use.
General
If this furnace replaces a furnace that was connected to a vent
system or chimney, the vent or vent connectors of other remaining
appliances may need to be re--sized. Vent systems or vent
connectors of other appliances must be sized to the minimum size
as determined using appropriate table found in the current edition
of National Fuel Gas Code NFPA 54/ANSI Z--223.1. In Canada,
refer to CAN/CSA--B149.1.
An abandoned masonry chimney may be used as a raceway for
properly insulated and supported combustion--air (when
applicable) and vent pipes. Each furnace must have its own set of
combustion--air and vent pipes and be terminated individually, as
shown in Fig. 47 for Direct Vent (2--Pipe) system, or Fig. 48 for
single--pipe or ventilated combustion air option.
A furnace shall not be connected to a chimney flue serving a
separate appliance designed to burn solid fuel.
Other gas appliances with their own venting system may also use
the abandoned chimney as a raceway providing it is permitted by
local code, the current edition of the National Fuel Gas Code, and
the vent or liner manufacturer’s installation instructions. Care must
be taken to prevent the exhaust gases from one appliance from
contaminating the combustion air of other gas appliances.
Do not take combustion air from inside the chimney when using
ventilated combustion air or single--pipe vent option.
These furnaces can be vented as direct--vent (two--pipe), ventilated
combustion air or non-direct (single--pipe) vent system. Each type
of venting system is described below. Common venting between
these furnaces or other appliances is prohibited.
Materials
U.S.A.
Combustion air and vent pipe, fittings, primers, and solvents must
conform to American National Standards Institute (ANSI)
standards and American Society for Testing and Materials (ASTM)
standards. See Table 13 for approved materials for use in the
U.S.A. This furnace is also CSA approved for venting with M&G
DuraVentR PolyProR polypropylene venting systems.
Canada
Special Venting Requirements for Installations in Canada,
Installation in Canada must conform to the requirements of
CAN/CSA B149 code. Vent systems must be composed of pipe,
fittings, cements, and primers listed to ULC S636. M&G DuraVent
PolyPro polypropylene venting systems are ULC S636 listed.
NOTE: When using polypropylene venting systems, all venting
materials used, including the vent terminations must be from the
same manufacturer.
Ven ti ng Systems
!
WARNING
CARBON MONOXIDE POISONING HAZARD
Failure to follow the instructions outlined below for each
appliance being placed into operation could result in carbon
monoxide poisoning or death.
For all venting configurations for this appliance and other gas
appliances placed into operation for this structure, provisions
for adequate combustion, ventilation, and dilution air must be
provided in accordance with:
U.S.A. Installations: Section 9.3 NFPA 54/ANSI
Z223.1--2012, Air for Combustion and Ventilation and
applicable provisionsof the local building codes.
Canadian Installations: Part 8 of CAN/CSA--B149.1--10.
Venting Systems and Air Supply for Appliances and all
authorities having jurisdiction.
NOTICE
RECOMMENDED SUPPORT FOR
VENT TERMINATION
It is recommended that sidewall vent terminations of over 24
inches (0.6 M) in length or rooftop vent terminations of over
36 inches (1 M) in length be supported by EITHER the
factory accessory vent termination kit or field--supplied
brackets or supports attached to the structure. A factory
accessory vent termination kit may be used for direct vent
terminations. Termination kits are available for 2--in. or 3--in.
pipe. See Table 12 for available options.
38
Page 39
Table 12 – Vent Termination Kit for Direct Vent (2--pipe)
Systems
DIRECT VENT
(2 --- PIPE)
TERMINATION KIT
2 --- i n . ( 5 1 m m )
Concentric Vent Kit
3 --- i n . ( 7 6 m m )
Concentric Vent Kit
TERMINATION
SYSTEM
Single Penetration of
Wall or Roof
Single Penetration of
wall or Roof
DIAMETER OF
COMBUSTION AIR
AND VENT PIPES ---
IN. (mm)
1, 1 --- 1/2, 2, or 2 ---1/2
(24, 36, 51, 64 mm)
2---1/2, 3 or 4
(64, 76, 102 mm)
Direct Vent / 2-Pipe System
In a direct-vent (2-pipe) system, all air for combustion is taken
directly from outdoor atmosphere, and all flue products are
discharged to outdoor atmosphere. Combustion-air and vent pipes
must terminate together in the same atmospheric pressure zone,
either through the roof (preferred) or a sidewall. See Fig. 45 for
references to clearances required by National code authorities.
NOTICE
OPTIONAL CONFIGURATION FOR COMBUSTION
AIR INLET PIPE
In applications where there is a risk of excessive moisture
entering the combustion air inlet pipe, a moisture trap may be
added to the inlet pipe to help prevent moisture from entering
the furnace from the combustion air inlet pipe. See Fig. 52.
When sizing venting systems, the equivalent length of the
optional inlet pipe moisture trap must be taken into account.
Ventilated Combustion Air Systems
In a ventilated combustion air option, the vent terminates and
discharges the flue products directly to the outdoors similar to a
direct vent system. See Fig. 46 for references to clearances required
by National code authorities.
All air for combustion is piped directly to the furnace from a space
that is well ventilated with outdoor air (such as an attic or crawl
space) and the space is well isolated from the living space or
garage. Combustion air requirements for this option are the same as
the requirements for providing outside air for combustion for a
single pipe vent system. Refer to the “Air For Combustion and
Ventilation” Section.
Non-Direct Vent (1-pipe) System
In a non direct-vent (1-pipe) system, all air for combustion is taken
from the area adjacent to furnace, and all flue products are
discharged to outdoor atmosphere. Air for combustion must be
supplied as described in the Air For Combustion and Ventilation
Section. Do not use an abandoned chimney to supply outside air to
the furnace. See Fig. 46 for references to vent clearances required
by National code authorities.
A combustion air pipe to the outdoors is not required for a
single--pipe vent system. A 12-in. (304 mm) long pipe with a 2--in.
(51 mm) tight radius 90 degree elbow is required to be attached to
the combustion air pipe adapter on the furnace. See Fig. 49. This
short inlet air pipe helps to ensure stable combustion, as well as
allow for sound attenuation. To aid sound attenuation, point the
inlet air pipe away from occupants. An extra elbow and/or five
feet of pipe may be used to accomplish the sound attenuation
function.
NOTICE
OPTIONAL VENTING BELOW THE FURNACE
The venting system may be positioned below the furnace
ONLY IF the factory accessory External Vent Trap Kit is used.
The External Vent Trap Kit is only approved for PVC/ABS
DWV venting systems.
CAREFULLY FOLLOW THE INSTRUCTIONS
PROVIDED WITH THE EXTERNAL VENT TRAP KIT
FOR LAYING OUT THE VENTING SYSTEM AND
THE DRAIN SYSTEM. The instructions included with this
furnace DO NOT APPLY to vent systems that are located
below the furnace.
!
WARNING
CARBON MONOXIDE POISONING HAZARD
Failure to follow the instructions outlined below for each
appliance being placed into operation could result in carbon
monoxide poisoning or death.
The instructions included with this furnace DO NOT APPLY
to vent systems that are located below the furnace.
CAREFULLY FOLLOW THE INSTRUCTIONS
PROVIDED WITH THE EXTERNAL VENT TRAP KIT
FOR LAYING OUT THE VENTING SYSTEM AND
THE DRAIN SYSTEM when all or part of the venting
system is placed below the furnace.
Proper configuration of the venting and drain system is critical
when placing all or part of the venting system below the level
of the furnace. VENT GASSES COULD BE RELEASED
FROM THE DRAINAGE SYSTEM if the instructions
provided with the External Vent Trap Kit are not followed.
Locating the Vent Termination
General
NOTE: Termination Requirements for the Provinces of
Alberta and Saskatchewan are located at the end of this
section.
Combustion--air inlet pipe (direct vent/2--pipe system only) and
vent pipe must terminate outside structure, either through sidewall
or roof.
For vent termination clearance, references to National codes are
shown in Fig. 45 for Direct Vent/2--Pipe system and Fig. 46 for
Ventilated Combustion Air/Non--direct Vent/1--Pipe system. For
exterior termination arrangements, refer to Fig. 47 for Direct
Vent/2--Pipe system and Fig. 48 for Ventilated Combustion
Air/Non--Direct/1--Pipe system. Contact Local code authorities for
other requirements to and/or exemptions from the National codes
shown in the figures.
Roof termination is often preferred since it is less susceptible to
damage or contamination, is usually located away from adjacent
structures, is less prone to icing conditions, and and it often has less
visible vent vapors. Sidewall terminations may require sealing or
shielding of building surfaces with a corrosive resistance material
due to the corrosive properties of combustion products from the
vent system, as well as protection of adjacent structures.
912SB
39
Page 40
NOTICE
RECOMMENDED SUPPORT FOR
VENT TERMINATIONS
It is recommended that sidewall vent terminations in excess of
24 inches (0.6 M) or rooftop terminations in excess of 36
inches (1 M) in vertical length be supported by EITHER the
Direct Vent Termination Kit shown in Table 12 or by
field--supplied brackets or supports fastened to the structure.
When determining appropriate location for termination, consider
the following guidelines:
1. Comply with all clearance requirements stated in Fig. 45 or
Fig. 46 per application.
2. Termination or termination kit should be positioned where
vent vapors will not damage plants/shrubs or air conditioning equipment.
3. Termination or termination kit should be positioned so that
it will not be affected by wind eddy, such as inside building
912SB
corners, nor by recirculation of flue gases, airborne leaves,
or light snow.
4. Termination or termination kit should be positioned where it
will not be damaged by or subjected to foreign objects such
as stones, balls, etc.
5. Termination or termination kit should be positioned where
vent vapors are not objectionable.
Direct Vent / 2-Pipe System
Direct vent (2--pipe) vent and combustion air pipes must terminate
outside the structure. See Fig. 45 For references to vent clearances
required by National code authorities. Allowable vent and
combustion air terminations are shown in Fig. 47.
!
WARNING
CARBON MONOXIDE POISONING HAZARD
Failure to follow the instructions outlined below for each
appliance being placed into operation could result in carbon
monoxide poisoning or death.
For all venting configurations for this appliance and other gas
appliances placed into operation for the structure, provisions
for adequate combustion, ventilation, and dilution air must be
provided in accordance with:
U.S.A. Installations: Section 9.3 NFPA 54/ANSI
Z223.1--2012 Air for Combustion and Ventilation and
applicable provisionsof the local building codes.
Canadian Installations: Part 8 of CAN/CSA--B149.1--10.
Venting Systems and Air Supply for Appliances and all
authorities having jurisdiction.
Ventilated Combustion Air
The vent pipe for a Ventilated Combustion Air System must
terminate outdoors. See Fig. 46 for references to vent clearances
required by National code authorities. Allowable vent terminations
are shown in Fig. 48. The combustion air pipe terminates in a
well--ventilated attic or crawl space. Follow the clearances as
shown in Fig. 50.
The combustion air pipe cannot terminate in attics or crawl spaces
that use ventilation fans designed to operate in the heating season.
If ventilation fans are present in these areas, the combustion air
pipe must terminate outdoors as a Direct Vent System.
Non-Direct Vent / 1-Pipe System
The vent pipe for a Non Direct Vent (1--pipe) system must
terminate outdoors. See Fig. 46 for references to vent clearances
required by National Code authorities. Allowable vent
terminations are shown in Fig. 48.
A combustion air inlet pipe to the outdoors is not required for a
Non--Direct (single--pipe) Vent System. A 12--in. long section of
pipe with a tight radius 2--in. (51 mm) 90 degree elbow is required
to be attached to the furnace. See Fig. 49. This short inlet air pipe
helps to ensure stable combustion, as well as allow for sound
attenuation. To aid sound attenuation, point the inlet air pipe away
from occupants. An extra elbow and/or five feet of pipe may be
used to accomplish the sound attenuation function.
Termination Requirements for the Provinces of Alberta and
Saskatchewan
The Provinces of Alberta and Saskatchewan require a minimum
unobstructed distance of 4 ft. (1.2 M) from the foundation to the
property line of the adjacent lot for vent termination of any
appliance with an input over 35,000 btuh. If there is less than 4 ft.
(1.2 M) of unobstructed distance to the property line of the
adjacent lot, no type of vent termination is permitted for appliances
with inputs greater than 35,000 btuh.
There are no additional restrictions on unobstructed distances
greater than 8 ft. (2.4 M). All single, two-pipe and concentric vents
may be used, providing all other Code and manufacturer’s
requirements in these instructions are adhered to. Refer to the
appropriate Vent Termination section above for locating the vent
termination
If the unobstructed distance from the foundation to the property
line of the adjacent lot is no less than 4 ft. (1.2 M) and no greater
than 8 ft. (2.4 M), it will be necessary to re-direct the flue gas
plume. In this situation, a concentric vent kit cannot be used. A
2-pipe termination (or single pipe termination when permitted) that
re-directs the flue gas away by use of an elbow or tee, certified to
ULC S636 from the adjacent property line must be used. See Fig.
49.
The concentric vent kit currently cannot be modified to attach an
elbow to the vent portion of the rain cap. A tee attached to the rain
cap could potentially direct the flue gas plume toward the intake air
stream and contaminate the incoming combustion air for the
furnace.
Refer to Fig. 49 for terminations approved for use in Alberta and
Saskatchewan.
Size the Vent and Combustion Air Pipes
General
VENT OR
COMBUSTION AIR
PIPE DIAMETERS
11/2-in. X N/A N/A
2-in. X N/A N/A
21/2-in. N/A X N/A
3-in. N/A X N/A
Note: Optional accessory 2-pipe termination brackets are sized for 2-in.
and 3-in. pipe. If a termination bracket is required for a 4-in. termination,
field fabricate the necessary brackets and clamps.
Furnace combustion air and vent pipe connections are sized for
2-in. (50 mm ND) PVC/ABS DWV pipe. The combustion air and
vent pipe connections also accommodate 60 mm polypropylene
venting systems with outside diameters of approximately 60 mm
(2--3/8 inches). Any pipe diameter change should be made outside
furnace casing in vertical pipe. Any change in diameter to the pipe
must be made as close to the furnace as reasonably possible.
The Maximum Vent Length for the vent and combustion air pipe
(when used) is determined from the Maximum Equivalent Vent
4-in. N/A X X
APPROVED 2 ---PIPE TERMINATION
FITTINGS
2-in. 3-in. 4-in.
40
Page 41
Length in Table 15 or 17, minus the number of fittings multiplied
by the deduction for each type of fitting used from Table 16.
NOTICE
OPTIONAL CONFIGURATION FOR COMBUSTION
AIR INLET PIPE
In applications where there is a risk of excessive moisture
entering the combustion air inlet pipe, a moisture trap may be
added to the inlet pipe to help prevent moisture from entering
the furnace from the combustion air inlet pipe. See Fig. 52.
When sizing venting systems, the equivalent length of the
optional moisture trap (15 feet/5 M) must be taken into
account.
Optional Combustion Air Inlet Moisture Trap
As an option to prevent moisture from trickling into the furnace
vestibule, a trap can be installed in the intake air pipe near the
furnace. Connecting a drain line to the trap is optional as trace
amounts of moisture will evaporate into the intake air stream. If the
combustion air inlet is located near a moisture exhaust duct, or
there are other concerns of excessive moisture being drawn into the
combustion air inlet, it is encouraged to connect a drain line to the
trap.
The trap can be constructed from a running tee of the same
diameter of the intake air pipe with EITHER a removable cap
attached to a 6-inch long pipe connected to the tee or the External
Vent Trap Kit to help prevent contaminants from entering the
furnace. See Fig. 52.
The External Vent Trap Kit accessory may be used as a trap for the
combustion air inlet pipe if a large amount of moisture must be
removed. The drain line may be connected to the same drain as the
furnace condensate and the evaporator coil condensate line ONLY
if the inlet air trap drain and the evaporator coil drain empty into an
open segment of pipe above the drain. See Fig.13. When using
the External Vent Trap Kit, refer to those instructions for proper
drain connections.
The tee may also be connected to the intake air pipe on the side of
the casing. See Fig. 52.
In any configuration, it will be necessary to add the equivalent
length of the tee (15 feet/5 M) to the Total Equivalent Vent Length
of the venting system.
NOTICE
ADDITIONAL INFORMATION FOR
POLYPROPYLENE VENTING SYSTEMS
Polypropylene venting systems include flexible vent pipe.
These flexible vent pipes have a different equivalent vent
length than straight sections of PVC/ABS DWV vent pipe. Be
sure to make the appropriate deductions from the Maximum
Equivalent Vent Length (MEVL), or additions to the Total
Equivalent Vent Length (TEVL), when applying flexible vent
pipes in polypropylene venting systems. See the
polypropylene vent system manufacturer’s installation
instructions for details.
When using metric-sized venting systems, use these
equivalencies for obtaining the proper MEVL from the Tables:
Use 2” Vent Tables for 60 mm (o.d.) vent systems
Use 3” Vent Tables for 80 mm (o.d.) vent systems
Use 4” Vent Tables for 100 mm (o.d.) vent systems
The measured length of pipe used in a single or 2--pipe termination
is included in the total vent length. Include deductions from the
Maximum Equivalent Vent Length (MEVL) contained in the
Venting Tables for elbows and flexible vent pipe. Factory
accessory concentric vent terminations or pipe lengths and elbows
used for “standard” vent terminations do not require a deduction
from the Maximum Equivalent Vent Length. See vent termination
figures associated with Table 15. Include a deduction for a Tee
when used for Alberta and Saskatchewan terminations.
NOTE: Polypropylene venting systems MAY require additional
deductions from the MEVL, or additions to the TEVL, for vent
terminations and flexible pipe sections. See the polypropylene
venting system manufacturer’s instructions for details on
equivalent lengths of vent terminations and flexible vent pipes,
and for calculating total vent lengths.
To calculate the Total Equivalent Vent Length (TEVL) of the
venting system:
1. Measure the individual distance from the furnace to the termination for each pipe.
2. Count the number of elbows for each pipe.
3. For each pipe, multiply the number of elbows by the equivalent length for the type of elbow used. Record the equivalent length of all the elbows for each pipe.
4. If a Tee is used on the termination (Alberta and Saskatchewan, when required) record the equivalent length of the
Tee u sed.
5. Calculate Total Equivalent Vent Length by adding the equivalent lengths of the fittings to the lengths of the individual
vent and combustion air pipes.
6. When using polypropylene venting systems with flexible
vent pipes, perform adjustments for the equivalent length of
the flexible vent pipe to the calculated total equivalent
venting system length. See the polypropylene vent system
manufacturer’s instructions for details.
7. Select a diameter of vent pipe from Tables 15 and 17 and
note the Maximum Equivalent Vent Length (MEVL) shown
for that application for that specific furnace input size.
Compare the Total Equivalent Vent Length (TEVL) to the
MEVL:
8. If the Total Equivalent Vent Length is shorter than the
Maximum Equivalent Vent Length for the diameter of pipe
chosen, then that diameter of pipe selected may be used.
9. If the Total Vent Length is longer than the Maximum
Equivalent Vent Length for the diameter of pipe chosen,
that diameter pipe MAY NOT be used for venting the
furnace. Try the next larger diameter pipe
NOTE: If the calculated Total Equivalent Vent Lengths results in
different diameter pipes for the vent and combustion air, select the
larger diameter for both pipes.
NOTE: If the Maximum Vent Length for diameter of the pipe
selected is longer than the measured length and the equivalent
length of all the fittings and terminations (TEVL), recalculate
Total Equivalent Vent Length using the next smaller diameter. If
the Maximum Equivalent Vent Length is still longer than the
longer TEVL of the vent pipe or combustion air pipe, then that
diameter of pipe selected may be used.
When installing vent systems pipe lengths of 10 ft. (3 M) or less,
use the smallest allowable pipe diameter. Using a pipe size greater
than required for short venting systems may result in loss of
efficiency, incomplete combustion, flame disturbance, or flame
sense lockout.
For vent systems longer than 10 ft. (3 M), any larger diameter vent
pipe shown in Table 15 or 17 FOR THAT SIZE FURNACE may
be used.
.
Combustion Air and Vent Piping Insulation
Guidelines
NOTE: Use closed cell, neoprene insulation or equivalent.
912SB
41
Page 42
The vent pipe may pass through unconditioned areas. The amount
of exposed pipe allowed is shown in Table 14.
1. Using winter design temperature (used in load calculations),
find appropriate temperature for your application and furnace model.
2. Determine the amount of total and exposed vent pipe.
3. Determine required insulation thickness for exposed pipe
length(s).
4. When combustion air inlet piping is installed above a suspended ceiling, the pipe MUST be insulated with moisture
resistant insulation such as Armaflex or other equivalent
type of insulation.
5. Insulate combustion air inlet piping when run in warm, humid spaces.
6. Install the insulation per the insulation manufacturer’s installation instructions.
NOTE: Pipe length (ft. / M) specified for maximum pipe lengths
located in unconditioned spaces cannot exceed total allowable pipe
length as calculated from Table 15 or 17.
Configure the Furnace
912SB
!
WARNING
CARBON MONOXIDE POISONING HAZARD
Failure to follow this warning could result in personal
injury or death.
To route the vent pipe and combustion air pipe through the
furnace, the manufacturer supplied kit must be used. Failure
to properly seal the blower compartment from the furnace
vestibule could result in the circulation of carbon monoxide
throughout the structure. The vent pipe and combustion air
pipe must be a continuous pipe while passing through the
blower compartment. Seals supplied in this kit must be
installed per the instructions provided. Follow all
procedures outlined in these instructions.
Install the Vent and Combustion Air Pipes
With the furnace installed in the required position, remove the
desired knockouts from the casing. It will be necessary to remove
one knockout for the vent pipe and the other knockout for the
combustion air connection. See Fig. 12.
Use a flat blade screwdriver and tap on the knockout on opposite
sides, where the knockout meets the casing. Fold the knockout
down with duct pliers and work the knockout back and forth until
it is removed. Trim any excess metal from the knockout with tin
snips.
The vent elbow can be rotated to the required location on the
casing if necessary. See Fig. 38. To rotate the vent elbow:
1. Loosen the clamp on the inlet of the vent elbow attached to
the inducer.
2. Rotate the vent elbow to the required position. There are
rounded notches on the vent elbow to align it with the
inducer housing for each orientation.
3. Tighten the clamp around the vent elbow. Torque the clamp
to 15 lb--in. See Fig. 39--42.
Installing the Vent Pipe Adapter and Combustion Air
Pipe Adapter
!
WARNING
CARBON MONOXIDE POISONING HAZARD
Failure to follow this warning could result in personal
injury or death.
To route the vent pipe and combustion air pipe through the
furnace, the manufacturer supplied kit must be used. Failure
to properly seal the blower compartment from the furnace
vestibule could result in the circulation of carbon monoxide
throughout the structure. The vent pipe and combustion air
pipe must be a continuous pipe while passing through the
blower compartment. Seals supplied in this kit must be
installed per the instructions provided. Follow all
procedures outlined in these instructions.
!
WARNING
CARBON MONOXIDE POISONING HAZARD
Failure to follow this warning could result in personal injury
or death.
DO NOT use cement to join polypropylene venting systems.
Follow the polypropylene venting system manufacturer’s
instructions for installing polypropylene venting systems.
NOTE: The rubber coupling that attaches to the vent pipe adapter
must be used. The adapter seals the vent pipe to the casing and
reduces the strain on the vent elbow attached to the inducer.
1. Apply the gaskets to the vent pipe and combustion air pipe
adapters. If supplied, remove and discard round center
“slug” from interior of gasket. See Fig. 37.
NOTE: The vent pipe adapter can be distinguished from the inlet
pipe adapter by the absence of an internal pipe--stopping ring. The
vent pipe can pass through the vent pipe adapter; it cannot pass
through the inlet pipe adapter.
2. Align the screw holes in the plastic vent pipe adapter with
the dimples in the casing.
3. Pilot drill the screw holes for the adapter in the casing and
attach the vent pipe adapter to the furnace with sheet metal
screws
4. Slide the end of the rubber vent coupling with notches in it
over the standoffs on the vent pipe adapter.
5. Insert a length of vent pipe through the coupling into the
outlet of the vent elbow.
6. Tighten the clamp around the outlet of the vent elbow.
Torque the clamp to 15 lb--in.
NOTICE
The following instructions are for PVC/ABS DWV vent
piping only. DO NOT USE THESE TECHNIQUES FOR
POLYPROPYLENE VENT PIPING SYSTEMS. See the
polypropylene vent system manufacturer’s instructions for
installing polypropylene venting systems.
Install the remaining vent and combustion air pipes as shown
below. It is recommended that all pipes be cut, prepared, and
pre--assembled before permanently cementing any joint.
1. Working from furnace to outside, cut pipe to required
length(s).
2. De--burr inside and outside of pipe.
42
Page 43
3. Chamfer outside edge of pipe for better distribution of
primer and cement.
4. Clean and dry all surfaces to be joined.
5. Check dry fit of pipe and mark insertion depth on pipe.
6. Insert the vent pipe into the vent elbow.
7. Torque clamp on vent elbow 15 lb--in.
8. Torque clamp on vent coupling 15 lb--in.
9. Insert the combustion air pipe into the adapter.
10. Pilot drill a screw hole through the adapter into the combustion air pipe and secure the pipe to the adapter with sheet
metal screws. DO NOT DRILL INTO POLYPROPYL-
ENE VENT PIPES. Use an optional accessory vent coupling, if needed.
11. Seal around the combustion air pipe with silicone or foil
tape. SILICONE SEALERS MAY NOT BE APPRO-
PRIATE FOR POLYPROPYLENE VENT SYSTEMS.
SEE POLYPROPYLENE VENT SYSTEM MANUFACTURER’S INSTRUCTIONS.
12. After pipes have been cut and pre--assembled, apply generous layer of cement primer to pipe fitting socket and end of
pipe to insertion mark. Quickly apply approved cement to
end of pipe and fitting socket (over primer). Apply cement
in a light, uniform coat on inside of socket to prevent
buildup of excess cement. Apply second coat. DO NOT
CEMENT POLYPROPYLENE FITTINGS.
13. While cement is still wet, twist pipe into socket with 1/4--in.
turn. Be sure pipe is fully inserted into fitting socket.
14. Wipe excess cement from joint. A continuous bead of cement will be visible around perimeter of a properly made
joint.
15. Handle pipe joints carefully until cement sets.
16. Horizontal portions of the venting system shall be supported to prevent sagging. Support combustion air piping and
vent piping a minimum of every 5 ft. (1.5M)[3 ft. (.91M)
for SDR--21 or --26 PVC] using perforated metal hanging
strap or commercially available hangars designed to support
plastic pipe.
17. Prevent condensate from accumulating in the pipes by sloping the combustion air piping and vent piping downward
towards furnace a minimum of 1/4-in. per linear ft. with no
sags between hangers.
18. Complete the vent and combustion air pipe installation by
connecting the concentric vent or by installing the required
termination elbows as shown in Figs. 47, 48 and 49.
For Ventilated Combustion Air Termination, See Fig. 50.
19. Use appropriate methods to seal openings where combustion air pipe and vent pipe pass through roof or sidewall.
!
WARNING
CARBON MONOXIDE POISONING HAZARD
Failure to follow this warning could result in personal injury
or death.
DO NOT use cement to join polypropylene venting systems.
Follow the polypropylene venting system manufacturer’s
instructions for installing polypropylene venting systems.
Optional Installation of the Vent Pipe
NOTE: DO NOT USE THIS TECHNIQUE FOR
POLYPROPYLENE VENTING SYSTEMS.
This option provides a disconnect point for the vent pipe. The vent
pipe must be cemented to the plastic vent pipe adapter to maintain
a sealed vestibule. See Fig. 43.
1. Insert a length of vent pipe through the casing into the
outlet of the vent elbow.
2. Slide the plastic vent pipe adapter over the length of the
vent pipe down to the furnace casing. Mark the pipe where
it is flush with the outlet of the adapter.
3. Remove the pipe from the furnace and the adapter and cut
off any excess pipe.
4. Clean and prime the end of the pipe that is flush with the
vent adapter with a primer that is appropriate for the type of
pipe being used.
5. Re--insert the pipe through the casing into the vent elbow.
6. Tighten the clamp around the outlet of the vent elbow.
Torque the clamp to 15 lb--in.
7. Apply cement to the end of the pipe and to the inside of the
plastic vent adapter.
8. Slide the adapter over the vent pipe and align the screw
holes in the adapter with the dimples in the furnace casing.
9. Pilot drill 1/8--in. screw holes for the adapter in the casing
and secure the adapter to the furnace with sheet metal
screws.
10. Loosen the clamps on the rubber vent coupling.
11. Slide the end of the coupling with notches in it over the
standoffs in the vent pipe adapter.
12. Tighten the clamp of the coupling over the vent pipe
adapter. Torque the lower clamp around the vent pipe
adapter to 15 lb--in.
13. Pilot drill a 1/8--in. hole in the combustion air pipe adapter.
14. Complete the vent and combustion air pipe as shown in
“Install the Vent and Combustion Air Pipe.”
NOTICE
FOR POLYPROPYLENE VENTING SYSTEMS
When using polypropylene venting systems, all venting
materials used, including the vent terminations, must be from
the same manufacturer.
Installing the Vent Termination
Roof Terminations
A roof termination of any type will require a 4-in. (102 mm)
flashing for a 2 in. (50 mm ND) concentric vent or a 5--in. diameter
(127 mm) flashing for a 3-in. (80 mm ND) concentric vent kit. For
two-pipe or single pipe vent systems, a flashing for each pipe of the
required diameter will be necessary.
It is recommended that the flashing be installed by a roofer or
competent professional prior to installing the concentric vent. The
terminations can be installed on a flat or pitched roof.
Concentric Vent
Single or multiple concentric vent must be installed as shown in
Fig. 47. Maintain the required separation distance between vents
or pairs of vents as shown in Fig. 47 and all clearance shown in
Fig. 45.
NOTE: Follow the instructions of the vent terminal manufacturer.
These instructions are provided as a reference, only.
Cut one 4--in. (102 mm) diameter hole for 2--in. (50 mm ND) kit,
or one 5--in. (127 mm) diameter hole for 3--in. (80 mm ND) kit in
the desired location.
Loosely assemble concentric vent/combustion air termination
components together using instructions in kit.
Slide assembled kit with rain shield REMOVED through hole in
wall or roof flashing.
912SB
43
Page 44
NOTE: Do not allow insulation or other materials to accumulate
inside of pipe assembly when installing it through hole.
Disassemble loose pipe fittings. Clean and cement using same
procedures as used for system piping. DO NOT CEMENT
POLYPROPYLENE FITTINGS.
Two--Pipe and Single--Pipe Terminations
Single and two pipe vent must be installed as shown in Fig. 47 and
48. Maintain the required separation distance between vents or
pairs of vents as shown in Fig. 47 and 48 and all clearance shown
in Fig. 45 and 46 .
NOTICE
RECOMMENDED SUPPORT FOR VENT
TERMINATIONS
It is recommended that rooftop vent terminations in excess of
36 inches (1 M) in vertical length be supported by EITHER
the Direct Vent Termination Kit shown in Table 12 or by
field--supplied brackets or supports fastened to the structure.
Cut the required number of holes in the roof or sidewall for vent
912SB
and (when used) combustion air pipes. Sidewall holes for two-pipe
vent terminations should be side-by-side, allowing space between
the pipes for the elbows to fit on the pipes.
Holes in the roof for direct--vent two--pipe terminations should be
spaced no more than 18 in. (457 mm) apart to help avoid vent gas
recirculation into combustion air intake.
Termination elbows will be installed after the vent and (if used)
combustion air pipe is installed.
Sidewall Terminations
Concentric Vent
NOTE: Follow the instructions of the vent terminal manufacturer.
These instructions are provided as a reference only.
Determine an appropriate location for termination kit using the
guidelines provided in section “Locating The Vent Termination” in
this instruction.
1. Cut one 4--in. diameter hole for 2--in. kit, or one 5--in. diameter hole for 3--in. kit.
2. Loosely assemble concentric vent/combustion air termination components together using instructions in kit.
3. Slide assembled kit with rain shield REMOVED through
hole.
NOTE: Do not allow insulation or other materials to accumulate
inside of pipe assembly when installing it through hole.
4. Locate assembly through sidewall with rain shield positioned no more than 1--in. (25 mm) from wall as shown in
Fig. 47.
5. Disassemble loose pipe fittings. Clean and cement using
same procedures as used for system piping. DO NOT CE-
MENT POLYPROPYLENE FITTINGS.
2-Pipe and 1-Pipe Vent Termination
NOTE: Follow the instructions of the vent terminal manufacturer.
These instructions are provided as a reference, only.
guidelines provided in section “Locating The Vent Termination” in
this instruction.
1. Cut two holes, one for each pipe, of appropriate size for
pipe size being used.
2. Loosely install elbow in bracket (if used) and place assembly on combustion--air pipe.
3. Install bracket as shown in Fig. 47 and 49.
NOTE: For applications using vent pipe option indicated by
dashed lines in Fig. 47 and 48, rotate vent elbow 90_ from
position.
4. Disassemble loose pipe fittings. Clean and cement using
same procedures as used for system piping. DO NOT CE-
MENT POLYPROPYLENE FITTINGS.
(Direct Vent / 2-Pipe System ONLY)
When two or more furnaces are vented near each other, two vent
terminations may be installed as shown in Fig. 47, but next vent
termination, or pair of vent terminations, must be at least 36 in.
(914 mm) away from the first two terminations. It is important that
vent terminations be made as shown in Fig. 47 to avoid
recirculation of vent gases.
Inducer Outlet Restrictor
To improve efficiency and operation of 40,000 BTUH input
models on very short vent systems, an inducer outlet restrictor is
required to be installed on the outlet of the inducer assembly. The
outlet restrictor is shipped in the loose parts bag.
To determine if the outlet restrictor is required, see Table 15 and
Table 17. Failure to use an outlet choke when required may
result in flame disturbance or flame sense lockout.
To install the outlet restrictor:
1. Remove the vent elbow from the inducer outlet.
2. Align the lock tabs on the outlet restrictor with the slots on
inside outlet of the inducer assembly.
3. Snap the outlet restrictor in place.
4. Re-install the vent elbow.
5. Torque vent elbow clamp 15-lb--in.
NOTICE
RECOMMENDED SUPPORT FOR VENT
TERMINATIONS
It is recommended that sidewall vent terminations in excess of
24 inches (0.6 M) in vertical length be supported by EITHER
the Direct Vent Termination Kit shown in Table 12 or by
field--supplied brackets or supports fastened to the structure.
Determine an appropriate location for termination kit using the
44
Page 45
Table 13 – Approved Combustion-Air and Vent Pipe, Fitting and Cement Materials (U.S.A. Installations)
ASTM SPECIFICATION
(MARKED ON MATERIAL)
D1527 ABS Pipe — — S c h e d u l e --- 4 0
D1785 PVC Pipe — — Sc h e d u l e --- 4 0
D2235 For ABS — — Solvent Cement For ABS
D2241 PVC Pipe — — S D R --- 2 1 & S D R --- 2 6
D2466 PVC — Fittings — Sc h e d u l e --- 4 0
D2468 ABS — Fittings — S c h e d u l e --- 4 0
D2564 For PVC — — Solvent Cement For PVC
D2661 ABS Pipe Fittings — DWV at Schedule---40 IPS sizes
D2665 PVC Pipe Fittings — DWV
F438 CPVC — Fittings — S c h e d u l e --- 4 0
F441 CPVC Pipe — — S c h e d u l e --- 4 0
F442 CPVC Pipe — — SDR
F493 For CPVC — — Solvent Cement For C PVC
F628 ABS Pipe — —
F656 For PVC — — Primer For PVC
F891 PVC Pipe — — Cellular Core Schedule ---40 & DWV
MATERIAL PIPE FITTINGS
SOLVENT CEMENT
AND PRIMERS
DESCRIPTION
Cellular Core DWV at Schedule---40
IPS sizes
912SB
45
Page 46
Single
Stage
Furnace
Input
40,000*
Winter
Design
Tem p
°F(°C)
20 (-10)
0 (-20)
20 (-30)
-40 ( -40)
Table 14 – Maximum Allowable Exposed Vent Lengths Insulation Table -- Ft. / M
Maximum Length of Uninsulated and Insulated Vent Pipe-Ft (M)
Pipe
Length in
Ft. & M
FT 25 42 42 N/A N/A 25 115 111 N/A N/A 25 115 130 N/A N/A
M 7.6 12.8 12.8 N/A N/A 7.6 35.1 33.8 N/A N/A 7.6 35.1 39.6 N/A N/A
FT 25 19 17 N/A N/A 25 75 66 N/A N/A 25 90 79 N/A N/A
M 7.6 5.8 5.2 N/A N/A 7.6 22.9 20.1 N/A N/A 7.6 27.4 24.1 N/A N/A
FT 14 7 5 N/A N/A 65 52 45 N/A N/A 25 64 55 N/A N/A
M 4.3 2.1 1.5 N/A N/A 19.8 15.8 13.7 N/A N/A 7.6 19.5 16.8 N/A N/A
FT 7 0 0 N/A N/A 49 38 31 N/A N/A 25 48 40 N/A N/A
M 2.1 0.0 0.0 N/A N/A 14.9 11.6 9.4 N/A N/A 7.6 14.6 12.2 N/A N/A
No Insulation 3/8-in. (9.5 mm) Insulation 1/2-in. (12.7 mm) Insulation
Pipe Diameter --- in. (mm) Pipe Diameter --- in. (mm) Pipe Diameter --- in. (mm)
11/2 2 21/2 3 4 11/2 2 21/2 3 4 11/2 2 21/2 3 4
(38) (51) (64) (76) (102) (38) (51) (64) (76) (102) (38) (51) (64) (76) (102)
912SB
60,000
80,000
100,000
120,000
20 (-10)
0 (-20)
-20 ( -30)
-40 ( -40)
20 (-10)
0 (-20)
-20 ( -30)
-40 ( -40)
20 (-10)
0 (-20)
-20 ( -30)
-40 ( -40)
20 (-10)
0 (-20)
-20 ( -30)
-40 ( -40)
Ft. 30 61 61 54 N/A 30 135 163 142 N/A 30 135 191 166 N/A
M 9.1 18.6 18.6 16.5 N/A 9.1 41.1 49.7 43.3 N/A 9.1 41.1 58.2 50.6 N/A
Ft. 30 31 30 23 N/A 30 113 100 85 N/A 30 135 120 101 N/A
M 9.1 9.4 9.1 7.0 N/A 9.1 34.4 30.5 25.9 N/A 9.1 41.1 36.6 30.8 N/A
Ft. 24 17 15 7 N/A 30 81 70 57 N/A 30 98 85 70 N/A
M 7.3 5.2 4.6 2.1 N/A 9.1 24.7 21.3 17.4 N/A 9.1 29.9 25.9 21.3 N/A
Ft. 15 8 5 0 N/A 30 61 52 40 N/A 30 75 64 51 N/A
M 4.6 2.4 1.5 0.0 N/A 9.1 18.6 15.8 12.2 N/A 9.1 22.9 19.5 15.5 N/A
Ft. 20 70 78 70 60 20 70 175 183 154 20 70 175 215 181
M 6.1 21.3 23.8 21.3 18.3 6.1 21.3 53.3 55.8 46.9 6.1 21.3 53.3 65.5 55.2
Ft. 20 42 41 33 21 20 70 132 111 89 20 70 157 133 107
M 6.1 12.8 12.5 10.1 6.4 6.1 21.3 40.2 33.8 27.1 6.1 21.3 47.9 40.5 32.6
Ft. 20 25 23 14 1 20 70 94 77 57 20 70 113 94 71
M 6.1 7.6 7.0 4.3 0.3 6.1 21.3 28.7 23.5 17.4 6.1 21.3 34.4 28.7 21.6
Ft. 20 14 12 3 0 20 70 71 56 38 20 70 86 70 50
M 6.1 4.3 3.7 0.9 0.0 6.1 21.3 21.6 17.1 11.6 6.1 21.3 26.2 21.3 15.2
Ft. N/A 25 99 89 78 N/A 25 110 233 265 N/A 25 110 235 229
M N/A 7.6 30.2 27.1 23.8 N/A 7.6 33.5 71.0 80.8 N/A 7.6 33.5 71.6 69.8
Ft. N/A 25 55 46 33 N/A 25 110 145 117 N/A 25 110 173 140
M N/A 7.6 16.8 14.0 10.1 N/A 7.6 33.5 44.2 35.7 N/A 7.6 33.5 52.7 42.7
Ft. N/A 25 34 24 11 N/A 25 110 103 79 N/A 25 110 124 97
M N/A 7.6 10.4 7.3 3.4 N/A 7.6 33.5 31.4 24.1 N/A 7.6 33.5 37.8 29.6
Ft. N/A 23 20 11 0 N/A 25 95 77 55 N/A 25 110 94 70
M N/A 7.0 6.1 3.4 0.0 N/A 7.6 29.0 23.5 16.8 N/A 7.6 33.5 28.7 21.3
Ft. N/A N/A 15 99 86 N/A N/A 15 100 219 N/A N/A 15 100 250
M N/A N/A 4.6 30.2 26.2 N/A N/A 4.6 30.5 66.8 N/A N/A 4.6 30.5 76.2
Ft. N/A N/A 15 51 38 N/A N/A 15 100 130 N/A N/A 15 100 156
M N/A N/A 4.6 15.5 11.6 N/A N/A 4.6 30.5 39.6 N/A N/A 4.6 30.5 47.5
Ft. N/A N/A 15 28 14 N/A N/A 15 100 88 N/A N/A 15 100 108
M N/A N/A 4.6 8.5 4.3 N/A N/A 4.6 30.5 26.8 N/A N/A 4.6 30.5 32.9
Ft. N/A N/A 15 14 0 N/A N/A 15 85 62 N/A N/A 15 100 79
M N/A N/A 4.6 4.3 0.0 N/A N/A 4.6 25.9 18.9 N/A N/A 4.6 30.5 24.1
20 (-10)
0 (-20)
140,000*
-20 ( -30)
-40 ( -40)
Not all families have these models.
Ft. N/A N/A 10 90 99 N/A N/A 10 90 210 N/A N/A 10 90 210
M N/A N/A 3.0 27.4 30.2 N/A N/A 3.0 27.4 64.0 N/A N/A 3.0 27.4 64.0
Ft. N/A N/A 10 61 47 N/A N/A 10 90 153 N/A N/A 10 90 183
M N/A N/A 3.0 18.6 14.3 N/A N/A 3.0 27.4 46.6 N/A N/A 3.0 27.4 55.8
Ft. N/A N/A 10 35 21 N/A N/A 10 90 104 N/A N/A 10 90 128
M N/A N/A 3.0 10.7 6.4 N/A N/A 3.0 27.4 31.7 N/A N/A 3.0 27.4 39.0
Ft. N/A N/A 10 20 NA N/A N/A 10 90 75 N/A N/A 10 90 94
M N/A N/A 3.0 6.1 NA N/A N/A 3.0 27.4 22.9 N/A N/A 3.0 27.4 28.7
46
Page 47
Table 15 – Maximum Equivalent Vent Length -- Ft. (M)
0 to 4500 Ft. (0 to 1370 M) Altitude
NOTE: Maximum Equivalent Vent Length (MEVL) includes standard and concentric vent termination and does NOT include elbows.
Use Table 16 - Deductions from Maximum Equivalent Vent Length to determine allowable vent length for each application.
Altitude
FT (M)
0 to 2000
(0 to 610)
2001 to 3000
(610 to 914)
3001 to 4000
(914 to 1219)
4001 to 4500
(1219 to 1370)
* Not all f amilies have these models.
NOTES: See notes at end of venting tables.
See Table 17 for altitudes over 4500 ft. ( 1370 M)
Unit Size
BTU/Hr
1
40,000*
60,000 30 (9.1) 135 (41.1) 235 (71.6) 265 (80.8) NA
80,000 20 (6.1) 70 (21.3) 175 (53.3) 235 (71.6) 265 (80.8)
100,000 NA 25 (7.6) 110 (33.5) 235 (71.6) 265 (80.8)
120,000 NA NA 15 (4.6) 100 (30.5) 250 (76.2)
140,000* NA NA 10 (3.0) 90 (27.4) 210 (64.0)
40,000* 22 (6.7) 105 (32.0) 232 (70.7) NA NA
60,000 27 (8.2) 127 (38.7) 222 (67.7) 250 (76.2) NA
80,000 17 (5.2) 64 (19.5) 165 (50.3) 222 (67.7) 249 (75.9)
100,000 NA 22 (6.7) 104 (31.7) 223 (68.0) 250 (76.2)
120,000 NA NA 11 (3.4) 93 (28.3) 237 (72.2)
140,000* NA NA NA 80 (24.4) 185 (56.4)
40,000* 18 (5.5) 94 (28.7) 214 (65.2) NA NA
60,000 23 (7.0) 119 (36.3) 210 (64.0) 235 (71.6) NA
80,000 15 (4.6) 59 (18.0) 155 (47.2) 210 (64.0) 232 (70.7)
100,000 NA 19 (5.8) 98 (29.9) 211 (64.3) 236 (71.9)
120,000 NA NA 8 (2.4) 86 (26.2) 224 (68.3)
140,000* NA NA NA 79 (24.1) 158 (48.2)
40,000* 16 (4.9) 88 (26.8) 205 (62.5) NA NA
60,000 21 (6.4) 115 (35.1) 204 (62.2) 228 (69.5) NA
80,000 14 (4.3) 56 (17.1) 150 (45.7) 202 (61.6) 224 (68.3)
100,000 NA 17 (5.2) 94 (28.7) 205 (62.5) 229 (69.8)
120,000 NA NA NA 83 (25.3) 217 (66.1)
140,000* NA NA NA 69 (21.0) 146 (44.5)
25 (7.6) 115 (35.1) 250 (76.2) NA NA
1-1/2 2 2-1/2 3 4
DIRECT VENT (2-PIPE) AND NON-DIRECT VENT (1-PIPE)
Vent Pipe Diameter (in.)
912SB
ELBOW CONFIGURATIONS
VENT TERMINAL CONFIGURATIONS
Concentric
Long
Medium
Mitered
Standard 2-in., 3-in., or
optional 4-in. termination.
Table 16 – Deductions from Maximum Equivalent Vent Length -- Ft. (M)
Pipe Diameter (in): 1-1/2 2 2-1/2 3 4
Mitered 90º Elbow 8 (2.4) 8 (2.4) 8 (2.4) 8 (2.4) 8 (2.4)
Medium Radius 90º Elbow 5 (1.5) 5 (1.5) 5 (1.5) 5 (1.5) 5 (1.5)
Long Radius 90º Elbow 3 (0.9) 3 (0.9) 3 (0.9) 3 (0.9) 3 (0.9)
Mitered 45º Elbow 4 (1.2) 4 (1.2) 4 (1.2) 4 (1.2) 4 (1.2)
Medium Radius 45º Elbow 2.5 (0.8) 2.5 (0.8) 2.5 (0.8) 2.5 (0.8) 2.5 (0.8)
Long Radius 45º Elbow 1.5 (0.5) 1.5 (0.5) 1.5 (0.5) 1.5 (0.5) 1.5 (0.5)
Tee 16 (4.9) 16 (4.9) 16 (4.9) 16 (4.9) 16 (4.9)
A13110
47
Page 48
Venting System Length Calculations
The Total Equivalent Vent Length (TEVL) for EACH combustion air or vent pipe equals the length of the venting system, plus the equivalent
length of elbows used in the venting system from Table 16.
Standard vent terminations or factory accessory concentric vent terminations count for zero deduction.
See vent system manufacturer’s data for equivalent lengths of flexible vent pipe or other termination systems. DO NOT ASSUME that one
foot of flexible vent pipe equals one foot of straight PVC/ABS DWV vent pipe.
Compare the Total Equivalent Vent Length to the Maximum Equivalent Vent Lengths in Tables 15 and 17.
Example 1
A direct--vent 60,000 Btuh furnace installed at 2100 ft. (640 M). Venting system includes, FOR EACH PIPE, 100 feet (30 M) of vent pipe,
95 feet (28 M) of combustion air inlet pipe, (3) 90_ long radius elbows, (2) 45_ long radius elbows and a factory accessory concentric vent
kit.
Can this application use 2--in. (50 mm ND) PVC/ABS DWV vent piping?
Measure the required linear length of air inlet and vent pipe; insert the
longest of the two here:
Add equiv length of (3) 90º long-radius elbows
(use the highest number of elbows for either the
vent or inlet pipe)
Add equiv length of (2) 45º long-radius elbows
(use the highest number of elbows for either the
912SB
vent or inlet pipe)
Add equiv length of vent termination 0ft. From Table 16
Add correction for flexible vent pipe, if any 0ft.
Total Equivalent Vent Length (TEVL) 112 ft. Add all of the above lines
Maximum Equivalent Vent Length (MEVL) 127 ft. For 2” pipe from Table 15
Is TEVL less than MEVL? YES Therefore, 2” pipe may be used
3 x 3ft = 9ft. From Table 16
2 x 1.5 ft = 3ft. From Table 16
100 ft
Use length of the longer of the vent
or air inlet piping system
From Vent Manufacturer’s instructions;
zero for PVC/ABS DWV
Example 2
A direct--vent 60,000 Btuh furnace installed at 2100 ft. (640 M) Venting system includes, FOR EACH PIPE, 100 feet (30 M) of vent pipe,
95 feet (28 M) of combustion air inlet pipe, (3) 90_ long radius elbows, and a polypropylene concentric vent kit. Also includes 20 feet (6 M)
of flexible polypropylene vent pipe, included within the 100 feet (30 M) of vent pipe.
Assume that one meter of flexible 60 mm or 80 mm polypropylene pipe equals 2 Meters of PVC/ABS pipe. VERIFY FROM VENT
MANUFACTURER’S INSTRUCTIONS.
Can this application use 60 mm (O.D.) polypropylene vent piping? If not what size piping can be used?
Measure the required linear length of air inlet and vent pipe; insert the
longest of the two here:
Add equiv length of (3) 90º long-radius elbows
(use the highest number of elbows for either the
vent or inlet pipe)
Add equiv length of (2) 45º long-radius elbows
(use the highest number of elbows for either the
vent or inlet pipe)
Add equiv length of vent termination 9M x 3ft/M = 18 ft. From Vent Manufacturer’s instructions
Add correction for flexible vent pipe, if any 1.8 x 20 ft = 36 ft. From Vent Manufacturer’s instructions
Total Equivalent Vent Length (TEVL) 163 ft. Add all of the above lines
3 x 3ft = 9ft. From Vent Manufacturer’s instructions
0 x = 0ft. From Vent Manufacturer’s instructions
100 ft
Use length of the longer of the vent
or air inlet piping system
Maximum Equivalent Vent Length (MEVL) 127 ft. For 2” pipe from Table 15
Is TEVL less than MEVL? NO
Maximum Equivalent Vent Length (MEVL) 250 ft. For 3” pipe from Table 15
Is TEVL less than MEVL? YES Therefore, 80 mm pipe may be used
Therefore, 60mm pipe may NOT be used;
try 80 mm
48
Page 49
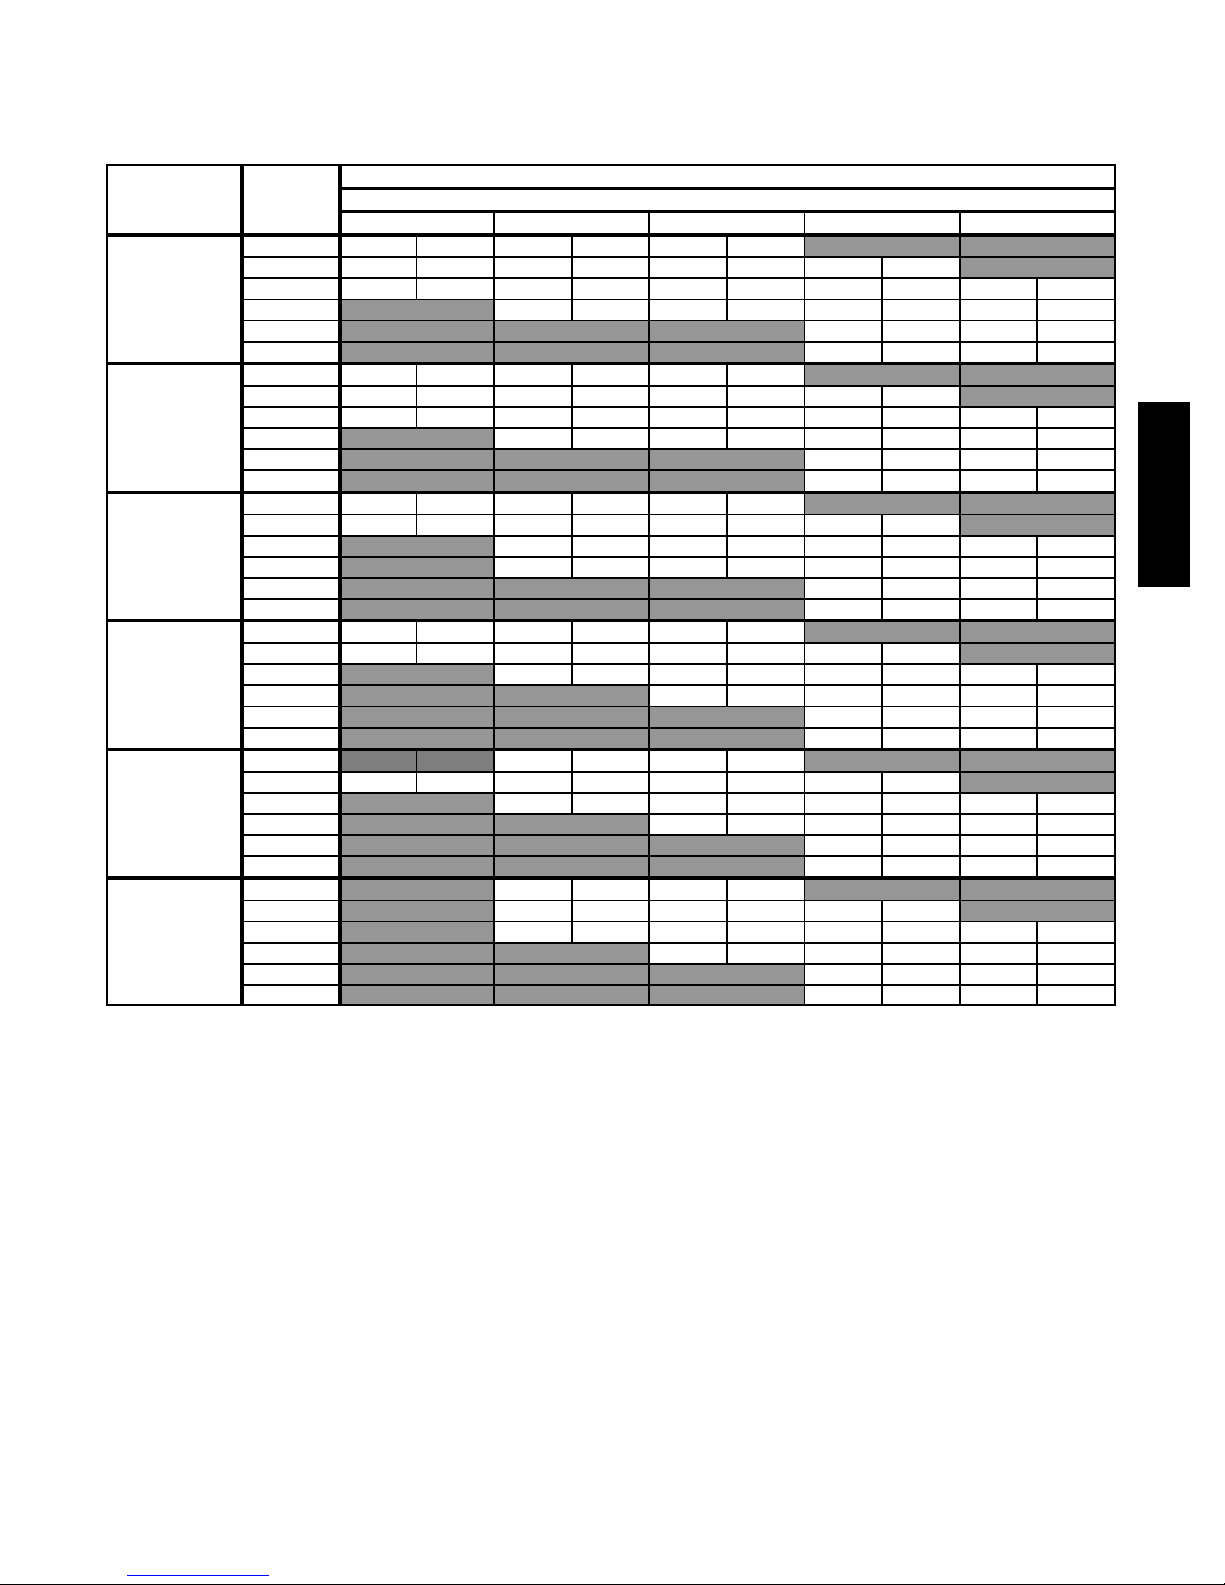
Table 17 – Maximum Equivalent Vent Length -- Ft. (M)
4501 to 10,000 Ft. (0 to 1370 M) Altitude
NOTE: Maximum Equivalent Vent Length (MEVL) includes standard and concentric vent termination and does NOT include elbows.
Use Table 16 - Deductions from Maximum Equivalent Vent Length to determine allowable vent length for each application.
Altitude
FT (M)
Unit Size
1-1/2 2 2-1/2 3 4
40,000* 15 (4.6) 83 (25.3) 196 (59.7) NA NA
60000* 20 (6.1) 111 (33.8) 198 (60.4) 221 (67.4) NA
4501 to 5000
(1370 to 1524)
80,000 13 (4.0) 54 (16.5) 146 (44.5) 195 (59.4) 216 (65.8)
100,000 NA 16 (4.9) 91 (27.7) 200 (61.0) 222 (67.7)
120,000 NA NA NA 80 (24.4) 211 (64.3)
140,000* NA NA NA 60 (18.3) 134 (40.8)
40,000* 12 (3.7) 73 (22.3) 179 (54.6) NA NA
60,000 16 (4.9) 103 (31.4) 186 (56.7) 207 (63.1) NA
5001 to 6000
(1524 to 1829)
80,000 11 (3.4) 49 (14.9) 137 (41.8) 183 (55.8) 200 (61.0)
100,000 NA 12 (3.7) 85 (25.9) 188 (57.3) 208 (63.4)
120,000 NA NA NA 74 (22.6) 199 (60.7)
140,000* NA NA NA 50 (15.2) 109 (33.2)
40,000* 9 (2.7) 63 (19.2) 162 (49.4) NA NA
60,000 13 (4.0) 96 (29.3) 174 (53.0) 194 (59.1) NA
6001 to 7000
(1829 to 2134)
80,000 NA 44 (13.4) 120 (36.6) 171 (52.1) 185 (56.4)
100,000 NA 10 (3.0) 79 (24.1) 178 (54.3) 195 (59.4)
120,000 NA NA NA 68 (20.7) 187 (57.0)
140,000* NA NA NA 41 (12.5) 87 (26.5)
40,000* 6 (1.8) 54 (16.5) 146 (44.5) NA NA
60,000 10 (3.0) 89 (27.1) 163 (49.7) 181 (55.2) NA
7001 to 8000
(2134 to 2438)
80,000 NA 40 (12.2) 120 (36.6) 159 (48.5) 170 (51.8)
100,000 NA NA 73 (22.3) 167 (50.9) 182 (55.5)
120,000 NA NA NA 62 (18.9) 175 (53.3)
140,000* NA NA NA 32 (9.8) 63 (19.2)
40,000* NA 44 (13.4) 130 (39.6) NA NA
60,000 7 (2.1) 82 (25.0) 152 (46.3) 168 (51.2) NA
8001 to 9000
(2438 to 2743)
80,000 NA 35 (10.7) 111 (33.8) 148 (45.1) 156 (47.5)
100,000 NA NA 67 (20.4) 157 (47.9) 170 (51.8)
120,000 NA NA NA 56 (17.1) 164 (50.0)
140,000* NA NA NA 23 (7.0) 42 (12.8)
40,000* NA 35 (10.7) 115 (35.1) NA NA
60,000 NA 76 (23.2) 142 (43.3) 156 (47.5) NA
9001 to 10,000
(2743 to 3048)
80,000 NA 31 (9.4) 103 (31.4) 137 (41.8) 142 (43.3)
100,000 NA NA 62 (18.9) 147 (44.8) 157 (47.9)
120,000 NA NA NA 51 (15.5) 153 (46.6)
140,000* NA NA NA 16 (4.9) 20 (6.1)
* Not all f amilies have these models.
NOTES:
1. Use only the vent pipe sizes shown for each furnace. It is NOT necessary to choose the smallest diameter pipe possible for venting.
2. NA --- Not allowed. Pressure switch will not close, or flame disturbance may result.
3. Total equivalent vent len gths under 10’ for 40,000 BTUH furnaces f rom 0 to 2000 ft. (0 to 610 M) above sea level r equ ire use of an outlet choke plate .
Failure to use an outlet choke when required may result in flame disturbance or flame sense lockout.
4. Not all furnace families include 140,000 BTUH input models.
5. Vent sizing for C a nadian installations over 4500 ft (1370 M) above sea level are subject to acceptance by local authorities having ju risdiction.
6. Size both the combustion air and vent pipe independently, then use the larger size for both pipes.
7. Assume the two 45_ elbows equal one 90_ elbow. Wide radius elbows are desirable and may be required in some cases.
8. Elbow and pipe sections within the furnace casing and at the vent termination should not be included in vent length or elbow count.
9. The minimum pipe length is 5 ft. (2 M) linear feet (meters) for all applications.
10. Use 3 ---in. (76 mm) diameter vent termination kit for instal lations requiring 4 ---in. (102 mm) diameter pipe.
DIRECT VENT (2-PIPE) AND NON-DIRECT VENT (1-PIPE)
Vent Pipe Diameter
912SB
49
Page 50
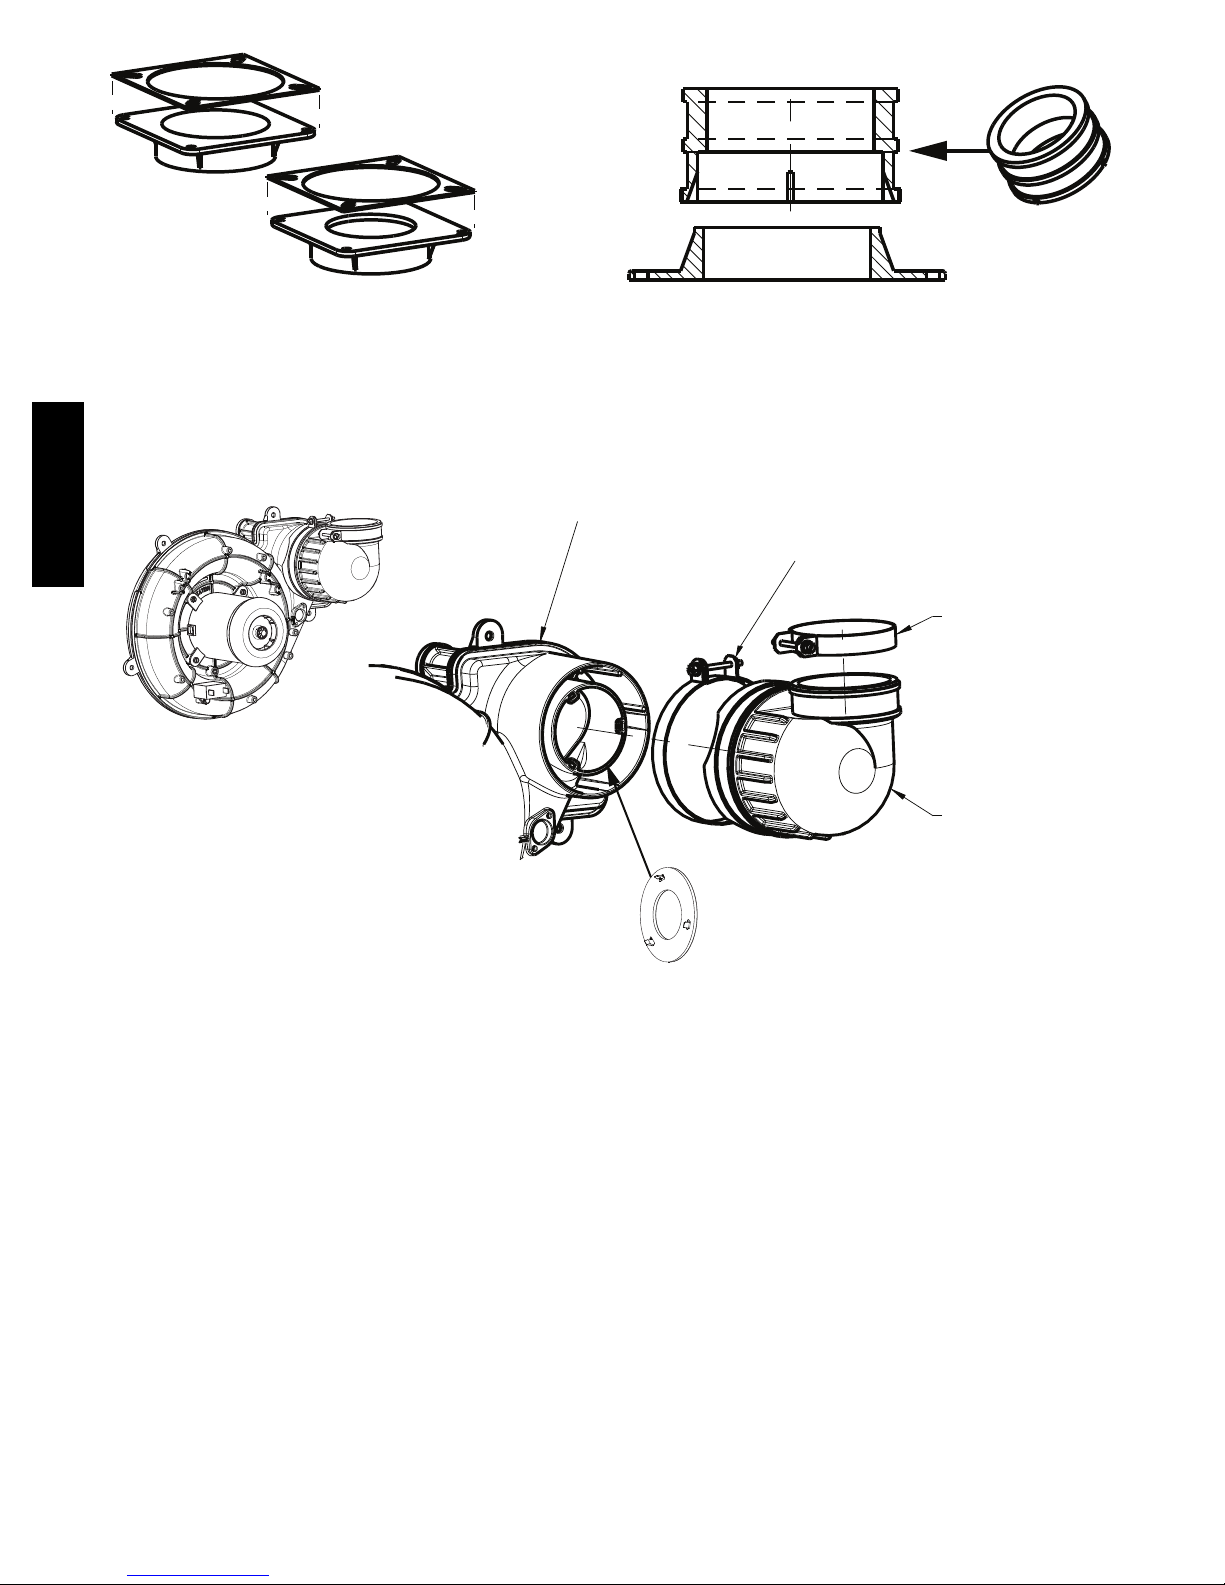
Attach gaskets to vent pipe and
combustion air adapters.
Fig. 37 -- Vent Coupling and Adapter with Gaskets
Vent Coupling and Adapter
A13074
912SB
PSC INDUCER ASSEMBLY
INDUCER OUTLET
VENT ELBOW CLAMP
TORQUE 15 LB-IN.
VENT PIPE CLAMP
TORQUE 15 LB-IN.
VENT ELBOW
INDUCER OUTLET CHOKE
40,000 BTUH MODELS ONLY
A13075
Fig. 38 -- Inducer Vent Elbow
50
Page 51
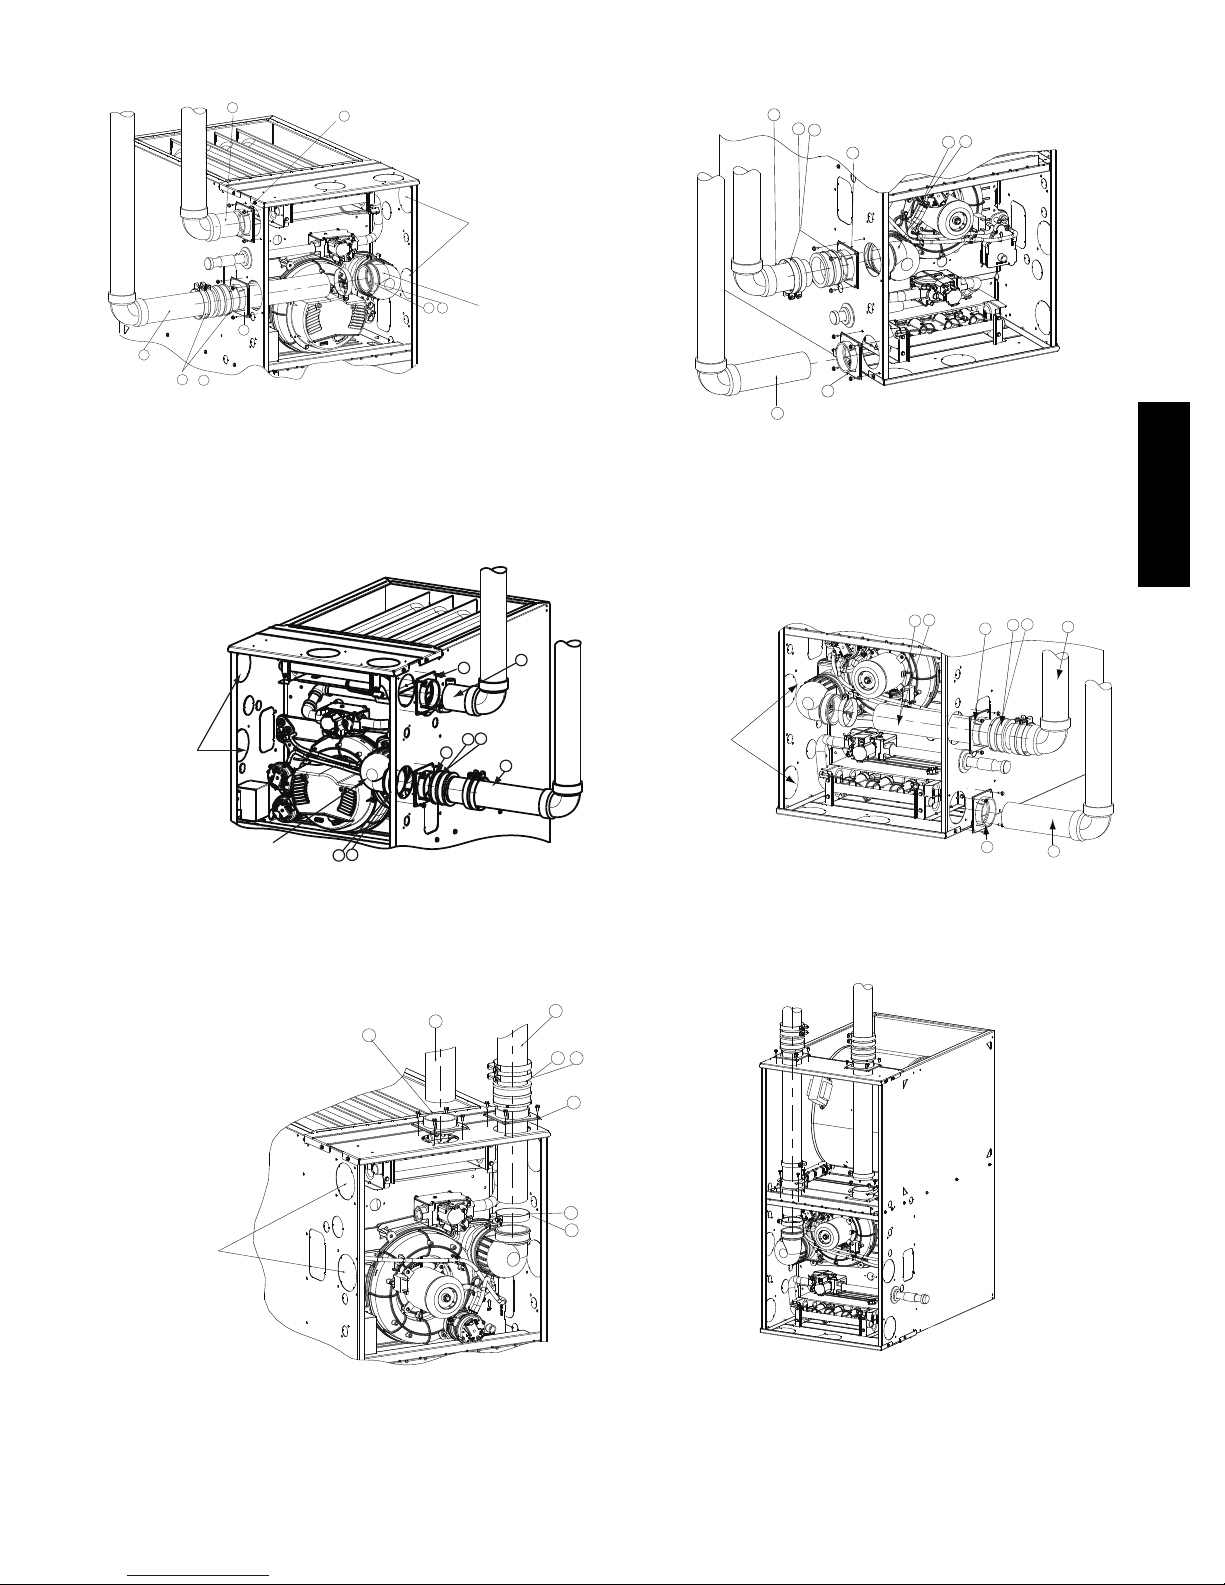
7
A
A
A
1
3
2
&
5
6
Any other unused
knockout may be used
for combustion air
connection.
Rotate vent elbow to
4
5
required position.
3
7
Rotate vent elbow to
required position.
2
5
6
4
1
5
UPFLOW LEFT CONFIGURATION
ny other unused
knockout may be used
for combustion air
connection.
Rotate vent elbow to
required position.
6
5
2
1
4
5
UPFLOW RIGHT CONFIGURATION
6
7
DOWNFLOW LEFT CONFIGURATION
A11309A
A11311A
912SB
Rotate vent elbow to
required position.
7
3
ny other unused
knockout may be used
for combustion air
connection.
DOWNFLOW RIGHT CONFIGURATION
A11308A
3
2
5
4
5
5
2
1
6
3
7
A11312A
ny other unused
knockout may be used
for combustion air
connection.
UPFLOW VERTICAL VENT
Fig. 39 -- Upflow Configurations (Appearance may vary)
See “Notes for Venting Options”
1
4
5
A11310A
Requires Accessory Internal Vent Kit.
See Product Data for current kit number.
DOWNFLOW VERTICAL
Fig. 40 -- Downflow Configurations (Appearance may vary)
See “Notes for Venting Options”
51
A11313A
Page 52
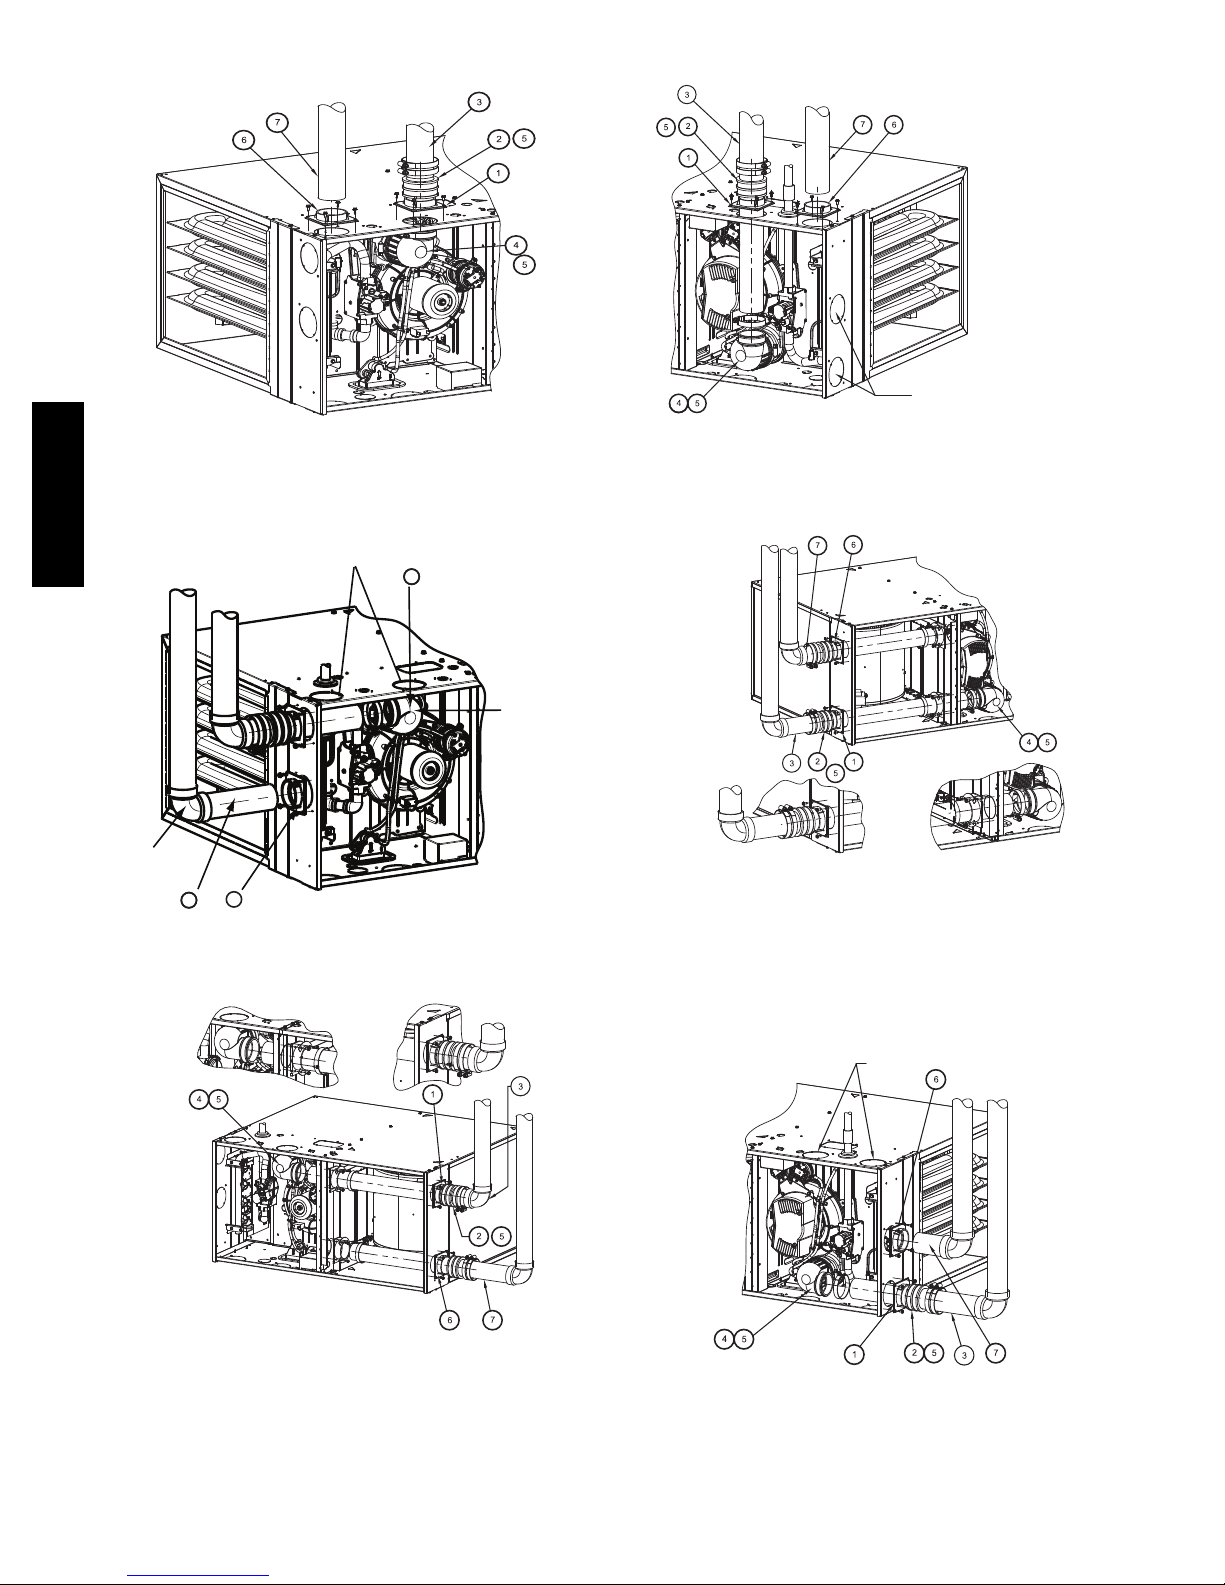
ALTERNATE
COMBUSTION
AIR CONNECTIONS
HORIZONTAL LEFT ---VERTICAL VENT CONFIGURATION
912SB
Alternate combustion air
connection.
Vent Pipe
5
6
HORIZONAL LEFT --- LEFT VENT CONFIGURATION
4
4
A11327A
Rotate vent
elbow to
required
position.
A11328A
HORIZONTAL RIGHT--- VERTICAL VENT CONFIGURATION
A11337
Requires Internal Vent Kit
See Product Data for Current Kit Number
HORIZONTAL RIGHT--- LEF T VENT CONFIGURATION
A11336
ALTERNATE
COMBUSTION
AIR CONNECTIONS
Requires Accessory Vent Kit
See Product Data for
Current Kit Number
HORIZONTAL LEFT ---RIGHT VENT CONFIGURATION
Fig. 41 -- Horizontal Left (Appearance may vary)
See “Notes for Venting Options”
A11329A
HORIZONTAL RIGHT--- RIGHT VENT CONFIGURATION
A11335
Fig. 42 -- Horizontal Right (Appearance may vary)
See “Notes for Venting Options”
52
Page 53
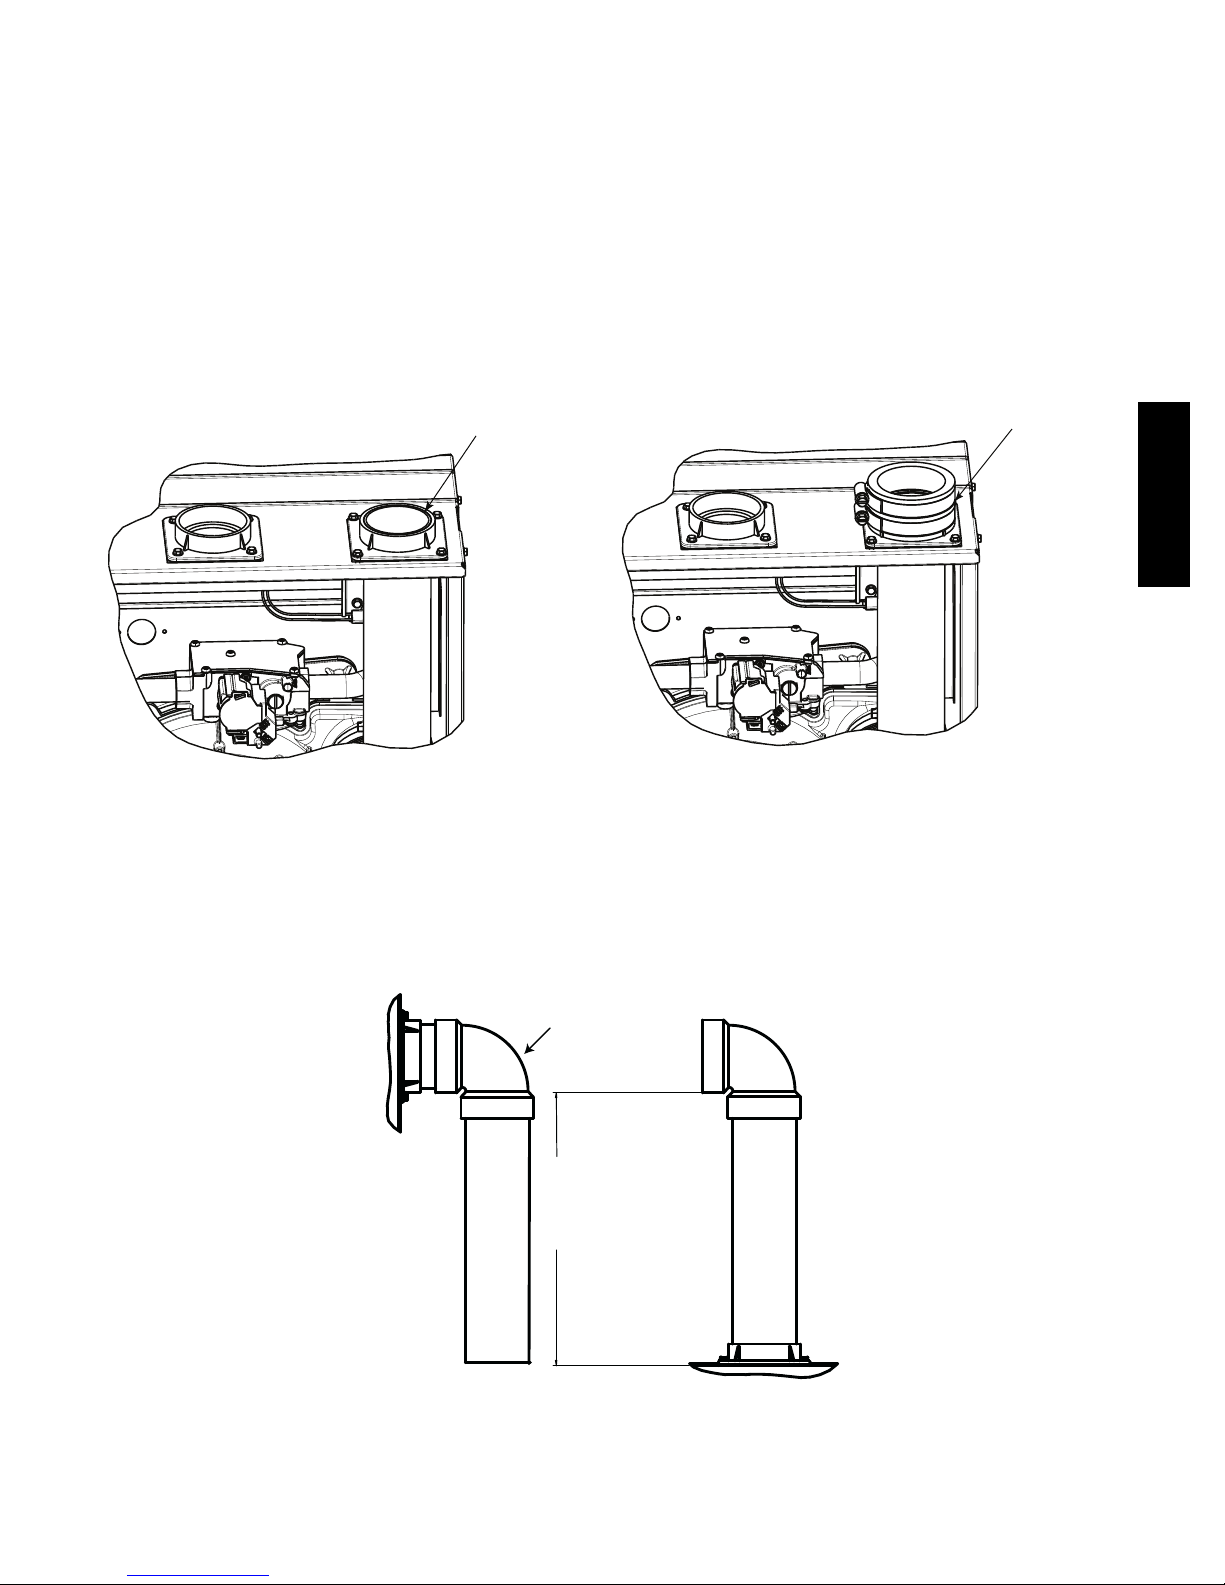
NOTES FOR VENTING OPTIONS
1. Attach vent pipe adapter with gasket to furnace casing.
2. Align notches in rubber coupling over standoffs on adapter. Slide clamps over the coupling.
3. Slide vent pipe through adapter and coupling into vent elbow.
4. Insert vent pipe into vent elbow.
5. Torque all clamps 15 lb.--in.
6. Attach combustion air pipe adapter with gasket to furnace.
7. Attach combustion air pipe to adapter with silicone. Pilot drill a1/8--in. hole in adapter and secure with a #7 x 1/2--in. sheet metal
screw.
VENT PIPE ADAPTER WITH GASKET
INSTALLED ON FURNACE VENT
PIPE IS CUT FLUSH WITH TOP OF
ADAPTER. PRIME AND CEMENT VENT
PIPE TO ADAPTER. ALLOW TO DRY
BEFORE INSTALLING VENT COUPLING.
VENT PIPE FLUSH WITH ADAPTER
Fig. 43 -- Vent Pipe Flush with Adaptor
ALIGN NOTCHES IN VENT PIPE
COUPLING OVER STAND-OFF
ON ADAPTER. TORQUE LOWER
CLAMP 15 LB-IN. WHEN REMAINING
VENT PIPE IS INSTALLED, TORQUE
UPPER CLAMP TO 15 LB-IN.
912SB
VENT PIPE FLUSH SHOWING COUPLING
A13076
Point elbow down towards
back of furnace
12" (256mm) minimum
to
60”(1524 mm) or
1 additional elbow maximum
CASING SIDE ATTACHMENT
COMBUSTION AIR PIPE
(NON-DIRECT VENT)
L12F042
Fig. 44 -- Combustion Air Pipe Attachment
53
Page 54
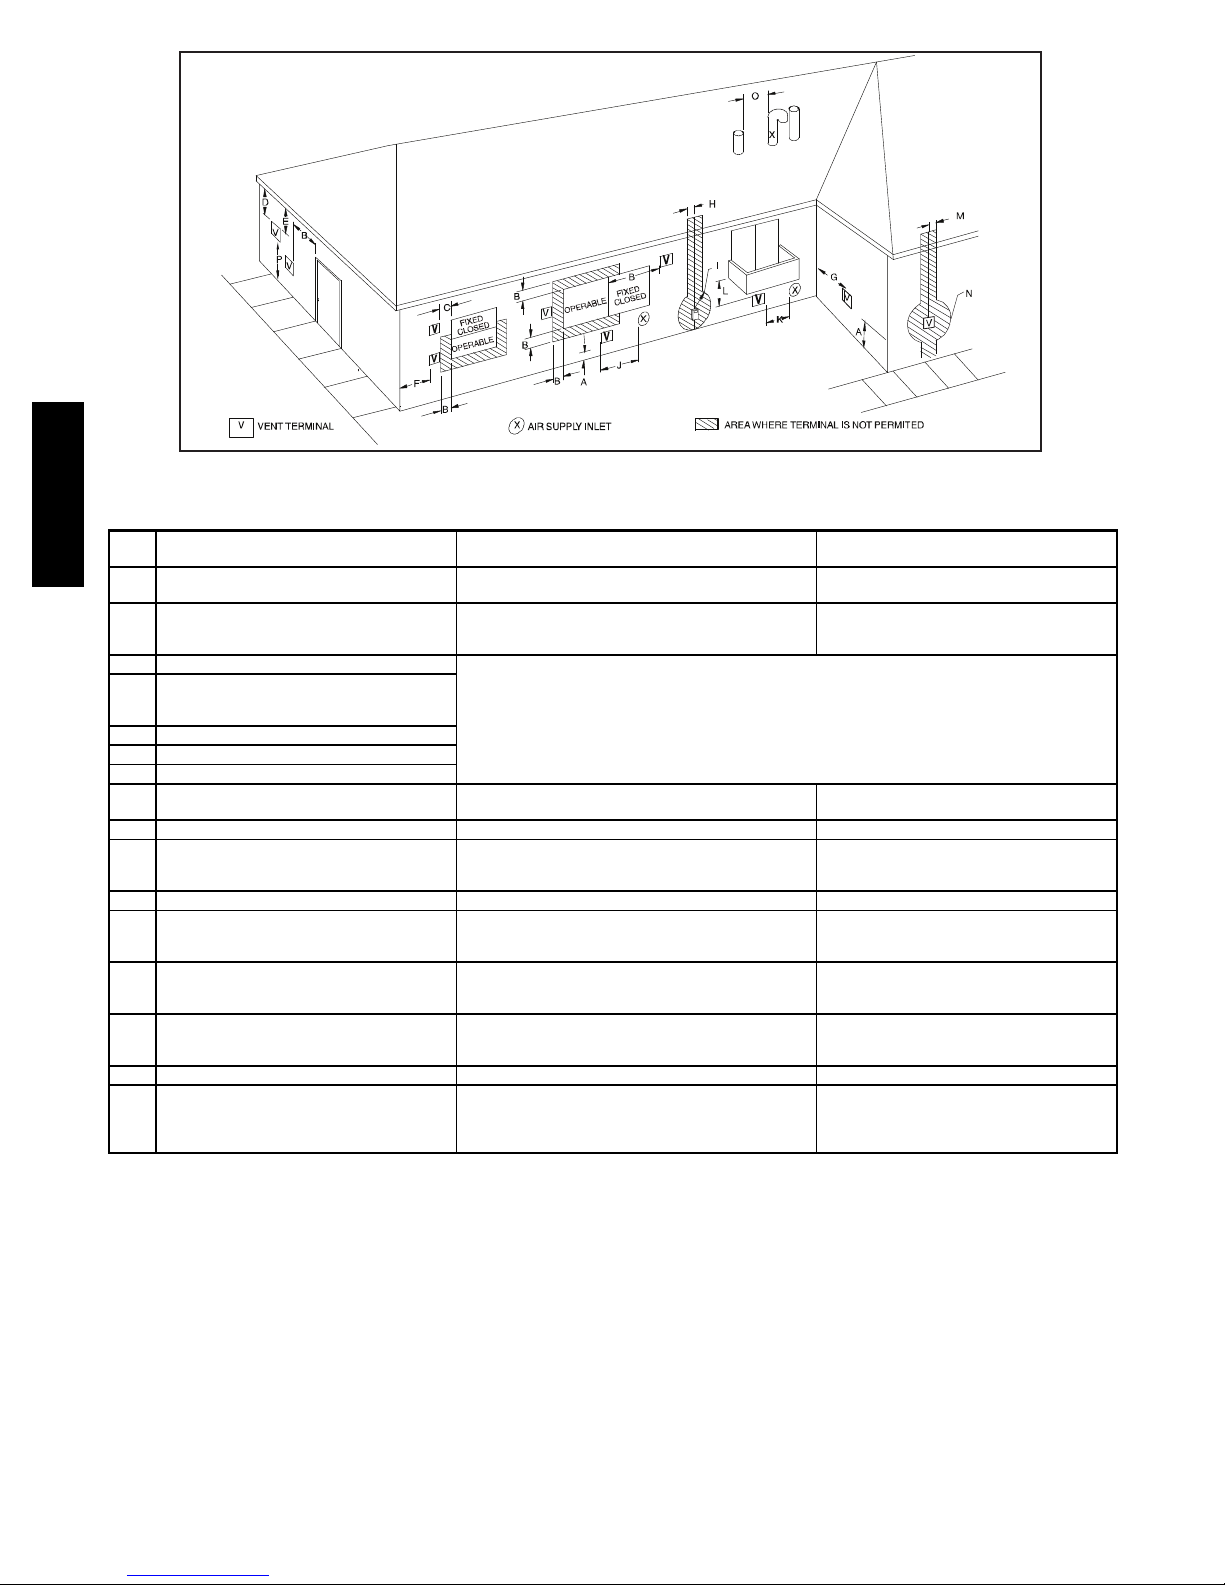
V
NOTE: The following is based upon National codes for gas appliances and is provided as a reference.
Refer to local codes which may supersede these standards and/or recommendations.
912SB
Item Clearance Description
Clearance above grade, veranda, porch, deck, balcony
A
B Clearance to a window or door that may be opened
C Clearance to a permanently closed window
Vertical clearance to a ventilated soffit located above
the terminal within a horizontal distance of 2 feet (61
D
E Clearance to an unventilated soffit
F Clearance to an outside corner
G Clearance to an inside corner
Clearance to each side of the centerline extended above
H
electrical meter or gas service regulator assembly
I Clearance to service regulator vent outlet 3ft. (.9 M) SeeNote4.
Clearance to non—mechanical air supply inlet to building
J
or the combustion air inlet to any other appliance
K Clearance to a mechanical air supply inlet 6 ft. (1.8 M) 3ft. (.9 M)
L Clearance under a veranda, porch, deck, or balcony
Clearance to each side of the centerline extended above
M
or below vent terminal of the furnace to a dryer or water
heater vent, or other appliance’s vent intake or exhaust
Furnace combustion air intake clearance to a water
heater vent, dryer vent or other types of appliance
N
0 Clearance from a plumbing vent stack 3ft.(.9M) 3 ft. (.9 M)
Clearance above paved sidewalk or paved driveway
P
> greater than, ≥ greater than or equal to, < less than, ≤ less than or equal to
or anticipated snow level
cm) from the centerline of the terminal
exhausts.
located on public property
Canadian Installations
(per CAN/CSA B149.1)
12 in. (305 mm)
18 in. (457 mm) above roof surface.
12 in. (305 mm) for appliances >10,000 Btuh (3 kW)
36 in. (914 mm) for appliances >100,000 Btuh (30 kW)
For clearances not specified in ANSI Z223.1/NFPA 54 or CAN/CSA B149.1, clearances shall be in accordance with local
36 in. (914 mm) for appliances >100,000 Btuh (30 kW)
Permitted only if veranda, porch, deck, or balcony is fully open on a
Vent shall not terminate above a sidewalk or paved driveway that is
located between two single family dwellings and serves both
and </=100,000 Btuh ( 30 kW),
installation codes and the requirements of the gas supplier and the manufacturer’s installation instructions.
3 ft. (.9 M) within 15 ft. (4.6 M)
above the meter/regulator assembly.
12 in. (305 mm) for appliances >10,000 Btuh(3 kW)
and </= 100,000 Btuh ( 30 kW),
12 in. (305 mm).
minimum of two sides beneath the floor.
12 in. (305 mm) 12 in. (305 mm)
3ft.(.9M) 3 ft. (.9 M)
7 ft. (2.1 M)
dwellings.
(1 )
Manufacturer’s Recommendation: See Notes 3-8.
Notes:
1 In accordance with the current CAN/CSA B149.1, Natural Gas and Propane Installation Code.
2 In accordance with the current ANSI Z223.1/NFPA 54, National Fuel Gas Code
3 NOTE: This table is based upon National codes for gas appliances, and are provided as a reference.
Refer to Local codes which may supersede these standards and/or recommendations.
4 For clearances not specified in ANSI Z223.1/NFPA 54 or CAN/CSA B 149.1, clearances shall be in accordance with local installation codes and the requirements
of the gas supplier and the manufacturer’s installation instructions.
5 When locating vent terminations, consideration must be given to prevailing winds, location, and other conditions which may cause recirculation of the combustion
products of adjacent vents. Recirculation can cause poor combustion, inlet condensate problems, vent termination icing, and/or accelerated corrosion of the heat
exchangers.
6 Design and position vent outlets to avoid ice build-up on and moisture damage to surrounding surfaces.
7 The vent for this appliance shall not terminate:
a. Near soffit vents of crawl space vents or other areas where condensate or vapor could create a nuisance or hazard or property damage; or
b. Where condensate vapor could cause damage or could be detrimental to the operation of regulators, relief valves, or other equipment.
8 Avoid venting under a deck or large overhang. Recirculation could occur and cause performance or system problems. Ice build-up may occur.
Fig. 45 -- Direct Vent Termination Clearance
V
U.S. Installations
(per ANSI Z223.1/NFPA 54)
12 in. (305 mm)
9 in. (229 mm) for appliances >10,000 Btuh (3 kW)
and </= 50,000 Btuh ( 15 kW),
12 in. (305 mm) for appliances >50,000 Btuh (15kW)
3ft.(.9M)within15ft.(4.6M)
above the meter/regulator assembly.
9 in. (9 mm) for appliances >10,000 Btuh (3 kW)
and </= 50,000 Btuh (15 kW),
12 in.(305 mm) for appliances >50,000 Btuh (15kW)
SeeNote4.
Manufacturer’s Recommendation: See Notes 3-8.
SeeNote4.
Manufacturer’s Recommendation: See Notes 3-8.
(2 )
A12326
54
Page 55
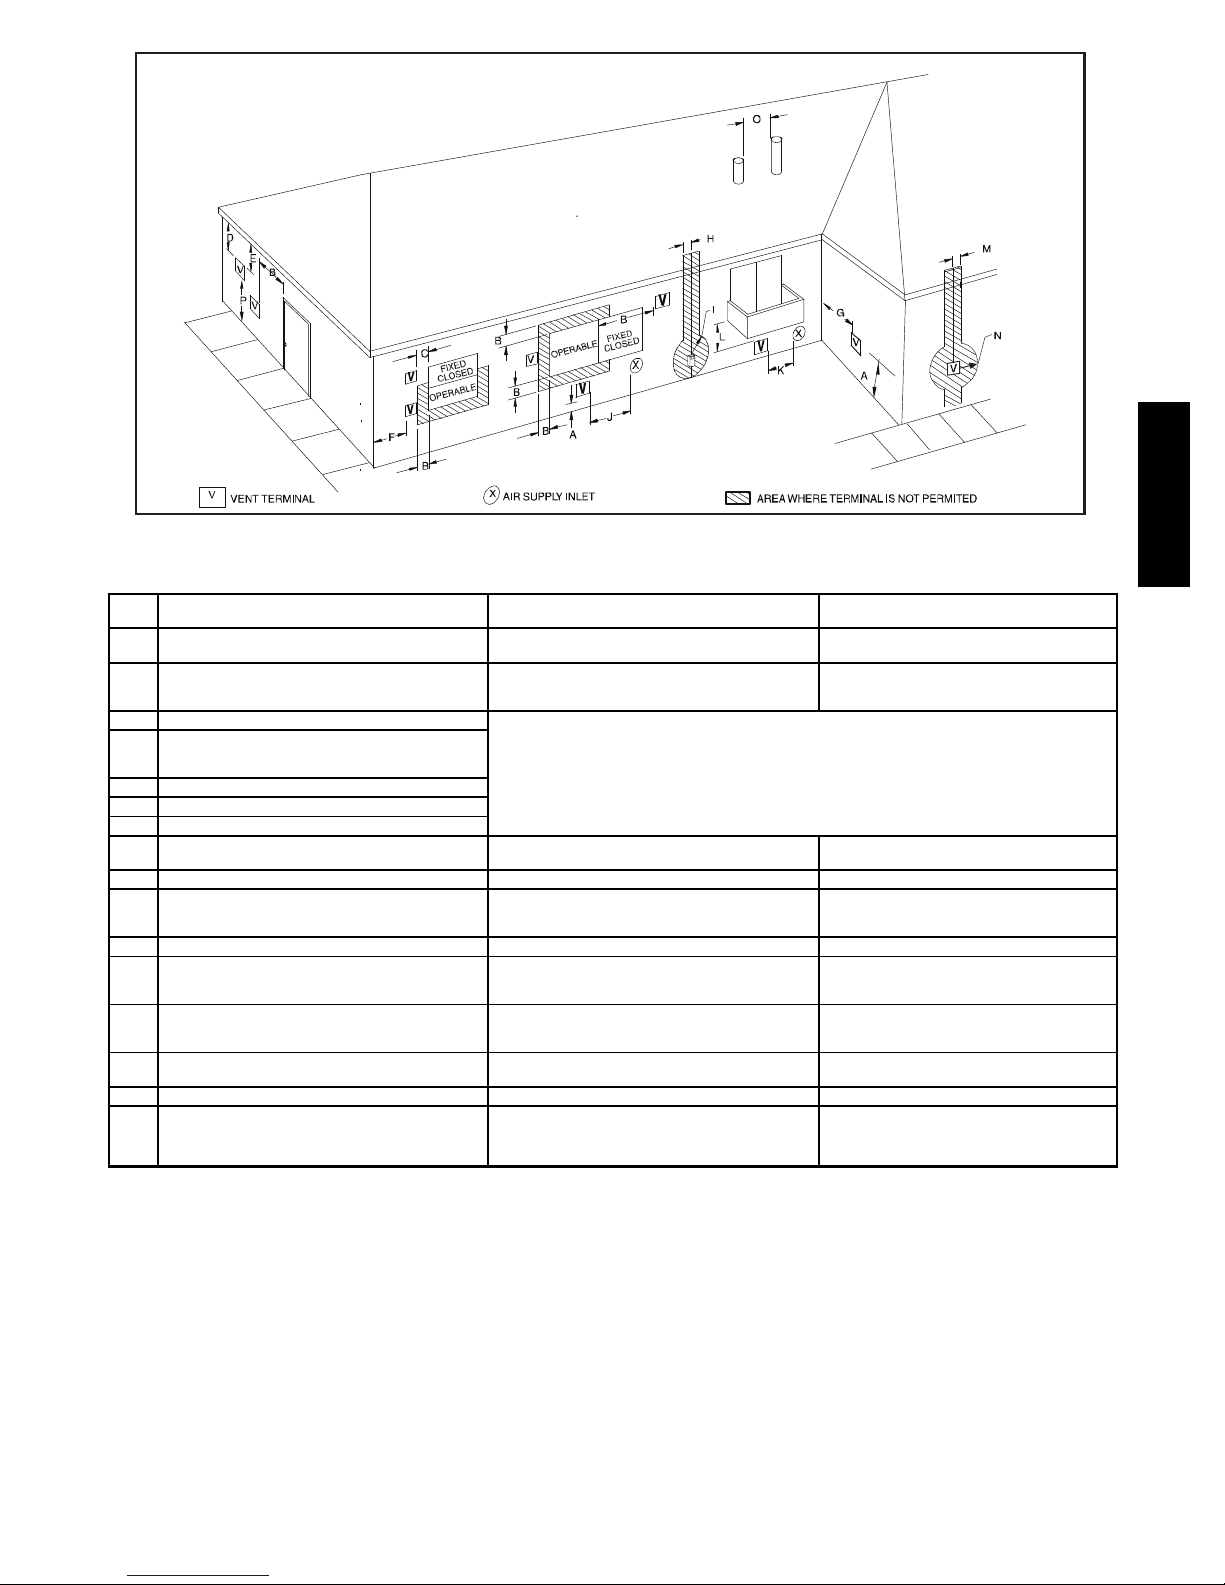
V
V
NOTE: The following is based upon National codes for gas appliances and is provided as a reference.
Refer to local codes which may supersede these standards and/or recommendations.
Item Clearance Description
Clearance above grade, veranda, porch, deck, balcony or
A
B Clearance to a window or door that may be opened
C Clearance to a permanently closed window
Vertical clearance to a ventilated soffit located above the
terminal within a horizontal distance of 2 feet (61 cm) from
D
E Clearance to an unventilated soffit
F Clearance to an outside corner
G Clearance to an inside corner
Clearance to each side of the centerline extended above
H
I Clearance to service regulator vent outlet 3ft. (.9 M) SeeNote4.
J
K Clearance to a mechanical air supply inlet 6 ft. (1.8 M) 3ft. (.9 M)
L Clearance under a veranda, porch, deck, or balcony
M
N
0 Clearance from a plumbing vent stack 3 ft. (.9 M) 3 ft. (.9 M)
P
> greater than, ≥ greater than or equal to, < less than, ≤ less than or equal to
electrical meter or gas service regulator assembly
Clearance to non—mechanical air supply inlet to building or
the combustion air inlet to any other appliance
Clearance to each side of the centerline extended above or
below vent terminal of the furnace to a dryer or water heater
vent, or other appliance’s direct vent intake or exhaust
Clearance above paved sidewalk or paved driveway located
anticipated snow level
the centerline of the terminal
Clearance to a moisture exhaust duct
(dryer vent, spa exhaust, etc.)
on public property
12 in. (305 mm) for appliances >10,000 Btuh (3 kW)
36 in. (914 mm) for appliances >100,000 Btuh (30 kW)
For clearances not specified in ANSI Z223.1/NFPA 54 or CAN/CSA B149.1, clearances shall be in accordance with local
12 in. (305 mm) for appliances >10,000 Btuh(3 kW)
36 in. (914 mm) for appliances >100,000 Btuh (30 kW)
Permitted only if veranda, porch, deck, or balcony is fully open
Vent shall not terminate above a sidewalk or paved driveway
that is located between two single-family dwellings and serves
Canadian Installations
(per CAN/CSA B149.1)
12 in. (305 mm)
18 in. (457 mm) above roof surface.
and </=100,000 Btuh ( 30 kW),
installation codes and the requirements of the gas supplier and the manufacturer’s installation instructions.
3 ft. (.9 M) within 15 ft. (4.6 M)
above the meter/regulator assembly.
and </= 100,000 Btuh ( 30 kW),
12 in. (305 mm).
on a minimum of two sides beneath the floor.
12 in. (305 mm) 12 in. (305 mm)
12 in. (305 mm) See Note 4 12 in. (305 mm) See Note 4
7 ft. (2.1 M).
both dwellings.
Notes:
1 In accordance with the current CAN/CSA B149.1, Natural Gas and Propane Installation Code.
2 In accordance with the current ANSI Z223.1/NFPA 54, National Fuel Gas Code
3 NOTE: This table is based upon National codes for gas appliances, and are provided as a reference.
Refer to Local codes which may supersede these standards and/or recommendations.
4 For clearances not specified in ANSI Z223.1/NFPA 54 or CAN/CSA B 149.1, clearances shall be in accordance with local installation codes and the requirements
of the gas supplier and the manufacturer’s installation instructions.
5 When locating vent terminations, consideration must be given to prevailing winds, location, and other conditions which may cause recirculation of the combustion
products of adjacent vents. Recirculation can cause poorcombustion, inlet condensation problems, venttermination icing, and/or accelerated corrosion ofthe heat
exchangers.
6 Design and position vent outlets to avoid ice build-up on and moisture damage to surrounding surfaces.
7 The vent for this appliance shall not terminate:
a. Near soffit vents of crawl space vents or other areas where condensate or vapor could create a nuisance or hazard or property damage; or
b. Where condensate vapor could cause damage or could be detrimental to the operation of regulators, relief valves, or other equipment.
8 These National standards apply to all non-direct-vent gas appliances. Contact Local code officials for additional requirements and/or exclusions.
(1 )
Manufacturer’s Recommendation: See Notes 3-8.
(per ANSI Z223.1/NFPA 54)
4ft. (1.2M) below or to the side of the opening,
1 ft (.3M) above the opening.
Manufacturer’s Recommendation: See Note 8.
3 ft. (.9 M) within 15 ft. (4.6 M)
above the meter/regulator assembly.
4ft. (1.2M) below or to the side of the opening,
1 ft (.3M) above the opening.
Manufacturer’s Recommendation: See Note 8
Manufacturer’s Recommendation: See Notes 3-8.
U.S. Installations
12 in. (305 mm)
SeeNote4.
7ft. (2.1M)
Fig. 46 -- Ventilated Combustion Air and Non--Direct Vent Termination Clearance
55
A12325
(2 )
912SB
Page 56
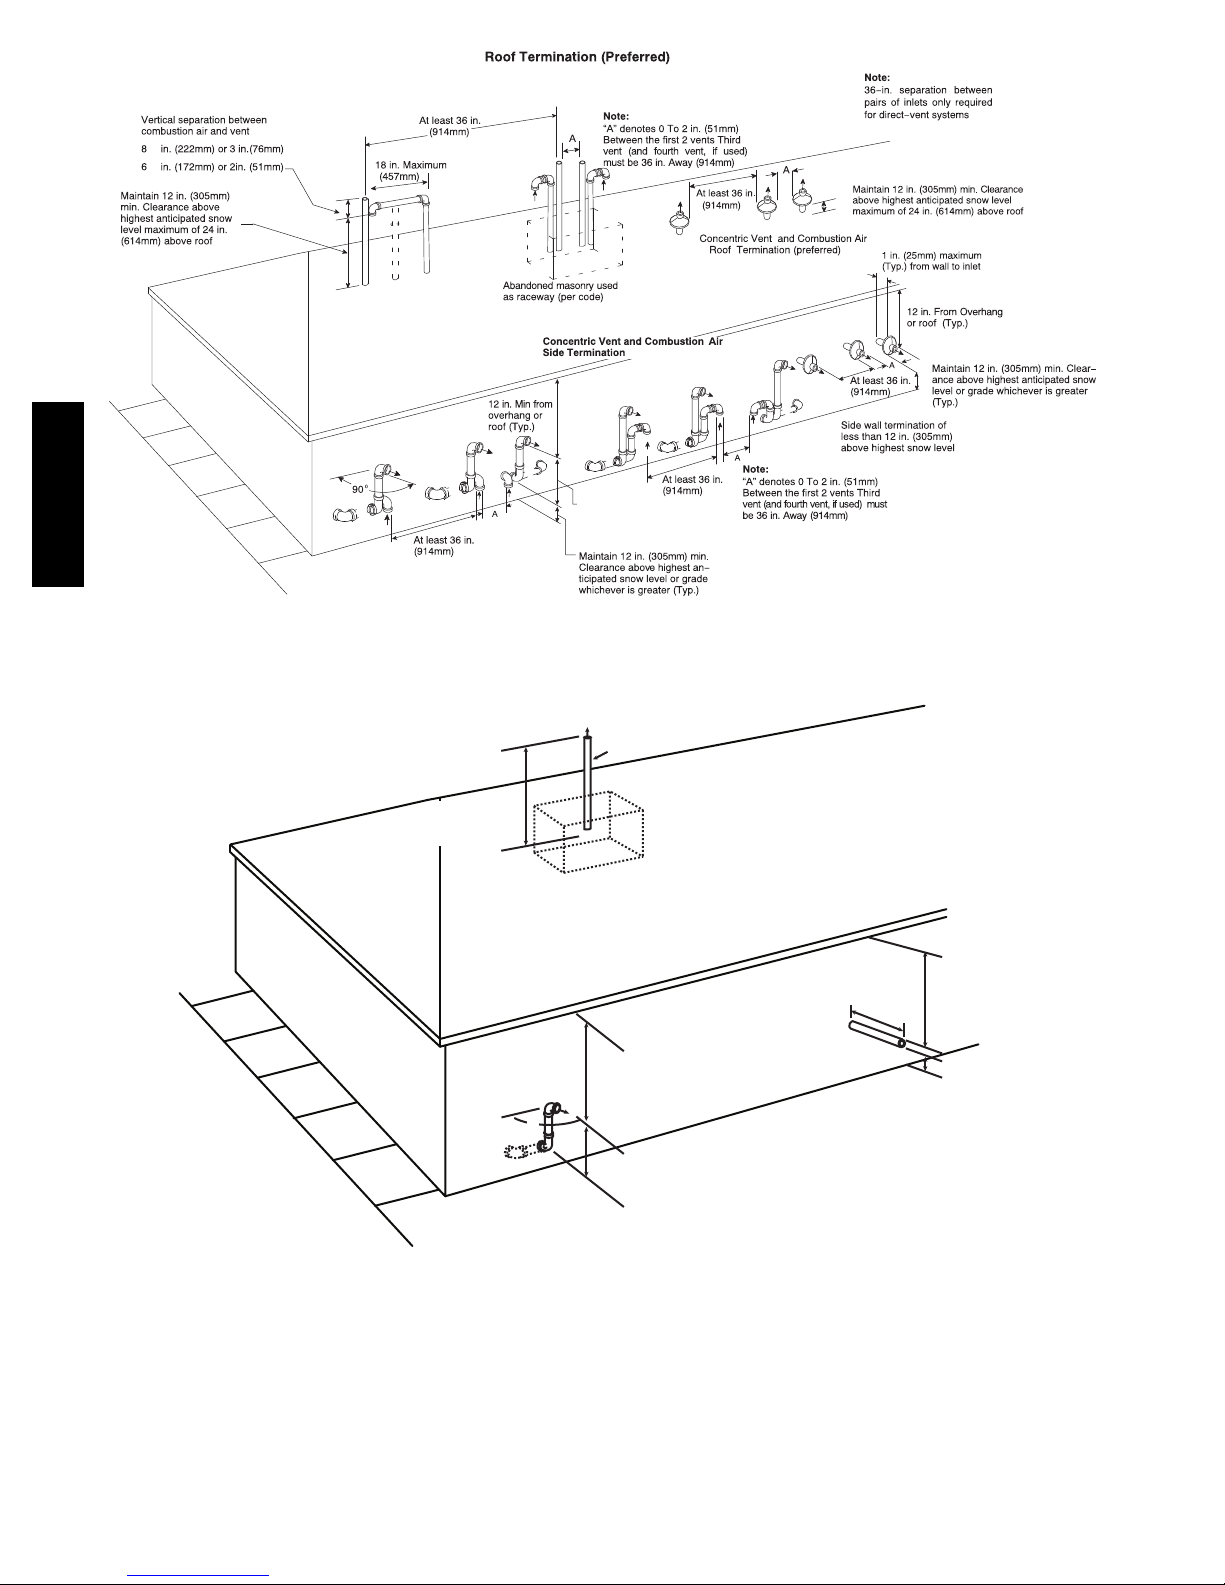
912SB
¾
¾
12 in. (305mm) min. separation
between bottom of combustion
air and bottom of vent (Typ.)
A13077
Fig. 47 -- Combustion Air and Vent Pipe Termination for Direct Vent (2--Pipe) System
Roof Termination (Preferred)
Ven t
(305mm)
Maintain 12 in .
minimum clearance
above highest anticipated
snow level maximum of
24 in. (610mm) above roof.
Abandoned masonry
used as raceway
(per code)
12 in. min. (305 mm)from
overhang or roof
Sidewall Termination
with Straight Pipe (preferred)
Maintain 12 in. (305mm)
minimum clearance
above highest anticipated
snow level or grade
whichever is greater
90°
Side wall termination
with 2 elbows (preferred)
12 in. (305 mm) min. from
overhang or roof
Maintain 12 in. (305mm)
minimum clearance
above highest anticipated
snow level or grade
whichever is greater.
6 in. (152mm) minimum clearance
between wall and end of vent pipe.
10 in. (254mm) maximum pipe length
Fig. 48 -- Vent Pipe Termination for Non--Direct Vent and Ventilated Combustion Air System
A05091
56
Page 57
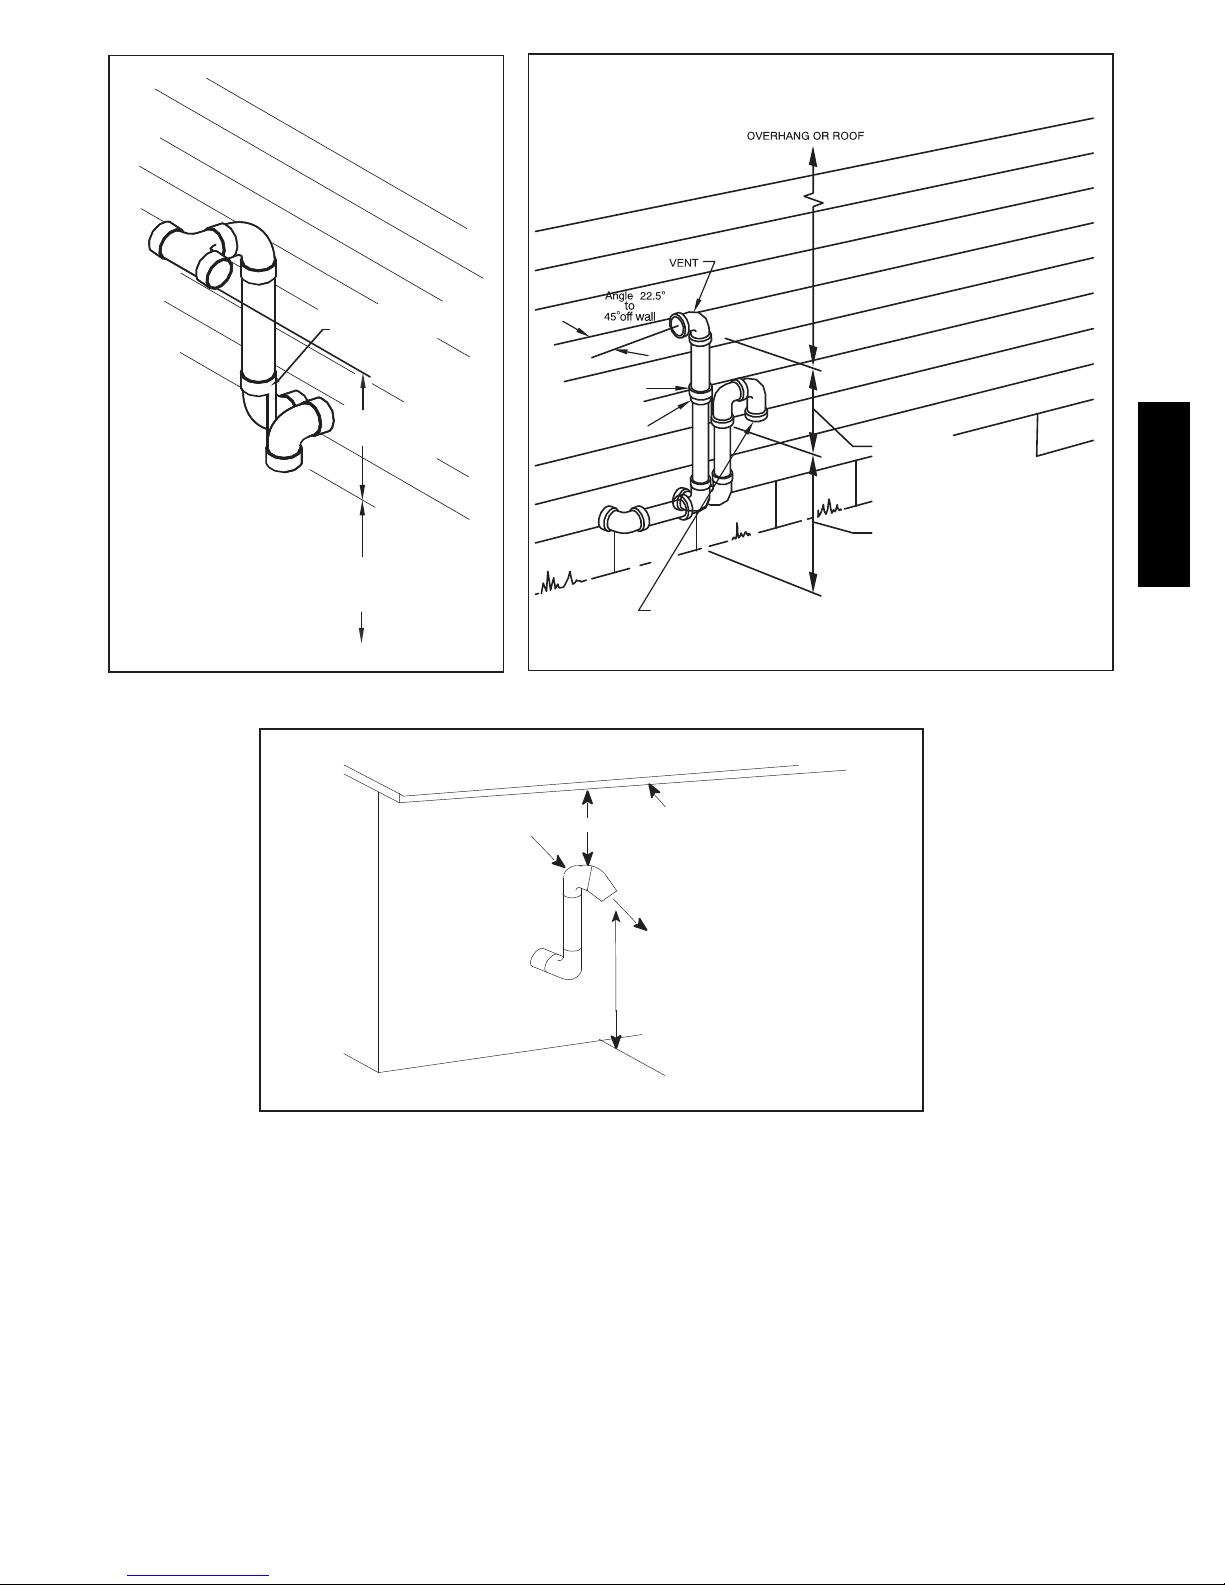
OPTIONAL TERMINATION
BRACKET FOR 2-PIPE
TERMINATIONS
12 IN. (305 MM) MIN.
SEPARATION BETWEEN
BOTTOM OFCOMBUSTION
AIR AND BOTTOM OF VENT.
12-IN. (305 MM)
ABOVE ANTICIPATED
SNOW LEVEL
EXHAUST
OPTIONAL
BRACKET
COUPLI NG
COMBUSTION-AIR
(ELBOW PARALLEL TO WALL)
OVERHANG
CLEARANCE TO OVERHANG PER CODE
12 IN. (305 MM) MIN. SEPARATION
BETWEEN BOTTOM OF
COMBUSTION AIR AND
BOTTOM OF VENT.
MAINTAIN 12 IN. (305 MM)
CLEARANCE ABOVE
HIGHEST ANTICIPATED
SNOW LEVEL OR GRADE,
WHICHEVER IS GREATER.
912SB
12 IN.
(305 MM) MIN. GROUND
LEVEL OR ANTICIPATED SNOW LEVEL
Fig. 49 -- Alberta and Saskatchewan Vent Termination
57
A13078
Page 58
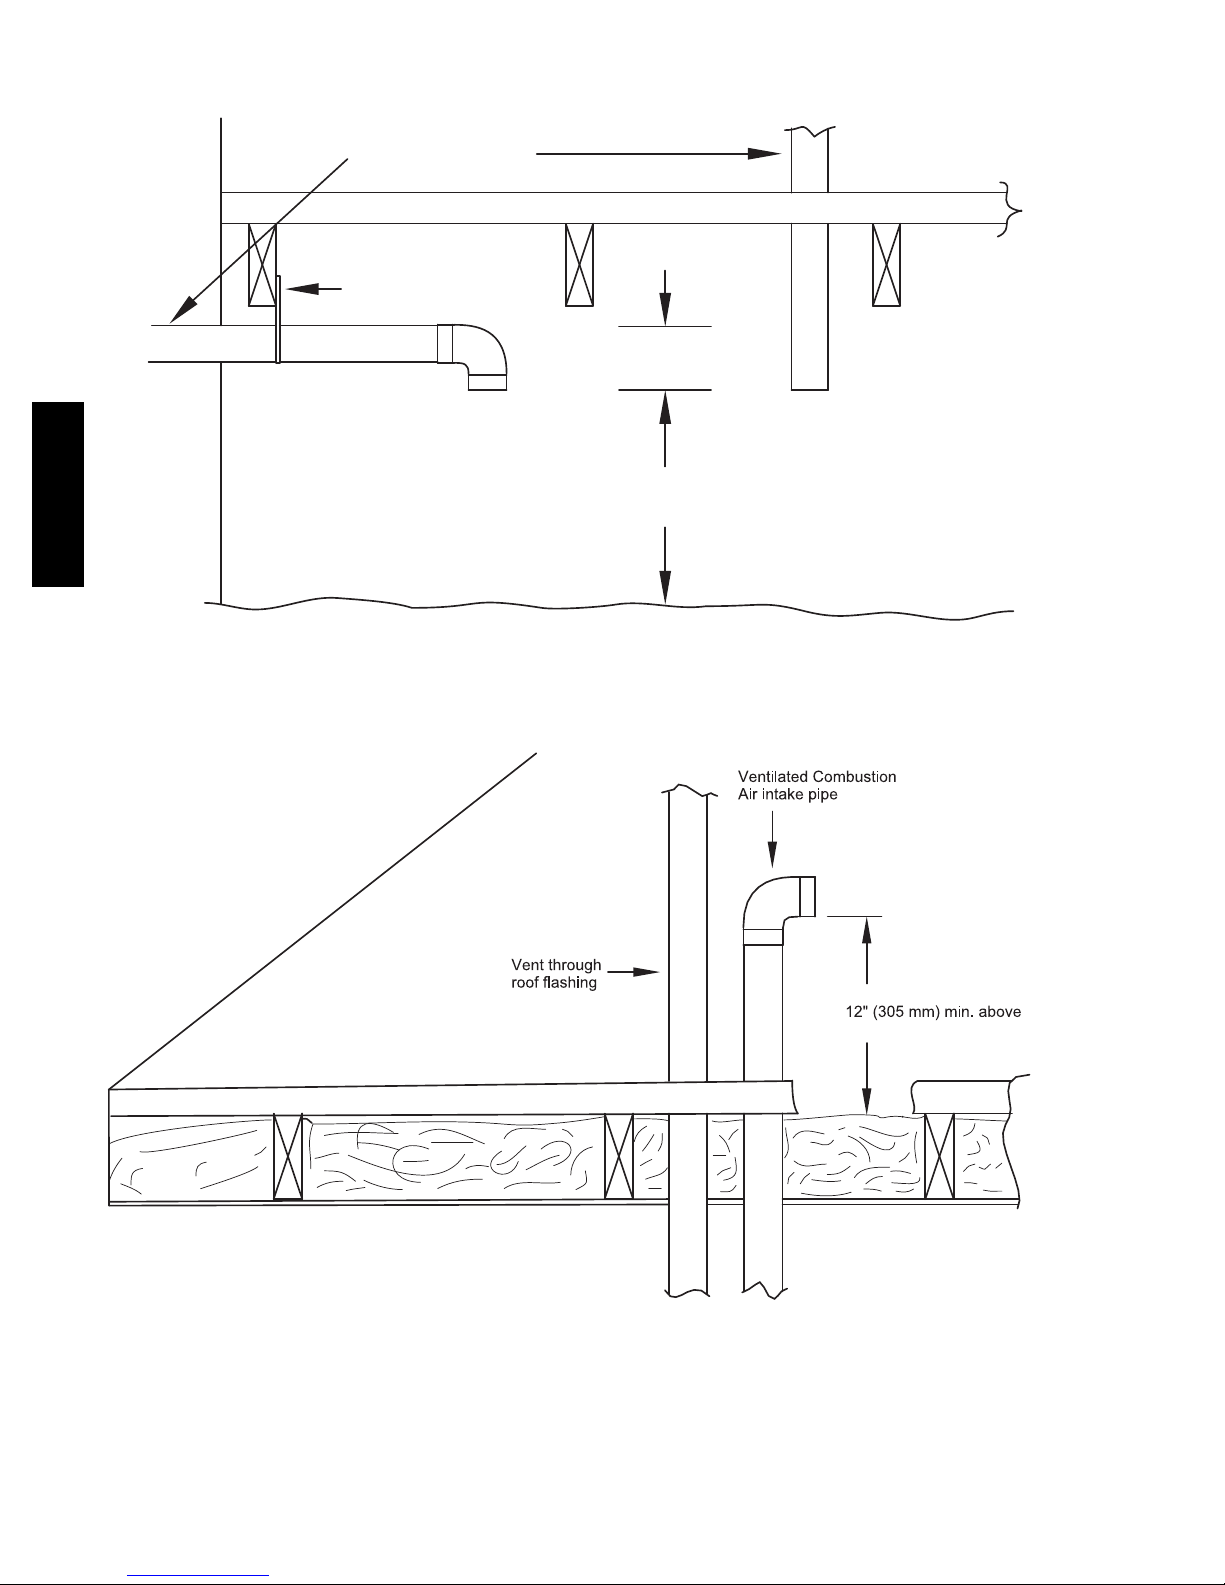
Ventilated Combustion
Air intake pipe
Pipe hangar
3” (76 mm)
912SB
Ventilated Combustion Air
intake termination in crawl
space
12” (305 mm)
CRAWL SPACE
highest level of insulation
Fig. 50 -- Vent Terminations for Ventilated Combustion Air
ATTIC
A10497
58
Page 59
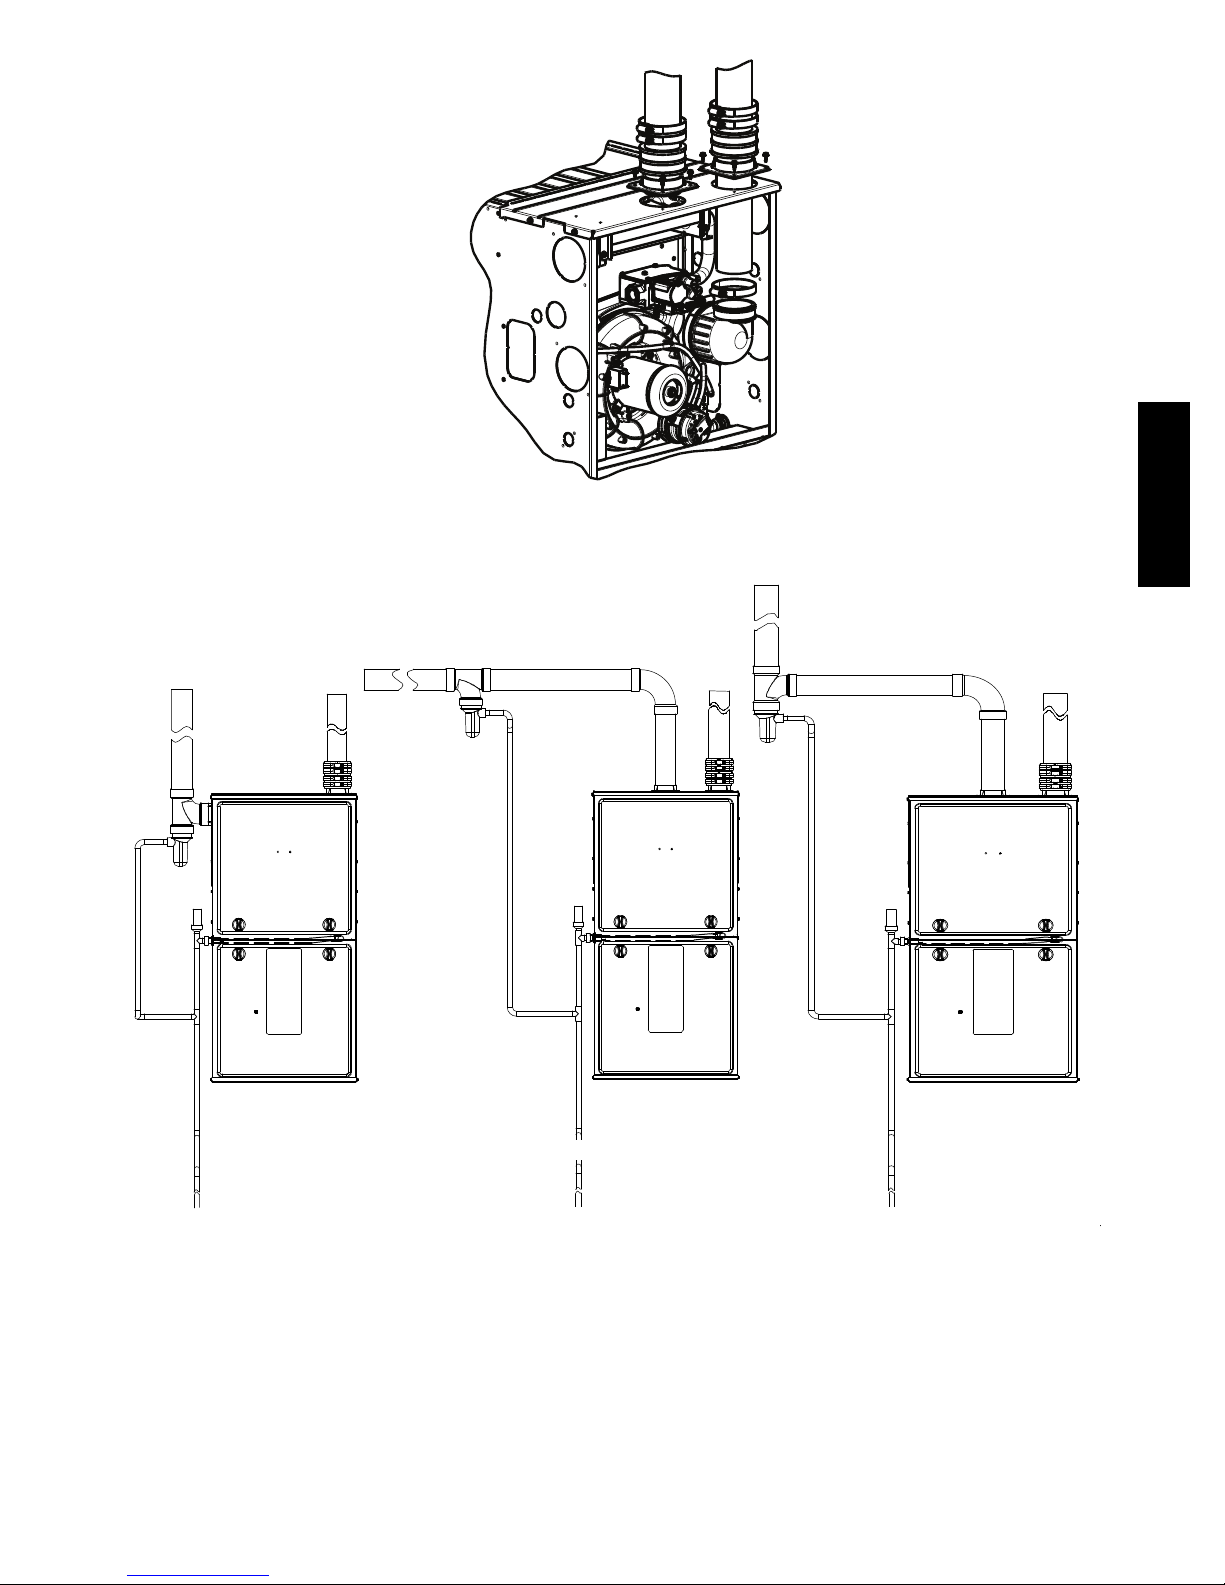
EXAMPLE FOR
1
UPFLOW INSTALLATIONS.
MAY BE APPLIED TO
OTHER CONFIGURATIONS.
Fig. 51 -- Sample Inlet Air Pipe Connection for
Polypropylene Venting Systems
A12220
912SB
Fig. 52 -- Optional Combustion Air Inlet Moisture Trap
TO CODEïAPPROVED DRAIN OR CONDENSATE PUMP
Representative drawing only, some models may vary in appearance
59
L
L12F028
Page 60
START--UP, ADJUSTMENT, AND SAFETY
CHECK
General
1. Furnace must have a 115-v power supply properly connected and grounded.
NOTE: Proper polarity must be maintained for 115-v wiring.
Control status indicator light flashes rapidly and furnace does not
operate if polarity is incorrect or if the furnace is not grounded.
2. Thermostat wire connections at terminals R, W, G, Y1 and
Y/Y2 must be made at 24-v terminal block on furnace control.
3. Natural gas service pressure must not exceed 0.5 psig (14in. W.C., 350 Pa), but must be no less than 0.16 psig
(4.5-in. W.C., 1125 Pa).
4. Blower door must be in place to complete 115-v electrical
circuit and supply power to the furnace components.
!
CAUTION
1. Remove upper and middle collector box drain plugs opposite of the condensate trap. See Fig. 59.
2. Connect field-supplied 5/8--in. (16 mm) ID tube with attached funnel to upper collector box drain connection. See
Fig. 59).
3. Pour one quart (liter) of water into funnel/tube. Water
should run through collector box, overfill condensate trap,
and flow into open field drain.
4. Remove funnel; replace collector box drain plug.
5. Connect field-supplied 5/8-in. (16 mm) ID tube to middle
collector box drain port.
6. Pour one quart (liter) of water into funnel/tube. Water
should run through collector box, overfill condensate trap,
and flow into open field drain.
7. Remove funnel and tube from collector box and replace collector box drain plug.
Purge Gas Lines
If not previously done, purge the lines after all connections have
been made and check for leaks.
912SB
UNIT OPERATION HAZARD
Failure to follow this caution may result in intermittent unit
operation or performance satisfaction.
These furnaces are equipped with a manual reset limit
switch in burner assembly. This switch opens and shuts off
power to the gas valve if an overheat condition (flame
rollout) occurs in the burner assembly/enclosure. Correct
inadequate combustion--air supply, improper gas pressure
setting, improper burner or gas orifice positioning, or
improper venting condition before resetting switch. DO
NOT jumper this switch.
Before operating furnace, check flame rollout manual reset switch
for continuity. If necessary, press button to reset switch.
EAC-1 (115vac) terminal is energized whenever blower operates.
HUM (24vac) terminal is only energized when the draft inducer is
energized in heating.
Prime Condensate Trap with Water
!
WARNING
CARBON MONOXIDE POISONING HAZARD
Failure to follow these warnings could result in personal injury
or death.
Failure to use a properly configured trap or NOT
water--priming trap before operating furnace may allow
positive pressure vent gases to enter the structure through drain
tube. Vent gases contain carbon monoxide which is tasteless
and odorless.
!
CAUTION
UNIT OPERATION HAZARD
Failure to follow this caution may result in intermittent unit
operation or performance satisfaction.
Condensate trap must be PRIMED or proper draining may
not occur. The condensate trap has two internal chambers
which can ONLY be primed by pouring water into the
inducer drain side of condensate trap.
!
WARNING
FIRE OR EXPLOSION HAZARD
Failure to follow this warning could result in personal
injury, death, and/or property damage.
Never purge a gas line into a combustion chamber. Never
test for gas leaks with an open flame. Use a commercially
available soap solution made specifically for the detection
of leaks to check all connections. A fire or explosion may
result causing property damage, personal injury or loss of
life.
Adjustments
!
WARNING
FIRE HAZARD
Failure to follow this warning could result in personal
injury, death and/or property damage.
DO NOT bottom out gas valve regulator adjusting screw.
This can result in unregulated manifold pressure and result
in excess overfire and heat exchanger failures.
!
CAUTION
FURNACE DAMAGE HAZARD
Failure to follow this caution may result in reduced furnace
life.
DO NOT redrill orifices. Improper drilling (burrs,
out--of--round holes, etc.) can cause excessive burner noise
and misdirection of burner flames. This can result in flame
impingement of heat exchangers, causing failures. See Fig.
54.
For proper operation and long term reliability, the Furnace input
rate must be within +/--2 percent of input rate on furnace rating
plate, or as adjusted for altitude.
The gas input rate on rating plate is for installations at altitudes up
to 2000 ft. (609.6M).
60
Page 61
NOTICE
The NATURAL GAS manifold pressure adjustments in Table
21 compensate for BOTH altitude AND gas heating value.
DO NOT apply an additional de--rate factor to the pressures
show in Table 21. The values in this table are NOT referenced
to sea level; they are AS--MEASURED AT ALTITUDE.
The heating content of natural gas at altitude may already
provide for a reduction in capacity of the furnace. Be sure to
obtain the expected in--season gas heating value of the gas
from the gas supplier BEFORE making any adjustments for
capacity or altitude. Refer to Table 21. No adjustments to the
furnace may be necessary at altitude for certain gas heating
values.
Refer to the instructions provided in the factory--specified
LP/Propane conversion kit for instructions for setting gas
manifold pressures for LP/Propane applications.
In the USA, the input rating for altitudes above 2000 ft. (609.6M)
must be reduced by 2 percent for each 1000 ft. (304.8M) above sea
level. Refer to Table 19. The natural gas manifold pressures in
Table 21 adjust for BOTH altitude and natural gas heating value.
In Canada, the input rating must be reduced by 5 percent for
altitudes of 2000 ft. (609.6M) to 4500 ft. (1371.6M) above sea
level. The natural gas manifold pressures in Table 21 adjust for
BOTH altitude and natural gas heating value.
NOTE: For Canadian altitudes of 2000 to 4500 ft. (610 to 1372
M), use USA altitudes of 2001 to 3000 ft. (611 to 914 M) in Table
21.
To adjust manifold pressure to obtain the proper input rate, first,
determine if the furnace has the correct orifice installed. At higher
altitudes or different gas heat contents, it may be necessary to
change the factory orifice to a different orifice. Tables have been
provided in the furnace installation instructions to match the
required orifice to the manifold pressure to the heat content and
specific gravity of the gas. To do this:
1. Obtain average yearly gas heat value (at installed altitude)
from local gas supplier.
2. Obtain average yearly gas specific gravity from local gas
supplier.
3. Find installation altitude in Table 21.
4. Find closest natural gas heat value and specific gravity in
Table 21. Follow heat value and specific gravity lines to
point of intersection to find orifice size and manifold pressure settings for proper operation.
5. Check and verify burner orifice size in furnace. NEVER
ASSUME ORIFICE SIZE. ALWAYS CHECK AND
VERIFY.
NOTICE
If orifice hole appears damaged or it is suspected to have been
redrilled, check orifice hole with a numbered drill bit of
correct size. Never redrill an orifice. A burr--free and squarely
aligned orifice hole is essential for proper flame characteristics.
6. Replace orifice with correct size, if required as shown in
Table 21. Use only factory--supplied orifices. See EXAMPLE 1.
EXAMPLE 1: 0 -- 2000 ft. (0 -- 609.6M) altitude
Heating value = 1050 Btu/cu ft.
Specific gravity = 0.62
Therefore: Orifice No. 44
(Furnace is shipped with No. 44 orifices. In this example, all main
burner orifices are the correct size and do not need to be changed to
obtain proper input rate.)
Manifold pressure: 3.4--in. W.C. (847 Pa).
NOTE: To convert gas manifold Table pressures to Pascals,
multiply the in. W.C. value by 249.1 Pa/in. W.C. (1 in. W.C. =
249.1 Pa).
1. Adjust manifold pressure to obtain proper gas input rate.
See Fig. 53.
a. Turn gas valve ON/OFF switch to OFF.
b. Remove manifold pressure tap plug from gas valve.
c. Connect a water column manometer or similar device to
manifold pressure tap.
d. Turn gas valve ON/OFF switch to ON.
e. Manually close blower door switch.
f. Jumper R andW thermostat connectionson controlto start
furnace. See Fig. 36.
g. Remove regulator adjustmentcap from gasvalve pressure
regulator and turn adjusting screw (3/16 or smaller flat-tipped screwdriver)counterclockwise(out) to decrease input rate or clockwise (in) to increase input rate. See Fig.
53.
NOTICE
DO NOT set manifold pressure less than 2.8--in. W.C. (697
Pa) or more than 3.8 in. W.C. (947 Pa) for natural gas. If
required manifold pressure is outside this range, change main
burner orifices to obtain manifold pressure in this range.
h. When correct input is obtained, replace cap that conceals
gasvalve regulator adjustmentscrews. Main burner flame
should be clear blue, almost transparent See Fig. 61.
i. Remove jumper R to W.
2. Verify natural gas input rate by clocking meter.
NOTE: Contact your HVAC distributor or gas supplier for metric
gas meter Tables, if required.
a. Turn off all other gas appliances and pilots served by the
meter.
b. Jumper R to W.
c. Run furnace for 3 minutes.
d. Measuretime(insec)forgasmetertocompleteone revolu-
tion and note reading. The 2 or 5 cubic feet dial provides
a more accurate measurement of gas flow.
e. Refer to Table 20 for cubic ft. of gas per hr.
f. Multiply gas rate cu ft./hr by heating value (Btuh/cu ft.) to
obtain input rate.
g. If clocked rate does not match required inputfrom Step 1,
increase manifold pressure to increase input or decrease
manifoldpressureto decreaseinput.Repeatstepsb through
e of Step 1 until correct heat input is achieved. Re--install
regulator seal cap on gas valve.
3. Restore furnace to normal operating condition.
a. Turn gas valve ON/OFF switch to OFF.
b. Remove water column manometer or similar device from
manifold pressure tap.
c. Replace manifold pressure tap plug to gas valve.
d. Turn gas valve ON/OFF switch to ON.
e. Check for gas leaks and verity furnace operation.
912SB
61
Page 62
!
WARNING
FIRE HAZARD
Failure to follow this warning could result in personal
injury, death, and/or property damage.
Reinstall manifold pressure tap plug in gas valve to prevent
gas leak.
Adjust Temperature Rise
NOTE: Blower door must be installed when taking temperature
rise reading. Leaving blower door off will result in incorrect
temperature measurements, due to possible changes in duct static
pressure and airflow.
!
CAUTION
FURNACE DAMAGE HAZARD
912SB
Failure to follow this caution may result in:
S Overheating the heat exchangers or condensing flue gases
in heat exchanger areas not designed for condensate.
S Shortened furnace life.
S Component damage.
Temperature rise must be within limits specified on furnace
rating plate. Recommended operation is at midpoint of rise
range or slightly above.
(Read following caution before changing taps).
!
UNIT DAMAGE HAZARD
To avoid operating outside the rise range and avoid
component damage:
Refer to the Air Delivery Tables to determine which airflows
and settings are allowed for proper heating airflow. DO NOT
use the highlighted settings for Heating airflow. The
highlighted settings are to be used for Cooling and
Continuous Fan ONLY.
Change these settings as required to maintain proper temperature
rise for Heating and Cooling as described above. To change blower
motor speed selections for heating mode, remove blower motor
lead from control HEAT terminal. See Fig. 36. Select desired
blower motor speed lead from one of the other motor leads and
relocate it/them to HEAT (heating blower tap) terminal(s).
Reconnect original lead on SPARE terminal.
CAUTION
Adjust Blower Off Delay (Heat Mode)
If desired, the main blower off time delay period may be
lengthened or shortened when operating in the heating mode to
provide greater comfort. For position and location of jumpers on
control center, see Fig. 36 and Fig. 65.
The blower off delay has four adjustable settings from 90 sec to
180 sec. See Table 18. To change the blower off delay setting,
move the jumper from one set of pins on the control to the pins
used for the desired blower off delay. Factory blower off delay
setting is 120 sec.
Jumper R to W to check gas--heat temperature rise. Do not exceed
temperature rise ranges specified on unit rating plate.
This furnace must operate within the temperature rise ranges
specified on the furnace rating plate. Determine the air temperature
as follows:
1. Place duct thermometers in return and supply ducts as close
to furnace as possible. Be sure thermometers do not “see”
heat exchangers so that radiant heat does not affect
thermometer readings. This is particularly important with
straight run ducts.
2. When thermometer readings stabilize, subtract return--air
temperature from supply--air temperature to determine
temperature rise.
If the temperature rise is outside this range, check the following:
1. Gas input rate.
2. Derate for altitude, if applicable.
3. Return and supply ducts for excessive restrictions causing
static pressures greater than 0.50--in. W.C. (125 Pa)
4. Adjust temperature rise by adjusting blower speed.
S Increase blower speed to reduce temperature rise.
S Decrease blower speed to increase temperature rise.
!
WARNING
ELECTRICAL OPERATION HAZARD
Failure to follow this warning could result in personal injury
or death.
Disconnect 115vac electrical power before changing speed tap.
Table 18 – Blower Off Delay Jumper Positions
PINS 1AND2 2AND3 3AND4 4AND5
Time (in sec.) 90 120 150 180
Adjust Cooling Airflow
The cooling airflow can be set from the remaining blower speed
taps. Refer to the Air Delivery Tables in these instructions.
!
CAUTION
FURNACE OVERHEATING HAZARD
Failure to follow this caution may result in reduced furnace
life.
Recheck temperature rise. It must be within limits specified
on the rating plate. Recommended operation is at the
mid--point of rise range or slightly above.
Adjust Thermostat Heat Anticipator
Mechanical thermostat: Set thermostat heat anticipator to match
the amp draw of the electrical components in the R--W circuit.
Accurate amp draw readings can be obtained at the wires normally
connected to thermostat subbase terminals R and W. The
thermostat anticipator should NOT be in the circuit while
measuring current.
1. Remove thermostat from subbase or from wall.
2. Connect an amp meter across the R and W subbase terminals or R and W wires at wall.
3. Record amp draw across terminals when furnace is in low
heat and after blower starts.
4. Set heat anticipator on thermostat per thermostat instructions and install on subbase or wall.
5. Install blower access door.
Electronic thermostat: Set cycle rate for 3 cycles per hr.
62
Page 63
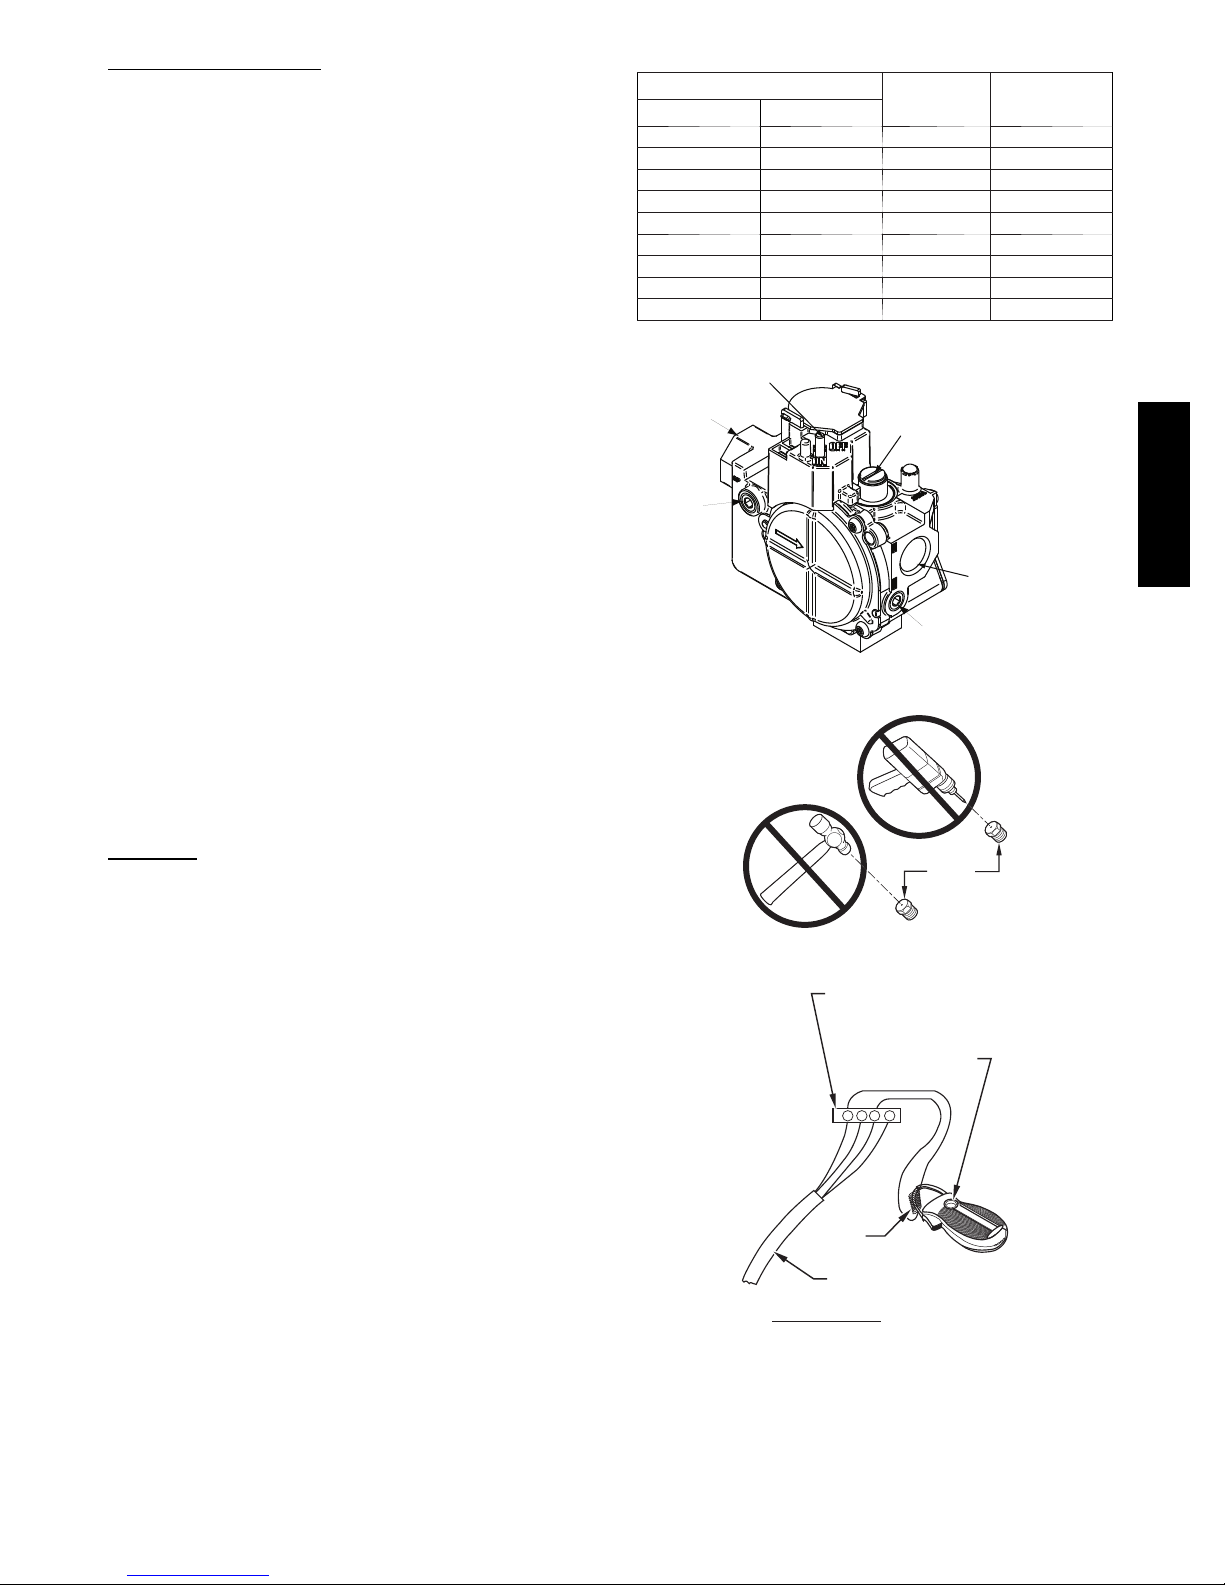
Check Safety Controls
The flame sensor, gas valve, and pressure switch were all checked
in the Start--up procedure section as part of normal operation.
1. Check Main Limit Switch
This control shuts off combustion system and energizes air-circulating blower motor, if furnace overheats. By using this
method to check the temperature limit control, it can be established that the limit is functioning properly and that the
limit will operate if there is a restricted return--air supply or
motor failure. If the limit control does not function during
this test, the cause must be determined and corrected.
a. Run furnace for at least 5 minutes.
b. Gradually block offreturn airwith a piece ofcardboard or
sheet metal until the limit trips.
c. Unblock return air to permit normal circulation.
d. Burners will re--light when furnace cools down.
2. Check Pressure Switch(es)
This control proves operation of the draft inducer blower.
a. Turn off 115--v power to furnace.
b. Disconnect inducer motor lead wires from wire harness.
c. Turn on 115--v power to furnace.
d. Set thermostat to “call for heat” and wait 1 minute. When
pressure switchis functioning properly,hot surface igniter
should NOT glow and control diagnostic light flashes a
status code 31. If hot surface igniter glows when inducer
motor is disconnected, shut down furnace immediately.
e. Determine reason low pressure switch did not function
properly and correct condition.
f. Turn off 115--v power to furnace.
g. Reconnect inducer motor wires, replace outer door, and
turn on 115--v power.
h. Blower will run for 90 sec before beginning the call for
heat again.
i. Furnace should ignite normally.
Checklist
1. Put away tools and instruments. Clean up debris.
2. Verify that the jumper is removed from the TEST/TWIN
terminal. Verify that there is nothing plugged into the PLT
connector. (Note: If there is a jumper connector plugged
into PLT, remove it and discard.) See Fig. 36.
3. Verify that the Blower/Heat Off Delay jumpers are set as
desired. See Fig. 36 and 65.
4. Verify that the blower (lower door in upflow position) and
control (“Main” or upper door in upflow position) doors are
properly installed.
5. Verify that the Status LED glows. If not, check that the
power supply is energized and that the blower door is
secure. See Fig. 56 to interpret diagnostic codes.
6. Cycle test furnace with room thermostat to be sure that it
operates properly with the room thermostat. Check all
modes including Heat, Cool and Fan.
7. Check operation of accessories per manufacturer’s
instructions.
8. Review Owner’s Manual with owner.
9. Attach entire literature packet to furnace.
Table 19 – Altitude Derate Multiplier for U.S.A.
ALTITUDE
FT. M
PERCENT
OF
DERATE
0–2000 0 --- 6 1 0 0 1.00
2001–3000 610---914 4 --- 6 0.95
3001–4000 914--- 1219 6 --- 8 0.93
4001–5000 1219---1524 8 --- 1 0 0.91
5001–6000 1524---1829 10--- 12 0.89
6001–7000 1829---2134 12--- 14 0.87
7001–8000 2134 ---2438 14--- 16 0.85
8001–9000 2438 ---2743 16--- 18 0.83
9001–10,000 2743 ---3048 18--- 20 0.81
*Derate multiplier factors are based on midpoint altitude for altitude range.
SINGLE-STAGE
ON/OFF Switch
1/2” NPT Inlet
1/8” NPT Inlet
Pressure Tap
Regulator Seal Cap
Regulator Adjustment
Regulator Seal Cap under Cap
1/8” NPT Manifold
Pressure Tap
DERATE
MULTIPLIER
FACTOR*
1/2” NPT Outlet
A11153
Fig. 53 -- Gas Valve
BURNER
ORIFICE
A93059
Fig. 54 -- Orifice Hole
THERMOSTAT SUBBASE
TERMINALS WITH
THERMOSTAT REMOVED
(ANITICIPATOR, CLOCK, ETC.,
MUST BE OUT OF CIRCUIT.)
HOOK-AROUND
AMMETER
R Y W G
10 TURNS
FROM UNIT 24-V
CONTROL TERMINALS
EXAMPLE:
5.0 AMPS ON AMMETER
10 TURNS AROUND JAWS
0.5 AMPS FOR THERMOSTAT
=
ANTICIPATOR SETTING
912SB
A96316
Fig. 55 -- Amp. Draw Check with Ammeter
63
Page 64
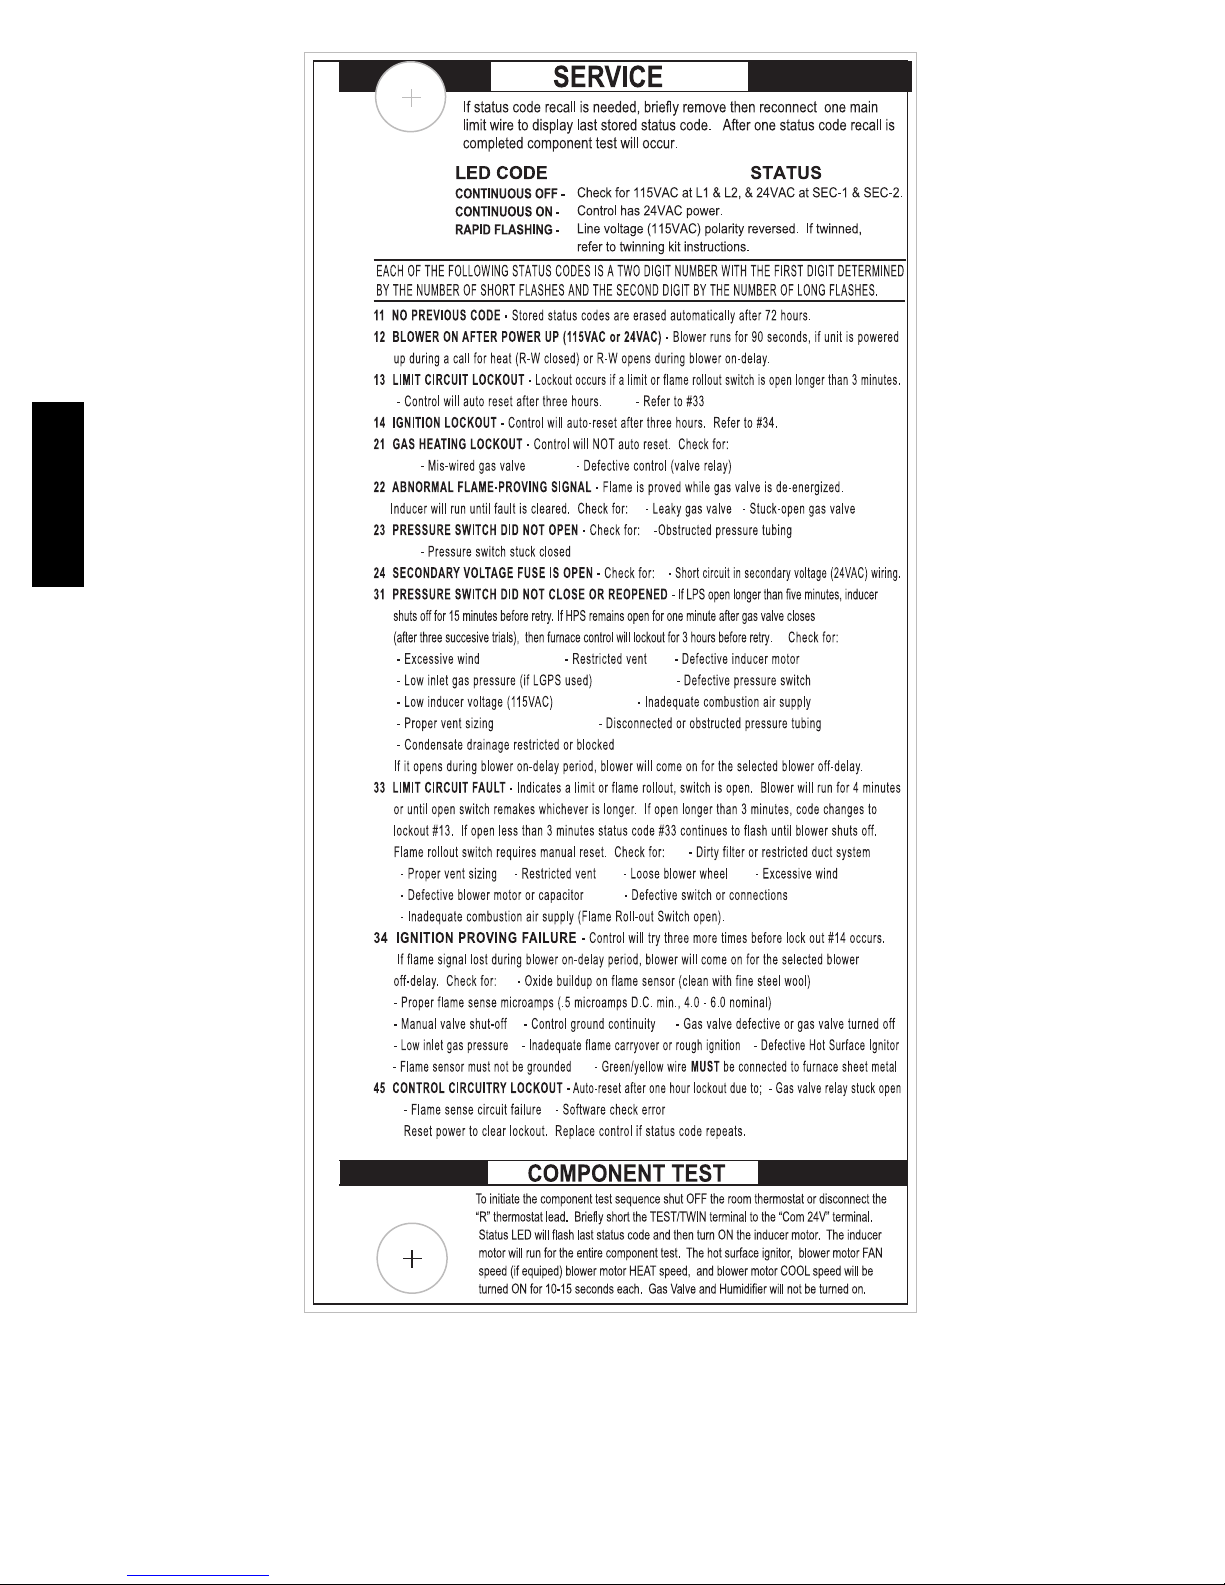
912SB
338309-201 Rev. E
A11602
Fig. 56 -- Service Label Information
64
Page 65
SECONDS
FOR 1 REVOLUTION
10 360 720 1800 50 72 144 360
11 327 655 1636 51 71 141 355
12 300 600 1500 52 69 138 346
13 277 555 1385 53 68 136 340
14 257 514 1286 54 67 133 333
15 240 480 1200 55 65 131 327
16 225 450 1125 56 64 129 321
17 212 424 1059 57 63 126 316
18 200 400 1000 58 62 124 310
19 189 379 947 59 61 122 305
20 180 360 900 60 60 120 300
21 171 343 857 62 58 116 290
22 164 327 818 64 56 112 281
23 157 313 783 66 54 109 273
24 150 300 750 68 53 106 265
25 144 288 720 70 51 103 257
26 138 277 692 72 50 100 250
27 133 267 667 74 48 97 243
28 129 257 643 76 47 95 237
29 124 248 621 78 46 92 231
30 120 240 600 80 45 90 225
31 116 232 581 82 44 88 220
32 113 225 563 84 43 86 214
33 109 218 545 86 42 84 209
34 106 212 529 88 41 82 205
35 103 206 514 90 40 80 200
36 100 200 500 92 39 78 196
37 97 195 486 94 38 76 192
38 95 189 474 96 38 75 188
39 92 185 462 98 37 74 184
40 90 180 450 100 36 72 180
41 88 176 439 102 35 71 178
42 86 172 429 104 35 69 173
43 84 167 419 106 34 68 170
44 82 164 409 108 33 67 167
45 80 160 400 110 33 65 164
46 78 157 391 112 32 64 161
47 76 153 383 116 31 62 155
48 75 150 375 120 30 60 150
49 73 147 367
Table 20 – Gas Rate (CU ft./hr)
SIZE OF TEST DIAL
1CuFt. 2CuFt. 5CuFt. 1CuFt. 2CuFt. 5CuFt.
SECONDS
FOR 1 REVOLUTION
SIZE OF TEST DIAL
912SB
65
Page 66
912SB
Table 21 – Orifice Size and Manifold Pressure (in. W.C.) for Gas Input Rate
SINGLE-STAGE FURNACE
(TABULATED DATA BASED ON 20,000 BTUH PER BURNER, DERATED 2%/1000 FT (305M) ABOVE SEA LEVEL)
ALTITUDE
RANGE
ft (m)
092543 3.6 43 3.7 43 3.8 42 3.2
(0) 950 43 3.4 43 3.5 43 3.6 43 3.7
to 1000 44 3.5 44 3.6 44 3.8 43 3.4
2000 1050 44 3.2 44 3.3 44 3.4 44 3.5
(610) 1075 45 3.7 45 3.8 44 3.3 44 3.4
U.S.A. 800 42 3.4 42 3.5 42 3.6 42 3.7
2001 (611) 825 43 3.8 42 3.3 42 3.4 42 3.5
to 850 43 3.6 43 3.7 42 3.2 42 3.3
3000 (914) 875 43 3.4 43 3.5 43 3.7 43 3.8
Canada 925 44 3.5 44 3.6 44 3.8 43 3.4
2001 (611) 950 44 3.3 44 3.4 44 3.6 44 3.7
U.S.A. and Canada
y
l
.S.A. On
U
y
l
n
.A. O
U.S
y U.S.A. Only U.S.A. and Canada
l
n
.A. O
U.S
to 975 44 3.2 44 3.3 44 3.4 44 3.5
4500 (1372) 1000 44 3.0 44 3.1 44 3.2 44 3.3
3001 800 43 3.8 42 3.2 42 3.3 42 3.4
(915) 825 43 3.6 43 3.7 43 3.8 42 3.2
to
4000 900 44 3.4 44 3.5 44 3.7 44 3.8
(1219) 925 44 3.2 44 3.4 44 3.5 44 3.6
4001 775 43 3.7 43 3.8 42 3.3 42 3.4
(1220) 800 43 3.5 43 3.6 43 3.7 43 3.8
to
5000 875 44 3.3 44 3.5 44 3.6 44 3.7
(1524) 900 44 3.2 44 3.3 44 3.4 44 3.5
5001 750 43 3.7 43 3.8 42 3.2 42 3.3
(1525) 775
to
6000 850 44 3.3 44 3.4 44 3.5 44 3.6
(1829) 875 44 3.1 44 3.2 44 3.3 44 3.4
6001 700 42 3.2 42 3.3 42 3.4 42 3.5
(1830) 725 43 3.6 43 3.7 43 3.8 42 3.3
to
7000 800 44 3.4 44 3.5 44 3.6 44 3.7
(2133) 825 44 3.2 44 3.3 44 3.4 44 3.5
HEATVALUE0.580.600.620.64
AT ALTITUDE Orifice Manifold Orifice Manifold Orifice Manifold Orifice Manifold
(Btu/cu ft) No. Pressure No. Pressure No. Pressure No. Pressure
900 43 3.8 42 3.2 42 3.3 42 3.4
975 44 3.7 44 3.8 43 3.4 43 3.6
1025 44 3.3 44 3.5 44 3.6 44 3.7
1100 46 3.7 46 3.8 45 3.8 44 3.2
900 44 3.7 44 3.8 43 3.5 43 3.6
775 42 3.3 42 3.4 42 3.5 42 3.6
850 44 3.8 43 3.5 43 3.6 43 3.7
875 44 3.6 44 3.7 43 3.4 43 3.5
950 44 3.1 44 3.2 44 3.3 44 3.4
750 42 3.3 42 3.4 42 3.5 42 3.6
825 44 3.8 43 3.4 43 3.5 43 3.6
850 44 3.5 44 3.7 44 3.8 43 3.4
925 44 3.0 44 3.1 44 3.2 44 3.3
725 42 3.2 42 3.3 42 3.4 42 3.5
43 3.4 43 3.5 43 3.7 43 3.8
800 44 3.7 44 3.8 43 3.4 43 3.5
825 44 3.5 44 3.6 44 3.7 44 3.8
900 44 2.9 44 3.0 44 3.1 44 3.2
675 42 3.4 42 3.5 42 3.6 42 3.8
750 43 3.4 43 3.5 43 3.6 43 3.7
775 44 3.6 44 3.7 43 3.4 43 3.5
850 44 3.0 44 3.1 44 3.2 44 3.3
SAGLARUTANFOYTIVARGCIFICEPSSAG.GVA
A11253A
66
Page 67
Table 21 -- Orifice Size and Manifold Pressure(in. W.C.) for Gas Input Rate (Cont.)
SINGLE-STAGE FURNACE
(TABULATED DATA BASED ON 20,000 BTUH PER BURNER, DERATED 2%/1000 FT (305M) ABOVE SEA LEVEL)
ALTITUDE
RANGE
ft (m)
7001 675 43 3.8 42 3.2 42 3.3 42 3.4
(2134) 700 43 3.5 43 3.7 43 3.8 42 3.2
to
8000 775 44 3.3 44 3.4 44 3.5 44 3.7
(2438) 800 44 3.1 44 3.2 44 3.3 44 3.4
8001 650 43 3.8 42 3.2 42 3.3 42 3.4
(2439) 675 43 3.5 43 3.6 43 3.7 42 3.2
to
9000 750 44 3.3 44 3.4 44 3.5 44 3.6
(2743) 775 44 3.0 44 3.2 44 3.3 44 3.4
9001 600 42 3.3 42 3.4 42 3.6 42 3.7
(2744) 625 43 3.7 42 3.2 42 3.3 42 3.4
to
10000 700 44 3.4 44 3.5 44 3.7 44 3.8
U.S.A. Only U.S.A. OnlyU.S.A. Only
(3048) 725 44 3.2 44 3.3 44 3.4 44 3.5
* Orifice numbers shown in BOLD are f actory-installed.
HEATVALUE0.580.600.620.64
AT ALTITUDE Orifice Manifold Orifice Manifold Orifice Manifold Orifice Manifold
(Btu/cu ft) No. Pressure No. Pressure No. Pressure No. Pressure
650 42 3.4 42 3.5 42 3.6 42 3.7
725 44 3.8 43 3.4 43 3.5 43 3.6
750 44 3.5 44 3.7 44 3.8 43 3.4
825 44 2.9 44 3.0 44 3.1 44 3.2
625 42 3.4 42 3.5 42 3.6 42 3.7
700 44 3.7 43 3.4 43 3.5 43 3.6
725 44 3.5 44 3.6 44 3.7 44 3.8
650 43 3.5 43 3.6 43 3.7 43 3.8
675 44 3.7 44 3.8 43 3.4 43 3.5
SAGLARUTANFOYTIVARGCIFICEPSSAG.GVA
912SB
A11253B
67
Page 68
SERVICE AND MAINTENANCE
PROCEDURES
!
WARNING
FIRE, INJURY OR DEATH HAZARD
Failure to follow this warning could result in personal
injury, death and/or property damage.
The ability to properly perform maintenance on this
equipment requires certain knowledge, mechanical skills,
tools, and equipment. If you do not possess these, do not
attempt to perform any service and maintenance on this
equipment other than those procedures recommended in the
Owner’s Manual.
!
CAUTION
ENVIRONMENTAL HAZARD
Failure to follow this caution may result in environmental
912SB
pollution.
Remove and recycle all components or materials (i.e. oil,
refrigerant, control board, etc.) before unit final disposal.
!
WARNING
ELECTRICAL SHOCK, FIRE OR EXPLOSION
HAZARD
Failure to follow this warning could result in personal
injury or death, or property damage.
Before installing, modifying, or servicing system, main
electrical disconnect switch must be in the OFF position and
install a lockout tag. There may be more than one
disconnect switch. Lock out and tag switch with a suitable
warning label. Verify proper operation after servicing.
!
CAUTION
ELECTRICAL OPERATION HAZARD
Failure to follow this caution may result in improper
furnace operation or failure of furnace.
Label all wires prior to disconnection when servicing
controls. Wiring errors can cause improper and dangerous
operation.
General
These instructions are written as if the furnace is installed in an
upflow application. An upflow furnace application is where the
blower is located below the combustion and controls section of the
furnace, and conditioned air is discharged upward. Since this
furnace can be installed in any of the 4 positions shown in Fig. 2,
you must revise your orientation to component location
accordingly.
Electrical Controls and Wiring
Each pressure switch is labeled with the reference location (noted
as “COLLECTOR BOX--LPS” or “HOUSING--HPS” on the
switch). The nominal break point of each switch is shown on the
label below the reference location in inches of water column,
“W.C.” The maximum and minimum break point of the switch is
+/-- 0.05 inches of water column from the nominal break point of
the switch. The maximum make point of the switch is 0.10 inches
of water above the maximum break point of the switch.
Example: Nominal break point on pressure switch is 0.68--in.
W.C. The minimum break point of the switch is 0.63--in. W.C.
The maximum break point of the switch is 0.73--in. W.C. The
maximum make point of the switch is 0.83--in. W.C.
!
WARNING
ELECTRICAL SHOCK HAZARD
Failure to follow this warning could result in personal injury
or death.
There may be more than one electrical supply to the furnace.
Check accessories and cooling unit for additional electrical
supplies that must be shut off during furnace servicing. Lock
out and tag switch with a suitable warning label.
The electrical ground and polarity for 115--v wiring must be
properly maintained. Refer to Fig. 35 for field wiring information
and to Fig. 65 for furnace wiring information.
NOTE: If the polarity is not correct, the STATUS LED on the
control will flash rapidly and prevent the furnace from heating. The
control system also requires an earth ground for proper operation
of the control and flame--sensing electrode.
The 24--v circuit contains an automotive--type, 3--amp. fuse located
on the control. See Fig. 36. Any shorts of the 24--v wiring during
installation, service, or maintenance will cause this fuse to blow. If
fuse replacement is required, use ONLY a 3--amp. fuse. The control
LED will display status code 24 when fuse needs to be replaced.
Troubleshooting
Refer to the service label. See Fig. 56.
The Troubleshooting Guide can be a useful tool in isolating
furnace operation problems. Beginning with the word “Start,”
answer each question and follow the appropriate arrow to the next
item. See Fig. 64.
The Guide will help to identify the problem or failed component.
After replacing any component, verify correct operation sequence.
Proper instrumentation is required to service electrical controls.
The control in this furnace is equipped with a Status Code LED
(Light--Emitting Diode) to aid in installation, servicing, and
troubleshooting. Status codes can be viewed at the indicator in
blower door. The amber furnace control LED is either ON
continuously, rapid flashing, or a code composed of 2 digits. The
first digit is the number of short flashes, the second digit is the
number of long flashes.
For an explanation of status codes, refer to service label located on
control door or Fig. 56, and the troubleshooting guide which can
be obtained from your distributor.
Retrieving Stored Fault Codes
NOTE: Fault codes cannot be retrieved if a thermostat signal
(24-v on W, Y, G, etc.) is present, or if any delays such as blower
off-delays are active.
The stored status codes will NOT be erased from the control
memory when 115- or 24-v power is interrupted. See the Service
Label (Fig. 56) for more information. The most recent fault code
may be retrieved as follows:
1. Leave 115-v power connected to furnace.
2. Observe the status LED through the blower door (the lower
door on upflow applications) indicator. Refer to the Service
Label (Fig. 56) to interpret the LED.
3. Remove the Main/Control door (the upper door on upflow
installations).
4. BRIEFLY disconnect and reconnect ONE of the main limit
wires.
5. The LED will flash the last stored fault code. Refer to the
Service Label (Fig. 56) to interpret the LED.
6. A component test sequence will follow.
7. Reinstall the Main/Control door.
68
Page 69
Component Self-Test
NOTE: The furnace control component test allows all
components to run for a short time; except the gas valve and
humidifier terminal HUM are not energized. The EAC-1 terminal
is energized when the blower is energized. This feature helps
diagnose a system problem in case of a component failure. The
component test feature will not operate if any thermostat signal is
present at the control and not until all time delays are completed.
To Begin Component Self-Test:
1. Remove blower access door.
2. Disconnect the thermostat R lead from furnace control.
3. Manually close blower door switch.
Caution must be taken when manually closing this switch for
service purposes.
!
WARNING
ELECTRICAL SHOCK HAZARD
Failure to follow this warning could result in personal injury,
or death.
Blower door switch opens 115--v power to furnace control.
No component operation can occur unless switch is closed.
Exercise caution to avoid electrical shock from exposed
electrical components when manually closing this switch for
service purposes.
4. For approximately 2 sec, short (jumper) the COM-24v
terminal on control to the TEST/TWIN 3/16—in. (5 mm)
quick-connect terminal on control until the LED goes off.
Remove jumper from terminals. See Fig. 36.
NOTE: If TEST/TWIN and COM-24v terminals are jumpered
longer than 2 sec, LED will flash rapidly and ignore component
test request.
Component test sequence is as follows:
a. LED will display previous status code 4 times.
b. Inducer motor starts and continues to run until Step f of
component test sequence.
c. After 7 sec the hot surface igniter is energized for 15 sec.,
then off.
d. Blower motor operates on HEAT speed for 10 sec.
e. Blower motor operates on COOL speed for 10 sec.
f. Inducer motor stops.
5. Reconnect R lead to furnace control, remove tape from
blower door switch, and re-install blower door.
6. Verify furnace shut down by lowering thermostat setting
below room temperature.
7. Verify that furnace restarts by raising thermostat setting
above room temperature.
Checklist
1. Put away tools and instruments. Clean up debris.
2. Verify that the jumper is removed from the TEST/TWIN
terminal. Verify that there is nothing plugged into the PLT
connector. (Note: If there is a jumper connector plugged
into PLT, remove it and discard.) See Fig. 36.
3. Verify that the Blower/Heat Off Delay jumpers are set as
desired. See Fig. 36.
4. Verify that the blower and control (“Main”) doors are
properly installed.
5. Verify that the Status LED glows. If not, check that the
power supply is energized and that the blower door is
secure. See Fig. 56.
6. Cycle test furnace with room thermostat to be sure that it
operates properly with the room thermostat. Check all
modes including Heat, Cool and Fan.
7. Check operation of accessories per manufacturer’s
instructions.
8. Review Owner’s Manual with owner.
9. Attach entire literature packet to furnace.
Care and Maintenance
!
WARNING
FIRE OR EXPLOSION HAZARD
Failure to follow this warning could result in personal
injury, death and/or property damage.
Never store flammable or combustible materials on, near, or
in contact with the furnace, such as:
1. Spray or aerosol cans, rags, brooms, dust mops,
vacuum cleaners, or other cleaning tools.
2. Soap powders, bleaches, waxes or other cleaning
compounds, plastic or plastic containers, gasoline,
kerosene, cigarette lighter fluid, dry cleaning fluids,
or other volatile fluids.
3. Paint thinners and other painting compounds, paper
bags, or other paper products. Exposure to these
materials could lead to corrosion of the heat
exchangers.
For continuing high performance and to minimize possible furnace
failure, periodic maintenance must be performed on this furnace.
Consult your local dealer about proper frequency of maintenance
and the availability of a maintenance contract.
!
WARNING
ELECTRICAL SHOCK AND FIRE HAZARD
Failure to follow this warning could result in personal injury,
death, and/or property damage.
Turn off the gas and electrical supplies to the furnace and
install lockout tag before performing any maintenance or
service. Follow the operating instructions on the label
attached to the furnace.
!
WARNING
CARBON MONOXIDE POISONING AND FIRE
HAZARD
Failure to follow this warning could result in personal
injury, death and/or property damage.
Never operate furnace without a filter or filtration device
installed. Never operate a furnace with filter or filtration
device access doors removed.
!
CAUTION
CUT HAZARD
Failure to follow this caution may result in personal injury.
Sheet metal parts may have sharp edges or burrs. Use care
and wear appropriate protective clothing, safety glasses and
gloves when handling parts, and servicing furnaces.
The minimum maintenance on this furnace is as follows:
1. Check and clean air filter each month or more frequently if
required. Replace if torn.
69
912SB
Page 70
2. Check blower motor and wheel for cleanliness each heating
and cooling season. Clean as necessary.
3. Check electrical connections for tightness and controls for
proper operation each heating season. Service as necessary.
4. Inspect burner compartment before each heating season for
rust, corrosion, soot or excessive dust. If necessary, have
furnace and burner serviced by a qualified service agency.
5. Inspect the vent pipe/vent system before each heating season for water leakage, sagging pipes or broken fittings.
Have vent pipes/vent system serviced by a qualified service
agency.
6. Inspect any accessories attached to the furnace such as a humidifier or electronic air cleaner. Perform any service or
maintenance to the accessories as recommended in the accessory instructions.
Cleaning and/or Replacing Air Filter
The air filter type may vary depending on the application or
orientation. The filter is external to the furnace casing. There are no
provisions for an internal filter with this furnace. See “Filter
Arrangement” under the “Installation” section of this manual.
912SB
CARBON MONOXIDE POISONING AND FIRE
HAZARD
Failure to follow this warning could result in personal
injury, death and/or property damage.
Never operate furnace without a filter or filtration device
installed. Never operate a furnace with filter or filtration
device access doors removed.
NOTE: If the filter has an airflow direction arrow, the arrow must
point toward the blower.
To clean or replace filters, proceed as follows:
ELECTRICAL SHOCK, FIRE OR EXPLOSION
HAZARD
Failure to follow this warning could result in personal
injury or death, or property damage.
Before installing, modifying, or servicing system, main
electrical disconnect switch must be in the OFF position and
install a lockout tag. There may be more than one
disconnect switch. Lock out and tag switch with a suitable
warning label. Verify proper operation after servicing.
1. Turn off electrical supply to furnace.
2. Remove filter cabinet door.
3. Slide filter out of cabinet.
4. If equipped with permanent, washable filter, clean filter by
5. If equipped with factory specified disposable media filter,
6. Slide filter into cabinet.
7. Replace filter cabinet door.
8. Turn on electrical supply to furnace.
!
WARNING
!
WARNING
spraying cold tap water through filter in opposite direction
of airflow. Rinse filter and let dry. Oiling or coating of the
filter is not recommended.
replace only with a factory specified media filter of the same
size.
Blower Motor and Wheel Maintenance
To ensure long life, economy, and high efficiency, clean
accumulated dirt and grease from blower wheel and motor
annually.
The inducer and blower motors are pre--lubricated and require no
additional lubrication. These motors can be identified by the
absence of oil ports on each end of the motor.
The following items should be performed by a qualified service
technician. Clean blower motor and wheel as follows:
1. Turn off electrical supply to furnace.
2. Remove blower door.
3. All factory wires can be left connected, but field thermostat
and accessory wiring may need to be disconnected depending on their length and routing.
4. If the vent and combustion air pipe passes through the
blower compartment, it will be necessary to remove the
pipes from the blower compartment.
Disconnect the vent and combustion air pipe by:
a. Loosen the clamps onthe vent couplingsand combustion
air pipe external to the furnace.
b. Separate the pipes from the couplings and move them
aside.
c. Loosen the clamps on the ventcouplings and combustion
air pipe located on the blower shelf.
d. Separate the pipes from the blower compartment and set
aside.
e. Removethecouplingsfromthepipeadaptersand set aside.
f. After servicing the blower, reverse steps a through e.
g. Tighten all clamps 15 lb --in.
See Fig. 62 for steps 5 through 14.
5. Remove screws securing blower assembly to blower shelf
and slide blower assembly out of furnace. Detach ground
wire and disconnect blower motor harness plugs from
blower motor.
NOTE: Blower wheel is fragile. Use care.
6. Clean blower wheel and motor by using a vacuum with soft
brush attachment. Be careful not to disturb balance weights
(clips) on blower wheel vanes. Do not bend wheel or blades
as balance will be affected.
7. If greasy residue is present on blower wheel, remove wheel
from the blower housing and wash it with an appropriate
degreaser. To remove wheel:
a. Mark blower wheel location on shaft before disassembly
to ensure proper reassembly.
b. Loosen setscrew holding blower wheel on motor shaft.
NOTE: Mark blower mounting arms and blower housing so each
arm is positioned at the same hole location during reassembly.
c. Mark blower wheel orientation and cutoff plate location to
ensure proper reassembly.
d. Remove screws securing cutoff plate and remove cutoff
plate from housing.
e. Remove bolts holding motor mounts to blower housing
and slide motor and mounts out of housing.
f. Remove blower wheel from housing.
g. Clean wheel per instructions on degreaser cleaner. Do not
get degreaser in motor.
8. Reassemble motor and blower wheel by reversing items 7b
through 7f. Ensure wheel is positioned for proper rotation.
9. Torque motor mounting bolts to 40 +/-- 10 lb--in. when reassembling.
10. Torque blower wheel set screw to 160 +/-- 20 lb--in. when
reassembling.
11. Verify that blower wheel is centered in blower housing and
set screw contacts the flat portion of the motor shaft. Loosen
set screw on blower wheel and reposition if necessary.
12. Spin the blower wheel by hand to verify that the wheel does
not rub on the housing.
70
Page 71
13. Reinstall blower assembly in furnace.
14. Reinstall 2 screws securing blower assembly to blower
deck.
15. Reconnect blower leads to furnace control. Refer to furnace
wiring diagram, and connect thermostat leads if previously
disconnected.
NOTE: Be sure to attach ground wire and reconnect blower
harness plugs to blower motor.
!
WARNING
ELECTRICAL OPERATION HAZARD
Failure to follow this warning could result in personal injury
or death.
Blower door switch opens 115--v power to control. No
component operation can occur unless switch is closed.
Caution must be taken when manually closing this switch for
service purposes.
16. Downflow or horizontal furnaces with vent pipe through
furnace only:
a. Install and connect short piece of vent pipe inside furnace
to existing vent.
b. Connect vent connector to vent elbow.
17. Turn on electrical supply. Manually close blower door
switch. Use a piece of tape to hold switch closed. Check for
proper rotation and speed changes between heating and
cooling by jumpering R to G and R to Y/Y2 on furnace
control thermostat terminals. If outdoor temperature is below 70_F(21_C), turn off circuit breaker to outdoor unit
before running furnace in the cooling cycle. Turn outdoor
circuit breaker on after completing cooling cycle. See Fig.
36.
NOTE: If R--W/W1 thermostat terminals are jumpered at the time
blower door switch is closed, blower will run for 90 sec before
beginning a heating cycle.
a. Performcomponent self--testas shownat thebottom ofthe
SERVICE label, located on the control door.
b. Verify blower is rotating in the correct direction
18. If furnace is operating properly, RELEASE BLOWER
DOOR SWITCH. Remove any jumpers or reconnect any
disconnected thermostat leads. Replace blower door.
19. Turn on gas supply and cycle furnace through one complete
heating cycle. Verify the furnace temperature rise as shown
in Adjustments Section. Adjust temperature rise as shown in
Adjustments Section.
Cleaning Burners and Flame Sensor
The following items must be performed by a qualified service
technician. If the burners develop an accumulation of light dirt or
dust, they may be cleaned by using the following procedure:
NOTE: Use a back-up wrench on the gas valve to prevent the
valve from rotating on the manifold or damaging the mounting to
the burner assembly.
!
WARNING
ELECTRICAL SHOCK AND FIRE HAZARD
Failure to follow this warning could result in personal injury,
death, and/or property damage.
Turn off the gas and electrical supplies to the furnace and
install lockout tag before performing any maintenance or
service. Follow the operating instructions on the label
attached to the furnace.
Refer to Fig. 63.
1. Disconnect power at external disconnect, fuse or circuit
breaker.
2. Turn off gas at external shut-off or gas meter.
3. Remove control door and set aside.
4. Turn electric switch on gas valve to OFF.
5. Disconnect the gas pipe from gas valve and remove pipe
from the furnace casing.
6. Remove individual wires from terminals on gas valve.
7. Disconnect Hot Surface Igniter (HSI) wires from HSI.
8. Disconnect Flame Sensor wire from Flame Sensor.
9. Support the manifold and remove the 4 screws that secure
the manifold assembly to the burner assembly and set aside.
Note the location of the green/yellow wire and ground terminal.
10. Inspect the orifices in the manifold assembly for blockages
or obstructions. Remove orifice and clean or replace orifice.
11. Remove the four screws that attach the top plate of the casing to the furnace.
12. Raise top plate up slightly and prop it up with a small piece
of wood or folded cardboard.
13. Support the burner assembly and remove the screws that attach the burner assembly to the heat exchanger cell panel.
14. Remove wires from both rollout switches.
15. Slide one--piece burner out of slots on sides of burner assembly.
16. Remove the flame sensor from the burner assembly.
17. (Optional) Remove the Hot Surface Igniter (HSI) and
bracket from the burner assembly.
18. Check igniter resistance. Nominal resistance is 40 to 70
ohms at room temperature and is stable over the life of the
igniter.
19. Clean burner with a brush and a vacuum.
20. Clean the flame sensor with fine steel wool (0000 grade).
Do not use sand paper or emery cloth.
To reinstall burner assembly:
1. Install the Hot Surface Igniter (HSI) and bracket in burner
assembly.
2. Install flame sensor on burner.
3. Align the edges of the one-piece burner with the slots in the
burner assembly and slide the burners forward until they are
fully seated in the burner assembly.
4. Align the orifices in the manifold assembly with the support
rings on the end of the burner.
5. Insert the orifices in the support rings of the burners.
NOTE: If manifold does not fit flush against the burner, do not
force the manifold on the burner assembly. The burners are not
fully seated forward in the burner assembly. Remove the manifold
and check burner positioning in the burner assembly assembly
before re-installing the manifold.
6. Attach the green/yellow wire and ground terminal to one of
the manifold mounting screws.
7. Install the remaining manifold mounting screws.
8. Check the igniter alignment. See Fig. 57, 58 and 63.
9. Attach the wires to the roll-out switches.
10. Align the burner assembly with the openings in the primary
cell inlet panel and attach the burner assembly to the cell
panel.
11. Connect the wire for the flame sensor.
12. Connect the wire for the Hot Surface Igniter.
NOTE: Use propane-resistant pipe dope to prevent leaks. Do not
use Teflon tape.
13. Install the gas pipe to the gas valve.
71
912SB
Page 72
!
WARNING
FIRE OR EXPLOSION HAZARD
Failure to follow this warning could result in personal
injury, death, and/or property damage.
Never purge a gas line into a combustion chamber. Never
test for gas leaks with an open flame. Use a commercially
available soap solution made specifically for the detection
of leaks to check all connections. A fire or explosion may
result causing property damage, personal injury or loss of
life.
14. Check for gas leaks with a commercially available soap
solution made specifically for the detection of leaks.
15. Turn gas on at electric switch on gas valve and at external
shut-off or meter
16. Turn power on at external disconnect, fuse or circuit breaker.
17. Run the furnace through two complete heating cycles to
check for proper operation
912SB
18. Install control door when complete.
Servicing Hot Surface Igniter
The igniter does NOT require annual inspection. Check igniter
resistance before removal. Refer to Fig. 57, 58 and 63.
1. Turn off gas and electrical supplies to furnace.
2. Remove control door.
3. Disconnect igniter wire connection.
4. Check igniter resistance. Igniter resistance is affected by
temperature. Only check resistance when the igniter is at
room temperature.
a. Using an ohm meter, check resistance across both igniter
leads in connector.
b. Cold reading should be between 40 ohms and 70 ohms.
5. Remove igniter assembly.
a. Using a 1/4--in. driver, removethe twoscrewssecuring the
igniter mounting bracket to the burner assembly See Fig.
63.
b. Carefully withdraw the igniter and bracket assembly
through the frontof the burner assembly without striking
the igniter on surrounding parts.
c. Inspect igniter for signs of damage or failure.
d. If replacement is required, remove the screw that secures
the igniter on igniter bracket and remove the igniter.
6. To replace igniter and bracket assembly, reverse items 5a
through 5d.
7. Reconnect igniter harness to the igniter, dressing the igniter
wires to ensure there is no tension on the igniter itself. See
Fig. 63.
8. Turn on gas and electrical supplies to furnace.
9. Verify igniter operation by initiating control board self--test
feature or by cycling thermostat.
10. Replace control door.
Flushing Collector Box and Drainage System
!
WARNING
ELECTRICAL SHOCK AND FIRE HAZARD
Failure to follow this warning could result in personal injury,
death, and/or property damage.
Turn off the gas and electrical supplies to the furnace and
install lockout tag before performing any maintenance or
service. Follow the operating instructions on the label
attached to the furnace.
1. Turn off gas and electrical supplies to furnace.
2. Remove control door.
3. Disconnect pressure switch tube from pressure switch port.
NOTE: Ensure the pressure switch tube disconnected from the
pressure switch is higher than the collector box opening or water
will flow out of tube.
4. Remove the collector box plug from the top port on the upper corner of the collector box. See Fig. 59.
5. Attach a funnel with a flexible tube to port on the collector
box.
6. Flush inside of collector box with water until discharge
water from condensate trap is clean and runs freely.
7. Repeat steps 4 thru 6 with middle plug on upper corner of
collector box.
8. Remove the pressure switch tube from the collector box.
NOTE:DoNOT blow into tube with tube connected to the
pressure switch.
9. Clean pressure switch port on collect box with a small wire.
Shake any water out of pressure switch tube.
10. Reconnect tube to pressure switch and pressure switch port.
11. Remove the relief tube from the port on the collector box
and the trap.
12. Clean the relief port on collect box and the trap with a small
wire. Shake any water out of the tube.
13. Reconnect relief tube to trap and collector box ports.
Cleaning Condensate Drain and Trap
NOTE: If the condensate trap is removed, a new gasket between
the trap and collector box is required. Verify a condensate trap
gasket is included in the service kit or obtain one from your local
distributor.
1. Disconnect power at external disconnect, fuse or circuit
breaker.
2. Turn off gas at external shut-off or gas meter.
3. Remove control door and set aside.
4. Turn electric switch on gas valve to OFF.
5. Disconnect external drain from condensate drain elbow or
drain extension pipe inside the furnace and set aside.
6. Disconnect the condensate trap relief hose from collector
box port and condensate trap.
NOTE: If condensate has a heat pad attached to the trap, trace the
wires for the pad back to the connection point and disconnect the
wires for the heat pad.
7. Remove the screw that secures the condensate trap to the
collector box, remove the trap and set aside.
8. Remove the trap gasket from the collector box if it did not
come off when the trap was removed.
9. Discard the old trap gasket.
10. Rinse condensate trap in warm water until trap is clean.
11. Flush condensate drain lines with warm water. Remember
to check and clean the relief port on the collector box.
12. Shake trap dry.
13. Clean port on collector box with a small wire.
To re-install Condensate Drain and Trap:
1. Remove adhesive backing from condensate trap gasket
2. Install gasket on collector box
3. Align the condensate trap with the drain opening on the collector box and secure the trap with the screw
4. Attach the relief hose to the relief port on the condensate
trap and collector box.
5. Secure tubing to prevent any sags or traps in the tubing.
6. Connect condensate drain elbow or drain extension elbow
to the condensate trap
7. Connect the leads of the condensate heat pad (if used)
8. Connect external drain piping to the condensate drain elbow
or drain extension pipe.
72
Page 73
9. Turn gas on at electric switch on gas valve and at external
shut-off or meter
10. Turn power on at external disconnect, fuse or circuit breaker.
11. Run the furnace through two complete heating cycles to
check for proper operation
12. Install control door when complete.
Checking Heat Pad Operation (If Applicable)
In applications where the ambient temperature around the furnace
is 32_F or lower, freeze protection measures are required. If this
application is where heat tape has been applied, check to ensure it
will operate when low temperatures are present.
NOTE: The Heat Pad, when used, should be wrapped around the
condensate drain trap. There is no need to use heat tape within the
furnace casing. Most heat tapes are temperature activated, and it is
not practical to verify the actual heating of the tape. Check the
following:
1. Check for signs of physical damage to heat tape such as
nicks, cuts, abrasions, gnawing by animals, etc.
2. Check for discolored heat tape insulation. If any damage or
discolored insulation is evident, replace heat tape.
3. Check that heat tape power supply circuit is on.
Cleaning Heat Exchangers
The following items must be performed by a qualified service
technician.
Primary Heat Exchangers
If the heat exchangers get an accumulation of light dirt or dust on
the inside, they may be cleaned by the following procedure:
NOTE: If the heat exchangers get a heavy accumulation of soot
and carbon, both the primary and secondary heat exchangers
should be replaced rather than trying to clean them thoroughly due
to their intricate design. A build--up of soot and carbon indicates
that a problem exists which needs to be corrected, such as improper
adjustment of manifold pressure, insufficient or poor quality
combustion air, improper vent termination, incorrect size or
damaged manifold orifice(s), improper gas, or a restricted heat
exchanger (primary or secondary). Action must be taken to correct
the problem.
1. Turn off gas and electrical supplies to furnace.
!
WARNING
ELECTRICAL SHOCK, FIRE OR EXPLOSION
HAZARD
Failure to follow this warning could result in personal
injury or death, or property damage.
Before installing, modifying, or servicing system, main
electrical disconnect switch must be in the OFF position and
install a lockout tag. There may be more than one
disconnect switch. Lock out and tag switch with a suitable
warning label. Verify proper operation after servicing.
!
WARNING
ELECTRICAL SHOCK AND FIRE HAZARD
Failure to follow this warning could result in personal injury,
death, and/or property damage.
Turn off the gas and electrical supplies to the furnace and
install lockout tag before performing any maintenance or
service. Follow the operating instructions on the label
attached to the furnace.
2. Remove control door.
3. Disconnect wires or connectors to flame rollout switch, gas
valve, igniter, and flame sensor.
4. Using backup wrench, disconnect gas supply pipe from furnace gas control valve.
5. Remove two screws attaching top filler plate and rotate upwards to gain access to screws attaching burner assembly to
cell panel.
6. Remove screws attaching burner assembly to cell panel.
See Fig. 63.
NOTE: Burner cover, manifold, gas valve, and burner assembly
should be removed as one assembly.
7. Clean heat exchanger openings with a vacuum and a soft
brush. See Fig. 60.
NOTE: After cleaning, inspect the heat exchangers to ensure they
are free of all foreign objects that may restrict flow of combustion
products.
8. Reverse items 6 through 1 for reassembly.
9. Refer to furnace wiring diagram and reconnect wires to
flame rollout switch, gas valve, igniter, and flame sensor.
10. Turn on gas and electrical supplies to furnace.
11. Check furnace operation through 2 complete heat operating
cycles. Look at burners. Burner flames should be clear blue,
almost transparent. See Fig. 61.
12. Check for gas leaks.
!
WARNING
FIRE OR EXPLOSION HAZARD
Failure to follow this warning could result in personal
injury, death, and/or property damage.
Never purge a gas line into a combustion chamber. Never
test for gas leaks with an open flame. Use a commercially
available soap solution made specifically for the detection
of leaks to check all connections. A fire or explosion may
result causing property damage, personal injury or loss of
life.
13. Replace main furnace door.
Secondary Heat Exchangers
The condensing side (inside) of the secondary heat exchanger
CANNOT be serviced or inspected without complete removal of
the heat exchanger assembly. Detailed information on heat
exchanger removal can be obtained from your Distributor.
WINTERIZATION
!
UNIT AND PROPERTY DAMAGE HAZARD
Failure to follow this caution may result in unit component or
property damage.
If the furnace is installed in an unconditioned space where the
ambient temperatures may be 32_ F(0_ C) or lower, freeze
protection measures must be taken to prevent minor property
or product damage.
Since the furnace uses a condensing heat exchanger, some water
will accumulate in the unit as a result of the heat transfer process.
Therefore, once it has been operated, it cannot be turned off and
left off for an extended period of time when temperatures will
CAUTION
912SB
73
Page 74
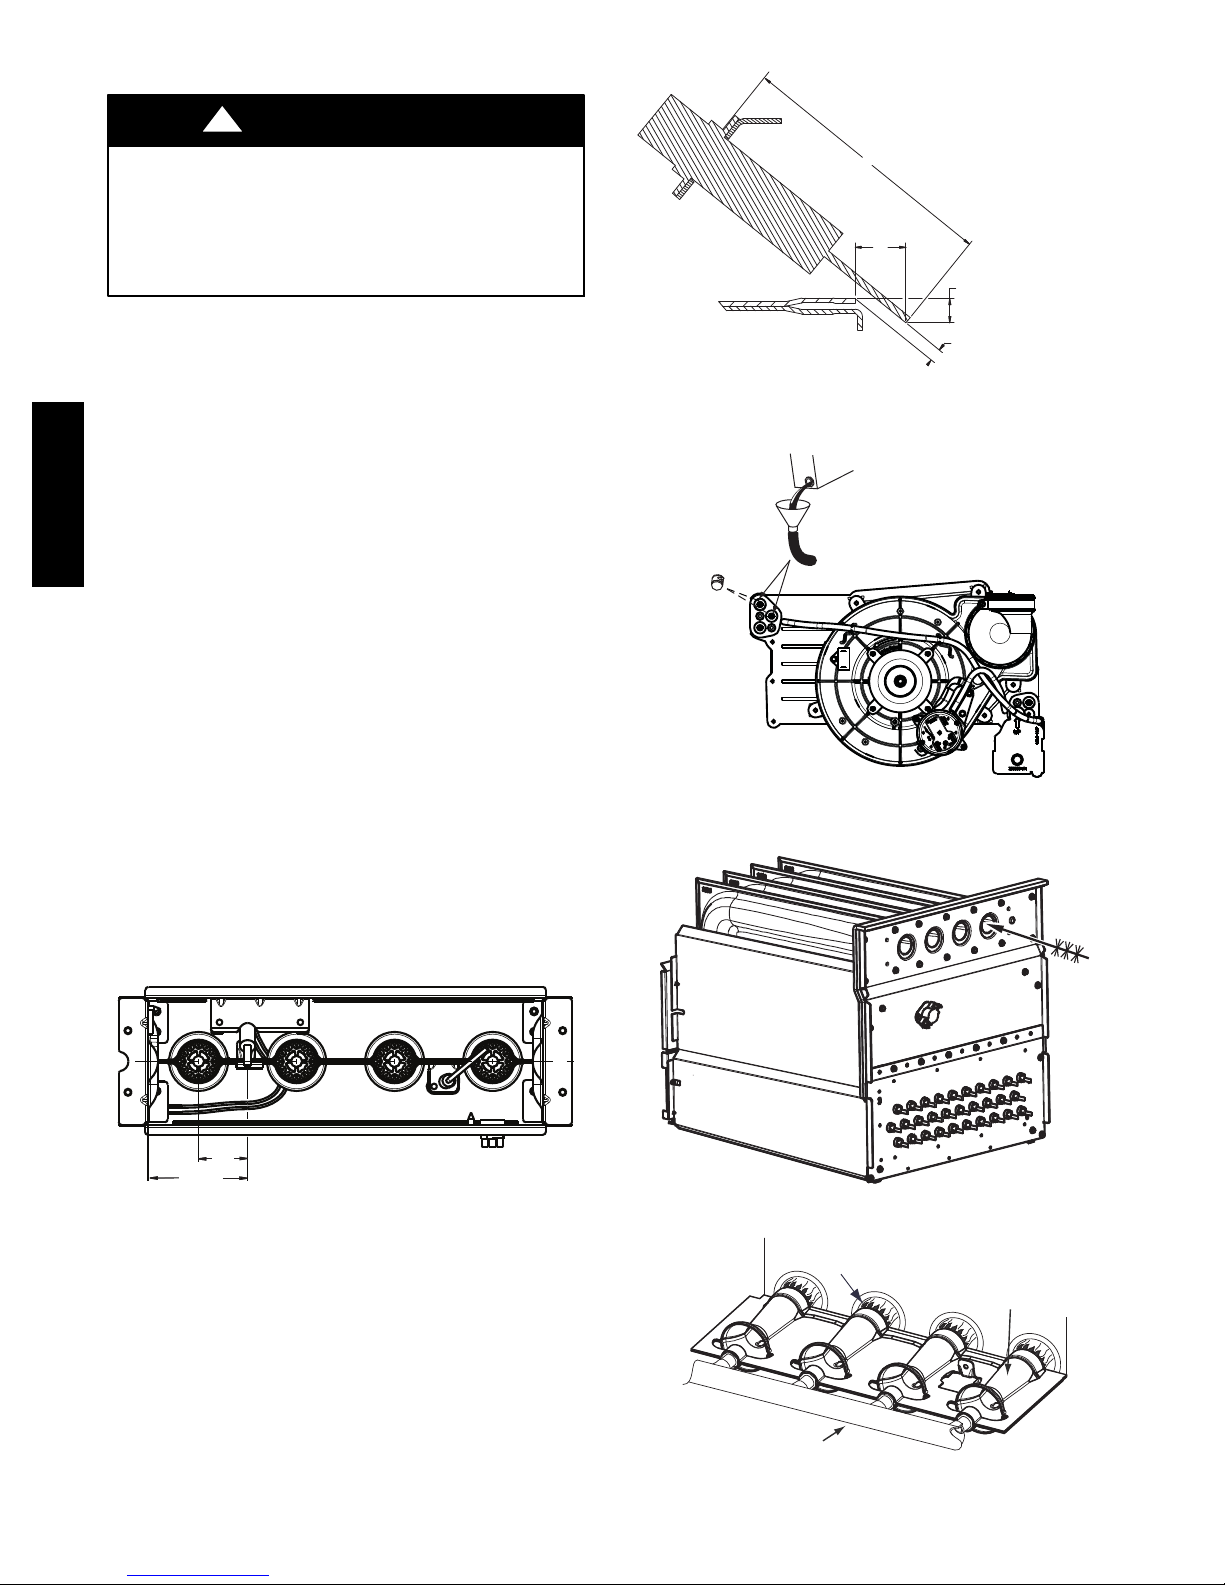
reach 32_F(0_C) or lower unless winterized. Follow these
procedures to winterize your furnace:
!
CAUTION
UNIT COMPONENT DAMAGE HAZARD
Failure to follow this caution may result in damage to the
furnace and other property damage.
Do not use ethylene glycol (automotive antifreeze coolant or
equivalent). Failure of plastic components may occur.
1. Obtain propylene glycol (RV/swimming pool antifreeze or
equivalent).
2. Turn off gas and electrical supplies to your furnace.
3. Remove furnace control door.
4. Remove the top unused rubber plug from the port on the
collector box opposite the condensate trap. See Fig. 59.
5. Connect a field supplied 3/8--in. (9.5--mm) ID tube to the
open port on the collector box.
912SB
6. Insert a field supplied funnel into the tube.
7. Pour one quart (liter) of anti--freeze solution into the funnel/
tube. Antifreeze should run through the inducer housing,
overfill condensate trap and flow to an open drain.
8. Replace the rubber plug in the port on the collector box.
9. Remove the middle unused rubber plug from the port on the
collector box opposite the condensate trap. See Fig. 59.
10. Repeat Steps 5 through 8.
11. If a condensate pump is used, check with pump manufacturer
to verify pump is safe for use with antifreeze used. Allow
pump to start and pump anti--freeze to open drain.
12. Replace main door.
13. When furnace is re--started, flush condensate pump with clear
water to check for proper operation before re--starting furnace.
14. Propylene glycol need not be removed before re--starting
furnace.
2 − in.
(50 mm)
3/8 − in.
(9.6 mm)
3/16− in.
(4.6 mm)
3/32− in., +1/32 -3/64-in.
(2.5 mm
Fig. 58 -- Igniter Position -- Side View
Fig. 59 -- Priming Condensate Trap
, +0.8 -1.5)
A12932
A11392
1-1/4-in.
(31.8)
2-1/2-in.
(64.4)
Fig. 57 -- Igniter Position -- Top View
A11405
A11273
Fig. 60 -- Cleaning Heat Exchanger Cell
Burner Flame
Burner
Manifold
A11461
Fig. 61 -- Burner Flame
74
Page 75
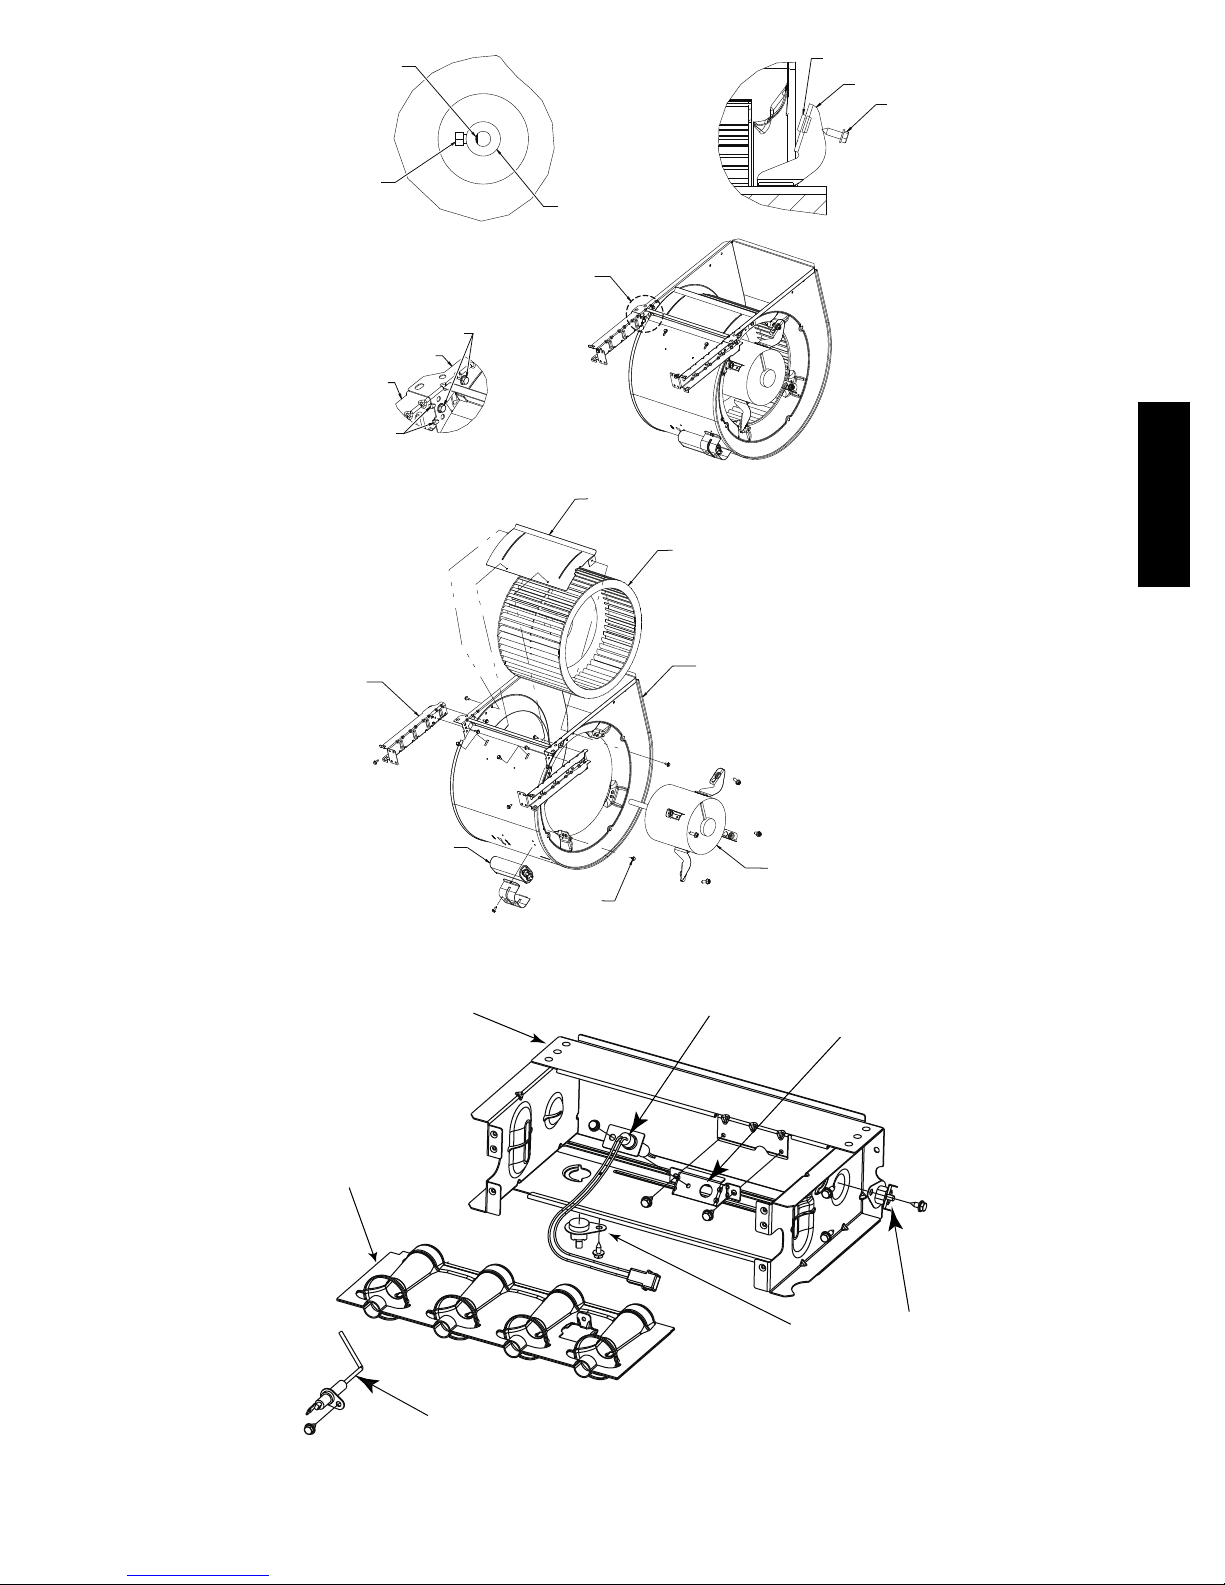
MOTOR SHAFT FLAT
SET SCREW
GROMMET
MOTOR ARM
SCREW
MOTOR WHEEL HUB
SCREW LOCATION
BLOWER HSG ASSY
BRACKET
BRACKET
ENGAGEMENT
DETAIL
BRACKET
CAPACITOR
OR POWER CHOKE
(WHEN USED)
SEE DETAIL
A
A
CUTOFF, BLOWER
912SB
WHEEL, BLOWER
BLOWER HSG ASSY
SCREW
(GND)
Fig. 62 -- Blower Assembly
MOTOR, BLOWER
A11584
BURNER SUPT. ASSY
BURNER ASSY
IGNITER
BRACKET, IGNITER
FLAME ROLLOUT
SWITCH
FLAME SENSOR
(BELOW BURNER)
A11403
Fig. 63 -- Burner Assembly
75
Page 76

SEQUENCE OF OPERATION
NOTE: Furnace control must be grounded for proper operation or
control will lock out. Control is grounded through green/yellow
wire routed to gas valve and manifold bracket screw. Using the
schematic diagram in Fig. 65, follow the sequence of operation
through the different modes. Read and follow the wiring diagram
very carefully.
NOTE: If a power interruption occurs during a call for heat (W),
the control will start a 90--sec blower--only ON period two sec after
power is restored, if the thermostat is still calling for gas heating.
The Amber LED light will flash code 12 during the 90--sec period,
after which the LED will be ON continuous, as long as no faults
are detected. After the 90--sec period, the furnace will respond to
the thermostat normally.
The blower door must be installed for power to be conducted
through the blower door interlock switch ILK to the furnace
control CPU, transformer TRAN, inducer motor IDM, blower
motor BLWM, hot--surface igniter HSI, and gas valve GV.
1. Heating
See Fig. 36 for thermostat connections.)
912SB
The wall thermostat “calls for heat,” closing the R--to--W
circuit. The furnace control performs a self--check, verifies
the pressure switch contacts Collector Box--LPS and Housing Pressure--HPS are open, and starts the inducer motor
IDM.
a. Inducer Prepurge Period-- As the inducer motor IDM
comes up to speed, the collector box pressure switch contacts LPS close to begin a 15--sec prepurge period. The
inducerhousing pressureswitch contactsHPS areignored
until one minute after the gas valve closes.
b. Igniter Warm--Up-- At the end ofthe prepurge period,the
Hot--Surface igniter HSI is energized for a 17--sec igniter
warm--up period.
c. Trial--for--Ignition Sequence-- When the igniter warm--
up period is completed, the main gas valve relay contacts
GVR close to energize the gas valve GV, the gas valve
opens, and 24 vac power is supplied for a field--installed
humidifierat the HUM terminal.The gasvalveGV permits
gas flow to the burnerswhere it isignited by the HSI. Five
secaftertheGVR closes,a 2--sec flameproving periodbegins. The HSI igniter will remain energized until the flame
is sensed or until the 2--sec flame proving period begins.
d. Flame--Proving-- When the burner flame is proved at the
flame--proving sensor electrode FSE, the furnace control
CPU beginsthe blower--ON delay periodand continuesto
hold the gas valve GV open. If the burner flame is not
proved within two sec, the control CPU will close thegas
valve GV, and the control CPU will repeat the ignition sequence for up tothree more Trials--For--Ignition before going toIgnition--Lockout.Lockout will bereset automatically after three hours or by momentarily interrupting 115
vac power to the furnace, or by interrupting 24 vac power
at SEC1 orSEC2 to the furnace controlCPU (notat W,G,
R, etc.).
If flame is proved when flame should not be present, the
furnace control CPU will lock out of Gas--Heating mode
andoperatetheinducermotorIDM untilflameisno longer
proved.
e. Blower--On Delay-- If the burner flame is proven, the
blowermotor isenergized on HEATspeed 25 sec after the
gas valve GV is energized.
Simultaneously, the electronic aircleaner terminal EAC--1
is energized and remains energized as long as the blower
motor BLWM is energized.
f. Blower--Off Delay-- When the thermostat is satisfied, the
R--to--W circuitisopened,de--energizingthegasvalveGV,
stoppinggasflowto theburners, andde--energizing the humidifier terminal HUM. The inducer motor IDM will remain energized for a 15--sec post--purge period. The
blower motor BLWM and air cleaner terminal EAC--1 will
remain energized for 90, 120, 150, or 180 sec (depending
on the blower--OFF delay selection). The furnace control
CPU is factory--set for a 120--sec blower--OFF delay.
2. Cooling Mode
The thermostat “calls for cooling.”
See Fig. 36 for thermostat connections)
The thermostat closes the R--to--G--and--Y circuits. The R--to-- Y
circuit starts the outdoor unit, and the R--to--G--and--Y circuits start
the furnace blower motor BLWM on COOL speed.
The electronic air cleaner terminal EAC--1 is energized with 115
vac when the blower motor BLWM is operating. When the
thermostat is satisfied, the R--to--G--and--Y circuits are opened. The
outdoor unit will stop, and the furnace blower motor BLWM will
continue operating on the COOL speed for an additional 90 sec.
3. Continuous Blower Mode
When the R--to--G circuit is closed by the thermostat, the
blower motor BLWM will operate on HEAT speed. Terminal EAC--1 is energized as long as the blower motor
BLWM is energized. During a call for heat, the blower
BLWM will stop during igniter warm--up (17 sec), ignition
(7 sec), and blower--ON delay (25 sec), allowing the furnace
heat exchangers to heat up more quickly, then restarts at the
end of the blower--ON delay period at HEAT speed.
When the thermostat “calls for cooling”, the blower motor
BLWM will operate at COOL speed. When the thermostat
is satisfied, the blower motor BLWM will operate an additional 90 sec on COOL speed before reverting back to continuous--blower (HEAT speed).
When the R--to--G circuit is opened, the blower motor
BLWM will continue operating for an additional 5 sec, if no
other function requires blower motor BLWM operation.
4. Heat Pump
When installed with a heat pump, the furnace control automatically changes the timing sequence to avoid long blower
off times during demand defrost cycles. When the R--to-Wa n d -- Y o r R -- t o -- W -- a n d -- Y -- a n d -- G c i r c u i t s a r e e n e r g i z e d
the furnace control CPU will continue to turn on the blower
motor BLWM at HEAT speed, and begin a heating cycle.
The blower motor BLWM will remain on until the end of
the prepurge period, then shut off for 24 sec then come back
on at HEAT speed. When the W input signal disappears, the
furnace control begins a normal inducer post--purge period
and the blower switches to COOL speed after a 3 sec delay.
If the R--to--W--and--Y--and--G signals disappear at the same
time, the blower motor BLWM will remain on for the selected blower-- OFF delay period. If the R--to--W--and--Y signals disappear, leaving the G signal, the blower motor
BLWM will continue running the blower motor at HEAT
speed after the selected blower--OFF delay period is completed.
Component Self-Test
Refer to page 69 for instructions.
76
Page 77
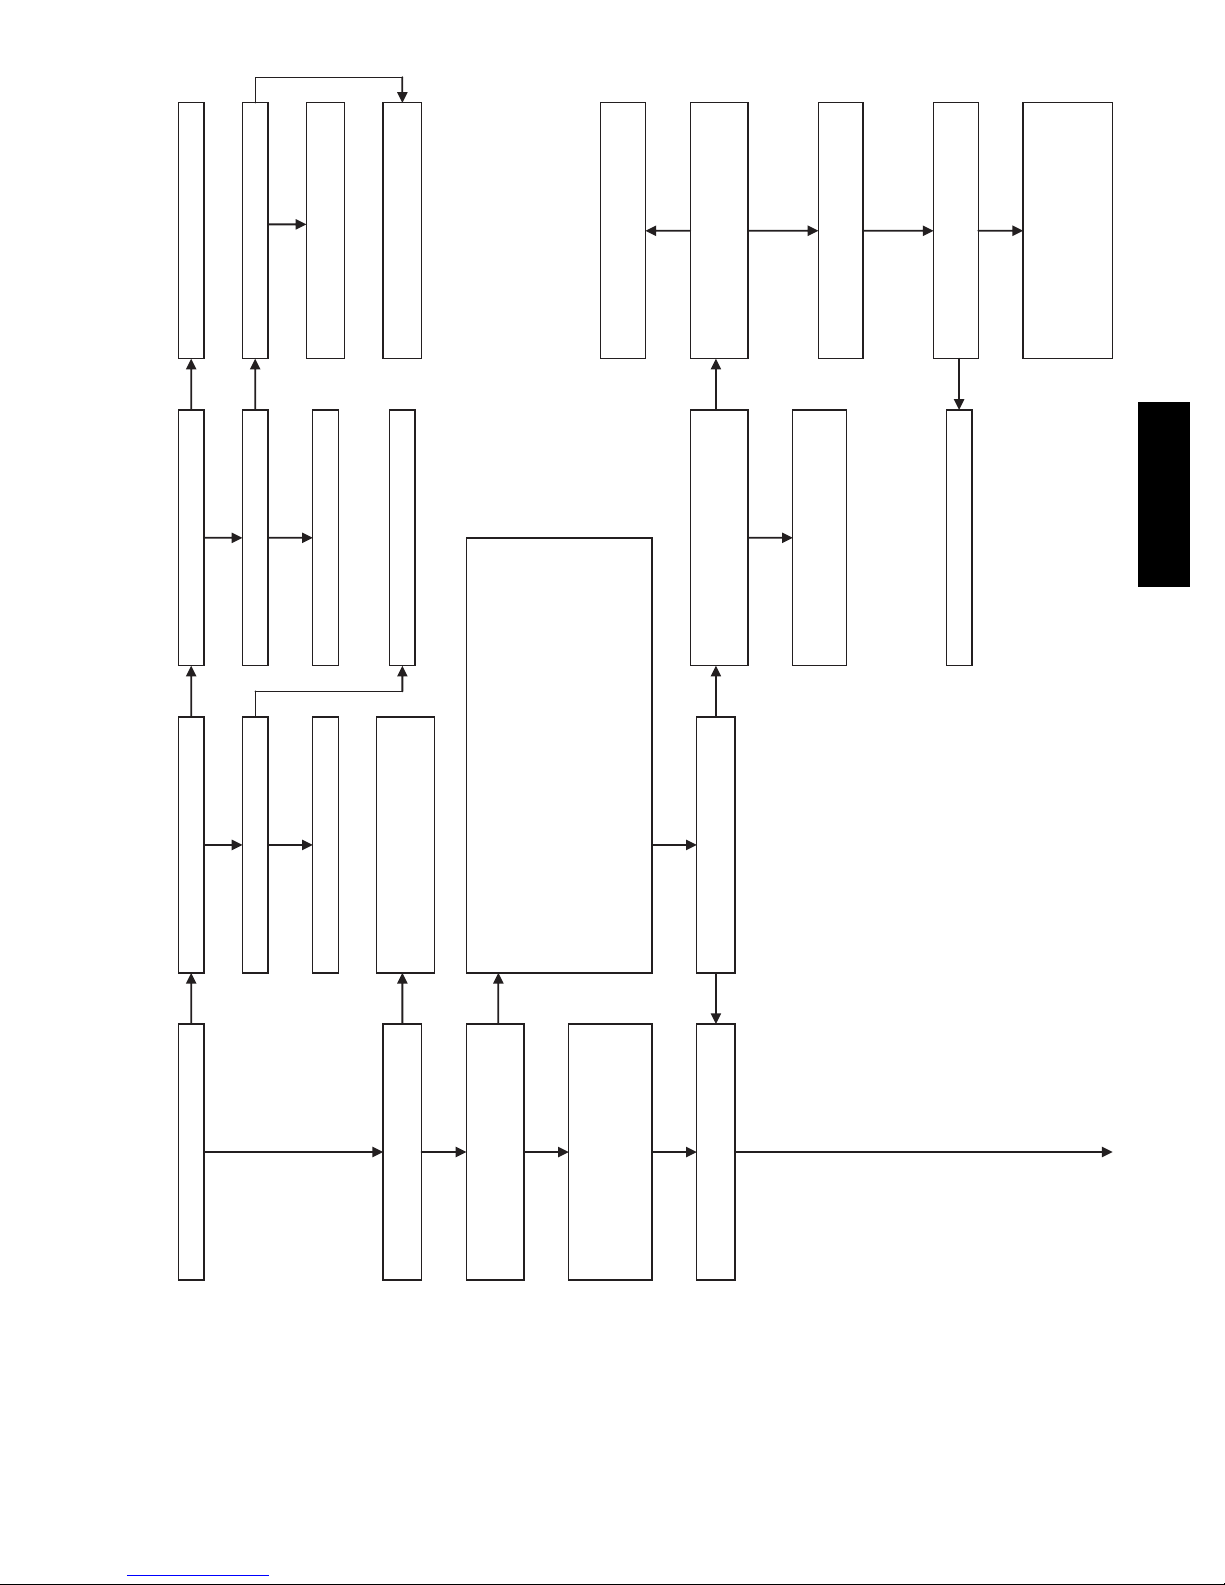
Is LED status light on?
Is there 24V at SEC-1 and SEC-2?
Is there 115V at L1 and L 2?
Replace furnace control.
Is door switch closed?
Replace transformer.
Replace door switch.
Is there 115V going to switch?
Is door switch closed?
Is circuit breaker closed?
Check for continuity in wire from circuit
breaker to furnace.
Close circuit breaker and go back to
START.
Is LED status light blinking rapidly without
a pause?
Check for correct line voltage polarity. If
units are twinned, check for proper low-
voltage (24V) transformer phasing.
Is LED status light blinking ON/OFF
slowly with a combination of short and
long flashes?
Determine status code. The status code
is a 2 digit number with the first digit
determined by the number of short
flashes and the second digit by the
number of long flashes?
To recall status code briefly remove and reconnect one RED wire from the
draft safeguard switch to display stored status code. You can also recall
the previous status code by momentarily shorting the TEST/TW IN
terminal to Com24V terminal until the LED goes out. LED will flash the
status code of the previous fault or status code #11 (1 short and 1 long
flash) if there was no previous fault. After the control repeats the code 4
times, the control will go throug h a brief component test sequence. The
inducer will start and run for the entire component test. The HSI, blower
motor FAN speed (when equipped) HEAT speed, and COOL
speed will run for 10 – 15 seconds each. Gas valve and humidifier will not
be turned on.
Was there a previous status code other
than #11?
Go to section below for the status code
that was flashed.
Does the control respond to W , Y1 (if
present), Y/Y2, and G (24V) thermostat
signals?
Run system through a heating or cooling
cycle to check operation. Status codes
are erased after 72 hours.
Is 24V present at W, Y1 (if present), Y/Y2
or G thermostat terminals on the furnace
control?
Check room thermostat or
interconnecting cable.
Disconnect all the thermostat wires from
the furnace control.
Does the problem repeat when using a
jumper wire?
Replace furnace control.
The thermostat is not compatible with the
furnace control. Either install a ballast
resistor, connect the Com24V thermostat
terminal to the thermostat, or replace the
thermostat.
YES
NO
YES
YES
YES
YES
YES
YES
YES
YES
YES
START
YES
YES
NO
NO
NO
NO
NO
NO
NO
NO
NO
NO
NO
Troubleshooting Guide
912SB
A11622
Fig. 64 -- Troubleshooting Guide
77
Page 78
11 NO PREVIOUS CODE – Stored codes are
erased after 72 hours. Run system
through a heating or cooling cycle to
check system.
12 BLOWER ON AFTER POWER UP –
(115V OR 24V) – Normal operation.
Blower runs for 90 seconds, if unit is
powered up during a call for heat (R-W
closed) or when (R-W opens) during the
blower on-delay period.
13 LIMIT CIRCUIT LOCKOUT – Lockout
occurs if the limit or flame rollout is o pen
longer than 3 minutes. Control will auto-
reset after 3 hours. See code 33.
14 IGNITION LOCKOUT – System failed to
ignite gas and prove flame in 4 attempts.
Control will auto-reset after 3 hours. See
status code 34.
21 GAS HEATING LOCKOUT – Turn off
power and wait 5 minutes to retry. Check
for:
- Stuck closed gas valve relay on control.
- Miswire or s hort to gas valve wire.
22 ABNORMAL FLAME-PROVING SIGNAL
Flame is proved while gas valve is de-
energized. Inducer will run until fault is
cleared. Check for:
- Stuck ope n or leaky gas valve.
23 PRESSURE SWITCH DID NOT OPEN –
Check for:
- Obstruct ed pressure tube.
- Pressure switch stuck closed.
24 SECONDARY VOLTAGE FUSE IS OPEN
Check for:
- Short circuit i n secondary voltage (24V)
wiring including thermostat leads .
Disconnect thermostat leads to isolat e
short circuit.
31 LPS or HPS PRESSURE SW ITCH DID
NOT CLOSE OR REOPENED – If opens
during blower on-delay period, blower will
come on for the selected blower off-delay.
Check for: - Proper vent sizing.
- Air leak between vestibule and blower
compartment.
- Low inlet ga s pressure (if LGPS used). - Disconnected or obstructed pressure
tubing.
- Defective or miswired pressure switches - Excessive wind.
- Plugged condensate drain
- Water in vent piping, possible sagging pipe
- Restricted vent.
- Defective Inducer motor.
- Low inducer voltage (115 VAC)
33 LIMIT CIRCUIT FAULT – Indicates the
limit, flame rollout is open. Blower will run
for 4 min. or until open switch remakes
whichever is longer. If open longer than 3
min, code changes to lockout #7. If open
less than 3 min. status code #4 continues
to flash until blower shuts off. Flame
rollout switch requires manual reset.
Check for: -
Loose blower wheel.
-
Defective switch or connections.
-
Dirty filter or restricted duct system.
-
Improper gas input adjustment.
-
Improper limit switch or no gasket unless
noted on switch.
34 IGNITION PROVING FAILURE – If flame
is not sensed during the trial for ignition
period, the control will repeat the ignition
sequence 3 more times before l ockout #14
occurs. If flame signal is lost during the
blower on-delay period, blo wer will come
on for the selected blower off-delay.
Check the following items first before
proceeding to the next step.
- Gas valve turned off.
- Manual shut-off valve.
- Green/Yellow wire MUST be connected
to furnace sheet metal.
- Flame sensor must not be grounded.
To determine whether the problem is in
the gas valve, igniter, or flame sensor the
system can be operated in the component
test mode to check the ignit er. First
remove the R thermostat connection from
the control and initiate the component test
sequence. Does the igniter glo w
orange/white by the end of the 15 second
warm-up period?
Check connections and retry.
If current is near typical valu e
(4.0-6.0 nominal) and burners
will not stay on, replace
control.
Clean flame sensor with fine steel wool
and recheck current. Nominal current is
4.0 to 6.0 microamps.
Is current near typical value?
Replace electrode.
Will main burners ignite and stay on?
Replace furnace control.
Fixed.
NO
YES
YES
YES
YES
NO
NO
45 CONTROL CIRCUITRY
LOCKOUT Auto-reset
after 1 hour lockout due
to:
- Flame circuit fail ure.
- Gas valve relay stuck
open.
- Software check error.
Reset power to clear
lockout. Replace
control if code repeats.
Unplug igniter harness from cont rol and
initiate another component test
sequence. Check for 115V b etween pin
1 and NEUTRAL-L2 on the control. W as
115V present for the 15 second period?
Replace furnace control.
Check for continuity in the
harness and igniter. Replac e
defective component.
Reconnect the R thermostat lead and set
thermostat to call for heat. Connect
voltmeter across gas valve connections.
Does gas valve receive 24V?
Does gas valve open and allow gas to
flow?
Do the main burners ignite?
Do the main burners stay on?
Allow blower to come on and
repeat test to check for
intermittent operation.
Check that all gas valves are
turned on. Replace valve.
Check connections. If OK,
replace control.
Repeat call for heat and check flame
sensor current during trial for ignition
period. Is the DC microamps below 0.5?
YES
YES
YES
YES
YES
NO
NO
NO
NO
NO
NO
Check for:
- Inadequate flame carryover
or rough ignition.
- Low inlet ga s pressure.
- Proper firing rate.
912SB
If LPS opens longer than 5 minutes,
inducer shuts off for 15 minutes before
retry. If HPS remains open for one minute
after gas valve closes the furnace will shut
down and retry. If HPS fails to close on
three successive cycles the furnace will
lockout for 3 hrs before retry.
A12421
Troubleshooting Guide (Cont)
78
Page 79
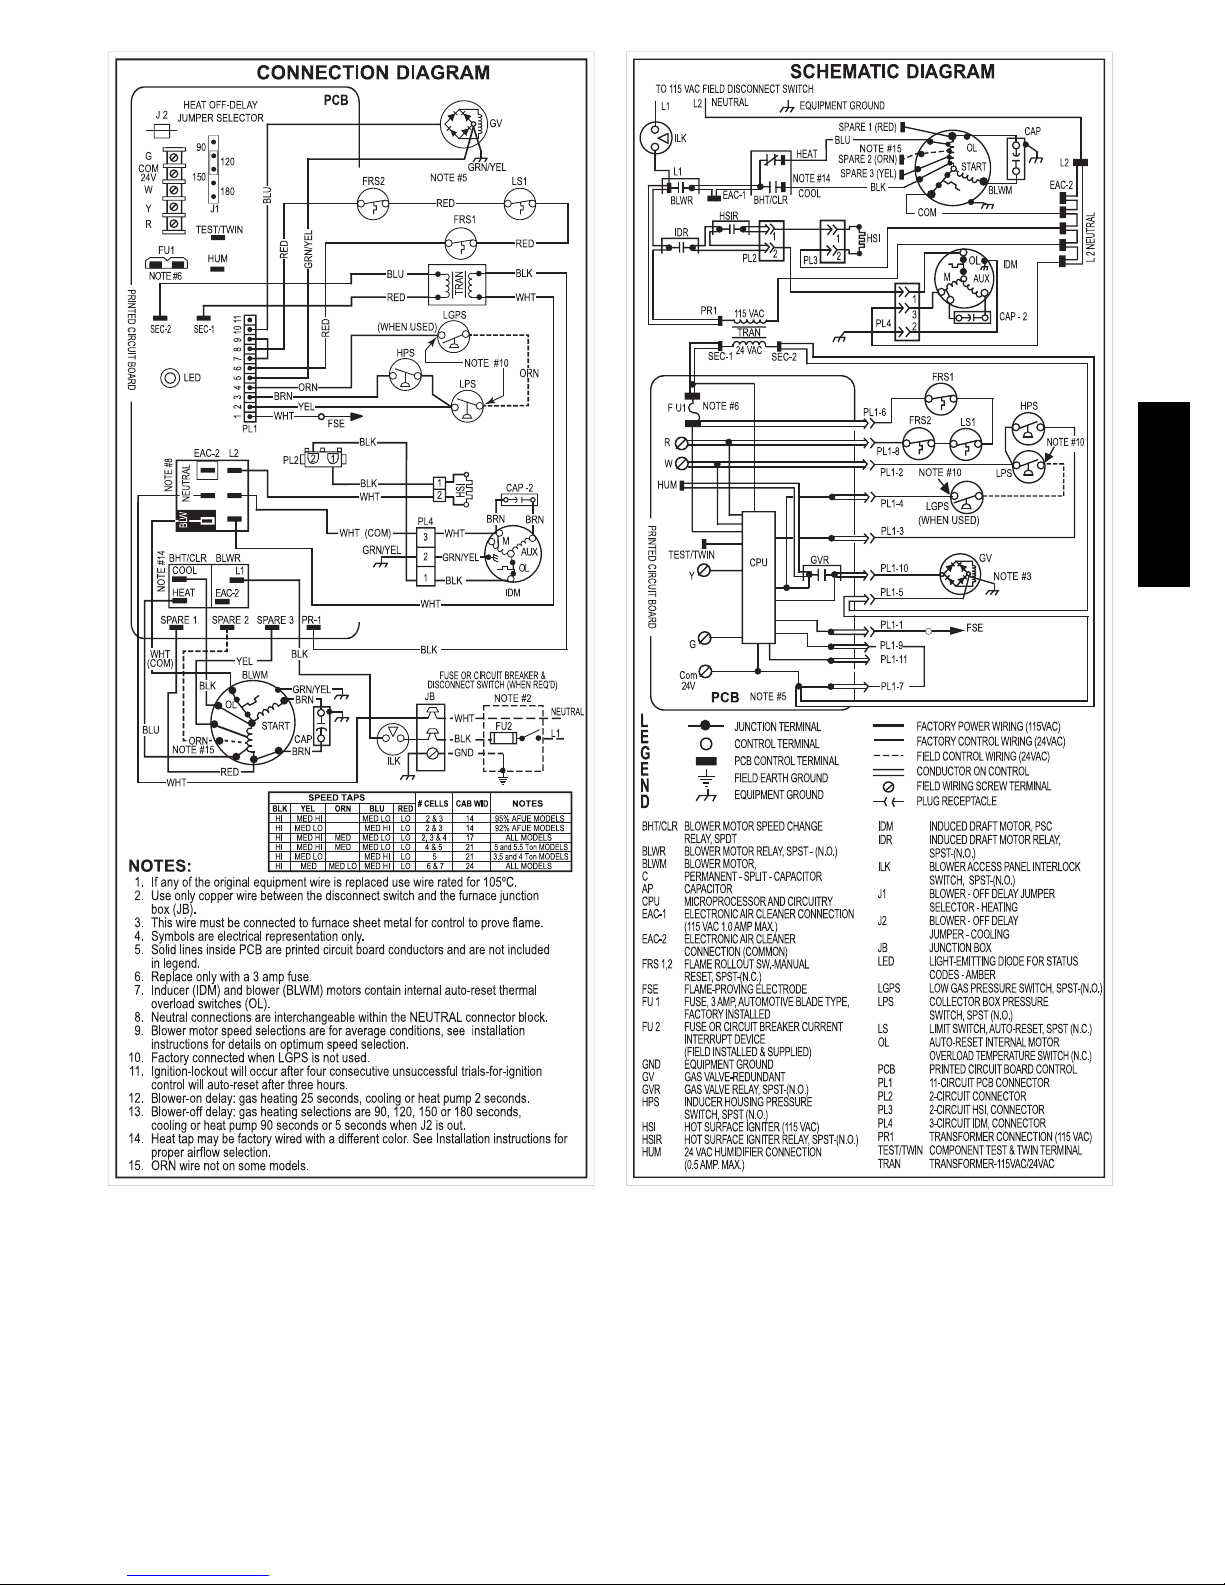
912SB
A12420
Fig. 65 -- Wiring Diagram
79
Page 80
PARTS REPLACEMENT INFORMATION GUIDE
Casing Group
Blower door
Bottom plate
Control door
Door knob assembly
Top filler plate
Electrical Group
3--Amp fuse
Circuit board
Control box
Door switch
Junction box
Limit switch(es)
Transformer
912SB
Blower Group
Blower housing
Blower motor
Blower wheel
Capacitor (when used)
Capacitor strap (when used)
Cut--off plate
Power choke (where used)
Filter Group
Filter(s)
Media Cabinet (when used)
Gas Control Group
Burner
Flame sensor
Gas valve
Hot surface igniter
Manifold
Orifice
Heat Exchanger Group
Containment plate
Coupling box
Heat exchanger assembly
Primary HX cell panel
Secondary HX assembly
Tubing gaskets
Inducer Group
Collector box
Condensate trap
Condensate trap elbow
Gaskets
Inducer
Inducer assembly
Inducer motor capacitor (when used)
Inducer motor module (when used)
Pressure switch(es)
TO OBTAIN INFORMATION ON PARTS: Consult your installing dealer or classified section of your local telephone directory under
“Heating Equipment” or “Air Conditioning Contractors and Systems” headings for dealer listing by brand name or contact:
BRYANT HEATING & COOLING SYSTEMS
Consumer Relations Department
P.O. Box 4952
Syracuse, New York 13221--4952
1--800--428--4326
Have available the model number, series number, and serial number located on the unit rating plate to ensure correct replacement part.
Model Nomenclature
MODEL
912SB 30 040 E 14 A -- A
FIRE, EXPLOSION, ELECTRICAL SHOCK AND CARBON MONOXIDE POISONING HAZARD
Failure to follow this warning could result in dangerous operation, personal injury, death or property damage.
Improper installation, adjustment, alteration, service, or maintenance can cause personal injury, property damage, or death. Consult a
qualified installer, service agency, or your local gas supplier for information or assistance. The qualified installer or service agency
must use only factory--authorized replacement parts, kits, or accessories when modifying this product.
COOLING
CAPACITY
HEATING
CAPACITY
!
MOTOR WIDTH VO LTAG E
WARNING
FEATURES/
MINOR
SERIES
E2013 Bryant Heating & Cooling Systems D 7310 W. Morris St. D Indianapolis, IN 46231 Edition Date: 04/13
Manufacturer reserves the right to discontinue, or change at any time, specifications or designs without notice and without incur ring obligations.
80
Catalog No. II912SB---02
Replaces: II912SB---01
 Loading...