

Page 1
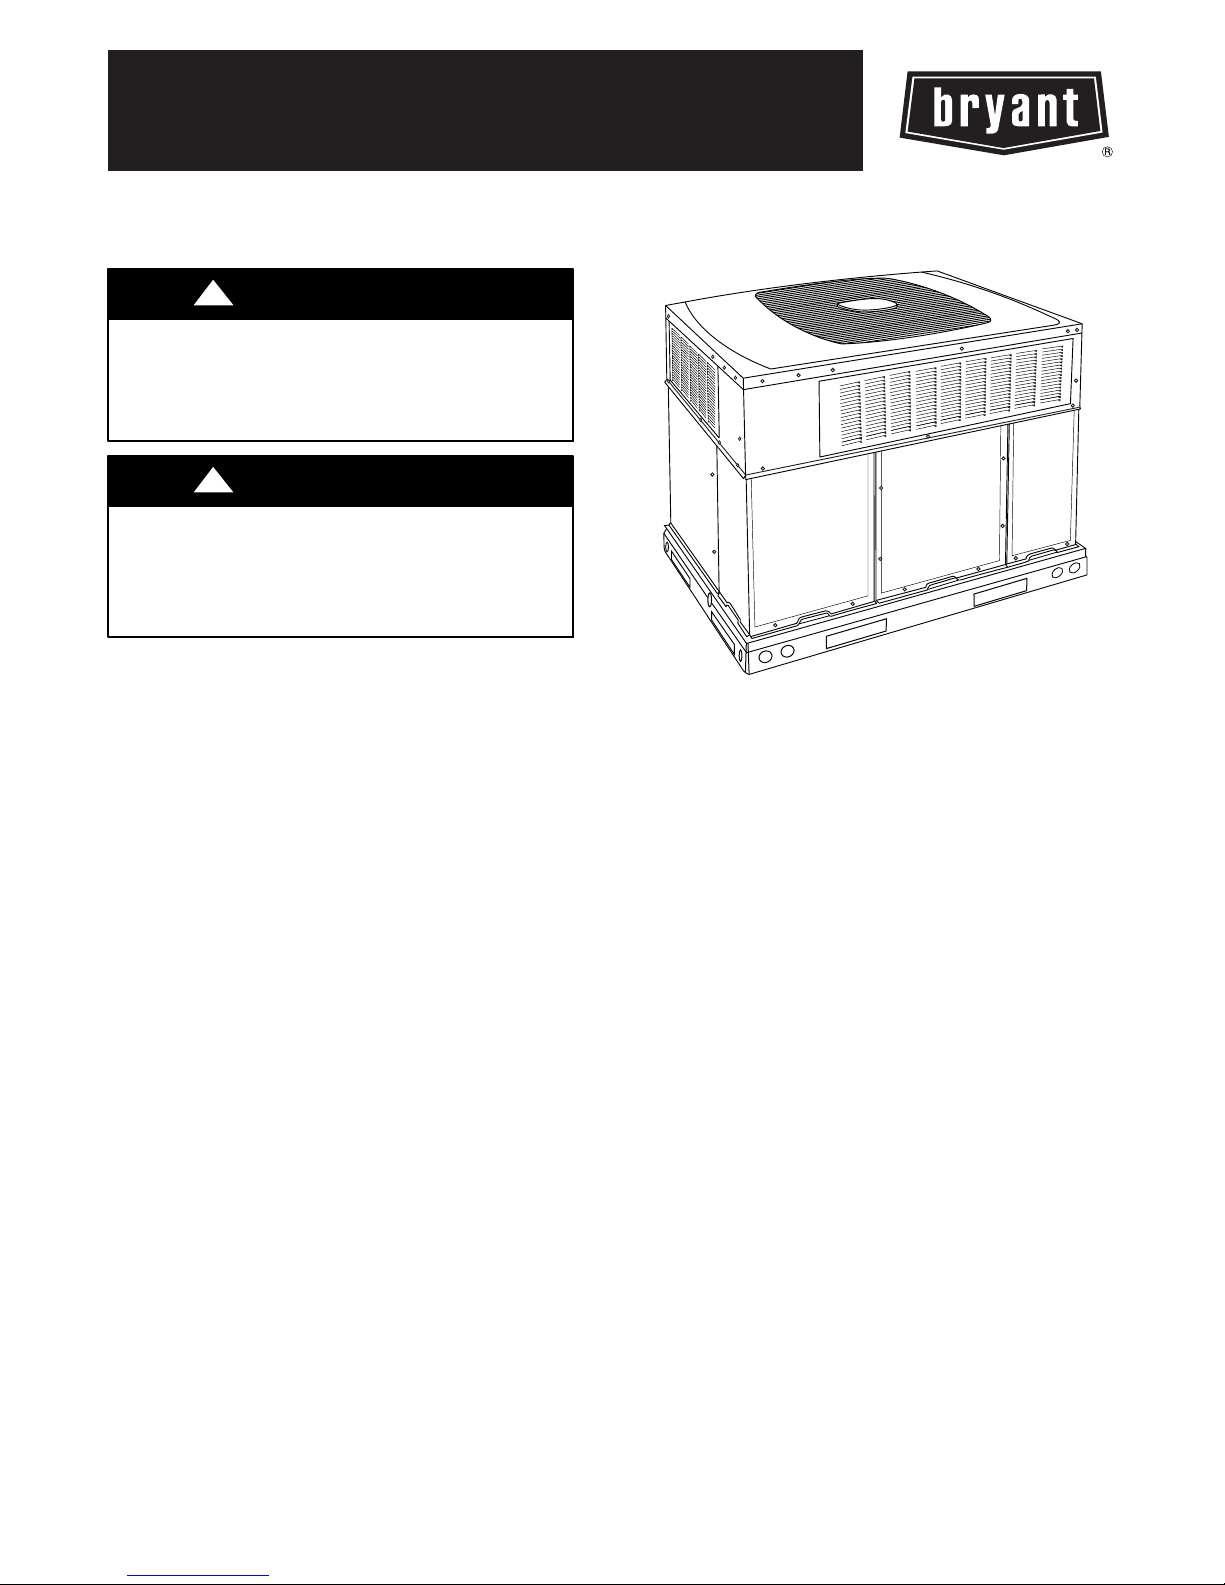
677D----A
EVOLUTIONR 15 SEER
SINGLE--PACKAGED HYBRID HEATR DUAL FUEL SYSTEM WITH
PURONr (R--410A) REFRIGERANT
2--5 NOMINAL TONS (SIZES 24--60)
Installation Instructions
!
CAUTION
EQUIPMENT OPERATION HAZARD
Failure to follow this caution may result in improper unit
operation.
OAT sensor must be field installed. Follow installation
instructions for proper installation.
!
CAUTION
EQUIPMENT OPERATION HAZARD
Failure to follow this caution may result in improper unit
operation.
This Evolutionr unit is designed for use with an Evolution
User Interface.
NOTE: Read the entire instruction manual before starting the
installation.
TABLE OF CONTENTS
PAGE
SAFETY CONSIDERATIONS 2.........................
INTRODUCTION 2...................................
RECEIVING AND INSTALLATION 2--13.................
Check Equipment 2..................................
Identify Unit 2....................................
Inspect Shipment 2.................................
Provide Unit Support 2...............................
Roof Curb 2......................................
Slab Mount 3.....................................
Provide Clearances 3.................................
Rig and Place Unit 3.................................
Inspection 3......................................
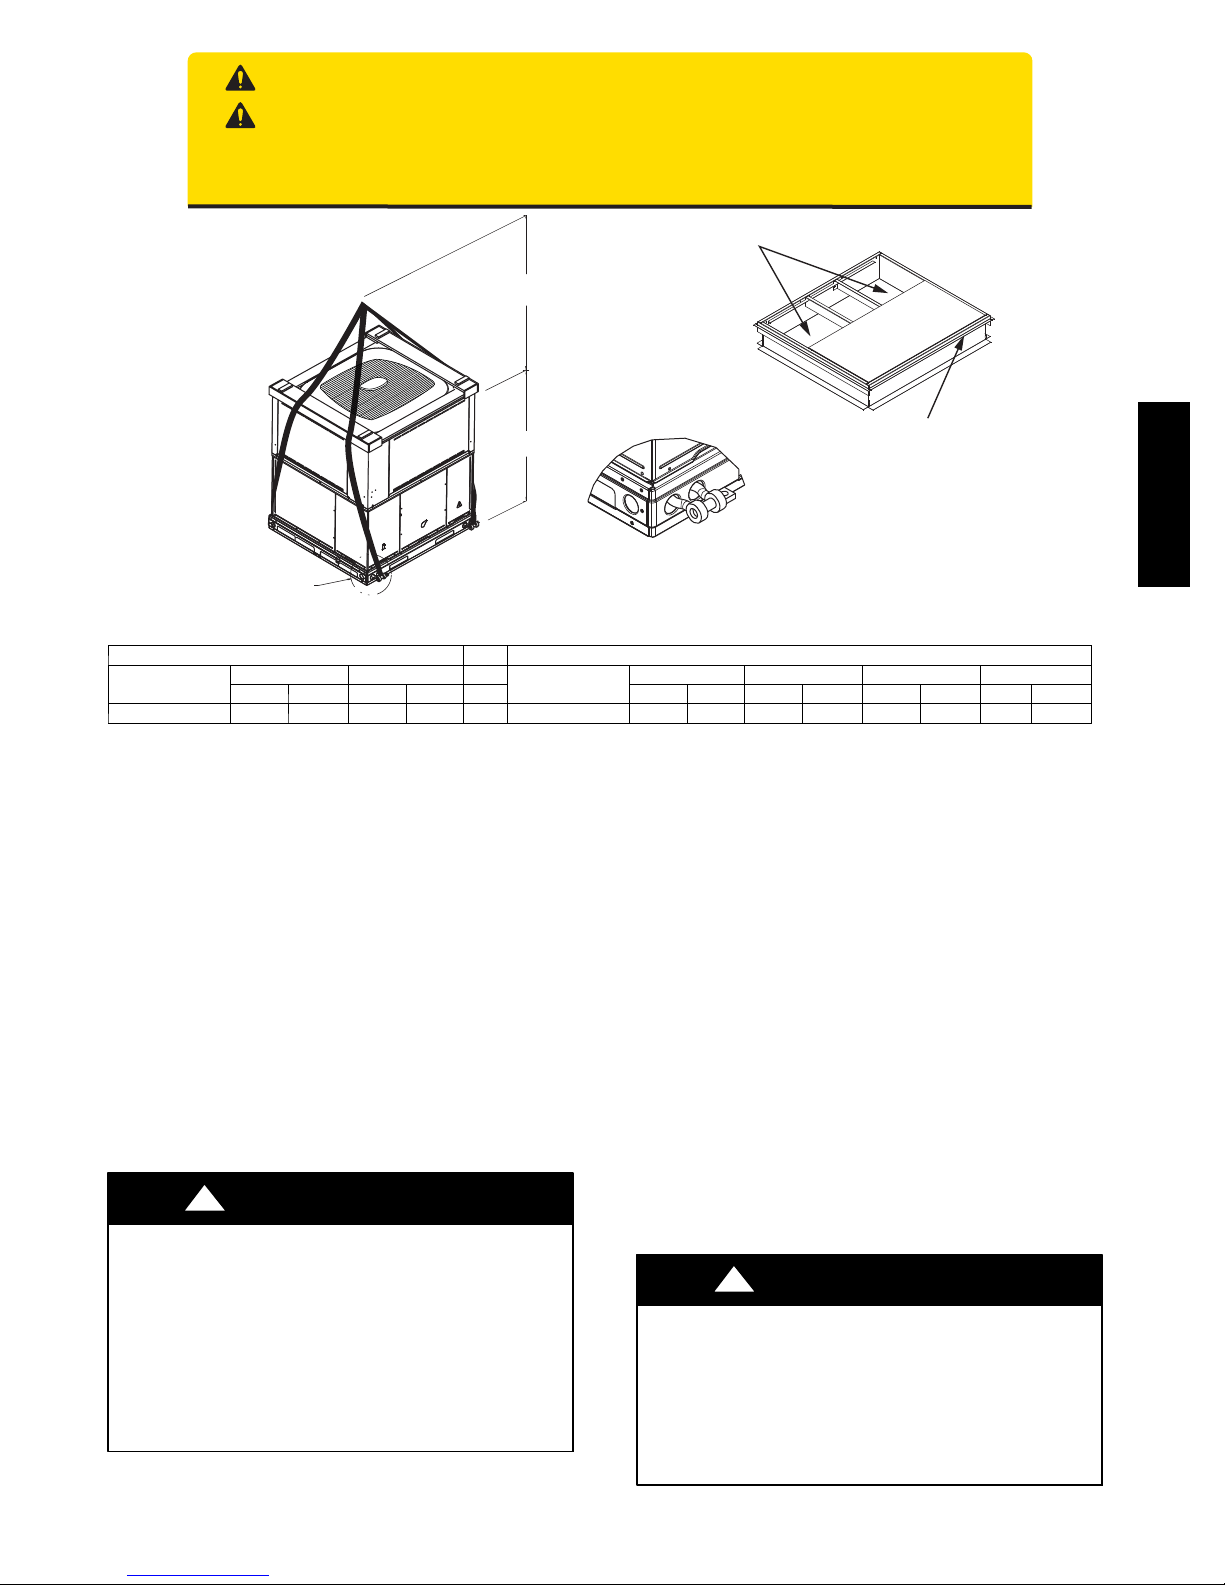
Rigging/Lifting of Unit 3............................
Select and Install Ductwork 9...........................
Converting Horizontal Discharge Units to Downflow
(Vertical) Discharge Units 9..........................
Provide for Condensate Disposal 10.....................
Install Flue Hood 10..................................
Install Gas Piping 10.................................
Install Electrical Connections 12........................
High--Voltage Connections 12........................
Routing Power Leads Into Unit 12.....................
Connecting Ground Lead to Ground Screw 12...........
Routing Control Power Wires 12.....................
Outdoor Air Temperature Sensor (OAT) 12..............
Accessory Installation 13............................
Special Procedures for 208--v Operation 13..............
PRE--START--UP 15...................................
START--UP 16--30.....................................
Unit Start--Up and Troubleshooting 16...................
Sequenceof Operation 22.............................
Check for Refrigerant Leaks 29.........................
Start--Up Adjustments 29..............................
Checking Cooling and Heating Control Operation 29......
A09032
Fig. 1 -- Unit 677D----A
Checking and Adjusting Refrigerant Charge 29...........
Refrigerant Charge 30..............................
No Charge 30.....................................
Low Charge Cooling 30.............................
To Use Cooling Charging Charts 30....................
Non--Communicating Emergency Cooling/Heating Mode 30..
MAINTENANCE 30--33................................
Air Filter 32........................................
Indoor Fan and Motor 32..............................
Combustion--Air Blower 32............................
Burner Ignition 32...................................
Main Burners 32....................................
Inducer Pressure Switch 33............................
Outdoor Coil, Indoor Coil, and Condensate Drain Pan 33.....
Outdoor Fan 33.....................................
Electrical Controls and Wiring 34.......................
Refrigerant Circuit 34.................................
Indoor Airflow 34...................................
Metering Devices–TXV & AccuRater
Pressure Switches 34.................................
L o s s -- o f -- C h a r g e S w i t c h 3 4............................
High--Pressure Switches 34............................
Copeland Scroll Compressor (Puron
Refrigerant System 34................................
Refrigerant 35....................................
Compressor Oil 35.................................
Servicing Systems on Roofs with Synthetic Materials 35....
Liquid--Line Filter Drier 35..........................
Puron (R--410A) Refrigerant Charging 35...............
TROUBLESHOOTING 35..............................
FINAL CHECKS 37...................................
CARE AND MAINTENANCE 37........................
START--UP CHECKLIST 40............................
®
Piston 34...........
®
Refrigerant) 34........
1
Page 2
SAFETY CONSIDERATIONS
Improper installation, adjustment, alteration, service maintenance,
or use can cause explosion, fire, electrical shock, or other
conditions which may cause death, personal injury, or property
damage. Consult a qualified installer, service agency, or your
distributor or branch for information or assistance. The qualified
installer or agency must use factory--authorized kits or accessories
when modifying this product. Refer to the individual instructions
packaged with the kits or accessories when installing.
Follow all safety codes. Wear safety glasses, protective clothing,
and work gloves. Have a fire extinguisher available. Read these
instructions thoroughly and follow all warnings or cautions
included in literature and attached to the unit. consult local
building codes, the current editions of the National Fuel Gas Code
(NFGC) NFPA 54/ANSI Z223.1, and the National Electrical Code
(NEC) NFPA 70.
In Canada refer to the current editions of the National Standards of
Canada CAN/CSA--B149.1 and .2 Natural Gas and Propane
Installation codes, and Canadian Electrical Code CSA C22.1
Recognize safety information. This is the safety--alert symbol
When you see this symbol on the unit and in instructions or manuals, be alert to the potential for personal injury. Understand these
677D-- --A
signal words: DANGER, WARNING, and CAUTION. These
words are used with the safety--alert symbol. DANGER identifies
the most serious hazards which will result in severe personal injury
or death. WARNING signifies hazards which could result in personal injury or death. CAUTION is used to identify unsafe practices which may result in minor personal injury or product and property damage. NOTE is used to highlight suggestions which will
result in enhanced installation, reliability, or operation.
Always install furnace to operate within the intended temperature
rise range with a duct system which has an external static pressure
within the allowable range, as specified in “Indoor Airflow Adjustments” section of these instructions. See furnace rating plate.
!
WARNING
ELECTRICAL SHOCK HAZARD
Failure to follow this warning could result in personal
injury or death.
Before installing or servicing system, always turn off main
power to system and install lock out tag. There may be
more than one disconnect switch. Turn off accessory heater
power switch if applicable.
!
WARNING
UNIT OPERATION AND SAFETY HAZARD
Failure to follow this warning could result in personal
injury or equipment damage.
Puron (R--410A) systems operate at higher pressures than
standard R--22 systems. DO NOT use R--22 service
equipment or components on Puron (R--410A) equipment.
Ensure service equipment is rated for Puron (R--410A).
!
CAUTION
CUT HAZARD
Failure to follow this caution may result in personal injury.
When removing access panels or performing maintenance
functions inside your unit, be aware of sharp sheet metal
parts and screws. Although special care is taken to reduce
sharp edges to a minimum, be extremely careful and wear
appropriate protective clothing, safety glasses and gloves
when handling parts or reaching into the unit.
INTRODUCTION
The 677D----A packaged HYBRID HEATR unit is a fully
self--contained combination Category I gas heating/electric heat
pump designed for outdoor installation (See Fig. 1). Standard units
are shipped in a horizontal--discharge configuration for installation
on a rooftop, or on a cement slab (see Fig. 4 for roof curb
dimensions). Standard units can be converted to downflow
(vertical) discharge configurations for rooftop applications.
In gas heating mode, this unit is designed for a minimum
continuous return--air temperature of 55_F(13_C) db and a
maximum continuous return--air temperature of 80_F(27_C) db.
Failure to follow these return--air temperature limits may affect
reliability of heat exchangers, motors, and other components.
Models with an N in the thirteenth position of the model number
are dedicated Low NOx units designed for California installations.
These models meet the California maximum oxides of nitrogen
(NOx) emissions requirements of 40 nanograms/joule or less as
shipped from the factory and must be installed in California Air
Quality Management Districts or any other regions in North
America where a Low NOx rule exists.
NOTE: Low NOx requirements apply only to natural gas
.
installations.
RECEIVING AND INSTALLATION
Check Equipment
IDENTIFY UNIT
The unit model number and serial number are printed on the unit
informative plate. Check this information against shipping papers.
INSPECT SHIPMENT
Inspect for shipping damage before removing packaging material.
If unit appears to be damaged or is torn loose from its anchorage,
have it examined by transportation inspectors before removal.
Forward claim papers directly to transportation company.
Manufacturer is not responsible for any damage incurred in transit.
Check all items against shipping list. Immediately notify the
nearest distributor’s office if any item is missing. To prevent loss or
damage, leave all parts in original packages until installation.
If the unit is to be mounted on a curb in a downflow application,
review “Converting Horizontal Discharge Units to Downflow” to
determine which method is to be used to remove the downflow
panels before rigging and lifting into place. The panel removal
process may require the unit to be on the ground.
Provide Unit Support
For hurricane tie downs, contact distributor for details and PE
(Professional Engineering) Certificate, if required.
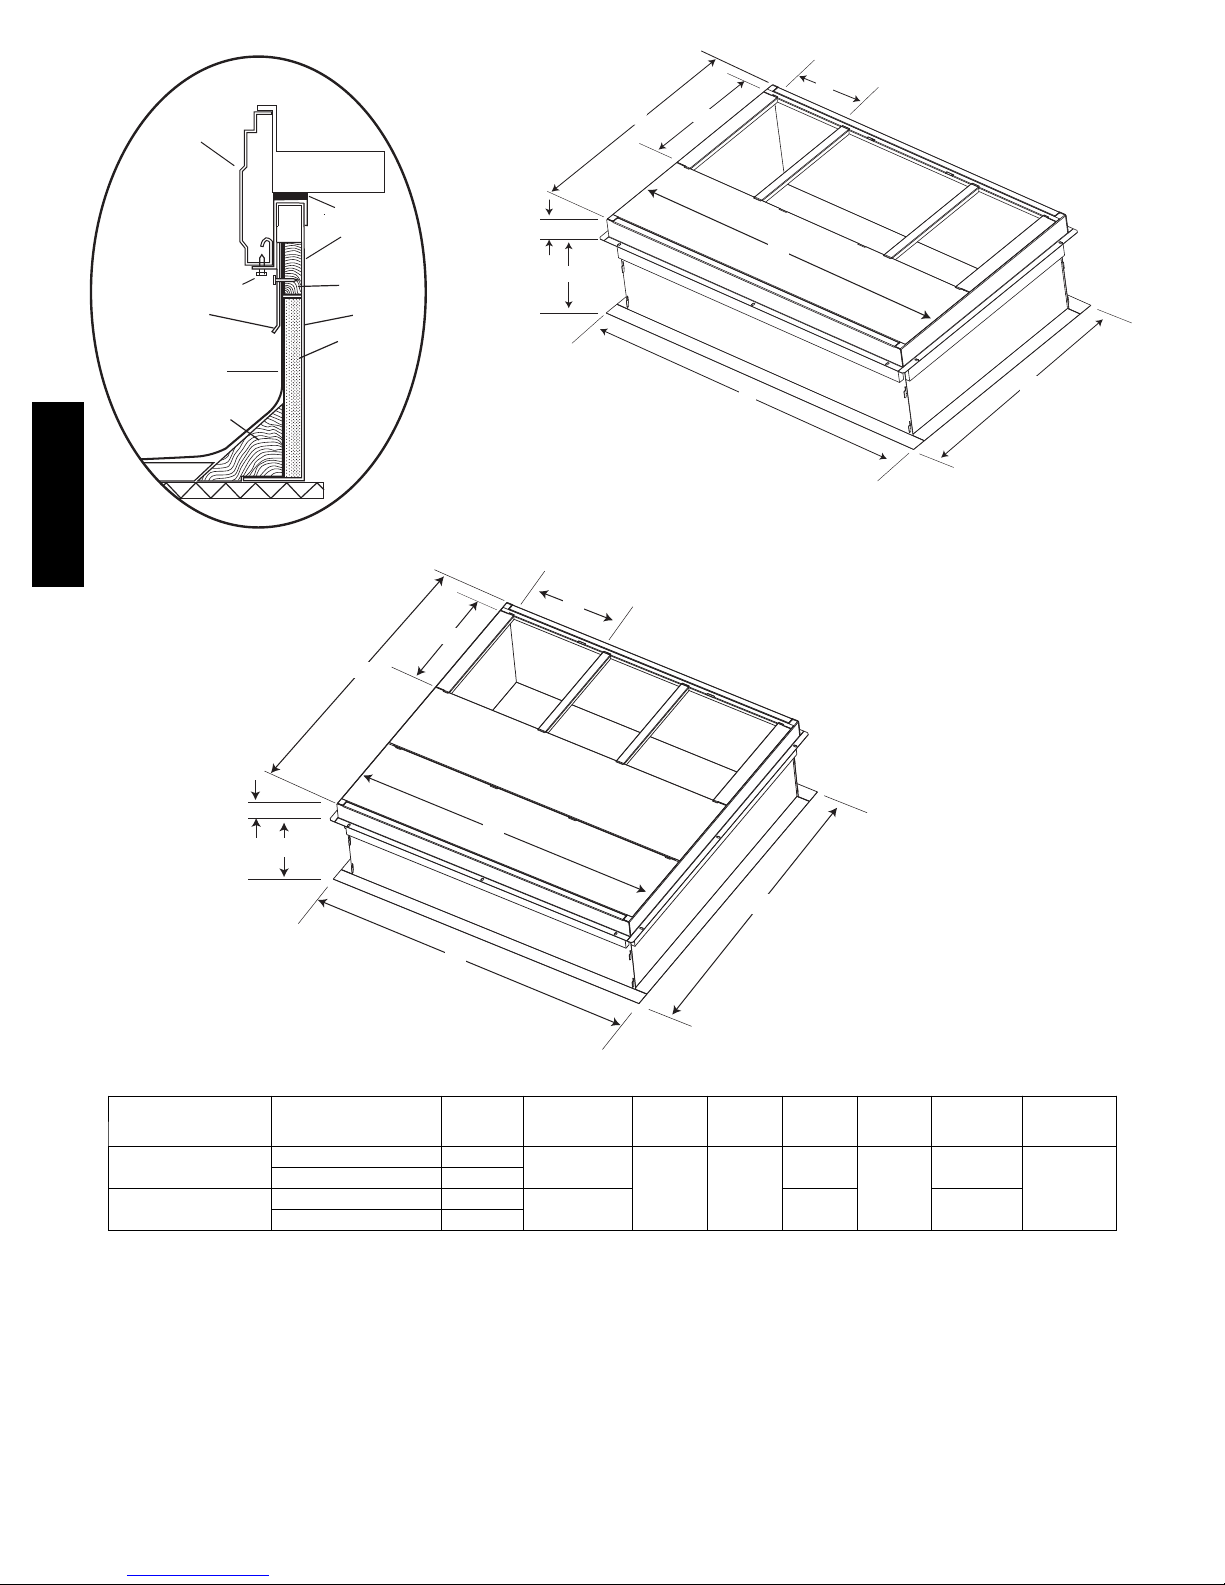
ROOF CURB
Install accessory roof curb in accordance with instructions shipped
with curb (See Fig. 4). Install insulation, cant strips, roofing, and
flashing. Ductwork must be attached to curb.
IMPORTANT: The gasketing of the unit to the roof curb is
critical for a water tight seal. Install gasketing material supplied
with the roof curb. Improperly applied gasketing also can result in
air leaks and poor unit performance.
Curb should be level to within 1/4 in. (6.35 mm) (See Fig. 2). This
is necessary for unit drain to function properly. Refer to accessory
roof curb installation instructions for additional information as
required.
Installation on older “G” seriesroof curbs.
Two accessory kits are available to aid in installing a new “G”
series unit on an old “G” roof curb.
1. Accessory kit number CPADCURB001A00, (small chassis)
and accessory kit number CPADCURB002A00, (large
chassis) includes roof curb adapter and gaskets for the
perimeter seal and duct openings. No additional
modifications to the curb are required when using this kit.
2. An alternative to the adapter curb is to modify the existing
curb by removing the outer horizontal flange and use
accessory kit number CPGSKTKIT001A00 which includes
2
Page 3
spacer blocks (for easy alignment to existing curb) and
A
gaskets for the perimeter seal and duct openings. This kit is
used when existing curb is modified by removing outer
horizontal flange.
Rig and Place Unit
!
WARNING
!
CAUTION
UNIT/STRUCTURAL DAMAGE HAZARD
Failure to follow this caution may result in property damage.
Ensure there issufficient clearancefor saw blade when cutting
the outer horizontal flange of the roof curb so there is no
damage to the roof or flashing.
C
MAXIMUM ALLOWABLE
B
A-B
(6.35)
1/4
Fig. 2 -- Unit Leveling Tolerances
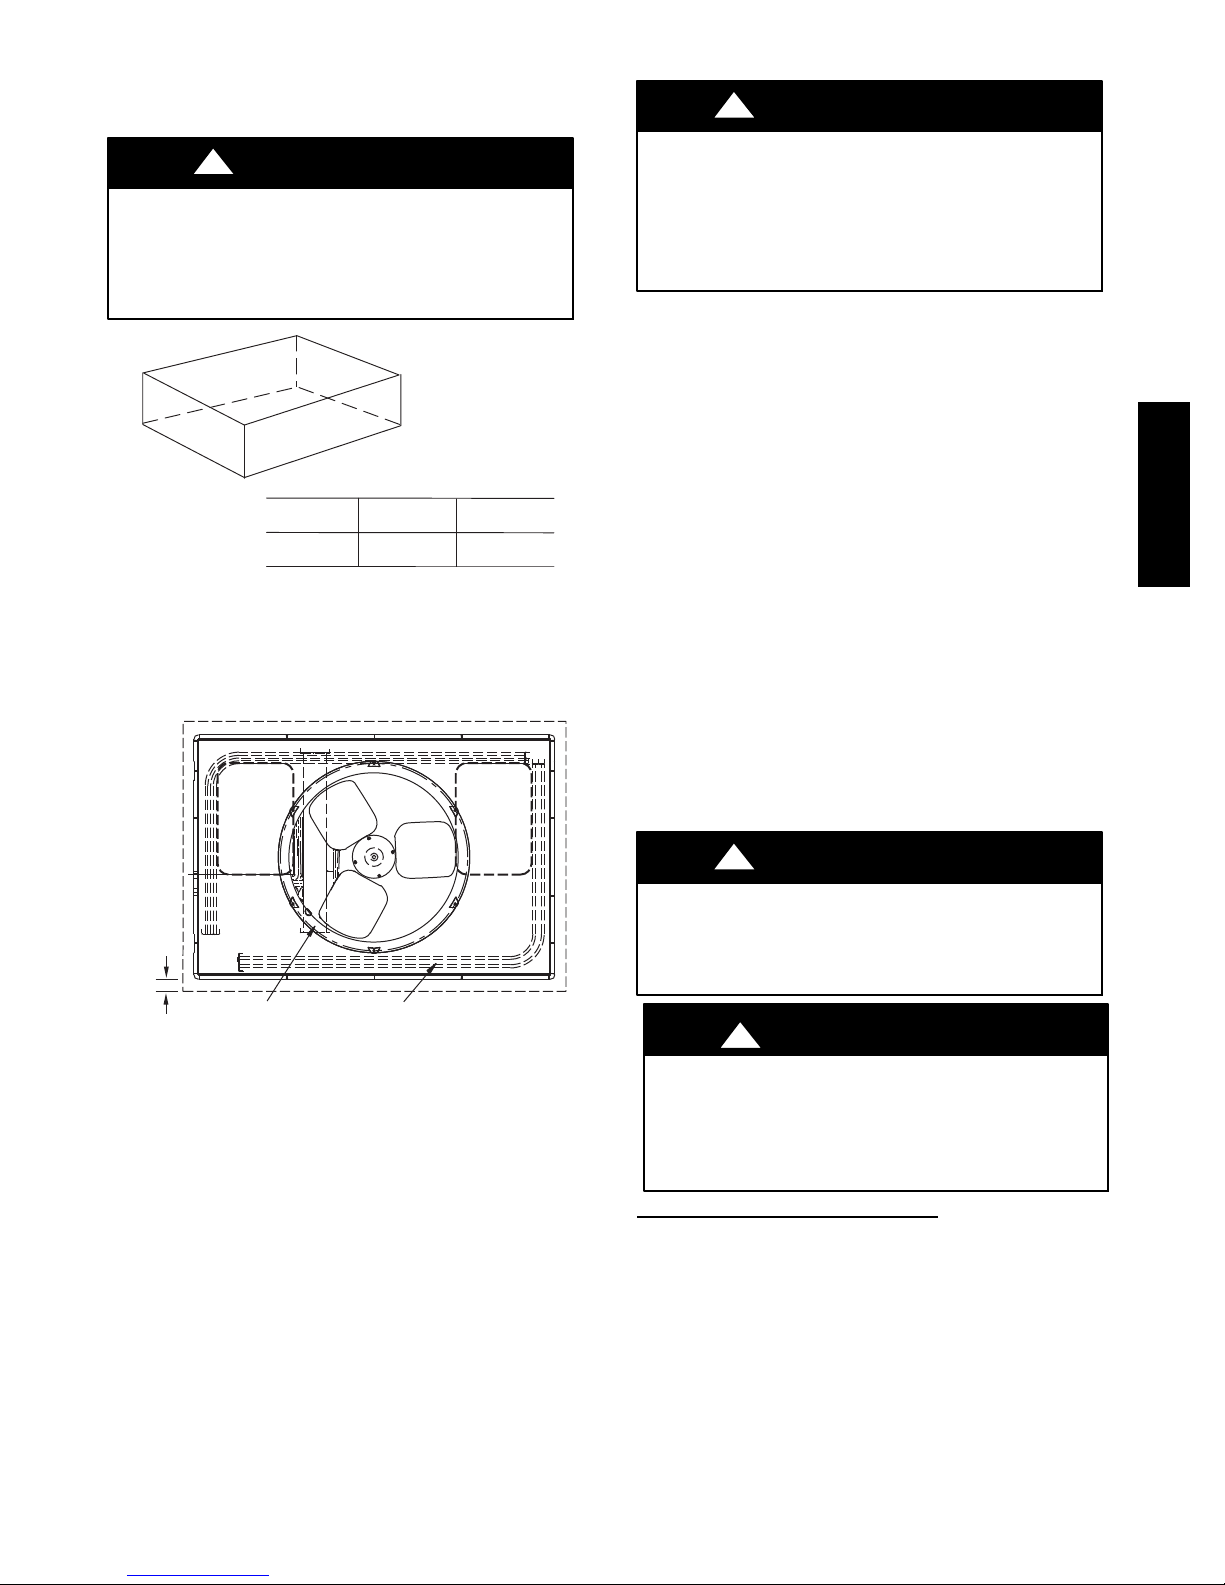
SLAB MOUNT
Place the unit on a solid, level pad that is at least 2 in. (51 mm)
above grade. The pad should extend approximately 2 in. beyond
the casing on all 4 sides of the unit (See Fig. 3). Do not secure the
unit to the pad except when required by local codes.
OPTIONAL
RETURN
AIR
OPENING
DIFFERENCE in. (mm)
B-C
(6.35)
1/4
1/4
OPTIONAL
SUPPLY
AIR
OPENING
A-C
(6.35)
A07925
PERSONAL INJURY OR PROPERTY DAMAGE
HAZARD
Failure to follow this warning could result in personal
injury, death or property damage.
When installing the unit on a rooftop, be sure the roof will
support the additional weight.
Rigging and handling of this equipment can be hazardous for
many reasons due to the installation location (roofs, elevated
structures, etc.).
Only trained, qualified crane operators and ground support staff
should handle and install this equipment.
When working with this equipment, observe precautions in the
literature, on tags, stickers, and labels attached to the equipment,
and any other safety precautions that might apply.
Training for operators of the lifting equipment should include, but
not be limited to, the following:
1. Application of the lifter to the load, and adjustment of the
lifts to adapt to various sizes or kinds of loads.
2. Instruction in any special operation or precaution.
3. Condition of the load as it relates to operation of the lifting
kit, such as balance, temperature, etc.
Follow all applicable safety codes. Wear safety shoes and work
gloves.
INSPECTION
Prior to initial use, and at monthly intervals, all rigging shackles,
clevis pins, and straps should be visually inspected for any damage,
evidence of wear, structural deformation, or cracks. Particular
attention should be paid to excessive wear at hoist hooking points
and load support areas. Materials showing any kind of wear in
these areas must not be used and should be discarded.
677D-- --A
!
WARNING
UNIT FALLING HAZARD
2˝
(50.8mm)
EVAP. COIL COND. COIL
Fig. 3 -- Slab Mounting Detail
A07926
Provide Clearances
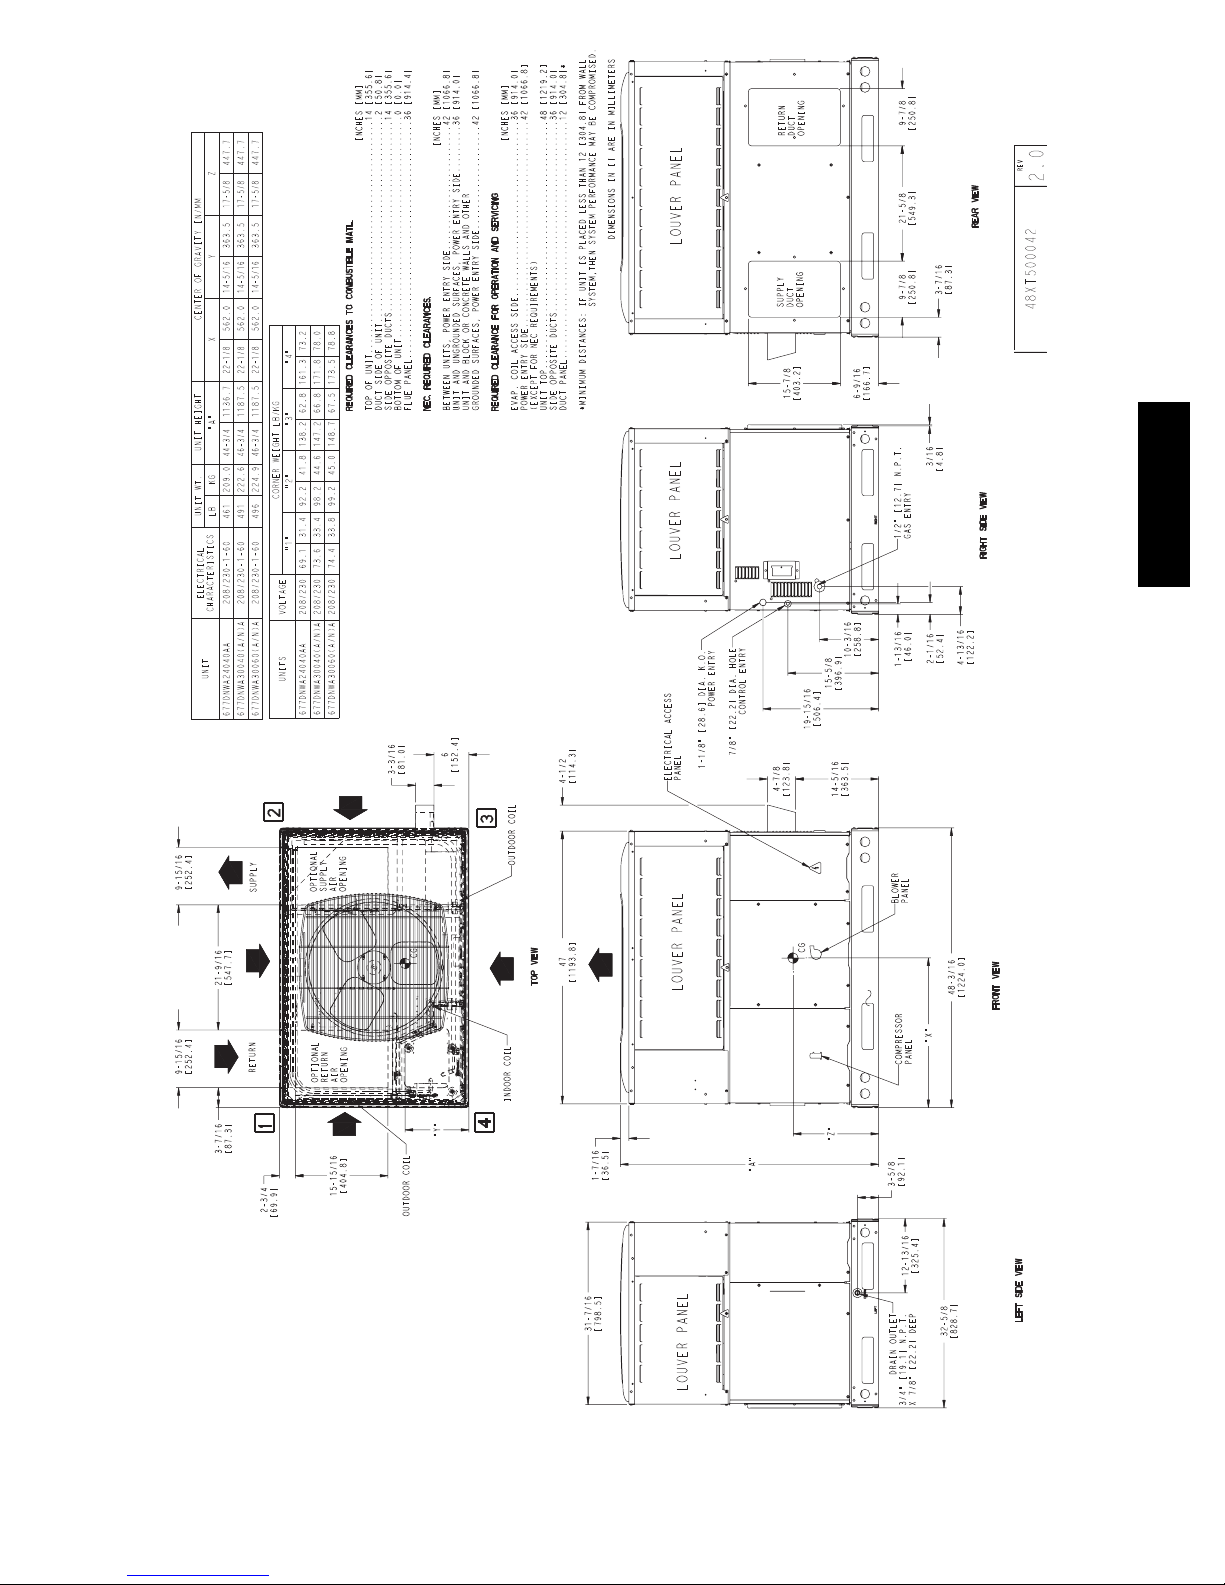
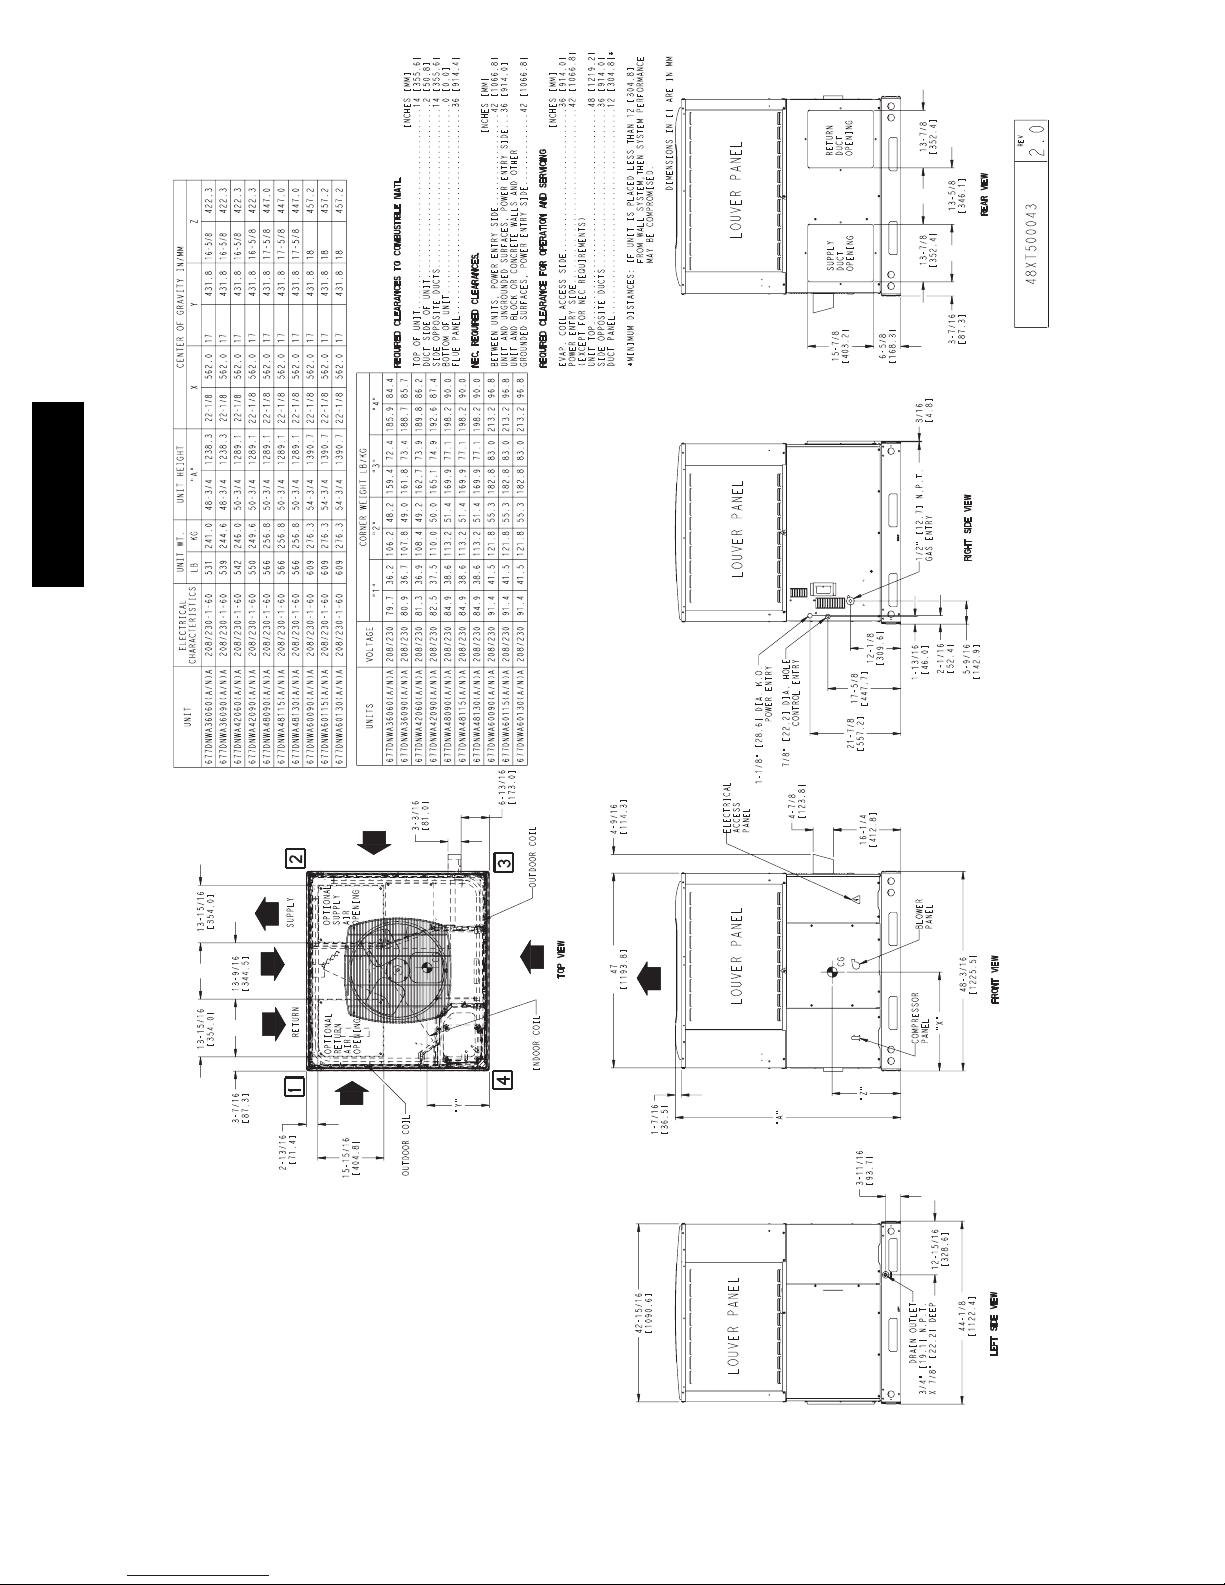
The required minimum service clearances are shown in Fig. 5 and
6. Adequate ventilation and outdoor air must be provided. The
outdoor fan draws air through the outdoor coil and discharges it
through the top fan grille. Be sure that the fan discharge does not
recirculate to the outdoor coil. Do not locate the unit in either a
corner or under an overhead obstruction. The minimum clearance
under a partial overhang (such as a normal house overhang) is 48
in. above the unit top. The maximum horizontal extension of a
partial overhang must not exceed 48 in. (1219 mm).
IMPORTANT: Do not restrict outdoor airflow. An air restriction
at either the outdoor--air inlet or the fan discharge may be
detrimental to compressor life.
Do not place the unit where water, ice, or snow from an overhang
or roof will damage or flood the unit. Do not install the unit on
carpeting or other combustible materials. Slab--mounted units
should be at least 2 in. (51 mm) above the highest expected water
and runoff levels. Do not use unit if it has been under water.
Failure to follow this warning could result in personal
injury or death.
Never stand beneath rigged units or lift over people.
WARNING
!
PROPERTY DAMAGE HAZARD
Failure to follow this warning could result in personal
injury/death or property damage.
When straps are taut, the clevis should be a minimum of 36
in. (914 mm) above the unit top cover.
Rigging/Lifting of Unit (See Fig. 7)
Lifting holes are provided in base rails as shown in Fig. 5 and 6.
1. Leave top shipping skid on the unit for use as a spreader bar
to prevent the rigging straps from damaging the unit. If the
skid is not available, use a spreader bar of sufficient length
to protect the unit from damage.
2. Attach shackles, clevis pins, and straps to the base rails of
the unit. Be sure materialsare rated to hold the weight of the
unit (See Fig. 7).
3. Attach a clevis of sufficient strength in the middle of the
straps. Adjust the clevis location to ensure unit is lifted level
with the ground.
After the unit is placed on the roof curb or mounting pad, remove
the top skid.
3
Page 4
HVAC unit
base rails
Anchor screw
Flashing field
supplied
Roofing material
field supplied
Cant strip
field supplied
HVAC unit
basepan
Sealing
Gasket
Roofcurb
Wood nailer*
Roofcurb*
Insulation
(field supplied)
B
G
C
H
F
A
D
E
SMALL CURB
*Provided with roofcurb
677D-- --A
ROOF CURB DETAIL
A09090
A09418
B
C
G
H
A
F
E
D
LARGE CURB
UNIT BASEPAN SIZE
Small
Large
NOTES:
1. Roof curb must be set up for unit being installed.
2. Seal strip must be applied, as required, to unit being installed.
3. Roof curb is made of 16--gauge steel.
4. Attach ductwork to curb (flanges of duct rest on curb).
5. Insulated panels: 1--in. (25 mm) thick fiberglass 1 lb. density.
IMPORTANT: Do not install large base pan HYBRID HEAT
units onto the small base pan (common curb). The center of gravity
on a large base pan HYBRID HEAT unit could overhang the curb
causing an unsafe condition. Before installing any large base pan
unit onto the common curb, check the “Y” distance in the product
CATALOG
NUMBER
CPRFCURB010A00 11 (279)
CPRFCURB011A00 14 (356)
CPRFCURB012A00 11 (279)
CPRFCURB013A00 14 (356)
A
IN. (mm)BIN. (mm)
10 (254)
14 (356)
Fig. 4 -- Roof Curb Dimensions
A09415
A09419
C
IN.
(mm)
16 (406)
D
IN.
(mm)
47.8
(1214)
E
IN.
(mm)
32.4
(822)
43.9
(1116)
F
IN.
(mm)
2.7 (69)
G
IN. (mm)HIN. (mm)
30.6 (778)
42.2 (1072)
46.1 (1170)
literature dimensional drawing to ensure that “Y” is greater than 14
in. (356 mm). Do not install any large base pan unit onto the
common curb with a “Y” dimension (center of gravity) less than 14
in. (356 mm).
4
Page 5
677D-- --A
A09561
Fig. 5 -- 677D----A24--30 Unit Dimensions
5
Page 6
677D-- --A
A09562
Fig. 6 -- 677D----A36--60 Unit Dimensions
6
Page 7
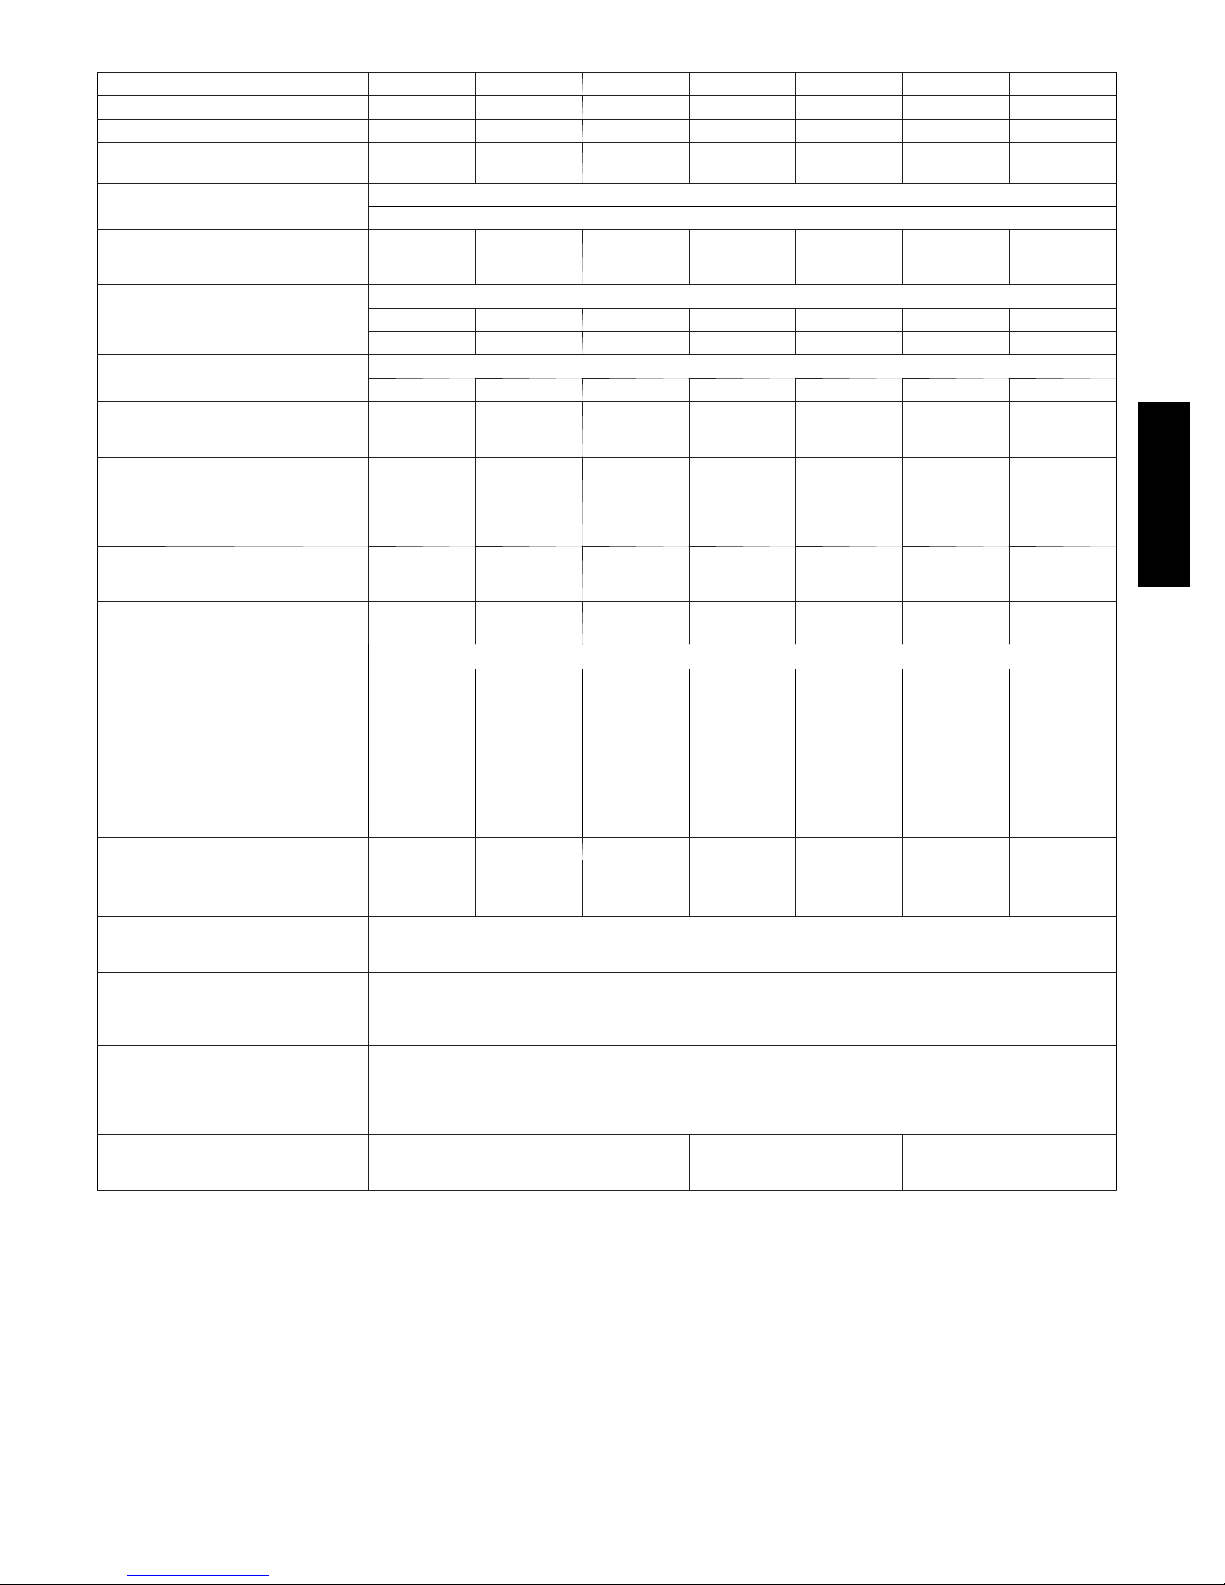
Table 1 – Physical Data -- Unit 677D----A
UNIT SIZE A24040 A30040 A30060 A36060 A36090 A42060 A42090
NOMINAL COOLING CAPACITY (ton) 2 2 --- 1 / 2 2 --- 1 / 2 3 3 3 --- 1 / 2 3 --- 1 / 2
NOMINAL HEATING C APACITY (Btu) 40,000 40,000 60,000 60,000 90,000 60,000 90,000
SHIPPING WEIGHT (lb)
COMPRESSORS
Quantity
REFRIGERANT: PURON (R ---410A)
Quantity (lb)
EXPANSION DEVICE --- HEATING AccuRater
Orifice OD (in.) --- Left 0.042 0.038 0.038 0.035 0.035 0.040 0.040
Orifice OD (in.) --- Right N/A 0.038 0.038 0.035 0.035 0.042 0.042
EXPANSION DEVICE --- COOLING TXV
OUTDOOR COIL
Rows...Fins/in.
Face Area (sq ft)
OUTDOOR FAN
Nominal Cfm
Diameter (in.)
Motor Hp (Rpm)
INDOOR COIL
Rows...Fins/in.
Face Area (sq ft)
(kg)
Size 2Ton 3Ton 3Ton 3Ton 3Ton 4Ton 4Ton
(mm)
(kg)
INDOOR FAN
Nominal Airflow (Cfm)
Comfort Variable based on Comfort Roll back (see User Interface instructions for more information).
Efficiency 700 875 875 1050 1050 1225 1225
Max 800 1000 1000 1200 1200 1400 1400
Furnace (gas ht.) airflow ---Low Stage 475 475 727 745 875 745 875
Furnace (gas ht.) airflow --- High Stage 844 844 1120 1120 1410 1120 1410
Size (in.)
(mm)
Motor HP 1/2 1/2 1/2 3/4 3/4 3/4 3/4
FURNACE SECTION*
Burner Orifice No. (Qty...Drill Size)
Natural Gas (Factory Installed)
Propane Gas
HIGH --- PRESSURE SWITCH (psig)
C u t --- o u t
Reset (Auto)
HIGH--- PRESSURE SWITCH 2 (psig)
(Compressor Solenoid)
C u t --- o u t
Reset (Auto)
L O S S --- O F --- C H A R G E /
LOW--- PRESSURE SWITCH
(Liquid Line) (psig)
C u t --- o u t
Reset (auto)
RETURN--- AIR FILTERS Throwaway
(in.)†
(mm)
Continued next page.
468
212
10.3
4.7
2...21
13.6
2700
22
559
1/8 (825)
3...17
3.7
10x10
254x254
2...44
2...55
498
226
11.5
5.2
2...21
15.3
2700
22
559
1/8 (825)
3...17
3.7
10x10
254x254
2...44
2...55
20x24x1
508x610x25
498
226
11.5
5.2
2...21
15.3
2700
22
559
1/8 (825)
3...17
3.7
10x10
254x254
3...44
3...55
540
245
Tw o --- S t a ge Sc r o l l
1
9.7
4.4
2...21
17.5
2800
22
559
1/8 (825)
3...17
4.7
11x10
279x254
3...44
3...55
670 ±10
470 ± 25
565 ± 15
455 ± 15
23 ± 5
55 ± 5
24x30x1
610x762x25
540
245
9.7
4.4
2...21
17.5
2800
22
559
1/8 (825)
3...17
4.7
11x10
279x254
3...38
3...53
551
250
14.0
6.4
2...21
19.4
2800
22
559
1/8 (825)
3...17
4.7
11x10
279x254
3...44
3...55
24x36x1
610x914x25
551
250
14.0
6.4
2...21
19.4
2800
22
559
1/8 (825)
3...17
4.7
11x10
279x254
3...38
3...53
677D-- --A
7
Page 8
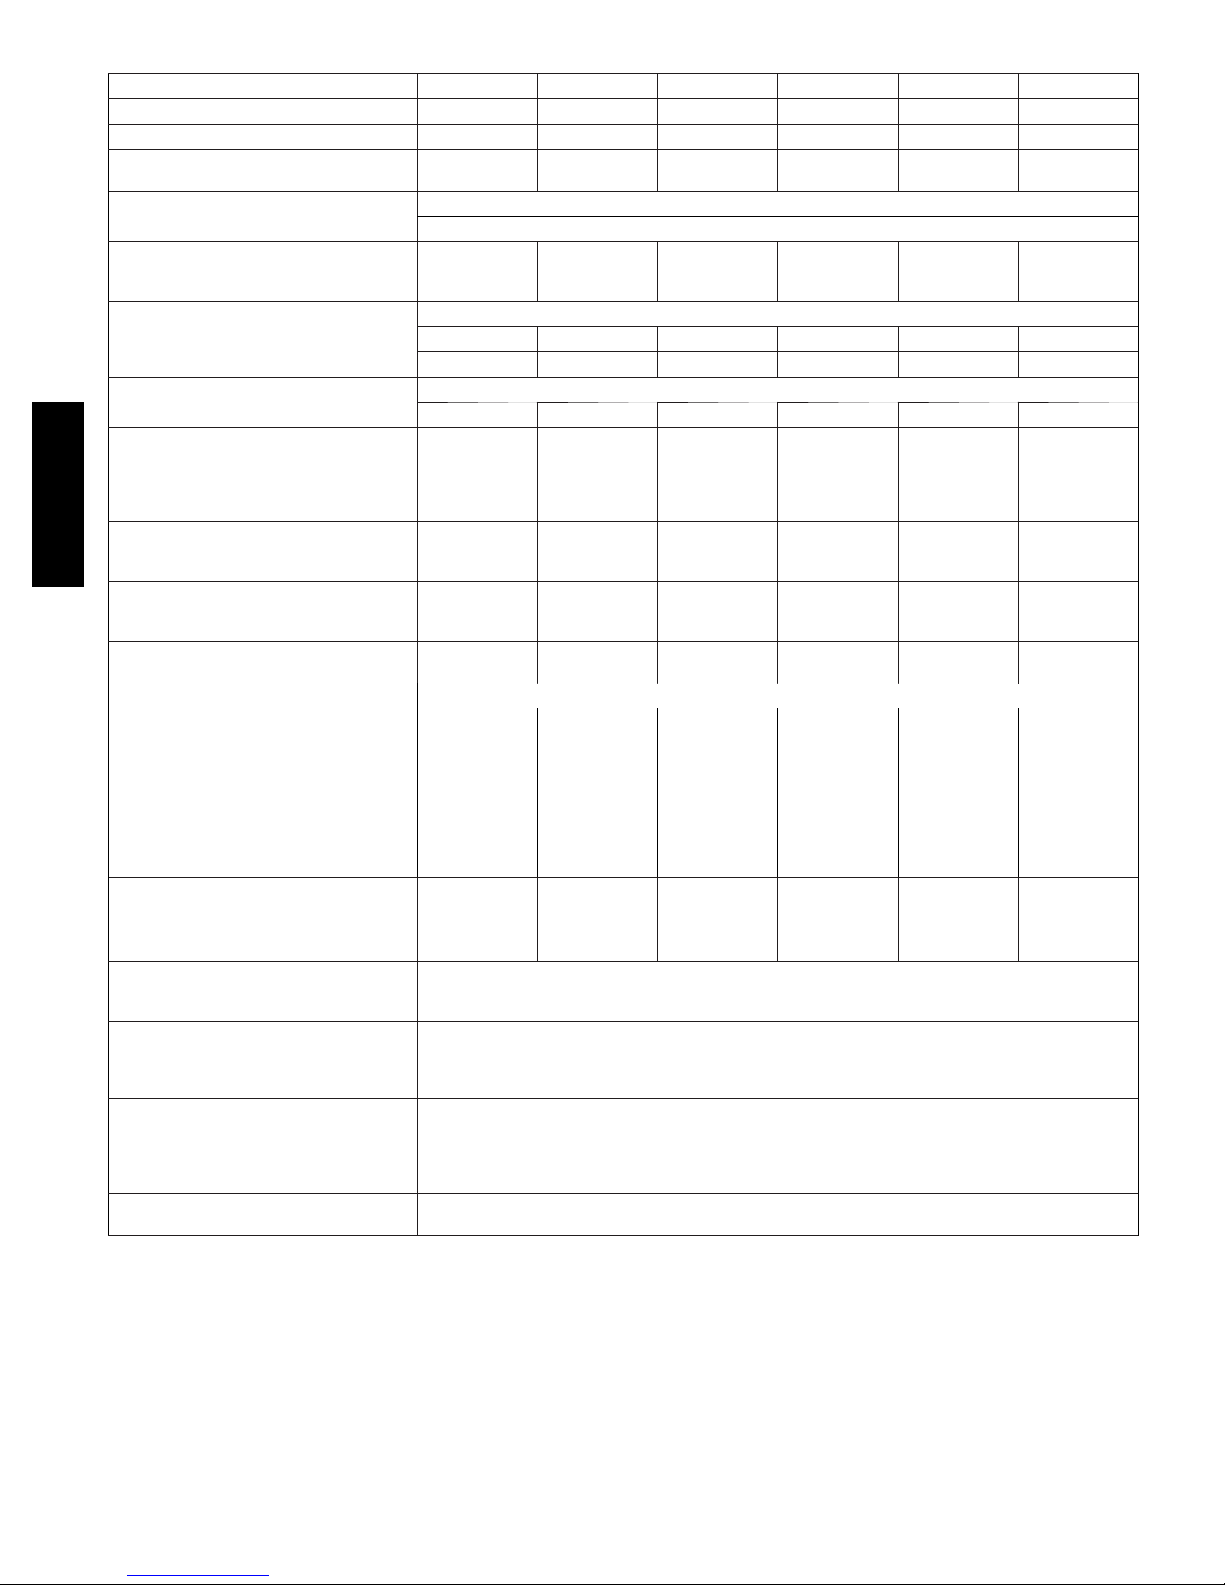
Table 1—Physical Data Con’t -- Unit 677D----A
UNIT SIZE A48090 A48115 A48130 A60090 A60115 A60130
NOMINAL COOLING CAPACITY (ton) 4 4 4 5 5 5
NOMINAL HEATING CAPACITY (Btu) 90,000 115,000 130,000 90,000 115,000 130,000
SHIPPING WEIGHT (lb)
COMPRESSORS
Quantity
REFRIGERANT: PURON (R--410A)
Quantity (lb)
EXPANSION DEVICE--HEATING AccuRater
Orifice OD (in.) -- Left 0.038 0.038 0.038 0.046 0.046 0.046
Orifice OD (in.) -- Right 0.046 0.046 0.046 0.046 0.046 0.046
EXPANSION DEVICE--COOLING TXV
Size 4Ton 4Ton 4Ton 5Ton 5Ton 5Ton
OUTDOOR FAN
Nominal Cfm
Diameter (in.)
Motor Hp (Rpm)
OUTDOOR COIL
677D-- --A
Rows...Fins/in.
Face Area (sq ft)
INDOOR COIL
Rows...Fins/in.
Face Area (sq ft)
INDOOR FAN
Nominal Airflow (Cfm)
Comfort Variable based on Comfort Roll back (see User Interface instructions for more information).
Efficiency 1400 1400 1400 1750 1750 1750
Max 1600 1600 1600 2000 2000 2000
Furnace (gas ht.) airflow---Low Stage 815 1215 1255 845 1215 1255
Furnace (gas ht.) airflow ---High Stage 1385 1885 1875 1300 1910 1920
Size in.
Motor HP 3/4 3/4 3/4 1 1 1
FURNACE SECTION*
Burner Orifice No. (Qty...Drill Size)
Natural Gas (Factory Installed)
HIGH--PRESSURE SWITCH (psig)
Cut--out
Reset (Auto)
HIGH--PRESSURE SWITCH 2 (psig)
(Compressor Solenoid)
Cut--out
Reset (Auto)
LOSS--OF--CHARGE /
LOW--PRESSURE SWITCH
(Liquid Line) (psig)
Cut--out
Reset (auto)
RETURN--AIR FILTERS Throwaway (in.)†
*Based on a ltitude of 0 to 2000 ft (0 ---610 m).
{Recommended filter sizes for field--- installed air filter grilles mounted on the wall or ceiling of the conditioned structure. Required filter sizes shown are based on
the larger of the ARI (Air Conditioning and Refrigeration Institute) rated cooling airflow or the heating airflow velocity of 300 ft/minute for throwaway type or 450
ft/minute for high ---capacity type. Air filter pressure drop for non ---standard filters must not exceed 0.08 IN. W.C.
(kg)
(mm)
(mm)
Propane Gas
(kg)
(mm)
575
261
15.5
7.0
3300
22
559
1/4 (1100)
2...21
19.4
3...17
5.7
11x10
279x254
3...38
3...53
575
261
15.5
7.0
3300
22
559
1/4 (1100)
2...21
19.4
3...17
5.7
11x10
279x254
3...33
3...51
575
261
Two--Stage Scroll
15.5
7.0
3300
22
559
1/4 (1100)
2...21
19.4
3...17
5.7
11x10
279x254
3...31
3...49
610x914x25
1
670 ± 10
470
± 25
565 ± 15
455 ± 15
23 ± 5
55
± 5
24x36x1
618
280
16.0
7.3
3300
22
559
1/3 (1110)
2...21
23.3
4...17
5.7
11x10
279x254
3...38
3...53
618
280
16.0
7.3
3300
22
559
1/3 (1110)
2...21
23.3
4...17
5.7
11x10
279x254
3...33
3...51
618
280
16.0
7.3
3300
22
559
1/3 (1110)
2...21
23.3
4...17
5.7
11x10
279x254
3...31
3...49
8
Page 9
CAUTION - NOTICE TO RIGGERS
PRUDENCE - AVIS AUX MANIPULATEUR
PANNEAUX D'ACCES DOIT ÊTRE EN PLACE POUR MANIPULATION.
Use top skid as spreader bar. / Utiliser la palette du haut comme barre de répartition
ACCESS PANELS MUST BE IN PLACE WHEN RIGGING.
DUCTS
MINIMUM HEIGHT: 36" (914.4 mm)
HAUTEUR MINIMUM
SEAL STRIP MUST BE IN
UNIT HEIGHT
HAUTEUR D'UNITÉ
DETAIL A
Unit *
VOIR DÉTAIL A
36 42 48 60
SEE DETAIL A
VOIR DÉTAIL A
SMALL CABINET LARGE CABINET
Unit *
Rigging Weight 468 212 498 226 Rigging Weight 540 245 551 250 575 261 618 280
NOTE: See dimensional drawing for corner weights.
24 30
lb kg lb kg lb kg lb kg lb kg lb kg
PLACE BEFORE PLACING
UNIT ON ROOF CURB
BANDE SCELLANT DOIT ÊTRE
EN PLACE AVANT DE PLACER
L'UNITÉ SUR LA BASE DE TOIT
50CY502286 2.0
Fig. 7 -- Suggested Rigging
Select and Install Ductwork
The design and installation of the duct system must be in
accordance with the standards of the NFPA for installation of
non--residence type air conditioning and ventilating systems,
NFPA 90A or residence type, NFPA 90B and/or local codes and
ordinances.
Select and size ductwork, supply--air registers, and return air grilles
according to ASHRAE (American Society of Heating,
Refrigeration, and Air Conditioning Engineers) recommendations.
The unit has duct flanges on the supply-- and return--air openings
on the side of the unit.
When designing and installing ductwork, consider the following:
1. All units should have field--supplied filters or accessory
filter rack installed in the return--air side of the unit.
Recommended sizes for filters are shown in Table 1.
2. Avoid abrupt duct size increases and reductions. Abrupt
change in duct size adversely affects air performance.
!
WARNING
PERSONAL INJURY HAZARD
Failure to follow this warning could result in personal
injury or death.
For vertical supply and return units, tools or parts could
drop into ductwork, therefore, install a 90 degree turn in the
return ductwork between the unit and the conditioned space.
If a 90 degree elbow cannot be installed, then a grille of
sufficient strength and density should be installed to prevent
objects from falling into the conditioned space.
ensure weather tight and airtight seal. When electric heat is
installed, use fireproof canvas (or similar heat resistant material)
connector between ductwork and unit discharge connection. If
flexible duct is used, insert a sheet metal sleeve inside duct. Heat
resistant duct connector (or sheet metal sleeve) must extend 24--in.
(610 mm) from electric heater element.
3. Size ductwork for max possible air flow (See Table 1).
4. Seal, insulate, and weatherproof all external ductwork. Seal,
insulate and cover with a vapor barrier all ductwork passing
through conditioned spaces. Follow latest Sheet Metal and
Air Conditioning Contractors National Association
(SMACNA) and Air Conditioning Contractors Association
(ACCA) minimum installation standards for residential
heating and air conditioning systems.
5. Secure all ducts to building structure. Flash, weatherproof,
and vibration--isolate duct openings in wall or roof
according to good construction practices.
6. Read unit rating plate for any required clearances around
ductwork.
CONVERTING HORIZONTAL DISCHARGE UNITS TO
DOWNFLOW (VERTICAL) DISCHARGE UNITS
!
WARNING
ELECTRICAL SHOCK HAZARD
Failure to follow this warning could result in personal
injury or death.
Before installing or servicing system, always turn off main
power to system and install lock out tag. There may be
more than one disconnect switch. Turn off accessory heater
IMPORTANT: Use flexible connectors between ductwork and
power switch if applicable.
unit to prevent transmission of vibration. Use suitable gaskets to
9
677D-- --A
A09079
Page 10
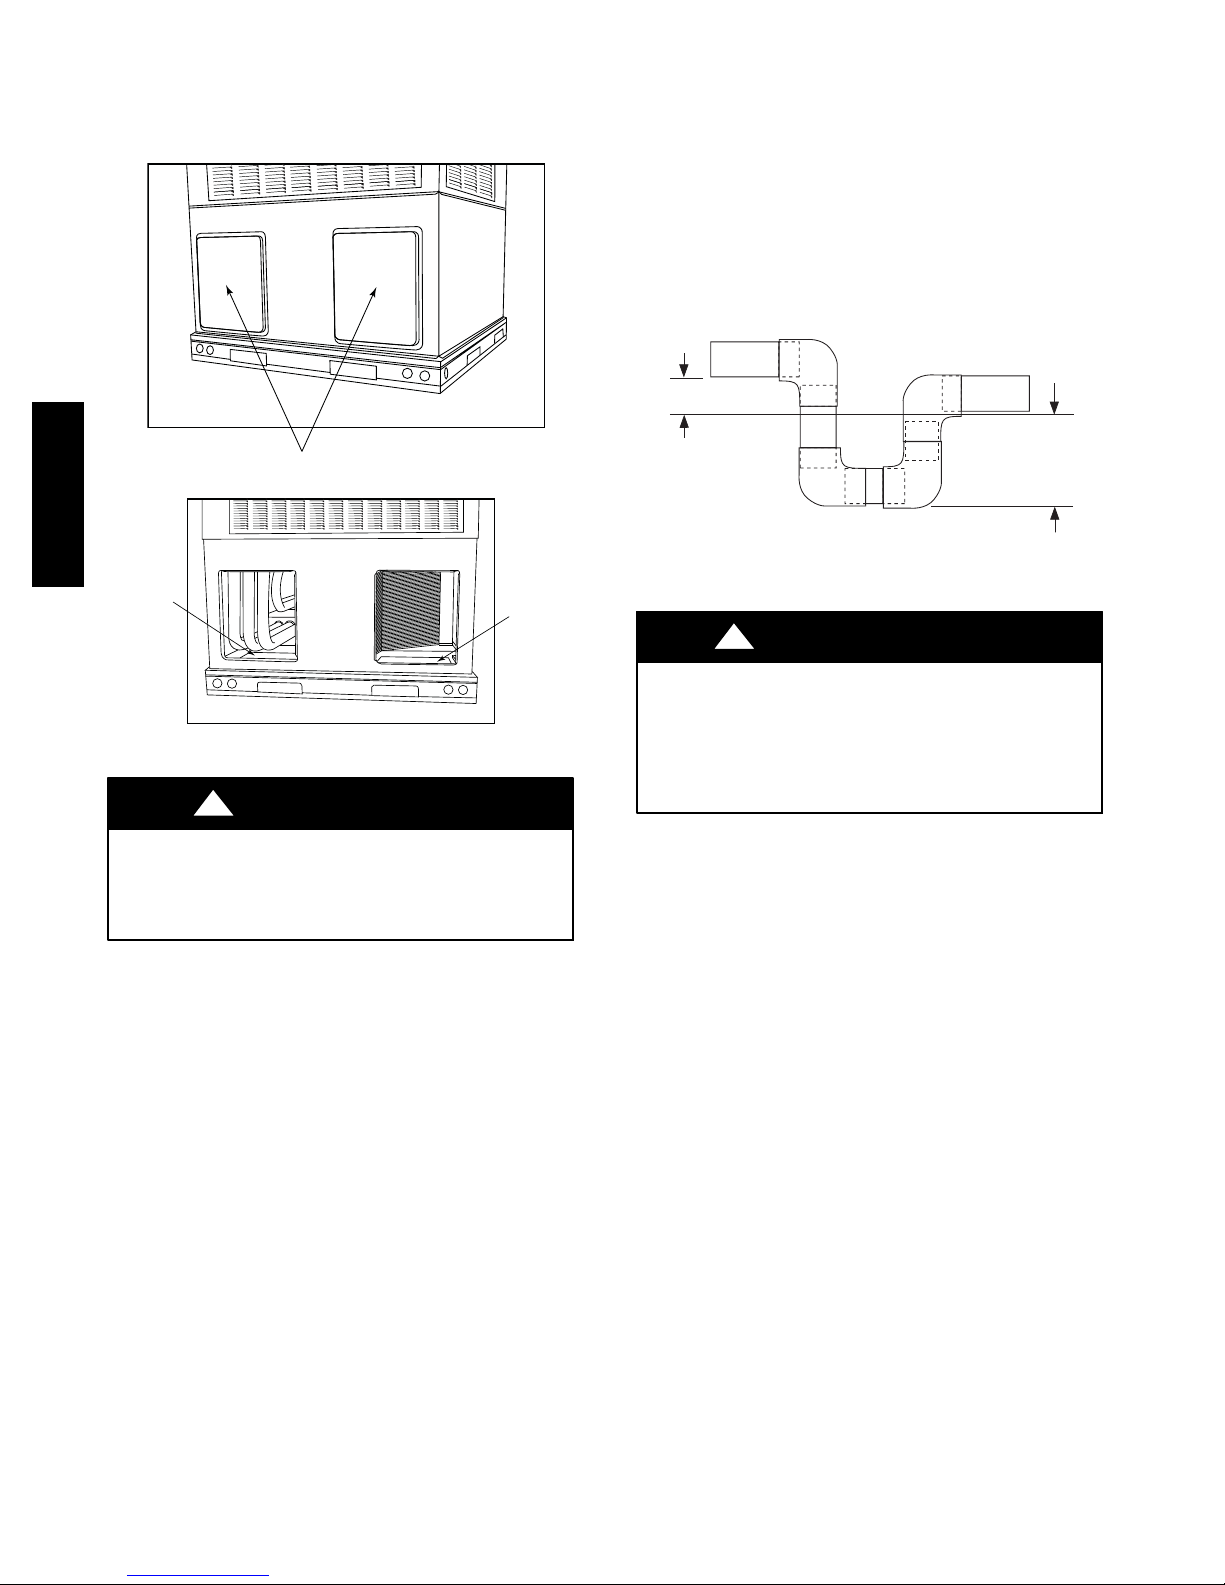
1. Open all electrical disconnects before starting any service
work.
2. Remove horizontal (metal) duct covers to access vertical
(downflow) discharge duct knockouts in unit basepan. (See
Fig. 8.)
If the installation requires draining the condensate water away from
the unit, install a field--supplied 2--in. (51 mm) trap at the
condensate connection to ensure proper drainage. Condensate trap
is available as an accessory or is field--supplied. Make sure that the
outlet of the trap is at least 1 in. (25 mm) lower than the unit
drain--pan condensate connection to prevent the pan from
overflowing. Connect a drain tube using a minimum of
field--supplied 3/4 --in. PVC or field--supplied 3/4 --in. copper pipe
at outlet end of the 2 --in. (51 mm) trap (See Fig. 9). Do not
undersize the tube. Pitch the drain tube downward at a slope of at
least 1 in. (25 mm) for every 10 ft (3 m) of horizontal run. Be sure
to check the drain trough for leaks. Prime the trap at the beginning
of the cooling season start--up.
TRAP
OUTLET
1-in. (25 mm) min.
Horizontal Duct Covers
677D-- --A
Basepan
Downflow
(Vertical)
Supply
Knockout
Fig. 8 -- Supply and Return Duct Opening
!
CAUTION
PROPERTY DAMAGE HAZARD
Failure to follow this caution may result in property damage.
Collect ALL screws that were removed. Do not leave screws
on rooftop as permanent damage to the roof may occur.
To remove downflow return and supply knockout covers, break
front and right side connecting tabs with a screwdriver and
hammer. Push cover down to break rear and left side tabs.
NOTE: These panels are held in place with tabs similar to an
electrical knockout. Reinstall horizontal duct covers (see Fig. 8)
shipped on unit from factory. Insure openings are air and
watertight.
NOTE: The design and installation of the duct system must be in
accordance with the standards of the NFPA for installation of non
residence--type air conditioning and ventilating systems, NFPA
90A or residence--type, NFPA 90B; and/or local codes and
ordinances.
Provide for Condensate Disposal
NOTE: Ensure that condensate--water disposal methods comply
with local codes, restrictions, and practices.
The units dispose of condensate through a 3/4 --in. NPT female
fitting that exits on the compressor end of the unit. Condensate
water can be drained directly onto the roof in rooftop installations
(where permitted) or onto a gravel apron in ground level
installations. Install a field--supplied condensate trap at end of
condensate connection to ensure proper drainage. Make sure that
the outlet of the trap is at least 1 in. (25 mm) lower than the
drain--pan condensate connection to prevent the pan from
overflowing. Prime the trap with water. When using a gravel apron,
make sure it slopes away from the unit.
A09076
Basepan
Downflow
(Vertical)
Return
Knockout
A09077
2-in. (51 mm) min.
A09052
Fig. 9 -- Condensate Trap
Install Flue Hood
!
WARNING
CARBON MONOXIDE POISONING HAZARD
Failure to follow this warning could result in personal
injury or death.
The venting system is designed to ensure proper venting.
The flue hood assembly must be installed as indicated in
this section of the unit installation instructions.
Install the flue hood as follows:
1. This installation must conform with local building codes
and with the National Fuel Gas Code (NFGC), NFPA 54
/ANSI Z223.1--2009 (in Canada, CAN/CSA B149.1, and
B149.2) latest revision. Refer to provincial and local
plumbing or wastewater codes and other applicable local
codes.
2. Remove flue hood from shipping location (inside the return
section of the blower compartment--See Fig. 8). Remove the
return duct cover to locate the flue hood. Remove two
screws on flue panel. Place flue hood assembly over flue
panel. Orient screw holes in flue hood with holes in the flue
panel.
3. Secure flue hood to flue panel by inserting a single screw on
the top and the bottom of the hood.
Install Gas Piping
The gas supply pipe enters the unit through the access hole
provided. The gas connection to the unit is made to the 1/2--in.
FPT gas inlet on the gas valve.
Install a gas supply line that runs to the heating section. Refer to
Table 2 and the current edition of NFGC in the U.S. and the current
NSCNGPIC in Canada. Do not use cast--iron pipe. It is
recommended that a black iron pipe is used. Check the local utility
for recommendations concerning existing lines. Size gas supply
piping for 0.5 IN. W.C. maximum pressure drop. Never use pipe
smaller than the 1/2--in. FPT gas inlet on the unit gas valve.
For natural gas applications, the gas pressure at unit gas connection
must not be less than 4.0 IN. W.C. or greater than 13 IN. W.C.
while the unit is operating. For propane applications, refer to
propane conversion kit instructions.
10
Page 11
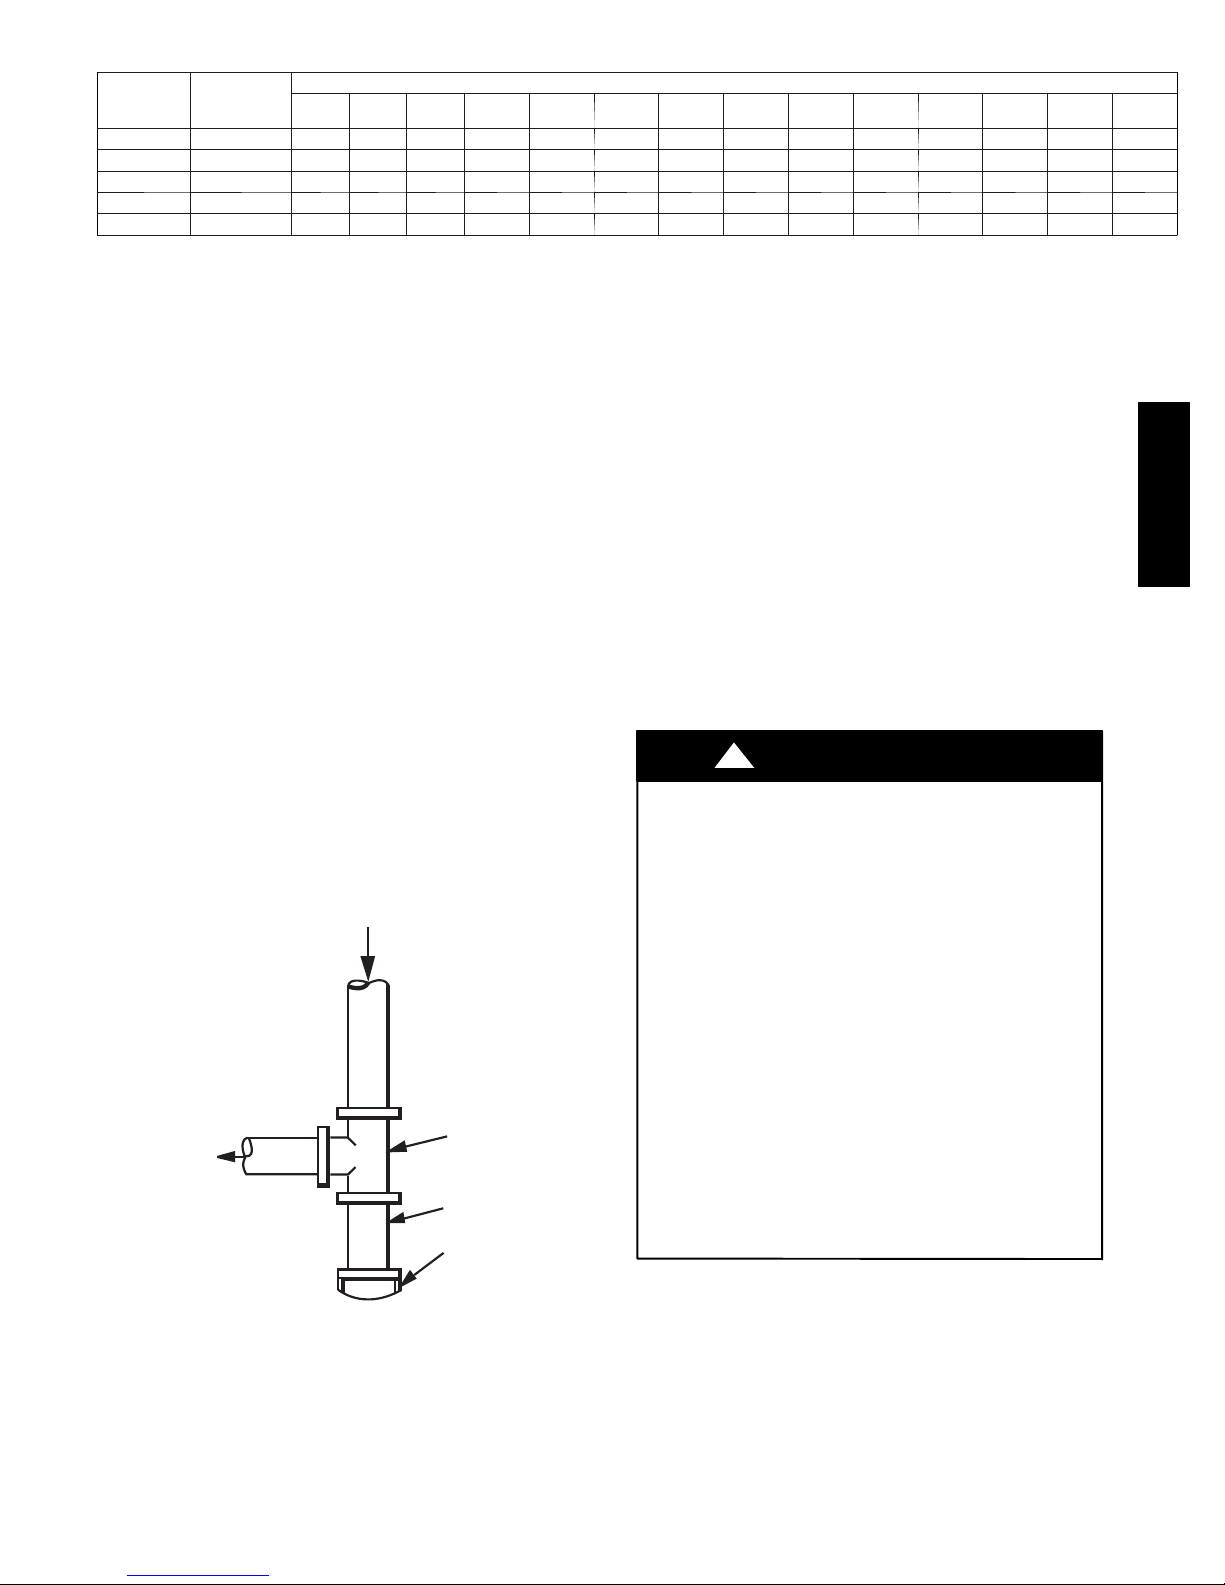
Table 2 – Maximum Gas Flow Capacity*
NOMINAL
IRON PIPE
SIZE (IN.)
1/2 .622 175 120 97 82 73 66 61 57 53 50 44 40 — —
3/4 .824 360 250 200 170 151 138 125 118 110 103 93 84 77 72
1 1.049 680 465 375 320 285 260 240 220 205 195 175 160 145 135
1 --- 1 / 4 1.380 1400 950 770 600 580 530 490 460 430 400 360 325 300 280
1 --- 1 / 2 1.610 2100 1460 1180 990 900 810 750 690 650 620 550 500 460 430
*Capacity of pipe in cu ft of gas per hr for gas pressure of 0.5 psig or less. Pressure drop of 0.5 --- IN. W.C. (based on a 0.60 specific gravity gas). Refer toTable2
and NFPA 54/ANSI Z223.1.
{ This length includes an ordinary number of fittings.
INTERNAL
DIAMETER
(IN.)
10
(3.0)20(6.1)30(9.1)40(12.1)50(15.2)60(18.3)70(21.3)80(24.4)90(27.4)
A 1/8--in. (3.2 mm) NPT plugged tapping, accessible for test gauge
connection, must be installed immediately upstream of the gas
supply connection to the gas valve and downstream of manual
equipment shutoff valve.
When installing the gas supply line, observe local codes pertaining
to gas pipe installations. Refer to the NFPA 54/ANSI Z223.1--2009
(in Canada, CAN/CGA B149.1).
NOTE: In the state of Massachusetts:
1. Gas supply connections MUST be performed by a licensed
plumber or gas fitter.
2. When flexible connectors are used, the maximum length
shall not exceed 36 in. (915 mm).
3. When lever handle type manual equipment shutoff valves
are used, they shall be T--handle valves.
4. The use of copper tubing for gas piping is NOT approved
by the state of Massachusetts.
In the absence of local building codes, adhere to the following
pertinent recommendations:
1. Avoid low spots in long runs of pipe. Grade all pipe 1/4 in.
LENGTH OF PIPE ft (m)†
100
(30.5)
125
(38.1)
150
(45.7)
175
(53.3)
4. Install sediment trap in riser leading to heating section (See
Fig. 10). This drip leg functions as a trap for dirt and
condensate.
5. Install an accessible, external, manual main shutoff valve in
gas supply pipe within 6 ft (1.8 m) of heating section.
6. Install ground--joint union close to heating section between
unit manual shutoff and external manual main shut off
valve.
7. Pressure test all gas piping in accordance with local and
national plumbing and gas codes before connecting piping
to unit.
NOTE: Pressure test the gas supply system after the gas supply
piping is connected to the gas valve. The supply piping must be
disconnected from the gas valve during the testing of the piping
systems when test pressure is in excess of 0.5 psig. Pressure test the
gas supply piping system at pressures equal to or less than 0.5 psig.
The unit heating section must be isolated from the gas piping
system by closing the external main manual shutoff valve and
slightly opening the ground--joint union.
for every 15 ft (4.6 m) of length to prevent traps. Grade all
horizontal runs downward to risers. Use risers to connect to
heating section and to meter.
2. Protect all segments of piping system against physical and
thermal damage. Support all piping with appropriate straps,
hangers, etc. Use a minimum of one hanger every 6 ft (1.8
m). For pipe sizes larger than 1/2 in., follow
recommendations of national codes.
IN
FIRE OR EXPLOSION HAZARD
Failure to follow this warning could result in fire, explosion,
personal injury, death and/or property damage.
S Connect gas pipe to unit using a backup wrench to avoid
S Never purge a gas line into a combustion chamber. Never
!
WARNING
damaging gas controls.
test for gas leaks with an open flame. Use a commercially
available soap solution made specifically for the detection
of leaks to check all connections.
S Use proper length of pipe to avoid stress on gas control
manifold.
S If a flexible connector is required or allowed by authority
having jurisdiction, black iron pipe shall be installed at
TEE
OUT
furnace gas valve and extend a minimum of 2 in. (51 mm)
outside furnace casing.
S If codes allow a flexible connector, always use a new
NIPPLE
CAP
connector. Do not use aconnector which has previously
serviced another gas appliance.
200
(61.0)
677D-- --A
Fig. 10 -- Sediment Trap
3. Apply joint compound (pipe dope) sparingly and only to
male threads of joint when making pipe connections. Use
only pipe dope that is resistant to action of liquefied
petroleum gases as specified by local and/or national codes.
Never use Teflon tape.
C99020
8. Check for gas leaks at the field--installed and
factory--installed gas lines after all piping connections have
been completed. Use a commercially available soap solution
made specifically for the detection of leaks (or method
specified by local codes and/or regulations).
11
Page 12
Install Electrical Connections
GROUND SCREW
(IN SPLICE BOX)
!
WARNING
ELECTRICAL SHOCK HAZARD
Failure to follow this warning could result in personal
injury or death.
The unit cabinet must have an uninterrupted, unbroken
electrical ground. This ground may consist of an electrical
wire connected to the unit ground screw in the control
compartment, or conduit approved for electrical ground
when installed in accordance with NEC, NFPA 70
American National Standards Institute/National Fire
Protection Association (latest edition) (in Canada, Canadian
Electrical Code CSA C22.1) and local electrical codes.
HIGH--VOLTAGE CONNECTIONS
The unit must have a separate electrical service with a
field--supplied, waterproof disconnect switch mounted at, or within
sight from, the unit. Refer to the unit rating plate, NEC and local
codes for maximum fuse/circuit breaker size and minimum circuit
amps (ampacity) for wire sizing.
677D-- --A
The field--supplied disconnect may be mounted on the unit over
the high--voltage inlet hole (See Fig. 5 and 6).
NOTE: Field supplied disconnect switch box should be
positioned so that it does not cover up any of the unit gas
combustion supply air louvers.
Operation of unit on improper line voltage constitutes abuse and
may cause unit damage that could affect warranty.
!
UNIT COMPONENT DAMAGE HAZARD
Failure to follow this caution may result in damage to the
unit being installed.
1. Make all electrical connections in accordance with NEC
NFPA 70 (latest edition) and local electrical codes
governing such wiring. In Canada, all electrical
connections must be in accordance with CSA standard
C22.1 Canadian Electrical Code Part 1 and applicable
local codes. Refer to unit wiring diagram.
2. Use only copper conductor for connections between
field--supplied electrical disconnect switch and unit. DO
NOT USE ALUMINUM WIRE.
3. Be sure that high--voltage power to unit is within
operating voltage range indicated on unit rating plate.
4. Insulate low--voltage wires for highest voltage contained
within conduit when low--voltage control wires are in
same conduit as high--voltage wires.
5. Do not damage internal components when drilling
through any panel to mount electrical hardware, conduit,
etc.
ROUTING POWER LEADS INTO UNIT
Use only copper wire between disconnect and unit. The high
voltage leads should be in a conduit until they enter the duct panel;
conduit termination at the duct panel must be watertight. Run the
high--voltage leads through the power entry knockout on the
power entry side panel. See Fig. 5 and 6 for location and size. For
single--phase units, connect leads to the black and yellow wires.
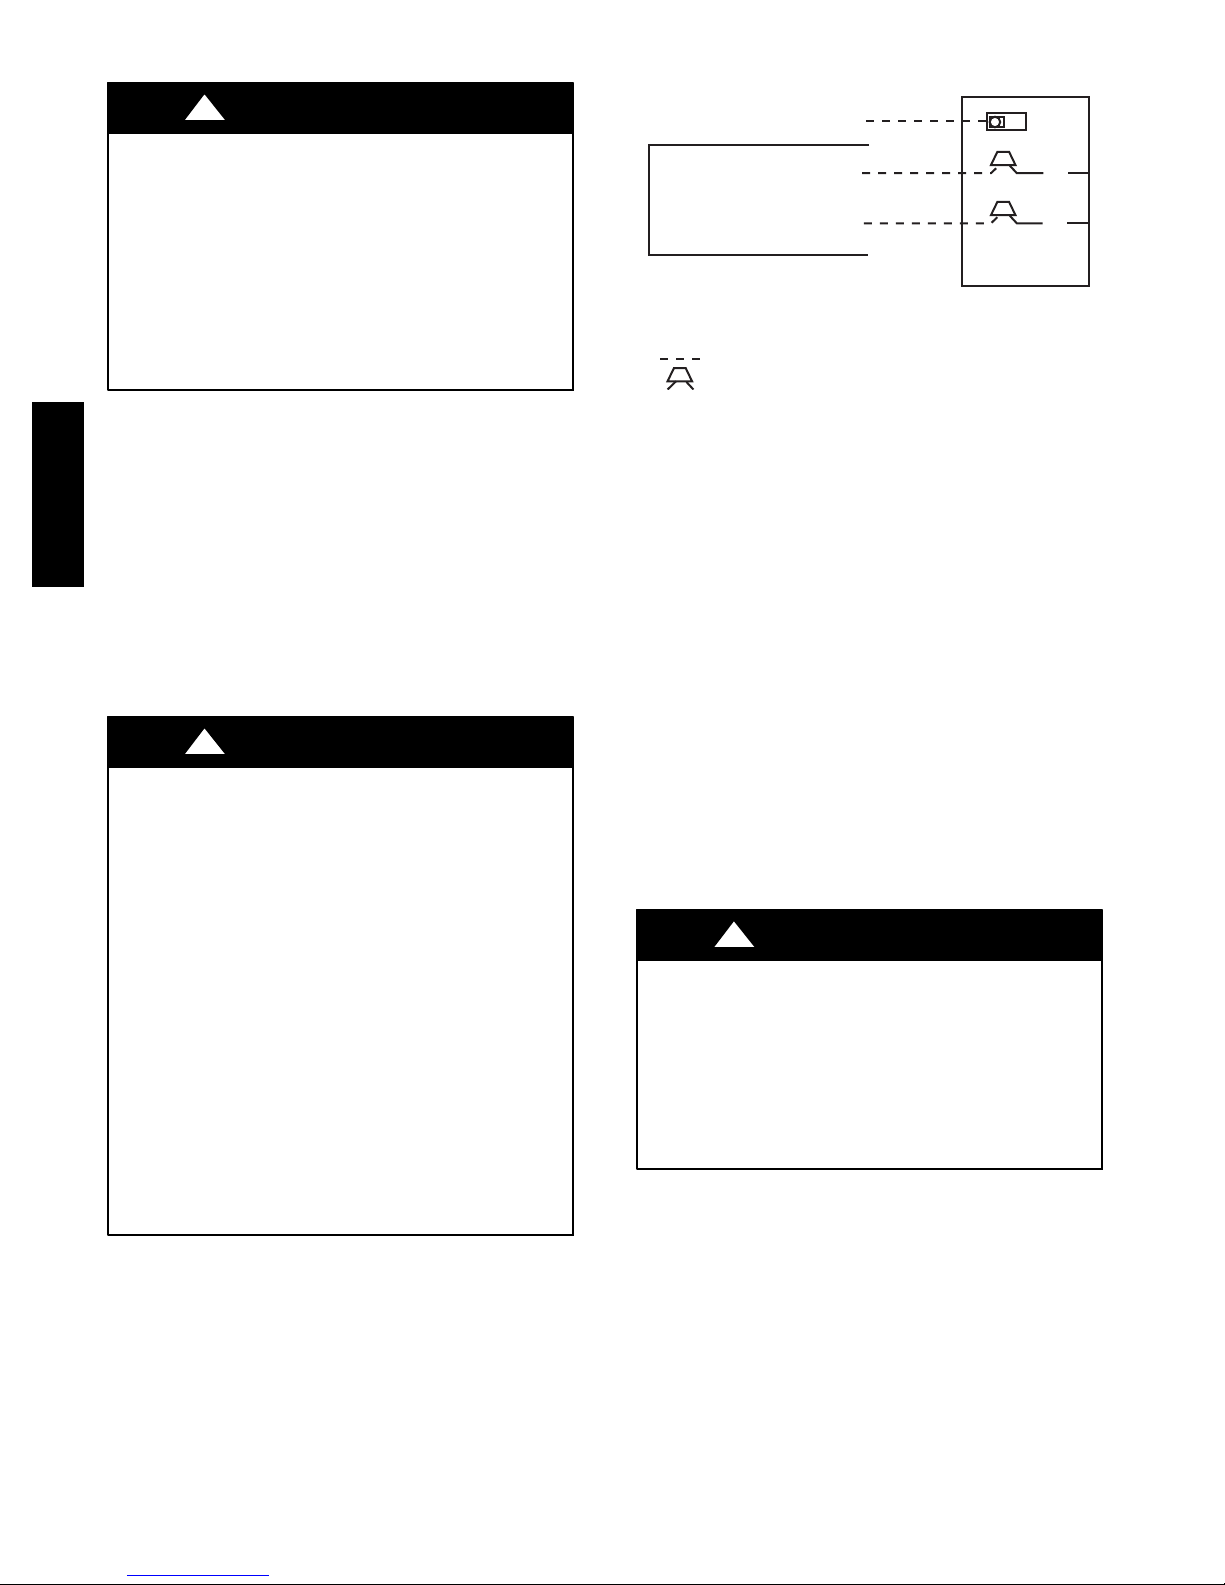
CONNECTING GROUND LEAD TO GROUND SCREW
Connect the ground lead to the chassis using the ground screw on
the control plate near the inducer switch (See Fig. 11).
CAUTION
GROUND
LEAD
SINGLE-PHASE
CONNECTIONS
TO DISCONNECT
PER NEC
LEGEND
NEC – National Electrical Code
Field Wiring
Splice Connections
Fig. 11 -- Line Power Connections
ROUTING CONTROL POWER WIRES
For detailed instruction on the low voltage connections to the User
Interface (UI), refer to the UI installation guide.
Form a drip--loop with the control leads before routing them into
the unit. Route the low voltage control leads through grommeted,
low--voltage hole provided into unit (See Fig. 5 and 6). Connect
user interface leads to unit control power leads as shown in Fig. 14.
The unit transformer supplies 24--v power for complete system
including accessory electrical heater. A fuse is provided in the
24--v circuit as a protection device (See Fig. 17 and 18).
Transformer is factory wired for 230--v operation. If supply voltage
is 208--v, rewire transformer primary as described in Special
Procedures for 208--v Operation section.
The furnace board is fused by a board--mounted automotive fuse
placed in series with transformer SEC1 and R circuit. The C circuit
of transformer circuit is referenced to chassis ground through a
printed circuit run at SEC2 and gas valve grounding wire. Check to
be sure control board is mounted securely using both
factory--installed screws.
OUTDOOR AIR TEMPERATURE SENSOR (OAT)
!
EQUIPMENT OPERATION HAZARD
The installation of an outdoor air temperature sensor (OAT)
using the Evolution control board OAT terminals is
required. Many Evolution features (auto humidity control,
comfort rollback, etc.) will be lost if the OAT is not
connected.
For detailed mounting instructions for the OAT sensor,
please refer to installation instructions shipped with the
OAT.
The OAT input is used to supply outdoor temperature data for
system level functions and for temperature display on User
Interface (UI). Using two wires of the field--supplied thermostat
wire cable, wire the ends of the two black OAT pigtails. Wire the
opposite ends of these two wires to the OAT provided with the UI.
There is no polarity to be observed.
NOTE: Mis--wiring OAT inputs will not cause damage to either
Evolution control or thermistor. If the thermistor is wired
incorrectly, no reading will appear at UI. Re--wire thermistor
correctly for normal operation.
Two options for mounting the OAT sensor
1. Adjacent Building Structure
2. Under the Unit
L1
L2
NOTE: Use copper wire only.
CAUTION
BLK
YEL
A06299
12
Page 13
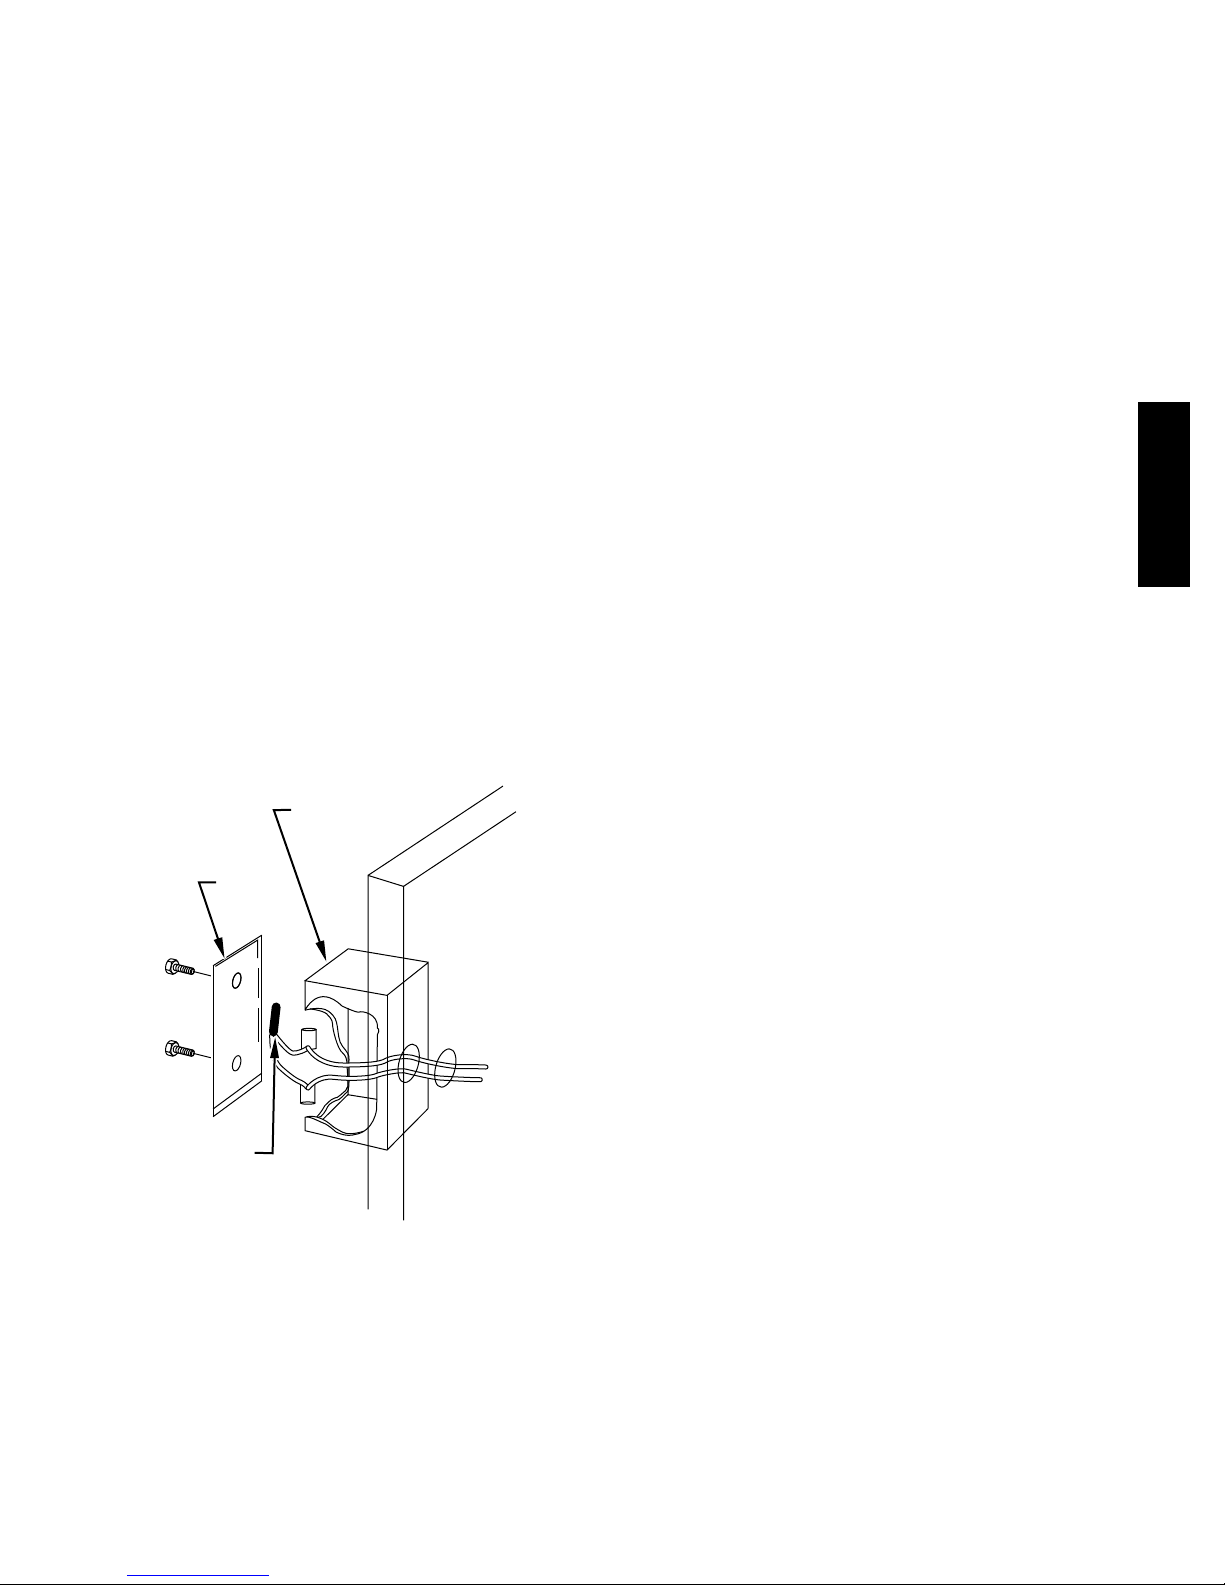
Option 1: Mounting Sensor to the Adjacent
Building Structure
1. The recommended wall for mounting the sensor is the north
side of the building. The mounting height should be at 2 to
3 ft above ground level, or all the way up into the eave. The
effect on the sun warming on the 3 walls (i.e. South, West
and East) can produce unacceptable temperature errors
under the right conditions. The sensor should be mounted
inside an ordinary or weatherproof outlet box. (See Fig. 12.)
2. Remove the Control access panel. The OAT Package is in a
bag located in Controls compartment. (See Fig. 13.)
3. Use the supplied clip, snap the sensor into the clip making
sure most of the sensor remains exposed, (not fully covered
by the clip). Ensure the mounting surface where the clip and
sensor will be located is clean and dry. To place the clip and
sensor, remove the protective paper exposing the clips
adhesive. Place on desired surface and hold in place for 5 to
10 seconds, ensuring positive contact.
4. Using the supplied wire nuts, connect sensor with splice
wires as required. Solid thermostat or stranded, 22 AWG (or
heavier wire) may be used for splicing. Connections should
be located within an outlet box or within the inside wall
(check your local codes). (See Fig. 12.)
5. Route the sensor wires around the unit through the control
wires entry. Connect the sensor wires to the black wire
pigtails in the control compartment. (See Fig. 13 and Fig.
14.)
Advantages:
S This is the most accurate way of reading outdoor temperature.
Disadvantages:
S This application requires dedicated wire between the sensor
location and the indoor termination point.
FIELD-SUPPLIED
OUTLET BOX
COVER
EXTERIOR
WALL
SENSOR
Fig. 12 -- Mounting Sensor to Outside Wall
A98288
ACCESSORY INSTALLATION
A. Humidifier Connections
The furnace control board terminal marked HUM is provided for
low voltage (24--vac) control of a humidifier. No humidistat is
required as UI monitors indoor humidity.
When commanded to operate humidifier, the unit control will
energize the HUM output to turn humidifier on and de--energize
HUM output to turn humidifier off. Wire HUM and COM
terminals directly to humidifier as shown in Fig. 14.
B. Electronic Air Cleaner
Electronic Air Cleaner terminals are provided on the Evolution
Control Board (EAC--1 and EAC--2). While these terminals can be
used to power a 230V EAC, it is recommended that any EAC be
installed per the EAC installation instructions and connected
separately to a standard 115V or 230V outlet with an airflow
sensor to control operation of the EAC.
SPECIAL PROCEDURES FOR 208--V OPERATION
Be sure unit disconnect switch is open.
Disconnect the black primary lead from the transformer. See unit
wiring label (See Fig. 17 and 18).
Connect the black primary lead to the transformer terminal labeled
200--v.
Option 2: Mounting Sensor Under the Outdoor
Unit
1. The sensor should be mounted under the northeast corner of
the unit. Mount the sensor on the unit in the area not
exposed to sunlight.
2. Remove the Control access panel. The OAT Package is in a
bag located in Controls compartment. (See Fig. 13.)
3. Using thesupplied clip, snap the sensor into the clip making
sure most of he sensor remains exposed, (not fully covered
by the clip). Ensure the mounting surface where the clip and
sensor will be located is clean and dry. To place the clip and
sensor, remove the protective paper exposing the clips
adhesive. Place on desired surface and hold in place for 5 to
10 seconds, ensuring positive contact.
4. Using the supplied wire nuts, connect sensor with splice
wires as required. Solid thermostat or stranded, 22 AWG (or
heavier wire) may be used for splicing. Connections should
be located within an outlet box (check your local codes).
Sensor and wires must be protected from the damage due to
animals and power equipment.
5. Route the sensor wires around the unit through the control
wires entry. Connect the sensor wires to the black wire
pigtails in the control compartment. (See Fig. 13 and Fig.
14.)
Advantages:
S Convenient mounting and wiring of outdoor air temperature
sensor.
Disadvantages:
S The sun may have some effect when unit is not running.
S Defrost cycle (if heat pump) can introduce a small temperature
error while defrosting.
S Snow and ice buildup under the outdoor unit may introduce
error.
S Landscaping around outdoor unit may affect temperature
reading.
677D-- --A
13
Page 14
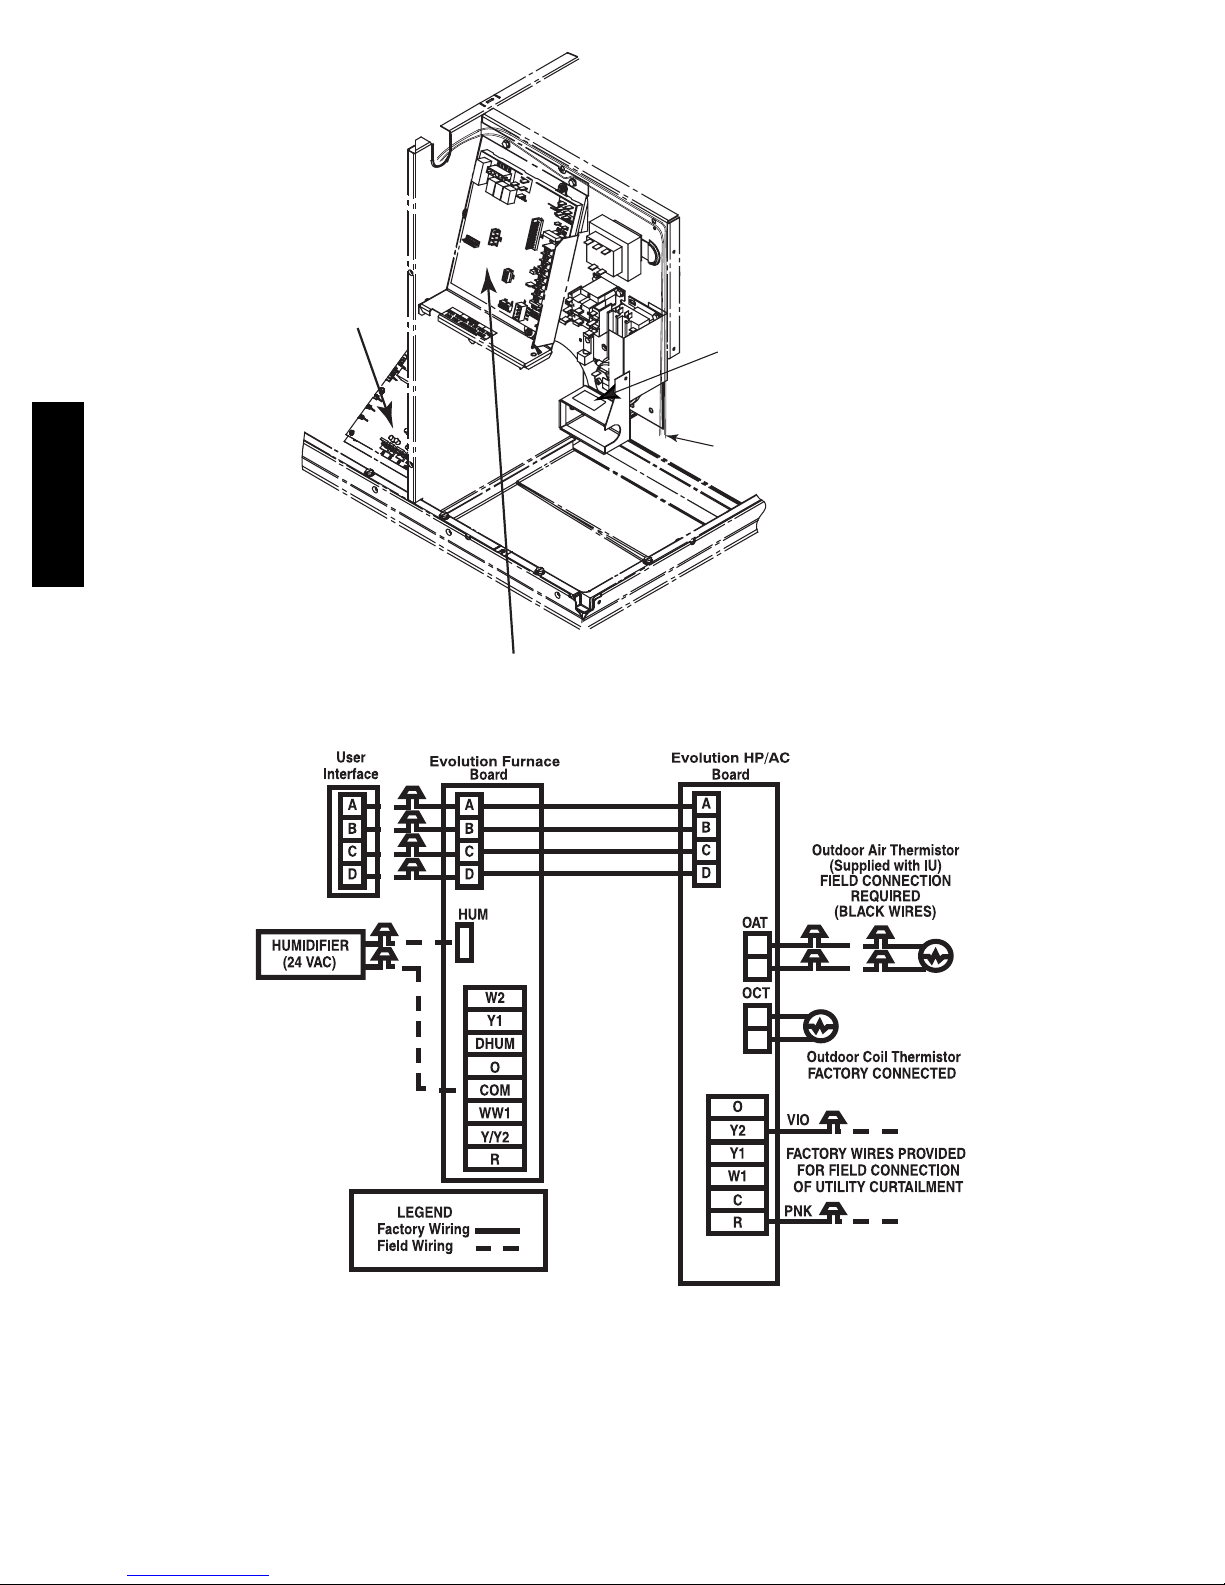
HP/AC
BOARD
OAT
PACKAGE
TWO BLACK WIRES
TO CONNECT OAT
SENSOR
677D-- --A
FURNACE BOARD
A12248
Fig. 13 -- Control Plate
A06357
Fig. 14 -- Control Voltage Wiring Connections
14
Page 15
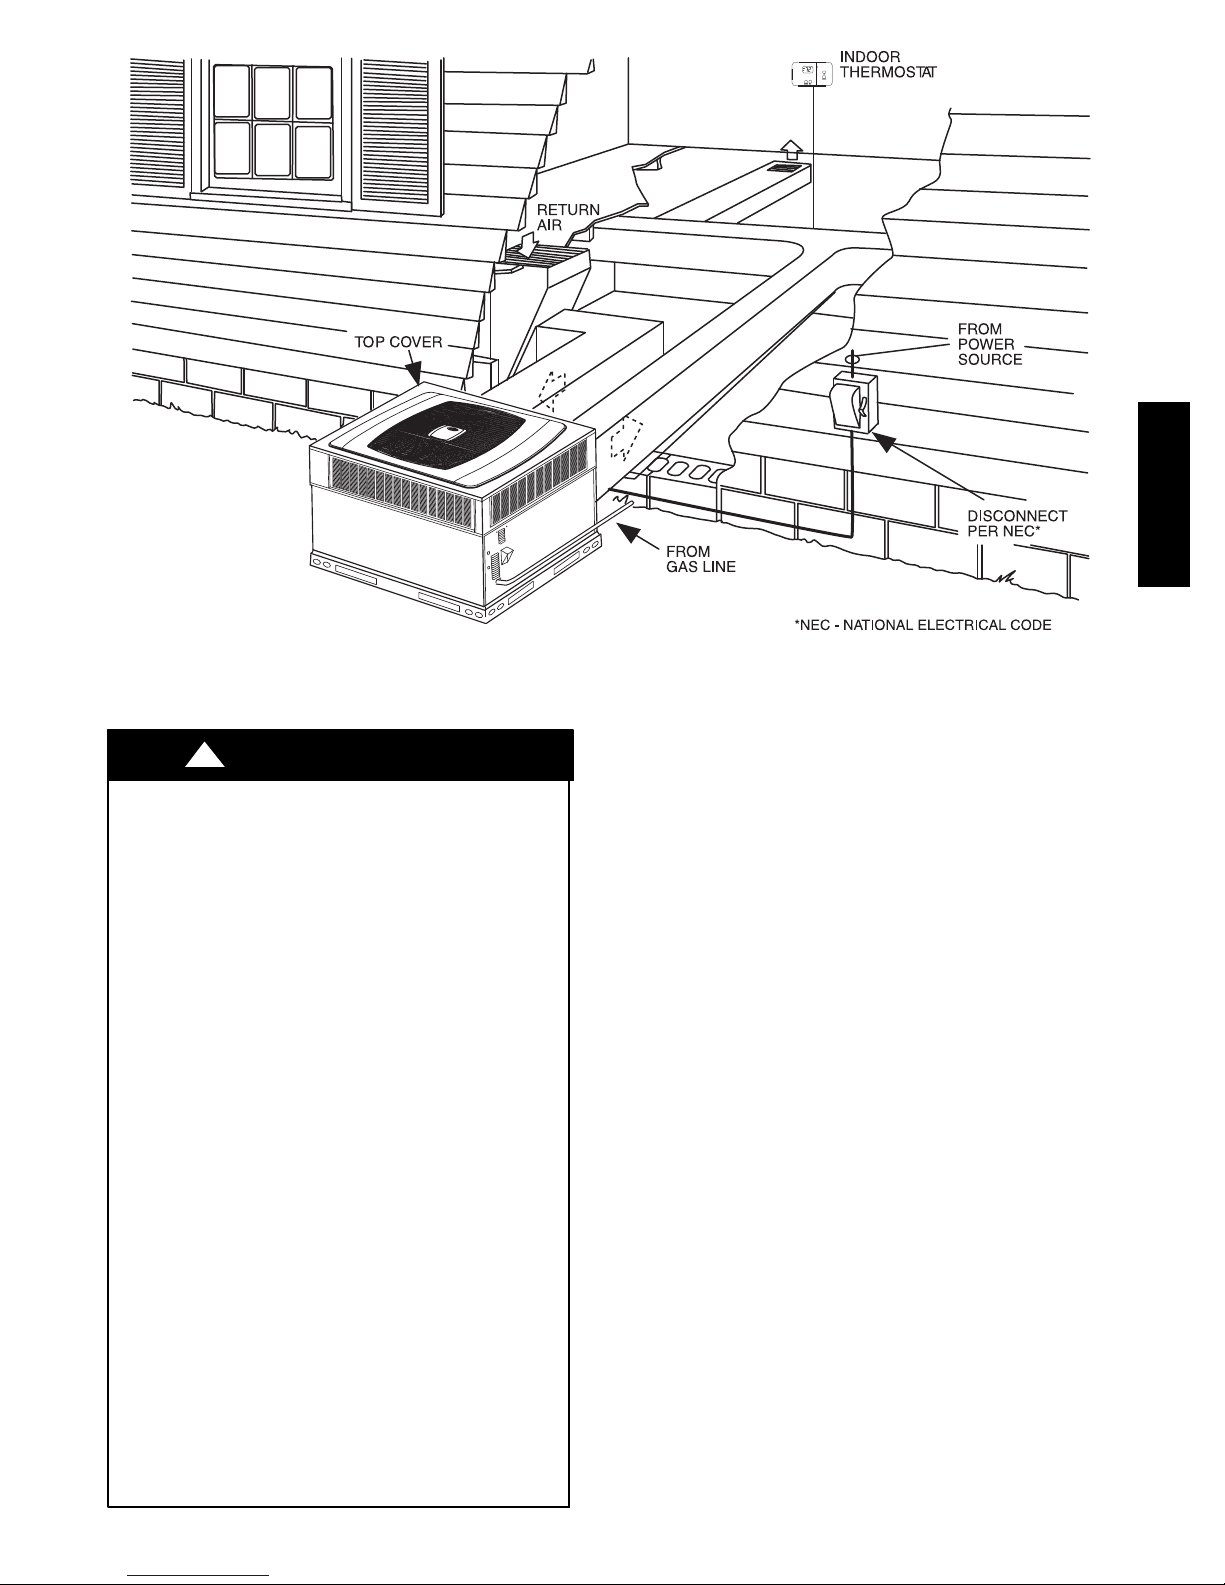
Fig. 15 -- Typical Installation
677D-- --A
A09075
PRE--START--UP
!
WARNING
FIRE, EXPLOSION, ELECTRICAL SHOCK AND
ENVIRONMENTAL HAZARD
Failure to follow this warning could result in personal
injury or death and/or property damage.
1. Follow recognized safety practices and wear protective
goggles when checking or servicing refrigerant system.
2. Do not operate compressor or provide any electric power
to unit unless compressor terminal cover is in place and
secured.
3. Do not remove compressor terminal cover until all
electrical sources are disconnected and lock out tag installed.
4. Relieve and recover all refrigerant from system before
touching or disturbing anything inside terminal box if
refrigerant leak is suspected around compressor
terminals.
5. Never attempt to repair soldered connection while
refrigerant system is under pressure.
6. Do not use torch to remove any component. System
contains oil and refrigerant under pressure.
7. To remove a component, wear protective goggles and
proceed as follows:
a. Shut off gas supply to unit.
b. Shut off electrical power to unit and install
lockout tag.
c. Relieve and reclaim all refrigerant from system
using both high-- and low--pressure ports.
d. Cut component connecting tubing with tubing
cutter and remove component from unit.
e. Carefully unsweat remaining tubing stubs when
necessary. Oil can ignite when exposed to flame.
Use the Start--Up Checklist supplied at the end of this book and
proceed as follows to inspect and prepare the unit for initial
start--up:
1. Remove all access panels. (See Fig. 25.)
2. Read and follow instructions on all DANGER, WARNING,
CAUTION, and INFORMATION labels attached to, or
shipped with unit.
3. Make the following inspections:
a. Inspect for shipping and handling damages, such as
broken lines, loose parts, disconnected wires, etc.
b. Inspect for oil at all refrigerant tubing connections and
on unit base. Detecting oil generally indicates a
refrigerant leak. Leak test all refrigerant tubing
connections using electronic leak detector, or
liquid--soap solution. If a refrigerant leak is detected, see
following Check for Refrigerant Leaks section.
c. Inspect all field-- and factory--wiring connections. Be
sure that connections are completed and tight.
d. Ensure wires do not touch refrigerant tubing or sharp
sheet metal edges.
e. Inspect coil fins. If damaged during shipping and
handling, carefully straighten fins with a fin comb.
4. Verify the following conditions:
a. Make sure gas line is free of air. Before lighting the unit
for the first time, perform the following with the gas
valve in the OFF position:
NOTE: If the gas supply pipe was not purged before connecting
the unit, it will be full of air. It is recommended that the ground
joint union be loosened, and the supply line be allowed to purge
until the odor of gas is detected. Never purge gas lines into a
combustion chamber. Immediately upon detection of gas odor,
retighten the union. Allow 5 minutes to elapse, then light unit.
b. Make sure that condenser--fan blade is correctly
positioned in fan orifice. Top 1/3 of condenser fan blade
should be within fan orifice venturi.
c. Ensure fan hub is positioned correctly with respect to
motor housing (See Fig. 28).
15
Page 16
d. Make sure that air filter(s) is in place.
e. Make sure that condensate drain trap is filled with water
to ensure proper drainage.
f. Make sure that all tools and miscellaneous loose parts
have been removed.
5. Compressors are internally spring mounted. Do not loosen
or remove compressor holddown bolts.
6. Each unit system has two Schrader--type ports, one
low--side Schrader fitting located on the suction line, and
one high--side Schrader fitting located on the compressor
discharge line. Be sure that caps on the ports are tight.
START--UP
Unit Start--Up and Troubleshooting
NOTE: Always check high-- and low--voltage supply to the unit
components. Check the integrity of the plug receptacle connections
and unit wiring harness prior to assuming a component failure.
A. LED Description
LEDs built into Evolution control boards provide installer or
service person information concerning operation and/or fault
condition of the unit controls and ECM motor. This information is
also available at the system UI in text with basic troubleshooting
677D-- --A
instructions. Careful use of information displayed will reduce the
need for extensive manual troubleshooting.
Both the furnace and heat pump (HP)/air conditioner (AC) boards
have an amber LED and a green LED. On the HP/AC board, these
are located near the System Communications connector (ABCD)
(lower right corner of the HP/AC board as installed in the unit).
On the furnace board, these are located at the upper right side,
adjacent to the fuse, above the terminal block. The amber LED is
the System Status LED, labeled STATUS. The green LED, labeled
COMM, is used as an indicator of system communications status
(See Fig. 16 and 19).
Status Codes will be displayed on the STATUS LED using the
following protocol:
1. The number of short flashes indicates first digit of code.
2. The number of long flashes indicates second digit of code.
3. A short flash is 0.25 seconds on. A long flash is 1 second
on.
4. The time between flashes is 0.25 seconds.
5. The time between last short flash and first long flash is 1
second.
6. The LEDs will be off for 2.5 seconds before repeating code.
7. If multiple status codes are active concurrently, the highest
priority status code is displayed.
B. Control Start--Up and System Communications
Troubleshooting
On power up, green COMM LEDs will be turned off until
successful system communications are established (this should
happen within 10 seconds). Once communications with UI are
successful, both COMM LEDs will be lit and held on. At the same
time, amber STATUS LEDs will be lit and held continuously on
until a request for operating mode is received. The STATUS LED
will be on any time unit is in idle mode.
If, at any time, communications are not successful for a period
exceeding 2 minutes, the Evolution control will only allow
emergency heating or cooling operation using a common
thermostat and the terminal strip connections on the two control
boards (See Non--Communicating Emergency Cooling/Heating
Mode) and will display Status Code 16, System Communication
Fault, on amber STATUS LED. No further troubleshooting
information will be available at UI until communications are
re--established.
If either COMM LED does not light within proper time period and
status codes are not displayed;
1. Check system transformer high-- and low--voltage to be sure
the system is powered.
2. Check ABCD connection on both boards.
3. Check fuse on furnace board to be sure it is not blown. If
fuse is open, check system wiring before replacing it to be
sure a short does not cause a failure of replacement fuse.
If COMM LED does not light within proper time period and status
code is displayed:
1. Check system wiring to be sure UI is powered and
connections are made A to A, B to B, etc. and wiring is not
shorted. Mis--wiring or shorting of the ABCD
communications wiring will not allow successful
communications.
NOTE: Shorting or mis--wiring low--voltage system wiring will
not cause damage to unit control or UI but may cause low voltage
fuse to open.
C. Indoor Fan Motor Troubleshooting
The indoor fan is driven by an ECM motor consisting of two
parts: the control module and the motor winding section. Do not
assume motor or module is defective if it will not start. Use the
designed--in LED information aids and follow troubleshooting
steps described below before replacing motor control module or
entire motor. Motor control module is available as a replacement
part.
VERIFY MOTOR WINDING SECTION
!
WARNING
ELECTRICAL SHOCK HAZARD
Failure to follow this warning could result in personal
injury or death.
After disconnecting power from the ECM motor, wait at
least 5 minutes before removing the control section. Internal
capacitors require time to discharge.
Before proceeding to replace a motor control module:
1. Check motor winding section to be sure it is functional.
2. Remove motor control module section and unplug winding
plug. Motor shaft should turn freely, resistance between any
two motor leads should be similar and resistance between
any motor lead and unpainted motor end should exceed
100,000 ohms.
3. Failing any of these tests, entire ECM motor must be
replaced.
4. Passing all of the tests, motor control module alone can be
replaced.
MOTOR TURNS SLOWLY
1. Low static pressure loading of blower while access panel is
removed will cause blower to run slowly. Particularly at low
airflow requests. This is normal, do not assume a fault
exists.
2. Recheck airflow and system static pressure using UI service
screens with access panel in place.
NOTE: Blower motor faults will not cause a lockout of blower
operation. The fan coil control will attempt to run the blower motor
as long as UI maintains a demand for airflow. The control will not
operate electric heaters while a fault condition exists. The control
communicates with the motor at least once every five seconds,
even when the motor is idle. If, during operation, the control does
not communicate with the motor for more than 25 seconds, the
motor will shut itself down and wait for communications to be
reestablished.
D. Furnace Control Troubleshooting
Furnace control faults indicated by flashing codes on the amber
system STATUS LED can be resolved using troubleshooting
16
Page 17
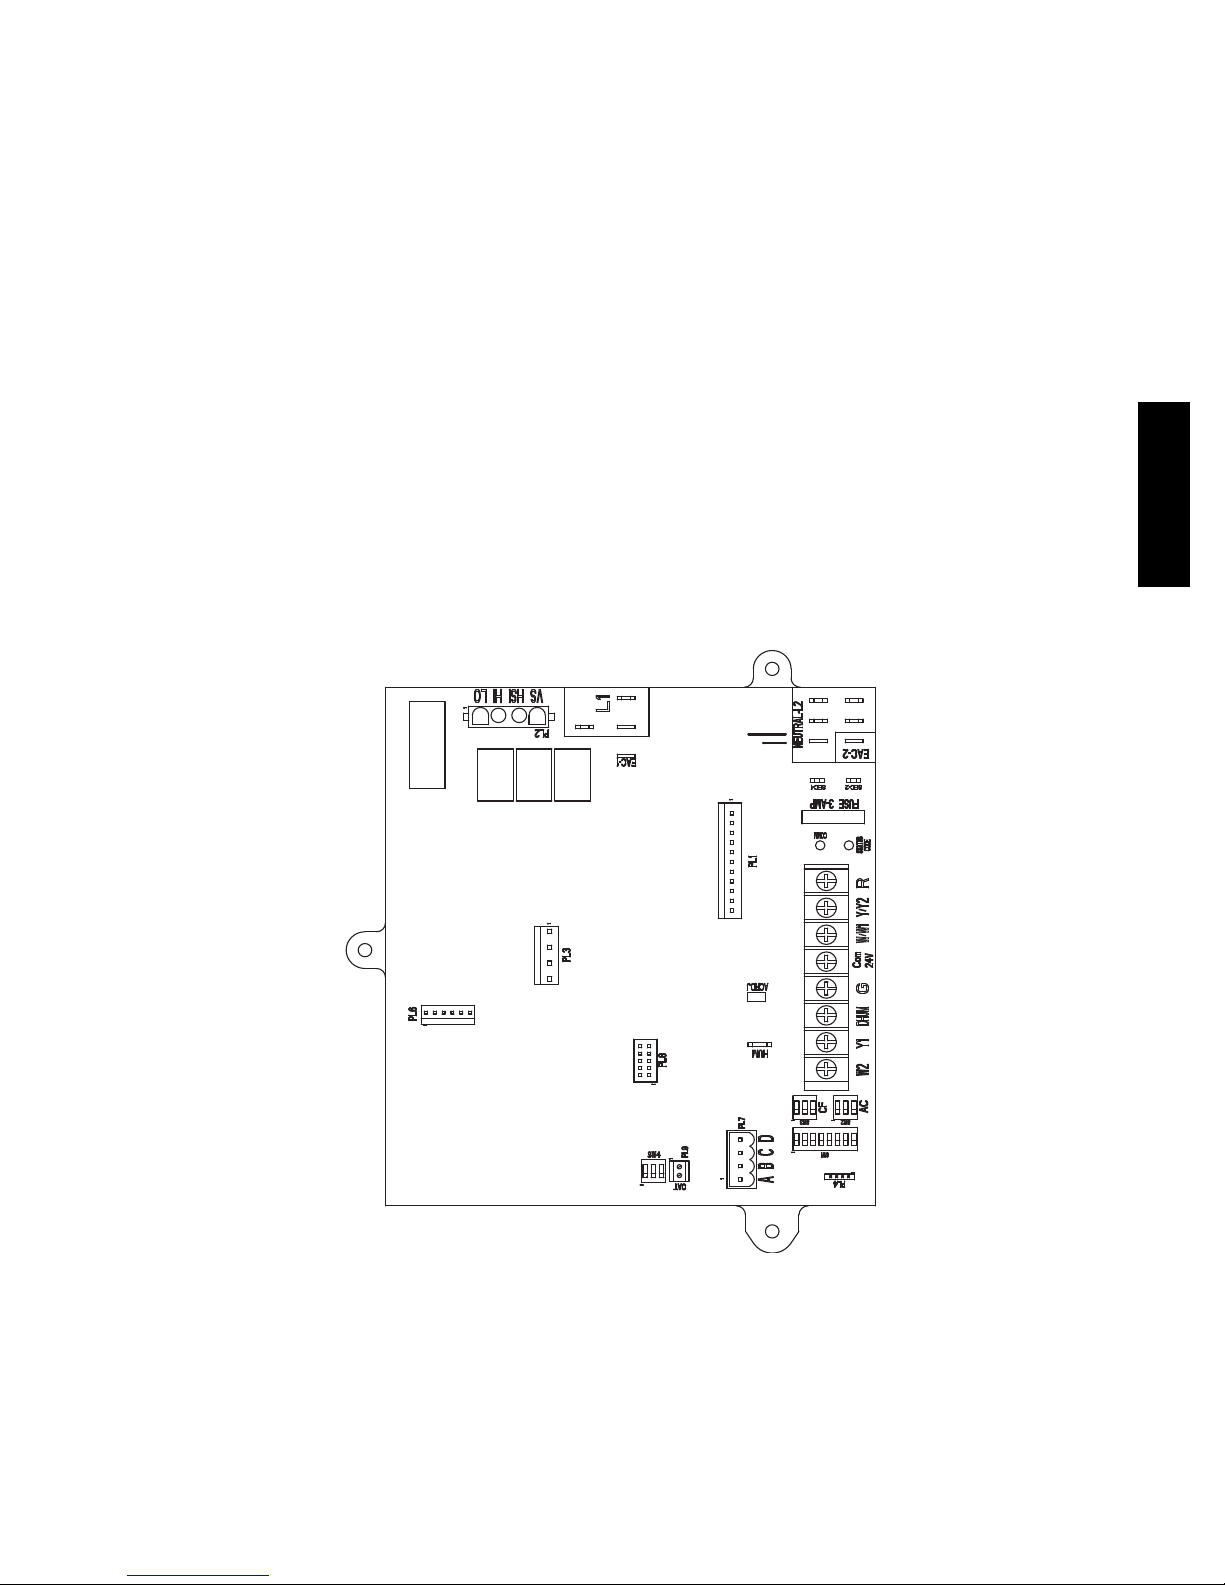
information provided below. Codes are listed in order of their
priority, highest to lowest. Though multiple faults can exist at any
time, only the highest priority code will be displayed on STATUS
LED. Clearing the indicated fault when multiple faults exist will
cause the next highest priority Status Code to be flashed. All
existing faults, as well as a fault history, can be viewed at UI.
STATUS CODE CONTINUOUS OFF
Check for 230 VAC at L1 and L2, and 24 VAC at SEC--1 and
SEC--2.
STATUS CODE CONTINUOUS ON
Control has 24 VAC power.
STATUS CODE 11 -- NO PREVIOUS CODE
Stored status codes are erased automatically after 72 hours.
STATUS CODE 12 -- BLOWER ON AFTER POWER UP
(230 VAC or 24 VAC) Blower runs for 90 seconds if unit is
powered up during a call for heat (R--W/W1 closed) or (R--W/W1
opens) during blower on--delay period.
STATUS CODE 13 -- LIMIT CIRCUIT LOCKOUT
Lockout occurs if a limit or flame rollout switch is open longer
than 3 minutes or 10 successive limit trips occurred during high
heat. Control will auto reset after three hours. Refer to status code
33.
STATUS CODE 14 -- IGNITION LOCKOUT
Control will auto reset after three hours. Refer to status code 34.
STATUS CODE 15 -- BLOWER MOTOR LOCKOUT
Indicates the blower failed to reach 250 RPM or the blower failed
to communicate within 30 seconds after being turned ON in two
successive heating cycles. Control will auto reset after 3 hours.
Refer to status code 41.
STATUS CODE 21 -- GAS HEATING LOCKOUT
Control will NOT auto reset. Check for mis--wired gas valve or
defective control (valve relay).
STATUS CODE 22 -- ABNORMAL FLAME--PROVING
SIGNAL
Flame is proved while gas valve is de--energized. Inducer will run
until fault is cleared. Check for leaky gas valve or stuck--open gas
valve.
STATUS CODE 23 -- PRESSURE SWITCH DID NOT OPEN
Check for obstructed pressure tubing or pressure switch stuck
closed.
STATUS CODE 24 -- SECONDARY VOLTAGE FUSE IS OPEN
Check for short circuit in secondary voltage (24VAC) wiring.
STATUS CODE 25 -- INVALID MODEL SELECTION OR
SETUP ERROR
Indicates either the model plug is missing or incorrect. If code
flashes 4 times on power--up, control is defaulting to model
selection stored in memory. Check for proper model plug number
and resistance values per wiring diagram.
677D-- --A
A06026
Fig. 16 -- Detail of Furnace Board
17
Page 18
677D-- --A
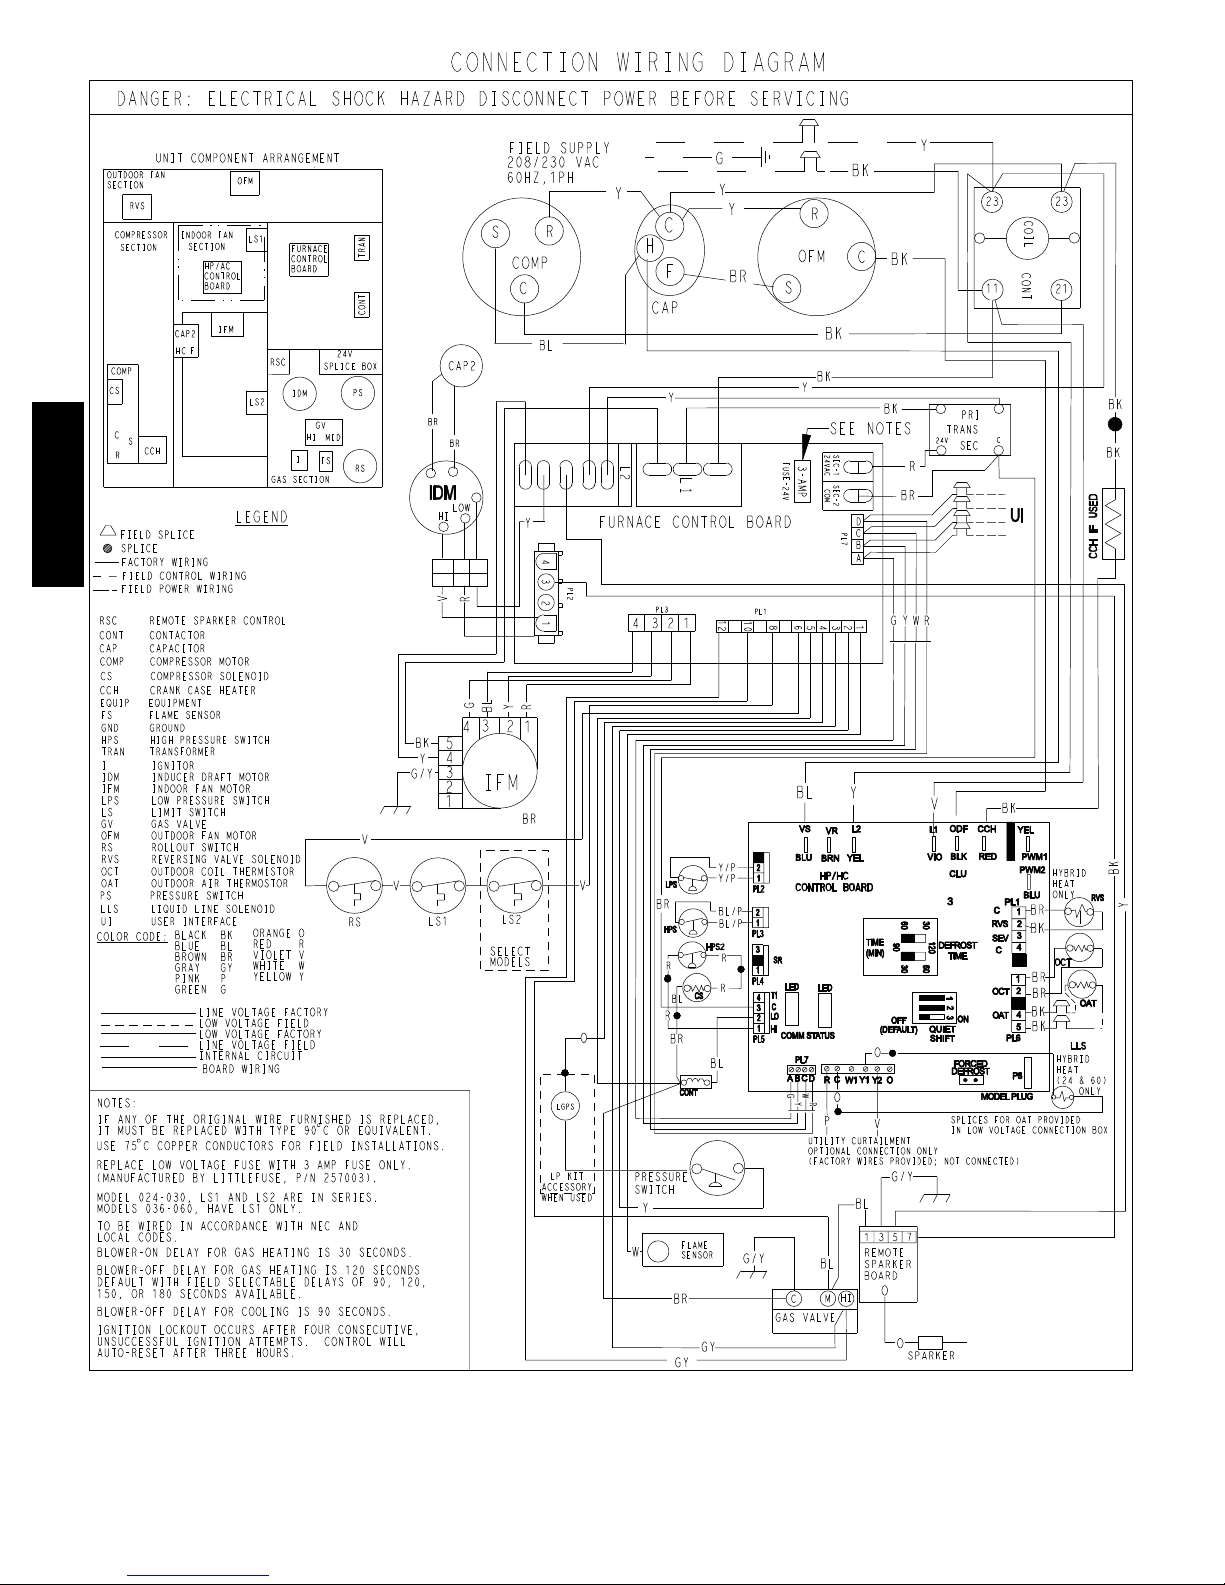
Fig. 17 -- Connection Wiring Schematic--677D----A Single Phase Gas Inputs 040, 060, 090 kBtu/hr
A10217C
18
Page 19
677D-- --A
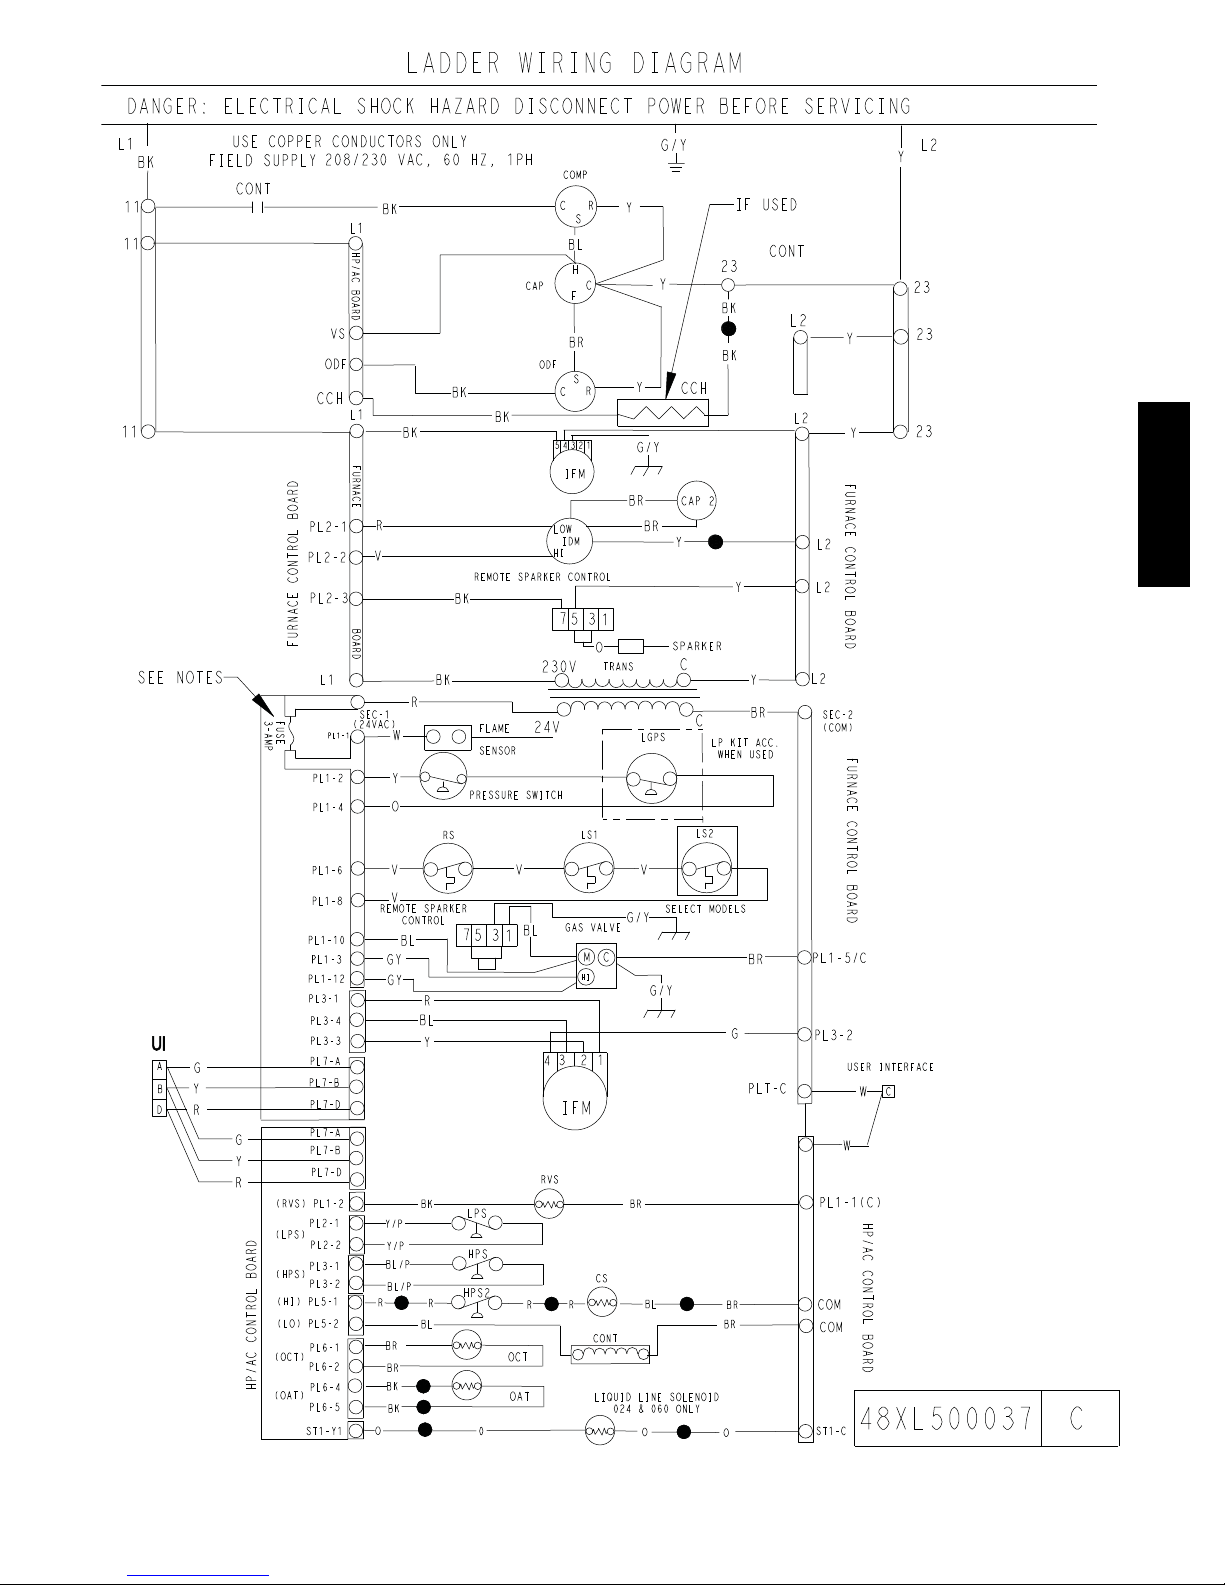
Fig. 16 Cont. -- Ladder Wiring Schematic--677D----A Single Phase Gas Inputs 040, 060, 090 kBtu/hr
A10217L
19
Page 20
677D-- --A
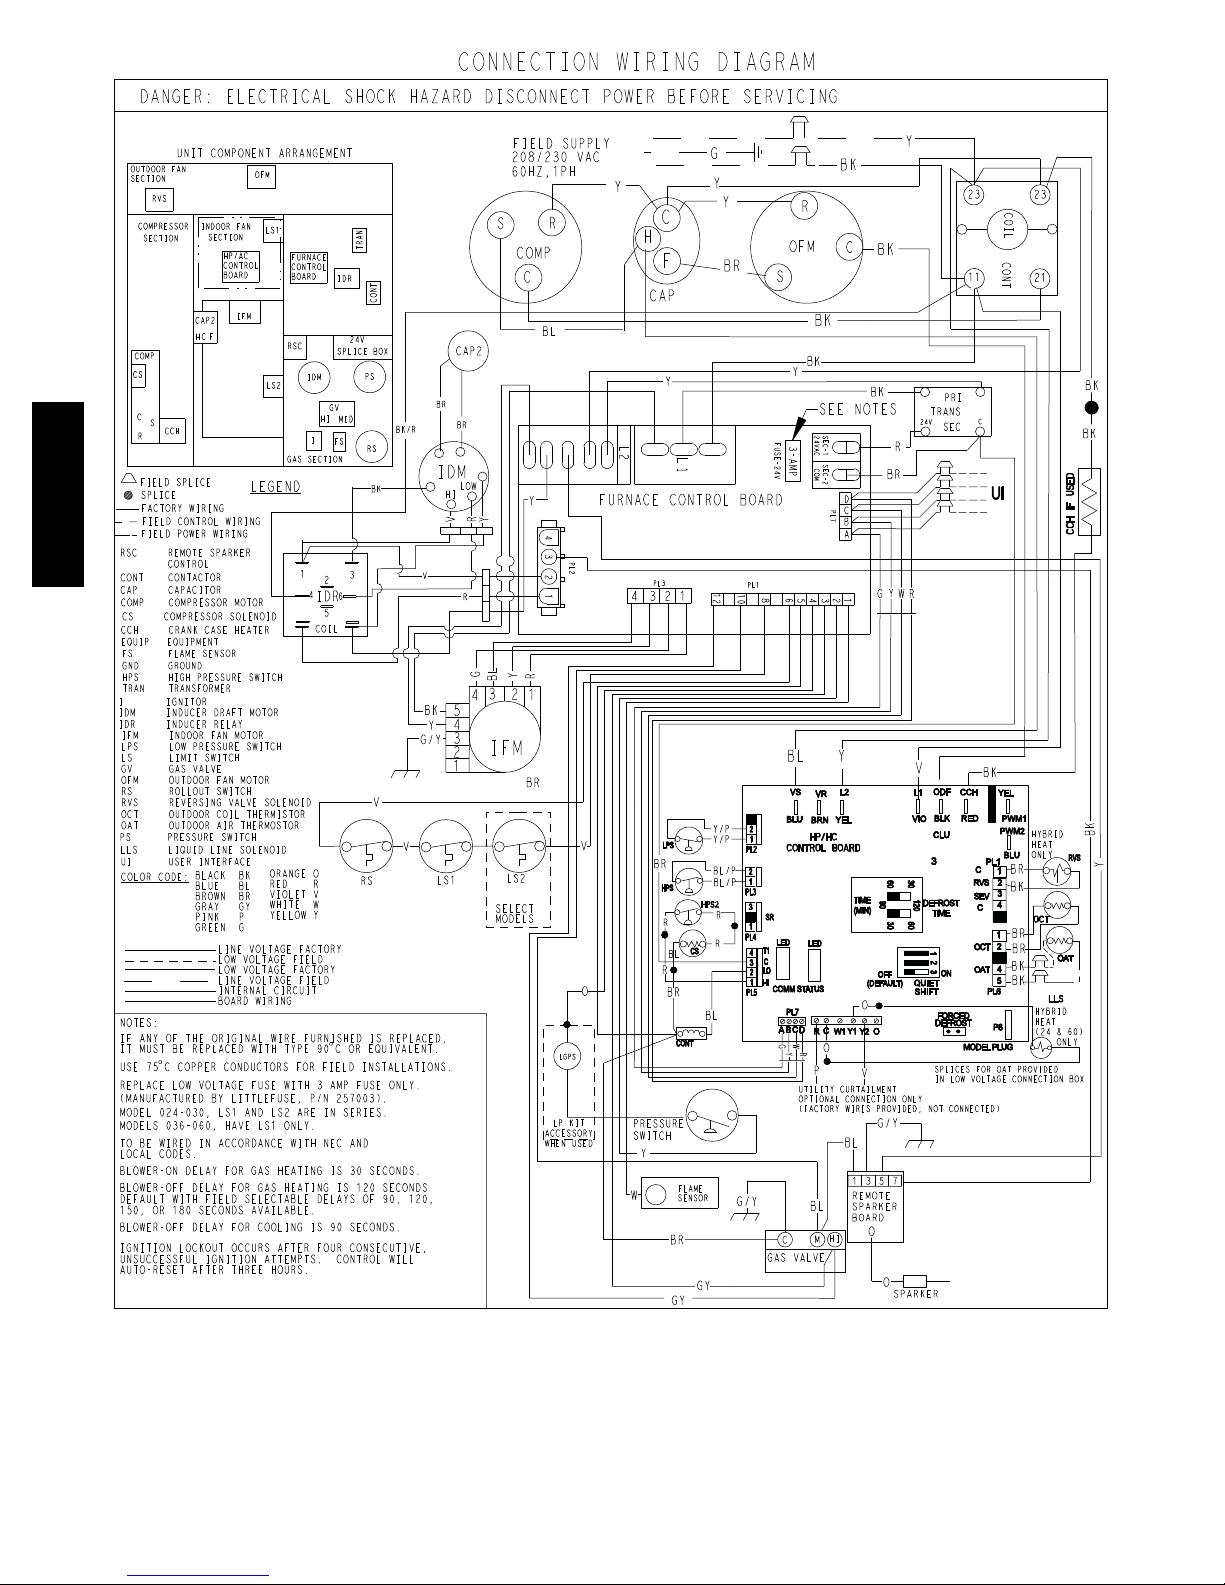
Fig. 18 -- Connection Wiring Schematic--677D----A Single Phase Gas Inputs 115, 130 kBtu/hr
A10219C
20
Page 21
677D-- --A
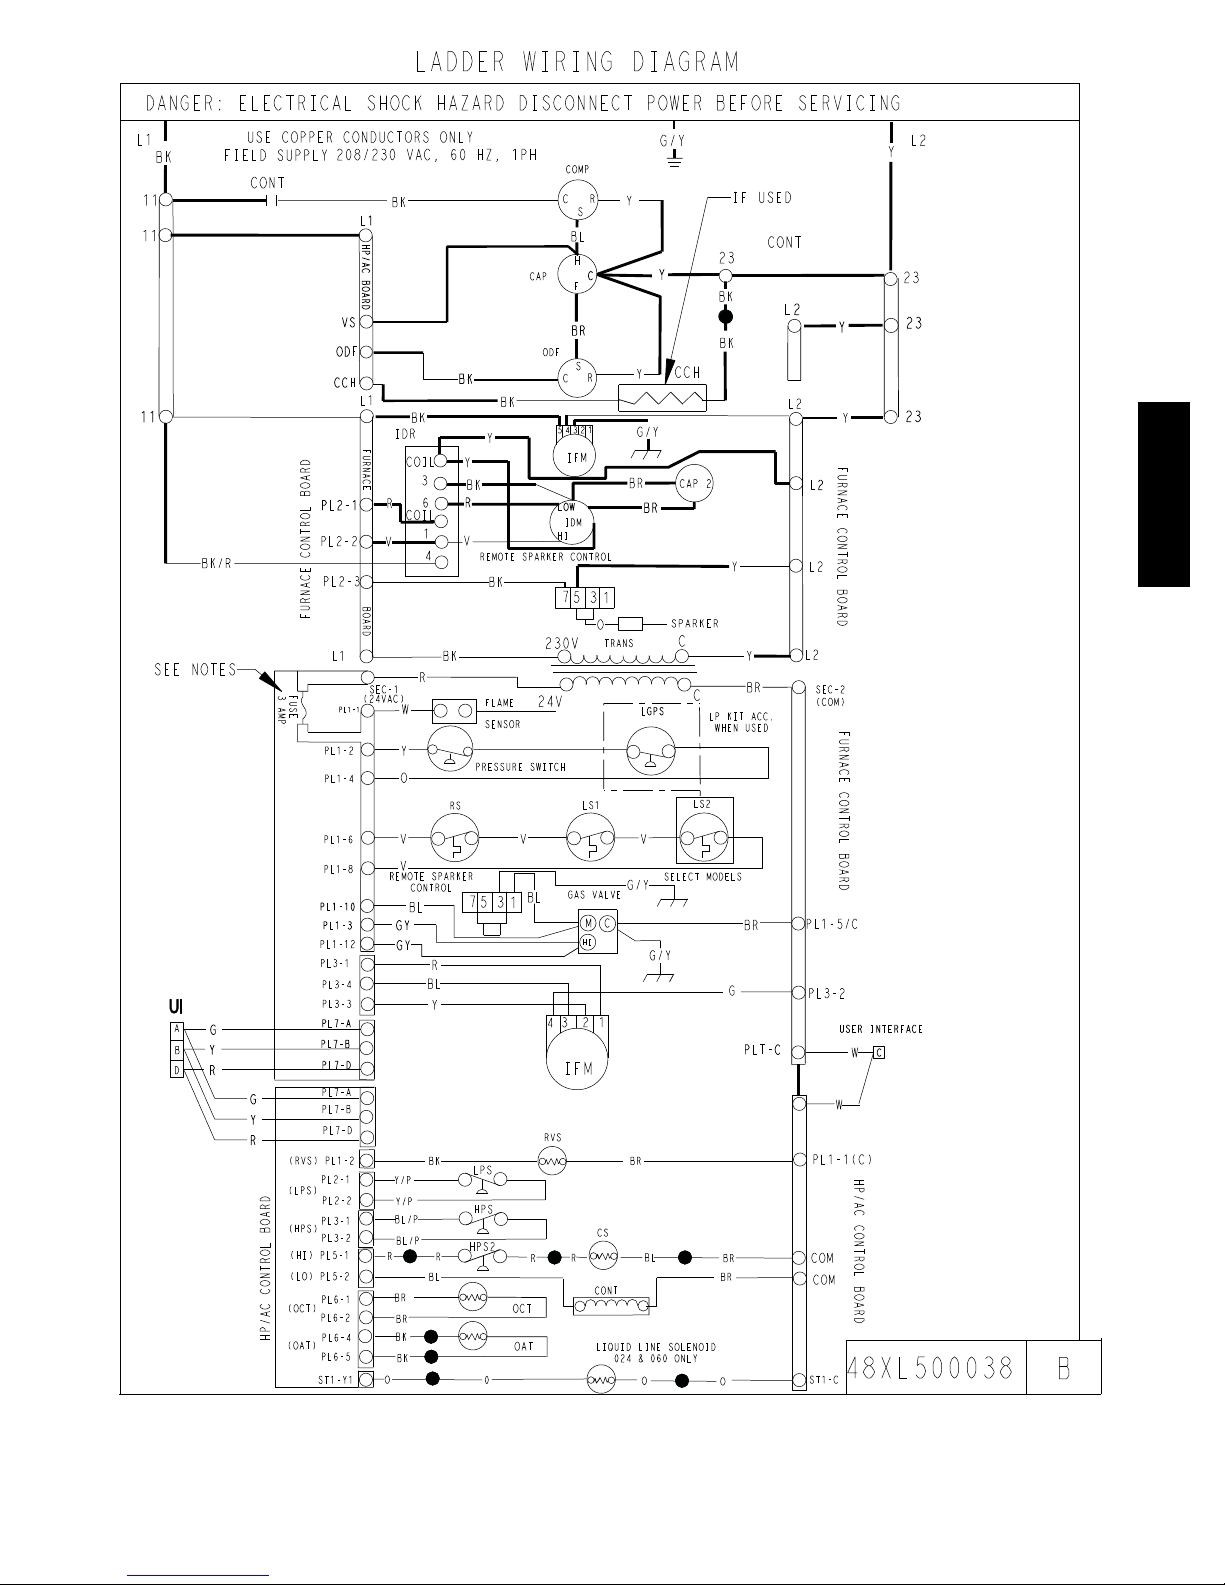
Fig. 17 -- Ladder Wiring Schematic--677D----A Single Phase Gas Inputs 115, 130 kBtu/hr
A10219L
21
Page 22
677D-- --A
*
SUPPLIED BY UTILITY PROVIDER
UTILITY RELAY
UTILITY SIGNAL
OPEN RELAY
*
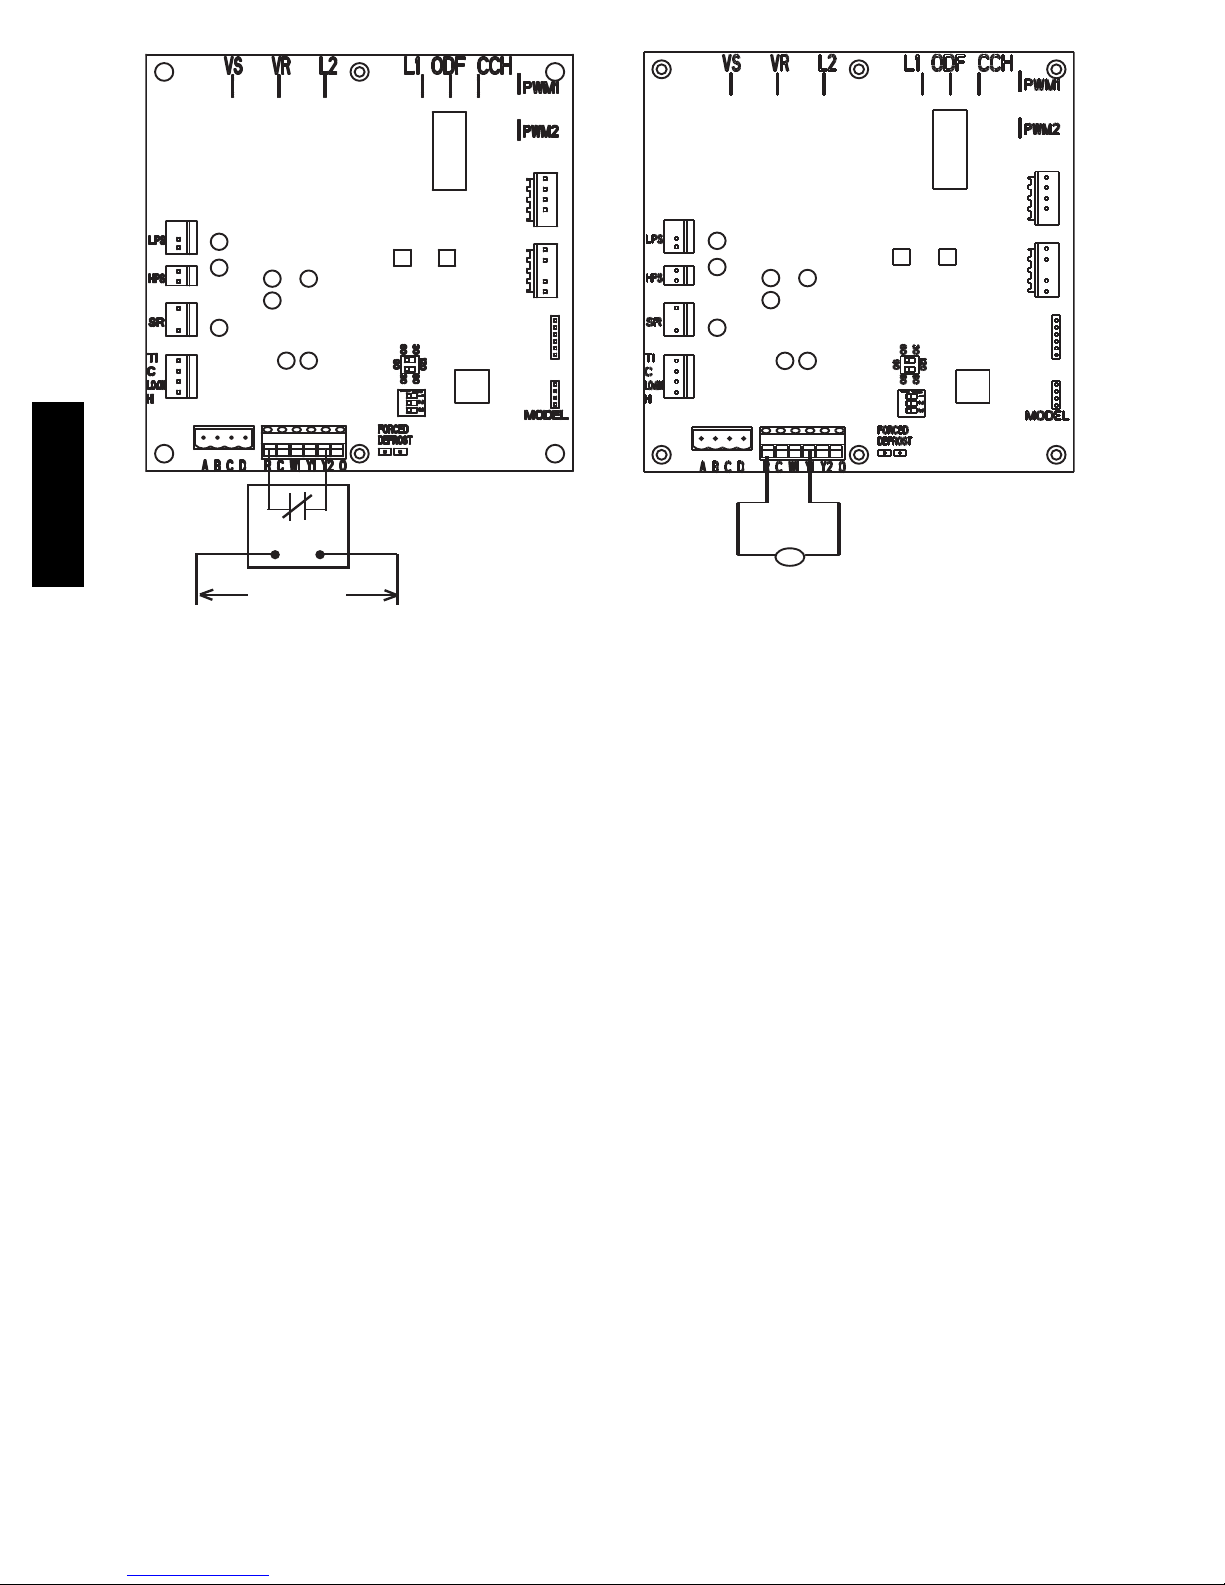
Fig. 19 -- 2--Stage HP/AC Control Board
STATUS CODE 31, 32 -- PRESSURE SWITCH OR RELAY
DID NOT CLOSE OR REOPENED
Control relay may be defective. If open longer than five minutes,
inducer shuts off for 15 minutes before retry. If opens during
blower on--delay period, blower will come on for the selected
blower off--delay. Check for excessive wind, restricted vent,
defective inducer motor, defective pressure switch, lower inducer
voltage (230VAC), inadequate combustion air supply,
disconnected or obstructed pressure tubing, or low inlet gas
pressure (if LGPS used).
STATUS CODE 33 -- LIMIT CIRCUIT FAULT
Indicates a limit or flame rollout switch is open. Blower will run
for 4 minutes or until open switch remakes, whichever is longer. If
open longer than 3 minutes, code changes to lockout 13. If open
less than 3 minutes status code 33 continues to flash until blower
shuts off. Check for loose blower wheel, restricted vent, excessive
wind, dirty filter or restricted duct system, defective switch or
connections, or inadequate combustion air supply (flame roll--out
switch open).
STATUS CODE 34 -- IGNITION PROVING FAILURE
Control will try three more times before lockout 14 occurs. If flame
signal lost during blower on--delay period, blower will come on for
the selected blower off--delay. Check for oxide buildup on flame
sensor (clean with fine steel wool), proper flame sense microamps
(.5 microamps D.C. min., 4.0--6.0 nominal), manual valve
shut--off, low inlet gas pressure, control ground continuity, gas
valve defective or turned off, flame sensor must not be grounded,
inadequate flame carryover or rough ignition, or green/yellow wire
must be connected to unit sheet metal.
STATUS CODE 41 -- BLOWER MOTOR FAULT
Indicates the blower failed to reach 250 RPM or the blower failed
to communicate within the prescribed time limits. Thirty seconds
after being turned ON or ten seconds during steady--state
operation.
STATUS CODE 42 -- INDUCER MOTOR FAULT
Indicates inducer motor hasn’t started within a prescribed time
limit. Check inducer motor and wiring.
LLS
Liquid Line Solenoid
A05247
STATUS CODE 45 -- CONTROL CIRCUITRY LOCKOUT
Auto reset after one hour lockout due to gas valve relay stuck open,
flame sense circuit failure, or software check error. Reset power to
clear lockout. Replace control if status code repeats.
E. HP/AC Control Troubleshooting
See Table 4 for HP/AC control board status codes and
troubleshooting information.
STATUS CODE 53, OUTDOOR AIR TEMPERATURE
SENSOR FAULT -- DETAILED DESCRIPTION
If an OAT sensor is found at power--up, input is constantly checked
to be within a valid temperature range. If sensor is found to be
open or shorted at any time after initial validation, Status Code 53
will be displayed at amber STATUS LED.
Check for faults in wiring connecting sensor to OAT terminals.
Using an Ohm meter, check resistance of thermistor for a short or
open condition.
If thermistor is shorted or open, replace it to return the system to
normal operation. If fault is in the wiring connections, correcting
the fault will clear the code and return the system to normal
operation.
NOTE: If fault condition is an open thermistor or a wiring problem
that appears to be an open thermistor and the power to the unit is
cycled off, the fault code will be cleared on the next power--up but
the fault will remain and system operation will not be as expected.
This is because on power--up, the unit control cannot discern
the difference between an open sensor or if a sensor is not
installed.
Sequence of Operation
The 677D----A HYBRID HEAT unit is designed for installation
with a communicating UI. This unit will not respond to commands
provided by a common thermostat except under certain emergency
situations described in Step 1—Start--Up and Troubleshooting.
The UI uses temperature, humidity and other data supplied from
indoor and outdoor system components to control heating or
cooling system for optimum comfort. The unit will be commanded
by UI to supply airflow. The unit will operate the indoor blower at
requested airflow for most modes.
22
Page 23
INDOOR AIRFLOW ADJUSTMENTS
The nominal requested airflow for heat pump operations will be
350 cfm per ton of nominal cooling capacity as defined by unit
size. Actual airflow request will be adjusted from nominal using
indoor and outdoor temperature and indoor humidity data to
optimize the system operation for occupant comfort and system
efficiency. Refer to UI literature for further system control details.
!
CAUTION
UNIT OPERATION HAZARD
Failure to follow this caution may result in unit damage.
For cooling operation, the recommended airflow is 350 to
450 cfm for each 12,000 Btuh of rated cooling capacity. For
heating operation, the airflow must produce a temperature
rise that falls within the range stamped on the unit rating
plate.
For gas heat operations, Table 3 shows the temperature rise in each
gas heating mode. Refer to these tables to determine the desired
heating airflow for the system being installed.
NOTE: Be sure that all supply--and return--air grilles are open,
free from obstructions, and adjusted properly. Airflow can be
changed using the User Interface. See UI installation instructions
for more detail.
NOTE: Once the compressor has started and then has stopped, it
should not be started again until 4 minutes have elapsed. The
cooling cycle remains “on” until the room temperature drops to
point that is slightly below the cooling control setting of the UI.
HYBRID HEAT SEQUENCE OF OPERATION
The HYBRID HEAT sequence of operation, from satisfied to full
heating, is as follows:
The system will attempt to satisfy the call for heat with the first
stage heat pump. There is a ten--minute staging timer before
switching to the second stage heat pump.
Second stage heat pump will run until call for heat is satisfied or
for fifteen minutes. If after 15 minutes the call for heat still exists,
the unit will stage to first stage gas.
For first stage gas the heat pump will be off unless the unit is in
defrost. There is a ten--minute staging timer on first stage gas. If
call for heat still exists after 10 minutes, the system will stage to
second stage gas and run until the call for heat is satisfied.
NOTE: Heat stages are not shortened due to a 5 degree or higher
demand. All stages are utilized for the full allotted time described
above. If the UI determines it is making sufficient progress toward
set point, it may not stage up after the staging timer has elapsed.
Pressing the FAN and TEMPERATURE UP buttons
simultaneously defeats cycle timers. See UI installation instructions
for more detail.
HEAT PUMP SEQUENCE OF OPERATION
COOLING AND HEATING OPERATION
With a call for first stage cooling, the outdoor fan, reversing valve,
and low stage compressor are energized. If low--stage cannot
satisfy cooling demand, high--stage cooling is energized by the UI.
After second stage is satisfied, the unit returns to low--stage
operation until first stage is satisfied or until second stage is
required again. When both first stage and second stage cooling are
satisfied, the compressor will shut off. The reversing valve will
remain energized until the control board power is removed or a call
for heating in initiated. With a call for heating, the outdoor fan and
compressor are energized. The compressor will operate in high or
low stage operation, as needed to meet the heating demand. When
the heating demand is satisfied, the compressor and fan will shut
off. The reversing valve is de--energized in the heating mode.
NOTE: When two--stage unit is operating at low--stage, system
vapor (suction) pressure will be higher than a standard single--stage
system or high--stage operation.
NOTE: Outdoor fan motor will continue to operate for one
minute after compressor shuts off, when outdoor ambient is greater
than or equal to 100°F(38°C).
UTILITY INTERFACE WITH Evolution CONTROL
The utility curtailment relay should be connected to factory
supplied pigtails (PINK, connected to R, VIOLET connected to Y2
on the control board) located in the low voltage splice box (See
Fig. 17, 18 and 19). This input allows a power utility device to
interrupt compressor operation during peak load periods. When the
utility sends a signal to shut the system down, the UI will display,
“Curtailment Active”.
677D-- --A
Table 3 – Air Delivery and Temperature Rise at Rated Heating Input
Rated Heating Input (Btu/hr) Heating Rise RangeoF(oC) Heating Rise Either Stage, °F(oC)
Unit
677DNWA24040
677DNWA30040
677DNWA30060
677DNWA36060
677DNWA42060
677DNWA36090
677DNWA42090
677DNWA48090
677DNWA60090
677DNWA48115
677DNWA60115
677DNWA48130
677DNWA60130
Airflow delivery values for external static pressure values of up to 1 IN. W.C.
High Stage Low Stage High Stage Low Stage
40,000 26,000
60,000 39,000
90,000 58,500
115,000 75,000
130,000 84,500
20 -- 50
(11--28)
25 -- 55
(14--31)
35 -- 65
(19--36)
30 -- 60
(17--33)
35 -- 65
(19--36)
15--45
(8--25)
25 -- 55
(14--31)
35 -- 65
(19--36)
30 -- 60
(17--33)
35 -- 65
(19--36)
23
“Efficiency” “Comfort”
High Stage Low Stage High Stage Low Stage
35
(19)
40
(22)
50
(28)
45
(25)
50
(28)
30
(17)
40
(22)
35
(19)
50
(28)
55
(31)
50
(28)
55
(31)
Page 24
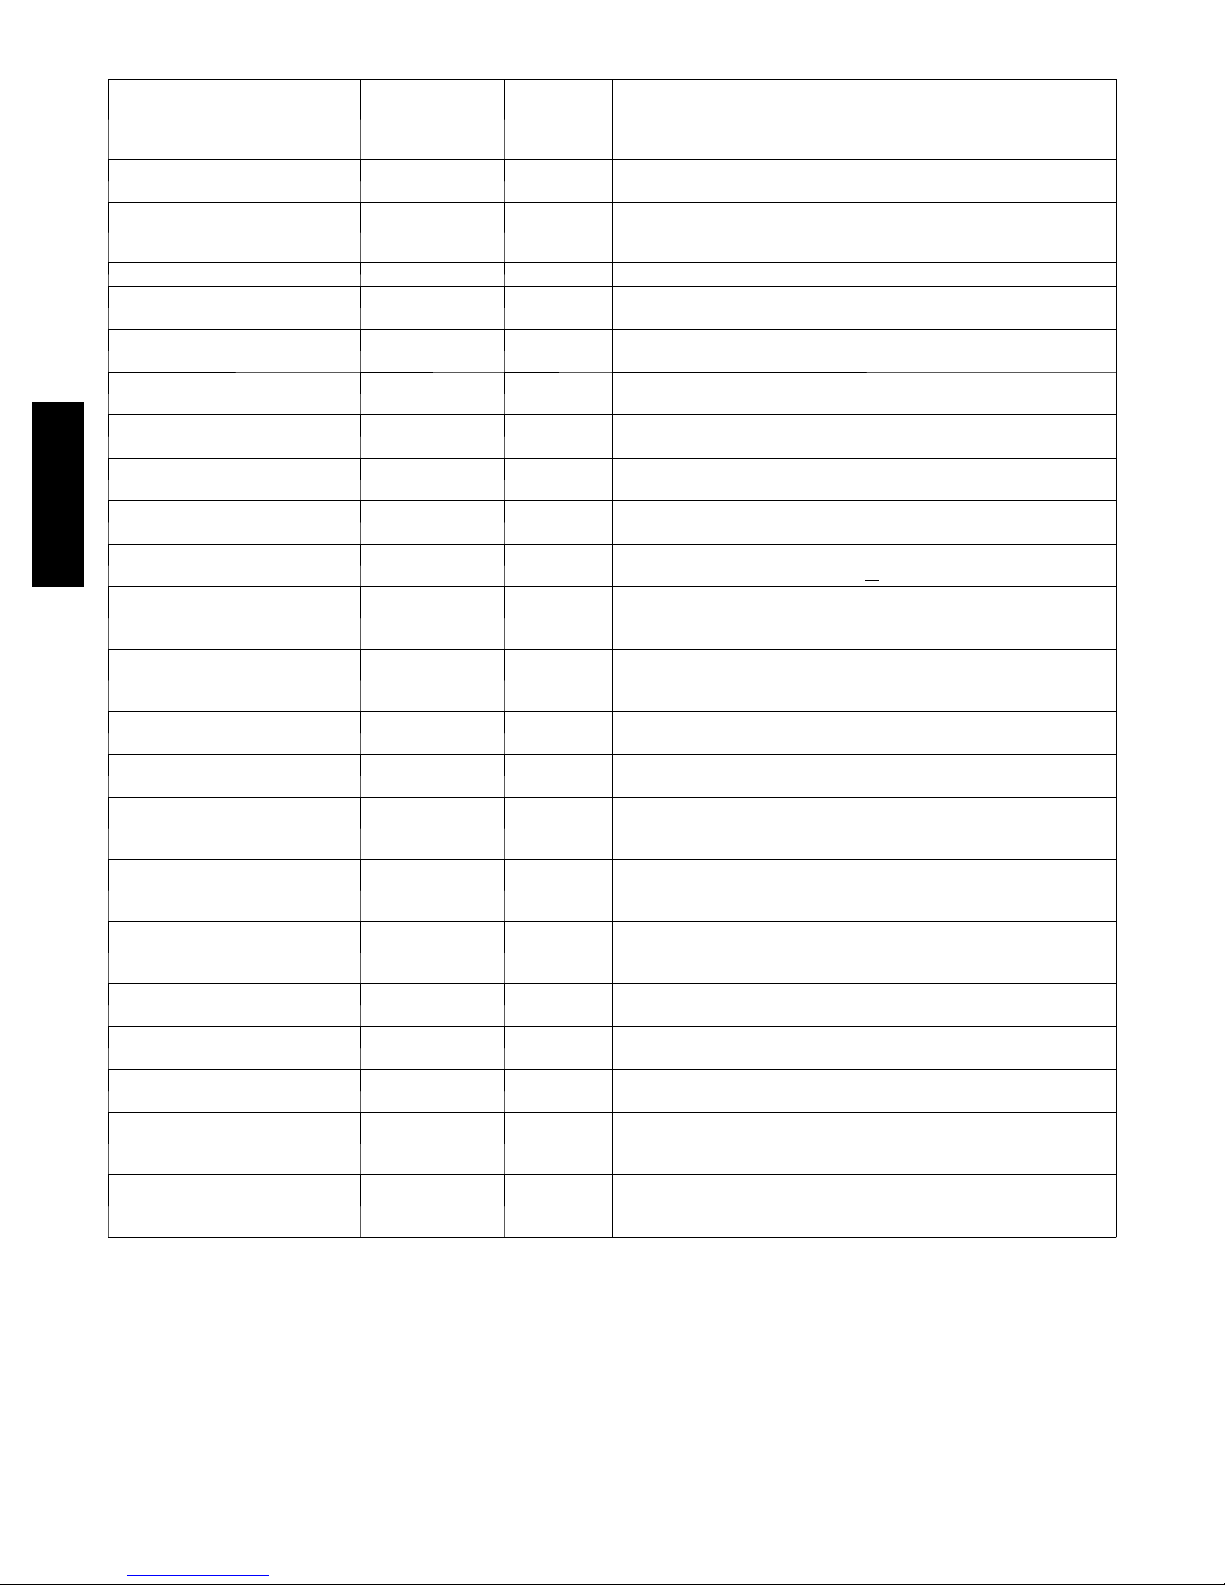
Table 4 – Heat Pump/Air Conditioner Board Status Codes
AMBER
OPERATION
Standby – no call for unit operation
Emergency Mode
Low Stage Cool/Heat Operation None 1, pause Normal operation.
High Stage Cool/Heat Operation
677D-- --A
FAULT
None
Standard Thermostat Control
None 2, pause Normal operation.
System Communications Failure
Invalid Model
Plug
H i g h --- P r e s s u r e
Switch Open
L o w --- P r e s s u r e
Switch Open
Control Fault 45
Brown Out
(230 v)
No 230v at Unit 47
Outdoor Air
Tem p S e n so r
Fault
Outdoor Coil
Sensor Fault
Thermistors Out
of Range
Low Stage Thermal Cutout
High Stage Thermal Cutout
Contactor
Shorted
No 230V at
Compressor
Low Stage Thermal Lockout
High Stage Thermal Lockout
L o w --- P r e s s u r e
Lockout
H i g h --- P r e s s u r e
Lockout
LED
FLASH
CODE
On solid,
no flash
Rapid, con-
tinuous
flashing
16 Communication with UI lost. Check wiring to UI, indoor and outdoor
25
31
32
46
53
55
56
71
72
73
74
81
82
83
84
Normal operation.
Unit being controlled by standard thermostat inputs instead of
Evolution Control. Only high stage operation is available. This
operating mode should be used in emergency situations only.
units.
Control does not detect a model plug or detects an invalid model
plug. Unit will not operate without correct model plug.
High --- pressure switch trip. Check refrigerant charge, outdoor fan
operation and coils for airflow restrictions.
Low ---pressure switch trip. Check refrigerant charge and indoor air
flow.
Outdoor unit control board has failed. Control board needs to be
replaced.
Line voltage < 187v for at least 4 seconds. Compressor and fan
operation not allowed until voltage>
There is no 230v at the contactor when indoor unit is powered and
cooling/heating demand exists. Verify the disconnect is closed and
230v wiring is connected to the unit.
Outdoor air sensor not reading or out of range. Ohm out sensor
and check wiring.
Coil sensor not reading or out of range. Ohm out sensor and check
wiring.
Improper relationship between coil sensor and outdoor air sensor.
Ohm out sensors and check wiring.
Compressor voltage sensed, then disappears while cooling or heating demand exists. Possible causes are internal compressor overload trip or start relay not releasing (if installed).
Compressor voltage sensed, then disappears while cooling or heating demand exists. Possible causes are internal compressor overload trip or start relay not releasing (if installed).
Compressor voltage sensed when no demand for compressor operation exists. Contactor may be stuck closed or there is a wiring
error.
Compressor voltage not sensed when compressor should be starting. Contactor may be stuck open or there is a wiring error.
Thermal cutout occurs in three consecutive low/ high stage cycles.
Low stage locked out for 4 hours or until 24v power recycled.
Thermal cutout occurs in three consecutive high/low stage cycles.
High stage locked out for 4 hours or until 24v power recycled.
Low--- pressure switch trip has occurred during 3 consecutive
cycles. Unit operation locked out for 4 hours or until 24v power
recycled.
High--- pressure switch trip has occurred during 3 consecutive
cycles. Unit operation locked out for 4 hours or until 24v power
recycled.
POSSIBLE CAUSE AND ACTION
190v. Verify line voltage.
24
Page 25
COMPRESSOR OPERATION
When the compressor is operating in low stage, the modulating
ring is deactivated, allowing two internal bypass ports to close off
33% of the scroll compression area so the system operates at part
load capacity. The 24--volt solenoid coil is de--energized in
low--stage operation.
When the compressor is operating at high stage, the modulating
ring is activated, sealing the bypass ports, which allows the
compressor to operate at full load capacity. The 24--volt solenoid
coil is energized in high stage operation.
CRANKCASE HEATER OPERATION (IF APPLICABLE)
The crankcase heater is energized during off cycle below 65_F
(18_C) outdoor air temperature.
OUTDOOR FAN MOTOR OPERATION
The outdoor unit control energizes the outdoor fan any time the
compressor is operating, except for defrost. The outdoor fan
remains energized if a pressure switch or compressor overload
should open. Outdoor fan motor will continue to operate for one
minute after the compressor shuts off when the outdoor ambient is
greater than or equal to 100_F(38°C).
TIME DELAYS--HEAT PUMP OPERATIONS
The unit time delays include:
S Five minute time delay to start heat pump cooling or heating
operation when thereis a call from the thermostat or user
interface. To bypass this feature, momentarily short and release
Forced Defrost pins.
S Five minute compressor recycle delay on return from a
brown--out condition.
S Two minute time delay to return to standby operation from last
valid communication (with Evolution only).
S One minute time delay of outdoor fan at termination of cooling
mode when outdoor ambient is greater than or equal to 100_F
(38°C).
S Fifteen second delay at termination of defrost before the
auxiliary heat (W1) is de--energized.
S Twenty second delay at termination of defrost before the outdoor
fan is energized.
S Thirty second compressor delay when quiet shift enabled.
S There is no time delay between heat pump staging from low to
high and from high to low capacity; the compressor will change
from low to high and from high to low capacity as demand
dictates.
EVOLUTION CONTROLLED LOW AMBIENT COOLING
NOTE: When this unit is operating below 55_F (12.8_C) outdoor
temperature, provisions must be made for low ambient operation.
This unit is capable of low ambient cooling down to 0_F
(--17.8_C) ONLY when using the Evolution control. A low
ambient kit is not required, and the outdoor fan motor does not
need to be replaced for Evolution controlled low ambient
operation. Low ambient cooling must be enabled in the UI
set--up. Fan may not begin to cycle until about 40_FOAT(4.4_C).
Fan will cycle based on coil and outdoor air temperature.
Evolution controlled low ambient mode operates as follows:
S In high stage, fan is off when outdoor coil temp is <outdoor air
temperature plus 3_F(1.7_C) or outdoor fan has been ON for 30
minutes. (Fan is turned off to allow refrigerant system to
stabilize.)
S In low stage, fan is off when outdoor coil temp is <outdoor air
temperature plus 1_F(.6_C) or outdoor fan has been ON for 30
minutes. (Fan is turned off to allow refrigerant system to
stabilize.)
S In high stage and low stage, fan is on when outdoor coil temp >
outdoor air temperature plus 25_F (13.4_C)or outdoor coil temp
>80_F (26.7_C) or if outdoor fan has been OFF for 30 minutes.
(Fan is turned on to allow refrigerant system to stabilize.)
S Low--pressure switch is ignored for first 3 minutes during low
ambient start up. After 3 minutes, if LPS trips, then outdoor fan
motoris turned off for10 minutes with thecompressor running. If
LPS closes within 10 minutes then cooling continues with the
outdoor fan cycling per the coil temperature routine listed above
for the remainder of the cooling cycle. If the LPS does not close
within 10 minutes, then the normalLPS trip response(shut down
cooling operation and generate LPS trip error) will occur.
DEFROST
This control offers 5 possible defrost interval times: 30, 60, 90, 120
minutes, or AUTO.
The defrost interval times: 30, 60, 90, and 120 minutes or AUTO
(default) are selected by the Evolution Control User Interface (the
dip switches are not used.)
AUTO defrost adjusts the defrost interval time based on the last
defrost time as follows:
S When defrost time <3 minutes, thenext defrost interval=120
minutes.
S When defrost time 3--5 minutes, the next defrost interval=90
minutes.
S When defrost time 5--7 minutes, the next defrost interval=60
minutes.
S When defrost time >7 minutes, thenext defrost interval=30
minutes.
The HP/AC control board accumulates compressor run time. As
the accumulated run time approaches the selected defrost interval
time, the control board monitors the coil temperature sensor for a
defrost demand. If a defrost demand exists, a defrost cycle will be
initiated at the end of the selected time interval. A defrost demand
exists when the coil temperature is at or below 32_F(0_C) for 4
minutes during the interval.
The defrost cycle is terminated when the coil temperature reaches
65_F(18_C) or 10 minutes has passed.
If the coil temperature does not reach 32_F(0_C) within the
interval, the interval timer will be reset and start over.
S Upon initial power up the first defrost interval is defaulted to 30
minutes. Remaining intervals are at selected times.
S Defrost is only allowed to occur below 50_F(10_C) outdoor
ambient temperature.
DEFROST HOLD
Defrost hold is not needed in a communicating system because the
UI will complete the defrost cycle before shutting down the
system.
FORCED DEFROST
Forced defrost is initiated with the UI.
During a Forced Defrost:
S If coil temperature is at defrost temperature of 32_F(0_C), and
outdoor air temperature is below 50_F(10_C), a full defrost
sequence will occur.
S If coil temperature or outdoor air temperature do not meet the
above requirements, an abbreviated 30 second defrost will occur.
QUIET SHIFT
Quiet Shift is a field--selectable defrost mode which may eliminate
occasional noise that could be heard at the start of the defrost cycle
and restarting of the heating cycle. This feature must be enabled at
25
677D-- --A
Page 26
the UI. When activated, the following sequence of operation will
occur. Reversing valve will energize and compressor will turn off
for 30 seconds, then turn back on to complete defrost. At the end
of the defrost cycle, the reversing valve de--energizes, compressor
will turn off for another 30 seconds, and the fan will turn off for 40
seconds, before starting in the heating mode.
DEHUMIDIFICATION MODE
This Evolution system can be used to dehumidify the living space.
See User Interface Installation Instructions for more details.
SEQUENCE OF OPERATION--GAS HEAT
NOTE: Evolution control must be grounded for proper operation
or control will lock out.
NOTE: If a power interruption occurs during a call for heat, the
control will start a 90--second blower--only ON period two seconds
after power is restored, if the UI is still calling for gas heating. The
amber LED light will flash code 12 during the 90--second period,
after which the LED will be ON continuously, as long as no faults
are detected. After the 90--second period, the unit will respond to
the UI normally.
GAS HEAT MODE AND ADJUSTMENTS
When the UI calls for gas heat, the Evolution furnace board
performs a self--check, verifies the pressure switch is open, and
677D-- --A
starts the inducer on high speed.
1. Inducer Pre--purge Period: When the inducer motor comes
up on high speed, the pressure switch closes, and the
Evolution ignition control on the furnace board begins a 15
second pre--purge period. If the pressure switch fails to
remain closed, the inducer will remain running. After the
pressure switch re--closes, the Evolution ignition control
will begin a 15 second pre--purge period.
2. Trial--For--Ignition Sequence: The spark igniter will spark
for 3 seconds. The main gas valve relay contact closes to
energize the gas valve on low stage. After 5 seconds, the
igniter is de--energized and a 2--second flame--proving
period begins. NOTE: The unit always lights on high
speed inducer and low stage gas valve operation.
3. Flame--Proving: When the burner flame is proved at the
flame--proving sensor, the furnace control determines what
heating stage to run based on feedback from the UI. If the
UI is asking for low stage gas heat, the ignition control will
change the inducer speed to low speed and keep the gas
valve energized on low stage. If the UI is asking for high
stage gas heat, the ignition control will maintain running the
inducer on high speed and energize the gas valve’s high
stage relay to increase gas flow.
If the burner flame is not proved within 2 seconds, the control will
close the gas valve and repeat the ignition sequence up to 3 more
Trials--For--Ignition before going to Ignition--Lockout. Lockout
will reset automatically after 3 hours, by momentarily interrupting
230 VAC power, or by interrupting 24 VAC power at SEC1 or
SEC2 to the furnace board.
If flame is proved when there should be no flame present, control
will lock out of Gas--Heating mode and operate the inducer motor
until flame is no longer proved.
4. Blower--On Delay: If the burner flame is proven,
approximately 37 seconds after the gas valve is opened the
Indoor Blower is turned on to the appropriate speed for the
gas heating stage.
Simultaneously, the humidifier terminal HUM and electronic air
cleaner terminal EAC--1 are energized throughout the heating
cycle.
NOTE: EAC--2 terminal is common with L2 and will have
115VAC--to--ground when unit is powered.
5. Blower--Off Delay: When the call for gas heat is satisfied,
the gas valve is de--energized, stopping the flow of gas to
the burners, and de--energizing the HUM terminal. The
inducer motor will remain on for a 4--second post--purge
period. The indoor blower and air cleaner terminal EAC--1
will remain energized for 90, 120, 150, or 180 seconds
(depending on selection of blower--off delay selected in the
UI). The factory--set default is 120--second blower--OFF
delay.
CHECK GAS INPUT (NATURAL GAS)
!
UNIT DAMAGE HAZARD
Failure to follow this caution may result in component
damage.
Do not redrill an orifice. Improper drilling (burrs,
out--of--round holes, etc.) can cause excessive burner noise
and misdirection of burner flame. If orifice hole appears
damaged or it is suspected to have been redrilled, check
orifice hole with a numbered drill bit of correct size.
!
FIRE HAZARD
Failure to follow this warning could result in personal
injury, death and/or property damage.
DO NOT bottom out gas valve regulator adjusting screws.
This can result in unregulated manifold pressure and result
in excess overfire and heat exchanger failures.
!
CARBON MONOXIDE POISONING HAZARD
Failure to follow this warning could result in personal
injury, death and/or property damage.
If the manifold pressure and/or gas rate is not properly
adjusted on HI and LO stages, excess carbon monoxide can
be produced.
!
FIRE AND UNIT DAMAGE HAZARD
Failure to follow this warning could result in personal
injury or death and/or property damage.
Unsafe operation of the unit may result if manifold pressure
is outside of the ranges listed in Table 6.
Gas input rates on rating plate are for installations at altitudes up to
2000 ft (610 m). Input rate must be within ± 2% of rating plate
input.
1. Determine the correct gas input rate.
a. The rated gas inputs shown in Table 3 are for altitudes
from sea level to 2000 ft (610 m) above sea level.
These inputs are based on natural gas with a heating
value of 1025 Btu/ft3 at .60 specific gravity.
IN THE U.S.A.:
The input rating for altitudes above 2,000 ft (610 m) must be
reduced by 4 percent for each 1,000 ft (305 m) above sea level.
For installations below 2,000 ft (610 m), refer to the unit rating
plate.
CAUTION
WARNING
WARNING
WARNING
26
Page 27
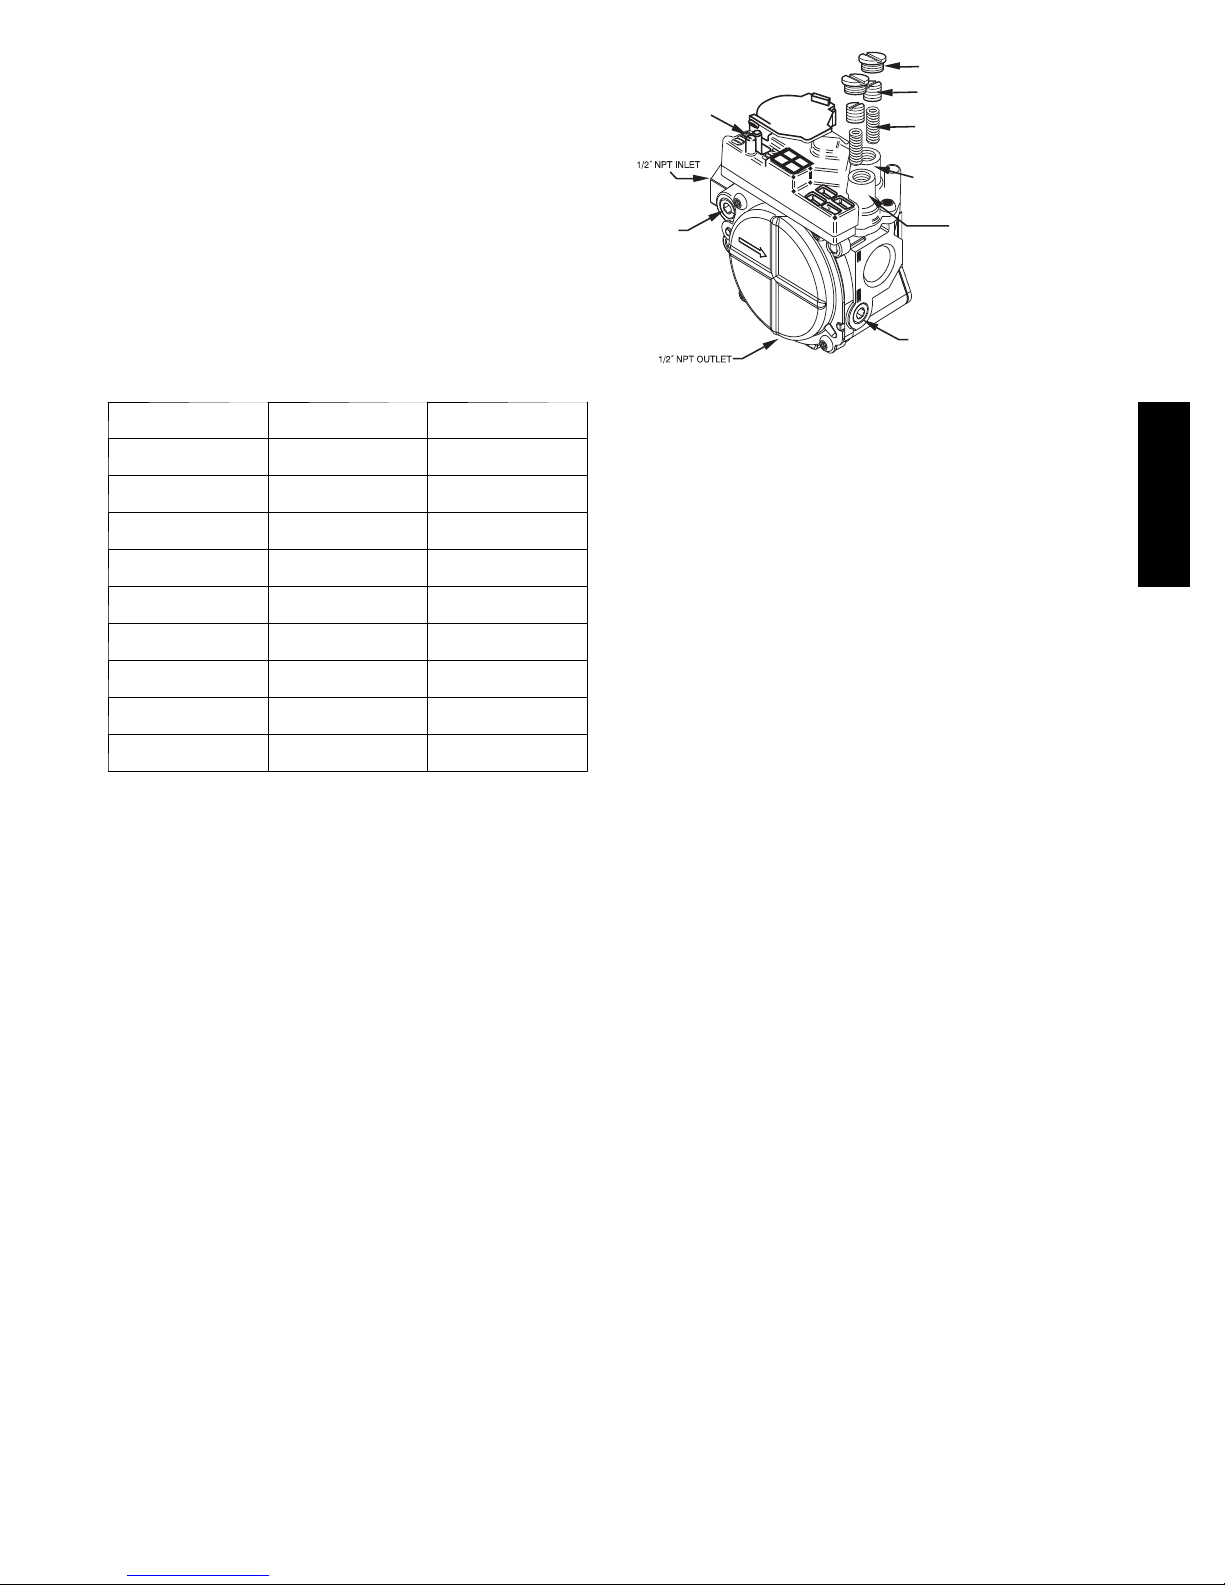
For installations above 2,000 ft (610 m), multiply the input by on
the rating plate by the derate multiplier in Table 5 for the correct
input rate.
IN CANADA:
The input rating for altitudes from 2,000 (610 m) to 4,500 ft (1372
m) above sea level must be derated 10 percent by an authorized
Gas Conversion Station or Dealer.
EXAMPLE:
90,000 Btuh Input Furnace Installed at 4300 ft (1311 m).
Furnace Input Rate Derate Multiplier Furnace Input Rate
at Sea Level X Factor = at Installation
Altitude
90,000 X 0.90 = 81,000
ON/OFF SWITCH
INLET
PRESSURE TAP
REGULATOR COVER SCREW
PLASTIC ADJUST SCREW
REGULATOR SPRING
HIGH STAGE GAS
PRESSURE REGULATOR
ADJUSTMENT
LOW STAGE
GAS PRESSURE
REGULATOR ADJUSTMENT
MANIFOLD
PRESSURE TAP
Table 5 – Altitude Derate Multiplier for U.S.A.*
Altitude ft (m) Percent of Derate
0--2000
(0--610)
2001--3000*
(610--914)
3001--4000
(915--1219)
4001--5000
(1220--1524)
5001--6000
(1524--1829)
6001--7000
(1829--2134)
7001--8000
(2134--2438)
8001--9000
(2139--2743)
9001--10,000
(2744--3048)
* In Canada see Canadian Altitude Adjustment
{Derate multiplier factor s ar e based on midpoint altitude for altitude range.
0 1.00
8--12 0.90
12--16 0.86
16--20 0.82
20--24 0.78
24--28 0.74
28--32 0.70
32--36 0.66
36--40 0.62
Derate Multiplier
Factor{
b. When the gas supply being used has a different heating
value or specific gravity, refer to national and local
codes, or contact your distributor to determine the
required orifice size.
2. Adjust manifold pressure to obtain low stage input rate (See
Fig. 20).
a. Turn off gas supply to unit.
b. Remove pipe plug on manifold (See Fig. 21) and
connect manometer. Turn on gas supply to unit.
c. Turn gas valve switch to ON.
d. Set unit to run for 20 minutes in low--stage gas heat
operation using the ”INSTALLER CHECKOUT” menu
on the UI.
e. Remove regulator adjustment cap from low stage gas
valve pressure regulator (See Fig. 20) and turn
low--stage adjusting screw (3/16 or smaller flat--tipped
screwdriver) counterclockwise (out) to decrease rate and
clockwise (in) to increase input rate.
A04167
Fig. 20 -- Redundant Automatic Gas Control Valve
NOTE: DO NOT set low stage manifold pressure less than 1.4
IN. W.C or more than 2.0 IN. W.C for natural gas. If manifold
pressure is outside this range, change main burner orifices.
f. Re--install low stage regulator adjustment cap.
g. Leave manometer connected.
NOTE: If orifice hole appears damaged or it is suspected to have
been re--drilled, check orifice hole with a numbered drill bit of the
correct size. Never re--drill an orifice. A burr--free and squarely
aligned orifice hole is essential for proper flame characteristics.
3. Verify natural gas low stage input rate.
a. Turn off all other gas appliances and pilots served by
the gas meter.
b. If unit is not running, set unit to run for 20 minutes in
low--stage gas heat operation using the ”INSTALLER
CHECKOUT” menu on the User Interface.
c. Record number of seconds for gas meter to complete
one revolution.
d. Divide number of seconds in step c. into 3600 (number
of seconds in 1 hour).
e. Multiply result of step d. by the number of cubic feet
shown for one revolution of test dial to obtain cubic feet
of gas flow per hour.
f. Multiply result of step f. by Btu heating value of the gas
to obtain total measured input shown in Table 3.
(Consult the local gas supplier if the heating value of
gas is not known).
EXAMPLE: Assume a 90,000 high stage input unit is being
installed. Assume that the size of the dial is 2 cubic ft., one
revolution takes 129 sec., and the heating value of the gas is 1025
Btu/ft3. Proceed as follows:
a. 129 sec. to complete one revolution
b. 3600/129 = 27.9
c.27.9x2=55.8ft3ofgasflow/hr.
d. 55.8 x 1050 = 58,590 Btuh input.
In this example, the nominal input rate for low stage is 58,500
Btu/hr, so the low stage manifold pressure is correctly set.
If the measured low stage rate is too low, increase the manifold
pressure to increase rate. If the measured low stage rate is too high,
decrease the manifold pressure to decrease rate.
NOTE: Double--check that UI is running on low stage gas heat
while clocking the low stage firing rate.
4. Verify proper low stage gas heat temperature rise.
a. Furnace must operate within rise range listed on rating
plate.
b. Select ”COMFORT” or ”EFFICIENCY” mode on User
Interface. ”COMFORT” mode will provide a warmer
677D-- --A
27
Page 28
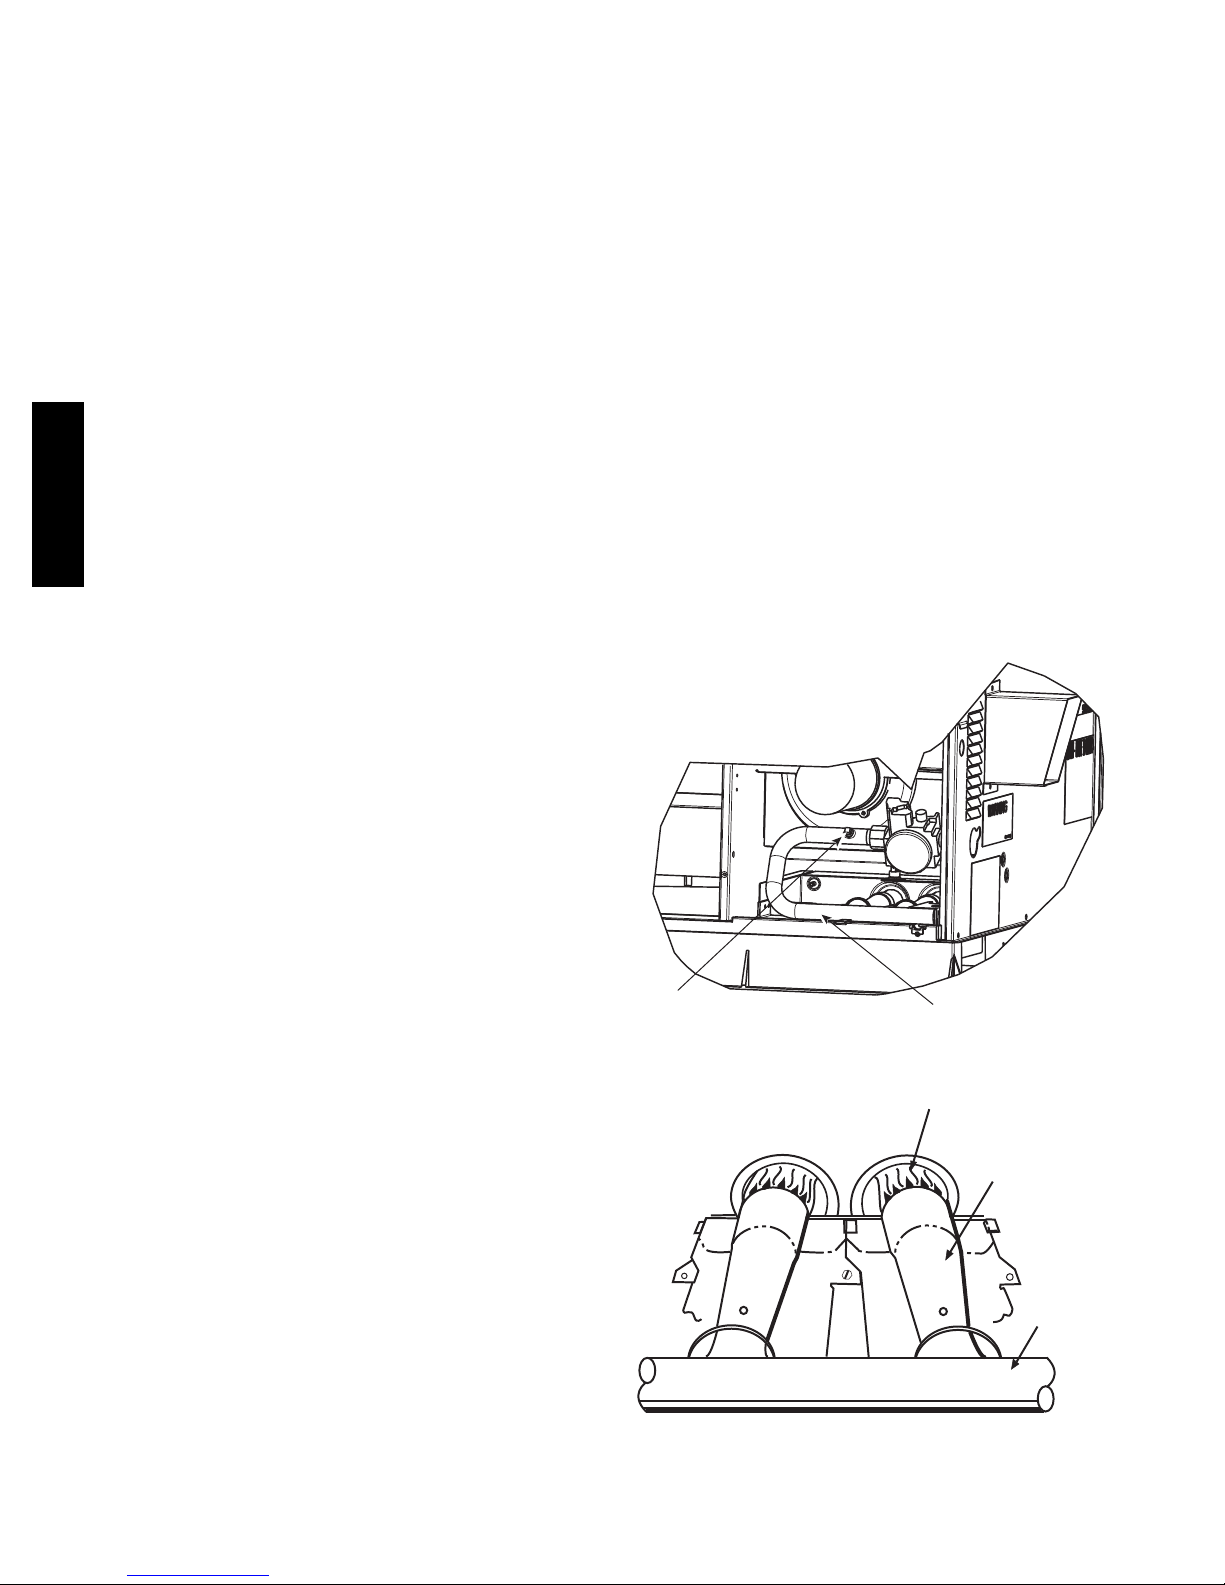
supply air temperature, while ”EFFICIENCY” will
provide lower gas consumption.
c. Make sure access panel is re--installed on the unit.
d. Measure supply and return temperatures as close to the
unit as possible. Subtract the return temperature from
the supply temperature to determine rise. Rise should
fall within the range specified on the rating plate.
5. Adjust manifold pressure to obtain high stage input rate
(See Fig. 20).
a. Set unit to run for 20 minutes in high--stage gas heat
operation using the ”INSTALLER CHECKOUT” menu
on the UI.
b. Remove regulator adjustment cap from high stage gas
valve pressure regulator (See Fig.20) and turn
high--stage adjusting screw (3/16 or smaller flat--tipped
screwdriver) counterclockwise (out) to decrease rate and
clockwise (in) to increase input rate.
NOTE: DO NOT set high stage manifold pressure less than 3.2
IN. W.C or more than 3.8 IN. W.C for natural gas. If manifold
pressure is outside this range, change main burner orifices.
c. Re--install high stage regulator adjustment cap.
677D-- --A
d. Leave manometer connected.
6. Verify natural gas high stage input rate.
a. Turn off all other gas appliances and pilots served by
the gas meter.
b. If unit is not running, set unit to run for 20 minutes in
high stage gas heat operation using the ”INSTALLER
CHECKOUT” menu on the User Interface.
c. Record number of seconds for gas meter to complete
one revolution.
d. Divide number of seconds in step c. into 3600 (number
of seconds in 1 hour).
e. Multiply result of step d. by the number of cubic feet
shown for one revolution of test dial to obtain cubic feet
of gas flow per hour.
f. Multiply result of step f. by Btu heating value of the gas
to obtain total measured input shown in Table 3.
(Consult the local gas supplier if the heating value of
gas is not known).
EXAMPLE: Assume a 90,000 high stage input unit is being
installed. Assume that the size of the dial is 2 cubic ft., one
revolution takes 84 sec., and the heating value of the gas is 1025
Btu/ft3. Proceed as follows:
a. 84 sec. to complete one revolution
b. 3600/84 = 42.9
c.42.9x2=85.8ft
3
of gas flow/hr.
d. 85.8 x 1050 = 90,090 Btuh input.
In this example, the nominal input rate for high stage is 90,000
Btu/hr, so the high stage manifold pressure is correctly set.
If the measured high stage rate is too low, increase the manifold
pressure to increase rate. If the measured high stage rate is too
high, decrease the manifold pressure to decrease rate.
NOTE: Double--check that User Interface is running on high stage
gas heat while clocking the low stage firing rate.
7. Verify proper high stage gas heat temperature rise.
a. Furnace must operate within rise range listed on rating
plate.
b. Make sure access panel is re--installed on the unit.
c. Measure supply and return temperatures as close to the
unit as possible. Subtract the return temperature from
the supply temperature to determine rise. Rise should
fall within the range specified on the rating plate.
NOTE: If the temperature rise is outside the rating plate range,
first check:
a. Gas input for low and high stage gas heat operation.
b. Derate for altitude, if applicable.
c. Return and supply ducts for excessive restrictions
causing static pressures in excess of .5 IN. W.C.
d. Make sure model plug is installed.
8. Final Check
a. Turn off gas to unit
b. Remove manometer from pressure tap.
c. Replace pipe plug on manifold (See Fig. 21).
d. Turn on gas to unit.
e. Check for leaks.
CHECK GAS INPUT (PROPANE GAS)
Refer to propane kit installation instructions for properly checking
gas input.
NOTE: For installations below 2,000 ft (610 mm), refer to the
unit rating plate for proper propane conversion kit. For
installations above 2,000 ft, contact your distributor for proper
propane conversion kit.
CHECK BURNER FLAME
With control access panel removed (see Fig. 25), observe the unit
heating operation. Watch the burner flames to see if they are light
blue and soft in appearance, and that the flames are approximately
the same for each burner. Propane will have blue flame (See Fig.
22). Refer to the Maintenance section for information on burner
removal.
Pipe Plug
Manifold
A09082
Fig. 21 -- Burner Assembly
BURNER FLAME
BURNER
MANIFOLD
C99021
Fig. 22 -- Monoport Burner
28
Page 29
Table 6 – Heating Inputs
ORIFICES
HEATING INPUT (BTU/HR)*
High Stage Low Stage
40,000 26,000 2 4.0 13.0 3.2∼ 3.8 1.4 ∼ 2.0
60,000 39,000 3 4.0 13.0 3.2∼ 3.8 1.4 ∼ 2.0
90,000 58,500 3 4.0 13.0 3.2∼ 3.8 1.4 ∼ 2.0
115,000 75,000 3 4.0 13.0 3.2∼ 3.8 1.4 ∼ 2.0
130,000 84,500 3 4.0 13.0 3.2∼ 3.8 1.4 ∼ 2.0
*Cubic ft of natural gas per hour for gas pressures of .5 psig (14 IN. W.C.) or less and a pressure drop of .5 IN. W.C. (based on a .60 specific gravity gas). Ref:
Table 6 2 ( b) NFPA54/ANSI Z223.1 ---2009.
NUMBER OF
LIMIT SWITCHES
Normally closed limit switch (LS) completes the control circuit.
Should the leaving--air temperature rise above the maximum
allowable temperature, the limit switch opens and the control
circuit “breaks.” Any interruption in the control circuit instantly
closes the gas valve and stops gas flow to the burners. The blower
motor continues to run until LS resets. The furnace board STATUS
LED will display STATUS CODE 33.
When the air temperature at the limit switch drops to the
low--temperature setting of the limit switch, the switch closes and
completes the control circuit. The direct--spark ignition system
cycles and the unit returns to normal heating operation.
ROLLOUT SWITCH
The function of the rollout switch is to close the main gas valve in
the event of flame rollout. The switch is located above the main
burners. When the temperature at the rollout switch reaches the
maximum allowable temperature, the control circuit trips, closing
the gas valve and stopping gas flow to the burners. The indoor fan
motor (IFM) continues to run until switch is reset. The furnace
board STATUS LED will display STATUS CODE 33.
CONTINUOUS FAN MODE
When continuous fan operation is requested by the User Interface
indoor fan motor will operate at continuous blower airflow.
Continuous fan operation is programmable. See the User Interface
Owner’s Manual for detailed instructions. Terminal EAC--1 is
energized as long as the indoor fan motor is energized.
During a call for gas heat, the Evolution control will transition the
indoor fan motor to continuous blower airflow or gas heat airflow,
whichever is lowest. The indoor fan motor will remain ON until
the burners ignite, then shut OFF and remain OFF for the
blower--ON delay allowing the heat exchangers to heat up more
quickly, then restarts at the end of the blower--ON delay period.
The indoor fan motor will revert to continuous--blower airflow
after the gas heating cycle is completed.
When the UI “calls for cooling”, the indoor fan motor will switch
to operate at cooling airflow. When the call for cooling is satisfied,
the indoor fan motor will operate an additional 90 seconds at
cooling airflow before transitioning back to continuous--blower
airflow.
When the call for continuous fan is removed, the indoor blower
will continue operating for an additional 5 seconds before shutting
down, if no other function requires blower motor operation.
COMPONENT TEST
The Evolution Furnace Board features a gas component test system
to help diagnose a system problem in the case of a gas component
failure. To initiate the component test procedure, ensure that there
are no UI inputs to the control (the ABCD connector can be
removed from the Evolution control board for this operation) and
all time delays have expired. Turn on setup switch SW1--6.
NOTE: The component test feature will not operate if the control
is receiving any UI signals or until all time delays have expired.
The component test sequence is as follows:
1. The control turns the inducer motor ON and keeps it ON
through step 3.
GAS SUPPLY PRESSURE (IN. W.C.) MANIFOLD PRESSURE (IN. W.C.)
Natural Natural
Min Max High Stage Low Stage
2. After waiting 10 seconds, the control turns the igniter ON
for 15 seconds, then OFF.
3. The control then turns the indoor fan motor on for 15
seconds, then OFF.
4. After shutting the blower motor OFF, the control runs the
inducer for 10 seconds, then turns it OFF.
NOTE: The EAC terminals are energized when the blower is
operating.
After the component test is completed, one or more status codes
(11, 25, or 41) will flash. See component test section or Status
Code Label for explanation of status codes.
NOTE: To repeat component test, turn setup switch SW1--6 to
OFF and then back ON.
Check for Refrigerant Leaks
Locate and repair refrigerant leaks and charge the unit as follows:
1. Use both high-- and low--pressure ports to relieve system
pressure and reclaim remaining refrigerant.
2. Repair leak following accepted practices.
NOTE: Install a filter drier whenever the system has been opened
for repair.
3. Check system for leaks using an approved method.
4. Evacuate refrigerant system and reclaim refrigerant if no
additional leaks are found.
5. Charge unit with Puron (R--410A) refrigerant, using a
volumetric--charging cylinder or accurate scale. Refer to
unit rating plate for required charge.
Start--Up Adjustments
Complete the required procedures given in the Pre--Start--Up
section before starting the unit. Do not jumper any safety devices
when operating the unit. Do not operate the unit in cooling mode
when the outdoor temperature is below 40°F(4.4_C) (unless
low--ambient operation is enabled in the UI). Do not rapid cycle
the compressor. Allow 5 min. between “on” cycles to prevent
compressor damage.
CHECKING COOLING AND HEATING CONTROL
OPERATION
See UI Installation Instructions for detailed system CHECKOUT.
CHECKING AND ADJUSTING REFRIGERANT CHARGE
The refrigerant system is fully charged with Puron (R--410A)
refrigerant and is tested and factory sealed.
NOTE: Any adjustment to refrigerant charge must be done with
unit operating in HIGH stage.
NOTE: Adjustment of the refrigerant charge is not required
unless the unit is suspected of not having the proper R--410A
charge. The charging label and the tables shown refer to system
temperatures and pressures in cooling mode only. A refrigerant
charging label is attached to the outside of the unit. If charge level
is suspect in heat pump heating mode, reclaim all refrigerant and
charge to rating plate amount. (This information may be obtained
from the physical data table also.)
IMPORTANT: When evaluating the refrigerant charge, an
indicated adjustment to the specified factory charge must always be
677D-- --A
29
Page 30
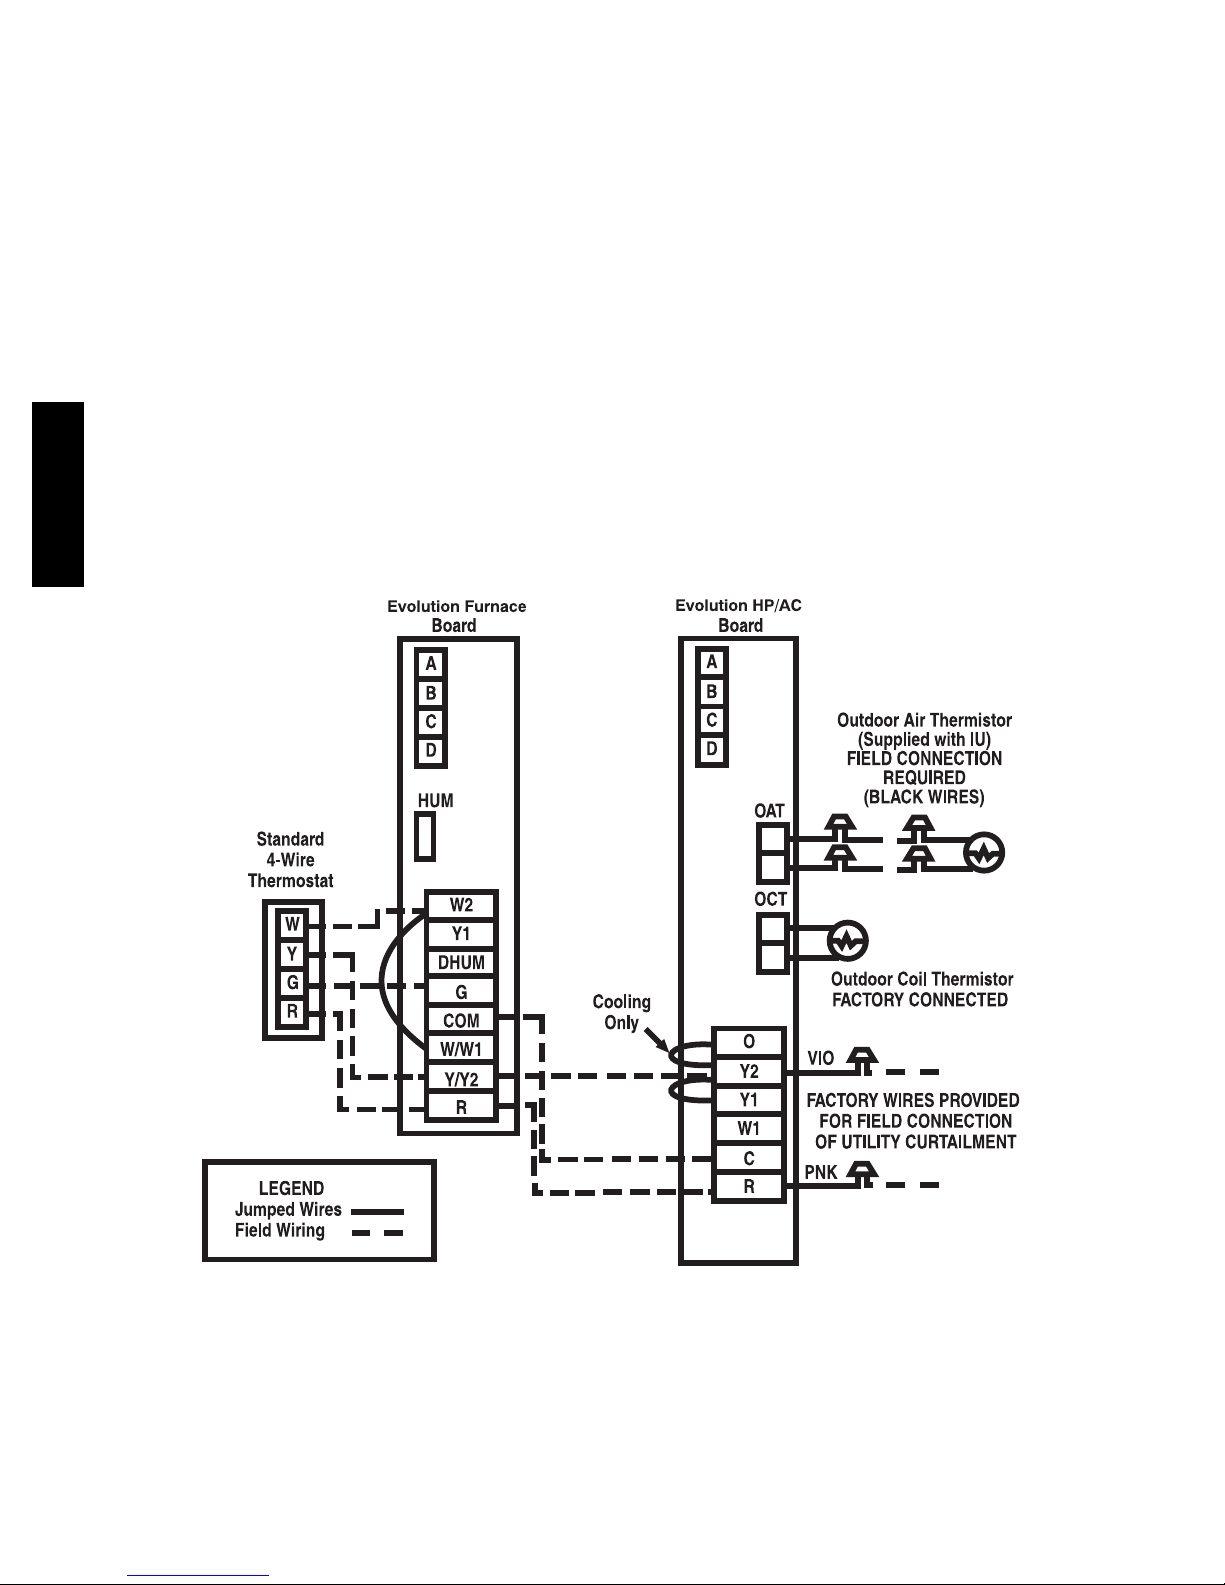
very minimal. If a substantial adjustment is indicated, an abnormal
condition exists somewhere in the cooling system, such as
insufficient airflow across either coil or both coils.
REFRIGERANT CHARGE
The amount of refrigerant charge is listed on the unit rating plate
and/or the physical data table. Refer to the Refrigeration Service
Techniques Manual, Refrigerants Section.
NO CHARGE
Check for leak. Use standard evacuating techniques. After
evacuating system, weigh in the specified amount of refrigerant
(refer to system rating plate).
LOW CHARGE COOLING
Use Cooling Charging Chart (Fig. 24). Vary refrigerant until the
conditions of the chart are met. Note that charging charts are
different from type normally used. Charts are based on charging
the units to correct subcooling for the various operating conditions.
Accurate pressure gauge and temperature sensing devices are
required. Connect the pressure gauge to the service port on the
suction line. Mount the temperature sensing device on the suction
line and insulate it so that the outdoor ambient does not affect the
reading. Indoor air CFM must be within the normal operating
range of the unit.
677D-- --A
TO USE COOLING CHARGING CHARTS
Take the liquid line temperature and read the manifold pressure
gauges.
Refer to the chart to determine what the liquid line temperature
should be.
NOTE: If the problem causing the inaccurate readings is a
refrigerant leak, refer to Check for Refrigerant Leaks section.
NON--COMMUNICATING EMERGENCY COOLING /
HEATING MODE: 4--WIRE THERMOSTAT
This mode of operation is provided only in the case where the UI
has failed or is otherwiseunavailable. If communications cannot be
established with the UI, the Evolution furnace board will enable
the standard thermostat input terminals to allow simple
thermostatic control of the 677D----A unit.
For control with a standard thermostat, disconnect the ABCD
connectors from both control boards and using No. 18 AWG
color--coded, insulated type 90°C minimum or equivalent wire,
make the connections between the standard thermostat, the furnace
board, and the HP/AC board per Fig. 23. Recommend the use of
interconnecting wire with 105°C, 600V, 2/64” insulation.
The Evolution control will respond to cooling and heating
demands with the maximum safe airflow based on gas furnace
output and unit cooling capacity.
Fig. 23 -- Non--Communicating Emergency Cooling/Heating Wiring Connections
A06358
30
Page 31
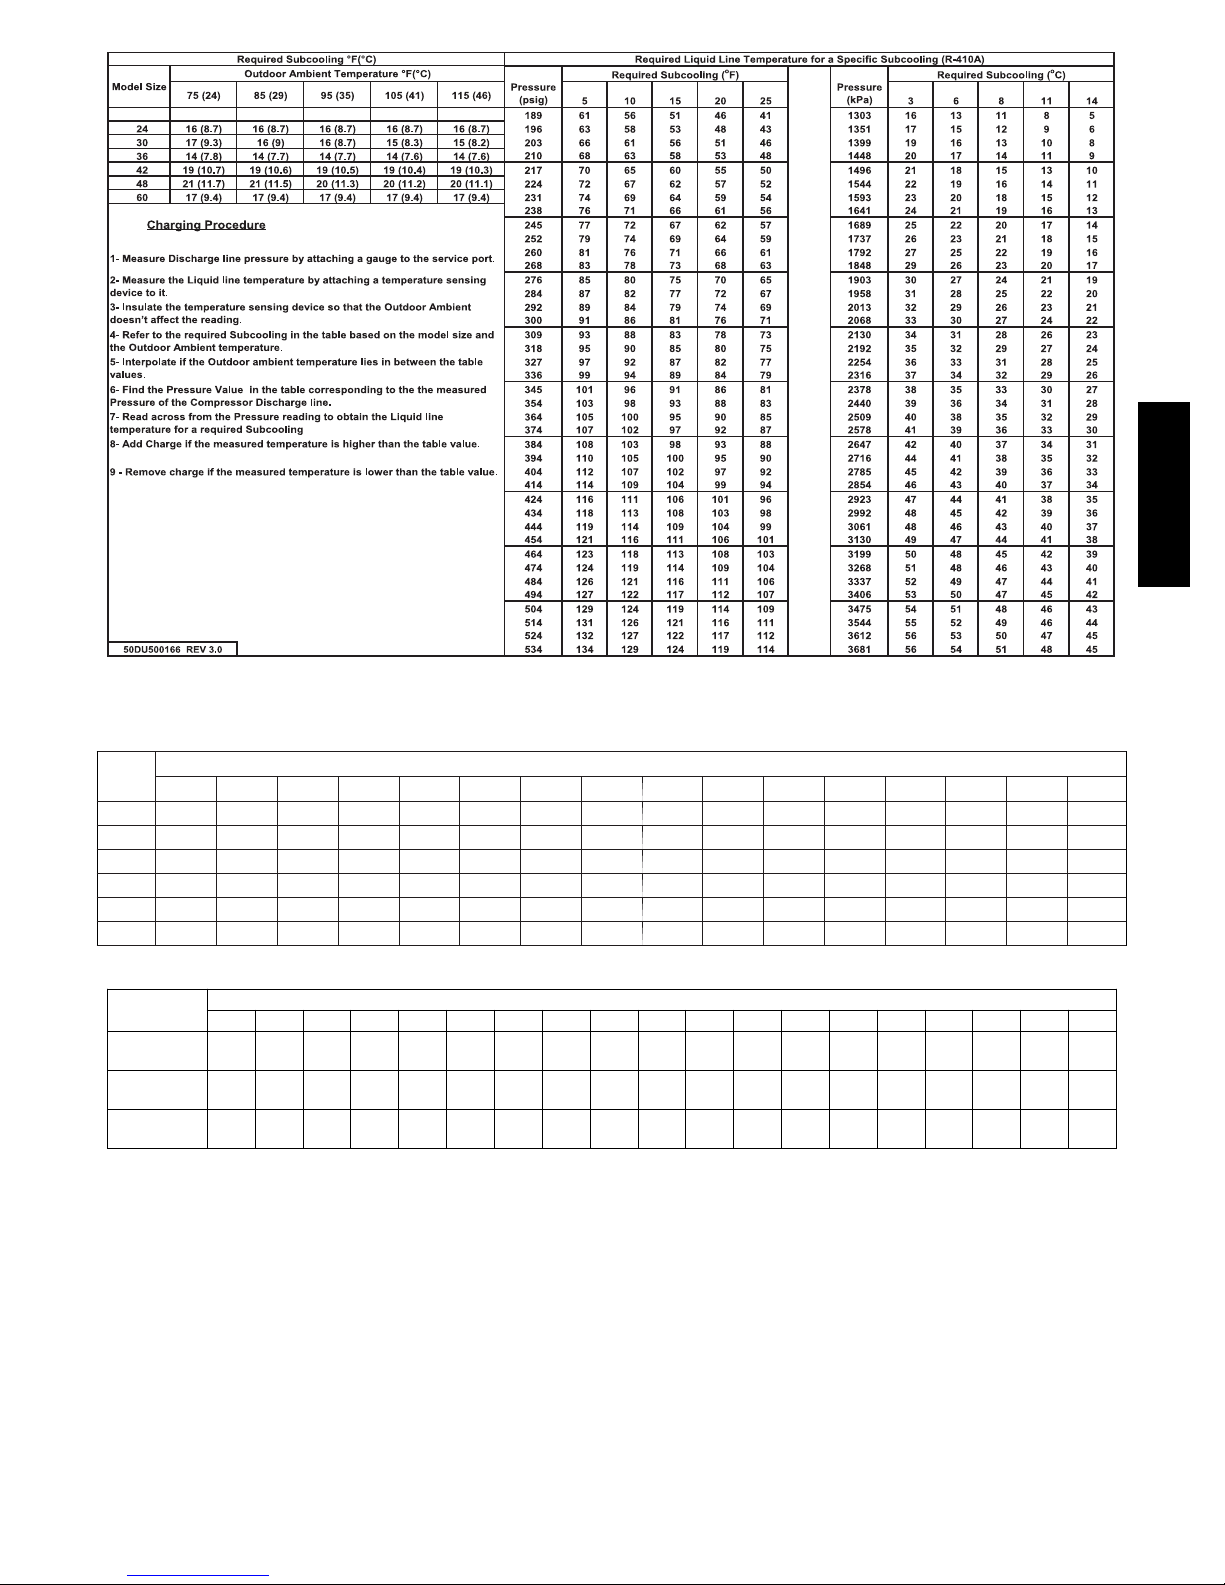
A09109
Fig. 24 -- Cooling Charging Table--Subcooling
Table 7 – ECM Wet Coil Pressure Drop (IN. W.C.)
UNIT
SIZE
600 700 800 900 1000 1100 1200 1300 1400 1500 1600 1700 1800 1900 2000 2100
24 0.005 0.007 0.010 0.012 0.015 – – – – – – – – – – –
30 – 0.007 0.010 0.012 0.015 0.018 0.021 0.024 – – – – – – – –
36 – – – 0.019 0.023 0.027 0.032 0.037 0.042 0.047 – – – – – –
42 – – – – 0.014 0.017 0.020 0.024 0.027 0.031 0.035 0.039 0.043 – – –
48 – – – – – – 0.027 0.032 0.036 0.041 0.046 0.052 0.057 0.063 0.068 –
60 – – – – – – – – – 0.029 0.032 0.036 0.040 0.045 0.049 0.053
STANDARD CFM (SCFM)
Table 8 – Filter Pressure Drop Table (IN. W.C.)
FILTER SIZE
in. (mm)
20x20x1
(508x508x25)
24x30x1
(610x762x25)
24x36x1
(610x914x25)
500 600 700 800 900 1000 1100 1200 1300 1400 1500 1600 1700 1800 1900 2000 2100 2200 2300
0.05 0.07 0.08 0.10 0.12 0.13 0.14 0.15 — — — — — — — — — — —
— — — — 0.05 0.60 0.07 0.07 0.08 0.09 0.10 — — — — — — — —
— — — — — — — 0.06 0.07 0.07 0.08 0.09 0.09 0.10 0.11 0.12 0.13 0.14 0.14
CFM
677D-- --A
31
Page 32
MAINTENANCE
To ensure continuing high performance, and to minimize the
possibility of premature equipment failure, periodic maintenance
must be performed on this equipment. This HYBRID HEAT unit
should be inspected at least once each year by a qualified service
person. To troubleshoot unit, refer to Tables 9--11, Troubleshooting
Chart and additional information int he Start--Up and
Troubleshooting section.
NOTE TO EQUIPMENT OWNER: Consult your local dealer
about the availability of a maintenance contract.
!
WARNING
PERSONAL INJURY AND UNIT DAMAGE
HAZARD
Failure to follow this warning could result in personal
injury or death and possible unit component damage.
The ability to properly perform maintenance on this
equipment requires certain expertise, mechanical skills,
tools and equipment. If you do not possess these, do not
attempt to perform any maintenance on this equipment,
677D-- --A
other than those procedures recommended in the Owner’s
Manual.
!
WARNING
ELECTRICAL SHOCK HAZARD
Failure to follow these warnings could result in personal
injury or death:
1. Turn off electrical power to the unit and install lock out
tag before performing any maintenance or service on this
unit.
2. Use extreme caution when removing panels and parts.
3. Never place anything combustible either on or in contact
with the unit.
!
CAUTION
UNIT OPERATION HAZARD
Failure to follow this caution may result in equipment
damage or improper operation.
Errors made when reconnecting wires may cause improper
and dangerous operation. Label all wires prior to
disconnecting when servicing.
7. Inspect all accessories. Perform any service or maintenance
to the accessories as recommended in the accessory
instructions.
Air Filter
IMPORTANT: Never operate the unit without a suitable air filter
in the return--air duct system. Always replace the filter with the
same dimensional size and type as originally installed. See Table 1
for recommended filter sizes.
Inspect air filter(s) at least once each month and replace
(throwaway--type) or clean (cleanable--type) at least twice during
each cooling season and twice during the heating season, or
whenever the filter becomes clogged with dust and lint.
Indoor Fan and Motor
NOTE: All motors are pre--lubricated. Do not attempt to lubricate
these motors.
For longer life, operating economy, and continuing efficiency,
clean accumulated dirt and grease from the blower wheel and
motor annually.
Inducer Blower
NOTE: All motors are pre--lubricated. Do not attempt to lubricate
these motors.
Clean periodically to assure proper airflow and heating efficiency.
Inspect blower wheel every fall and periodically during the heating
season. For the first heating season, inspect blower wheel
bi--monthly to determine proper cleaning frequency.
Limit Switch
Remove unit access panel to gain access to the limit switch. The
limit switch is located above the indoor blower housing.
NOTE: On small chassis units, a second limit switch is located
beside the indoor blower housing.
Burner Ignition
Unit is equipped with a direct spark ignition 100 percent lockout
system. Ignition module is located in the control box. Module
contains a self--diagnostic LED. During servicing, refer to label
diagram for LED interpretation.
Main Burners
At the beginning of each heating season, inspect for deterioration
or blockage due to corrosion or other causes. Observe the main
burner flames and adjust, if necessary.
!
CAUTION
EQUIPMENT DAMAGE HAZARD
Failure to follow this caution may result in equipment
damage or improper operation.
When servicing gas train, do not hit or plug orifice spuds.
The minimum maintenance requirements for this equipment are as
follows:
1. Inspect air filter(s) each month. Clean or replace when
necessary.
2. Inspect indoor coil, drain pan, and condensate drain each
cooling season for cleanliness. Clean when necessary.
3. Inspect indoor fan motor and wheel for cleanliness each
cooling season. Clean when necessary.
4. Check electrical connections for tightness and controls for
proper operation each cooling season. Service when
necessary.
5. Check for restrictions on inducer outlet. Clean flue hood.
6. Inspect burner compartment before each heating season for
rust, corrosion, soot or excessive dust.
Removal of Gas Train
To remove the gas train for servicing:
1. Shut off main gas valve.
2. Shut off power to unit and install lockout tag.
3. Remove control access panel (See Fig. 25).
4. Disconnect gas piping at unit gas valve.
5. Remove fan partition mounting bracket (2 screws located
on the left side of control compartment on the fan partition
panel). Slide bracket forward, bottom first, to remove. (See
Fig. 26.)
6. Remove wires connected to gas valve. Mark each wire.
7. Remove the mounting screw that attaches the burner rack to
the unit base (See Fig. 26).
32
Page 33
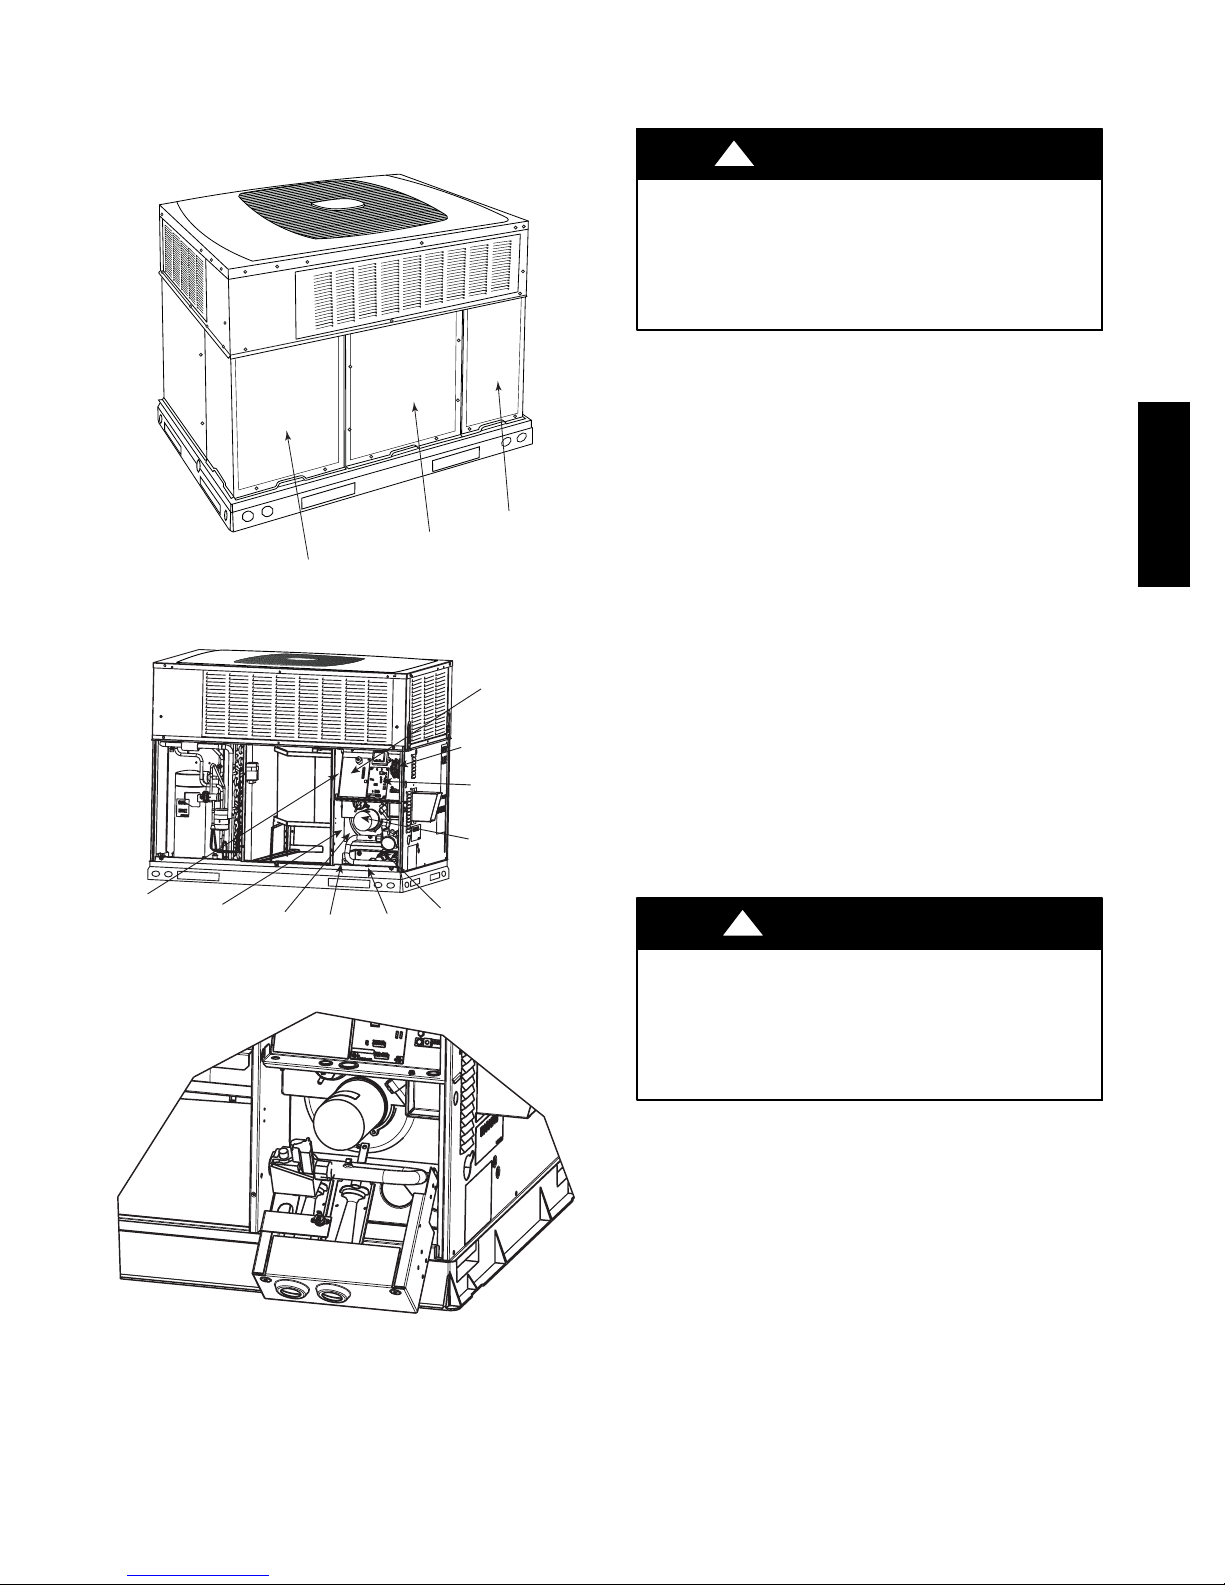
8. Partially slide the burner rack out of the unit (see Fig. 26
and 27). Remove ignitor and sensor wires at the burner assembly. Remove wires to rollout switch.
9. Slide the burner rack out of the unit (See Fig. 26 and 27).
10. To reinstall, reverse the procedure outlined above.
Control
Access
Panel
Compressor
Access Panel
Blower
Access
Panel
Fig. 25 -- Unit Access Panels
Integrated
Gas Unit
Controller
(IGC)
Auto Transformer
fuses used on 460
volt units only.
(Hidden)
Interface Fan
Board (IFB)
Induced Draft
Motor
Fan Partition
Mounting
Bracket
Flue
Collector
Box
Inducer
Blower
Housing
Burner
Rack
Mounting
Screw
Rollout
Switch
Fig. 26 -- Blower Housing and Flue Collector Box
A09479
A09480
Inducer Pressure Switch
Inspect pressure switch connections. Inspect pressure switch tube
for cracks or restrictions. Replace if needed.
!
WARNING
ELECTRICAL SHOCK HAZARD
Failure to follow this warning could result in personal
injury or death.
Disconnect and install lock out tag on electrical power to
the unit before cleaning and lubricating the blower motor
and wheel.
Outdoor Coil, Indoor Coil, and Condensate
Drain Pan
Inspect the condenser coil, evaporator coil, and condensate drain
pan at least once each year.
The coils are easily cleaned when dry; therefore, inspect and clean
the coils either before or after each cooling season. Remove all
obstructions, including weeds and shrubs, that interfere with the
airflow through the condenser coil. Straighten bent fins with a fin
comb. If coated with dirt or lint, clean the coils with a vacuum
cleaner, using the soft brush attachment. Be careful not to bend the
fins. If coated with oil or grease, clean the coils with a mild
detergent and water solution. Rinse coils with clear water, using a
garden hose. Be careful not to splash water on motors, insulation,
wiring, or air filter(s). For best results, spray condenser coil fins
from inside to outside the unit. On units with an outer and inner
condenser coil, be sure to clean between the coils. Be sure to flush
all dirt and debris from the unit base.
Inspect the drain pan and condensate drain line when inspecting
the coils. Clean the drain pan and condensate drain by removing all
foreign matter from the pan. Flush the pan and drain trough with
clear water. Do not splash water on the insulation, motor, wiring, or
air filter(s). If the drain trough is restricted, clear it with a
“plumbers snake” or similar probe device.
Outdoor Fan
!
CAUTION
UNIT OPERATION HAZARD
Failure to follow this caution may result in damage to unit
components.
Keep the outdoor fan free from all obstructions to ensure
proper cooling operation. Never place articles on top of the
unit.
677D-- --A
Fig. 27 -- Burner Rack Removed
A07680
1. Remove 4 screws holding outdoor grille and motor to top
cover.
2. Turn motor/grille assembly upside down on top cover to
expose fan blade.
3. Inspect the fan blades for cracks or bends.
4. If fan needs to be removed, loosen setscrew and slide fan off
motor shaft.
5. When replacing fan blade, position blade according to the
table shown in Fig. 28.
6. Ensure that set screw engages the flat area on the motor
shaft when tightening.
7. Replace grille.
33
Page 34
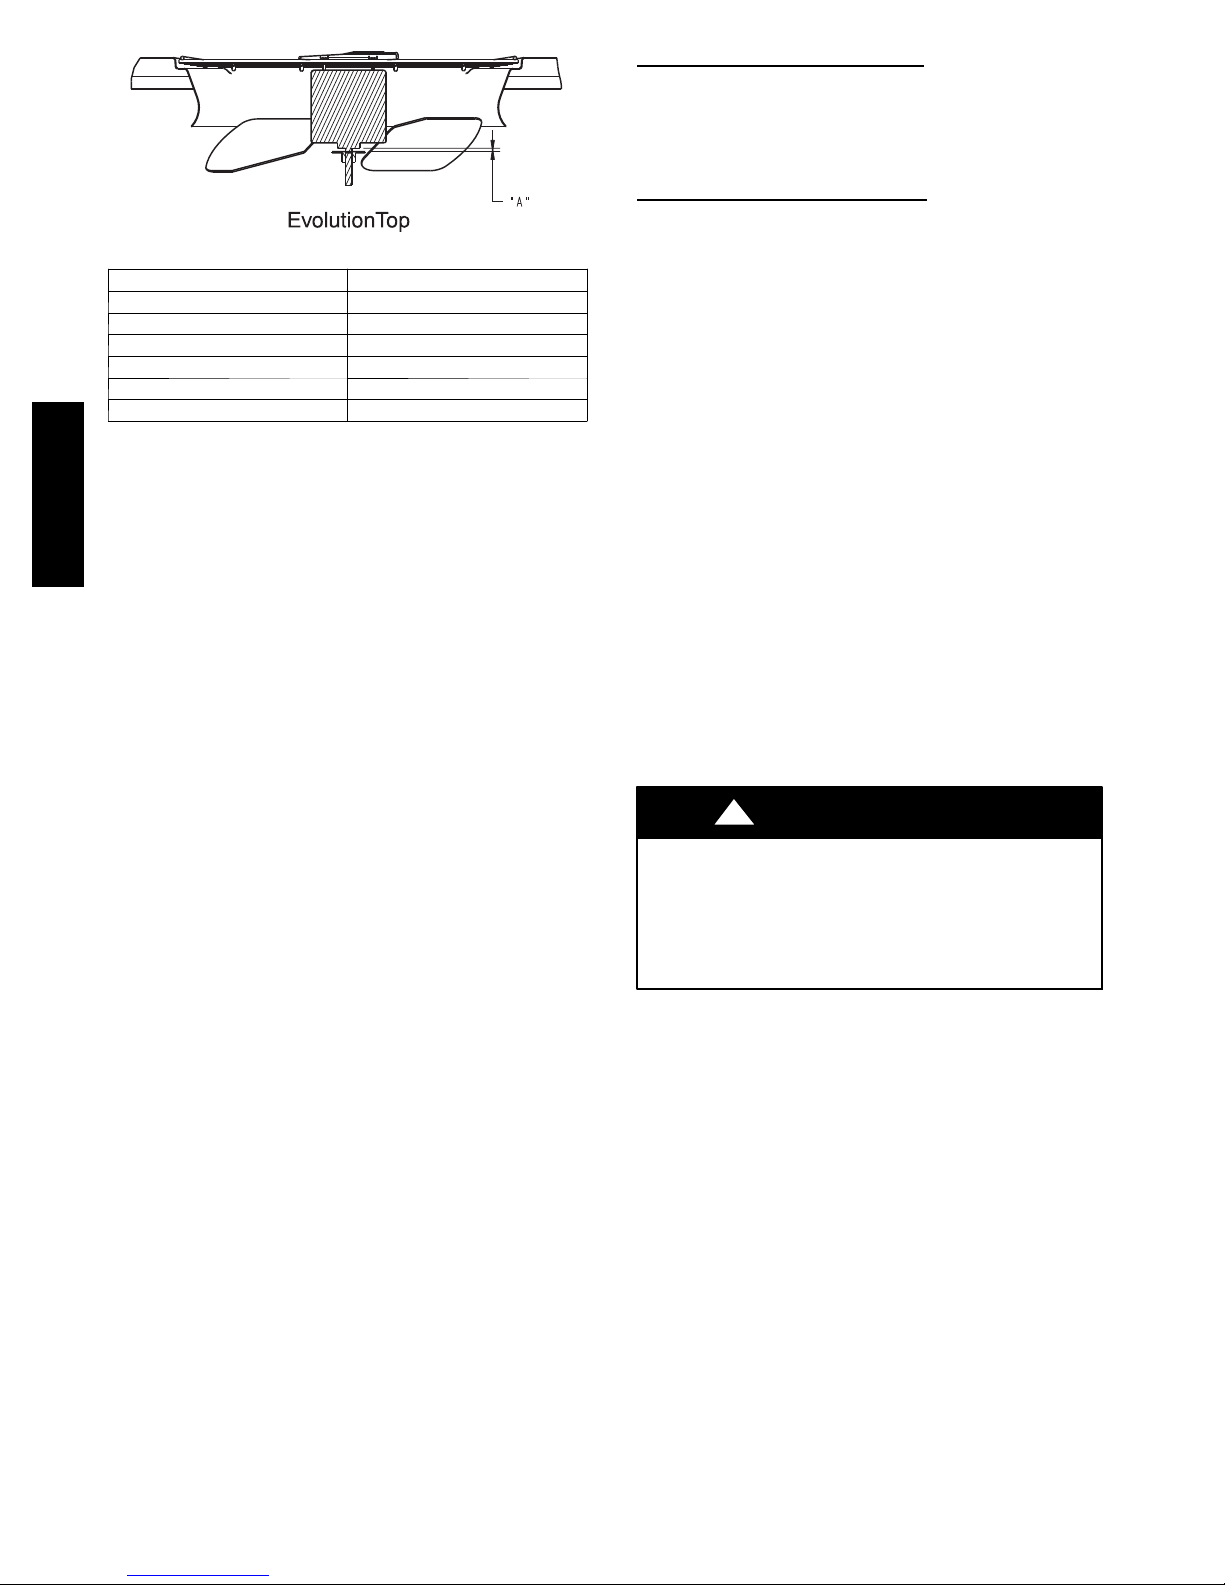
UNIT SIZE
24 1 (26)
30 1 (26)
36 1 (26)
42 1 (26)
48 11/32 (9)
60 9/16 (14)
Fig. 28 -- Outdoor Fan Blade Clearance
“A” DIM. IN. (MM)
Electrical Controls and Wiring
Inspect and check the electrical controls and wiring annually. Be
sure to turn off the electrical power to the unit.
677D-- --A
Remove access panel to locate all the electrical controls and wiring.
Check all electrical connections for tightness. Tighten all screw
connections. If any smoky or burned connections are noticed,
disassemble the connection, clean all the parts, re--strip the wire
end and reassemble the connection properly and securely.
After inspecting the electrical controls and wiring, replace all the
panels. Start the unit, and observe at least one complete cooling
cycle to ensure proper operation. If discrepancies are observed in
operating cycle, or if a suspected malfunction has occurred, check
each electrical component with the proper electrical
instrumentation. Refer to the unit wiring label when making these
checks.
Refrigerant Circuit
Inspect all refrigerant tubing connections and the unit base for oil
accumulation annually. Detecting oil generally indicates a
refrigerant leak.
If oil is detected or if low performance is suspected, leak test all
refrigerant tubing using an electronic leak detector, or liquid--soap
solution. If a refrigerant leak is detected, refer to Check for
Refrigerant Leaks section.
If no refrigerant leaks are found and low performance is suspected,
refer to Checking and Adjusting Refrigerant Charge section.
Indoor Airflow
The heating and/or cooling airflow does not require checking
unless improper performance is suspected. If a problem exists, be
sure that all supply-- and return--air grilles are open and free from
obstructions, and that the air filter is clean.
Metering Devices--TXV & AccuRater®Piston
This unit uses 2 types of metering devices. The outdoor metering
device is a fixed orifice and is contained in the brass--hex body in
the liquid line feeding the outdoor coils. The indoor metering
device is a TXV--type device. No maintenance should be required.
Pressure Switches -- Refrigerant Circuit
Pressure switches are protective devices integrated into the control
circuit (low voltage). They shut off compressor if abnormally high
or low pressures are present in the refrigeration circuit. These
pressure switches are specifically designed to operate with Puron
(R--410A) systems. R--22 pressure switches must not be used as
replacements for the Puron (R--410A) system.
A06132
Loss--of--Charge (Low Pressure)
This switch is located on the liquid line and protects against low
suction pressures caused by such events as loss of charge, low
airflow across indoor coil, dirty filters, etc. It opens if the system
pressure drops to about 20 psig. If system pressure is above this,
switch should be closed.
High--Pressure Switches (HPS &
The high--pressure switches are located on the discharge line and
protects against excessive condenser coil pressure. HPS opens at
670 psig shutting down the compressor, while HPS2 opens at 565
psig, limiting the compressor to low--stage operation only.
High pressure may be caused by a dirty outdoor coil, failed fan
motor, or outdoor air recirculation.
To check switches:
1. Turn off all power to unit.
2. Disconnect leads on switch.
3. Apply ohm meter leads across switch. You should have
continuity on a good switch.
NOTE: Because these switches are attached to refrigeration
system under pressure, it is not advisable to remove this device for
troubleshooting unless you are reasonably certain that a problem
exists. If switch must be removed, remove and recover all system
charge so that pressure gauges read 0 psi. Never open system
without breaking vacuum with dry nitrogen.
Switch
HPS2)
Copeland Scroll Compressor (Puron Refrigerant)
The compressor used in this product is specifically designed to
operate with Puron (R--410A) refrigerant and cannot be
interchanged.
The compressor is an electrical, as well as mechanical, device.
Exercise extreme caution when working near compressors. Power
should be shut off, if possible, for most troubleshooting techniques.
Refrigerants present additional safety hazards.
!
WARNING
EXPLOSION, FIRE HAZARD
Failure to follow this warning could result in personal
injury or death and/or property damage.
Wear safety glasses and gloves when handling refrigerants.
Keep torches and other ignition sources away from
refrigerants and oils.
The scroll compressor pumps refrigerant throughout the system by
the interaction of a stationary and an orbiting scroll. The scroll
compressor has no dynamic suction or discharge valves, and it is
more tolerant of stresses caused by debris, liquid slugging, and
flooded starts. The compressor is equipped with a noise reducing
shutdown device and an internal pressure--relief port. The noise
reducing device prevents the scroll from turning backwards and
replaces the need for a cycle protector. The pressure--relief port is a
safety device, designed to protect against extreme high pressure.
The relief port has an operating range between 550 and 625 psig
differential pressure.
Refrigerant System
This step covers the refrigerant system of the 677D----A, including
the compressor oil needed, servicing systems on roofs containing
synthetic materials, the filter drier, and refrigerant charging.
34
Page 35
REFRIGERANT
!
WARNING
UNIT OPERATION, SAFETY AND
ENVIRONMENTAL HAZARD
Failure to follow this warning could result in personal
injury or equipment damage.
This system uses Puron (R--410A) refrigerant which has
higher operating pressures than R--22 and other refrigerants.
No other refrigerant may be used in this system. Gauge set,
hoses, and recovery system must be designed to handle
Puron. If you are unsure, consult the equipment
manufacturer.
COMPRESSOR OIL
If additional oil is needed, use Uniqema RL32--3MAF. If this oil is
not available, use Copeland Ultra 32 CC or Mobil Arctic EAL22
CC. This oil is extremely hygroscopic, meaning it absorbs water
readily. POE oils can absorb 15 times as much water as other oils
designed for HCFC and CFC refrigerants. Take all necessary
precautions to avoid exposure of the oil to the atmosphere.
SERVICING SYSTEMS ON ROOFS WITH SYNTHETIC
MATERIALS
POE (polyolester) compressor lubricants are known to cause long
term damage to some synthetic roofing materials.
Exposure, even if immediately cleaned up, may cause
embrittlement (leading to cracking) to occur in one year or more.
When performing any service that may risk exposure of
compressor oil to the roof, take appropriate precautions to protect
roofing. Procedures which risk oil leakage include, but are not
limited to, compressor replacement, repairing refrigerant leaks, and
replacing refrigerant components such as filter drier, pressure
switch, metering device, coil, accumulator, or reversing valve.
Synthetic Roof Precautionary
1. Cover extended roof working area with an impermeable
polyethylene (plastic) drip cloth or tarp. Cover an
approximate 10x10 ft (3x3 m) area.
2. Cover area in front of the unit service panel with a terry
cloth shop towel to absorb lubricant spills and prevent
run--offs, and protect drop cloth from tears caused by tools
or components.
3. Place terry cloth shop towel inside unit immediately under
component(s) to be serviced and prevent lubricant run--offs
through the louvered openings in the unit base.
4. Perform required service.
5. Remove and dispose of any oil--contaminated material per
local codes.
LIQUID--LINE BI--FLOW FILTER DRIER
The bi--flow filter drier is specifically designed to operate with
Puron. Use only factory--authorized components. Filter drier must
be replaced whenever the refrigerant system is opened. When
removing a filter drier, use a tubing cutter to cut the drier from the
system. Do not unsweat a filter drier from the system. Heat from
unsweating will release moisture and contaminants from drier into
system.
PURON (R--410A) REFRIGERANT CHARGING
Refer to unit information plate and charging chart. Some R--410A
refrigerant cylinders contain a dip tube to allow liquid
refrigerant to flow from cylinder in upright position. For
cylinders equipped with a dip tube, charge Puron units with
cylinder in upright position and a commercial metering device in
manifold hose. Charge refrigerant into suction line.
Procedure
TROUBLESHOOTING
LED DESCRIPTION
LEDs built into Evolution control boards provide installer or
service person information concerning operation and/or fault
condition of the unit controls and ECM motor. This information is
also available at the system UI in text with basic troubleshooting
instructions. Careful use of information displayed will reduce the
need for extensive manual troubleshooting. See section B in
Start--Up and Troubleshooting and Table 4, as well as the UI
instructions, for additional information. Additional
Troubleshooting information can be found in Tables 9--11.
MAJOR COMPONENTS
2--STAGE HP/AC BOARD
The two--stage HP/AC control board controls the following
functions:
-- Low-- and high--stage compressor operation
-- Outdoor fan motor operation
-- Reversing valve operation
-- Defrost operation
-- Low ambient cooling
-- Crankcase heater operation
-- Compressor external protection
-- Pressure switch monitoring (refrigerant)
-- Time delays
FURNACE BOARD
The furnace board controls the following functions:
-- Indoor blower operation
-- G a s v a l v e
-- Inducer motor
-- Remote sparker module
-- Pressure switch monitoring (gas)
SYSTEMS COMMUNICATION FAILURE
If communication with the Evolution Control is lost with the UI,
the controls will flash the appropriate fault codes. Check the wiring
to the UI, indoor and outdoor units.
MODEL PLUG
The HP/AC control board must have a valid model plug to operate.
If a valid model plug is not detected, it will not operate and the
control will flash the appropriate fault code, shown in Table 4.
PRESSURE SWITCH PROTECTION--REFRIGERANT
The unit is equipped with high-- and low--pressure switches. If the
control senses the opening of a high-- or low--pressure switch, it
will respond as follows:
1. De--energize the compressor contactor (HPS1 & LPS) or the
compressor solenoid contactor (HPS2).
2. Keep the outdoor fan operating for 15 minutes.
3. Display the appropriate fault codes.
4. After a 15 minute delay, if there is still a call for cooling and
the LPS or HPS is reset, the compressor contactor is
energized.
5. If LPS or HPS has not closed after a 15 minute delay, the
outdoor fan is turned off. If the open switch closes anytime
after the 15--minute delay, then resume operation with a call
for cooling.
6. If LPS or HPS trips 3 consecutive cycles, the unit operation
is locked out for 4 hours.
7. In the event of a high--pressure switch trip or high pressure
lockout, check the refrigerant charge, outdoor fan operation
and outdoor coil for airflow restrictions.
8. In the event of a low--pressure switch trip or low pressure
lockout, check the refrigerant charge and indoor airflow.
677D-- --A
35
Page 36
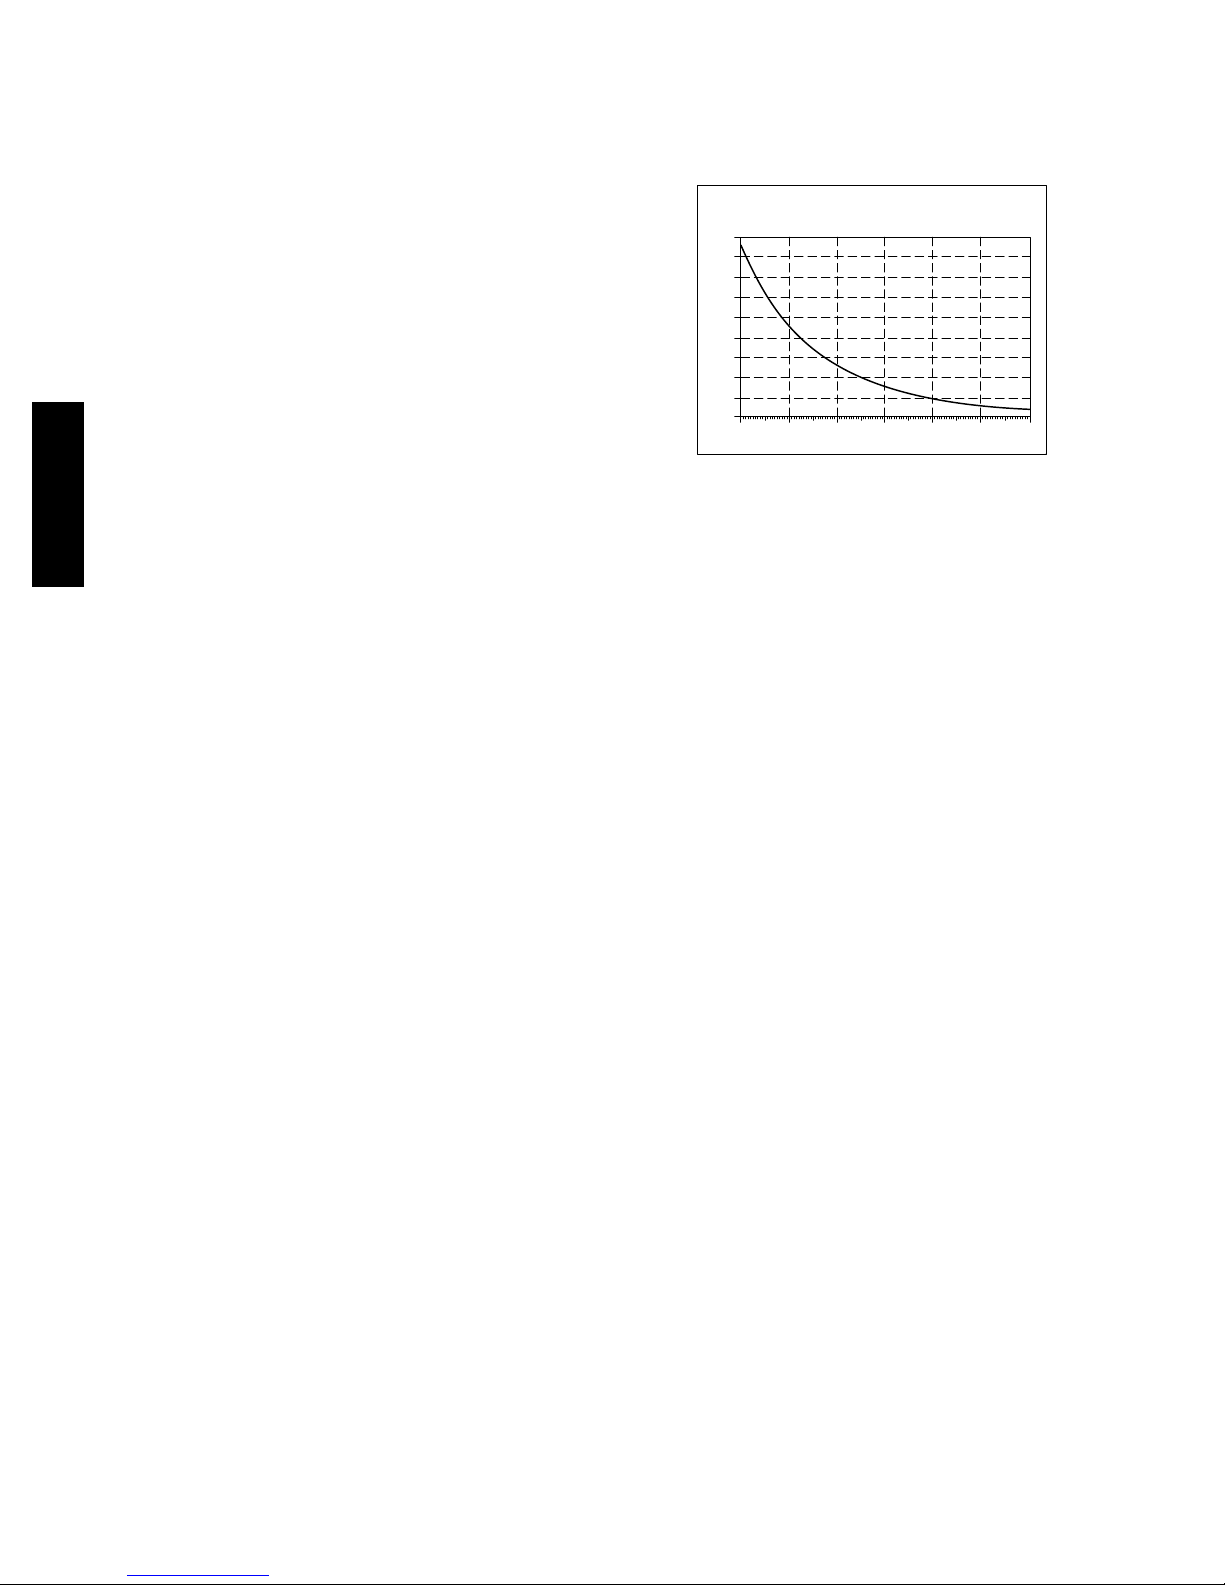
CONTROL FAULT
If the HP/AC control board has failed, the control will flash the
appropriate fault code (See Table 4). The control board should be
replaced.
BROWN OUT PROTECTION
If the line voltage is less than 187v for at least 4 seconds, the
appropriate compressor contactor and fan relay are de--energized.
Compressor and fan operation are not allowed until voltage is a
minimum of 190v. The control will flash the appropriate fault
code (See Table 4).
230V LINE (POWER DISCONNECT) DETECTION
If there is no 230v at the compressor contactor when the unit is
powered and cooling demand exists, the appropriate error code is
displayed. Verify that the disconnect is closed and 230v wiring is
connected to the unit.
COMPRESSOR VOLTAGE SENSING
The control board input terminals VS and L2 (See Fig. 19) are
used to detect compressor voltage status, and alert the user of
potential problems. The control continuously monitors the high
voltage on the run capacitor of the compressor motor. Voltage
should be present any time the compressor contactor is energized,
and voltage should not be present when the contactor is
677D-- --A
de--energized.
CONTACTOR SHORTED DETECTION
If there is compressor voltage sensed when there is no demand for
compressor operation, the contactor may be stuck closed or there is
a wiring error. The control will flash the appropriate fault code.
COMPRESSOR THERMAL CUTOUT
If the control senses the compressor voltage after start--up, and is
then absent for 10 consecutive seconds while cooling demand
exists, the thermal protector is open. The control de--energizes the
compressor contactor for 15 minutes, but continues to operate the
outdoor fan. The control Status LED will flash the appropriate
code shown in Table 4. After 15 minutes, with a call for low or
high stage cooling, the compressor contactor is energized. If the
thermal protector has not re--set, the outdoor fan is turned off. If
the call for cooling continues, the control will energize the
compressor contactor every 15 minutes. If the thermal protector
closes (at the next 15 minute interval), check the unit will resume
operation.
If the thermal cutout trips for three consecutive cycles, then unit
operation is locked out for 4 hours and the appropriate fault code is
displayed.
NO 230V AT COMPRESSOR
If the compressor voltage is not sensed when the compressor
should be starting, the contactor may be stuck open or there is a
wiring error. The control will flash the appropriate fault code.
Check the contactor and control box wiring.
TROUBLESHOOTING UNIT FOR PROPER SWITCHING
BETWEEN LOW & HIGH STAGES
Check the suction pressures at the service valves. Suction pressure
should be reduced by 3--10% when switching from low to high
capacity.
NOTE: The liquid pressures are very similar between low and
high stage operation, so liquid pressure should not be used for
troubleshooting.
Compressor current should increase 20--45% when switching from
low to high stage. The compressor solenoid, when energized in
high stage, should measure 24vac.
COMPRESSOR INTERNAL RELIEF
The compressor is protected by an internal pressure relief (IPR)
which relieves discharge gas into compressor shell when
differential between suction and discharge pressures exceeds 550 -625 psig. The compressor is also protected by an internal overload
attached to motor windings.
TEMPERATURE THERMISTORS
Thermistors are electronic devices which sense temperature. As the
temperature increases, the resistance decreases. Thermistors are
used to sense outdoor ambient (OAT) and coil temperature (OCT).
Refer to Fig. 29 for resistance values versus temperature. See Fig.
30 for OCT location.
THERMISTOR CURVE
90
80
70
60
50
40
30
20
RESISTANCE (KOHMS)
10
0
0 20 40 60 80 100 120
TEMPERATURE (DEG. F)
A91431
Fig. 29 -- Resistance Values Versus Temperature
If the outdoor ambient or coil thermistor should fail, the HP/AC
control will flash the appropriate fault code (See Table 4).
IMPORTANT: Coil thermistor is factory mounted. Check to
insure thermistor is mounted properly. Outdoor air thermistor
(OAT) is field mounted and connected by two black leads (located
in the control section)on the outdoor control board. Verify that the
OAT has been properly installed.
THERMISTOR SENSOR COMPARISON
The control continuously monitors and compares the outdoor air
temperature sensor and outdoor coil temperature sensor to ensure
proper operating conditions. The comparison is:
S In cooling mode, if the outdoor air sensor indicates ≥ 10 _F
(5.5_C) warmer than the coil sensor (or) the outdoor air sensor
indicates ≥ 20_F(11_C) cooler than the coil sensor, the sensors
are out of range.
S In heating if the outdoor air sensor indicates ≥ 35_F (19.3_C)
warmer than the coil sensor (or) the outdoor air sensor indicates
≥ 10_F(5.5_C) cooler than the coil sensor, the sensors are out of
range.
If the sensors are out of range, the control will flash the appropriate
fault code as shown in Table 4.
The thermistor comparison is not performed during low ambient
cooling operation.
FAILED THERMISTOR DEFAULT OPERATION
Factory defaults have been provided in the event of failure of
outdoor air thermistor and/or coil thermistor.
If the OAT sensor should fail, low ambient cooling will not be
allowed and the one--minute outdoor fan off delay will not occur.
Defrost will be initiated based on coil temperature and time.
If the OCT sensor should fail, low ambient cooling will not be
allowed. Defrost will occur at each time interval during heating
operation, but will terminate after 5 minutes.
If there is a thermistor out of range error, defrost will occur at each
time interval during heating operation, but will terminate after 5
minutes.
Refer to the Troubleshooting Chart (Tables 9--11) for additional
troubleshooting information.
36
Page 37
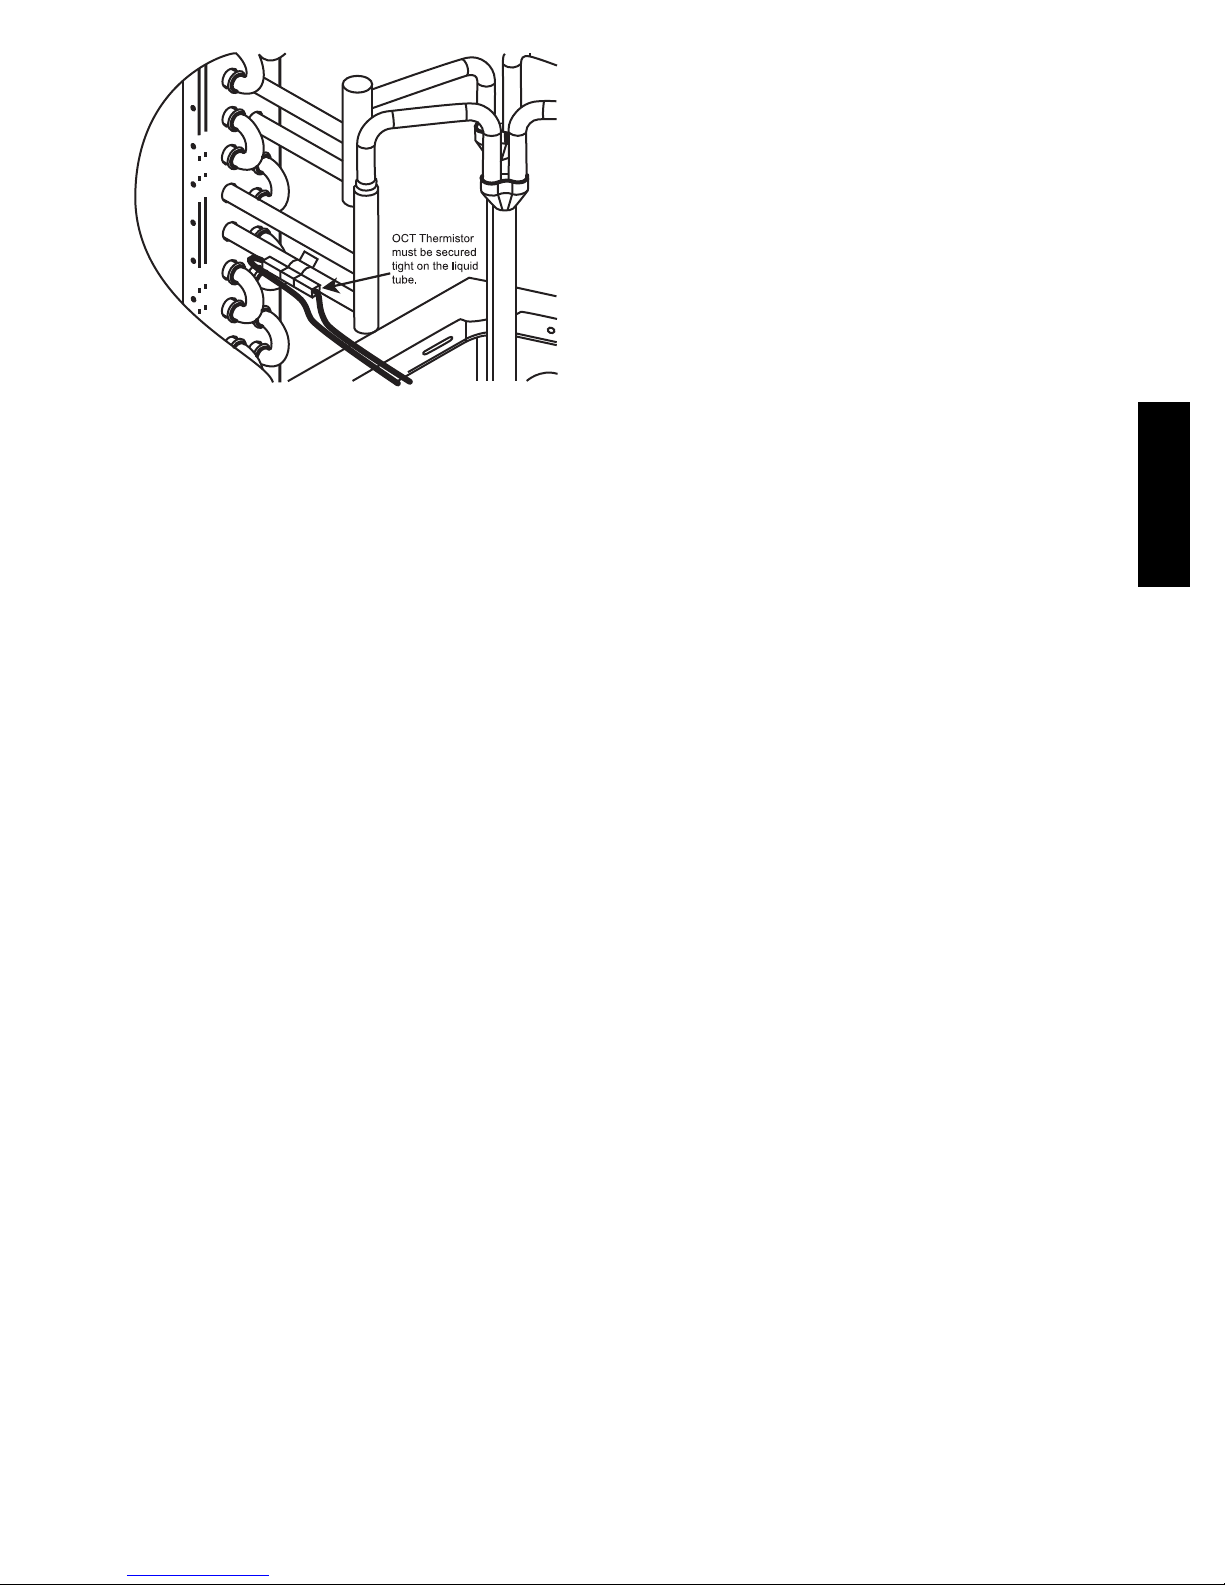
FINAL CHECKS
IMPORTANT: Before leaving job, be sure to do the following:
1. Ensure that all wiring is routed away from tubing and sheet
metal edges to prevent rub--through or wire pinching.
2. Ensure that all wiring and tubing is secure in unit before
adding panels and covers. Securely fasten all panels and
covers.
3. Leave Users Manual with owner. Explain system operation
and periodic maintenance requirements outlined in manual.
4. Fill out Start--Up Checklist located at the back of this
manual and place in customer file.
CARE AND MAINTENANCE
For continuing high performance and to minimize possible
equipment failure, periodic maintenance must be performed on this
A06311
Fig. 30 -- Outdoor Coil Thermistor (OCT) Attachment
equipment.
Frequency of maintenance may vary depending upon geographic
areas, such as coastal applications. See Users Manual for
information.
HEAT PUMP WITH PURON
REFRIGERATION SECTION QUICK--REFERENCE GUIDE
Puron refrigerant operates at 50--70 percent higher pressures than R--22. Be sure that servicing equipment and replacement components are
designed to operate with Puron. Puron refrigerant cylinders are rose colored.
S Puron refrigerant cylinders manufactured prior to March 1, 1999, have a dip tube that allows liquid to flow out of cylinder in upright
position. Cylinders manufactured March 1, 1999 and later DO NOT have a dip tube and MUST be positioned upside down to allow liquid
to flow.
S Recovery cylinder service pressure rating must be 400 psig. DOT 4BA400 or DOT BW400.
S Puron systems should be charged with liquid refrigerant. Use a commercial--type metering device in the manifold hose.
S Manifold sets should be minimum 700 psig high side and 180 psig low side with 550 psig low side retard.
S Use hoses with minimum 700 psig service pressure rating.
S Leak detectors should be designed to detect HFC refrigerant.
S Puron, as with other HFCs, is only compatible with POE oils.
S Vacuum pumps will not remove moisture from oil.
S Only use factory--specified liquid--line filter driers with rated working pressures no less than 600 psig.
S Do not install a suction--line filter drier in liquid line.
S POE oils absorb moisture rapidly. Do not expose oil to atmosphere.
S POE oils may cause damage to certain plastics and roofing materials.
S Wrap all filter driers and service valves with wet cloth when brazing.
S A Puron liquid--line filter drier is required on every unit.
S Do not use an R--22 TXV.
S Never open system to atmosphere while it is under a vacuum.
S When system must be opened for service, break vacuum with dry nitrogen and replace filter driers.
S Do not vent Puron into the atmosphere.
S Observe all warnings, cautions, and bold text.
S Do not leave Puron suction line driers in place for more than 72 hrs.
677D-- --A
37
Page 38
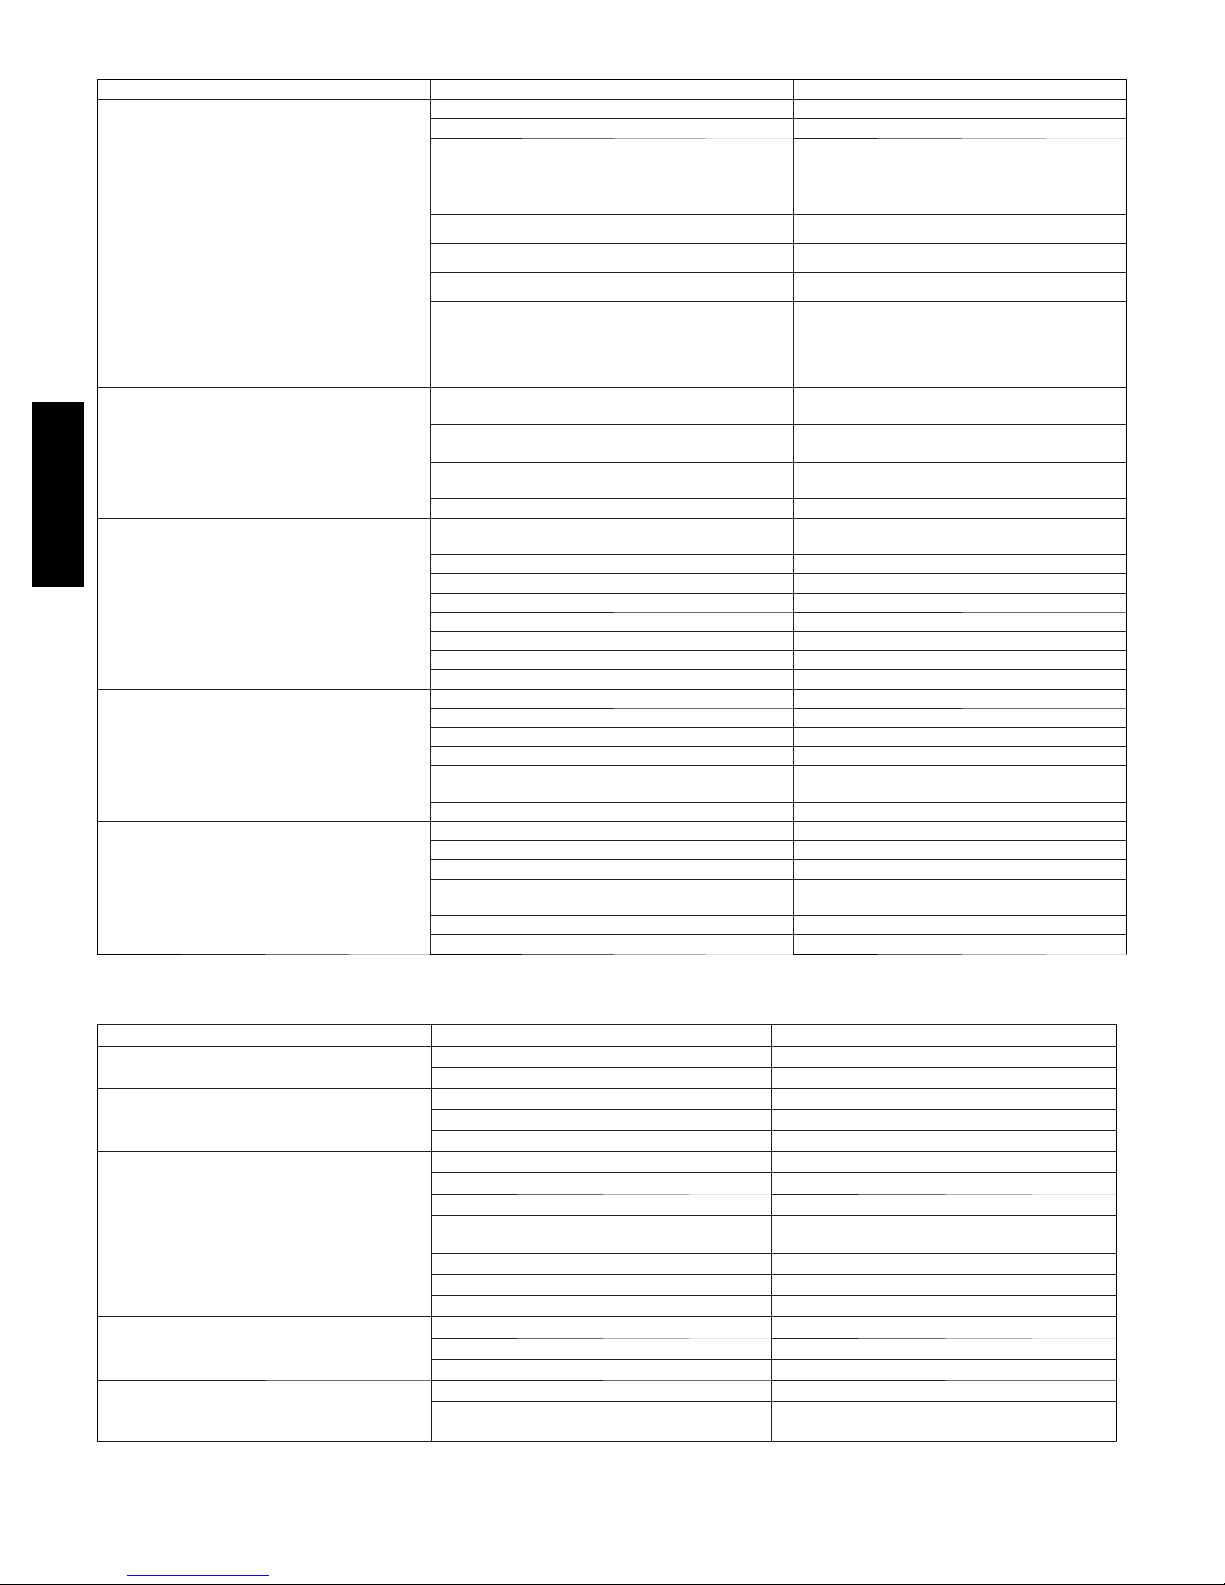
Table 9 – Troubleshooting Chart--Heat Pump Operation
SYMPTOM CAUSE REMEDY
Power failure Call power company
Fuse blown or circuit breaker tripped Replace fuse or reset circuit breaker
Defective contactor, transformer, HP/AC control board,
or high--pressure, loss--of--charge or low--pressure
switch
Replace component
Compressor and outdoor fan
will not start
Compressor will not start but outdoor fan
runs
677D-- --A
Compressor cycles (other than normally satisfying) cooling/heating calls
Compressor operates continuously
Excessive head pressure
Continued next page.
Insufficient line voltage Determine cause and correct
Incorrect or faulty wiring Check wiring diagram and rewire correctly
User Interface setting too low/too high ResetUIsetting
DO NOT bypass this compressor time
Units have a 5--minute time delay
Faulty wiring or circuit
Loose connections in compressor
Compressor motor burned out, seized, or Determine cause
internal overload open Replace compressor
Defective run capacitor, overload, or PTC (positive
temperature coefficient) thermistor
Low input voltage Determine cause and correct
Refrigerant overcharge or undercharge
Defective compressor Replace and determine cause
Insufficient line voltage Determine cause and correct
Blocked outdoor coil Determine cause and correct
Defective run/start capacitor, overload or start relay Determine cause and replace
Faulty outdoor fan motor or capacitor Replace
Damaged reversing valve Determine cause and correct
Restriction in refrigerant system Locate restriction and remove
Dirty air filter Replace filter
Unit undersized for load Decrease load or increase unit size
UI temperature set too low/too high ResetUIsetting
Low refrigerant charge Locate leak, repair, and recharge
Air in system
Outdoor coil dirty or restricted Clean coil or remove restriction
Dirty air filter Replace filter
Dirty indoor or outdoor coil Clean coil
Refrigerant overcharged Recover excess refrigerant
Air in system
(Heat) Indoor air restricted or recirculating Determine cause and correct
Indoor or outdoor air restricted or air short--cycling Determine cause and correct
delay–wait for 5 minutes until time--delay
relay is de--energized
Check wiring and repair or replace
Determine cause and replace
Recover refrigerant, evacuate system, and recharge to capacities shown on rating plate
Recover refrigerant, evacuate system, and recharge
Recover refrigerant, evacuate system, and recharge
Table 10 – Troubleshooting Chart--Heat Pump Operation
SYMPTOM CAUSE REMEDY
Head pressure too low
Excessive suction pressure
Suction pressure too low
IFM does not run
IFM operation is intermittent
IFM--Indoor Fan Motor
Low refrigerant charge Check for leaks, repair and recharge
Restriction in liquid tube Remove restriction
(Cool) High Heat load Check for source and eliminate
Reversing valve hung up or leaking internally Replace valve
Refrigerant overcharged Recover excess refrigerant
(Cool) Dirty air filter Replace filter
Low refrigerant charge Check for leaks, repair and recharge
Metering device or low side restricted Remove source of restriction
(Cool) Insufficient coil airflow
(Cool) Temperature too low in conditioned area ResetUIsetting
(Cool) Outdoor ambient below 55°F(13°C) Verify low--ambient cooling enabled in UI
Filter drier restricted Replace
Blower wheel not secured to shaft Properly tighten blower wheel to shaft
Insufficient voltage at motor Determine cause and correct
Power connectors not properly sealed Connectors should snap easily; do not force
Water dripping into motor Verify proper drip loops in connector wires
Connectors not firmly sealed
Increase air quantity
Check filter–replace if necessary
Gently pull wires individually to be sure they are
crimped into the housing
38
Page 39
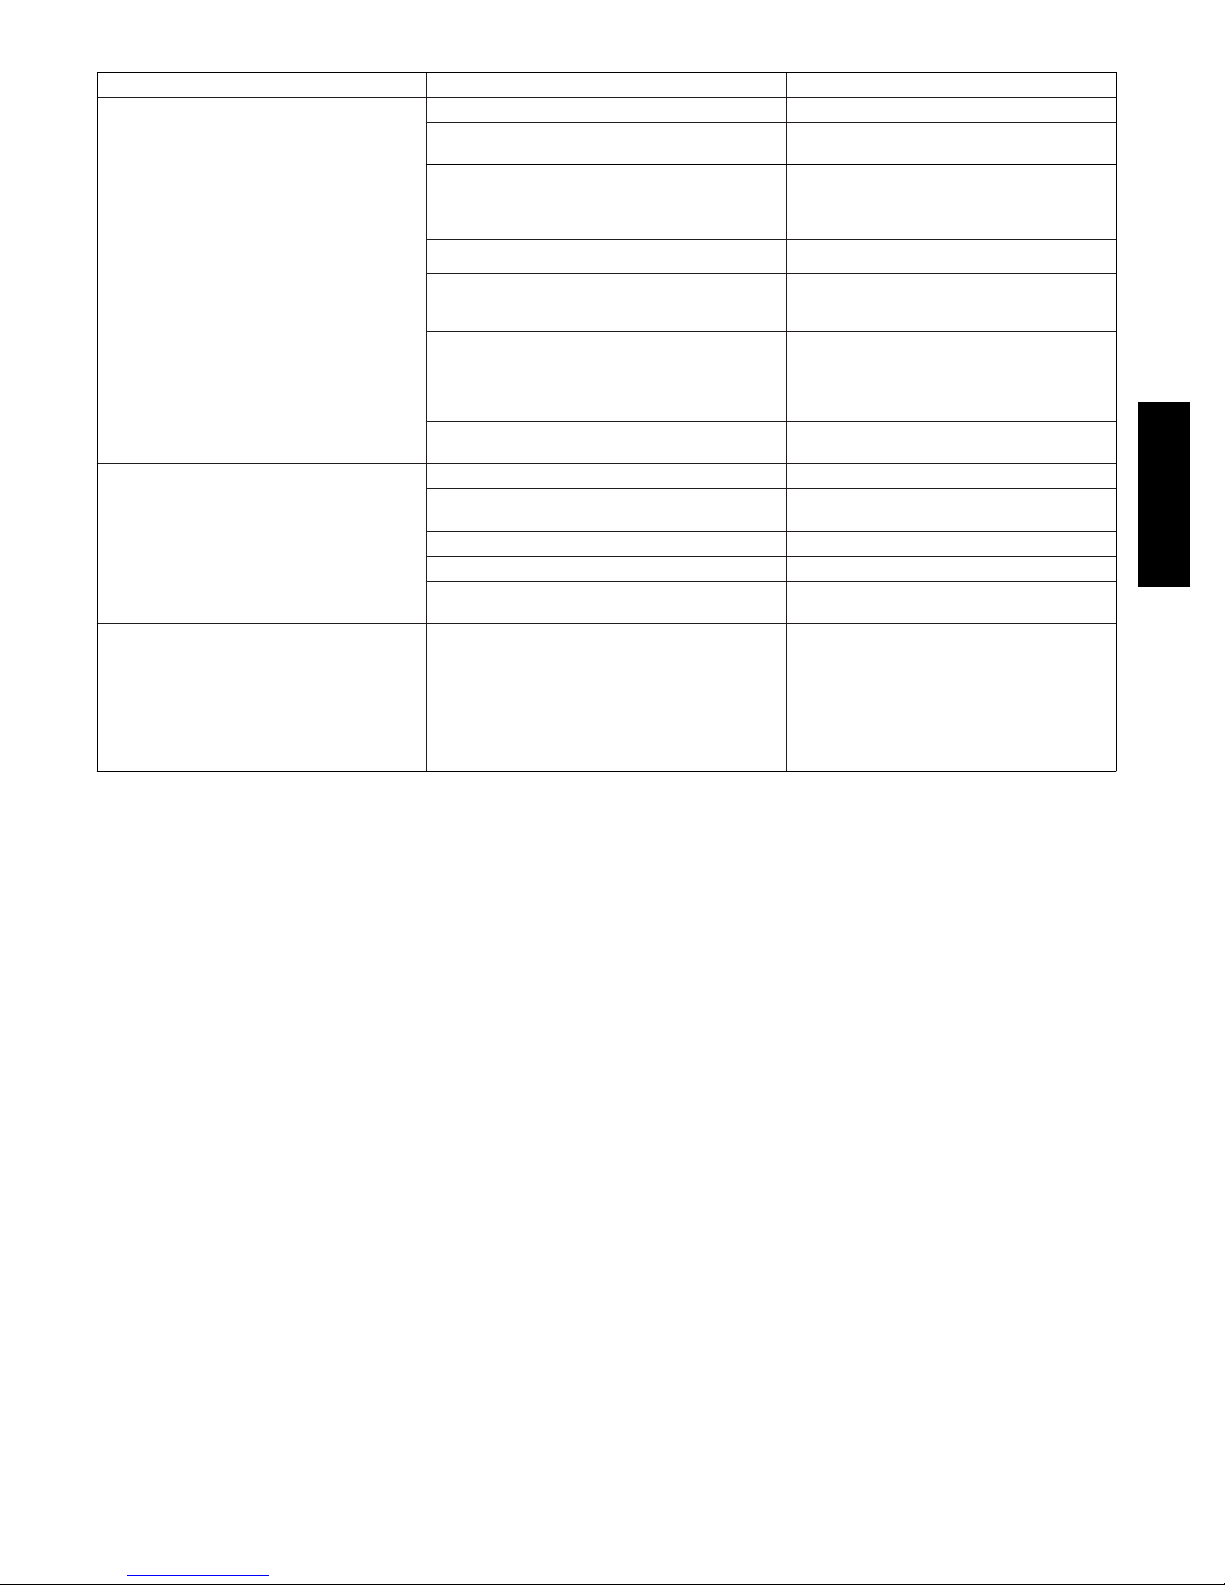
SYMPTOM CAUSE REMEDY
Burners will not ignite
Inadequate heating
Poor flame characteristics
Table 11 – Troubleshooting Chart--Gas Furnace Operation
Water in gas line Drain. Install drip leg.
No power to unit
No 24--v power supply to control circuit
Mis--wired or loose connections Check all wiring and wire nut connections
Misaligned spark electrodes
No gas at main burners
Inducer pressure switch not closing
Dirty air filter Clean or replace filter as necessary
Gas input to unit too low
Unit undersized for application Replace with proper unit or add additional unit
Restricted airflow Clean or replace filter. Remove any restriction.
Limit switch cycles main burners
Incomplete combustion results in: Aldehyde odors,
carbon monoxide, sooting flame, floating flame
Check power supply fuses, wiring or circuit
breaker.
Check transformer.
NOTE: Some transformers have internal over-current protection that requires a cool--down period to reset.
Check flame ignition and sense electrode positioning.
Adjust as necessary.
1. Check gas line for air. Purge as necessary.
NOTE: After purging gas line of air, wait at least 5
minutes for any gas to dissipate before attempting to light unit.
2. Check gas valve.
1. Check pressure switch wires, connections,
and tubing. Repair or replace if necessary.
Check gas pressure at manifold match with that
on unit nameplate
Check rotation of blower, temperature rise of unit.
Adjust as necessary.
1. Tighten all screws around burner compartment
2. Cracked heat exchanger. Replace.
3. Unit over--fired. Reduce input (change orifices
or adjust gas line or manifold pressure).
4. Check burner alignment.
5. Inspect heat exchanger for blockage. Clean
as necessary.
677D-- --A
39
Page 40
START--UP CHECKLIST
(Remove and Store in Job Files)
I. PRELIMINARY INFORMATION
MODEL NO.:
SERIAL NO.:
DATE:
TECHNICIAN:
II. PRESTART--UP (Insert check mark in box as each item is completed)
( ) VERIFY THAT ALL PACKING MATERIALS HAVE BEEN REMOVED FROM UNIT
( ) REMOVE ALL SHIPPING HOLD DOWN BOLTS AND BRACKETS PER INSTALLATION INSTRUCTIONS
( ) CHECK ALL ELECTRICAL CONNECTIONS AND TERMINALS FOR TIGHTNESS
( ) CHECK GAS PIPING FOR LEAKS (WHERE APPLICABLE)
( ) CHECK THAT INDOOR (EVAPORATOR) AIR FILTER IS CLEAN AND IN PLACE
( ) VERIFY THAT UNIT INSTALLATION IS LEVEL
( ) CHECK FAN WHEEL, AND PROPELLER FOR LOCATION IN HOUSING/ORIFICE AND SETSCREW TIGHTNESS
677D-- --A
( ) MAKE SURE THAT -- (If Applicable) ON A60 SIZE PURON HEAT PUMP ONLY, THE TWO WIRE TIRES FASTEN TO THE
OUTDOOR COILS AND REVERSING VALVE/ACCUMULATOR HAVE BEEN REMOVED
III. START--UP
ELECTRICAL
SUPPLY VOLTAGE
COMPRESSOR AMPS
INDOOR (EVAPORATOR) FAN AMPS
TEMPERATURES
OUTDOOR (CONDENSER) AIR TEMPERATURE DB
RETURN--AIR TEMPERATURE DB WB
COOLING SUPPLY AIR DB WB
GAS HEAT SUPPLY AIR
PRESSURES
GAS INLET PRESSURE IN. W.C.
GAS MANIFOLD PRESSURE IN. W.C.
REFRIGERANT SUCTION PSIG, SUCTION LINE TEMP*
REFRIGERANT DISCHARGE PSIG, LIQUID TEMP{
( ) VERIFY REFRIGERANT CHARGE USING CHARGING CHARTS
GAS HEAT TEMPERATURE RISE
TEMPERATURE RISE (See Literature) RANGE
MEASURED TEMPERATURE RISE
( ) VERIFY THAT CONDENSATE CONNECTION IS INSTALLED PROPERLY
( ) VERIFY THAT OUTDOOR AIR THERMISTOR (OAT) IS PROPERLY INSTALLED & CONNECTED
* Measured at suction inlet to compressor
{ Measured at liquid line leaving condenser.
E2012 Bryant Heating & Coo ling Systems D 7310 W. Morris St. D Indianapolis, IN 46231 Edition Date: 06/12
Manufacturer reserves the right to dis continue, or change at any time, specifications or designs without notice and without incurring obligations.
40
Catalog No. II677D--- 07
Replaces: II677D ---06
 Loading...