

Bryant 538P, 619P Owner's Manual
619P/538P
Heating & Cooling Systems
A
NOTE
GENERAL
PART
OPERATING
REMOTE
REMOTE
USING
OPERATING
CLEANING,MAINTENANCE
MAINTENANCE
TROUBLESHOOTING
ABOUT
NAMES
THE
SAFETY
...............................................................................................
............................................................................................
INSTRUCTIONS
CONTROL
CONTROL
REMOTE
INSTRUCTIONS
...................................................................................
.................................................................................
OPERATION
FUNCTIONS
CONTROL
TIPS
Owner•
TABLE
.........................................................................
.....................................................................
. . . . . . . . . . . . . . . . . . . . . . . . . . . . . . . . . . . . . . . . . . . . . . . . . . . . . . . . . . . . . . . . . . 6-8
. . . . . . . . . . . . . . . . . . . . . . . . . . . . . . . . . . . . . . . . . . . . . . . . . . . . . . . . . . . . . . . . .
....................................................................
AND
TROUBLESHOOTING
.......................................................................
NOTE
10
s
Manual
OF
CONTENTS
............................................
EQUIPMENT OWNER:
Please read this Owner's Information Manual carefully before
conditioner and keep this manual for future reference.
For your convenience, please record the model and serial numbers
spaces provided. This information, along with the installation
will
be helpful should your system require maintenance or service.
PAGE
9-16
17-19
20
21-22
23-25
installing and using this air
of
your new equipment in the
data and dealer contact information,
2
2
3
4
5
UNIT INFORMATION DEALERSHIP CONTACT INFORMATION
Model#
Serial
INSTALLATION INFORMATION
Date
_____________
# Address:
Installed-----------
Company Name:
-----------------
Phone
Technician Name:
Number:.
___________
___________
___________
_
_
_
SAFETY PRECA U TION S
2

PART
NAMES
Indoor
unit
Outdoor
unit
Names
Indoor
1.
2.
Air inlet
3.
Air filter
4.
Air outlet
5.
6.
7.
Outdoor
8.
Connecting pipe
9.
Connecting cable
10. Stop valve
NOTE:
All
illustrations
reference
differ
include
of
parts
unit
Front panel
Horizontal
Vertical air flow louver(inside)
Display panel
air
flow grille
unit
are
for
only.
Your
unit
in
appearance
all
components
or
may
may
not
shown.
Indicator
Depending
the
on
indoor
(e
lamp
on
unit
unit
size,
may
(A)
(B)
the
display window
look
like
the
following:
Indicator
~
FRESH
~
This
Air
onono
DEFROST
ououo
(Enabled on cooling & heating models only):
Lights
defrosting automatically or when the warm
air
operation.
OPERATION
This
conditioner
TIMER
Lights
8181
DIGITAL DISPLAYindicator(optional)
• Displays
air conditioner is
• Displays
lamp
Indicator
lamp
feature
control feature is activated in heating
lamp
illuminates
is activated.
Indicator
up
when the
illuminates
is
Indicator
up
during
the temperature settings when the
the malfunction code.
(optional)
air
conditioner starts
Indicator
in
operation.
Timer
operational.
when
when
operation.
Clean
the
air

OPERATING
INSTRUCTIONS
Special
Refrigerant
When a refrigeration
on
the
Louver
The
unit
louver
power
SELF
• Under
• The
operation
ONLY operation. Once the FAN ONLY operation has ended, the unit
Note:
e This function
• Before selecting this function, it
operation
all TIMER settings will be cancelled.
lfthe
•
process, the
functions
Leakage
indoor
Angle
safety
is
unit
unit
Memory
will
memorize
limitations.
turned
CLEAN
this
function, the
will operate in following sequence: FAN ONLY mode
at
LOW fan speed (applicable to cooling & heating models
is
for
approximately
SELF CLEAN function
unit
Detection
leak
is
detected
display
off
or
function
only available under COOL(AUTO COOL, FORCED COOL) and DRY mode.
automatically
panel.
Function(optional):
the
previous
Note: The
the
manual
COptional)
air
conditioner will automatically clean and dry the evaporator.
one
is
at
the
outdoor
angle
louver
control button
is
recommended to run the
half
selected while the SELF CLEAN function is
shut
of
the
will
of
an hour. Once the
down.
unit, an
louver,
return to
is
pressed.
as
long
the
standard
Self
'EC'
at
air
error
code
will
appear
as
it
is
set
within the
position
LOW
conditioner
Clean function is activated,
fan speed, Heating
only)
will
if
the
and then
turn off.
under
already
FAN
Cooling
in
Vertical
After
using the remote control.
swing
the
function
air
conditioner is operating, users can control the vertical
(Optional)
louver
swing
by
4
•
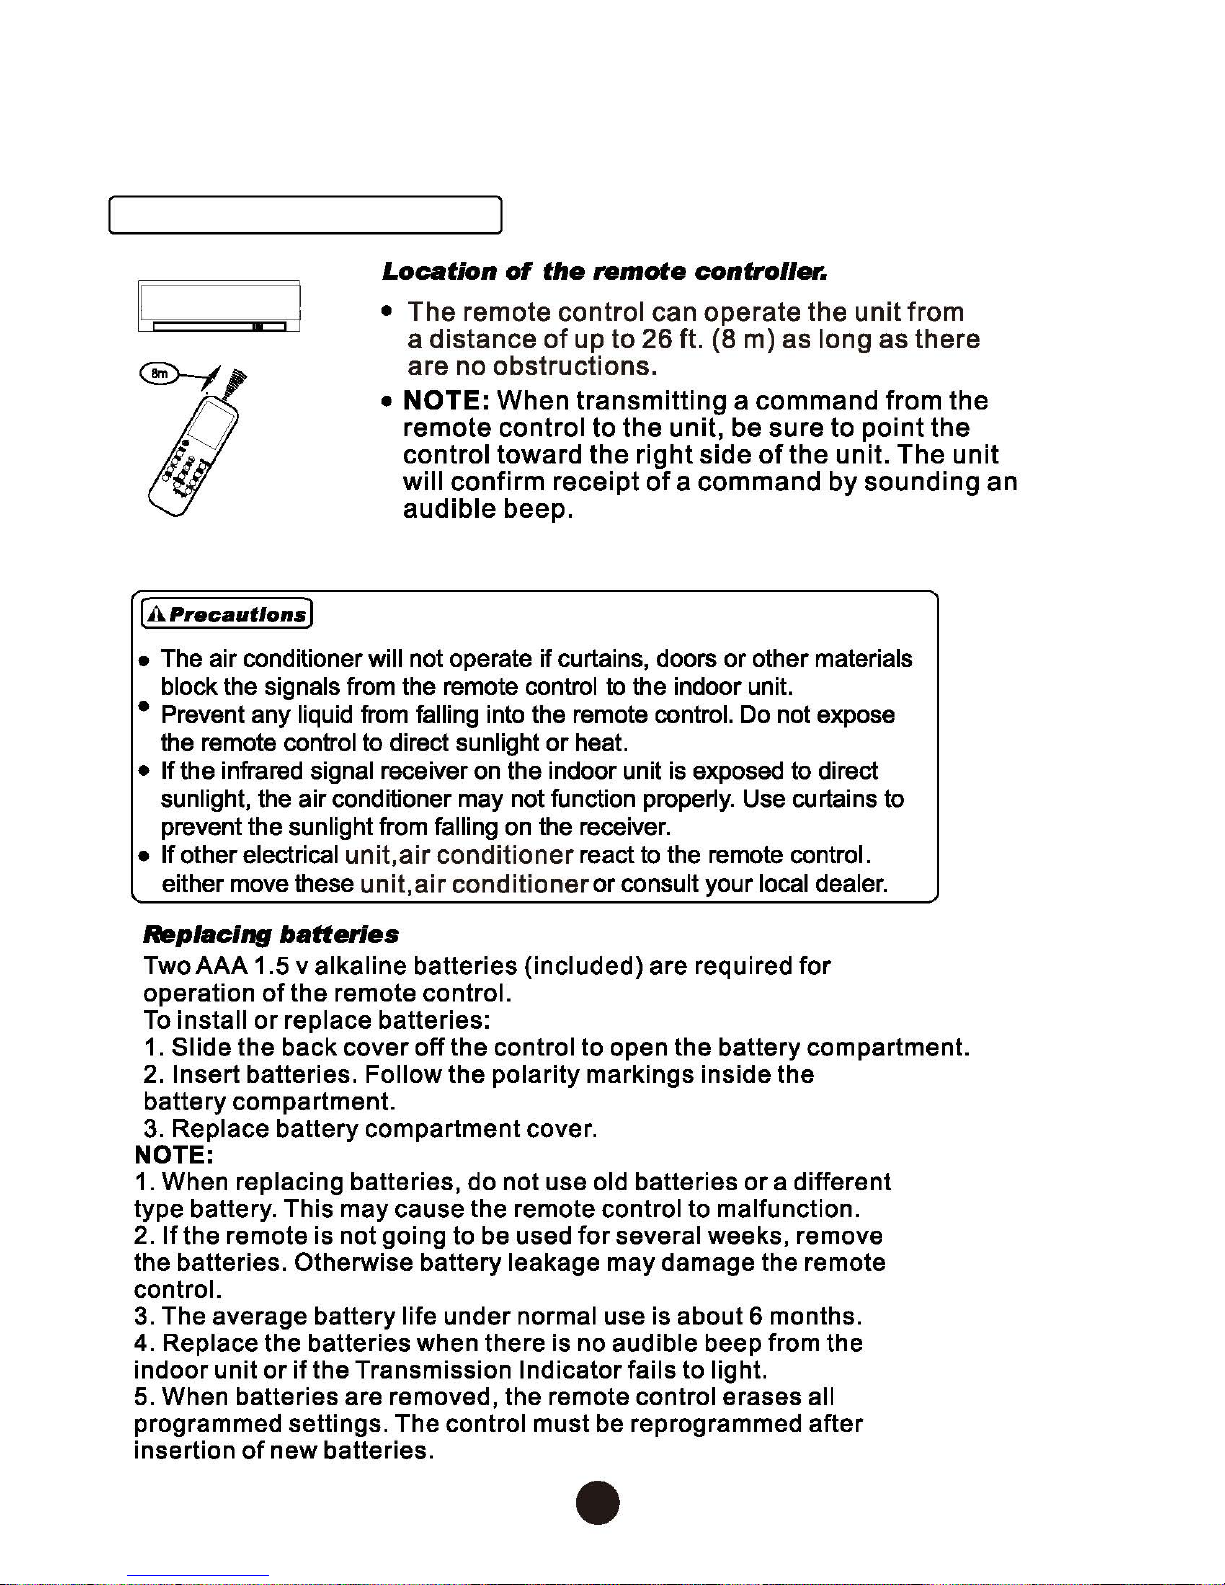
REMOTE CONTROL OPERATION
Using the r emote control
Location
•
• I I
The
a
distance
are
• NOTE:
remote
control
will
audible
(A.
Precautions)
• The air conditioner will not operate if curtains, doors or other materials
block the signals from the remote control
• Prevent any liquid
the remote control to direct sunlight or heat.
•
If
the infrared signal receiver
sunlight,
prevent the sunlight from falling
•
If
other electrical unit,
either move these
the
air conditioner may not function properly.
from
falling into the remote control.
air
conditioner
unit,air
of
the
remote
remote
no
obstructions.
confirm
on
conditioner
control
of
up
When
control
toward
beep.
the indoor unit is exposed
on
transmitting a command
the
receipt
the
receiver.
react
can
to
26ft.
to
the
right
of a command
to
the indoor unit.
to
or consult your local dealer.
controller.
operate
(8
m)
unit,
the
be
sure
side
of
Do
not expose
Use
remote control.
the
unit
as
long
to
point
the
unit.
by
sounding
to
direct
curtains to
as
from
The
from
there
the
the
unit
an
Replacing
TwoAAA
operation
To
install
1.
Slide the back
2.
Insert batteries. Follow the polarity markings inside the
battery compartment.
3.
Replace battery compartment cover.
batteries
1.5 v alkaline batteries (included) are required
of
the remote control.
or
replace batteries:
cover
off
the control to open the battery compartment.
for
NOTE:
1. When replacing batteries,
type battery. This may cause the remote control to malfunction.
2.
lfthe
the batteries. Otherwise battery leakage may damage the remote
control.
3. The average battery life under normal use is about 6 months.
4. Replace the batteries when there is no audible beep from the
indoor
5. When batteries are removed, the remote control erases all
programmed settings. The control must be reprogrammed
insertion
remote is not going to be used
unit
or
if
the Transmission Indicator fails to light.
of
new batteries.
do
not use old batteries
for
several weeks, remove
or
a different
after
5
•
REMOTE CONTROL FUNCTIONS
Two AAA 1.5v alkaline batteries
26ft (8m)
s
6
I
Function
buttons
I
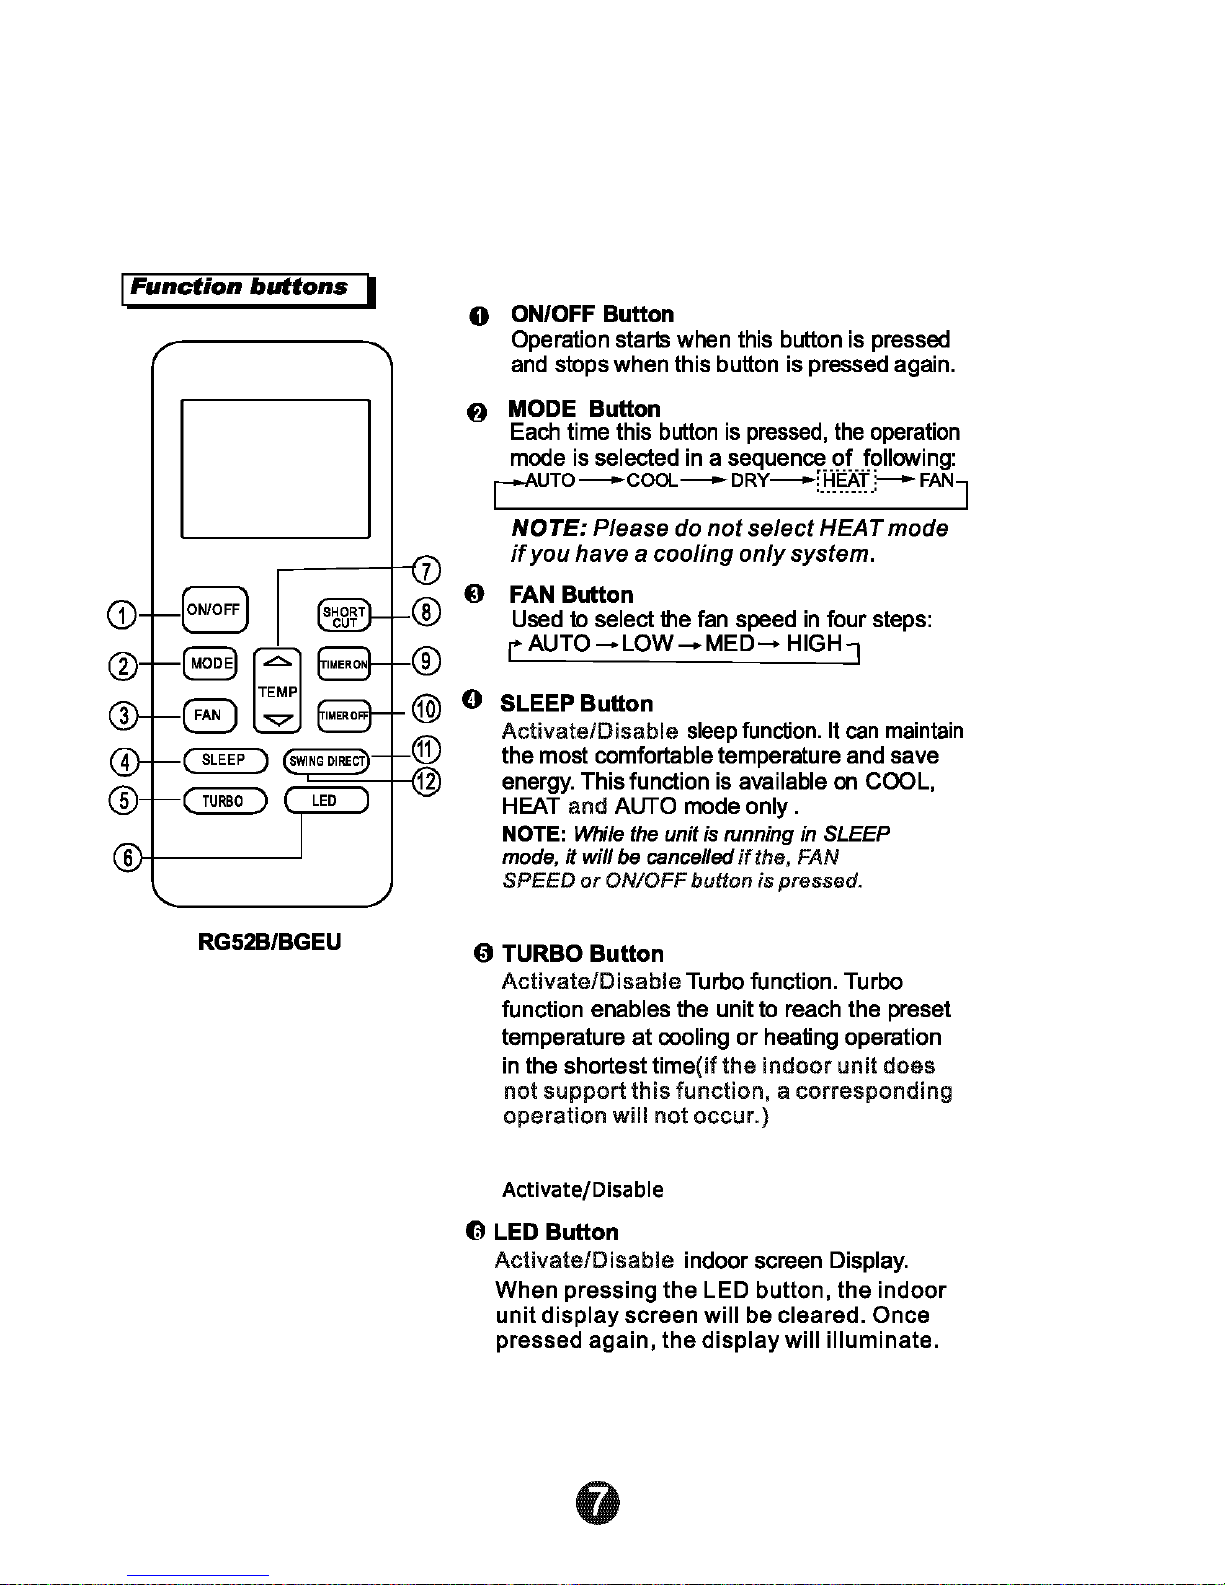
0 ON/OFF
Operation starls when this button is pressed
and stops when this button is pressed again.
f)
MODE Button
Each time this button
mode is
cum
Button
is
pressed,
selected in a sequence
--coOL--
DRY--f.i:l_i0:(:---
the
of
operation
following:
FAN]
(oN/OFF)
(MODE)
[T:P]
8"'7
(
SLEEP
)
~=:=.J_I
(
TURBO
)
RG52B/BGEU
NOTE:
if
you have a cooling
D
FAN
Used
rAUTO-LOW-MED-
0 SLEEP Button
Activate/Disable
the most comfortable temperature and save
energy. This function
HEAT and AUTO mode only .
NOTE: While the unit is running in SLEEP
mode, it will be cancelled
SPEED
0 TURBO Button
Activate/Disable
function
temperature
in
the shortest time(
not
operation
Please do
Button
to
select the
or
ON/OFF button
enables the unit to reach the preset
at
support
this
will not occur.}
not
select
only
fan
speed
sleep
function.
is
available
if
the, FAN
is
Turbo function. Turbo
cooling
function, a corresponding
if
or
the
HEAT mode
system.
in
four steps:
HIGH]
It
on
pressed.
heating operation
indoor
unit
can
maintain
COOL,
does
Activate/Disable
a
LED
Button
Activate/Disable
When pressing the LED button, the
unit
display
pressed again, the
indoor screen Display.
screen will be cleared. Once
display
will illuminate.
indoor
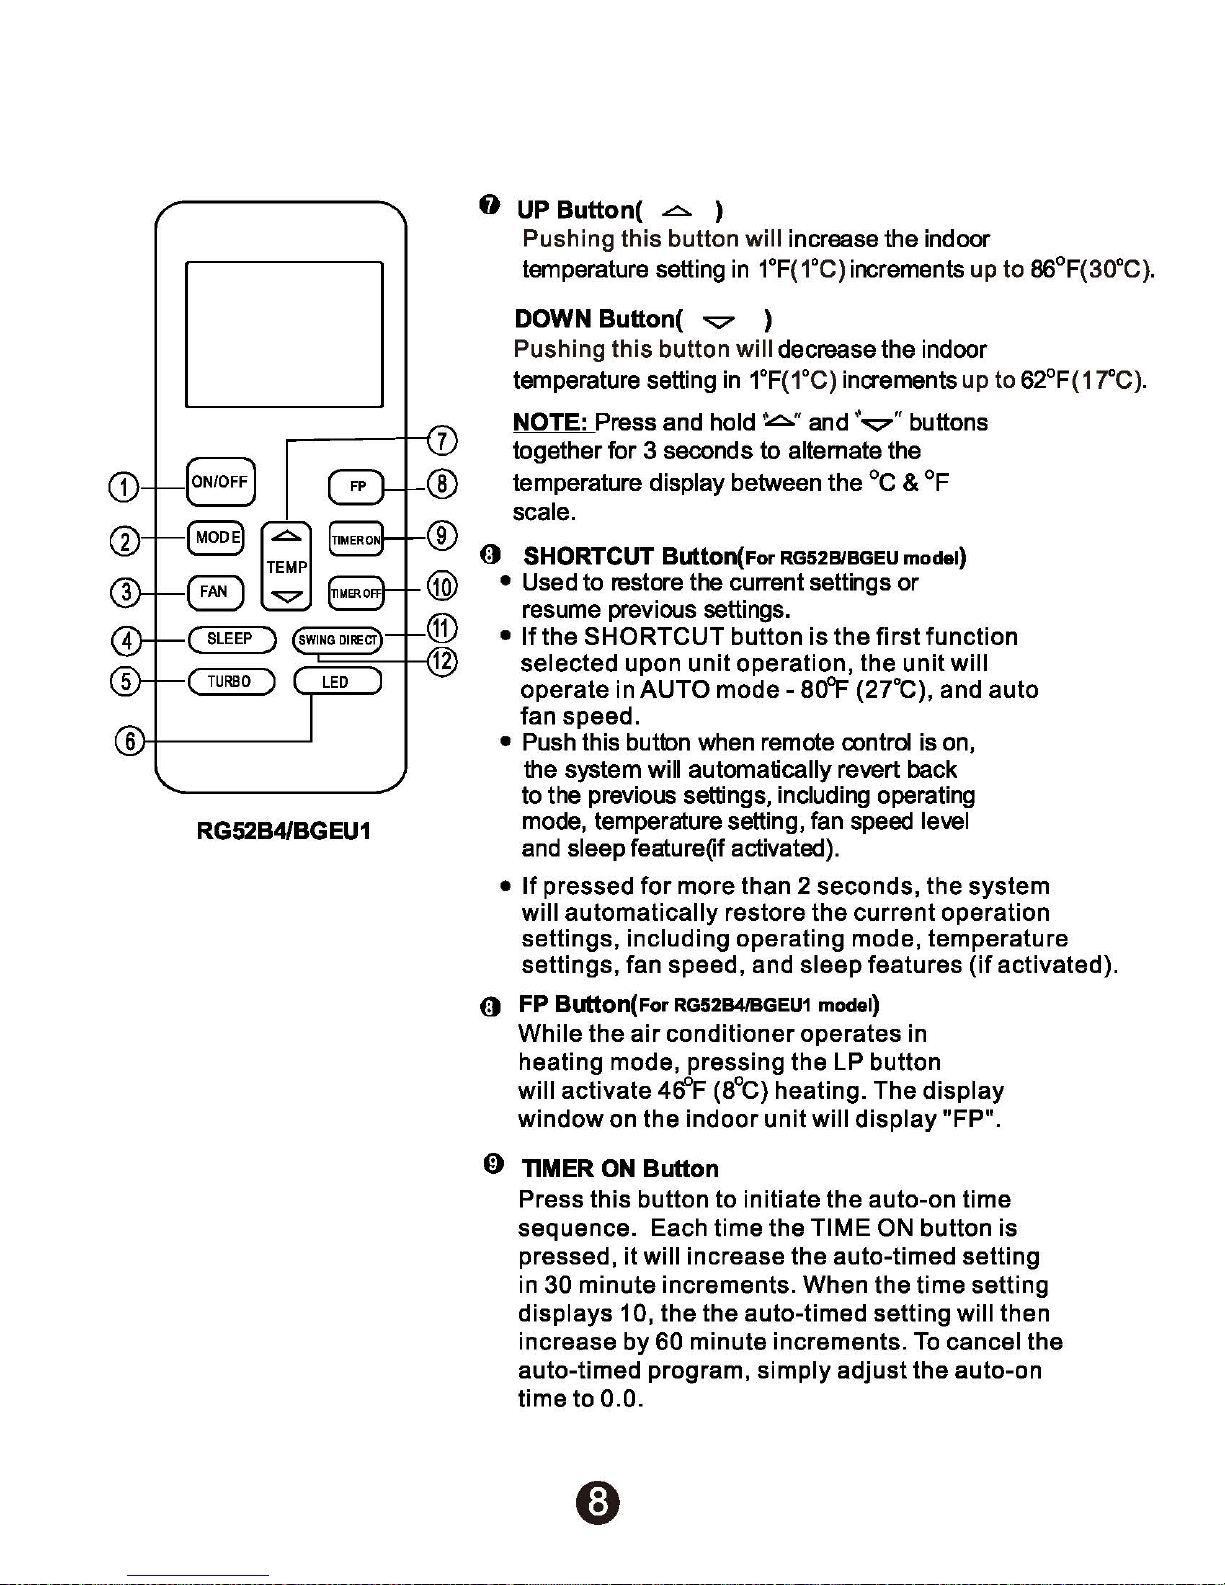
0 UP Button(
Pushing this button will increase the indoor
temperature setting
~
)
in
1°F(1°
C)
increments up to 86°F(30°C).
........------t--t
(•oo~
[r:•]
a'Q'
(SLEEP
(
RG52B4/BGEU1
TURBO
)
)
DOWN Button(
Pushing this button
temperature setting
7
NOTE: Press and hold
together for 3 seconds to
temperature
scale.
9 SHORTCUT Button(
• Used to restore the current settings or
resume previous settings.
•
If
the SHORTCUT button is
selected
operate
fan speed.
• Push this button when remote control is on,
the system
to the previous settings,
mode, temperature setting, fan speed
and
•
If
pressed
will
settings,
settings, fan speed, and
upon
in
AUTO
will automatically revert back
sleep featureQf activated).
for
automatically
including operating mode, temperature
"V'
display between the °C &
unit
more
)
will
decrease the indoor
in
1°F(1°
For
operation, the
mode-
than 2 seconds, the system
restore
C)
increments up to 62°F(17°C).
~~~
and
~'Q',
alternate the
RG52BIBGEU
the
80~
including operating
the
sleep
model)
first function
unit
(27°C), and auto
current
features
buttons
°F
will
level
operation
(if
activated).
(l) FP Button(
While
heating mode, pressing the LP button
will
activate
window
the
on
For
RG52B4JBGEU1 model)
air
conditioner
4EfF (8°C} heating. The
the
indoor
operates
unit
will
0 TIMER ON Button
Press this button
sequence. Each time
it
pressed,
in
30 minute increments. When the time setting
displays 10,
increase by 60 minute increments.
auto-timed program,
time
to
will increase the auto-timed setting
0.0.
to
the the
initiate
auto-timed setting will then
simply
the
the
TIME ON button is
adjust
in
display
display
auto-on time
"FP".
To
cancel the
the
auto-on
 Loading...