

Page 1
USER’S INFORMATION MANUAL
USER’S INFORMATION MANUAL
MODEL 311AAV and 312AAV
DOWNFLOW/HORIZONTAL/
UPFLOW GAS FURNACE
NOTE TO INSTALLER:
This manual must be left with the
equipment user.
Multipoise
!
WARNING: If the information in this manual
is not followed exactly, a fire or explosion may
result causing property damage, personal injury
or loss of life.
— Do not store or use gasoline or other flammable
vapors and liquids in the vicinity of this or any
other appliance.
— WHAT TO DO IF YOU SMELL GAS:
• Do not try to light any appliance.
• Do not touch any electrical switch; do not use
any phone in your building.
• Immediately call your gas supplier from a
neighbor’s phone. Follow the gas supplier’s
instructions.
• If you cannot reach your gas supplier, call the
fire department.
— Installation and service must be performed by a
qualified installer, service agency or the gas
supplier.
Do not use this furnace if any part has been under
water. Immediately call a qualified service technician to inspect the furnace and to replace any part
of the control system and gas control which has
been under water.
Page 2
2
WELCOME TO
TODAY’S
GENERATION OF
COMFORT
Congratulations! Your new, higher efficiency gas furnace is a
sound investment which will reward you and your family
with years of warm memories winter after winter.
Not only is your new furnace energy efficient, it is also extremely reliable. Spend just a few minutes with this booklet
to learn about the operation of your new furnace—and the
small amount of maintenance it takes to keep it operating at
peak efficiency. Years went into the development of your new
furnace. Take a little time now to assure its most efficient
operation for years to come.
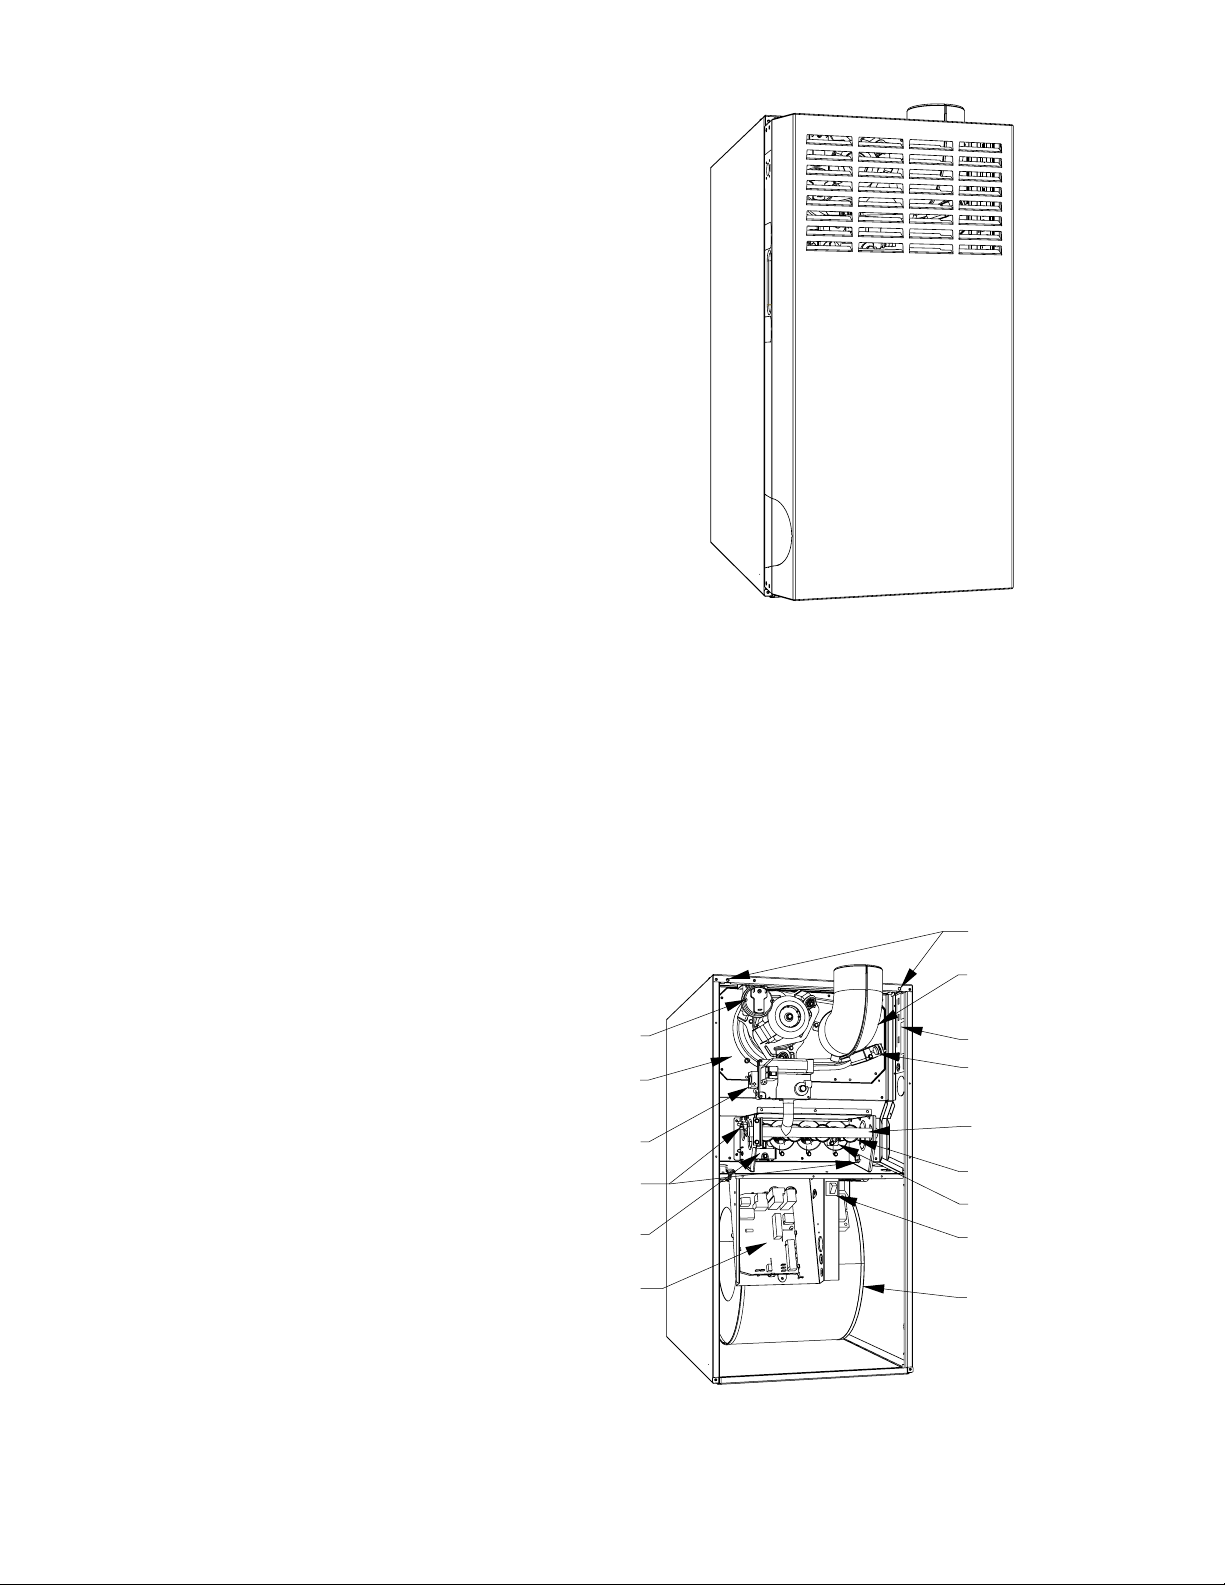
FURNACE
COMPONENTS
PRESSURE
SWITCH
FLUE
COLLECTOR
BOX
GAS VALVE
MANUAL RESET
LIMIT SWITCHES
HOT SURFACE
IGNITER
MODEL 311AA V and 312AAV
(Furnace shown in upflow position; ma y be
used in downflow or horizontal positions also)
OUTER DOOR
MOUNTING SCREWS
VENT ELBOW*
RATING PLATE
BLOCKED
VENT
SAFEGUARD
GAS MANIFOLD
GAS BURNER
FLAME SENSOR
BLOWER DOOR
SAFETY SWITCH
1
CONTROL
2
BLOWER AND
MOTOR
*Elbow may be turned to a different position,
depending on type of installation
Page 3
IMPORTANT FACTS
Your furnace must have adequate airflow for efficient combustion and safe
ventilation. Do not enclose it in an
airtight room or “seal’’ it behind solid
doors. To minimize the possibility of
serious personal injury, fire, damage
to your furnace, or improper operation;
carefully follow these safety rules:
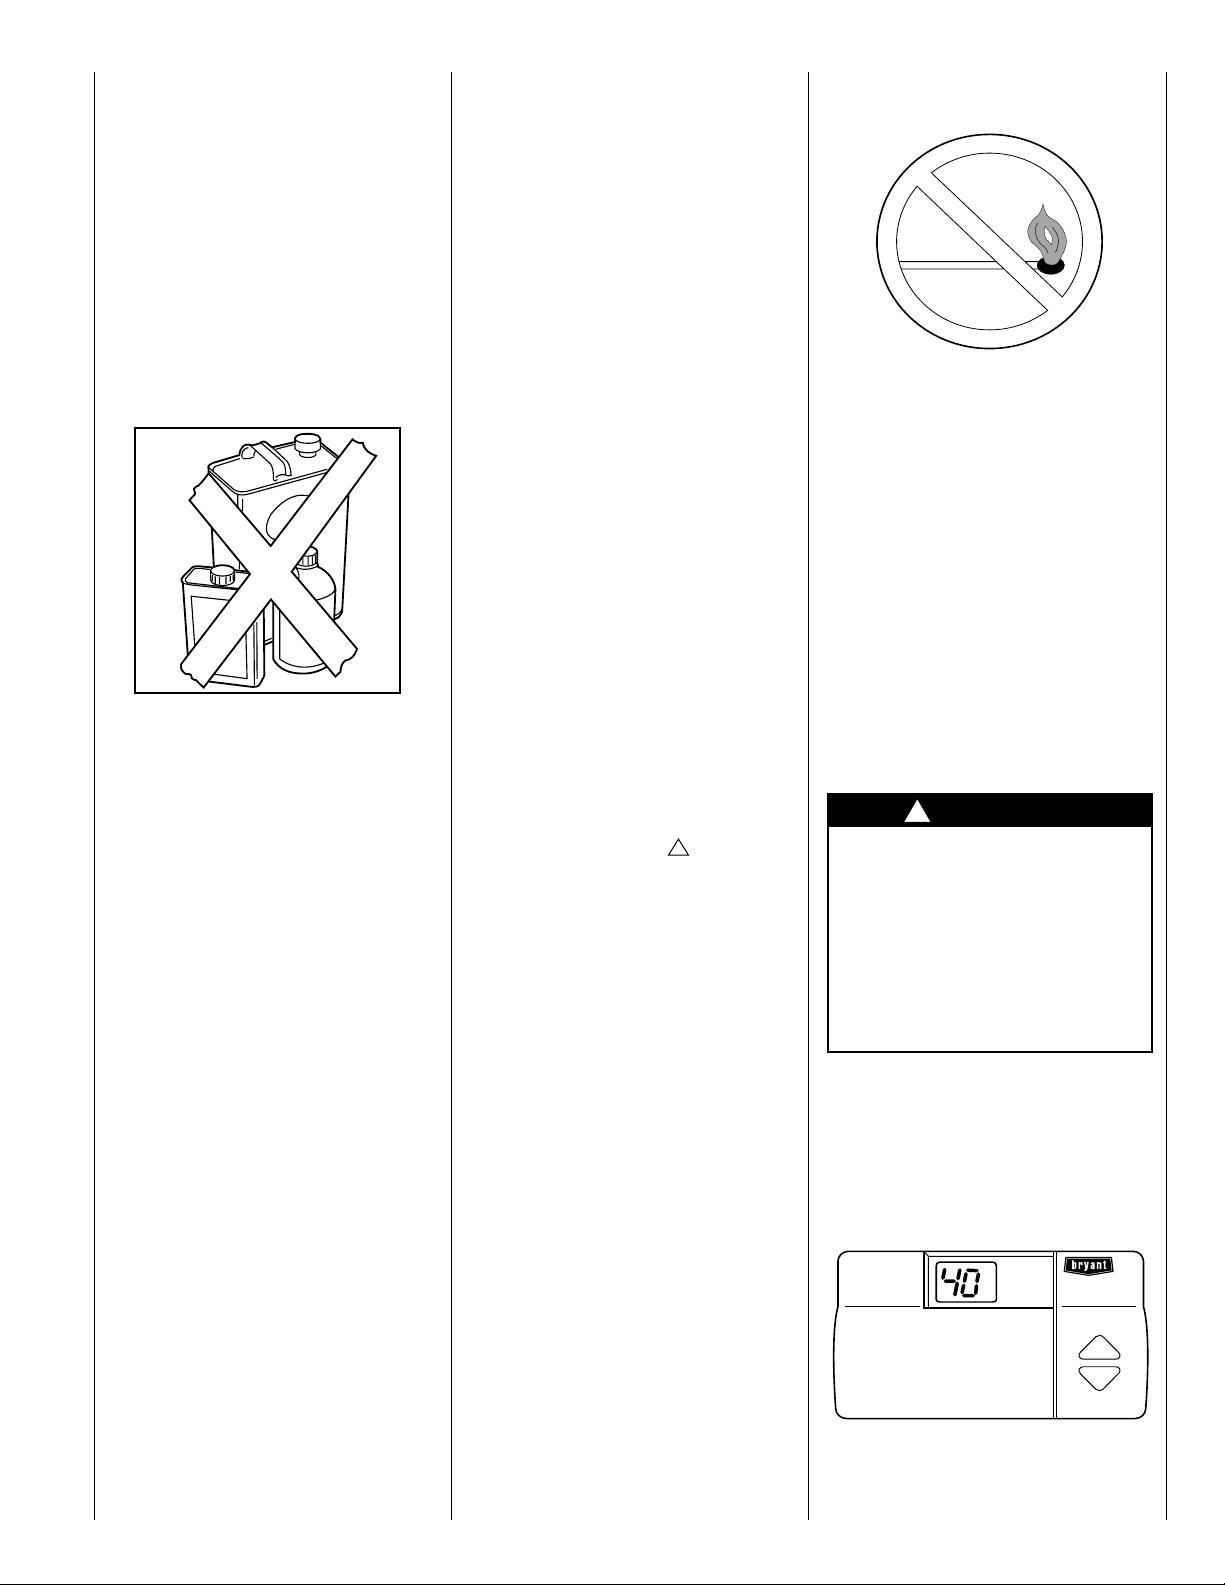
• Keep the area around your furnace
free of combustible materials, gasoline,
and other flammable liquids and
vapors.
• Do not cover the furnace, store trash
or debris near it, or in any way block
the flow of fresh air to the unit.
• Combustion air must be clean and
uncontaminated with chlorine or fluorine. These compounds are present in
many products around the home, such
as: water softener salts, laundry
bleaches, detergents, adhesives, paints,
varnishes, paint strippers, waxes, and
plastics.
During remodeling be sure the combustion air is fresh and uncontaminated. If these compounds are burned
in your furnace, the heat exchangers
and metal vent system may deteriorate.
• A furnace installed in the attic or
other insulated space must be kept free
and clear of the insulating material.
Examine the furnace area when installing the furnace or adding more insulation. Some materials may be
combustible.
NOTE: Do not use this furnace if any
part has been under water. Immediately
call a qualified service technician to inspect the furnace and to replace any
part of the control system and any gas
control which has been under water.
NOTE: The qualified installer or
agency must use only factoryauthorized re-placement parts, kits,
and accessories when modifying or
repairing this product.
This furnace contains safety devices
which must be manually reset. If the furnace is left unattended for an extended
period of time, have it checked periodically for proper operation. This precaution will prevent problems associated
with no heat, such as frozen water pipes,
etc. See “Before You Request a Service
Call’’ section in this manual.
SAFETY
CONSIDERATIONS
Installing and servicing heating equipment can be hazardous due to gas and
electrical components. Only trained
and qualified personnel should install,
repair, or service heating equipment.
Untrained personnel can perform basic
maintenance functions such as cleaning and replacing air filters. All other
operations must be performed by
trained service personnel. Observe
safety precautions in this manual, on
3
tags, and on labels attached to the furnace and other safety precautions that
may apply.
Recognize safety information: This is
the safety-alert symbol
see this symbol on the furnace and in
instructions or manuals, be alert to the
potential for personal injury.
Understand the signal words—DANGER, WARNING, and CAUTION.
These words are used with the
safety-alert symbol. DANGER identifies the most serious hazards which
result in severe personal injury or
death. WARNING signifies hazards
which
could result in personal injury or
death. CAUTION is used to identify
unsafe practices which
minor personal injury or product and
property damage. NOTE is used to
highlight suggestions which will result
in enhanced installation, reliability or
operation.
!
would result in
STARTING YOUR
FURNACE
Your furnace uses an automatic hot surface ignition system to light the burners
each time the thermostat signals the
furnace to start.
tant safeguards:
• Never attempt to manually light the
Follow these impor-
. When you
will
burners with a match or other source of
flame.
• Read and follow the operating instructions on the furnace, especially the
item that reads as follows:
“Wait 5 minutes to clear out any gas.
Then smell for gas, including near the
floor. If you smell gas,
“B’’ in the safety information above on
this label. If you don’t smell gas, go to
the next step.”
• If a suspected malfunction occurs
with your gas control system, such as
the burners do not light when they
should, refer to the shutdown procedures on the furnace, or in the next section, to turn off your system, then call
your dealer as soon as possible.
!
WARNING
Should overheating occur, or
the gas valve fail to shut off the
gas supply, turn off the manual
gas valve (See Fig. 6) to the furnace BEFORE turning off the
electrical supply. A failure to
follow this warning could result in a fire or explosion, and
personal injury or death.
•
CHECK AIR FILTER: Before at-
tempting to start your furnace, be sure
the filter is clean and in place. (See the
maintenance section of this manual.)
Then proceed as follows:
STOP! Follow
®
4
5
3
Page 4
STEPS FOR STARTING
YOUR FURNACE
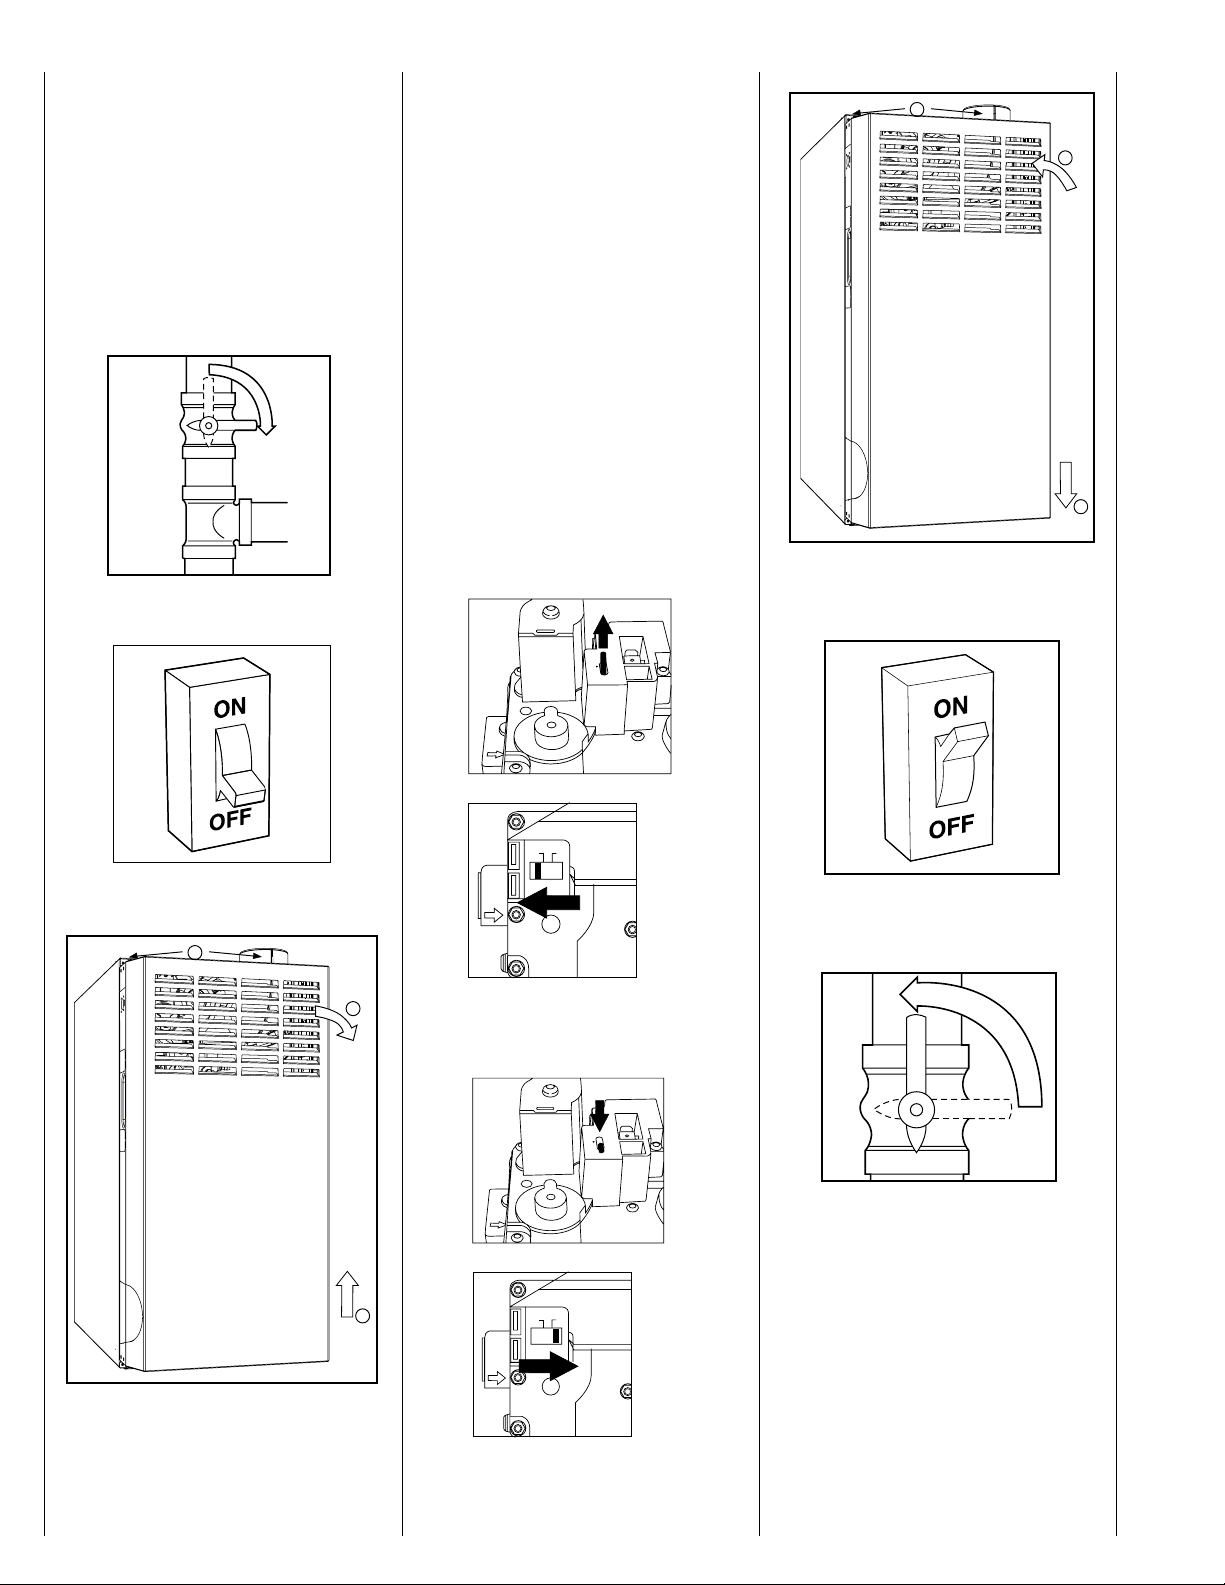
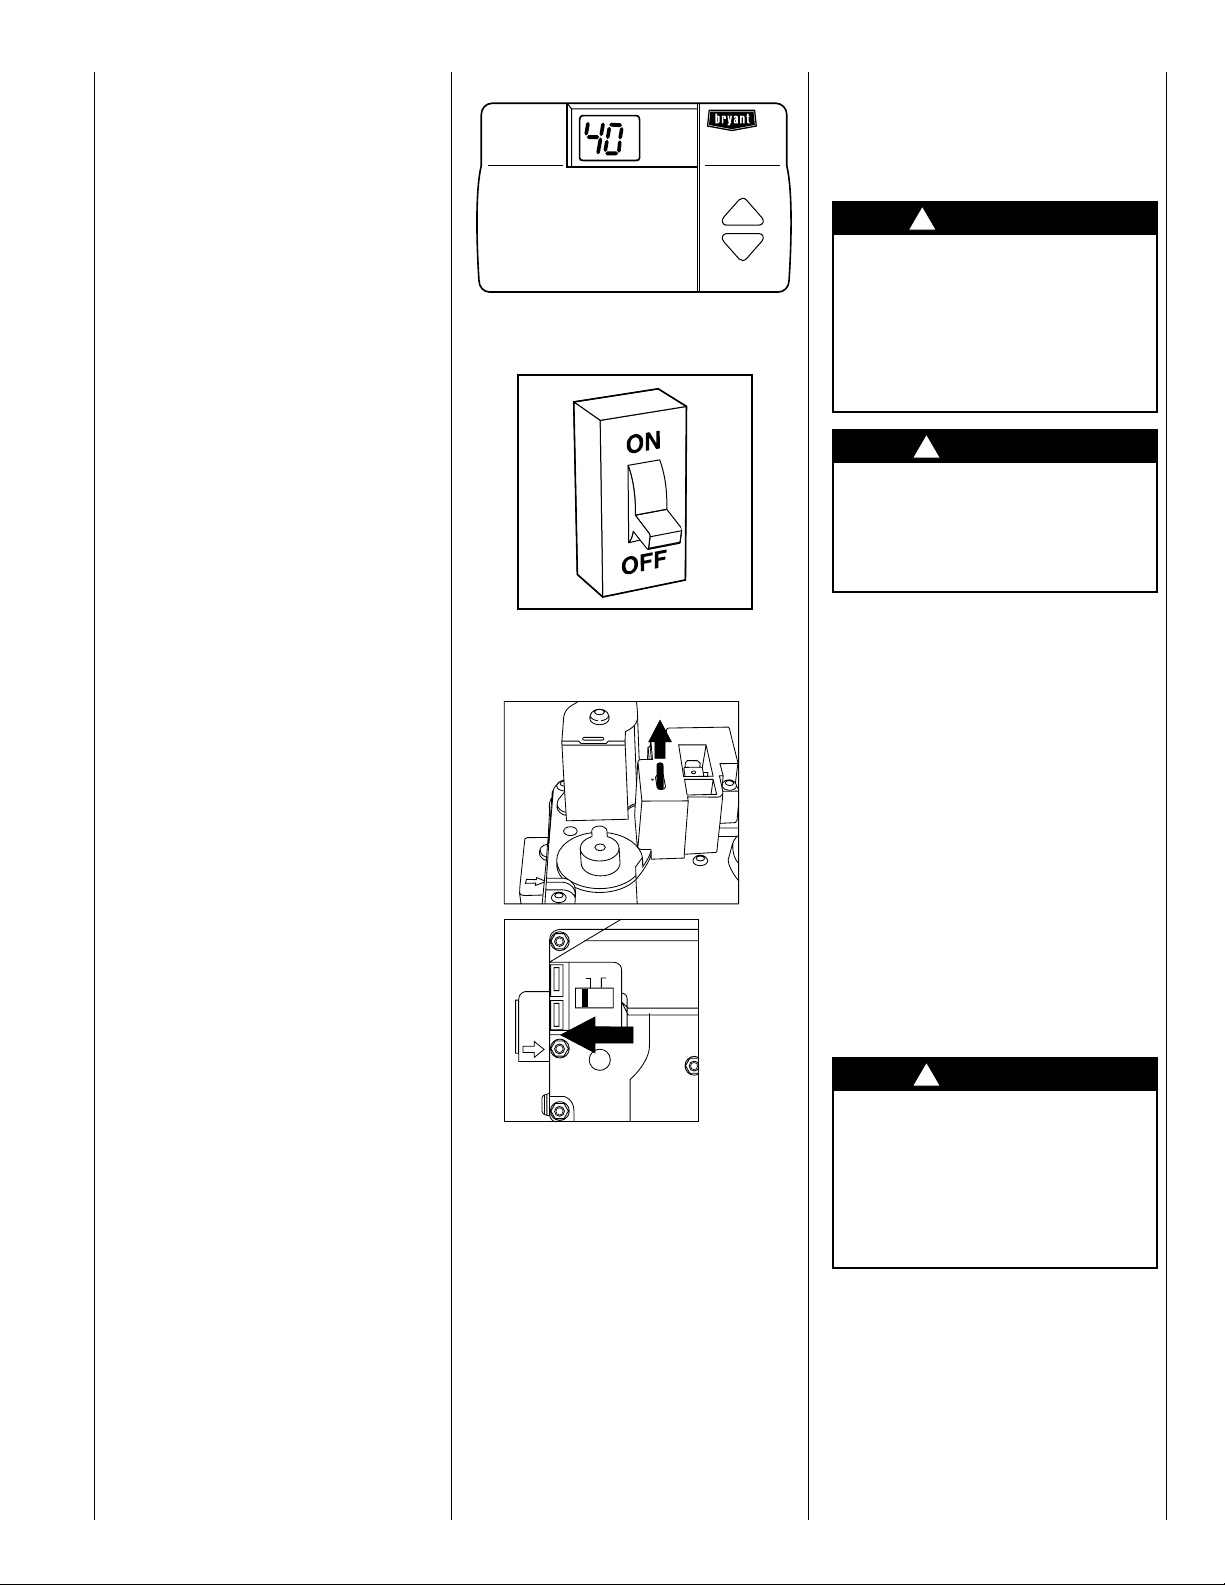
1.Set your room thermostat to the
lowest temperature setting. (See
Fig. 5.)
2.Close the external manual gas
valve. (See Fig. 6.)
3.Turn OFF the electrical supply to
your furnace. (See Fig. 7.)
C
L
O
S
E
switch to turn off and on. Turn the
control switch on the gas valve to
the OFF position and wait 5 minutes. (See Fig. 9.)
6.After waiting 5 minutes, turn the
control switch on the gas valve to
the ON position. (See Fig. 10.)
7.Replace the outer door using two
screws. (See Fig. 11.)
8.Turn ON the electrical supply to
the furnace. (See Fig. 12.)
9.Open the external manual gas
valve. (See Fig. 13.)
10.Set the room thermostat to a temperature slightly above the room
temperature. This will automatically signal the furnace to start. The
inducer motor will start, and the hot
surface igniter will energize. When
hot, the igniter will have an orange
glow.
6
M
O
O
P
F
F
F
F
ON
3
2
1
11
1
3
2
C
OR
OFF
ON
7
1
2
1
M
3
O
O
P
F
F
F
F
2
C
N
O
9
OR
O
P
E
N
12
13
11. After 32 to 70 sec, the gas valv e
permits gas to flow to the main
OFF
3
ON
8
burners where it is ignited. Hot
flames begin to warm the furnace’s
heat exchanger . After a time delay
of approximately 25 (45 sec lowstage for 2-stage furnaces) sec, the
furnace blower is switched on.
4.Remove the outer door by removing two screws. (See Fig. 8.)
5.The gas valve will have a control
10
nite, the furnace control system will go
through 3 more ignition cycles. Then,
if burners fail to ignite, the system will
4
NOTE: If the main burners fail to ig-
Page 5
lockout. If lockout occurs, or the
blower doesn’t come on—shut down
your furnace and call your dealer for
service.
12. Set your thermostat to the temperature that satisfies your comfort requirements. SUGGESTION:
Setting the thermostat back a few
degrees—and compensating for the
difference with warmer clothing—
can make a big difference in your
fuel consumption on extremely
cold days. The few degrees at the
top of your thermostat “comfort
level’’ are the most costly degrees
to obtain.
When the room temperature drops
below the temperature selected on
the thermostat, the furnace will be
switched on automatically. When the
room temperature reaches the degree
selected on the thermostat, the furnace
will be switched off automatically.
Some thermostats have a “fan’’ mode
with 2 selections: AUTO or ON. When
set on AUTO, the furnace blower cycles on and off, controlled by the thermostat. In the ON position, the furnace
blower runs continuously except for a
42-sec (62 sec low-stage for 2-stage
furnaces) delay at the “call for heat.’’
This keeps the temperature level in
your home more evenly balanced. It
also continuously filters the indoor air.
SHUTTING DOWN
YOUR FURNACE
Should you ever suspect a malfunction
in your furnace, you will need to turn
the furnace off. The following procedures must be followed:
1. Set your room thermostat to
the lowest temperature setting.
(See Fig. 14.)
2. Close the external manual gas
valve. (See Fig. 6 on page 4.)
3. T urn OFF the electrical supply to
your furnace. (See Fig. 15.)
4. Remove the outer door on your furnace. (See Fig. 8.)
5. T urn the control switch on the gas
valve to the OFF position. (See
Fig. 9.
®
14
15
1
M
3
P
2
C
N
O
OR
OFF
ON
O
O
F
F
F
F
16
6. Replace the outer door. (See Fig.
11.)
7. If the furnace is being shut down
because of a malfunction, call your
dealer as soon as possible.
PERFORMING
ROUTINE
MAINTENANCE
With the proper maintenance and care,
your furnace will operate economically
and dependably. Basic maintenance,
which can easily be accomplished by
someone who follows the directions, is
found on this and the following pages.
However, before beginning maintenance, follow these safety precautions:
!
WARNING
Turn off electrical power supply to your furnace before removing the access doors to
service or perform maintenance. A failure to follow this
warning could result in personal injury or death.
!
CAUTION
Although special care has
been taken to minimize sharp
edges, be extremely careful
when handling parts or reaching into the furnace.
FILTERING OUT
TROUBLE
A dirty filter will cause excessive stress
on the furnace blower motor and can
cause it to overheat and automatically
shut down. The furnace filter should be
checked every 3 or 4 weeks and cleaned
if necessary.
If installed with factory specified disposable media filter, check or replace
filter before each heating and cooling
season. Replace disposable media filter
at least once a year.
If your furnace filter needs replacing, be
sure to use the same size and type of filter that was originally supplied.
!
CAUTION
Never operate your furnace
without a filter in place. Doing
so may damage the furnace
blower motor. An accumulation of dust and lint on internal
parts of your furnace can
cause a loss of efficiency.
The air filter is located in the factorysupplied filter cabinet attached to the
side or bottom of the blower cabinet.
If air filter has been installed in another
location, contact your dealer for instructions. To inspect, clean, and/or replace
the air filter(s), follow these steps:
1. T urn off electrical supply to furnace (See Fig. 7.)
5
Page 6
*
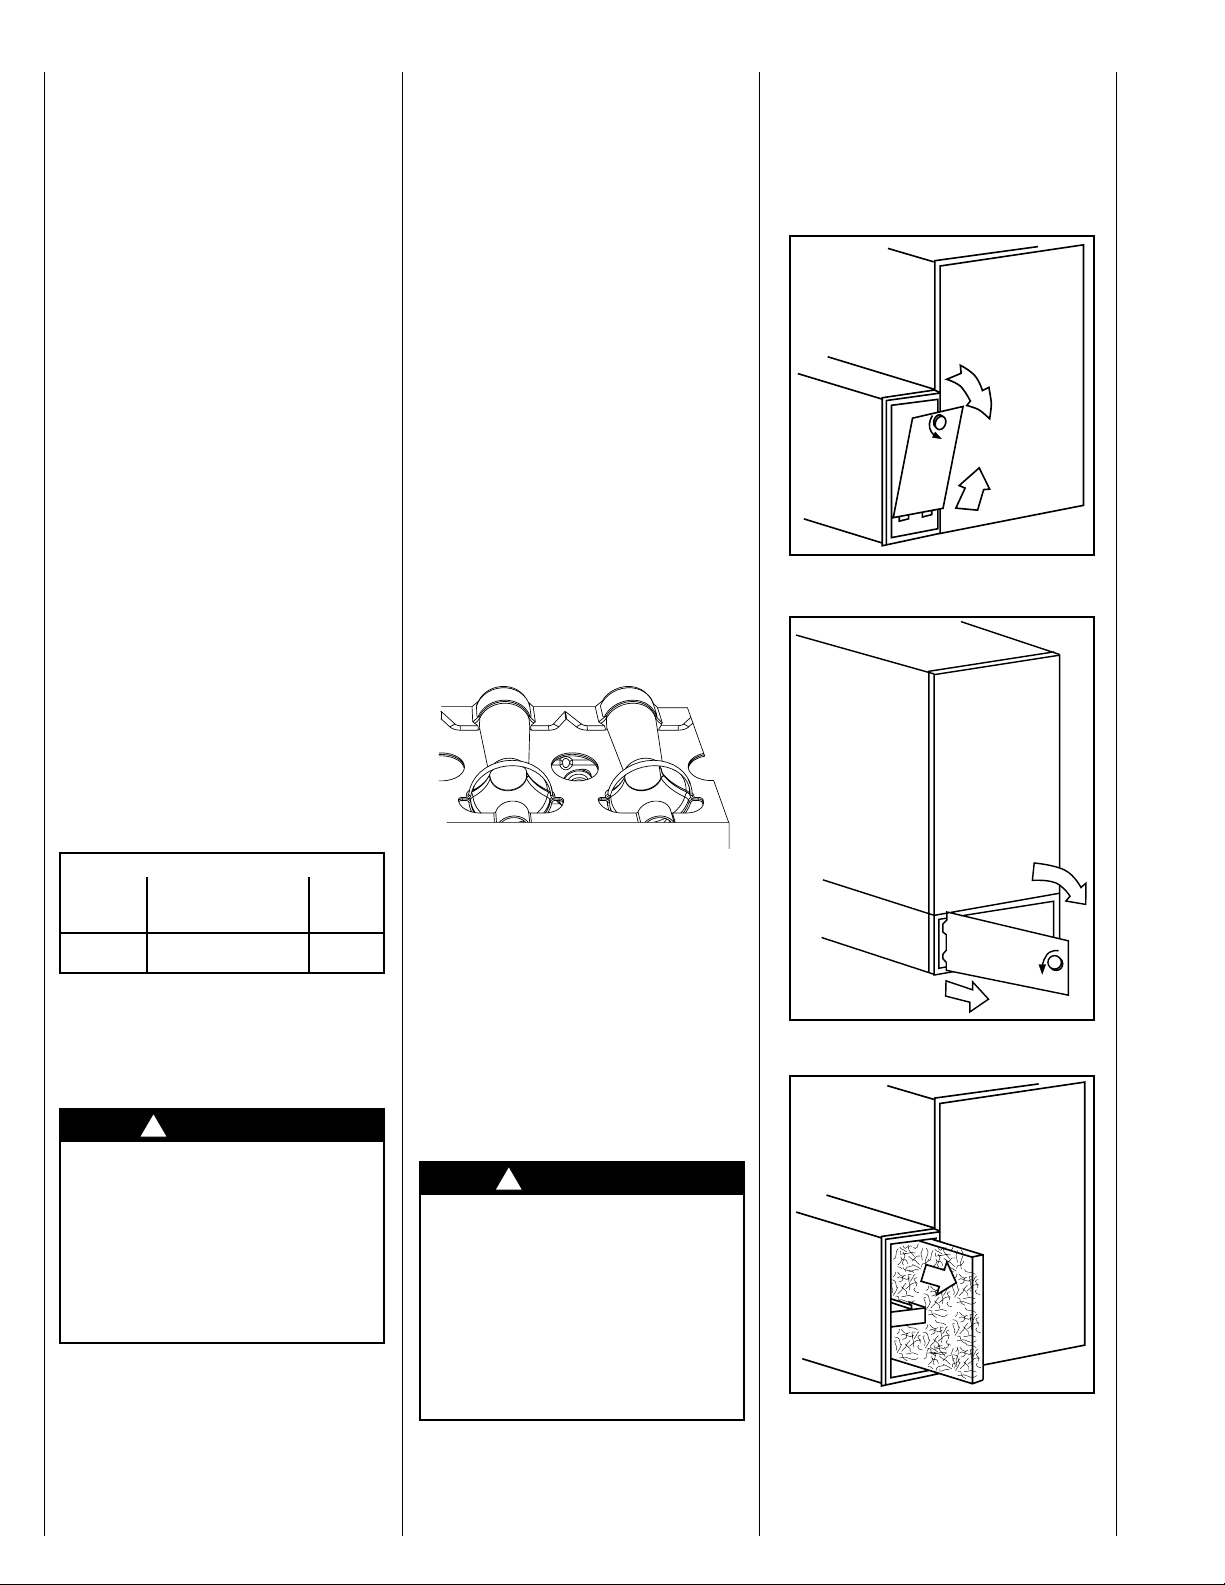
2. Remove filter cabinet door (See
Fig. 18 and 19.)
NOTE: It will be necessary to re-
move 1 thumbscrew
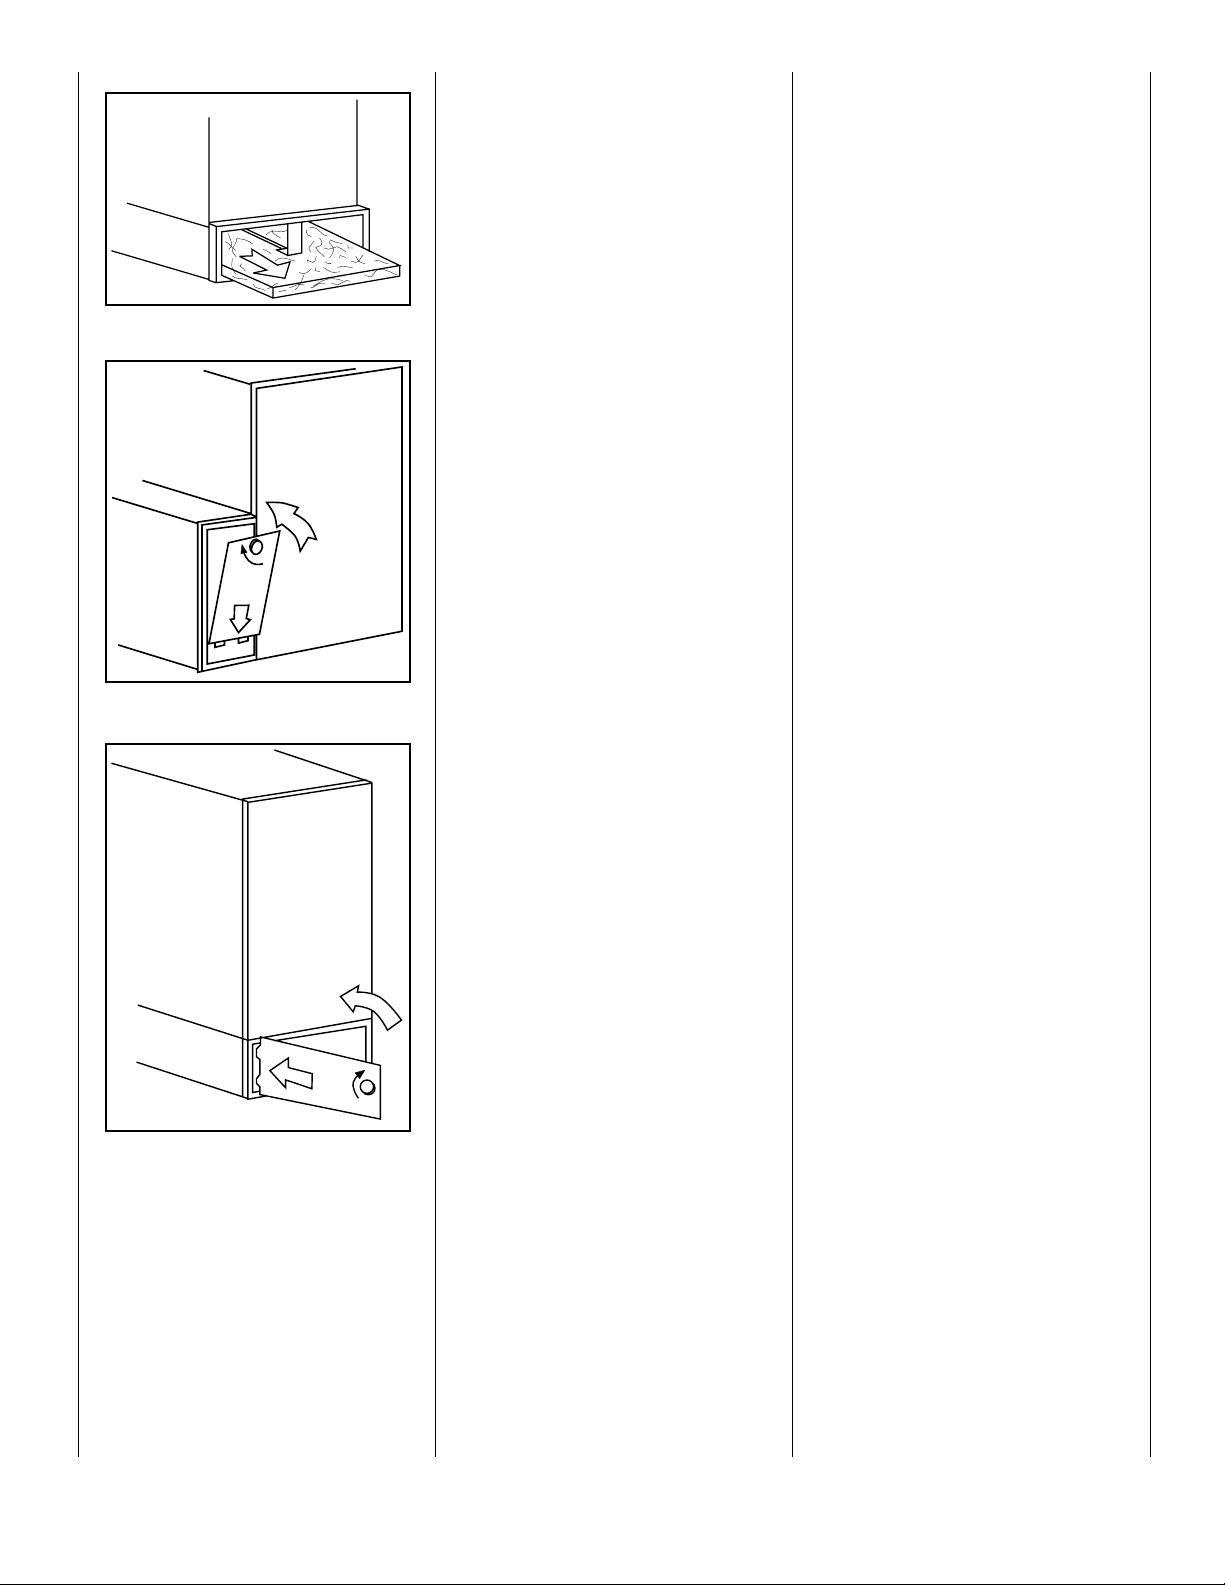
3. Slide air filter out of filter cabinet.
Keep dirty side up (if dirty) to avoid
spilling dirt. See Fig. 20 and 21.)
4. Inspect the filter. If torn, replace it.
NOTE: If washable filter that was
shipped with the furnace has been replaced by:
a) Factory specified disposable media
filter – Do not clean. If dirty, replace only
with media filter having the same part
number and size. Install with airflow direction arrow pointing towards blower.
b) Electronic air cleaner (EAC) – Refer to EAC o wner’s Manual for maintenance information.
5. Wash filter (if dirty) in sink, bathtub, or outside with a garden hose.
Always use cold tap water. A mild
liquid deter gent may be used if necessary . Spray w ater through filter in
the opposite direction of airflow.
Allow filter to dry.
6. Reinstall clean air filter.
7. Replace filter cabinet door. (See
Fig. 22 and 23.)
8. T urn on electrical supply to furnace
(see Fig. 12.)
COMBUSTION AREA
AND VENT SYSTEM
Inspect the combustion area and vent
system before each heating season. An
accumulation of dirt, soot, or rust can
mean a loss of efficiency and improper
performance. Buildups on the main
burners can cause faulty firing. This
“delayed ignition’’ is characterized by
an alarmingly loud sound. If your furnace makes a loud noise when the main
burners are ignited, shut down the furnace—call your servicing dealer.
Use your flashlight and follow these
steps for inspecting the combustion
area and vent system of your furnace:
1. T urn off the electrical supply to the
furnace and remove the access
door. (See Fig. 7 and 8.)
2. Carefully inspect the gas burner
(see Fig. 17) for dirt, rust, or scale.
Then inspect the elbow, flue connection area, and the vent pipe for
rust.
5. Start the furnace and observe its
operation. If possible, watch the
burner flames. Are they burning
bright blue? If not (or if you suspect
some other malfunction), call your
servicing dealer.
18
AIR FILTER LOCATED IN FILTER CABINET:
FILTER
CABINET
HEIGHT (IN.)
16 (1)16x25x1*
Factory provided with the furnace.
Filters may be field modified by cutting
filter material and support rods (3) in filters. Alternate sizes and additional filters may be ordered from your dealer.
Use care when cutting support
rods in filters to protect
against flying pieces and
sharp rod ends. Wear safety
glasses, gloves, and appropriate protective clothing. Failure
to follow this caution could result in personal injury.
FILTER SIZE
(IN.)
or (1)16x25x4-5/16
!
CAUTION
FILTER
TYPE
Cleanable
Disposable
17
NOTE:
If dirt, rust, soot, or scale accumulations are found, call your servicing dealer. DO NOT OPERATE THE
FURNACE.
3. Inspect the vent pipe for a sag,
holes, or a disconnection. A horizontal vent pipe must slope upward
away from furnace. If rusty joints
or seams, or signs of water leakages
are found call your dealer for service.
!
WARNING
If holes are found—or if the
vent pipe is obstructed or is
not connected—toxic fumes
can escape into your home. DO
NOT OPERATE YOUR FURNACE. Call your dealer for service. A failure to follow this
warning could result in personal injury or death.
4. Replace the access door and restore
electrical power to the furnace.
(See Fig. 12.)
19
20
6
Page 7
21
22
23
BEFORE YOU REQUEST
A “SERVICE CALL”
BEFORE YOU CALL FOR
SERVICE, CHECK FOR
SEVERAL EASILY SOL VED
PROBLEMS:
• Check for sufficient airflow. Check
the air filter for dirt. Check for blocked
return-air or supply-air grilles. Be sure
they are open and unobstructed. If this
isn’t the cause, call your servicing
dealer.
If your furnace isn’t operating at all,
check the following list for easily
solved problems:
• Is your thermostat set above room
temperature? Is the HEAT mode
selected?
• Is the electrical power supply switch
ON? Is the blower access door firmly
in place? Are any fuses blown? (There
is a fuse on the furnace control board.)
Has a circuit breaker tripped?
• Is the manual shutoff valve in the gas
supply pipe leading to the furnace
open? Does the lever point in the same
direction that the pipe runs (open)? Or
is it at right angles (closed)?
NOTE:
next checks, turn OFF the electrical
power supply to the furnace. Remove
the access door.
• Is the switch on the gas valve turned
to the ON position? If this or the preceding check shows an interruption in
the gas supply, make sure the gas has
not been shut off for safety reasons. If
nothing else seems to be wrong, follow
the startup procedures found on pages
4 and 5 of this booklet.
• If for some reason the vent is
blocked, the blocked vent safeguard
switch will shut off the furnace. (See
page 2 for switch location.) The switch
will automatically reset after the furnace cools off.
• Check the manual-reset limit
switches located near the burners. If the
furnace has experienced a high-temperature condition, due to inadequate
combustion air, these switches will
shut off the furnace. Reset the switches
by pushing the button on the switch. If
the switch trips a second time, turn off
the furnace and call for service.
• If your furnace still fails to operate,
call your servicing dealer for troubleshooting and repairs. Tell your dealer
the model and serial numbers for your
furnace. (You should have them recorded on page 8 of this booklet.) By
knowing exactly which furnace you
have, the dealer may be able to offer
suggestions over the phone, or save
valuable time through knowledgeable
preparation for the service call.
Before proceeding with the
REGULAR DEALER
MAINTENANCE
In addition to the type of routine maintenance you might be willing to do,
your furnace should be inspected
regularly by a properly trained service
technician. An annual inspection (or
biennial inspection, at least) should
include the following:
1. Inspection of all flue gas passages—including the burners, heat
exchanger, inducer, elbow, and vent
pipe.
2. Inspection of all combustion
and ventilation air passages and
openings.
3. Close check of all gas pipes
leading to (and inside of) your
furnace.
4. Inspection and cleaning of the
blower motor and wheel.
5. Routine inspection and cleaning/
replacement of the air filter.
6. Inspection of all supply- and
return-air ducts for obstructions,
air leaks, and insulation. An y problems found should be resolved at
this time.
7. Inspection of furnace installation
for proper support and any obvious deterioration of the furnace.
The support must be sound and
without sags, gaps, cracks, etc.,
around the furnace base so as to
provide an air seal between the
return-air duct and furnace.
8. A check for loose connections
attaching individual components.
Inspection of all electrical wiring
and their connections.
9. Operational check of the furnace
itself to determine working condition. Repair or adjustment should
be made at this time.
Ask your servicing dealer for
further details about an economical
service contract that covers seasonal
inspections.
7
Page 8
INSTALLATION DATA
Date Installed
Dealer Name
Address
City
State/Province Zip/Postal Code
Telephone
FURNACE
Product No.
Model No.
Serial No.
AIR CONDITIONER OR HEAT PUMP
OUTDOOR UNIT:
Product No.
Model No.
Serial No.
INDOOR COIL:
Product No.
Model No.
Serial No.
© 2000 Bryant Heating & Cooling Systems, 7310 W. Morris St. Indpls., IN 46231 PRINTED IN U.S.A. Catalog No. 5331-101 11-00
8
New OM04-38
 Loading...