

Page 1
Page 2

20/50 W stereo head
To me complexity does not always represent the best opportunity for the guitarist.
The market is full of high technology amplifier units that offer more and more options in
terms of features. However , the reality is that as musicians we are quickly tired of "technology"
for its own sake and instead look for the marriage of basic principles and genuine technological
insight.
Star -T-Rack is an amplifier that respects the true "tube" tradition. It is the first to offer a stereo
head with 2 levels of operation: 20W in class A, or 50W in class AB, per channel. This flexibility
is not obtained by the use of artificial electronic simulations but by a completely new circuit
model: the ACIA ( Automatic Current Impedance Adaptor ), which allows this flexibility
through simple switching. These developments have meant a small revolution in my approach
and development of amplifier design. In order that the true dynamics and clarity of Brunetti
can operate within this radical "dual power" design I have chosen 6L6GC tubes for this
amplifier model.
The preamplifier section needs no elaborate introduction: 4 channels that range from the
totally transparent to the totally driven all enjoying a whole world of tonal variation within
a minimal number of control centres.
The effects loop is all tube with separate L and R mixing. In this way both L and R signals
can retain their total independence. 20W class A on one channel and 50 A/B on another.
If you want it Star-T-Rack can do it.
Following in the tradition of all Brunetti products construction is of the very highest quality.
Knobs in turned aluminium, satinized and galvanized grilles plus chromium footswitches
are just some of the extraordinary details of this amplifier. As ever all assembly is strictly by
hand and is carried out by people with the outstanding knowledge and care to build a true
classic.
Ultimately Star-T-Rack is the creation of a new reference point in amplifier design. My work,
my passion and my fulfilment is to provide you, the artist, with groundbreaking designs that
unify the best of the past with the promise of the future.
Marco Brunetti
®
Page 3

20/50 W stereo head
Technical specifications
®
• TYPOLOGY only tubes signal path 5x12AX7A + 4x6L6GC
• PREAMP 2+2 channels CLEAN/OVERDRIVE/CLEAN BOOST/OVERDRIVE BOOST
• POWER AMP 20+20 “A” class or 50+50W “AB” class @ 8/16 Ω (switchable) with ACIA
power dimension system
• AUXILIARY CONTROLS DEPTH controls for L & R power channels
• LOOP serial/parallel with separated variable controls Mix% L & R
Send level max: 0,85Vrms Clean/2,2Vrms Other
Return level L & R for max power out ( 50W/ch): 1,9 Vrms
• SWITCHING Manual / foot (supplied) / Midi (128 preset)
• POWER SUPPLY 117 / 240V +/- 5% 380/400VA max
• DIMENSIONS W 585xD 310xH 240
• WEIGHT 18Kg
REMEMBER! Don’t obstruct the fans air flux. Damage can occur!
Page 4
BOOST
INPUT
FOOTSW
BOOST
DRIVE
BASS
MID
EDGE
VOLUME
8
6
0
4
10
6
2
0
4
10
8
6
2
0
4
10
8
6
2
0
4
10
8
6
2
0
4
10
6
2
0
4
10
8
8
6
2
0
4
10
8
6
2
0
4
10
8
6
2
0
4
10
6
2
0
4
10
6
0
4
10
EFX
mix%
0
100
80
60
20
40
0
100
80
60
20
40
HT fuse
LINE
ON
STDBY
L
R
BASS
MID
EDGE
GAIN
MASTER
BOOST
MASTER
6
0
4
10
8
6
0
4
10
VOLUME
CLEAN
OVERDRIVE
20/50watts stereo head
®
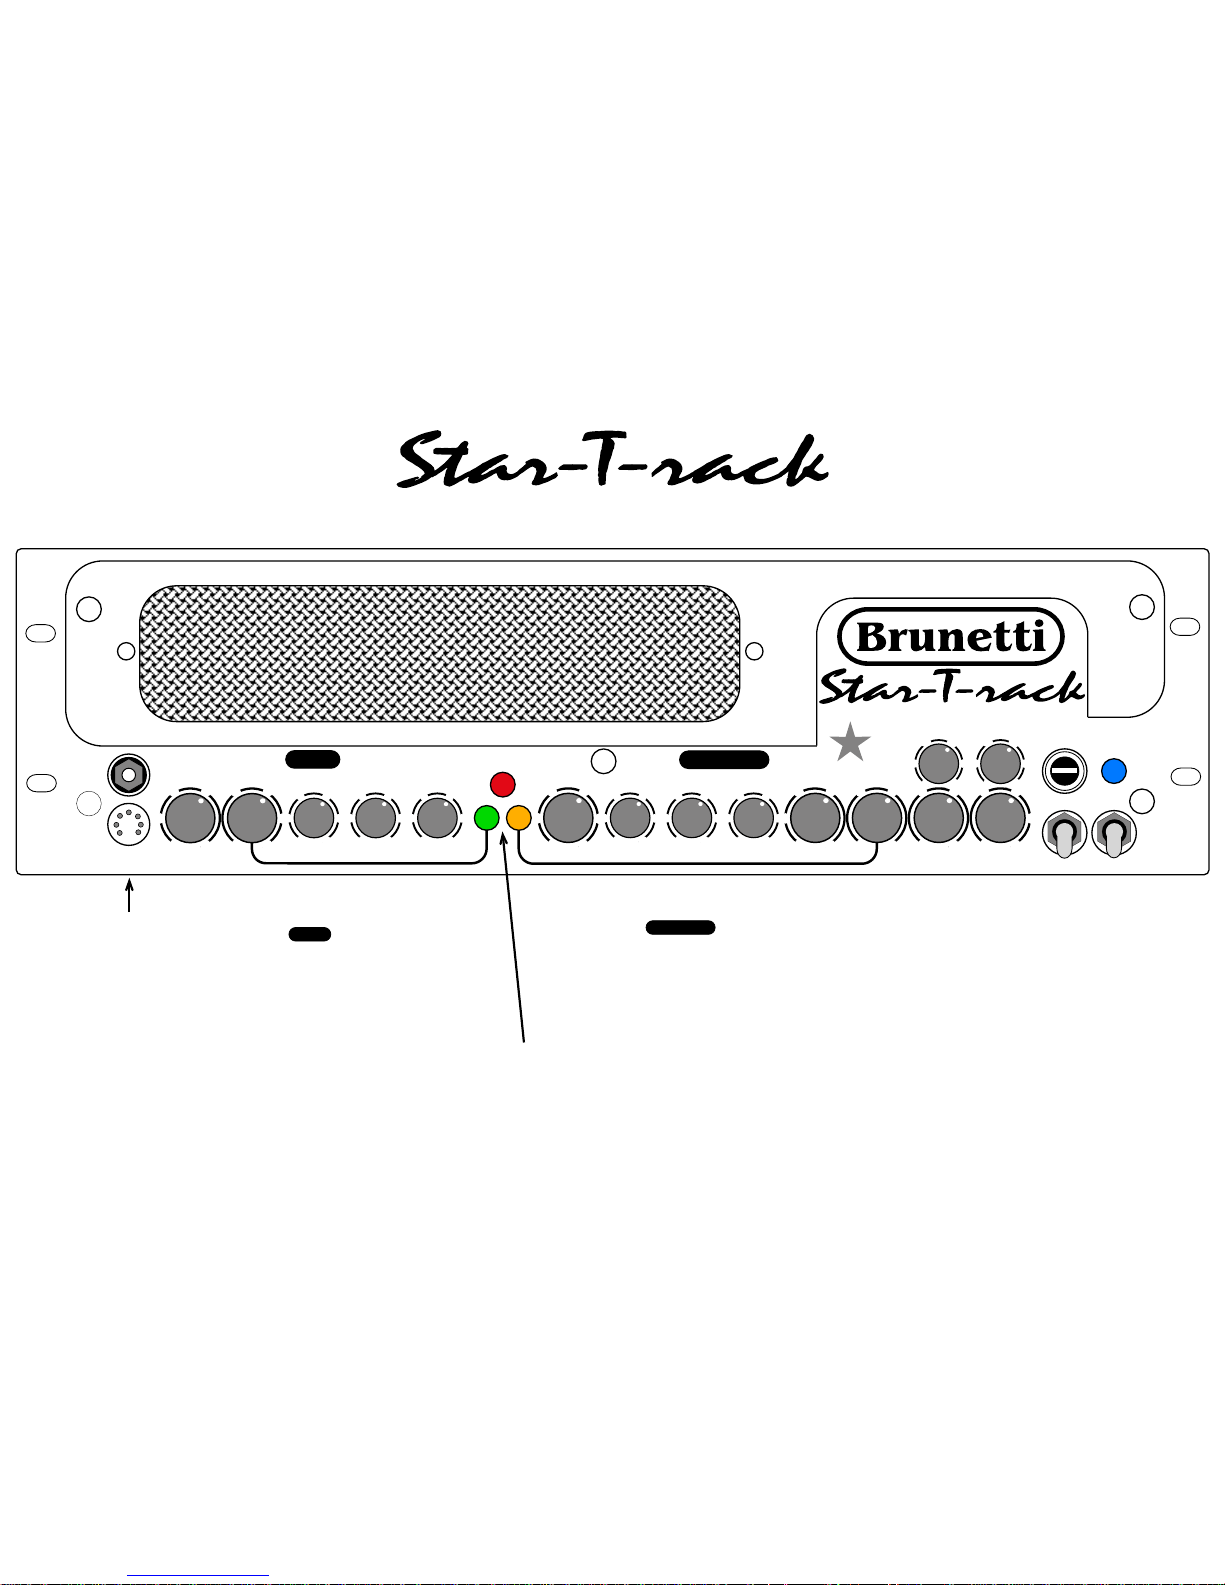
FOOTSWITCH socket
WARNING!!!
Don’t connect any MIDI
system. The sockets for the
MIDI controller are located
on the rear panel
The channel switching can be: manual (push buttons), or by
footswitch (supplied), or MIDI. All the three systems can be
used at the same time.
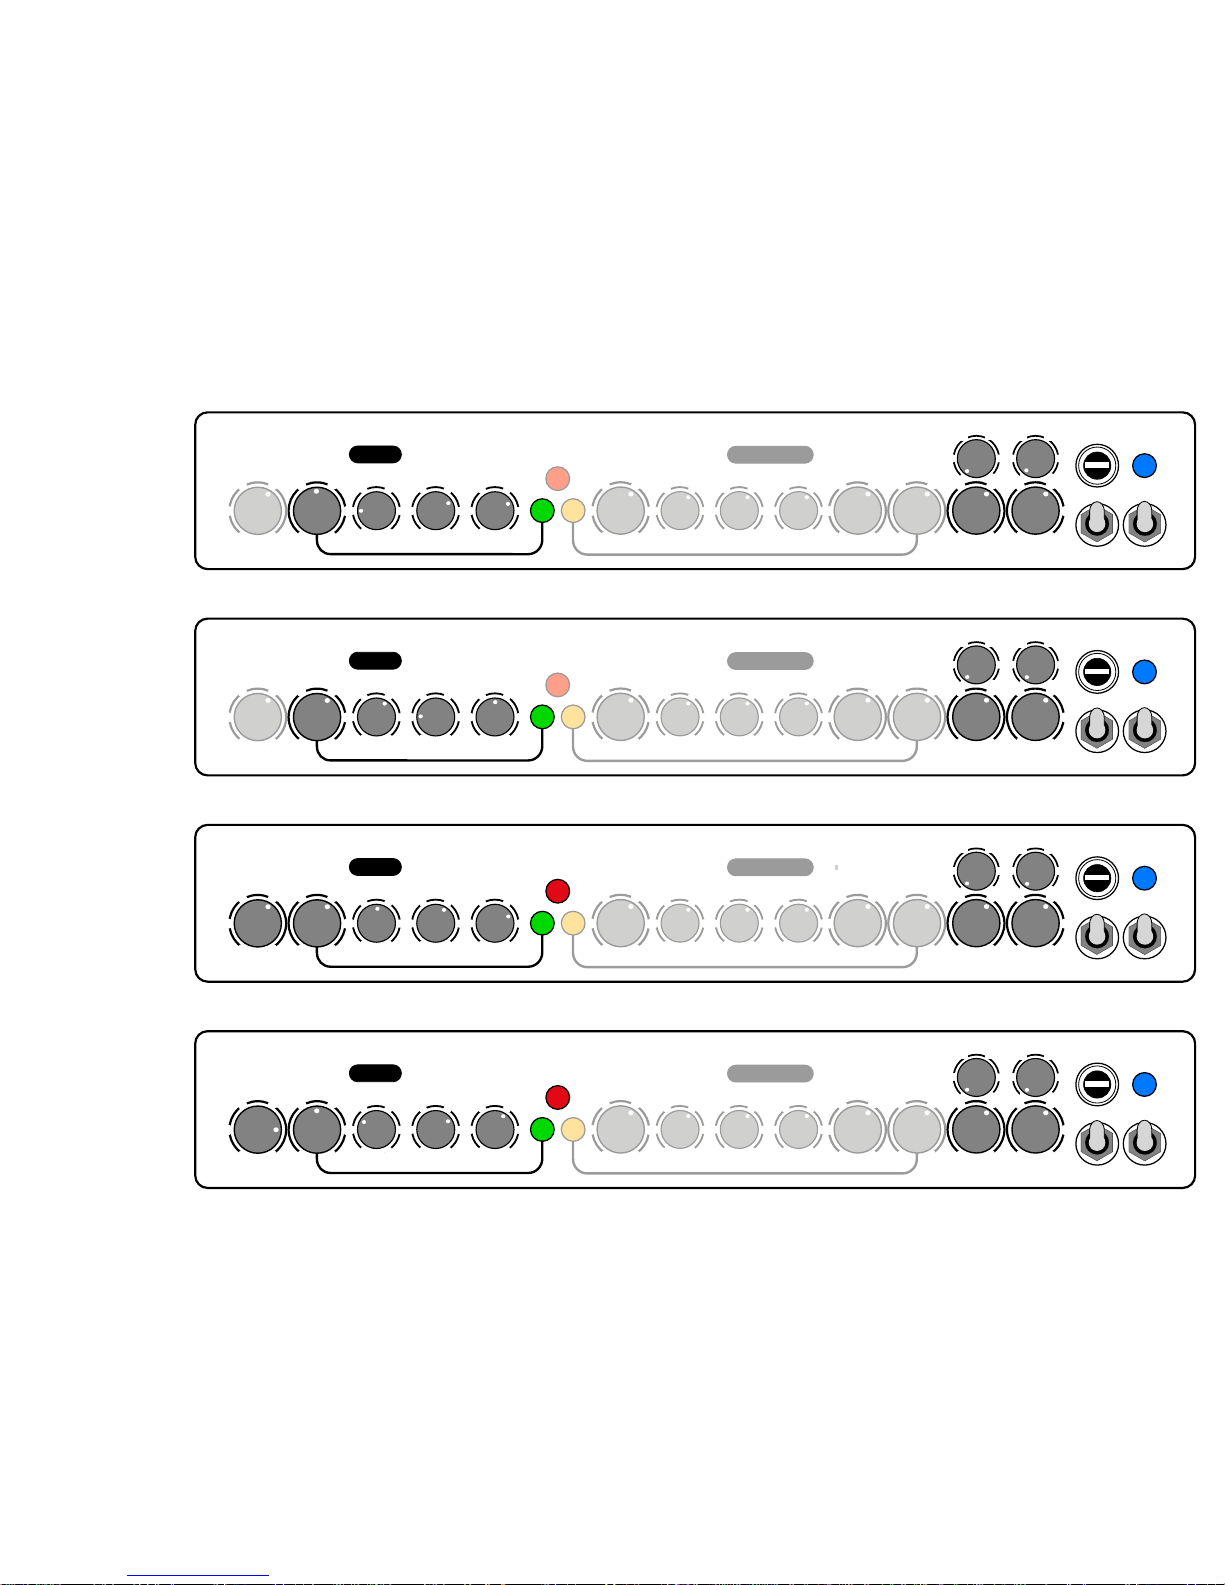
The channel is controlled
by GAIN, BASS,MID,EDGE & MASTER. You
can add the BOOST function to have more
drive and with BOOST MASTER you’ll be
able to have a different master volume.
OVERDRIVE
VOLUME L / R control the power output. For the best
signal /noise ratio pls set these controls between
6 and 8.
WARNING!!
The HT fuse must be replace with a SB
( Slow Blow ) type. The trip value must be
630mA
The channel is controlled
by VOLUME, BASS,MID & EDGE. You can
add the BOOST function to control with
the BOOST DRIVE the armonics quantity
CLEAN
Page 5
Rear panel
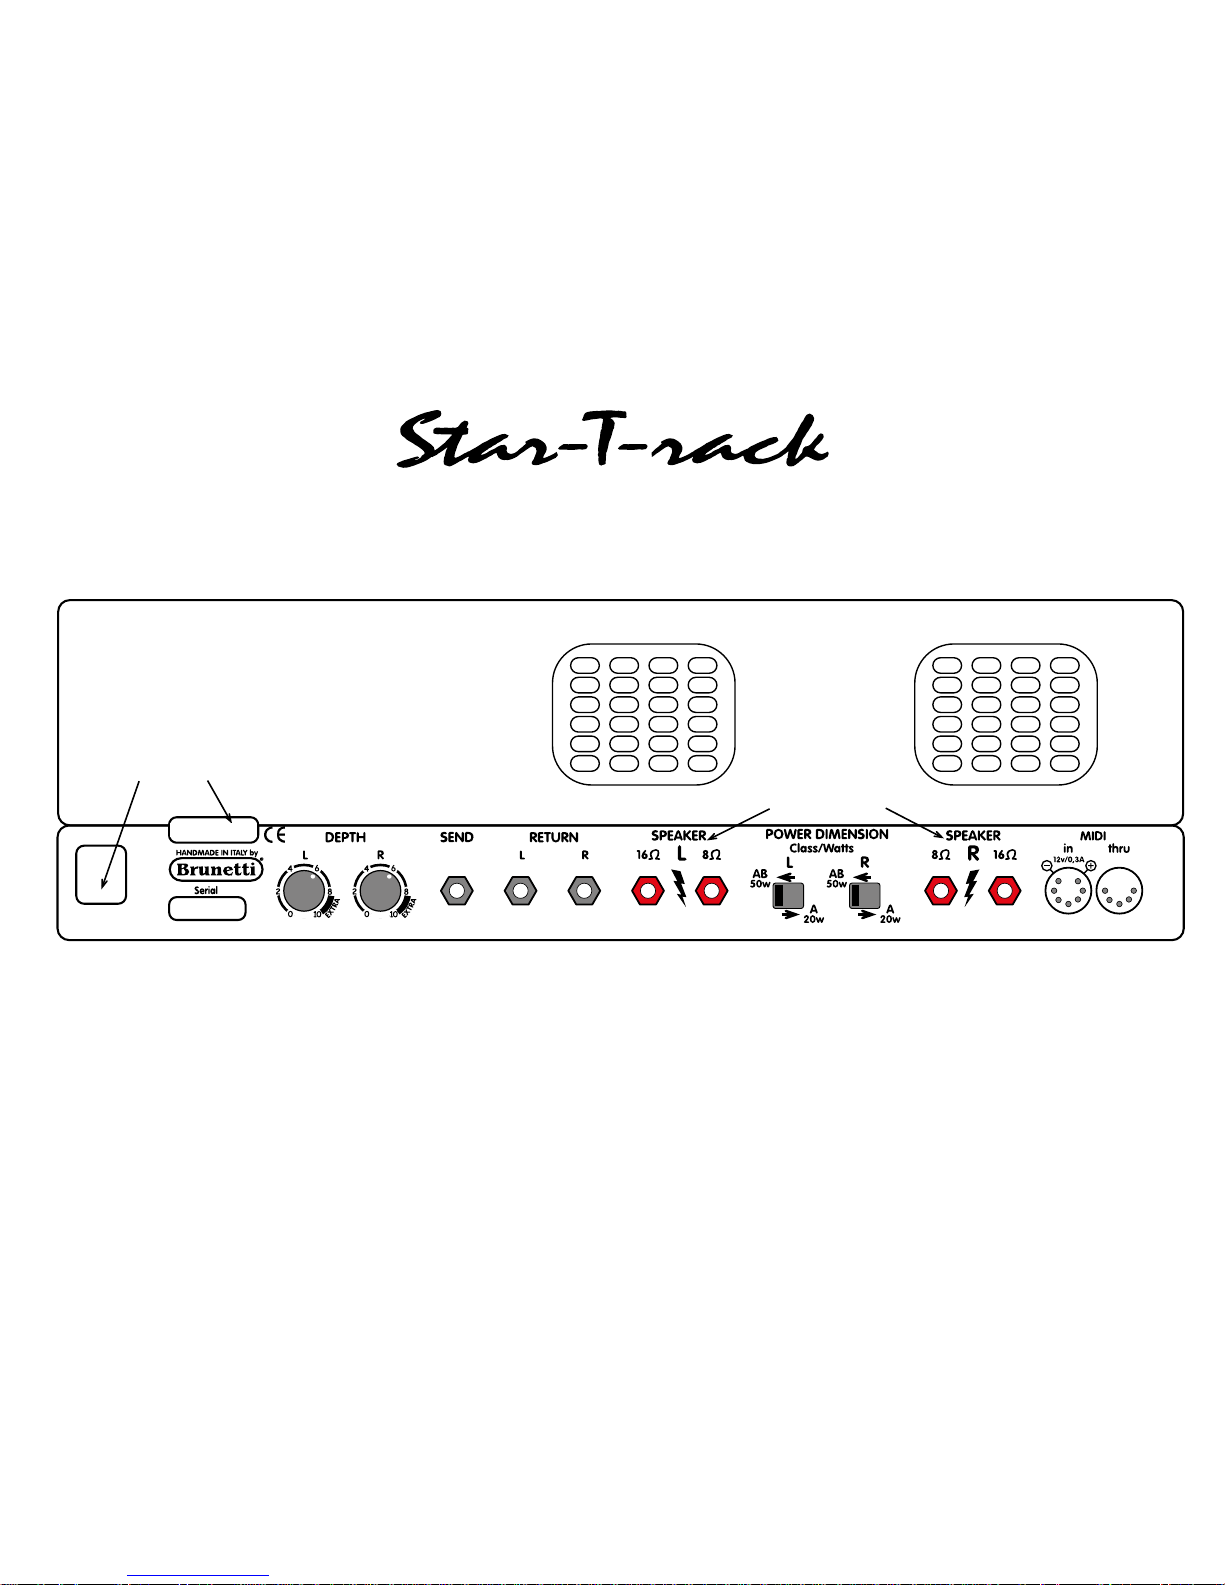
WARNING!!
Replace this fuse with SLOW BLOW
type. Any FAST type fuse will blow
immediately
DEPTH makes a thicker
sound until “8”. From 8
to 10 the amp will work
in real no feedback
Jacks for effect
connections. SEND level
is set by the MASTER
volume of the two
channels. With no jacks
the loop is bypassed
220V/T2A
Speaker jacks.Pls
don’t mismatch the
labeled impedance
to avoid damage
These switches select
the two power/classes
of the amp. AB class
delivers 50W with a
modern style sound,
while A class delivers
20W with a vintage and
compressed dynamic
The MIDI system receives the program change
in OMNI channel.
To store a preset:
1) Select the preset number on the
footcontroller (1-128)
2)Select the channel on the Star, with or
without BOOST function
3)Keep pushed the channel switch for about
5/6 sec, until the leds will blink
Page 6
Suggestions for loop effects use
®
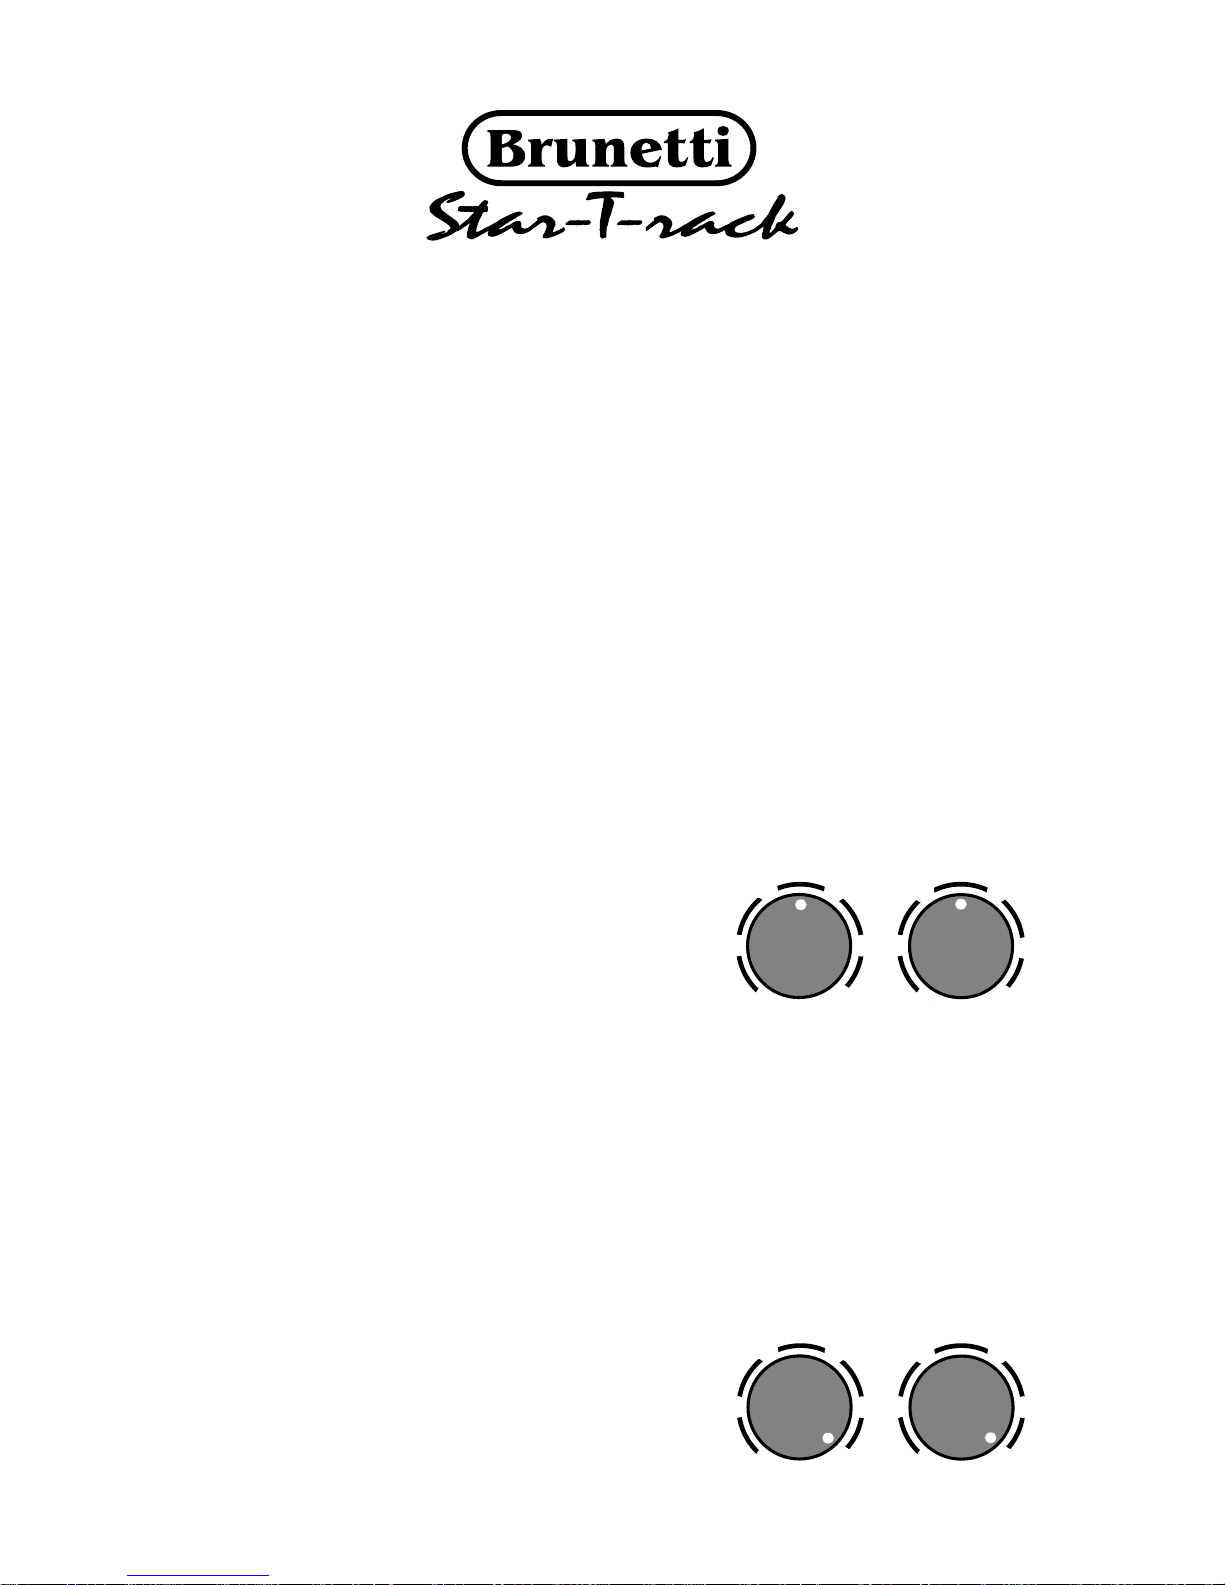
The Star loop is tubes stereo loop
Pls use hi-level rack effects only. Pedals
or lo-level equipments can affect to the
Star sound quality!
PARALLEL USE
Program the effect killing the dir ect signal
(DRY) from the MIX page. Set the efx
level (WET) to max. Use the mono input
of the efx (L/mono)
Set the two EFX mix% pots until you’ll
find the correct balance between the
direct sound and the effect sound. The
0% position means only direct sound,
while 100% position means only effect
sound ( Serial)
SERIAL USE
Use the effect preset without changing,
and set the EFX mix% pots to 100%. In
this way , the loop works in SERIAL mode
and the direct/effect
balance will be controlled by the efx
itself
Es: parallel use with
50%DRY+50%WET
mixing
Es: serial use with
0% DRY+100% WET
mixing
0
100
80
20
0
100
80
20
EFX
mix%
L
R
60
60
40
40
0
100
80
20
0
100
20
EFX
mix%
L
R
60
60
40
40
80
Page 7
BOOST
INPUT
FOOTSW
BOOST
DRIVE
BASS
MID
EDGE
VOLUME
8
6
0
4
10
6
2
0
4
10
8
6
2
0
4
10
8
6
2
0
4
10
8
6
2
0
4
10
6
2
0
4
10
8
8
6
2
0
4
10
8
6
2
0
4
10
8
6
2
0
4
10
6
2
0
4
10
6
0
4
10
EFX
mix%
0
100
80
60
20
40
0
100
80
60
20
40
HT fuse
LINE
ON
STDBY
L
R
BASS
MID
EDGE
GAIN
MASTER
BOOST
MASTER
6
0
4
10
8
6
0
4
10
VOLUME
CLEAN
OVERDRIVE
20/50watts stereo head
®
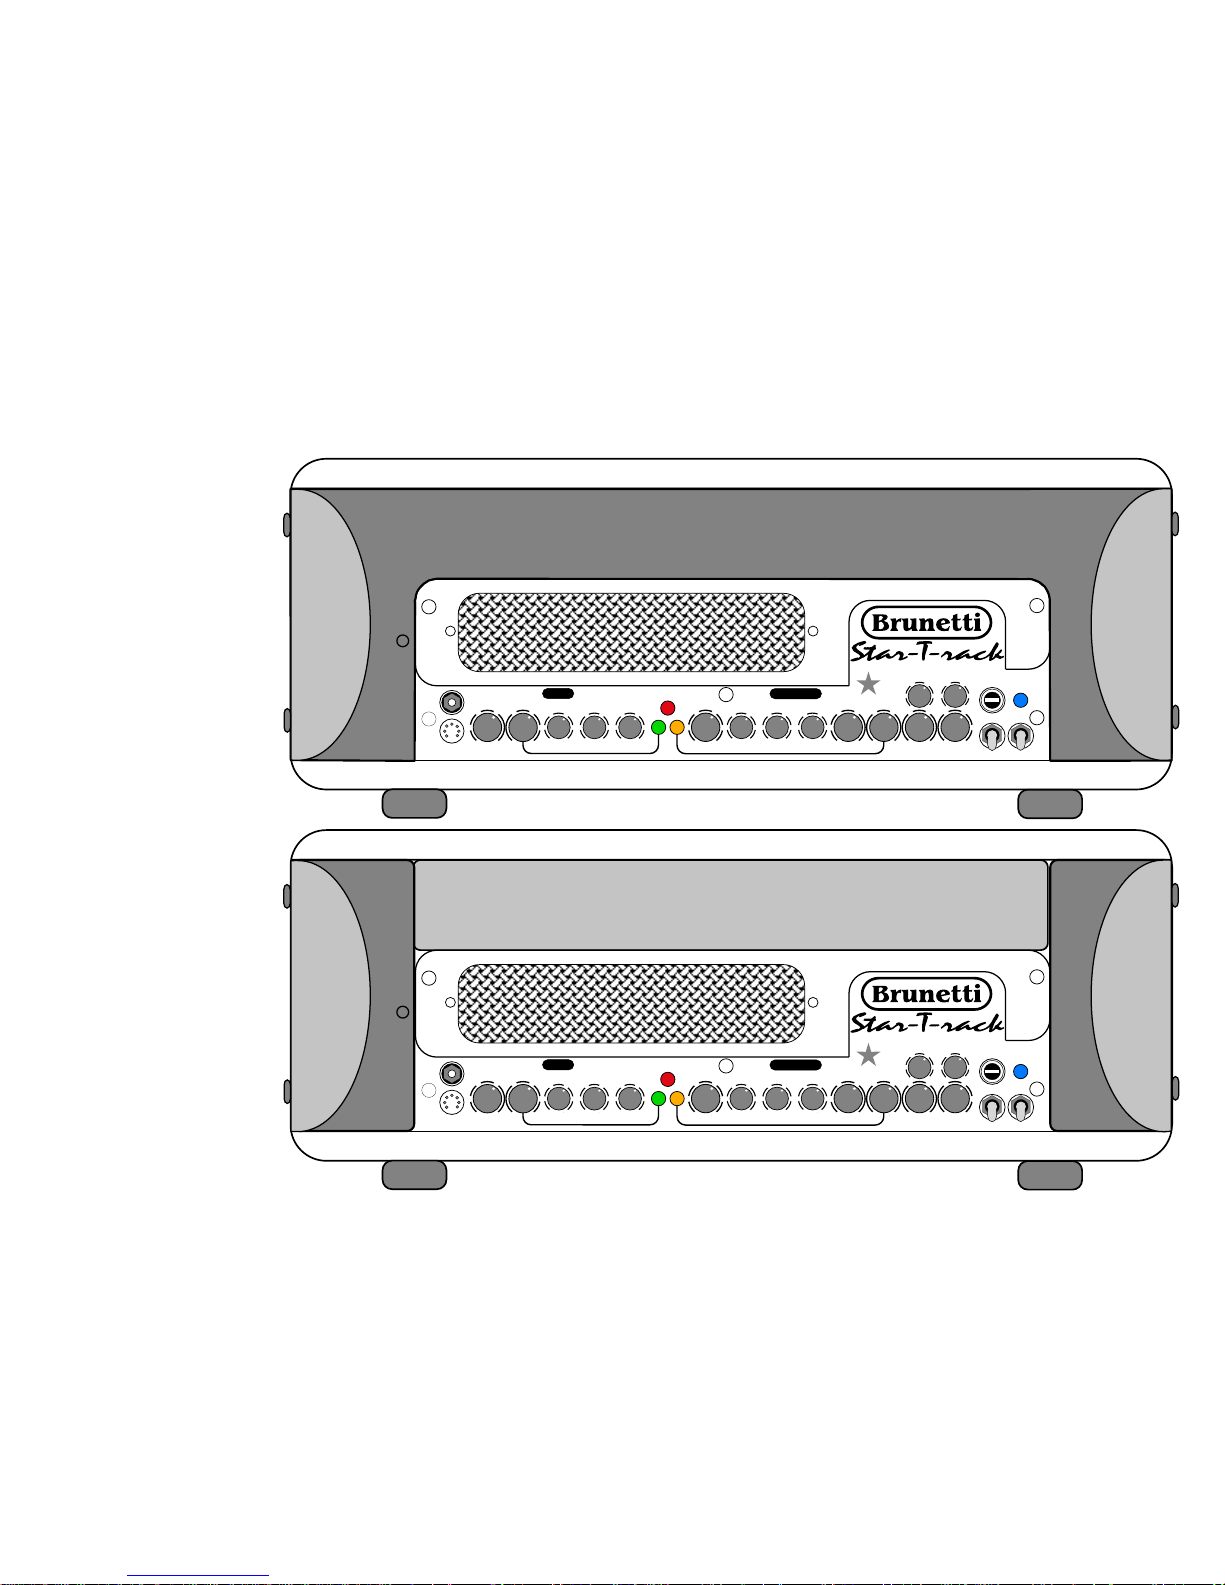
1U rack mounting instructions
A
B
C
D
E
F
1 ) Unscrew the four A,B,C,D
2) Remove aluminium corners
(E ed F)
3) Remove G panel
4) Fix the efx to the rack rails
5) Cover the rack rails with the
two black blockets (H e J,
founded into the packing)
6) Fix the corner (E, F) with the
four screws (A,B,C,D)
G
BOOST
INPUT
FOOTSW
BOOST
DRIVE
BASS
MID
EDGE
VOLUME
8
6
0
4
10
6
2
0
4
10
8
6
2
0
4
10
8
6
2
0
4
10
8
6
2
0
4
10
6
2
0
4
10
8
8
6
2
0
4
10
8
6
2
0
4
10
8
6
2
0
4
10
6
2
0
4
10
6
0
4
10
EFX
mix%
0
100
80
60
20
40
0
100
80
60
20
40
HT fuse
LINE
ON
STDBY
L
R
BASS
MID
EDGE
GAIN
MASTER
BOOST
MASTER
6
0
4
10
8
6
0
4
10
VOLUME
CLEAN
OVERDRIVE
20/50watts stereo head
®
E
F
H
J
EFX
Page 8
VOLUME
BOOST
BOOST
DRIVE
BASS
MID
EDGE
VOLUME
8
6
0
4
10
6
2
0
4
10
8
6
2
0
4
10
8
6
2
0
4
10
8
6
2
0
4
10
6
2
0
4
10
8
8
6
2
0
4
10
8
6
2
0
4
10
8
6
2
0
4
10
6
2
0
4
10
6
0
4
10
0
100
80
20
0
100
80
20
LINE
ON
STDBY
BASS
MID
EDGE
GAIN
MASTER
BOOST
MASTER
6
0
4
10
8
6
0
4
10
CLEAN
OVERDRIVE
BOOST
BOOST
DRIVE
BASS
MID
EDGE
VOLUME
8
6
0
4
10
6
2
0
4
10
8
6
2
0
4
10
8
6
2
0
4
10
8
6
2
0
4
10
2
0
4
GAIN
CLEAN
EFX
mix%
L
R
VOLUME
BOOST
BOOST
DRIVE
BASS
MID
EDGE
VOLUME
8
6
0
4
10
6
2
0
4
10
8
6
2
0
4
10
8
6
2
0
4
10
8
6
2
0
4
10
6
2
0
4
10
8
8
6
2
0
4
10
8
6
2
0
4
10
8
6
2
0
4
10
6
2
0
4
10
6
0
4
10
0
100
80
20
0
100
80
20
LINE
ON
STDBY
BASS
MID
EDGE
GAIN
MASTER
BOOST
MASTER
6
0
4
10
8
6
0
4
10
CLEAN
OVERDRIVE
EFX
mix%
L
R
VOLUME
BOOST
BOOST
DRIVE
BASS
MID
EDGE
VOLUME
8
6
0
4
10
6
2
0
4
10
8
6
2
0
4
10
8
6
2
0
4
10
8
6
2
0
4
10
6
2
0
4
10
8
8
6
2
0
4
10
8
6
2
0
4
10
8
6
2
0
4
10
6
2
0
4
10
6
0
4
10
0
100
80
20
0
100
80
20
LINE
ON
STDBY
BASS
MID
EDGE
GAIN
MASTER
BOOST
MASTER
6
0
4
10
8
6
0
4
10
CLEAN
OVERDRIVE
EFX
mix%
L
R
VOLUME
BOOST
BOOST
DRIVE
BASS
MID
EDGE
VOLUME
8
6
0
4
10
6
2
0
4
10
8
6
2
0
4
10
8
6
2
0
4
10
8
6
2
0
4
10
6
2
0
4
10
8
8
6
2
0
4
10
8
6
2
0
4
10
8
6
2
0
4
10
6
2
0
4
10
6
0
4
10
0
100
80
20
0
100
80
20
LINE
ON
STDBY
BASS
MID
EDGE
GAIN
MASTER
BOOST
MASTER
6
0
4
10
8
6
0
4
10
CLEAN
OVERDRIVE
EFX
mix%
L
R
60
40
60
40
60
40
60
40
60
40
60
40
60
40
60
40
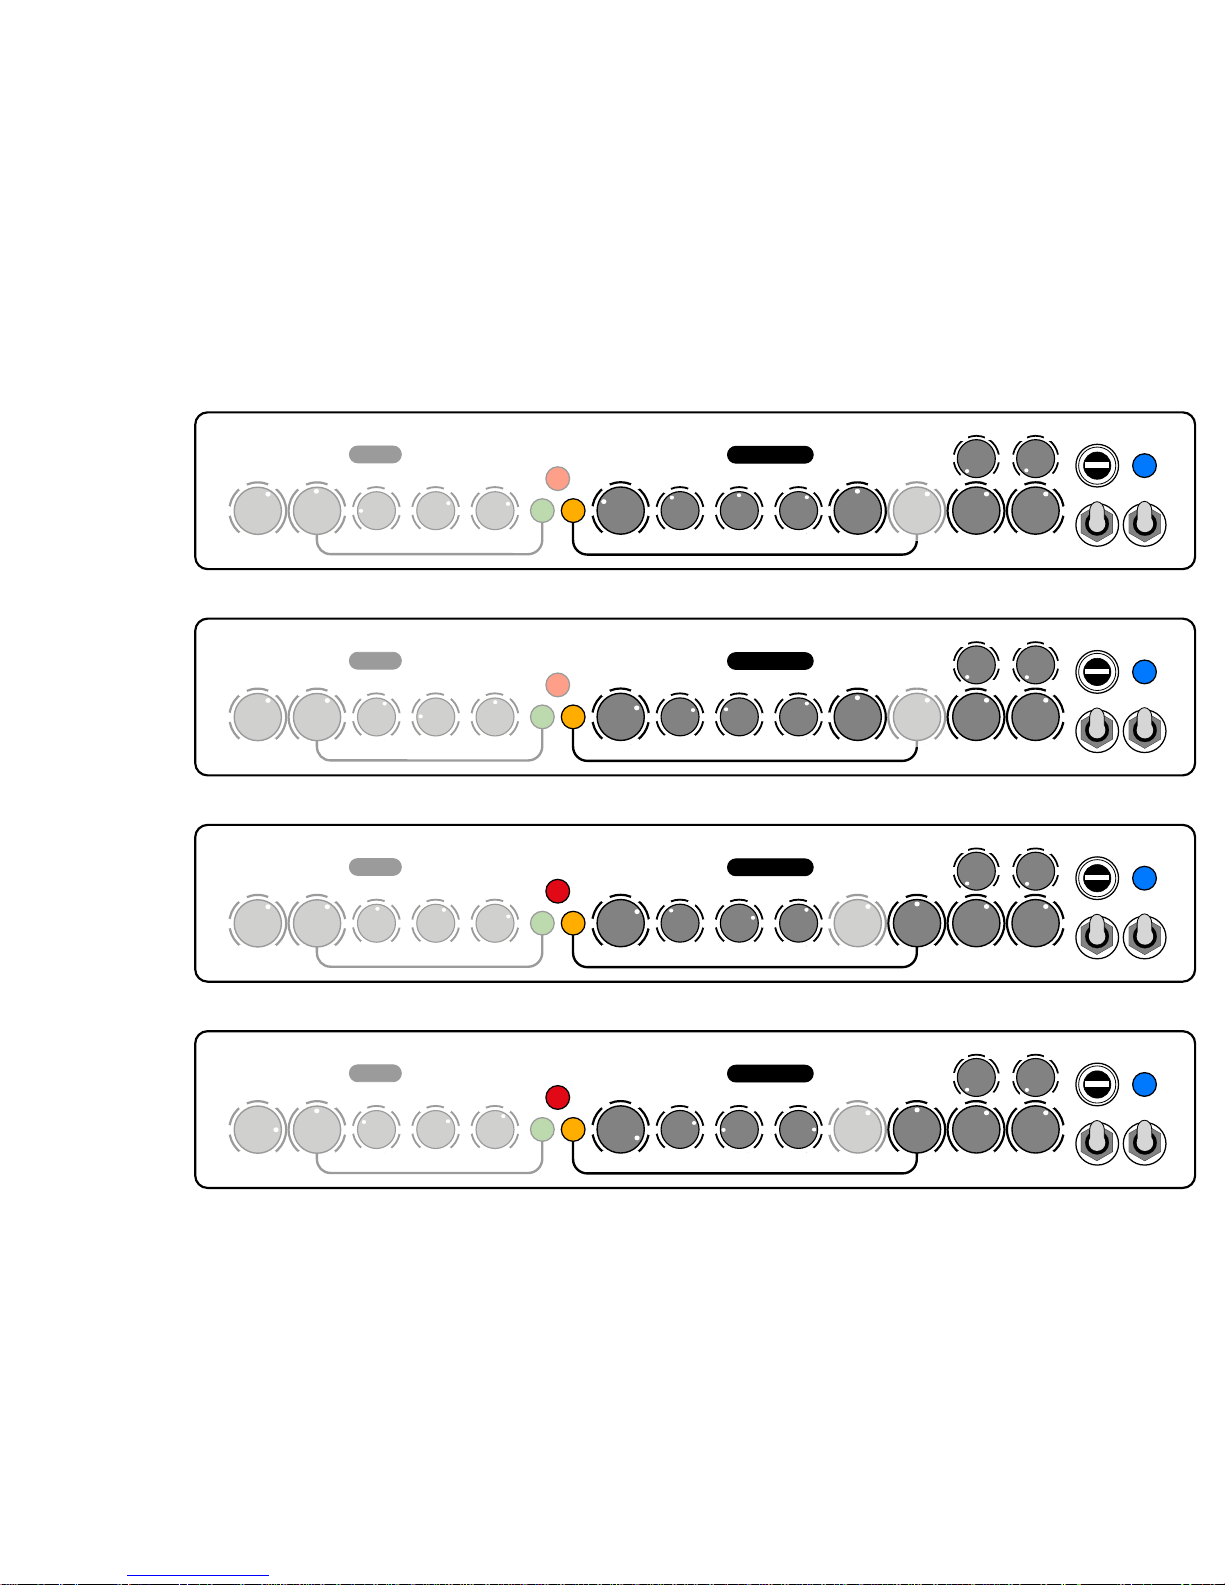
OVERDRIVE SETTING
BOOST
BOOST
DRIVE
BASS
MID
EDGE
VOLUME
8
6
0
4
10
6
2
0
4
10
8
6
2
0
4
10
8
6
2
0
4
10
8
6
2
0
4
10
2
0
4
GAIN
CLEAN
BOOST
BOOST
DRIVE
BASS
MID
EDGE
VOLUME
8
6
0
4
10
6
2
0
4
10
8
6
2
0
4
10
8
6
2
0
4
10
8
6
2
0
4
10
CLEAN
BOOST
BOOST
DRIVE
BASS
MID
EDGE
VOLUME
8
6
0
4
10
6
2
0
4
10
8
6
2
0
4
10
8
6
2
0
4
10
8
6
2
0
4
10
CLEAN
Rock
Modern
Solo
Heavy
6
0
4
10
BOOST
MASTER
6
0
4
10
BOOST
MASTER
6
2
0
4
10
MASTER
6
2
0
4
10
MASTER
Page 9
VOLUME
BOOST
BOOST
DRIVE
BASS
MID
EDGE
VOLUME
8
6
0
4
10
6
2
0
4
10
8
6
2
0
4
10
8
6
2
0
4
10
8
6
2
0
4
10
6
2
0
4
10
8
8
6
2
0
4
10
8
6
2
0
4
10
8
6
2
0
4
10
6
2
0
4
10
6
0
4
10
0
100
80
20
0
100
80
20
LINE
ON
STDBY
BASS
MID
EDGE
GAIN
MASTER
BOOST
MASTER
6
0
4
10
8
6
0
4
10
CLEAN
OVERDRIVE
BOOST
6
2
0
4
10
8
8
6
2
0
4
10
8
6
2
0
4
10
8
6
2
0
4
10
6
2
0
4
10
6
0
4
10
BASS
MID
EDGE
GAIN
MASTER
BOOST
MASTER
OVERDRIVE
EFX
mix%
L
R
VOLUME
BOOST
BOOST
DRIVE
BASS
MID
EDGE
VOLUME
8
6
0
4
10
6
2
0
4
10
8
6
2
0
4
10
8
6
2
0
4
10
8
6
2
0
4
10
6
2
0
4
10
8
8
6
2
0
4
10
8
6
2
0
4
10
8
6
2
0
4
10
6
2
0
4
10
6
0
4
10
0
100
80
20
0
100
80
20
LINE
ON
STDBY
BASS
MID
EDGE
GAIN
MASTER
BOOST
MASTER
6
0
4
10
8
6
0
4
10
CLEAN
OVERDRIVE
BOOST
6
2
0
4
10
8
8
6
2
0
4
10
8
6
2
0
4
10
8
6
2
0
4
10
6
2
0
4
10
6
0
4
10
BASS
MID
EDGE
GAIN
MASTER
BOOST
MASTER
OVERDRIVE
EFX
mix%
L
R
VOLUME
BOOST
BOOST
DRIVE
BASS
MID
EDGE
VOLUME
8
6
0
4
10
6
2
0
4
10
8
6
2
0
4
10
8
6
2
0
4
10
8
6
2
0
4
10
6
2
0
4
10
8
8
6
2
0
4
10
8
6
2
0
4
10
8
6
2
0
4
10
6
2
0
4
10
6
0
4
10
0
100
80
20
0
100
80
20
LINE
ON
STDBY
BASS
MID
EDGE
GAIN
MASTER
BOOST
MASTER
6
0
4
10
8
6
0
4
10
CLEAN
OVERDRIVE
6
2
0
4
10
8
8
6
2
0
4
10
8
6
2
0
4
10
8
6
2
0
4
10
6
2
0
4
10
6
0
4
10
BASS
MID
EDGE
GAIN
MASTER
BOOST
MASTER
OVERDRIVE
EFX
mix%
L
R
VOLUME
BOOST
BOOST
DRIVE
BASS
MID
EDGE
VOLUME
8
6
0
4
10
6
2
0
4
10
8
6
2
0
4
10
8
6
2
0
4
10
8
6
2
0
4
10
6
2
0
4
10
8
8
6
2
0
4
10
8
6
2
0
4
10
8
6
2
0
4
10
6
2
0
4
10
6
0
4
10
0
100
80
20
0
100
80
20
LINE
ON
STDBY
BASS
MID
EDGE
GAIN
MASTER
BOOST
MASTER
6
0
4
10
8
6
0
4
10
CLEAN
OVERDRIVE
EFX
mix%
L
R
BOOST
DRIVE
6
2
0
4
10
BOOST
DRIVE
6
2
0
4
10
6
2
0
4
10
8
8
6
2
0
4
10
8
6
2
0
4
10
8
6
2
0
4
10
6
2
0
4
10
6
0
4
10
BASS
MID
EDGE
GAIN
MASTER
BOOST
MASTER
OVERDRIVE
60
40
60
40
60
40
60
40
60
40
60
40
60
40
60
40
Funky
Normal
Rhythm 1
Rhythm 2
CLEAN SETTING
Page 10

PREAMP TUBES
The preamp tubes are used to preamplifier the signal. They usually last the entire life of the amplifier.
The possible problems of these kind of tubes are: microphonics and noise.
Microphonics
The microphonics is the ability of a tube to reproduce external vibrations further the signal.
This phenomenon can be much more evident in high gain stage like the distortion channels.
Lightly tapping on the glass side of the preamp tubes, while the head is on, you' ll hear a stroke through the
speaker, this is normal don' t worry.
But if you hear hi frequencies (ringing or squealing) and in some case a distorted sound, it means that the tube is
microphonics.
You will note that the first tube is more subject to reproduce this stroke more than the others, because it' s at
the begin of the preamplification chain.
Noise
Tube has an own intrinsic floor noise that comes from its work and construction.
During tube life this noise may increase creating a sort of a ringing or squealing.
In these two cases, you have to find the defective tube and repleace it with a new one.
The preamp tube doesn't need to be selected, (normally this control has been made by the constructor), but be sure
to replace with good quality tubes.
We suggest thay you use tubes of same brand and model.
POWER TUBES
Power tubes are the last amplification stage before the out trasformer and speaker out, and they can get exhausted.
Normally a power tube working in A/B class lasts 800 - 1000 hours. It depends also on the volume used.
In an amplifier with same power, in A class, the tube lasts 600 - 800 hours. In this class work tubes are more stressed.
When replace power tubes
You can recognize an exhausted tube because there's a loss of power and volume. Sound has not the same impact,
in particular on low frequencies.
Main faults on this kind of tube are :
- short inside the tube. In this case normally the HT fuse will blow.
- tube light off. It's easy to recognize this problem tube because you can't see any light inside the tube.
- tube become glowing. In this case there's an increase of noise (hum) and sound will be distorted.
In all the above cases tubes can' t be fixed, and have to be replaced.
If the problem tube has worked more that 1 year, we suggest that you replace all power tubes, this to guarantee the
best performance of your amp.
If the problem tube has less than 1 year you can replace only that one.
Warning!!
You have to mount only selected and matched tubes, with the same characteristics of the tube supplied on your
aplifier. See the ''Matching Reference'' label on the tube.
If you mount tubes with different ''Matching Reference'' is necessary to adjust the Bias, to let the amp work properly.
GENERAL INFORMATION
Page 11
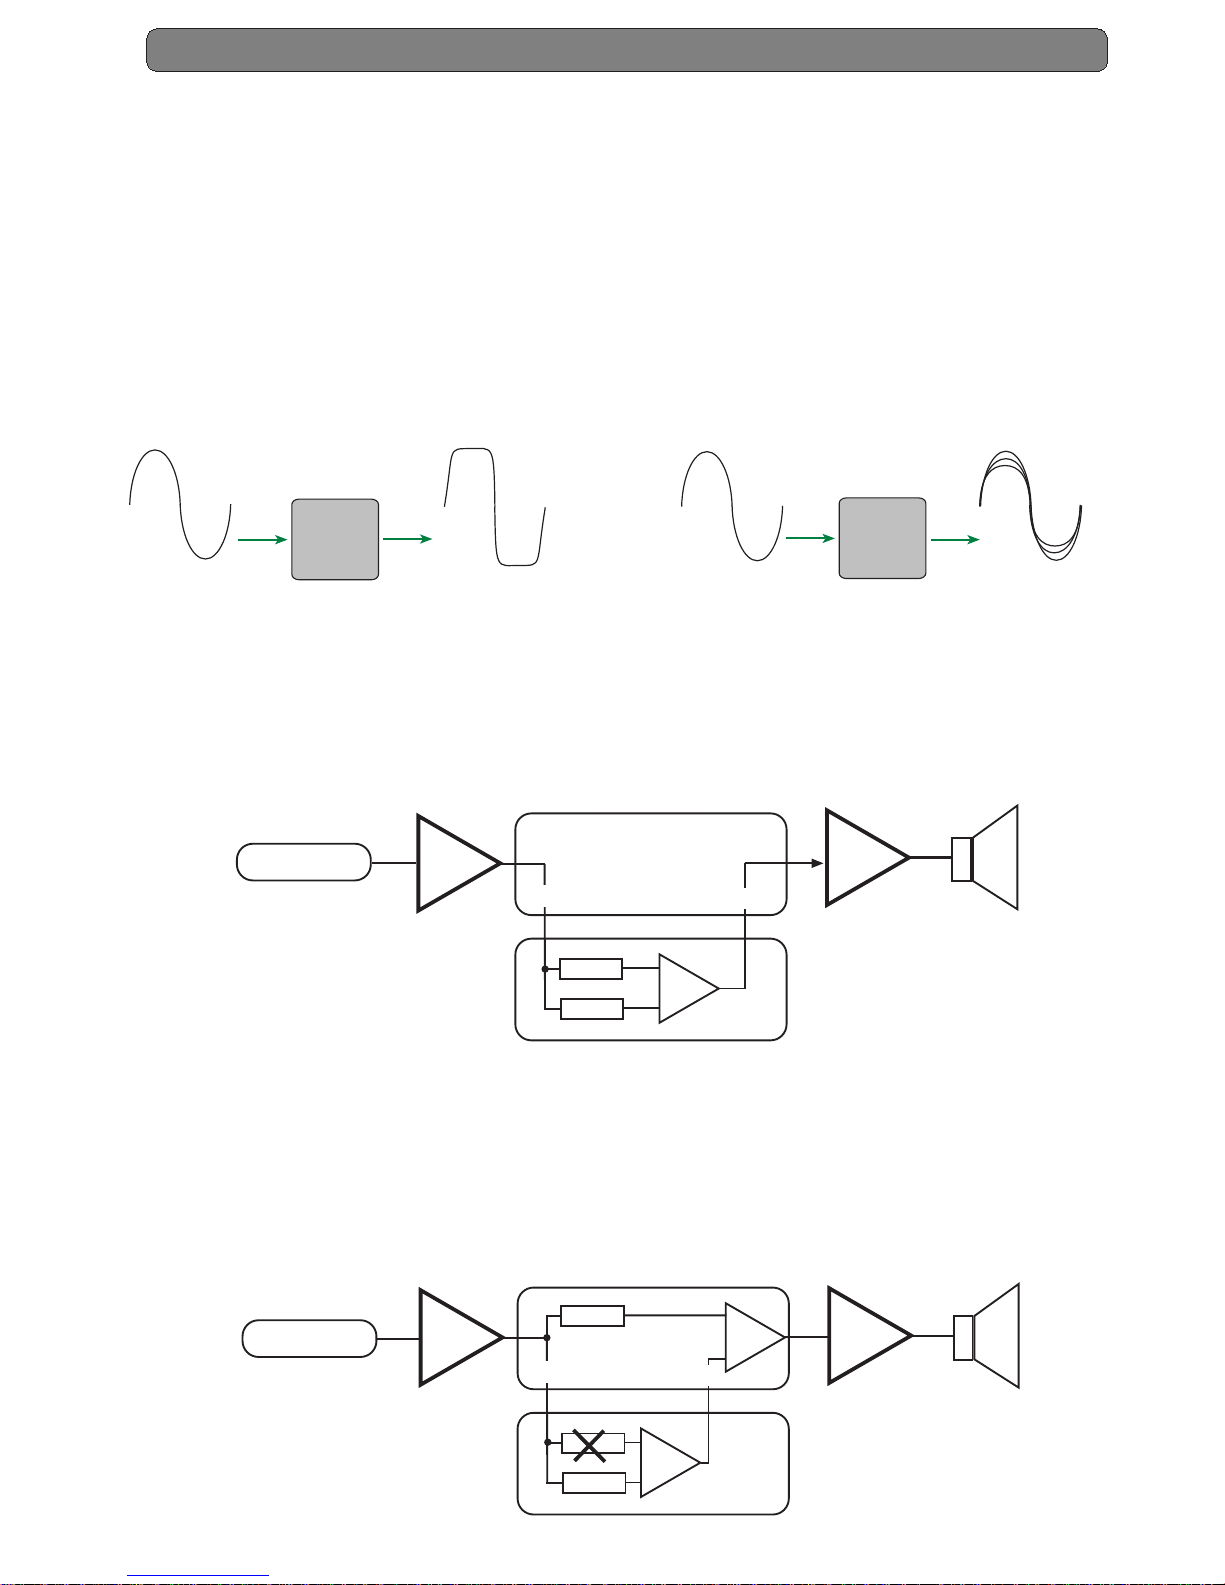
MODULATION EFFECTS
The main characteristic of the modulation effect (see example) is to add and/or lay other wave forms to the signal.
This kind of effect should be used in the loop effect of your amp, that is between the Premaplifier and the Power
amp.
SYNTHESIS EFFECTS
The main characteristic of the synsthesis effect (see example) is to modify the signal wave form. (i.e. the
distortion effects).
This kind of effect should be used between the guitar and the input of your amp, in a standard connection chain.
SERIAL LOOP
In a Serial Loop all the output signal coming from the Preamp passes throught the effect. In this case on your
effect unit it is necessary to adjust the balance between the DIRECT (DRY) and the EFFECT( WET).
PARALLEL LOOP
In a Parallel Loop only a part of the direct sound passes throught the loop effect, without going out from the
Send. This part of the signal will be mixed with the signal that comes from the Return.
In this connection the quality of the effect is not so important as it is in the Serial Loop connection, because the
Direct will be kept by the loop (see drawing).
PRE
POWER
EFFECT
SEND
RETURN
MIX
DIRECT
EFFECT
SERIAL LOOP
IN OUT
IN
GUITAR
OUT
PRE
EFFECT
SEND
RETURN
MIX
DIRECT
EFFECT
PARALLEL LOOP
IN
OUT
DIRECT
MIX
EFFECT=100%
DIRECT=0%
IN
GUITAR
OUT
To obtain a good sound
we suggest that you set on zero ''0''
the DIRECT (DRY) on the effect.
POWER
Input Signal
Output Signal
OUT
IN
SYNTHESIS
Input Signal
Output Signal
MODULATION
EFX
OUT
IN
EFX
GENERAL INFORMATION
Page 12
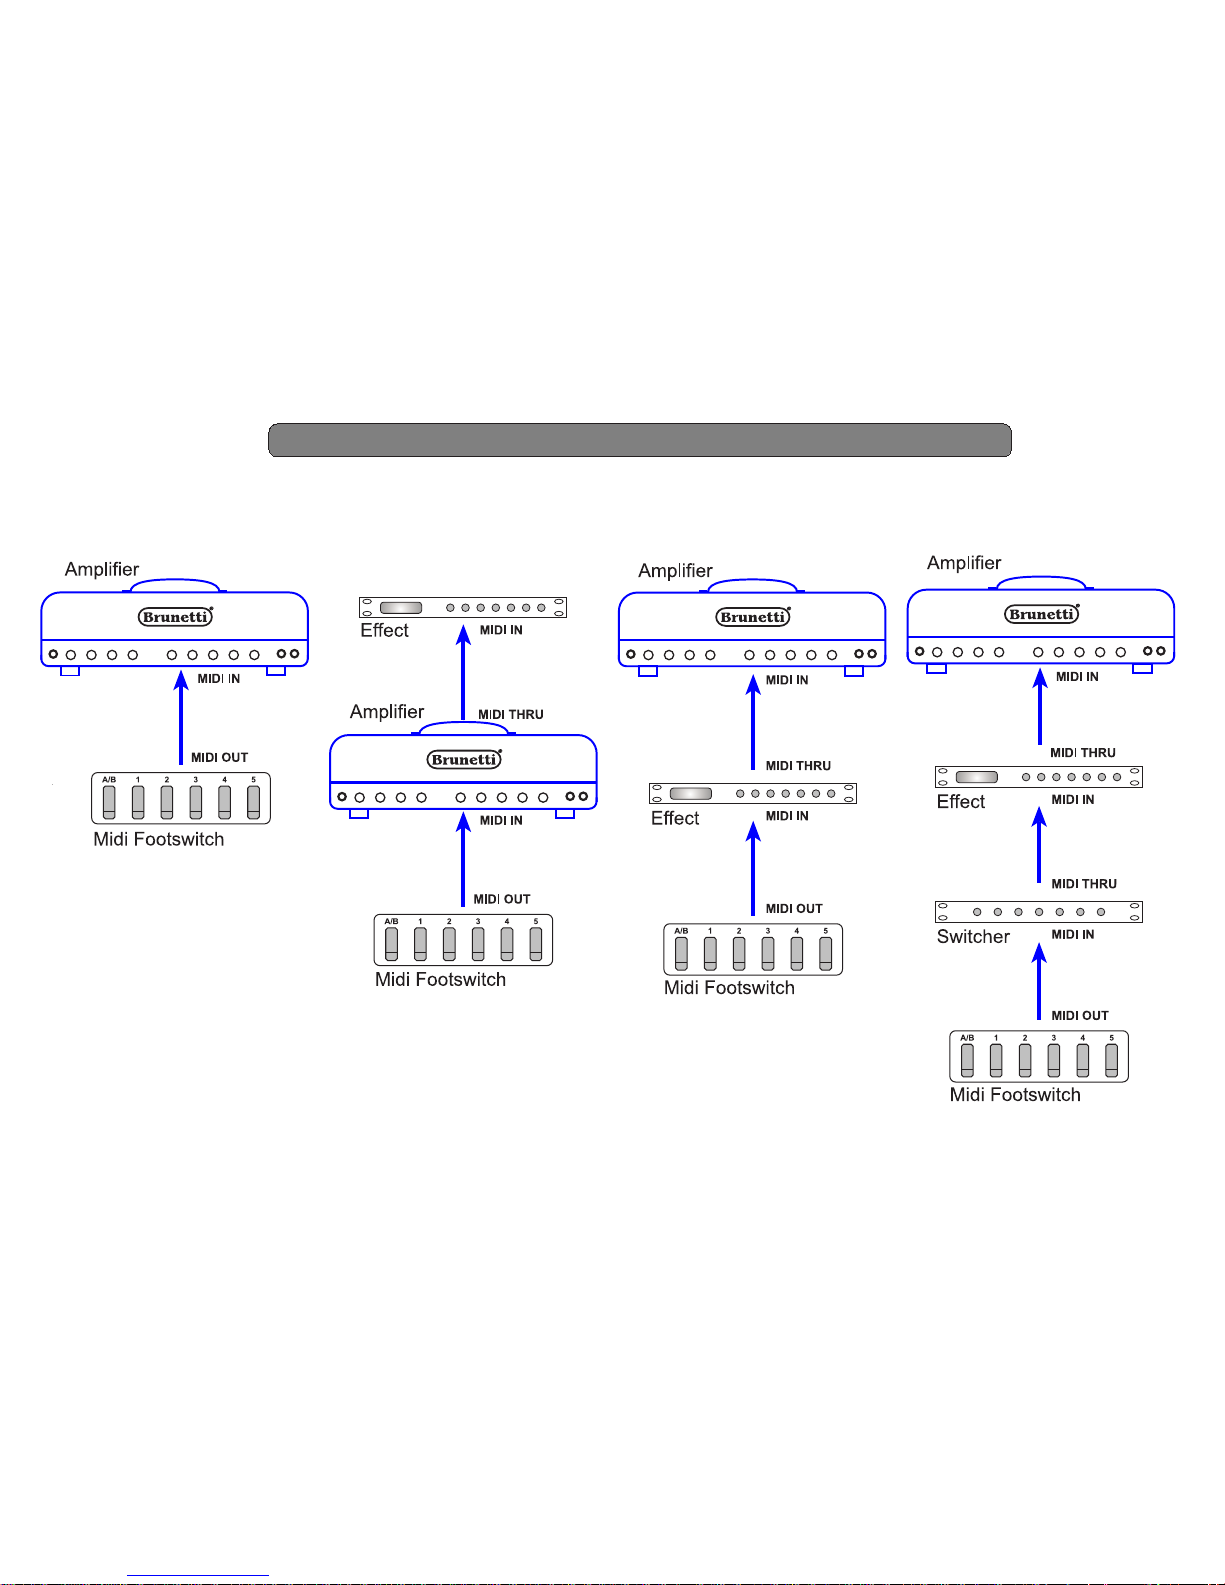
MIDI CONNECTIONS
GENERAL INFORMATION
Page 13
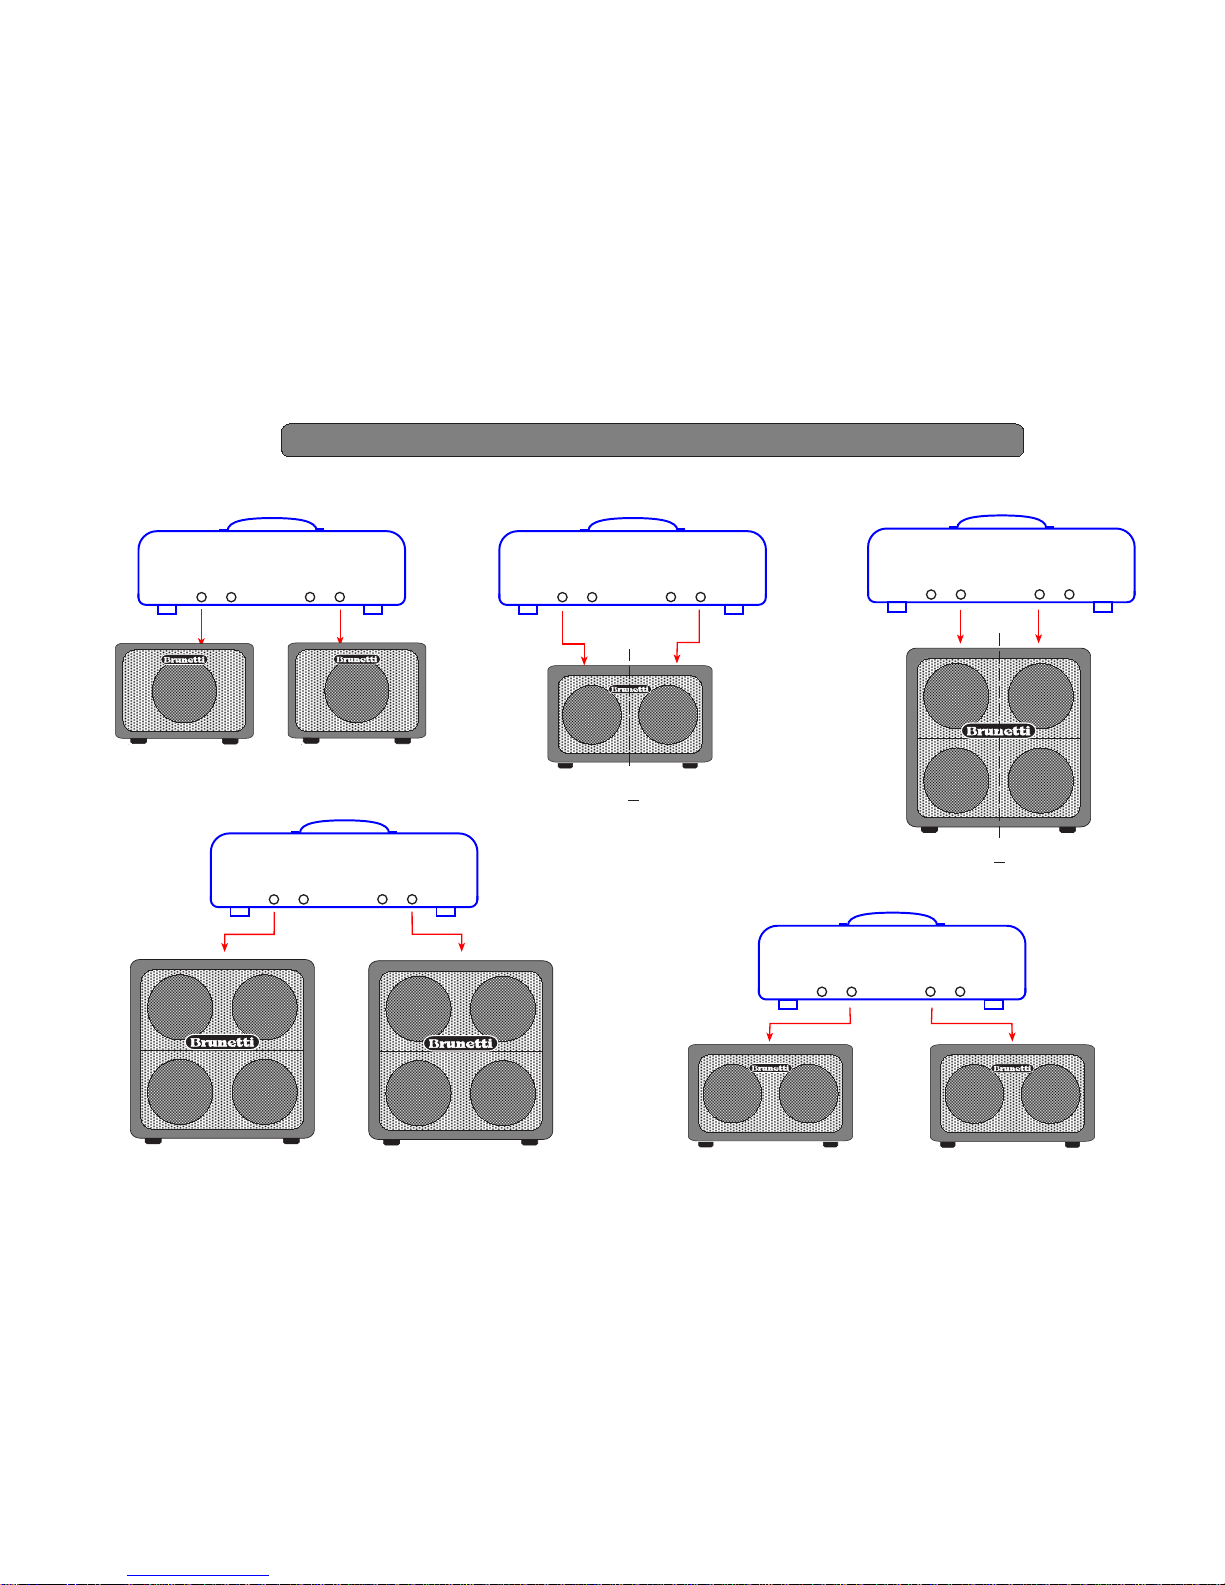
CABINET CONNECTIONS
GENERAL INFORMATION
16Ω
CABINET 4x12'' MONO
16Ω
CABINET 4x12'' MONO
HEAD
Speaker L
8Ω
16Ω
16Ω
8Ω
Speaker R
HEAD
Speaker L
8Ω
16Ω
16Ω
8Ω
Speaker R
HEAD
Speaker L
8Ω
16Ω
16Ω
8Ω
Speaker R
HEAD
Speaker L
8Ω
16Ω
16Ω
8Ω
Speaker R
HEAD
Speaker L
8Ω
16Ω
16Ω
8Ω
Speaker R
CABINET 4x12''
CABINET 2x12''
CABINET 1x12''
CABINET 1x12''
16Ω
16Ω
16Ω
16Ω
CABINET 2x12'' MONO
8Ω
CABINET 2x12'' MONO
8Ω
8Ω
8Ω
Page 14

CLEANING
Before any kind of cleaning operation, disconnect the appliance from the electric supply.
- Do not throw water jets directly on the appliance.
- Do not use water steams to clean the appliance.
- Do not use solvents to clean the appliance.
Surface Cleaning: system suggested
Satin Aluminium: Soft cloth + product for metal parts
Stainless steel : Paper + product for chrome parts
WARNINGS
− The manufacturer declines all responsibility for any kind of damage to persons, things and/or
animals resulting from a wrong use of the appliance.
− The appliance' s conformity is proved by CE symbol on the rear side.
− The manufacturer reserves the right to make any useful and essential change to the products
without compromise the main safety and working features.
− Do not use the appliance barefoot.
− Do not touch the appliance with wet or moist hands or feet.
− Do not allow children or incompetents to use the appliance.
− Do not leave inflammable materials near to the appliance.
− Do not pull up the appliance by control knobs.
− Read carefully, compile and deliver the warranty attached to the appliance.
− The appliance' s repair may be done during the warranty period only by us, in our laboratory, or by
authorized staff, in conformity to the national previsions in force.
− Control periodically all cables supplied with the appliance, if they result damaged, you have to replace
them immediately with another one with the same characteristics.
− In case of damage contact the shop where you bought the appliance.
− The appliance must be earthed in conformity to the national previsions in force.
For any further information and/or support contact us.
Brunetti Marco & C. S.a.s
Via Deí Bonomini, 25/27
I - 41100 MODENA - ITALIA
Phone number : +39 059 / 243404
http://www.brunetti.it
e-mail : [email protected] commercial info
e-mail : [email protected] technical info
GENERAL INFORMATION
 Loading...