

Bruker Fourier 300 Guide
Loading a sample
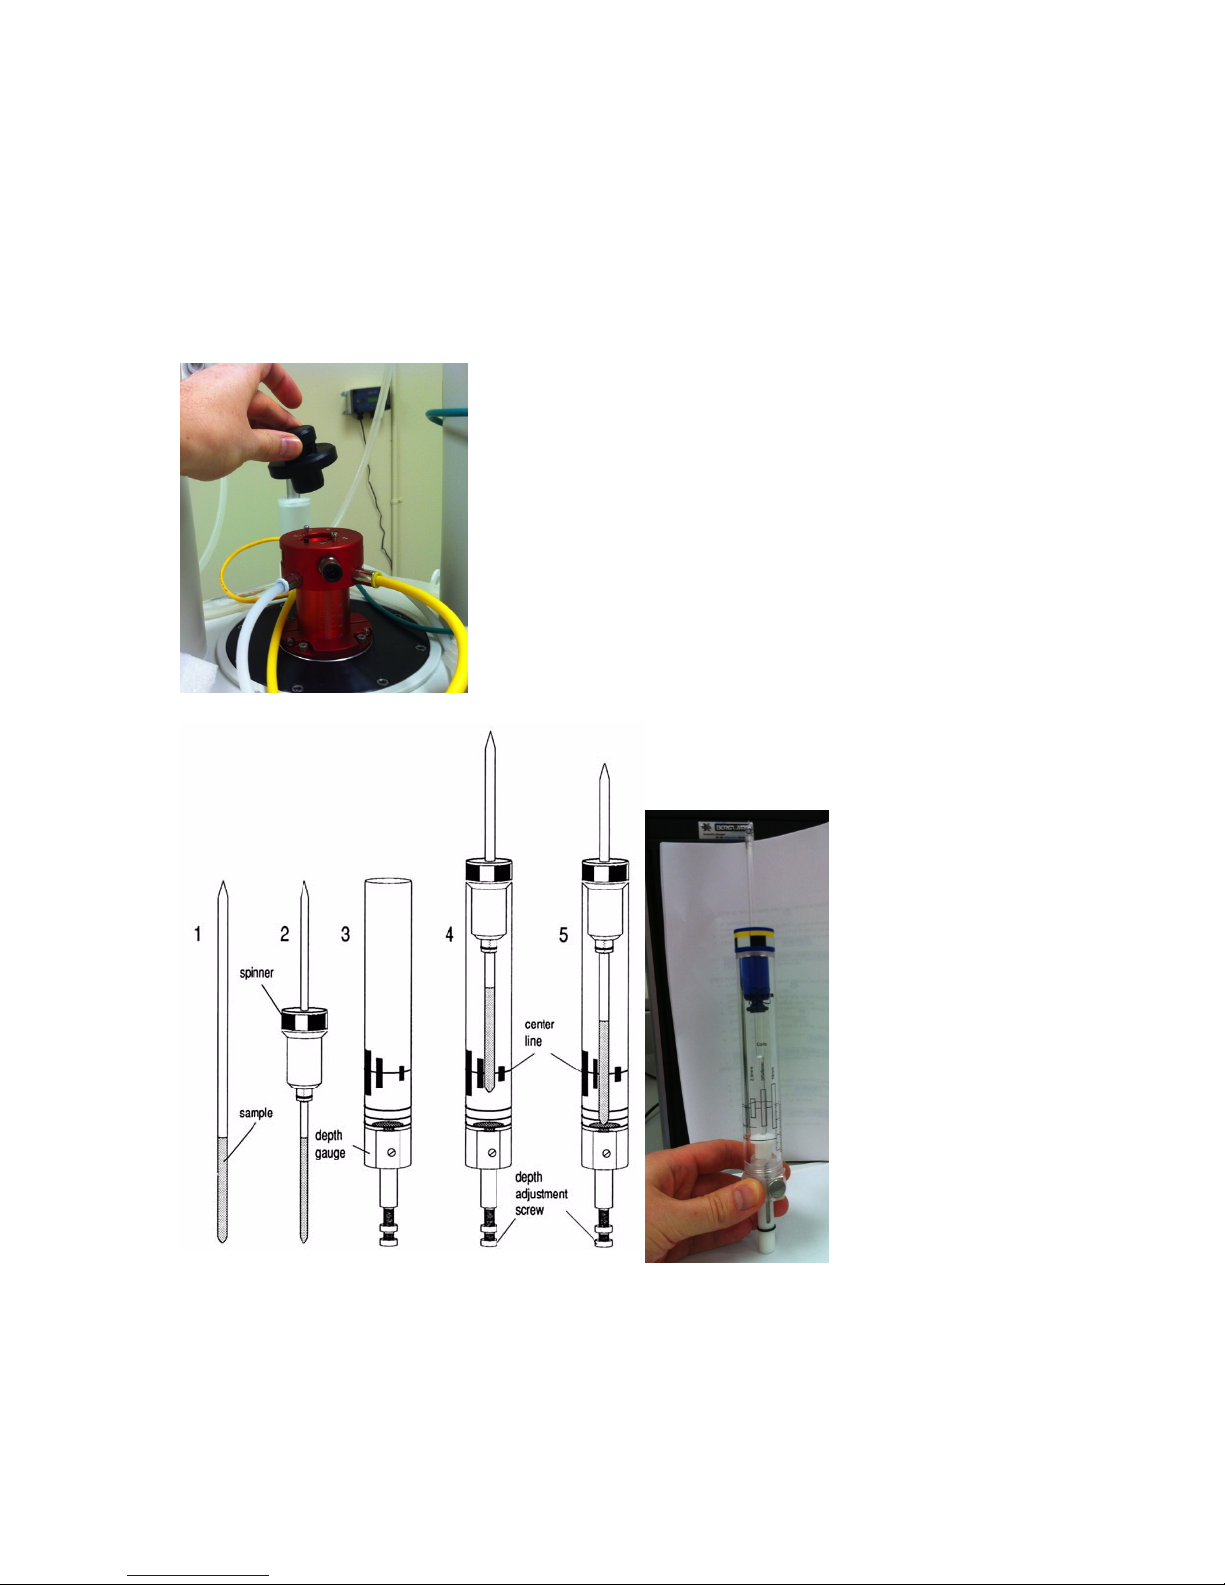
• Check your solvent height. For best shimming homogeneity, the sample height should be 5 cm.
• Wipe the exterior of the tube clean using a Kimwipe.
• If present, remove the cap from the top of the magnet bore.
•
• Type “ej” in the command line at the bottom of the screen to turn the lift on.
•
• Use the depth gauge to adjust the spinner height on the tube.
• Carefully place your sample into the bore. Make sure air flow is on before releasing sample!
• Type “ij” to turn off the lift.

Experiment Set-up
g
• Click on the ‘Start’ tab in the TopSpin Menu bar
•
• Select by clicking on it.
•
• Give your experiment a NAME and an experiment number (EXPNO)
• Make sure your data directory (DIR) is set to C:\data\student\nmr
• Press the “Select” button next to Experiment, and choose which NMR experiment you will
carry out.

•
• Once you have clicked on the experiment you wish to run, be sure to click the “Set selected item
in editor” button.
! Note: If you change the parameter folder to nmr\par\user, you will be presented with a much
more manageable set of experiments!
!

• Choose the correct solvent from the drop down menu next to “Set solvent”.
• Enter a Title for your experiment.
• Click on
• Click on the ‘Acquire’ tab in the TopSpin menu bar.
•
• Type lock in the command line at the bottom of the screen, or click on the “Lock” button.
Select your deuterated solvent from the list that appears.
•
• Click on the “OK” button, and wait for the lock routine to finish. At the bottom left corner of
the screen, a message “lockn: finished” should appear.
• Select by clicking on the icon.
• Wait for the shimming to finish before continuing. It should take about 1-minute to shim. The
message “gradshimau: finished” will appear in the lower left corner of the screen once gradientshimming is complete.
• Note: shimming only needs to be performed once per sample. If you run a 13C experiment
after a 1H experiment, this step can be omitted.
• Select by clicking on it
• NOTE: This will load the pulse width and power levels in to the parameter set.

Acquisition
• Select by clicking on it.
• Click on Close if the following window appears:
• Wait for the receiver gain auto-adjust (rga) procedure to finish before continuing. The message
“rga: finished” will appear in the lower left corner of the screen once the receiver gain has been
automatically set.
• Select by clicking on it.
• NOTE: The 1H (16 scans) experiment will take ~2 minutes.

Processing
• Click on the ‘Process’ tab in the TopSpin Menu bar.
•
• Click on
• NOTE: This executes a processing program including commands such as an exponential
window function ‘em’, Fourier transformation ‘ft’, an automatic phase correction ‘apk’ and a
baseline correction ‘abs’.
•
• Expand the spectrum to include all peaks. This can be done by left clicking inside the spectrum
window, and dragging from one side to the other, and then letting go of the mouse button.
•

•
• Another option is to click the button, and type in the desired left and right ppm values.
•
• Spectrum intensity (vertical-zoom) can be increased/decreased by pushing the mouse scroll-
wheel forwards/backwards.
• You can also use the icons below:
•
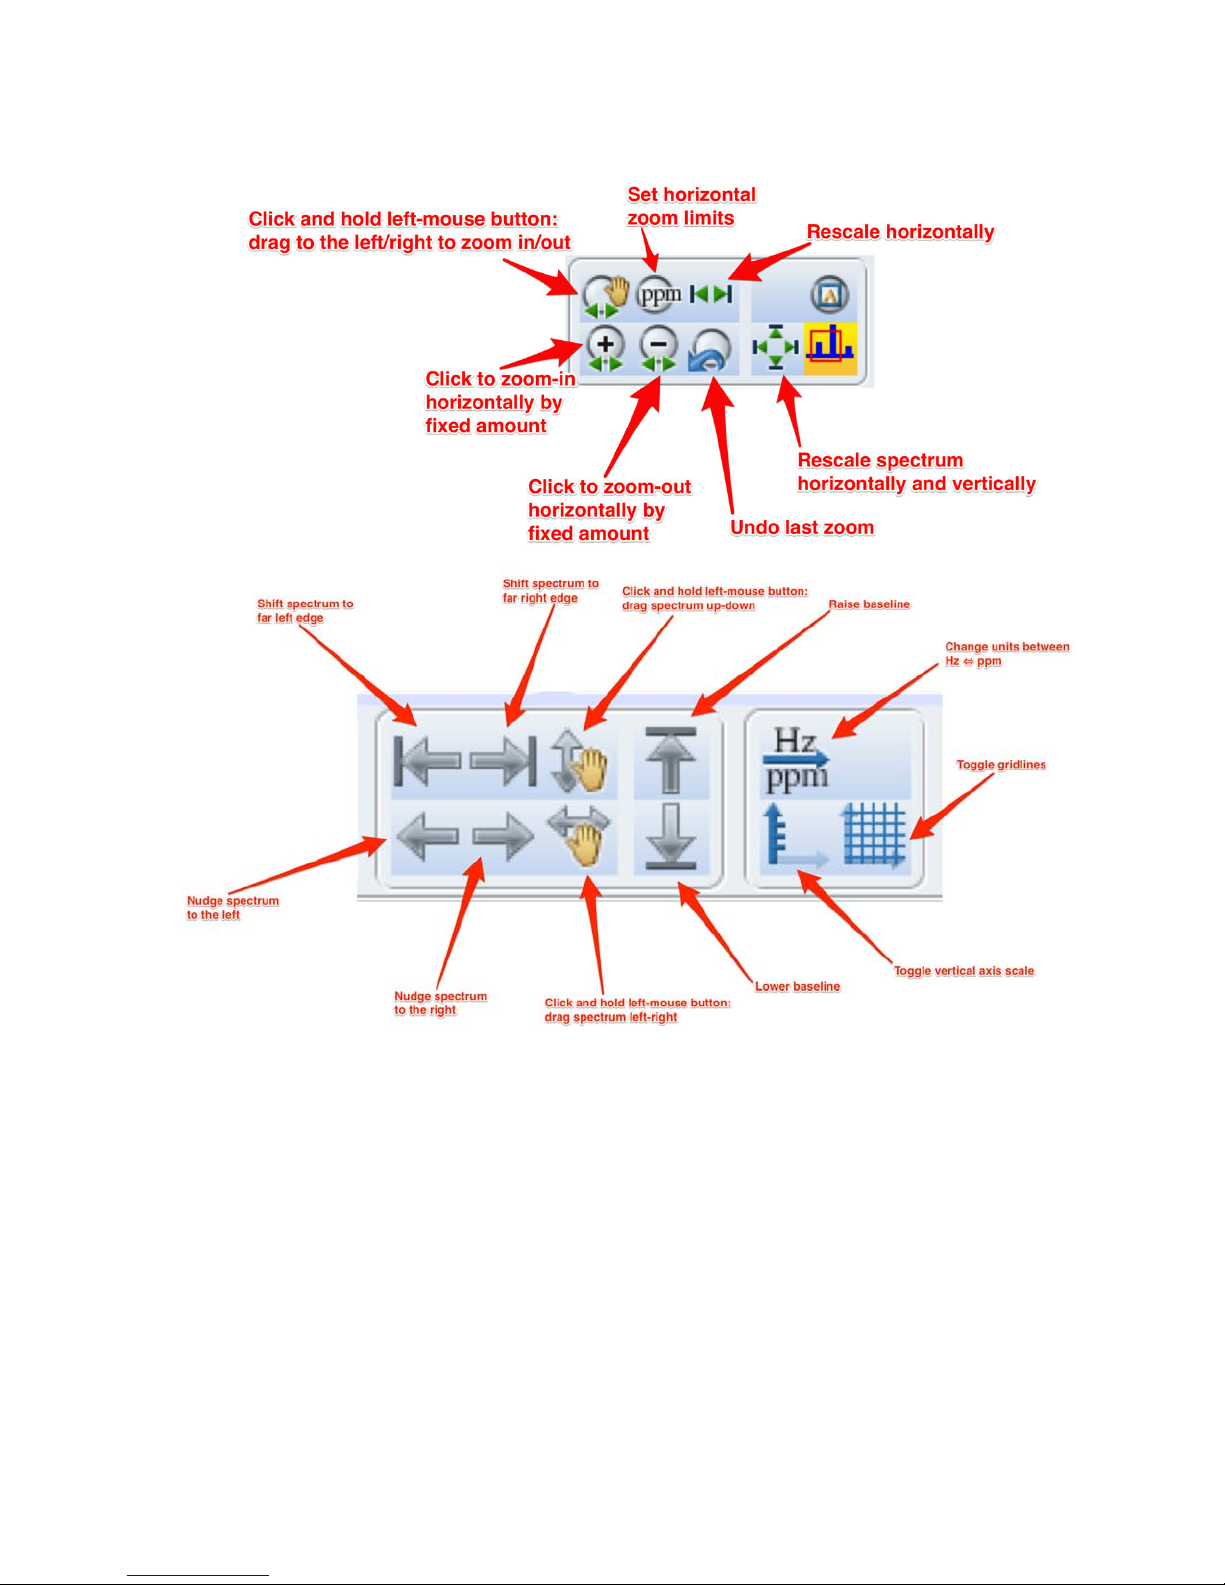
• The following toolbar icons can be used to manipulate the spectrum.
•

!"#$%&'(#)*'+#,-%
• If you are using an internal standard such as TMS (tetramethyl silane), you can set the position
of a particular peak quite easily.
• Zoom in on the peak whose position you wish to set.
• Click on the Calib. Axis. Button.
•
• Left click on the peak you wish to set.
•
• Type in the peak position in the dialog box the appears.

./'0%.#10#-2%
• Click the peak picking button on the toolbar.
• Drag the cursor over the tip of a peak to select it. The green box only needs to enclose the tip of
the peak—dragging the box to the baseline may cause noise to be identified as peaks.
•
• Click the save and return button when you are done picking peaks.
• If you wish to pick additional peaks, be sure that the select region icon ( ) is highlighted.

3-+/2*'+#,-%
##
## #
# #####
# # # # ## # #
# # # # ## # #
### #
• Click on
• Set the cursor line, starting at the left of the spectrum, to the left of the first peak to be
integrated, click the left mouse button and drag the cursor line to the right of the peak, then
release the mouse button.
•
• Repeat the previous step for the remainder of the peaks
•
• Note: the first peak integrated will be assigned an area of 1.000.
• To change the integration values, right click on the integration mark below the peak, and select
Calibrate Current Integral from the menu that appears. Type in the new value of the integral
from the dialog box that appears.
•
• Click on to save the integration regions.

Printing
• Click on the ‘Publish’ tab in the TopSpin Menu bar.
•
• Click on
•
• Click on to plot the spectrum.

Advanced Topics
&*/'+#-2%#-$/+$%
While in the Plot Layout mode (Publish !" Plot Layout), click on the Insert New Elements, NMR
icon, and select 1D spectrum.
By clicking and holding the left-hand mouse button, draw out the region where the insert will be
placed.
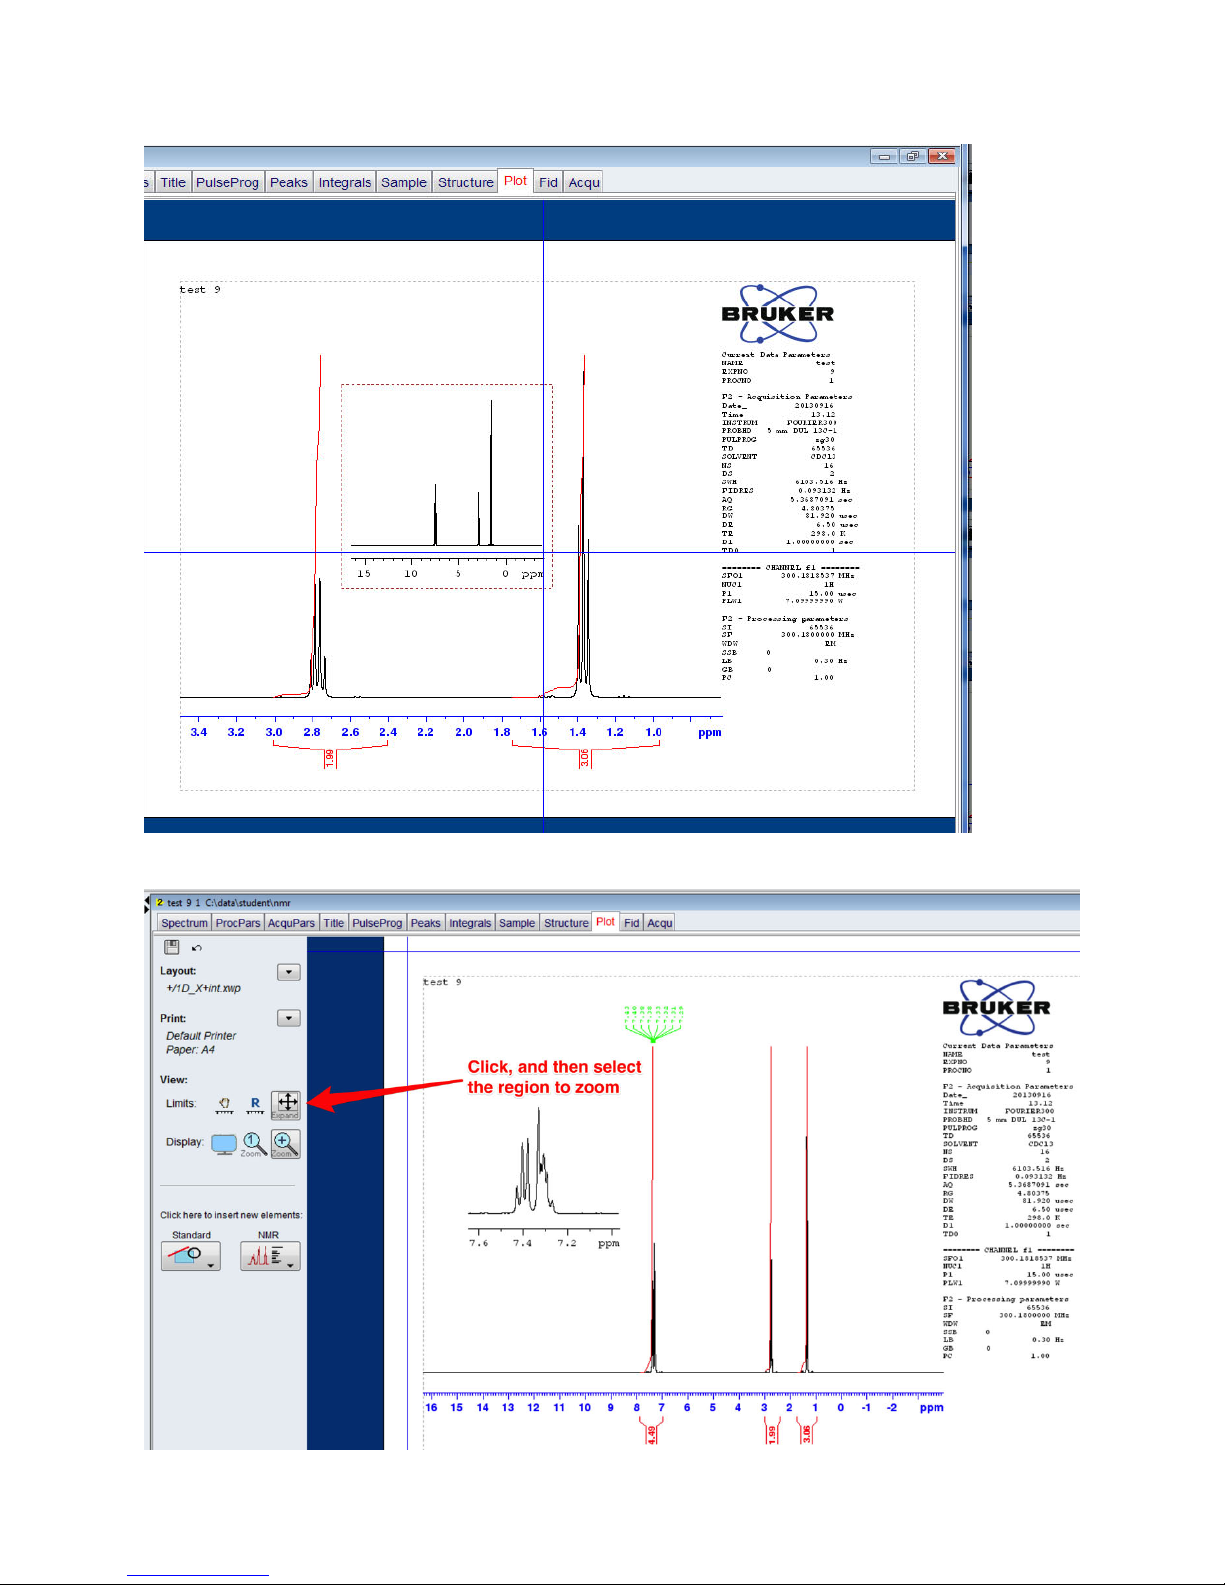
To zoom in on the insert, click on the Expand icon, then hover over the insert window until you see
it highlighted in green, then zoom in on the peak(s) of interest.

To show peak positions, etc. in the inset, select the inset region, then click the checkbox next to
Labels under the Peaks sections. Click the blue up-triangle once you are finished. If the Browser
window has been hidden from display, press Control-D to toggle its visibility.

Some Useful TopSpin Commands
3-$+*45/-+%6/+47%
Create dataset edc or new
Turn on eject gas ej
Insert sample and turn off eject gas ij
Turn spin gas on ro on
Load shims rsh
Open lock display lockdisp
Turn lock on lock
8"7/*#5/-+%6/+47%'-9%!1:4#$#+#,-%
Adjust parameters (ns, sw, d1, etc.) ased
Set receiver gain rga
Start experiment zg
Transfer acquired FIDs tr
Add more scans to FID go
Change number of scans to 32 (say) ns 32
Change pre-acquisition delay to 20s (say) d1 20
;'+'%.*,1/$$#-2%
Fourier Transform ft
Autophase spectrum apk
Autophase spectrum (different algorithm) apks
Stop experiment & save data halt
Exponential multiply, FT, and phase efp
Baseline correction abs
</"+%8"7/*#5/-+%,-%6'5/%6'57(/%
Increment the experiment number iexpno
=>/-%?#-#$>/9%
Turn spin off ro off
Eject sample ej
 Loading...