

Page 1
PLEASE READ THIS MANUAL BEFORE USE
MODEL BTC-5HD-APX
INSTRUCTION MANUAL
Page 2
Page 3
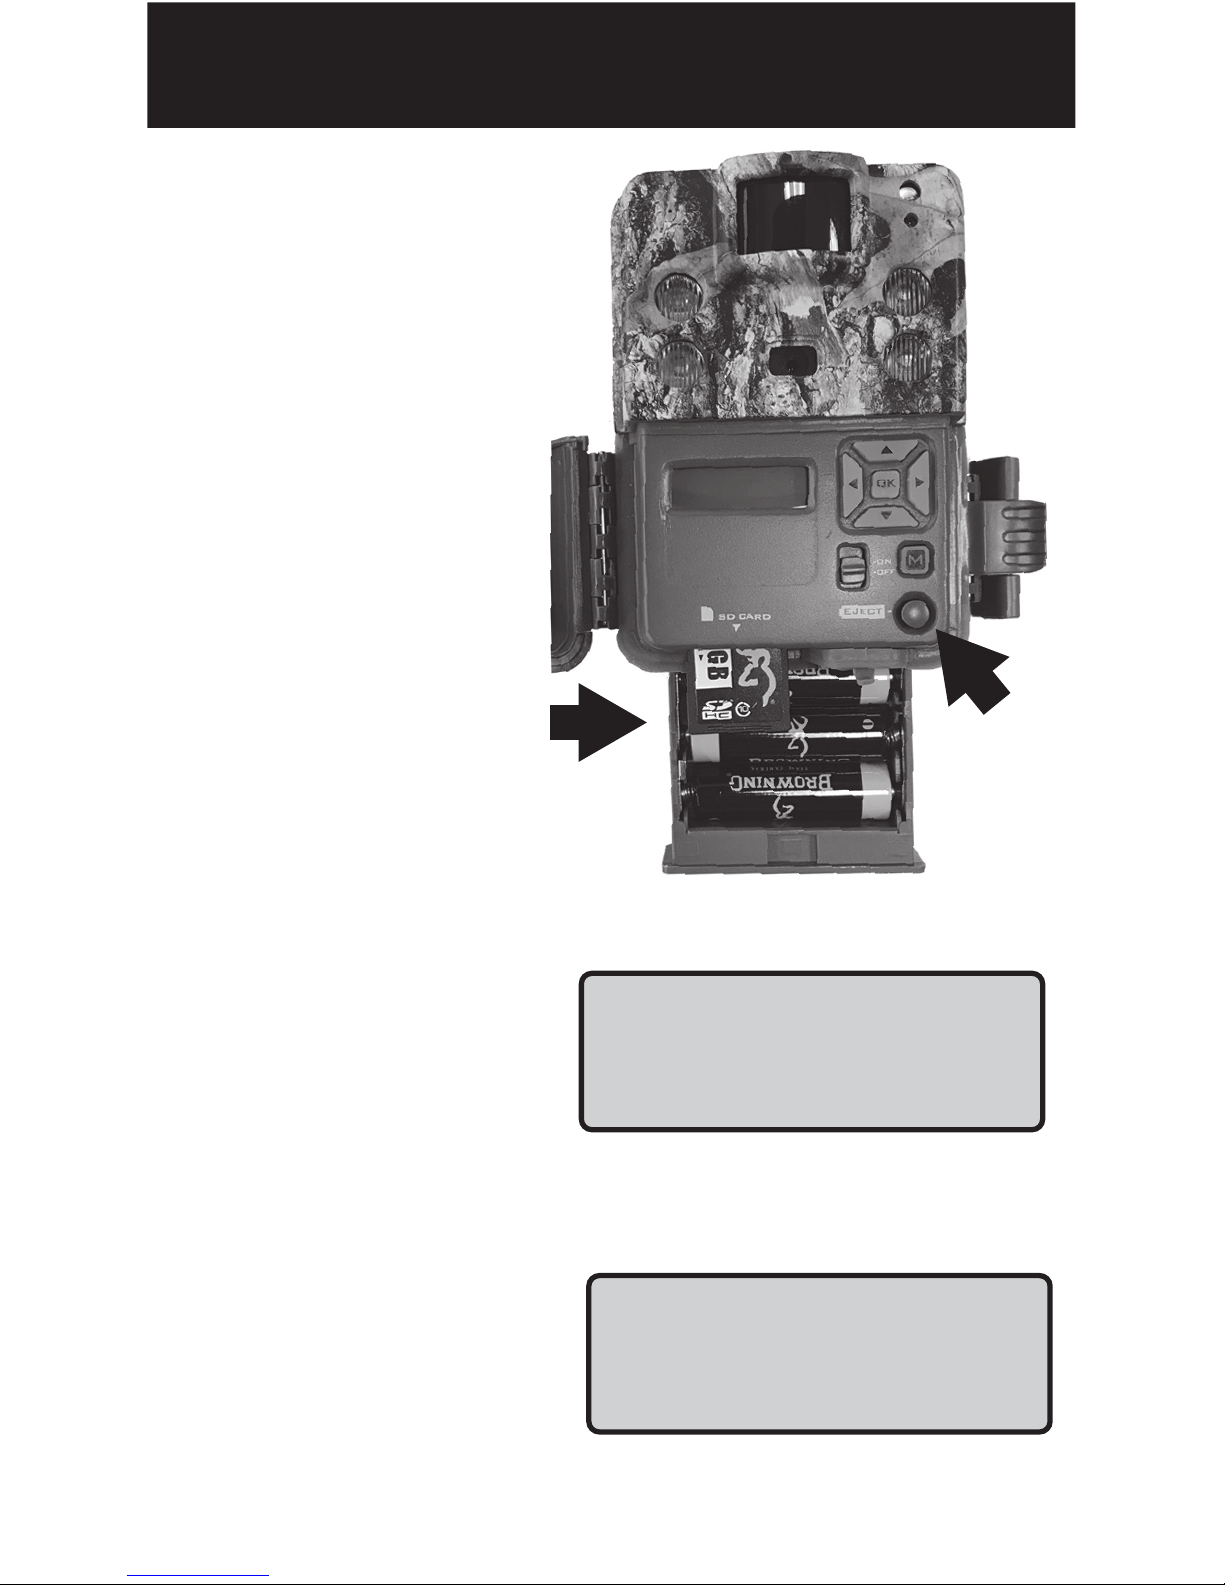
STEP 1
Press the battery
tray eject button
to release the
battery tray.
The tray will eject
about 1/2”.
Insert6 AA
Alkaline Batteries
and an SD card
into the camera.
Insert
SD Card
Battery
Eject
STEP 2
Using the control pad,
set the time and date.
STEP 3
Press the MODE button
once.Camera will
countdown a 20 second
delay and then be
ready to capture images.
Set Date
02/12/19
Trail DLY20
0004/3800
QUICK START GUIDE
Page 4

TABLE OF CONTENTS
Package Contents 1
Batteries and SD cards 1
Camera Diagram 2
Battery Installation 3
Home Screen 4
Time and Date 5
Capture Mode 6
Capture Delay / Picture Size 7
Video Quality / Video Length 8
Multishot Setting 9
Smart IR / Night Exposure 10
Timelapse Settings 11
Temp Units / Info Strip / SD Management 12
Motion Test / Camera Name 13
Default Settings / Delete Images 14
Software Upgrade 14
Image Retrieval 15
Timelapse Viewer Software 16,17
Field Installation 18
Warranty 19
Accessories 20
FCC 21
Camera Specifications / SD card size chart 22
Page 5
1
Getting Started
Package contents:
1- Trail Camera
1- 6’ Tree Strap
1- Instruction Manual
SD Card Selection
Install a good quality memory card.
The best brands of SD cards are
Browning branded cards,
Sandisk or Kingston branded cards.
Your camera can operate on standard
class 10 or higher SD cards ranging
from 4-32 GB . You can also use
higher capacity SDXC cards ranging
from 64-512GB.
Please see page 22 for a graph
showing how many photos, videos
and timelapse segments can be
stored on SD cards from 4-32GB.
Based on your intended camera
usage, this table will help you
determine what size SD card you
need to usein your camera.
Page 6
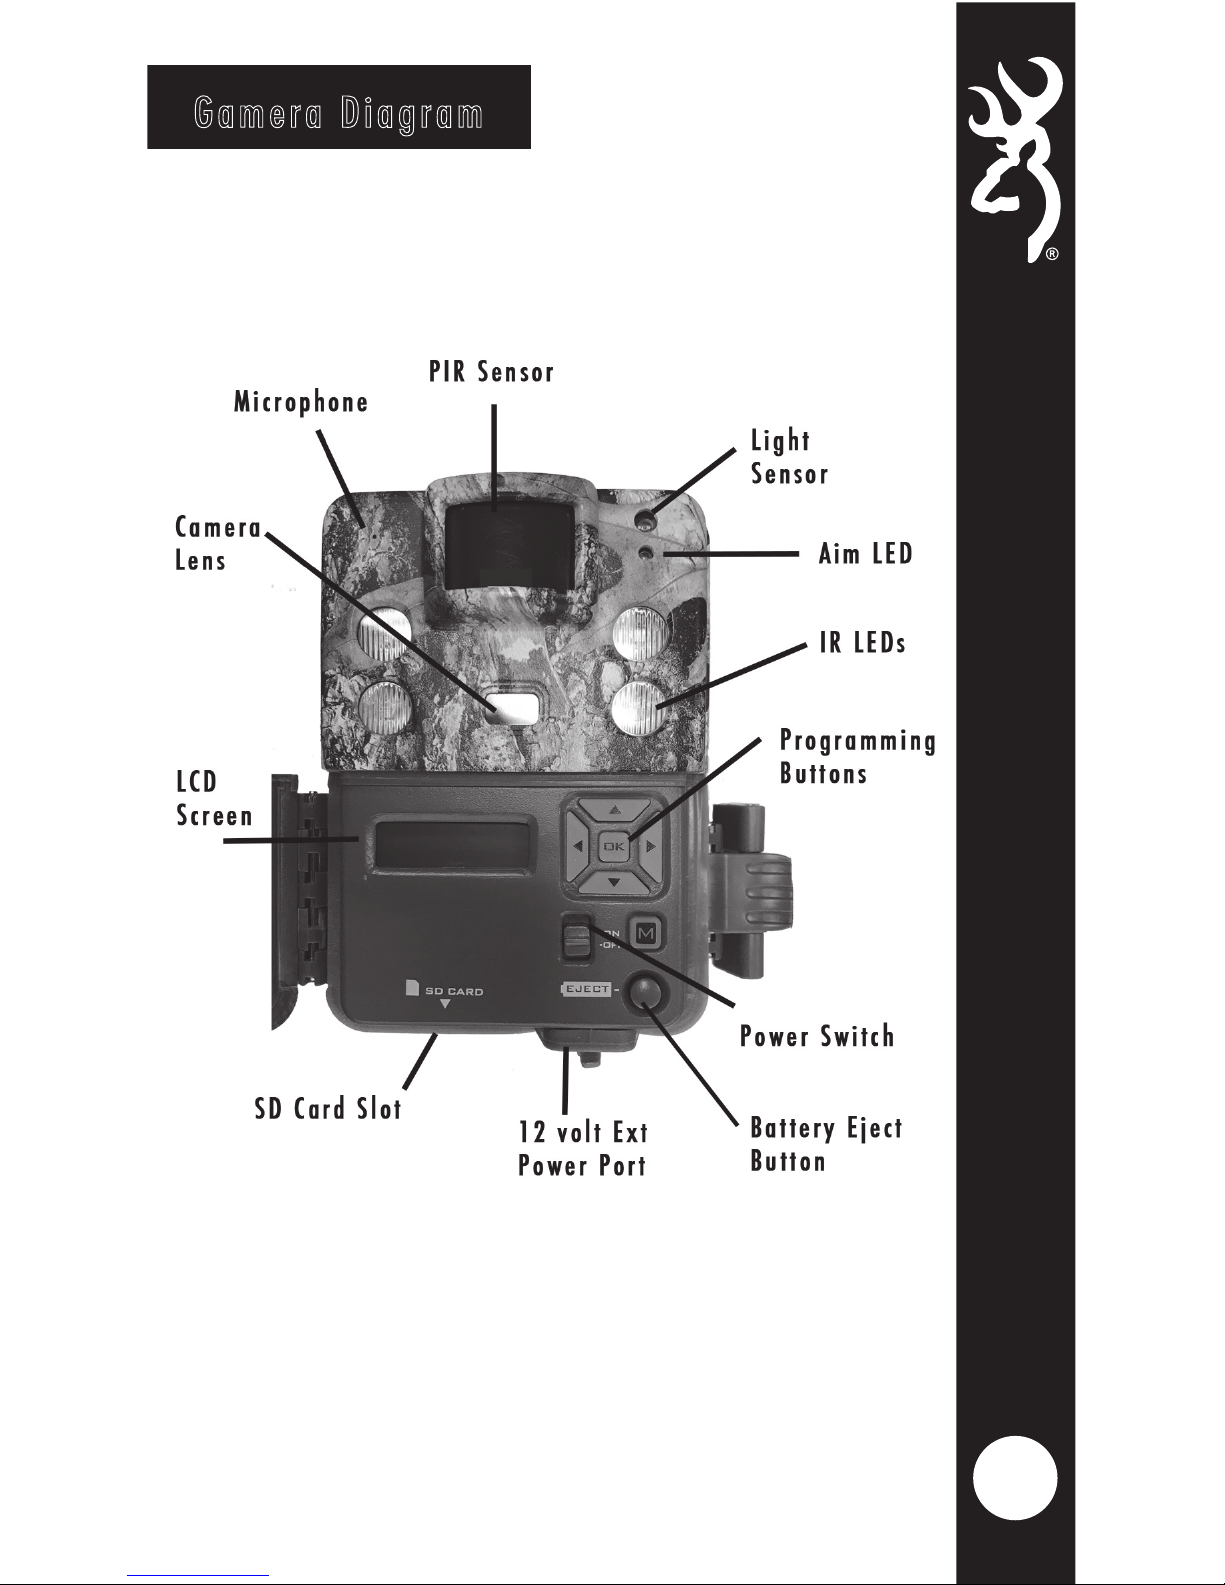
2
Gamera Diagram
Page 7
3
Battery Installation
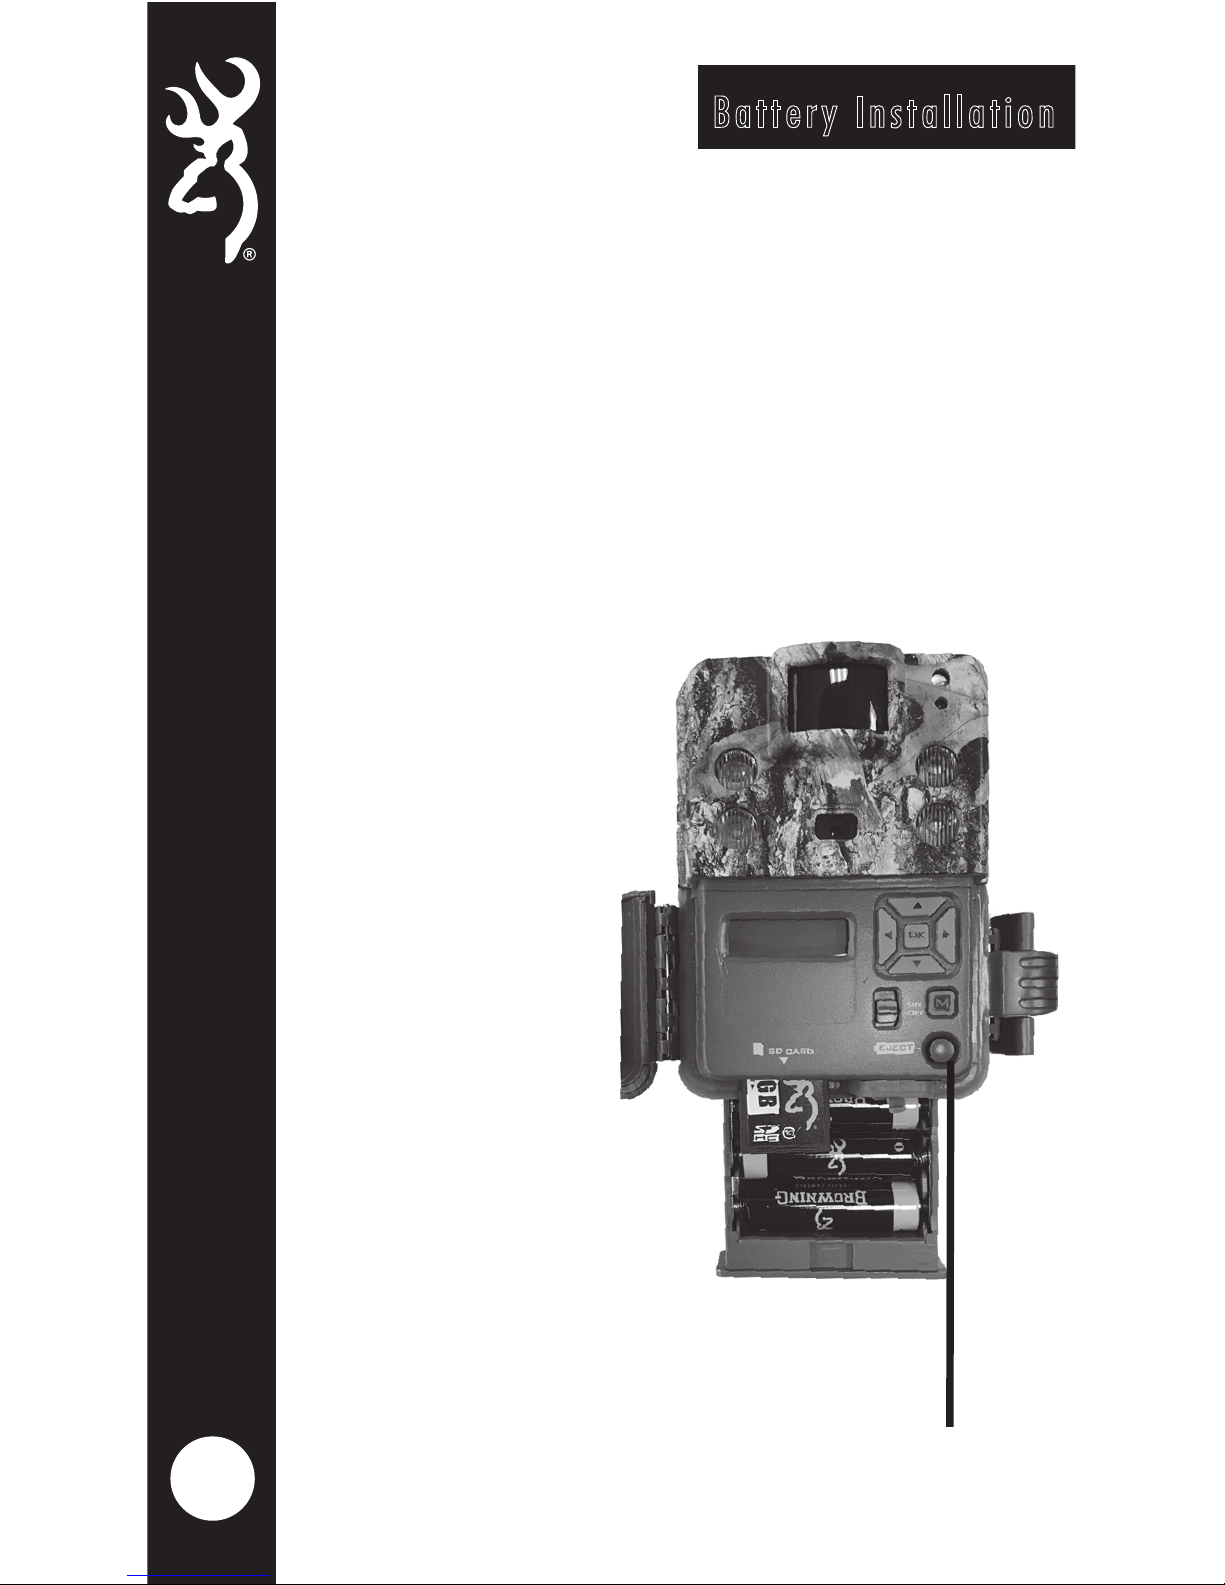
Release the battery tray by pressing the
Battery Eject button. The battery tray will
eject about 1/2”. To completely remove
the battery tray, simply pull the tray with
a bit of force.
Install 6 AA Alkalineor Lithium batteries in
the battery tray. Make sure you install the
batteries with the
correct polarity,
following the
markings on the
battery tray. For
opimtimal
performance we
recommend using
Browning
branded
batteries,Energizer
or Duracell.
Slide the battery
tray into the
closed position.
Battery
Eject
Button
Page 8
4
Home Screen
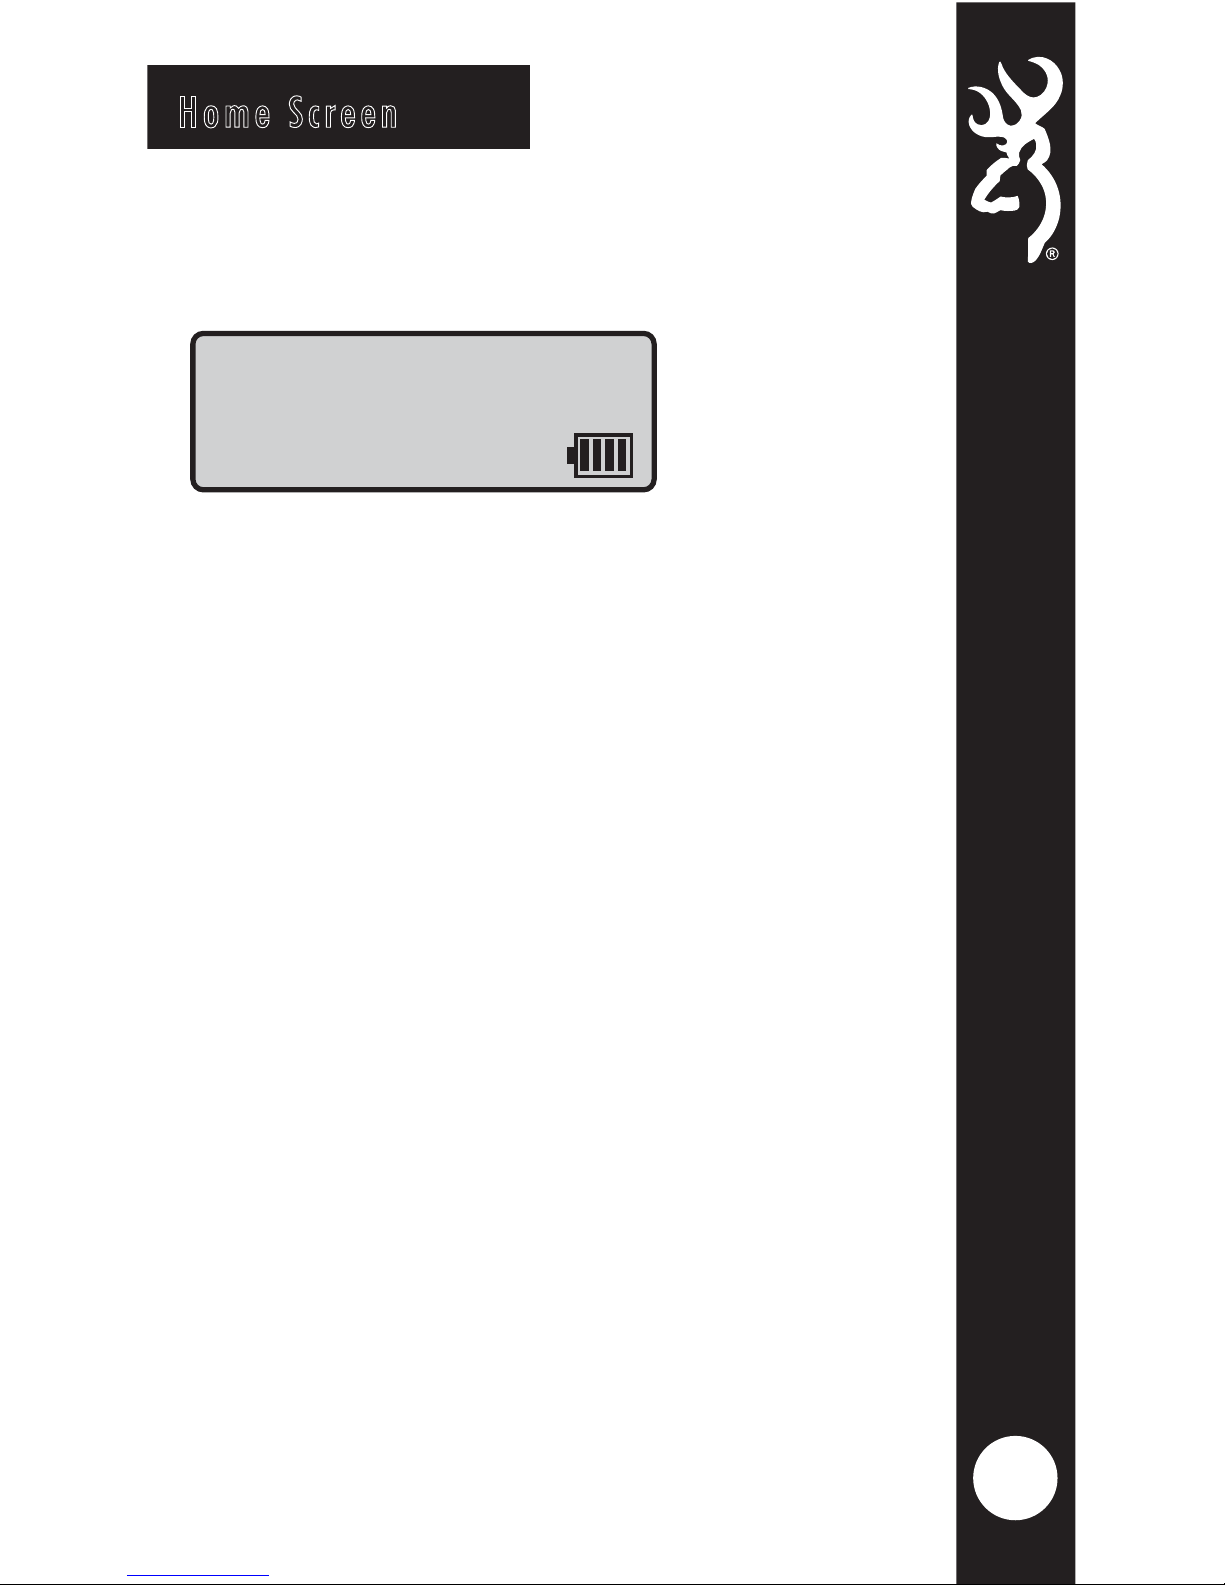
Turn the camera’s power on by sliding
the power switch to the ON position.
The home screen displays the camera
operation mode, pictures or videos
taken, pictures or videos possible on
the SD card, camera delay countdown
and battery life meter. With home
screen displayed, the camera is armed
and ready to start taking pictures.
The possible camera modes displayed are
Trail, Video,and Timelapse Plus (TL+).
The battery life meter shows the charge
left in your batteries.
The battery indicator changes to EXT
when an external battery is plugged into
the external power port.
Trail DLY19
0005/3500
Page 9

5
To Set the time and date:
From the HOME screen, press the MODE
button once. This will take you to the
SET DATE screen.
Press the OK button once. The month
selection will highlight. Use the UP and
DOWN buttons to set the correct month.
When finished setting the month, press the
RIGHT ARROW key to advance to set the
correct day. Use the UP and DOWN buttons
to change selections. Press the RIGHT
ARROW to set the correct year using the UP
and DOWN arrow keys. Press the OK button
to save your settings.
Press the DOWN button once to set the
current time of day.
Use the UP and DOWN arrow to adjust the
correct hour. Continue to set the correct
minute and AM/PM selection. Once finished,
press the OK key save your settings.
Press the DOWN ARROW key to set the
CAPTURE MODE.
Set Date
01/14/19
Time and Date
Page 10
6
Capture Mode
Capture Mode
Trial Cam
Using the RIGHT ARROW key, select the
operation mode for your camera.
CAPTURE MODE OPTIONS:
- TRAIL CAM This setting will take still
pictures of game during the day and night,
when motion is detected. This is the most
popular setting for trail camera use.
- TIMELAPSE+ This setting allows you to
take timelapse images during the day. In
addition, your camera will also take motion
activated pictures as well during the day
and night to make sure you do not miss
any game activity.
- VIDEO MODE This setting will take HD
video clips of game during the day and
night.
To continue and set the camera’s
CAPTURE DELAY, press the
DOWN arrow once.
Page 11
7
Picture Size
Capture Delay
To set CAPTURE DELAY, press the RIGHT
button to scroll through the available
options.
CAPTURE OPTIONS:
1, 5, 10, 20, 30 seconds
1, 2, 5, 10, 30, 60 minutes
The CAPTURE DELAY option allows you to
choose how much of a“timeout” there is
between taking still pictures or videos.
Press the DOWN ARROW to proceed to
set PICTURE SIZE.
To set the PICTURE SIZE, use the RIGHT
ARROW button to scroll through the
options.
OPTIONS:
-LOW 4MP
-MED 8MP
-HIGH 12MP
-ULTRA 18MP
Press the DOWN ARROW to proceed to
the MULTI SHOT settings.
Capture Delay
5 Seconds
High
Med(8MP)
Page 12
8
Video Quality
To change your video settings, press the
ENTER button once to make the default
selection flash. Use the UP and DOWN
arrows to change selections.
Press the ENTER button to save the changes.
VIDEO RESOLUTION
The Options for video Quality are:
HIGH 1296 x 720 @ 30FPS
ULTRA 1600 x 900 @ 24FPS
Video Length
VIDEO LENGTH
You can select the length of your video clip
as well in the VIDEO LENGTH window. Your
options are: 5, 10, 20, 30 seconds, 1 minute
or 2 minute lengths.
NOTES:
To conserve battery power, your night videos are limited to a
maximum time of 20 seconds. For example, if your video length
is set at 30 seconds, your camera will take 30 second videos during
the day, and your night videos will be limited to 20 seconds.
If you set your camera in video mode, you
will be able to set the Video quality and
Video length options. If your camera is set
in Trail Cam mode, the video settings
menu will not be displayed.
Page 13

9
Multishot
Off
Multishot Setting
To program the MULTI SHOT mode, use the
RIGHT ARROW button to scroll through the
available options. Your Browning Trail
Camera can take multiple shots each time
the camera is triggered. The default setting
is 1 picture.Your options are as follows:
-MULTI SHOT OFF
This is the default setting. Your camera will
only take 1 picture when triggered.
-MULTI SHOT STANDARD
The selections available are 1-8 shots in
this mode. If you select 8-SHOT STANDARD,
your camera will take 8 pictures, spaced 2
seconds apart.
-RAPID FIRE
This selection allows rapid image capture.
When triggered, your camera will take 2-8
RAPID FIRE shots, with only 0.3 seconds
between pictures. Your available options
are 2,3,4,5,6,7, or 8 RAPID FIRE shots.
Press the DOWN arrow button to set the
TEMPERATURE UNITS.
Page 14
10
Smart IR Video
Info Strip
Smart IR Video is a feature that will allow
a daytime video clip to keep recording as
long as the camera detects movement
during filming. If the deer stands still in
front of the camera and the camera does
not detect movement, the camera will
end the video clip. The maximum record
time for a video clip using this feature is
2 minutes.To enable Smart IR Video, press
the RIGHT button once, the default NO
setting will change to YES.Press the DOWN
arrow to advance to the next setting option.
Night Exposure
Using the RIGHT or LEFT arrow keys, select
the desired night exposure setting. Your
available options:
POWER SAVE
LONG RANGE
FAST MOTION
This option is for saving battery power by
firing the camera's flash at 75%. Use this
setting in deep woods or short range
shots.
Use this mode for maximum distance
shots at night with maximum flash power.
Use this mode on trails or where game
will be travelling fast for great shots.
Press the DOWN arrow to continue to
additional settings
Page 15
11
Timelapse Settings
Your Browning Trail Camera has the ability
to function as a timelapse camera. This is
useful if you want to view the entire
activity in a given area such as a large
field. We recommend you use the TRAIL
CAM mode for game when watching trails
and feeding areas.
TIMELAPSE FREQUENCY
Your trail camera can be set to take
timelapse pictures at the following
frequencies: 5, 10, 20, 30, 60 seconds;
1, 2, 5, 10, 30 and 60 minutes.
TIMELAPSE DURATION
The timelapse duration controls how many
hours per day the camera captures
timelapse images. Your available
TIMELAPSE DURATION options are:
- ALL DAY Camera takes images from sunrise
to sunset.
- 2, 3 or 4 HOUR These Durations limit the
camera from taking images either 2, 3 or 4
hours after sunrise and 2,3 or 4 hours prior
to sunset.
NOTE: Your trail camera learns the length of a day and
constantly adjusts the 2,3 or 4 hour durtion modes automatically.
Timelapse Freq
20 Seconds
Timelapse Period
3HOUR
Page 16
12
Temperature Units
Info Strip
Your temperature units can be displayed
on the picture’s info bar in Fahrenheit or
Celsius. To change the selection, Press the
RIGHT arrows to make your selection.
Your trail camera has an information bar
that is printed at the bottom of each photo
taken. This info strip shows the following
information: time, date, moonphase,
temperature, and camera ID. This option
can be turned on or off, using the RIGHT
or LEFT arrow buttons.
SD Card Management
By turning the SD Card Management feature
ON, the camera will erase the oldest pictures
or videos on the SD card when the SD card
becomes full. This allows your camera to
continue taking pictures if you cannot get to
the field to swap out a full SD card.
If the SD Card Management feature is turned
off, when your SD card fills up, the camera
will not record any additional pictures or
videos when triggered until you change out
the SD card or delete the images.
Page 17
13
Motion Test
Your trail camera is equipped with a MOTION
TEST feature. This feature helps you aim the
camera at your target area. With the motion
test turned on, simply walk around in your
target area. When your presence is detected,
a red LED on the front of the camera will
flash. Simply press the OK button, the red
LED will flash when motion is detected.
Make sure you turn OFF the MOTION TEST
function before leaving the camera in the
field by pressing the OK button.
Press the DOWN arrow to proceed to the next setting.
Motion Test
Off
Camera Name
Camera1
You can add a custom name for your camera
if needed. To name your camera, Press the
OK button once. This will highlight the first
character in the camera name. Use the UP
and DOWN arrows to change the field. Press
the RIGHT ARROW button to move to the next
letter. Your available characters are Capital
A-Z, 0-9 or a blank space. When finished,
press the ENTER key to save your selection.
Camera Name
Page 18
14
The following options can be changed by pressing
the OK button to highlight the option, and changing
the selection using the RIGHT or LEFT arrows.
Remember to press the OK button to save your
selection. Press the DOWN button to move to each
new option to set below.
This selection returns your camera back to the
factory default selections for each setting.
By selecting DELETE ALL, all of the images on your
SD card are erased. This function also reformats
your SD card. It is a good idea to use the DELETE
ALL function and reformat your SD card each time
you install it in the camera for use.
The software upgrade function allows you to
upgrade your software. If a software upgrade is
available for your camera, it will be posted on our
website, along with detailed instructions for
upgrading at:
www.browningtrailcameras.com/customer-service
Delete All
Software Upgrade
Default Settings
Page 19

15
Image Retrieval
The most popular way to review the
images on your SD card is to review the
images on your home computer.The
pictures can be viewed on both PC and
Mac computers.
Simply insert the SD card into the SD
card slot on your desktop or laptop
computer. If your computer does not
have an SD card slot, you will need an
SD card reader. These are inexpensive
and can be found at your local sporting
goods or electronics store.
After your SD card is inserted into your
computer, navigate to START/MY
COMPUTER/. Look for the SD card icon.
Double click on the SD card icon.
A folder named DCIM will appear.
Double click on the DCIM folder. A new
folder appears with called 100_BTCF.
Your pictures are in this folder.
Page 20
16
INSTALLING THE TIMELAPSE VIEWER
SOFTWARE IS FOR VIEWING YOUR
TIMELAPSE FILES. YOU COMPUTER
ALREADY HAS PROGRAMS INSTALLED
TO VIEW STILL PICTURES AND VIDEOS
CLIPS.
Timelapse Viewer Installation
In order to playback your TIMELAPSE FILES, you
need to install the Browning Buck Watch Timelapse
Viewer software. This software will work on any
PC running Windows XP or later version. The Buck
Watch Timelapse Viewer can be downloaded from
our website at:
www.browningtrailcameras.com/Buckwatch.
IMPORTANT: Once you have
loaded the Buck Watch viewer
on your computer, a full set of
operation instructions is
available by clicking on the
HELP icon in the viewer window.
Page 21
17
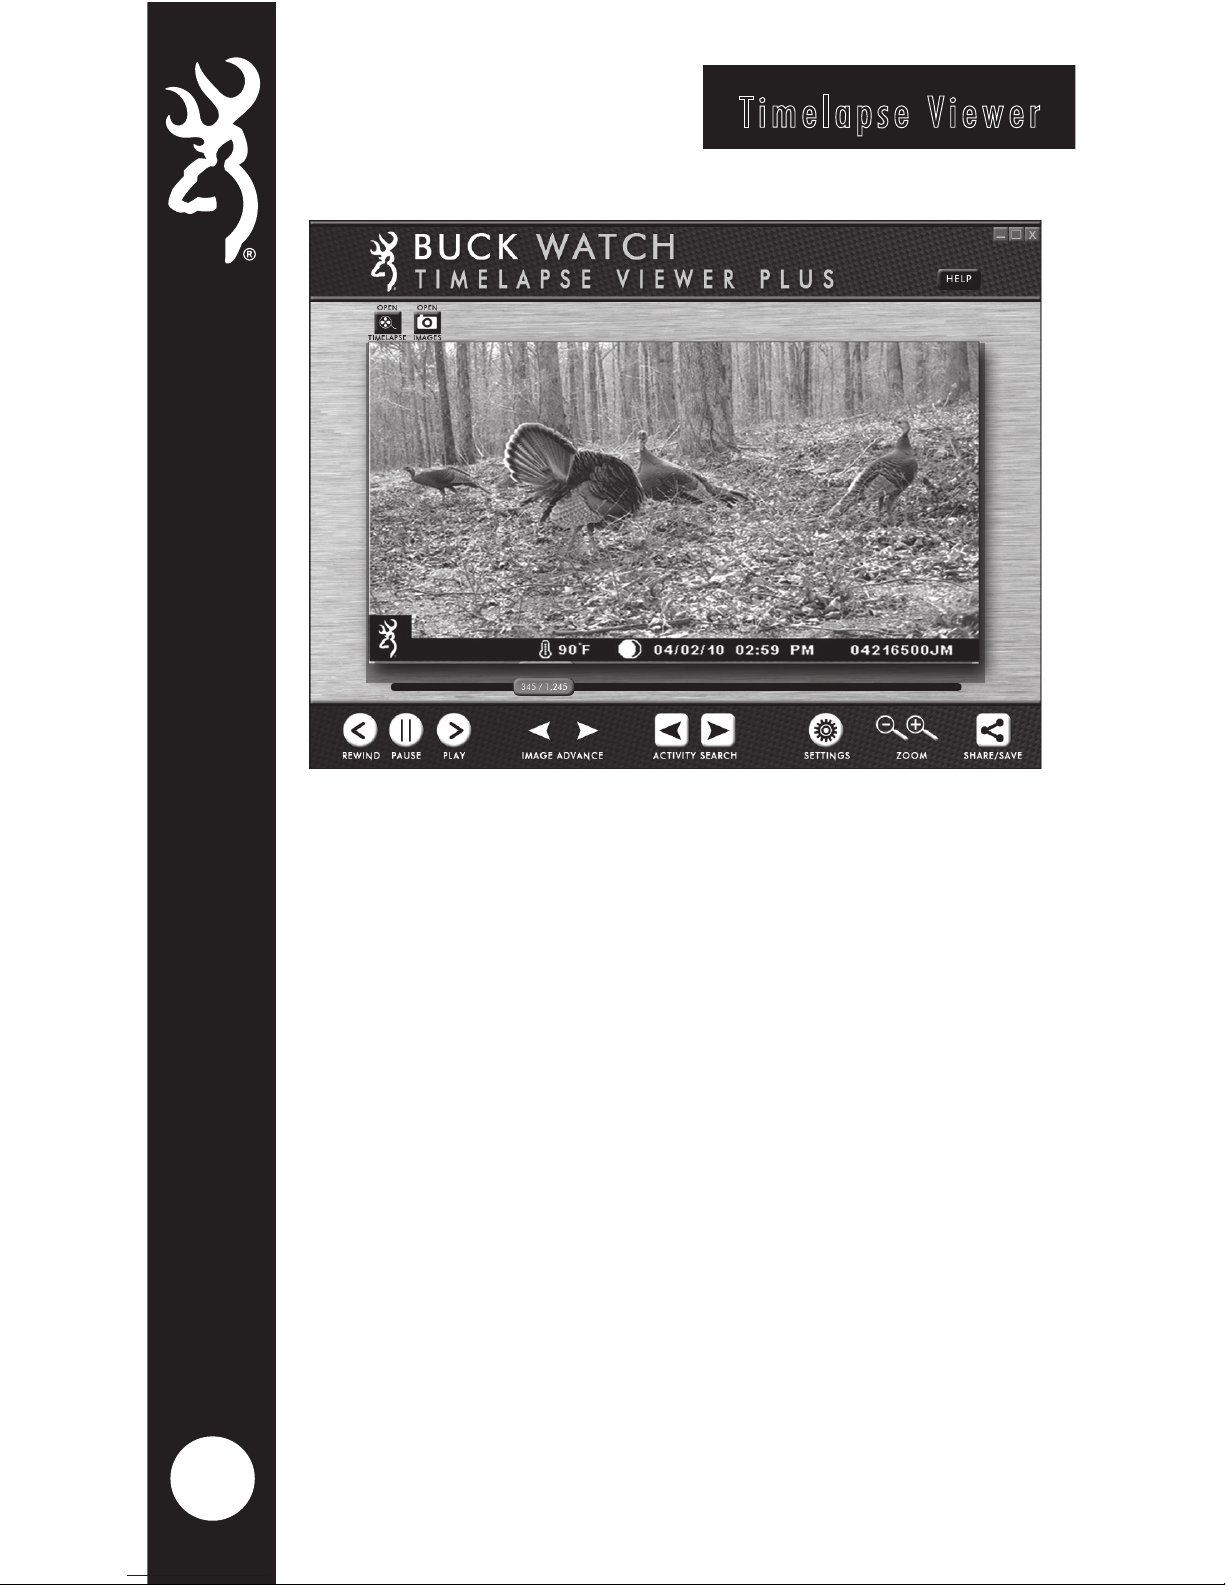
Timelapse Viewer
The Browning Buck Watch Timelapse Viewer
is a powerful tool to help manage game on
your property. You can easily playback an
entire days worth of timelapse imagery in
only a few minutes, as well as view each
image one-by-one if desired.
For a quick look at long video files, you
can also use the "Activity Search" function
to allow the software to skip frames with
no game activity, and stop only on frames
where game or movement is present.
Page 22
18
Field Installation
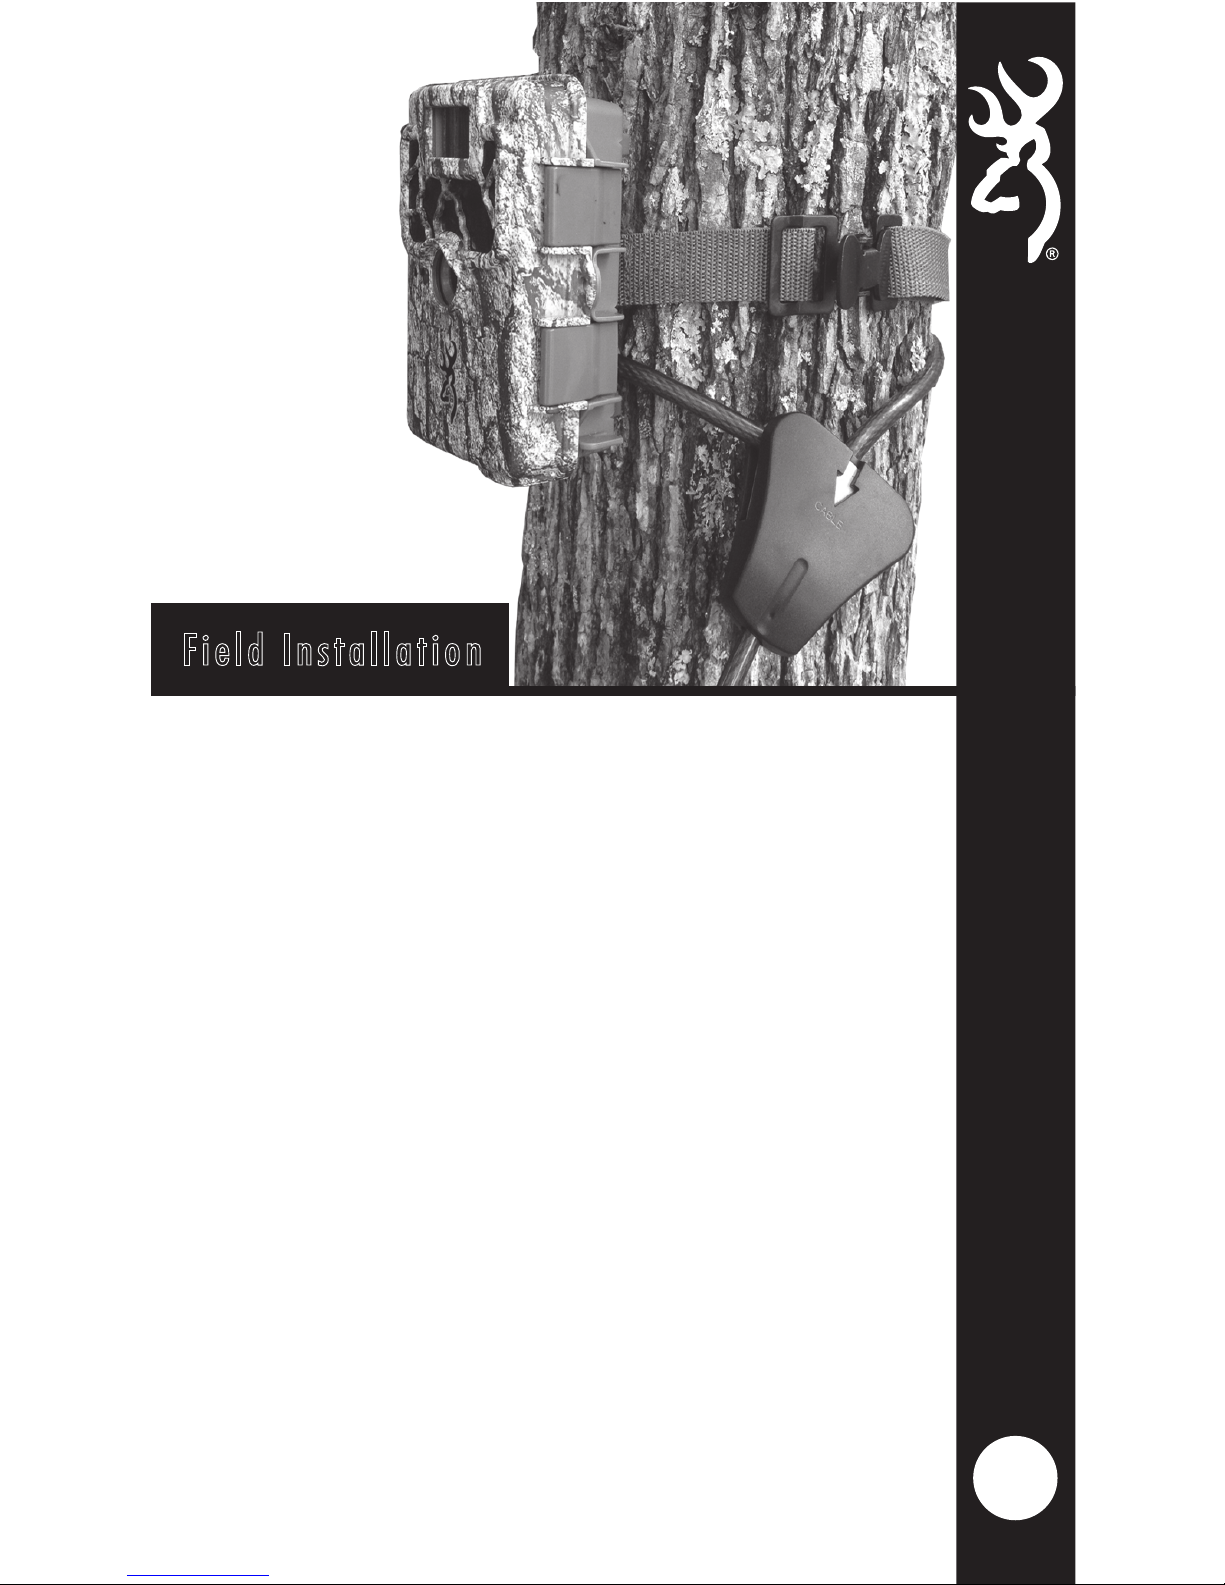
We recommend mounting your new trail camera at
a height of approximately 3 feet off the ground.
The heavy duty 1” nylon strap threads through
the strap mounting loops in the back of the
camera and will secure your trail camera to trees
large or small.
For optimal trail camera mounting,
we recommend using the Browning Trail Camera
Tree Mount. This mount has a locking gimbal that
can position your trail camera at the optimal
angle.
The back of your trail camera is also equipped
with built in security cable loops. These are
perfect for using a locking steel cable or a 5/16”
Python cable lock (not included).
Page 23

19
ONE YEAR LIMITED WARRANTY
Your Browning Trail Camera warranty covers your
trail camera for one year. We warrant that your
camera will be free from defects in workmanship
and materials when operated in normal use and
conditions. This warranty will allow Browning
Trail Cameras, at its discretion, to repair the
product or replace it with a new or refurbished
unit.
Warranty limitations:
This warranty does not cover cameras that have been:
1. Neglected or abused (including, but not limited
to water damage caused by submersion, battery
leakage, or improper storage).
2. Modifications or repairs by unauthorized agents.
3. Damaged cameras that have cracked or broken
outer cases due to excessive impact, heat or
mishandling.
4. Damages caused by wild animals.
WARRANTY SERVICE
In the event warranty service is needed, contact
Browning Trail Camera’s customer service at
1.888.618.4496. Our knowledgeable agents can help
troubleshoot any issues with your trail camera. In the
event your camera needs to be returned for service,
our agents will advise the correct mailing address and
RMA number needed for proper service of your unit.
You will also need your original receipt, or proof of
purchase for warranty service. You are responsible
for packaging and shipping cost of your camera unit
to our warranty center.
Warranty
Page 24
20
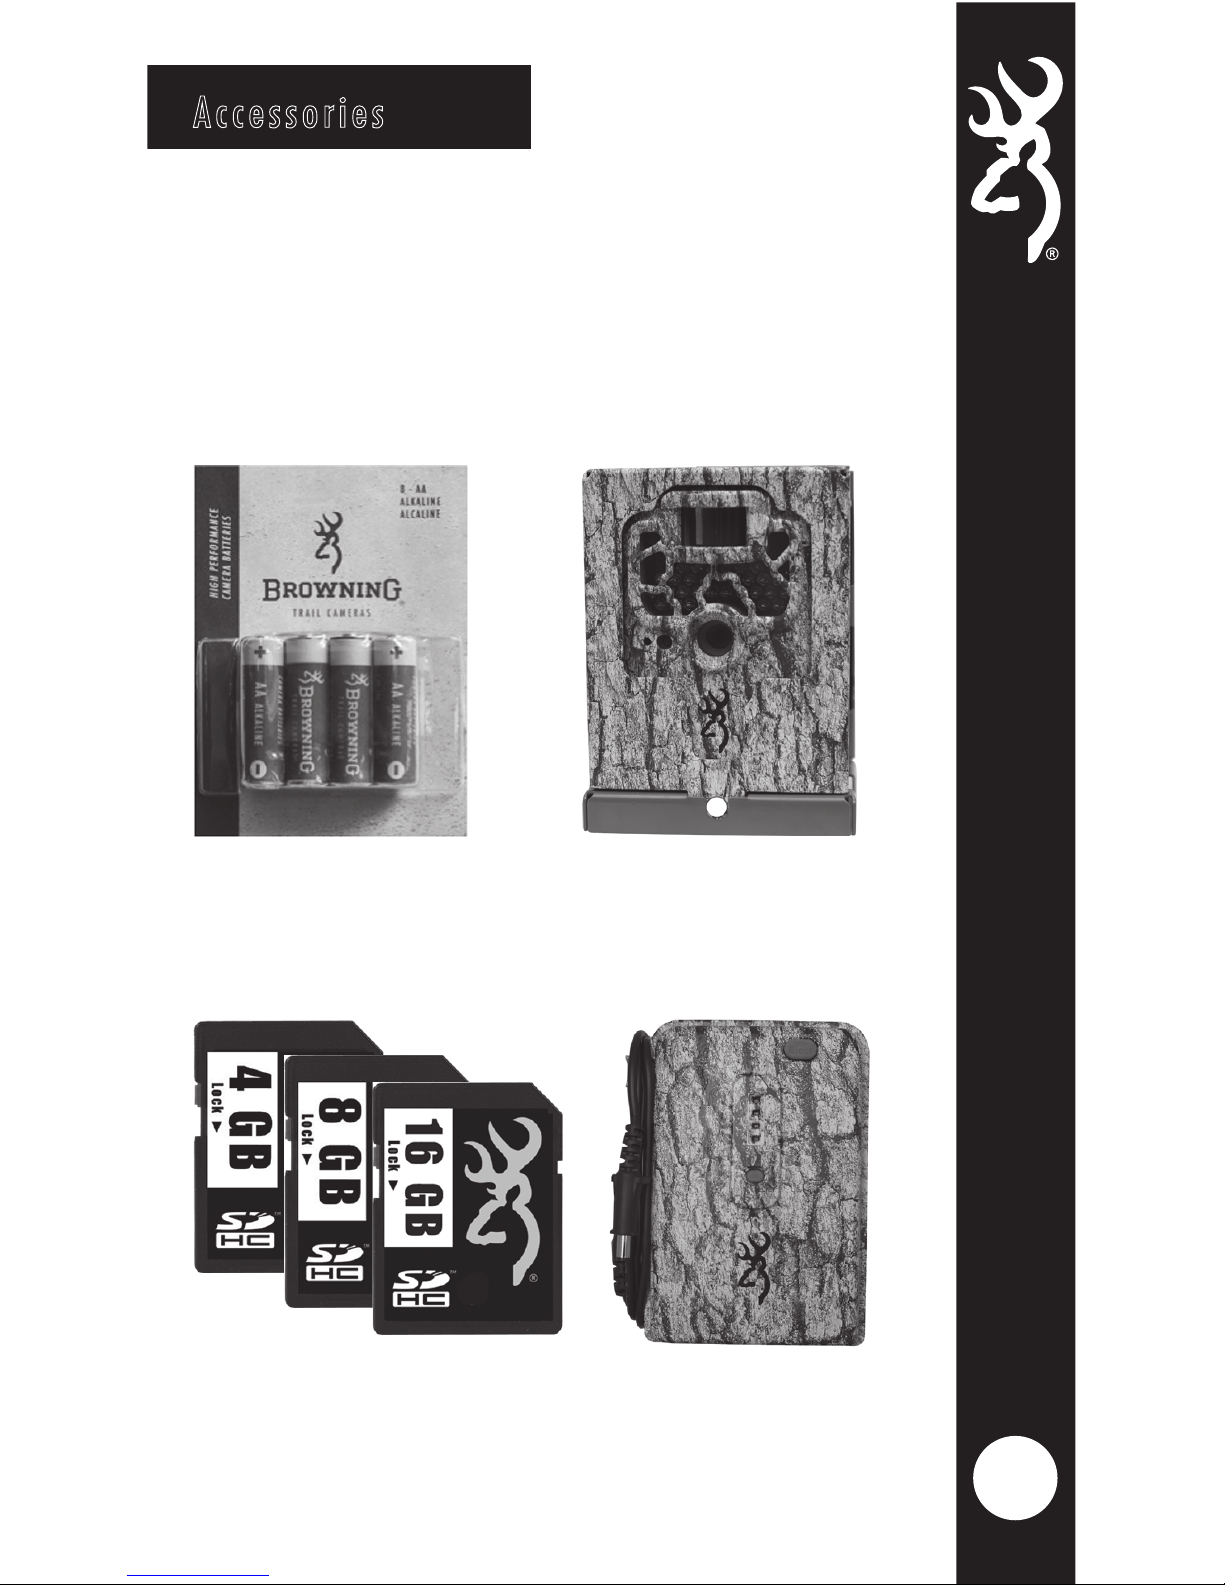
We offer a full line of accessories for
use with your new Browning Trail Camera.
Accessories
AA Batteries STEEL SECURITY BOXES
SD CARDS BATTERY PACKS
Page 25

21
FCC Statement
This equipment has been tested and found to comply with
the limits for a Class B digital device, pursuant to part 15
of the FCC Rules. These limits are designed to provide
reasonable protection against harmful interference in a
residential installation. This equipment generates, uses
and can radiate radio frequency energy and, if not
installed and used in accordance with the instructions, may
cause harmful interference to radio communications.
However, there is no guarantee that interference will not
occur in a particular installation. If this equipment does
cause harmful interference to radio or television reception,
which can be determined by turning the equipment off and
on, the user is encouraged to try to correct the interference
by one or more of the following measures:
• Reorient or relocate the receiving antenna.
• Increase the separation between the equipment and
receiver.
• Connect the equipment into an outlet on a circuit
different from that to which the receiver is connected.
• Consult the dealer or an experienced radio/TV
technician for help.
Caution: Changes or modifications not expressly approved
by the party responsible could void the user’s authority to
operate this device.
Page 26
22
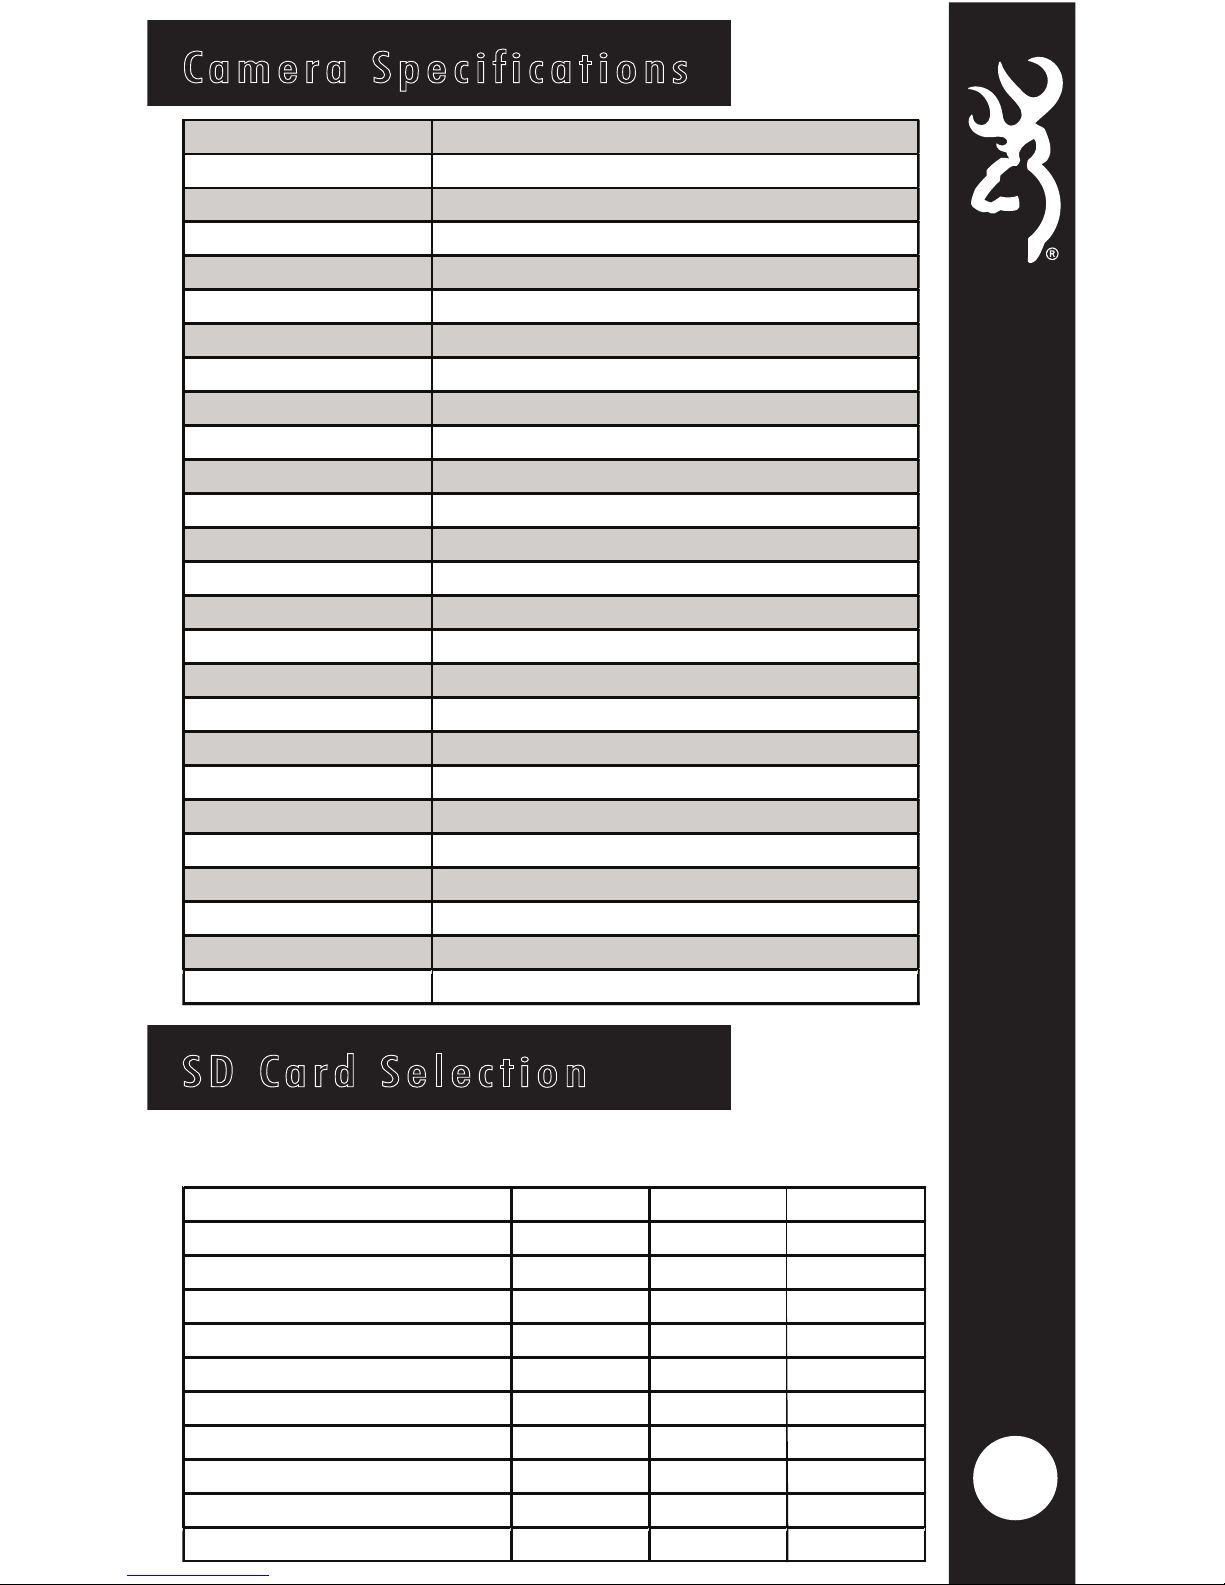
Camera Specifications
PHOTOS YES
Ultra 18MP
High 12MP
Medium 8MP
Low 4MP
VIDEOS YES
High 1296 x 720 @30fps (720p)
Ultra 1600 x 900 @ 24fps (900p HD+)
Length 5, 10, 20, 30 sec. 1, 2 min.
Sound YES
TIMELAPSE YES
Modes Timelapse plus IR triggered pictures
Timela pse Delay 5, 10, 20, 30, 60 sec.,1, 2, 5, 10, 30, 60 min.
Eecve Pixels 2688 x 1520
Removeable Memory up to 512GB
Trigger Time 0.22 Seconds
Field of View 55 degrees
Shoo ng Modes Sll, Video, Timelapse Plus
Baery requirements 6AA Alkaline or Lithium Baeries
Mounng 1" nylon stra p 6" long
Aux. Power Input 12V
IR Detecon 80. Average
IR Flash Illuminaon 100.
Cerc
aons FCC, CE
Info printed on Picture
me, date, moonphase, temp, cam ID
Other features SD card management, Smart IR Video
8GB 16GB 32GB
PHOTOS
18MP 780 1560 3120
12MP 1200 2400 4800
8MP 2400 4800 9600
4MP 4500 9000 18000
VIDEOS (20 Seconds)
High Resoluon
55 110 165
60 120 240
Number of pictures, videos, or timelapse segments that can be
stored on each size SD card. Actual pictureconuts may vary.
TIMELAPSE
All Day @ 1 Min.intervals 10 days 20 days 40 days
Ultra Resoluon
SD Card Selection
Page 27
Manufactured and Distributed by:
Prometheus Group, LLC P.O. Box 130100
Birmingham, Alabama 35213-0100
1-888-618-4496
©Prometheus Group, LLC
Browning trademarks licensed from Browning
 Loading...