

Page 1
QUALITY SINCE 1878
Compound Bow
USER’S GUIDE
VERY IMPORTANT: SAVE THIS BOOKLET. CAREFULLY READ ALL
INSTRUCTIONS IN THIS MANUAL BEFORE USING YOUR NEW BOW.
Page 2

2
Compound Bow
USER’S GUIDE
WELCOME TO THE BROWNING ARCHERY FAMILY
Thank you from the entire Browning Archery family for purchasing a Browning Archery bow. Your Browning
Archery bow was manufactured from the finest materials available and handcrafted with pride in the USA. With
proper care and use you will enjoy this product for years to come.
We at Browning Archery wish you much success in the archery field you have chosen to pursue.
Please read this entire booklet before shooting or adjusting your bow.
Remember, most adjustments to a compound bow should be made by your authorized Browning Archery dealer.
Whenever shooting a bow, be certain of your target as well as what else lies downrange.
SAFETY
As with any shooting activity, safe operation of your Browning Archery
bow must always be the highest priority. ALWAYS WEAR SAFETY
GLASSES WHEN HANDLING A BOW. Do not attempt to use your
bow without proper instruction. Doing so can result in serious injury.
a. Never "dry-fire" any bow. Dry-fire is to draw and release the bowstring without an arrow in the bow.
Dry-firing will likely cause damage to the bow and serious injury to the archer. If you ever dry-fire your
Browning Archery bow, take it to an authorized Browning Archery dealer for proper inspection.
b. Always be sure of your intended target, as well as what lies behind the target area. An arrow can travel
a considerable distance, so it is important to have a safe and sound backstop.
c. If you draw a bow and need to let it down, do so in a slow and careful manner. Keep your support arm
straight and prepare for a rapid and aggressive let-down as the bow returns to peak weight. Avoid hitting
your hand on protruding accessories such as the cable guard or quiver. Keep your head and face back and out
of the string path during let-down.
d. Never modify any part of the bow or its components by drilling extra holes or removing material. This voids
the warranty and presents safety problems.
e. Never draw a bow with a peak weight above your comfort level.
f. Always use a bow sling when drawing and shooting a bow.
BROWNING AUTHORIZED SERVICE
Your local authorized Browning Archery dealer is your best source for
information and assistance. Visit them for these and other typical services.
CONTACT US
520-838-2004
www.browning-archery.com
Browning Archery
Warranty Registration
P.O. Box 5507
Tucson, Arizona 85703
• Adjusting draw length and draw weight
• Replacing / servicing strings and cables
• All aspects of bow tuning
• Correct arrow selection
• Cleaning and lubrication
• Mounting new accessories
• Adjusting tiller
Page 3
Compound Bow
USER’S GUIDE
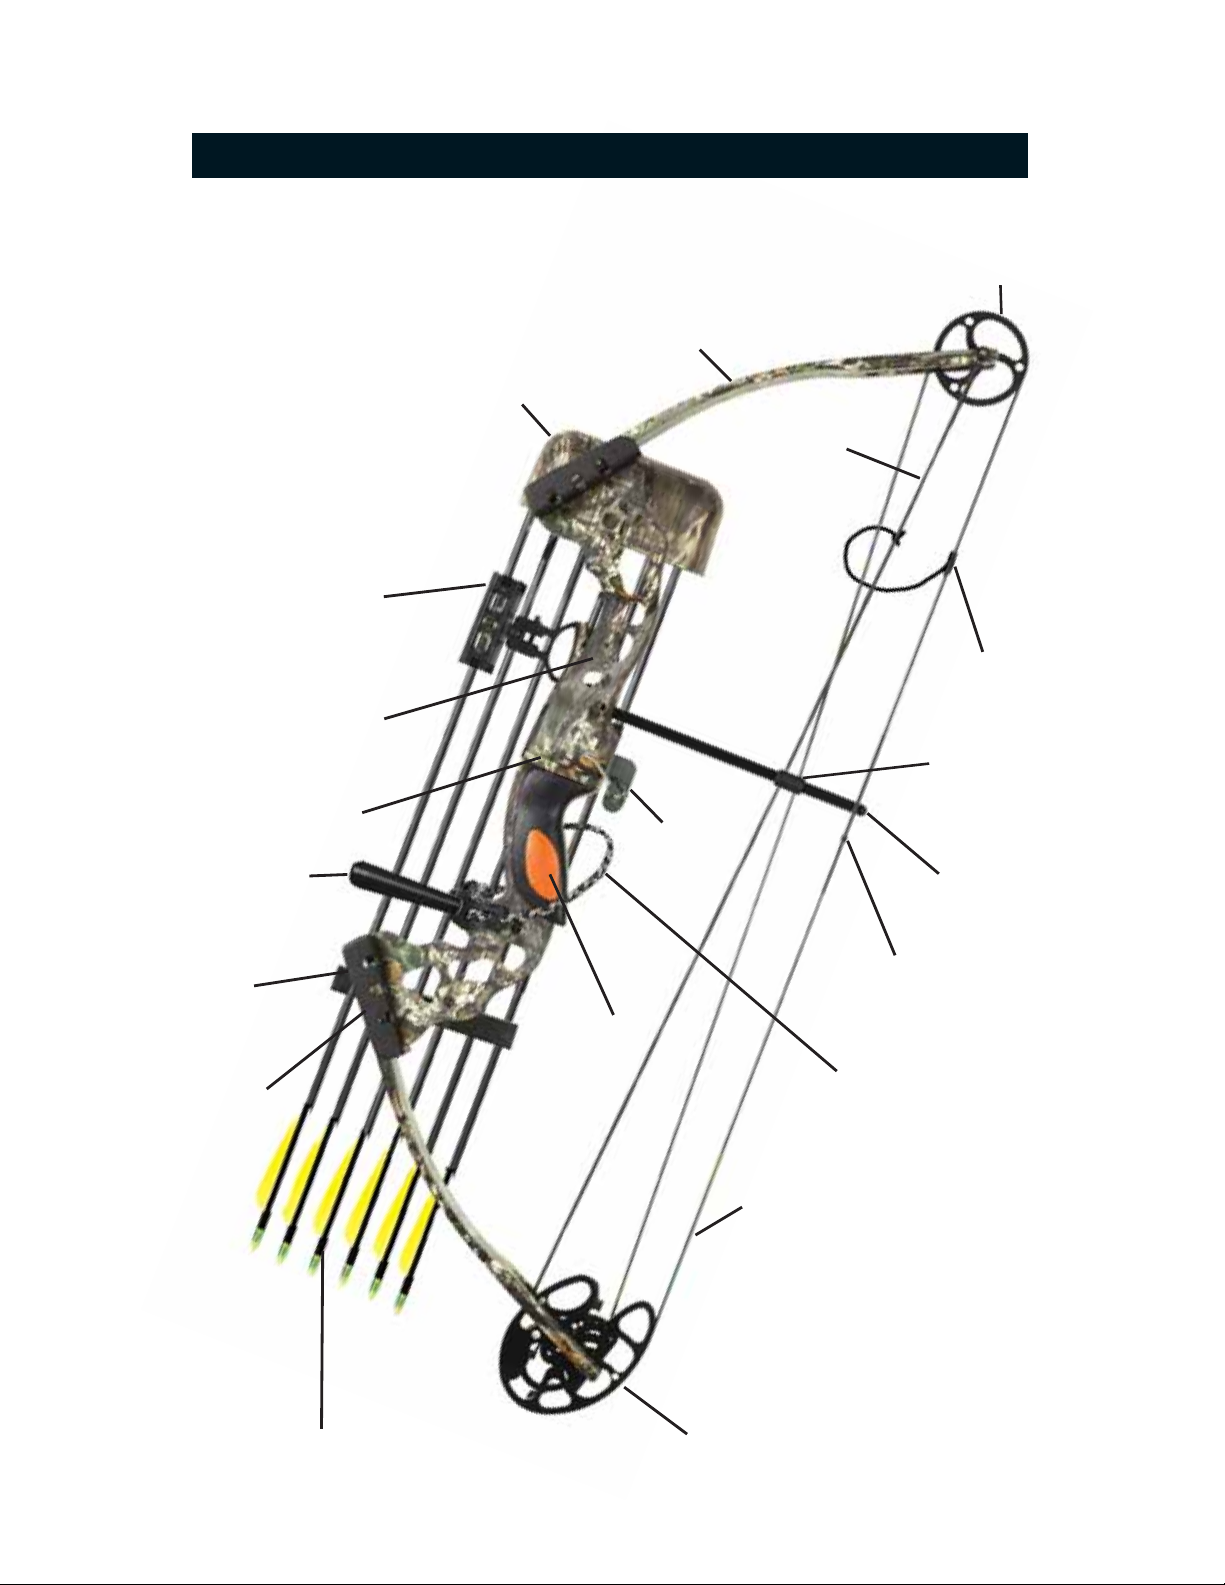
LIMB
LIMB
POCKET
ARROW
REST
GRIP
IDLER WHEEL
CABLE
STRING
PEEP
SIGHT
NOCK
POINT
CABLE
GUARD
CABLE
GUARD
SLIDE
BOW
SLING
CAM
ARROW
3
BOW
QUIVER
SIGHT
RISER
SHELF
STABILIZER
LIMB
BOLT
BOW TERMINOLOGY
Page 4
4
Compound Bow
USER’S GUIDE
GENERAL OPERATING INSTRUCTIONS
• Always inspect your bow thoroughly before each shooting session to
ensure that it is in good working order. Check for worn or
missing components and have them replaced as required.
• Inspect your arrows to insure that they are straight, undamaged, not cracked and that each nock is in good
condition. A cracked nock can break when fired from the
bow and cause the bow to "dry fire" which can cause
injury to the archer and damage to the bow.
• When purchasing arrows for your bow, consult the
selection chart from the arrow manufacturer and select
the correct arrow for your application. Always use an
arrow that meets the weight requirement stated in the
warranty. Failure to do so could cause personal injury
and damage to your bow.
BOW MAINTENANCE
Your Browning Archery bow will give you many years of
service if maintained and cared for properly.
• Keep synthetic cables and string waxed. Apply bow
string wax to your synthetic cables and string before
each shooting session.
• Strings and cables must be replaced periodically. A worn
cable or string can suddenly break, causing serious
injury to the archer and damage to the bow. It is
recommended that the string and cables be replaced
every 5,000 shots or 12 months, whichever comes first.
• Always store your bow in a cool dry place. High
temperatures, such as those that can occur in a trunk or
interior of a vehicle, can cause serious damage to your
bow.
• After use in high humidity or damp conditions, wipe metal
components of bow with a light oil.
Page 5
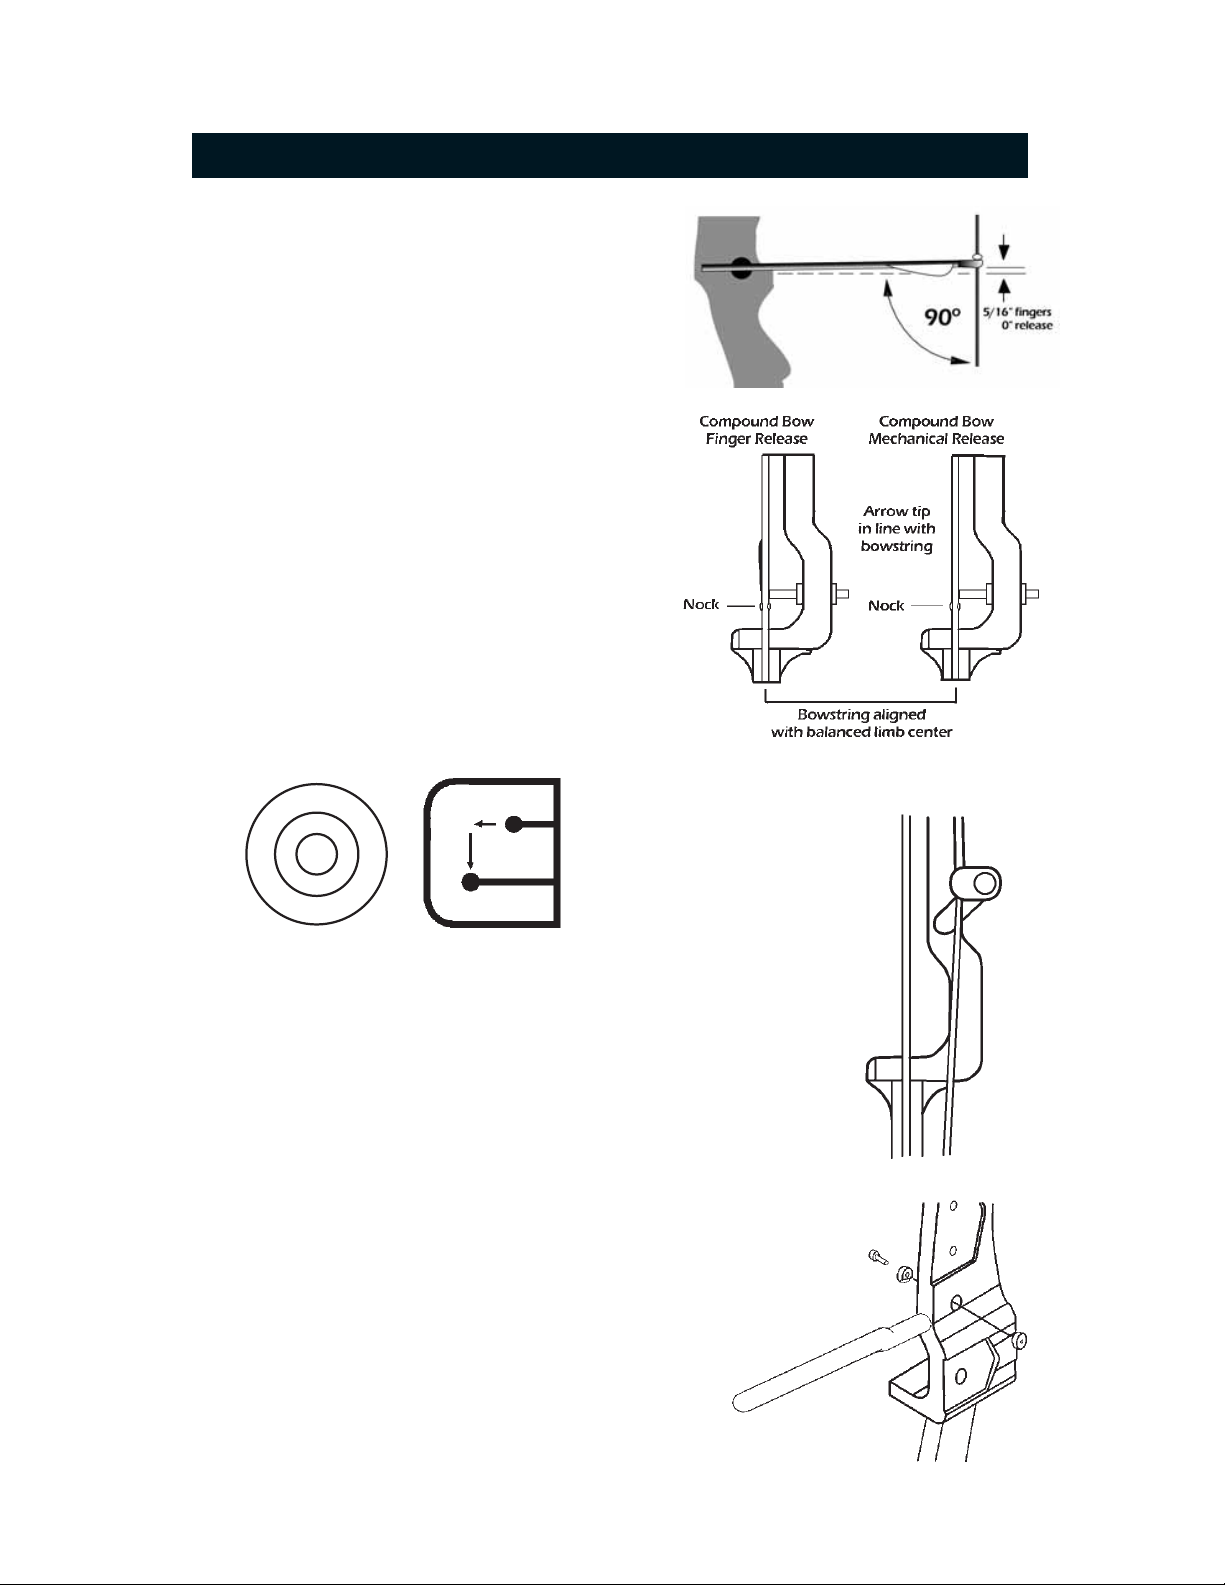
Nocking Point Placement:
Finger shooters: For the initial
setting, install the nocking point on the bowstring approximately
5/16” plus the arrow width above a point where a horizontal line
from the rest intersects the string.
Release Aid Shooters:
Install the nocking point the width of
the arrow above a point where a horizontal line from the rest
intersects the string. When the arrow is in position on the rest, the
arrow nock should fit snug against the bottom of the nocking point.
Arrowrest Adjustment:
The in/out position of the arrowrest
should be adjusted so that the arrow is in alignment with the
string when shooting with a release aid. The arrow tip should be
one-half shaft diameter to a full shaft to the left on a righthanded bow, (opposite for left-handed) when shooting with
fingers.
Sight Adjustment:
When adjusting the sight pin locations,
always remember to "follow the group". That is, if the shot group
is to the left of the target, move the sight pins to the left. If the
shot group is low, move the sight pins down.
Cable Guard Adjustment:
The purpose of a cable guard is to hold the cables
out of the path of the arrow. Many Browning Archery bows have a non-adjustable
cable guard. When adjusting the angle of an adjustable cable guard, adjust it so the
cables just clear the arrow vanes. Excessive arrow clearance may cause the cables to
track incorrectly on the wheels and cause serious personal injury and/or damage to
the bow. Always adjust the cable guard with the rod in the up position
(approximately 1 o'clock for a right-handed bow).
Cam-Lock™Cable Guard Instructions:
1. Insert cable guard into riser as shown.
2. Insert socket head cap screw and unthreaded half of clamp (A) into hole on the
sight window side of riser (align quarter round cut out with cable guard).
3. Insert threaded half of clamp (B) into opposite side of riser (align quarter round
cut-out with cable guard rod) and thread cap screw, but do not tighten.
4. Rotate cable guard rod (as shown) to achieve clearance. Then
tighten cap screw.
Please note the rod should be adjusted only as far as needed to achieve
clearance (cable should line up with back edge of riser - as shown).
••
•
before
after
5
Compound Bow
USER’S GUIDE
SETTING UP YOUR BOW
A
B
Page 6

INSTALLATION OF ACCESSORIES
Arrowrest/Overdraw:
The arrowrest or overdraw should be installed
according to the instructions received with the product. It is usually mounted to
the riser in the threaded hole on the side opposite the shelf (hole "A") using
the hardware provided with the arrowrest or overdraw.
Sight:
The sight should be installed according to the instructions received
with the product. It is usually mounted to the riser in the threaded holes (holes
"B") on the side opposite the shelf using the hardware provided with the sight.
Stabilizer:
Likewise, the stabilizer should be mounted according to the
manufacturer's recommendation. It is usually mounted in the threaded hole on
the front of the riser (hole "C").
Bow Sling:
The bow sling attaches to the riser of the bow generally with the
stabilizer. If a stabilizer is not used, attach the sling to the riser with the correct
sized bolt using the hole provided for the stabilizer (hole "C").
OTHER ADJUSTMENTS
Draw Weight:
Your bow is factory-set to the peak weight indicated on the
label on the lower limb of the bow. Slight changes in draw weight can be
obtained by turning the limb bolt in or out. Before making any changes in
weight, turn the limb bolt clockwise until it no longer moves. This adjusts the
limb to its maximum weight setting. Never use extreme torque when turning
the bolt or damage to the limb may occur. The limb bolt then may be turned
counterclockwise to obtain the desired weight, but NEVER more than 4 turns
or revolutions out from the bottomed position. Adjust each limb exactly the
same. If the bow has a limb bolt lock, you will need to loosen the lock screw
before making any adjustments.
Wheels/Cams:
All Browning Archery wheels and cams have adjustable features. Each one comes from the
factory set-up and ready to use, but there may be occasions where you need to adjust the draw-length setting of
your bow. If you are not sure of the adjustment you are making, stop and see your Browning Archery dealer for
assistance.
Your authorized Browning Archery dealer is supplied with technical information on Browning Archery bows and
cams. Please see your dealer for assistance when making these adjustments.
Compound Bow
USER’S GUIDE
6
Hole
A
Hole
C
Shelf
Hole
B
Shelf
D
Limb
Bolt
Lock
Page 7
Compound Bow
USER’S GUIDE
7
STRING RECOIL SUPPRESSOR (SRS) SYSTEM
• Rotate the rubber stop approximately 60 degrees every 500 shots
• Replace rubber stops when the string and cables are replaced
• Do NOT adjust the SRS bracket. It is factory set in the correct
position.
• See your Browning Archery Dealer for replacements and
installation
CAM ADJUSTMENTS
Cam Adjustments:
All Browning Archery cams use the patented Inner
Cam System. This system allows draw length adjustments over a
prescribed range without putting the bow in a bowpress. In all cases, the
"A" setting is the longest draw length for that bow and draw lengths get
shorter as you progress up the alphabet (A to B, B to C, etc.). When
adjusting the inner cam on a two-cam bow or hybrid cam bow, both cams
must be set in the same letter position.
WARNING:
Tighten all cam screws before shooting your bow!
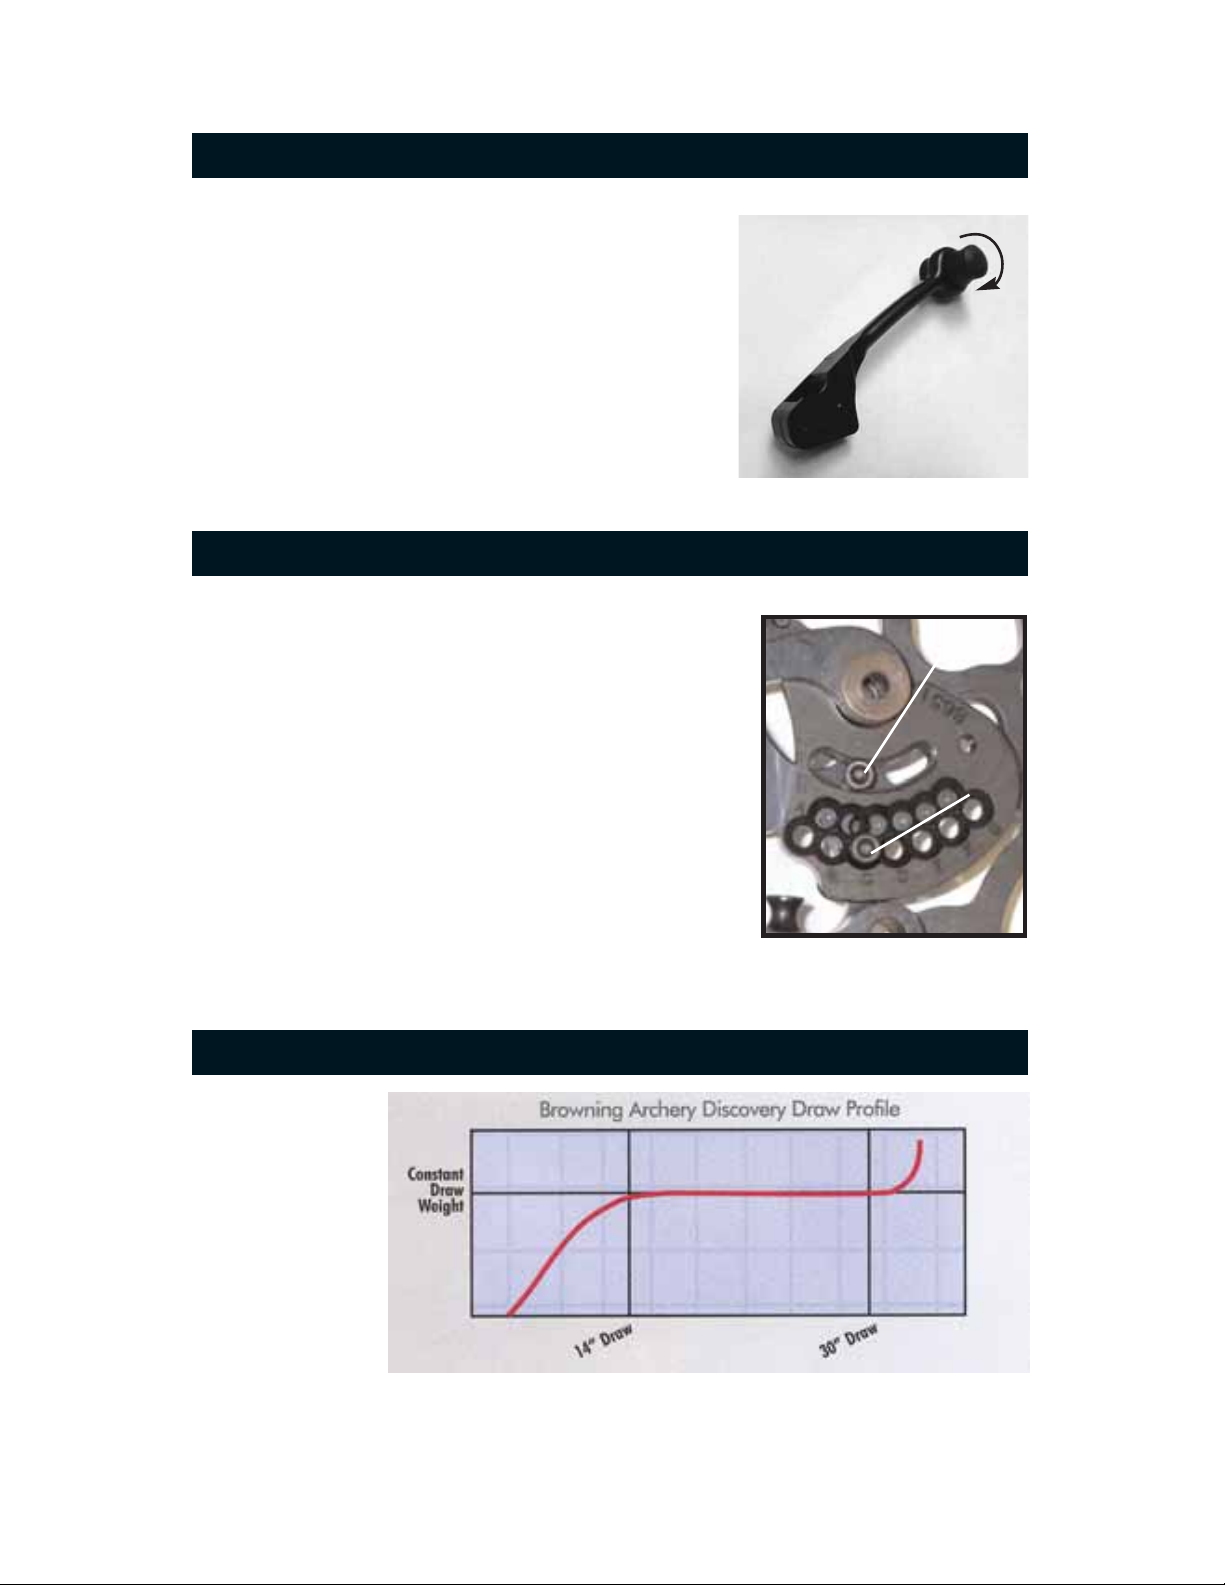
BROWNING ARCHERY DISCOVERY™CAMS
The Discovery™cam
design ramps up to
the bow’s peak draw
weight and then
holds a constant
draw weight up to
30 inches.
Inner
Cam
Screw
Lock
Screw
SRS System Patent Pending
60º
Page 8

8
Compound Bow
USER’S GUIDE
TRANCE™CAM INSTRUCTIONS
Cam Adjustments:
The Browning Archery Trance™Cam features a
patented inner cam system which allows draw
length adjustments to be made in 1” increments
and let-off to be set at either 65% or 80%
without putting the bow in a bow press. The
letter “A” engraved on the cam represents the
longest draw length setting and the letter “D”
represents the shortest draw length possible.
Inner Cam:
The cam is factory-set at a
draw length of 29” (in the “B” setting) as
shown in the photo to the right. To change
to 30” draw simply remove the screws from
the inner cam and move it to the set of
holes marked “A” and reinstall the screws.
For 28” draw, move the inner cam to the set
of holes marked “C”. For 27” draw use the
“D” setting.
Draw Stop:
The draw stop must be positioned
in the set of holes corresponding to the inner
cam. If the set of holes marked “B” are used on
the inner cam, the “B” setting must be used for
the draw stop. Each set of letters has a 65% and
an 80% let off position. The sets of holes are
connected by a line engraved on the cam. The
“A”, “B” and “C” holes are on one side of the
cam and the “D” holes are on the opposite side
of the cam. The “E” and “F” settings are
currently not being used but are for future
development. The draw stop always goes to the
inside of the cam.
Additional ¼” adjustments in the draw
length may also be made by moving the
string to either the “+” post or the “-“
post. Moving the string to the “+” increases
the draw by ¼” and to the “-“ decreases the
draw by ¼”. A bow press must be used to
make this adjustment.
65%
Inner Cam
80%
“D” setting 80%
Factory
Setting
-¼” post
Draw Stop
“D” setting 65%
+¼” post
Page 9

9
Compound Bow
USER’S GUIDE
BROWNING ARCHERY PATENT NUMBERS:
Des. 429,309 4,489,705 4,686,955 4,784,962 B1 4,748,962 4,774,927 4,909,231
5,020,507 B1 5,020,507 5,054,462 5,190,022 5,479,712 5,495,843 5,678,529 5,762,060
5,914,775 5,960,778 6,112,732 6,360,735
SERIAL # OF BOW WHERE PURCHASED
BOW MODEL
YOUR NAME
ADDRESS
CITY STATE ZIP
COUNTRY POSTAL CODE
EMAIL ADDRESS
DATE PURCHASED / / PHONE ( )
IMPORTANT – WARRANTY REGISTRATION
THIS FORM MUST BE RECEIVED BY BROWNING
ARCHERY WITHIN 30 DAYS OF PURCHASE
TO ACTIVATE WARRANTY.
Cut out and mail form to:
Browning Archery WARRANTY REGISTRATION
P.O. Box 5507 • Tucson, Arizona 85703
©BROWNING ARCHERY
Browning Archery assumes no responsibility for spelling,
grammatical or technical errors in this booklet. Browning Archery
reserves the right to change, alter or modify any specifications or
details of the product line without notice.
No portion of this book may be reproduced without the express
written consent of the Browning Archery Marketing Department.
Page 10

GET THE LATEST INFORMATION ON
BROWNING ARCHERY PRODUCTS
YOUR ONLINE SOURCE TO THE
WORLD OF BROWNING ARCHERY
BOWS AND ACCESSORIES!
10
Compound Bow
USER’S GUIDE
BROWNING ARCHERY PROUDLY USES
MOSSY OAK
®
BREAKUP™CAMO
www.browning-archery.com
Page 11

11
Compound Bow
USER’S GUIDE
SERIAL # OF BOW WHERE PURCHASED
BOW MODEL
YOUR NAME
ADDRESS
CITY STATE ZIP
COUNTRY POSTAL CODE
EMAIL ADDRESS
DATE PURCHASED / / PHONE ( )
KEEP YOUR RECEIPT AND BOW INFORMATION IN A SAFE
LOCATION IN CASE OF FIRE, THEFT OR WARRANTY REPAIR.
ATTACH ORIGINAL RECEIPT HERE
NOTE: DO NO
T
SEND THIS PAGE WITH YOUR
ORIGINAL RECEIPT INTO BROWNING ARCHERY
WARRANTY. THIS PAGE IS FOR YOUR RECORDS ONLY.
YOUR PURCHASE RECORD
Page 12

Compound Bow
USER’S GUIDE
PN A826702 REV: 09/22/05
www.browning-archery.com
Browning Archery Tucson, Arizona
BROWNING TRADEMARKS LICENSED FROM BROWNING
STATEMENT OF WARRANTY LIMITED
CONDITIONS OF PRODUCT WARRANTY
BROWNING BOWS:
a) All metal components carry a 100% warranty against manufacturer’s defects to the original owner.
b) Limbs, composite wheels/cams, grips or other bow components will be covered 100% for five years.
After the fifth year, any defective part will be replaced at 50% of replacement cost.
c) Strings and buss cables are not covered under this warranty.
Strings and cables will be inspected for wear and replaced, if necessary, on all bows returned to Browning Archery
for warranty service. A minimal charge will be assessed for all bows returned to Browning Archery for warranty
service. Evidence of abuse, mishandling, or alteration to any Browning Archery product voids any claim to warranty.
Browning Archery cannot be held responsible for injury or product failure resulting from improper use, neglect or
failure to follow maintenance schedules prescribed by Browning Archery.
Browning Archery recommends that all bows undergo string and cable changes every 5,000 shots or every twelve
months (whichever comes first) to maintain Browning Archery warranty coverage. Total arrow weight must be a
minimum of five grains per pound of bow peak draw weight. Over stressing Browning Archery compound bows by
using arrows lighter than the five grain minimum will void the warranty and may cause damage to the bow and
possible injury to the shooter. Browning Archery makes no other claims of warranty either expressed or implied. In
the interest of product improvement and consumer safety, Browning Archery reserves the right to make changes in
product design, color and specifications without notice. In the event a product needs to be returned to Browning
Archery please contact Browning Archery Customer Service for a Return Authorization Number and shipping
instructions. Please send accompanying documentation, such as dated sales receipt showing the purchase date of
the product. If no documentation is received, Browning Archery will utilize the serial number to determine
warranty status.
BROWNING ACCESSORIES:
Browning Archery sights (excluding sight pins), bow quivers (excluding hood liner), and arrowrests carry a 100%
warranty for five years to the original owner.
WWaarrrraannttyy wwoorrkk mmuusstt bbee ppeerrffoorrmmeedd bbyy BBrroowwnniinngg AArrcchheerryy oorr aann aauutthhoorriizzeedd BBrroowwnniinngg AArrcchheerryy ddeeaalleerr..
Contact Browning Archery at 520-838-2004 prior to returning your bow
for service or warranty work to obtain a “Return Authorization Number”.
 Loading...