

Page 1
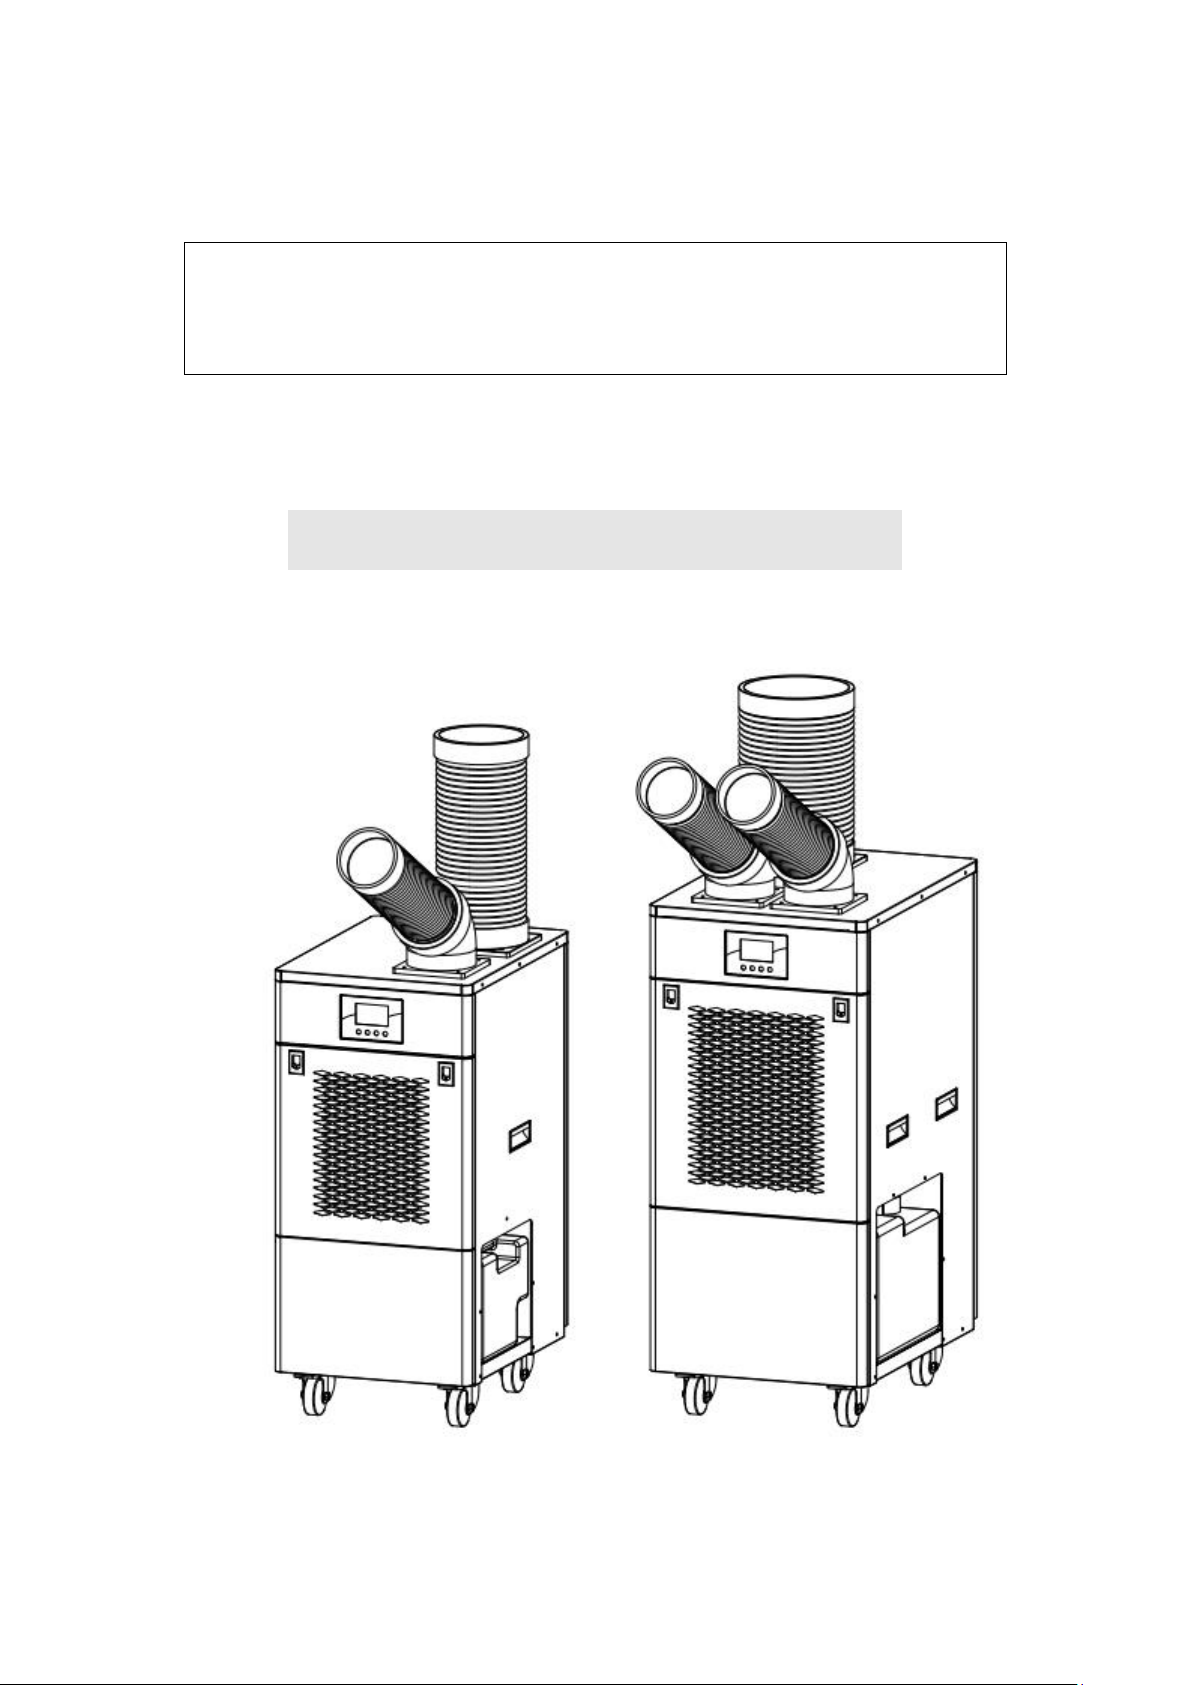
Portable Air Conditioner
INSTRUCTION MANUAL
MCe3.0 and MCe4.0 Units
(Cooling only type)
Page 2
1
INDEX
1 For your safety....................................................................................................................................................... 2
2 Product specifications ........................................................................................................................................... 4
3 Parts ....................................................................................................................................................................... 5
① The control panel ......................................................................................................................................... 5
② Operation panel and instructions .............................................................................................................. 6
③ Function Description. .................................................................................................................................. 6
④ Controller, terminal, temperature sensor.................................................................................................. 7
4 Setup ....................................................................................................................................................................... 7
① Placing the unit ............................................................................................................................................ 7
② Attaching the cool air duct ......................................................................................................................... 8
③ Connecting to a power source .................................................................................................................. 10
④ Trial operation ........................................................................................................................................... 10
5 How to use ............................................................................................................................................................ 10
① Adjusting the direction of airflow ............................................................................................................ 10
② The drain tank ........................................................................................................................................... 10
6 Safety devices ........................................................................................................................................................ 11
7 Maintenance and storage ..................................................................................................................................... 11
① Cleaning the filter ....................................................................................................................................... 11
② External maintenance ................................................................................................................................ 11
③ Before storing the unit ............................................................................................................................... 11
8 Safety inspections ................................................................................................................................................ 12
9 Troubleshooting ................................................................................................................................................... 12
10 After service ....................................................................................................................................................... 13
Please read this manual to the end before commencing operation. Please also store this instruction
manual in a place where it can be used by anyone who needs it at all times.
Thank you for purchasing this product.
Δ Note:
Do not use the unit in places with gases or vapor containing hydrochloric acid, sulphuric acid, or any other
corrosive substances.
Page 3
2
1 For your safety!
Warning: Incorrect use can cause death or severe injury.
● General caution
Caution
Do not use the unit in any other way than is described
in this manual.
**Incorrect use can cause electric shock, short circuit,
water leakage and other accidents.
Do not use the unit on ships or in vehicles.
**Use on ships or in vehicles can result in water
leakage and a short circuit.
● Carrying / Moving the unit
Caution
When carrying, or moving the unit in any other way,
please keep it balanced and adapt your movement to
the shape and weight of the unit at all time.
**If the unit is dropped, there is a risk of injury and
other accidents.
When packing the unit into and out of a vehicle, be
sure to be 2 or more people to ensure safe operation.
**If the unit is dropped, there is risk of physical injury
and damage to the unit.
● Testing and operating the unit
Warning
Do not put wet hands on the plug, the switch or the
electric wires.
**This can cause electric shock and injury.
Do not expose to water or oil.
**Water or oil can cause a short circuit, electric shock
and other accidents.
Earth the unit securely, and use a earth leakage
breaker (bought separately).
**When the unit is broken or has a short circuit, there
is risk of electric shock.
Use a suitable electrical outlet. Do not plug in any
other electrical appliance in the same outlet.
**If other appliances are connected in the same outlet
at the same time, the outlet can overheat and catch
fire.
Please do not operate the unit before carefully reading and understanding the content of this section. The items
treated in this section are to ensure safe use of the unit and to beforehand prevent harm or injury to you and
others. Further, to clarify the severity of the harm and injuries that can result from incorrect use, the items in
this section are divided into two categories; Warnings and Caution. However, since the actions explained under
caution also sometimes can cause severe harm, please follow all instructions in this section carefully regardless
of category.
Warning
Please do not use the unit close to kerosene, gasoline,
thinner, ether, paints or other flammable or explosive
objects.
**This can result in fire or explosion.
Do not use the unit close to dust, gas or steam
containing aluminum, magnesium, titanium or other
flammable substances.
**This can result in fire or explosion.
Page 4
3
Caution
If the unit is not working properly, pull the plug
immediately and turn it in for service or repair.
**There is risk of electric shock or fire caused by a
short circuit.
Do not expose your body to the cold air from the unit
for an extended period of time.
**Prolonged exposure can harm your health. Use the
swivel function, or direct the duct so it does not point
directly at you.
Do not use the unit in vibrating or shaking places, or
on slanting surfaces.
**The unit can unexpectedly move or fall, causing
accidents and injuries.
**Place the unit on a stabilize level surface.
Do not use the unit in places where it is exposed to
water.
**Contact with water can damage the insulation
and cause electric shock, short circuit, fire and other
accident and injuries.
Do not use in places with electrically conductive dust
from Iron, carbon, casting, aluminum etc.
**Electric shock or fire caused by a short circuit can
occur.
If you use the unit in a very dusty environment,
make sure to clean the interior of the unit regularly.
**Electric shock or fire caused by a short circuit can
occur.
Keep away from fire.
**The unit can become deformed, causing short
circuit and possibly fire.
Do not put hands or fingers into the exhaust hole.
**There is risk of injury.
Do not use the unit if the cord or plug is damaged, or
if the plug is loose in the socket.
**Electric shock or fire caused by a short circuit can
occur.
If you use an extension cord, make sure to use one
that meets the specified requirements.
**There is risk of the cord overheating and catching
fire.
Do not let the plug get dirty or get exposed to metal
objects while plugged.
**There is risk of electric shock, short circuit and fire.
Do not put heavy objects onto the electric cord.
**If the cord gets damaged, there is risk of electric
shock and fire.
Do not use the extension cord while its is coiled or
bundled together.
**There is risk of the cord overheating and catching
fire.
**Make sure that the extension cord is extended
before use.
Do not use the unit in other than the stated operation
conditions.
**Since there is risk of electric shock, short circuit and
malfunction, please use the unit within the suitable
range: 18º (50% humidity) ~ 45º (40% humidity).
Do not damage, process, nor bend, pull, twist or
bundle the cord excessively.
**If the cord gets damaged, there is risk of electric
shock or fire.
Do use electricity within the allowed range: 198V 244V.
**There is risk of electric shock and short circuit.
Remove the plug from the electric outlet when the unit
is not in use.
**There is risk of burning and other injuries, electric
shock, fire caused by short circuit etc.
Do not use the unit in places with a lot of cutting oil
or mineral oil.
**They can cause the resin made parts of the unit to
deteriorate, which can result in accidents and injuries.
When you unplug the plug, be sure not to pull it by
the cord, but to pull it out holding the plug directly.
**There is risk of electric shock, short circuit and fire.
Lock the caster wheels with the caster stoppers before
starting to operate the unit.
**The unit can start to move unexpectedly and cause
accidents and injuries.
Do not use the unit in a place with dust that is harmful to the human body.
**If harmful dust sticks to the unit, there is risk of harmful dust dispersal when the unit is in operation.
Page 5
4
Caution
Make sure that the unit is unplugged when in storage.
**There is risk of injury and electric shock.
● Maintenance
Caution
Disassemble, repair and reassemble is not to be
attempted by anyone other than an authorized
repairman/ technician.
**Inadequate or poor handling can result in fire,
malfunction and injuries.
All maintenance must be conducted while the unit is
unplugged.
**There is risk of electric shock and physical injuries.
2 Product specifications
Model
MCe3.0
MCe4.0
Voltage
AC220V/50HZ (Single phase)
AC220V/50HZ (Single phase)
Cooling capacity
3000W
4000W
Air volume
520m³/h
800 m³/h
Rated Power
1200W
1700W
Rated Current
3.6A
7.5A
Noise
50-60dB
50-60dB
Dimensions
400*540*880mm
440*620*1010mm
Cold air hose
1
2
Weight
55kg
75kg
Working temperature
18-45℃
18-45℃
Refrigerant
R290
R290
Remarks
Above refrigerating capacity, power consumption, current operation on the basis of
working temperature 35 ℃ test values.
Page 6
5
3 Parts
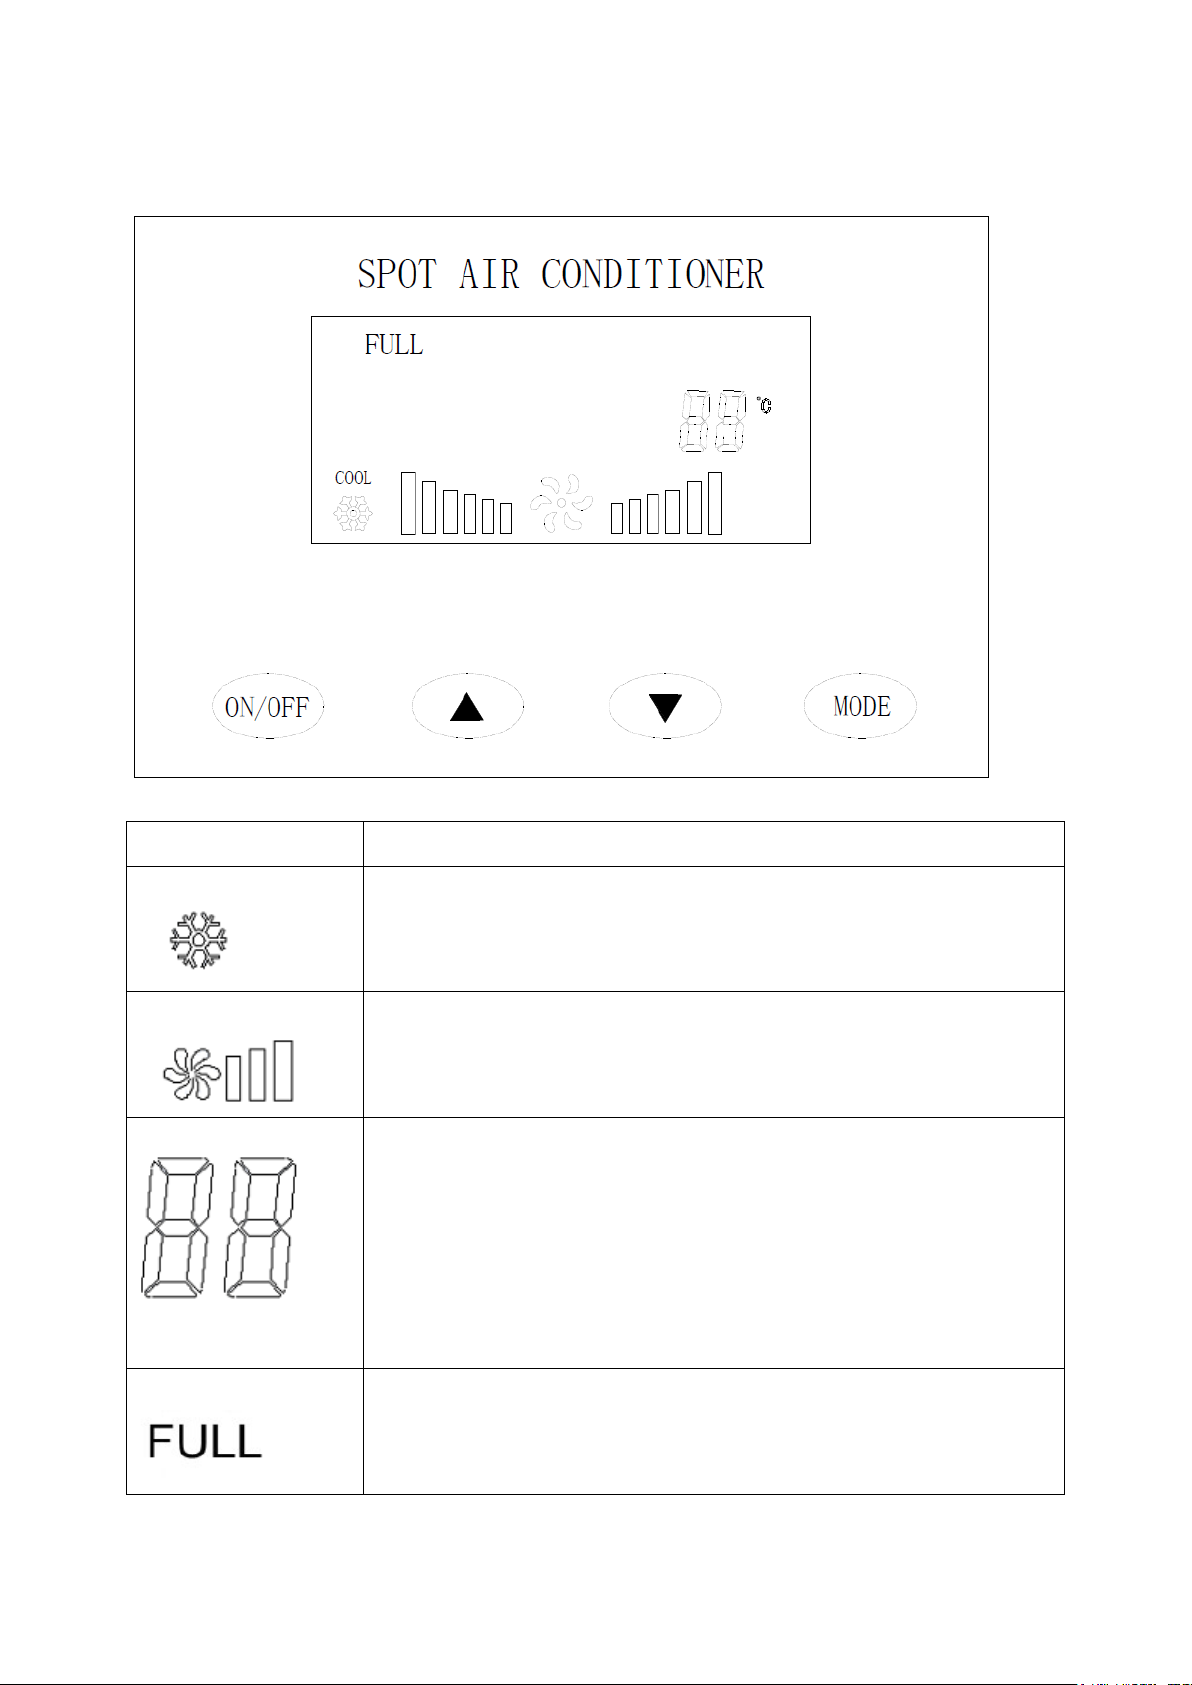
1. The control panel
Display Icon
Description
Refrigeration Icon
COOL
1. This icon will be fixed when compressor is working.
2. This icon will be flashing when compressor is not working
3. This icon will not be displayed when machine turn off.
Wind Speed Icon
1. Switch On: High wind display fast, low wind display slowly.
2. Switch Off: Fixed display.
Digital Icon
1. This icon will be fixed to display the set temperature value, and
words ”setting” is showed on the top of this icon.
2. This icon will be flashing when setting temperature, and after setting, it
needs 10 seconds to be fixed.
3. This icon will not be displayed when machine turn off.
4. This icon could also show current ambient temperature and coil
temperature through combined button, and press MODE button to
exit.
Water Filled Icon
1. Normal situation:Without this icon.
2. When the water tank is full or not placed correctly, this icon flashes.
3. After emptying the water tank and put back in correct position, this icon
disappear, then machine restart.
Page 7
6
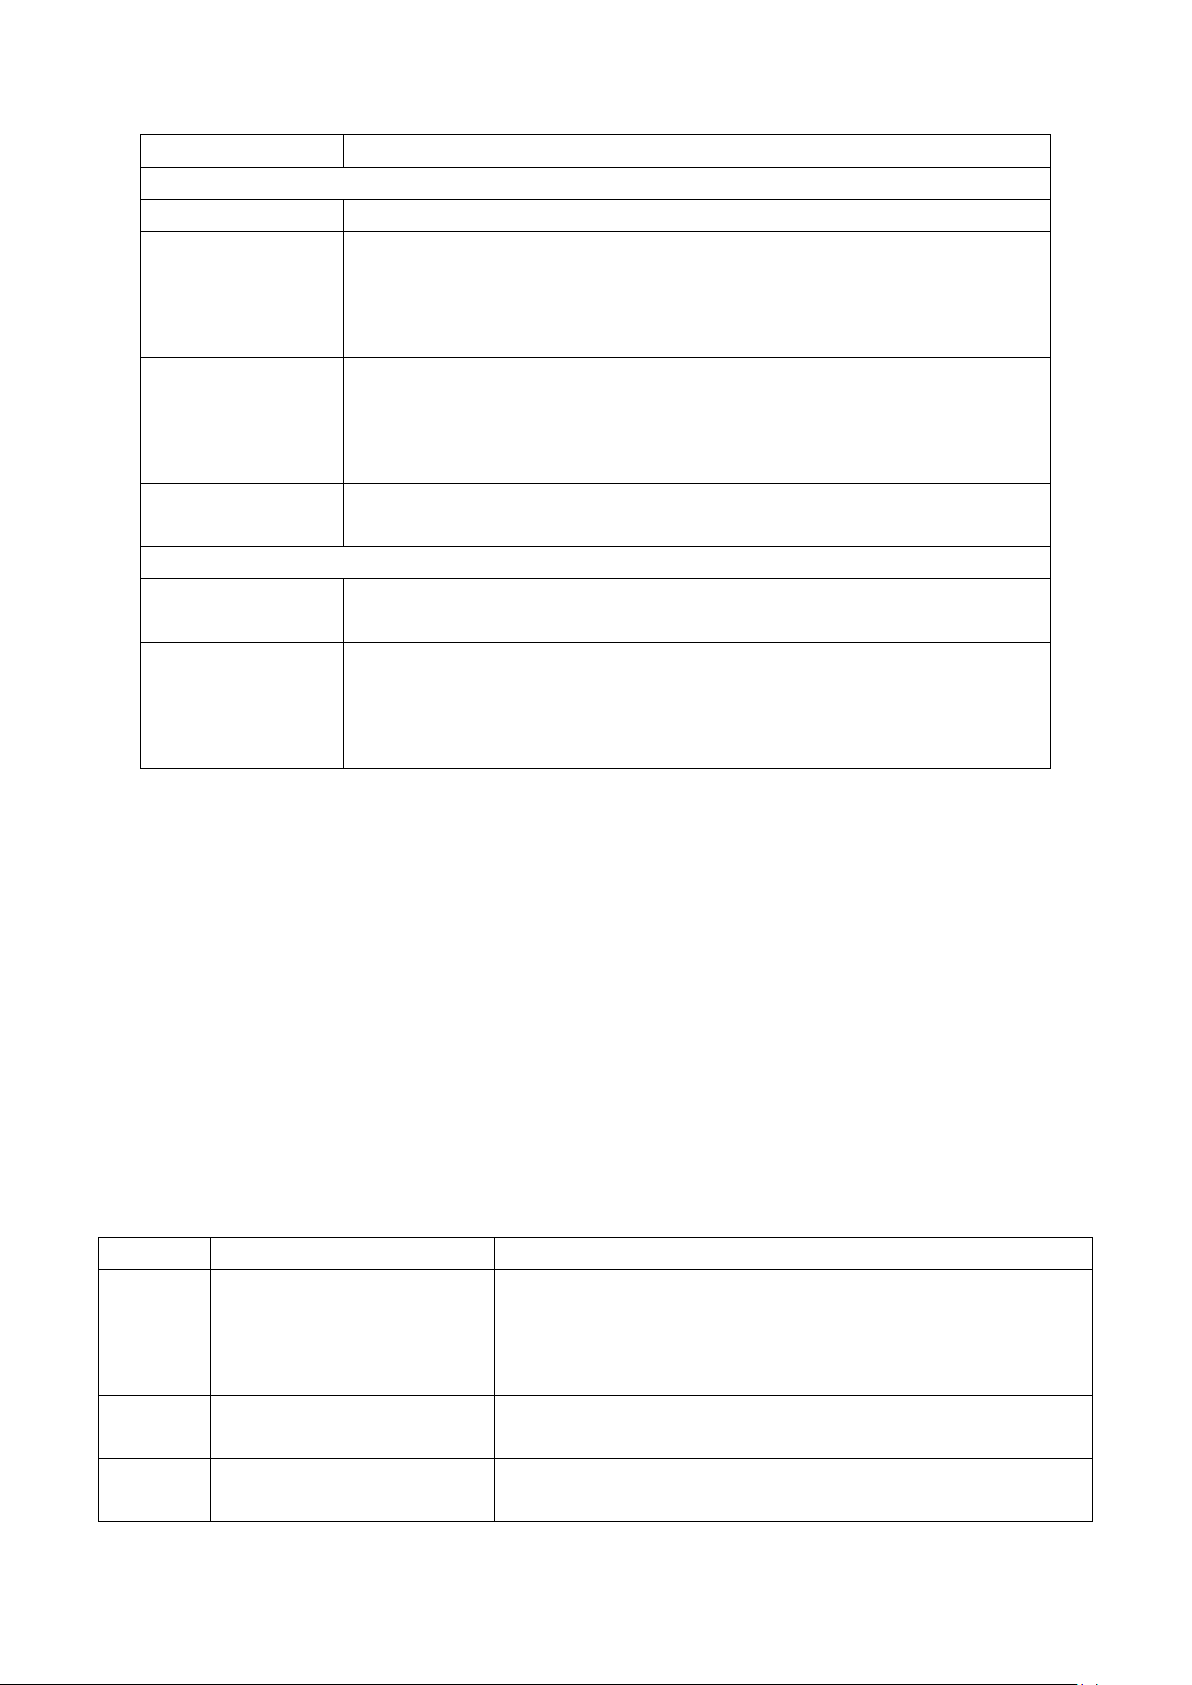
2. Operation panel and instructions:
Button
Instruction of the buttons
1.A single button instruction:
ON/OFF
Conversion between power on and power off after you press each time;
▲
Adjust the different value in different condition:
1. Increase temperature setting value.(Range 10-45℃);
2. Increase wind speed.
3. Increase timing hours.
▼
Adjust the different value in different condition:
1. Decrease temperature setting value(Range 10-45℃);
2. Decrease wind speed.
3. Decrease timing hours.
MODE
Press this button each short while as following cycle:
Setting temperature→Setting wind speed→Setting timer on/off hours→Exit.
2. Combined button instruction
▲+MODE
Display coil temperature (Press these 2 buttons for 3 seconds at same time)
Press MODE button to exit.
▲+▼
Press these two button at the same time for 5 seconds, then turn to button
▼,click once, it appears ON, the A/C will work with the water tank; click ▼
again, it appears OFF the A/C will work with pipe draining. And click
MODE, exit.
3. Function Description:
Temperature control:
Please press MODE button to go into temperature setting, then use ▲ and ▼ buttons to adjust
temperature. When machine reach the set temperature, it will stop working automatically;
Protection function:
⑴ Compressor once stopped, it needs 3 minutes to re-start;
⑵ When water tank is full or not placed correctly, machine will stop work.
Additional function:
Power-off memory function: When the power failure, all settings can be restored.
Fault code table:
Fault code
Fault reason
Related content
E1
Ambient temperature sensor
failure
Checking sensor wiring connection.
Replace new sensor.
Ambient temperature is too high to test, please decrease
ambient temperature.
E3
Coil temperature sensor
failure
Checking sensor wiring connection.
Replace new sensor.
E4
System fault
After 20 minutes, if the compressor is not detected temperature
dropping, need to check the compressor and refrigerant gas.
Page 8
7
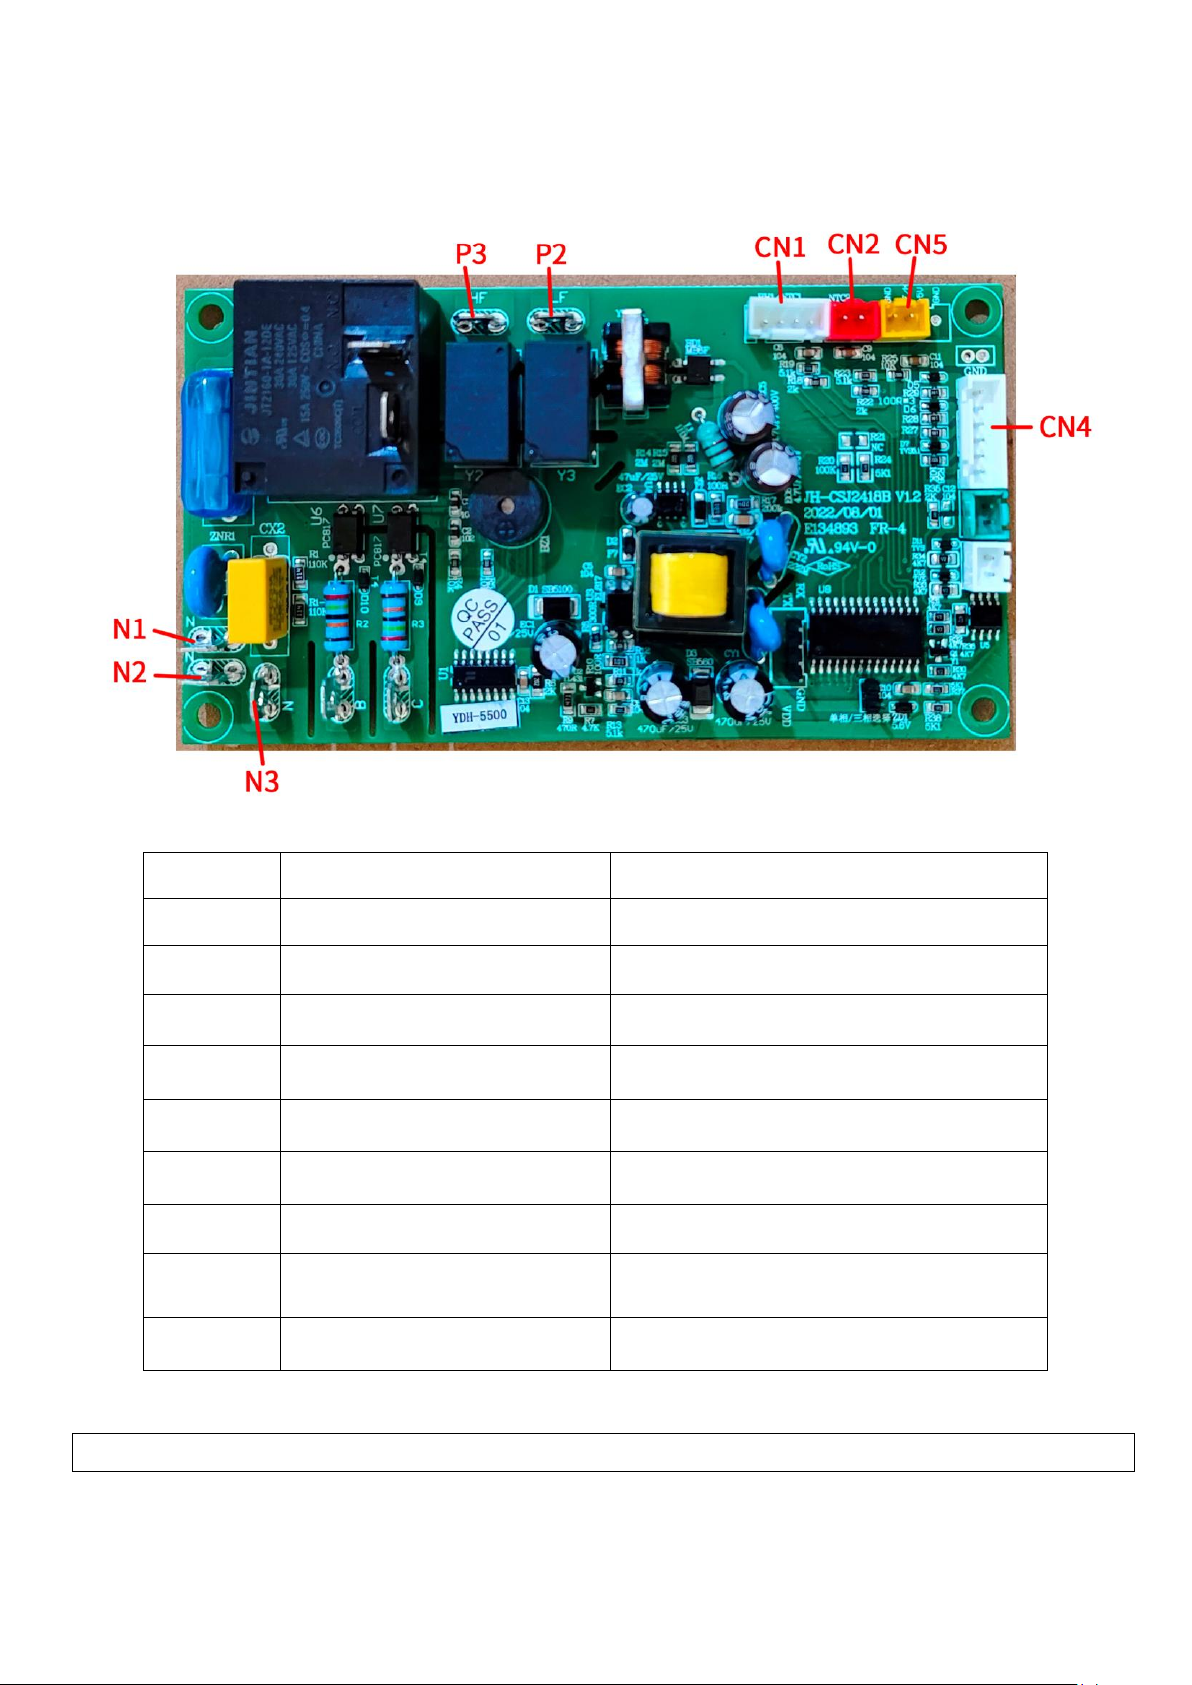
4. Controller, terminal, temperature sensor:
Terminal instructions:
Marking
Specification Model
Introduction
N1,N2, N3
T6.3 Single insert
The AC power zero input/output end.
Relay COM
T6.3 Single insert
The ac power fire line input
Relay N.O
T6.3 Single insert
The compressor output interface
P3
T6.3 Single insert
High speed fan output interface
P2
T6.3 Single insert
Low speed fan output interface
CN1
B4B-XH White slot
The temperature sensor input interface
CN2
Red slot
Detection systems sensor input interface
CN4
B9B-XH White slot
From the main board to display panel
interface.
CN5
Yellow slot
Water level sensor input interface
4 Setup
Important: To ensure safety, read section one “1 For your safety!” first.
1. Placing the unit
Make sure that the unit is placed so that there is nothing blocking the front side filter, the cool air duct or the hot air
Page 9
8
exhaust duct.
There is only an air inlet on the front side, and the only air outlets are on the top, so the unit can be placed with the
other sides directly against a wall, in a corner or in any other confined space.
Note: Do not use the unit in places containing hydrochloric acid, sulphuric acid or any other corroding gas or steam.
** There is risk of gas leak or deterioration of performance.
2. Attaching the cool air duct
(1) Attaching the duct elbow
I. Insert the duct elbow into the elbow holder, fitting the attachment notch to the black mark on the inside of the
holder.
II. After you have inserted the duct elbow into the holder, fasten it so does not come loose by turning it to either side.
(2)Attaching the cold air duct
① Insert the cold air duct into the duct elbow, fitting the attachment peg on the duct to the attachment notch in
the elbow, then turn it to the right.
② Point the duct in the direction you want the air to blow in, fixing the duct elbow with your other hand.
Note: Make sure that the duct elbow is correctly inserted into the holder. If the duct elbow is not attached
evenly, reattach it correctly.
(3)Removing the duct elbow
① Remove the cool air duct from the elbow.
② Turn the elbow until the attachment notch is aligned with the insertion mark.
③ Remove the duct elbow by pulling it straight up from the holder.
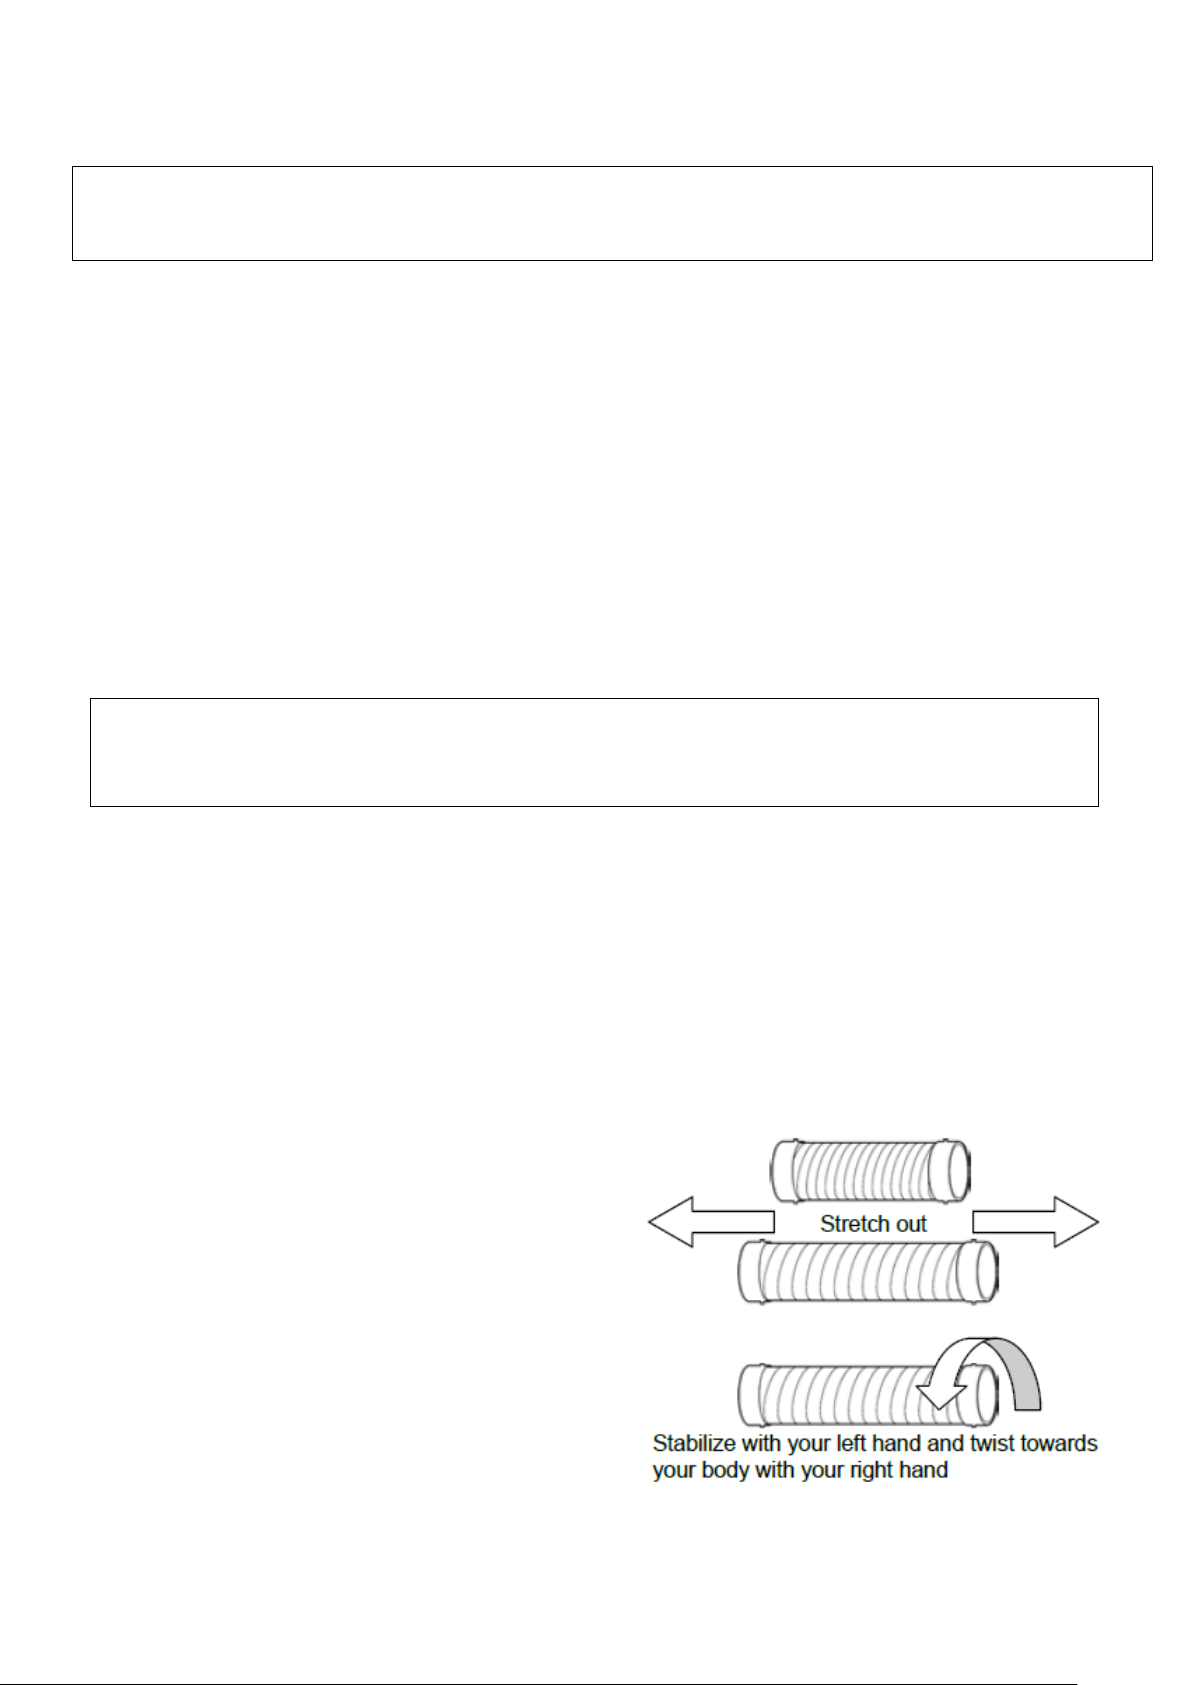
● Adjusting the firmness of the cold air duct
If the cold air duct is too loose, it will just droop down,
not maintaining the desired direction of the cool airflow.
If this is the case,
tighten the duct in the following manner.
① Grab both ends of the duct and stretch it until it is
fully extended.
② Make the duct tighter by twisting the right end of the
Duct one or two times, fixing the left end of the duct
with your other hand. Now the duct should maintain any
shape desired by the user.
Page 10
9
Note: ① If something is dropped into the exhaust air vent, do not use a stick or similar object to try to
retrieve it. You may damage internal parts and cause malfunction.
② Do not block the exhaust air vent in any way. This will obstruct the function of the unit and cause
malfunction.
(Optional)Cool air duct extension
The cool air duct extension (Ø 125mm, length 5m) can be used when the unit can not be placed close to the
workplace where it is needed.
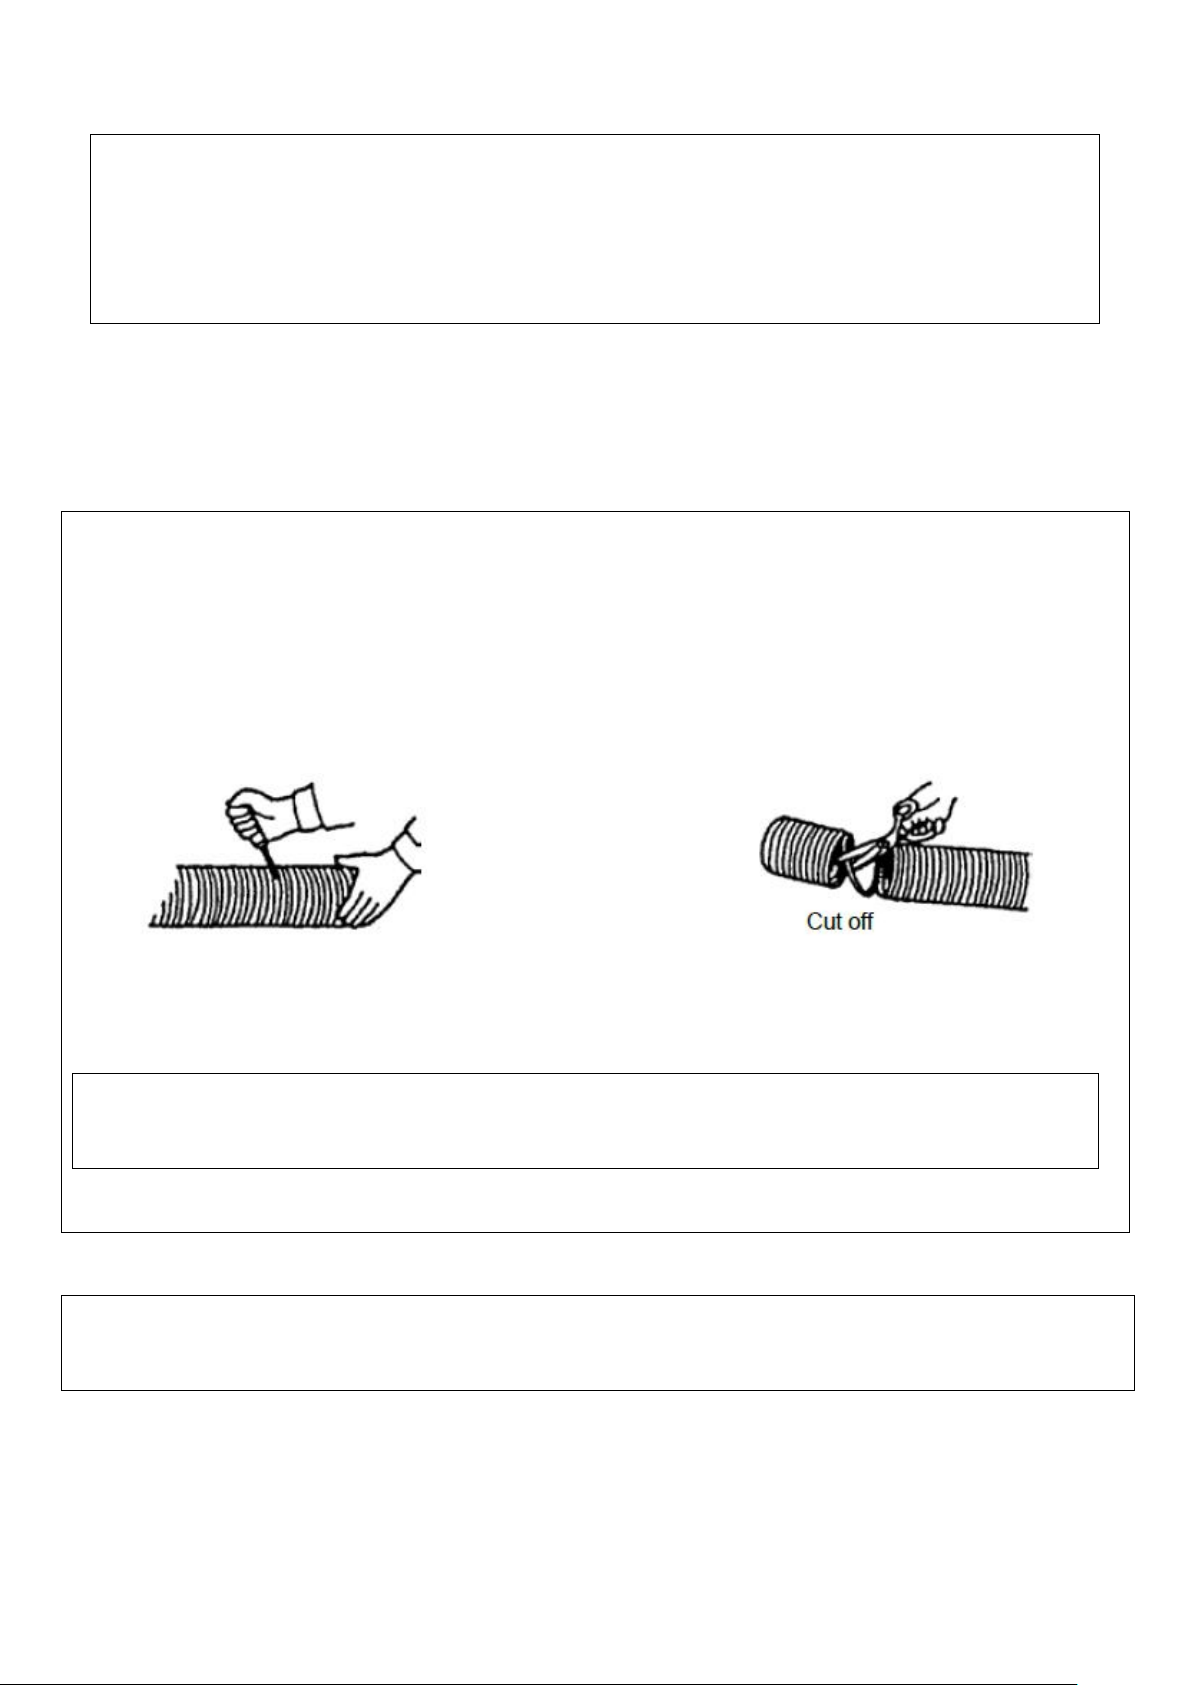
● Cutting the cool air duct extension
Cut the cool air duct extension according to required length in the following way.
① Make a hole in the duct extension where you want ② Cut the duct extension all the way around
to cut it with a flat screwdriver or similar tool. using scissors or a side cutter.
● Changing the diameter
You can reduce the diameter of the cool air duct by twisting it to the left, thereby increasing the air flow velocity.
Note Be careful not to make the duct extension too narrow. This could cause deterioration of performance
and malfunction.
Note: Do not use the swivel function when the duct extension is attached.
** This will damage the swivel device.
Page 11
10
3. Connecting to a power source
Note Do not connect any other electrical appliance to the same power source that the unit is connected to.
(1)Electrical wiring
Make sure that no other electrical appliance is connected do the same power source as the unit.
(2)The circuit breaker
Use a suitable circuit breaker for the items as instructed.
(3)Connecting the unit to a power source
Insert the plug into the power source.
4. Trial operation
Turn on the power switch, the airflow adjustment switch and the swivel switch to make sure that everything works
properly.
① The properties of all the switches are explained further in the next section “How to use”.
② If the unit does not work properly, please consult page 12 “Trouble shooting” for further guidance.
5 How to use
Important: To ensure safety, read section one “ 1 For your safety!“ first.
1. Adjusting the direction of airflow
The cool air duct can be adjusted, so please operate the unit after having pointed it in the desired direction.
2. The drain tank
(1)The drain tank collects the condensed water
Part of the condensed water that appears in the upper cold part of the heat exchanger on the front of
the unit vaporizes when it passes through the warm lower part on the way down to the drain tank. In
certain environments almost all water will vaporize, leaving nothing for the drain tank. This does not
mean that the unit is not working.
Note: ①The amount of condensed water that gathers in the drain tank varies depending on the
temperature and humidity of the environment where the unit is used, as well as how clean or dirty the
heat exchanger is. The amount of condensed water increases remarkably during rainy seasons and
other times with high humidity, so be extra attentive at these times.
② When the drain tank becomes full the water will start spilling out on the floor, so check the amount
of water in the drain tank frequently and empty it before it gets full.
③ Since the condensed water in the drain tank will spill when the unit is moved, be sure to empty the
tank first.
Page 12
11
(2)Draining the condensed water with a hose
You can drain the condensed water directly to a drain or other desired place by attaching a hose onto the drain pipe.
The inside diameter of the hose should be 16mm.
① Remove the drain tank.
② Attach the hose to the drain pipe, located on the upper left side of the drain tank compartment.
③ Place the other end of the hose in a drain or other suitable place.
6 Safety devices
The compressor overload relay
① The overload relay protects the compressor from over currents and overheating engine.
② The compressor overload relay is automatic. If the overload relay starts to work frequently (and the unit stops
working), please take steps to eliminate the cause of the problem. If the cause is left unfixed, the unit can break down
or malfunction.
Please consult “Trouble shooting“ on page 13 for more information.
7 Maintenance and storage
Important: To ensure safety, read section one “1 For your safety!” first.
1. Cleaning the filter
① Remove the filter by pulling it straight up.
② Clean off the dust from the filter with a vacuum cleaner.
③ If the filter is dirty, it should be cleaned with water.
④ Reinstall the filter into the unit after it has dried completely.
2. External maintenance
Wipe the ducts and other external parts clean with a dry piece of cloth, or a cloth with diluted neutral detergent.
Note Be very careful if you use thinner, benzene,
chemicals or polishing powder or similar substances when cleaning the unit. You can easily damage the coating
Or cause malfunction.
3. Before storing the unit
① Clean the filter and the exterior of the unit.
② Empty the drain tank and let it dry completely.
③ Turn on “Ventilation” for approximately one hour to let the internal parts dry completely.
④ Cover the unit with a suitable cover to prevent dust from gathering.
⑤ Store all the parts in a secure place so that nothing gets lost or damaged.
⑥ Clean the electric cord before storing it.
* Regarding cleaning of the heat exchanger, the sirocco fan and other internal parts, please consult with your local
dealer. If you clean the internal parts before storage, the unit can be used immediately afterwards.
Page 13
12
Note: Store the unit in a vertical standing position. Do not store it lying down.
** If the unit is stored lying down, the compressor or other parts can break down or malfunction.
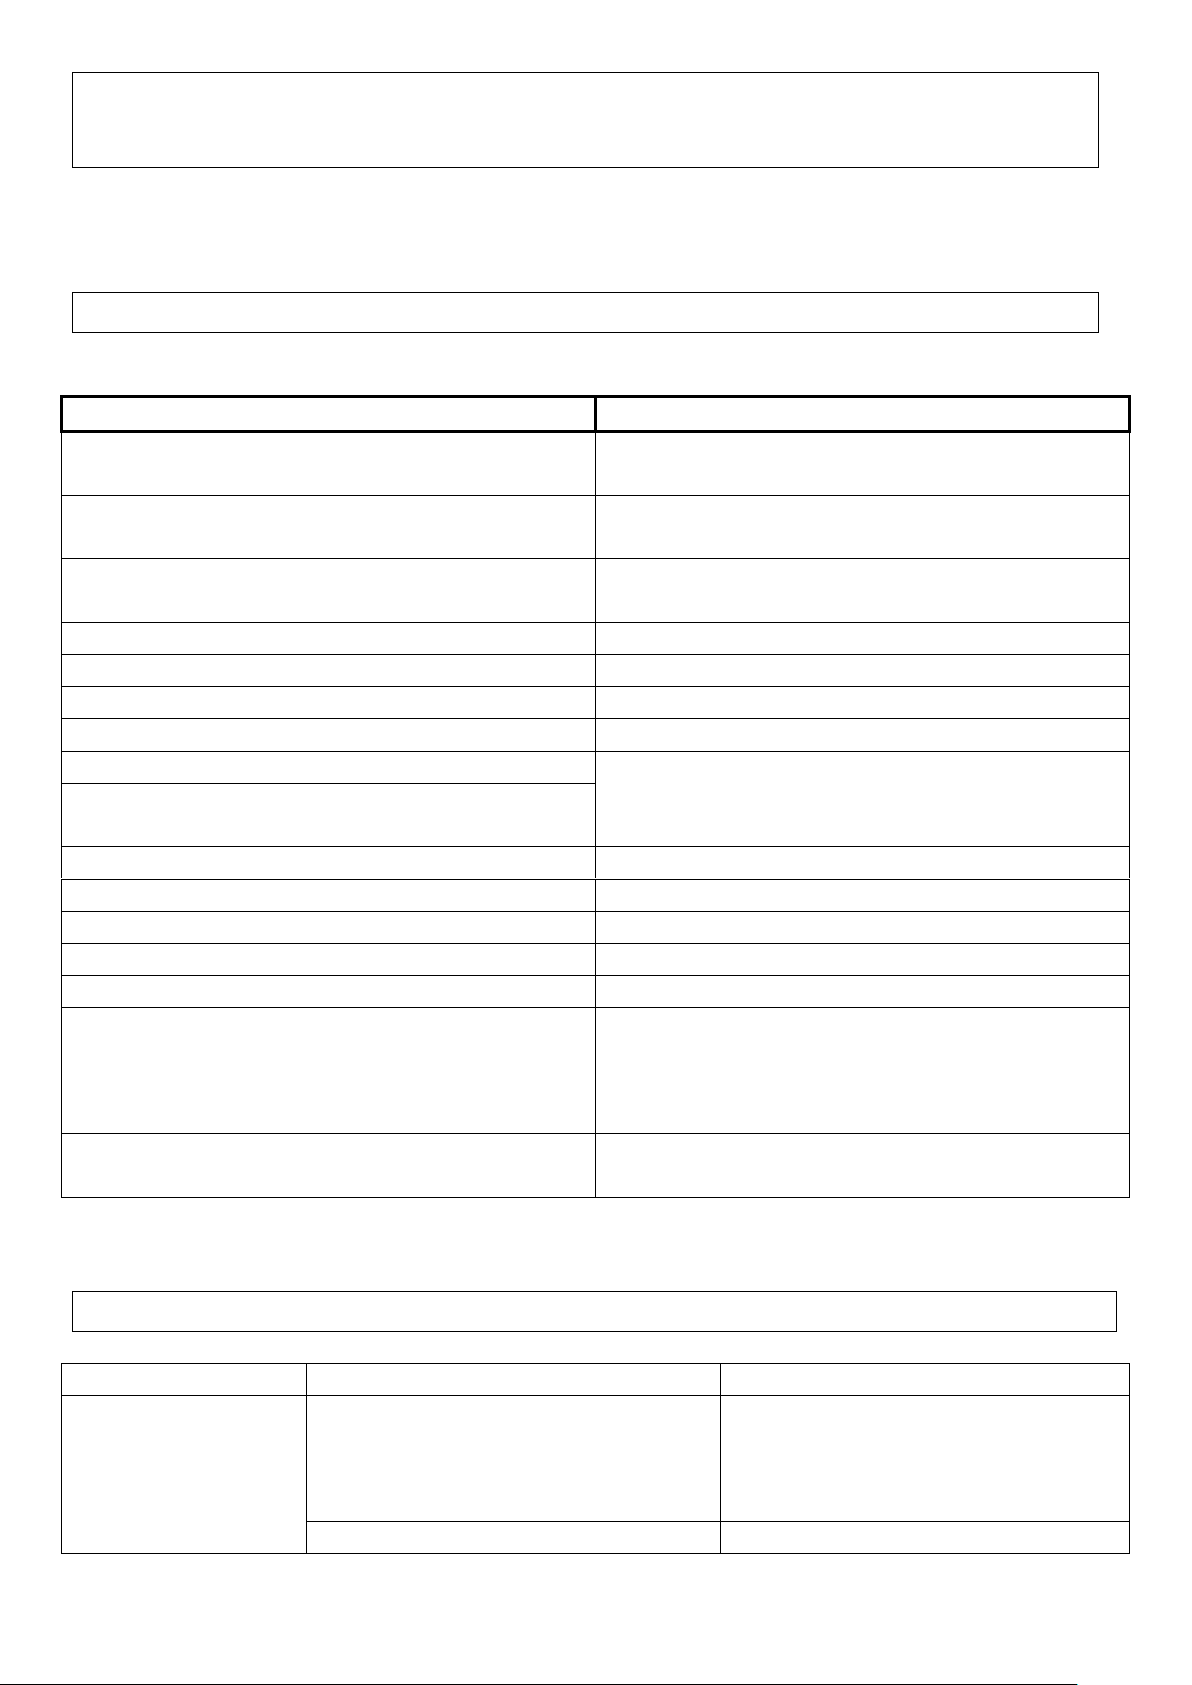
8 Safety inspections
Important: To ensure safety, read section one “1 For your safety!” first.
To ensure safe operation, please perform the following inspections before use.
Inspection
Measure
Is the electric cord damaged or deformed?
Change the cord after having consulted with an
authorized electrician.
Is the plug deformed or broken?
Change the plug after having consulted with an
authorized electrician.
Is the cord and the power source connected
correctly?
If not, connect them correctly.
Are the ducts deformed or torn?
Change them for new ones.
Is the filter clogged with dust or dirt?
Clean the filter.
Is the filter installed correctly?
If not, install it correctly.
Is the filter torn or damaged?
Change it for a new one?
Is the fin of the heat exchanger broken?
Hand the unit in for inspection and repair at your
local retailer.
Is the heat exchanger fin covered with dust or
greasy dirt?
Is the filter or cool air duct blocked?
Remove the obstructing object.
Is the drain tank installed correctly?
If not, Install it correctly.
Is the drain tank damaged?
Change it for a new drain tank.
Are the caster wheels worn out?
Change the caster wheels.
Are the caster stoppers working normally?
If not, change the caster wheels.
Are all the switches and buttons working properly?
If not, consult page 13 of this manual and follow
the instructions. If the problem remains even after
that, please consult with your local dealer regarding
inspection and repair.
Is the unit emitting strange sounds or smells?
Please consult with your local dealer regarding
inspection and repair.
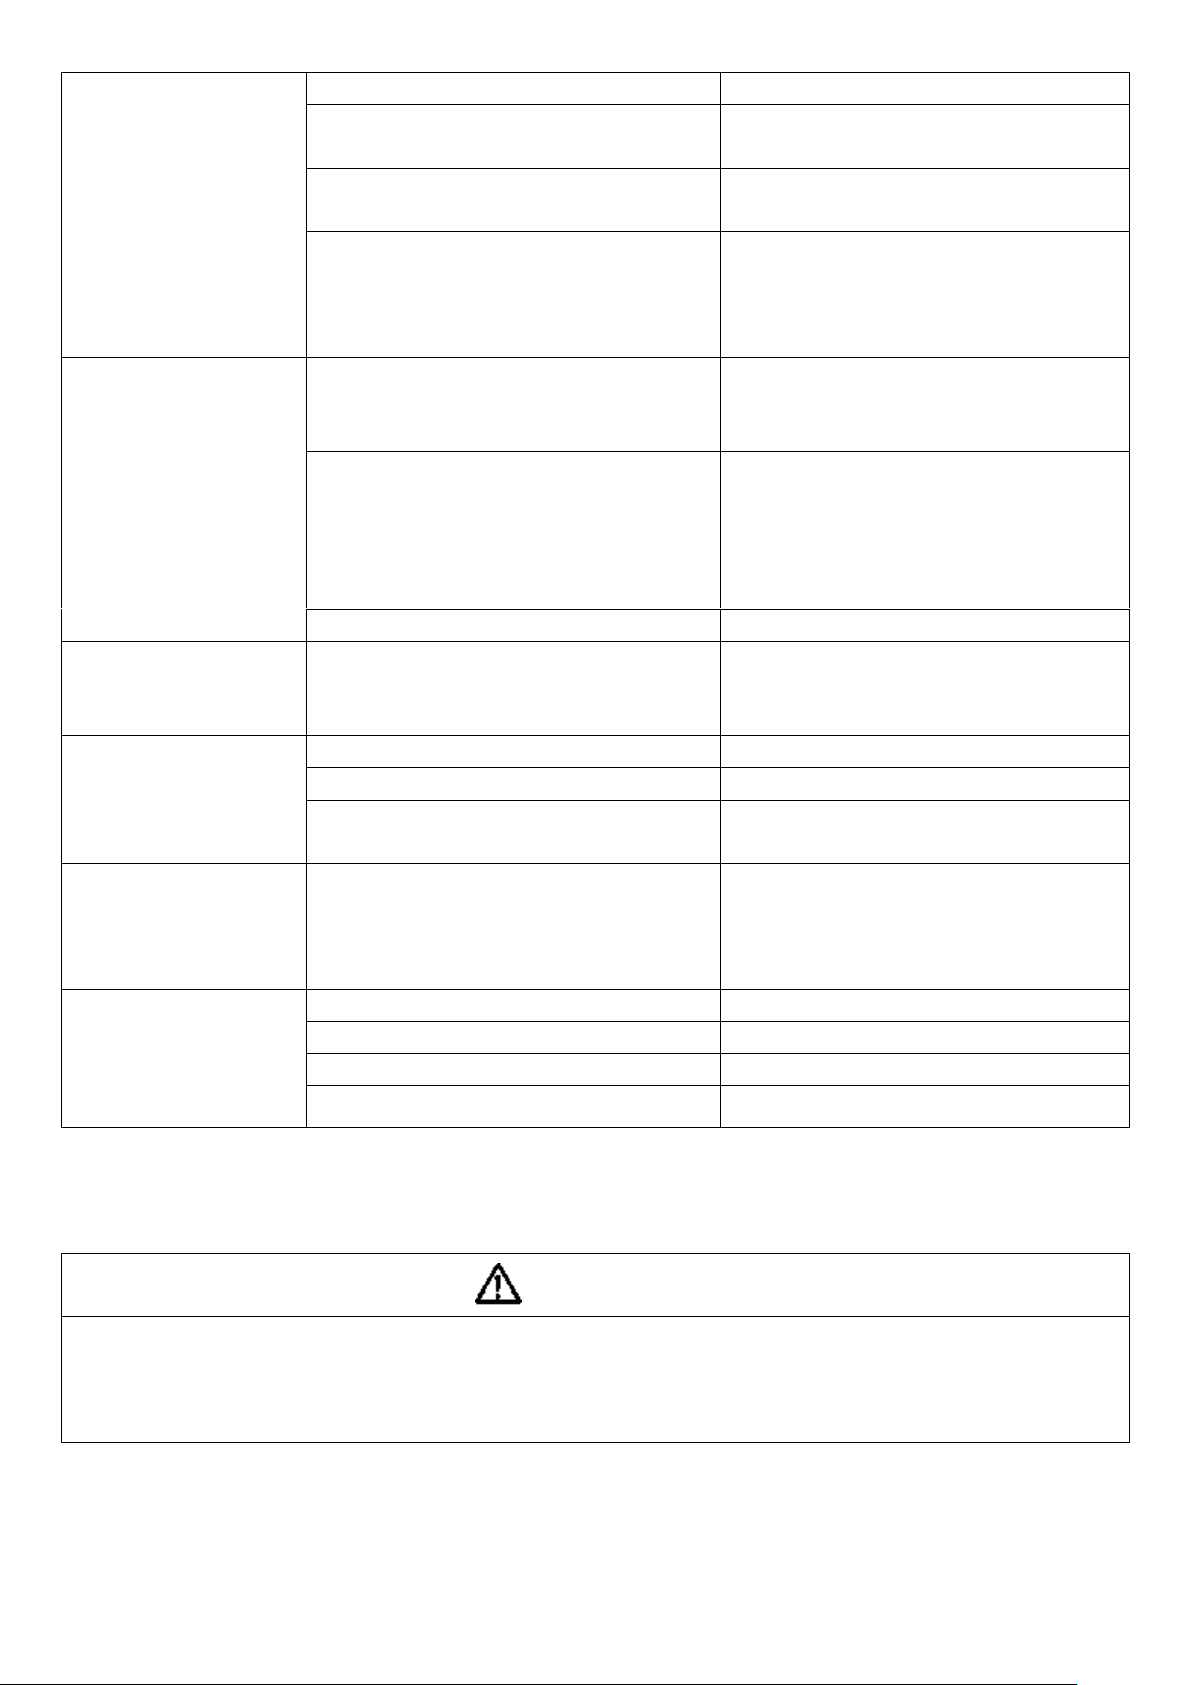
9 Troubleshooting
Important: To ensure safety, read section one “1 For your safety!” first.
What’s wrong?
What to check
Measure
I can not turn on the
Is there power supply?
(The power could be off because
of blackout etc.)
Turn the power switch to “STOP” until
the power is back on again. If the switch is
turned to “COOL” when the power comes
back on, the fuse might blow.
Is the plug correctly connected
Insert the plug correctly into the outlet.
Page 14
13
unit
in the outlet?
Is the electric cord broken or
damaged in any other way?
Fix the cord if possible, otherwise
change it for a new one.
Is the electric fuse blown or the
breaker down?
Please consult with an electrician or your
local retailer.
Is the overload relay running?
The unit will restore itself automatically.
Wait for the unit to be restored, turn the
switch to “STOP”, wait 3 minutes and then
restart the unit.
The fuse blew or the
breaker is down
Is the capacity of the breaker
sufficient?
Make sure that no other appliance is
connected to the breaker or the branch
circuit.
Did you keep the cooler turned
off for three minutes?
If you have turned off the unit, make sure
to wait at least 3 minutes before turning
on the “COOL“ again. (This does not
apply to “AIR”, which can be turned on
immediately.)
Is the voltage too low?
Consult with your electric company.
The unit turns itself on
and off frequently (The
overload relay)
Is the voltage too low?
Consult with your electric company.
The air from the unit
is not cool
Is the power switch not set to“COOL”?
Set the switch to “COOL“.
Is the filter or cold air duct blocked?
Remove the obstructing object.
If the filter clogged with dust or
dirt?
Clean the filter.
The cooling effect is
weak
Is the room temperature too high?
(Higher than 45ºC is too high)
Improve the ventilation to lower the
temperature of the room, or use the unit in
a room that correspond to required
conditions: 25ºC - 45ºC.
Water is leaking from
the unit
Is the drain tank damaged?
Repair it or change it for a new one.
Is the drain pipe clogged?
Clean the drain pipe.
Is the drain tank full?
Empty the drain tank.
Is the drain tank placed correctly?
If not, place it in its correct position.
█ If the problems do not get resolved by the above suggested measures, please consult with your local dealer.
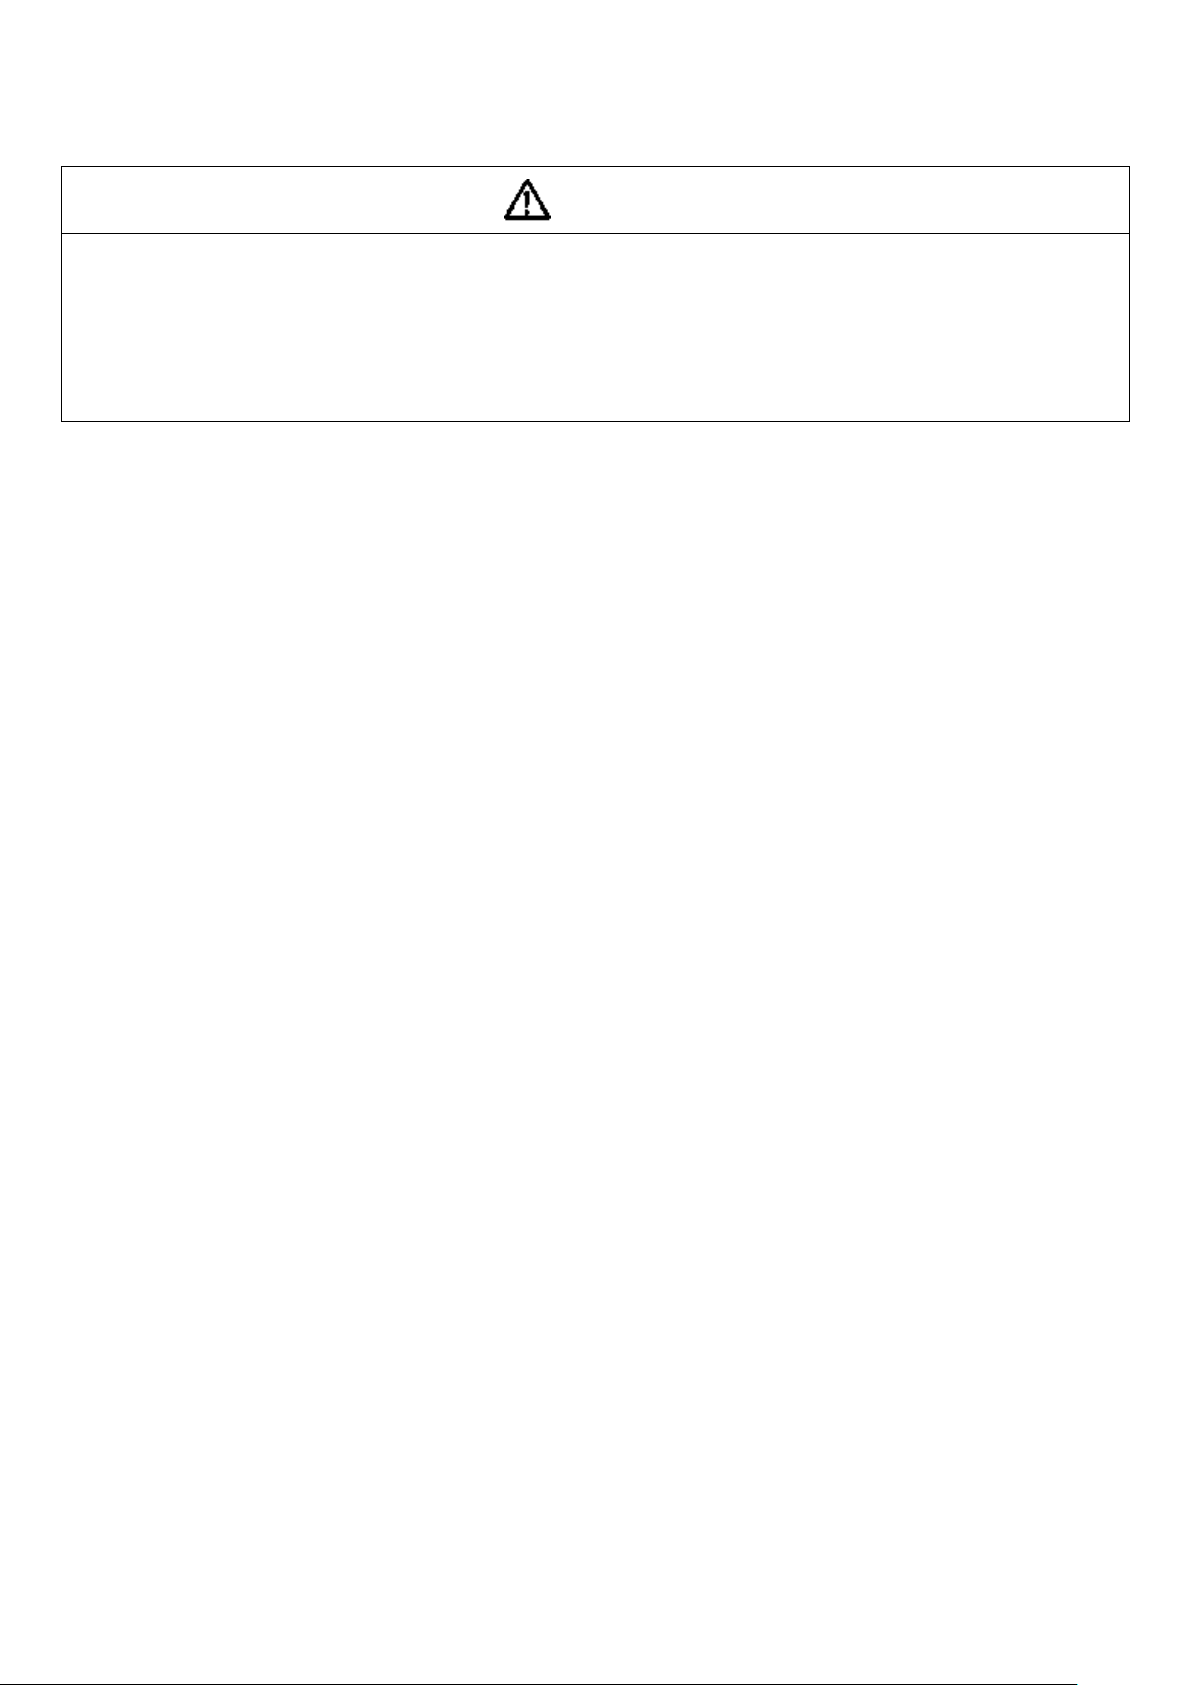
10 After service
Caution
Please use standard parts for maintenance and repair.
**If you use spare parts other than standard parts, there is risk that they will not fit properly and can cause
malfunction or accidents.
**The same condition applies also to the case if spare parts are used in products from other companies.
● Repair
Page 15
14
For questions regarding acquiring spare parts or regarding repair, please contact the store where you purchased the
unit, after having prepared the product number, the manufacturer’s serial number and the date of purchase.
For your safety
**If you intend to use the unit to preserve food products, animals and plants, precision machines, art objects etc.,
please check the specific requirements of those objects carefully before you commence. Inaccurate or inappropriate
use can cause the quality of the objects to deteriorate.
**Sometimes it will be necessary to perform installation work and electric work to the unit. In these cases, contact
your local dealer or an experienced professional. If the works are performed inadequately, there is risk of electric
shock, fire or accidents.
 Loading...