

Page 1
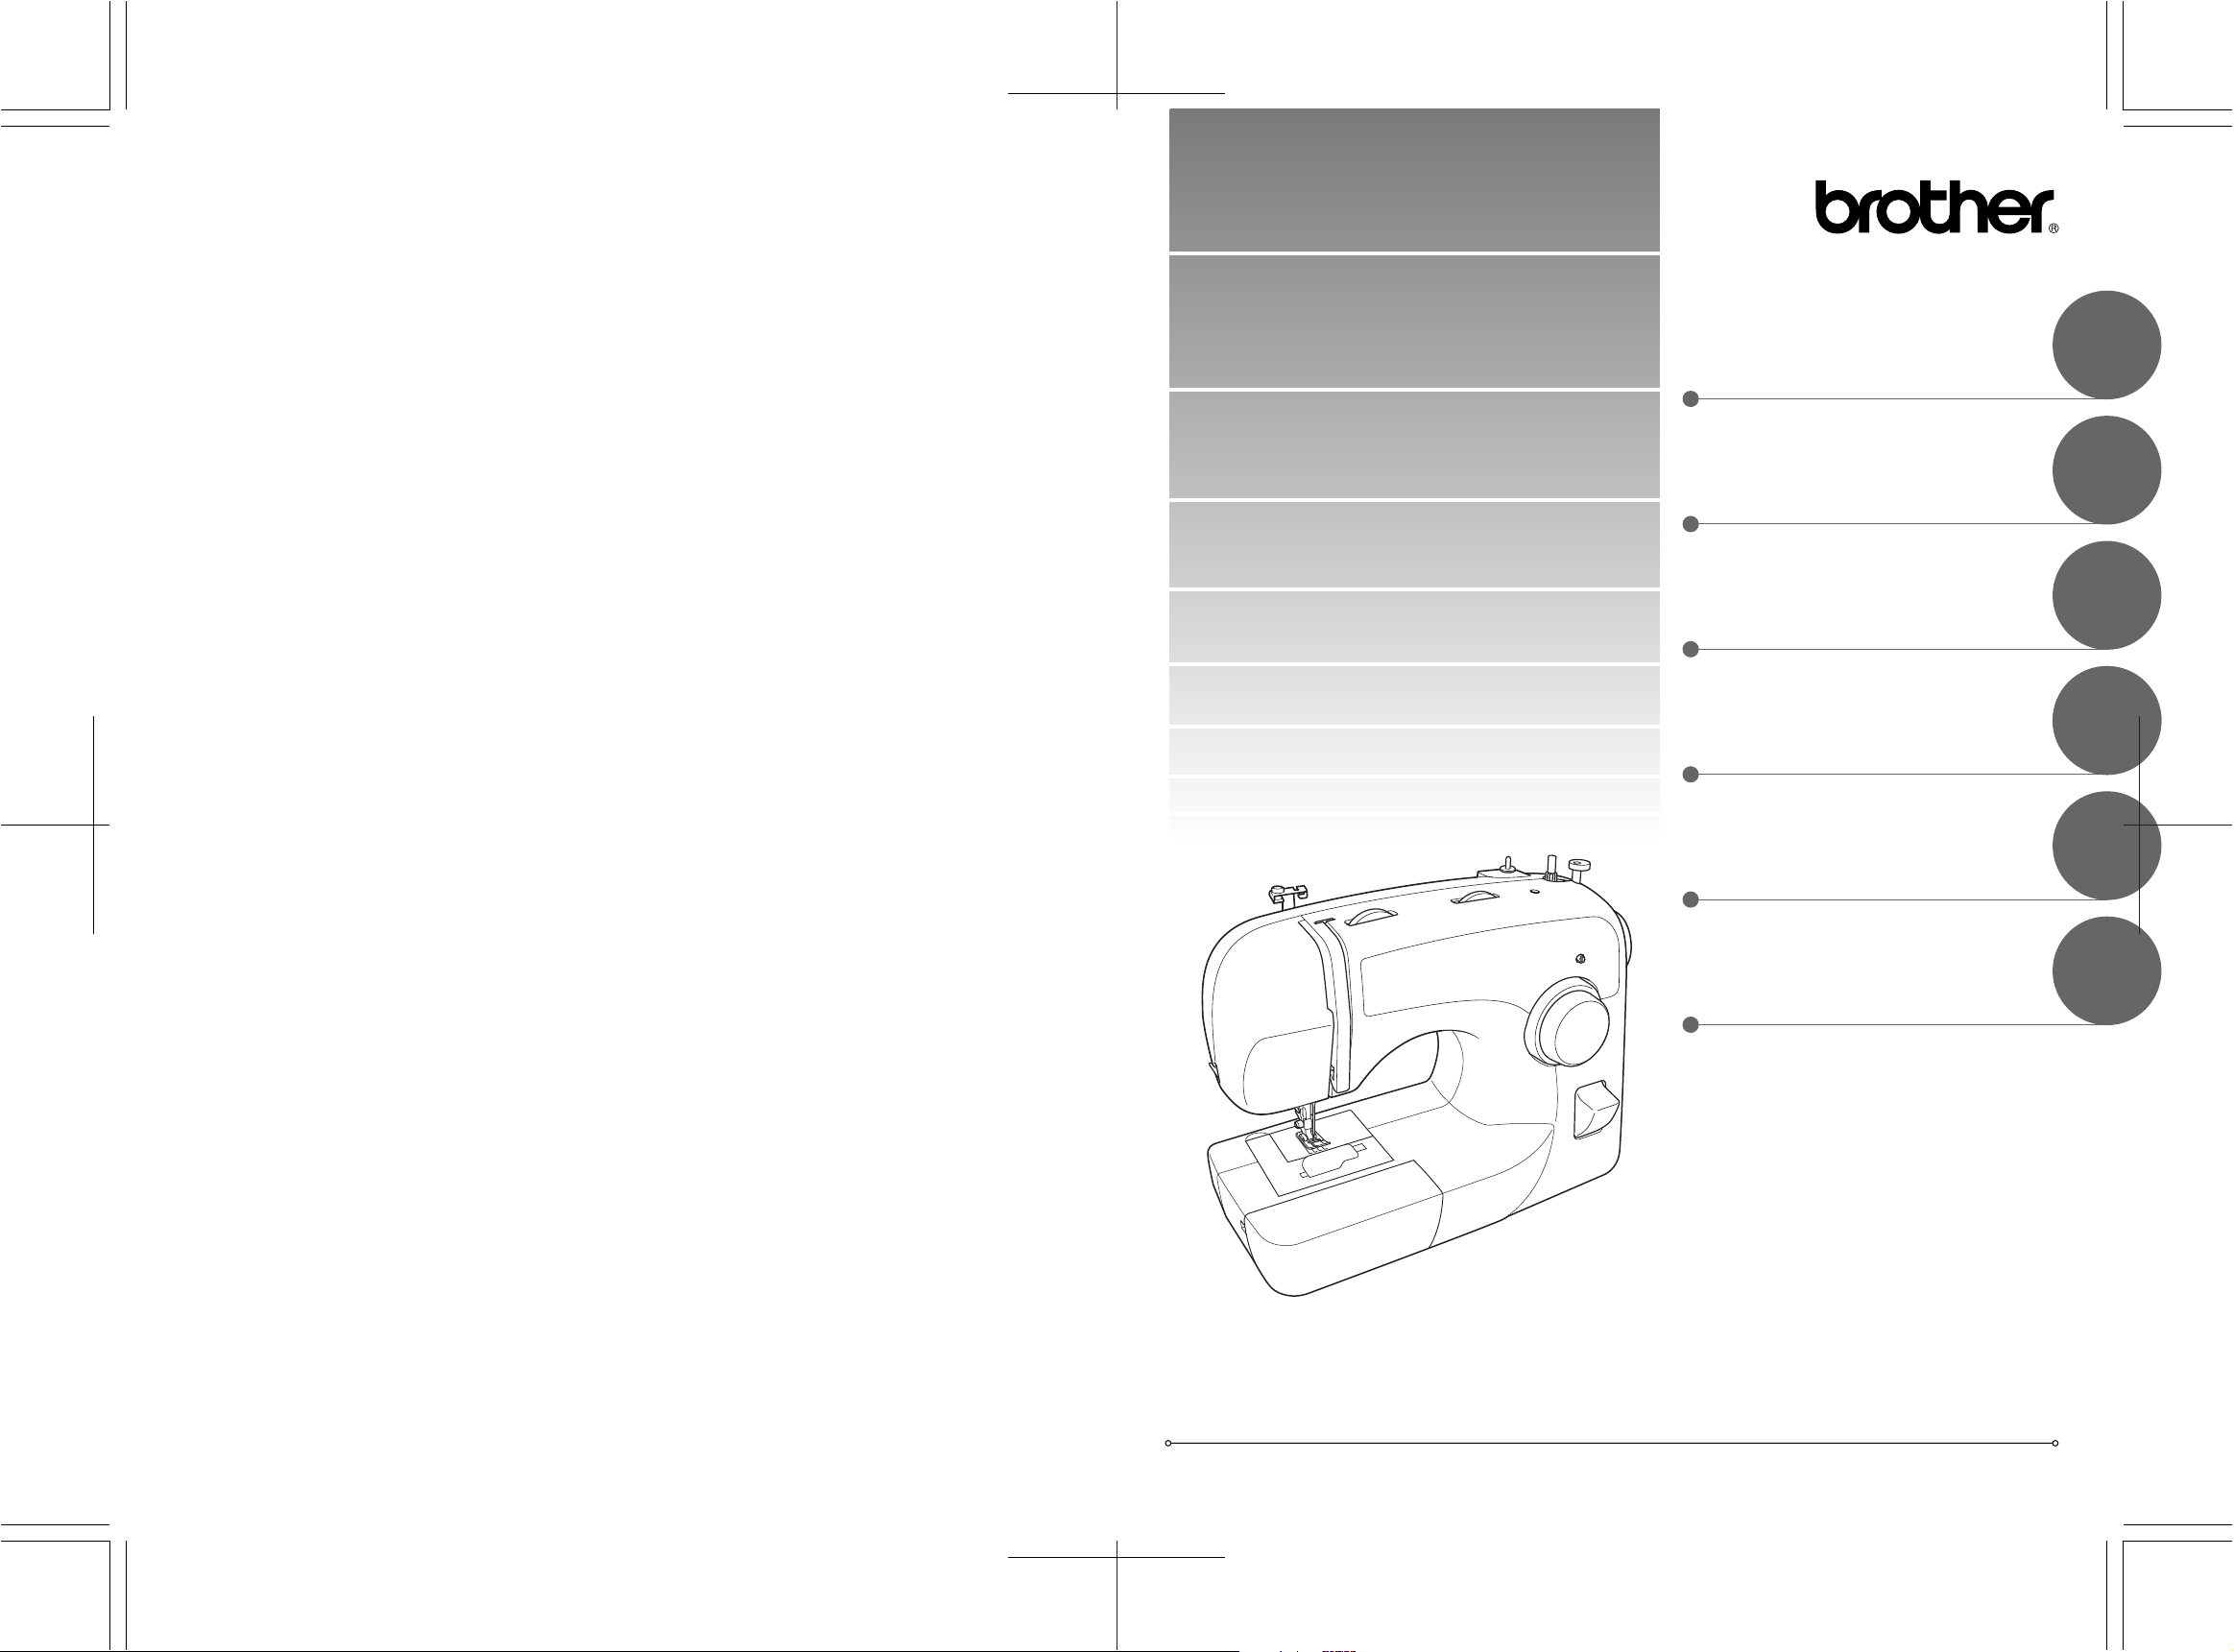
XL_brother_cover_Eng
KNOWING YOUR
SEWING MACHINE
1
STRAIGHT AND
ZIGZAG STITCHING
2
BUILT-IN STITCHES
3
SEWING BUTTONHOLES
AND BUTTONS
4
USING ATTACHMENTS
AND APPLICATIONS
5
APPENDIX
6
ENGLISH
885-S25/S27
XC6771-021
Printed in China
Operation Manual
Page 2
XL2600_precaution_Cover.fm Page 1 Thursday, November 4, 2004 9:57 PM
IMPORTANT SAFETY INSTRUCTIONS
When using this machine, basic safety precautions should always be taken, including the following:
Read all instructions before using.
DANGER - To reduce the risk of electric shock:
1. The machine should never be left unattended while plugged in. Always unplug the machine
from the electrical outlet immediately after using and before cleaning.
2. Always unplug the machine before you change the light bulb.
Replace the bulb with same type rated 15 watts.
WARNING - To reduce the risk of burns, fire, electric shock, or injury to persons:
1. Do not allow this machine to be used as a toy. Close attention is necessary when the machine is
used by or near children.
2. Use this machine only for its intended use as described in this manual. Use only accessories
recommended by the manufacturer as contained in this manual.
3. Never operate this machine if it has a damaged cord or plug, if it is not working properly, if it has
been dropped or damaged, or dropped into water. Return the machine to the nearest authorized
dealer or service center for examination, repair, electrical or mechanical adjustment.
4. Never operate the machine with any air openings blocked. Keep ventilation openings of the
machine and foot control free from the accumulation of lint, dust, and loose cloth.
5. Never drop or insert any object into any opening.
6. Do not use outdoors.
7. Do not operate where aerosol (spray) products are being used or where oxygen is being
administered.
8. To disconnect, turn the machine switch to the symbol “{” position which represents off, then
remove plug from outlet.
9. Do not unplug by pulling on cord. To unplug, grasp the plug, not the cord.
10. Keep fingers away from all moving parts. Special care is required around the machine needle.
11. Always use the proper needle plate. The wrong plate can cause the needle to break.
12. Do not use bent needles.
13. Do not pull or push fabric while stitching. It may deflect the needle, causing it to break.
14. Switch the machine to the symbol “{” position to turn it off when making any adjustments in the
needle area, such as threading needle, changing needle, threading bobbin, or changing presser
foot, and the like.
15. Always unplug the machine from the electrical outlet when removing covers, lubricating, or
when making any other user servicing adjustments mentioned in the instruction manual.
16. This sewing machine is not intended for use by young children or infirm persons without
supervision. (For Australia and New Zealand only)
17. Young children should be supervised to ensure that they do not play with this machine.
SAVE THESE INSTRUCTIONS
This machine is intended for household use.
Page 3
XL2600.book Page 1 Thursday, November 4, 2004 9:46 PM
FOR USERS IN THE UK, EIRE, MALTA AND CYPRUS ONLY
If this machine is fitted with a three-pin non-rewireable BS plug then please read the following.
IMPORTANT
If the available socket outlet is not suitable for the plug supplied with this equipment, it should be cut
off and an appropriate three pin plug fitted. With alternative plugs an approved fuse must be fitted in
the plug.
NOTE: The plug severed from the main leads must be destroyed as a plug with bared flexible cords is
hazardous if engaged in a live socket outlet. In the event of replacing the plug fuse, use a fuse
approved by ASTA to BS 1362, i.e. carrying the mark, rating as marked on plug.
Always replace the fuse cover. Never use plugs with the fuse cover omitted.
WARNING: DO NOT CONNECT EITHER WIRE TO THE EARTH TERMINAL WHICH IS MARKED
WITH THE LETTER ‘E’, BY THE EARTH SYMBOL OR COLOURED GREEN OR GREEN AND
YELLOW.
The wires in this main lead are coloured in accordance with the following code:
Blue Neutral
Brown Live
As the colours of the wiring in the main lead of this appliance may not correspond with the coloured
markings identifying the terminals in your plug, proceed as follows:
The wire which is coloured blue must be connected to the terminal which is marked with the letter
‘N’ or coloured black or blue.
The wire which is coloured brown must be connected to the terminal which is marked with the letter
‘L’ or coloured red or brown.
1
Page 4
XL2600.book Page 2 Thursday, November 4, 2004 9:46 PM
UNPACKING/REPACKING INSTRUCTIONS
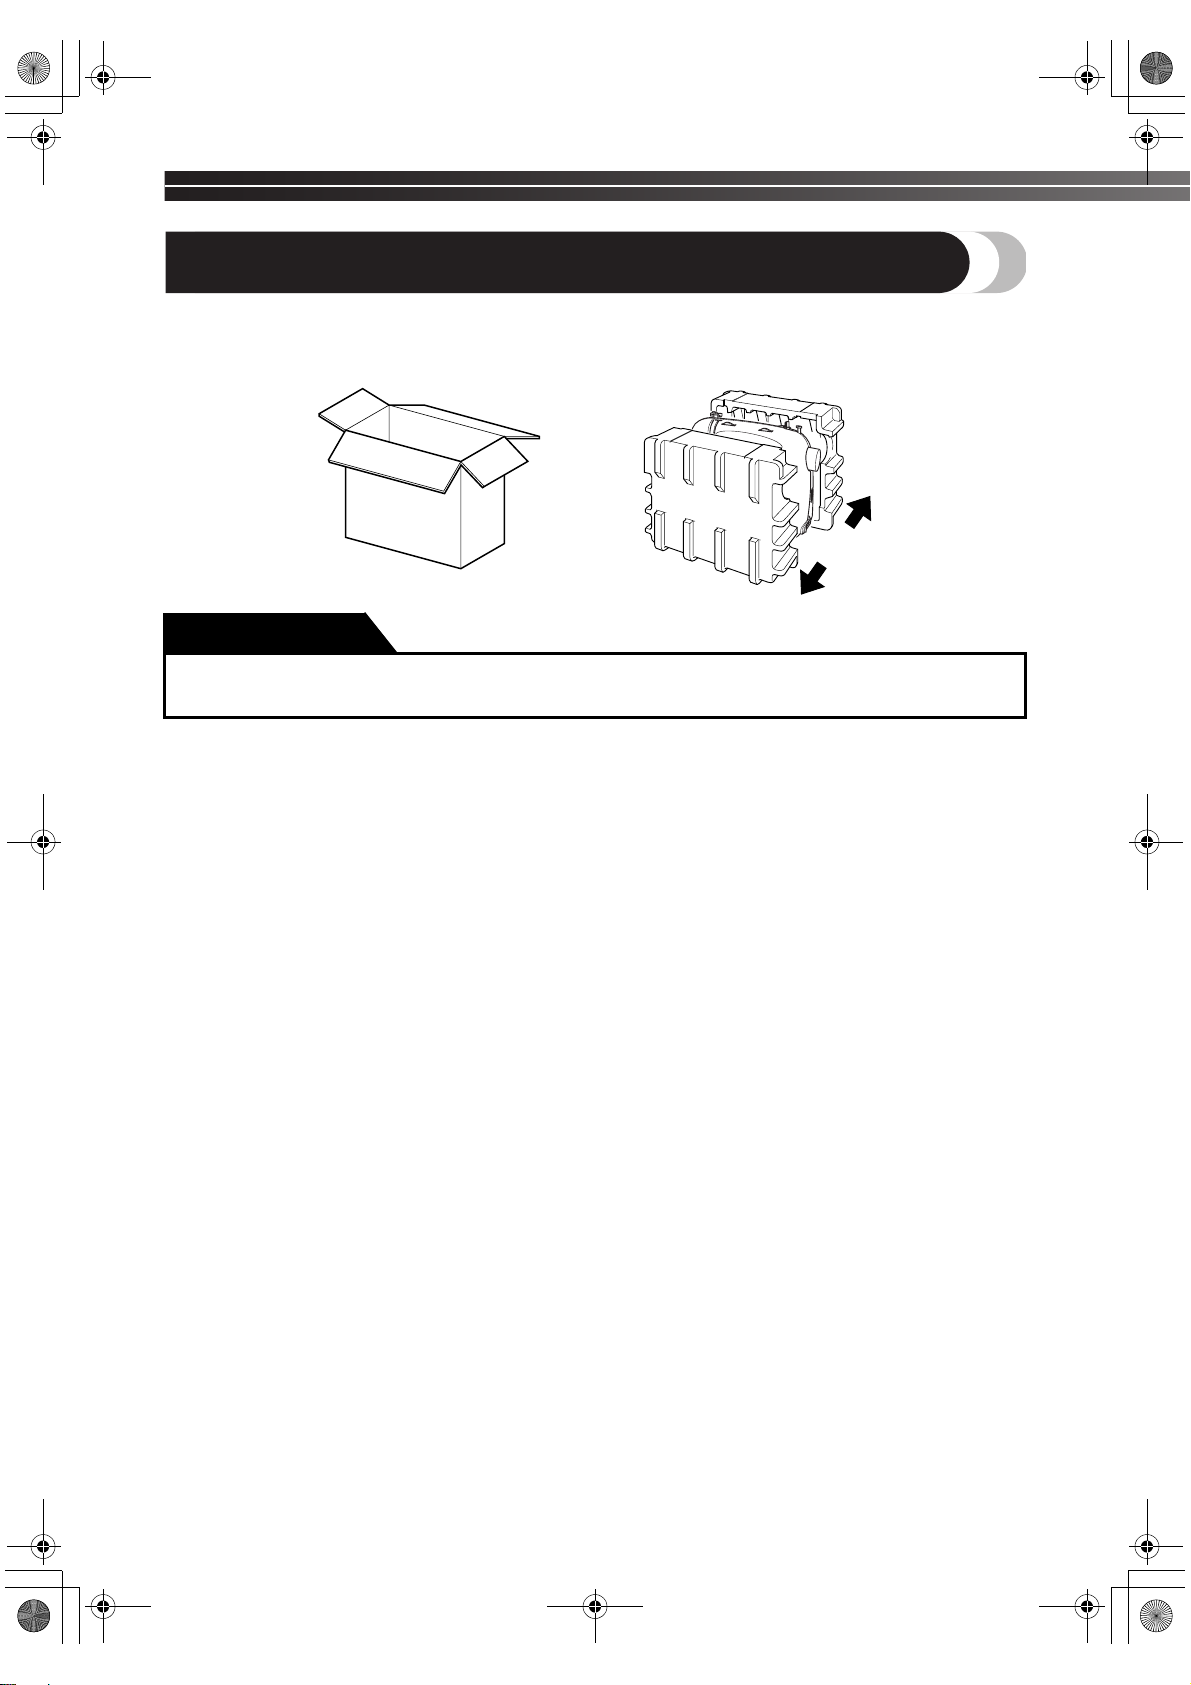
Keep the carton and packing materials. You may have to take or send the machine to be repaired. If you do not
pack it properly, or do not use the right packing material, the machine could be damaged.
Please follow the diagram below to unpack and repack the machine.
IMPORTANT
● This packing material is designed to prevent damage. Save this packing material if you need to
take or send this machine to be repaired.
PLEASE READ THESE INSTRUCTIONS BEFORE YOU USE THE MACHINE.
To use the machine safely
1. Make sure you watch the needle carefully while you are sewing. Do not touch the handwheel,
thread take-up lever, needle, or other moving parts.
2. Turn off the main power and unplug the cord in the following circumstances:
• When you have stopped using the machine
• When you are replacing or removing the needle or any other part
• If there is a power failure while you are using the machine
• If you are checking or cleaning the machine
• Leaving the machine unattended
3. Do not store anything on the foot controller.
4. Plug the machine directly into the wall. Do not use extension cords.
To give your machine a longer life
1. Do not store this machine in direct sunlight or in high humidity conditions. Do not use or store
the machine near a heater, iron, halogen lamp or other hot objects.
2. Use only mild soaps or detergents to clean the case. Benzene, thinner, and scouring powders
can damage the case and machine, and should never be used.
3. Do not drop or hit the machine.
4. Always consult this manual before you replace or fit presser feet, the needle, or any other parts to
make sure you fit them correctly.
To repair or adjust the machine
If the machine breaks down or needs adjustment, first follow the troubleshooting table in the
Appendix to inspect and adjust the machine yourself. If the problem is still there, consult your local
authorized dealer.
For additional product information and updates, visit our web site at www.brother.com.
The contents of this manual and specifications of this product are subject to change without notice.
2
Page 5

XL2600.book Page 3 Thursday, November 4, 2004 9:46 PM
CONTENTS
1. KNOWING YOUR SEWING MACHINE ..........................................................5
THE MAIN PARTS ............................................................................................................... 5
ACCESSORIES ..................................................................................................................... 6
Optional Accessories ........................................................................................................................................ 6
USING YOUR SEWING MACHINE .....................................................................................7
Connecting Plugs .............................................................................................................................................. 7
Main Power and Sewing Light Switch ............................................................................................................... 8
Foot Controller .................................................................................................................................................. 8
Checking the Needle ......................................................................................................................................... 8
Replacing the Needle ........................................................................................................................................ 8
Changing the Presser Foot ................................................................................................................................. 9
Flat Bed Attachment ........................................................................................................................................ 10
Using a Free-arm Style .................................................................................................................................... 10
THE CONTROLS ............................................................................................................... 11
Pattern Selection Dial ...................................................................................................................................... 11
Patterns and Stitch Names ............................................................................................................................... 12
Stitch Length Dial ............................................................................................................................................ 14
Stretch Stitching .............................................................................................................................................. 15
Stitch Width Dial ............................................................................................................................................ 15
Reverse Sewing Lever ...................................................................................................................................... 15
THREADING THE MACHINE ............................................................................................16
Winding the Bobbin ........................................................................................................................................ 16
Lower Threading ............................................................................................................................................. 18
Lower Threading (for models equipped with a quick-set bobbin) .................................................................... 19
Upper Threading ............................................................................................................................................. 21
Using the Needle Threader (for models equipped with a needle threader) ....................................................... 22
Drawing up the Lower Thread ......................................................................................................................... 24
Sewing with a Twin Needle ............................................................................................................................ 24
Thread Tension ............................................................................................................................................... 25
FABRIC, THREAD, AND NEEDLE COMBINATIONS ......................................................... 26
2. STRAIGHT AND ZIGZAG STITCHING .........................................................27
Please Read Before Sewing ............................................................................................................................. 27
Straight Stitching ............................................................................................................................................. 27
Zigzag Stitching .............................................................................................................................................. 28
3. BUILT-IN STITCHES ......................................................................................29
Blind Hem Stitching ........................................................................................................................................ 29
Shell Tuck Stitching ......................................................................................................................................... 29
Elastic Stitching ............................................................................................................................................... 30
Double Action Stitching .................................................................................................................................. 31
Patchworking .................................................................................................................................................. 31
Overedge Stitching .......................................................................................................................................... 31
Feather Stitching ............................................................................................................................................. 32
Triple Zigzag Stretch Stitching ......................................................................................................................... 32
Decorative Stitching ........................................................................................................................................ 33
4. SEWING BUTTONHOLES AND BUTTONS ..................................................34
Making a Buttonhole ....................................................................................................................................... 34
Adjusting Buttonholes ..................................................................................................................................... 35
Sewing Buttons ............................................................................................................................................... 36
3
Page 6
—
XL2600.book Page 4 Thursday, November 4, 2004 9:46 PM
——————————————————————————————————————————————————————————————
5. USING ATTACHMENTS AND APPLICATIONS .............................................37
Zipper Insertion ............................................................................................................................................... 37
Gathering ........................................................................................................................................................ 38
Darning ........................................................................................................................................................... 38
Appliqués ........................................................................................................................................................ 39
Monogramming and Embroidering ................................................................................................................. 39
OPTIONAL ACCESSORIES ................................................................................................41
Using the Walking Foot ................................................................................................................................... 41
Using the Quilting Foot ................................................................................................................................... 42
Using the 1/4-inch Quilting Foot ..................................................................................................................... 43
6. APPENDIX .....................................................................................................44
MAINTENANCE ................................................................................................................44
Changing the Light Bulb .................................................................................................................................. 44
Cleaning ......................................................................................................................................................... 44
Troubleshooting .............................................................................................................................................. 46
INDEX ............................................................................................................................... 49
4
Page 7
XL2600.book Page 5 Thursday, November 4, 2004 9:46 PM
1
KNOWING YOUR SEWING MACHINE
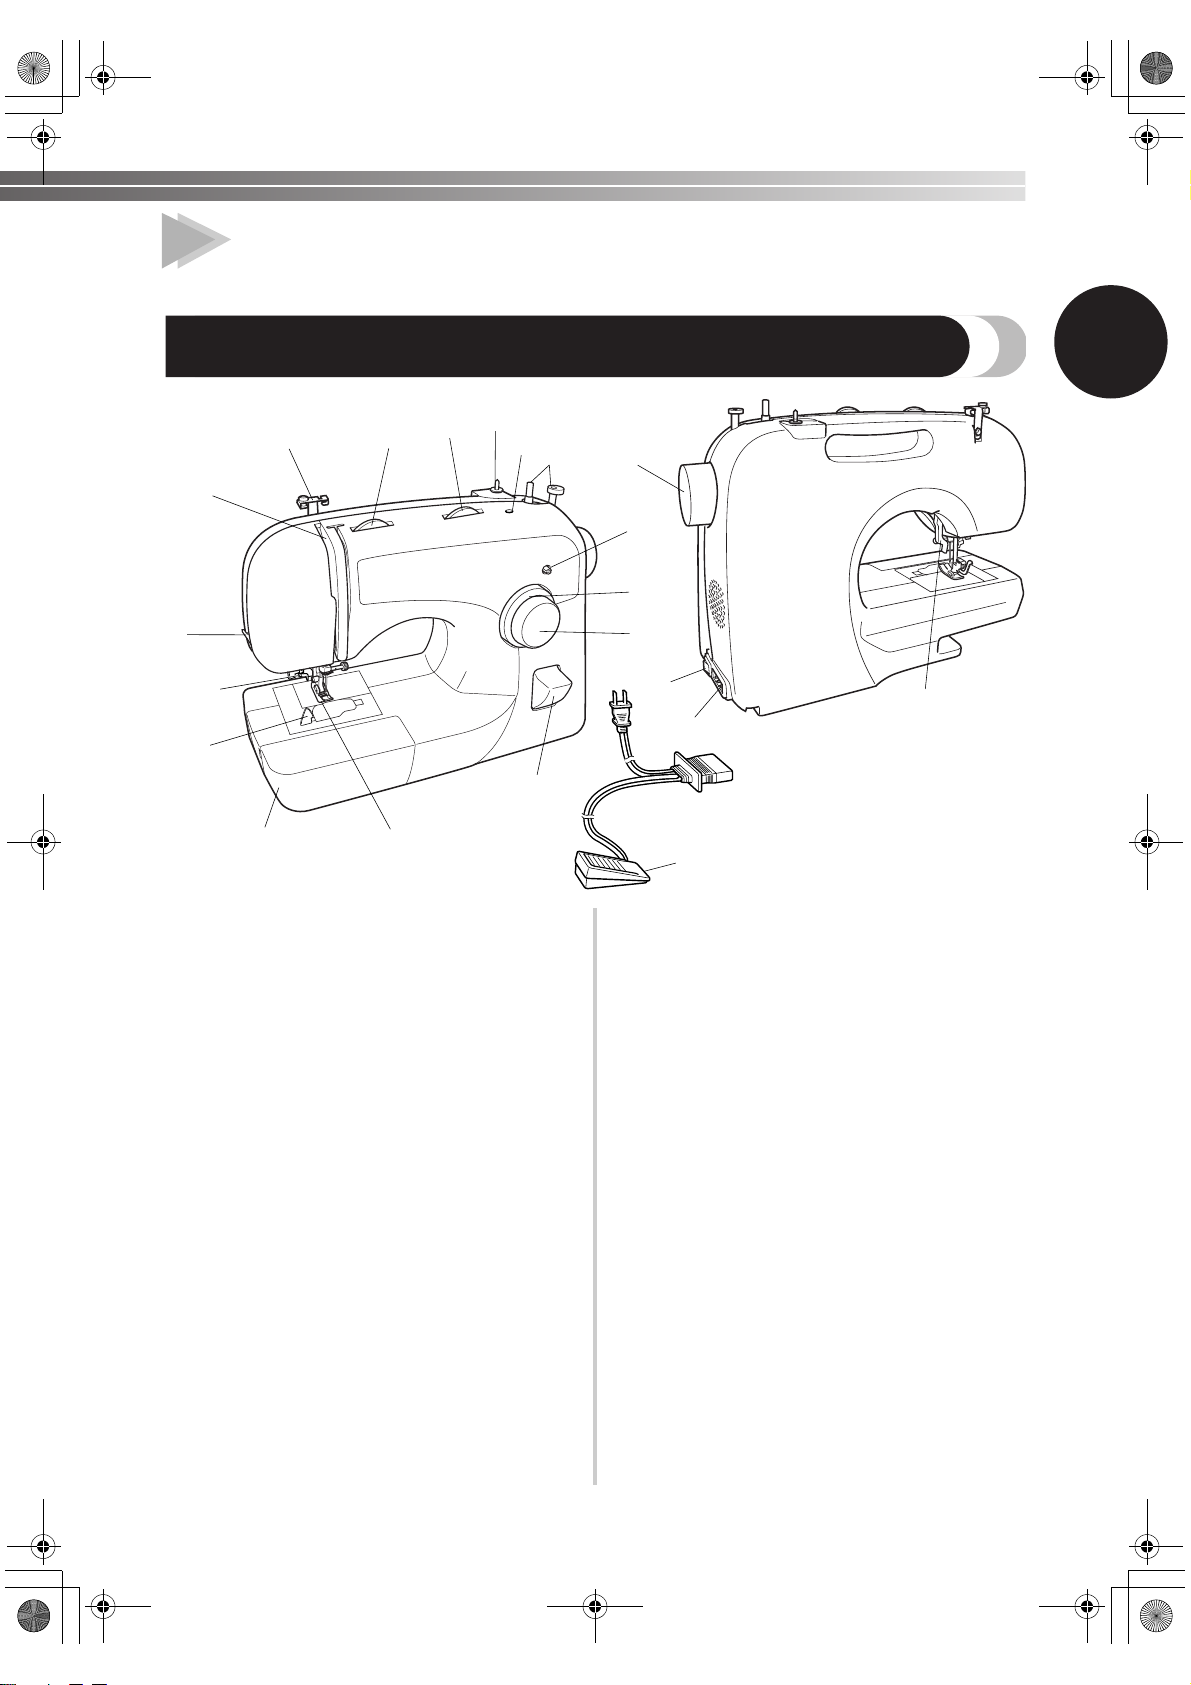
THE MAIN PARTS
3
4
8
9
0
7
6
2
5
C
1
G
F
E
D
H
1
J
I
A
1 Bobbin winder (Page 16)
This winds the thread onto the bobbin for use as the
lower thread.
2 Spool pin (Page 16, 21)
This holds the spool of thread.
3 Thread guide (Page 16, 21)
This is used when winding the thread onto the bobbin
and then threading the machine.
4 Thread take-up lever (Page 21)
5 Hole for extra spool pin (Page 25)
This holds a second spool of thread for sewing with the
twin needle.
6 Stitch width dial (Page 15)
This controls the stitch width.
7 Upper tension-control dial (Page 25)
This controls the tension of the upper thread.
8 Thread cutter (Page 28)
Pass the threads through the thread cutter to cut them.
9 Needle threader (Page 22)
(This is only available on certain models.)
0 Quick-set bobbin (Page 19)
(This is only available on certain models.)
A Flat bed attachment with accessory compartment
(Page 10)
B Presser foot (Page 9)
C Reverse sewing lever (Page 15)
You can push this to stitch in the reverse direction.
B
K
D Pattern selection dial (Page 11)
You can turn this in either direction to choose the stitch
you want.
E Stitch length dial (Page 14)
This controls the stitch length.
F Buttonhole fine-adjustment screw (Page 35)
G Handwheel
Used to manually raise and lower the needle.
H Main power and sewing light switch (Page 8)
You can turn the main power and sewing light switch
on and off.
I Foot controller jack / socket (Page 7)
Plug in the foot controller plug and connect the
machine to the power supply.
J Presser foot lever (Page 21)
Used to raise and lower the presser foot.
K Foot controller (Page 8)
You can use this to control the sewing speed, and to
start and stop sewing.
Parts Code for Zigzag Presser Foot: XC4901-051
Foot Controller: Model KD-1902
Parts Code: XC7359-021 (110/120V Area)
XC7438-221 (220/240V Area)
XC7456-221 (U.K.)
XC7455-021 (Australia, New Zealand)
5
Page 8
—
XL2600.book Page 6 Thursday, November 4, 2004 9:46 PM
KNOWING YOUR SEWING MACHINE —————————————————————————————————————————————
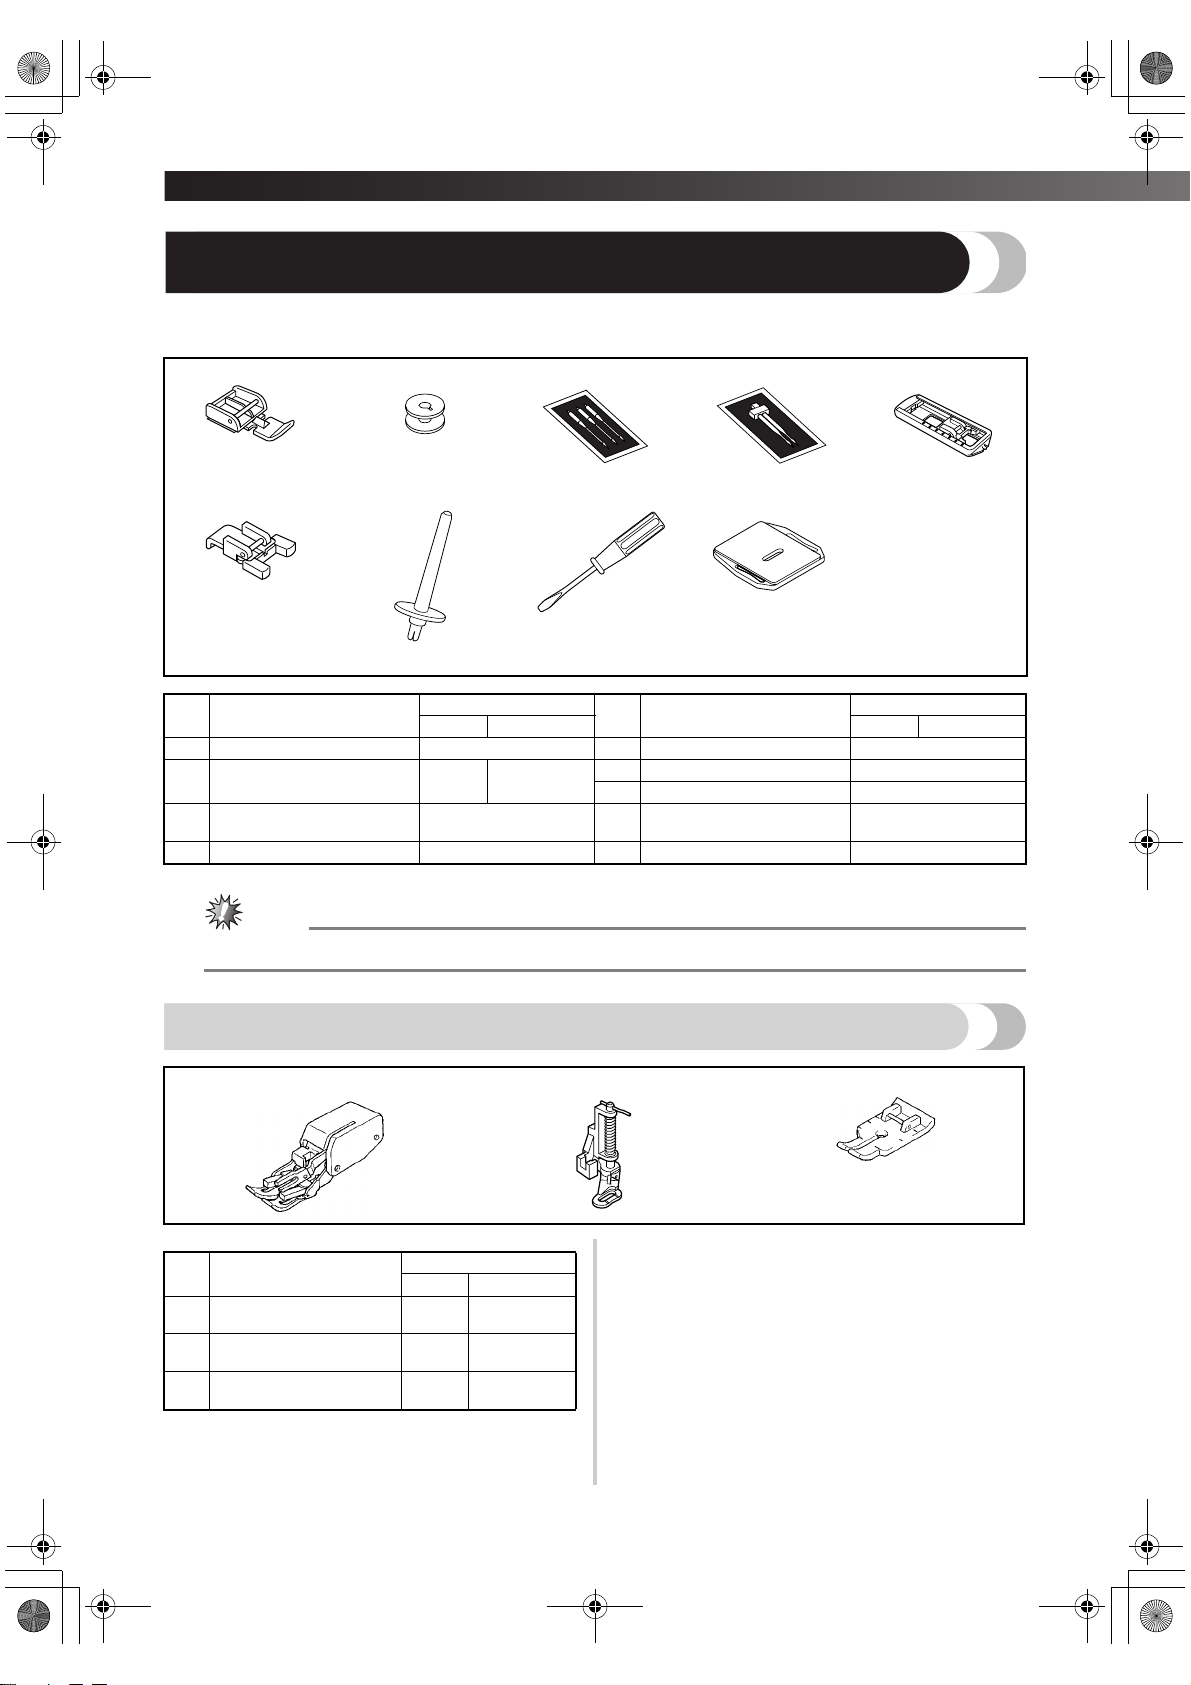
ACCESSORIES
The following accessories are stored in the flat bed attachment. We have designed these accessories to help you
be able to carry out most sewing tasks.
1. 2. 3. 4. 5.
6. 7. 8. 9.
No. Part Name
1 Zipper foot (1 pc.) X59370-021 5 Buttonhole Foot (1 pc.) X59369-321
2 Bobbin (3 pcs.) SA156
Needle Pack (Regular Single
3
Needle HAX130 (3 pcs.))
4 Twin Needle (1 pc.) X57521-021 9 Darning Plate (1pc.) XC6063-021
Part Code
USA Others USA Others
SFB:
XA5539-151
129583-021 8 Screwdriver (1 pc.) X55467-021
No. Part Name
6 Button Sewing Foot (1 pc.) X59375-121
7 Extra Spool Pin (1 pc.) 130920-021
Part Code
Note
● The included accessories vary depending on the machine model.
Optional Accessories
1. 2. 3.
No. Part Name
1 Walking Foot SA107
2 Quilting Foot SA129
3 1/4-inch Quilting Foot SA125
Part Code
U.S.A. Others
F034N:
XC2165-002
F005N:
XC1948-002
F001N:
XC1944-002
6
Page 9
XL2600.book Page 7 Thursday, November 4, 2004 9:46 PM
USING YOUR SEWING MACHINE
WARNING
● Use only regular household electricity for the power source. Using other power sources may
result in fire, electric shock, or damage to the machine.
● Turn off the main power and remove the plug in the following circumstances:
• When you are away from the machine
• After using the machine
• When the power fails during use
• When the machine does not operate correctly due to a bad connection or a disconnection
• During electrical storms
CAUTION
● Do not use extension cords or multi-plug adapters with many other appliances plugged in to
them. Fire or electric shock may result.
● Do not touch the plug with wet hands. Electric shock may result.
● When unplugging the machine, always turn off the main power first. Always grasp the plug to
remove it from the outlet. Pulling on the cord may damage the cord, or lead to fire or electric
shock.
● Do not allow the power cord to be cut, damaged, modified, forcefully bent, pulled, twisted,
or bundled. Do not place heavy objects on the cord. Do not subject the cord to heat. These
things may damage the cord and cause fire or electric shock. If the cord or plug is damaged,
take the machine to your authorized dealer for repairs before continuing use.
● Unplug the power cord if the machine is not to be used for a long period of time, otherwise a
fire may result.
1
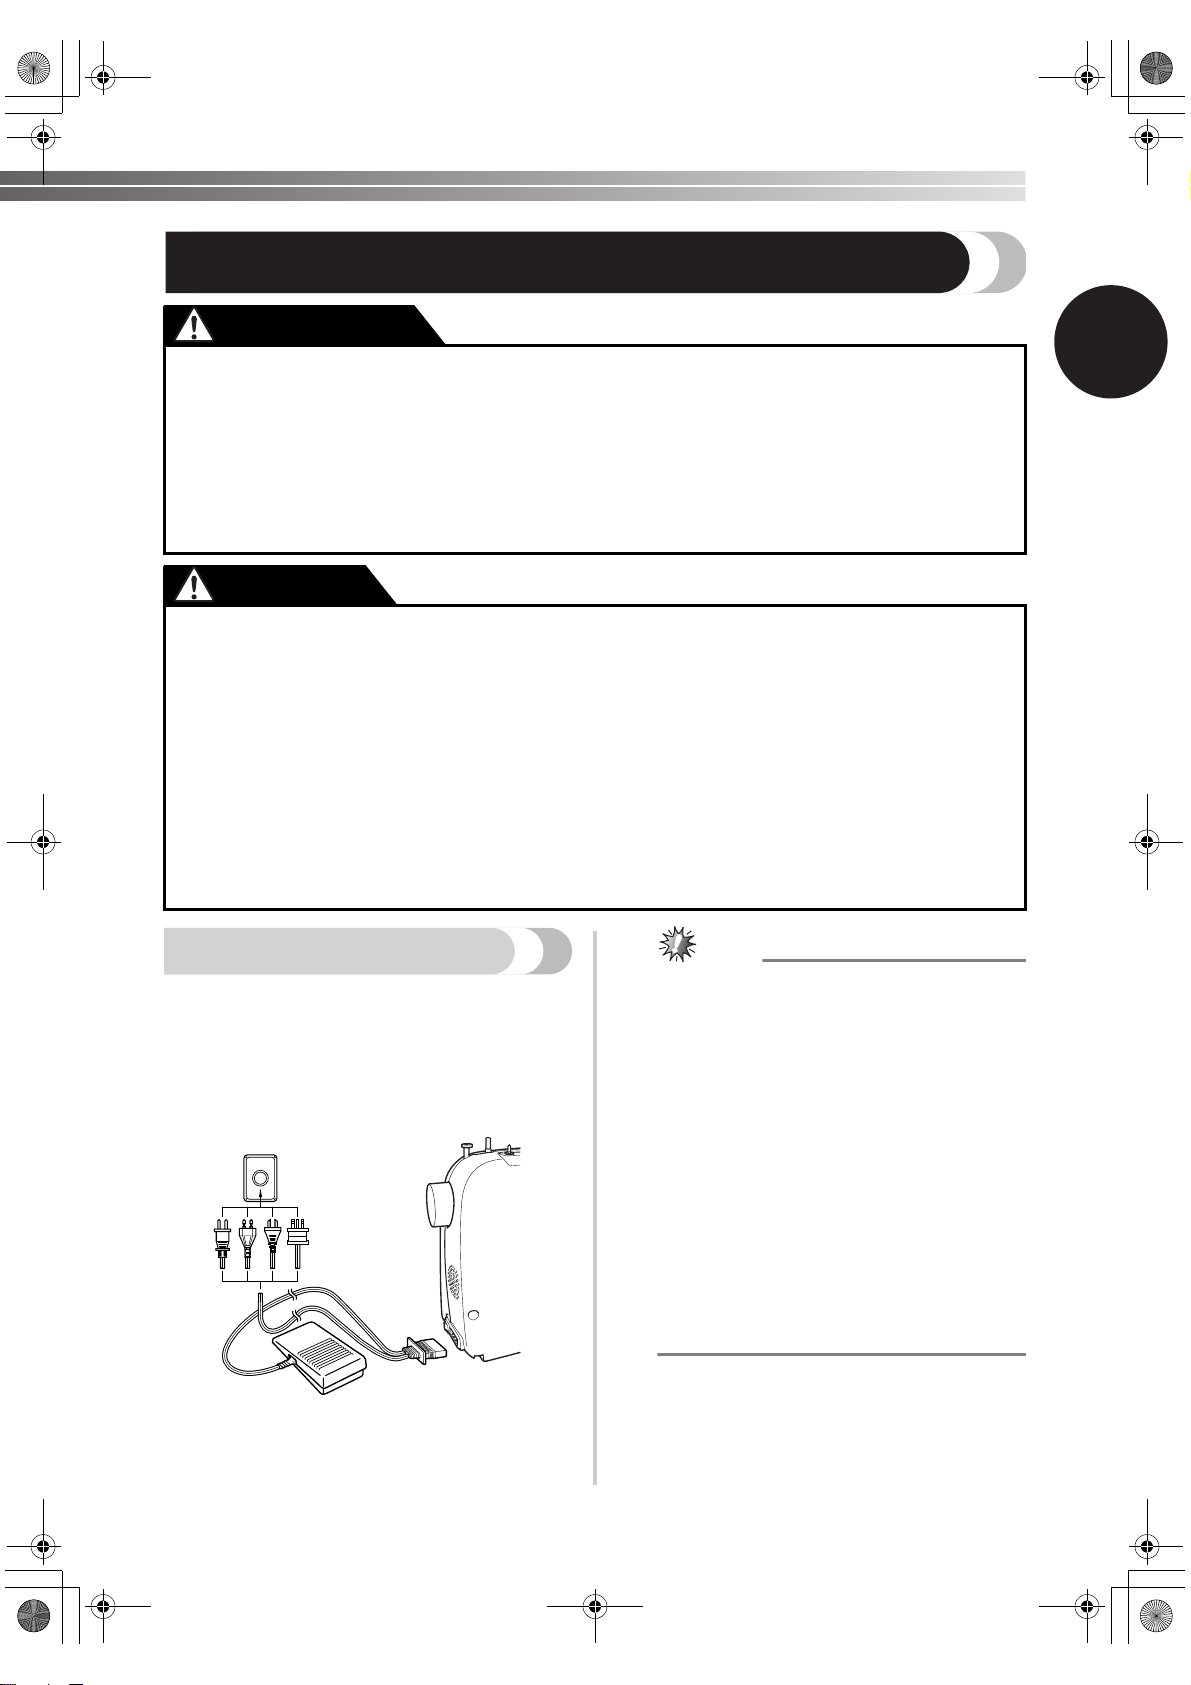
Connecting Plugs
Connect the foot controller plug to the
1
machine.
Connect the power supply plug to a wall
2
outlet.
Note
● When leaving the machine unattended, the
main switch of the machine should be
switched off or the plug must be removed
from the wall outlet.
● When servicing the machine, or when
removing covers or changing bulbs, the
machine must be unplugged.
(For U.S.A. only)
● This appliance has a polarized plug (one
blade wider than the other). To reduce the
risk of electric shock, this plug is intended
to fit in a polarized outlet only one way. If
the plug does not fit fully in the outlet,
reverse the plug.
If it still does not fit, contact a qualified
electrician to install the proper outlet. Do
not modify the plug in any way.
7
Page 10
—
XL2600.book Page 8 Thursday, November 4, 2004 9:46 PM
KNOWING YOUR SEWING MACHINE —————————————————————————————————————————————
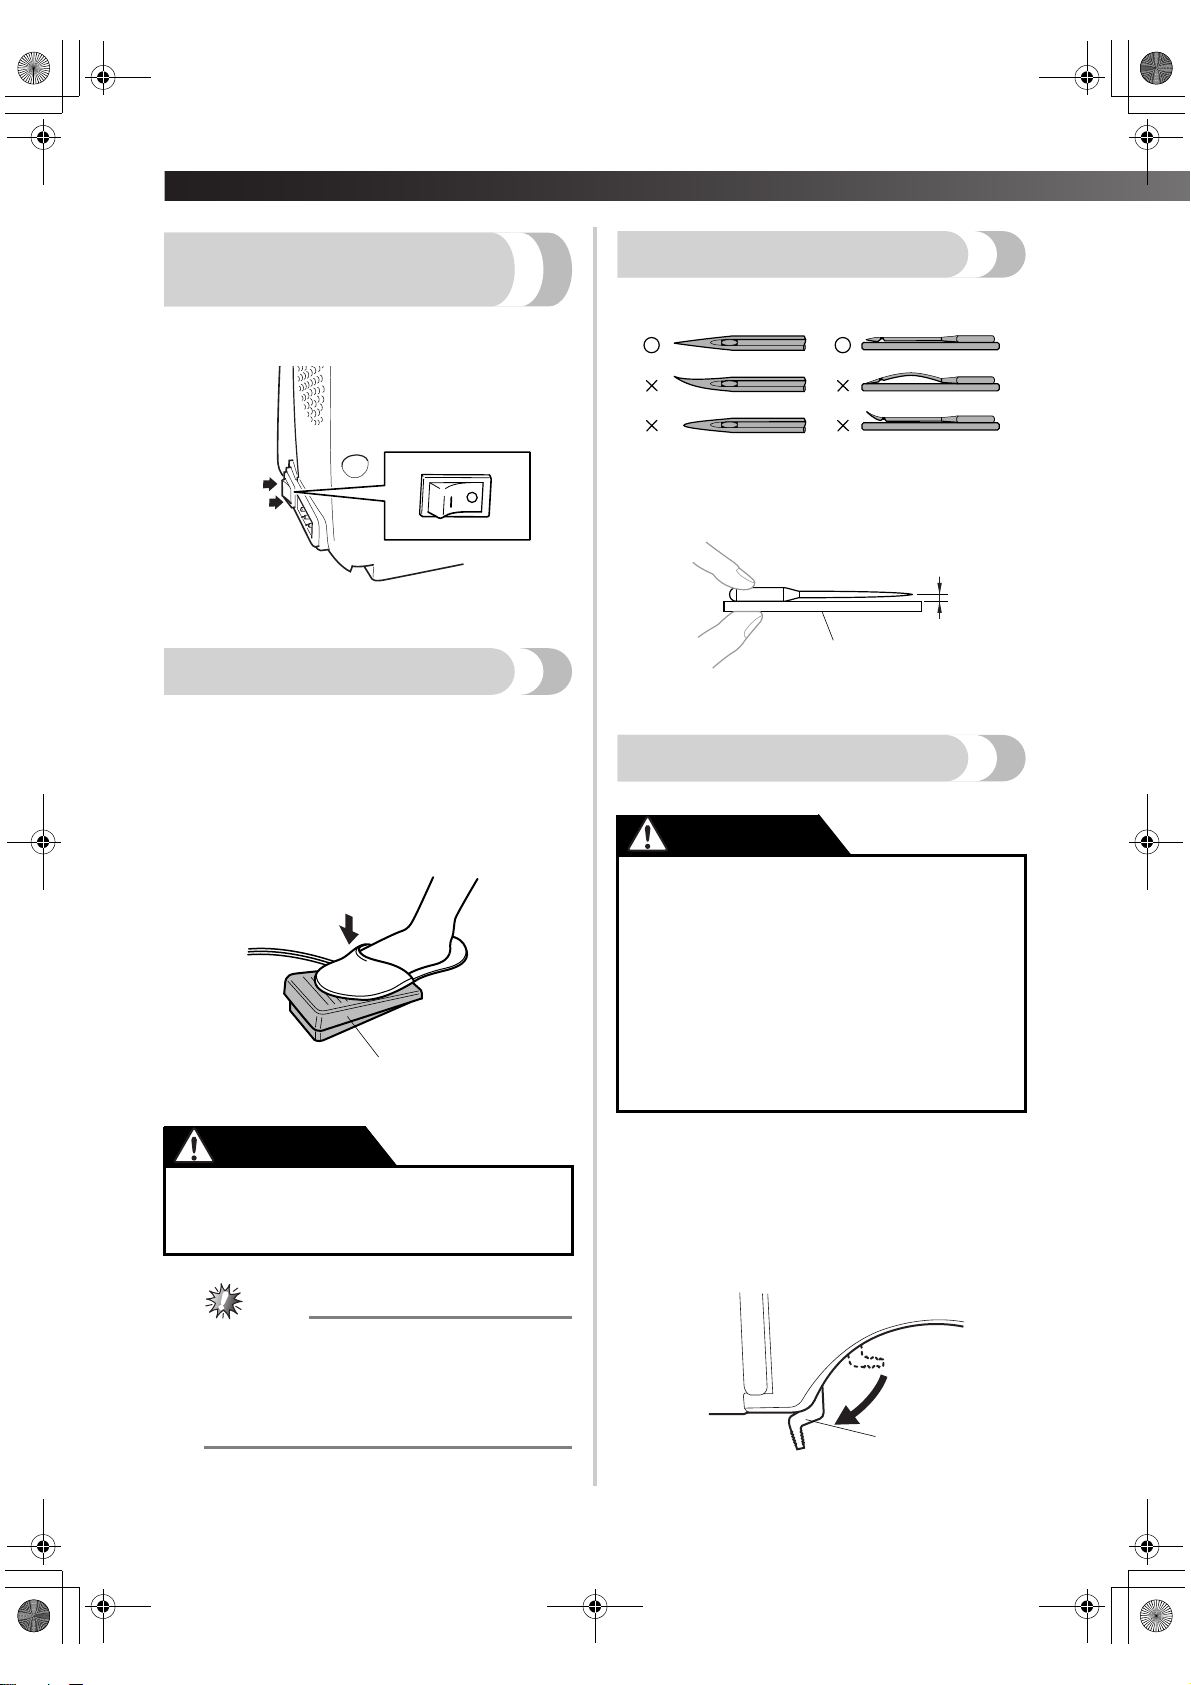
Main Power and Sewing
Light Switch
This switch turns the main power and sewing light
on or off.
1
2
1 Turn on (toward the ‘I’ mark)
2 Turn off (toward the ‘O’ mark)
Foot Controller
When you press the foot controller down lightly, the
machine will run at a low speed. When you press
harder, the machine’s speed will increase. When you
take your foot off the foot controller, the machine
will stop. You should make sure that nothing is
placed on the foot controller when the machine is
not in use.
1
1 Foot controller
Checking the Needle
The sewing needle must always be straight and sharp
for smooth sewing.
■ Checking the Needle Correctly
Put the flat side of the needle on a flat surface.
Check the needle from the top and the sides.
Dispose of any bent needles safely.
1
2
1 Parallel space
2 Level surface (bobbin cover, glass, etc.)
Replacing the Needle
CAUTION
● Turn the main power switch off before
you change the needle. If you leave the
main power on and step on the foot
controller, the machine will start and you
may be injured.
● Only use sewing machine needles for
home use. Other needles may bend or
break and cause injury.
● Never sew with a bent needle. A bent
needle will easily break and cause injury.
CAUTION
● Do not allow pieces of cloth and dust to
build up on the foot controller. Doing so
could cause a fire or an electric shock.
Note
(For U.S.A. only)
● Foot Controller: Model KD-1902
This foot controller can be used for Model
XL-3500, XL-2600, XL-3510, XL-2610,
XL-3520, XL-2620.
8
Remove the power supply plug from the outlet.
1
Raise the needle to its highest position by turning
2
the handwheel toward you (counterclockwise) so
that the mark on the handwheel points directly up.
Lower the presser foot lever.
3
1
1 Presser foot lever
Page 11
XL2600.book Page 9 Thursday, November 4, 2004 9:46 PM
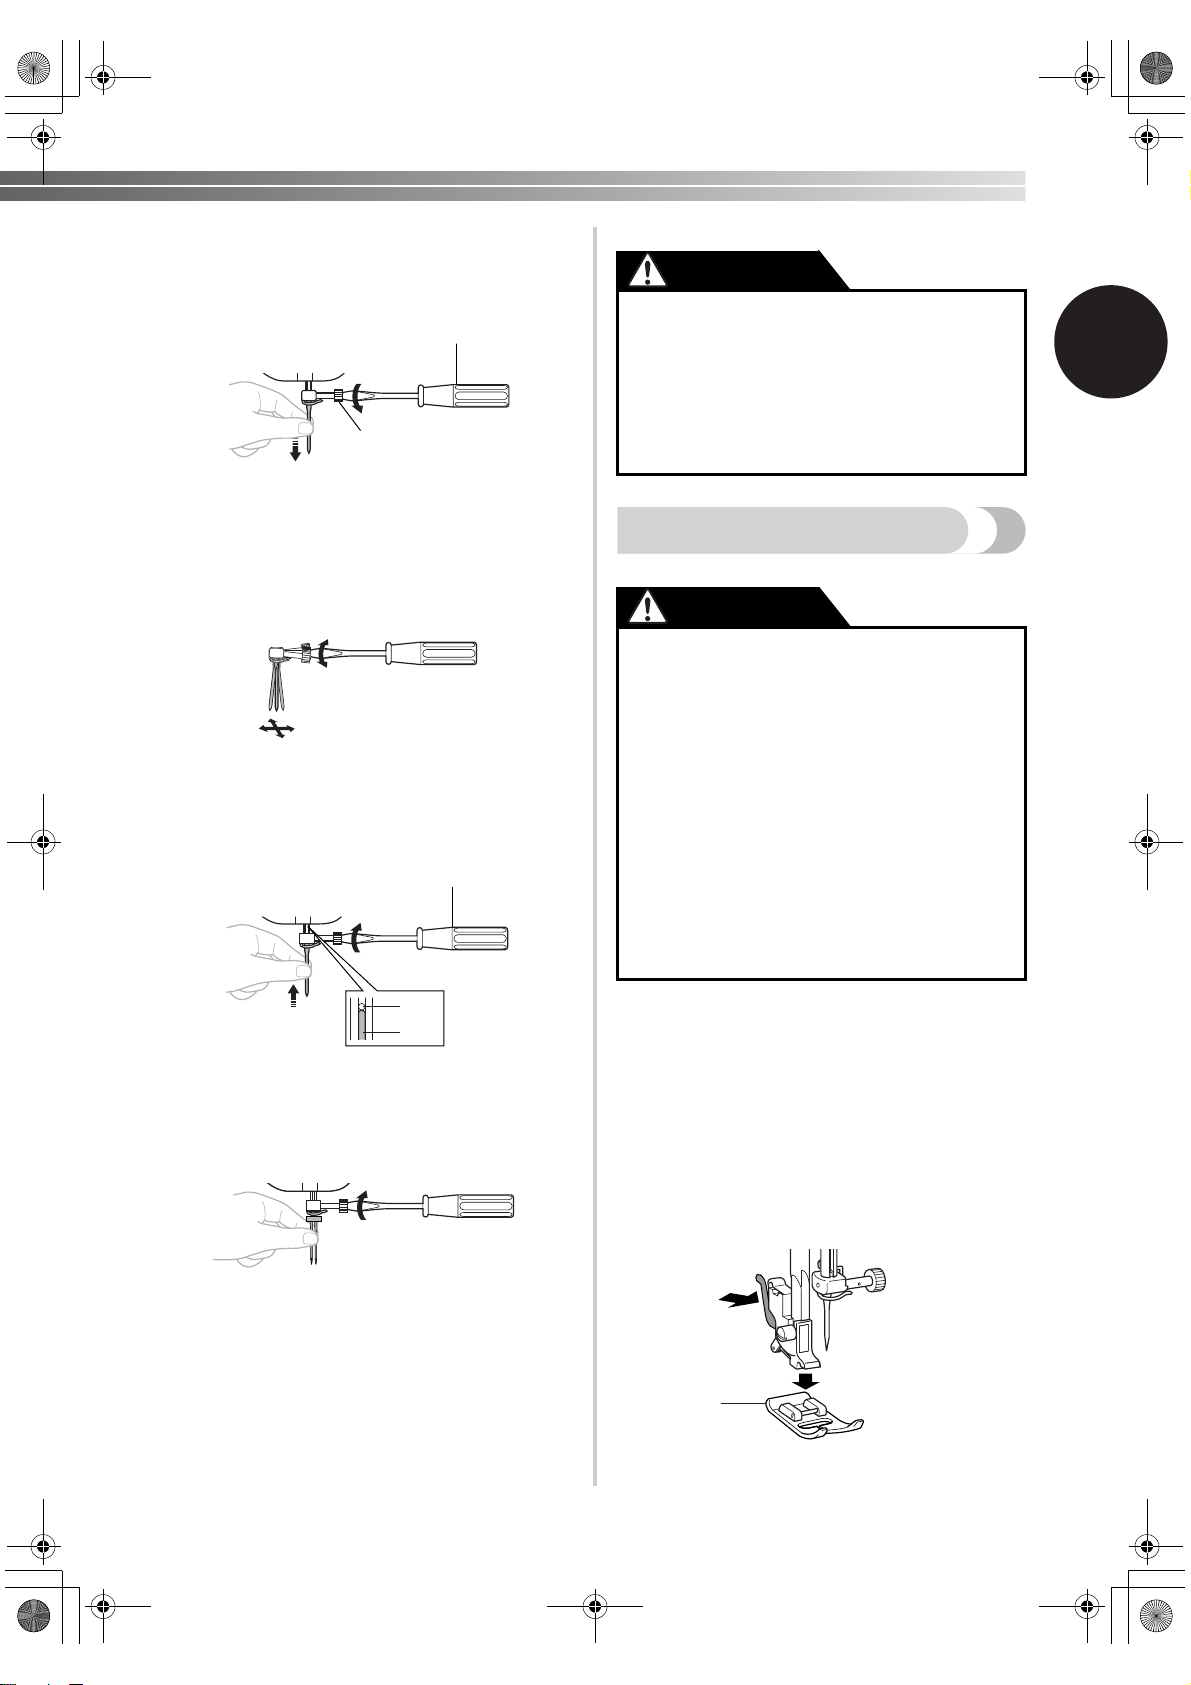
Hold the needle with your left hand, and then
4
use a screwdriver to turn the needle clamp
screw counterclockwise to remove the
needle.
1
2
1 Screwdriver
2 Needle clamp screw
• Do not use excessive force when loosening
or tightening the needle clamp screw,
otherwise certain parts of the sewing
machine may be damaged.
With the flat side of the needle toward the
5
back of the machine, insert the needle until it
touches the needle stopper. Next, tighten the
needle clamp using the screwdriver.
1
CAUTION
● Make sure you insert the needle until it
touches the stopper, and securely tighten
the needle clamp screw with a
screwdriver. If the needle is not fully
inserted, or if the needle clamp screw is
loose, the needle may break or the
machine may be damaged.
Changing the Presser Foot
CAUTION
● Always turn off the power before you
change the presser foot. If you leave the
power on and step on the controller, the
machine will start and you may be
injured.
● Always use the correct presser foot for
the stitch pattern you have chosen. If you
use the wrong presser foot, the needle
may strike the presser foot and bend or
break, and may cause injury.
● Only use presser feet that have been
designed to be used with this machine.
Using any other presser foot may cause
accident or injury.
1
2
3
1 Screwdriver
2 Needle Stopper
3 Needle
Put the twin needle in the same way.
You will have to change the presser foot depending
on what you want to sew and how.
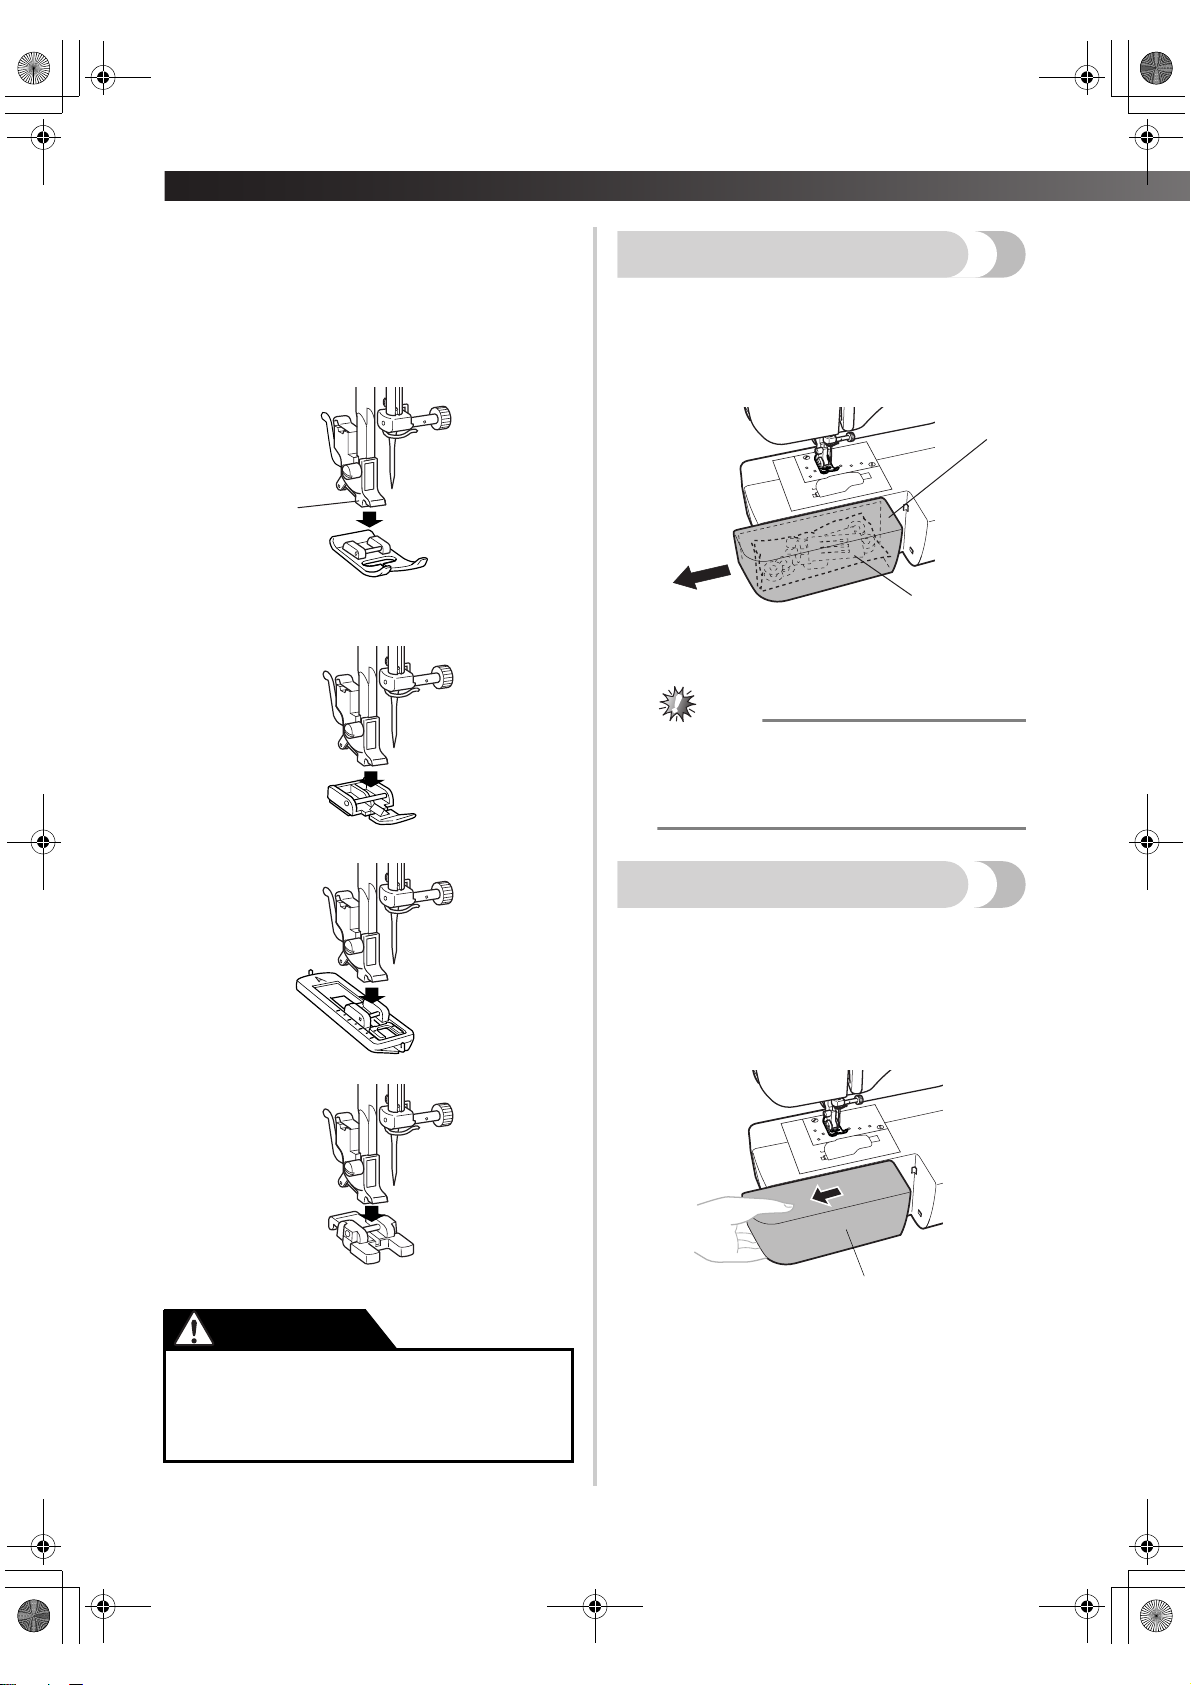
■ Snap-on Type
Raise the needle to its highest position by
1
turning the handwheel toward you
(counterclockwise), and then raise the presser
foot lever.
Release the foot by raising the lever at the
2
back of the holder.
1
1 Presser Foot
9
Page 12
—
XL2600.book Page 10 Thursday, November 4, 2004 9:46 PM
KNOWING YOUR SEWING MACHINE —————————————————————————————————————————————
Put a different presser foot on the needle plate
3
so that the bar on the presser foot is in line
with the slot on the shank.
Lower the presser foot lever and fix the
4
presser foot onto the shank. If the presser foot
is in the correct place, the bar should snap in.
Flat Bed Attachment
The accessories are stored in a compartment inside
the flat bed attachment.
Slide the flat bed attachment to the left to
1
open it.
1
1
1 Shank
■ Presser Foot Installation Orientation
2
1 Flat bed attachment
2 Storage compartment
Note
● Put the accessories inside a bag, and then
store the bag inside the compartment. If the
accessories are not in a bag, they may fall
out and be lost or damaged.
Using a Free-arm Style
Free-arm sewing is convenient for sewing tubular
and hard-to-reach areas. To change your machine to
the free-arm style, lift out the flat bed attachment.
Slide the flat bed attachment to the left to
1
release it.
CAUTION
● If the presser foot is not installed with the
correct orientation, the needle may strike
the presser foot, which may bend or
break the needle and cause injury.
10
1
1 Flat bed attachment
Page 13
XL2600.book Page 11 Thursday, November 4, 2004 9:46 PM
THE CONTROLS
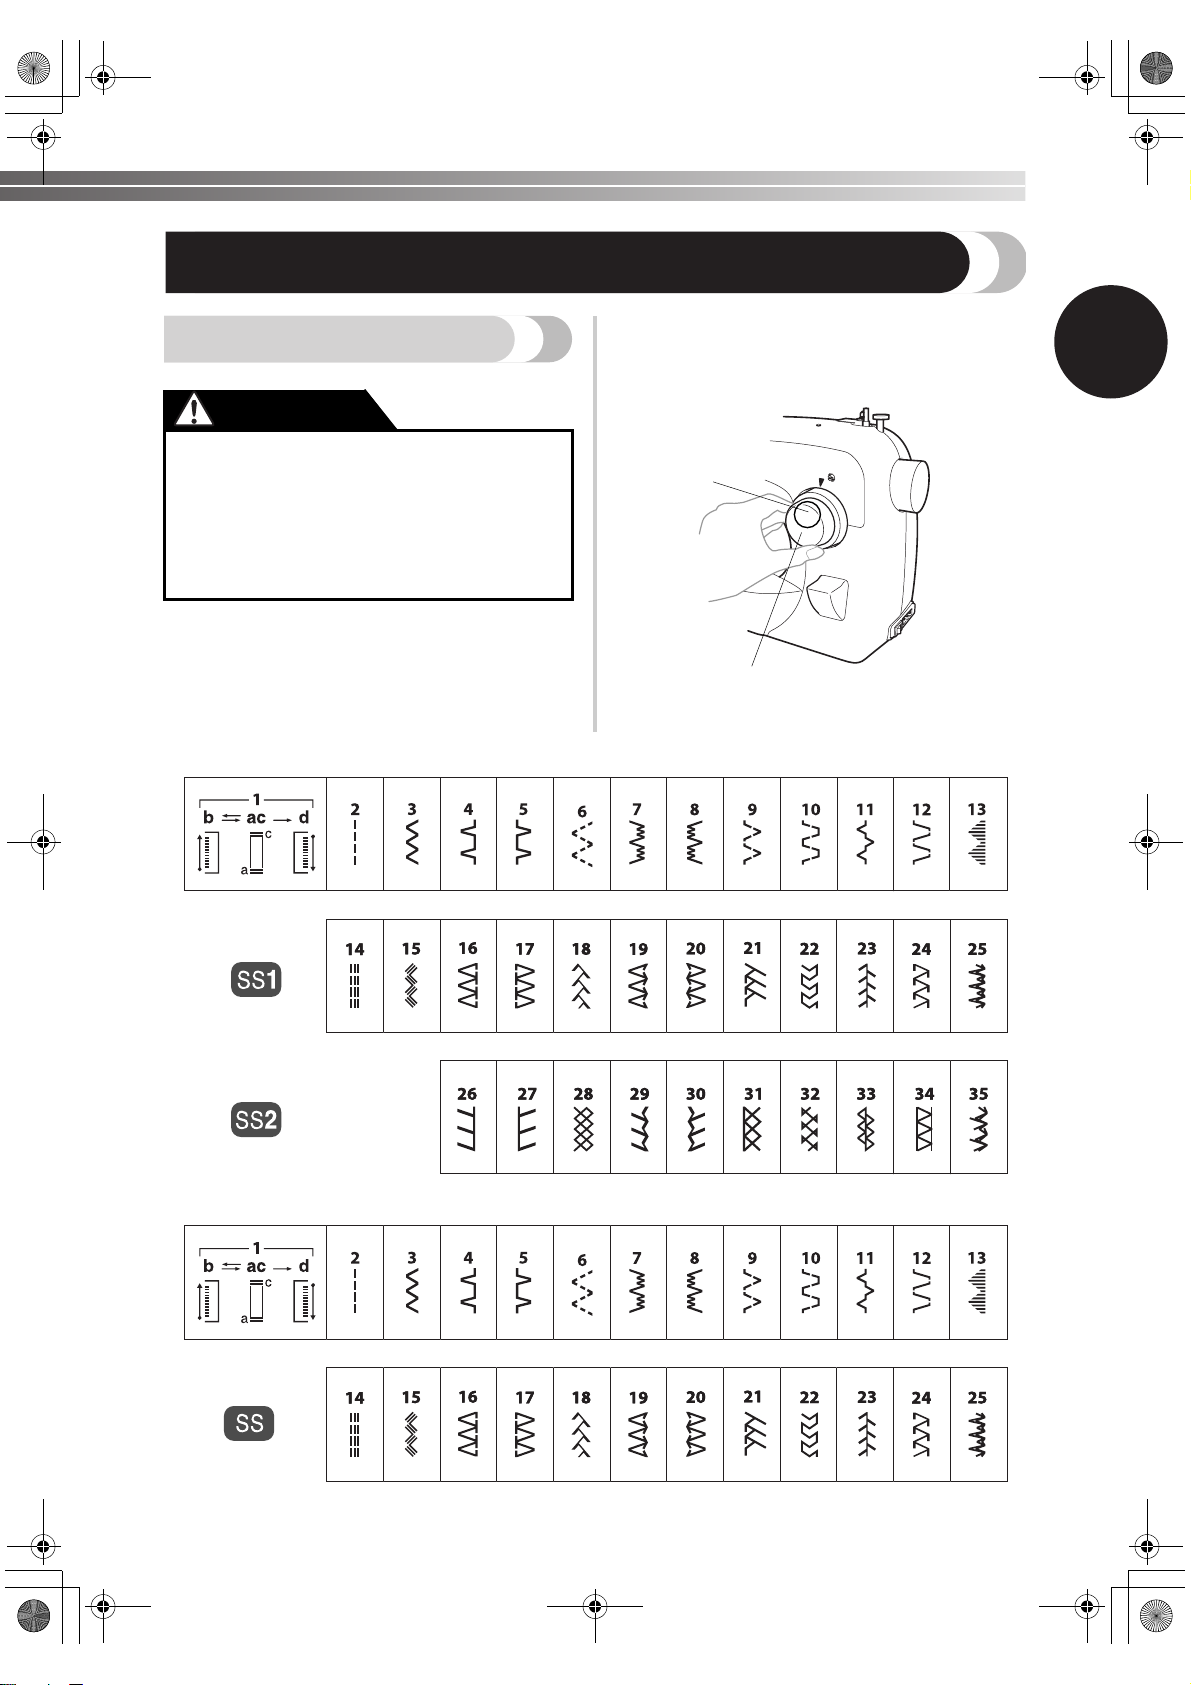
Pattern Selection Dial
CAUTION
● When you use the pattern selection dial to
choose a pattern, turn the handwheel toward
you (counterclockwise) to set the needle in
the highest position. If the needle is in the
down position when you turn the pattern
selection dial, the needle, presser foot or
fabric may be damaged.
■ 35 Stitches (only available on certain models)
To choose a stitch, simply turn the pattern selection
dial in either direction. The next section shows
recommended stitch lengths and widths.
2
1
1 Pattern selection dial
2 Chosen pattern number
1
■ 25 Stitches
11
Page 14
—
XL2600.book Page 12 Thursday, November 4, 2004 9:46 PM
KNOWING YOUR SEWING MACHINE —————————————————————————————————————————————
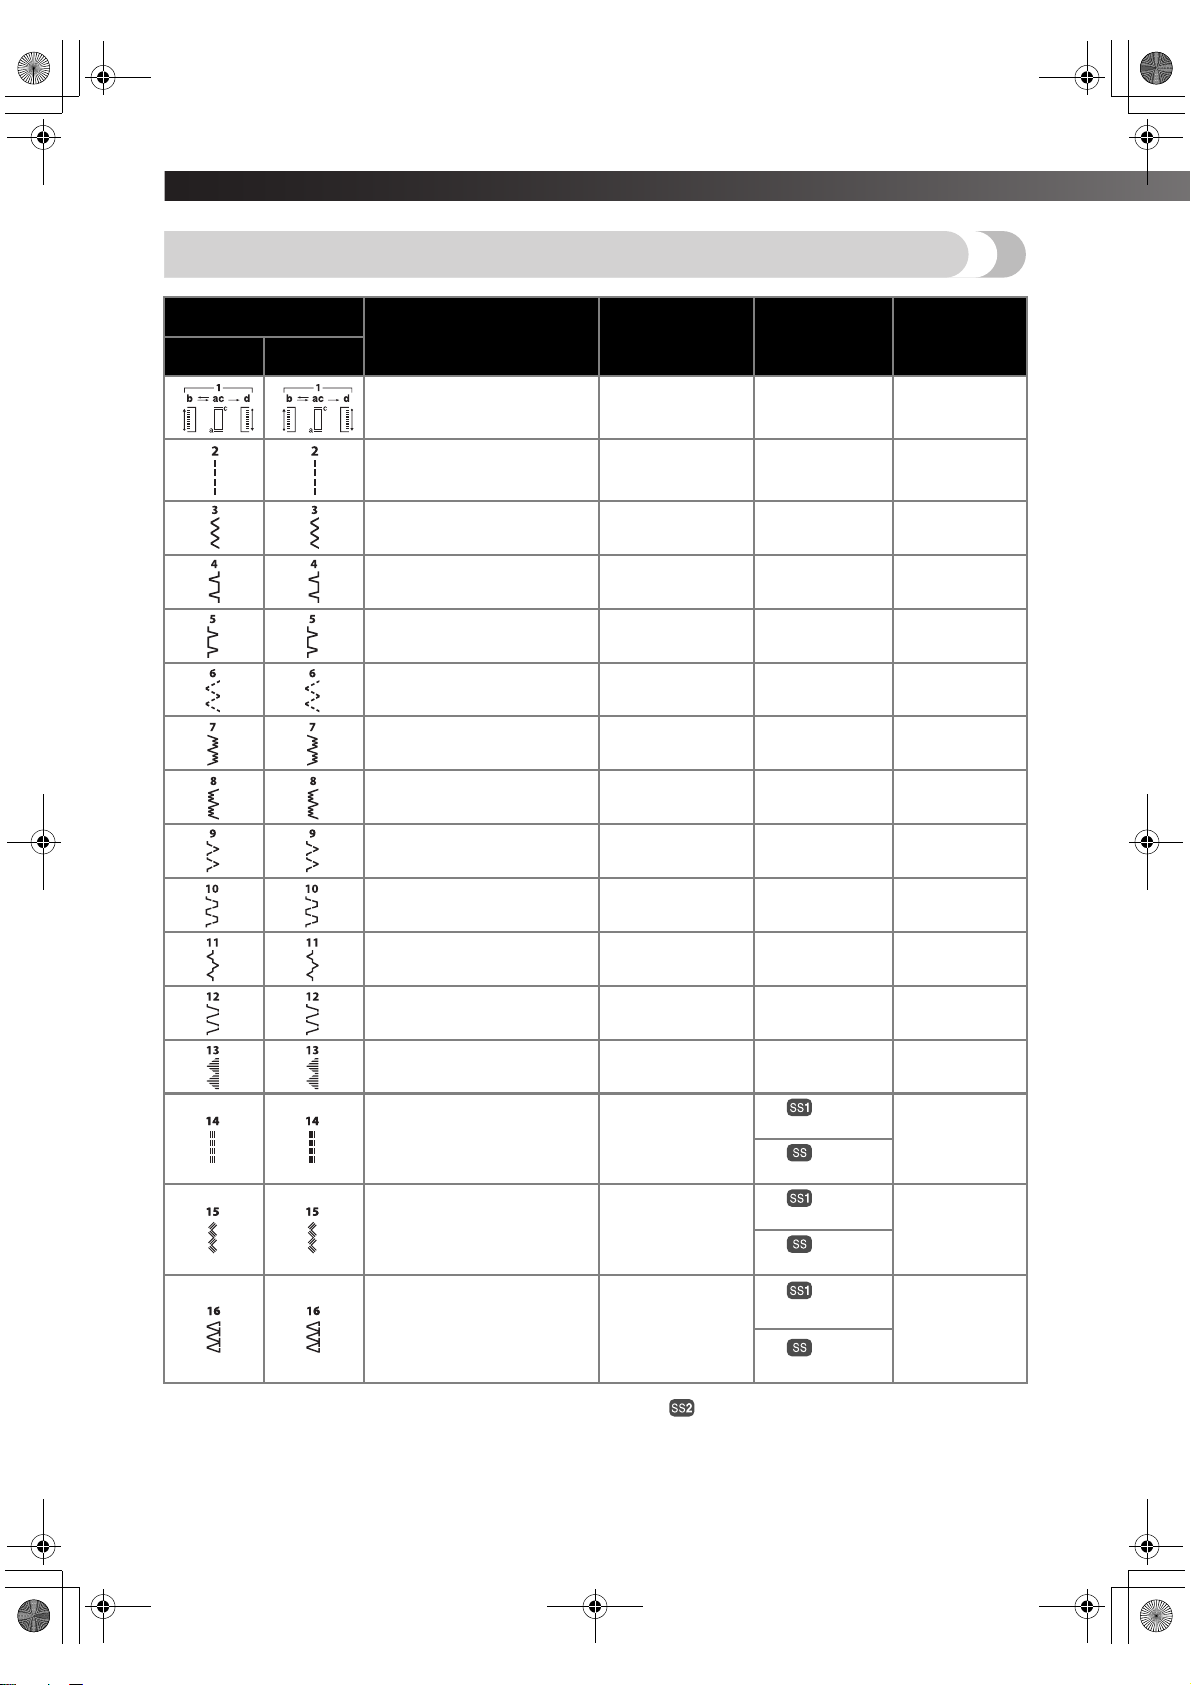
Patterns and Stitch Names
Pattern
35 Stitches 25 Stitches
Stitch Name
4-STEP AUTOMATIC
BUTTONHOLE
STRAIGHT STITCH
ZIGZAG STITCH
BLIND HEM STITCH
SHELL TUCK STITCH
ELASTIC STITCH
STRETCH BLIND HEM
STITCH
STRETCH BLIND HEM
STITCH
ELASTIC SHELL TUCK
STITCH
Recommended
Width
(mm (inch))
3-5
(1/8 – 3/16)
0-5 (0-3/16)
(Changes needle
position)
0-5
(0-3/16)
3-5
(1/8-3/16)
3-5
(1/8-3/16)
3-5
(1/8-3/16)
3-5
(1/8-3/16)
3-5
(1/8-3/16)
3-5
(1/8-3/16)
Recommended
Length
(mm (inch))
F- 1.5
(1/64-1/16)
1-4
(1/16-3/16)
F-4
(1/64-3/16)
F-2
(1/64-1/16)
F-3
(1/64-1/8)
F-2.5
(1/64-3/32)
F-1.5
(1/64-1/16)
F-1.5
(1/64-1/16)
F-3
(1/64-1/8)
Instruction
Manual Page
34
27, 37, 38, 41,
42, 43
28, 36, 39, 41
29
29
30
29
29
31
DOUBLE ACTION STITCH
BRIDGING STITCH
RAMPART STITCH
TRIANGLE STITCH
TRIPLE STRETCH STITCH
TRIPLE ZIGZAG STRETCH
STITCH
STRETCH OVERLOCK
STITCH
* The stitch can also be sewn when the stitch length dial is set to .
3-5
(1/8-3/16)
3-5
(1/8-3/16)
3-5
(1/8-3/16)
3-5
(1/8-3/16)
0-5 (0-3/16)
(Changes needle
position)
3-5
(1/8-3/16)
3-5
(1/8-3/16)
F-3
(1/64-1/8)
F-3
(1/64-1/8)
F-3
(1/64-1/8)
F- 1.5
(1/64-1/16)
Fixed
2.5 (3/32)
Fixed
2.5 (3/32)
Fixed
2.5 (3/32)
Fixed
2.5 (3/32)
Fixed
2.5 (3/32)
Fixed
2.5 (3/32)
31
31
31
33
*
*
27
32
31
12
Page 15
XL2600.book Page 13 Thursday, November 4, 2004 9:46 PM
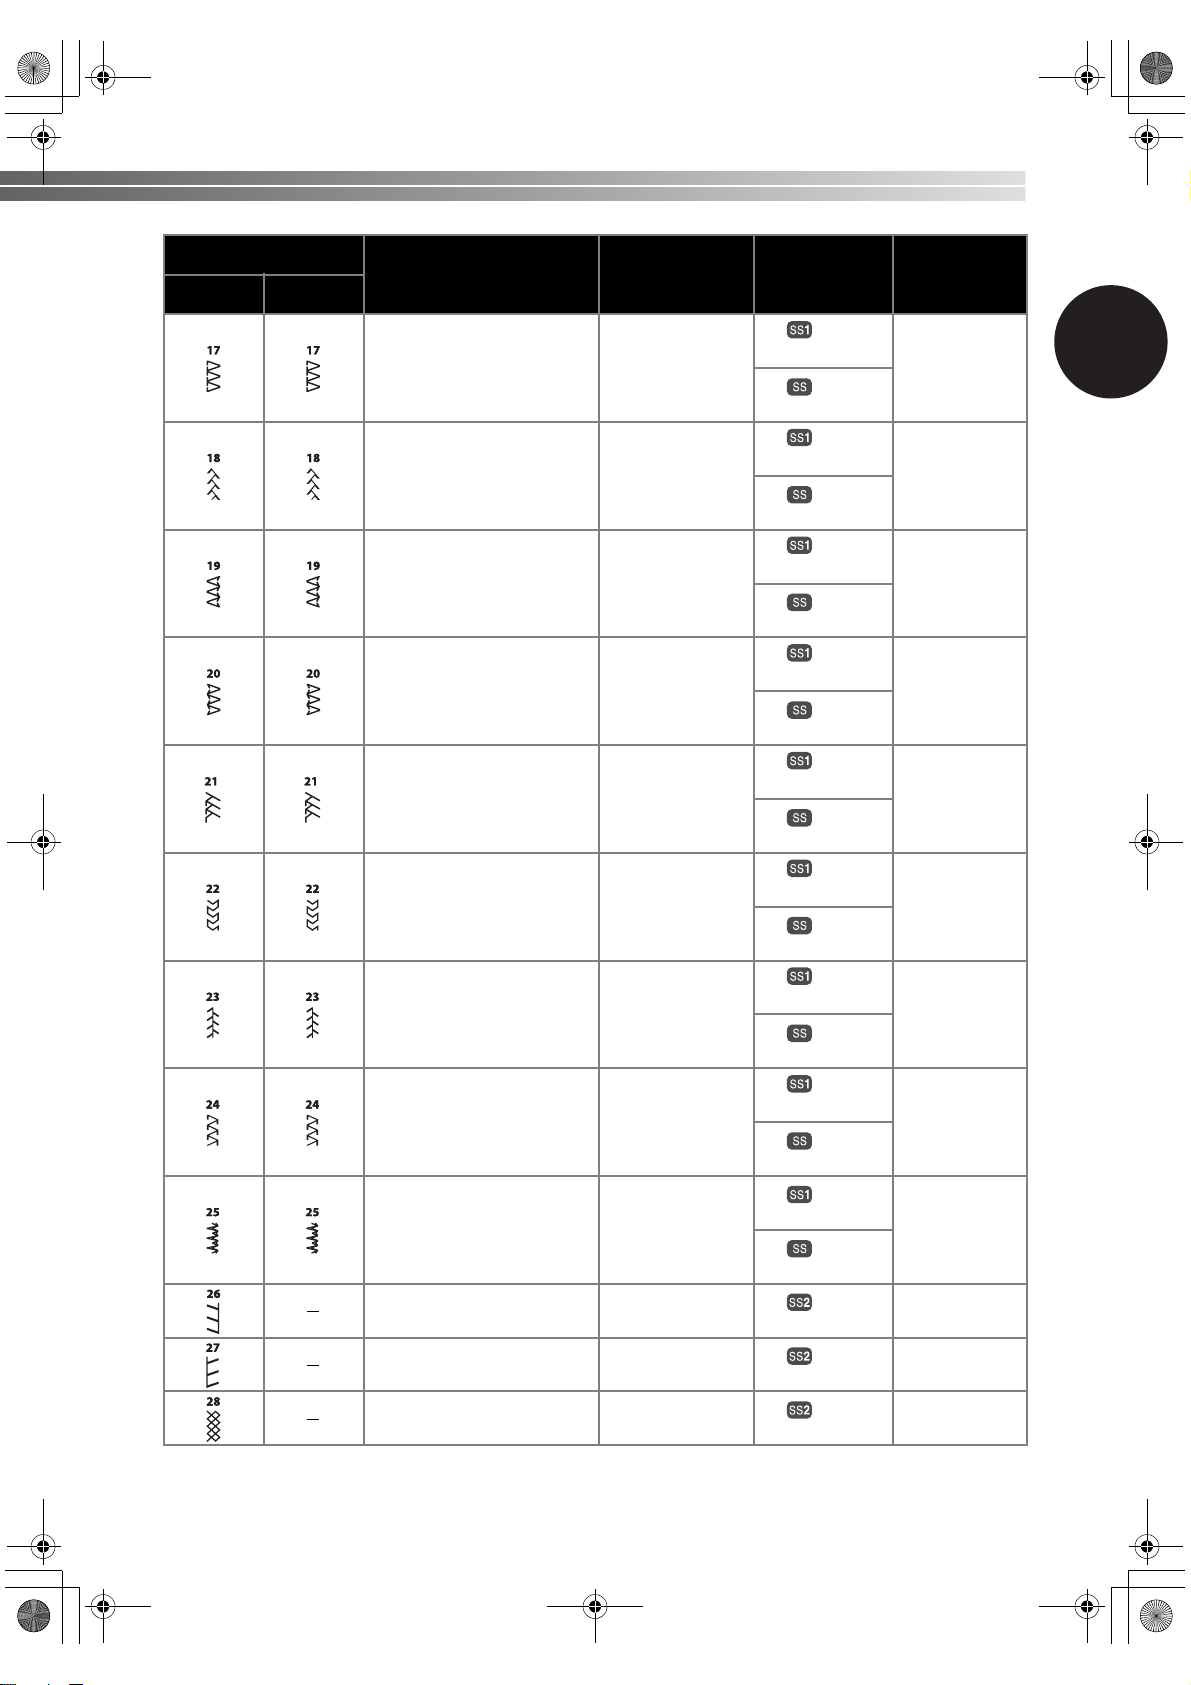
Pattern
35 Stitches 25 Stitches
Stitch Name
ELASTIC OVERLOCK
STITCH
FEATHER STITCH
ARROWHEAD STITCH
ARROWHEAD STITCH
DECORATIVE STITCH
LEAF STITCH
TREE STITCH
LEGS STITCH
Recommended
Width
(mm (inch))
3-5
(1/8-3/16)
3-5
(1/8-3/16)
3-5
(1/8-3/16)
3-5
(1/8-3/16)
3-5
(1/8-3/16)
3-5
(1/8-3/16)
3-5
(1/8-3/16)
3-5
(1/8-3/16)
Recommended
Length
(mm (inch))
Fixed
2.5 (3/32)
Fixed
2.5 (3/32)
Fixed
2.5 (3/32)
Fixed
2.5 (3/32)
Fixed
2.5 (3/32)
Fixed
2.5 (3/32)
Fixed
2.5 (3/32)
Fixed
2.5 (3/32)
Fixed
2.5 (3/32)
Fixed
2.5 (3/32)
Fixed
2.5 (3/32)
Fixed
2.5 (3/32)
Fixed
2.5 (3/32)
Fixed
2.5 (3/32)
Fixed
2.5 (3/32)
Fixed
2.5 (3/32)
Instruction
Manual Page
31
32
31
31
33
33
33
33
1
DECORATIVE STITCH
STRETCH OVERLOCK
STITCH
STRETCH OVERLOCK
STITCH
SMOCKING STITCH
3-5
(1/8-3/16)
3-5
(1/8-13/64)
3-5
(1/8-13/64)
3-5
(1/8-13/64)
Fixed
2.5 (3/32)
Fixed
2.5 (3/32)
Fixed
2.5 (3/32)
Fixed
2.5 (3/32)
Fixed
2.5 (3/32)
33
33
33
31
13
Page 16
—
XL2600.book Page 14 Thursday, November 4, 2004 9:46 PM
KNOWING YOUR SEWING MACHINE —————————————————————————————————————————————
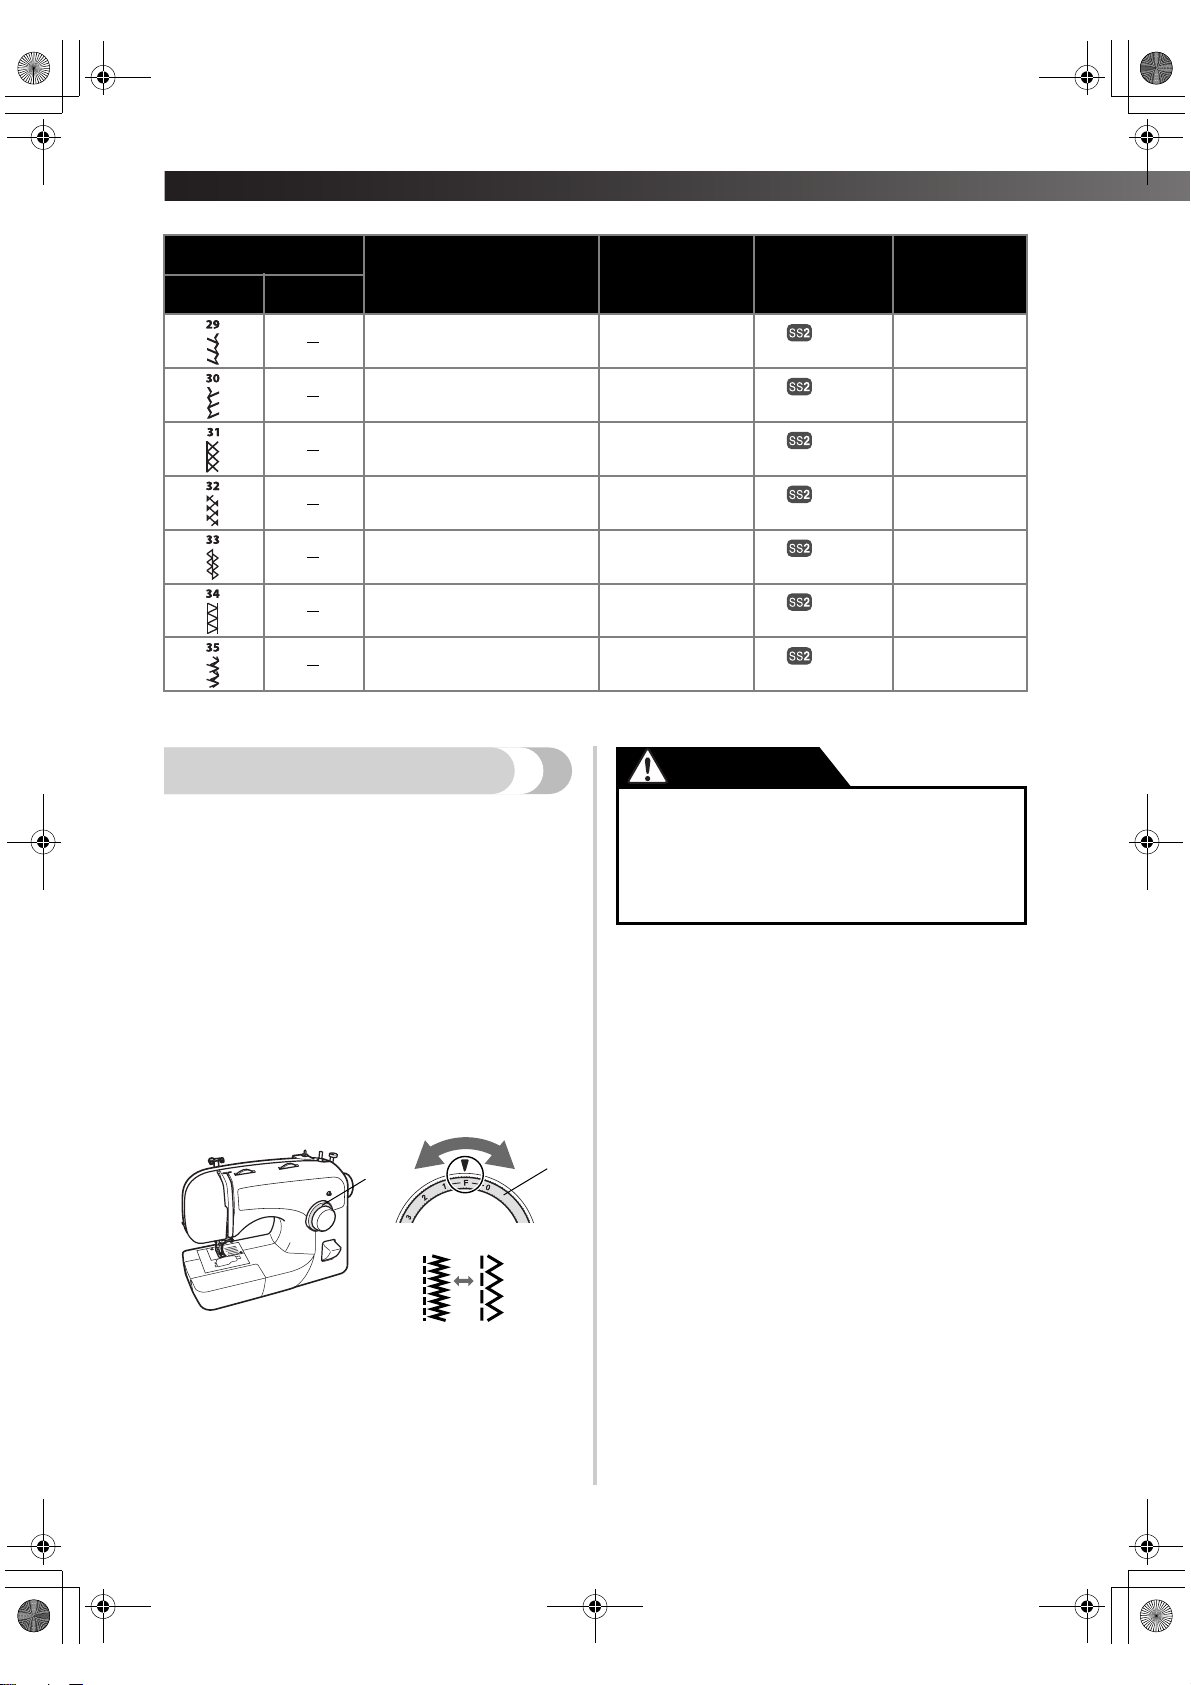
Pattern
Stitch Name
35 Stitches 25 Stitches
COMB STITCH
COMB STITCH
DECORATIVE STITCH
FAGOTING STITCH
DECORATIVE STITCH
DECORATIVE HEM STITCH
DECORATIVE STITCH
Stitch Length Dial
Depending on the selected stitch, you may need to
adjust the stitch length for best results.
The numbers marked on the stitch length dial represent
the stitch length in millimeters (mm) (1/25 inch).
THE HIGHER THE NUMBER, THE LONGER THE
STITCH. With the “0” setting, material is not fed. This is
used when sewing a button.
The “F” range is for making a satin stitch (close zigzag
stitch), which is used for making buttonholes and
decorative stitches. The position needed for making the
satin stitch varies according to the material and thread
being used. To determine the exact dial position, first
test the stitch and length settings on a scrap piece of
fabric to observe the feeding of the material.
Recommended
Width
(mm (inch))
3-5
(1/8-3/16)
3-5
(1/8-3/16)
3-5
(1/8-3/16)
3-5
(1/8-13/64)
3-5
(1/8-3/16)
3-5
(1/8-3/16)
3-5
(1/8-3/16)
Recommended
Length
(mm (inch))
Fixed
2.5 (3/32)
Fixed
2.5 (3/32)
Fixed
2.5 (3/32)
Fixed
2.5 (3/32)
Fixed
2.5 (3/32)
Fixed
2.5 (3/32)
Fixed
2.5 (3/32)
Instruction
Manual Page
CAUTION
● If the stitches are bunched together,
lengthen the stitch length and continue
sewing. Do not continue sewing without
lengthening the stitch length, otherwise
the needle may break and cause injury.
31
31
33
31
31
33
33
1 Stitch length dial
2 Shorter
3 Longer
14
2
1
3
1
Page 17
XL2600.book Page 15 Thursday, November 4, 2004 9:46 PM
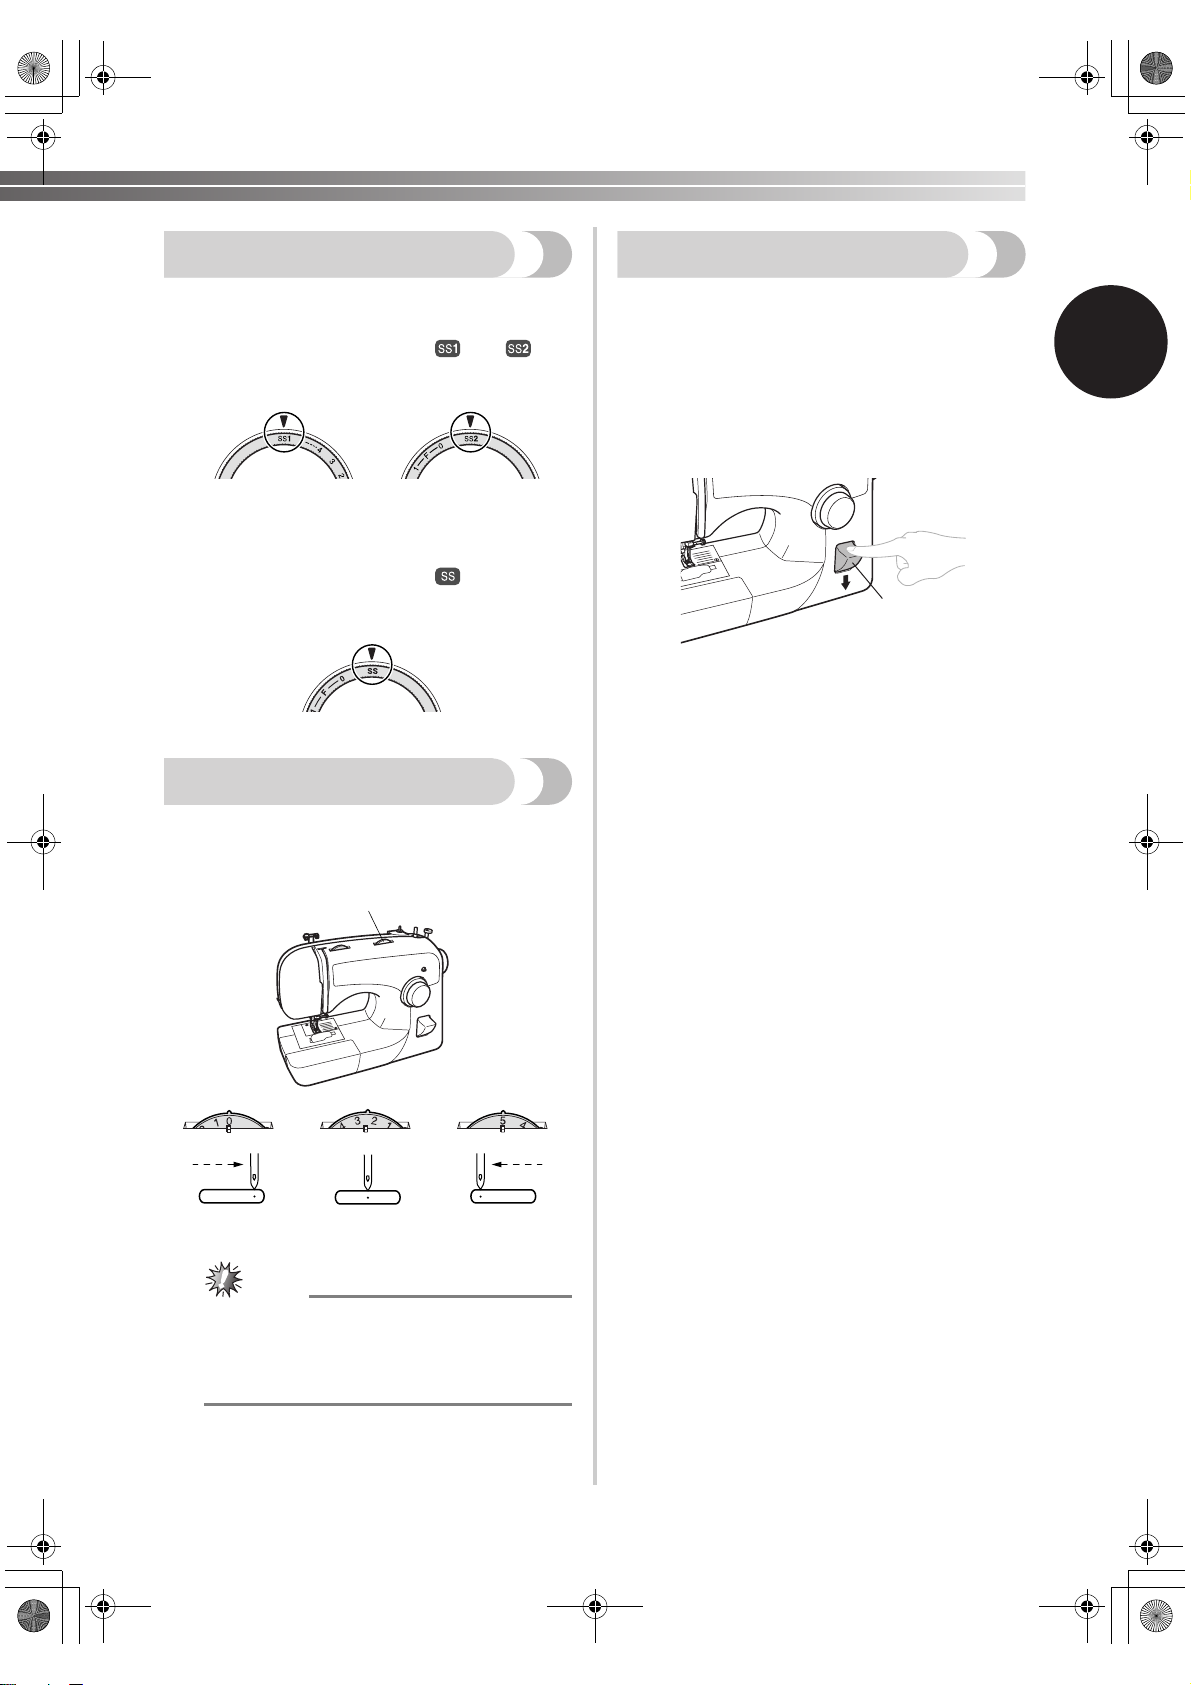
Stretch Stitching
■ 35 Stitches
Selecting a Stretch Stitch
Setting the stitch length dial to “ ” or “ ”
changes the selected pattern to a stretch stitch.
■ 25 Stitches
Selecting a Stretch Stitch
Setting the stitch length dial to “ ” changes the
selected pattern to a stretch stitch.
Stitch Width Dial
The numbers marked on the dial represent the stitch
width. THE HIGHER THE NUMBER, THE WIDER
THE STITCH.
Reverse Sewing Lever
You can use reverse sewing for back tacking and
reinforcing seams.
To sew in reverse, push the reverse sewing lever in
as far as possible and hold it in that position while
you lightly push the foot controller. To sew forward,
release the reverse sewing lever. The machine will
then sew forward.
1
1 Reverse sewing lever
1
1
1 Stitch width dial
Note
● When the Straight or Triple Stretch Stitch is
selected, the needle position can be
changed from left to right by adjusting the
.
stitch width dial.
15
Page 18
—
XL2600.book Page 16 Thursday, November 4, 2004 9:46 PM
KNOWING YOUR SEWING MACHINE —————————————————————————————————————————————
THREADING THE MACHINE
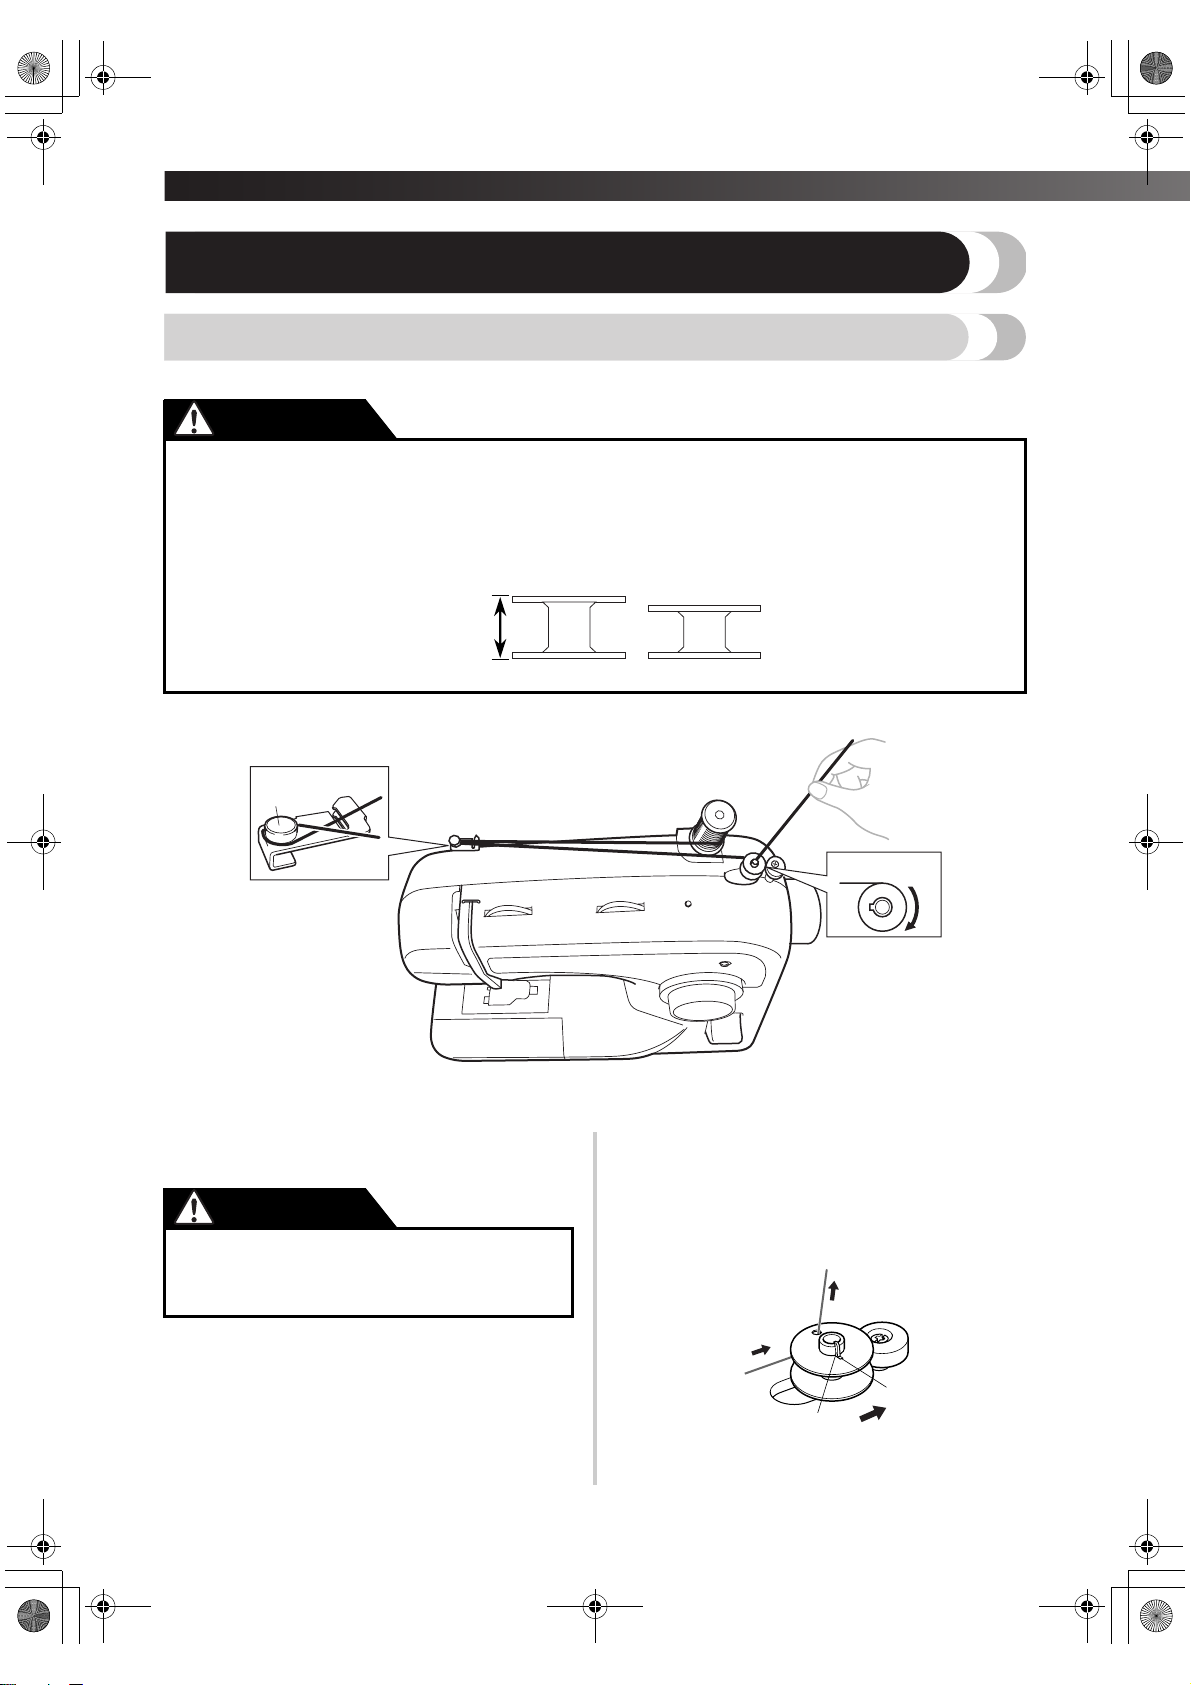
Winding the Bobbin
CAUTION
● Only use bobbins (part code: SA156, SFB (XA5539-151)) that have been designed for this
sewing machine. Using other bobbins may cause damage to the machine.
● We designed the bobbin that comes with this machine. If you use bobbins from other models,
the machine will not work properly. Only use the bobbin that comes with this machine or
bobbins of the same type (part code: SA156, SFB (XA5539-151)).
Actual size
11.5 mm
(7/16 inch)
This model Other models
1
1Pre-tension disk
2Bobbin winder shaft
Put the spool of thread on the spool pin and
1
pass the thread around the pre-tension disk.
CAUTION
● If the spool of thread is not in the right
place, the thread may tangle on the spool
pin.
Pass the end of the thread through the hole on
2
the bobbin from the inside of the bobbin.
2
Put the bobbin onto the bobbin winder shaft
3
and slide the bobbin winder shaft to the right.
Turn the bobbin clockwise, by hand, until the
spring on the shaft slides into the groove of
the bobbin.
2
1
1 Spring on the shaft
2 Groove of the bobbin
16
Page 19
XL2600.book Page 17 Thursday, November 4, 2004 9:46 PM
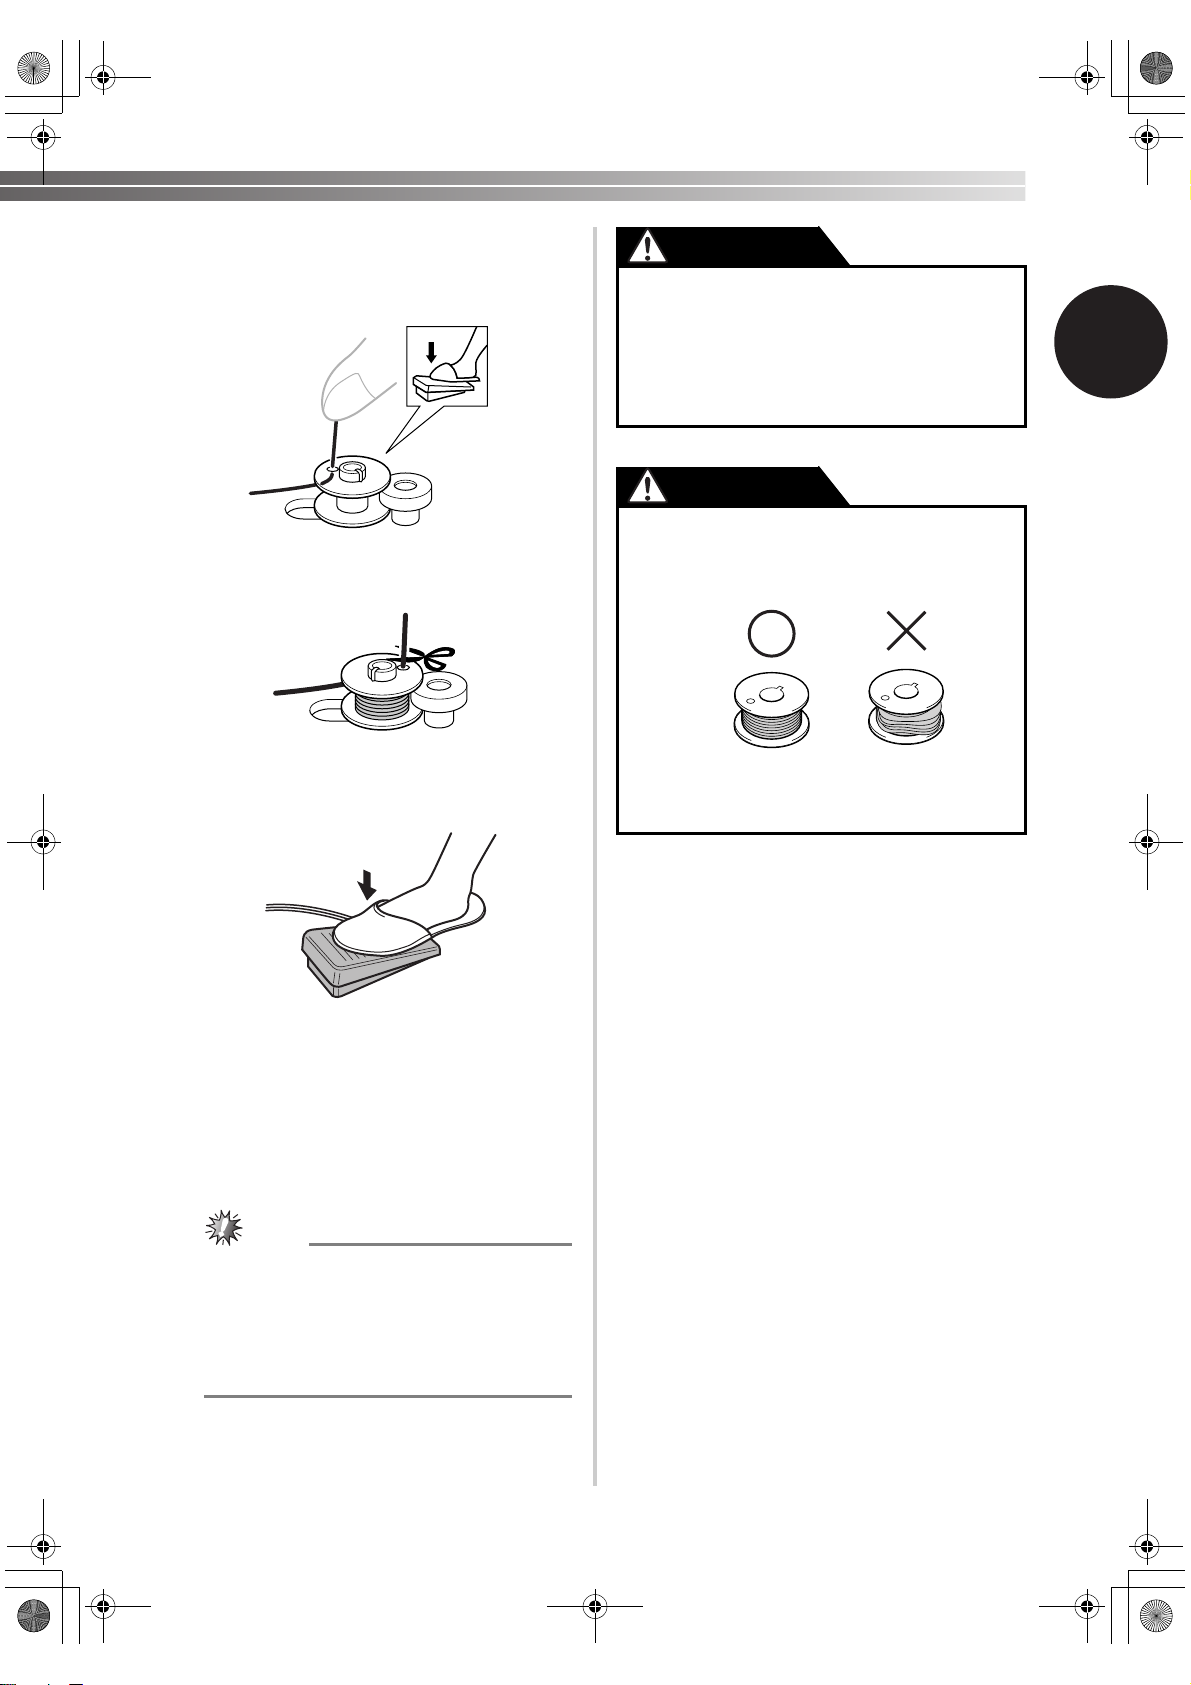
While holding the end of the thread, gently
4
press the foot controller to wind the thread
around the bobbin a few times. Then stop the
machine.
Trim the excess thread above the bobbin.
5
Press the foot controller to start.
6
CAUTION
● Make sure you follow the instructions
carefully. If you do not cut the excess
thread completely before winding the
bobbin, when the thread runs low it may
tangle around the bobbin and cause the
needle to break.
CAUTION
● Not winding the bobbin properly may
cause the thread tension to loosen, and
may break the needle.
1
1 Wound evenly
2 Wound poorly
2
1
When the bobbin seems full and begins
7
spinning slowly, take your foot off the foot
controller.
Cut the thread, slide the bobbin winder shaft
8
to the left and remove the bobbin.
Note
● The needle bar does not move when you
slide the bobbin winder shaft to the right.
● Immediately after winding the bobbin, it is
normal to hear the sound of the clutch
engaging when beginning to sew or turning
the handwheel.
17
Page 20
—
XL2600.book Page 18 Thursday, November 4, 2004 9:46 PM
KNOWING YOUR SEWING MACHINE —————————————————————————————————————————————
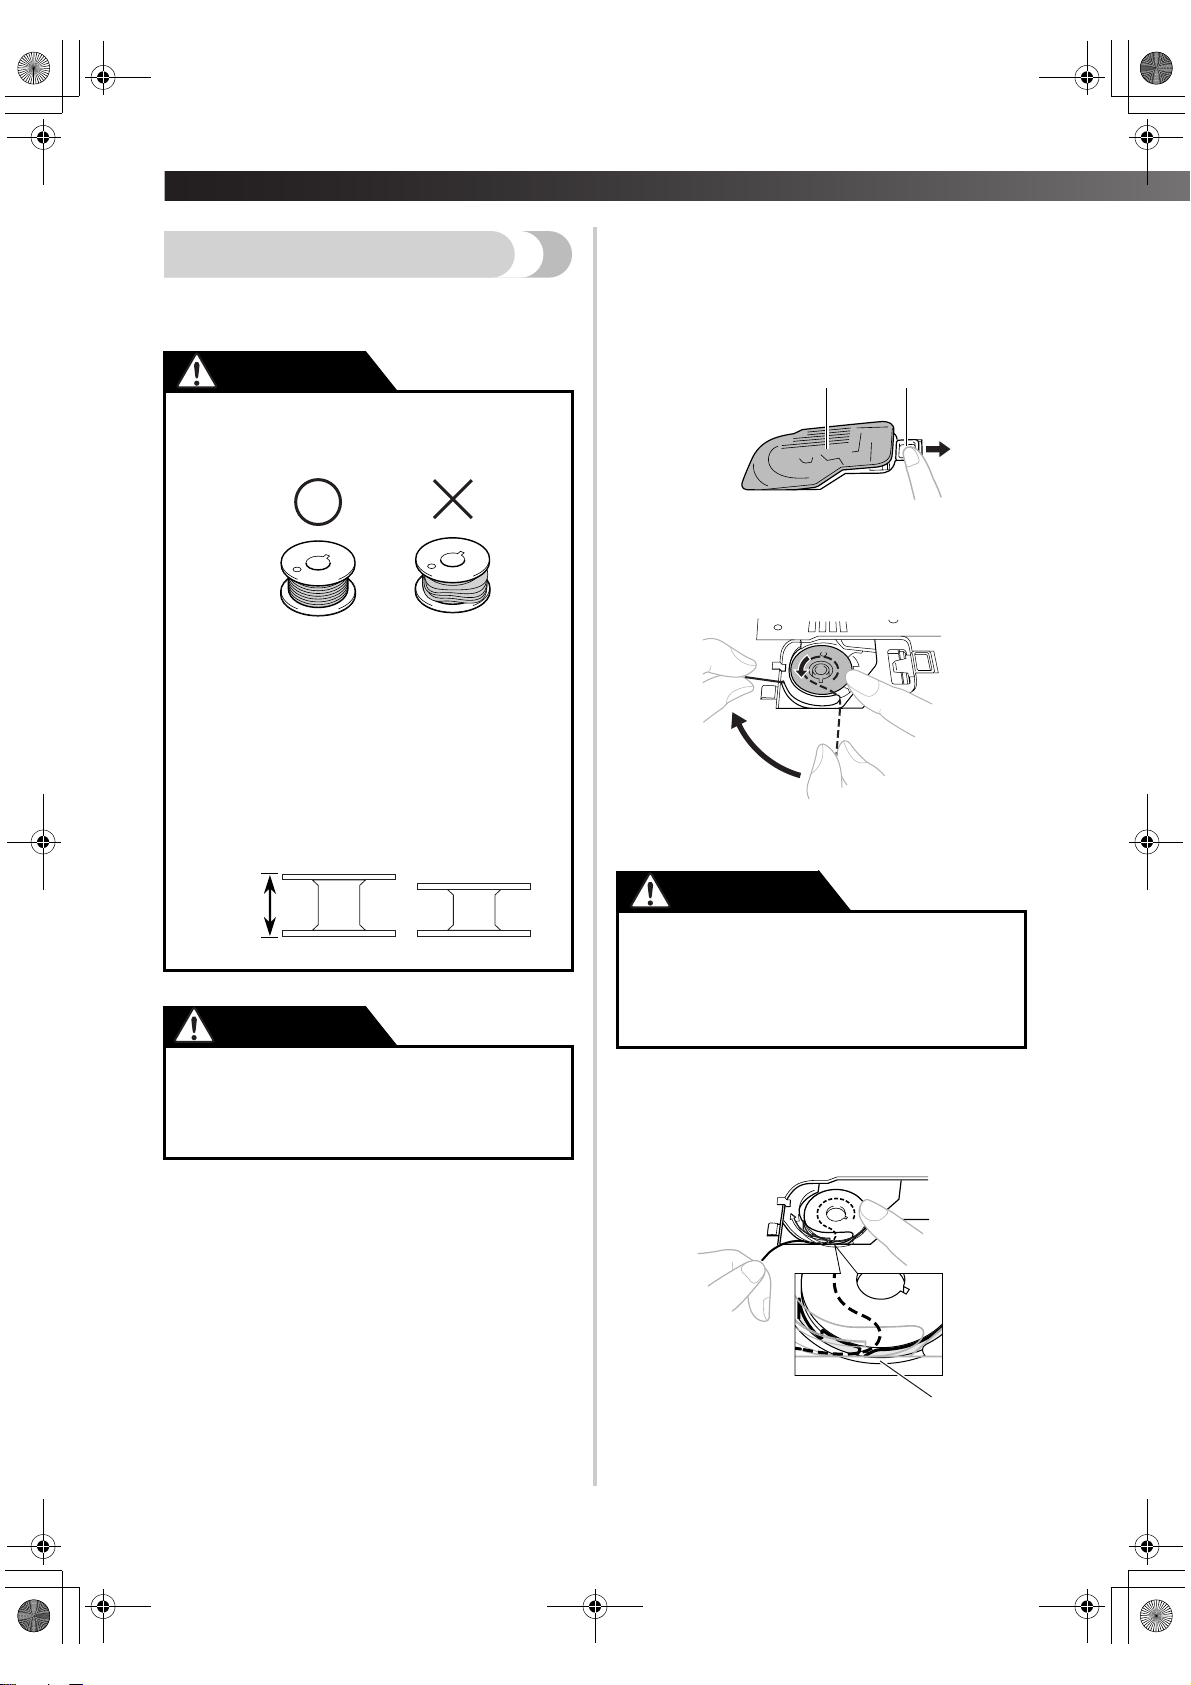
Raise the needle to its highest position by
1
Lower Threading
• For more details on using the quick-set bobbin, see
page 19.
CAUTION
● Not winding the bobbin properly may cause
the thread tension to loosen, and may break
the needle.
turning the handwheel toward you
(counterclockwise) and raise the presser foot
lever.
Slide the button and open the cover.
2
1 Cover
2 Slide button
Put the bobbin in so the thread comes out in
3
the direction shown by the arrow.
12
1
1 Wound evenly
2 Wound poorly
● The bobbin was designed specifically for
2
this sewing machine. If bobbins from other
models are used, the machine will not
operate correctly. Use only the enclosed
bobbin or bobbins of the same type
(part code: SA156, SFB (XA5539-151)).
Actual size
11.5 mm
(7/16 inch)
This model Other models
CAUTION
●
Make sure you turn the power off while
threading the machine. If you accidentally
step on the foot controller and the machine
starts to sew, you could be injured.
• Only use bobbins that were designed to be
used with this machine.
CAUTION
● Make sure you set the bobbin so the
thread unrolls in the right direction. If
the thread unrolls in the wrong direction,
it may cause the thread tension to be
incorrect or break the needle.
• Make sure that the thread is correctly
inserted through the tension-adjusting spring
of the bobbin case. If it is not inserted, reinsert the thread.
18
1
1 Tension-adjusting spring
Page 21
XL2600.book Page 19 Thursday, November 4, 2004 9:46 PM
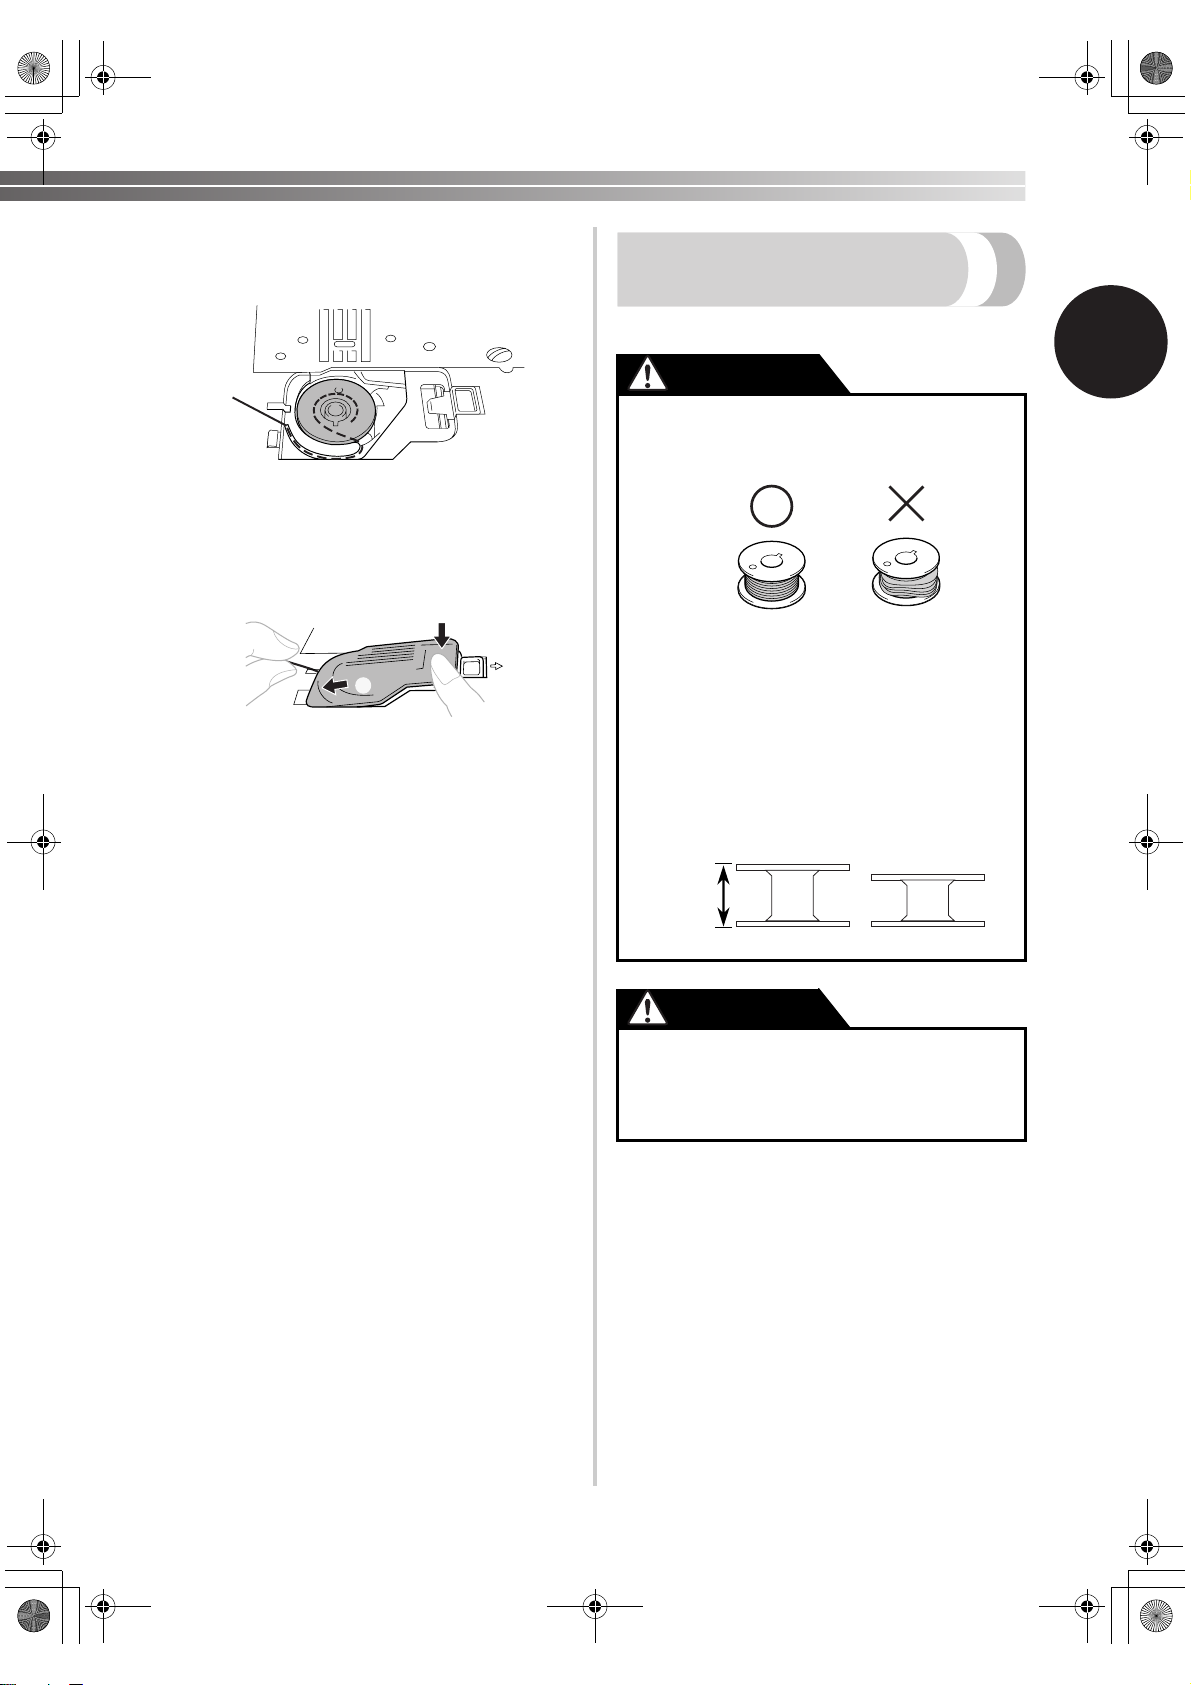
Hold the end of the thread, push the bobbin
4
down with your finger, and then pass the
thread through the slit, as shown.
Reattach the bobbin cover. Put the left tab in
5
place (see arrow 1), and then press lightly on
the right side (see arrow 2) until the cover
clicks into place.
Lower Threading (for models
equipped with a quick-set bobbin)
This feature is only available on certain models.
1
CAUTION
● Winding the bobbin improperly may cause
the thread tension to loosen, breaking the
needle and resulting in injury.
2
1
• Replace the cover so that the end of the
thread comes out from the left side of the
cover (as shown by the line in the
illustration).
1
1 Wound evenly
2 Wound poorly
● The bobbin was designed specifically for
2
this sewing machine. If bobbins from other
models are used, the machine will not
operate correctly. Use only the enclosed
bobbin or bobbins of the same type
(part code: SA156, SFB (XA5539-151)).
Actual size
11.5 mm
(7/16 inch)
This model Other models
CAUTION
● Be sure to turn off the power. If you
accidentally step on the foot controller
and the machine begins to operate, injury
could result.
19
Page 22
—
XL2600.book Page 20 Thursday, November 4, 2004 9:46 PM
KNOWING YOUR SEWING MACHINE —————————————————————————————————————————————
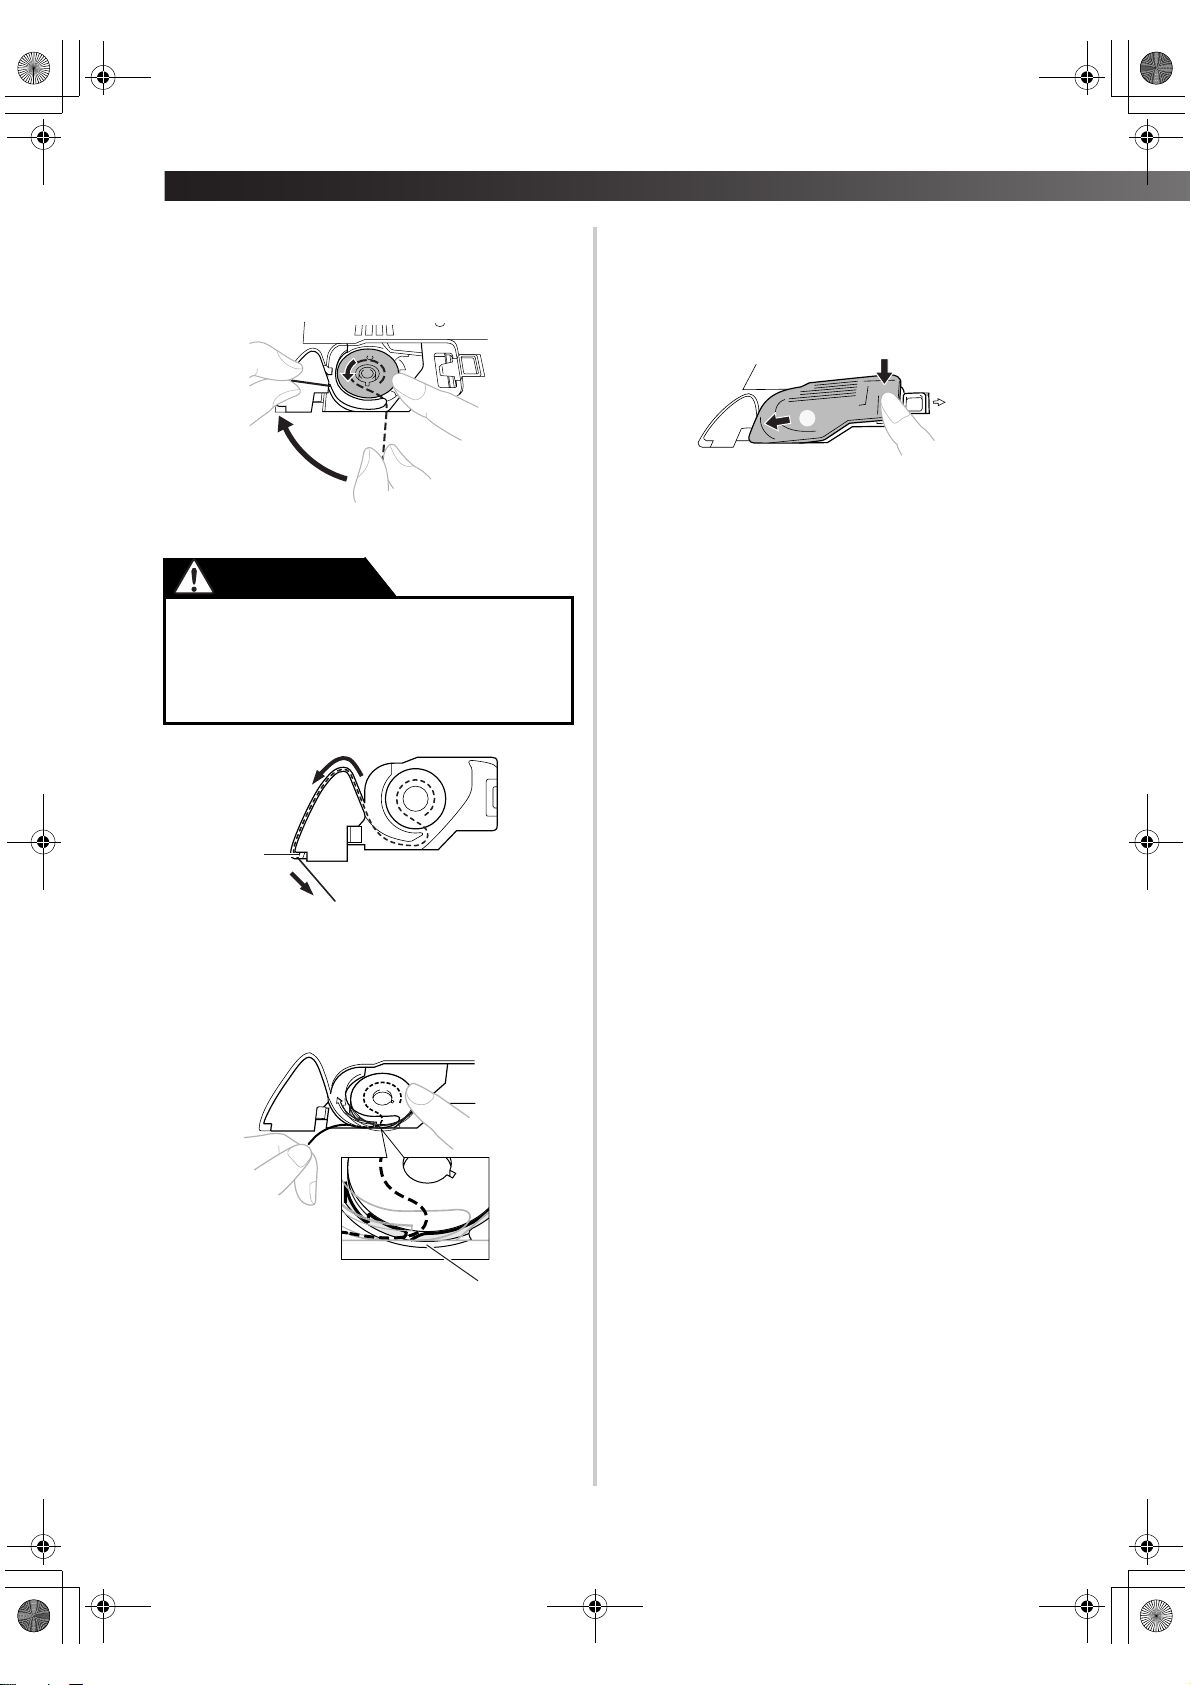
Follow steps 1 and 2 from “Lower Threading”.
1
Put the bobbin in, feed the end of the thread
2
through the slit, and then pull the thread to cut it.
• Only use bobbins that were designed to be
used with this machine.
CAUTION
● Make sure you set the bobbin so the thread
unrolls in the right direction. If the thread
unrolls in the wrong direction, it may cause
the thread tension to be incorrect or break
the needle.
Reattach the bobbin cover. Put the left tab in
3
place (see arrow 1), and then press lightly on
the right side (see arrow 2) until the cover
clicks into place.
2
1
• You can begin sewing immediately without
drawing up the bobbin thread. If you want to
draw up the bobbin thread before you start
to sew, follow the procedure in “Drawing up
the Lower Thread” (page 24).
1
1 Cutter
• Make sure that the thread is correctly
inserted through the tension-adjusting spring
of the bobbin case. If it is not inserted, reinsert the thread.
1
1 Tension-adjusting spring
20
Page 23
XL2600.book Page 21 Thursday, November 4, 2004 9:46 PM
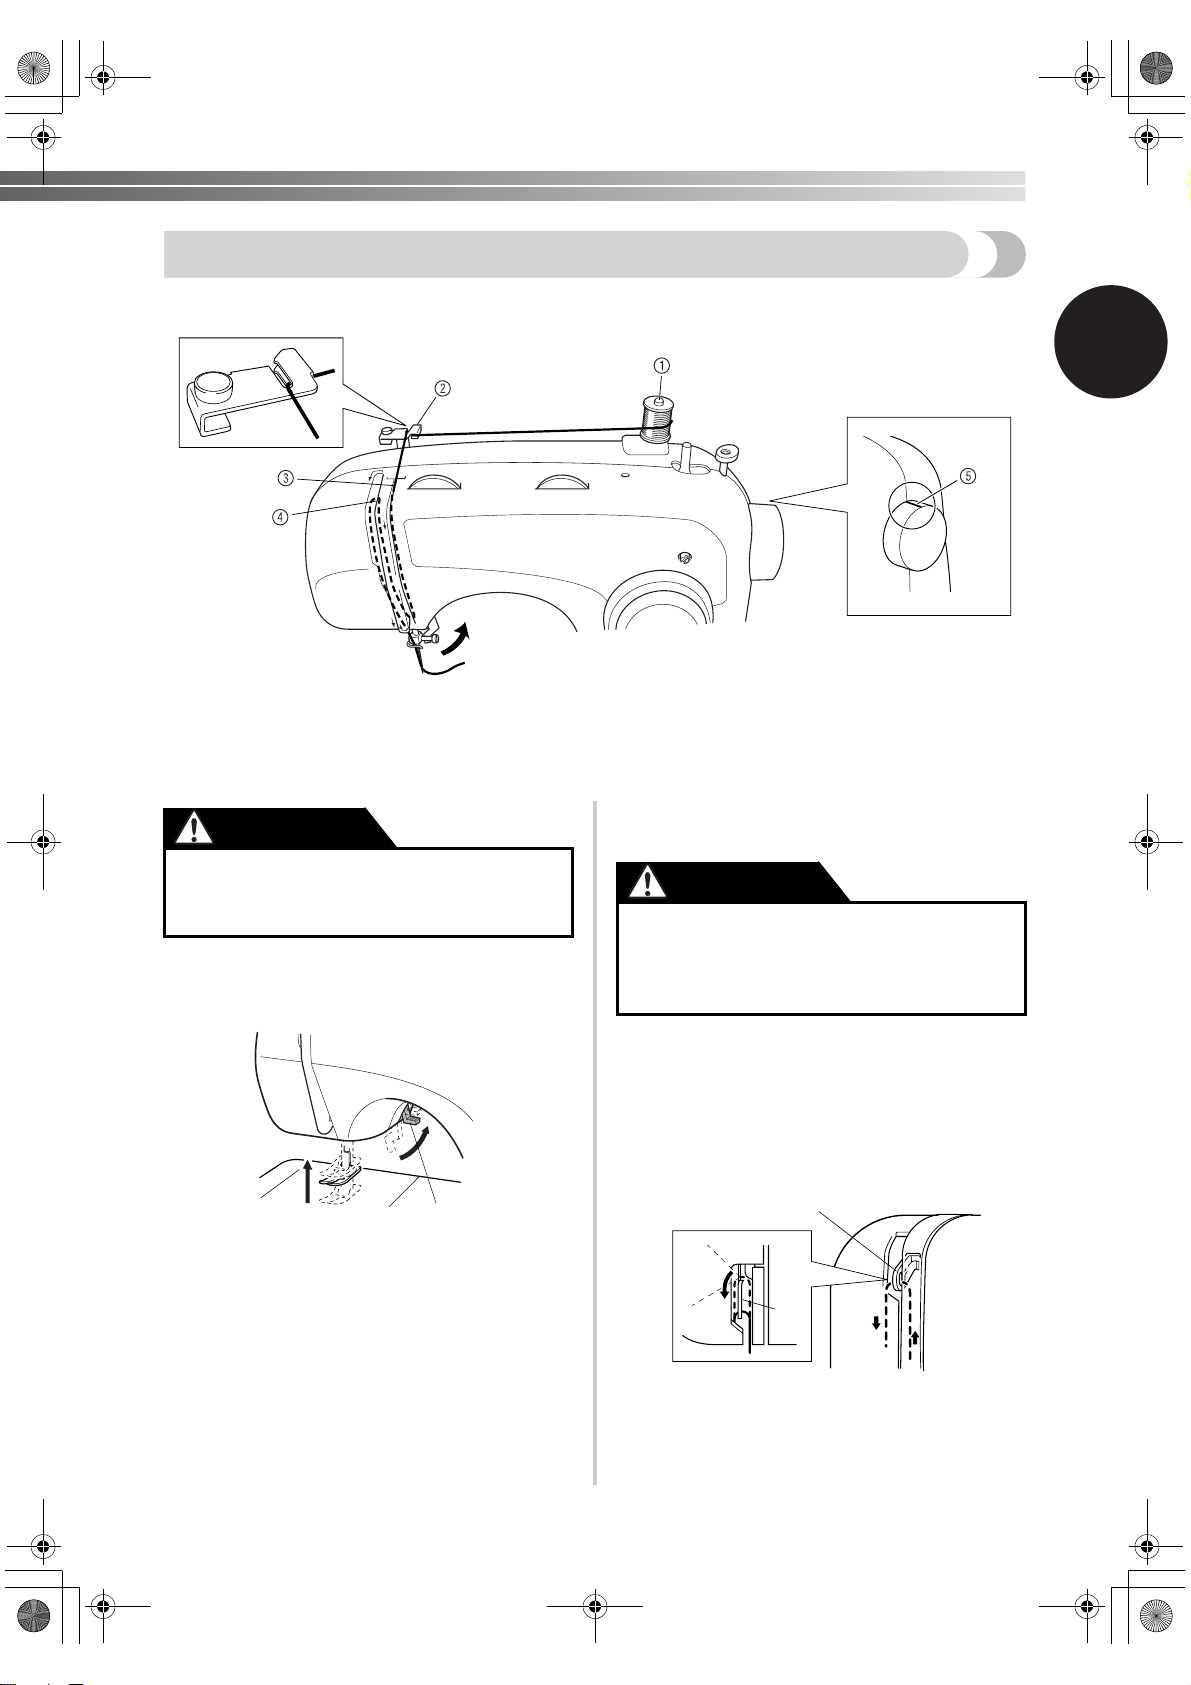
Upper Threading
1
1 Spool pin
2 Thread guide (back)
3 Thread guide (front)
4 Thread take-up lever
5 Mark on the handwheel
CAUTION
● Make sure you thread the machine
properly. Otherwise, the thread could
tangle and break the needle.
IMPORTANT:
1
Raise the presser foot using the presser foot
lever.
1
1 Presser foot lever
Raise the needle to its highest position by
2
turning the handwheel toward you
(counterclockwise) so that the mark on the
handwheel points directly up.
• If the needle is not correctly raised, the
sewing machine can not be threaded.
Be sure to turn the handwheel so that
the mark on the wheel points up before
threading the sewing machine.
Pull up the spool pin and put a spool of thread
3
on this pin.
CAUTION
● If the spool of thread is in the wrong
place, or is set incorrectly, the thread
may tangle on the spool pin and cause
the needle to break.
Feed the upper thread as shown in the
4
illustration above. Pass the thread through
both thread guides: the back one first, and
then the front one.
Make sure you guide the thread through the
5
thread take-up lever from right to left.
1
1
1 Thread take-up lever
21
Page 24
—
XL2600.book Page 22 Thursday, November 4, 2004 9:46 PM
KNOWING YOUR SEWING MACHINE —————————————————————————————————————————————
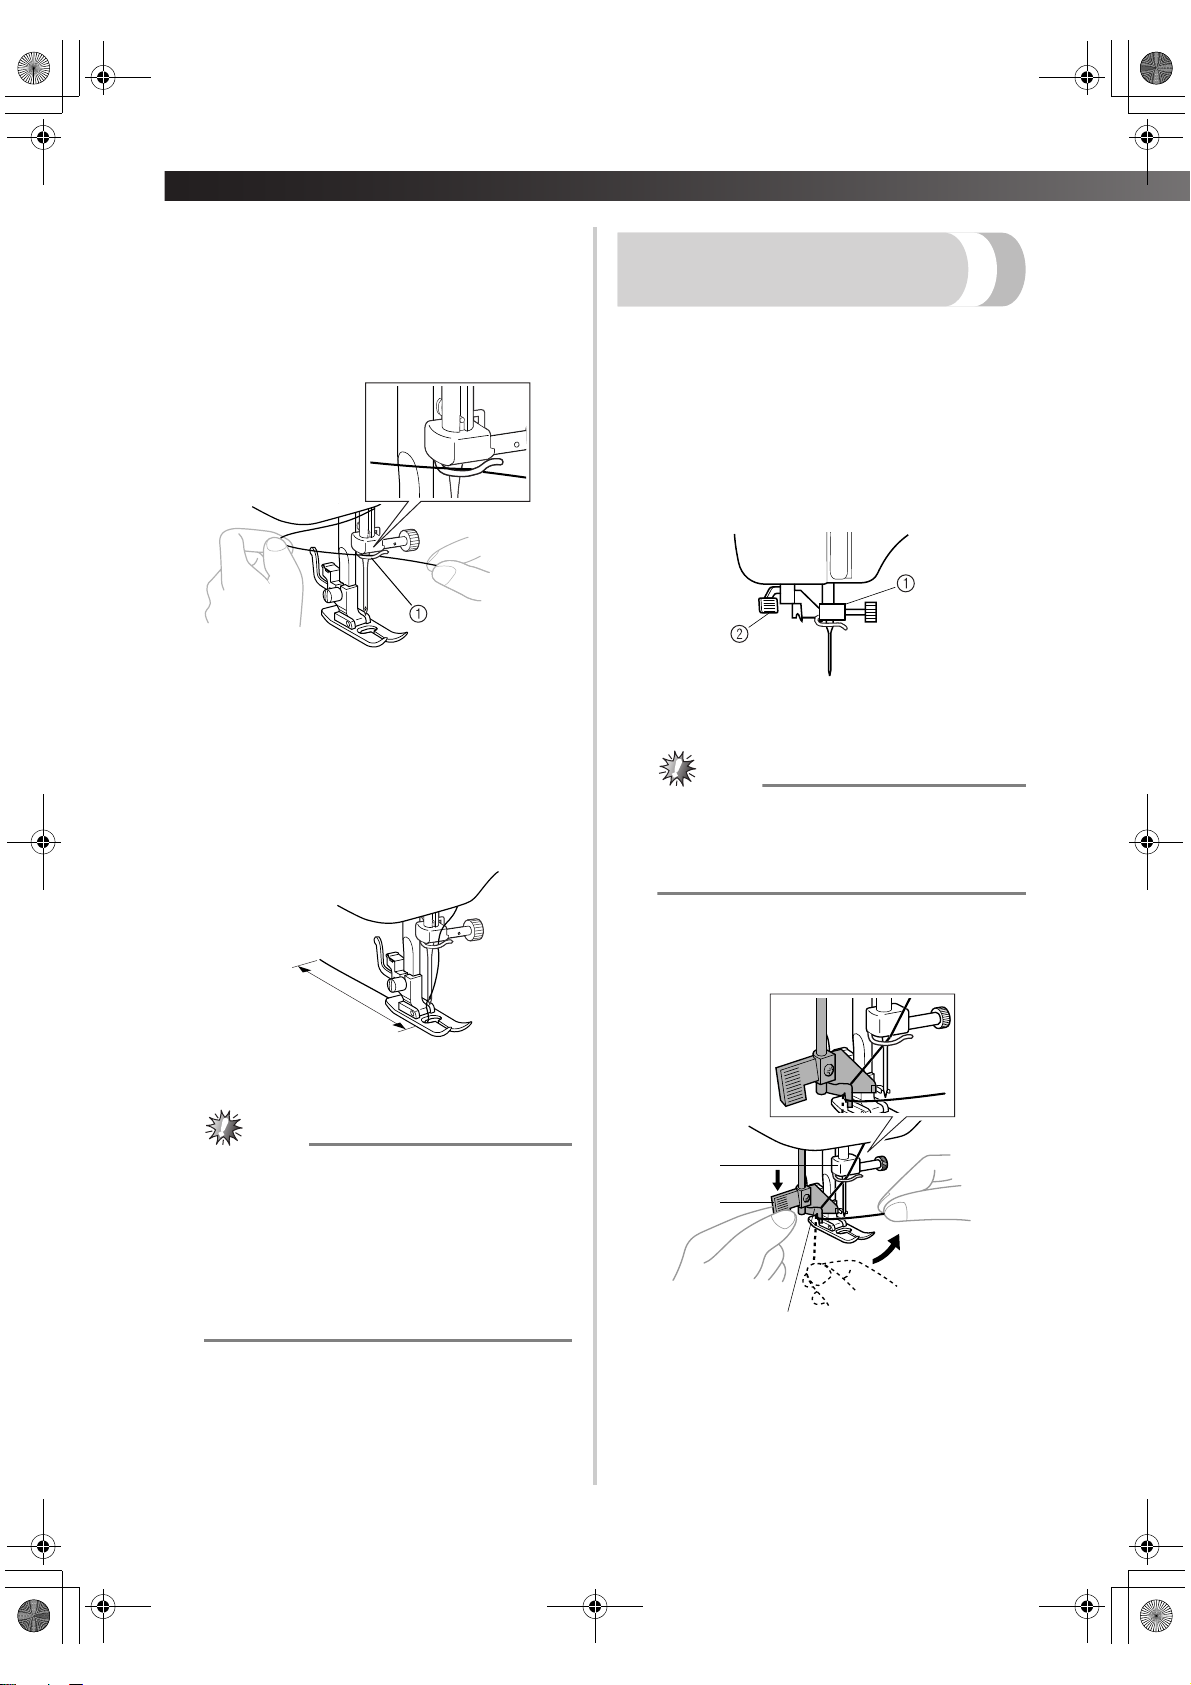
Put the thread behind the guide above the
6
needle.
• The thread can easily be passed behind
the needle bar thread guide by holding
the thread in your left hand, then
Using the Needle Threader (for models
equipped with a needle threader)
This feature is only available on certain models.
feeding the thread with your right hand.
Turn the power off and lower the presser foot
1
lever.
Raise the needle to its highest position by
2
turning the handwheel toward you
(counterclockwise) so that the mark on the
handwheel points directly up.
1 Needle bar thread guide
IMPORTANT:
7
Thread the needle from front to back leaving a
thread tail of about 5 cm (2 inch).
• If your sewing machine is equipped with a
needle threader, use the needle threader to
thread the needle (see next section).
1
1 5 cm (2 inch)
Note
● If the thread take-up lever is lowered, the
upper thread can not be wrapped around
the thread take-up lever. Make sure you
raise the presser foot lever and the thread
take-up lever before you feed the upper
thread.
● If you incorrectly feed the thread you may
cause sewing problems.
1 Needle holder
2 Needle threader lever
Note
● When you use the needle threader, make
sure the needle holder is in the highest
position, otherwise the hook may be
damaged.
While lowering the needle threader lever,
3
hook the thread onto the guide.
1
2
3
22
1 Needle holder
2 Needle threader lever
3 Guide
Page 25
XL2600.book Page 23 Thursday, November 4, 2004 9:46 PM
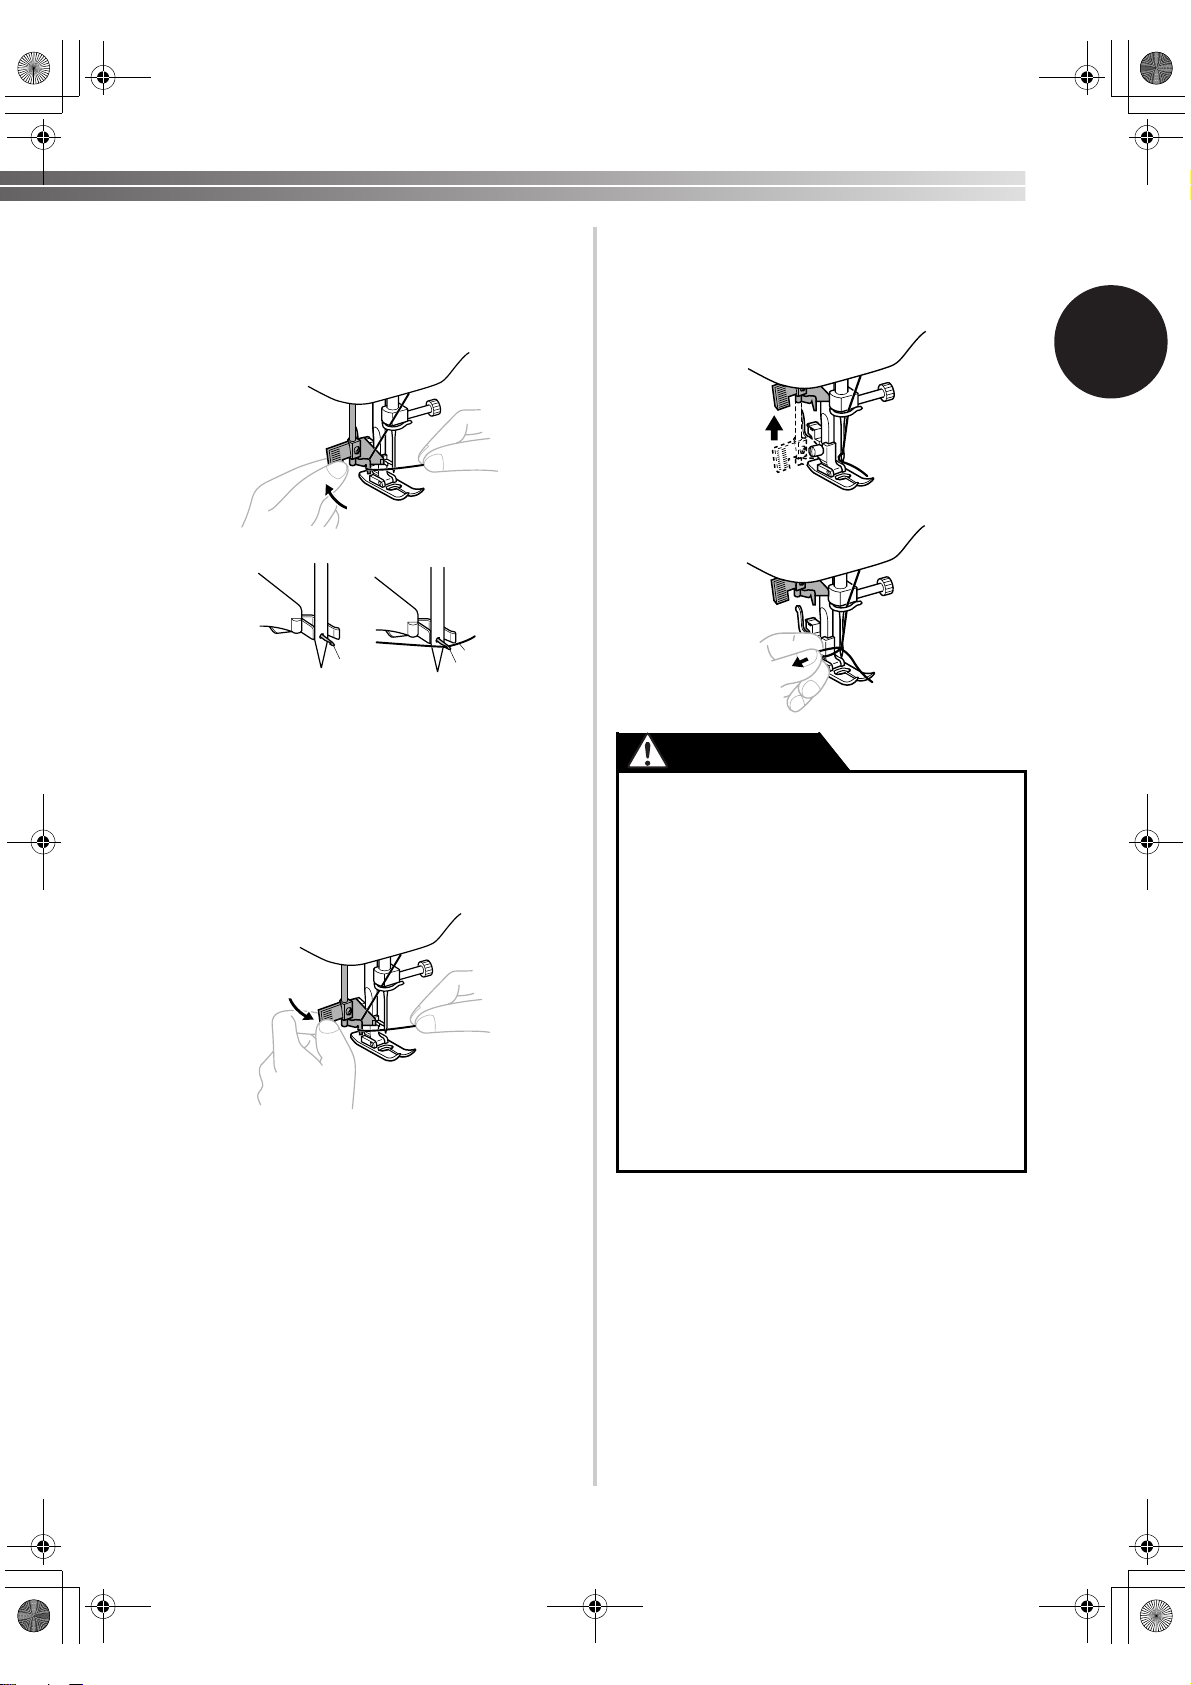
Pull down the needle threader lever as much
4
as possible, and then turn the lever toward the
back of the machine (away from you). Make
sure that the hook passes through the eye of
the needle and grabs the thread.
1
1 Hook
2 Thread
• Hold the thread in front of the needle to
make sure that the hook grabs it.
While lightly holding the thread, turn the
5
needle threader lever toward the front of the
machine (toward you). The hook will pull the
thread through the needle.
1
2
Raise the needle threader lever and pull out
6
about 5 cm (2 inch) of thread through the
needle toward the back of the sewing
machine.
CAUTION
● The needle threader can only be used
with home sewing machine needles size
75/11-100/16. Check the table on page
26 for the appropriate needle and thread
combinations. If you are using
transparent nylon mono-filament thread,
you can only use needles in the range of
90/14-100/16.
● You can not use the needle threader if
you are using decorative threads or
special needles, such as the twin needle
and wing needle.
When using these needles or threads you
will need to thread the needle by hand.
Make sure the main power switch is off
when threading.
1
23
Page 26
—
XL2600.book Page 24 Thursday, November 4, 2004 9:46 PM
KNOWING YOUR SEWING MACHINE —————————————————————————————————————————————
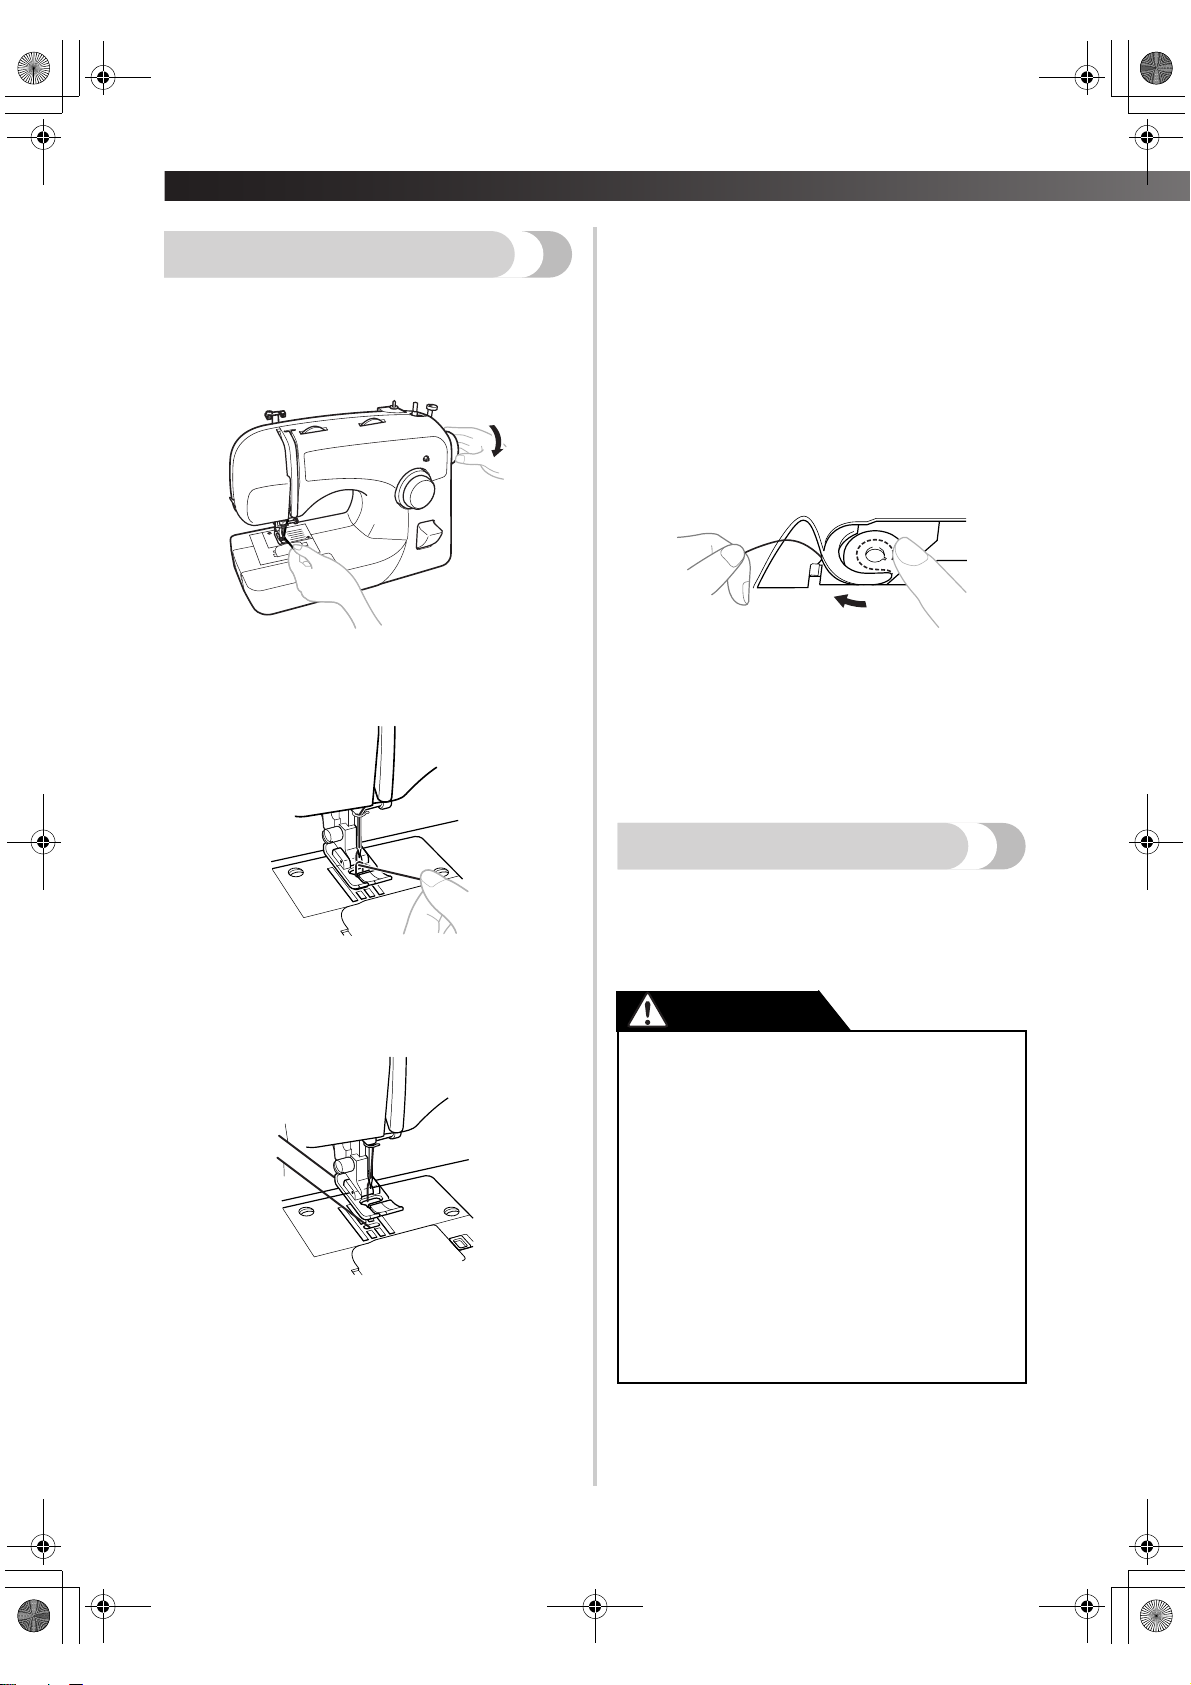
■ Quick-set Bobbin Threading
Drawing up the Lower Thread
While lightly holding the end of the upper
1
thread, slowly turn the handwheel toward you
(counterclockwise) by hand to lower and then
raise the needle.
This is only available on certain models.
You can begin sewing immediately without
drawing up the bobbin thread. When sewing
gathers or darts, you can draw up the lower
thread by hand so that some thread will be left
over. Before you draw up the lower thread, put
the bobbin back in.
Pass the thread along the slit in the direction
1
of the arrow, and leave it there without
cutting it.
Pull on the upper thread to draw up the lower
2
thread.
Pull out about 10 cm (4 inch) of both threads
3
and put them toward the back of the machine
under the presser foot.
1
2
1 Upper thread
2 Lower thread
• The bobbin cover should still be removed.
Draw up the lower thread as described in the
2
previous steps 1 to 3.
Replace the bobbin cover.
3
Sewing with a Twin Needle
We have designed your machine so you can sew
with this needle and two top threads. You can use
the same color or two different colors of thread for
making decorative stitches.
CAUTION
● Use only twin needles that have been
made for this machine (part code:
X57521-021). Other needles could break
and damage the machine.
● When using the twin needle, make sure
the stitch width is not set above 3 since
this may cause the needle to hit the
needle plate and break.
● Make sure that the needle does not strike
the presser foot.
● Do not sew with bent needles. The
needle could break and injure you.
● When using the twin needle, make sure
you use the zigzag presser foot only.
24
Page 27
XL2600.book Page 25 Thursday, November 4, 2004 9:46 PM
■ Attaching the Twin Needle
Attach the twin needle in the same way as a
single needle (see page 8). The flat side of the
needle should face toward the back and the
rounded side should face toward you.
■ Attaching the Extra Spool Pin
Put the extra spool pin in the hole on the top of
the machine. Put the second spool of thread onto
the extra spool pin.
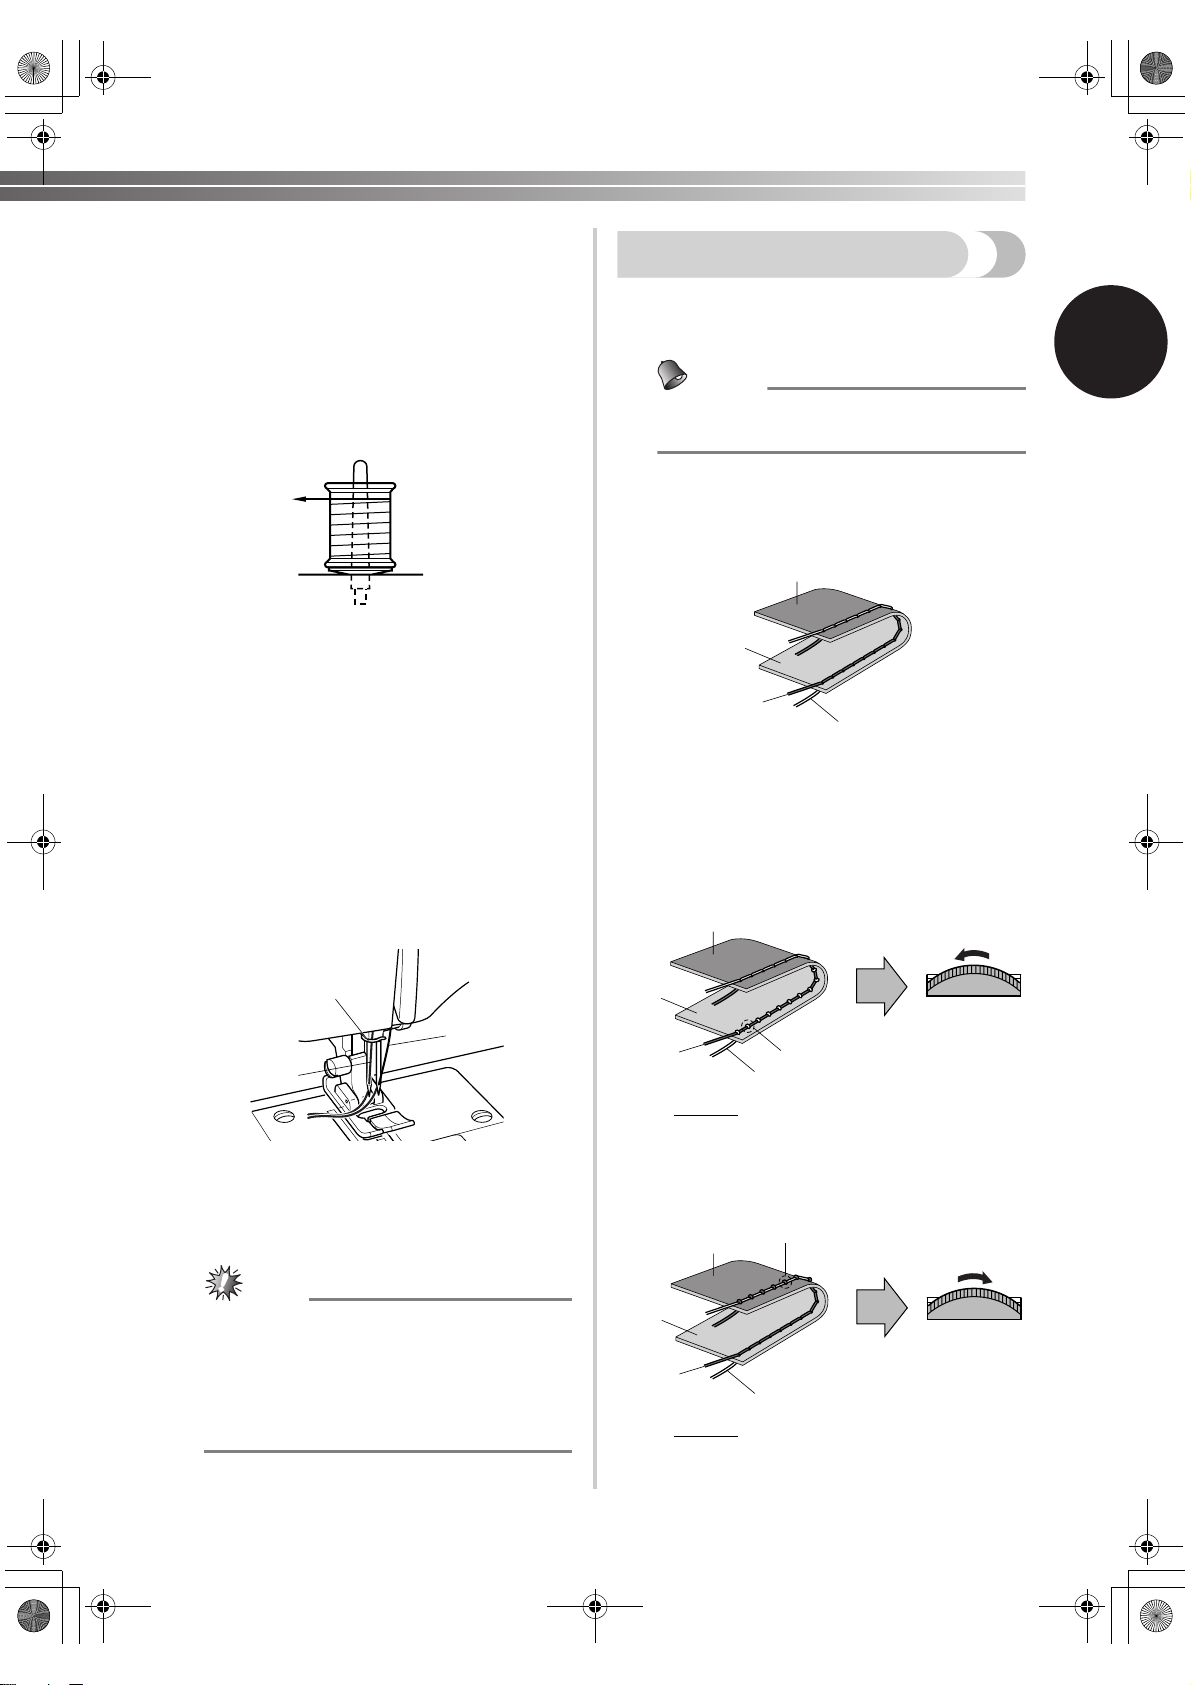
Thread Tension
The tension of the thread will affect the quality of
your stitches. You may need to adjust it when you
change fabric or thread.
Memo
● We recommend that you do a test sample
on scrap of a fabric before you start to sew.
■ Correct Tension
Correct tension is important as too much or too
little tension will weaken your seams or cause
puckers on your fabric.
2
1
■ Twin Needle Threading
You should thread each needle separately.
Thread the left needle.
1
Follow the same instructions for threading a
single needle (see page 21).
Thread the right needle.
2
Thread the right needle in the same way that
you threaded the left needle using the thread
from the spool on the extra spool pin, but do
not pass the thread through the guide above
the needle before you pass it through the eye
of the right needle.
3
2
1
1 Left needle thread passes through the needle bar
thread guide
2 Right needle thread passes in front of the needle
bar thread guide
3 Needle bar thread guide
1
3
4
1 Surface of fabric
2 Back of fabric
3 Upper thread
4 Lower thread
5 Loops appear on surface of fabric
6 Loops appear on back of fabric
■ Upper Tension is too Tight
Loops will appear on the surface of the fabric.
2
1
3
5
4
Solution
Reduce the tension by turning the upper
tension control dial to a lower number.
■ Upper Tension is too Loose
Loops appear on the back of the fabric.
2
6
4
3
5
Note
Models Equipped with a Needle Threader
● You can not use the needle threader to
thread the twin needle. Instead, thread the
twin needle by hand, from front to back.
Using the needle threader may damage the
machine.
1
3
4
Solution
Increase the tension by turning the upper
tension control dial to a higher number.
4
3
5
25
Page 28
—
XL2600.book Page 26 Thursday, November 4, 2004 9:46 PM
KNOWING YOUR SEWING MACHINE —————————————————————————————————————————————
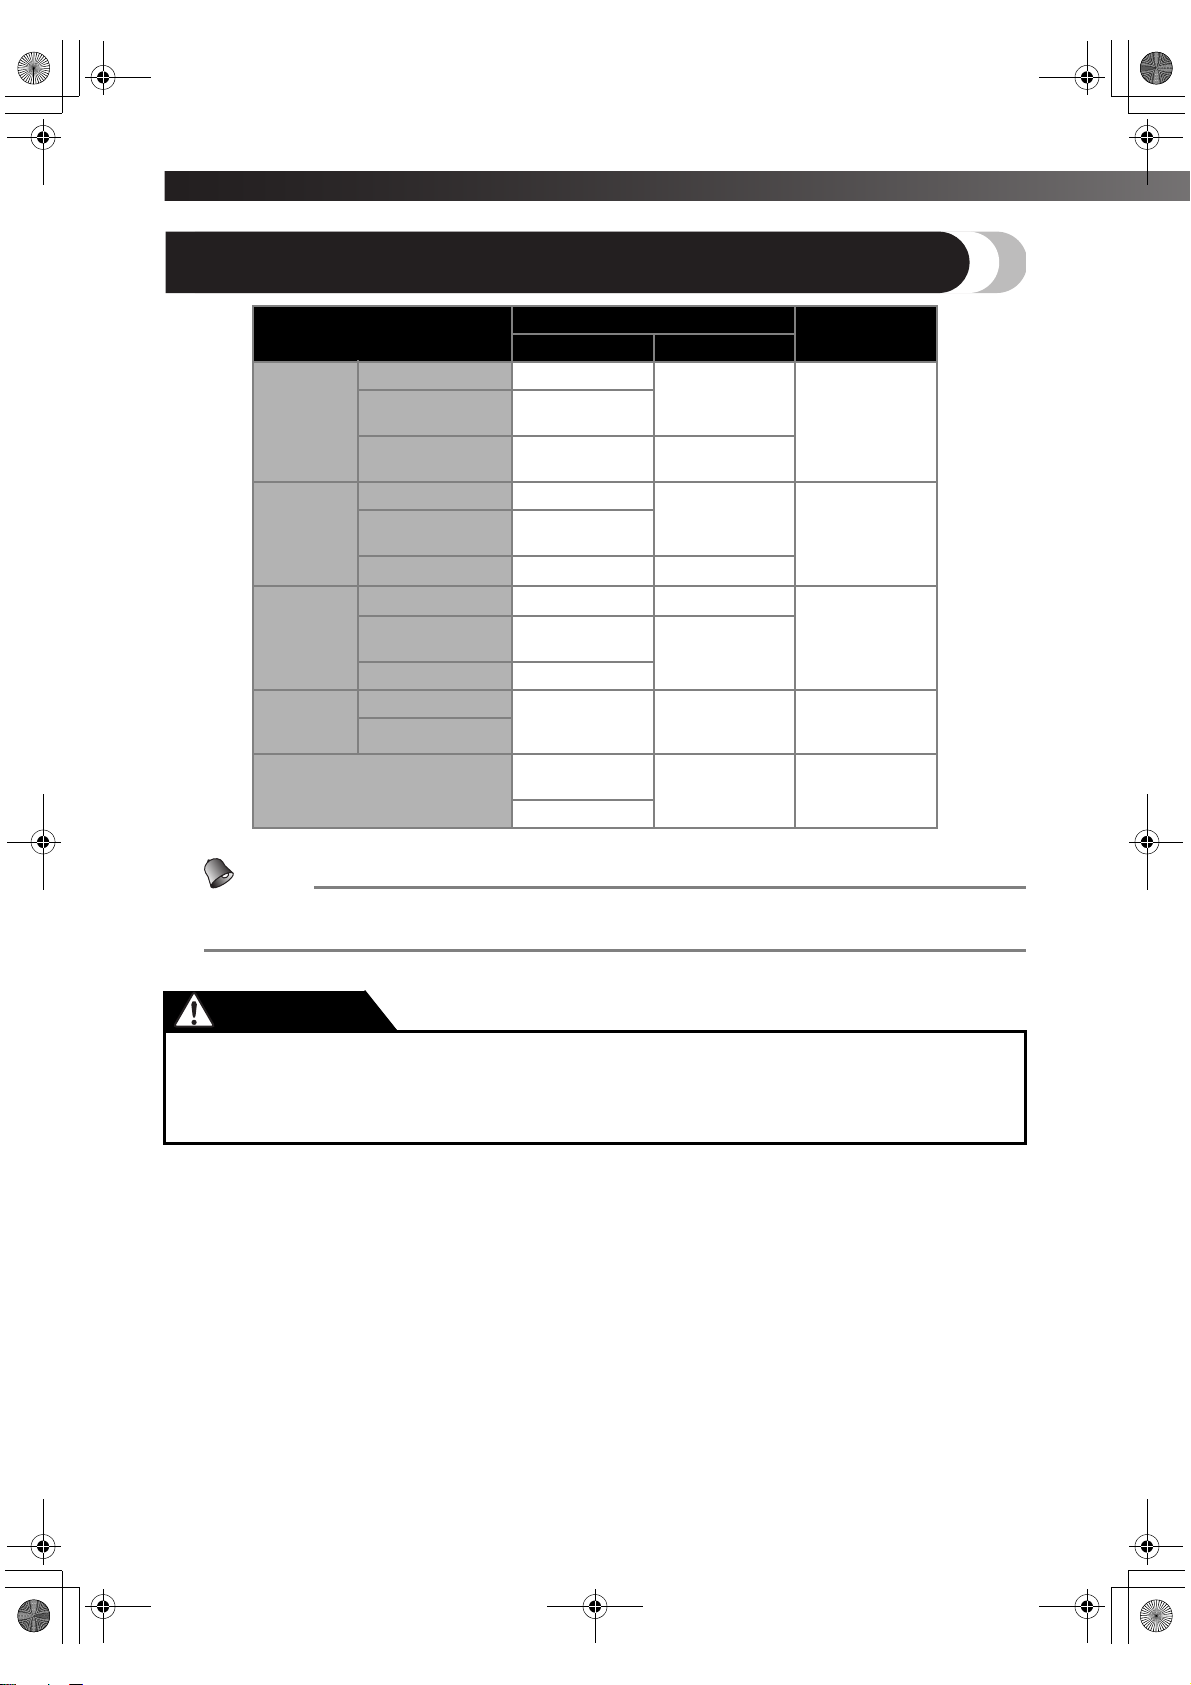
FABRIC, THREAD, AND NEEDLE COMBINATIONS
Silk
Thread
Size of Needle
60
–80
50
–80
60
–80
50–80
30–50
50
Ball point needle
50–60
30 90/14–100/16
(golden colored)
Medium
weight
fabrics
Lightweight
fabrics
Heavyweight
fabrics
Stretch
fabrics
For top stitching
Fabric Type
Broadcloth Cotton
Taffeta
Flannel,
Gabardine
Lawn, Batiste Cotton
Georgette
Challis, Satin Silk
Denim Cotton
Corduroy
Tweed Silk
Jersey
Tricot
Type Size
Thread synthetic
mercerized
Silk or silk
finished
Thread synthetic
mercerized
Thread synthetic
mercerized
Thread for knits
Thread synthetic
mercerized
Memo
● For clear nylon thread, always use needle 90/14 - 100/16.
● You can also use the same thread for the bobbin thread and upper threading.
75/11–90/14
65/9–75/11
90/14–100/16
75/11–90/14
CAUTION
Make sure you follow the needle, thread, and fabric combinations listed in the table.
●
Using the wrong combination, such as heavyweight fabric like denim with a small needle
(65/9-75/11), may bend or break the needle. The wrong combination may also cause the seam
to be uneven, the fabric to pucker, or the machine to skip stitches.
26
Page 29
XL2600.book Page 27 Thursday, November 4, 2004 9:46 PM
2
STRAIGHT AND ZIGZAG STITCHING
Please Read Before Sewing
CAUTION
● To avoid being injured, watch the needle carefully while you are using the machine. Keep
your hands away from moving parts.
● Do not stretch or pull the fabric during sewing, otherwise the needle may be damaged and
you may be injured.
● Do not use bent or broken needles, otherwise you may be injured.
● Take care that the needle does not hit basting pins or other objects during sewing. The needle
may break and you may be injured.
● Always use the correct presser foot. If you use the wrong presser foot, the needle may hit the
presser foot and bend or break and you may be injured.
● When you turn the handwheel by hand, always turn it toward you (counterclockwise).
Turning it the other way may cause the thread to tangle and damage the needle or fabric, and
you may be injured.
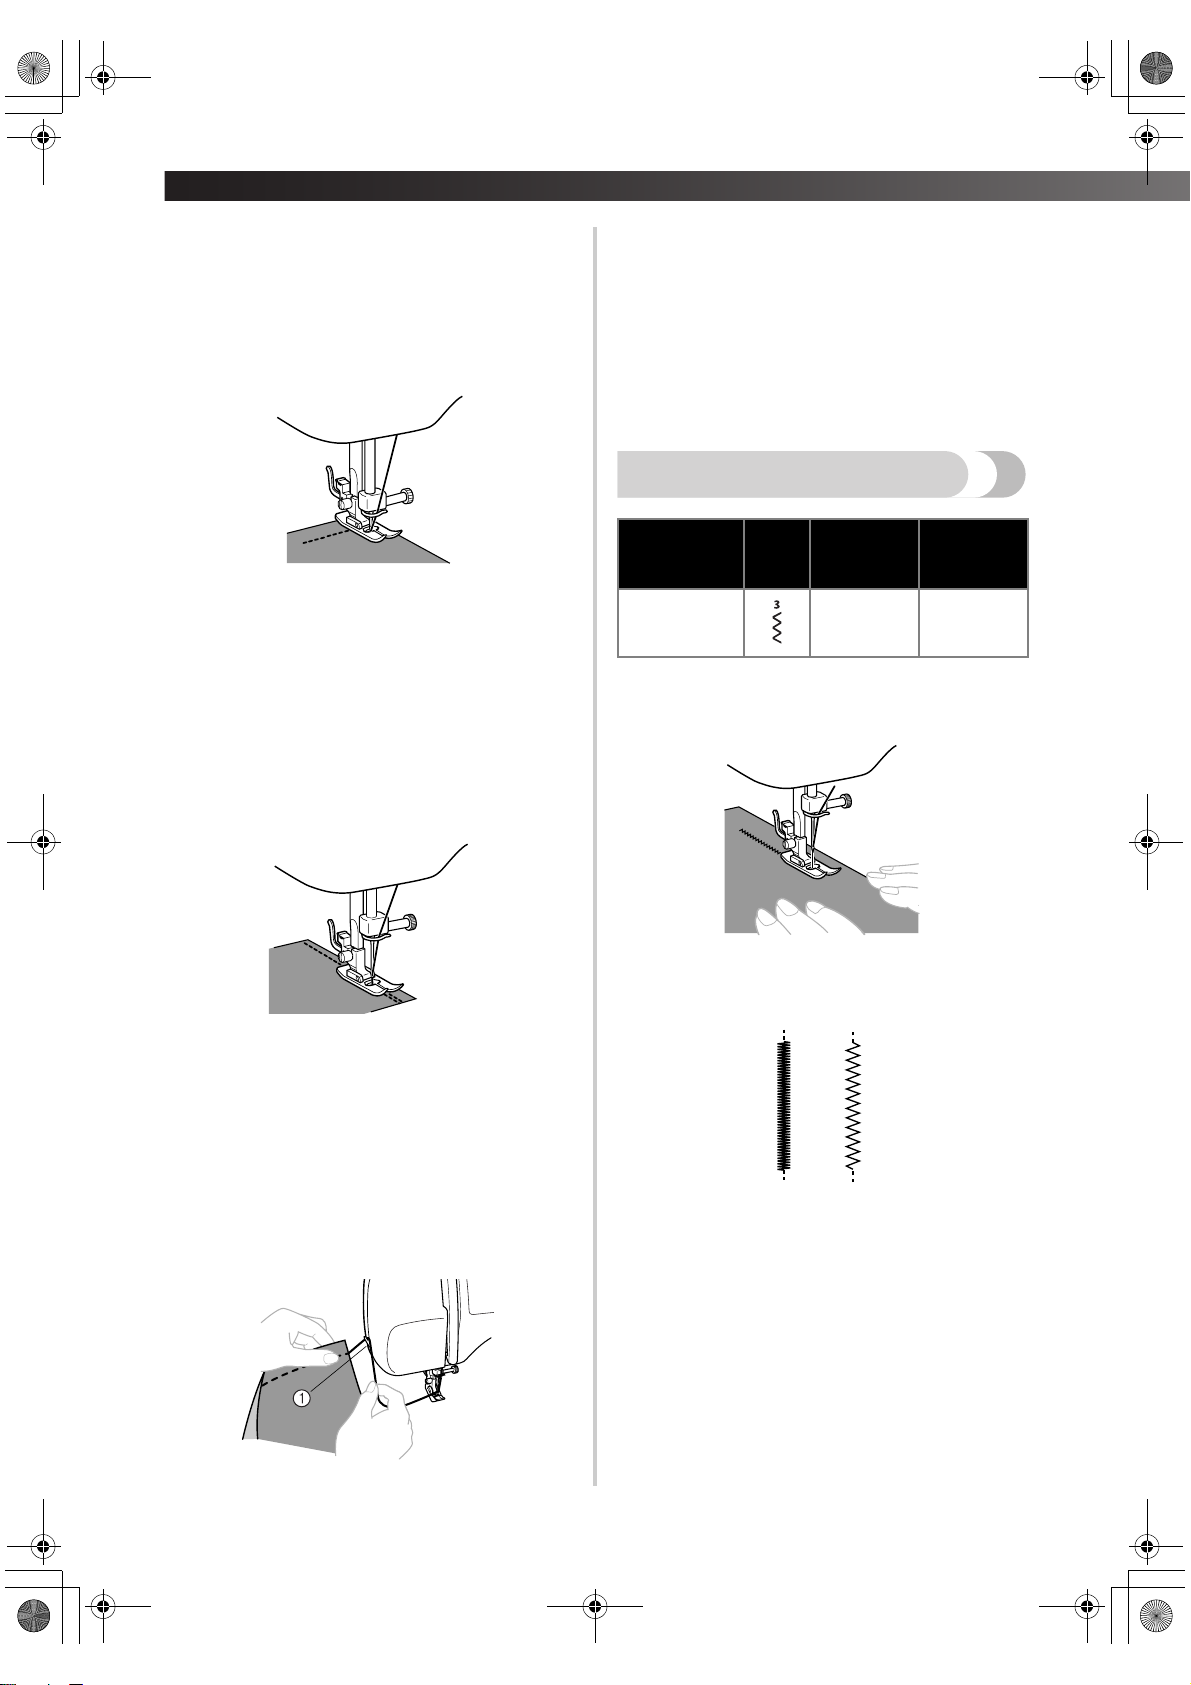
Put the fabric under the presser foot and
4
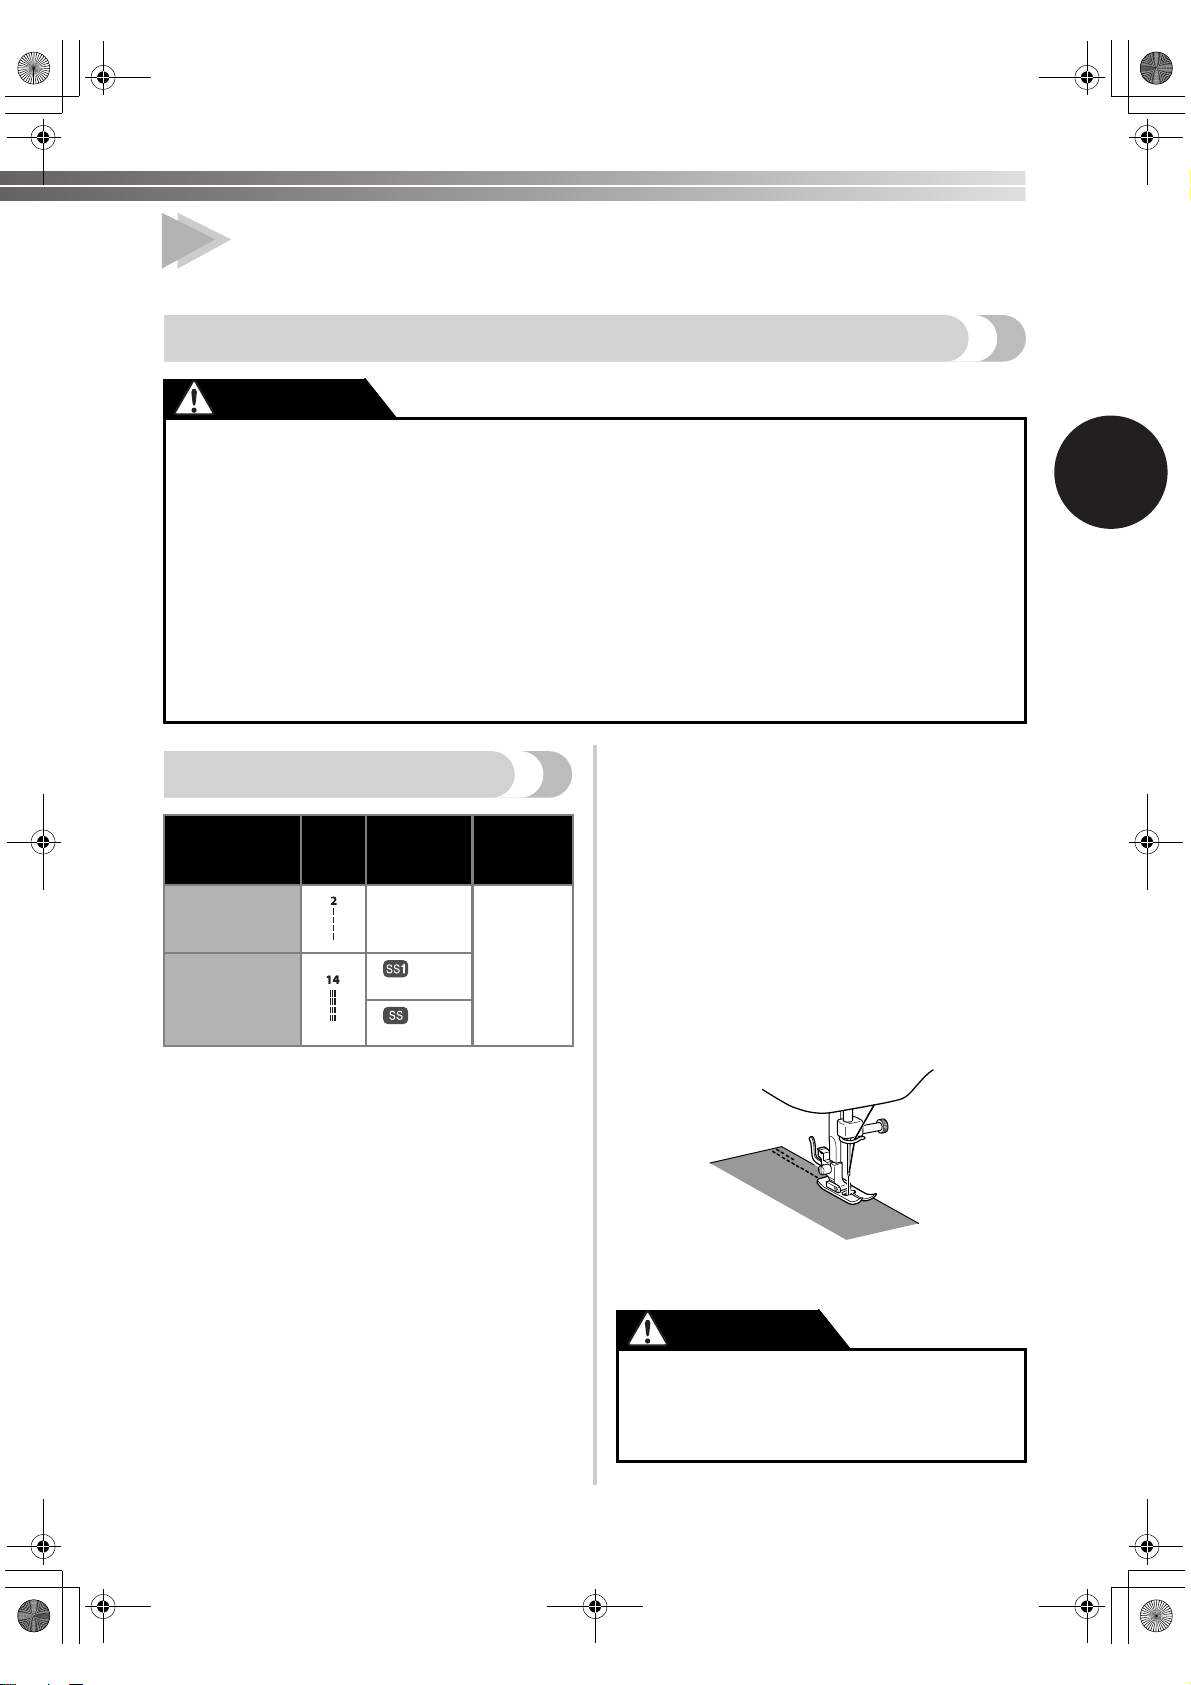
Straight Stitching
Stitch Name Pattern
Straight Stitch
Triple Stretch
Stitch
Stitch
Length
[mm (inch)]
1-4
(1/64-3/16)
Fixed
2.5 (3/32)
Fixed
2.5 (3/32)
Stitch
Width
[mm (inch)]
5-0*
(3/16-0)
position the needle 1 cm (3/8 inch) from the
edge of the fabric.
Lower the presser foot.
5
To back tack, push down the reverse sewing
6
lever as far as possible, and then press the foot
controller to start reverse sewing. Release the
foot controller to stop sewing.
Release the reverse sewing lever and start
7
sewing in the forward direction by pressing
the foot controller.
*Turn the stitch width dial to adjust the needle
position. Setting the dial to 5 selects the left
needle position; setting the dial to 0 selects the
right needle position.
■ Starting Sewing
2
Turn the pattern selection dial to choose the
1
stitch number you want. You also need to set
the pattern selection dial to the Straight Stitch
or Triple Stretch Stitch.
Raise the needle to its highest position and lift
2
the presser foot lever.
Pull the upper thread though the toes of the
3
presser foot.
• You can use reverse sewing for locking the
end of seams and to strengthen a stitch.
CAUTION
● Make sure the needle does not hit a pin
or any other object during sewing. The
thread could tangle or the needle could
break, and you may be injured.
27
Page 30
—
XL2600.book Page 28 Thursday, November 4, 2004 9:46 PM
STRAIGHT AND ZIGZAG STITCHING ——————————————————————————————————————————————
■ Changing Sewing Direction
Stop the machine at the point where you want
1
to change direction with the needle still in the
fabric.
Raise the presser foot and turn the fabric to its
2
new direction using the needle as a pivot.
Lower the presser foot and start sewing in the
3
new direction.
■ Finishing Sewing
You can use stitching to lock the threads at the
end of the seam or to strengthen a stitch.
Stitch to the end of the seam and stop.
1
Push the reverse sewing lever and stitch
2
backwards for 1 cm (3/8 inch) from the end of
the fabric.
To prepare the machine for the next seam,
4
pull about 10 cm (4 inch) of thread through
the toes of the presser foot toward the back of
the machine.
■ Top Stitching and Stretch Materials
You can use a straight stitch for top stitching and
sewing lightweight fabrics.
You can use a triple stretch stitch for sewing
stretch fabrics.
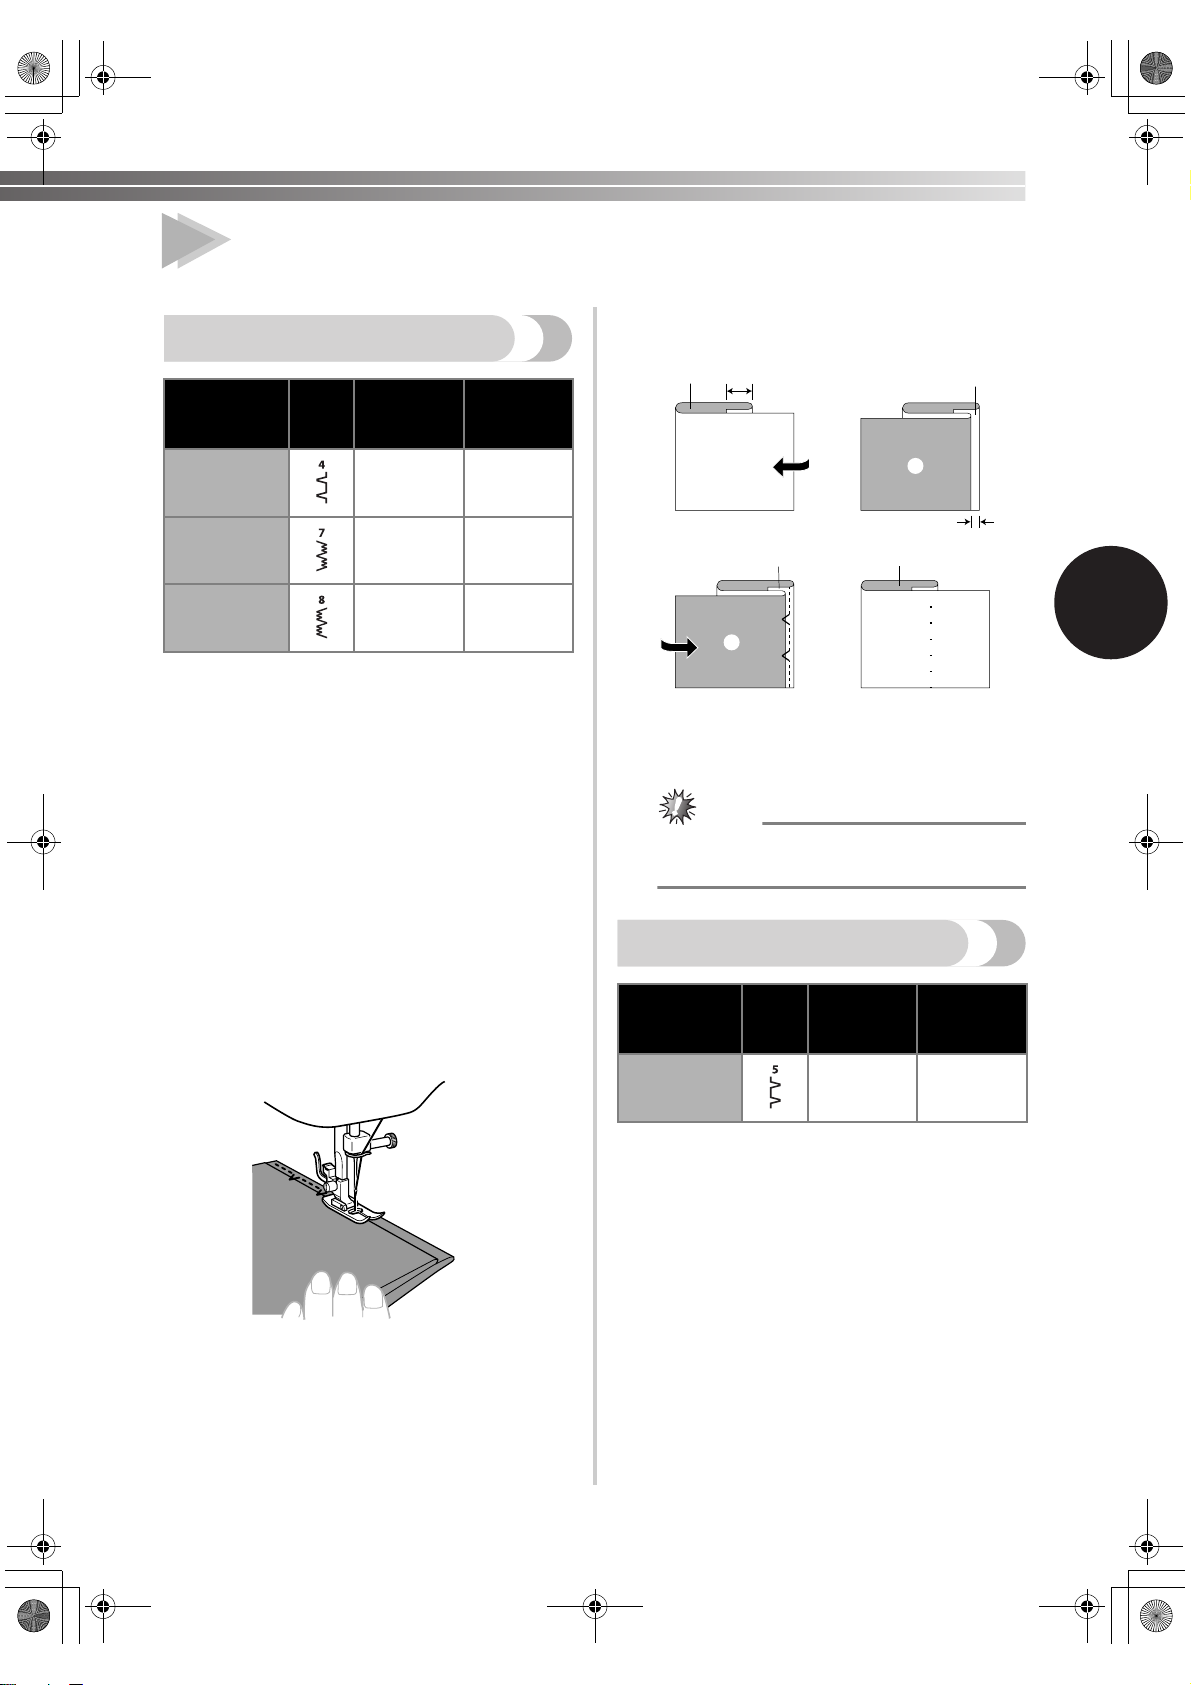
Zigzag Stitching
Stitch
Stitch Name Pattern
Length
[mm (inch)]
Zigzag Stitch
F-4
(1/64-3/16)
■ Zigzag Stitch
Turn the pattern selection dial to the Zigzag
Stitch, and then start sewing.
Stitch
Width
[mm (inch)]
(0-3/16)
0-5
■ Removing the Material from the Machine
Stop the machine.
1
Raise the needle to its highest position and
make sure that the thread take-up lever is also
in its highest position.
Lift the presser foot and pull the fabric out
2
gently to the left hand side.
Cut both threads with the thread cutter on the
3
left hand side of the machine
.
1 Thread cutter
28
We recommend that you sew using the Straight
Stitch at the beginning and end of zigzag stitches.
(This acts as a reinforcement stitch.)
■ Satin Stitch
Setting the Zigzag Stitch length in the “F” range
produces a satin stitch (close zigzag stitch). The
Satin Stitch can be used for making buttonholes
and decorative stitches. Set the pattern selection
dial to the Zigzag Stitch, set the stitch length in
the “F” range, and set the stitch width dial
between 0 and 5.
Page 31
XL2600.book Page 29 Thursday, November 4, 2004 9:46 PM
3
BUILT-IN STITCHES
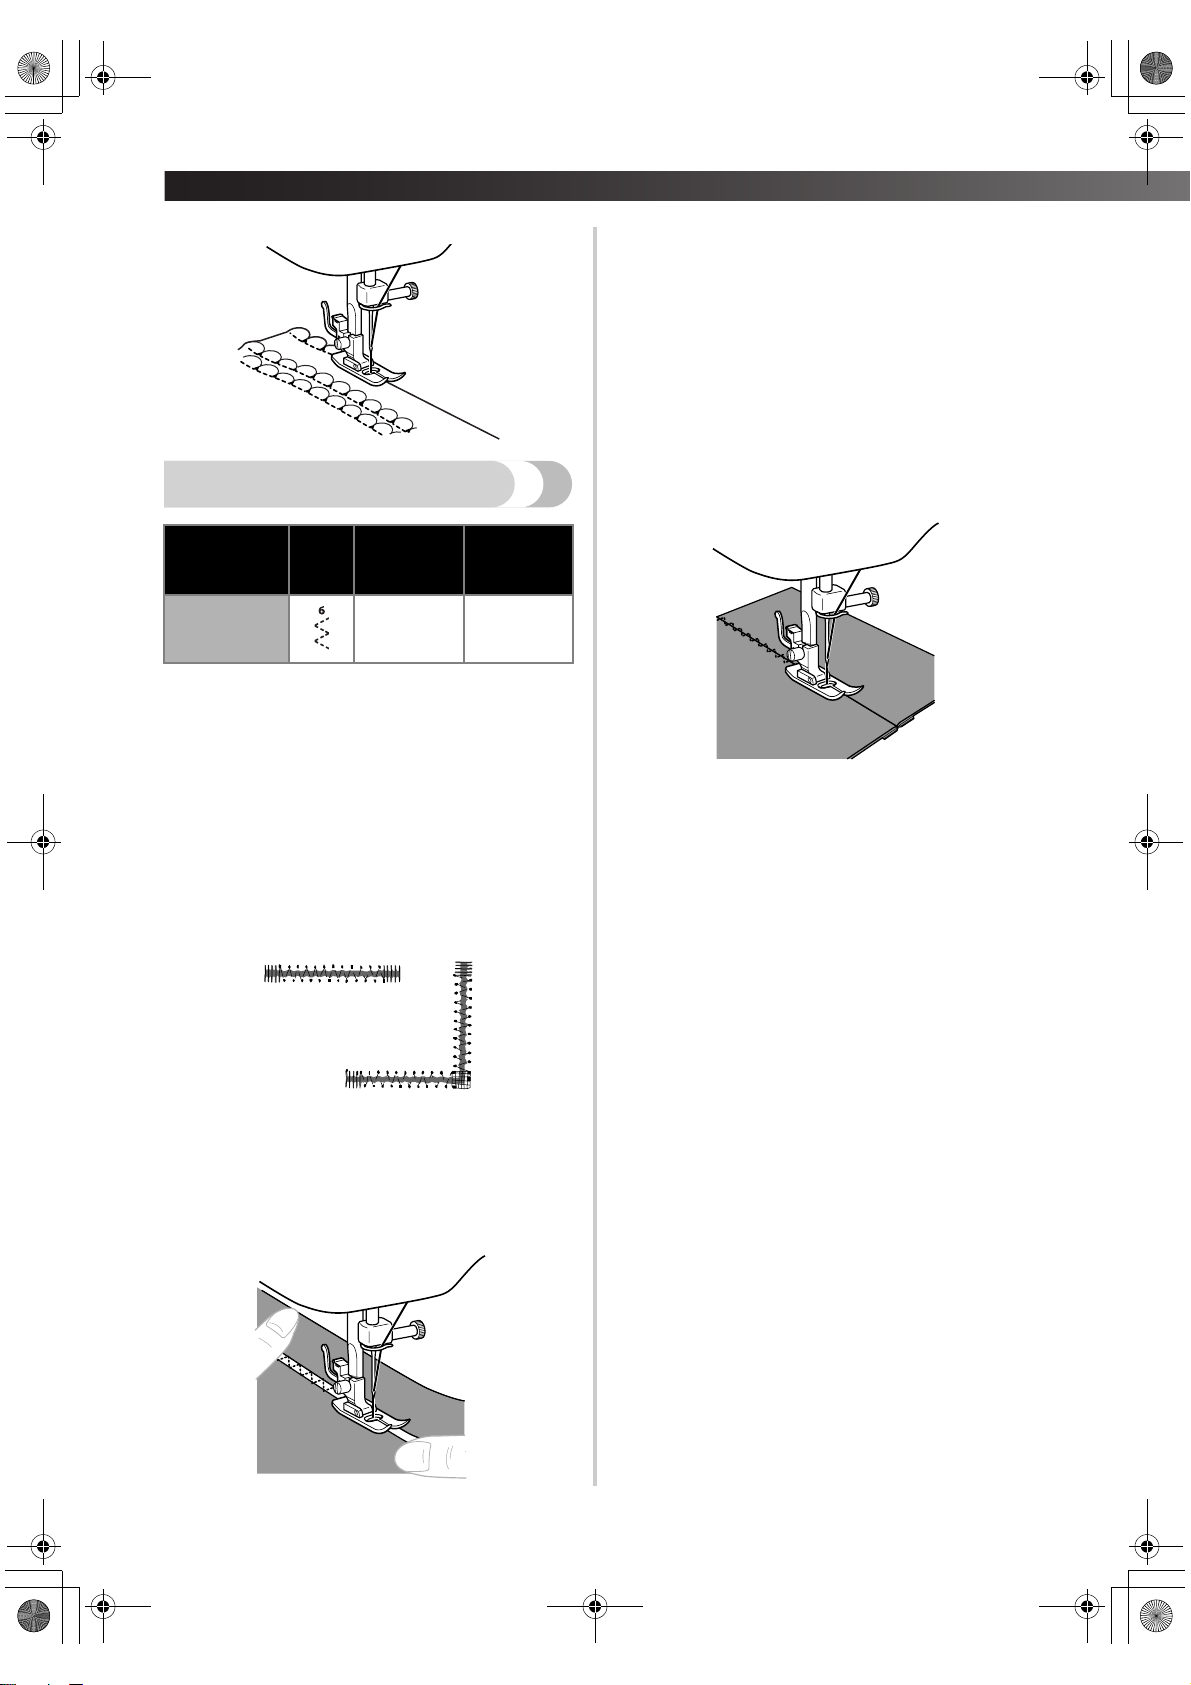
Blind Hem Stitching
Stitch
Stitch Name Pattern
Blind Hem
Stitch
Stretch Blind
Hem Stitch
Stretch Blind
Hem Stitch
You can use the Blind Hem Stitch to finish the edge
of a project, like the hem of a pair of trousers,
without the stitch showing. Use the Blind Hem Stitch
when sewing on non-stretch fabrics, and the Stretch
Blind Hem Stitch for stretch fabrics.
Both threads should be the same color as the
1
fabric.
Fold back the hem, as shown in Fig. A. Then
2
fold the edge of the fabric as in Fig. B. Leave a
6 mm (15/64 inch) overlap at the edge.
Set the pattern selection dial to the Blind Hem
3
Stitch or Stretch Blind Hem Stitch, and then
set the stitch length.
Sew on the fold as in Fig. C.
4
Length
[mm (inch)]
F-2
(1/64-1/16)
F-1.5
(1/64-1/16)
F-1.5
(1/64-1/16)
Stitch
Width
[mm (inch)]
3-5
(1/8-3/16)
3-5
(1/8-3/16)
3-5
(1/8-3/16)
When the fabric is unfolded you will have a
5
Blind Hem Stitch as shown in Fig. D.
3
2
AB
1
1
2
2
CD
2
1 Right side of fabric
2 Wrong side of fabric
3 10 mm (3/8 inch)
4 5 mm (3/16 inch)
1
Note
● The Stretch Blind Hem Stitch is useful for
stretch fabrics.
Shell Tuck Stitching
Stitch
Stitch Name Pattern
Shell Tuck
Stitch
Length
[mm (inch)]
F-3
(1/64-1/8)
[mm (inch)]
(1/8-3/16)
1
4
3
Stitch
Width
3-5
The Shell Tuck Stitch can be used to sew a picot
(lace-like) edge on lightweight fabric.
Set the pattern selection dial to the Shell Tuck
1
Stitch.
Adjust the thread tension so that it is tighter
2
than normal.
Place the fabric under the presser foot so that
3
it will be sewn along the bias, with the straight
stitches sewn on the seamline and the zigzag
stitches sewn slightly over the folded edge.
29
Page 32
—
XL2600.book Page 30 Thursday, November 4, 2004 9:46 PM
BUILT-IN STITCHES —————————————————————————————————————————————————————
Sew at a slow speed.
4
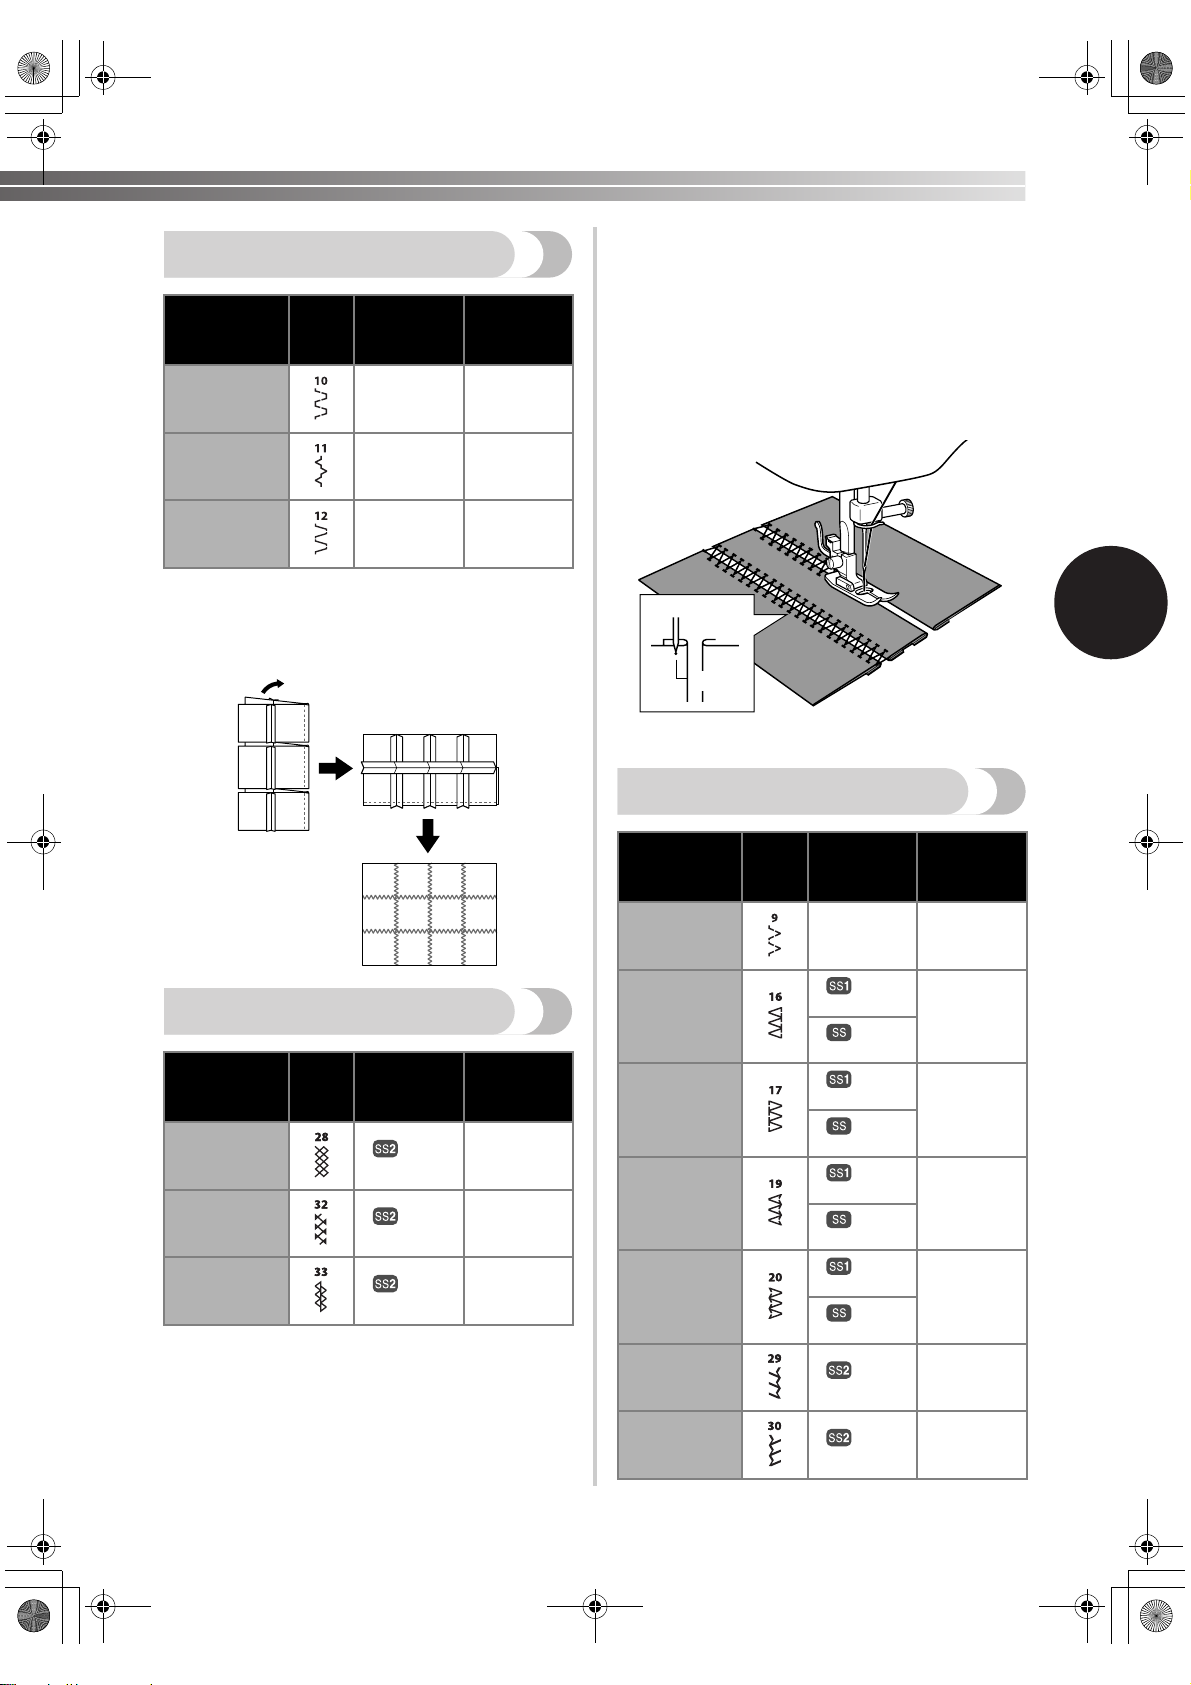
Elastic Stitching
Stitch
Stitch Name Pattern
Length
[mm (inch)]
Elastic Stitch
F-2.5
(1/64-3/32)
You can use the Elastic Stitch for mending, sewing
elastic or joining fabric. Each is explained below.
Set the pattern selection dial to the Elastic Stitch.
■ Mending
Set the stitch length dial between “F” and 2.5.
1
Place the reinforcement fabric under the area
2
you want to mend.
Stitch
Width
[mm (inch)]
3-5
(1/8-3/16)
■ Joining Fabric
You can use the Elastic Stitch to join two pieces of
fabric together and it is very effective when
sewing knitted fabrics. If you are using nylon
thread, the stitch will not be visible.
Put the edge of the two pieces of fabric
1
together and center them under the presser
foot.
Sew them together using the Elastic Stitch.
2
Make sure you keep the two fabric edges close
together.
Following the line of the tear, sew using the
3
Elastic Stitch as shown.
■ Sewing Elastic
Place the elastic on the fabric.
1
As you sew, stretch the elastic in front of and
2
behind the presser foot.
30
Page 33
XL2600.book Page 31 Thursday, November 4, 2004 9:46 PM
Double Action Stitching
Stitch
Stitch Name Pattern
Double Action
Stitch
Bridging Stitch
Length
[mm (inch)]
F-3
(1/64-1/8)
F-3
(1/64-1/8)
Stitch
Width
[mm (inch)]
3-5
(1/8-3/16)
3-5
(1/8-3/16)
Set the pattern selection dial to the Smocking
2
Stitch, Fagoting Stitch, or Decorative Stitch.
Stitch along the edge, pulling both threads
3
slightly when beginning to sew.
Use thicker than normal threads for sewing.
After sewing, remove the basting and the
4
paper. Finish by tying knots on the reverse
side at the beginning and the end of the
seams.
Rampart Stitch
These stitches are used for joining two pieces of
fabric, such as when making patchwork. Set the
pattern selection dial to the Double Action Stitch,
Bridging Stitch, or Rampart Stitch.
F-3
(1/64-1/8)
3-5
(1/8-3/16)
Patchworking
Stitch
Stitch Name Pattern
Smocking
Stitch
Fagoting
Stitch
Decorative
Stitch
These stitches are used to join two pieces of fabric
while leaving a space between their edges.
Fold over the edges of the two pieces of fabric
1
for the hem and baste the edges to a thin
piece of paper leaving a small space between
them.
Length
[mm (inch)]
Fixed
2.5 (3/32)
Fixed
2.5 (3/32)
Fixed
2.5 (3/32)
Stitch
Width
[mm (inch)]
3-5
(1/8-13/64)
3-5
(1/8-13/64)
3-5
(1/8-3/16)
1
1.5 mm
1 First needle drop
Overedge Stitching
Stitch Name Pattern
[mm (inch)]
Elastic Shell
Tuck Stitch
Stretch
Overlock
Stitch
Elastic
Overlock
Stitch
Arrowhead
Stitch
Arrowhead
Stitch
Comb Stitch
Comb Stitch
(1/64-1/8)
2.5 (3/32)
2.5 (3/32)
2.5 (3/32)
2.5 (3/32)
2.5 (3/32)
2.5 (3/32)
2.5 (3/32)
2.5 (3/32)
2.5 (3/32)
2.5 (3/32)
Stitch
Length
F-3
Fixed
Fixed
Fixed
Fixed
Fixed
Fixed
Fixed
Fixed
Fixed
Fixed
3
Stitch
Width
[mm (inch)]
3-5
(1/8-3/16)
3-5
(1/8-3/16)
3-5
(1/8-3/16)
3-5
(1/8-3/16)
3-5
(1/8-3/16)
3-5
(1/8-3/16)
3-5
(1/8-3/16)
31
Page 34
—
XL2600.book Page 32 Thursday, November 4, 2004 9:46 PM
BUILT-IN STITCHES —————————————————————————————————————————————————————
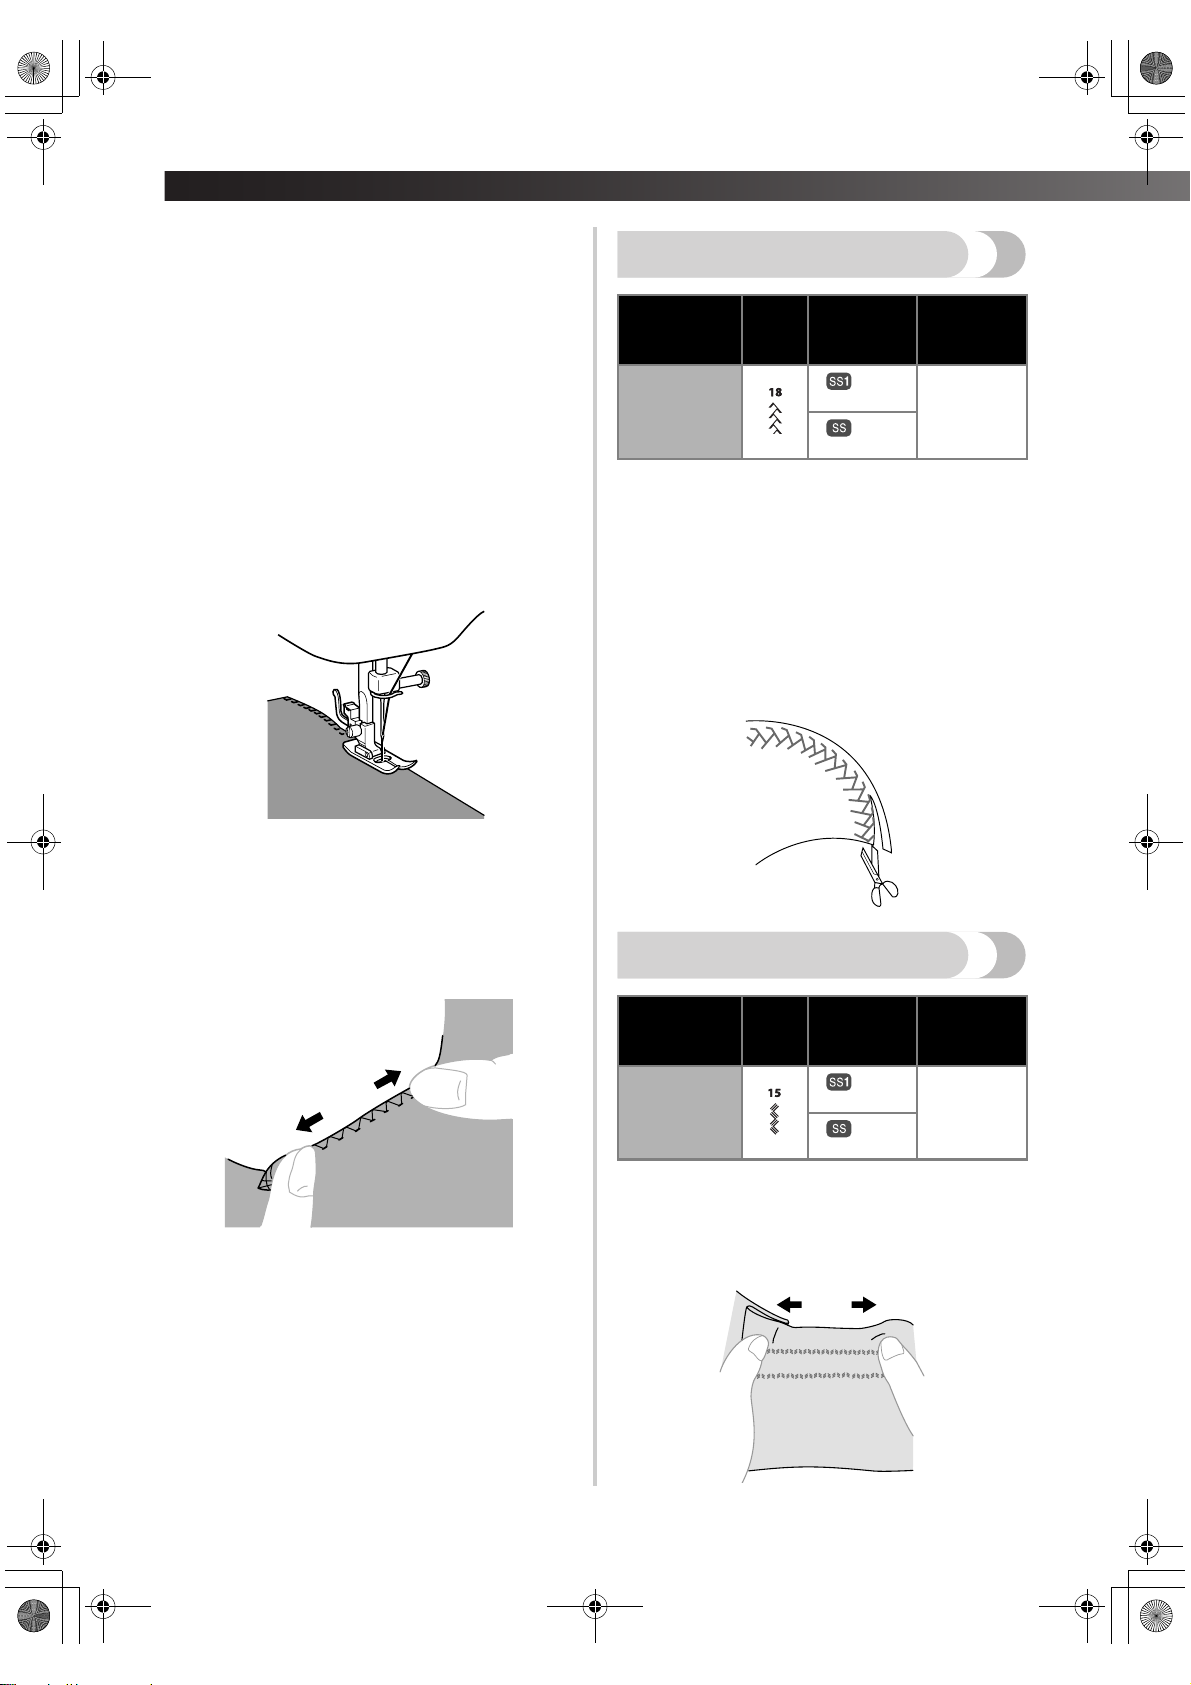
You can use these stitches to join together seams and
finish them in one operation. The Overlock Stitches
Feather Stitching
are also useful for sewing stretch materials while the
Arrowhead Stitch is ideal for sewing the edge of a
blanket.
Set the pattern selection dial to an overedge
1
stitch.
Put the fabric under the presser foot so that
2
the seamline (or arrowhead point) is
approximately 3 mm (1/8 inch) to the left of
the center of the presser foot. This stitch
works best with a seam allowance of
Stitch Name Pattern
Feather Stitch
Use the Feather Stitch as a decorative top stitch
when embroidering or when hemming blankets,
tablecloths, or draperies.
Stitch
Length
[mm (inch)]
Fixed
2.5 (3/32)
Fixed
2.5 (3/32)
Stitch
Width
[mm (inch)]
3-5
(1/8-3/16)
approximately 5 mm (3/16 inch) as this allows
the right (zigzag) side of the stitch to overlock
the cut edge of the fabric.
Set the pattern selection dial to the Feather
1
Stitch.
Place the fabric right side up and sew 1 cm
2
(3/8 inch) from the edge of the fabric.
If the seam allowance is wider than the stitch
3
pattern, trim away any excess fabric after
stitching.
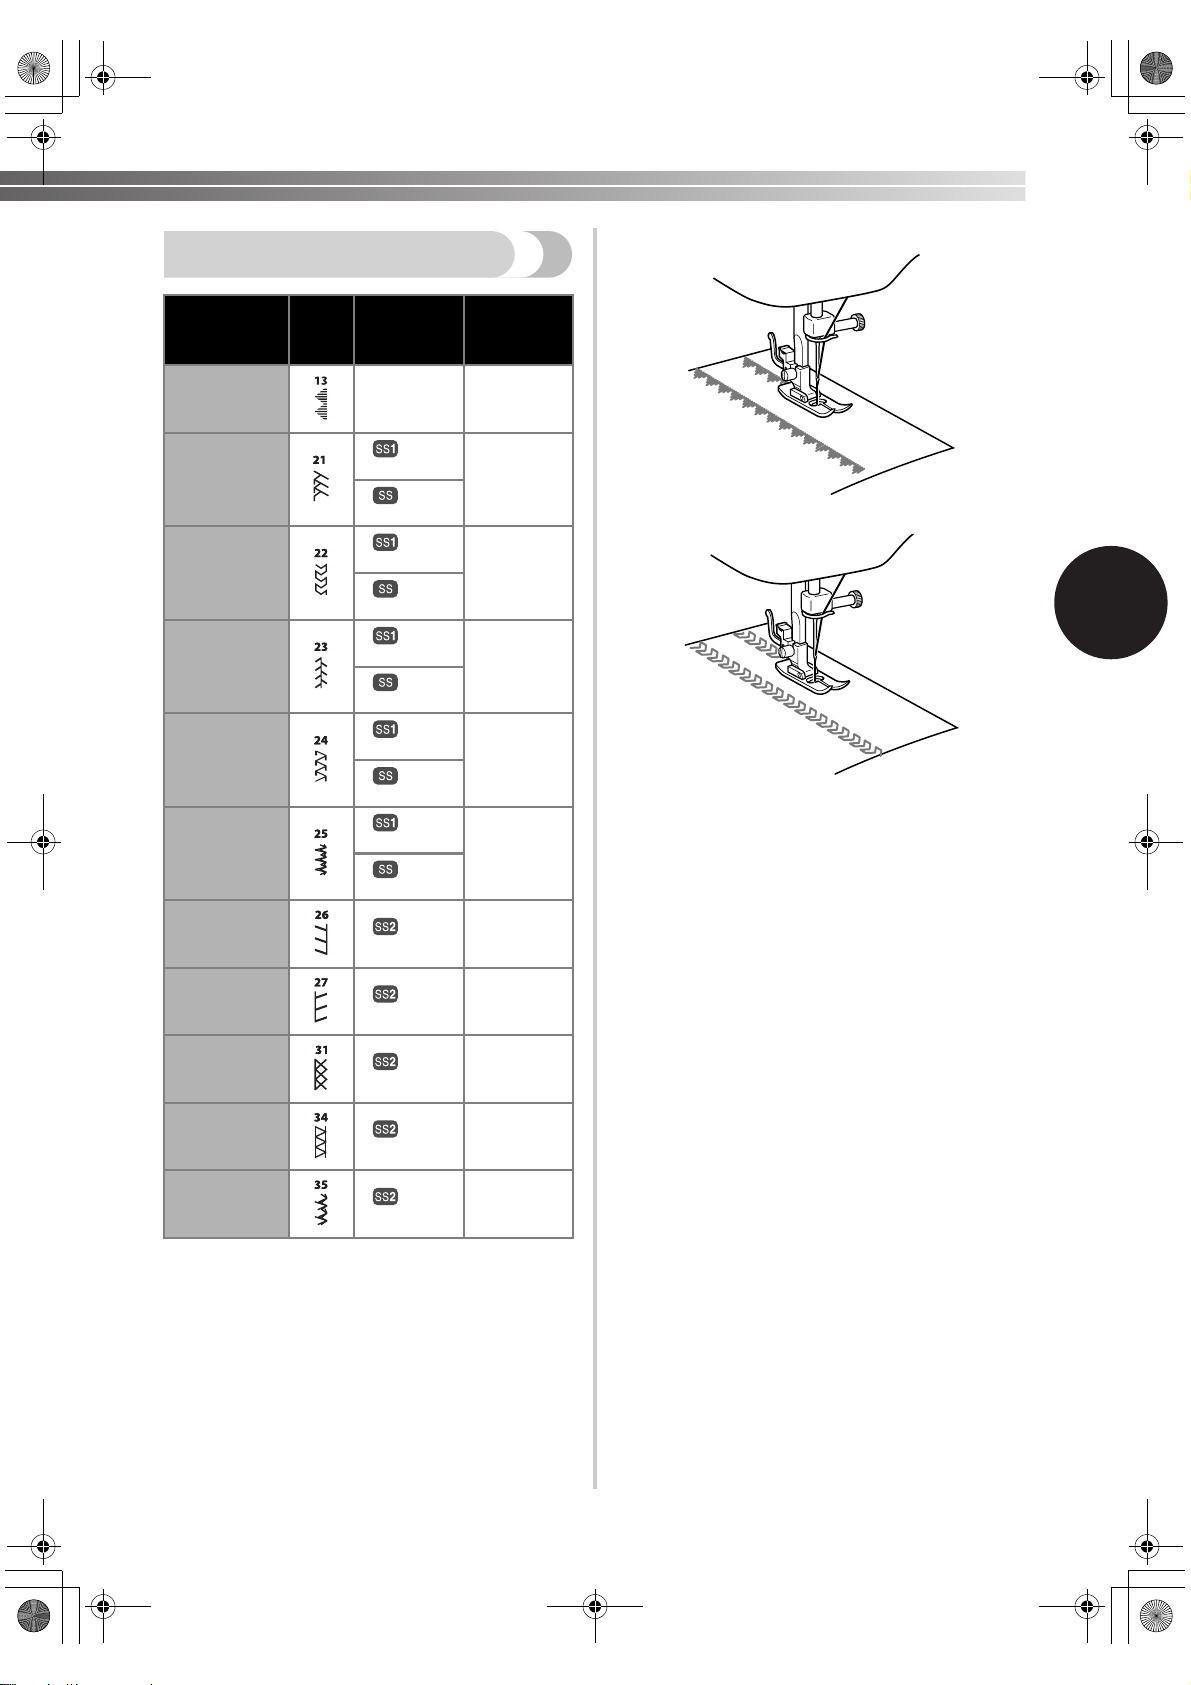
A finished Elastic Overlock Stitch is shown in the
illustration below.
Trim close to the stitching.
3
The stitch will prevent the fabric from unravelling.
Triple Zigzag Stretch Stitching
Stitch
Stitch Name Pattern
Length
[mm (inch)]
Fixed
Triple Zigzag
Stretch Stitch
2.5 (3/32)
Fixed
2.5 (3/32)
This stitch can be used wherever a zigzag stitch
would be used to sew heavyweight stretch fabrics.
The Triple Zigzag Stretch Stitch can also be used as a
decorative top stitch. Set the pattern selection dial to
the Triple Zigzag Stretch Stitch.
Stitch
Width
[mm (inch)]
3-5
(1/8-3/16)
32
Page 35
XL2600.book Page 33 Thursday, November 4, 2004 9:46 PM
Decorative Stitching
Stitch Name Pattern
Triangle Stitch
Decorative
Stitch
Leaf Stitch
Tree Stitch
Legs Stitch
Decorative
Stitch
Stretch
Overlock
Stitch
Stretch
Overlock
Stitch
Stitch
Length
[mm (inch)]
F-1.5
(1/64-1/16)
Fixed
2.5 (3/32)
Fixed
2.5 (3/32)
Fixed
2.5 (3/32)
Fixed
2.5 (3/32)
Fixed
2.5 (3/32)
Fixed
2.5 (3/32)
Fixed
2.5 (3/32)
Fixed
2.5 (3/32)
Fixed
2.5 (3/32)
Fixed
2.5 (3/32)
Fixed
2.5 (3/32)
Fixed
2.5 (3/32)
Stitch
Width
[mm (inch)]
3-5
(1/8-3/16)
3-5
(1/8-3/16)
3-5
(1/8-3/16)
3
3-5
(1/8-3/16)
3-5
(1/8-3/16)
3-5
(1/8-3/16)
3-5
(1/8-13/64)
3-5
(1/8-13/64)
Decorative
Stitch
Decorative
Hem Stitch
Decorative
Stitch
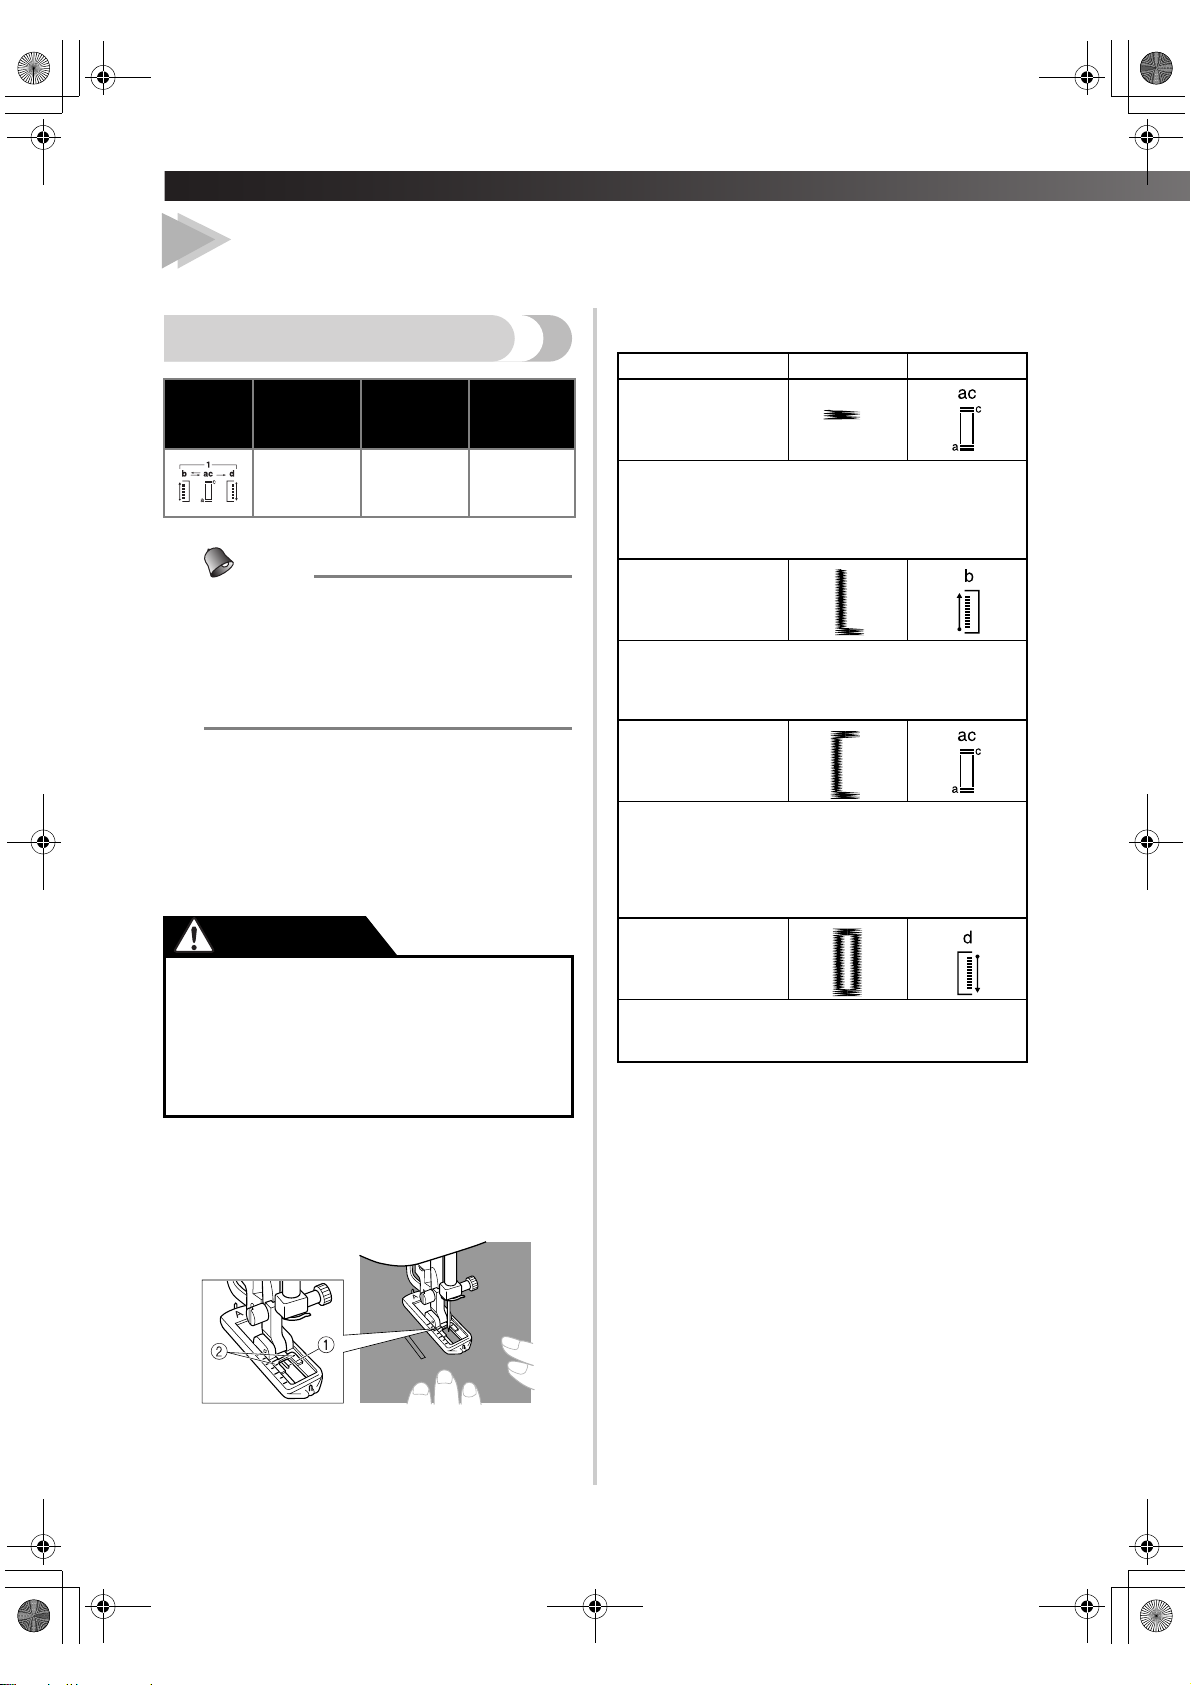
These stitches can be used for decorative top
stitching and for smocking. Set the pattern selection
dial to the Triangle Stitch, Leaf Stitch, etc.
Fixed
2.5 (3/32)
Fixed
2.5 (3/32)
Fixed
2.5 (3/32)
3-5
(1/8-3/16)
3-5
(1/8-3/16)
3-5
(1/8-3/16)
33
Page 36
—
XL2600.book Page 34 Thursday, November 4, 2004 9:46 PM
SEWING BUTTONHOLES AND BUTTONS ———————————————————————————————————————————
4
SEWING BUTTONHOLES AND BUTTONS
Making a Buttonhole
Stitch
Pattern
Length
[mm (inch)]
F-1.5
(1/64-1/16)
Memo
● We recommend that you practice making a
buttonhole on a scrap piece of fabric before
you try it on an actual garment.
● When making buttonholes on soft fabrics,
place a stabilizer material on the underside
of the fabric.
Using tailor’s chalk, mark the position and
1
length of the buttonhole on the fabric.
Attach the buttonhole foot and push the frame
2
back until it stops with the plastic insert at the
front of the frame.
Stitch
Width
[mm (inch)]
3-5
(1/8 – 3/16)
CAUTION
●
If the presser foot is not installed with the
correct orientation, the needle may strike
the presser foot, which may bend or
break the needle and cause injury. (See
page 9 for the correct presser foot
orientation.)
Foot
Buttonhole
Foot
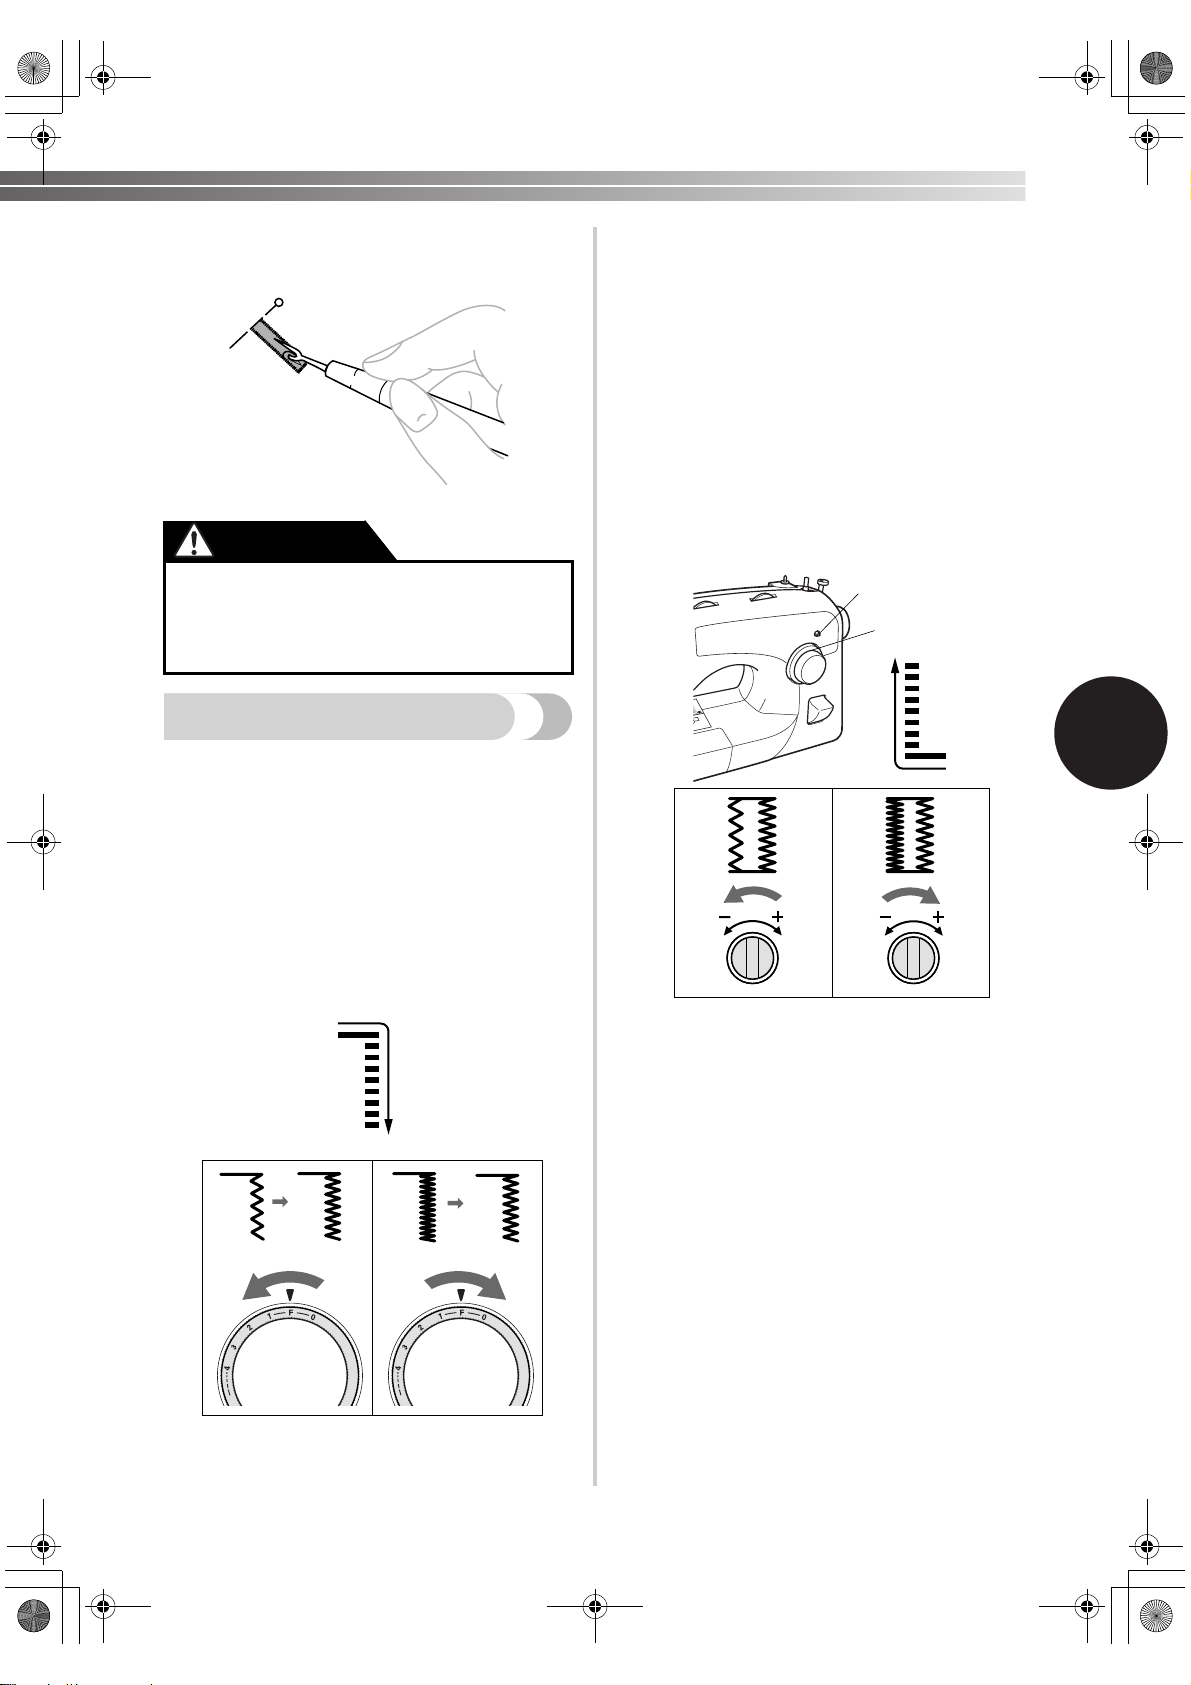
■ Making a Buttonhole
Step Sewn section Pattern
Step 1
(Front bar tack)
1. Set the pattern selection dial to ‘a’.
2. Lower the presser foot and sew 5 to 6 stitches.
3. Stop the machine when the needle is at the left
side of the stitches and then raise the needle from
the material.
Step 2
(Left side)
1. Turn the pattern selection dial to ‘b’.
2. Sew the length of the tailor’s chalk line.
3. Stop the machine when the needle is at the left
side of the stitch and then raise the needle.
Step 3
(Back bar tack)
1. Turn the pattern selection dial to ‘c’ (same
position as in step 1).
2. Sew 5 to 6 stitches.
3. Stop the machine when the needle is at the right
side of the stitch and then raise the needle from
the material.
Step 4
(Right side)
1. Set the pattern selection dial to ‘d’.
2. Sew the right side until the needle reaches the
stitches sewn in step 1.
■ Securing the Stitching and Cutting the
Buttonhole
a
b
c
d
You need to sew the front bar tack first. Line
3
the bar tack mark under the center of the
presser foot and match it up to the two lines
on the presser foot.
1 Front of chalk mark
2 Red lines
34
To secure the stitching, turn the material 90
1
degrees counterclockwise and sew straight
stitches to the end of the front bar tack of the
buttonhole.
Remove the material from the machine. We
2
recommend that you put pins across both
ends of the buttonhole to prevent the stitches
from being cut.
Page 37
XL2600.book Page 35 Thursday, November 4, 2004 9:46 PM
Cut an opening in the middle of the
3
buttonhole with the seam ripper tool. Be
careful not to cut through any stitches.
CAUTION
● When using the seam ripper to open the
buttonhole, do not put your hand or
finger in the path of the ripper. The seam
ripper may slip and you may be injured.
Adjusting Buttonholes
If the stitching on the two sides of the buttonhole is
not the same, you can make the following
adjustments.
Set the stitch length dial between "F" and 1.5
1
and sew the buttonhole on a scrap piece of
fabric to observe how the material is fed.
After obtaining a satisfactory feed on the right
3
side, stitch the buttonhole and observe the
feeding.
If the left side is too coarse or fine compared
4
with the right side, adjust the buttonhole fineadjustment screw as described below.
If the left side is too coarse, turn the buttonhole
fine-adjustment screw with a large screwdriver
– direction.
in the
If the left side is too fine, turn the buttonhole
fine-adjustment screw with a large screwdriver
in the + direction.
• This adjustment ensures both sides of the
buttonhole are the same.
2
1
3
4
4
4
If the right side of the buttonhole is too coarse
2
or fine, adjust the feeding of the material with
the stitch length dial.
1
2
1 Right side
2 Shorter
3 Longer
3
1 Stitch length dial
2 Buttonhole fine-adjustment screw
3 Left side
4 Buttonhole appearance
35
Page 38
—
XL2600.book Page 36 Thursday, November 4, 2004 9:46 PM
SEWING BUTTONHOLES AND BUTTONS ———————————————————————————————————————————
At a slow speed, sew about 10 stitches.
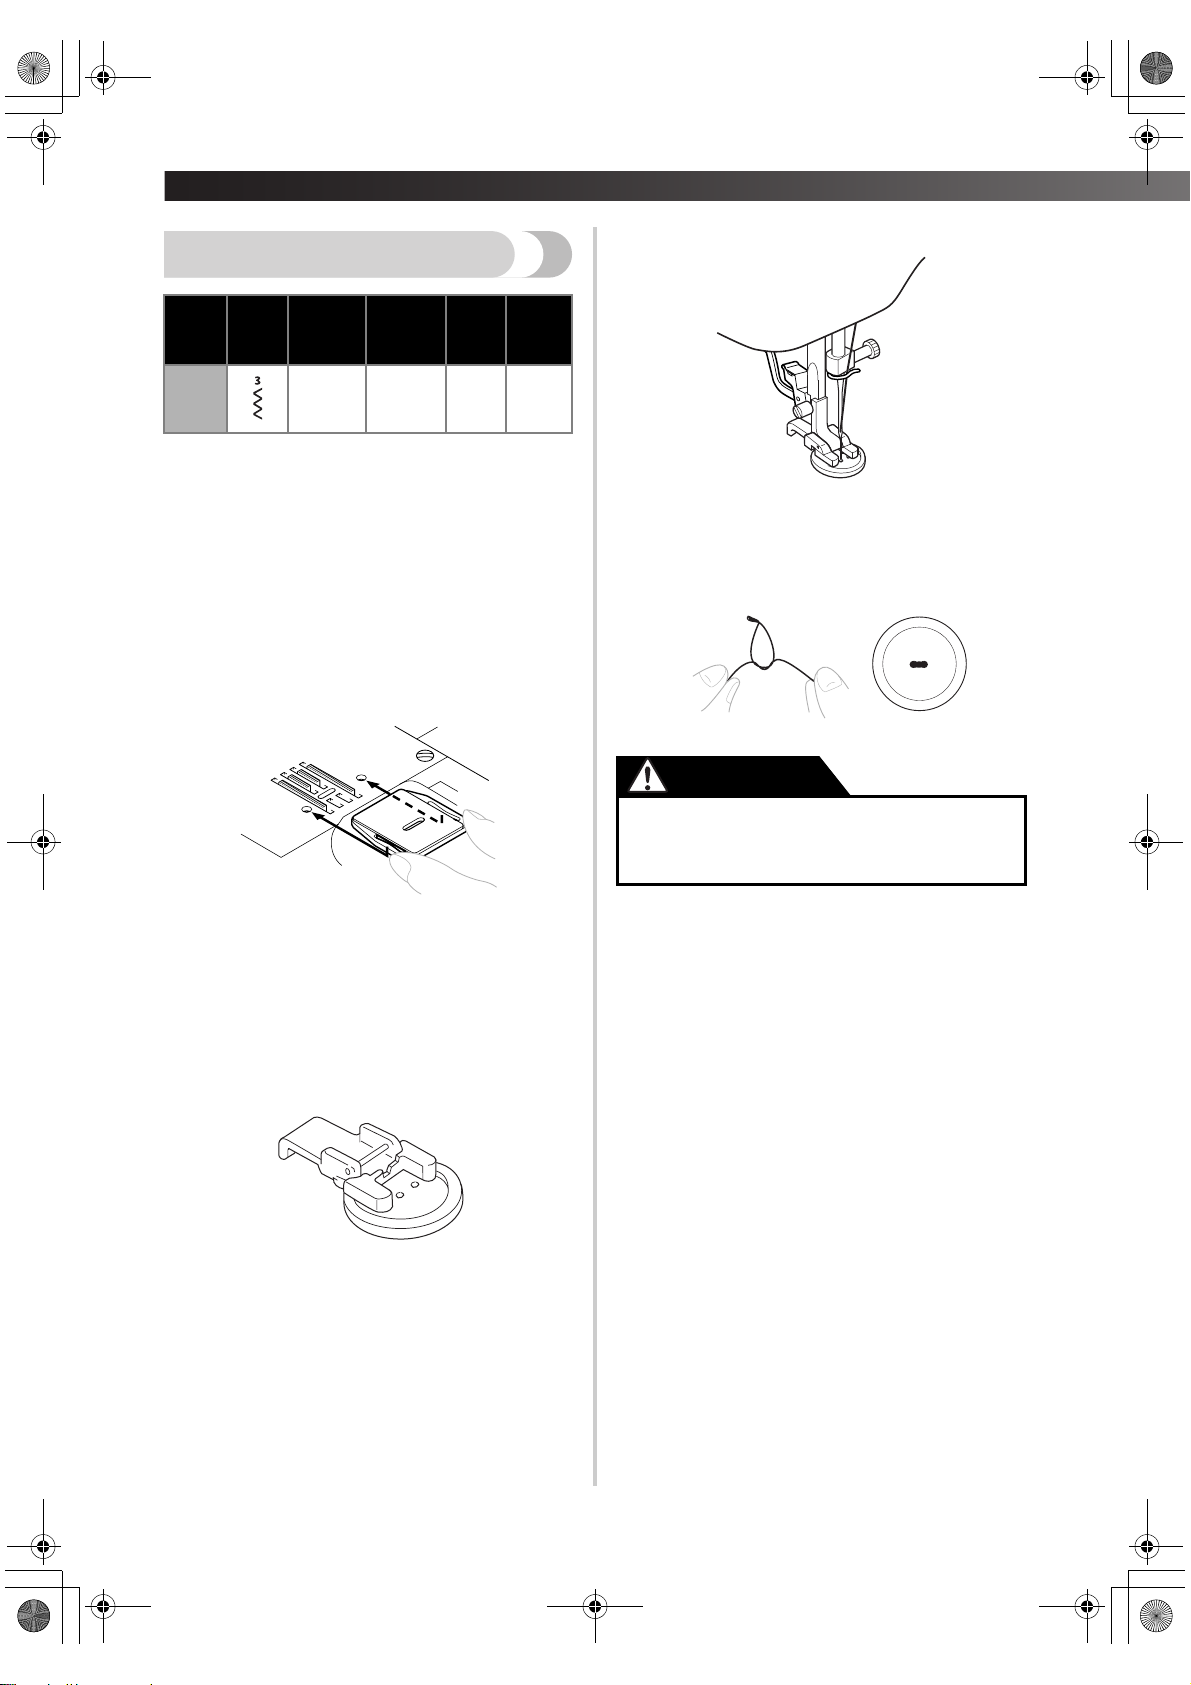
Sewing Buttons
7
Stitch
Name
Pattern
Zigzag
Stitch
Measure the distance between the
1
buttonholes and set the pattern selection dial
Stitch
Length
[mm (inch)]
F
(1/64)
Stitch
Width
[mm (inch)]
Any
Foot Other
Button
Sewing
Foot
to the Zigzag Stitch, and set the width you
want.
Remove the power supply plug from the
2
outlet.
Change the foot to the button sewing foot.
3
Place the darning plate on the needle plate.
4
Darning
Plate
Remove the material from the machine. Cut
8
the upper and lower threads and tie both
threads at the back of the material.
CAUTION
● Make sure the needle does not hit the
button during sewing. The needle may
break and you may be injured.
Connect the power supply plug into the wall
5
outlet.
Put a button between the foot and the fabric
6
and make sure that the needle enters the holes
without hitting the button. If it hits, see step
1.
36
Page 39
XL2600.book Page 37 Thursday, November 4, 2004 9:46 PM
5
USING ATTACHMENTS AND APPLICATIONS
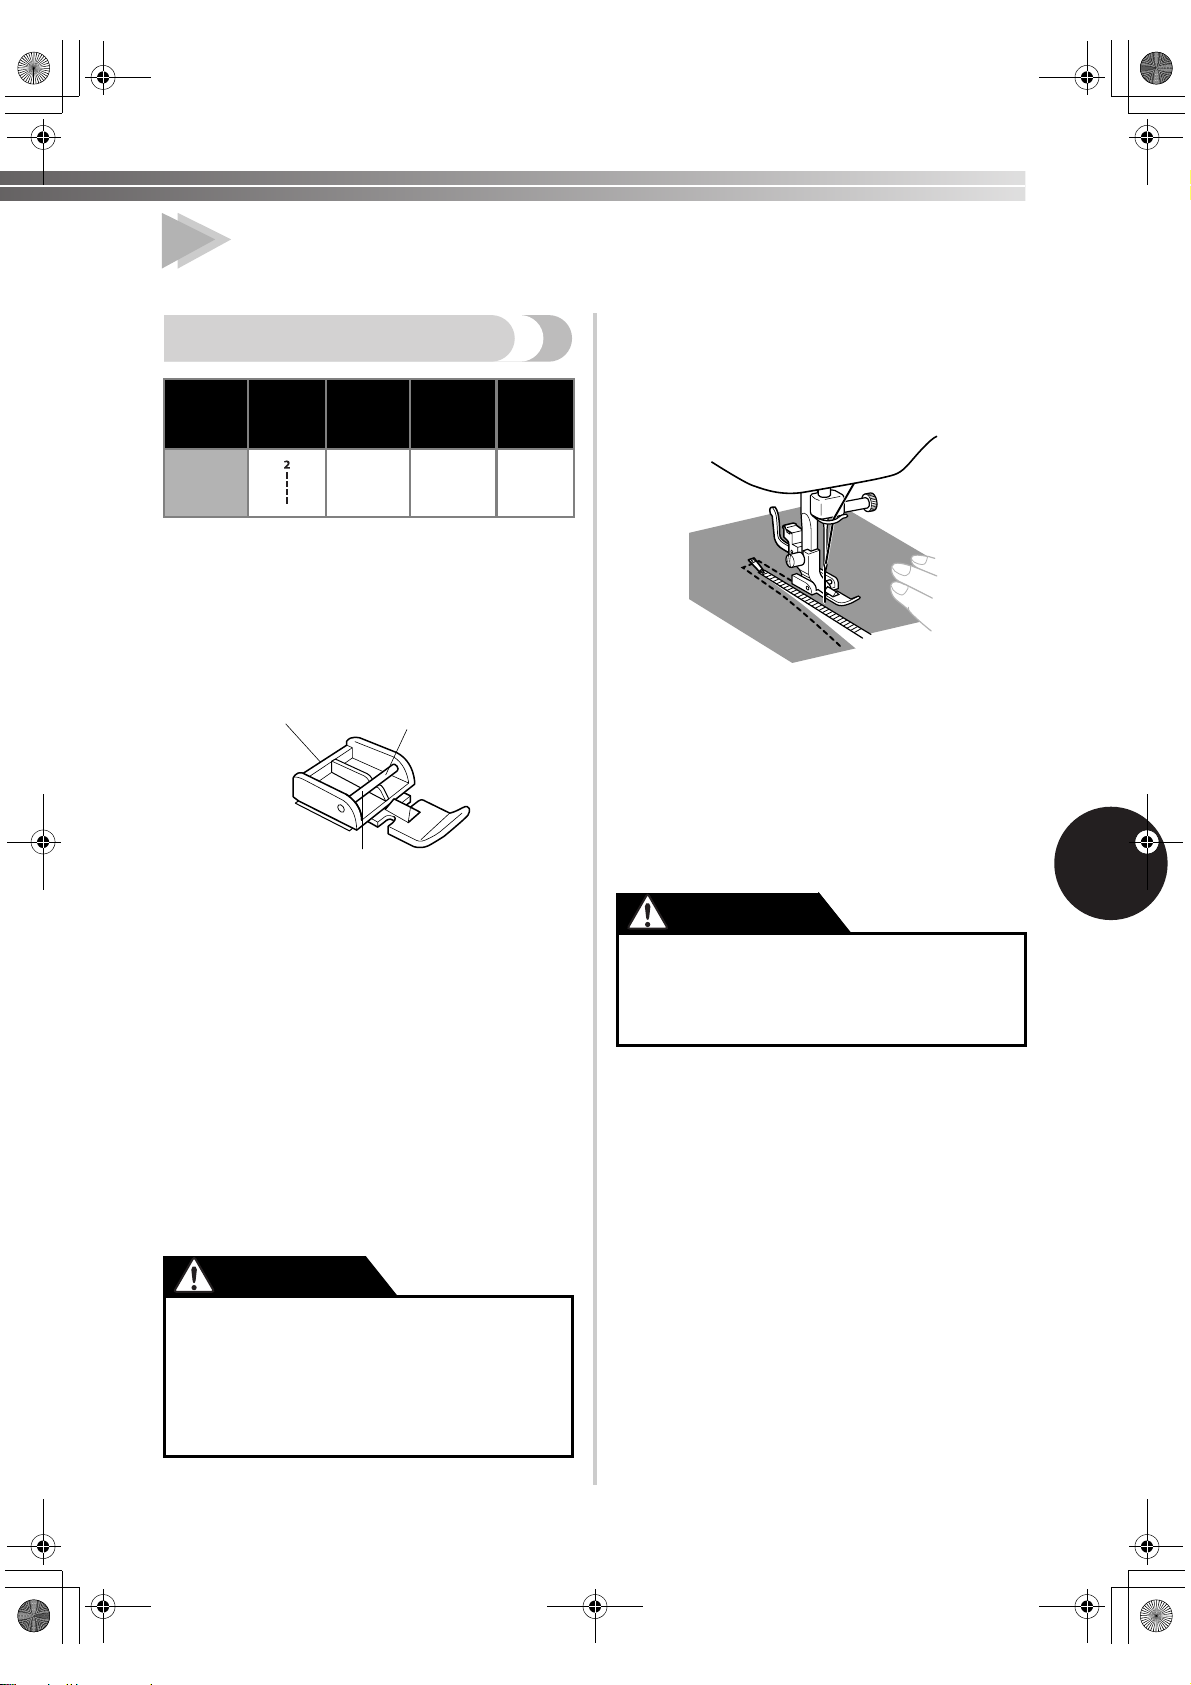
Zipper Insertion
Stitch
Name
Straight
Stitch
You can use the zipper foot to sew different types of
zippers, and can easily position it to the right or left
side of the needle.
When sewing the right side of the zipper, attach the
shank to the left pin of the zipper foot. When sewing
the left side of the zipper, attach the shank to the
right pin of the zipper foot.
Pattern
Stitch
Length
[mm (inch)]
2-3
(1/16-1/8)
1
3
1 Zipper foot
2 Right pin for sewing the left side of the zipper
3 Left pin for sewing the right side of the zipper
Set the pattern selection dial to the Straight
1
Stitch. Set the stitch length between 2 (1/16 inch)
and 3 (1/8 inch). Set the stitch width at 2.5 (3/32
inch).
Stitch
Width
[mm (inch)]
2.5
(center)
(3/32)
2
Foot
Zipper
Foot
Sew from the bottom of the zipper toward the
4
top on both sides. The needle should be
positioned on the zipper side of the foot for
best results.
To sew the opposite side of the zipper, first
5
turn the machine off and raise the presser foot
lever. Release the zipper foot by pressing the
button located at the back of the foot, then fit
the foot on the other side of the zipper.
Continue sewing using the pin on that side of
the zipper foot.
CAUTION
● Make sure the needle does not hit the
zipper during sewing. If the needle hits
the zipper, the needle may break and you
may be injured.
5
Lower the presser foot lever and fix either the left
2
or right pin of the zipper foot onto the shank.
Fold the edge of the material 2 cm (3/4 inch)
3
and place the zipper under the folded section.
Lower the needle into the notch located either
on the left or right side of the zipper foot.
CAUTION
Turn the handwheel by hand to make
●
sure the needle does not hit the zipper
foot before you start sewing. Choosing a
different stitch will cause the needle to
hit the presser foot and break, and you
may be injured.
37
Page 40
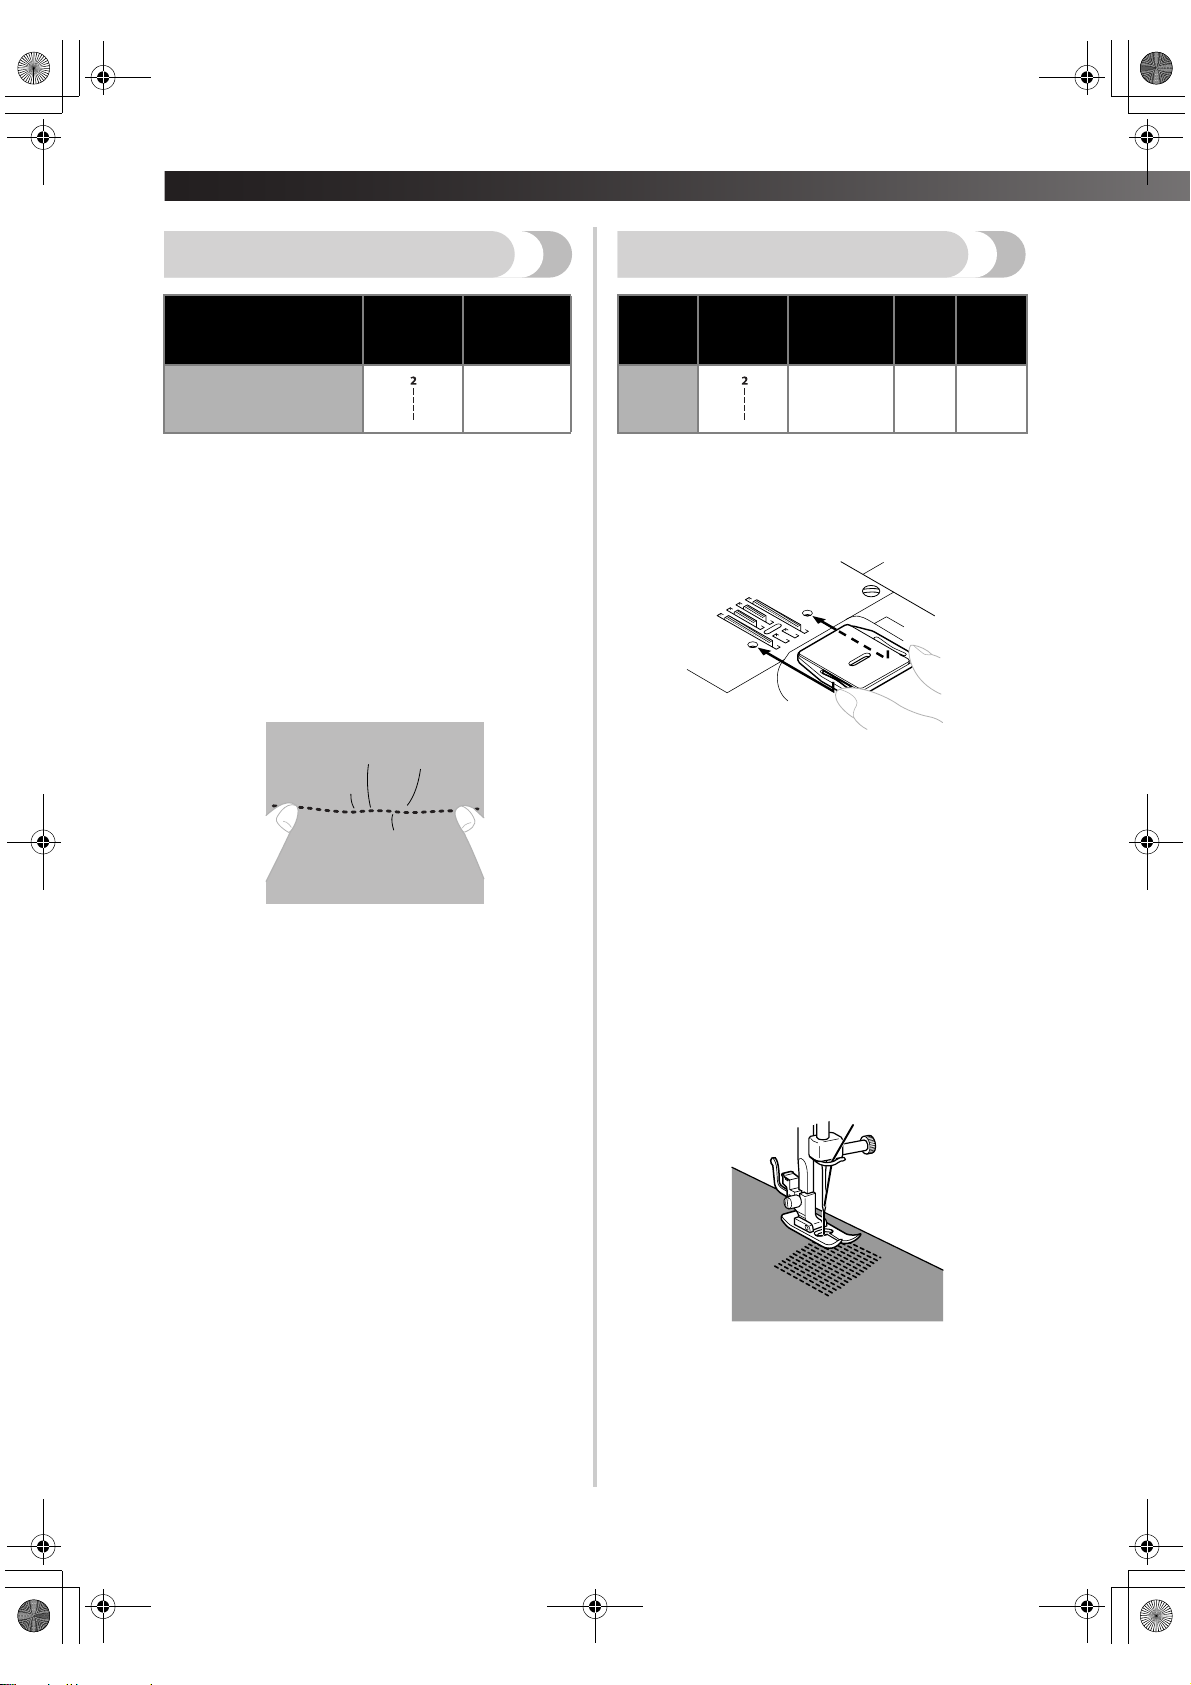
—
XL2600.book Page 38 Thursday, November 4, 2004 9:46 PM
USING ATTACHMENTS AND APPLICATIONS ——————————————————————————————————————————
Gathering
Stitch Name Pattern
Straight Stitch 4 (3/16)
Set the pattern selection dial to Straight
1
Stitch.
Loosen the tension of the upper thread so that
2
the lower thread lies on the underside of the
material.
Sew a single row (or many rows) of straight
3
stitches.
Pull the lower threads to gather the material.
4
Stitch
Length
[mm (inch)]
Darning
Stitch
Name
Pattern
Straight
Stitch
Remove the power supply plug from the
1
outlet. Put the darning plate on the needle
plate. Connect the power supply plug to the
wall outlet.
Set the pattern selection dial to the Straight
2
Stitch.
Stitch
Length
[mm (inch)]
Any
Foot Other
Zigzag
Presser
Foot
Darning
Plate
Put the section you want to darn under the
3
presser foot together with fabric for
reinforcement.
Lower the presser foot.
4
Begin sewing by alternating between gently
5
drawing the work away from you and pulling
it toward you.
Repeat this motion until the darn section is
6
filled with parallel lines of stitching.
38
Page 41
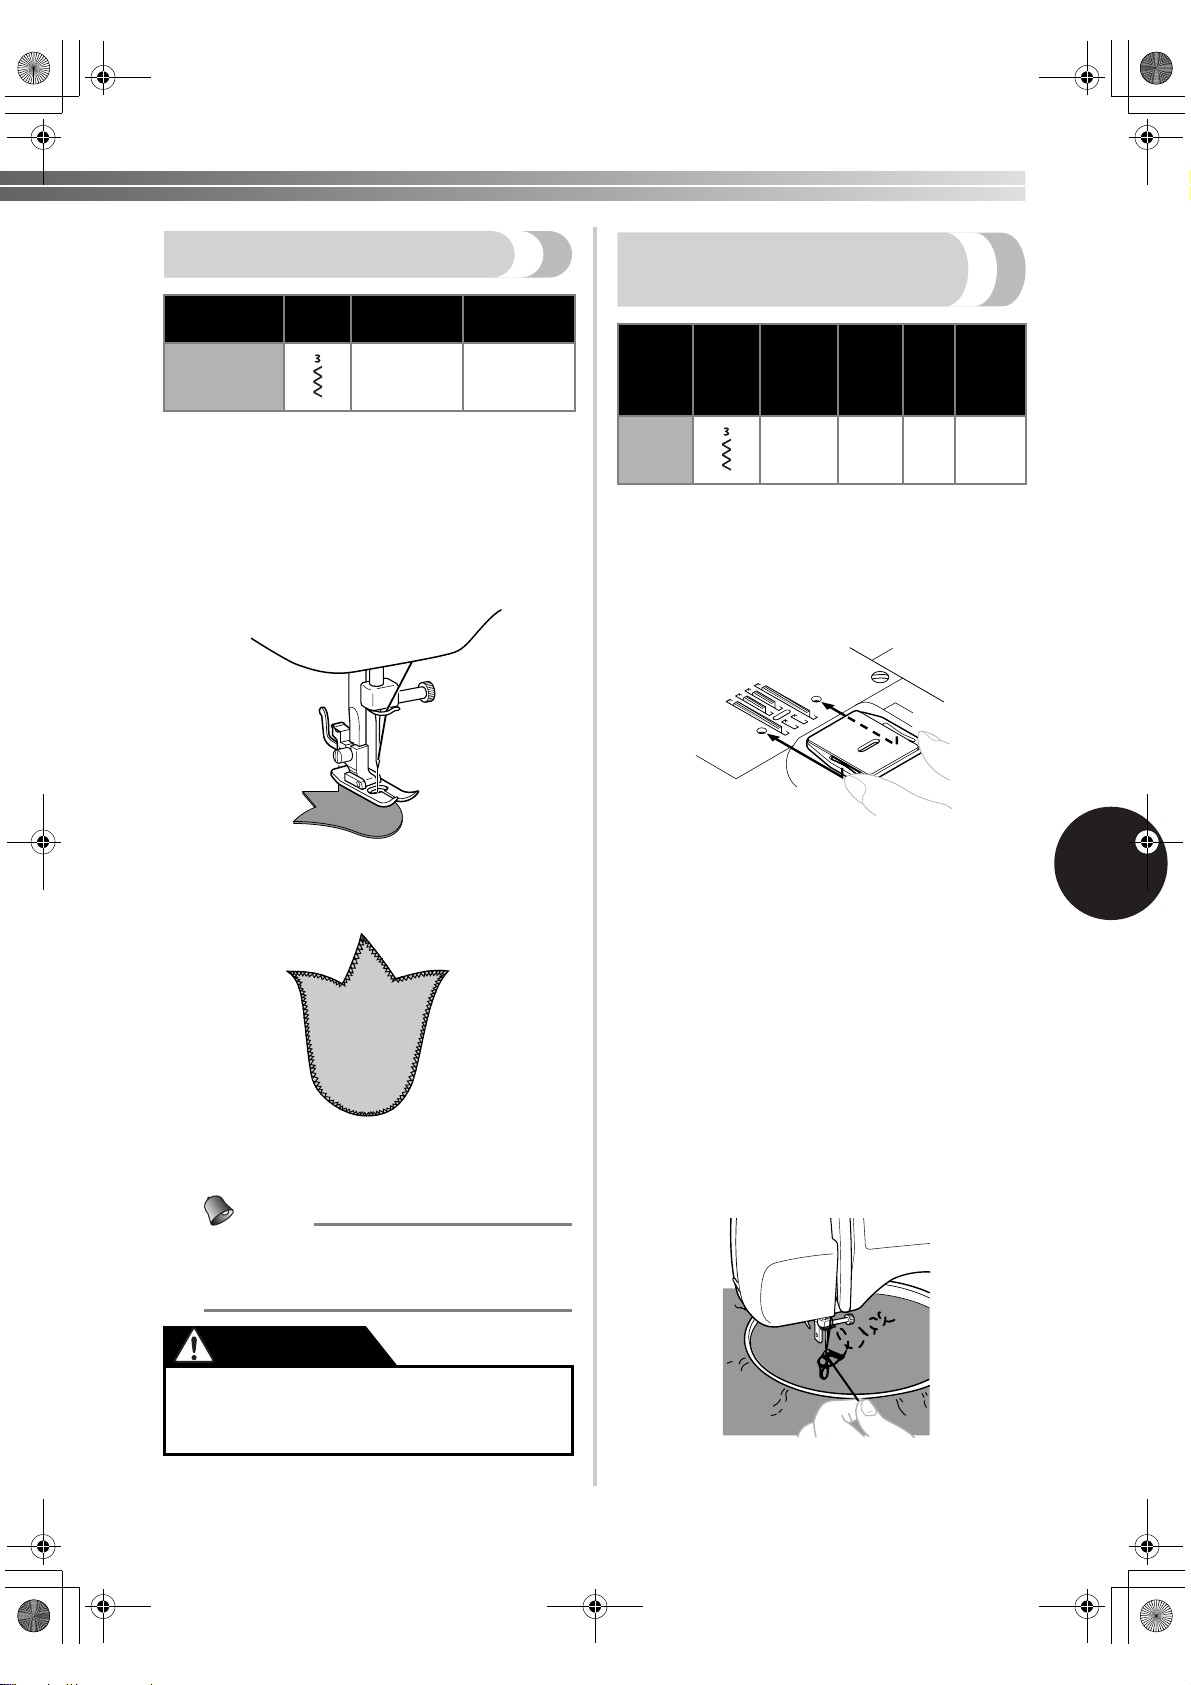
XL2600.book Page 39 Thursday, November 4, 2004 9:46 PM
Appliqués
Stitch Name Pattern
Zigzag Stitch
You can create an applique by cutting a different
piece of fabric into a shape and using it as a
decoration.
Baste the cut design to the fabric.
1
Carefully sew around the edge of the design
2
with a zigzag stitch.
Stitch Length
[mm (inch)]
F-2
(1/64-1/16)
Stitch Width
[mm (inch)]
Any
Monogramming and
Embroidering
Stitch
Stitch
Name
Zigzag
Stitch
■ Preparing for Monogramming and Embroidering
1
Pattern
Remove the power supply plug from the
outlet. Place the darning plate on the needle
plate, and reconnect the power supply plug to
the wall outlet.
Length
[mm
(inch)]
Any Any None
Stitch
Width
[mm
(inch)]
Foot Other
Darning
Plate
Cut away any fabric that is left outside the
3
stitching.
Remove the basting, if necessary.
4
Memo
● Make reinforcing straight stitches at the
beginning and the end of the zigzag
stitching.
CAUTION
● Be careful that the needle does not hit a
pin during sewing. The needle could
break, and you may be injured.
Set the pattern selection dial to Zigzag Stitch.
2
Draw the lettering (for monogramming) or
3
design (for embroidering) on the surface of
the fabric.
Stretch the fabric between embroidery hoops
4
as firmly as possible, with the underside of the
fabric on the bottom of the inside hoop.
Put the work under the needle and lower the
5
presser bar with the foot removed.
Pull the lower thread up through the starting
6
position by turning the handwheel and make a
few holding stitches.
5
39
Page 42
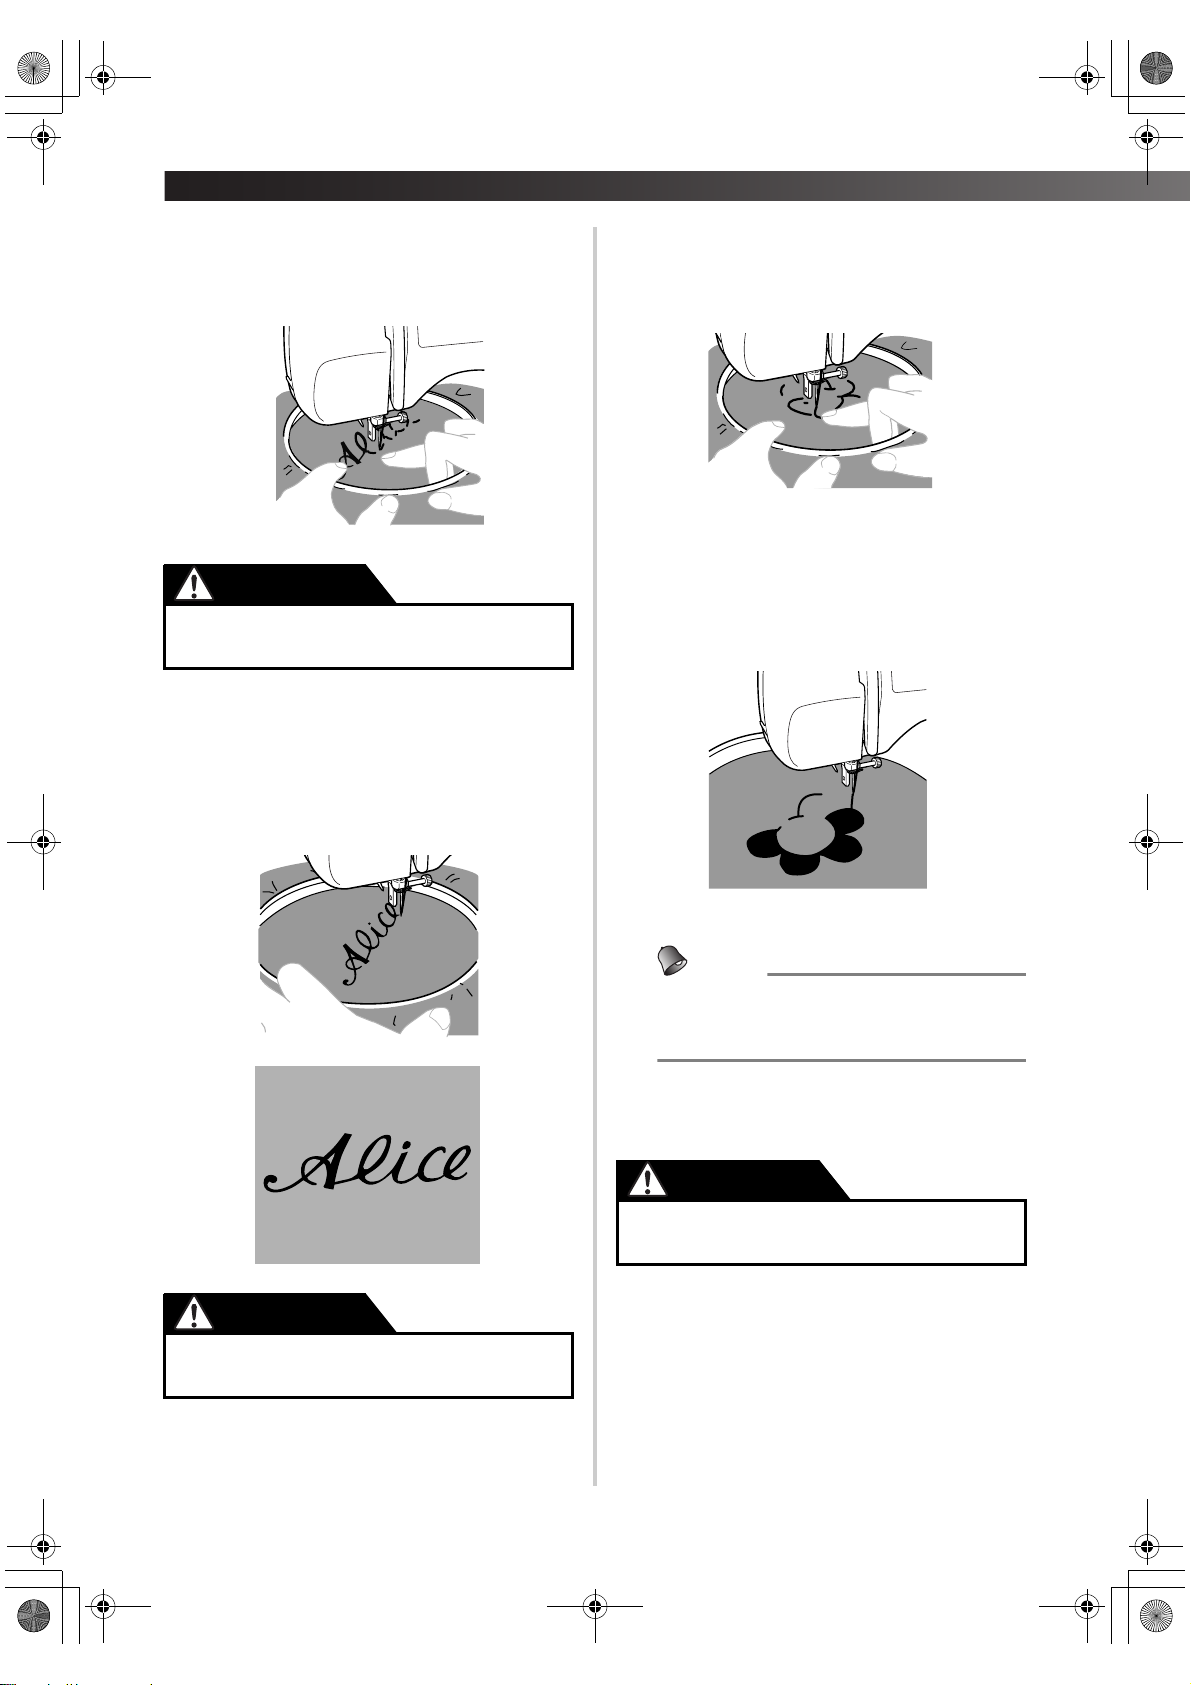
—
XL2600.book Page 40 Thursday, November 4, 2004 9:46 PM
USING ATTACHMENTS AND APPLICATIONS ——————————————————————————————————————————
Grip the hoop with your thumbs and
7
forefingers while pressing the fabric with your
middle and third fingers and supporting the
outside of the hoop with your little fingers.
CAUTION
● Keep fingers away from moving parts,
especially needles.
■ Monogramming
Sew by moving the hoop slowly along the
1
lettering at a constant speed.
Secure with a few straight stitches at the end
2
of the last letter.
■ Embroidering
Stitch the outline of the design by moving the
1
embroidery hoop.
Fill in the design alternating from the outline
2
of the design to the inside and from the inside
to the edge of the outline until the design is
completely filled in. Keep the stitching close
together.
CAUTION
● Keep fingers away from moving parts,
especially needles.
40
Memo
● You can make long stitches by moving the
embroidery hoop rapidly and short stitches
by moving it slowly.
Secure with a few straight stitches at the end
3
of the design.
CAUTION
● Keep fingers away from moving parts,
especially needles.
Page 43
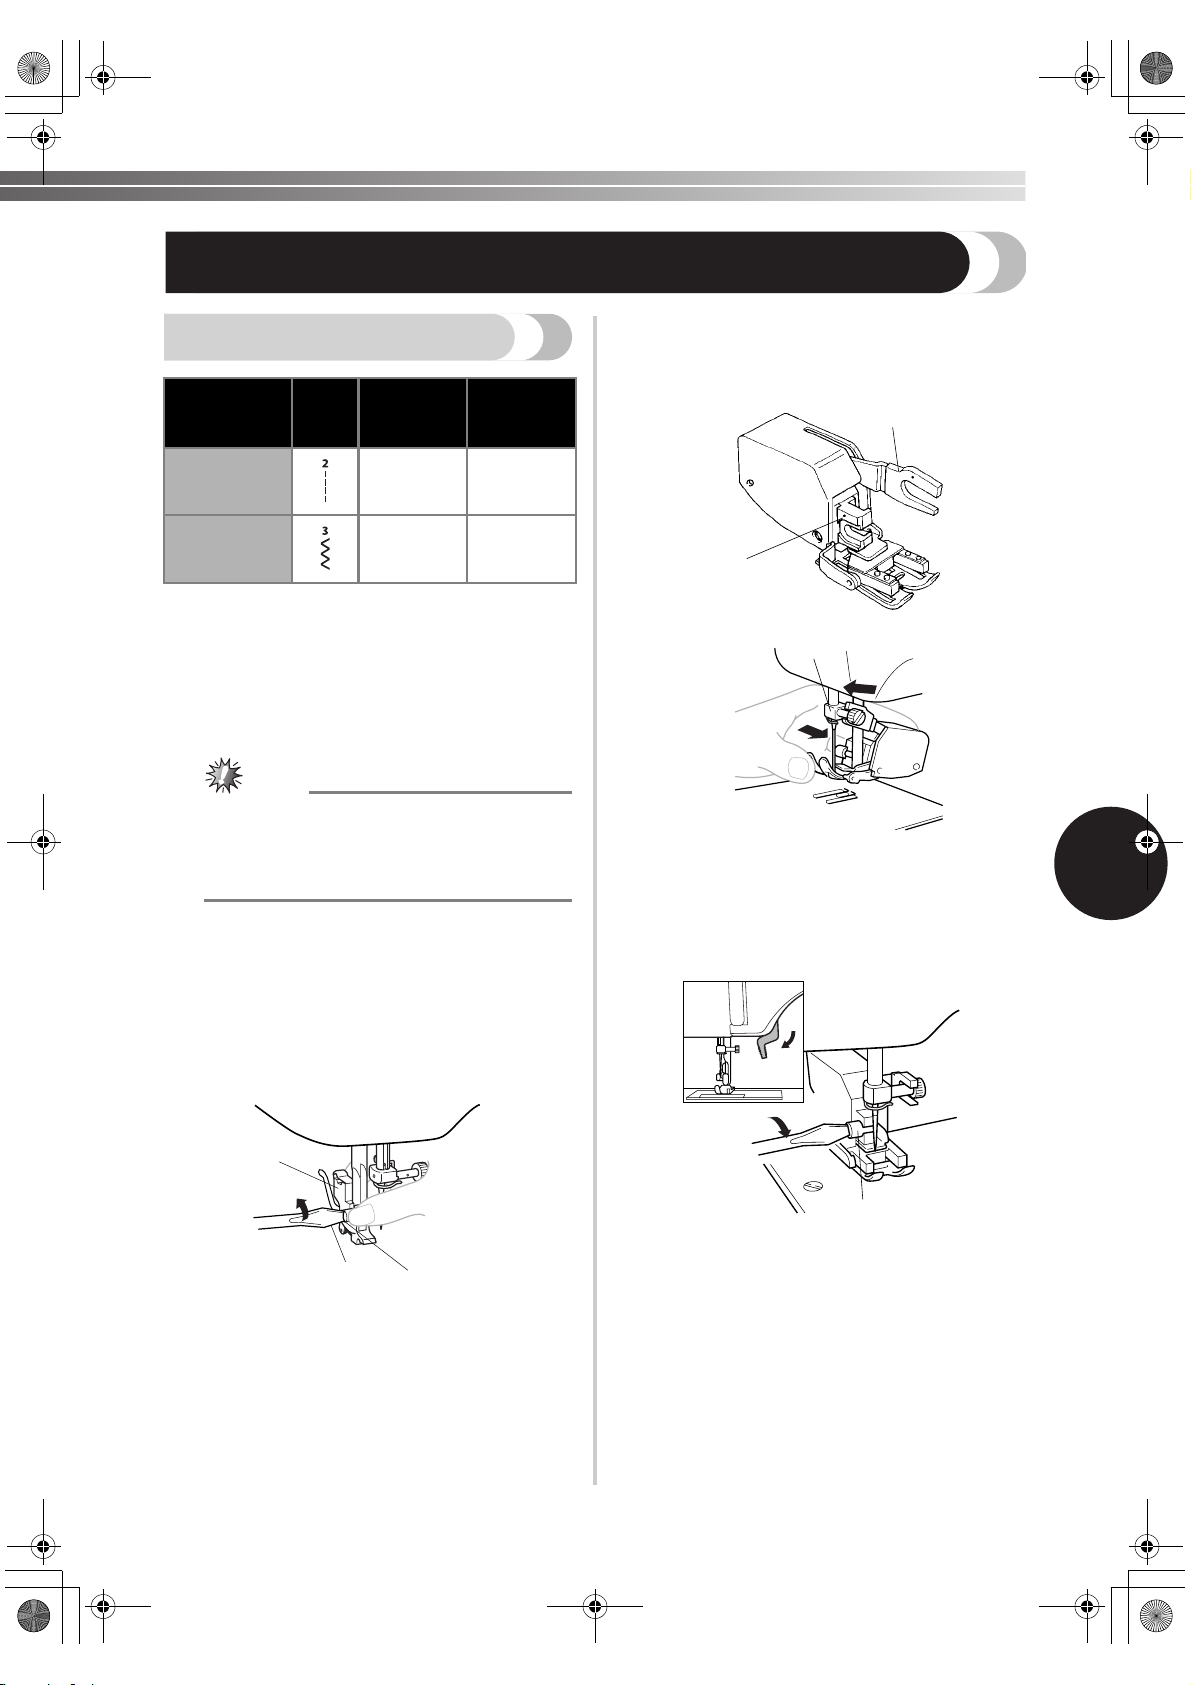
XL2600.book Page 41 Thursday, November 4, 2004 9:46 PM
OPTIONAL ACCESSORIES
Using the Walking Foot
Stitch
Stitch Name Pattern
Straight Stitch
Zigzag Stitch
This foot is very useful for sewing materials such as
vinyl cloth, synthetic leather, thin leather, etc. These
materials are difficult to feed when sewing. The
walking foot prevents these materials from
crumpling, slipping or sticking between the presser
foot and the material.
Length
[mm (inch)]
1-4
(1/16-3/16)
1-4
(1/16-3/16)
Note
● Only use the walking foot with straight or
zigzag stitches. Do not use other patterns.
Reverse stitches can not be sewn with the
walking foot.
Stitch
Width
[mm (inch)]
2-3
(1/16-1/8)
0-5
(0-3/16)
Attach the forked section of the connecting
4
lever to the needle clamp, and fit the walking
foot to the presser bar.
1
2
3
1 Forked part of operation lever
2 Presser bar holder
3 Needle clamp
5
Remove the power supply plug from the
1
outlet.
Raise the needle and the presser foot.
2
Loosen the presser foot screw to remove the
3
presser foot holder.
2
1
1 Screwdriver
2 Presser foot holder
3 Presser foot screw
3
Lower the presser foot lever and then tighten
5
the presser foot screw.
1
1 Presser foot screw
41
Page 44
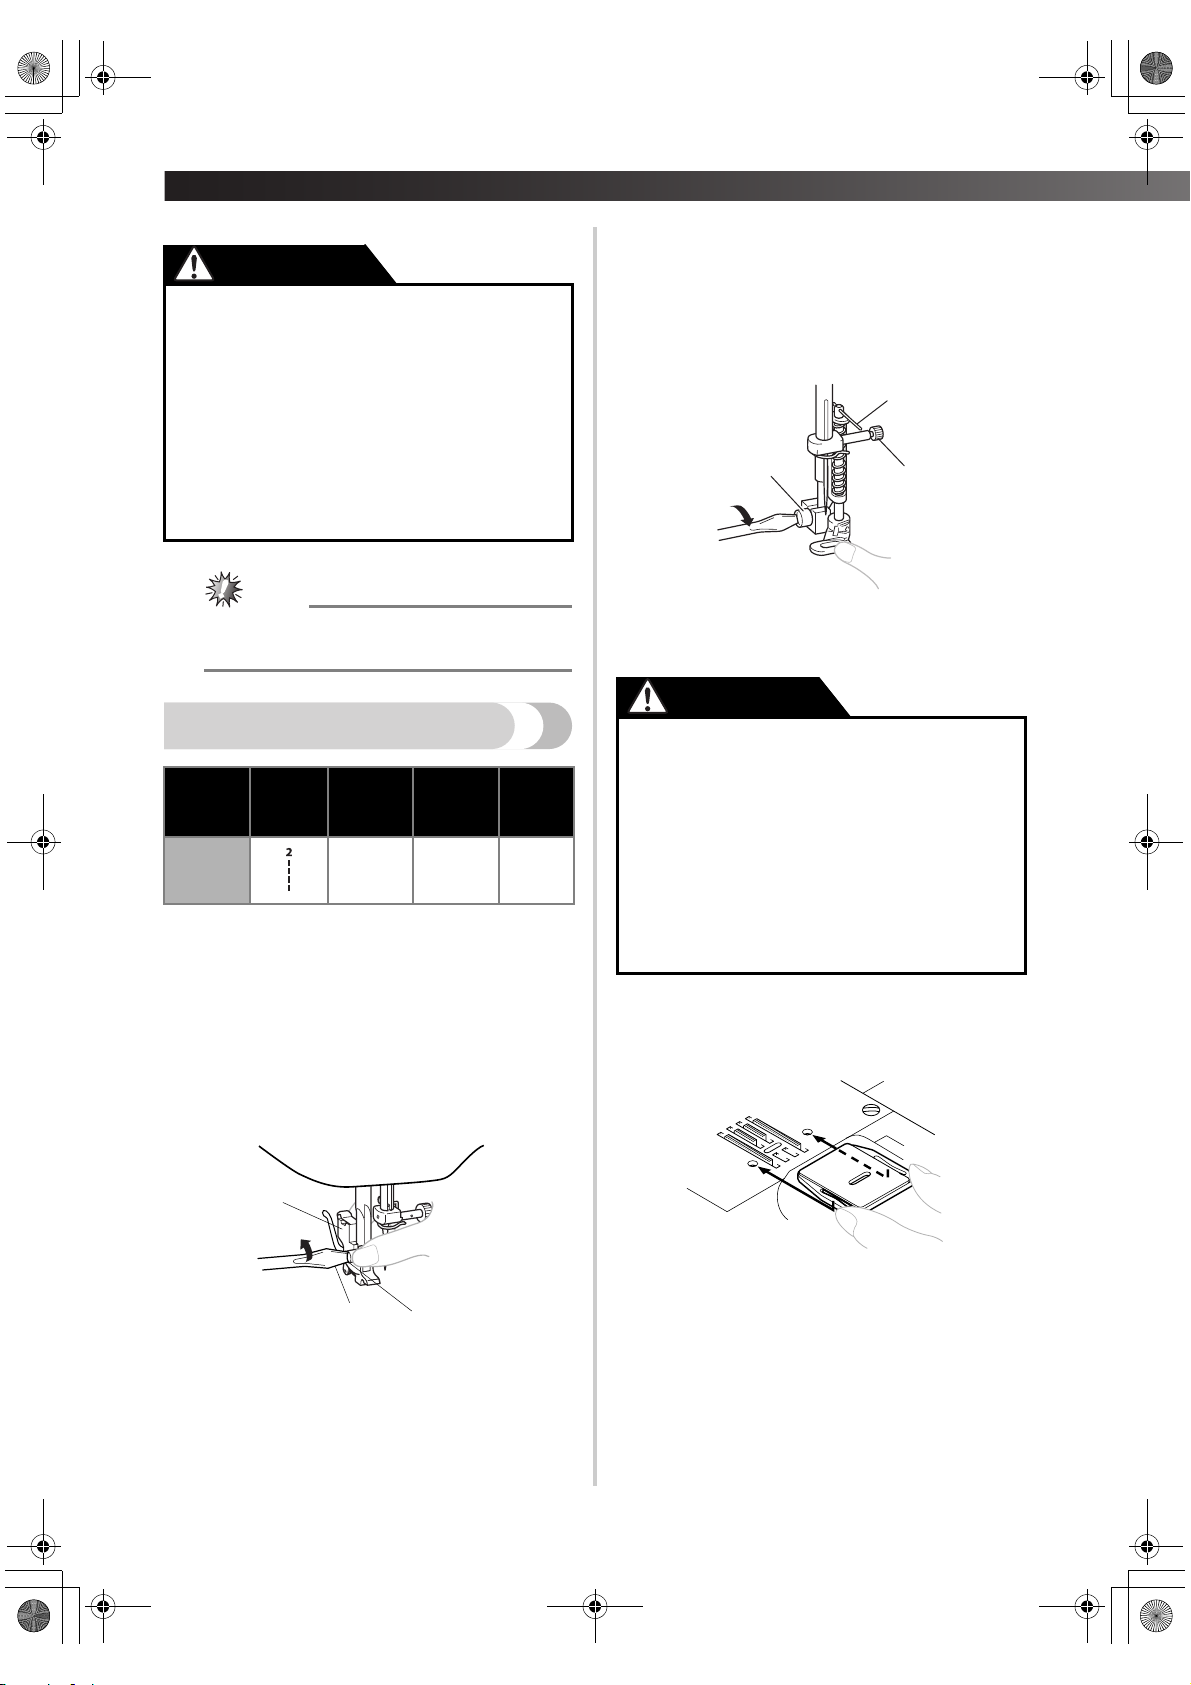
—
XL2600.book Page 42 Thursday, November 4, 2004 9:46 PM
USING ATTACHMENTS AND APPLICATIONS ——————————————————————————————————————————
Attach the quilting foot, making sure that part
4
CAUTION
Use a screwdriver to tighten the screw
●
securely. If the screw is loose, the needle
may hit the presser foot and you may be
A shown in the illustration is above the
needle clamp screw. Then lower the presser
foot lever and tighten the presser foot screw.
• Make sure that the needle clamp screw is
firmly tightened.
injured.
● Before you start sewing, make sure you
A
turn the handwheel toward you
(counterclockwise) to check that the
needle does not hit the presser foot.
● Be careful not to touch the needle,
1
2
otherwise you may be injured.
Note
● When sewing with the walking foot, sew at
medium to low speeds.
1 Presser foot screw
2 Needle clamp screw
Using the Quilting Foot
Stitch
Name
Straight
Stitch
The Quilting Foot is useful for darning and
free-motion machine quilting.
1
2
3
Pattern
Remove the power supply plug from the
outlet.
Raise the needle and the presser foot.
Loosen the presser foot screw to remove the
presser foot holder.
Stitch
Length
[mm (inch)]
Any
2
Stitch
Width
[mm (inch)]
2.5
(3/32)
Other
Darning
Plate
CAUTION
● Be careful not to touch the needle,
otherwise you may be injured.
● Use a screwdriver to tighten the presser
foot holder screw securely. If the screw is
loose, the needle may hit the presser foot
and you may be injured.
● Before you start sewing, make sure you
turn the handwheel toward you
(counterclockwise) to check that the
needle does not hit the presser foot.
Put the darning plate on the needle plate.
5
Connect the power supply plug to the wall
outlet.
1 Screwdriver
2 Presser foot holder
3 Presser foot screw
42
1
3
Set the pattern selection dial to the Straight
6
Stitch.
• Before starting to sew, draw the quilting
design on the fabric.
Page 45
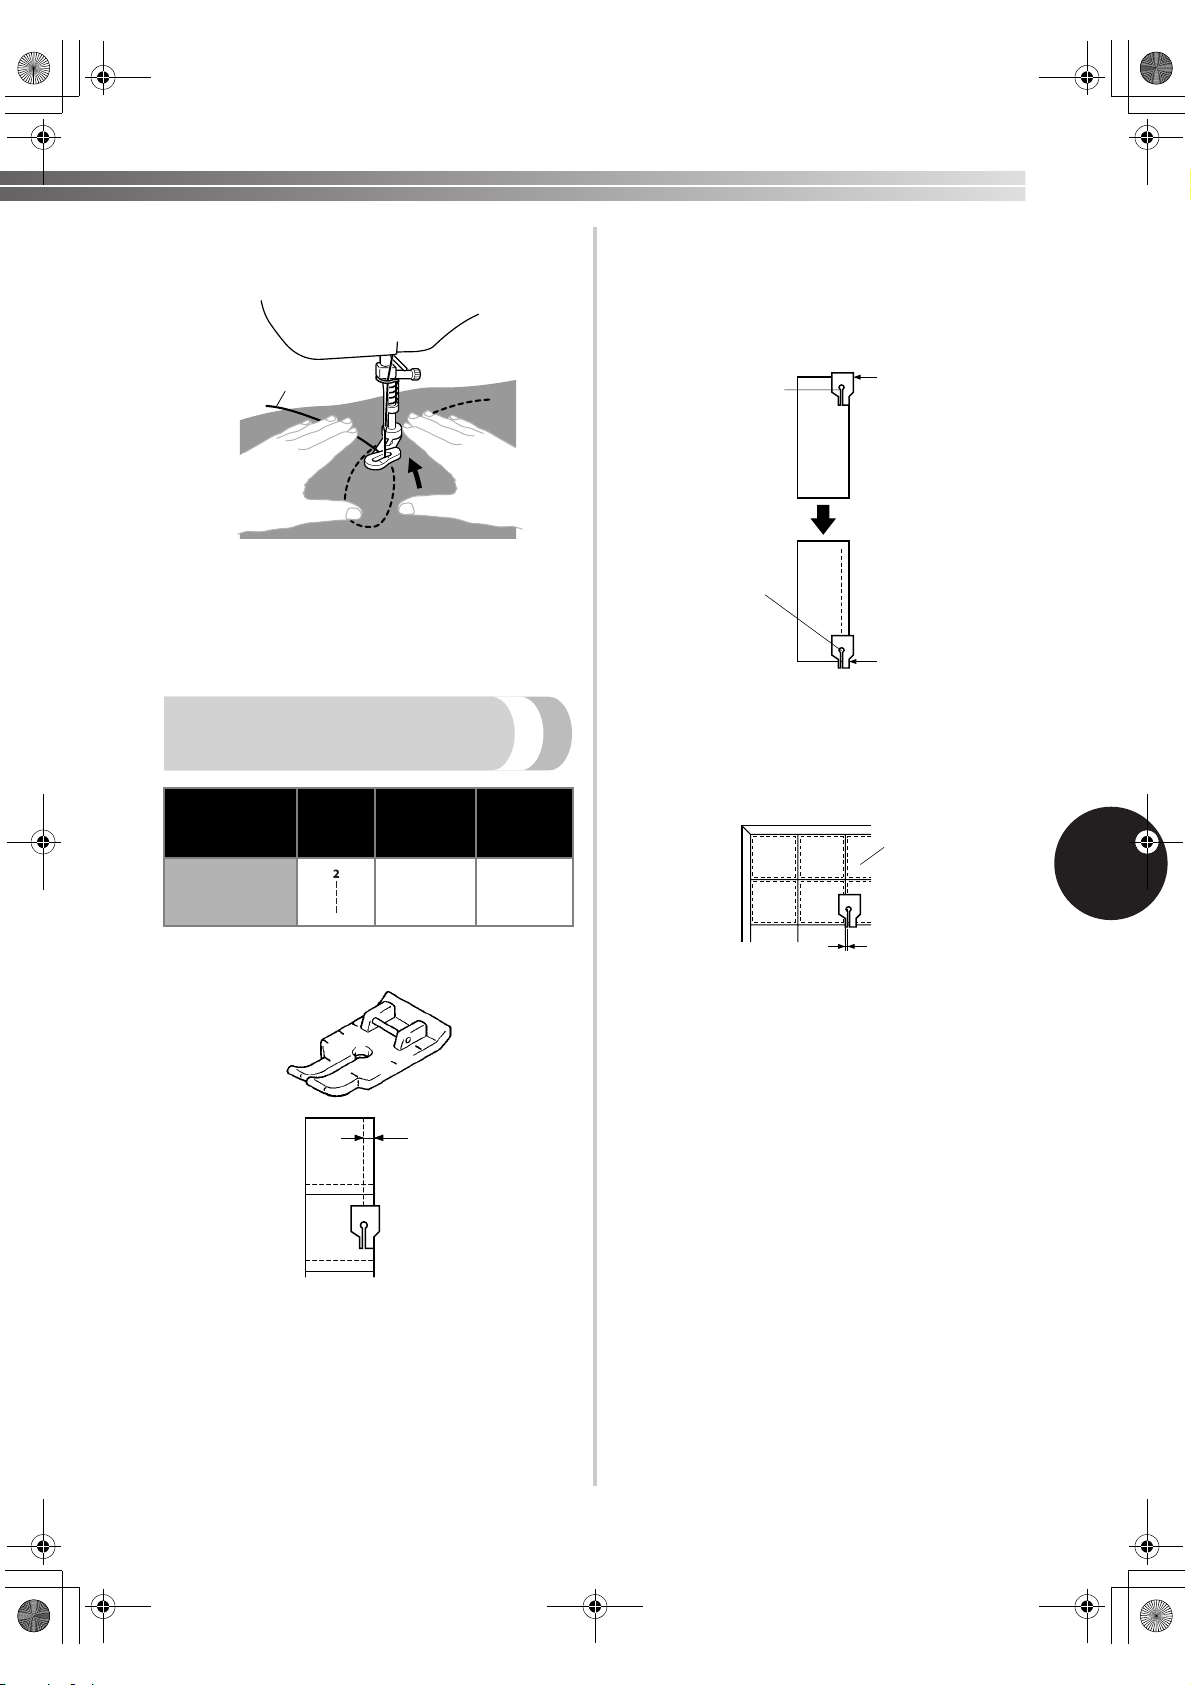
XL2600.book Page 43 Thursday, November 4, 2004 9:46 PM
Use both hands to keep the fabric firmly
7
stretched and move the fabric to sew over the
drawn design.
1
1 Quilting design
The length of the stitch depends on how
8
quickly you move the fabric and on the
machine’s sewing speed. Sew while moving
the fabric slowly.
Using the 1/4-inch
Quilting Foot
Stitch
Stitch Name Pattern
Straight Stitch
Length
[mm (inch)]
2-2.5
(1/16-3/32)
Stitch
Width
[mm (inch)]
2.5 (center)
(3/32)
Attach the 1/4-inch Quilting Foot.
3
Position the presser foot over the fabric and
4
sew as shown in the illustration below.
■ Achieving an Accurate Seam Allowance
1
2
3
4
1 Beginning of stitching
2 Align this mark with the edge of the fabric.
3 End of stitching
4 Align this mark with the edge of the fabric.
■ Quickly Stitch Together a Quilt
1
5
You can use the 1/4-inch Quilting Foot to sew fixed
seams when piecing together a quilt.
1
1 Seam allowance 6.5 mm (1/4 inch)
Remove the power supply plug from the
1
outlet.
Set the pattern selection dial to the Straight
2
Stitch. Set the stitch length between 2 (1/16
inch) and 2.5 (3/32 inch). Set the stitch width
at 2.5 (3/32 inch) (center).
2
1 Top of fabric
2 Seam 3.2 mm (1/8 inch)
43
Page 46
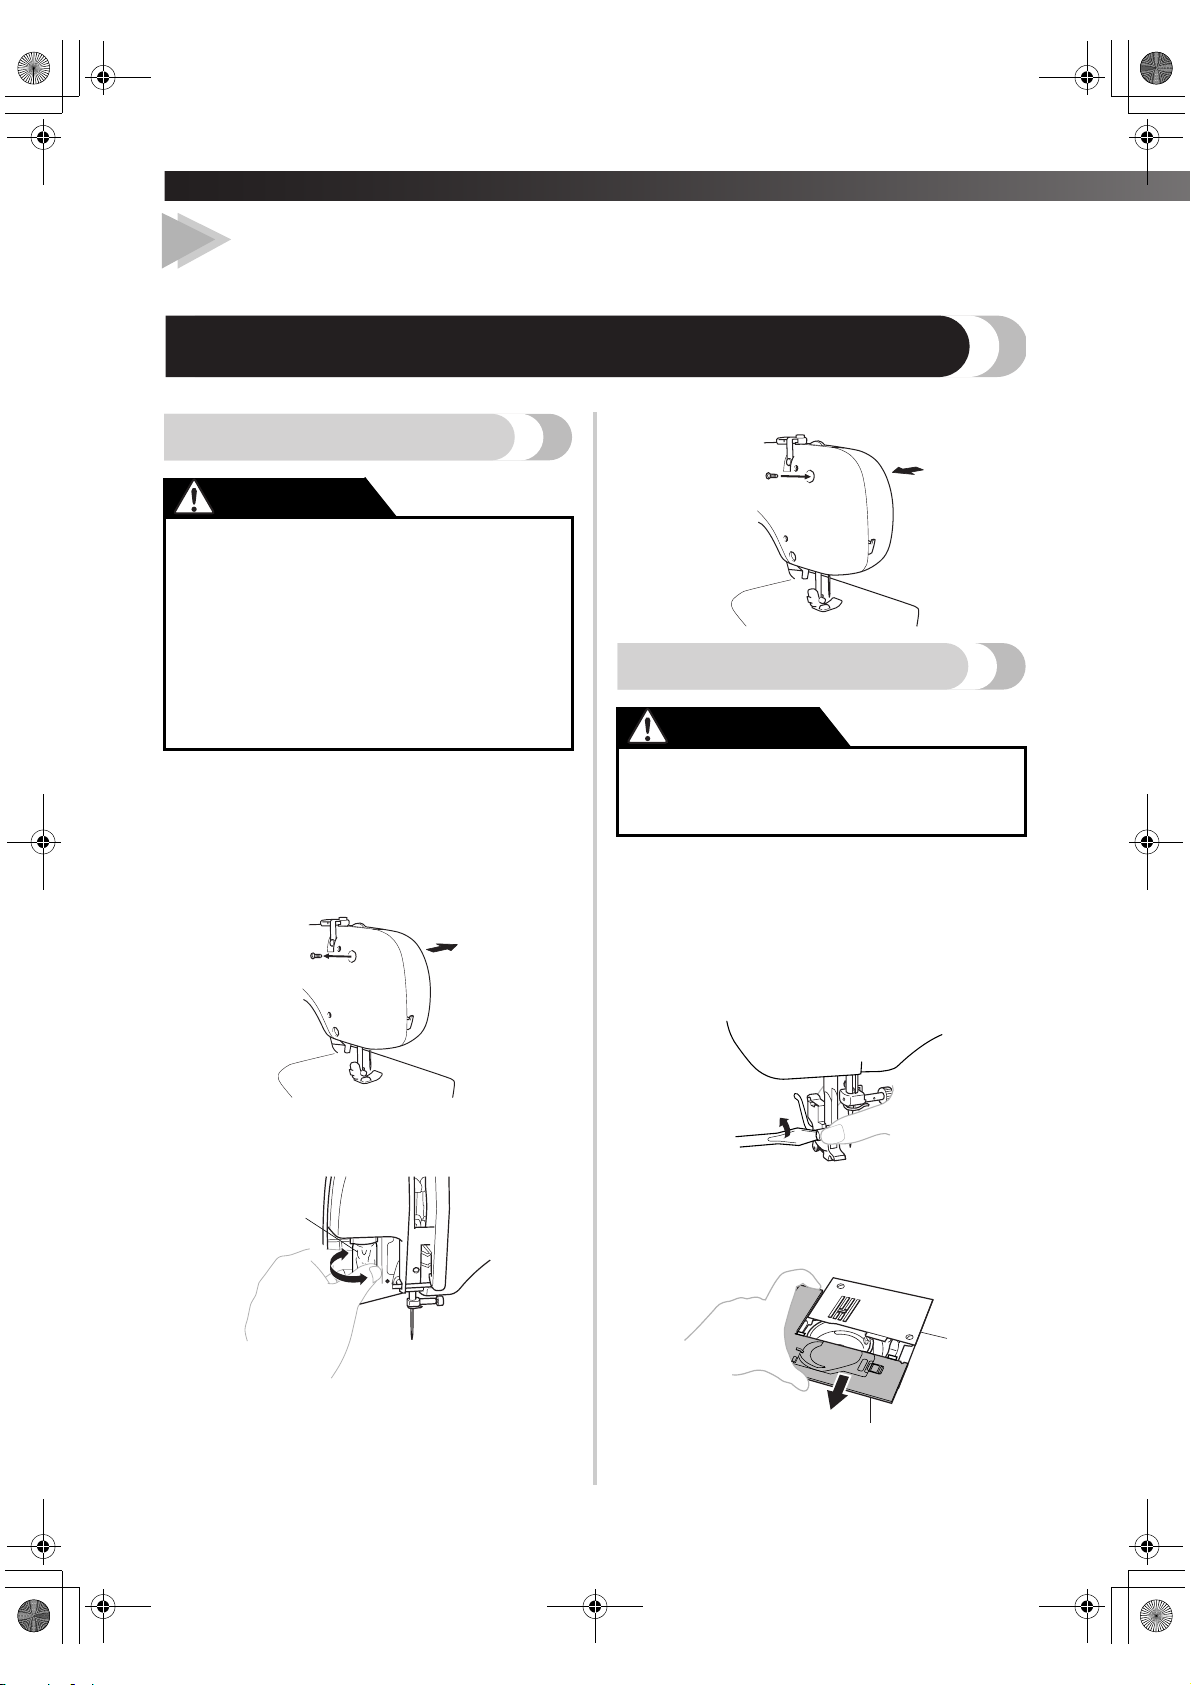
—
XL2600.book Page 44 Thursday, November 4, 2004 9:46 PM
APPENDIX —————————————————————————————————————————————————————————
6
APPENDIX
MAINTENANCE
Changing the Light Bulb
CAUTION
● Turn off the main power switch and
unplug the machine before you change
the light bulb. If the main power switch is
on when you change the light bulb, you
may get an electric shock. If the machine
is on and you step on the foot controller,
you may be injured.
● To avoid burns, let the light bulb cool
down before you change it.
Remove the power supply plug from the
1
outlet.
Loosen the screw on the back of the sewing
2
head. Then remove the light cover from the
machine.
Put the light cover back on and fasten the screw.
4
Cleaning
CAUTION
● Make sure you unplug the machine
before you clean it, otherwise you risk
getting an electric shock or being injured.
Switch the machine off and unplug it.
1
Raise the needle and the presser foot.
2
Loosen the presser foot screw and the needle
3
clamp screw to remove the presser foot
holder and the needle.
Replace the sewing light bulb.
3
1
2
3
1 Bulb
2 Loosen
3 Tighten
44
Grasp both sides of the needle plate cover,
4
and then slide it toward you to remove the
needle plate cover.
1
1 Needle plate cover
Page 47
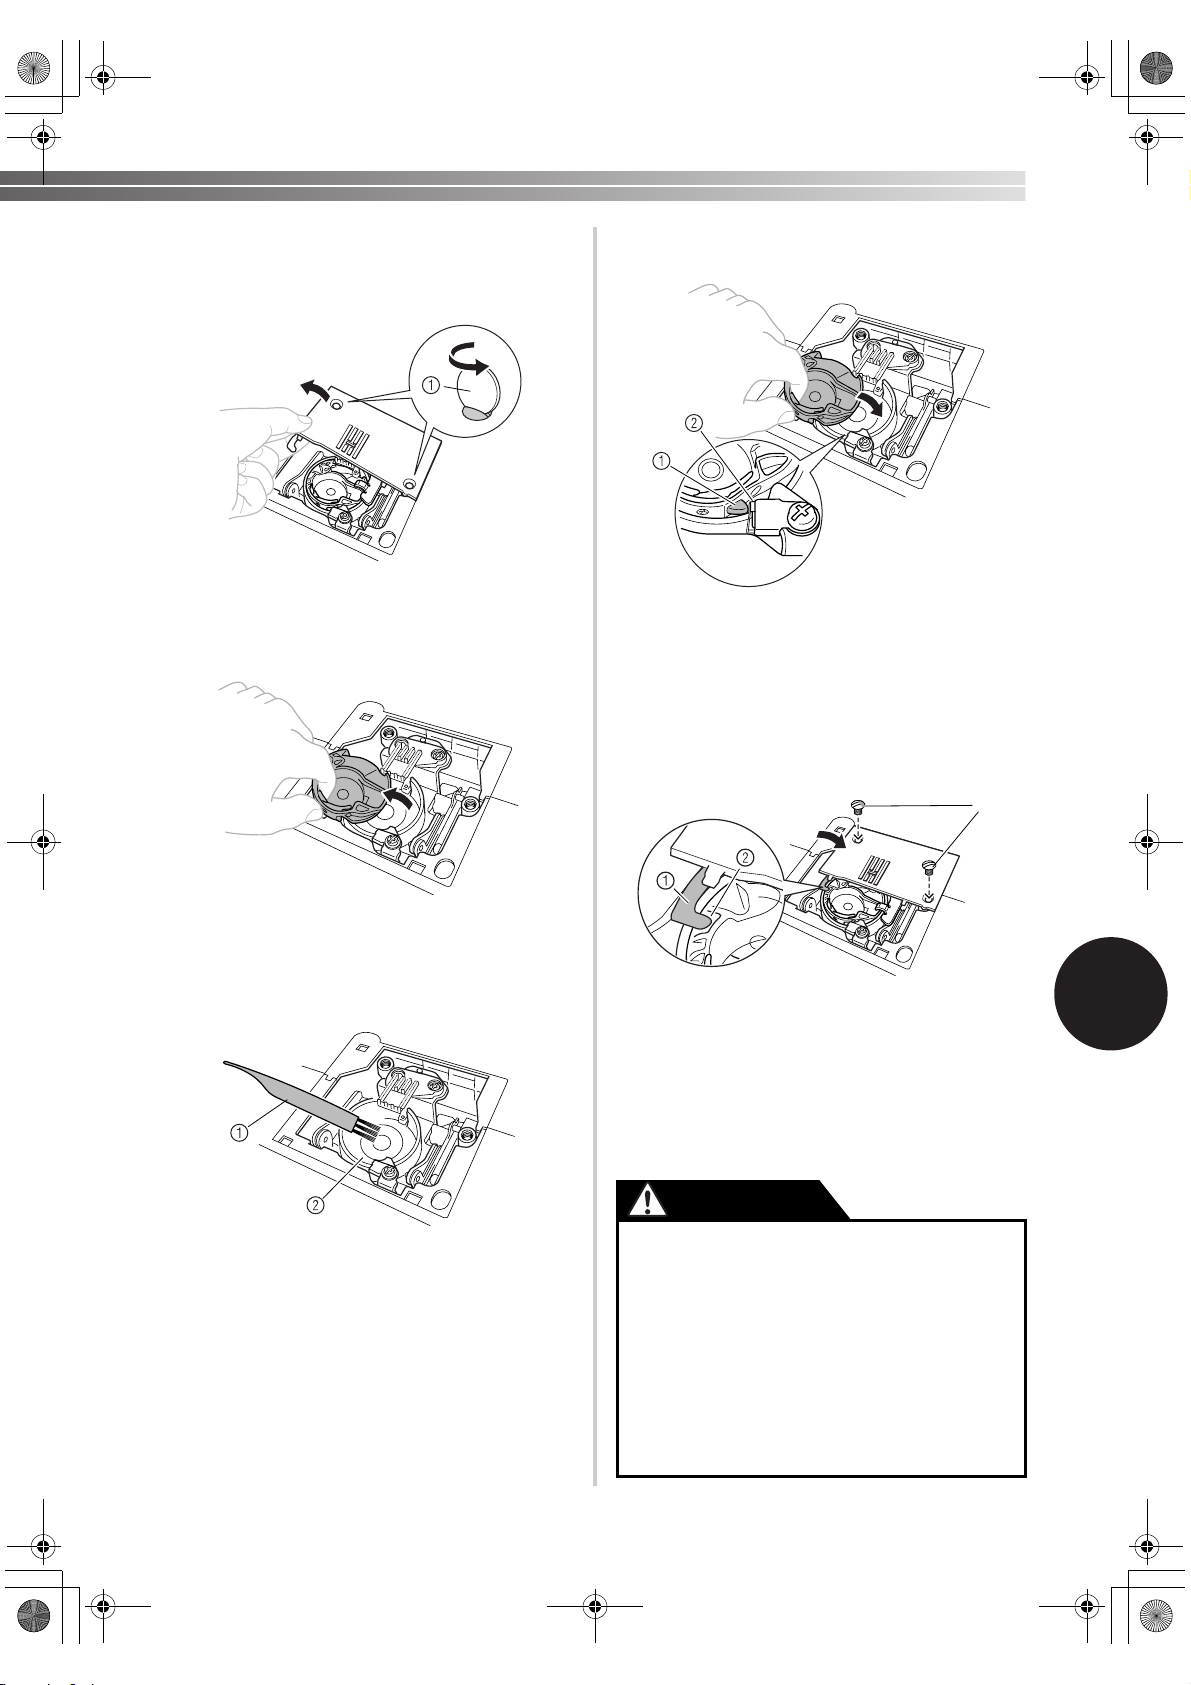
XL2600.book Page 45 Thursday, November 4, 2004 9:46 PM
Using a coin, remove the two screws.
5
Lift up the needle plate as shown in the
illustration, and then slide the needle plate to
the left to remove it.
1 Use a coin or screwdriver
Grasp the bobbin case, and then lift it out to
6
the left.
Insert the bobbin case so that the projection
8
on the bobbin case aligns with the spring.
1 Projection
2 Spring
Install the needle plate, sliding it to the right
9
to secure it, and then tighten the screws.
Make sure that the tab on the left side of the
needle plate is aligned with the notch in the
bobbin case.
3
Use the cleaning brush or a vacuum cleaner to
7
remove any dust from the race and its
surrounding area.
1 Cleaning brush
2 Race
• Do not apply oil to the bobbin case.
1 Tab
2 Notch
3 Screws
Install the needle plate cover.
0
Insert the tabs on the needle plate cover into
the notches in the needle plate, and then slide
the cover back into position.
CAUTION
● Never use a bobbin case that is
scratched; otherwise the upper thread
may become tangled, the needle may
break, or sewing performance may
suffer. For a new bobbin case (part code:
XC8993-021), contact your nearest
authorized service center.
● Make sure that you fit the bobbin case
properly, otherwise the needle may
break.
6
45
Page 48
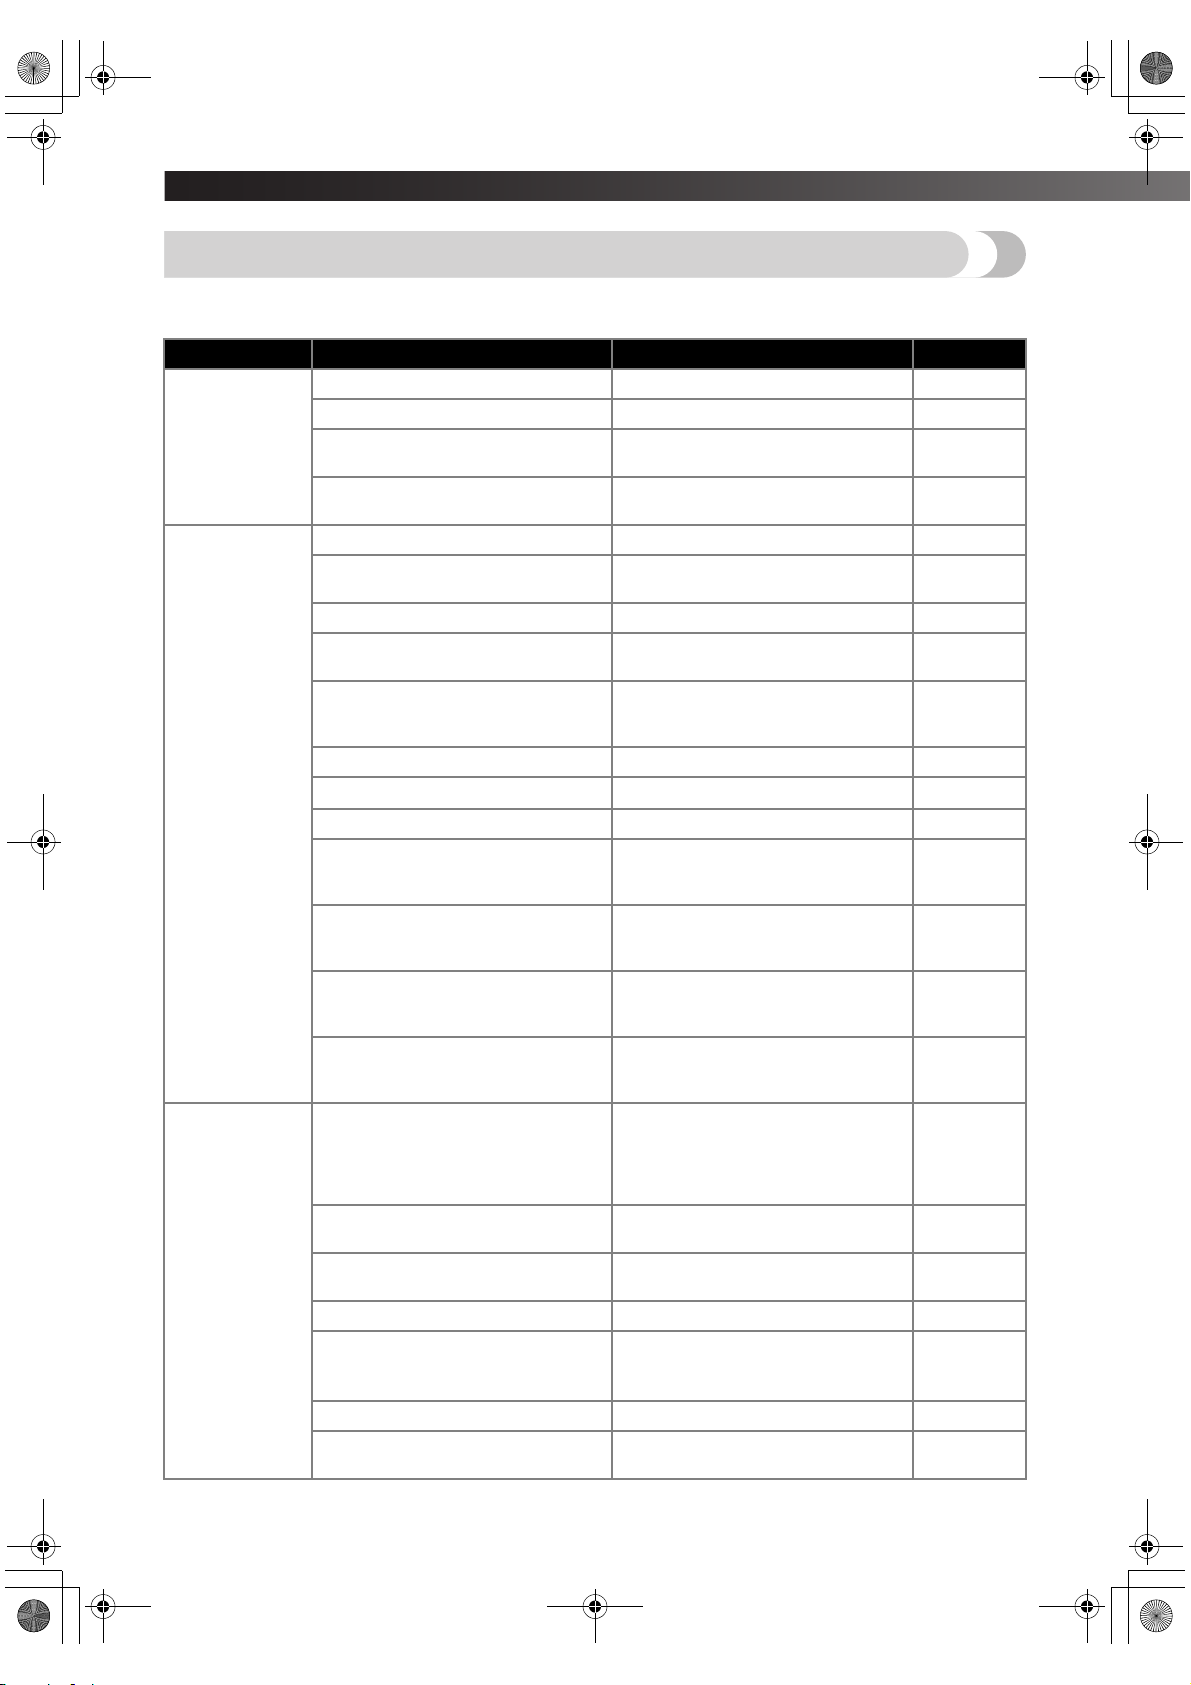
—
XL2600.book Page 46 Thursday, November 4, 2004 9:46 PM
APPENDIX —————————————————————————————————————————————————————————
Troubleshooting
If the machine stops working properly, check the following possible problems.
If the problem is still there, contact your retailer or the nearest authorized service center.
Symptom Possible cause How to put it right Reference
The machine is not plugged in. Plug the machine in. page 7
The sewing
machine does
not work.
The needle
breaks.
The upper
thread breaks.
The main power switch is turned off. Turn on the main power switch. page 8
The bobbin-winder shaft is pushed
to the right.
You have not used the foot controller properly.
The needle is not fitted properly. Fit the needle properly. page 8
The needle clamp screw is loose.
The needle is bent or blunt. Replace the needle. page 8
You have not used the right combination of fabric, thread and needle.
The presser foot you are using is not
appropriate for the type of stitch that
you want to sew.
The upper thread tension is too tight. Loosen the upper thread tension. page 25
You are pulling the fabric too much. Lightly guide the fabric.
You have not fitted the spool properly.
The area around the hole in the needle plate is scratched.
The area around the hole in the
presser foot is scratched.
The bobbin case is scratched.
You have not used a bobbin that has
been designed for this machine.
You have not threaded the upper
thread properly. (For example, you
have not fitted the spool properly, or
the thread has come out of the guide
above the needle.)
There are knots or tangles in the
thread.
The needle is not appropriate for the
thread you are using.
The upper-thread tension is too tight. Loosen the upper thread tension. page 25
The thread is tangled.
The needle is bent or blunt. Replace the needle. page 8
You have not inserted the needle
properly.
Move the bobbin-winder shaft to the
left.
Use the foot controller properly. page 8
Use the screwdriver to firmly tighten
the screw.
Choose a thread and needle that are
appropriate for the type of fabric.
Attach the presser foot that is correct
for the type of stitch that you want to
sew.
page 17
page 9
page 26
–
–
Fit the spool properly. page 21, 25
Replace the needle plate.
Contact your retailer or the nearest
authorized service center.
Replace the presser foot.
Contact your retailer or the nearest
authorized service center.
Replace the bobbin case.
Contact your retailer or the nearest
authorized service center.
Incorrect bobbins will not work
properly. Only use a bobbin that has
been designed for this machine.
Correct the upper threading. page 21
Remove any knots or tangles.
Choose a needle that is appropriate
for the type of stitch.
Remove the tangled thread. If the
thread is tangled in the bobbin case,
clean the bobbin case.
Insert the needle properly. page 8
–
–
–
page 16
–
page 26
page 44
46
Page 49
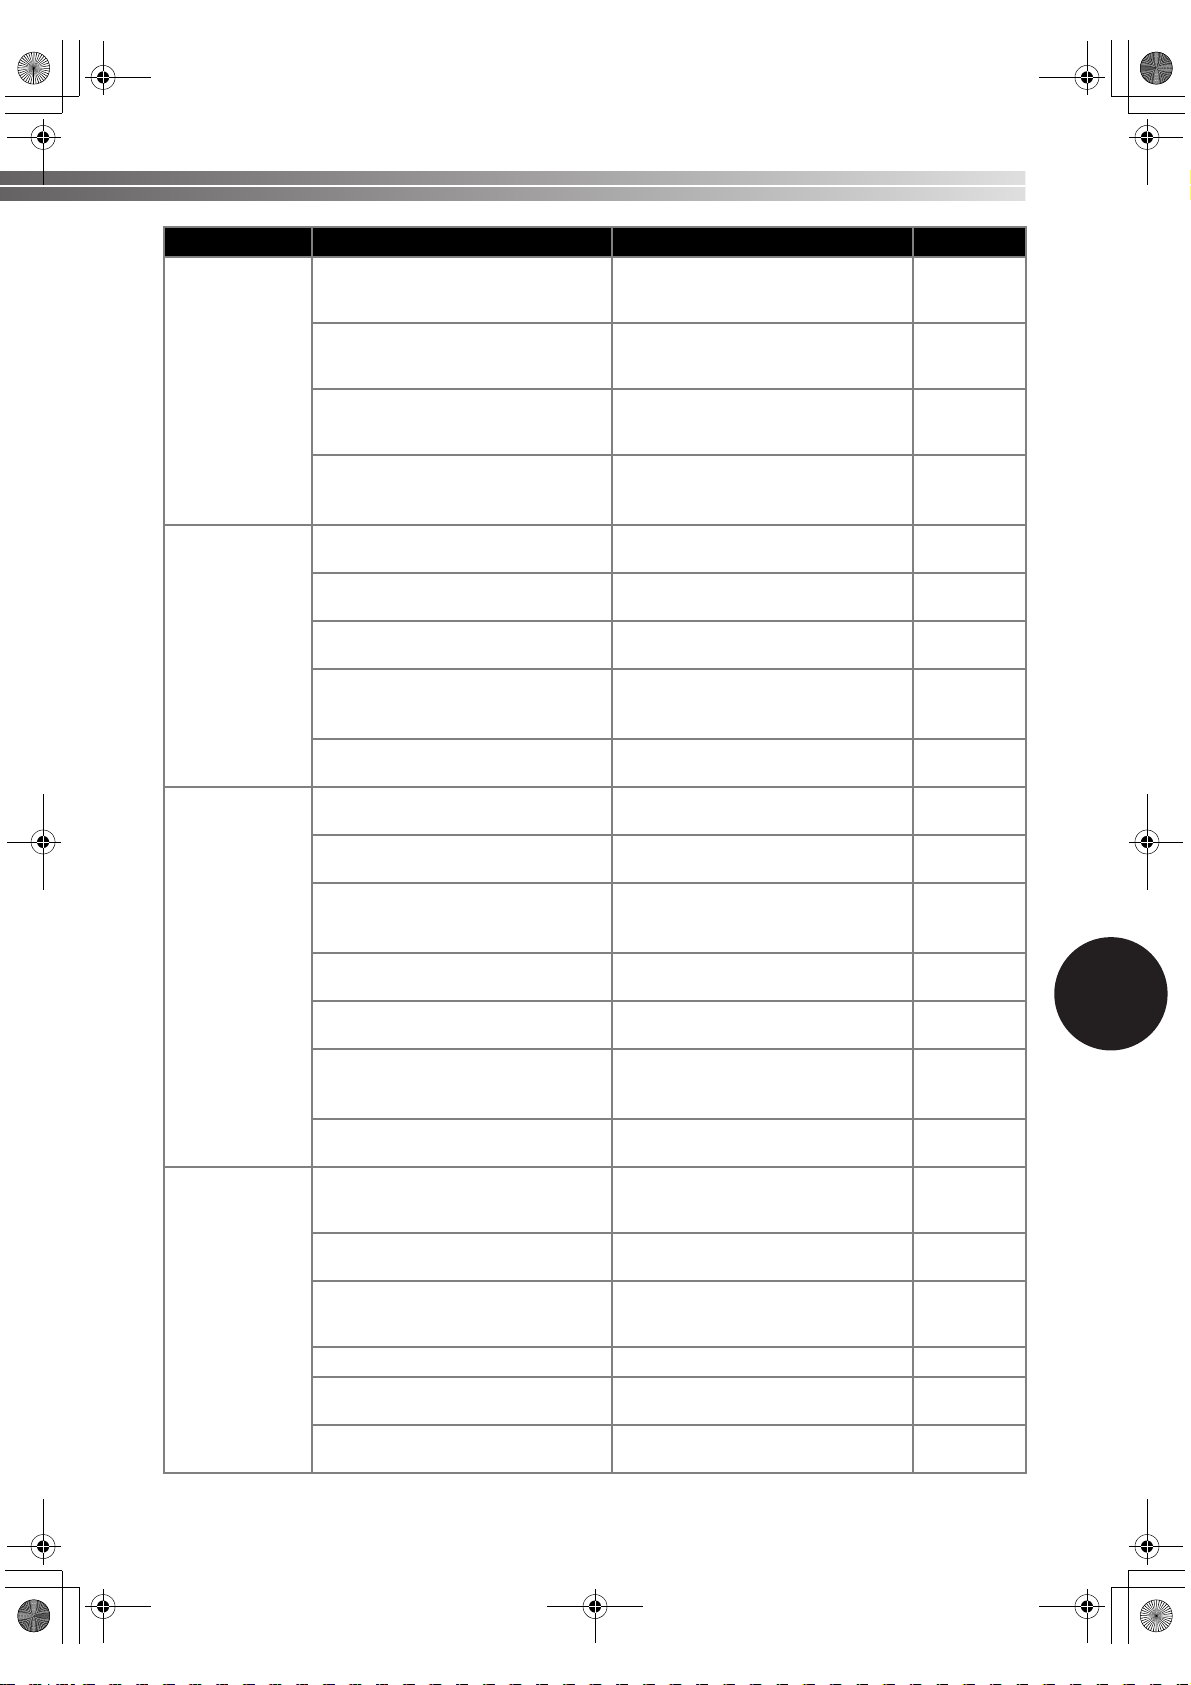
XL2600.book Page 47 Thursday, November 4, 2004 9:46 PM
Symptom Possible cause How to put it right Reference
The area around the hole in the needle plate is scratched.
The area around the hole in the
The upper
thread breaks.
The lower
thread is tangled
or breaks.
The thread tension is incorrect.
The fabric is
wrinkled.
presser foot is scratched.
The bobbin case is scratched, or has
a burr on it.
You have not used a bobbin that has
been designed for this machine.
You have not wound the bobbin
thread properly.
The bobbin is scratched or does not
turn smoothly.
The thread is tangled.
You have not used a bobbin that has
been designed for this machine.
Bobbin is set incorrectly. Reset the bobbin thread correctly.
You have not threaded the upper
thread properly.
You have not wound the bobbin
thread properly.
You have not threaded the right
combination of thread and needle
for the fabric you are using.
You have not attached the presser
foot holder properly.
The thread tension is incorrect.
You have not used a bobbin that has
been designed for this machine.
Bobbin is set incorrectly. Reset the bobbin thread correctly.
You have not threaded the upper
thread properly or fitted the bobbin
properly.
You have not fitted the spool properly.
You have not used the right
combination of fabric, thread and
needle.
The needle is bent or blunt. Replace the needle. page 8
If you are sewing thin fabric, the
stitch is too thick.
The thread tension is incorrect.
Replace the needle plate.
Contact your retailer or the nearest
authorized service center.
Replace the presser foot.
Contact your retailer or the nearest
authorized service center.
Replace the bobbin case.
Contact your retailer or the nearest
authorized service center.
Incorrect bobbins will not work
properly. Only use a bobbin that has
been designed for this machine.
Wind the bobbin properly. page 16
Replace the bobbin.
Remove the tangled thread and
clean the bobbin case.
Incorrect bobbins will not work
properly. Only use a bobbin that has
been designed for this machine.
Correct the upper threading. page 21
Wind the bobbin thread properly. page 16
Choose a thread and needle that are
appropriate for the type of fabric.
Attach the presser foot holder properly.
Adjust the tension of the upper
thread.
Incorrect bobbins will not work
properly. Only use a bobbin that has
been designed for this machine.
Thread the upper thread and wind
the bobbin thread properly.
Fit the spool properly. page 21, 25
Choose a thread and needle that are
appropriate for the type of fabric.
Sew with stabiliser material under
the fabric.
Adjust the tension of the upper
thread.
–
–
–
page 16
–
page 44
page 16
page 18, 19,
20
page 26
–
page 25
page 16
page 18, 19,
20
page 18, 19,
21
page 26
–
page 25
6
47
Page 50
—
XL2600.book Page 48 Thursday, November 4, 2004 9:46 PM
APPENDIX —————————————————————————————————————————————————————————
Symptom Possible cause How to put it right Reference
Stitches are
skipped.
There is a highpitched noise
while sewing.
The needle
threader can not
be used.
The stitch is not
sewn correctly.
The fabric does
not feed.
The sewing light
bulb does not
come on.
You have not threaded the upper
thread properly.
You have not used the right combination of fabric, thread and needle.
The needle is bent or blunt. Replace the needle. page 8
You have not inserted the needle
properly.
Dust has accumulated under the
needle plate or in the bobbin case.
Dust has built up in the feed dogs or
in the bobbin case.
You have not threaded the upper
thread properly.
The bobbin case is scratched.
You have not used a bobbin that has
been designed for this machine.
You have not moved the needle
holder to its highest position.
You have not inserted the needle
properly.
The presser foot that you are using is
not correct for the type of stitch.
The thread tension is incorrect.
The thread is tangled.
The stitch is too fine. Lengthen the stitch length.
The darning plate is fitted on the
needle plate.
You have not used the right combination of fabric, thread and needle.
The thread is tangled.
The sewing light bulb is damaged. Replace the sewing light bulb. page 44
Correct the upper threading. page 21
Choose a thread and needle that are
appropriate for the type of fabric.
Insert the needle properly. page 8
Remove the needle plate cover and
clean the plate and the bobbin case.
Clean the bobbin case. page 44
Correct the upper threading. page 21
Replace the bobbin case.
Contact your retailer or the nearest
authorized service center.
Incorrect bobbins will not work
properly. Only use a bobbin that has
been designed for this machine.
Turn the handwheel toward you
(counterclockwise) to raise the needle holder to the highest position.
Insert the needle properly. page 8
Attach the presser foot that is correct
for the type of stitch that you want to
sew.
Adjust the tension of the upper
thread.
Remove the tangled thread. If the
thread is tangled in the bobbin case,
clean the bobbin case.
page 26
page 44
–
page 16
page 22
–
page 25
page 44
–
Remove the darning plate.
Choose a thread and needle that are
appropriate for the type of fabric.
Remove the tangled thread. If the
thread is tangled in the bobbin case,
clean the bobbin case.
–
page 26
page 44
48
Page 51
XL2600.book Page 49 Thursday, November 4, 2004 9:46 PM
INDEX
Numerics
1/4-inch quilting foot .................................................... 43
A
Accessories ..................................................................... 6
optional .............................................................. 6, 41
Appliqués
B
Blind hem stitching .......................................................29
Bobbin
Buttonhole
Buttonhole fine-adjustment screw
Buttons
C
Cleaning ....................................................................... 44
Connecting plugs
D
Darning ........................................................................38
Darning plate
Decorative stitching
Double action stitching
Drawing up the lower thread
E
Elastic stitching ............................................................. 30
Embroidering
F
Fabric, thread, and needle combinations ...................... 26
Feather stitching
Flat bed attachment
Foot controller
Free-arm style
G
Gathering ...................................................................... 38
H
Handwheel ................................................................... 21
L
Light bulb
Light switch
Lower threading
M
Main parts ....................................................................... 5
Main power
Maintenance
Monogramming
N
Needle
.....................................................................39
winding ................................................................... 16
adjusting ..................................................................35
making .................................................................... 34
sewing ..................................................................... 36
.................................35
............................................................ 7
............................................36, 38, 39, 42
......................................................33
.................................................31
........................................24
................................................................ 39
............................................................ 32
......................................................10
................................................................ 8
............................................................... 10
changing .................................................................44
....................................................................8
............................................................18
quick-set bobbin ............................................... 19, 24
.................................................................... 8
.................................................................44
............................................................ 39
checking .................................................................... 8
combinations with fabric and thread .......................... 26
replacing ................................................................... 8
Needle threader
O
Overedge stitching ........................................................ 31
P
Patchworking ................................................................31
Pattern selection dial
Patterns
Presser foot
changing ...................................................................9
Q
Quick-set bobbin ................................................... 19, 24
Quilting foot
R
Race
cleaning .................................................................. 44
Repacking instructions
Reverse sewing lever
S
Satin stitch .................................................................... 28
Shell tuck stitching
Spool pin
extra ........................................................................25
Stitch length dial
Stitch width dial
Stitches
built-in ....................................................................29
names .....................................................................12
Straight stitching
Stretch stitching
T
Thread cutter ................................................................28
Thread tension
Threading
lower ............................................................... 18, 19
needle threader ........................................................22
twin needle ..............................................................25
upper ......................................................................21
Triple zigzag stretch stitching
Troubleshooting
Twin needle
attaching ............................................................ 9, 25
sewing .....................................................................24
U
Unpacking instructions ...................................................2
Upper tension control dial
Upper threading
W
Walking foot ................................................................. 41
Z
Zigzag stitching ............................................................. 28
Zipper insertion
............................................................ 22
..................................................... 11
.........................................................................12
.................................................................42
.................................................... 2
..................................................... 15
........................................................29
............................................................... 16, 21
........................................................... 14
............................................................15
...........................................................27
............................................................15
.............................................................. 25
........................................32
............................................................46
............................................25
............................................................ 21
............................................................37
49
 Loading...