

Page 1
Page 2

IMPORTANT SAFETY INSTRUCTIONS
When using this machine, basic safety precautions should always be taken,
including the following:
Read all instructions before using.
DANGER - To reduce the risk of electric shock:
1. The machine should never be left unattended while plugged in. Always unplug the machine
from the electrical outlet immediately after using and before cleaning.
2. Always unplug before changing the light bulb. Replace bulb with same type rated 12V 5 watts.
WARNING - To reduce the risk of burns, fire, electric shock, or injury to persons:
1. Do not allow this machine to be used as a toy . Close attention is necessary when the machine
is used by or near children.
2. Use this machine only for its intended use as described in this manual. Use only accessories
recommended by the manufacturer as contained in this manual.
3. Never operate this machine if it has a damaged cord or plug, if it is not working properly, if it
has been dropped or damaged, or dropped into water. Return the machine to the nearest
authorized dealer or service center for examination, repair, electrical or mechanical adjustment.
4. Never operate the machine with any air openings blocked. Keep ventilation openings of the
machine and foot control free from the accumulation of lint, dust, and loose cloth.
5. Never drop or insert any object into any opening.
6. Do not use outdoors.
7. Do not operate where aerosol (spray) products are being used or where oxygen is being administered.
8. To disconnect, turn the main switch to the symbol “ ” position which represents off, then
remove plug from outlet.
9. Do not unplug by pulling on cord. To unplug, grasp the plug, not the cord.
10.Keep fingers away from all moving parts. Special care is required around the machine needle.
11.Always use the proper needle plate. The wrong plate can cause the needle to break.
12.Do not use bent needles.
13.Do not pull or push fabric while stitching. It may deflect the needle causing it to break.
14.Switch the machine to the symbol “ ” position when making any adjustments in the needle
area, such as threading needle, changing needle, threading bobbin, or changing presser foot,
and the like.
15.Always unplug the machine from the electrical outlet when removing covers, lubricating, or
when making any other user servicing adjustments mentioned in the instruction manual.
16.This sewing machine is not intended for use by young children or infirm persons without
supervision.
17.Young children should be supervised to ensure that they do not play with this machine.
SAVE THESE INSTRUCTIONS
This machine is intended for household use.
Introduction A-1
Page 3

FOR USERS IN THE UK, EIRE, MALTA
AND CYPRUS ONLY
If this machine is fitted with a three-pin non-rewireable BS plug then please read the following.
IMPORTANT
If the available socket outlet is not suitable for the plug supplied with this equipment, it should be
cut off and an appropriate three-pin plug fitted. With alternative plugs an approved fuse must be
fitted in the plug.
NOTE
The plug served from the main lead must be destroyed as a plug with bared flexible cords is
hazardous if engaged in a live socket outlet. In the event of replacing the plug fuse, use a fuse
approved by ASTA to BS 1362, i.e. carrying the mark, rating as marked on plug.
Always replace the fuse cover, never use plugs with the fuse cover omitted.
WARNING
DO NOT CONNECT EITHER WIRE TO THE EARTH TERMINAL WHICH IS MARKED WITH THE
LETTER ‘E’, BY THE EARTH SYMBOL OR COLOURED GREEN OR YELLOW.
The wires in this main lead are coloured in accordance with the following code:
Blue Neutral
Brown Live
As the colours of the wiring in the main lead of this appliance may not correspond with the
coloured markings identifying the terminals in your plug, proceed as follows.
The wire which is coloured blue must be connected to the terminal which is marked with the letter
‘N’ or coloured black or blue.
The wire which is coloured brown must be connected to the terminal which is marked with the
letter ‘L’ or coloured red or brown.
A-2 Introduction
Page 4

CONGRATULATIONS ON CHOOSING
OUR MACHINE
Your machine is the most advanced computerized household sewing machine.
To fully enjoy all the features incorporated, we suggest that you study the manual.
PLEASE READ BEFORE USING THIS MACHINE
For safe operation
1. Be sure to keep your eye on the needle while sewing. Do not touch the pulley , thread take-up,
needle, or other moving parts.
2. Remember to turn off the power switch and unplug the cord when:
• Operation is completed
• Replacing or removing the needle or any other parts
• A power failure occurs during use
• Maintaining the machine
• Leaving the machine unattended.
3. Do not store anything on the foot controller.
4. Plug the machine directly into the wall. Do not use extension cords.
For a longer service life
1. When storing this machine, avoid direct sunlight and high humidity locations. Do not use or
store the machine near a space heater, iron, halogen lamp, or other hot objects.
2. Use only neutral soaps or detergents to clean the case. Benzene, thinner, and scouring powders can damage the case and machine, and should never be used.
3. Do not drop or hit the machine.
4. Always consult the operation manual when replacing or installing any assemblies, the presser
feet, needle, or other parts to assure correct installation.
For repair or adjustment
In the event a malfunction occurs or adjustment is required, first follow the troubleshooting table
in the back of the operation manual to inspect and adjust the machine yourself. If the problem
persists, please consult your local authorized Brother dealer.
For additional product information and updates, visit our web site at www.brother.com
Introduction A-3
Page 5
WHAT YOU CAN DO WITH THIS MACHINE
Special Features
- On screen sewing advisor gives advice about sewing and general machine use, in addition to
illustrated step-by-step instructions on the large LCD display.
- Machine sets thread tension automatically - no more bothersome trial sewing.
- Prepare the bobbin thread for sewing with one touch - no need to pull the bobbin thread up
through the needle plate.
- Attach the knee lifter to raise and lower the presser foot without using your hands - convenient
for quilting and patchwork.
- Wind the bobbin easily, even while the machine is embroidering.
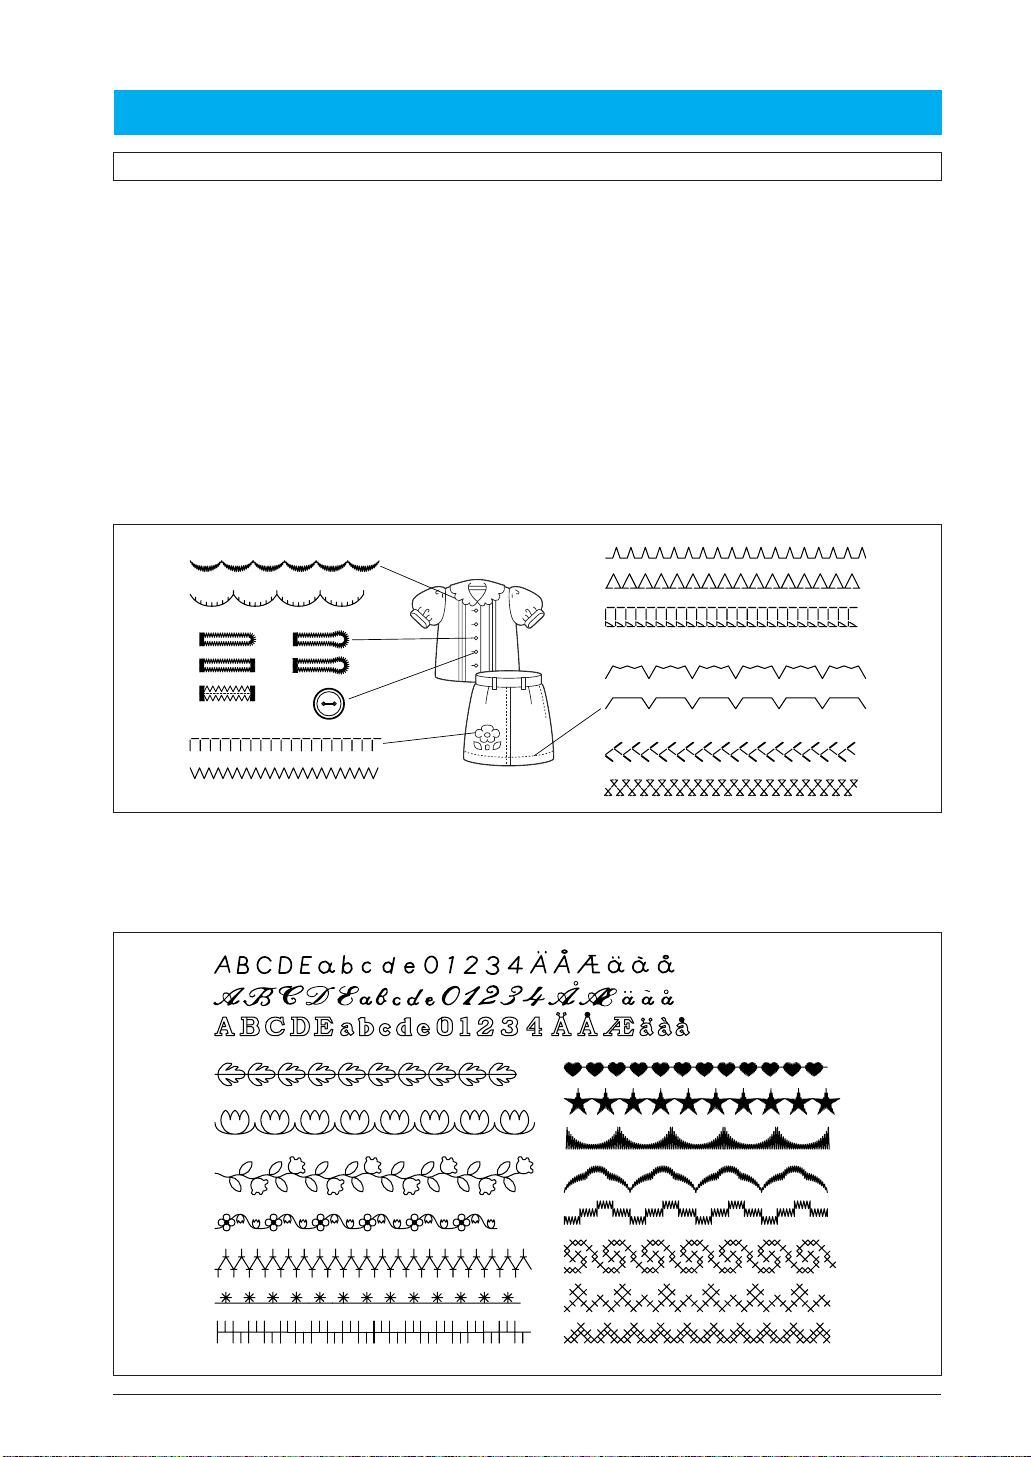
Utility Stitches
There are 107 pre-programmed stitches in the machine, for garment construction or mending.
Character/Decorative Stitches
Sew alphabetical character patterns, decorative stitch patterns, satin stitch patterns, cross stitch
patterns, and more.
A-4 Introduction
Page 6
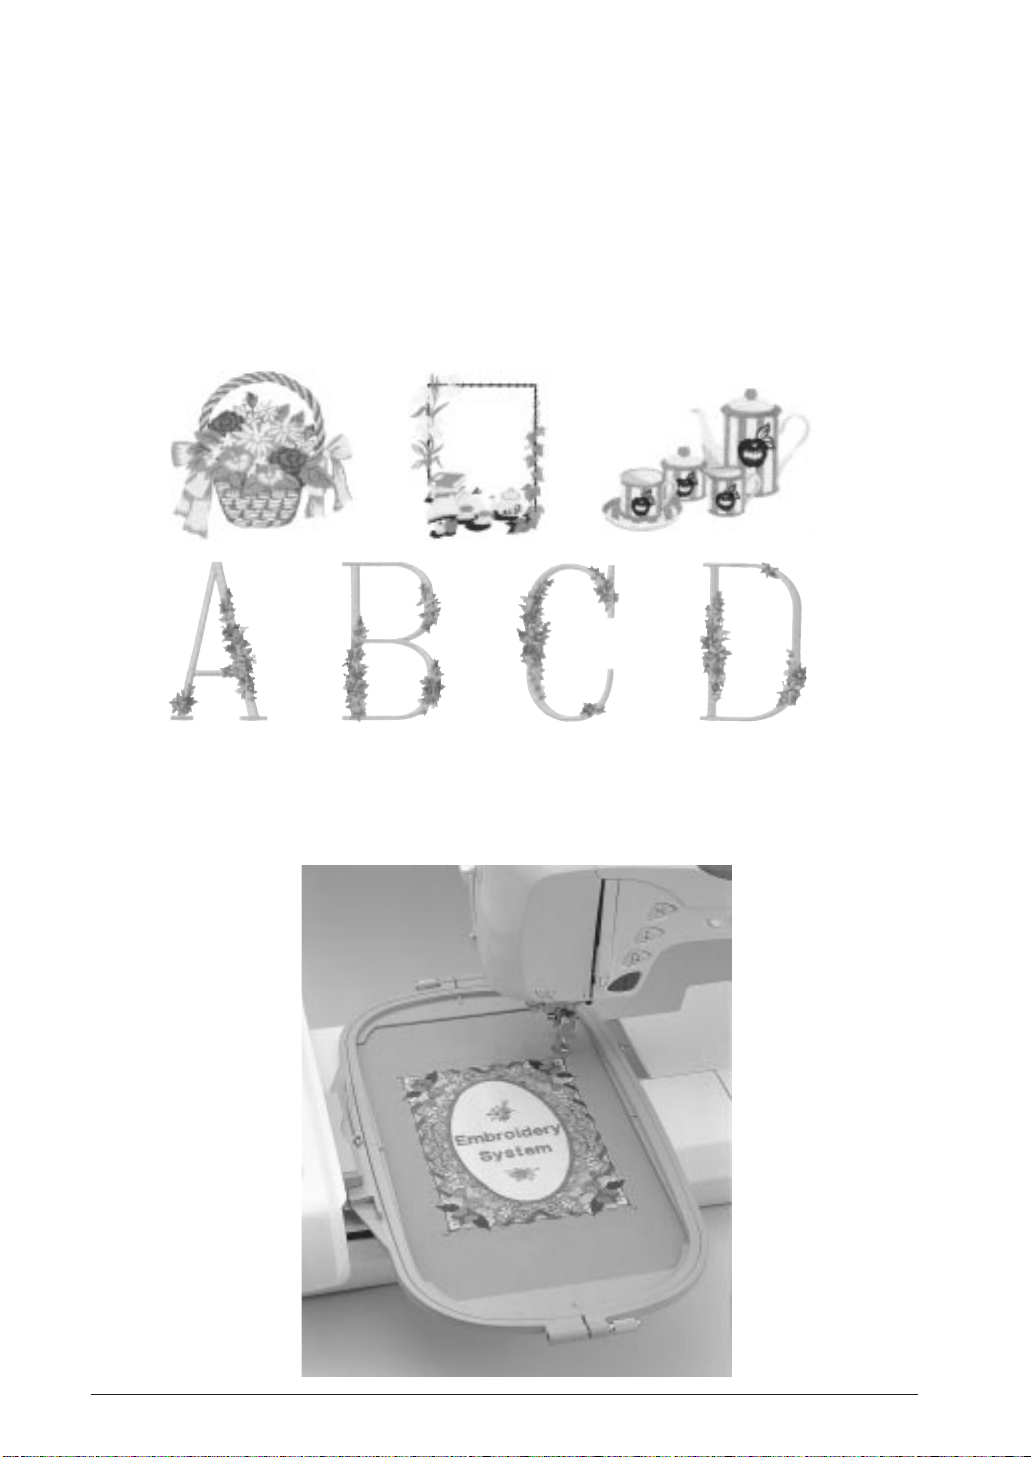
Attach the embroidery unit to enjoy sewing realistic embroidery patterns. Choose from the alphabetic (character) patterns, built-in designs, or decorative borders to frame your patterns pre-programmed into the machine, or choose from a wide selection of embroidery cards (sold separately)
to increase creativity.
Embroidery
Select the “Embroidery” function icon to choose a pattern and sew it as it appears on the screen.
Embroidery Editing
You can combine characters and patterns, or change the configuration of characters easily with
the “Embroidery Edit” functions.
Introduction A-5
Page 7
HOW TO USE THIS MANUAL
Chapter 1 and Chapter 2 explain your sewing machine’s basic operation procedures for someone
who is using the sewing machine for the first time. If you want to sew utility stitches or character/
decorative stitches, read Chapter 1 and Chapter 2, then go on to Chapter 3 (Sewing Utility Stitches)
or Chapter 4 (Sewing Character/Decorative Stitches).
When you are ready to begin using the embroidery function after reading Chapter 1 and Chapter
2, proceed to Chapter 5 (Embroidery). Once you understand the steps explained in Chapter 5, go
on to Chapter 6 for an explanation about the convenient embroidery edit functions.
In the screens that appear in the step-by-step directions the parts that are used for the operation are
shown in . Compare the screen in the directions with the actual screen, and carry out the
operation.
If, while using the machine, you experience something you do not understand, or there is a func-
tion you would like to know more about, refer to the index at the back of the operation manual in
conjunction with the table of contents to find the section of the manual you should refer to.
Chapter 3
To sew utility
stitches
Sewing Utility
Stitches
To sew
character or
decorative
stitches
To do machine
embroidery
Chapter 1
Chapter 1
Chapter 2
Chapter 2
Chapter 4
Sewing Character/
Decorative
Stitches
Chapter 5
Embroidery
Chapter 6
Embroidery
Edit
A-6 Introduction
Page 8

CONTENTS
CONTENTS
WHAT YOU CAN DO WITH THIS MACHINE
Special Features
HOW TO USE THIS MANUAL
Chapter 1 Setting Up
PRINCIPAL PARTS AND THEIR
OPERATION......................................... 1-1
Principal Parts ....................................... 1-1
■ Embroidery Unit ............................. 1-2
■ Hard Case ...................................... 1-2
■ Embroidery Unit Storage Case ........ 1-2
■ Operation Buttons .......................... 1-3
■ Balance Wheel ............................... 1-4
■ Presser Foot Lever .......................... 1-4
■ Sewing Speed Controller ................ 1-4
■ Bobbin Winder Button.................... 1-4
■ Top Cover....................................... 1-5
■ Supplemental Spool Pin ................. 1-5
■ Free Arm ........................................ 1-5
■ Feed Dog Position Switch............... 1-6
■ Presser Foot Dial ............................ 1-6
■ Knee Lifter ...................................... 1-6
■ Foot Controller ............................... 1-7
Included Accessories............................. 1-8
Options............................................... 1-10
■
When Using the Multi-thread Stand
BASIC OPERATION............................ 1-12
Connecting the Power......................... 1-12
Viewing the LCD Display.................... 1-13
■ Key Functions............................... 1-14
Using the LCD Display........................ 1-16
Adjusting Screen Brightness ................ 1-16
Choosing the Display Language .......... 1-18
Using the Machine Settings Key .......... 1-19
Using the Machine Operations Key..... 1-20
■ Contents of Other Categories........ 1-22
Using the Pattern Explanation Key....... 1-24
Bobbin Winding/Lower Threading ...... 1-25
■
Winding the Bobbin During Sewing
Setting the Bobbin............................... 1-31
Upper Threading................................. 1-32
■ Using the Spool Net ..................... 1-37
Pulling Up the Bobbin Thread............. 1-38
Changing the Presser Foot................... 1-39
■ Removing the Presser Foot ........... 1-39
■ Attaching the Presser Foot ............ 1-39
1-10
1-29
■ Attaching the Walking Foot .......... 1-40
■
Reattaching the Presser Foot Holder ...
Changing the Needle .......................... 1-43
■ About the Needle ......................... 1-45
■
Fabric/Thread/Needle Combinations ..
1-42
1-45
Chapter 2 Getting Ready to Sew
TRIAL SEWING..................................... 2-1
Basic Sewing......................................... 2-1
Sewing Reinforcement Stitches.............. 2-3
Changing Sewing Direction................... 2-3
Sewing Curves ...................................... 2-3
Sewing Heavyweight Fabrics................. 2-4
Sewing Lightweight Fabrics ................... 2-4
Using the Twin Needle Mode................ 2-5
STITCH SETTINGS................................ 2-8
Setting Stitch Width for Zigzag Stitch
Patterns................................................. 2-8
Setting the Stitch Length........................ 2-9
■ Stitch Pattern Width/
Stitch Length Settings Table .......... 2-10
Setting the Thread Tension .................. 2-13
■ Proper Thread Tension.................. 2-13
MACHINE FUNCTION SETTINGS...... 2-14
Automatic Reinforcement Stitching ..... 2-14
Using the Automatic Thread Cutter ..... 2-15
Chapter 3 Sewing Utility
Stitches
QUICK REFERENCE TABLE................... 3-1
SELECTING UTILITY STITCHES............ 3-9
Selecting a Stitch Pattern....................... 3-9
■ Stitch Selection Screens ................ 3-10
■ Using the Mirror Image Key...........3-11
■
Saving Your Preferred Stitch Settings
Using the Sewing Type Selection Key .. 3-13
SEWING THE STITCHES..................... 3-16
Straight Stitches................................... 3-16
■ Changing the Needle Position
(Left Needle Position Patterns Only)
Basting ................................................ 3-19
Zigzag Stitches .................................... 3-20
3-12
3-18
1 —
2 —
3 —
4 —
5 —
6 —
7 —
8 —
9 —
?
Index
!
Page 9
■
Overcasting (Using a Zigzag Stitch)
■ Appliqué (Using a Zigzag Stitch) .. 3-21
■ Patchwork (for Crazy Quilt) .......... 3-21
■
Sewing Curves
(Using a Zigzag Stitch) ...................
Elastic Zigzag Stitches ......................... 3-22
■ Tape Attaching ............................. 3-22
■ Overcasting .................................. 3-22
Overcasting......................................... 3-23
■
Overcasting Using Presser Foot “G”
■ Overcasting Using Presser Foot “J” 3-24
■ Overcasting Using the Side Cutter 3-25
Quilting .............................................. 3-28
■ Piecing ......................................... 3-29
■ Quilting........................................ 3-30
■ Appliqué ...................................... 3-31
■ Quilting with Satin Stitches .......... 3-33
Blind Hem Stitches.............................. 3-35
■
If the Needle Does not Catch the
Fold ...............................................
■ If the Needle Catches Too Much
of the Fold.................................... 3-36
Appliqué............................................. 3-37
■ Sewing Sharp Curves .................... 3-38
Shelltuck Stitches ................................ 3-39
Scallop Stitches................................... 3-41
Patchwork Stitches.............................. 3-42
Smocking Stitches ............................... 3-44
Fagoting.............................................. 3-46
Tape or Elastic Attaching ..................... 3-47
Heirloom ............................................ 3-49
■ Hemstitching (1) (Daisy stitch) ...... 3-49
■ Hemstitching (2) (Drawn work) .... 3-50
■ Hemstitching (3) ........................... 3-52
Buttonholes......................................... 3-53
■ Sewing Stretch Fabrics.................. 3-56
■
Odd Shaped Buttons/Buttons that do
not Fit into the Button Holder Plate..
Darning............................................... 3-57
Bar Tacks ............................................ 3-59
Button Sewing..................................... 3-61
■ Attaching 4 Hole Buttons ............. 3-62
■ Attaching a Shank to the Button ... 3-63
Eyelet.................................................. 3-63
Multi-directional Sewing
(Straight Stitch and Zigzag Stitch) ........ 3-65
Zipper Insertion................................... 3-67
■ Centered Zipper ........................... 3-67
■ Inserting a Side Zipper.................. 3-68
3-20
3-21
3-23
3-36
3-56
Chapter 4 Sewing Character/
Decorative Stitches
SELECTING A STITCH PATTERN .......... 4-1
Decorative Stitch Patterns ..................... 4-2
7mm Decorative Stitch Patterns ............ 4-3
Satin Stitch Patterns............................... 4-3
7mm Satin Stitch Patterns...................... 4-4
Cross Stitch ........................................... 4-4
Utility Decorative Stitch Patterns........... 4-5
Alphabetical Characters ........................ 4-6
■ If You Make a Mistake Selecting the
Character ....................................... 4-7
SEWING CHARACTER/DECORATIVE
STITCH PATTERNS ............................... 4-8
Sewing Attractive Finishes..................... 4-8
Basic Sewing of Character/
Decorative Stitches ............................... 4-9
Making Stitch Pattern Adjustments .......4-11
EDITING CHARACTER/DECORATIVE
STITCH PATTERNS ............................. 4-13
■ Key Functions............................... 4-14
Changing the Size of the Stitch Patterns .
Changing the Stitch Pattern Length
(for 7mm Satin Stitch Patterns Only).... 4-16
Creating a Vertical Mirror Image ......... 4-16
Creating a Horizontal Mirror Image..... 4-16
Sewing Pattern Continuously............... 4-17
■
When Sewing the Pattern Continuously
■ When Sewing Single Stitches........ 4-17
COMBINING STITCH PATTERNS....... 4-18
Before Combining Stitch Patterns ........ 4-18
Combining Decorative Stitch and
Character Stitch Patterns ..................... 4-18
Combining Large and Small Stitch
Patterns............................................... 4-20
Combining Horizontal Mirror Image
Stitch Patterns ..................................... 4-21
Combining Stitch Patterns of Different
Lengths ............................................... 4-22
Making Step Stitch Patterns
(for 7mm Satin Stitch Patterns Only).... 4-23
■ More Examples............................. 4-25
Checking Combined Stitch Patterns..... 4-26
MEMORY FUNCTIONS ...................... 4-27
4-15
4-17
CONTENTS
1 —
2 —
3 —
4 —
5 —
6 —
7 —
8 —
9 —
!
?
Index
Page 10
CONTENTS
Saving Stitch Patterns .......................... 4-27
■
If You Can Not Save the Stitch Pattern
Retrieving Saved Stitch Patterns........... 4-31
4-28
Chapter 5 Embroidery
PREPARING TO EMBROIDER............... 5-1
Before Beginning................................... 5-1
■ Copyright Information .................... 5-1
■ About the Embroidery Unit............. 5-1
■ About Embroidery Cards
(Sold Separately)............................. 5-1
■ About Floppy Disks ........................ 5-2
BASIC EMBROIDERY............................ 5-3
Attaching Embroidery Foot “Q”............. 5-4
Attaching the Embroidery Unit.............. 5-5
■ Removing the Embroidery Unit ...... 5-7
SELECTING PATTERNS......................... 5-8
One Point Patterns ................................ 5-9
Character Patterns ................................5-11
Floral Alphabet Patterns ...................... 5-13
Frame Patterns .................................... 5-15
Selecting Patterns from an Embroidery
Card.................................................... 5-17
Selecting a Pattern from a Floppy Disk
(Only for Machines with Floppy Disk Drives) ..
VIEWING THE SEWING SCREEN ....... 5-19
PREPARING THE EMBROIDER Y
FRAME................................................ 5-20
Attaching a Stabilizer Material to the
Fabric.................................................. 5-20
Setting the Fabric in the Embroidery
Frame.................................................. 5-21
■ Inserting the Fabric ....................... 5-22
■ Using the Embroidery Sheet ......... 5-23
Attaching the Embroidery Frame ......... 5-24
■ Removing the Embroidery Frame.. 5-25
DETERMINING THE PATTERN
POSITION .......................................... 5-26
Changing the Pattern Position ............. 5-26
Checking the Pattern’s Position ........... 5-27
Previewing the Completed Pattern ...... 5-28
SEWING AN EMBROIDERY PATTERN 5-29
5-18
Sewing Attractive Finishes................... 5-29
■ Needle Plate Cover ...................... 5-29
Basic Embroidery Method ................... 5-30
■
Embroidering Order for Pattern Parts
Sewing Embroidery Patterns Which Use
Appliqué ............................................. 5-33
■ Directions for Appliqué ................ 5-33
ADJUSTMENTS DURING
THE EMBROIDERY PROCESS ............. 5-35
The Bobbin Runs Out of Thread.......... 5-35
The Thread Breaks During Sewing ...... 5-36
Sewing Again from the Beginning ....... 5-38
Continuing Embroidery After Turning off
the Power............................................ 5-39
MAKING EMBROIDERY ADJUSTMENTS ..
Adjusting Thread Tension .................... 5-40
■ Correct Thread Tension ................ 5-40
■ If the Upper Thread Tension is Too
Strong........................................... 5-40
■ If the Upper Thread Tension is Too
Weak............................................ 5-41
Adjusting the Embroidery Speed.......... 5-41
Changing the Thread Color Display .... 5-42
Changing the Embroidery Frame
Display ............................................... 5-43
REVISING THE PATTERN ................... 5-44
■ Key Functions............................... 5-44
Changing the Size of the Pattern.......... 5-45
Rotating the Pattern............................. 5-46
Creating a Horizontal Mirror Image..... 5-46
Changing the Density of a Pattern
(Character and Border Patterns Only).. 5-47
Changing the Colors of Character
Patterns............................................... 5-48
MEMORY FUNCTION........................ 5-49
Saving Embroidery Patterns ................. 5-49
■ Saving a Pattern............................ 5-49
■ If You Can Not Save the Pattern .... 5-50
Retrieving Patterns from Memory ........ 5-53
EMBROIDERY APPLICATIONS ........... 5-55
Aligning the Left Side of a Pattern and
Sewing ................................................ 5-55
Connecting Characters ........................ 5-56
Embroidering an Outline of a Pattern .. 5-58
.. 5-32
5-40
1 —
2 —
3 —
4 —
5 —
6 —
7 —
8 —
9 —
!
?
Index
Page 11
CONTENTS
Using a Frame Pattern to Make
Appliqué (1)........................................ 5-59
Using a Frame Pattern to Make
Appliqué (2)........................................ 5-60
Embroidering Small Fabrics or Fabric
Edges .................................................. 5-62
Chapter 6 Embroidery Edit
Functions
EXPLANATION OF THE EDITING
FUNCTIONS......................................... 6-1
SELECTING PATTERNS TO EDIT .......... 6-2
Selecting Character Patterns.................. 6-5
EDITING EMBROIDERY PATTERNS ..... 6-8
■ Key Functions................................. 6-8
Moving the Pattern................................ 6-9
Rotating the Pattern............................. 6-10
Changing the Size of the Pattern...........6-11
Deleting the Pattern ............................ 6-12
Changing the Thread Color ................. 6-13
Changing the Configuration of Character
Patterns............................................... 6-15
Changing Character Spacing ............... 6-16
Changing the Color of Each Character
in a Pattern.......................................... 6-17
ADJUSTING PATTERNS AFTER EDITING ..
6-18
ENTERING STITCH DATA .................... 7-3
Creating Stitch Data .............................. 7-3
Editing Stitch Data................................. 7-6
■ Moving a Point ............................... 7-7
■ Moving Part or All of the Design..... 7-8
■ Inserting New Points ...................... 7-9
MEMORY FUNCTIONS ...................... 7-11
Storing the custom design ....................7-11
Retrieving a Stitch Design That Has Been
Saved .................................................. 7-13
Chapter 8
CHANGING THE LIGHT BULB ............ 8-1
CLEANING THE MACHINE .................. 8-2
■ Cleaning the LCD Screen ............... 8-2
■ Cleaning the Machine Casing ......... 8-2
■ Cleaning the Race and Shuttle ........ 8-2
CLEANING THE FLOPPY DISK DRIVE
HEADS ................................................. 8-4
Care and Maintenance
Chapter 9 Troubleshooting
ADJUSTING THE SCREEN .................... 9-1
ADJUSTING THE TOUCH PANEL ........ 9-2
1 —
2 —
3 —
4 —
5 —
6 —
7 —
COMBINING AND EDITING PATTERNS ..
SEWING COMBINED EMBROIDERY
PATTERNS .......................................... 6-28
ADJUSTING EDITED PATTERNS ........ 6-30
MEMORY FUNCTIONS ...................... 6-32
Saving Edited Patterns ......................... 6-32
■ Saving a Pattern............................ 6-32
■ If You Can Not Save the Pattern .... 6-33
Retrieving Saved Patterns .................... 6-36
Chapter 7
DESIGNING THE STITCH .................... 7-1
MY CUSTOM STITCH
6-20
USING THE “TROUBLESHOOTING”
FUNCTION .......................................... 9-4
MAKING MINOR MACHINE
ADJUSTMENTS..................................... 9-5
ERROR MESSAGES ............................. 9-10
■ Alarm Sounds ............................... 9-15
Appendix
SPECIFICATIONS.................................. A-1
Index
8 —
9 —
?
Index
!
Page 12

Chapter 1 Setting Up
PRINCIPAL PARTS AND THEIR OPERATION
Principal Parts
J
K
1
2
D
B
C
5
6
3
7
4
8
A
=
9
E
F
H
G
I
N
X
L
CONTENTS
1 —
2 —
3 —
4 —
M
5 —
1 Needle threader lever ............. (P.1-35)
2 Presser foot dial ........................ (P.1-6)
3 Thread cutter ............................(P.1-3)
4 Presser foot holder ........ (P.1-39, 1-42)
5 Presser foot ............................... (P.1-8)
6 Feed dogs ................................. (P.1-6)
7 Bobbin cover .......................... (P.1-31)
8 Flat bed attachment with accessory com-
partment ............................(P.1-5, 1-8)
9 “Start/Stop” button .................... (P.1-3)
= “Reverse/Reinforcement Stitch” button
................................................. (P.1-3)
A “Needle Position” button .......... (P.1-3)
B “Thread Cutter” button .............. (P.1-3)
C Sewing speed controller ............ (P.1-4)
D “Bobbin Winder” button ........... (P.1-4)
E Feed dog position switch .......... (P.1-6)
F L.C.D. (liquid crystal display) .. (P.1-13)
G Spool cap ...................... (P.1-25, 1-33)
H Spool pin ...................... (P.1-25, 1-33)
I Bobbin winder ........................ (P.1-27)
J Thread guide for bobbin winding
............................................... (P.1-27)
K Supplemental spool pin ............ (P.1-5)
L Knee lifter mounting slot ........... (P.1-6)
M Knee lifter ................................. (P.1-6)
O
P
Y
Q
R
W
S
T
U
N Handle
O Balance wheel .......................... (P.1-4)
P Embroidery card slot ............... (P.5-17)
Q Floppy disk drive slot .............. (P.5-18)
R Foot controller jack ................... (P.1-7)
S Main power switch ................. (P.1-12)
T Cord jack ................................ (P.1-12)
U Foot controller .......................... (P.1-7)
V Needle clamp screw ............... (P.1-44)
W Buttonhole lever .. (P.3-55, 3-58, 3-60)
X Presser foot lever ....................... (P.1-4)
Y Air vent
Setting Up 1-1
V
6 —
7 —
8 —
9 —
?
Index
!
Page 13
CONTENTS
1
■ Embroidery Unit
2
1
2
4
1 Main power switch
2 Power cord
CAUTION
• When leaving the machine unattended, the main
switch of the machine should be switched off or
the plug must be removed from the socket-outlet.
• When servicing the machine, or when removing covers or changing bulbs, the machine or
the electrical set must be unplugged.
• For U.S.A. only
This appliance has a polarized plug (one blade
wider than the other). T o reduce the risk of electrical shock, this plug is intended to fit in a polarized outlet only one way.
If the plug does not fit fully in the outlet, reverse
the plug. If it still does not fit, contact a qualified electrician to install the proper outlet. Do
not modify the plug in any way.
1 Carriage
2 Release button
3 Embroidery unit connection
4 Embroidery frame holder
1 —
2 —
3 —
4 —
5 —
6 —
3
■ Hard Case ■ Embroidery Unit Storage Case
1-2 Setting Up
7 —
8 —
9 —
?
Index
!
Page 14
CONTENTS
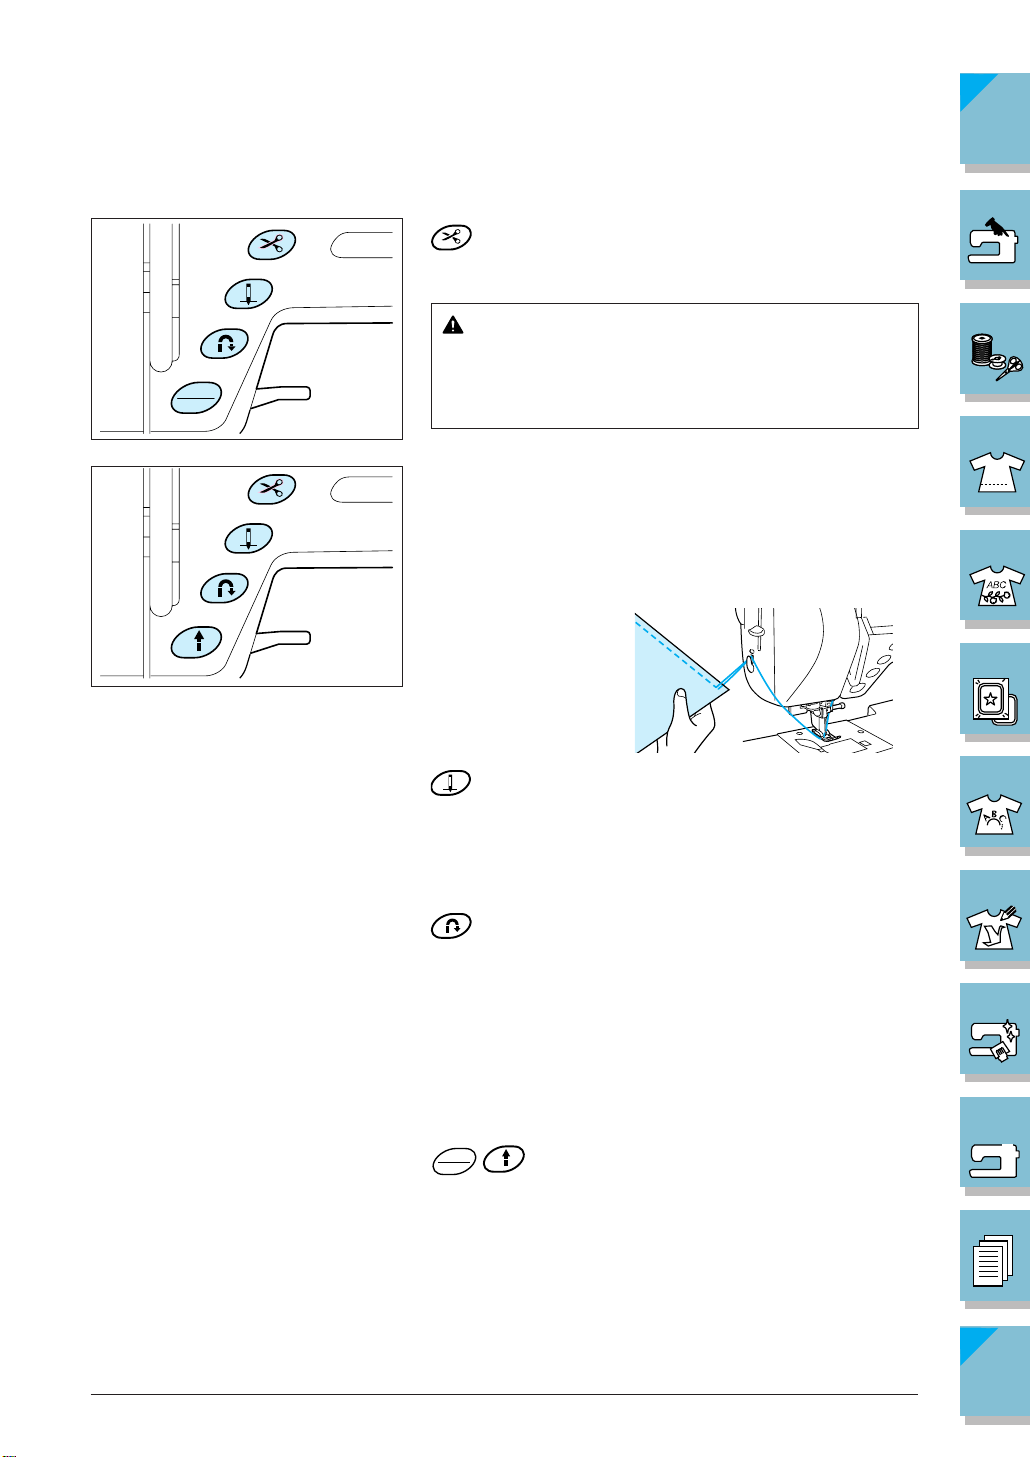
■ Operation Buttons
START
STOP
“Thread Cutter” Button
Press this button after sewing to automatically trim the
excess thread.
CAUTION
Do not repeat thread cutting after the threads are
cut. The thread may tangle or the needle may
break, resulting in damage.
CAUTION
• Do not press the “Thread Cutter” button when there
is no fabric in the machine or during machine operation. The thread may tangle resulting in damage.
• When cutting thread thicker than #30, nylon thread,
or other specialty threads, use the thread cutter on
the side of the machine.
“Needle Position” Button
Use this button when changing sewing direction or for
detailed sewing in small areas. Press this button to raise or
lower the needle position. Press the button twice to sew a
single stitch.
1 —
2 —
3 —
4 —
5 —
6 —
7 —
“Reverse/Reinforcement Stitch” Button
Use this button to sew reinforcement stitches at the beginning and end of sewing. Press this button, and the machine sews 3 stitches in the same spot and stops automatically. For straight and zigzag stitch patterns that take reverse stitches, the machine will sew reverse stitches at low
speed only while holding down the “Reverse/Reinforcement Stitch“ button (the stitches are sewn in the opposite
direction from the main seam). (See page 2-3.)
START
STOP
Press this button and the machine will sew a few stitches
at a slow speed, then begin sewing at the speed set by the
sewing speed controller . Press the button again to stop the
machine. Hold the button down to sew at the machine’s
slowest speed. The button changes color according to the
machine’s operation mode.
Green : the machine is ready to sew or is sewing.
Red : the machine can not sew.
“Start/Stop” Button
Setting Up 1-3
8 —
9 —
?
Index
!
Page 15
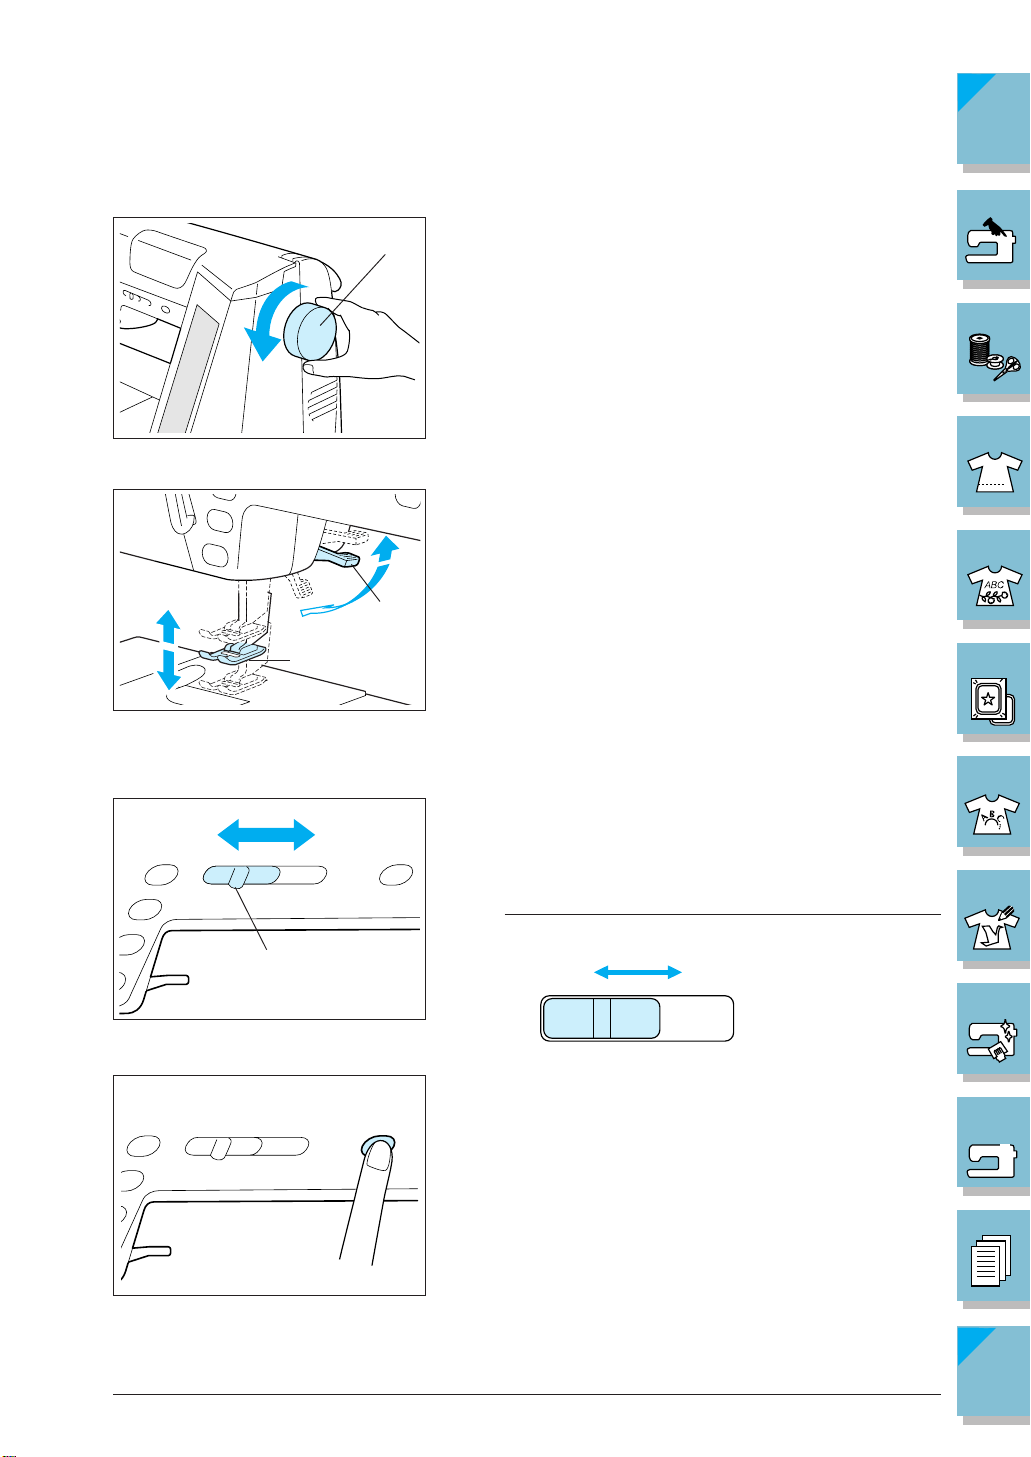
CONTENTS
■ Balance Wheel
■ Presser Foot Lever
1
■ Sewing Speed Controller
1
■ Bobbin Winder Button
2
1
Turn the balance wheel to raise or lower the needle. The
wheel should be turned toward the front of the machine.
1 Balance wheel
Lower the presser foot lever to lower the presser foot and
apply pressure to the fabric. If the presser foot is raised to
the second position, and you want to sew heavy weight,
stacked fabrics, etc., that are hard to set under the presser
foot, raise the presser foot lever higher and hold it to make
room for the fabric (see page 2-4).
1 Presser foot
2 Presser foot lever
CAUTION
The machine will not operate with the presser foot
raised.
Use this controller to adjust the sewing speed. Move the lever to the left to sew at slower speeds. Move the lever to the
right to sew at higher speeds.
1 Lever
Note
Beginners should sew at a slow speed.
12
1 Slow
2 Fast
Use this button to wind the bobbin (see page 1-25).
1 —
2 —
3 —
4 —
5 —
6 —
7 —
8 —
9 —
!
?
1-4 Setting Up
Index
Page 16
CONTENTS
■ Top Cover
■ Supplemental Spool Pin
■ Flat Bed Attachment
Open the top cover to wind the bobbin or do the upper
threading. To open the cover, place your hand under the
clear section of the cover and lift up.
Use this spool pin to wind the bobbin thread during sewing, or when sewing with the twin needle (see pages 1-29,
2-5).
Use the free arm sewing option to attach cuffs, hem pant
legs, and sew other tubular pieces. Pull the flat bed attachment to the left to remove it and create the convenient free arm sewing mode.
1 —
2 —
3 —
4 —
5 —
6 —
Setting Up 1-5
7 —
8 —
9 —
?
Index
!
Page 17
CONTENTS
■ Feed Dog Position Switch
■ Presser Foot Dial
1
3
2
■ Knee Lifter
1
Use this switch when attaching buttons (see page 3-61) or
for other similar projects. Remove the flat bed attachment
and raise the presser foot lever to operate the feed dog
position switch. Set the lever in the position for normal sewing
1 Feed dog position switch
..... The feed dogs are up and will help guide
the fabric.
..... The feed dogs are down and will not help
guide the fabric.
Turn the presser foot dial in order to adjust the pressure
applied by the presser foot. The higher the number, the
stronger the pressure will be. The presser foot dial has settings from 1 (weakest) to 4 (strongest). Use setting “3” for
normal sewing. Lower the presser foot lever before turning the presser foot dial. If you adjust the setting, be sure
to return it to “3” after sewing.
1 Weak
2 Strong
You can use the knee lifter to raise and lower the presser
foot without using your hands, so it is convenient for quilting and other similar projects.
1 —
2 —
3 —
4 —
5 —
6 —
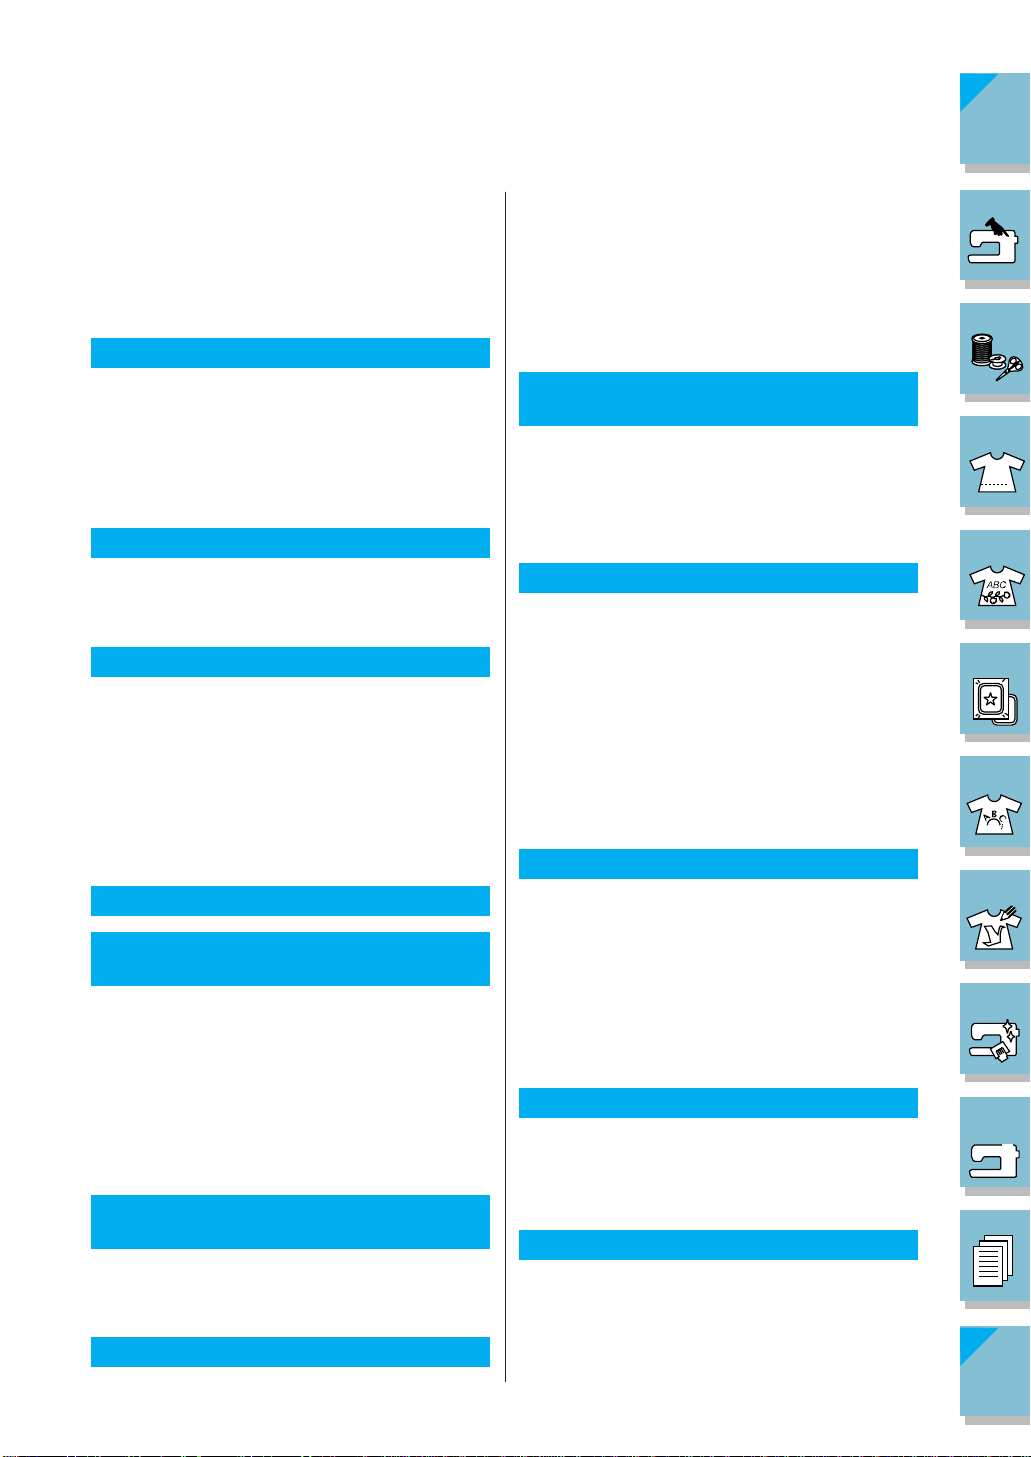
To attach, angle the knee lifter about 20 degrees to the left
and insert it into the mounting slot as far as possible.
20°
6
CAUTION
If the knee lifter is not pushed into the mounting slot as
far as possible, it may come out during use.
Use your knee to move the knee lifter to the right in order
to raise the presser foot. Release to the left for the presser
foot to lower.
CAUTION
Be sure to keep your knee away from the knee
lifter during sewing. If the machine is operated
while the knee lifter is pushed, the needle may
break or the thread tension may loosen.
1-6 Setting Up
7 —
8 —
9 —
?
Index
!
Page 18
CONTENTS
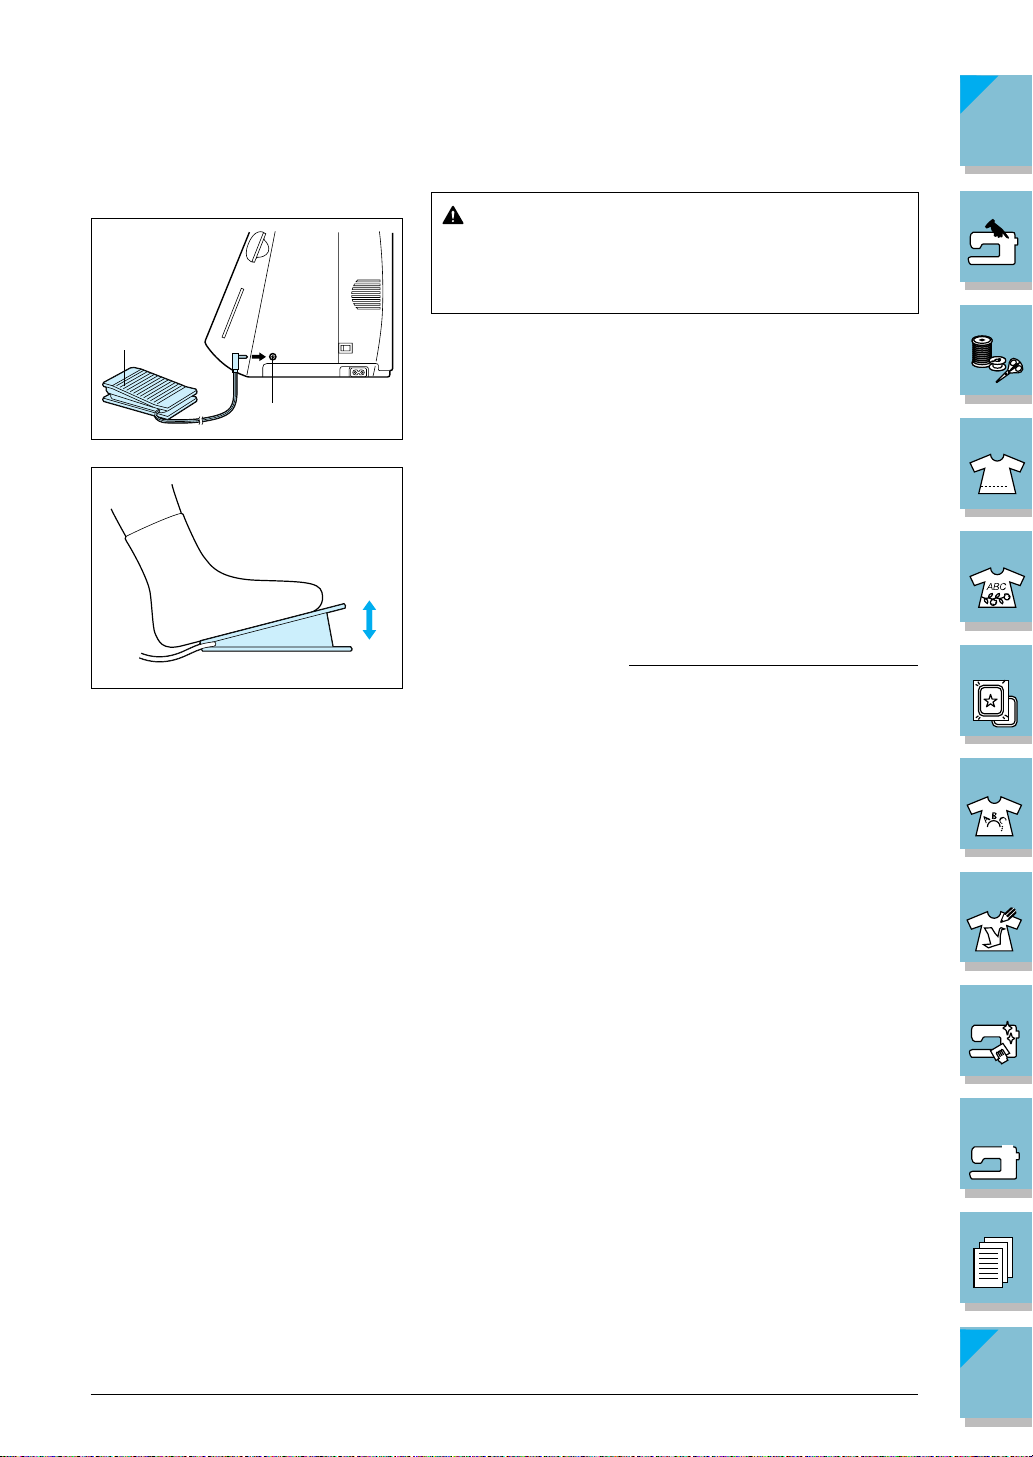
■ Foot Controller
1
2
CAUTION
Do not allow fabric pieces and dust to collect in
the foot controller. Doing so could cause a fire or
an electric shock.
1. With the machine turned off, insert the foot controller
plug into its jack on the machine.
1 Foot controller
2 Foot controller jack
2. Switch on the machine, then slowly depress the foot
controller to start sewing.
* The speed set using the sewing speed controller is the
foot controller’s maximum sewing speed.
3. Release the foot controller to stop this machine.
* When the foot controller is being used, the “Start/Stop”
button has no effect on the sewing.
Note (For U.S.A. only)
Foot controller: Model P
This foot controller can be used on this machine model
ULT2001/ULT2002D.
1 —
2 —
3 —
4 —
5 —
6 —
Setting Up 1-7
7 —
8 —
9 —
?
Index
!
Page 19
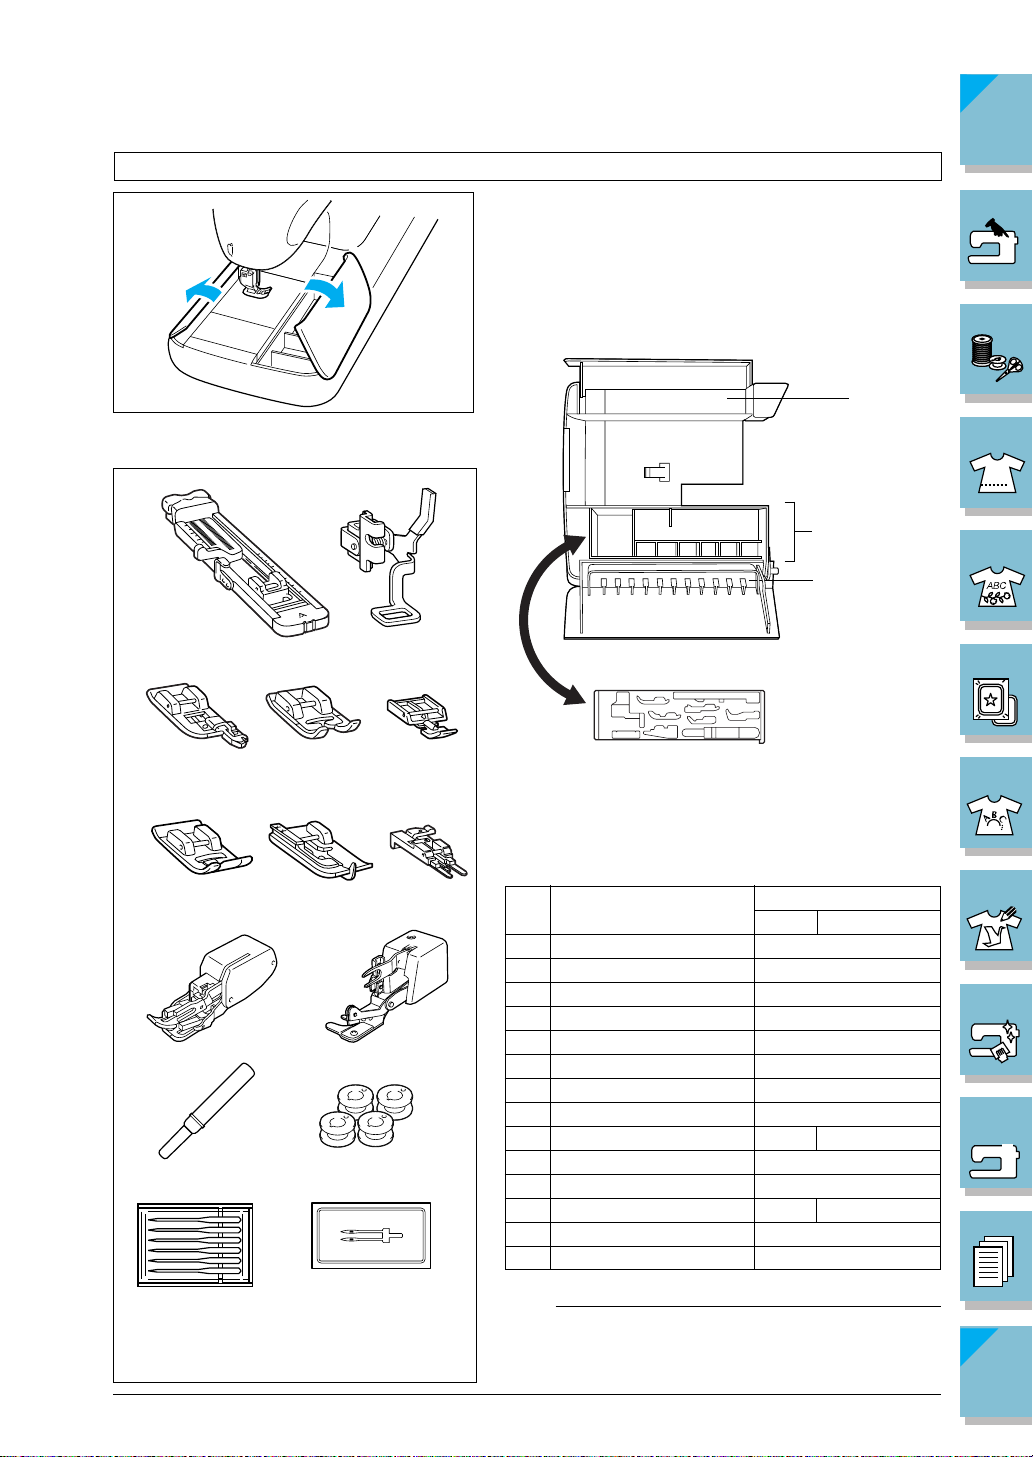
Included Accessories
1 2
Pull the top of the flat-bed attachment towards you
to open the accessory compartment.
1 Storage space
2 Presser foot storage space
3 Bobbin storage space
1
CONTENTS
1 —
2 —
3 —
3
6 78
9
13
4
1211
14
5
10
2
3
No. Part Name
1 Buttonhole foot “A” X57789-101
2 Embroidery foot “Q” XC1274-001
3 Overcasting foot “G” X51162-001
4
Monogramming foot “N ”
5 Zipper foot “I” X59370-051
6 Zigzag foot “J” 137748-101
7 Blind stitch foot “R” X56409-001
8 Button fitting foot “M” 130489-001
9 Walking foot SA140 X81065-002
10 Side Cutter X80943-001
11 Seam ripper (P.3-55) X54243-001
12 Bobbin SA-155 XA3812-051
13 Needle set X58358-001
14 Twin needle (P.2-5) X59296-001
Part Code
U.S.A. Others
X53840-301
4 —
5 —
6 —
7 —
8 —
9 —
!
?
75/11 2 needles
90/14 2 needles
90/14 2 needles : Ball point needle
(gold colored)
1-8 Setting Up
Note
• The machine comes with zigzag foot “J” attached.
• Always use accessories recommended for this
machine.
Index
Page 20
CONTENTS
15 16 17
18 19 20
21 22 23
25
27
26
28
30
29
31
32
3534 36
37 38 39
24
33
No. Part Name
15 Low shank adapter SA131 XA6126-002
16 Screw (large) XA5904-051
17 Scissors 184783-001
18 Chalk pen 184944-001
19
Cleaning brush (P.8-3)
20 Eyelet punch
21 Screwdriver (large) X55467-051
22 Screwdriver (small) X55468-051
23 Spool cap (small) 130013-004
24 Spool cap (medium) × 2 X55260-053
25 Spool cap (large) 130012-004
26
Disc-shaped screwdriver
27 Embroidery set
H 10 cm × W 10 cm
(H 4 inch × W 4 inch)
28
Embroidery set (medium plus)
H 18 cm × W 13 cm
29 Spool net (P.1-37) 127610-000
30 Embroidery set (large) SA428 X81274-002
(H 10-1/4 inch
× W 6-1/4 inch)
31 Embroidery set (small) SA426 X81275-002
(H 1 inch
× W 2-1/2 inch)
32 Foot controller 120V XC1157-051
33
34 Grid sheet set (P.7-1) SA507 X81277-001
35 Touch pen (P.9-3) XA9940-001
36 Knee lifter (P.1-6) XA6941-001
37 Embroidery bobbin SA-EBT XA8375-001
38 Operation manual 193220-011
39 Quick reference guide 193220-060
(H 7 inch × W 5 inch)
H 26 cm × W 16 cm
H 2 cm × W 6 cm
Needle plate cover (P.5-29)
thread
(P.3-55,64)
(medium)
(P.1-7) 230V XC1159-001
Part Code
U.S.A. Others
XA4527-001
135793-001
XC1074-051
SA427 X81273-002
SA429 X81329-002
XA9939-051
Note (For U.S.A. only)
Foot controller: Model P
This foot controller can be used on this machine
model ULT2001/ULT2002D.
The screw of the presser foot holder is available
through your authorized dealer (Part code XA4813-
051).
1 —
2 —
3 —
4 —
5 —
6 —
7 —
8 —
9 —
!
?
Setting Up 1-9
Index
Page 21
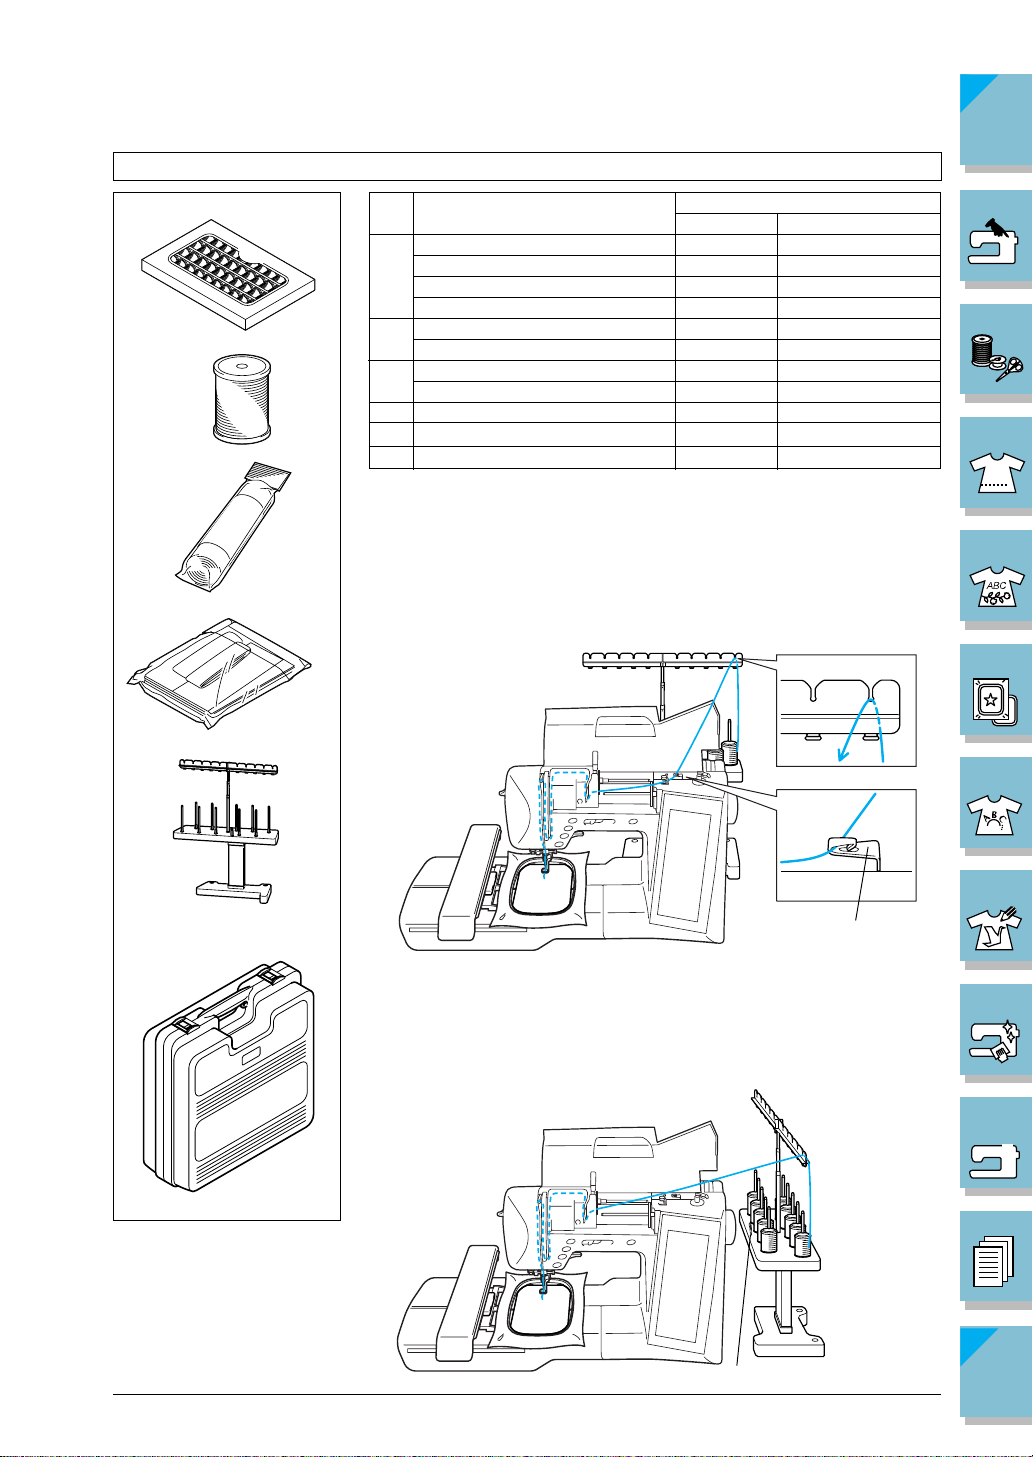
Options
CONTENTS
1
2
3
No. Part Name
1 40 colors embroidery threads SA740 X80928-100
40 colors country threads CYT40 X81078-102
22 colors embroidery threads SA741 X81276-102
21 colors country threads CYT41 X81269-102
2 Embroidery bobbin thread
Embroidery bobbin thread
3 Stabilizer material SA519 X81175-001
Water soluble stabilizer SA520 X81267-001
4 Country bag SA152 X80922-002
5 Multi-thread stand SA503 X81123-001
6 Embroidery unit carrying case SA528 XC1291-002
(White)
(Black)
U.S.A. Others
SA-EBT XA8375-001
SAEBT999 XC1376-001
Part Code
1 —
2 —
3 —
■ When Using the Multi-thread Stand
• Using the Multi-thread Stand When Placed Behind the Sewing Machine:
Do not pass the thread through the thread guide on the multi-thread
stand. Pass the thread through the thread guide of the sewing machine,
4
then pass the thread around the thread guide plate.
1 Thread guide of the sewing machine
4 —
5 —
5
6 —
6
• Using the Multi-thread Stand When Placed to the Right of the Sewing
Machine :
Do not pass the thread through the thread guide on the multi-thread
stand, or through the thread guide on the sewing machine. Pass the
thread directly around the thread guide plate.
2 Thread guide on the multi-thread stand
1-10 Setting Up
2
1
7 —
8 —
9 —
?
Index
!
Page 22
CONTENTS
7
8
CAUTION
Embroidery cards purchased in foreign countries may not work with
your machine.
No. Part Name
7 Embroidery card
No. 1 Alphabet SA298 X58317-001
No. 2 Flower SA299 X58321-001
No. 3 Dinosaur SA300 X58362-001
No. 6 Moskowitz’s World SA303 X58497-001
No. 7 Country Life SA304 X59322-001
No. 8 Holiday SA305 X59357-001
No. 9 Hobby Craft SA306 X59511-001
No. 10 Monogram Emblem SA307 X59567-001
No. 11 Frame SA311 XA0257-001
No. 12 Transportation SA312 XA0275-001
No. 13 Sports Emblem SA313 XA0517-001
No. 14 Large Floral SA314 XA1223-001
No. 15 Cute Kids SA315 XA1325001
No. 16 Dogs & Cats SA316 XA1406-001
No. 19 Marine SA319 XA2452-001
No. 20 Petite Designs SA320 XA2869-001
No. 21 Needlework SA321 XA2873-001
No. 22 Large Quilt SA322 XA3431-001
No. 23 White on White SA323 XA3430-001
No. 25 Horse SA325 XA3791-001
No. 27 Birds SA327 XA4289-001
No. 28 Christmas SA328 XA4502-001
No. 29 Lace SA329 XA4664-001
No. 30 Wildlife Animals SA330 XA4771-001
No. 31 Large Flower II SA331 XA5037-001
No. 32 Musical Instrument SA332 XA5386-001
No. 33 Trees SA333 XA5567-001
No. 35 Cats & Dogs II SA335 XA5629-001
No. 36 Fruits & Vegetables SA336 XA5659-001
No. 37 Appliqué Alphabet SA337 XA5753-001
No. 38 Angel SA338 XA5781-001
No. 39 Doll Face SA339 XA5978-001
No. 40 Sports 3 SA340 XA6111-001
No. 41 Renaissance Alphabet SA341 XA6586-001
No. 42 Farm SA342 XA6733-001
No. 43 Victorian SA343 XA6769-001
No. 44 Lace2 SA344 XA6849-001
No. 45 Fancy Work SA345 XA7770-001
No. 46 Australian Animals SA346 XA7893-001
No. 47 Butterfly SA347 XA8206-001
No. 48 Australian Flowers SA348 XA8250-001
No. 49 Folk Art SA349 XA8348-001
No. 50 Fairy & Floral SA350 XA8414-001
No. 52 Bear Collections SA352 XA8511-001
No. 53 Scene SA353 XA8936-001
No. 54 Tea Time SA354 XA9129-001
No. 55 Gardening SA355 XA9348-001
No. 56 Asian SA356 XC0025-001
No. 57 Large Christmas SA357 XC0057-001
No. 58 New Quilt Traditions SA358 XC0861-001
No. 60 Summer Fun SA360 XC1168-001
8 Embroidery disk
No. 59 Blouse SA359 XC1078-001
Part Code
U.S.A. Others
1 —
2 —
3 —
4 —
5 —
6 —
7 —
8 —
9 —
!
?
Setting Up 1-11
Index
Page 23
BASIC OPERATION
Connecting the Power
CONTENTS
WARNING
• Use only regular household electricity for the power source. Using other power sources
may result in fire, electric shock, or damage to the machine.
• Turn off the main power and remove the plug in the following circumstances:
- When you are away from the machine
- After using the machine
- When the power fails during use
- When the machine does not operate correctly due to a bad connection or a dis-
connection
- During electrical storms
CAUTION
• Do not use extension cords or multi-plug adapters with many other appliances plugged
in to them. Fire or electric shock may result.
• Do not touch the plug with wet hands. Electric shock may result.
• When unplugging the machine, always turn off the main power first. Always grasp the
plug to remove it from the outlet. Pulling on the cord may damage the cord, or lead to
fire or electric shock.
• Do not allow the power cord to be cut, damaged, modified, forcefully bent, pulled,
twisted, or bundled. Do not place heavy objects on the cord. Do not subject the cord
to heat. These things may damage the cord and cause fire or electric shock. If the
cord or plug is damaged, take the machine your authorized dealer for repairs before
continuing use.
• Unplug the power cord if the machine is not to be used for a long period of time.
Otherwise a fire may result.
1 —
2 —
3 —
4 —
5 —
6 —
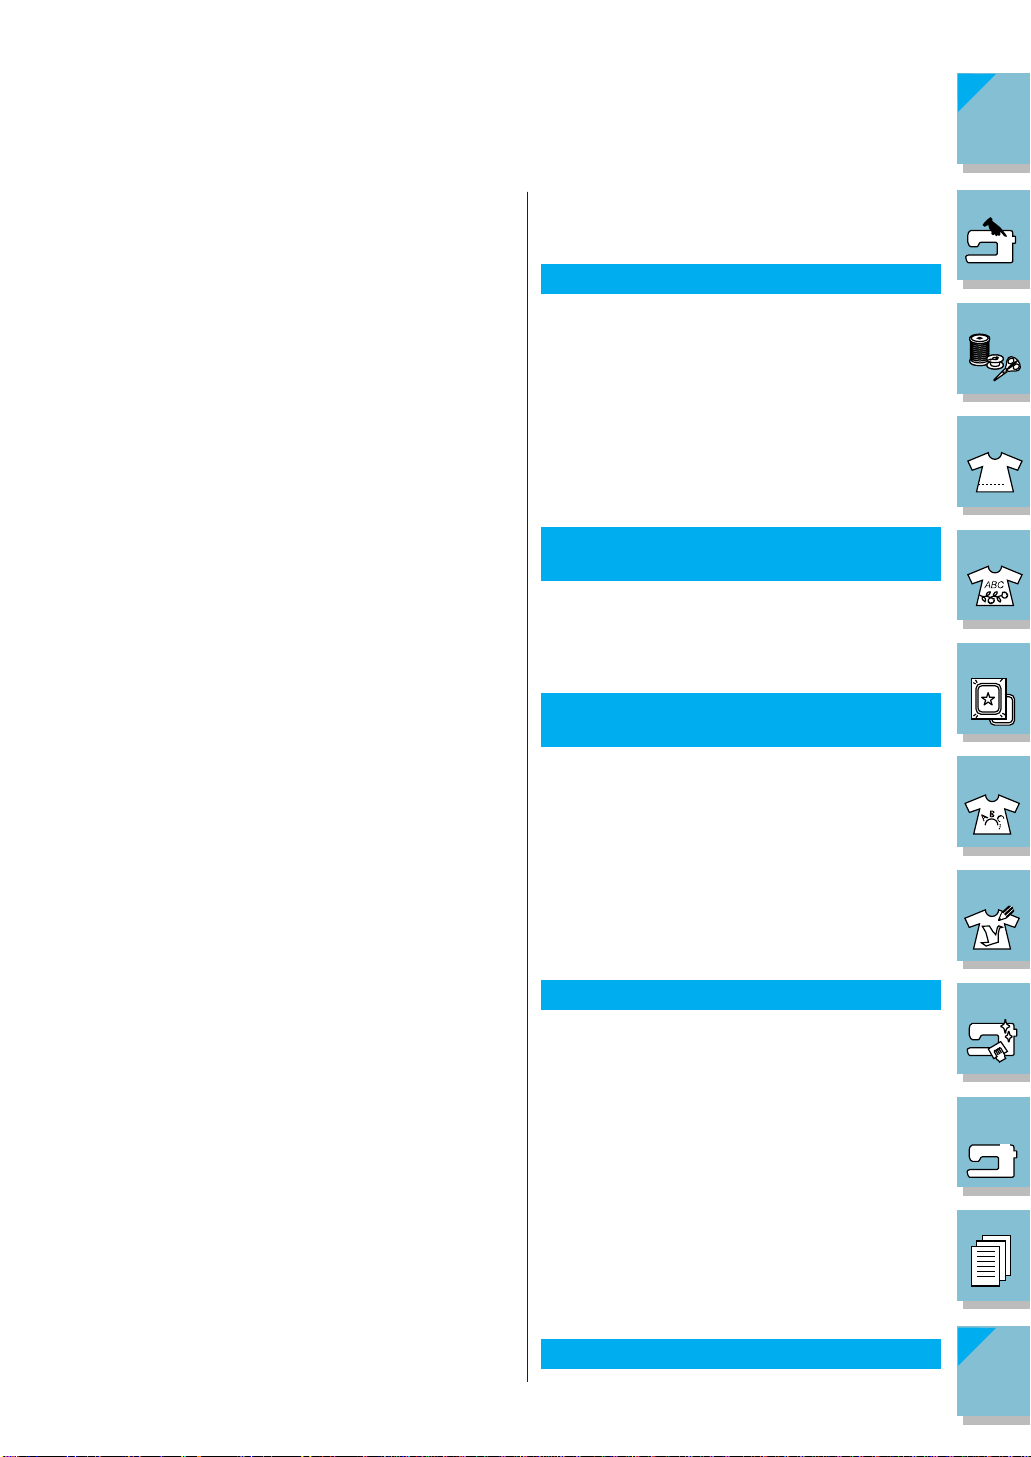
1. Insert the power cord into the cord jack, then insert
the plug into a wall outlet.
1 Main power switch
2 Power cord
1
1
1-12 Setting Up
2
2
2. Turn the main power switch to “I” to turn on the machine.
1 OFF
2 ON
3. Turn the main power switch to “O” to turn off the machine.
7 —
8 —
9 —
?
Index
!
Page 24
Viewing the LCD Display
CONTENTS
When switching on machine, the screen will display the name of the machine. Touch the screen
to display the utility stitch. The often used “Straight stitch (left)” (1-01) is automatically selected.
1 Shows the amount of thread remaining in the
bobbin during sewing. If the display is yellow, the bobbin is running out of thread.
1
3
4
5
2
6
Note
This bobbin symbol does not show the
amount of bobbin thread remaining when the
machine is not sewing.
2 Shows single or twin needle mode setting, and
the needle stop position.
Single needle/
down position
Twin needle/
down position
Single needle/
up position
Twin needle/
up position
1 —
2 —
3 —
4 —
5 —
6 —
3 Presser foot code. Attach the presser foot in-
dicated in this display before sewing.
4 Shows the name and code number of the se-
lected stitch.
5 Shows a preview of the selected stitch.
6 To select, press the key of the stitch pattern
you want to sew.
Setting Up 1-13
7 —
8 —
9 —
?
Index
!
Page 25
■ Key Functions
Display Explanation Page
Key Name
Pattern
explanation
key
Operation
guide key
Setting key
Utility stitch
key
Character/
Decorative
stitch key
Press this key to see an explanation of the selected pattern.
Press this key to see explanations for upper threading, winding the bobbin, changing the presser foot, and how to use the
machine.
Press this key to change the needle stop position, turn the
buzzer ON/OFF , adjust the pattern or screen, and change other
machine settings.
Press this key to select a straight stitch, zigzag stitch, buttonhole, blind hem stitch, or other stitches commonly used in
garment construction.
Press this key to select character or decorative stitch patterns,
or use the My Custom Stitch
stitch patterns.
TM function to create your own
1-24
1-20
1-19
3-9
4-1
CONTENTS
1 —
2 —
3 —
4 —
Embroidery
key
Embroidery
edit key
Sewing type
selection key
Stitch selection
display
Automatic
reinforcement
stitch key
Automatic
thread cutting
key
Mirror image
key
Attach the embroidery unit and press this key. (Caution: the
Embroidery screen will not display if the embroidery unit is
not attached.) Press this key to sew embroidery.
Attach the embroidery unit and press this key. (Caution: the
Embroidery Edit screen will not display if the embroidery unit
is not attached.) Press this key to combine embroidery patterns. With the embroidery edit functions, you can also create original one point patterns or frame patterns.
Press this key when you do not know which stitch pattern to
select, and get help selecting the appropriate stitch pattern
for the sewing application, and instructions on how to sew
the stitch pattern. This key is very useful for beginners.
Stitch Pattern Selection Screen
Press the key of the pattern you want to sew.
Use the
Press this key to use the automatic reinforcement stitching
(reverse stitching) setting. If you select this setting before sewing the machine will automatically sew reinforcement stitches
at the beginning and end of sewing (depending on the pattern, the machine may sew reverse stitches).
Press this key to set the automatic thread cutting function. Set
the automatic thread cutting function before sewing to have
the machine automatically sew reinforcement stitches at the
beginning and end of sewing (depending on the pattern, the
machine may sew reverse stitches) and trim the threads after
sewing.
Press this key to create a mirror image of the selected stitch
pattern. If the key display is light gray, a mirror image of the
selected stitch pattern cannot be sewn.
to change selection screens.
5-5
6-2
3-13
3-10
2-14
2-15
3-11
5 —
6 —
7 —
8 —
9 —
!
?
1-14 Setting Up
Index
Page 26
CONTENTS
Display Explanation Page
Key Name
Needle mode
selection key
(single/double)
Stitch width and
stitch length key
Thread tension
key
Manual memory
key
Reset key
Press this key to select twin needle sewing mode. The sewing
mode changes between single needle mode and twin needle
mode each time you press the key. If the key display is light
gray, the selected stitch pattern can not be sewn in twin needle mode.
Shows the zigzag width and stitch length settings of the currently selected stitch pattern. Y ou can use the plus and minus
keys to adjust the zigzag width and stitch length settings.
Shows the thread tension setting of the currently selected stitch
pattern. The thread tension is usually set automatically. You
can use the plus and minus keys to change the thread tension
settings.
Change the stitch pattern settings as you like (zigzag width
and stitch length, thread tension, automatic thread cutting or
automatic reinforcement stitching, etc.), then save them by
pressing this key.
Press this key to return the selected stitch pattern’s saved settings to the original settings.
2-5
2-8
2-13
3-12
3-12
1 —
2 —
3 —
4 —
5 —
6 —
Setting Up 1-15
7 —
8 —
9 —
?
Index
!
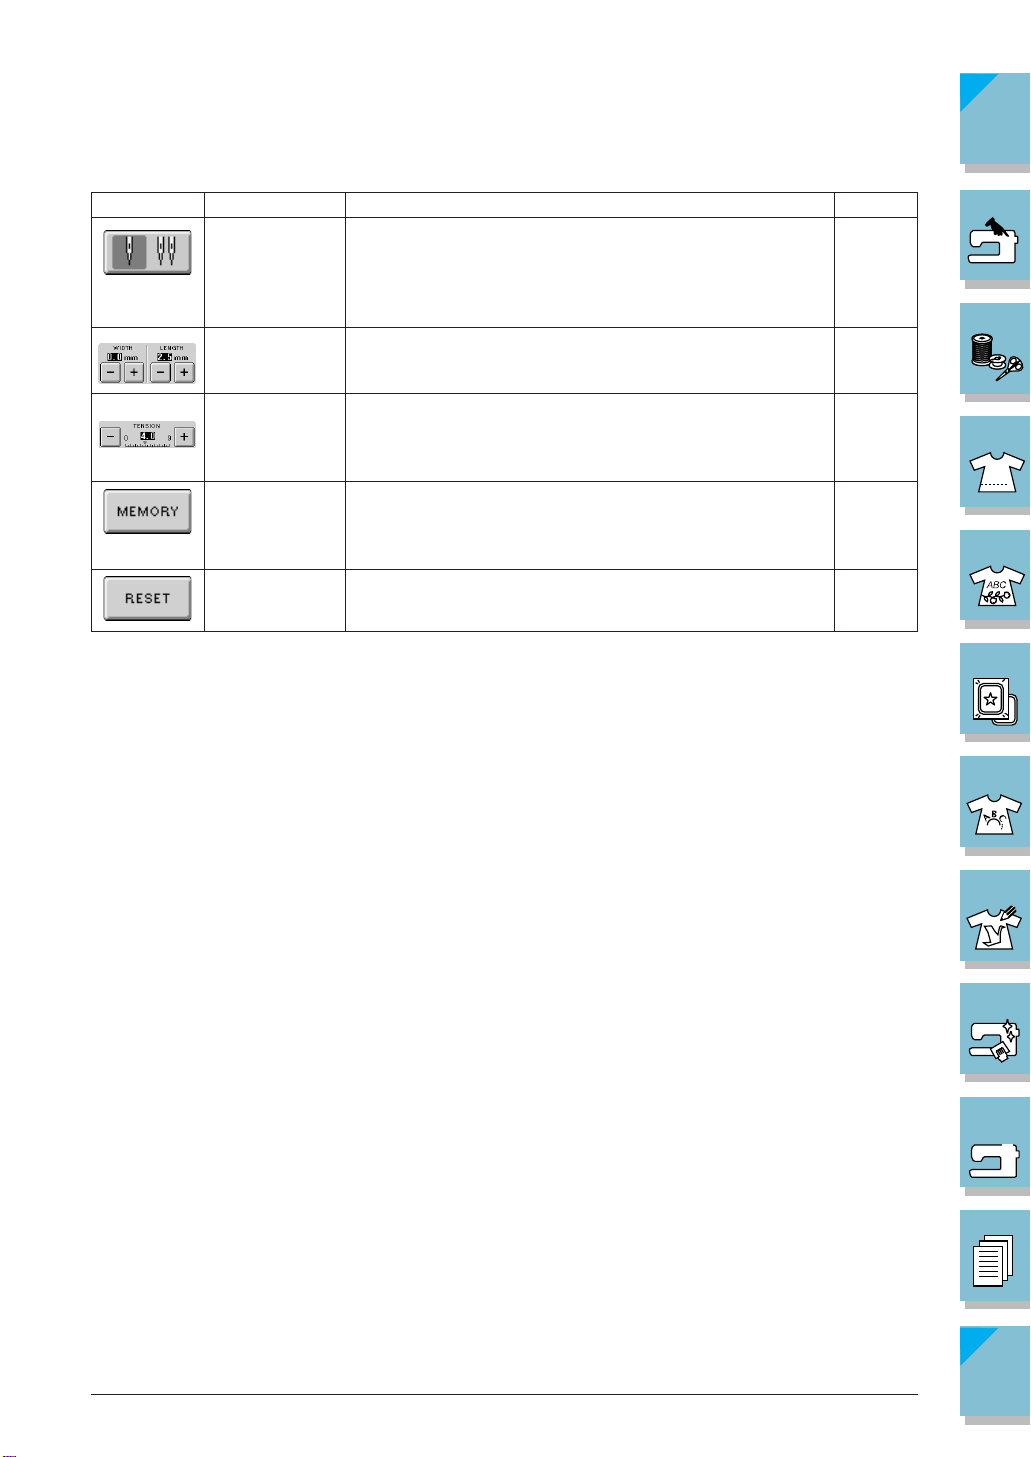
Page 27
Using the LCD Display
Press a key with your finger to select the stitch pattern, or to select a
machine function, or operation indicated on the key.
CAUTION
Only touch the screen with your finger or the included touch
pen. Do not use a sharp pencil, screwdriver, or other hard or
sharp object. It is not necessary to press hard on the screen.
Pressing too hard or using a sharp object may damage the screen.
CONTENTS
1 —
2 —
3 —
4 —
5 —
Adjusting Screen Brightness
CAUTION
• All or part of the screen may sometimes become darker or lighter because of changes in the
air temperature or other changes in the environment around the screen. This is normal and is
not a sign of malfunction. Adjust the screen if it is difficult to read.
• The screen may be dark immediately after turning on the power . This is a function of the LCD
back light screen, and it is not a sign of malfunction. The screen will return to its normal level
of brightness after approximately 10 minutes.
• If you are not directly in front of the machine when you view the LCD, the colors may appear
to change or the screen may be difficult to see. This is a characteristic of the LCD, and not a
sign of damage or malfunction. For best results operate the screen while sitting in front of the
machine.
6 —
7 —
8 —
9 —
!
?
1-16 Setting Up
Index
Page 28
CONTENTS
1. Press to open the screen at left.
2. Press to go to the next screen.
3. On the display, use and to adjust the
screen brightness.
1 —
2 —
3 —
4 —
5 —
6 —
* makes the screen darker
* makes the screen lighter
4. Once you have adjusted the screen brightness,
press .
Setting Up 1-17
7 —
8 —
9 —
?
Index
!
Page 29
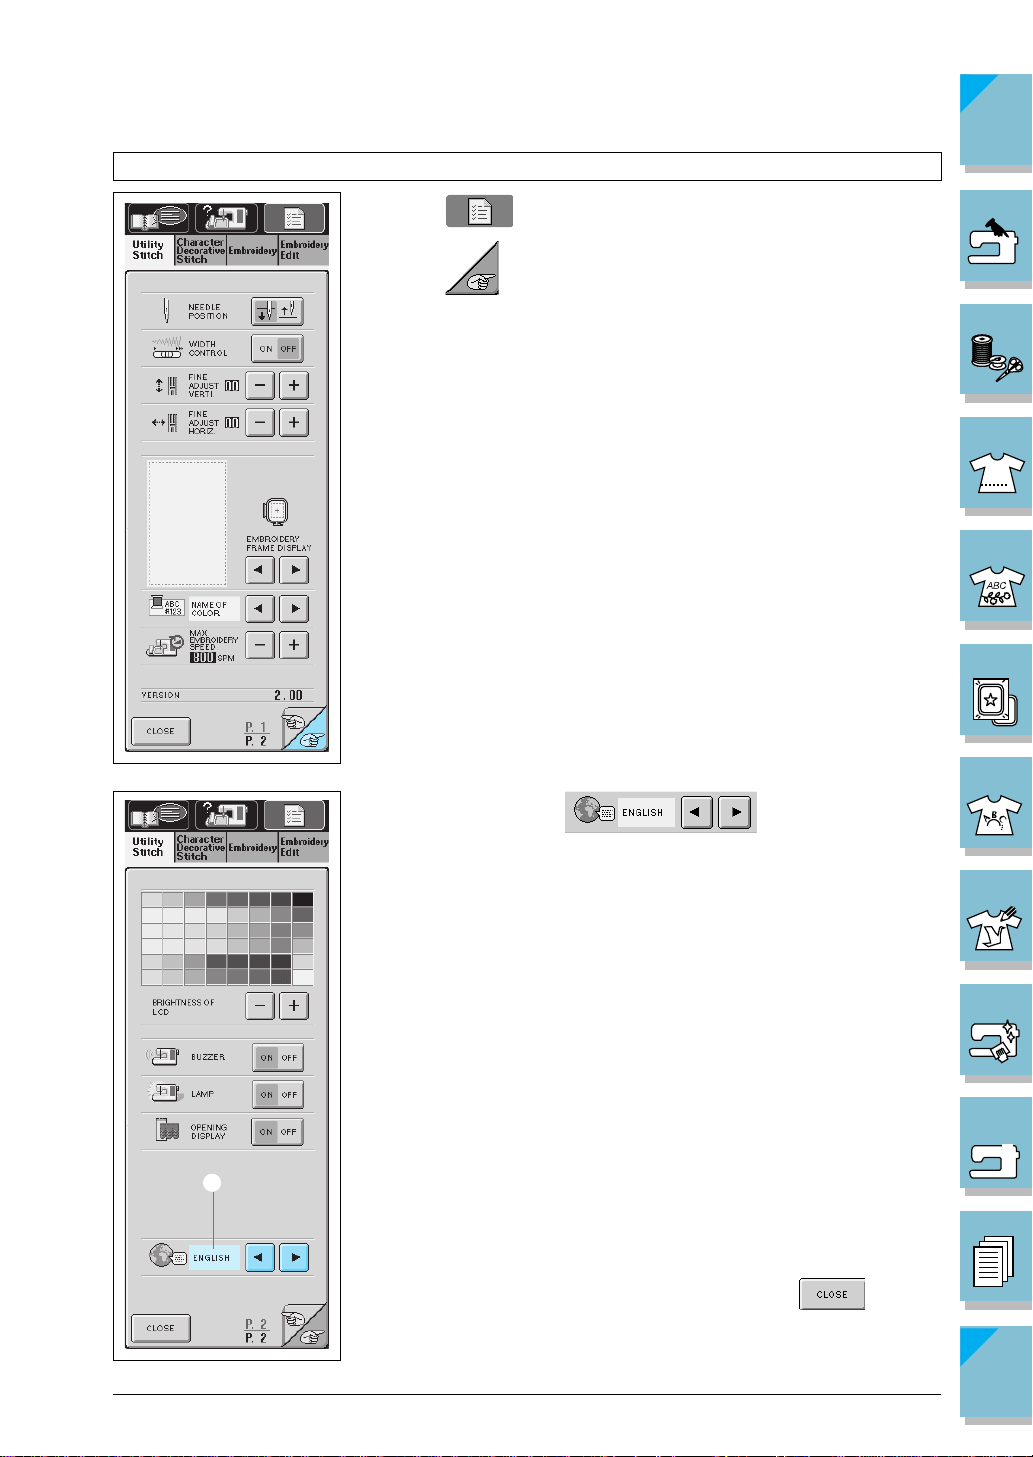
Choosing the Display Language
CONTENTS
1. Press to open the screen at left.
2. Press to go to the next screen.
1 —
2 —
3 —
4 —
5 —
6 —
1
3. When you see this display, press the arrow keys to choose the display language.
* Choose from the following languages: ENGLISH
GERMAN
FRENCH
ITALIAN
DUTCH
SPANISH
DANISH
NORWEGIAN
FINNISH
SWEDISH
PORTUGUESE
JAPANESE
1 Shows the selected display language
4. When the desired language is displayed, press .
7 —
8 —
9 —
!
?
1-18 Setting Up
Index
Page 30
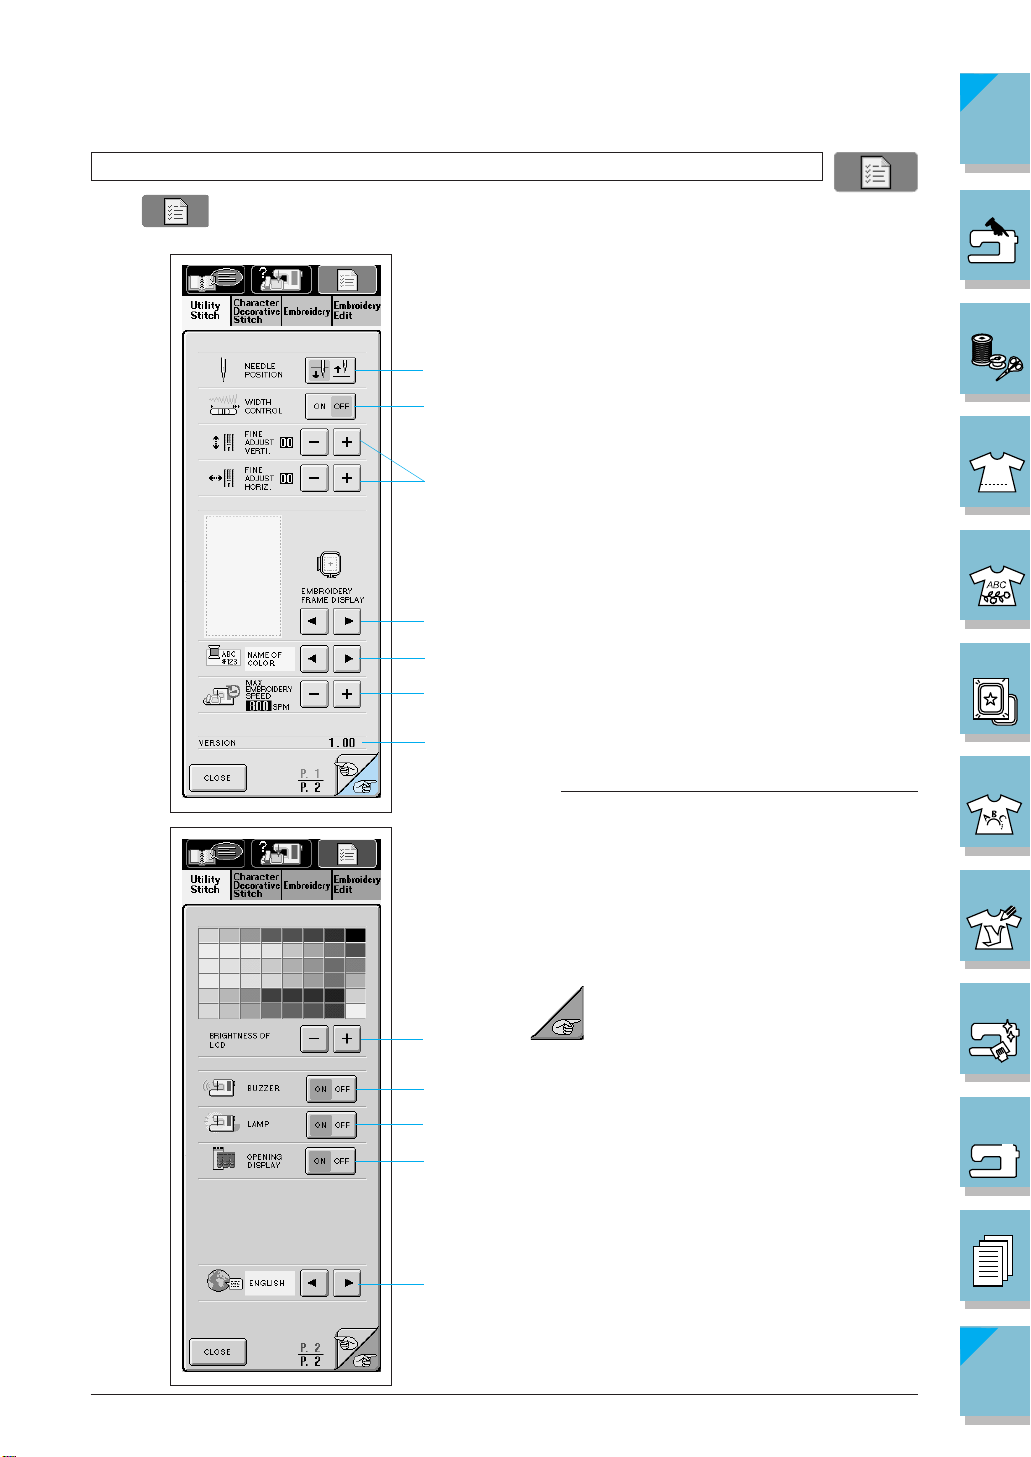
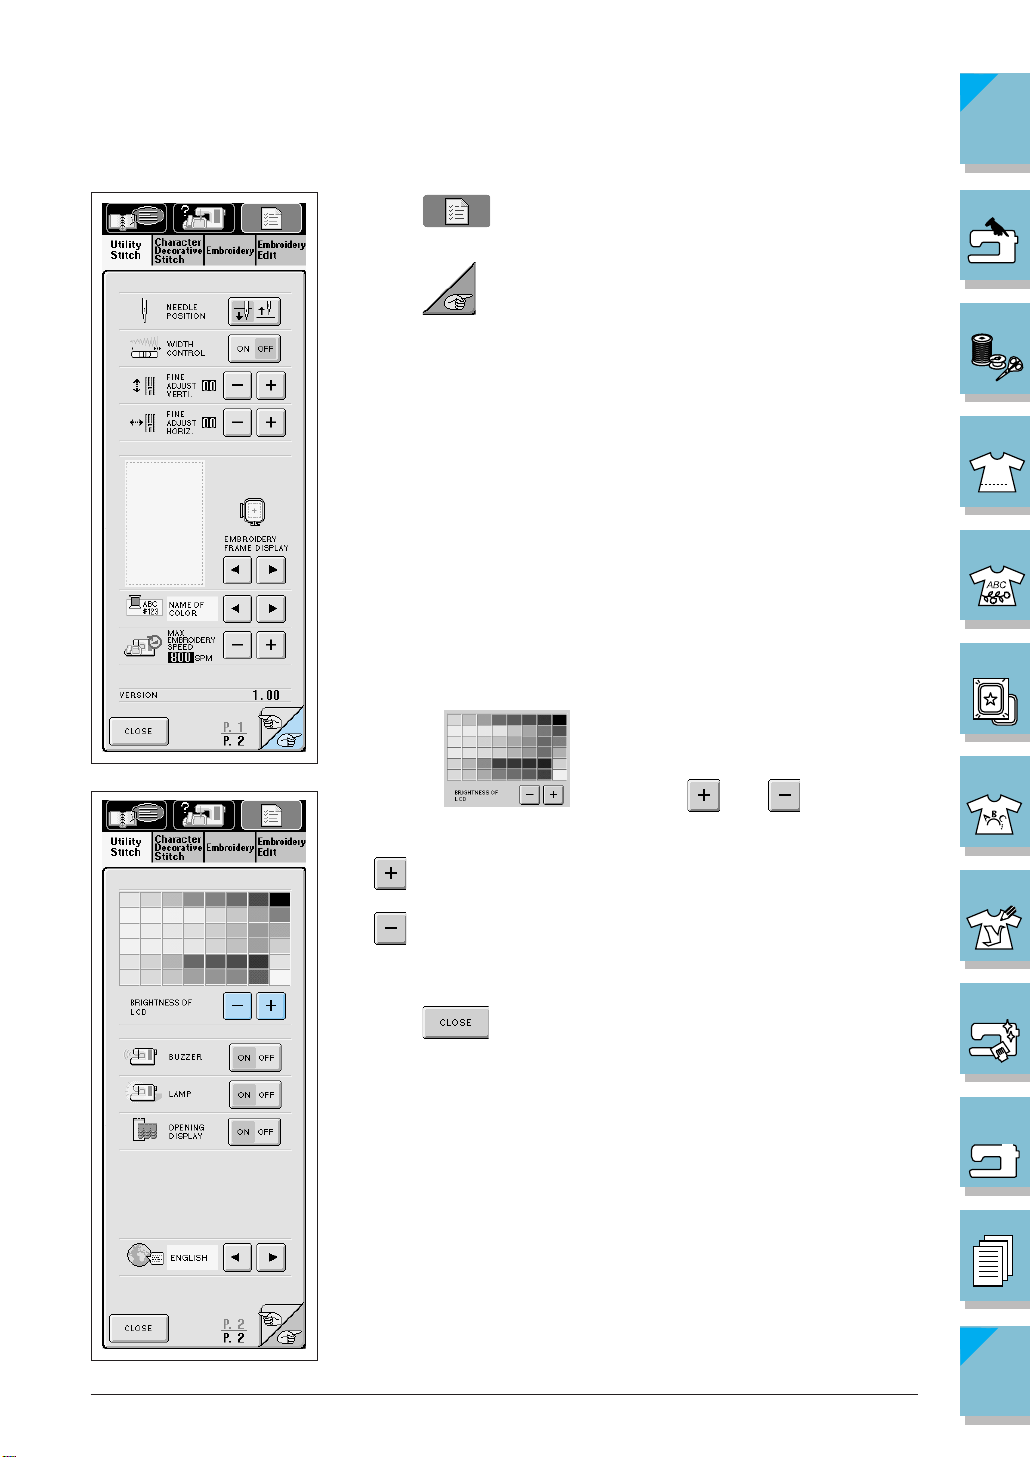
Using the Machine Settings Key
CONTENTS
Press to change the default machine settings (needle stop position, embroidery speed,
opening display, etc.)
1 Select the needle stop position (the needle
position when the machine is not operating)
to be up or down.
2 Select whether to use the sewing speed con-
1
2
3
4
5
6
7
troller to determine the zigzag width (see page
3-34).
3 Make adjustments to character or decorative
stitch patterns (see page 4-12).
4 Select from among 8 displays when using the
Embroidery functions (see page 5-43).
5 Change the thread color display on the em-
broidery screen; display the thread number,
color name or each time to embroider (see
page 5-42).
6 Adjust the maximum embroidery speed set-
ting (see page 5-41).
7 Program version display
Note
V ersion 1.0, this is the installed software version
for your machine. Check with your local authorized Brother dealer or at www.brother.com for
notification of an available updates.
1 —
2 —
3 —
4 —
5 —
6 —
7 —
Press to go to the next screen.
1
2
3
4
5
1 Change the brightness of the LCD (see page
1-16).
2 Turn the buzzer ON or OFF.
3 Turn the lamp ON or OFF.
4 Turn the opening screen display ON or OFF.
5 Change the display language (see page 1-18).
Setting Up 1-19
8 —
9 —
?
Index
!
Page 31

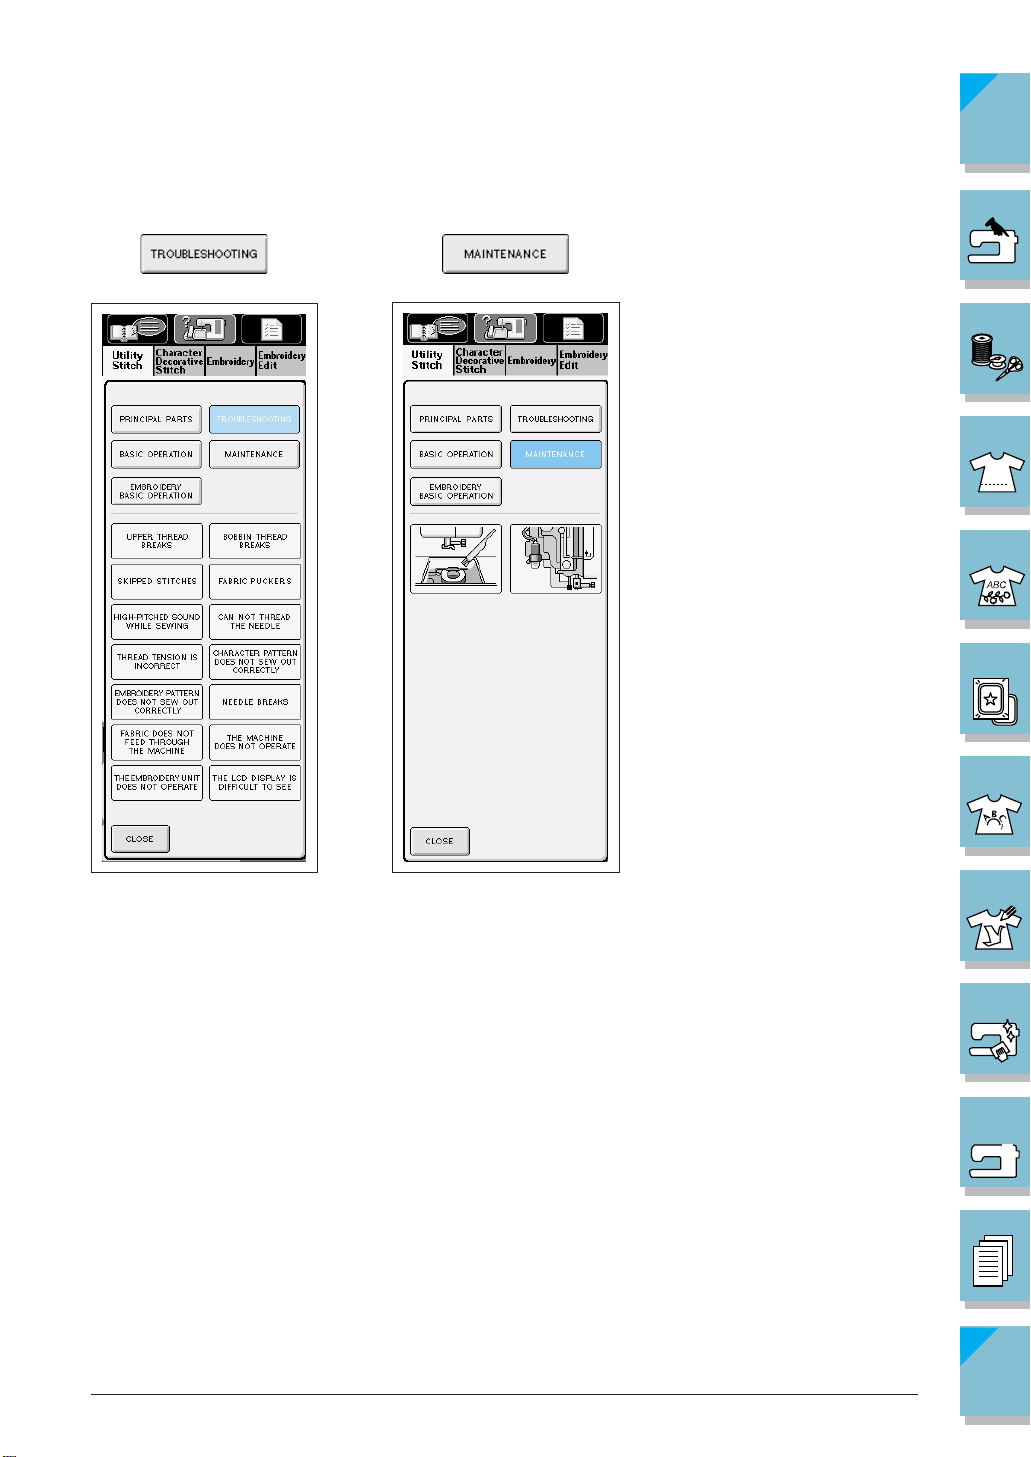
Using the Machine Operations Key
CONTENTS
Press to open the screen shown below. Five categories are displayed at the top of the
screen. Press a key to see more information about that category.
1 displays information about
the main parts of the machine and their functions. This is the first screen displayed when
1
2
3
4
5
you press .
2 displays information about
threading the machine, changing presser feet,
etc.
3 displays information about
attaching the embroidery unit, feeding fabric, etc.
4 displays information about deal-
ing with minor difficulties.
5 displays information about
changing the lamp, cleaning the machine, etc.
1 —
2 —
3 —
4 —
5 —
6 —
1-20 Setting Up
7 —
8 —
9 —
?
Index
!
Page 32
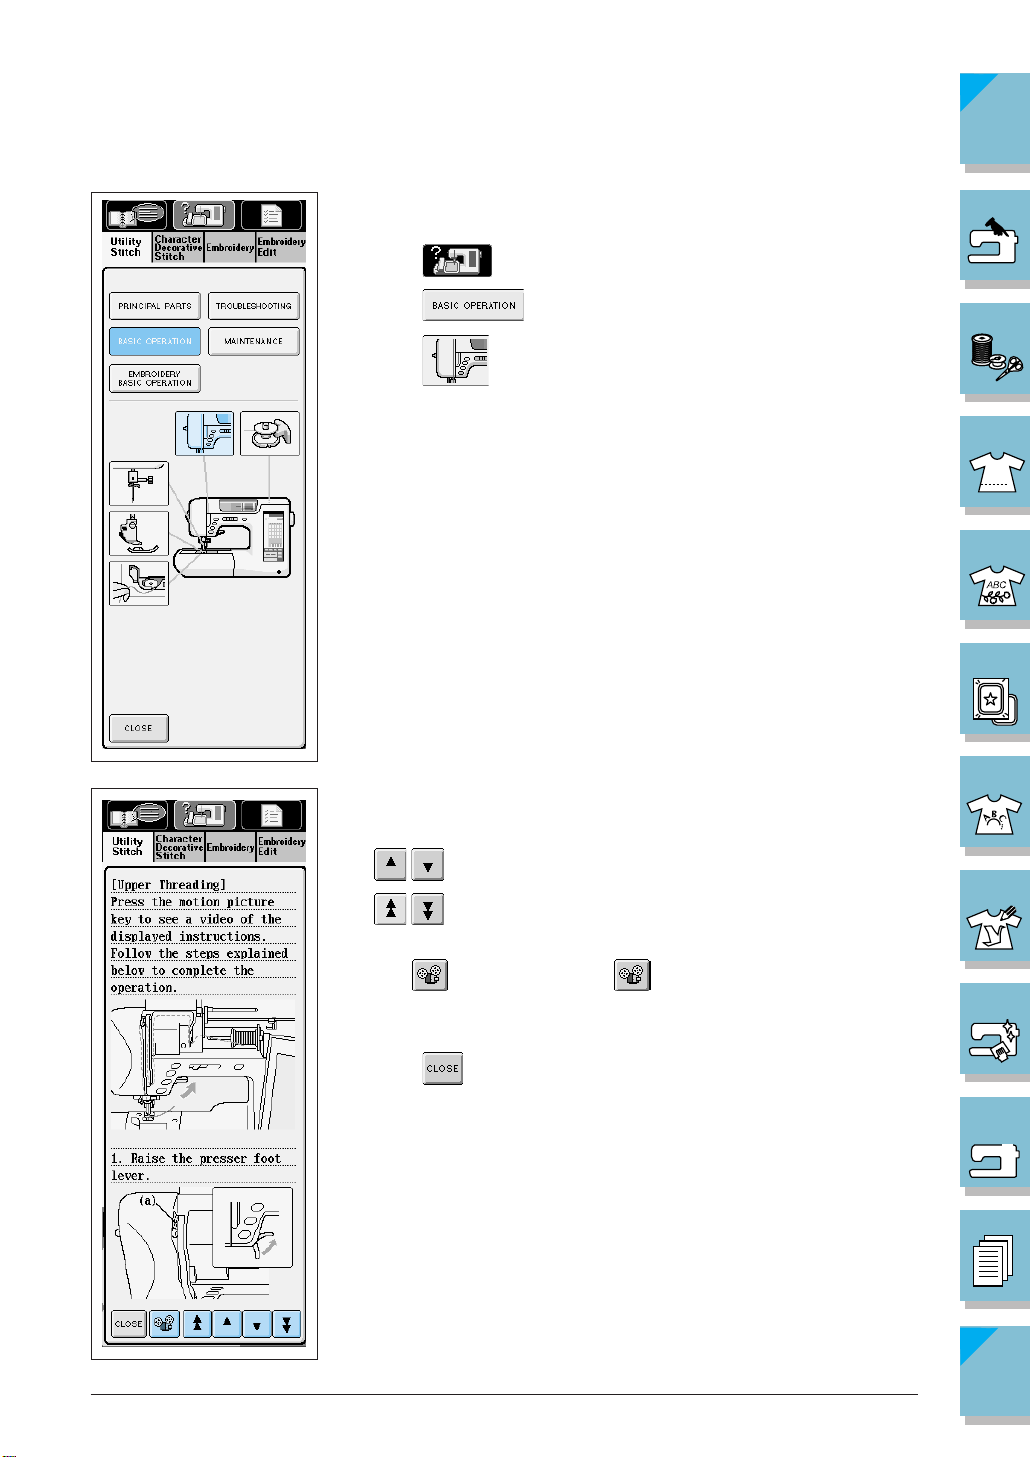
CONTENTS
Example: Displaying information about upper threading
1. Press .
2. Press . The lower half of the screen will change.
3. Press (upper threading).
4. This screen shows instructions for threading the machine.
Use the arrow keys to scroll downward for more information.
1 —
2 —
3 —
4 —
5 —
6 —
= to scroll slowly
= to scroll quickly
If you select bobbin winding, setting the bobbin, or upper threading, is displayed. Press to see a video of the displayed
instructions.
5. Press to go back to the original screen.
Setting Up 1-21
7 —
8 —
9 —
?
Index
!
Page 33

CONTENTS
■ Contents of Other Categories
1 —
2 —
3 —
4 —
5 —
6 —
1-22 Setting Up
7 —
8 —
9 —
?
Index
!
Page 34
CONTENTS
1 —
2 —
3 —
4 —
5 —
6 —
7 —
8 —
9 —
!
?
Setting Up 1-23
Index
Page 35
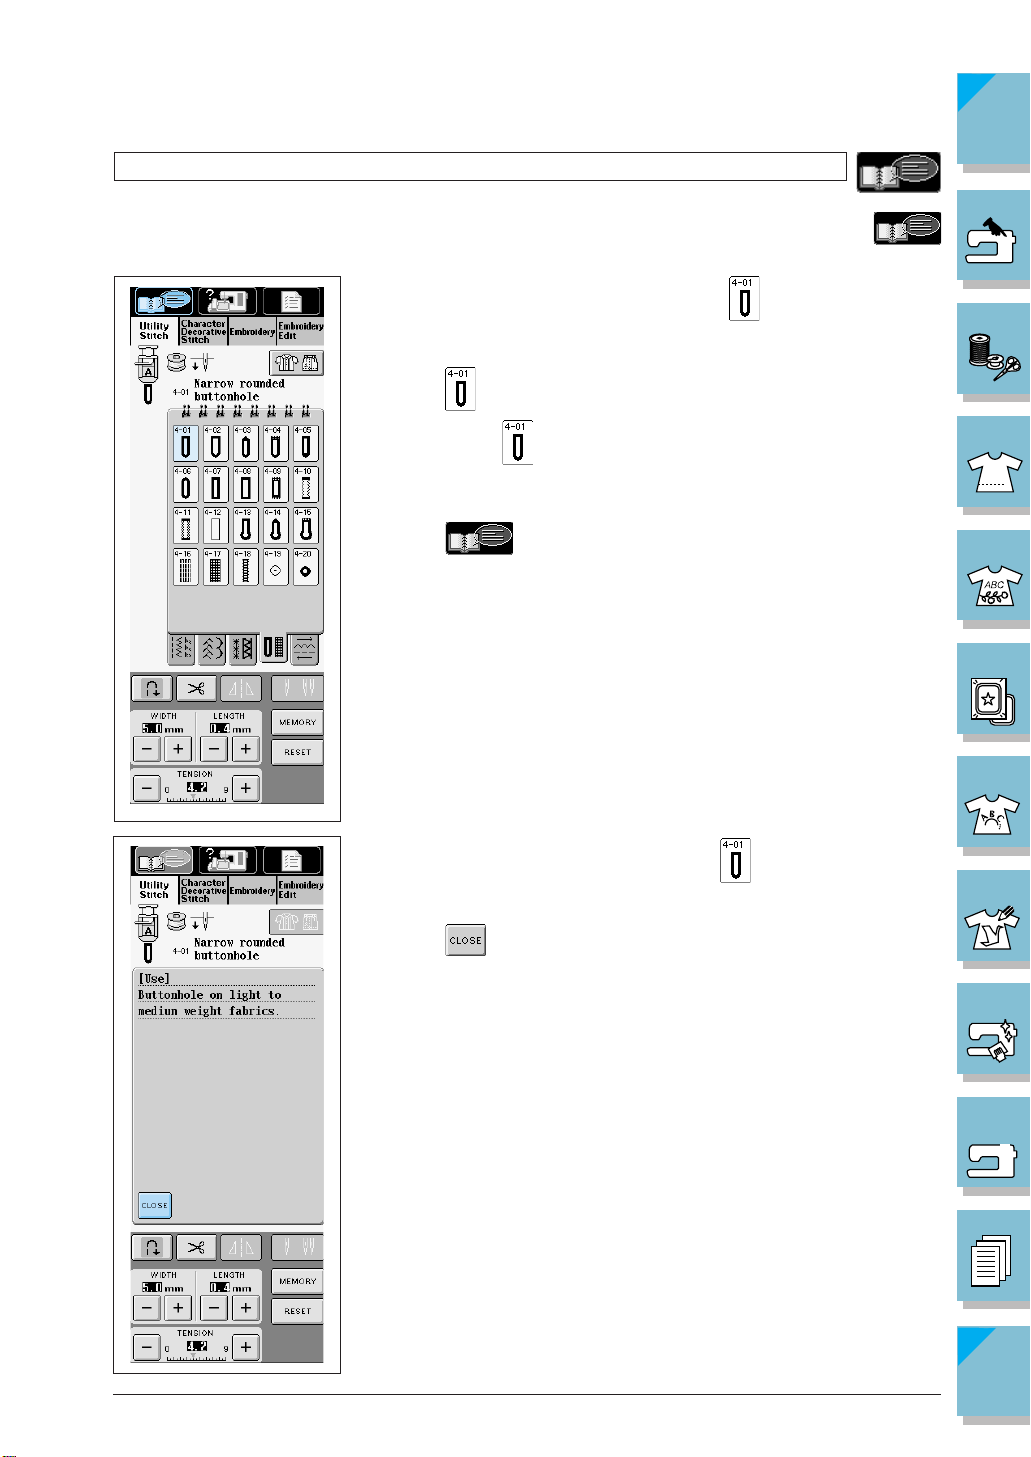
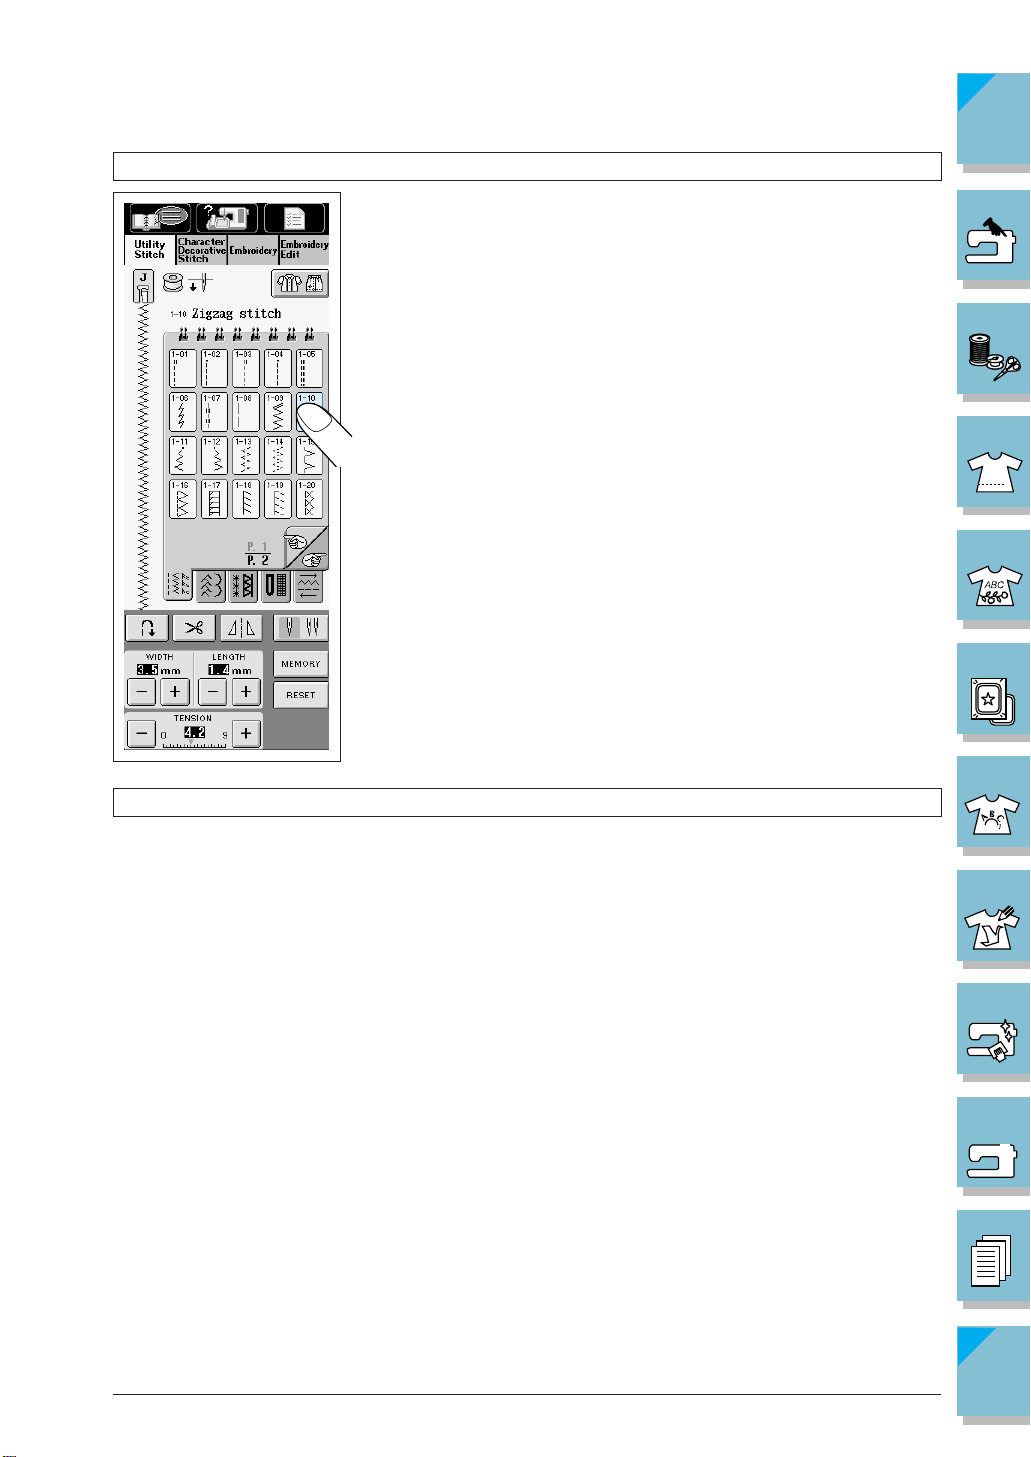
Using the Pattern Explanation Key
CONTENTS
If you want to know more about the uses for a stitch pattern, select the pattern and press
to see an explanation of the stitch selection.
Example: Displaying information about
1. Press . (If the currently displayed stitch selection screen does
not include use the screen selection tabs to go to the correct
screen).
2. Press .
1 —
2 —
3 —
4 —
5 —
6 —
3. The screen shows information about .
4. Press to return to the original screen.
1-24 Setting Up
7 —
8 —
9 —
?
Index
!
Page 36
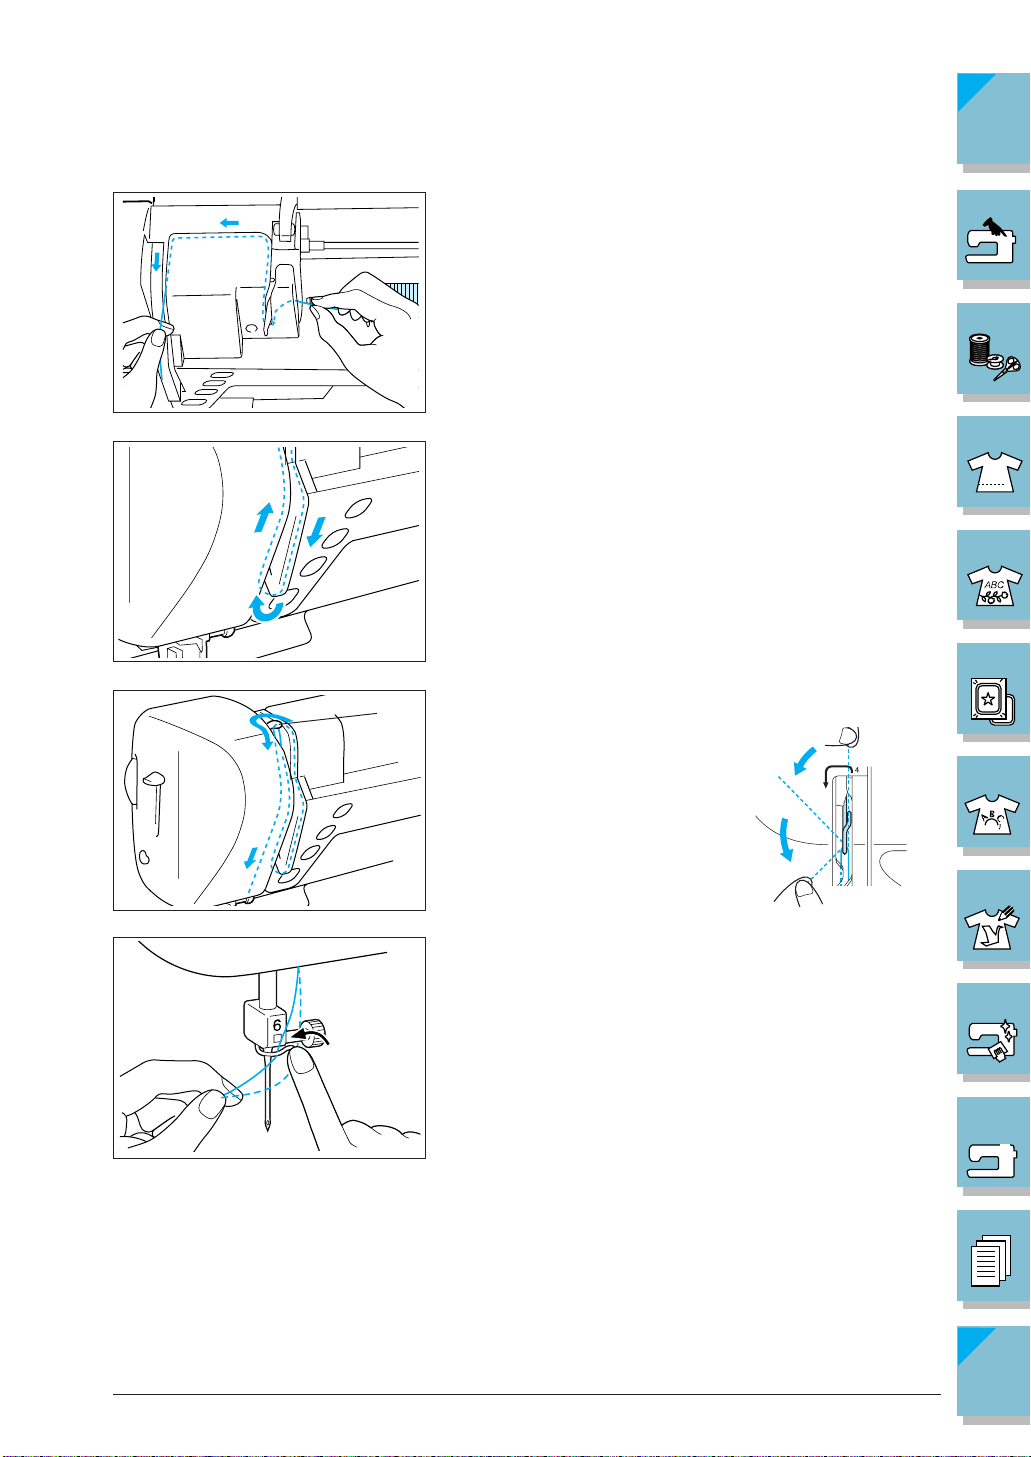
Bobbin Winding/Lower Threading
CONTENTS
Press ➜ ➜ ➜ in that order to display a video example of bobbin
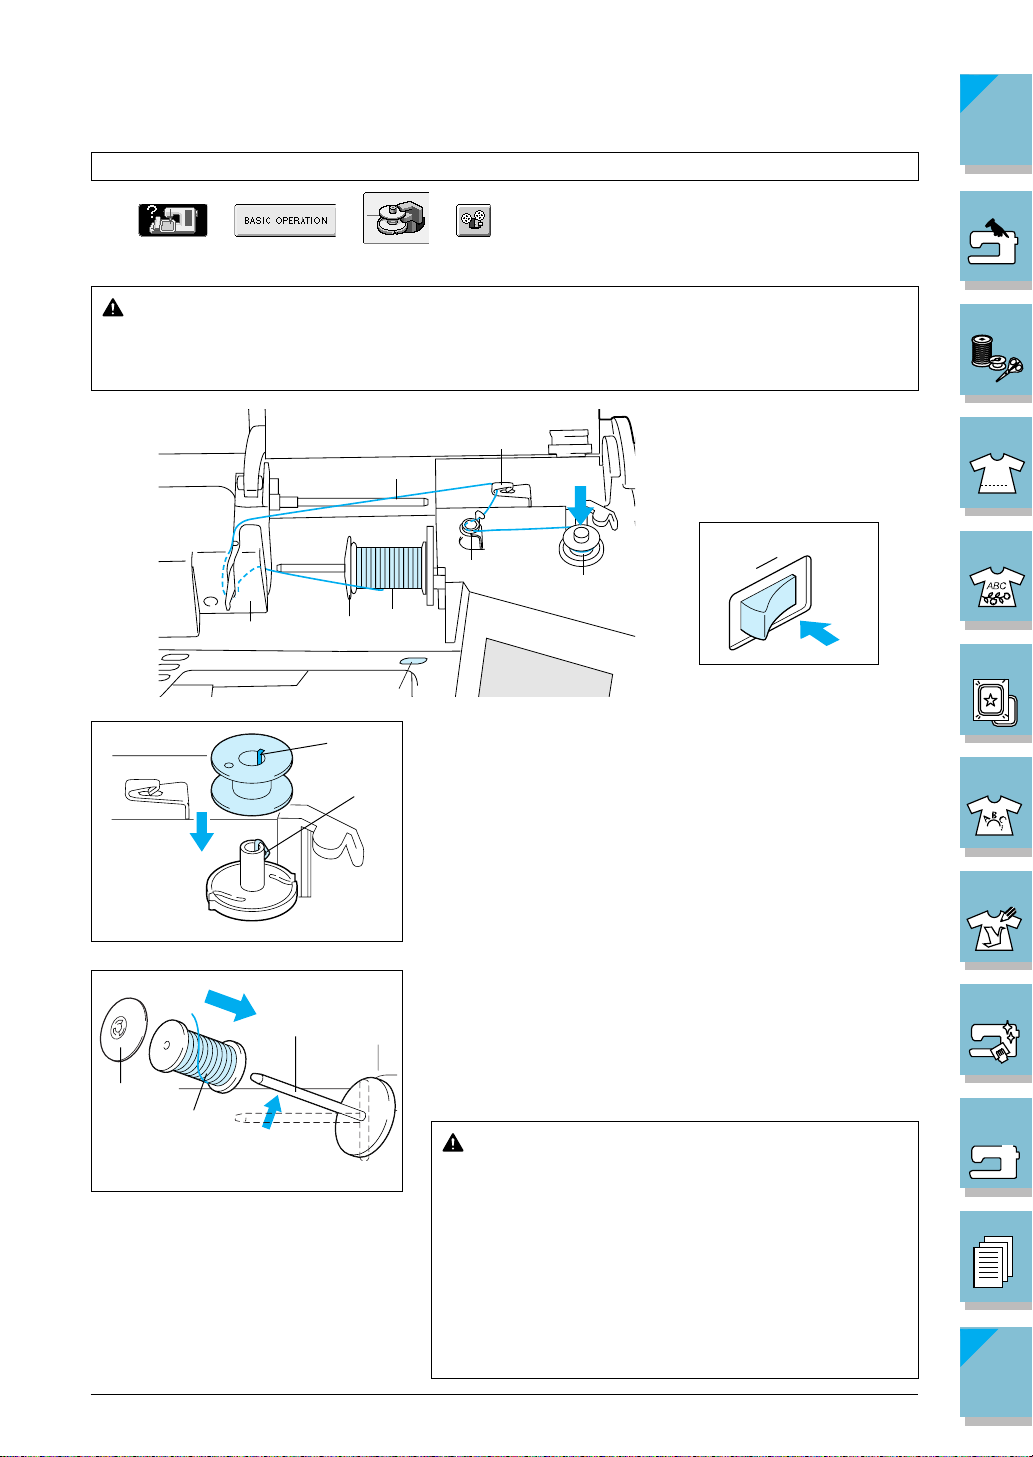
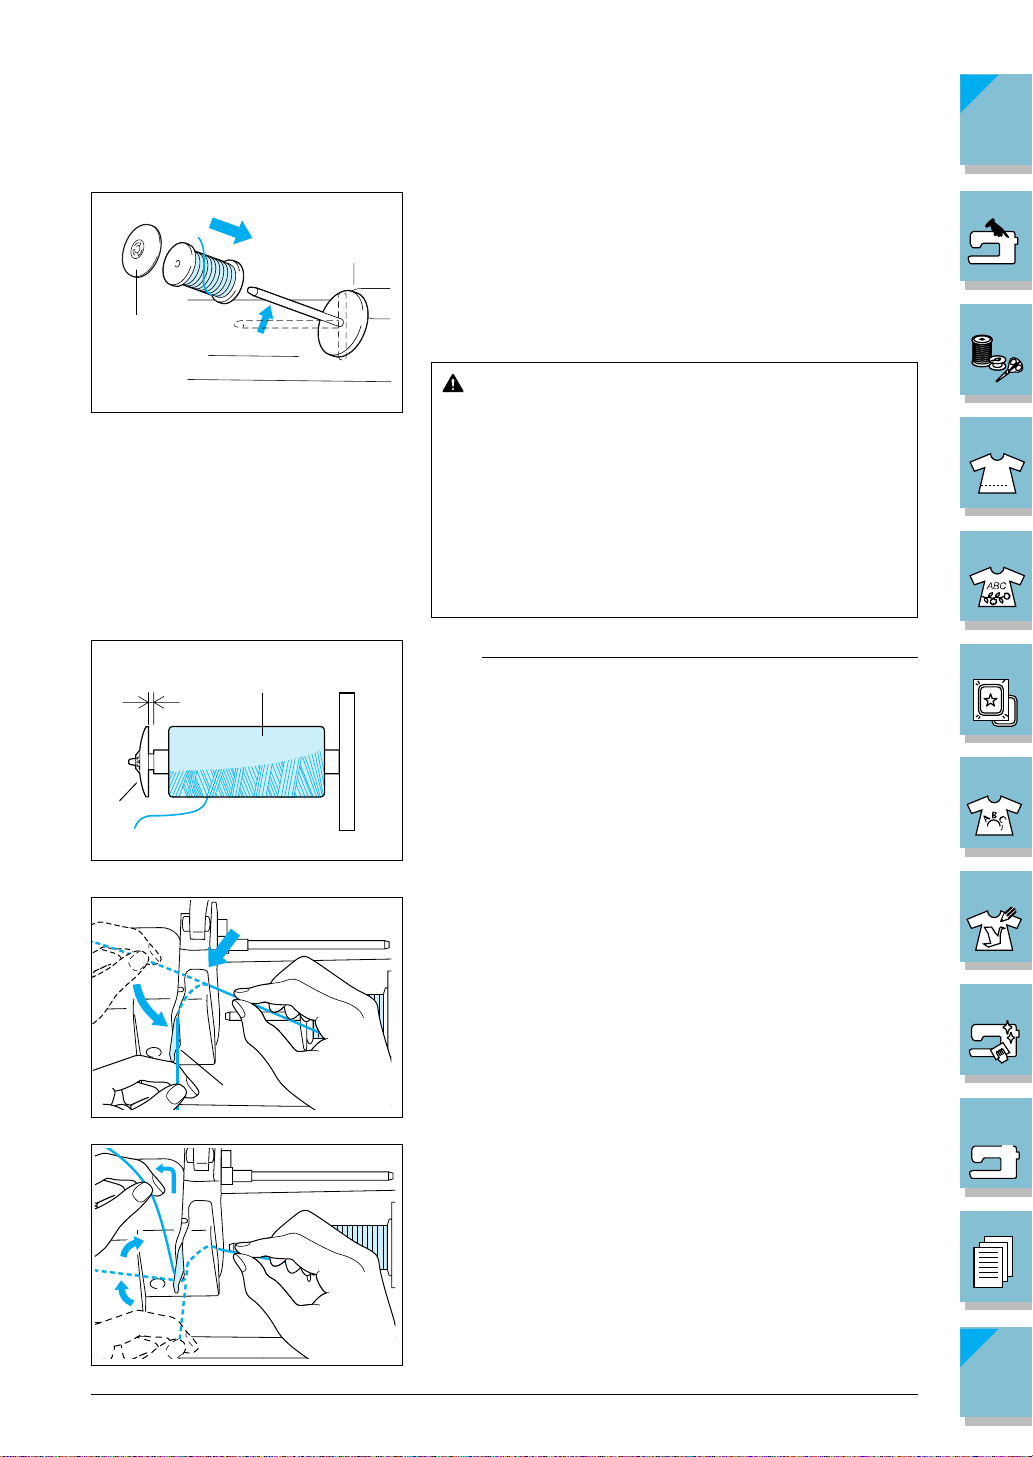
winding on the LCD (see page 1-21). Follow the steps explained below to complete the operation.
CAUTION
Use only bobbins recommended by the manufacturer of this machine (see page 1-8).
Using other bobbins may result in damage or injury.
7
6
8
3
5
4
11
1
2
1. Turn on the main power switch.
2. Align the groove in the bobbin with the spring on the
bobbin winder shaft, and set the bobbin on the shaft.
1 Groove of the bobbin
2 Spring on the shaft
2
9,10
l
o
1
1 —
2 —
3 —
4 —
5 —
6 —
2
3
1
3. Pivot the spool pin so that it angles toward the front of
the machine. Set the thread spool on the spool pin so
that the thread unrolls from the front of the spool.
4. Push the spool cap on the spool pin as far as possible,
then return the spool pin to its original position.
1 Spool pin
2 Spool cap
3 Thread spool
CAUTION
• If the thread spool and/or spool cap are set
incorrectly, the thread may tangle on the spool
pin and cause the needle to break.
• Use the spool cap (large, medium, or small)
that is closest in size to the thread spool. If a
spool cap smaller than the thread spool is used,
the thread may become caught in the slit on
the edge the spool and cause the needle to
break.
Setting Up 1-25
7 —
8 —
9 —
?
Index
!
Page 37
CONTENTS
1
Note
3
2
1
22
1
▼
When sewing with fine, cross-wound thread (see the illustration at left), use the small spool cap, and leave a
small space between the cap and the thread spool (see the
illustration at left).
1 Spool cap (small)
2 Thread spool (cross-wound thread)
3 Space
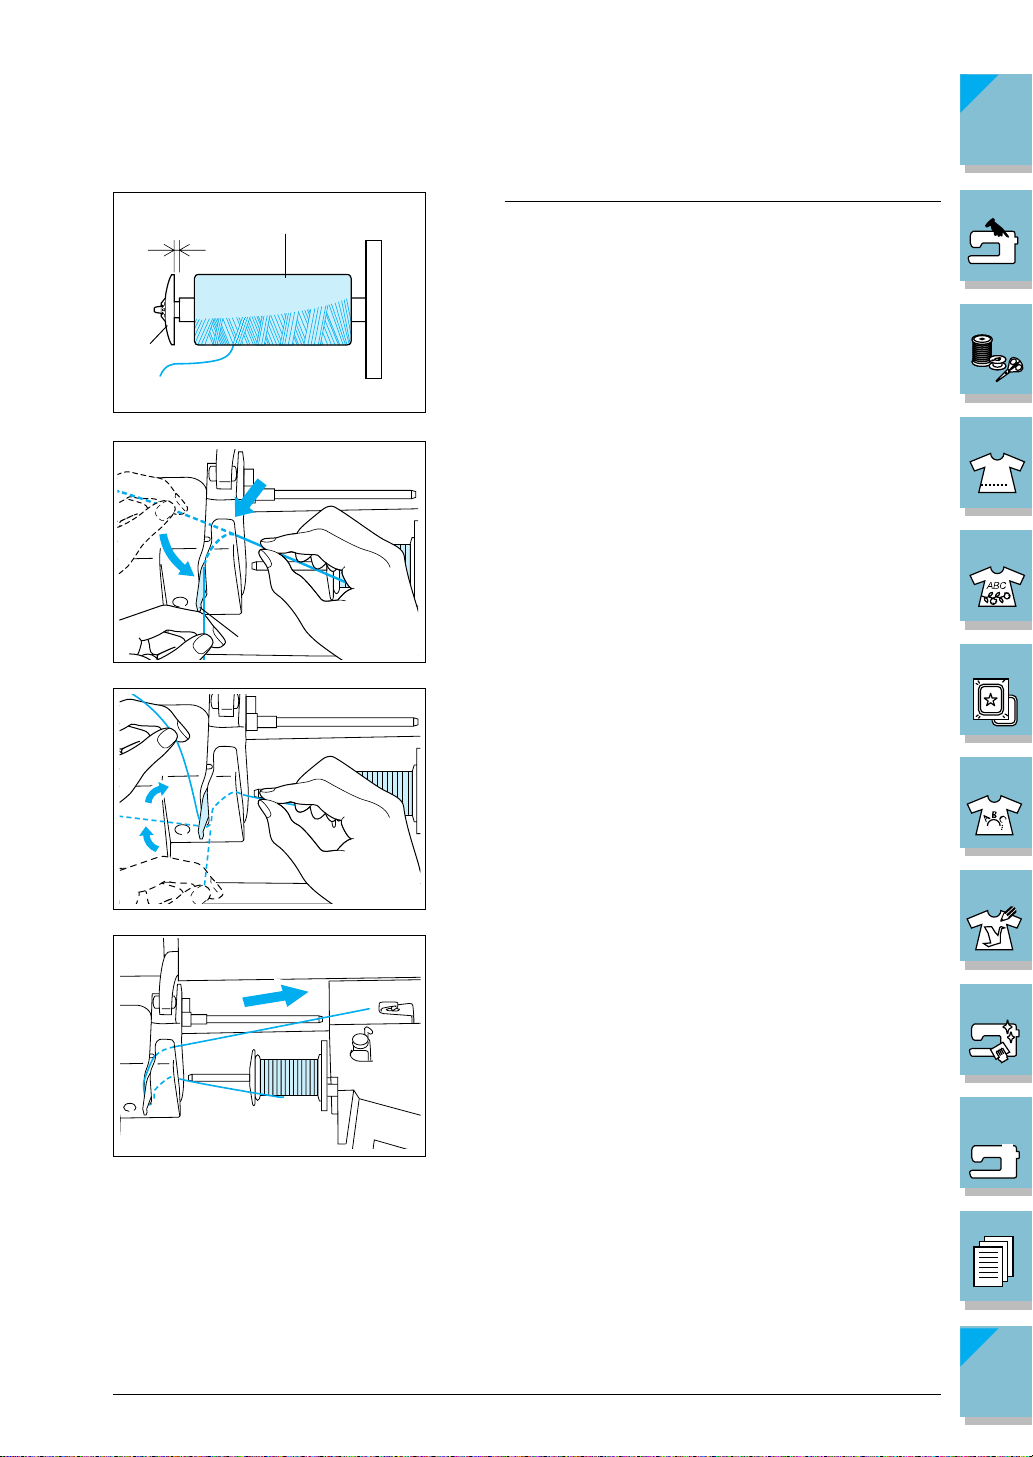
5. Hold the thread from the spool in both hands, and pass
the thread behind the thread guide cover on top of the
machine.
Use both hands to set the thread around the thread
guide plate.
1 Thread guide plate
1 —
2 —
3 —
4 —
5 —
6 —
6. Pull the thread out as indicated on drawing.
1-26 Setting Up
7 —
8 —
9 —
?
Index
!
Page 38

CONTENTS
2
1
7. Use both hands to set the thread around projection in
the thread guides.
1 Projection in the thread guides
1 —
2 —
3 —
4 —
1
8. Pass the thread around the thread guide shaft and the
pretension disk as indicated on drawing. Make sure
that thread is correctly inserted inside the pretension
disk.
1 Thread guide shaft
2 Pretension disk
5 —
9. Wind the thread clockwise around the bobbin 4-5 times
(as shown in the illustration).
2
6 —
3
1
1
10.Pass the end of the thread through the guide slit in the
bobbin winder seat, and pull the thread to the right.
The cutter will cut the thread.
1 Guide slit
2
2 Bobbin winder seat
CAUTION
Be sure to follow the process described. If the
thread is not cut with the cutter, and the bobbin
is wound, when the thread runs low it may tangle
around the bobbin and cause the needle to break.
Setting Up 1-27
7 —
8 —
9 —
?
Index
!
Page 39

CONTENTS
1
11. Set the bobbin holder to the left, until it clicks into
place.
1 Bobbin holder
12.Press the “Bobbin Winder” button to start winding the
bobbin.
13.The bobbin will stop rotating automatically when it is
done winding, and the bobbin holder will return to the
original position.
14.Remove the bobbin.
1 —
2 —
3 —
4 —
5 —
6 —
CAUTION
When removing the bobbin, do not pull on the bobbin
winder seat. Doing so could loosen or remove the bobbin winder seat, resulting in damage to the machine.
CAUTION
Setting the bobbin improperly may cause the thread tension
to loosen, breaking the needle and resulting in injury.
1 Wound evenly
2 Wound poorly
1-28 Setting Up
1
2
7 —
8 —
9 —
?
Index
!
Page 40

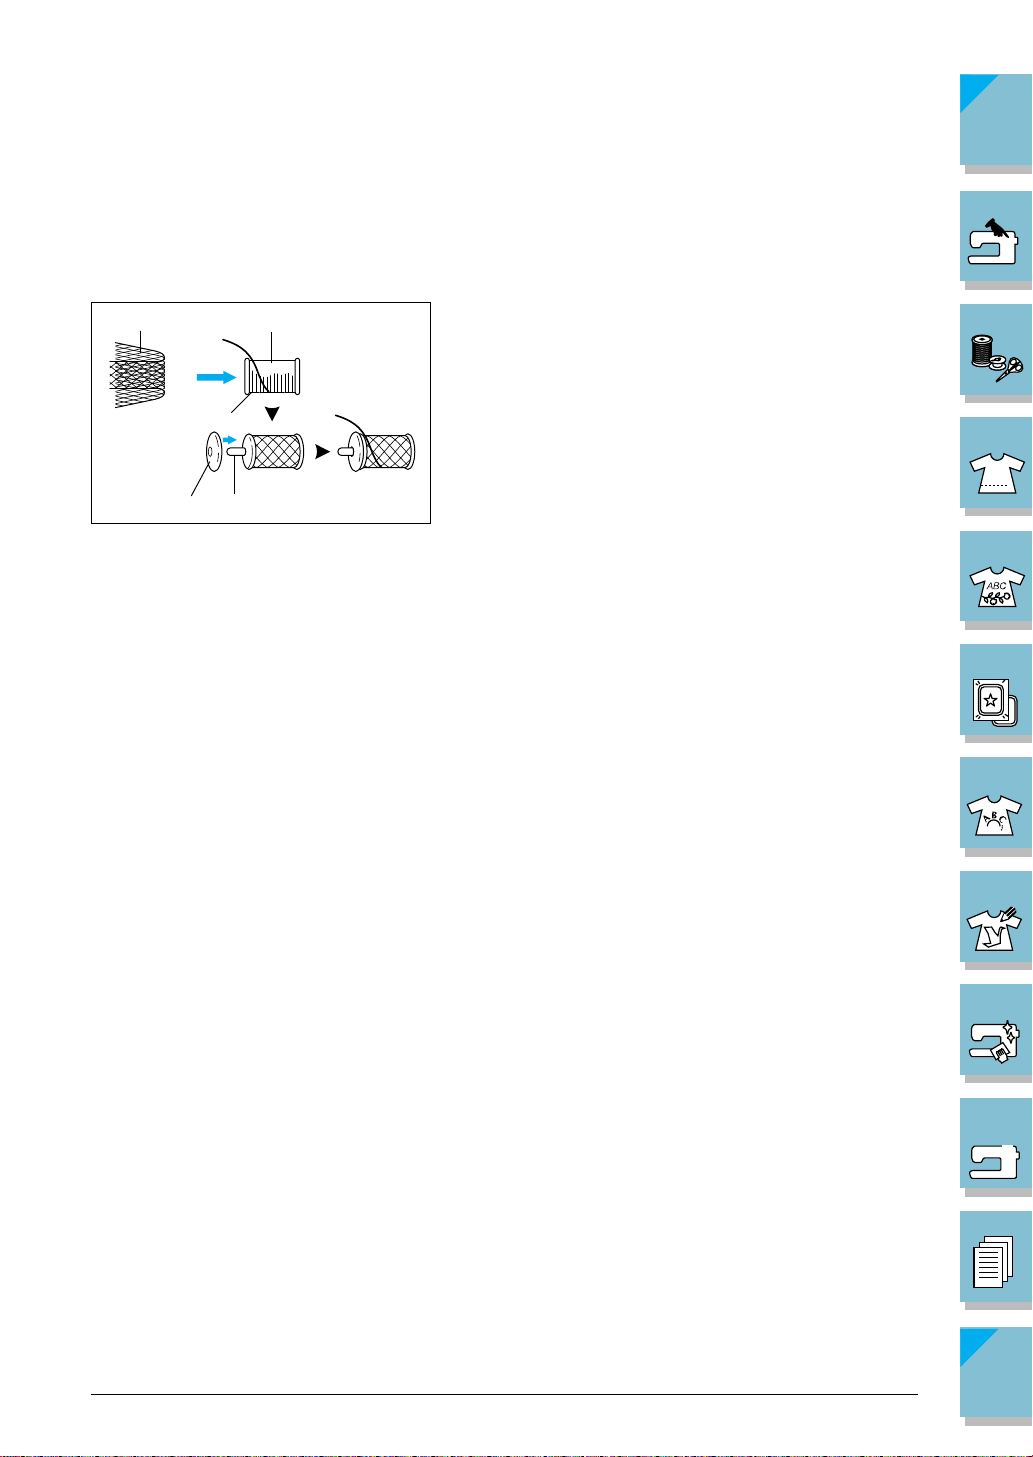
CONTENTS
■ Winding the Bobbin During Sewing
With this machine, you can wind the bobbin during sewing. It will be convenient to wind the
bobbin embroidery thread while sewing embroidery. The threading process is different from the
earlier section, so read and follow the instructions carefully.
1
3
2
4
1
1 Supplemental spool pin
5
6
1
2
1. Align the groove in the bobbin with the spring on the
bobbin winder shaft, and set the bobbin on the shaft.
1 Groove of the bobbin
2 Spring on the shaft
1 —
2 —
3 —
4 —
5 —
6 —
1
3
2
1
2. Pull up the supplemental spool pin and set it in the
“up” position.
1 Supplemental spool pin
3. Place the spool of thread on the supplemental spool
pin, so that thread unrolls from the back. Then push a
spool cap onto the spool pin as far as possible to secure the thread spool.
1 Spool pin
2 Spool cap
3 Thread spool
Setting Up 1-29
7 —
8 —
9 —
?
Index
!
Page 41

CONTENTS
1
2
1
4. With your left hand, hold the thread near the thread
spool. With your right hand, hold the end of the thread,
and use both hands to set the thread around the thread
guides.
1 Projection in the thread guides
5. Pass the thread around the projection in the thread
guides, then pass the thread under the pretension disk.
Make sure to set the thread securely under the pretension disk.
1 Thread guide shaft
2 Pretension disk
6. Follow steps 9 - 14 from the previous section (see pages
1-27, 1-28 ).
1 —
2 —
3 —
4 —
5 —
6 —
1-30 Setting Up
7 —
8 —
9 —
?
Index
!
Page 42

Setting the Bobbin
CONTENTS
Press ➜ ➜ ➜ in that order to display a video example of the
operation on the LCD (see page 1-21). Follow the steps explained below to complete the operation.
CAUTION
Setting the bobbin improperly may cause the thread tension
to loosen, breaking the needle and resulting in injury.
1 Wound evenly
2 Wound poorly
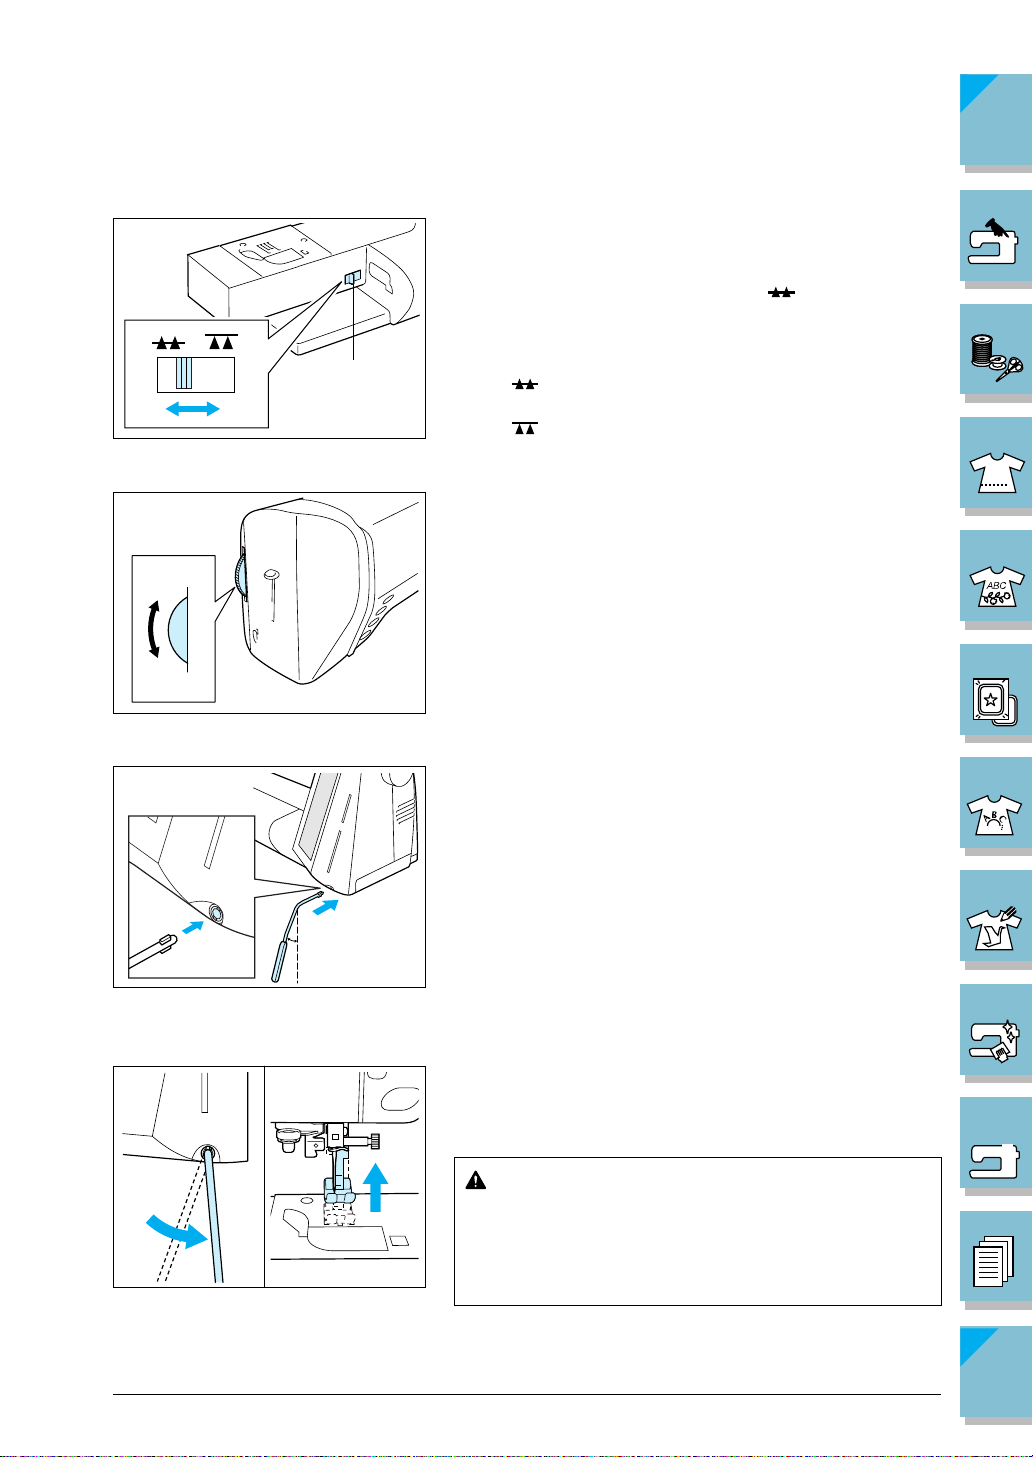
1
1
1. Raise the presser foot lever.
2. Slide the bobbin cover latch to the right, and remove
the bobbin cover.
1 Bobbin cover
3. Put the bobbin in the shuttle, making sure the thread
unrolls as shown.
2
CAUTION
Be sure the bobbin is set so the thread unrolls in
the correct direction. If the thread unrolls in the
wrong direction, it may cause the thread tension
to be incorrect or the needle to break.
1 —
2 —
3 —
4 —
5 —
6 —
7 —
1
4. Guide the thread through the groove, then pull the
thread toward you to cut off any excess.
1 Cutter
5. Replace the bobbin cover. Place the left tab in place
(see arrow 1 at left), then press lightly on the right side
(see arrow 2 at left) until the cover clicks into place.
Note
You can begin sewing without pulling up the bobbin
thread.
When you need to pull up the bobbin thread (free motion
embroidery) see the illustrated directions on page 1-38.
Setting Up 1-31
8 —
9 —
?
Index
!
Page 43
Upper Threading
CONTENTS
Press ➜ ➜ ➜ in that order to display a video example of the
operation on the LCD (see page 1-21). Follow the steps explained below to complete the operation.
CAUTION
Be sure to thread the machine properly. Improper threading can cause the thread to
tangle and break the needle, leading to injury.
7
6
12
5
4
3
10
9
8
2
1
11
1 —
2 —
3 —
4 —
5 —
6 —
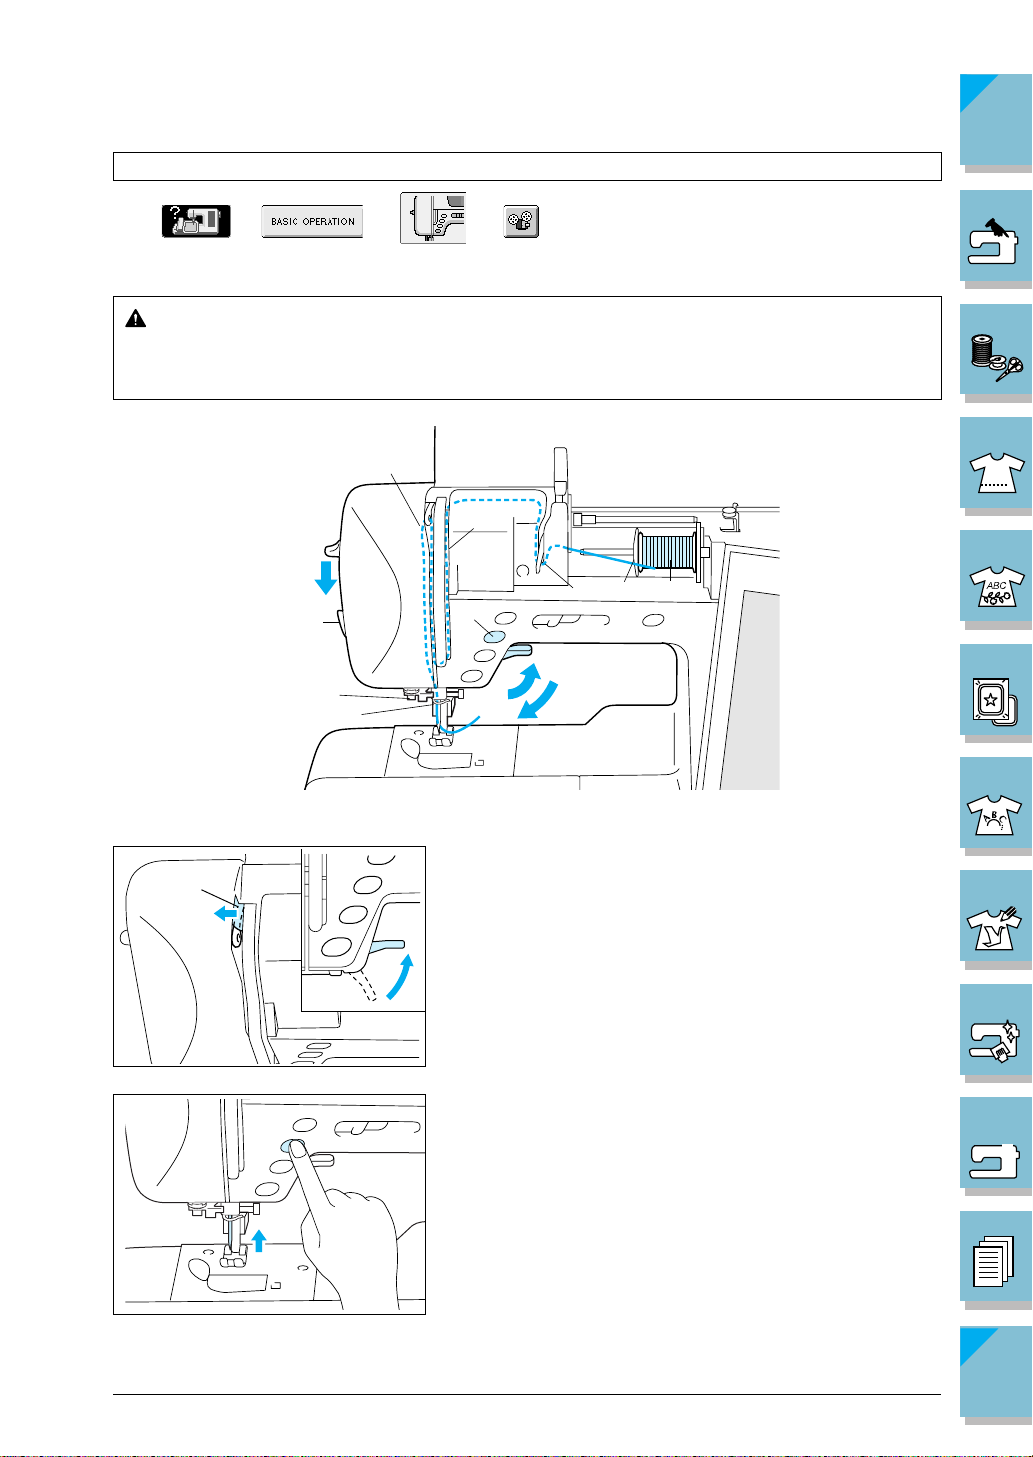
1. Raise the presser foot lever.
1
CAUTION
The machine has an upper threading shutter to insure
proper threading. The upper threading shutter opens
when the presser foot is raised. Upper threading can
not take place if the presser foot is not raised.
1 Upper threading shutter
2. Press the “Needle Position” button to set the needle in
the up position.
This step moves the thread take-up lever to a position
in which it can be threaded. Be sure to do this step
before continuing.
1-32 Setting Up
7 —
8 —
9 —
?
Index
!
Page 44
CONTENTS
1
1
3
2
3. Pivot the spool pin so that it angles toward the front of
the machine. Set the thread spool on the spool pin so
that the thread unrolls from the front of the spool.
4. Push the spool cap onto the spool pin as far as possible, then return the spool pin to its original position.
1 Spool cap
CAUTION
• If the thread spool and/or spool cap are set
incorrectly, the thread may tangle on the spool
pin and cause the needle to break.
• Use the spool cap (large, medium, or small)
that is closest in size to the thread spool. If a
spool cap smaller than the thread spool is used,
the thread may become caught in the slit on
the end of the spool and cause the needle to
break.
Note
When sewing with fine, cross-wound thread (see the illustration), use the small spool cap, and leave a small space
between the cap and the thread spool (see the illustration
at left).
1 Spool cap (small)
2 Thread spool (cross-wound thread)
3 Space
1 —
2 —
3 —
4 —
5 —
6 —
1
5. Hold the thread from the spool in both hands, and pass
the thread around the plate in the thread guides. Use
both hands to set the thread around the thread guide
plate.
7 —
8 —
22
1
▼
1 Thread guide plate
9 —
!
?
33
22
1
Setting Up 1-33
Index
Page 45
CONTENTS
▼
1
6. Pass the thread through the groove according to the
threading sequence (numbers) indicated on the machine.
7. To thread the take-up lever, pass the thread from the
back right side to the front left side.
1 Threading the take-up lever
1 —
2 —
3 —
4 —
5 —
6 —
8. Set the thread behind the needle clamp thread guide
on the needle bar. To set the thread easily, hold the
end of the thread with your left hand, and use your
right hand to guide the thread behind the needle clamp
thread guide.
1-34 Setting Up
7 —
8 —
9 —
?
Index
!
Page 46

CONTENTS
9. Set the thread securely into the slit of the disk in the
thread guide. Be sure that the thread catches the corner of the thread guide.
6
1 Corner of the thread guide
7
1
10.Use the thread cutter on the side of the machine to cut
the thread.
3
5
1 —
2 —
3 —
4 —
5 —
11.Lower the presser foot lever.
CAUTION
Be sure to lower the presser foot lever. Continuing
without lowering the lever may cause damage to the
machine.
6 —
7 —
5
6
12.Push down the needle threader lever as far as possible.
The hook will rotate and pass through the eye of the
needle. Make sure that the hook does not catch the
fabric or any other objects near the presser foot.
1 Hook
8 —
9 —
1
Setting Up 1-35
!
?
Index
Page 47
CONTENTS
5
6
13.Slowly return the needle threader lever to its original
position. Check that the hook has pulled the thread
through the eye, then release the lever.
1 —
2 —
5
6
14.Pull the thread loop toward the back of the machine.
Note
Do not pull the thread too strongly , as you may bend the
needle.
CAUTION
The needle threader lever can only be used with home
sewing machine needles size 75/11-100/16. Check the
table on page 1-45 for appropriate needle and thread
combinations. Note that, if you are using transparent
nylon mono-filament thread, only needles in the range
of 90/14-100/16 can be used.
3 —
4 —
5 —
6 —
15.Pass the thread under the presser foot, and pull it about
5
6
100 mm (3 inch - 4 inch) toward the back of the machine.
1 100 mm (3 inch - 4 inch)
7 —
CAUTION
1
1-36 Setting Up
• If the threading is not successful, raise the presser foot
lever and start again from step 8, setting the thread in
the needle clamp thread guide.
• There are certain decorative threads that can not be
threaded using the needle threader lever . When using
these threads, set the thread behind the needle clamp
thread guide (step 8), then thread the eye of the needle manually . Make sure the main power switch is OFF
when threading the needle manually.
8 —
9 —
?
Index
!
Page 48
CONTENTS
■ Using the Spool Net
If using transparent nylon thread, metallic thread, or other strong thread, place the included spool
net over the spool before using.
If the spool net is too long, fold it once to match it to the spool size before placing it over the spool.
1
4
2
4
3
1 Spool net
2 Thread spool
3 Spool pin
4 Spool cap
1 —
2 —
3 —
4 —
5 —
6 —
Setting Up 1-37
7 —
8 —
9 —
?
Index
!
Page 49

Pulling Up the Bobbin Thread
There may be some sewing applications when you want to pull up the bobbin thread, for example,
when making gathers, darts, free motion quilting or embroidery.
1. Guide the bobbin thread through the groove, following the arrow in the illustration. Do not cut the thread.
* Do not replace the bobbin cover.
CONTENTS
1 —
2 —
3 —
2
6
1
2. While holding the upper thread, press the needle position button to raise the needle.
3. Gently pull the upper thread, and a loop of the bobbin
thread will come out of the hole in the needle plate.
4. Pull up the bobbin thread, then pass it under the presser
foot and pull it about 100 mm (3-4 inch) toward the
back of the machine, matching the upper thread.
5. Replace the bobbin cover.
1 Upper thread
2 Bobbin thread
4 —
5 —
6 —
7 —
8 —
9 —
!
?
1-38 Setting Up
Index
Page 50

Changing the Presser Foot
CONTENTS
CAUTION
• Always turn off the power before changing the presser foot. If the power is on and the
“Start/Stop” button or another button is pressed, the machine will start and may cause
injury .
• Always use the correct presser foot for the selected stitch pattern. If the wrong presser
foot is used, the needle may strike the presser foot and bend or break, and may cause
injury.
• Only use presser feet for this machine. Using other presser feet may lead to accident
or injury.
■ Removing the Presser Foot
1. Press the “Needle Position” button to raise the needle,
and then turn off the sewing machine.
1
2. Raise the presser foot lever.
2
3. Press the black button at the back of the presser foot
holder. The presser foot comes off.
1 Presser foot holder
1
1 —
2 —
3 —
4 —
5 —
6 —
■ Attaching the Presser Foot
1
2
4. Place the new presser foot under the holder, aligning
the foot pin with the notch in the holder. Lower the
presser foot lever so that the presser foot pin snaps into
the notch in the holder.
1 Notch
2 Pin
Setting Up 1-39
7 —
8 —
9 —
?
Index
!
Page 51

CONTENTS
■ Attaching the Walking Foot
The walking foot holds the fabric between the presser foot and the upper and lower feed dogs to
feed the fabric, this enables you to have better fabric control when sewing difficult fabrics (such as
vinyl cloth, leather, or synthetic leather) or fabrics that slip easily (such as quilting or velvet).
* The walking foot can only be used with straight or zigzag stitch patterns. Reverse stitches can
not be sewn with the walking foot. Only select straight or zigzag stitch patterns with reinforcement stitches.
* T o use the walking foot, you need the low shank adapter and the screw (lar ge) for the walking
foot.
Adapter
1. Press the “Needle Position” button to set the needle in
the up position, and then turn off the main power
1
switch.
2. Raise the presser foot lever.
Screw(large)
1 —
2 —
3 —
4 —
5 —
6 —
2
3. Push the black button on the presser foot holder and
remove the presser foot.
1
1 Presser foot holder
4. Loosen the screw of the presser foot holder to remove
the presser foot holder.
1
2
1-40 Setting Up
7 —
8 —
9 —
?
Index
!
Page 52
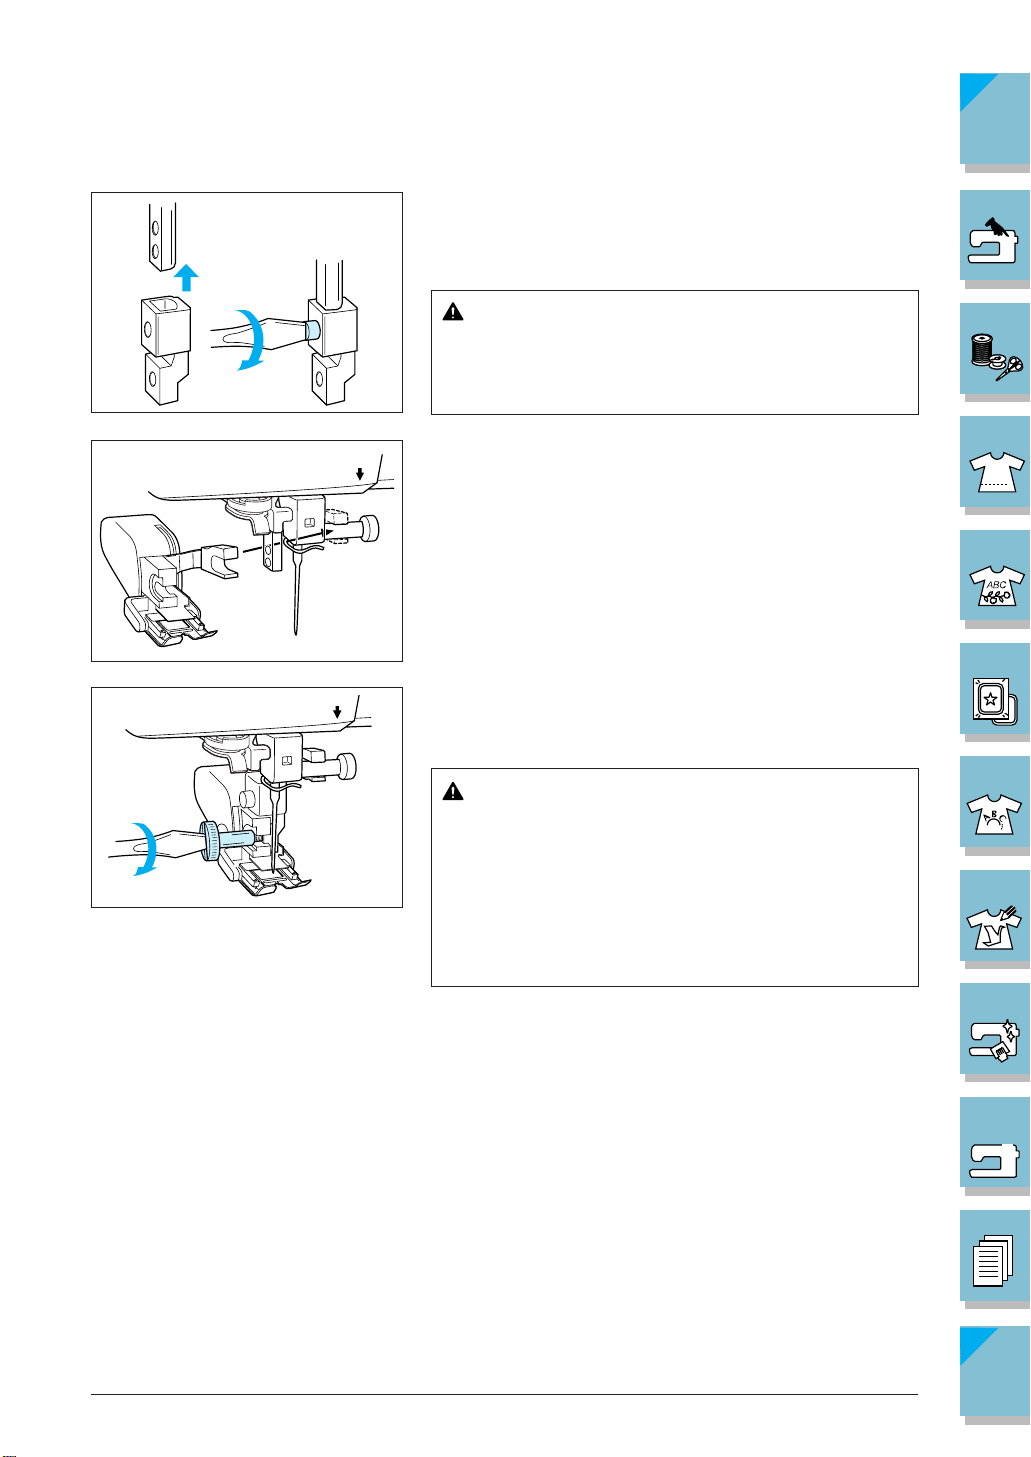
CONTENTS
5. Set the low shank adapter for the walking foot that came
with your machine on the presser foot shaft, and push
it up as far as possible. Tighten the screw securely with
the screwdriver.
CAUTION
Use the screwdriver to tighten the screw securely .
If the screw is loose, the needle may strike the
presser foot and cause injury.
6. Set the operation lever of the walking foot so that the
fork surrounds the needle clamp, and set the walking
foot on the presser foot shaft.
6
1 —
2 —
3 —
4 —
5 —
7. Lower the presser foot lever, insert the screw (large)
for the walking foot, and tighten the screw securely
6
with the screwdriver.
6 —
CAUTION
• Use the screwdriver to tighten the screw securely. If the screw is loose, the needle may
strike the presser foot and cause injury.
• Be sure to turn the balance wheel toward the
front of the machine to check that the needle
does not strike the presser foot. If the needle
strikes the presser foot, injury may result.
7 —
CAUTION
When sewing with the walking foot, sew at medium to
low speeds.
Setting Up 1-41
8 —
9 —
?
Index
!
Page 53
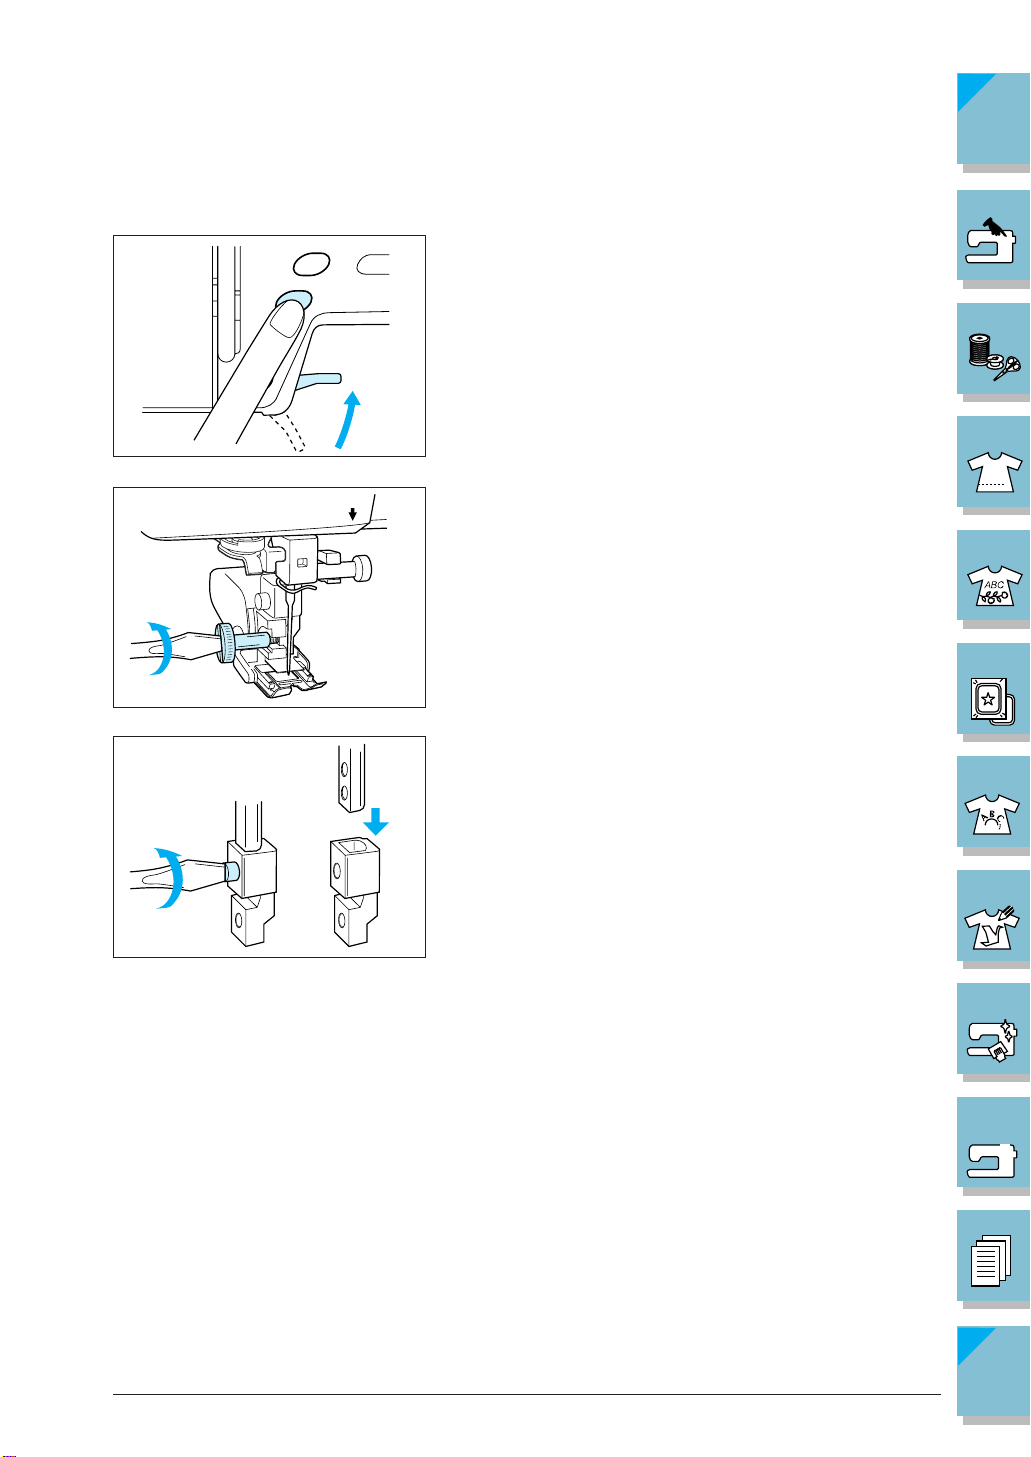
CONTENTS
■ Reattaching the Presser Foot Holder
1
2
6
1 —
1. Push the “Needle Position” button to raise the needle,
then turn the main power switch to OFF.
2. Raise the presser foot lever.
2 —
3 —
3. Loosen the screw with the screwdriver, and remove
the walking foot.
4 —
5 —
4. Remove the low shank adapter.
6 —
1-42 Setting Up
7 —
8 —
9 —
?
Index
!
Page 54
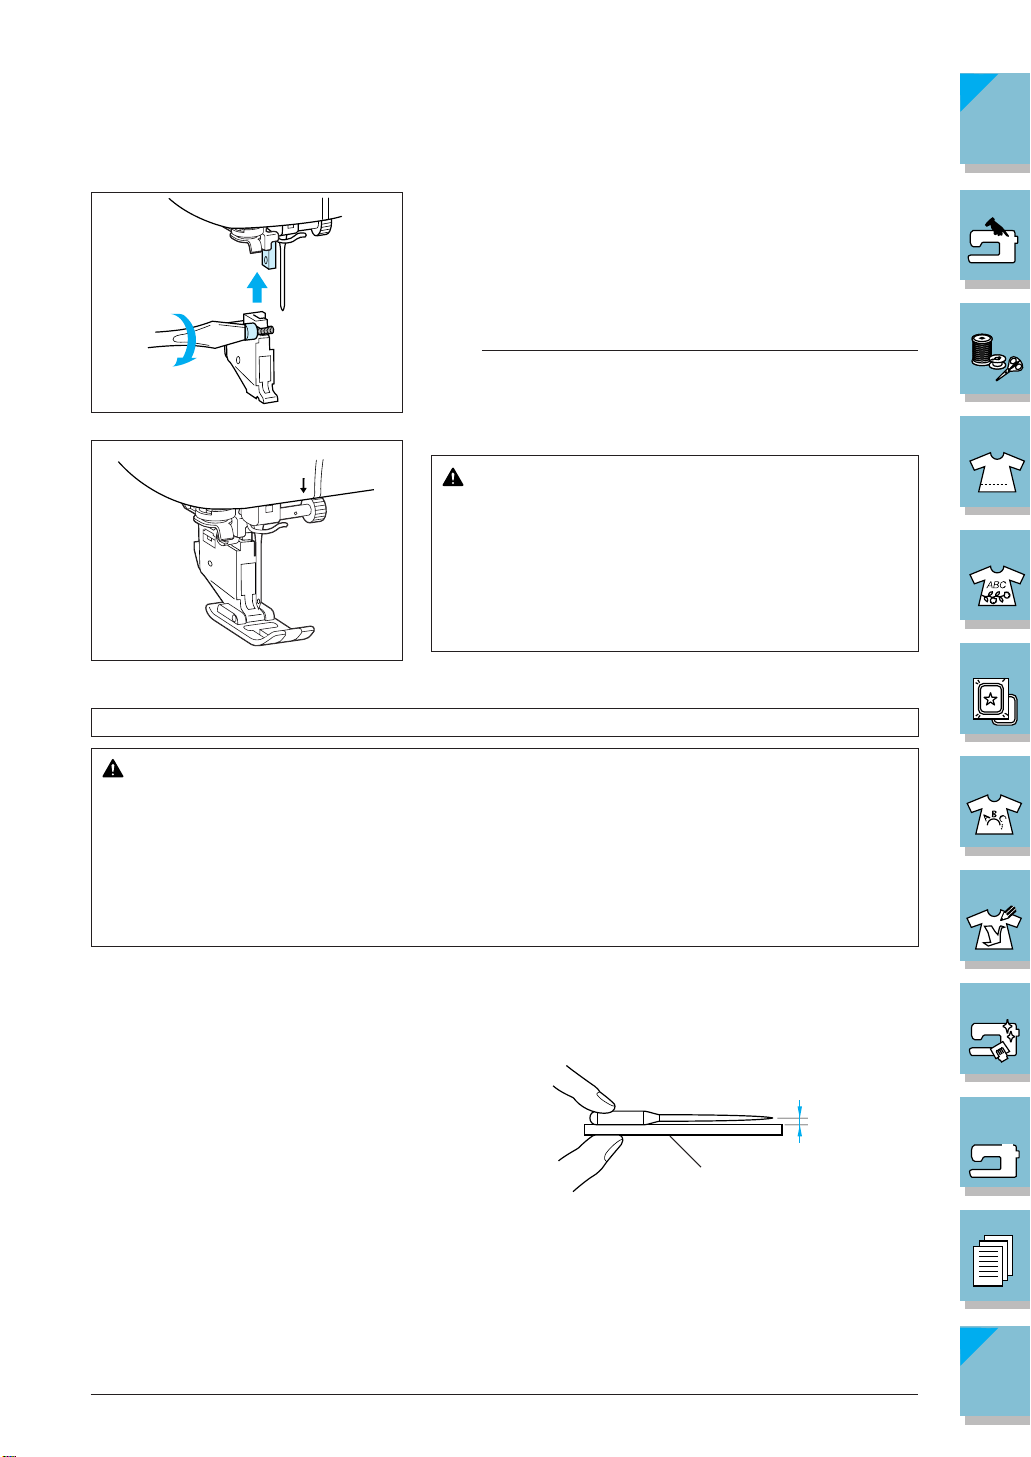
CONTENTS
5. With the presser foot lever raised, tighten the screw
lightly to attach the presser foot holder.
6. Place the presser foot “J” under the holder. Lower the
1
presser foot lever and use the screwdriver to tighten
the screw firmly.
2
Note
If the presser foot holder is not installed correctly , the thread
tension may loosen due to improper presser foot holder
height.
5
6
Changing the Needle
CAUTION
• Be careful not to touch the needle during this
time, otherwise injury may result.
• Use the screwdriver to tighten the presser foot
holder screw securely. If the screw is loose,
the needle may strike the presser foot and cause
injury .
CAUTION
• T urn the main power switch to OFF before changing the needle. If the main power is
left on and the Start/Stop button or another operation button is pressed accidentally,
the machine will start and injury may result.
• Use only sewing machine needles for home use. Other needles may bend or break and
cause injury.
• Never sew with a bent needle. A bent needle will easily break and cause injury.
1 —
2 —
3 —
4 —
5 —
6 —
7 —
To Check the Needle Correctly:
To check the needle, place the flat side of the needle on a flat surface. Check the needle from the
top and the sides. Throw away any bent needles.
1 Parallel space
2 Level surface (bobbin cover, glass, etc.)
1
2
* Place a level surface under the needle
Setting Up 1-43
8 —
9 —
?
Index
!
Page 55

CONTENTS
1. Press the “Needle Position” button to raise the needle,
1
then turn the main power switch to OFF.
2. Lower the presser foot lever.
1 —
2 —
2
3. Use the screwdriver to turn the screw toward the front
of the machine and loosen the screw , then remove the
needle.
6
CAUTION
Do not apply pressure to the needle clamp screw. Doing so may damage the needle or machine.
3 —
4 —
5 —
4. With the flat side of the needle facing the back, insert
the new needle all the way to the top of the needle
6
stopper (viewing window) in the needle clamp. Use a
screwdriver to securely tighten the needle clamp screw .
6 —
2
1
3
1 Needle stopper
2 Hole for setting needle
3 Flat side of needle
CAUTION
Be sure to push in the needle until it touches the stopper , and securely tighten the needle
clamp screw with a screwdriver. If the needle is not completely inserted or the needle
clamp screw is loose, the needle may break or the machine may be damaged.
1-44 Setting Up
7 —
8 —
9 —
?
Index
!
Page 56
CONTENTS
■ About the Needle
The sewing machine needle is probably the most important part of the sewing machine. Choosing
the proper needle for your sewing project will result in a beautiful finish and fewer problems.
Below are some things to keep in mind about needles.
• The smaller the needle number, the smaller the needle. As the numbers increase, the needles
get thicker.
• Use fine needles with lightweight fabrics, and thicker needles with heavyweight fabrics.
• To avoid skipped stitches, use ball point needle (golden colored) 90/14 with stretch fabrics.
• T o avoid skipped stitches, use ball point needle (golden colored) 90/14 when sewing character
or decorative stitches without the embroidery unit.
• Use needle 75/11 for embroidery. Ball point needles (golden colored) 90/14 are not recommended for embroidery, as they may bend or break, causing injury.
• It is recommended that a 90/14 needle should be used when embroidering on heavyweight
fabrics or stabilizing products (for example, denim, puffy foam, etc.). 75/11 needle may bend
or break, which could result in injury.
• A home sewing machine needle 75/11 is inserted in the sewing machine.
■ Fabric/Thread/Needle Combinations
Fabric
Medium weight fabric
Lightweight fabric
Heavyweight fabric
Stretch fabric
For top stitching
Broadcloth
Taffeta
Flannel,
Gabardine
Lawn, Batiste
Georgette
Challis, Satin
Denim
Corduroy
Tweed
Jersey
Tricot
Cotton
Synthetic mercerized
Silk or silk finished
Cotton
Synthetic mercerized
Silk
Cotton
Synthetic mercerized
Silk
Thread for knits
Synthetic mercerized
Silk
Type
Thread
Size
60 - 80
60 - 80
50 - 80
60 - 80
60 - 80
50 - 80
30 - 50
50
50
50 - 60
30
30
Size of needle
75/11 - 90/14
65/9 - 75/11
90/14 - 100/16
Ball point needle
(golden colored)
75/11 - 90/14
90/14 - 100/16
Note
• For transparent nylon thread, always use needle 90/14 - 100/16.
• The same thread is usually used for the bobbin thread and upper threading.
1 —
2 —
3 —
4 —
5 —
6 —
7 —
8 —
9 —
!
?
CAUTION
Be sure to follow the needle, thread, and fabric combinations listed in the table. Using an
improper combination, especially a heavyweight fabric (i.e., denim) with a small needle
(i.e., 65/9 - 75/11), may cause the needle to bend or break, and lead to injury. Also, the
seam may be uneven, the fabric may pucker, or the machine may skip stitches.
Setting Up 1-45
Index
Page 57

CONTENTS
1 —
2 —
3 —
4 —
5 —
6 —
7 —
8 —
9 —
!
?
1-46 Setting Up
Index
Page 58

Chapter 2 Getting Ready to Sew
TRIAL SEWING
CONTENTS
Basic Sewing
CAUTION
• T o avoid injury, pay special attention to the needle while the machine is in operation.
Keep your hands away from moving parts while the machine is in operation.
• Do not stretch or pull the fabric during sewing. Doing so may lead to injury.
• Do not use bent or broken needles. Doing so may lead to injury.
• Take care that the needle does not strike basting pins or other objects during sewing.
Otherwise, the needle may break and cause injury.
• If stitches become bunched, lengthen the stitch length setting before continuing sewing. Otherwise, the needle may break and cause injury.
1. Turn on the main power switch, and push the “Needle
Position” button to raise the needle.
2. Press a stitch selection key to select a stitch.
3. Install the correct presser foot. The symbol of the correct presser foot will be displayed in the upper left corner of the LCD display.
CAUTION
Always use the correct presser foot. If the wrong
presser foot is used, the needle may strike the
presser foot and bend or break, resulting in injury.
1 —
2 —
3 —
4 —
5 —
6 —
1
2
4. Set the fabric under the presser foot. Hold the fabric
and thread ends in your left hand, and turn the balance wheel to set the needle in the sewing start position.
5. Lower the presser foot.
* You do not have to pull up the bobbin thread.
6. Adjust the sewing speed with the speed control lever.
* You can use this lever to adjust sewing speed during
sewing.
1 Slow
2 Fast
Getting Ready to Sew 2-1
7 —
8 —
9 —
?
Index
!
Page 59
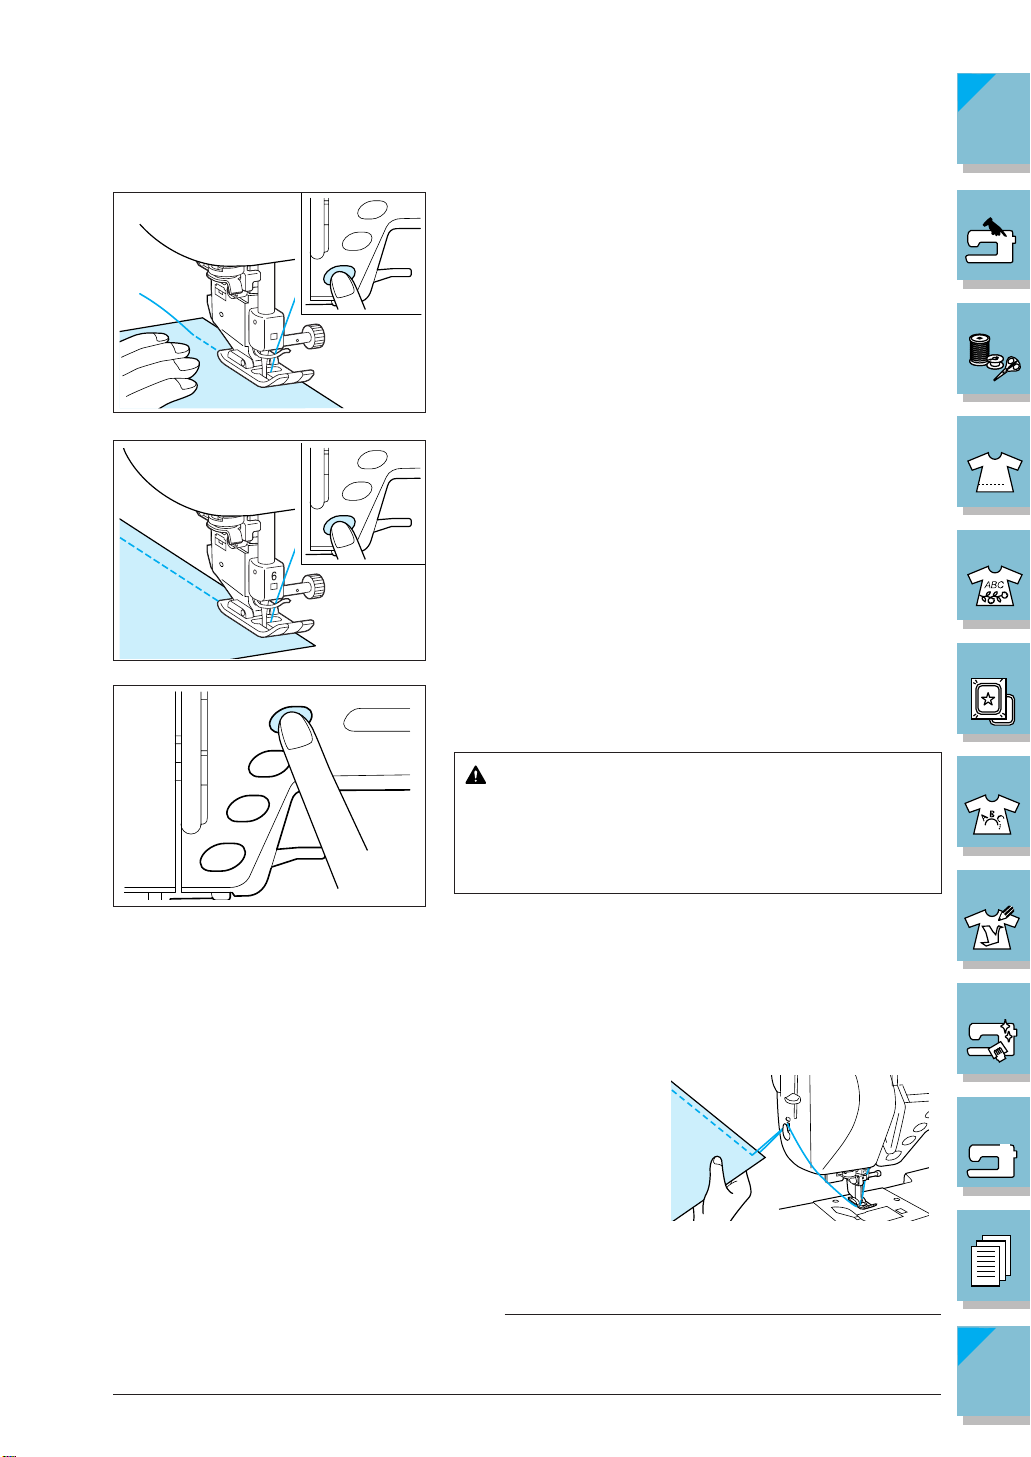
CONTENTS
6
5
7. Press the “Start/Stop” button to begin sewing.
* Guide the fabric lightly by hand.
8. Press the “Start/Stop” button again to stop sewing.
9. Press the “Thread Cutter” button to trim the threads.
* The needle will return to the up position automatically.
CAUTION
Do not press the “Thread Cutter” button after the
threads have been cut. Doing so could tangle the
thread or break the needle and damage the machine.
1 —
2 —
3 —
4 —
5 —
6 —
7 —
CAUTION
• Do not press the “Thread Cutter” button when there
is no fabric set in the machine or during machine operation. The thread may tangle, resulting in damage.
• When cutting thread thicker than #30, nylon thread,
or other decorative threads, use the thread cutter on
the side of the machine.
10.When the needle has stopped moving, raise the presser
2-2 Getting Ready to Sew
foot and remove the fabric.
Note
This machine has a display to warn you when the bobbin
thread has run out. If the warning displays, re-thread the
machine immediately.
8 —
9 —
?
Index
!
Page 60
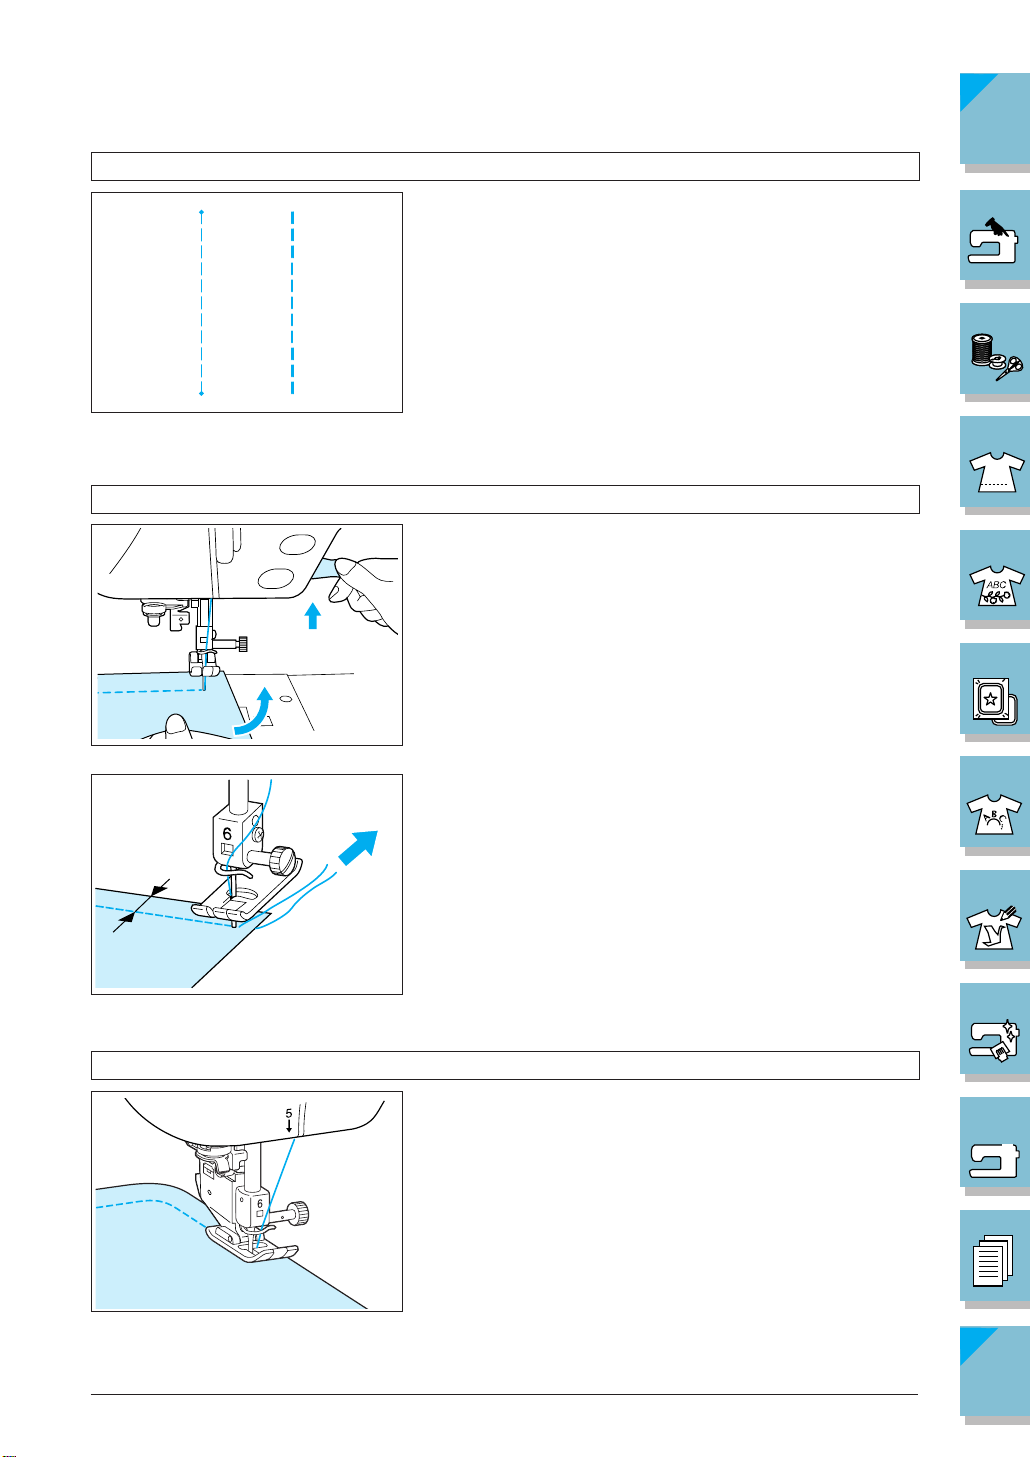
Sewing Reinforcement Stitches
CONTENTS
Changing Sewing Direction
6
1
Reverse/reinforcement stitches are generally necessary at
the beginning and end of sewing. You can use “Reverse/
Reinforcement Stitch” button to sew reverse/reinforcement
stitches manually (see page 1-3).
On the screen if the automatic reinforcement stitch key is
selected, reverse stitches (or reinforcement stitches) will
be sewn automatically at the start of sewing when pressing the “Start/Stop” button. Press the “Reverse/Reinforcement Stitch” button to sew reverse stitches (or reinforcement stitches) automatically at the finish of the sewing
(see page 2-14).
Stop the machine. Leave the needle in the fabric, and raise
the presser foot. Using the needle as a pivot, turn the fabric so that you can sew in the new direction. Lower the
presser foot lever and start sewing.
When edge stitching a short stitch length and close to the
edge of the fabric, the presser foot may not cover enough
fabric for proper feeding. Before you begin to sew, sew a
basting thread at the corner point. When you change direction at the corner, start sewing as you pull the basting
thread toward the back.
1 —
2 —
3 —
4 —
5 —
6 —
7 —
Sewing Curves
1 5 mm (3/16 inch)
Sew slowly while keeping the seam parallel with the fabric edge as you guide the fabric around the curve.
Getting Ready to Sew 2-3
8 —
9 —
?
Index
!
Page 61

Sewing Heavyweight Fabrics
CONTENTS
The sewing machine can sew fabrics up to 6 mm(1/4 inch)
thick. If the thickness of a seam causes sewing to occur on
an angle, help guide the fabric by hand and sew on the
downward slope.
CAUTION
Do not forcefully push fabrics more than 6 mm
(1/4 inch) thick through the sewing machine. This
may cause the needle to break and cause injury.
1 —
2 —
3 —
If the presser foot lever is in the up position, and you are
sewing heavyweight or multiple layers of fabric which does
not fit easily under the presser foot, raise the presser foot
6
lever as high as possible by hand to bring the presser foot
to its highest position. The fabric will now fit under the
presser foot.
4 —
5 —
If the presser foot is not level and the fabric does not feed
at the beginning of sewing (as shown at left), place a piece
of fabric, paper or cardboard of the same thickness as the
fabric being sewn under the back of the presser foot. The
machine can then sew normally.
6 —
1 Fabric
2
Sewing Lightweight Fabrics
2-4 Getting Ready to Sew
1
1
2 Thick paper
Place thin paper under thin fabrics to make sewing easier .
Gently tear off the paper or the stabilizer for embroidery
after sewing.
1 Thin paper
7 —
8 —
9 —
?
Index
!
Page 62

Using the Twin Needle Mode
CONTENTS
The twin needle can only be used for patterns that show after being selected.
Before you select a stitch pattern, make sure the stitch can be sewn in the twin needle mode (see
page 3-1 “Quick Reference Table”).
CAUTION
• Use only twin needles made for this machine (part code X59296-001). Other needles
could break, resulting in damage.
• Be sure to set the twin needle mode when using the twin needle. Using the twin
needle while the machine is in single needle mode could cause the needle to break,
resulting in damage.
• Do not sew with bent needles. The needle could break and cause injury.
• When using the twin needle, be sure to use presser foot “J” only. Refer to chart on
page 3-1 through 3-8 for proper presser foot “J”.
1. Turn the main power switch to OFF, and install the
twin needle (see page 1-43 “Changing the Needle”).
6
1 —
2 —
3 —
4 —
5 —
6 —
2. Do the upper threading. Follow the steps for threading
a single needle for the first threading (see page 1-32
“Upper Threading”).
7 —
8 —
3. Pass the thread through the needle clamp thread guide
on the needle bar, then thread the needle on the left
6
side.
CAUTION
The needle threader lever can not be used. Thread the
twin needle by hand, from front to back. Using the
needle threader lever may result in damage to the machine.
Getting Ready to Sew 2-5
9 —
?
Index
!
Page 63
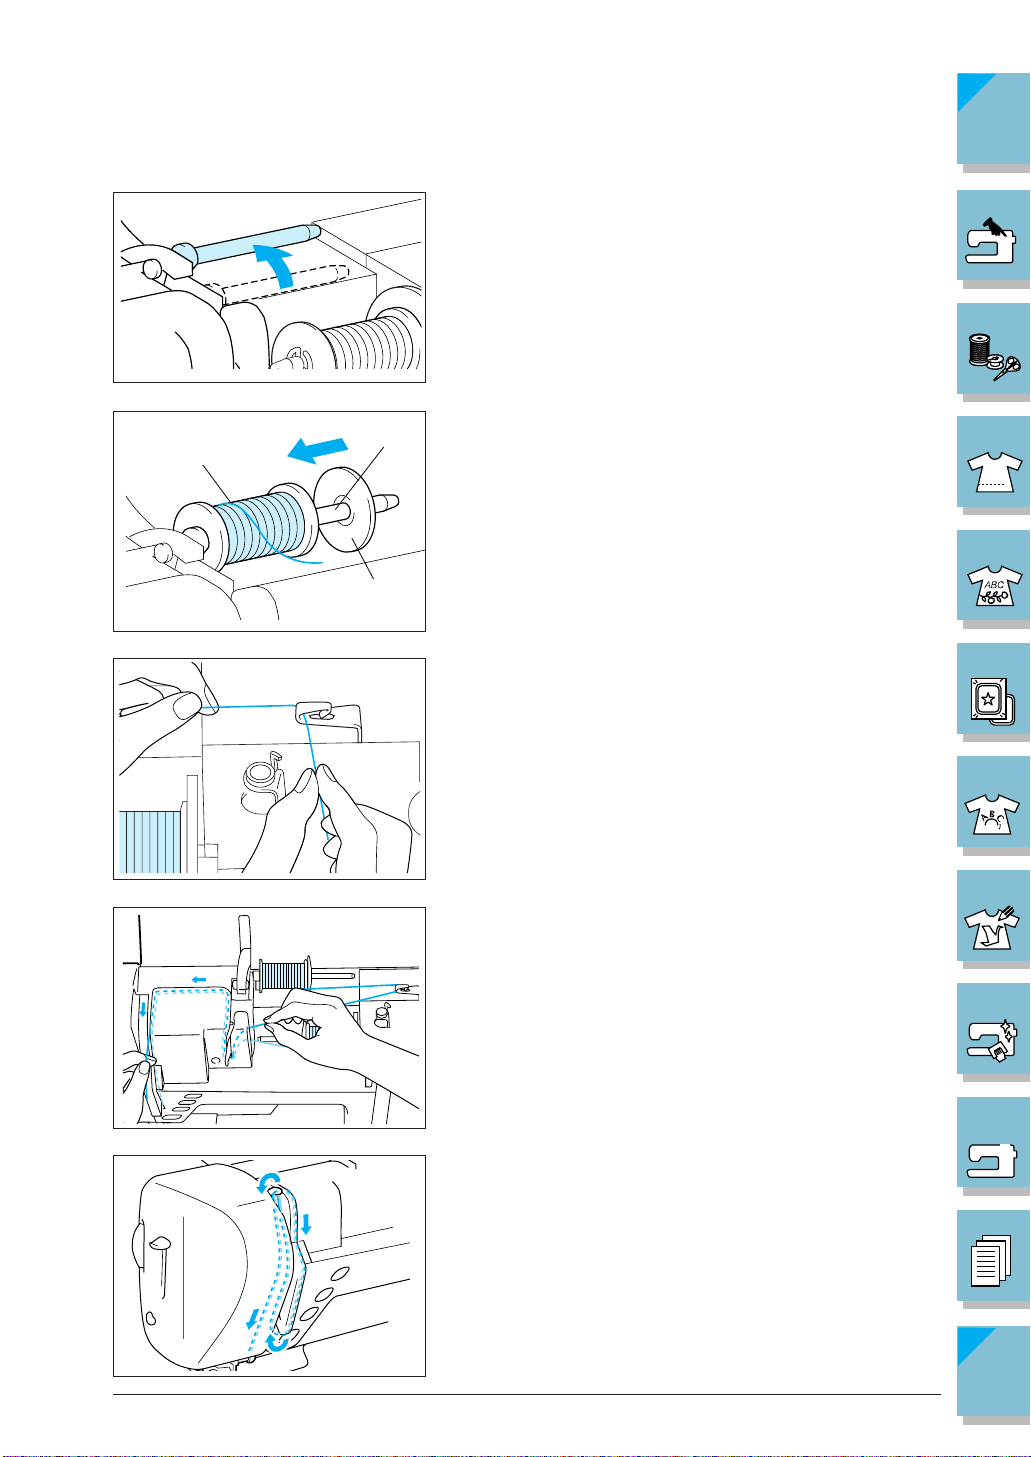
CONTENTS
3
2
1
4. Pull up the supplemental spool pin and set it in the up
position.
5. Place additional spool of thread on the supplemental
spool pin, so that the thread unrolls from the back.
Then insert a spool cap onto the spool pin all the way
in, to secure the thread spool.
1 Spool pin
2 Spool cap
3 Additional spool of thread
6. Hold the thread from the spool with both hands, and
set the thread in the thread guide.
* Do not set the thread in the bobbin winding thread
guide.
1 —
2 —
3 —
4 —
5 —
6 —
7. Set the thread around the thread guide plate, then pass
the thread through the groove according to threading
sequence (numbers) indicated on the machine.
▼
2-6 Getting Ready to Sew
7 —
8 —
9 —
?
Index
!
Page 64

CONTENTS
8. Do not set the thread in the needle clamp thread guide
on the needle bar . Thread the needle on the right side.
6
CAUTION
The needle threader can not be used. Thread the twin
needle by hand, from front to back. Using the needle
threader may result in damage to the machine.
9. Select a stitch pattern. Refer to chart on page 3-1
through 3-8 for proper presser foot “J”.
1
CAUTION
If the key is light gray after selecting the stitch,
the selected stitch can not be sewn in twin needle
mode.
10. Press to select twin needle mode.
1 The appears next to the bobbin thread display .
1 —
2 —
3 —
4 —
5 —
CAUTION
Be sure to set the twin needle mode when using
the twin needle. Using the twin needle while the
machine is in single needle mode could cause the
needle to break, resulting in damage.
11. Start sewing.
6 —
7 —
Sample of Twin Needle Sewing
Getting Ready to Sew 2-7
8 —
9 —
?
Index
!
Page 65
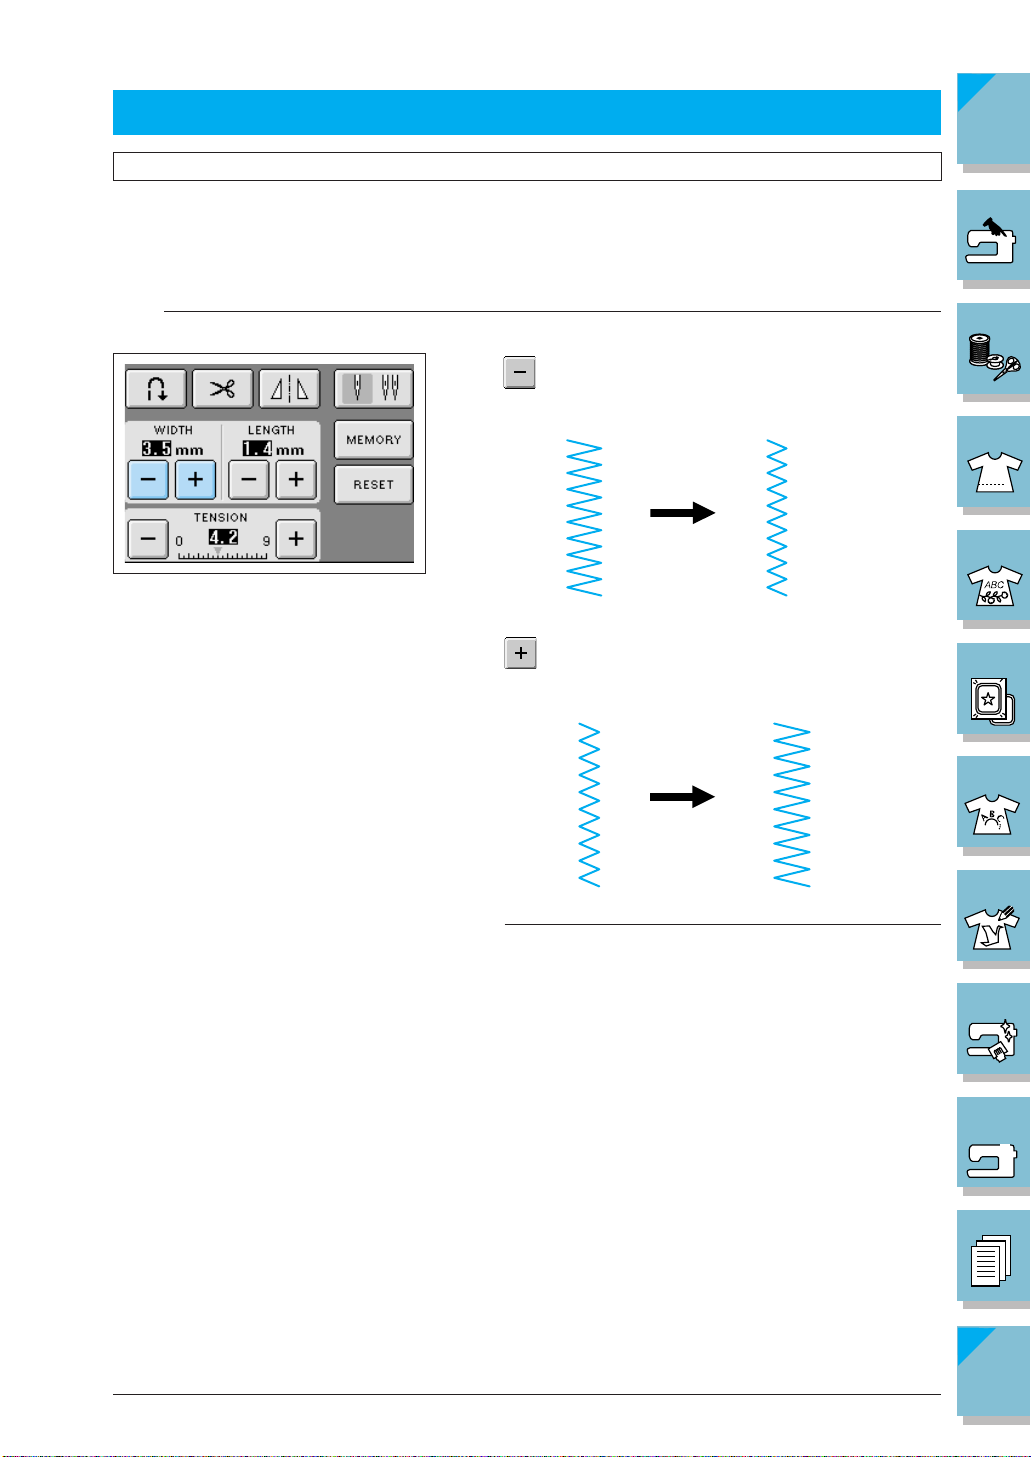
STITCH SETTINGS
Setting Stitch Width for Zigzag Stitch Patterns
CONTENTS
You can change the stitch width of each zigzag stitch. Normally, the machine automatically sets
an appropriate zigzag stitch pattern width when the stitch pattern is selected. Follow the steps
below when you want to change the zigzag stitch pattern width.
Note
It is not possible to change the width of some stitches (see page 2-10 for reference ).
Press to narrow the zigzag stitch pattern width. The
value in the display gets smaller.
Press to widen the zigzag stitch pattern width. The
value in the display gets bigger.
1 —
2 —
3 —
4 —
5 —
6 —
Note
For an alternate method of changing stitch width using
the speed controller (see page 3-34).
2-8 Getting Ready to Sew
7 —
8 —
9 —
?
Index
!
Page 66
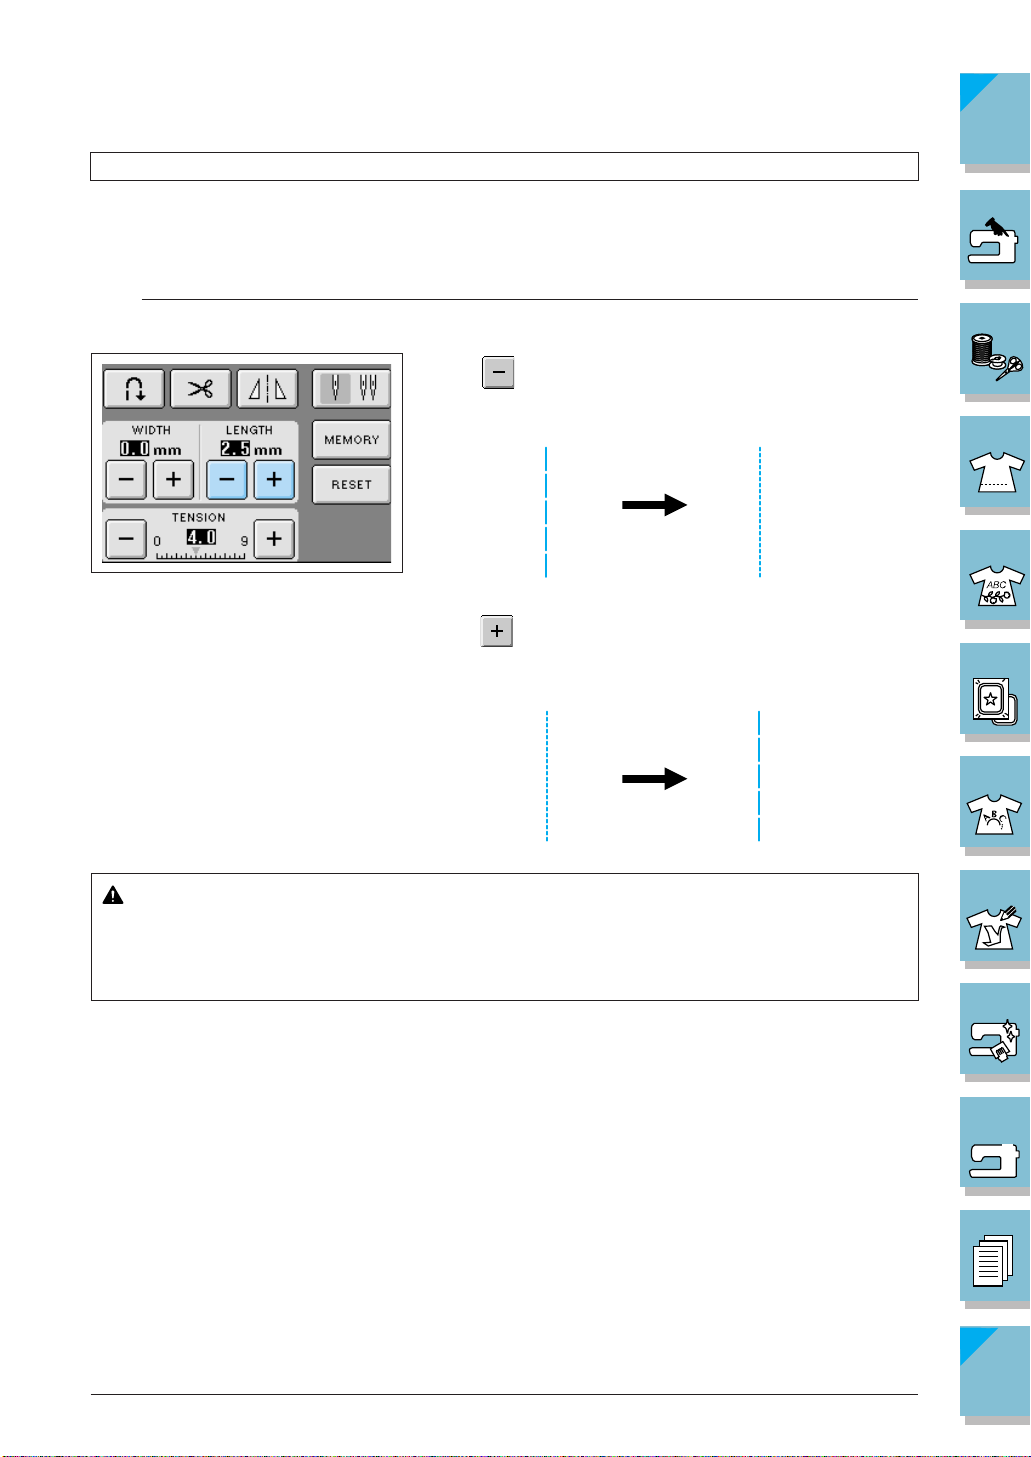
Setting the Stitch Length
CONTENTS
Y our machine automatically sets the stitch length when you select a stitch. However , there may be
times when you want to change the stitch length. With this machine, you can change the length of
each individual stitch in a seam.
Note
It is not possible to change the length of some stitches (see page 2-10 for reference).
Press to shorten the stitch length. The value in the
display gets smaller.
Press to lengthen the stitch length. The value in the
display gets bigger.
1 —
2 —
3 —
4 —
5 —
6 —
CAUTION
If the stitches get bunched together, lengthen the stitch length and continue sewing. Do
not continue sewing without lengthening the stitch length, otherwise the needle may
break and cause injury.
Getting Ready to Sew 2-9
7 —
8 —
9 —
?
Index
!
Page 67

■ Stitch Pattern Width/ Stitch Length Settings Table
CONTENTS
Pattern
Stitch width [mm (inch.)] Stitch length [mm (inch.)]
Auto. Manual Auto. Manual
0.0 0.0 - 7.0 2.5 0.2 - 5.0
(0) (0 - 1/4) (3/32) (1/64 - 3/16)
0.0 0.0 - 7.0 2.5 0.2 - 5.0
(0) (0 - 1/4) (3/32) (1/64 - 3/16)
——
——
0.0 0.0 - 7.0 2.5 1.5 - 4.0
(0) (0 - 1/4) (3/32) (1/16 - 3/16)
1.0 1.0 - 3.0 2.5 1.0 - 4.0
(1/16) (1/16 - 1/8) (3/32) (1/16 - 3/16)
0.0 0.0 - 7.0 2.5 1.0 - 4.0
(0) (0 - 1/4) (3/32) (1/16 - 3/16)
0.0 0.0 - 7.0 20.0 5.0 - 30.0
(0) (0 - 1/4) (3/4) (3/16 - 1-3/16)
3.5 0.0 - 7.0 1.4 0.0 - 4.0
(1/8) (0 - 1/4) (1/16) (0 - 3/16)
3.5 0.0 - 7.0 1.4 0.0 - 4.0
(1/8) (0 - 1/4) (1/16) (0 - 3/16)
3.5 2.5 - 5.0 1.4 0.3 - 4.0
(1/8) (3/32 - 3/16) (1/16) (1/64 - 3/16)
3.5 2.5 - 5.0 1.4 0.3 - 4.0
(1/8) (3/32 - 3/16) (1/16) (1/64 - 3/16)
5.0 1.5 - 7.0 1.0 0.2 - 4.0
(3/16) (1/16 - 1/4) (1/16) (1/64 - 1/16)
5.0 1.5 - 7.0 1.0 0.2 - 4.0
(3/16) (1/16 - 1/4) (1/16) (1/64 - 1/16)
3.5 2.5 - 5.0 2.0 1.0 - 4.0
(1/8) (3/32 - 3/16) (1/16) (1/16 - 3/16)
5.0 2.5 - 5.0 2.5 1.0 - 4.0
(3/16) (3/32 - 3/16) (3/32) (1/16 - 3/16)
5.0 3.5 - 5.0 2.5 1.0 - 4.0
(3/16) (1/8 - 3/16) (3/32) (1/16 - 3/16)
5.0 0.0 - 7.0 2.5 0.5 - 4.0
(3/16) (0 - 9/32) (3/32) (1/32 - 3/16)
5.0 0.0 - 7.0 2.5 0.5 - 4.0
(3/16) (0 - 9/32) (3/32) (1/32 - 3/16)
4.0 0.0 - 7.0 4.0 1.0 - 4.0
(3/16) (0 - 1/4) (3/16) (1/16 - 3/16)
2.5 0.2 - 5.0
(3/32) (1/64 - 3/16)
2.5 0.2 - 5.0
(3/32) (1/64 - 3/16)
Pattern
Stitch width [mm (inch.)] Stitch length [mm (inch.)]
Auto. Manual Auto. Manual
5.0 0.0 - 7.0 4.0 1.0 - 4.0
(3/16) (0 - 1/4) (3/16) (1/16 - 3/16)
6.0 1.0 - 7.0 3.0 1.0 - 4.0
(15/64) (1/16 - 1/4) (1/8) (1/16 - 3/16)
6.0 1.0 - 7.0 1.8 1.0 - 4.0
(15/64) (1/16 - 1/4) (1/16) (1/16 - 3/16)
0.0 0.0 - 2.5 2.5 0.2 - 5.0
(0) (0 - 3/32) (3/32) (1/64 - 3/16)
3.5 3.5 - 5.0 1.4 0.0 - 4.0
(1/8) (1/8 - 3/16) (1/16) (0 - 3/16)
3.5 3.5 - 5.0 2.0 1.0 - 4.0
(1/8) (1/8 - 3/16) (1/16) (1/16 - 3/16)
5.0 3.5 - 5.0 2.5 1.0 - 4.0
(3/16) (1/8 - 3/16) (3/32) (1/16 - 3/16)
5.0 3.5 - 5.0 2.5 1.0 - 4.0
(3/16) (1/8 - 3/16) (3/32) (1/16 - 3/16)
5.5 0.0 - 7.0 1.6 0.2 - 5.0
(7/32) (0 - 1/4) (1/16) (1/64 - 3/16)
1.5 0.0 - 7.0 1.6 0.2 - 5.0
(1/16) (0 - 1/4) (1/16) (1/64 - 3/16)
0.0 0.0 - 7.0 2.5 1.0 - 4.0
(0) (0 - 1/4) (3/32) (1/16 - 3/16)
3.5 0.0 - 7.0 1.4 0.0 - 4.0
(1/8) (0 - 1/4) (1/16) (0 - 3/16)
1.5 0.5 - 5.0 1.2 1.0 - 4.0
(1/16) (1/64 - 3/16) (1/16) (1/16 - 3/16)
7.0 1.0 - 7.0 1.6 1.0 - 4.0
(1/4) (1/16 - 1/4) (1/16) (1/16 - 3/16)
0.0 +3.0 - -3.0 2.0 1.0 - 3.5
(0) (+1/8 - -1/8) (1/16) (1/16 - 1/8)
0.0 +3.0 - -3.0 2.0 1.0 - 3.5
(0) (+1/8 - -1/8) (1/16) (1/16 - 1/8)
3.5 2.5 - 5.0 2.5 1.6 - 4.0
(1/8) (3/32 - 3/16) (3/32) (1/16 - 3/16)
4.0 0.0 - 7.0 2.5 0.2 - 4.0
(3/16) (0 - 1/4) (3/32) (1/64 - 1/16)
5.0 2.5 - 7.0 0.5 0.1 - 1.0
(3/16) (3/32 - 1/4) (1/32) (1/64 - 1/16)
7.0 0.0 - 7.0 1.4 1.0 - 4.0
(1/4) (0 - 1/4) (1/16) (1/16 - 3/16)
1 —
2 —
3 —
4 —
5 —
6 —
7 —
8 —
9 —
!
?
2-10 Getting Ready to Sew
Index
Page 68
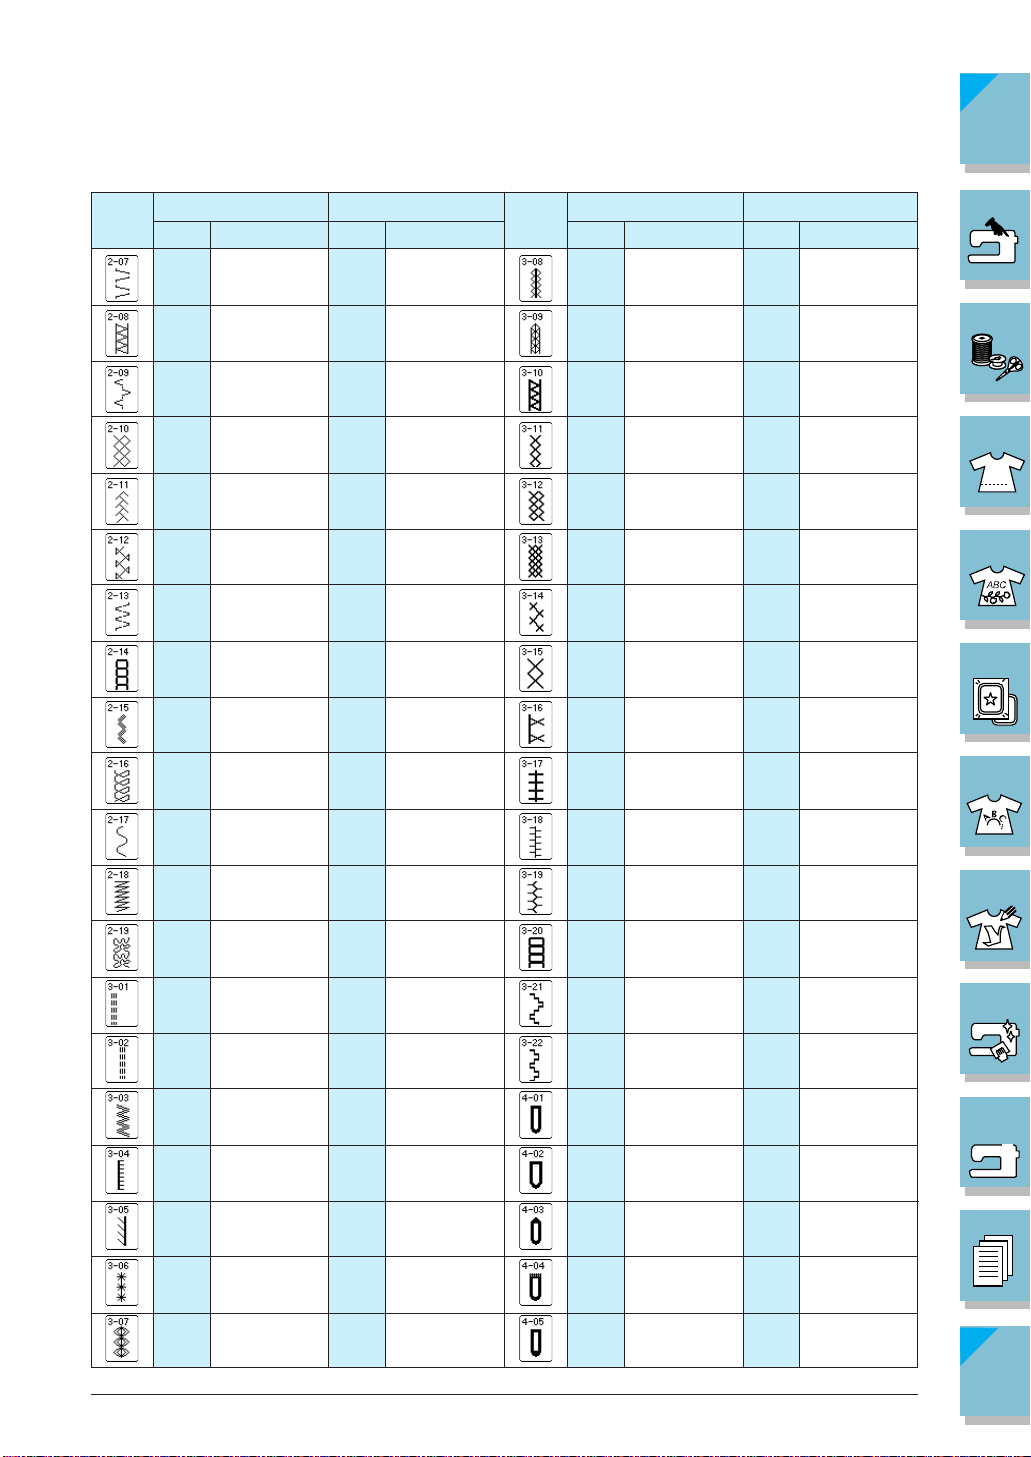
CONTENTS
Pattern Pattern
Stitch width [mm (inch.)] Stitch length [mm (inch.)]
Auto. Manual Auto. Manual
4.0 0.0 - 7.0 1.2 0.2 - 4.0
(1/16) (0 - 1/4) (1/16) (1/64 - 1/16)
5.0 2.5 - 7.0 2.5 1.0 - 4.0
(3/16) (3/32 - 1/4) (3/32) (1/16 - 3/16)
5.0 0.0 - 7.0 1.2 0.2 - 4.0
(3/16) (0 - 1/4) (1/16) (1/64 - 1/16)
5.0 0.0 - 7.0 1.6 1.0 - 4.0
(3/16) (0 - 1/4) (1/16) (1/16 - 3/16)
5.0 0.0 - 7.0 2.5 1.0 - 4.0
(3/16) (0 - 1/4) (3/32) (1/16 - 3/16)
5.0 2.5 - 7.0 2.5 1.0 - 4.0
(3/16) (3/32 - 1/4) (3/32) (1/16 - 3/16)
4.0 0.0 - 7.0 1.0 0.2 - 4.0
(3/16) (0 - 1/4) (1/16) (1/61 - 3/16)
4.0 0.0 - 7.0 3.0 2.0 - 4.0
(3/16) (0 - 1/4) (1/8) (1/16 - 3/16)
4.0 0.0 - 7.0 2.5 1.0 - 4.0
(3/16) (0 - 1/4) (3/32) (1/16 - 3/16)
5.5 0.0 - 7.0 1.6 1.0 - 4.0
(3/16) (0 - 1/4) (1/16) (1/16 - 3/16)
5.0 1.5 - 7.0 1.0 0.2 - 4.0
(3/16) (1/16 - 1/4) (1/16) (1/64 - 3/16)
6.0 1.0 - 7.0 1.0 0.2 - 4.0
(15/64) (1/16 - 1/4) (1/16) (1/64 - 3/16)
7.0 1.0 - 7.0 1.6 1.0 - 4.0
(1/4) (1/16 - 1/4) (1/16) (1/16 - 3/16)
1.0 1.0 - 7.0 2.5 1.5 - 4.0
(1/16) (1/16 - 1/4) (3/32) (1/16 - 3/16)
3.5 1.0 - 7.0 2.5 1.5 - 4.0
(1/8) (1/16 - 1/4) (3/32) (1/16 - 3/16)
6.0 1.5 - 7.0 3.0 1.0 - 4.0
(15/64) (1/16 - 1/4) (1/8) (1/16 - 3/16)
3.5 1.5 - 7.0 2.5 1.6 - 4.0
(1/8) (1/16 - 1/4) (3/32) (1/16 - 3/16)
3.0 1.5 - 7.0 3.5 1.6 - 4.0
(1/8) (1/16 - 1/4) (1/8) (1/16 - 3/16)
6.0 1.5 - 7.0 3.0 1.5 - 4.0
(15/64) (1/16 - 1/4) (1/8) (1/16 - 3/16)
5.0 1.5 - 7.0 3.5 1.6 - 4.0
(3/16) (1/16 - 1/4) (1/8) (1/16 - 3/16)
Stitch width [mm (inch.)] Stitch length [mm (inch.)]
Auto. Manual Auto. Manual
5.0 1.5 - 7.0 3.5 1.5 - 4.0
(3/16) (1/16 - 1/4) (1/8) (1/16 - 3/16)
5.0 1.5 - 7.0 3.5 1.6 - 4.0
(3/16) (1/16 - 1/4) (1/8) (1/16 - 3/16)
5.0 1.5 - 7.0 4.0 1.5 - 4.0
(3/16) (1/16 - 1/4) (3/16) (1/16 - 3/16)
4.0 1.5 - 7.0 2.5 1.5 - 4.0
(3/16) (1/16 - 1/4) (3/32) (1/16 - 3/16)
5.0 1.5 - 7.0 2.5 1.0 - 4.0
(3/16) (1/16 - 1/4) (3/32) (1/16 - 3/16)
6.0 1.5 - 7.0 3.5 1.5 - 4.0
(15/64) (1/16 - 1/4) (1/8) (1/16 - 3/16)
6.0 1.5 - 7.0 1.6 1.0 - 4.0
(15/64) (1/16 - 1/4) (1/16) (1/16 - 3/16)
6.0 1.5 - 7.0 3.0 1.5 - 4.0
(15/64) (1/16 - 1/4) (1/8) (1/16 - 3/16)
6.0 1.5 - 7.0 4.0 1.5 - 4.0
(15/64) (1/16 - 1/4) (3/16) (1/16 - 3/16)
4.0 1.5 - 7.0 2.5 1.5 - 4.0
(3/16) (1/16 - 1/4) (3/32) (1/16 - 3/16)
5.0 1.5 - 7.0 2.0 1.5 - 4.0
(3/16) (1/16 - 1/4) (1/16) (1/16 - 3/16)
6.0 1.5 - 7.0 2.0 1.5 - 4.0
(15/64) (1/16 - 1/4) (1/16) (1/16 - 3/16)
5.0 1.5 - 7.0 3.0 1.5 - 4.0
(3/16) (1/16 - 1/4) (1/8) (1/16 - 3/16)
6.0 1.5 - 7.0 1.6 1.0 - 4.0
(15/64) (1/16 - 1/4) (1/16) (1/16 - 3/16)
5.0 1.5 - 7.0 1.6 1.0 - 4.0
(3/16) (1/16 - 1/4) (1/16) (1/16 - 3/16)
5.0 3.0 - 5.0 0.4 0.2 - 1.0
(3/16) (1/8 - 3/16) (1/64) (1/64 - 1/16)
5.5 3.5 - 5.5 0.4 0.2 - 1.0
(7/32) (1/8 - 7/32) (1/64) (1/64 - 1/16)
5.0 3.0 - 5.0 0.4 0.2 - 1.0
(3/16) (1/8 - 3/16) (1/64) (1/64 - 1/16)
5.0 3.0 - 5.0 0.4 0.2 - 1.0
(3/16) (1/8 - 3/16) (1/64) (1/64 - 1/16)
5.0 3.0 - 5.0 0.4 0.2 - 1.0
(3/16) (1/8 - 3/16) (1/64) (1/64 - 1/16)
1 —
2 —
3 —
4 —
5 —
6 —
7 —
8 —
9 —
!
?
Getting Ready to Sew 2-11
Index
Page 69

CONTENTS
Pattern Pattern
Stitch width [mm (inch.)] Stitch length [mm (inch.)]
Auto. Manual Auto. Manual
5.0 3.0 - 5.0 0.4 0.2 - 1.0
(3/16) (1/8 - 3/16) (1/64) (1/64 - 1/16)
5.0 3.0 - 5.0 0.4 0.2 - 1.0
(3/16) (1/8 - 3/16) (1/64) (1/64 - 1/16)
5.5 3.5 - 5.5 0.4 0.2 - 1.0
(7/32) (1/8 - 7/32) (1/64) (1/64 - 1/16)
5.0 3.0 - 5.0 0.4 0.2 - 1.0
(7/32) (1/8 - 7/32) (1/64) (1/64 - 1/16)
6.0 3.0 - 6.0 1.0 0.5 - 2.0
(15/64) (1/8 - 15/64) (1/16) (1/32 - 1/16)
6.0 3.0 - 6.0 1.5 1.0 - 3.0
(15/64) (1/8 - 15/64) (1/16) (1/1 - 1/8)
5.0 0.0 - 6.0 2.0 0.2 - 4.0
(3/16) (0 - 15/64) (1/16) (1/64 - 3/16)
7.0 3.0 - 7.0 0.5 0.3 - 1.0
(1/4) (1/8 - 1/4) (1/32) (1/64 - 1/16)
7.0 3.0 - 7.0 0.5 0.3 - 1.0
(1/4) (1/8 - 1/4) (1/32) (1/64 - 1/16)
7.0 3.0 - 7.0 0.5 0.3 - 1.0
(1/4) (1/8 - 1/4) (1/32) (1/64 - 1/16)
7.0 2.5 - 7.0 2.0 0.4 - 2.5
(1/4) (3/32 - 1/4) (1/16) (1/64 - 1/16)
7.0 2.5 - 7.0 2.0 0.4 - 2.5
(1/4) (3/32 - 1/4) (1/16) (1/64 - 1/16)
2.0 1.0 - 3.0 0.4 0.3 - 1.0
(1/16) (1/16 - 1/8) (1/64) (1/64 - 1/16)
3.5 2.5 - 4.5
(1/8) (3/32 - 3/16)
7.0 7.0 6.0 5.0 7.0 7.0 6.0 5.0
(1/4) (1/4 15/64 3/16) (1/4) (1/4 15/64 3/16)
——
Stitch width [mm (inch.)] Stitch length [mm (inch.)]
Auto. Manual Auto. Manual
————
————
————
————
————
————
————
*— : Non - adjustable
1 —
2 —
3 —
4 —
5 —
6 —
7 —
8 —
————
————
————
————
————
2-12 Getting Ready to Sew
9 —
?
Index
!
Page 70

Setting the Thread Tension
Your machine will automatically set the thread tension when you select a stitch. However, you
may need to change the thread tension, depending on the fabric and thread being used.
■ Proper Thread Tension
1
2
3
4
The upper and lower threads should cross near the center
of the fabric. If thread tension is not properly set, the seam
may have a poor finish or the fabric may pucker.
1 Reverse side
2 Surface
3 Upper thread
4 Bobbin thread
CONTENTS
1 —
2 —
3 —
4 —
5 —
3
3
1
2
1
2
4
4
If the upper thread tension is too strong (the bobbin thread
can be seen on the top side of the fabric), press the
key.
1 Bobbin thread
2 Upper thread
3 Surface
4 Locks appear on surface of fabric
If the upper thread tension is too weak (the upper thread
can be seen on the bottom side of the fabric), press the
key.
1 Upper thread
2 Bobbin thread
3 Reverse side
4 Locks appear on reverse side of fabric
Note
If you change the thread tension setting, but turn off the
power or select another stitch afterwards, the thread tension will return to the default setting.
6 —
7 —
8 —
9 —
!
?
Getting Ready to Sew 2-13
Index
Page 71
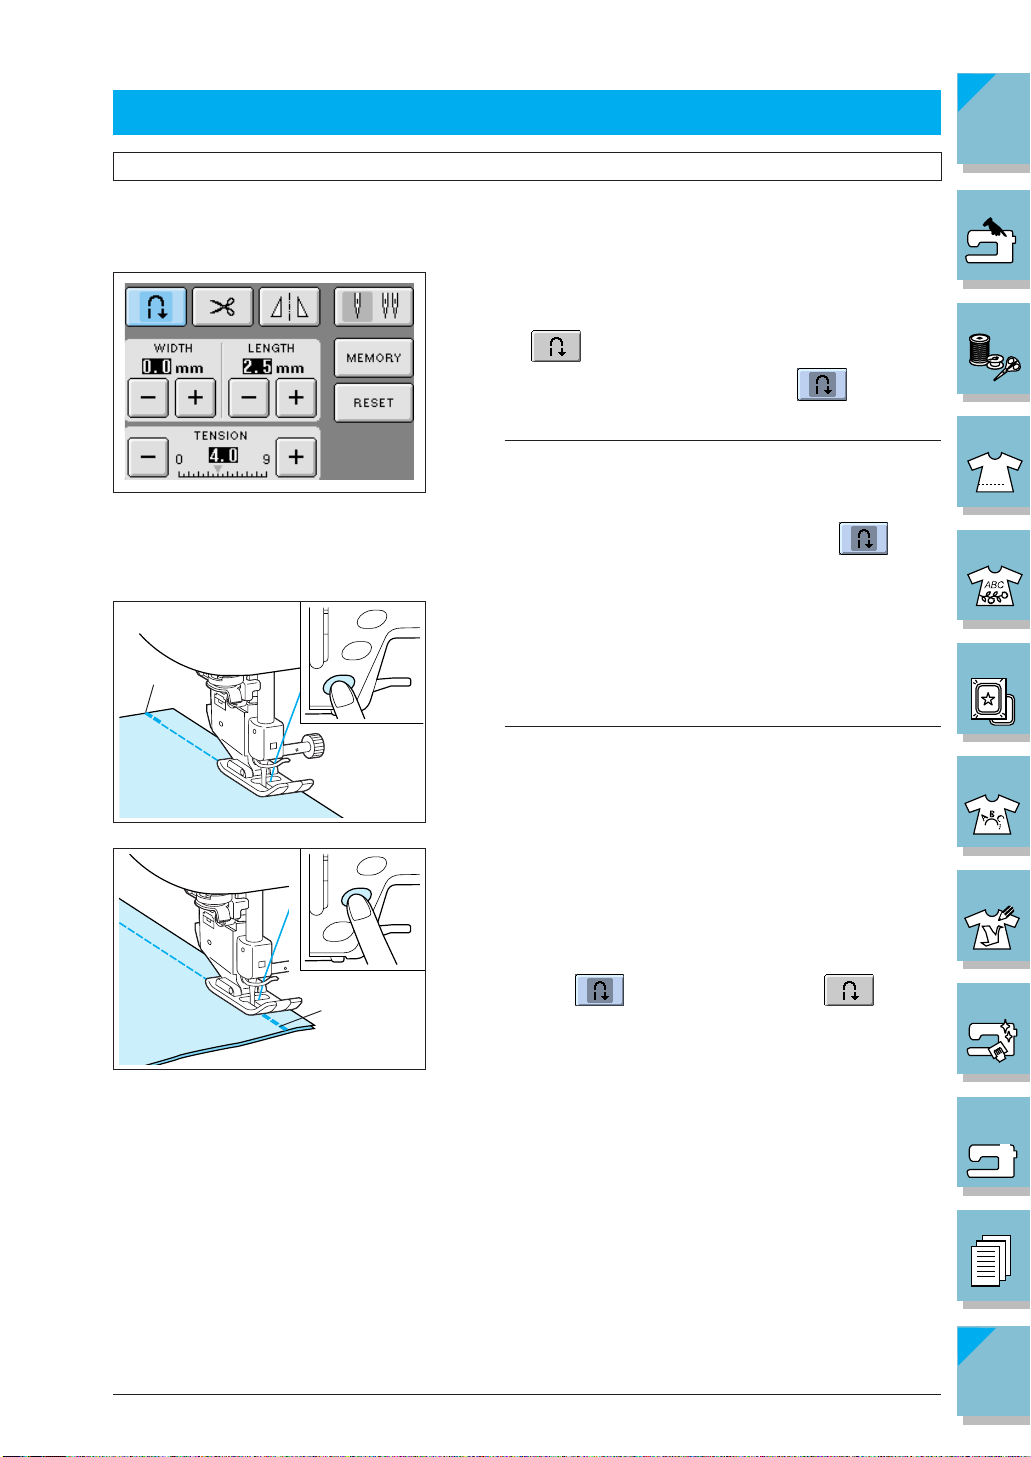
MACHINE FUNCTION SETTINGS
Automatic Reinforcement Stitching
CONTENTS
After selecting a stitch pattern, turn on the automatic reinforcement stitching function before sewing, and the machine will automatically sew reinforcement stitches (or reverse stitches, depending
on the stitch pattern) at the beginning and end of sewing.
1. Select a stitch pattern.
2. Press to set the automatic reinforcement stitching function. The key will display as .
Note
Some stitches, such as buttonholes and bar tacks, require
reinforcement stitches at the beginning of sewing. If you
select one of these stitches, the machine will automati-
cally turn on this function (the key appears as when
the stitch is selected).
3. Set the fabric in the start position and start sewing. The
5
1
6
machine will automatically sew reverse stitches (or
reinforcement stitches) and then continue sewing.
1 Reverse stitches (or reinforcement stitches)
Note
If you press the “Start/Stop” button to pause sewing, press
it again to continue. The machine will not sew reverse
reinforcement stitches again.
1 —
2 —
3 —
4 —
5 —
6 —
5
6
1
2-14 Getting Ready to Sew
4. Press the “Reverse/Reinforcement Stitch” button. The
machine will sew reverse stitches (or reinforcement
stitches) and stop.
To turn off the automatic reinforcement stitching function, press again, so it appears as .
1 Reverse stitches (or reinforcement stitches)
7 —
8 —
9 —
?
Index
!
Page 72

Using the Automatic Thread Cutter
After selecting a stitch pattern, turn on the automatic thread cutting function before sewing, and
the machine will automatically sew reinforcement stitches (or reverse stitches, depending on the
stitch pattern) at the beginning and end of sewing, and trim the threads at the end of sewing. This
function is useful when sewing buttonholes and bar tacks.
CONTENTS
1 —
1
1. Select a stitch pattern.
2. Press to set the automatic thread cutting function. The key will display as .
Note
This function is set automatically when sewing embroidery.
3. Set the fabric in the start position and start sewing. The
5
machine will automatically sew reverse stitches (or
reinforcement stitches) and then continue sewing.
1 Reverse stitches (or reinforcement stitches)
2 —
3 —
4 —
5 —
6
Note
If you use the “Start/Stop” button to pause sewing, press
the same button again to continue. The beginning reverse/
reinforcement stitches will not be sewn again.
6 —
5
6
4. Press the “Reverse/Reinforcement Stitching” button. The
machine will sew reverse stitches (or reinforcement
stitches), then trim the thread.
T o turn off the automatic thread cutting function, press
the again, so it appears as .
7 —
1
1 Sews reverse stitches (or reinforcement stitches) and
automatically trims the thread.
Getting Ready to Sew 2-15
8 —
9 —
?
Index
!
Page 73

CONTENTS
1 —
2 —
3 —
4 —
5 —
6 —
7 —
8 —
9 —
!
?
2-16 Getting Ready to Sew
Index
Page 74

Chapter 3 Sewing Utility Stitches
QUICK REFERENCE TABLE
CONTENTS
Pattern
Name of pattern
Straight stitch (Left)
Straight stitch (Left)
Straight stitch (Middle)
Straight stitch (Middle)
Triple stretch stitch
Stem stitch
Decorative stitch
Type of
presser
foot
Use
General sewing, gather, pintuck, etc. Reverse stitch
is sewn while pressing “Reverse/Reinforcement Stitch”
button.
General sewing, gather, pintuck, etc. Reinforcement
stitch is sewn while pressing “Reverse/Reinforcement
Stitch” button.
General sewing, gather, pintuck, etc. Reverse stitch
is sewn while pressing “Reverse/Reinforcement Stitch”
button.
General sewing, gather, pintuck, etc. Reinforcement
stitch is sewn while pressing “Reverse/Reinforcement
Stitch” button.
General sewing for reinforcement and decorative
topstitching
Reinforced stitching, sewing and decorative applications
Decorative stitching, top stitching
Twin
needle
possi-
bility
OK
( J )
OK
( J )
OK
( J )
OK
( J )
OK
( J )
OK
( J )
OK
( J )
1 —
2 —
3 —
4 —
5 —
6 —
Basting stitch
Zigzag stitch
Zigzag stitch
Zigzag stitch (right)
Zigzag stitch (left)
2 step elastic zigzag
3 step elastic zigzag
Overcasting stitch
Basting
For overcasting, mending. Reverse stitch is sewn while
pressing “Reverse/Reinforcement Stitch” button.
For overcasting, mending. Reinforcement stitch is
sewn while pressing “Reverse/Reinforcement Stitch”
button.
Start from right needle position, zigzag sew at left.
Start from left needle position, zigzag sew at right.
Overcasting (medium weight and stretch fabrics), tape
and elastic
Overcasting (medium, heavyweight and stretch fabrics), tape and elastic
Reinforcing of light and medium weight fabrics
NO
OK
( J )
OK
( J )
OK
( J )
OK
( J )
OK
( J )
OK
( J )
NO
Sewing Utility Stitches 3-1
7 —
8 —
9 —
?
Index
!
Page 75

CONTENTS
Pattern
Name of pattern
Overcasting stitch
Overcasting stitch
Overcasting stitch
Overcasting stitch
Overcasting stitch
Overcasting stitch
Single diamond overcast
Type of
presser
foot
Use
Reinforcing of heavyweight fabric
Reinforcing of medium, heavyweight and easily
frayable fabrics or decorative stitching.
Reinforced seaming of stretch fabric
Reinforcing of medium stretch fabric and heavyweight
fabric, decorative stitching
Reinforcement of stretch fabric or decorative stitching
Stretch knit seam
Reinforcement and seaming stretch fabric
Twin
needle
possi-
bility
NO
NO
OK
( J )
OK
( J )
OK
( J )
NO
OK
( J )
1 —
2 —
3 —
4 —
5 —
6 —
Single diamond overcast
With side cutter
With side cutter
With side cutter
With side cutter
With side cutter
Piecing stitch (right)
Piecing stitch (left)
Reinforcement of stretch fabric
Straight stitch while cutting fabrics
Zigzag stitch while cutting fabrics
Overcasting stitch while cutting fabrics
Overcasting stitch while cutting fabrics
Overcasting stitch while cutting fabrics
Piecework/patchwork
6.5 mm (1/4 inch) right seam allowance
Piecework/patchwork
6.5 mm (1/4 inch) left seam allowance
3-2 Sewing Utility Stitches
OK
( J )
NO
NO
NO
NO
NO
NO
NO
7 —
8 —
9 —
?
Index
!
Page 76

CONTENTS
Name of patternPattern
Hand-look quilting
Quilting appliqué zigzag
stitch
Quilting appliqué stitch
Quilting stippling
Blind hem stitch
Blind hem stitch stretch
Blanket stitch
Type of
presser
foot
Use
Quilting stitch made to look like hand quilting stitch
Zigzag stitch for quilting and sewing on appliqué
quilt pieces
Quilting stitch for invisible appliqué or attaching
binding
Background quilting
Hemming woven fabrics
Hemming stretch fabric
Appliqués, decorative blanket stitch
Twin
needle
possi-
bility
NO
NO
NO
NO
NO
NO
OK
( J )
1 —
2 —
3 —
4 —
5 —
6 —
Shell tuck edge
Satin scallop stitch
Scallop stitch
Patchwork join stitch
Patchwork double overlock
stitch
Couching stitch
Smocking stitch
Feather stitch
Shell tuck edge finish on fabrics
Decorating collar of blouse, edge of handkerchief
Decorating collar of blouse, edge of handkerchief
Patchwork stitches, decorative stitching
Patchwork stitches, decorative stitching
Decorative stitching attaching cord and couching
Smocking, decorative stitching
Fagoting, decorative stitching
OK
( J )
OK
( J )
NO
OK
( J )
OK
( J )
OK
( J )
OK
( J )
OK
( J )
Sewing Utility Stitches 3-3
7 —
8 —
9 —
?
Index
!
Page 77

CONTENTS
Pattern
Name of pattern
Fagoting cross stitch
Tape attaching
Ladder stitch
Rick-rack stitch
Decorative stitch
Serpentine stitch
Decorative stitch
Type of
presser
foot
Use
Fagoting, bridging and decorative stitching
Attaching tape to seam in stretch fabric
Decorative stitching
Decorative top stitching
Decorative stitching
Decorative stitching and attaching elastic
Decorative stitching and appliqué
Twin
needle
possi-
bility
OK
( J )
OK
( J )
NO
OK
( J )
OK
( J )
OK
( J )
OK
( J )
1 —
2 —
3 —
4 —
5 —
6 —
Decorative stippling stitch
Hemstitching
Hemstitching
Hemstitching zigzag
Hemstitching
Hemstitching
Hemstitching
Hemstitching
Decorative stitching
Decorative hems, triple straight at left
Decorative hems, triple straight at center
Decorative hems, top stitching
Decorative hems, lace attaching pin stitch
Decorative hems
Decorative hems daisy stitch
Heirloom, decorative hems
3-4 Sewing Utility Stitches
NO
OK
( J )
OK
( J )
OK
( J )
NO
NO
NO
NO
7 —
8 —
9 —
?
Index
!
Page 78
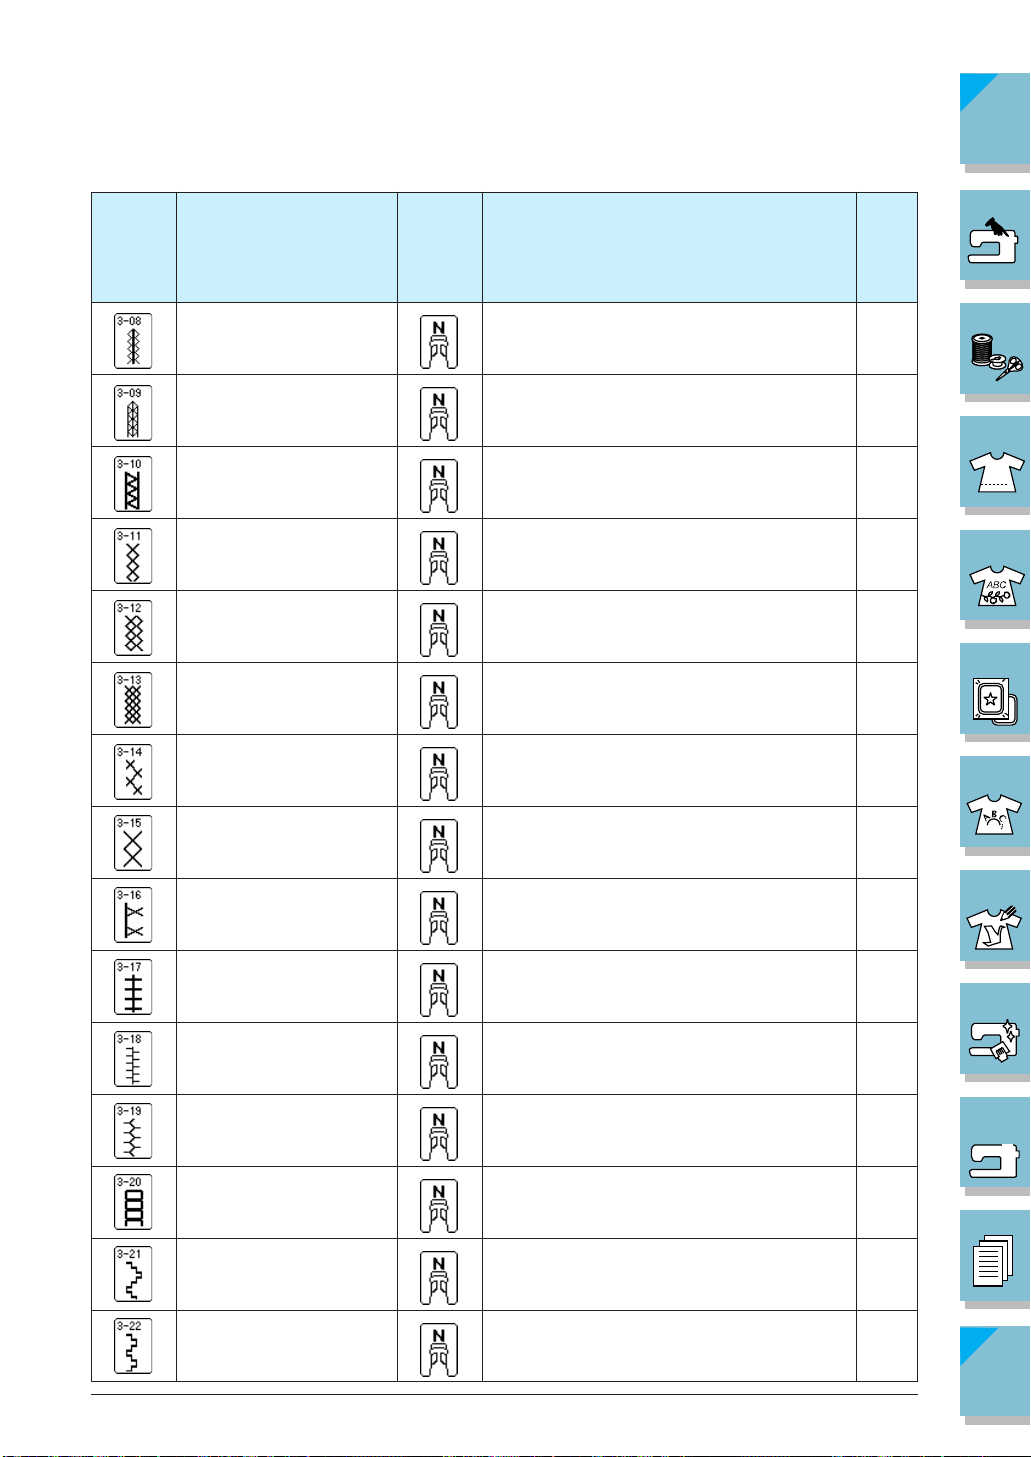
CONTENTS
Pattern
Name of pattern
Hemstitching
Hemstitching
Hemstitching
Hemstitching
Honeycomb stitch
Honeycomb stitch
Hemstitching
Type of
presser
foot
Use
Heirloom, decorative hems
Heirloom, decorative hems
Heirloom, decorative hems
Heirloom, decorative hems
Heirloom, decorative hems
Heirloom, decorative hems
Heirloom, decorative hems
Twin
needle
possi-
bility
NO
OK
( J )
OK
( J )
OK
( J )
OK
( J )
OK
( J )
OK
( J )
1 —
2 —
3 —
4 —
5 —
6 —
Hemstitching
Hemstitching
Hemstitching
Hemstitching
Hemstitching
Hemstitching
Hemstitching
Hemstitching
Heirloom, decorative hems
Heirloom, decorative hems
Heirloom, decorative hems
Heirloom, decorative hems
Decorative hems and bridging stitch
Decorative hems. Fagoting attaching ribbon
Decorative hems, smocking
Decorative hems, smocking
NO
OK
( J )
NO
OK
( J )
OK
( J )
OK
( J )
NO
NO
Sewing Utility Stitches 3-5
7 —
8 —
9 —
?
Index
!
Page 79
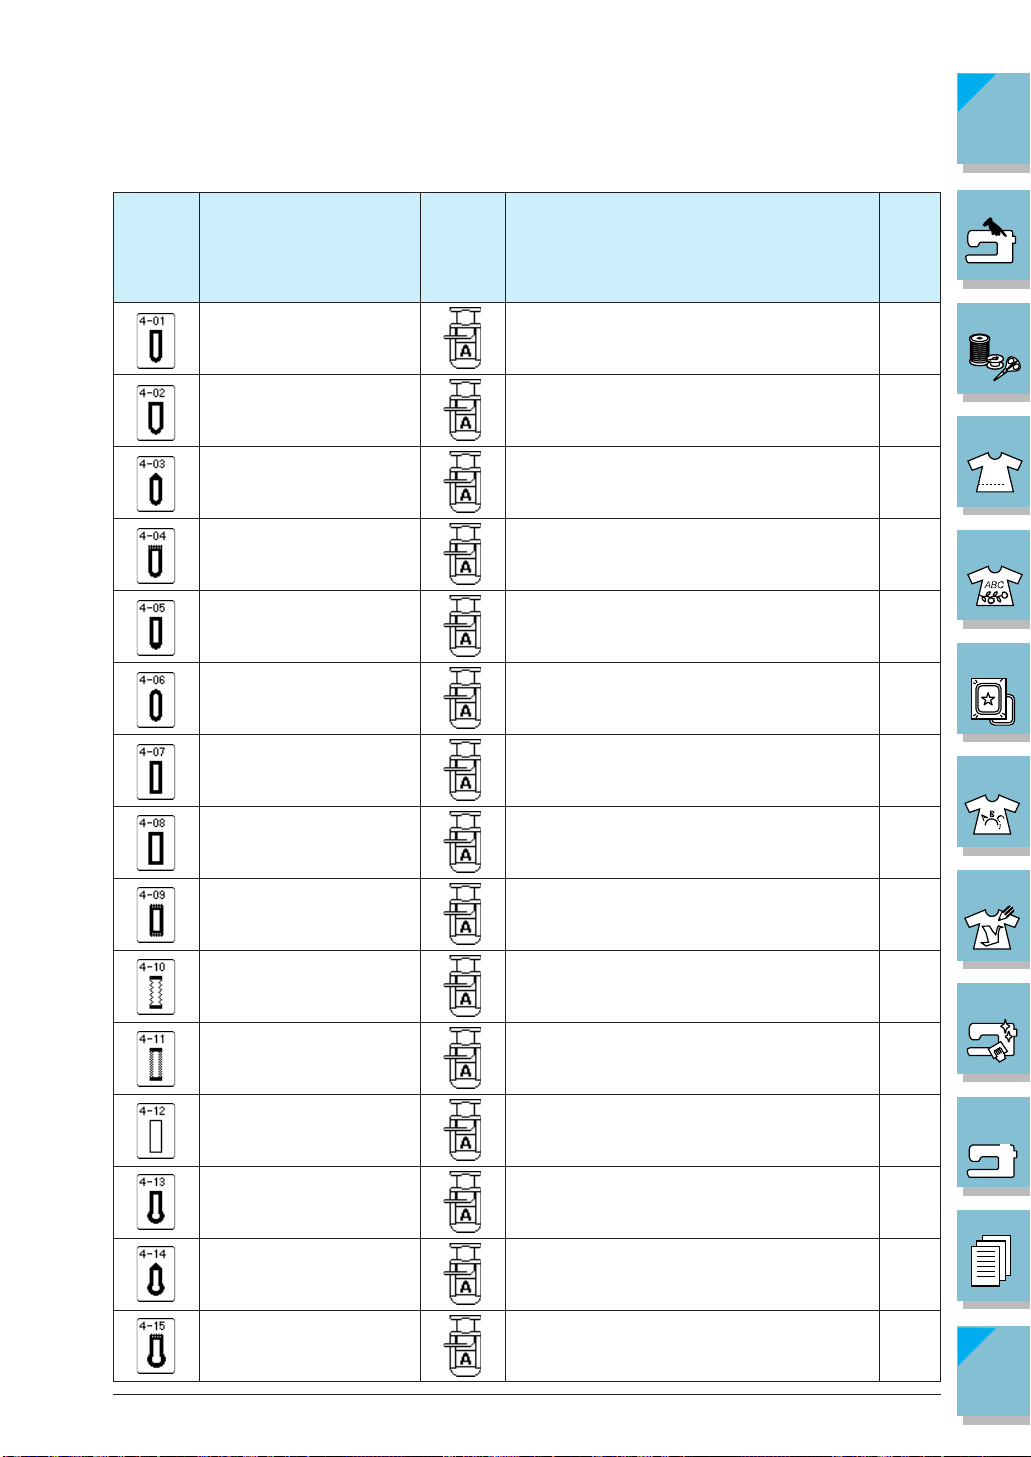
CONTENTS
Name of patternPattern
Narrow rounded buttonhole
Wide round ended buttonhole
Tapered round ended
buttonhole
Round ended buttonhole
Round ended buttonhole
Round double ended
buttonhole
Narrow squared buttonhole
Type of
presser
foot
Use
Buttonhole on light to medium weight fabrics
Buttonholes with extra space for larger buttons
Reinforced waist tapered buttonholes
Buttonholes with vertical bar tack in heavyweight
fabrics
Buttonholes with bar tack
Buttonhole for fine, medium to heavyweight fabrics
Buttonholes for light to medium weight fabrics
Twin
needle
possi-
bility
NO
NO
NO
NO
NO
NO
NO
1 —
2 —
3 —
4 —
5 —
6 —
Wide squared buttonhole
Squared buttonhole
Stretch buttonhole
Heirloom buttonhole
Bound buttonhole
Keyhole buttonhole
Tapered keyhole buttonhole
Keyhole buttonhole
Buttonholes with extra space for larger decorative
buttons
Heavy-duty buttonholes with vertical bar tacks
Buttonholes for stretch or woven fabrics
Buttonholes for heirloom and stretch fabrics
The first step in making bound buttonholes
Buttonholes in heavyweight or thick fabrics for larger
flat buttons
Buttonholes in medium to heavy weight fabrics for
larger flat buttons
Buttonholes with vertical bar tack for reinforcement
in heavyweight or thick fabrics
3-6 Sewing Utility Stitches
NO
NO
NO
NO
NO
NO
NO
NO
7 —
8 —
9 —
?
Index
!
Page 80

CONTENTS
Name of patternPattern
Darning
Darning
Bar tack
Button sewing
Eyelet
Diagonally left up (Straight)
Reverse (Straight)
Type of
presser
foot
Use
Darning of medium weight fabric
Darning of heavyweight fabric
Reinforcement at opening of pocket, etc.
Attaching buttons
For making eyelet, holes on belt, etc.
For attaching appliqué on tubular pieces of fabric and
mitering corners
For attaching appliqué on tubular pieces of fabric and
mitering corners
Twin
needle
possi-
bility
NO
NO
NO
NO
NO
NO
NO
1 —
2 —
3 —
4 —
5 —
6 —
Diagonally right up
(Straight)
Sideways to left (Straight)
Sideways to right (Straight)
Diagonally left down
(Straight)
Forward (Straight)
Diagonally right down
(Straight)
Sideways to left (Zigzag)
Sideways to right (Zigzag)
For attaching appliqué on tubular pieces of fabric and
mitering corners
For attaching appliqué on tubular pieces of fabric
For attaching appliqué on tubular pieces of fabric
For attaching appliqué on tubular pieces of fabric and
mitering corners
For attaching appliqué on tubular pieces of fabric and
mitering corners
For attaching appliqué on tubular pieces of fabric and
mitering corners
For attaching appliqué on tubular pieces of fabric
For attaching appliqué on tubular pieces of fabric
NO
NO
NO
NO
NO
NO
NO
NO
Sewing Utility Stitches 3-7
7 —
8 —
9 —
?
Index
!
Page 81
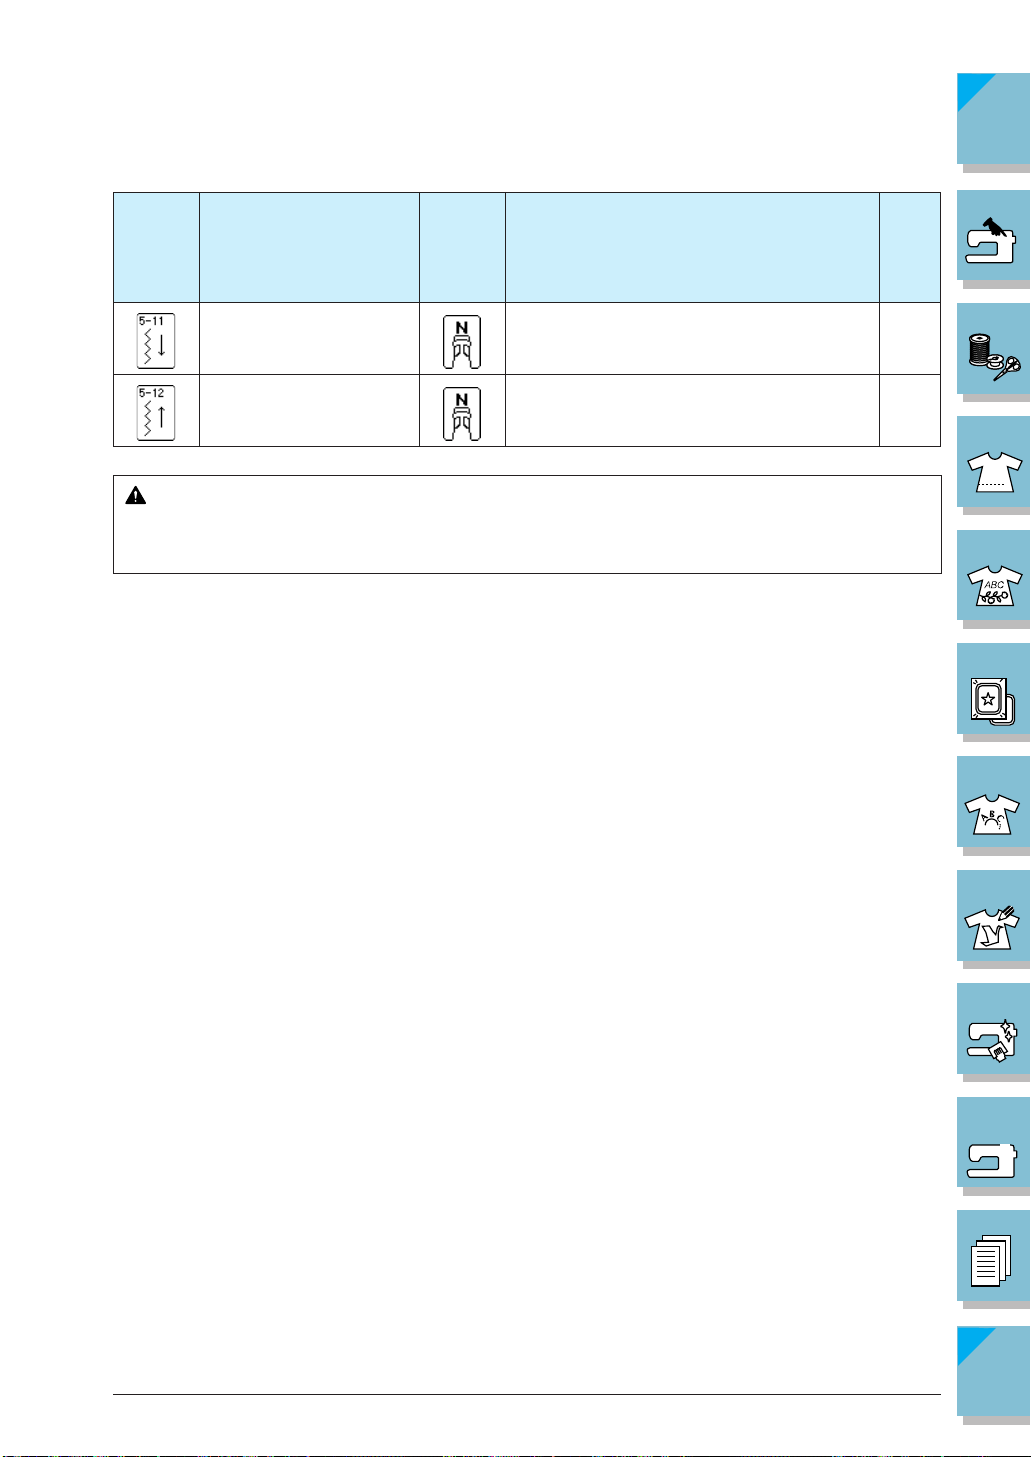
CONTENTS
Name of patternPattern
Forward (Zigzag)
Reverse
(Zigzag)
Type of
presser
foot
Use
For attaching appliqué on tubular pieces of fabric and
mitering corners
For attaching appliqué on tubular pieces of fabric and
mitering corners
needle
possi-
CAUTION
Make sure to use the correct presser foot for each stitch pattern. Otherwise, the needle
may strike the presser foot and bend or break, causing injury.
Twin
bility
NO
NO
1 —
2 —
3 —
4 —
5 —
6 —
3-8 Sewing Utility Stitches
7 —
8 —
9 —
?
Index
!
Page 82
SELECTING UTILITY STITCHES
Selecting a Stitch Pattern
1. Turn the main power switch to ON. The screen
shown at left is displayed. The often-used “1-01
Straight (left)” stitch pattern is automatically selected.
CONTENTS
1 —
1
* Press to view this screen if another screen
displays.
2. Use to find the stitch pat-
2
tern you want.
1 Preview of the selected stitch
2 Stitch selection screen
3. Touch the key of the stitch pattern you want to
sew to select it.
2 —
3 —
4 —
5 —
6 —
Sewing Utility Stitches 3-9
7 —
8 —
9 —
?
Index
!
Page 83

CONTENTS
■ Stitch Selection Screens
Straight/Overcasting/Quilting Stitches Decorative Stitches
Press to go to the next page.
Heirloom Stitches Buttonholes/Bar tacks Multi-directional Sewing
1 —
2 —
3 —
4 —
5 —
6 —
3-10 Sewing Utility Stitches
7 —
8 —
9 —
?
Index
!
Page 84
CONTENTS
■ Using the Mirror Image Key
Depending on the type of utility stitch you select, you may be able to sew a horizontal mirror
image of the stitch pattern.
If is lit when you select a pattern, it will be possible to make a mirror image of the pattern.
CAUTION
If is light gray after you select a stitch pattern, you can not create a horizontal mirror
image of the selected stitch pattern (this is true of buttonholes, multi-directional sewing, and
others).
Press so it appears as to create a horizontal mirror image of the selected stitch pattern.
1 —
2 —
3 —
4 —
5 —
6 —
▼
Sewing Utility Stitches 3-11
7 —
8 —
9 —
?
Index
!
Page 85

CONTENTS
■ Saving Your Preferred Stitch Settings
The settings for zigzag stitch width, stitch length, thread tension, automatic thread cutting or automatic reinforcement stitching, etc., are preset by the computer for each stitch pattern. If you want
to change those settings, input the new settings and press for each pattern you want to
change. The new settings will replace the computer settings.
Example: You always use a length setting of
2.0 mm (1/16 inch) for a straight stitch
1. Select the straight stitch.
2. Set the length to 2.0 mm (1/16 inch), and press .
3. Go back to the original screen, or turn off the machine. The next
time you select the same straight stitch, the stitch length setting
should be 2.0 mm, as you saved it.
CAUTION
• You can change any of the settings on the
screen in the same manner.
1 —
2 —
3 —
4 —
5 —
6 —
• If you do not press or after saving the new stitch
settings, the new stitch settings will be displayed whenever you
select that stitch, even after turning off the power.
* Press to return to the original machine settings.
3-12 Sewing Utility Stitches
7 —
8 —
9 —
?
Index
!
Page 86

Using the Sewing Type Selection Key
CONTENTS
You can also select utility stitches using . Use this key when you are not sure which stitch
to use for your application, or to get advice about sewing particular stitches. For example, if you
want to sew overcasting, but you do not know which stitch to use or how to sew the stitch, you can
use this screen to get advice. We recommend that beginners use this method to select patterns.
1. Press to view the advice screen.
2. Press a key to see advice about that type of stitch or application.
Example: Displaying information about overcasting
* Press to return to the original screen.
1 —
2 —
3 —
4 —
5 —
6 —
Sewing Utility Stitches 3-13
7 —
8 —
9 —
?
Index
!
Page 87

CONTENTS
3. The upper part of the screen displays a selection of overcasting
stitches with explanations. Read the explanations and select the
appropriate stitch.
4. The screen displays directions for sewing the selected stitch.
1 —
2 —
3 —
4 —
5 —
6 —
3-14 Sewing Utility Stitches
7 —
8 —
9 —
?
Index
!
Page 88

CONTENTS
5. Press to scroll the screen in the direction of arrow selected,
and see the next part of the instructions.
Press to scroll the screen 1 line at a time, in the direction
of the arrow selected.
Press to scroll a larger section of the screen in the direction of the arrow selected.
Follow the directions to sew the stitch.
* Press at any time to return to the selection screen.
1 —
2 —
3 —
4 —
5 —
6 —
Sewing Utility Stitches 3-15
7 —
8 —
9 —
?
Index
!
Page 89
SEWING THE STITCHES
Straight Stitches
CONTENTS
1. Select a stitch pattern.
If the stitch which you select has a double mark “ ” at
the top of the key display , you can sew reverse stitches
holding the “Reverse/Reinforcement Stitch” button.
If the stitch which you select has a dot mark “ ” at the
top of the key display, you can sew reinforcement
stitches holding the “Reverse/Reinforcement Stitch”
button (see page 2-3).
Straight stitch (left needle position)
Straight stitch (left needle position)
Straight stitch (middle needle positio)
Straight stitch (middle needle position)
Triple stretch stitch (left needle position)
Stem stitch for stretch fabrics (middle needle position)
1 —
2 —
3 —
4 —
5 —
6 —
Decorative straight stitch (left needle position)
Basting stitch (left needle position)
1
1 Reverse stitch
2 Reinforcement stitch
3-16 Sewing Utility Stitches
2
J J
1
1 Left needle position
2 Middle needle position
2
7 —
8 —
9 —
?
Index
!
Page 90

CONTENTS
1
2. Attach presser foot “J”. Hold the thread tails and fabric
with your left hand, and turn the balance wheel with
your right hand to insert the needle into the fabric. This
is the sewing start position.
6
1 —
2 —
5
6
3. Lower the presser foot, and hold the “Reverse/Reinforcement Stitch” button to sew 3-4 stitches. After the machine sews reverse stitches (or reinforcement stitches),
press the “Start/Stop” button to sew forward. The machine will begin sewing slowly .
1 3 - 4 reverse stitches
3 —
4 —
CAUTION
Be sure the needle does not strike a basting pin,
or any other objects, during sewing. The thread
could tangle or the needle could break, causing
injury.
6
4. When sewing is completed, hold the “Reverse/Reinforcement Stitch” button to sew 3-4 reverse stitches (or
reinforcement stitches) at the end of seam.
5 —
6 —
5. After sewing, press the “Thread Cutter” button to trim
the threads.
* When the automatic thread cutting and automatic re-
inforcement stitch keys on the screen are selected, reverse stitches (or reinforcement stitches) will be sewn
automatically at the start of sewing when pressing the
“Start/Stop” button. Press the “Reverse/Reinforcement
Stitch” button to sew reverse stitches (or reinforcement
stitches) and trim the thread automatically at the finish
of sewing.
Sewing Utility Stitches 3-17
7 —
8 —
9 —
?
Index
!
Page 91
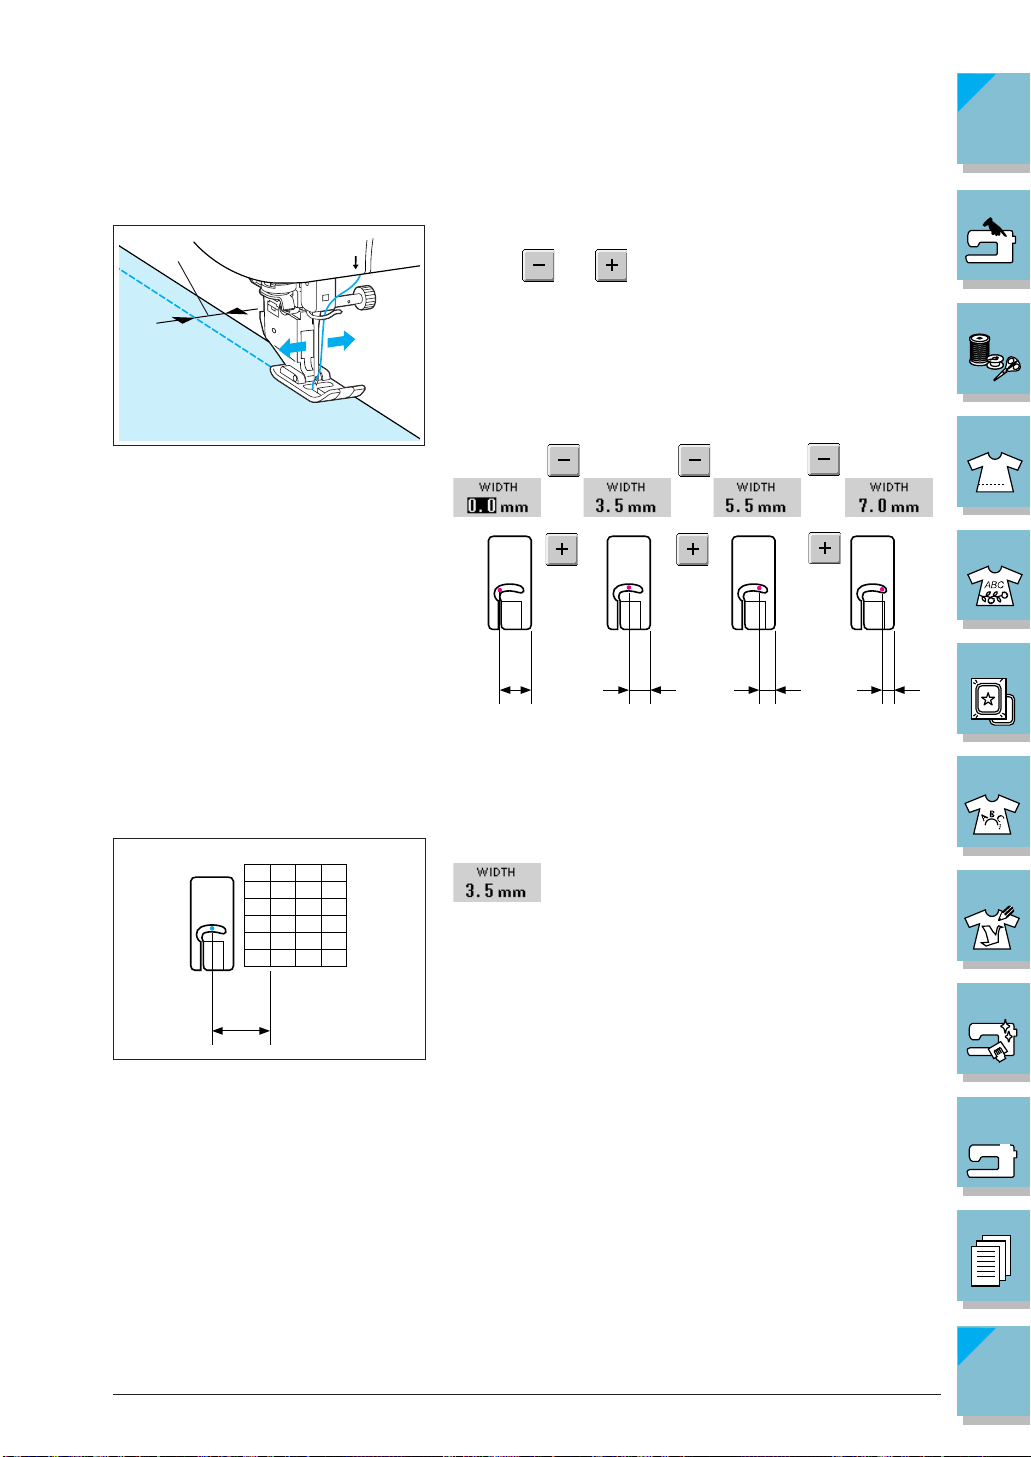
CONTENTS
■ Changing the Needle Position (Left Needle Position Patterns Only)
1
5
6
When you select left needle position stitch patterns, you
can use and in the Stitch W idth display to change
the position of the needle. Match the distance from the
right edge of the presser foot to the needle with the stitch
width, then align the edge of the presser foot with the edge
of the fabric during sewing for an attractive finish.
1 Stitch width
➜
➜ ➜
J J JJ
12.0 mm
(1/2 inch)
8.5 mm
(11/32
inch)
➜
6.5 mm
(1/4 inch)
1 —
2 —
3 —
➜
➜
4 —
5 —
5.0 mm
(3/16 inch)
6 —
15 25 35
J
1
3-18 Sewing Utility Stitches
For standard 16 mm (5/8 inch) seam allowance, set
on LCD.
1 16 mm (5/8 inch)
7 —
8 —
9 —
?
Index
!
Page 92

Basting
CONTENTS
1. Select .
2. Attach presser foot “J”. Press the “Reverse/ Reinforcement Stitch” button to sew reinforcement stitches, then
continue sewing.
1 —
2 —
3 —
4 —
5 —
6 —
Note
• If you do not want to use a reinforcement stitch at the
beginning, you should lift the presser foot, rotate the
balance wheel, pull up the bobbin thread and pull a
length of top and bobbin thread out from the rear of
the machine.
• You can set the stitch length between 5 mm (3/16 inch)
and 30 mm (1-3/16 inch)
1 Between 5mm (3/16 inch) and 30 mm (1-3/16 inch)
1
3. Sew while keeping the fabric pulled tight.
4. End the basting with reinforcement stitches.
6
Sewing Utility Stitches 3-19
7 —
8 —
9 —
?
Index
!
Page 93

Zigzag Stitches
Zigzag stitches are useful for overcasting, appliqué, patchwork, and many other applications.
Select a stitch pattern, and attach presser foot “J”.
If the stitch which you select has a double mark “ ” at the
top of the key display , you can sew reverse stitches holding the “Reverse/Reinforcement Stitch” button.
If the stitch which you select has a dot mark “ ” at the top
of the key display, you can sew reinforcement stitches
holding the “Reverse/Reinforcement Stitch” button (see
page 2-3).
Zigzag stitch pattern
To adjust the zigzag width, use the WIDTH key.The size
of the width is the same distance on both sides of the
center needle position.
Zigzag stitch pattern
To adjust the zigzag width, use the WIDTH key.The size
of the width is the same distance on both sides of the
center needle position.
Zigzag stitch pattern
T o adjust the zigzag width, use the WIDTH key . The RIGHT
side of the zigzag is stationary. The width change is from
right to left.
Zigzag stitch pattern
T o adjust the zigzag width, use the WIDTH key. The LEFT
side of the zigzag is stationary. The width change is from
left to right.
CONTENTS
1 —
2 —
3 —
4 —
5 —
6 —
1
■ Overcasting (Using a Zigzag Stitch)
1
3-20 Sewing Utility Stitches
5
6
Sew the overcasting along the edge of the fabric so that
the right-hand side needle drop point is over the edge of
the fabric.
1 Needle drop position
2
1 Reverse stitch
2 Reinforcement stitch
7 —
8 —
9 —
?
Index
!
Page 94
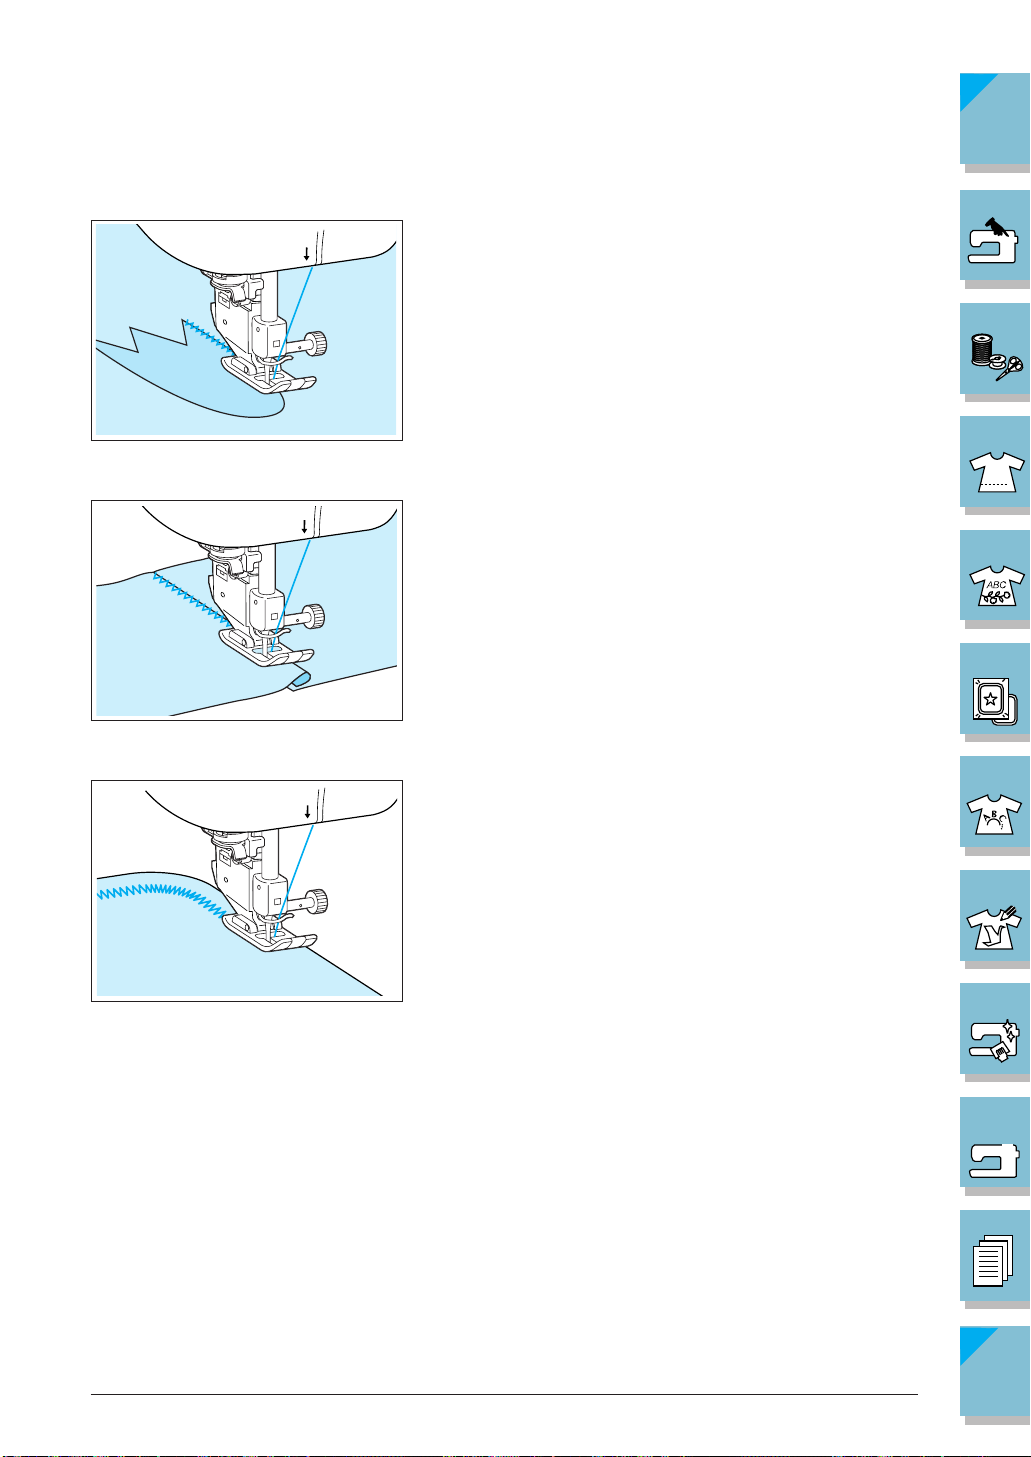
CONTENTS
■ Appliqué (Using a Zigzag Stitch)
5
6
■ Patchwork (for Crazy Quilt)
5
6
■ Sewing Curves (Using a Zigzag Stitch)
5
Attach the appliqué using a temporary spray adhesive or
basting, then sew it.
* Sew a zigzag stitch while positioning the right hand
needle drop point just outside the edge of the fabric.
Turn back the desired width of fabric and position it over
the lower fabric, then sew so that the stitch bridges both
pieces of fabric.
Shorten the stitch length setting to obtain a fine stitch. Sew
slowly , keeping the seams parallel with the fabric edge as
you guide the fabric around the curve.
1 —
2 —
3 —
4 —
5 —
6 —
6
7 —
8 —
9 —
!
?
Sewing Utility Stitches 3-21
Index
Page 95

Elastic Zigzag Stitches
Use elastic zigzag stitches for tape attaching, overcasting, darning, or a wide variety of other uses.
1. Select a stitch pattern, and attach presser foot “J”.
2 step elastic zigzag
3 step elastic zigzag
CONTENTS
1 —
2 —
3 —
4 —
5 —
■ Tape Attaching
■ Overcasting
6 —
5
Stretch the tape flat. While stretching the tape flat, sew the
tape to the fabric.
7 —
1 Tape
6
1
8 —
9 —
5
6
Use this stitch to sew overcasting on the edge of stretch
fabrics. Sew the overcasting along the edge of the fabric
with the needle dropping off the edge of the fabric at the
right.
!
?
3-22 Sewing Utility Stitches
Index
Page 96
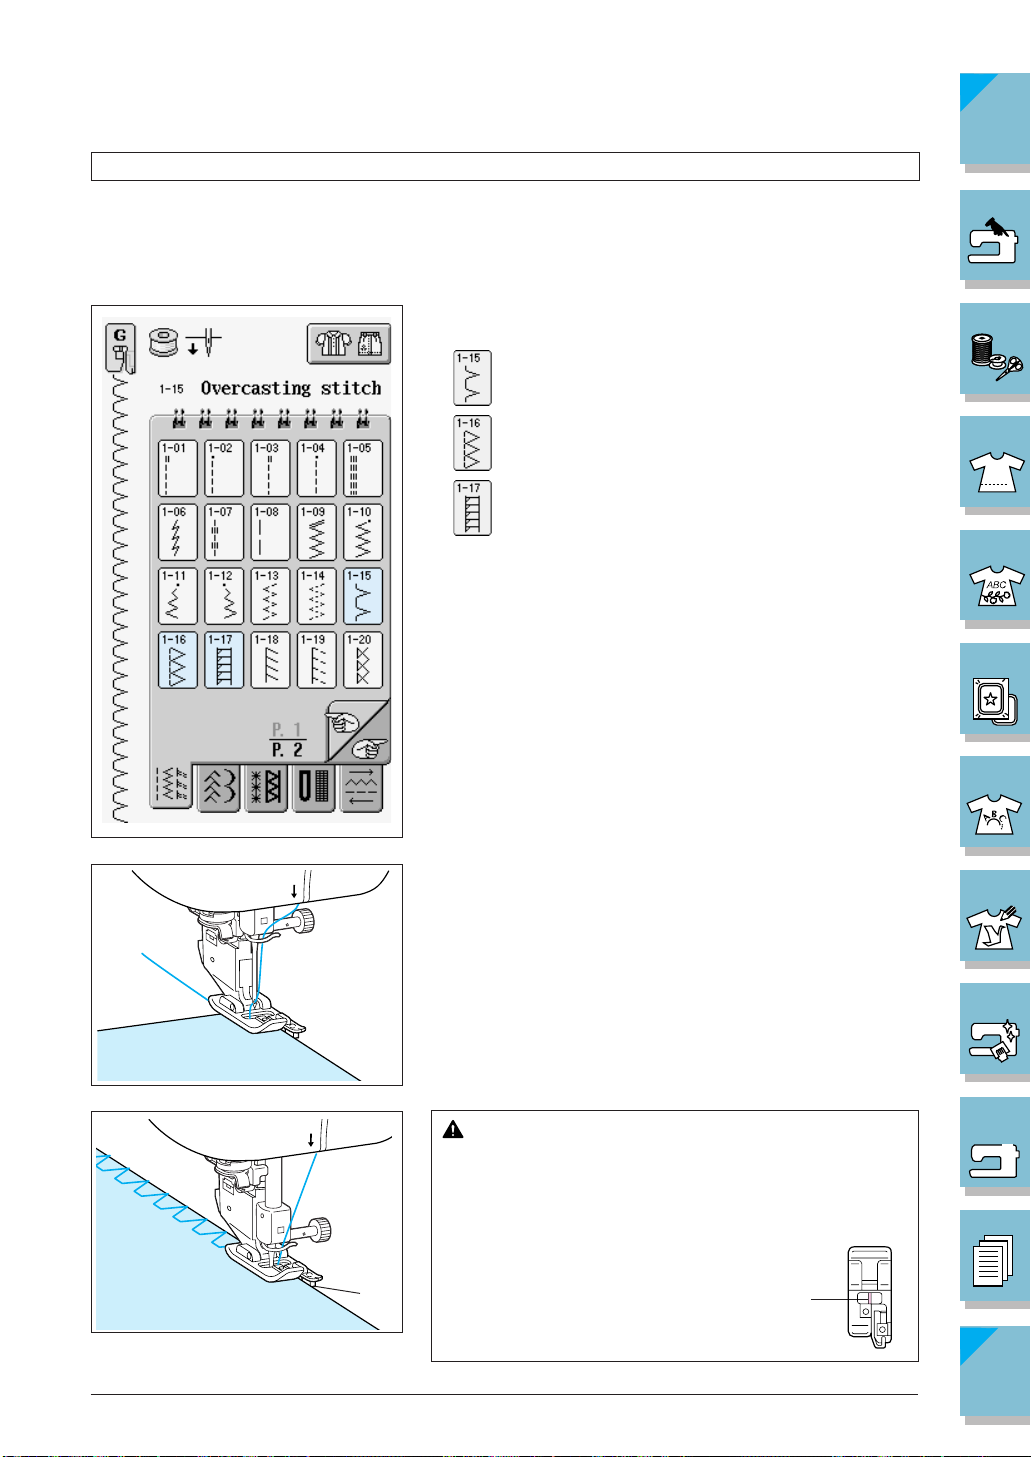
Overcasting
Use for the beginning and end of seams in skirts or trousers, and the beginning and end of all
cuttings. Use presser foot “G”, presser foot “J”, or the side cutter attachment depending on the
kind of overcasting stitch you select.
■ Overcasting Using Presser Foot “G”
1. Select a stitch pattern.
For sewing light and medium weight fabrics
CONTENTS
1 —
2 —
For sewing heavyweight fabrics
For sewing medium or heavyweight and easily-frayable fabric
3 —
4 —
5 —
6 —
5
6
2. Attach presser foot “G”. Lower the presser foot so that
the presser foot guide is exactly against the edge of the
fabric.
7 —
8 —
3. Sew along the presser foot guide.
1 Guide
5
6
1
CAUTION
After the stitch width is adjusted, turn the balance wheel toward you by hand and check that
the needle does not touch the presser foot. If the
needle hits the presser foot the needle may
break and cause injury.
1 The needle should not touch
Sewing Utility Stitches 3-23
1
G
9 —
?
Index
!
Page 97
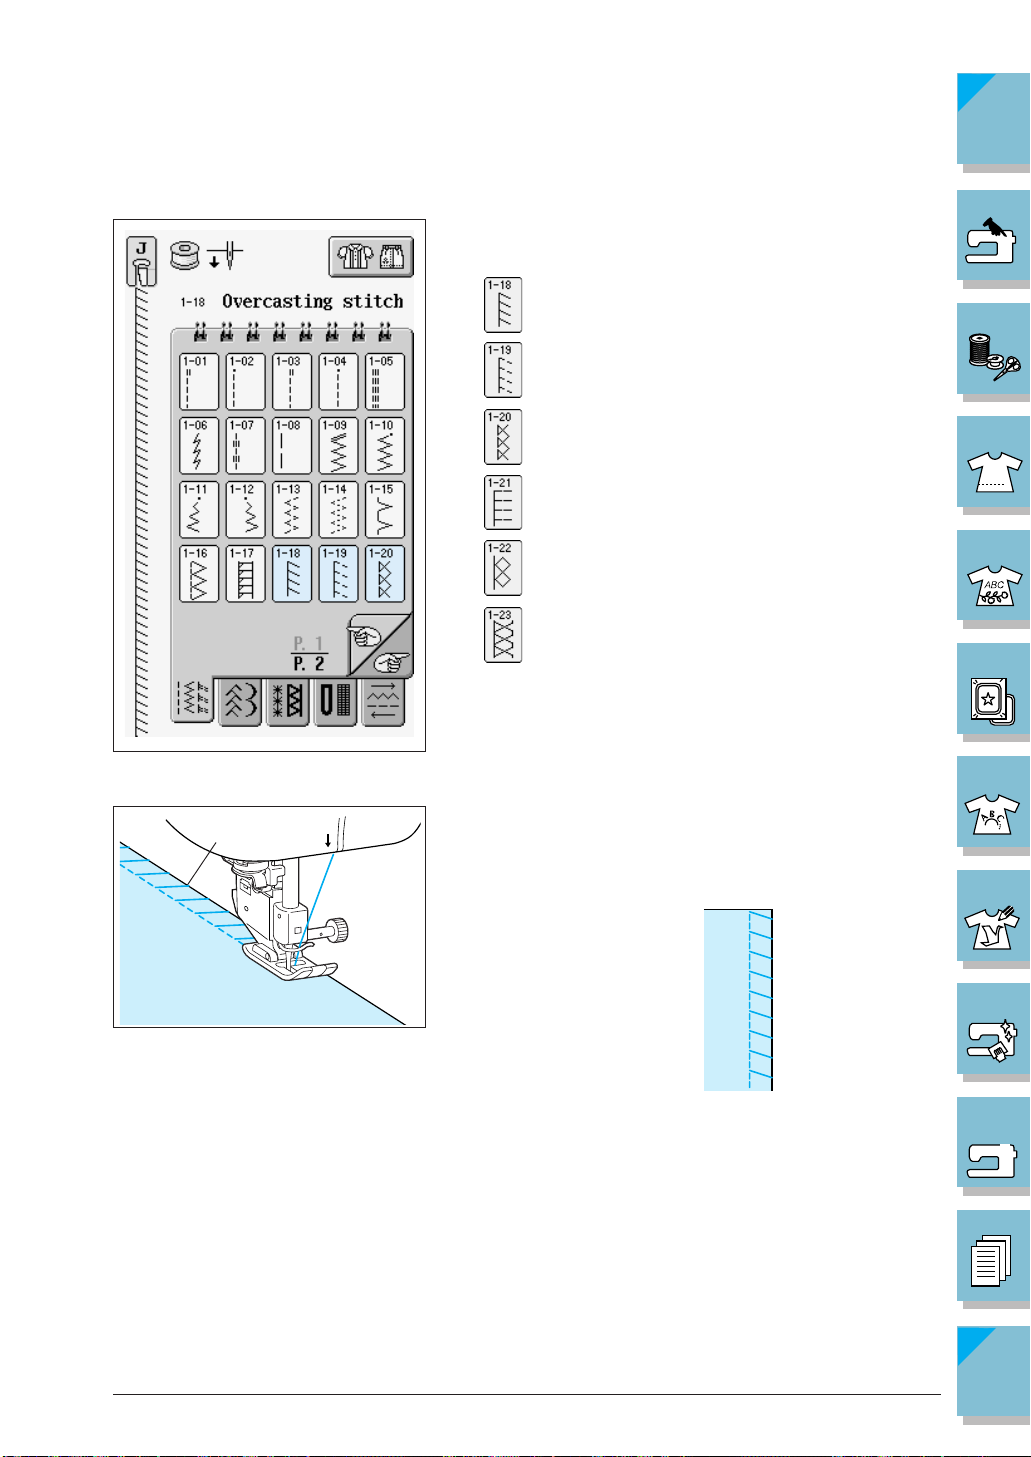
CONTENTS
■ Overcasting Using Presser Foot “J”
1. Select a stitch pattern.
For sewing stretch fabrics
For sewing medium stretch fabrics and heavyweight
fabrics
For sewing stretch fabrics
For sewing knit stretch fabrics
For sewing stretch fabrics
For sewing stretch fabrics
1 —
2 —
3 —
4 —
5 —
6 —
1
5
6
2. Attach presser foot “J”. Sew with the needle dropping
slightly off the edge of the fabric.
1 Needle drop position
7 —
8 —
9 —
!
?
3-24 Sewing Utility Stitches
Index
Page 98

CONTENTS
■ Overcasting Using the Side Cutter
By using the side cutter, you can do overcasting while cutting the fabrics.
1. Push the “Needle Position” button to raise the needle,
then turn off the power.
1
2. Raise the presser foot lever.
2
3. Press the black button on the presser foot holder, and
remove the presser foot.
4. Use the included screwdriver to loosen the screw of
the presser foot holder, and remove the presser foot
holder.
1
1 —
2 —
3 —
4 —
5 —
6 —
2
7 —
2
5. Set the fork of the operating lever around the needle
5
1
clamp screw.
1 Needle clamp screw
2 Operating lever
* Make sure that the fork of the operating lever is set
onto the screw firmly.
Sewing Utility Stitches 3-25
8 —
9 —
?
Index
!
Page 99
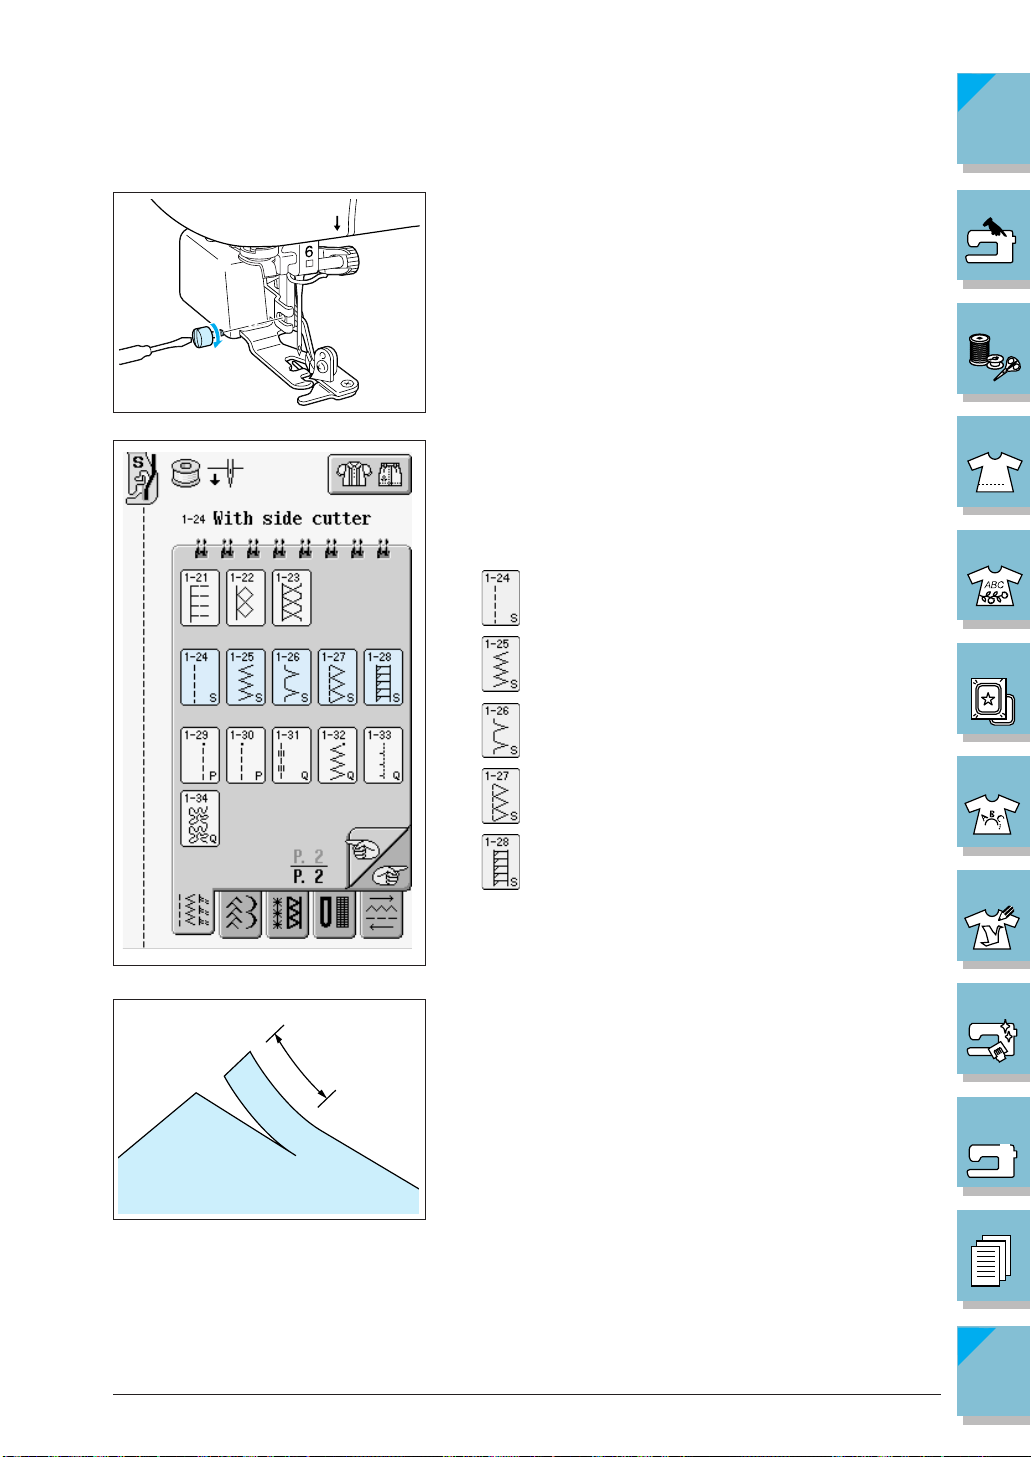
CONTENTS
5
5. With the presser foot raised, align the presser foot holder
screw hole directly with the notch in the side cutter,
then insert the screw and lightly tighten it. Lower the
presser foot lever and firmly tighten the screw.
1 —
2 —
6. Select a stitch pattern.
If there is an “S” in the bottom of the key display, the
indicated stitch pattern can be sewn with the side cutter .
3 —
4 —
Normal sewing
Zigzag stitch
5 —
Overcasting stitch for light and medium weight fabrics
Overcasting stitch for heavyweight fabrics
6 —
Overcasting stitch for medium and heavyweight stretch
fabrics
7. Make a cut of about 20 mm (3/4 inch) in the fabric.
1
3-26 Sewing Utility Stitches
1 20 mm (3/4 inch)
7 —
8 —
9 —
?
Index
!
Page 100
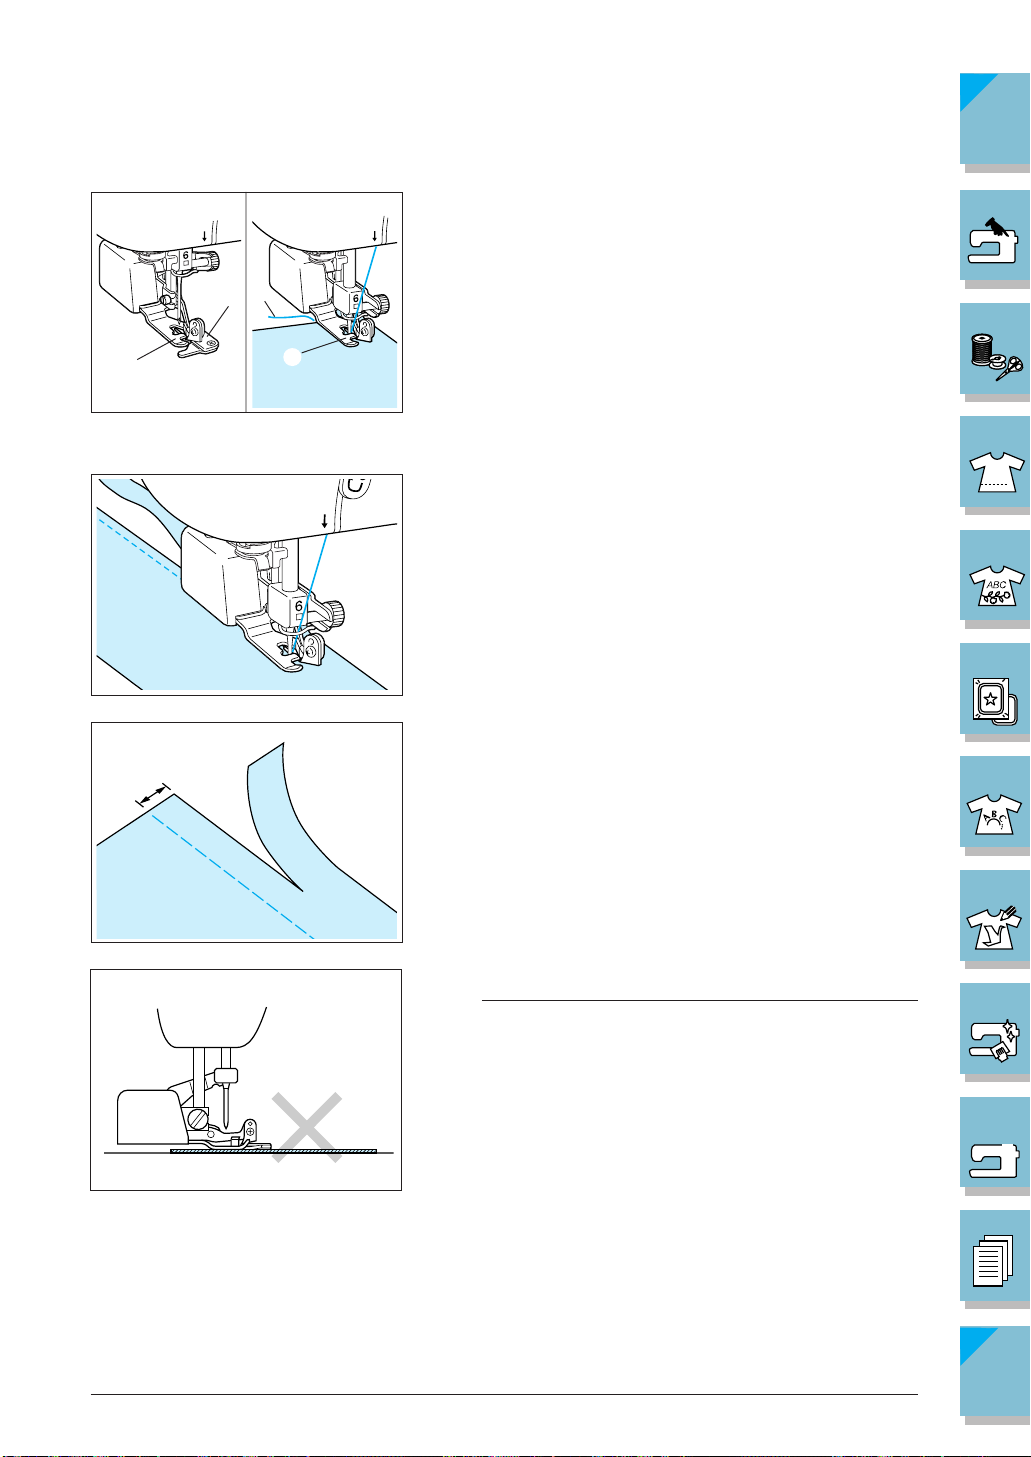
CONTENTS
3
2
1
A
8. Place the fabric as shown left figure B.
5
3
1
5
- Right side of cut: on top of the guide plate
- Left side of cut: underneath the presser foot
1 Guide plate (lower knife)
2 Presser foot
1 —
2 —
2
B
5
9. Thread the needle, then pull out a long section of the
upper thread, pass it below the presser foot and pull it
out in the fabric feed direction (see left figure B).
2 Presser foot
3 Upper thread
10.Lower the presser foot lever.
CAUTION
If the width has been adjusted, turn the balance wheel
by hand to check that the needle does not touch the
side cutter. If the needle touches the side cutter, it may
cause the needle to break.
3 —
4 —
5 —
When Sewing Straight Stitches only
The seam margin should be about 5 mm (3/16 inch).
1 Seam margin
6 —
* Make sure you select a pattern for the side cutter.
* Clean the side cutter after use, to avoid having dust
and scraps of thread build up on it.
* Add a small amount of oil as required to the cutting
edge of the cutter.
Note
• The fabric will not be cut if the whole fabric is simply
spread out underneath the presser foot guide plate. Set
the fabric as explained in step 8, and then start sewing.
• Check that the needle is raised when the presser foot
lever is raised.
• One layer of 13 oz. denim can be cut.
Sewing Utility Stitches 3-27
7 —
8 —
9 —
?
Index
!
 Loading...