

Page 1
User’s Guide TP-M5000N
TP-M5000N
Before using this machine, be sure to read this
User’s Guide. We suggest that you keep this
manual for future reference.
Version 0
ENG
Page 2

Introduction
Thank you for purchasing the Brother TP-M5000N (hereafter referred to as “the machine”).
Be sure to read the User’s Guide (this manual) before using the machine. The latest version
of the User’s Guide can be downloaded from the Brother Solutions Center website
(http://support.brother.com/
). We suggest that you keep this manual for future reference.
i
Page 3

Important Information
The contents of this document and specifications of the machine are subject to change without
notice.
The contents of this document may not be duplicated or reproduced, partially or in full, without
permission.
We assume no responsibility for damages arising from earthquakes, fire, other disasters,
actions of third parties, the user’s intentional or negligent operation, misuse or operation under
other special conditions.
We assume no responsibility for damage (such as losses, loss of income, lost profits, business
disruptions, a lost means of communication or claims from third parties) that may result from
the use or inability to use this machine.
The actual windows and dialog boxes of the software as well as the machine screens may
differ from those described in this manual, depending on your machine, or the operating
system running on your computer.
Before using this machine, be sure to read all included documentation for details on its safe
and correct use.
In the event that this machine is defective due to faulty manufacturing, we shall repair
or replace it. We shall not be obligated to repair or replace the product under any other
circumstances.
We assume no responsibility for damages that may result from a malfunction of this machine
from connecting incompatible equipment or using incompatible software.
Brother Industries, Ltd. reserves the right to modify, without notice, materials and specifications
published in this document. In addition, we assume no responsibility for damages (including
consequential damages) resulting from the use of published materials, including typographical
errors or any other error included in the publications.
This machine is approved for use only within the country where it was purchased. Since
regulations for electronics may differ by country, do not use this machine in any country other
than where it was purchased.
Windows Vista
Windows
Windows
Windows
Windows Server
of Windows Server
Windows Server
of Windows Server
®
is the general term in this manual for all editions of Windows Vista®.
®
7 is the general term in this manual for all editions of Windows® 7.
®
8 is the general term in this manual for all editions of Windows® 8.
®
8 is the general term in this manual for all editions of Windows® 8.1.
®
2008 is the general term in this manual for all editions
®
2008 and Windows Server® 2008 R2.
®
2012 is the general term in this manual for all editions
®
2012 and Windows Server® 2012 R2.
Precautions for Creating Tape
Observe the following precautions when creating tape.
Copyrighted material
Creating tape of copyrighted material is prohibited, except for personal use.
ii
Page 4

Table of Contents
1 Getting Started 1
Product Safety ....................................................................................................... 1
Safety Precautions ..........................................................................................2
Operating Precautions..................................................................................... 7
Trademarks............................................................................................................8
Open Source Licensing Remarks .......................................................................... 8
Regulation..............................................................................................................9
LAN Connection .............................................................................................. 9
Disconnect device ...........................................................................................9
Included Items .....................................................................................................10
Consumables (Not Included) .........................................................................10
General Description ............................................................................................. 11
Operation Panel.............................................................................................11
Setting Up the Machine .......................................................................................13
Connecting the Power Supply ....................................................................... 13
Installing the Tape Cassette ..........................................................................13
Installing the Ink Ribbon Cassette .................................................................14
Installing the Paper Core Holder ...................................................................14
About the Tape Cassettes and Ink Ribbon Cassettes ...................................17
Installing the Printer Driver and Software ............................................................17
Connecting the Computer and Machine .............................................................. 18
USB Cable Connection..................................................................................18
Wired Network Connection ............................................................................ 19
2Software 20
About the Software ..............................................................................................20
Using P-touch Editor............................................................................................20
Operation Modes ........................................................................................... 21
Creating/Printing Tapes in P-touch Editor .....................................................23
Creating Multiple Tapes................................................................................. 27
Image Files .................................................................................................... 28
Using P-touch Library ..........................................................................................28
Registering Templates With P-touch Library ................................................. 29
Using P-touch Library .................................................................................... 29
Using the P-touch Update Software ....................................................................31
Updating P-touch Editor or the Firmware ...................................................... 31
iii
Page 5

3 Printer Setting Tool 33
About the Printer Setting Tool..............................................................................33
Before Using the Printer Setting Tool ............................................................ 33
Using the Printer Setting Tool..............................................................................33
Communication Settings......................................................................................34
Settings Dialog Box .......................................................................................34
Menu Bar ....................................................................................................... 35
Applying Setting Changes to Multiple Tape Creators.................................... 37
Device settings ....................................................................................................38
Menu Bar ....................................................................................................... 38
4 Network Features 40
Specifying the IP Address, Subnet Mask and Gateway ......................................40
Using the BRAdmin Light Utility..................................................................... 40
Other Management Utilities ................................................................................. 41
Using Web-Based Management (Web Browser)........................................... 41
Using the BRAdmin Professional Utility.........................................................41
Managing With Web-Based Management (Web Browser) .................................. 42
Configuring Machine Settings Using Web-Based Management
(Web Browser)........................................................................................... 42
Network Specifications ........................................................................................ 43
5 Maintenance 44
Print Head Maintenance ...................................................................................... 44
Ink Ribbon Guide Roller Maintenance ................................................................. 45
Platen Roller Maintenance................................................................................... 45
Bottom Cover Maintenance ................................................................................. 45
Paper Core Holder Maintenance ......................................................................... 45
6 Troubleshooting 46
When Indicators are Lit or Blink........................................................................... 46
When Messages Appear ............................................................................... 47
Problems and Solutions....................................................................................... 48
Frequently Asked Questions ......................................................................... 48
General..........................................................................................................48
Network ......................................................................................................... 52
7 Appendix 55
Product Specifications .........................................................................................55
iv
Page 6

v
Page 7
1
Getting Started 1
1
Product Safety 1
If the machine malfunctions, immediately stop using it, and contact your reseller or Brother customer
service for assistance.
In order to prevent injuries or damage to the machine, follow the safety information in this chapter.
The following symbols and conventions are used throughout the documentation.
This indicates a potentially hazardous situation which, if the product is handled
WARNING
CAUTION
IMPORTANT
without following the warnings and instructions, could result in death or serious
injuries.
This indicates a potentially hazardous situation which, if not avoided, may result
in minor or moderate injuries.
This indicates a potentially hazardous situation which, if not avoided, may result
in damage to property or loss of product functionality.
1
Indicates risk of fire under certain circumstances
Indicates risk of injury, such as electric shock, if the indicated part of the machine is disassembled
Indicates risk of electric shock under certain circumstances
Indicates risk of electric shock if the machine is exposed to water
Indicates risk of burns under certain circumstances
Indicates an action that must be performed
Indicates an action that must not be performed
Indicates that the power cord must be unplugged from the electrical socket
Indicates risk of combustion if fire is nearby
Indicates that flammable sprays must not be used
Indicates that organic solvents such as alcohol and liquids must not be used
Indicates supplemental information or operations for the machine
1
Page 8

Chapter 1
Safety Precautions 1
WARNING
Machine
Do not use the machine if it is operating abnormally (for example, if it produces smoke or an
unusual odour or noise), otherwise fire, electric shock or damage to the machine may result.
Immediately turn off the machine, unplug the power cord from the electrical socket, and then
contact your reseller or Brother customer service for assistance.
Keep out of the reach of children, particularly infants, otherwise injuries may result.
Do not allow children to play with the plastic bag that contained the machine. Dispose of the bag
or keep it away from infants and children. There is a risk of suffocation.
Do not try to disassemble or alter the machine, otherwise fire, electric shock or damage may
result. Contact your reseller or Brother customer service for machine servicing, adjustments
or repairs. (The warranty does not cover damage resulting from disassembly or alterations
performed by the user.)
Do not use or store the machine in the following locations, otherwise fire, electric shock or
damage may result.
Near water, such as in a kitchen or bathroom, near a water heater, or in an extremely humid
location
In a location where it is exposed to rain or moisture
In an extremely dusty location
Near open flames, heaters or volatile combustible material
In an extremely hot location, such as in direct sunlight
In a location where condensation may form
Do not touch the machine during a severe thunderstorm, as this may result in electric shock.
Do not spill liquids of any type on the machine, otherwise fire, electric shock or damage may
result.
2
Do not use the machine near open flames, otherwise fire, electric shock or damage may result.
Do not place the following objects on the machine. Fire, electric shock or damage may result if
any of these objects come into contact with the internal electrical parts. If any of these objects
enter the machine, unplug the power cord from the electrical socket, and then contact your
reseller or Brother customer service for assistance.
Metal objects such as necklaces or bracelets
Objects containing water or liquids, such as cups, flower vases or flower pots
In order to assure proper ventilation, do not place the machine in a location where its vents
would be blocked, otherwise heat will accumulate, which may result in fire.
Page 9
WARNING
Getting Started
Do not use combustible sprays when cleaning the machine or near it, otherwise fire or electric
shock may result.
Clean the machine by wiping it with a soft, dry cloth.
Examples of combustible sprays:
Dust removing cleaners
Pesticides
Disinfectants and deodorisers that contain alcohol
Organic solvents or liquids such as alcohol
Do not allow organic solvents, such as benzene, thinner, polish remover or deodorisers, to come
into contact with the plastic cover of the machine. These may cause the plastic cover to warp
or dissolve, resulting in electric shock or fire.
Do not insert foreign objects into the machine or its connectors and ports. Fire, electric shock or
damage may result if metal objects, such as paper clips or staples, or liquids come into contact
with internal machine parts. If foreign objects enter the machine, immediately turn it off, unplug
the power cord from the electrical socket, and then contact your reseller or Brother customer
service for assistance.
Before cleaning the machine, be sure to turn it off and unplug the power cord from the electrical
socket, otherwise fire, electric shock or damage may result.
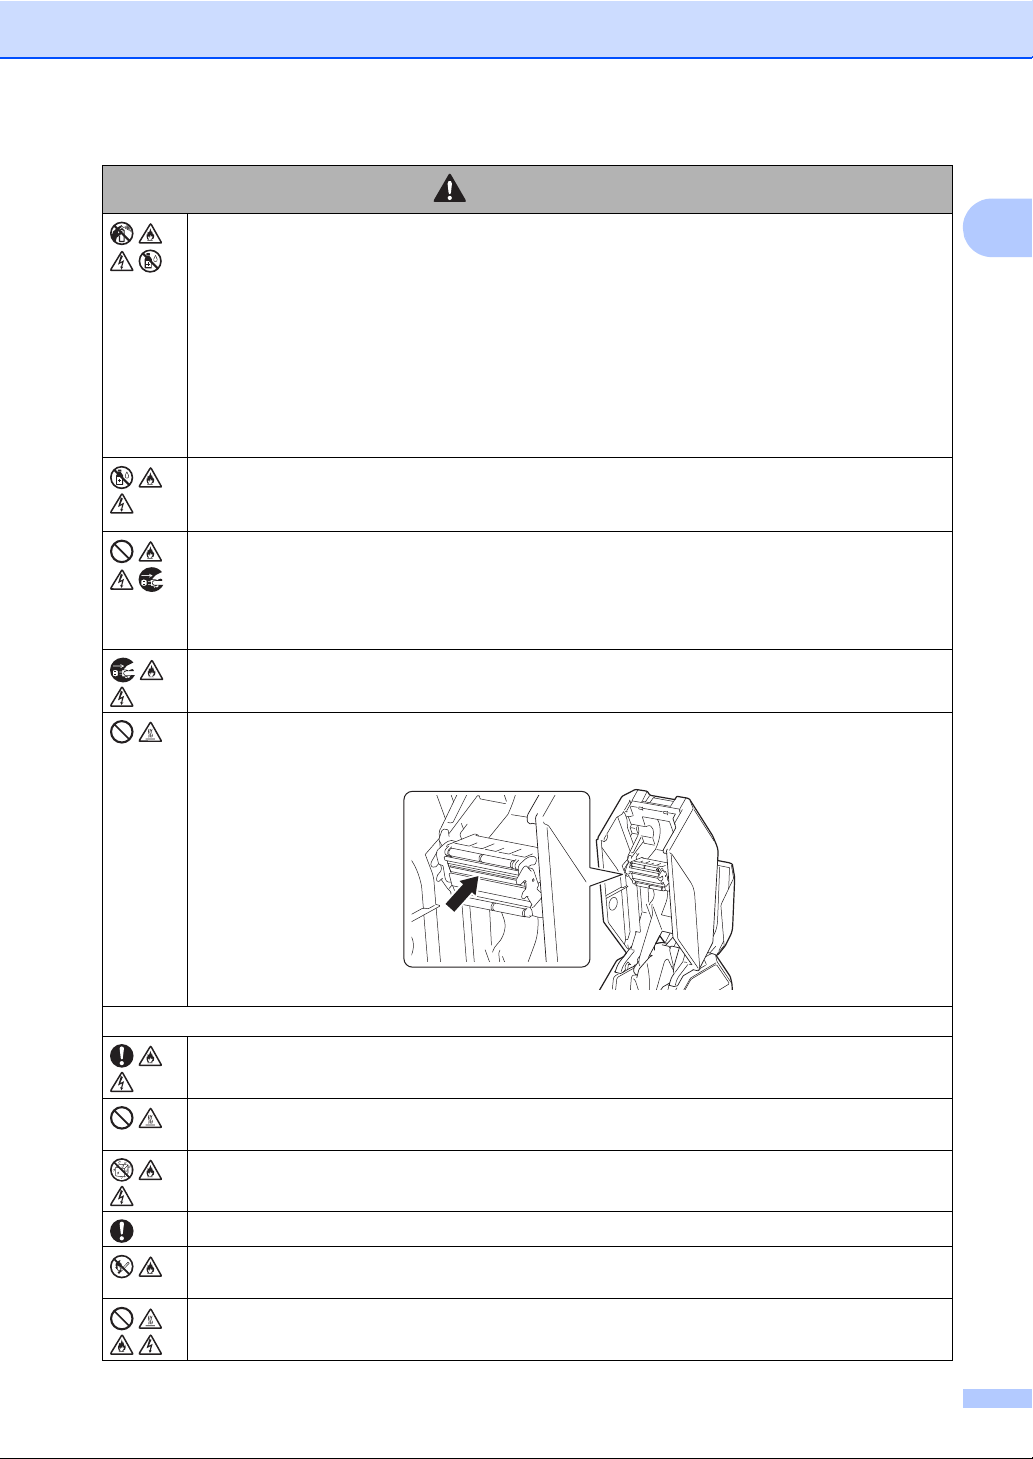
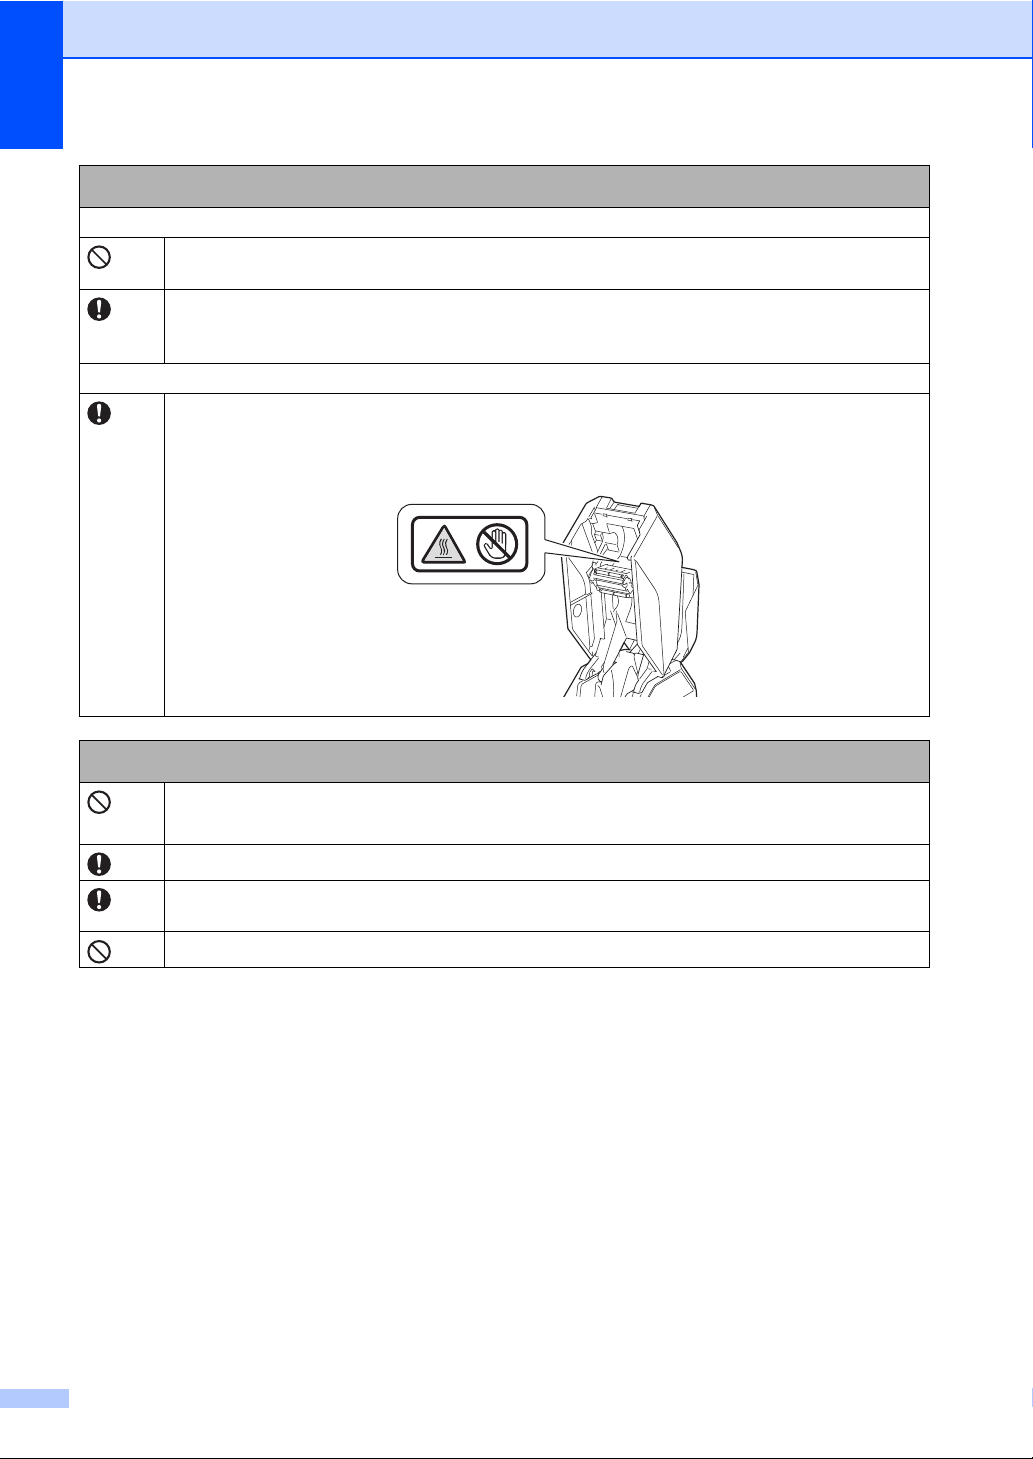
Do not touch any metal parts near the print head. The print head becomes very hot during use
and remains very hot for some time after use. Do not touch it directly with your hands.
1
Power cord
Only use the included power cord and the specified power supply.
Use under any other conditions may result in a fire, electric shock or damage.
Do not touch the power cord or the power plug with wet hands, otherwise it may result in
an electric shock.
Do not spill liquids of any type on the machine, otherwise fire, electric shock or damage may
result.
Keep out of the reach of children, particularly infants, otherwise injuries may result.
Do not use the machine near open flames, otherwise the covering of cables may melt, resulting
in fire, electric shock or damage.
Do not insert objects into the power cord socket, USB port or Ethernet network port, otherwise
fire, burns, electric shock or damage may result.
3
Page 10

Chapter 1
WARNING
Regularly remove the power plug from the electrical socket, and clean the base of the prongs
and between the prongs. If the power plug is left in the electrical socket for an extended period
of time, dust will accumulate at the base of the power plug prongs. This could cause a short
circuit that may result in fire.
Do not allow organic solvents, such as benzene, thinner, polish remover or deodorisers, to come
into contact with the cables. These may cause the cables to warp or dissolve, resulting in electric
shock or fire.
Do not use damaged power plugs or a bent electrical socket, otherwise fire, electric shock or
damage may result.
Do not overload electrical sockets or plug multiple devices into the same electrical socket,
otherwise fire, electric shock or damage may result.
When unplugging the power cord from the electrical socket, do not pull on the cord. Hold
the power plug and pull it out of the electrical socket, otherwise fire, electric shock or damage
may result.
Use the cables correctly and observe the following precautions, otherwise fire or electric shock
may result.
Do not damage them.
Do not modify them.
Do not twist them.
Do not severely bend them.
Do not pull on them.
Do not place objects on them.
Do not subject them to heat.
Do not bind them.
Do not allow them to be pinched.
Fully insert the power plug into the electrical socket and power cord connector into the power
cord socket, otherwise fire, electric shock or damage may result.
Brother strongly recommends that you DO NOT use any extension cord.
However, if an extension cord is required, use it correctly and in compliance with the general
guidelines for its use. If an extension cord is incorrectly used, fire, electric shock or damage may
result.
When connecting cables and installing tape cassettes and ink ribbon cassettes, be sure
to connect and install them correctly and in the correct order.
Only connect items that are designed specifically for this machine, otherwise fire or injury
may result. Refer to the User's Guide when making connections.
4
Page 11
Machine
Getting Started
CAUTION
1
Make sure that small children do not put their fingers between moving parts or in openings
of the machine.
Do not hold the machine with only one hand. The machine may slip out of your hand.
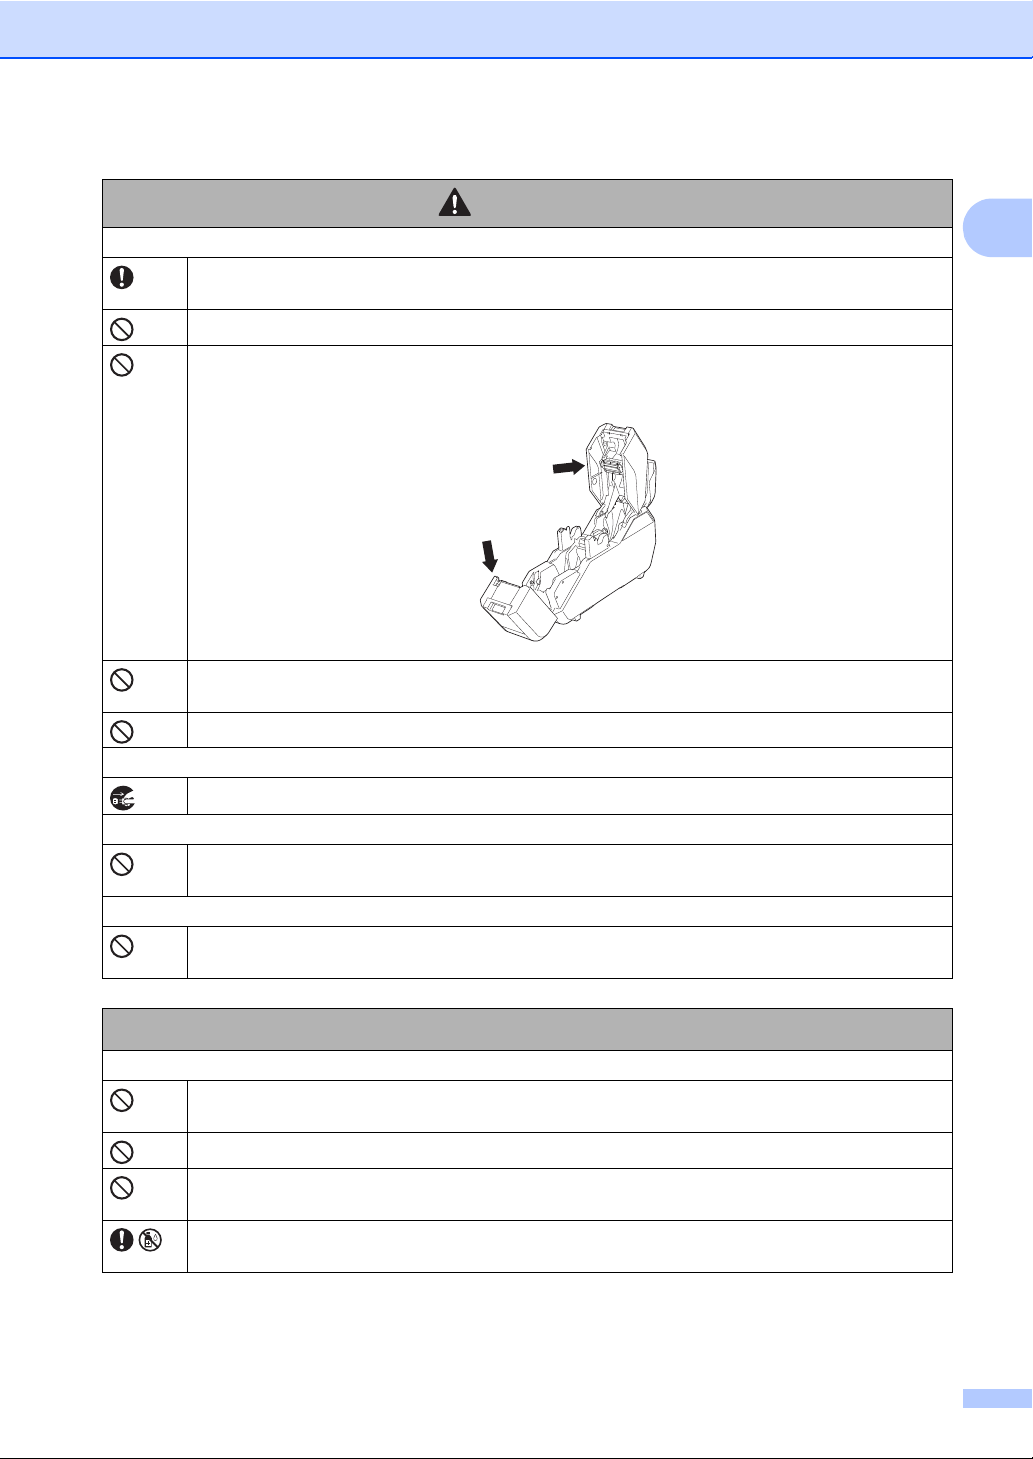
Do not hold the machine by its cover. There is a risk of injury if the cover detaches and
the machine falls.
Do not place the machine on an unstable surface, such as an unsteady table or a high shelf.
If the machine falls, injuries may result.
Do not place heavy objects on top of this machine. If the objects fall, injuries may result.
Power cord
If the machine will not be used, unplug the power cord from the electrical socket.
Tape cassette/ink ribbon cassette
Do not place the tape cassettes and ink ribbon cassettes on an unstable surface, such as
an unsteady table or a high shelf. If the cassettes fall, injuries may result.
Print head cleaning pen
Do not place the print head cleaning pen in your mouth or allow it to contact your eyes or skin.
Do not put it into a fire.
Machine
The machine may malfunction if left near a television, radio, microwave oven, etc. Do not use
the machine near any device that can cause electromagnetic interference.
Do not drop, hit or otherwise damage the machine.
Do not remove the labels affixed to the machine. These labels provide operational information
and indicate the machine’s model number.
Do not use paint thinner, benzene, alcohol or any other organic solvents to clean the machine,
otherwise damage to the surface finish may result. Use a soft, dry cloth to clean the machine.
IMPORTANT
5
Page 12
Chapter 1
CD-ROM
Do not scratch the CD-ROM, expose it to extremely high or low temperatures, place heavy
objects on top of it, or bend it.
The software contained on the CD-ROM is meant for use with this machine only. See the Licence
on the CD-ROM for details. This software may be installed on multiple computers for use in
an office, etc.
Warning label
The following warning labels appear on the machine. Fully understand the contents of each
warning label and perform operations while observing the precautions that are described.
In addition, be very careful that the warning labels do not peel off and are not scratched.
IMPORTANT
Other warnings/precautions
Make sure that the power cord is accessible so that it can be removed in an emergency.
Do not place objects on or near the power cord.
Always keep the top cover and bottom cover closed when printing.
If the machine will not be used for an extended period, remove the tape cassette before storing
the machine.
Do not touch the machine with wet hands, otherwise a malfunction may result.
6
Page 13
Getting Started
Operating Precautions 1
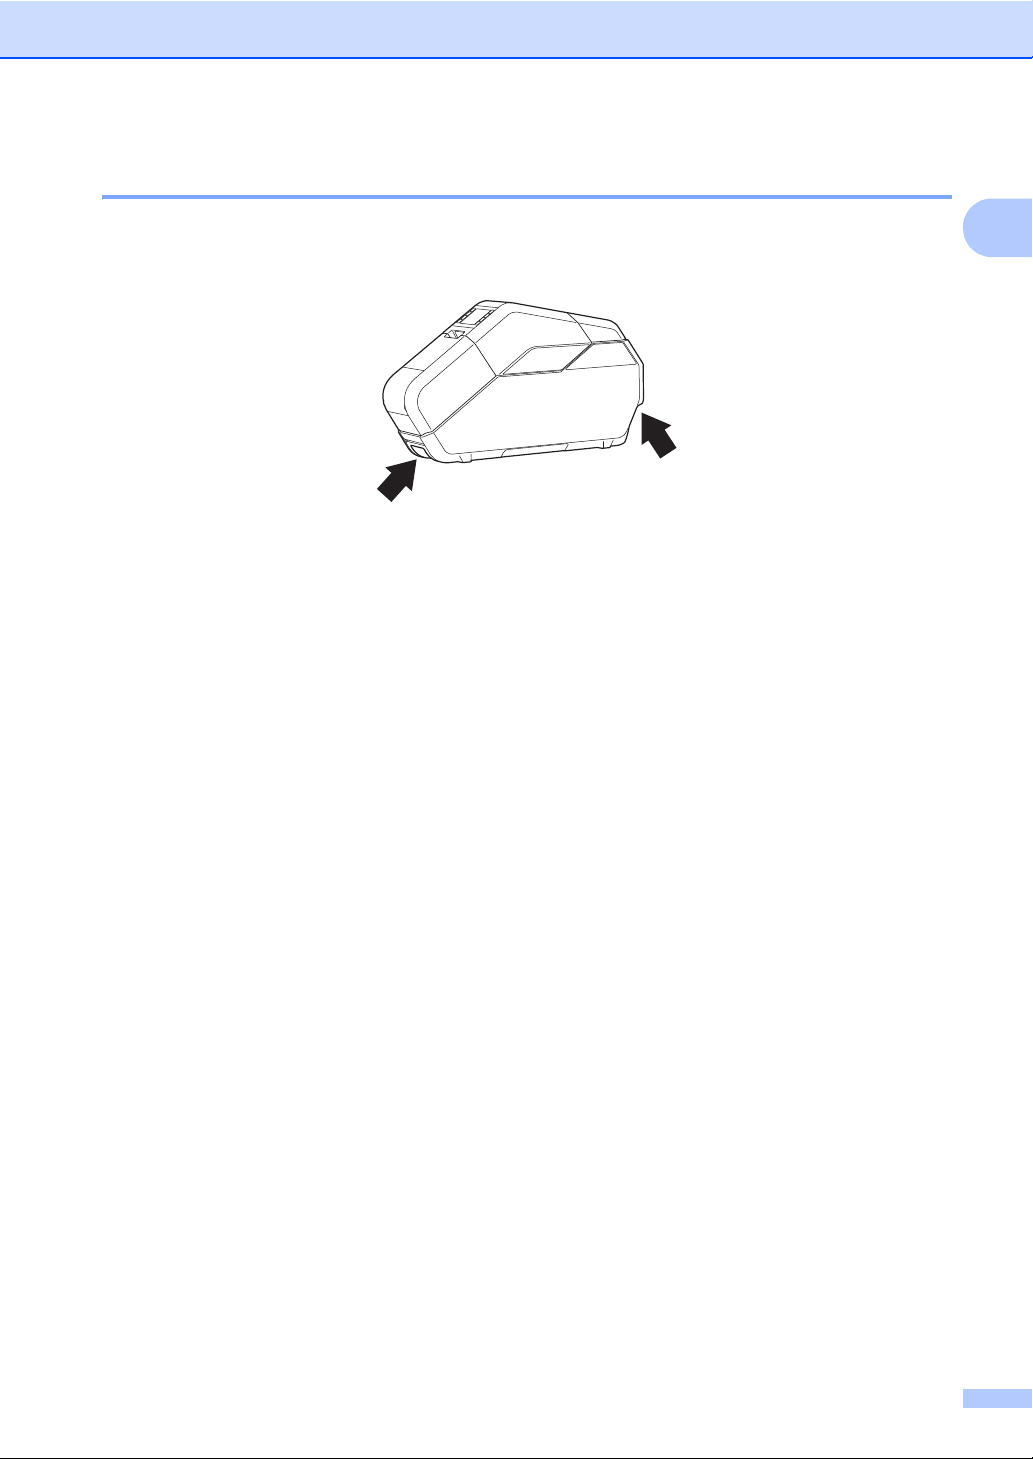
When transporting the machine, hold it with both hands at the areas indicated below. Do not
hold the machine at any areas other than those indicated.
Since the machine may become extremely hot if it is used for an extended period, do not touch
any internal machine parts, other than to install the tape cassette, ink ribbon cassette and
paper core.
Do not leave the machine for an extended period with its cover open, otherwise dust may
accumulate on the internal machine parts.
Do not touch sensors inside the machine.
Do not leave rubber or vinyl on the machine for an extended period.
If the machine will not be used for an extended period, unplug the power cord from the electrical
socket before storing the machine.
1
When the machine is purchased, a protective film is attached to the LCD. Peel off the protective
film before using the machine.
Pausing and resuming prints will leave a gap in the printed tape. Take care when pausing
prints.
7
Page 14

Chapter 1
Trademarks 1
BROTHER is either a trademark or a
registered trademark of Brother Industries, Ltd.
© 2014 Brother Industries, Ltd. All rights
reserved.
Microsoft, Windows, Windows Vista and
Windows Server are either registered
trademarks or trademarks of Microsoft Corp.
in the United States and/or other countries.
Adobe and Reader are either registered
trademarks of Adobe Systems Incorporated
in the United States and/or other countries.
Each owner whose software title is mentioned
in this document has a Software Licence
Agreement specific to its proprietary programs.
Any trade names and product names
appearing on Brother products, related
documents and any other materials are all
trademarks or registered trademarks of their
respective companies.
Open Source Licensing Remarks 1
To see the open source licensing remarks,
go to the manual download section on your
model’s web page of Brother Solutions Center
at http://support.brother.com/
8
Page 15

Getting Started
Regulation 1
LAN Connection 1
Caution: Connect this product to a LAN connection which is not subject to overvoltages.
Disconnect device 1
This product must be installed near an electrical socket that is easily accessible. In case of
emergencies, you must disconnect the power cord from the electrical socket in order to shut off
power completely.
Declaration of Conformity (Europe Only)
We, Brother Industries, Ltd.
15-1, Naeshiro-cho, Mizuho-ku,
Nagoya 467-8561 Japan
declare that this product and AC adapter are in conformity with the essential requirements of all relevant
directives and regulations applied within the European Community.
The Declaration of Conformity (DoC) can be downloaded from the Brother Solutions Center.
Visit http://support.brother.com/
select “Europe”
select your country
select "Manuals"
select your model
select “Declaration of Conformity”
click “Download”
Your Declaration will be downloaded as a PDF file.
and:
1
9
Page 16
Chapter 1
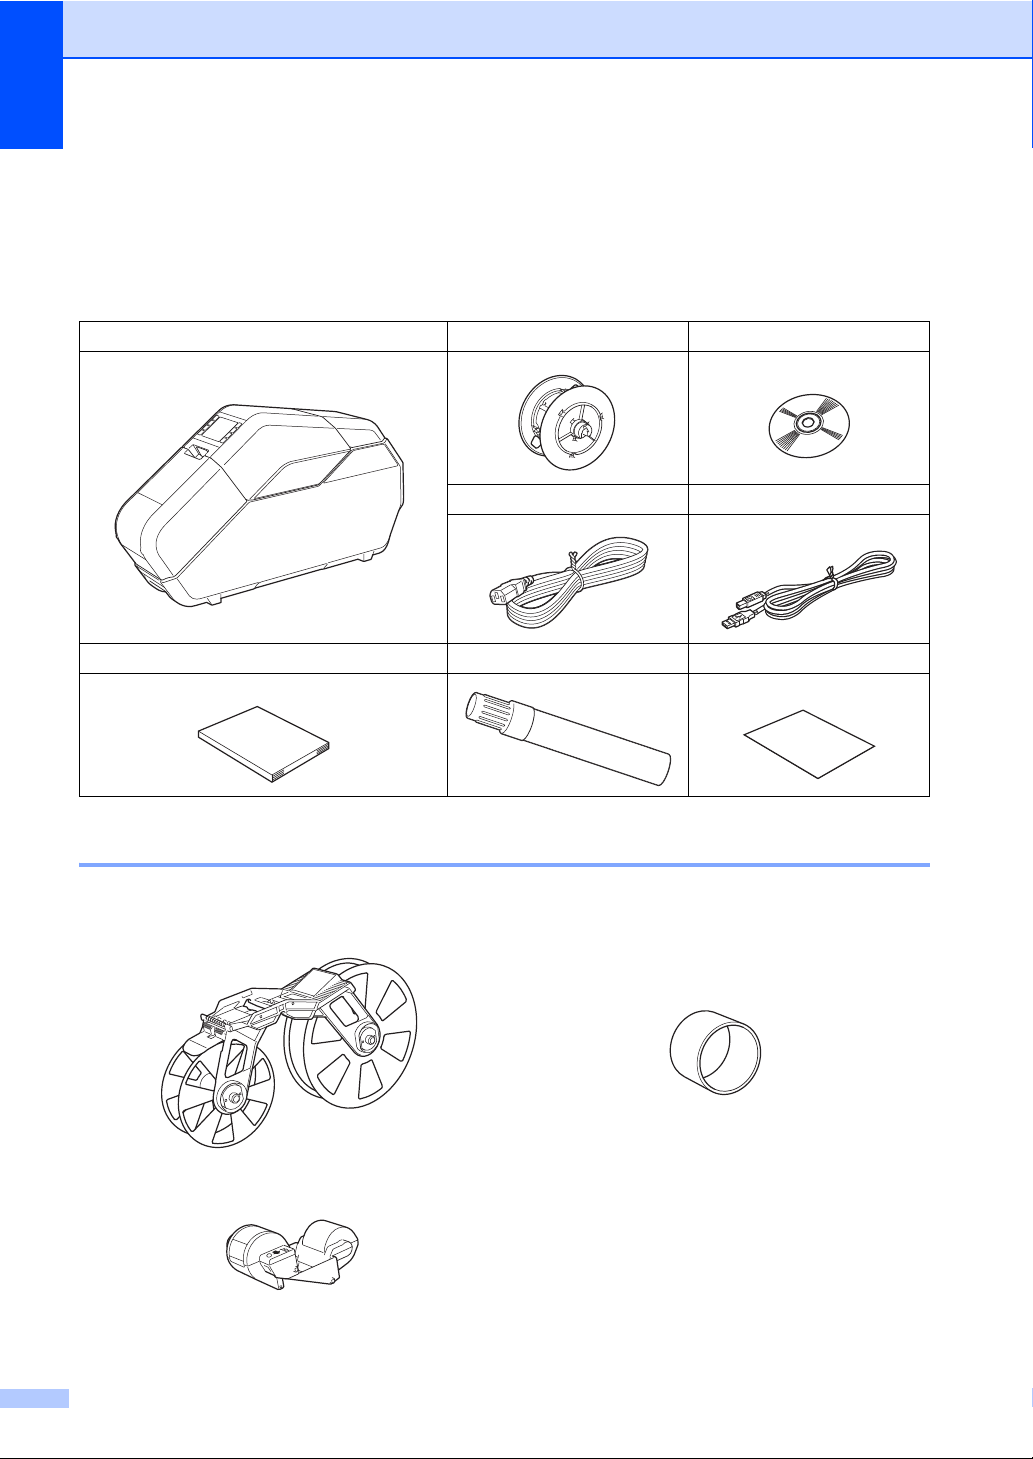
Included Items 1
Before using the machine, check that all of the following contents are included. If any item
is missing or damaged, contact the retailer where it was purchased.
(The illustrations may differ from the original items.)
TP-M5000N Paper core holder CD-ROM
Power cord USB cable
User’s Guide (this manual) Print head cleaning pen Quick Setup Guide
Consumables (Not Included) 1
Tape cassette Paper core
Ink ribbon cassette
10
Page 17
Getting Started
1
4
2
3
5
6
8
7
1
2
3
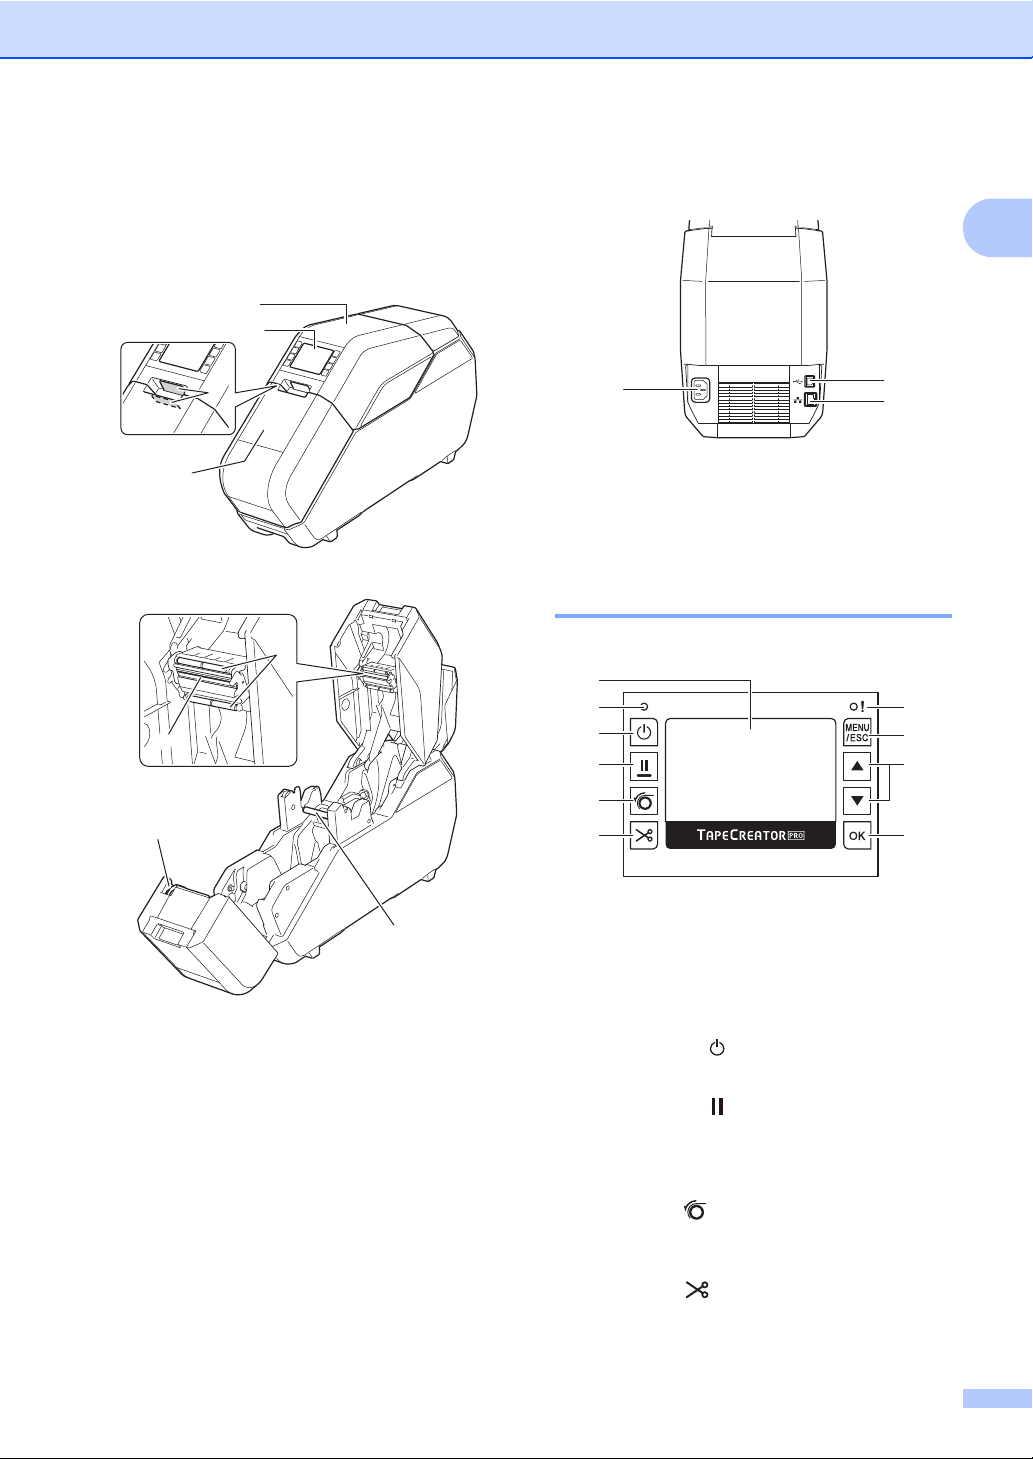
General Description 1
Front 1
Back 1
1 Power cord socket
2USB port
3 Ethernet network port
Operation Panel 1
1
2
3
4
7
8
9
1
5
6
1LCD
Shows the levels of the tape cassette and ink
ribbon cassette, as well as various menus and
error messages.
1Top cover
2 Operation panel
3 Open button
4 Bottom cover
5 Print head
6 Ink ribbon guide rollers
7 Cutter
8 Platen roller
2 Power indicator
3 Power button ( )
Press to turn power on/off.
4 Pause button ( )
While printing, hold down this button to pause
printing. Then, you can select whether to resume
or cancel printing.
5 Set button ( )
Press after attaching tape to the paper core
to prepare for printing.
6 Cut button ( )
Cuts the tape.
7 Status indicator
10
11
Page 18
Chapter 1
NOTE
8 MENU/ESC button
While the machine is in standby, press this
button to display the parameters that can
be specified from the machine.
While performing operations with the buttons,
press this button once to return to the previous
screen.
Settings for the following parameters can be
specified from the machine.
Display Setting
Switches the main screen between the
Details Mode and the View Mode.
• Details Mode
• View Mode
Check Size
By default, a message will appear if the ink
ribbon cassette is wider than the installed
tape cassette. Printing will be possible after
pressing the OK button.
To set the machine so no message appears
when the installed ink ribbon cassette is
wider than the tape cassette, select [Off].
Printer Configuration
Network Configuration
Displays the IP address, subnet mask and
gateway address for the machine.
Reset
9 / buttons
Continues to the next screen, or returns to the
previous screen.
10 OK button
Press to apply the selection.
When the remaining quantity of ink ribbon
or tape is less than a set amount, appears
on the screen.
Backlight
Unit
Language
Set the language for the screens that
appear.
Auto Power Off
LCD Contrast
12
Page 19
Getting Started
1
Setting Up the Machine1
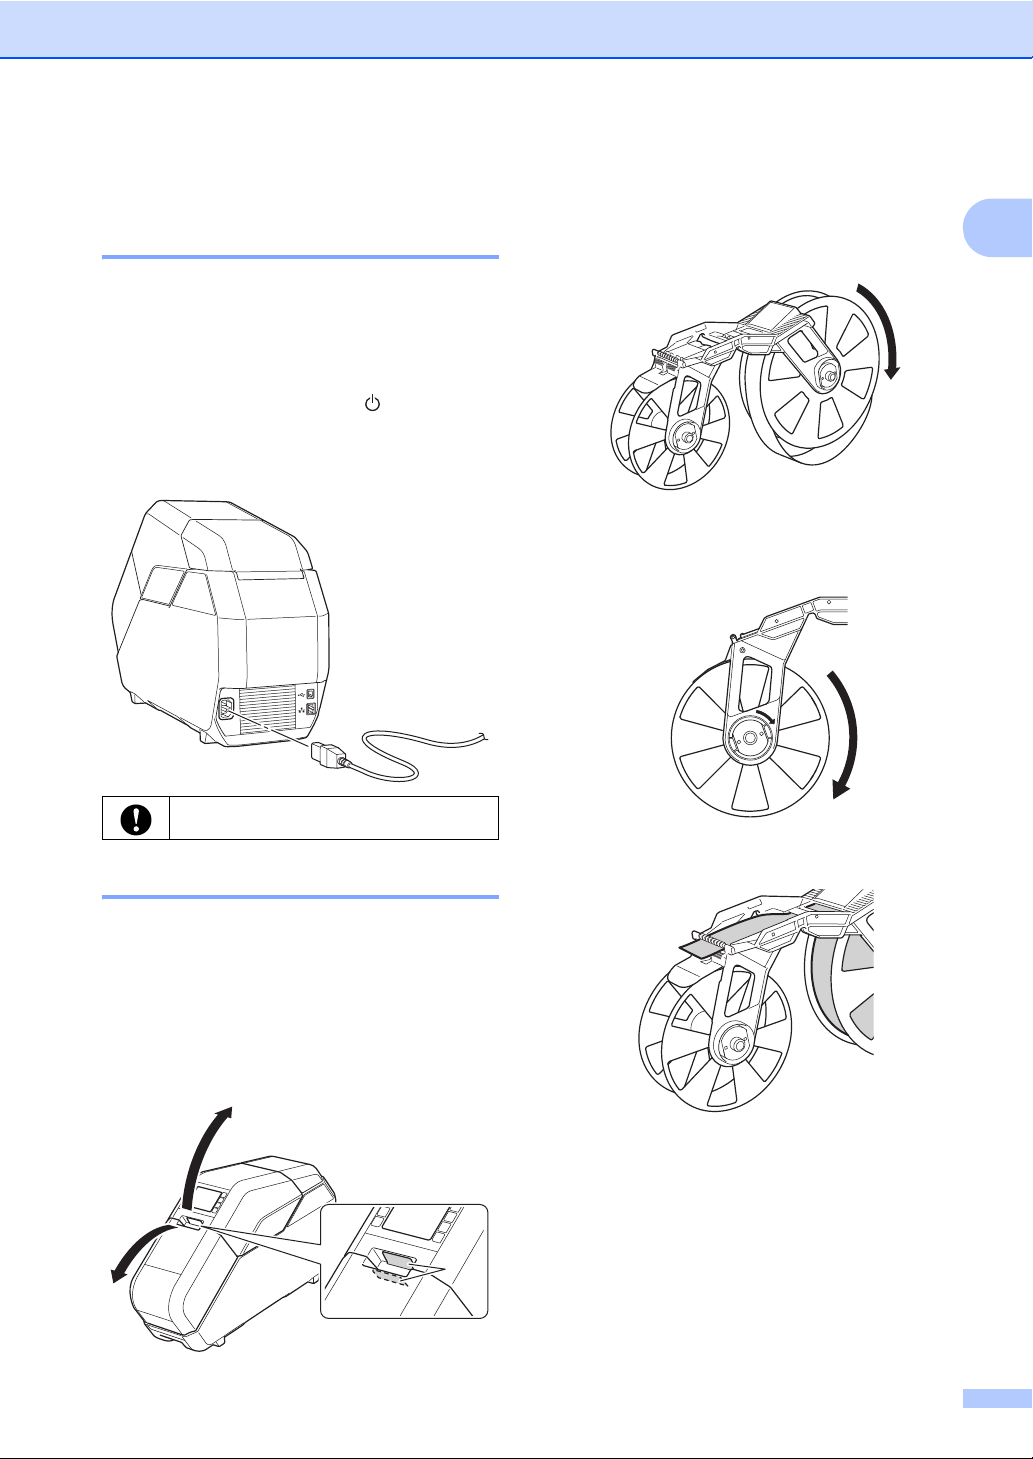
Connecting the Power Supply1
1 Plug the power cord into the power cord
socket on the machine.
2 Plug the power cord into the electrical
socket.
3 Press the power button ( ) on the
machine to turn it on. The power
indicator will illuminate green,
and the machine is in standby.
2 Make sure that there is no slack in the
tape cassette.
If there is slack in the tape, turn the
reel as shown to remove any slack.
If there is slack in the backing paper,
turn the reel in the direction of the
arrow to remove any slack.
1
Unbundle the power cord before use.
Installing the Tape Cassette 1
Install the tape cassette in the machine.
The tape cassette integrates a reel wound with
tape and a reel wound with backing paper.
1 Open the top cover and bottom cover
of the machine.
Press the open buttons (1) to open
the covers.
3 Make sure that the end of the tape
extends from the tape cassette.
13
Page 20

Chapter 1
NOTE
4 Hold the tape cassette with both hands,
and then insert it into the machine with the
tape reel toward the back of the machine.
Do not directly touch the tape with your
fingers.
Installing the Ink Ribbon Cassette 1
1 Make sure that there is no slack in the
ink ribbon cassette.
If there is slack in the ink ribbon, turn
the gear in the direction of the arrow
to remove any slack.
Installing the Paper Core Holder 1
Install, onto the paper core holder, the paper
core to be wound with the printed tape.
1 Remove the rim of the paper core holder.
2 Adjust the paper core holder to the width
of the paper core to be used.
Use the marks on the paper core holder
as a guide.
Hold the ink ribbon cassette as shown.
Do not directly touch the ink ribbon with
your fingers.
2 Install the ink ribbon cassette on top
of the tape cassette.
Align on the ink ribbon cassette
with on the machine.
14
If the paper core holder is locked, rotate
it in the direction of the arrow until it is
unlocked.
Page 21

Getting Started
NOTE
1
3 Rotate the rim of the paper core holder
in the direction of the arrow until it locks
into the slot of the paper core holder.
4 Slide the paper core onto the paper core
holder.
5 Attach the rim of the paper core holder.
Firmly attach the rim so that there is no
gap between the paper core and the
rims of the paper core holder.
6 With the lock (1) of the paper core holder
on the left, insert it into the machine.
7 Pull the lock of the paper core holder
toward you until it locks into place.
1
If there is a gap between the paper core
and the rims of the paper core holder,
the tape will be incorrectly wound.
Make sure that there are no gaps.
8 Pull the tape from the tape cassette,
and then securely affix it to the paper
core.
15
Page 22

Chapter 1
NOTE
NOTE
1
• If the tape is not securely affixed, it may
come off the paper core and be incorrectly
wound.
• Correctly align the tape before affixing it.
If the tape is affixed at an angle, it may
wrinkle at the edge of the paper core
holder and be incorrectly wound.
• When affixing the tape to the paper core,
make sure that the tape does not attach
to the tape cassette guide (1). Otherwise,
the tape will not wind on the paper core,
resulting in a malfunction.
9 Close the top cover and bottom cover,
and then press the set button ( ).
Press down on the covers until they click
into place.
When the tape is installed, a test print
is performed, and the tape is wound
on the paper core.
Look through the small window of the
machine at the test-printed tape wound on
the paper core to check the print condition
and print position (left and right margins,
etc.).
Good sample Bad sample
If the print position is shifted, adjust
it by clicking [Device settings] [Print Position Adjustment] (page 38)
of the “Printer Setting Tool”.
This completes the machine setup.
Do not open a cover during printing
as it will not restart.
To pause printing, hold down
the pause button ( ). However,
a space will be left in the printed
tape when resuming printing after
being paused. Take care when
pausing printing.
Do not open a cover while the
tape is being cut, otherwise the
tape cannot be cut correctly.
16
Page 23

Getting Started
NOTE
1
2
3
4
About the Tape Cassettes and Ink Ribbon Cassettes 1
Storage
When the tape cassettes and ink ribbon
cassettes are not being used, store them
in their packaging, otherwise they may
become dusty, resulting in blurred printing.
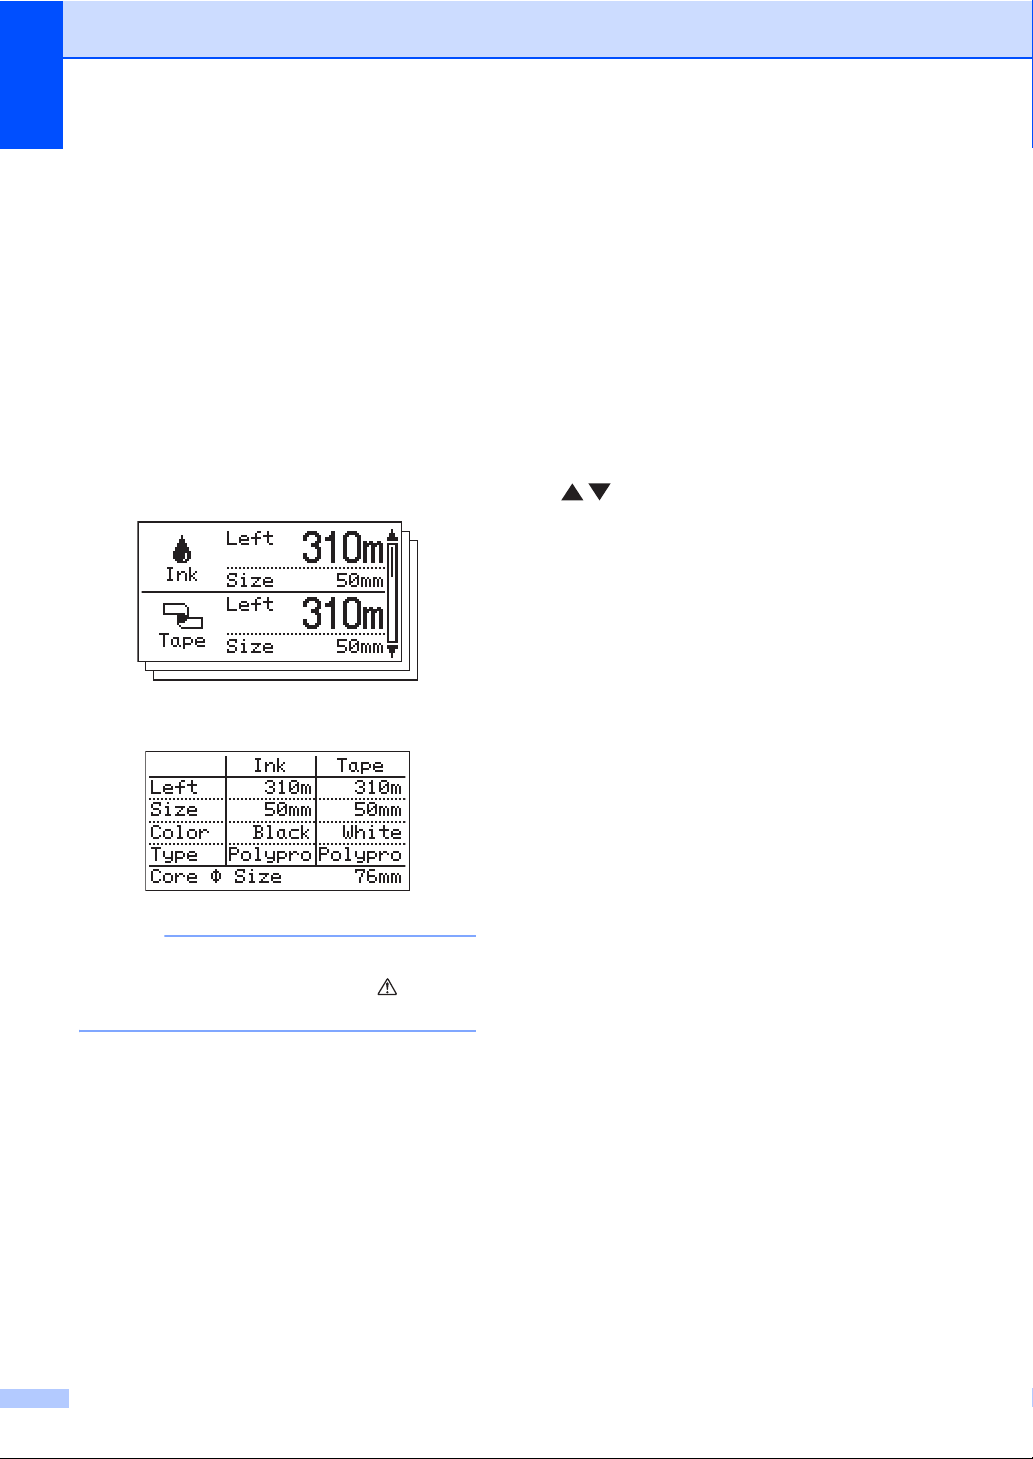
Checking remaining quantities
The remaining quantities of the tape
cassettes and ink ribbon cassettes are
shown in the main screen on the LCD.
The remaining quantities can also be
estimated by checking the markings
on the tape cassettes and ink ribbon
cassettes.
Installing the Printer Driver and Software 1
The printer driver and software can be
installed using a USB cable connection
or a wired network connection.
Before starting the installation, make
sure that you are logged on to the
computer with administrator rights.
1 Insert the installer CD-ROM into your
CD-ROM drive. If the language screen
appears, choose your language.
If the installer screen does not
automatically appear:
• Windows Vista
Display the contents of the CD-ROM drive
folder, and then double-click [start.exe].
• Windows
®
/Windows®7:
®
8/Windows®8.1:
1
Click [Run start.exe] in the [Start] screen,
or display the contents of the CD-ROM
drive folder from the desktop, and then
double-click [start.exe].
1 Standard Installation
Installs P-touch Editor 5.1, the printer
driver, P-touch Update Software and
Printer Setting Tool.
17
Page 24

Chapter 1
NOTE
2 Custom Installation
Allows P-touch Editor 5.1, the printer
driver, P-touch Update Software and
Printer Setting Tool to be individually
selected for installation.
3 Advanced Applications
Installs the BRAdmin Light utility.
4 Brother Support
Displays the support website
(Brother Solutions Center).
2 Click [Standard Installation].
Continue the installation according
to the instructions that appear on the
screen.
If multiple TP-M5000N machines are
to be connected to the network, check
the IP address of the machine being
connected, and then specify the
appropriate settings. The IP address
can be checked using any of the following
methods.
• Press the MENU/ESC button, and then
select “Network Configuration” in the
menu that appeared. For details,
see Operation Panel on page 11.
Connecting the Computer and Machine1
The machine can be connected to your
computer using either of the following
methods:
USB cable connection
Wired network connection
USB Cable Connection 1
Before connecting the machine to the
computer, install the printer driver.
1 Before connecting the USB cable, make
sure that the machine is turned off.
2 Plug the USB cable into the USB port
on the back of the machine.
3 Plug the other end of the USB cable into
the USB port on the computer.
• Check with [Communication settings]
of the “Printer Setting Tool”.
For details, see Communication
Settings on page 34.
4 Turn on the machine.
18
Page 25

Wired Network Connection 1
NOTE
Getting Started
In order for the machine to use a static
IP address to communicate through
a wired network connection, the printer
driver and the “Printer Setting Tool”
must first be installed, and the wired
network connection settings must be
specified.
1 Before connecting the network cable,
make sure that the machine is turned off.
2 Plug the network cable into the Ethernet
network port on the back of the machine,
and then turn on the machine.
• The machine’s communication settings
can be changed with [Communication
settings] of the “Printer Setting Tool”.
For details, see Communication Settings
on page 34.
• By using the “Printer Setting Tool”, the
communication settings can be changed
and easily applied to multiple machines.
For details, see Applying Setting Changes
to Multiple Tape Creators on page 37.
1
19
Page 26

2
NOTE
Software 2
About the Software 2
The included software enables you to easily
create your own tape designs, and then save
and manage them.
Before using the software, make sure you
have installed the printer driver and the
software from the included CD-ROM. Select
[Standard Installation] from the CD-ROM
Top Menu to install all required software.
To download the latest printer driver and
software, visit the Brother Solutions Center
at: http://support.brother.com/
Using P-touch Editor 2
P-touch Editor can be used to edit and create
print designs.
The actual windows and dialog boxes of the
software may differ from those shown in this
manual depending on your computers
operating system.
1 Start P-touch Editor.
Windows Vista
Click , [All Programs] [Brother P-touch] -
[P-touch Editor 5.1].
Windows
Click [P-touch Editor 5.1] on
the [Apps] screen, or double-click
[P-touch Editor 5.1] on the desktop.
When P-touch Editor starts,
the startup window appears.
®
/Windows® 7:
®
8/Windows® 8.1:
• You can also start P-touch Editor using
shortcuts if you selected to create
shortcuts during installation.
• Shortcut icon on the desktop:
Double-click to start P-touch Editor.
• Shortcut icon in the Quick Launch bar:
Click to start P-touch Editor.
• To change how P-touch Editor functions
when it is started, click [Tool] - [Options]
in the P-touch Editor menu bar to display
the [Options] dialog box. Click the
[General] tab, and then select the desired
setting in the [Operations] list box under
[Startup Settings]. The default setting
is [Display New View].
20
Page 27

Software
2
1
4
3
7
2
1
3
4
5
6
7
2
1
3
4
8
6
5
2 In the startup window, select the data
to be created.
1 To create a new layout, click the
[New Layout] button.
2 To create a new layout using a
pre-set layout, double-click the
desired tape width and category.
3 To connect a pre-set layout to
a database, select the [Connect
Database] check box.
4 To open an existing layout,
click [Open].
Operation Modes 2
P-touch Editor has three different operation
modes: [Express] mode, [Professional]
mode and [Snap] mode. You can easily
switch between modes by using the mode
selection buttons.
Express mode
1Menu bar
2 Command bar
3 Draw/Edit toolbar
4 Property bar
5 Layout window
6 Database window
7 Mode selection buttons
Professional mode
2
1Menu bar
2 Standard toolbar
3 Property palette
4 Draw/Edit toolbar
5 Layout window
21
Page 28

Chapter 2
NOTE
6 Database window
7 Mode selection buttons
8Side bar
Snap mode
This mode allows you to capture all or
a portion of your computer screen content,
print it as an image, and save it for future
use.
1 Click the [Snap] mode selection
button. The [Description of Snap
mode] dialog box appears.
2 Click [OK]. The Snap mode palette
appears.
• If you select the [Do Not Display This
Dialog Again] check box in the
[Description of Snap mode] dialog box,
that dialog box will not appear the next
time that you switch to Snap mode.
• Windows Vista
You can also start P-touch Editor
in [Snap] mode by clicking [All Programs] - [Brother P-touch] -
[P-touch Editor 5.1 (Snap mode)].
• Windows
You can also start P-touch Editor in [Snap]
mode by clicking [P-touch Editor 5.1
(Snap mode)] on the [Apps] screen.
22
®
/Windows® 7
®
8/Windows® 8.1
Page 29

Software
Creating/Printing Tapes in P-touch Editor 2
Use P-touch Editor 5.1, which is included on the CD-ROM, to design and create tapes.
Using an Existing Design 2
P-touch Editor comes pre-installed with various designs. You can easily use an existing design
as a template for creating your own design.
In the following procedure, we will create the following tape design.
P-touch Editor main window ([Express] mode)
2
1
2
1 Start P-touch Editor 5.1.
23
Page 30

Chapter 2
NOTE
NOTE
2 Double-click the desired tape width and category.
3 Double-click the desired design.
4 The text in the design can be changed.
Click the text to display the cursor, and then type in the text (1).
In this example, change “brother” to “TP-M5000N”.
5 Select the text object, and then change the font, character style, etc. (2).
You can also change other format settings, such as the character size and text arrangement.
6 After creating the design, click [Print], and then click [Print] in the dialog box that appears.
• To check and change the print settings, click [Properties].
• When printing starts, a line is printed to indicate the starting point.
Creating a New Design 2
P-touch Editor can be used to create your own original tape designs. Logos and images can also
be added to the design.
In the following procedure, we will create the following tape design.
24
Page 31

P-touch Editor main window ([Express] mode)
NOTE
NOTE
12
4
3
5
Software
2
1 Start P-touch Editor 5.1.
2 Click [New Layout].
3 Specify the size of the tape to be created.
Click [Paper] (1), and then specify the tape size and length.
To add margins before and after the design, specify settings for [Margins].
4 Type in the text.
Click [Text] (2), and then specify the font and character style.
5 Click (3) to display the cursor so text can be typed in.
In this example, type “Thank you for purchasing”.
After typing in the text, click the text box with the pointer in order to move it.
6 Arrange the image files.
Click [Image] (4), and then select [Clip Art] (5).
In this example, select [Sings2] from the [Category] list, and then select the desired image.
You can also adjust the size and position.
25
Page 32

Chapter 2
NOTE
NOTE
7 To replace an image; insert the new image, delete the unwanted image, and then move
the new image to the location of the deleted image.
To increase the spacing between the pattern repeating, drag the white end of the pattern to the
right with your mouse.
8 Repeat these steps to complete the tape design.
9 After creating the design, click [Print], and then click [Print] in the dialog box that appears.
• To check and change the print settings, click [Properties].
• When printing starts, a line is printed to indicate the starting point.
26
Page 33

Software
2
3
1
Creating Multiple Tapes 2
By using copy printing in P-touch Editor 5.1,
you can create multiple copies of tapes with
the same design.
In Express mode
1 After creating the tape design,
click [Print].
The [Print] dialog box appears.
2 After specifying the desired number of
copies in [Copies], click [Print] to begin
printing.
In Professional mode
1 After creating the tape design, display
the Print Properties (1).
2 In (2), specify the desired
number of copies.
3 Click (3) to begin printing.
3 Install a new paper core.
For details, see Installing the Paper
Core Holder on page 14.
4 Close the covers, and then press the set
button ( ).
Printing continues.
2
When a roll of tape has been printed with copy printing
2
1 When a roll of tape has been printed
with copy printing, the machine will
automatically stop.
The indicator blinks in green, and the
machine is in setup standby.
2 Open the top cover and bottom cover
of the machine, and then remove the
printed tape.
27
Page 34

Chapter 2
NOTE
2
3
1
4
5
Image Files 2
Pictures in the following formats can be
inserted as image files into P-touch Editor.
Bitmap File (*.bmp, *.dib)
JPEG File (*.jpg, *.jpeg)
GIF File (*.gif)
TIFF File (*.tif)
Icon File (*.ico)
Windows Meta File (*.wmf, *.emf)
PNG File (*.png)
Printing Data Created in Illustrator
When creating original designs and logos
in Illustrator
save the files as WMF format, not AI or EPS
formats.
Images saved as AI or EPS formats must be
converted to WMF format before use.
Creating WMF Format Files
®
to insert into P-touch Editor,
®
Using P-touch Library 2
Using P-touch Library, you can manage
P-touch templates and other data from
your computer.
1 Start P-touch Library.
Windows Vista
Click , [All Programs] [Brother P-touch] - [P-touch Tools] -
[P-touch Library 2.2].
Windows
Click [P-touch Library 2.2] on the
2
[Apps] screen.
When P-touch Library starts, the main
window appears.
®
/Windows® 7
®
8/Windows® 8.1
1 In Illustrator
®
, open the image saved
as AI or EPS format.
2 On the menu bar, click [File] -
[Export].
3 From the formats list, select
[Windows Metafile (*WMF)],
and then save the file at the desired
location.
To use WMF format images in P-touch
Editor, click [Insert] - [Image] - [From file]
on the menu bar.
1 Menu bar
Provides access to all available commands,
which are grouped under each menu title
([File], [Edit], [View], [Tool], and [Help])
according to their functions.
2Toolbar
Provides access to frequently used commands.
3 Folder list
Displays a list of folders. When you select
a folder, the templates or other data in the
selected folder is displayed in the templates list.
4 Templates list
Displays a list of the templates or other data
in the selected folder.
5Preview
Displays a preview of the template or other
data selected in the templates list.
28
Page 35

Software
NOTE
2
3
1
4
5
Explanations of Toolbar Icons
Icon/Button Name Function
Opens the selected
template.
Open
Prints the selected label
template with the machine.
Print (Only for
P-touch Library)
Allows you to search for
templates or other data
that are registered to
Search
Display Style
P-touch Library.
Changes the file display
style.
Registering Templates With P-touch Library 2
Templates or other data can be registered
with P-touch Library using any of the following
methods.
Drag and drop the created template to the
[All contents] folder or to the folder list.
Using P-touch Library 2
Opening and Editing Templates 2
Select the template to be opened or edited,
and then click [Open].
The program associated with the template
will be started so that the template can be
edited.
The program that starts depends on the
format of the file that was selected. For
example, if you select a P-touch template,
P-touch Editor starts.
2
Follow the procedure below to
automatically register created templates
with P-touch Library.
1 On the P-touch Editor menu bar, click
[Tool] - [Options].
2 On the [General] tab of the [Options]
dialog box, click [Registration Settings].
3 Select the timing for registering
templates created in P-touch Editor,
and then click [OK].
29
Page 36

Chapter 2
Printing Templates 2
Select the template to be printed, and then
click [Print].
The template is printed with the connected
Tape Creator.
Searching for Templates or Other Data
You can search for templates or other data
registered with P-touch Library.
1 Click [Search].
The [Search] dialog box appears.
Criteria Details
Multiple
Parameters
Name Allows you to search for
Type Allows you to search for
Size Allows you to search for
Date Allows you to search for
2
3 Click [Begin Search].
The search begins.
Determines how the program
searches when multiple criteria
are specified. Select [AND] to
search for files that satisfy all of
the criteria. Select [OR] to search
for files that satisfy any of the
criteria.
a template or other data
by specifying the file name.
a template or other data
by specifying the file type.
a template or other data
by specifying the file size.
a template or other data
by specifying the file modification
date.
2 Specify the search criteria.
The following search criteria
are available.
30
4 Close the [Search] dialog box.
The search results can be confirmed by
clicking [Search Results] in the folder
list.
Page 37

Software
NOTE
NOTE
Using the P-touch Update Software 2
By using the P-touch Update Software,
P-touch Editor and the machine firmware
can be updated to the newest versions.
Do not turn off the machine while
transferring data or updating the
firmware.
If any other application is running,
exit that application.
• The P-touch Update Software must be
used on a computer connected to the
Internet.
• Your software may differ from the contents
of this manual.
• When the P-touch Update Software
is installed, an icon will appear on
the desktop for your convenience.
Windows® 8/Windows® 8.1:
Click [P-touch Update Software] on
the [Apps] screen, or double-click
[P-touch Update Software] on the
desktop.
3 Select the update function to be
performed.
To update P-touch Editor:
Click the [Computer software
update] icon, and then go to step 4.
To update the firmware:
Click the [Machine update] icon,
and then go to step 5.
2
Updating P-touch Editor or the Firmware 2
1 Connect the machine to the computer
with a USB cable, and then turn on the
machine.
2 The P-touch Update Software starts.
Windows Vista
Double-click the [P-touch Update
Software] icon.
You can also start the P-touch Update
Software using the following method.
Click , [All Programs] - [Brother
P-touch] - [P-touch Update Software].
®
/Windows® 7:
31
Page 38

Chapter 2
4 Select settings for [Printer] and
[Language], select the check box
beside the P-touch Editor to be updated,
and then click [Install].
6 Select a setting for [Language], select
the check box beside the firmware to be
updated, and then click [Transfer].
When a confirmation message appears,
check the details of the data to be
transferred, and then click [Start].
Do not turn off the machine or
disconnect the cable while data is being
transferred.
A message appears, indicating that the
installation is finished.
P-touch Editor has been updated.
5 Select a setting for [Printer], check that
[The machine is connected correctly.]
appears, and then click [OK].
7 After the transfer is completed
successfully, click [OK] to complete
the operation.
32
Page 39

3
NOTE
Printer Setting Tool 3
About the Printer Setting Tool 3
By using the “Printer Setting Tool”,
the machine’s communication settings
and device settings can be specified from
the computer.
•The “Printer Setting Tool” is installed
at the same time as other software such
as the printer driver. For details, see
Installing the Printer Driver and Software
on page 17.
•The “Printer Setting Tool” is available
only with Brother machines compatible
with this tool.
Before Using the Printer Setting Tool 3
Plug the machine into the electrical socket
with the power cord.
Make sure that the printer driver has been
installed and is functional.
Using the Printer Setting Tool 3
1 Connect the Tape Creator to be
configured to the computer.
2 Start “Printer Setting Tool”.
In order to open [Communication
settings] and [Device settings],
you must be logged on with
administrator rights.
Windows Vista
Click , [All Programs] - [Brother] [Label & Mobile Printer] -
[Printer Setting Tool].
Windows
Click the [Printer Setting Tool] icon
on the [Apps] screen.
The main window appears.
1
®
/Windows®7:
®
8/Windows®8.1:
3
Connect this machine to a computer with
a USB cable.
With this tool, settings cannot be specified
using a wired network connection.
2
3
4
1Printer
Select the Tape Creator to be configured.
2 Communication settings
Specify wired network communication
settings.
33
Page 40

Chapter 3
NOTE
9
10
11
12
3
2
1
4
7
8
3 Device settings
Specify Tape Creator device settings,
such as power settings and print settings.
4Exit
Closes the window.
3 Check that the Tape Creator to be
configured appears beside [Printer].
If a different printer is displayed,
select the desired Tape Creator
from the drop-down list.
If only one Tape Creator is connected,
it is unnecessary to make a selection
since only that machine will appear.
4 Click the button for the settings to be
specified, and then specify or change the
settings in the dialog box that appeared.
For more information about the settings
dialog boxes, see Communication
Settings on page 34 or Device settings
on page 38.
Communication Settings 3
Using [Communication settings] in the
“Printer Setting Tool” when connected to
the machine with a USB cable, you can set or
change the network communication settings.
Not only can you change the communication
settings for one Tape Creator, but you can
also easily apply the same settings to multiple
Tape Creators.
Settings Dialog Box 3
Current Status Dialog Box 3
1
2
4
5 After changing the settings, click [Apply] -
3
5
[Exit] in the settings dialog box to apply
the settings to the Tape Creator.
6 Click [Exit] in the main window to finish
specifying settings.
8
Use the “Printer Setting Tool” to
configure the machine only when the
machine is in standby. The machine
may malfunction if you attempt to
configure it while it is handling a job.
TCP/IP (Wired) Dialog Box 3
6
7
34
Page 41

Printer Setting Tool
NOTE
NOTE
1 Menu bar
Select a command from a list contained in a menu. (See Menu Bar on page 35.)
2Printer
Select the Tape Creator whose communication
settings are to be specified.
If only one Tape Creator is connected, it is
unnecessary to make a selection since only
that machine will appear.
3Items
When [Current Status] is selected, the current
settings appear in the settings display/change
area.
When [TCP/IP (Wired)] is selected, the settings
can be changed.
4Node Name
Displays the node name. The node name
can also be changed. (See Change Node
Name/Bluetooth Device Name on page 36.)
5 Settings Display/Change Area
Displays the current settings for the selected
item. Change the settings as necessary using
the drop-down menus, direct entry, or other
appropriate methods.
6Refresh
Click to update the displayed settings with the
most recent information.
7Exit
Exits [Communication settings], and returns to
the main window of the “Printer Setting Tool”.
10 IP Address/Subnet Mask/Gateway
Specify the various values.
You can only enter settings when the IP address
is set to [STATIC].
11 DNS Server Method
Select [STATIC] or [AUTO].
12 Primary DNS Server IP Address/Secondary
DNS Server IP Address
You can only enter settings when the DNS server
is set to [STATIC].
Menu Bar 3
Select a command from a list contained in
a menu.
File Menu 3
Apply Settings to the Printer
Applies the settings to the machine.
Save Settings in Command File
Saves the specified settings in a
command file. The file extension is “.bin”.
The saved command file can be used with
the BRAdmin utility to apply the settings
to a machine.
• The following information is not saved with
the command file.
3
Settings are not applied to machines if the [Exit]
button is clicked, without clicking the [Apply]
button after changing settings.
8Apply
Click [Apply] to apply the settings to the
machine.
To save the specified settings in a command
file, select [Save in Command File] from the
drop-down menu.
The saved command file can be used with
the BRAdmin utility to apply the settings to
a machine.
9 Boot Method
Select [STATIC], [AUTO], [BOOTP], [DHCP]
or [RARP].
• Node name
• IP address, subnet mask and default
gateway (when the IP address is set
to [STATIC])
• The saved communication settings
commands are only intended to be
used for applying settings to a machine.
The settings cannot be applied by
importing this command file.
Do not send the command file to a Tape
Creator whose model was not specified
when the command file was exported.
35
Page 42

Chapter 3
NOTE
NOTE
NOTE
NOTE
Import
• Select a Profile to import
Imports the exported file and applies
the settings to this tool.
Click [Browse] to display a dialog box
to browse to the file. Select the file
to be imported. The settings in the
selected file appear in the settings
display/change area.
• All settings, such as TCP/IP settings,
can be imported. However, node names
cannot be imported.
• Only profiles that are compatible with the
selected Tape Creator can be imported.
• If the imported profile’s IP address is set to
[STATIC], change the IP address of the
imported profile, if necessary, so that
it does not duplicate the IP address of
an existing Tape Creator on the network
whose settings have been completed.
Export
Saves the current settings in a file.
Exported files are not encrypted.
Tool Menu 3
Option Settings
• Automatically restart the printer
after applying new settings
If this check box is selected, the Tape
Creator automatically restarts after
communication settings are applied.
If this check box is cleared, the Tape
Creator must be manually restarted.
When configuring multiple Tape Creators,
you can reduce the time required to
change settings by clearing this check
box. In this case, we recommend selecting
this check box when configuring the first
Tape Creator, so you can confirm each
setting is operating as intended.
• Automatically detects the connected
printer, and retrieves the current
settings.
If this check box is selected when
a Tape Creator is connected to
the computer, the Tape Creator
is automatically detected and its
current settings are displayed in
the [Current Status] pane.
If a model other than a Tape Creator
is shown in the [Printer] drop-down list,
the settings available on all tabs change
to match the connected printer.
Change Node Name/Bluetooth Device
Name
The node name can be changed.
Reset to Default Communication
Settings
Returns the communication settings
to their factory defaults.
Help Menu 3
Display Help
Displays the Help.
About
Displays the version information.
36
Page 43

Printer Setting Tool
NOTE
NOTE
NOTE
Applying Setting Changes to Multiple Tape Creators 3
1 After applying settings to the first Tape
Creator, disconnect the machine from
the computer, and then connect the
second Tape Creator to the computer.
2 Select the newly connected Tape Creator
from the [Printer] drop-down box.
If the [Automatically detects the
connected printer, and retrieves
the current settings.] check box in the
[Option Settings] dialog box is selected,
the Tape Creator connected with the
USB cable is automatically selected.
For details, see Automatically detects the
connected printer, and retrieves the
current settings. on page 36.
3 Click [Apply].
The same settings that were applied
to the first Tape Creator are applied
to the second Tape Creator.
4 Repeat steps 1 – 3 for all the Tape
Creators whose settings you wish to
change.
If the IP address is set to [STATIC],
the Tape Creator’s IP address will also
be changed to the same address as the
first machine.
Change the IP address if necessary.
To save the current settings in a file,
click [File] - [Export].
The same settings can be applied to
another Tape Creator by clicking [File] [Import], then selecting the exported
settings file. (See Import on page 36.)
3
If the [Automatically restart the printer
after applying new settings] check box
is cleared, the Tape Creators will not be
restarted after the settings are changed,
reducing the time required to configure
the machines. However, we recommend
selecting the [Automatically restart the
printer after applying new settings]
check box when configuring the first
Tape Creator so that you can confirm that
a connection with the access point can
be correctly established with the settings.
For details, see Automatically restart the
printer after applying new settings
on page 36.
37
Page 44

Chapter 3
6
1
2
3
4
5
7
Device settings 3
Use the [Device settings] the “Printer
Setting Tool”, to change the default Tape
Creator settings.
When printing from a computer application,
various printing settings can be specified
from the printer driver; however, by using
[Device settings] of the “Printer Setting
Tool”, more advanced settings can be
specified.
When [Device settings] is opened, the Tape
Creator’s current settings are retrieved and
displayed. If the current settings could not be
retrieved, the previous settings are displayed.
If the current settings could not be retrieved
and previous settings have not been specified,
this tool’s default settings are displayed.
4 Print Position Adjustment
Adjust the print position along the width of the
tape.
When the tape is installed, a test print is
performed, and the tape is wound on the paper
core. Look through the small window of the
machine at the tape wound on the paper core
to check the print position.
5 Current Settings
Click this button to retrieve the settings from
the currently connected Tape Creator and
display them in the dialog box.
6Exit
Exits [Device settings], and returns to the
main window of the “Printer Setting Tool”.
7Apply
Click [Apply] to apply the settings to the Tape
Creator.
To save the specified settings in a command
file, select [Save in Command File] from the
drop-down menu.
Menu Bar 3
Select a command from a list contained in
a menu.
File Menu 3
Apply Settings to the Printer
Applies the settings to the machine.
Performs the same operation as when the
[Apply] button is clicked.
Save Settings in Command File
1 Menu bar
Select a command from a list contained in
a menu. (See Menu Bar on page 38.)
2Printer
Select the Tape Creator whose settings are
to be specified.
If only one Tape Creator is connected, it is
unnecessary to make a selection since only
that machine will appear.
3Auto Power Off
Specify the amount of time that passes before
the machine turns off automatically.
Saves the specified settings in a command
file. The saved command file can be used
with the BRAdmin utility to apply the settings
to a machine. However, the setting for [Print
Position Adjustment] is not saved.
Performs the same operation as when
[Save in Command File] is selected from
the [Apply] drop-down list.
Import
Imports the exported file and applies the
settings to this tool.
Export
Saves the current settings in a file.
38
Page 45

Tool Menu 3
Reset to Factory Defaults
Returns all Tape Creator settings, including
the communication settings, to their factory
defaults.
Option Settings
If the [Do not display an error message
if the current settings cannot be
retrieved at startup.] check box is
selected, a message will not be displayed
next time.
Help Menu 3
About
Displays the version information.
Printer Setting Tool
3
39
Page 46

4
NOTE
NOTE
Network Features 4
Specifying the IP Address, Subnet Mask and Gateway
Using the BRAdmin Light Utility 4
The BRAdmin Light utility is designed for
the initial setup of this network-connected
machine. It can also search for these
machines in a TCP/IP environment, show the
status and configure basic network settings,
such as the IP address.
Installing BRAdmin Light 4
1 Make sure that the machine is turned on.
2 Turn on your computer. Before
beginning installation, exit any
applications that are running.
3 Insert the included CD-ROM into your
CD-ROM drive. The opening screen
appears.
4 The CD-ROM main menu appears.
Click [Advanced Applications].
• The node name appears in the BRAdmin
Light window. The default node name for
the machine is “BRNxxxxxxxxxxxx”.
4
(“xxxxxxxxxxxx” is based on your
machine’s MAC address/Ethernet
address.)
• The default password for the machine
is “access”.
Setting the IP Address, Subnet Mask and Gateway With BRAdmin Light
1 Start BRAdmin Light.
Windows Vista
Click , [All Programs] [Brother]- [BRAdmin Light] -
[BRAdmin Light].
Windows
Click [BRAdmin Light] on the
[Apps] screen.
®
/Windows® 7:
®
8/Windows®8.1:
2 BRAdmin Light automatically searches
for new devices.
3 Double-click the unconfigured device.
4
5 Click [BRAdmin Light], and then follow
the on-screen instructions.
• The newest version of BRAdmin Light
can be downloaded from
http://support.brother.com/
• If more advanced management is
required, use BRAdmin Professional after
downloading the newest version from
http://support.brother.com/
• If a firewall, anti-spyware or antivirus
software is being used, temporarily
disable them. After checking that printing
can be performed, enable them again.
40
If a DHCP, BOOTP or RARP server is not
being used, the device will appear as
[Unconfigured] in the BRAdmin Light
utility screen.
Page 47

Network Features
NOTE
4 Select [STATIC] for [Boot Method].
Specify settings for [IP Address],
[Subnet Mask] and [Gateway] of your
machine, if necessary.
5 Click [OK].
6 If the IP address has been correctly
specified, the node and model name
of the machine appears in the list.
Other Management Utilities 4
This machine can be used with the following
management utilities in addition to the
BRAdmin Light utility. You can change your
network settings using these utilities.
Using Web-Based Management (Web Browser) 4
Using HTTP (Hypertext Transfer Protocol),
a standard web browser can be used to change
your print server settings. See Configuring
Machine Settings Using Web-Based
Management (Web Browser) on page 42.
Using the BRAdmin Professional Utility 4
BRAdmin Professional is a utility for more
advanced management of network connected
devices. This utility can search for Brother
products on your network, and show the
device status in an easy-to-read Explorer-style
window with colour changes indicating the
status of each device. You can configure
network and device settings as well as update
device firmware from a Windows
on your local area network (LAN). BRAdmin
Professional can also log activity of Brother
devices on your network and export the log
data in an HTML, CSV, TXT or SQL format.
For more information and download details,
visit us at http://support.brother.com/
®
computer
4
• The newest version of BRAdmin
Professional can be downloaded from
http://support.brother.com/
• If a firewall, anti-spyware or antivirus
software is being used, temporarily disable
them. After checking that printing can
be performed, enable them again.
• The node name appears in the BRAdmin
Professional window. The default node name
for the machine is “BRNxxxxxxxxxxxx”.
(“xxxxxxxxxxxx” is based on your machine’s
MAC address/Ethernet address.)
41
Page 48

Chapter 4
NOTE
NOTE
Managing With Web-Based Management (Web Browser)
Using HTTP (Hypertext Transfer Protocol),
you can use a standard web browser to
manage this machine on your network.
When using web-based management,
the following are possible:
Display machine status information.
Change network settings such as TCP/IP
information.
Display software version information
of the machine and print server.
Change network and machine
configuration settings.
If you have edited the hosts file on your
computer or are using a Domain Name
System, enter the name assigned to
this machine, instead of the IP address.
4
Since the machine supports TCP/IP and
NetBIOS, you can also enter the NetBIOS
name of the machine. The NetBIOS name
assigned is the first 15 characters of the
node name and, by default, will appear
as “BRNxxxxxxxxxxxx” (where
“xxxxxxxxxxxx” is the Ethernet address).
3 Change the print server settings.
Specifying a Password 4
We recommend specifying a password in order
to prevent unauthorised access to web-based
management. When a password is specified,
unauthorised users will not be able to change
settings except on the [Basic] tab.
Make sure that JavaScript and cookies
are always enabled in whichever web
browser you use.
In order to use web-based management, your
network must use TCP/IP, and the machine
and computer must have valid IP addresses.
Configuring Machine Settings Using Web-Based Management (Web Browser) 4
A standard web browser can be used
to change print server settings by using
HTTP (Hypertext Transfer Protocol).
1 Open your web browser.
2 Type “http://xxx.xxx.xxx.xxx/” into
the web browser’s address bar.
(“xxx.xxx.xxx.xxx” is the IP address
of the Brother machine.)
Example: If the IP address of the
machine is 192.168.1.2.
http://192.168.1.2/
1 Open your web browser.
2 Type “http://xxx.xxx.xxx.xxx/” into
the web browser’s address bar.
“xxx.xxx.xxx.xxx” is the IP address
of the Brother machine.
Example: If the IP address of the
machine is 192.168.1.3.
Type “http://192.168.1.3/” into the
web browser’s address bar.
3 Click the [Administrator] tab.
4 Type in the password that you want
to use (up to 32 characters).
5 Re-type the password in [Confirm new
password].
6 Click [OK].
From next time you access to the
Web Based Management, enter a
password in the [Login] box, and then
click . After configuring the settings,
logout by clicking .
If no password has been specified, you can
specify one by clicking [Please configure
the password.].
42
Page 49

Network Features
Network Specifications 4
The protocols and security features supported by the machine are listed below.
Interface Ethernet 10BASE-T, 100BASE-TX
Network Protocol (IPv4) ARP, RARP, BOOTP, DHCP, APIPA (Auto IP),
WINS/NetBIOS name resolution, DNS Resolver,
mDNS, LLMNR responder, LPR/LPD, Custom
Raw Port/Port9100, FTP Server, TFTP server,
SNTP client, SNMP v1/v2c, SNMP v3, ICMP
4
43
Page 50

5
CAUTION
2
1
Maintenance 5
Perform machine maintenance as required.
Some environments require that maintenance
must be done more frequently (for example,
if the machine is located in dusty conditions).
Before performing machine maintenance,
turn off the machine, and then unplug the
power cord from the electrical socket.
Print Head Maintenance5
Immediately after printing, the print head
will be hot. Be careful not to be burned.
Do not directly touch the print head with
your fingers.
1 Press the open button to open the top
cover.
IMPORTANT
About cooling mode
If the print head becomes too hot, printing will
stop so that the print head can cool down.
At that time, an extra vertical line will be
printed on the tape. After cooling, printing
will resume.
This may occur when printing a high volume
of text with a high print density.
To avoid or delay the onset of this condition,
edit your design to reduce the detail.
When printing stops in cooling mode,
do not open the top cover or bottom
cover, otherwise printing will not resume.
2 Lift up the protective cover (1), and then
lightly wipe the print head (2) with the
cleaning pen.
44
Page 51

Maintenance
1
1
1
Ink Ribbon Guide Roller Maintenance 5
1 Press the open button to open the top
cover.
2 Clean the roller (1) with a cloth slightly
moistened with ethanol or isopropyl
alcohol.
Do not use organic solvents such
as benzene.
Bottom Cover Maintenance 5
1 Press the open button to open the
bottom cover.
2 Clean the parts shown in grey in
the illustration with a cloth slightly
moistened with ethanol or isopropyl
alcohol.
Paper Core Holder Maintenance 5
5
Platen Roller Maintenance
Use a piece of cellophane tape to remove dirt
or dust from the surface of the platen roller (1).
If tape adhesive accumulates on the inside (1)
of the rims for the paper core holder, clean
5
it off.
1 Remove the paper core holder from
the machine, and then remove the
paper core.
2 Clean with a cloth slightly moistened
with ethanol or isopropyl alcohol.
45
Page 52

Troubleshooting 6
6
When Indicators are Lit or Blink 6
The indicators light and blink to indicate the machine’s status. The following symbols are used in
this section to show the different indicator patterns. (G = Green, O = Orange and R = Red)
: Indicator is lit
: Indicator is blinking
(off) : Indicator is off
Example: G = Indicator blinks in green
Power Status Description
Machine is on
Initialising
Preparing to print
Transferring
Setup standby during copy printing
G
G
O
(off)
(off) Cover open
(off)
O
(once every
second)
O
(once every
2 seconds)
G
G
O R
(off)
(off) Cooling
(off) Remaining ink ribbon/remaining tape/size confirmation mode
R
(once every
1.8 seconds)
R
(twice every
1.8 seconds)
R
Tape incorrectly attached to the paper core
Top cover open
Cutter error: Close the cover, and then turn the machine off,
then on again.
Power supply fan motor error: The power supply fan motor
is not operating. Turn the machine off, then on again.
System error
Boot mode (operating system error)
46
Page 53

Troubleshooting
When Messages Appear 6
Message Solution
Cooling…
Please Wait
Head is Worn!
Contact Customer Service
Wait while the machine is cools down.
Do not open the top cover or bottom cover, otherwise printing
will not resume.
Contact your reseller or Brother customer service.
6
47
Page 54

Chapter 6
Problems and Solutions 6
Frequently Asked Questions 6
Problem Solution
I want to correct a shift in the print position. Adjust the print position with the “Printer Setting Tool”.
1 Start “Printer Setting Tool”.
®
Windows Vista
Click , [All Programs] - [Brother] [Label & Mobile Printer] - [Printer Setting Tool].
Windows
Click the [Printer Setting Tool] icon on the [Apps]
screen.
2 After the main window appears, click [Device settings].
3 Change the setting for [Print Position Adjustment].
General 6
/Windows® 7:
®
8/Windows® 8.1:
Problem Solution
The machine does not turn on. Is the power cord inserted correctly?
Make sure that the power cord is inserted correctly. If it is,
try plugging it into a different electrical socket.
Make sure you are using a genuine Brother power cord.
If the power indicator still does not light up, contact your
reseller or Brother customer service for assistance.
The indicators show that the machine is
in boot mode (operating system error).
The top cover or bottom cover was
opened while the machine was cooling.
The top cover or bottom cover was
opened during printing.
Media is jammed.
The power cord was unplugged while the firmware was
being updated, and the machine started up in boot mode
the next time it was started.
This issue must be resolved. Contact your reseller or Brother
customer service for assistance.
Printing has stopped.
Press the cut button ( ) to cut the tape, and then remove
the printed tape. Then, reinstall the paper core holder.
For details, see Installing the Paper Core Holder on page 14.
48
Page 55

Problem Solution
The pause button ( ) was pressed.
The indicators show that a system error
has occurred.
The machine does not print. Is a cable loose?
Tape is not fed correctly. Is the platen roller dirty?
Printing has paused.
While printing, hold down the pause button ( ) to pause
printing. Then, you can select whether to resume or cancel
printing.
• If you selected to resume printing:
A space will be left in the printed tape, and printing
is restarted.
• If you selected to cancel printing:
To cancel printing and try again, press the cut button ( )
to cut the tape, and then remove the printed tape. Then,
install a new paper core onto the paper core holder
before installing it into the machine.
For details, see Installing the Paper Core Holder
on page 14.
If this condition occurs, turn off the machine, and then contact
your reseller or Brother customer service for assistance.
Make sure that the cables are securely connected.
Is the status indicator blinking?
An error occurred. Follow the instructions for the error
message that appeared on the LCD.
Are the top cover and bottom cover firmly closed?
Press down on the top cover and bottom cover until they
click into place.
Are the tape cassette and ink ribbon cassette installed?
Make sure that the tape cassette and ink ribbon cassette
are installed.
Has the paper core holder been locked?
Make sure that the paper core holder is locked. For details,
see Installing the Paper Core Holder on page 14.
Is there any remaining ink ribbon and tape?
Make sure that there is remaining ink ribbon and tape.
For details, see Checking remaining quantities on page 17.
Cancel the print job, and then turn off the machine. Turn
the machine on, and then try printing again.
Use a piece of cellophane tape to clean the surface of the
platen roller.
For details, see Platen Roller Maintenance on page 45.
Troubleshooting
6
49
Page 56

Chapter 6
Problem Solution
A data transmission error appears on
your computer.
Tape is jammed.
Tape is incorrectly wound.
Is the correct port selected?
Make sure that the correct port is selected.
Is the machine in cooling mode (the power indicator
is blinking in orange)?
Wait until the indicator stops blinking, and then try printing
again.
Is someone printing via the network?
If you try to print while other users are printing large amounts
of data, the machine will be unable to accept your print job
until ongoing printing is finished. In such a situation, execute
the print job again after the other jobs are completed.
Is there dust or dirt on the print head or ink ribbon guide
rollers, preventing the rollers from turning freely?
Clean the print head or ink ribbon guide rollers. For details,
see Print Head Maintenance or Ink Ribbon Guide Roller
Maintenance on page 45.
Is the inside of the rims for the paper core holder dirty,
causing the tape to be incorrectly wound?
Clean the paper core holder. For details, see Paper Core
Holder Maintenance on page 45.
Remove the tape cassette, and then reinstall it.
Make sure there is no slack in the tape cassette and ink
ribbon cassette.
For details, see Installing the Tape Cassette on page 13.
Make sure that the covers are firmly closed.
Is the paper core holder correctly installed in the machine?
Pull the lock of the paper core holder toward you to secure
it firmly in the machine.
Securely attach the tape to the paper core. If the tape is not
securely affixed or is affixed at an angle, the tape will not be
correctly wound.
50
Page 57

Troubleshooting
Problem Solution
The tape or ink ribbon ran out during
printing.
The print quality is poor.
Printed tape contains white streaks.
Printed text is blurry.
There are missing characters in the
printed text.
I want to reset the machine. To reset the machine, perform the following procedure.
I want to stop the operation that is being
performed.
Replace the consumables with new ones.
To restart printing after consumables are replaced, start
printing again from the beginning of that roll.
• With a USB cable connection
To restart printing after replacing consumables, click
[Resume] on the computer screen.
To cancel printing, click [Cancel] on the computer
screen while the tape end error or ribbon end error
is displayed.
• With a wired network connection
Printing is automatically restarted when the covers are
closed after consumables have been replaced.
To cancel printing, press the MENU/ESC button on the
machine while the tape end error or ribbon end error is
displayed.
Is the print head dirty?
Clean the print head. For details, see Print Head
Maintenance on page 44.
Is there dust or dirt on the ink ribbon guide rollers,
preventing them from turning freely?
Clean the ink ribbon guide rollers. For details, see Ink
Ribbon Guide Roller Maintenance on page 45.
Is the print head dirty?
Clean the print head. For details, see Print Head
Maintenance on page 44.
Is there slack in the ink ribbon cassette?
Make sure that there is no slack in the ink ribbon cassette,
and then reinstall it.
For details, see Installing the Ink Ribbon Cassette
on page 14.
1 Press the power button ( ) on the machine to turn it on.
2 Press the MENU/ESC button.
3 Press or to select [Reset], and then press the OK
button.
4 Press or to select [Factory Reset], and then press
the OK button.
All of the machine settings and transferred data from the
computer will be deleted, and the machine will be reset
to its factory settings.
Hold down the pause button ( ).
6
51
Page 58

Chapter 6
Problem Solution
I want to cancel the current print job.
Even though data is being sent to the
machine, the power indicator is not
blinking in green.
While printing, hold down the pause button ( ) to pause
printing. Then, select to cancel printing.
Make sure that the USB cable is firmly and correctly connected.
Otherwise, try using a different USB cable.
Network 6
The machine is not found on the network during installation. 6
Checks Solution
Is security software being used? Check the settings in the installer dialog box.
Grant permission if the security alert message appears
while installing the printer driver and software.
The machine cannot print over the network. The machine is not found on the network even after successful installation.
6
Checks Solution
Is security software being used? See Security software is being used. on page 53.
Is the machine assigned an available
IP address?
Check the IP addresses and the subnet masks.
Make sure that both the IP addresses and subnet masks
of your computer and the machine are correct and located
on the same network.
For information on how to check the IP address and subnet
mask, ask the network administrator.
Use the [Communication settings] of the “Printer Setting
Tool” to check the IP address, subnet mask and other
network settings.
52
Page 59

Troubleshooting
Checks Solution
Did the previous print job fail? If the failed print job is still in your computer’s print queue,
delete it.
Double-click the Tape Creator icon in the folder described
below, and then click [Cancel All Documents] in the
[Printer] menu.
®
®
7
I have checked all the above, but the
machine still does not print.
• Windows Vista
Click , [Control Panel] - [Hardware and Sound] [Printers].
• Windows
Click , [Devices and Printers] - [Printers and Faxes].
• Windows® 8/Windows® 8.1
On the [Apps] screen, click [Control Panel] [Hardware and Sound] - [Devices and Printers] [Printers and Faxes].
Uninstall the printer driver and software, and then reinstall them.
6
Security software is being used. 6
Checks Solution
Did you grant permission when the
security alert message appeared during
a standard installation or BRAdmin Light
installation or when using the printing
features?
Has the port number required for the
Brother network features been specified?
If you did not grant permission when the security alert message
appeared, the firewall function of your security software may be
preventing access. Some security software may block access
without showing a security alert message. To allow access,
see the instructions for the security software or contact the
manufacturer.
The following port number is used for Brother network features.
BRAdmin Light → Port number 161 / Protocol UDP
For details on opening the port, see the instructions for the
security software or contact the manufacturer.
53
Page 60

Chapter 6
I want to check that my network devices are working correctly. 6
Checks Solution
Are the machine, access point/router
and network hub turned on?
Where can I find the machine’s network
settings, such as IP address?
Check for the following.
The power cord is correctly connected, and the machine
is turned on.
All protective packaging has been removed from the
machine.
The top cover and bottom cover are fully closed.
The tape cassette is correctly installed.
A network cable is securely connected to the machine
and the router or hub.
The IP address of the machine can be checked using any of the
following methods.
Press the MENU/ESC button, and then select “Network
Configuration” in the menu that appeared. For details,
see Operation Panel on page 11.
Use the [Communication settings] of the “Printer Setting
Tool”. For details, see Communication Settings on page 34.
54
Page 61

Appendix 7
7
Product Specifications 7
Item/Model Name TP-M5000N
Dimensions/Weight
External
Dimensions
Machine Weight Machine Weight Approximately 9.0 kg
Printing/Feeding
Printing
Specifications
Power Supply AC Power Supply AC 100 – 240 V, 50/60 Hz
Tape
Specifications
Ink Ribbon
Specifications
Paper Core
Specifications
Width/Depth/
Height
Printing
Technology
Maximum Print
Height
Printing Resolution 300 dpi
Print Speed Minimum 225 mm/s
Maximum Print
Length
Minimum Print
Length
Compatible Tape
Width
Compatible Ribbon For 15 mm, 38 mm and 50 mm
Compatible Paper
Core Width
Compatible Paper
Core Inner
Diameter
(Diameter)
Approximately 173 mm (W) × 647 mm (D) × 363 mm (H)
Thermal transfer
44 mm
(May differ depending on the media being used.)
66 m (May differ depending on the media being used.)
1 m
15 mm, 38 mm, 50 mm
15 mm, 38 mm, 50 mm
Ø76.2 mm
7
55
Page 62

Chapter 7
Item/Model Name TP-M5000N
Operating Environment
Interface USB USB Ver. 2.0 (Full Speed)
Device Class
Printer Class
USB Connector B type
Environment
Temperature
Ethernet (Wired
connection)
Guaranteed
Operating
Temperature/
Humidity
10/100 Base-TX
RJ-45 connector
5 – 35 °C
20 – 80%
Max. wet-bulb temperature: 27 °C
System Requirements
Compatible Operating System Windows Vista
®
Windows® 7
Windows
®
8
Windows® 8.1
Windows Server® 2008
Windows Server
®
2008 R2
Windows Server® 2012
Windows Server® 2012 R2
Hard disk Disk space: 70 MB or more
®
Memory Windows Vista
/Windows Server® 2008/2008 R2/2012/2012 R2:
512 MB or more
Windows® 7: 1 GB or more (32-bit) or 2 GB or more (64-bit)
Windows
®
8/Windows® 8.1: 1 GB or more (32-bit) or
2 GB or more (64-bit)
Monitor SVGA, high color or higher graphics card
56
Page 63

 Loading...