

Page 1
WARNING
CAUTION
1
1
Print head
Tape cutter
lever
Cassette
cover
2
3
Toothed
Wheel
Cutter’s
edge
End of tape
Tape
exit slot
Tape guide
4
AC adapter jack
User’s Guide
English
With your new Brother P-touch labeller, you can create a wide
variety of custom, self-adhesive labels. This labeller uses
Brother "TZe" tapes from 3.5 mm to 12 mm widths. "TZe" tape
cassettes are available in many colours and sizes. Visit
www.brother.com
your machine.
Read this manual carefully before starting and keep the manual
in a handy place for future reference.
LAH187001
for a complete list of tapes compatible with
Safety Precautions
Indicates a potentially hazardous
situation which, if not avoided,
could result in death or serious
Follow these guidelines to avoid the risk of fire, burns, injury, electric
shocks, rupture, overheating, abnormal odours or smoke.
• Always use the specified voltage and the suggested AC adapter (AD-24ES) for the
P-touch labeller to prevent any damage or failure.
• Do not touch the P-touch labeller during a lightning storm.
• Do not use the P-touch labeller/AC adapter in places of high humidity such as
bathrooms.
• Do not overload the power cord.
• Do not place heavy objects on, or damage, the power cord or plug. Do not forcibly
bend or pull the power cord. Always hold the AC adapter when disconnecting from
the electrical socket.
• Make sure that the plug is fully inserted into the electrical socket. Do not use a socket
that is loose.
• Do not allow the P-touch labeller/AC adapter/power plug/batteries to get wet, for
example, by handling them with wet hands or spilling liquids on them.
• Since loss of eyesight may occur when leaked fluid from batteries gets into your eyes,
immediately rinse your eyes with a large amount of clean water, and then seek
medical attention.
• Do not disassemble or modify the P-touch labeller/AC adapter/batteries.
• Do not allow a metal object to contact both the plus and minus ends of a battery.
• Do not use sharp objects, such as tweezers or a metallic pen, to change the batteries.
• Do not throw the batteries into fire or expose to heat.
• Disconnect the AC adapter and remove batteries immediately and stop using the
P-touch labeller if you notice abnormal odour, heat, discolouration, deformation or
anything unusual while using or storing it.
• Do not use a damaged or leaking battery as the fluid may get on your hands.
•
Do not use a deformed or leaking battery or one whose label is damaged as it may
generate excessive heat.
injuries.
Indicates a potentially hazardous
situation which, if not avoided, may
result in minor or moderate injuries.
Follow these guidelines to avoid personal injury, liquid leakage,
burns or heat.
• When the P-touch labeller is not being used, store it out of the reach of children. In
addition, do not allow children to put the P-touch labeller parts or labels in their
mouths. If any object has been swallowed, seek medical attention.
• Do not touch metal parts around the print head immediately after printing.
• Do not touch the cutter blade.
• If leaked fluid from batteries gets on your skin or clothes, immediately rinse them with
clean water.
• Remove the batteries and disconnect the AC adapter if you do not intend to use the
P-touch labeller.
• Do not use a battery other than that specified. Do not use combinations of old and
new batteries or combinations of different types, different charging levels, different
manufacturers or different models. Do not insert a battery with its plus and minus
ends reversed.
• Do not drop or hit the P-touch labeller/AC adapter.
• Do not press the Liquid-Crystal Display (LCD).
• Do not put your finger inside the P-touch labeller when you close the cassette cover.
• Before using Ni-MH rechargeable batteries, carefully read the instructions for the
batteries and battery charger, and be sure to use them correctly.
• When using Ni-MH rechargeable batteries, charge the batteries with a specialised
battery charger before using the batteries. The AC adapter (AD-24ES) cannot be
used to recharge Ni-MH rechargeable batteries.
General Precautions
• Depending on the location, material, and environmental conditions, the label may
unpeel or become irremovable, the colour of the label may change or be transferred
onto other objects. Before applying the label, check the environmental conditions and
the material.
• Do not use the P-touch labeller in any way or for any purpose not described in this
guide. Doing so may result in accidents or damage the P-touch labeller.
•
Use only Brother TZe tapes with the P-touch labeller. Do not use tapes that do not
have the mark.
• Only use a soft, dry cloth to clean the labeller; never use alcohol or other organic
solvents.
• Use a soft, lint free cloth to clean the print head. Never touch the print head
directly with your hands.
• Do not put any foreign objects into the tape exit slot, AC adapter connector, battery
compartment, etc.
• Do not place the P-touch labeller/batteries/AC adapter in direct sunlight or rain, near
heaters or other hot appliances, in any location exposed to extremely high or low
temperatures (e.g., on the dashboard or in the back of your car) or high humidity, or
in dusty locations.
• Do not apply excessive pressure to the cutter lever.
• Do not try to print if the cassette is empty; it will damage the print head.
• Do not pull the tape while printing or feeding; it will damage the tape and the P-touch
labeller.
• Any data stored in memory will be lost due to failure, repair of the P-touch labeller, or
if the battery discharges completely.
• The P-touch labeller is not equipped with a charging feature for rechargeable batteries.
• The printed text may differ from the text that appears on the LCD.
• The length of the printed label may differ from the displayed label length.
• A protective clear plastic sticker is placed over the display during manufacturing and
shipping. This sticker should be removed prior to use.
• When power is disconnected for more than three minutes, all text, format settings and
any text files stored in the memory will be cleared.
Declaration of Conformity (Europe/Turkey Only)
We, Brother Industries, Ltd.
15-1, Naeshiro-cho, Mizuho-ku,
Nagoya 467-8561 Japan
declare that this product and AC adapter are in conformity with the essential
requirements of all relevant directives and regulations applied within the
European Community.
The Declaration of Conformity (DoC) can be downloaded from the Brother
Solutions Center.
Visit http://support.brother.com/ and:
• select "Europe"
• select your country
• select "Manuals"
• select your model
• select "Declaration of Conformity"
• click "Download"
Your Declaration will be downloaded as a PDF file.
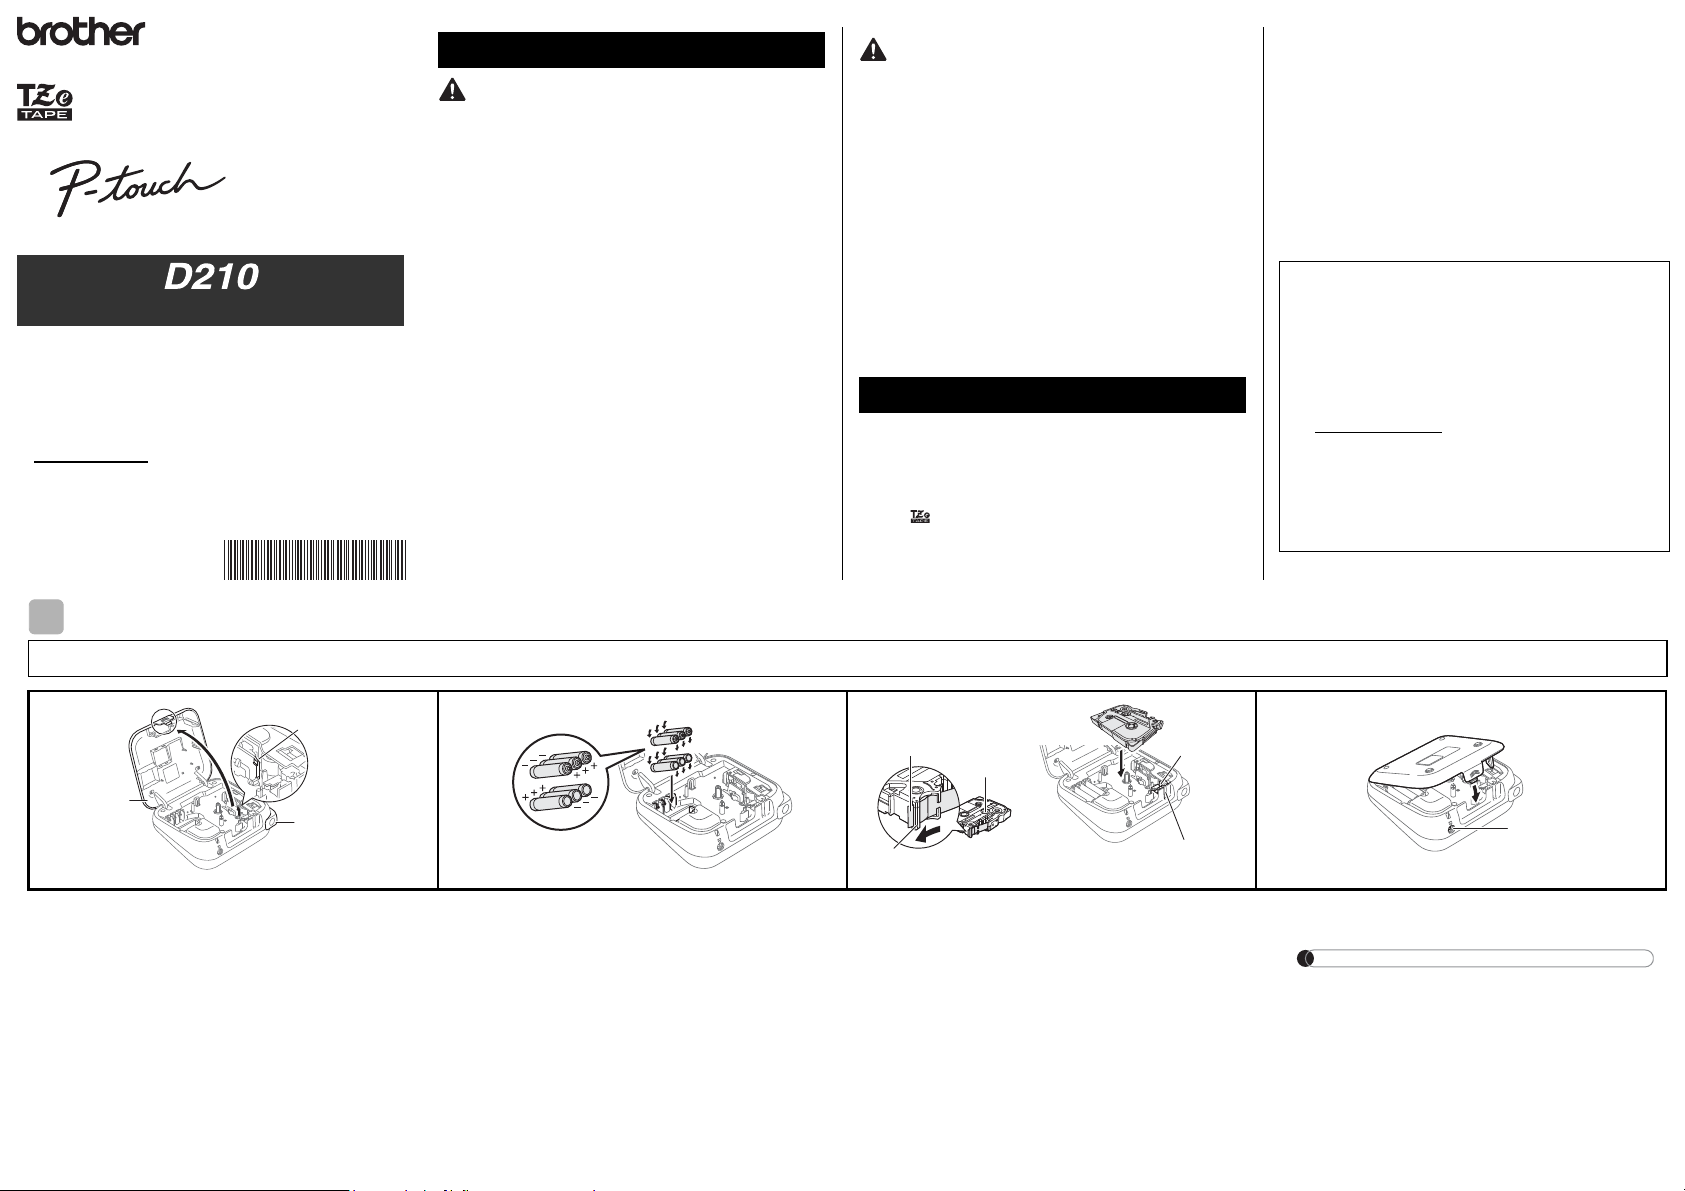
GETTING STARTED
Power Supply and Tape Cassette
Open the cassette cover by pressing the
above indicated area at the top end of the
machine.
• If a tape cassette is already installed, remove it by
pulling it straight up. If batteries are already inserted,
remove them.
• The power must be turned off when replacing
batteries or tape cassettes.
Insert six new AAA alkaline batteries
(LR03) or fully charged Ni-MH batteries
(HR03), making sure their poles point in
the correct directions.
• Users of alkaline batteries:
Always replace all six batteries at the same time
with brand new ones.
• Users of Ni-MH batteries:
Always replace all six batteries at the same time
with fully charged ones.
Insert a tape cassette, making sure it
locks into place.
• The end of the tape must feed under the tape
guides.
• Use only Brother TZe tapes with this machine.
Securely close the cassette cover, making
sure it locks into place.
NOTE
When using AC adapter (AD-24ES)
1. Insert the plug on the adapter cord into
the AC adapter socket on the top end of
the machine.
2. Insert the plug into the nearest standard
electrical socket.
For memory backup, we recommend
using AAA alkaline batteries (LR03) or
Ni-MH batteries (HR03) together when
using the AC adapter.
Page 2
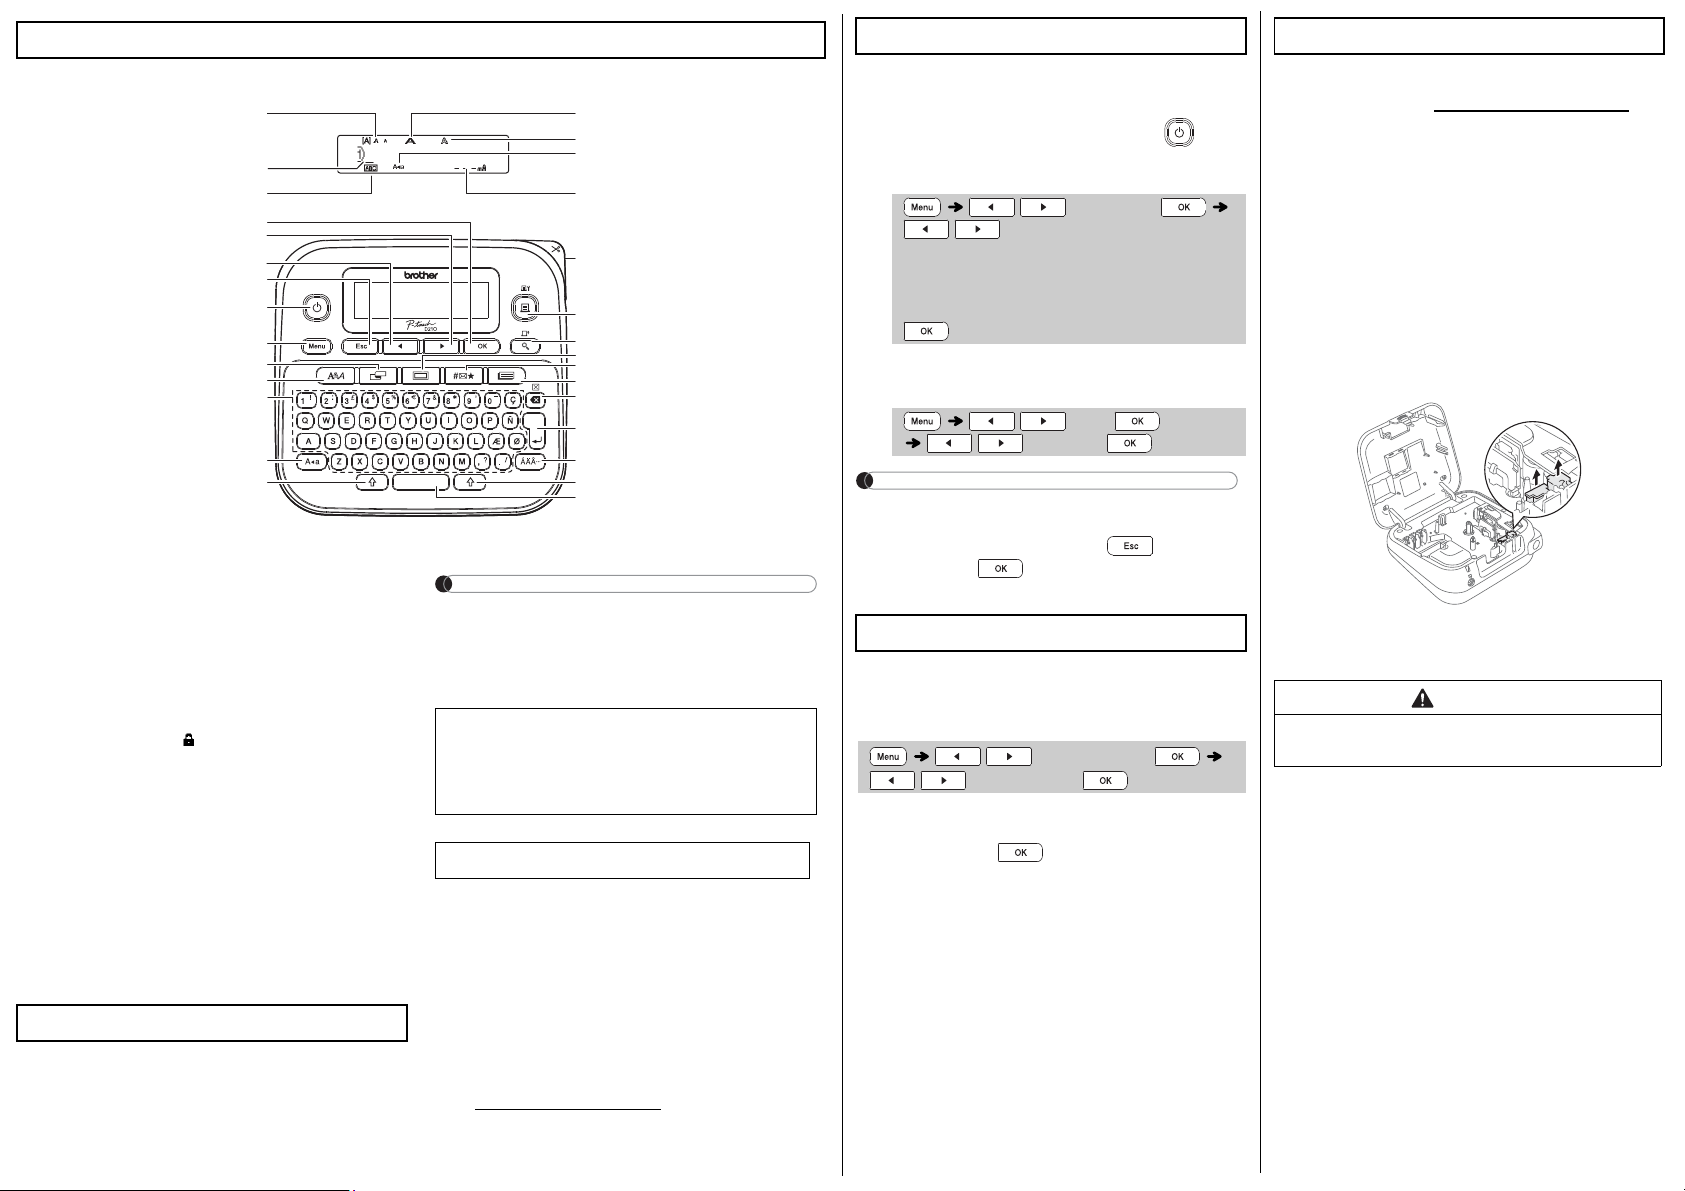
LCD and Keyboard
11
3
8
9
10
11
16
12
13
17
14
27
6
4
5
7
18
15
20
19
21
23
24
25
26
18
28
2
22
Initial Setup
Accessories
1. Size
2. Cursor
3. Underline/Frame
4. Width
5. Style
6. Caps
7. Label Length
If a specific label length
has been selected,
also appears.
8. OK key
9. Cursor key: Right (Use
with Shift key to go to
end of the text.)
10. Cursor key: Left (Use
with Shift key to go to
top of the text.)
11. Escape key
12. Power key
13. Menu key
14. Label key
Carton Contents
P-touch
Starter Tape Cassette
AC adapter (optional on the D210)
User's Guide
The default setting is [English].
15. Font key
16. Character key
17. Caps key
18. Shift key
19. Tape cutter lever
20. Print key
21. Preview key
22. Frame key
23. Symbol key
24. Template Library key
25. Backspace key
26. Enter key
27. Accent key
28. Space key
NOTE
• The LCD shows one row of 15 characters;
however, the text you enter can be up to 80
characters in length.
• While selecting the settings, press the Space key
to go back to the default item.
• Pressing the Preview key displays a generated
image of the label, which may differ from the
actual label when printed.
• The label length shown on the LCD may differ
slightly from the actual label length when printed.
Specifications
Dimensions:
(W x D x H)
Weight: Approx. 490 g
Power supply: Six AAA alkaline batteries (LR03)
Tape cassette: Brother TZe tape (width)
*1Visit the Brother Solutions Center at
http://support.brother.com
information about the recommended batteries.
*2The AC adapter is optional on the D210.
Approx. 157(W) x 150(D) x 68(H) mm
(without batteries and tape cassette)
Six AAA Ni-MH batteries (HR03)*
AC adapter (AD-24ES)*
3.5 mm, 6 mm, 9 mm, 12 mm
1
2
for the latest
1 Turn your machine on.
Insert six AAA batteries or connect the AC
adapter (AD-24ES), and then press .
2 Set the language.
/ [Language]
/ [English/Español/Français/
Hrvatski/Italiano/Magyar/Nederlands/
Norsk/Polski/Português/Portug. (BR)/
Română/Slovenski/Slovenský/Suomi/
Svenska/Türkçe/Čeština/Dansk/Deutsch]
.
3 Set the unit of measurement.
The default setting is [mm].
/ [Unit]
/ [inch/mm] .
NOTE
• The machine automatically turns off if you press no
key within five minutes.
• To cancel any operation, press .
• After pressing , "Accepted" appears for
about one second.
LCD Contrast Adjustment
This function allows you to set the brightness of the
LCD. You can select from five levels of brightness.
The default setting is [0].
/ [LCD Contrast]
/ [-2/-1/0/+1/+2]
• To change back to the default setting, press the
Space key.
• After pressing , "Accepted" appears for
about one second.
Tape
Cassettes:
Visit the Brother Solutions Center
at http://support.brother.com/
for the latest information about
consumables.
AC Adapter: AD-24ES
Cutter Unit: TC-4 (replacement)
If the cutter blade becomes blunt after repetitive use
and the tape cannot be cut cleanly, replace with a
new cutter unit (supplies code TC-4) you can obtain
from an authorised Brother dealer.
Replacing the Cutter Unit
1. Pull out the two sections of the cutter unit
(green) in the direction of the arrows shown in
the illustration.
2. Install a new cutter unit. Push it in until it locks
into place.
WARNING
Do not touch the cutter blade directly with your
fingers.
Page 3
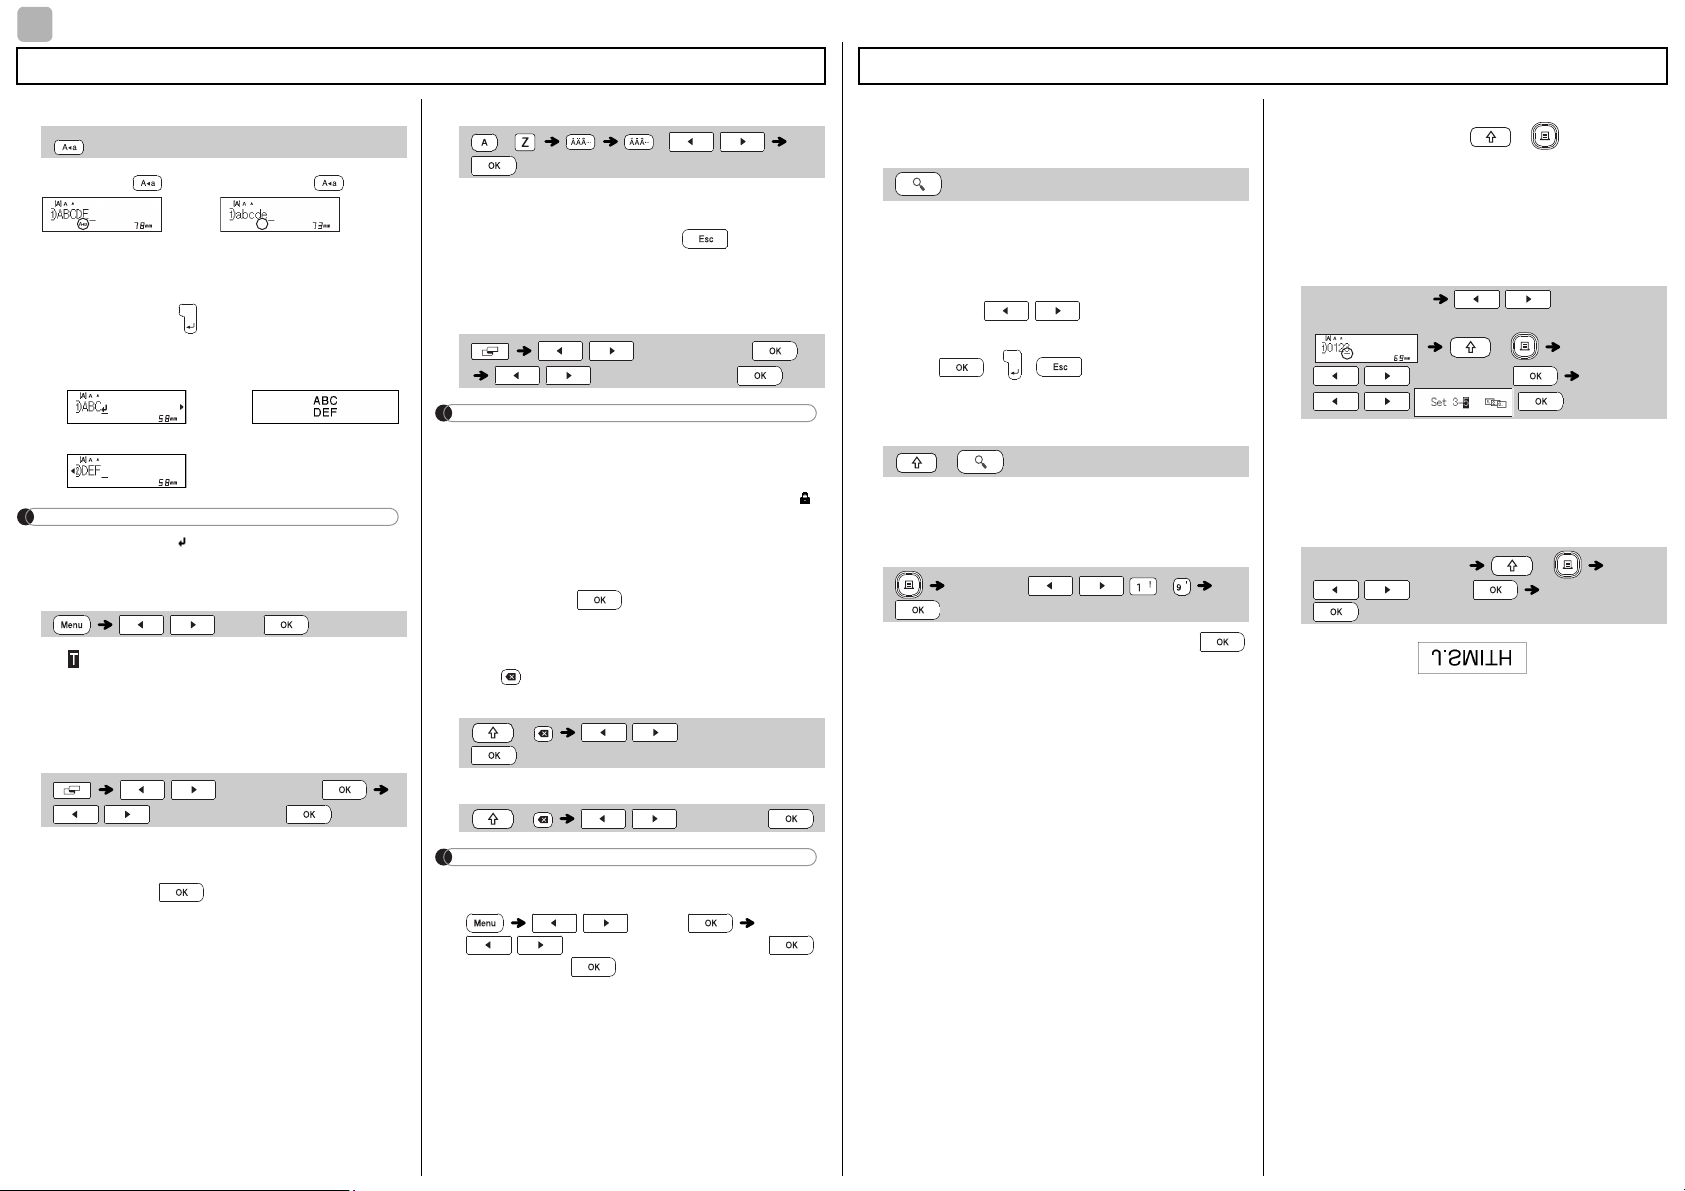
BASIC USAGE
2
Caps
Caps
Entering Text
Switching Upper Case/Lower Case
Upper case ( ON) Lower case ( OFF)
Creating Two-Line Labels
Move the cursor to where you want to start the
next line and press . Use either 9 mm or 12 mm
wide tape for two-line printing.
Line 1 Label image
Line 2
NOTE
• The return symbol ( ) appears if you press the
Enter key.
Entering Tabs
/ [Tab]
• A appears if you insert a tab into the text.
• The maximum number of tabs for a label is 80
(without text). If you enter one letter, you can
enter 79 tabs.
Changing Tab Length
/ [Tab Length]
/ [Auto/0-100 mm]
• To change the setting back to default, press the
Space key. The default setting is [Auto].
• After pressing , "Accepted" appears for
about one second.
Entering Accented Characters
- / /
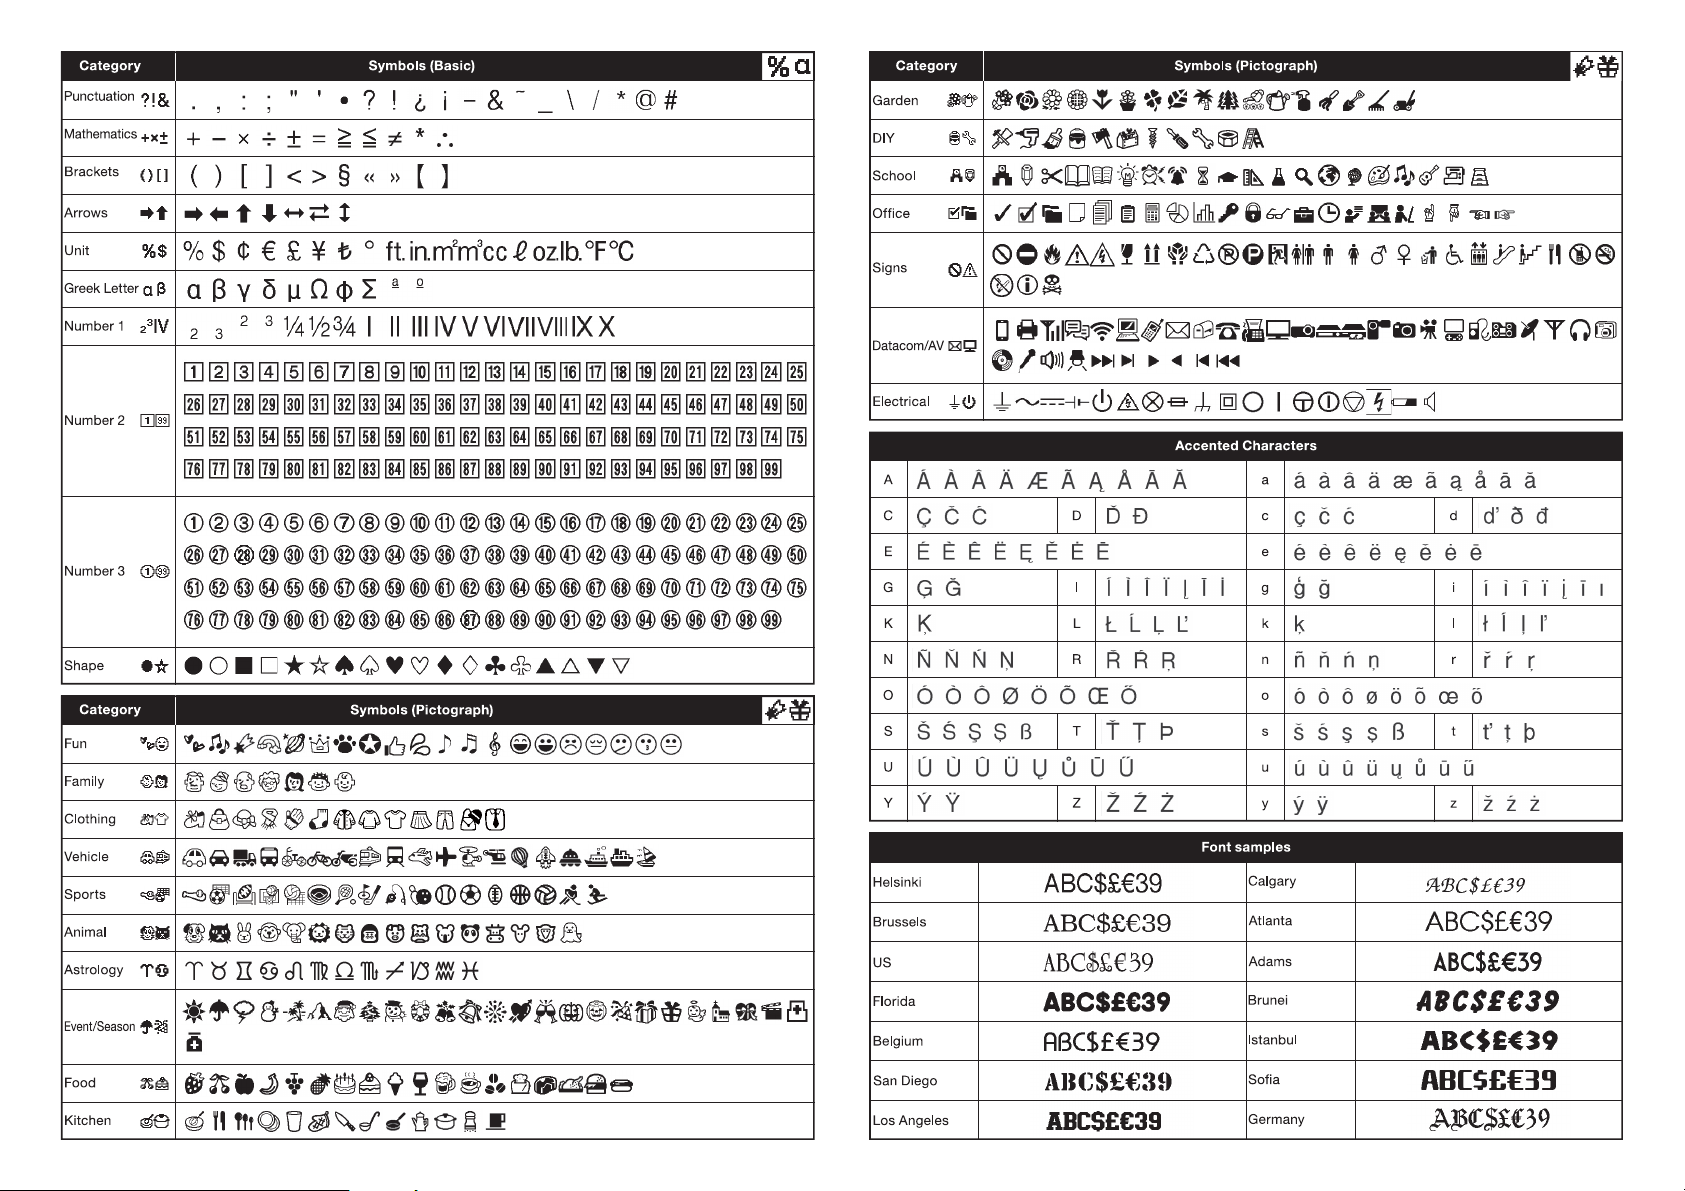
• Refer to the table of accented characters
included in this insertion sheet.
• To cancel operations, press .
• The order of accented characters differs by the
selected LCD language.
Changing Label Length
/ [Label Length]
/ [Auto/30-300 mm]
NOTE
• After the label is printed, cut along the printed
dots (:) with scissors so that the label length
matches what is shown on the LCD.
• If a specific label length has been selected,
also appears in the LCD.
• To use [Auto], press the Space key.
• To change the setting back to default, press the
Space key.
• After pressing , "Accepted" appears for
about one second.
To Clear
Press to delete individual letters.
To delete all text and settings:
+ / [Text&Format]
To delete text only:
+ / [Text Only]
NOTE
• To delete all text and settings or text only by
pressing
/ [Clear]
/ [Text&Format]/[Text Only]
•
After pressing , "Accepted" appears for
about one second.
Printing Labels
Preview
You can preview the text before printing.
• Press the Preview key to display a generated
image of the label (it may differ from the actual
label when printed).
• When the LCD cannot display all the text at
once, press / to display the hidden
text.
• Press / / to leave the preview
mode.
Feeding (Tape Feed)
+
• This function feeds approximately 25 mm of
blank tape.
Printing
[Copies: ] / / -
• To print only one copy of the label, press
without selecting the number of copies.
• You can print up to nine copies of each label.
• To specify the number of copies, press a
number key.
• To cut the label, push in the tape cutter lever in
the upper-right corner of the machine after the
message "Please Cut" appears.
• To prevent damage to the tape, do not touch the
cutter lever while the "Please Wait" message is
displayed.
• To remove the backing, fold the label
lengthwise with the text facing inward, to
uncover the inside edges of the backing. Peel
off the backing one piece at a time and apply.
Using Print Options ( + )
[Numbering]
You can print a series of up to nine labels at a time
using auto-numbering. The number of labels you
can print at one time depends on the initial number.
Example: To print copies of a label containing a
serial number (0123, 0124 and 0125):
Enter numbers / Move the
cursor to the number you wish to increase
+
/ [Numbering]
/
• When selecting the number you want to
increase, always select the highest number.
[Mirror]
Example: To Mirror Print "J.SMITH", enter
"J.SMITH" and follow the instructions:
Enter text/characters
/ [Mirror] [Mirror Print?]
• Use a clear tape in [Mirror], so the labels can be
read correctly from the opposite side when
attached on glass, windows or other
transparent surfaces.
+
Page 4
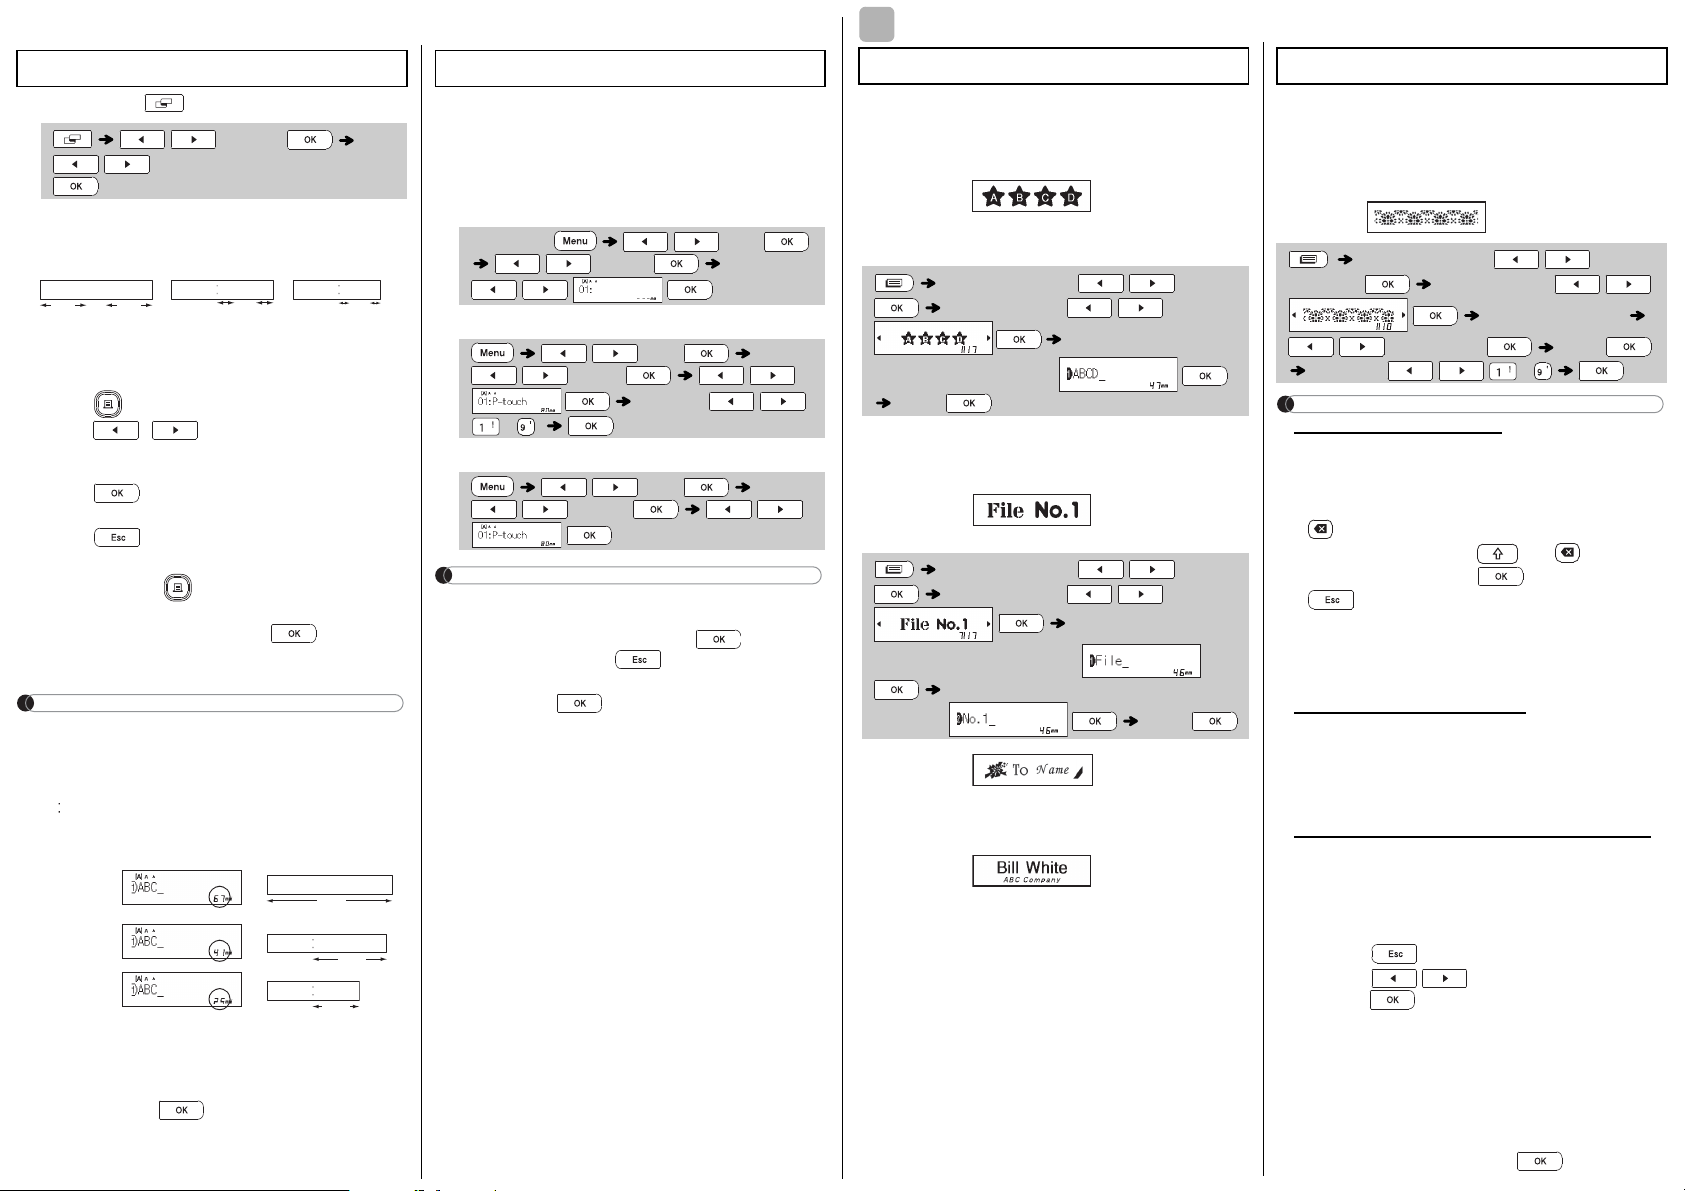
USING TEMPLATES
3
Full
Half
Narrow
41mm
ABC
25mm
ABC
Printing Labels (continued)
Set Margins
[Full]/[Half]/[Narrow]
Sets equal margins on both sides of the text.
25mm
[Chain Print]
Allows to print several labels with minimum margins.
1. Enter text.
2. Press , then [Copies: ] appears.
3. Press / , or enter a number using
the number keys, to select the number of
copies.
4. Press . Printing will start, and then the
message "Feed OK?" appears.
5. Press to enter more text.
6. Clear the text, enter the text for the next label,
and then press .
7. When the message "Feed OK?" appears after
the last label is printed, press .
8. After the tape is fed, press the cutter lever to
cut off the chain of labels.
NOTE
• When [Chain Print] is set, feed the tape before using
the cutter; otherwise a part of the text may be cut off.
• When [Half] or [Narrow] is set, the displayed
label length is the length from the printed dots
( ) to the end of the label. Cut along the printed
dots (:) with scissors.
Full
Half
Narrow
• To print more than one copy of a label with a
minimum margin, set the margin to [Narrow].
• Do not pull the tape since this may damage the
tape cassette.
• After pressing , "Accepted" appears for
about one second.
()
/ [Margin]
/ [Full/Half/Narrow/Chain Print]
ABC ABC
25mm
ABC
12mm 12mm
LCD Label image
ABC
67mm
Saving Label Files
You can save up to 30 labels and recall them for
printing at a later date. A maximum of 80 characters
can be saved per file and a maximum of 2400
Text Label
This function allows you to create various labels
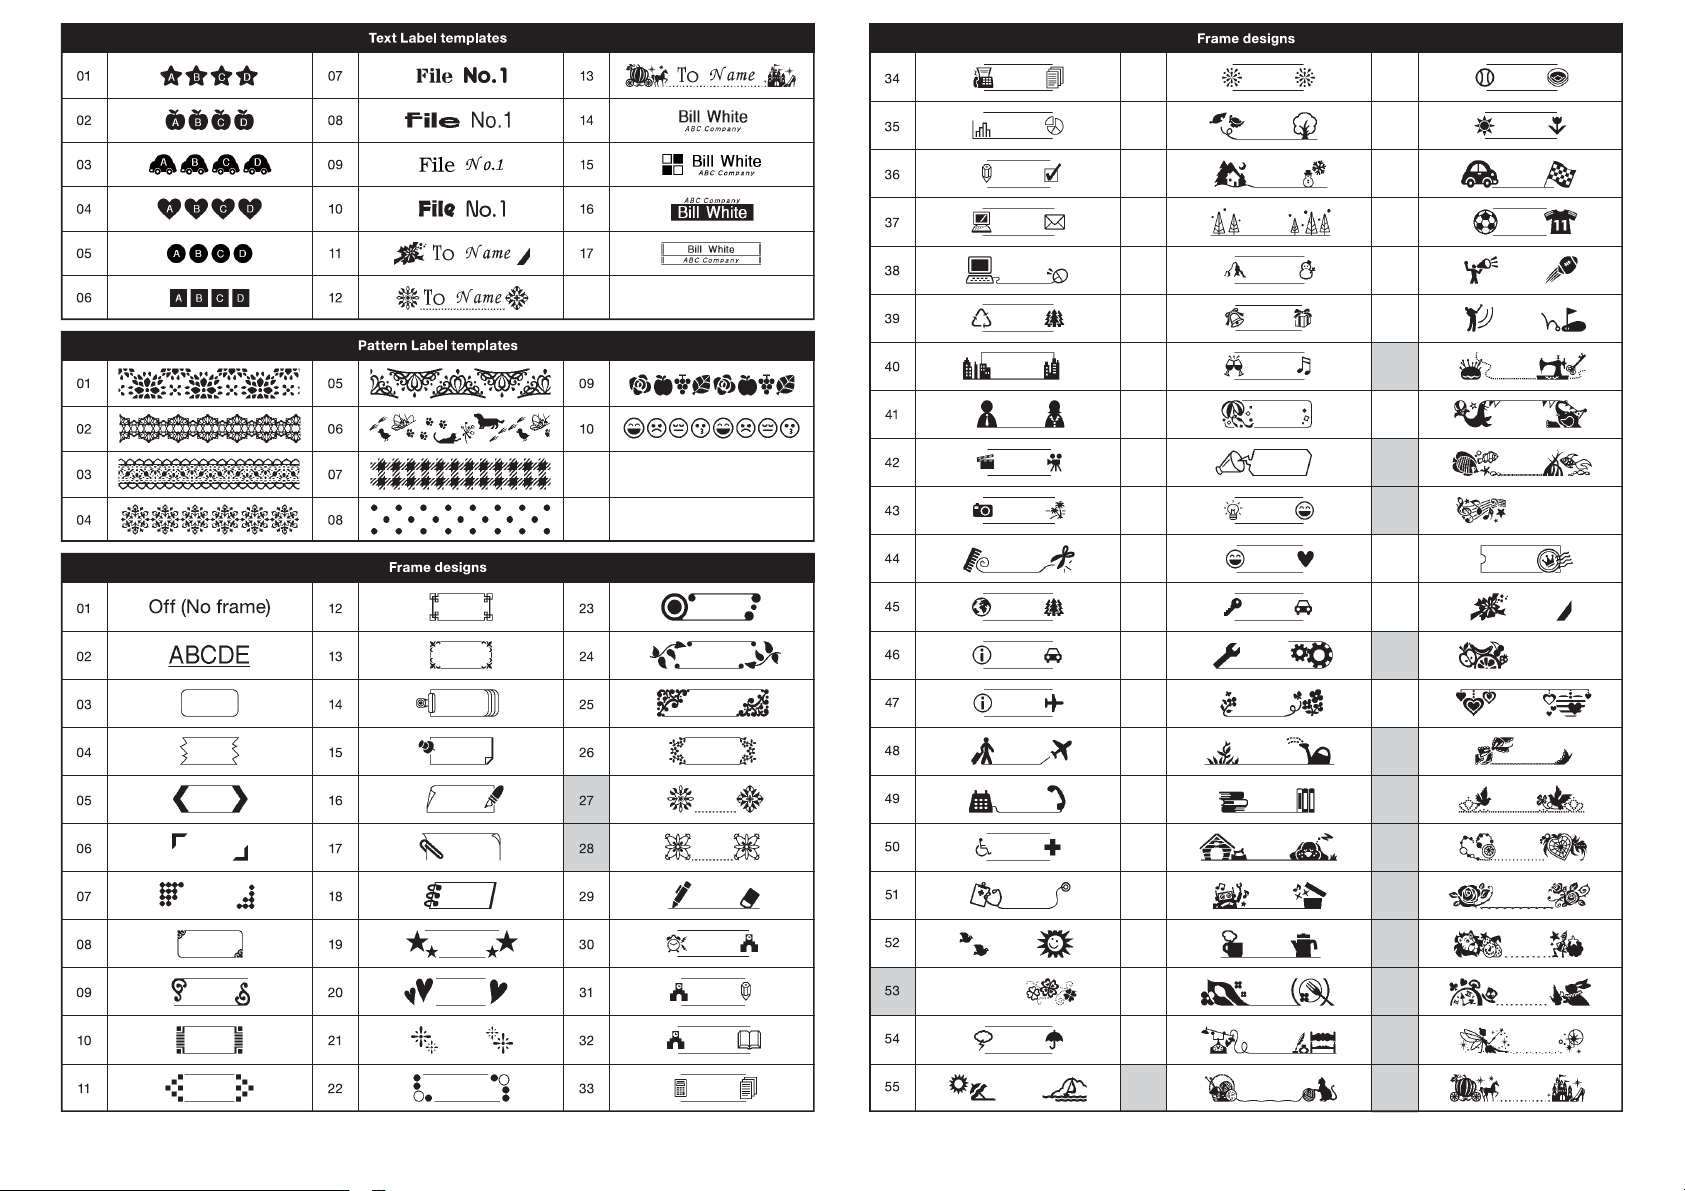
using the built-in templates. Refer to the Text Label
templates table included in this insertion sheet.
characters can be saved in the device's memory.
You can also edit and overwrite the stored labels.
Save
Enter Text / [File]
Example 1:
[A template that includes one
repeated graphic]
/ [Save]
4mm4mm
Print
/ [File]
/ [Print] /
/
[Copies: ] / /
-
Open
/ [File]
/ [Open] /
NOTE
• If you try to store a label when there is already a
label stored with that number, a message
“Overwrite OK?” appears. Press to save
your new label. Press to cancel.
• You must type text before using the save function.
• After pressing , "Accepted" appears for
about one second.
[Select Category] / [Text]
[Select Design] /
[Input Text 1] Clear the
text, and then enter text
[Print]
• To use two different fonts on one label, select
one of the three additional Text Label templates
(Examples 2-4).
Example 2:
[A template that includes two fonts]
[Select Category] / [Text]
[Select Design] /
[Input Text 1] Clear
the text and then enter text
[Input Text 2] Clear the text and then
enter text [Print]
Pattern Label
This function allows you to create unique labels by
using built-in templates. Refer to the Pattern Label
templates table included in this insertion sheet.
You cannot enter text when using Pattern Label
templates.
Example:
[Select Category] /
[Patterns] [Select Design] /
[Set Label Length]
/ [30-999 mm]
[Copies: ]
NOTE
// -
For Text Label Templates
• You cannot use Set Label Length when printing
Text Label templates.
• To clear the text, move the cursor to the right
side of the text you want to clear, and then press
.
• To clear all text, press and . When “All
Clear” appears, press to clear. Press
to cancel.
• To preview labels, press the Preview key when
[Print] appears on the LCD.
• The copy print function is disabled when using
Text Label templates.
For Pattern Label Templates
• Press the Space key to return to the factory
[Print]
setting for the “Label Length” mode. The factory
Example 3:
[Template that includes two fonts
and a frame]
• Please see the procedure in Example 2.
Example 4:
[Template that includes two fonts on
two lines]
• Please see the procedure in Example 2.
setting is [100 mm].
• You cannot use the preview feature when using
Pattern Label templates.
For Text Label and Pattern Label Templates
• These templates are only available when using
12 mm wide tape cassettes.
• The templates cannot be edited.
• To exit templates and return to the text input
screen, do one of the following:
a) Press .
b) Press / to select [Quit], and then
press when "Print" appears.
• You cannot save labels created using templates
to memory.
• When you access Text Label or Pattern Label
templates, your most recently printed Text
Label or Pattern Label template label length will
be recalled.
• "Please Cut" appears on the LCD for
two seconds after pressing .
Page 5
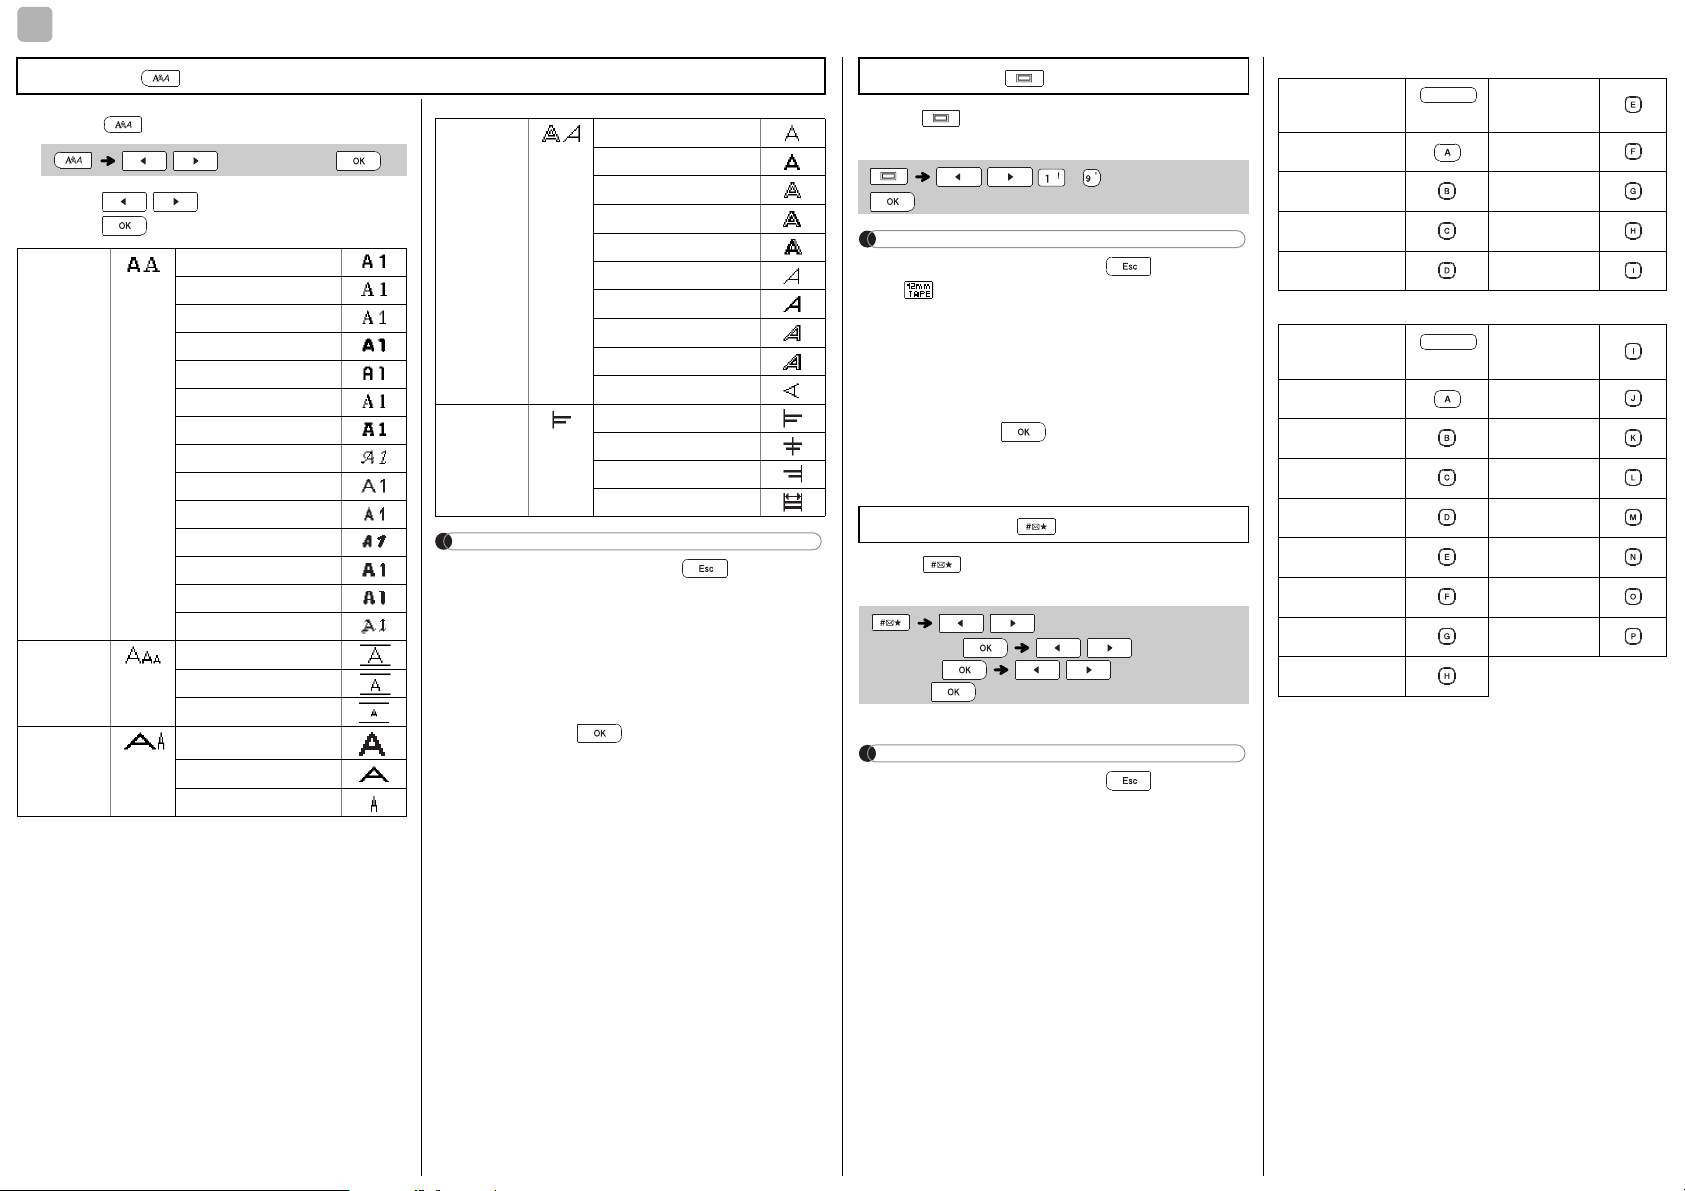
FORMATTING KEYS
4
(Space key)
(Space key)
Font Key
1 Press to change the font settings.
/ Select an item
2 Press / to select the settings and
press .
Font Helsinki
Brussels
US
Florida
Belgium
San Diego
Los Angeles
Calgary
Atlanta
Adams
Brunei
Istanbul
Sofia
Germany
Size Large
Medium
Small
Width Normal
× 2
× 1/2
Style Normal
Bold
Outline
Shadow
Solid
Italic
I+Bold
I+Outline
I+Shadow
Vertical
Alignment Left
Center
Right
Justify
NOTE
• To cancel operations, press .
• Refer to the Font samples table included in this
insertion sheet.
• When characters reach a minimum size, the
selected font changes to a custom font, which is
based on the Helsinki style, to allow printing the
smallest text possible on narrow or multi-line
labels.
• After pressing , "Accepted" appears for
about one second.
Frame Key
Press to select a frame design. Refer to the
Frame designs table included in this insertion sheet.
/ / - Select a frame
NOTE
• To cancel operations, press .
• If appears on the right side of the display
when selecting a frame, you must use 12 mm
wide tape cassettes.
• To select a frame design, press the number of
the frame design you want to use (see the
Frame designs table included in this insertion
sheet).
• After pressing , "Accepted" appears for
about one second.
Symbol Key
Press to add a symbol (see the table of
symbols included in this insertion sheet).
/ [History*/Basic/
Pictograph] / Select
category / Choose a
symbol
* History stores up to seven recently used symbols.
NOTE
• To cancel operations, press .
• If you choose History, you cannot select a
category.
• You can also select from basic and pictograph
categories by pressing the shortcut keys
included in this insertion sheet.
Basic
Punctuation Greek Letter
Mathematics Number 1
Brackets Number 2
Arrows Number 3
Unit Shape
Pictograph
Fun Kitchen
Family Garden
Clothing DIY
Vehicle School
Sports Office
Animal Signs
Astrology Datacom/AV
Event/Season Electrical
Food
Page 6
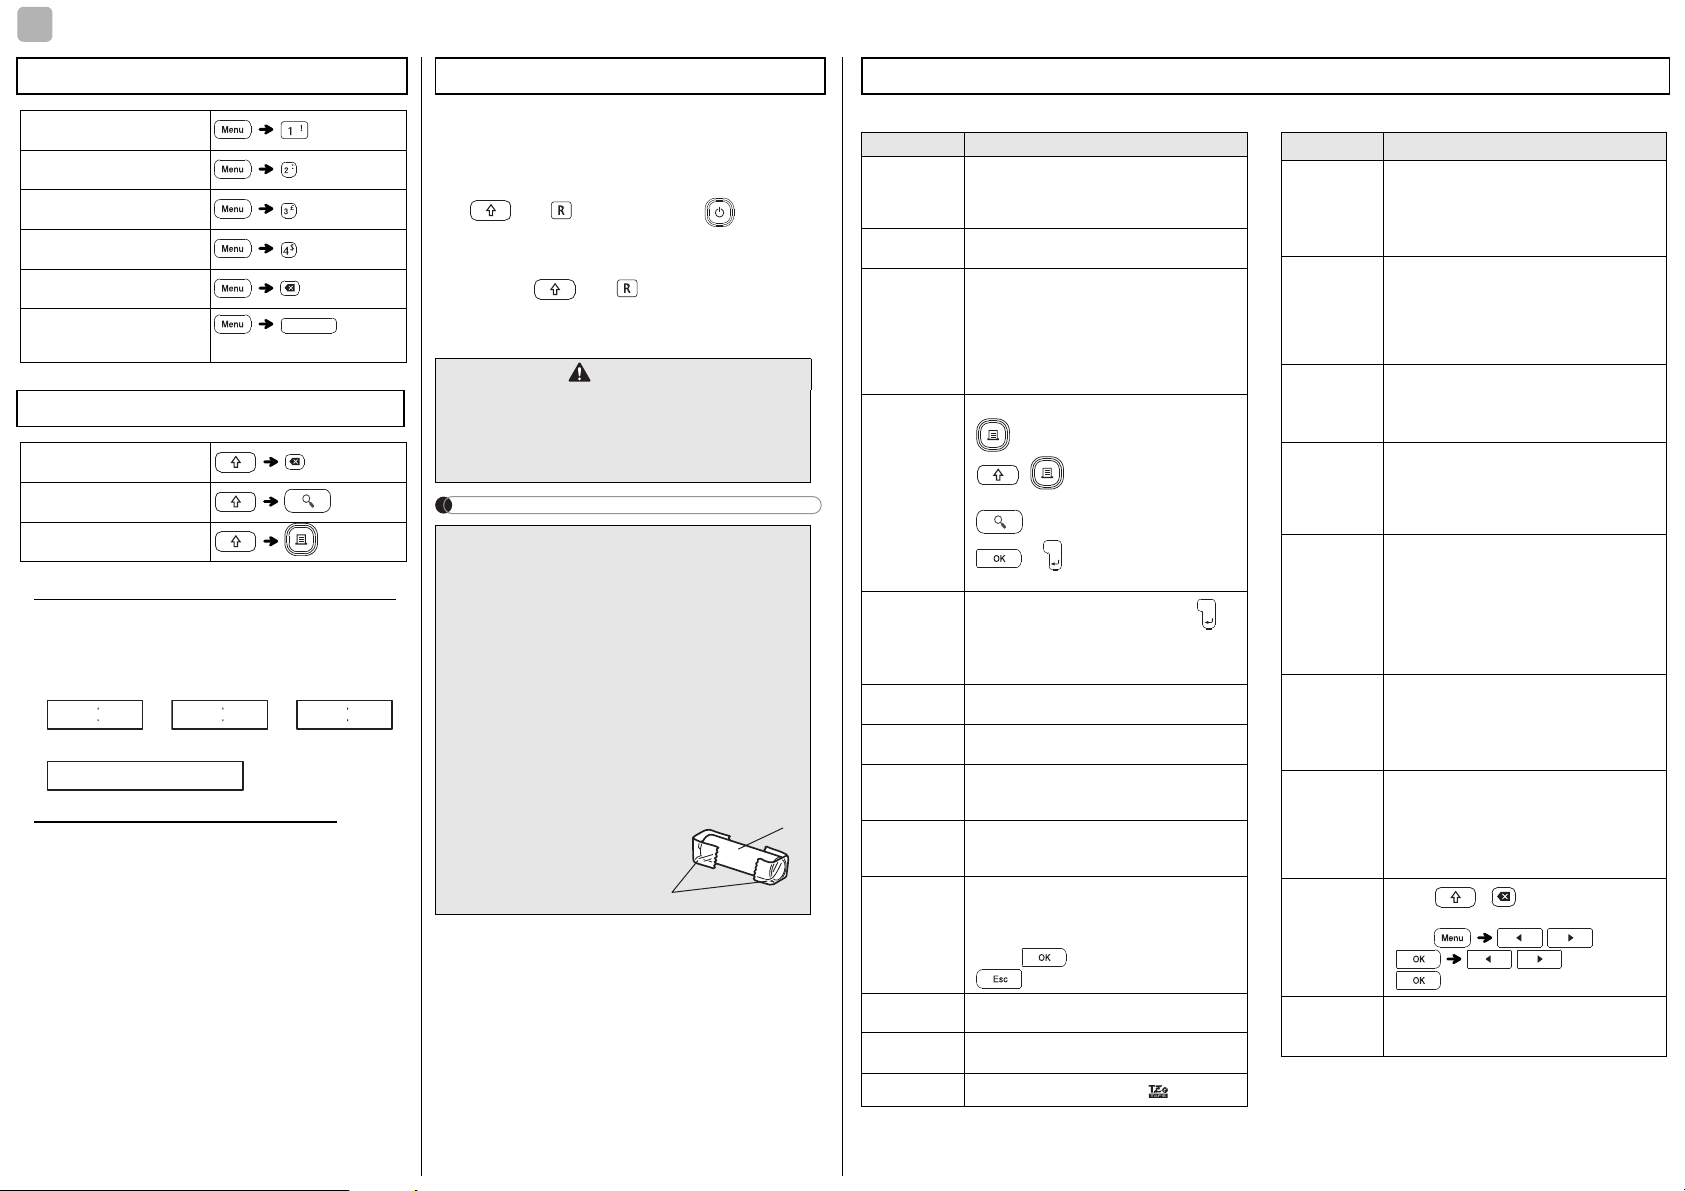
TIPS
5
(Space key)
DEF
2
1
Shortcuts
File
Tab
1 Turn off the P-touch labeller, press and hold
Unit
LCD Contrast
2 First release the power button, and then
Clear
Language
Common Operations
Clear
Feed
Print Options
Tip 1 To reduce the margin on printed labels
See “Set Margins”. By selecting the Chain Print
option, the margin can be reduced to a minimum
when printing multiple labels with alternate text.
Narrow
ABC
Chain Print
DEF
ABC
Tip 2 When the LCD is difficult to see
See “LCD Contrast Adjustment” and change the
setting.
Be sure to remove the protective sticker placed over
the LCD at the time of product shipment.
GHI
GHI
Resetting the P-touch
You can reset the P-touch labeller to revert to the
factory settings, or if the labeller is not working
correctly. All text, settings and stored files are cleared.
and , and then press to turn the
P-touch labeller back on.
release and .
The P-touch labeller turns on with the internal
memory reset.
CAUTION
USING A COMBINATION OF DIFFERENT
BATTERIES (SUCH AS Ni-MH AND ALKALINE), MAY
RESULT IN AN EXPLOSION. DISPOSE OF USED
BATTERIES ACCORDING TO THE INSTRUCTIONS.
NOTE
Battery Recommendations
• Remove the batteries if you do not intend to
use the P-touch labeller for an extended
period of time.
• Dispose of the batteries at an appropriate
collection point, not in the general waste
stream. In addition, be sure to observe all
applicable local regulations.
• When storing or discarding the batteries, wrap
them (for example with cellophane tape) to
prevent them from short-circuiting. (Refer to
the illustration below)
(Battery insulation example)
1. Cellophane tape
2. Alkaline or Ni-MH
battery
Troubleshooting
Error messages What to do when...
Message Cause/Solution
Battery Low! The batteries are running low.
Battery Empty! The installed batteries are running low and
Invalid! • There is no text above the cursor when you
No Text! • No data in memory to print a text file.
2 Line Limit! /
1 Line Limit!
No Cassette! Install a cassette to print, feed or preview a
Cutter Pressed The tape cutter lever has been pressed in the
Text Full! The maximum number of characters
Change Length Since the number of entered characters
No Frame OK? • Printing on the 3.5 mm tape with an invalid
Feed OK? • Feeding tape after printing when [Chain Print]
Insert 12 mm • Use the 12 mm tape cassette designed for
Use TZe Tape!
If using AAA alkaline batteries: Replace them
with new ones.
If using Ni-MH batteries: Charge them fully.
must be changed for continued operation.
select [Numbering].
• An invalid character is selected for [Numbering].
• An invalid number is selected for [Tab Length]
or [Label Length].
• An invalid value was entered as the label
length while using templates.
• is pressed when no text is entered.
• + is pressed when no text is
entered.
is pressed when no text is entered.
•
• or was pressed when no text
was entered while using templates.
• Cannot enter a third line by pressing .
• Cannot print or preview two lines of text while
3.5 mm or 6 mm tape is installed. Use a larger
tape size.
label.
middle of the printing process.
(80 characters for text, 50 characters for
templates) exceeded.
exceeds the label length, reduce the text, or
select [Auto] as the label length.
Frame setting ON.
• Make sure you use the 12 mm wide tape
cassette.
(Select to print with no Frame,
to cancel.)
is selected. Refer to “Set Margins”.
templates.
• Use a tape cassette with the mark.
Problem Solution
The display
stays blank
after you have
turned the
machine on.
The machine
does not print,
or the
characters are
printed
incorrectly.
The setting has
cleared on its
own.
A blank
horizontal line
appears
through the
printed label.
The machine
has “locked up”
(nothing
happens when
a key is
pressed, even
though the
machine is on).
The power
turns off when
you try to print.
The tape does
not feed
correctly or the
tape gets stuck
inside the
machine.
All text and
format settings
need to be
cleared to
create a new
label.
To change
language
setting.
• Check that the batteries are correctly
inserted.
• If the batteries are running low, replace them.
• Check that the AD-24ES adapter is correctly
connected.
• Check that the tape cassette has been
inserted correctly.
• If the tape cassette is empty, replace it.
• Check that the cassette cover is closed
correctly.
• If the batteries are running low, replace them.
• When power is disconnected for more than
three minutes, all text and formats in the
display will be lost.
• There may be some dust on the print head.
Remove the tape cassette and use a dry
cotton cloth to carefully wipe the print head
with an up-and-down motion.
• Refer to “Resetting the P-touch”.
• If the batteries are running low, replace them.
• Check that the batteries are correctly
inserted.
• A wrong adapter is used; the recommended
adapter is AD-24ES.
• Check that the end of the tape feeds under
the tape guides.
• The cutter lever is pressed while printing. Do
not touch the cutter lever during printing.
• Press + and select
[Text&Format].
• Press / [Clear]
• Refer to “Initial Setup”.
/ [Text&Format]
Page 7
Page 8
56
57
58
59
60
61
62
63
64
65
66
67
68
69
70
71
72
73
74
75
76
77
78
79
80
81
82
83
84
85
86
87
88
89
90
91
92
93
94
95
96
97
98
99
* Images are for illustrative purposes only.
* Frames with highlighted numbers are only available when using 12 mm wide tape cassettes.
 Loading...