

Page 1
Brother Quick Setup Guide
Paper Wire
Extension
Paper T ray
Press Key
once twice
three times four times
A
D
G
P
J
M
T
W
B
E
H
K
N
Q
U
X
C
F
R
I
L
O
V
Y
five times
2
3
4
5
6
S
8
Z
A
D
G
7
9
J
M
T
2
3
4
5
6
7
8
9
FAX ONLY
FAX/TEL
TAD:ANSWER MACH.
MANUAL
TAD:MSG MGR
3.STATION ID
FAX:
TEL:
NAME:
FAX-T84, FAX-T86
1
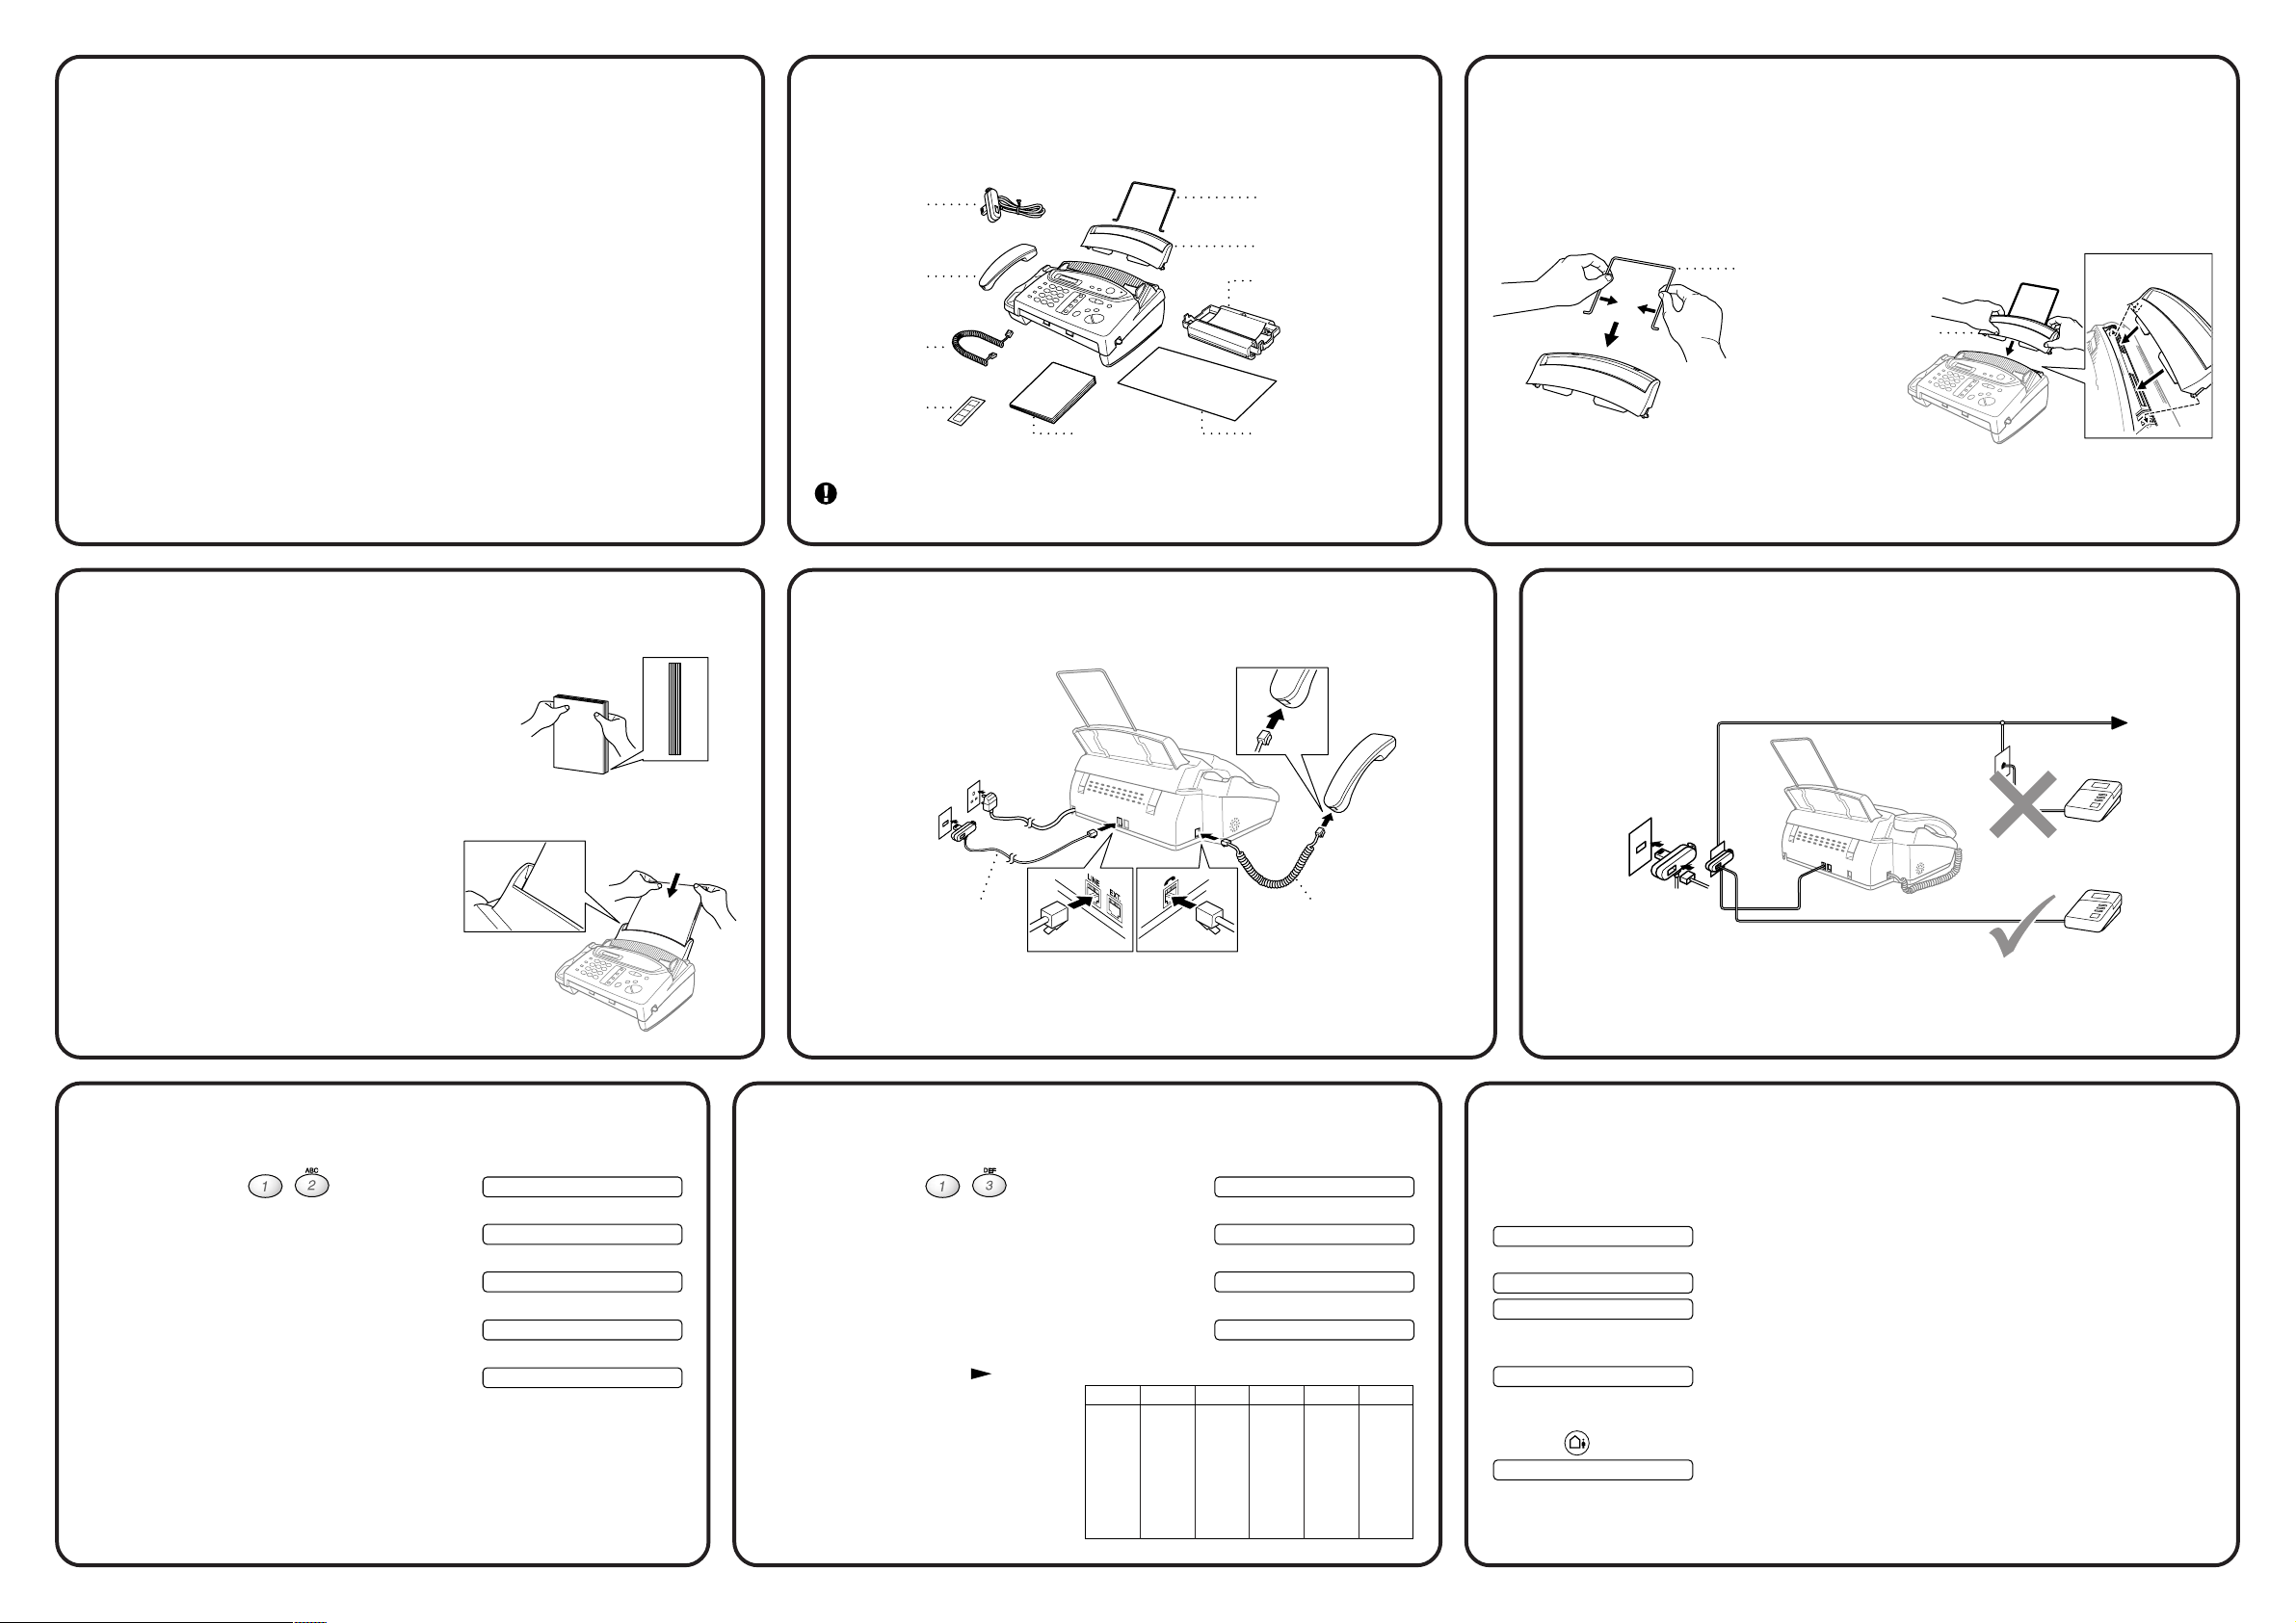
Make sure you have the items shown below.
THANK YOU!
… FOR PURCHASING YOUR BROTHER MACHINE.
WE ARE SURE YOU WILL BE IMPRESSED WITH THE CONVENIENT WAY THAT
YOUR NEW MACHINE PERFORMS SO MANY TASKS WITH GREAT RESULTS!
Follow these simple instructions in numerical order.
For greater detail, consult your Owner’s Manual.
Curled Cord
Packing List
Telephone
Line Cord
Telephone
Handset
Handset
Paper
Wire Extension
Paper T ray
Printing Cartridge*
(up to 140 pages (A4))
Attach the Paper Wire Extension and
2
A. Attach the paper wire extension. B. Attach the paper tray.
Paper Tray
Alternatively, if you cannot solve a problem:
Refer to Frequently Asked Questions (FAQ’s) on Brother Solutions Web Site:
URL: http://www.brother.com
Call Brother Customer Service at: 0870-830-4000
Load the Paper
3
A. Place up to 30 sheets of paper in the paper
tray.
Acceptable Paper
Size: A4
Weight: 64 to 90 g/m
Thickness: 0.08 – 0.10 mm
2
Tap the stack of paper
so the edges are even.
One Touch
Name Labels
* The printing cartridge is already installed in the machine.
Keep the packing materials for possible future transport. If you do not
pack the machine properly, it could void your warranty.
Owner’s
Manual
Quick Setup Guide
Connect the handset, power cord
4
and telephone line cord
(Example for the U.K.)
Telephone Line Cord
Handset Curled Cord
5
If you are sharing one phone line
with an external telephone
answering device, connect it now
TAD
TAD
(Example
for the U.K.)
Set Date and Time
6 7 8
A. Press Menu/Set, , .
B. Enter the last two digits of the year, and
then press Menu/Set.
C. Enter two digits for the month, and then
press Menu/Set.
D. Enter two digits for the day, and then press
Menu/Set.
E. Enter the time in 24-hour format, and then
press Menu/Set.
F. Press Stop.
2.DATE/TIME
ENTER YEAR:XX
ENTER MONTH:XX
ENTER DAY:XX
ENTER TIME:XX:XX
A. Connect the handset.
B. Connect the power cord.
C. Connect the telephone line.
Set Station ID
A. Press Menu/Set, ,
B. Enter your fax number (up to 20 digits), and then
press Menu/Set.
C. Enter your telephone number (up to 20 digits), and
then press Menu/Set.
D. Enter your name (up to 20 characters) using the
dial pad and the chart, and then press Menu/Set.
To enter a space press
E. Press Stop.
.
twice.
For more details, see “Connecting an External Telephone Answering Device (TAD)” in
Owner’s Manual.
Select Receive Mode
Choose the mode that best suits your needs by pressing Mode repeatedly until the screen
displays the setting you want to use.
For use with a dedicated fax line. Every call is answered as a
fax.
For receiving fax and voice calls on one line.
(FAX-T84 only) For use with an external answering device. The
TAD answers every call and stores voice messages.
Fax messages are printed.
For receiving fax and voice calls on one line. You control the
phone line and must answer every call yourself.
Once an Outgoing message has been recorded, you can choose the mode below by
pressing
For more details, see “Answer Mode Settings” in Owner’s Manual.
until it lights. (FAX-T86 only)
A built-in answering machine answers every call and stores
voice and fax messages. For details, see chapter 11 of the
Owner’s Manual.
Page 2
○○○○○○○○○○○○○○○○○○○○○○○○○○○○○○○○○○○○○○○○○○○○○○○○○○○○○○○○○○○○○○○○○○○
Quic k Reference Car d
For complete instructions about all the features and operations of your fax machine, be sure to read your
Owner’s Manual.
Dialling Options
One-Touch Dialling
Pick up the handset.
1
Press the One Touch key of the location you
want to call.
Recording OGM
Press Menu/Set, 8, 3.
1
Press or to reach TAD MESSAGE, and
2
then press Menu/Set.
Press or to select RECORD MSG, and
3
then press Menu/Set.
Sending Faxes
Automatic T ransmission
Insert the document face down in the ADF.
1
Enter the fax number using the dial pad,
2
One Touch, Speed Dial or Search.
Press Start.
3
Manual T ransmission
Manual transmission lets you hear the dial tone,
ringing and fax receiving tones before sending the
fax.
Insert the document face down in the ADF.
1
Pick up the handset and listen for a dial tone.
2
—OR—
Press Speaker Phone (FAX-T86).
Enter the fax number using the dial pad,
3
One Touch, Speed Dial or Search.
When you hear the fax tone, press Start. If you
4
are using the handset, hang up.
Receiving Faxes
For a detailed explanation about receiving faxes
please see Chapter 3 and 8 of the Owner’s Manual.
Manual Reception
Pick up the handset.
1
Press Start if you hear fax tones (beeps).
2
Note: If you set Fax Detect to ON, you don’t have to
press Start. Just wait until the machine takes
over the call automatically. (See Fax Detect in
the Owner’s Manual.)
When the LCD shows RECEIVE, replace the
3
handset.
Making Copies
Making a Single Copy
Insert the document face down in the ADF.
1
Press Copy/Help twice.
2
To cancel, press Stop.
Do NOT pull on the paper while copying is in
progress.
Setup Auto Dial Number s
Storing One-Touch Dial Numbers
Press Menu/Set, 6, 1.
1
Press the One Touch key where you want to store
2
the number.
Enter a number (up to 20 digits), and then press
3
Menu/Set.
Enter a name (up to 15 characters), and then
4
press Menu/Set.
Press or to select FAX, TEL or F/T
5
(according to the type of number you stored), and
then press Menu/Set.
Press Stop.
6
Storing Speed Dial Numbers
Press Menu/Set, 6, 2.
1
Enter a two-digit speed dial number, and then
2
press Menu/Set.
Enter a number (up to 20 digits), and then press
3
Menu/Set.
Enter a name (up to 15 characters), and then
4
press Menu/Set.
Press or to select FAX, TEL or F/T
5
(according to the type of number you stored),
and then press Menu/Set.
To hang up, replace the handset.
2
Speed Dialling
Pick up the handset.
1
Press Mute/Search, press #, and then press the
two-digit Speed Dial number.
To hang up, replace the handset.
2
Searching the Auto Dial Numbers
Press Mute/Search, and then enter the first
1
letter of the name you are looking for.
Press or to search the memory.
2
When the name is displayed, lift the handset for a
3
voice call.
—OR—
Press Speaker phone (FAX-T86).
Press Start to begin dialling.
4
Message Manager
(FAX-T86 Only)
Turning ON Message Manager Mode
For a more detailed explanation please see Chapter
11 of the Owner’s Manual.
Record the Outgoing Message
1
(TAD MESSAGE).
Press until it lights.
2
Pick up the handset to record a message.
4
Replace the handset.
5
Playing a Voice Message
Press Play/Record.
1
Use (RWD) to repeat a message.
2
Use # (FWD) to skip a message.
Press Stop.
3
Printing a Fax Message
Press Play/Record.
1
After voice messages have played, press 1.
2
Erasing Messages
To erase voice messages individually
Press Play/Record.
1
Press Erase after the two short beeps or while
2
the message is playing.
Press 1.
3
Press Stop.
4
To erase messages all at once
Press Erase.
1
Press or to select VOICE, DOC or MSG.,
2
and then press Menu/Set.
Press 1.
3
Press Stop.
6
 Loading...