

Page 1

FAX-2000P
<
)
C
User's Reference Guide
)
k
)
Page 2

Page 3

Special Notice to User
For the U.S.A.
WARNING;
This equipment is hearing-aid compatible.
This equipment has been tested and found to comply with the limits for a Class B digital device, pursuant te
Part 15 of the FCC rules. These limits are designed to provide reasonable protection against harmful
interference when the equipment is operated in a residential installation. This equipment generates, uses,
and can radiate radio frequency energy and, if not installed and used in accordance with the instructions,
may cause harmful interference to radio communications. However, there is no guarantee that interference
will not occur in a particular installation. If this equipment does cause harmful interference to radio or
television reception, which can be determined by turning the equipment off and on, the user is encouraged
to try to correct the interference by one or more of the following measures:
— Reorient or relocate the receiving antenna.
— Increase the separation between the equipment and receiver.
— Connect the equipment into an outlet on a circuit different from that to which the receiver is connected.
— Consult the dealer or an experienced radio/TV technician for help.
The Brother FAX-2000P complies with Part 68 of FCC rules. Prior to connecting a Brother FAX-2000P to the
telephone line, you must, upon request, provide the following information to your telephone company.
1. The TELEPHONE NUMBER of the line to which you will connect your Brother FAX-2000P.
2. The FCC REGISTRATION NUMBER of the Brother FAX-2000P.
3. The RINGER EQUIVALENCE NUMBER (REN) of the Brother FAX-2000P.
The Brother FAX-2000P connects to the telephone line by means of a standard jack called the USOC
RJ11C. If this type of jack is not available where you want to install the Brother FAX-2000P, you may order it
from the telephone company.
The Brother FAX-2000P is designed to be used on standard-device telephone lines. Connection to
telephone company-provided coin service (central office implemented system) is prohibited. Connection to
party lines service is subject to state tariffs.
if you have any questions about your telephone line, such as how many pieces of equipment you can
connect to it, the telephone company will provide this information upon request.
The telephone company may make changes in its communication facilities, equipment, operation or
procedures, where such action is reasonably required in the operation of its business and is not
inconsistent with FCC rules. If such changes can be reasonably expected to render any customer’s devices
incompatible with telephone company facilities, or require modification or alteration, or otherwise materially
affect their performance, written notification must be given to the user to allow uninterrupted service.
Page 4

Disclaimer
Brother has made every effort to ensure that the information in this manual is
complete and accurate. However, constant efforts are also being made to
improve and update the product. Therefore, Brother assumes no liability for
damages incurred directly or indirectly from errors, omissions, or discrepancies
between the equipment and the manual.
Page 5

Precaurions
Read the following precautions carefully before you install or use the Brother
FAX.
Safety
Installation
Operate the Brother FAX using a standard 110V to 120V AC, 50/60Hz, 15A or
more outlet only. Do not use a multiple plug connector to share the power
supply with any other appliances.
Avoid bending, kinking or damaging the power cord.
Never insert or remove the power cord with wet hands. Also, be sure to hold
the cord by the plug when removing it from the outlet.
Do not install the Brother FAX near heaters, air conditioners, or in a location
exposed to direct sunlight or strong light,
Leave the space shown below between the machine and the nearest wall.
8 inches : right side and rear side
20 inches : left side
16 inches ; frontside
Place the machine on a stable, horizontal surface, unexposed to vibrations.
Do not place any electrical equipment such as a radio or television next to the
machine. They may cause electrical interference,
FAX-2000P is equipped with a 3-wire grounding type plug, a plug with a third
(grounding) pin. This plug will only fit into a grounding-type power outlet. This
is a safety feature. It you are unable to insert the plug into the outlet, contact
your electrician to upgrade your outlet, and benefit from the grounding-type
plug.
Avoid acidic and alkaline gases, water vapor, etc.
Place FAX-2000P in a well-ventilated room. Free of dust and foreign matter.
The FAX-2000P generates ozone in amounts that are considered harmless to
humans. However, in a poorly ventilated environment an ozone odor may be
noticeable .
Use only Brother authorized toner. Unauthorized toner will not only result in
poor printing quality, but also bring about a malfunction of Brother FAX.
If you are located in an area subject to earthquakes, consult an authorized
Brother service representative for measures to protect the Brother FAX.
Ill
Page 6

Precautions
Operation
Daily Use
Maintain an ambient temperature of 50°F to 95°F and a humidity level of 35%
to 80% RH {without visible condensation) when you use the Brother FAX, If
the room temperature is raised rapidly, for example during winter, paper
misfeeds or poor copy quality may result, due to the formation of
condensation inside the machine. In that case, make copies continuously; the
condensation will dry up as the machine warms up.
High-voltage electrical power exists inside the recording unit. Do not open the
cover except for removing a jammed paper or replacing toner/drum units.
Avoid using volatile gases such as thinner and alcohol near the FAX-2000P.
Do not disassemble this unit, try to repair it or make modifications of any kind.
Be sure that small foreign objects such as paper clips, etc. do not enter the
ventilation opening.
Under the following conditions unplug the FAX-2000P and contact the Brother
service personnel at 1-800-284-4FAX (U.S.A. Only).
1. Abnormal sound, smell or smoke generating from the FAX unit.
2. Power failure or blown fuse.
3. Liquid spilling into the FAX-2000P.
Do not use the FAX-2000P for purposes other than facsimile, and avoid
placing any objects on top.
Do not connect the fax unit with any non-approved apparatus.
Periodically check the FAX-2000P for the following:
1. Abnormal heat generation at power cord or plug.
2. Loose connection of power plug. Damage to power cord.
3. Connection of grounding line.
Clean the Brother FAX with a soft, dry cloth, or a soft cloth lightly moistened
with a neutral detergent solution. Do not use any chemicals or liquid agents.
Answering Machine
Compatibility
IV
Although the FAX-2000P is capable of routing a voice caller to an external
answering machine, there is no guarantee that any specific answering
machine will work.
Page 7

How to Use this Manual
Read this section before using your new Brother FAX. It will give you an overall
idea of how this manual is organized and how to find the information you need
quickly.
ThiG manual consistG of three PartG.
PART 1: Up and Running with the Brother FAX>2000P
• Overview of the FAX-2000P
• Installation
• Basic Settings and Preparation Before Using
• Basic Procedure for Transmission and Reception
• Using the Fax as a Telephone and as, a Copier
PART 2: Advanced Features and Functions of the Brother FAX-2000P
• Transmission Using Various Modes
• Polling
• ECM Mode, Closed User Group Communication, Voice Request and
RS-232C Printer
PART 3: Appendices
• Troubleshooting and Daily Maintenance
• Specifications
Symbols The following symbols are used throughout this manual.
The symbol for a “Note.’’ It indicates additional and important related
information.
!££► "SEE^" points to documentation that provides further related information.
V
Page 8

Contents
Special Notice to User.....
For the USA.
Disclaimer..................................................................................................................
Precautions
How to Use This Manual.....................................................................................................................................v
........................................ ..........
..............................
.................................................................
......... ........... ........... ...................
............. ..........................................
................... ..........................................................................j
...................................................................
.....................................
.........................................................................................i ii
PART 1: Up and Running with the Brother FAX-2000P
Getting Started
Setting Up Your Facsimile
..................................... ....................... .................................................................................
Major Functions and Features of FAX-2000P
Major Parts........................................................................................................................................
......................................
Removing Transport Spacers.......................................................................................................... 0
Packed Items..................................................................................
Installing {or Replacing) Toner Unit............................................................................................... 13
Replacing Toner Unit............................................................................................................14
Replacing Fixing Cleaner
Replenishing Toner...............................................................................................................16
Replacing Waste Toner Bottle
Installing (or Replacing) Drum Unit....
Attaching Accessories............................................................................................................. 21
Loading Recording Paper............................................................................................................. 25
Tuning on the Power........................................................................................................................27
........................................................................................................................................9
.........
..........
..........................................
..................................................................................
-■■■■■■
.........................................................................................-.IS
.............................................................................. 18
.....................................................19
....................................
j
ii
3
4
6
Preparing Your Facsimile.....................
Operation Panel............................................................................................................................. 30
Setting the Clock............................................................................................................................ 32
Storing Your Brother FAX ID............................................................................................................33
Setting the Dialing Signal (Puise/Tone)......................................................................................... 36
Setting the Reception Mode........................................................................................................... 37
.
............................................................................................................ 29
VI
Page 9

Contents
Storing Frequently Used Fax Numbers Under Abbreviated Dials
Ho\A/ to Store.............................................................................
How to Clear All Abbreviated Dials.........................................................................................
How to Print Abbreviated Dial List...........................................................................................43
Storing Frequently Used Fax Numbers Under One-touch Dials.........................................................44
How to Store
How to Clear Ail One-touch Dials (01-24)...............................................................................47
How to Print One-touch Dial List...............................................................................
Storing Frequently Used Communication Modes Under One-touch Program Keys.....
How to Set for One-touch Dials
How to Clear All One-touch Program Keys Used as One-touch Dials
How to Set a Communication Mode........................................................................................51
How to Clear All One-touch Program Keys for Communicatioh Mode
How to Print One-touch Program List.................................................................................. 54
Basic Oporations.................................................................................................................................................. 55
Sending Documents........................................................................................................................ 56
Types of Documents You Can Send......................................................................................56
Placing Documents on the ADF Tray....................................................................................57
Dialing.................................................................................................................................. 57
Resolution and Contrast
Header.................................................................................................................................. 59
Sending Documents............................................................................................................. 60
Setting the Communication Confirmation Report
Redialing............................................................................................................................... 63
Receiving Documents................................................................................................................. 53
Automatic Reception Mode
Manual Reception Mode.................................................................................................... 65
Out-of-paper Reception..........................................................................................................65
Manual Reception by External Telephone........................................................................... 66
Communication Journal................................................................................................................. 67
How to Set Auto-print Mode...................................................................................................67
How to Print out Manually
Communication Journal...................................................................................................... 68
..........................................................................................................................
........................................
.......
............................................................................................ 58
.............................................................
.................................................................................................. 64
................................................................................................... 67
.....................................................
.............................................
..............
.....................
......................................................49
...................................
...
..........
..................
...53
..62
38
38
42
44
48
49
50
VII
Page 10

Contents
Other Useful Basic Functions............................................................................................................
Using the Brother FAX Telephone........................................................................
Making a Call...................................................................................................................... 70
Answering a Call
Placing a Call on Hold......................................................................................................... 70
Hold-melody On/Off............................................................................................................. 70
Pulse/Tone Switching...........................................................................................................70
Telephone Answering System Connection......................................................................................71
How to Set Answering Machine Connection..........................................................................72
How to Set External Telephone Connection..........................................................................72
How to Set the Silence Detection Time..................................................................................73
Making Copies............................................................................................................................... 74
.................................................................................................
......
........................... ...........................
............................
.....;
............
PART 2: Advanced Features and Functions of the Brother FAX-2000P
Transmission................................................................................................................................................. 77
Sending Documents at a Preset Time (Delayed Transmission)..................................
How to Cancel Delayed Transmission................................................................................ 79
Sending Documents to Multiple Stantions (Broadcasting)
How to Cancel Delayed Broadcasting.......................................................................... .....81
Sending Confidential Documents (Confidential Transmission)
How to Register a New Mailbox at the Receiving Side
How to Edit Name and Key Number of Existing Mailbox
How to Set Storage Time (Days) for Keeping Received Confidential Documents................84
I low to Print the Mailbox List.............................................................................................. 05
How to Send Confidential Documents..................................................................................86
How to Cancel a Delayed Confidential Transmission
Mailbox Reception Notice................................................................................................... 87
How to Print out Received Confidential Documents
Transmission Reservation and Interruption.....................................................................................89
Transmission Reservation....................................................................................................89
Transmission Interruption.....................................................................................................89
Sending Documents after Talking on the FAX Phone.................................................................... 90
..............................................................
.......................................................
.........................................................
......................................................
...........................................................
............................................................
.....................
80
82
88
69
70
70
78
82
83
87
Polling.......................................................................................................................................................................................................... 91
Preparing Your FAX to be Polled.....................................................................................................
How to Print out Polled Documents in Memory
How to Cancel Polled Transmission.....................................................................................
.......
..............................................................
VIM
92
93
94
Page 11

Contents
Polling/Delayed Polling
How to Canoe! Delayed Polling
Sequential Polling/Delayed Sequential Polling...................................................................................96
How to Cancel Delayed Sequential Polling
Confirmation and Cancellation of Timer-related Operation.......................................................................
Confirming and Cancelling Timer-related Operation
Howto Print out Timer-related Operation List (List of Commands}
How to Print out Documents Stored in Memory...............................
How to Cancel Timer-related Operations...............................................................................
How to Abort Broadcasting or Sequential Polling...............................................................................102
Display of Status of Timers (Commands) and Memory in Use .........................................................
Other Functions................................................................................................................................................ 105
Setting ECM
Closed User Group Communication................................................................................................ 107
Requesting Phone Communication
Used as RS-232C Printer..................................................................................................................109
.......................................................................................................................................
How to Set Password............................................................................................................ 107
How to Set Closed User Reception Mode...............................................................................107
How to Set Parameters........................................................................................................ 109
How to Print Using the RS-232C interface
ASCII Code Table................................................................................................................ 111
.......................................................................................................................
.......
............
......................................
............................
.....................................................................
...................................................................................... 108
.............................................................................
................................................
.......
........................................
.
..................
....100
.....................................
......................................
95
95
97
99
...100
101
101
103
106
110
Optional Settings............................................................................................................................................................................................. 113
Parameters for Dialing and Ringing...................................................................................................114
Howto Set the Number of Rings..............................................................................................
How to Set Auto/Manual Reception Mode Switching..............................................................114
How to Set the Redial Count
Howto Set the Redial Interval................................................................................................115
How to Set the Pause Time...................................................................................................116
Parameters for Image Scanning....................................................................................................... 117
How to Set the Scanning Width............................................................................................ 117
How to Set the Home Position for Resolution.................................................................... 117
Howto Set the Home Position for Contrast
How to Set the Halftone Mode...............................................................................................118
..........................................................
.....................................................................
........................................115
114
118
ix
Page 12

Contents
Parameters for Recording (Printing) Unit........................................................................................ 119
How to Set the Standby Time for the Printer (Power Saving Mode)...
How to Set Page Separation Function and Reduction Rate
Printing the Machine Settings..........................................................................................................121
.................................................
.........
.........................
119
119
PART 3: Appendices
Troubleshooting............................................................................................................................................. 125
Check Messages............................................................................................................................. 126
Check Messages Displayed in the LCD.......................................................................... 126
Check Mcssagee Printed in the Sheet................................................................................ 130
Clearing Original Misfeeds...............................................................................................................132
Clearing Mishandled Recording Paper
Cleaning Recording Unit..,........................................................................................................ 135
Troubleshooting Recording Unit Faults........................................................................................ 136
Inquiries......................................................................................................................................... 1^8
Service...................................................................................................................................... 138
..........................................................................................
133
Specifications
Index.............................................................................................................................................................................................................. 143
...................
.......................................................................................................
....................... 139
Page 13

Part 1
(Ip and Running with
the Brother FBX-2000P
Page 14

Page 15

Getting Started
This section illustrates all the major parts and functions of the
Brother FAX-2000P.
Please read this section carefully before operating the machine
to learn how to operate it safely and correctly.
Page 16

Major Functions and Features of FAX-2000P
Basic Functions
and Features
Plain Paper Recording
Recording is made on plain paper with a printing quality equivalent to that of a
photo copier.
Auto-dialers
60 abbreviated dials and 30 one-touch dials,
Program Keys
6 keys out of the 30 one-touch keys can be used as program keys as well as
one-touch dials, which store various communication modes.
Telephone
In addition tp use as an ordinary telephone, an answering machine is
connectablej
Copier
Single or multiple copying can be done.
Out-of-paper Reception
Incoming messages can be stored in memory even when recording paper or
toner runs out.
ECM (Error Correction Mode)
Error-fre© communication
Advanced
Functions
Delayed Communications
Transmission and polling can be performed at a preset time. Documents for
transmission can be stored in memory.
Page 17

Major Funcrions and Features of FAX-2000P
Broadcasting
Documents can be transmitted to multiple destinations after being stored in
memory. The destinations can be set by specifying group number(s), which
have been previously stored in abbreviated dials and/or one-touch dials or by
specifying abbreviated dials and/or one-touch dials individually.
Confidential Communication
Transmitted confidential documents can be stored in memory (mailbox) at a
receiving machine.
Poiiing
Documents for polled transmission can be stored in memory. At this time, the
stored document can bo printed out just for confirmation. Delayed polling and
multi-station polling are possible.
Closed User Group Communication
Internal communications within a closed user group can be carried out using
a 4-digit password.
RS-232C Printer
The FAX-2000P can be used as a peripheral printer for a computer using an
RS-232C interface.
Page 18
Major Parts
Front View
O Document Guide
Adjust the left and right guides to the width of
the document you are about to send.
O ADF Tray Extension
Helps to hold documents on the tray.
0 Top Cover Release Button
Press to open the cover of the recording unit.
O Operation Panel Release Lever
Push down to open the operation panei.
0 Document Collecting Tray
Coliects transmitted or copied documents.
0 Operation Panel
Use to control facsimile operations.
Page 19
Rear and Side View
Mojor Parts
O Handset
Use for ordinary telephone conversation.
O PHONE 1 Connector
Connect a built-in handset.
0 PHONE 2 Connector
Connect an external telephone or answering
apparatus.
O LINE Connector
Connect telephone line cord.
0 Waste Toner Bottle Cover
Contains a waste toner bottle.
O Power Switch
Switches facsimile ON and OFF. Normally, leave
this switch ON at all times.
0
AC Power Input Connector
Connect the power cord here.
0 Recording Density Control
Use to increase (CCW) or decrease (CW)
recording density. Normally, neutral (12 o’clock)
position.
O Turn Guide
Open to remove mishandled paper.
Page 20

Page 21

Setting CIp YtMir
Read this section for instructions on;
• Removing transport spacers
• Checking packed items
• Installing (replacing) the toner unit
• Installing (replacing) the drum unit
• Attaching Accessories
• Loading the recording paper
• Turning ON the power
Facsimile
Page 22

Removing Transport Spacers
After unpacking, first remove four transport spacers.
Removing Upper 1. Push the cover release button, and open the top cover.
Guide Plate Spacer
2. Slightly rotate the spacer on the left to release it, as shown below.
Grip of upper guide plate
10
3. Lift up the upper guide plate, and remove the spacer as shown at right.
Page 23
Removing Transport Spacers
Removing Fixing 1 • i^^sh the cover release button, and open the top cover. Unit Spacers
2. Open the fixing unit cover.
3. Remove the spacer by moving it in the direction as shown beiow.
11
Page 24

Packed Hems
When you are ready to install your Brother FAX, open the carton containing the
machine and accessories. Check the contents.
The carton contains the following items:
•Brother FAX-2000P........................................................................... 1
•ADF Tray Extension...........................................................................1
•Document Collecting Tray..................................................................1
•Handset with coiled cord....................................................................1
•Paper Cassette (Letter)......................................................................1
•Modular Cord................................................................................... 1
•Power Cord
•User's Reference Guide.............
•lest Sheet..................................................................................... 1
•Warranty Card................................................................................ 1
.................................................................................. 1
......................................................
1
12
Page 25
Installing (or Replacing) Toner Unit
i^j
Check the feed indicator of the toner unit
When “RED" indication is displayed, no nnore toner can be installed in the toner
unit. When the signal to add toner is displayed, the toner unit must be replaced
with a new toner kit. Also replace the fixing cleaner, then supply toner and
change the waste toner bottle.
When 3~1 number is indicated, supply toner and change the waste toner bottle.
Handle the toner unit carefully to avoid scattering toner.
Before starting, turn off the power switch, unplug the power cord and push down
the top cover release button to open the cover.
13
Page 26
Installing (or Replocing) Toner Unit
Replacing Toner
Unit
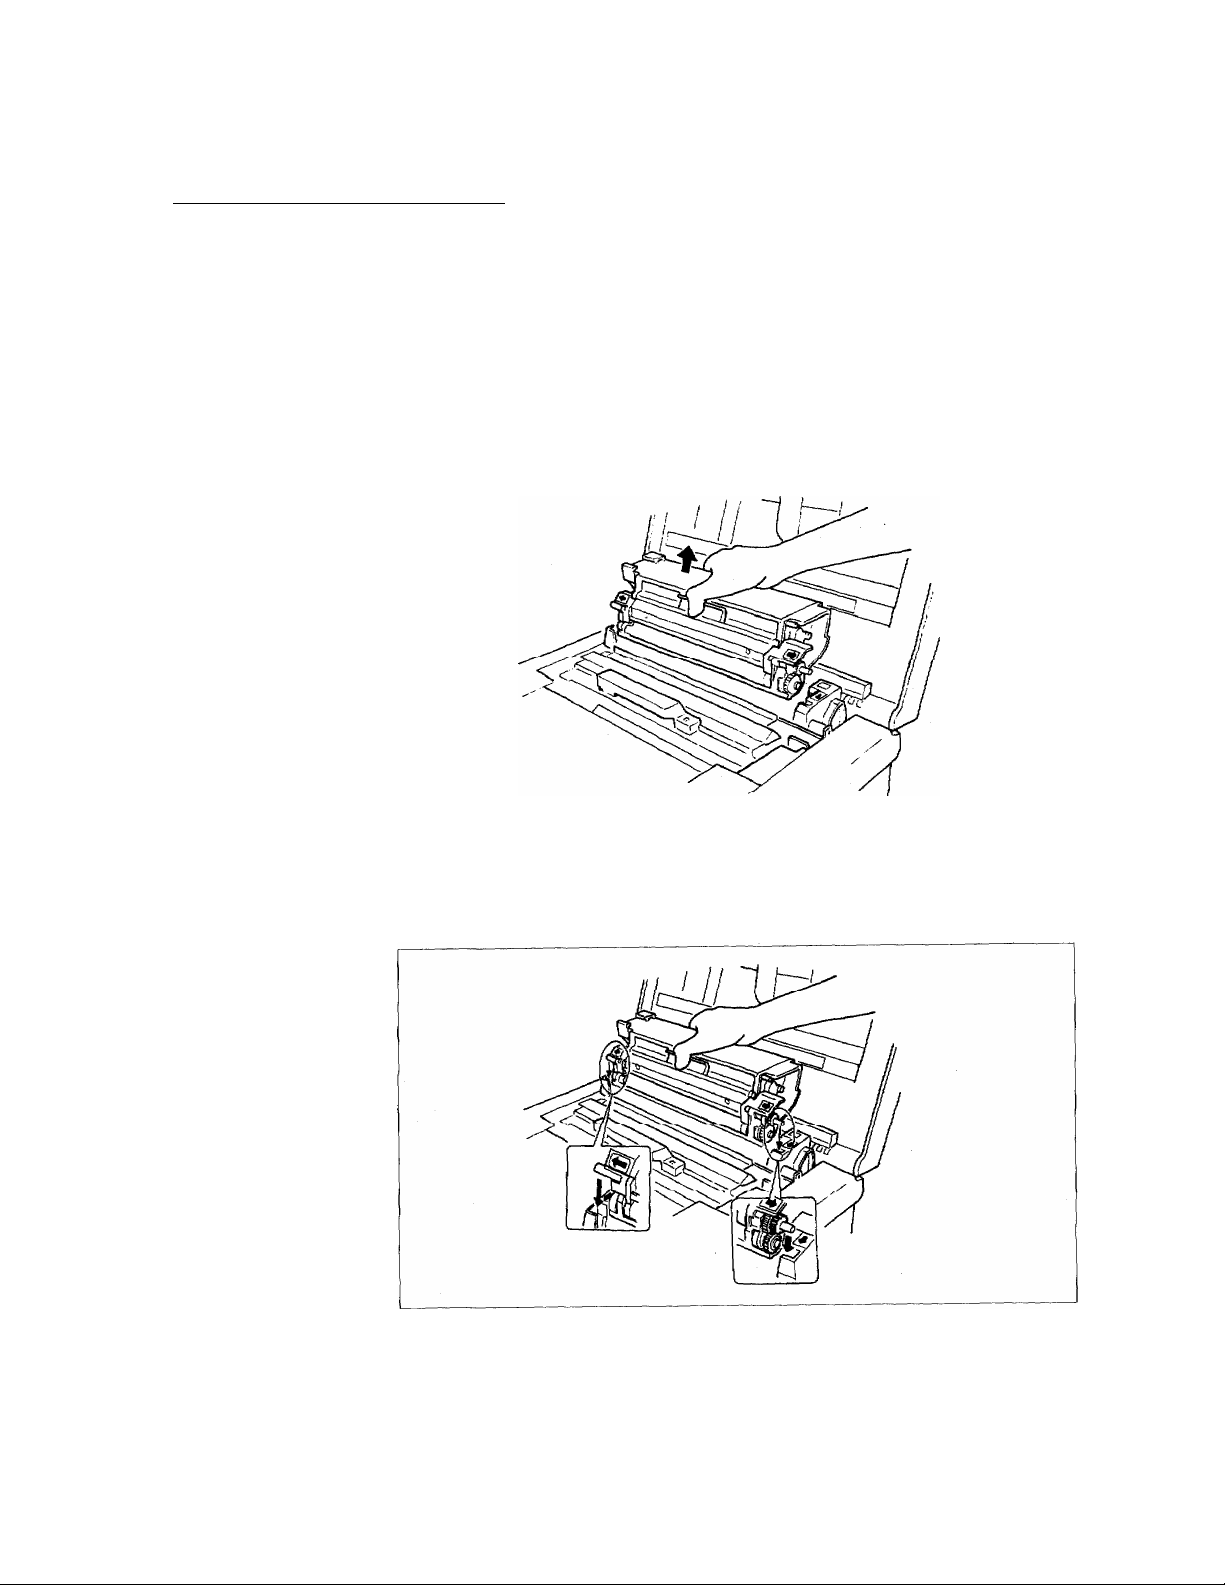
1. Removing a used toner unit
Hold the grip of the used toner unit, and lift it upward.
If the housing of the toner unit (upper guide plate and under guide plate) is
soiled by toner or any other material, remove the drum set, and clean off the
housing with paper.
2. Installing a new toner unit
Hold the grip of the new toner unit.
Engage the left and right projections with the grooves of the main body (see
green arrows), then insert the unit horizontally.
14
Do not touch the surface of the roller.
Page 27
InstqlHng (or Replacing) Toner Unît
Replacing Fixing
Cleaner
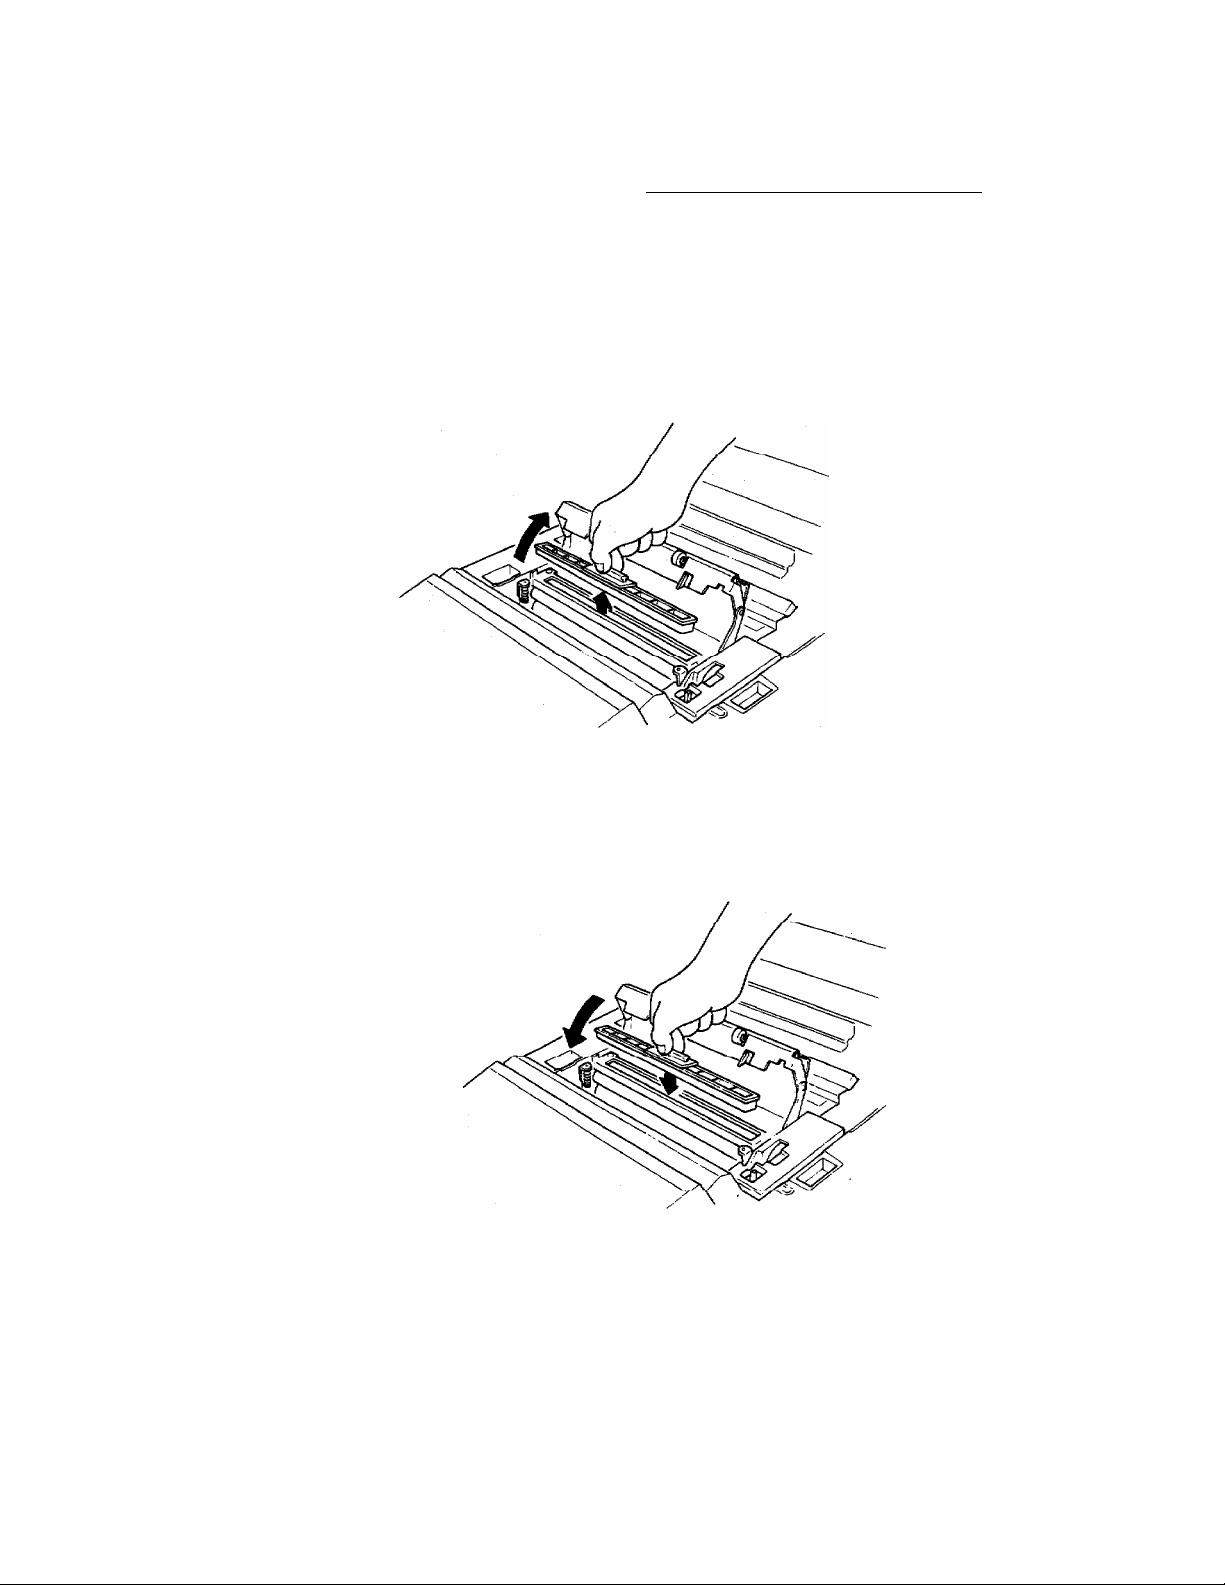
1. Replacing used cleaner
Open the fixing unit cover. Lift the used fixing cleaner using the hand grip.
2. Installing new cleaner
Attach a new fixing cleaner to the inlet of the fixing unit, then shut the unit
cover.
15
Page 28
Installing (or Replacing) Toner Unit
Replenishing Toner
Use only Brother authorized toner. Unauthorized toner will not only result /n
poor printing quality but may also cause a malfunction of the Brother FAX.
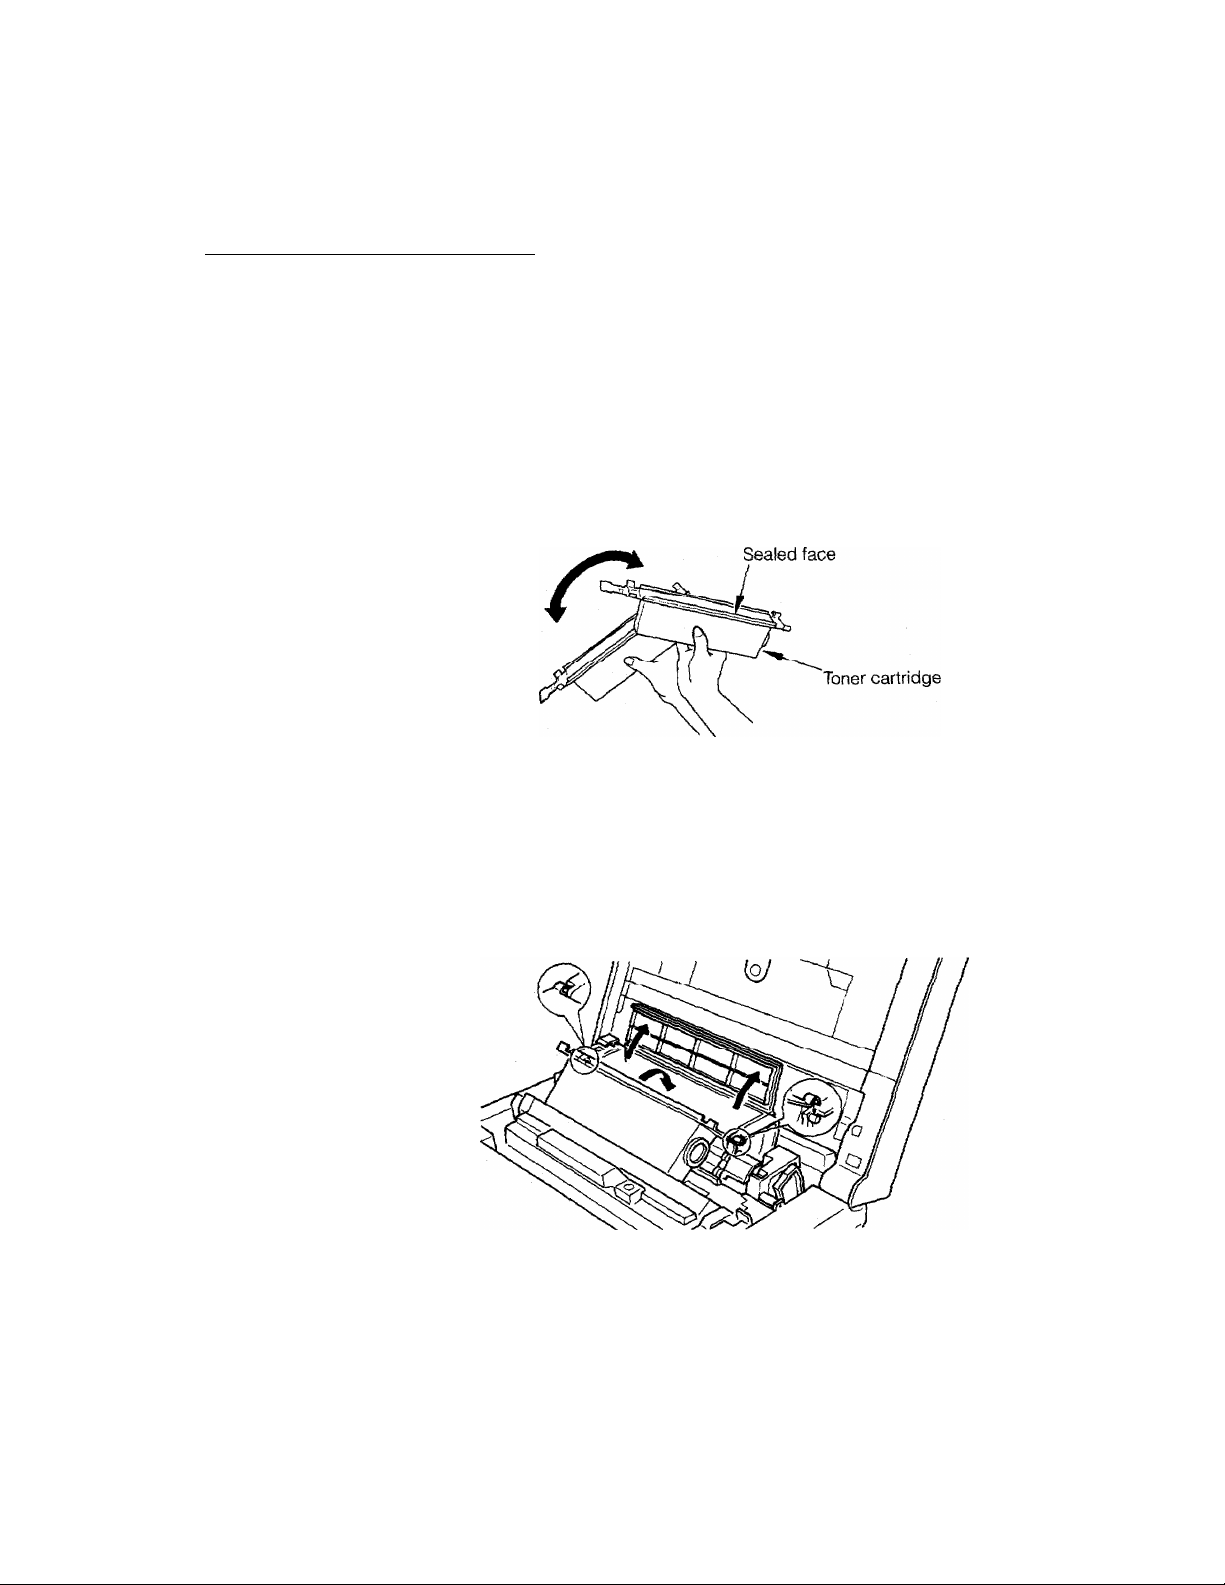
1. Preparation
Before replenishing toner, shake the toner cartridge at least 10 times keeping
the sealed face upward.
2. Placing a cartridge onto the toner unit
Open the toner unit cover
Keeping the sealed face upwards, set the right and left hooks of the toner
cartridge onto the holding shaft of the toner unit, and turn in the direction
indicated by the arrow.
16
Page 29
Installing (or Replacing) Toner Unit
3. Removing the cartridge seal
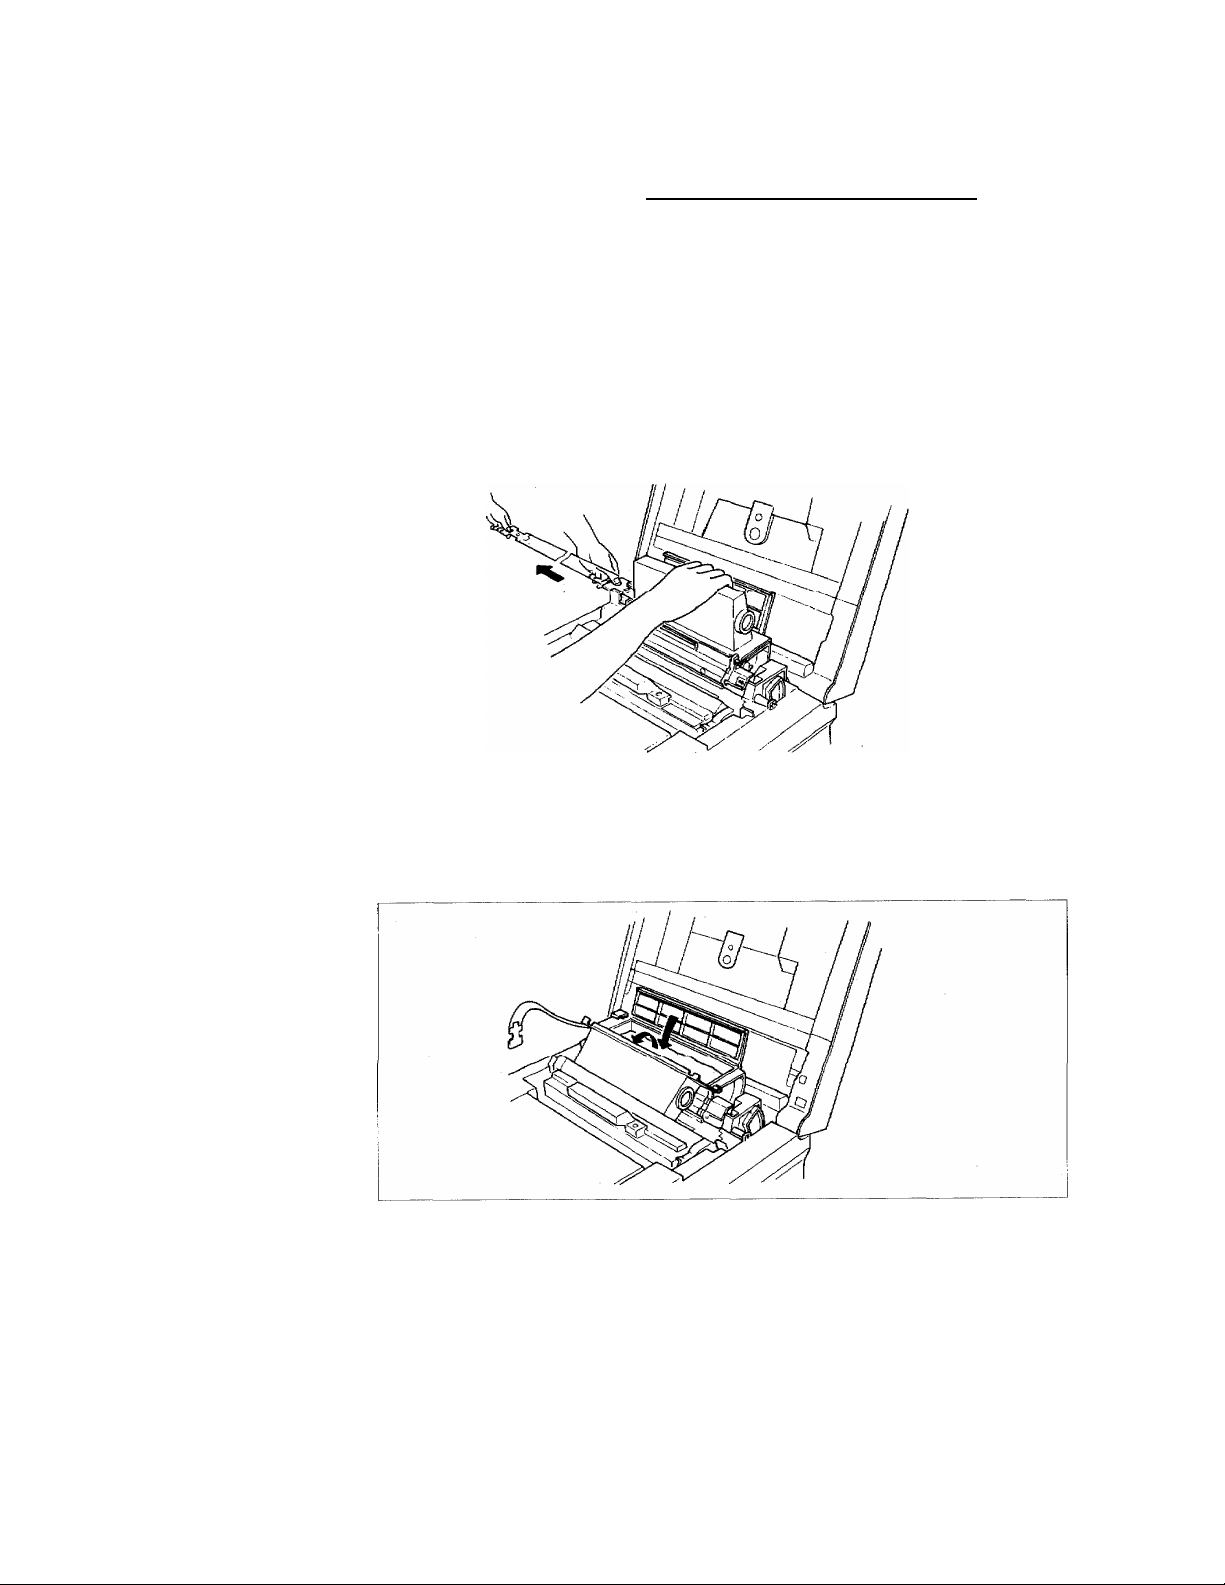
While pressing the toner cartridge, pull the tab on the sealerstrip in the
direction ot the arrow until a red line appears. Allow toner to pour into the
toner unit. Then tap the cartridge on the top to dislodge the remaining toner.
4. Removing the toner cartridge
Return the toner cartridge to the original position, when first attached, then
carefully remove it from the toner unit to avoid spilling toner.
Close the toner unit cover precisely.
(Put Ihe used toner cartridge in a vinyl bag for disposal)
17
Page 30

ifiskilling (or Replacing) Toner Unit
Replacing Waste
Toner Bottle
1. Removing the toner cartridge
Raise the side cover and remove the used waste toner bottle. Place used
bottle in the packing saved from the new bottle, then discard.
To discard the used waste toner bottle, put it in a vinyl bag for cartridge
packing.
if the housing of a waste toner bottle is soiled by toner or by any other
material, clean the housing with the special tool packed with the drum set, or
use paper.
2. Installing a new bottle
Attach a new waste toner bottle to the housing, and close the side cover.
18
Page 31

Installing (or Replacing) Drum Unit
Do not expose the drum to direct sunlight or strong light.
Do not touch or damage the surface of the drum.
Before starting, turn off the power switch, unplug the power cord and
push down the cover open lever to open the cover
1. Removing a used
drum unit
2. Opening the drum while holding a new drum set by the hand grip, open the drum cover by pulling
cover of a new
drum unit
Press the top cover open button to open the top cover.
Lift the used drum set upward while holding the grip.
If the drum set housing (transport guide stay, transfer wire) is stained by toner or
any other material, remove the toner unit, then clean the housing with paper.
in the direction of the arrow as shown. The drum cover should lock back in the
open position.
19
Page 32

Installing (or Replacing) Drum Unit
3. Installing a new Engage the right and left projections on the drum with the grooves (blue arrow
drum unit mark) on the main body (see blue arrows), and insert the drum set horizontally,
20
Also, change the cleaning pieces packed together with the drum set.
Page 33

Attaching Accessories
1. Connect the Attach one end of the coiled handset cord into the jack in the handset, handset.
2. Connecting Plug the modular plug end of the modular cord into the LINE connector. Plug the
modular cord other end of the modular cord into the wall modular jack provided by the
When you remove the cord from the handset, be sure to unclip the
modular plugs carefully.
Plug the other end of the handset cord into the modular jack in the handset
cradle.
When you remove the cord from the handset cradle, be sure to unclip the
modular plugs carefully.
Plug the modular plug end of the straight handset-cradle cord into the
PHONE 1 connector.
telephone company.
3. Connecting power connect the power cord to the connector located in the left side panel.
cord Make sure that the power switch is turned off, then connect the plug end of the
cord to an outlet.
21
Page 34

Atfaching Accessories
4. Attach the ADF Hook the ADF tray extension tabs into the slots on the ADF to secure the
tray extension. extension unit to the machine.
5. Attach the
document
collecting tray.
22
® Use this document tray when you locate and use your Brother FAX on the
edge of a table or counter.
Insert the document guard bar into the holes on the bottom of the lower
document collecitng tray.
Page 35

Attaching Accessories
Insert the hooks on the back side of the upper tray into the holes in the lower
collecting tray.
Note that there are three rows of holes on the lower collecting tray that allow you
to adjust the length of the tray to the size of the documents.
Insert the hooks on the upper document collecting tray under the document
output slot.
23
Page 36

Attaching Accessories
6. Attach the one- Lift and remove the sheet protector,
touch sheet
Apply the One-touch sheet. Then replace the sheet protector.
24
Page 37

Loading Recording Paper
1. Removing the Raise the cassette slightly and pull it toward you to remove,
cassette
2. Supplying paper Piace paper in cassette by first inserting sheets under the paper stops located
at the rear.
25
Page 38

Loading Recording Paper
3. Installing the
cassette
Hold the cassette as shown and insert it into the cassette inlet, until it locks into
place.
26
Page 39

Turning On the Power
Turn on the power switch at the left side of the FAX-2000R
After turning on the power switch, the fan starts rotating. The standby message
wili then appear in the LCD dispiay as shown beiow.
Fax Ready
Mar 01,91 10:10
Caution; Once the Brother FAX is installed and power is turned on, do not turn
off the power. If turned off, confidential documents stored in memory
will be deleted.
27
Page 40

Page 41

Preparing Ybar
Facsimile
Read this section to iearn how to set the ciock, FAX iD, and
dialing signai and how to store frequentiy used facsimiie
numbers for abbreviated dialing and one-touch dialing. This
section begins with a description of the control panel.
Before you proceed with the activities in this section, please
check to see that the Brother FAX is installed properly and is
turned ON.
Page 42

Operation Panel
O HOLD Key
Press this key to place a call on hold.
OOIAUVOICE REQ Key
Press this key to perform on-hook dialing
through the keypad.
Press this key to make a phone reservation
during communication.
0 REDIAL Key
Press this key to redial the last number you
dialed.
OAUTO/MAN receive Key
Press this key to switch between manual
receiving and automatic receiving modes.
©FUNCTION Key
Press this key to select operations such as
setting the communication parameters, setting
the clock, and storing abbreviated numbers.
30
© PAU3E Key
Press this key to enter a pause for dialing an
external line access number.
Press this key while in the mode for character
entry to scroll up the character group.
©CONFIRM/ENTERKey
Press this key to set transmission/receptlon
confirmation report output to ON or OFF.
Press this key while in the setting mode to enter
the data or item currently displayed.
® TONE Key
Press this key to switch a DP signal to a PB tone
during dialing.
Press this key to move the cursor to the left in
the data entry display.
Page 43

►
13
19
PI 1^ P2|
H >
§
'“a
1
------
1141
------
i
-------
1201
------
____
1
1211~~1
1 P311
------
22
P4^__1
1 ^^1
23
rrzi
P5^__1
©RESOLUTION/SELECT Key
Press this key to change the resolution. Press
this key while in the setting mode to call up an
item following the currently displayed item.
© -i>-Key
Press this key to enter a dash (-) while
programming a facsimile number.
Press this key to move the cursor to the right
while in the data entry mode.
©CONTRAST/CANCEL Key
Press this key to change the scanning density.
Press this key while in the setting the operation
mode to cancel the data currently displayed.
© ^ ABBR Key
Press this key first to perform abbreviated
dialing.
Press this key while in the mode for character
entry to scroll down the character group.
------
24
i
-------
P6,__,
1
___
Operation Panel
©Numeric Keypad
Twelve-key set used to dial or store a facsimile
number. Also, press these keys after pressing
the FUNCTION key to specify the operation
mode.
©START Key
Press this key to begin communication.
©One-touch Program Keys (P1-P6)
Used for programming one-touch dialing or
1
1
1
communication mode.
©One-touch Keys (01-24)
Press this key to start one-touch dialing.
©STOP Key
Press this key to manually terminate
transmission, reception, copying and mode
setting operations.
©COPY Key
Press this key to begin copying the document
placed on the ADR
Press this key to print out various llsts/reports
manually.
©AUTO RECEIVE Lamp
Lights when the FAX-2000P is in the automatic
reception mode (Fax Ready, Tel/Fax Ready or
Ans/Fax Ready).
©CONFIRM REPORT Lamp
Indicates that the transmission (or reception)
confirmation report is to be printed out.
©ON HOOK Lamp
Lights when dialing a facsimile/telephone
number after pressing the DIAL key.
©HOLD Lamp
Indicates that a telephone call is being placed
on hold.
©ERROR Lamp
Indicates occurrence of an error.
©LCD Display
Indicates the operating status.
31
Page 44

Setting the Clock
The built-in clock of your Brother FAX displays the date and time on the
operation panel LCD when the machine is in standby. The clock is also
used by the maohine to perform operations such as delayed
transmission at a preset time.
In the standby mode, press FUNCTION, 0,9 and ENTER.
Press 1,6 and ENTER.
2
Current date and time are displayed. Move the cursor to the numerai you want to change by using cursor keys and ^), then enter the numeral through the keypad.
Press ENTER each time you change the year, month, date,
hour and minutes. If you enter a wrong number, press
ENTER once, then return the cursor by the key.
Re-enter the correct number.
9. User Settings
01-12 Enter/Select
1. Set Phone Type
01-25 Enter/Seiect
16.Set Date and Time
01-25 Enter/Select
Enter Year
’91 03/01 10:10
32
Press ENTER several times to return to standby mode.
The number of times ENTER is pressed varies with the
position of the cursor.
Page 45

Storing Your Brother FAX ID
Enter a name with up to 22 characters (for example, your company
name) and a number with up to 20 digits (for example, your facsimile
number) to identify your Brother FAX. The FAX ID will be printed in the
header of your documents when they are received by the remote
facsimile.
In standby mode, press FUNCTION, 0,9 and ENTER.
1
]
Press 2,1 and ENTER.
2
a. When a numeric ID has not been registered and you
wish to program a new numeric ID, press ENTER
and go to step 4.
If you do not wish to program a numeric ID, press
SELECT and go to step 5.
9. User Settings
01-12 Enter/Select
1. Set Phone Type
01-25 Enter/Select
21.Enter FAX ID
01-25 Enter/Select
(When numeric ID not registered)
Tel :
Enter/Select
b. When a numeric ID has been registered and you wish
to change the numeric ID, press CLEAR and go to
step 4. If you do not wish to change the ID, press
ENTER and go to step 5.
(When numeric ID registered)
111-2222
Tel :
Select/Cancel
33
Page 46

Storing Your Brother FAX ID
Enter numerals through the keypad.
Si
Press ENTER last.
(Usable Keys)
Keypad (0~9)............Numeric entry
Dash (-) key
CANCEL key
a. When a character ID has not been registered and
you wish to program a new character ID, press
ENTER and go to step 6. If you do not wish to
program a character ID, press SELECT.
b. When a character ID has been registered and you
wish to change the character ID, press CANCEL
and go to step 6. If you do not wish to change the
ID, press SELECT.
.............
...........
Dash or plus (+) entry.
Press once
Press twice "+" can be
specified at only the first column.
Deletes one character
Tel :
203-123-4567
(When character ID not registered)
Name:
Enter/Select
(When character ID registered)
Name: BROTHER
Select/Cancel
34
Page 47

Storing Your Broifier FAX IP
Use up {^), down {^) and cursor (<^ and keys to
d)
locate the character you wish to enter, then press ENTER.
The 2-digit number in the upper-right corner shows the
number of characters already entered.
The following character groups are scrolled by pressing the
up-down ('if', keys.
A B
K L
V w X Y Z
U
b c d e f
a
k i
V w X
u
0 1
"
!
u e
c
t T i
u
u
f 6
D E F
C
N
M
m
n O
2 3
<
#
$
a a a
A
d
Y
h N 0 0
u
G
P
0
Q
q
P q
z
Y
+
4 5 6
?
>
@
% &
A E ae
G
0
H 1 J
R
+
1
h I
r s t
1
7 8
[ 1 { 1
1
(
a
Q
/E 6 6
¥
e
¿
S
-
-
)
e
Pt
8
To correct an entered character, press CANCEL. The last
entered character is deleted.
T
i
9
*
e e
f
i
ABCDEFGHIJ
00
/
/
-
6
a
(&) !n the table of character groups, the blank cells are
spaces that can be entered.
Press FUNCTION to finish setting.
35
Page 48

Setting the Dialing Signal (Pulse/Tone)
This setting allows you to select the dialing signal in accordance with the
type of line you subscribe to.
In standby mode, press FUNCTION, 0,9 and ENTER.
Press ENTER.
a. Press ENTER for connecting to a rotary pulse line.
b. Press SELECT, then press ENTER for connecting
to a PB tone line.
How to verify the correct setting.
• Pick up the handset. You will hear a dial tone
through the earpiece.
• Press any number on the keypad.
• Then dial tone should stop.
9. User Settings
01-12 Enter/Select
1. Set Phone Type
01-25 Enter/Select
Rotary Line
Enter/Select
Tone Line
Enter/Select
36
Page 49

Setting the Reception Mode
Your Brother FAX has four kinds of reception modes as shown below. The mode
can be changed by pressing the AUTO/MAN RECEIVE key in standby status.
Tel Ready (Manual Reception)
In this mode, the Brother FAX can accept an incoming telephone call. Ringing
will continue until the handset is picked up or the caller disconnects the line.
If the call is from a telephone, begin speaking after picking up the handset. If the
call is from a facsimile, press START to begin reception.
Set your Brother FAX to this mode if the telephone line is shared by a telephone
and a facsimile, but is normally used more often as a telephone.
Fax Ready
In this mode, the Brother FAX will accept an incoming call from a facsimile or
a telephone.
A tone will ring the number of times which you set for “# of Rings.” You can
pick up the handset before line capture. If you do not pick up the handset,
facsimile transmission will begin after line capture, but an unanswered phone
call will disconnect. If you pick up the handset, a fax call will require that you
press START to begin transmission, or, you may begin speaking if the call is
from a telephone. Set your Brother FAX to this mode if you have a facsimile
dedicated line.
Tel/Fax Ready
In this mode, the Brother FAX will determine whether a call is from a facsimile
or a telephone. If the caller Is a facsimile, the Brother FAX starts receiving a
message after automatic line capture. In the meantime, if the caller Is a
telephone, your Brother FAX sends out the following voice message to the caller
and generates simulated ring tones. "Flello. If you wish to send a fax, transmit
now. If not, check the number and dial again. Thank you.”
You can pick up the handset while the voice message is being output (10 sec.)
Ans./Fax Ready
Set your Brother FAX to this mode when an answering apparatus is connected
as an external telephone. Refer to “Using the Brother FAX telephone” in PART 1.
37
Page 50

^•wiHiy rie«|uenny usea rax Numbers
Under Abbre^ted Dials
FAX-2000P has 60 abbreviated dials (01-60) which can store the foiiowing itenns;
• Facsimile Number
• Party's Name
• Group Mumber(s) used for Broadcasting and Sequential Polling
How to Store
In standby mode, press FUNCTION, 0,5 and ENTER.
D
Press ENTER.
3
Enter an abbreviated number from the keypad, and press
ENTER.
(Fyample) 0, 1, ENTER
5.ABBR Dial Settings
01-lZ Enter/Select
l.Set ABBR Dial
1-3 Enter/Select
ABBR Dial 01 to 60
Select and Press
(01)
(When not stored)
(01)=Not Stored
Enter/Select
(When stored)
(01)=2031234567
Select/Cancel
38
Page 51

Storing Frequently Used Fax Numbers Under Abbreviated Dials
a. When a number has not yet been stored, press ENTER
4
to store a new number.
If you press SELECT at this time, the control panel returns
to the display in step 2.
b. When a number has already been stored, press
CANCEL to change the number.
If you press SELECT at this time, the control panel
displays the party name entry mode (step 6).
Enter a facsimile number from the keypad, and press ENTER. Up to 40 digits can be stored including dashes {-), pauses, etc.
<Useable Keys>
Keypad (0-9) ;
Dash {-) Key
Numeric entry
Dash mark entry or dial tone
detection.
Press once
Press twice
..............
.............
entry. Ignored
when dialing.
entry to check
dial tone.
(Ol)Tel. Number
(01 )Te1. Number
(01)=Tel. Number
203-111-2222
(When no name stored)
(01)=Name
Enter/Select
(When name stored)
C01)=BR0THER
Select/Cancel
PAUSE Key :
TONE Key :
CANCEL Key :
Pause (5 sec) entry. is displayed
in LCD.
Switching from pulse signal to tone
is displayed in LCD.
Deletes the last digit in LCD.
39
Page 52

Storing Frequently Used Fax Numbers Under Abbreviated Dials
a. When a name has not yet been stored, press ENTER to
store a new name.
If you press SELECT at this time, the control panel
displays the group number entry mode (step 8).
b. When a name has already been stored, press CANCEL
to change the name.
If you press SELECT at this time, the control panel
displays the group number entry mode (step 8).
Enter a name using the same procedure as for FAX
character ID entry. To complete name entry, press
V
FUNCTION. The control panel displays the group
number entry.
Up to 12 characters can be stored.
ABCDEFGHIJ.
ABCDEFGHIJ. 00
ABCDEFGHIJ.
BROTHER USA
(When no group stored)
(01)==Group Number
Ertter/Select
00
09
a. When a group number has not yet been stored, press
^ ^ ENTER to store a new group number.
If you press SELECT al this time, the control panel
displays the entering another abbreviated number
(step 10).
40
(When group stored)
(01)=1,3
Select/Cancel
(01)=Group Number
Page 53

Storing Frequently Used Fax Numbers Under Abbreviated Dials
b. When a group number has already been stored, press
CANCEL to change the group number.
If you press SELECT at this time, the control panel will
display the mode for entering another abbreviated
number (step 10).
Enter group number(s) (1-5). If you wish to specify
d
mutiple group numbers, press FUNCTION after entering
each number. Finally, press ENTER.
1
V^y control panel will display the mode for entering
^ another abbreviated number. If you wish to program
another abbreviated dial, perform steps 3 to 9.
To finish the programming, press STOP.
(01)=Group Number
(01)=Group Number
1.5
41
Page 54

Storing Frequently Used Fax Numbers Under Abbreviated Dials
How to Clear All Abbreviated Dials
In standby mode, press FUNCTION, 0,5 and ENTER.
Press SELECT and CANCEL. 2.Erase ABBR Dial
2
Press CANCEL again to clear all abbreviated dials.
If you press SELECT at this time, the control panel returns to
the standby mode display without clearing abbreviated dials.
5.ABBR Dial Settings
Dl -i z
bnter/select
l.Set ABBR Dial
1-3 Enter/Select
1-3 Select/Cancel
Erase ABBR Dial
Sure? Select/Cancel
42
Page 55

Storing Frequently Used Fax Numbers Under Abbreviated! Dials
How to Print Abbreviated Dial List
^ In standby mode, press FUNCTION, 0,5 and ENTER.
Press SELECT twice, then press COPY.
BROTHER FAX
Telephone Directory
No,
Name
TEL:203-123-4567
Telephone Number
5.ABBR Dial Settings
01-12 Enter/Select
l.Set ABBR Dial
1-3 Enter/Select
3.Print ABBR Dial
1-3 Copy/Select
Mar 01.91 10:10
Group Number
(01)
(02)
(03)
BIC-USA ■
BIC-SF
BIC-LA 213-444-5555
203-111-2222 1.3
211-111-2222
1
43
Page 56

^■wniig rrequenny used Fox Numbers
Under One-touch Dials
FAX-2000P has 24 one-touch dials (01-24) which can store the following items:
• Facsimile Number
• Party's Name
• Group Number(s) used for Broadcasting and Sequential Polling
How to store
In standby mode, press FUNCTION, 0,4 and ENTER.
u
Press ENTER.
Press a one-touch key (01-24).
(example) One-touch key 01
a. When a number has not yet been stored, press ENTER
to store a new number.
4.One-touch Settings
01 12 Enter/Select
1.Enter One-touch
1-3 Enter/Select
One-touch 01 to 24
Select and Press
When not stored)
[01]=Not Stored
EnLer/Select
When stored)
[011=2031234567
Select/Cancel
[01]=Tel. Number
44
If you press SELECT at this time, the control panel returns
to the display in step 2.
Page 57

Storing Frequenriy Used Fax Numbers Under One-touch Dials
b. When a number has already been stored, press
CANCEL to change the number.
If you press SELECT at this time, the control panel
displays the party name entry mode (step 6)_
Enter a facsimile number through the keypad, and press
ENTER. Up to 40 digits can be stored inciuding dashes
(-), pauses, etc.
<Usable Keys>
Keypad (0-9)
Dash {-) Key
PAUSE Key
Numeric entry
Dash mark entry or dial tone
detection.
Press once
Press twice
Pause (5 sec) entry. is displayed
in LCD.
..............
..............
entry. Ignored
when dialing.
“!” entry to check
dial tone.
[01]==Tel . Number
[01]=Tel. Number
203-111-2222
(When no name stored)
[Dl]=Name
Enter/Select
{When name stored)
[01]=BR0THER
Select/Cancel
TONE Key
CANCEL Key
a. When a name has not yet been stored, press ENTER to
store a new name.
if you press SELECT here, control goes to the display of
group number entry (step 8).
b. When a name has aiready been stored, press CANCEL
to change the name.
If you press SELECT here, control goes to the display of
group number entry (step 8).
Switching from pulse signal to tone,
is displayed in LCD.
Deletes the last digit in LCD.
ABCOEFGHIJ
ABCOEFGHIJ
00
00
45
Page 58

Storing Frequently Used Fax Numbers Under One-fouch Dials
Enter a name using same procedure as for FAX character
ID entry. To complete name entry, press FUNCTION. The
5/
control panel displays the group number entry.
Up to 12 characters can be stored.
a. When a group number has not yet been stored, press
ENTER to store a new group number.
If you press SELECT at this time, the control panel
displays the mode for entering another abbreviated
number (step 10).
b. When a group number has been stored, press CANCEL
to change the group number.
ABCDEFGHIJ.
BROTHER USA
(When no group stored)
[01]=Group Number
Enter/Select
(When group stored)
[01]==!,3
Select/Cancel
[01]=Group Number
[01]=Group Number
09
46
If you press SELECT at this time, the control panel
displays the mode for entering another abbreviated
number (step 10).
Enter group number(s) (1-5). If you wish to specify
multiple group numbers, press FUNCTION after entering
9
a number. Finally, press ENTER.
[01]=Group Number
1,5
Page 59

Storing Frequently Used Fax Numbers Under One-touch Plak
T1 ffil control panel will display the mode for entering
LI VJy another one-touch key. If you wish to program another
one-touch key, perform steps 3 to 9.
To finish the programming, press STOP.
How to Clear All One-touch Dials (01-24)
^ In standby mode, press FUNCTION, 0, 4 and ENTER.
Press SELECT and CANCEL.
2
Press CANCEL again to clear all one-touch dials.
If you press SELECT at this time, the control panel returns to
the standby mode display without clearing one-touch dials.
4.One-touch Settings
01-12 Enter/Select
1.Enter One-touch
1-3 Ehter/Select
2.Erase One-touch
1-3 Select/Cancel
Erase One-touch
Sure? Select/Cancel
47
Page 60

Storing Frequently Used Fax Numbers Under One-touch Dials
How to Print One-touch Dial List
^ In standby mode, press FUNCTION, 0, 4 and ENTER.
Press SELECT twice, then press COPY.
BROTHER FAX
One Touch Directory
No.
Nam e
TEL:203-123-4567
Tel epho ne Numb er
4.One-touch Settings
01-12 Enter/Select
1.Enter One-touch
1-3 Enter/Select
3.Print One-touch
1-3 Copy/Select
Mar 01.91 10:10
Gro up N umb er
48
[01 ]
[02 ]
[03]
BIC-USA
BIC-SF
BIC-LA
203 -111 -22 22
211 -111 -22 22
213-444-5555
1,3
1
Page 61

storing Frequently Used Communication
Modes Under One-touch Program Keys
FAX-2000P has 6 one-touch program keys {P1-P6) which can be used
as one-touch dial and/or program keys for communication mode.
If used as one-touch dial, these keys can store the following items which
are the same as those for one-touch keys 01 to 24:
• Facsimile Number
• Party's Name
• Group Number(s) used for Broadcasting and Sequential Polling
If used as program keys for communication mode, the following modes
can be stored:
• Transmission (or Delayed Transmission)
• Broadcasting (or Delayed Broadcasting)
• Mailbox Transmission (Confidential Communication)
• Polling (or Delayed Polling)
• Sequential Polling (or Delayed Sequential Polling)
[<S>] Both of one-touch dialing and communication mode can be stored
in a single one-touch program key. in this case, the key operates
for one-touch dialing when the key is pressed for specifying a
destination in a setting display of delayed transmission,
broadcasting, confidential (mailbox) transmission, polling or
sequential polling.
How to Set for One-touch Dials
In standby mode, press FUNCTION, 1, 0 and ENTER.
11
After this, perform the same procedures as for one-touch
dials (01-24) given on the previous pages.
2
10.Program One-touch
01-12 Enter/Select
1. Enter One-touch
1 -5 Enter/Select
49
Page 62

Storing Frequenify Used Communication Modes Under One-touch Program Keys
How to Clear All One-touch Program Keys Used as One-touch Dials
In standby mode, press FUNCTION, 1,0 and ENTER.
Press SELECT twice, then press CANCEL.
2
Press CANCEL again to clear all one-touch program keys
used as one-touch dials.
If you press SELECT at this time, the control panel returns to
the standby mode display without clearing one-touch
program keys.
10.Program One-touch
01- 12 C n te r/ Se T e ct
1.Enter One-touch
1-5 Enter/Select
3.Erase One-touch
1-5 Se1ect/Cancel
Erase One-touch
Sure? Select/Cancel
50
Page 63

Storing Frequently Used Communication Modes Under One^uch Program Keys
How to Set a Communication Mode
In standby mode, press FUNCTION, 1, 0 and ENTER.
Press SELECT.
Press ENTER.
Press a one-touch program key (P1~>P6).
(Example) Program Key P1
10.Program One-touch
01-12 Enter/Sel ect
1.Enter One-touch
1-5 Enter/Select
2. Program One-touch
1-5 Enter/Sel ect
Program Key PI to P6
Select and Press
(Wh en n o t pr og ra mm e d)
[Pl]=Not Stored
Enter/Select
(Wh en p r og ra mm ed )
[Pl]=Delayed XMIT
Enter/Select
a. If the key has not yet been programmed, press ENTER
for the newly programmed communication mode.
If you press SELECT at this time, the control panel returns
to the display of step 3.
b. If the key has already been programmed, press
CANCEL to change the communication mode.
If you press SELECT at this time, the control panel returns
to the display in step 3.
1.Delay Transmission
1-5 Enter/Select
1.Delay Transmission
1-5 Enter/Select
51
Page 64

Storing Frequently Used Communication Modes Under One-iouch Program Keys
The following communication modes can be
^' programmed:
1 Immediate or delayed transmission with or without
Gtorage in memory.
2 Immediate or delayed broadcasting with storage in
memory.
3 Immediate or delayed confidential transmission with
or without storage in memory.
4 Immediate or delayed polling.
5 Immediate or delayed sequential polling.
Press SELECT as required to call up the desired mode and press ENTER.
52
Follow the procedure given later in this manual for each
mode.
Refer TO The appropriate section in PART2: Advanced
Functions and Features for operating procedures.
When programming is finished, the control panel returns to the standby mode display.
ft is not necessary to place a dummy document on
the ADF tray for programming.
Page 65

Storing Frequently^ Used Communication Modes Under One'iouch Program Keys
How to Clear Ail One-touch Program Keys for Communication Mode
In standby mode, press FUNCTION, 1,0 and ENTER.
D
Press SELECT three times, then press CANCEL.
2
10.Program One-touch
01-12 Enter/Select
1.Enter One-touch
1-5 Enter/Select
4.E ra se P r On e -t ou ch
1-5 S el e ct /C an ce l
Erase Pr One-touch
Sure? Sel ect/(Jancel
Press CANCEL again to clear all one-touch program keys user for communication mode.
If you press SELECT at this time, the controi panei returns to
the standby mode dispiay without clearing one-touch
program keys.
I^F) This procedure does not erase one-touch keys that
are used as regular one-touch dials.
53
Page 66

Storing Frequently Used Communication Atedes Under One-touch Program Keys
How to Print One-touch Program List
^ In standby mode, press FUNCTION, 1,0 and ENTER.
Press SELECT four times, then press COPY.
BROTHER FAX TEL:203-123-4567
Program One Touch Directory
No.
[P2 ]
Pro gr am Mo de L i st
Name
BIC -U K
No.
Remote Station
lelephone Number
405 2 02 0
Start
10.Program One-touch
01-12 Enter/Select
1,Enter One-touch
1-5 Enter/Select
5,Print Pr One-touch
1 5 C op y /S el cc t
Mar 01.91 10:10
Gro up N u mb er
1
Note
[PI]
CP3]
[P5] (08)
54
(01)
[01]
[02]
[05]
(06)
G1
in Start column shows Immediate communication.
-: -
20:00
-: -
Transmi SSI on
Delayed Broadcast
Transmit Mailbox
Mai 1 box # 5
Page 67

Basic Operations
Read this section for instructions on how to send and receive
documents using your Brother FAX. This section also provides
information on the communication journal which lists all the
transmisslon/reception activities performed by the machine.
Page 68

Sending Documents
Types of documents Number of sheets and sheet dimensions
you can send Load up to 30 sheets (161b to 201b (45kg to 70kg)) at one time. If your document
sizes vary, copy them all to a specified copy size and send the copy.
Standard document size
Approx. 10" X 14.3"
(257mm x 364mm)
T
10"
(^) Maximum width uf ducuments to be fed is 11 in. (280mm). You can send
documents up to 35.4 in. (900mm) long with manual support.
Document precautions
The following documents should not be transmitted; instead, copy them first and
send the copy.
• Torn, wrinkled, or curled documents
• Coated documents
• Documents with carbon paper attached
• Thin paper such as onion skin paper
• Film copies of documents
Minumum document size
Approx. 4.8" X 3.9"
(120mm X 100mm)
FT
4.8"
56
Effective scanning width
B4 (10") original 9.9" ± 2% (G3, copy), 9.5" ± 2% (G2)
Letter/A4 original 8.2" ± 2% (G3, copy), 8.0" ± 2% (G2)
Automatic document reduction
Depending on the size of the receiving machine's recording paper, your Brother
FAX can automatically reduce the size of the documents you send.
Page 69

Sending Documents
Placing documents Place document face down on the ADF tray and adjust the document guides
on the ADF tray to the document width. When you send multiple-sheet document, form the
document into featheredged shape.
The control panel LCD will display the message.
Fax
Ready
A4 Norm
The above message indicates that the facsimile is ready to send or copy a
document.
As long as some pages remain on the ADF tray, pages can be. added to
the stack even while documents are being sent or copied. However, the
total number of pages on the tray must not exceed 30.
Norm
Dialing
You can use the following methods to dial a remote facsimile number from your
machine.
• One-touch dialing
• Abbreviated (2-digit) dialing
• Full number (keypad) dialing
One-touch dialing
With this method, press only one key to activate dialing of a facsimile number
assigned to that key. The number of the remote facsimile must be preset
beforehand.
Abbreviated dialing
With this method, press ABBR plus two numeric keys and START to dial a
facsimile number assigned to these keys. The number of the remote facsimile
must be preset beforehand.
Full number (keypad) dialing
With this method, dial the full number of the remote facsimile using the number
.keypad.
Group dialing
Group number(s) can be used to specify parties, abbreviated dials and
one-touch dials for broadcasting or sequential polling. All abbreviated dials
and/or one-touch dials having the specified group number will be used for
dialing. This is calied group dialing.
57
Page 70

Sending Documents
Resolution and
contrast
When sending documents, select the appropriate resolution and contrast so
that the remote facsimile can receive and print the documents in good quality.
Resolution mode
The Brother FAX provides the following resolution modes,
• NORMAL mode
• FINE mode
• GRAY mode
• G2 mode
NORMAL mode
Select this mode to send regular printed documents.
FINE mode
Select this mode to send documents containing fine print
GRAY mode
Select this mode to send documents with tones, such as a photographs.
G2 mode
Use this mode when the receiving machine is a G2 machine.
Contrast
The Brother FAX provides the following contrast modes.
58
• NORMAL mode
• DARK mode
• LIGHT mode
NORMAL mode
Select this mode to send documents printed using normal density.
DARK mode
Select this mode to send documents printed on colored paper,
LIGHT mode
Select this mode to send documents printed using lighter density (for example,
a document written in pencil).
Page 71

Sending Documents
Header
The transmitted documents display information at the top of each page.
This information is referred to as the Header.
0 FAX character ID of the sending facsimile.
CD FAX numeric ID of the sending facsimile.
CD Date and time
0 Communication number.
0 The numerator indicates number of each page. The denominator
indicates the total number of pages sent when transmitted from
memory or when specified.
59
Page 72

Sending Documenfs
Sending Documents
^ Place the documents face down on the ADF tray.
Press the RESOLUTION key as required to change the
resolution. If you wish to send the documents in the
2
resolution currently displayed, skip to step 3.
Each time you press the RESOLUTION key, the display
cycles in the following order:
Norm O Fine O Gray O G2
Press the CONTRAST key as required to change the
contrast. If you wish to send the documents in the
contrast currently displayed, skip to step 4.
Each time you press the CONTRAST key, the display cycles
In the following order;
Norm o Dark Light
Fax
Ready
A4 Norm Norm
60
a. To dial the destination using one-touch dialing
4
Press the one-touch key storing the facsimile number
of the other party.
(Example) One-touch 01
Fax Ready
[01]
BROTHER USA
A4 Norm
Norm
Page 73

Sending Documents
b. To dial the destination using abbreviated dialing
Press ABBR, and enter a 2-digit number.
Then press START.
(Example) ABBR 01
c. To dial the destination using keypad dialing
Enter the facsimile number of the other party through
the keypad. Then, press START.
Transmission starts when your machine receives a
facsimile response from the other party.
When transmission starts, you can switch the printing
function of the communication confirmation report
(transmit or receive confirmation report). Press CONFIRM
as necessary. In addition, you can change the resolution
for upcoming pages by pressing RESOLUTION.
Fax Ready
(01)=BR0THER USA
BROTHER USA
A4 Norm
Fax Ready
2112223333
2122223333
A4 Norm
T ransmit
A4 Norm
+1 212 222
333k
A4 Norm
L
___
1
Resolution
of next
page
Norm
Norm
Norm
Norm
Resolution
of current
page
If the CONFIRM lamp is turned on, the communication
confirmation report will be printed out after completing the
transmission.
Transmit Confirmation Report
No.
Recei ver
T ransmi tter
Date
T i me
Resol .
Pages
Result
010
BROTHER USA
BROTHER FA
Mar 01,91 10:10
00'28
Norm
01
OK
Receive Confirmation Report
No.
Recei ver
T ransmitter
Date
Time
Resol.
Pages
Result
000
BROTHER USA
BROTHER FA
Mar 01,91 10:10
00’28
Norm
01
OK
61
Page 74

Sending Documents
Setting the Communication Confirmation Report
The communication confirmation report is printed automatically after
transmission is oompletad and consists of two types of reports; Transmit
confirmation report and receive confirmation report.
The transmit confirmation report shows the communication result based
on the data included in the transmitting side (i.e. your machine).
The receive confirmation report is sent back from the receiving side after
the transmission of the fax message is completed.
Consequently, the reliability of the information on the receive
comrhunication result is higher than that of the transmission confirmation
report.
However, the receive confirmation report can be printed out only during
communication with another FAX-2000P.
Select a type of confirmation report and set the auto-output function
ON/OFF as shown below.
In standby mode, press FUNCTION, 0,9 and ENTER.
Press 0,8 and ENTER.
2
Select RCR (receive confirmation report) or TCR
(transmit confirmation report) by using the SELECT key,
then press ENTER.
9.User Settings
01-12 Enter/Select
l.Set Phone Type
Gl-25 Enter/Select
8.Set Comm, Report
01 - 25 Enter/Select
RCR
Enter/Select
Automatic Print;On
Enter/Select
62
Page 75

Sending Documents
To turn off the auto-print function, select Off, and press ENTER.
4
Even if the RCR is selected, TCR will be printed out if
the other party is not a FAX-2000R
Redialing If a line is busy or if there is no answer, the Brother FAX will automatically redial
the number twice, with a three-minute pause dialing. The following two
messages appears alternately.
Fax Ready
Mar 01,91 10:10
Automatic redialing takes place when dialing a facsimile number, but not when
dialing a telephone number.
Automatic redialing is cancelled when you remove the documents placed on the
ADF.
Manual Redial
To manually redial the last number dialed, press REDIAL and START. Note that
you cannot perform this function while your Brother FAX is in an auto-redial
pause.
i^l Chain dialing
Chain dialing is an advanced technique for dialing. With this method, you
can combine abbreviated dialing with additional abbreviated dialing or with
keypad dialing or one-touch dialing.
For example, assume that the ABC company has different facsimiles for
different departments and they are identified by the last three digits as
shown below:
General affair 203-111-2222-001
Engineering 203-111-2222-002
In this case, store the number, except for the last three digits, under an
abbreviated dial, and specify the last three (3) digits by another
abbreviated dial or by the keypad.
Mar
01,91
Mar
01,91 10:10
10:13
Note that a one-touch key must be pressed last when you use one-touch
dialing for chain dialing.
Chain dialing cannot be used for broadcasting and sequential polling.
63
Page 76

Receiving Documents
As previously described in the section of "Preparing Your Facsimile”, the FAX-2000P has the following four
reception modes:
• Fax Ready
• Tel/Fax Ready
• Ans/Fax Ready
• Tel Ready
In modes other than "Tel Ready", the AUTO RECEIVE indicator lights and messages from facsimiles can be
received automatically. This reception mode is called the automatic reception mode. On the contrary, in the
Tel Ready mode, an incoming call is not accepted by your machine even if the call is from a facsimile.
Therefore, it is necessary to pick up the handset and to press START in order to receive a message. This
reception mode is called the manual reception mode.
Automatic Reception When your machine receives a call from the transmitting side, a ring tone
Mode sounds the number of times previously set. (Initial value is twice).
The LCD then display the following message sequence:
Fax Ready
Mar 1,91
Called
2031112222
Recei ve
A FAX numeric ID is indicated in the upper row, and the resolution in the lower
right position of the LCD during reception.
The control panel returns to the standby mode when all received pages are
printed.
10:10
Norm
(Ringing)
(Cal! arrived)
(During reception)
64
Page 77

Receiving Documents
Manual Reception Mode
When a call reaches your Brother FAX. the fax will keep on ringing. Lift the
handset, confirm that the calling side is a facsimile (you will hear a pip sound
repeated), then press START,
Your machine will start receiving.
The handset can b© replaced on the cradle.
Tel. Ready
Mar 1,91
Telephone
2031112222
Recei ve Norm
During reception, a FAX numeric ID is indicated in the upper row. and the
resolution is indicated in the lower right position of the LCD.
The control panel returns to the standby mode when all received pages are
printed.
10:10
(Ringing)
(Handset lifted)
(During reception)
Out-of-paper
Reception
Incoming messages are automatically stored in memory when the recording
paper or toner runs out. This operation is called out-of-paper reception.
During the out-of-paper reception operation, “Memory” is shown in the lower
row of the LCD.
2031112222
Receive Memory Norm
The stored message will be printed out automatically when the paper is
reloaded or when toner is replenished.
Up to 5 communications can be stored in memory during the out-of
paper reception.
65
Page 78

Receiving Documents
Manual Reception
by External
Telephone
While in the manual reception mode (Tel. Ready), instruct your Brother FAX to
start receiving after you pick up the handset of an external telephone. This is
called remote reception.
To activate remote reception, press "6" button on the telephone t\A/ice within
one second. Note that if the telephone line is a DP signal line, special settings
must be applied to your FAX. Ask your Brother Service Representative for the
setting instructions.
66
Page 79

Communication Journal
The FAX-2000P can store the last 25 communication records (transmission
plus reception). The communication journal, listing these records, can be
printed out manually at anytime. In addition, the journal is automatically
printed out after every 25 communications once the auto-printing mode is
activated.
How to Set Auto-print Mode
^ In standby mode, press FUNCTION, 0,9 and ENTER.
Press 1,4 and ENTER.
a
Select ON using the SELECT key and press ENTER to activate the mode.
How to Print out Manually
9.User Settings
01- 12 E n te r/ Se le c t
l.Set Phone Type
01-25 Enter/Select
14.Journal On/Off
01-25 Enter/Select
Automatic PrintrOff
Enter/Select
^ In standby mode, press FUNCTION, 0,7 and ENTER.
Press COPY.
/.Print Journal
01-12 Copy/select
67
Page 80

Communication Journal
Communication Journal
Transmit and receive journals are printed out separately,
BROTHER FAX
TEL:2031234567
wh11e Feb 28 ~ Mar 01
Transmit Journal
Ho. Remote Station Resol . Start ■ Time Pages
001 2031112222
002
+81 111 2222
BROTHER FAX
Norm
28, 10:15
Norm 28, 11:13
TEL:2031234567
00'27
01
or 02 02
while Feb 28 ~ Mar 01
Receive Journal
No.
006
001
Rem ot e S ta ti on
BRO TH ER TO KY O
+1 203 123 4444
Res ol .
Norm
Sta r t
28, 15:15
Norm 01, 08:15
T1 me Page s
0046
or 25
02
03
Mar 01,91 10:10
Result
Note
OK TX
OK
TX
Mar 01.91 10:10
Res ul t
OK
OK
Not e
No.
Remote Station
Resol.
Start
Time
Pages
Result
Note
68
: Communication number starting from 001 every day.
: Fax ID of the other party, name or number stored under one-touch dial or abbreviated
dial, dialed number by keypad, etc.
Resolution
Start time
Communication duration
Suocessfully communicated sheets
Communication result Asterisk shows ECM.
Communication type
Page 81

Other CIsefal
Basic Functions
Read this section to learn how to use the Brother FAX
teiephone for ordinary caiis and to make copies of documents.
Page 82

Using the Brother FAX Telephone
Making a Call
Lift the handset or press DIAL.
The ON HOOK light will turn on if DIAL is pressed.
Dial the telephone number using keypad dialing, one-
touch dialing or abbreviated dialing.
2
When you dial the number after pressing DIAL, lift the
handset if the other party’s voice is heard from the built-in
speaker. If the other party does not answer, press DIAL
again to disconnect the line.
Answering a Call
Lift the handset if your Brother FAX continues ringing. Return the handset
to the cradle after completing a conversation.
Placing a Call on Hold
To place a call on hold after being connected to the other party, press
HOLD. The HOLD light will turn on. To re-connect the line, press HOLD
again.
Telephone
Hold-melody On/Off
Hold-melody can be enabled or disabled in the setting menu.
FUNCTION, 0, 9, ENTER, 0, 4, ENTER.
Pulse/Tone Switching
You can output tone signals after being connected to the other party
even if your Brother FAX is on a pulse signal line. Press TONE after
dialing. LCD shows to indicate that the signal type has been
switched from pulse to tone.
External Telephone Connection
If you wish to use an external telephone, connect the telephone to
PHONE 2 Jack and set the connection mode. Refer to “Telephone
Answering System Connection” for the setting procedure.
70
Page 83

Telephone Answering System Connection
The FAX-2000P can be connected to a telephone answering system
which operates in Ans./Fax Ready mode. To use the answering system,
the following settings are required.
• Ano/Fax Ready mode
Use the AUTO/MANU RECEIVE key to set the mode.
• Answering System Connection
Normally, an external telephone is to be connected to PHONE 2 jack.
Use the setting menu to set the machine for connecting the answering
system to PHONE 2.
• Silence Detection Time
In the Ans./Fax Ready mode, the answering system will capture an
incoming cal! if the fax signal (CNG) is not detected. However, the line
will be switched from the answering system to your FAX when silence
continues for a certain time interval. The time interval can be set
between 0 and 15 seconds.
• External Telephone Connection
Call up the setting menu to set the FAX machine for connection to an
external telephone.
71
Page 84

Telephone Answering System Connection
How to Set Answering Machine Connection
^ In standby mode, press FUNCTION, 0, 9 and ENTER.
Press 0,3 and ENTER.
Select PHONE 2 by pressing SELECT.
Then press ENTER.
How to Set External Telephone Connection
In standby mode, press FUNCTION, 0, 9 and ENTER.
1
9.User Settings
01-12 Enter/Select
l.Set Phone Type
01-25 Enter/Select
3.Select Tel/Fax/Ans
01-25 Enter/Select
Ans . De v .: P HO NE 1
Enter/Select
9.User Settings
01-12 Enter/Select
72
Press 0,2 and ENTER.
Select On, then press ENTER.
l.Set Phone Type
01 25 E n te r/ Se le c t
2.Set 2nd Telephone
01-25 Enter/Select
External Tel: Off
Enter/Select
Page 85

How to Set the Silence Detection Time
Telephone Answering System Connection
in standby mode, press 0,3 and ENTER.
1]
Enter the time in seconds (00 to 15 seconds), using
keypad, then press ENTER.
2
3 .Answer
01-12 Enter/Select
Silent Time Set
(0-15)
00
73
Page 86

Making Copies
The Brother FAX can be used as a plain paper copier and multiple
copying of each page is possible. Sorting on/off can be set for multiple
copying.
Place the documents to be copied face down on the ADF
tray.
1]
To make a single copy, just press COPY. No other action is
needed.
To make multiple copies, specify Fine resolution, if
necessary, enter the number of copies through the
a
keypad, then press COPY.
(Example) 4 copies
Press COPY to sort copying.
Otherwise, press SELECT, then press COPY.
All pages will be stored in memory.
Memory usage is shown in percent in the upper right
portion of the LCD.
Fax
Rea dy
A4
Fax Rea dy
4
Sorted Copy ON
01
A4 Norm
Nor m No rm
Copy/Select
Pages
(000%)
Norm
74
The specified number of copies will be printed out after the
memory storage of the documents has been completed
Page 87

fldvanccd Features
Part 2
and Functions
of the Brother FBX-ZOOOP
Page 88

Page 89

IKinsiiiission
Read this section for information on various transmission
features and for instructions on how to perform these
transmission features using your Brother FAX.
Section contents;
Sending documents at a preset time (Delayed Transmission)
Sending documents to multiple stations (Broadcasting)
Sending confidential documents (Confidential Transmission)
Transmission reservation and Interruption
Sending documents after talking on the FAX telephone
Page 90

Sending Documents at a Preset Time (Delayed Transmission)
This section explains how to send documents automatically at a
specified time (within one month from the current time) using the built-in
clock in your machine.
Place the documents face down on the ADF tray.
1
Select the suitable resolution and/or contrast if
necessary.
Press FUNCTION and press ENTER twice.
Press ENTER to store the documents in memory.
^ Otherwise, press SELECT.
To enabie the machine to check the number of originai
documents, enter the number through the keypad, then
press ENTER. Othenwise, press only ENTER.
Specify the destination using keypad diaiing, one-touch
diaiing or abbreviated dialing, then press ENTER.
1.Transmi ssi on
01-12 Enter/Select
1.Delay Transmission
1-3 Enter/Select
Memory Transmi ssi on
Enter/Select
Delay Transmission
Number of Pages
Delay Transmission
Enter Fax Number
Delay Transmission
(01)=BIC
78
Delay Transmission
Date : 01,10:10
Page 91

Sending Documents at a Preset Time (Delayed Transmission)
The LCD shows the current date and time. If you wish to
send the documents immediately, press ENTER. To send
u
the documents using the timer, specify date, hour and/or
minute.
Move the cursor to the position you wish to specify.
Enter the numbers using the keypad, then press ENTER.
If you press ENTER without a change, the setting will end.
If the timer has been set the date and time will flash in the
upper row of the LCD after the setting is completed.
8
How to Cancel a Delayed Transmission
Refer to the section on Confirmation and Cancellation of
Timer-reserved Operation.
Mar m ,9 1
01,91
Mar
Fax Ready
Mar 01,91
20:00
10:10
10:10
79
Page 92

Sending Documents to Multiple Stations (Broadcasting)
Broadcasting is a transmission method for sending the same documents
to more than one remote facsimile after storing the documents in
memory. Delayed broadcasting is also possible using the built-in clock.
Specify the destinations by one-touch dialing, abbreviated dialing and/or
group number.
Place the documents face down on the ADF tray.
n
Select a suitable resolution and/or contrast, if necessary.
2
Press FUNCTION, ENTER, 2 and ENTER.
if you want the machine to check the number of pages in
the documents, enter the number using the keypad, then
Hi
press ENTER. If not, press only ENTER.
Specify the destinations using one-touch dialing,
abbreviated dialing and/or group number. To specify the
group number, press the # key, then enter the numeral(s)
(1 to 5).
If you want to specify another destination, press
FUNCTION. Finally, press ENTER.
Up to 5 dials and/or groups can be specified here.
(Example) ABBR01, Group 1
1.Transmi ssi on
01-12 Enter/Select
2.Delayed Broadcast
1-3 Enter/Select
Delayed Broadcast
Number of Pages:
Delayed Broadcast
Enter Fax Number
Delayed Broadcast
(01),G1
Del ay ed
Dat e :
Bro ad ca s t
01, 10 :1 0
80
Page 93

Sending Documents to Multiple Starions (Broadcasting)
The LCD shows the current date and time. If you wish to
send the documents immediately, press ENTER. To send
d)
the documents using the timer, specify date, hour and/or
minute.
Move the cursor to the position you wish to specify, using
the cursor key. Enter the numerals using the keypad, then
press ENTER.
If you press ENTER without a change, transmission will start
immediately.
If the timer is set, the date and time will blink in the upper
row of the LCD after the setting is completed.
How to Cancel Delayed Broadcasting
Refer to the section on Confirmation and Cancellation of
Timer-re served Operation.
Mar 01,91
Mar 01,91
Fax Ready
Mar 01.91
20:00
10:10
10:10
81
Page 94

Sending Confidenrial Documents (Confidential Transmission)
If you specify a mailbox number destined to receive confidential
documents, the documents wiii be stored in the mailbox at the receiving
side and only the mailbox reception notice will be printed out. This
transmission is called confidential transmission. To perform confidential
transmission, the mailbox number and its key number {A digits) must be
previously registered at the receiving side. Up to 10 mailboxes can be
registered. Note that the time (days) to keep the received documents in
mailboxes is restricted (1 to 30 days).
Note that document received in mailbox will be stored there for a limited
amount of time (1 to 30 days). If they are not printed out within this time,
the documents will be automatically deleted.
Confidential transmission can be performed only between FAX-
200QFS.
How to Register a New Mailbox at the Receiving Side
|j In standby mode, press FUNCTION, 0,9 and ENTER.
Press 2,0, then press ENTER twice.
2
Enter a mailbox number (0-9), then press ENTER.
(Example) Mailbox 1
Press ENTER.
9.User Settings
01-12 Enter/Select
l.Set Phone Type
01-25 Enter/Select
20.Set
01-25 Enter/Select
l.Set Mailbox
1-3 Enter/Select
Set Mailbox
Mailbox Number:
Set Mai 1 box
Mailbox Number:!
Set Mailbox
Your Key #:
ABCDEFGHIJ.
Mai 1 box
0000
00
82
Page 95

Sending Confidential Documents (Confidential Transmission)
Enter a name (up to 8 characters) by the same procedure
as FAX character ID entry. To complete name entry, press
FUNCTION.
The name specified here will he printed on the mailbox
reception notice.
Press CANCEL.
Enter a 4-digit number, using the keypad, then press
ENTER.
V
The number, “0000” cannot be used as a key number,
(^E) Gnce a key number is programmed, it must be
remembered by the user, as there is no way to extract
it from memory.
How to Edit Name and Key Number of Existing Maiibox
Perform steps 1 and 2, shown above for the procedure, to
ti
caii up the mailbox setting menu.
^ABCDEFGHI.
ENG
Change Key Number?
Set ect/Cance
Change Key Number?
Your Key #: 0000
Set Mailbox
Mailbox Number:
03
Enter the number (0-9) of the maiibox you wish to edit,
2
then press ENTER.
(Example) Mailbox 1
Enter the key number previously registered, then press
ENTER.
(Example) Key number 1111
Set Mailbox
Mailbox Number:!
Set Mailbox
Your Key #;
Set Mailbox
Your Key #:
ENG
Seiect/Cancel
0000
III!
83
Page 96

Sending Confidenrial Pocoments (Confidenrial Transmission)
If you wish to change the name, press CANCEL.
Enter a new name (up to 8 characters), referring to the
FAX character ID entry procedures. Finally, press
FUNCTION.
If you do not change the name, press SELECT.
If you want to change the key, press CANCEL. Then, enter
a new key, and press ENTER.
If you do not change the key, press SELECT.
If you want to delete the mailbox, press CANCEL, enter
0000, then press ENTER.
How to Set Storage Time (Days) for Keeping Received Confidentiai Documents
In Standby mode, press FUNCTION, 0, 9 and ENTER.
il
ABCDEFGHIJ.
Change Key Number?
Select/Cancel
9.User Settings
01-12 Enter/Select
00
84
Press 2,0, then press ENTER.
Press SELECT twice, then press ENTER.
l.Set Phone Type
01-25 Enter/Select
20.Set
01-25
l.Set Mailbox
1-3 Enter/Select
3.Mail box-Keep Days
1-3 Enter/Select
Mail box-Keep Days
(1-31) 01
Mai 1 box
Enter/Select
Page 97

Sending Confidentiql Documents (Confidenriol Transmission)
Enter the number of days using the keypad, then press
ENTER.
How to Print the Maiibox List
^ In standby mode, press FUNCTION, 0, 9 and ENTER.
Press 2, 0, then press ENTER.
Press SELECT and COPY.
BROTHER FAX TEL:203-123-4567
MailBox
9.User Settings
01-12 Enter/Selcct
l.Set Phone Type
01'25 Enter/Select
20.Set Mai 1 box
01-25
1.Set Mai 1 box
1-3 Enter/Select
2.Print Mailbox List
1-3 Copy/Select
Enter/Select
Mar 01,91 10:10
Mailbox #
1
2
Name
ENG'NG
GENERAL
85
Page 98

Sending Confidenfial Documents (Confidenfial Transmission)
How to Send Confidential Documents
Place documents face down on the ADF tray.
u
Select the suitable resolution and/or contrast, if
necessary.
3
Press FUNCTION, ENTER, 3 and ENTER.
Press ENTER to store the documents in memory before
sending. Otherwise, press SELECT.
Enter a mailbox number (0-9), then press ENTER.
The mailbox specified here must have been previously
registered at the receiving side.
If you want the machine to check the number of pages in
the documents, enter the number through the keypad,
a>
then press ENTER. If not, press only ENTER.
1.Transmission
01-12 Enter/Select
1.Delay Transmission
1-3 Enter/Select
3.Trans. Mail box
1 - 3 Enter/Select
Memory Transmission
Enter/Select
Trans. Mailbox
Mailbox Number:
Trans. Mailbox
Number of Pages:
Trans. Mailbox
Enter Fax Number
86
Specify the destination using keypad dialing, one-touch
dialing or abbreviated dialing, then press ENTER.
Trans. Mailbox
(01)=KSK
Trans . Mai 1 box
Date : 01,10:10
Page 99

Sending Confidential Document's (Confidential Transmission)
The LCD shows the current date and time. If you want to
send the documents immediately, press ENTER. To send
3
the documents using the timer, specify date, hour and/or
minutes.
Move the cursor to the position you wish to specify using
the cursor key. Enter the numerals through the keypad, then
press ENTER.
If you press ENTER without a change, setting will end.
If the timer is set, the date and time will blink in the upper row of the LCD after the setting is compieted.
9
If you did not use the timer, document scanning starts.
How to Cancel a Delayed Confidential Transmission
Refer to the section on Confirmation and Cancellation of
Timer-reserved Operation
Mailbox Reception Notice
The mailbox reception notice is automatically printed out
when your machine receives a confidential document.
Mailbox Reception Notice
GENERAL received a Mailbox message on Mar 01,91
Please print out before Mar 02,91 14:23
This Message was received from BROTHER
Ma r 01,91 20:00
Mar 01,91 10:10
Fax Ready
Mar 01,91 10:10
14:23
87
Page 100

Sending Confidential Documents (Confidential Transmission)
How to Print out Received Confidential Documents
Print out the received documents within the time limitation
noted in the mailbox reception notice.
In the standby mode, press FUNCTION, 0,6 and COPY.
Enter your mailbox number (0-9) and press ENTER.
Enter your key number (4 digits) and press ENTER.
6.Print Mailbox
01-12 Copy/Select
Print Mailbox
Mailbox Number;
Print Mailbox
Your Key #:
88
 Loading...