

Page 1
Before you can use the machine, you must set up the hardware.
To help you get started in setting up the machine, please read this “Setup Guide” and
follow the simple instructions.
Setting Up
the Machine
FAX-1820C
To find the best solution for your problem or question, access the Brother Solutions Center,
http://solutions.brother.com
Keep this “Quick Setup Guide” and User’s Guide in a convenient place for quick and easy
reference at all times.
Setting Up the Machine
Setup is Complete!
for PC-FAX Send
Using the FAX as a Printer or
Quick Setup Guide
Page 2
■ Getting Started
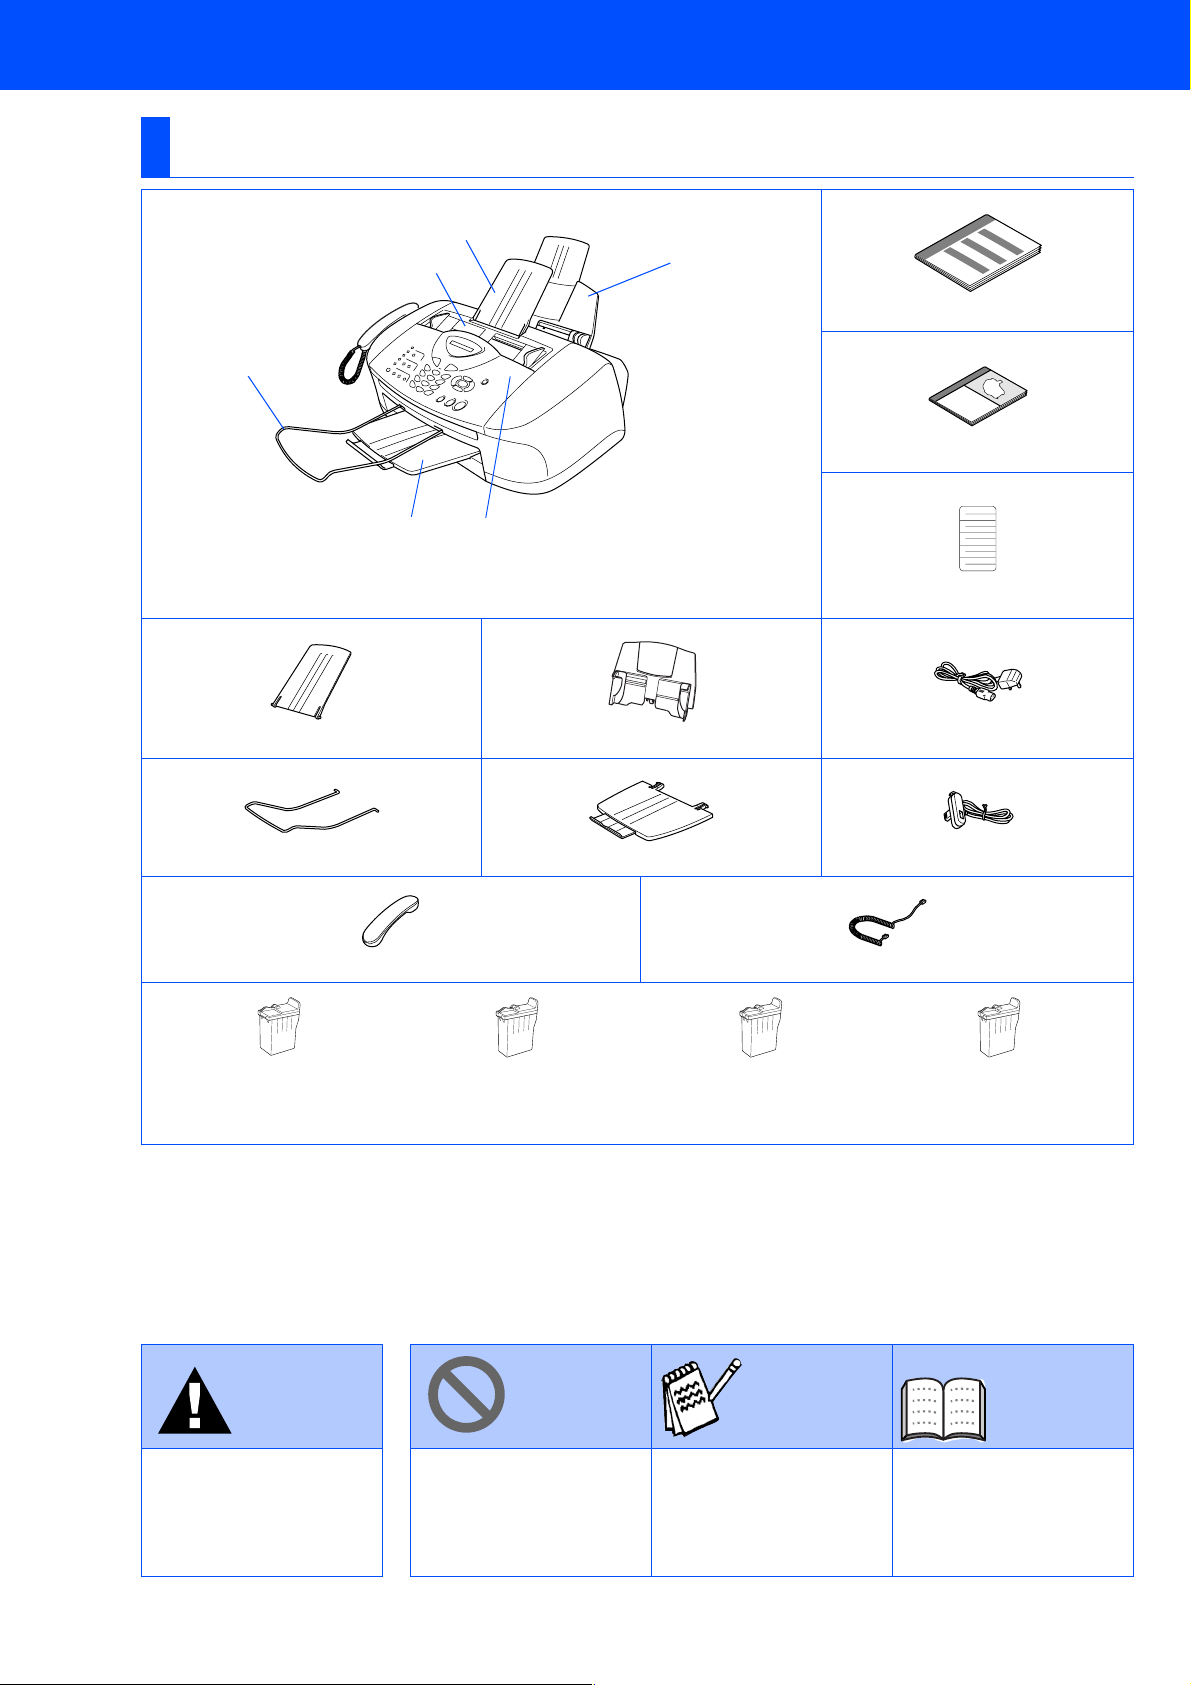
Carton Components
FAX
3
2
4
Quick Setup Guide
5
User’s Guide
1
. Top Cover
2
. Control Panel
1
6
One Touch Labels
3 4
ADF Document Support Paper Tray Power Cord
5 6
ADF Document Output Support Output Paper Support Telephone Line Cord
Telephone Handset Handset Curled Cord
Black
(LC800BK)
Magenta
(LC800M)
Yellow
(LC800Y)
Cyan
(LC800C)
Ink Cartridges
Carton components may differ from one country to another.
Save all packing materials and the carton.
Warning Hint User’s Guide
Indicates warnings that
must be observed to
prevent possible
personal injury.
Indicates cautions that
must be observed to use
the machine properly or
to prevent damage to the
machine.
Indicates notes and
useful tips to remember
when using the machine.
Indicates reference to the
User’s Guide.
1
Page 3
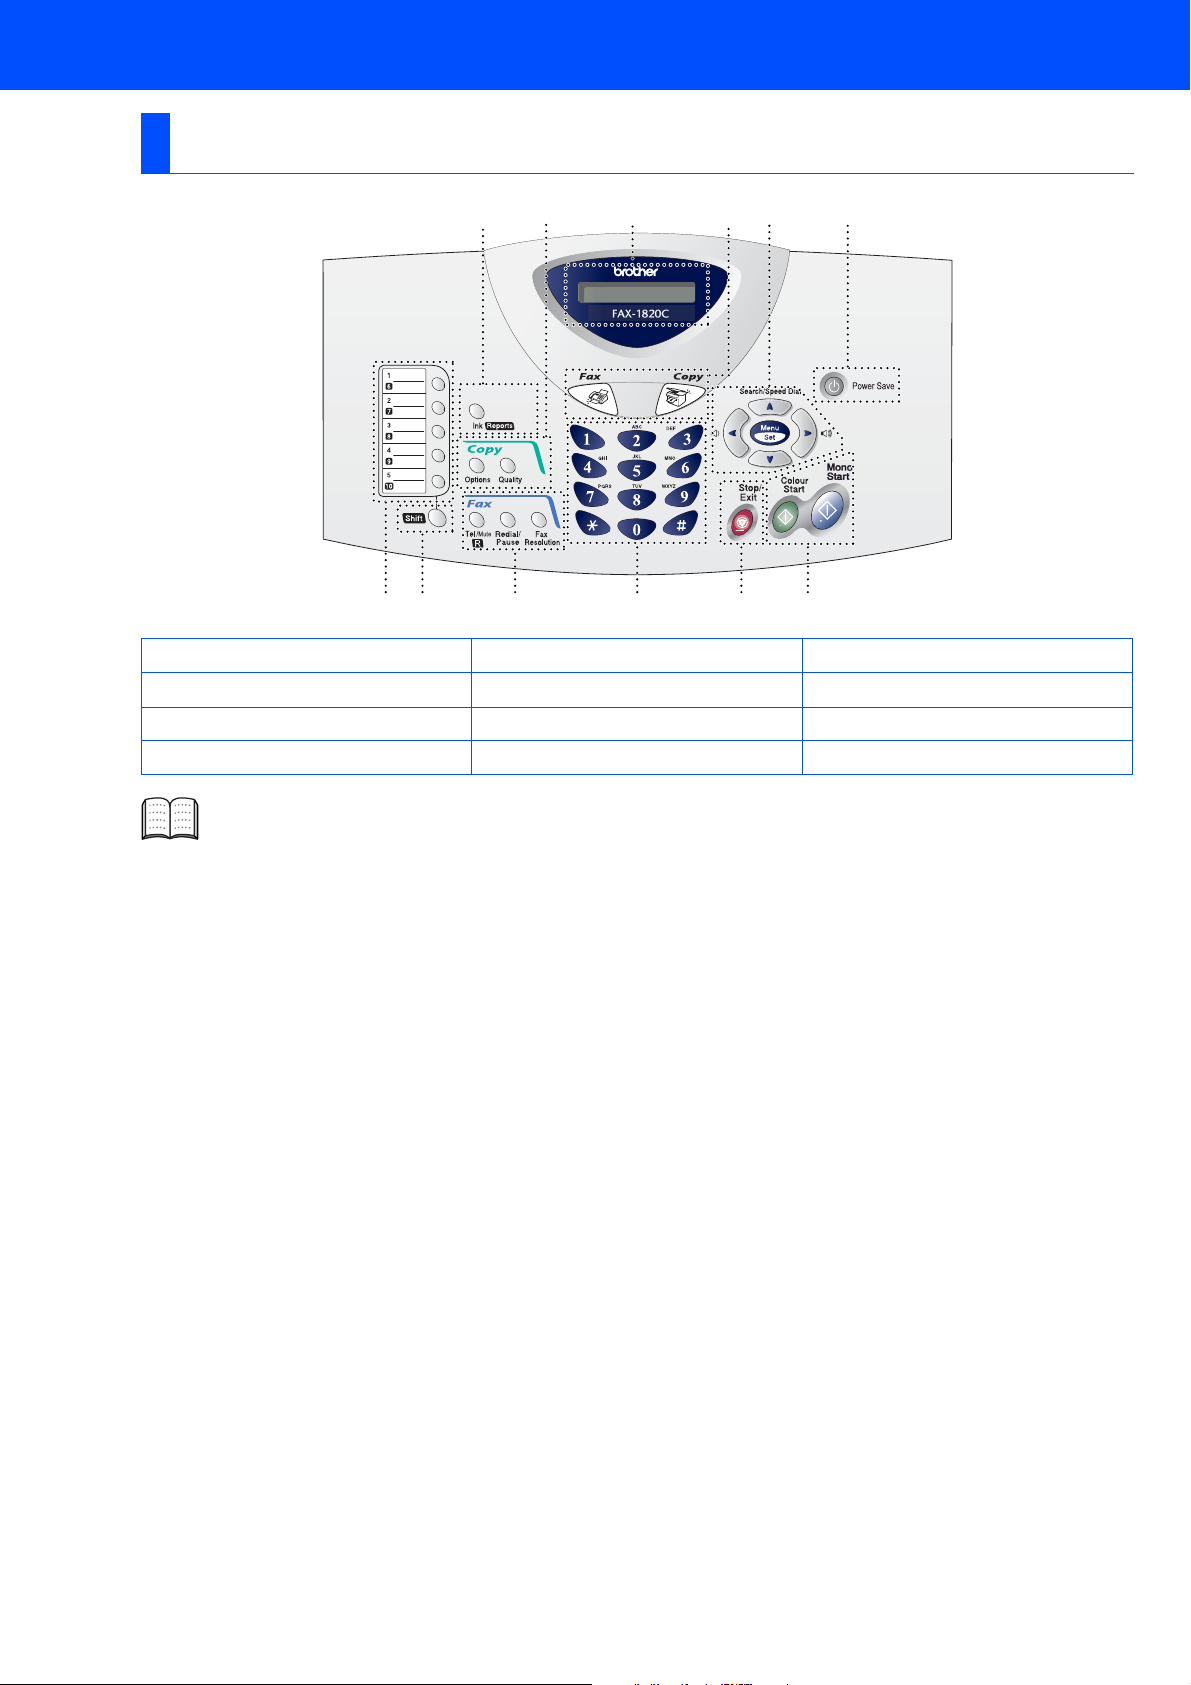
Control Panel
8
9101112
12 3 4 5 6
1. One Touch keys 5. Stop/Exit 9. Mode keys
2. Shift 6. Start keys 10. Liquid Crystal Display (LCD)
7
3. Fax and telephone keys 7. Power Save key 11. Copy keys
4. Dial Pad 8. Navigation keys 12. Ink/Reports key
For the details of the control panel, see "Control panel overview" in Chapter 1 of the User’s Guide.
(Temporary Settings)
2
Page 4

Table of Contents
Setting Up the Machine
1. Removing the Protective Parts .........................................................................4
2. Install Handset....................................................................................................4
3. Attaching the Paper Tray and Supports ..........................................................5
4. Loading Paper ....................................................................................................5
5. Install Phone Line and Power Cord..................................................................6
6. Installing the Ink Cartridges..............................................................................7
7. Colour Block Quality and Alignment Check....................................................9
8. Setting the Date and Time...............................................................................11
9. Setting Your Station ID....................................................................................12
10. Selecting a Receive Mode ...............................................................................13
11. Using the FAX as a Printer or for PC-FAX Send ...........................................13
3
Page 5
Setting Up the Machine
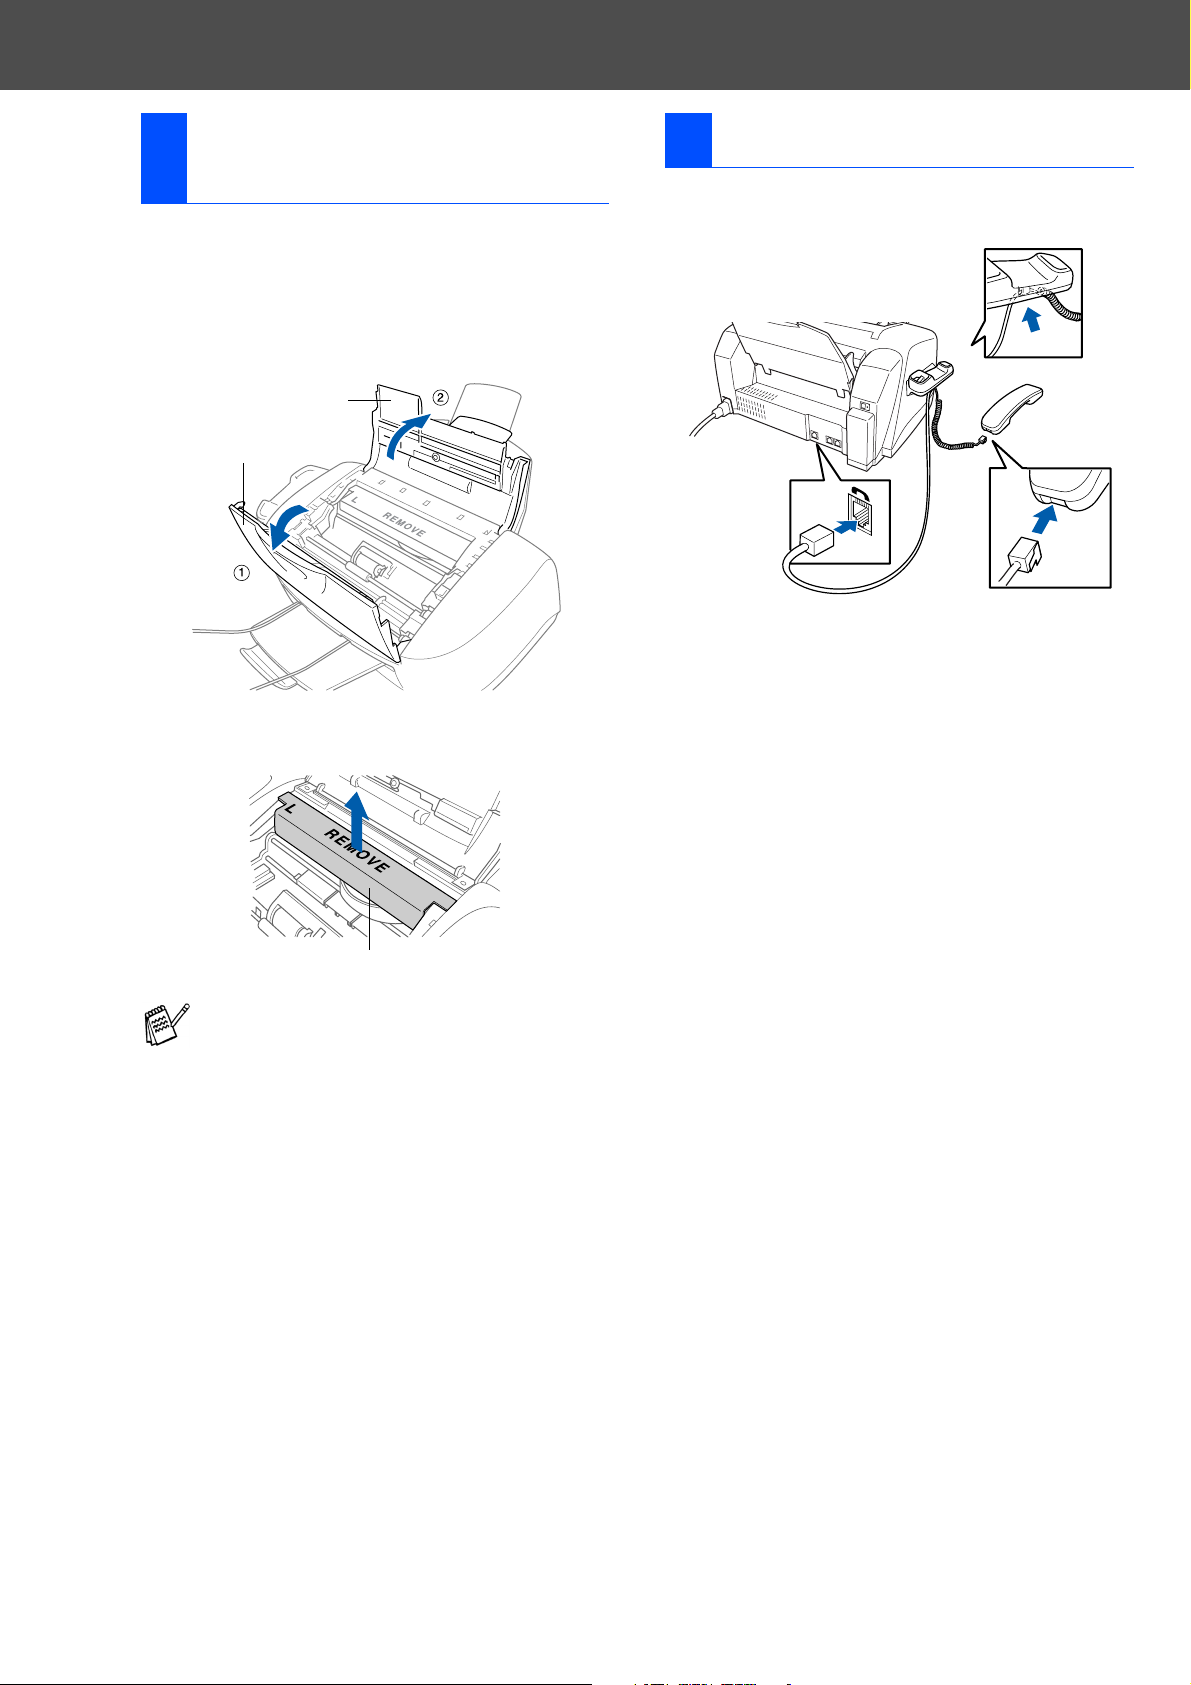
Removing the Protective
1
Parts
Remove the protective tape and paper in
1
the ADF.
Open the control panel cover by pulling it
2
toward you (1), and then lift the top cover
toward the back (2).
Top Cover
Control Panel Cover
2 Install Handset
Connect the curled handset cord to the
1
machine and the other end to the handset.
Pull the protective yellow bar out of the
3
machine.
Protective Yellow Bar
Do not throw away the protective yellow bar.
You will need it in the future to transport the
machine.
Close the top cover, and then close the
4
control panel cover.
4
Page 6

Attaching the Paper Tray
3
and Supports
Insert the paper tray from above into the
1
back of the machine.
Paper Tray
Attach the ADF document support.
2
ADF Document
Support
4 Loading Paper
You can load up to 100 sheets of 80 g/m2
paper.
For more details, see “Paper Capacity of
the Paper Tray” in Chapter 2 of the User’s
Guide.
Fan the stack of paper well to avoid paper
1
jams and misfeeds.
Unfold the paper support and then press
2
and slide the paper guide to fit the paper
width.
Setting Up
the Machine
Attach the output paper support to the paper
3
output slot, and then pull out the extension.
Output Paper Support
Output Paper
Support Extension
Attach the ADF document output support.
4
ADF Document
Output Support
Paper Support
Paper Width Guide
Gently insert the paper.
3
Make sure the print side is towards you and
the paper is below the maximum paper
mark.
Maximum Paper Mark
Paper
for PC-FAX Send
Using the FAX as a Printer or
Print Side
5
Page 7

Setting Up the Machine
Install Phone Line and
5
Power Cord
Connect the power cord.
1
Power Cord
Connect the telephone line cord.
2
Connect one end of the telephone line cord
to the socket on the machine marked LINE
and the other end to a modular wall socket.
If you are sharing one phone line with an
external telephone, connect it as shown
below.
(Example
for the U.K.)
If you are sharing one phone line with an
external telephone answering machine,
connect it as shown below.
Please set the Receive Mode to “External
TAD” if you have an external answering
machine. For more details, see
“Connecting the machine” in Chapter 1 of
the User’s Guide.
Warning
■
The machine must be grounded using a 3-prong
plug.
■
Since the machine is grounded through the power
outlet, you can protect yourself from potentially
hazardous electrical conditions on the telephone
network by keeping the power to your machine on
when you connect it to a telephone line. Similarly,
you can protect yourself when you want to move
your machine by disconnecting the telephone line
first and then the power cord.
TAD
TAD
(Example
for the U.K.)
6
Page 8

Installing the Ink
6
Cartridges
Remove the white shipping cover by pulling
4
it towards you.
Warning
If ink gets in your eyes irrigate them with water
immediately, and if irritation occurs consult a doctor.
Make sure that the power is turned on.
1
The LCD shows;
Check Cartridge
Open the control panel cover by pulling it
2
toward you (1), then lift the top cover
toward the back (2).
The print heads will move to the ink
replacement position.
Top Cover
Control Panel Cover
White Shipping Cover
■
The bottom of the white shipping cover is
wet with ink that will cause stains, so wipe
it clean before you place it down.
■
Do not throw away the white shipping
cover. You will need it when you transport
the machine.
Take out the black ink cartridge.
5
Setting Up
the Machine
for PC-FAX Send
Using the FAX as a Printer or
Push the four coloured ink cartridge covers
3
one at a time so they pop up.
Coloured Ink
Cartridge Covers
PUSH
PUSHPUSH
Carefully remove the sealing tape from the
6
ink cartridge.
To prevent spilling ink and staining your
hands and clothing, peel the sealing tape
PUSH
gently and slowly.
Opening
• Do not touch the ink opening on
the cartridge or removed tape.
Continued...
7
Page 9

Setting Up the Machine
Gently insert the black ink cartridge in the
7
black ink position.
Press the cover down until it clicks.
8
Repeat Steps 5 to 8 to install each colour ink
9
cartridge. Match the colours of the ink
cartridge covers.
Close the top cover and control panel cover.
0
The machine will enter a head cleaning
cycle for approximately four minutes.
Cleaning
• DO NOT remove ink cartridges if
you do not need to replace them.
If you do so, it may reduce the ink
quantity and the machine will not
know the quantity of ink left in
the cartridge.
• DO NOT shake the ink cartridges.
If ink stains your body or
clothing, wash with soap or
detergent immediately.
• Brother strongly recommends
that you do not refill the ink
cartridges provided with your
machine. We also strongly
recommend that you continue to
use only Genuine Brother Brand
replacement ink cartridges.
Using or attempting to use
potentially incompatible inks
and/or cartridges in your
machine may cause damage to
the machine itself and/or it may
result in unsatisfactory print
quality. Our warranty coverage
does not apply to any problem
that was caused by the use of
unauthorized third party ink and/
or cartridges. To protect your
investment and guarantee your
print quality please continue to
replace consumed ink cartridges
with only Genuine Brother
Branded Supplies.
Please Wait
■
If you mix the colours by installing an ink
cartridge in the wrong position, you must
clean the print head by running several
cleaning cycles after correcting the
cartridge installation. (See “Cleaning the
print head” on page 12-11 of the User’s
Guide.)
■
Once you open an ink cartridge, install it in
the machine and use it up within six
months of installation. Use unopened ink
cartridges by the expiration date written
on the cartridge package.
■
If INK EMPTY shows on the LCD after you
install the ink cartridges, check to make
sure the ink cartridges are installed
correctly.
8
Page 10

Colour Block Quality and
7
Alignment Check
After the cleaning cycle is finished, the LCD
1
shows;
Set Paper and
Step A: Colour Block Quality
Check
The LCD shows:
1
Is Step "A" OK?
1.Yes 2.No
Setting Up
the Machine
Press Start
Make sure the paper is loaded in the paper
2
tray.
Press Colour Start.
The machine starts printing the PRINT
3
QUALITY CHECK SHEET (only during
initial ink cartridge installation).
Check in Step A
Check in Step B
Check the quality of the four colour blocks
formed by the short lines printed on the
sheet.
(BLACK/CYAN/YELLOW/MAGENTA)
If all lines are clear and visible, press
2
on the dial pad to go to STEP B: Alignment
Check.
---OR--If you can see missing short lines, press
on the dial pad and go to
OK Poor
The LCD asks you if the print quality is OK
3
for each colour. Press or on the
dial pad.
3
Black OK?
1.Yes 2.No
.
for PC-FAX Send
Using the FAX as a Printer or
When you have finished selecting
(YES) or (NO) for each colour,
the LCD shows:
Start Cleaning?
1.Yes 2.No
Press (YES), and then machine starts
cleaning the colours.
After cleaning is finished, press
Colour Start. The machine starts printing
the PRINT QUALITY CHECK SHEET again
and goes back to the first step of STEP A.
9
Page 11

Setting Up the Machine
Step B: Alignment Check
The LCD shows:
1
Is Step "B" OK?
1.Yes 2.No
Check the 600 dpi and 1200 dpi test print to
see if No.5 most closely matches the OK
sample (No.0). Press if No.5 matches
it.
No.5
600 DPI
If another test print number is a better match
for either 600 dpi or 1200 dpi, press to
select NO and go to
For 600 dpi, select the number from 1 to 8
2
that most closely matches the No.0 sample
and enter it using the dial pad.
1200 DPI
.
2
600dpi Adjust
Select Best #
For 1200 dpi, enter the number from 1 to 8
3
that most closely matches the No.0 sample.
1200dpi Adjust
Select Best #
10
The Quality check is now complete.
Page 12

8 Setting the Date and Time
Menu/Set
Stop/ExitDial pad
Setting Up
the Machine
The machine displays the date and time, and prints it
on every fax you send.
Press Menu/Set.
1
Press .
2
Press .
3
Enter the last two digits of the year on the
4
dial pad, and then press Menu/Set.
Year:2004
(e.g. Enter 0, 4 for 2004.)
Enter the two digits for the month on the dial
5
pad, and then press Menu/Set.
Month:03
(e.g. Enter 0, 3 for March.)
Enter the two digits for the day on the dial
6
pad, and then press Menu/Set.
Day:01
(e.g. Enter 0, 1.)
Enter the time in 24-hour format on the dial
7
pad, and then press Menu/Set.
Time:15:25
(e.g. Enter 1, 5, 2, 5 for 3:25 P.M.)
Press Stop/Exit.
8
If you want to repeat from step1, press
Stop/Exit.
for PC-FAX Send
Using the FAX as a Printer or
11
Page 13

Setting Up the Machine
9 Setting Your Station ID
Menu/Set
Stop/ExitDial pad
You should store your name and fax number to be
printed on all fax pages that you send.
Press Menu/Set.
1
Press .
2
Press .
3
Enter your fax number (up to 20 digits) on
4
the dial pad, and then press Menu/Set.
Fax:_
Use the dial pad to enter your name (up to
5
20 characters), and then press Menu/Set.
Name:_
■
Refer to the following chart for entering
your name.
■
If you need to enter a character that is on
the same key as the previous character,
press to move the cursor to the right.
Press
key
2 ABC2
3 DEF 3
4 GH I 4
5 JKL5
6 MNO 6
7 PQRS
8 TUV8
9 WXY Z
Press Stop/Exit.
6
One
time
For more details, see “Setting the Station
ID” in Chapter 4 of the User's Guide.
If you want to repeat from step1, press
Stop/Exit.
Two
times
Three
times
Four
times
12
Page 14

10 Selecting a Receive Mode
Are you connecting an external telephone or external telephone answering
device to the FAX?
Yes No
Are you using the voice message
function of your external telephone
answering device?
Yes
There are four possible receive modes: Fax Only,
Fax/Tel, Manual and External TAD.
Press Menu/Set.
1
Press .
2
Do you want to receive a fax
automatically?
Yes
Do you use the FAX for the fax use
only?
No
Manual
No
You control the phone line and must answer
every call yourself.
Fax Only
Yes
The FAX automatically answers every call
as a fax.
Fax/Tel
The FAX controls the line and
automatically answers every call. If the
call is not a fax, it will ring for you to pick
up the call.
External TAD
Your external telephone answering
device (TAD) automatically answers
every call. Voice messages are stored on
the external TAD. Fax messages are
printed.
Press or to select the mode.
4
Press Menu/Set.
5
Press Stop/Exit.
6
Setting Up
the Machine
for PC-FAX Send
Using the FAX as a Printer or
Press .
3
For more details, see “Setup Receive” in
Chapter 5 of the User’s Guide.
11 Using the FAX as a Printer or for PC-FAX Send
You can download the Brother Printer Driver and
PC-FAX Send driver from the Brother Solutions
Center for use with your machine.
Visit us at:
http://solutions.brother.com
■
Please download the Printer Driver first
before connecting the machine to your
computer with the USB cable.
■
You must use the appropriate USB cable.
If you don’t have it, please purchase a
USB cable that is no longer than 2 meters.
13
Page 15

UK
 Loading...